

Page 1

TCH 2000 E
EN
OPERATING MANUAL
DESIGNER GLASS CONVECTOR
TRT-BA-TCH2000E-TC-001-EN
Page 2

Table of contents
Notes regarding the operating manual................................. 1
Safety .....................................................................................2
Information about the device................................................4
Transport and storage...........................................................5
Follow the manual
Information marked with this symbol indicates that the
operating manual must be observed.
You can download the current version of the operating manual
and the EU declaration of conformity via the following link:
Assembly and installation.....................................................5
Operation ...............................................................................9
Errors and faults..................................................................12
Maintenance ........................................................................12
Technical annex...................................................................12
Disposal ...............................................................................15
Notes regarding the operating manual
Symbols
Warning of electrical voltage
This symbol indicates dangers to the life and health of
persons due to electrical voltage.
Warning of hot surface
This symbol indicates dangers to the life and health of
persons due to hot surface.
Warning
This signal word indicates a hazard with an average
risk level which, if not avoided, can result in serious
injury or death.
TCH 2000 E
http://hub.trotec.com/?id=39555
Legal notice
This release replaces all previous versions. No part of this
publication may be reproduced without written permission from
TrotecGmbH&Co.KG. The same applies for electronically
processing, duplicating or spreading the publication. Subject to
technical changes. All rights reserved. Trademarks are used
without guarantee that they may be used freely and primarily
following the spelling of the manufacturer. Product names are
registered.
Changes to construction in the interests of constant
improvements to the product, as well as changes to the shape
and colour are reserved.
The scope of delivery may vary from product images. This
document was created with all due care.
TrotecGmbH&Co.KG accepts no liability whatsoever for
possible mistakes or omissions.
© TrotecGmbH&Co.KG
Caution
This signal word indicates a hazard with a low risk
level which, if not avoided, can result in minor or
moderate injury.
Notice
This signal word indicates important information
(e.g. material damage), but does not indicate hazards.
Info
Information marked with this symbol helps you to carry
out your tasks quickly and safely.
1 EN
Operating manual – designer glass convector TCH 2000 E
Page 3

Warranty and liability
The device complies with the fundamental health and safety
requirements of the applicable EU regulations and was tested at
the factory for perfect functionality multiple times.
However, if faults in the functionality occur and cannot be
remedied with the measures in the chapter Errors and faults,
please get in touch with your dealer or distributor.
When making a warranty claim, supply the device number (see
the rear of the device).
When manufacturer's instructions or legal regulations have not
been followed, or after unauthorised changes to the device are
made, the manufacturer is not responsible for the resulting
damages. Changes to the device or unauthorised replacement
of individual parts can drastically impact the electrical safety of
this product and will result in the loss of the warranty. Liability
does not extend to damages to people or property caused by the
device being used other than as described in the instructions in
this operating manual. Subject to changes to technical design
and model changes as part of constant development and
product improvement without prior notice.
No liability is accepted for damages resulting from improper
use. In such a case, any warranty claims will be voided also.
Safety
Read this manual carefully before starting or using the
device. Always store the manual in the immediate vicinity
of the device or its site of use!
Warning
Read all safety warnings and all instructions.
Failure to follow the warnings and instructions may
result in electric shock, fire and/ or serious injury.
Save all warnings and instructions for future
reference.
This appliance can be used by children aged from
8 years and above and persons with reduced physical,
sensory or mental capabilities or lack of experience
and knowledge if they have been given supervision or
instruction concerning use of the appliance in a safe
way and understand the hazards involved.
Children shall not play with the appliance. Cleaning and
user maintenance shall not be made by children
without supervision.
• Do not use the device in potentially explosive rooms.
• Do not use the device in aggressive atmosphere.
• Set the device up in an upright and stable position.
• Let the device dry out after a wet clean. Do not operate it
when wet.
• Do not use the device with wet or damp hands.
• Do not expose the device to directly squirting water.
• Never insert any objects or limbs into the device.
• Do not cover or transport the device during operation.
• Do not sit on the device.
• This appliance is not a toy! Keep away from children and
animals. Do not leave the device unattended during
operation.
• Check accessories and connection parts for possible
damage prior to every use of the device. Do not use any
defective devices or device parts.
• Ensure that all electric cables outside of the device are
protected from damage (e.g. caused by animals). Never
use the device if electric cables or the power connection
are damaged!
• The electrical connection must correspond to the
specifications in chapter Technical data.
• Insert the mains plug into a properly secured mains
socket.
• Observe the device's power input, cable length and
intended use when selecting extensions to the power
cable. Completely unroll extension cables. Avoid electrical
overload.
• Before carrying out maintenance, care or repair work on
the device, remove the mains plug from the mains socket.
Hold onto the mains plug while doing so.
• Switch the device off and disconnect the power cable from
the mains socket when the device is not in use.
• Do not under any circumstances use the device if you
detect damages on the mains plug or power cable.
Defective power cables pose a serious health risk.
• Observe the storage and operating conditions (see chapter
Technical data).
• Ensure a minimum distance of 50 cm to combustible
substances. Do not use the device in rooms where fuel,
solvents, varnishes or other easily inflammable vapours
are stored.
• Do not use the device in immediate proximity to curtains.
• Make sure that the air inlet and outlet are not obstructed.
• Do not place the device on combustible ground.
• Allow the device to cool down before transport and/ or
maintenance work.
EN 2
Operating manual – designer glass convector TCH 2000 E
Page 4

Intended use
Only use the device for heating closed rooms whilst adhering to
the technical data.
Intended use comprises heating the air in:
• living spaces
• storerooms
• salesrooms
• construction areas
• containers
• basements
Warning
Improper handling entails a risk of burning and electric
shock. Only use the device as intended!
Warning
Dangers can occur at the device when it is used by
untrained people in an unprofessional or improper way!
Observe the personnel qualifications!
Warning
The device is not a toy and does not belong in the
hands of children.
Improper use
• Do not place the device on wet or flooded ground.
• Do not place any objects, e.g. clothing, on the device.
• Do not use the device outdoors.
• Do not use the device for heating in vehicles.
• The device must not be used near swimming pools.
• Do not use this device in the immediate vicinity of sinks,
bathtubs or other water containers.
Never immerse the device in water.
• Any operation other than as described in this manual is
prohibited. Non-observance renders all claims for liability
and guarantee null and void.
• Any unauthorised modifications, such as alterations or
structural changes to the device, are forbidden.
Personnel qualifications
People who use this device must:
• be aware of the dangers that occur when working with
electric devices in damp areas.
• have read and understood the operating manual, especially
the Safety chapter.
Maintenance tasks which require the housing to be opened
must only be carried out by specialist electrical companies or by
Trotec.
Residual risks
Warning of electrical voltage
Work on the electrical components must only be
carried out by an authorised specialist company!
Warning
Do not leave the packaging lying around. Children may
use it as a dangerous toy.
Warning
Improper installation entails a risk of fire.
Do not place the device on combustible ground.
Do not place the device on high-pile carpets.
Do not use the device without the feet attached.
Warning
In order to avoid overheating and fire hazards, the
heater must not be covered.
Behaviour in the event of an emergency
1. In an emergency, disconnect the device from the mains
feed-in: Switch the device off and disconnect the power
cable from the mains socket. Hold onto the mains plug
while doing so.
2. Do not reconnect a defective device to the mains.
Overheating protection
The device is provided with a safety thermostat, which is
activated by overheating of the device.
Once the safety thermostat has switched itself on, the heating
will be turned off automatically.
Allow the device to cool down and switch it off. Investigate the
cause of overheating. Should the problem persist, please
contact the customer service.
Warning of electrical voltage
Before any work on the device, remove the mains plug
from the mains socket!
Hold onto the mains plug while pulling the power cable
out of the mains socket.
Warning of hot surface
Parts of this appliance can become very hot and cause
burns. Particular attention is to be paid when there are
children or vulnerable persons present!
3 EN
Operating manual – designer glass convector TCH 2000 E
Page 5
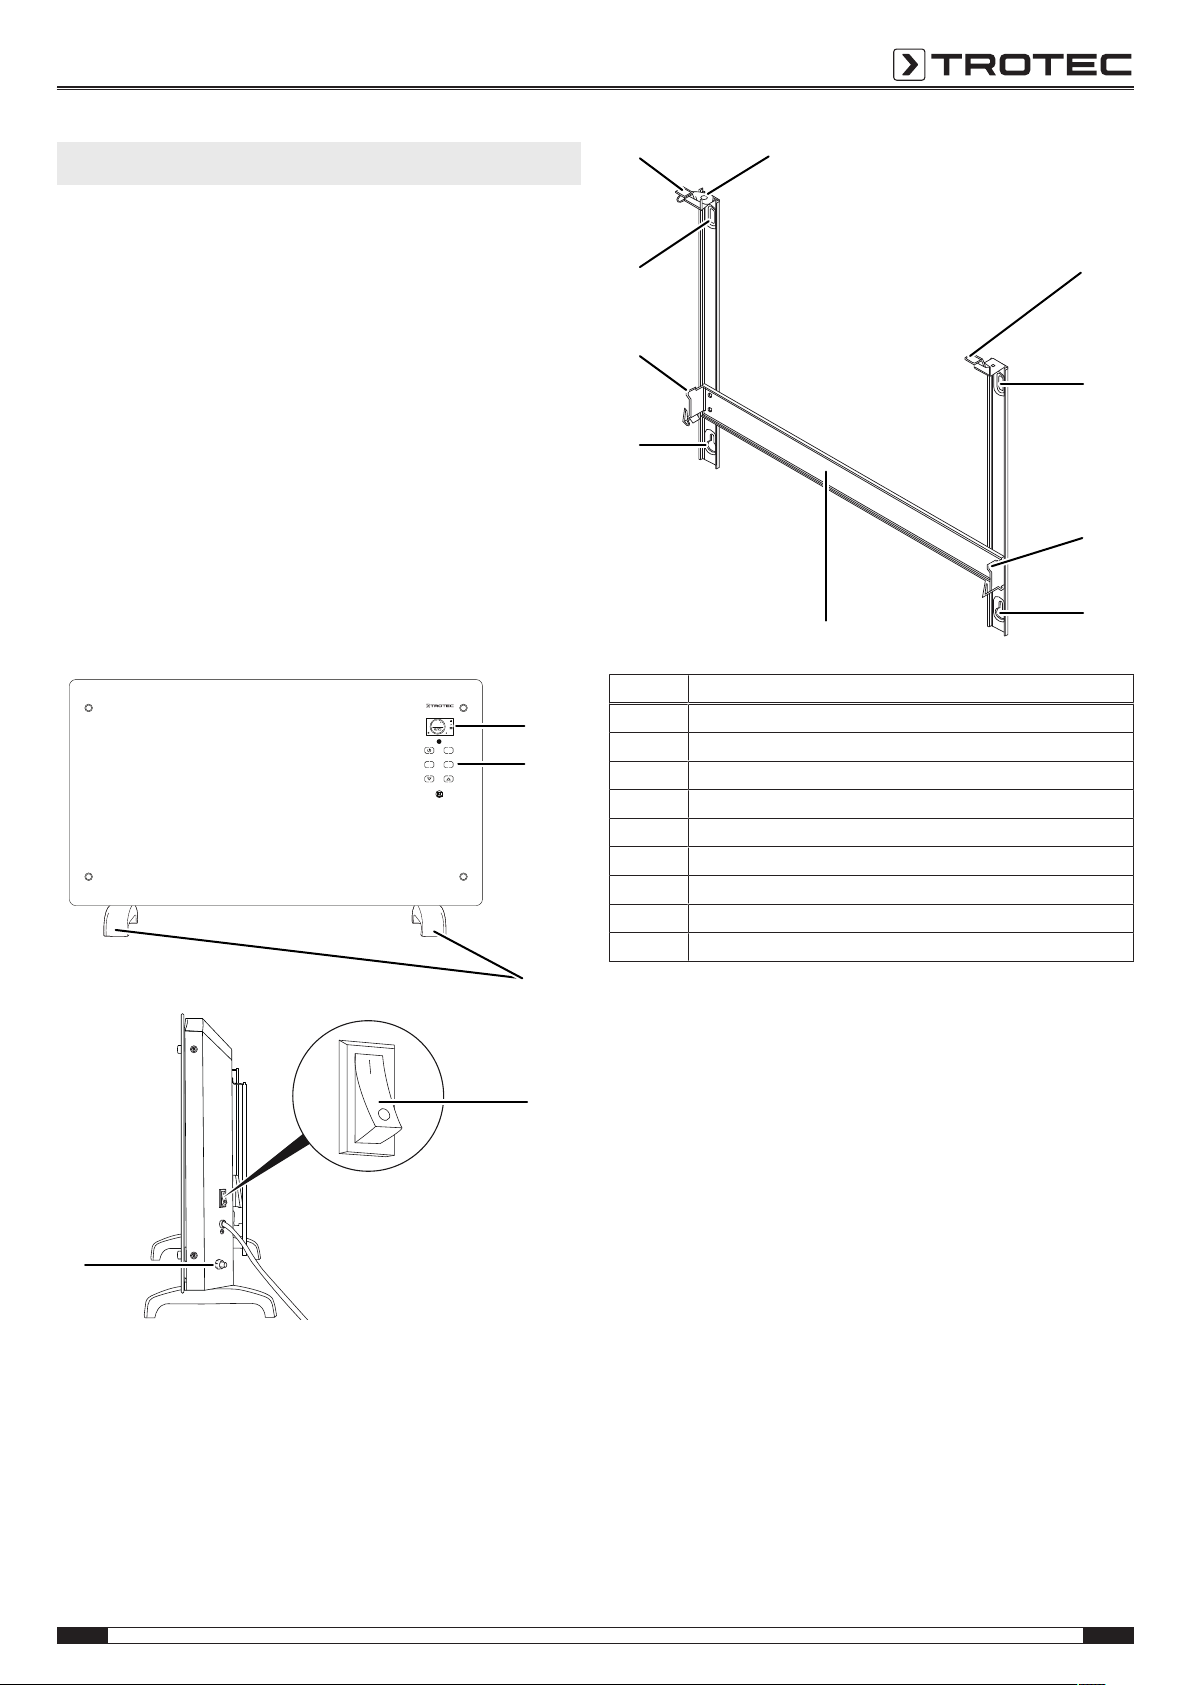
Information about the device
MODE TIME
TEMP
23
TCH2000 E
2
1
3
4
9
5
6
6
6
6
8
5
5
5
7
Device description
The designer glass convector TCH 2000 E is used to generate
warm air for interior spaces.
The device generates heat by means of an electric heating
element. The air surrounding the heating element is heated. The
heated air rises through the air outlet and thus creates a natural
suction that makes the cold room air flow into the device.
The device is equipped with an integrated temperature sensor
which controls the heating depending on the current and the
desired room temperature.
Using the touch panel integrated in the safety glass, you can set
a target temperature value between 15°C and 50°C.
Moreover, the device is equipped with a remote control that can
be used for controlling all functions and settings.
Device depiction
No. Designation
1 Display
2 Control panel
3 Foot
4 On/off switch
5 Suspension point for fastening the wall holder to the device
6 Holes for fastening screws
7 Wall holder
8 Lock with screw
9 Temperature sensor
EN 4
Operating manual – designer glass convector TCH 2000 E
Page 6

Transport and storage
3
Notice
If you store or transport the device improperly, the
device may be damaged.
Note the information regarding transport and storage of
the device.
Transport
Before transporting the device, observe the following:
• Switch off the device.
• Hold onto the mains plug while pulling the power cable out
of the mains socket.
• Do not use the power cable to drag the device.
• Allow the device to cool down sufficiently.
Storage
Before storing the device, proceed as follows:
• Allow the device to cool down sufficiently.
When the device is not being used, observe the following
storage conditions:
• dry and protected from frost and heat
• in an upright position where it is protected from dust and
direct sunlight
• with a cover to protect it from invasive dust if necessary
• Place no further devices or objects on top of the device to
prevent it from being damaged.
• Remote batteries from the remote control.
Feet assembly
1. Place the device on a table or on the packaging board with
the glass surface pointing down.
2. Fasten both feet(3) with four screws each.
3. Check the feet(3) for tight fit.
Assembly and installation
Scope of delivery
• Device
• Remote control
• Wall holder
• 2 x Screw for wall mounting
• 2 x Plastic dowel for wall mounting
• 2 x Fastening screw with steel dowel for wall mounting
• 2 x Foot
• 8 x Screw for feet assembly
• Manual
Unpacking the device
1. Open the cardboard box and take the device out.
2. Completely remove the packaging.
3. Fully unwind the power cable. Make sure that the power
cable is not damaged and that you do not damage it during
unwinding.
5 EN
Operating manual – designer glass convector TCH 2000 E
Page 7

4. Set the device up in an upright and stable position.
MODE TIME
TEMP
23
TCH2000 E
60 cm
30 cm
30 cm
30 cm
8
7
Wall mounting
Instead of being positioned on the feet, the device may also be
mounted to a wall.
1. Loosen the screw at the lock for the wall holder and push
back the catch(8).
• Do not install the device directly behind a door.
• Do not install the device directly below a wall socket.
• Never install the device in a way that it radiates directly
onto walls or other objects.
• Only install the device in a horizontal position.
2. Remove the wall holder(7) from the device.
3. Mark the positions for the bore holes on the wall using the
wall holder(7) as a template. Observe the minimum
distances.
EN 6
Operating manual – designer glass convector TCH 2000 E
Page 8

4. Drill the holes into the wall at the marked positions.
5. Insert appropriate dowels into the bore holes depending on
the type of wall.
6. Fasten the wall holder(7) to the wall.
7. Hang the device into the wall holder(7) from above.
8. Push the catch(8) into the device. Make sure that the catch
engages with the device.
9. Fasten the screw at the lock(8) and check it for tight fit.
7 EN
Operating manual – designer glass convector TCH 2000 E
Page 9

Start-up
A
B
C
C
D
Info
Odours might arise upon initial start-up or after a
longer period of non-use.
When positioning the device, observe the minimum distance
from walls or other objects as described in the Technical data
chapter.
Connecting the power cable
1. Insert the mains plug into a properly secured mains socket.
Make sure that the power cable is guided along the back of
the device. Never guide the power cable along the front of
the device!
• Before restarting the device, check the condition of the
power cable. If there are doubts as to the sound condition,
contact the customer service.
• Set the device up in an upright and stable position or
suspend the device horizontally.
• Do not create tripping hazards when laying the power
cable or other electric cables, especially when positioning
the device in the middle of the room. Use cable bridges.
• Make sure that extension cables are completely unrolled.
• Make sure that no curtains or other objects interfere with
the air flow.
• Do not position the device directly below a wall socket.
• Make sure that the device cannot come into contact with
moisture or water.
EN 8
Operating manual – designer glass convector TCH 2000 E
Page 10

Operation
MODE TIME
TEMP
88
88:88
°C
10
19
12
13
16
20
21
11
17
18
22
23
24
14
15
• Avoid open doors and windows.
Control panel
No. Designation Meaning
10 Comfort heating mode
indication
11 Economy heating mode
indication
12 Frost monitor heating mode
indication
13 Heating 1 indication Is displayed with a black frame when
14 Heating 2 indication Is displayed when the heating is
15 Infrared receiver Signal reception from the remote control
16 TEMP button Setting the desired room temperature
17 TIME button Switching the timer function on and off
18 Increase value button Setting the desired room temperature
19 Decrease value button
20 MODE button Selecting the operating mode:
21 Power button Switching the device on or activating
22 Timer indication Flashes when the timer is activated
23 Hours / minutes indication Indication of the number of hours and
24 Temperature indication Indication of the current room
Is displayed with a black frame when
comfort heating mode is activated
Is displayed with a black frame when
economy heating mode is activated
Is displayed with a black frame when
frost monitor heating mode is activated
the heating is activated
activated
(1min to 24h):
1 to 23h in increments of 1h,
1 to 59 min in increments of 1min
(15°C to 50 °C) or the timer run-time
(1min to 24h)
Comfort heating mode
Economy heating mode
Frost monitor heating mode
standby mode
minutes during timer programming
Indication of remaining timer run-time
temperature during operation
Indication of the desired room
temperature during temperature
adjustment
Info
The display comes with a blue background
illumination. The background illumination switches on
as soon as one of the control panel buttons is pressed.
After approx.15s without any input, the background
illumination switches back off.
9 EN
Operating manual – designer glass convector TCH 2000 E
Page 11

Switching the device on
Once you have completely installed the device as described in
the Start-up chapter, you can switch it on.
1. Set the on/off switch(4) to I.
ð An acoustic signal is emitted.
ð The device is now in standby mode.
2. Press the power button(21).
ð The device starts in frost monitor heating mode.
ð The frost monitor heating mode indication(12) is
displayed with a flashing black frame.
Setting the operating mode
Mode
The following types of heating can be selected:
• Comfort heating mode (heating capacity 2000 W)
• Economy heating mode (heating capacity 1000 W)
• Frost monitor heating mode
1. Press the MODE button(20) until the desired heating mode
is selected.
ð The selected mode and the heating1 indication(13) are
displayed with a black frame.
ð The heating2 indication(14) is displayed in comfort
heating mode and in economy heating mode, but not in
frost monitor heating mode.
Comfort heating mode
The device operates with a heating capacity of 2000W until
reaching the desired room temperature. When the desired room
temperature is reached, the device reduces the heating capacity
to 1000W. The comfort heating modeindication(10) continues
to be displayed.
If the determined room temperature exceeds the desired room
temperature by 2°C, the heating switches off.
The heating1indication (13) is no longer framed and the
heating2indication(14) goes out.
If the determined room temperature falls below the desired
room temperature by 5°C, the heating switches back to
comfort heating mode.
Frost monitor heating mode
In frost monitor heating mode the devices heats automatically if
the room temperature is below 5°C. This temperature cannot
be changed.
Setting the desired room temperature
The room temperature determined by the temperature
sensor(9) is displayed on the temperature indication(24). You
can set the desired room temperature at any time.
The room temperature is preset to 35°C.
1. Press the TEMP button(16).
ð The temperature indication (24) flashes.
ð The desired room temperature is displayed.
2. Press the arrow buttons increase value(18) or decrease
value(19) to adjust the desired room temperature. Setting is
possible in the range between 15°C and 50°C in
increments of 1°C.
ð The desired room temperature is saved and shown on
the temperature indication(24) for approx.5seconds.
Then the current room temperature is displayed again.
Info
The desired room temperature should be higher than
the current room temperature.
Setting the timer
The timer has two modes of operation:
• automatic switch-on upon expiry of a preset number of
hours.
• automatic switch-off upon expiry of a preset number of
hours.
The timer run-time can be between 1 minute and 24 hours and
can be adjusted in increments of 1min.
Note:
Do not leave the operating device unattended in a freely
accessible room with an activated timer.
Economy heating mode
The device operates with a heating capacity of 1000W until the
determined room temperature exceeds the desired room
temperature by 2°C. Then the heating switches off.
The heating1indication (13) is no longer framed and the
heating2indication(14) goes out.
If the determined room temperature falls below the desired
room temperature by 5°C, the heating switches back to
economy heating mode.
EN 10
Operating manual – designer glass convector TCH 2000 E
Page 12

Automatic switch-on
MODE
TEMP
TIMER
21
20
16
17
18
19
25
ü The device is switched on.
ü The device is in frost monitor heating mode.
1. Press the TIME button(17).
2. Select the desired number of hours by use of the arrow
buttons (18 or 19). The value range is between 1 and 23.
ð The number of hours flashes on the hours / minutes
indication(23).
3. Press the TIME button(17).
4. Select the desired number of minutes by use of the arrow
buttons (18 or 19). The value range is between 1 and 59.
ð The number of minutes flashes on the hours / minutes
indication(23).
5. Press the TIME button(17).
ð The desired time until automatic switch-on is saved.
ð The timer(22) and frost monitor heating mode(12)
indications flash.
ð The time left until switch-on is shown on the hours /
minutes indication(23) and counted down.
ð The device will then start in comfort heating mode with
the last set temperature.
Notes regarding automatic switch-on:
• Manually switching the device on disables the automatic
switch-on function.
• If you select 0hours, the timer will be off.
Automatic switch-off
ü The device is switched on.
ü The device is in heating mode (comfort or economy).
1. Press the TIME button(17).
2. Select the desired number of hours by use of the arrow
buttons (18 or 19). The value range is between 1 and 23.
ð The number of hours flashes on the hours / minutes
indication(23).
3. Press the TIME button(17).
4. Select the desired number of minutes by use of the arrow
buttons (18 or 19). The value range is between 1 and 59.
ð The number of minutes flashes on the hours / minutes
indication(23).
5. Press the TIME button(17).
ð The desired time until automatic switch-off is saved.
ð The timer indication (22) flashes.
ð The time left until switch-off is shown on the hours /
minutes indication(23) and counted down.
ð In device will then switch to standby mode.
Notes regarding automatic switch-off:
• Manually switching the device off disables the automatic
switch-off function.
• If you select 0hours, the timer will be off.
Remote control
All settings of the device can also be made using the remote
control included in the scope of delivery.
No. Designation Meaning
16 TEMP button Setting the desired room temperature
17 TIME button Switching the timer function on and
off (1min to 24h):
1 to 23h in increments of 1h,
1 to 59 min in increments of 1min
18 Increase value button Setting the desired room temperature
19 Decrease value button
20 MODE button Selecting the operating mode:
21 Power button Switching the device on or activating
25 Transmitter Sends signals to the device
(15°C to 50 °C) or the number of
hours of the timer (1min to 24h)
Comfort heating mode
Economy heating mode
Frost monitor heating mode
standby mode
Shutdown
Warning of electrical voltage
Do not touch the mains plug with wet or damp hands.
1. Switch off the device.
2. Hold onto the mains plug while pulling the power cable out
of the mains socket.
3. Allow the device to cool down sufficiently.
4. Clean the device according to the Maintenance chapter.
5. Store the device according to the Storage chapter.
11 EN
Operating manual – designer glass convector TCH 2000 E
Page 13

Errors and faults
Maintenance
The device has been checked for proper functioning several
times during production. If malfunctions occur nonetheless,
check the device according to the following list.
The device does not start:
• Check the power connection.
• Check the power cable and mains plug for damages.
• Check the room temperature. The room thermostat may
have switched off, because the desired room temperature
has been reached.
• Wait for 10minutes before restarting the device. If the
device is not starting, have the electrics checked by a
specialist electrical company or by Trotec.
The device is switched on, but the heating is not operating:
• Check the room temperature. The room thermostat may
have switched off, because the desired room temperature
has been reached.
• Check whether the overheating protection has tripped, see
chapter Safety.
• The heating resistor might have blown. Have a defective
heating resistor replaced by a specialist electrical
company.
• The room thermostat might be defective. Have a defective
room thermostat replaced by a specialist electrical
company.
Activities required before starting maintenance
Warning of electrical voltage
Do not touch the mains plug with wet or damp hands.
• Switch off the device.
• Hold onto the mains plug while pulling the power cable out
of the mains socket.
• Allow the device to cool down completely.
Warning of electrical voltage
Maintenance tasks which require the housing to be
opened must only be carried out by authorised
specialist companies or by Trotec.
Cleaning the housing
Warning of electrical voltage
Never immerse the device in water!
Clean the device with a soft, damp and lint-free cloth. Ensure
that no moisture enters the housing. Protect electrical
components from moisture. Do not use any aggressive cleaning
agents such as cleaning sprays, solvents, alcohol-based or
abrasive cleaners to dampen the cloth. Wipe the housing dry
after cleaning.
Technical annex
The air current is reduced:
• Check the air inlet and outlet. Make sure that air inlet and
outlet are not obstructed. Remove any dirt. Observe the
minimum distance from walls or other objects according to
the technical data.
Notice
Wait for at least 3 minutes after maintenance and
repair work. Only then switch the device back on.
Your device still does not operate correctly after these
checks?
Please contact the customer service. If necessary, bring the
device to an authorized specialist electrical company or to
Trotec for repair.
Technical data
Parameter Value
Model TCH 2000 E
Heating capacity 1000 W – 2000 W
Setting range 15 °C to 50 °C
Mains connection 220 – 240V / 50/60 Hz
Power input 2000 W
Nominal current consumption 8.3 A
Cable length 1.6 m
Weight 9.5 kg
Dimensions
(length x width x height)
Plug type CEE 7/7
Minimum distance to walls and
other objects
D: front:
120 x 860 x 470 mm
A: top:
60 cm
B: rear:
30 cm
C: side:
30 cm
30 cm
EN 12
Operating manual – designer glass convector TCH 2000 E
Page 14

Wiring diagram
a b
b
d
d
L
N
PE
c
a On/off switch b Safety thermostat
c Mainboard d Heating element
13 EN
Operating manual – designer glass convector TCH 2000 E
Page 15

Spare parts drawing and list
Info
The position numbers of the spare parts differ from
those describing the positions of other parts mentioned
in this operating manual.
EN 14
Operating manual – designer glass convector TCH 2000 E
Page 16

No. Spare part No. Spare part No. Spare part
1 back cover 9 nut 17 circuit panel 2
2 clapboard 10 circuit panel 1 18 foot
3 glass panel 11 control box of circuit 19 cord
4 explored bracket 12 radiator 20 thermostat
5 button 13 bracket 21 hanging decoration
6 switch 14 crust of fixing 22 remote control
7 protector ring 15 screw
8 glass bracket 16 fixing lid
Disposal
The icon with the crossed-out waste bin on waste
electrical or electronic equipment stipulates that this equipment
must not be disposed of with the household waste at the end of
its life. You will find collection points for free return of waste
electrical and electronic equipment in your vicinity. The
addresses can be obtained from your municipality or local
administration. For further return options provided by us please
refer to our website www.trotec24.com.
The separate collection of waste electrical and electronic
equipment aims to enable the re-use, recycling and other forms
of recovery of waste equipment as well as to prevent negative
effects for the environment and human health caused by the
disposal of hazardous substances potentially contained in the
equipment.
You are responsible for deleting any personal data stored on the
waste equipment to be disposed of.
15 EN
Operating manual – designer glass convector TCH 2000 E
Page 17

Page 18

Trotec GmbH & Co. KG
Grebbener Str. 7
D-52525 Heinsberg
+49 2452 962-400
+49 2452 962-200
[email protected]
www.trotec.com
 Loading...