

Page 1
4 A
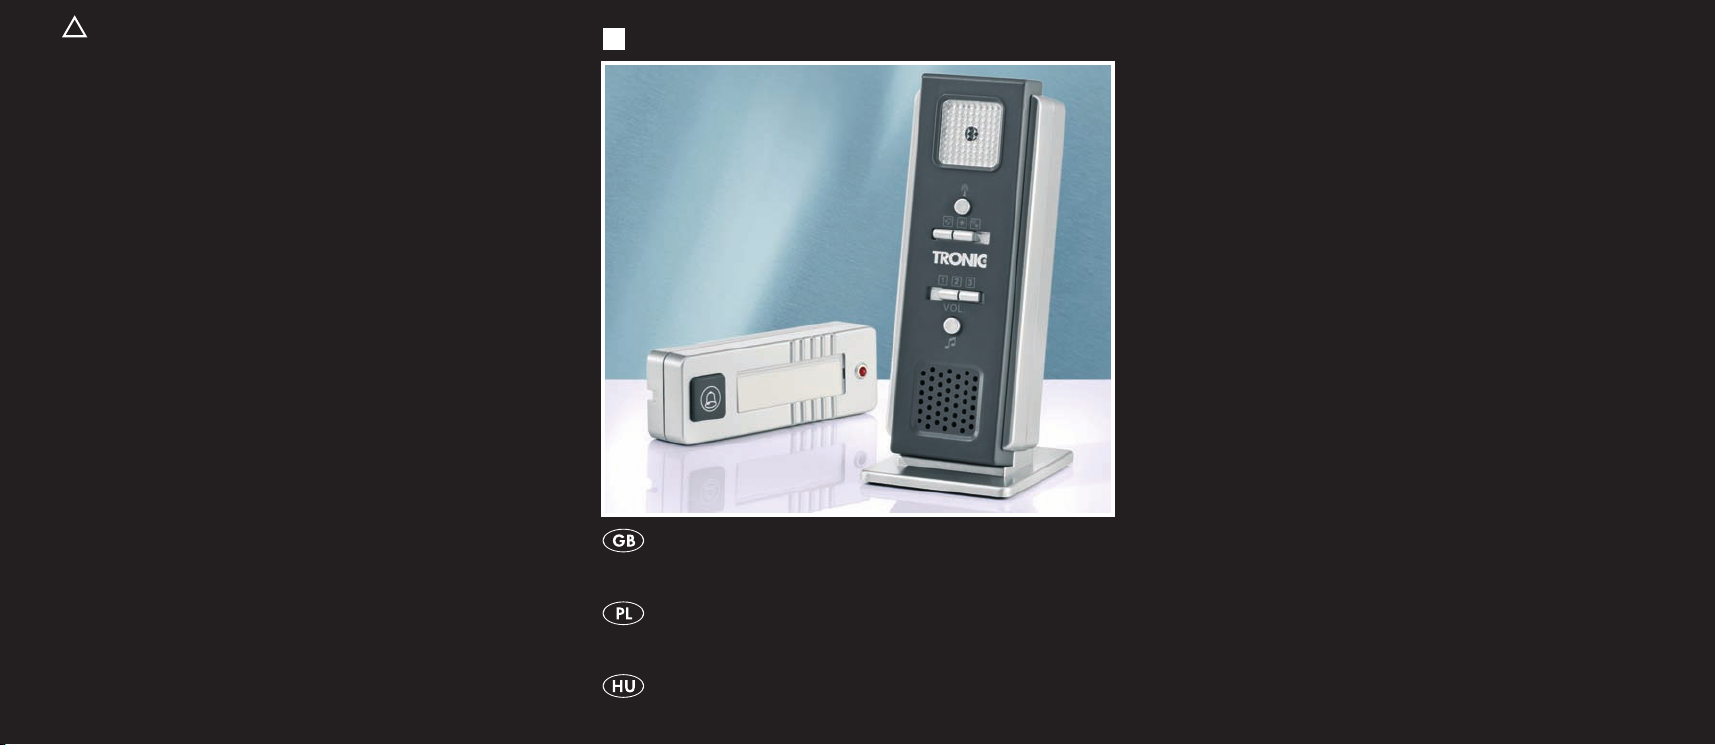
WIRELESS DOORBELL
KH 205
WIRELESS DOORBELL
Operating manual
KOMPERNASS GMBH
BURGSTRASSE 21 • D-44867 BOCHUM
www.kompernass.com
ID-NR.: KH205-05/08-V3
DZWONEK DO DRZWI
Instrukcja obs³ugi
DRÓTNÉLKÜLI AJTÓCSENGÕ
Használati utasítás
Page 2
KH 205
A
o
q
a
w
u
y
i
e
r
t
B
d
s f
hg
j
Page 3

Index Page
Intended use 2
Items supplied 2
Technical Data 3
Safety instructions 3
The appliance parts 5
Taking the appliance into use 6
Maintenance 10
Cleaning and Care 10
Disposal 11
CE-Conformity 12
Importer 12
Warranty and service 12
Read these operating instructions carefully before using the appliance for the first time and preserve this booklet for later reference.
Pass this booklet on to whoever might acquire the appliance at a
future date.
- 1 -
Page 4

Intended Use
This appliance serves as a radio doorbell system for wireless
visitor signalisation and thus makes possible the operation of
a door bell without wiring. The appliance is intended for
domestic use only, not for commercial or industrial applications.
No warranty is provided for damages resulting from improper
use of the appliance!
Items supplied
1 Receiver
1 Sender
2 1.5 V Batteries, Type "AA/Mignon/LR6"
1 12 V Battery, Type 23A
1 Stand for the receiver
2 Screws for fixing the sender on to the assembly plate
5 Nameplates
2 Wallplugs with screws for sender assembly
1 Wallplug with a screw for receiver suspension
1 Operating manual
- 2 -
Page 5
Technical data
Power supply
Receiver: 2 x 1.5V Type "AA/Mignon/LR6"
Sender: 1 x 12V Type 23A
Transmission frequency: 433 MHz
Range: 100 mtrs (Free-space range)
Ring-tone volume: min. 73dB(A) in 1 min (on max. setting)
Safety instructions
Do not permit children to handle electrical appliances •
without supervision, as they cannot correctly assess the
possible dangers of injury.
Check the appliance and all parts for visible damages. •
If the appliance is damaged, arrange for it to be checked
by Customer Services.
NEVER open the appliance. There are no user-serviceable •
elements inside.
Risk of accidents and injury!
This appliance is not intended for use by individuals (including •
children) with restricted physical, physiological or intellectual
abilities or deficiences in experience and/or knowledge
unless they are supervised by a person responsible for their
safety or receive from this person instruction in how the appliance is to be used. Children should be supervised to ensure
that they do not play with the appliance.
- 3 -
Page 6
Keep batteries well away from children. Children can put bat-•
teries into their mouths and swallow them. If a battery is swallowed, medical assistance must be sought IMMEDIATELY.
For the handling of batteries please observe the following:•
Risk of explosion!
Do not throw batteries into a fire.•
Do not recharge the batteries. •
Never open batteries, never solder or weld batteries. •
The risk of explosions and injuries exists!
Regularly check the condition of the batteries. Leaking •
batteries can cause damage to the appliance.
If you do not intend to use the appliance for an extended •
period, remove the batteries.
Damage on the appliance
Avoid the simultaneous usage of batteries of varying •
types resp. capacities.
Do not use any aggressive chemical substances for •
cleaning.
NEVER submerse the appliance in water. Wipe it only •
with a slightly damp cloth.
Protect the receiver against moisture. Use it only in dry •
rooms, do not use it when it is raining outdoors or when
close to liquids.
Ensure that, when the receiver is in use, it cannot become •
wet or moist and that it cannot be damaged.
- 4 -
Page 7

The appliance parts
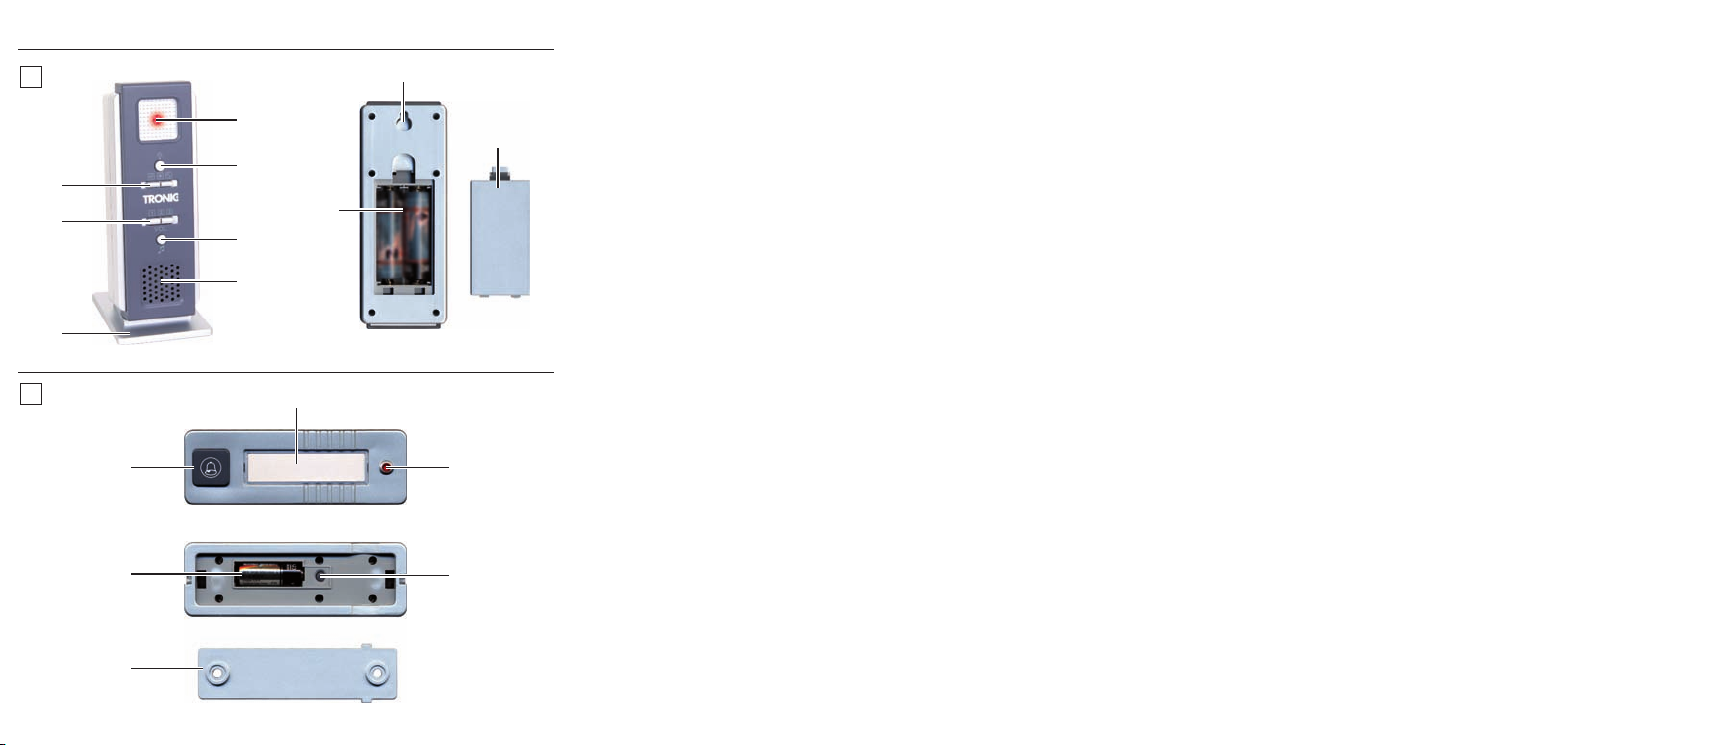
Receiver (Fig. A)
q Signal indicator
w Synchronisation button, Receiver
e Button for melody selection
r Speaker
t Stand
y Volume regulator
u Signal type switch (optical/acoustic)
i Battery compartment - receiver
o Loop for suspension of the receiver
a Battery compartment cover - receiver
Sender (Fig. B)
s Bell button
d Nameplate
f Indicator for signal confirmation
g Battery compartment - sender
h Synchronisation button - sender
j Assembly plate - sender
- 5 -
Page 8
Taking the appliance into use
Take the appliance out of the carton and remove all packaging
materials.
Inserting the batteries in the receiver
Open the battery compartment > i on the rear of the
appliance.
Insert 2 x 1.5V batteries of the type "AA/Mignon/LR6" >
as per the insertion markings shown in the battery compartment i.
Replace the battery compartment cover > a.
The appliance now switches automatically into the syn- >
chronisation mode. Press the synchronisation button on
the receiver
Inserting the battery in the sender
Remove the assembly plate > j from the sender.
Insert a 12 V battery, Type 23A as per the insertion >
markings shown in the battery compartment g.
Pay attention to correct poling of the batteries, otherwise the >
appliance will not function and could even be damaged.
Should the performance of the appliance diminish or fall
away completely, it means the batteries are exhausted.
w to provisionally leave this mode.
The used batteries should then be changed for new ones >
of the same type.
- 6 -
Page 9
Take note that, after changing the batteries, the
appliance MUST be synchronised once again.
Selecting the signal type
The receiver can indicate the reception of a door-ring signal
either optically, acoustically or optically and acoustically. To
select, bring the signal type switch u into the desired position:
- only acoustic ring indications, the selected melody
sounds,
- only optical ring indications, the signal indicator blinks,
- optical and acoustic ring indications.
Adjusting the signal sound volume
To select the desired signal sound level bring the volume
regulator y into the required position:
- Lower volume level
- Medium volume level
- Higher volume level.
Selecting the call melody
There are 16 different call melodies stored in the appliance.
Repeatedly press the button for melody selection >
e.
When the desired melody sounds, stop the selection. >
The appliance will utilise the last melody it played as the
call melody.
- 7 -
Page 10
Synchronising the sender and receiver
The sender and receiver in this doorbell system can communicate with each other over a number of different frequencies. Therefore, several doorbell systems can be operated
within the appliance range without them disturbing each
other. The precondition for this is that the sender and receiver within a system are working on the same frequency. For
this, you must synchronise the appliances as follows:
Press the synchronisation button on the receiver >
w.
The red signal indicator now glows.
Now press the synchronisation button on the sender > h.
The indicator f on the sender blinks a few times, then it
goes out.
Now press the bell button >
s.
If the synchronisation has been a success, the receiver notifies
you of the programmed call signal. The appliances then conclude the synchronisation mode. Should the receiver not
react as described, repeat the synchronisation.
The sender shows, with a brief glowing of the indicator f
when being activated, the transmission of the signal to
the receiver.
Installing the appliance
Select a suitable positioning for the sender, close to your >
outer door.
- 8 -
Page 11

Using the assembly plate > j of the sender, mark the posi-
tions required for the two boreholes (spacing approx.
68 mm) and then bore the holes for the enclosed wallplugs (S6).
Screw the assembly plate > j onto the wall.
Carefully slide the plastic covering over the nameplate > d
to the side and then remove it.
Write the name(s) of the residents on the plate > d and
then replace the plastic covering.
Place the sender on the assembly plate > j and secure it,
with the enclosed small screws, to the assembly plate j.
You can install the receiver at a suitable location either >
suspended by its loop o or make use of the stand t.
Bear in mind that the given range refers to the free-space
range. If being utilised in a building, this range is reduced quite distinctly.
To suspend the receiver, fix the enclosed screw, with the >
wallplug, at a suitable location on the wall and hang the
appliance from it.
- 9 -
Page 12
Maintenance
Important!
NEVER open any parts of the doorbell system! Arrange
for the appliance to be repaired by specialists only.
The appliance is maintenance-free. No form of maintenance,
either on or in the appliance, is intended for execution by
the user. In the event of malfunction or apparent damage,
make contact with Customer Services. If the appliance is not
to be in use for an extended period, remove the batteries.
Cleaning and Care
Important!
NEVER submerse the appliance or its components in water •
or other fluids!
Do not allow any liquids to penetrate into the appliance •
housing. If they do, there is a risk that the appliance could
be damaged.
Cleaning the appliance:
Clean the appliance only with a dry or lightly moistened >
cloth. Do not use aggressive cleaning agents!
These could damage the plastic upper surfaces.
In the event of the batteries leaking acids, put on a pair >
of protective gloves. Then clean the battery compartment
and the battery contacts with a dry cloth.
- 10 -
Page 13
Disposal
Do not, under any circumstances, dispose
of the appliance in your household refuse.
This appliance is subject to the provisions of
European Guidelines 2002/96/EG.
Sender and receiver units
Arrange for the product, or parts of it, to be disposed of •
by a professional disposal company or by your communal
waste facility.
Observe the currently applicable regulations. In case of •
doubt, please contact your waste disposal centre.
Batteries/rechargeable batteries
Used batteries/rechargeable batteries may not be dis-•
posed of in household waste.
Batteries can contain poisons which are damaging to •
the environment. Therefore, dispose of the batteries/
rechargeable batteries in accordance with statutory
regulations.
Every consumer is legally obligated to surrender batteries/ •
rechargeable batteries to a community collection centre
in their district or to a dealer. The purpose of this obligation
is to ensure that batteries are disposed of in a non-polluting
manner.
Dispose of all packaging materials in an
environmentally friendly manner.
- 11 -
Page 14

CE Conformity
This appliance has been both examined and approved in
regard to conformity with the fundamental requirements
and other relevant regulations of the EMC Directive
2004/108/EG as well as the Directive for Low Voltage
Appliances 1999/5/EG.
IMPORTER
KOMPERNASS GMBH
BURGSTRASSE 21
44867 BOCHUM, GERMANY
www.kompernass.com
Warranty and Service
You receive a 3-year warranty for this device as of the purchase date. The appliance has been manufactured with care
and meticulously examined before delivery. Please retain your
receipt as proof of purchase. In the case of a warranty claim,
please make contact by telephone with our service department. Only in this way can a post-free dispatch of your goods
be assured.
The warranty covers only claims for material and maufacturing
defects, not for worn parts or for damage to fragile components, e.g. buttons or batteries. The device is intended solely
for private domestic use, not for commercial applications.
- 12 -
Page 15

In the event of misuse and improper handling, use of force
and interference not carried out by our authorized service
branch, the warranty will become void.
Your statutory rights are not restricted in any way by this
warranty.
DES Ltd
Units 14-15
Bilston Industrial Estate
Oxford Street
Bilston
WV14 7EG
Tel.: 0870/787-6177
Fax: 0870/787-6168
e-mail: support.uk@kompernass.com
Irish Connection
Harbour view
Howth
Co. Dublin
Tel: 00353 (0) 87 99 62 077
Fax: 00353 18398056
e-mail: support.ie@kompernass.com
- 13 -
Page 16

Spis treści Strona
Zastosowanie zgodnie z przeznaczeniem 15
Zakres dostawy 15
Dane techniczne 16
Wskazówki bezpieczeństwa 16
Części urządzenia 19
Uruchamianie urządzenia 20
Konserwacja 24
Czyszczenie i konserwacja 24
Usuwanie/wyrzucanie 25
Deklaracja zgodności CE 26
Importer 26
Gwarancja i serwis 26
Przed pierwszym użyciem zapoznaj się z instrukcją obsługi
i zachowaj ją w celu późniejszego wykorzystania. Przekazując
urządzenie innej osobie należy jej również udostępnić niniejszą
instrukcję obsługi.
- 14 -
Page 17

Zastosowanie zgodnie z przeznaczeniem
Produkt służy jako bezprzewodowy dzwonek drzwiowy do
sygnalizowania lokatorom przybycia gości. Urządzenie jest
przewidziane wyłącznie do użytku prywatnego domowego,
nie zaś do komercyjnego ani przemysłowego.
Za szkody, powstałe w wyniku zastosowania niezgodnego
z przeznaczeniem, producent nie ponosi żadnej odpowiedzialności!
Zakres dostawy
1 Odbiornik
1 Nadajnik
2 Baterie 1,5 V, typ „AA/Mignon/LR6”
1 Bateria 12 V, typ 23A
1 Podstawka na odbiornik
2 Śruby do przymocowania nadajnika do płytki
montażowej
5 Tabliczki opisowe
2 Kołki ze śrubami do montażu nadajnika
1 Kołek ze śrubą do zawieszenia odbiornika
1 Instrukcja obsługi
- 15 -
Page 18

Dane techniczne
Zasilanie
Odbiornik: 2 x 1,5V typ „AA/Mignon/LR6”
Nadajnik: 1 x 12 V typ 23A
Częst. nadajnika: 433 MHz
Zasięg: 100 m (zasięg na odkrytym polu)
Głośność dzwonka: min. 73 dB(A) na 1 m
(przy ustawieniu maks.)
Wskazówki bezpieczeństwa
Nie pozwól aby dzieci mogły same korzystać z urzą-•
dzeń elektrycznych, ponieważ nie potrafi ą one jeszcze
samodzielnie oceniać ryzyka odniesienia obrażeń ciała.
Sprawdzać urządzenie oraz wszelkie jego elementy •
pod kątem widocznych uszkodzeń. W przypadku stwierdzenia uszkodzenia produktu, oddaj go do sprawdzenia
w punkcie serwisowym.
Nigdy nie otwieraj urządzenia. We wnętrzu nie ma •
żadnych elementów obsługowych.
- 16 -
Page 19

Niebezpieczeństwo wypadku i odniesienia
obrażeń!
Urządzenie nie jest przeznaczone do użytkowania przez •
osoby (w tym dzieci) z ograniczoną sprawnością fi zyczną,
ruchową bądź umysłową lub nieposiadające doświadczenia i / lub wiedzy, chyba że będą one przebywały pod
opieką osoby odpowiedzialnej za ich bezpieczeństwo
lub uzyskają od niej wskazówki dotyczące właściwego
używania urządzenia. Nie można pozwolić dzieciom
na zabawę urządzeniem.
Baterie nie powinny nigdy trafi ć w ręce dzieci. Dzieci •
mogą połknąć baterię. W wypadku połknięcia baterii,
jak najszybciej udać się do lekarza.
Podczas obchodzenia się z bateriami należy przestrzegać •
następujących zasad:
Niebezpieczeństwo wybuchu!
Baterii nie wolno wrzucać do ognia.•
Nigdy nie ładować rozładowanych baterii. •
Nigdy nie otwierać, lutować lub spawać baterii. •
Istnieje niebezpieczeństwo wybuchu i obrażeń!
Regularnie sprawdzaj stan baterii. Rozlane baterie mogą •
spowodować uszkodzenia urządzenia.
Wyjmij baterie z urządzenia, jeśli zamierzasz go nie •
używać przez dłuższy czas.
- 17 -
Page 20

Szkody w urządzeniu
Unikaj używania jednocześnie baterii różnych typów •
wzgl. o różnej pojemności.
Do czyszczenia nie używaj żrących substancji chemicz-•
nych.
Nigdy nie zanurzać urządzenia w wodzie. •
Do czyszczenia użyj lekko zwilżonej szmatki.
Chroń odbiornik przed wilgocią. Używaj go wyłącznie •
w suchych pomieszczeniach, unikaj wystawiania na
deszcz, a także trzymaj z dala od wilgoci.
Zwróć uwagę, by odbiornik w czasie użytkowania nie •
miał kontaktu z wilgocią, ani nie uległ uszkodzeniu
w żaden inny sposób.
- 18 -
Page 21

Części urządzenia
Odbiornik (ilustracja A)
q Wskaźnik
w Przycisk synchronizacji odbiornika
e Przycisk wyboru melodii
r Głośnik
t Podstawka
y Regulator głośności
u Przełącznik rodzaju sygnału (optyczny/dźwiękowy)
i Komora na baterie odbiornika
o Ucho do zaczepienia odbiornika
a Klapka komory na baterie odbiornika
Nadajnik (ilustracja B)
s Klawisz dzwonka
d Tabliczka opisowa
f Wskaźnik uruchomienia dzwonka
g Komora na baterie nadajnika
h Przycisk synchronizacji nadajnika
j Płytka montażowa nadajnika
- 19 -
Page 22

Uruchamianie urządzenia
Wyjmij urządzenie z opakowania i dokładnie zdejmij
wszystkie elementy opakowania.
Wkładanie baterii do odbiornika
Otwórz komorę na baterie > i z tyłu odbiornika.
Włóż 2 x baterie 1,5 V typu „AA/Mignon/LR6” zgodnie >
z pokazanym w komorze na baterie i schematem po-
łożenia.
Załóż klapkę komory na baterie > a.
Urządzenie automatycznie przechodzi w tryb synchroni- >
zacji. Naciśnij przycisk synchronizacji w odbiorniku
by tryb zakończyć wcześniej.
Wkładanie baterii do nadajnika
Zdejmij płytkę montażową > j nadajnika.
Włóż baterię 12 V, typu zgodnie ze schematem > g
przedstawionym w komorze na baterie.
Zwróć uwagę na prawidłowe ułożenie biegunów, >
w przeciwnym razie urządzenie nie będzie działać
i może ulec uszkodzeniu.
Gdy zmniejszy się moc urządzenia lub urządzenie przestanie
działać, wyczerpały się baterie.
w,
Zużyte baterie wymień na nowe tego samego typu. >
- 20 -
Page 23

Pamiętaj, że po wymianie baterii urządzenia należy
ponownie zsynchronizować.
Ustawienie typu sygnału
Odbiornik może sygnalizować odbiór sygnału dzwonka
albo optycznie, albo dźwiękowo, a także równocześnie
optyczniei dźwiękowo. Przełącznik typu sygnału u ustaw
w żądanym położeniu:
- tylko dźwiękowe sygnalizowanie dzwonka, słychać
wybraną melodię,
- tylko optyczne sygnalizowanie dzwonka, miga wskaźnik
sygnalizacyjny,
- optyczne i dźwiękowe sygnalizowanie dzwonka.
Ustawienie głośności dzwonka
W celu wybrania głośności dzwonka, ustaw regulator
głośności y w żądane położenie:
- mała głośność
- średnia głośność
- wysoka głośność.
Wybór melodii dzwonka
Urządzenia ma w pamięci 16 różnych melodii dzwonka.
Ponownie naciśnij przycisk wyboru melodii >
- 21 -
e.
Page 24

Zakończ wybór, gdy wybrana melodia zostanie odtwo- >
rzona.
Urządzenie zastosuje wybraną melodię do sygnalizowania.
Synchronizacja nadajnika i odbiornika
Nadajnik i odbiornik tego dzwonka bezprzewodowego
mogą się komunikować na różnych częstotliwościach. Dlatego
też w zakresie zasięgu urządzenia można korzystać z kilku
dzwonków bezprzewodowych bez występowania zakłóceń.
Warunkiem tego jest jednak nastawienie nadajnika i odbiornika każdego układu na tę samą częstotliwość. Urządzenia należy zsynchronizować w następujący sposób:
Naciśnij przycisk synchronizacji w odbiorniku >
w.
Zapala się czerwony wskaźnik sygnału.
Naciśnij przycisk synchronizacji w nadajniku > h.
Wskaźnik f w nadajniku miga kilka razy, a następnie gaśnie.
Naciśnij klawisz dzwonka >
s.
Po zakończeniu synchronizacji odbiornik komunikuje się
ustawionym sygnałem. Urządzenia pracują w trybie synchronizacji. Gdy odbiornik nie będzie pracował tak, jak
opisano, powtórz synchronizację.
W nadajniku po zadziałaniu dzwonka zapala się przez
krótki czas wskaźnik f przesyłania sygnału do odbiornika.
- 22 -
Page 25

Przymocowanie urządzeń
Wybierz odpowiednie miejsce na zamontowanie nadaj- >
nika w pobliżu drzwi wejściowych.
Przy pomocy płytki montażowej > j nadajnika zaznacz
położenie 2 otworów (odstęp około 68 mm), a następnie
wywierć otwory na dołączone kołki (S6).
Przykręć płytkę montażową > j do ściany.
Ostrożnie odsuń osłonę plastikową tabliczki opisowej > d
i zdejmij ją.
Na tabliczce wpisz nazwisko > d i ponownie załóż osłonę
plastikową.
Przystaw nadajnik na płytkę montażową > j i przykręć
go dołączonymi małymi śrubkami do płytki montażowej j.
Odbiornik możesz zawiesić za zaczep > o lub postawić
na podstawce t w wybranym miejscu. Pamiętaj, że podany zasięg odnosi się do komunikacji na wolnej przestrzeni. Przy użytkowaniu w domu zasięg jest wyraźnie
mniejszy.
Wywierć w ścianie otwór na kołek, wkręć dołączoną >
śrubę, a następnie zawieś na niej odbiornik.
- 23 -
Page 26

Konserwacja
Uwaga!
Nigdy nie próbuj otwierać żadnych części dzwonka!
Wszelkie naprawy powierzaj wykwalifi kowanym
specjalistom.
Urządzenie jest bezobsługowe. W urządzeniu nie ma żadnych
elementów, przewidzianych do samodzielnej naprawy przez
użytkownika. W przypadku stwierdzenia błędów w działaniu
lub uszkodzeń urządzenia, zwróć się do autoryzowanego punktu serwisowego. W przypadku dłuższej przerwy w użytkowaniu
wyjmij baterie.
Czyszczenie i konserwacja
Uwaga!
Nigdy nie zanurzać urządzenia w wodzie lub w innych •
cieczach!
Dopilnuj aby do środka obudowy nie przedostały się żadne •
płynne substancje. Groziłoby to uszkodzeniem urządzenia.
Czyszczenie urządzenia:
Produkt czyść wyłącznie suchą lub lekko zwilżoną szmatką. >
Nie stosować agresywnych środków czystości! W przeciwny razie można uszkodzić plastikowe powierzchnie.
Do wyjęcia wylanych baterii załóż rękawice ochronne. >
Komorę baterii i styki baterii należy czyścić tylko suchą
szmatką.
- 24 -
Page 27

Usuwanie/wyrzucanie
Nie wyrzucaj urządzenia do śmieci z innymi
odpadkami domowymi. W odniesieniu do
produktu ma zastosowanie dyrektywa
europejska 2002/96/WE.
Zespół nadajnika z odbiornikiem
Urządzenie należy usuwać poprzez licencjonowane zakła-•
dy usuwania odpadów lub miejscowe komunalne przedsiębiorstwo usuwania odpadów.
Przestrzegaj aktualnie obowiązujących przepisów. W razie •
pytań i wątpliwości odnośnie zasad utylizacji skontaktować
z najbliższy zakładem utylizacji.
Baterie i akumulatory
Baterii lub akumulatorów nie wolno wyrzucać razem ze śmie-•
ciami domowymi.
Baterie mogą zawierać substancje trujące, szkodliwe dla •
środowiska naturalnego. Dlatego bezwzględnie należy utylizować baterie lub akumulatory zgodnie z obowiązującymi
wymaganiami ustawowymi.
Każdy konsument jest ustawowo zobowiązany do oddawa-•
nia wszystkich baterii i akumulatorów w punktach zbiorczych
gminy lub dzielnicy albo do zwracania ich do handlu. Obowiązek ten wprowadzony został po to, aby baterie/akumulatorki były usuwane w sposób nieszkodliwy dla środowiska
naturalnego.
- 25 -
Page 28

Wszystkie materiały wchodzące w skład opakowania
należy przekazać do odpowiednich punktów zbiórki
odpadów.
Deklaracja zgodności CE
To urządzenie zostało poddane badaniom pod kątem spełniania podstawowych wymogów oraz stosownych przepisów
dyrektywy dotyczącej kompatybilności elektromagnetycznej
2004/108/WE oraz dyrektywy R&TTE1999/5/WE, a także
uzyskało odnośny certyfi kat.
IMPORTER
KOMPERNASS GMBH
BURGSTRASSE 21
44867 BOCHUM, GERMANY
www.kompernass.com
Gwarancja i serwis
Urządzenie objęte jest trzyletnią gwarancją, licząc od daty zakupu. Urządzenie zostało starannie wyprodukowane i poddane
skrupulatnej kontroli przed wysyłką. Paragon należy zachować
jako dowód dokonania zakupu. W przypadku napraw na gwarancji skontaktuj się telefonicznie z najbliższym punktem serwisowym. Tylko w ten sposób można zagwarantować bezpłatną
wysyłkę zakupionego produktu.
- 26 -
Page 29

Gwarancja obejmuje wyłącznie wady materiałowe i fabryczne,
natomiast nie obejmuje części ulegających zużyciu ani
uszkodzeń części łatwo łamliwych, np. wyłącznika lub akumulatorów. Produkt przeznaczony jest wyłącznie do użytku domowego, a nie do zastosowań przemysłowych i profesjonalnych.
Gwarancja wygasa w razie niewłaściwego lub niezgodnego
z instrukcją użycia, zastosowania przemocy lub w przypadku
ingerencji w urządzenie poza autoryzowaną placówkę
serwisową.
Niniejsza gwarancja nie ogranicza ustawowych praw
nabywcy urządzenia.
Kompernass Service Polska
ul. Strycharska 4
26-600 Radom
Tel.: 048 360 91 40
048 360 94 32
Faks: 048 384 65 38
048 369 93 63
E-mail: support.pl@kompernass.com
- 27 -
Page 30

Tartalomjegyzék Oldalszám
Rendeltetésszerű használat 29
Tartozékok 29
Műszaki adatok 30
Biztonsági utasítás 30
A készülék részei 33
A készülék üzembehelyezése 34
Karbantartás 38
Tiszítás és ápolás 38
Ártalmatlanítás 39
CE megfelelőség 40
Gyártja 40
Garancia és szerviz 40
Az első használat előtt fi gyelmesen olvassa el a használati utasítást
majd későbbi használatra tegye el. A készülék harmadik fél részére
történő továbbadásakor adja át a leírást is.
- 28 -
Page 31

Rendeltetésszerű használat
A termék a vezetékmentes látogatójelzés rádiós ajtócsengő
rendszereként szolgál és ily módon lehetővé teszi a házi
csengő vezetékes bekötés nélküli üzemeltetését. A készülék
magánjellegű, nem pedig ipari és kereskedelmi használatra
készült. A készülék nem rendeltetésszerű használatából eredő
károkért nem vállalunk felelősséget!
Tartozékok
1 vevő
1 adó
2 db 1,5 V-os AA/ceruzaelem/LR6
1 db 12 V, 23A típusú elem
1 talp a vevőhöz
2 db csavar az adó szerelőlemezhez való rögzítéséhez
5 db névtábla
2 db dübel csavarokkal az adó szereléséhez
1 db dübel csavarokkal a vevő felfüggesztéséhez
1 használati utasítás
- 29 -
Page 32

Műszaki adatok
Feszültségellátás
Vevő: 2 db 1,5 V AA/ceruzaelem/LR6
Adó: 1 db 12 V, 23A típusú elem
Adó frekvencia: 433 MHz
Hatótávolság: 100 m (szabadmezős hatóerő)
Csengőhang hangerő: legalább 73dB(A) 1 m-en
(maximális beállítás esetén)
Biztonsági utasítás
Ne engedje, hogy gyermekek felügyelet nélkül használják az •
elektromos készülékeket, mivel nem tudják mindig helyesen
felbecsülni, hogy azok mennyire balesetveszélyesek.
Ellenőrizze a készüléket és valamennyi alkatrészt, hogy •
nincsenek-e rajtuk látható sérülések. Ha a termék megsérült,
ellenőriztesse a vevőszolgálattal.
Soha ne nyissa fel a készüléket. A készülékházon belül •
semmiféle kezelőelem nem található.
- 30 -
Page 33

Baleset- és sérülésveszély!
A készülék nem alkalmas arra, hogy olyan személyek •
(ideértve a gyermekeket is) használják, akiket testi, érzékszervi vagy elmebeli képességeik vagy tapasztalatuk
és ismeretük hiánya megakadályoznának abban, hogy
biztonságosan használják a készüléket, kivéve, ha a
biztonságukról gondoskodó felügyelettel vannak, vagy
ha előtte felvilágítosották őket a készülék használatáról.
Vigyázni kell a gyermekekre, hogy ne játsszanak a
készülékkel.
Ne engedje, hogy az elemek gyermek kezébe jussanak. •
A gyermekek a szájukba vehetik az elemeket és lenyelhetik
őket. Ha valaki lenyelné az elemeket, azonnal orvoshoz
kell fordulni.
Az elemek kezelésére vonatkozólag az alábbiakat kell •
betartani:
Robbanásveszély!
Ne dobja az elemet a tűzbe.•
Ne töltse fel az elemeket. •
Soha ne nyissa fel az elemeket, ne forrassza és hegessze •
őket! Ekkor robbanás- és balesetveszély alakul ki!
Rendszeresen ellenőrizze az elemeket. A kifolyó elemsav •
kárt okozhat a készülékben.
Ha hosszabb ideig nem használja a készüléket, vegye ki •
belőle az elemeket.
- 31 -
Page 34

A készüléken lévő sérülések
Ne használjon egy időben eltérő típusú vagy kapacitású •
elemeket.
Ne használjon a tisztításhoz agresszív vegyi anyagokat.•
Ne merítse a készüléket vízbe! Csak enyhén nedves •
kendővel törölje meg.
Védje a vevőt a nedvességtől! Csak száraz helyiségek-•
ben használja, folyadék használja szabadban, ha
csapadék esik vagy folyadékok közelében.
Ügyeljen arra, hogy a vevő üzemelés közben ne legyen •
nedves vagy vizes és ne sérüljön meg.
- 32 -
Page 35

A készülék részei
Vevő ("A" ábra)
q jelzéskijelző
w a vevő szinkronizációs gombja
e dallamválasztó gomb
r hangszóró
t talp
y hangerőszabályzó
u jelzéstípus kapcsoló (optikai/akusztikus)
i vevő elemrekesze
o a vevő felakasztására szolgáló akasztólyuk
a vevő elemrekeszének fedele
Adó ("B" ábra)
s csengőgomb
d névtábla
f jelzésnyugtázás kijelzése
g adó elemrekesze
h adó szinkronizációs gombja
j adó szerelőlemeze
- 33 -
Page 36

A készülék üzembehelyezése
Vegye ki a készüléket a csomagból és vegye le róla a
csomagolóanyagokat.
Helyezze be az elemeket a vevőbe.
Nyissa ki a vevő hátoldalán lévő elemrekeszt > i.
Helyezzen bele az elemrekeszbe az elemrekeszben > i
ábrázolt módon 2 db 1,5V „AA//LR6” ceruzaelemet.
Helyezze vissza ez elemrekesz fedelét > a .
A készülék most automatikusan szinkronizációs üzemmódba >
kapcsol át. Nyomja meg a vevőn
gombot, hogy elhagyja ezt az üzemmódot.
Az elemek adóba történő behelyezése
Vegye le az adó szerelőlemezét > j .
Helyezzen be az elemrekeszben > g ábrázolt módon egy
12 V-os 23A típusú elemet.
Ügyeljen arra, hogy az elemek a megfelelő pólussal >
legyenek benne, mert különben a készülék nem működik
és kár keletkezhet benne.
Amennyiben a készülék teljesítménye csökkenne vagy
egyáltalán nem működne tovább, az elemek lemerültek.
w lévő szinkronizációs
Ilyenkor a használt elemeket cserélje ki azonos típusú >
újakra.
- 34 -
Page 37

Kérjük, vegye fi gyelembe, hogy az elemek cseréje után
újra össze kell hangolni a készülékeket.
A jelzéstípus beállítása
A vevő az ajtócsengő jelzésének vételét optikai, akusztikus
vagy optikai és akusztikus módon jelezheti ki. Ehhez állítsa
be a jelzéstípus kapcsolót u a kívánt helyzetbe:
- csak akusztikus csengőjelzés, a kiválasztott dallam szólal
meg,
- csak optikai csengőjelzés, a jelzés kijelzése villog,
- optikai és akusztikus csengőjelzés.
A jelzés hangerősségének beállítása
A kívánt csengőhang hangerejének kiválasztásához állítsa
a hangerőszabályzót y a kívánt helyzetbe:
- alacsony hangerő
- közepes hangerő
- nagy hangerő
A csengődallam kiválasztása
16 különböző csengődallamot lehet lementeni a készülékben.
Nyomja meg többször a dallamválasztás gombját >
e.
Ha megszólal a kívánt dallam, fejezze be a kiválasztást. >
A készülék a legutóbb lejátszott dallamot használja üzemelés
közben.
- 35 -
Page 38

Az adó és vevő behangolása
Az ajtócsengő rendszer adója és vevője különböző frekvenciákon tudnak kommunikálni egymással. Ezért több ajtócsengő rendszert lehet üzemeltetni a készülék hatósugarán
belül anélkül, hogy zavarnák egymást. Ennek előfeltétele
azonban az, hogy egy rendszer adója és vevője azonos
frekvencián működjenek. Ehhez a készüléket az alábbi
módon kell behangolni:
Nyomja meg a vevő szinkronizációs gombját >
w.
A piros jelzéskijelző most világít.
Ekkor nyomja meg az adó szinkronizációs gombját > h.
Az adón lévő kijelzés f párszor villog, majd kialszik.
Ekkor nyomja meg a csengőgombot > s.
A sikeres behangolás után a vevő a beállított jelzéssel jelez.
A készülékek ekkor befejezik a behangolási üzemmódot.
Ha a vevő nem a leírtaknak megfelelően reagál, ismételje
meg a hangolást.
Az adó csengetéskor a kijelzés f rövid világításával
jelzi a jelzés átvitelét a vevőre.
A készülék felszerelése
Válasszon ki egy helyet az adóhoz a külső ajtó közelében. >
Az adó szerelőlemezével > j jelölje meg a 2 szükséges
furat helyét (egymástól kb. 68 mm-es távolságra) és fúrja
ki a tartozék dübelek lyukát (S6).
- 36 -
Page 39

Csavarozza a szerelőlemezt > j a falra.
Óvatosan tolja oldalra a névtábla > d feletti műanyagtakarást
és vegye le.
Írja rá a lakó nevét a táblára > d és helyezze vissza a
műanyag takarást.
Helyezze az adót a szerelőlemezre > j és rögzítse a
mellékelt kis csavarokkal a szerelőlemezre j.
A vevőt vagy a rajta lévő akasztólyukkal > o akassza fel
vagy a talp t segítségével állítsa fel egy arra alkalmas
helyen. Vegye fi gyelembe, hogy a megadott hatótávolság
a szabadmezős átvitelre vonatkozik. Házakban való
használat esetén ez a távolság jelentősen csökken.
Ha fel szeretné akasztani, csavarozza a dübeleket a >
mellékelt csavarok segítségével a falba és akassza rájuk
a vevőt.
- 37 -
Page 40

Karbantartás
Figyelem!
Soha ne nyissa fel az ajtócsengő rendszer részeit!
Javítást csak szakemberrel végeztessen.
A készüléket nem kell karbantartani. A készülék külsején
vagy belsejében a felhasználónak semmilyen munkát nem
kell végeznie. Hibás működés vagy felismerhető hiba esetén
forduljon az ügyfélszolgálathoz. Ha hosszabb ideig nem
használja a készüléket, vegye ki az elemeket.
Tiszítás és ápolás
Figyelem!
Soha ne merítse a készülék részeit vízbe vagy más •
folyadékba!
Ne engedje, hogy folyadék kerüljön a burkolatba.•
Egyébként fennáll annak a veszélye, hogy a készülék
megsérül.
A készülék tisztítása
A terméket száraz vagy kissé benedvesített kendővel tisz- >
títsa meg. Ne használjon erős tisztítószert! Máskülönben
megsérülhet a műanyag felület.
Ha kifolyna az elemsav, vegyen fel védőkesztyűt. Az >
elemrekeszt és az elemek érintkezéseit csak száraz
kendővel tisztítsa!
- 38 -
Page 41

Ártalmatlanítás
A készüléket semmi esetre se dobja a rendes ház-
tartási hulladékba. A termékre az 2002/96/EK
irányelv vonatkozik.
Az adó-/vételi egység
A készüléket vagy annak részeit engedélyezett hulladék-•
gyűjtő helyen vagy a helyi hulladékeltávolító üzemnél
tudja kidobni.
Vegye fi gyelembe az érvényben lévő idevonatkozó •
előírásokat. Ha bizonytalan, vegye fel a kapcsolatot
a hulladékfeldolgozó vállalattal.
Elemek/akkuk
Az elemeket/akkukat nem szabad a háztartási hulladékba •
dobni.
Az elemek mérgezőanyagokat tartalmazhatnak, melyek •
káros hatással vannak a környezetre. Az elemeket/akkukat
ezért mindenképpen az érvényes törvényes előírásoknak
megfelelően selejtezze ki.
Minden felhasználó törvényes kötelessége, hogy az •
elemeket/akkukat leadja lakóhelye gyűjtőhelyén vagy
a kereskedőnél. Ez a kötelezettség azt a célt szolgálja,
hogy az elemek/akkuk környezetkímélő ártalmatlanításra
kerülhessenek.
Valamennyi csomagolóanyagot juttasson el a
környezetbarát hulladékhasznosítóhoz.
- 39 -
Page 42

CE megfelelőség
A készülék az elektromágneses összeférhetőségről szóló 2004/108/EK uniós irányelv, valamint a
rádióberendezésekről és a távközlő. végberendezésekről
szóló 1999/5/EK irányelv alapvető elvárásainak és más
vonatkozó előírásainak való megfelelés tekintetében be van
vizsgálva és engedélyezve van.
Gyártja
KOMPERNASS GMBH
BURGSTRASSE 21
44867 BOCHUM, GERMANY
www.kompernass.com
Garancia és szerviz
A készülékre 3 év garanciát adunk a vásárlás dátumától
számítva. A készüléket gondosan gyártottuk, és szállítás
előtt lelkiismeretesen ellenőriztük. Kérjük, a vásárlás
igazolására őrizze meg a pénztári blokkot. Kérjük,
garanciaigény esetén vegye fel a kapcsolatot telefonon
az Ön közelében lévő szervízzel. Csak ebben az esetben
garantálhatjuk, hogy ingyen tudja beküldeni az árut.
- 40 -
Page 43

A garancia csak anyag- és gyártási hibára vonatkozik, nem
pedig kopásra vagy törékeny részek (pl. kapcsoló vagy elem)
sérülésére. A termék csakis magán és nem pedig kereskedelmi
használatra alkalmas.
A garancia érvényét veszti visszaélésszerű vagy szakavatatlan
kezelés, erőszak alkalmazása vagy olyan beavatkozások
esetén, amelyeket nem engedélyeztetett szervizelő üzleteink
hajtottak végre.
Az ön törvényes jogait ez a garancia nem korlátozza.
Hornos kft.
H - 2600 Vác
Zrínyi utca 39.
Telefon +36 27 999 350
Telefax +36 27 317 212
e-mail: support.hu@kompernass.com
- 41 -
 Loading...