

Page 1
T2-C User Guide
Page 2

Page 3

Trojan™ T2-C User Guide
Part Number 22834689-EN-E
Revision 1.0
2/2018
Trojanlabel, An AstroNova™ Company
Marielundvej 46A, 2.
2730 Herlev
Denmark
Phone +45 2964 0005
www.trojanlabel.com
Page 4

© 2018 Trojanlabel
This document, attachments and information contained herein are the confidential and
proprietary property of Trojanlabel and their suppliers. As such, this document, attached files
and information contained herein are subject to all nondisclosure and proprietary information
agreements currently in effect with your organization. Copies of this document, any portion of
this document or attachments may not be transmitted or disclosed to any third party without the
prior written permission of Trojanlabel.
All content is the confidential property of, or licensed to, Trojanla bel ("Trojanlabel," "we," or "us")
and is protected under Danish and Foreign copyright, trademark and other intelle ctual property
laws.
Trademarks
Trojan™ is a trademark of AstroNova, Inc.
Microsoft® Windows® XP, Windows® Vista, Windows® 7, Windows® 8, and Windows® 10 are
registered trademarks of Microsoft Corporation.
Page 5
Certificate of compliance and Safety information
Page 6

T2-C User Guide 7
Page 7

Contents
Chapter 1: Introduction . . . . . . . . . . . . . . . . . . . . . . . . . . . . . . . . . . . . . . . 11
General information . . . . . . . . . . . . . . . . . . . . . . . . . . . . . . . . . . . 11
Overview and application . . . . . . . . . . . . . . . . . . . . . . . . . . . . . . . . 12
Chapter 2: Setting up the T2-C press . . . . . . . . . . . . . . . . . . . . . . . . . . . . . . .17
Physical setup . . . . . . . . . . . . . . . . . . . . . . . . . . . . . . . . . . . . . .17
Cabling (network and power supply) . . . . . . . . . . . . . . . . . . . . . . . . . . . 18
Chapter 3: Power on . . . . . . . . . . . . . . . . . . . . . . . . . . . . . . . . . . . . . . . . 19
Visible safety check . . . . . . . . . . . . . . . . . . . . . . . . . . . . . . . . . . . 19
Power on process . . . . . . . . . . . . . . . . . . . . . . . . . . . . . . . . . . . . 19
Installing ink tanks and the printhead . . . . . . . . . . . . . . . . . . . . . . . . . . 20
Installing the ink tanks . . . . . . . . . . . . . . . . . . . . . . . . . . . . . . 20
Unpacking the printhead . . . . . . . . . . . . . . . . . . . . . . . . . . . . 23
Installing the printhead . . . . . . . . . . . . . . . . . . . . . . . . . . . . . 25
Chapter 4: Loading the label material . . . . . . . . . . . . . . . . . . . . . . . . . . . . . . .29
Unwinder and rewinder roll direction . . . . . . . . . . . . . . . . . . . . . . . . . . . 29
Rolling direction unwinder - Ink jet coating on the inside or outside . . . . . . 29
Rolling direction rewinder . . . . . . . . . . . . . . . . . . . . . . . . . . . . 30
Threading the label material from scratch . . . . . . . . . . . . . . . . . . . . . . . . 31
Adjusting the label edge sensor . . . . . . . . . . . . . . . . . . . . . . . . . . . . . 35
Calibrate tension for the label web . . . . . . . . . . . . . . . . . . . . . . . . . . . . 35
Splicing and changing the label roll . . . . . . . . . . . . . . . . . . . . . . . . . . . 37
Page 8

Contents
Chapter 5: Select and queue print / start print job . . . . . . . . . . . . . . . . . . . . . . . . 39
Chapter 6: Pause, resume, or stop a print job . . . . . . . . . . . . . . . . . . . . . . . . . . 41
Chapter 7: Moving the label web . . . . . . . . . . . . . . . . . . . . . . . . . . . . . . . . . . 43
Chapter 8: Printing modes . . . . . . . . . . . . . . . . . . . . . . . . . . . . . . . . . . . . . 45
Continuous printing mode . . . . . . . . . . . . . . . . . . . . . . . . . . . . . . . . 45
Die-cut printing mode . . . . . . . . . . . . . . . . . . . . . . . . . . . . . . . . . . 46
Calibrating the label gap sensor . . . . . . . . . . . . . . . . . . . . . . . . . 46
Blackmark printing mode . . . . . . . . . . . . . . . . . . . . . . . . . . . . . . . . . 48
Calibrating the label gap/blackmark sensor . . . . . . . . . . . . . . . . . . . 48
Gap size and speeds . . . . . . . . . . . . . . . . . . . . . . . . . . . . . . . . . . 50
Chapter 9: Shutting down the T2-C press . . . . . . . . . . . . . . . . . . . . . . . . . . . . . 51
Chapter 10: Driver installation and features . . . . . . . . . . . . . . . . . . . . . . . . . . . . 53
Driver installation . . . . . . . . . . . . . . . . . . . . . . . . . . . . . . . . . . . . .53
Driver features and functions . . . . . . . . . . . . . . . . . . . . . . . . . . . . . . 56
General driver settings . . . . . . . . . . . . . . . . . . . . . . . . . . . . . 57
Integrating additional color profiles . . . . . . . . . . . . . . . . . . . . . . . 59
Chapter 11: User Interface (UI) . . . . . . . . . . . . . . . . . . . . . . . . . . . . . . . . . . . 61
Right side status bar . . . . . . . . . . . . . . . . . . . . . . . . . . . . . . . . . . . 61
General settings (HOME tab) . . . . . . . . . . . . . . . . . . . . . . . . . . . . . . 62
Overview menu . . . . . . . . . . . . . . . . . . . . . . . . . . . . . . . . . 62
Settings menu . . . . . . . . . . . . . . . . . . . . . . . . . . . . . . . . . . 63
Statistics menu . . . . . . . . . . . . . . . . . . . . . . . . . . . . . . . . . 70
Shutdown . . . . . . . . . . . . . . . . . . . . . . . . . . . . . . . . . . . . 72
Exporting statistics data to a CSV file / viewing statistics from a
browser . . . . . . . . . . . . . . . . . . . . . . . . . . . . . . . . . . . . . 72
T2-C press handling menus (TrojanTwo tab) . . . . . . . . . . . . . . . . . . . . . . 74
Overview menu . . . . . . . . . . . . . . . . . . . . . . . . . . . . . . . . . 74
Handling menu . . . . . . . . . . . . . . . . . . . . . . . . . . . . . . . . . 75
Maintenance menu . . . . . . . . . . . . . . . . . . . . . . . . . . . . . . . 77
Job Library menu . . . . . . . . . . . . . . . . . . . . . . . . . . . . . . . . 79
Print Queue menu . . . . . . . . . . . . . . . . . . . . . . . . . . . . . . . . 82
Diagnostics menu . . . . . . . . . . . . . . . . . . . . . . . . . . . . . . . . 83
Media Settings menu . . . . . . . . . . . . . . . . . . . . . . . . . . . . . . 84
Chapter 12: Updating software and firmware . . . . . . . . . . . . . . . . . . . . . . . . . . . 89
Updating via the online updater . . . . . . . . . . . . . . . . . . . . . . . . . . . . . 89
Updating via the offline updater . . . . . . . . . . . . . . . . . . . . . . . . . . . . . 90
Chapter 13: Using the built in slitter for the T2-C press . . . . . . . . . . . . . . . . . . . . . . 93
Purpose . . . . . . . . . . . . . . . . . . . . . . . . . . . . . . . . . . . . . . . . . 93
Usage . . . . . . . . . . . . . . . . . . . . . . . . . . . . . . . . . . . . . . . . . . 93
Replacing the slitter blades . . . . . . . . . . . . . . . . . . . . . . . . . . . . . . . 95
Chapter 14: Maintenance . . . . . . . . . . . . . . . . . . . . . . . . . . . . . . . . . . . . . . 97
Regular cleaning/checking tasks . . . . . . . . . . . . . . . . . . . . . . . . . . . . . 97
8 T2-C User Guide
Page 9

Contents
Cleaning the NIP roller . . . . . . . . . . . . . . . . . . . . . . . . . . . . . 97
Cleaning other rollers . . . . . . . . . . . . . . . . . . . . . . . . . . . . . . 99
Emptying the waste ink bottle . . . . . . . . . . . . . . . . . . . . . . . . . . 99
Replacing the wiper roller . . . . . . . . . . . . . . . . . . . . . . . . . . . . . . . 101
Manual printhead wiping . . . . . . . . . . . . . . . . . . . . . . . . . . . . . . . . 105
Clean or replace aerosol filter . . . . . . . . . . . . . . . . . . . . . . . . . . . . . 108
Chapter 15: Preparing the T2-C press for transportation . . . . . . . . . . . . . . . . . . . . 109
Removing the printhead . . . . . . . . . . . . . . . . . . . . . . . . . . . . . . . . 109
Storing used or opened printheads . . . . . . . . . . . . . . . . . . . . . . . . . . 110
Removing the ink from the reservoir ink tanks . . . . . . . . . . . . . . . . . . . . . 111
Removing the ink from the ink filters . . . . . . . . . . . . . . . . . . . . . . . . . . 112
Empty and clean the waste ink bottle . . . . . . . . . . . . . . . . . . . . . . . . . 113
Removing the ink tanks . . . . . . . . . . . . . . . . . . . . . . . . . . . . . . . . 113
Chapter 16: Troubleshooting . . . . . . . . . . . . . . . . . . . . . . . . . . . . . . . . . . . 115
Error states . . . . . . . . . . . . . . . . . . . . . . . . . . . . . . . . . . . . . . . 115
Error messages on screen . . . . . . . . . . . . . . . . . . . . . . . . . . . . . . . 119
Appendix A: Spare parts . . . . . . . . . . . . . . . . . . . . . . . . . . . . . . . . . . . . . . 121
Consumables . . . . . . . . . . . . . . . . . . . . . . . . . . . . . . . . . . . . . 121
Print engine . . . . . . . . . . . . . . . . . . . . . . . . . . . . . . . . . . . . . . 121
Circuit boards . . . . . . . . . . . . . . . . . . . . . . . . . . . . . . . . . . . . . 122
Tubes, cables, and other parts . . . . . . . . . . . . . . . . . . . . . . . . . . . . . 123
Index . . . . . . . . . . . . . . . . . . . . . . . . . . . . . . . . . . . . . . . . . . 125
T2-C User Guide 9
Page 10

Contents
10 T2-C User Guide
Page 11
1
Introduction
Original instructions
These instructions are Trojanlabel's original instructions for the Trojanlabel press
(henceforth called the machine or TrojanTwo-Compact press or T2-C press).
Purpose
The purpose of these instructions is to ensure correct installation, use, handling and
maintenance of the machine.
Accessibility
The instructions are to be kept in a location known to the staff and must be easily accessible
for the operators and maintenance personnel.
Knowledge
It is the duty of the employer (the owner of the machine) to ensure that anyone who is to
operate, service, maintain, or repair the machine have read the instructions. As a minimum ,
they should have read the part(s) relevant for their work. In addition, anyone who is to
operate, service, maintain, or repair the machine is under obligation to look for in formation
in the instructions themselves.
General information
Manufacturer
The machine has been manufactured by:
Company name: Trojanlabel
Address: Marielundvej 46A 2 sal, 2730 Herlev, Denmark
The machine's designation
The machine's complete designation is Label Press type T2-C.
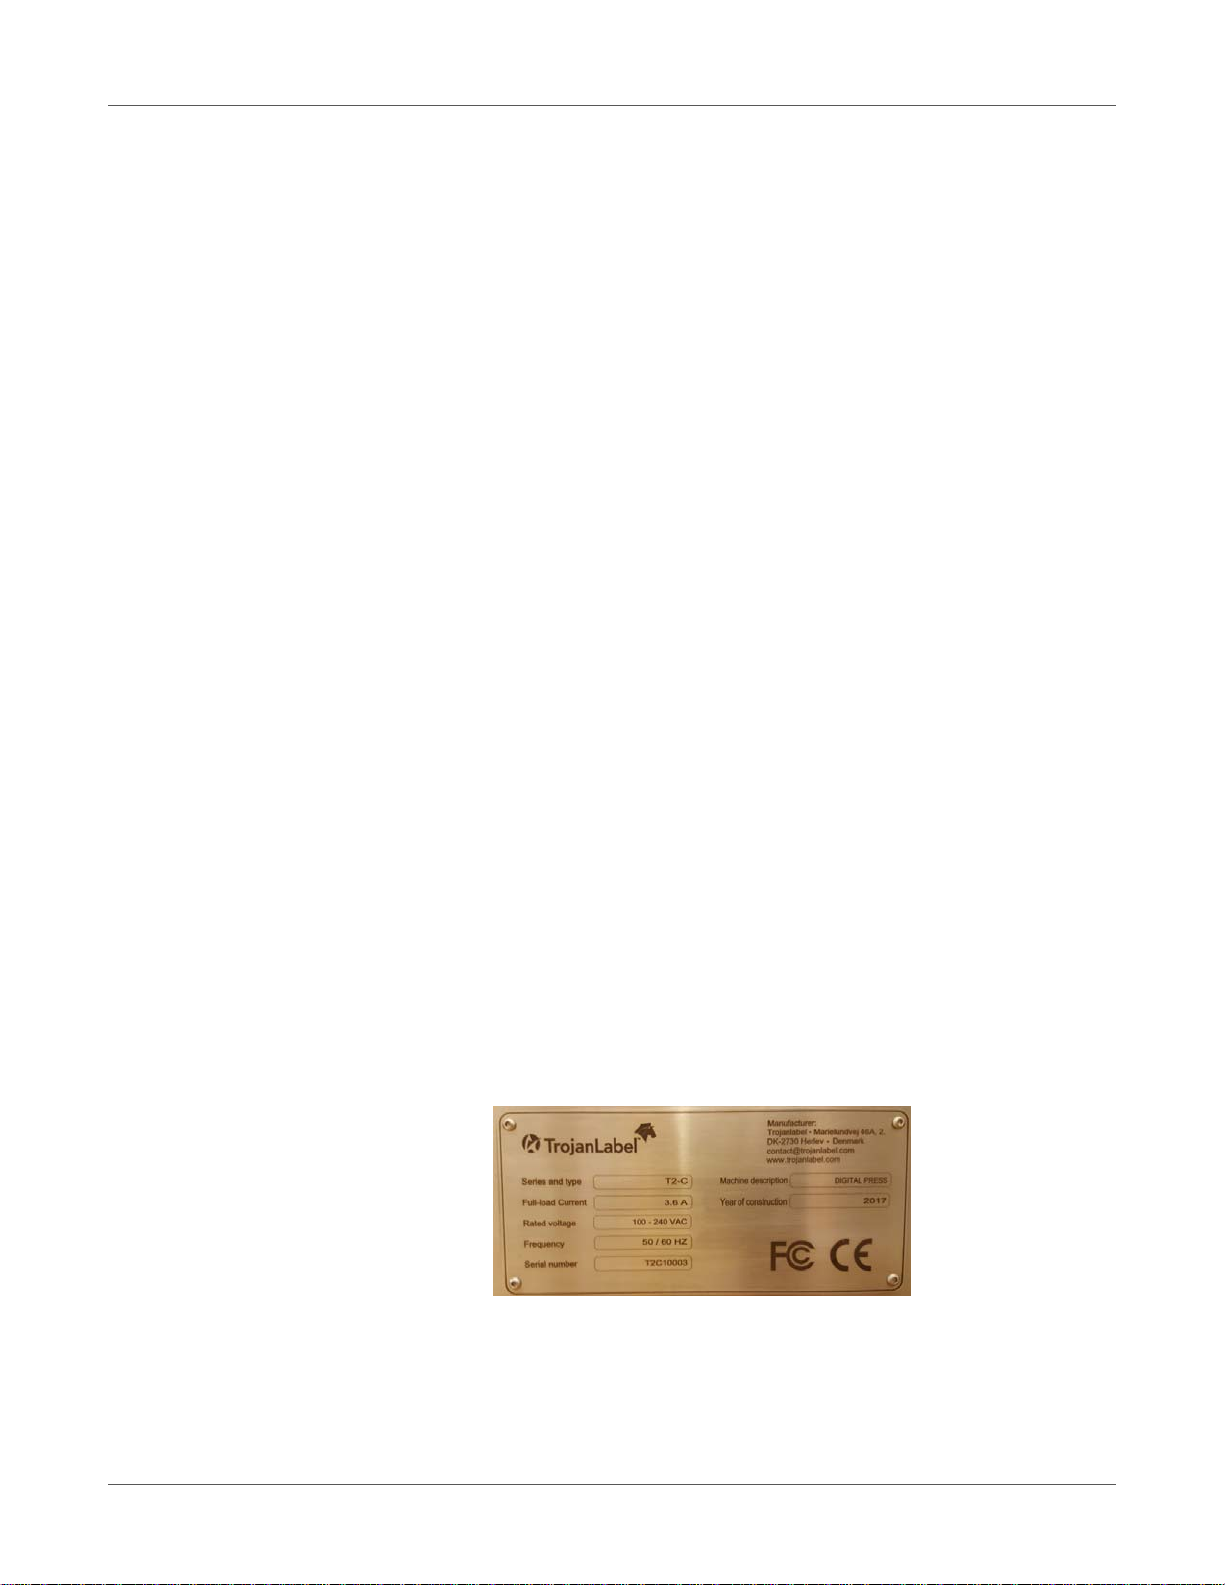
Machine plate
The machine plate (picture) is situated on the back side of the machine on the middle
bottom:
T2-C User Guide 11
Page 12

Introduction
Overview and application
General description
The machine consists of an unwinder/rewinder, label edge sensor, label gap and
blackmark sensor, NIP roller, slitter and 4 ink tanks.
If any changes or alterations are made to the ma chine, the se chan ge s o r al te ratio ns must
be reflected in these instructions as necessary.
The machine's purpose and intended use
Application: The machine is only to be used to print labels.
The machine must not be used for any other purpose than the purpose mentioned above.
Warning about foreseeable misuse
The T2-C press may not be used with inks not endorsed by Trojanlab el. All inks purchased
from Trojanlabel or from official Trojanlabel distributors worldwide are endorsed by
Trojanlabel.
Technical specifications
Physical dimensions in inches and millimeters:
• Length 23.8" x Width 22.8" x Height 31.3"
• Length 606 mm x Width 580 mm x Height 795 mm
Weight:
• 132.3 lbs. (60 kg) without ink tanks and label roll
Electrical:
• Nominal supply voltage: 100-240V AC
• Nominal supply frequency: 50-60hz
• Estimated peak consumption: 240W
• Full-load current: 3.6 A
• Machine power supply:
240 W (48 VDC, 5 A), please see "T2-C_Meanwell_SP-240-SPEC.PDF" for details:
http://www.trojanextranet.com/media/59742/t2-c_meanwell_sp-240-spec.pdf
Operating positions, location, and arrangement
The machine is intended to be used in a light industrial/office environment. The operator
operates the machine in a standing or sitting position.
The machine should be placed on a properly leveled worktable or cabinet wh ich is able to
handle the T2-C press weight and size. Use spirit level to check leveling.
Note: Improper leveling of the machine might cause print quality issues and shorten the
printhead life.
12 T2-C User Guide
Page 13

Introduction
Temperature
Recommend operational temperatures
• Operation: 20° to 30° Celsius at RH 22-80% (non-condensing)
• Storage: -5° to 50° Celsius at RH up to 85%, non-condensing at 65°
If transferring the machine from different temperatu re cond itions, ensur e that th e machine
has time to acclimatize.
Operating Environment
It is important that the machine is placed in a clean environ ment as possible, with sufficient
air conditioning/cleaning. Avoid placing it in an environment with dust and paper debr is, as
the printhead nozzles are sensitive to this.
Label Materials
The machine requires ink jet coated label materials for optimal print quality; some
non-coated materials will also work. Please contact Trojanlabel or your distributor for
recommendations of suited materials.
It is imperative to have a local source of material, to ensure a stable production.
Media specifications
• Roll Size: max. 12"(300 mm), inner core diameter 2.99" (76 mm)
• Media Types: Plain Paper, Gloss Paper, Matte Pape r an d Syn th et ic
pressure-sensitive; Ink jet treatment (coating) recommended.
• Media Thickness 4 pt. /mil to 12 pt. /mil (0.1-0.3 mm) - with default print height setting,
print height is adjustable for thicker media.
• Label Size/Print Area
Width 1.0" (25.4 mm) to 8.66" (220 mm)
Length 0.59" (15 mm) - 30.0" (762 mm) - 30.0" (762 mm) maximum length can be
extended with stitch function.
Print Speed and Resolution
• Printing Technology: Thermal Inkjet
• Resolution and Speed:
6 ips (9m/min.) at 1600 x 1600 dpi
12 ips (18m/min.) at 1600 x 800 dpi
T2-C User Guide 13
Page 14
Introduction
Overview
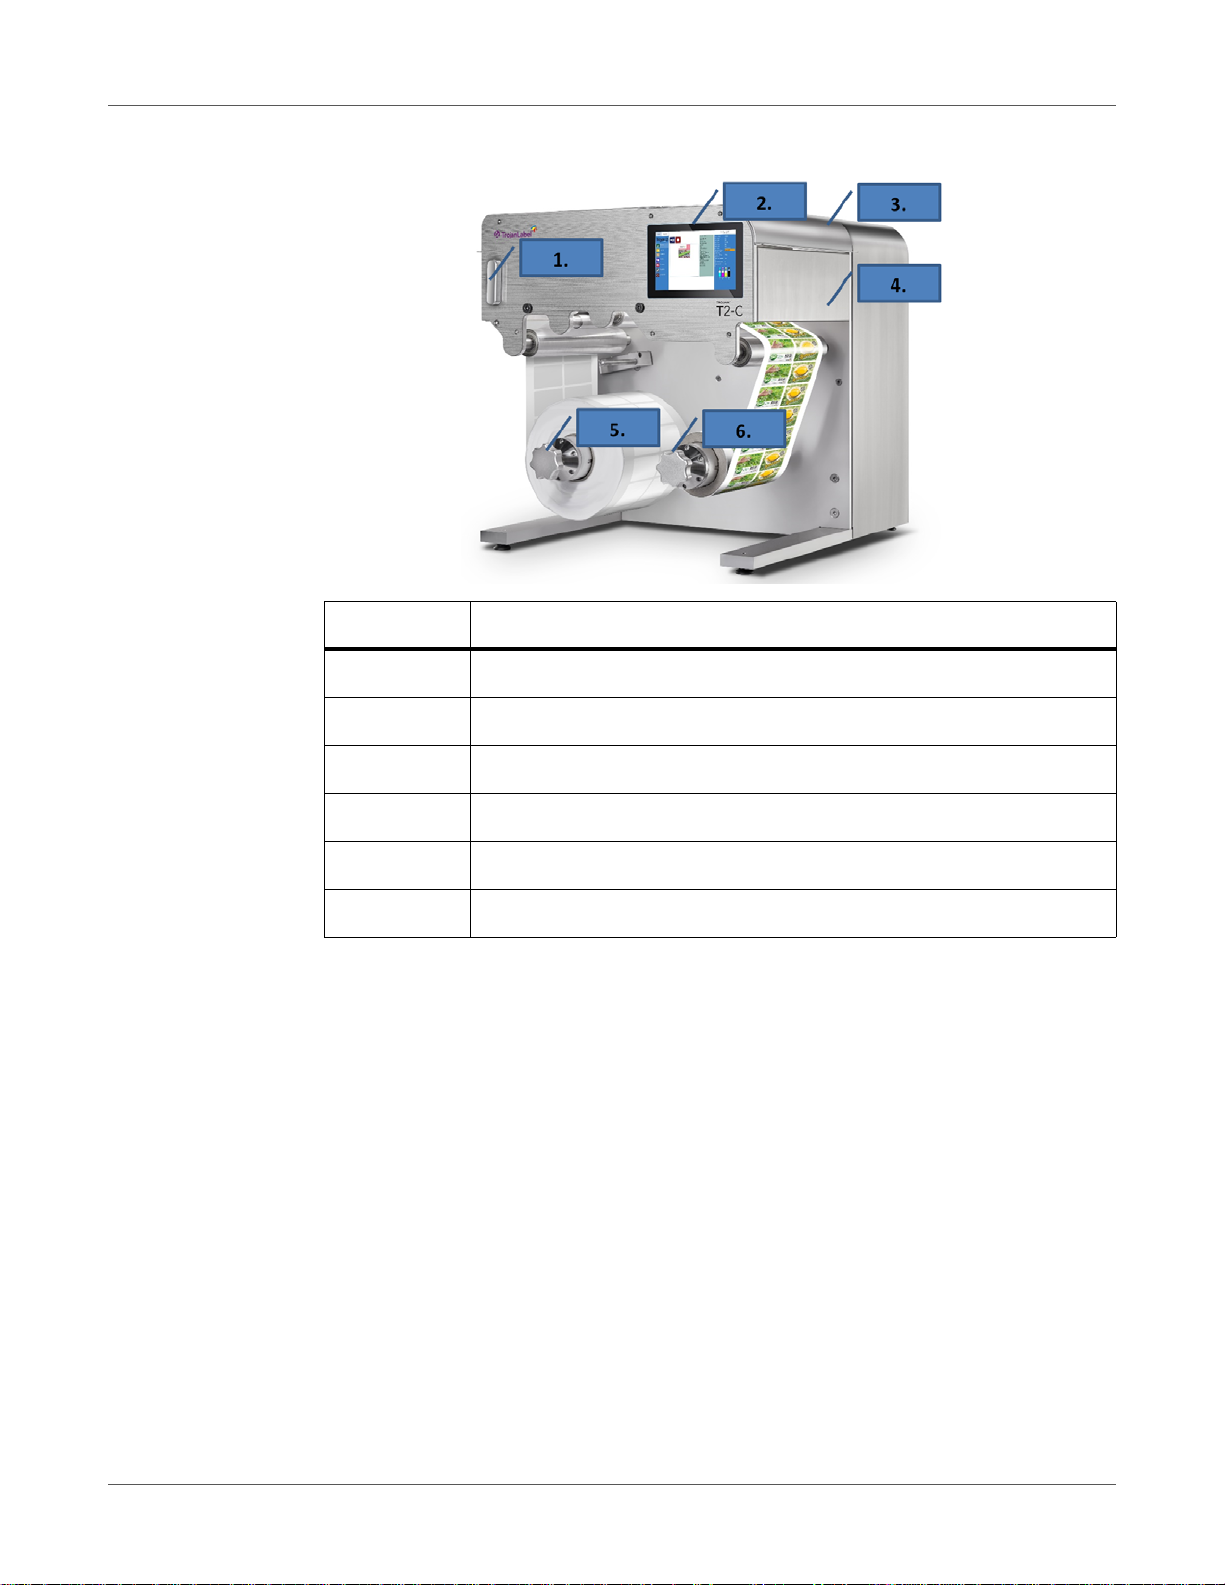
# Description
1 NIP clamp
2 7" Touch screen display
3 Lid to access aerosol filter and slitter knifes
4 Built-in slitter knifes
5 Unwinder
6 Rewinder
14 T2-C User Guide
Page 15
Introduction
# Description
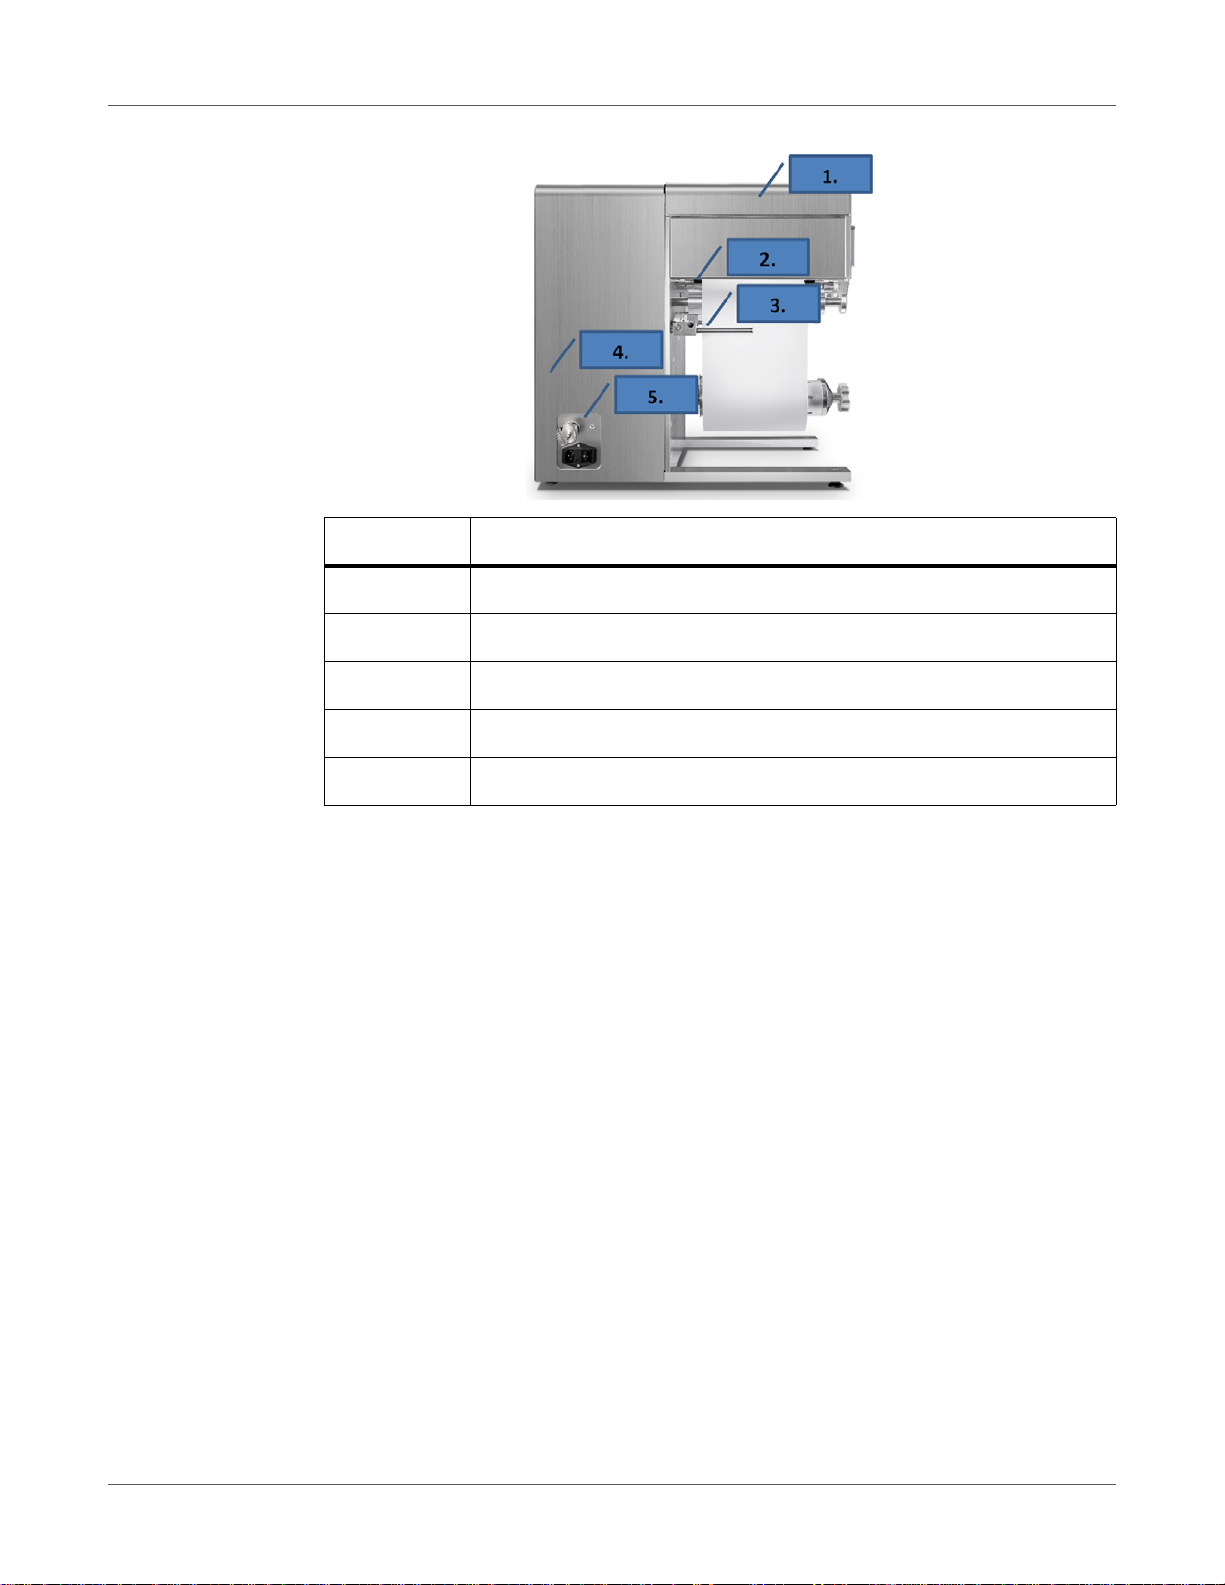
1 Lid for easy access to gap/blackmark sensor and maintenance
2 Sensor for gap/blackmark detection
3 Label edge sensor
4 Waste Ink bottle inside (can be accessed via drawer)
5 Easy installation (Ethernet and power outlet 100-240V AC - 50/60 Hz)
T2-C User Guide 15
Page 16

Introduction
16 T2-C User Guide
Page 17
2
Physical setup
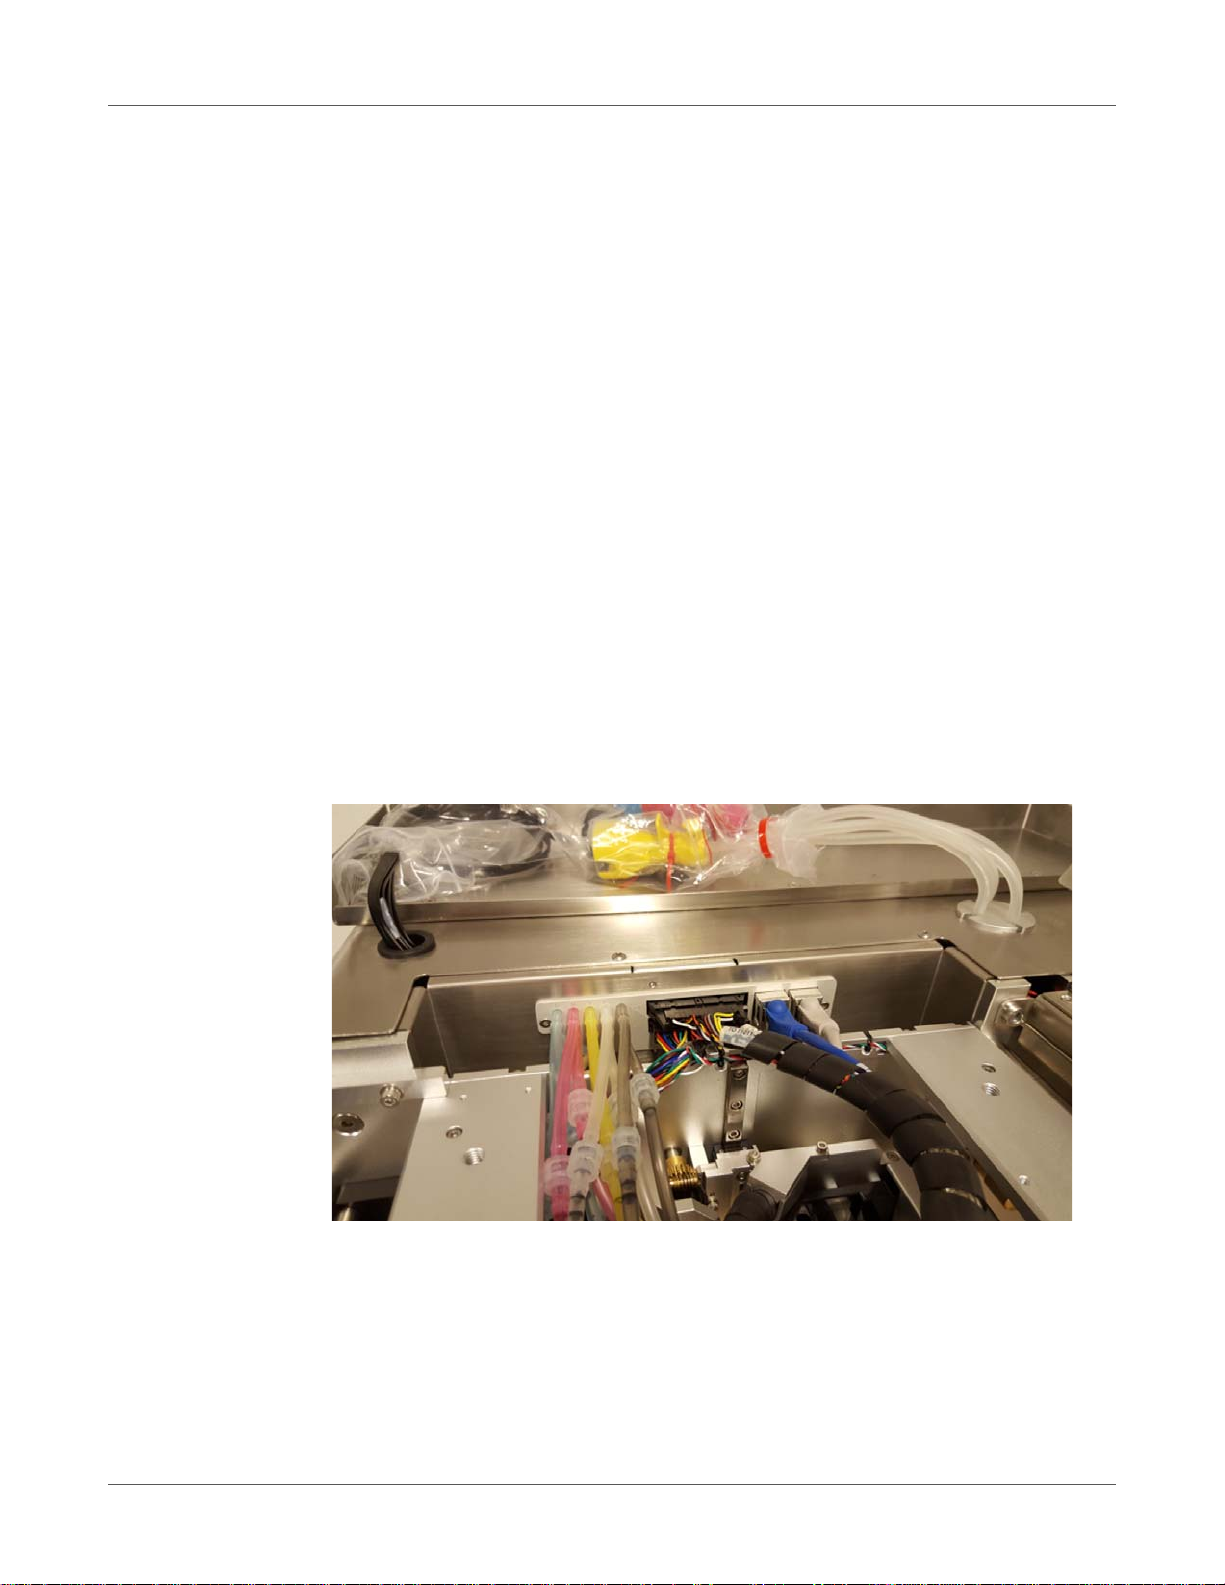
The T2-C press is packed in a wooden crate and shipped strapped on top of a wooden pallet
(total weight of the package including the crate is around 80kg). After opening the wooden crate
the machine must be lifted out from the crate. The approximate weight of the machine is 132.3
lbs. (60 kg). Therefore it is advised to lift the machine out of the box with multiple perso ns to
avoid injury.
The machine should be placed on a properly leveled worktable or cabinet which is able to
handle the T2-C press' weight and size. Footprint: Length 23.8" (606mm) x Width 22.8"
(580mm) x Height 31.3" (795mm). The machine is standing on 4 height adjustable feet. In case
it is not possible to set the worktable to level, then each foot's height can be adjusted by tur ning
the foot clockwise (lifting the machine) or turning the foot counter-clockwise (lowering the
machine). Make sure the machine is standing stable and legs are adjusted so that the machine
is horizontally level. Check leveling using a spirit leveler.
Warning: Improper leveling of the machine might cause print quality issues and shorten the
printhead life.
Remove any zip ties and other remaining packaging materials, such as bags covering the ink
tank connectors. Open the lids and make sure that the luers for the ink tubes are tightened to
avoid ink leakage.
Setting up the T2-C press
T2-C User Guide 17
Page 18
Setting up the T2-C press
Cabling (network and power supply)
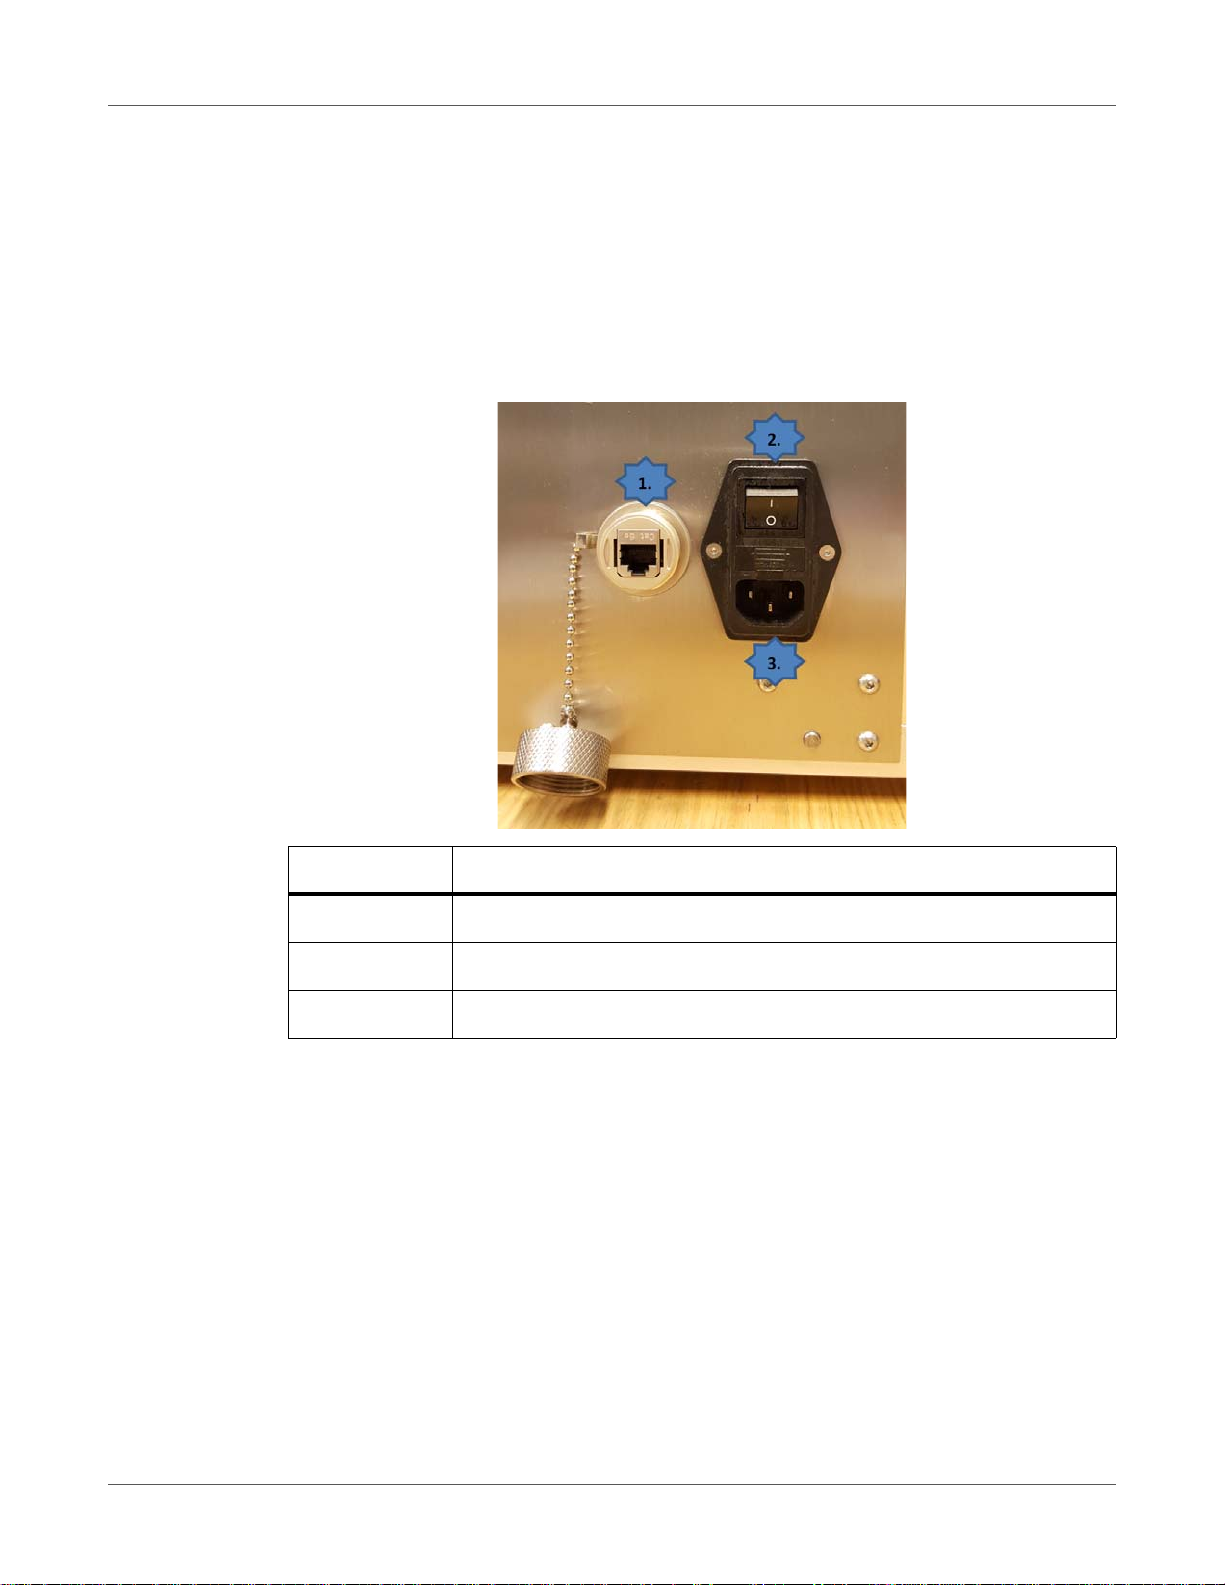
The machine has two cable inlets:
1) Power supply
2) Ethernet
Only the power supply cable is necessary for powering up the machine. The network cable is
necessary for sending new print jobs to the T2-C press and for remote support/software
updates.
# Description
1 Ethernet port
2 Power on/off switch
3 Power supply
Note: Ethernet cable is not included in the T2-C press package. It is recommended to use
Cat5, Cat5e or Cat6 Ethernet cable versions to connect the T2-C press to the local network
and/or to the Internet.
18 T2-C User Guide
Page 19
3
Visible safety check
Before powering on the machine, visibly ensure that no foreign objects are interfering with the
print engine module and web-path.
Power on process
1 Press the physical power switch on the left side of the T2-C press, switching it fro m 0 to 1.
Turning the main power switch on starts the TrojanControl software on the touch screen
and also starts the print engine.
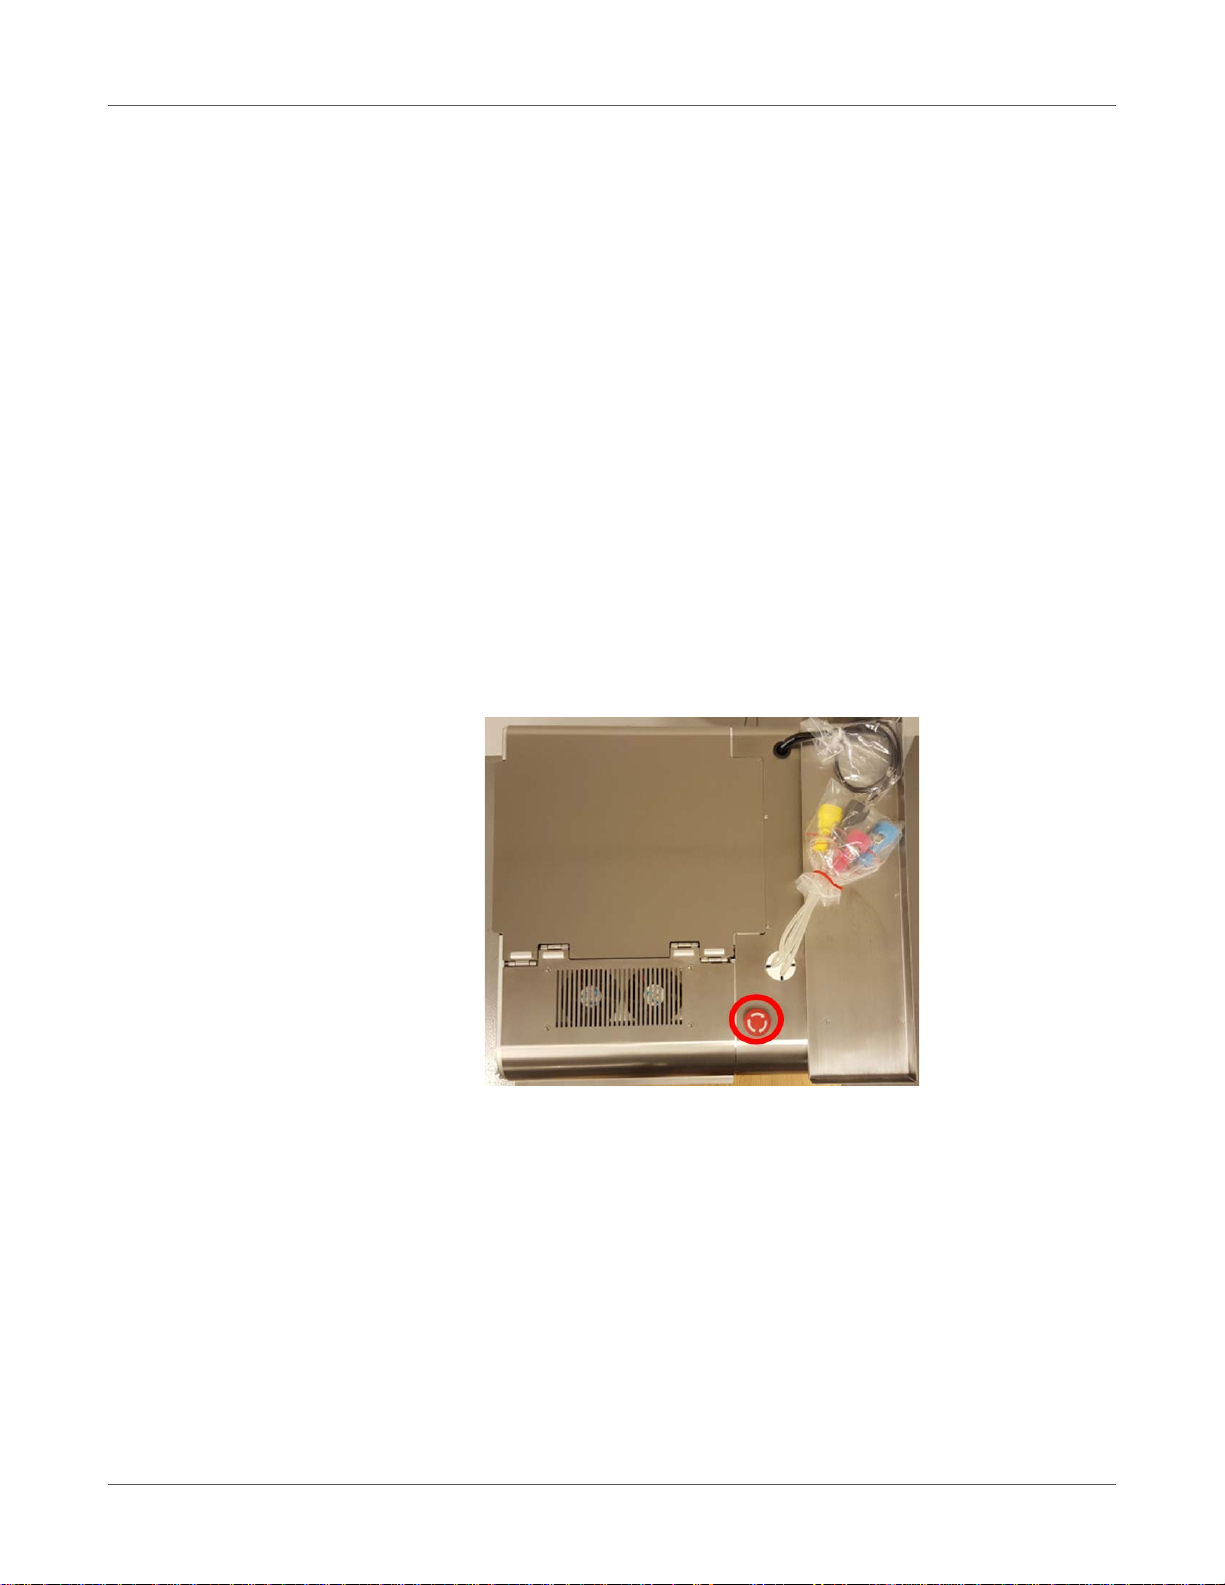
2 Release the Emergency Stop (ER) button in case it is pressed down. To release the ER
button, the button has to be twisted clockwise. As long as the ER button is pressed down,
the servo motors for the Unwinder, Rewinder, and NIP are powered off for safety reasons.
It is advised to press the ER button whenever the operator wants to perform any actions on
the web path system other than threading the label materi al or splicing and installing a new
label roll.
Power on
T2-C User Guide 19
Page 20
Power on
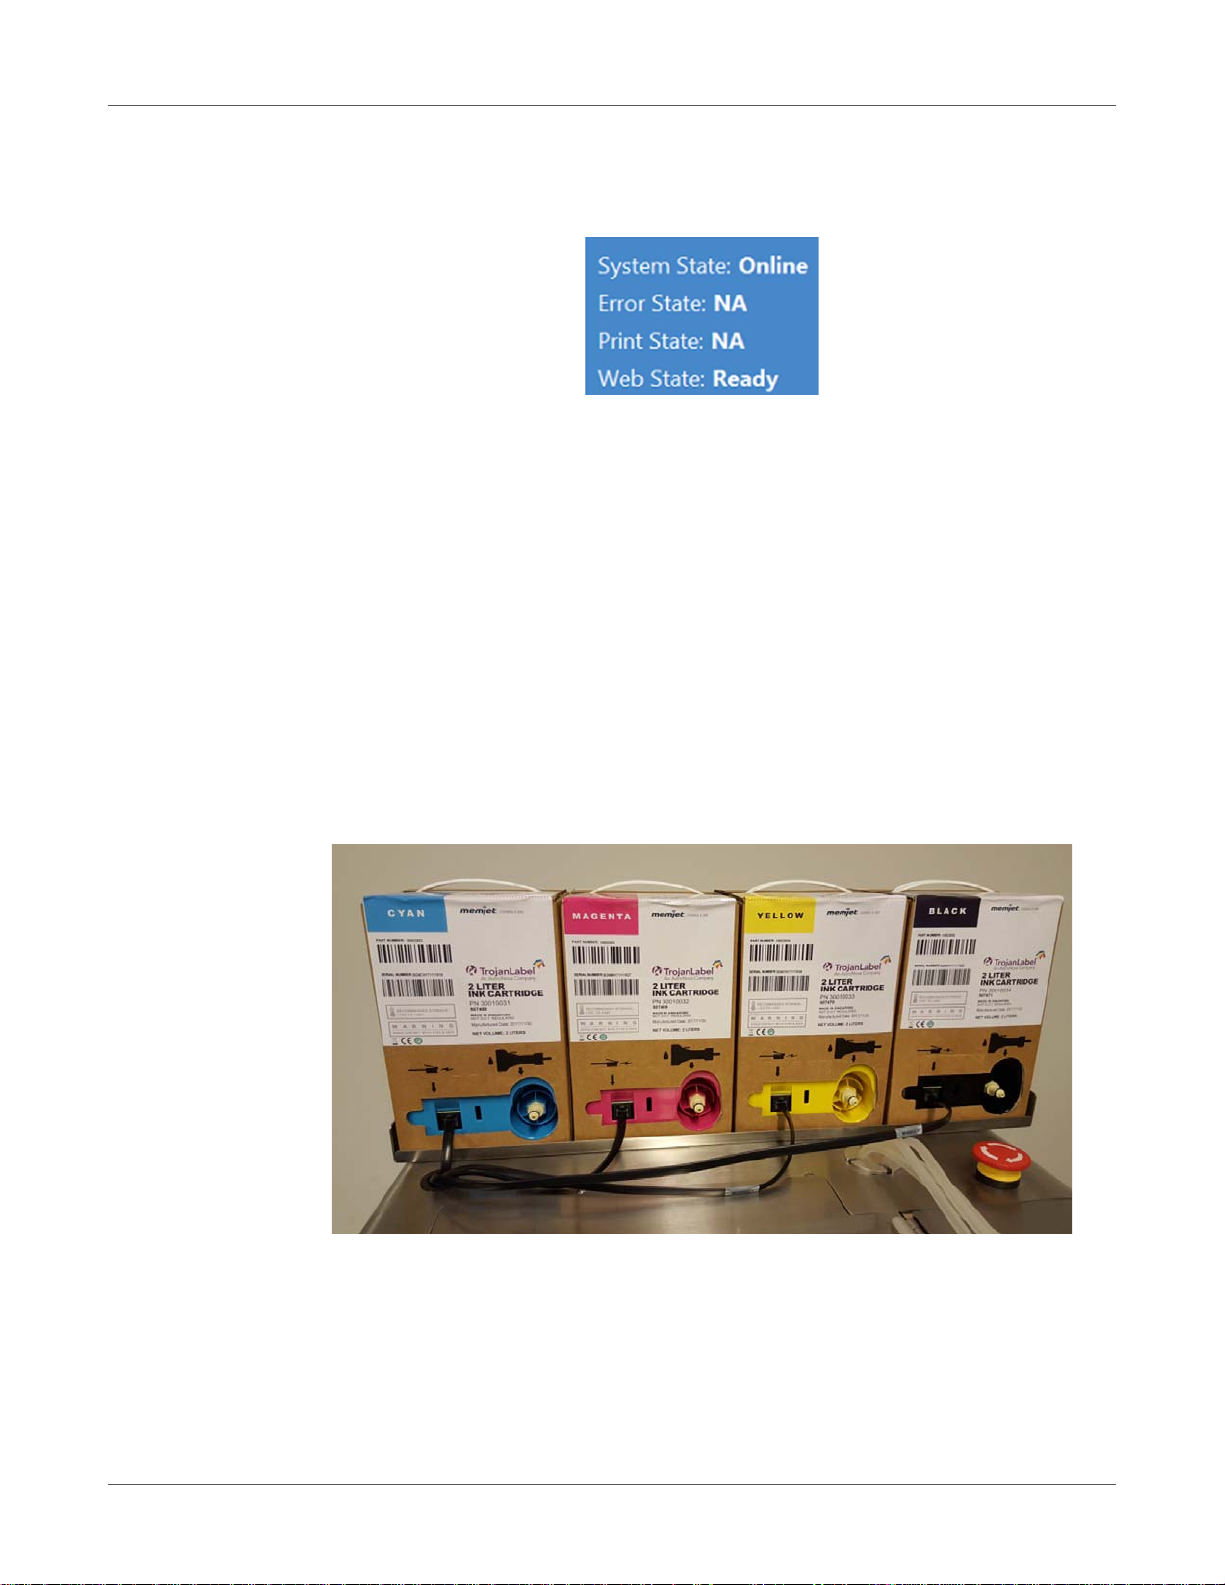
3 The machine is fully functional when the TrojanTwo tab is visible in the TrojanControl
software. In the right side status bar the System State field is online, and Media Path State
is ready.
Note: System state can only be online if all ink tanks are installed and the printhead is also
installed and primed with ink. See “Installing ink tanks and the printhead” on page 20.
Note: Web state can only be ready if the label material is loaded in the unwinder and
rewinder and tension for the label web is calibrated. See “Loading the label material” on
page 29.
Installing ink tanks and the printhead
Installing the ink tanks
The T2-C press uses CMYK ink tanks. Each contains 2 liters of ink when opened. Every T2-C
ink tank is QA chip protected ensuring that only genu in e Tr oja n lab el ink tanks can be used.
The tray for the ink tanks is situated on top of the machine. The ink tanks are installed from left
to right in CMYK order.
20 T2-C User Guide
Page 21
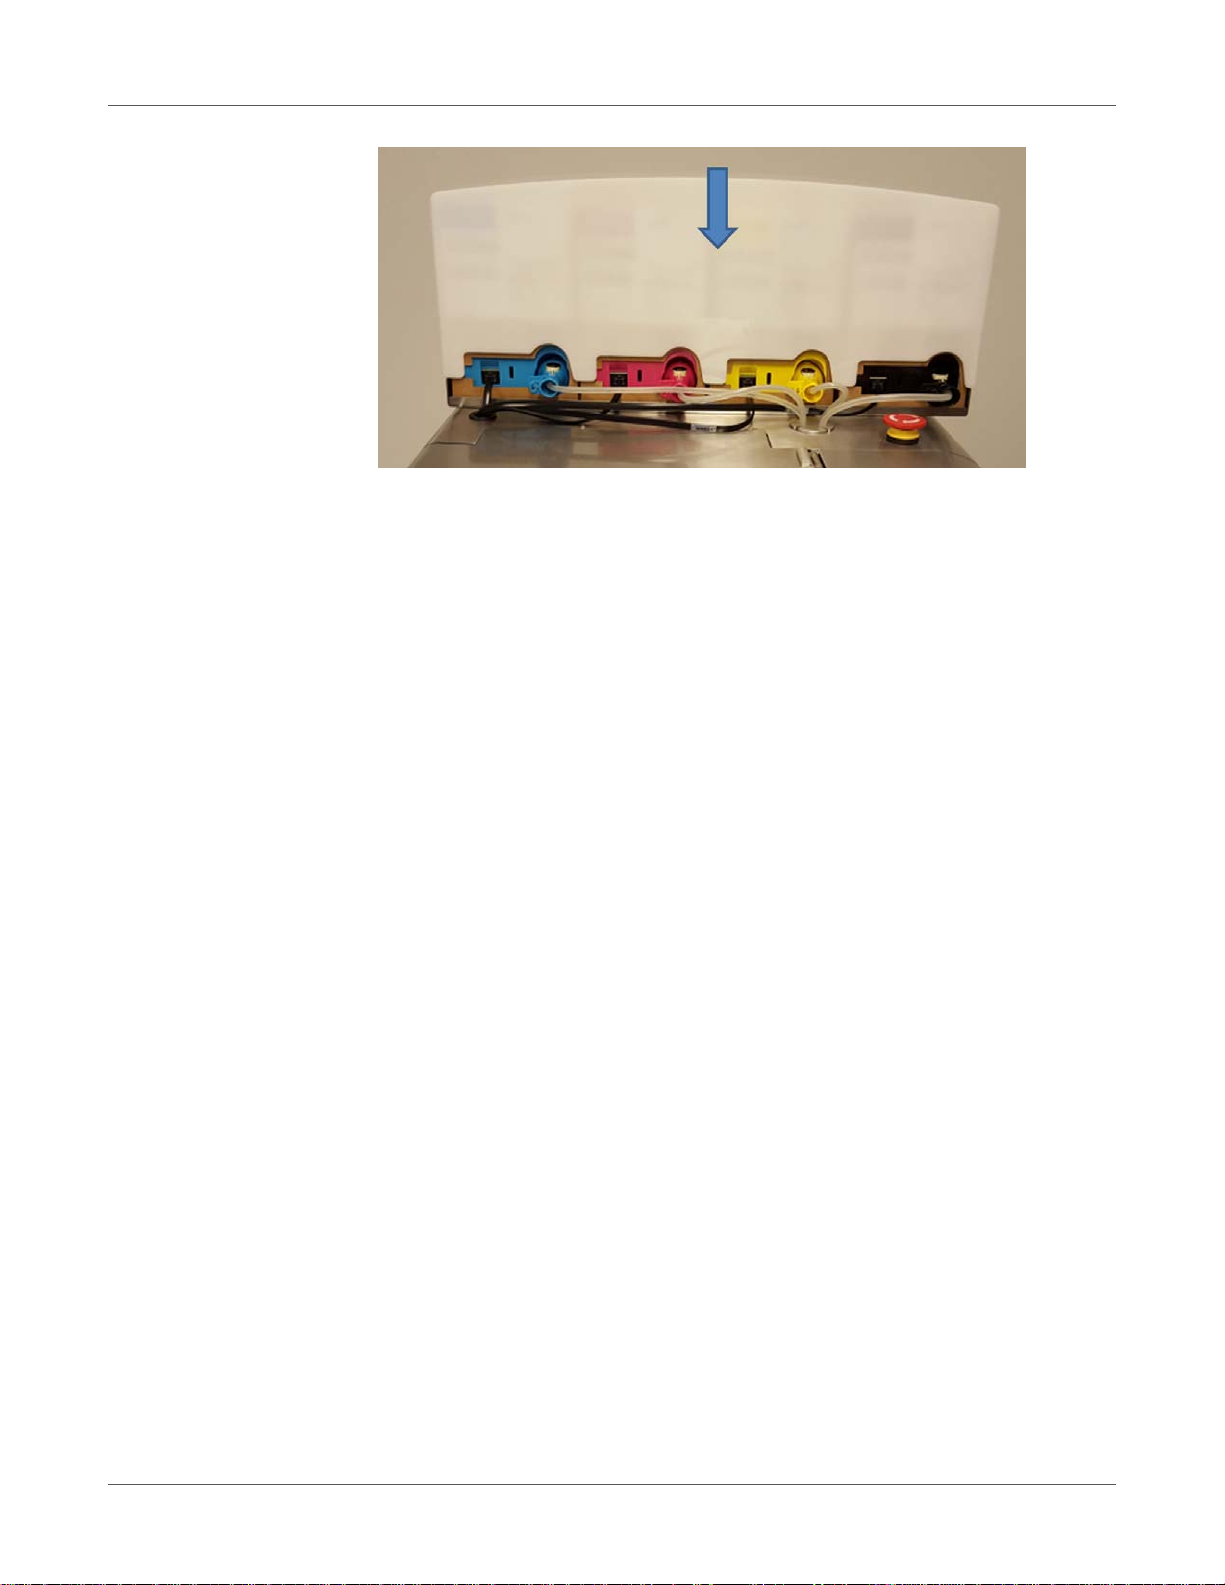
1 Connect the black QA chip reader cables.
Connect one QA chip reader cable to each ink tank. It do es not matter which QA chip reader
cable is connected to which ink tank. However, the length of these cables are made to best
fit to the closest ink tank.
2 Connect the matching ink tube connector to each ink tank. The particular ink tube
connector's color is matched to the corresponding ink tank. Once the connector is pushed
onto the matching slot on the ink tank, the connector clicks into the right position.
Power on
Warning: Do not mix up the colors! Each ink tube connector has to be connected to the
matching colored ink tank. Mixing up the ink tube connectors (if the yellow connector is
connected to the black ink tank, for example) will contaminate the inks in the system and
leads to significant financial damage because the contaminated ink is wasted.
T2-C User Guide 21
Page 22
Power on
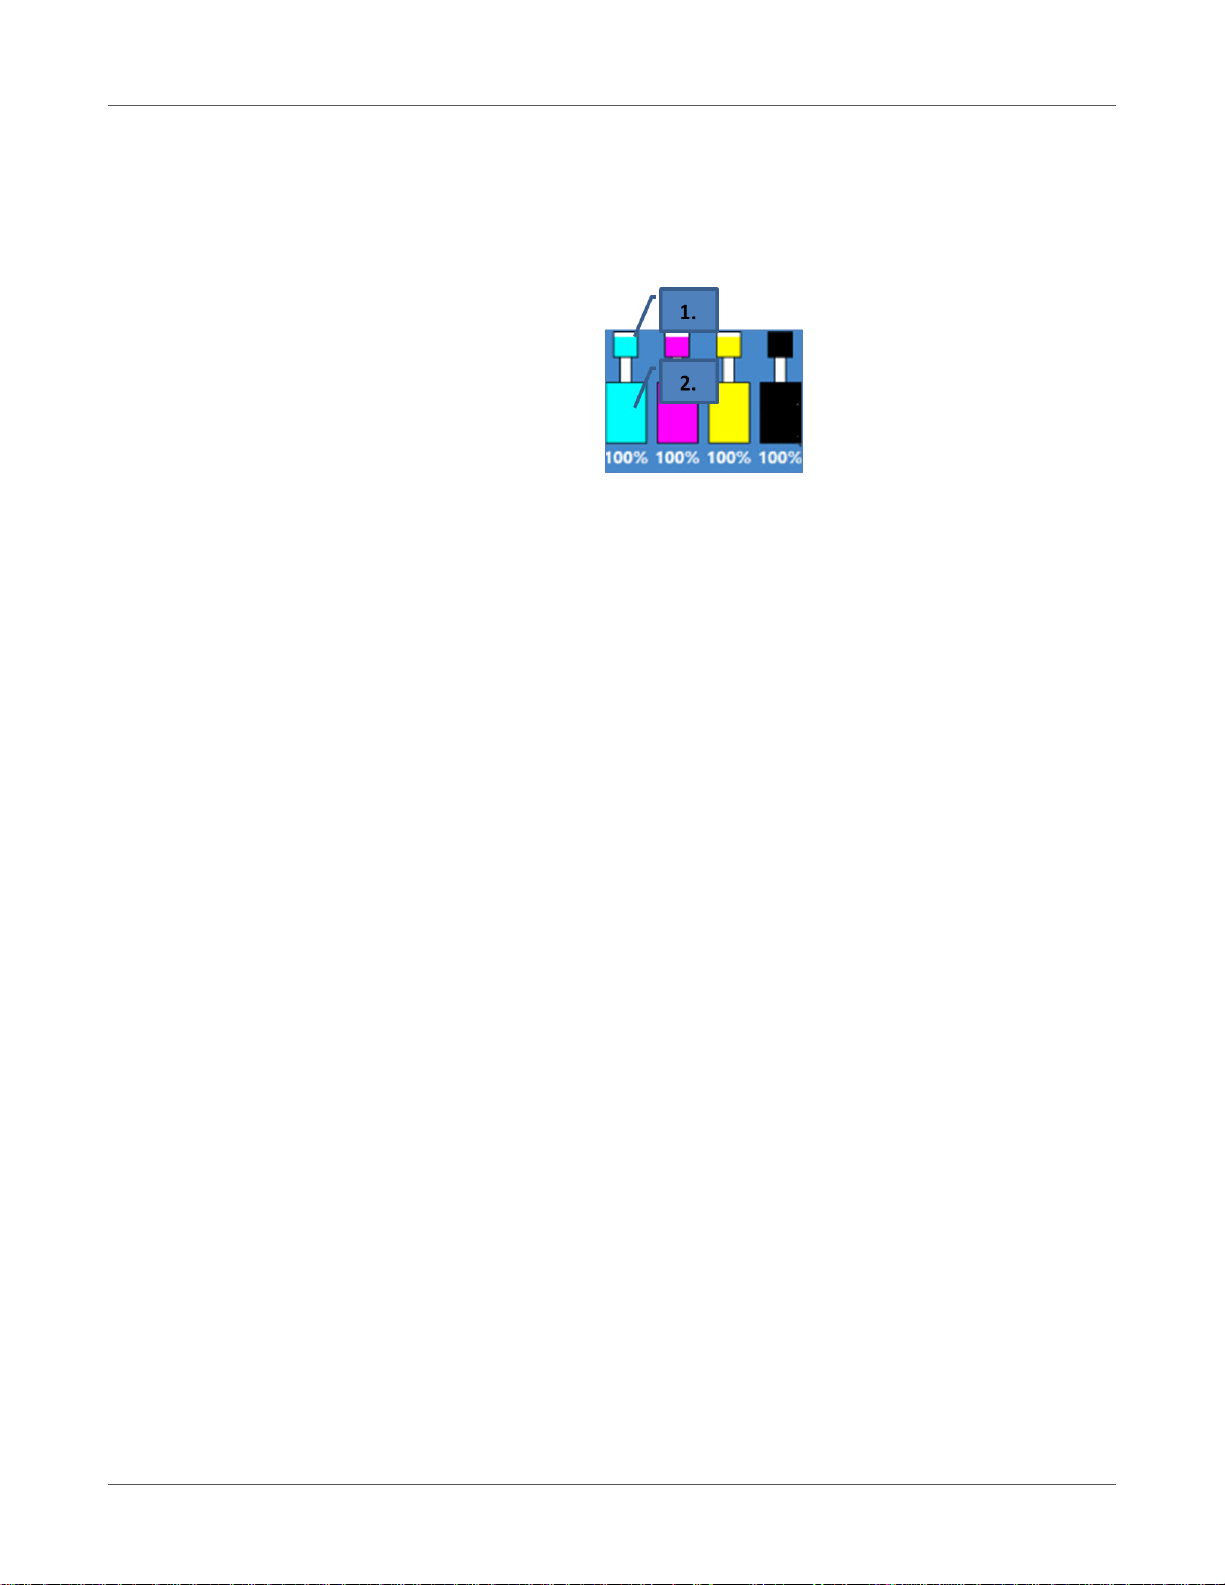
3 Put the white plastic protector cap on top of the ink tanks.
When a 2 liter ink tank is connected, the proper ink level is displayed in percentages in
status bar on the touch screen. Reservoir ink tank levels (1) and 2 liter ink tank levels (2)
are displayed.
During operation, the ink used for printing comes from the built in reservoir ink tanks. The
reservoir tanks have ink level sensors and refilling of these reservoir ink tanks is done from
the 2 liter ink tanks directly. This refilling process is performed automatically by the system
when ink level drops under a certain limit for the particular reservoir ink tank.
During the first time installation when the ink system is empty, after installing the 2L ink
tanks, the system automatically starts filling up the reservoir ink tanks (located inside the
machine) with ink. This is done one by one in CMYK order and the process is displayed o n
the screen where the movement of the ink is indicated between 2L ink tank and reservoir
ink tank.
The reservoir ink tanks have the capacity of 200ml and all 4 reservoir ink tanks ar e around
half full when the process is finished.
The amount of ink used to fill the reservoir ink tanks and tubes for the first time is not
registered back to the QA chip of the 2L ink tanks (ink consumption is measured based on
the ink going through the printhead nozzles), therefore for th e first set of ink it is likely that
the 2L ink tanks will run out of ink physically when still around 5% ink level is displayed on
the screen. This is normal and this around 5% ink is not wasted but used to fill the ink
system. From the second ink set, the ink level % calculation is normal and ink tanks run out
of ink according to the ink level % displayed on the screen.
Note: T2-C 2L ink tanks are not refillable and shall be treated as hazardous waste when
empty.
22 T2-C User Guide
Page 23
Power on
Unpacking the printhead
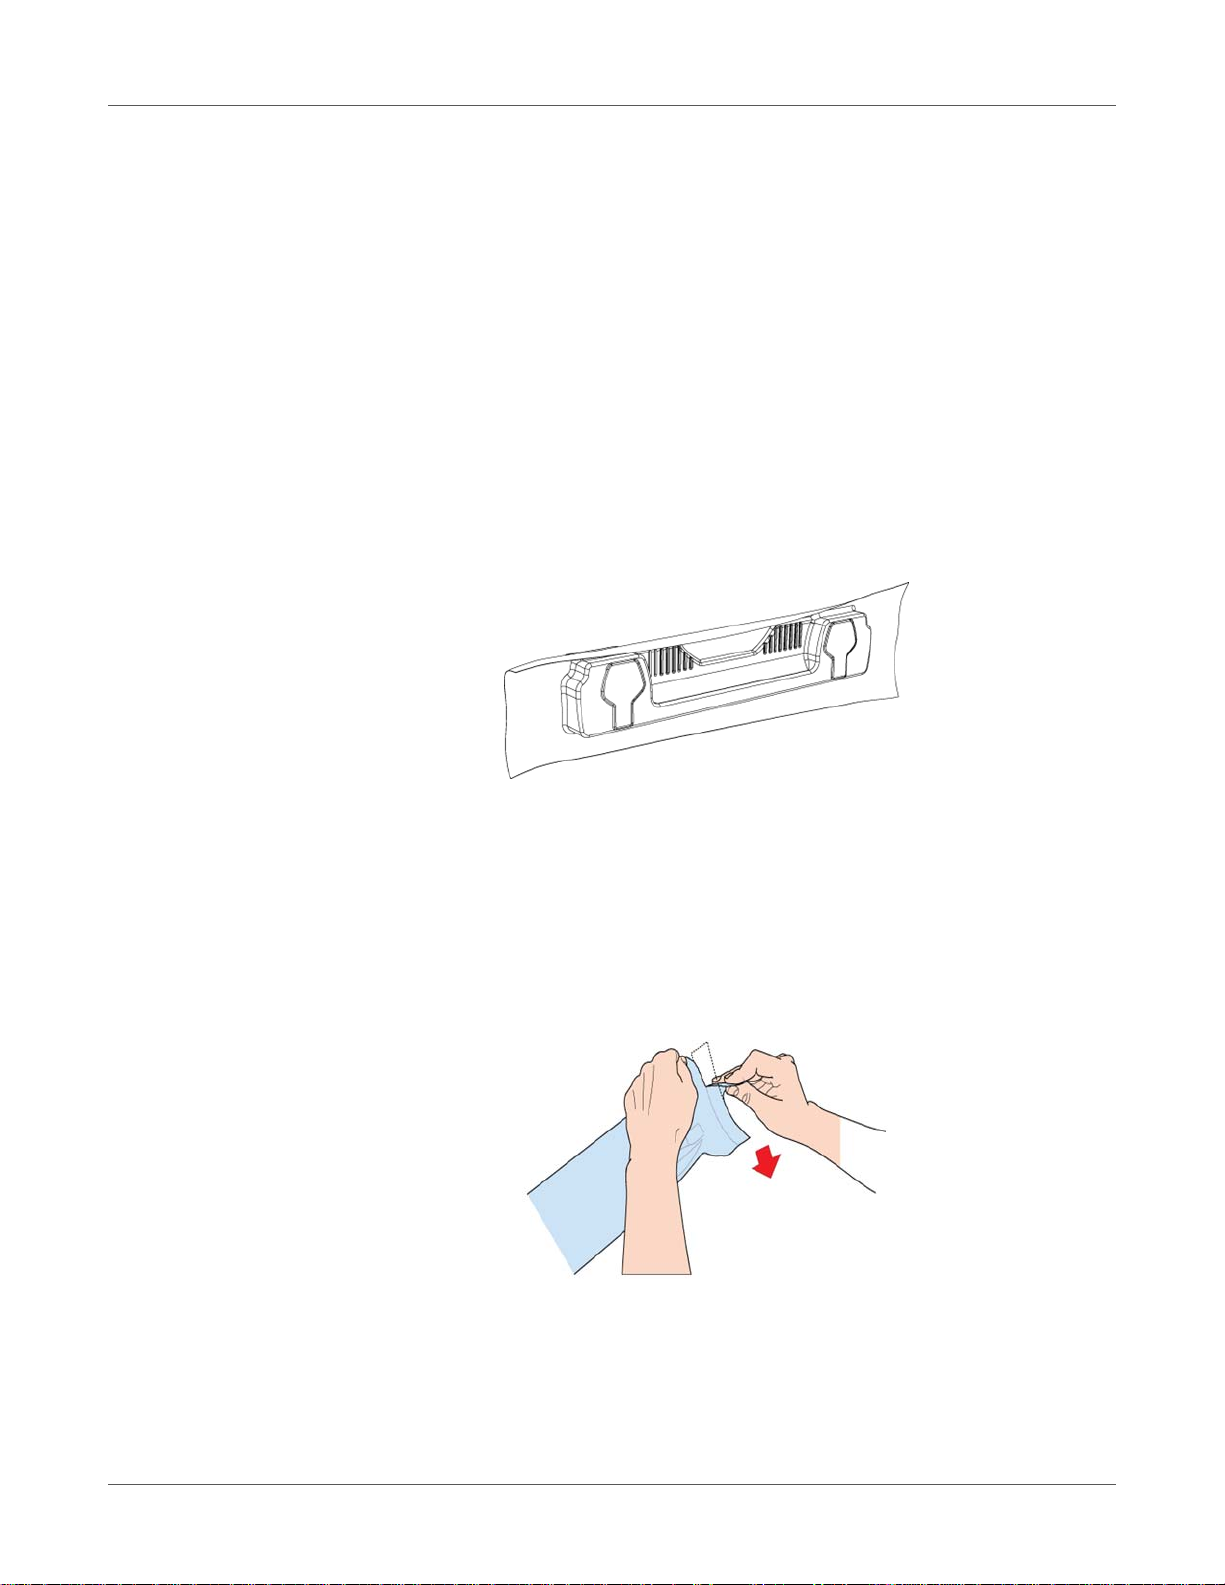
Caution: DO NOT touch the printhead cartridge's ink couplings, nozzle surface or the
electrical contacts when installing the printhead cartridge. Hold the printhead cartridge ONLY
by the handles.
Caution: DO NOT unpack the printhead cartridge until the machine is ready for installation.
Once unwrapped, delay in installing the printhead can compromise print quality due to
dehydration.
Caution: DO NOT place an unwrapped printhead on any surface before installing. Protect the
printhead at all times from dust, fibers, dirt and ot he r co nt am in an ts.
Important: Do not throw away the printhead p ackaging. The white b ox has the serial number ,
part number and manufacturing date of the printhead. Also it is recommended to store
printheads which are currently not installed in the original packaging.
1 Open the end of the printhead package outer box and slide out the foil bag.
Inspect the integrity of the foil vacuum sealing. The foil bag should be forme d tightly to the
contours of the printhead cartridge as shown above. If the foil is loose to any degree then
the seal has been compromised.
Note: If a poor seal is suspected, DO NOT USE the printhead. Report the issue to your
supplier.
2 Carefully rip the foil packaging open at the notch. Use scissors if your foil bag d oes not have
a notch or you are finding it difficult to tear the bag.
3 Remove the printhead from the foil bag.
T2-C User Guide 23
Page 24
Power on
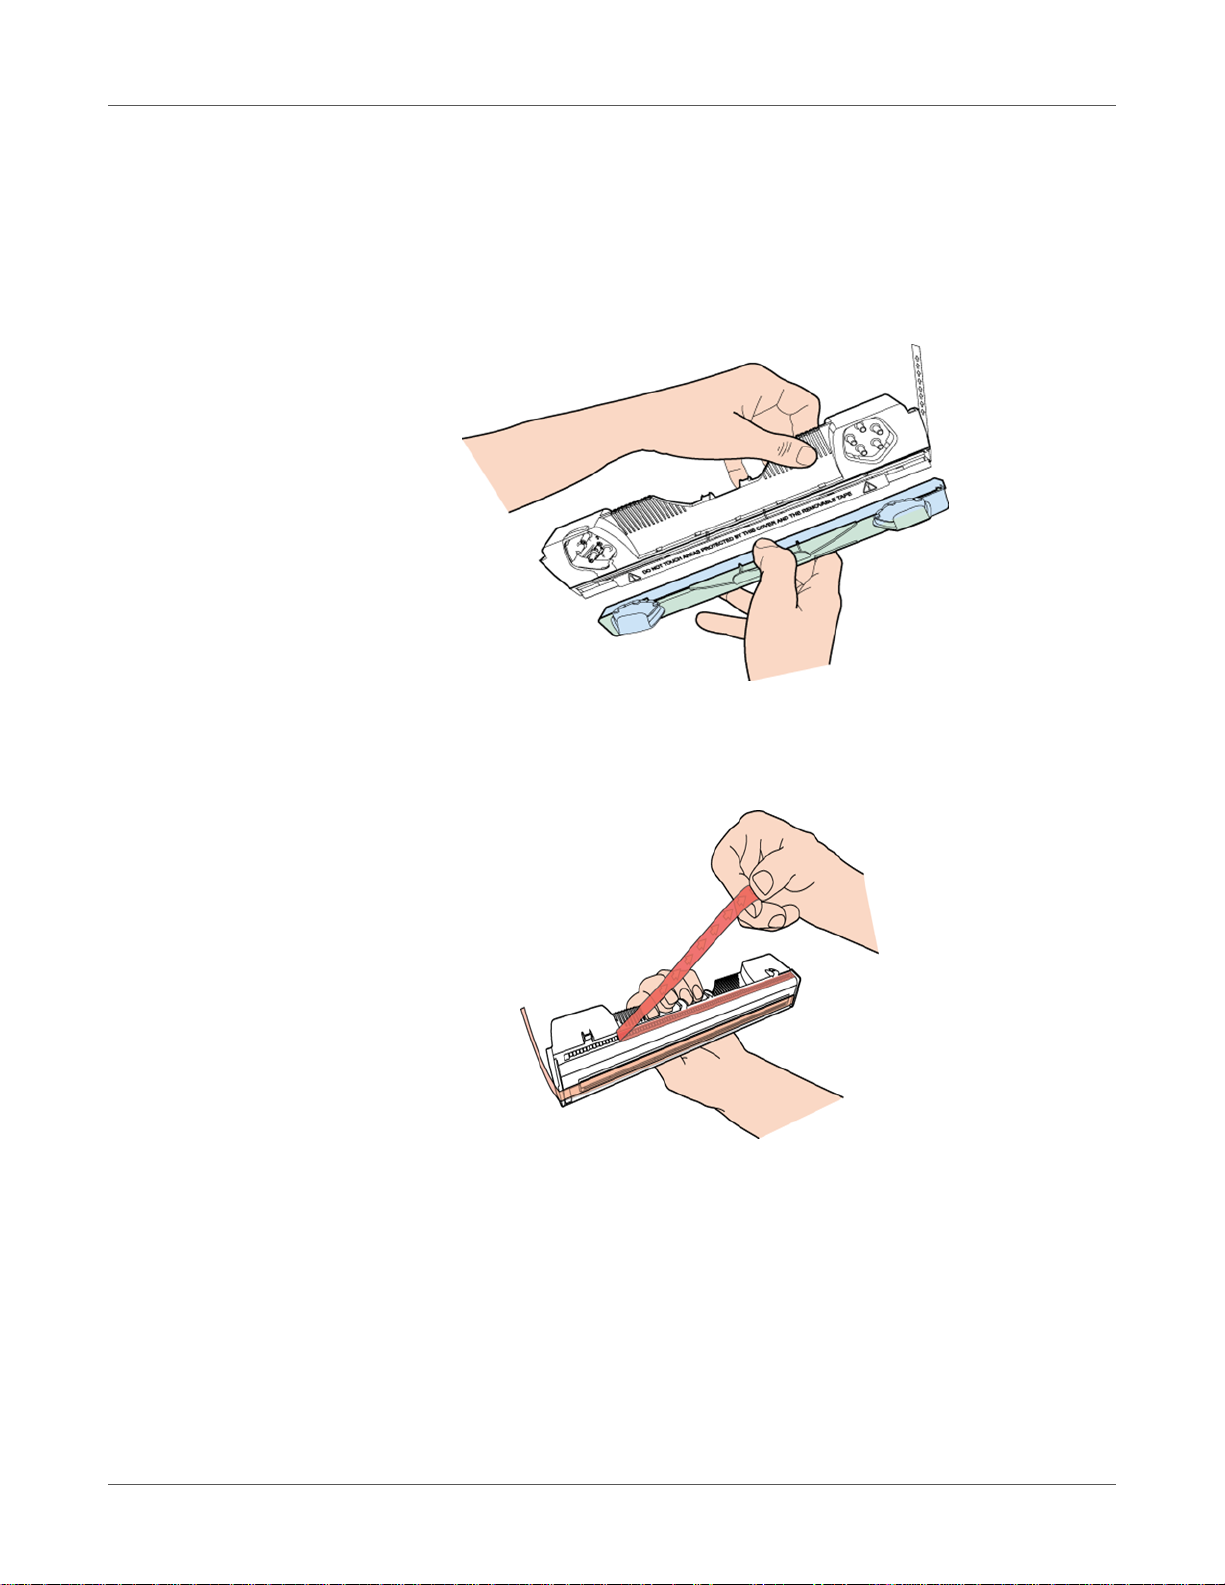
4 Remove the orange protective plastic cover from the printhead cartridge. Holding the
printhead cartridge by the handle:
a) Release the flaps covering the ink ports.
b) Release the clip retaining the cover near the center of the printhead cartridge.
c) Carefully remove the protective cover.
5 Remove the protective strip from the electrical contacts. While holding the printhead
cartridge by the handle with one hand, grasp the pull tab with the other hand and, slowly
and carefully, peel back the plastic strip covering the electrical contacts.
Note: Dispose of the removed strip immediately and do not allow the removed strip to
contact the electrical contacts.
24 T2-C User Guide
Page 25
Power on
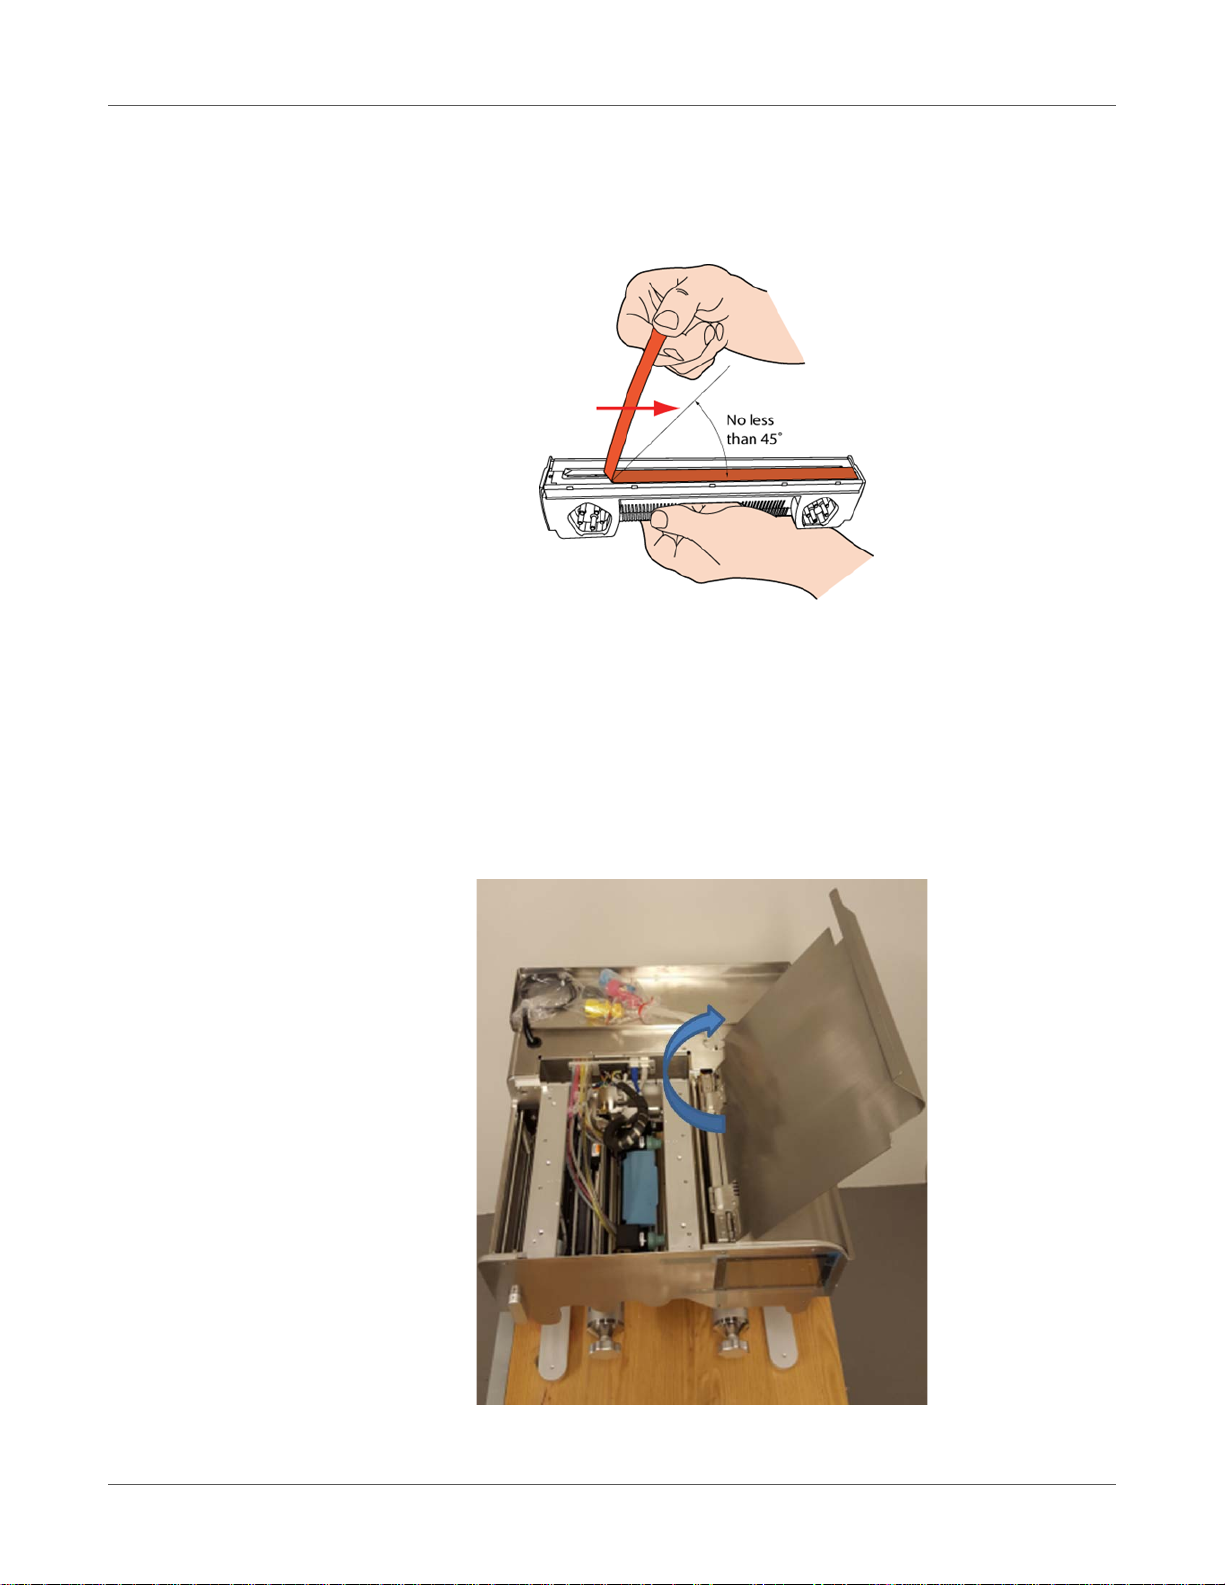
6 Remove the protective strip from the printhead nozzles. While holding the printhead
cartridge by the handle with one hand, grasp the pull tab with the other hand and slowly and
carefully peel back the plastic strip covering the printhea d nozzles. Maintain an angle of no
less than 45° with the printhead surface when pulling on the strip.
Note: Dispose of the removed strip immediately and do not allow the removed strip to
contact the electrical contacts or the printhead nozzles.
Installing the printhead
Important: The printhead can only be filled with ink when the reservoir ink tanks are filled. For
the first time installation, the printhead can only be primed when filling the reservoir tanks
procedure is completed.
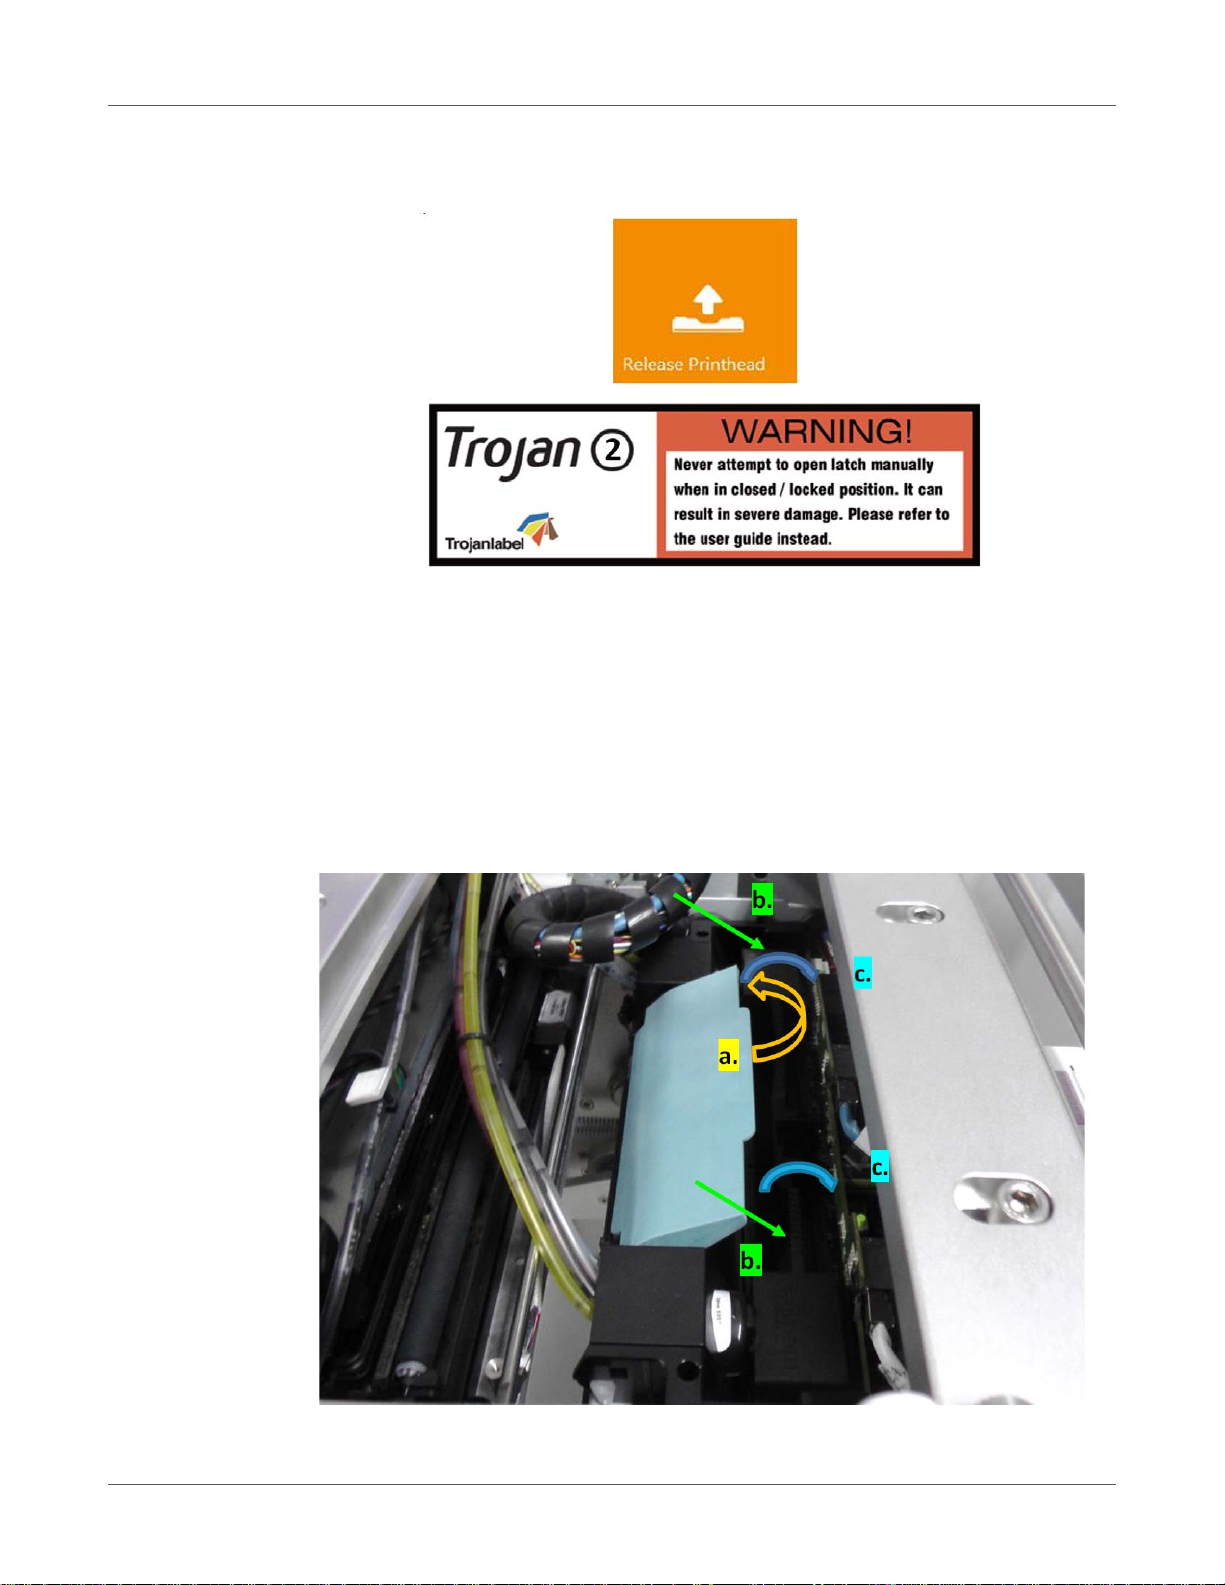
1 Open the top lid on the T2-C press to gain access to the print engine.
T2-C User Guide 25
Page 26
Power on
2 Press the Release Printhead button in the TrojanTwo ta b > Maintenance menu to open
the printhead latch.
Note: The above warning label can be found on the printhead latch. Trying to open the
blue plastic latch manually by the handle will most likely break the latch. Breaking the latch
is considered as improper usage and therefore replacement is out of warranty. Breaking
the latch also causes the machine to be non-op er at ion a l until the br oken part is replaced.
3 Insert the printhead by the handle into the crad le.
a) Open the printhead latch all the way up.
b) Insert the printhead into the cradle by the handles.
c) Pull the printhead backwards until it snaps into the proper place standing upright.
26 T2-C User Guide
Page 27
Power on
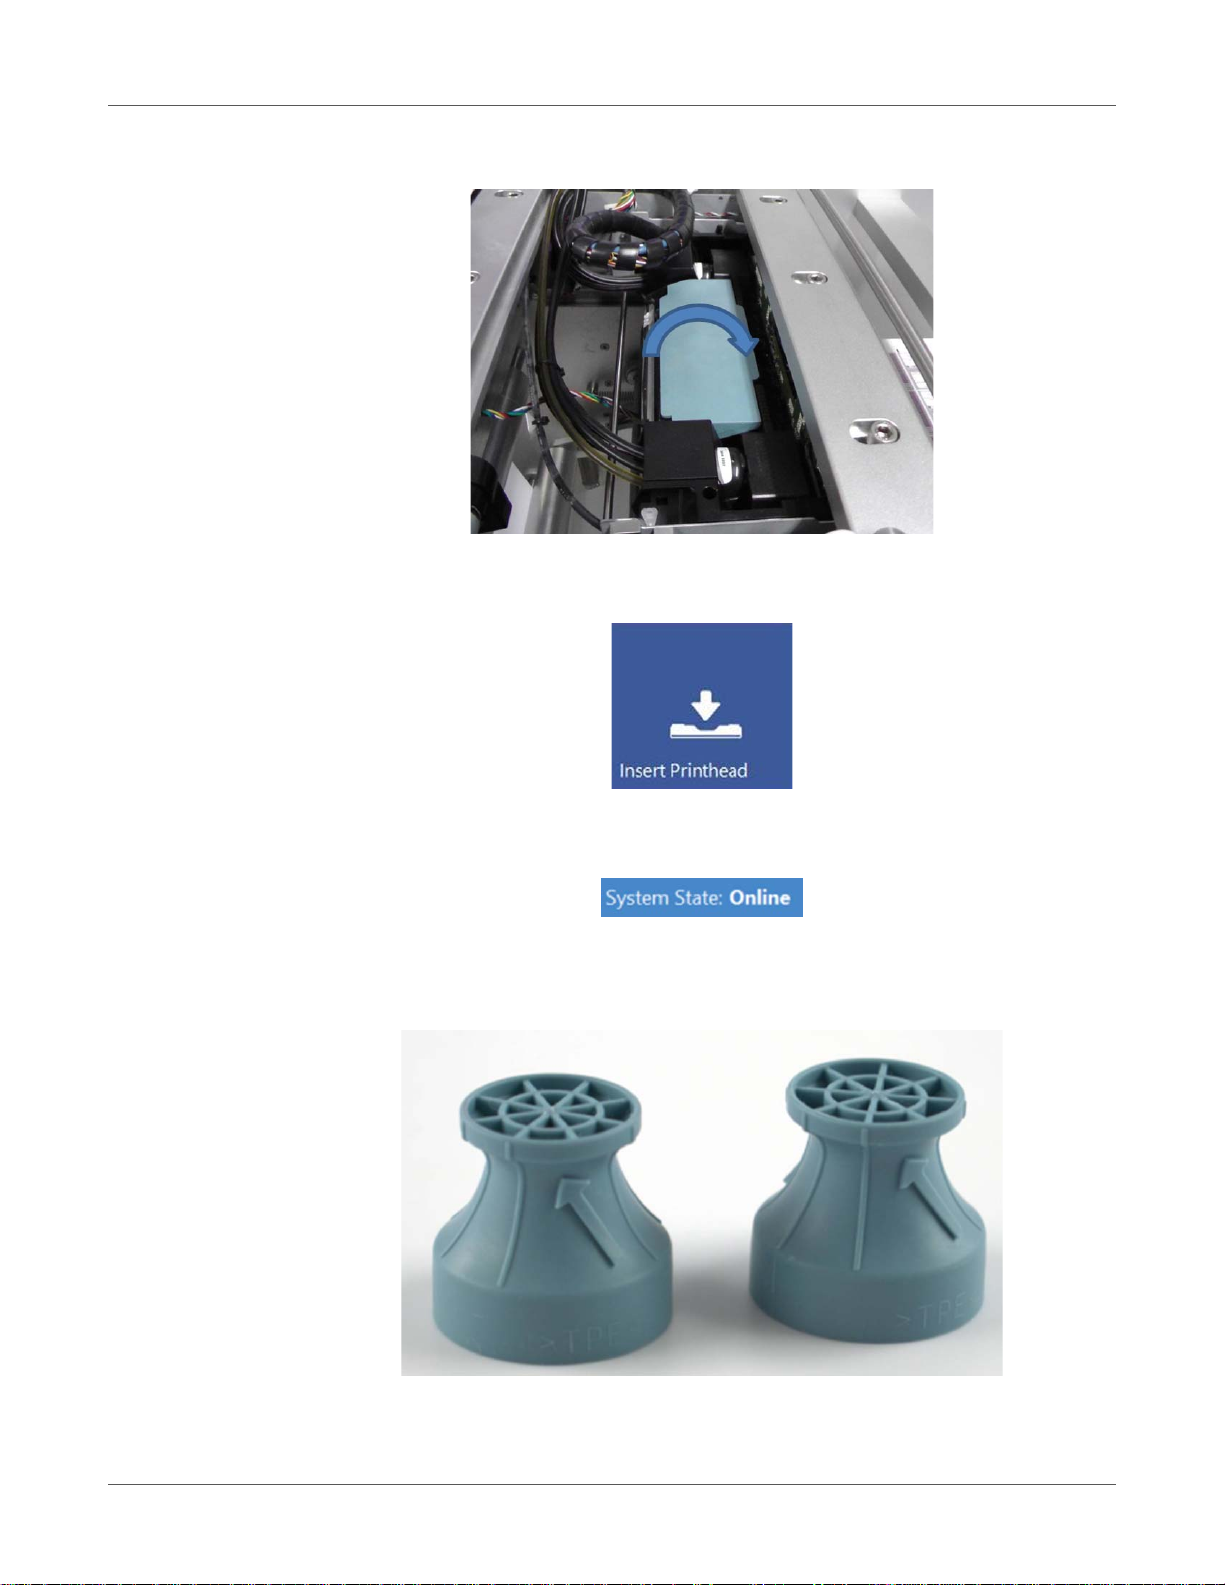
4 Close the printhead latch.
5 Press the Install Printhead button in the TrojanTwo tab > Maintenance menu to start
priming the printhead with ink.
Printhead priming takes about 3-5 minutes and the system state become s online when the
process is finished and the machine is ready for printing.
Note: Do not throw away the blue rubber dock protector caps (included with the T2-C
press). These prevent ink leaking from the revolvers during transportation or when there is
no printhead installed.
T2-C User Guide 27
Page 28

Power on
28 T2-C User Guide
Page 29
Loading the label material
4
There are two common methods of threading the machine: threa ding from scratch, i.e. there is
no material present in the machine, or using the currently installed material to thread the
machine.
Unwinder and rewinder roll direction
Rolling direction unwinder - Ink jet coating on the inside or outside
Regardless of the threading procedure, you mus t inse rt th e lab el roll on th e un win de r co re
according to the ink jet coated side (coated side must be up for printing).
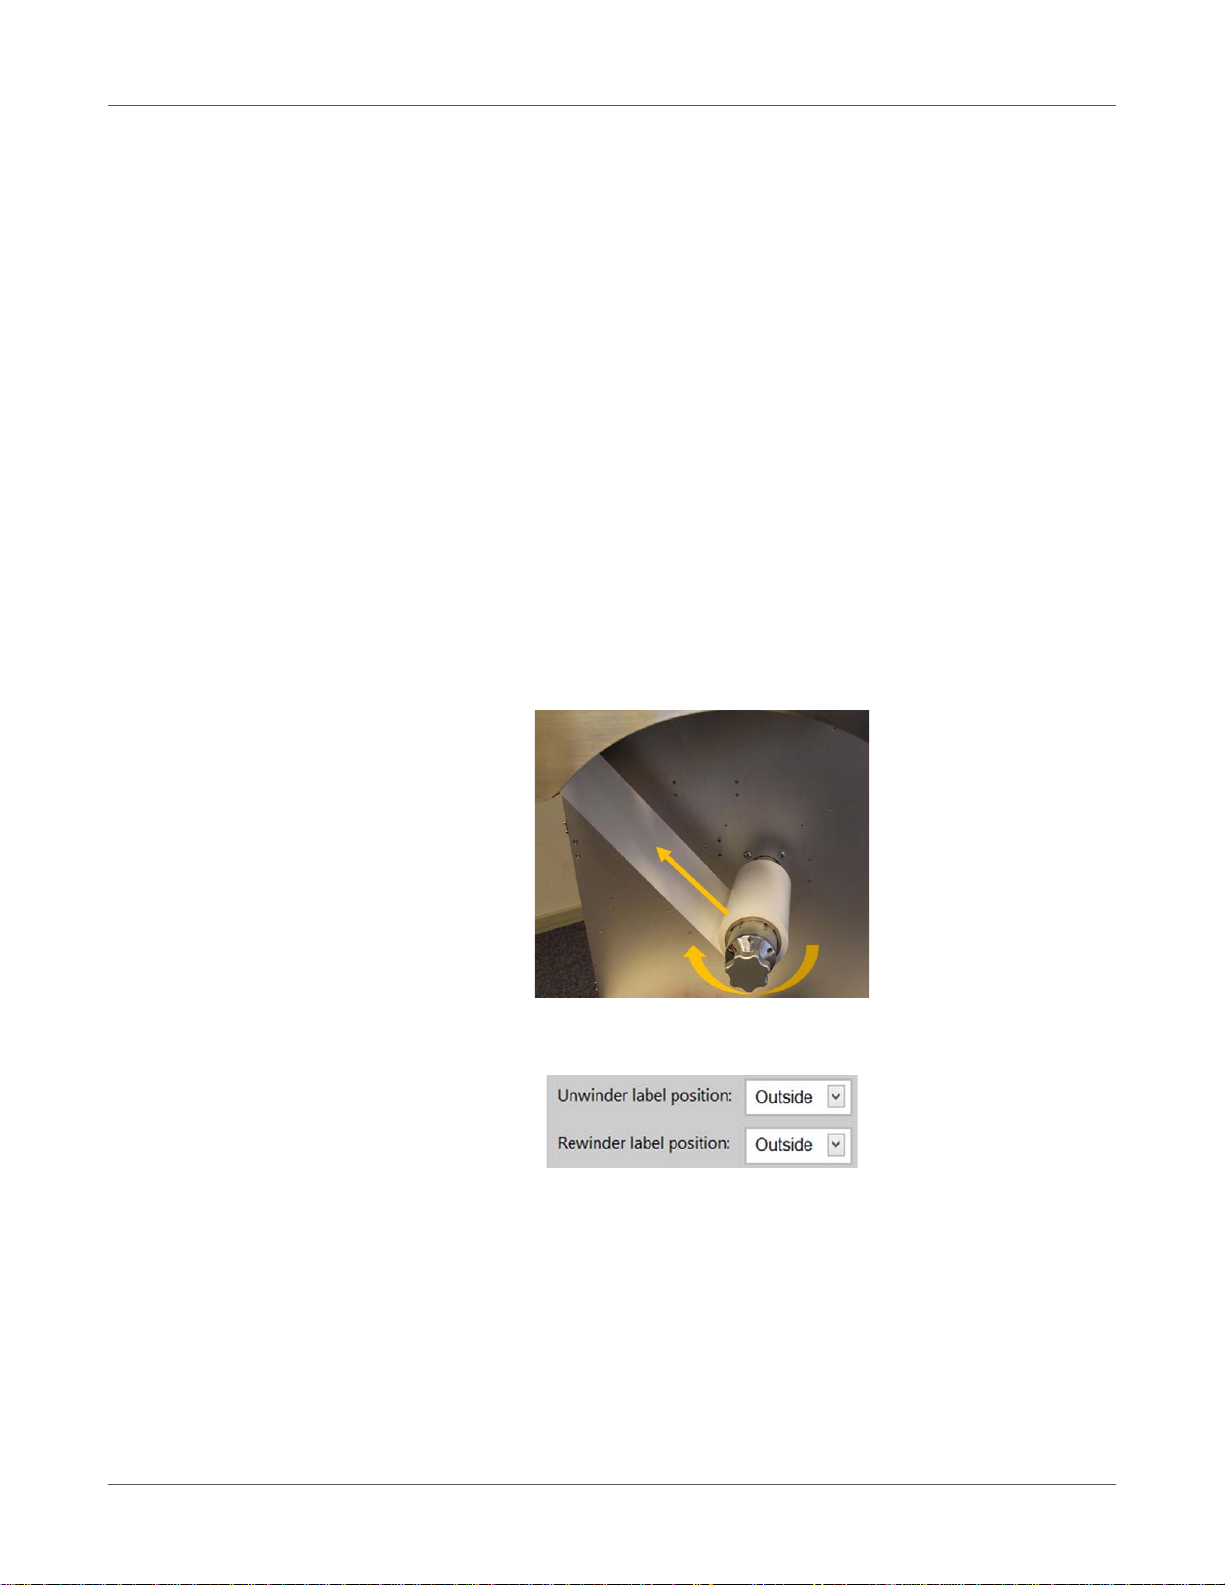
1 Outside - Printing on the outside of the label roll
If the ink jet coating is on the outside of the material, which is the most common, place the
roll so the end of the material is facing clockwise.
Important: Ensure Media Settings > Unwinder or Rewinder label position states:
Outside
T2-C User Guide 29
Page 30
Loading the label material
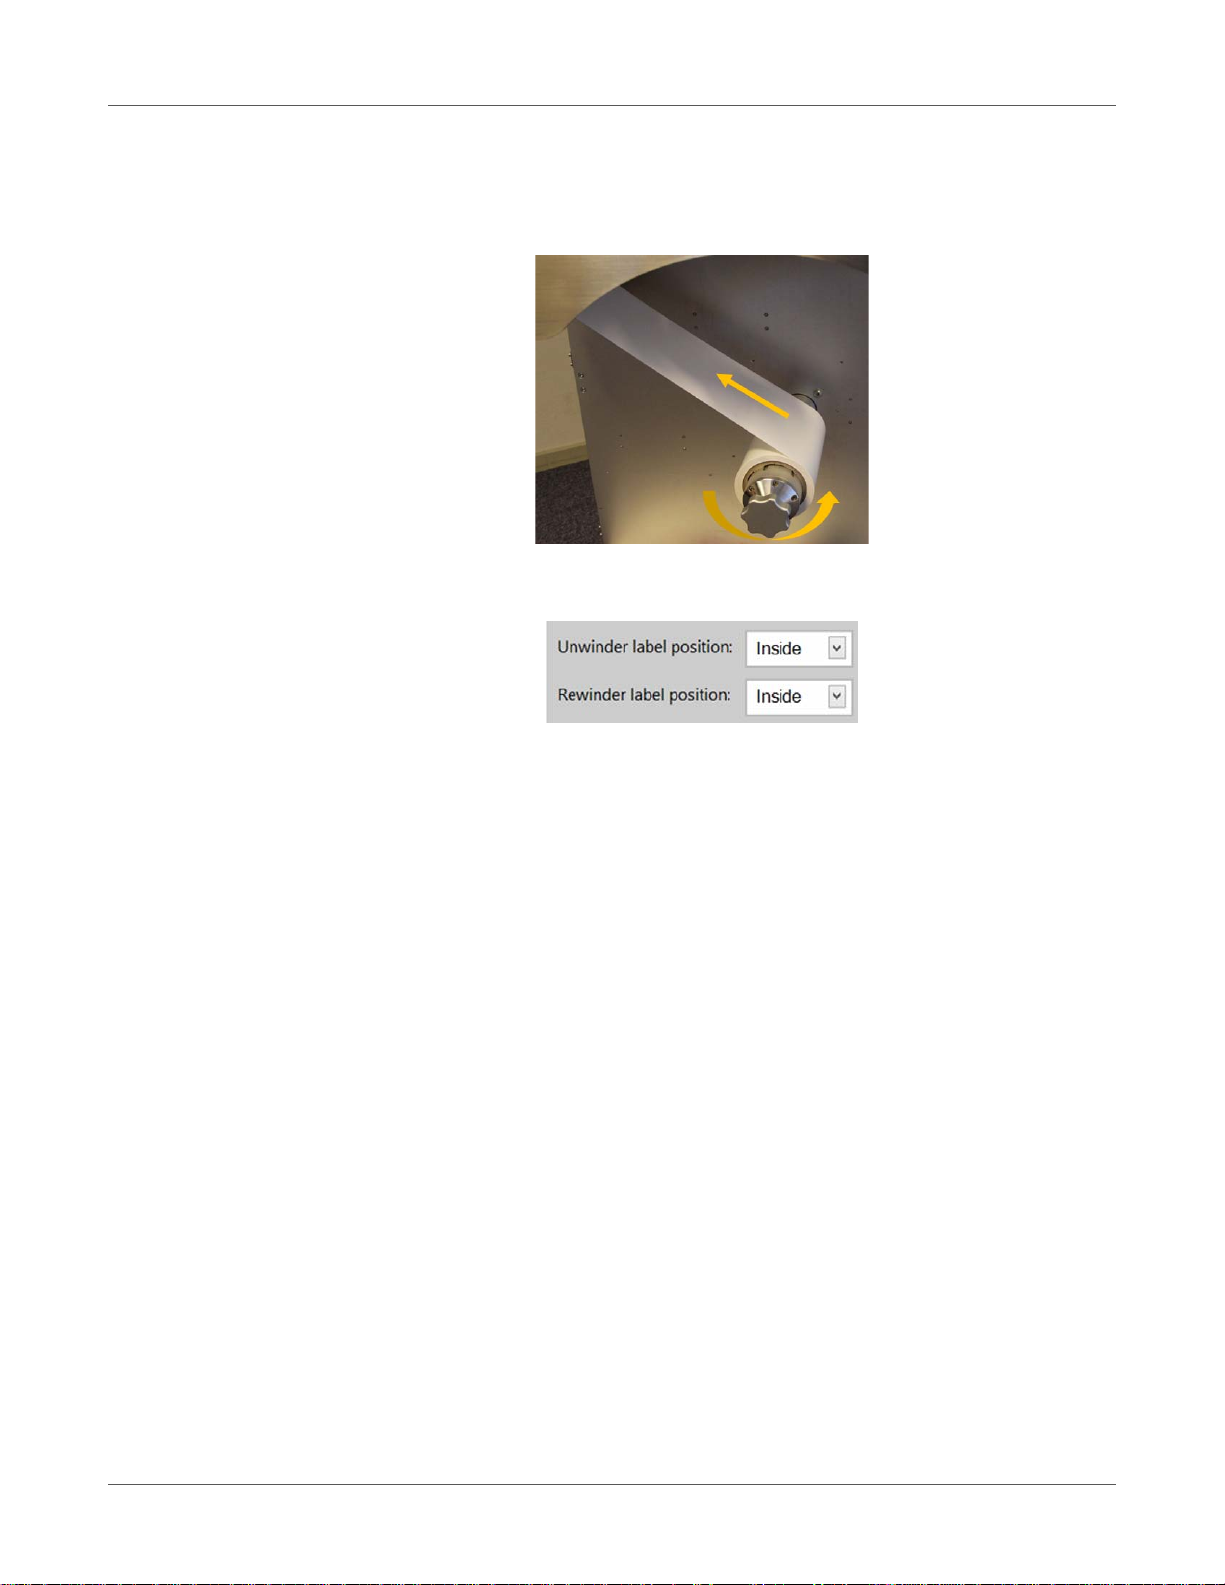
2 Inside - Printing on the inside of the label roll
If the ink jet coating is on the inside of the material, then place the roll so the end of the
material is facing counter-clockwise.
Important: Ensure Media Settings > Unwinder or Rewinder label position states:
Inside
Rolling direction rewinder
The rewinder can place the label material on the outside or inside of the roll. The criteria are the
same as for the unwinder, please refer to the above for placement and direction and update the
Media settings to reflect this.
30 T2-C User Guide
Page 31
Threading the label material from scratch
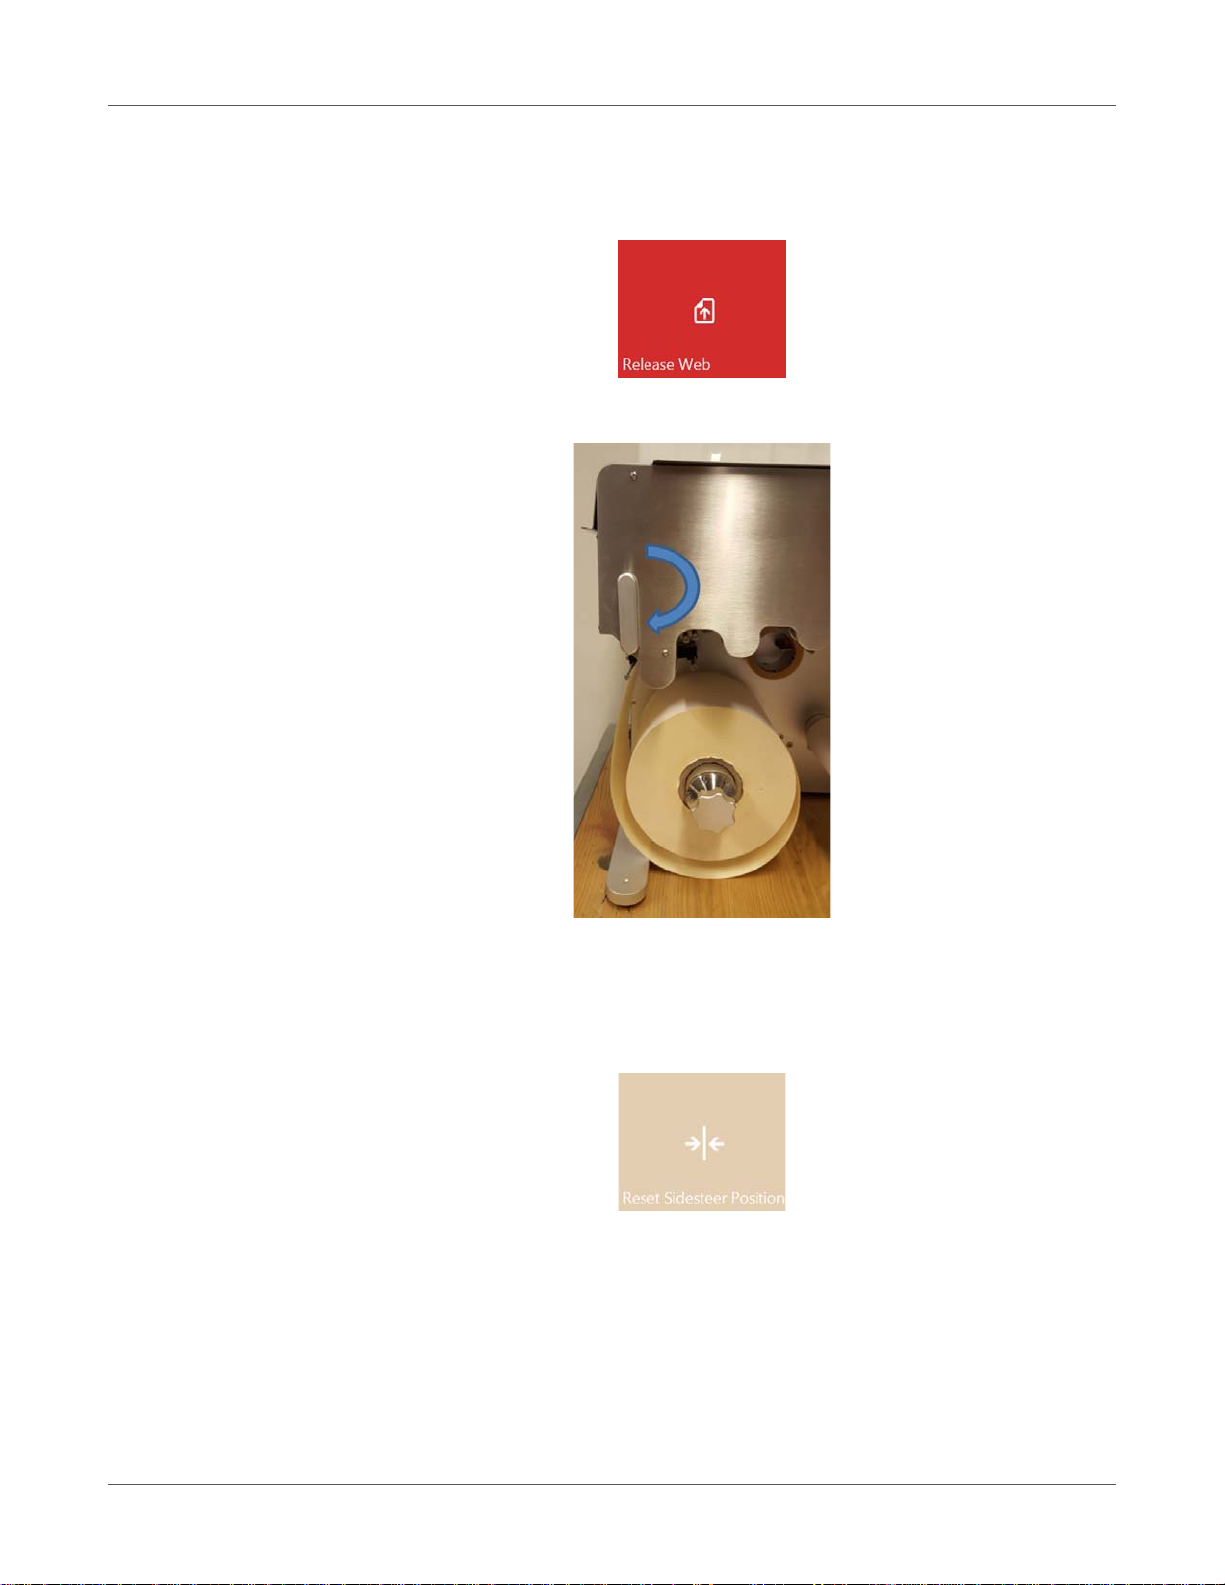
1 Press the Release Web button in the TrojanTwo tab > Handling menu.
2 Make sure that the NIP clamp is in the open position.
Loading the label material
3 Place the chosen label material roll on the un winder shaft. See “Rolling direction unwinder
- Ink jet coating on the inside or outside” on page 29.
4 Press the Reset Sidesteer Position button in the TrojanTwo ta b > Handling menu to set
the unwinder core horizontal position to the default position.
T2-C User Guide 31
Page 32
Loading the label material
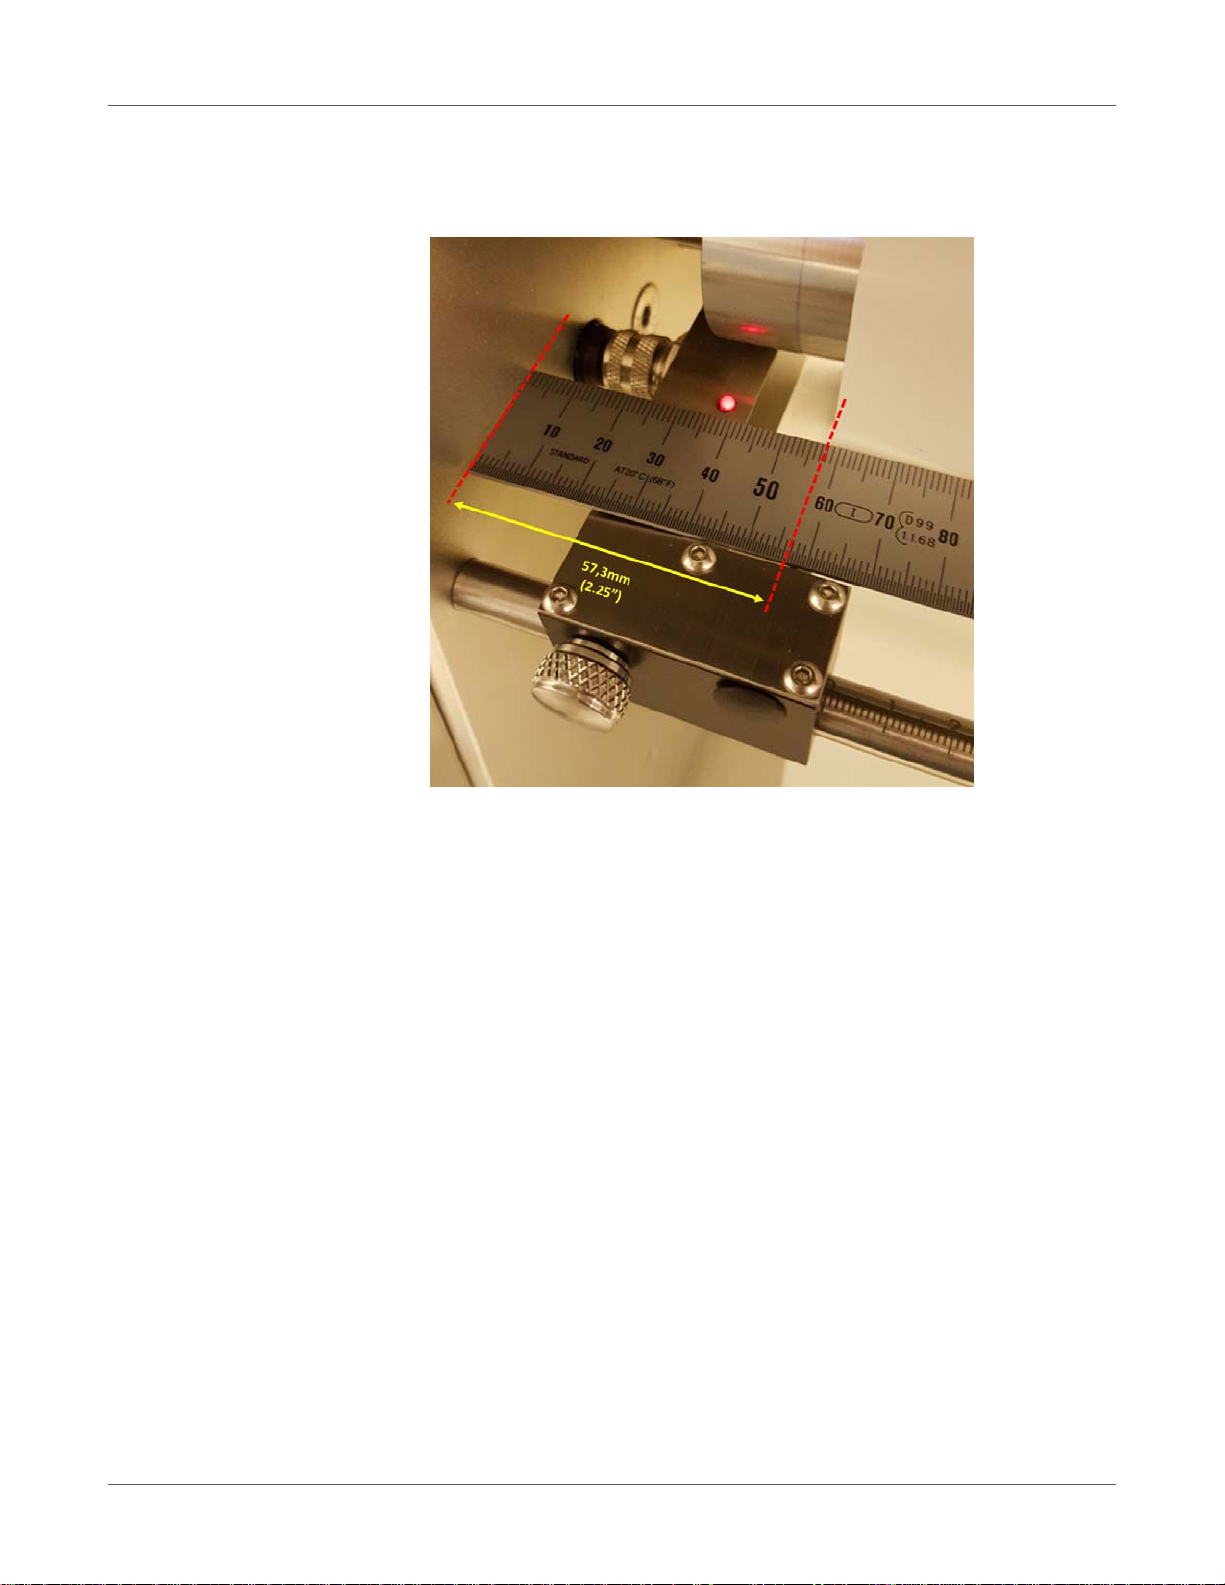
5 Adjust the left edge of the media roll to be 57.3mm (2.25") fr om the wall. This e nsures that
the media left edge will be at the same position as the left edge of the printhead nozzles
(where the printing zone begins).
Note: It does not have to be exactly 57.3mm as that is difficult to measure exactly with an
ordinary ruler. The best way is to set it around 57mm from the wall. The label edge sensor
will make the position correction later, once it is set. See “Adjusting the label edge sensor”
on page 35.
32 T2-C User Guide
Page 33
Loading the label material
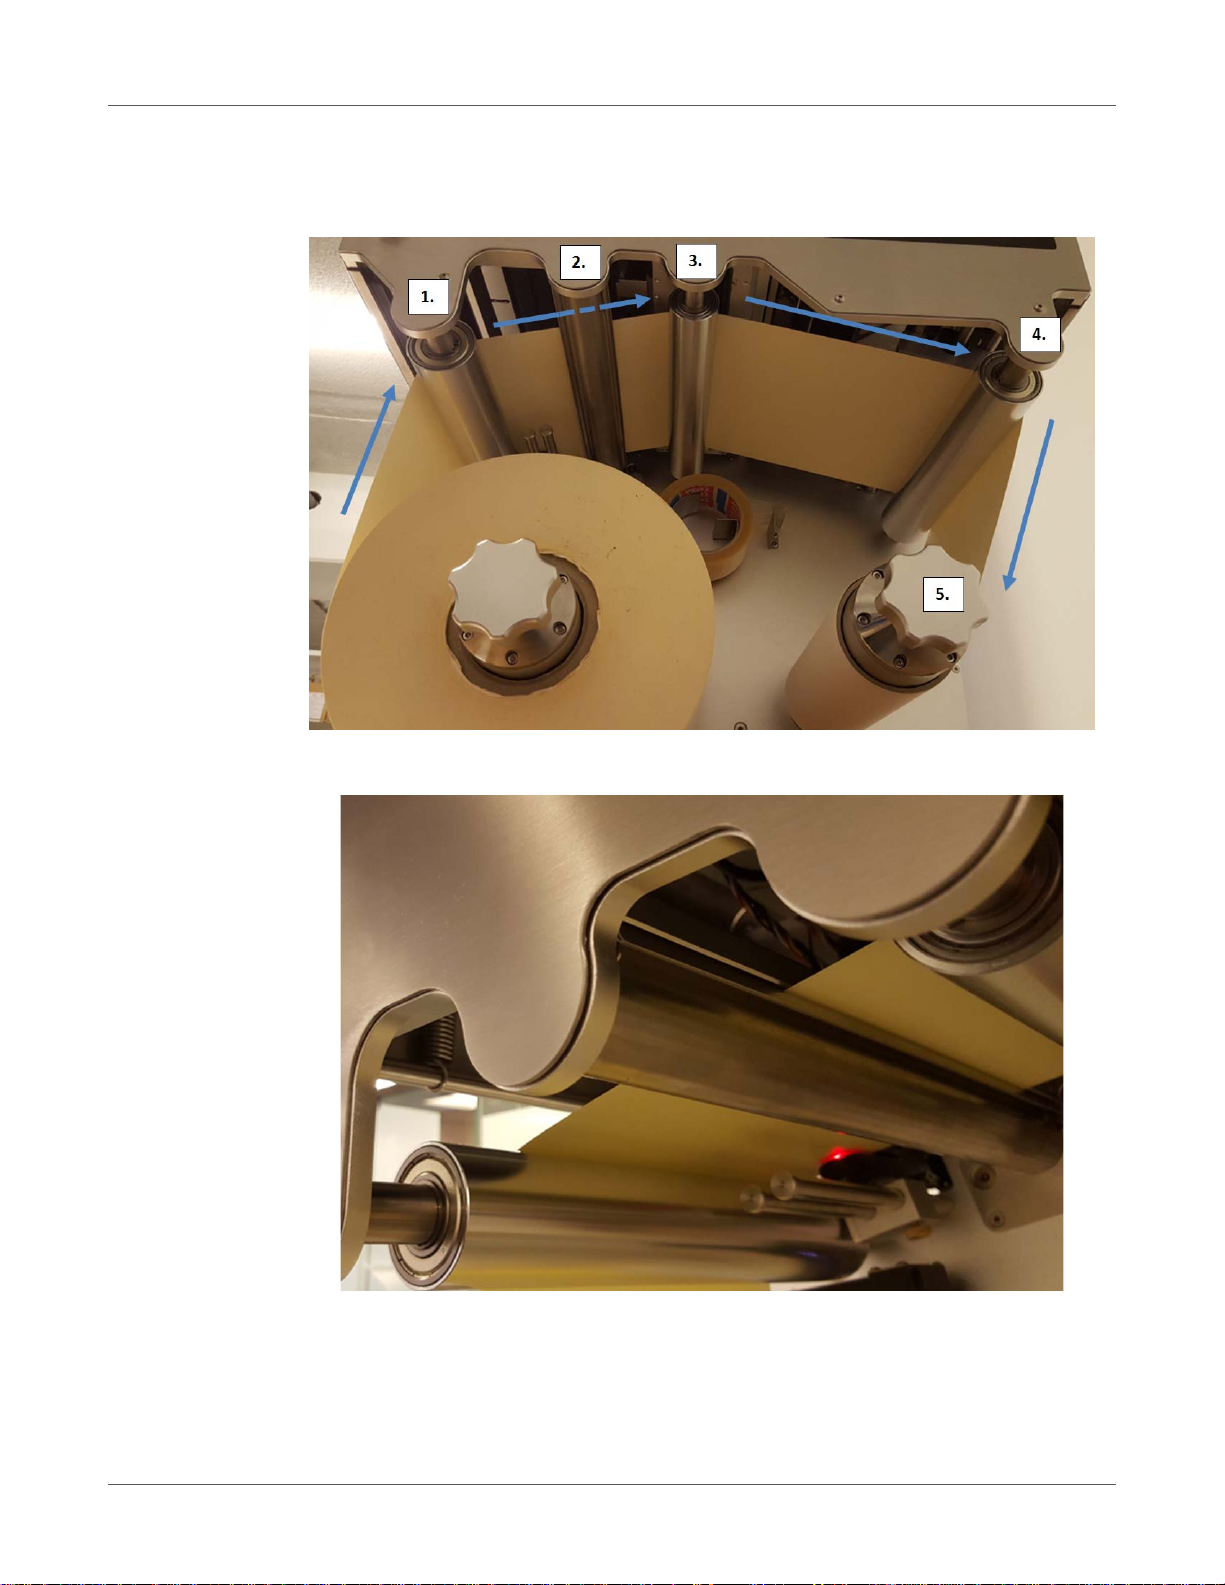
6 Thread the label material over the first metal roll (1), th en between the NIP clamps (2), then
over the metal roll under the printhead (3), then over the last metal roll (4) and fix it with
adhesive tape to an empty paper core on the rewinder shaft (5).
Media going through between the NIP clamp s :
T2-C User Guide 33
Page 34
Loading the label material
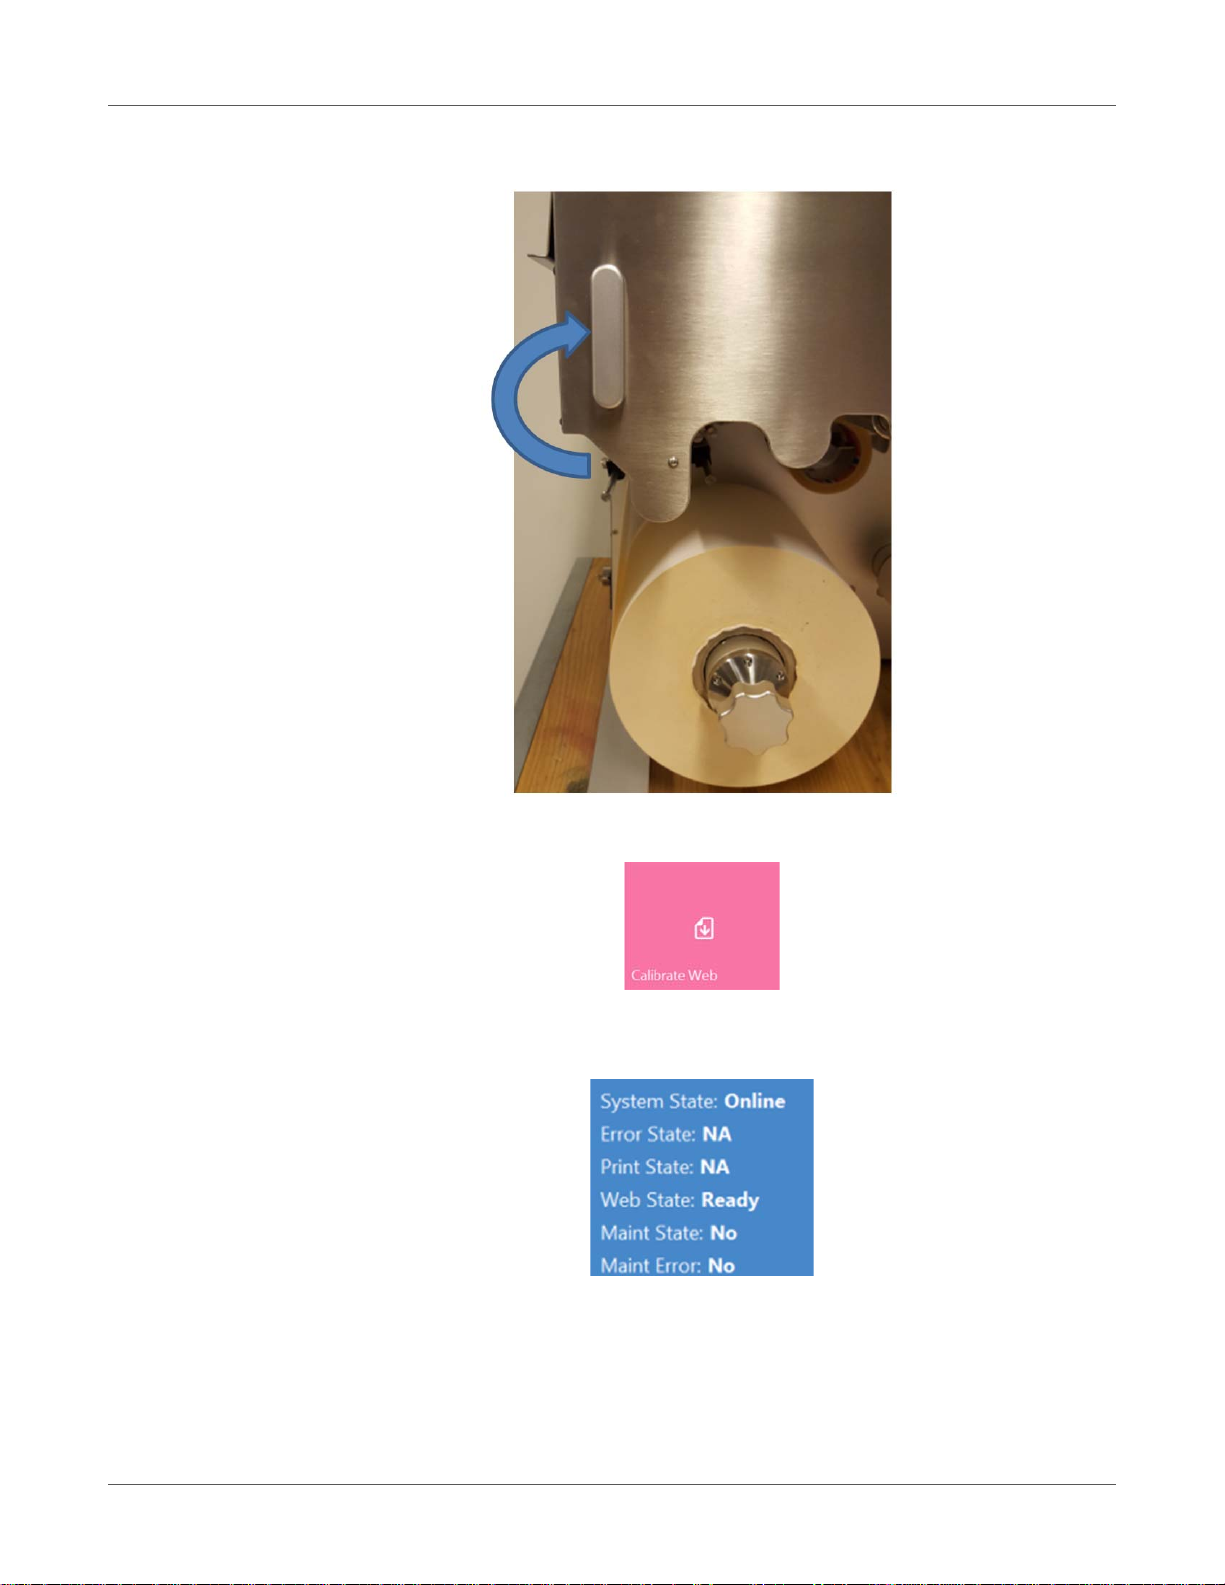
7 Close the NIP clamp.
8 Press the Calibrate Web button in the TrojanTwo tab > Handling menu.
9 Tension calibration is completed when Web State becomes ready in the right side status
bar on the touchscreen.
34 T2-C User Guide
Page 35
Adjusting the label edge sensor
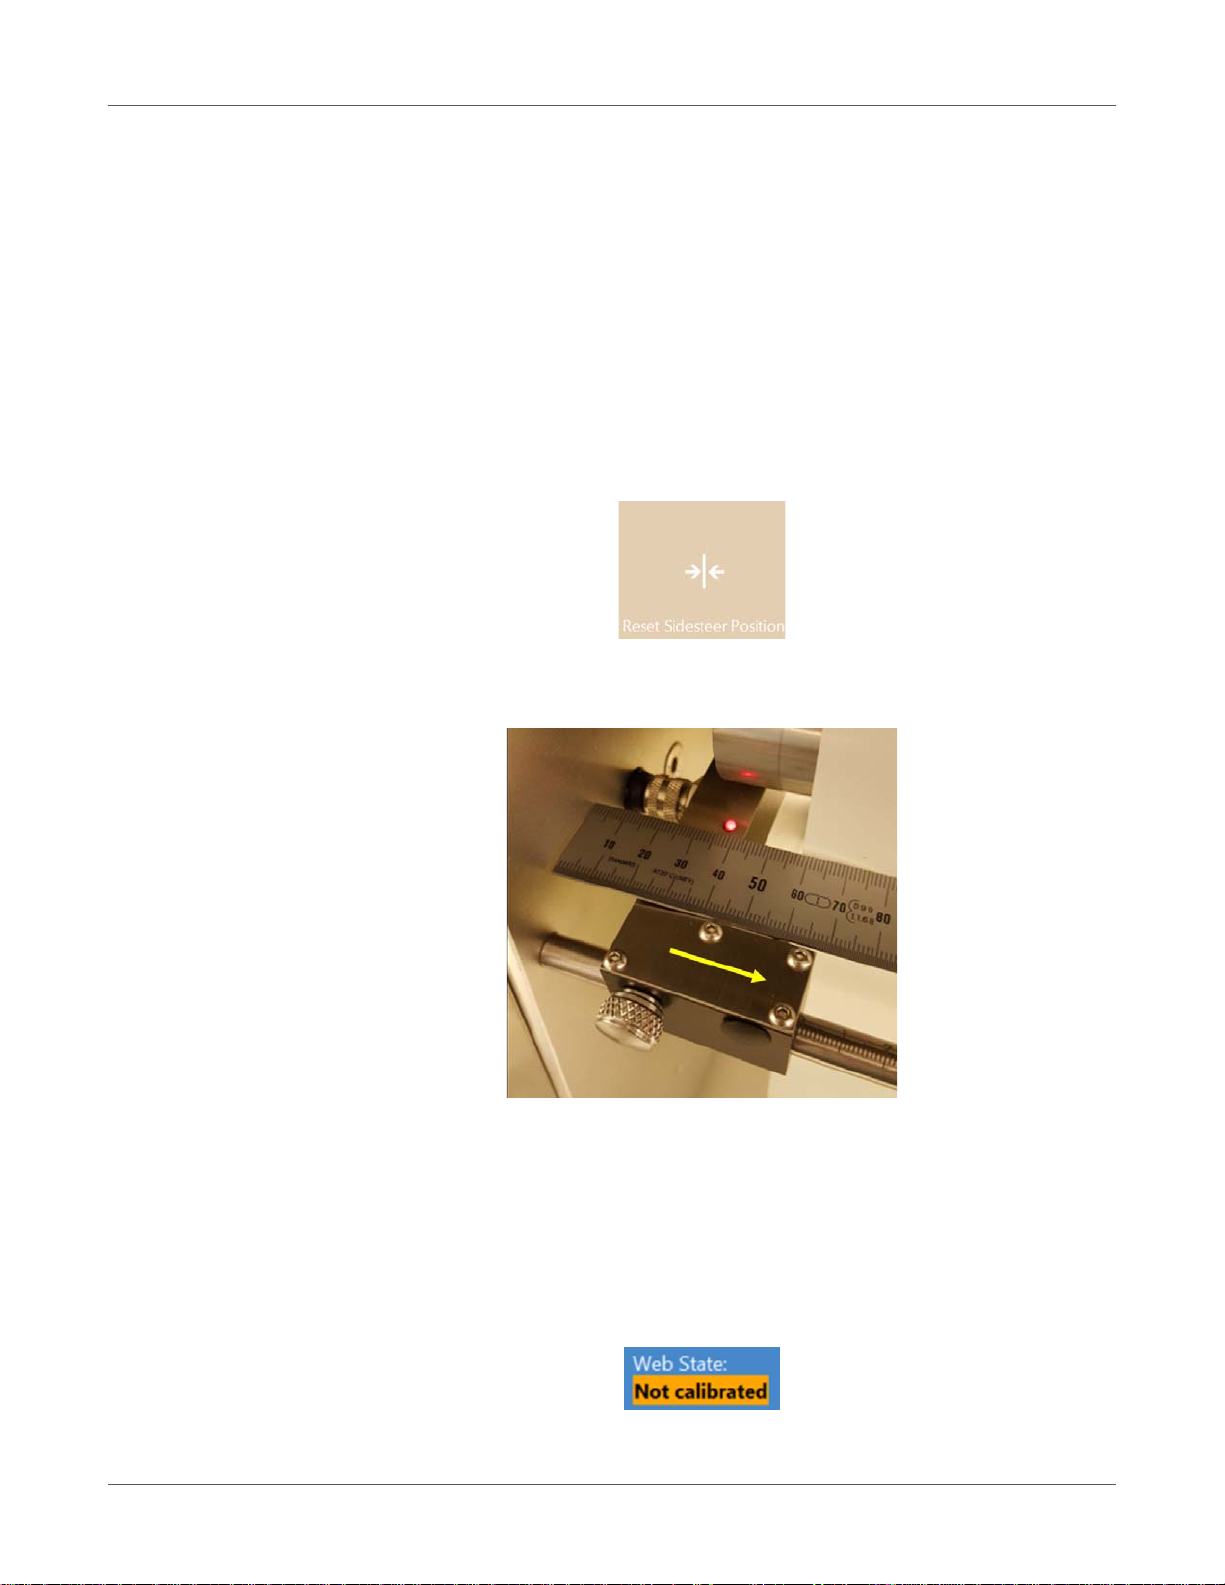
• The label edge sensor is for adjusting the left edge of the media physically throughout the
whole web path for the best rollup performance.
• Adjusting the sensor can be done manually by physically moving the sensor. Moving the
sensor has an immediate effect on the label roll position.
• As a starting position for the sensor, it is advised to align the sensor to the 0 po sition
on the metric scale at the axis where the sensor can be moved.
• Further adjustments can be done even during printing as if needed.
1 Press the Reset Sidesteer Position button in the TrojanTwo tab > Handling menu after
a new media roll has been threaded.
Loading the label material
2 Adjust the label edge sensor's bracket to be exactly at the 0 position on the metric scale at
the axis where the sensor can be moved.
Note: When moving the sensor, the manual knob that locks the sensor's position has to
be released.
Calibrate tension for the label web
It is assumed that the label rolls are placed correctly and the machine is threaded with media.
1 Web state is currently: 'Not calibrated':
T2-C User Guide 35
Page 36
Loading the label material
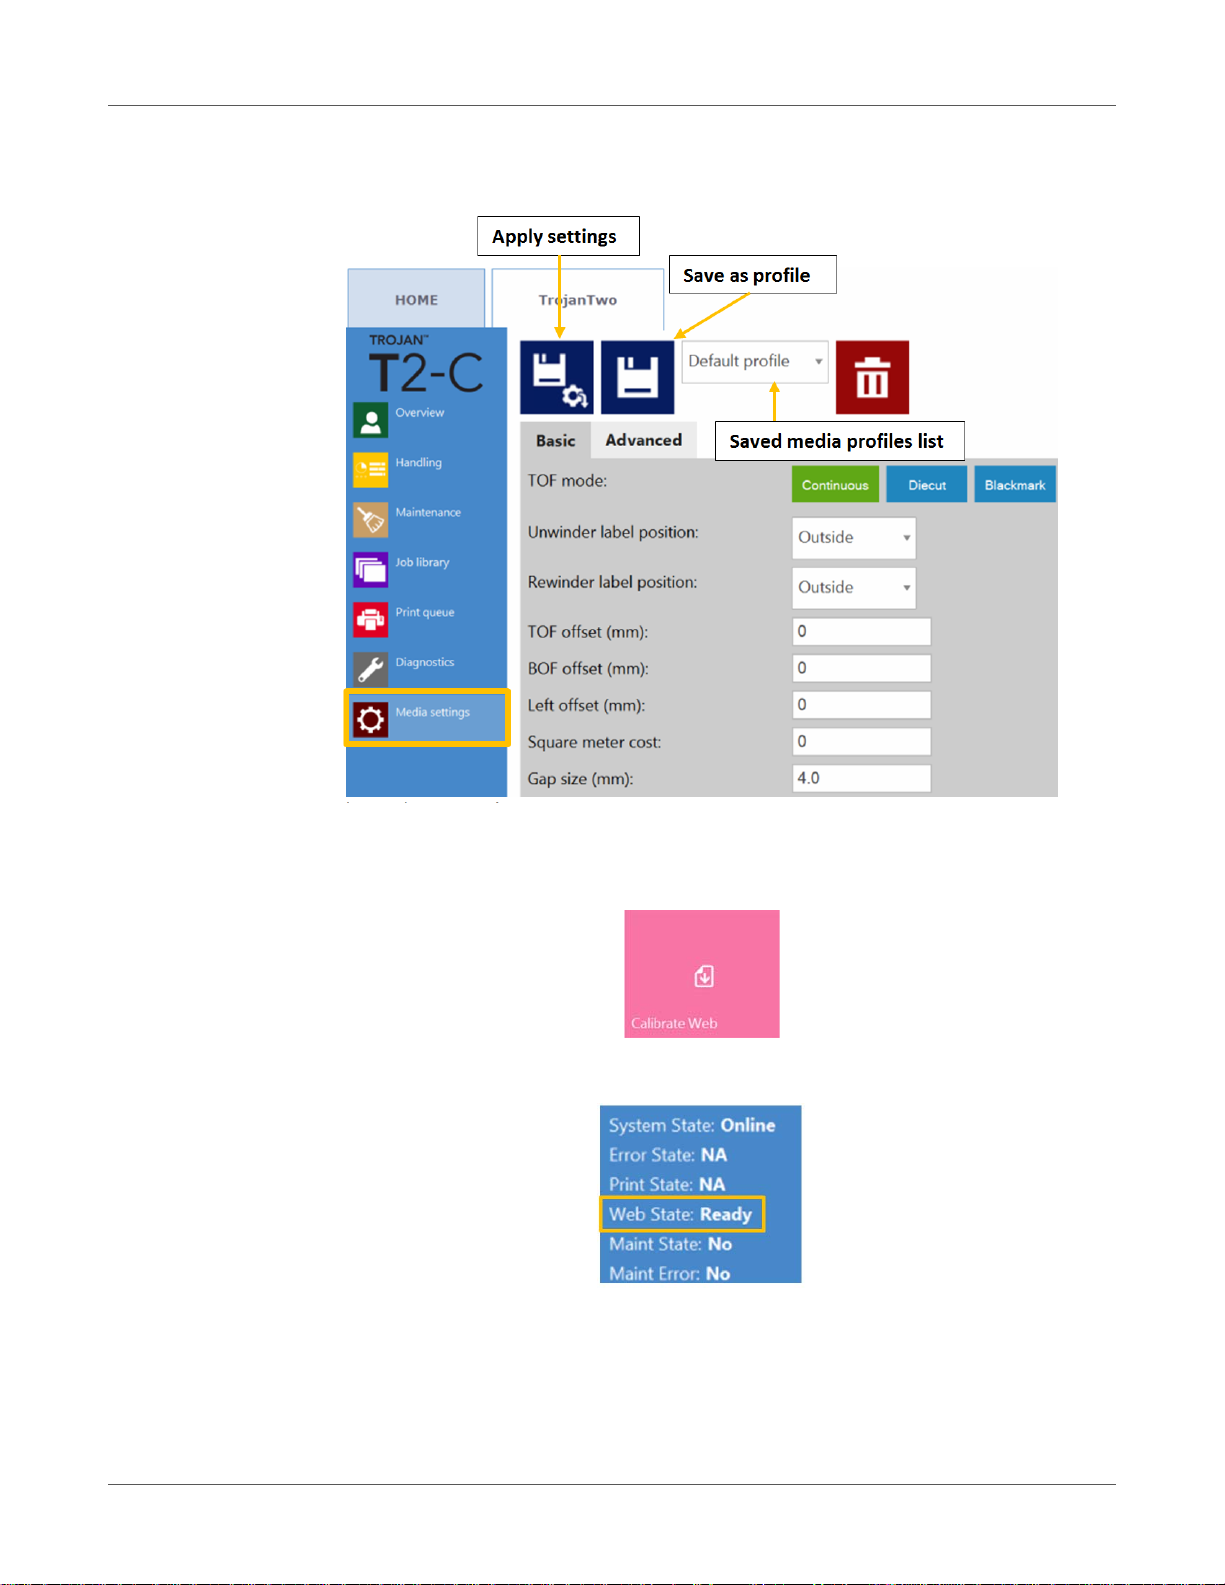
2 Go to the TrojanTwo tab > Media Settings menu and select the correct Media Profile that
fits the paper or create a profile that matches the material and print job.
3 Press the apply settings button.
4 Go to the TrojanTwo tab > Handling menu and press the Calibrate web button.
5 The calibration is finished when the "Web State" status reads "Ready".
36 T2-C User Guide
Page 37
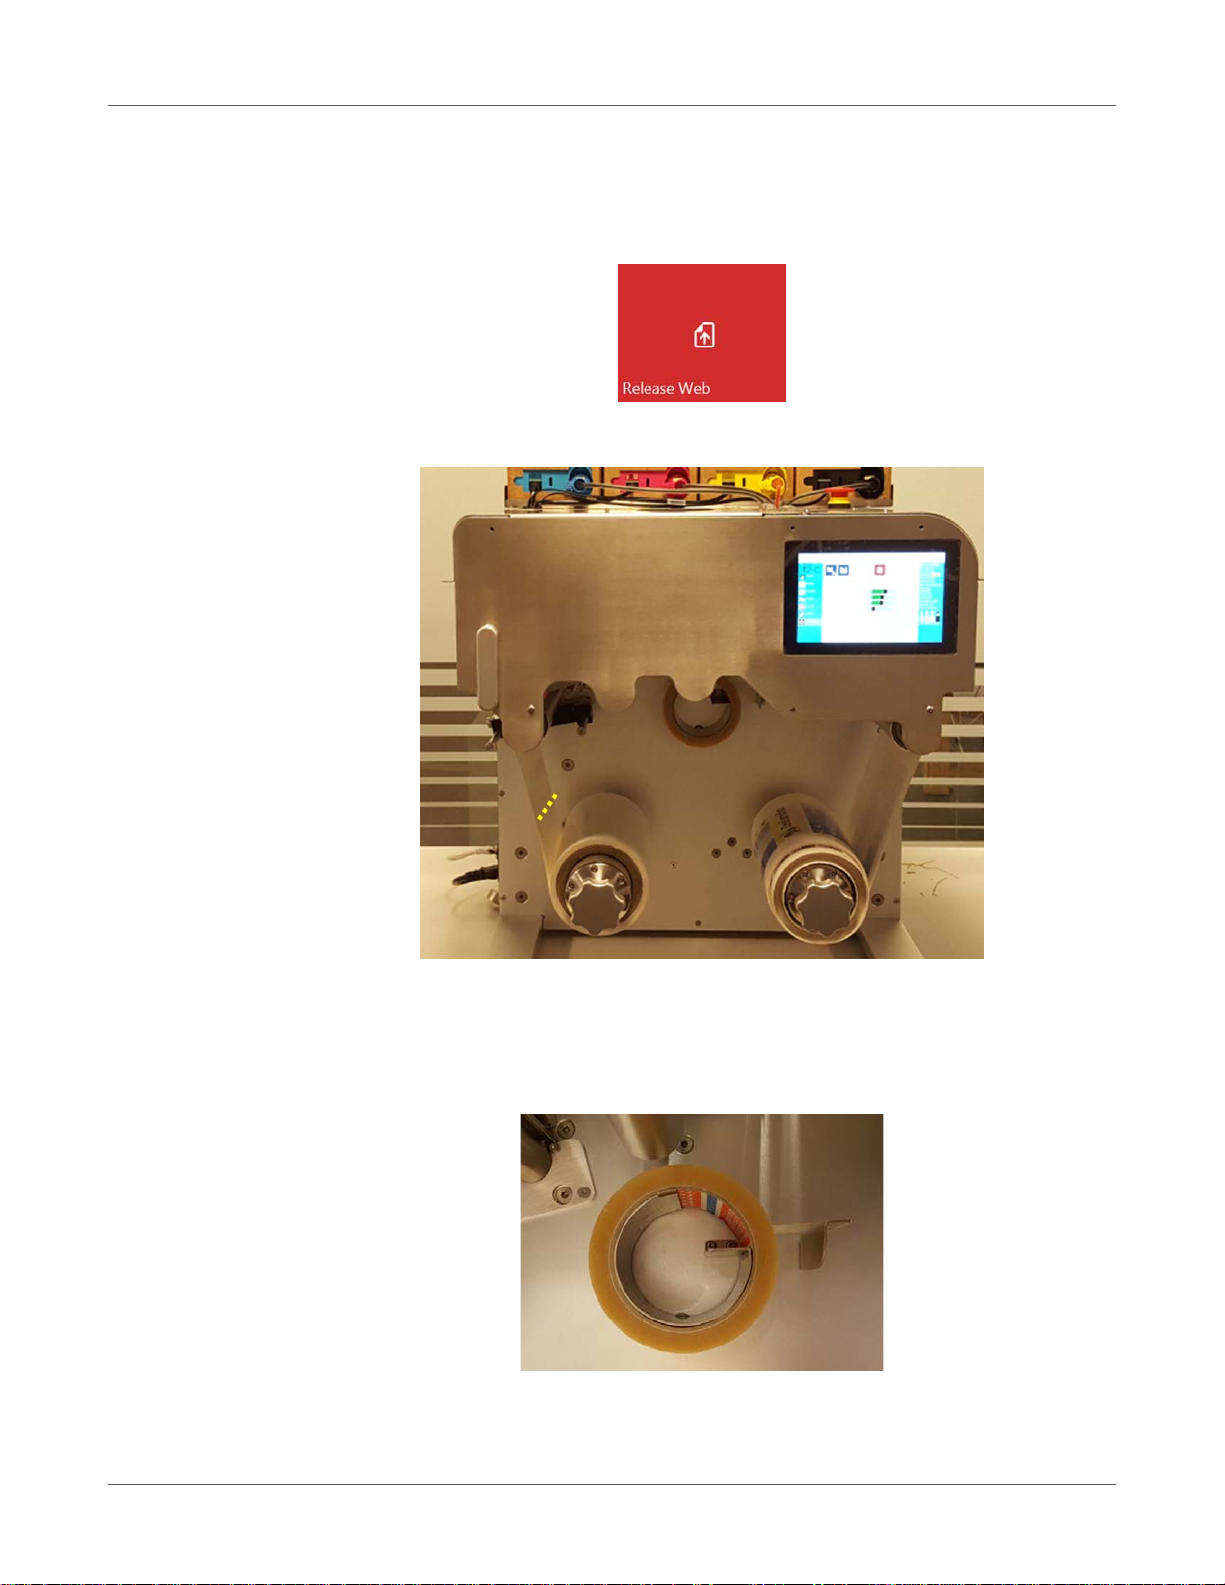
Splicing and changing the label roll
1 Go to the TrojanTwo tab > Handling menu and press the Release Web button to release
the tension for the label roll.
2 Cut the media above the unwinder shaft somewhere close to the unwinder.
Loading the label material
3 Load the new media roll onto the Unwinder shaft. See “Rolling direction unwinder - Ink jet
coating on the inside or outside” on page 29.
4 Use the built in adhesive tape dispenser to stick the new media roll to the media that is still
threaded via the web path.
Note: Adhesive tape is not included in T2-C package.
T2-C User Guide 37
Page 38

Loading the label material
5 Go to the TrojanTwo tab > Handling menu and press the Calibrate Web button to
calibrate tension for the media.
38 T2-C User Guide
Page 39
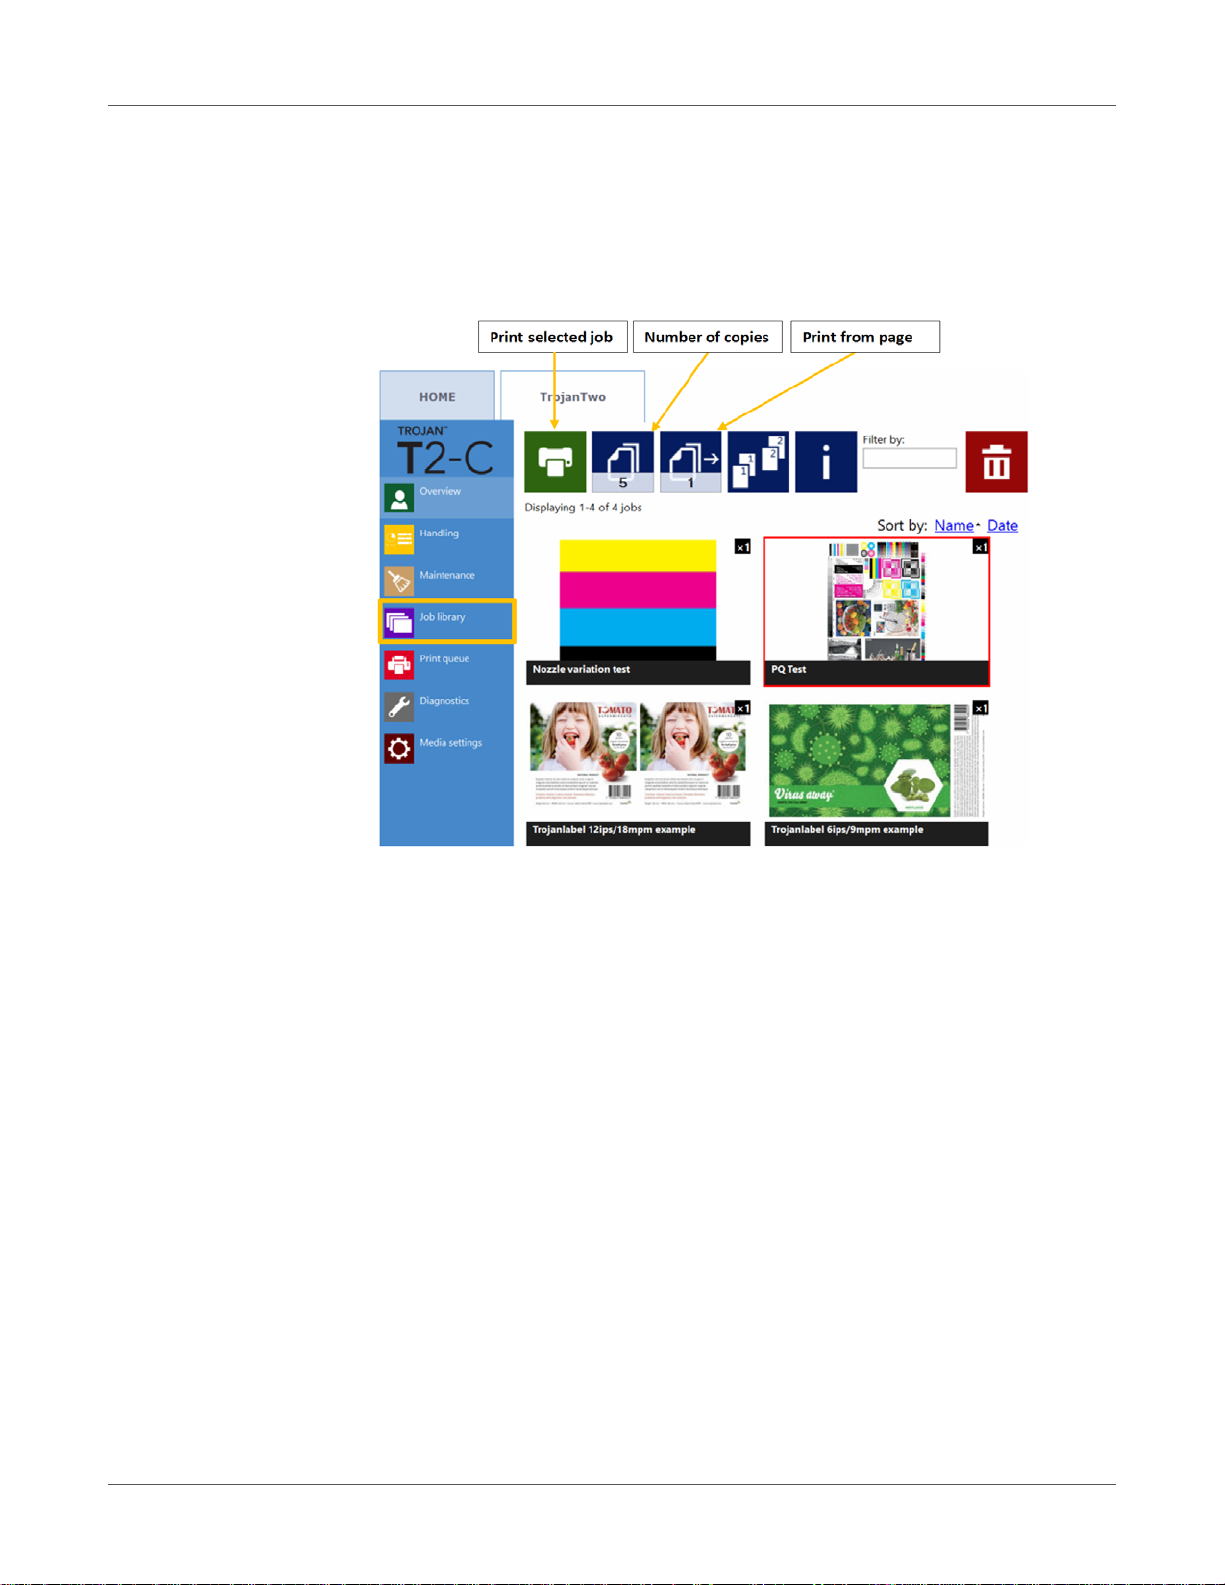
Select and queue print / start
5
print job
1 Select Job Library. See “Job Library menu” on page 79.
2 Select a job by pressing the image. The selection is indicated with a re d box ar ou nd the
selection.
3 Choose the number of copies or the starting page number to print, by pressing the Number
of Copies button or the Print from Page button (printing job from a certain page number).
4 Send the print to queue by pressing the green print button.
T2-C User Guide 39
Page 40
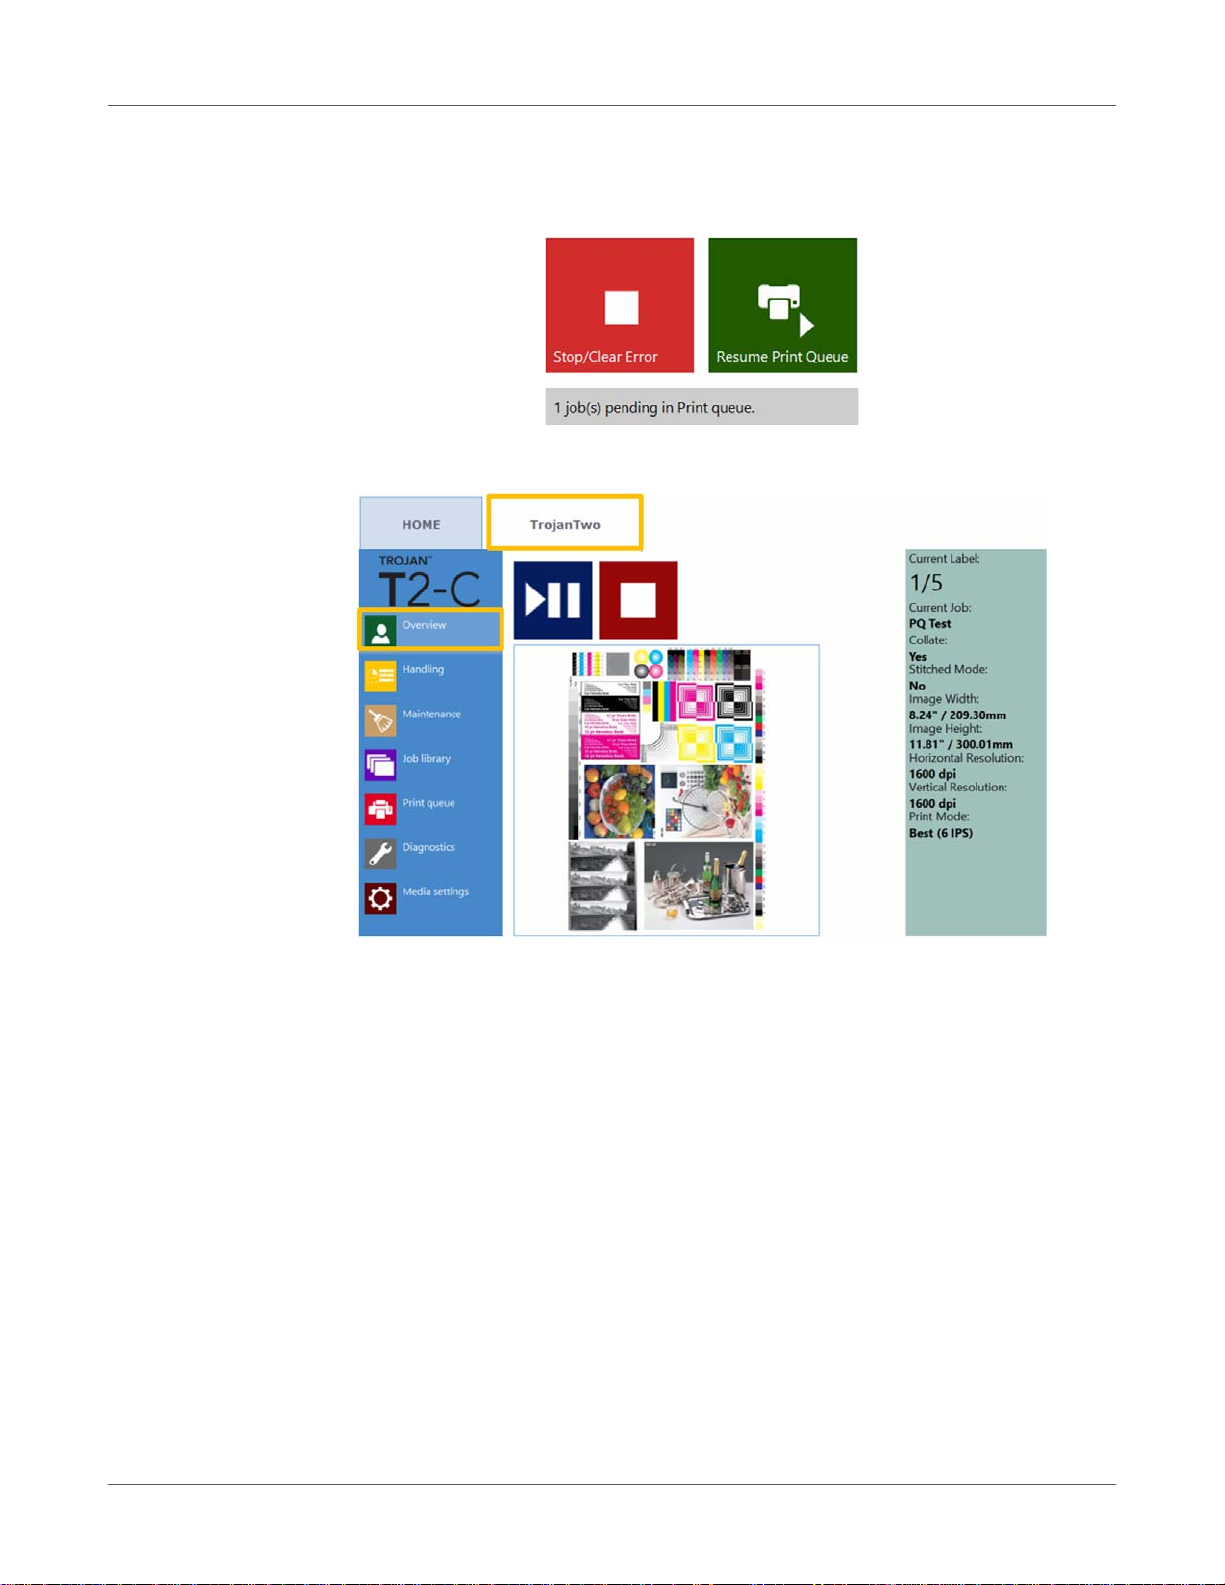
Select and queue print / start print job
5 If the Print Queue is paused, press the resume button o n the overview screen. If the queue
is active the print job will start immediately, and the print job progress is displayed in the
Overview screen, which is automatically displayed when starting a print.
Print queue is paused. Press Resume Print Queue button to start printing.
Print job in progress in overview menu.
40 T2-C User Guide
Page 41
6
Pause, resume, or stop a print job
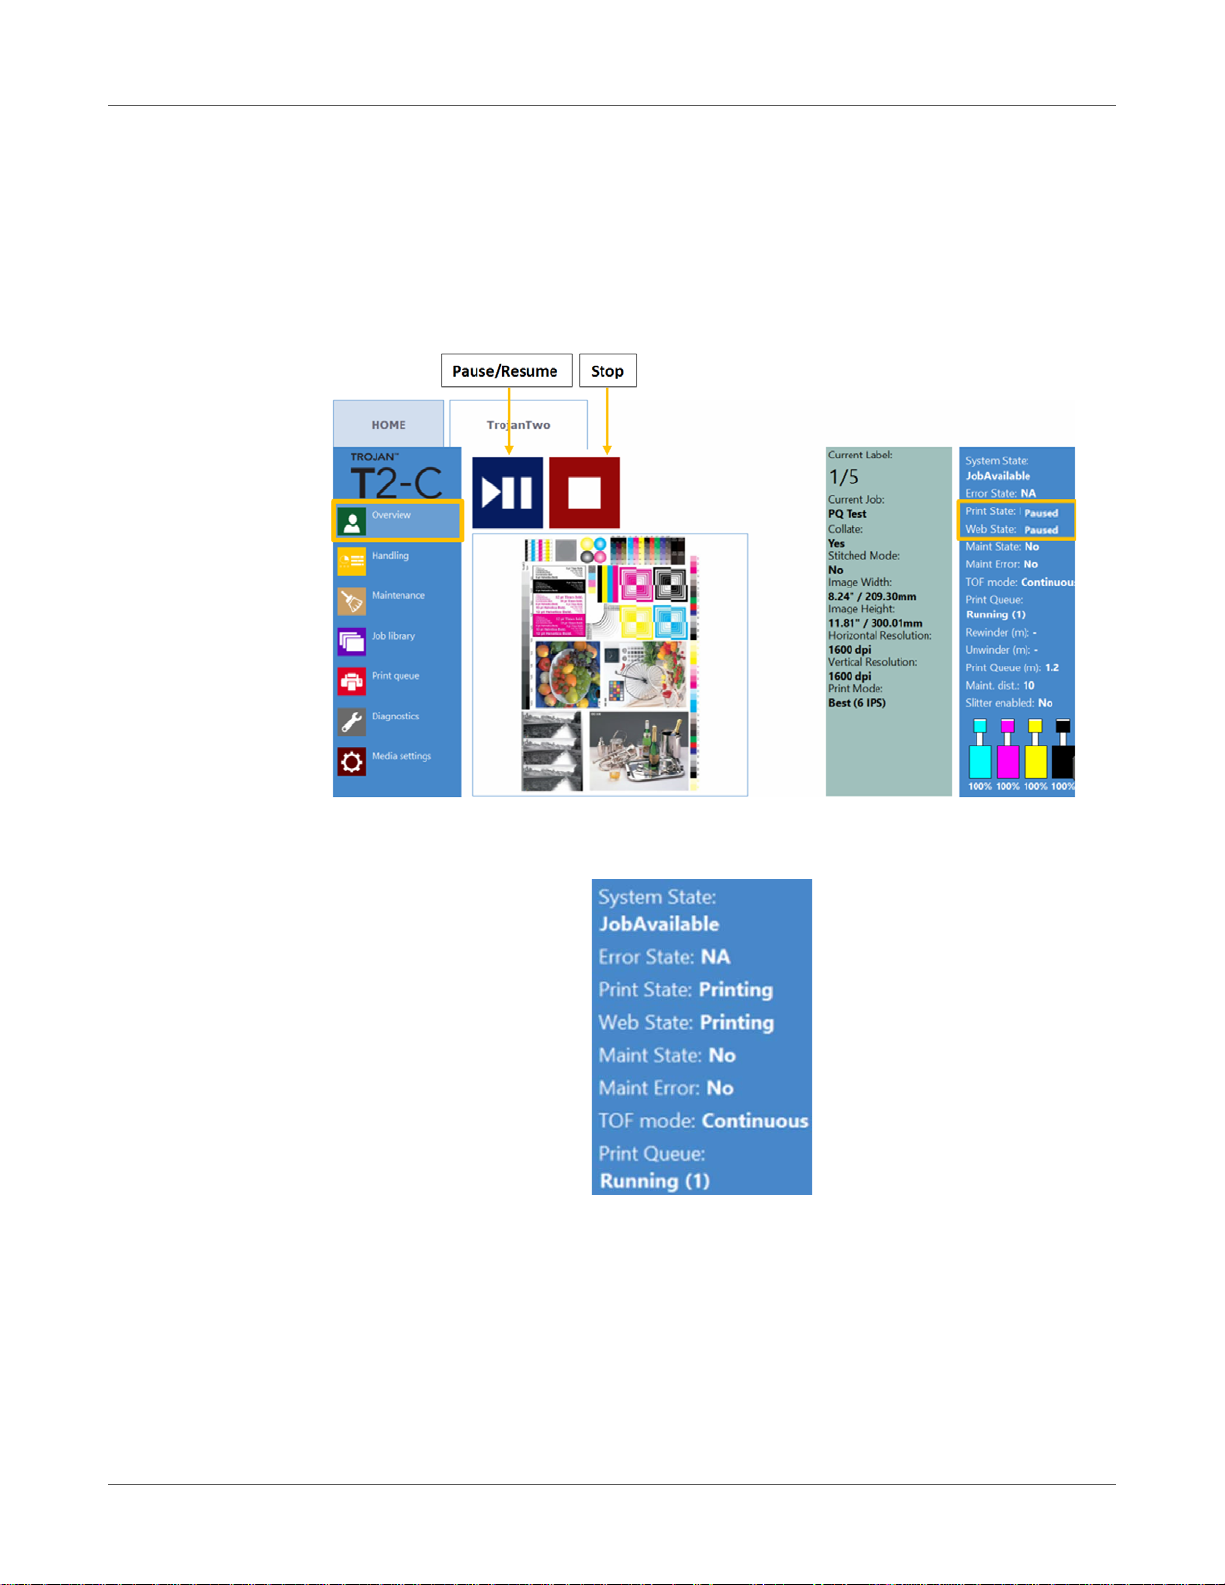
Pausing, resuming, and stopping print jobs is done from the TrojanTwo tab > Overview menu.
• Pause: Press the Pause/Resume button. Print state will change to "Paused".
• Resume of paused job: Press the Pause/Resume button once more. Print state will change
to "Printing".
T2-C User Guide 41
Page 42
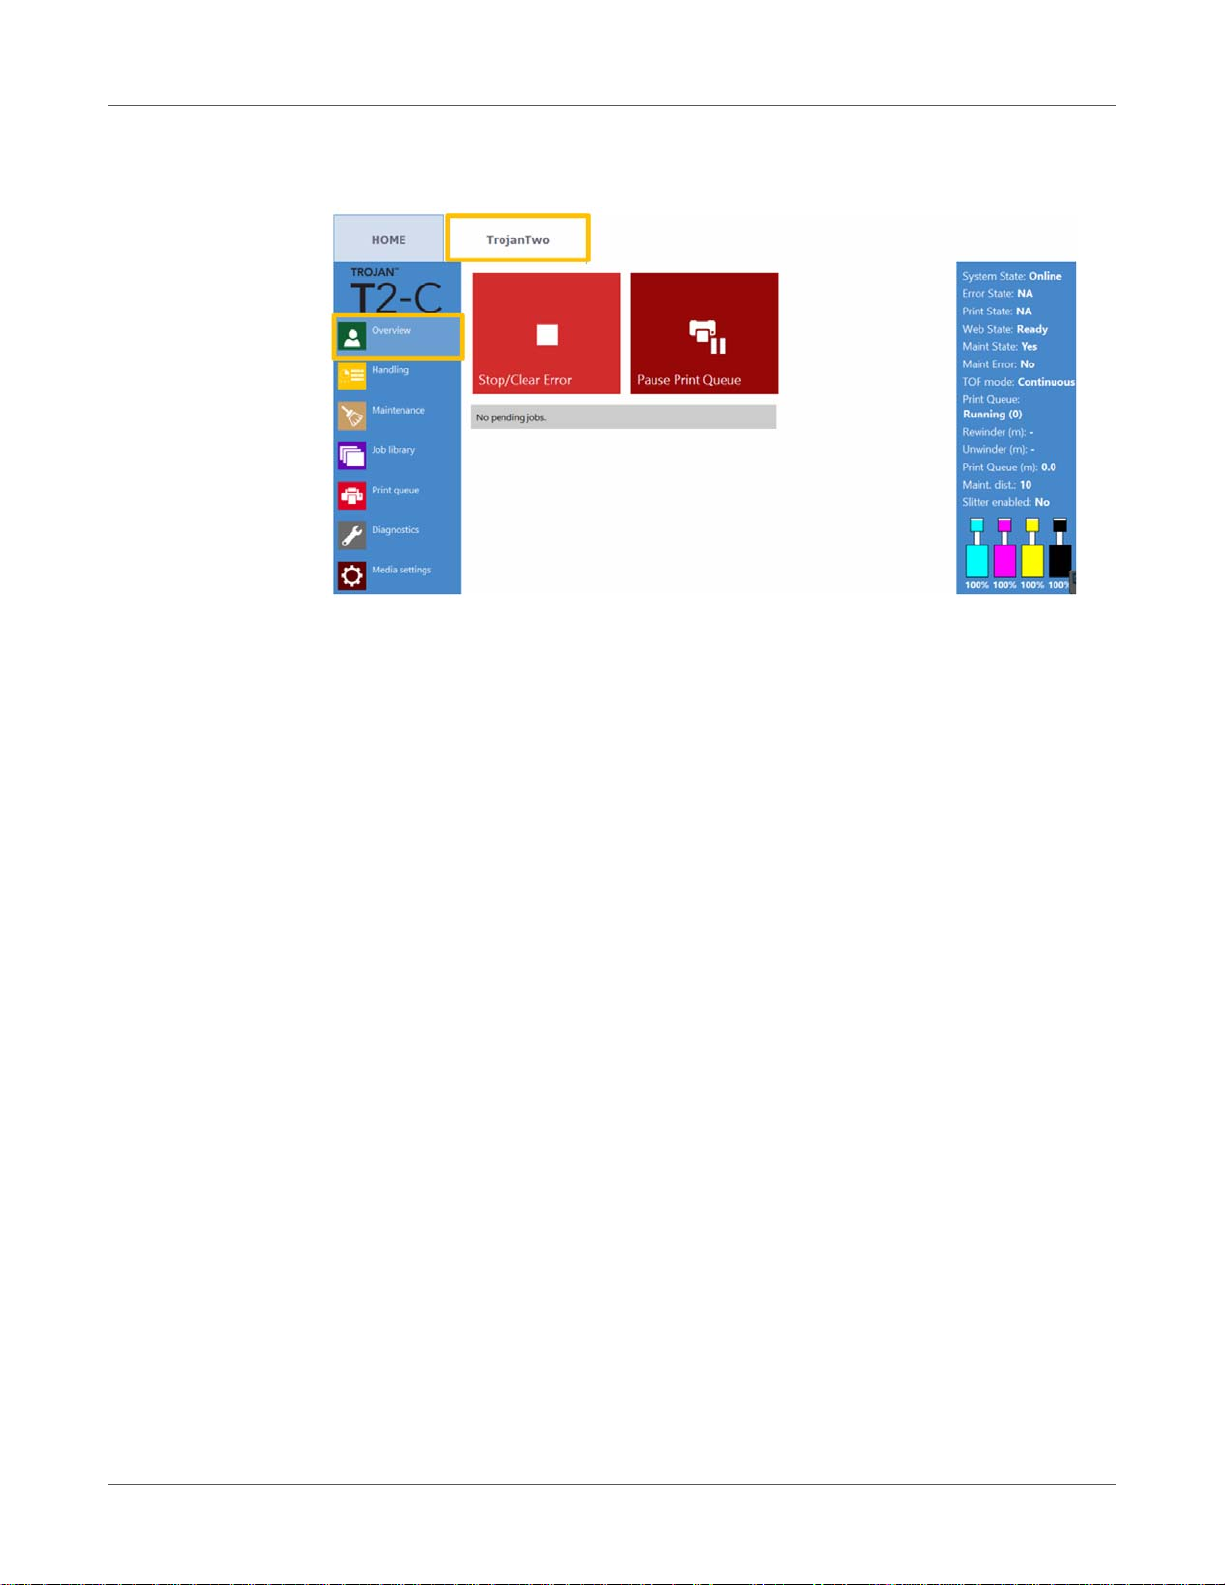
Pause, resume, or stop a print job
• Stop: Press the stop button. Print state will change to "NA" and the current print job is
canceled and removed from the print queue.
Note: NA = Not Available
42 T2-C User Guide
Page 43
7
Moving the label web
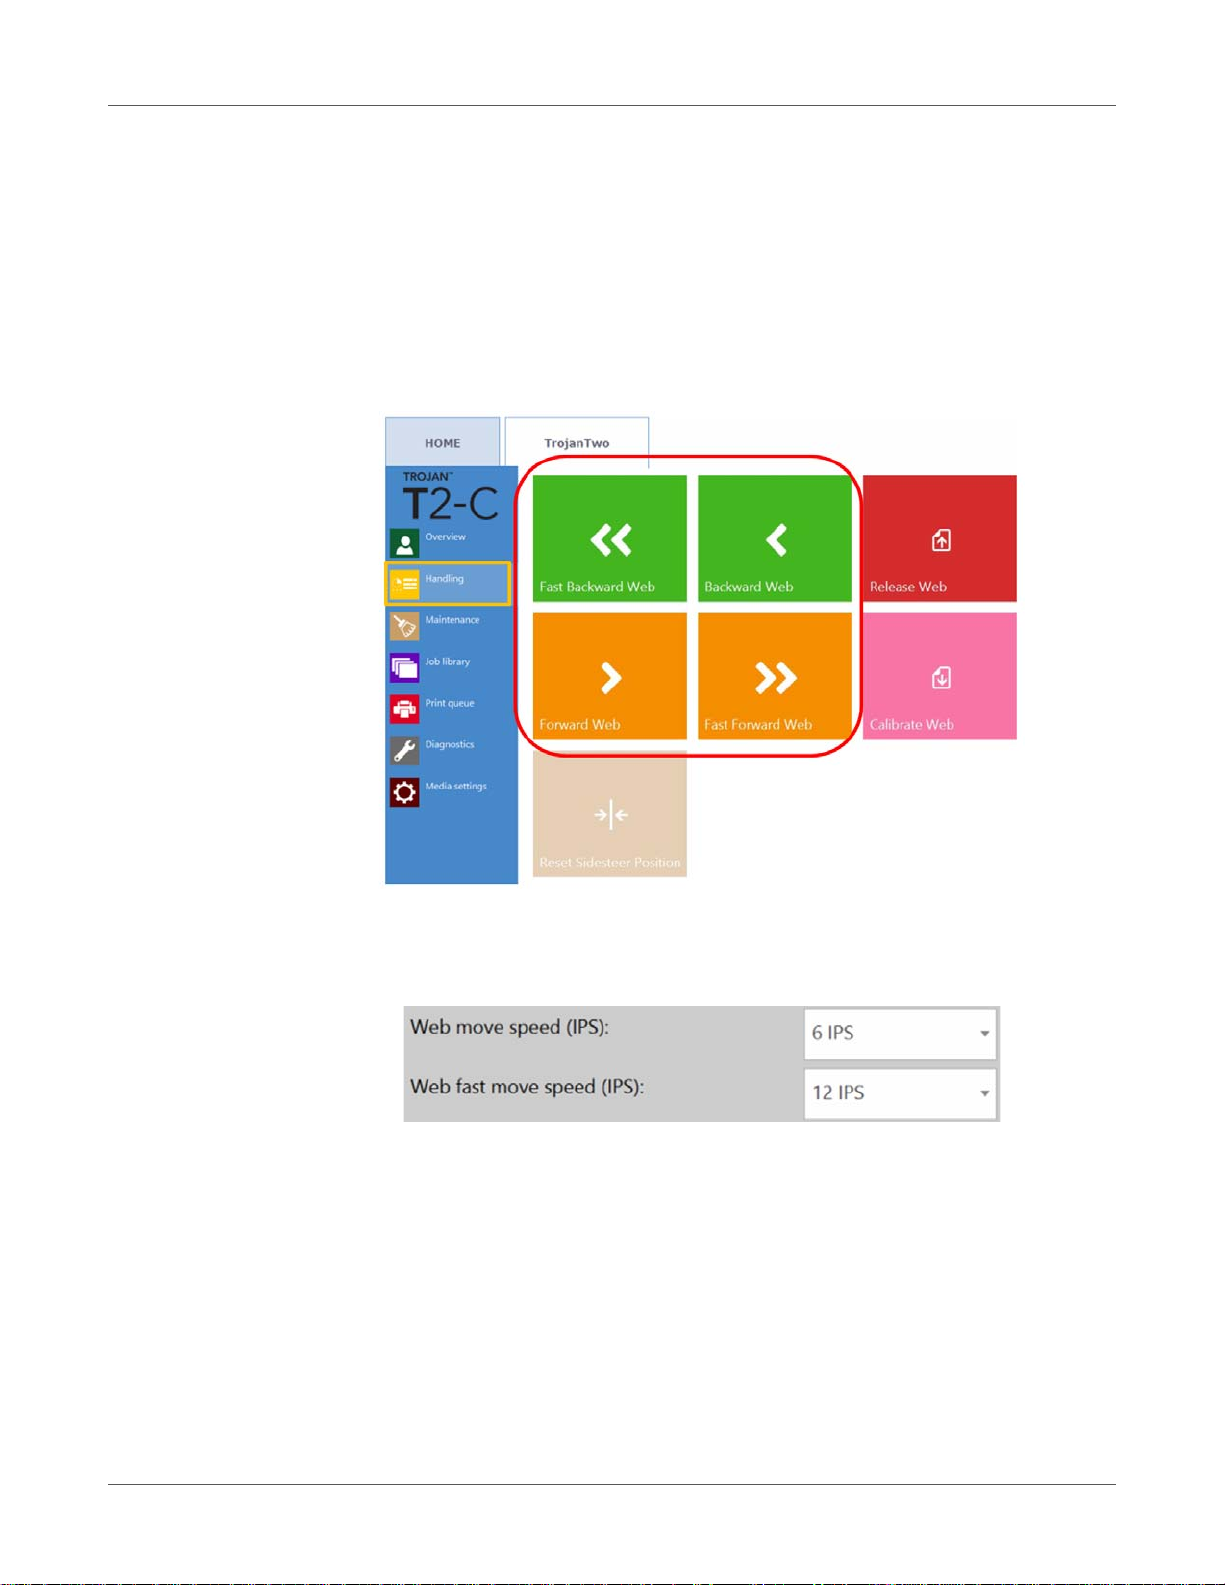
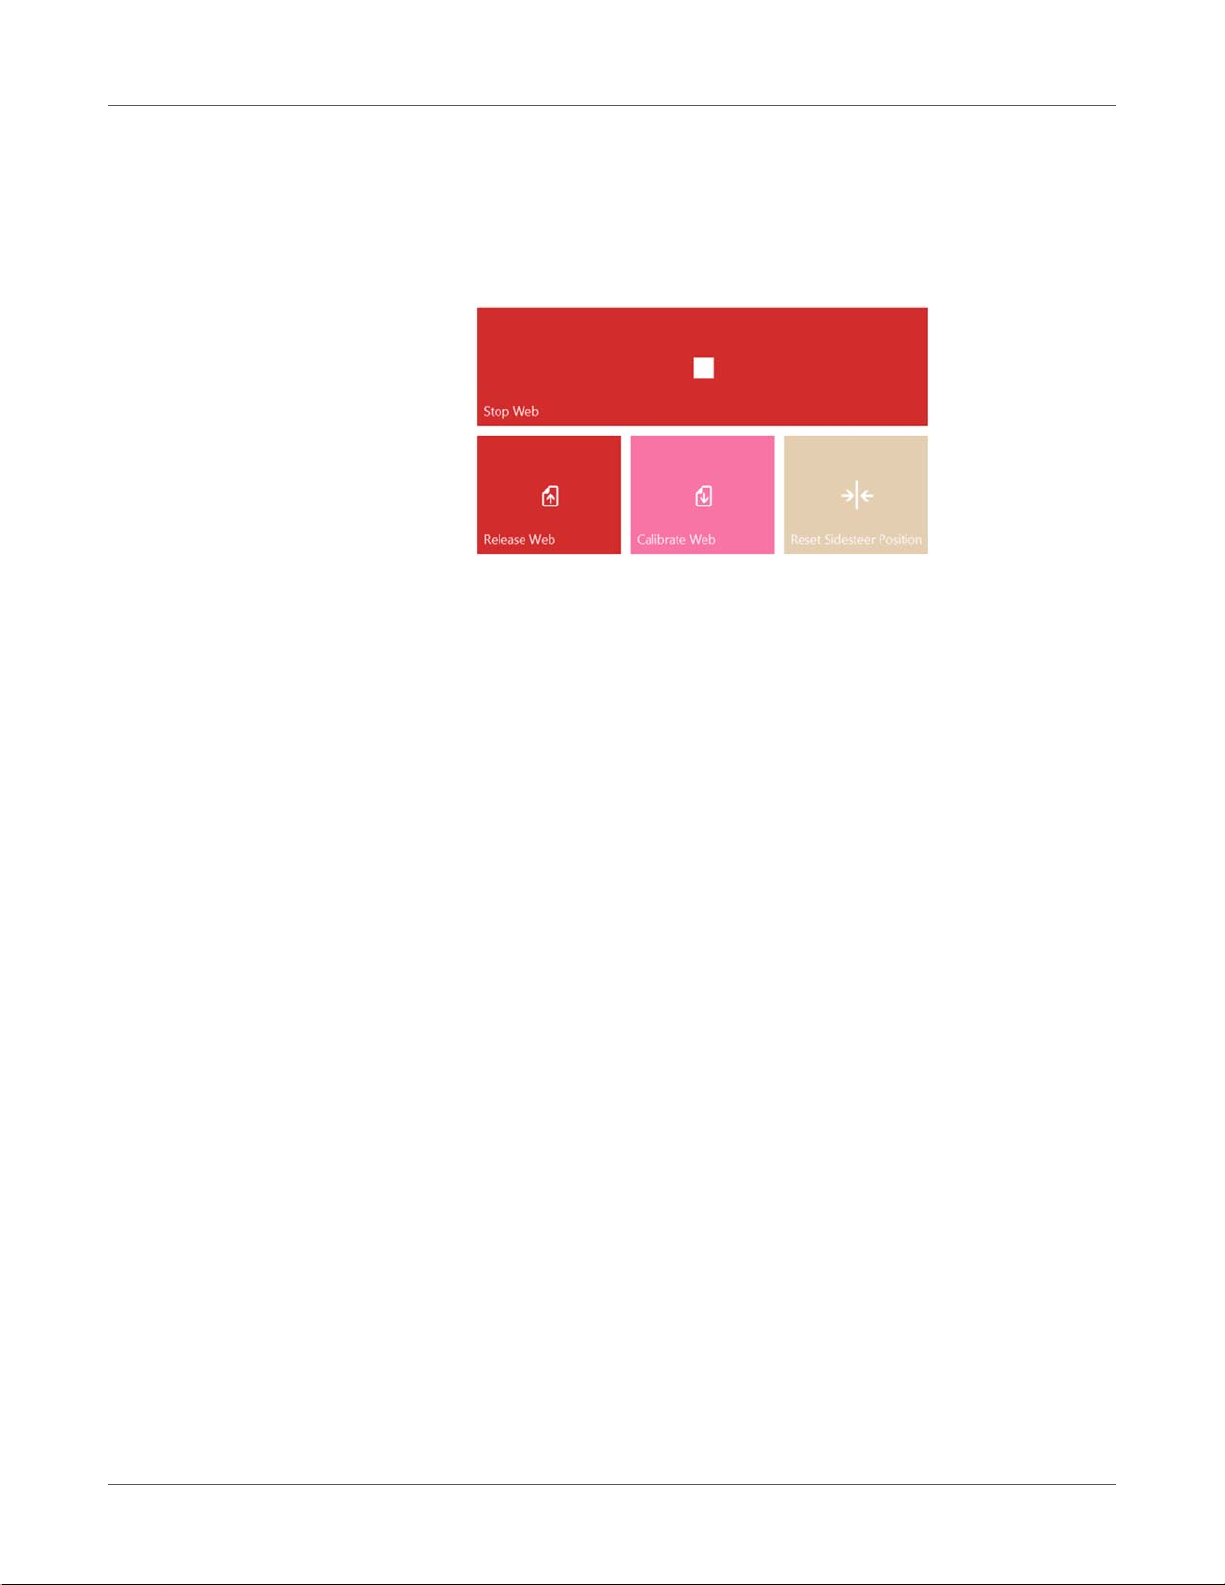
It is possible to move the label web forwards and backwards at two speeds. In the TrojanTwo
tab > Handling menu, select the speed and direction by selecting one of the four
directional/speed buttons highlighted below. When a directional button is pressed, the four
buttons are replaced with one single stop button. Pressing the button will stop the web moving.
See “Handling menu” on page 75.
• Setting the speed for moving the web:
The movement speed of Forward/Backward Web and Fast Forward/Fast Backward Web
buttons can be set by the user in the HOME > Settings > Printing Preferences menu:
Web move speed can be set to 1,3,6,9 inches per second (IPS) an d web fast move speed
can be set to 9,12,15,18 IPS.
T2-C User Guide 43
Page 44

Moving the label web
44 T2-C User Guide
Page 45
8
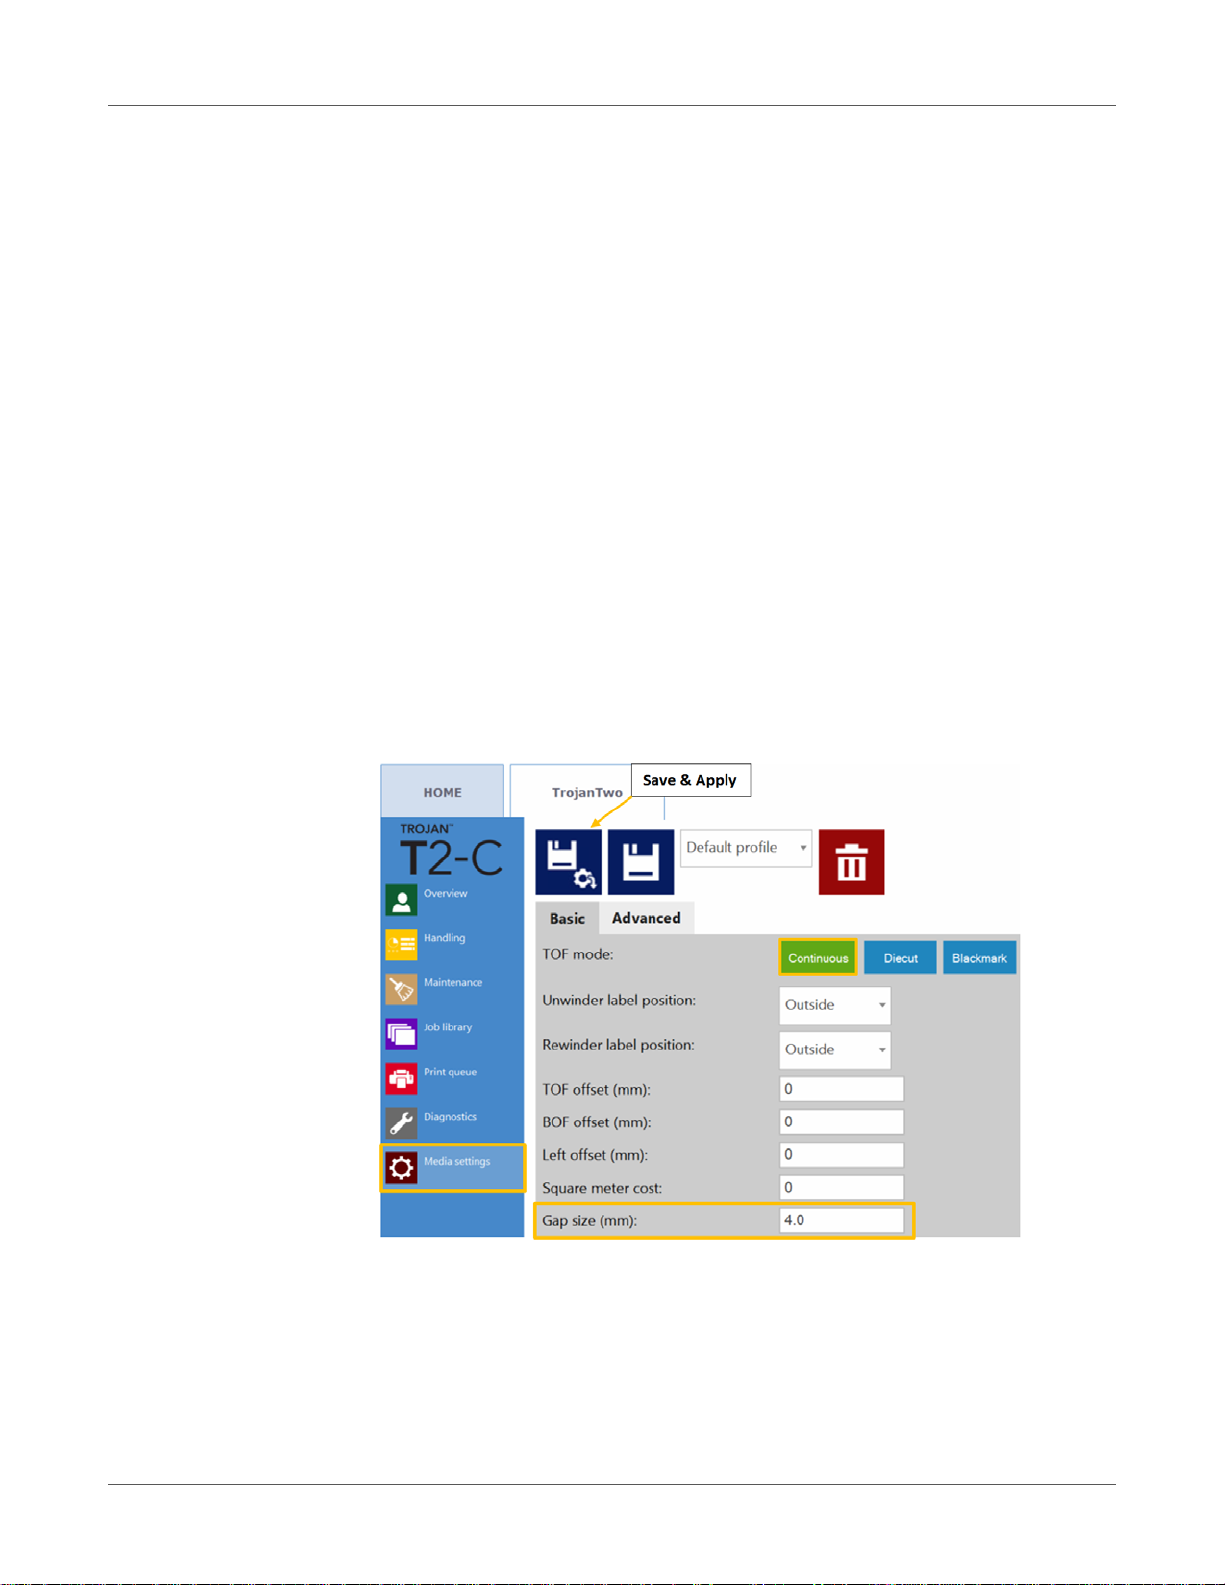
The T2-C press supports three printing modes: Continuous, Diecut, or Blackmark, depending
on the format of the applied label material.
Continuous printing mode
• In continuous label material format, the label roll has no pre-cut gaps or pre-printed
registration marks (black marks) between the labels.
• To set the T2-C press to continuous printing mode, go to TrojanTwo tab > Media settin gs
menu and select the Continuous button in th e TOF mode field. Then press the Save and
Apply button to apply the setting changes.
Note: TOF = Top of Form. The top of form algorithm describes how to detect the top of the
next label.
• The currently active TOF mode is displayed in green.
• In continuous mode the label gap/blackmark sensor is not used.
• The gap between the labels can be set in the TrojanTwo tab > Media Settings menu.
Printing modes
Because of inter-page actions the printed labels require:
• Minimum 2.2 mm gap at 6 IPS mode
• Minimum 3 mm gap at 12 IPS mode
• Maximum gap size is 65 mm
T2-C User Guide 45
Page 46
Printing modes
Important: Setting label gap outside the minimum and maximum range ca n result in label
skipping or high label gaps.
Die-cut printing mode
• In diecut label material, the labels are pre-cut into shape p rior to printing and there are label
gaps between the labels.
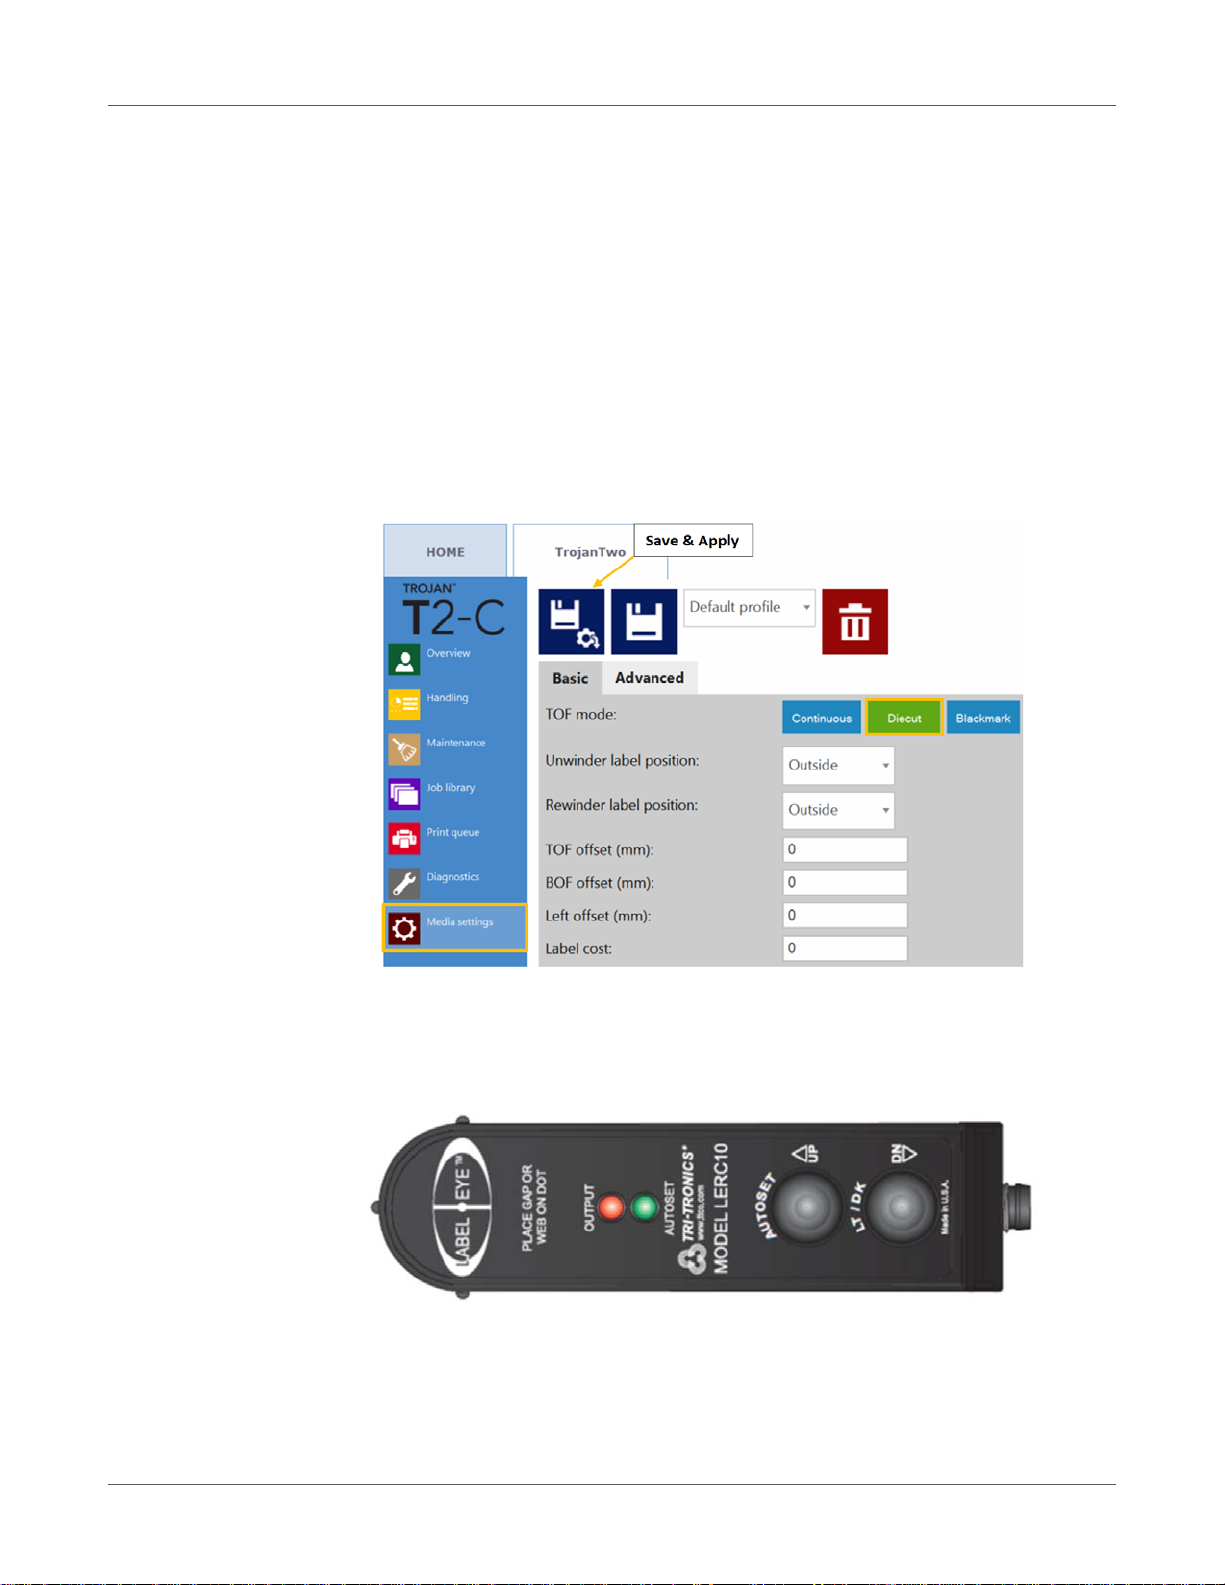
• To set the T2-C press to Diecut printing mode, go to TrojanTwo tab > Media Settings
menu and select the Diecut button in the TOF mode field. Then press the Save and Apply
button to apply the setting changes.
Note: TOF = Top of Form. The top of form algorithm describes how to detect the top of the
next label.
• In Diecut mode the built in label gap/blackmark sensor has to be calibrated to each applied
label material.
Calibrating the label gap sensor
• AUTOSET - Simply put the gap in view and push and hold the AUTOSET button for 1
second. The AUTOSET LED will remain on when the setup is complete. If the setup is not
adequate, the AUTOSET and Output LEDs will flash 3 times. This may indicate a backing
material that is too dense to penetrate.
46 T2-C User Guide
Page 47
Printing modes
• UP/DN Adjustments - The Label Eye sensor has the ability to adjust the setup
incrementally. Simply momentarily tap the AUTOSET (UP) button, or LT/DK (DN) button to
adjust the sensor to a more stable and repeatable setting. This feature is used when the
AUTOSET does not provide the optimum setting initially.
Example: If the label backing material is inconsistent, or the label material has more
translucent areas coming into view, then the sensor may need to be adjusted slightly for
this rare occasion. Having the ability to fine tune the sensor for changing conditions
provides a solution that is easy to implement and simple to understand.
• Light/Dark - Push the LT/DK button to change output from Dark On to Light On. Output
LED turns on when label is in view, or output LED turns on when gap is in view.
1 Cut a piece from the liner only (peel off the label from top) and put the piece of liner under
the dot at the middle of the LABEL • EYE™ text on the sensor, where the small dot indicates
the exact position of the sensor beam.
2 Keeping the piece of liner under the sensor beam, press and hold the AUTOSET button on
the sensor until only the green AUTOSET LED is lit constantly (the red output and the green
autoset LEDs will start flashing first and then the red LED goes off and the green LED stays
lit if calibration is successful).
3 Check detection by moving a label (not gap) into the sensor beam. If sensor is properly
calibrated, then the red output indicator LED will go on indicating that the sensor can
differentiate between gap and label. When only a la bel gap (liner) is under the sensor, then
only the green autoset LED is lit.
4 Repeat the calibration in case you do not see the same result as descr ibed in point 3 above.
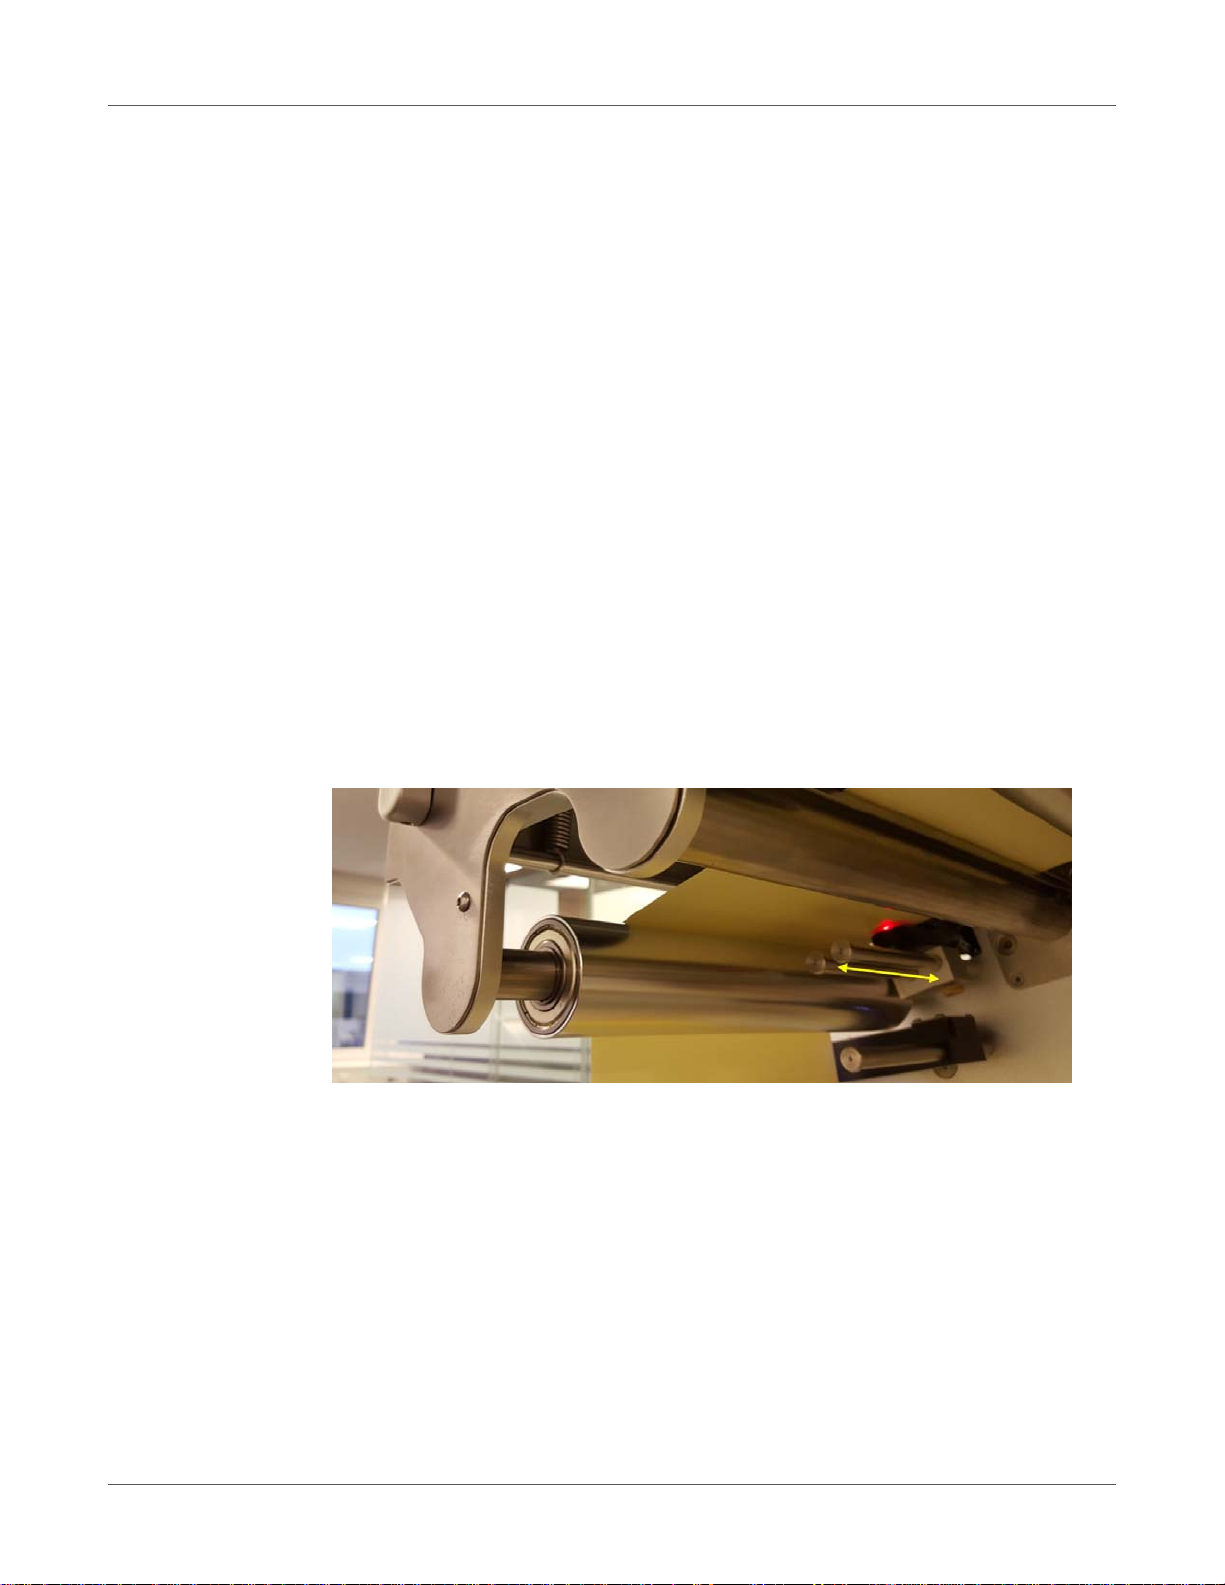
Label eye sensor for detecting label gaps and black marks. Sensor can be moved manually
along the 2 rods (indicated with yellow arrow on picture ab ove ).
Because of inter-page actions the printed labels require:
• Minimum 2.2 mm gap at 6 IPS mode
• Minimum 3 mm gap at 12 IPS mode
• Maximum gap size is 65 mm
Important: Setting the label gap outside the minimum and maximum range can result in
label skipping or high label gaps.
T2-C User Guide 47
Page 48
Printing modes
Blackmark printing mode
• In blackmark label material, the label material has pr e-printed registration marks, so called
'blackmarks' on the label material (can be on front or back side of the label roll).
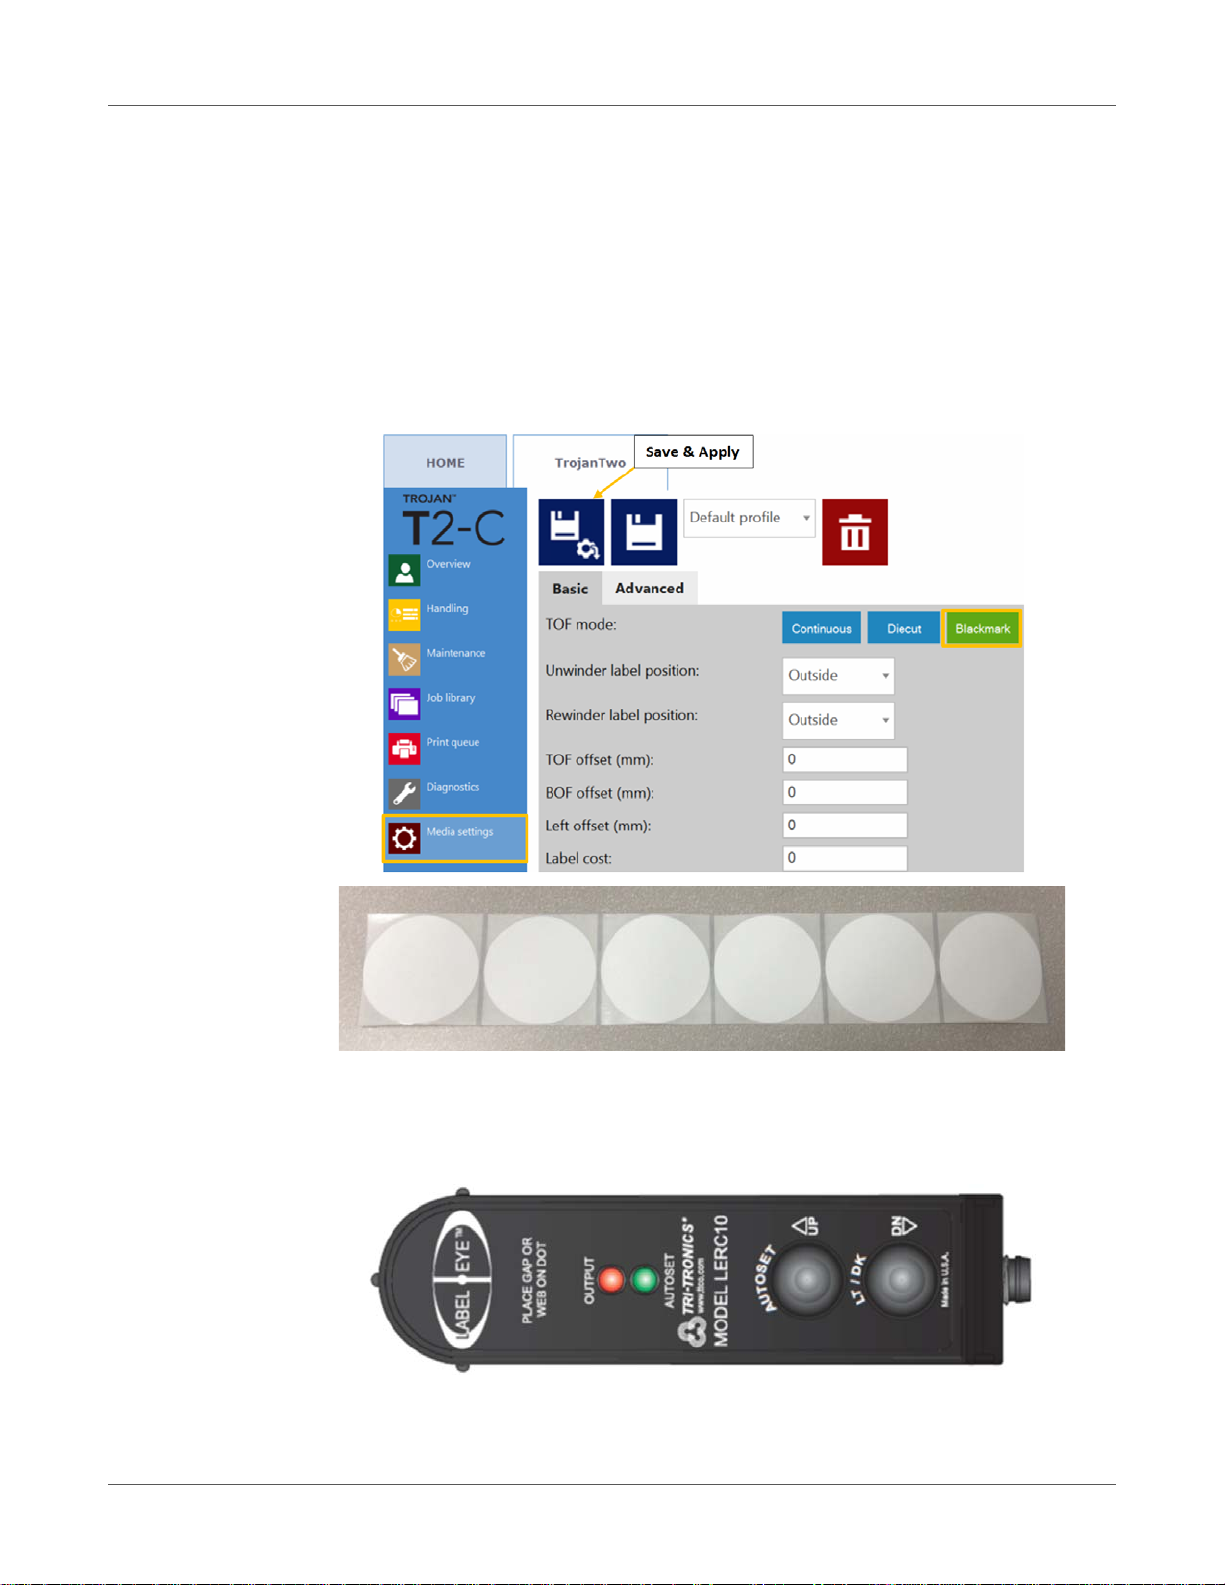
• To set the T2-C press to Blackmark printing mode, go to TrojanTwo tab > Media Settings
menu and select the Blackmark button in the TOF mode field. Then press the Save and
Apply button to apply the setting changes.
Note: TOF = Top of Form. The top of form algorithm describes how to detect the top of the
next label.
Example of blackmark label material. Registration marks can be on the front or back side
of the label roll.
Calibrating the label gap/blackmark sensor
48 T2-C User Guide
Page 49

Printing modes
• AUTOSET - Simply put the gap in view and push and hold the AUTOSET button for 1
second. The AUTOSET LED will remain on when the setup is complete. If the setup is not
adequate, the AUTOSET and Output LEDs will flash 3 times. This may indicate a backing
material that is too dense to penetrate.
• UP/DN Adjustments - The Label Eye sensor has the ability to adjust the setup
incrementally. Simply momentarily tap the AUTOSET (UP) button, or LT/DK (DN) button to
adjust the sensor to a more stable and repeatable setting. This feature is used when the
AUTOSET does not provide the optimum setting initially.
Example: If the label backing material is inconsistent, or the label material has more
translucent areas coming into view, then the sensor may need to be adjusted slightly for
this rare occasion. Having the ability to fine tune the sensor for changing conditions
provides a solution that is easy to implement and simple to understand.
• Light/Dark - Push the LT/DK button to change output from Dark On to Light On. Output
turns on when the label is in view, or output turns on when the gap is in view.
1 Cut a piece from the label material which has a blackmark on it. Then put the blackmark
exactly under the middle of the LABEL • EYE™ text on the sensor, where the small dot
indicates the exact position of the sensor beam.
2 Keeping the blackmark under the sensor beam, press and hold the AUTOSET button on
the sensor until only the green AUTOSET LED is lit constantly (the red output and the green
autoset LEDs will start flashing first and then the red LED goes off and the green LED stays
lit if calibration is successful).
3 Check detection by moving a label (not blackmark) into the sensor beam. If sensor is
properly calibrated, then the red output indicator LED will go on indicating that the sensor
can differentiate between blackmark and label. When the blackmark is under the sensor,
then only the green autoset LED is lit.
T2-C User Guide 49
Page 50
Printing modes
4 Repeat the calibration in case you do not see the same result as descr ibed in point 3 above.
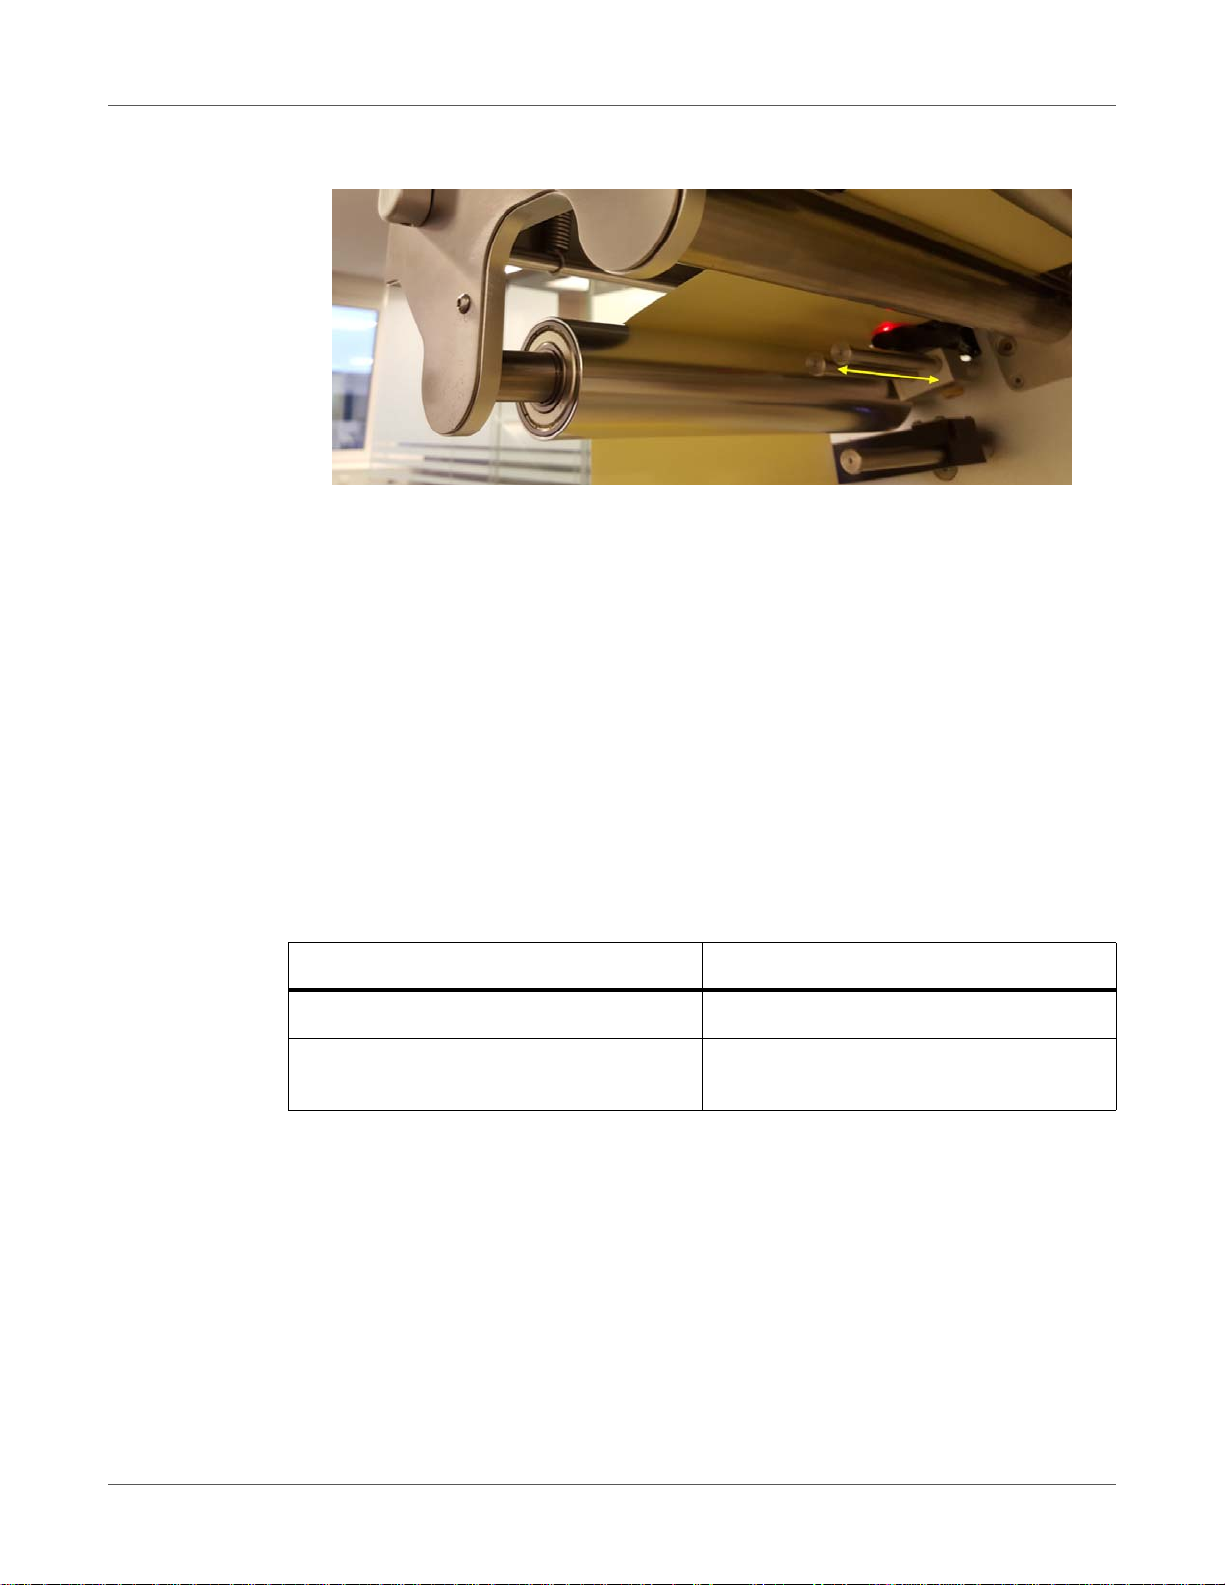
Label eye sensor for detecting label gaps and black marks. Sensor can be moved manually
along the 2 rods (indicated with yellow arrow on picture ab ove ).
Requirements for the format of the blackmarks are the same as for label gaps as
blackmarks practically act as label gaps. Due to inter-page actions the printed labels
require:
• Minimum 2.2 mm high blackmarks at 6 IPS mode (he ight measur ed accor ding to print
direction)
• Minimum 3 mm high blackmarks at 12 IPS mode (height measured according to print
direction)
Gap size and speeds
The minimum gap size and print speed have a dependency due to the image processing in the
printhead. Therefore, we recommend these minimum gap size settings:
Print speed Minimum gap size
6 inches per second / 9 meters per minute 2.2 mm (0.086")
12 inches per second / 18 meters per
minute
Note: The complexity of the image may also influence this. A very simple bar code image may
allow for shortened gap sizes.
The T2-C press will display an error in the 'Error'-field: 'Missed TOF or datapath underrun' if this
occurs.
3 mm (0.118")
50 T2-C User Guide
Page 51
9
Shutting down the T2-C press
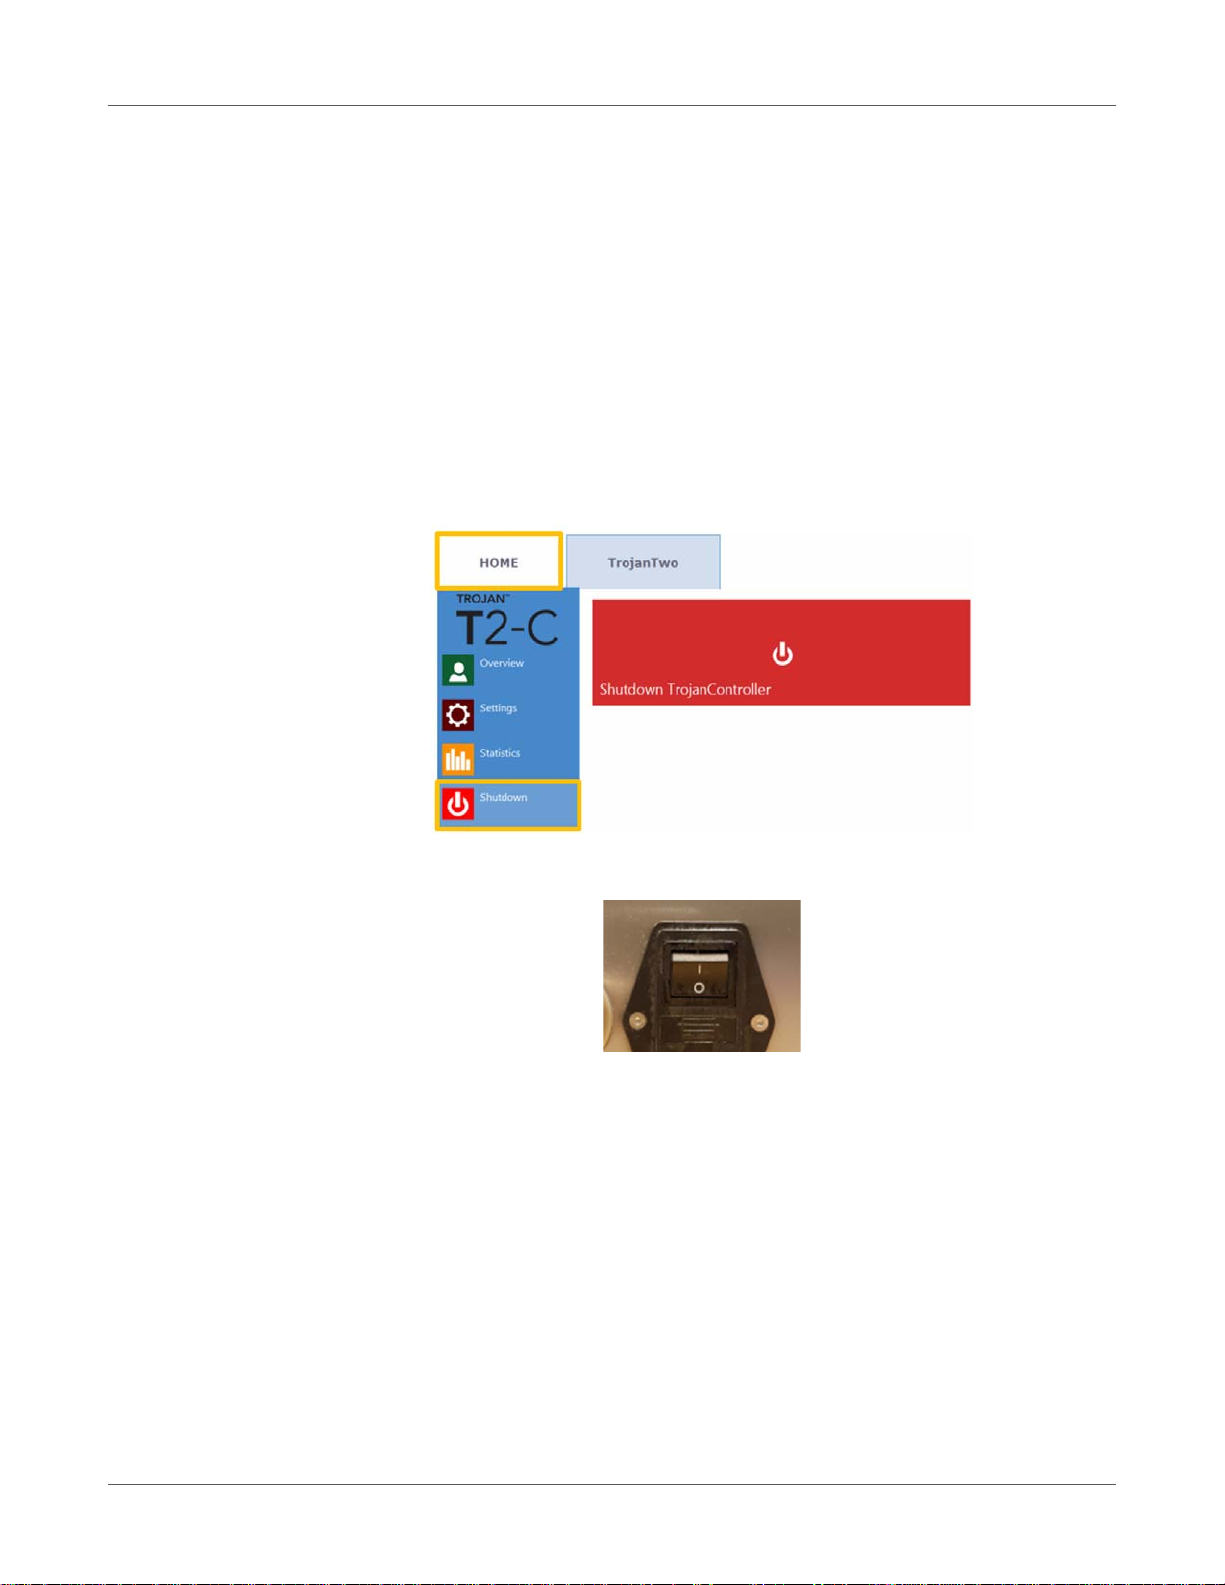
1 Go to the HOME tab.
2 Press the Shutdown menu.
3 Press the big red Shutdown TrojanController button.
4 Confirm by selecting OK.
5 Green info button is displayed. There is no need to press OK on that button.
6 The machine is shut down when the screen goes blank.
7 Turn off the power switch to the 0 position.
T2-C User Guide 51
Page 52

Shutting down the T2-C press
52 T2-C User Guide
Page 53
10
Driver installation
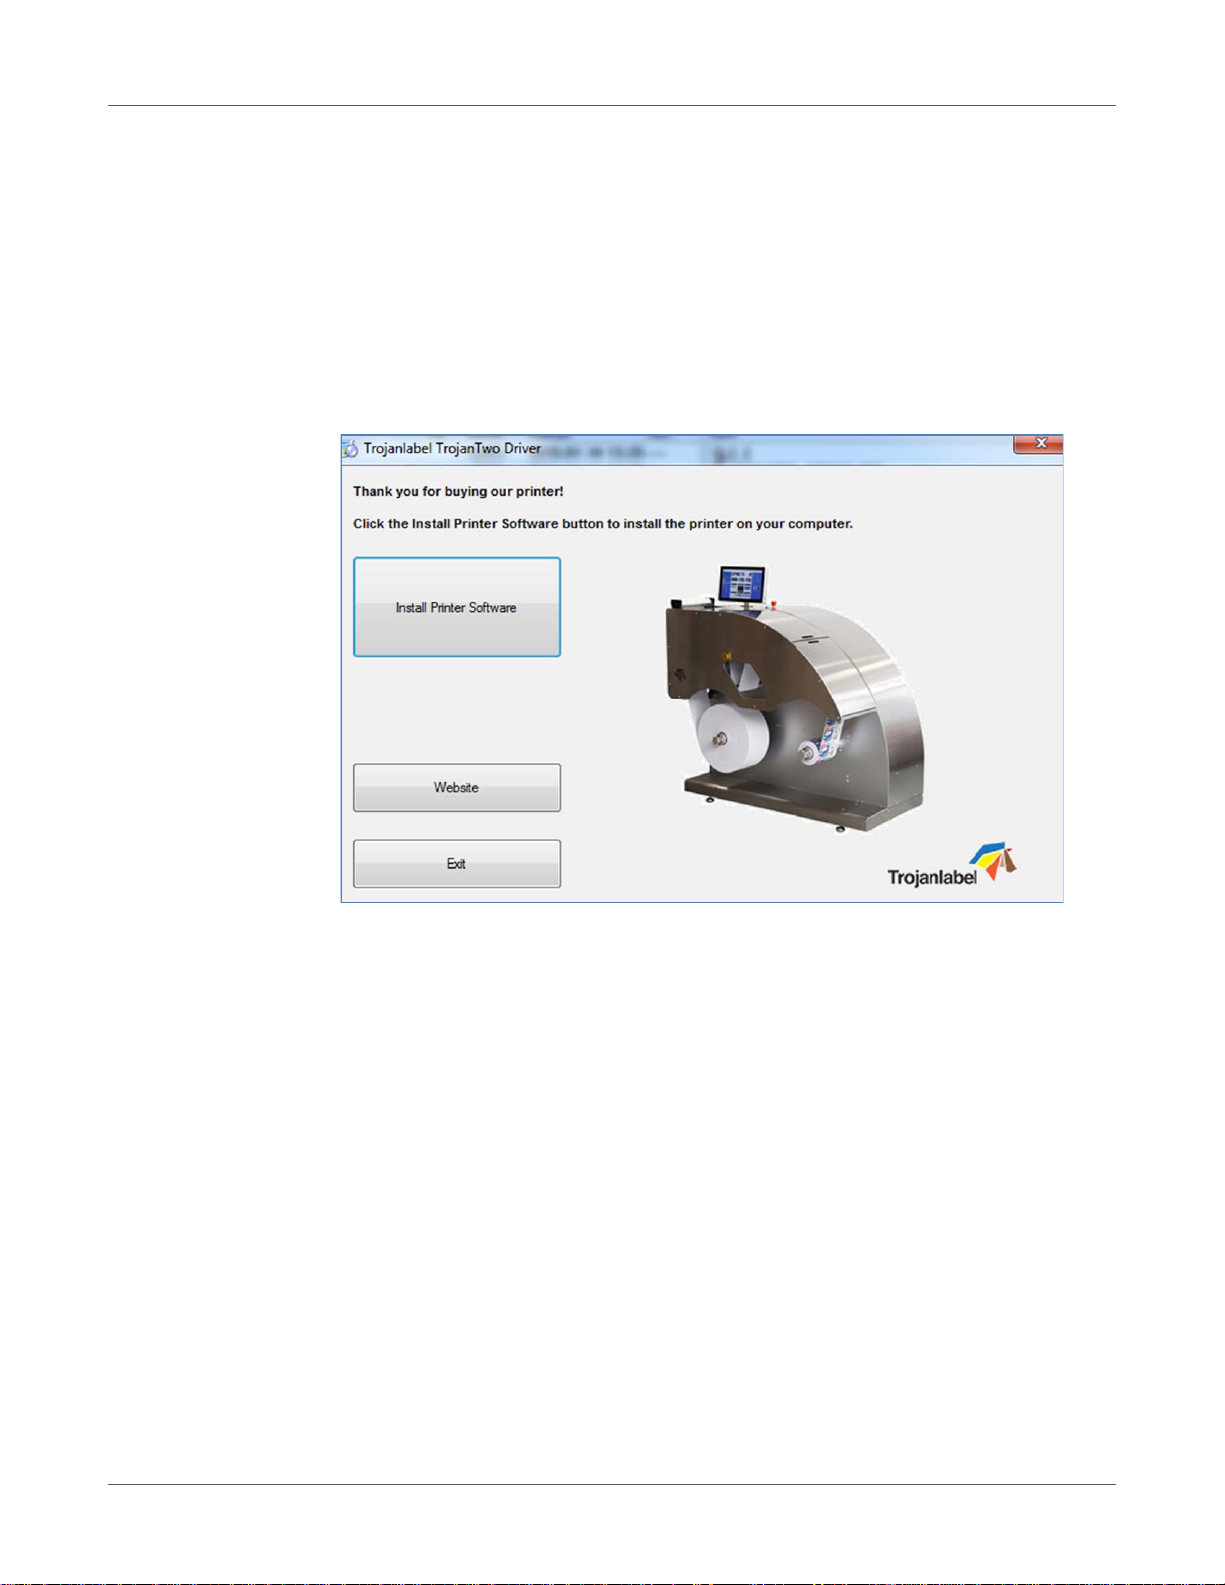
• The T2-C driver can be found on the USB stick supplied with the T2-C package.
• Open the TrojanTwo Driver installer on user's PC, run WinSetup.exe (preferably with
administrator privileges) and choose 'Install Printer Software'.
Driver installation and features
T2-C User Guide 53
Page 54
Driver installation and features
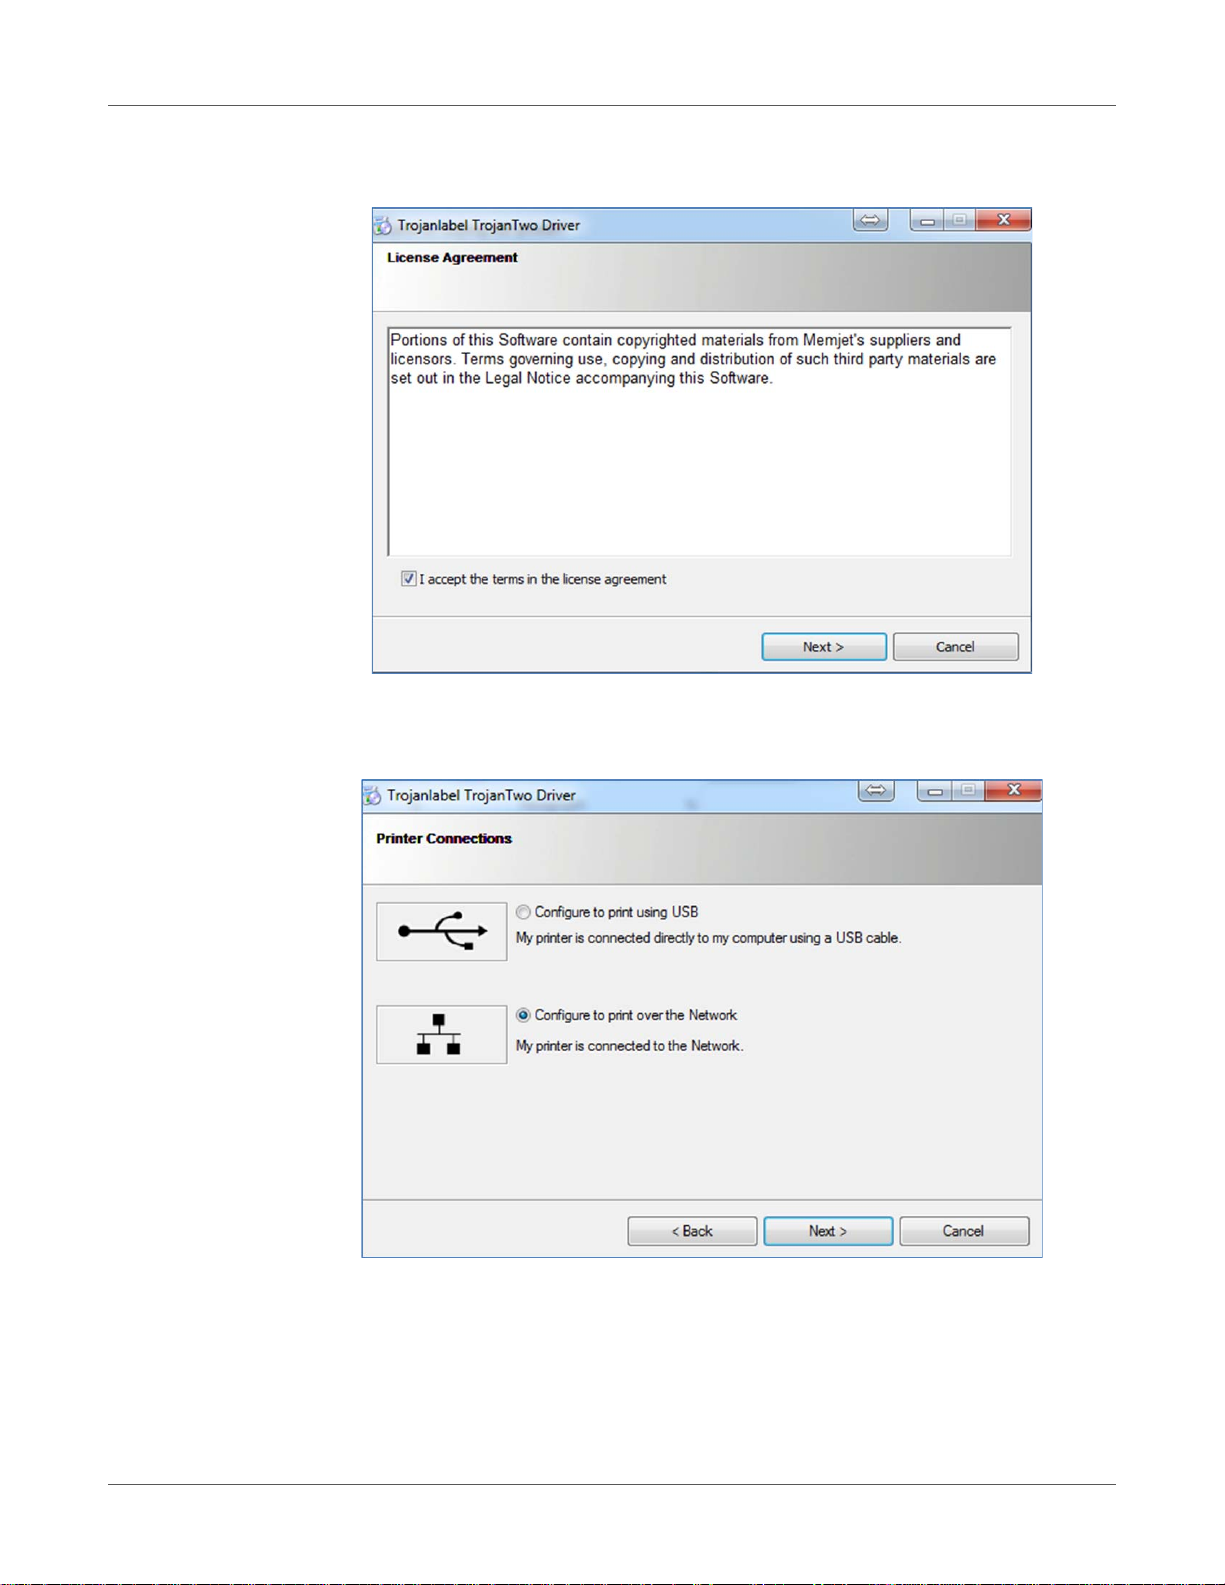
• Select the 'I accept the terms in the license agreement' checkbox and press the 'Next'
button to continue.
• Select 'Configure to print over the Network'
Note: USB printing is not supported for the T2-C press.
54 T2-C User Guide
Page 55
Driver installation and features
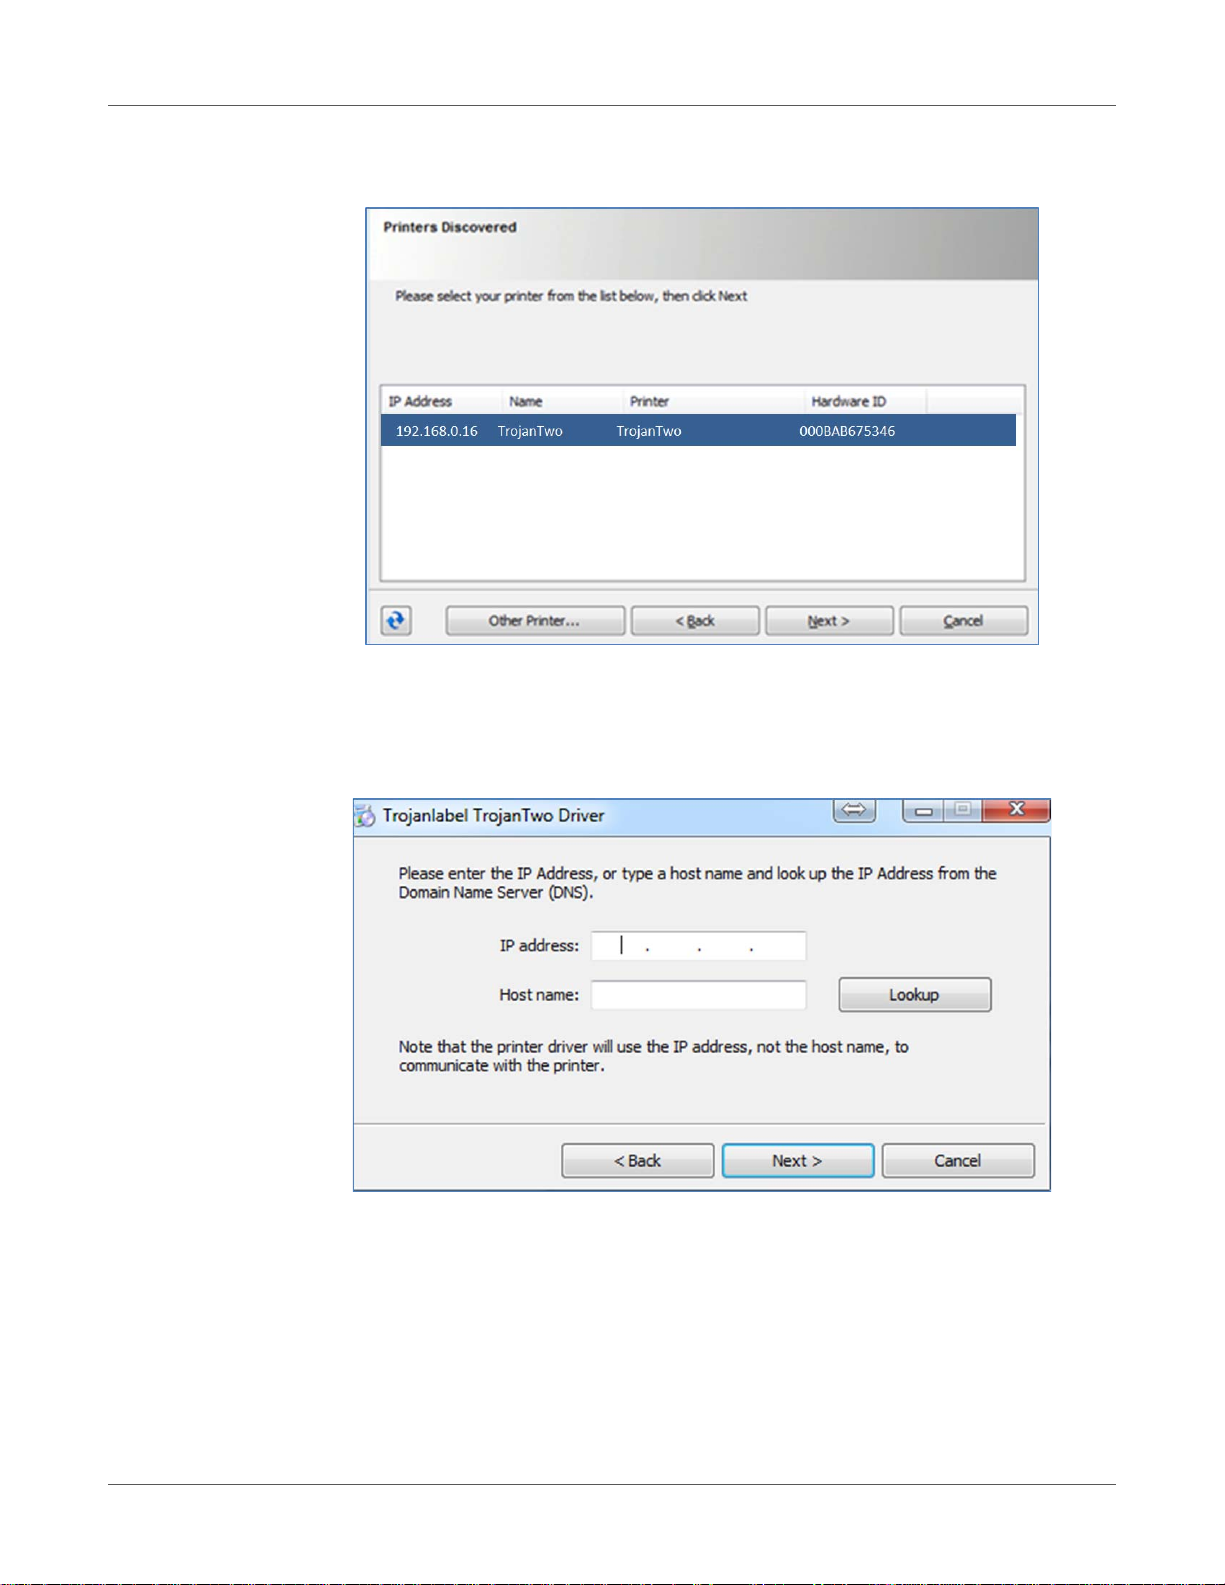
• During the setup process, the installer will detect the T2-C press as a TrojanTwo on the
network. Select the detected TrojanTwo and press the 'Next' button to continue installation.
• Depending on Local Network policy there might be occasions when the auto detection of
the T2-C press is not working. In this case type the IP address of the machine manually.
Note: The current IP address of the T2-C press can be checked on the touchscreen in the
HOME > Settings > Network menu.
• You might be asked a couple of times (depending on the Microsoft Windows OS version)
to give permission to proceed with setup. Press 'Yes' or 'Unblock' each time and wait until
the progress bar finishes the installation.
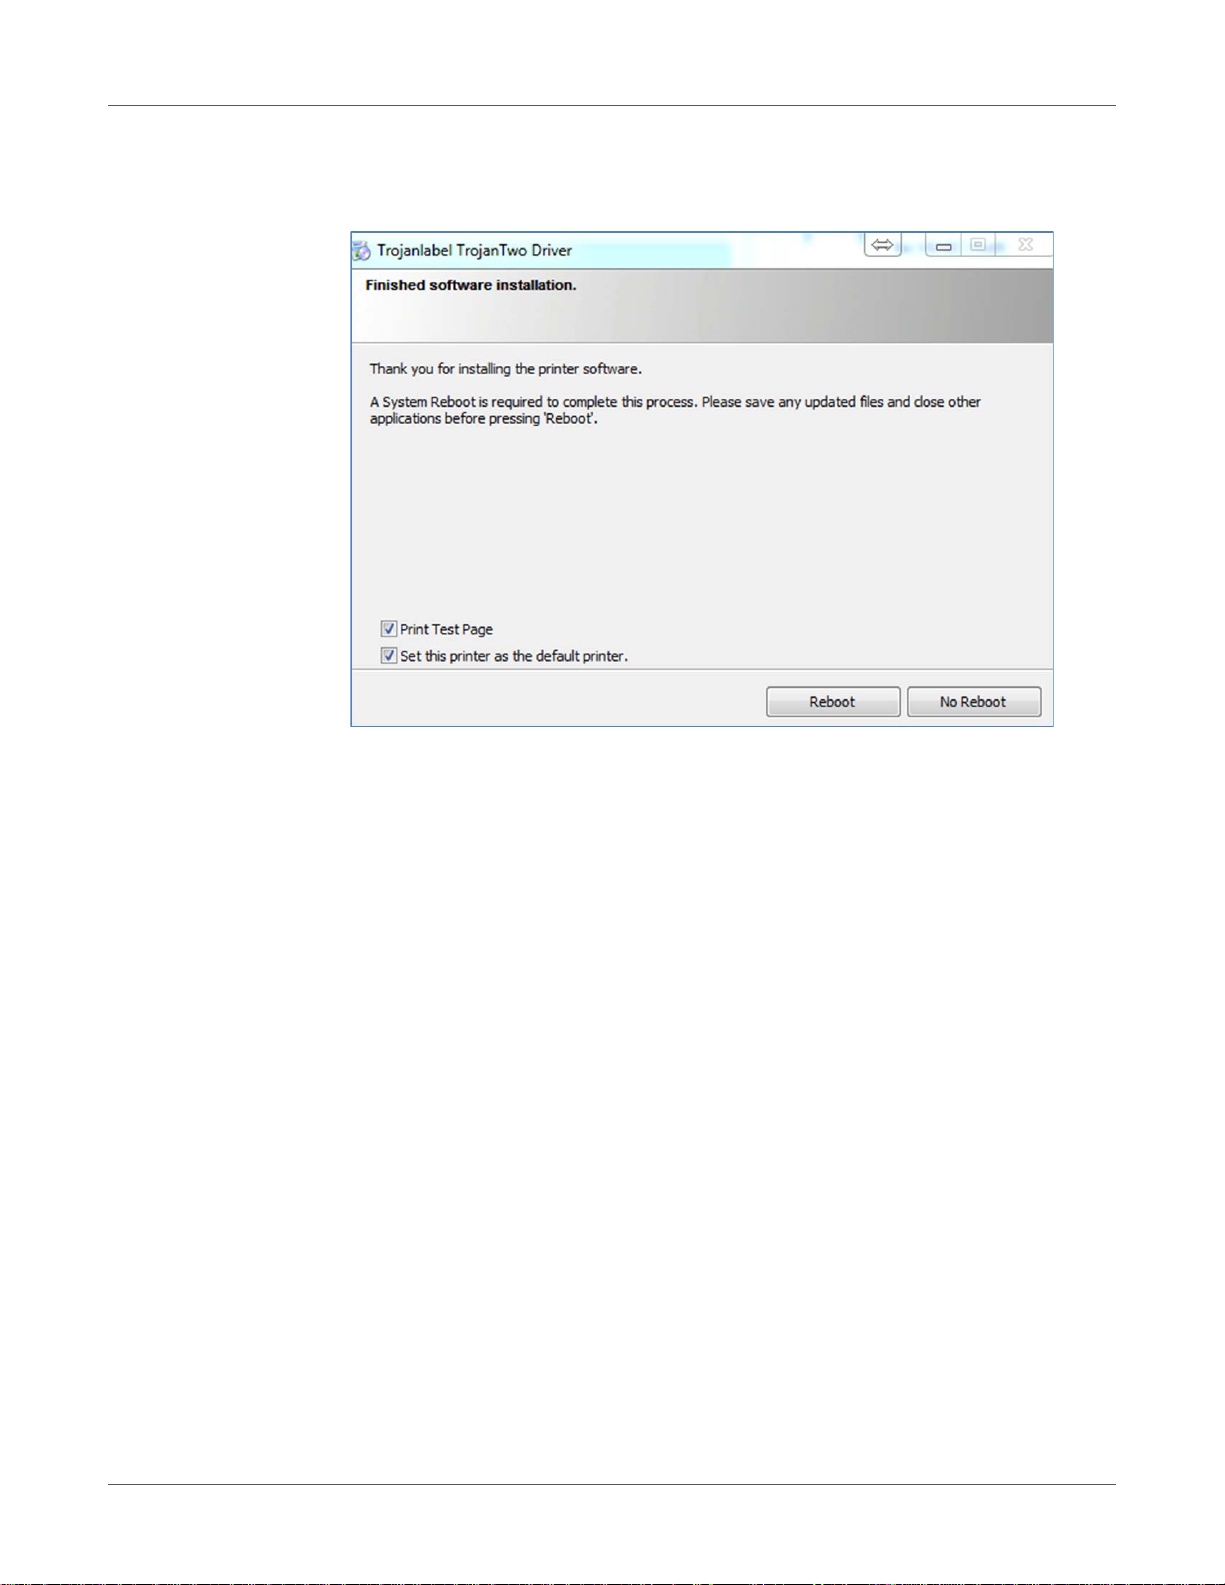
• When the installation is finished you might need to restart your PC to make sure that the
installation process made all necessary changes in your operating system.
• Print a test page (test page is the regular Micro soft Windows test page set to A4 size sheet).
Unselect if you do not want to print this out.
T2-C User Guide 55
Page 56
Driver installation and features
• Set this printer as the default printer (the T2-C press can be set as the defa ult printer on the
particular PC meaning that the T2-C will be on the top of the printer list when printing is
selected).
Driver features and functions
• The driver is compatible with Windows XP, Windows Vista, Windows 7, Windows 8, and
Windows 10 (both 32bit and 64bit versions).
Important: T2-C driver is not compatible with MAC, Linux, and Android operating systems.
• The T2-C press can print from any software which is able to print from Microsoft Windows
environment.
• Handles ICM color profiles (provided by Trojanlabel).
56 T2-C User Guide
Page 57
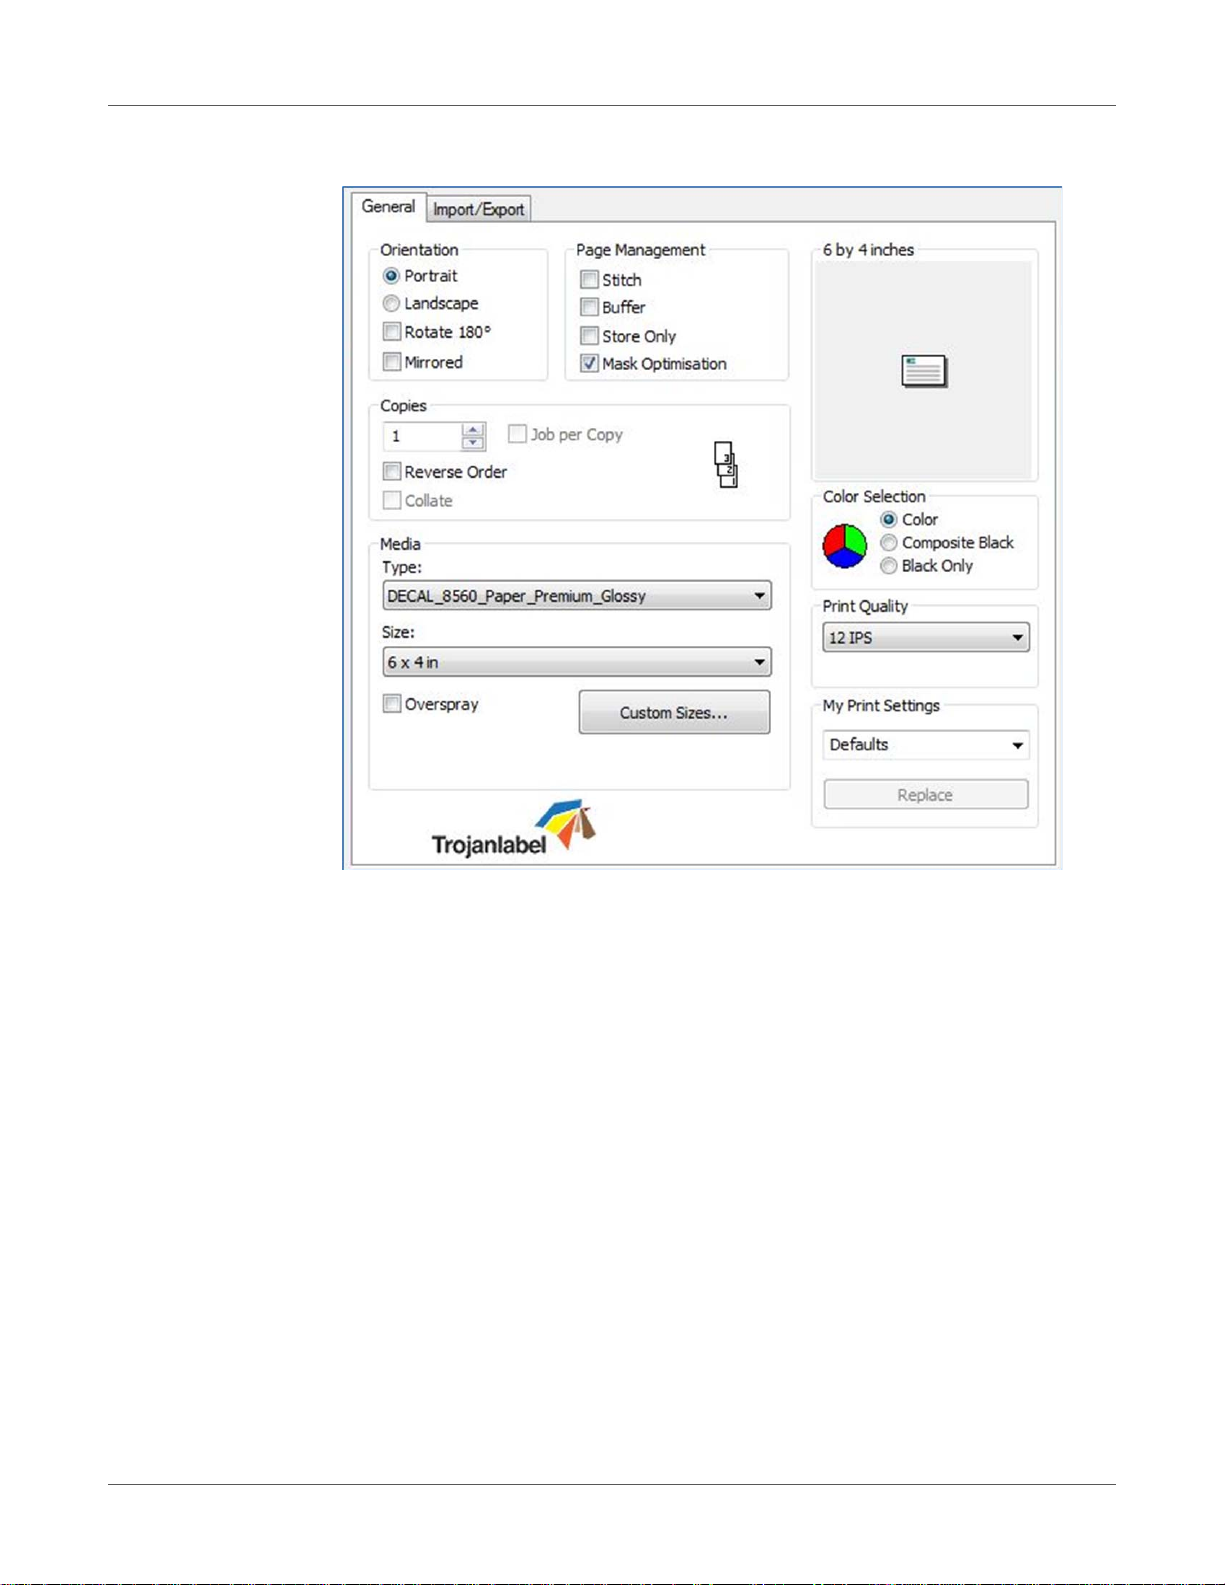
General driver settings
Driver installation and features
Orientation
Adopts software settings (from Adobe Read e r, fo r exam ple ).
• Portrait/Landscape: orientation modes.
• Rotate 180°/Mirrored: these are the only rotation options in this driver.
Note: If the artwork has to be rotated by a different angle than 180°, then this can only
be done in the design software.
Copies
Number of copies times the number of pages in the actu al pr int job .
My Print Settings
Can create and load driver profiles from settings.
Media
• Type: List of available color profiles.
T2-C User Guide 57
Page 58
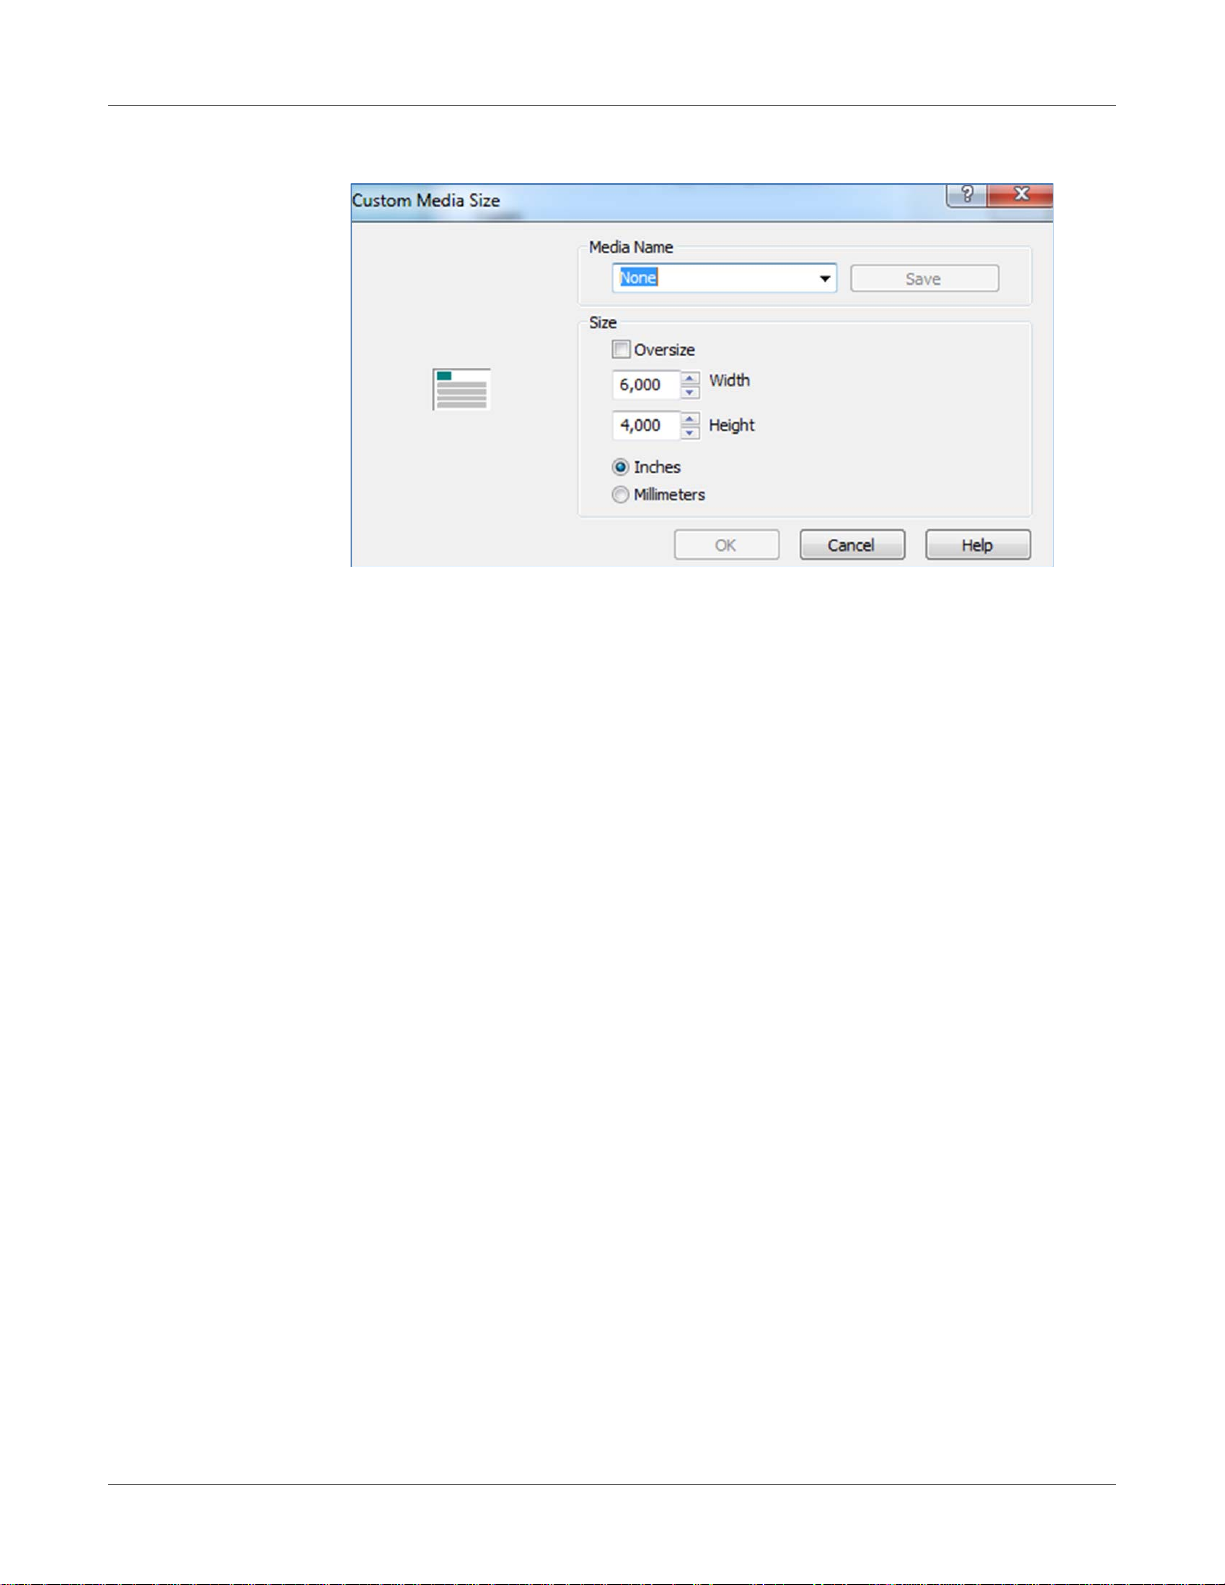
Driver installation and features
• Size: Predefined size from the list or custom size.
• Media Name: Save custom size into the profile list.
• Oversize: Full bleed printing = oversizing the image by 1mm over the edges when
printed. Aspect ratio is locked.
• Overspray: Overspray printed image over the label size by 0.5mm. Does not preserve
aspect ratio.
Color Selection
• Color mode (uses CMYK ink to mix colors on labels)
• Composite Black (uses CMYK to mix black color on labels)
• Black Only (uses only black ink for printing black color on labels)
Print speed
• 6 IPS (resolution 1600 x 1600 dpi)
• 12 IPS (resolution 1600 x 800 dpi)
Page Management
• Stitching: Stitching images together make one continuous image. This mode is for
exceeding the maximum printable label length which is 762mm.
The maximum printable label length is 762mm. If 762mm label height is not enough,
then stitching is the workaround option. In practice, create a multi-page PDF where the
long image is cut into pieces. This way if stitching option is on, the TrojanTwo press will
stick all images from the multi-page PDF together and print it out as one continuous
image without gaps between pages.
Note: The PAUSE function only works at the mid job maintenance distance in stitch
mode. Mid job maintenance distance is set in the TrojanTwo tab > Media Settings >
Advanced menu. The reason for this is that a stitch job practically counts as 1 page for
the firmware no matter how many pages are being stitched.
58 T2-C User Guide
Page 59

Driver installation and features
• Buffer: Buffers the whole print job into the user PC's memory before sending it to the
TrojanTwo press. This can be useful when the hardware of the user PC (where the
driver is installed) is not powerful enough to generate the print stream in real time.
Especially for large print jobs with variable data.
• Store only: Sends and stores the selected print job into the T2-C press Job Library
without actually printing. The stored job can be printed later from the Job Library menu
in the T2-C touch screen.
• Mask Optimisation: Mask Optimisation is a facility that switches between two different
methods of image processing, affecting how an image is processed and printed. By
default, Mask Optimization is selected to make sure that it optimizes the image
processing for the majority of the printing applications used by the end users. However ,
for some users (particularly those using FlexMail), printing artifacts appear in the
output. If this happens, the user should deselect 'Mask Optimisation' to correct this
issue.
Integrating additional color profiles
• Color profiling is done on demand by Trojanlabel.
• Color profile installer packages are available at official Trojanlabel distributors or from
Trojanlabel.
T2-C User Guide 59
Page 60
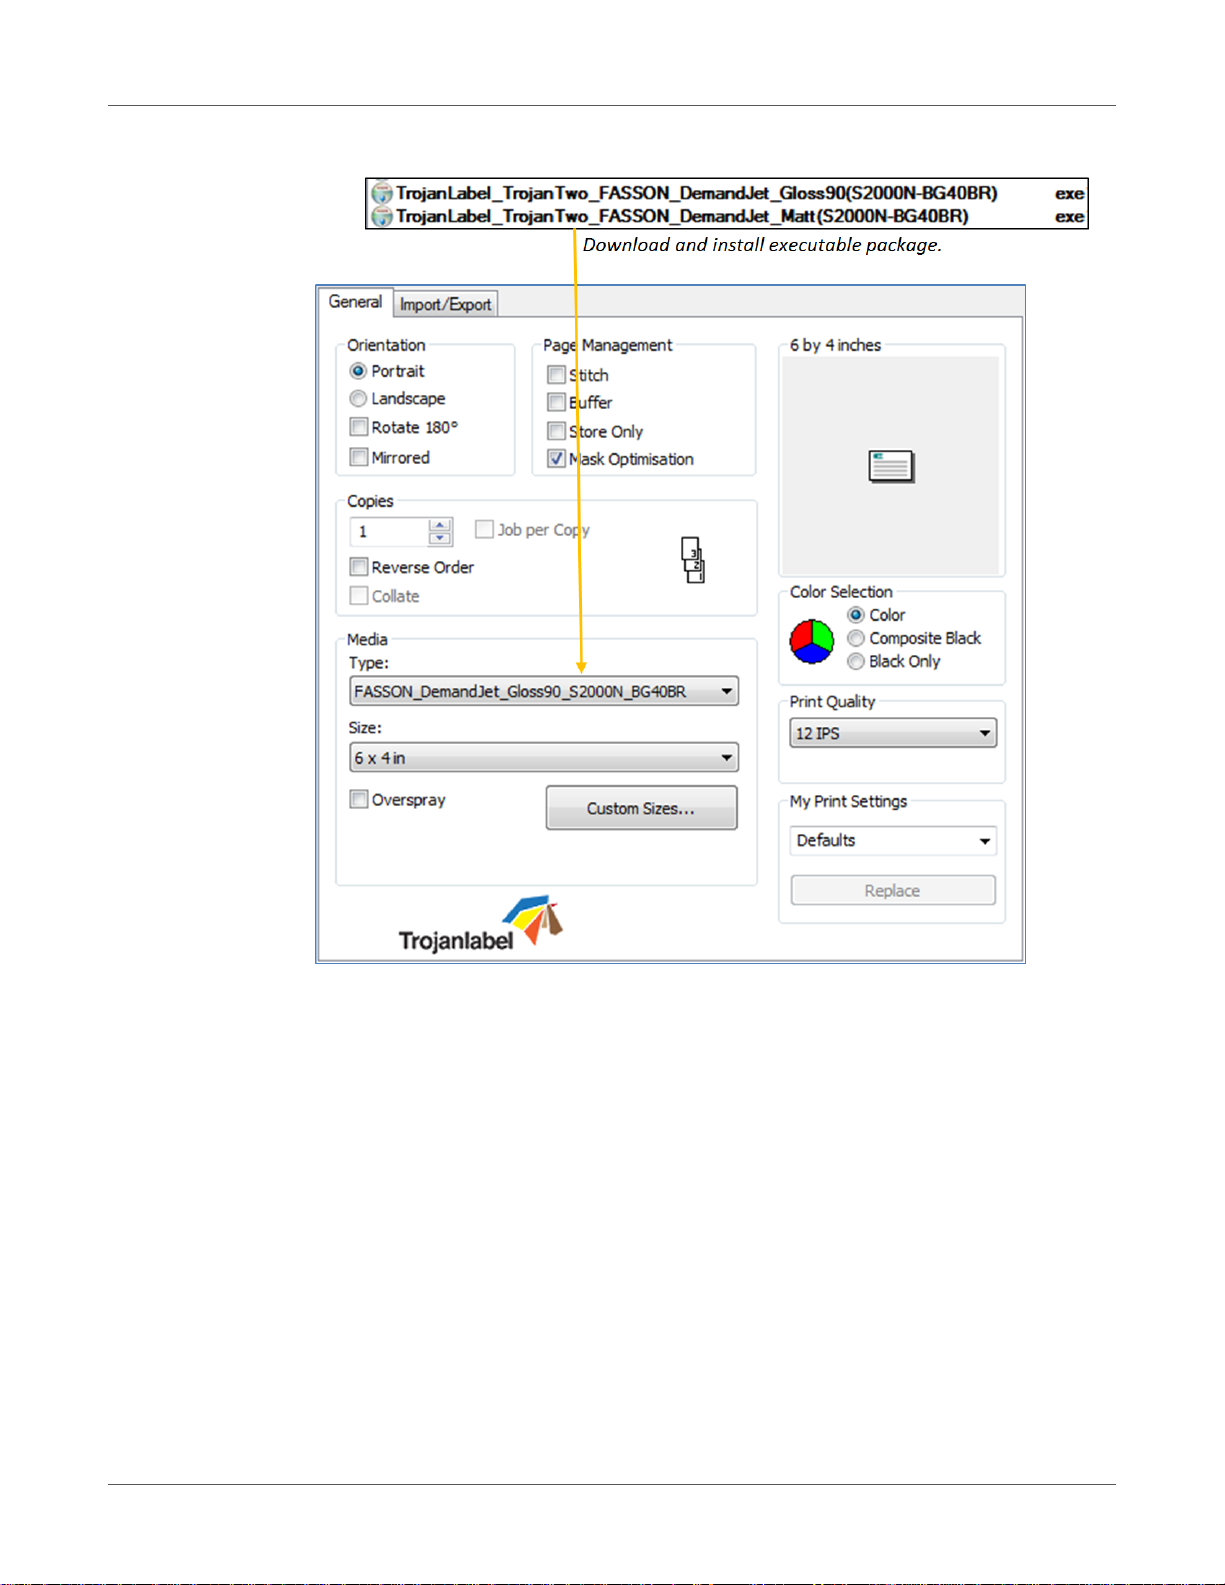
Driver installation and features
Installing additional color profiles
Installed color profiles are available in media type list after installation.
60 T2-C User Guide
Page 61
11
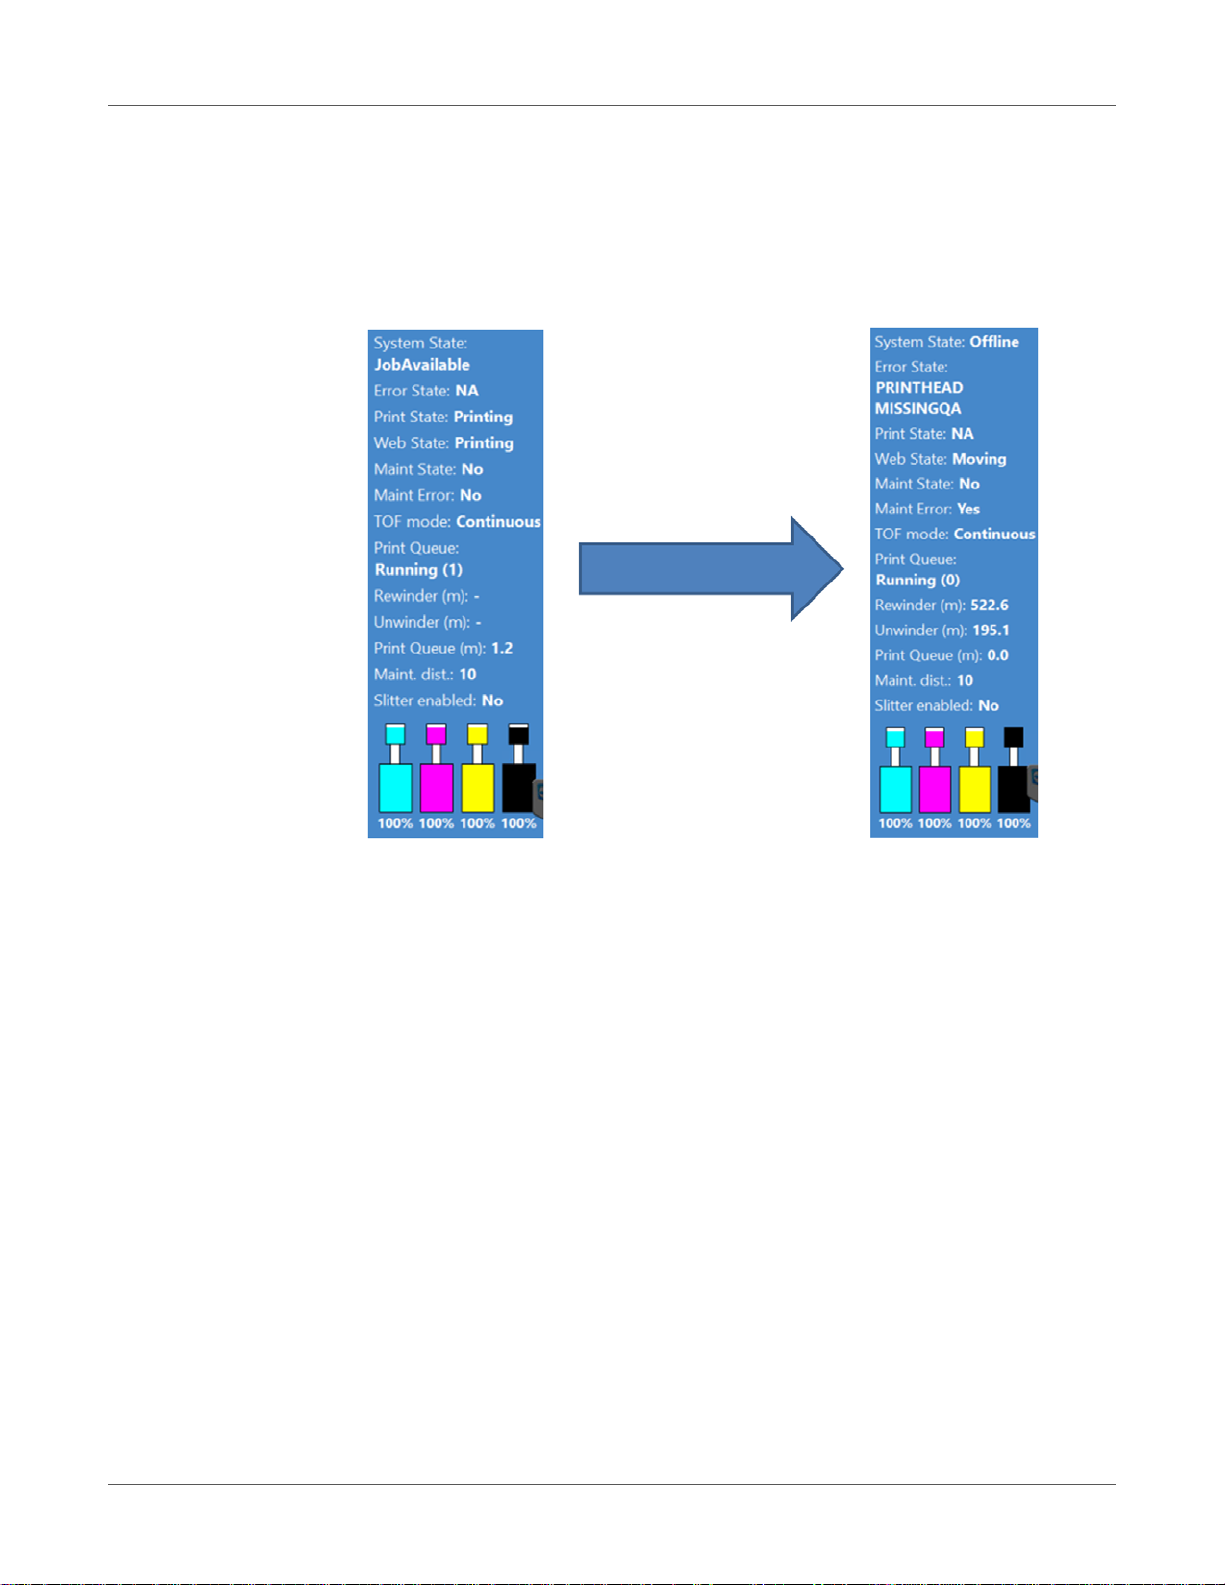
Right side status bar
User Interface (UI)
The status bar provides real time information about the T2-C current status. The main points
are:
• System State: The machine is only ready to print if the system state is 'ONLINE'. Other
system statuses can be 'JobAvailable' (when print job(s) are loaded to the print queue),
'Maintenance Busy' (when the printer is doing maintenance) or 'Offline' (if no printhead is
installed or if there is an error state).
• Error state: Displays a certain error message if there is an error state. See
“Troubleshooting” on page 115. NA = Not Available if there is no error state.
• Print state: 'NA' if the T2-C is in the idle state, 'Printing' if the T2-C is printing and 'Pause'
if current print job is paused.
• Web state: Displays the current status of the web path system. It is 'Ready' when tension
is calibrated and web path system is ready to print, 'Not Calibrated' when tension is not
calibrated, 'Moving' when the label web is moving, 'Printing' when machine is printing and
'Paused' if the current print job is being paused or mid job maintenance is occurring du ring
printing.
• Maint state: 'Yes' when there is maintenance occurring or 'No' when there is no ongoing
maintenance.
• Maint error: 'Yes' when there is an error with the maintenance or 'No' if there is n o problem.
T2-C User Guide 61
Page 62
User Interface (UI)
• TOF mode: Displays current TOF mode set in the TrojanT wo tab > Media Settings menu.
Can be 'Continuous', 'Diecut' or 'Blackmark'.
• Print queue: Displays the current print queue status. Can be 'Running (x)' or 'Paused (x)'
where x is the number of jobs pending in the print queue.
• Rewinder (m): displays the length of the label material in meters currently on the rewi nder.
• Unwinder (m): Displays the length of the label material in meters currently on the
unwinder.
• Print queue (m): Displays the total length of the print job(s) pending in the print queue.
• Maint. dist.: Displays the mid job maintenance distance set in the TrojanTwo tab > Media
Settings > Advanced menu.
• Slitter enabled: 'Yes' if slitter option is enabled, 'No' if slitter option is disabled. Slitter can
be enabled/disabled in the TrojanTwo tab > Media Settings > Adv anc ed m enu bu t only
if the current TOF mode is set to Diecut. See “Using the built in slitter for the T2-C press”
on page 93.
• Ink levels: Displays ink levels in ink tanks and reservoir ink tanks. Also indicates movement
of the ink when reservoir tanks are being refilled from the ink tanks.
General settings (HOME tab)
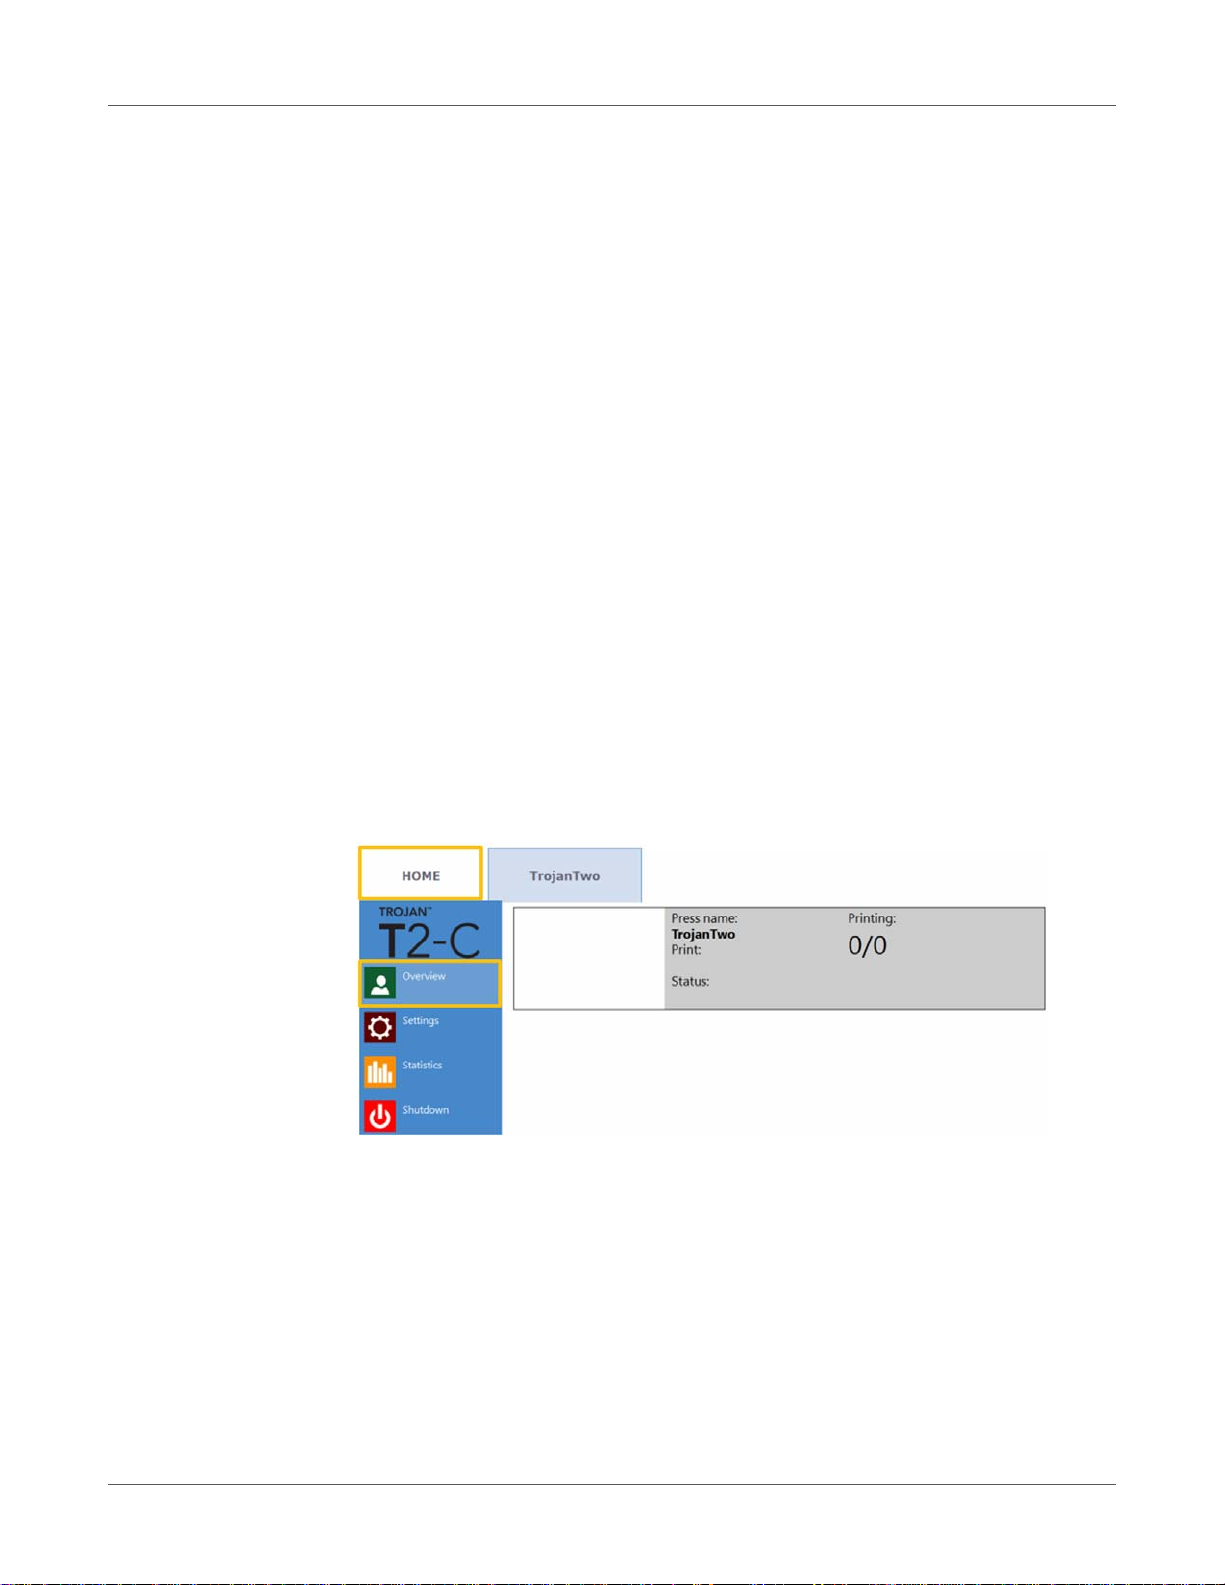
Overview menu
Information from currently printed job, including:
• Preview image of the label which is being printed at the moment
• Label counter
• Name of the print job in the Job Library
62 T2-C User Guide
Page 63
Settings menu
User Interface (UI)
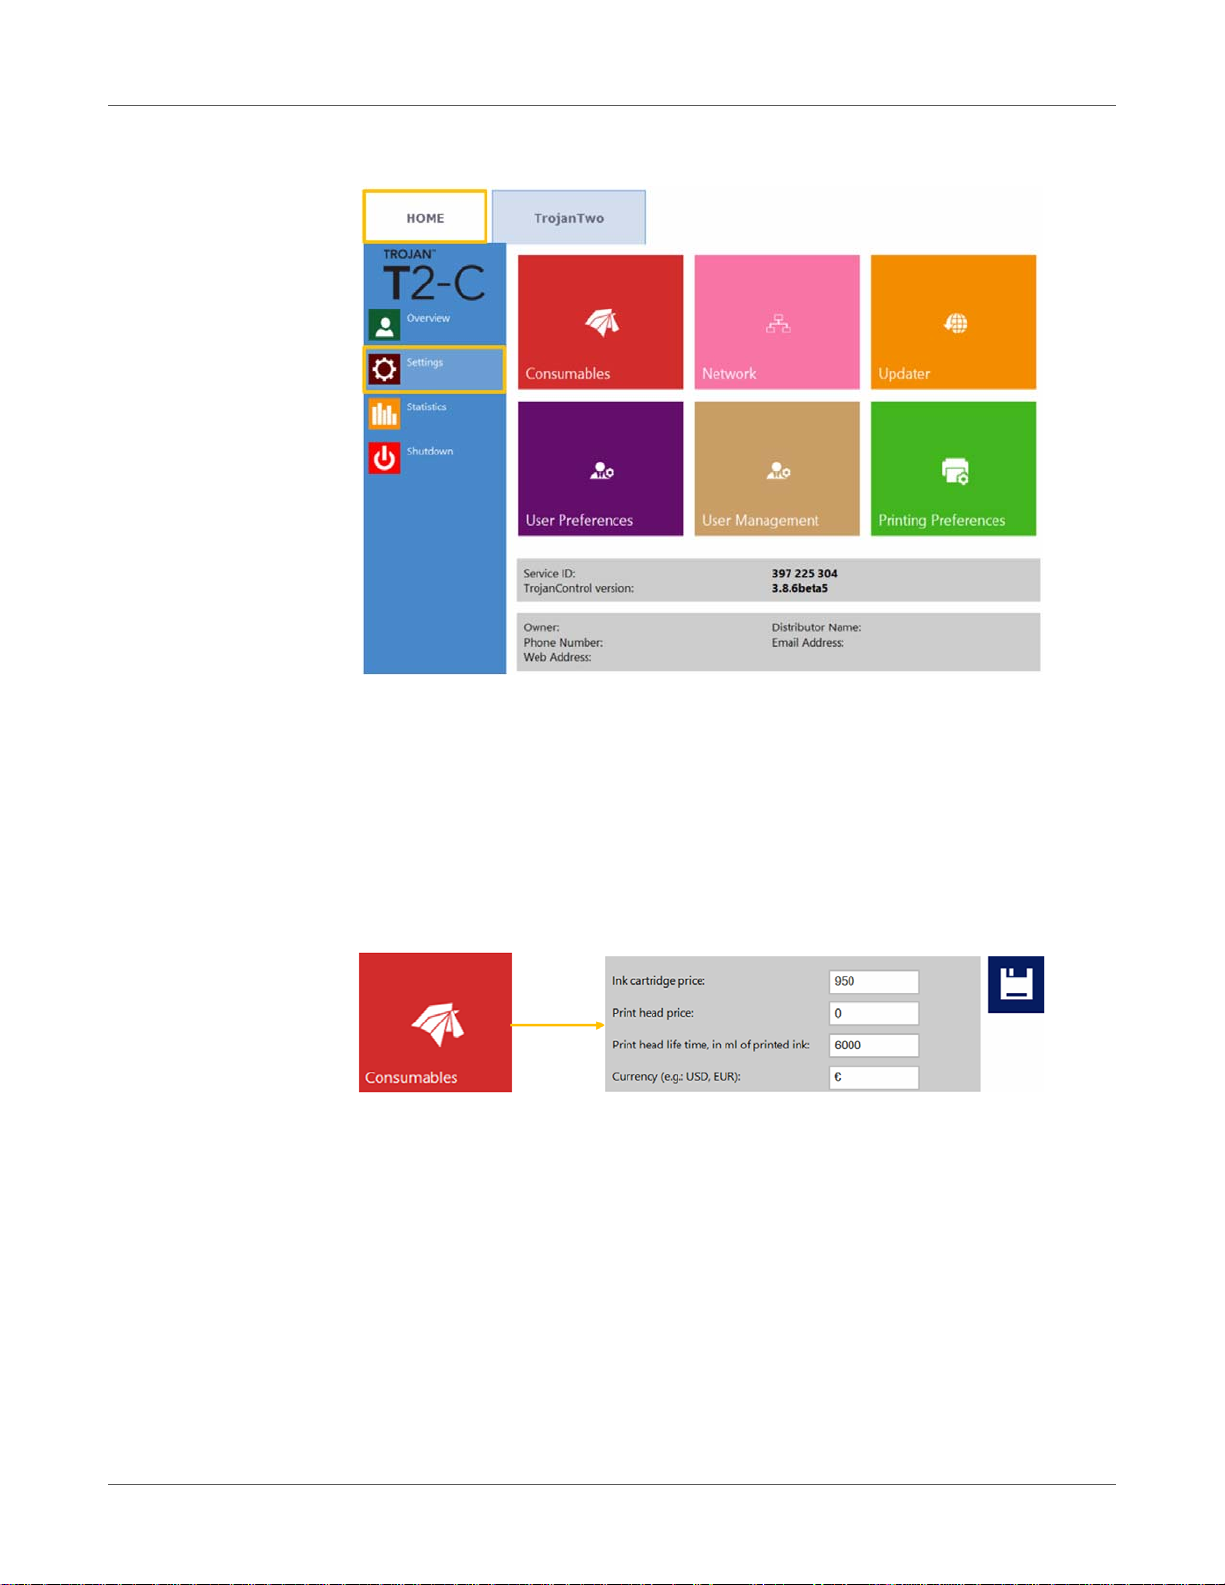
• Service ID: A unique ID for each T2-C press. Based on the service ID, the Trojanlabel
support team can access the Trojan Control remotely via the Internet and p rovide technical
support.
• Actual software version: Version number of the Trojan Control interface (GUI) currently
running on the machine.
• Trojanlabel technicians or the local Trojanlabel distributor fills out the owner and distributor
contact information field at installation. This field is not editable for end users.
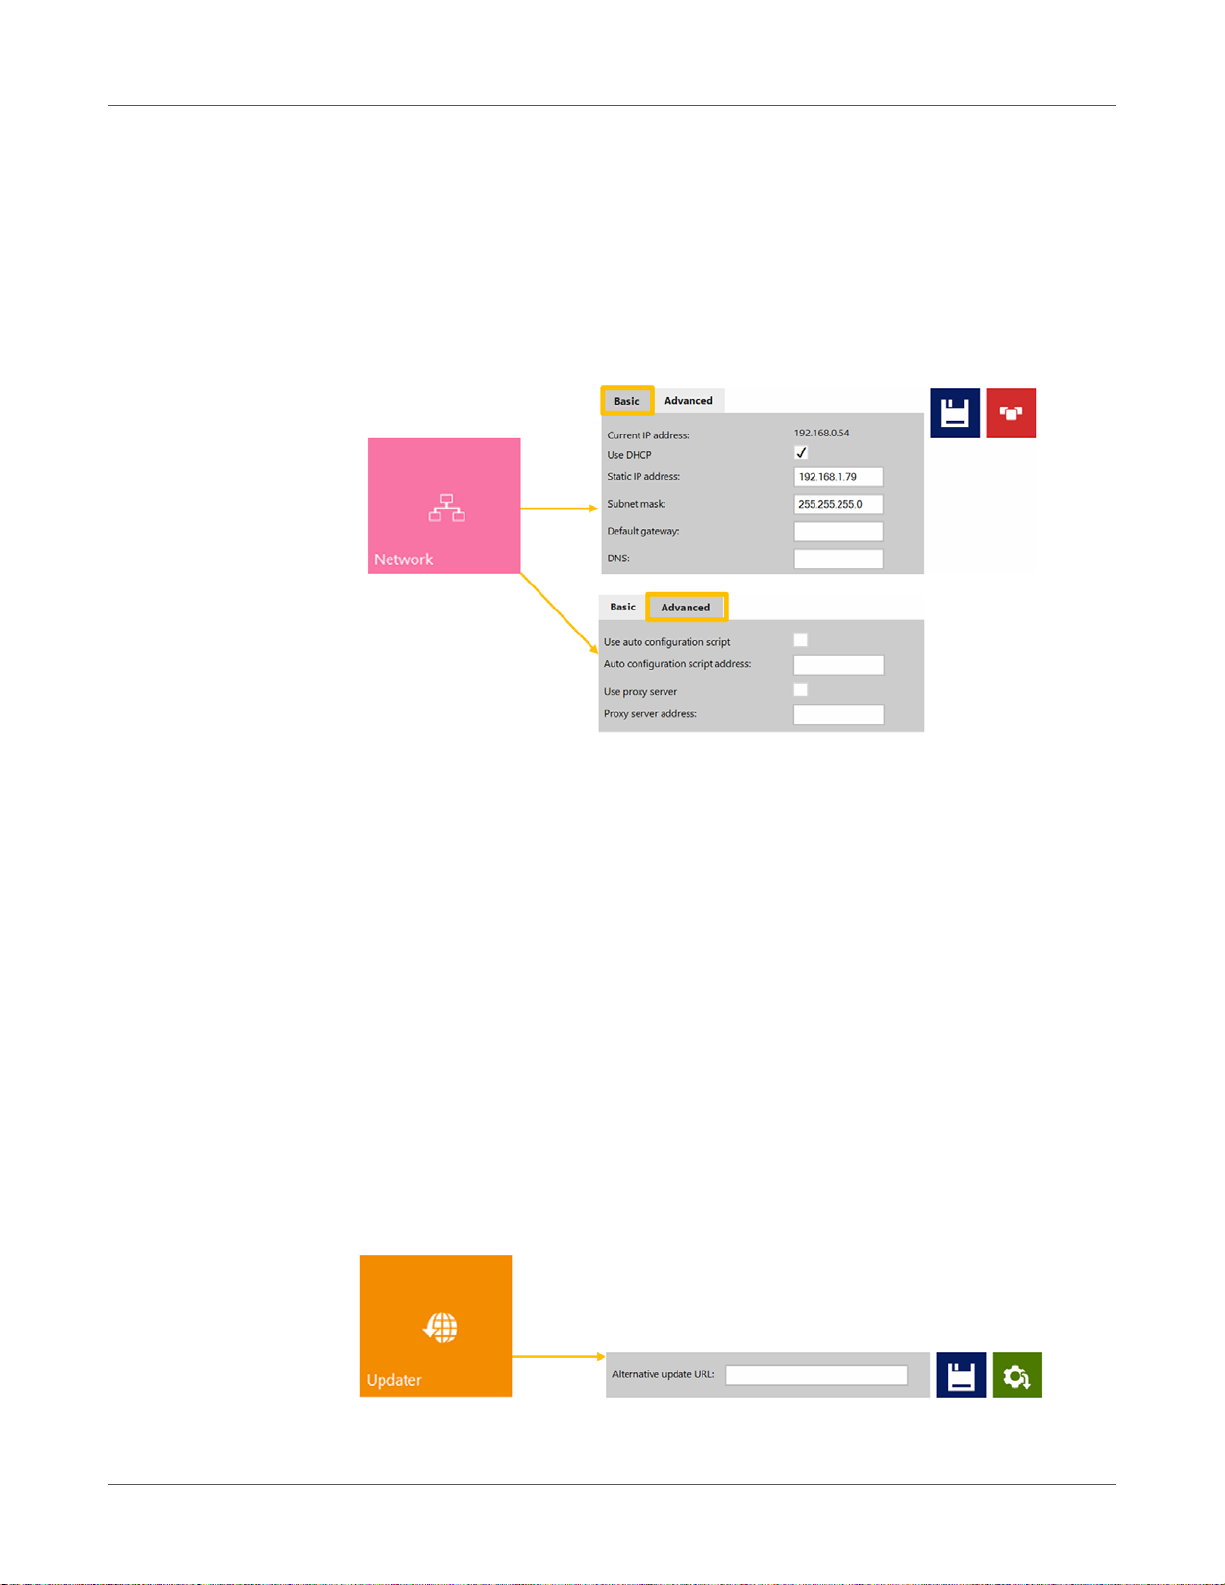
Consumables Button
• Ink cartridge price is the base of ink cost/label calculation in the statistics menu. See
“Statistics menu” on page 70. The actual price of a 2 Liter ink tank should be typed
here.
Note: The ink price displayed above is for illustration only. Actual prices can vary in
different regions and based on selected business models.
• Print head price when entered is also included in cost/label calculation in the statistics
menu. See “Statistics menu” on page 70.
T2-C User Guide 63
Page 64
User Interface (UI)
• Print head life time is theoretical value given in milliliters, which can be included in
cost/label calculation as well. The value entered here represents the printed ink volume
until a planned printhead change.
Example: Planning to print 3000 ml ink with the currently installed prin thead. This way
an expected amortization is also calculated with the cost/label calculation.
Important: Every time when you change a setting press the blue 'Save' button to apply the
changes.
Network Button
•Select Use DHCP checkbox to acquire IP address for the T2-C press from the local
network (as long as DHCP mode is selected, the T2-C press ignores any static IP
settings).
• Current IP address field displays the current IP address of the T2-C press on the local
network.
• Uncheck Use DHCP checkbox when local network policy recommends using a static
IP address.
• Red button: Restart Trojan Control and Print Engine button is for re-initializing the
software and also restarting the print engine.
Note: Use only if user interface becomes unresponsive to restart print engine and
software.
• Advanced tab: Enables usage of auto configuration scripts or proxy server whenever
the local network policy requires these for network/Internet connection.
Important: Every time you change a setting press the blue Save button to apply the
changes.
Updater Button
64 T2-C User Guide
Page 65
User Interface (UI)
• By default for system updates the Alternative update URL field has to be empty. See
“Updating software and firmware” on page 89.
• Press the green Download button to download updates if available.
Important: Every time you change a setting press the blue Save button to apply the
changes.
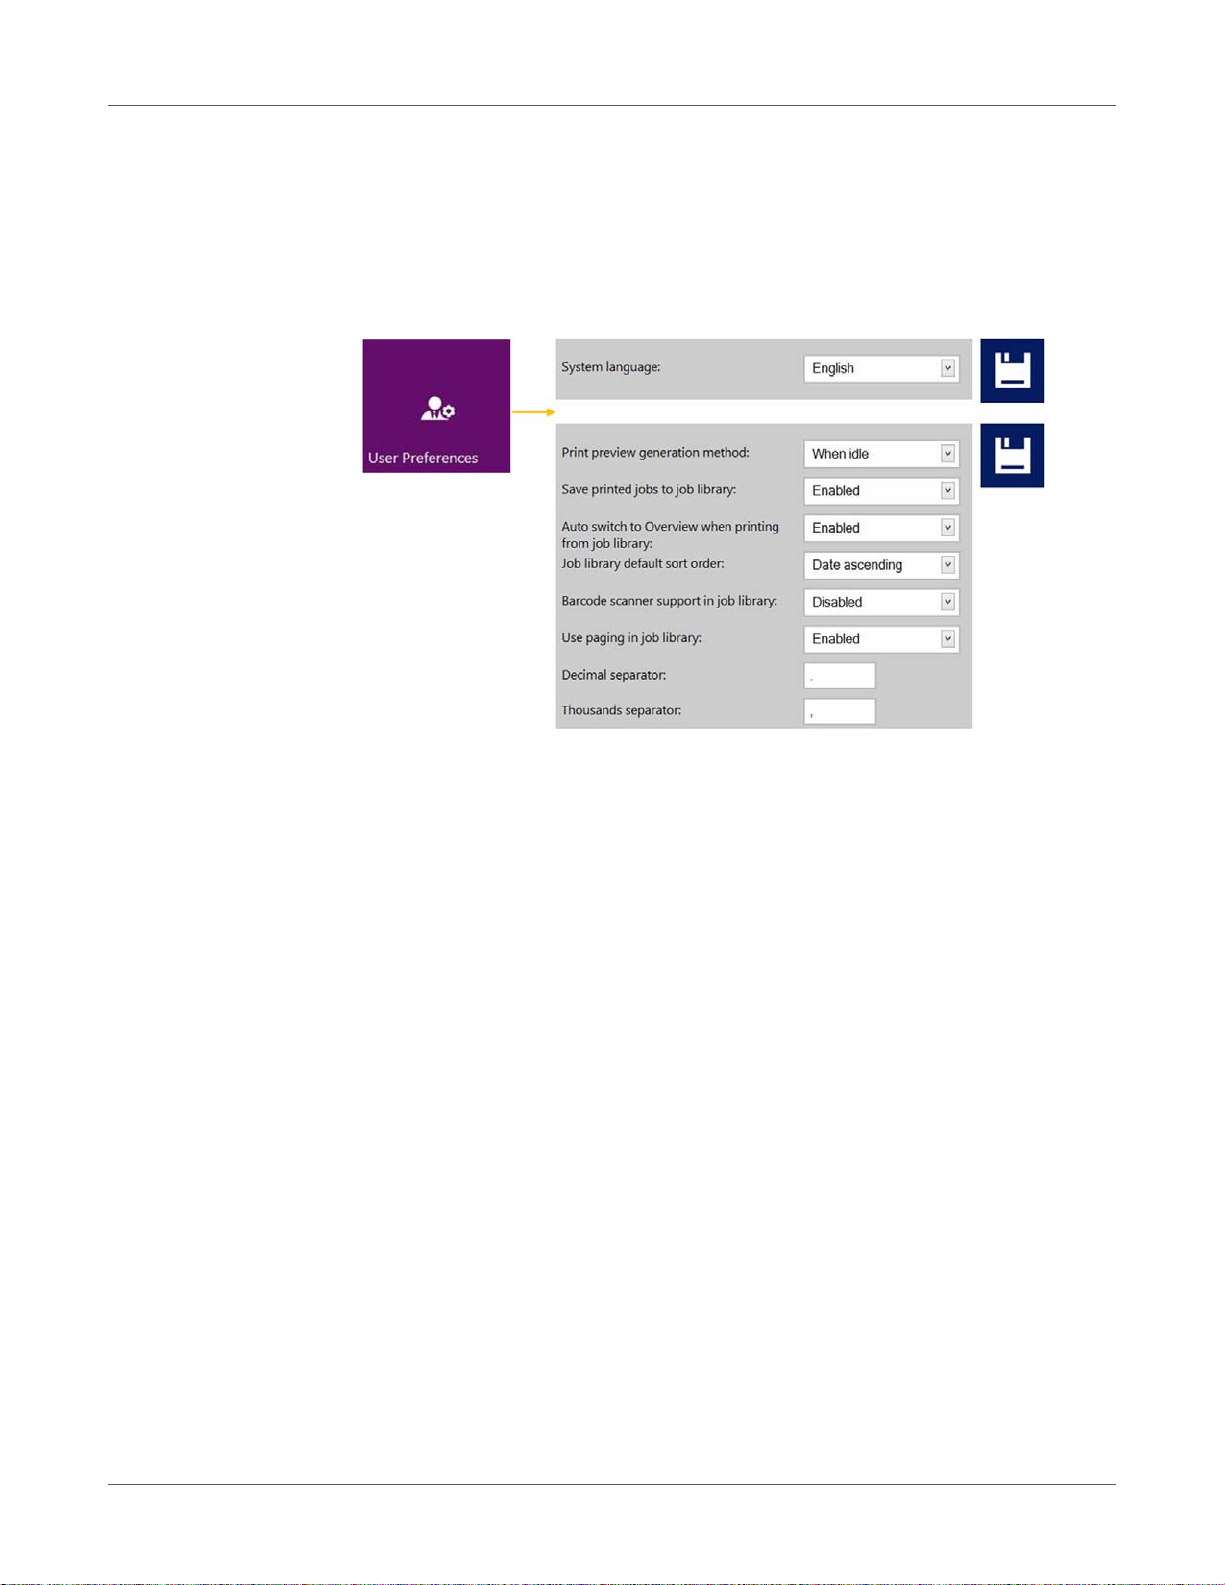
User Preferences Button
• System language: Select the desired language from the list.
Press blue Save button next to scroll-down menu to apply selected language.
• Print preview generation method:
When idle (default): Creates one preview thumbna il image from the first image in the
actual print job when the print job arrives, then the job is printed out. Previews for
subsequent labels are created later in the background when the system is in the idle
state.
Instantly: Creates preview images from all images in the actual print jo b when the print
job arrives, then sends the job to print when finished with image creation.
Never: No preview.
The preview is available in the Job Library. See “Job Library menu” on page 79 .
Warning: When preview generation is set to Instantly, it greatly increases the transfer
time of large print jobs due to generating a preview image for every page in real time.
This is demanding for the CPU and can also cause Data Path Underrun errors when
large variable data jobs are sent.
• Save printed jobs to job library:
Enabled: The print job is stored and available for reprinting from the job library.
Disabled: The print jobs sent after disabling this option are not stored in the job library.
However, jobs that have already been in the library will remain and be available for
printing.
T2-C User Guide 65
Page 66
User Interface (UI)
• Auto switch to Overview when printing from job library:
Enabled: When printing from the job library the screen switches to overview mode.
Disabled: When printing from the job library the screen remains in job library view.
• Barcode scanner support in job library: Enabled/disabled.
When barcode scanner support is enabled, the search filter in Job Library menu will be
active and only accepts input from a connected Barcode scanner (the virtual keyboard
is disabled on screen) when searching for job names. See “Job Library menu” on pa ge
79.
Note: Rename print jobs to match with barcode input to make this function work.
• Use paging in job library:
Enabled: Enables paging with finger swipe and with scroll bar in Job Library.
Disabled: Disables swiping and scroll bar in Job Library.
• Decimal separator: User can define separator for displaying decimals in the user
interface.
• Thousands separator: User can define separator for displaying thousands in the user
interface.
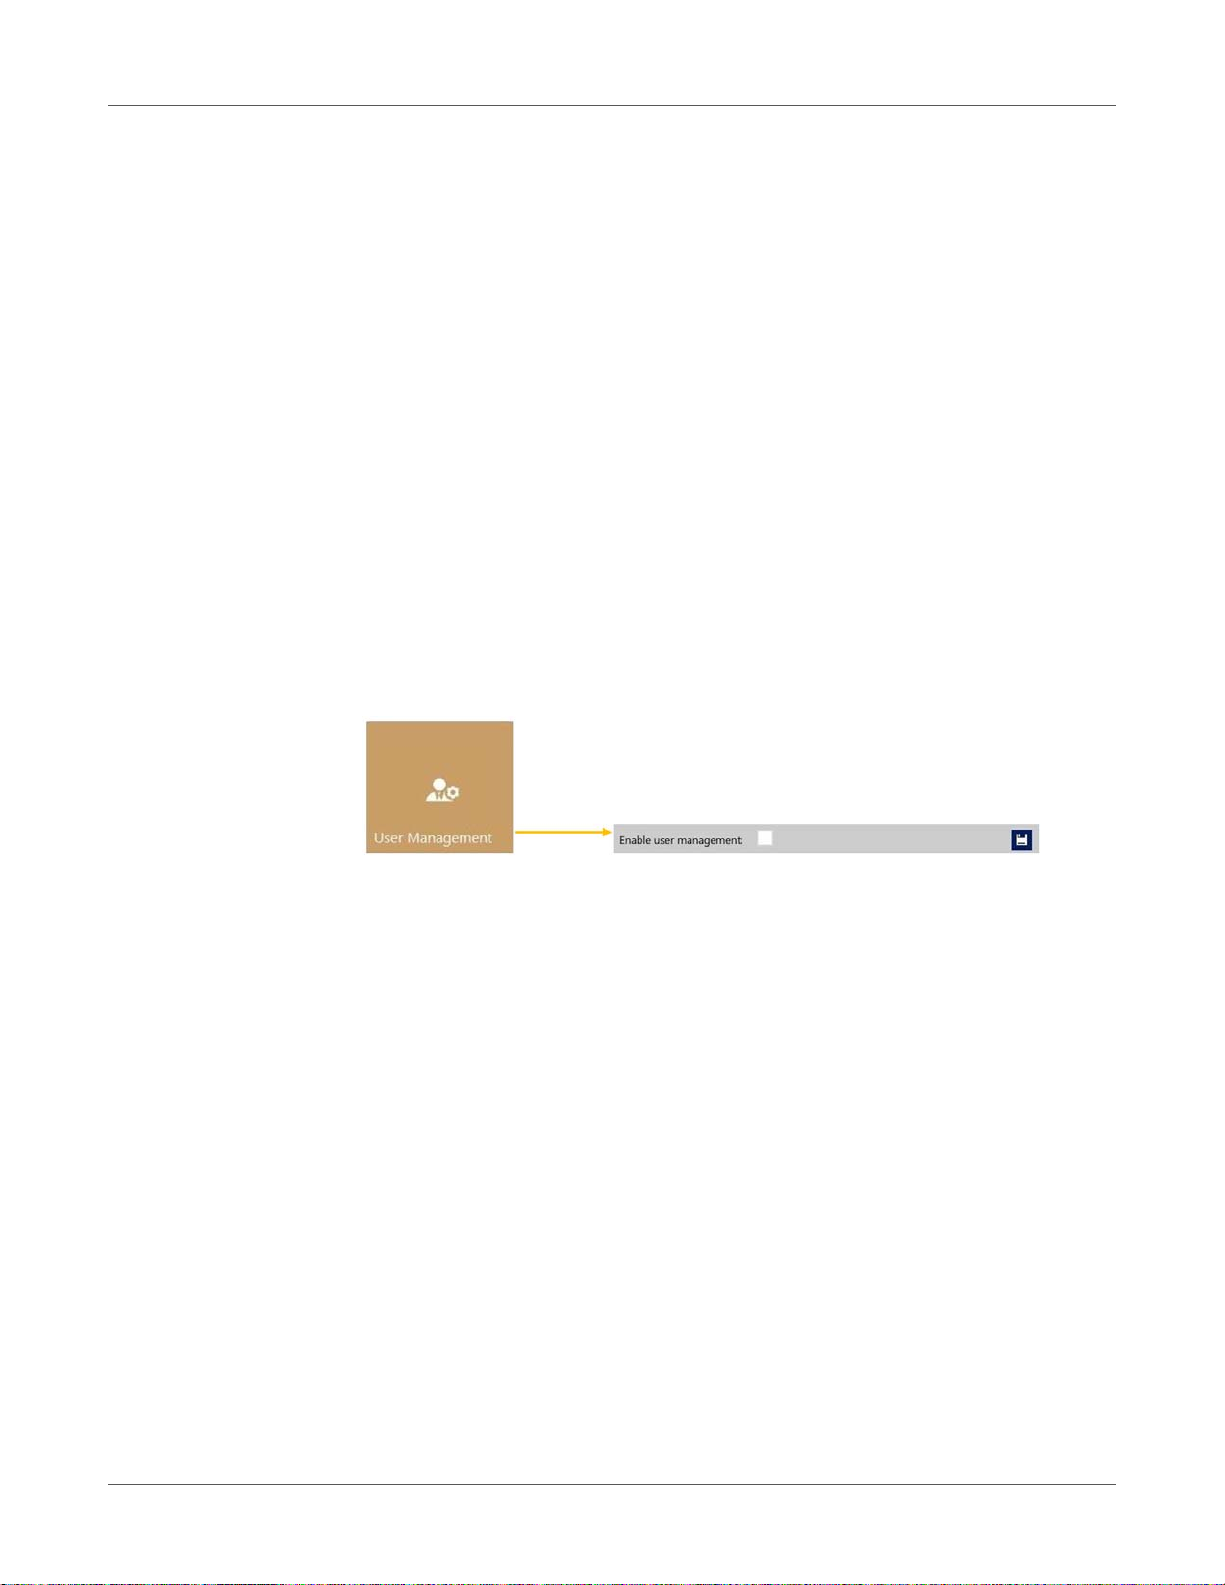
User Management button
• By default user management is not enabled, therefore every function of the T2-C press
is accessible without user authentication.
66 T2-C User Guide
Page 67
User Interface (UI)
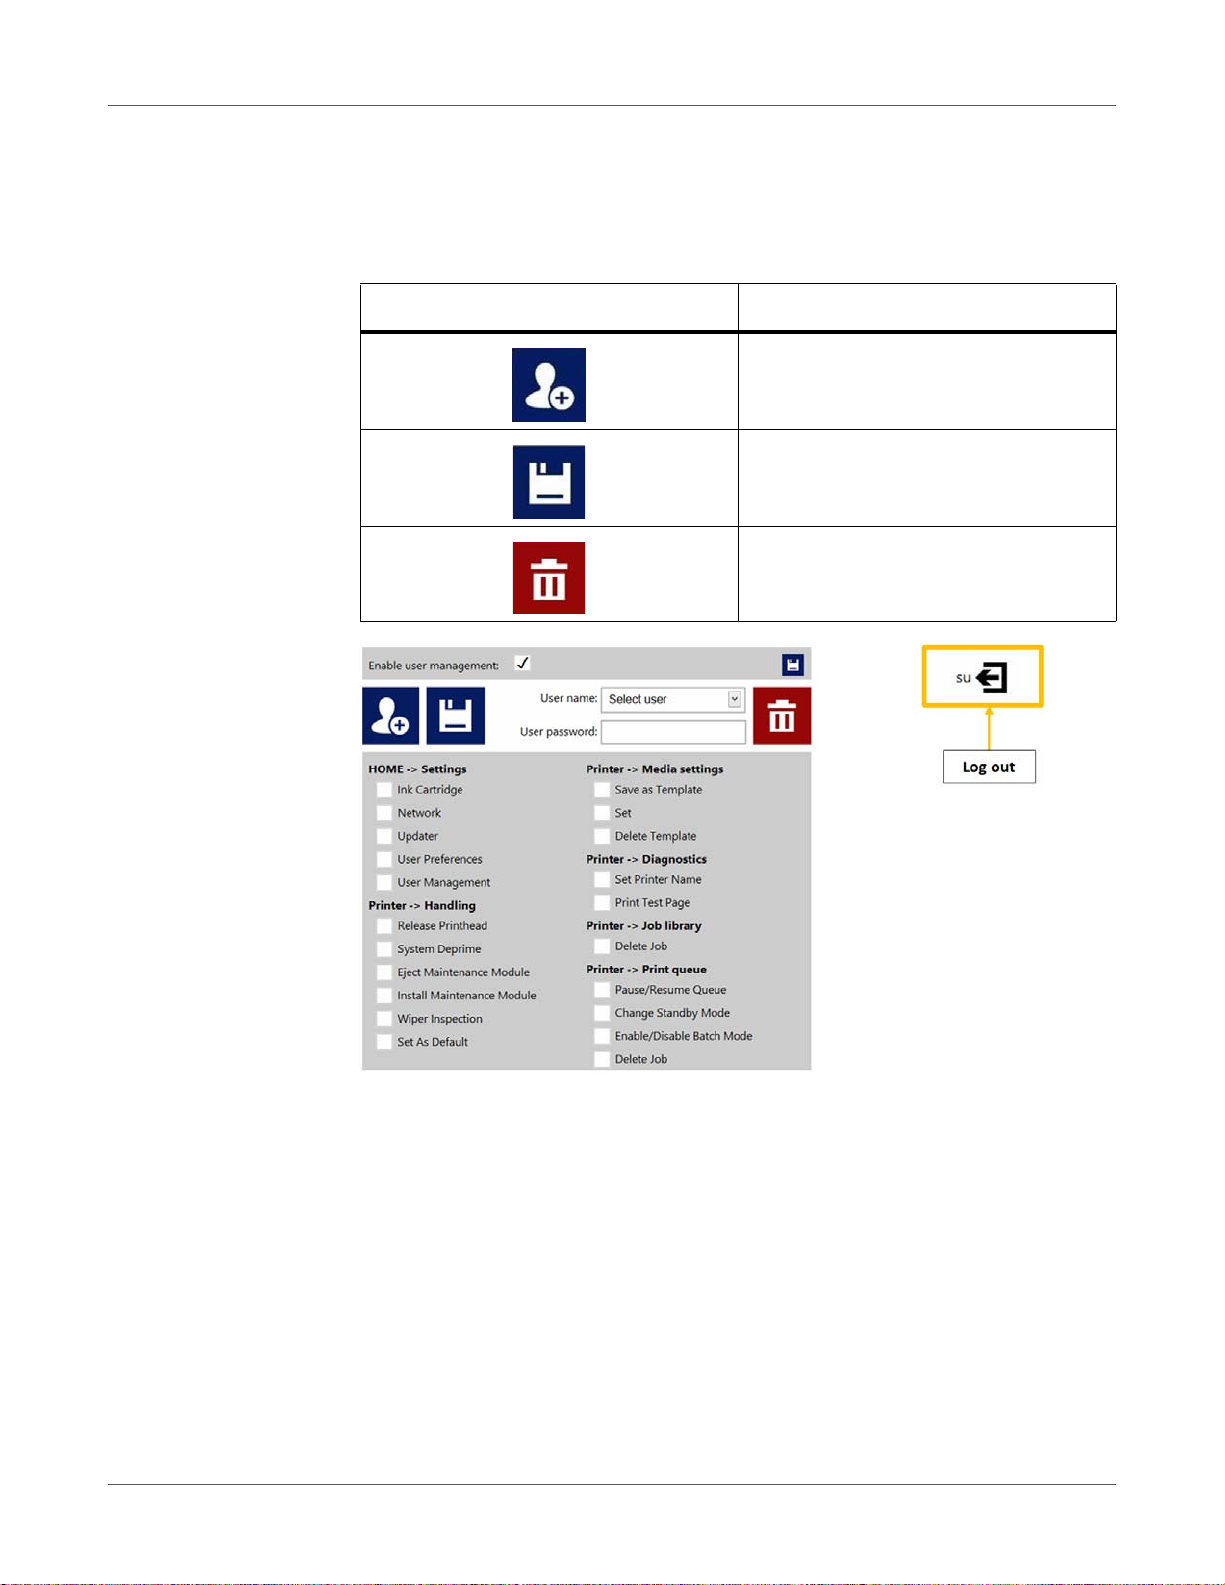
• Enable user management checkbox: When selected and activated, then user
authentication is required for accessing specific functions in TrojanControl software. A
user with 'User Management' rights (like the built in 'admin' user) can create user
accounts and can assign rights for each user to access certain functions in Trojan
Control software.
Icon Description
Add new user
Save new user settings / save changes
in existing user account
Delete user from list
Important: The default password for the admin user is 123.
Note: Passwords can only contain numbers.
Warning: Do not lock yourself out! At least one user must have User Management
rights otherwise there is no way to add or change properties of other users. If you end
up locked out please contact Trojanlabel support who can restore the default user
settings.
T2-C User Guide 67
Page 68
User Interface (UI)
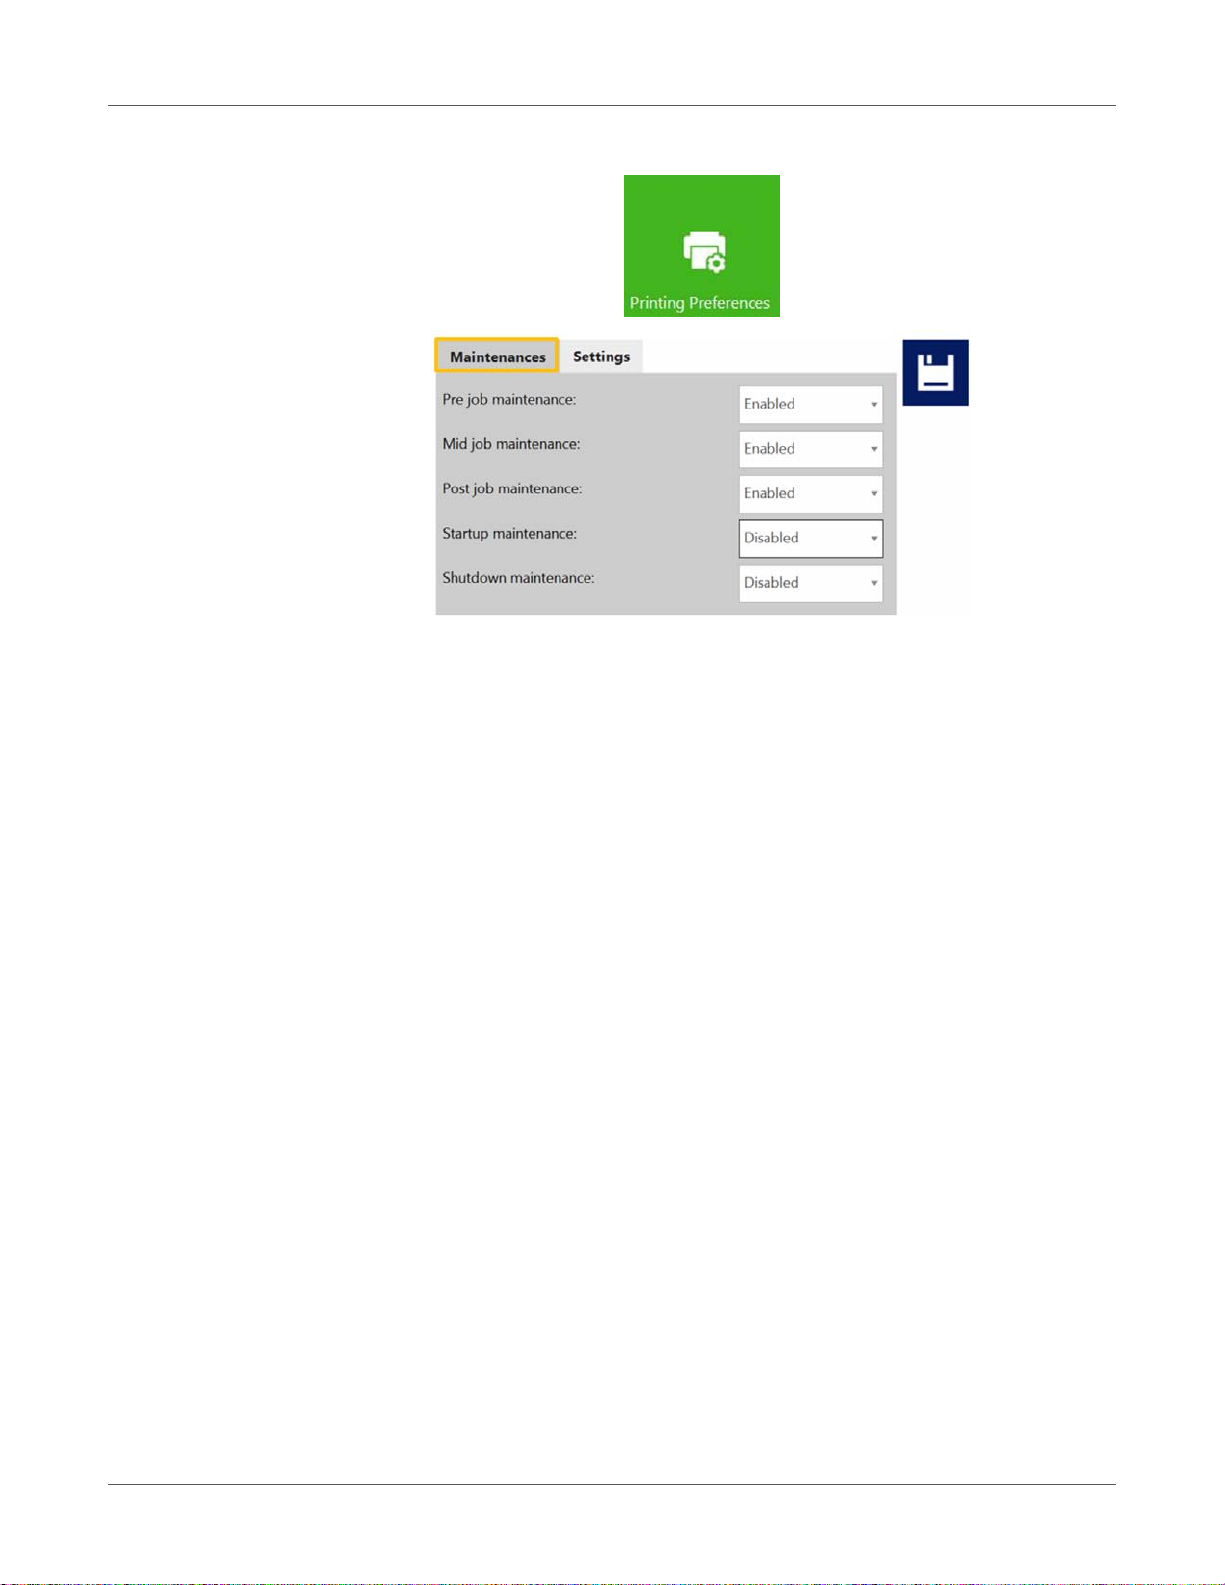
Printing Preferences Button
Maintenances tab
• Pre job maintenance: Enabled/Disabled.
When disabled there is no printhead maintenance before printing.
• Mid job maintenance: Enabled/Disabled.
When disabled there is no printhead maintenance during print jobs.
• Post job maintenance: Enabled/Disabled.
When disabled there is no printhead maintenance after print jobs.
• Startup maintenance: Enabled/Disabled.
When disabled there is no print ead maintenance when the machine starts up.
• Shutdown maintenance: Enabled/Disabled.
When disabled there is no printhead maintenance when the machin e is shutting down.
68 T2-C User Guide
Page 69
User Interface (UI)
Important: Every time you change a setting press the blue Save button to apply the
changes.
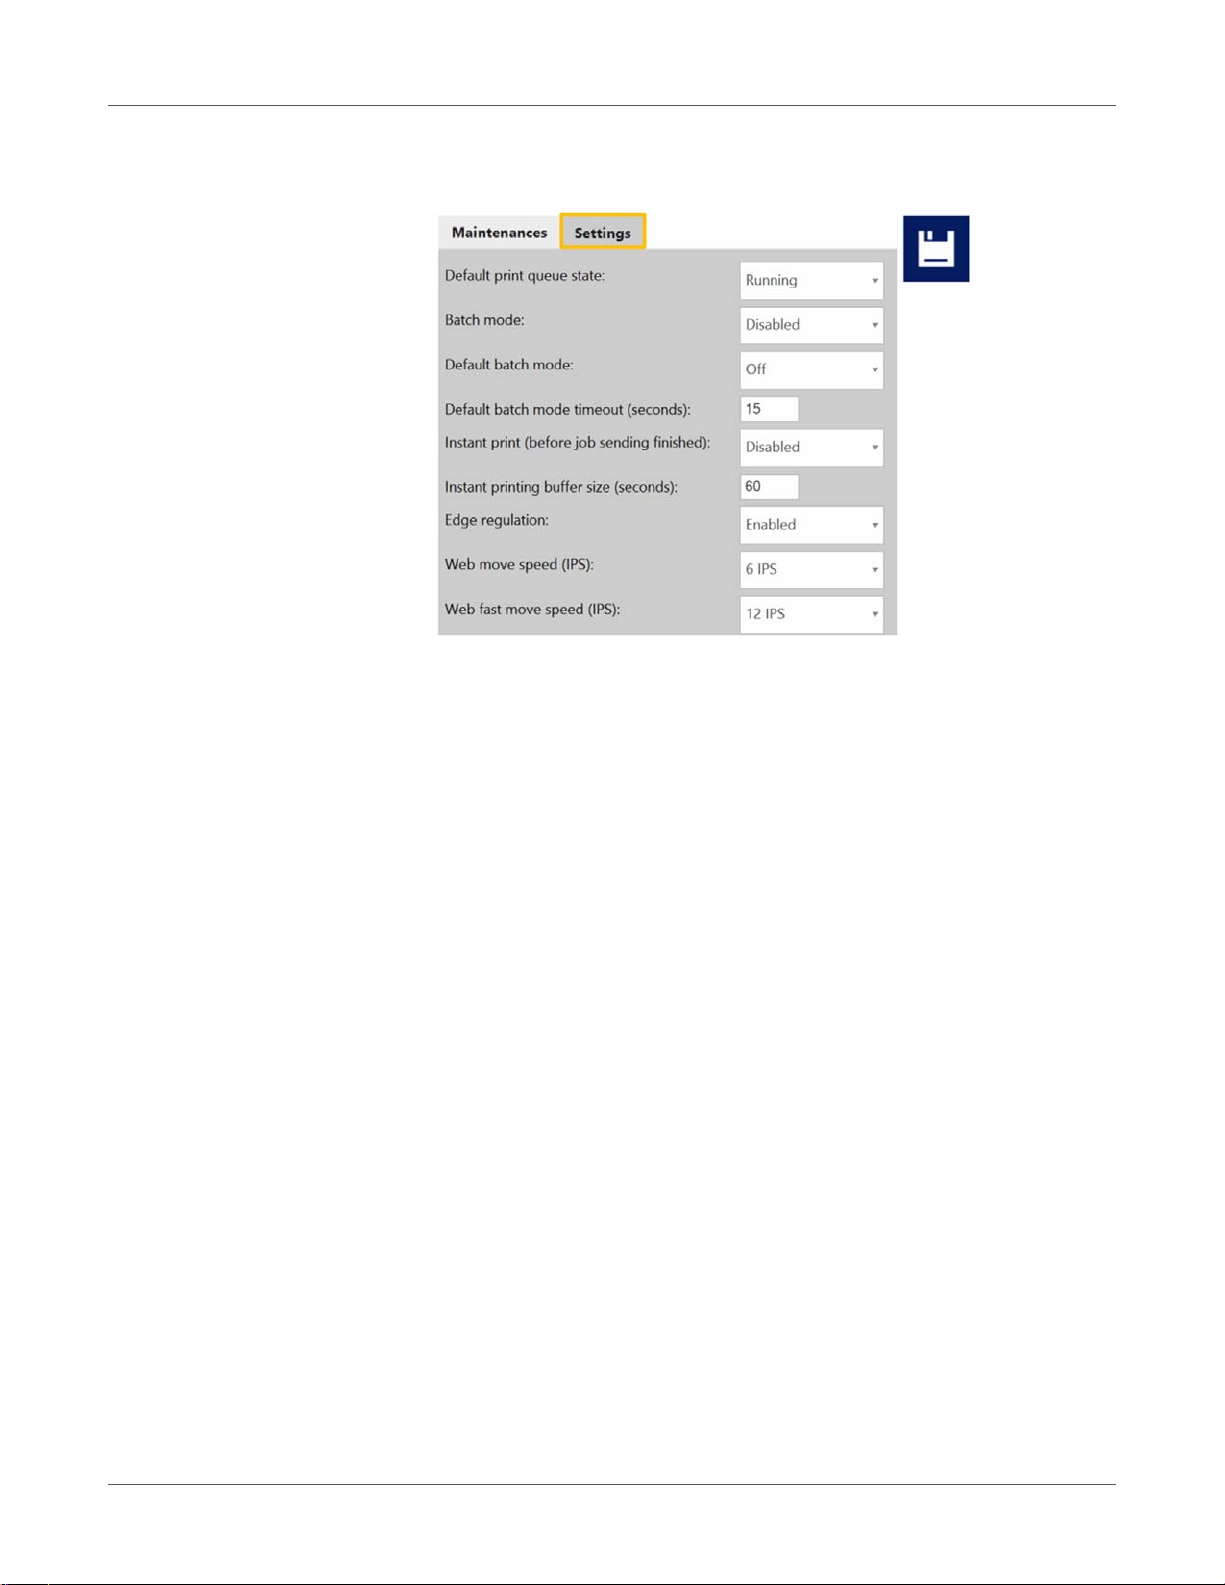
Settings tab
• Default print queue state:
Running: (Default) Print jobs are queued progressively as they are sent and
processed in a FIFO (first in first out) system. The queue can be managed from the
Print queue menu. See “Print Queue menu” on page 82.
Paused: The print queue is paused when machine starts.
• Default batch mode:
Note: Batch mode means that the T2-C press is waiting for a certain pe riod of time and
batches the print jobs sent during the batch mode timeout. Batched print jobs are
merged into 1 print job and printed out at once. Batched print jobs show up as 1 print
job in statistics.
Off: (default) Batch mode is switched off by default.
On: Batch mode is on.
• Default batch mode timeout (seconds):
If batch mode is on, the press is waiting for the print jobs to be sent until the timeout
interval expires. All print jobs sent during this timeout period will be merged into 1 print
job and printed out at once when the timeout expires.
• Instant print (before job sending finished): Enabled/Disabled.
Note: This function only works when printing from the optional Trojan Print Processor
(TPP) software and not from the regular T2-C driver.
When disabled the T2-C press buffers the whole print job which is being sent to the
press via the driver before actually starting to print.
When enabled the T2-C press starts printing right after buffering X seconds of print
stream (buffering time is set at next menu point).
T2-C User Guide 69
Page 70
User Interface (UI)
• Instant printing buffer size (seconds): Timer set for buffering when Instant print
option is enabled.
• Edge regulation: Enabled/Disabled.
When disabled, the label edge sensor is not used.
Note: Label edge sensor is for physical alignment of the label web. Moving the label
edge sensor results in aligning the left edge of the label web physically thr oughout th e
paper path for perfect roll up on the rewinder.
• Web move speed (in IPS): Defines the movement speed when using the
Forward/Backward Web buttons in the Handling m enu. See “Handling menu” on page
75. Speed can be 1,3,6,9 inches per second (IPS).
• Web fast movement speed (in IPS): Defines the movement speed when using the
Fast forward/backward buttons in the Handling menu. See “Handling menu” on p age
75. Speed can be 9,12,15,18 inches per second (IPS).
Important: Every time you change a setting press the blue Save button to apply the
changes.
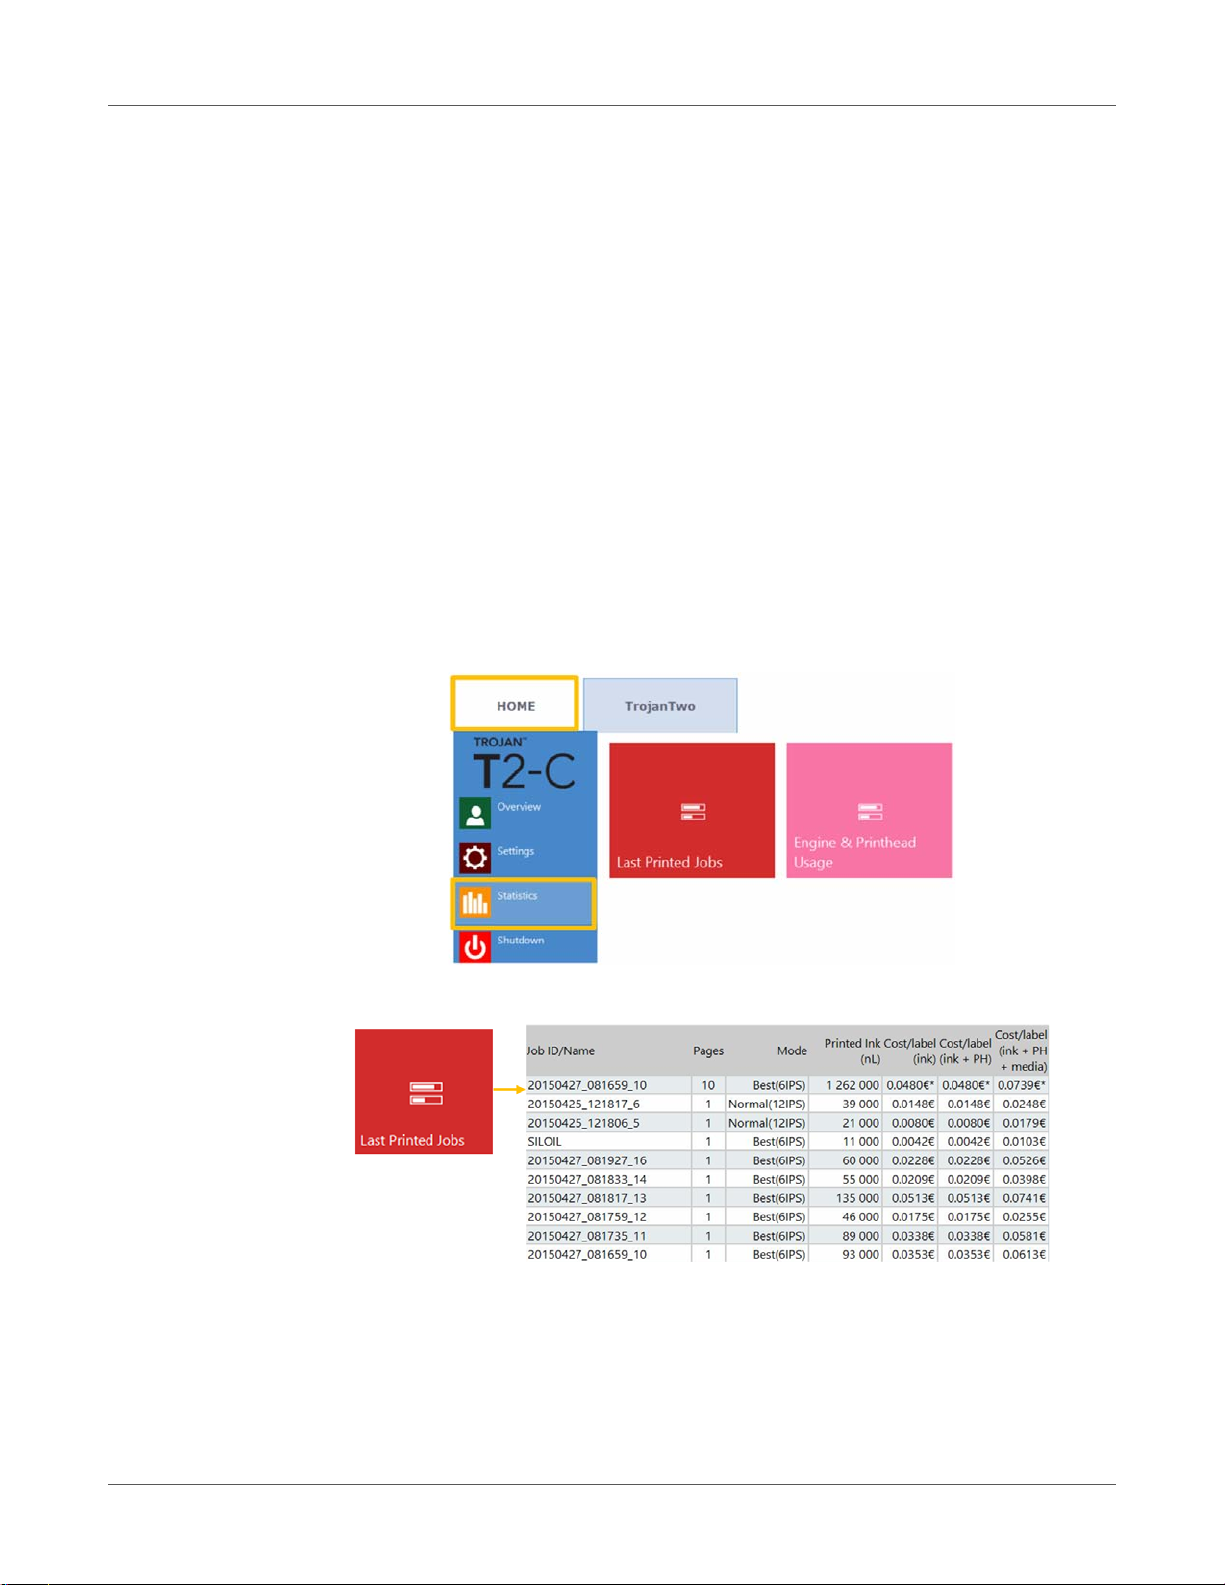
Statistics menu
Last Printed Jobs Button
• Statistics list for the last 30 printed jobs (contains: number of pages, print speed, ink
consumption, ink cost/label calculation, ink + printhead cost/label, ink + media +
printhead cost/label calculation).
• Cost/label (ink only) calculation is th e cost/1 label in the actual print job based on ink
tank price given in the HOME > Settings > Consumables menu.
70 T2-C User Guide
Page 71
User Interface (UI)
• Cost/label (ink + PH) calculation is the cost/1 label in the actual print job based on
ink tank price and printhead price given in the HOME > Settings > Consumables
menu. Print head cost is added.
• Cost/label (ink + PH + media) calculation is the cost/1 label in the actual print job
based on ink tank price and printhead price given in the HOME > Settings >
Consumables menu and in addition media price given in the TrojanTwo t ab > Media
Settings menu. See “Media Settings menu” on page 84.
• Job ID/Name is the name of the actual print job in the Job Library. A unique name can
be specified instead of random numbers in Job Library. See “Job Library menu” on
page 79.
Note: Prices marked by * contain estimated cost of maintenances as well (pre-, mid-, post
job maintenance). Prices without * mark are pure printing cost of 1 label without
maintenance cost added. See “Maintenance menu” on page 77.
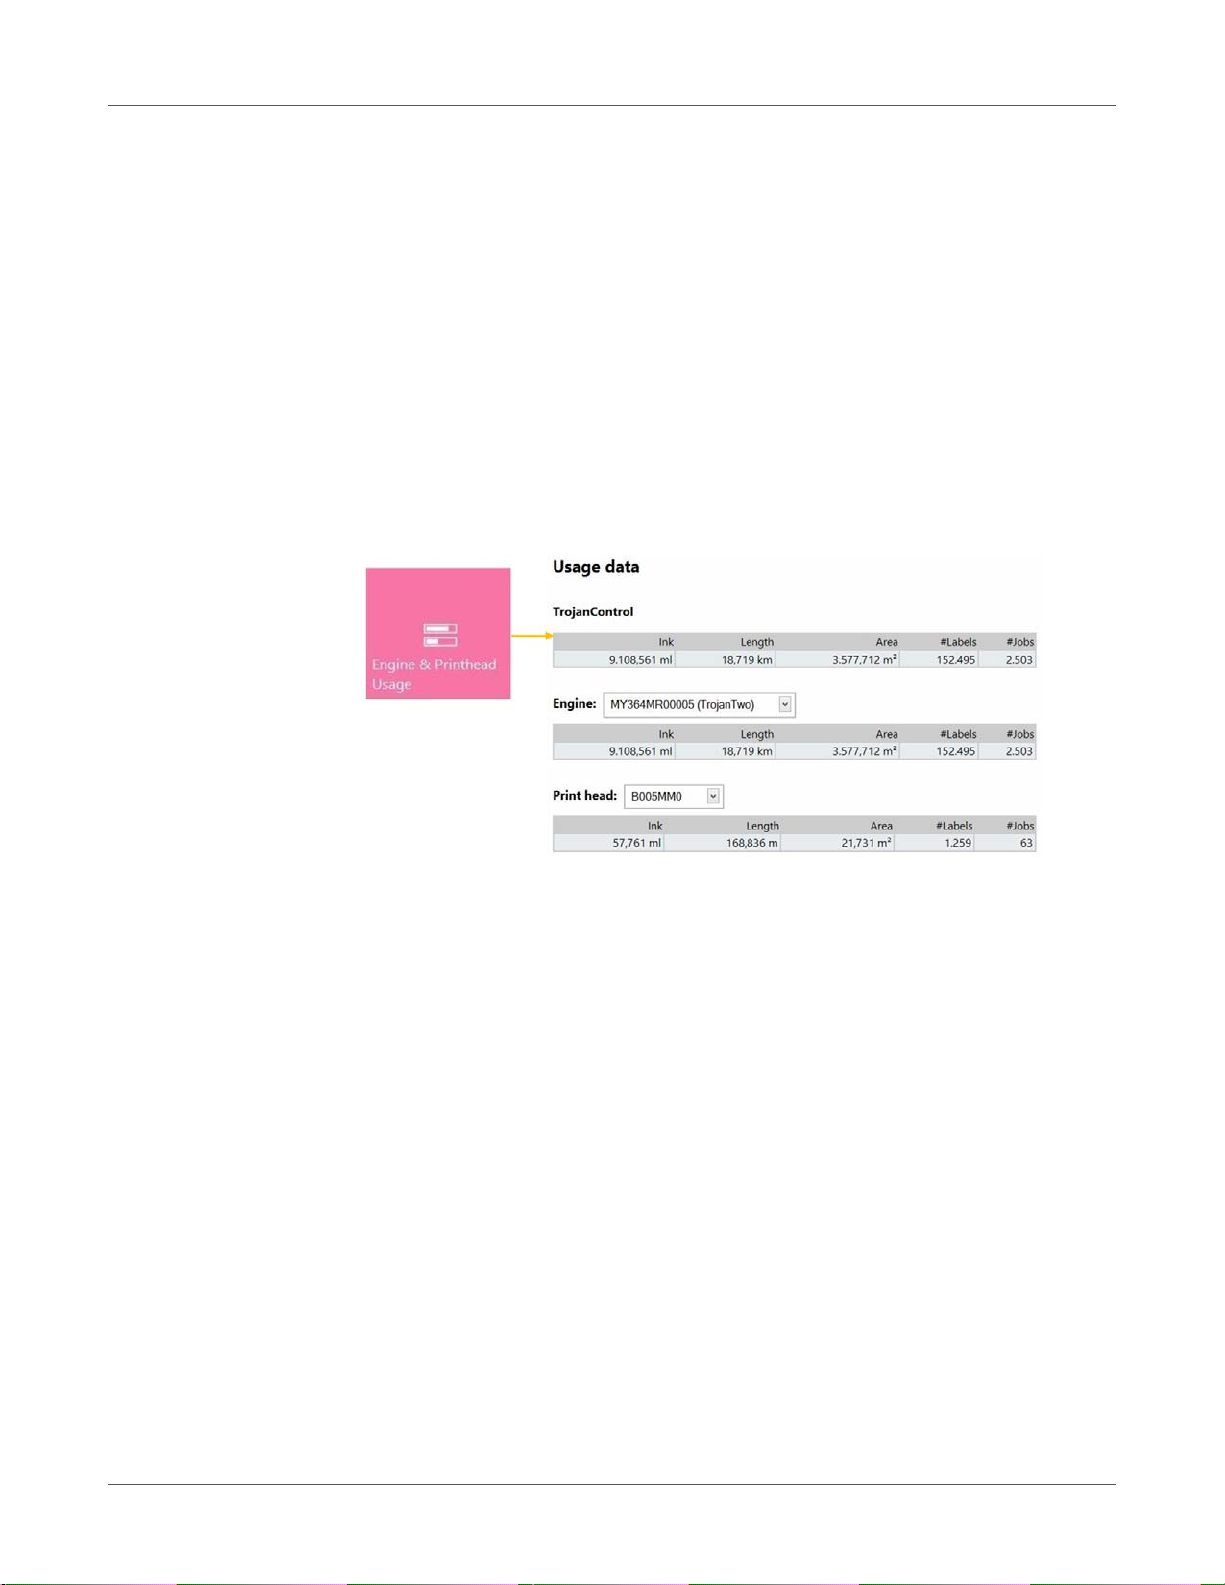
Engine & Printhead Usage Button
• TrojanControl: Total statistics for the T2-C press for ink usage, printed length, printed
area, number of labels and printed jobs.
• Engine: Total statistics and history for print engine(s). If there is a print engine
replacement, all serial numbers will be registered and statistics for each print engine
can be compared.
• Print head: Total statistics and history for all the printheads which have been
connected to the T2-C press. All connected printhead serial numbers will be registered
and statistics for each printhead can be compared.
Note: A printhead must print at least 1 page to be able to register the usage statistics.
A freshly installed printhead that has not printed any pages at the certain T2-C press is
displayed as an empty record.
Note: Printhead usage data is the total usage in the particular T2-C press. It does not
include usage history from usage data on other T2-C presses if the particular printhead
has been used in multiple machines.
T2-C User Guide 71
Page 72
User Interface (UI)
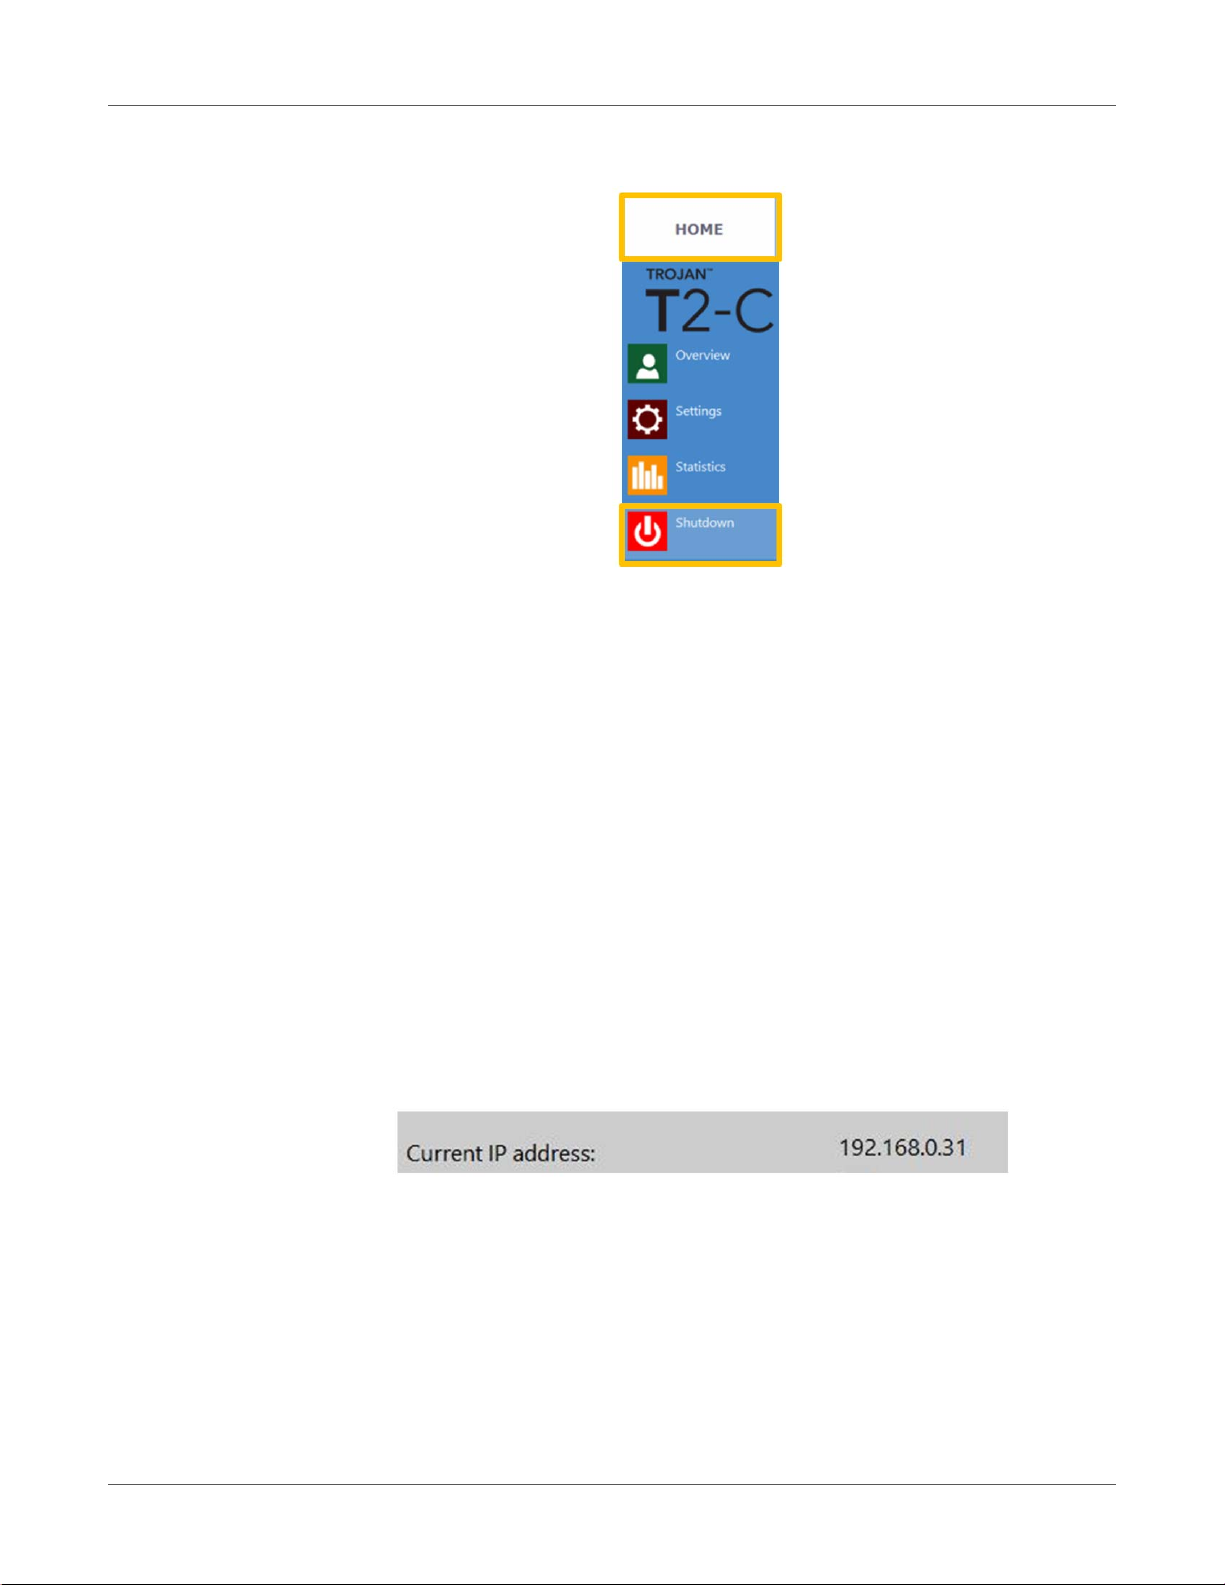
Shutdown
• Shuts down the T2-C press completely.
When shutting down the unit it is advised to wait with turning the power switch off until the
shutdown process is finished. There is a message on the display when the shutdown
process is initiated to indicate that the shutdown process is still going on.
When the shutdown process is finished (the screen turns blank) it is advised to turn the
physical power switch off. The power switch is located at the back of the TrojanTwo pre ss.
Caution: Always wait until the shutdown process finishes before shutting down the power
supply! Otherwise the maintenance module inside the machine might end up in the wrong
position and cannot protect the printhead from dehydration. Dehydration of nozzles in the
printhead may result in print quality defects. The shutdown process may take 1-2 minutes.
Exporting statistics data to a CSV file / viewing statistics from a browser
Statistics data from the HOME > Statistics menu can be exported and saved into a CSV file
from a user PC which is connected to the same network as the T2-C press.
• Actual IP address of the T2-C press can be set or acquired in the HOME > Settings >
Network menu. See “Settings menu” on page 63.
Note: The IP address shown above is an example only. The actual IP address is local
network dependent and can always be checked in the HOME > Settin gs > Network menu.
72 T2-C User Guide
Page 73
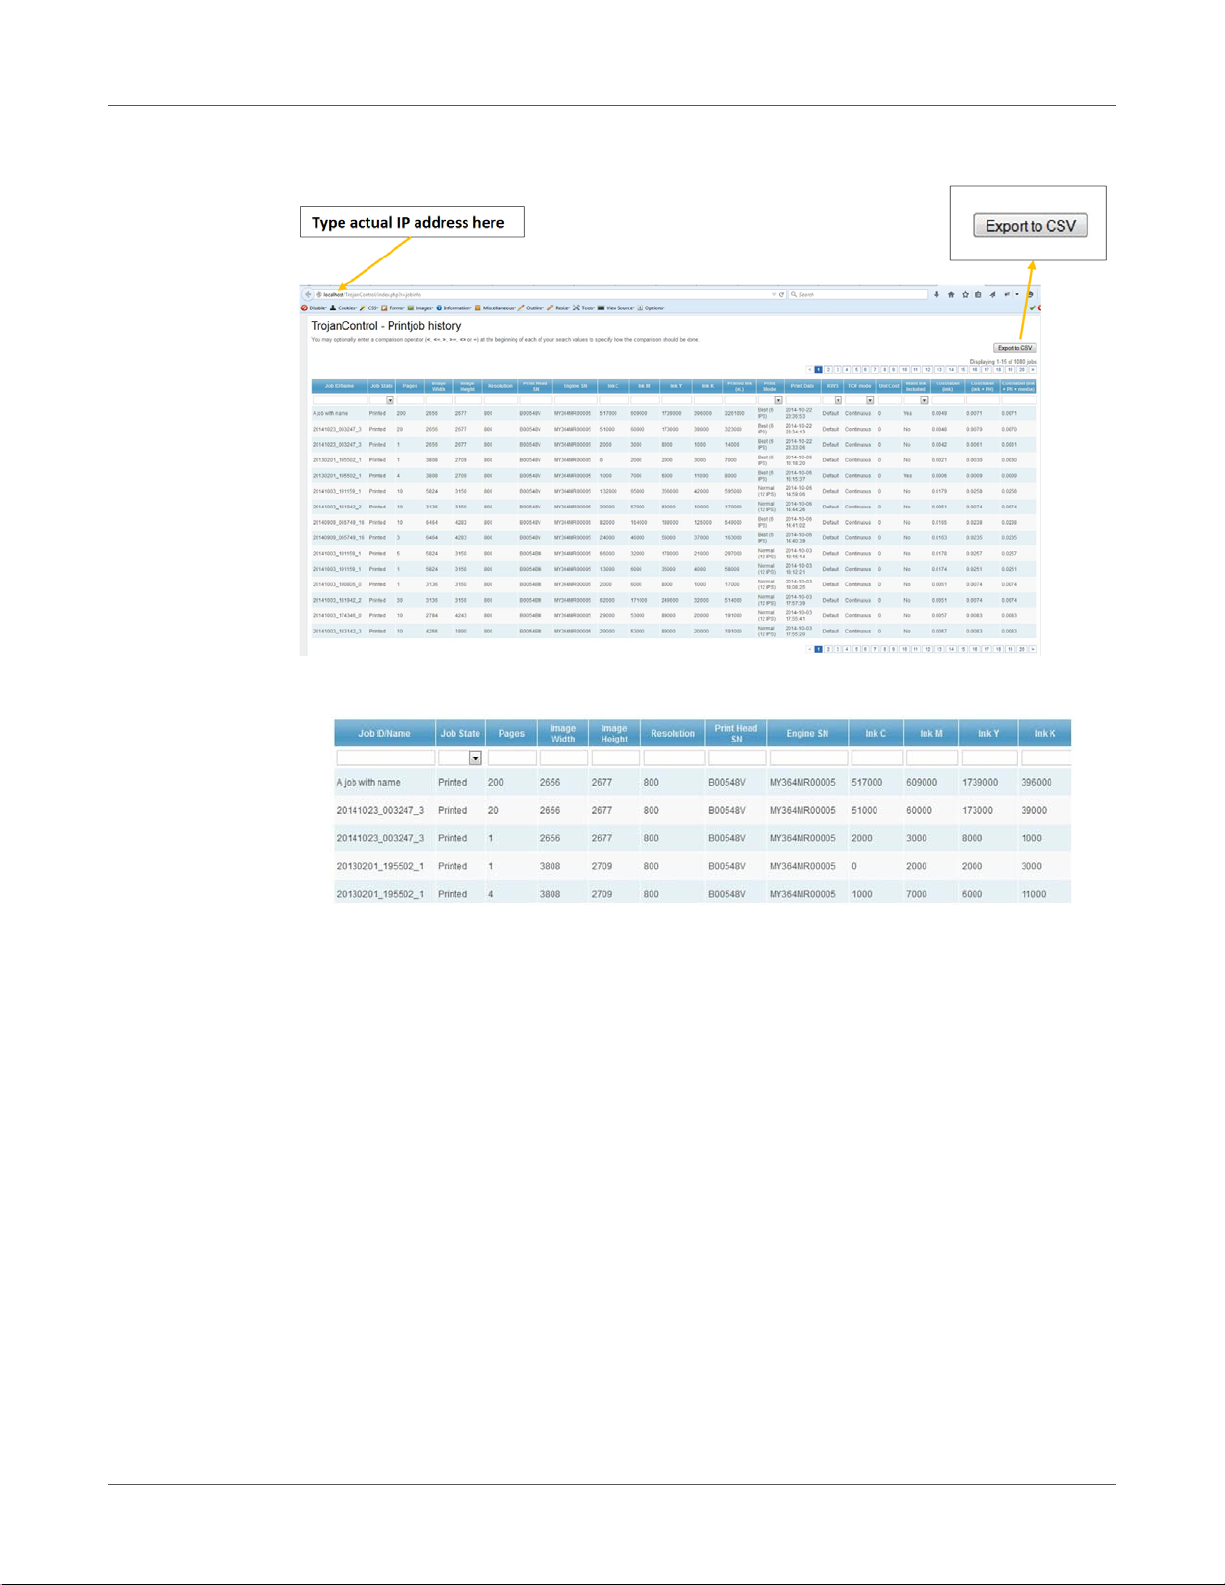
• Type the actual IP address of the T2-C press into a browser at a user PC:
User Interface (UI)
• Press the Export to CSV button on the page to save the statistics into a CSV file.
Ink consumption is more detailed in this view and displayed for each used base color
(CMYK) and in total as well.
T2-C User Guide 73
Page 74
User Interface (UI)
T2-C press handling menus (TrojanTwo tab)
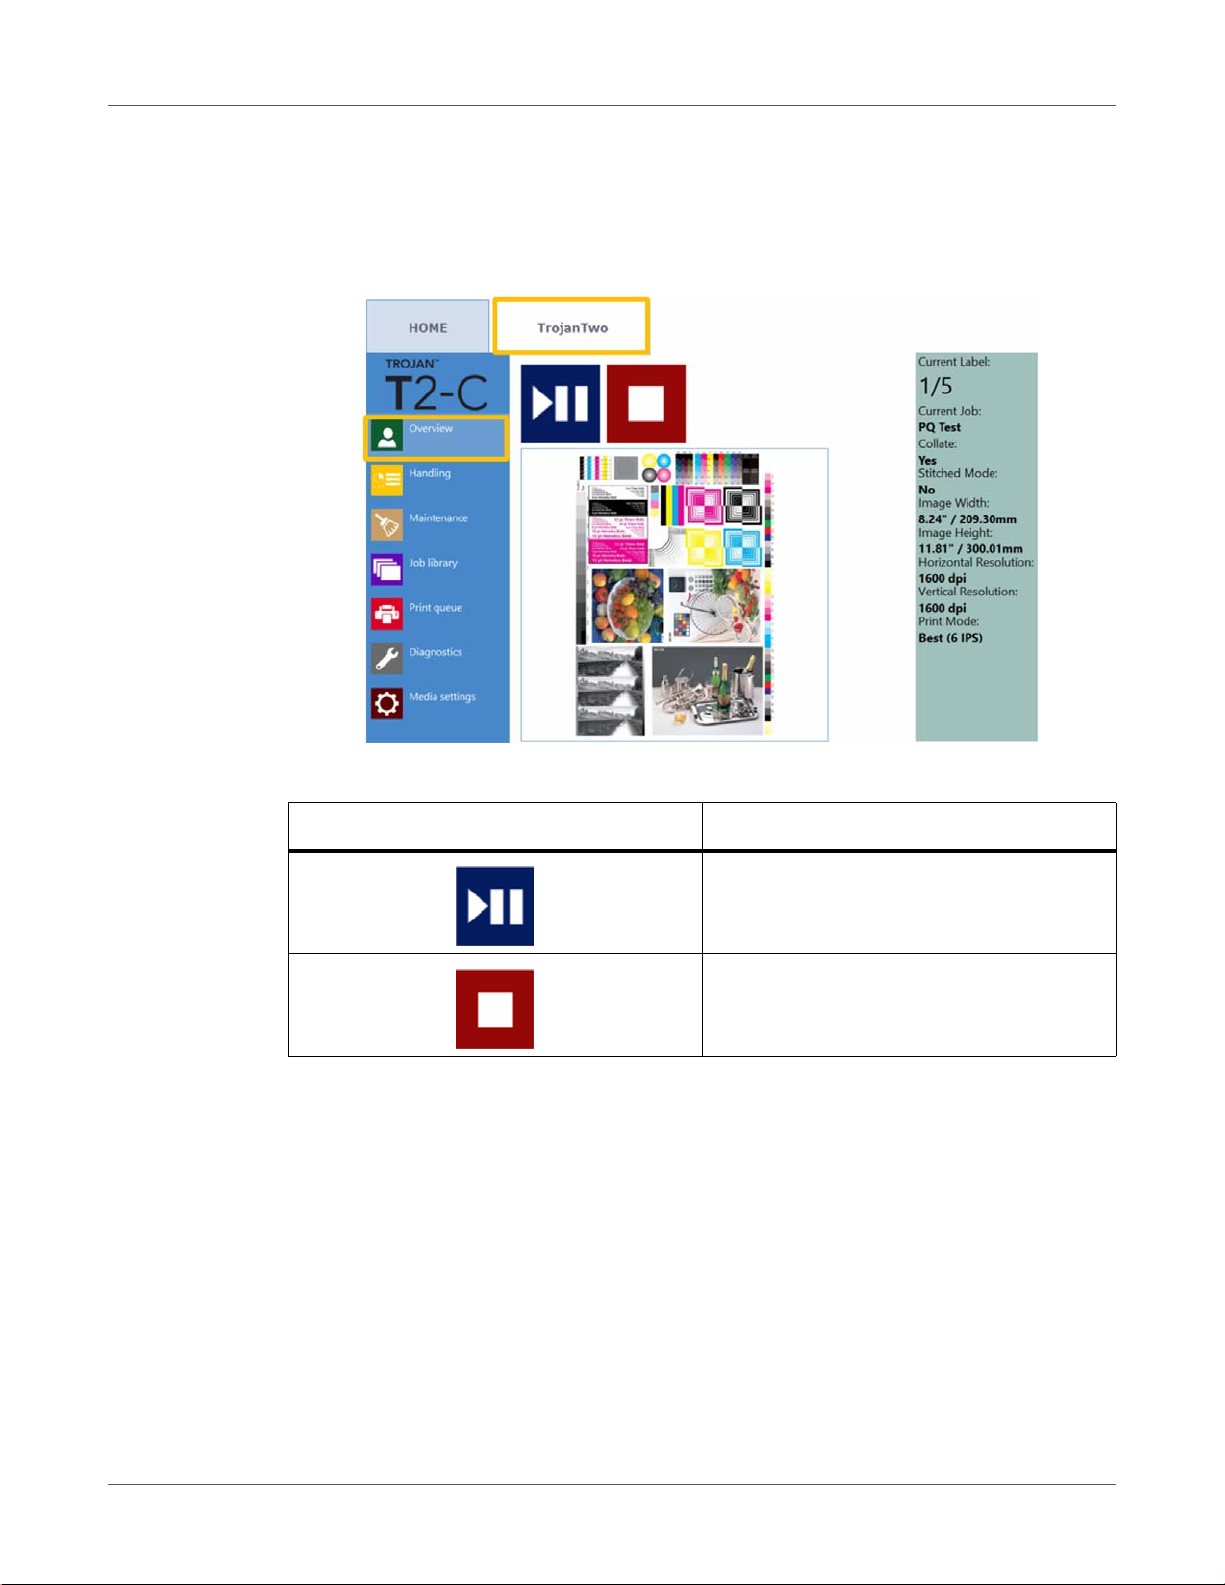
Overview menu
Overview menu when the T2-C press is printing.
Icon Description
Pause/Resume print job
Stop/Cancel print job
• Information from currently printed job, including:
– Preview image of the label which is being printed at the moment
– Label counter
– Name of print job in Job Library
74 T2-C User Guide
Page 75
User Interface (UI)
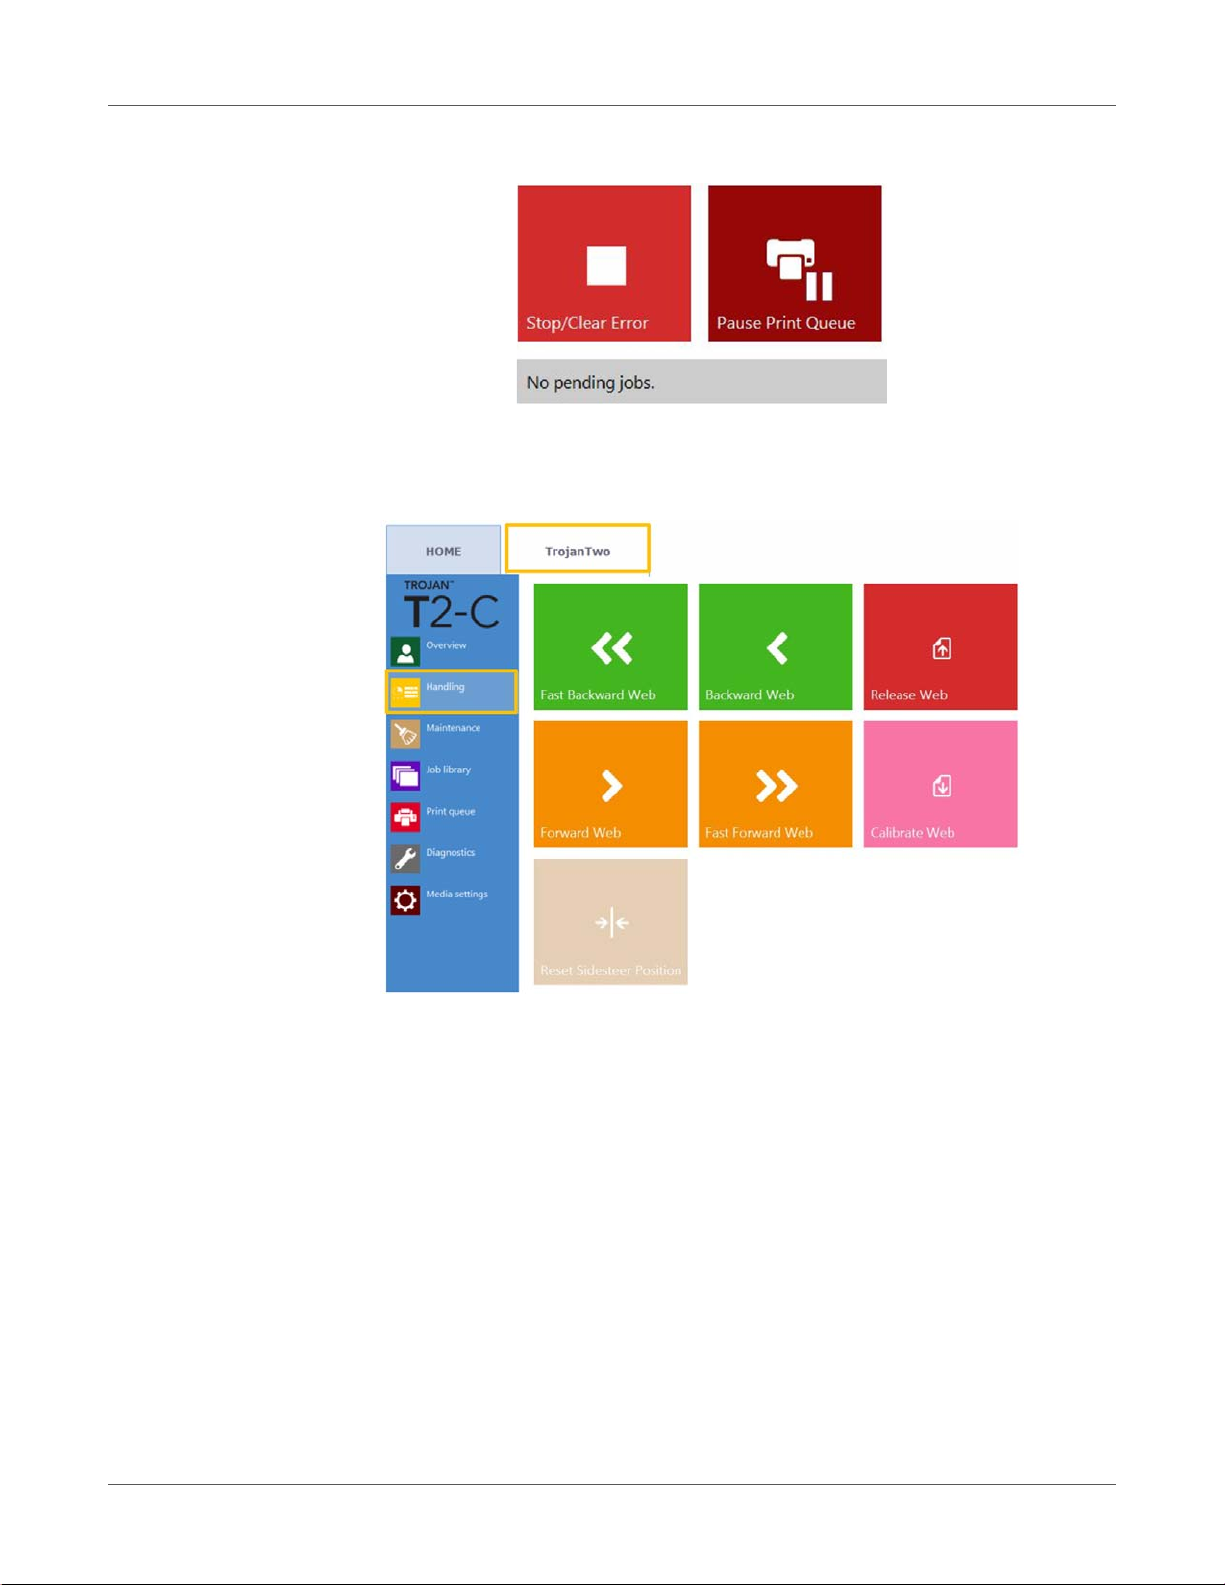
• Shows Print Queue state and Stop/Clear Error button when machine is in idle mode.
Handling menu
The Handling menu includes all the web path related actions.
Backward/Forward Web Button
Moves the label web backward/forward. The movement speed is defined in the HOME >
Settings > Printing Preferences menu. See “Settings menu” on pa ge 63.
T2-C User Guide 75
Page 76
User Interface (UI)
Fast Backward/Forward Web Button
Moves the label web fast backward/forward. The movement speed is defin ed in the HOME
> Settings > User Preferences menu. See “Settings menu” on page 63.
Note: When using the web moving buttons in the top row, the screen switches to the Stop
Web button instead of forward/backward buttons until web movement is stopped.
Release Web Button
Releases tension on the label web, allowing users to change label roll.
Calibrate Web Button
Calibrates and sets proper tension for the label web.
Note: Printing only starts when the web status is Ready (calibrated) in the right status bar.
See “Right side status bar” on page 61.
Reset Sidesteer Position Button
Moves the unwinder core to the default horizont al position. This function is needed when a
new label roll is loaded onto the unwinder core to align the label edge and label edge sensor
to the printhead's left edge. See “Adjusting the label edge sensor” on page 35.
Note: This function is only active when the web state is Not Calibrated. Otherwise the
button is grayed out and inactive.
76 T2-C User Guide
Page 77
Maintenance menu
User Interface (UI)
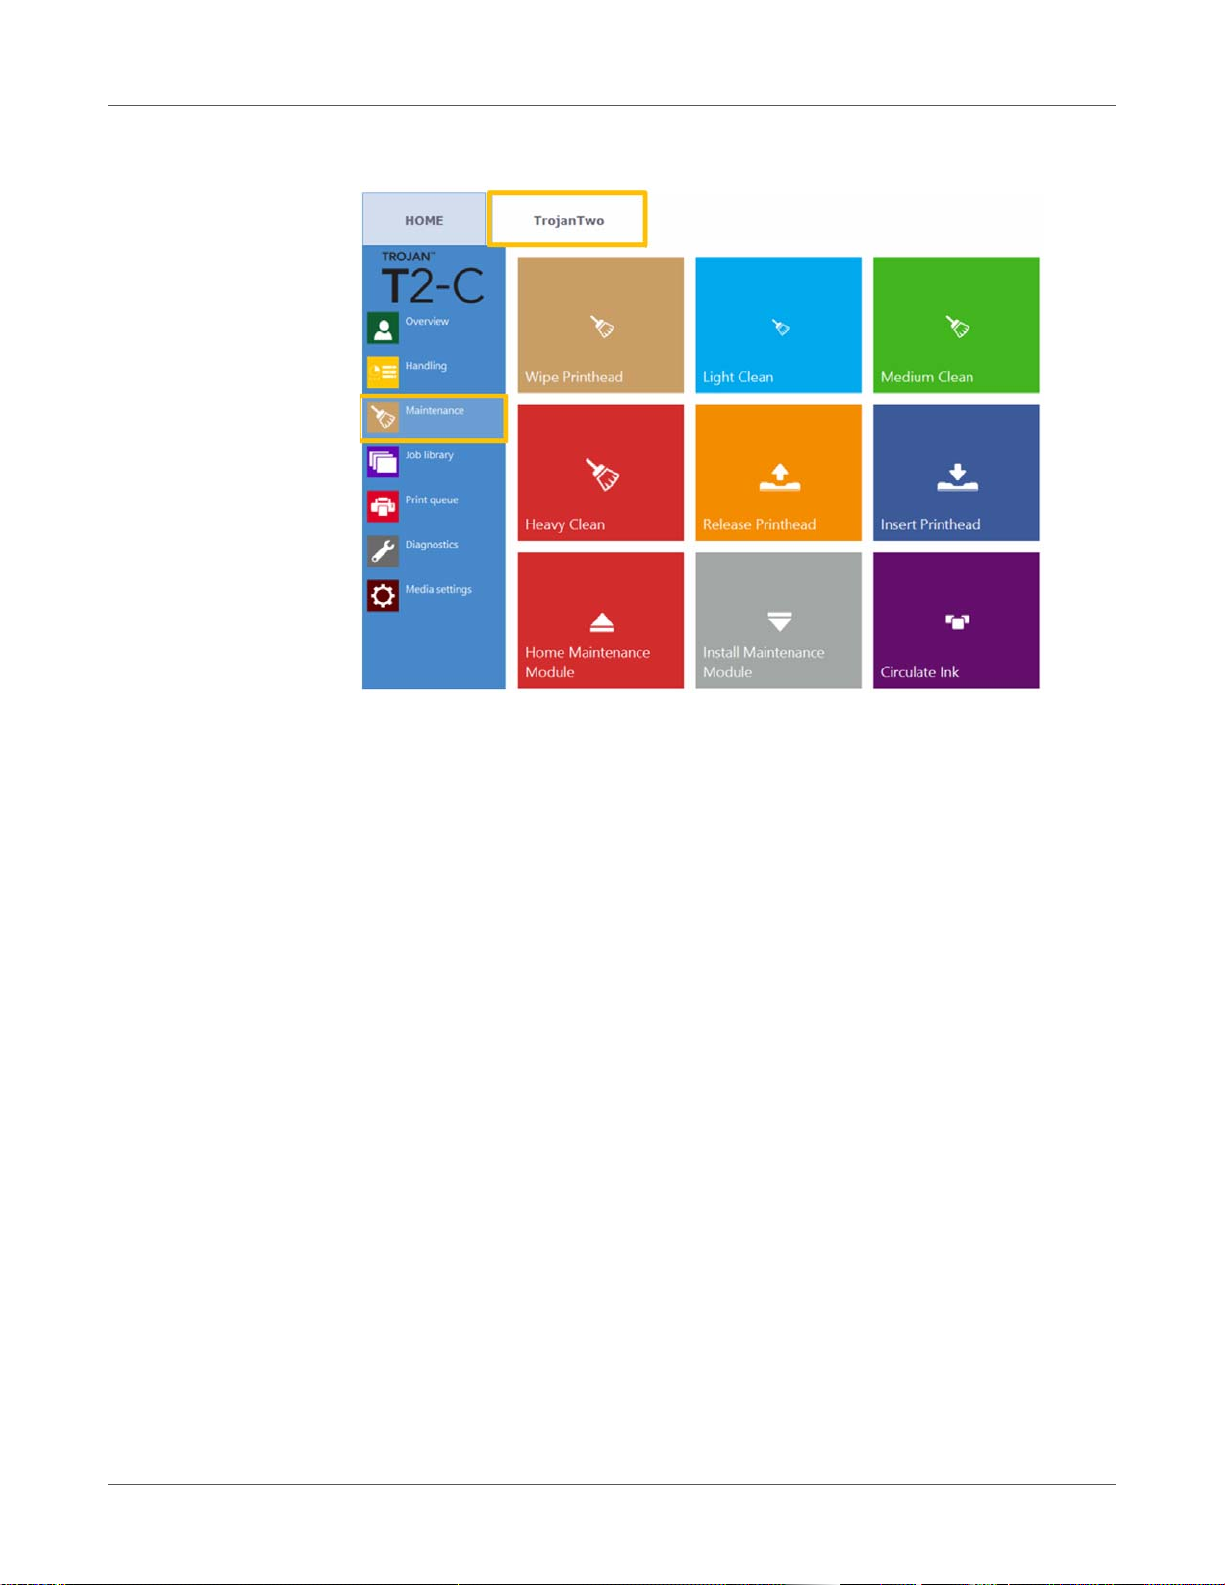
Wipe Printhead Button
The maintenance module performs printhead wiping 3 times to clean the surface of the
printhead.
Light Clean Button
Additional maintenance routine for fixing fine streaks and for cleaning the printhead
surface. Takes about a minute. Can be run multiple times. Advised to use when automatic
maintenance routines and ink circulations are not enough.
Medium Clean Button
Additional maintenance routine for fixing stre ak s, spitting ink through the nozzles and for
cleaning the printhead surface. Takes about 2-3 minutes. Heavie r form of Light Clean.
Advised to use when automatic maintenance routin es, ink circulations and Light Cleanings
are not enough to recover print quality. Usually when medium clean is nee ded, it is the sign
of the particular printhead is getting aged and near the end of life.
Heavy Clean Button
Additional maintenance routine for fixing serious streaks and printhead nozzle dehydration.
Heavy cleaning takes about 5 minutes. Only advised to use when Medium clean does not
prove to be enough to recover print quality. Heavy cleaning creates a significant amount of
waste ink. Usually when heavy cleaning is needed, it is a sign that the installed printhead
has reached end of life or the printhead nozzles are heavily dehydrated.
Release Printhead Button
Opens the printhead latch to be able to install/replace the printhead physically.
T2-C User Guide 77
Page 78

User Interface (UI)
Insert Printhead Button
Primes the newly inserted printhead with ink.
Note: Priming the printhead with ink may take several minutes.
Note: During first time installation, the printhead priming does not begin until the reservoir
tank ink levels are high enough. Pressing the Insert Printhead button might be required 2
times to prime the printhead with ink in this case.
Home Maintenance Module Button
Moves the maintenance module into the home position. Maintenance module slides out
from below the printhead. When maintenance module is in the home position it can be
inspected/cleaned and the wiper roller, cap module can be replaced.
Warning: It is not advised to keep the maintenance module in the home position for a long
period of time as the printhead is not protected and can dehydrate quickly when the
maintenance module is not protecting the printhead.
Install Maintenance Module Button
Moves the maintenance module back to the inst alle d po sit ion (un de r th e pr int head ) . Th e
printhead is only protected properly when the maintenance module is in this position.
Circulate Ink Button
Circulates ink in the system to purge air bubbles. This function does not create waste ink
and can be run as many times as needed. One ink circulation cycle takes a few seconds
only.
Note: Ink circulation is a very useful function and can help to get rid of fine streaks
generated by air bubbles which might be blocking some printhead nozzles. It takes less
time than Light Cleaning.
78 T2-C User Guide
Page 79
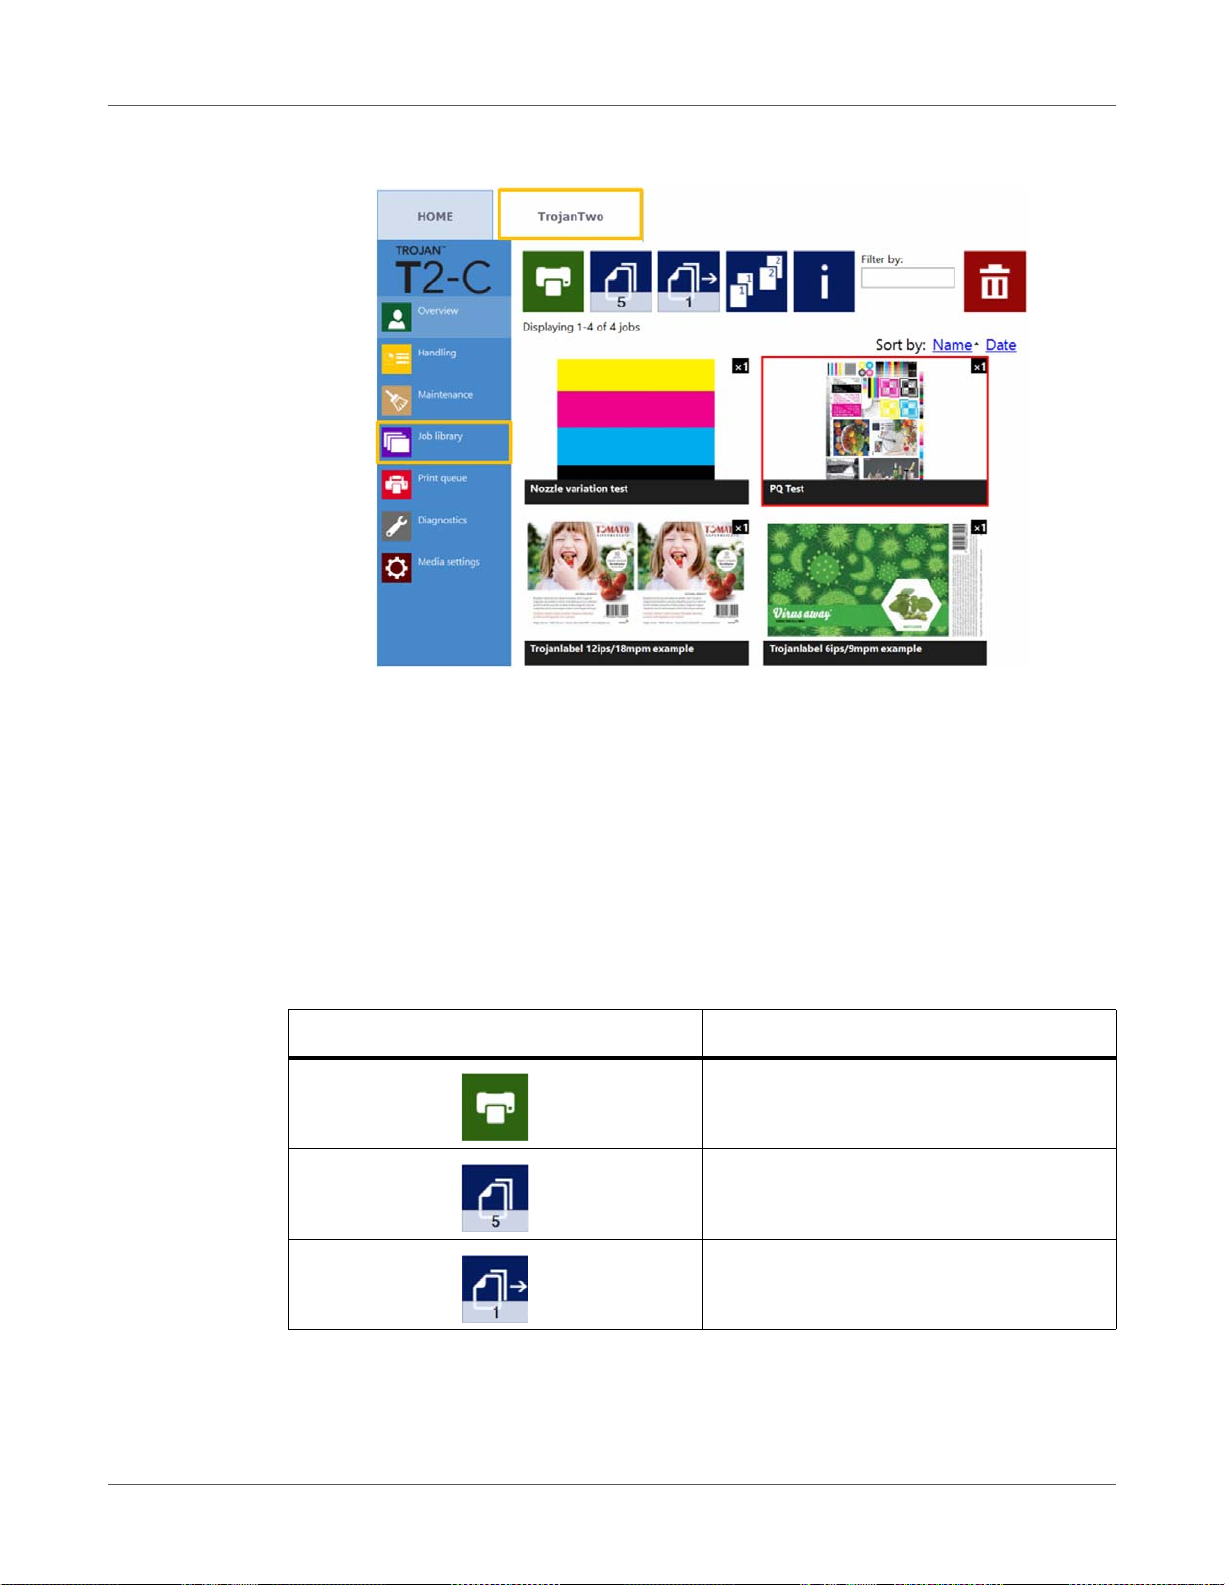
Job Library menu
User Interface (UI)
• Stores 30 printed jobs with random job names by default (print streams uploaded from
driver).
• Print jobs can be renamed: Renamed print jobs are stored beyond the default 30 with
random names. Only the drive space is the limit for storing jobs. Renaming can be done in
the information window. See picture below.
• Remembers last visited page and job when returning to the Job Library menu.
• Any stored print job can be selected by tapp ing it and can be printed any time from th e Job
Library. The selected job is highlighted with red.
• Can swipe on the touchscreen or use the scroll bar for paging whe n paging is enabled
in the HOME > Settings > User Preferences menu. See “Settings menu” on page 63.
Icon Description
Print selected print job
Number of copies
Print from a certain page number
T2-C User Guide 79
Page 80
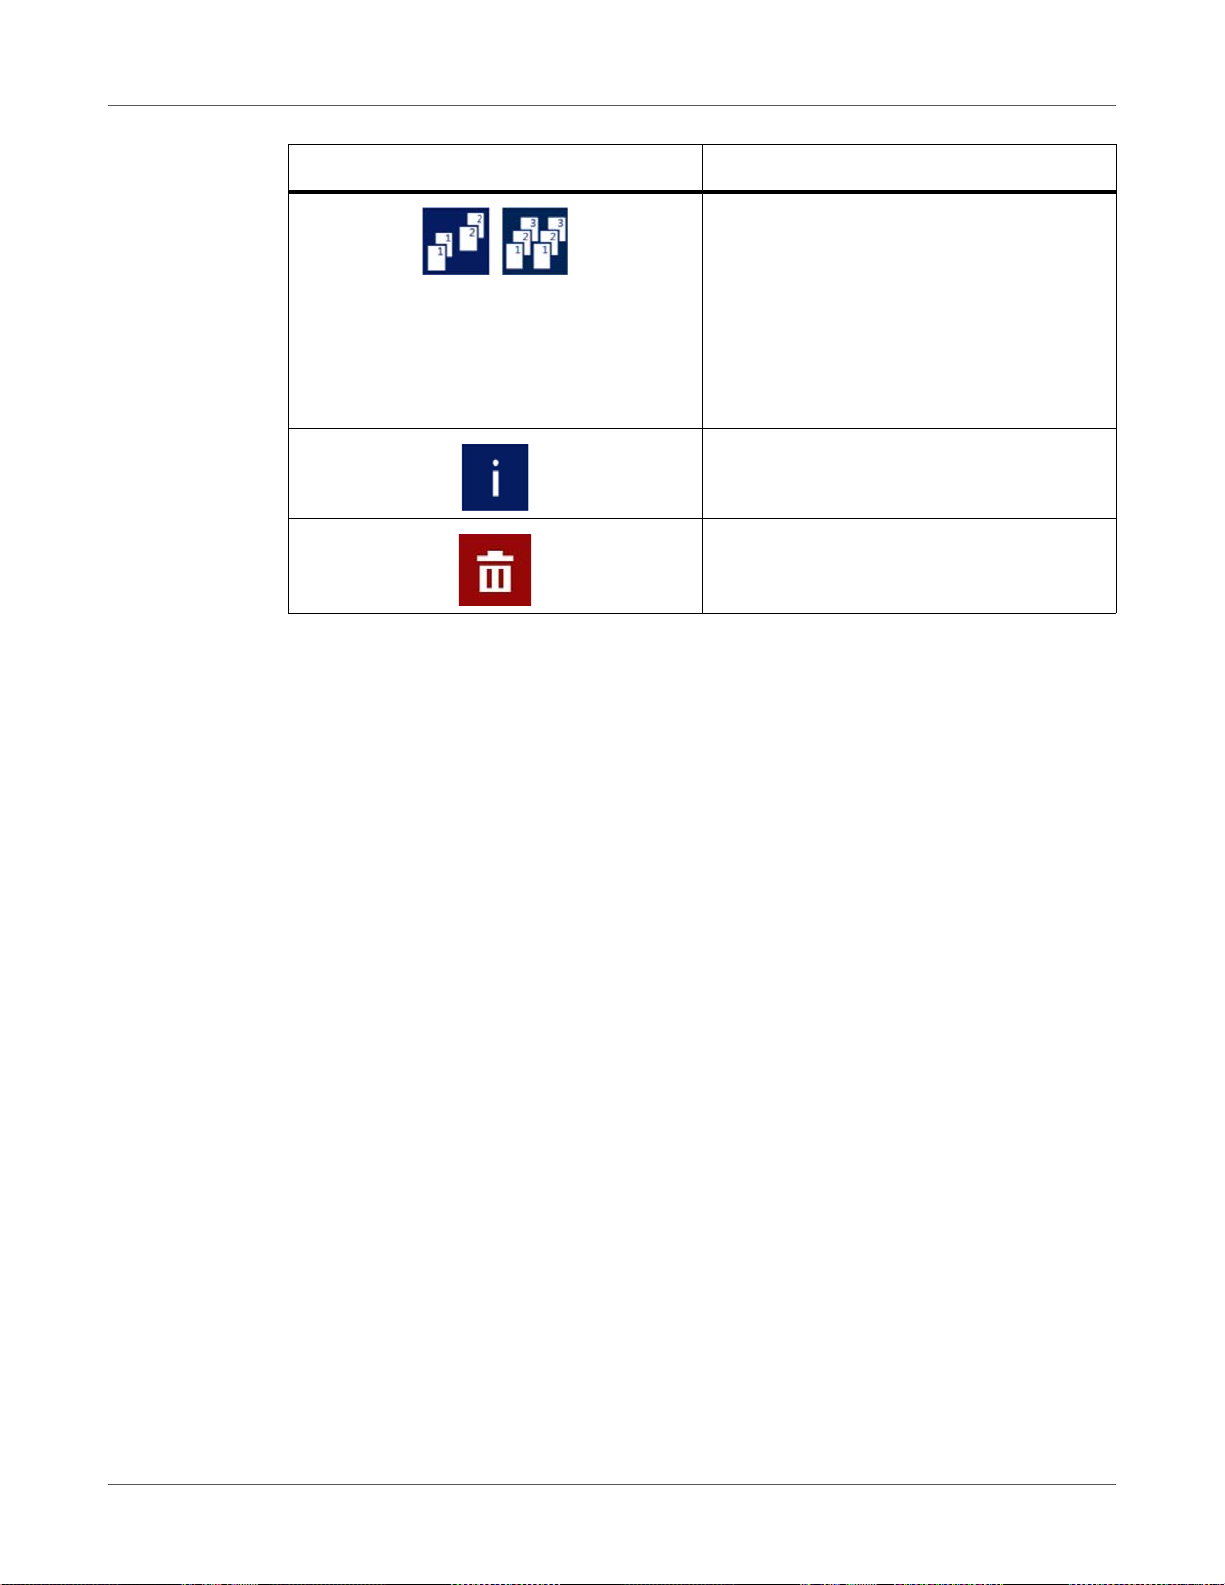
User Interface (UI)
Icon Description
Collate options
Describes the printing order when printing a
multi-page file:
1 Copies of a page are printed one a fter the
other within a print job.
2 Copies of pages are printed in sequential
order within a print job.
Information from selected print job
Delete the selected print job
Example: The number of copies is set to 1000, but the user wants to print from page 560 to
1000. Then the value 560 should be set for the print from certain page number field.
80 T2-C User Guide
Page 81
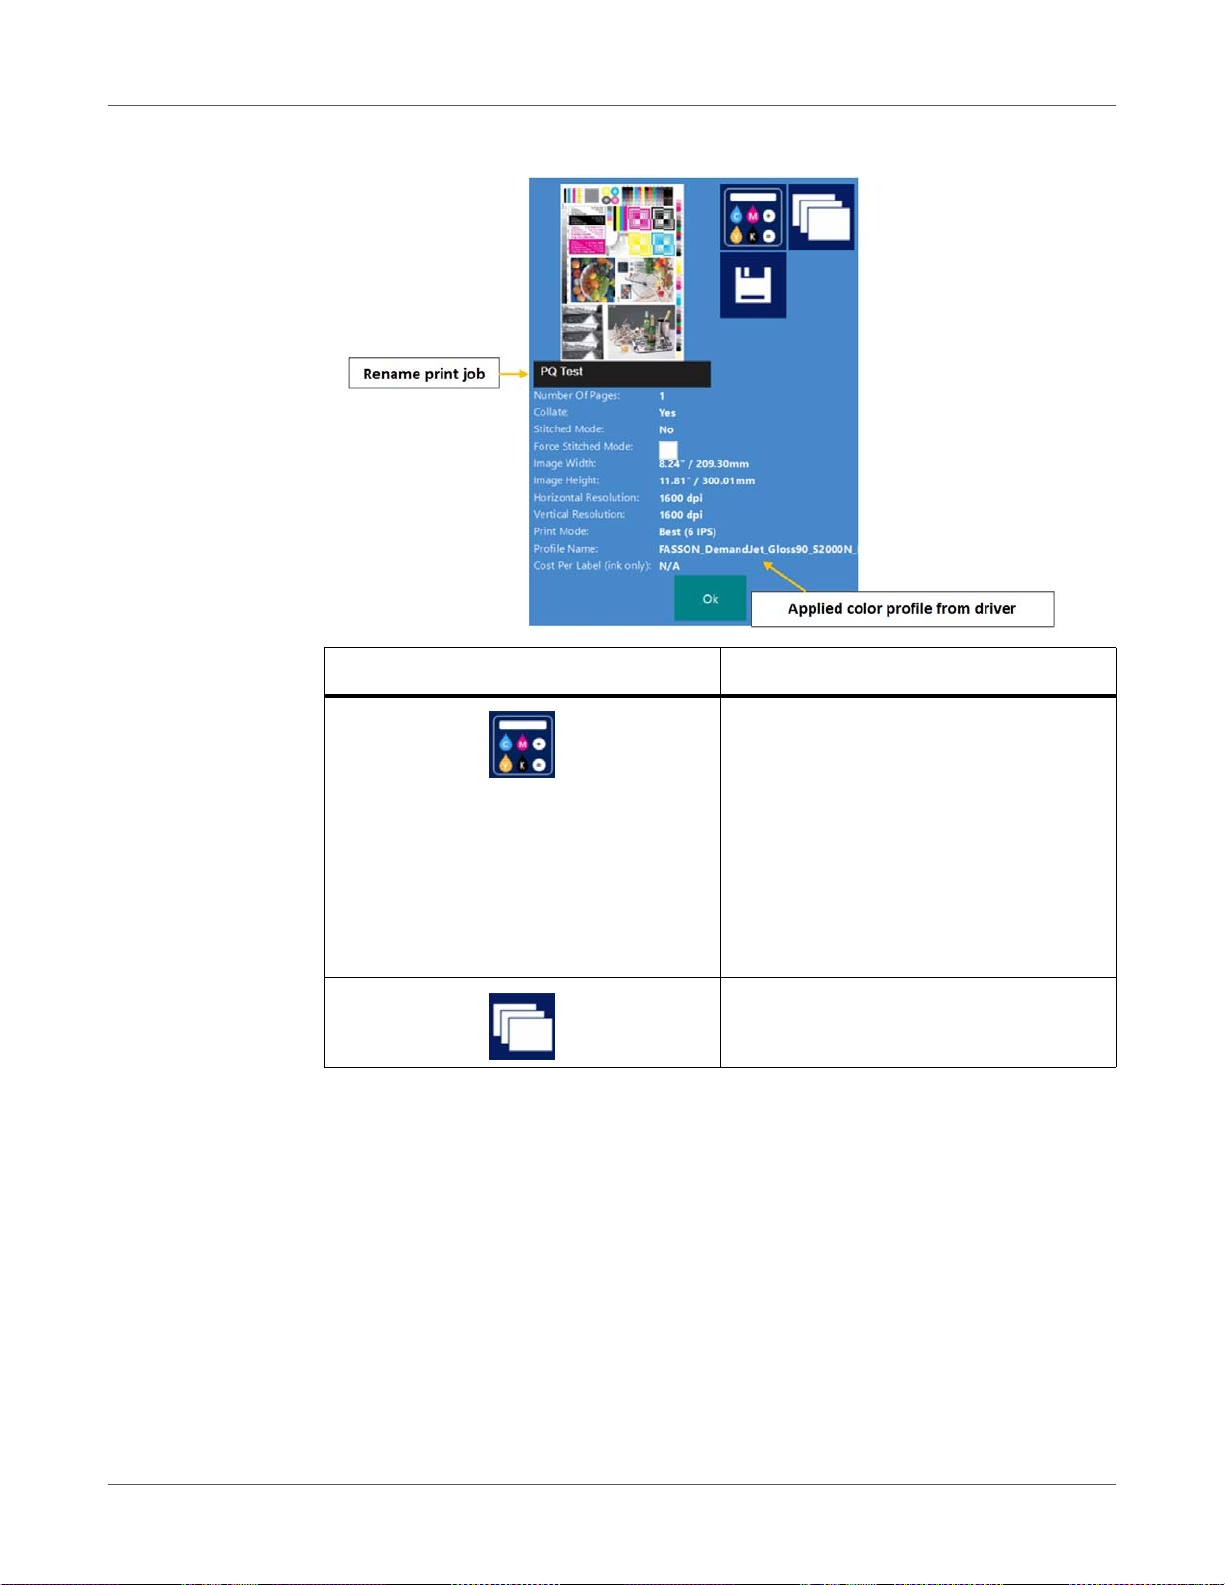
Information Button
User Interface (UI)
Icon Description
Cost/label calculation button
Pressing this button will simulate printing
(actual printing is not required) and
calculate the pure ink cost of printing 1
label from the particular print job. The
base of the calculation is the ink tank price
for a 2L ink tank (from the HOME >
Settings > Consumables menu) and the
estimated ink consumption for printing 1
label.
View preview images for the particular
print job
• Rename print job: Tap on the black field with the name of the actual print job to
rename it. Giving a unique name to a print job ensures that the particular print job will
not be deleted until the user wants to delete it. By default the new print jobs will get a
random name from the system with the date of sending and a random serial number.
Only 30 print jobs can be stored from these randomly named print jobs. The 31st
randomly named job will delete the 1st randomly named print job (FIFO system). The
reason for this is that it is assumed that until a print job is renamed, it can be very much
for testing only. However when renamed, the user confirms that the particular print job
is not for testing but to print as a production batch.
• Applied color profile: The color profile applied in the driver when the job was sent.
See “Driver features and functions” on page 56.
T2-C User Guide 81
Page 82
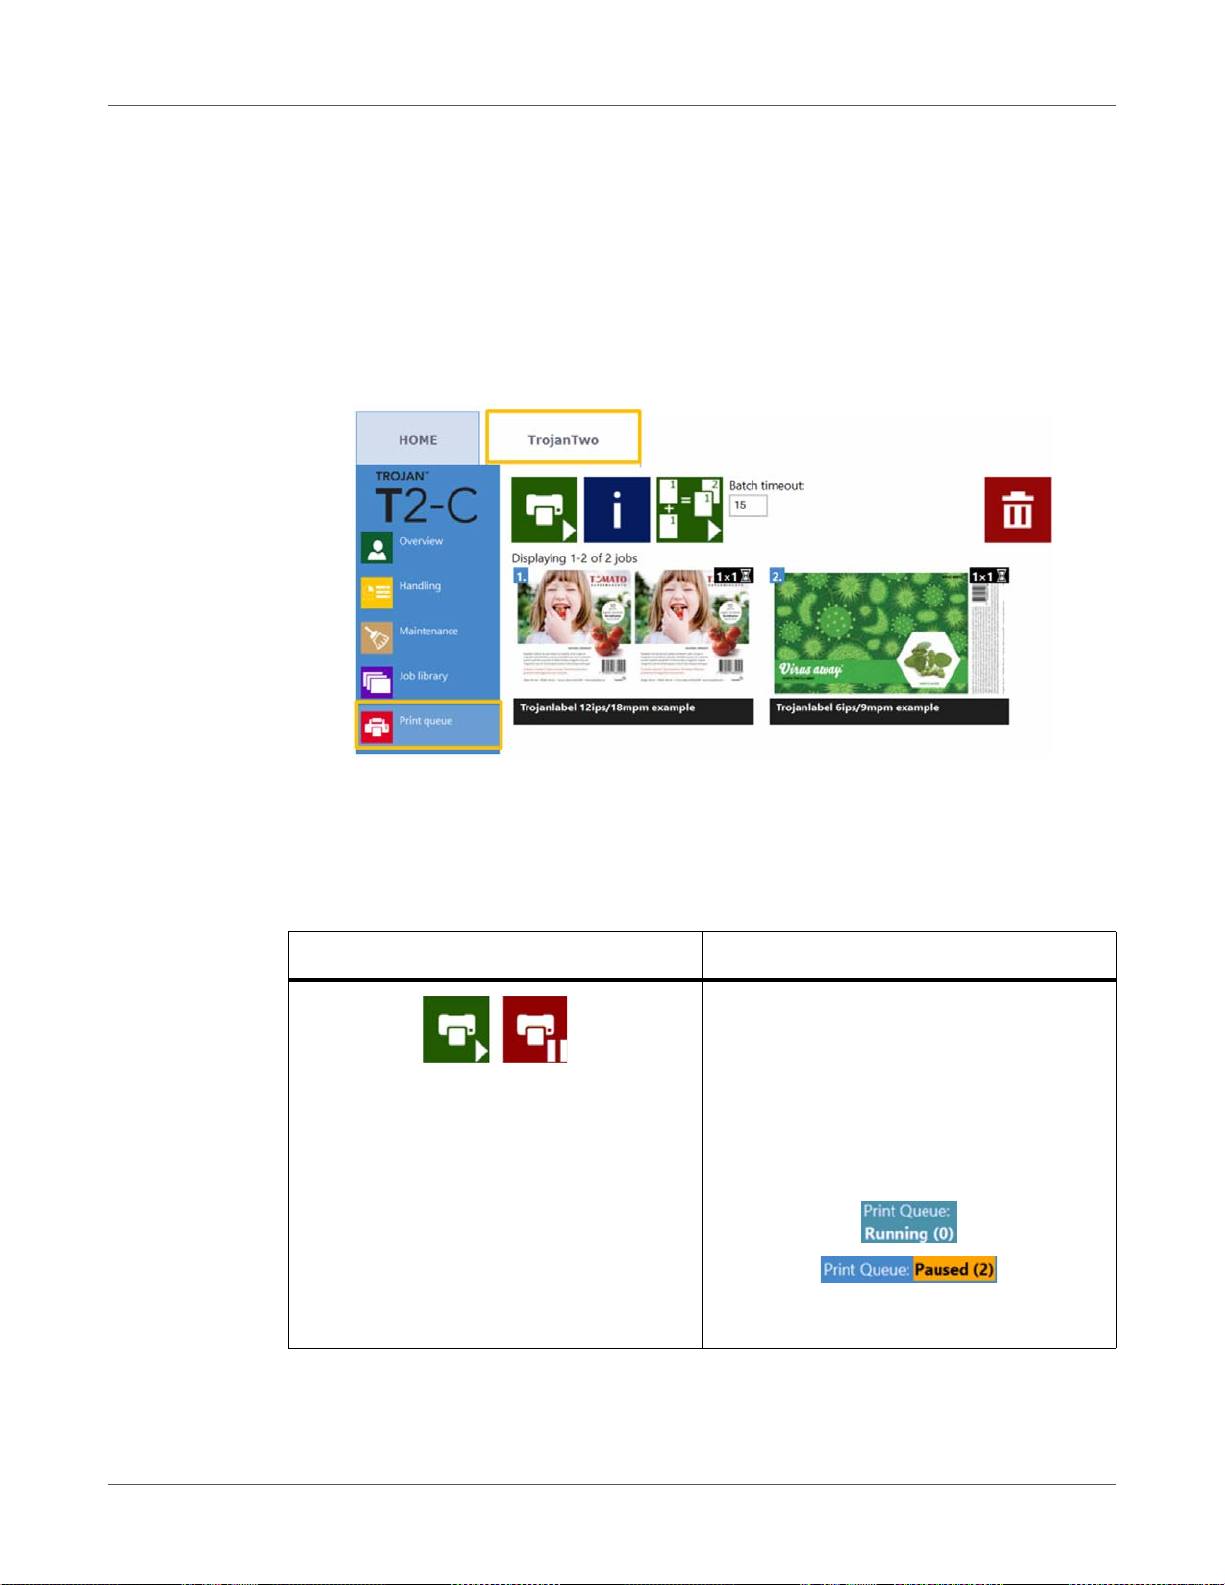
User Interface (UI)
• Force Stitch Mode checkbox: Normally Stitch mode can be enabled from the T2-C
driver. See “Driver features and functions” on page 56. However enabling the stitch
mode checkbox will create a stitch mode job from the actual print job when printed. This
function is useful when the job was sent from a RIP software where the stitch mode
option is not available.
Note: Press the save button when name of the print job is changed or when the force stitch
checkbox is selected to save the changes.
Print Queue menu
• Print jobs are queued progressively as they are sent and processed in a FIFO (first in first
out) system. The queue can be managed from the Print queue menu.
• The print queue is stored even if the T2-C press is restarted.
Note: The currently printing job in the queue cannot be deleted.
Icon Description
Pause/Resume Print Queue button
• While a print queue is paused, the print
jobs are pending in the queue and printing
only starts when the queue is resumed.
• The current print queue status (if running
or paused) is also always displayed in
right side status bar.
• The number in () indicates the number of
print jobs pending in the print queue.
82 T2-C User Guide
Page 83
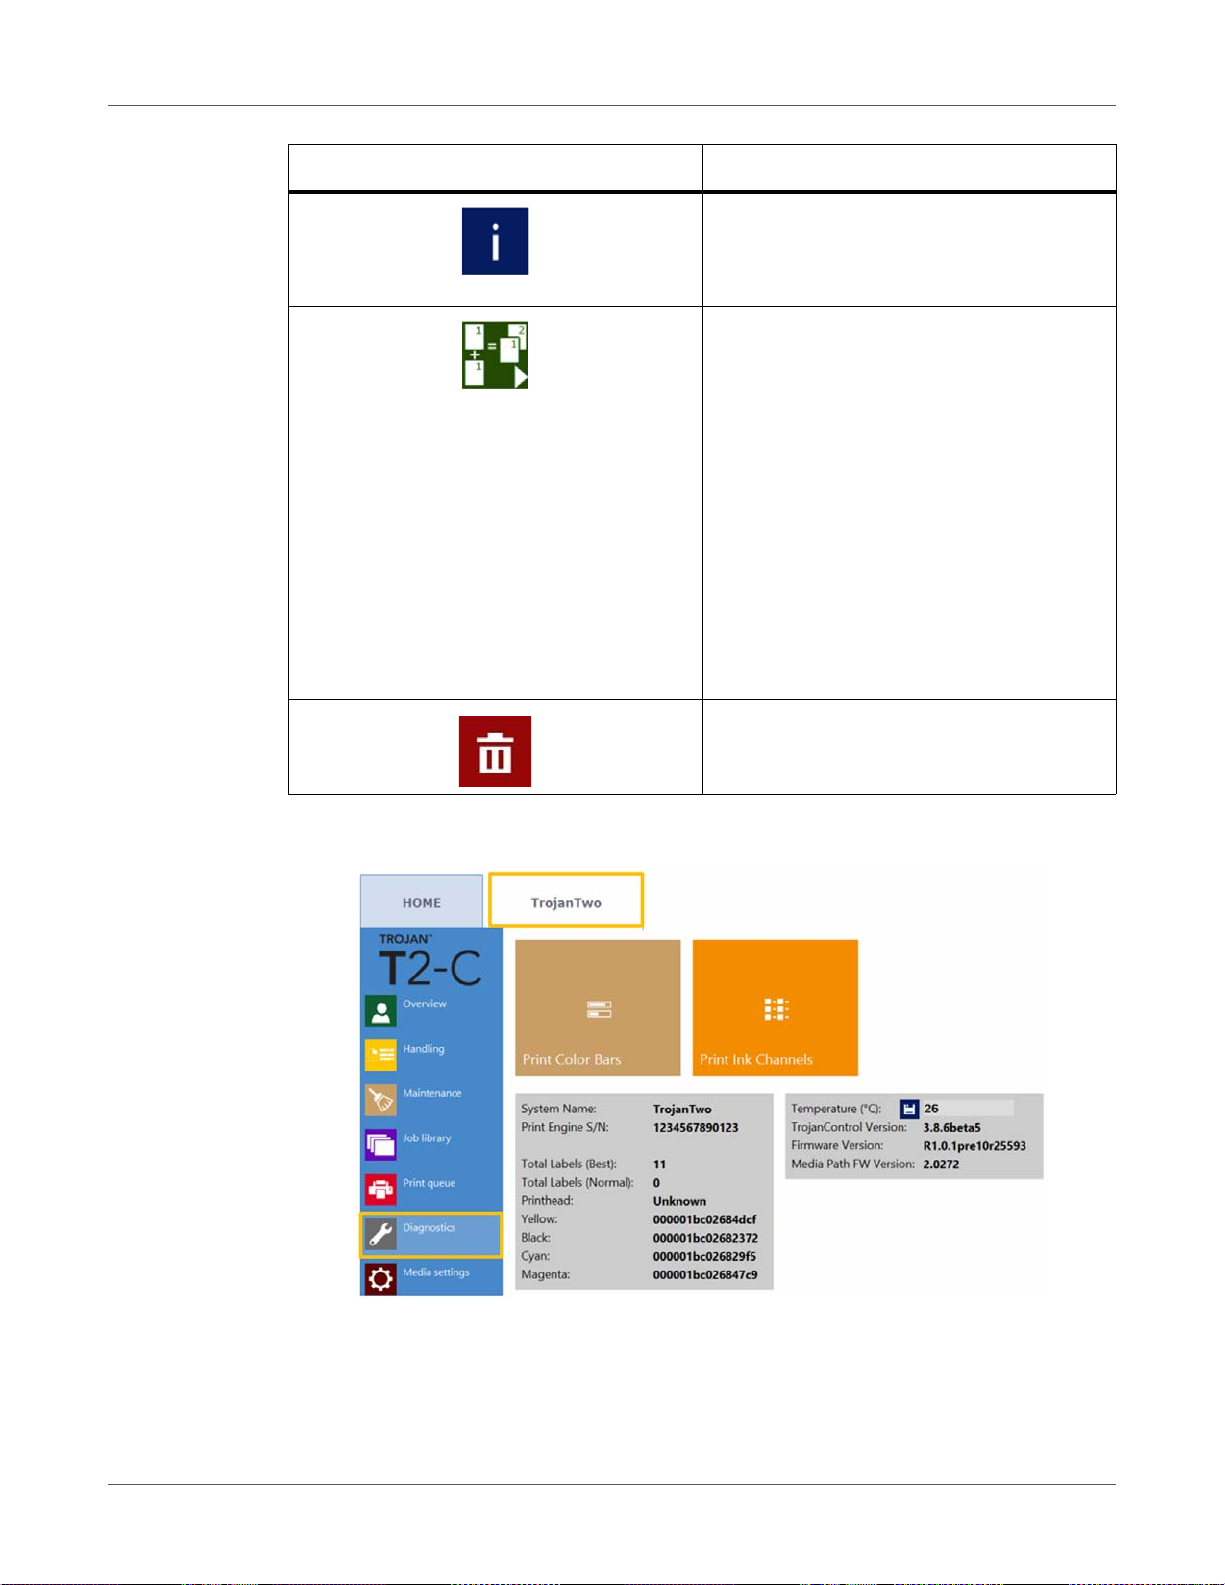
Icon Description
Information button
Same as in Job Library. See “Job Library
menu” on page 79.
Batch Mode on/off
• Batch mode means that all print jobs sent
within a defined timeout period will be
merged into 1 job and will be printed at
once when the timeout expires.
The timeout counter begins when batch
mode is switched on. When the timer
expires, a new print job appears in the
print queue and Job Library, which
includes all the jobs that were sent during
the timeout period.
• Bath mode timeout: Period of time in
seconds while jobs are merged together
when batch mode is on.
User Interface (UI)
Diagnostics menu
Delete the selected print job
• Information about software, firmware, serial numbers and total label counter.
T2-C User Guide 83
Page 84
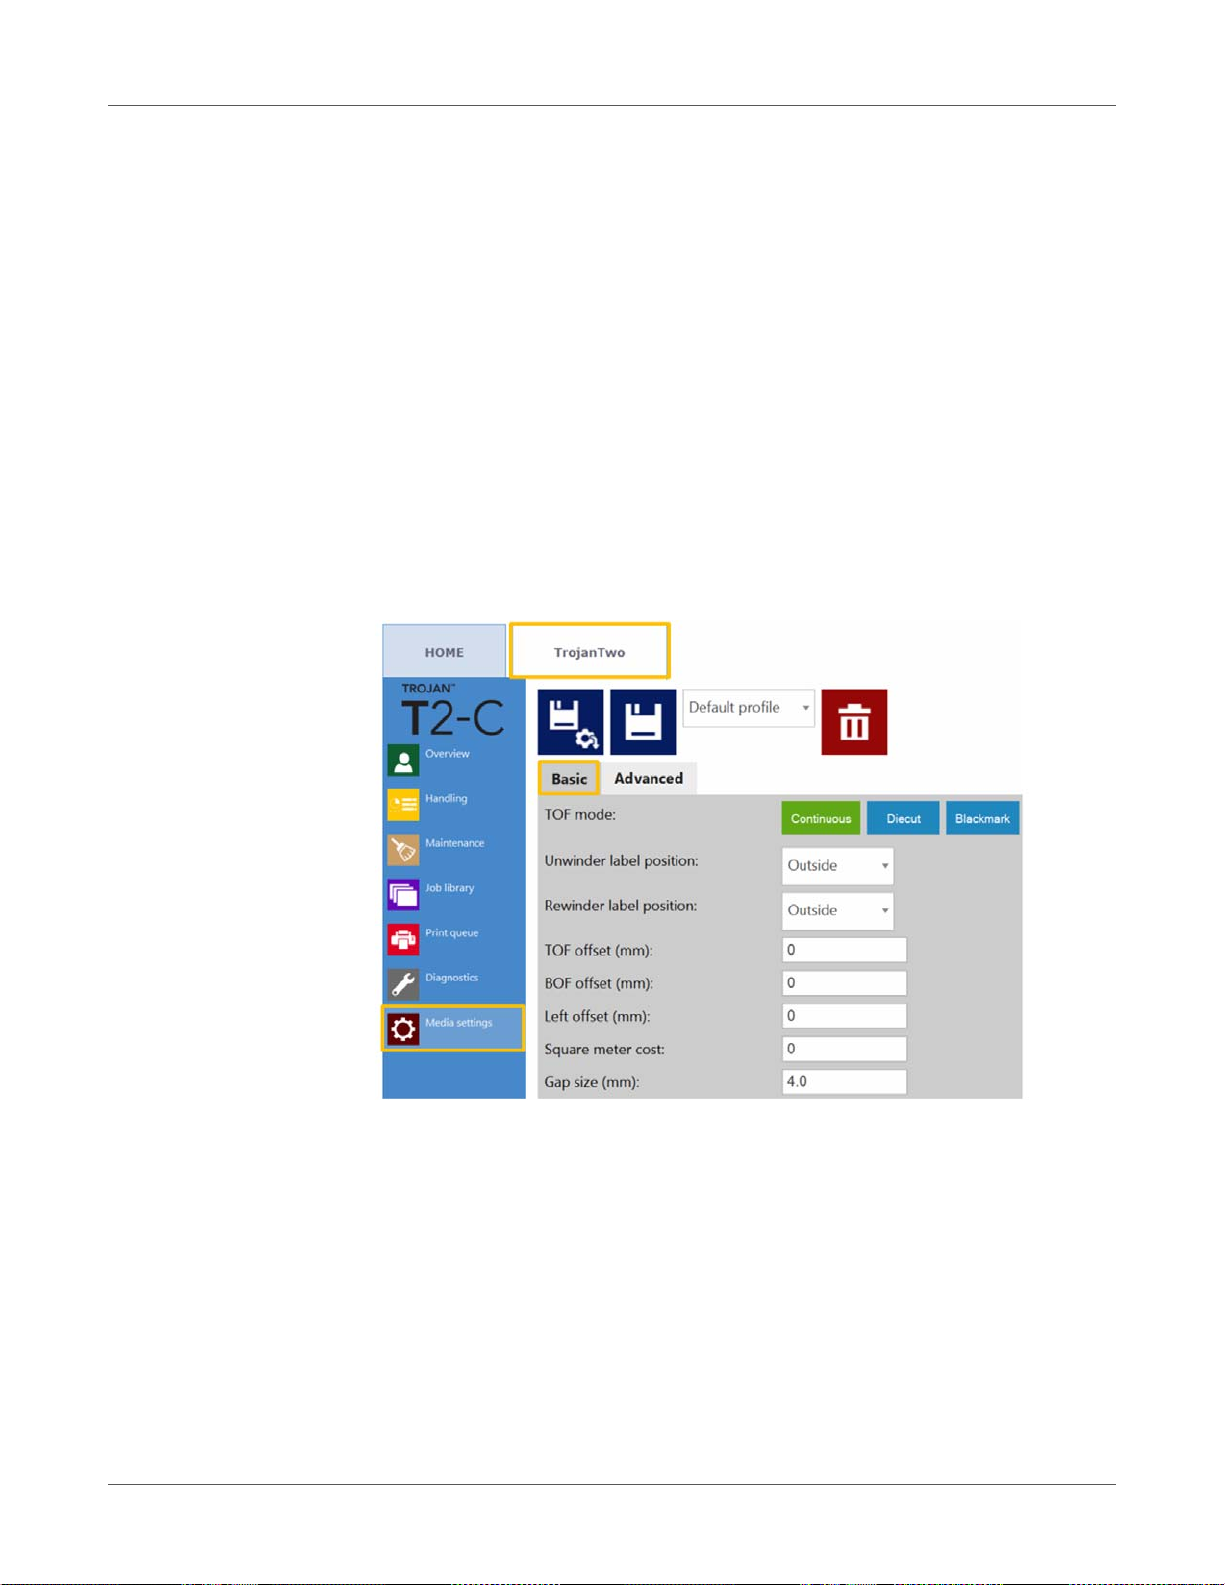
User Interface (UI)
• Temperature: Adjusting ink temperature to room temperatur e for the best print quality. The
average temperature of the room where the T2-C press is set up is displayed in the
temperature field based on the feedback of th e built in temperature sensor. Heating the ink
right before printing will be adjusted to the environmental temperature. This field is filled
automatically based on the temperature sensor but can be overwr itten by the user.
Note: User defined temperature value remains valid only until the next reboot.
• Color Bars: Standard color bars for checking printhead nozzles, mixes CMYK colors (A4
size).
• Ink Channels: Printing a color bar with each ink channel, no ink mixing (CMYK - A4 size).
Important: The ink channels test plot is the best diagnostic tool to verify the current state
of the printhead nozzles. If there is any blocked/dehydrated nozzle or other nozzle defect,
then this can be clearly seen on this diagnostic page.
Media Settings menu
Media Settings Basic
• TOF mode: TOF (Top Of Form) has to be set according to the applied label medi a type:
Continuous (continuous roll, no gaps between labels).
Diecut (gaps between labels, the labels are pre die-cut on the liner).
Blackmark (pre-printed blackmarks on the media, blackmarks can be outside or inside
on the roll).
• Unwinder label position: Inside/Outside. Unwinder is rotating according to printing
inside or outside of the label roll.
• Rewinder label position: Inside/Outside. Rewinder is rotating according to printing
inside or outside of the label roll.
84 T2-C User Guide
Page 85
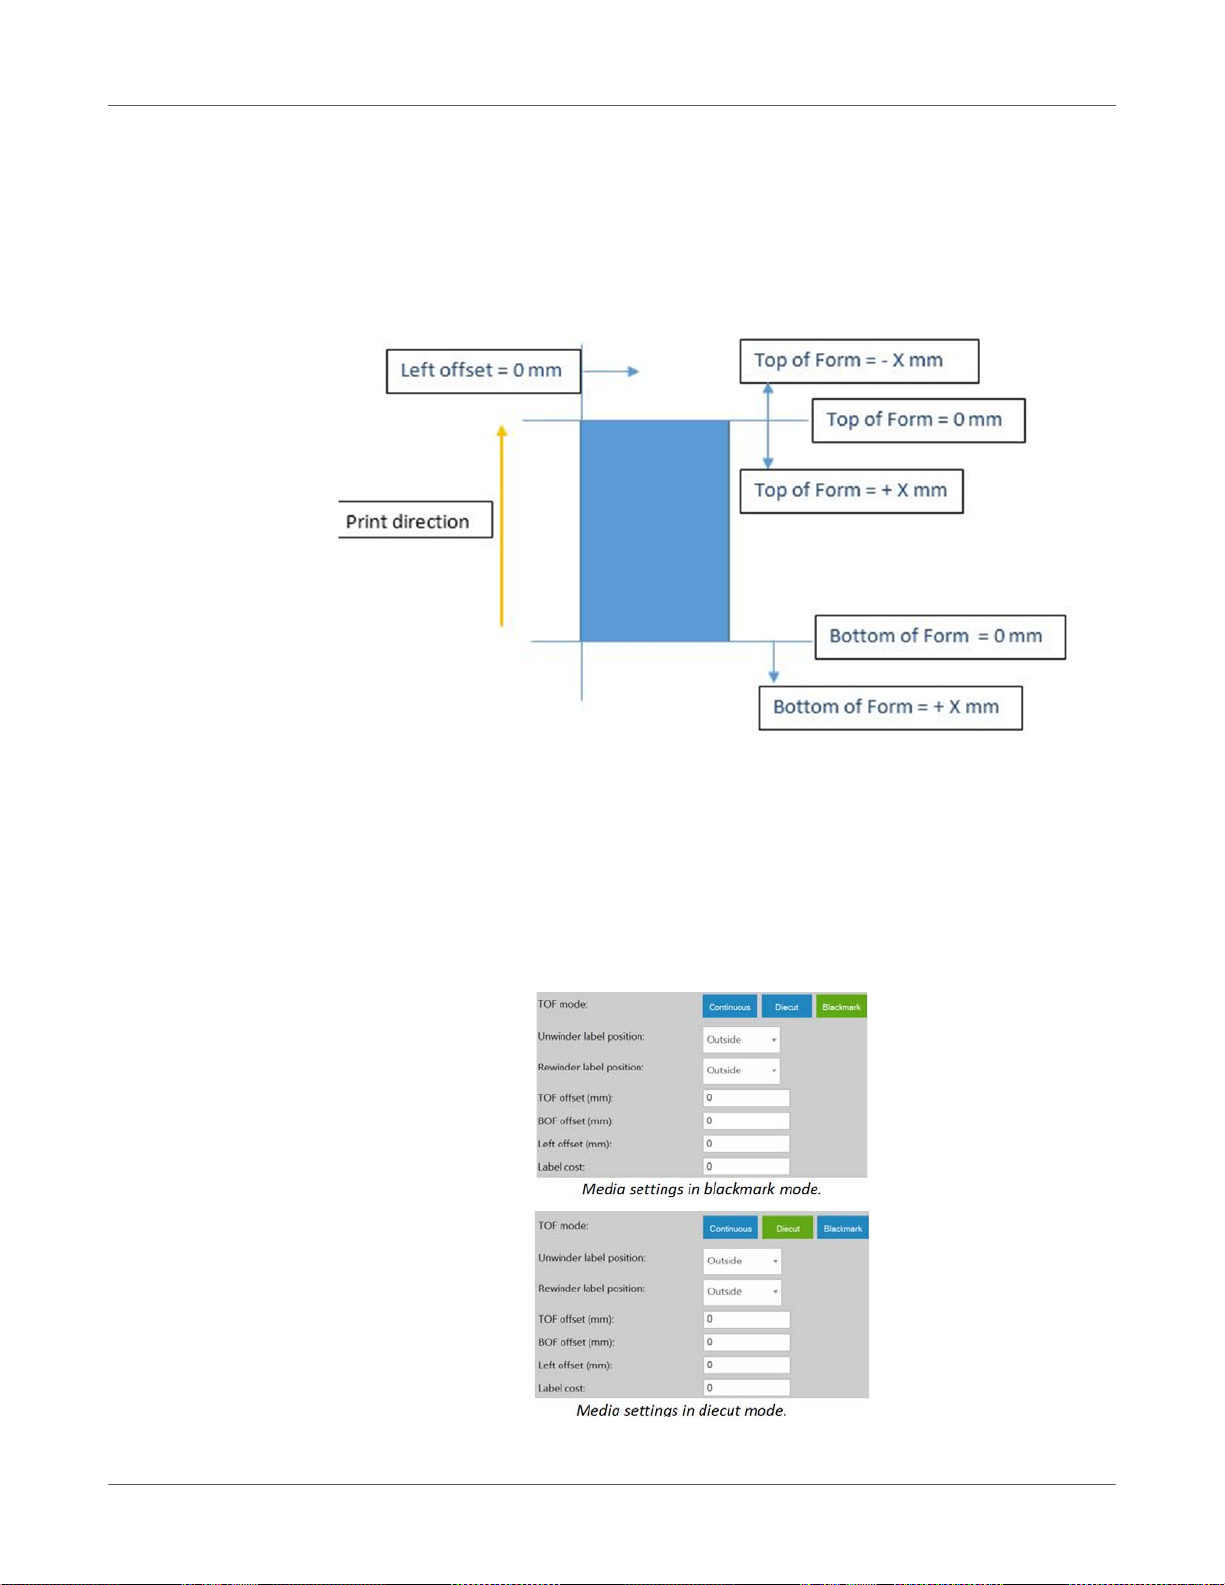
User Interface (UI)
• TOF offset (mm): Top Of From (top of label) can be +/- depending on m oving the top
of the image up or down on label. NOTE: limits -160mm to +160mm
• BOF offset (mm): Bottom of Form (bottom of label) can be +/- depending on moving
the bottom of the image up or down on label. NOTE: limits 0mm to 100mm
• Left offset (mm): Move printed image towards left or right comp ared to the left edge
of the printhead. NOTE: limits -127mm to 222mm
• Square meter/Label cost: Price of one label for die cut material. Square meter price
for Continuous and Blackmark label material. Used for total cost/label calculation . See
“Statistics menu” on page 70.
• Gap size: Setting the gap size between printed labels.
Note: Maximum gap is 65mm.
Note: Gap size field is only displayed if TOF mode is continuous. In diecut and
blackmark modes, the label eye sensor detects the label gaps/blackmarks.
T2-C User Guide 85
Page 86
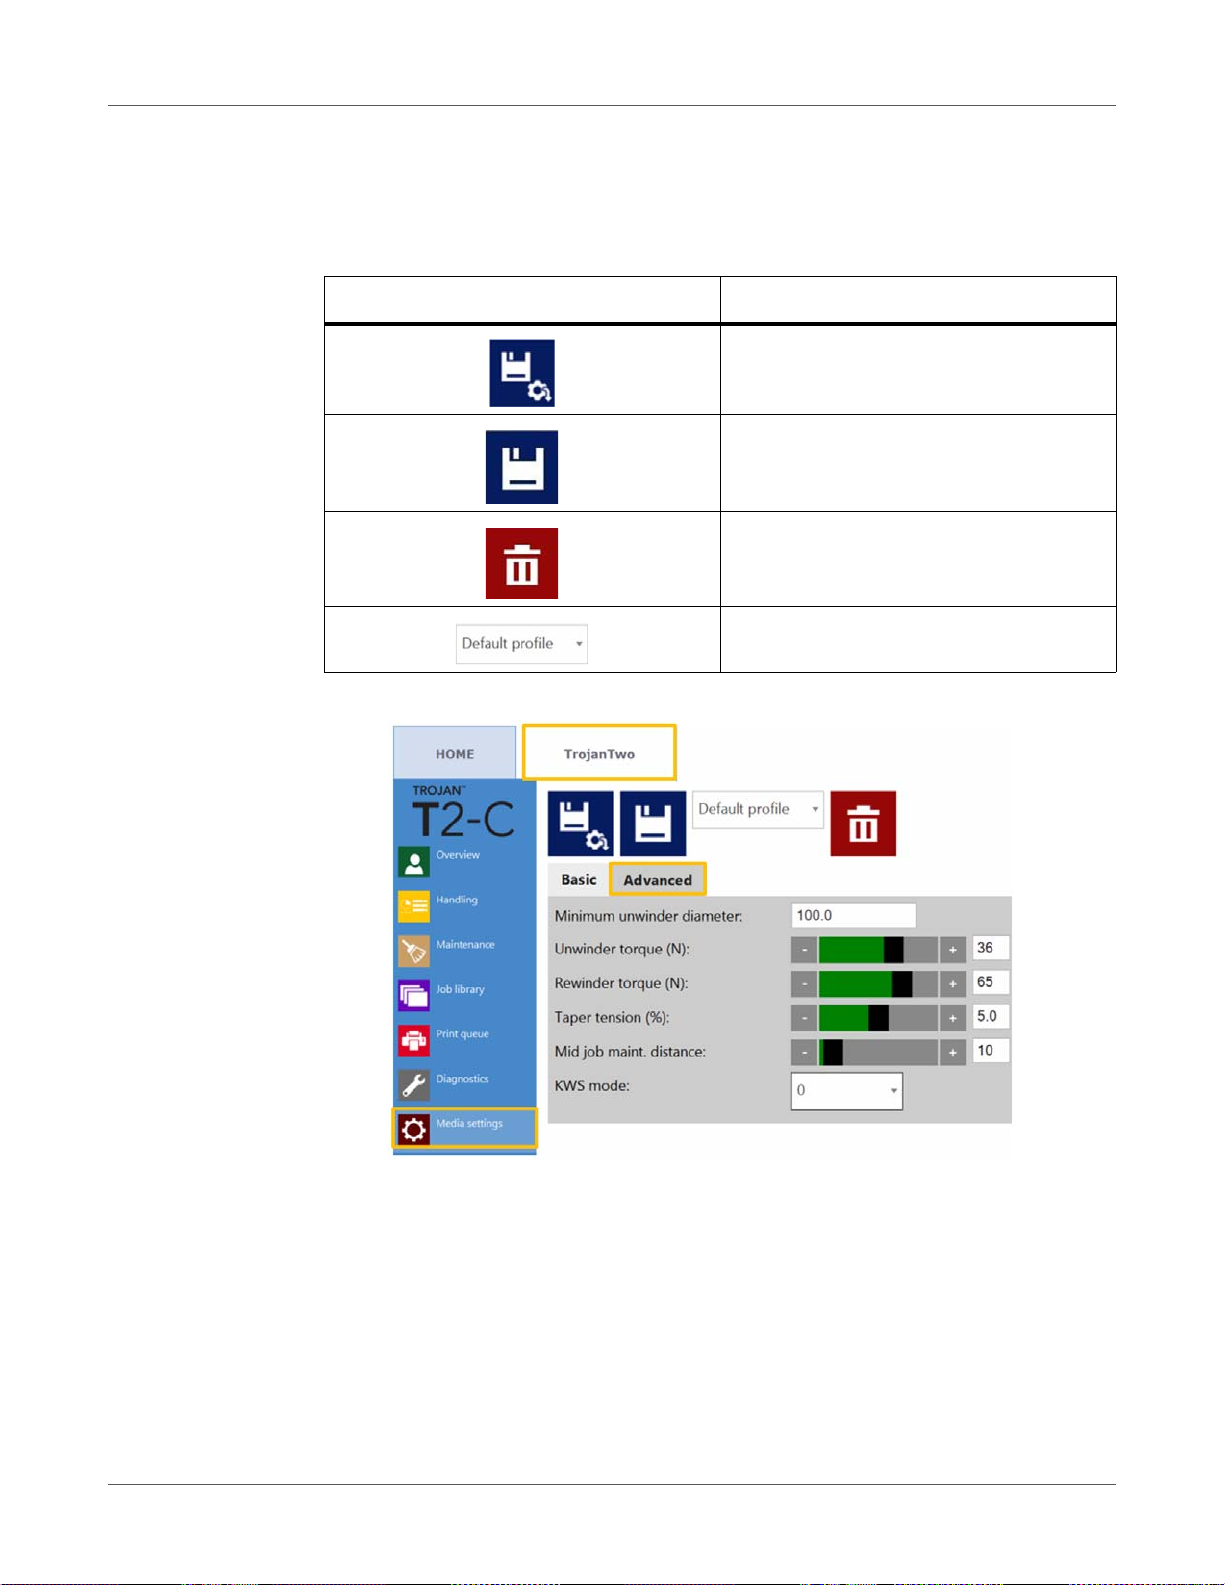
User Interface (UI)
Important: There is a minimum gap required to be able to print in continuous mode!
See “Gap size and speeds” on page 50.
Setting the gap size to 0mm in continuous mode will result in an error state. For gapless
printing use the stitch mode option. See “Driver features and functions” on page 56.
Icon Description
Save and apply
Save settings to a media profile
Delete a media profile
Media profiles list
Media Settings Advanced
• Minimum unwinder diameter (mm): When roll diameter reaches the minimum
unwinder diameter value, the printing will be paused and new label roll can be loaded
and spliced. This sensor setting is to avoid running out of label material during a print
job.
• Unwinder torque (N): Tension for the unwinder. Minimum value is 10, maximum value
is 50.
• Rewinder torque (N): Tension for the rewinder. Minimum value is 10, maximum value
is 85.
86 T2-C User Guide
Page 87

User Interface (UI)
• Taper tension (%): In winding systems, decreasing the unwinder tension while the
rewinder radius increases is called taper tension control. This makes unwinder tension
tighter while releasing some tension from the rewinder as the rewinder roll diameter
increases, thus avoid slipping of the label media. Minimum value is 0%, maximum
value is 10%. Recommended is 5%.
• Mid job maintenance distance (m): Setting mid-job mainten ance frequency in printed
linear meters. Mid-job maintenance is a full printhead ma inten ance dur ing p ro cessing
a print job to preserve the best print quality.
Note: Actual value is always displayed in the status bar on the screen.
• KWS mode: KWS = Keep Wet Spitting.
KWS is a function to protect the 70,400 printhead nozzles from dehydration. In practice
it means that during printing all nozzles fire some ink, even the nozzles which do not
take part effectively in printing. As a result, tiny (almost microscopic) dark spots of ink
can be seen on printouts, especially when the background of the printed image is light
in color. When those tiny spots are not acceptable from a print quality point of view, this
function can be reduced or switched off completely.
T2-C User Guide 87
Page 88
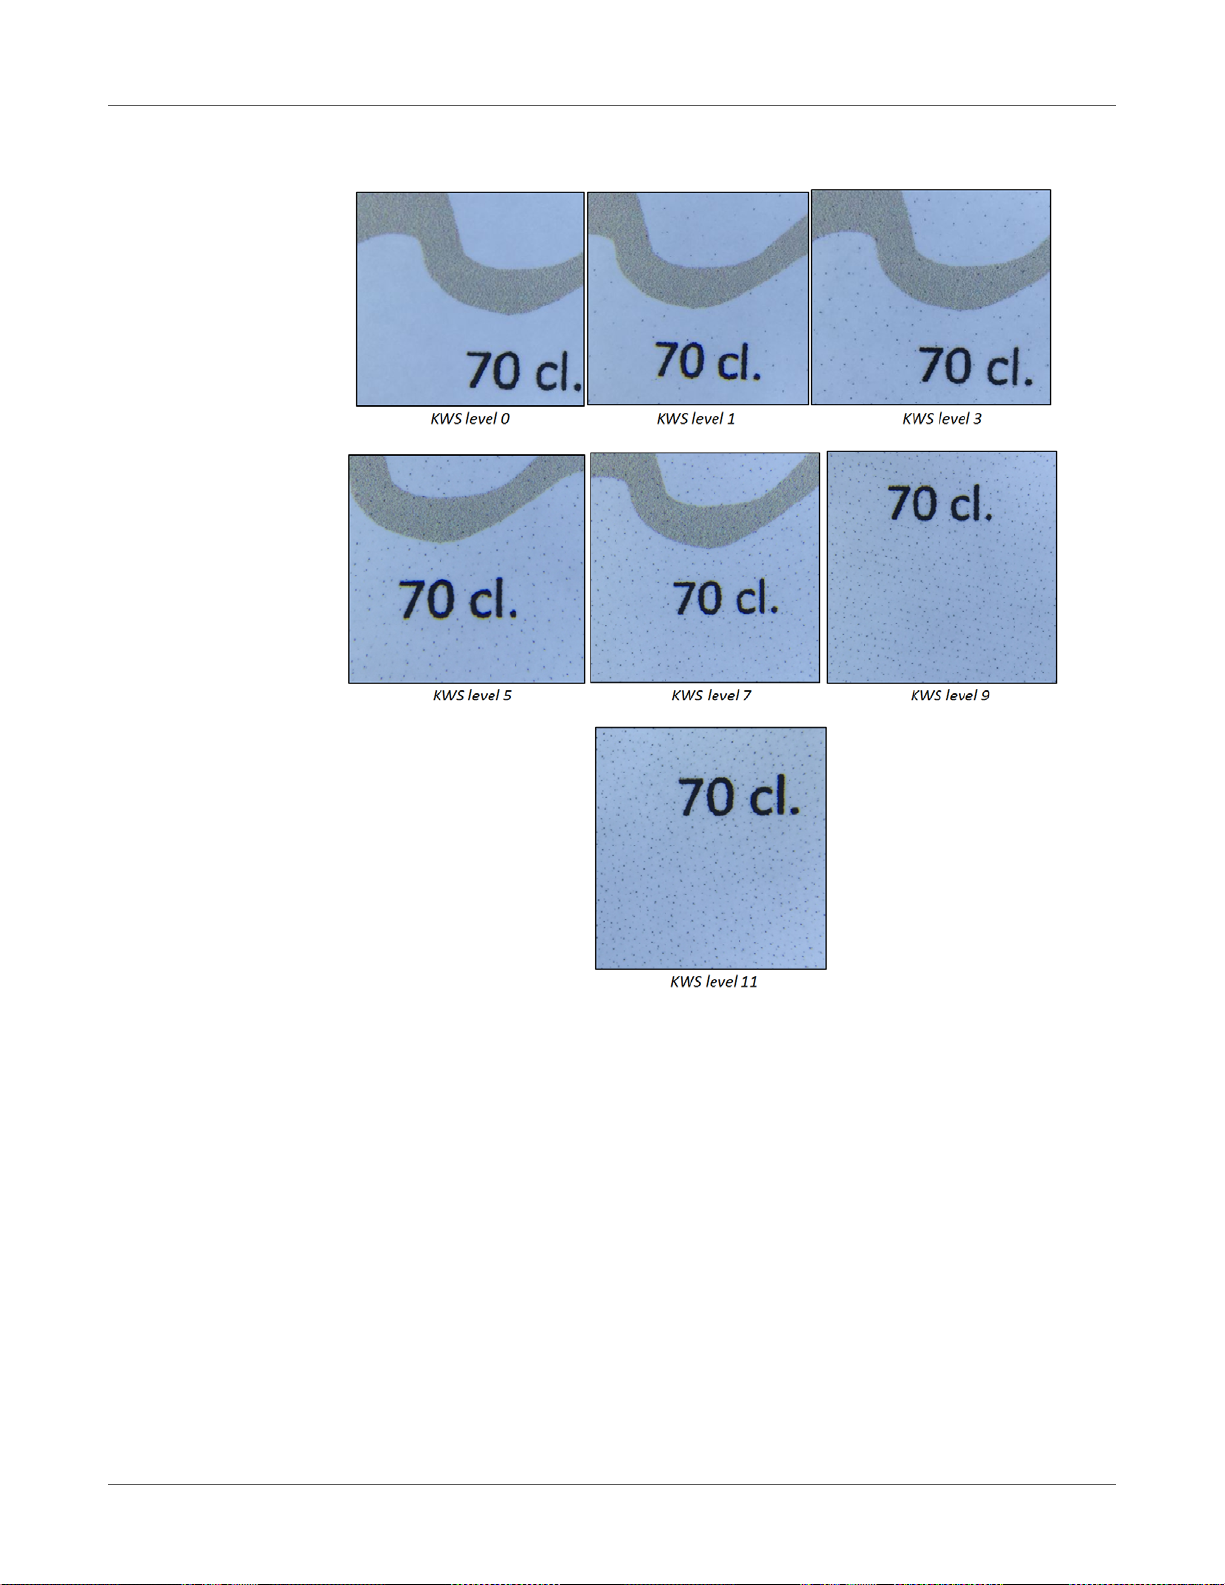
User Interface (UI)
• KWS levels
Warning: The degree of KWS has an effect on printhead life. The higher the KWS
level is set the more protection the printhead gets against dehydration of nozzles.
ALTHOUGH switching KWS off (0) does not result in loosing warranty for the printhead,
it is still advised to enable KWS and set it to a level where the small dots are still
acceptable in terms of print quality.
88 T2-C User Guide
Page 89
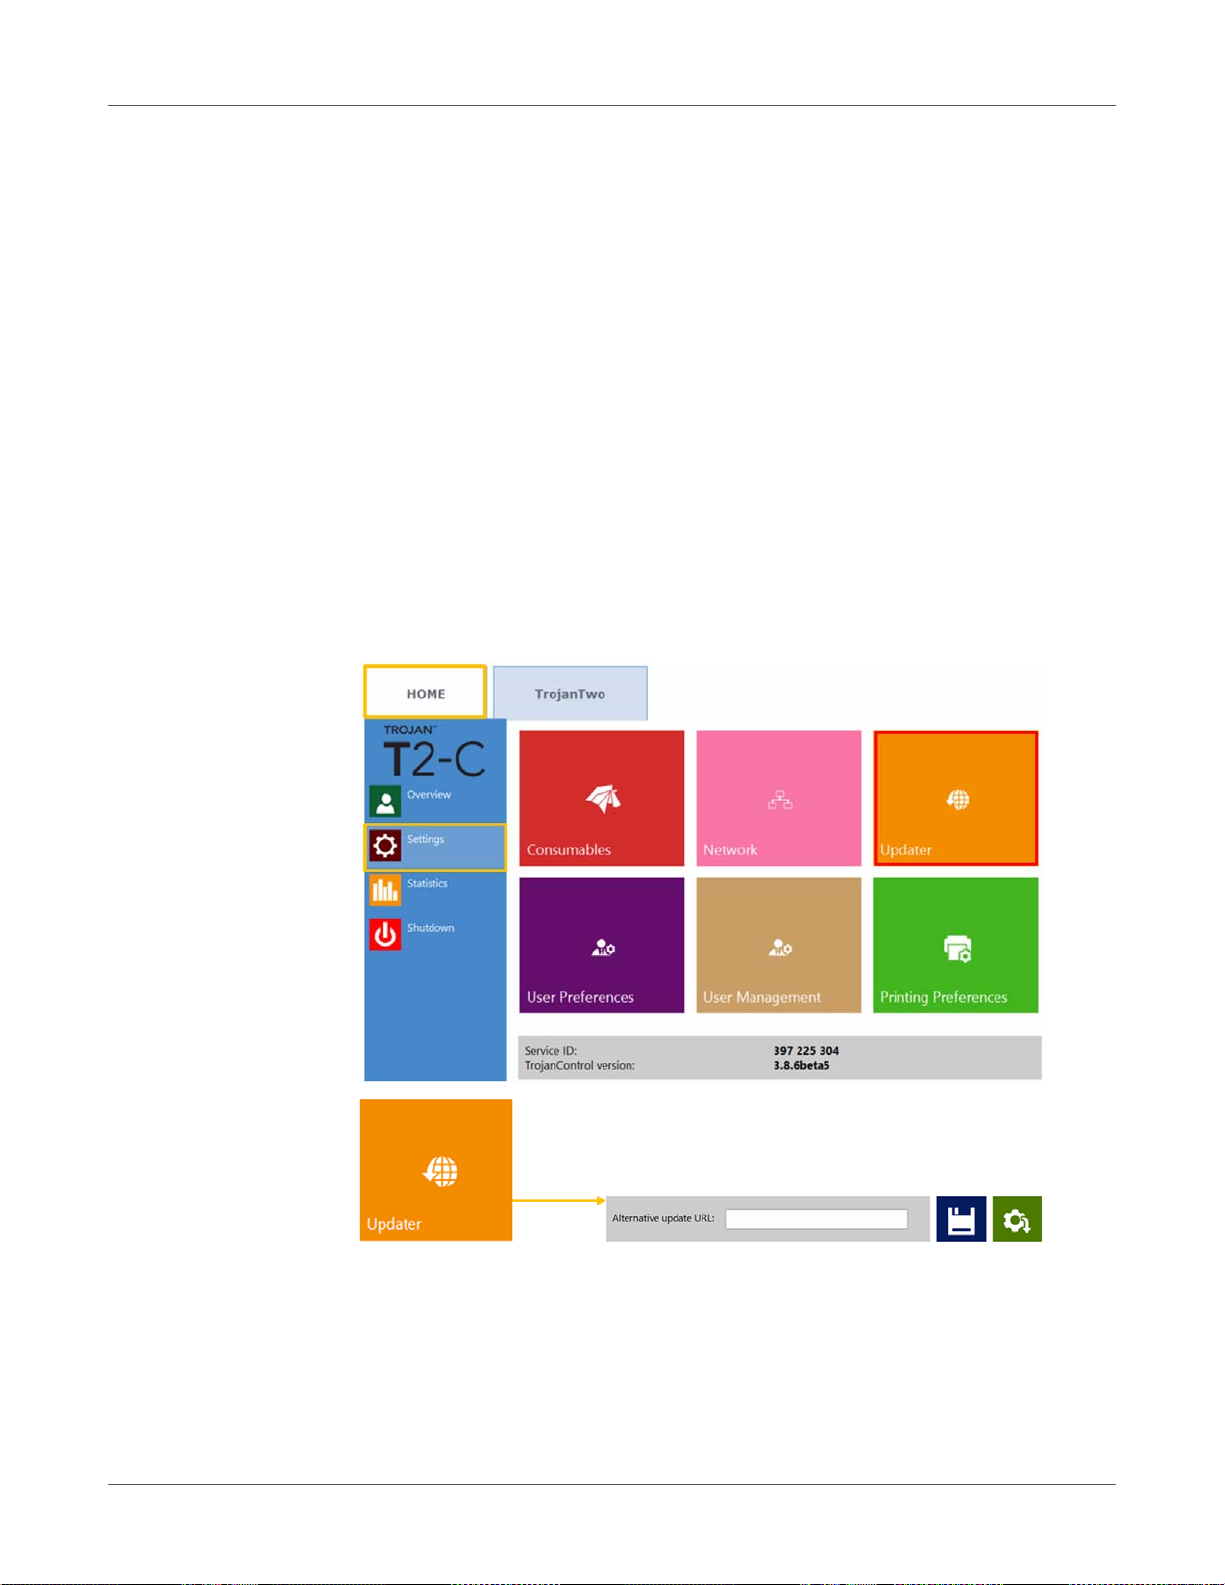
Updating software and firmware
12
Trojanlabel is regularly updating the Trojan Control interface and the firmware for the T2-C
press. Each time when a new update is available a newsletter or a technical bulletin is sent out
to customers.
• If an Internet connection is available for the T2-C press, then updating is done over the
Internet by just pressing the download button and going through the installation process.
• If an Internet connection is not available for T2-C press directly, then an offline update
package can be downloaded from our extranet site and updating can be done via the local
network.
Updating via the online updater
The updater option can be found in the HOME > Settings > Updater menu in the Trojan Control
interface. Actual software version can also be checked in the HOME > Settings menu.
1 Make sure the T2-C press is connected to the Internet.
2 Make sure that the Alternative update URL field is empty.
Note: The Alternate update URL field is reserved for customize d updates and for offline
updating.
3 Press the green download button.
T2-C User Guide 89
Page 90
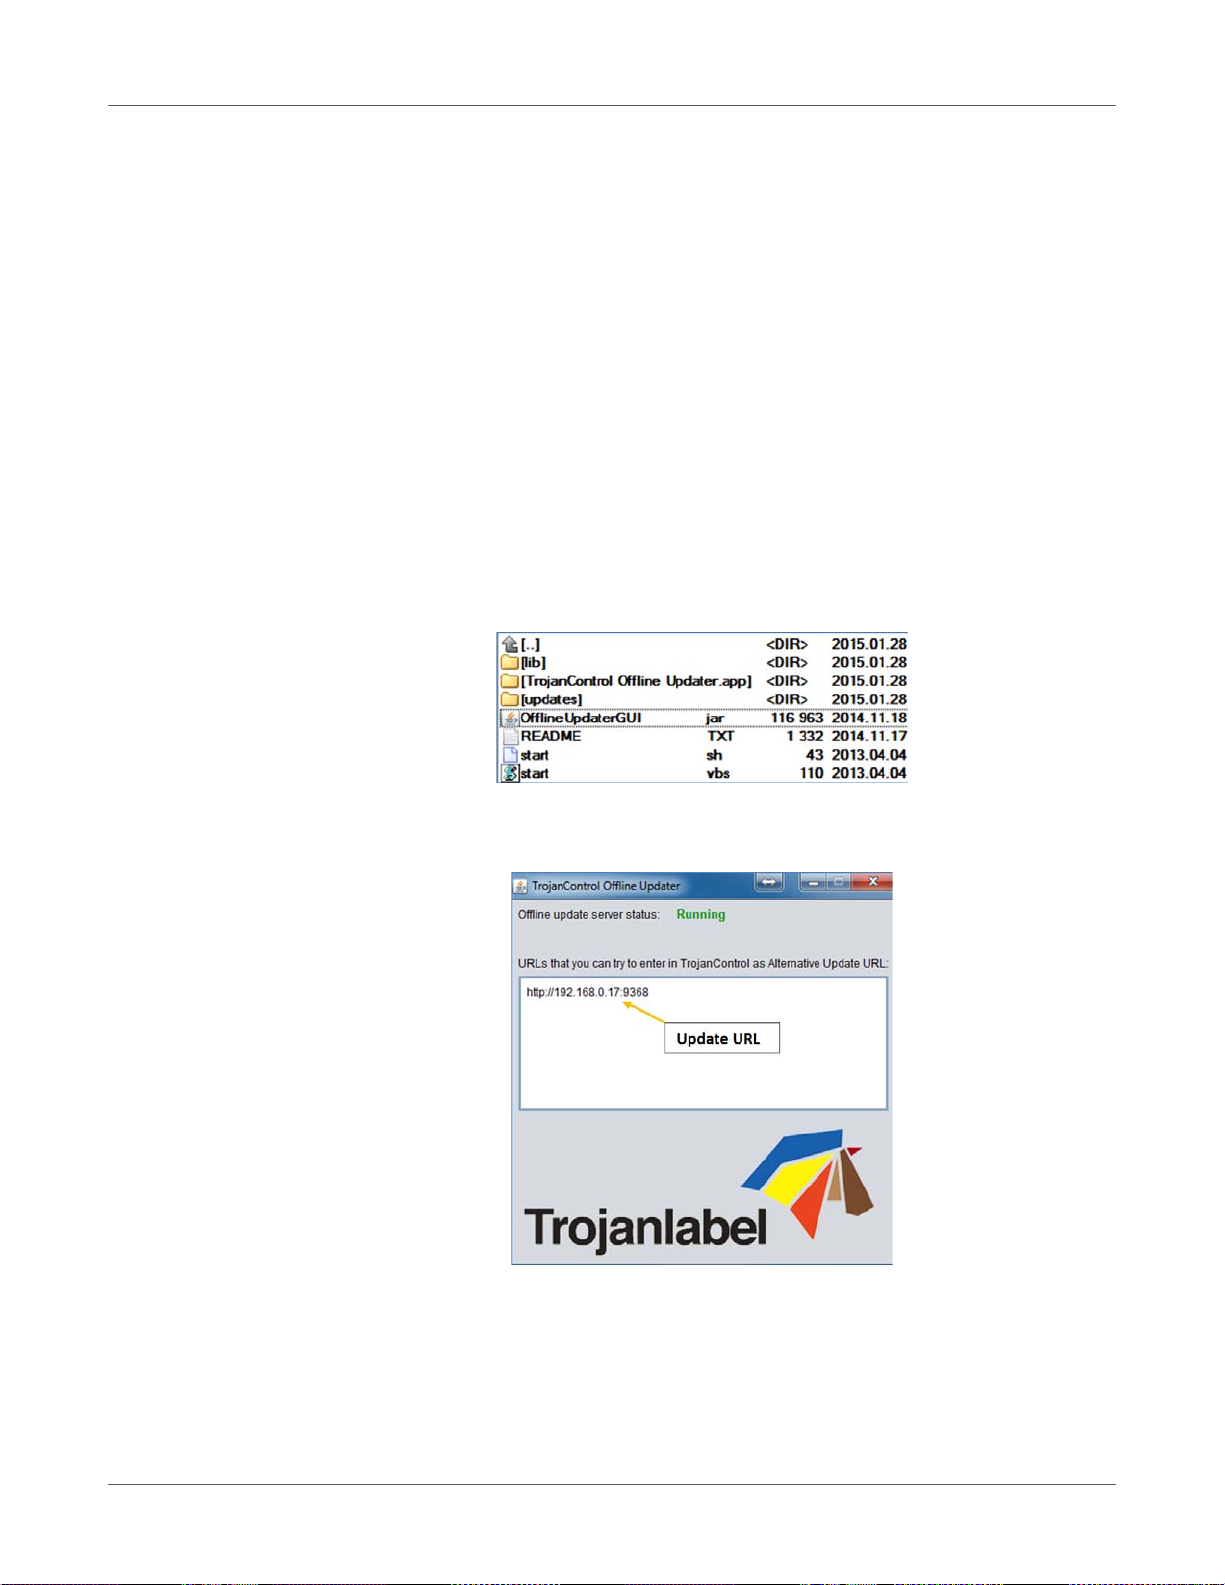
Updating software and firmware
4 Installation starts automatically.
5 Press the NEXT button when asked during the installation.
6 Check Trojan Control version number after installation.
Note: The Trojan Control may restart several times during the update process.
7 After updating the Trojan Control interface the updater detects the current fir mware version
and will start updating the firmware when needed.
Updating via the offline updater
1 The actual offline updater package can always be downloaded from the Trojanlabel
extranet site or acquired from the official Trojanlabel reseller.
2 Copy and unzip the updater package on a user PC which is connected to the same network
as the T2-C press.
3 Double click on OfflineUpdaterGUI.jar to start the update server.
4 The update server window will open. The window should be left open as long as the update
is going on.
5 The update server will provide an update URL (usually with the IP address of the certain
user PC).
90 T2-C User Guide
Page 91
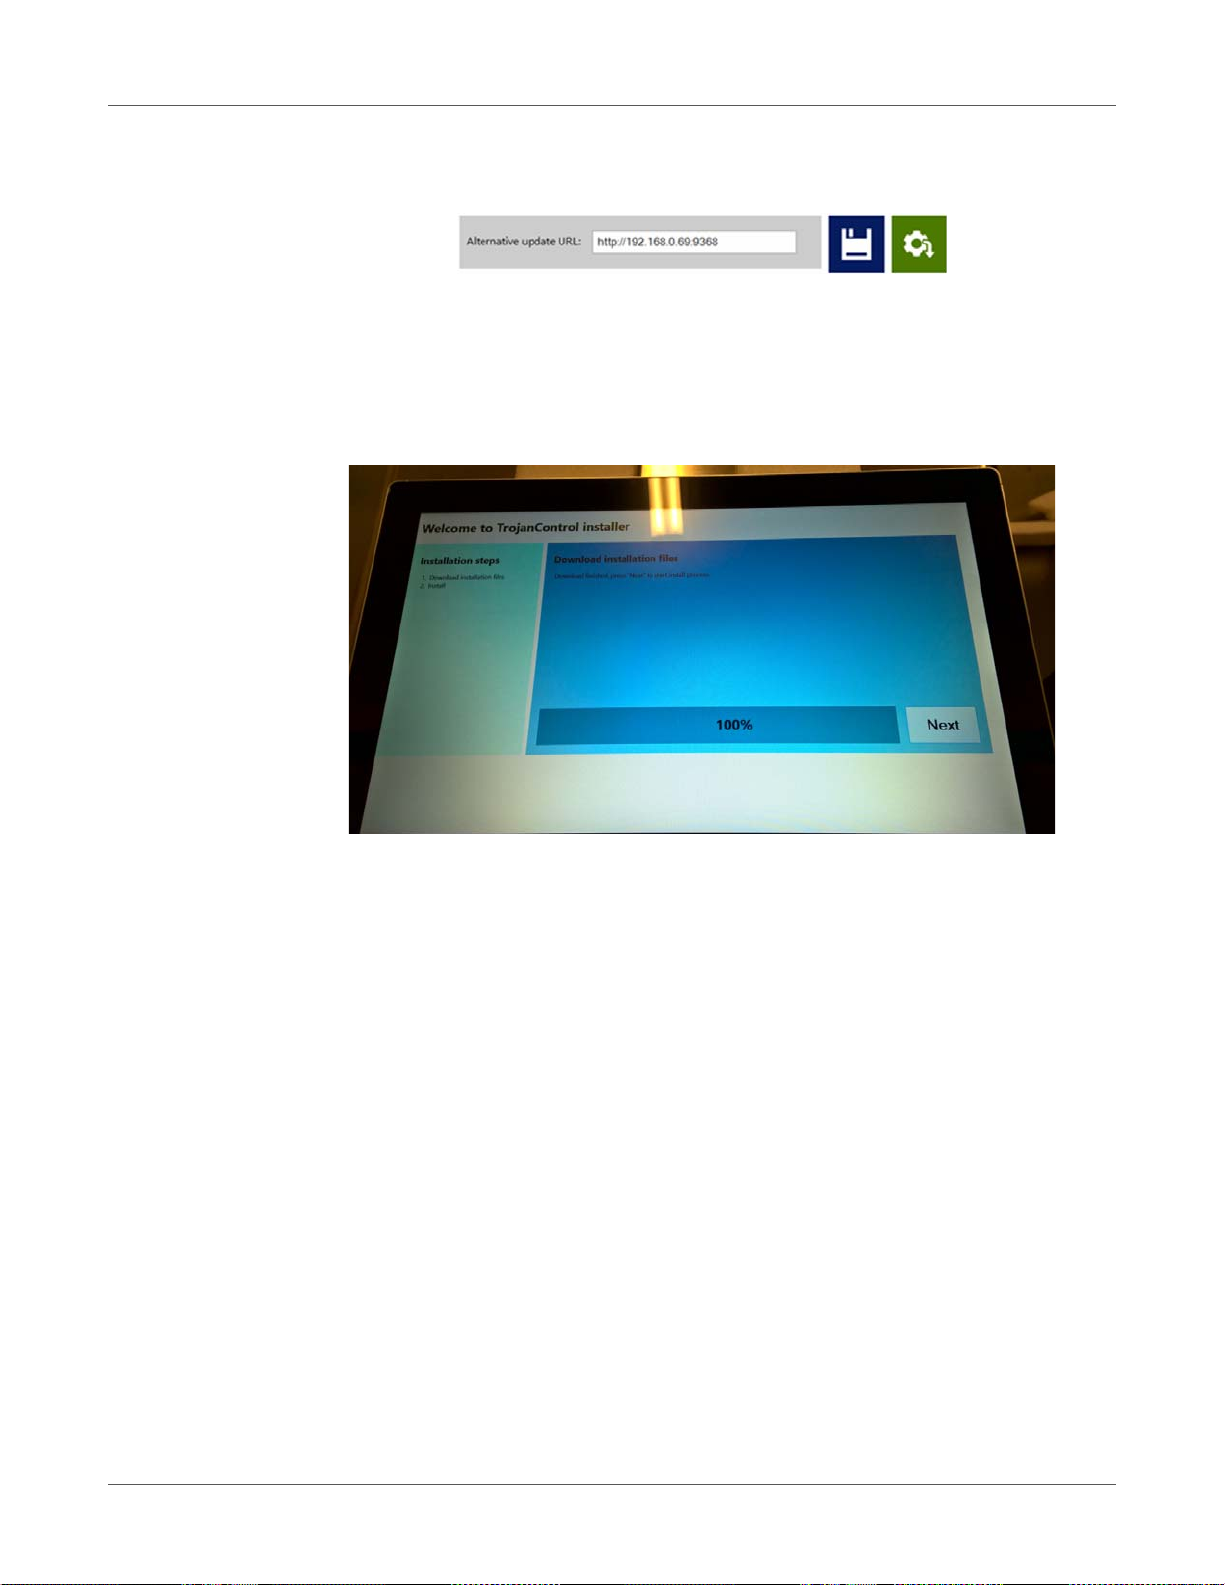
Updating software and firmware
6 Type the update URL into the HOME > Settings > Alternate update URL field and press
the save button:
7 Press the green download button.
8 Installation starts automatically.
9 Press the NEXT button when asked during the installation.
The update will appear similar to the following illustration of the TrojanTwo update process.
10 Check the Trojan Control version number after installation.
Note: The Trojan Control may restart several times during the update process.
11 After updating the Trojan Control interface the updater detects the current firmware version
and will start updating the firmware when needed.
T2-C User Guide 91
Page 92

Updating software and firmware
92 T2-C User Guide
Page 93
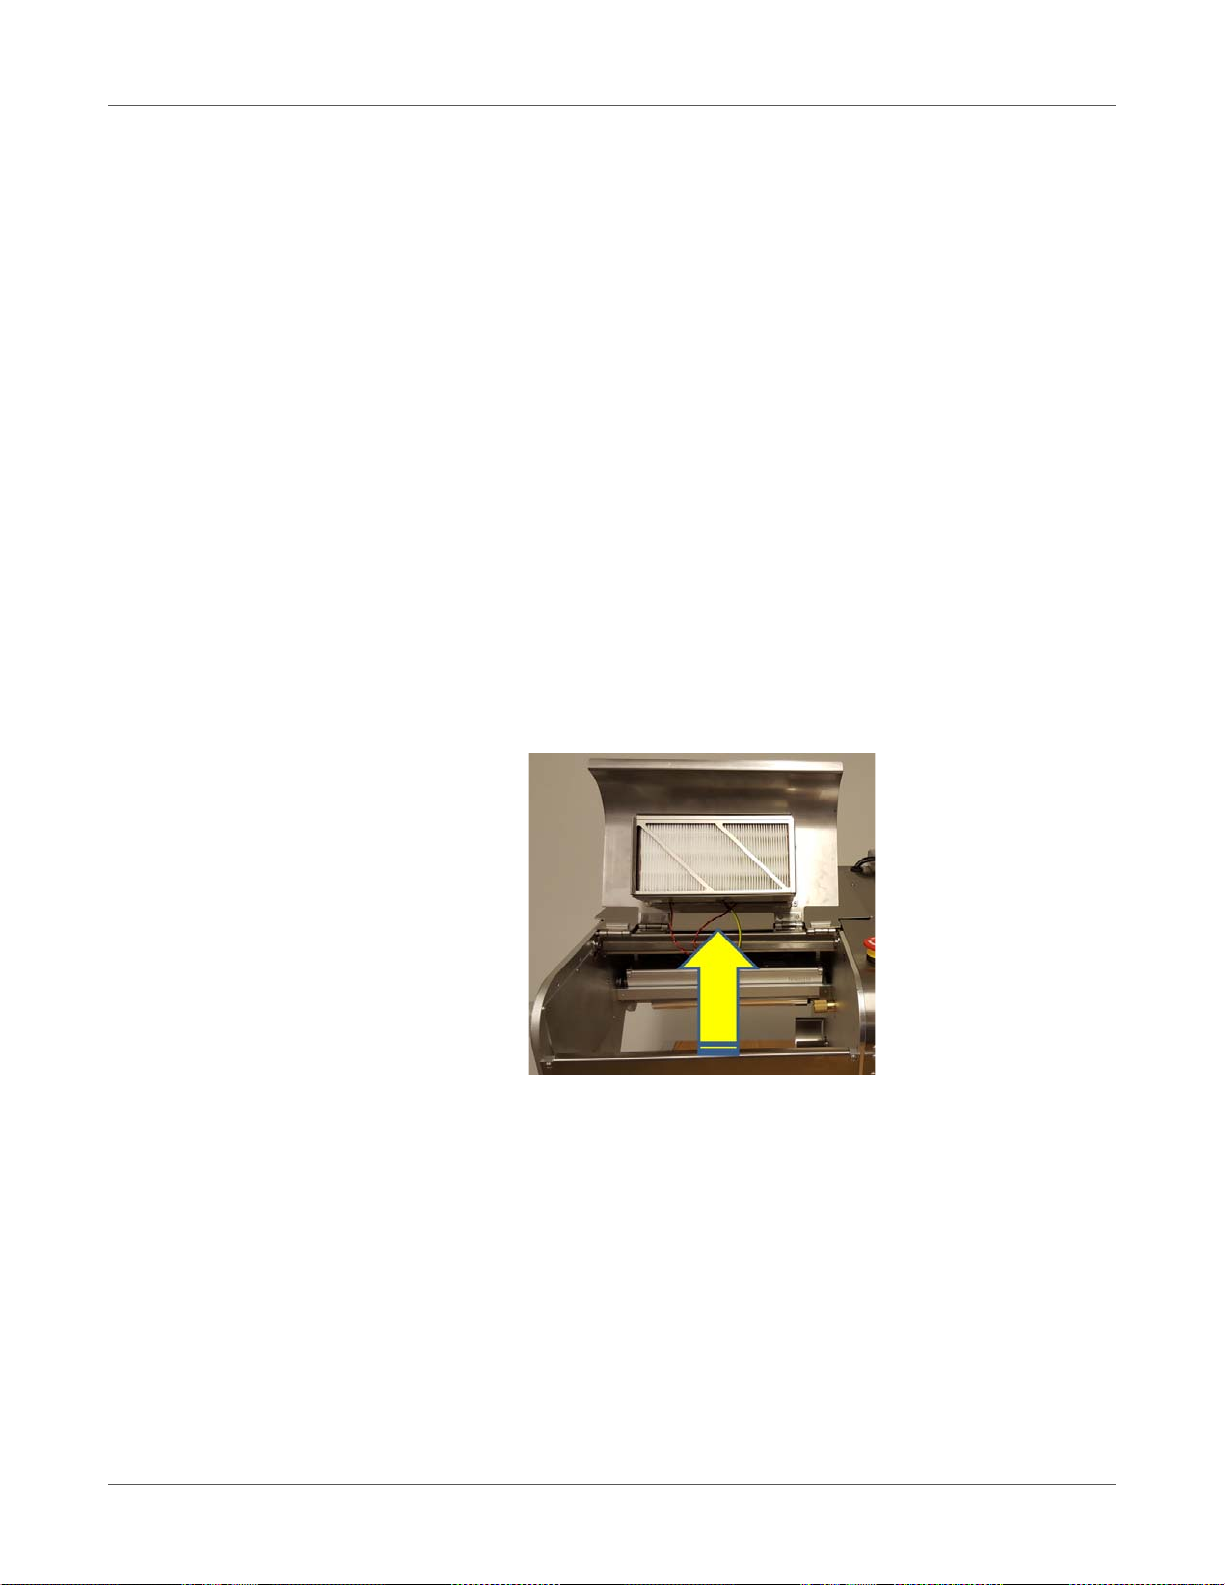
Using the built in slitter for the
13
Purpose
Usage
T2-C press
The T2-C press has a built in, in-line slitter that works perfectly with die cut label material. Slit
up to four (4) rolls, with the three (3) easy to replace oscillating blades that ensure long life time
and perfect cuts. The blades can be placed in any position or moved to the side when not in use.
Important: The built in slitter blades can only be used with pr e-diecut label material. Therefore
the slitter can only be enabled if TOF mode is set to diecut in the TrojanTwo tab > Media
Settings menu.
1 Thread the diecut label roll throughout the web path of the T2-C press. See “Loading the
label material” on page 29.
2 Load matching cardboard paper cores onto the rewinde r shaft according to how many rolls
are to be slit (max. 4).
3 Open the back lid all the way up on the T2-C press to gain access to the slitter blades.
T2-C User Guide 93
Page 94
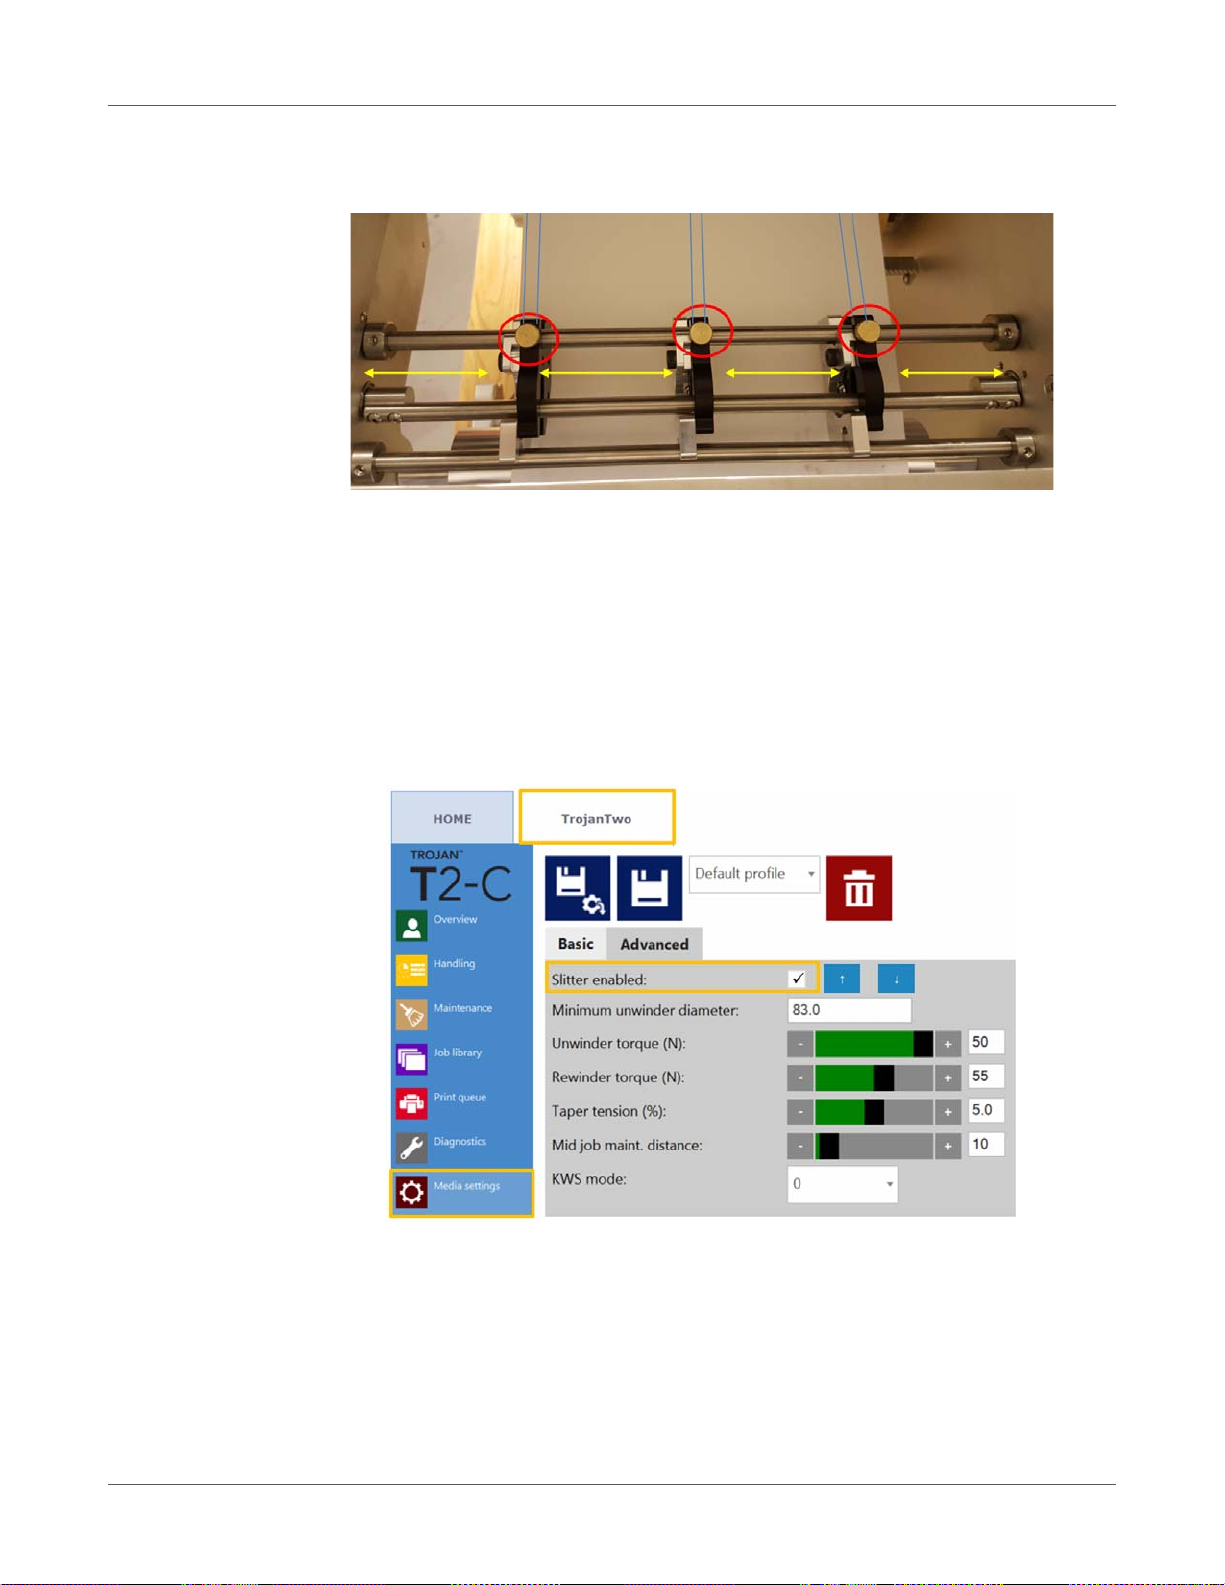
Using the built in slitter for the T2-C press
4 Move the slitter blades manually to the position where you want to slit the rolls along the
pre-diecut lines on the label roll.
• The blades which are currently not intended to be used can be pulled on the sides.
• Turn the brass knob (marked with a red circle on above picture) clockwise to tighten a
blade into position and counter-clockwise to loosen and move it.
• Blue lines indicate the pre-diecut lines where the slitter blades will slit the roll.
Note: On above picture it is a continuous roll loaded, but imagine the blue lines as
pre-diecut lines, where only the liner is going under the slitter blades.
5 Enable the slitter blades in TrojanTwo tab > Media Settings > Advanced menu by
selecting the Slitter enabled checkbox and pressing the Save and Apply button.
6 The slitter blades will move down into the cut position when the Save and Apply button is
pressed and slitter is enabled. Also 2 additional buttons will appear to be able to move the
slitter blades up or down to check the cutting position and adjust blades position up or down
if needed.
7 Start printing and slitter blades will start cutting as soon as the media starts moving.
94 T2-C User Guide
Page 95
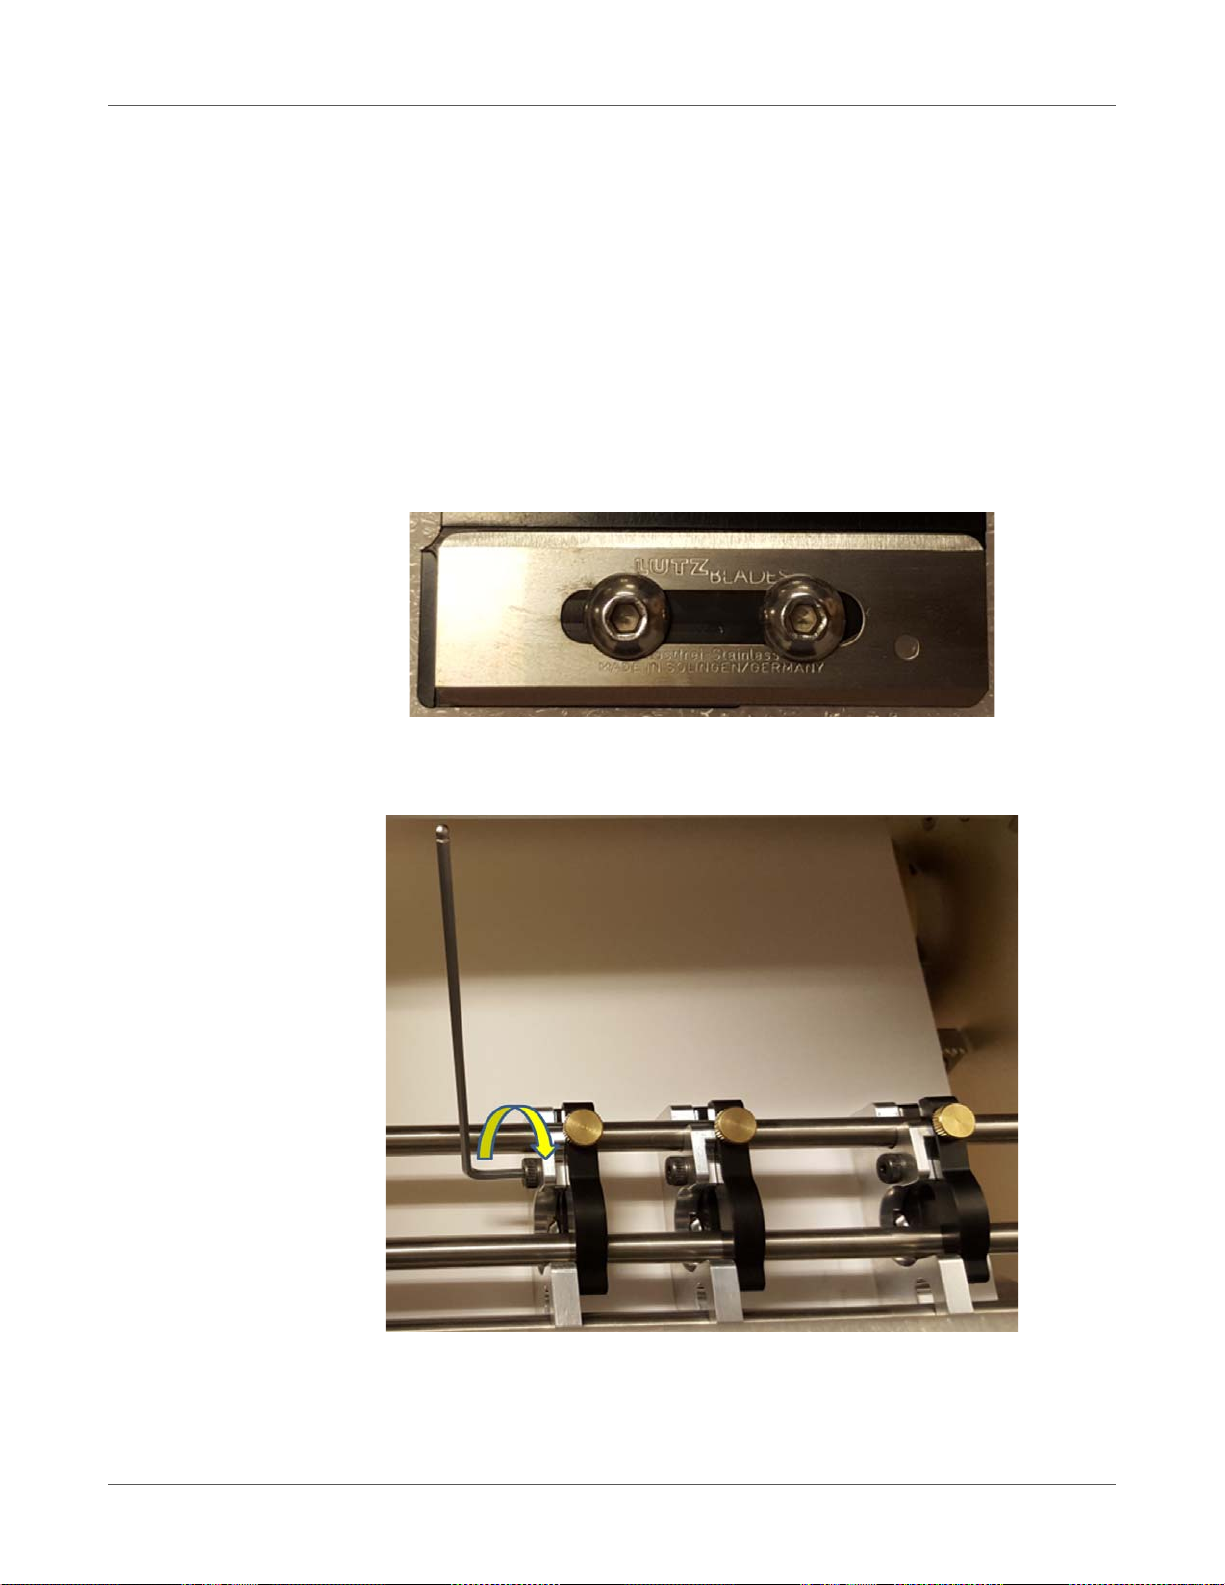
8 Disable the slitter blades (blades will move up) when printing is done to be able to remove
the finished rolls. Slitter blades can be disabled in TrojanTwo tab > Media Settings >
Advanced menu by unselecting the Slitter enabled checkbox and pressing the Save and
Apply button.
Caution: Beware of the oscillating blades during printing! Touching the blades during
operation can result in serious injury.
Replacing the slitter blades
The blade for the slitter is a consumable and needs to be replaced when the blade wears and
edges are no longer sharp.
Part number for the slitter blade is: 10000036 Blade set (6 blades), type: LUTZ 0700.0400.
Using the built in slitter for the T2-C press
1 Open the lid on top of T2-C press to gain access to the slitter blades.
2 Loosen the screw for the slitter bracket using a hex key size 2.5.
T2-C User Guide 95
Page 96
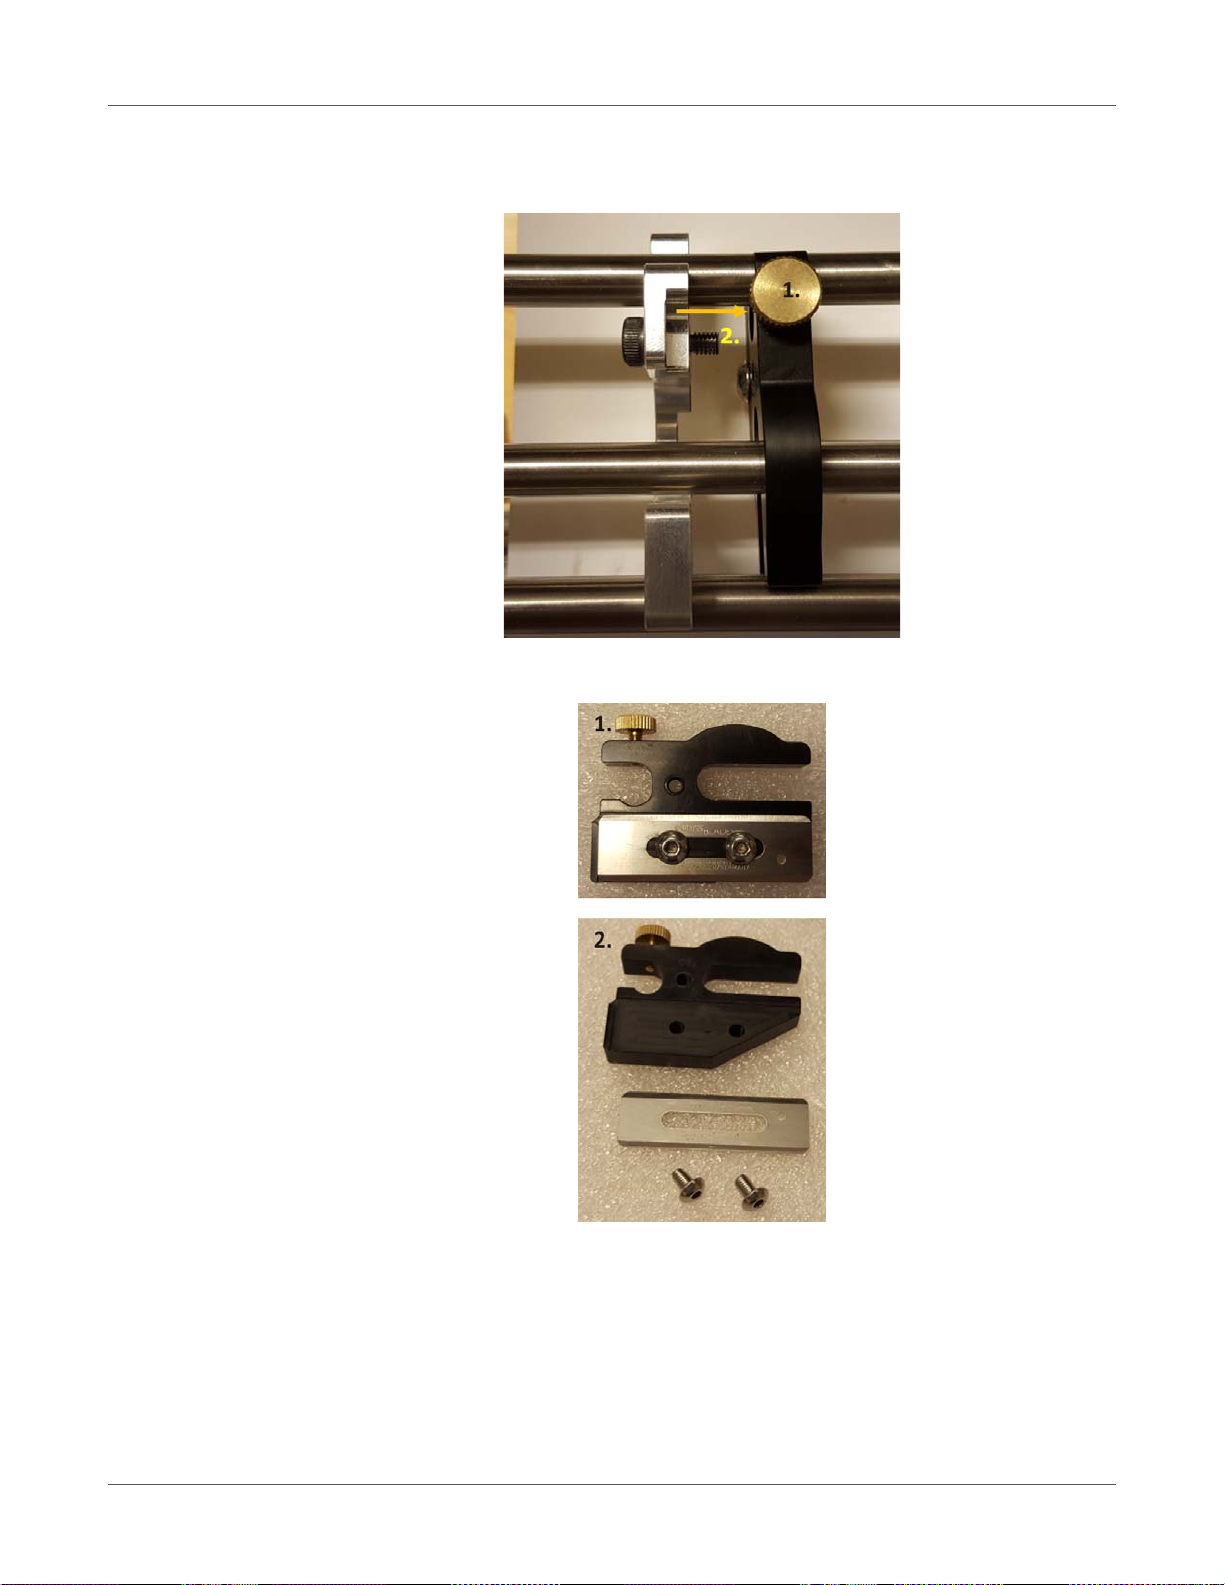
Using the built in slitter for the T2-C press
3 Loosen brass finger screw that fixes the blade holder bracket (1.) and remove the blade
holder (2.).
4 Remove the 2 screws that fix the blade onto the blade holder using a hex key size 2.5.
5 Take off the old blade and replace with a brand new blade.
6 Fix the new blade with the 2 screws (see step 4 above for screws).
7 Attach the blade holder bracket back to where it was and fix it with the screw (see step 3
above).
8 Replacement is done. Close the lid.
96 T2-C User Guide
Page 97
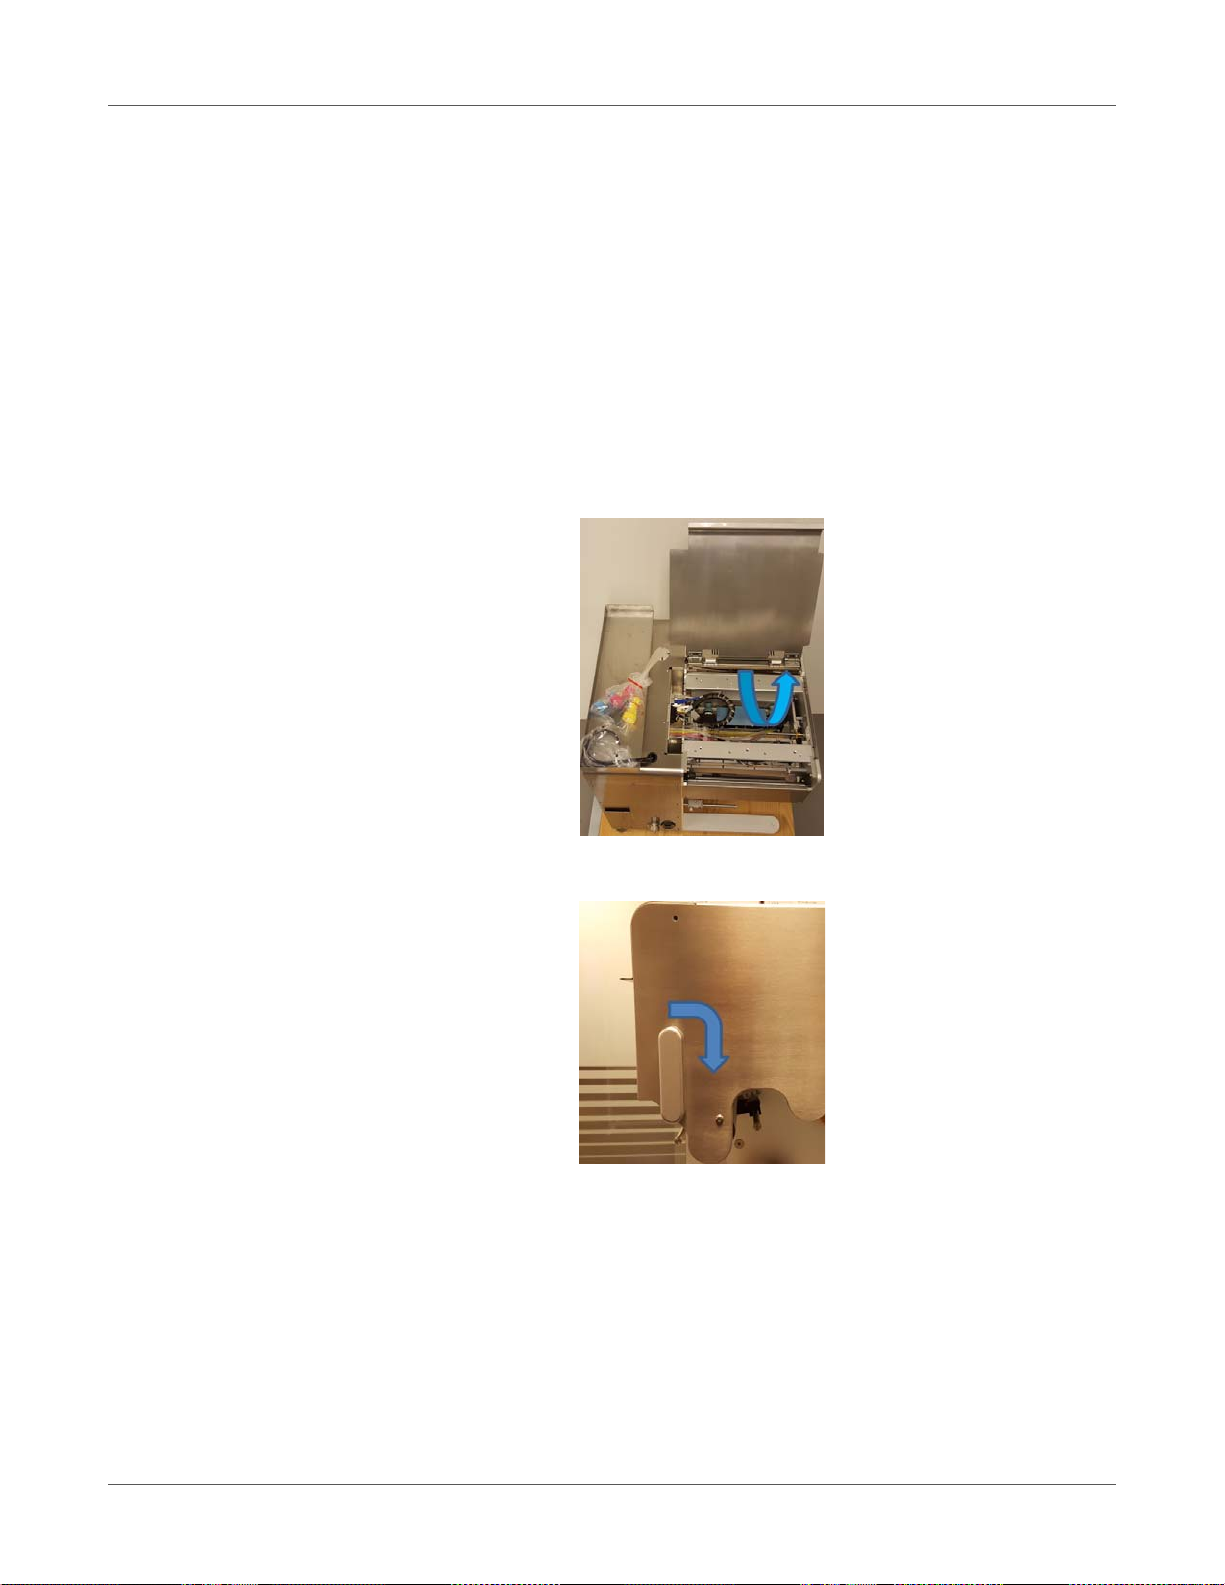
14
Regular cleaning/checking tasks
Cleaning the NIP roller
The NIP roll assembly includes a rubber roller (NIP clamp) and a metal roller that the label
material is sitting on. Bas ed on weekly visual checking it is recommended to clean these rollers
when they look dusty/dirty.
1 Open top left lid on the T2-C press to gain access to the NIP roller and clamp.
Maintenance
2 Open the NIP clamp latch, so the NIP metal and rubber roller can turn freely.
T2-C User Guide 97
Page 98
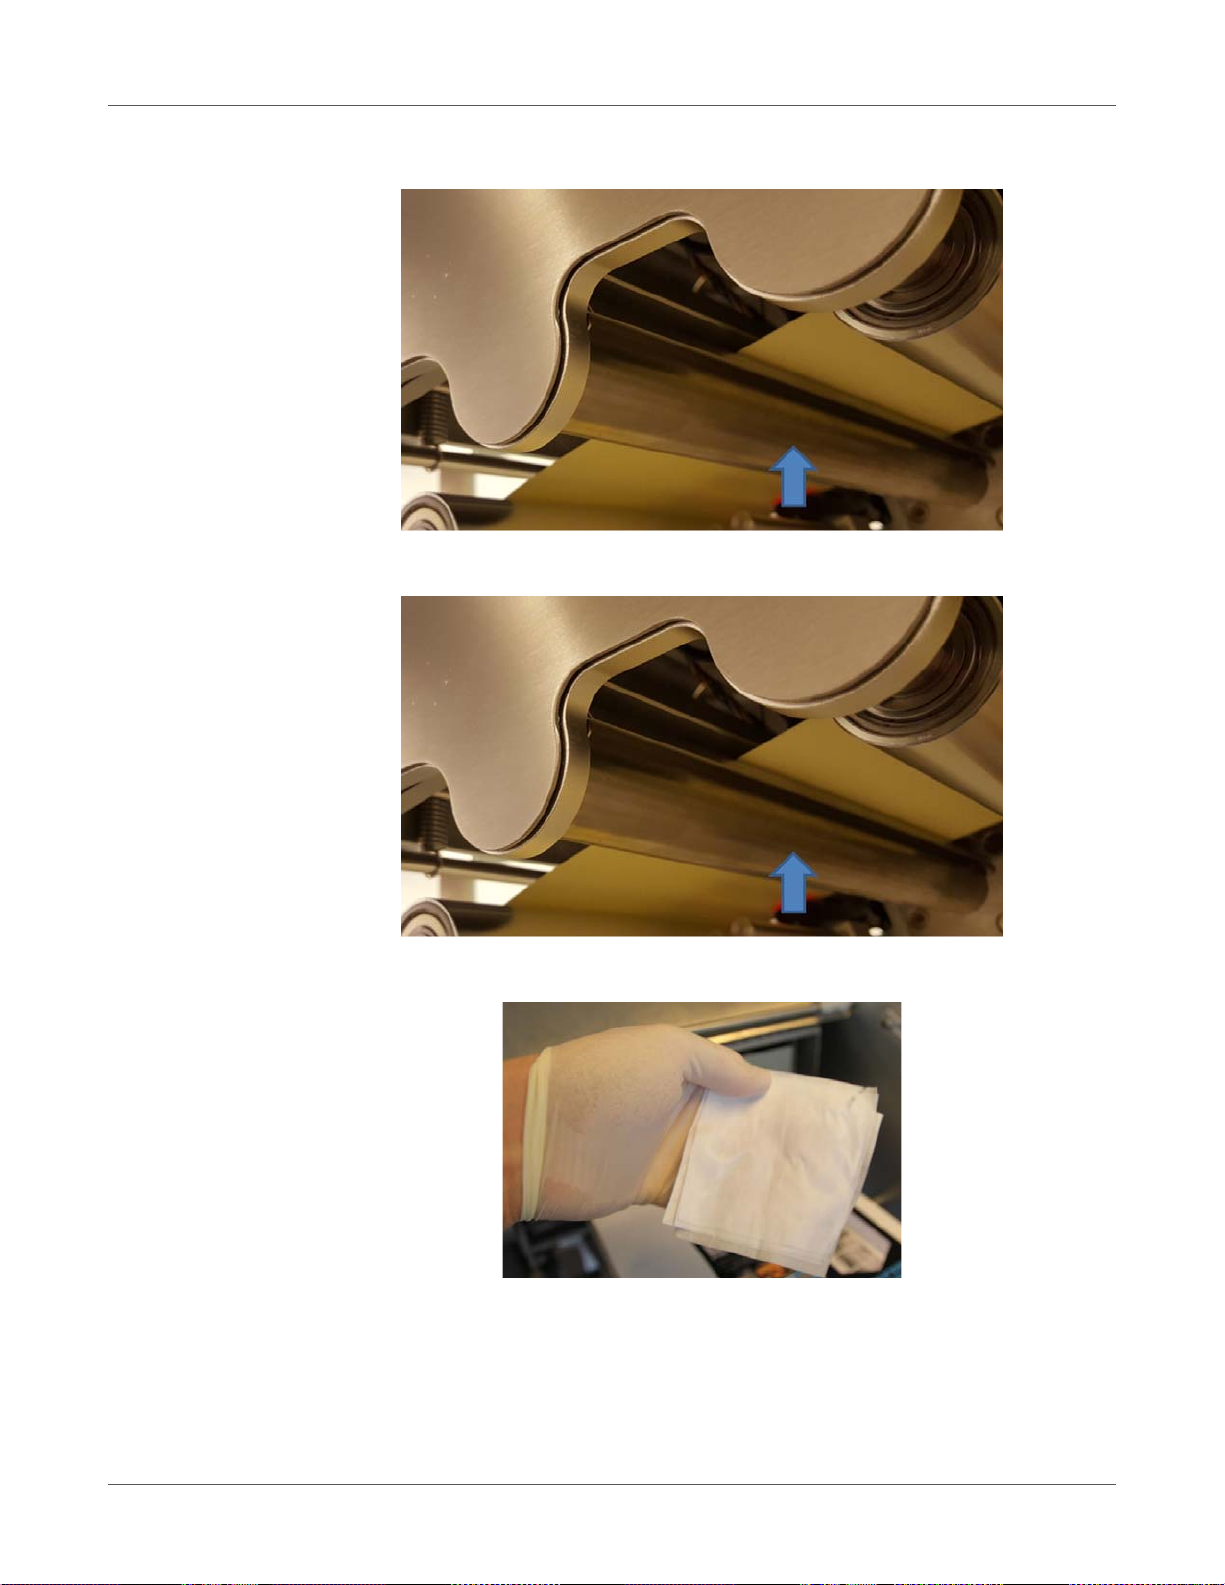
Maintenance
3 Wipe the dust and debris off with a wet lint free cloth from the rubber and metal rollers.
NIP clamp rubber roller marked with an arrow.
NIP metal roller marked with an arrow.
Use a wet lint-free cloth and roll the NIP roller to wipe off dust from all over the surface.
98 T2-C User Guide
Page 99
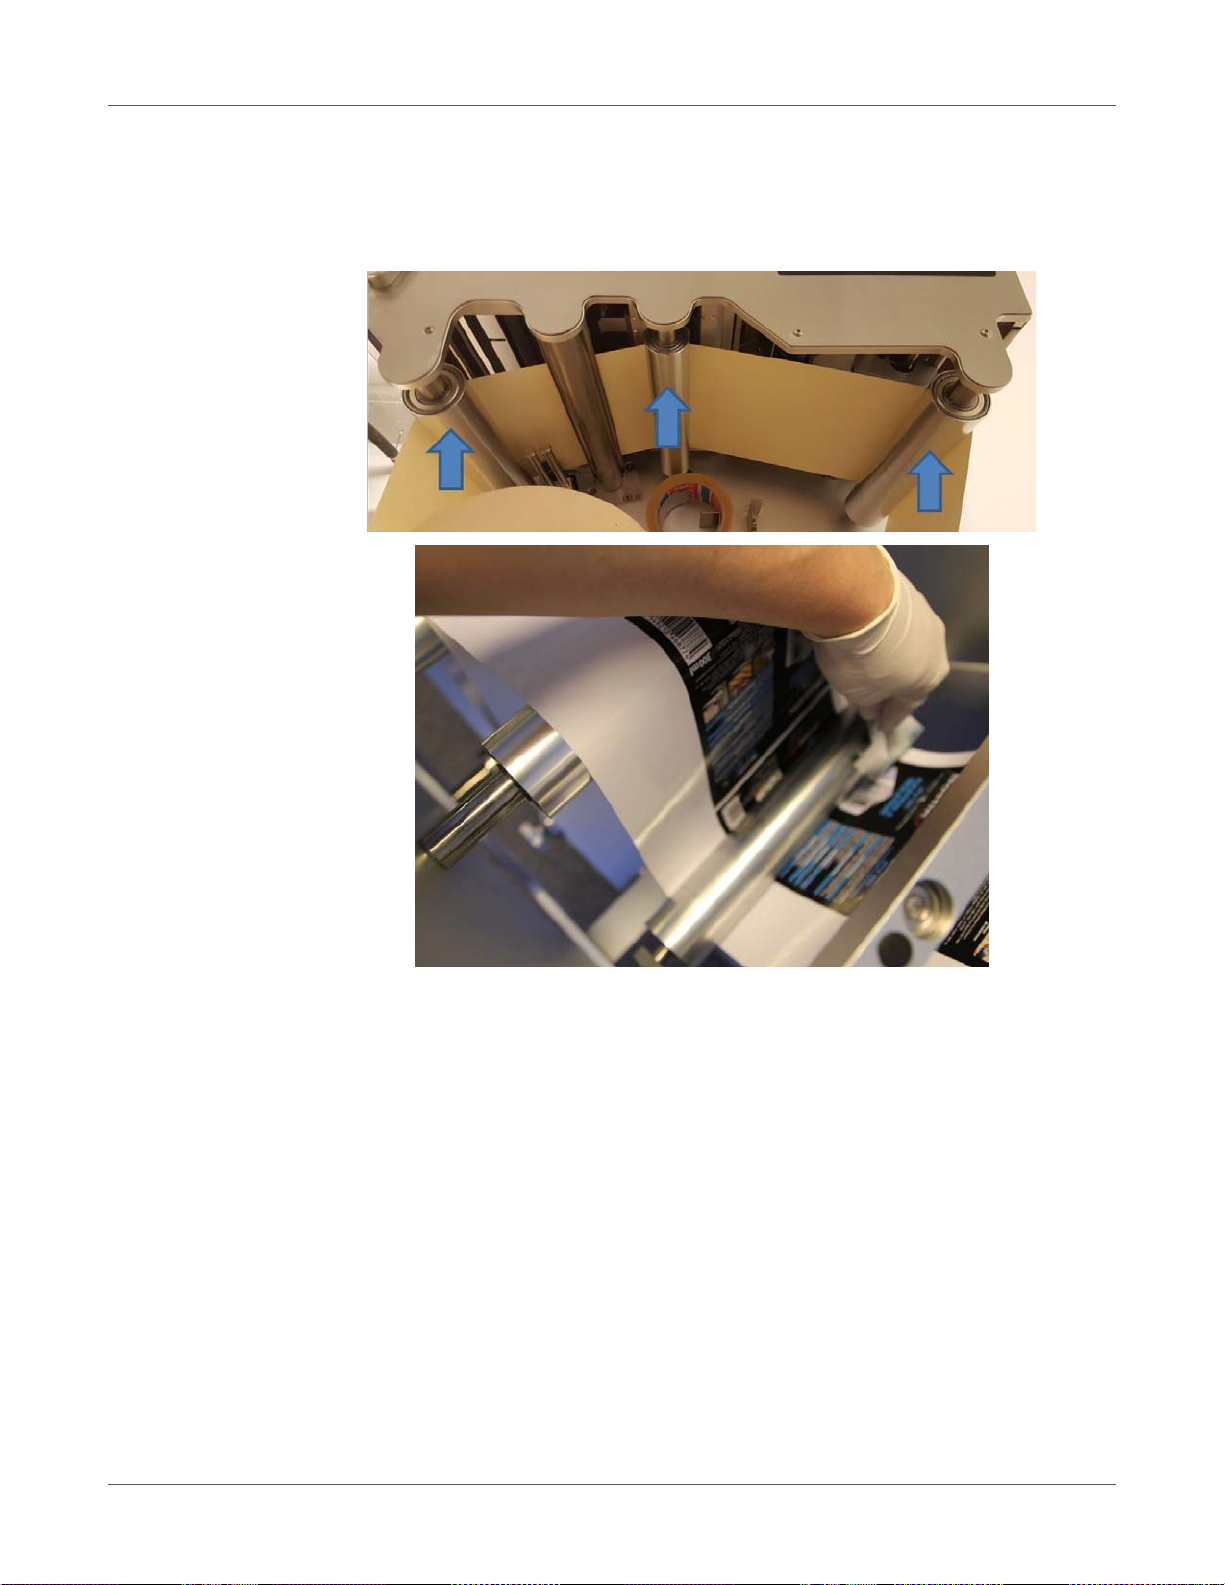
Maintenance
Cleaning other rollers
Visually inspect all other metal rollers throughout the web path and use a wet lint-free cloth to
wipe the ink/dust off from each roller. Remove the label web fro m the web path if needed to gain
access to all rollers.
Wipe each roller using a wet lint-free cloth.
Emptying the waste ink bottle
Maintenance routines which protect the printhead produce some waste ink. This waste ink goes
into the waste ink bottle. The waste ink b ottle is located inside the machine cabinet and can be
accessed through a drawer on the left side of the machine.
T2-C User Guide 99
Page 100
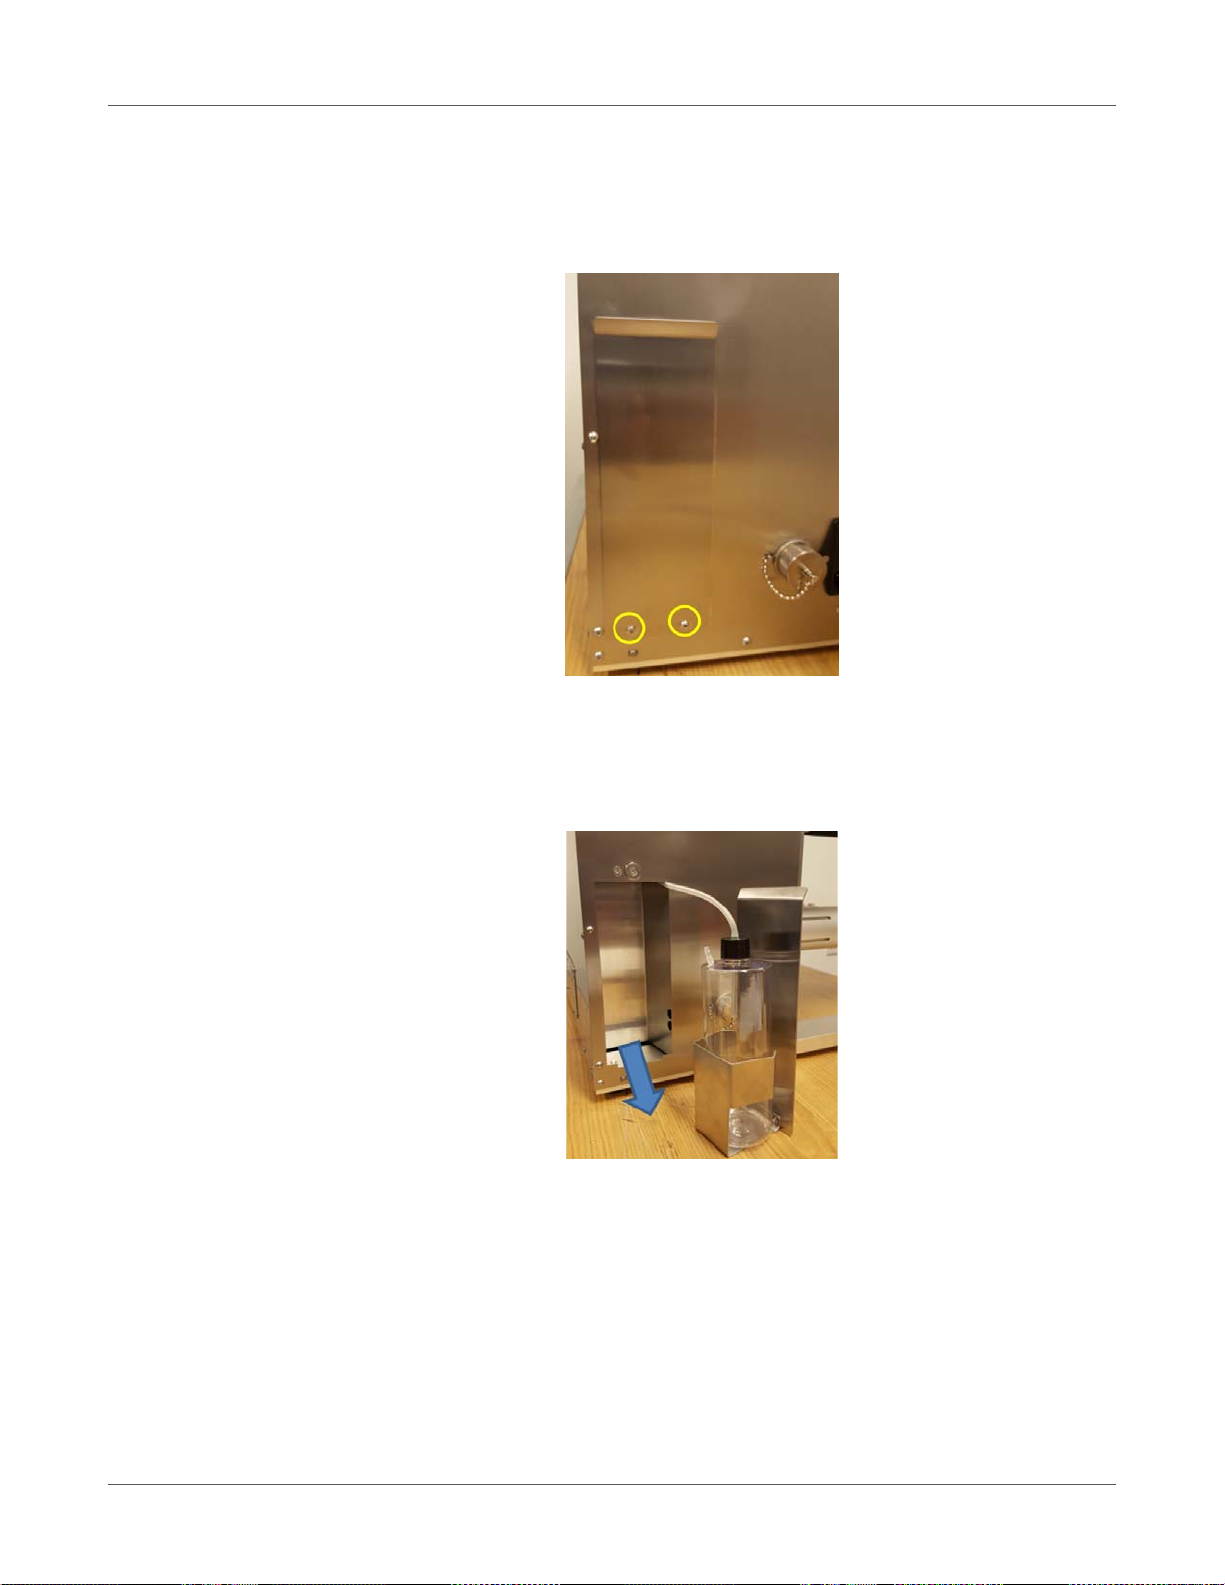
Maintenance
Important: It is advised to check the waste ink bottle at least on a weekly basis and empty it
regularly. It might need to be checked/emptied more often when printing high volumes.
1 Remove the 2 screws that lock the drawer of the waste ink bottle on the left side of the
machine.
Note: The drawer does not have to be locked with the 2 screws during everyday usage.
However it is advised to put these screws back during transportation or when the machine
is moved to another location in-house.
2 Pull the drawer out to gain access to the waste ink bottle.
3 Unscrew the cap of the waste ink bottle carefully and dispose of the waste ink.
Warning: The ink might be considered as Hazardous Waste in some countries. Make sure
you fill the waste ink from the bottle into a separated tank and disposal is done according
to the local regulations!
However in other countries, the Trojan ink is not considered as hazardous waste and can
be disposed down the drain.
Material Safety Data Sheets (MSDS) for the Trojan ink can be downloaded from the
Trojanlabel extranet or acquired from the local partners.
100 T2-C User Guide
 Loading...