

Page 1
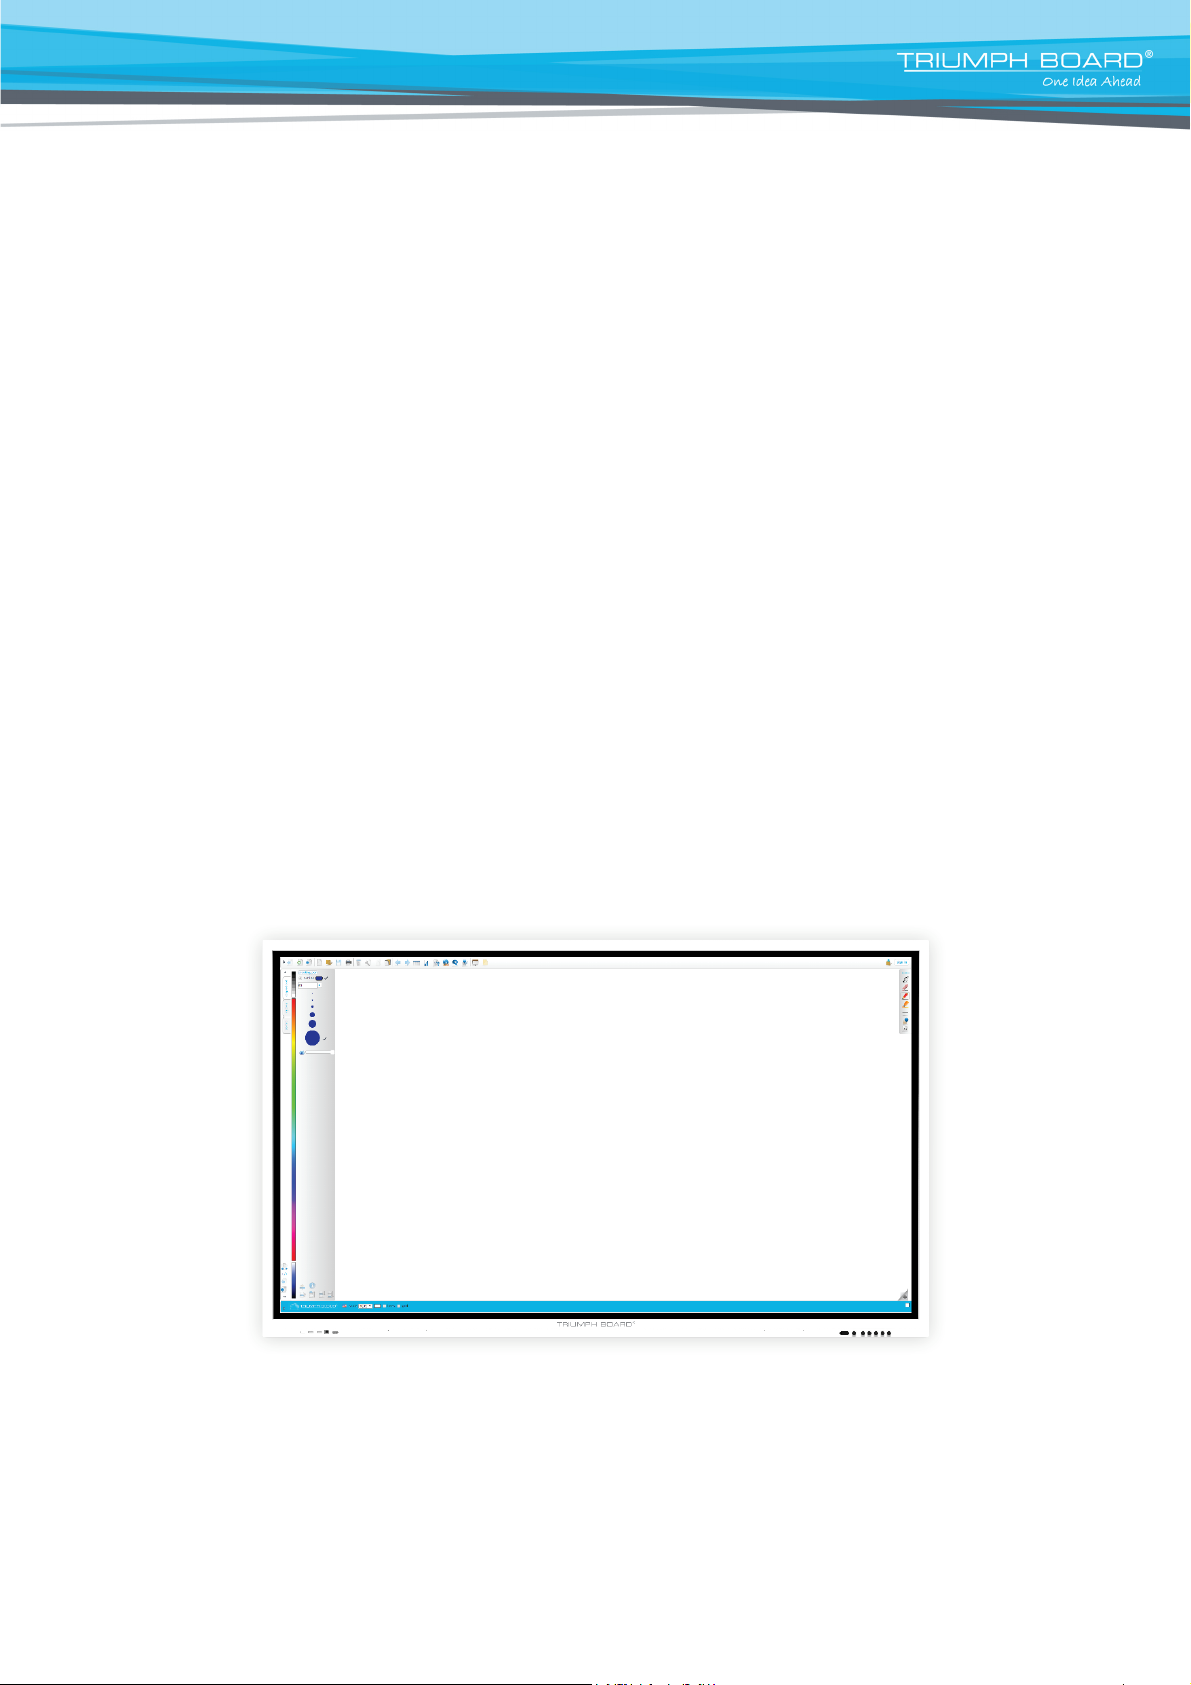
User Manual
INTERACTIVE FLAT
PANEL Series
65″/ 75″/ 86″
2021
Page 2

Contents
1. Product Description…………………………….……………………...………3
2. Technical Specifications………………………………………………………3
3. Safety Warning………………………………………………………...………….5
Placement…………………………………………………………………………………...…5
Power Supply……………………………………………….…………………………………5
Screen………………………………………………………………………………………….5
Range of Visibility……………………………………………………………………...…….5
Temperature………………………………………………………………………………...…5
Humidity……………………………………………………………………………………….5
Ventilation………………………………………………………………………………….….6
Headphones…………………………………………………………………………..............6
Standby……………………………………………………………………………………...…6
Battery………………………………………………………………………………………....6
Caution…………………………………………………………………………………….….6
Notes on Cleaning……………………………………………………………………….…...6
Notes on Maintenance……………………………………………………………………....6
Power Switch Status Indicator……………………………………………………….……6
4. Preparing for Installation……………………………………………….…….7
Unpacking …………………………………………………………………………….………7
Accessories…………………………………………………………………………………..7
Installation of Wall Mount………………………………………………………………….8
Control Panel…………………………………………………………………………....……9
5. Remote control………………………………………………………………...…10
Precautions………………………………………………………………………......10
Button instructions……………………………………………………………...….10
Instructions for Use…………………………………………………………………11
6. IFP Interface Inputs, Outputs……………………………...……………......11
7. Connection and Set Up……………………………………………………….13
HDMI Connection………………………………………………………………...….14
RS232 Connection……………………………………………………………...…...15
8. Android System……………………………………………………………...…...16
9. Basic Operations………………………………………………………......…….17
Start-up/shutdown…………………………………………………………...……...17
Source Switching…………………………………………………………...……….17
Display Settings…………………………………………………………...…...……17
Audio Settings……………………………………………………………...….…….17
Security and Privacy……………………………………………………...…...…...17
Keyboard and Input Method……………………………………………...…...….17
Language Selection………………………………………………………...…...….17
System Time………………………………………………………………...……….17
Screenshot…………………………………………………………………...……….17
10. Network Settings……………………………………………………………………17
Wireless Network…………………………………………………………...…...….17
Wired Network……………………………………………………………...…...……17
Wireless Hotspot…………………………………………………………...…...…...18
11. Wi-Fi module………………………………………………………...…….…18
12. Troubleshooting………………………………………………………...…….…20
13. Maintenance……………………………………………………………...…….…22
14. Repair Service and Contacts……………………………………...………...23
2
Page 3

1. Product Description
TRIUMPH BOARD INTERACTIVE FLAT PANEL
TRIUMPH BOARD INTERACTIVE FLAT PANEL is a fully integrated, professional, multi-touch UHD IFP
with amazing performance and stunning display quality.
TRIUMPH BOARD INTERACTIVE FLAT PANEL is an effective presentations tool for showing lessons, or
presentations interactively in any classroom or meeting room. The latest IR LED optical technology allows
20 finger touch, with up to 20 users being able to write and draw using their fingers or a stylus.
2. Technical Specifications
TRIUMPH BOARD 65″ INTERACTIVE FLAT PANEL
EAN: 8592580117244
Screen Type:
Resolution: 3840 × 2160
Brightness: 400 cd/m2
Contrast: 5000:1
Response time:
Refresh Frequency: 60 Hz
Display Area: 1428.48 (H) x 803.52 (V) (56.22″ H x 31.62″ V)
Product Dimensions: 1489 x 897 x 88 mm (58.6″ x 35.3″ x 3.4″)
Package Dimensions: 1656 x 1050 x 204 mm (65.2″ x 41.3″ x 8″)
Open Cell DLED Backlight
6,5 ms
Net / Gross weight: 38 / 49,75 kg (83.7 / 110 lb.)
TRIUMPH BOARD 75″ INTERACTIVE FLAT PANEL
EAN: 8592580117237
Screen Type:
Resolution: 3840 × 2160
Brightness: 400 cd/m2
Contrast: 4000:1
Response time:
Refresh Frequency:
Display Area:
Product Dimensions: 1709 x 1020 x 87 mm (67.28″ x 40.11″ x 3.38″)
Package Dimensions: 1863 x 1140 x 225 mm (73.3″ x 44.88″ x 8.8)
Net / Gross weight: 52.85 / 68.6 kg (116.5 / 151.2 lb.)
Open Cell DLED Backlight
8 ms
60 Hz
1649.66 (H) x 927.94 (V) mm (64.92″ H x 36.5″ V)
TRIUMPH BOARD 86″ INTERACTIVE FLAT PANEL
EAN: 8592580117220
Screen Type: Open
Resolution: 3840 × 2160
Brightness: 400 cd/m2
Contrast: 1200:1 (4000:1 Dynamic)
Response time: 8
Refresh Frequency:
Display Area:
Product Dimensions: 1957 x 1160 x 86 mm (77.04″ x 45.6″ x 3.3″)
Package Dimensions: 2146 x 1308 x 280 mm (84.25″ x 52.75″ x 11.0″)
Net / Gross weight: 67.5 / 88 kg (148.8 / 194 lb.)
Cell DLED Backlight
ms
60 Hz
1895.04 (H) x 1065.96 (V) mm (74.6″ H x 41.97″)
3
Page 4

Inputs and Outputs
OPS:
1
HDMI IN:
4
USB Type-C
VGA:
1
1
AUDIO IN:
1
AUDIO OUT:
1
LAN:
2
SPDIF:
1
USB 2.0:
3
USB 3.0:
5
TOUCH USB:
3
RS 232:
1
Sound System
Power Amplification:
2 x 10 W (2.0)
Power
Power Requirements:
100 – 240 V AC 50/60 Hz
MAX Power Consumption:
< 300 W / 350 W / 500 W
Standby Power Consumption:
< 0.5 W
* Depends on the model.
Ambient Conditions
Operation Temperature:
0°C ~ 40°C
Operation Humidity:
20% ~ 80% RH
Storage Temperature:
- 10°C ~ 60°C
Storage Humidity:
10% ~ 60% RH
Touch System
Touch Input: 20
Sensor type:
Response Time: < 10 ms
Output Coordinates:
Communication Mode:
Writing Screen: Antibacterial Tempered glass (Mohs hardness 7)
Touch Input (Windows support with driver)
Infrared Transmission (multi-touch)
32768×32768
USB 2.0
Android System
Version: Android 8.0
CPU: A73x2 A53x2
GPU: Mali G51x2
RAM: 3 GB
ROM: 32 GB
4
Page 5

3. Safety Warnings
Before using the device, please read the instructions carefully.
Placement
• Do not place the device on surfaces that are unstable, easy to tilt or which can fall.
• Do not place the device in places with direct sunlight, or near sources of heat, such as electric heaters
or bright light sources.
• Do not use the device next to appliances that generate magnetic fields.
• Do not place the device in damp places or places where it might be exposed to moisture or liquids.
• Do not insert any items inside of the device.
• Do not place heavy objects on the device.
Power Supply
• Please verify compatibility between the voltage rating on back shell nameplate and the main power
supply voltage rating.
• In case of thunderstorm and lightning weather, please unplug power cord and antenna plug.
• When no one is indoors or the device will not be in use for an extended period of time, please unplug
the power cord.
• Please protect the power cord from physical or mechanical damage.
• Please use the original power cord, and do not modify or extend the power cord.
• Please check and make sure the AC power ground wire is connected.
Screen
• When writing on screen, please do not use hard or sharp objects.
• When the screen requires cleaning, please unplug the power cord first.
• Please use a soft, dust-free, dry cloth to wipe the screen.
• Do not use water or a spray cleaner to clean the device.
• Please contact the service center for internal cleaning of the device.
• Do not display image with high brightness on the screen for a long time.
• Please turn off the device after usage, it is not made for 24/7 use. Recommended screen time 16/7.
Range of Visibility
• The ideal distance between the eyes of viewer and the screen is 2 to 7 times of the screen diagonal.
• The best viewing angle between the eyes of viewer and screen is within 178 degrees up and down, left
and right.
Temperature
• Do not place the device near an electric radiator or heating unit.
• When moving the device from a low temperature area to a high temperature area, before connecting
the device to power, please leave the device idle in the new environment for some time to allow for
temperature adjustment, to sufficiently diffuse internal condensation prior to powering on.
• The device’s normal working temperature is 0~40°C, storage temperature is -10~60°C.
Humidity
• Do not expose the device to rain, moisture, or places near water.
• Please make sure the indoor environment is cool and dry, the device’s normal working humidity is
20 - 80% RH, storage humidity is 10~60% RH.
5
Page 6

Ventilation
• Please place the device in ventilated places and ensure the device’s good heat dissipation.
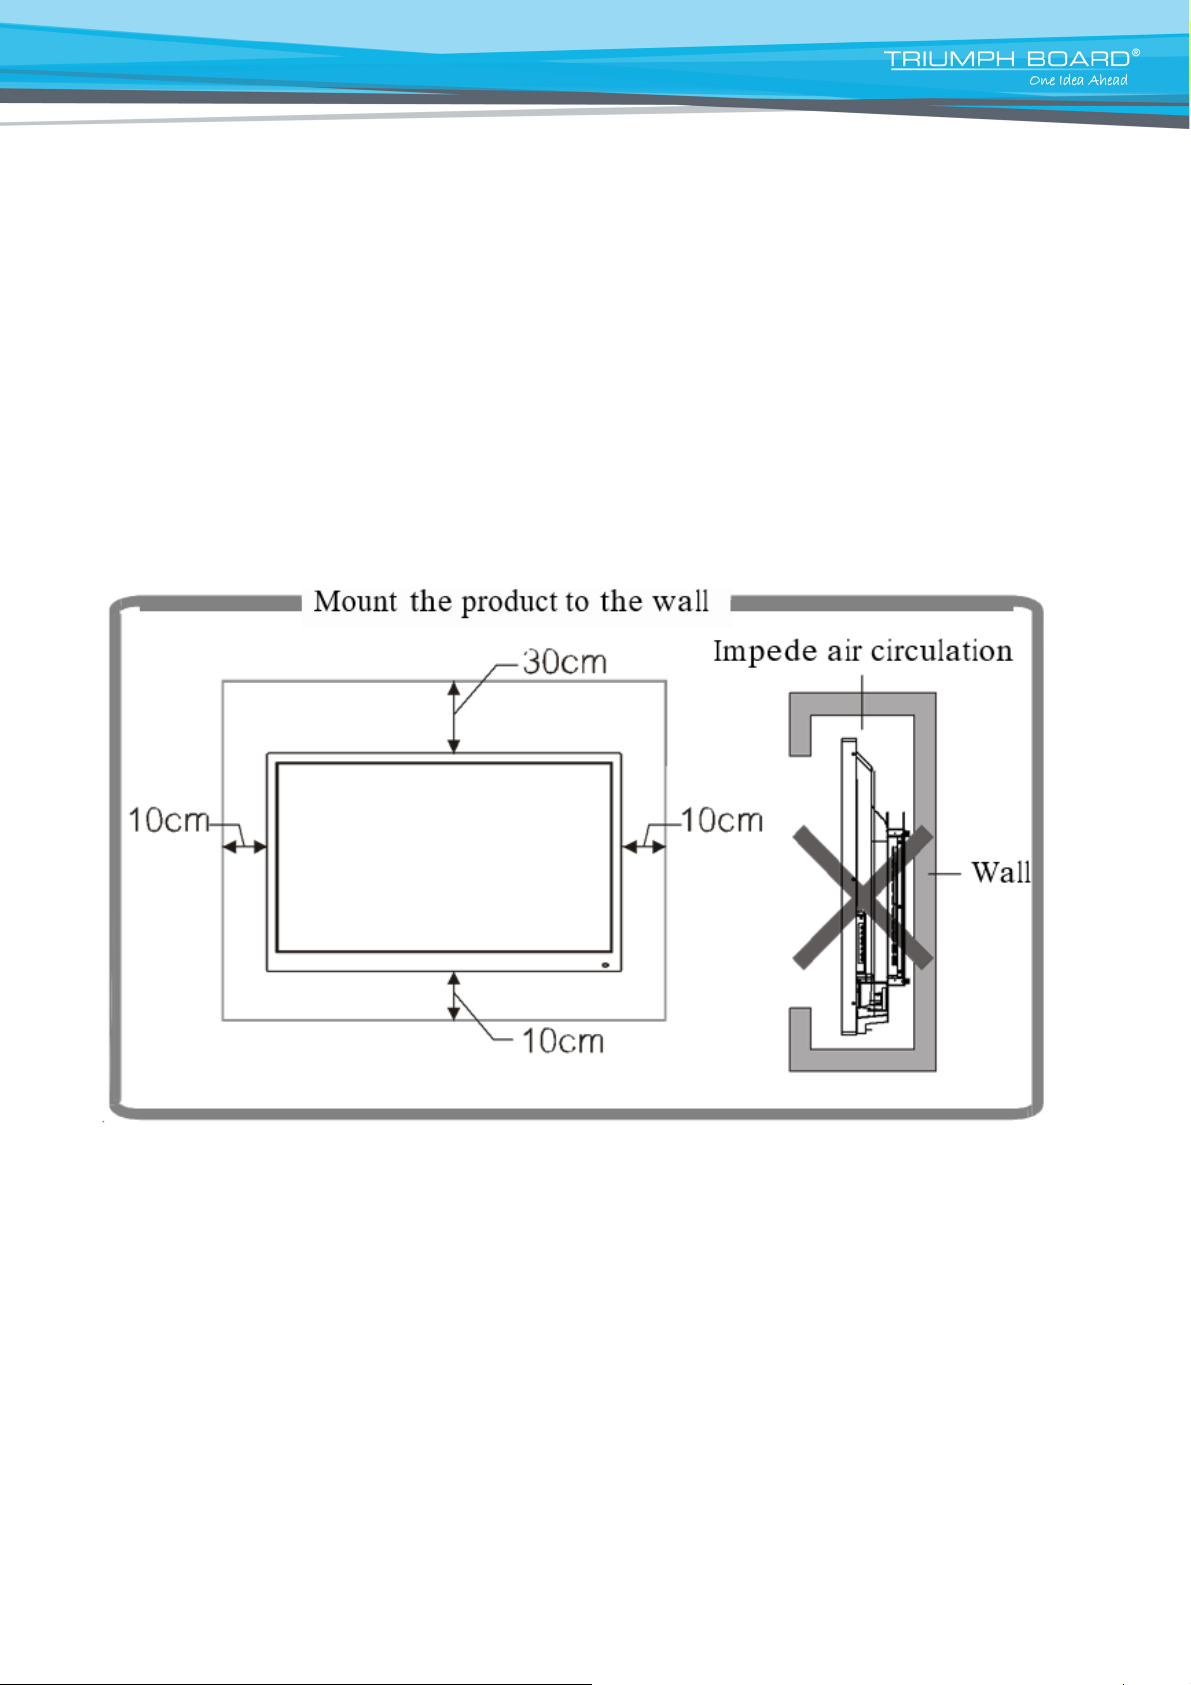
• Please ensure ventilation gaps of 10 cm (4 inches) on the sides and back, and 30 cm (12 inches) on the
top of the device.
Headphones
• Extended use of headphones at high volumes may damage hearing. If external headphones/earbuds
are needed, please turn down the device volume in advance.
Power button
• If you hold the power button on the front of the device for 1s, this will not completely shut off the device,
but only place the device in standby mode. For complete shutdown it is necessary to press and hold the
power button for 3s.
• If the control diode flashes, do not switch off the IFP with the power switch or do not unplug the device
from the socket. As a result, your equipment may not power on and repair by a service technician may
be required. The device can be turned off using the main switch and unplugged from the socket when
the light is still red.
Battery
• Please dispose of used batteries properly, and recycle.
• To avoid danger, please do not let children touch the battery, and avoid contact with water.
Caution
• This device may cause radio interference in the living environment. In this case, the user may be required
to take practical measures to mitigate the effects.
Notes on Cleaning
• There are vents on back cover, please do not use any liquid on or spray this area directly during cleaning.
• It is recommended to use TRIUMPH Cleaning Pads for cleaning the screen (see page 21)
Power Switch Status Indicators
• ″I″ means power on, ″O″ means power off.
Notes on Maintenance
• This device can only be serviced by a certified engineer.
6
Page 7
4. Preparing for Installation
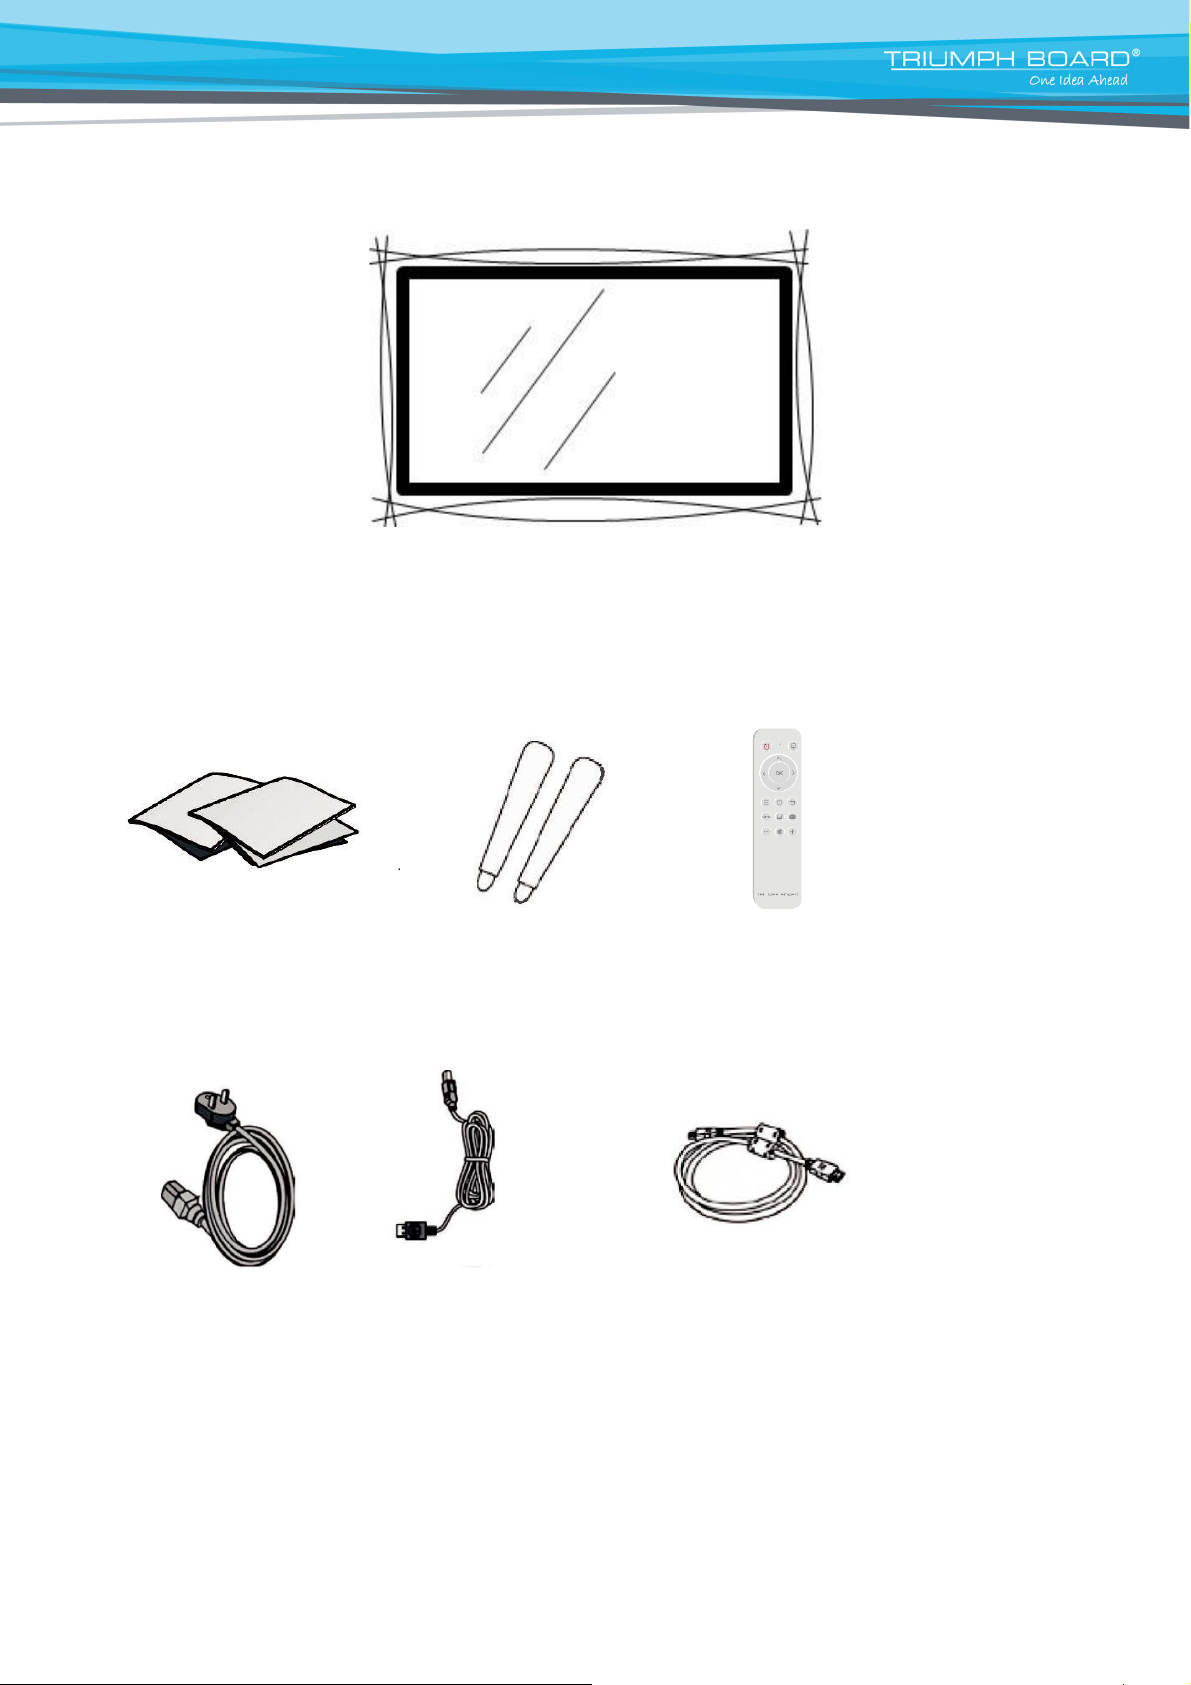
Unpacking
Accessories
Quick Start Guide, 2x styluses, remote control, Wi-Fi Module, power cables (UK, US, EU), touch
USB cable
Quick Start Guide 2x Stylus Remote control
Power cable (US, UK, EU) Touch USB Cable HDMI Cable
7
Page 8
Installation of Wall Mount
Precautions
• For installation of the wall-mount bracket, at least two professional workers are needed; you should not
attempt to install it alone, as this may result in injury.
• During installation, assistance from professional workers is needed to designate the installation, and
measurements should be taken to make sure the wall can bear a certain amount of external force. Make
sure, the wall mount is installed on a wall or other surface which can provide strong support.
• This device should be installed on a vertical plane, not on an oblique plane; also, it should not be installed
in a horizontal position; otherwise, damage of the device or personal injury may be caused.
• To avoid damage of the device or injury, keep the wall mount out of the reach of children.
• Tighten the screws during installation to avoid device damage and injury.
• The installation is shown in the figure below; ventilation space should be maintained around the device.
! Wall Mount is included in the package with the device.
8
Page 9
Control Panel
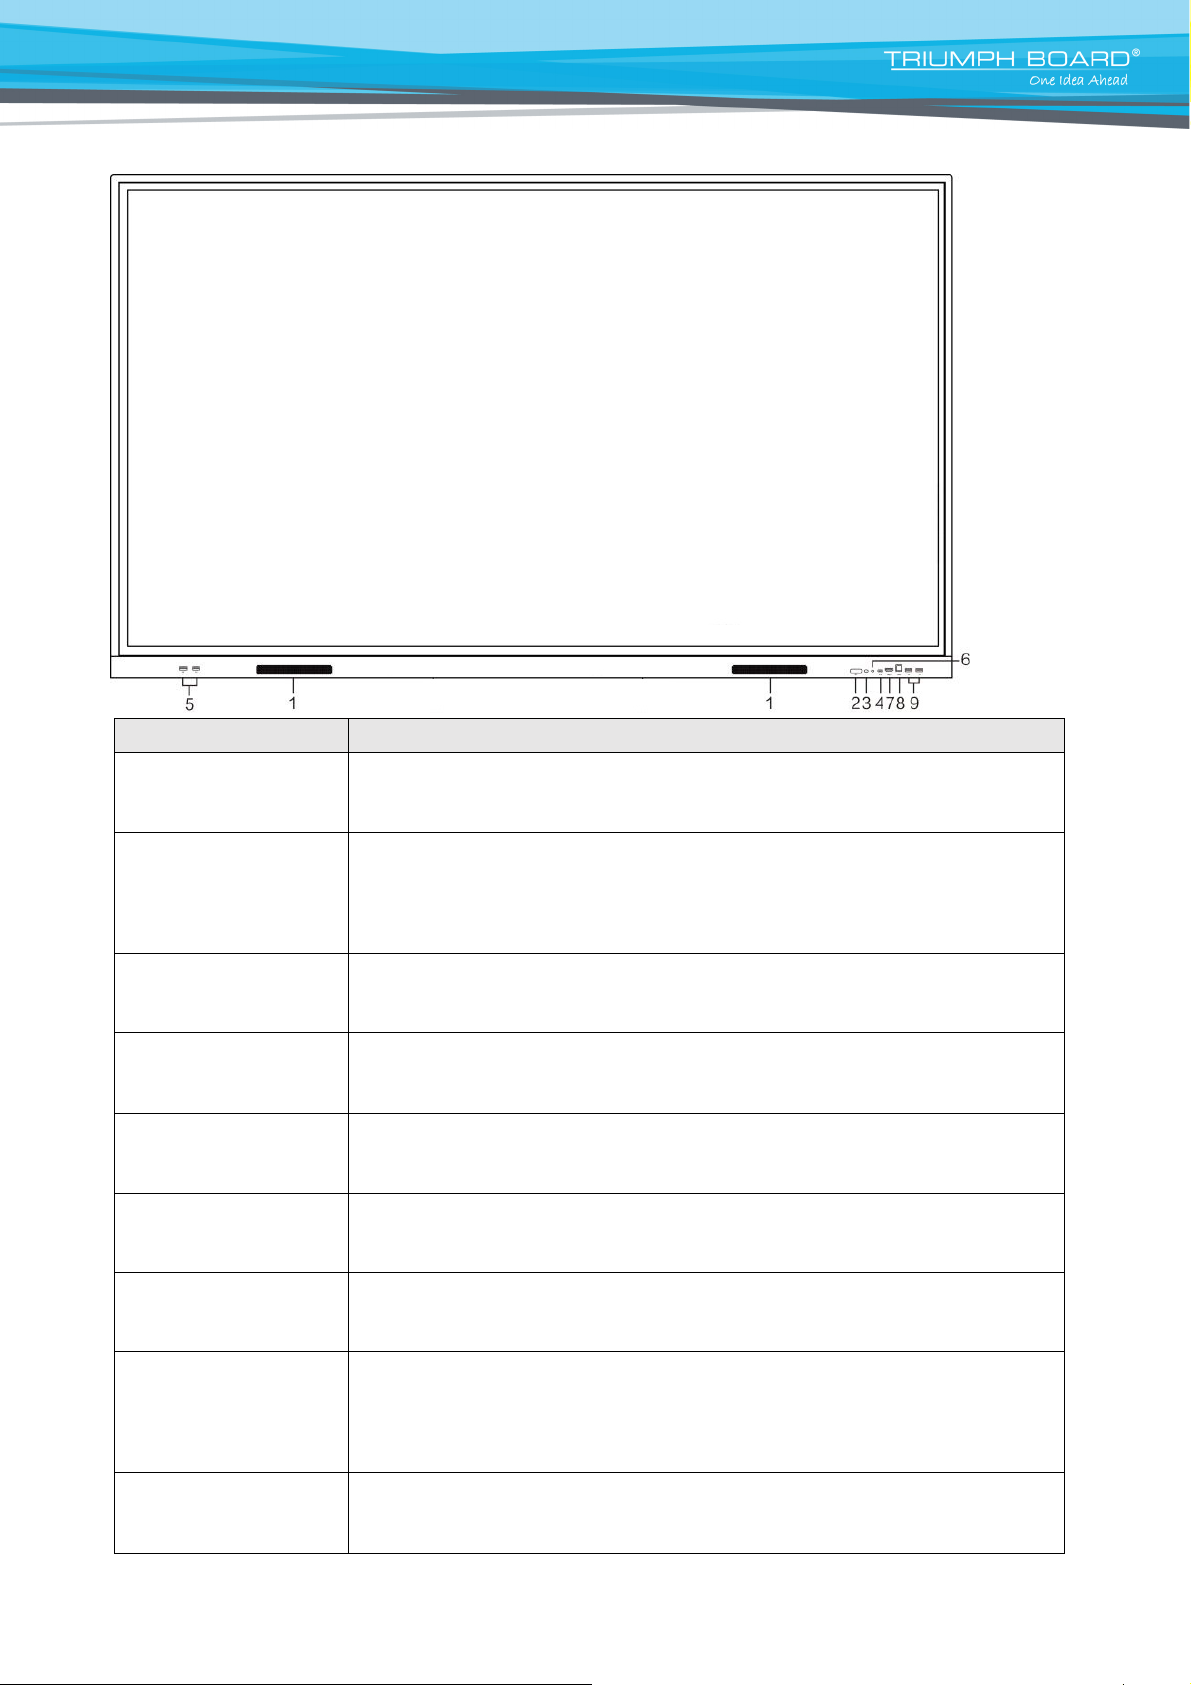
Ports
Description of Function
2x10W
Turns Interactive Flat Panel ON/OFF,
Remote control signal receiver
USB Type-C supports charging, data transmission, extension for audio and
video output interface. (Please charge those external devices with the same or
lower rated charging power with the port. Do not attempt to charge laptops that
require higher charging power than the rated power of the USB Type C port)
Connect USB devices such as portable hard drives, USB drives, USB keyboard
and mouse, etc.
Automatically identifies the brightness based on ambient light
For connection to display devices with HDMI output function. Maximum
resolution supported by HDMI port is 4K@60HZ.
External computer touch signal input. Default touch function is available under
optional built
connecting external computer VGA and au
USB port needs to be connected to the equipment.
driver is installed, the external computer can
equipment (touch function is effective in PC, VGA and HDMI channel by default).
Connect USB devices such as portable hard drives, USB drives, USB keyboard
and mouse, etc.
1. Front Speakers
2. Power
3. Signal Receiver
4. USB Type-C
5. USB 2.0
6. Light Sensor
7. HDMI IN
- Tap to enter energy saving mode
- Press for at least 2 seconds to enter standby mode
8. TOUCH USB
9. USB 3.0
-in OPS PC. When connecting an external computer, in addition to
9
dio signals, the external computer’s
Under the condition that
be touch controlled through the
Page 10
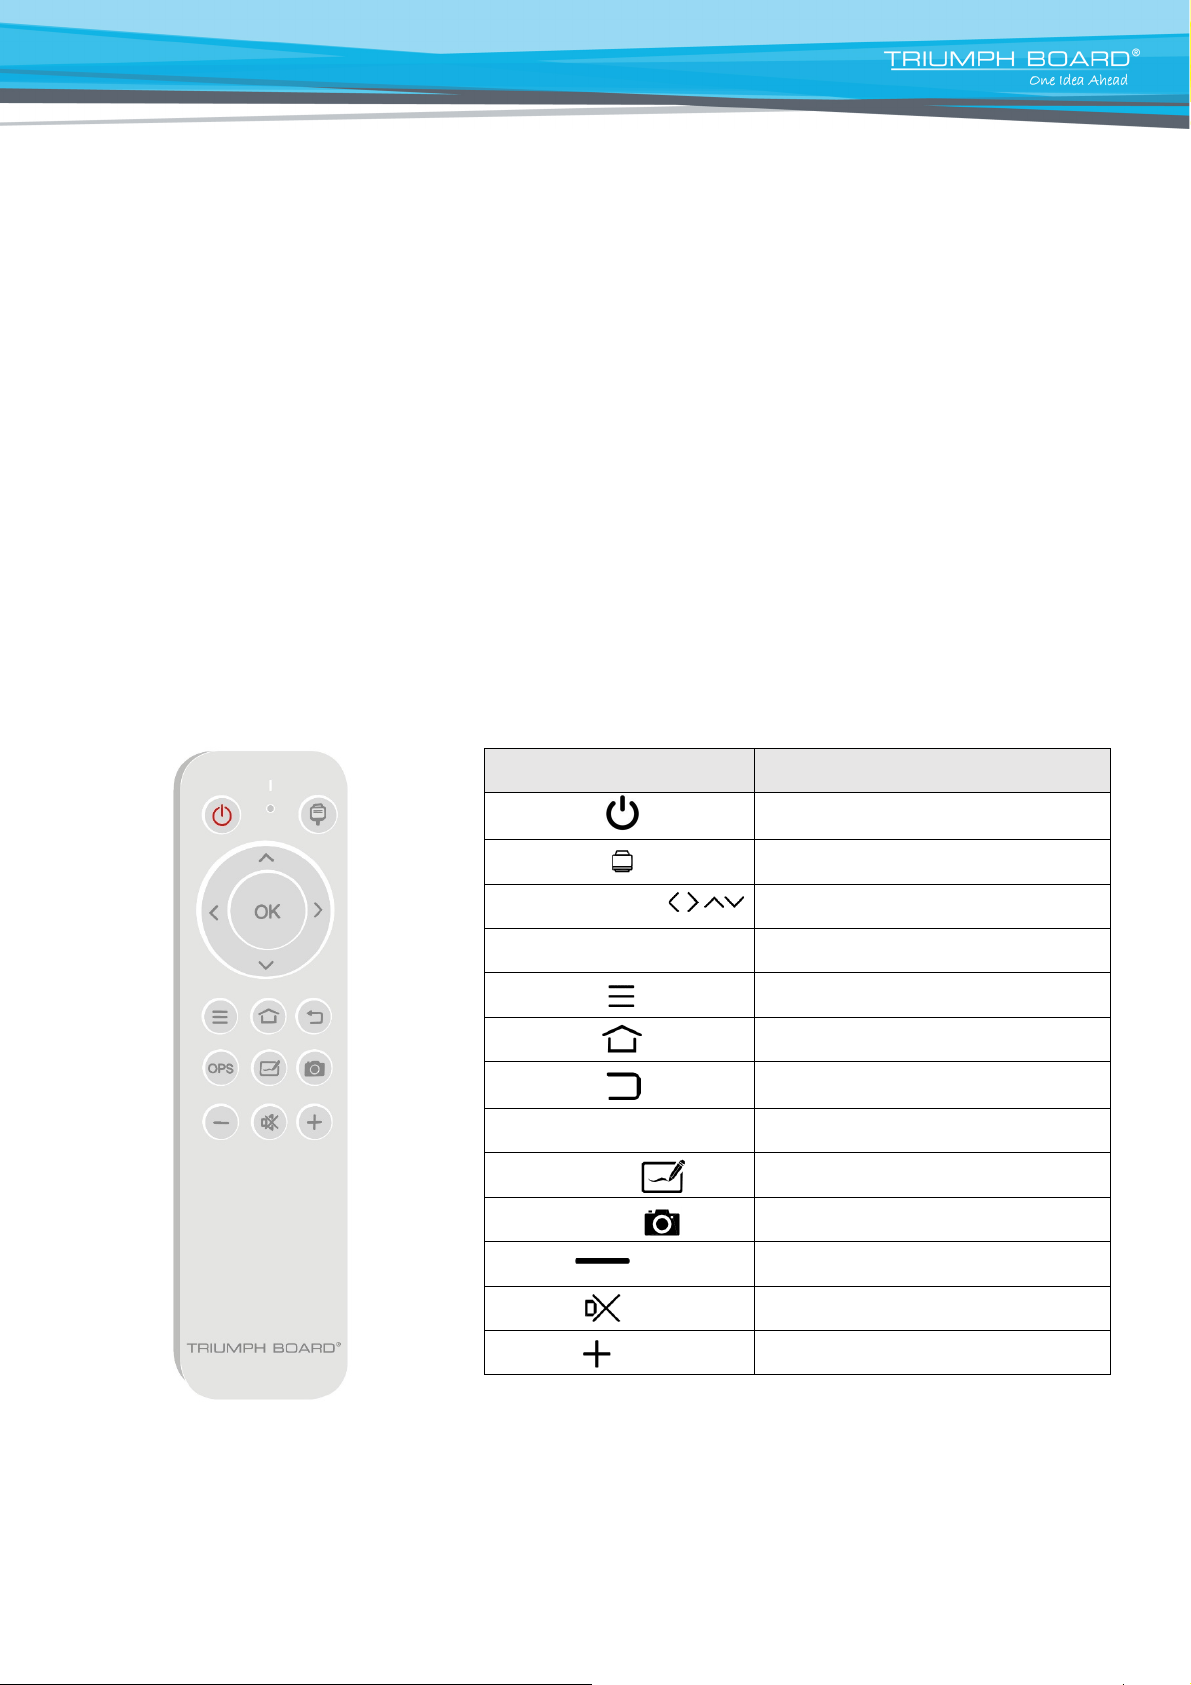
Button
Description
Power
Switch between power on and power
(off)
Source
Open/close the signal source list
Navigation keys
Select or adjust menu options
OK
Confirm the operation
Menu
Show/Hide the main menu
Home
Display the Android homepage
Back
Return to the previous interface
OPS
Switch to OPS source
Annotation
Switch to annotation application
Screenshot
Take a screenshot
Vol -
Decrease the volume
MUTE
Enable/Disable sound
Vol +
Increase the volume
5. Remote Control
Precautions:
• Aim the remote control at the remote receiver when using the remote control. Any object placed between
the remote control and the remote receiver may interfere with operation.
• Protect the remote control from vibration. Do not expose the remote control to direct sunlight, as heat
may deform it.
• When the remote receiver is subject to direct sunlight or strong light, the remote control may malfunction.
In such case, please change the angle of lighting, reposition the device, or operate the remote control
closer to the remote receiver.
• Replace the batteries in case of low battery as low battery power will reduce the range of the remote
control. If the remote control is to be left unused for a long period of time or the batteries are depleted,
please remove the batteries as battery leakage may damage the remote control.
• Do not use batteries of different types or mix a new battery with a used one. Always replace batteries in
pairs.
• Do not throw the batteries into a fire or recharge or disassemble the batteries. Do not recharge, shortcircuit, disassemble/assemble, heat or burn any used batteries. Please dispose of waste batteries
according to applicable environmental regulations. Do not expose batteries to any hot environment, like
direct sunlight or fire.
Remote control button instructions:
10
Page 11
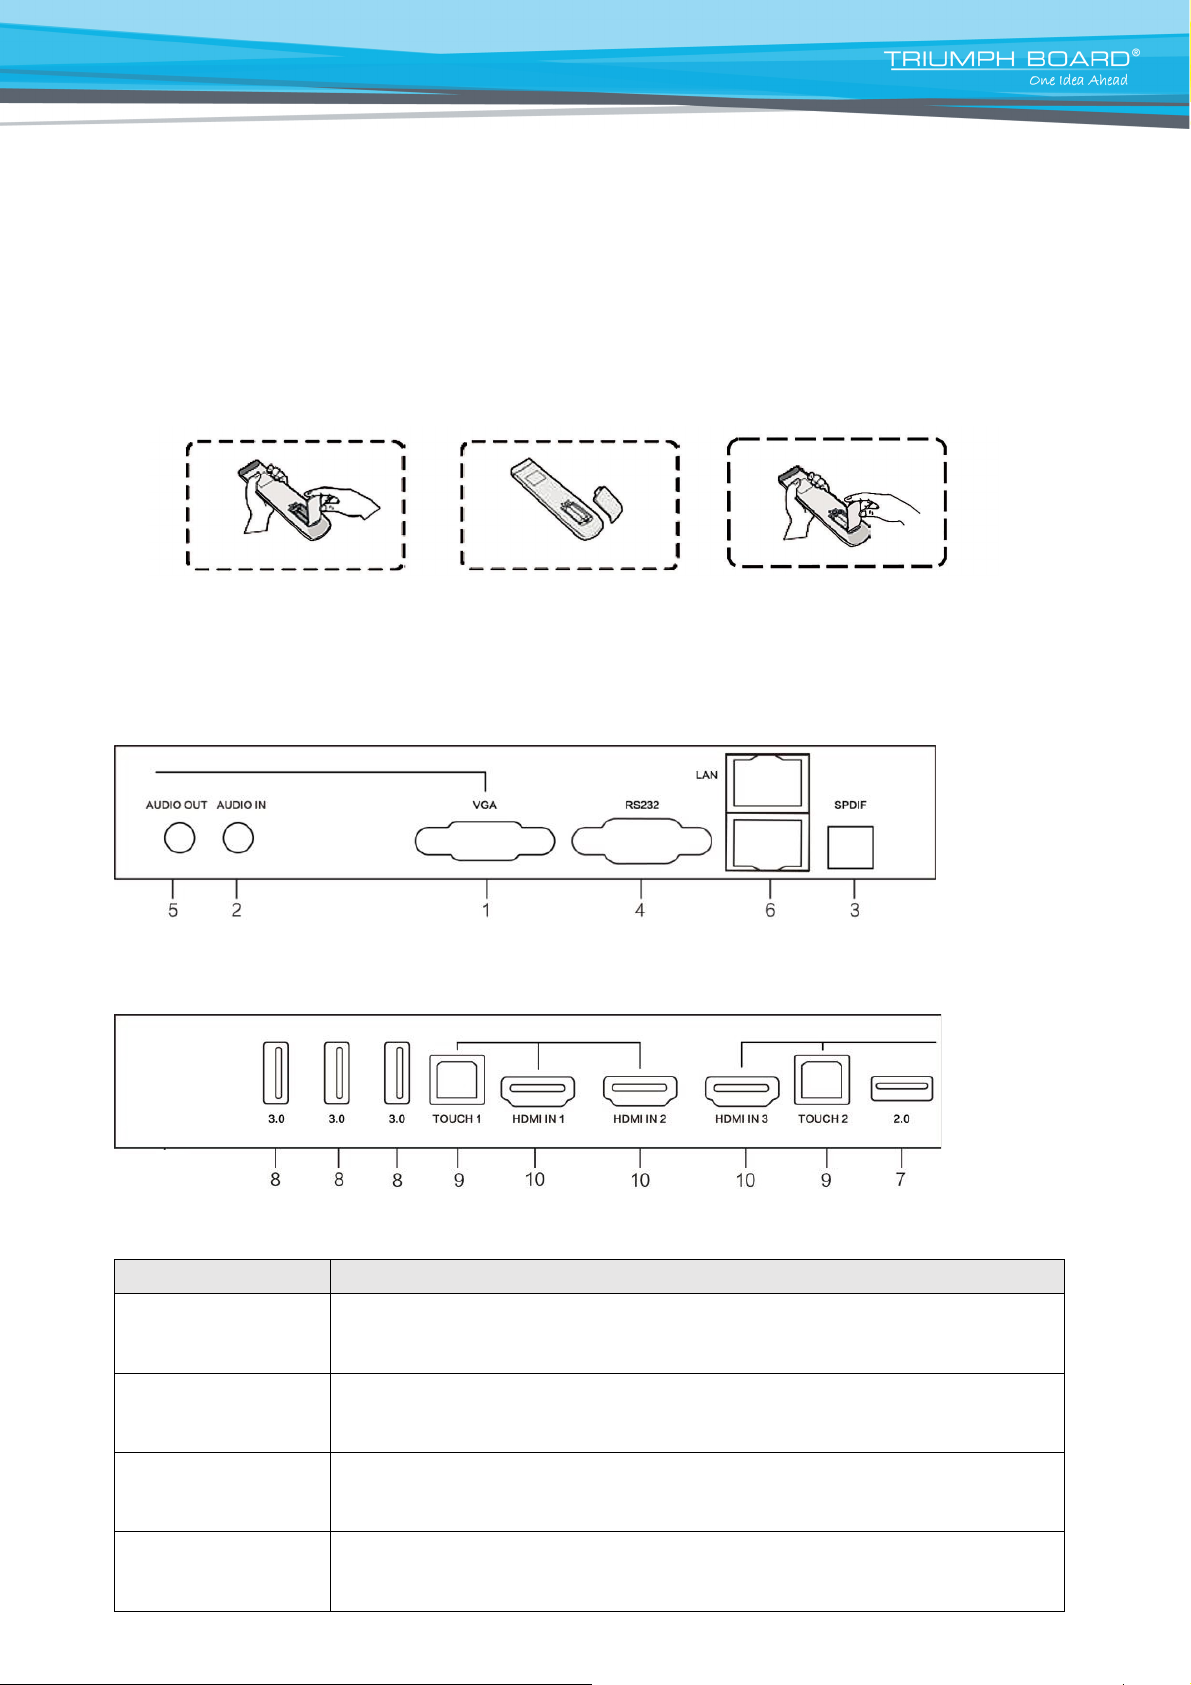
Remote Control Use Instructions
Ports
Description of Function
Connect USB devices such as portable hard drives, USB drives, USB keyboard
and mouse, etc.
External computer audio input.
SPDIF Out
signals to external speakers with a SPDIF
Serial interface, used for mutual transfer of data between devices.
Install Batteries
1) Open back cover of battery compartment on the back of remote control.
2) Install AAA type batteries according to the corresponding electrode, make sure the battery positive and
negative poles are correctly placed (“+” to “+”, “-” to “-”), please do not mix old and new batteries.
3) After batteries are installed, close the back cover of battery compartment, and snap the clip fastener shut
against the bottom of the remote.
6. IFP Interface Inputs, Outputs
Right bottom side of IFP interface:
Right side of IFP interface:
10. VGA
11. AUDIO IN
12. SPDIF
– digital optical audio output. This port can output the device’s audio
-IN port.
13. RS 232
11
Page 12
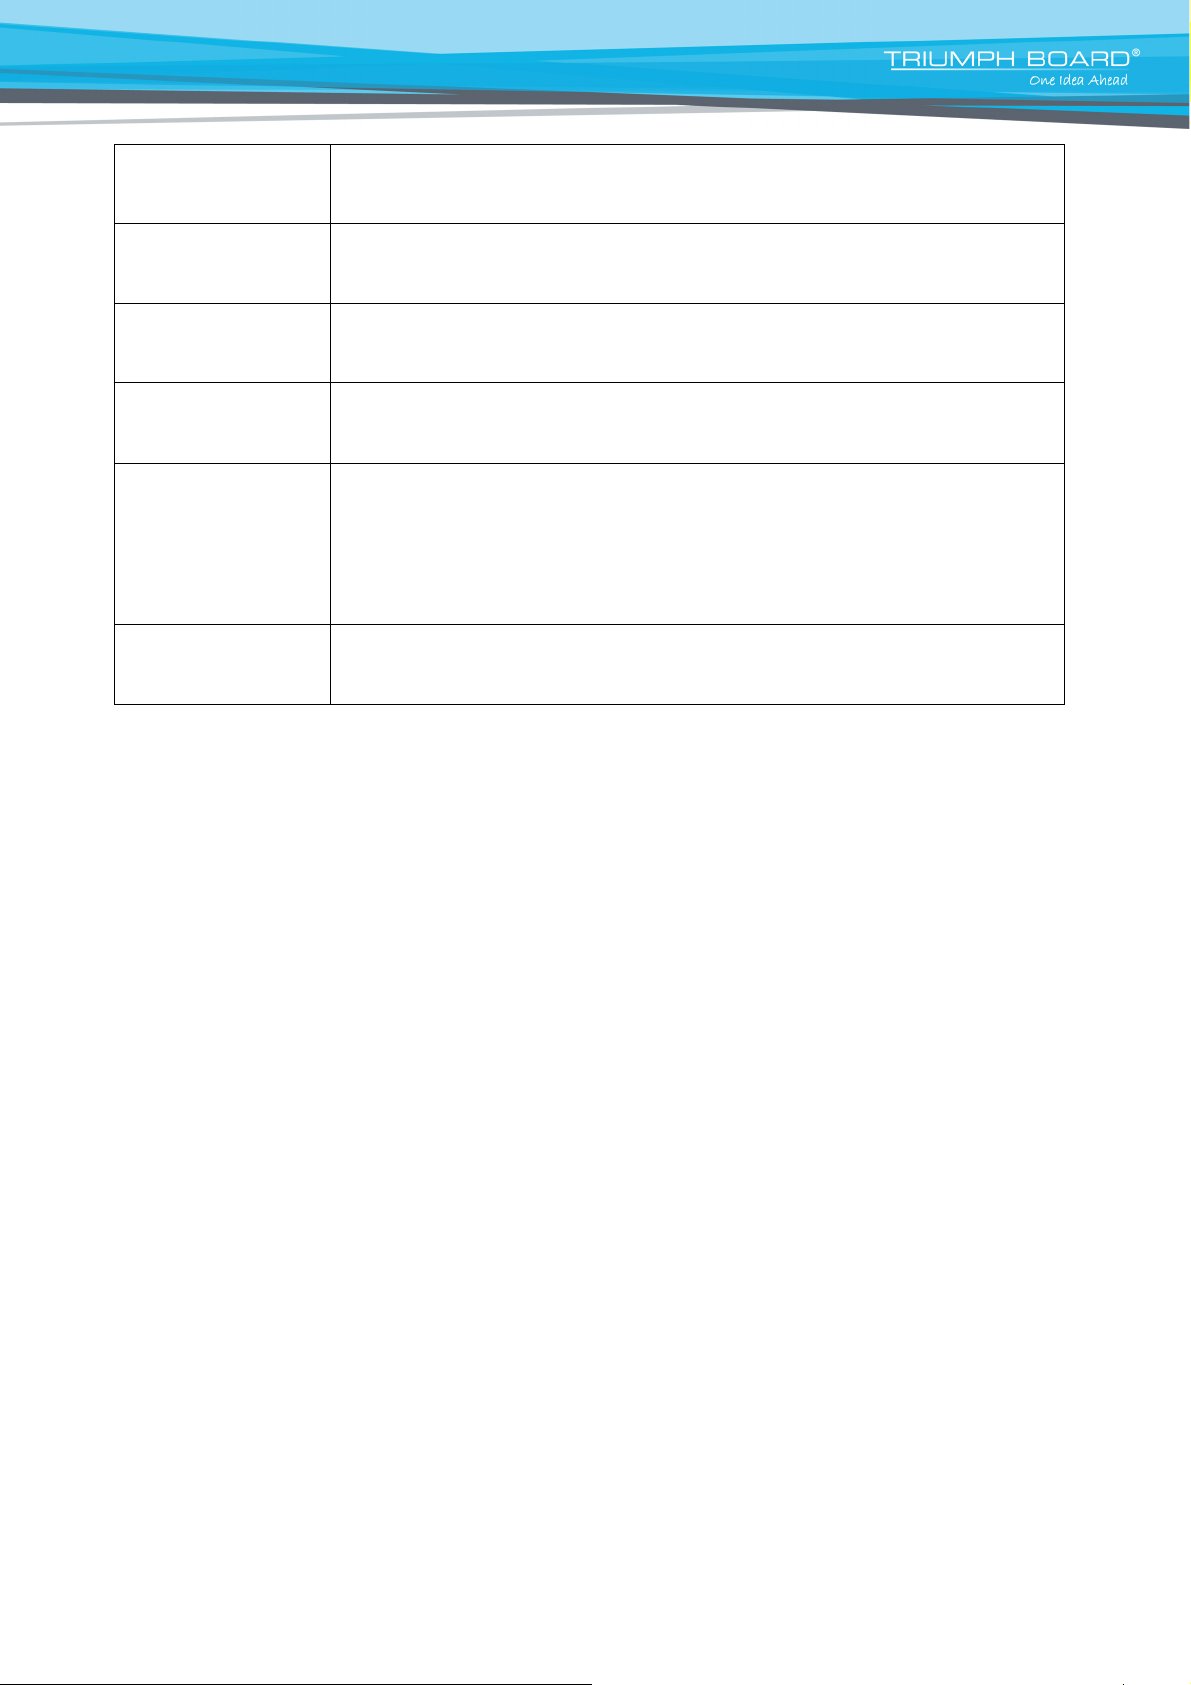
14. AUDIO OUT
Audio output to the external speaker.
LAN interface for connecting RJ45 terminals.
Connect USB devices such as portable hard drives, USB drives, USB keyboard
and mouse, etc.
Connect USB devices such as portable hard drives, USB drives, USB keyboard
and mouse, etc.
External computer touch signal input. Default touch function is available
under optional built
addition to connecting external computer VGA and audio signals, the
external computer’s USB port needs to be connected to the equipment.
Under the condition that driver is installed, the external computer can
be touch controlled through the eq
PC, VGA and HDMI channel by default).
For connection to display devices with HDMI output function. Maximum resolution
supported by HDMI port is 4K@60HZ.
15. LAN
16. USB 2.0
17. USB 3.0
18. TOUCH USB
19. HDMI
-in OPS PC. When connecting an external computer, in
uipment (touch function is effective in
12
Page 13
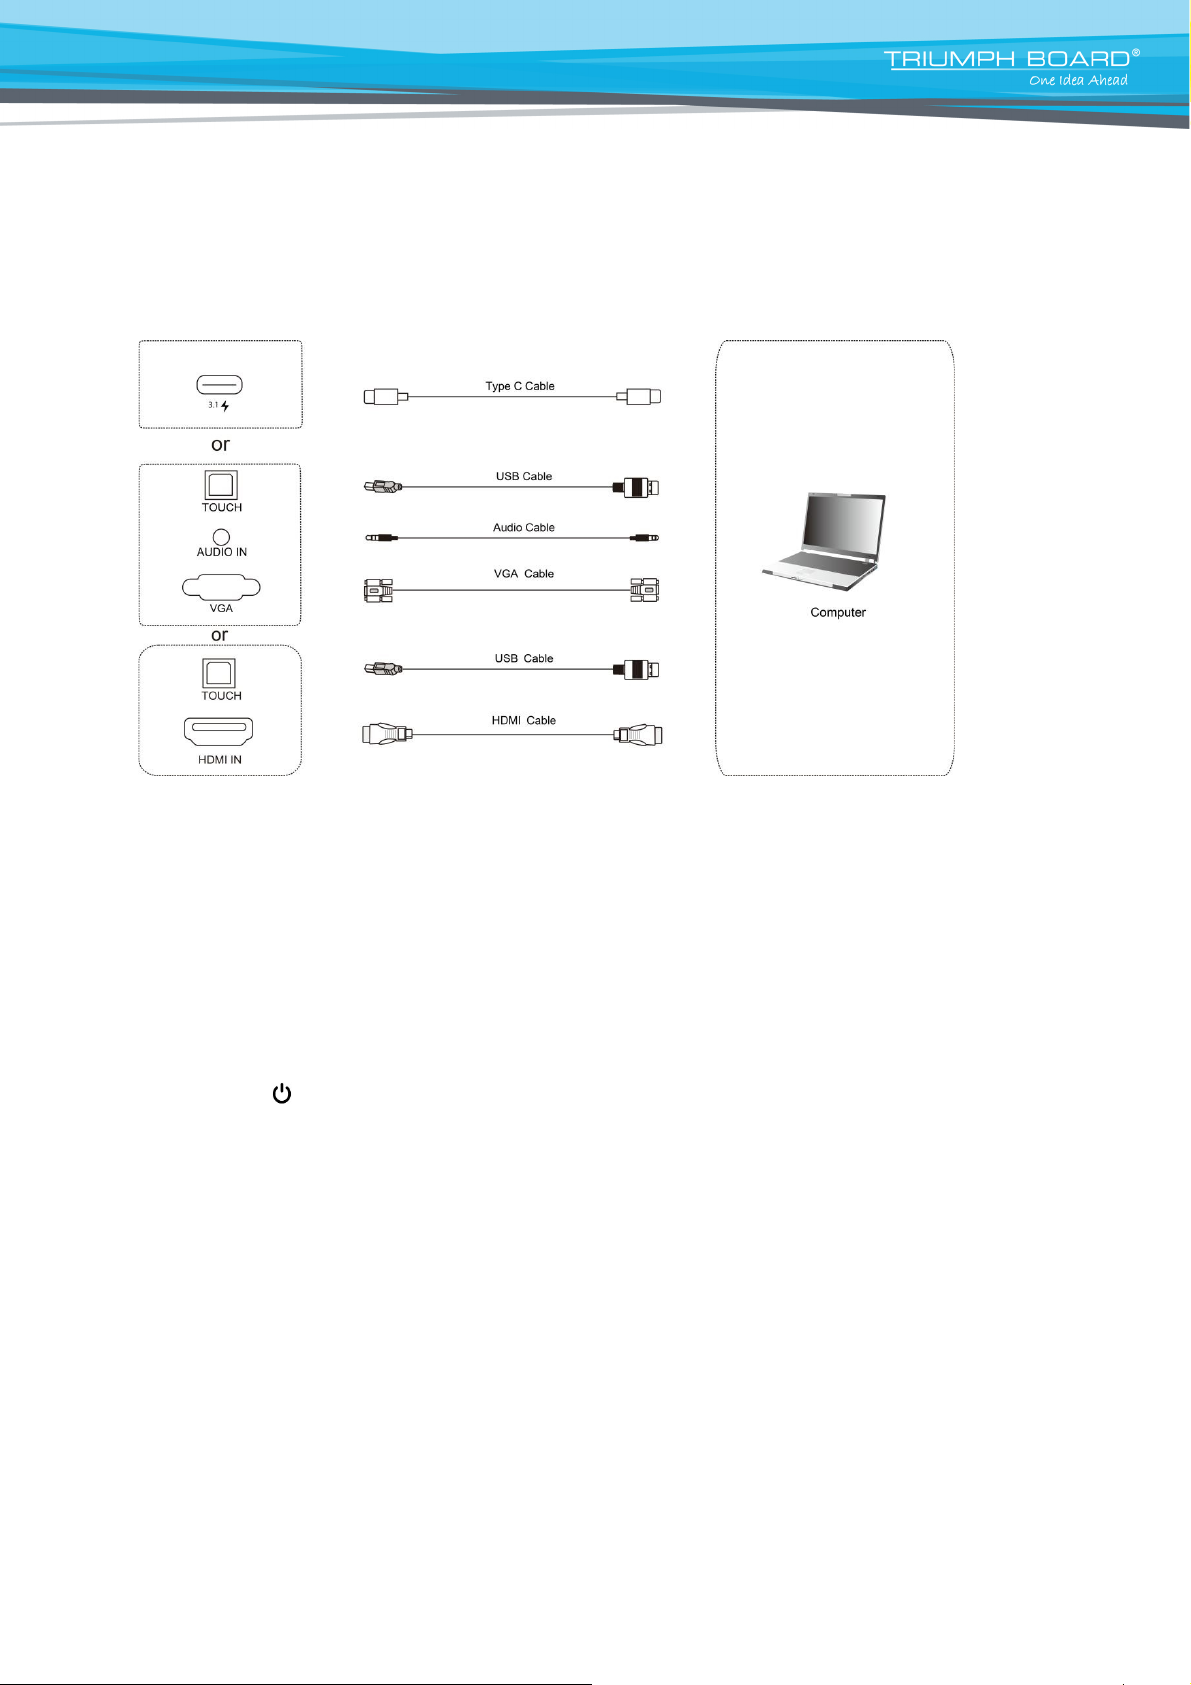
7. Connection and Set Up
CAUTION
For your own safety and the safety of the device, please do not connect any power cord before the external
device has been prepared.
External Computer and Touch Connection
Connecting of VGA cable and USB touch cable:
1. Use VGA line to connect to VGA output port of external computer, and meanwhile use headphone
audio line to connect to external computer audio output interface.
2. Use a USB cable to connect to the external computer USB port.
3. After connection is completed, plug in power cord, and switch POWER to ON.
4. Start external computer.
5. Press key , and the equipment is powered on.
6. Press the INPUT key to switch to VGA channel.
NOTE:
For external computer output, the device’s best resolution is 3240x2160. The
VGA standard does not support this resolution. If you want to display data in a
resolution higher than FULL HD like 4K, then we recommend using a
connection between the external computer and device via HDMI/Display Port
cable.
13
Page 14
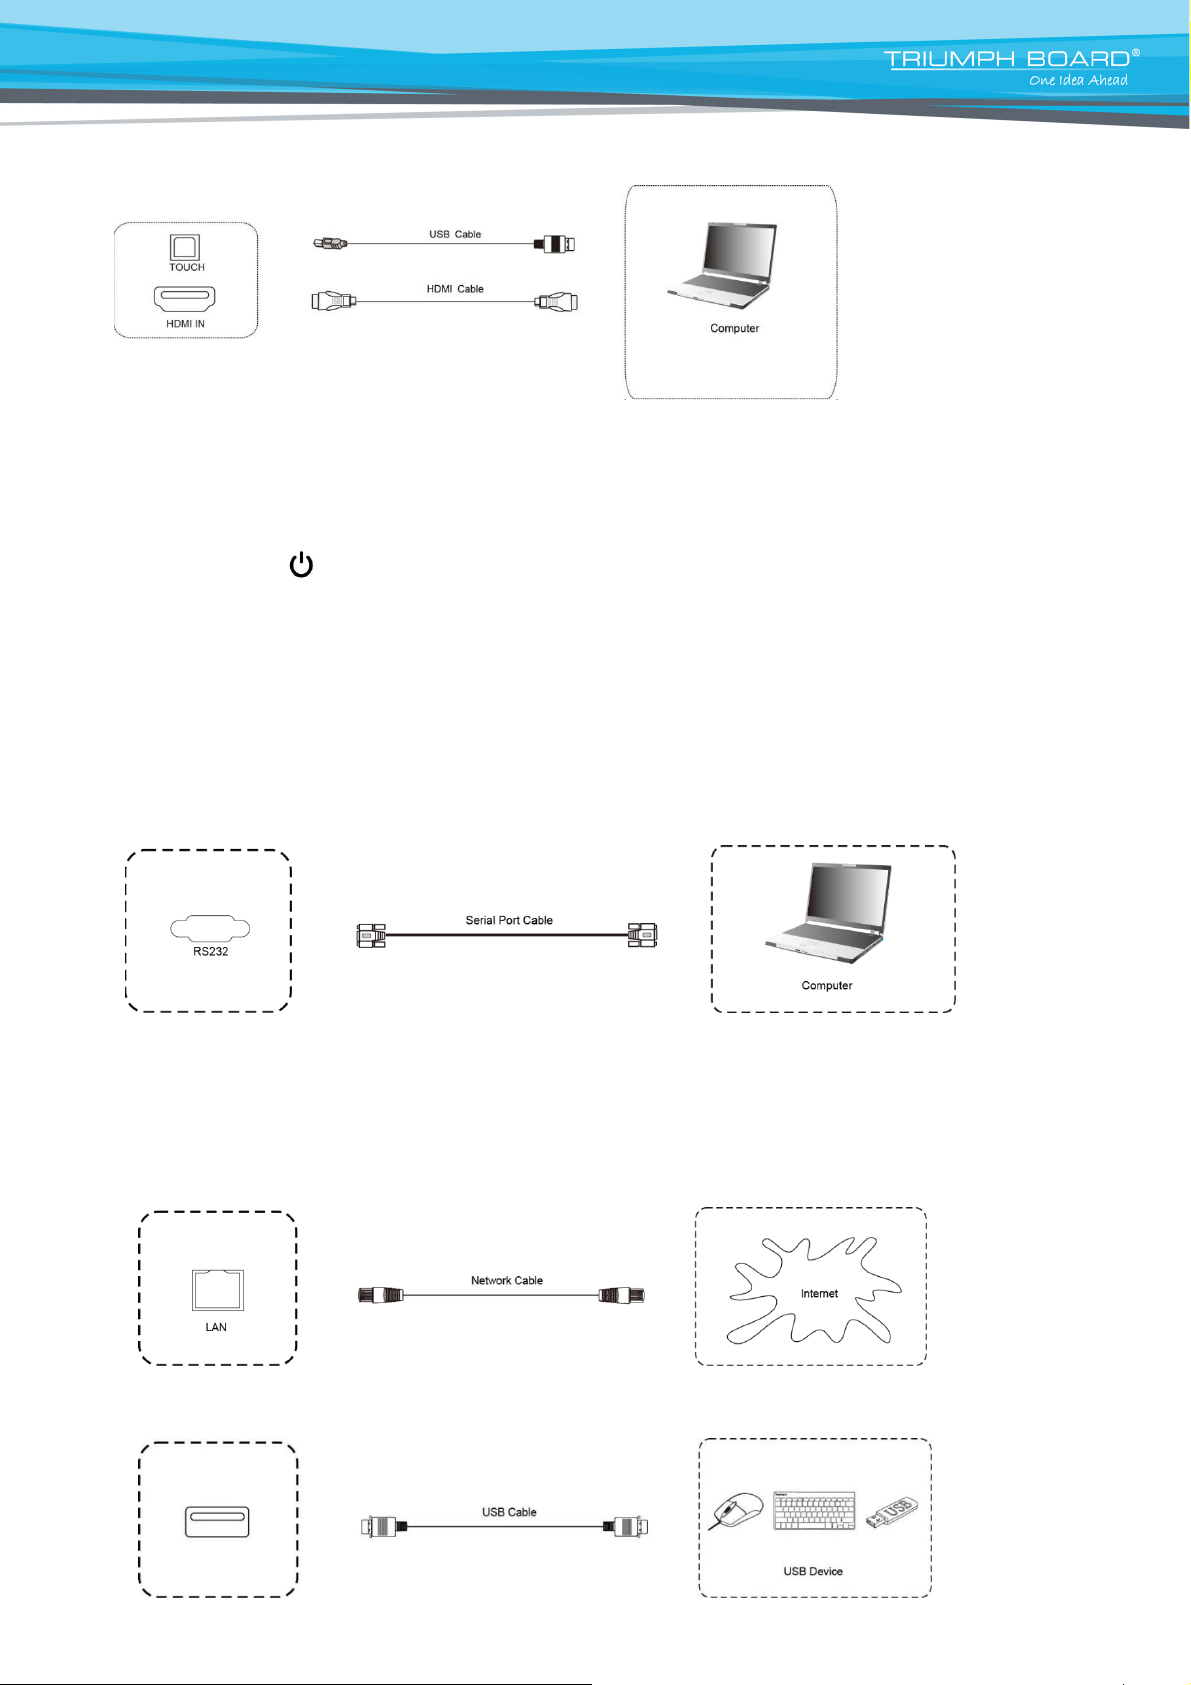
Connecting of HDMI cable and USB touch cable:
HDMI1 /HDMI2 / HDMI3 Connection
1. Use HDMI line to connect to HDMI output port of external computer
2. Use a USB cable to connect to the external computer USB port.
3. After connection is completed, plug in power cord, and switch POWER to ON.
4. Start external computer.
5. Press key , and the equipment is powered on.
6. Press the INPUT key to switch to HDMI channel.
Connecting of HDMI/VGA cable and USB touch cable:
HDMI 1/2--> TOUCH USB 1
HDMI 3/VGA--> TOUCH-USB 2
HDMI 4--> TOUCH-USB 3
RS232 Serial Port Connection
After using the serial port line to connect central control equipment and the device, certain functions of the
device can be controlled via the central control device, such as: device ON/OFF, and adjustment of sound
volume, etc. RS232 codes are available on our support webpage: https://www.triumphboard.com/support/.
LAN Connection
USB Connection
14
Page 15
8. Android System
Call up Control Menu.
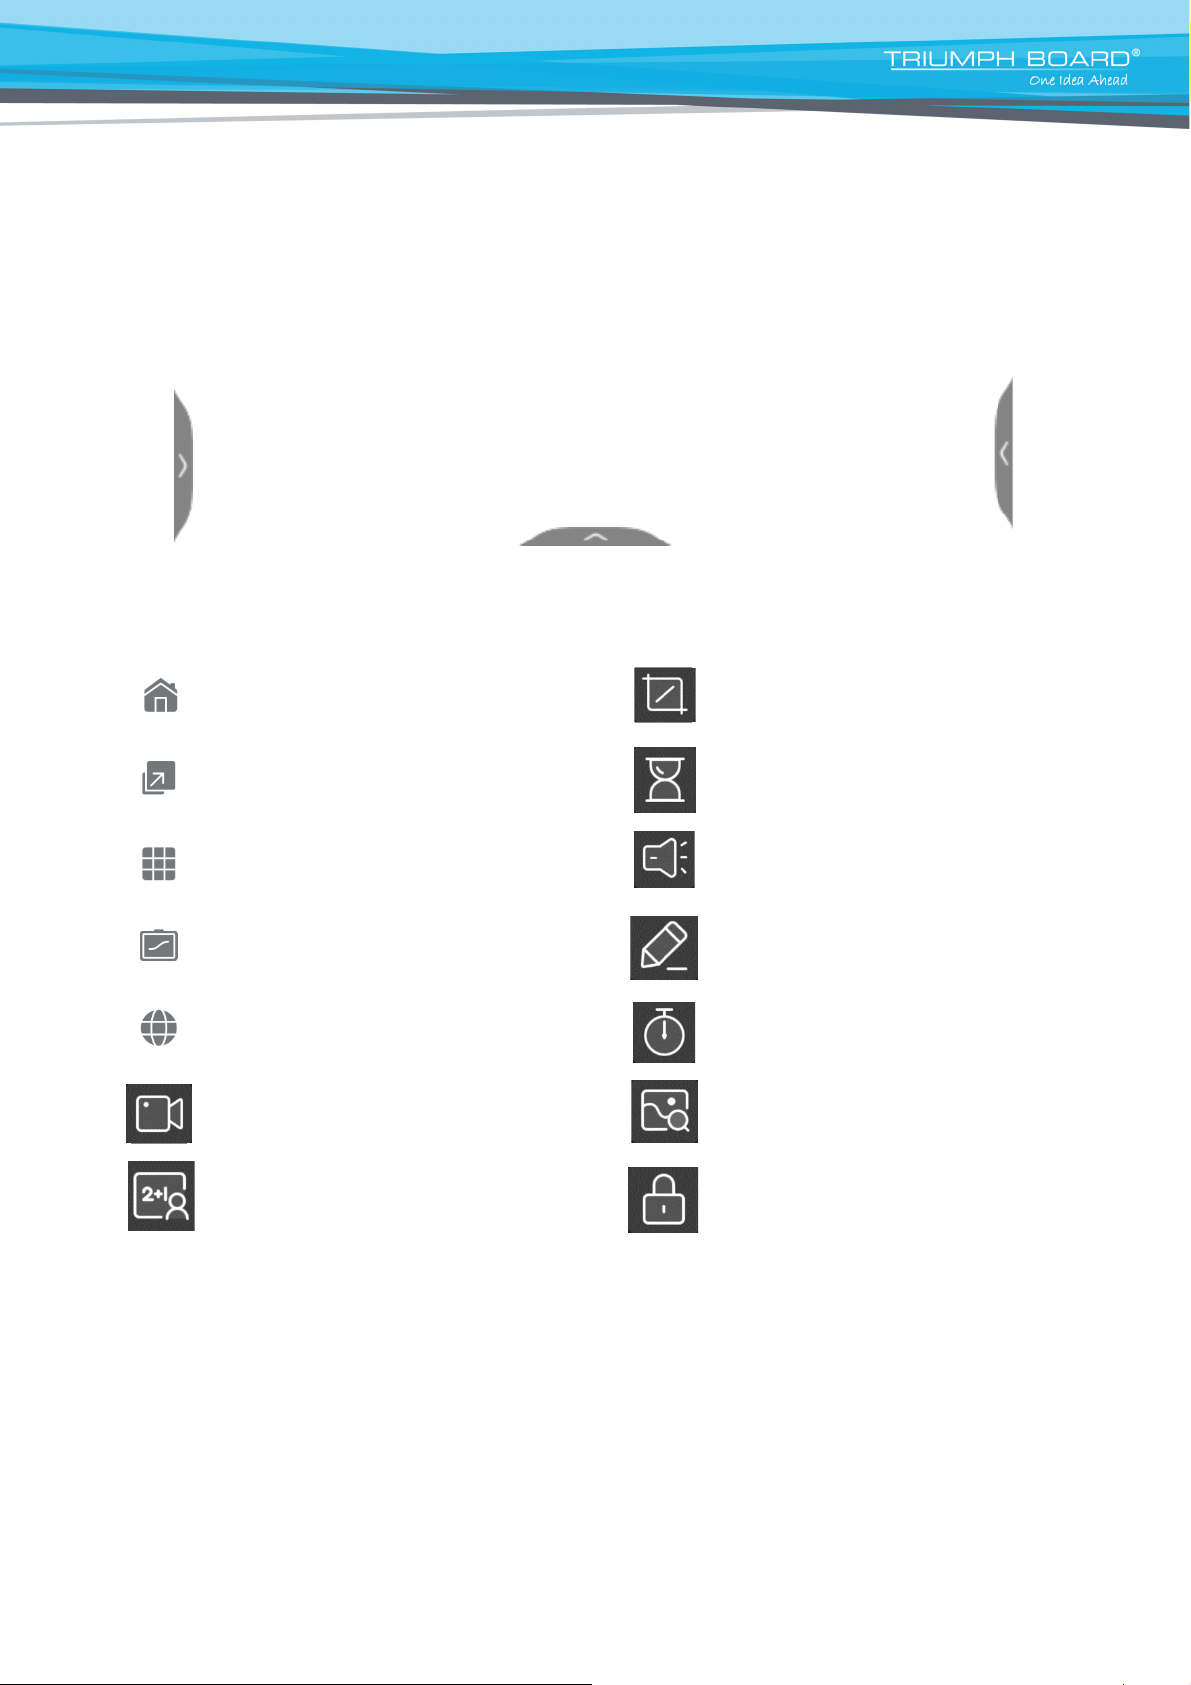
There are 3 arrows on the screen that are used to call Control Menu. One is on the left side, one is on
the right side, one is on the bottom. Touch the arrow to call Control Menu. Control Menu will disappear
after 5 seconds of inactivity.
Control Menu
Home (Return to Android Home Page) Crop (Crop screen & screenshot)
Switcher (Switch through open apps and Inputs) Timer
All Apps (All installed apps) Spotlight
Note (Annotation) Mark (Annotation on glass)
Browser Stopwatch
Record (Recording of the screen) Freeze
AirClass (Online Voting system) Screen Lock
Disappearing of Control menu
Press on arrows between the sections or wait 5 seconds.
15
Page 16
9. Basic Operations
Start-up / shutdown
Use 100-240V AC as the power supply.
The Power button on the front panel and the remote control can be used to switch between power ON and OFF
state.
Auto standby shutdown
In the Android main interface, whether there is signal input or not, the device will not auto shutdown.
In the non-Android main interface, if there is no signal input within 5 min, the device will automatically shut off.
Upgrade Android firmware
For OTA online upgrade please connect device to internet either via Wi-Fi or LAN cable. Afterwards go to
Settings – System– System Update - Check Update. If there is new update available, you will be asked to
upgrade the device. Follow the instructions on screen to install the newest Android firmware. Please make sure
you always have the newest Android firmware installed.
Settings save before shutdown
Before shutdown, the device will save the display and sound settings. Upon restart, these settings will be used.
Source Switching
You can use the remote control or Input Settings icon to switch the source by the following methods:
Method one: press the “Signal Source” key on the remote controller to call “Signal Source Menu”, press the
cursor key on the remote control to select a signal source, press the “OK” key, the device will switch to the
selected input signal source.
Method two: Press the Input Settings icon on top right corner. Input settings will pop up, select signal source,
the device will switch to the selected input signal source.
Display Settings
Start Common Settings > click on three dots > Display, to adjust display frame back light, color temperature,
aspect ratio, image mode, saturation and so on. (adjustable only on non-Android input).
Audio Settings
Start Common Settings > click on three dots > Sound, to adjust volume, bass, treble, sound output device and
so on.
Change Password
Select Settings > System > Lock Screen Password. Set desired 4-digit password. Password can be changed
after entering initial password in password settings.
If the password is forgotten, please contact after-sale personnel (see page 25) on how to reset the password.
16
Page 17

Keyboard and input method
Settings > Language & Keyboard > Keyboard & Inputs, the system is provided with an “Android Keyboard”.
Language selection
Settings > Language & Keyboard > Languages and select the desired language.
Select System Time
Settings > System > Date & Time. The system will automatically synchronize the time from the network; in case
the device is not connected to network, date and time must be set manually.
Screenshot
Press the “Screenshot” key on the remote control or open crop widget (in the Control Menu) to take a screenshot.
The screenshot picture is stored in the “\Notes\Mark” folder in the local file management.
To adjust backlight
Press on the backlight icon on the home screen – drag into desirable value
To adjust volume
Press on the volume icon on the home screen – drag into desirable value
10. Network Settings
Wireless Network
1. System Settings > Wireless & Network > WLAN
2. Turn on Wi-Fi switch
3. Select the network to be connected from Network List, enter the connecting password
and press connect.
4. If there is no desired network in Network List, manually add a network.
This Wi-Fi Built-in Adapter is intended only for use in the Android mode.
Ethernet
There are two LAN network ports on this device, LAN 1 can be used to connect to a wired
network. When one network port is connected to a router, the other port can be connected to an
external device. The device’s Android system, OPS (Windows system only) and the external
device form a LAN, which can be connected to the network simultaneously.
1. Connect the one end of the network cable to the network port of this device before using wired network,
and then connect the other end to a router.
2. Select System Settings > Wireless & Network > Ethernet
3. Turn on connecting switch
4. Select “DHCP” in IP settings, IFP will automatically obtain an IP address and connect to network.
5. Select “Static” in IP settings, manually input IP address, gateway, network prefix length, DSN address,
and then click “Save” to connect to network.
17
Page 18
Wireless Hotspot
Wireless hotspot works only when following conditions are met:
• Built-in Wi-Fi is connected to IFP.
1. Select System Settings > Wireless & Network > Hotspot
2. Turn on hotspot feature (activation may take a few seconds)
3. Enter the hotspot name in the textbox. The default name is “AndroidAP_7817”, which is
customizable.
4. Enter the hotspot password in the textbox. The default password is 12345678. Password
is customizable.
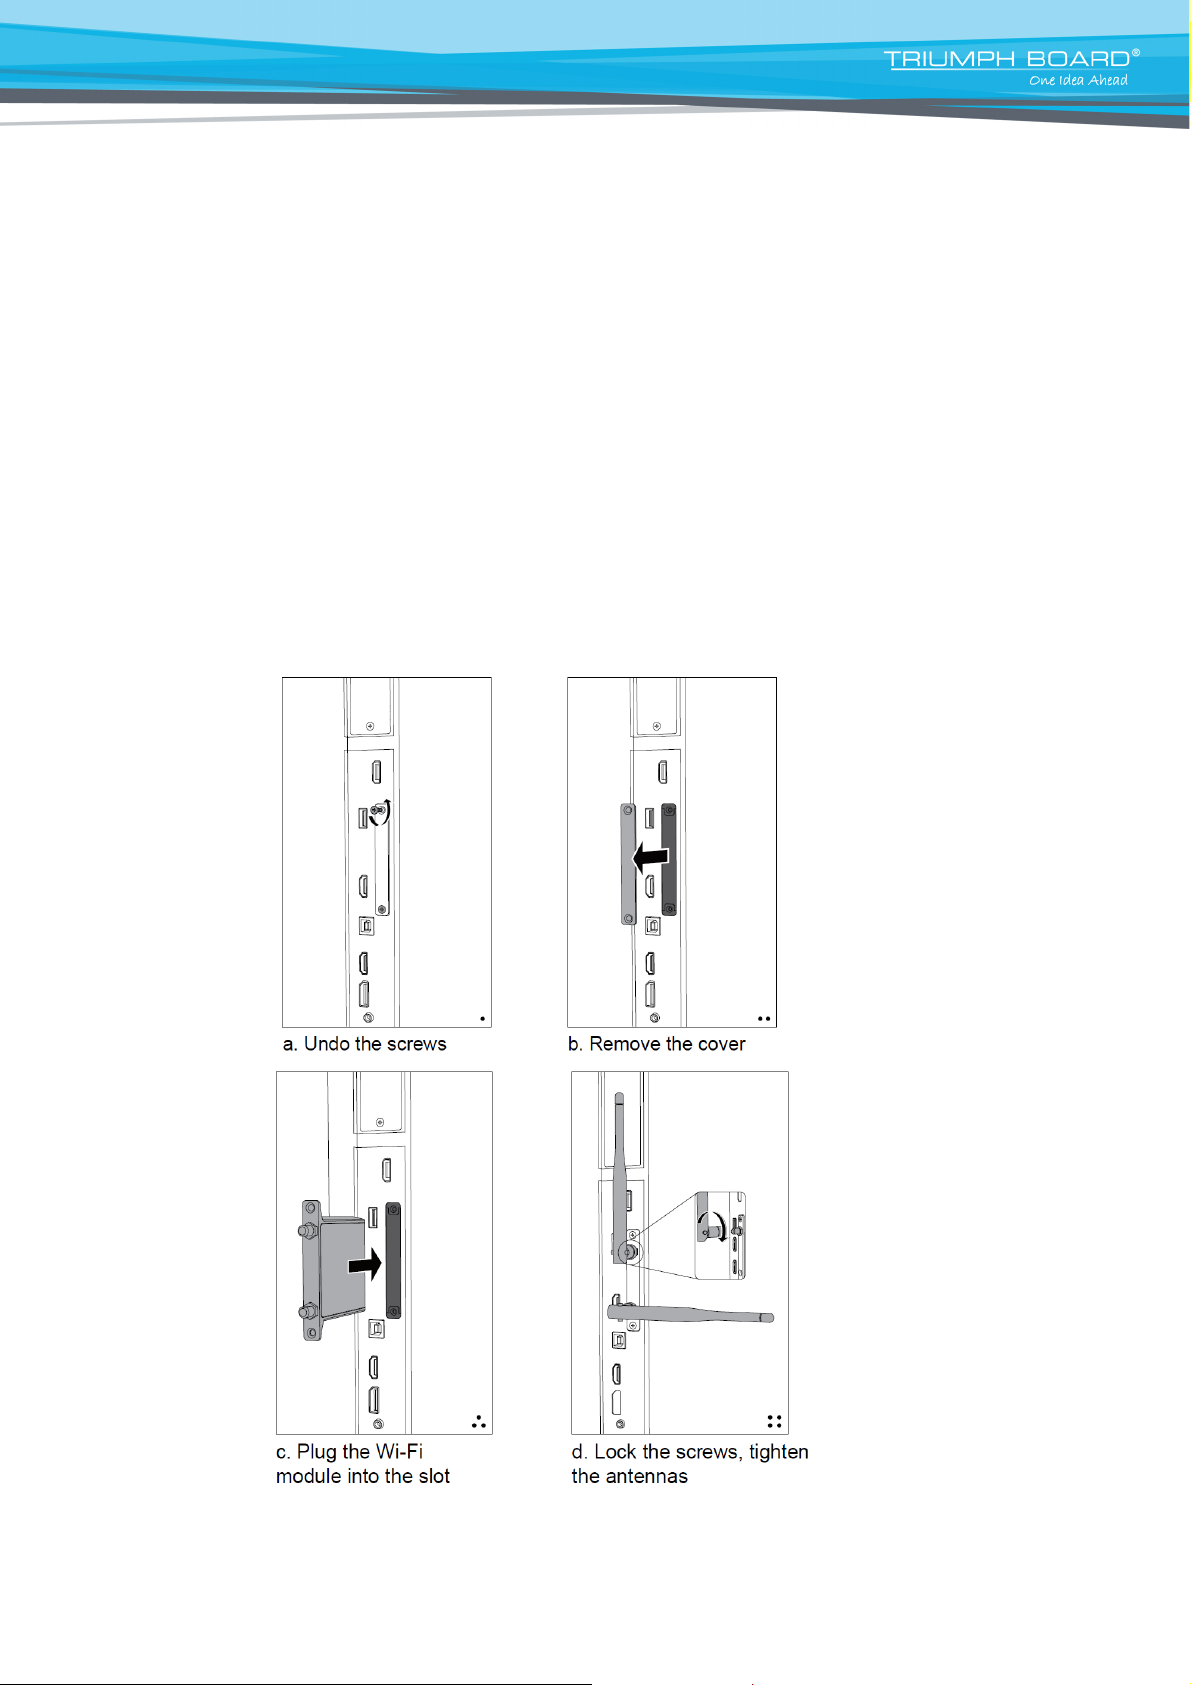
11. Wi-Fi module
Installation Procedure
Warning: Please make sure the power cord of the Interactive Flat Panel (IFP) is disconnected before
installation.
Note: This Wi-Fi module only works for the IFP by plugging it into the above slot.
18
Page 19
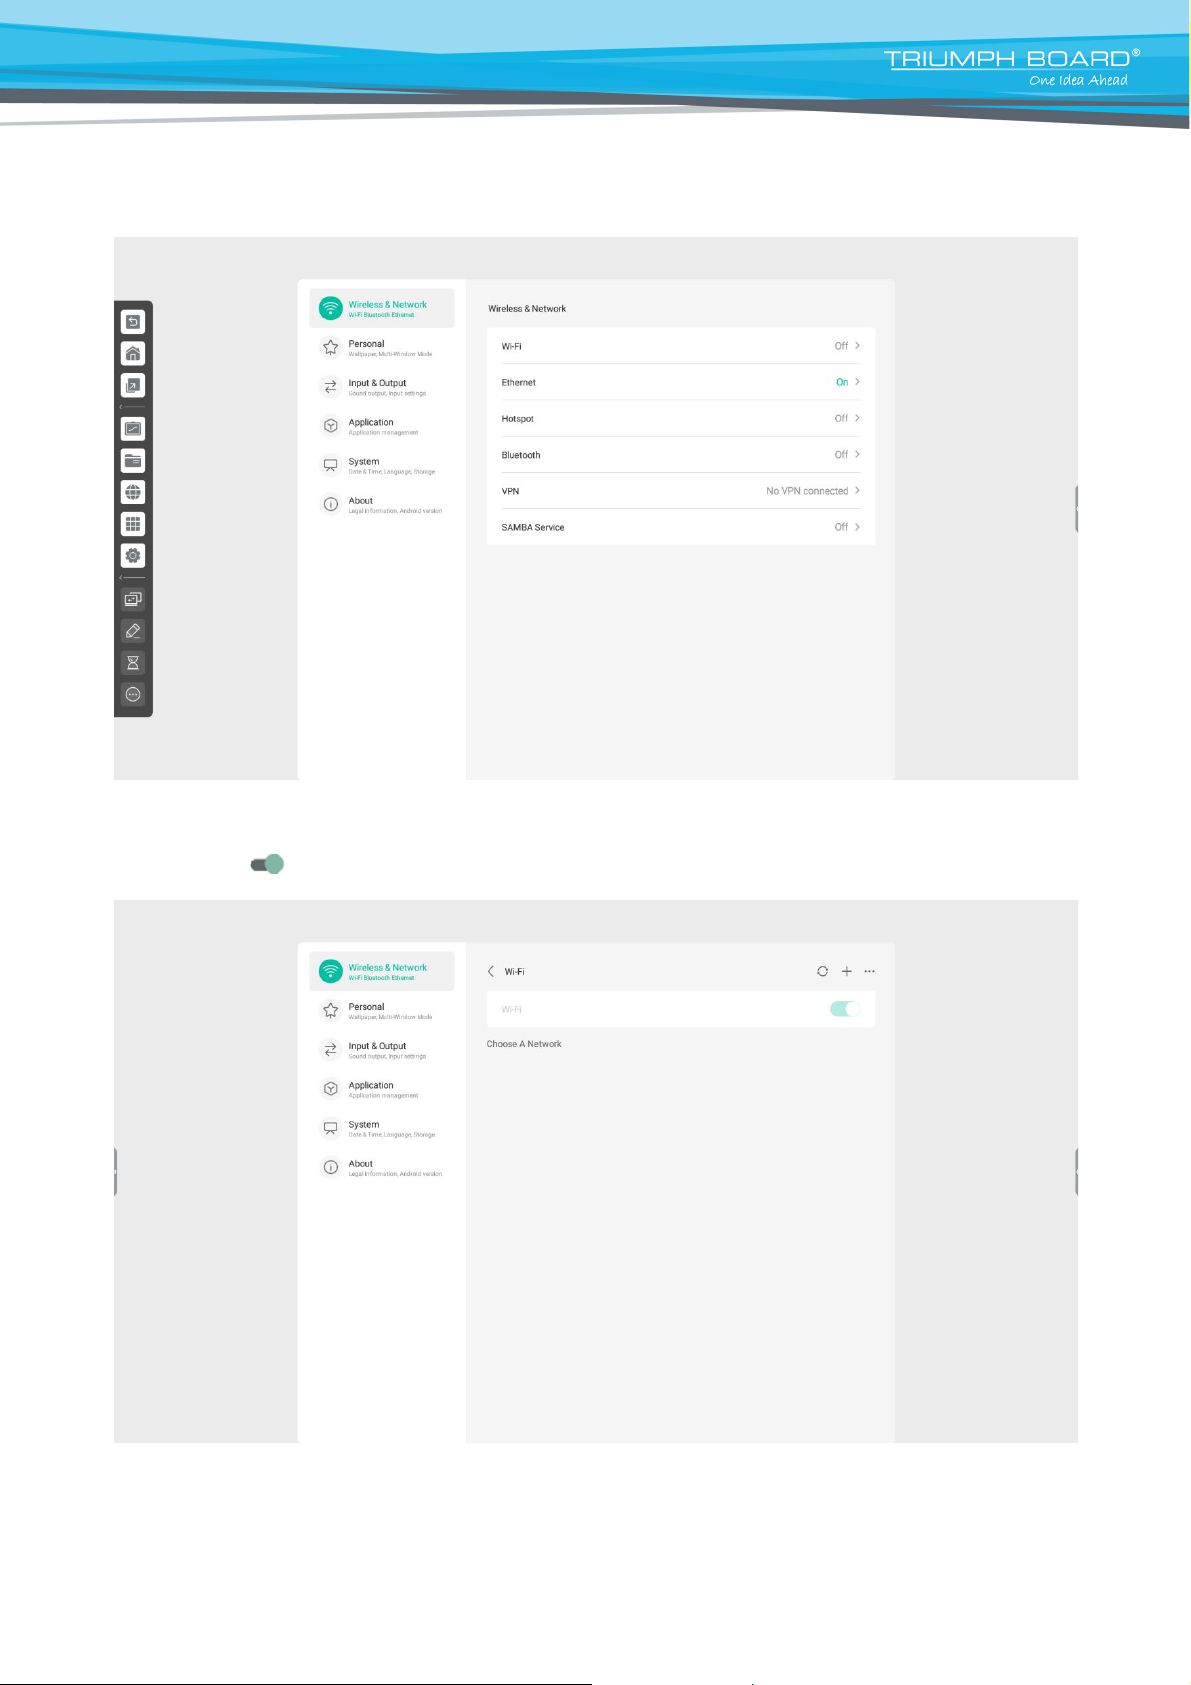
Function
After completing the installation, turn on the IFP, and the Wi-Fi module will run automatically.
Click "Settings" on the screen, you can see the following interface.
Click “Wi-Fi”, enter the following Wi-Fi setting interface.
Click the icon “ ”, you can turn on/off the Wi-Fi function.
Key Specifications
Wi-Fi-Standard: Support 802.11 a/b/g/n/ac
Bluetooth: Support BT 2.1/3.0/4.0
Operating Frequency: 2.4G & 5G (5150MHz-5250MHz indoor use) Antenna Type: Dipole
Antenna Gain: BT/ 2.4G Wi-Fi 3dBi;5G Wi-Fi 4.3dBi
Antenna Impedance: 50Ω
19
Page 20
12. Troubleshooting
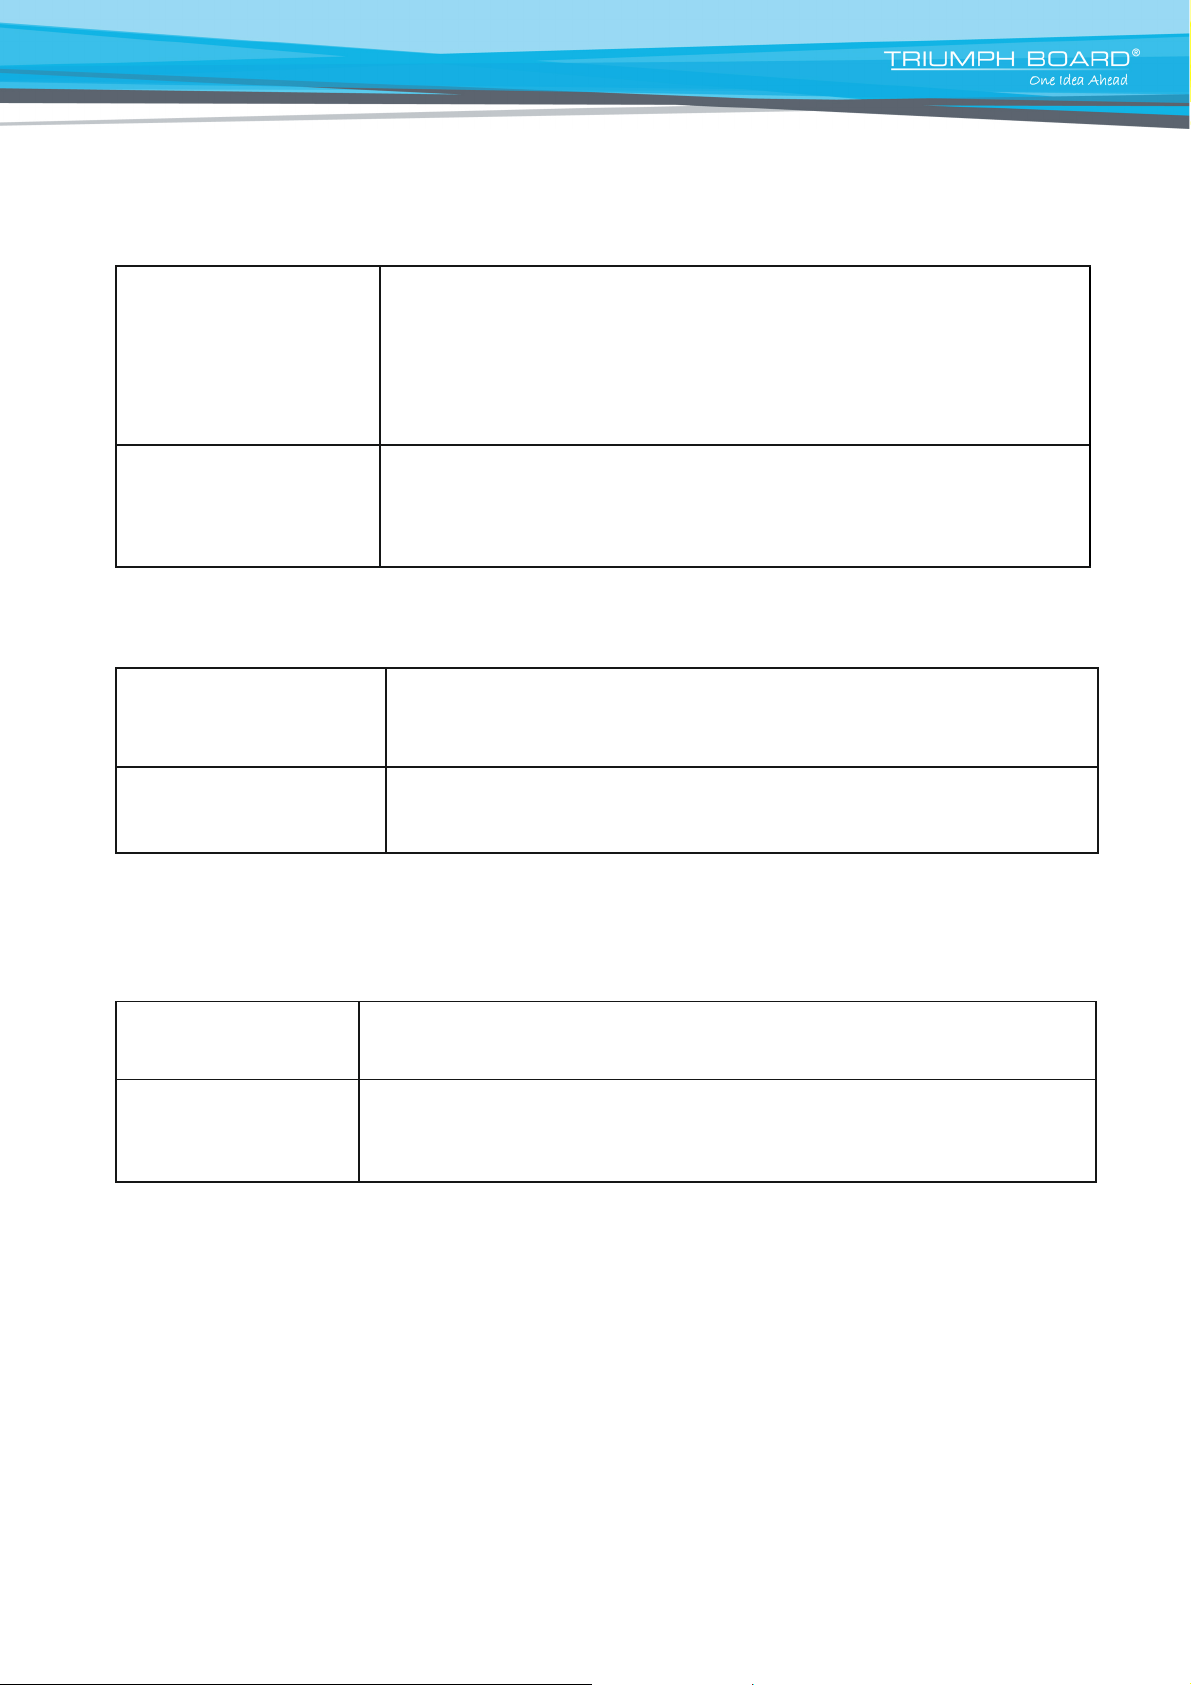
1.
Check whether there are other objects between remote control and
television remote control receiving window, blocking signal transmission
Remote control failure
and thus, leading to failure of remote control.
2.
Check whether the battery terminal in the remote control is correctly
connected.
3.
Check whether remote control needs battery replacement.
Device automatically
1.
Check whether the No Signal Auto Shutdown is set or not.
2.
Check whether there has been a sudden power outage.
shuts down
3.
Check whether there is no automatic shutdown.
Signal out of range
1.
Check whether display is set correctly.
3.
2. Check whether resolution is the best resolution.
Adjust line and field synchronization in menu.
Image lack of color, color
1. Check whether video cable is possibly not securely connected or has a quality
problem.
is incorrect
2.
Adjust color and brightness or contrast in menu.
Touch function invalid
1.
Check whether touch driver is installed and running.
2.
Check whether the size of article touched is comparable with finger.
Touch positioning not
1. Check whether driver is properly installed and make correction.
correct
2.
Make sure your finger or stylus is making good contact with the touch screen
IFP fails to work normally
PC module
Touch Function
20
Page 21
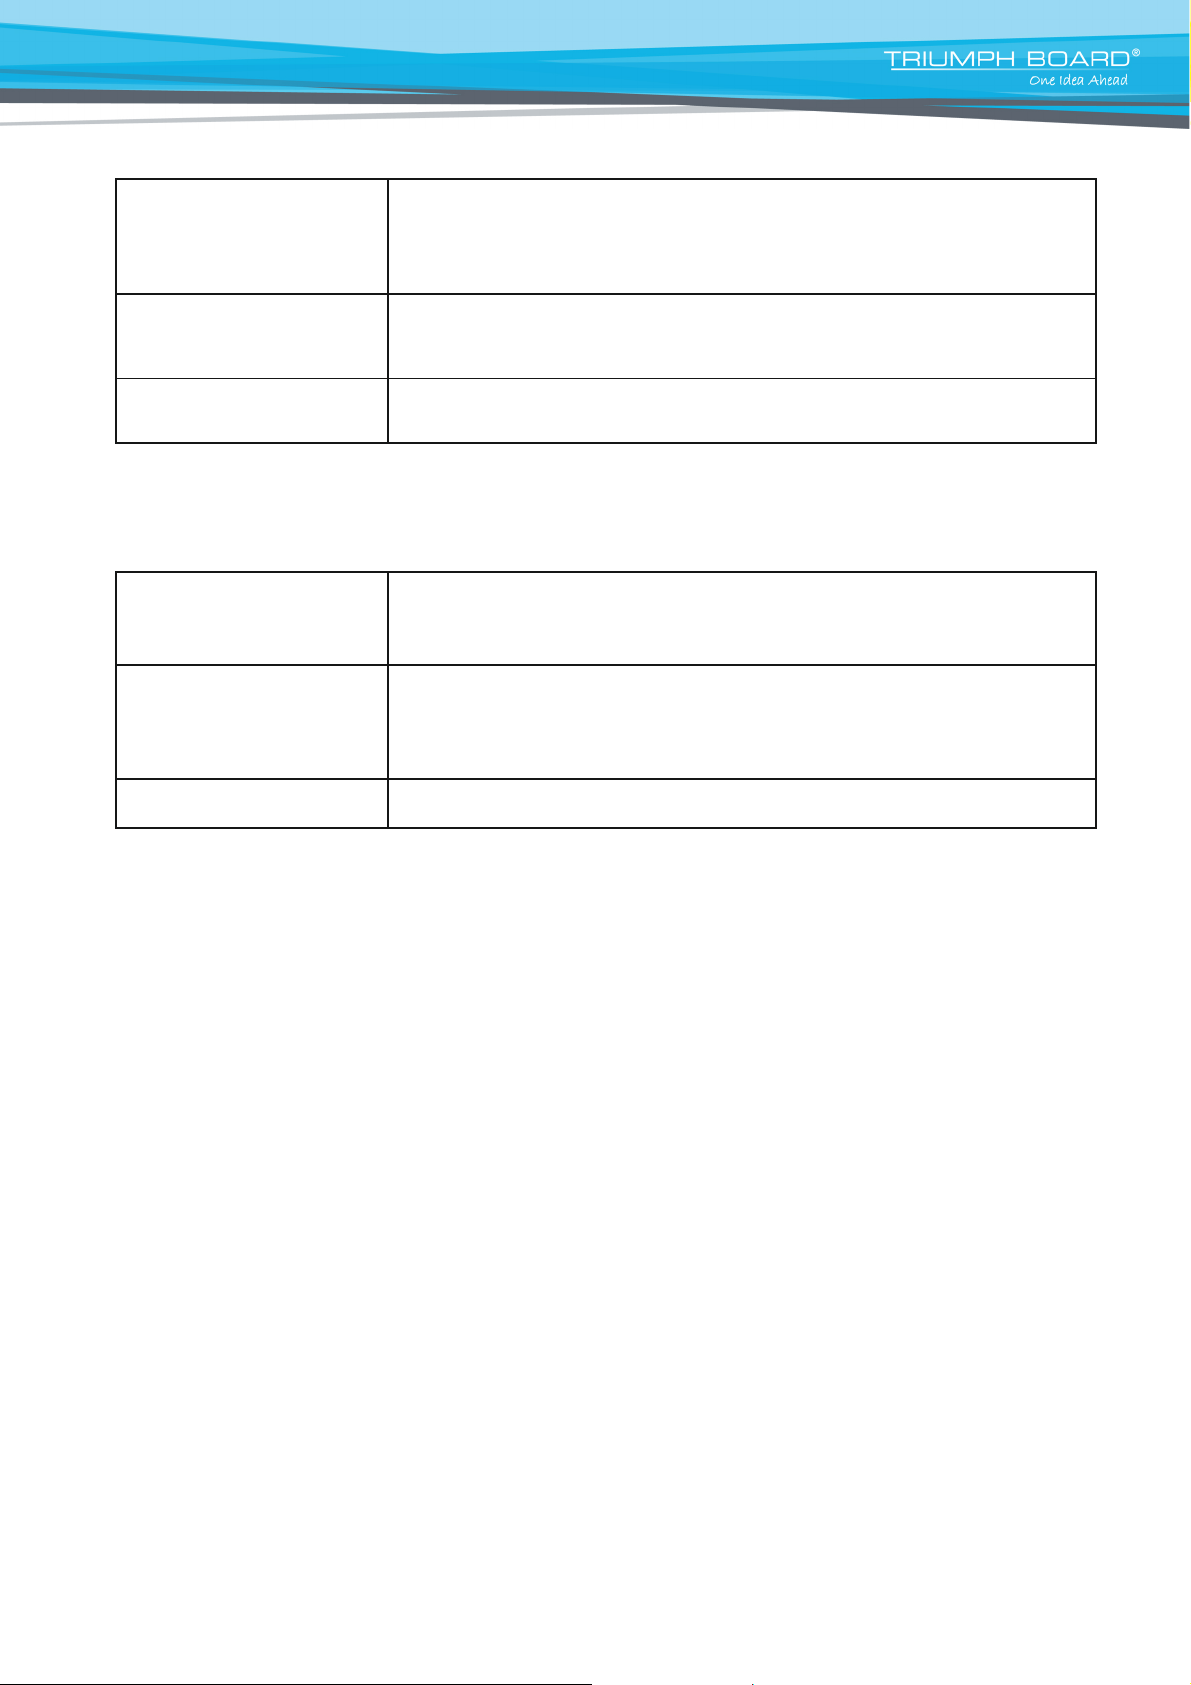
Video Malfunctions
No picture and no sound
1.
Check whether the device is in active mode.
2.
Check whether the signal wire is plugged in securely, using the correspon-
ding INPUT.
3.
If in internal computer mode, check whether internal computer is running.
With horizontal or vertical
1.
Check whether signal wire is securely connected.
stripes or image distortion
2.
Check whether other electronic equipment or power tools are placed
around the device.
No color, color is weak or
1. Adjust color and brightness or contrast in menu.
image is weak
2.
Check whether signal wire is securely connected.
1.
Check whether mute button is pressed for mute.
Image but no sound
2.
Press VOL. + / - to adjust volume.
3.
Check whether audio line is connected correctly.
1. Adjust sound balance in menu.
Only one speaker has
2.
Check whether computer sound control panel only sets up one sound
sound
channel.
3.
Check whether the audio line is connected correctly.
VGA output without sound
1.
Check whether an external device is connected via the headphone jack.
Audio Malfunctions
21
Page 22
13. Maintenance
Proper maintenance can prevent many early malfunctions. Regular, careful cleaning can keep the device
like brand new. Please unplug power plug before cleaning and maintenance, to prevent electric shock.
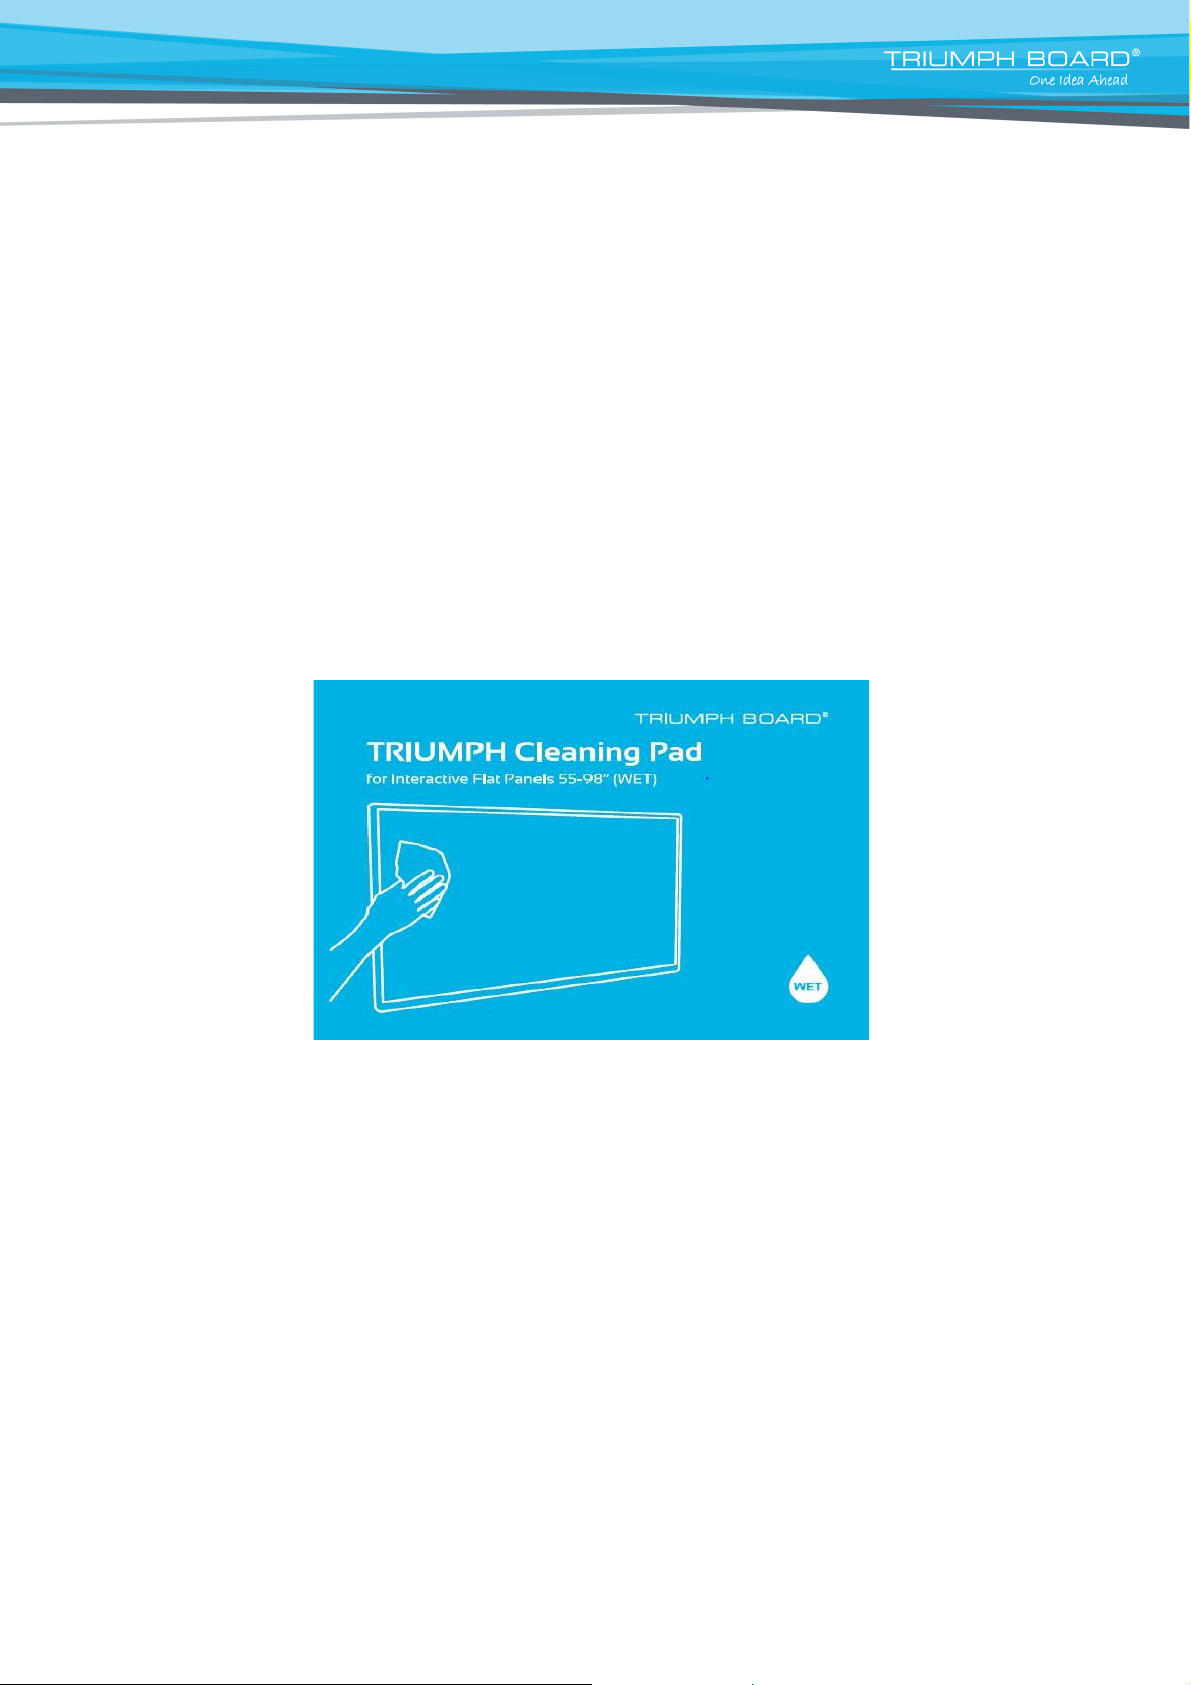
Clean screen
For cleaning of the IFP, we recommend using the TRIUMPH
Cleaning Pad (EAN:8592580083365). Be aware that using
fabric softener might damage the screen.
Clean front frame
Please use a dry, soft, lint-free cloth to wipe the front frame.
Device to remain unused for extended period
If the device will not be used for an extended time, such as during a vacation, please make sure to unplug
the cord to prevent any possible dangers caused by power surges from lightning.
For cleaning the glass surface of your IFP, we recommend using: TRIUMPH Cleaning Pad
(EAN:8592580083365).
22
Page 23
14. Repair Service and Contacts
Warranty
Please contact your local dealer regarding warranty options in your territory.
You can find our standard warranty conditions on our website
www.triumphboard.com/support/warranty
Technical support
Please fill in your RMA or Product question on our website
https://www.triumphboard.com/support/technical-support/
If you have any questions, please email us at [email protected]
Notices
Every effort has been made to ensure all information contained in this user guide is correct, but the
accuracy or completeness is not guaranteed. Before using this device, you must evaluate it and
determine if it is suitable for your intended application. You assume all risks and liability associated
with such use. Any statements related to this device not contained in this manual or any contrary
statements appearing on your purchase order shall have no force of effect unless expressly agreed
upon, in writing, with this company.
Reproduction or reprinting of this user guide or any part without permission is prohibited.
The content of this user manual is subject to change without prior notice.
E-mail: [email protected] www.triumphboard.com
TRIUMPH BOARD a.s.
Neklanova 122/15
128 00 Prague 2
Czech Republic
EU
Phone: +420 224 910 221
© TRIUMPH BOARD
23
 Loading...