

Page 1
INSTRUCTION HANDBOOK
FAX 930
Page 2
System overview
3
4
13
14
6b
Control panel
12
15
11
16
17
18
19
1
2
202122
23
47
10
24
5
6a
7
9
8
25
+
QRYUI
WE T
(
46
A
45
44
43
42
(*) Depending on model.
’$-_ "
)
S
(*)
<>
[
]
DG
F
=
ZVN
?
!
;
XC B
41
\
{
HJ
,
KL
:
Redial
ECO
39
&
O
}
]
M
%
P
~
/
.
@
Fax
Ctrl
messages
Std Fine Photo
Mode Auto Answ.
C
373840
36
Tel. TADFax
Menu
3335
31
OK
Vocal
messages
On
3034
456
321
987
0
#
@
2627282932
Page 3

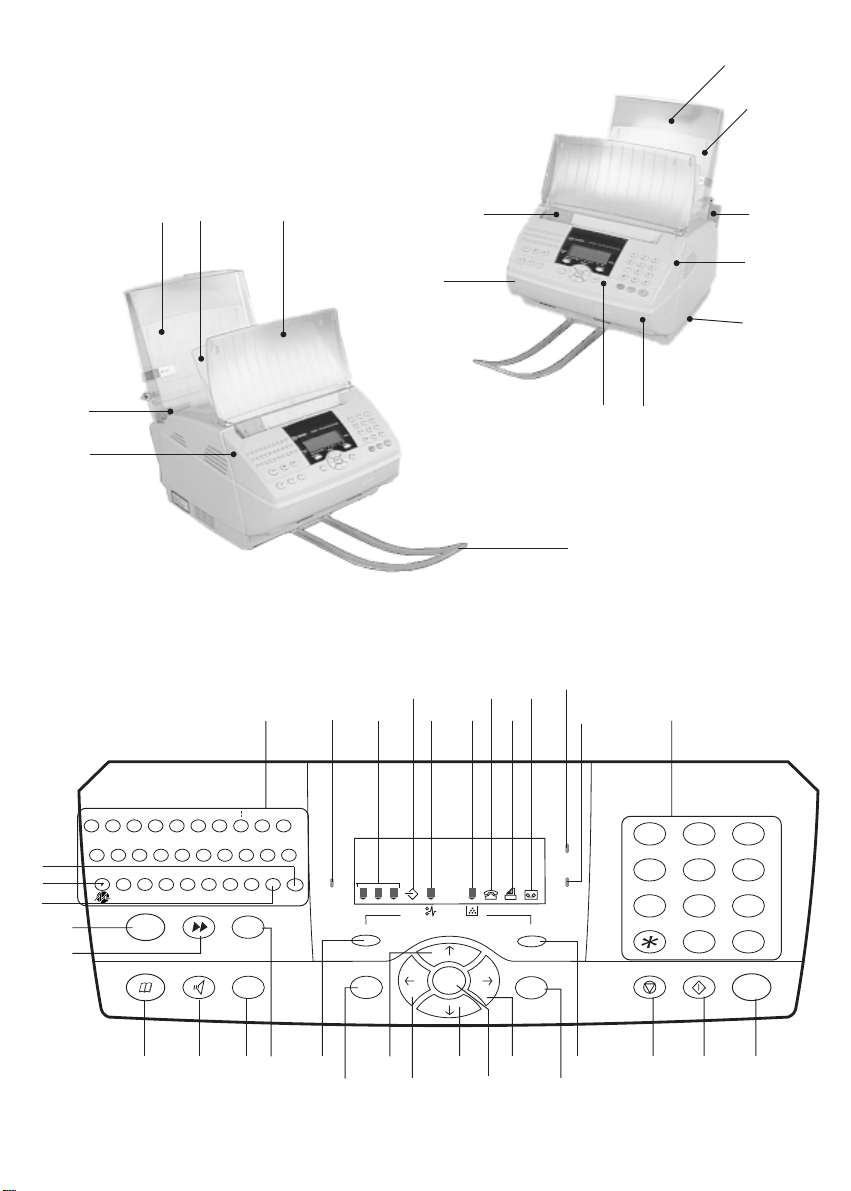
1. Fax unit
2. Paper-in adjustable guide
3. Paper tray cover
4. Printer paper tray
5. Printer paper tray locking lever
6. (a) and (b) buttons used to unlock the
scanning assembly
7. Memory expansion slot (optional)
8. Scanning assembly
9. Control panel
10.Scanned paper tray
11.Scanning sheet feeder
12.Printer output tray
13.Printer paper guard
14.Adjustable printer tray paper guide
15.Alphabetic keypad
16.Fax-Answering indicator:
Lit: indicates that the unit is in fax-
answering mode
Flashing: message received in fax-
answering mode
17.Scan resolution for fax transmission
(Standard, Fine, Photo)
18.Line icon:
Lit: call in progress
Flashing: connecting
19.Paper jam icon
20.Toner gauge icon:
Lit: toner empty
Flashing: toner low
21.Tel icon: indicates that a telephone
handset is connected
22.Fax icon: automatic fax receive mode
23.TAD icon: indicates that a telephone
answering device is connected
24.On indicator
Green: unit is powered up
Red: incident
25.Numeric keypad
26.INTERNET key: send fax via Internet
27.FAX/COPY: fax transmission or local copy
28.STOP key: interrupt current operation
29.Auto Answ. key: receiving mode choice
30.OK key: confirm the information displayed on
screen
31.MENU key: access the unit’s functions
32 to 35: Navigation keys
36.CORRECTION key: back to previous menu
37.Fax transmission scanning resolution selector
38.REDIAL or key (depending on model):
redial one of the last numbers called
39.ECO key: send off-peak
40.DIAL TONE key
41.DIRECTORY key: to access the directory and
list of quick-dial numbers
42.BROADCAST key: send fax to several
subscribers
43.GUIDE key (i or
unit’s functions (depending on model)
or
VOCAL MESSAGES key ( ): to listen to voice
messages (depending on model)
44.@ key: use in conjunction with the CTRL key to
obtain the @ character of an Internet address
45.SHIFT key ( ): use in conjunction with any
letter on the keypad to obtain a capital letter; use
in conjunction with OK to obtain the Mercury
key
46.CTRL key: use in conjunction with any letter on
the keypad to access the special symbols shown
above the alphabetic characters.
47.Vocal messages indicator: presence of voice
messages on the answering machine
): prints out a list of all the
i
/
Page 4

FOREWORD
This unit is a quick-scan laser output plain paper fax equipped with memory. Its display and navigation keys
provide quick and easy access to the information you need.
The access to the Internet functions are described in the Internet chapter.
SENDING FAXES OVER THE INTERNET
Page 5
SAFETY WARNINGS
APPAREIL A RAYONNEMENT LASER
DE CLASSE 1
CLASS 1 LASER PRODUCT
LASER KLASSE 1
APPARECCHIO LASER DI CLASSE 1
PRODUCTO LASER DE CLASE 1
APARELHO A LASER DE CLASSE 1
Before powering on your unit, make sure the mains outlet it is connected to
meets the requirements printed on the warning label on your unit, or on the
separate power supply (depending on the model).
If your unit works with a separate Power Supply, use only the one delivered
with your unit; never use another power supply.
If your unit works with a battery, replace it only with the same type of battery
or an equivalent type recommended by the manufacturer.
Warning: incorrect replacement of the battery may cause an explosion.
Used batteries must be disposed of following the manufacturer’s instructions.
Depending on the model, the unit’s mains plug may be the only way to
disconnect the unit from the power network. Therefore you must respect the
following:
• Your unit must be connected to a mains outlet located nearby.
• The mains outlet must remain easily accessible.
Your unit is delivered with a power cord including a plug which, depending
on the model, may be:
• without earth (the symbol on the warning label)
• with earth (no symbol on the warning label). It is imperative that a power
plug with an earth be connected to a wall outlet with an earth.
The European version of this unit includes the stamp, following the 73/
23/CEE, 89/336/CEE and 93/68/CEE directives.
23225972-4B
If the machine is powered when you remove the
upper cover, be careful with the two following
dangers:
. Laser beam interception by human eye can
produce irremediable injuries.
. Human contact with parts electrically
powered can produce a very dangerous
electric shock.
Page 6

CONTENTS
INTRODUCTION ................................................................................................................... ......... 3
CHAPTER 1: INSTALLATION ....................................................................................................... 5
1. UNP ACKING THE UNIT ................................................................................................................................. 5
2. INSTALLATION................................................................................................................................................ 5
3. CONNECTIONS.............................................................................................................................................. 10
4. POWERING UP YOUR FAX MACHINE ...................................................................................................... 10
CHAPTER 2: USING THE NAVIGATION KEYS .......................................................................... 11
1. PRESENT ATION ............................................................................................................................................. 11
2. ACCESSING THE UNIT’S FUNCTIONS USING THE NAVIGAT OR ........................................................ 11
CHAPTER 3: SENDING YOUR FIRST FAX................................................................................ 13
1. SETTING THE DATE AND TIME ................................................................................................................. 13
2. ENTERING YOUR NUMBER........................................................................................................................ 13
3. ENTERING YOUR NAME ............................................................................................................................. 13
4. TEST TRANSMISSION .................................................................................................................................. 13
CHAPTER 4: INTERNET .............................................................................................................15
1. SUBSCRIPTION AND ACCESS PROVIDER ............................................................................................... 15
2. SENDING / RECEIVING ON THE INTERNET............................................................................................ 16
3. SETTINGS ....................................................................................................................................................... 18
CHAPTER 5: THE DIRECTORY ................................................................................................. 21
1. SUBSCRIBER RECORDS .............................................................................................................................. 21
2. BROADCAST LIST OF SUBSCRIBERS....................................................................................................... 22
3. VIEWING, MODIFYING OR DELETING A SUBSCRIBER RECORD ...................................................... 23
4. PRINTING OUT THE DIRECTORY .............................................................................................................. 24
CHAPTER 6: SETTINGS ............................................................................................................ .25
1. GENERAL SETTINGS ................................................................................................................................... 25
2. TRANSMISSION ............................................................................................................................................ 25
3. RECEPTION .................................................................................................................................................... 25
4. NETWORK ...................................................................................................................................................... 27
5. DIRECT INCOMING FAXES TO MEMORY “FAX ANSWER MODE” ..................................................... 27
6. TECHNICAL P ARAMETERS ........................................................................................................................ 28
CHAPTER 7: SENDING A FAX ................................................................................................... 30
1. SETTING THE RESOLUTION ...................................................................................................................... 30
2. DIALLING USING THE DIRECTOR Y ......................................................................................................... 30
3. LAST TEN NUMBER REDIAL ..................................................................................................................... 30
4. FAX BROADCASTING.................................................................................................................................. 31
5. STOPPING A TRANSMISSION IN PROGRESS ..........................................................................................31
CHAPTER 8: VOCAL ANSWERINGMACHINE ......................................................................... 32
1. STARTUP......................................................................................................................................................... 32
2. SELECT THE TYPE OF ANSWERING MACHINE ..................................................................................... 32
3. RECORDING YOUR ANNOUNCEMENTS.................................................................................................. 32
4. LISTENING TO THE ANNOUNCEMENTS ................................................................................................. 32
5. MESSAGES ..................................................................................................................................................... 33
6. LOCAL MEMO ............................................................................................................................................... 33
7. CALL FILTERING .......................................................................................................................................... 33
8. REMOTE INTERROGATION OF THE VOCAL ANSWERING MACHINE.............................................. 34
9. PRIVILEGED ACCESS ................................................................................................................................. 35
1
Page 7

CHAPTER 9: ADVANCED COMMUNICATION FUNCTIONS ..................................................... 36
1. SCHEDULED TRANSMISSION.................................................................................................................... 36
2. LOADING A DOCUMENT FOR F AX ON DEMAND.................................................................................. 36
3. POLLING......................................................................................................................................................... 36
4. MANAGING YOUR FAX MACHINE’S MAILBOX SYSTEM ................................................................... 37
5. SECURE TRANSMISSION TO A MAILBOX ON A REMOTE FAX MACHINE ...................................... 38
6. RETRIEVING FAXES FROM REMOTE MAILBOXES .............................................................................. 38
7. RELA Y BROADCASTING OF A DOCUMENT............................................................................................ 39
8. TRANSMISSION QUEUE .............................................................................................................................. 39
9. MANUAL SEND ............................................................................................................................................. 40
10. VOICE CALL DURING TRANSMISSION ................................................................................................. 41
11. RELAY .......................................................................................................................................................... 41
12. LOCAL PREFIX ........................................................................................................................................... 41
CHAPTER 10: ANCILLARY FUNCTIONS .................................................................................. 43
1. PHOTOCOPYING ........................................................................................................................................... 43
2. SEND AND RECEIVE LOGS......................................................................................................................... 43
3. GUIDE ............................................................................................................................................................. 43
4. MERCURY’S RESIDENTIAL SERVICES (DEPENDING ON MODEL) .................................................... 43
CHAPTER 11: OPERATING MALFUNCTIONS .......................................................................... 46
1. COMMUNICA TION FAILURES.................................................................................................................... 46
2. PRINTER ERRORS......................................................................................................................................... 48
3. MISCELLANEOUS FAULTS ......................................................................................................................... 49
CHAPTER 12: CARING FOR YOUR UNIT ................................................................................. 50
1. GENERALS ..................................................................................................................................................... 50
2. CARING FOR THE CONSUMABLES .......................................................................................................... 50
3. MISCELLANEOUS MAINTENANCE .......................................................................................................... 51
CHAPTER 13: TECHNICAL CHARACTERISTICS ..................................................................... 52
1. FAX MACHINE .............................................................................................................................................. 52
2. CONSUMABLES ............................................................................................................................................ 53
2
Page 8

INTRODUCTION
Your fax machine is a highly advanced unit equipped with automated features for increased ease of use.
It features laser output on plain paper, a fast scanner and a 2-line by 16 characters display.
You can use it to send and receive faxes over the Internet.
Your fax machine has a 200 sheet paper in-tray.
It has a non-volatile memory which can be used for both send and receive operations.
Here is a summary of your unit’s features:
TRANSMISSION
- Send documents over the telephone network (normal fax transmission) or over the Internet
- Choose from three different resolutions: standard, fine and photographic
- Send the same document to several subscribers at once
- Schedule transmissions (you can cancel or activate them at any time)
- Fax transmission queue (delete or send immediately any fax in the queue)
- Automatic redial
- Send faxes using pre-recorded names of subscribers
- Send faxes using mailing lists
- Initialize the Broadcast faxes to a group of subscribers
- Load documents into the unit for polling by one or more remote fax machines
- Send faxes directly into a remote fax mailbox for confidentiality
- Monitors the number of pages sent
- Send documents directly or from memory
- Interrupt a fax transmission to switch to voice call mode
- Send documents over the Internet even to a fax machine which does not have any Internet function (if you have
subscribed to a « F@x-to-Fax » service)
- Use your fax to send e-mails
- Send a voice mail
DIRECTORY
- Stores a large number of subscribers’ names and addresses
- Stores fax broadcast lists
- Lets you access subscribers / broadcast lists directly by name
- Allows you to record a fax number and e-mail address for each subscriber
RECEPTION
- Connect an external telephone handset to the unit for manual receive (optional)
- Connect a telephone answering device to the unit to record voice messages automatically (optional)
- Poll documents from a remote fax
- Receive faxes automatically from the Internet
- Receive e-mails automatically, with translation of all attachments received with your E-mails (if you have
subscribed to a « F@x-to-Fax » service)
- Receive a voice mail
PRINTOUTS
Print out:
- A list of settings
- A list of phone numbers, broadcast lists, and e-mail addresses stored in the directory
- The send and receive logs
- A list of faxes in the send queue
- Fax transmission reports
- Documents in the queue (loaded into memory)
- A list of the unit’s functions
- The contents and list of mailboxes
3
Page 9

MISCELLANEOUS FACILITIES
- Photocopy documents
- Configure network settings (ringing tone, pulse / tone dial, etc.)
- The name of the subscriber and the page number are displayed during a call
- The unit can optionally be used as a PC multi-function peripheral
- Redial any of the last 10 numbers dialled
- Create mail-boxes and load incoming faxes or local documents into them
- Receive faxes to memory and schedule printing with PIN protection
4
Page 10
CHAPTER 1: INSTALLA TION
1. UNPACKING THE UNIT
Check for the following contents:
Fax machine (wrapped in plastic film)
Paper tray for scanned documents
Scanner feeder
Printer tray
Printer paper guard
2. INSTALLATION
POSITIONING YOUR UNIT
When choosing the location of your fax machine, you should take the following points into account:
- The telephone socket should be located less than 2 metres from your fax machine, otherwise you will require an
extension cord.
- To provide easy access to the fax machine, ensure there is clearance of around 10 cm on either side and to the rear
of the unit. The front of the unit should always be kept unobstructed.
- Do not expose the unit to direct sunlight, or position it close to sources of heat such as radiators, air conditioning
facilities and, as a general rule, to any excessively hot, dry, humid or dusty environment.
- Avoid exposing the unit to strong vibrations.
- Avoid environments where the unit is likely to come in contact with water or other foreign matter.
- Avoid touching the heat element and do not attempt to remove the internal panels (laser beam).
- Allow the heat element to cool for a few minutes prior to changing the toner cartridge.
Telephone line cord
User guide
Paper tray cover
Photosensitive drum
FREE printer toner cartridge for up to 700 pages + toner gauge
card
FITTING THE PAPER TRAY
a
1
b
c
1- Remove the fax unit from its plastic packaging.
Fit the paper guard (a) by positioning the two pins
(b) into the slots (c) of the paper tray at the angle
shown.
Swivel the paper gard (a) round to its rear
position.
2
d
e
f
2- Fit the paper tray cover (d) by slotting the two
joints (e) into the pins (f) of the paper tray at the
angle shown.
5
Page 11
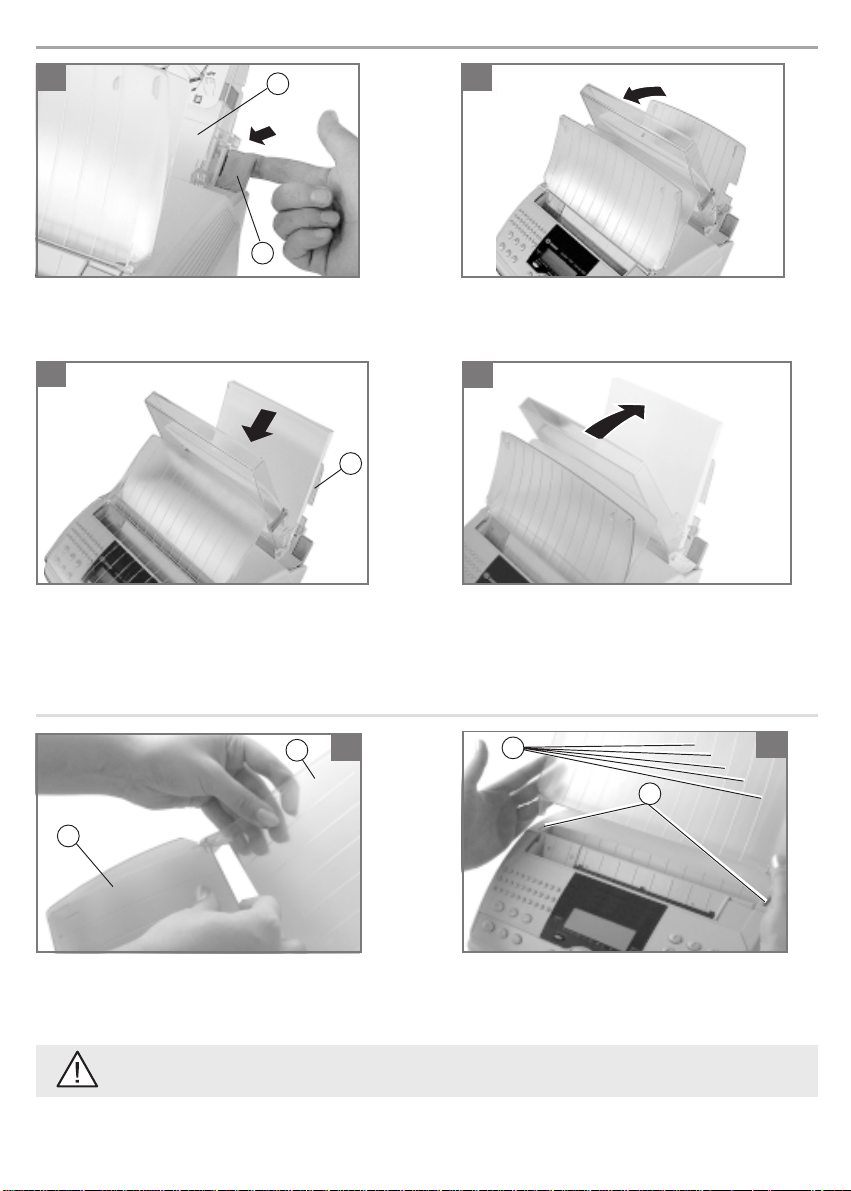
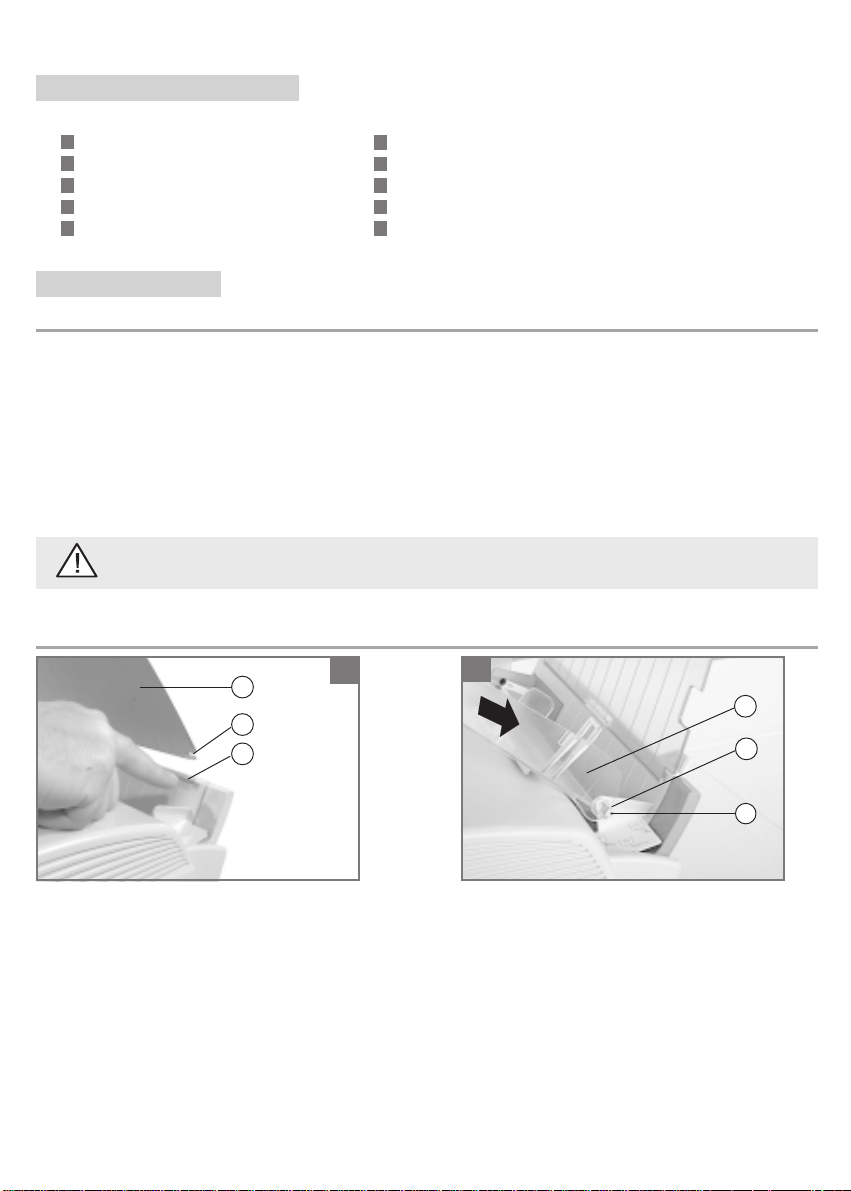
LOADING THE PAPER
1
g
h
1- Flip the paper tray (g) forwards by pulling the
lever (h) in the direction shown.
3
3- Place a sheath of paper against the paper guard (a)
behind any remaining sheets of paper in the cover
(a red line in the paper tray indicates the maximum
capacity of the latter).
2
2- Hold the top of the cover and open it by pulling
it towards you.
4
a
4- Close the tray cover.
FITTING THE SCANNING FEEDER AND THE PRINTER OUTPUT TRAY
1
k
l
j
1- Assemble the scanning feeder (j) and the printer
output tray (k) by bending the latter slightly.
The ribbing on the trays (l) must be facing towards the unit’s keypad.
6
2- Fit the resulting assembly into the two slots (m)
of the unit’s top cover.
2
m
Page 12
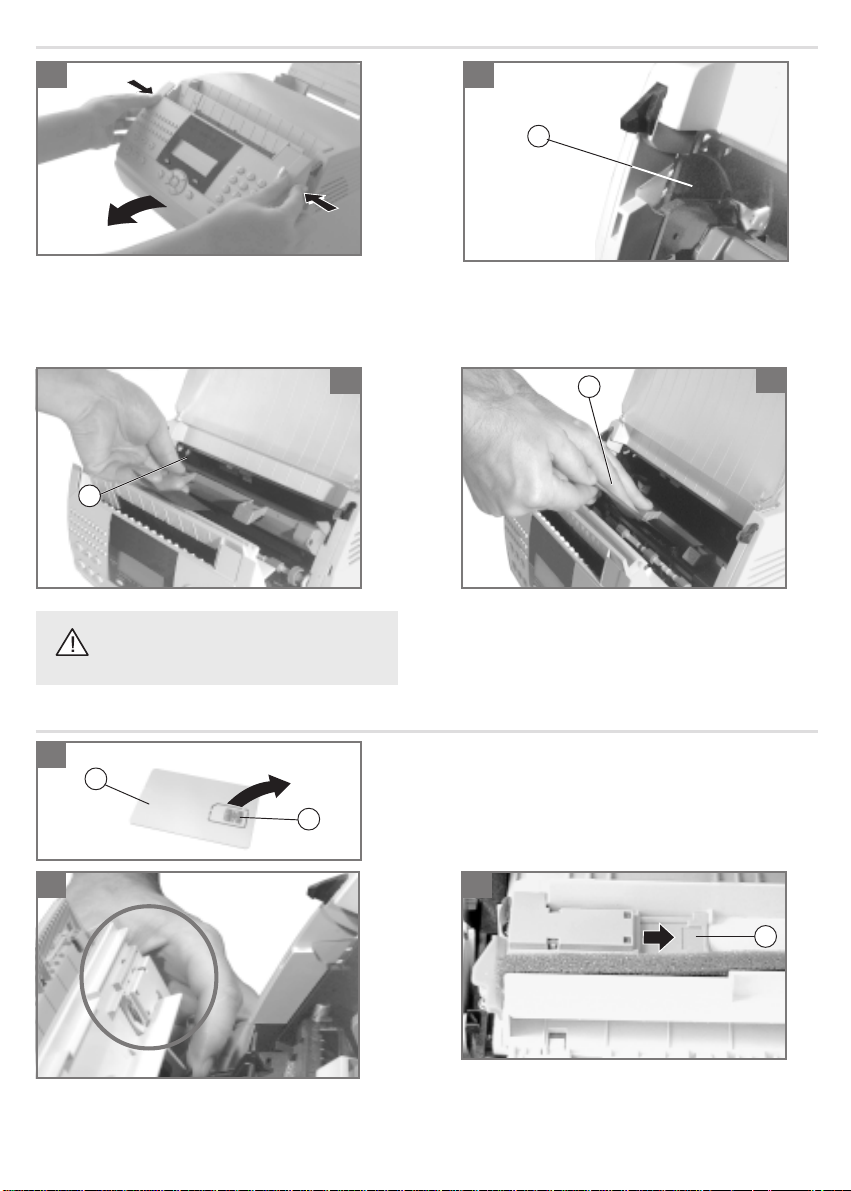
FITTING THE PHOTOSENSITIVE DRUM
21
G
1- Open the cover housing the scanning assembly
by pressing simultaneously on the two buttons
located to either side.
2- Unpack the photosensitive drum.
3
L
4- Gently pull on the strip (L) of the black protective
Unfurl the strip (L) of the black protective
sheath prior to fitting the photosensitive
drum.
Should the black protective sheath tear, carefully remove
any remaining pieces.
FITTING THE GAUGE AND THE TONER CARTRIDGE
1
h
i
1- Remove the card bearing the gauge (h) from its aluminium
packaging.
- Detach the gauge mini-smartcard (i) from the card.
Using the two handles, slot the right-hand-side
roller gear with its black protective sheath into
the runners (G)
L
sheath until the sheath has been completely
removed.
4
2 3
2. Open the cover housing the scanning assembly by
simultaneously pressing on the buttons located on
either side.
Locate the panel housing the gauge.
j
3. Slide the panel (j) open and position the gauge minismartcard (i) in its housing ensuring that the contacts
are facing outwards.
7
Page 13
4 5
i
4. Slide the panel back.
Ensure that the gauge mini-smartcard stays in
place while you slide the panel back.
6
6. Unclip the protective plastic guard of the toner
cartridge using the two tabs.
Carefully remove the plastic guard and the foam
gasket.
The foam gasket is attached to the plastic guard
at one end.
8
5. Remove the toner cartridge from its aluminium
packaging.
Remove the strips of adhesive tape.
Gently shake the cartridge sideways 5-6 times to
distribute the toner evenly.
7
M
M
7. Hold the toner cartridge by the handle with the text
facing upwards.
Check that the photosensitive drum is in position,
otherwise refer to the previous section: fitting the
photosensitive drum.
Slot the toner cartridge into the unit along the lateral
guides (M).
Push the cartridge in firmly using the handle until it
slots into place.
8. Close the scanning assembly cover. Press down on both sides
of the cover to make sure that it locks into place.
8
Page 14
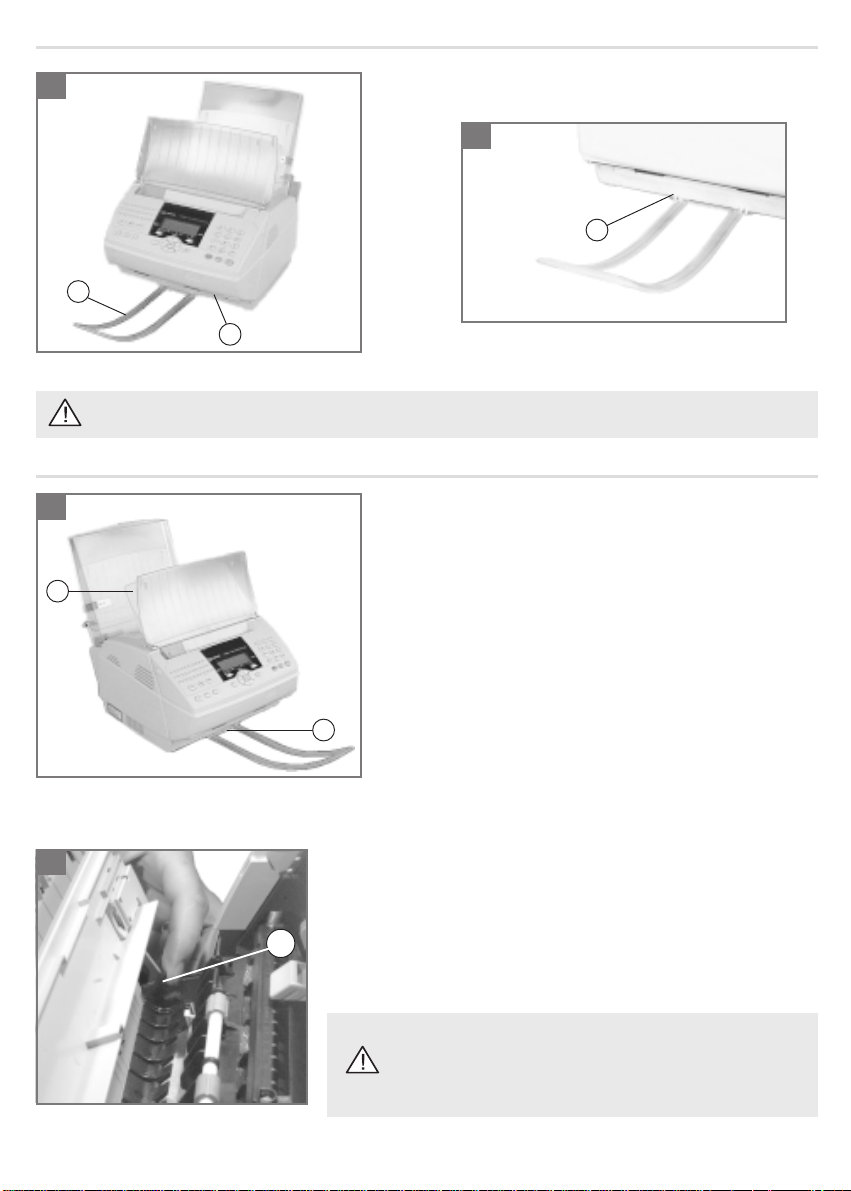
FITTING THE SCANNING OUT-TRAY
1
2
a
c
1-2- Clip the scanning out-tray (a) into the two slots (b) of the unit’s base (c).
Ensure you always remove the scanning out-tray prior to opening the cover housing the scanning assembly.
SELECTING THE PRINTER OUTPUT CONFIGURATION
1
Your unit directs printed output by default to the tray located above
a
the unit (a) (incoming documents are printed out in the correct
order).
The capacity of the printer output tray (a) varies between 40 and 60
pages depending on the weight of the paper used.
A sensor warns the user when the paper tray is full.
b
b
1- To direct paper output to the front of the unit (b), for special applications, e.g. printing off a PC using headed paper:
2
Open the cover housing the scanning assembly by pressing on the two
buttons located to either side.
2- Flip the lever (c) to the upwards position
c
- lever down: paper output to top of unit
- lever up: paper output to front of unit
Finally, close the cover.
With printer output directed towards the front of the unit, pages
received are printed out in reverse order.
Scanned documents may be mixed up with received documents.
9
Page 15
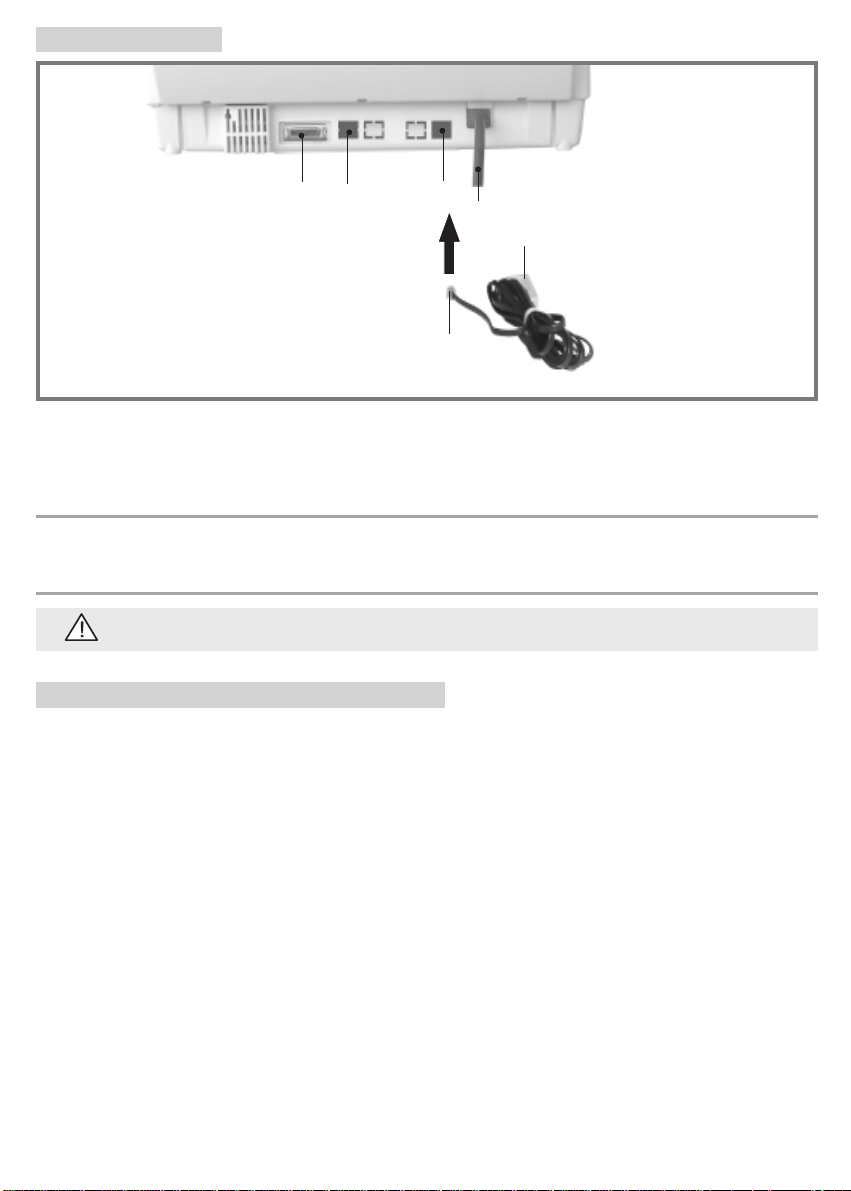
3. CONNECTIONS
45
46
44
43
B
A
A RJ11 connector 44 Telephone cable socket
B Telephone wall socket connector 45 Socket used for linking the unit up to a PC (optional)
43 Mains lead 46 DECT connection socket (optional)
CONNECTING THE TELEPHONE LINE
Plug connector A of the telephone line cable into socket 44, located to the rear of the unit underneath the printer paper
tray, and plug connector B (standard stackable telephone plug) into the telephone wall socket.
CONNECTING TO THE MAINS
Refer to the safety guidelines set out at the beginning of this booklet.
Plug the end of the mains lead (43) into a mains socket.
4. POWERING UP YOUR FAX MACHINE
Plug in the mains lead.
After a few seconds, during which the printer warms up, the date and time are displayed. Set the your fax machine’s date
and time - for instructions, see the section entitled setting the date and time in the chapter headed SENDING YOUR
FIRST FAX.
10
Page 16
CHAPTER 2: USING THE NAVIGATION KEYS
1. PRESENTATION
THE NAVIGATOR PAD:
This consists of 7 keys which you can use to navigate through the menus displayed by
your fax machine.
OK
MENU
C
TO ACCESS THE MAIN MENU:
Press the MENU key (whatever your position within the unit’s menus)
TO NAVIGATE THROUGH THE MENUS:
Press the down arrow key to select the next line of a menu.
Press the up arrow key o select the previous line of a menu.
Press OK to access the next menu level.
Press C to return to the previous menu level.
Press FAX/COPY to confirm your selection and exit the current menu.
TO NAVIGATE ALONG A DATA ENTRY FIELD:
Press the arrow key to move left.
Press the arrow key to move right.
Press OK to confirm your entry.
Press C to delete one character.
Press FAX/COPY to confirm your selection and return to the initial display.
THE DISPLAY:
This consists of 2 lines of 16 characters. The cursor shows the currently selected line.
LINE 1
LINE 2
MENU
OK
C
OK
C
To view further lines in a menu, scan through it using the and keys of the navigator pad.
2. ACCESSING THE UNIT’S FUNCTIONS USING THE NAVIGATOR
You may access the various functions of your unit by either of two means:
Step by step by navigating through the menu structure using the and keys of the navigator pad.
Directly by pressing the MENU key and entering the number of the function you require on the numeric
keypad.
When your fax machine is not in use, to print out a comprehensive list of the functions of your fax
machine.
i
Press GUIDE (i or
or (*)
press MENU, 5, 1
(*) Depending on model
/
(*))
11
Page 17
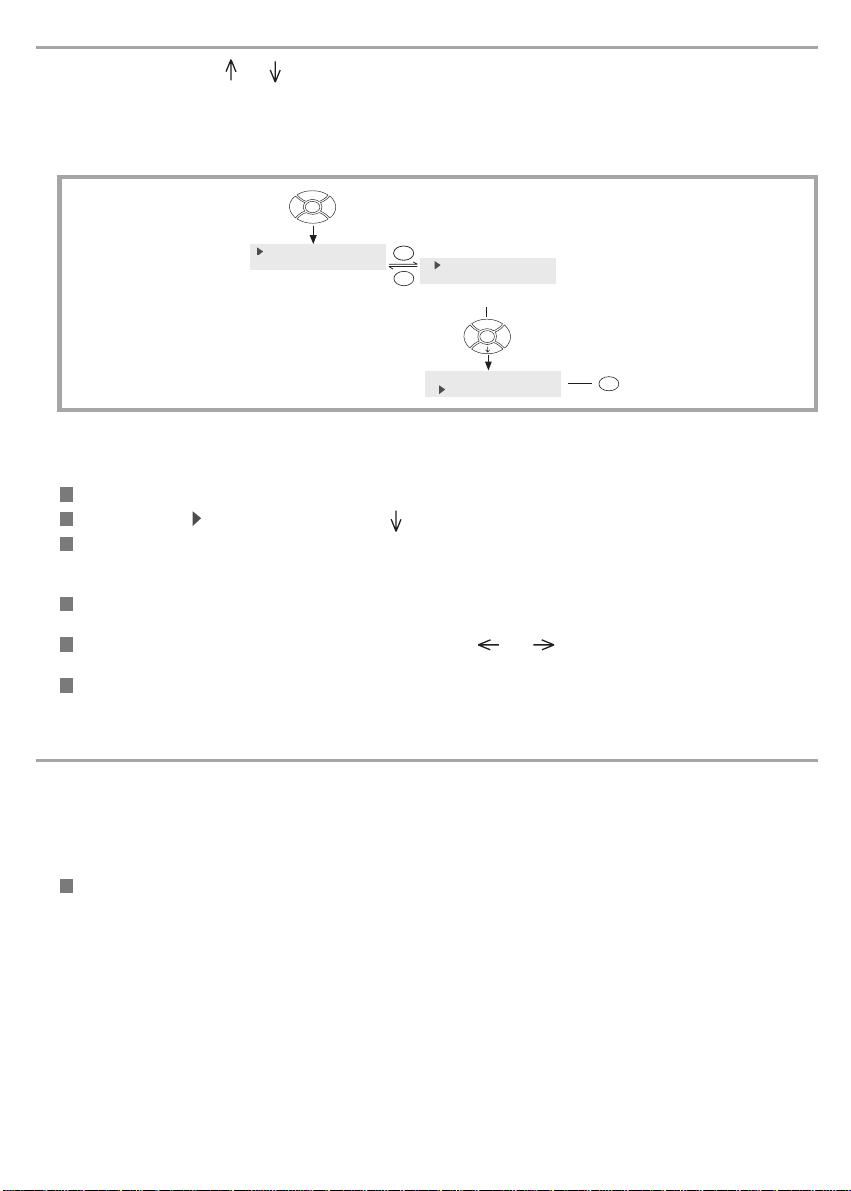
STEP BY STEP FUNCTION ACCESS
In this mode, you use the and keys of the navigator pad to scan through the options of a menu, and the OK and C
keys to access the following or previous menu level.
Example 1:
To access the PRINT OUT DIRECTORY menu step by step:
MENU
1 DIRECTORY
2 SETUP
OKOK
11 ADD NAME
12 ADD LIST
C
14 CANCEL
15 PRINT
4 times
OK
Example 2:
To access your unit’s date and time settings:
To access this function step by step:
Press the MENU key.
Move the cursor to 2 SETUP by pressing the key on the navigator pad once.
Press two times OK.
Note:
Throughout this document, the position of the data entry cursor will be represented by a “_”.
To input a new date and time, e.g. 16:45 on 07 March 1998, enter the following sequence using the numeric
keypad: 0, 7, 0, 3, 9, 8, 1, 6, 4, 5.
Should you need to amend the data you have entered, use the and keys to position the cursor on the
character to be altered.
Once you have input the right date and time, press OK to confirm your entry and enter a number to dial, or press
FAX/COPY to confirm your entry and exit the menu.
DIRECT FUNCTION ACCESS
In this access mode, you press the MENU (FUNCTION) key followed by a numerical code to directly access the function
required.
Example:
Setting your unit’s date and time
To access this function directly:
Press MENU followed by 2, 1 and OK. You are now in data entry mode and can enter the new date and time using
the numeric keypad (see previous section).
12
Page 18

CHAPTER 3: SENDING YOUR FIRST FAX
When you first power up your unit, we recommend you configure the following settings prior to sending your first fax:
- DATE TIME : enter the current date and time.
- NUMBER : enter the telephone number of your fax machine.
- NAME : enter the name your wish to appear at the top of each fax page sent out (if the TX
Note: see Chapter - SETTINGS for a list of all your unit’s other settings.
HEADER option is on).
1. SETTING THE DATE AND TIME
You may alter the unit’s date and time settings at any moment. To do so using the direct access mode:
Press MENU followed by 2, 1 and OK.
Enter the date and time using the numerical keypad then press FAX/COPY to confirm your entry. For example, to
enter 7 May 1999, 9:15am, enter the following sequence: 0 7 0 5 9 9 0 9 1 5, then press FAX/COPY.
2. ENTERING YOUR NUMBER
Your number will be printed on all fax pages you send out if the SENDING option is on. To input your number using the
direct access mode:
Press MENU followed by 2, 2 and OK.
Input the telephone number of your fax machine using the numeric keypad.
Press FAX/COPY to confirm your entry.
3. ENTERING YOUR NAME
This is the name which identifies your fax machine.
It will be printed on all fax pages sent out when the TX HEADER option is on. To input your name using the direct access
mode:
Press MENU followed by 2, 3 and OK.
Input your name using the alphabetic keypad then press FAX/COPY to confirm your entry.
4. TEST TRANSMISSION
In order to check that your fax machine is operating properly over the telephone network, carry out a test send then a test
receive operation after powering it up for the first time.
SENDING A FAX
Send a fax to someone (clearly indicating that this is a test transmission).
Place the document to be sent face down in the fax machine’s feeder, with the first page at the bottom of the
stack.
Notes:
You can dial the subscriber’s number before placing the document in the sheet feeder - this is handy as it enables
you to read the fax number off the document to be sent.
The sheet feeder has two small guides which will help you to position your document optimally for scanning.
Dial the subscriber’s number using the numeric keypad and press FAX/COPY.
Notes:
If you want to insert a pause in the number dialled (e.g. after dialling 00): press the / key on the alphabetic keypad.
A “/” will be inserted in the number on the display.
The LINE icon flashes as your unit connects to the remote fax, and stays lit continuously once the two fax machines
communicate.
When the transmission is over, the initial screen is displayed.
13
Page 19

RECEIVING A FAX
Ask the subscriber to send you a fax by return in order to test your unit’s receive capability.
As the first page is being received by your fax machine, the following screen is displayed:
Incoming Call
Reception Pg:1 (example)
+33 140807207
14
Page 20

CHAPTER 4: INTERNET
You can send faxes to recipients world-wide over the Internet.
Just ensure:
- that you subscribe to the Internet through an access provider,
- that your fax machine’s parameters are configured in accordance with your access provider’s instructions.
1. SUBSCRIPTION AND ACCESS PROVIDER
In order to access the Internet you must first take out a subscription with an Internet Access Provider.
Your machine already includes a free E-Mail account.
In order to benefit from this offer and create your own permanent E-Mail address:
Fill in the Internet subscription form provided with your machine,
Insert this form into the document feeder (as if you are sending a fax),
Press MENU, 9, 9, 1 and OK: the form will automatically be sent to the provider to register your subscription.
If you wish to modify your E-mail address, proceed as follows:
Press MENU, 9, 9, 2 and OK,
Enter your new preferred address,
Confirm with OK.
Ensure that the technical characteristics of your Internet access provider are compatible with those set out in
!
the chapter headed TECHNICAL CHARACTERISTICS.
CHOOSING AN ACCESS PROVIDER
If you wish to use an E-Mail address you already know (for instance that of a PC):
Press MENU, 9, 1 and OK keys.
Use the or keys to choose from the list of Internet providers:
• HIWAY
• PROVIDER2
• PROVIDER3: if your provider is not displayed in the previous list.
Press OK to confirm.
Generally, you must define all settings manually, which enable your identification on the INTERNET (you can obtain them
from your access provider):
• access number,
• login (1) identifier,
• login (2) password,
• E-mail identifier,
• E-mail password,
• E-mail address,
• SMTP server: automatically indicates the server address for all Internet transmissions,
• POP3 server: automatically indicates the server address for all documents received in your Internet mailbox,
• PRIMARY DNS, then SECONDARY DNS: transmits messages on the Internet (the server address consists
of four groups of three digits maximum, separated by dots).
Note 1 :
If your access provider did not give you a Secondary DNS address, enter the PRIMARY DNS address again.
Note 2 :
If your unit is connected to a private automatic exchange (PABX), you may have to insert a dialling prefix before
the phone number of the access provider (except if you have already configured it via MENU 83).
(1) If the identifier exceeds 16 characters, the text is automatically moved to the left.
(2) During editing, each previously entered character appears as an asterisk (for protection against prying eyes).
15
Page 21

DISABLING INTERNET FUNCTIONS
If you do not wish to use the Internet functions:
Press MENU, 9, 1 and OK keys,
Use the or keys to select « NO ACCESS ».
Press OK to confirm,
2. SENDING / RECEIVING ON THE INTERNET
CONNECTING TO THE INTERNET
The following steps are involved in an Internet-fax connection via an access provider:
- send all the Internet-faxes and E-mails queued for transmission to your correspondent’s mailbox,
- receive all the Internet-faxes and E-mails located in your personal Internet mailbox.
Both operations take place during the same call via an Internet access provider.
Note :
the actual fax-document itself is sent as an E-mail attachment.
The connection can be made in either of three ways, depending on how your machine is programmed (refer to § Settings
- Set times (Menu 951)):
1. three times a day at set times (default setting: 9:00, 12:30 and 17:00),
2. at regular intervals (default setting: every 3 hours): every (n) hours,
3. manually and immediately by pressing the following keys:
• INTERNET twice,
or
• MENU, 9, 2 and OK (INTERNET / IMMED ACCES).
Note :
The unit will in fact automatically connect to the Internet (cases 1 and 2) up to 12 minutes before or after the
programmed time, to avoid a flood of Internet accesses resulting in the simultaneous sending of several pending
documents, which would saturate the network.
SENDING ON THE INTERNET
Whatever the document to be sent (fax, E-mail or voice mail *), the document is stored in memory. It will be sent
on the Internet the next time you connect.
Note:
If you are sending a document to a computer, it will be received as an E-mail attachment.
SENDING TO AN E-MAIL ADDRESS
Sending faxes to an E-mail address
Place the document to be sent face down in the fax’s sheet feeder, with the first page at the bottom of the stack.
Press the INTERNET key.
Enter the E-mail address of your recipient (for example a.dupont@messag.gb) or use the DIRECTORY key
(refer chapter SENDING A FAX).
Note:
- to enter the @ character, use the corresponding key on the alphabetic keyboard,
- to enter a dot, press the • / key on the alphabetic keyboard,
- for uppercase characters, use the (Shift) key.
Press the INTERNET key. The document is scanned and stored in memory.
Notes:
You may use the directory to find a subscriber’s E-mail address (refer to § Dialing using the directory chapter
SENDING A FAX).
You may send document to several subscribers at a time (fax or Internet) (refer to § the fax broadcast chapter
SENDING A FAX).
* Depending on option.
16
Page 22

Sending E-mail to an E-mail address
You can send a message entered on the keyboard to an electronic mailbox:
Press the INTERNET key.
or
Press MENU, 9, 3 and OK.
Enter the E-mail address and press OK to confirm.
Enter the subject of the message and press OK to confirm.
Enter the message and press OK to confirm.
Sending voice mail to an E-mail address*
You can send voice mail to an electronic mailbox:
Press the INTERNET key.
or
Press MENU, 9, 4 and OK.
Enter the E-mail address.
Press the VOCAL MESSAGES key or OK.
Pick up the handset and record your voice mail.
Hang up the handset when you finish recording the voice mail. The Internet communication is automatically
active.
SENDING FAXES TO A FAX MACHINE (F@X TO FAX)
To send a document to another fax via the Internet with this service
This function can be used only if the F@X TO FAX setting is set to WITH (Menu 97) and if your subscription includes
a code for access to that service.
Insert document in paper feeder.
Press the « + » key (or ECO key) and dial the international code (even ‘44’ for UK) and your correspondent’s
number omitting the ‘0’.
Example: for 0181 760 0708, type +441817600708).
Press the INTERNET: the document will be sent automatically.
Note 1 :
If you wish to keep the «international» number of your correspondent in your directory to send documents via the
F@X TO FAX service in the future, you must enter the + (pressing the « + » key), followed by this number, in the
place reserved for the E-Mail address of your correspondent, in the directory.
Note 2 :
If you have entered the INTER. PREFIX (refer to § Settings - F@x to Fax), you can get in touch with your foreign
correspondents automatically via the F@X TO FAX function. To do so, you just have to dial your correspondent’s
number and press INTERNET key to confirm your transmission request. You can also start transmission from the
directory.
RECEIVING FROM THE INTERNET
All the types of documents (fax, E-mail) are received automatically whenever you connect to the
Internet.
Note:
Your fax cannot process files other than faxes (e.g. word processing files, CAD files, etc.). You can keep these
documents in your Internet mailbox for use by your computer (refer § Settings - SORT MESSAGES (MENU 96))
or if the F@X TO FAX (MENU 97) function is activated, you can benefit from the automatic translation of the pieces
received with your E-mail.
17
Page 23

LISTENING TO VOICE MAIL RECEIVED FROM THE INTERNET *
To listen to your messages, use the same procedure as for listening to messages on your answering machine: press the
key.
Note :
The status of the «VOCAL MESSAGES» lamp tells you of the presence of message received in memory (off: no
messages; flashing: at least one message received in memory; lit: presence of messages. All the messages have been
listened to).
DELETING THE VOICE MAIL
To delete the voice messages, press CORRECTION key whilst listening to the message to suppress.
3. SETTINGS
PRINTING YOUR INTERNET SETTINGS
Your Internet settings are printed at same time with the others settings by pressing the MENU, 5, 4 and OK keys
or directly by pressing the MENU, 9, 5, 5 and OK.
STANDARD SETTINGS
These settings define the connection mode and frequency to your access provider
STANDARD SETTINGS
This menu allows you to choose the mode for connecting to the Internet:
Press MENU, 9, 5, 1 and OK then choose an option (SET TIMES, PERIODIC, ON DEMAND) using the or
keys and press OK to confirm.
• SET TIMES selected
The machine will automatically set up an Internet connection each day at 9:00, 12:30 and 17:00 (these are default
values). Of course, time settings may be changed, and a call may even be cancelled.
Remark:
The unit will in fact automatically connect to the Internet up to 12 minutes before or after the programmed time, to
avoid a flood of Internet accesses resulting in the simultaneous sending of several pending documents, which would
saturate the network.
To modify or cancel connections, access to horary choice (Menu 9, 5, 3 and OK).
Move the cursor to the time you want to cancel using the and keys.
Modify the connection hour, using the numeric keyboard.
Press the # key or the and keys to cancel the time.
Press OK to confirm.
• PERIODIC selected
The machine will automatically set up an Internet connection every 3 hours (this is a default value). You can
change the connection frequency access to the periodical choice (MENU, 9, 5, 3 and OK) (the frequency should
be included between 00.01 am and 11.59 pm).
Remark:
The unit will in fact automatically connect to the Internet up to 12 minutes before or after the programmed time, to
avoid a flood of Internet accesses resulting in the simultaneous sending of several pending documents, which would
saturate the network.
• ON DEMAND selected
The connection to the Internet will be set up only at your request through MENU, 9, 2 and OK (IMMED
ACCESS) or pressing INTERNET twice.
* Depending on option.
18
Page 24

Remark:
The « Net valid » and « Net active » settings make it possible to determine if connections can or not take place at
night and during weekends (by default 6.00 am to 10.00 pm during the week) (refer to § Technical parameters
chapter SETTINGS).
SENDING (MENU 952)
This menu allows you to choose the mode for sending data on the Internet:
Press MENU, 9, 5, 2 and OK then choose an option (IMMEDIATE OR DURING CNX) using the or keys
and press OK to confirm:
IMMEDIATE selected
Internet-faxes are sent/received immediately as soon as you are finished with transmission programming. It will
allow the automatic reception of the Internet-fax and E-Mails received in your mailbox.
DURING CNX
Internet-faxes are sent/received only during connections (periodic or set time).
SERVERS (MENU 954)
If you are connected to HIWAY, this menu allows you to access the server settings (you obtain them from your access
provider):
Press MENU, 9, 5, 4 and OK then choose one of the servers (SMTP, POP3, PRIMARY DNS or SECONDARY
DNS) using the or keys and press OK to confirm.
You can modify these servers parameters:
SMTP Server: indicates the name or the server address for all standard Internet transmissions. After modification,
press OK to confirm.
POP3 Server: indicates the name or the server address for all documents to be recovered in your Internet mailbox.
After modification, press OK to confirm.
PRIMARY DNS / SECONDARY DNS: send messages on the Internet. After modification, press OK to confirm.
SORT MESSAGES (MENU 96)
This menu allows you to choose where the E-mail messages received on your fax should be sent. You can:
- retrieve and print them on your fax,
- transfer E-Mails with unusable attachments to another E-Mail address,
- keep them in your Internet mailbox for later use with a computer.
Press MENU, 9, 6 and OK then choose an option (F@X ONLY, PC ONLY, SHARE PC) using the or keys
and press OK to confirm.
• F@X ONLY selected: all usable E-Mails are polled and printed on your fax machine. On the other hand, if
the F@X to fax function is active (see below), the E-Mails including locally unusable attachments are
automatically transmitted to the translation server. Once translated, the messages will be automatically
received in your fax machine.
• PC ONLY selected: the E-Mails received in your Internet mailbox are not polled. They can be exploited
by a PC. After each Internet connection, the number of E-Mails present in your mailbox appears on the
display screen of your fax machine.
• SHARE PC selected: then, select either one of the two alternatives DISTINCT PC MB, SHARED PC
MBOX using the or keys and press OK to confirm.
. DISTINCT PC MB selected: enter the E-Mail address of a PC which will receive all or some of the
E-Mails stored in your mailbox and press OK to confirm (this implies that the Internet
subscription of the PC is different from that of your fax machine).
Then choose the E-mails type to transfer by using the or keys and press OK to confirm:
- all the E-Mails,
- only the E-Mails including unusable attachments.
19
Page 25

. SHARED PC MBOX selected (if the PC and your fax share the same E-mail address). Then choose
between DELETE MAILS and SAVE MAILS for the E-Mails already exploited by the fax machine
(if you choose SAVE MAILS the fax machine will act as an E-Mail printer for the PC).
If you have chosen SHARE PC, the number of E-Mails still present in your mailbox appears on the display screen
of your fax machine after each Internet connection.
F@X TO FAX (MENU 97)
This menu allows you:
• to send a document to another normal fax (which does not have any Internet functions), via the Internet,
• to translate all the pieces received with your E-Mails.
In order to benefit from this offer, you have to subscribe to this service, filling in the subscription form provided with
your machine.
To activate this service:
Press MENU, 9, 7 and OK.
By using the or keys choose WITH then press OK to confirm.
Enter the PIN CODE (4 digits), which is given to you upon acceptance of your application to use this service.
Press OK to confirm.
In case of a transmission to a foreign correspondent in automatic mode, enter the INTERN. PREFIX for access to
the international telephone service (00 for instance) and press OK to confirm.
In case of a transmission to a national correspondent, no prefix is necessary. Only press OK to confirm.
Enter a LOCAL PREFIX for the fax machines connected to a private automatic exchange (PABX) and press OK
to confirm. If you already have defined the local prefix (Menu 83), this choice is not proposed.
To deactivate this service:
Press MENU, 9, 7 and OK.
By using the or keys choose WITHOUT then press OK to confirm.
20
Page 26

CHAPTER 5: THE DIRECTORY
Your fax machine enables you to input records of data for individual subscribers as well as fax broadcast lists.
SUBSCRIBER RECORDS:
You may enter up to 100 subscriber records, consisting of the names of individual subscribers and their contact details.
BROADCAST LISTS:
You may group several subscribers together in order to form up to 8 broadcast lists.
You may at any stage:
- alter the content of the subscriber records or broadcast lists,
- print them out,
- call them.
1. SUBSCRIBER RECORDS
ADDING A SUBSCRIBER RECORD
To access this menu, press MENU, followed by OK and OK.
Your fax machine automatically creates a new, blank record. You may now enter the details of the new
subscriber.
- You may at any stage cancel the new record by pressing STOP.
- Furthermore, you need not fill in all the fields of the record (only the name of your contact, and the fax number or
e-mail number are mandatory). You may at any stage save the record in its present state by pressing FAX/COPY.
ENTERING THE SUBSCRIBER’S NAME
Using the alphabetic cursor, enter the name used to identify the subscriber. You may correct your entry by
pressing the C and keys.
Press OK to confirm the entry of the subscriber’s name.
ENTERING THE SUBSCRIBER’S FAX NUMBER
Using the numeric cursor, enter the subscriber’s fax number.
Press OK to confirm the entry of the subscriber’s fax number.
Note:
If your fax machine is connected to a private automatic exchange (PABX), you may have to insert a pause in the
number; to do so, insert an “/” into the subscriber’s number.
ENTERING THE SUBSCRIBER’S E-MAIL ADDRESS
If the subscriber has an Internet address, enter it into the directory.
Using the keypad, enter the subscriber’s E-MAIL address (e.g. smith@messaging.uk), then press OK to confirm.
ENTERING AN ASSIGNED NUMBER FOR THE SUBSCRIBER
Your fax machine automatically assigns a number to each of the subscribers whose details you enter into the directory.
If you do not like the number assigned, you may modify it as follows:
Enter the number of your choice using the numeric keypad.
Press OK to confirm the assigned number you have chosen to assign to the subscriber.
SETTING THE TRANSMISSION SPEED FOR OUTGOING FAXES
Your fax machine provides you with the option of choosing between several transmission speeds.
If the line conditions are good (the line is suited to data transmissions, there is no echo), transmission can usually take place
at 14,400 baud (bits per second).
However, it is sometimes necessary to restrict transmission speeds for certain sessions. To set an upper limit on the speed:
Move the cursor to required transmission SPEED using the and keys of the navigator pad.
Press OK to confirm your selection.
21
Page 27

ASSIGNING AN ASSOCIATED KEY TO A SUBSCRIBER
You may store a subscriber’s details to be associated with each of the keypad’s 26 alphabetic keys, (A to Z).
To log a subscriber under a one-touch dialling key, proceed as follows:
Move the cursor if required to W. ASSOC. KEY using the and keys of the navigator pad. Only those keys
that are free and available are shown on the display.
- either using the alphabetic keypad,
- or using the and keys of the navigator pad to position the cursor on the associated key which you
would like to assign to the subscriber.
Press OK to confirm your choice of the key to be assigned to the subscriber.
2. BROADCAST LIST OF SUBSCRIBERS
A list consists of subscribers entered in the directory:
- subscribers with a fax number,
- subscribers with an e-mail address,
- subscriber entries with both an e-mail address and a fax number.
A given list may include both fax and Internet subscribers.
To send a fax to a broadcast list of subscribers, press either the FAX/COPY or INTERNET keys.
Should a subscriber entry include 2 addresses (fax no. and e-mail address):
- he or she will receive your fax on their fax machine if you pressed the FAX/COPY key,
- he or she will receive your fax in their e-mail mailbox if you pressed the INTERNET key.
ADDING A BROADCAST LIST
To access this menu, press MENU, followed by 1, 2 then OK and move the cursor to ADD LIST, then press OK.
Your fax machine automatically creates a new record. You may now enter the characteristics of this list of subscribers.
- You may at any stage cancel the new list by pressing STOP.
- Furthermore, you need not fill in all the characteristics of the list. You may at any stage save the list in its present
state by pressing on FAX/COPY.
ENTERING THE NAME AND QUICK-DIAL NUMBER OF A BROADCAST LIST
The procedure used to enter the name and quick-dial number of a new broadcast list is identical to that used to enter the
name and quick-dial number of a subscriber into the directory.
For further information on these procedures, refer to the sections entering the subscriber’s name, entering an assigned
number for the subscriber in this chapter.
CREATING THE LIST
A broadcast list consists of subscribers whose details have already been entered into the directory. When creating a new
list, you must indicate which subscribers are to be included.
Enter the list name to dial and its assigned number before to press OK to confirm.
Enter the elements of the list.
There are several ways of entering these elements:
1- You can type the first few letters of the subscribers’ names using the alphabetic keypad; the fax machine will
search for the relevant subscriber as you type. Press OK to add the chosen subscriber to the list.
2- Directly key in the subscribers’ quick-dial numbers.
3- Click on the DIRECTORY key and select a subscriber by moving the cursor using the and . Click on
OK to confirm your choice.
Press OK to confirm the list contents.
Press FAX/COPY to save the entire record.
ENTERING A LIST NUMBER
Your fax machine supports up to 8 fax broadcast lists, numbered L-0 to L-7. The list number is used for relay broadcasting
(see the Relay broadcasting: remote fax machine section in the chapter RELAY BROADCASTING OF A DOCUMENT).
Note:
Your fax machine automatically assigns a quick-dial number to each list. If you do not like the assigned number, you
may modify it as follows:
22
Page 28

Move the cursor if required to LIST NUMBER - using the and keys of the navigator pad.
Enter the number of your choice (between 0 and 7).
Press OK to confirm the list number.
DELETING A SUBSCRIBER FROM A BROADCAST LIST
Press MENU followed by 1, 3 and OK.
Select the list (L) from which you want to remove a subscriber using the and .
Press OK to display the list selected.
Press OK key until you reach ENTER ABR. NUM. parameter. The display will show the numbers forming part
of the list under consideration.
Position the cursor on the number of the subscriber who is to be removed, using the and keys, then press
the C key.
To remove further subscribers from the list, simply repeat the last step.
Press FAX/COPY.
ADDING A SUBSCRIBER TO A BROADCAST LIST
To add one or more subscribers to a previously created list:
Press MENU followed by 1, 3 and OK.
Select the list (L) to which you want to add a subscriber using the and .
Press OK.
Press OK key until you reach ENTER ABR. NUM. parameter to see the numbers currently in the list.
Enter the quick-dial number of the subscriber you wish to add to the list, and press OK key.
To add further subscribers to the list, enter the additional quick-dial numbers.
Press FAX/COPY.
Notes:
- Some of your subscribers may feature on several lists.
- You cannot enter the quick-dial number of a list as part of the numbers in another list.
3.
VIEWING, MODIFYING OR DELETING A SUBSCRIBER RECORD
Press MENU followed by 1.
If you wish to view or modify a record or a list in the directory, press 3.
If you wish to delete a record or list from the directory, press 4.
Press OK.
F13-- MODIFY 012 SMITH or
012 SMITH: The subscriber known as “SMITH” is registered under quick-dial number 012
Note:
Subscriber records and broadcast lists in the directory are sorted in alphabetical order
Select the record or list you wish to view, modify or delete.
F14-- DELETE 012 SMITH
STEP BY STEP SELECTION USING THE AND
Example: searching for WATSON in the directory:
Move the cursor using the and until you reach the subscriber known as “WATSON”.
Press OK to carry out the chosen operation on the selected list or record.
SELECTION BY NAME
Example: searching for WATSON in the directory:
Enter the letters W then A.
If several respondents’ names start with these same letters, narrow the search by keying in the next letters in the subscriber’s
name.
Your fax will search for the subscriber as you type.
Press OK to carry out the chosen operation on the selected list or record.
23
Page 29

SELECTION BY QUICK-DIAL NUMBER
Example: searching for WATSON, registered under quick-dial number 3 in the directory:
Press the number 3.
Press OK to carry out the chosen operation on the selected list or record.
4. PRINTING OUT THE DIRECTORY
To print the directory (both subscribers and broadcast lists):
Press MENU, followed by 1, 5 and OK. The directory is printed out in alphabetical order.
24
Page 30

CHAPTER 6: SETTINGS
You can print a list of parameters at any time, in order to check the status of your unit’s default settings and modified
settings.
To print a list of settings, press MENU, followed by 5, 4 and OK. Your fax will print out a list of parameters.
You may modify the parameters of your fax machine at any moment in time.
1. GENERAL SETTINGS
To access the general settings of your fax machine, press MENU followed by 2.
Move the cursor using the and , then enter or modify the date and time, your number and your name.
Press OK to confirm your entries.
2. TRANSMISSION
REPORT
Your fax machine can be programmed to print out a transmission report (for standard transmission over the telephone
network) or a send notice (for documents sent over the Internet) following each fax you transmit. You can set the parameters
of this report as follows:
To access the various types of report available, press MENU followed by 2, 4, 1 and OK.
To select WITH directly, press MENU followed by 2, 4, 1, 1 and OK.
A transmission report will be printed out upon each successful or finally abandoned transmission. Only one report
will therefore be printed out for each send request.
To select WITHOUT directly, press MENU followed by 2, 4, 1, 2 and OK.
No transmission reports will be printed (see the send log for a record of fax transmission sessions).
To select ALWAYS directly, press MENU followed by 2, 4, 1, 3 and OK.
A report will be printed out upon each transmission attempt.
To select ON ERROR directly, press MENU followed by 2, 4, 1, 4 and OK.
Transmission reports will only be printed out when all attempts to send the fax have failed and the transmission
request is finally abandoned.
Note:
A reduced-size representation of the first page of the document is automatically added to the transmission report when
the document is sent from memory (see the section entitled Transmission from memory or from the feeder).
FAX TRANSMISSION
This function enables you to request that documents be loaded into memory prior to transmission. You can retrieve your
documents faster in this way, and your telephone costs will be lower.
To select MEMORY directly, press MENU followed by 2, 4, 2, 1 and OK.
To select FEEDER directly, press MENU followed by 2, 4, 2, 2 and OK.
3. RECEPTION
RECEIVE MODE (MACHINE WITHOUT THE DECT OPTION)
You can choose between 4 receive modes: a standard mode (fax mode), and three other modes which can be used when
a telephone handset and/or an external TAD-recorder are connected to your fax machine.
The chosen receive mode is represented by three icons located at the low part of the display, press the AUTO ANSW. key
at least once to configure the reception mode you want.
MANUAL MODE
TEL icon lit, FAX and TAD icons off.
An external telephone handset must be connected to your fax machine. You will have to lift the receiver to receive a
document (by pressing on FAX/COPY).
FAX MODE
Fax icon lit, Tel and TAD icons off.
Your machine will receive faxes automatically. This is the most commonly used mode.
25
Page 31

FAX - TEL MODE
Tel and Fax icons lit, TAD icon off.
An external telephone handset must be connected to your fax machine (see the section entitled Connections in the chapter
headed INSTALLATION). Your fax machine automatically discriminates between different types of calls. In this
receive mode, you are advised to set the number of rings before the unit picks up incoming calls to 2 if you expect a heavy
fax traffic or 5 if you expect only few. When there is an incoming call, the unit automatically answers the call after the
set number of rings, and plays an intermittent beeping tone inviting the caller to wait. Then:
- if the call is a fax, your unit switches to fax receive mode,
- if it is a voice call, your unit rings to warn you. If you do not take the call within 30 seconds, the unit switches to
fax receive mode. To take the call, pick up the telephone handset’s receiver and take the line by pressing on the
LINE key on your fax machine.
- if you lift the receiver while the telephone handset is ringing and the call turns out to be an incoming fax, press
FAX/COPY and hang up.
FAX - ANSWERING MODE
Fax and TAD icons lit, Tel icon off.
Your fax machine supports an external telephone answering device (see the Connections section in the INSTALLATION
chapter). In this mode, your answering device will answer incoming voice calls and your fax machine will automatically
receive any incoming faxes.
Please ensure that your answering device is on constantly and configured to automatic answering mode.
When there is an incoming call, the unit automatically answers the call and listens silently to the call signature.
- if the call is a fax, your unit switches to fax receive mode,
- if it is a voice call, it lets your answering device record any messages.
RECEIVE MODE (MACHINE WITH THE DECT OPTION)
You can choose between 3 receive modes, press the AUTO ANSW. key at least once to configure the reception mode you
want.
The chosen receive mode is represented by three icons located at the low part of the display.
MANUAL MODE
TEL icon lit, FAX and TAD icons off.
Your machine acts as a telephone. You use this mode if the fax traffic is low.
On an incoming call, the machine rings. It never unhooks automatically (except after 10 rings if remote interrogation
is authorised, in which case it transmits the announcement or bips if no announcement has been recorded).
If you unhook, you can either continue in vocal conversation or receive a fax by pressing the START key.
FAX PHONE MODE
TEL and FAX icons lit, TAD icon off.
Your machine automatically sorts calls before presenting them to you. You use this mode when fax traffic is high
and you do not want to be disturbed by reception of a fax.
On an incoming call, the machine unhooks automatically without disturbing you, transmits a welcome message to
your correspondent inviting him to wait (example: "Please hold the line"), then:
• if the call is a fax, your machine receives the fax,
• if it is a vocal communication, your machine rings (alert ring) for 30 seconds to let you know. During this time,
your correspondent hears a ringing tone.
FAX PHONE TAD MODE
TEL, FAX and TAD icons lit.
Your machine acts as a telephone with an answering machine associated with a fax. You use this mode when you
are absent or if you do not want to lose telephone calls and faxes.
On an incoming call, your machine unhooks after a few rings and transmits your answering machine announcement:
- if the call is a fax, your machine passes into fax reception mode,
- if it is a vocal communication, your correspondent can leave a message.
Remark:
You can set the number of rings before your machine unhooks.
26
Page 32

PAPERLESS RECEPTION
If you select WITHOUT PAPER, your fax machine will receive incoming faxes directly to memory when its printer is
unavailable.
If you select WITH PAPER, your fax machine will refuse incoming faxes when its printer is unavailable.
To set your fax machine to WITHOUT PAPER mode, press MENU followed by 2, 5, 2, 1 and OK.
To set your fax machine to WITH PAPER mode, press MENU followed by 2, 5, 2, 2 and OK.
4. NETWORK
NETWORK TYPE
The telephone line to which your fax machine is connected can be linked to a public network, or to a private network
(running off a corporate automatic telephone exchange, or PABX).
To configure your fax machine for operating on a private network (PABX), press MENU followed by 2, 6, 1, 1
and OK.
To configure your fax machine for operating on a public network (PSTN), press MENU followed by 2, 6, 1, 2
and OK.
DIAL MODE
This is the dial mode used by the automatic telephone exchange to which your fax machine is connected: pulse or tone.
To determine which dial mode is in use, select TONE dialling and test your setup by calling someone. If you are unable
to connect, switch to PULSE dialling.
To configure your fax machine for TONE dialling, press MENU followed by 2, 6, 2, 1 and OK.
To configure your fax machine for PULSE dialling, press MENU followed by 2, 6, 2, 2 and OK.
5. DIRECT INCOMING FAXES TO MEMORY “FAX ANSWER MODE”
ACTIVATING
This function enables you to request incoming faxes to be stored in memory rather than printed out. This facility provides
protects the confidentiality of incoming faxes.
To activate FAX ANSWER mode, press MENU followed by 4, 1, 2, 1 and OK. The Fax Messages indicator lights
up (it starts to flash when your unit receives incoming faxes).
To de-activate FAX ANSWER mode, press MENU followed by 4, 1, 2, 2 and OK. The Fax Messages indicator
switches off.
Note:
This mode has nothing to do with the Fax-answering mode and does not require the presence of an answering device.
If you want to print a fax from the memory, press the MENU, 4, 1, 1 and OK keys.
To remotely poll the contents of the fax-answering machine, proceed as described in the chapter ADVANCED
COMMUNICATION FUNCTIONS § Retrieving faxes from remote mailboxes, using mailbox 00.
In that case, the code of the fax-answering machine will be the polling code for mailbox 00.
FAX ANSWER SECURITY CODE
The confidentiality of your incoming faxes is protected by a 4-digit security code. Once you set this code, you will need
to enter it in order to print out any incoming faxes that have been saved in the unit’s memory. You will also need to enter
it to de-activate FAX ANSWER mode.
To enter a fax answer security code, press MENU followed by 4, 3 and OK; enter the code, then press OK.
27
Page 33

6. TECHNICAL PARAMETERS
You can adapt your fax machine to your specific requirements by setting the unit’s various technical parameters.
To set the technical parameters, press MENU followed by 2 and 9, then move the cursor to the required setting
and press OK to confirm.
Parameter Value Procedure Description
SCANNING MODE NORMAL MENU291OK1
FINE MENU291OK2
PHOTO MENU291OK3
TX HEADER WITH MENU292OK1
WITHOUT MENU292OK2
TX SPEED 14400 MENU293OK1
12000 MENU293OK2
9600 MENU293OK3
7200 MENU293OK4
4800 MENU293OK5
2400 MENU293OK6
ECHO PROTECT WITH MENU294OK1
WITHOUT MENU294OK2
EPT WITH MENU296OK1
MODE WITHOUT MENU296OK2
COM. DISPLAY SPEED MENU297OK1
PAGE NUMBER MENU297OK2
RX HEADER WITH MENU2910OK1
WITHOUT MENU2910OK2
Default resolution for outgoing documents
If this parameter is activated, all documents you send out
will bear a header featuring your name, number, the date
and the page no.
Your fax machine supports several transmit speeds. Where
line conditions are good (adapted, no echo) transmission
usually takes place at a speed of 14400 baud.
However, transmission speeds must sometimes be limited
for certain sessions.
If this parameter is set, the unit will automatically damp
the echo on long distance calls.
On some long-distance calls (via satellite), the echo on the
line can hamper transmissions.
Choice between display of the number of the page currently
being transmitted and the transmission speed.
If this parameter is set, all incoming faxes will be printed
out with a header featuring the sender’s name and number
(if available), the date and the page no.
RX SPEED 14400 MENU2911OK1
9600 MENU2911OK2
4800 MENU2911OK3
2400 MENU2911OK4
RINGS 2 to 5 MENU2912
MEMORY EXT WITHOUT MENU2940
OK
OK
+(x) p
NET VALID 6:01 21:59 MENU2970
28
Your fax machine supports several receive speeds. Where
line conditions are good (adapted, no echo) reception
usually takes place at a speed of 14400 baud.
However, receive speeds must sometimes be limited for
certain sessions
The number of rings before your fax machine picks up the
call
Enables you to specify whether the memory has been
extended and the additional capacity (in pages)
OK
You can change the Internet connection time slot for
periodic access (menu 9412), thus avoiding night-time
access
Page 34

Parameter Value Procedure Description
NET ACTIVE 7 DAYS/WEEK MENU2971OK1
Monday to MENU2971OK2
Friday
MODEM SPEED 14400 MENU2972OK1
12000 MENU2972OK2
9600 MENU2972OK3
7200 MENU2972OK4
4800 MENU2972OK5
2400 MENU2972OK6
1200 MENU2972OK7
600 MENU2972OK8
IMPROVE REP @ WITH MENU2973OK1
WITHOUT MENU2973OK2
ERASE MAILBOX WITH MENU2974OK1
WITHOUT MENU2974OK2
Enables you to choose whether to allow automatic access
7 days a week or only from Monday to Friday (to avoid
weekend access)
Your fax machine supports several maximum speeds for
Internet access. Where line conditions are good (adapted,
no echo) transmission usually takes place at a speed of
14400 baud.
However, transmission speeds must sometimes be limited
for certain sessions (owing to poor line quality or the
specific configuration of the access provider)
When activated, this parameter enables the Internet address
of the party at the other end of the line (if available) to be
automatically recorded into the directory .
- WITH F@x-to-Fax subscription
ERASE MAILBOX ON: when the fax machine receives
an e-mail with an attachment which it cannot handle, it
erases the message from the mailbox with the access
provider, then prints out and sends to the issuer of the
message a “COULD NOT PROCESS MESSAGE”
notification.
If the parameter is not set (WITHOUT), the fax machine
does not erase the message from the mailbox; instead,
it prints out a “COULD NOT PROCESS MESSAGE”
notification, advising you to retrieve the offending
message by other means. This parameter should only
be used if you have other means of doing so (e.g. a
computer). The storage space provided by your
access provider is limited. If you fail to empty your
mailbox regularly, this may cause the system to
refuse new incoming messages.
- Without F@x-to-Fax subscription
No comment.
TEXT WITH MENU2975OK1
ATTACHMENT WITHOUT MENU2975OK2
This parameter allows you to delete the printing of the
Text Attachments for recieved Internet documents.
29
Page 35

CHAPTER 7: SENDING A FAX
TO SEND A DOCUMENT:
Place the document or the stack of documents face down in the scanner feeder, with the first page at the bottom
of the stack).
Adjust the document scan resolution if required.
Dial the fax number of the intended subscriber.
Press FAX/COPY to begin transmission of your document.
To interrupt a fax transmission, press STOP.
1. SETTING THE RESOLUTION
RESOLUTION
You can choose between 3 scan modes for your outgoing faxes:
- Use STANDARD (Std) mode for documents that are clear and do not incorporate any small detailing.
- Use FINE (F) mode for documents that feature small characters and drawings.
- Use PHOTO (Ph) mode for sending photographs.
The mode you select is shown by one of 3 icons at the bottom of the display.
Press on the MODE key as many times as required to select one of these 3 scan modes.
2. DIALLING USING THE DIRECTORY
When sending a fax, you may use the directory to rapidly locate the fax number and / or e-mail address of the intended
subscriber.
You can use the directory whenever you are required to dial a number.
ALPHABETIC DIALLING
Key in the first few letters of the subscriber’s name on the alphabetic keypad until the system identifies the
intended subscriber.
Press on the FAX/COPY or INTERNET keys.
DIALLING USING QUICK-DIAL NUMBERS
Press the DIRECTORY key. Your fax machine will display the contacts and broadcast lists stored in the
directory.
Select the subscriber or broadcast list you wish to send the fax to using the and keys on the navigator pad.
or
Key in the quick-dial number of the subscriber or broadcast list you wish to send the fax to. The cursor positions
itself by the subscriber associated with the number you entered.
Press on the FAX/COPY or INTERNET keys.
SECURE ONE-TOUCH DIALLING
Press the DIRECTORY key.
Press the key associated with the subscriber or broadcast list you wish to send the fax to. The cursor positions
itself by the subscriber associated with the number you entered.
Press on the FAX/COPY or INTERNET keys.
30
Page 36

3. LAST TEN NUMBER REDIAL
Your fax machine enables you to re-dial any of the last 10 numbers dialled.
To re-dial one of the last ten FAX numbers dialled:
Press the REDIAL or key (*); the display will show the last number dialled.
You can select an earlier number using the and keys on the navigator pad, or by pressing REDIAL
or (*) again.
Press on the FAX/COPY or INTERNET keys, and your fax machine will transmit the fax to the chosen number.
To re-dial one of the last ten Internet addresses entered:
Press the INTERNET key followed by the REDIAL key (*) and proceed as above.
4. FAX BROADCASTING
The fax broadcast facility enables you to send a document out to several subscribers at once (by fax or over the Internet).
Note:
The fax machine must be set to Send from Memory (see the SETTINGS chapter).
Place the document in the fax machine’s scanner feeder.
Dial the fax number or key in the name of the first subscriber.
Notes:
- By pressing the DIRECTORY key, you can rapidly access the quick-dial number or one-touch dial key of
a subscriber or broadcast list.
- By pressing the REDIAL key, you can access the last 10 numbers dialled.
Press the BROADCAST key to enter the next subscriber’s quick-dial number.
Key in the second subscriber’s quick-dial number.
Repeat the procedure for all the subscribers (whether fax or Internet-based) or broadcast lists to which you want to
send the document (up to 8 subscribers).
Press on the FAX/COPY or INTERNET keys.
5. STOPPING A TRANSMISSION IN PROGRESS
To stop a transmission in progress:
Press on STOP. The fax machine will prompt you to press STOP again to confirm.
Press STOP again to confirm your instruction to abort the transmission.
Notes:
- In the case of a fax transmitted from memory to a single subscriber, the document is erased from memory.
- In the case of a fax transmitted to several subscribers, only the current subscriber at the time the STOP button is
pressed is removed from the transmit queue.
- If the transmission report parameter is set to anything but WITHOUT, the fax machine will print out a
transmission report indicating that the operator aborted the fax’s transmission.
(*) Depending on model.
31
Page 37

CHAPTER 8: VOCAL ANSWERING MACHINE
1. STARTUP
To make your answering machine operational:
The TAD icon should be lit. If this is not the case, press the AUTO ANSW. key.
To switch off your answering machine:
The TAD icon should be off. If this is not the case, press the AUTO. ANSW. key.
Remarks:
• The TAD icon flashes in the following two cases:
- no announcement recorded, (see § recording your announcements in this chapter).
- the answering machine memory is saturated: delete the voice messages (see § messages in this chapter).
• The maximum length of a recorded message is 90 seconds.
2. SELECT THE TYPE OF ANSWERING MACHINE
Your fax machine has two types of answering machine:
• answering machine - recorder,
• simple answering machine.
SELECT THE TYPE ANSWERING MACHINE - RECORD UNIT:
Press keys MENU, 4, 2, 5, 1 and OK.
SELECT THE ANSWER ONLY MACHINE:
Press keys MENU, 4, 2, 5, 2 and OK.
3. RECORDING YOUR ANNOUNCEMENTS
The machine has two announcements, lasting between 4 and 20 seconds each corresponding to the two types of
answering machine:
• the announcement for the answering machine - recorder (you have one pre-recorded announcement),
• the announcement for the simple answering machine.
RECORDING THE OGM
Press the keys MENU, 4, 2, 1, 1 and OK.
Lift the handset, you can start dictating your message.
Hang up the handset to end recording. The message is automatically played back.
At the end of the playback the answering machine can be activated.
RECORDING THE SIMPLE OGM
Press the keys MENU, 4, 2, 1, 2 and OK.
Proceed in the same way as for recording the first answering machine message.
Remarks:
After selecting the type of answering machine (simple or recorder), you can directly record or change the
corresponding announcement.
To do so:
- press the MENU then keys.
4. LISTENING TO THE ANNOUNCEMENTS
After having recorded one or other type of announcement, you can listen to:
- the answering machine-recorder announcement,
- the simple answering machine announcement.
OGM PLAYING MACHINE - RECORDER ANNOUNCEMENT
Press the keys MENU, 4, 2, 2, 1 and OK.
Your fax machine plays the announcement you have recorded.
32
Page 38

LISTENING TO THE SIMPLE OGM
Press the keys MENU, 4, 2, 2, 2 and OK.
Your fax machine plays the message you have recorded.
5. MESSAGES
PRESENCE OF MESSAGES
The status of the "VOCAL MESSAGES" lamp tells you of the presence of messages:
• "VOCAL MESSAGES" off: no messages.
• "VOCAL MESSAGES" flashing: at least one message not listened to.
• "VOCAL MESSAGES" lit: presence of messages. All the messages have been listened to.
LISTENING TO MESSAGES
Press .
Your machine gives the number of messages and, for each message being listened to, the order number and date/
time of reception.
Whilst listening to the VOCAL messages, you can:
Press the key to return to the start of the message.
Press the key twice to go to the previous message.
Press the key to start listening to the next message.
Press the key to pause. Pressing a second time restarts listening.
DELETING THE MESSAGES
You can delete messages in two distinct manners:
- globally (if all the messages have been listened to, and not whilst listening to messages).
Press MENU, 4, 2, 4 and OK keys.
- one by one (whilst listening to a message).
Press C key whilst listening to the message to supress.
Then the next message, if any, can be listened to.
SATURATION OF ANSWERING MACHINE
When there are too many messages in memory, the answering machine is saturated and can no longer record more
messages. The TAD icon flashes and the screen displays "MEMORY FULL".
You should listen to the recorded messages to empty the memory.
6. LOCAL MEMO
A memo is a message which you record locally on your answering machine. This message can be intended for your
relatives or your collaborators.
RECORDING A LOCAL MESSAGE
Press the keys MENU then , or else the MENU, 4, 2, 3 and OK keys.
Unhook the handset and speak.
Hang up the handset to finish recording.
LISTENING TO A LOCAL MESSAGE
To listen to a local message, proceed in the same way as for a message (see § listening to messages in this chapter).
7. CALL FILTERING
The call filtering function allows you to listen to a message while it is being recorded.
• In "WITH CALL FILTERING" mode you hear the messages being recorded on your answering machine:
. you can take the communication by lifting the handset,
. you can adjust the volume of the SPEAKER using the keys, or even turn down the SPEAKER volume
until it is off.
33
Page 39

• In "WITHOUT CALL FILTERING", the messages are recorded in silence:
Delete
1
2
Announce
3
4 5 6
machine
7
8 9
* 0
Answering
ON
machine
Answering
OFF
Messages
(Menu)
FAX
Last
Message
Next
Message
Message
#
. you can, however, take the communication by lifting the handset,
. you can adjust the volume of the SPEAKER using the keys in order to listen to a message being
recorded.
To activate the CALL FILTERING mode:
Press keys MENU, 4, 2, 6, 1 and OK.
To deactivate the CALL FILTERING MODE:
Press keys MENU, 4, 2, 6, 2 and OK.
8. REMOTE INTERROGATION OF THE VOCAL ANSWERING MACHINE
The interrogation code allows you to:
- remotely interrogate your voice answering machine (remote consultation of voice messages),
- locally consult the voice messages and the fax messages on your unit if the access is locked.
On delivery, the vocal answering machine is not capable of being interrogated remotely. To make this possible, you
should enter a remote interrogation code consisting of four digits other than 0000.
This function allows you to define the code necessary for locally or remotely accessing the vocal messages recorded
or the faxes received by your machine and stored in memory.
To enter an inquiry code, press MENU, 4, 3 and OK keys.
Enter your remote inquiry code.
Press the OK key to confirm your choice.
To access your voice messages remotely:
On the remote telephone, dial your number.
Press the * key during the announcement (or during the bips if the announcement has not been recorded).
Type your 4 digit remote interrogation code.
Listening of all the voice messages starts automatically.
At the end of listening, or if there are no messages, the machine sends a series of bips.
For remote calling to work, you should use a telephone configured in tone dialling mode.
You can carry out the following operations over a remote telephone:
Whilst listening:
• pause or resume message listening by pressing 5,
• go on to next message, by pressing 6,
• start listening to message again, by pressing 4,
• go back to previous message, by pressing 4 twice.
After listening:
• delete received messages, by pressing 1 and 5,
• record your announcement, by pressing 8 and 3 and stop the
recording of your announcement, by pressing any key,
• listen to your announcement, by pressing 3,
• switch on your answering machine, by pressing 7,
• switch off your answering machine, by pressing 9,
• resume message listening, by pressing 5.
34
Page 40

9. PRIVILEGED ACCESS
PRIVILEGED ACCESS CALLS
If you do not want to be disturbed by anyone except privileged access callers (with a special access code), set the
unit to TAD receive mode and input a privileged access code:
Press MENU, 4, 2, 7 and START/COPY or OK.
Input an access code other than 0000 and press START/COPY to confirm.
Note: You must activate the privileged access facility using MENU 4, 2, 8, 1 and OK (setting: WITH).
INCOMING CALLS
To call you, your privileged callers (knowing your privileged access code) will proceed as follows:
Dial your number.
Wait for your terminal to answer the call.
Press the * key, then enter the 4-digit privileged access code.
Note: if you do not answer the call, the caller will be prompted to leave a message on your TAD.
The «remote message retrieval» and «privileged access» codes must be different. To de-activate the
privileged access facility, simply set the code to 0000.
35
Page 41

CHAPTER 9: ADVANCED COMMUNICATION FUNCTIONS
NUMBER OF PAGES CHECK
The number of pages scanned is compared to the value provided by the user.
SCHEDULED TRANSMISSION
Enables you to specify a time when the document should be sent.
FAX ON DEMAND
A document is loaded into your fax machine and made available to one or more subscribers who can receive a fax of this
document by calling your fax machine using the POLLING function. The document is then sent out to the requesting fax.
You can either load the document in the scanner feeder or in memory. The latter option is preferable, for it leaves your
machine free and means the document can be accessed by several consecutive callers.
POLLING
This is where you request a fax of a document from a remote fax machine. Simply call that machine and it will send the
document to your fax machine automatically.
QUEUE
This is a list of all the documents awaiting transmission (scheduled transmission, fax on demand, polling calls).
1. SCHEDULED TRANSMISSION
Use this facility to send a document at a specified time.
Place the document in the fax machine’s feeder.
Press MENU followed by 3, 1 and OK.
Enter the subscriber’s number and press OK to confirm.
Enter the time when you want the document to be sent out.
The time shown is the current time.
Press OK. The document will be sent out at the specified time.
Having entered all the other parameters of the transmission, press FAX/COPY to launch the scheduled transmis-
sion.
2. LOADING A DOCUMENT FOR FAX ON DEMAND
To prepare a document in your fax machine to be sent to remote fax machines via polling, proceed as followes:
Place the document in the fax machine’s feeder.
Press MENU followed by 3, 3 and OK.
To configure the type of fax on demand arrangement:
Realise your choose using the and keys of the navigator pad and then press OK to confirm.
- SIMPLE : the document may only be polled once.
- MULTIPLE : the document may be polled any number of times.
If you choose MEMORY, the document will be scanned and loaded into your fax machine’s memory.
If you select FEEDER, the document will be kept in the feeder.
In the latter case, the TYPE of the polling operation is SIMPLE by definition, since the document can only be
polled once.
Press OK to load the document ready for fax on demand.
3. POLLING
To poll a fax on demand document stored on a remote fax machine:
Press MENU followed by 3, 2 and OK.
To set the number from which the document should be polled:
36
Page 42

Dial the fax number or key in the name of your contact (if it is registered in the directory) then press:
- FAX/COPY : to launch the polling operation.
- BROADCAST : to poll from several remote fax machines.
- OK : to schedule the polling time.
4. MANAGING YOUR FAX MACHINE’S MAILBOX SYSTEM
Your fax machine’s mailboxes enable secure transmission of documents.
Your fax machine supports up to 9 MAILBOXES (numbered 00 to 08). Each MAILBOX is protected by a secret access
code.
Each MAILBOX in use can be identified by a handy mnemonic.
MAILBOX 00 is a public mailbox which holds any faxes stored by the fax machine when in fax answer mode. Its mailbox
access code is that of the FAX ANSWER MODE.
Mailboxes 01 to 08 are private mailboxes.
There is no need to enter an access code to load documents into a mailbox.
Any document loaded into a mailbox is added to documents already in it.
To retrieve a document from a mailbox you require that mailbox’s access code (this also applies to the public mailbox,
00).
You may load data into and retrieve data from the mailboxes on your fax machine or a compatible remote fax machine.
Conversely, a compatible remote fax machine can load data into and retrieve data from the mailboxes on your fax machine.
To access the mailbox management menu, press MENU followed by 7 and OK.
For each menu function (except F75 PRINT LIST), you must select the requisite mailbox from the list of mailboxes.
The first element of the mailbox list is displayed. You can navigate through the list using the and keys, or by directly
entering the number of the mailbox you wish to manipulate: the (free) indication means that there is a non-initialise
Mailbox.
An asterisk “*” at the end of a line indicates that the mailbox concerned contains FAX messages.
INITIALISING A MAILBOX
Press MENU followed by 7, 1 and OK.
Select a FREE MAILBOX from the list of mailboxes, then press OK.
You can also change the characteristics of an existing mailbox. If the latter has an access code, you must key it in.
To key in the access code of a mailbox:
Press MENU followed by 7, 1 and OK, select the mailbox from the list of mailboxes using the and keys or by
directly entering its number (between 01 and 08). Press OK two times. The number 0000 is displayed.
Enter a 4-digit code of your choice (other than 0000) and press OK to confirm.
To set the mailboxes handy mnemonic:
Press MENU followed by 7, 1 and OK, select the mailbox from the list of mailboxes using the and keys or by
directly entering its number (between 01 and 08). Press OK followed by and OK.
Key in the mnemonic and press OK to confirm.
Press C to initialise another mailbox or STOP to leave the menu.
LOADING A FAX ON DEMAND DOCUMENT INTO A MAILBOX
Place the fax on demand document in the fax machine’s feeder, with the first page at the bottom of the stack.
Press MENU followed by 7, 2 and OK. Select the from the list of mailboxes using the and keys or by
directly entering its number (between 01 and 08), then press OK.
The document you placed in the feeder is loaded into the mailbox you selected and added to any documents previously
loaded into it.
PRINTING THE CONTENTS OF A MAILBOX
The relevant mailbox must contain documents (as shown by the presence of an asterisk “*” in the list of mailboxes).
Press MENU followed by 7, 3 and OK. Select the mailbox whose content you want to print from the list of
mailboxes using the and keys or by directly entering its number (between 01 and 08), then press OK.
37
Page 43

If the mailbox is protected by an access code, you will be prompted to key it in. Once you have confirmed your entry, all
the documents contained in the mailbox will be printed.
A mailbox whose contents have been printed out is effectively emptied.
DELETING A MAILBOX
The mailbox in question must have been initialised and must not contain any messages.
Press MENU followed by 7, 4 and OK. Select the mailbox to be deleted from the list of mailboxes using the
and keys or by directly entering its number (between 01 and 08), then press OK.
If the mailbox is protected by an access code, you will be prompted to key it in. Once you have confirmed your entry, the
mailbox will be deleted. It will be shown as (free) in the list of mailboxes.
PRINTING THE LIST OF MAILBOXES
To print the list and status of all the mailboxes, press MENU followed by 7, 5 and OK.
5. SECURE TRANSMISSION TO A MAILBOX ON A REMOTE FAX MACHINE
To send a confidential document, ensure that the target remote fax machine incorporates “private mode” type functionality
(i.e. that it has similar functionalities to your fax machine).
The document will be loaded into one of the subscriber’s mailboxes, and will then be accessible by means of an access
code.
Place the document to be sent out in the fax machine’s feeder. Ensure that the first page is at the bottom of the stack.
Press MENU followed by 3, 4 and OK. The Send to Mailbox menu is displayed. This is very similar to the one
used for standard fax transmissions.
However, it comprises an additional line which is the number of the remote mailbox into which you want to send your
fax.
The parameters required are:
- the fax number(s) of the subscriber(s)
- the subscriber’s mailbox number (00 to 08)
- the scheduled transmission time
- the send mode: from the feeder or memory
- the number of pages in the document to be transmitted
Only the first two lines are mandatory.
Press FAX/COPY to confirm the secure transmission to a mailbox.
The document is (eventually) loaded into memory and the transmission takes place as with any normal send operation
(see the SENDING A FAX chapter).
6. RETRIEVING FAXES FROM REMOTE MAILBOXES
Retrieving faxes from remote mailboxes involves picking up the document(s) from a mailbox of a compatible remote fax
machine, incorporating “private mode” type functionalities. You need to know the number of the mailbox containing the
document, as well as its access code.
Press MENU followed by 3, 5 and OK. The retrieve from remote mailbox menu is displayed. This is very similar
to the one used for standard fax polling operations.
However, it comprises additional lines for the number of the remote mailbox from which to poll the fax and its access code.
The parameters required are:
- the fax number(s) of the subscriber(s)
- the subscriber’s mailbox number (00 to 08)
- the access code of the subscriber’s mailbox (4 digits)
- the scheduled connection time
Only the first three lines are mandatory.
Press FAX/COPY to confirm the remote mailbox fax polling operation.
Your fax machine calls up the remote fax machine; the document(s) contained in the remote mailbox are then received
by your fax machine.
38
Page 44

7. RELAY BROADCASTING OF A DOCUMENT
A relay broadcast operation consists in transmitting a document and a broadcast list number to a remote fax machine which
then automatically proceeds to broadcast the document received to all the subscribers on the broadcast list in question.
This list forms part of the directory of the remote fax machine; its number must be known by the initiating fax machine.
For this operation to succeed, the initiating and remote fax machines must both incorporate the “private mode” relay
broadcasting functionality.
Your fax machine incorporates this function; but it can be only used as the initiator of the relay broadcasting operation.
INITIATING FAX
MACHINE
document and distribution
list No. (e.g. 5)
REMOTE FAX
MACHINE
DOCUMENT
LIST 5
RELAY BROADCASTING: INITIATING FAX MACHINE
Place the document to be transmitted in your fax machine’s feeder. The first page should be at the bottom of the
stack.
Press MENU followed by 3, 6 and OK. The forwarding menu will be displayed. This is very similar to the one
used for standard fax transmission.
However, it incorporates an additional line for the number of the remotely held broadcasting list to be used.
The parameters required are:
- the subscriber fax number (remote fax machine)
- the number of the broadcast list
- the scheduled connection time
- the transmission mode: from feeder or memory
- the number of pages to be transmitted
Only the first two lines are mandatory.
To confirm the relay broadcasting operation, press FAX/COPY.
The document you placed in the feeder will be sent to the remote fax machine which will proceed to
broadcast it.
RELAY BROADCASTING: REMOTE FAX MACHINE
The relay broadcasting process takes place automatically.
When the remote fax machine receives a document to be broadcast to one of its broadcast lists, it broadcasts the document
to the subscribers in the broadcast list whose number was sent to it by your (initiating) fax machine.
8. TRANSMISSION QUEUE
This queue comprises all the documents awaiting transmission (scheduled transmission, fax on demand documents,
polling operations).
Print out this list to find out which documents are pending and their schedules transmission times; you can then modify
this list using the navigator pad.
To access these functions:
Press MENU followed by 6 and OK.
PRINTING THE QUEUE
To directly print the queue, press MENU followed by 6, 5 and OK. Each column features the following data:
1 The job’s sequence number within the queue
2 The subscriber’s name or number
3 The scheduled transmission time
4 The nature of the operation to be carried out in conjunction with the document: transmit from memory, scheduled
transmission, fax on demand.
5 The number of pages
6 The size of the document (the proportion of the memory which it occupies)
39
Page 45

MODIFYING OR VIEWING THE QUEUE
Press MENU followed by 6, 2 and OK.
Your fax machine will display the status of the documents in the queue:
TX : Transmission
DOC : Fax on demand
POL : Polling
MBX : Send to mailbox
PMB : Retrieval from mailbox
REL : Transmission for forwarding
TR. : Job in process
CNX : Internet connection
NET : Internet transmission
Should you wish to modify any of the documents in the queue:
You can scroll through the pending jobs in the queue using the and keys of the navigator pad or by keying in
their sequence number.
Press OK. You can then change the parameters of the job displayed.
Press FAX/COPY to confirm the changes you made and exit.
IMMEDIATE EXECUTION OF A PENDING JOB
Use this function to have a pending job executed as soon as possible:
Press MENU followed by 6, 1 and OK.
Use the and keys of the navigator pad to select pending jobs in the queue or type in their sequence number.
Press OK or FAX/COPY to initiate immediate execution of the job selected.
DELETING A JOB FROM THE QUEUE
Press MENU followed by 6, 3 and OK.
Use the and keys of the navigator pad to select the document to be deleted and press OK.
Confirm your delete request by pressing FAX/COPY key or OK key.
PRINTING A SCHEDULED TRANSMISSION OR FAX ON DEMAND DOCUMENT
You can print out any scheduled transmission or fax on demand documents in the fax machine’s memory.
Press MENU followed by 6, 4 and OK.
Use the and keys of the navigator pad to select the document to be printed and press OK.
9. MANUAL SEND
You can listen in to line activity through your fax machine’s loudspeaker while the unit dials a number to send a fax (except
for Internet transmissions).
This function is useful, for example, in the following circumstances:
- after several failed attempts to send a document. By listening in to the line you can hear whether the subscriber’s
fax machine is busy and activate transmission as soon as it becomes free.
- you want to monitor the transmission being unsure of the accuracy of the number, etc.
Place the document to be sent out in your fax machine’s feeder.
Press the DIAL TONE key.
Adjust the volume if required using the and keys of the navigator pad.
Dial the subscriber’s fax number.
Note:
- Press the REDIAL key to access the last number dialled.
- By pressing the REDIAL key before the DIAL TONE key you can access the last 10 numbers dialled.
As soon as you hear the fax tone of the remote fax machine, this means it is available.
Press FAX/COPY. Your fax will proceed to send the document.
Note:
The transmission report (if that option is on) will not show a copy of the first page of your fax; instead, a line will
be printed indicating that the transmission was manual.
40
Page 46

10. VOICE CALL DURING TRANSMISSION
If a telephone handset is connected to your fax machine, you can have a conversation with the subscriber to whom you
are in the process of sending a fax.
WARNING: this function is only available for documents sent directly from the feeder (as opposed to those that are loaded
into memory first).
Please the document to be sent out in your fax machine’s feeder.
Dial the subscriber’s fax number and press OK.
Select the FEEDER transmission mode.
Press FAX/COPY.
During document transmission, press DIAL TONE to indicate that you wish to initiate a telephone conversation.
Your fax will sound an initial series of beeps to indicate that your request has been forwarded to the subscriber’s
fax machine; a second series of beeps indicates that the latter has accepted your request.
Pick up the telephone handset and press the DIAL TONE key on your fax machine. You will be able to speak to
the subscriber as soon as the page currently being sent has gone through.
Once your conversation is over, press FAX/COPY and hang up to resume transmission of your fax.
11. RELAY
The relay function makes it possible to automatically transfer all received messages (wherever they come from) either
to another fax machine or to an E-Mail address (associated for instance to a PC).
Press MENU, 8, 1 and OK,
Choose an option using the or keys:
• ON selected: transfer activation according to the settings below.
The message RELAY ON appears on the display screen of your fax machine.
• OFF selected: transfer deactivation. Yet, current settings are preserved.
• SETUP selected, then choose between WITH RELAY, WITH RELAY @, WITHOUT RELAY using
the or keys and press OK to confirm.
* WITH RELAY selected: all the received faxes are transferred to a fax machine. Enter the phone
number of that fax machine and press OK to confirm.
* WITH RELAY @ selected: all the received faxes are transferred to an E-Mail address.
. Then, choose the transfer address TO MY E-MAIL, TO OTHER ADD. using the or keys and
press OK to confirm.
- TO MY E-MAIL: to transfer the received faxes to your own E-Mail address (shared with a PC
for instance). The automatic polling of your Internet mailbox is inhibited.
- TO OTHER ADD.: to transfer the received faxes to another address, enter the new E-Mail
address and press OK to confirm.
Connection will take place as required according to the Internet connection mode you have
* WITHOUT RELAY: no automatic message transfer.
selected.
12. LOCAL PREFIX
Your fax machine can add a prefix to all the numbers comprising at least a minimum number of digits which you dial.
This function is useful when your fax machine is set up on a corporate private exchange:
- internal numbers, for which the prefix is not required, are short (10 digits in France),
- external numbers, for which a prefix is not required, are short.
For example, if your fax machine is set up on a corporate private exchange where:
- the prefix required to connect to the public switched telephone network is «0/» (0 followed by pause),
- internal numbers have 5 digits.
You can program your fax machine to automatically add the prefix «0/» to all numbers dialled which comprise 6 or more
digits.
Note :
Prefixes are also added to numbers in the directory.
If you program the unit to automatically add a prefix to dialled numbers, ensure you do not incorporate such a prefix
independently in front of the numbers you enter in the directory.
41
Page 47

To specify a prefix
Press MENU 8, 3 and OK.
By using the or keys, select the PREFIX SETTING menu then press OK to confirm.
Type the dialling prefix
Note :
The dialling prefix can include up to 5 characters.
Press OK to register this new prefix
To alter the minimum length:
Press MENU, 8, 3 and OK.
By using or keys, select the SIZE. NUMBER menu then press OK to confirm.
You may replace the default value provided by a value between 1 and 30.
Press OK to register the new length.
42
Page 48

CHAPTER 10: ANCILLARY FUNCTIONS
1. PHOTOCOPYING
Your fax machine can be used to produce one or more copies of a single or multiple page document placed in its feeder.
Place the document face down in your fax machine’s feeder, with the first page at the bottom of the stack.
For local copying of photographs, adjust the resolution setting if required by pressing the RESOLUTION key. If
you do not select PHOTO mode, the copies will come out in FINE mode.
Press FAX/COPY.
2. SEND AND RECEIVE LOGS
All fax send and receive sessions are logged in send and receive logs which can be printed out at any moment in time.
They are printed automatically after every 30 sessions (send and receive).
To print the logs, press MENU followed by 5, 2 and OK. The columns display the following data:
1 The date and time when the document was sent or received.
2 The subscriber’s fax number or e-mail address.
3 The transmission mode (STANDARD, FINE or PHOTO).
4 The number of pages sent or received.
5 The duration of the session.
6 “Correct” if the send or receive session was successful.
or
a reference code in the case of a specific session (polling, manual send, etc.).
7 The reason in the event that the session fails (e.g. “No answer”).
3. GUIDE
You can at any time print the a guide showing all your fax machine’s functions.
Press the GUIDE (i) key.
or alternatively
Press MENU followed by 5, 1 and OK.
4. MERCURY’S RESIDENTIAL SERVICES (DEPENDING ON MODEL)
Mercury’s Residential Service is a highly competitive telephone service for the residential and small business user. Most
UK long distance and international calls are cheaper over Mercury, especially in the Economy period.
Mercury calls are rounded to the second, and charged to the nearest tenth of a penny. You will also receive fully itemised
bills. Mercury Customer Services are available 24 hours a day to provide the highest level of customer service.
There are two ways to access Mercury, the Residential 132 Service and the Mercury PIN Codes Service. You can find out
the best method for you by calling Mercury Customer Services on FreeCall 0500-500 194 (24 hours). Most homes and
businesses are now able to access the Mercury network via their existing BT line. Mercury Customer Services will be able
to check whether Mercury is available in your area. All Mercury’s charges and tariffs are the same for both methods of
accessing Mercury the only difference is how you connect to the Mercury network.
FOR RESIDENTIAL 132 SERVICE CUSTOMERS
Once you have become a Mercury Residential 132 customer, you simply dial 132 before a long distance or international
call to send it over the Mercury network.
The Mercury key on your unit comes with the digits ‘132’ pre-stored in it.
To check that you have access to Mercury, press the DIAL TONE key and wait for the dial tone.
Select MERCURY service ; two possibilities for this:
- press CTRL and OK keys at the same time,
- press SHIFT and OK keys at the same time,
The call is free of charge. You should be connected to a recorded message welcoming you to the Mercury network.
43
Page 49

To send your long distance and international calls over Mercury:
Press the DIAL TONE key and wait for the dial tone.
Press MERCURY key (SHIFT and OK keys at the same time).
Enter STD code and telephone number of your correspondent.
Note:
If you have any difficulties, please contact Mercury Customer Services (Fault Reporting) on FreeCall 0500-500 193
(24 hours).
FOR MERCURY PIN CODES SERVICE CUSTOMERS
PROGRAMMING THE MERCURY KEY WITH YOUR PIN CODE:
After you apply for Mercury PIN Codes Service you will receive a Mercury PIN Code in two separate parts.
The PIN Code, which is similar to bank PIN number, identifies you as Mercury customer and will need to be stored in the
unit’s memory using the MERCURY key.
Before programming your machine with the Mercury PIN Code, you must ascertain which type of local BT exchange you
are connected to. Ensure that the unit is plugged into the BT socket.
Reset the Mercury dial memory (see § Resetting Mercury dial memory).
Press MENU key followed by 1, 3 and OK.
Move the cursor using the and keys and select the MERCURY record, then press OK.
Press OK to acceed to the MERCURY number.
Press key and then 1.
Press MERCURY keys (CTRL and OK keys at the same time). A «*» is displayed.
Press key / once or more times if a pause is necessary.
Note:
If your machine is connected to a pulse dialling exchange, press * key (to switch your machine in tone dialling mode)
before entering your PIN Code number.
Enter your whole PIN Code number (the two parts) using the numeric keyboard. It is displayed
as «*».
Press OK to validate the MERCURY PIN code.
Press FAX/COPY to validate the MERCURY record, then press STOP key.
To check if the PIN Code has been programmed correctly:
Press DIAL TONE key, wait for the dialling tone.
Press MERCURY key (SHIFT and OK keys at the same time).
Enter the chosen Cost Centre Code(*) (any two or three digit number except 112 or 999).
Enter 1500.
The call is free of charge. During the conversation you will hear a series of short beeps. This is the Mercury dial tone.
After a few seconds you should be connected to a recorded message welcoming you to the Mercury network.
Note 1:
If you call has been unsuccessful:
- Maybe you made a mistake when you entered your PIN Code number: try again.
Note 2:
If you have any difficulties, please contact Mercury Customer Services on FreeCall 0500-500 193 (24 hours).
MAKING A CALL VIA MERCURY:
Press DIAL TONE key. You hear the dial tone.
Press MERCURY key (SHIFT and OK keys at the same time or M key).
Enter the chosen Cost Centre Code(*) if applicable (any two or three digit number except 112 or 999).
(*) Cost Centre Codes
Cost Centre Codes are selectable on your Mercury order form. By keying in a code number (either 2 or 3 digits) before dialling each
and every Mercury call, businesses can allocate calls to different jobs, or residential users can see who is responsible for each call.
44
Page 50

Enter the call number of your correspondent by using a full number.
Note:
Please note that Cost Centre Codes are not currently available with residential 132 Service.
RESETTING MERCURY DIAL MEMORY:
If you wish to change your Mercury code to a new one or if you need to send your machine away for repair, you must reset
the Mercury dial memory using the following procedure:
Press MENU key followed by 1, 3 and OK.
Move the cursor using the and keys and select the MERCURY record, then press OK.
Press OK to acceed to the Mercury PIN Codes Service number.
Press key to erase the Mercury PIN Codes Service number:
Press MERCURY key (SHIFT and OK keys at the same time) and enter a new Mercury Code, if any.
Press OK to validate the MERCURY PIN code.
Press FAX/COPY to validate the MERCURY record, then press STOP key.
RETURNING TO RESIDENTIAL 132 SERVICES:
Press MENU key followed by 1, 3 and OK.
Move the cursor using the and keys and select the MERCURY record, then press OK.
Press OK to acceed to the Mercury PIN Codes Service number.
Press key to erase the PIN Code number and then press 2 instead of 1.
Press the OK key to validate the MERCURY number.
Press FAX/COPY to validate the MERCURY record, then press STOP key.
45
Page 51

CHAPTER 11: OPERATING MALFUNCTIONS
1. COMMUNICATION FAILURES
In the event of a failure to connect, the fax machine will notify you of another re-dial attempt at a later time.
Example of what is displayed:
FRI 11 SEP 20:13
0142685014 20:18
FOR TRANSMISSIONS FROM THE FEEDER
You may either:
- wait for the fax machine to try again at the time indicated,
- attempt to retransmit the document immediately by pressing FAX/COPY provided the document is still in the
feeder,
- or cancel transmission by pressing STOP. To eject the document, press STOP again.
FOR TRANSMISSIONS FROM MEMORY
You may either:
- wait for the fax machine to try again at the time indicated,
- attempt to retransmit the document immediately by modifying the queue(see the Immediate execution of a
pending job section in the ADVANCED COMMUNICATION FUNCTIONS chapter). If the document consists
of several pages, transmission will resume from the first page which failed to go through,
- or cancel transmission by deleting the job entry from the queue (see the Deleting a job from the queue section in
the ADVANCED COMMUNICATION FUNCTIONS chapter).
The fax machine will attempt to re-dial the number up to 5 times.
CONNECTION ERROR CODES PRINTED IN THE TRANSMISSION REPORTS AND LOGS
Code 01 - Busy or no fax answer
This code is displayed after 6 unsuccessful attempts to connect. Try sending later.
Code 02 - Burnt number
A number is said to be “bad” when 6 attempts to dial it have failed. The fax machine will not allow any further calls to
that number. In order to be able to use the number again, you have to re-initialise it by viewing its record in the directory.
Code 03 - User break
Transmission was aborted by the user by pressing STOP.
Code 04 - Non programmed number
Invalid quick-dial or one-touch dialling number: check the number. For example: a scheduled transmission has been
programmed using a one-touch dialling key which has been eliminated in the meantime.
Code 05 - Scanning error
An error has occurred in the scanning assembly, e.g. a paper jam.
Code 06 - Printer default
An error has occurred in the unit’s printer: it may be out of paper, or there could be a paper jam, or an open cover. This
error will only occur while receiving an incoming fax if the PAPERLESS RECEPTION parameter is set to NO.
Code 07 - Disconnected
The line was cut off (poor line conditions). Check the fax number too.
Code 08 - Quality
The document you were sending was not received properly: contact the subscriber to find out whether you need to re-send
the document. The error may have occurred in a part of the document that isn’t vital.
Code 0A - No document to be polled
You tried to retrieve a document from a remote fax but there was no document ready for polling (no fax on demand) on
the latter or you entered the wrong access code.
Code 0B - Wrong number of pages
There is a discrepancy between the number of pages specified by the user while setting up the transmission and the number
of pages actually sent: check the number of pages in the document.
Code 0C - Received document error
Ask the senders to check the length of their document (it might be too long to receive in one go).
46
Page 52

Code 0D - Tranmission failed
Ask the sender to re-transmit the document.
Code 13 - Memory full
Your fax machine can no longer receive any data because its memory is full: too many documents have been received and
are awaiting printing, or too many documents are awaiting transmission.
Print out the documents received by your fax machine or send any pending documents out immediately.
Code 14 - Memory full
The memory is full of documents received. Ensure the printer is functioning.
Code 15 - Unknown Mailbox number x
You are trying to send a document to a subscriber’s fax mailbox but there is no mailbox under that number on the
subscriber’s fax machine.
Code 16 - No Relay Bcst list Nr x
You requested the relay broadcasting of a document by a remote fax machine but the broadcast list required does not exist.
Code 17 - Unknown Mailbox number x
You are trying to retrieve a document from a remote fax mailbox, but there is no mailbox under that number on the remote
fax machine.
Code 18 - Relay Bcst impossible
You requested relay broadcasting of a document by a fax machine which does not have this facility.
Code 19 - Subscriber has stopped
The person at the other end of the line has aborted the session (e.g. a remote fax machine wants to poll your unit but you
have no fax on demand currently).
Code 1A - Disconnected
The call could not proceed - there is too much noise on the line.
Code 1B - Transmission failed
Transmission: re-send the document.
Incoming fax: ask the sender to retransmit the document.
INTERNET ACCESS ERROR CODES
Codes 40 and 41 - No response from supplier
Cannot establish modem connection with your access provider. If the error occurs repeatedly, check the Internet access
number provided by your access provider.
Code 42 - Cannot connect to Internet
The Internet provider is refusing you access - the service is temporarily unavailable. Should the error recur, check your
Internet connection parameters.
Code 43 - Xmission server unavailable
Cannot establish connection to the SMTP electronic mail forwarding server - the service is temporarily unavailable.
Should the error recur, check your e-mail and server parameters.
Code 44 - Reception server unavailable
Cannot establish connection to the POP 3 electronic mail retrieval server - the service is temporarily unavailable. Should
the error recur, check your e-mail and server parameters.
Code 45 - Supplier disconnected
The service is temporarily unavailable; try connecting later.
Code 46 - Xmission server disconnect
The SMTP mail forwarding server is disconnected; the service is temporarily unavailable; try again later.
Code 47 - Reception server disconnect
The POP 3 mail retrieval server is disconnected; the service is temporarily unavailable; try again later.
Code 48 - Disconnecting from Internet
The service is temporarily unavailable; try again later.
Code 49 - Cannot connect to Internet
Check the fax number and eventually the associated prefix of the machine.
To check your fax machine’s Internet parameters, print them out by pressing MENU followed by 9, 6 and FAX/COPY.
47
Page 53

2. PRINTER ERRORS
When you open the printer cover, a message appears on the unit’s display:
IF NEW TONER
CHANGE GAUGE
This message reminds you that you should change the gauge when you replace the printer toner cartridge.
PAPER EMPTY
Insert more paper into the paper tray.
CHANGE TONER
The TONER icon at the low part of the display is lit.
1) TONER out: change the toner cartridge and gauge.
2) Missing toner cartridge: insert the toner cartridge into place.
Note:
The TONER icon will start to flash when the TONER is low.
PAPER JAM
The PAPER JAM icon flashes at the low part of the display.
1
1- Open the cover housing the scanning assembly by
simultaneously pressing on the buttons located on either
side.
Wait a few minutes for the heat elements to cool down.
Remove the toner cartridge and photosensitive drum.
3
A
2
2- Hold the toothed wheel (A) and turn it in the
direction shown
4
3- Un-jam the sheet of paper completely towards
the back by turning the toothed wheel (A).
INVALID GAUGE
The ON icon is flashing red. Install the toner gauge (see the Installing the gauge paragraph), or check whether the gauge
installed is working.
CHECK PRINTER: XY
Open and close the cover housing the scanning assembly. If the error persists, contact your local TA distributor.
CHECK PAPER
LOAD PAPER
Reload paper into the paper tray (see the INSTALLATION chapter).
4- Remove the sheet of paper by pulling it out
towards you.
48
Page 54

3. MISCELLANEOUS FAULTS
The display stays blank when the unit is powered up.
Check that the mains cord is properly plugged in and check the mains socket.
The fax machine fails to detect the document you have inserted. The “READY” message is not displayed.
The display shows “REMOVE DOCUMENT” just before or during scanning and the ON indicator is red.
Remove the document or press STOP.
Check that the document is not too thick (30 sheets of 80 g/m2 paper).
Split the document up if required.
Ensure the document stack is properly fed in.
The fax machine does not receive faxes
If the FAX icon is off and the TEL icon is on, this means that the receive mode parameter is set to MANUAL. Set it to
FAX (see the SETTINGS chapter).
Check that the telephone cable is properly plugged in and that there is a dial tone on the line.
If the fax icon is flashing, this means that the fax machine’s memory is full. If the machine is configured in fax answer
mode, print out the documents in its memory (Menu 4, 1).
You receive a blank page
Try making a local copy. If this comes through OK, your fax machine is functioning properly. Contact the sender of the
fax, and find out whether they fed the document in the wrong way round.
You cannot send out faxes
Check the telephone cable.
Check the dial tone on the line by pressing the LINE key.
Check the DIALLING parameter (see the SETTINGS chapter).
49
Page 55

CHAPTER 12: CARING FOR YOUR UNIT
1. GENERALS
To guarantee the optimal functioning of your fax machine, we recommend you regularly clean the inside of your unit.
Please abide by the following guidelines when operating the unit:
. do not leave the cover housing the scanning assembly open unnecessarily. Do not expose the unit directly to a
strong source of light.
. Do not attempt to lubricate the unit.
. Do not slam the cover shut nor expose the unit to excessive vibrations.
. Do not open the cover while the printer is operating.
. Do not try to take the unit apart.
. Always use the two buttons at the sides to open the cover housing the scanning assembly.
. Do not use paper which has been left in the paper tray for too long.
Refer to the safety guidelines at the start of this booklet.
2. CARING FOR THE CONSUMABLES
CLEANING THE PHOTOSENSITIVE DRUM
If there are black marks on printed out faxes, clean the photosensitive drum. Proceed as follows:
1
1- Open the cover housing the scanning assembly by pressing on the two buttons
located on either side as indicated in the Printer errors section of the
OPERATING MALFUNCTIONS chapter.
Remove the photosensitive drum for cleaning (you will have to take out the
toner cartridge first).
2
2- Tightly roll up a clean sheet of paper and holding it at right angles to the drum,
gently swipe it across to remove any toner particles from the surface of the
drum (do not clean the drum by sweeping it’s surface).
For instructions on how to replace the clean photosensitive drum in the fax
machine, see the Fitting the photosensitive drum section in the
INSTALLATION chapter.
While cleaning the photosensitive drum:
- Avoid any contact with the surface of the drum (fingers, water, alcohol, solvents, etc.).
- Avoid cleaning the surface of the drum with the edge of the sheet of paper (this might cause scratches).
Do not leave the photosensitive drum outside the fax machine for a long period of time. The physical
characteristics of the drum might be affected resulting in clear or dark areas when printing and reducing the
drum’s useful lifespan.
REPLACING THE PHOTOSENSITIVE DRUM
To ensure high quality printed output, we recommend you change the photosensitive drum after every 20,000 printed pages
under normal operating conditions and provided the drum was not exposed to direct light for any length of time.
To ascertain the number of pages that have been printed out, press MENU followed by 8, 4 and 1.
If the pages output by the unit’s printer are too light or there are gaps in the toner despite the drum having been cleaned
and the toner cartridge changed, change the photosensitive drum.
50
Page 56

1. Open the cover housing the scanning assembly by pressing on the two buttons located on either side as indicated
in the Printer errors section of the OPERATING MALFUNCTIONS chapter.
2. Remove the toner cartridge first to access the used drum (see the Fitting the gauge and the toner cartridge
section in the INSTALLATION chapter).
3. For guidance on how to install the new photosensitive drum, see the Fitting the photosensitive drum section in
the INSTALLATION chapter).
REPLACING THE TONER CARTRIDGE
Open the cover housing the scanning assembly by pressing on the two buttons located on either side as indicated in the
Printer errors section of the OPERATING MALFUNCTIONS chapter.
1
Remove the used toner cartridge.
Take the new toner cartridge out of its aluminium packaging.
Follow the instructions in the Installing the toner cartridge and gauge
section in the INSTALLATION chapter to install the new toner cartridge.
The CHANGE TONER message, and the TONER icon lit, indicate that the toner cartridge should be replaced.
REPLACING THE GAUGE
Always replace the gauge (supplied with each toner cartridge) whenever you replace the toner cartridge itself.
For instructions on changing the gauge, refer to the Fitting the gauge and the toner cartridge section in the
INSTALLATION chapter.
3. MISCELLANEOUS MAINTENANCE
CLEANING THE PHOTOSENSITIVE SENSOR BAR
1
c
Open the cover housing the scanning assembly by pressing on the two buttons located on either side as indicated in the
Printer errors section of the OPERATING MALFUNCTIONS chapter.
3
Close the cover housing the scanning assembly.
Always unlock the mobile plate before attempting to remove a document which has jammed while being scanned.
2
1-2- Unlock the mobile plate by pushing the two green clips (c) towards
the back of the unit.
3- Clean the photosensitive sensor bar to remove corrector fluid or ink
stains using a clean cloth dipped in surgical spirit.
Do not use any detergents or abrasives.
Push the mobile plate back until it locks into place.
51
Page 57

CHAPTER 13: TECHNICAL CHARACTERISTICS
Device type: Fast, ITU-T group 3 compatible office fax machine.
1. FAX MACHINE
Net dimensions (excluding trays):
Width: 308 mm Depth: 310 mm Height: 180 mm
Weight: around 5.6 kg
Power supply: 220-240 V - 50-60 Hz - 2,5 A
Power rating (maximum values):
Idle: 11 W
Transmission: 21 W
Reception: 440 W (max) / 90 W on average
Photocopying: 450 W (max) / 100 W on average
Acceptable temperature range: when operating: +10 C to 35 C
Acceptable humidity: when operating: +20% to 80% HR (no condensation)
Outgoing document format:
Width: 210 - 216 mm
Length: 150 to 1000 mm (user assisted)
Thickness: 0.05-0.15 mm (1 page) - 0.06-0.12 mm (multiple pages)
Scanner feeder:
Maximum capacity: 3 mm thick stack (i.e. normal capacity of 30 sheets of 80 g/m2 paper).
Incoming document format (A4):
Width: 210 mm
Length: 297 mm
Output paper: standard photocopier paper (80 g /m2)
Capacity of the paper output tray: maximum 200 sheets of 80 g/m2 paper
Capacity of the paper output tray: around 50 sheets of 80 g/m2 paper
Transmission protocol: ITU-T group 3 fax compatible
Network compatibility: can be connected to all PSTN (or equivalent) networks
Scanning resolution:
Horizontal: 200 dpi
Vertical: 100 dpi (STANDARD)
200 dpi (FINE or PHOTO)
Scanning system: CIS electro-optical read plane
Printing system: laser output on plain paper
Transmission speed:
Group 3: 14400 / 12000 / 9600 / 7200 / 4800 / 2400 baud
The effective time taken to transmit a page of A4 varies from a few seconds to around a minute (depending on the line
quality, the modem speed, the amount of data on the page and the scanning resolution)*
* excluding the time taken to connect to the remote fax machine.
Encryption protocols:
Internet: General characteristics
MH (Modified Huffman)
MR (Modified Read)
TCP / IP / PPP protocols
SMTP / POP3 / MIME protocols for electronic mail
TIFF-F file format
52
Page 58

2. CONSUMABLES
Storage of drum and cartridge consumables:
Temperature range: 5 to 35 °C, shelf life: 24 months in original packaging
Humidity range: 20 - to 85% (without condensation)
53
 Loading...