

Page 1

Instruction Handbook
DC 2116 | 2120 | 2125
Scan (F)
Digital Multifunctional
System
Page 2

This Operation Guide mentions that DC 2116 is a 16 ppm (prints per minute) machine, DC 2120 is a 20
ppm (prints per minute) machine and DC 2125 is a 25 ppm (prints per minute) machine.
Note This Operation Guide contains information that corresponds to using both the inch and metric
versions of this machine.
This Operation Guide shows messages of the inch version. When using the metric version, see
the messages of the inch version for reference. With regard to the messages in the text, if a
message has only the difference of upper- and lower-case spelling, we show only the message
of the inch version. When there is even a slight difference in the message, we have listed the
information for the inch version followed, in brackets, by the corresponding information for the
metric version.
Page 3

Trademark Information
• Microsoft, Windows, Windows NT and Internet Explorer are registered trademarks of
Microsoft Corporation of America and other countries.
• Windows Me , Windows Server and Windows XP are trademarks of Microsoft Corporation.
• Ethernet is a registered trademark of Xerox Corporation.
• IBM and IBM PC/AT are trademarks of International Business Machines Corporation of
America.
• Adobe and Acrobat are registered trademarks of Adobe Systems Incorporated.
• PaperPort is a registered trademark of ScanSoft Inc. of America and other countries.
All other company and product names contained in this Operation Guide are trademarks or
registered trademarks of their respective companies. The designations
used in this Operation Guide.
™ and ® will not be
All rights reserved. No part of this material may be reproduced or transmitted in any form or by
any means, electronic or mechanical, including photo c opying, recording or by any information
storage and retrieval system, without permission in writing from the Publisher.
Legal Restriction On Copying
• It may be prohibited to copy copyrighted material without permission of the copyright owner.
• It is prohibited under any circumstances to copy domestic or foreign currencies.
• Copying other items may be prohibited.
i
Page 4

About this Operation Guide
This Operation Guide is meant to be read when the Scanner Interface Card is installed and your
copier is to be used as a network scanner. It explains set-up procedures and other related
operation on the machine.
As the required set-up in order to use the copier as a scanner may differ depending upon the
environment in use in the connected computer, please read those sections related to your
specific computer environment and perform the appropriate set-up procedures explained there.
This Operation Guide should also be read and used together with the appropriate Operation
Guide <Functions Edition> (On-Line Manual) that is on the incl uded CD-ROMs. The On-Line
Manual <Functions Edition> explains how to scan, various setting methods, and operation
procedures from a computer.
Using the Operation Guide <Functions Edition> (On-Line Manual)
The CD-ROMs included with this product contain the Operation Guide <Functions Edition>
(On-Line Manual) in a PDF (Portable Document Format) file format.
The Operation Guide <Functions Edition> (On-Line Manual) explains how to use the re quired
applications when using your copier as a network scanner. The main content of the CD-ROMs is
as follows:
• Introduction of the network scanner system
• Explanation of setting procedures when using an Internet Web browser
• Explanation of setting procedures at the scanner
• Explanation of attached utilities:
Scanner File Utility
Address Book
Address Editor
TWAIN Source
Configuration tool
Opening the On-Line Manual
Carry out the following procedures in order to open and view the On-Line Manual.
Insert the appropriate CD-ROM into the CD-ROM drive of your computer. The Main Menu
1
screen for set-up will appear automatically.
Click on [Documents] under the [Main Menu] in order to access the desired On-Line Manual
2
for viewing.
Note Adobe Acrobat Reader must be installed in your computer in order to access the On-Line
Manual. The Adobe Acrobat Reader software is included on the CD-ROMs contained with this
product and can be installed from there directly onto your hard disk.
ii
Page 5

Important:
The use of scanned legally copyrighted materials, such as documents, musical scores, pictures,
woodblock prints, maps, drawings and photographs, for any intent other than your own personal
or home use, or other such purpose, is prohibited under the copyright law without prior
permission from the legal copyright owner.
Simply scanning the following items may result in legal penalty:
Bank notes, coins, government-issue securities, national bonds, local bonds, foreign currencies
and securities, unused postage stamps, government post cards, government stamps, and
securities regulated by the liquor tax law.
Other items that you should also not scan:
It is additionally recommended that you do not attempt to scan government-issue passports, or
licenses, permits, ID cards, securities, commuter tickets, passes, books of tickets and meal
coupons issued by public organizations or private parties.
iii
Page 6
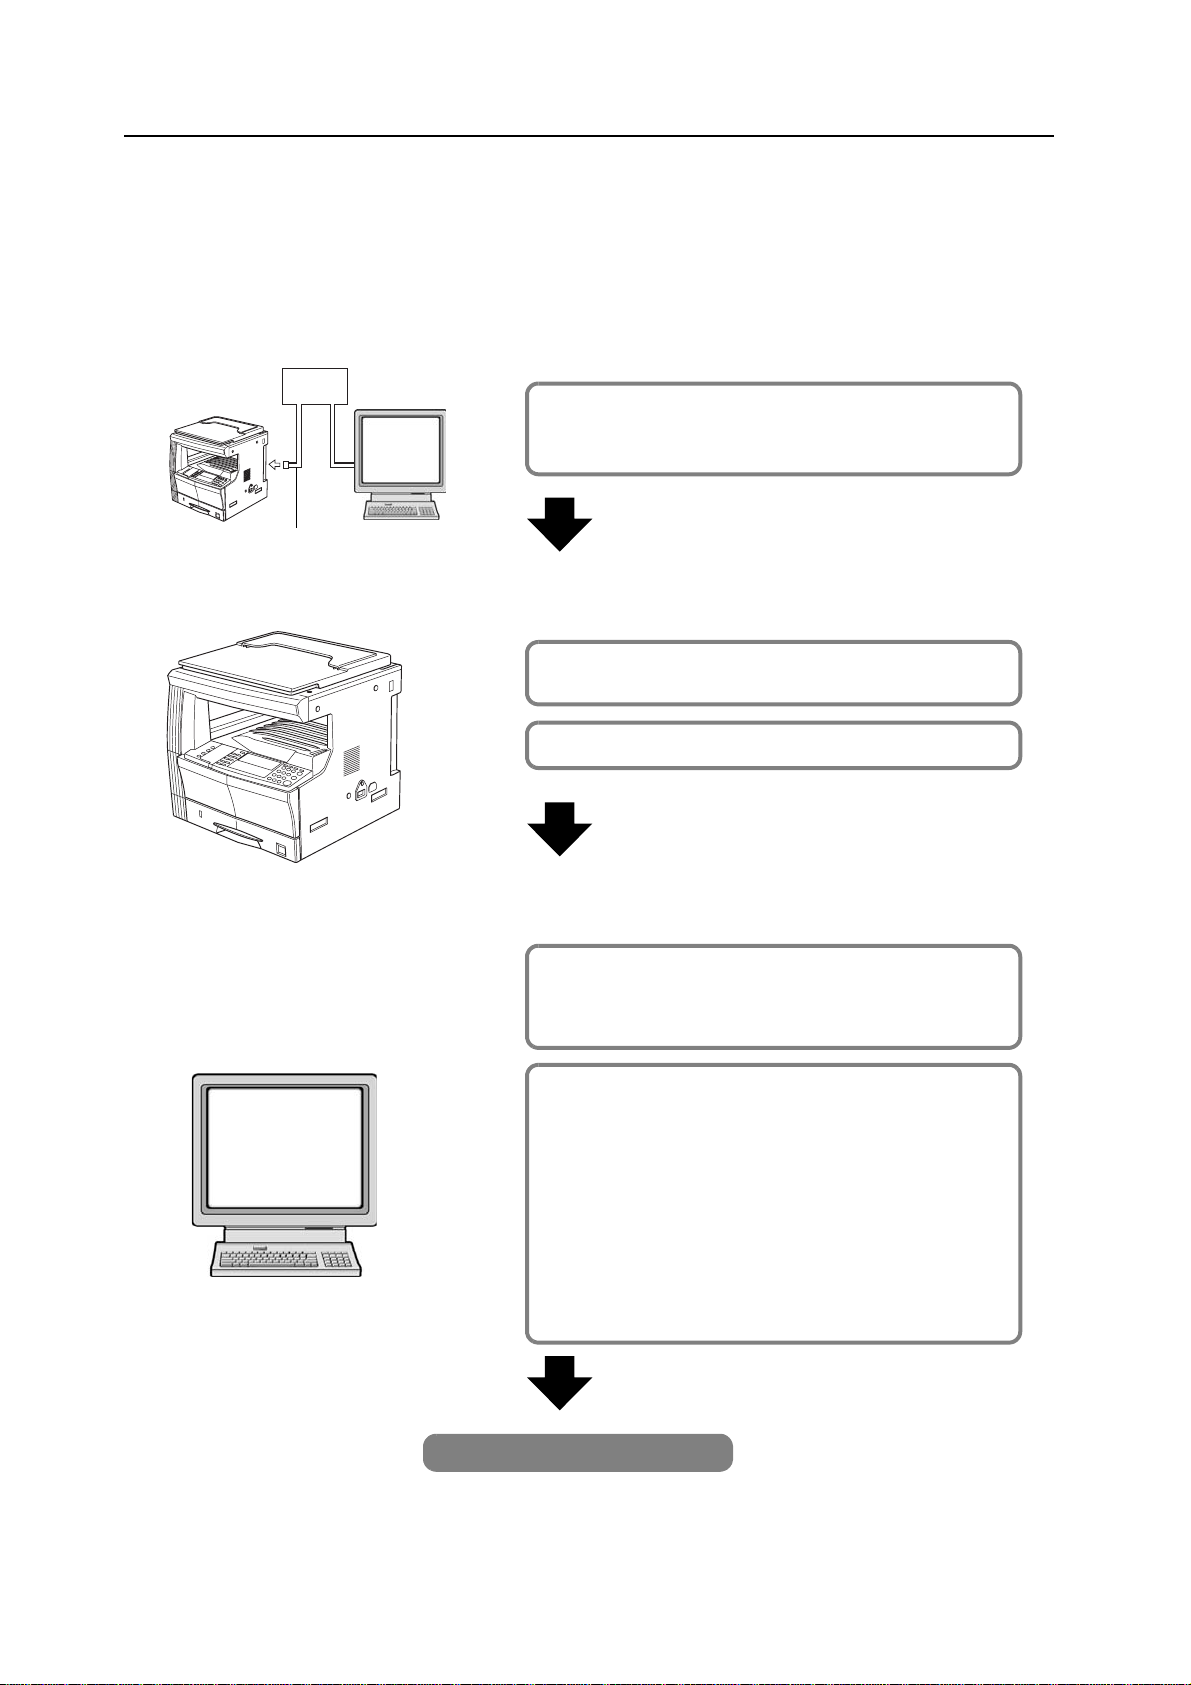
Getting connected
The following procedures are required in order to use this machine as a scanner.
Connect the scanner to your computer
<Example connection>
Hub
Connecting the scanner to your computer
network with a network cable
PC
(100BASE-TX and 10BASE-T)
Network cable
Perform the required operation at the scanner
Basic scanner settings
(register the host name and IP address, etc.)
Date/time and time difference settings
Perform the required operation at your computer
Registering and editing user information
Registers users (transmitters) who use the scanner.
See the Online Manual <Functions Edition>.
page 2-2
page 2-3
page 2-4
Installing the various software (included on the enclosed
CD-ROM disk)
Scanner File Utility
PC
Saves the scanned image as a data file on your computer.
TWAIN Source
Enables you to operate scanning from a TWAIN-compatible application.
Address Book
A personal address book that you can access from the scanner’s operation
panel.
Address Editor (Management Tool)
Enables you to register and edit the shared Address Book, make
network-related settings and change various default settings.
Refer to the On-Line Manual <Functions Edition> for more detailed
information on the included software.
You’re now ready to scan!
iv
Page 7

Table of contents
1 Preparations ...................................................................................................1-1
Names of parts .........................................................................................................................1-1
Main body ...........................................................................................................................1-1
Operation Panel ..................................................................................................................1-2
Accessories ..............................................................................................................................1-3
Utilities and other software (the main content of the included CD-ROMs) ...............................1-3
Required items ............................................................ ....................................... ... ...................1-3
2 Set-up ..............................................................................................................2-1
Setting up the scanner .............................................................................................................2-1
Outline and network configuration ......................................................................................2-1
Connecting the scanner to your computer network ............................................................2-2
Network (TCP/IP) settings ............................................. .....................................................2-3
User registration ................................................................................................................2-4
Date/Time and Time Difference ..........................................................................................2-4
Other settings .....................................................................................................................2-5
Setting up the scanner software ...............................................................................................2-6
System requirements ..........................................................................................................2-6
Installing the software .........................................................................................................2-6
Installing the utilities ...........................................................................................................2-7
Installing the TWAIN source ...............................................................................................2-8
3 Performing the Required Operation at the Scanner ...................................3-1
Scanning under the Scan to PC and Send E-mail functions ....................................................3-1
Before using the Scan to PC function .................................................................................3-1
Before using the Send E-mail function ...............................................................................3-1
How to scan under Scan to PC and Send E-mail ...............................................................3-1
Sending information ............................................................................................................3-3
Scanning with TWAIN ........................................... ........................................ .. .........................3-4
When performing the scanning operation at the scanner ...................................................3-4
When performing the scanning operation at your computer ...............................................3-5
Scan setting .............................................................................................................................3-6
v
Page 8

vi
Page 9
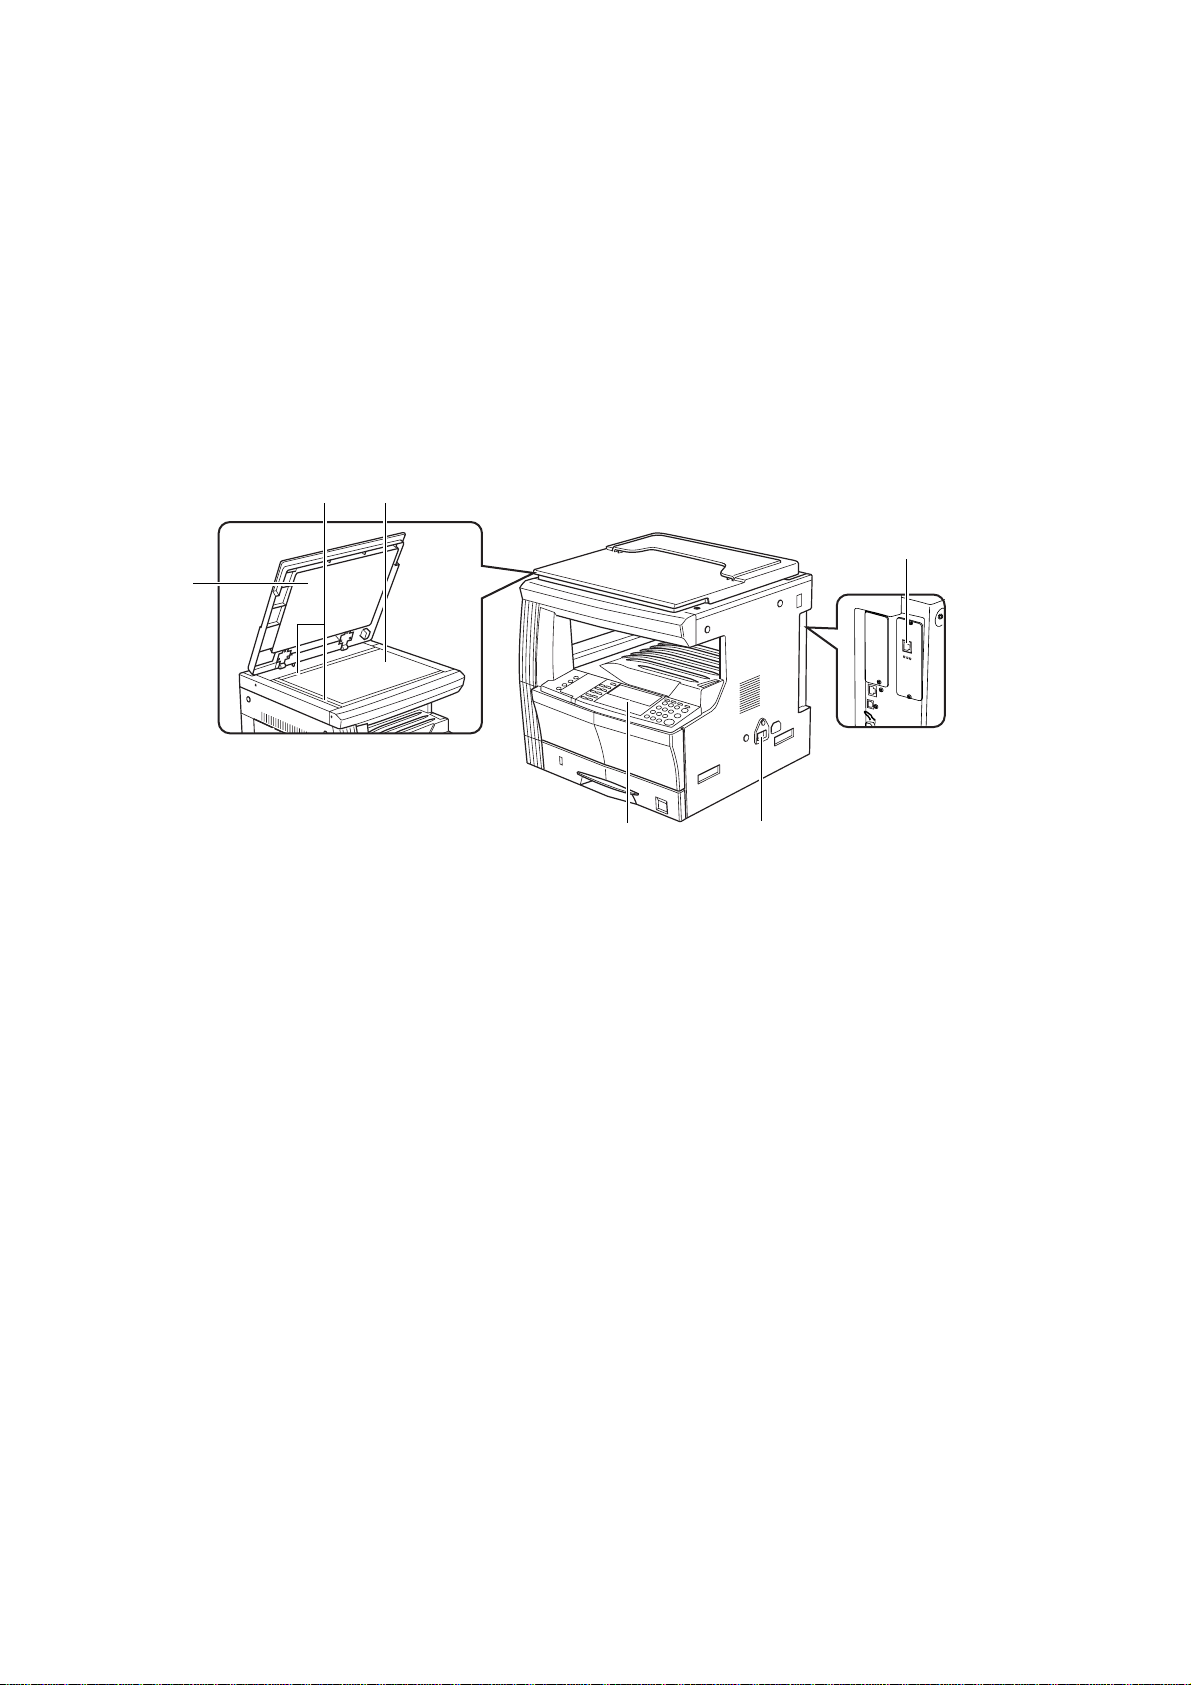
1 Preparations
Names of parts
Main body
2
3
1
6
45
1 Original cover — Open and close this cover when setting an original on the platen.
2Platen — Set the original to be scanned face-down in the left-rear portion of the platen.
3 Original size indicator lin es — Be sure to align the original with these lines when setting an
original on the platen.
4 Operation panel — Perform operations here.
5 Main switch — Turn this switch ON (|) when using the scanner.
6 Scanner interface connector — Use to connect the scanner to the computer network with a
10BASE-T or 100BASE-TX cable.
Important! NEVER attempt to remove the Scanner Interface Card.
1-1
Page 10
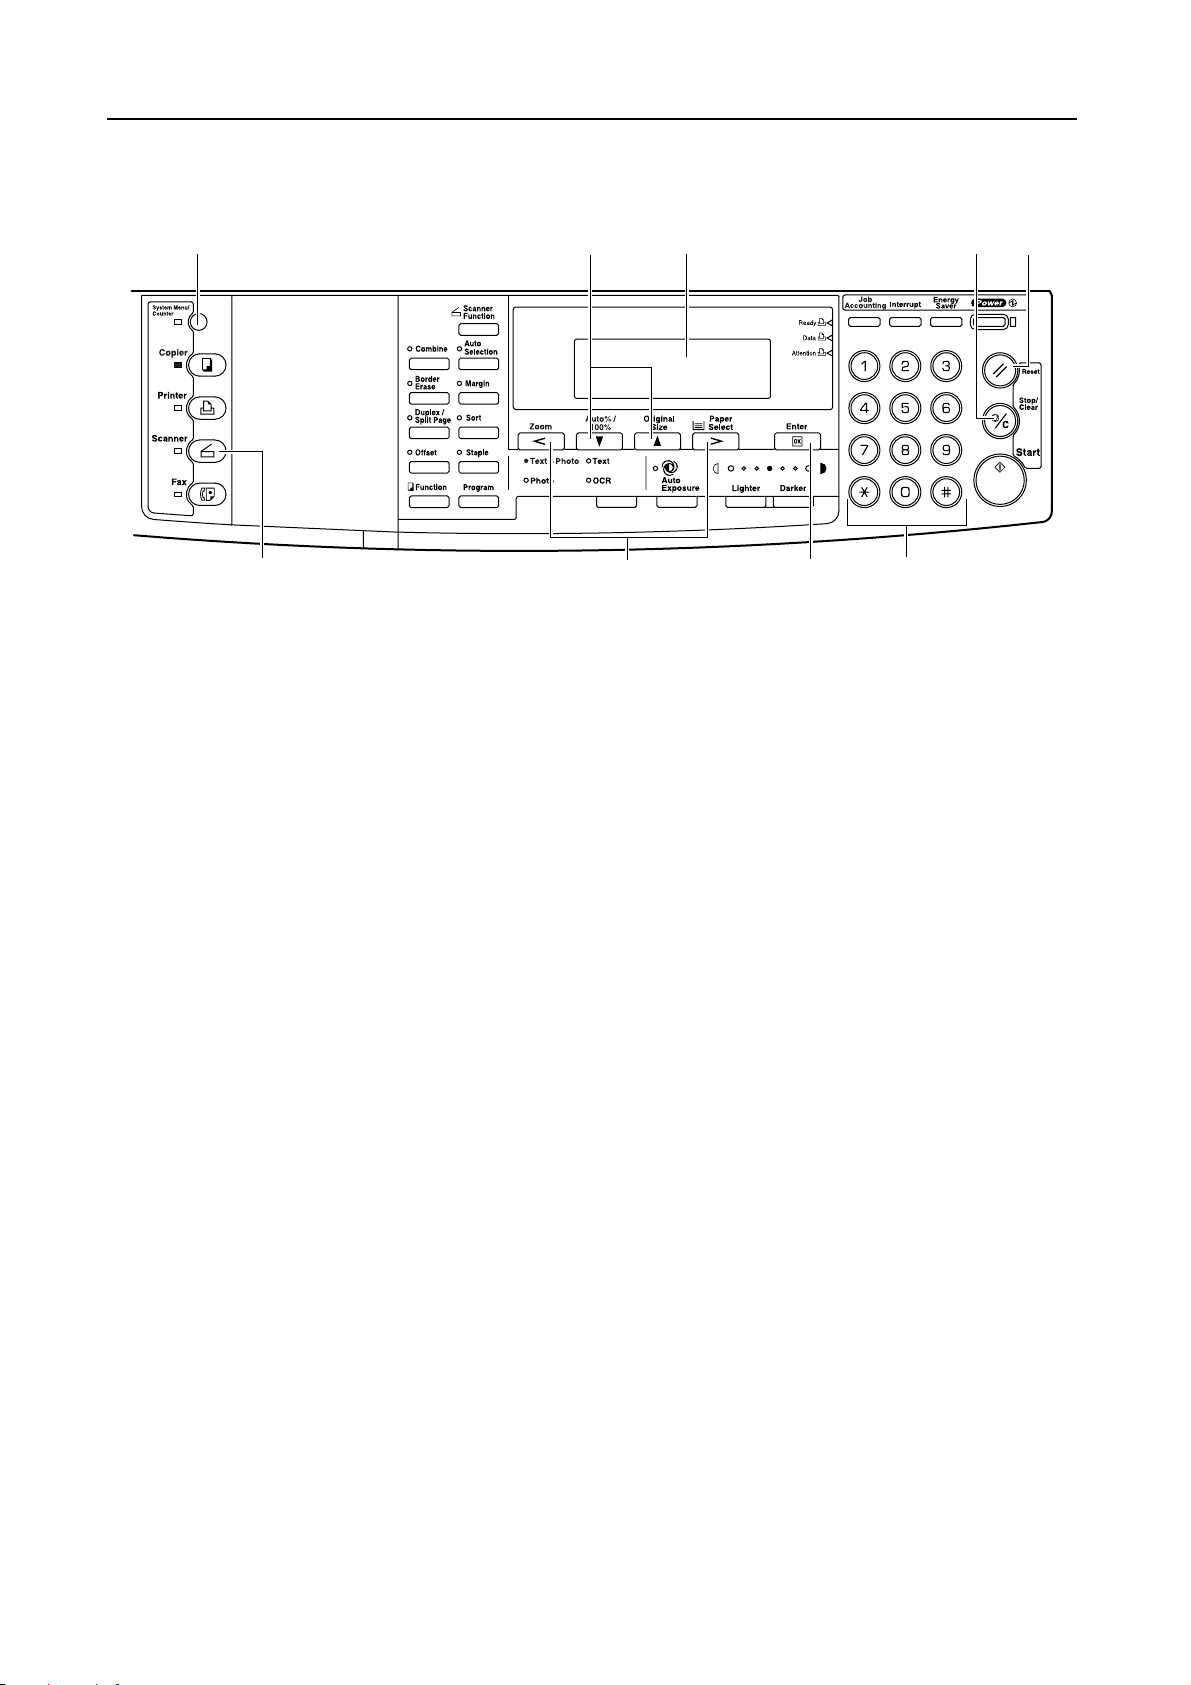
Preparations
Operation Panel
1 4572
6
1 System Menu/Counter key — Press this key when you want to set the network address, the
date/time, and the time difference of this scanner.
2 Message display — Indicates the scanner condition or setting values.
3Numeric key — Press these keys when you want to enter a desired value directly. If th er e is a
number in front of the selection item, you can select the item with these Numeric keys.
4 Stop/Clear key — Press this key whe n yo u w an t to canc el set ti n g an d retu rn to th e previous
screen.
5 Reset key — Press this key when you want to cancel initial setting change or date/time setting.
6 Scanner key — Press this key when you want to switch the machine to the scanner mode.
When the scanner mode is selected, the scanner indicator will light up.
7 S and T cursor keys — Press these keys to select an item in various settings.
8 < and > cursor keys — Press these keys to change the date/time setting.
9 Enter (OK) Key — Press this key when you want to register a setting. Press this key when
scanning is completed
8
39
1-2
Page 11

Accessories
Prior to using the scanner for the first time, verify that the following accessories are included with
this product.
• 1 CD-ROM (Scanner Library)
• 1 CD-ROM (TWAIN-compatible application)
• Operation Guide
Utilities and other software (the main content of the included CD-ROMs)
CD-ROM (Scanner Library)
• Scanner File Utility
• TWAIN Source
•Address Book
• Address Editor
• Configuration Tool
• Acrobat Reader
Preparations
Note Refer to the On-Line Manual <Functions Edition> of this Operation Guide for information on using
Required items
Note Be absolutely sure that the 10BASE-T or 100BASE-TX cable that you use is a shielded cable.
• On-Line Manual
• Read me
the included utilities and other software.
CD-ROM (TWAIN-compatible application)
You must have on hand one of the following cables as appropriate to your computer network
environment.
• 100BASE-TX cable (shielded type)
• 10BASE-T cable (shielded type)
1-3
Page 12

Preparations
1-4
Page 13

2 Set-up
Setting up the scanner
Outline and network configuration
Example of transmission modes for data scanned using the Scan System and the required software
The software indicated in the thick-lined balloons is included with this product. Install the software
that is appropriate to your operating environment and needs.
Configuration Tool
Address Editor Internet Web browser
Adminis-
trators PC
SMTP server
Email application
Email
destination
Network settings
Scanner default settings
User and destination registration
Send E-mail
TWAIN source
TWAIN scan
Users PC
Scan to PC
Scan to PC
TWAIN-compatible
application
Destina-
Scanner File Utility
tion PC,
Server PC,
etc.
Scanner File Utility
Users PC
Address Book
Note Refer to the On-Line Manual <Functions Edition> for information on using the included utilities and
other software.
2-1
Page 14

Set-up
Connecting the scanner to your computer network
Turn the main switch located on the right side of the
1
scanner OFF ({).
Caution ALWAYS turn the main switch to the scanner OFF BEFORE connecting the network cable.
Connect a 10BASE-T or 100BASE-TX cable to the
2
scanner interface connector located at the back side
of the right side of the scanner.
Important! NEVER attempt to remove the Scanner Interface Card.
Turn the main switch to the scanner back ON ( | ).
3
2-2
Page 15

Network (TCP/IP) settings
This section explains the procedures to set the network address for the scanner.
Notes • The network address that should be set here will differ depending upon your network
environment. Check with your network administrator BEFORE performing this setting.
• If you are using a DHCP server to set the network addresses, you will not need to change the
IP address and the subnet mask because the DHCP has been enabled (ON) as the factory
default setting.
Press the System Menu/Counter key to display the
1
Default setting screen.
Use the S and T keys to move D to select Scan
2
default and then press the Enter key . The password
entry screen will appear.
Set-up
Default setting / Co u n ter
Copy default
Machin e defau lt
Scan default
Enter the password with Numeric keys. The password
3
at the factory default setting is 1600 for the 16 ppm
model, 2000 for the 20 ppm model and 2500 for the 25
ppm model.
Enter Pin Code using # key.
Notes • If the password matches, the screen will change to the Scanner setting screen.
• Four-digit password can be changed. Refer to the Operetion Guide of machine.
Use the S and T keys to move D to select DHCP and
4
then press the Enter key. Screen will change to the
DHCP/BOOTP setting screen.
Use the S and T keys to move D to select 1 Off
5
and then press the Enter key. Screen will return to the
Scanner setting screen of Step 4.
Scan Default:
Subnet
Gateway
DHCP/BOOTP
DHCP/BOOTP
Off
>
On
255.255.255. 0
:
10.On181. 12.11
:
:
Note If you are using a DHCP server, select 2 On. In this case, even if you enter each IP address and
subnet mask manually, the entered settings will be ignored.
Use the S and T keys to move D to select IP
6
address and then press the Enter key. Screen will
change to the IP address setting screen.
Scan Default:
IP Address
Subnet
Gatewa y
10.181. 15. 11
:
255.255. 255. 0:
: 10.181. 12. 11
Enter the IP address by every three digits with Numeric
7
keys. Press > key to move to the following three digits.
Check the entered IP address and then press the
Enter key if it is correct. Screen will return to the
Scanner setting screen of Step 6.
IP Address
10 15..11181.
2-3
Page 16

Set-up
In the same manner, set Subnet for subnet mask and
8
Gateway for gateway addresses.
Once it is complete to enter all network addresses and
9
returned to the Scanner setting screen of Step 7, use
the S and T keys to move D to select End and then
press the Enter key.
Note In a network environment with RARP, select RARP and then select On on the Scanner setting
screen. In this case, you will not need to set the IP address manually.
For other network settings, use a web browser or Address Editor.
10
User registration
To use the scanner, user registration is needed in addition to the network setting. User (transmitter)
registration is performed from a web browser or Address Editor. For details, see the Online Manual
<Functions Edition>.
Date/Time and Time Difference
Scan Default:
IP Address
Subnet
Gatewa y
Scan Default:
End
IP Address
Subnet
10.181. 15. 11
:
255. 255. 0:
255.
:
10.181. 13. 11
181. 15. 11::10.
255.255. 255. 0
Sets the required area information for the Send E-mail function. The time of day when email is sent
from the scanner is included in the header of that email message as the transmission time. Perform
the following procedure in order to set the date and time in your area, as well as the time difference
to GMT (Greenwich Mean Time).
Press the System Menu/Counter key.
1
Use the S and T keys to move D to select Machine
2
Default and press the Enter key. The password
entry screen will appear.
System Menu / Counter
Job Accounting
Copy Def ault
Machin e D efaul t
Enter the password using the numeric keys. The
3
password at the factory default setting is 1600 for the
16 ppm model, 2000 for the 20 ppm model and 2500
for the 25 ppm model.
Enter Pin Code using # key.
2-4
Use the S and T keys to move D to select
4
Date/Time and press the Enter key.
Use the S and T keys to move D to select the item to
5
be changed and use the < and > keys to select the
desired setting.
Machin e D efault
Low P ower Time
Key Sound On/Off
Date/Time
Date/Time
End
Time
DST
: 09:35
Off:
15
:Min.
On
:
09:35
:
Page 17

Note Set the time difference and then the date and time.
Note If you change both the summer time and date/time settings, the summer time setting will be ignored.
Other settings
After completing the settings, move D to select End
6
and press the Enter key. The settings will be
registered.
It is possible to change certain default settings for the scanner function. Refer to the Online Manual
for details on each setting.
Date/Time
End
Time
DST
::09:35
OFF
Set-up
2-5
Page 18

Set-up
Setting up the scanner software
System requirements
PC IBM PC/AT or compatible
OS Windows 95 (OSR2), Windows 98 (Second Edition),
System environment CPU Pentium 133 MHz or faster
Recommended environment CPU Celeron 500 MHz or faster
CD-ROM drive 1 drive
Ethernet cable 10BASE-T or 100BASE-TX
Windows NT 4.0 (Service Pack 5 or later), Windows
2000 (Service Pack 2 or later), Windows Me, Windows
XP or Windows Server 2000
RAM 64 MB or more
HDD 20 MB or more
RAM 128 MB or more
HDD 300 MB or more
Installing the software
There are three main functions available with this network scanner. Perform the following procedure
in order to install into your computer the required utility that is appropriate to the application and
operating system in use in your computer.
Scan to PC
Stores the image data of scanned originals as a file in a desired folder on your computer. Install the
Scanner File Utility into the corresponding computer in order to use this function.
Note • Registration of the save folder in your computer, as well as registration in the scanner of the
• For information on making settings from an Internet Web browser, as well as for each utility,
Send E-mail
Sends the image data of scanned originals to the desired receiver as a file attached to an email
message.
Note Registration in the scanner of the corresponding SMTP server settings is required. For information
on making settings from an Internet Web browser, as well as for each utility, refer to the On-Line
Manual <Functions Edition> of this Operation Guide.
TWAIN
Connects to the scanner from the TWAIN-compatible application according to the procedures of that
particular application. Install the TWAIN Source on the computer that contains the application in
order to use this function.
destination is required.
refer to the On-Line Manual <Functions Edition> of this Operation Guide.
2-6
Page 19

Installing the utilities
The following utilities are contained on the CD-ROM that is included with this product.
Note Refer to the On-Line Manual <Functions Edition> of this Operation Guide for information on using
the included utilities.
Run Windows.
1
Quit all other applications that may be open.
Insert the CD-ROM that is included with the scanner into the CD-ROM drive of your computer.
2
The License Agreement will be displayed. If
3
you agree with the conditions contained
therein, click on [Accept].
If this screen does not appear after you
insert the CD-ROM, open the CD-ROM
window to access its contents and
double-click on the [setup.exe] file.
Set-up
• Scanner File Utility
• Address Book
• Address Editor (Management Tool)
Click on [Scanner Utilities] in the Main
4
Menu.
Click on the name of the utility that you want to install. The installation window for that utility will
5
appear. Follow the instructions on screen in order to install the selected utility.
2-7
Page 20

Set-up
Installing the TWAIN source
In order to scan originals using PaperPort, TWAIN Source must be installed PRIOR to installing the
PaperPort application.
Run Windows.
1
Quit all other applications that may be open.
Insert the CD-ROM that is included with the scanner into the CD-ROM drive of your computer.
2
The License Agreement will be displayed. If
3
you agree with the conditions contained
therein, click on [Accept].
If this screen does not appear after you
insert the CD-ROM, open the CD-ROM
window to access its contents and
double-click on the [setup.exe] file.
Click on [TWAIN Source] in the Main Menu.
4
The Model Select window will appear. Select the model of the scanner that you are using.
5
When the installation window appears, follow the instructions on screen in order to install the
6
TWAIN Source.
2-8
Page 21

3 Performing the Required Operation at the
Scanner
Scanning under the Scan to PC and Send E-mail functions
Before using the Scan to PC function
When performing the Scan to PC function, perform the following settings in advance.
Install the Scanner File Utility in the destination computer.
1
Run the Scanner File Utility and register the destination folder for the scanned image data.
2
Register the IP address, the registration name, and the destination number of the destination
3
computer in the scanner using a web browser or Address Editor.
Note Be sure to enter the same number in the Save folder No. field here as the save folder number (001
– 100) that was registered in the Scanner File Utility.
Refer to the On-Line Manual <Functions Edition> for more detailed information.
Before using the Send E-mail function
Register the destination name and the email address in the scanner using a web browser or
Address Editor.
How to scan under Scan to PC and Send E-mail
Press the Scanner key to display the Select Scanner
1
Function screen.
Use the S and T keys to select 1 Scan to PC
2
(SEND TO PC) or 2 Send E-mail.
Use the S and T keys to move D to select your user
3
name and press the Enter key.
Notes • If a password has been registered for the selected user, you must enter the password. Enter
the password using the numeric keys and press the Enter key.
• If your user name is not displayed even if the S and T keys are pressed, use a web browser
or AddressEditor to check to see if your user name has been registered.
Select function.
Scan to PC
Send E-mail
TWAIN
Select Sender (User)
001 USER ABCDE
#---
3-1
Page 22

Performing the Required Operation at the Scanner
Use the S and T keys to move D to select the desired destination. An item can be selected from
4
Send to User PC (SEND TO USER PC), Private Book, and Common Book. Select the
desired item and press the Enter key.
When storing data in the PC of the transmitter (user):
Move D to select 2 Send to User PC (SEND TO
USER PC) and press the Enter key.
Select Address Book
End
Send to User PC
:
Off
Private Book
Note When registering a transmitter (user), you must set the IP address of the computer.
When selecting a destination (receiver) from the private address book:
1. Move D to select 3 Private Book and press the
Enter key.
2. Move
Notes • If a password has been registered for the selected destination, you must enter the password.
• When you enter a displayed number using the numeric keys, the confirmation screen will
D to select the desired destination and press
the Enter key.
Enter the password using the numeric keys and press the Enter key.
appear. When you press the EnterEnter key, the destination will be selected.
Select Address Book
End
Send to User PC
Private Book
Select destination.
000
Finish to select
001 AdrN O PQ R S T UV WXYZ
#---
:
Off
3. If you have selected the destination, move
select 000 Finish to select (000 SELECT.
COMPLETE) and press the Enter key.
D to
Select destination.
000
Finish to select
001 AdrN O PQ R S T UV WXYZ
#---
When selecting a destination (receiver) from the common address book:
Move D to select 4 Common Book and press the
Enter key.
Operate in a similar way to the procedure for the
private address book.
Notes • For the private address book, AddressBook must be started in the computer of the transmitter
(user).
• For the common address book, the destinations must be set with a web browser or
AddressEditor.
• Up to 20 destinations can be selected at the same time.
Select Address Book
Send to User PC
Private Book
Comm on B ook
:
Off
3-2
Page 23

5
Sending information
Performing the Required Operation at the Scanner
Finally move D to select 1 End and press the Enter
key. The scanner setting screen will appear. See Scan
setting on page 3-6.
Select Address Book
End
Send to User PC
Private Book
:
Off
The history of sending with the Send E-mail and Scan
to PC functions is displayed.
Press the Scanner key, use the S and T keys to
D to select 4 Sending Information (SEND
move
INFORMATION), and press the Enter key.
The sending confirmation list will be displayed. For more details of the history, move
desired history and press the Enter key.
Sending Confirmation List
End
ABCD
EFGH NG
ABCD
EFGH
05:56
OK
14:56
D to select the
3-3
Page 24

Performing the Required Operation at the Scanner
Scanning with TWAIN
The following explains the settings that need to be made in the scanner in order to scan using the
TWAIN function.
When performing the scanning operation at the scanner
Press the Scanner key to display the Select Scanner
1
Function screen.
Use the S and T keys to move D to select 3 TWAIN
2
and press the Enter key. The TWAIN Mode screen will
appear.
Select function.
Scan to PC
Send E-mail
TWAIN
Set the original that you want to scan.
3
Run the TWAIN Source in the corresponding application. The main dialogue box for the TWAIN
4
Source will appear. Make any settings that you want, click on the [Connect] button in the dialogue
box and, once the connection to the scanner is made, click on the [Scan] button. Scanning will
begin.
3-4
Page 25

Performing the Required Operation at the Scanner
When performing the scanning operation at your computer
Run the TWAIN Source in the corresponding application. The main dialogue box for the TWAIN
1
Source will appear. Make any settings that you want, and put a check mark in the [Waiting Scan]
checkbox.
Click on the [Connect] button in the main dialogue box and, once the connection to the scanne r is
2
made, click on the [Scan] button.
Note Putting a check mark in the [Waiting Scan] checkbox will allow you to start the actual scanning
operation by pressing the Start key at the scanner.
Set the original that you want to scan in the scanner
3
and press the Start key. Scanning will begin.
Notes • Scan settings can also be made on the operation panel of the scanner. Change any settings
there that you want.
• If you enter different settings in your computer and in the scanner, the settings made on the
operation panel of the scanner will take priority.
3-5
Page 26

Performing the Required Operation at the Scanner
Scan setting
The scan setting screen is displayed when scanning originals. To carry out the various settings, perform the following
procedures. After completing the scan settings, if you set an original in the scanner and press the Start key, scanning will
start.
K
G
C
E
F
H
J
D
A
A Auto Exposure key — Press this key to select the automatic exposure setting.
B Image concentration adjustment key — Press these keys to select an exposure level.
B
I
Notes • 7 levels in the normal mode, 13 levels in the maximum mode.
• If the automatic exposure mode is set, all the exposure indicators are off.
C Auto%/100% key — Press this key when you enable automatic paper orientation selection
depending on the original in the gray scale mode.
D Original Image Type key — Press this key to select the original image type.
Note The Photo mode cannot be selected with the Send E-mail function.
E Original Size key — Press this key to specify the original size.
F Paper Select key — Press this key to specify the transmission (image) size. The scanned
original image will be automatically reduced or enlarged to the specified size.
Note In the gray scale mode, the orientation of paper will be changed with this key. To enable again the
automatic paper orientation selection depending on the original, press the AMS/100% key.
G Scanner Function key — The following settings can be adjusted.
• Resolution
•File type
• Original type
• Auto selection
• Border erase
• Original set direction
• Continuous scanning
• Output by page
3-6
Note For details on each setting, see the Online Manual.
H Enter (OK) key — Press this key to confirm the setting in various setting screens.
I Start key — Press this key to start scanning.
J Stop/Clear key — Press this key to stop scanning, clear an entered value or return to the
previous screen.
K Scanner key — If you select this key to cancel scan setting, the scan setting screen will
appear.
Page 27

After completing the setting, display the scan setting
1
screen.
Performing the Required Operation at the Scanner
Ready t o scan.
Set the original.
2
Press the Start key. Scanning the original starts.
3
When Continue scan (MULTIPLE SCAN) is set On
4
on the scan setting screen, the screen will appear to
select whether to continue scanning originals or not
when scanning is complete.
Auto
Auto PDF
100%
Press START Key to c o ntinue
Press to Start TX
Auto
Auto PDF
100%
600dpi
600dpi
Notes • To continue scanning, set the next original, change the settings as needed, and press the Start
key.
• Press the Enter (OK) key when you want to complete scanning originals.
• When you want to cancel all scanned copies, press the Stop/Clear key. Screen will return to
the scan setting screen of Step 1.
3-7
Page 28

Performing the Required Operation at the Scanner
3-8
Page 29

MEMO
Page 30

Page 31

Page 32

UTAX GmbH, Ohechaussee 235, 22848 Norderstedt, Germany
 Loading...