

Page 1
Instruction Handbook
Advanced
DC 2060 | 2080
Digital Multifunctional
System
Page 2

This Advanced Operation Guide is for models DC 2060 and DC 2080. In this guide, DC 2060
refers to the 60 cpm (copies per minute) model and DC 2080 to the 80 cpm model.
NOTE: This Advanced Operation Guide contains information that corresponds to using both the
inch and metric versions of these copiers.
The inch versions of these copiers are shown in the screens in this guide. If you are using the
metric version, use the messages provided for the inch version as reference only. In the body
text, only the inch messages are given if these versions differ only in capitalization. When there
is even a slight difference in the message, we have listed the information for the inch version
followed, in brackets, by the corresponding information for the metric version.
Page 3

Introduction
This Advanced Operation Guide includes the following chapters:
1 Copying Functions
Describes the full-featured copying functions of the copier.
2 Document and Output Management Functions
Explains the copier’s versatile functions for managing original documents and jobs during and
after copying.
3 System Settings
Covers general default settings.
4 Job Accounting
Provides instructions on managing copier use among departments.
Appendix
Lists the copier specifications (mechanical and performance specifications and supported
paper) and intercompatible functions. Includes a glossary.
i
Page 4

Guides Included
The following guides are included with this copier. Refer to the proper guide for your needs.
Operation Guide
Describes how to load paper, basic copier operations, and troubleshooting.
Advanced Operation Guide (This Guide)
Covers copying details in depth as well as default settings.
Conventions in This Guide
The following conventions are used depending on the nature of the description.
Convention Description Example
Bold Indicates operation panel keys. Press the Start key.
[Regular] Indicates touch panel keys. Press [Basic].
Italic Indicates touch panel messages. Ready to copy is displayed.
NOTE Indicates supplemental information or
operations for reference.
NOTE: -
IMPORTANT Indicates items that are required or
prohibited so as to avoid problems.
IMPORTANT: -
ii
Page 5

Contents
Introduction ...................................................................................................................................................... i
Guides Included ..........................................................................................................................ii
Conventions in This Guide .......................................................................................................... ii
1 Copying Functions ........................................................................................ 1-1
Paper Source ...........................................................................................................................1-2
Original Size .............................................................................................................................1-3
Copy Quantity ..........................................................................................................................1-7
Original Orientation ..................................................................................................................1-8
Offset Mode ............................................................................................................................1-10
Stapling ..................................................................................................................................1-11
Punching ................................................................................................................................1-13
Combine Mode .......................................................................................................................1-15
Margin Mode ..........................................................................................................................1-18
Centering Originals ................................................................................................................1-20
Border Erase ..........................................................................................................................1-21
Page Numbering ....................................................................................................................1-25
Cover Mode ............................................................................................................................1-28
Form Overlay .........................................................................................................................1-30
Booklet from Sheets ...............................................................................................................1-32
Booklets from Facing Pages ..................................................................................................1-35
Memo Mode ...........................................................................................................................1-38
Batch Scanning ......................................................................................................................1-40
Proof Mode .............................................................................................................................1-41
Repeat Copy ..........................................................................................................................1-42
Backing Sheets for Transparencies .......................................................................................1-46
Auto Rotation .........................................................................................................................1-48
Output Destination .................................................................................................................1-49
EcoPrint Mode ........................................................................................................................1-50
Inverted Copying ....................................................................................................................1-51
Mirror Image ...........................................................................................................................1-52
Auto Selection Mode ..............................................................................................................1-53
Multi-Page Forms ...................................................................................................................1-56
Programmed Copying ............................................................................................................1-57
Assigning Register Keys ........................................................................................................1-60
Programming Multi-Part Jobs .................................................................................................1-62
2 Document and Output Management Functions .......................................... 2-1
Document Management Functions ..........................................................................................2-2
Output Management Functions ..............................................................................................2-16
3 System Settings ............................................................................................. 3-1
Default Settings ........................................................................................................................3-2
Weekly Timer .........................................................................................................................3-36
Configuring MP Tray ..............................................................................................................3-39
Registering Non-standard Sizes for Originals ........................................................................3-40
Setting Document Management Defaults ...............................................................................3-42
Hard Disk Management .........................................................................................................3-49
Printing Reports .....................................................................................................................3-50
Checking Total Copy Count ....................................................................................................3-53
Refreshing the Drum ..............................................................................................................3-54
Entering Characters on Touch Panel .....................................................................................3-55
4 Job Accounting .............................................................................................. 4-1
Overview of Job Accounting .....................................................................................................4-2
Managing Accounts ..................................................................................................................4-4
iii
Page 6

Copy Count per Department .................................................................................................. 4-14
Activating and Deactivating Job Accounting .......................................................................... 4-18
Job Accounting Default Settings ............................................................................................ 4-19
Copying with Job Accounting ON .......................................................................................... 4-28
Appendix .....................................................................................................Appendix-1
Paper .......................................................................................................................... Appendix-2
Specifications ............................................................................................................. Appendix-9
Intercompatible Functions ........................................................................................ Appendix-12
Glossary ................................................................................................................... Appendix-16
Index ................................................................................................................... Index-1
iv
Page 7

1 Copying Functions
This chapter explains the following topics.
• Paper Source...1-2
• Original Size...1-3
• Copy Quantity...1-7
• Original Orientation...1-8
• Offset Mode...1-10
• Stapling...1-11
• Punching...1-13
• Combine Mode...1-15
• Margin Mode...1-18
• Centering Originals...1-20
• Border Erase...1-21
• Page Numbering...1-25
• Cover Mode...1-28
• Form Overlay...1-30
• Booklet from Sheets...1-32
• Booklets from Facing Pages...1-35
• Memo Mode...1-38
• Batch Scanning...1-40
• Proof Mode...1-41
• Repeat Copy...1-42
• Backing Sheets for Transparencies...1-46
• Auto Rotation...1-48
• Output Destination...1-49
• EcoPrint Mode...1-50
• Inverted Copying...1-51
• Mirror Image...1-52
• Auto Selection Mode...1-53
• Multi-Page Forms...1-56
• Programmed Copying...1-57
• Assigning Register Keys...1-60
• Programming Multi-Part Jobs...1-62
1-1
Page 8
Copying Functions
½
½
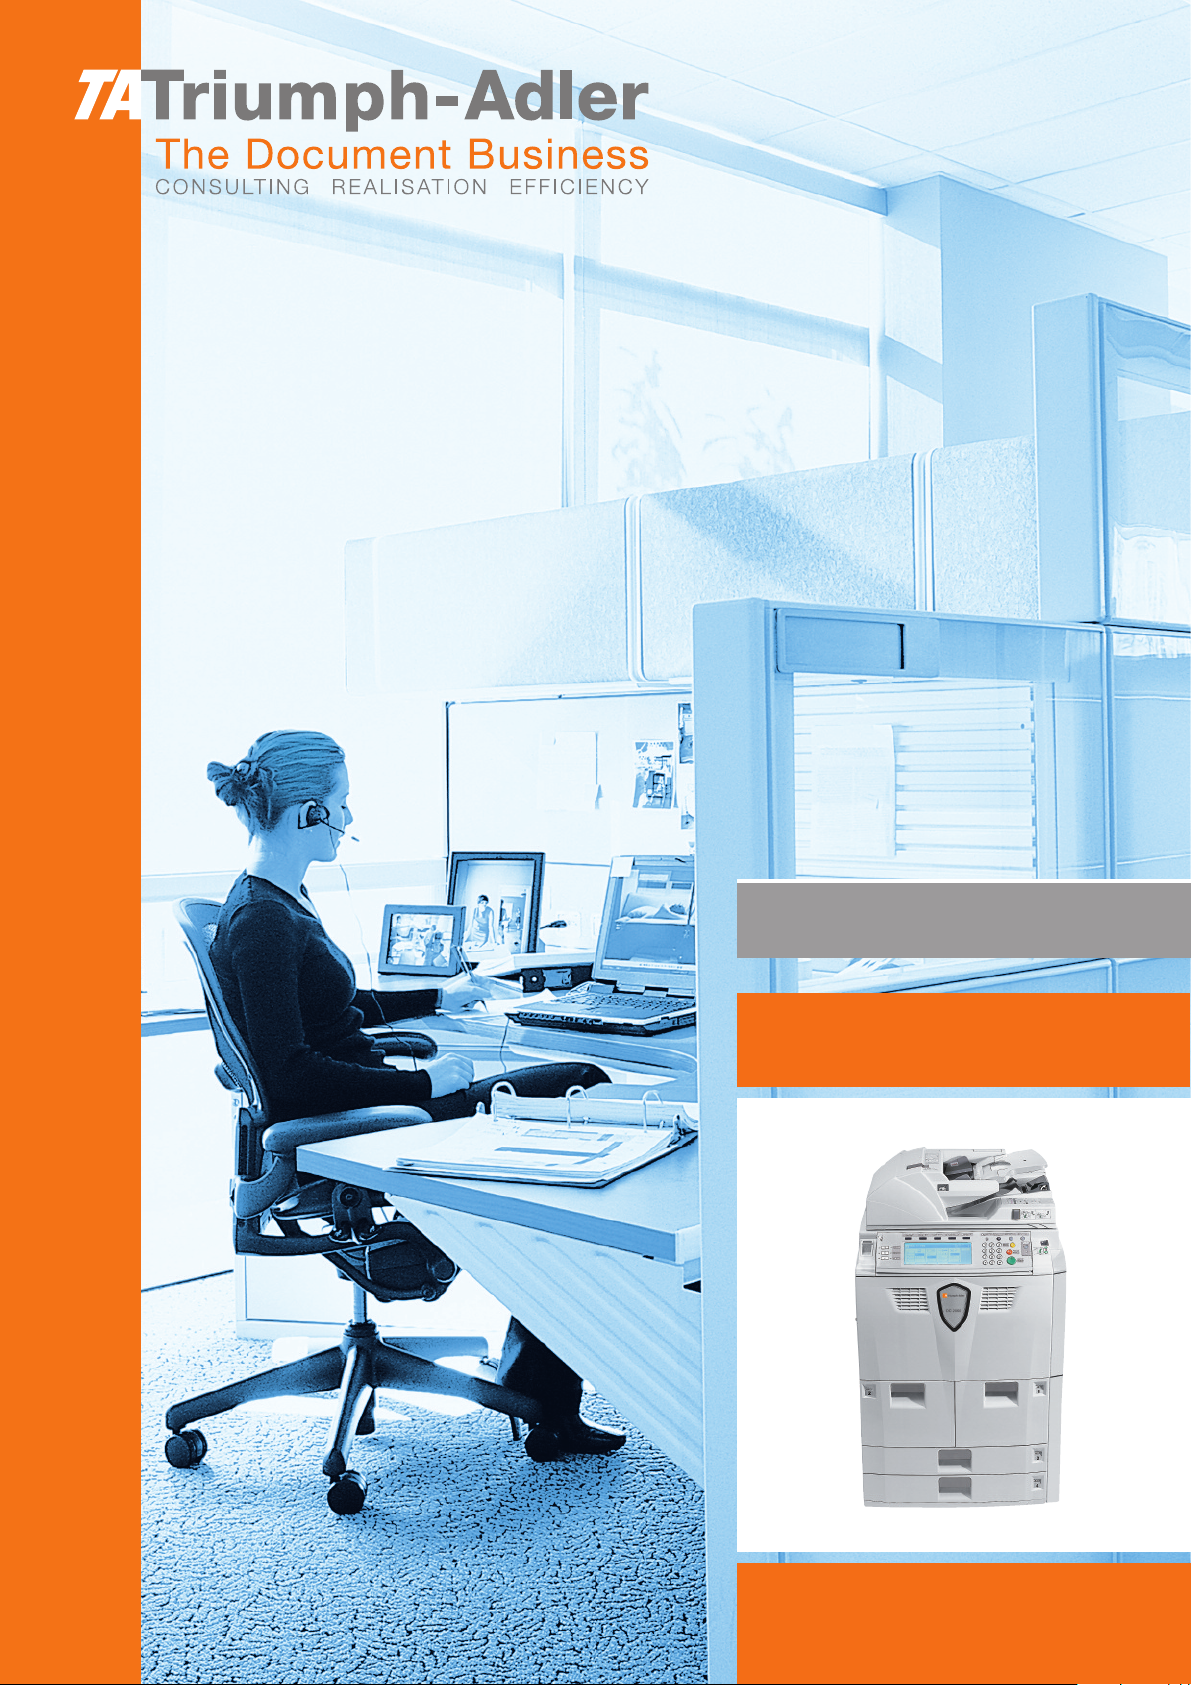
Paper Source
Switch the paper supply to the MP tray or different cassettes to select paper of different sizes.
Follow the steps as below to select the paper source.
Place the originals in the document
1
processor or on the platen.
When [APS] is selected, paper matching
the size of the original will be selected
automatically.
NOTE: You may override the automatic
paper selection default. For details,
refer to Selecting Paper on page 3-7.
To change the paper size, press the
2
button corresponding to the desired
paper size to select that paper source.
When using the MP tray, specify the
paper size and type. Refer to
Configuring MP Tray on page 3-39.
Ready to copy.
11x8½"
Plai n
11x8½"
Rec ycl ed
11x17"
Plai n
8½x11"
Plai n
Basi c
APS Au to %
MP tr ay
Plai n
11x8½"
Plai n
Ready to copy.
11x8½"
Plai n
11x8½"
Rec ycl ed
11x17"
Plai n
8½x11"
Plai n
Basi c
APS Au to %
MP tr ay
Plai n
11x8½"
Plai n
100%
Red uce
/Enlar ge Mode
100%
Red uce
/Enlar ge Mode
Auto
Exposure
Exposure
Auto
Exposure
Exposure
ProgramFunctionUser choice
ProgramFunctionUser choice
Paper Si ze
Staple Off
Staple
Left Top
Staple
/Punch
Paper Si ze
Staple Off
Staple
Left Top
Staple
/Punch
System Menu / Counter
MP tra y Setti ng
Paper Si ze Paper Type
Unit
Back
100%
100%
11x8
11x8
Press the Start key to start copying.
3
Auto
Detection
Input size
Others
Standard
Centi mete r
Inch
Plai n
1-2
Page 9
Original Size
½
o
½
Copying Functions
Specify the size of originals that will serve as the basis for scanning. Be sure to specify the original
size when copying originals of nonstandard sizes.
Choose the original size from the following groups of original size.
• Standard Size - Standard sizes in commonly used.
Inch models: 11 × 17", 8
8
1/2 × 13", 11 × 15", B4 and A4
Metric models: A3, B4, A4, A4R, B5, B5R, A5, A5R, B6, B6R, A6R, Folio, 11 × 15", 11 × 8
and 8
1/2 ×11"
• Other Standard Size - Standard sizes not in commonly used.
Inch models: A3, B4, B5, B5R, A5, A5R, B6, B6R, A6R, Folio, P. Card, OUFUKU, 8K, 16K and
16KR
Metric models: 11 × 17", 8
OUFUKU, 8K, 16K and 16KR
• Input Size - Non-standard sizes which you enter width and length.
• Custom Size - Non-standard sizes which you enter and register as custom sizes. For
instructions on registering original sizes, refer to Registering Non-standard Sizes for Originals
on page 3-40.
1/2 × 14", 11 × 8 1/2", 8 1/2 ×11", 51/2 ×81/2", 8 1/2 ×51/2", 8 1/2 ×131/2",
1/2"
1/2 ×14", 51/2 ×81/2", 8 1/2 ×51/2", 8 1/2 ×131/2", 8 1/2 × 13", P. Card,
Standard Size
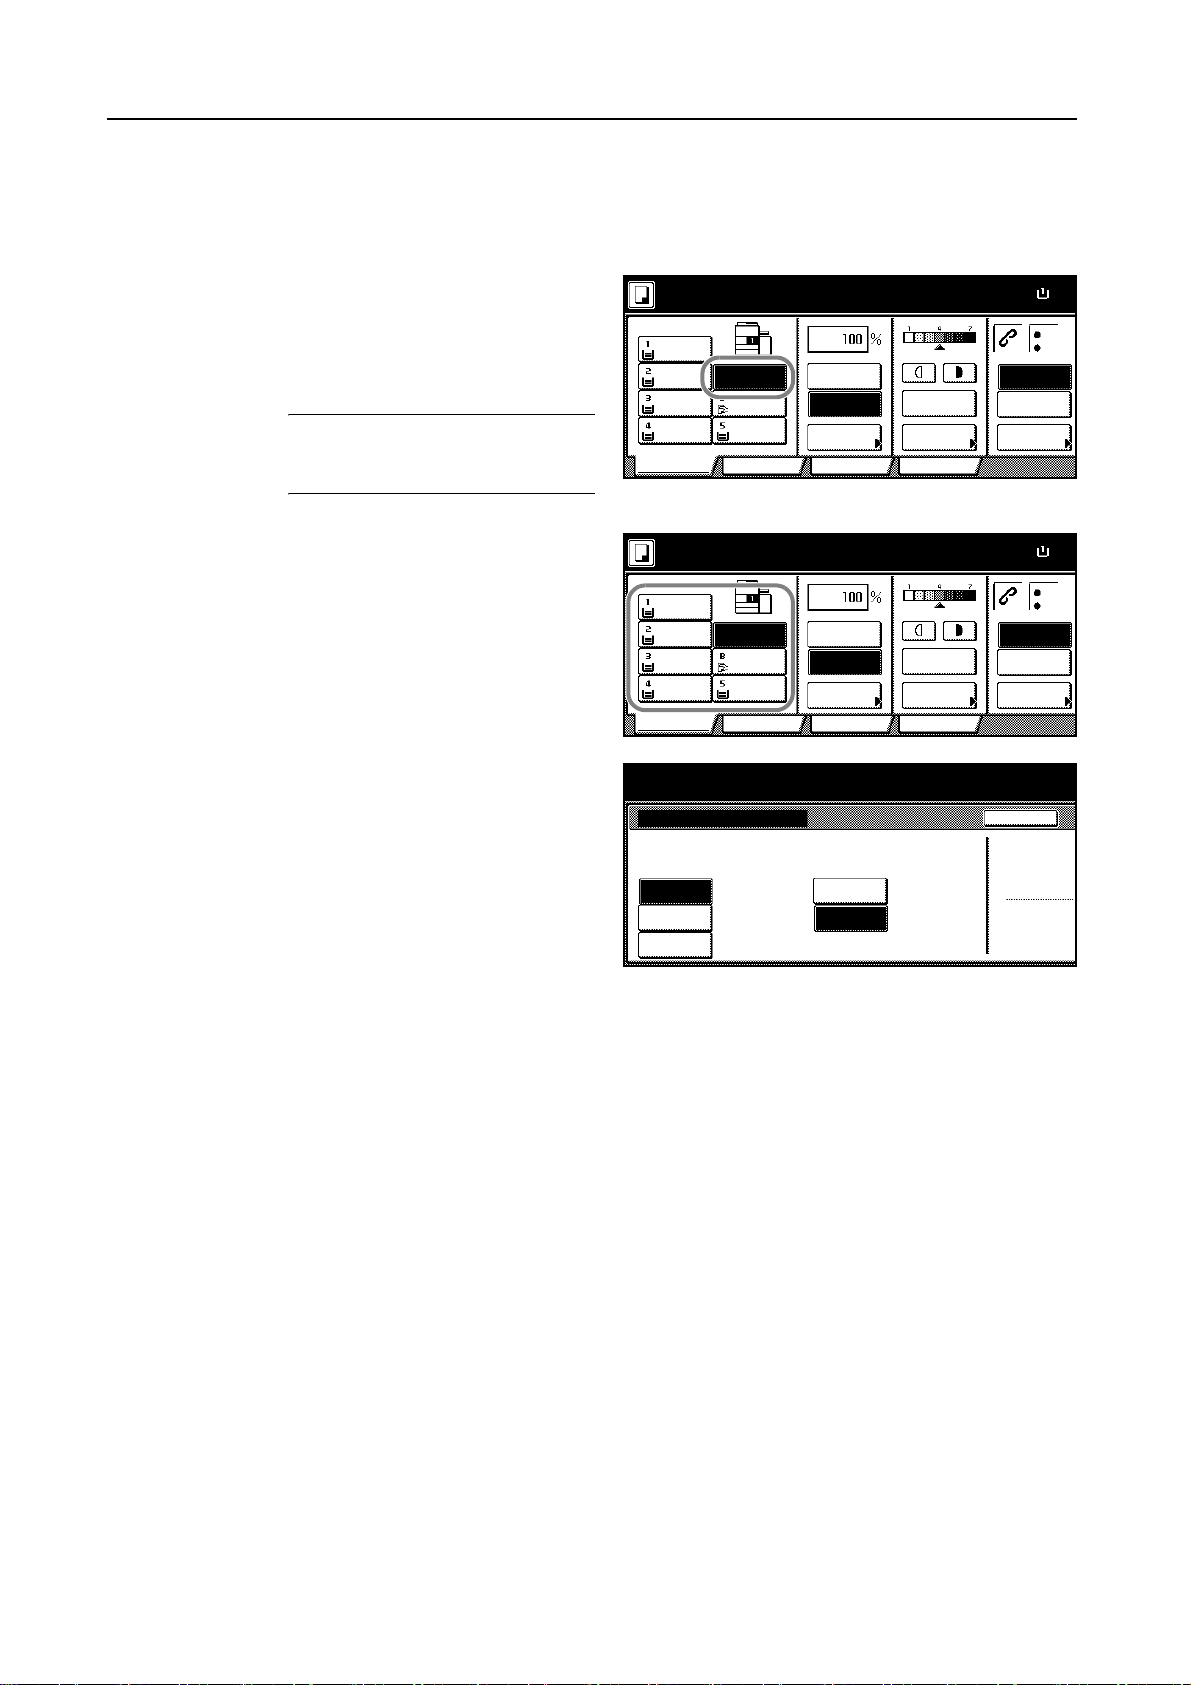
Follow the steps as below to specify the standard size.
Place the originals in the document processor or on the platen.
1
Press [Function].
2
Press [Select Orig.Size] ([Select Size
3
Orig.]).
Select the original size.
4
Choose [Auto] to match the size of
placed originals automatically.
Ready to copy.
Sele ct
Paper Separa tion
Exposure Reduce
Mode / Enlar ge
Ori g.Image
Qual ity
Sort/
Offset
Ready to copy.
Sele ct
size
Input size
Other
stand.S ize
2 sided/
Mar g in /
Cente ri ng
Bor der
Erase Mode
User choiceBasi c
Auto
8½x11"
11x8½"
Sele ct
Orig.Size
Auto
Selection
Page #
Cov er
Function
8½x14"
5½x8½"11x17"
8½x5½"
11x15"
Comb ine
Batch
Scanning
Form
Over lay
Book let
Shortcut
8½x13½"
8½x13"
A4
A4
Progr am
Paper Size
Up
Down
Paper Size
100%
BackSelect Original Size
100%
11x8
11x8
Cust
2x2"
2x2"
2x2"
2x2"
Press the Start key to start copying.
5
1-3
Page 10
Copying Functions
½
o
½
½
1
2
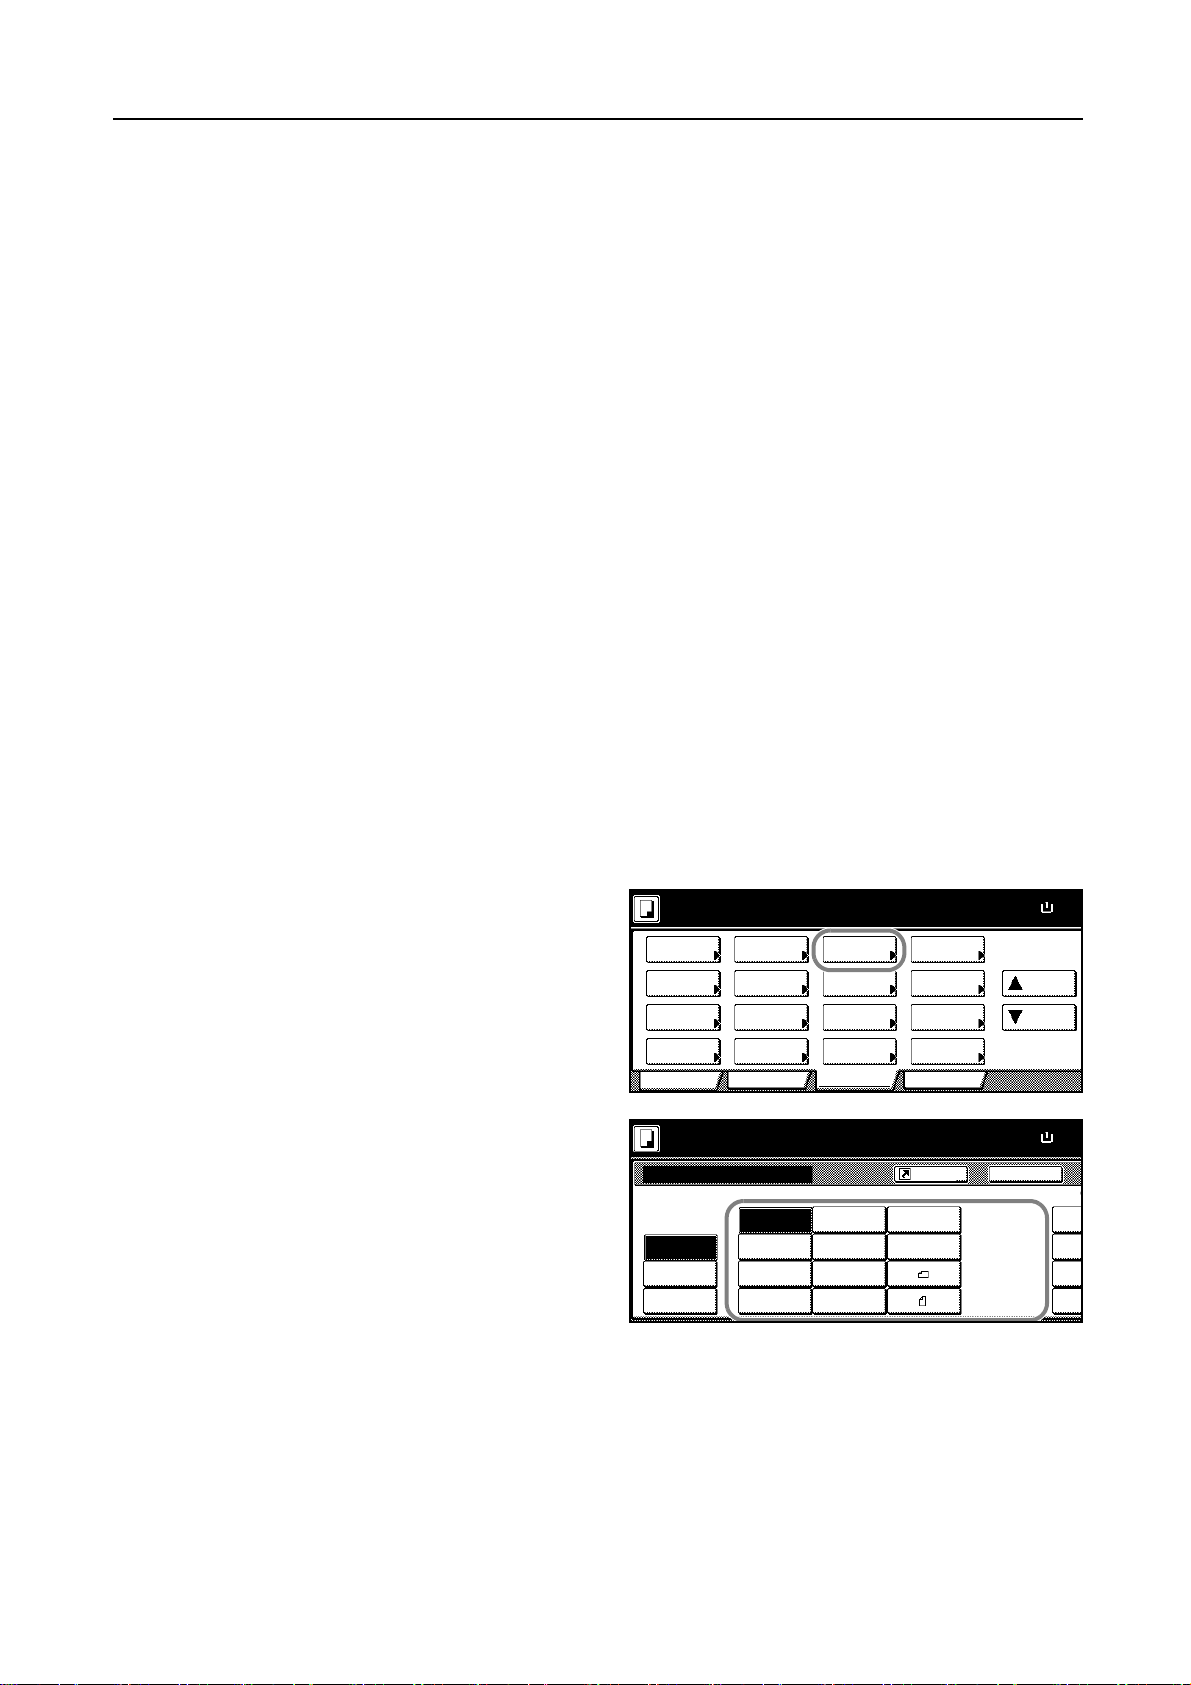
Other Standard Size
Follow the steps as below to specify the other standard sizes.
Place the originals in the document processor or on the platen.
Press [Function].
Press [Select Orig.Size] ([Select Size
3
Orig.]).
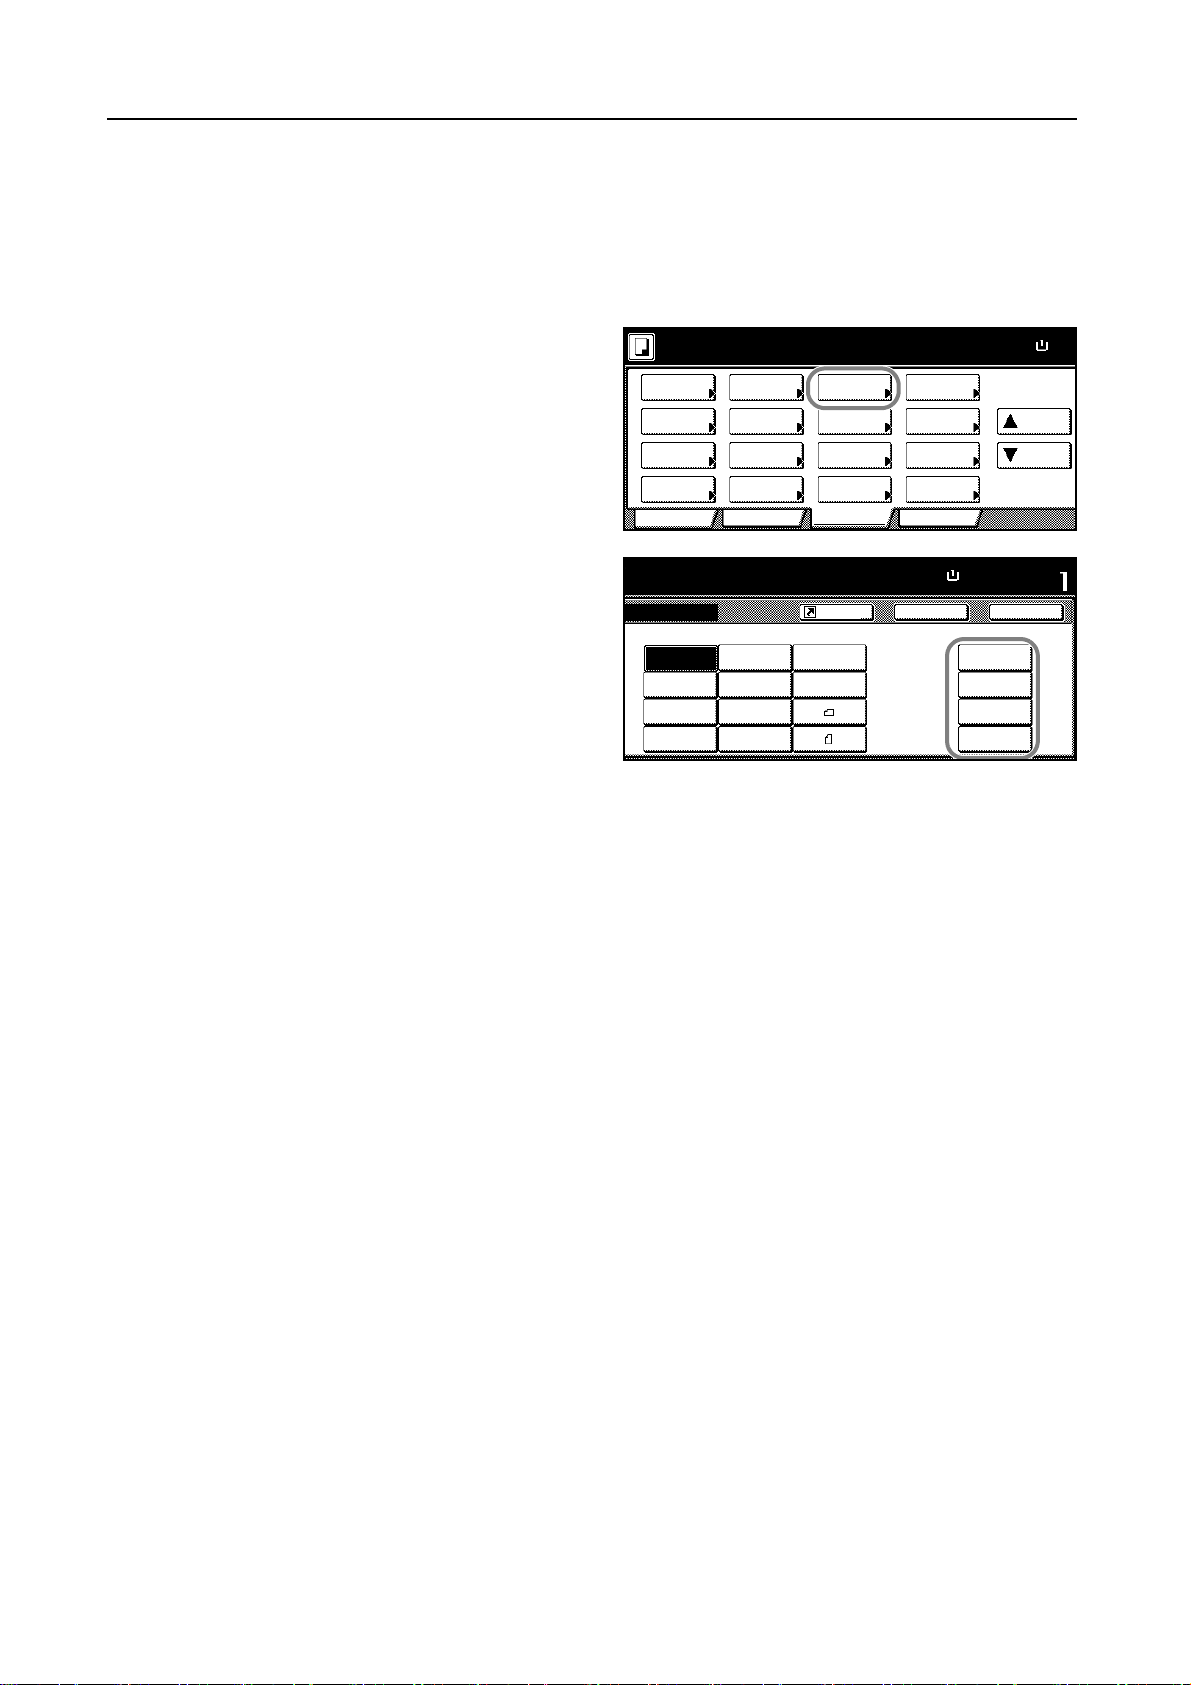
Press [Other stand.Size] ([Others
4
stand.Size]).
Select the original size.
5
Ready to copy.
Sele ct
Paper Separation
Exposure Reduce
Mode / Enlar ge
Ori g.Image
Qual ity
Sort/
Offset
2 sided/
Mar g in /
Cente ring
Bord er
Erase Mode
User choiceBasi c
Ready to copy.
Auto
Sele ct
size
Input size
Other
stand.S ize
8½x11"
11x8½"
Ready to copy.
Select Original Size
A3
Sele ct
size
Input size A5 B5
Other
stand.S ize
A5
A6
Select
Orig.Size
Auto
Selection
Page #
Cov er
Function
8½x14"
5½x8½"11x17"
8½x5½"
11x15"
B4
B5
B6
Combi ne
Batch
Scanning
Form
Ove rl ay
Booklet
Shortcut
8½x13½"
8½x13"
A4
A4
Shortcut
B6
Folio
P.Card
OUFU KU
HAGAKI
Program
8K
16K
16K
Paper Si ze
Up
Down
Paper Si ze
BackSelect Original Size
Paper Size
Back
100%
100%
100%
11x8
11x8
Cust
2x2"
2x2"
2x2"
2x2"
A3
Press the Start key to start copying.
6
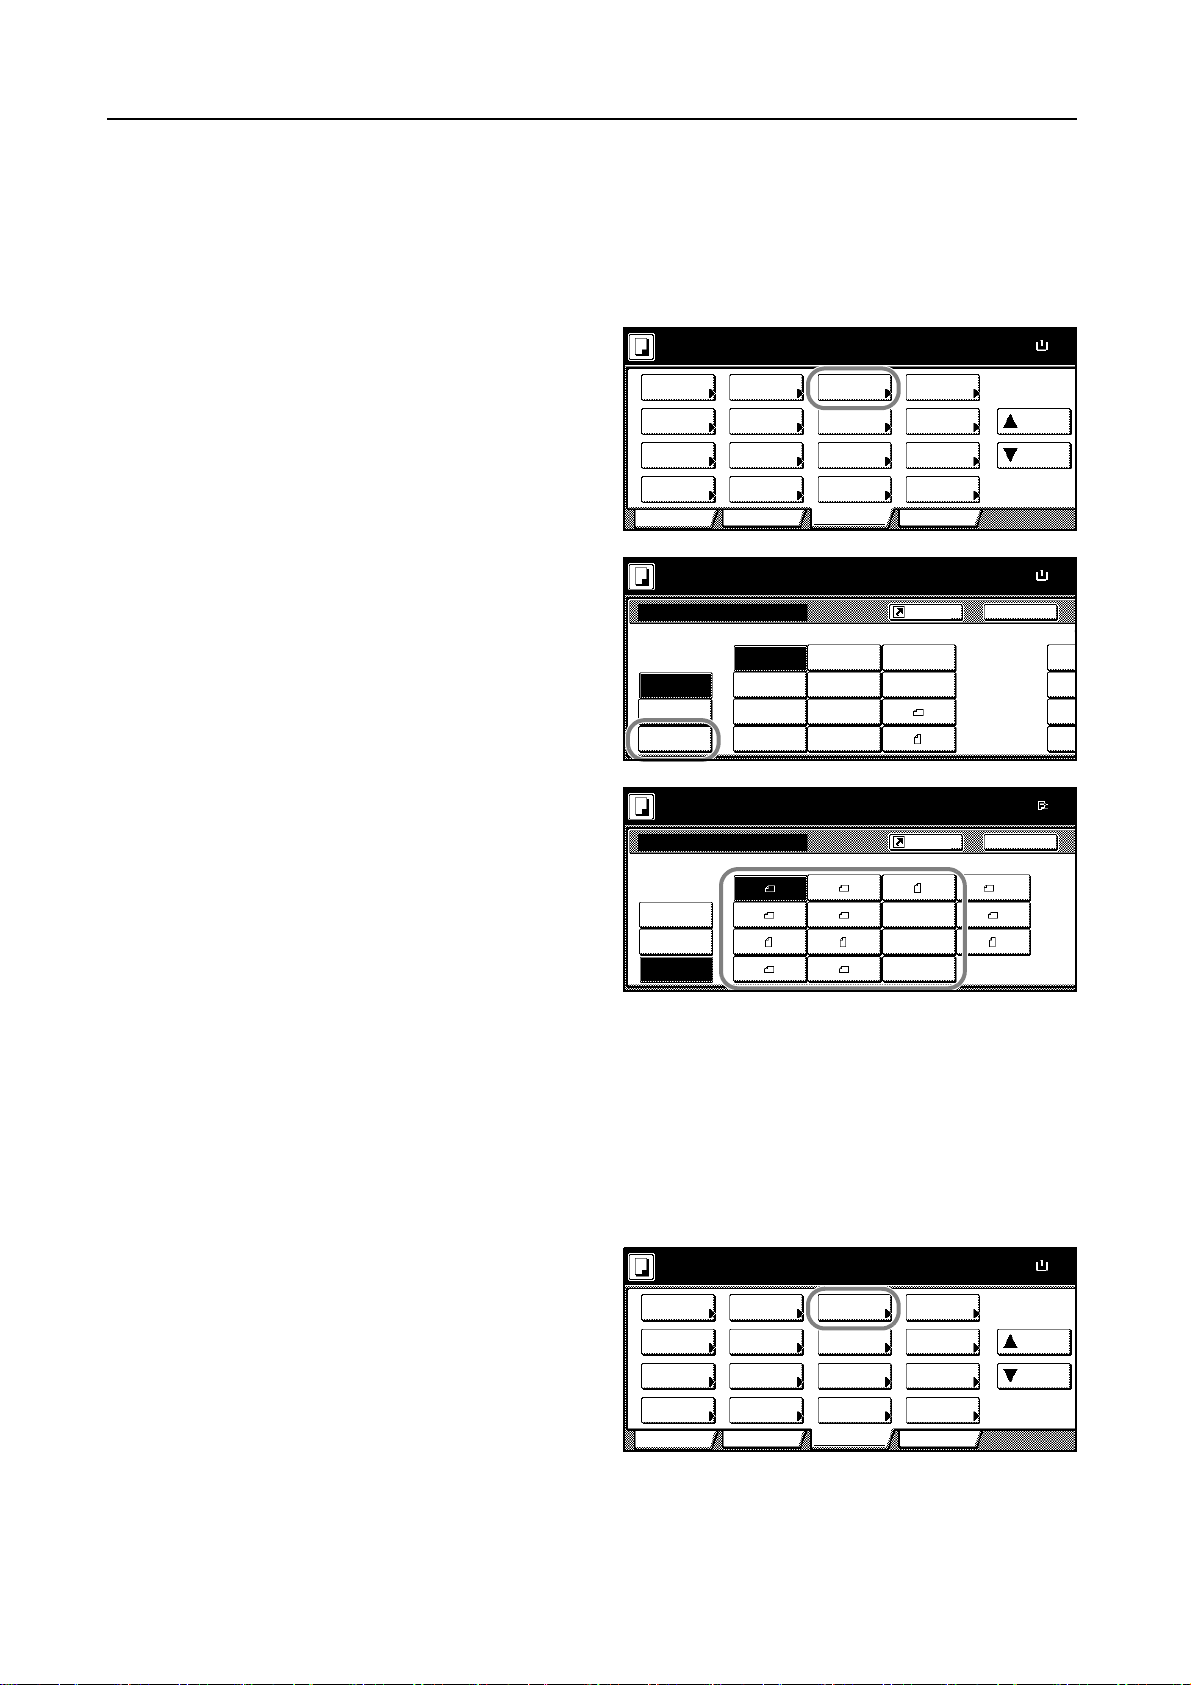
Input Size
Follow the steps as below to enter the original size which is not included in the standard sizes.
Place the originals in the document processor or on the platen.
1
Press [Function].
2
Press [Select Orig.Size] ([Select Size
3
Orig.]).
Ready to copy.
Sele ct
Paper Separation
Exposure Reduce
Mode / Enlar ge
Ori g.Image
Qual ity
Sort/
Offset
2 sided/
Mar g in /
Cente ring
Bord er
Erase Mode
User choiceBasi c
Select
Orig.Size
Auto
Selection
Page #
Cov er
Function
Combi ne
Batch
Scanning
Form
Ove rl ay
Booklet
Program
Paper Si ze
Up
Down
100%
11x8
1-4
Page 11
Copying Functions
o
½
½
d
X
½
d
X
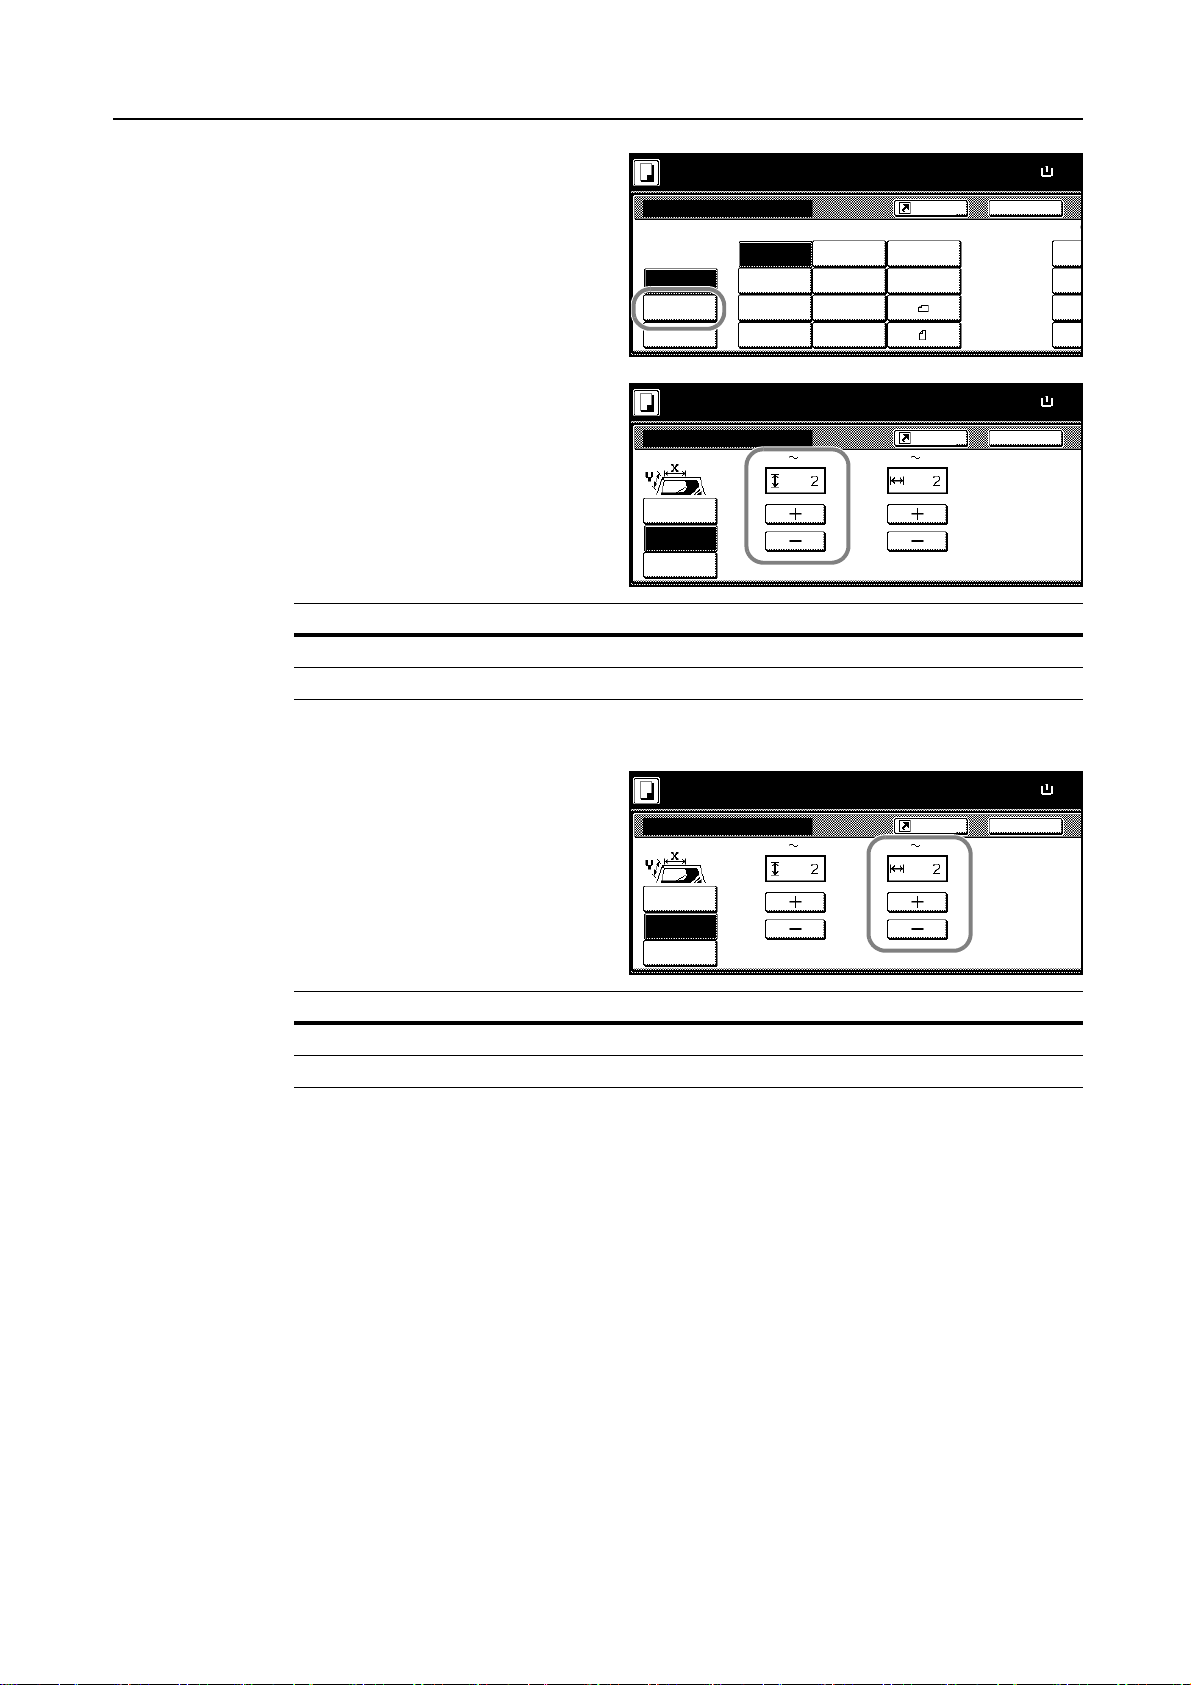
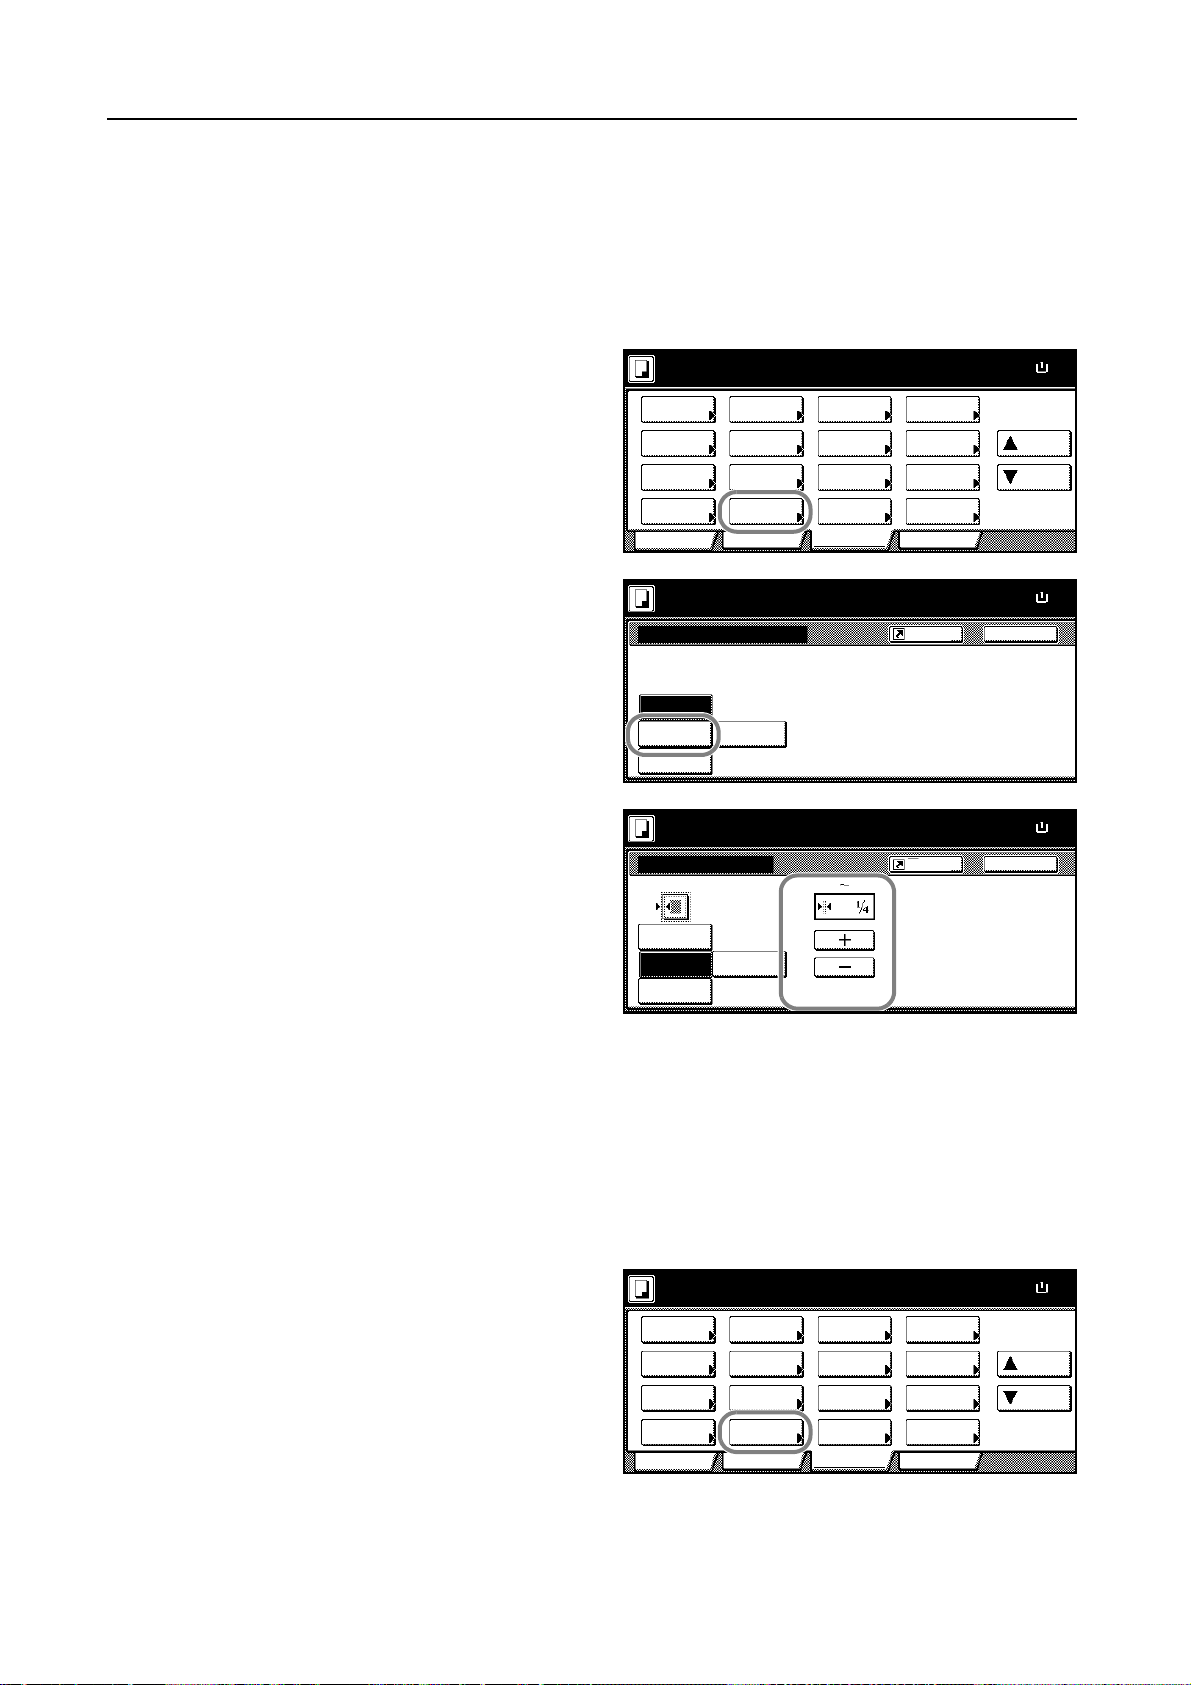
Press [Input size].
4
Press [+] and [-] to specify the vertical
5
size (Y).
Ready to copy.
Sele ct
size
Input size
Other
stand.S ize
Ready to copy.
Sele ct
size
Input size
Other
stand.S ize
Auto
8½x11"
11x8½"
(2 11
8½x14"
5½x8½"11x17"
8½x5½"
11x15"
5
/8) 17)(2
XY" "
Shortcut
8½x13½"
8½x13"
A4
A4
Shortcut
Setting Range
Inch models 2 to 11
5/8" (in 1/8" increments)
Metric models 50 to 297 mm (in 1-mm increments)
With metric models, you can enter the size directly using the numeric keys after pressing [#-Keys].
Paper Size
11x8
100%
BackSelect Original Size
Cust
2x2"
2x2"
2x2"
2x2"
Paper Si ze
11x8
100%
BackSelect Original Size
Set original on platen an
scanning ra nge. (Y side ,
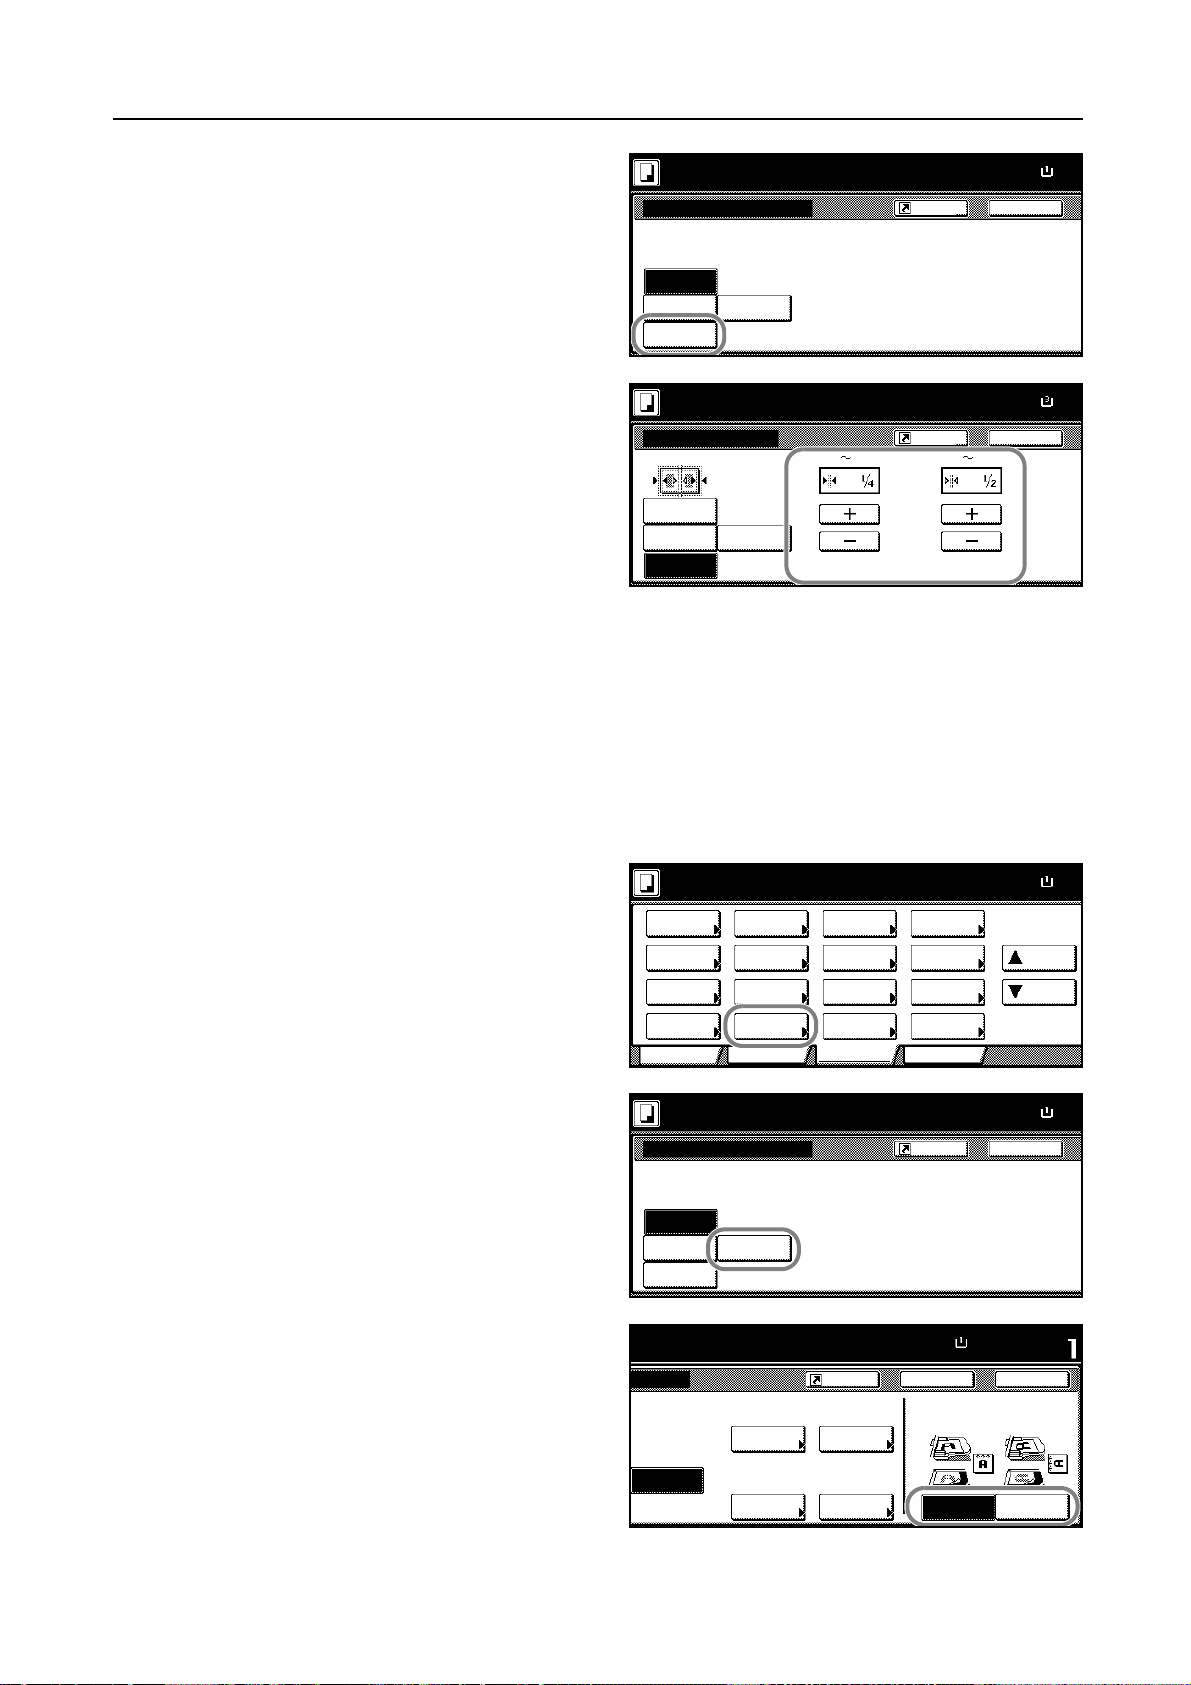
Press [+] and [-] to specify the horizontal
6
size (X).
Ready to copy.
Sele ct
Sele ct
Input size
Other
stand.S ize
5
(2 11
/8)(217)
XY" "
Shortcut
Setting Range
Inch models 2 to 17" (in 1/8" increments)
Metric models 50 to 432 mm (in 1-mm increments)
With metric models, you can enter the size directly using the numeric keys after pressing [#-Keys].
Press the Start key to start copying.
7
Paper Si ze
11x8
100%
BackSelect Original Size
Set original on platen an
scanning ra nge. (Y side ,
1-5
Page 12
Copying Functions
½
1
2
Custom Size
Follow the steps as below to specify one of the four custom sizes.
Place the originals in the document processor or on the platen.
Press [Function].
Press [Select Orig.Size] ([Select Size
3
Orig.]).
Select the registered custom size.
4
Press the Start key to start copying.
5
Ready to copy.
Sele ct
Paper Separation
Exposure Reduce
Mode / Enlar ge
Ori g.Image
Qual ity
Sort/
Offset
to copy.
Auto
8½x11"
11x8½"
2 sided/
Mar g in /
Cente ring
Bord er
Erase Mode
User choiceBasi c
8½x14"
5½x8½"11x17"
8½x5½"
11x15"
8½x13½"
8½x13"
A4
A4
Select
Orig.Size
Auto
Selection
Page #
Cov er
Function
Shortcut
Combi ne
Batch
Scanning
Form
Ove rl ay
Booklet
Program
Paper Size
BackSize
100%
11x8½"
Custo m Size
2x2"
2x2"
2x2"
2x2"
Paper Si ze
Set
Clo se
Up
Down
100%
11x8
1-6
Page 13

Copy Quantity
1
Copying Functions
Specify the copy quantity for individual jobs within the range of 1 to 9,999.
Follow the steps as below to specify the copy quantity.
Place the originals in the document processor or on the platen.
Use the numeric keys on the operation
2
panel to enter the desired copy quantity.
The copy quantity will be displayed at
the top right corner of the touch panel.
NOTE: To clear the copy quantity,
press the Stop/Clear key. This will
restore the quantity to 1.
Press the Start key to start copying.
3
to copy.
APS Au to %
MP tr ay
Plai n
11x8½"
Plai n
100%
Red uce
/Enlarge Mode
Auto
Exposure
Exposure
Progr amFunctionUser choice
Paper Si ze Set
11x8½"
100%
Staple Off
Staple
Left Top
Staple
/Punch
4 in 1
Mar g in
Left
Sheet
Erase
1-7
Page 14
Copying Functions
Original Orientation
Specify the original orientation to use these functions.
• Duplex mode
• Split mode (separate copies from two-sided originals)
• Margin mode
• Centering originals
• Border erase
• Combine mode
• Memo mode
• Page numbering
• Booklets
• Stapling (optional feature)
• Punching (optional feature)
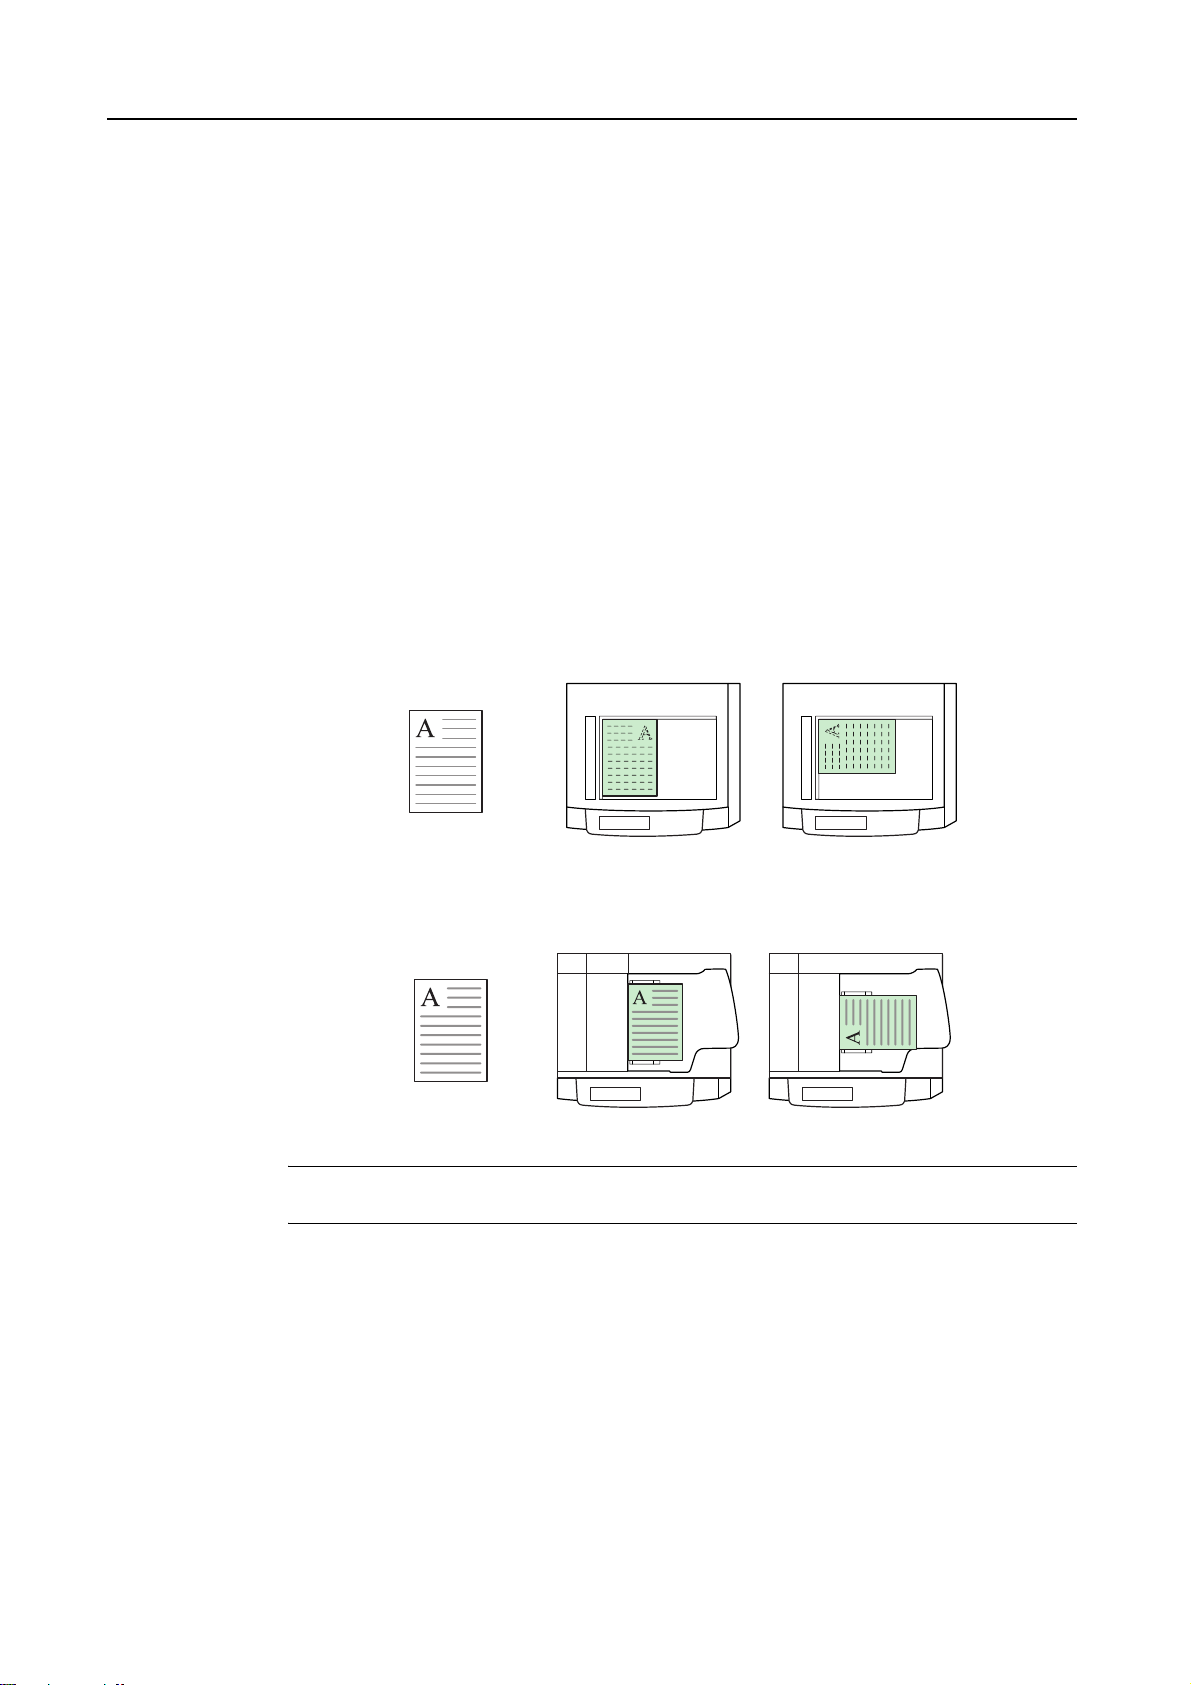
When placing originals on the platen
Originals Rear Left
When placing originals in the document processor
Originals Rear Left
NOTE: You can change the default setting for the original orientation. Refer to Orientation of
Original Document on page 3-27 for details.
Follow the steps as below to specify the original orientation.
Place the originals in the document processor or on the platen.
1
Press [Function] and [T Down] to move to the second page.
2
1-8
Page 15
Copying Functions
½
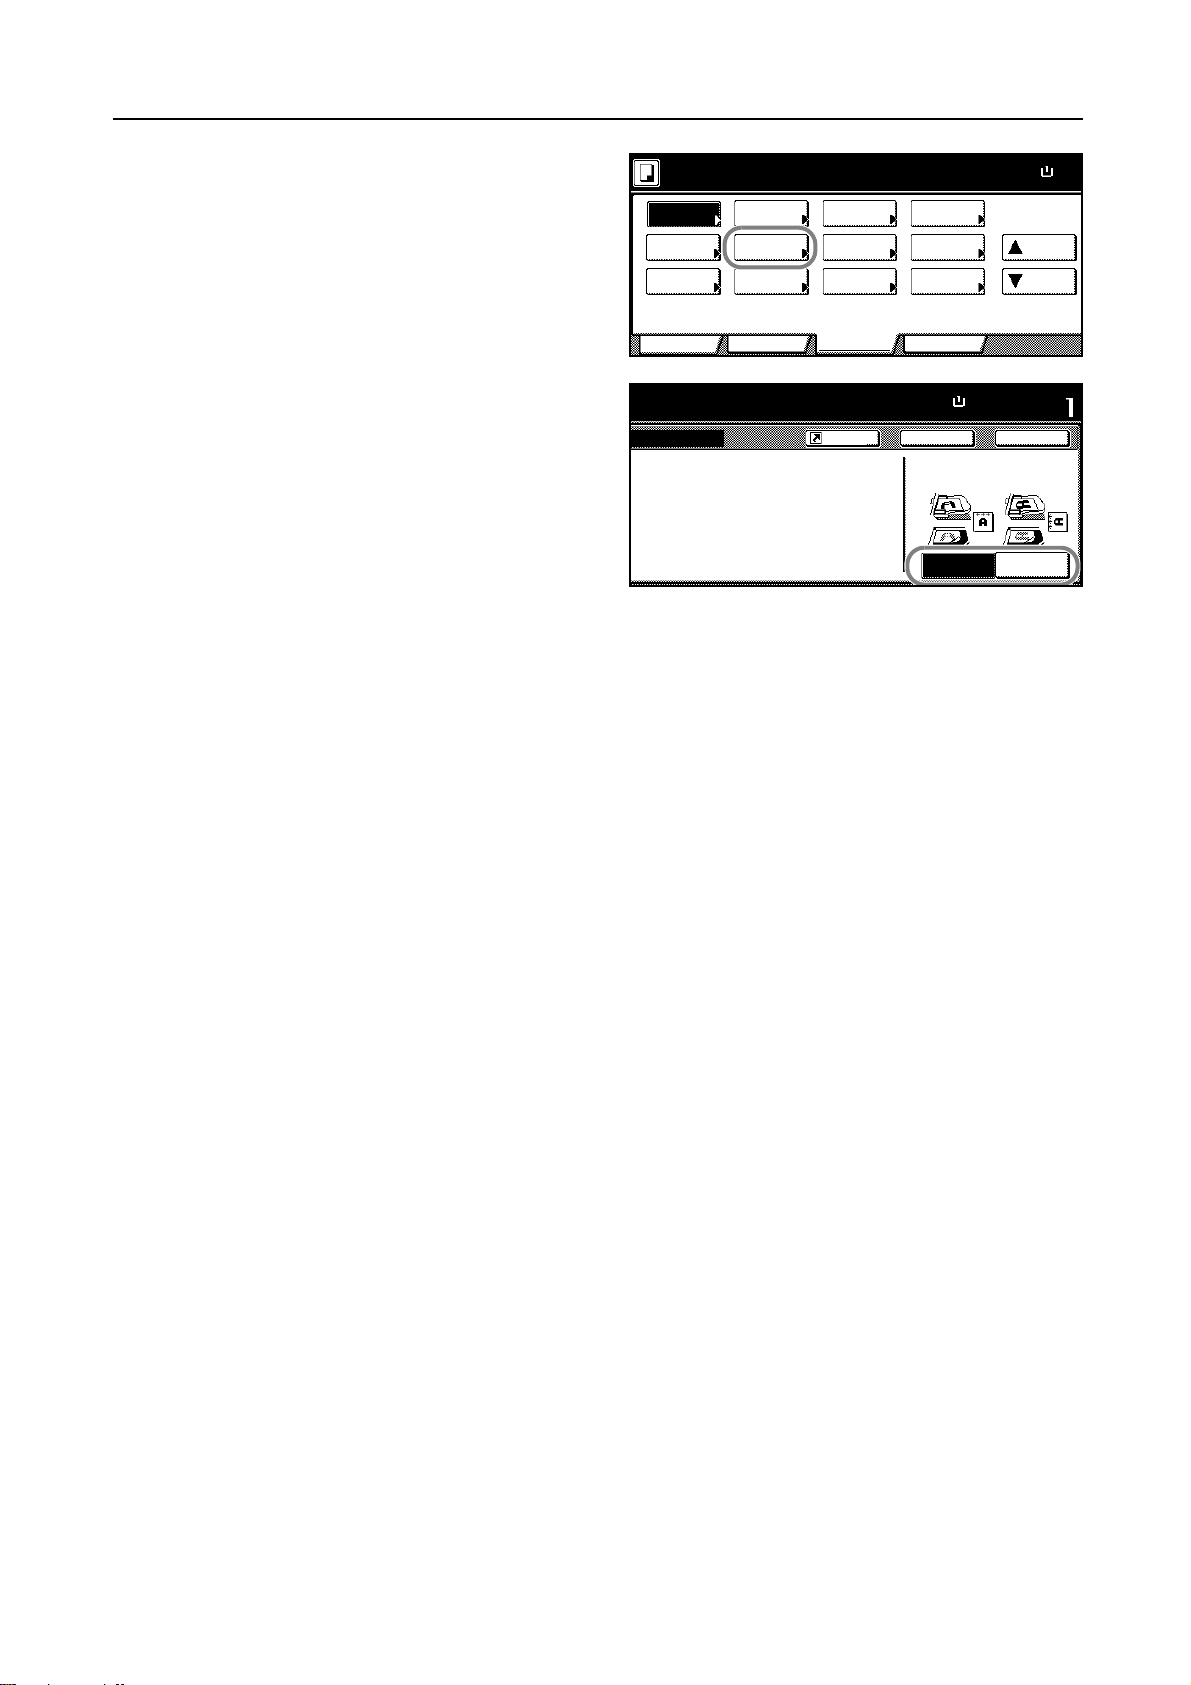
Press [Orig. Set Direction].
3
Press [Top Edge] ([Back Edge]) or [Left
4
Top Edge] ([Left top corner]) that
matches the direction you customarily
Ready to copy.
Auto
Rotati on Back ing
EcoPri nt
Rep ea t
Copy
to copy.
ion
OHP
Ori g. Set
Direction
Sele ct of
Output
User choiceBasi c
use.
"Select Original Image Direction." can
be shown at right side of di splay .
Fol low the ste ps. If setti ng mode is
wrong, incorr ect copy will result.
Press [Close].
5
Specify the function which original orientation affects, such as Duplex mode.
6
Press the Start key to start copying.
7
Proof Copy
Invert
Staple
/Punch
Function
Shortcut
Mem o
Pages
Mirror
Image
Multi-Page
Form
Progr am
Paper Si ze
11x8½"
100%
Back
Select Original Image
Dire ction.
Top Edge
Paper Size
Set
Clo se
Left Top
Edge
Up
Down
100%
11x8
1-9
Page 16
Copying Functions
½
½
c
Offset Mode
Deliver the printed copies so that each set is stacked
perpendicular to the previous set.
NOTE: Paper of the same size must be loaded in the
different cassettes with portrait and landscape
orientations.
The supported paper sizes are 11 × 8
1/2", A4, B5 and
16K.
Follow the steps as below for using the Offset mode.
Press [Function].
1
Press [Sort/Offset] ([Sort/Group]).
2
Press [On] ([1 set] or [Output each
3
page]).
1
Originals Copies
Ready to copy.
Sele ct
Paper Separation
Exposure Reduce
Mode / Enlar ge
Ori g.Image
Qual ity
Sort/
Offset
2 sided/
Mar g in /
Cente ring
Bord er
Erase Mode
User choiceBasi c
Ready to copy.
Sort/Offset
Sort Offset
3
Select
Orig.Size
Auto
Selection
Page #
Cov er
Function
2
1
3
Combi ne
Batch
Scanning
Form
Ove rl ay
Booklet
Program
Shortcut
2
1
3
2
1
Paper Si ze
Up
Down
Paper Si ze
Back
100%
100%
11x8
11x8
3
2
Sort:Off
Sort:On
Use the numeric keys to enter the copy quantity.
4
Place the originals in the document processor or on the platen. Press the Start key to start copying.
5
Off
On
The type of Copy output can be sele
by choosing either Sort or G roup
1-10
Page 17
Stapling
½
Copying Functions
You can staple sets of copies.
NOTE: Stapling requires the optional document finisher.
The orientations of the original and corresponding staple positions are as follows.
Originals
Copies
One staple
Two staples (Left/Right)
Two staples (Top)
One staple
Orientation of Original
Platen
Document
Processor
Two staples (Left/Right)
Two staples (Top)
Follow the steps as below for stapling.
Press [Function] and then [T Down].
1
Press [Staple/Punch].
2
Ready to copy.
Auto
Rotati on Back ing
EcoPri nt
Rep ea t
Copy
OHP
Ori g. Set
Direction
Sele ct of
Output
User choiceBasi c
Proof Copy
Invert
Staple
/Punch
Function
Mem o
Pages
Mirror
Image
Multi-Page
Form
Progr am
Paper Size
Up
Down
100%
11x8
1-11
Page 18
Copying Functions
m
½
½
m
Press [1 staple] or [2 staples].
3
Select the staple position.
4
Place the originals in the document processor or on the platen and press the Start key.
5
Ready to copy.
Staple/ Punch
Staple
None
1 staple
2 staples
Staple Mode.
:maximum capaci ty
50
Staple/ Punch
Staple
None
1 staple
Position
Left side
Ri gh t si de
Top si de
Punch
Shortcut
None
2 holes
3 holes
Shortcut
Punch
None
2 holes
3 holes
If the original is placed on the platen, Scan next original(s) will be displayed. Place the next original
and press the Start key.
After scanning all originals, press [Scanning finished] to start copying.
Paper Si ze
11x8
100%
Back
Select Original I
Direction.
Top Edge
Paper Si ze
11x8
100%
Back
Select Original I
Direction.
Top Edge2 staples
1-12
Page 19
Punching
½
Copying Functions
Punch holes in sets of finished copies in preparation for binding.
NOTE: Punching requires the optional document finisher and punching unit.
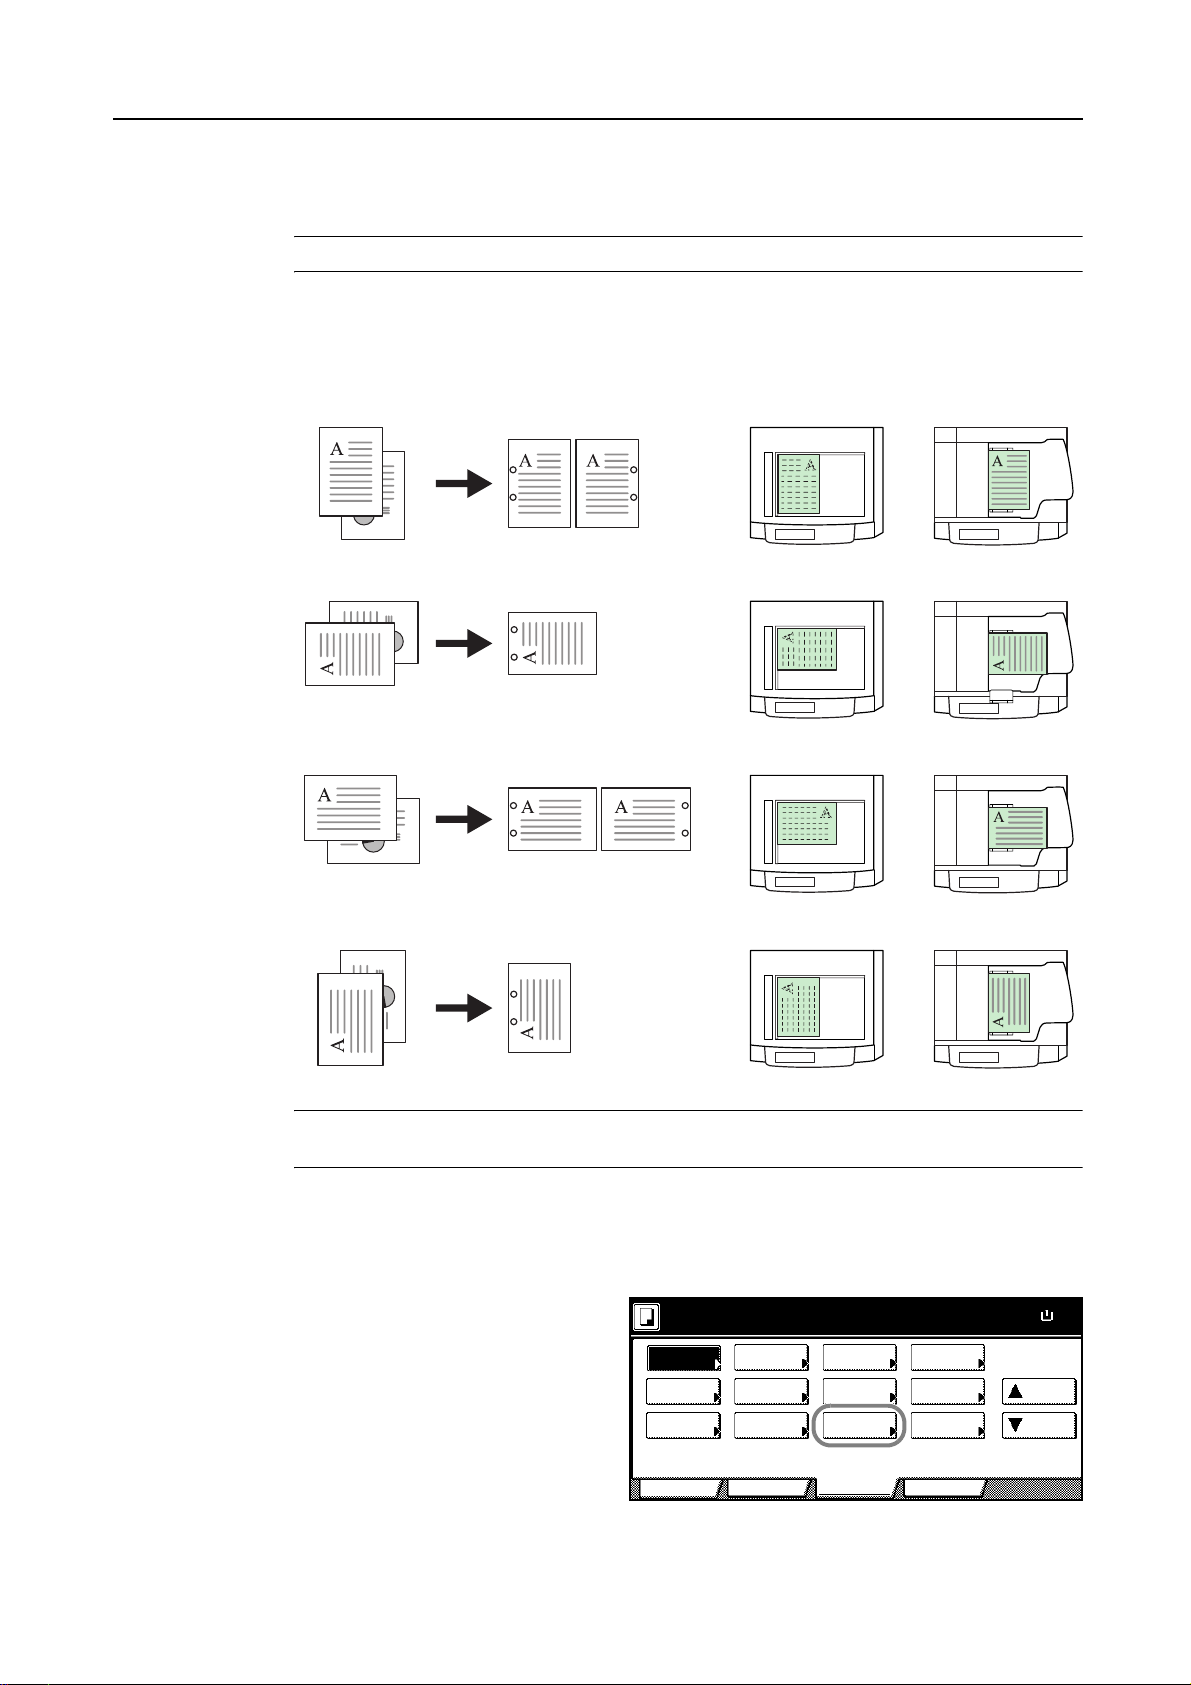
The orientations of the original and corresponding punch positions are as follows.
Originals Copies
Two Holes (Left/Right)
Two Holes (Top)
Two Holes (Left/Right)
Orientation of Original
Platen
Document
Processor
Two Holes (Top)
NOTE: The inch model provides two-hole and three-hole punching. The metric model provides
two-hole and four-hole punching.
Follow the steps as below for punching.
Press [Function] and then [T Down].
1
Press [Staple/Punch].
2
Ready to copy.
Auto
Rotati on Back ing
EcoPri nt
Rep ea t
Copy
OHP
Ori g. Set
Direction
Sele ct of
Output
User choiceBasi c
Proof Copy
Invert
Staple
/Punch
Function
Mem o
Pages
Mirror
Image
Multi-Page
Form
Progr am
Paper Size
Up
Down
11x8
100%
1-13
Page 20
Copying Functions
m
½
½
m
Press [2 holes] or [3 holes] for the inch
3
model. Press [2 holes] or [4 holes] for
the metric model.
Select the hole punch position.
4
Place the originals in the document processor or on the platen. Press the Start key to start copying.
5
Ready to copy.
Staple/ Punch
Staple
None
1 staple
2 staples
Ready to copy.
Staple/ Punch
Staple
None
1 staple
Punch
None
2 holes
3 holes
Punch Position
None
2 holes
3 holes
Shortcut
Shortcut
Left side
Right side
Top side
Paper Si ze
11x8
100%
Back
Select Original I
Direction.
Top Edge
Paper Si ze
11x8
100%
Back
Select Original I
Direction.
Top Edge2 staples
1-14
Page 21
Combine Mode
Copying Functions
Images from either two or four originals are reduced and combined onto a single copy. The page
boundary of each original can be indicated by a solid or dotted line.
NOTE: Combine mode is available for the copy paper sizes of A3, B4, A4, A4R, B5, B5R, 11 × 17",
11 × 8 1/2", 8 1/2 × 11", 8K and 16K.
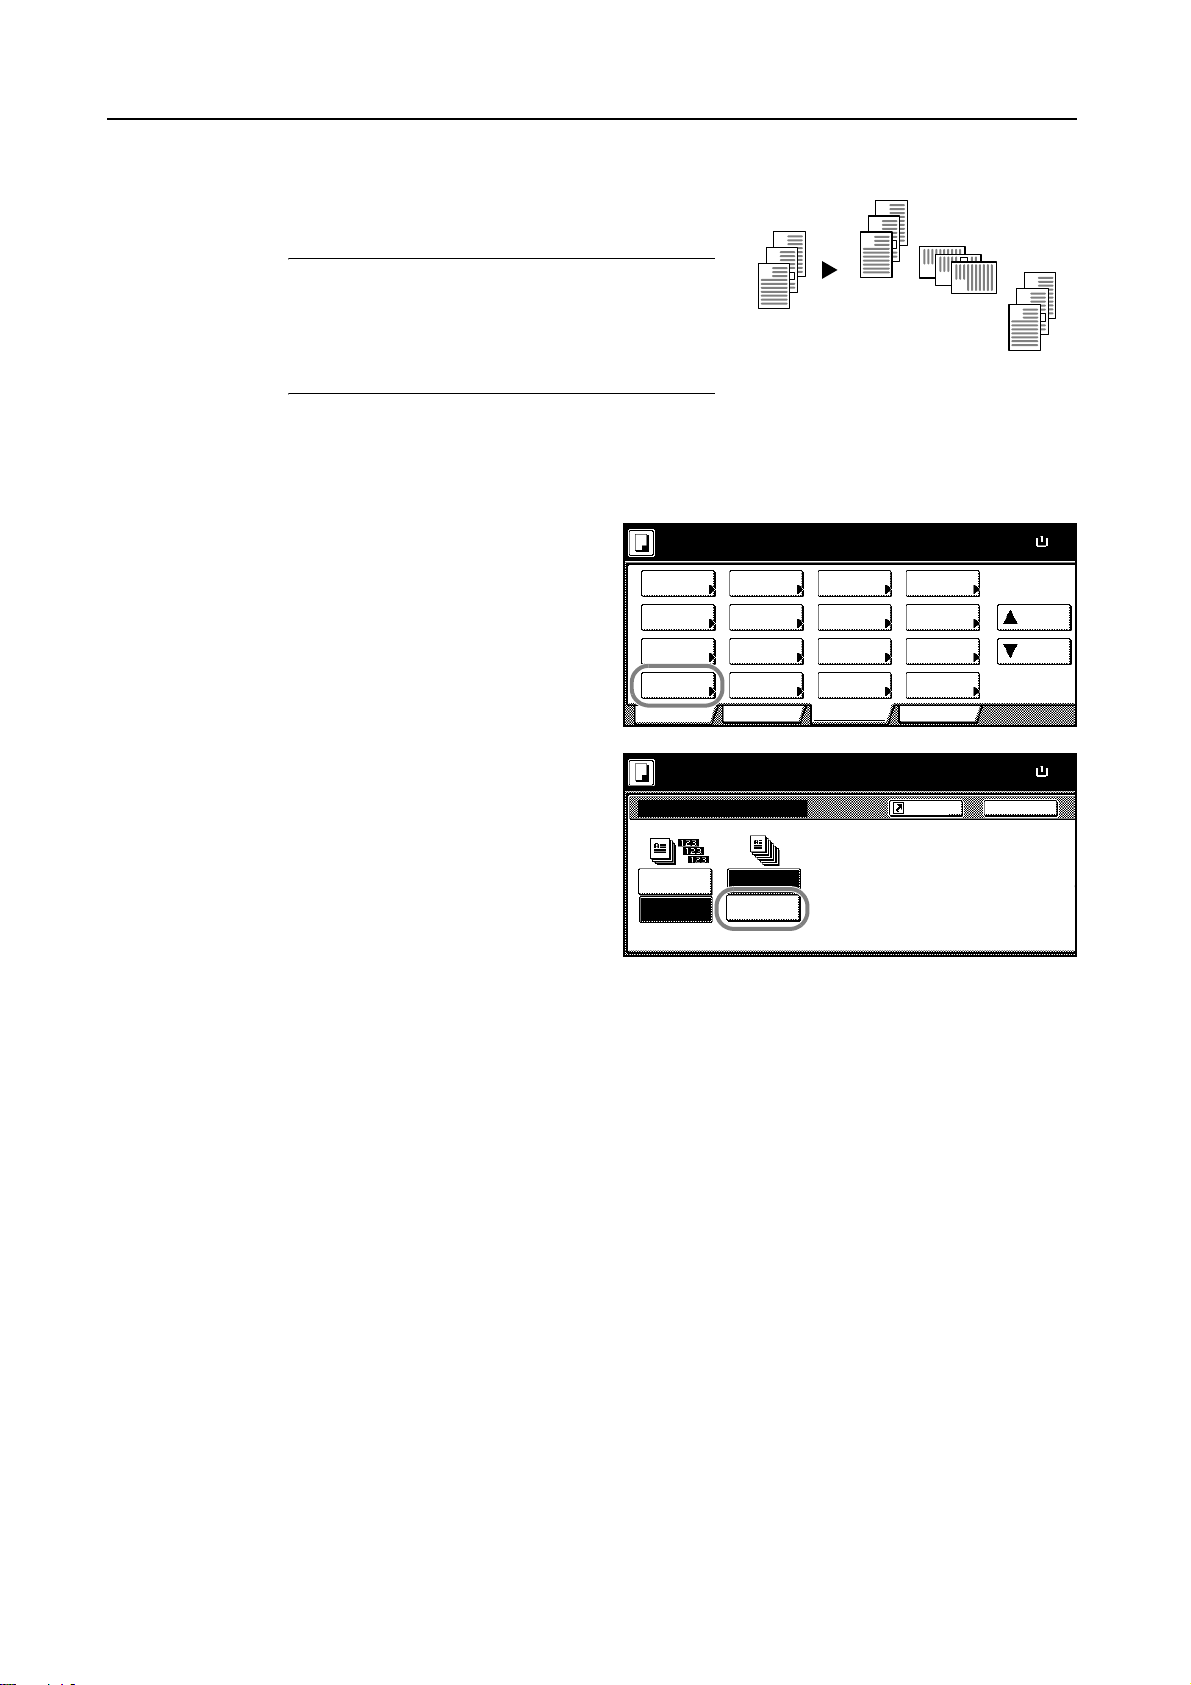
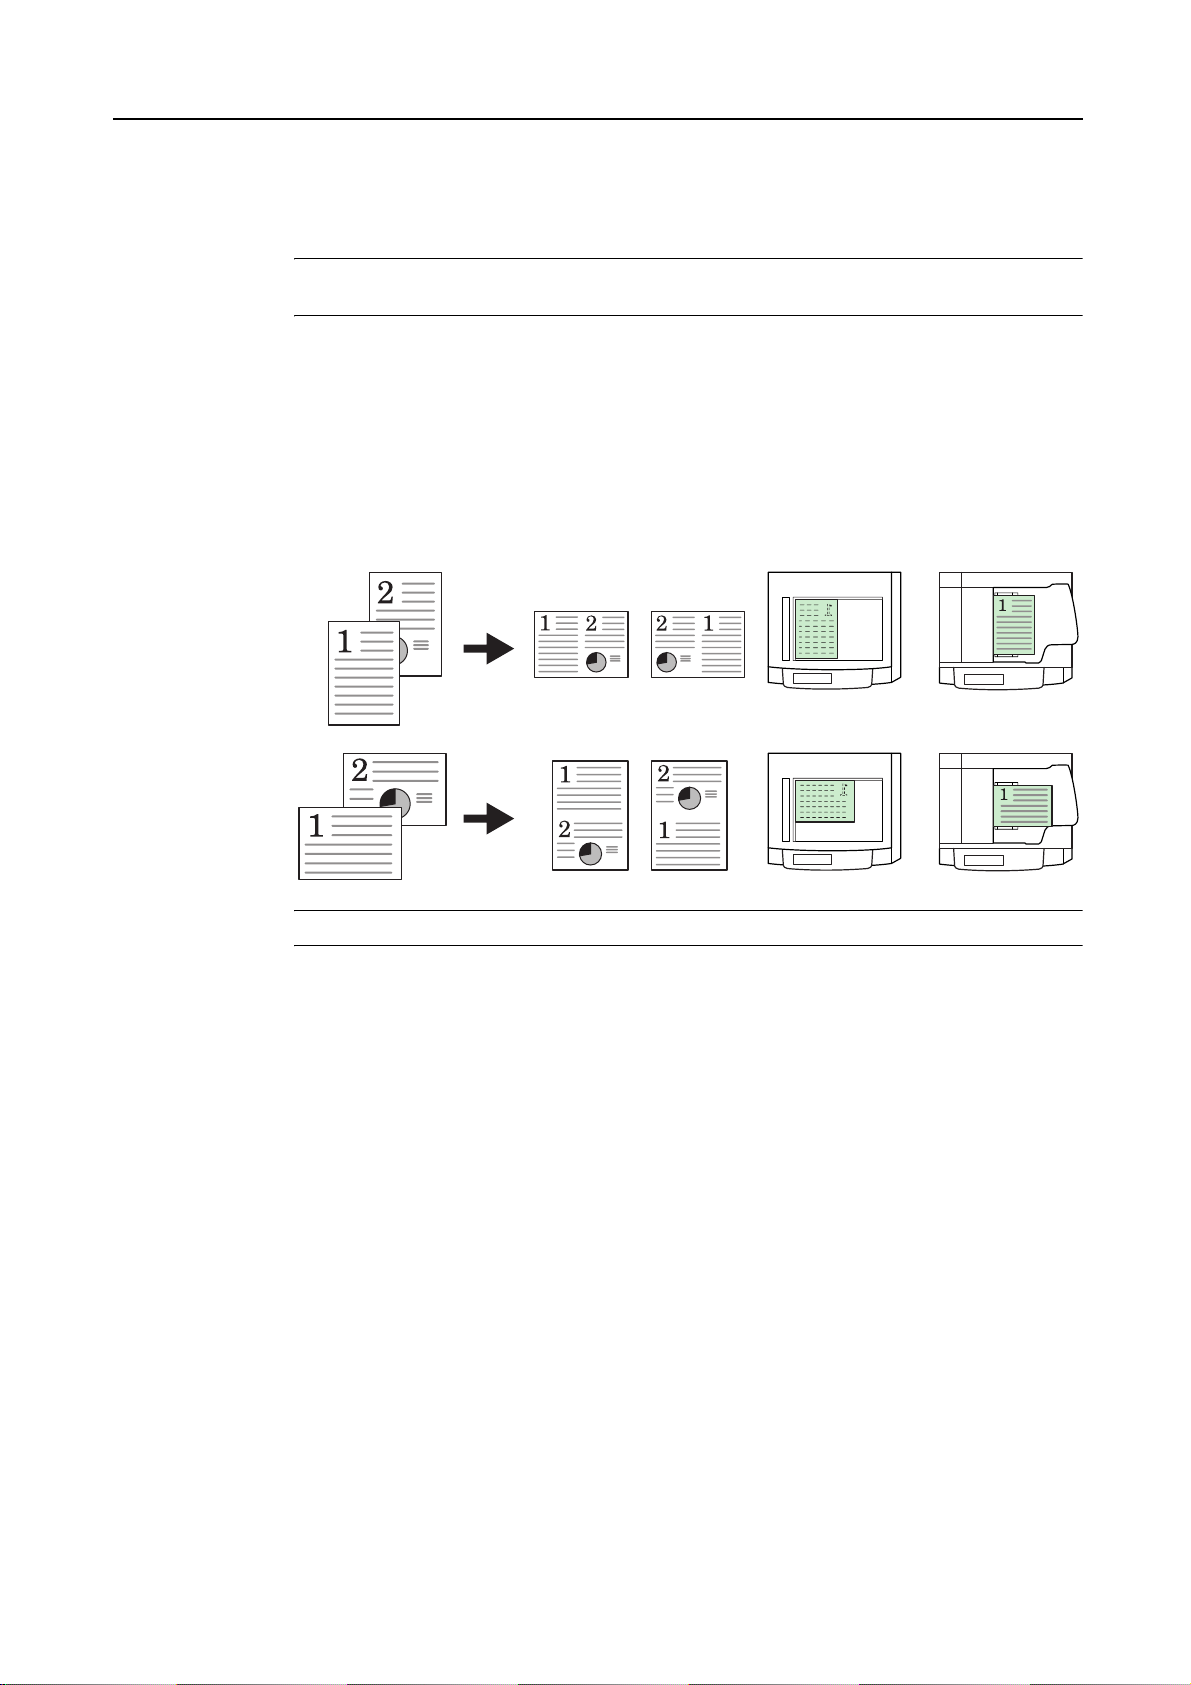
2-in-1 Mode
For copying two originals onto a single sheet. This mode can be used with Duplex mode to copy
four originals onto one sheet.
The orientations of the original and corresponding output are as follows.
CopiesOriginals Orientation of Original
Platen
Document
Processor
NOTE: When placing the original on the platen, copy originals in the order of the page.
1-15
Page 22
Copying Functions
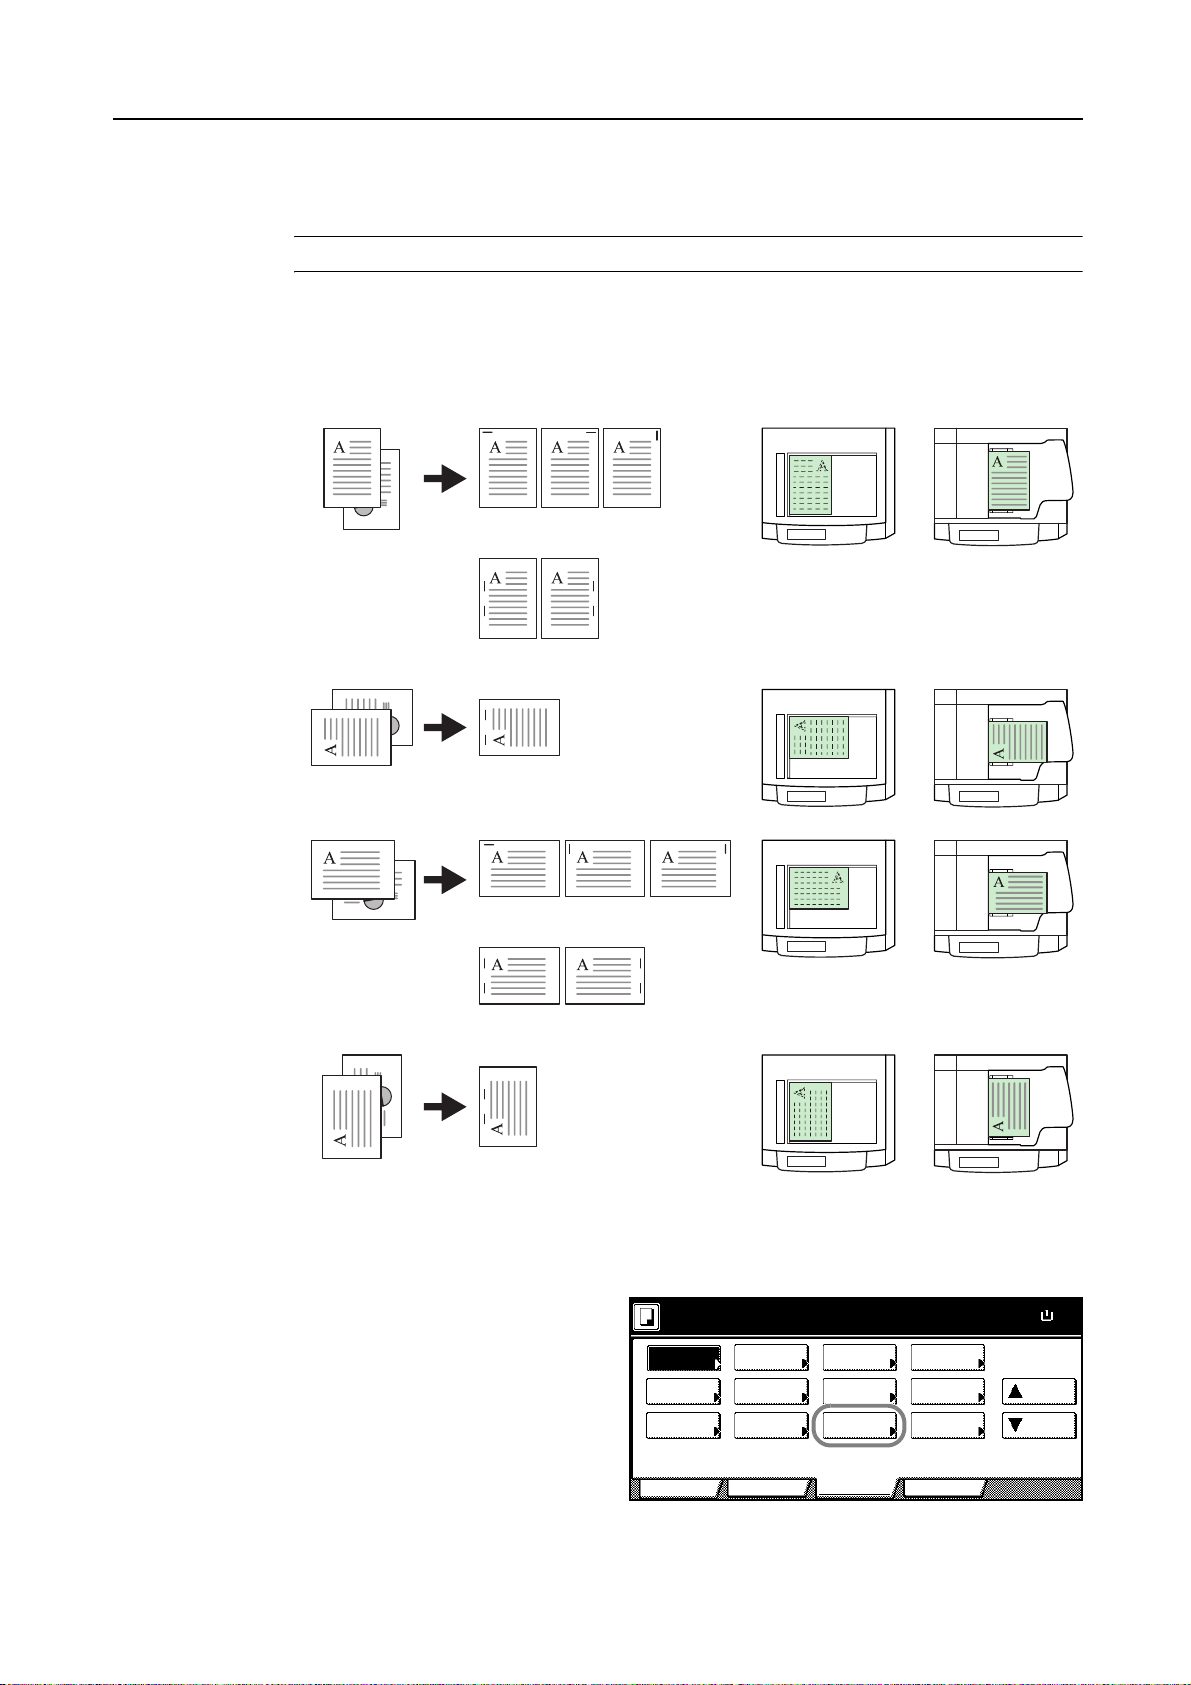
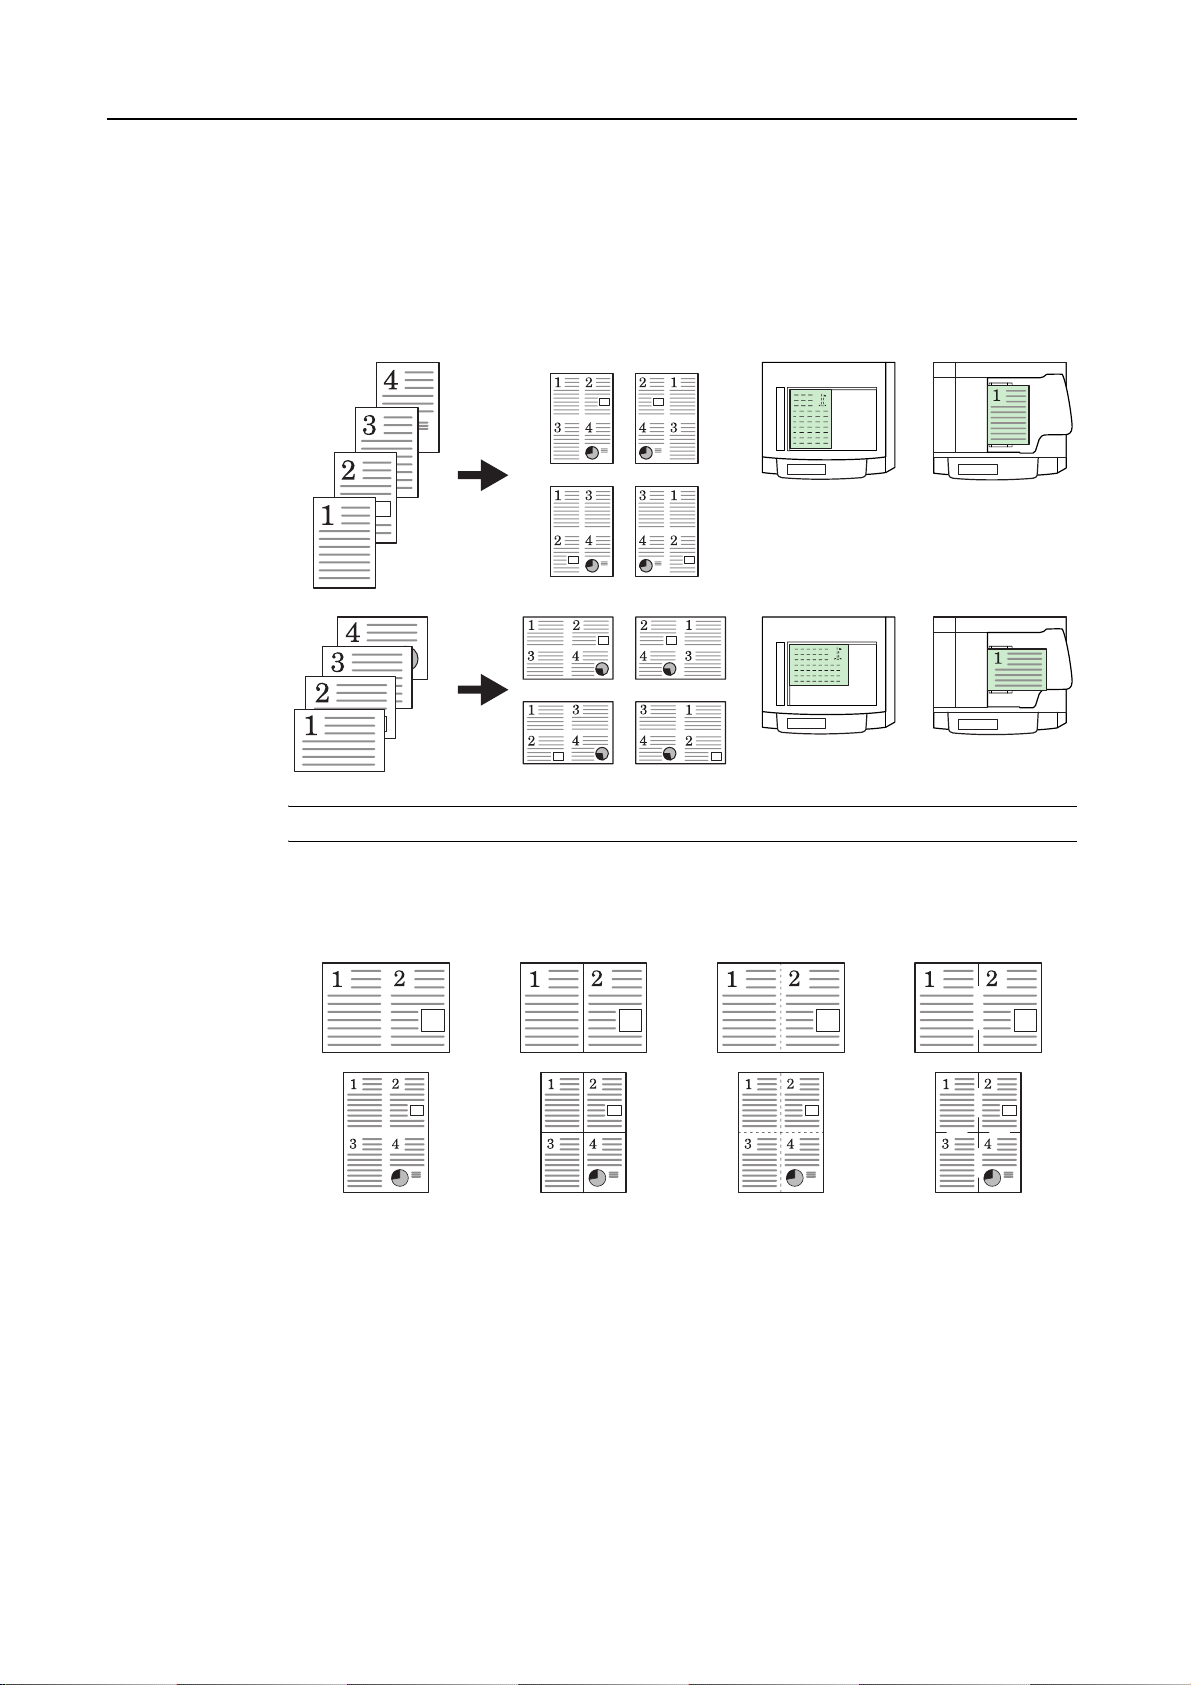
4-in-1 Mode
For copying four originals onto a single sheet. This mode can be used with Duplex mode to copy
eight originals onto one sheet.
The orientations of the original and corresponding output are as follows.
CopiesOriginals Orientation of Original
Platen
Document
Processor
NOTE: When placing the original on the platen, copy originals in the order of the page.
Types of Page Boundary Lines
Choose from the following types of the lines for page boundaries.
None Dotted LineSolid Line Mark or Cropmark
Follow the steps as below to combine originals.
Press [Function].
1
1-16
Page 23
Copying Functions
½
½
n
m
½
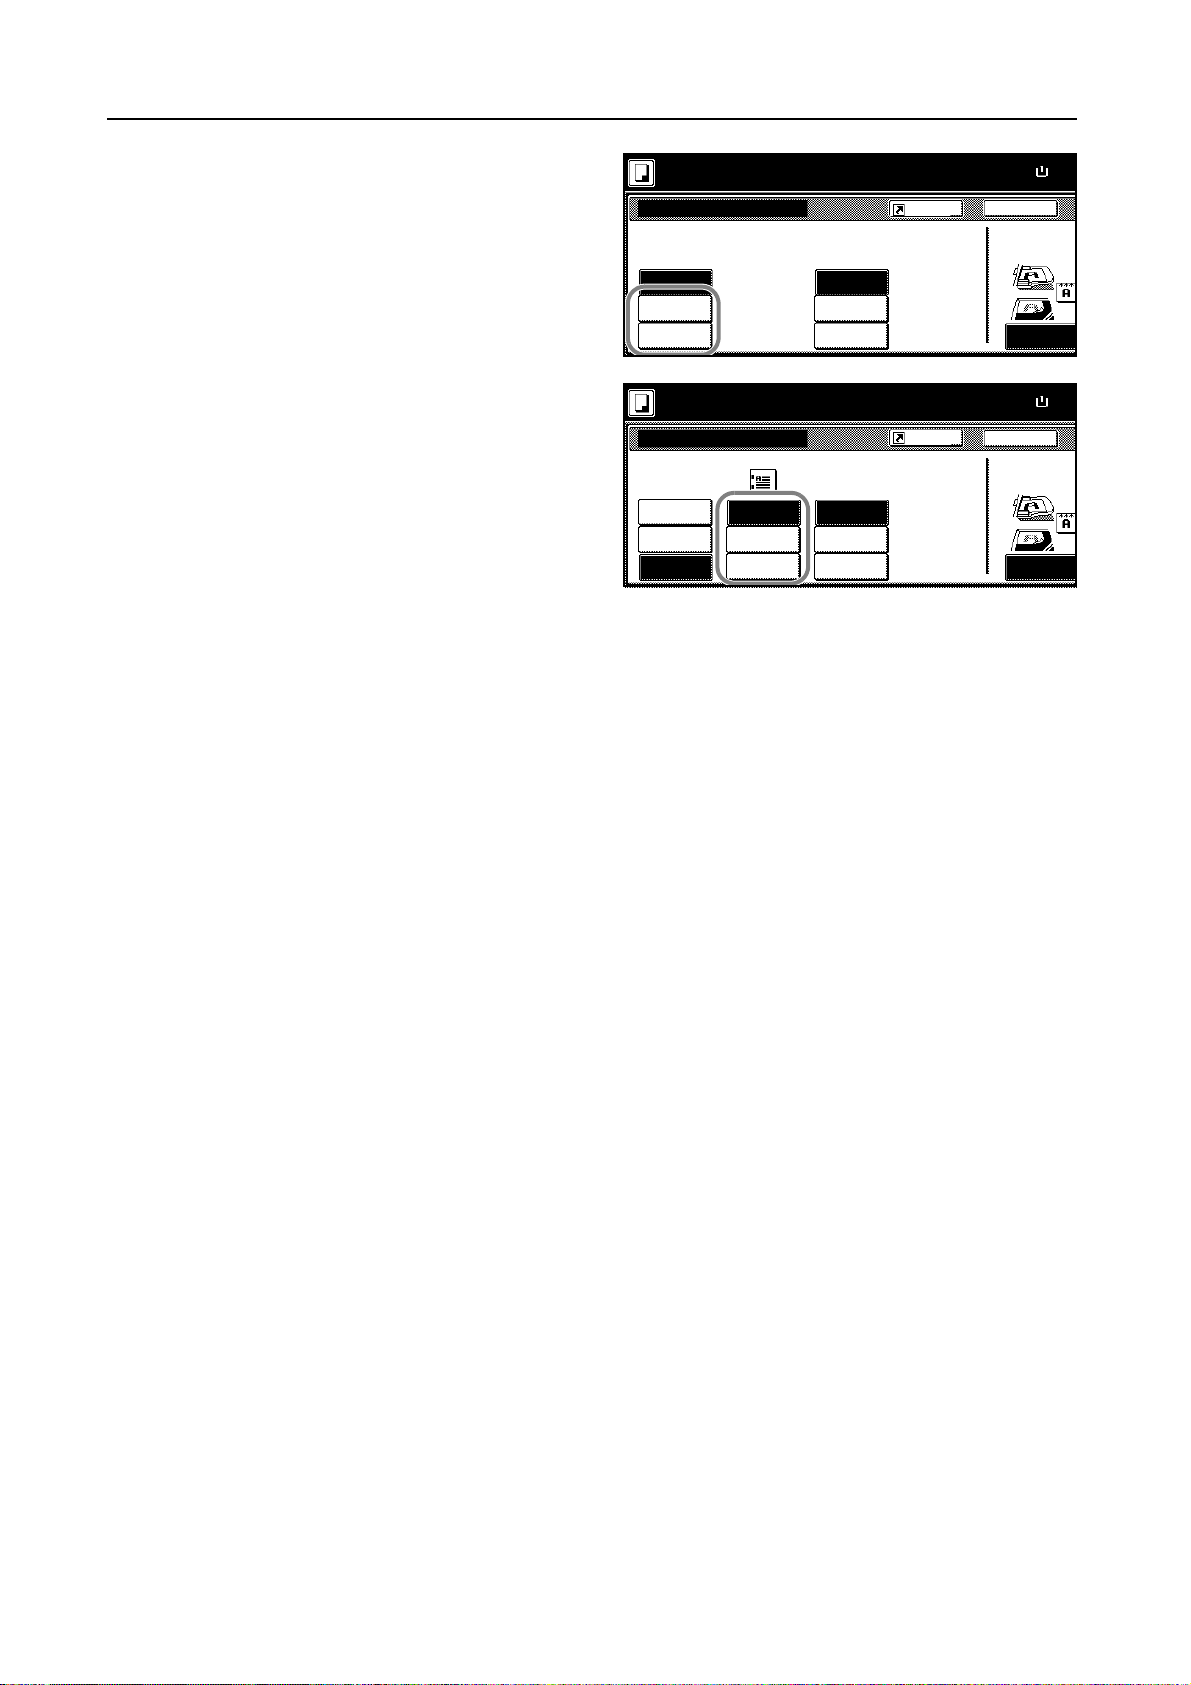
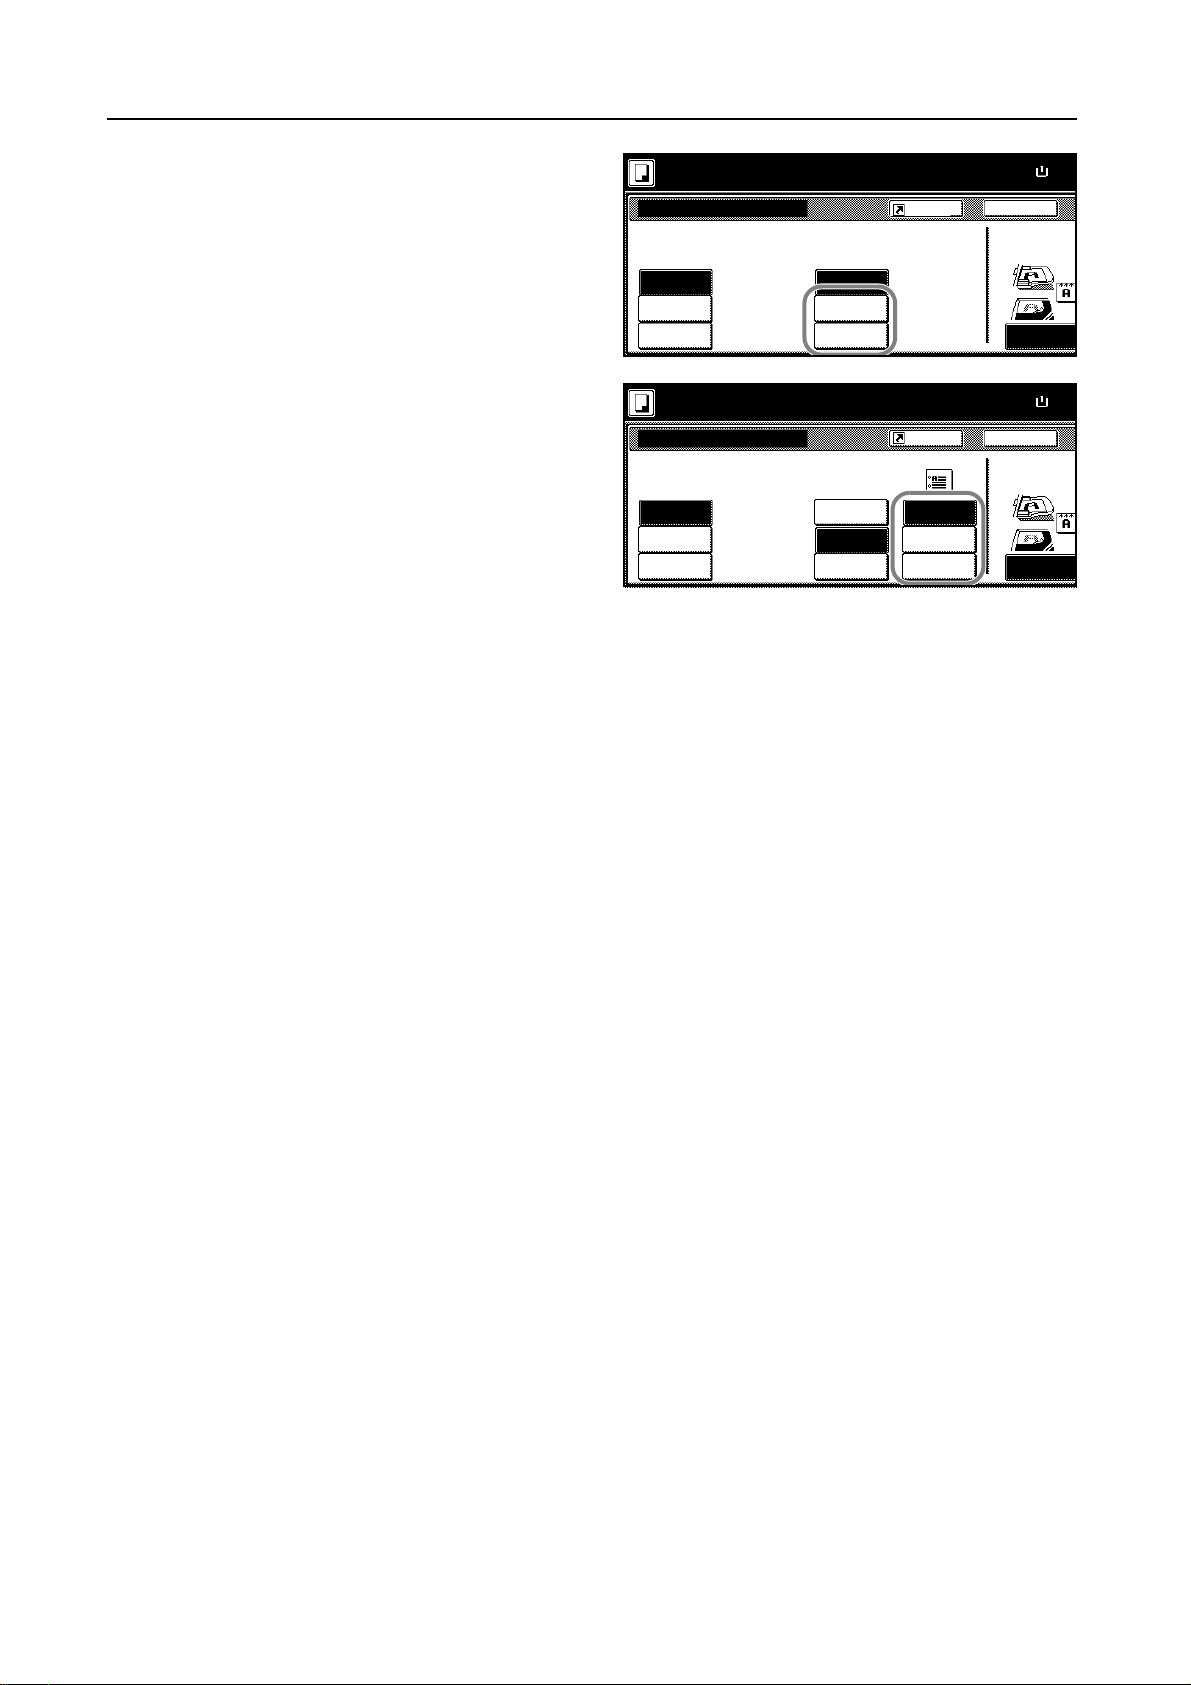
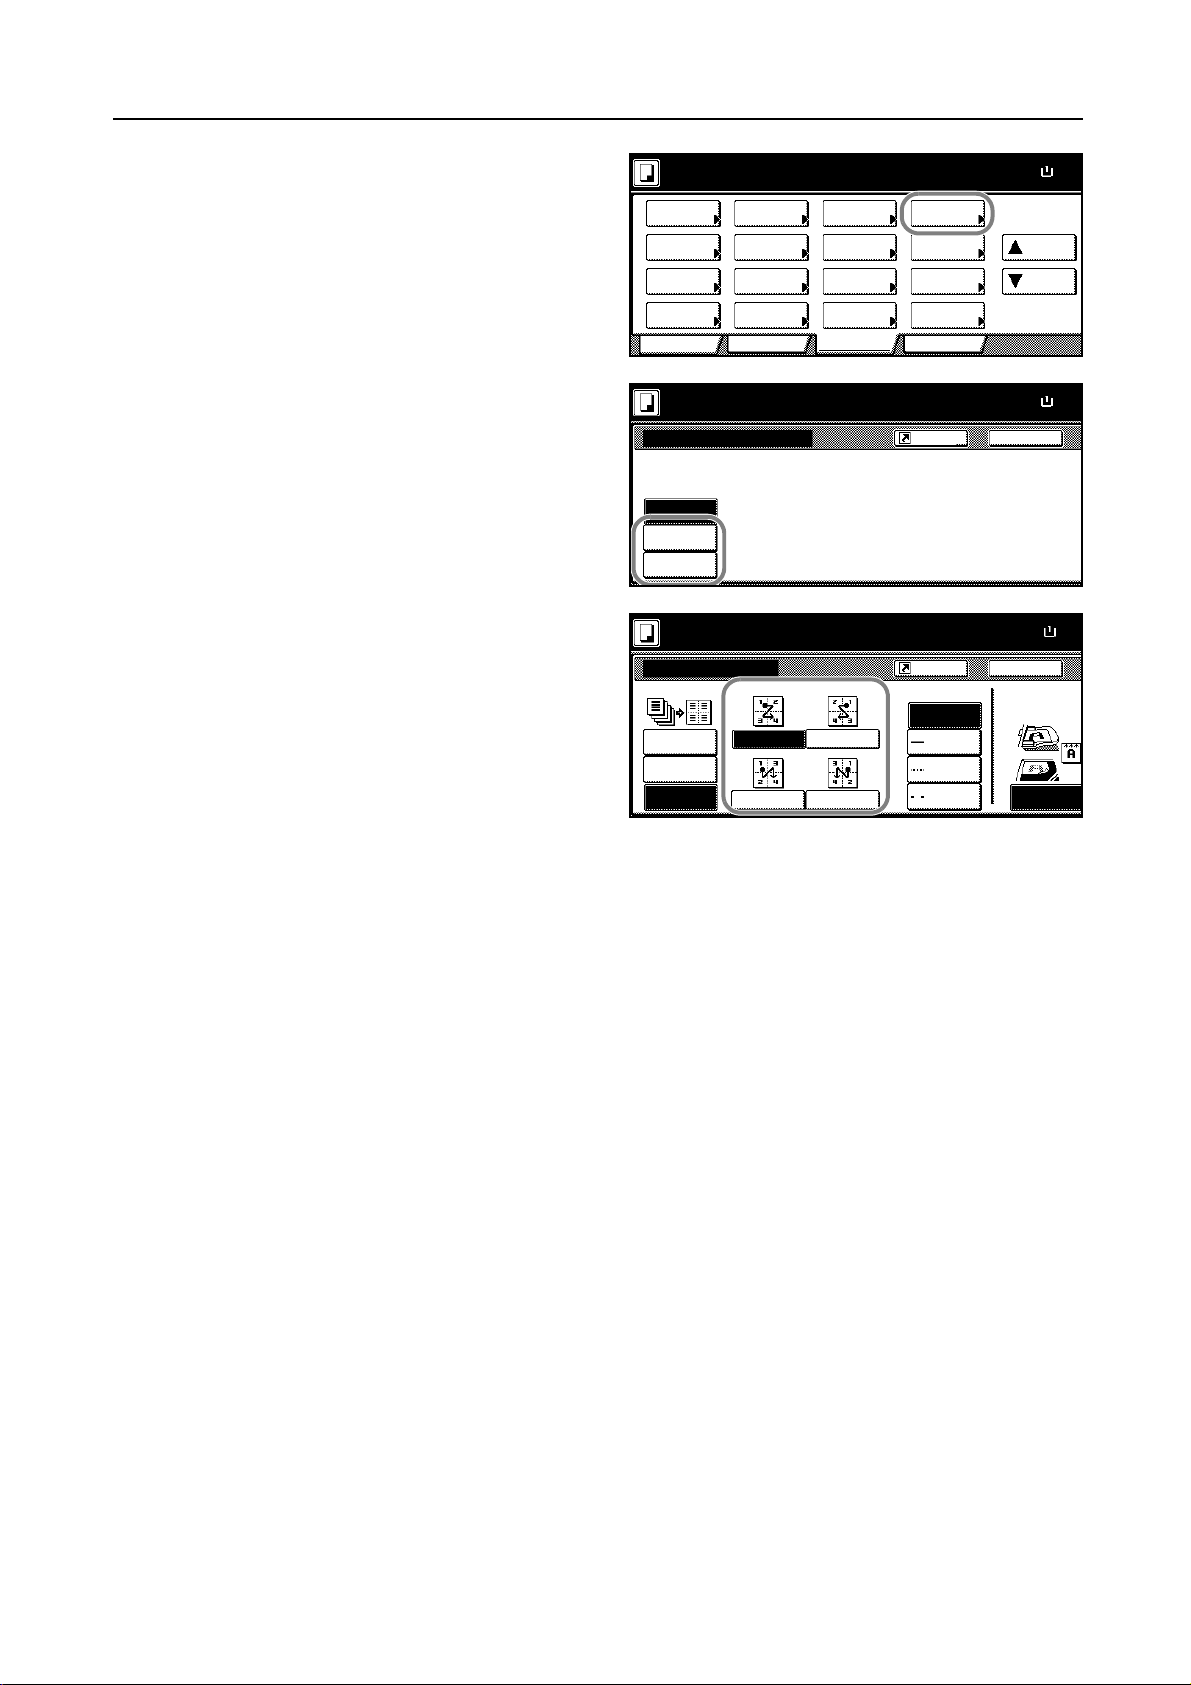
Press [Combine] ([Merge copy]).
2
Press [2 in 1] ([2-in-1]) or [4 in 1]
3
([4-in-1]).
Select the desired layout.
4
Ready to copy.
Sele ct
Paper Separa tion
Exposure Reduce
Mode / Enlar ge
Ori g.Image
Qual ity
Sort/
Offset
2 sided/
Mar g in /
Cente ri ng
Bor der
Erase Mode
User choiceBasi c
Ready to copy.
None
2 in 1
4 in 1
Ready to copy.
Comb ine
None
2 in 1
4 in 1
Layout
Sele ct
Orig.Size
Auto
Selection
Page #
Cov er
Function
Paper Size
100%
Comb ine
Batch
Scanning
Form
Over lay
Book let
Progr am
Shortcut
2 or 4 original pages can combine o
one page.
Shortcut
Bord er line
None
Soli d
Dotted
Bor ders
Up
Down
Paper Si ze
100%
BackComb ine
Paper Size
50%
Back
Select Original I
Dire ction.
Top Edge
11x8
11x8
11x8
Select the type of the lines to indicate page boundaries.
5
Place the originals in the document processor or on the platen and press the Start key.
6
If the original is placed on the platen, Scan next original(s) will be displayed. Place the next original
and press the Start key.
After scanning all originals, press [Scanning finished] to start copying.
1-17
Page 24
Copying Functions
½
½
m
½
Margin Mode
You can shift the original image to make space on the copy for binding on the left (right) or top
(bottom) side. The supported margin width is as follows.
Margin Width
Inch models 0 to 3/4" (in 1/8" increments)
Metric models 0 to 18 mm (in 1-mm increments)
Margin on the Back Side
When duplexing, you can also specify the margin on the back side.
Auto - When [Auto] is specified, the left and right margins on the front are reversed on the back. For
example, if the left margin on the front is 1/2" (10 mm), the right margin on the back will be 1/2"
(10 mm). The top and bottom margin widths on the back will match those on the front.
Separate Front/Back Margins - Enables you to specify the front and back settings separately.
NOTE: You can set the default margin width. Refer to Default Margin on page 3-15 for details.
Follow the steps as below to use the Margin mode.
Place the originals in the document processor or on the platen with the top edge facing either the
1
rear or the left side of the copier.
Press [Function].
2
Press [Margin/Centering]
3
([Margin/Imag.Shift]).
Press [Margin].
4
Use [S], [T], [W] and [X] to specify the
5
margins.
Ready to copy.
Sele ct
Paper Separation
Exposure Reduce
Mode / Enlar ge
Ori g.Image
Qual ity
Sort/
Offset
2 sided/
Mar g in /
Cente ring
Bord er
Erase Mode
User choiceBasi c
Ready to copy.
None
Mar g in
Auto
Cen ter
Ready to copy.
Mar g in /Ce nte r in g
None
Mar g in
Auto
Cen ter
Front page
(0
Left
Select
Orig.Size
Auto
Selection
Page #
Cov er
Function
(0
3
/4)
"
Combi ne
Batch
Scanning
Form
Ove rl ay
Booklet
Program
Shortcut
Reposition image to left/right or
top/bottom, and also center image
on paper.
Shortcut
3
/4)
"
Auto
Back page
marg in
Paper Si ze
11x8
100%
Up
Down
Paper Si ze
11x8
100%
BackMar g in /Ce nte r in g
Paper Si ze
11x8
100%
Back
Select Original I
Direction.
Top Edge
1-18
When duplexing, press [Back page margin].
6
Page 25
Copying Functions
m
½
Press [Auto] or [Front/Back margin].
7
[Auto] specifies the margin on the back
side automatically based on the front
margin.
If you choose [Front/Back margin], use
[S], [T], [W] and [X] to specify the
margins.
Specify the orientation of placed
8
originals.
Press the Start key to start copying.
9
Ready to copy.
Back page mar gin
Auto
Front/Back
marg in
to copy.
Back page
If "AUTO" is sele cted for duplex
copying, rear will have same margin
setti ng as tha t for the fro nt page .
3
/4)(0
"
3
/4)(0
"
Paper Si ze
11x8½"
100%
Back
Select Original Image
Dire ction.
Top Edge
Paper Si ze
100%
Back
Select Original I
Dire ction.
Top Edge
Set
Clo segin
Left Top
Edge
11x8
1-19
Page 26
Copying Functions
½
½
Centering Originals
When you copy onto paper larger than the original size, you can center the original image on the
paper.
Follow the steps as below for centering.
Place the originals in the document processor or on the platen with the top edge facing either the
1
rear or the left side of the copier.
Press [Function].
2
Press [Margin/Centering]
3
([Margin/Imag.Shift]).
Press [Auto Center] ([Image shift]).
4
Specify the orientation of the placed
5
originals.
Ready to copy.
Sele ct
Paper Separation
Exposure Reduce
Mode / Enlar ge
Ori g.Image
Qual ity
Sort/
Offset
Ready to copy.
None
Mar g in
Auto
Cen ter
to copy.
ng
2 sided/
Mar g in /
Cente ring
Bord er
Erase Mode
User choiceBasi c
Select
Orig.Size
Auto
Selection
Page #
Cov er
Function
Shortcut
Paper Si ze
100%
Combi ne
Batch
Scanning
Form
Ove rl ay
Booklet
Program
Shortcut
Reposition image to left/right or
top/bottom, and also center image
on paper.
Paper Si ze
100%
Back
Select Original Image
Dire ction.
11x8½"
Up
Down
Paper Si ze
100%
BackMar g in /Ce nte r in g
Set
Clo se
11x8
11x8
Press the Start key to start copying.
6
Able to center scanned i mage on pape r.
Top Edge
Left Top
Edge
1-20
Page 27
Border Erase
Copying Functions
Use this mode to prevent the appearance of shadows from around the edges of originals.
Choose from the following Border Erase modes.
• Sheet Border Erase - Use this mode to erase black borders around the single sheet original.
Originals Copies
• Book Border Erase - Use this mode to erase black borders around the edges and in the
middle of the original such as a thick books. You can specify the widths individually to erase the
borders around the edges and in the center of the book.
Originals Copies
• Separate Border Erase - Use this mode to specify border widths individually on all sides to
erase.
Originals Copies
In each mode, the range for the widths are as follows.
Width Range
Inch models 0 to 2" (in 1/8" increments)
Metric models 0 to 50 mm (in 1-mm increments)
NOTE: You can set the default width for erasing border. Refer to Erasing Borders on page 3-15 for
details.
1-21
Page 28
Copying Functions
½
½
½
½
1
2
Sheet Border Erase
Follow the steps as below to erase the black borders from around the edges of the single sheet
original.
Place the originals in the document processor or on the platen.
Press [Function].
Press [Border Erase] ([Erase Mode]).
3
Press [Sheet Erase] ([Border Erase]).
4
Press [+] and [-] to specify the border
5
width to erase.
With metric models, you can enter the
border width directly using the numeric
keys after pressing [#-Keys].
Ready to copy.
Sele ct
Paper Separation
Exposure Reduce
Mode / Enlar ge
Ori g.Image
Qual ity
Sort/
Offset
2 sided/
Mar g in /
Cente ring
Bord er
Erase Mode
User choiceBasi c
Ready to copy.
None
Sheet
Erase
Book
Erase
Individual
BordrErase
Ready to copy.
Bor der Er ase
None
Sheet
Erase
Book
Erase
Individual
BordrErase
Bord er
Select
Orig.Size
Auto
Selection
Page #
Cov er
Function
(0 2)
Combi ne
Batch
Scanning
Form
Ove rl ay
Booklet
Program
Shortcut
Erase the border shadow of original
or shadow from center of book.
Shortcut
"
Paper Si ze
Up
Down
Paper Si ze
BackBor der E ra se
Paper Si ze
Back
100%
100%
100%
11x8
11x8
11x8
1-22
Press the Start key to start copying.
6
Book Border Erase
Follow the steps as below to erase the black borders around the edges of original such as a book.
Place the originals in the document processor or on the platen.
1
Press [Function].
2
Press [Border Erase] ([Erase Mode]).
3
Ready to copy.
Sele ct
Paper Separation
Exposure Reduce
Mode / Enlar ge
Ori g.Image
Qual ity
Sort/
Offset
2 sided/
Mar g in /
Cente ring
Bord er
Erase Mode
User choiceBasi c
Select
Orig.Size
Auto
Selection
Page #
Cov er
Function
Combi ne
Batch
Scanning
Form
Ove rl ay
Booklet
Program
Paper Si ze
Up
Down
100%
11x8
Page 29
Copying Functions
½
½
½
Press [Book Erase].
4
Press [+] and [-] to specify the border
5
width to erase.
With metric models, you can enter the
border width directly using the numeric
keys after pressing [#-Keys].
Press the Start key to start copying.
6
Ready to copy.
None
Sheet
Erase
Book
Erase
Individual
BordrErase
Ready to copy.
Bor der E rase
None
Sheet
Erase
Book
Erase
Individual
BordrErase
(0 2) (0 2)
Bor der
""
Shortcut
Erase the border shadow of original
or shadow from center of book.
Shortcut
Cen ter
Separate Border Erase
Follow the steps as below to erase the black borders specifying the width of the borders individually.
Paper Si ze
BackBor der E rase
Paper Size
Back
100%
100%
11x8
8½x1
Place the originals in the document processor or on the platen with the top edge facing either the
1
rear or the left side of the copier.
Press [Function].
2
Press [Border Erase] ([Erase Mode]).
3
Press [Individual BordrErase]
4
([Individual Erase Mode]).
Specify the orientation of original.
5
Ready to copy.
Sele ct
Paper Separa tion
Exposure Reduce
Mode / Enlar ge
Ori g.Image
Qual ity
Sort/
Offset
Ready to copy.
None
Sheet
Erase
Book
Erase
Individual
BordrErase
to copy.
2 sided/
Mar g in /
Cente ri ng
Bor der
Erase Mode
User choiceBasi c
Shortcut
¼ " ¼ "
Top
Bottom
Sele ct
Orig.Size
Auto
Selection
Page #
Cov er
Function
Comb ine
Batch
Scanning
Form
Over lay
Book let
Progr am
Shortcut
Erase the border shadow of original
or shadow from center of book.
Paper Si ze Set
100%
Back
Select Original Image
Dire ction.
11x8½"
Paper Size
Up
Down
Paper Si ze
BackBor der E rase
Clo se
100%
100%
11x8
11x8
Individual
BordrErase
¼ " ¼ "
Left
Rig ht
Top Edge
Left Top
Edge
1-23
Page 30
Copying Functions
m
m
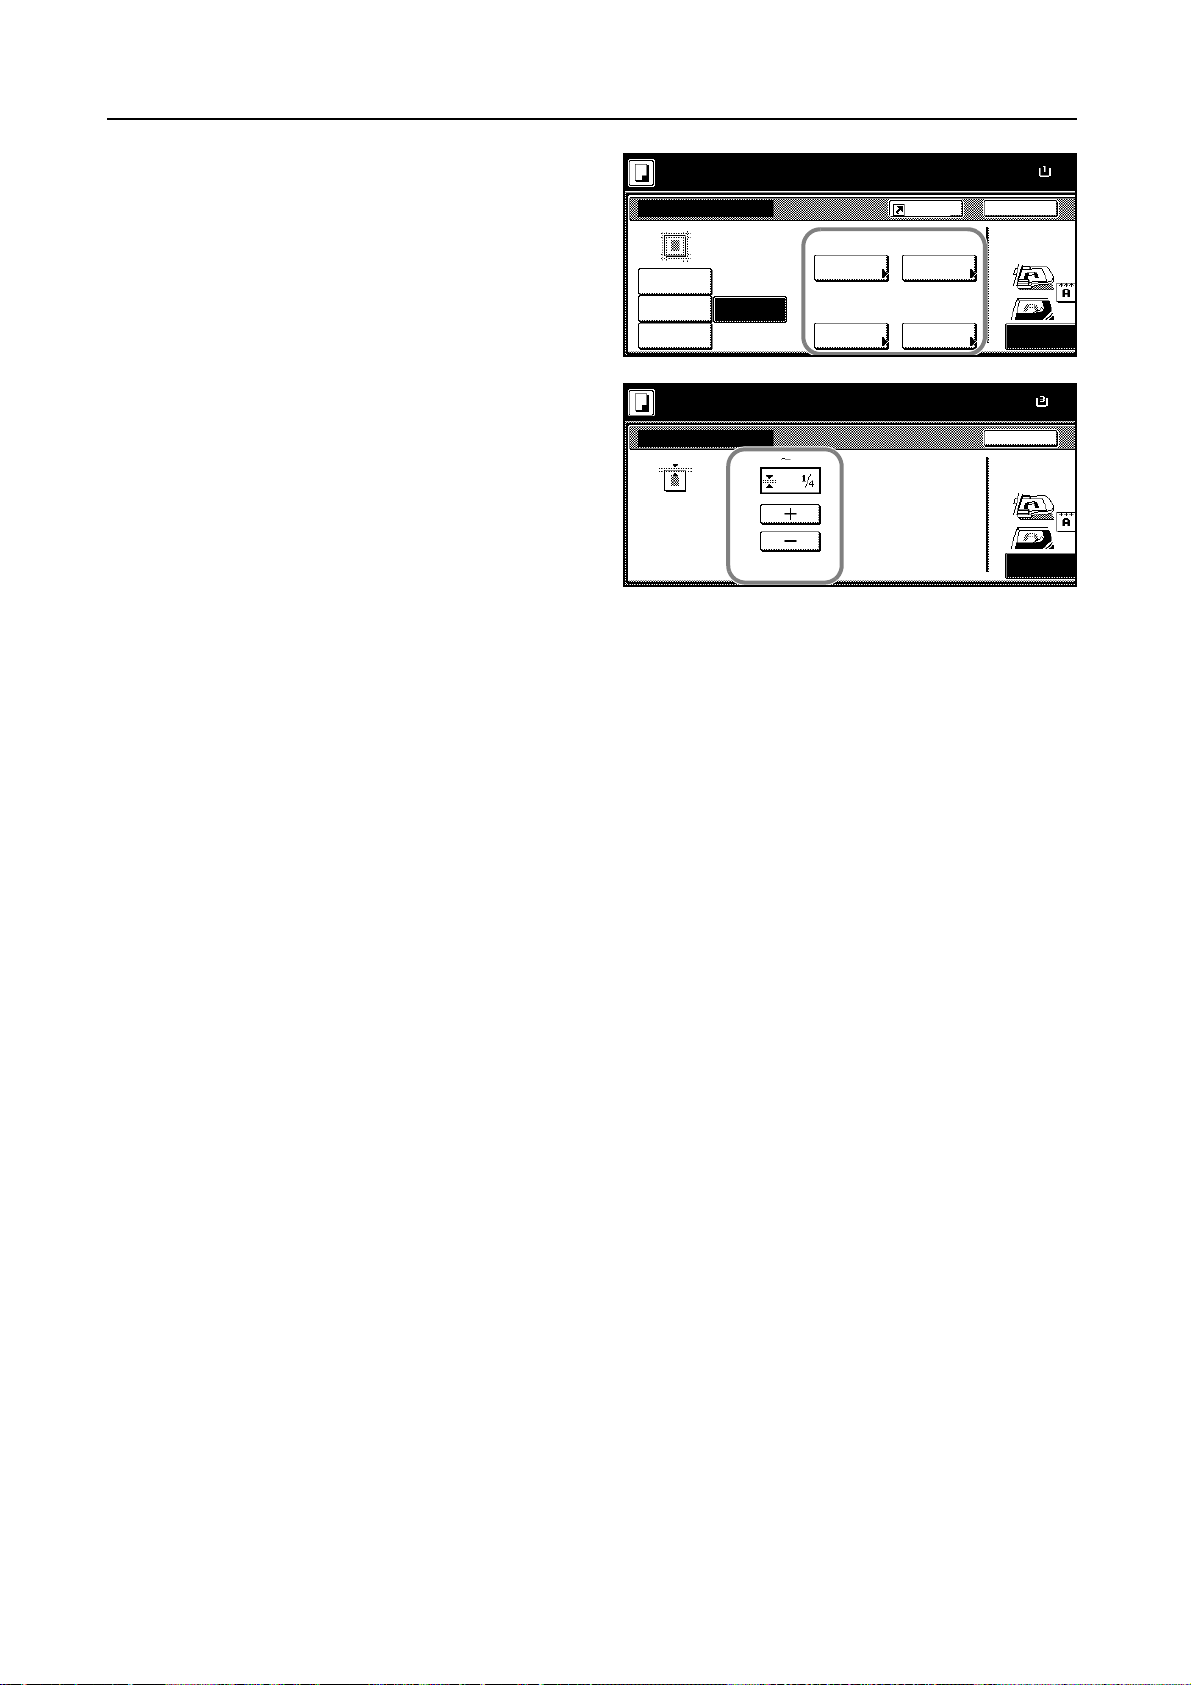
Select the border for which you will
6
specify the width to erase.
Press [+] or [-] to specify the border
7
width to erase.
With metric model, you can enter the
border width directly using the numeric
keys after pressing [#-Keys].
Press [Close]. To specify widths of other borders to erase, repeat steps 6 to 8.
8
Press the Start key to start copying.
9
Ready to copy.
Bor der Er ase
None
Sheet
Erase
Book
Erase
Individual
BordrErase
Ready to copy.
Indiv idual Border Erase
(0 2)
Top
¼ " ¼ "
Top
¼ " ¼ "
Left
"
Shortcut
Bottom
Ri ght
Paper Si ze
11x8
100%
Back
Select Original I
Direction.
Top Edge
Paper Si ze
8½x1
100%
Back
Select Original I
Direction.
Top Edge
1-24
Page 31

Page Numbering
½
½
o
½
m
Numbers the multiple pages of original in sequential order. The formats of numbering include: [-1-],
[P. 1], or [1/n]. The format [1/n] prints the total number of pages in the place of [n].
The page number will be centered at the bottom of the page.
Follow the steps as below for page numbering.
Place the originals in the document processor or on the platen with the top edge facing either the
1
rear or the left side of the copier.
Copying Functions
Originals [-1-] [P. 1] [1/n]
Press [Function].
2
Press [Page #] ([Page numbering]).
3
Select the numbering format.
4
To start page numbering from the page
5
other than the first page, press [Select
1st page] ([Setting 1st page]).
Ready to copy.
Sele ct
Paper Separa tion
Exposure Reduce
Mode / Enlar ge
Ori g.Image
Qual ity
Sort/
Offset
2 sided/
Mar g in /
Cente ri ng
Bor der
Erase Mode
User choiceBasi c
Ready to copy.
None
-1-
P.1
1/n
Ready to copy.
Page #
None
-1-
P.1
1/n
Sele ct
Orig.Size
Auto
Selection
Page #
Cov er
Function
Start Page # Start #
Sele ct
1st page
Finish Page #
Last page
Sele ct
last page
Comb ine
Batch
Scanning
Form
Over lay
Book let
Progr am
Shortcut
Page # can be added on bottom of c
Shortcut
Select
start #
Denomina tor #
Auto
Sel denominator #
Paper Size
11x8
100%
Up
Down
Paper Si ze
11x8
100%
BackPage #
Paper Si ze
100%
Back
Select Original I
Dire ction.
Top Edge
11x8
1-25
Page 32

Copying Functions
½
m
m
m
Press [+] or [-] to select the starting page
6
and press [Close].
To specify the starting a number other than 1, press [Select start #] ([Setting start page]).
7
Press [+] or [-] to select the starting
8
number and press [Close].
You can also enter the number with the
numeric keys after pressing [# keys]
Ready to copy.
(1 10)
Page
Ready to copy.
Sele ct start #
(1 999)
([#-Keys]).
# ke ys
To specify the page to end numbering, press [Select last page] ([Setting last page]).
9
Press [Manual].
10
Ready to copy.
Select la st page
Auto
Man ua l
Paper Si ze
11x8
100%
BackSelect 1st page
Sele ct Origina l I
Direction.
Top Ed ge
Paper Si ze
11x8
100%
Back
Select Original I
Direction.
Top Edge
Paper Si ze
11x8
100%
Back
Select Original I
Direction.
Top Edge
Press [+] or [-] to select the ending page
11
and press [Close].
Follow the step 12 to 14 when specifying
the denominator for [1/n]. If not, go to the
step 15.
To specify the total number of pages for the format [1/n], press [Select denominator #] ([Set
12
Ready to copy.
(0 -10)
Page
Auto
Man ua l
Denomin. #]).
Press [Manual].
13
Ready to copy.
Sele ct denominator #
Auto
Man ua l
Paper Si ze
11x8
100%
BackSelect last page
Sele ct Origina l I
Direction.
Top Ed ge
Paper Si ze
11x8
100%
Back
Select Original I
Direction.
Top Edge
1-26
Page 33

Copying Functions
m
½
Press [+] or [-] to select the total number
14
of pages and press [Close].
You can also enter the number with the
numeric keys after pressing [# keys]
Ready to copy.
Select denominator #
(1 999)
([#-Keys]).
Auto
Man ua l
# keys
Specify the orientation of the original.
15
Press the Start key.
16
to copy.
P.1
1/n
Start Page # Start #
Sele ct
1st page
Finish Page #
Last page
Sele ct
last page
Shortcut
Select
start #
Denomina tor #
Auto
Sel denominator #
Paper Si ze Set
Back
Select Original Image
Dire ction.
Top Edge
If the original is placed on the platen, Scan next original(s) will be displayed. Place the next original
and press the Start key.
After scanning all originals, press [Scanning finished] to start copying.
100%
11x8½"
Paper Si ze
100%
Back
Select Original I
Dire ction.
Top Edge
Clo se
Left Top
Edge
11x8
1-27
Page 34

Copying Functions
Cover Mode
Copies the first page and/or the last page onto colored paper or thick paper which is fed from other
paper source that the normal paper source.
Front Cover
Originals Duplex Copy on front side
Back Cover
Originals Duplex Copy on front side
You can select not to print the first page and/or last page so that the cover is blank for both one side
and duplex printing.
Front Cover
Originals Copy on back side Blank
Back Cover
1-28
Originals Copy on back side Blank No back cover
Page 35

Copying Functions
½
½
Adding the back cover is optional.
The paper source to supply the paper for the cover is specified using the system menu. Refer to
Specifying Cassette for Cover Paper on page 3-9.
Thick or transparency must be supplied from the MP tray.
IMPORTANT: During one-sided copying, duplexing and copying on the back of covers are not
available even if specified. Only the front side of the cover will be copied.
Follow the steps as below for adding cover.
Place the originals in the document processor or on the platen.
1
Press [Function].
2
Press [Cover Mode].
3
Press [Add Cover] and complete the
4
front cover settings.
Ready to copy.
Sele ct
Paper Separa tion
Exposure Reduce
Mode / Enlar ge
Ori g.Image
Qual ity
Sort/
Offset
2 sided/
Mar g in /
Cente ri ng
Bor der
Erase Mode
User choiceBasi c
Ready to copy.
Front cover
No cover
Add Co ver
Bla nk
Front copy
Setting Description
[Blank] Both the front and back covers are blank.
[Front copy] Copied on the front cover.
[Back copy] Copied on the back cover.
[2 sided copy] Copied on both the front and back covers.
Sele ct
Orig.Size
Auto
Selection
Page #
Cov er
Function
Back copy
2 sided
copy
Comb ine
Batch
Scanning
Form
Over lay
Book let
Progr am
Shortcut
No cover
Add Cover
Paper Size
Up
Down
Paper Si ze
BackCov er Mod e
100%
100%
11x8
11x8
For the back cover, press [Add Cover] or
5
[No cover] as desired.
If you press [Add Cover], complete the
back cover settings.
Press the Start key.
6
to copy.
Bla nk Ba ck copy
Front copy
2 sided
copy
Shortcut
Rea r co ver
Add Co ver
Back
Bla nkNo cover
Front copy
100%
11x8½"
If the original is placed on the platen, Scan next original(s) will be displayed. Place the next original
and press the Start key.
After scanning all originals, press [Scanning finished] to start copying.
SetPaper Si ze
Back copy
2 sided
copy
Clo se
1-29
Page 36

Copying Functions
½
½
m
e
½
f
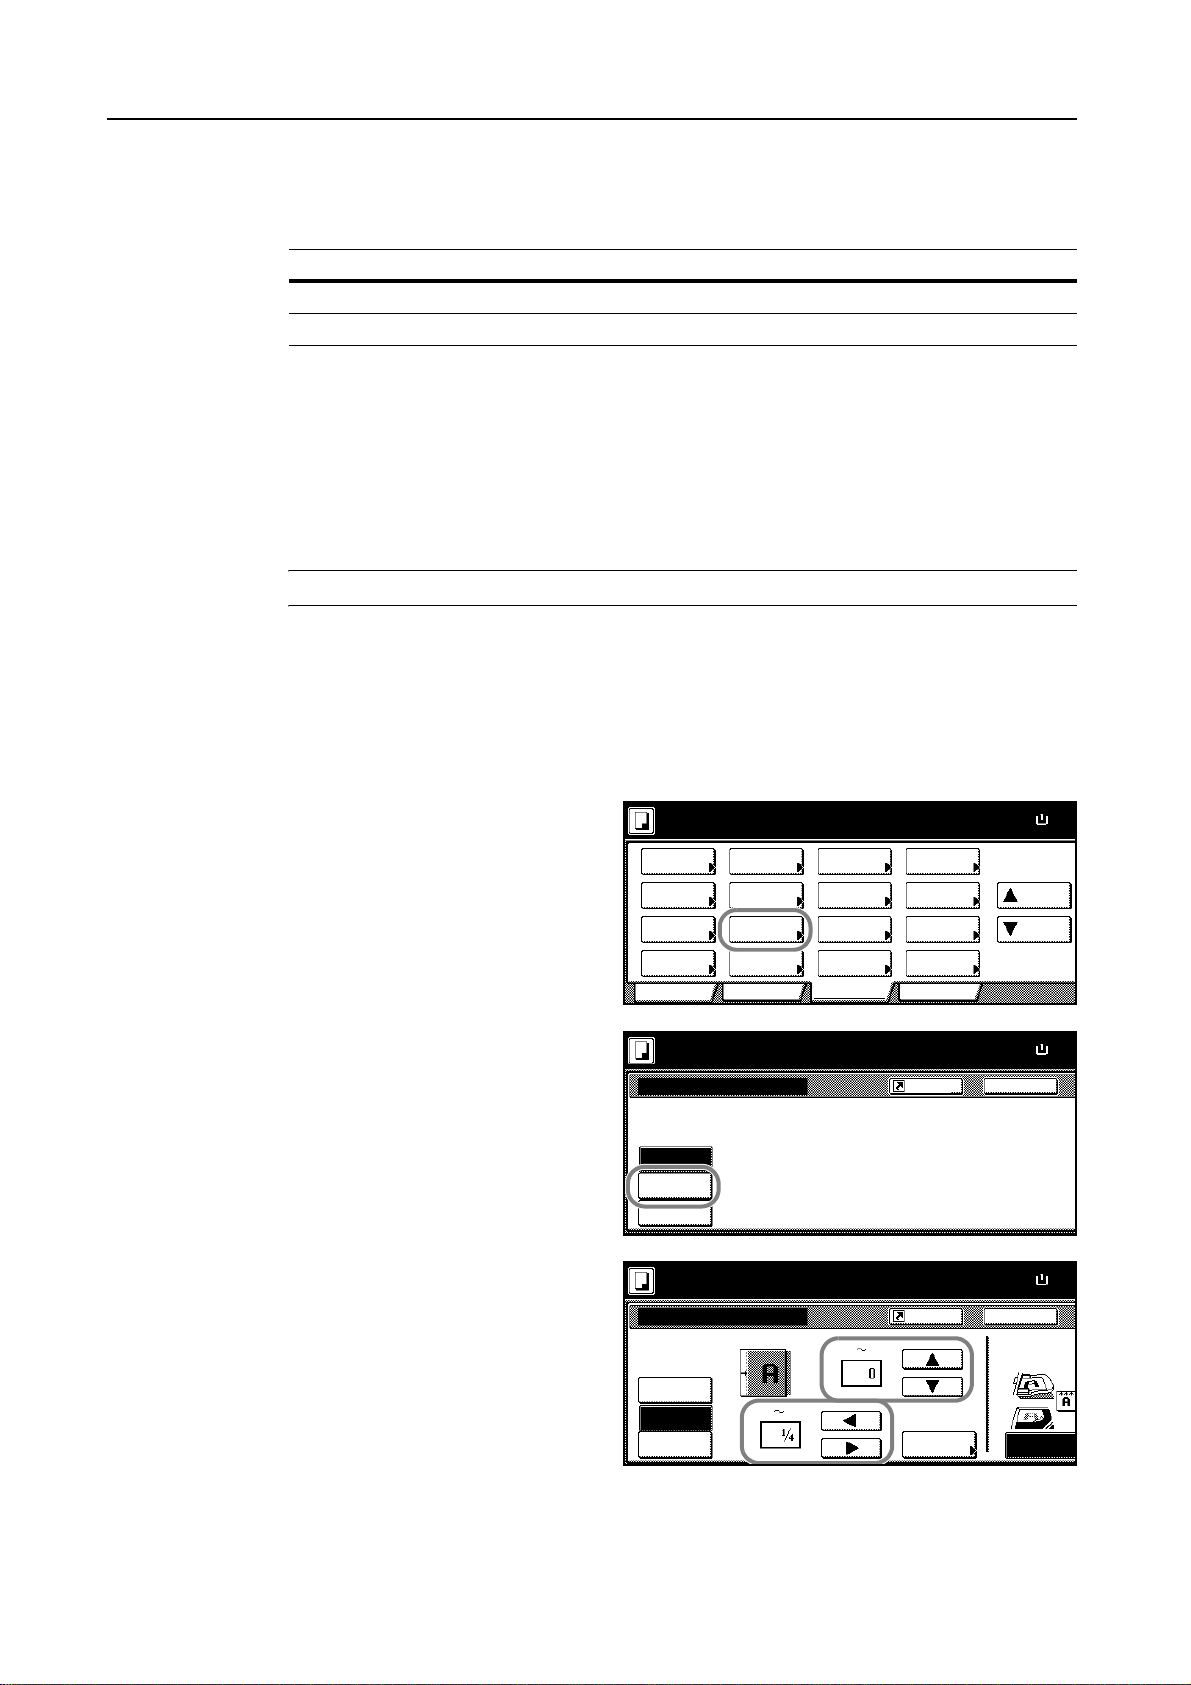
Form Overlay
1
Copy the original images onto the form. Once you scan
and register the form, the scanned original is overlayed
onto the form.
NOTE: To register the form, refer to Form Box on
page 2-2.
Follow the steps as below for form overlay.
Press [Function].
Originals CopiesForms
Press [Form Overlay].
2
Press [On].
3
Press [+] or [-] to adjust the exposure of
4
the form. Choose from ten levels in 10 %
increments.
A sample copy image is displayed at
right.
Ready to copy.
Sele ct
Paper Separation
Exposure Reduce
Mode / Enlar ge
Ori g.Image
Qual ity
Sort/
Offset
2 sided/
Mar g in /
Cente ring
Bord er
Erase Mode
User choiceBasi c
Ready to copy.
Off
On
Place form first then press Start.
Form Overlay
Exposure
Off
On
Select
Orig.Size
Auto
Selection
Page #
Cov er
Function
Combi ne
Batch
Scanning
Form
Ove rl ay
Booklet
Program
Shortcut
Use the first scanned image as a for
for copy after second original imag
Shortcut
Scan new form
Form
Sele cted
Paper Si ze
Up
Down
Paper Si ze
BackForm Overlay
Paper Si ze
Back
100%
100%
100%
11x8
11x8
11x8
1-30
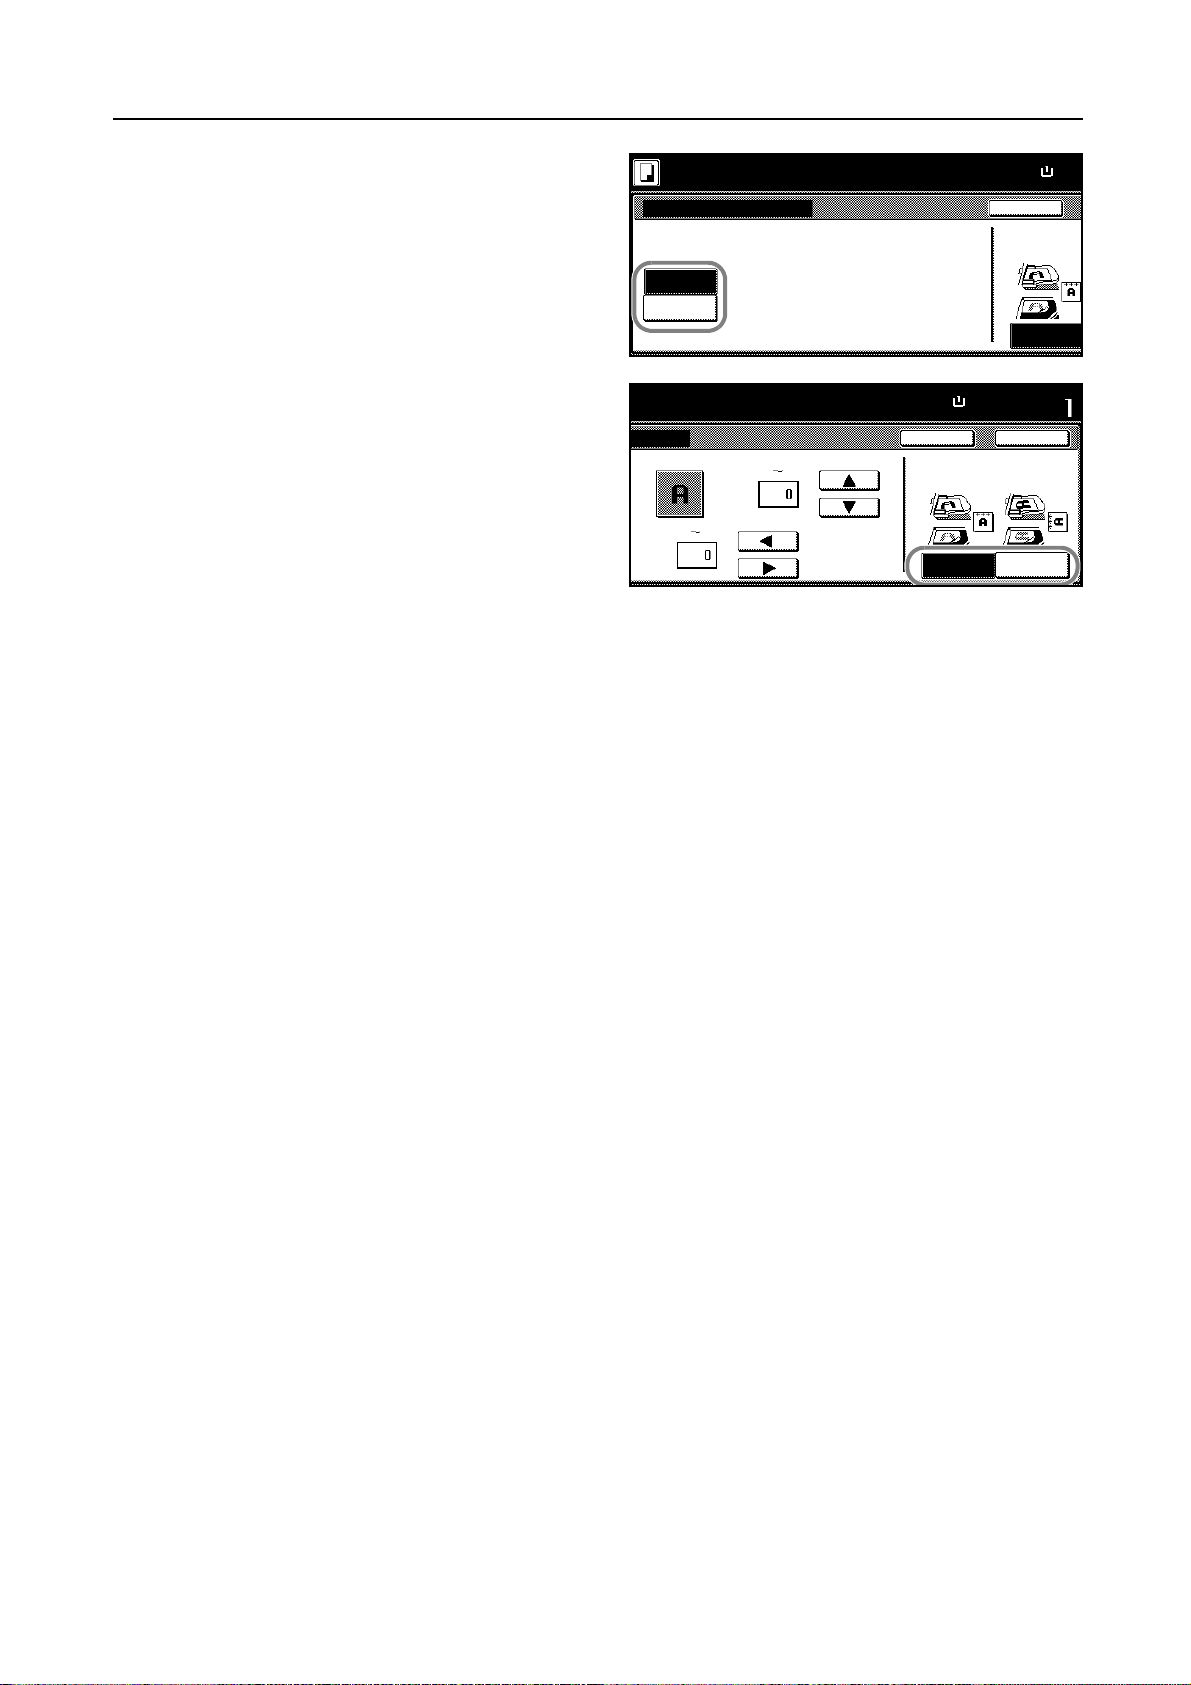
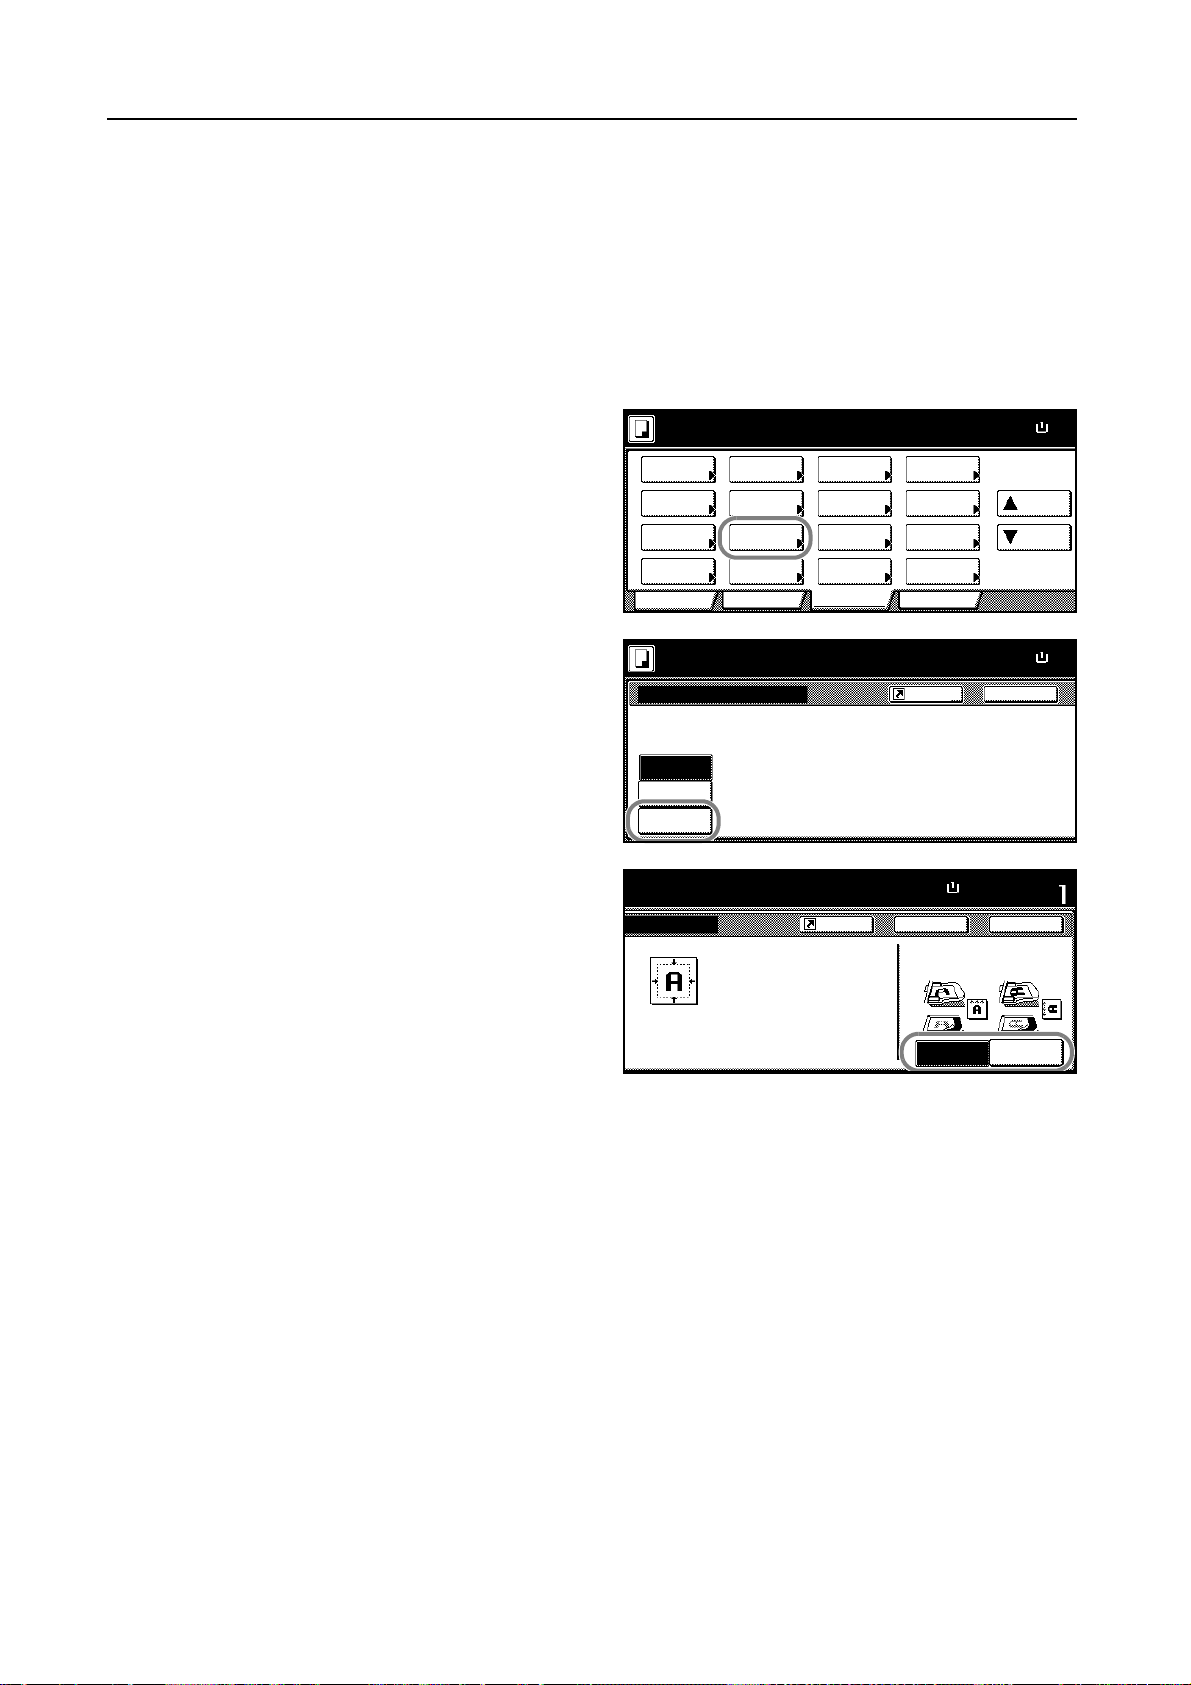
To use forms already registered, press [Form Selected] ([Form Selection]) and proceed to the step
5
6.
To scan new forms, move to step 8.
Press [Select Stored Frm] ([Loading
6
Form]).
Sca n new
form
Selec t
Store d Frm
Overlay fir st sc anned image onto
the scanned image or on registered
BackSelec t F orm
Page 37

Copying Functions
Select the form from the list and press
7
[Close].
Place the original for the form on top of the other originals.
8
When using the platen, place the original for the forms first.
Press the Start key.
9
When the original is placed on the platen, Place originals then press Start key (Set original. Press
Start key) will be displayed. Place the next original and press the Start key.
Form
Form003
Form002
Form001
The arrow means direction of registered form.
Set original and form directions.
8½x11"
8½x11"
8½x11"
------
------
dpi
Back
Up
Down
Clo se
1-31
Page 38

Copying Functions
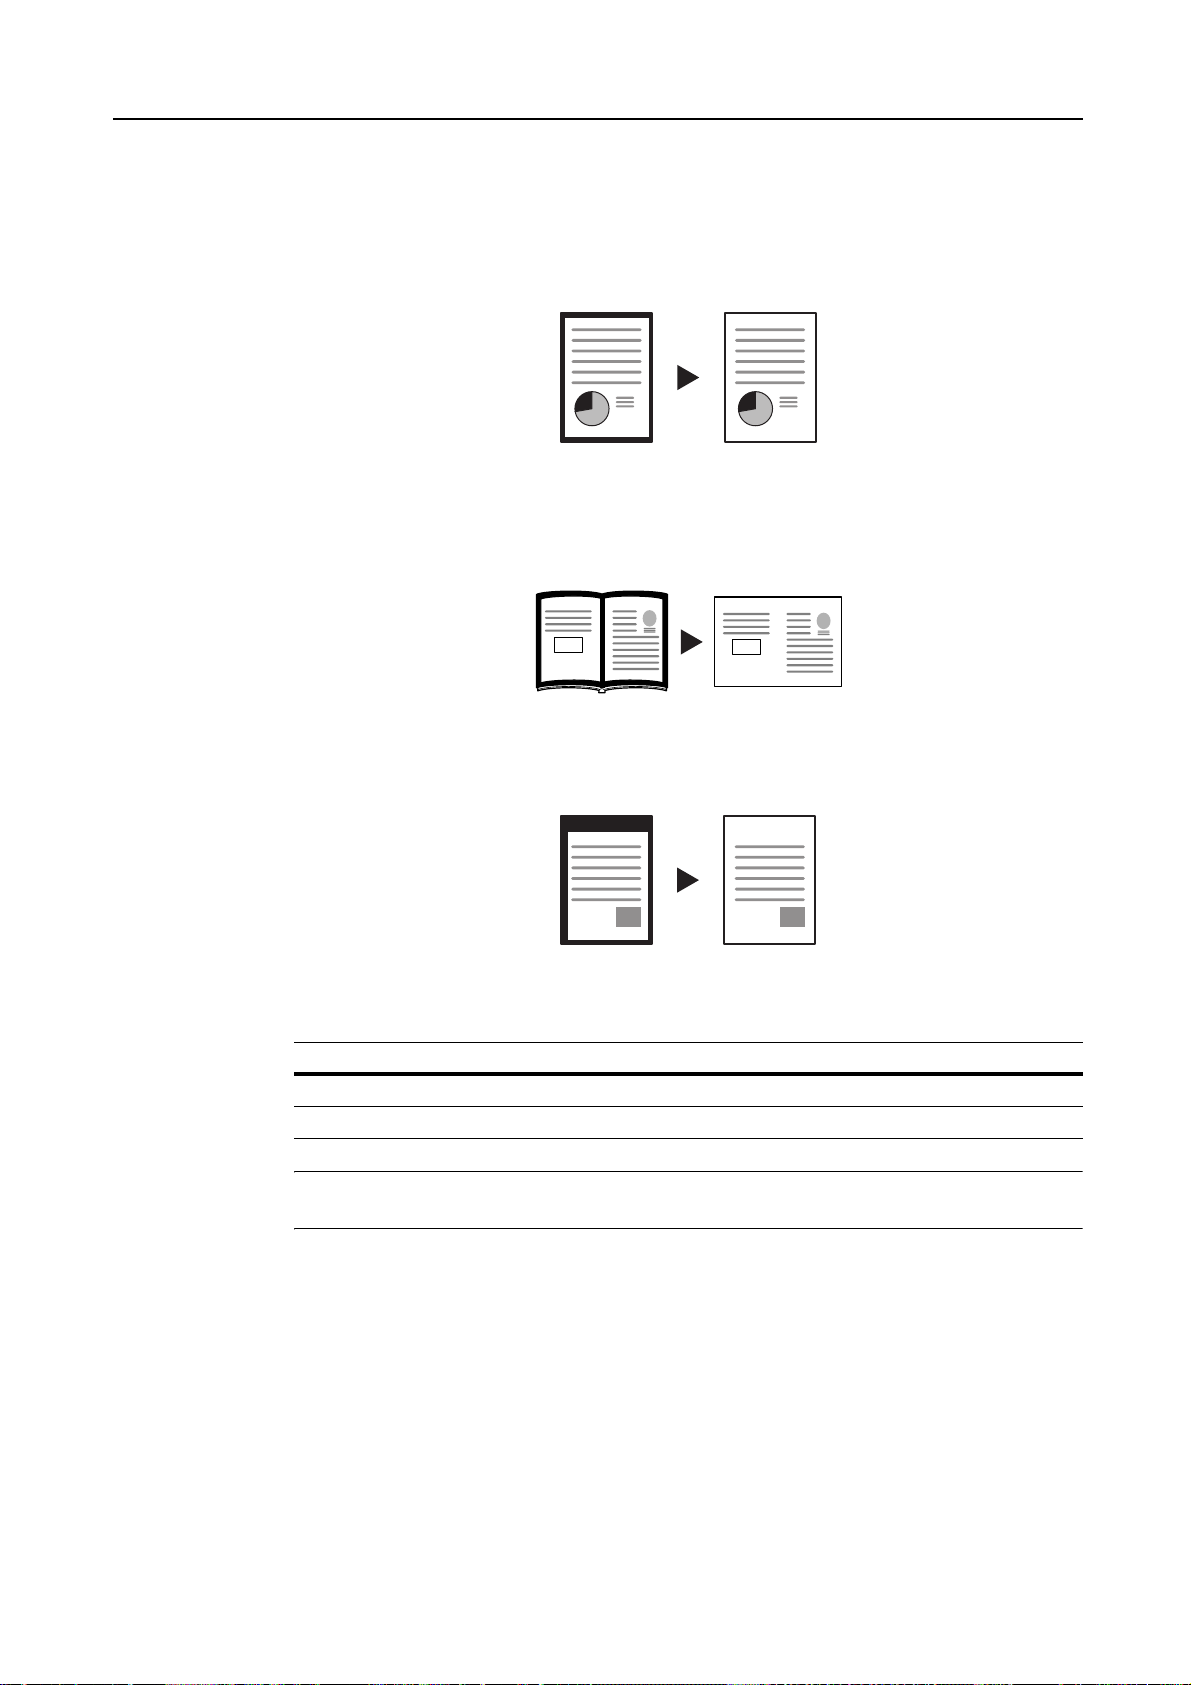
Booklet from Sheets
Delivers booklet of two-sided copies with facing pages from one-sided or two-sided originals.
Booklet, such as a magazine, is available by folding at the center. You can copy the cover page onto
colored paper or thick paper.
The paper source to supply the paper for the cover is specified using the system menu. Refer to
Specifying Cassette for Cover Paper on page 3-9.
NOTE: The supported paper sizes are as follows.
Supported Paper Sizes
Inch models 11 × 17", 8
Metric models A3, B4, A4, A4R, B5 and B5R
If your copier is equipped with the optional document finisher, you can staple the booklet in the
center margin. If the copier is also equipped with a folding unit, you can combine a center margin
with folding at the center. The following paper sizes are supported when stapling the center margin
or combining a center margin with center folding.
Supported Paper Sizes
Inch models 11 × 17", 8 1/2 × 14" and 8 1/2 ×11"
Metric models A3, B4 and A4R
1/2 ×14", 11×8 1/2" and 8 1/2 ×11"
For binding on the left side
The folded copies can be read from left to right.
Originals Copies
For binding on the right side
The folded copies can be read from right to left.
Originals Copies
1-32
Page 39

Copying Functions
½
For top binding
The folded copies can be read from top to bottom.
Originals Copies
Specifying a booklet cover
When using colored paper or thick paper for front or back covers, you can specify how to copy.
Front Cover
Originals No copying Copy on
outside
Back Cover
Originals No copying Copy on
outside
NOTE: The figures shown above are an example of binding on the left.
Follow the steps as below for booklet.
Press [Function].
1
Press [Booklet].
2
Ready to copy.
Sele ct
Paper Separa tion
Exposure Reduce
Mode / Enlar ge
Ori g.Image
Qual ity
Sort/
Offset
2 sided/
Mar g in /
Cente ri ng
Bor der
Erase Mode
User choiceBasi c
Copy on
inside
Copy on
inside
Sele ct
Orig.Size
Auto
Selection
Page #
Cov er
Function
Comb ine
Batch
Scanning
Form
Over lay
Book let
Progr am
Duplexing
Duplexing
Paper Size
100%
Up
Down
11x8
1-33
Page 40

Copying Functions
½
7
m
7
p
7
Press [Booklet].
3
Specify the binding direction of both the
4
originals and finished copies.
If the message It is impossible to copy in
present setting mode. Change setting of
original and finishing mode is displayed,
confirm that you are selecting the correct
original orientation (shown at the right of
the touch panel) and the proper settings
for the original and finished copies.
If the copier is equipped with the optional document finisher, [Saddle Stitch] ([Center Staple]) will be
5
Ready to copy.
None
Book let
Book
Booklet
2 sided mode.
Book let
None
Book let
Book
Book let
Ori ginal
1 sided
2-sided
Left/Right
2-sided
Top/Bo ttom
Shortcut
Edit one or two sided original pages
and output a Book.
Use Book Booklet for book ori ginal
Finished Stitching
Open fr om
Open fr om
Open fr om
right
Open fr om
top
Shortcut
Stitching
Front cv rleft
Saddle
Stitch
Off
None
displayed and you can specify center margin stapling. If the copier is also equipped with a folding
unit, you can specify folding along the center of copies where the center margin is stapled. To
specify center margin stapling or a center margin with center folding, press [Saddle Stitch] ([Center
Staple]) and follow these steps.
Paper Si ze
11x8
100%
BackBook let
Paper Si ze
11x1
100%
Back
Select Original I
Direction.
Top Edge
To skip these settings, move to step 7.
Select [Saddle stitch] or [Bind & Fold]
6
and press [Close]. Up to 16 sheets
2 sided mode.
(64 pages) can be accomplished with
center margin stapling or with center
margin stapling and center folding.
Off
Saddle
stitch
Bin d &
Fold
To set up a cover, press [Stitching Front Cvr] ([Stitching Front cov.]) and move to the next step.
7
To skip the cover settings, move to step 9.
Press [Cover] and specify whether or not
8
to copy on the front and back covers.
2 sided mode.
Press [Close].
No cover
Cov er
Copy onto different medi a for
fro nt/ba ck cov er.
Please specify drawer for Cover
Paper Si ze
BackSaddle Stitch
Paper Si ze
BackStitching Front Cvr
100%
100%
11x1
11x1
1-34
Place the originals in the document processor or on the platen and press the Start key.
9
NOTE: When using the platen, be sure to place the originals in page order.
If the original is placed on the platen, Scan next original(s) will be displayed. Place the next original
and press the Start key.
After scanning all originals, press [Scanning finished] to start copying.
Page 41

Booklets from Facing Pages
Delivers booklets, such as a magazine, by adding front and back covers (with or without copying).
The paper source to supply the paper for the cover is specified using the system menu. Refer to
Specifying Cassette for Cover Paper on page 3-9.
NOTE: The supported original sizes and paper sizes are as follows.
Inch models 11 × 17" and 8 1/2 ×11" 11×17", 81/2 × 14", 11 × 8 1/2" and
Metric models A3, B4, A4R, B5R, A5R and 8K A3, B4, A4, A4R, B5 and B5R
If your copier is equipped with the optional document finisher, you can staple the booklet in the
center margin. If the copier is also equipped with a folding unit, you can combine a center margin
with folding at the center. The following paper sizes are supported when stapling the center margin
or combining a center margin with center folding.
Inch models 11 × 17", 8
Metric models A3, B4 and A4R
Copying Functions
Original Size Paper Size
8 1/2 ×11"
Supported Paper Sizes
1/2 × 14" and 8 1/2 ×11"
Copying on covers
The original for the cover is scanned first. When the finished copies are folded, that page will be
copied onto the front and back covers.
Originals Copies
Blank covers
When the finished copies are folded, both the front and back covers will be blank.
Originals Copies
Follow the steps as below for this kind of booklet.
Place the originals and press [Function].
1
1-35
Page 42

Copying Functions
½
½
r
t
7
7
r
t
7
Press [Booklet].
2
Press [BookJBooklet].
3
Specify the binding direction of both the
4
originals and finished copies.
Ready to copy.
Sele ct
Paper Separation
Exposure Reduce
Mode / Enlar ge
Ori g.Image
Qual ity
Sort/
Offset
2 sided/
Mar g in /
Cente ring
Bord er
Erase Mode
User choiceBasi c
Ready to copy.
None
Book let
Book
Booklet
Set first page.
Press "Start" key.
Booklet
None
Book let
Book
Booklet
Original Finished Copy front
Book
Left
Book Open f ro m
Ri ght
Select
Orig.Size
Auto
Selection
Page #
Cov er
Function
Open fr om
left
right
Paper Si ze
100%
Combi ne
Batch
Scanning
Form
Ove rl ay
Booklet
Program
Shortcut
Edit one or two sided original pages
and output a Book.
Use Book Booklet for book ori ginal
Shortcut
Off
Copy on
fro nt cvr
None
Saddle
Stitch
Up
Down
Paper Si ze
100%
BackBook let
Paper Si ze
100%
Back
Set th e bo ok o
top side direct
11x8
11x8
11x1
If the copier is equipped with the optional document finisher, [Saddle Stitch] ([Center Staple]) will be
5
displayed and you can specify center margin stapling. If the copier is also equipped with a folding
unit, you can specify folding along the center of copies where the center margin is stapled. To
specify center margin stapling or a center margin with center folding, press [Saddle Stitch] ([Center
Staple]) and follow these steps.
To skip these settings, move to step 7.
Select [Saddle stitch] or [Bind & Fold]
6
and press [Close]. Up to 16 sheets
Set fi rst p age .
Press "Start" ke y.
(64 pages) can be accomplished with
center margin stapling or with center
margin stapling and center folding.
Off
Saddle
stitch
Bin d &
Fold
To set up a cover, press [Copy on front cvr] ([Copy on front cov.]) and proceed to the next step.
7
For a blank cover, move to step 9.
Press [On] and then [Close].
8
NOTE: When you copy onto the
Set first page.
Press "Start" key.
Copy on front cover
covers, be sure to set the original that
you want to have copied onto the cover
first.
Off
On
When selecting "ON" for copying on the
fr on t cov er, foll ow the i nstr uctio n.
1.Scan front cover book or iginal.
2.Start scan book origi nals.
Paper Si ze
100%
BackSaddle Stitch
Paper Si ze
100%
Back
Set th e bo ok o
top side direct
11x1
11x1
1-36
Page 43

Press the Start key to start scanning the original.
9
Scan next original(s) is displayed. Place the next original and press the Start key.
After scanning all originals, press [Scanning finished] to start copying.
Copying Functions
1-37
Page 44

Copying Functions
Memo Mode
Delivers copies with a space for adding notes. You can also copy two originals onto the same sheet
with a space.
NOTE: Memo mode is available for the copy paper sizes of A3, B4, A4, A4R, B5, B5R, 11 × 17",
11 × 8 1/2", 8 1/2 × 11", 8K and 16K.
Layout A
Reduces images of each original page for copying onto half of a page, leaving the other half blank
for notes.
Originals Copies
Layout B
Reduces images of two original pages for copying onto half of a single page, leaving the other half
blank for notes.
Originals Copies
Types of Page Boundary Lines
Choose from the following options for lines to indicate page boundaries.
1-38
None Dotted LineSolid Line Mark or
Follow the steps as below for Memo mode.
Press [Function] and then [T Down].
1
Cropmark
Page 45

Copying Functions
½
½
½
Press [Memo Pages].
2
Press [Layout A] or [Layout B].
3
Select the layout.
4
Ready to copy.
Auto
Rotati on Back ing
EcoPri nt
Rep ea t
Copy
OHP
Ori g. Set
Direction
Sele ct of
Output
User choiceBasi c
Ready to copy.
None
Layout A
Layout B
Ready to copy.
None
Layout A
Man ua l
Layout B
Layout
Proof Copy
Invert
Staple
/Punch
Function
Paper Size
Mem o
Pages
Mirror
Image
Multi-Page
Form
Progr am
Shortcut
Reduce original to create area
for taki ng notes.
Shortcut
Bord er line
None
Solid
Dotted
Bord ers
Up
Down
Paper Si ze
BackMem o Pa ges
Paper Si ze
BackMem o Pa ges
Select Original I
Dire ction.
Top Edge
100%
100%
50%
11x8
11x8
11x8
Select the page boundary line.
5
Place the originals in the document processor or on the platen and press the Start key.
6
If the original is placed on the platen, Scan next original(s) will be displayed. Place the next original
and press the Start key.
After scanning all originals, press [Scanning finished] to start copying.
1-39
Page 46

Copying Functions
½
½
s
Batch Scanning
1
Scans multiple originals for a single copy job without using the document processor. You can also
prepare single copy jobs if there are too many originals to place at once when using the document
processor. Divide the original into smaller sets and scan each set with the document processor. In
Batch Scanning mode, you can continue scanning originals until you press [Scanning finished].
Follow the steps as below to use batch scanning.
Press [Function].
Press [Batch Scanning].
2
Press [On].
3
Place the originals in the document processor or on the platen and press the Start key.
4
Ready to copy.
Sele ct
Paper Separation
Exposure Reduce
Mode / Enlar ge
Ori g.Image
Qual ity
Sort/
Offset
2 sided/
Mar g in /
Cente ring
Bord er
Erase Mode
User choiceBasi c
Ready to copy.
Off
On
Select
Orig.Size
Auto
Selection
Page #
Cov er
Function
Combi ne
Batch
Scanning
Form
Ove rl ay
Booklet
Program
Shortcut
Copy ima ges fr om Do cument Pr oces
platen for output as one job.
Place the next original and press the Start key. Repeat these steps to scan the remaining originals.
After scanning all originals, press [Scanning finished] to start copying.
Paper Si ze
Up
Down
Paper Si ze
BackBatch Scanning
100%
100%
11x8
11x8
1-40
Page 47

Proof Mode
½
½
f
Copying Functions
Delivers a single copy of a high-volume copy job to check before approving the job. If there are any
problems with the copy, simply cancel the job to avoid wasting paper.
Follow the steps as below to check a single copy in a job.
Press [Function] and then [T Down].
1
Press [Proof Copy] ([Test Copy]).
2
Press [On].
3
Place the originals in the document processor or on the platen. Press the Start key to deliver a test
4
Ready to copy.
Auto
Rotati on Back ing
EcoPri nt
Rep ea t
Copy
OHP
Ori g. Set
Direction
Sele ct of
Output
User choiceBasi c
Ready to copy.
Off
On
Proof Copy
Invert
Staple
/Punch
Function
Mem o
Pages
Mirror
Image
Multi-Page
Form
Progr am
Shortcut
Proof copy outputs one set for proofi
copy.
After delivering the test copy, the
5
confirmation screen will be displayed.
The copier will remain in standby mode
until the job is approved or cancelled.
Check the test copy.
If it is acceptable, press the Start key to
deliver the specified quantity.
copy .
retry, press "Cancel" key.
to pr int, pr ess "S tart" k ey.
APS
Count/Set
11x8½"
1 sided
Sort
Plain
Output
Left tray
Cha nge
Preset
To change the copy quantity, press
[Change Preset].
Paper Size
Paper Si ze
BackProof Copy
Cance l
Up
Down
100%
100%
11x8
11x8
If there is a problem with the copy, press [Cancel] to redo the copy settings.
1-41
Page 48

Copying Functions
½
½
Repeat Copy
Enable additional copies in the desired quantity as necessary after a copy job is completed. For
confidential documents, you can set up a pass code for the use of Repeat Copy. In such a case, the
correct pass code must be entered when using Repeat Copy or copies will not be delivered.
NOTE: Repeat Copy job is cleared when the main power switch is turned off.
Repeat Copy cannot be selected when using document management functions or for copies with
form overlay.
Repeat Copy is not available when the copier is equipped with the optional security kit.
Depending on your needs, you can disable repeat copying or specify as the default mode. Refer to
Enabling Repeat Copy on page 3-16.
Preparing a Job for Repeat Copy
Follow the steps as below to prepare a job for repeat copies as needed.
Press [Function] and then [T Down].
1
Press [Repeat Copy].
2
Press [On].
3
For confidential jobs, press [# keys]
([#-Keys]) and enter the pass code.
NOTE: Enter the pass code from 1 to 8
digits.
If you forget the pass code, Repeat
Copy will be unavailable. Take note if
Ready to copy.
Auto
Rota tio n Back ing
EcoPri nt
Rep ea t
Copy
OHP
Ori g. Set
Dire ction
Select of
Output
User choiceBasi c
Ready to copy.
Off
On
Proof Copy
Invert
Staple
/Punch
Function
Mem o
Pages
Mi rr or
Image
Multi-Page
Form
Program
Shortcut
Repeat copy allows sets to be saved
to the HDD.
Using Repeat Copy function,
jobs can be recal led and output.
Indiv idual passwords can be set.
necessary.
Place the originals in the document processor or on the platen. Press the Start key to start copying
4
and register this job as a Repeat Copy job.
Paper Si ze
Up
Down
Paper Si ze
BackRep eat Cop y
100%
100%
11x8
11x8
1-42
Page 49

Outputting Repeat Copy Jobs
Press the Repeat Copy key to list the Repeat Copy jobs and review the list of registered jobs. You
can view, print, and delete registered jobs.
Re-Printing Jobs
Follow the steps as below to output Repeat Copy jobs again.
Press the Repeat Copy key.
1
Select the job to repeat and press
2
[Reprint].
Copying Functions
Rep eat Cop y
Job U ser Origina l Se t Type
Reg istr ati on
Norm. Copy
Norm. Copy
The input screen will be displayed if you
have specified a pass code. Use the
numeric keys to enter the pass code and
press [Enter].
Press [+] or [-] or use the numeric keys
3
to enter the copy quantity.
Press [Printing] to start printing.
4
Repeat Copy
-print code.
Reprint
Clear
Rep ri nt
(Enter by #key )
Delete
Check
Details
Stop
Enter
Set
1-43
Page 50

Copying Functions
1
2
Reviewing Jobs
Follow the steps as below to check the registered Repeat Copy jobs.
Press the Repeat Copy key.
Select the job to review and press
[Check Details].
User Original Set Type
End
Reg istr ati on
Norm. Copy
Norm. Copy
An input screen will be displayed if you
specified a pass code. Use the numeric
keys to enter the pass code and press
[Enter].
Check the job. Press [Print from 1st]
3
([Head Print]) to print the first page for
reviewing.
After reviewing the job, press [Close].
4
To review other jobs, repeat steps 2 to 4.
-print code.
Che ck D etai ls / Rep ri nt
User name
Job name
Ori g. Page
Set
Print size
Input Source
Reg istr ati on D ate
Output
Job
Item
Rep ri nt
Clear
Delete
(Enter by #key )
8½x11"
Copy
Left Tray
Details
Check
Details
Enter
Print
fro m 1st
Stop
1-44
Press [End] to display the [Basic] screen.
5
Page 51

Deleting Repeat Copy Jobs
Follow the steps as below to delete registered Repeat Copy jobs.
Press the Repeat Copy key.
1
Select the job to delete and press
2
[Delete].
Rep eat Cop y
Job U ser Or igi nal Set Type
Copying Functions
Reg istr ati on
Norm. Copy
Norm. Copy
Press [Yes] to delete the selected job.
3
To delete other jobs, repeat steps 2 and 3.
Press [End] to display the [Basic] screen.
4
Repeat Copy
Rep ri nt
Delete
Check
Details
1-45
Page 52

Copying Functions
Backing Sheets for Transparencies
When two or three transparencies are stacked on top of each other, static electricity may cause
them difficult to handle. This mode automatically inserts a backing sheet between transparencies for
easier handling. You can copy the same image onto the backing sheet or make multiple copies from
the original.
NOTE: Always use the MP tray when copying onto transparencies.
When installing the optional document finisher, you may need to specify the output destination for
finished copies. For instructions, refer to Selecting Output Destination on page 3-29.
Copying on Backing Sheets
Copies the same image as the transparency onto the backing sheet. (In the figure, the asterisk
indicates transparencies.)
1
*
1
2
3
1
2
*
2
3
*
3
Originals Copies
Blank Backing Sheets
Supplies a blank backing sheet after copying to a transparency. (In the figure, the asterisk indicates
transparencies.)
1
1
2
3
Originals Copies
Follow the steps as below to produce backing sheets for transparencies.
Place the originals in the document processor or on the platen.
1
Load transparencies in the MP tray.
2
IMPORTANT: Fan through the transparencies before
loading them.
Up to 25 transparencies can be loaded at one time.
Be sure that paper of the same size and orientation
as the transparencies is loaded.
*
2
*
3
*
1-46
Press [Function] and then [T Down].
3
Page 53

Copying Functions
½
½
p
Press [OHP Backing] ([OHP Back]).
4
Press [Copy] or [Blank].
5
Press the Start key to start copying.
6
Ready to copy.
Auto
Rotati on Back ing
EcoPri nt
Rep ea t
Copy
OHP
Ori g. Set
Direction
Sele ct of
Output
User choiceBasi c
Ready to copy.
None
Copy
Bla nk
Proof Copy
Invert
Staple
/Punch
Function
Paper Size
100%
Mem o
Pages
Mirror
Image
Multi-Page
Form
Progr am
Shortcut
Insert a blank paper between piece
OHP film, or copy to a OHP back pa
Place the OHP fil m
!
in the Multipurpose tray.
Up
Down
Paper Si ze
100%
BackOHP Back ing
11x8
11x8
1-47
Page 54

Copying Functions
½
½
r
Auto Rotation
1
Automatically rotates the image when the sizes of the original and the loaded paper matches but the
orientations are different. The images will be rotated 90° counter-clockwise prior to copying.
NOTE: You can select Auto Rotation as the default mode. Refer to Selecting Auto Rotation on
page 3-14.
The following paper sizes can be used in Auto Rotation mode.
Supported Paper Sizes
Inch models 11 × 8 1/2", 8 1/2 × 11" and 5 1/2 ×8 1/2"
Metric models A4, A4R, B5, B5R, A5R, B6R, A6R and 16K
Follow the steps as below for automatic rotation.
Press [Function] and then [T Down].
Press [Auto Rotation].
2
Press [Rotate] to specify automatic
3
rotation.
Ready to copy.
Auto
Rota tio n Back ing
EcoPri nt
Rep ea t
Copy
OHP
Ori g. Set
Dire ction
Select of
Output
User choiceBasi c
Ready to copy.
No Ro tate
Rotate
Proof Copy
Invert
Staple
/Punch
Function
Paper Si ze
100%
Mem o
Pages
Mi rr or
Image
Multi-Page
Form
Program
Shortcut
When origi nal a nd paper ha ve diffe
dire ction, image wil l be r otated.
Up
Down
Paper Si ze
100%
BackAuto Rota tion
11x8
11x8
1-48
Page 55

Output Destination
½
d
o
½
Particular trays of the document finisher or multi-job tray can be specified as the output destination
for accomplished copies.
Destination Description
Auto Copies are sent to an empty tray. If multiple trays are empty, copies
Tray A Sent to the tray A of the document finisher.
Tray B Sent to the tray B of the document finisher. This tray cannot be
Tray 1 Sent to the tray 1 (the first tray) of the multi-job tray.
Tray 2 Sent to the tray 2 (the second tray) of the multi-job tray.
Tray 3 Sent to the tray 3 (the third tray) of the multi-job tray.
Tray 4 Sent to the tray 4 (the fourth tray) of the multi-job tray.
Tray 5 Sent to the tray 5 (the fifth tray) of the multi-job tray.
NOTE: Requires the optional document finisher and multi-job tray.
You can change the default destination for copies. Refer to Selecting Output Destination on
page 3-29 for details.
You can check the record of where completed jobs were sent. Refer to Output Management
Functions on page 2-16 for details.
Copying Functions
are sent to the bottom tray first and higher trays thereafter.
specified when the multi-job tray is installed.
Follow the steps as below to select the output destination.
Press [Function] and then [T Down].
1
Press [Select of Output].
2
Select the output destination for finished
3
copies.
Place the originals in the document processor or on the platen. Press the Start key to start copying.
4
Ready to copy.
Auto
Rotati on Back ing
EcoPri nt
Rep ea t
Copy
OHP
Ori g. Set
Direction
Sele ct of
Output
User choiceBasi c
Ready to copy.
Auto
Tra y A
Tra y 1
Tra y 2
Tra y 3
Tra y 4
Tra y 5
Proof Copy
Invert
Staple
/Punch
Function
Mem o
Pages
Mirror
Image
Multi-Page
Form
Progr am
Shortcut
Sel ect pr oper outp ut tr ay to avo i
mixing jobs.
You can confirm output tray with
manag ement.
Paper Size
Up
Down
Paper Si ze
BackSele ct of Output
100%
100%
11x8
11x8
1-49
Page 56

Copying Functions
½
EcoPrint Mode
1
Helps economizing the toner used for copies. Use this mode when high-quality copying is not
required (e.g., when making test copies).
NOTE: Copies in this mode are somewhat lighter.
Follow the steps as below for EcoPrint mode.
Press [Function] and then [T Down].
Press [EcoPrint].
2
Press [On] to activate EcoPrint mode.
3
Ready to copy.
Auto
Rota tio n Back ing
EcoPri nt
Rep ea t
Copy
to copy.
coPr int mode sav es toner .
utput will be lighter.
OHP
Ori g. Set
Dire ction
Select of
Output
User choiceBasi c
Proof Copy
Invert
Staple
/Punch
Function
Shortcut
Mem o
Pages
Mi rr or
Image
Multi-Page
Form
Program
Paper Si ze
11x8½"
100%
Back
EcoPri nt
It is possible to reduce
toner consumption.
!
Image is light.
Off
Paper Si ze
Set
Clo se
On
Up
Down
100%
11x8
1-50
Page 57

Inverted Copying
½
½
Inverts black and white portions of the image for copying.
Follow the steps as below for inverted copying.
Press [Function] and then [T Down].
1
Copying Functions
Press [Invert].
2
Press [On] to specify inverted copying.
3
Ready to copy.
Auto
Rotati on Back ing
EcoPri nt
Rep ea t
Copy
OHP
Ori g. Set
Direction
Sele ct of
Output
User choiceBasi c
Ready to copy.
Off
On
Proof Copy
Invert
Staple
/Punch
Function
Paper Size
Mem o
Pages
Mirror
Image
Multi-Page
Form
Progr am
Paper Si ze
Shortcut
Positive/Negative Reverse
11x8
100%
Up
Down
11x8
100%
BackInvert
1-51
Page 58

Copying Functions
½
½
Mirror Image
1
Copies the mirrored images of the original.
Follow the steps as below for mirror image copying.
Press [Function] and then [T Down].
Press [Mirror Image].
2
Press [On] to specify mirror image
3
copying.
Ready to copy.
Auto
Rota tio n Back ing
EcoPri nt
Rep ea t
Copy
OHP
Ori g. Set
Dire ction
Select of
Output
User choiceBasi c
Ready to copy.
Off
On
Proof Copy
Invert
Staple
/Punch
Function
Paper Si ze
100%
Mem o
Pages
Mi rr or
Image
Multi-Page
Form
Program
Shortcut
Creates Mirror Image of document.
Up
Down
Paper Si ze
100%
BackMirror Image
11x8
11x8
1-52
Page 59

Auto Selection Mode
Using the document processor, scans originals of different sizes for automatic copying onto paper
sizes matching each original.
NOTE: In this mode, up to 30 originals of different sizes can be placed in the document processor at
the same time.
Originals of the Same Width
Place all originals of the same width.
The supported combinations of originals are as follows.
Copying Functions
• 11 × 17" and 11 × 8
1/2 × 14" and 8 1/2 × 11" (Folio and A4R)
•8
• B4 and B5
1/2" (A3 and A4)
1-53
Page 60

Copying Functions
Originals of Different Widths
Place all originals of different widths.
NOTE: This setting is only available for metric models.
The supported combinations of originals are as follows.
• A3, B4, A4 and B5
• B4, A4R and B5
• Folio, A4R and B5R
NOTE: Place originals flush against the document width guide toward the back of the copier.
Follow the steps as below for automatic paper selection.
Place originals in the document processor.
1
IMPORTANT: When placing the originals of different
widths, be sure to flip up the original guide on the
document processor.
1-54
Page 61

Press the Auto Selection key.
½
c
u
2
Copying Functions
Press [Auto selection].
3
On metric models, press the [Same
4
Width Original] or [Diff Width Original]
key.
Press the Start key to start copying.
5
Ready to copy.
Off
Auto
selection
Ready to copy.
Auto Selection
Off
Auto
selection
Same Width
Original
Diff Width
Original
Shortcut
Scan mixed sized originals
usi ng the D ocument Pr ocesso r.
Copy size is same as original.
Shortcut
Mixed size originals (Same width)
be copi ed to same size as or igina
using the Document Processor
See the Operation Guide for
usable original sizes and proced
NOTE: When copying the originals of different widths, the reading speed of the document processor
becomes slower than as usual to read the originals certainly.
Paper Si ze
BackAuto Selection
Paper Size
Back
100%
100%
11x8
A4
1-55
Page 62

Copying Functions
½
½
Multi-Page Forms
Using the document processor, scans multiple originals
bound together as a single set, such as accounting
forms.
NOTE: Place the original forms one by one in the
document processor.
Insert originals binding side first in the document
processor.
Follow the steps as below to copy multi-page forms.
Place an original in the document processor.
1
Press [Function] and then [T Down].
2
Press [Multi-Page Form] ([Multi-Page
3
Forme]).
Press [On].
4
Press the Start key.
5
Ready to copy.
Auto
Rota tio n Backi ng
EcoPri nt
Rep ea t
Copy
OHP
Ori g. Set
Dire ction
Select of
Output
User choiceBasi c
Ready to copy.
Off
On
Proof Copy
Invert
Staple
/Punch
Function
Mem o
Pages
Mi rr or
Image
Multi-Page
Form
Program
Shortcut
Preferred mode to feed multiple
page forms.
Place the next original and press the Start key. Repeat these steps to scan the remaining originals.
Paper Si ze
Up
Down
Paper Si ze
BackMulti-Page Form
100%
100%
11x8
11x8
1-56
Page 63

Programmed Copying
Registers combinations of up to eight copy modes and functions displayed on the operation panel
as a single program. After registering sets of frequently used functions as a single program, you can
simply press the program number as needed to recall those functions. You can also name the
programs to identify them.
Registering Programs
Follow the steps as below to register programs.
Access the copy mode to register (e.g., five sets of copies, Sort mode, or Margin mode) and press
1
[Program].
Copying Functions
Press [Register].
2
Press a number (1 to 8) for the program
3
number.
Enter the program name and press
4
[End].
NOTE: For instructions on entering
characters, refer to Entering
Characters on Touch Panel on
page 3-55.
to copy.
Register present s etting
Select program number.
No registration
No registration
No registration
No registration
Name to display
Paper Si ze Set
11x8½"
100%
Reg ./D el ete
Reg ist er
Delete
Cha nge
Name
FunctionUser choice
Progr am
No registration
No registration
No registration
No registration
Limit:16 letters including #
All Del .
4 in 1
Mar g in
Left
Sheet
Erase
Stop
Press [Yes] to register the program.
5
Cap ital
Register program.
Letter Num./Sym. Space
Program #
Program name
The s et program is re gistered. Is it c orrect ?
Yes No
1-57
Page 64

Copying Functions
½
1
Using Programs to Copy
Follow the steps as below to copy using registered programs.
Press [Program].
Press the program number (1 to 8) to
2
recall the program.
Place the originals in the document processor or on the platen and press the Start key to copy using
3
Ready to copy.
Rec al l
FunctionUser choiceBasi c
Program
the program as it was created.
Editing Program Names
Follow the steps as below to rename programs.
Press [Program].
1
Press [Change Name].
2
to copy.
FunctionUser choice
Progr am
Paper Si ze Set
11x8½"
100%
Reg ./D el ete
Reg ist er
Delete
Cha nge
Name
Paper Si ze
Reg./Delete
Reg ist er
Delete
Chan ge
Name
4 in 1
Mar g in
Left
Sheet
Erase
100%
11x8
Press the number (1 to 8) of the program
3
to rename.
Enter the new program name and press
4
[End] to register the program with the
new name.
NOTE: For instructions on entering
characters, refer to Entering
Characters on Touch Panel on
page 3-55.
Registration name change
Select the number for c hanging name.
Name to display
Cap ital
Letter Num./Sym. Space
No registration
Stop
Limit:16 letters including #
All Del .
1-58
Page 65

Deleting Programs
Follow the steps as below to delete programs.
Press [Program].
1
Copying Functions
Press [Delete].
2
Press the number (1 to 8) of the program
3
to delete.
Press [Yes] to delete the program.
4
to copy.
Delete registration
Select the number of program to delete.
Delete program.
FunctionUser choice
Program #
Program name
This program will be delete d. A re you sure ?
Progr am
No registration
Paper Si ze Set
11x8½"
100%
Reg ./D el ete
Reg ist er
Delete
Cha nge
Name
4 in 1
Mar g in
Left
Sheet
Erase
Yes No
1-59
Page 66

Copying Functions
m
Assigning Register Keys
Assigns three frequently used functions listed on the [Function] screen to register keys. You can
also assign functions on the [Basic] screen and the [User choice] screen.
Assigning Register Keys
Follow the steps as below to assign register keys.
NOTE: Assigning register keys requires that registered buttons be displayed. Refer to Enabling
[Shortcut] ([Register]) Key on page 3-18.
Display the functions you want to assign to keys.
1
Press [Shortcut] ([Register]).
2
NOTE: Functions for which [Shortcut]
([Register]) is displayed may be
assigned register keys.
Press [Register].
3
Press a number (1 to 3) to register the
4
function.
Ready to copy.
Comb ine
None
2 in 1
4 in 1
Layout
Select item.
Cre ate Sho rtcut
Reg ist er
Delete
Regist er present s etting
Select t he number of program to regis tered.
No
registrat.
No
registrat.
No
registrat.
Shortcut
Bor der l ine
None
Soli d
Dotted
Bor ders
Paper Si ze
11x8
50%
Back
Select Original I
Direction.
Top Ed ge
1-60
Press [Yes].
5
The registered register keys will be
displayed at the right of the [Basic]
screen.
Register this function.
Register No.
Regis ter this se lect ing mode. OK?
Yes No
Page 67

Deleting Register Keys
m
½
Follow the steps as below to delete register keys.
Press a registered register key to display the assigned function.
1
Copying Functions
Press [Shortcut] ([Register]) to display
2
Create Shortcut (Register).
Press [Delete].
3
Press the number (1 to 3) of the function
4
to delete.
Ready to copy.
Comb ine
None
2 in 1
4 in 1
Select item.
Cre ate Sho rtcut
Reg ist er
Delete
Delete re gistration
Se le ct the nu mber of pr ogr am to del ete.
4 in 1
Mar g in
Left
Sheet
Erase
Layout
Shortcut
Bord er line
None
Soli d
Dotted
Bor ders
Paper Size
11x8
50%
Back
Select Original I
Dire ction.
Top Edge
Press [Yes] to delete the register key.
5
Delete registration.
Register No.
Ar e you s ure you want to de lete?
Yes No
1-61
Page 68

Copying Functions
Programming Multi-Part Jobs
With a job build, scans individual sets of originals in separate steps for a single copy job. In each
step of the scanning process you can specify different settings (such as zooming and border erase)
and you can specify different types of originals. Other examples include inserting a blank sheet
between sets of copies from each step and specifying a front cover page during a duplexing step.
Job Build Procedure
This procedure describes how to use a job build for the following example.
Example
<Finished Copies>
In the figure, pages with asterisks indicate blank
sheets.
<Originals>
NOTE: For the preparation of this job, colored paper for the cover is loaded in the MP tray and
standard paper is loaded in the cassette 1.
Step 1: Display the Job Build screen
Press the Job Build key.
1
1-62
Complete the Settings Common to All Steps
Specify Duplexing and Repeat Copy.
NOTE: Repeat Copy is used to enable additional copies later.
A variety of other settings and functions are available besides those shown in this example. Refer to
Specifying Copy Functions on page 1-67 for details.
Page 69

Press [1 sided/2 sided]
a
e
2
([1-sided/2-sided]).
Press [2 sided Copy] ([2-sided Copy])
3
and [Open from left] ([Left binding]).
Press [Close] to return to the screen of
step 2.
Press [Edit]. On the next screen, press
4
[Repeat Copy].
Ready to Job build.
Place originals then press Star t k ey.
Job Build
11x8½"
Sele ct
Paper Type
Finished
Basi c
Ready to Job build.
Place originals then press Start key .
1 sided/2 s ided Copy
1 sided
Copy
2 sided
Copy
Ready to Job build.
Place originals then press Star t k ey.
Job Build
Off
Bor der
Cen teri ng
Basi c Qua lity
Step
1 sided
Original
Auto %
Red uce
/Enlarge
Qual ity
Finished
Open from
left
Open from
right
Open from
top
Step
Auto
Select
Ori g.SizeEra se Copy
NoneNone
Page #
1 sided Copy
1 sided/
2 sided
Rea r
Ori g. Set
Direction
Edit
Off
Rep eat
Tra y A
Select ofMar g in /
Output
Edit
Copying Functions
1 sided copy- Left
Fini shed page #:
Back
Selec t Original Im
Direction.
Top Edge
2 sided copy- Left
Fini shed page #:
Press [On]. Press [Close] to return to the
5
screen of step 4.
Ready to Job build.
Place originals then press Star t k ey.
Off
On
Complete the settings for original A
Specify the MP tray (for colored paper) for the paper selection setting.
Press [Basic]. On the next screen, press
6
[Select Paper].
Ready to Job build.
Place originals then press Star t k ey.
Job Build
11x8½"
Sele ct
Paper Type
Finished
Basi c
Step
1 sided
Original
Auto %
Red uce
/Enlarge
Qual ity
2 sided Copy
1 sided/
2 sided
Rea r
Ori g. Set
Dire ction
Edit
BackRep eat Cop y
Repeat copy all ows sets to be sav
to the HDD.
Using Repeat Copy function,
jobs can be recal led and output.
Indiv idual passwords can be set.
2 sided copy- Left
Fini shed page #:
1-63
Page 70

Copying Functions
7
8
Select the MP tray. Press [Close] to
return to the screen of step 6.
Ready to Job build.
Place originals then press Start key.
11x8½"
Plain
11x8½"
Recy cle d
11x17"
Plain
8½x11"
Plain
MP tr ay
Col or
Place original A and press the Start key to start scanning.
Step 2: Specify that the back of original A will be left blank.
BackSele ct Paper
Press [Print from Front page].
9
This setting leaves the back blank and
starts copying on the next sheet.
riginal(s).
igi nals a nd pre ss star t ke y.
ning fini shed" key when starting copy.
Step
1 sided
Original
Type
Auto %
Red uce
/Enlarge
Qual ity
2 sided Copy
1 si ded/
2 si ded
Ori g. Set
Dire ction
Step 3: Complete the settings for original B.
Specify the cassette 1 (for standard paper) for the paper selection setting.
Press [Select Paper].
10
Select the cassette 1. Press [Close] to
11
return to the screen of step 10.
Scan next original(s).
Place the originals and press start key.
Press "Scanni ng finished " key when starting copy.
Job Build
11x8½"
Sele ct
Paper Type
Finished
Basi c
Scan next original(s).
Place the originals and press start key.
Press "Scanni ng finished " key when starting copy.
Ori ginal
Red uce
/Enlarge
Rea r
Edit
Step
1 sided
Auto %
Qual ity
2 sided copy- Left
Fini shed page #:
Next copy page: Rear
2 sided Copy
1 si ded/
2 si ded
Rea r
Ori g. Set
Direction
Edit
Set
Cance l
Insert
page
Print from
Front page
Scanning
fini shed
2 sided copy- Left
Finished page #:
Next copy page: Front
BackSele ct Paper
1-64
Place original B and press the Start key to start scanning.
12
11x8½"
Plain
11x8½"
Recy cle d
11x17"
Plain
8½x11"
Plain
11x8½"
Col or
Page 71

Step 4: Complete the settings for original C.
Specify the MP tray (for colored paper) for the paper selection setting.
Press [Select Paper].
13
Select the MP tray. Press [Close] to
14
return to the screen of step 13.
Scan next original(s).
Place the originals and press start key.
Pre ss "Scanni ng fini shed" k ey when sta rting co py .
Job Build
11x8½"
Sele ct
Paper Type
Finished
Basi c
Scan next original(s).
Place the originals and press start key.
Pre ss "Scanni ng fini shed" k ey when sta rting co py .
Step
1 sided
Original
Auto %
Red uce
/Enlarge
Qual ity
11x8½"
Plai n
11x8½"
Recy cled
11x17"
Plai n
8½x11"
Plai n
2 sided Copy
1 si ded/
2 si ded
Rea r
Ori g. Set
Dire ction
Edit
MP t ra y
Col or
Copying Functions
2 sided copy- Left
Fini shed page #:
Next copy page: Front
BackSele ct Paper
Place original C and press the Start key to start scanning.
15
Step 5: Specify that the back of original C will be left blank.
Press [Print from Front page].
16
This setting leaves the back blank and
starts copying on the next sheet.
riginal(s).
igi nals a nd pre ss star t ke y.
ning fini shed" key when starting copy.
Step
1 sided
Original
Type
Auto %
Red uce
/Enlarge
Qual ity
2 sided Copy
1 si ded/
2 si ded
Rea r
Ori g. Set
Dire ction
Edit
Step 6: Complete the settings for original D.
Specify the cassette 1 (for standard paper) for the paper selection setting.
Press [Select Paper].
17
Scan next original(s).
Place the originals and press start key.
Pre ss "Scanni ng fini shed" k ey when sta rting co py .
Job Build
Sele ct
Paper
Finished
11x8½"
Basi c
Step
1 sided
Original
Type
Auto %
Red uce
/Enlarge
Qual ity
2 sided copy- Left
Fini shed page #:
Next copy page: Rear
2 sided Copy
1 si ded/
2 si ded
Rea r
Ori g. Set
Dire ction
Edit
Set
Cance l
Insert
page
Print from
Front page
Scanning
fini shed
2 sided copy- Left
Fini shed page #:
Next copy page: Front
1-65
Page 72

Copying Functions
18
19
20
Select the cassette 1. Press [Close] to
return to the screen of step 17.
Scan next original(s).
Place the originals and press sta rt key.
Press "Scanning finished" key when starting copy.
11x8½"
Plain
11x8½"
Recy cle d
11x17"
Plain
8½x11"
Plain
11x8½"
Col or
Place original D and press the Start key to start scanning.
Step 7: Specify blank colored paper for the back cover.
Specify the MP tray (for colored paper) for the paper selection setting.
Press [Select Paper].
Scan next original(s).
Place the originals and press sta rt key.
Press "Scanning finished" key when starting copy.
Job Build
11x8½"
Sele ct
Paper Type
Finished
Basi c
Step
1 sided
Ori ginal
Auto %
Red uce
/Enlarge
Qual ity
2 sided Copy
1 si ded/
2 si ded
Ori g. Set
Direction
Rea r
Edit
BackSele ct Paper
2 sided copy- Left
Finished page #:
Next copy page: Front
Select the MP tray. Press [Close] to
21
return to the screen of step 20.
Press [Insert page] ([Insert blank page]).
22
All originals have been scanned. Press [Scanning finished] to start the job.
23
If there are no problems with the accomplished copies, you can use Repeat Copy to produce
24
Scan next original(s).
Place the originals and press sta rt key.
Press "Scanning finished" key when starting copy.
11x8½"
Plain
11x8½"
Recy cle d
11x17"
Plain
8½x11"
Plain
riginal(s).
igi nals a nd pre ss star t ke y.
ning fini shed" key when starting copy.
Step
1 sided
Original
Type
Auto %
Red uce
/Enlarge
Qual ity
2 sided Copy
1 si ded/
2 si ded
Rea r
Ori g. Set
Dire ction
Edit
MP tr ay
Col or
2 sided copy- Left
Fini shed page #:
Next copy page: Front
additional copies in the desired quantity as needed. Refer to Repeat Copy on page 1-42 for details.
You are now completed programming the job with a job build.
BackSele ct Paper
Set
Cance l
Insert
page
Print from
Rear page
Scanning
fini shed
1-66
Page 73

Specifying Copy Functions
Paper Selection
Select the paper size as follows.
On the [Basic] screen, press [Select
1
Paper].
Select the MP tray or a cassette and
2
press [Close].
Ready to Job build.
Place originals then press Star t k ey.
Job Build
11x8½"
Sele ct
Finished
Basi c
Ready to Job build.
Place originals then press Star t k ey.
Sele ct Paper
Step
1 sided
Original
Auto %
Red uce
/Enlarge
Qual ity
11x8½"
Plai n
11x8½"
Recycl ed
11x17"
Plai n
8½x11"
Plai n
2 sided Copy
1 sided/
2 sidedPaper Type
Rea r
Ori g. Set
Dire ction
Edit
MP tr ay
Col or
Copying Functions
1 sided copy- Left
Fini shed page #:
Back
Types of Originals
Select originals that are one-sided or two-sided, have facing pages like books or magazines, or are
like multi-page business forms.
On the [Basic] screen, press [Original
1
Type].
Based on the originals to be placed,
2
select [1 sided] ([1-sided]), [2 sided]
([2-sided]), [Book], or [Multi-Page Form]
([Multi-Page Forme]).
NOTE: When selecting [2 sided]
([2-sided]), check the binding direction
and be sure that the originals are
placed in the correct orientation.
When selecting [Book], be sure that the
binding direction is correct.
Ready to Job build.
Place originals then press Star t k ey.
Job Build
11x8½"
Sele ct
Finished
Basi c
Ready to Job build.
Place originals then press Start key .
Original T ype
1 sided
2 sided
Book
Original
Red uce
/Enlarge
Multi-Page
Form
Step
1 sided
Auto %
Qual ity
2 sided Copy
1 sided/
2 sidedPaper Type
Rea r
Ori g. Set
Dire ction
Edit
1 sided copy- Left
Fini shed page #:
Back
Press [Close].
3
1-67
Page 74

Copying Functions
a
1
2
One-Sided Copying or Duplexing
Select one-sided copying or duplexing as follows.
On the [Basic] screen, press
[1 sided/2 sided] ([1-sided/2-sided]).
NOTE: The setting for one-sided
copying or duplexing applies to all
other steps. Simply complete this
setting once as an initial step.
Press [1 sided Copy] ([1-sided Copy]) or
[2 sided Copy] ([2-sided Copy]) and
select the binding direction.
Follow the instructions at the right of the
touch panel and confirm the orientation
of the originals.
NOTE: Failure to place originals
correctly may result in copying errors.
Ready to Job build.
Place originals then press Start key.
Job Build
Sele ct
Finished
Ready to Job build.
Place originals then press Start key.
1 sided/2 s ided Copy
1 sided
Copy
2 sided
Copy
11x8½"
Basi c
Step
1 sided
Ori ginal
Auto %
Red uce
/Enlarge
Qual ity
Finished
Open from
left
Open from
right
Open from
top
2 sided Copy
1 sided/
2 sidedPaper Type
Rea r
Ori g. Set
Direction
Edit
1 sided copy- Left
Finished page #:
Back
Selec t Original Im
Direction.
T op Edge
Press [Close].
3
Processing of Finished Copies
Specify stacking of accomplished copies as follows. If your copier is equipped with the optional
document finisher, you can also specify stapling or hole punching.
Function Optional Equipment Description
Stacking Document finisher: None Each completed set is rotated 90° before
stacking.
Document finisher: Installed Stacked by the document finisher.
Stapling Document finisher: None Stapling is not available.
Document finisher: Installed Stapling is available.
Center margin
stapling
Punching Document finisher: None Punching not is available.
On the [Basic] screen, press [Finished].
1
NOTE: The finish settings apply to all
other steps. Simply complete this
setting once as an initial step.
Document finisher: None Center margin stapling is not available.
Document finisher: Installed
Center margin stapling is available.
Folding unit: None
Document finisher: Installed
Folding unit: Installed
Document finisher: Installed
Center margin stapling as well as center
margin with center folding is available.
Punching is available.
Punching unit: Installed
Ready to Job build.
Place originals then press Start key.
Job Build
11x8½"
Sele ct
Finished
Basi c
Step
1 sided
Ori ginal
Auto %
Red uce
/Enlarge
Qual ity
2 sided Copy
1 sided/
2 sidedPaper Type
Rea r
Ori g. Set
Direction
Edit
1 sided copy- Left
Finished page #:
1-68
Page 75

For finishing, press [On] ([1 set] or
a
m
2
[Output each page]) or [Off]. Refer to
Offset Mode on page 1-10 for details.
Ready to Job build.
Place originals then press Start key .
Off set Staple Punch
Off
On
Copying Functions
Staple Punc h
Mode
Saddle
Stit ch
None
Mode
BackFinished
Selec t Original Im
Direction.
Top Edge
For stapling, press [Staple Mode] and
complete the settings. Refer to Stapling
on page 1-11 for details.
For hole punching, press [Punch Mode]
and complete the settings. Refer to
Punching on page 1-13 for details.
For center margin stapling, press
[Saddle Stitch] ([Center Staple]) and
complete the settings.
For center margin stapling, press
[Saddle stitch].
For center margin stapling with center
folding, press [Bind & Fold].
Ready to Job build.
Place originals then press Star t k ey.
Staple
None
1 staple
2 staples
Ready to Job build.
Place originals then press Star t k ey.
Punch Mode
Punch Prev iew
None
2 holes
3 holes
Ready to Job build.
Place originals then press Start key .
Off
Saddle
stitch
Bind &
Fold
Li mited number of staple pa ges.
The limit is set in setting mode.
When selecting staple function
!
the offset can not be combined.
BackStaple Mode
Select Original I
Dire ction.
Top Edge
Back
Select Original I
Dire ction.
Top Edge
BackSaddle St itc h
Follow the instructions at the right of the touch panel and confirm the orientation of the placed
3
originals.
NOTE: Failure to place originals correctly may result in copying errors.
Press [Close].
4
1-69
Page 76

Copying Functions
x
%
%
%
x
%
x
1
2
Reducing/Enlarging
Select the desired magnification as follows.
On the [Basic] screen, press
[Reduce/Enlarge].
Select the desired magnification.
For instructions on reducing/enlarging,
refer to Reducing/Enlarging in Chapter 3
of the Operation Guide for details.
Ready to Job build.
Place originals then press Start key.
Job Build
11x8½"
Sele ct
Finished
Basi c
Ready to Job build.
Place originals then press Start key.
Red uce /En la rg e
Standard
Zoom
XY Zoom
Step
1 sided
Ori ginal
Auto %
Red uce
/Enlarge
Qual ity
# keys
2 sided Copy
1 sided/
2 sidedPaper Type
Rea r
Ori g. Set
Direction
Edit
Auto %
100%
400%
200%
5½x8½" 11x17"
1 sided copy- Left
Finished page #:
154%
5½x8½" 8½x14" 11
129%
8½x11" 11x17"
121%
8½x14" 11x17"
78%
8½x14" 8½x11"
Back
77
64
11
50
11
25
Press [Close].
3
Original Orientation
Specify the original orientation as follows.
On the [Basic] screen, press [Orig. Set
1
Direction].
Based on the original orientation, press
2
[Top Edge] ([Back Edge]) or [Left Top
Edge] ([Left top corner]).
NOTE: Failure to place originals
correctly may result in copying errors.
Ready to Job build.
Place originals then press Start key.
Job Build
11x8½"
Sele ct
Finished
Basi c
to Job build.
al s then pr ess Start ke y.
ion
"Select Original Image Direction." can
be shown at right side of di splay .
Fol low the ste ps. If setti ng mode is
wrong, incorr ect copy will result.
Ori ginal
Red uce
/Enlarge
Step
1 sided
Auto %
Qual ity
2 sided Copy
1 sided/
2 sidedPaper Type
Rea r
Ori g. Set
Direction
Edit
1 sided copy- Left
Finished page #:
Set
Back
Select Original Image
Dire ction.
Top Edge
Left Top
Edge
Clo se
1-70
Press [Close].
3
Page 77

Exposure Level
r
s
Specify the copy exposure level as follows.
Press [Quality]. On the next screen,
1
press [Exposure Mode].
Ready to Job build.
Place originals then press Star t k ey.
Job Build
Density 4
Exposure
Mod e Q ua li ty
Step
Text + Pho to
Ori g.Image
EcoPrint
Copying Functions
Off
1 sided copy- Left
Fini shed page #:
Basi c
For automatic exposure adjustment,
2
press [Auto]. To adjust the exposure
Ready to Job build.
Place originals then press Start key .
manually, press [Manual]. Next, press
[Lighter] or [Darker] to adjust the
exposure.
Auto
Lighter Darker
Press [Close].
3
Manua l
Original Quality
Specify the Image Quality mode to match the type of original as follows.
Press [Quality]. On the next screen,
1
press [Orig.Image Quality] ([Image
Quality]).
Ready to Job build.
Place originals then press Star t k ey.
Job Build
Density 4
Exposure
Mod e Q ua li ty
Text + Pho to
Ori g.Image
Qual ity
Step
Edit
EcoPrint
BackExpos ure M ode
Off
1 sided copy- Left
Fini shed page #:
Select the Image Quality mode from
2
[Text+Photo], [Photo] and [Text].
Press [Close].
3
Basi c
Ready to Job build.
Place originals then press Start key .
Orig.I mage Qualit y
Text+Photo
Photo
Text
Qual ity
Edit
Back
Text+Photo:Set this mode to copy o
with mixed text and photo.
Photo: For copy ing photo and pict ure
Te xt: For c opying tex t pages
1-71
Page 78

Copying Functions
1
EcoPrint
To economize toner, specify EcoPrint as follows.
Press [Quality]. On the next screen,
press [EcoPrint].
Job Build
NOTE: The setting for EcoPrint applies
to all other steps. Simply complete this
setting once as an initial step.
Exposure
Mod e Q ua li ty
Ready to Job build.
Place originals then press Start key.
Step
Density 4
Text + Photo
Ori g.Image
EcoPri nt
Off
1 sided copy- Left
Finished page #:
Press [On] to activate EcoPrint.
2
Press [Close].
3
Basi c
to Job build.
s then press Start k ey.
coPrint mode saves toner.
utput will be lighte r.
Qual ity
Border Erase
Prevents the appearance of shadows from around the edges of originals.
Press [Edit]. On the next screen, press
1
[Border Erase] ([Erase Mode]).
Ready to Job build.
Place originals then press Start key.
Job Build
Off
Bor der
Erase Copy
None
Mar g in /
Cen teri ng
Basi c
Step
Auto
Sele ct
Ori g.Size
None
Page #
Qual ity
Rep ea t
Tra y A
Sele ct of
Output
Edit
Edit
Set
Back
EcoPr int
It is possible to reduc e
toner co ns umpti on.
Image is light.
!
Off
Off
1 sided copy- Left
Finished page #:
Close
On
1-72
Press [Sheet Erase] ([Border Erase]) or
2
[Individual BordrErase] ([Individual
Erase Mode]) and specify the border
width to erase. Refer to Border Erase on
page 1-21 for details.
Press [Close].
3
Ready to Job build.
Place originals then press Start key.
Sheet
Eras e
Individual
BordrErase
BackBorder Erase
Erase the border shadow of original.None
Page 79

Original Size
o
e
Specify the original size as follows.
Press [Edit]. On the next screen, press
1
[Select Orig.Size] ([Select Size Orig.]).
Select the original size. Refer to Original
2
Size on page 1-3 for details.
Ready to Job build.
Place originals then press Star t k ey.
Job Build
Off
Bor der
Erase Copy
None
Mar g in /
Cen teri ng
Basi c
Ready to Job build.
Place originals then press Start key.
Sele ct
size
Input size
Other
stand.S ize
Step
Auto
Select
Ori g.Size
None
Page #
Qual ity
Auto
8½x11"
11x8½"
8½x14"
5½x8½"11x17"
8½x5½"
11x15"
Rep eat
Tra y A
Select of
Output
Edit
Copying Functions
Off
1 sided copy- Left
Fini shed page #:
BackSelect Original Size
Cust
8½x13½"
8½x13"
A4
A4
2x2 "
2x2 "
2x2 "
2x2 "
Press [Close].
3
Repeat Copy
Specify Repeat Copy as follows. Use Repeat Copy to enable the production of additional copies as
needed after a copy job is completed.
Press [Edit]. On the next screen, press
1
[Repeat Copy].
NOTE: The Repeat Copy setting
applies to all other steps. Simply
complete this setting once as an initial
step.
Press [On] to activate Repeat Copy.
2
Refer to Repeat Copy on page 1-42 for
details.
Ready to Job build.
Place originals then press Star t k ey.
Job Build
Off
Bor der
Erase Copy
None
Mar g in /
Cen teri ng
Basi c
Ready to Job build.
Place originals then press Star t k ey.
Off
On
Step
Auto
Select
Ori g.Size
None
Page #
Qual ity
Rep eat
Tra y A
Select of
Output
Edit
Off
1 sided copy- Left
Fini shed page #:
Repeat copy all ows sets to be sav
to the HDD.
Using Repeat Copy function,
jobs can be recal led and output.
Indiv idual passwords can be set.
BackRep eat Cop y
Press [Close].
3
1-73
Page 80

Copying Functions
o
1
2
Margin Mode and Centering Originals
Specify the Margin mode and centering of originals as follows.
Press [Edit]. On the next screen, press
[Margin/Centering] ([Margin/Imag.Shift]).
NOTE: The Margin mode and
centering settings apply to all other
steps. Simply complete this setting
once as an initial step.
Press [Margin] or [Auto Center] ([Image
shift]). For details, refer to Margin Mode
on page 1-18 or Centering Originals on
page 1-20.
Ready to Job build.
Place originals then press Start key.
Job Build
Off
Bor der
Erase Copy
None
Mar g in /
Cen teri ng
Basi c
Ready to Job build.
Place originals then press Start key.
Step
Auto
Sele ct
Ori g.Size
None
Page #
Qual ity
Rep ea t
Tra y A
Sele ct of
Output
Edit
Off
1 sided copy- Left
Finished page #:
BackMargin/Centering
None
Margin
Auto
Center
Press [Close].
3
Page Numbering
Specify page numbering in the sequence of originals as follows.
Press [Edit]. On the next screen, press
1
[Page #] ([Page numbering]).
NOTE: The page numbering setting
applies to all other steps. Simply
complete this setting once as an initial
step.
For instructions on page numbering,
2
refer to Page Numbering on page 1-25.
Ready to Job build.
Place originals then press Start key.
Job Build
Off
Bor der
Erase Copy
None
Mar g in /
Cen teri ng
Basi c
Ready to Job build.
Place originals then press Start key.
Step
Auto
Sele ct
Ori g.Size
None
Page #
Qual ity
Rep ea t
Tra y A
Sele ct of
Output
Edit
Repos ition image to left /right or
top/bottom, and also c enter image
on paper.
Off
1 sided copy- Left
Finished page #:
BackPage #
1-74
Press [Close] to return to the screen of step 1.
3
None
-1-
P.1
1/n
Page # can be added on bo ttom
Page 81

Output Destination
t
Specify the optional document finisher or multi-job tray as the output destination as follows.
Press [Edit]. On the next screen, press
1
[Select of Output].
NOTE: The option to select the output
destination is displayed only if the
copier is equipped with the optional
document finisher or multi-job tray.
The output destination setting applies
to all other steps. Simply complete this
setting once as an initial step.
Specify the output destination. Refer to
2
Output Destination on page 1-49 for
details.
Ready to Job build.
Place originals then press Star t k ey.
Job Build
Off
Bor der
Erase Copy
None
Mar g in /
Cen teri ng
Basi c
Ready to Job build.
Place originals then press Start key .
Step
Auto
Select
Ori g.Size
None
Page #
Qual ity
Rep eat
Tra y A
Select of
Output
Edit
Off
Copying Functions
1 sided copy- Left
Fini shed page #:
BackSelec t o f Out put
Press [Close].
3
Auto
Tray A
Tray 1
Tray 2
Tray 3
Tray 4
Tray 5
Selec t proper out put t ray t o avoid
mixing jobs.
You ca n co nfir m out put t ray with ou
management.
1-75
Page 82

Copying Functions
1-76
Page 83

2 Document and Output Management Functions
This chapter explains the functions used for managing original documents as well as jobs during
and after copying.
• Document Management Functions...2-2
• Output Management Functions...2-16
2-1
Page 84

Document and Output Management Functions
8
Document Management Functions
Overview of Document Management Functions
Document management functions enable you to store documents (i.e., scanned images of originals)
on the copier’s hard disk for printing later.
Documents are assigned to different ‘boxes’, the document storage areas, depending on the
functions to be used. Stored documents are accessible from the boxes where they are kept until
deleted.
The following boxes are available.
Box Description Reference
Form Box For storage of forms using for form overlay (refer to
page 1-30).
Shared Data Box For storage of documents consisting of scanned originals.
These documents can be printed in the desired quantity as
needed.
Synergy Print Box For storage of documents consisting of scanned originals.
Up to ten of these documents can be combined into a single
copy job for printing.
Page
2-2
2-4
2-8
Form Box
Register and store forms using for form overlay (refer to page 1-30) in the Form Box.
Registering Forms
Scan originals as forms to register in the Form Box.
Place the originals to register as forms and press the Document Management key.
1
Press [Form Reg.] ([Form Registr.]).
2
Press [Change Name] and enter the
3
form name.
For instructions on entering characters,
refer to Entering Characters When Using
Document Management Functions on
page 3-58.
If you prefer not to name the form, go to
the next step.
function.
gement
Synergy Print B ox Form box
Document Document Form
Printing Input Printing
Box
Editing
Ready to register form(s).
Place originals then press Start key.
Form Registration
Form box
Documents
Form004
Cha nge
Name
Document
Reg.
Box
Editing
Auto
Sele ct
Ori g.Size
Auto si ze
Sele ct
Reg i. S i ze
Basi c
08/08/'04 05:34
Original
100%
Red uce
/Enlarge
Qual ity
End
8½x11"
08/0
2-2
Page 85

Document and Output Management Functions
Complete the scanning settings required for the original.
4
The following functions are available.
Tab Fu nctions
Basic Selection of original sizes, selection of document sizes, zooming, and original
orientation
Quality Exposure level and original quality
Edit Border erase
Press the Start key to start scanning the original. When scanning is complete, the touch panel will
5
return to the Document Management screen. To register another form, switch the original and
repeat steps 2 to 5.
Reviewing and Renaming Forms
Check the size, registering date and other information on stored forms, and rename forms. You can
also print forms to check them.
Press the Document Management key.
1
Under Form Box, press [Box Editing].
2
function.
gement
08/08/'04 05:34
Synergy Print B ox Form box
End
Select the form to be checked and press
3
[Document Propaties] ([Check/Rev.
Details]).
NOTE: You can change the sort order
of the forms. Press [Order of indication]
and choose from [Sort by Date] ([New
J Old] and [Old J New]) or [Sort by
Name] ([A J Z] and [Z J A]).
Check the displayed selection.
4
To print the form, press [Print Form].
To rename the form, press [Change form
name] and enter the new form name.
For instructions on entering characters,
refer to Entering Characters When Using
Document Management Functions on
page 3-58.
Document Document Form
Printing Input Printing
Box
Editing
Box Editing
Form
Form003
Form002
Form001
Document Management
Che ck/ Corr ect De tail s
User name
Document Name
Size
Orig. Set Direction
Input Source
Res ol utio n
Reg istr ati on D at e
Document Management For m box
-
Item Details
--
8½x11"
8½x11"
8½x11"
Form box
Document
08/08/04
08/08/04
08/08/04
- - - - - - - Form003
8½x11"
Rea r
Copy
1200dpi
08/08/'04 02:29
Box Edi ting
Reg.
Box
Editing
Up
Down
Orde r of
indication
Document
Propaties
Delete
Chan ge
for m name
Print
Form
After reviewing the form, press [Close]. The touch panel will return to the screen in step 3. To check
5
other forms, repeat steps 3 to 5.
Press [Close]. The touch panel will return to the Document Management screen.
6
2-3
Page 86

Document and Output Management Functions
/
Deleting Forms
Delete unnecessary forms.
Press the Document Management key.
1
Under the Form Box, press [Box
2
Editing].
function.
gement
08/08/'04 05:34
End
Synergy Print B ox Form box
Select the form to delete and press
3
[Delete].
NOTE: You can change the sort order
of the forms. Press [Order of indication]
Document Document Form
Printing Input Printing
Box
Editing
Box Edi ting
Form
Form003
Form002
Form001
8½x11"
8½x11"
8½x11"
Document
08/08/04
08/08/04
08/08/04
and choose from [Sort by Date] ([New
J Old] and [Old J New]) or [Sort by
Name] ([A J Z] and [Z J A]).
4
Document Management
Press [Yes].
-
Form box
To delete other forms, repeat steps 3
and 4.
Form Name
This form will be delet ed. D o you rea lly want t o delet e it?
Yes No
Press [Close]. The touch panel will return to the Document Management screen.
5
Form003
Reg.
Box
Editing
Up
Down
Orde r of
indication
Document
Propatie s
Delete
Shared Data Box
1
2
2-4
Register originals as documents in the Shared Data Box to print them later in the desired quantity as
needed without the originals themselves. It is particularly convenient to register frequently used
formats.
Registering Documents
Register documents in the Shared Data Box as follows. The box can hold up to 100 documents.
Place the originals to be registered as documents and press the Document Management key.
Under Shared Data Box, press
[Document Input] ([Document Registr.]).
Select function.
Document Management
Shared Da ta B ox
Document
Input
Box
Editing
Syner gy Pr int B ox
Document Document Form
Printing Input Printing
Box
Editing
Document
Form box
Reg.
Box
Editing
08/08
Page 87

Document and Output Management Functions
8
/
Press [Change Name] and enter the
3
document name.
For instructions on entering characters,
refer to Entering Characters When Using
Document Management Functions on
page 3-58.
If you prefer not to name the document,
go to the next step.
Complete the scanning settings required for the original.
4
Ready to register document(s).
Place originals then press Star t k ey.
Document Input
Share d Data Box
Documents
Doc001
Cha nge
Name
Auto
Sele ct
Orig.Size
Auto si ze
Sele ct
Reg i. S i ze
Basi c
The following functions are available.
Tab Fu nctions
Basic Selection of original sizes, selection of document sizes, selection of original
types, zooming, and original orientation
Quality Exposure level and original quality
Edit Border erase, batch scanning
Press the Start key to start scanning the original. When scanning is complete, the touch panel will
5
return to the Document Management screen. To register other documents, switch the original and
repeat steps 2 to 5.
Printing Documents
Ori gina l
1 sided
Ori ginal
Typ e
100%
Red uce
/Enlarge
Qual ity
8½x11"
08/0
Print documents stored in the Shared Data Box as follows.
Press the Document Management key.
1
Under Shared Data Box, press
2
[Document Printing].
Docum ent M anagement
Shared Da ta B ox
Document
Input
Box
Editing
Select the document to be printed and
3
press [Finish selecting].
Document Pri nting
NOTE: You can change the document
sort order. Press [Order of indication]
and choose from [Sort by Date] ([New
J Old] and [Old J New]) or [Sort by
Name] ([A J Z] and [Z J A]).
To verify the content of selected
Document Management Share d Data Box
documents, press [Document
Propaties] ([Check/Rev. Details]). Refer
to Reviewing and Renaming
Documents on page 2-6.
Select function.
Document Document Form
Printing Input Printing
Document Data Box
Doc003
Doc002
Doc001
-
Synergy Print B ox
Box
Editing
1 08/08/'04
3 08/08/'04
2 08/08/'04
Document
Up
Down
Form box
Reg.
Box
Editing
Orde r of
indication
Document
Propaties
08/08
2-5
Page 88

Document and Output Management Functions
/
Complete the function settings as required.
4
The following functions are available.
Tab Functions
Basic Paper selection, sort/offset, duplexing, and stapling or hole punching
Edit Image compositing, margins, covers, page numbering, booklets, and output
destination
To select other documents, press [Select document].
Use the numeric keys to enter the copy quantity.
5
Press the Start key to start printing.
6
Reviewing and Renaming Documents
Check the size, registering date and other information on documents stored in the Shared Data Box,
and rename documents. You can also print the first page of documents for review.
Press the Document Management key.
1
Under Shared Data Box, press
2
[Document Printing] or [Box Editing].
Select function.
Document Management
Shared Da ta B ox
Syner gy Pr int B ox
08/08
Form box
Select the document to be checked and
3
press [Document Propaties]
([Check/Rev. Details]).
NOTE: You can change the document
sort order. Press [Order of indication]
and choose from [Sort by Date] ([New
J Old] and [Old J New]) or [Sort by
Name] ([A J Z] and [Z J A]).
Check the displayed selection.
4
To print the first page, press [Print from
1st] ([Head Print]).
To rename the document, press
[Change doc. name] and enter the new
document name.
For instructions on entering characters,
refer to Entering Characters When Using
Document Management Functions on
page 3-58.
Document
Input
Box
Editing
Box Edi ting
Document Data Box
Document Management Shar ed Data Box
Che ck/ Corr ect De tail s
User name
Document Na me
Reg istr ati on S i ze
Ori g. Set Dir ection
page #
Input Source
Res olu tio n
Reg istr ati on D at e
Document Management Share d Data Box
Document Document Form
Printing Input Printing
Box
Editing
Doc003
Doc002
Doc001
Item Details
1 08/08/'04
3 08/08/'04
2 08/08/'04
-
- - - - - - - Doc003
8½x11"
Rea r
1
Copy
1200dpi
08/08/'04 05:41
--
Document
Box Editing
Up
Down
Reg.
Box
Editing
Orde r of
indication
Document
Propatie s
Delete
Chan ge
doc. name
Print
fro m 1st
2-6
After reviewing the document, press [Close]. The touch panel will return to the screen from step 3.
5
To check other documents, repeat steps 3 to 5.
Press [Cancel] or [Close]. The touch panel will return to the Document Management screen.
6
Page 89

Deleting Documents
/
Delete unnecessary documents in the Shared Data Box.
Press the Document Management key.
1
Under Shared Data Box, press [Box
2
Editing].
Document and Output Management Functions
Select function.
Docum ent M anagement
Shared Da ta B ox
Synergy Print B ox
Form box
08/08
Select the document to delete and press
3
[Delete].
NOTE: You can change the document
sort order. Press [Order of indication]
Document
Input
Box
Editing
Box Editing
Document Data Box
Document Document Form
Printing Input Printing
Box
Editing
Doc003
Doc002
Doc001
1 08/08/'04
3 08/08/'04
2 08/08/'04
and choose from [Sort by Date] ([New
J Old] and [Old J New]) or [Sort by
Name] ([A J Z] and [Z J A]).
4
Document Management Shar ed Data Box
Press [Yes].
-
To delete other documents, repeat steps
3 and 4.
Document Na me
This document(s) will be del eted. Do you want to delete i t?
Yes No
Press [Close]. The touch panel will return to the Document Management screen.
5
Document
Up
Down
Doc003:
Reg.
Box
Editing
Orde r of
indication
Document
Propaties
Delete
2-7
Page 90

Document and Output Management Functions
/
(
8
Synergy Print Box
Register originals as documents in the Synergy Print Box to print later in the desired quantity as
needed without the originals themselves. Up to ten of these documents can be combined into a
single copy job for printing. You can also print out all documents in the Synergy Print Box as a single
job. If the copier is equipped with the optional printer kit or scanner kit, you can also register printing
or scanning data in the Synergy Print Box. For further details, refer to the Operation Guides of the
printer or scanner kit.
The Synergy Print Box holds 100 individual boxes (numbered 001 to 100). The boxes can be
assigned to each departments. The documents registered to each box can be used as shared
documents among departments.
Registering Documents
Register documents in the Synergy Print Box as follows.
Place the originals to register as documents and press the Document Management key.
1
Under Synergy Print Box, press
2
[Document Input] ([Document Registr.]).
Select function.
Document Management
Shared Da ta B ox
Syner gy Pr int B ox
08/08
Form box
Select the destination box. To enter the
3
box number, press the key for the box,
or use the numeric keys followed by
pressing [Enter].
Press [Change Name] and enter the
4
document name.
For instructions on entering characters,
refer to Entering Characters When Using
Document Management Functions on
page 3-58.
If you prefer not to name the document,
go to the next step.
Complete the scanning settings required for the original.
5
The following functions are available.
Document
Input
Box
Editing
Document Input
Selec t box N o.
Doc ument M anagement Synergy Print B ox
Ready to register document(s).
Place originals then press Start key.
Document Input
Documents
Doc001
Document Document Form
Printing Input Printing
Box
Editing
-
Cha nge
Name
Document
Auto
Sele ct
Ori g.Size
Auto si ze
Sele ct
Reg i. S i ze
Basi c
Reg.
Box
Editing
Original
1 sided
Ori ginal
Type
100%
Red uce
/Enlarge
Qual ity
8½x11"
08/0
2-8
Tab Functions
Basic Selection of original sizes, selection of document sizes, selection of original
types, zooming and original orientation
Quality Exposure level and original quality
Edit Border erase and batch scanning
Press the Start key to start scanning the original. When scanning is complete, the touch panel will
6
return to the Document Management screen. To register other documents, repeat steps 2 to 6.
Page 91

Document and Output Management Functions
/
(
Combining and Printing Documents
Combine and print documents stored in the Synergy Print Box as follows. You can combine up to 10
documents for printing as a single copy job.
Press the Document Management key.
1
Under Synergy Print Box, press
2
[Document Printing].
Select function.
Docum ent M anagement
Shared Da ta B ox
Synergy Print B ox
08/08
Form box
Select the box where the documents for
3
printing are stored. To enter the box
number, press the key for the box, or
use the numeric keys followed by
pressing [Enter].
If a password has been set up for the
box, a screen for password entry will be
displayed. Use the numeric keys to enter
the password and press [Enter].
NOTE: For instructions on setting up
passwords, refer to Specifying Box
Passwords on page 2-14.
Select the documents to print in the
4
desired order and press [Finish
selecting]. You can choose up to 10
documents.
If you select a document that was
registered from a computer, press [W/
current setting] ([Current setting]) or [W/
changed setting] ([Changed setting]).
Document
Input
Box
Editing
Doc ument Print ing
Selec t box N o.
Document Management Synergy Print Box
Document Pri nting
Document Management
Document Document Form
Printing Input Printing
Box
Editing
-
Clear
Sele ct:
Doc005
Doc004
Doc003
Doc002
Doc001
1 SUN 05:46
1 SUN 05:46
1 SUN 05:46
1 SUN 05:46
1 SUN 05:45
-
Syner gy Prin t Box
Document
(Enter by #key )Pass word
Up
Down
Reg.
Box
Editing
Stop
Enter
Orde r of
indication
Document
Propaties
Select/
Cance l
NOTE: You can change the document sort order. Press [Order of indication] and choose from [Sort
by Date] ([New J Old] and [Old J New]) or [Sort by Name] ([A J Z] and [Z J A]).
Documents registered from scanned originals are indicated by before the document name and
documents registered from a computer are indicated by before the document name.
To verify the content of selected documents, press [Document Propaties] ([Check/Rev. Details]).
Refer to Reviewing and Renaming Documents on page 2-6.
When selecting multiple documents, choose documents that are all the same size. An error will
occur if you select documents of different sizes.
2-9
Page 92

Document and Output Management Functions
/
(
Complete the function settings as required.
5
The following functions are available.
Tab Functions
Basic Paper selection, sort/offset, duplexing, and stapling or hole punching
Edit Image compositing, margins, covers, page numbering, booklets, and output
destination
If you select documents that were registered from a computer and choose [W/ current setting]
([Current setting]), only the settings for paper selection and sort/offset will be available.
To select other documents, press [Select document].
Use the numeric keys to enter the copy quantity.
6
Press the Start key to start printing.
7
Batch Printing of Documents
All documents stored in the Synergy Print Box can be printed as a single job using the following
procedure.
Press the Document Management key.
1
Under Synergy Print Box, press
2
[Document Printing].
Select the source box. To enter the box
3
number, press the key for the box, or
use the numeric keys followed by
pressing [Enter].
If a password has been set up for the
box, a screen for password entry will be
displayed. Use the numeric keys to enter
the password and press [Enter].
NOTE: For instructions on setting up
passwords, refer to Specifying Box
Passwords on page 2-14.
Select function.
Document Management
Shared Da ta B ox
Document
Input
Box
Editing
Document Printing
Selec t box N o.
Doc ument M anagement Synergy Print B ox
Document Document Form
Printing Input Printing
Syner gy Pr int B ox
Box
Editing
-
Clear
08/08
Form box
Document
(Enter by #key )Pass word
Reg.
Box
Editing
Enter
Stop
2-10
Page 93

Document and Output Management Functions
/
(
Press [Print once all data] to start
4
printing.
ing
ement
1 SUN 05:46
1 SUN 05:46
1 SUN 05:46
1 SUN 05:46
1 SUN 05:45
Syner gy Prin t Box
-
Sele ct:
Up
Down
Orde r of
indication
Document
Propaties
Select/
Cance l
Reviewing and Renaming Documents
Check the size, registering date and other information on documents stored in the Synergy Print
Box, and rename documents. You can also print the first page of documents for review.
Press the Document Management key.
1
Under Synergy Print Box, press
2
[Document Printing] or [Box Editing].
Select function.
Docum ent M anagement
Shared Da ta B ox
Synergy Print B ox
Cance l
Print once
all data
Finish
selecting
Form box
08/08
Select the box to be checked. To enter
3
the box number, press the key for the
box, or use the numeric keys followed by
pressing [Enter].
If a password has been set up for the
box, a screen for password entry will be
displayed. Use the numeric keys to enter
the password and press [Enter].
NOTE: For instructions on setting up
passwords, refer to Specifying Box
Passwords on page 2-14.
Select the document to be checked and
4
press [Document Propaties]
([Check/Rev. Details]).
NOTE: You can change the document
sort order. Press [Order of indication]
and choose from [Sort by Date] ([New
J Old] and [Old J New]) or [Sort by
Name] ([A J Z] and [Z J A]).
Document
Input
Box
Editing
Box Editing
Selec t box N o.
Document Management Synergy Print Box
Bo x Editing
Document Management Synergy Print Box
Document Document Form
Printing Input Printing
Box
Editing
-
Clear
Doc005
Doc004
Doc003
Doc002
Doc001
1 SUN 05: 46
1 SUN 05: 46
1 SUN 05: 46
1 SUN 05: 46
1 SUN 05: 45
-
Document
(Enter by #key)Pass word
Up
Down
Reg.
Box
Editing
Stop
Enter
Order of
indicat ion
Document
Propaties
Delete
2-11
Page 94

Document and Output Management Functions
/
(
Check the displayed selection.
5
To print the first page, press [Print from
1st] ([Head Print]).
To rename the document, press
[Change doc. name] and enter the new
document name.
For instructions on entering characters,
refer to Entering Characters When Using
Document Management Functions on
page 3-58.
After reviewing the document, press [Close]. The touch panel will return to the screen from step 4.
6
To check other documents, repeat steps 4 to 6.
Press [Cancel] or [End]. The touch panel will return to the Document Management screen.
7
Deleting Documents
Delete unnecessary documents from the Synergy Print Box.
Press the Document Management key.
1
Che ck/ Corr ect De tail s
Item Details
User name
Document Na me
Reg istr ati on S i ze
Ori g. Set Dir ection
page #
Input Source
Res olu tio n
Reg istr ati on D at e
Document Management Syner gy Print Box
--
- - - - - - - Doc001
8½x11"
Rea r
1
Copy
1200dpi
08/08/'04 05:45
Box Edi ting
Chan ge
doc. name
Print
fro m 1st
Under Synergy Print Box, press [Box
2
Editing].
Select the box where the documents to
3
be deleted are stored. To enter the box
number, press the key for the box, or
use the numeric keys followed by
pressing [Enter].
If a password has been set up for the
box, a screen for password entry will be
displayed. Use the numeric keys to enter
the password and press [Enter].
NOTE: For instructions on setting up
passwords, refer to Specifying Box
Passwords on page 2-14.
Select function.
Document Management
Shared Da ta B ox
Document
Input
Box
Editing
Box Editing
Selec t box N o.
Doc ument M anagement Synergy Print B ox
Document Document Form
Printing Input Printing
Syner gy Pr int B ox
Box
Editing
-
Clear
08/08
Form box
Document
(Enter by #key )Pass word
Reg.
Box
Editing
Enter
Stop
2-12
Page 95

Select the document to delete and press
/
(
4
[Delete].
NOTE: You can change the document
sort order. Press [Order of indication]
and choose from [Sort by Date] ([New
J Old] and [Old J New]) or [Sort by
Name] ([A J Z] and [Z J A]).
Press [Yes].
5
To delete other documents, repeat steps
4 and 5.
Document and Output Management Functions
Bo x Editing
Doc005
Doc004
Doc003
Doc002
Doc001
Document Management Synergy Print Box
1 SUN 05: 46
1 SUN 05: 46
1 SUN 05: 46
1 SUN 05: 46
1 SUN 05: 45
-
Up
Down
Order of
indicat ion
Document
Propaties
Delete
Document Na me
This document(s) will be del eted. Do you want to delete i t?
Yes No
Press [End]. The touch panel will return to the Document Management screen.
6
Deleting All Documents
Delete all documents in selected Synergy Print boxes simultaneously.
Press the Document Management key.
1
Under Synergy Print Box, press [Box
2
Editing].
Select the box where all documents to
3
be deleted are stored. To enter the box
number, press the key for the box, or
use the numeric keys followed by
pressing [Enter].
Select function.
Docum ent M anagement
Shared Da ta B ox
Document
Input
Box
Editing
Box Editing
Selec t box N o.
Document Document Form
Printing Input Printing
Doc001:
Synergy Print B ox
Box
Editing
Document
Form box
Reg.
Box
Editing
08/08
If a password has been set up for the
box, a screen for password entry will be
displayed. Use the numeric keys to enter
the password and press [Enter].
NOTE: For instructions on setting up
passwords, refer to Specifying Box
Passwords on page 2-14.
Document Management Synergy Print Box
-
Clear
Stop
(Enter by #key )Pass word
Enter
2-13
Page 96

Document and Output Management Functions
/
(
Press [Delete all Data/Box] ([Delete all
4
box data]).
Press [Yes].
5
1 SUN 05: 46
1 SUN 05: 46
1 SUN 05: 46
1 SUN 05: 46
1 SUN 05: 45
-
ment Synergy Print Box
Up
Down
Order of
indicat ion
Document
Propaties
Delete
End
Delete all
Data/Box
Box
Pas sword
Document Number
Press [End]. The touch panel will return to the Document Management screen.
6
:
All data i n the box will be deleted. Do you want to dele te?
Are you sure ?
Yes No
Specifying Box Passwords
Specify passwords to maintain the confidentiality of documents stored in the Synergy Print Box. The
passwords must be entered to review, print, or delete the documents.
Press the Document Management key.
1
Under Synergy Print Box, press [Box
2
Editing].
Select the box to be given a password.
3
To enter the box number, press the key
for the box, or use the numeric keys
followed by pressing [Enter].
Select function.
Document Management
Shared Da ta B ox
Document
Input
Box
Editing
Box Editing
Selec t box N o.
Syner gy Pr int B ox
Document Document Form
Printing Input Printing
Box
Editing
Document
Form box
Reg.
Box
Editing
08/08
2-14
If a password has been set up for the
box, a screen for password entry will be
displayed. Use the numeric keys to enter
the password and press [Enter].
Doc ument M anagement Synergy Print B ox
-
Clear
Stop
(Enter by #key )Pass word
Enter
Page 97

Press [Box Password].
4
Use the numeric keys to enter the new
5
password and press [Enter].
Document and Output Management Functions
1 SUN 05: 46
1 SUN 05: 46
1 SUN 05: 46
1 SUN 05: 46
1 SUN 05: 45
-
ment Synergy Print Box
ord.
Up
Down
Order of
indicat ion
Document
Propaties
Delete
End
Delete all
Data/Box
Box
Pas sword
Stop
NOTE: The password can be from 1 to
8 digits long.
If you prefer not to specify a password,
Clear
press [Clear], and, without having
entered any password, press [Enter].
Press [End]. The touch panel will return to the Document Management screen.
6
(Enter by #key)Ne w pas swor d
Enter
2-15
Page 98

Document and Output Management Functions
Output Management Functions
Overview of Output Management Functions
Output management functions enable you to manage multiple copy jobs in job queue. You can
manage both queued and finished jobs. You can manage print jobs sent from computers using
optional printer functions in the same manner as copy jobs.
Output management functions are convenient in the following situations.
Purpose Method
You want to know the order in which a job
will be completed when the job is queued.
You want to know whether a job has been
completed when the job is queued.
You want to know the status of jobs sent
from a computer using the copier’s printer
functions.
You want to check the content of queued
copy or print jobs.
You want to know where finished copy or
print jobs have been sent when using the
document finisher or multi-job tray.
You want to print a queued copy or print
job immediately.
You want to cancel a queued copy or print
job.
You can check the status of currently queued jobs on
the [Prt Status] ([Prnt Status]) screen. The jobs will be
completed in the order listed, from the top down,
enabling you to check the order of your job.
You can check the status of completed or canceled jobs
on the [Job History] screen. If the job is not listed on the
[Job History] screen, check the [Prt Status] ([Prnt
Status]) screen. Jobs on the [Prt Status] ([Prnt Status])
screen have not yet been completed.
You can check the status of these jobs just as you would
copy jobs, on the [Prt Status] ([Prnt Status]) screen.
Completed or canceled jobs are listed on the [Job
History] screen. (In the list, copy jobs are indicated by
, print jobs by .)
Access the [Prt Status] ([Prnt Status]) screen to check
the job type, user name, number of original pages, copy
quantity, date and time sent, and status. If you need
more detailed information, select a job and press
[Document Properties] ([Check/Rev. Details]) to display
the job name, output paper size and output destination
(if a destination was specified).
Select the job on the [Job History] screen and press
[Check Details] to check where the finished job was
sent. (It will be displayed in the Output column.)
On the [Prt Status] ([Prnt Status]) screen, select the
high-priority job and press [Move Ahead] ([Move up]).
This will move the job to a higher position in the output
queue. You can also press [Interrupt Print] to pause the
job in progress and print the selected job first.
On the [Prt Status] ([Prnt Status]) screen, select the job
and press [Cancel/Delete] to cancel the job.
2-16
Page 99

Using Output Management Functions
Manage jobs using output management functions from the [Prt Status] ([Prnt Status]) and [Job
History] screens.
Press the Print Management key to
display the [Prt Status] ([Prnt Status])
screen.
To display the [Job History] screen,
press [Job History] below the [Prt Status]
([Prnt Status]) tab.
[Prt Status] ([Prnt Status]) Screen
The screen shows queued jobs and the current output status.
Document and Output Management Functions
Pri nt Management
Job User Ori ginal Set Registratio n State
Ahead Behind Delete
Prt Status
Mov eMov e Ca nce l/
Job History
Interrupt
Print
Printing
Waiting
Document
Properties
Pri nt Management
Job User Ori ginal Set Registratio n State
1
2
Ahead Behind Delete
Prt Status
Mov eMov e Ca nce l/
Job History
9
Interrupt
Print
3 4 5 6
Printing
Waiting
Document
Properties
End
8
7
1 Job List: Provides job information. The job currently in progress is listed on top, with
subsequent jobs listed below in the order they will be finished. In the list, copy jobs are
designated by and print jobs by .
2 [Move Ahead] ([Move up]): Moves the selected job order higher in the queue so it will be
delivered sooner. You can move jobs up to the second position.
3 [Move Behind] ([Move down]): Moves the selected job order lower in the queue so it will be
delivered later.
4 [Interrupt Print]: Pauses the job in progress and starts printing the selected job, which is then
moved to the top of the list.
5 [Cancel/Delete]: Removes the selected job from the list.
6 [Document Properties]
([Check/Rev. Details]): Displays
the Check/Correct Details
(Check/Revise Details) screen.
From this screen, you can check
the content of the selected job,
change the print quantity, and so
on.
Che ck/ Corr ect De tail s
User name
Job name
Ori g. Page
Set
Print size
Input Source
Reg istr ati on D ate
Output
Job
Item
8½x11"
Copy
Left Tray
Details
Cha nge
Preset
7[S] and [T]: Used when selecting jobs.
8[End]: Exits the output management functions. Pressing this key displays the [Basic] screen or
shows the current progress.
9 [Job History]: Switches to the [Job History] screen.
2-17
Page 100

Document and Output Management Functions
[Job History] Screen
The screen lists completed and/or canceled jobs.
Pri nt Management
Job User Ori ginal Set Regi stration Res.
1
5
Prt Status
Job History
Stop
End
End
End
Check
Details
End
4
3
2
1Job List: Provides completed job information. The most recent job is listed at the very top of
the list. The older job is low on the list. In the list, indicates copy jobs and indicates print
jobs.
NOTE: Jobs of which are canceled while copy operations are still in progress will not be displayed.
2 [Check Details]: Displays the
Check Details screen. From this
screen, you can check the content
of the selected job.
Che ck D etai ls
User name
Job name
Ori g. Page
Set
Print size
Input Source
Reg istr ati on D ate
Output
Job
Item
8½x11"
Copy
Left Tray
Details
3[S] and [T]: Used to select jobs.
4[End]: Exits from the output management functions. The touch panel will return to the [Basic].
5 [Prt Status] ([Prnt Status]): Switches to the [Prt Status] ([Prnt Status]) screen.
2-18
 Loading...