

Triumph Tiger 800 XR LRH, Tiger 1200 XR, Tiger 1200 XC, Tiger 1200 XR LRH, Tiger XCA Fitting Instructions Manual
...Page 1
1 of 10
English
Publication part number A9900585 issue 11
© Triumph Designs Ltd. 2017
Fitting Instructions:
Tiger XR, Tiger XR
T, Tiger XRX, Tiger XC, Tiger XCA, Tiger XCX,
Tiger 800, Tiger 800XC, Tiger 800 XC
X, Tiger 800 XCA, Tiger 800 XR,
Tiger 800 XR
X, Tiger 800 XRX LRH, Tiger 800 XRT,
Tiger Explorer, Tiger Explorer XC, Explorer XR, Explorer XRx, Explorer XR
T,
Explorer XC, Explorer XCx, Explorer XC
A,
Tiger 1200 XCX, Tiger 1200 XCA, Tiger 1200 XR, Tiger 1200 XRX,
Tiger 1200 XR
X LRH, Tiger 1200 XRT
A9510086, A9510096, A9510077, A9510170
Thank you for choosing this Triumph genuine accessory kit. This accessory kit is the product of Triumph's use of proven
engineering, exhaustive testing, and continuous striving for superior reliability, safety and performance.
Completely read all of these instructions before commencing the installation of the accessory kit in order to become
thoroughly familiar with the kit’s features and the installation process.
These instructions should be considered a permanent part of your accessory kit, and should remain with it even if your
accessory-equipped motorcycle is subsequently sold.
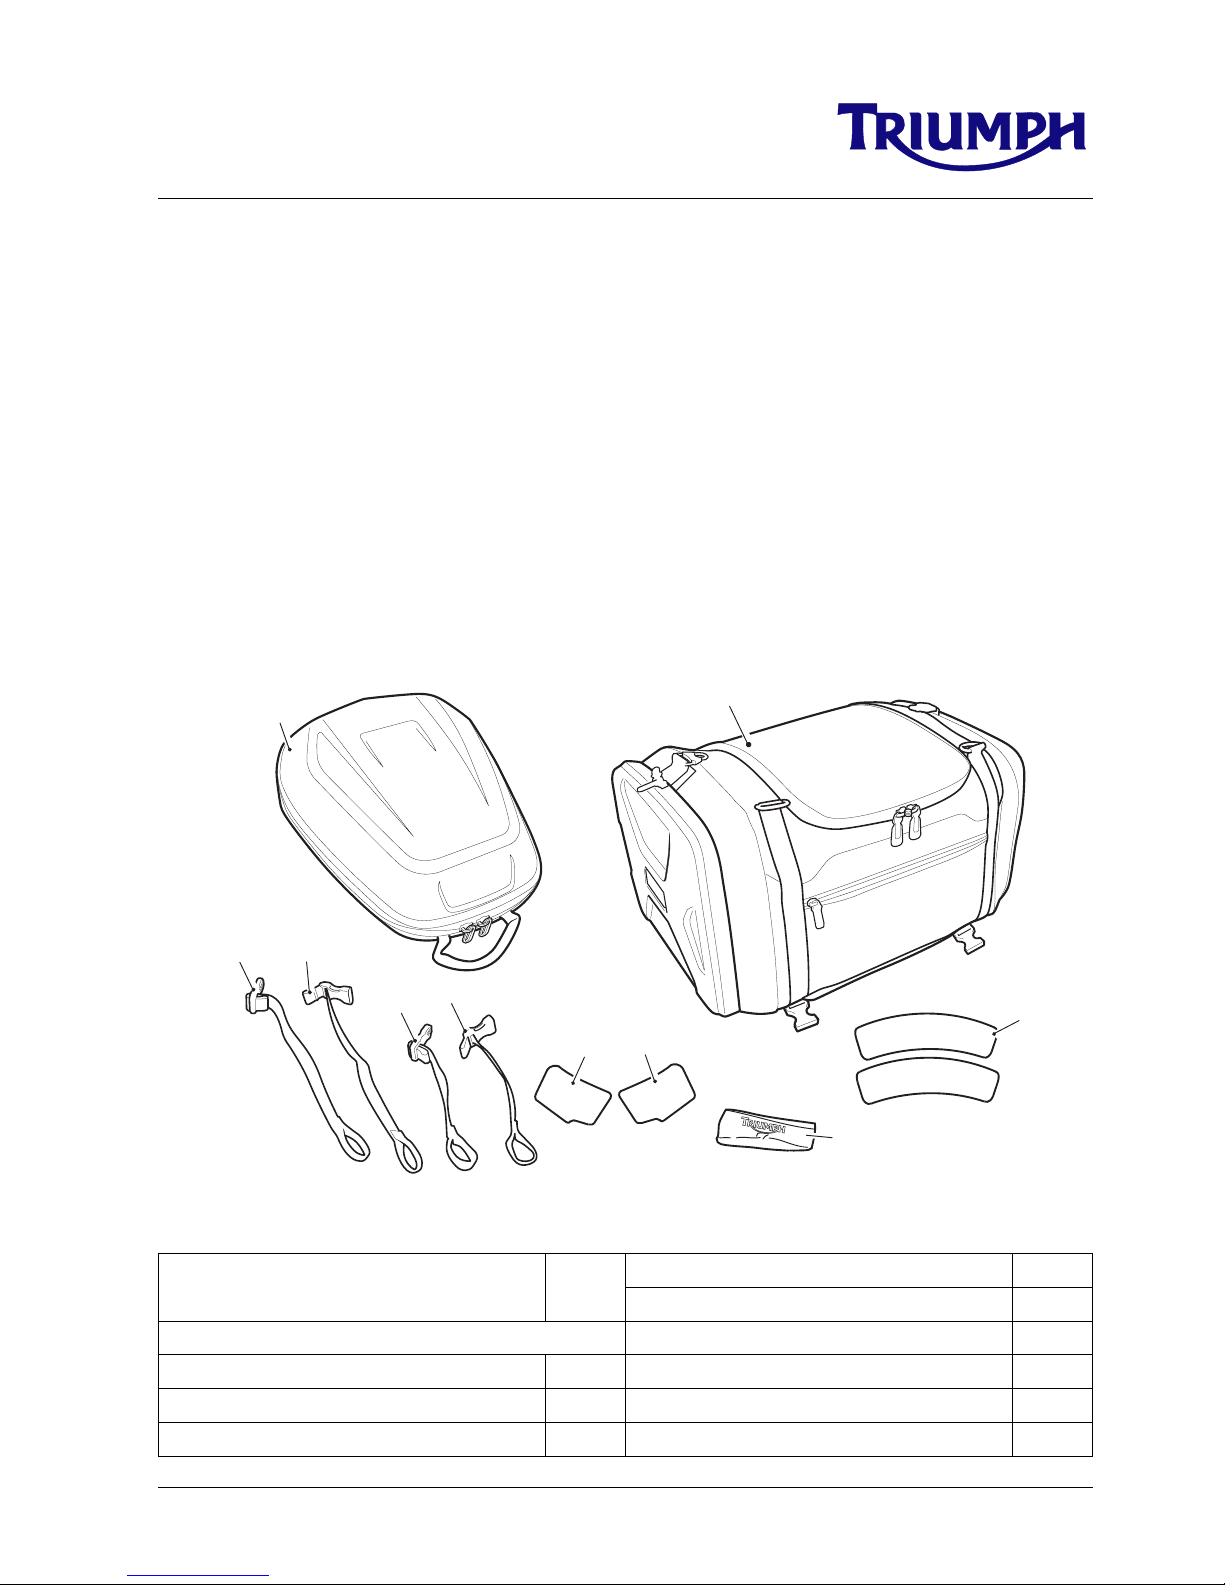
Parts Supplied:
1. Tail pack, 10 litre
(Tiger 800 and Tiger 800XC only)
1 off 5. Mount strap short, male 1 off
6. Mount strap short, female 1 off
or 7. Protective film - left hand (if supplied) 1 off
2. Tail pack, 50 litre 1 off 8. Protective film - right hand (if supplied) 1 off
3. Mount strap long, male 1 off 9. Protective film (if supplied) 2 off
4. Mount strap long, female 1 off 10. Cleaning wipe (if supplied) 1 off
1
4
3
6
5
2
7
8
9
10
Page 2
2 of 10
Warning
The accessory kits covered in this instruction are
designed for use on specific models of Triumph
motorcycle. The accessory kits and the models
applicable are listed at the start of the instruction. They
should not be fitted to any other Triumph model or to
any other manufacturer’s motorcycle. Fitting an
accessory kit to a Triumph model not listed, or to any
other manufacturer’s motorcycle will affect the
performance, stability and handling of the motorcycle.
This may affect the rider’s ability to control the
motorcycle and could cause an accident.
Warning
Always have Triumph approved parts, accessories and
conversions fitted by a trained technician of an
authorised Triumph dealer. The fitment of parts,
accessories and conversions by a technician who is not
of an authorised Triumph dealer may affect the
handling, stability or other aspects of the motorcycle’s
operation which may result in loss of motorcycle control
and an accident.
Warning
Throughout this operation, ensure that the motorcycle is
stabilised and adequately supported to prevent risk of
injury from the motorcycle falling.
Warning
If the engine has recently been running, the exhaust
system will be hot. Before working on or near the
exhaust system, allow sufficient time for the system to
cool, as touching any part of a hot exhaust could cause
burn injuries.
Warning
The tail pack must not be fitted to the sliding carriage
(if fitted). If a sliding carriage is fitted, the tail pack must
either be fitted to the pillion seat, or the sliding carriage
must be removed and the bike reverted to its standard
condition prior to fitting the tail pack to the rear rack.
Installation of the tail pack on to the sliding carriage will
affect the handling, stability or other aspects of the
motorcycle’s operation which may result in loss of
motorcycle control and an accident.
Warning
The tail pack must not be fitted in conjunction with a top
box. Installation of the tail pack together with a top box
will affect the handling, stability or other aspects of the
motorcycles’s operation which may result in loss of
motorcycle control and an accident.
Warning
Install the tail pack only in the positions described below.
Installation of the tail pack in any other position on the
motorcycle will affect the handling, stability or other
aspects of the motorcycle’s operation which may result
in loss of motorcycle control and an accident.
Warning
Remove all straps from the motorcycle when operating
the motorcycle with the tail pack removed. Operation of
the motorcycle with the straps fitted, and the tail pack
removed, may result in loss of motorcycle control and
an accident.
Warning
Remove the shoulder strap(s) from the tail pack before
mounting to the motorcycle.
Operation of the motorcycle with the shoulder strap(s)
fitted may result in loss of motorcycle control and an
accident.
Warning
50 Litre Tail Pack only: Secure the carry handles in to
the zipped compartments on either side of the tail pack
before mounting to the motorcycle.
Operation of the motorcycle with the carry handles
unsecured may result in loss of motorcycle control and
an accident.
Warning
Always ensure the tail pack straps are correctly
tensioned before riding the motorcycle. Operation of
the motorcycle with the tail pack loose may result in loss
of motorcycle control and an accident.
Page 3

3 of 10
Note:
• When using the tail pack, always pack heavier
items at the bottom of the bag.
Fitment to the Rear Rack
Tiger 800, Tiger 800XC
10 Litre Tail Pack:
1. Wrap the short male mounting strap around the
left hand grab rail to the inside of the front lug, so
that the tensioning strap is uppermost.
2. Wrap the short female mounting strap around the
right hand grab rail to the inside of the front lug, so
the tensioning strap is uppermost.
1. Short female mounting strap
2. Grab handle lug (right hand shown)
Note:
• On the 10 litre tail pack, the long straps are not
used when the tail pack is fitted to the rear rack.
Retain the long straps for use when fitting the tail
pack to the rear seat.
• Ensure the underside of the tail pack is clean and
dry prior to fitting.
3. Position the tail pack to the rear rack, with the logo to
the rear.
Note:
• On the 10 litre tail pack ensure the rear mounting
straps are clipped together, as they are not used
when the tail pack is fitted to the rear rack.
Caution
Remove all straps from the motorcycle when operating
the motorcycle with the tail pack removed. Operation of
the motorcycle with the straps fitted, and the tail pack
removed, may result in damage to the straps or
motorcycle.
Warning
Always ensure any excess mounting strap is tied back
around itself to prevent the strap becoming trapped in
the motorcycle.
Operation of the motorcycle with any excess strap
hanging loose may lead to the strap becoming
entangled with the rider and/or the motorcycle and
result in loss of motorcycle control and an accident.
Caution
Always tie any excess mounting strap back around itself
to prevent the strap touching the motorcycle exhaust or
chafing against the motorcycle.
Operation of the motorcycle with any excess strap not
secured may result in damage to the straps or the
motorcycle.
Warning
Ensure the tail pack or its mounting straps do not
obscure the rear light unit or direction indicators.
Riding the motorcycle with the rear lights or direction
indicators obscured may reduce other road users’
visibility of the motorcycle leading to an accident.
1
2
T0863
Page 4

4 of 10
4. Slide the loop strap on the bottom of the tail pack
under the rear rack, as shown below.
1. Tail pack (10 litre shown)
2. Loop strap
3. Rear rack
5. Clip the straps to the tail pack and tension.
6. Securely tie any excess strap back around itself.
Tiger XR, Tiger XRT, Tiger XRX, Tiger XC,
Tiger XC
A, Tiger XCX,
Tiger 800, Tiger 800 XC, Tiger 800 XC
X,
Tiger 800 XC
A, Tiger 800 XR, Tiger 800 XRX,
Tiger 800 XR
X LRH, Tiger 800 XRT
50 Litre Tail Pack:
Note:
• The kit may include self-adhesive protective film
(item 9). Where applicable, follow steps 1 to 8
below. If self-adhesive protective film is not
included in the kit, go to step 9.
• Read the warning notices printed on the cleaning
wipe packet in the fitting kit.
1. Using the cleaning wipe provided, clean the grab
handles in the area shown below, on both the left
and right hand sides.
1. Grab handle (right hand shown)
2. Cleaning area
2. Take one of the self-adhesive protective films from
the kit and peel off the clear coloured upper cover.
3. Peel the white coloured backing paper away for
approximately 15 mm from the top edge of the
protective film.
1
3
2
4
Page 5

5 of 10
4. Locate the self-adhesive protective film against the
right hand grab handle, aligning the top edge of the
protective film with the contour of the grab handle,
as shown.
1. Grab handle (right hand shown)
2. Self-adhesive protective film
5. When aligned correctly, carefully press the exposed
area of film onto the right hand grab handle.
6. Gradually peel away the backing paper from the
protective film, pressing the areas of exposed film to
the contours of the right hand grab handle until the
protective film is fully applied, as shown.
1. Grab handle (right hand shown)
2. Self-adhesive protective film
7. Use a soft, lint free cloth to press the protective film
firmly on to the right hand grab handle, removing
possible air pockets where necessary.
8. Repeat steps 2 to 7 for the left hand grab handle.
9. Wrap the short male mounting strap around the left
hand grab rail, to the inside of the front lug, so that
the tensioning strap is uppermost.
10. Wrap the short female mounting strap around the
right hand grab rail, to the inside of the front lug, so
the tensioning strap is uppermost.
1. Short female mounting strap
2. Grab handle lug (right hand shown)
Note:
• Ensure the underside of the tail pack is clean and
dry prior to fitting.
11. Position the tail pack to the rear rack, with the logo to
the rear.
Note:
• On the 50 litre tail pack, the long loop strap is not
used when the tail pack is fitted to the rear rack.
Ensure the long loop strap is positioned between
the tail pack and the rear rack.
4
4
1
2
T0863
Page 6

6 of 10
12. Slide the short loop strap on the bottom of the tail
pack under the rear rack, as shown below.
1. Loop strap (short)
2. Rear rack
13. On the side of the tail pack with the logo, and using
the two long straps supplied, wrap the strap through
the D-loop on the bag and connect to the buckle on
the bag, as shown below.
1. 50 litre tail pack
2. Long male strap
3. Long female strap
4. Buckles
14. Clip the straps to the tail pack and tension.
15. Securely tie any excess strap back around itself.
Tiger Explorer, Tiger Explorer XC
Explorer XR, Explorer XRx, Explorer XR
T,
Explorer XC, Explorer XCx, Explorer XC
A,
Tiger 1200 XCX, Tiger 1200 XCA,
Tiger 1200 XR, Tiger 1200 XR
X,
Tiger1200 XR
X LRH, Tiger 1200 XRT
50 Litre Tail Pack:
Note:
• The kit may include self-adhesive protective film
(items 7 and 8). Where applicable, follow steps 1
to 8 below. If self-adhesive protective film is not
included in the kit, go to step 9.
• Read the warning notices printed on the cleaning
wipe packet in the fitting kit.
1. Using the cleaning wipe provided, clean the grab
handle in the area shown below, on both the left and
right hand sides.
1. Grab handle
2. Cleaning area
2. Take the right hand self-adhesive protective film from
the kit and peel off the clear coloured upper cover.
3. Peel the backing paper away for approximately
15 mm from the bottom, stepped edge, of the
protective film.
1
2
4
2
1
3
4
2
1
Page 7

7 of 10
4. Locate the self-adhesive protective film against the
right hand grab handle, aligning the step in the
protective film with the contour of the grab handle,
as shown.
1. Self-adhesive protective film (right hand shown)
2. Grab handle (right hand shown)
5. When aligned correctly, carefully press the exposed
area of film onto the grab handle.
6. Gradually peel away the backing paper from the
protective film, pressing the areas of exposed film to
the contours of the grab handle until the protective
film is fully applied, as shown.
1. Grab handle
2. Self-adhesive protective film
7. Use a soft, lint free cloth to press the protective film
firmly on to the grab handle, removing possible air
pockets where necessary.
8. Repeat steps 2 to 7 for the left hand grab handle.
9. Wrap the long male mounting strap around the
left hand grab handle, to the inside of the front lug,
so that the tensioning strap is uppermost.
10. Wrap the long female mounting strap around the
right hand grab handle, to the inside of the front lug,
so the tensioning strap is uppermost.
1. Long female mounting strap
2. Grab handle (right hand shown)
Note:
• Ensure the underside of the tail pack is clean and
dry prior to fitting.
11. Position the tail pack to the rear rack, with the logo to
the rear.
Note:
• On the 50 litre tail pack, the short loop strap is not
used when the tail pack is fitted to the rear rack.
Ensure the short loop strap is positioned between
the tail pack and the rear rack.
12. Slide the long loop strap fully under the rear rack, as
shown below.
1. Loop strap (long)
2. Rear rack
13. Clip the straps to the tail pack and tension.
14. Securely tie any excess strap back around itself.
1
2
2
1
1
T1034
2
1
2
Page 8

8 of 10
Fitment to the Pillion Seat
Tiger 800, Tiger 800XC
10 Litre and 50 Litre Tail Packs:
Tiger XR, Tiger XRT, Tiger XRX, Tiger XC,
Tiger XC
A, Tiger XCX, Tiger 800 XCX,
Tiger 800 XC
A, Tiger 800 XR, Tiger 800 XRX,
Tiger 800 XR
X LRH, Tiger 800 XRT
50 Litre Tail Pack:
1. Wrap the long male mounting strap around the
left hand side of frame, so the tensioning strap is
uppermost.
2. Wrap the long female mounting strap around the
right hand side of frame, so the tensioning strap is
uppermost.
1. Long female mounting strap
2. Frame (right hand side)
3. Wrap the short female mounting strap around the
lashing hook on the right hand rear side panel, so
the tensioning strap is uppermost.
4. Wrap the short male mounting strap around the
lashing hook on the left hand rear side panel, so the
tensioning strap is uppermost.
1. Short male mounting strap
2. Lashing hook (left hand shown)
Note:
• Ensure the underside of the tail pack is clean and
dry prior to fitting.
5. If necessary, uncouple the tail pack straps from each
other.
6. Position the tail pack on the pillion seat, with the logo
to the rear.
7. Attach the straps to the tail pack and tension.
8. Securely tie any excess strap back around itself.
1
2
T0860
1
2
T0858
Page 9

9 of 10
Tiger Explorer, Tiger Explorer XC
Explorer XR, Explorer XRx, Explorer XR
T,
Explorer XC, Explorer XCx, Explorer XC
A,
Tiger 1200 XCX, Tiger 1200 XCA,
Tiger 1200 XR, Tiger 1200 XR
X,
Tiger1200 XR
X LRH, Tiger 1200 XRT
50 Litre Tail Pack:
1. Wrap the long male mounting strap through the
front eyelet of the left hand side pannier mounting,
so the tensioning strap is uppermost.
2. Wrap the long female mounting strap through the
lashing eyelet of the right hand side pannier
mounting, so the tensioning strap is uppermost.
1. Long female mounting strap
2. Lashing eyelet (right hand shown)
3. Wrap the short male mounting strap through the
eyelet of the left hand side pannier mounting, as
shown below, so the tensioning strap is uppermost.
4. Wrap the short female mounting strap through the
eyelet of the right hand side pannier mounting, as
shown below, so the tensioning strap is uppermost.
1. Short female mounting strap
2. Lashing eyelet (right hand shown)
Note:
• Ensure the underside of the tail pack is clean and
dry prior to fitting.
5. Position the tail pack on the pillion seat, with the logo
to the rear.
6. Attach the straps to the tail pack and tension.
7. Securely tie any excess strap back around itself.
All Models
1
2
Warning
Ensure the tail pack or its mounting straps do not
interfere with the correct operation of the sliding
carriage (if fitted).
Riding the motorcycle with the sliding carriage operation
restricted may cause the motorcycle to become unstable
leading to loss of control and an accident.
1
2
Page 10

10 of 10
Cleaning
To help maintain its appearance, clean the tail pack using
a sponge or cleaning cloth with low alkaline soap and
water.
Caution
Use of chemicals or high-pressure spray washers is not
recommended for cleaning the tail pack. Using
chemicals or pressure washers may damage the tail
pack.
Warning
The maximum safe load for the tail pack is 3 kg
(6.6 lbs). Never exceed this loading limit as this may
cause the motorcycle to become unstable leading to loss
of control and an accident.
Warning
After fitting the accessory kit the motorcycle will exhibit
new handling characteristics. Operate the motorcycle in
a safe area free from traffic to gain familiarity with any
new characteristics. Operation of the motorcycle when
not familiar with any new handling characteristics may
result in loss of motorcycle control and an accident.
Warning
Never ride an accessory-equipped motorcycle (including
those fitted with Triumph approved windscreens and
luggage systems) at speeds above 80 mph (130 km/h).
The presence of accessories such as windscreens and
luggage systems will cause changes in the stability and
handling of the motorcycle. Failure to allow for changes
in motorcycle stability may lead to loss of control or an
accident.
Remember that the 80 mph (130 km/h) limit will be
reduced by the fitting of non-approved accessories,
incorrect loading, worn tyres, overall motorcycle
condition and poor road or weather conditions.
Warning
This motorcycle must not be operated above the legal
road speed limit except in authorised closed-course
conditions.
Warning
Only operate this Triumph motorcycle at high speed in
closed-course, on-road competition or on closed-course
racetracks. High speed operation should only be
attempted by riders who have been instructed in the
techniques necessary for high speed riding and are
familiar with the motorcycle’s characteristics in all
conditions.
High speed operation in any other circumstances is
dangerous and will lead to loss of motorcycle control
and an accident.
 Loading...