

Page 1

Operating and
Safety Instructions
Jigsaw Kit
AJA300
www.tritontools.com
Page 2

2
GB
Thank you for purchasing this Triton tool. These instructions contain information necessary
for safe and effective operation of this product.
Please read this manual to make sure you get the full benefit of its unique design.
Keep this manual close to hand and ensure all users of this tool have read and fully understand the
instructions.
CONTENTS
Symbols 2
Parts List 3
Safety 4
Assembly 5
Warranty 7
SYMBOLS
Always wear ear, eye and respiratory
protection.
Contents / Symbols
Instruction warning.
Do not use before viewing
and fully understanding the
operating instructions
Page 3
3
GB
PARTS LIST
1. Jigsaw plate (1)
2. Overhead arm (1)
3. Support arm (1)
Fastener Bag 1 - Jigsaw Plate
4. Plate clamp base (4)
5. M6 x 45 Countersunk screw (4)
6. M6 Flange nut (9)
7. Plate clamp knob (flat bottom) (4)
8. Back stop (1)
9. M6 x 20 Coach bolt (1)
10. Clamp base (4)
11. M6 x 40 Coach bolt (4)
12. Clamp knobs (recessed bottom) (4)
Fastener Bag 2 - Support Arm
13. Blade guard (1)
14. M6 x 40 Coach bolt (2)
15. Small round knob with M6 nut (1)
16. Bridge (1)
17. M6 x 55 Hex bolt (1)
18. Arm locator (1)
19. M6 x 10 Screw (1)
20. M6 Flange nut (1)
21. Tube plug (1)
22. Large roung knob with M6 nut (2)
7
6
12
1
22
6
8
9
13
15
6
10
11
14
2
4
5
16
2
3
17
14
22
19
18
6
21
Parts List
Page 4

4
GB
GENERAL SAFETY INSTRUCTIONS
WARNING. Read all safety warnings
and all instructions. Failure to follow the
warnings and instructions may result in
electric shock, fire and/or serious injury.
Save all warnings and instructions for future
reference.
The term 'power tool' in the warnings refers
to your mains-operated (corded) power tool or
battery operated (cordless) power tool.
1. Work area safety
a. Keep work area clean and well lit. Cluttered
and dark areas invite accidents.
b. Do not operate power tools in explosive
atmospheres, such as in the presence of
flammable liquids, gases or dust. Power tools
create sparks which may ignite the dust or
fumes.
c. Keep children and bystanders away while
operating a power tool. Distractions can cause
you to lose control.
2. Electrical safety
a. Power tool plugs must match the outlet. Never
modify the plug in any way. Do not use any
adaptor plugs with earthed (grounded) power
tools. Unmodified plugs and matching outlets
will reduce risk of electric shock.
b. Avoid body contact with earthed or grounded
surfaces such as pipes, radiators, ranges
and refrigerators. There is an increased risk
of electric shock if your body is earthed or
grounded.
c. Do not expose power tools to rain or wet
conditions. Water entering a power tool will
increase the risk of electric shock.
d. Do not abuse the cord. Never use the cord for
carrying, pulling or unplugging the power tool.
Keep the cord away from heat, oil, sharp
edges or moving parts. Damaged or entangled
cords increase the risk of electric shock.
e. When operating a power tool outdoors, use an
extension cord suitable for outdoor use. Use
of a cord suitable for outdoor use reduces the
risk of electric shock.
f. If operating a power tool in a damp location
is unavoidable, use a residual current device
(RCD) protected supply. Use of an RCD
reduces the risk of electric shock.
3. Personal safety
Do not use a power tool while you are tired
or under the influence of drugs, alcohol or
General Safety Instructions
medication. A moment of inattention while
operating power tools may result in serious
personal injury.
a. Use safety equipment. Always wear eye
protection. Safety equipment such as dustmask, non-slip safety shoes, hard hat, or
hearing protection used for appropriate
conditions will reduce personal injuries.
b. Avoid accidental starting. Ensure the switch is
in the off position before plugging in. Carrying
power tools with your finger on the switch or
plugging in power tools that have the switch
on invites accidents.
c. Remove any adjusting key or wrench before
turning the power tool on. A wrench or a key
left attached to a rotating part of the power
tool may result in personal injury.
d. Do not overreach. Keep proper footing and
balance at all times. This enables better
control of the power tool in unexpected
situations.
e. Wear suitable cloting and footwear. Do not
wear loose clothing or jewellery. Keep your
hair, clothing and gloves away from moving
parts. Loose clothes, jewellery or long hair can
be caught in moving parts.
f. If devices are provided for the connection of
dust extraction and collection facilities, ensure
these are connected and properly used. Use
of these devices can reduce dust related
hazards.
4. Power tool use and care
a. Do not force the power tool. Use the correct
power tool for your application. The correct
power tool will do the job better and safer at
the rate for which it was designed.
b. Do not use the power tool if the switch
does not turn it on and off. Any power tool
that cannot be controlled with the switch is
dangerous and must be repaired.
c. Disconnect the plug from the power source
before making any adjustments, changing
accessories, or storing power tools. Such
preventive safety measures reduce the risk of
starting the power tool accidentally.
d. Store idle power tools out of the reach of
children and do not allow persons unfamiliar
with the power tool or these instructions
to operate the power tool. Power tools are
dangerous in the hands of untrained users.
Page 5

5
GB
e. Always unplug your power tool when leaving
it unattended. Such preventative safety
measures reduce the risk of starting the
power tool accidentally by untrained users.
f. Maintain power tools. Check for misalignment
or binding of moving parts, breakage of parts
and any other condition that may affect the
operation of the power tool. If damaged, have
the power tool repaired before use. Many
accidents are caused by poorly maintained
power tools.
g. Keep cutting tools sharp and clean. Properly
maintained cutting tools with sharp cutting
edges are less likely to bind and are easier to
control.
ASSEMBLY
Step 1
Fit the Plate Clamp Bases (4) to the corners
of the underside of the Jigsaw Plate (1) with
the M6 x 45 Countersunk Screws (5) and M6
Flange Nuts (6), as shown. Do not yet fully
tighten.
Fit the jigsaw plate into the router table cutout (clamp bases facing down) with the slots
at the front (switchbox end). Push the clamp
bases outward until they locate against the
square tube supports while tightening with a
Phillips-head screwdriver.
Screw the Plate Clamp Knobs (7) onto the
screws until they hold the plate firmly into the
table (they cut their own thread).
In use: The clamps have flat side edges.
When all four cut-aways are facing outward
the plate can be removed. Turn the knobs
clockwise about half a turn to tighten it back
down.
Step 2
For this step, release the plate clamp knobs
and turn the plate upside down in the router
table cut-out, with the clamps upward.
Use a square to ensure the jigsaw blade is set
at 90° to its base, and make any necessary
adjustments.
Place your jigsaw onto the plate with the blade
locating approximately central through the
jigsaw blade slot. Position the jigsaw base
approximately parallel to the sides of the plate.
h. Use the power tool, accessories and tool bits,
in accordance with these instructions and in
the manner intended for the particular type of
power tool, taking into account the working
conditions and the work to be performed. Use
of the power tool for operations different from
those intended could result in a hazardous
situation.
5. Service
a. Have your power tool serviced by a qualified
repair person using only identical replacement
parts. This will ensure that the safety of the
power tool is maintained.
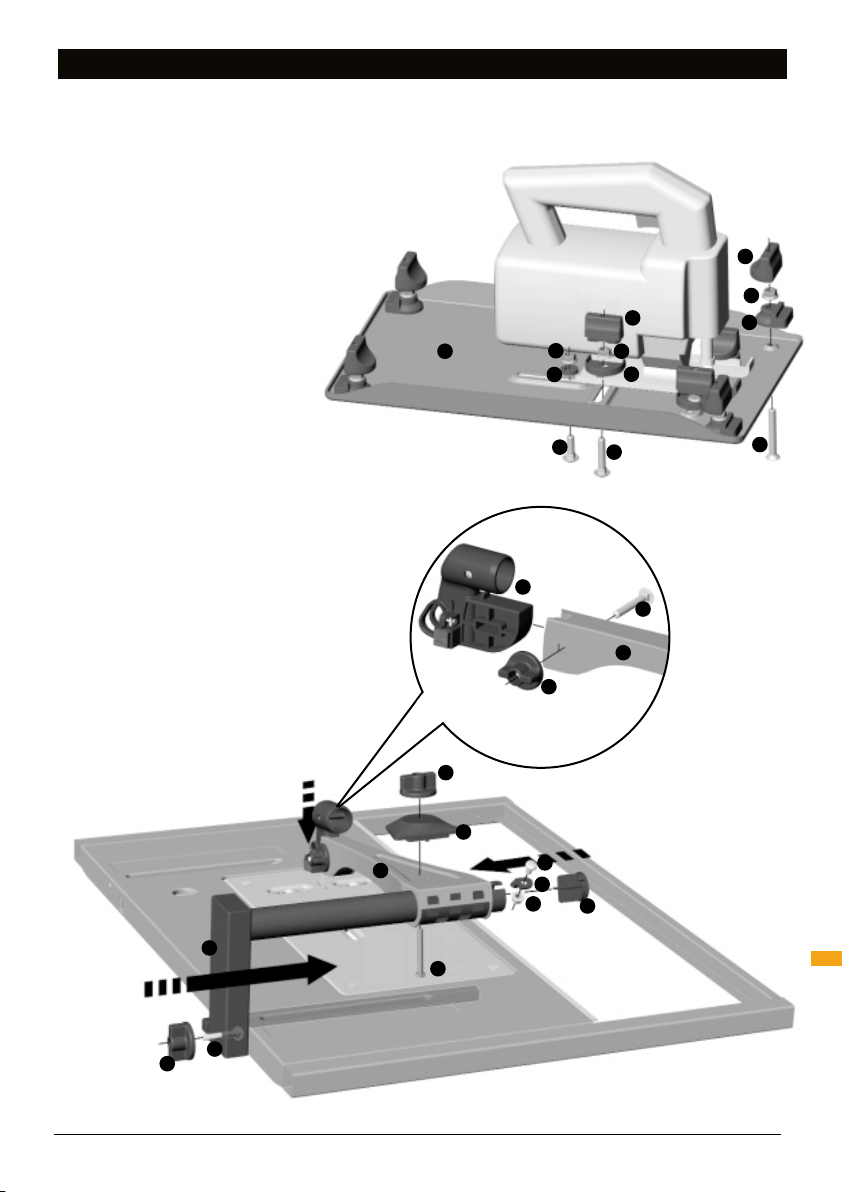
Fit the Back Stop (8) to the rear slot using the
M6 x 20mm Coach Bolt (9) and a flange nut,
as shown. Tighten into position against the
back edge of the jigsaw base.
Position the four Clamp Bases (10) into the
slots on either side of the jigsaw base with
their straight edges touching the sides of the
base. Tighten them into position with the M6
x 40mm Coach Bolts (11) and M6 flange nuts,
as shown.
Screw the Clamp Knobs (12) on (they cut their
own thread) until they tighten firmly onto the
top edge of the jigsaw base. The flat sides of
the clamps should be facing away from the
jigsaw. Note: It may be necessary to remove
the jigsaw while screwing the clamp knobs
into position.
In use: When the flat sides of all four clamps
are facing inward the jigsaw can be removed.
Turn the knobs clockwise half a turn to tighten
it back down.
Remove the plate then re-fit and lock it into
the Router Table with the blade pointing
upward.
Step 3
Push the Blade Guard (13) into the front of
the Overhead Arm (2) and fit the M6 x 40mm
Coach Bolt (14) and Small Round Knob (15),
as shown. As the bolt is designed for a firm
fit pulling the guard forward slightly will allow
easier assembly.
General Safety Instructions / Assembly
Page 6

6
GB
Step 4
Insert the M6 x 40mm Coach Bolt (14) from
inside the edge of the Router Table. Fit the
Support Arm (3) into the square hole and
onto the coach bolt and slide it fully home, as
shown.
Tighten into position with a Large Round Knob
(22).
Slide the overhead arm onto the round tube of
the support arm.
Raise the arm and fit the Bridge (17) using the
Hex Bolt (18) and Large Round Knob (22), as
shown.
Lower the the arm onto the jigsaw blade and
position the arm until the blade is central
within the guard. Tighten the arm in place.
Storage note: Loosen the arm clamp when
storing for extended periods to avoid fatigue.
Step 5
Insert the Arm Locator (19) into the slot on the
support arm round tube, with the side wall
of the overhead arm engaging in the groove
on the locator. Tighten the locator firmly in
position using the M6 x 10mm Screw (20) and
Flange Nut (6), as shown.
Push-fit the Tube Plug (21) into the end of the
tube, as shown. Note the notch in the plug
must line up with the arm locator.
Loosen the round knob on the blade guard and
adjust the guard forward or backward until the
teeth on the jigsaw blade are just in front of the
two wooden guide blocks, then tighten. Loosen
the two Philips-head screws in the blade guard
and move the guide blocks in until they almost
touch the sides of the blade, then tighten. See
Fig. 2.
In use: When the guide blocks wear down,
over time, they should be re-adjusted close
to the blade. Blocks can be reversed and
rotated until all sides are worn. Replacement
blocks can be ordered through your local Triton
stockist, or alternatively you can make your
own from any fine grained hardwood.
Dust Extraction
The Jigsaw Kit has been designed for use with
any vacuum cleaner for sawdust extraction.
While the stroke of the jigsaw forces most dust
beneath the table, connecting to a vacuum
source provides better visibility of the cut line
and reduces airborne dust.
Screw the vacuum hose, supplied with your
Router Table, onto the dust port in the back
of the blade guard (left-hand thread) and
plug the wand of your vacuum cleaner into
the hose adaptor. For a larger collection
capacity, consider fitting a Triton Dust Collector
(DCA300) to your vacuum.
OPERATION
• Always disconnect your jigsaw from power
when making any tool adjustments.
• Always wear eye protection whenever
operating power tools. The use of a dust mask
and ear muffs is also recommended.
• Do not wear loose clothing or jewellery when
operating power tools. Tie back long hair.
• If the power switch on your jigsaw does not
permanently lock on, use tape or a releasable
cable tie to hold the switch on during
operation. Alternatively a trigger strap (part
no. AGA001) can be ordered through your local
Triton stockist.
• Always adjust the overhead arm to suit the
thickness of your workpiece. Loosen the arm
clamp and set the height of the arm until it
rests on top of your workpiece, then tighten
(Fig. 1).
Assembly / Warranty
• Do not over-tighten the arm clamp. This will
allow the arm to raise should the blade contact
it during use - rather than breaking your blade.
• Before turning on the jigsaw check that the
blade extends beyond the thickness of your
workpiece at the bottom of its stroke. At least
one blade tooth should always project above
the work (Fig.1) and the blade should never
exit the guide blocks. Failing to ensure this can
Page 7

7
GB
damage your blade, or cause the overhead arm
to “fling” up.
• Regularly check that the blade is located
centrally inside the guard with the guide blocks
close to the blade but back from the blade
teeth (Fig. 2).
• Always keep ngers well clear of the blade and
never trail your fingers behind the cut line.
• The overhead arm should be tted and
correctly adjusted at all times.
• Never start the jigsaw with the blade touching
the workpiece.
• Remove all loose objects from the table before
operating to prevent them from vibrating into
the cutter.
• Feed the workpiece slowly, particularly when
cutting along the grain, or when using fine
toothed blades (Fig. 3). Smoking or burn marks
on the cut edges indicate the curves were too
tight, or the feed rate was too fast. Overheating
can dull a blade rapidly.
• Hold the workpiece rmly and evenly against
the table while guiding it smoothly through the
blade.
• If you wish to stop mid-way through a cut,
switch off the power with your knee and hold
the workpiece steady until the blade has
completely stopped.
• Don’t try to cut too tight a radius in thick
material. If necessary, edge up to the line in
a series of shallow cuts, whittling away the
waste.
• There is a wide selection of jigsaw blades
available, and using the right blade for the
material being cut will ensure best results.
For cutting small circles and sharp curves we
suggest you fit a narrow blade.
• Ensure all fasteners are regularly checked for
tightness as jigsaw vibration can loosen them.
• Always disconnect power when work is
completed for the day, or when leaving the unit
unattended.
WARRANTY
To register your guarantee visit our web site at
www.tritontools.com* and enter your details.
Your details will be included on our mailing list
(unless indicated otherwise) for information on
future releases. Details provided will not
be made available to any third party.
PURCHASE RECORD
Date of Purchase: ___ / ___ / ____
Model: AJA300
Retain your receipt as proof of purchase
Triton Precision Power Tools guarantees to
the purchaser of this product that if any part
proves to be defective due to faulty materials
or workmanship within 12 MONTHS from the
date of original purchase, Triton will repair, or
at its discretion replace, the faulty part free of
charge.
This guarantee does not apply to commercial
use nor does it extend to normal wear and
tear or damage as a result of accident, abuse
or misuse.
* Register online within 30 days.
Terms & conditions apply.
This does not affect your statutory rights
 Loading...