

Page 1

SINGLE-CASSETTE CASH DISPENSER
OPERATION MANUAL
(MODEL 9610)
VERSION 1.1
TDN 07103-00005 06/01
CORPORATE HEADQUARTERS: RMA (RETURN MATERIAL AUTHORIZATION)
RETURN ADDRESS:
522 E. Railroad Street 21405 B Street
Long Beach, MS 39560 Long Beach, MS 39560
PHONE: (228) 868-1317
FAX: (228) 868-0437
COPYRIGHT NOTICE
Copyright © 2001 Triton Systems , Inc. All rights reserved. No part of this publication may
be reproduced, transmitted, transcribed, stored in a retrieval system, or translated into any
human or computer language, in any form, by any means whatsoever, without the express
written permission of Triton Systems, Inc.
Page 2

SINGLE-CASSETTE CASH DISPENSER OPERATION MANUAL - MODEL 9610
DISCLAIMER
The manufacturer of the Cash Dispenser product(s) described herein makes no representations or warranties,
either expressed or implied, by or with respect to anything in this manual, and shall not be liable for any implied
warranties of fitness for a particular purpose or for any indirect, special or consequential damages. Information in
this document is subject to change without notice and does not represent a commitment on the part of the manufacturer.
FCC COMPLIANCE
Warning:
Changes or modifications to this unit not expressly approved by the party responsible for compliance could void the
user’s authority to operate the equipment.
Note:
This equipment has been tested and found to comply with the limits for a Class A digital device, pursuant to Part 15
of FCC Rules. These limits are designed to provide reasonable protection against harmful interference when the
equipment is operated in a commercial environment. This equipment generates, uses, and can radiate radio frequency
energy and, if not installed and used in accordance with the instruction manual, may cause harmful interference to
radio communications. Operation of this equipment in a residential area is likely to cause harmful interference in
which case the user will be required to correct the interference at his own expense.
CANADIAN EMISSION REQUIREMENTS
This digital apparatus does not exceed the Class A limits for radio noise emissions from digital apparatus set in the
Radio Interference Regulations of the Canadian Department of Communications.
Le present appareil numerique n’emet pas de bruits radioelectriques depassant les limites applicables aux appareils
numeriques de la Class A prescrites dans le Reglement sur le brouillage radioelectrique edicte par le ministere des
Communications du Canada.
AUSTRALIAN EMISSION REQUIREMENTS
Warning:
This is a Class A product. In a domestic environment this product may cause radio interference in which case the
user may be required to take adequate measures.
iiTRITON SYSTEMS, INC.
Page 3

SINGLE-CASSETTE CASH DISPENSER OPERATION MANUAL - MODEL 9610
NOTICE:
The Industry Canada label identifies certified equipment. This certification means that the equipment meets telecommunications network protective, operational and safety requirements as prescribed in the appropriate Terminal
Equipment Technical Requirements document(s). The Department does not guarantee the equipment will operate
to the user’s satisfaction.
Before installing this equipment, users should ensure that it is permissible to be connected to the facilities of the
local telecommunications company . The equipment must also be installed using an acceptable method of connection. The customer should be aware that compliance with the above conditions may not prevent degradation of
service in some situations.
Repairs to certified equipment should be coordinated by a representative designated by the supplier. Any repairs or
alterations made by the user to this equipment, or equipment malfunctions, may give the telecommunications company cause to request the user to disconnect the equipment.
Users should ensure for their own protection that the electrical ground connections of the power utility, telephone
lines and internal metallic water pipe system, if present, are connected together. This precaution may be particularly
important in rural areas. Caution: Users should not attempt to make such connections themselves, but should
contact the appropriate electric inspection authority, or electrician, as appropriate.
NOTICE:
The Ringer Equivalence Number (REN) assigned to each terminal device provides an indication of the maximum
number of terminals allowed to be connected to a telephone interface. The termination on an interface may consist
of any combination of devices subject only to the requirement that the sum of the Ringer Equivalence Numbers of all
the devices does not exceed 5.
TRITON SYSTEMS, INC.
iii
Page 4

SINGLE-CASSETTE CASH DISPENSER OPERATION MANUAL - MODEL 9610
AVIS:
L’étiquette d’Industrie Canada identific le matériel homologué. Cette étiquette certifie que le matériel est conforme
aux normes de protection, d’exploitation et de sécurité des réseaux de télécommunications, comme le prescrivent
les documents concernant les exigences techniques relatives au matériel terminal. Le Ministère n’assure toutefois
pas que le matériel fonctionnera à la satisfaction de l’utilisateur.
Avant d’installer ce matériel, l’utilisateur doit s’assurer qu’il est permis de le raccorder aux installations de 1’entreprise
locale de télécommunication. Le maté-riel doit également être installé en suivant une méthode acceptée de
raccordement. L’abonné ne doit pas oublier qu’il est possible que la comformité aux conditions énoncées ci-dessus
n’empêche pas la dégradation du service dans certaines situations.
Les réparations de matériel homologué doivent être coordonnées par un représentant désigné par le fournisseur.
L’entreprise de télécommunications peut demander à I’utilisateur de débrancher un appareil à la suite de réparations
ou de modifications effectuées par l’utilisateur ou à cause de mauvais fonctionnement.
Pour sa propre protection, l’utilisateur doit s’assurer que tous les fils de mise à la terre de la source d’énergie
électrique, des lignes téléphoniques et des canalisations d’eau métalliques, s’fl y en a, sont raccordés ensemble.
Cette précaution est particulièrement importante dans les régions rurales. Avertissement: L’utilisateur ne doit pas
tenter de faire ces raccordements lui-même; il doit avoir recours à an service d’inspection des installations électriques,
ou à un électricien, selon le cas.
AVIS:
L’indice d’équivalence de la sonnerie (IES) assigné à chaque dispositif terminal indique le nombre maximal de
terminaux qui peuvent étre raccordés à une interface. La terminaison d’une interface téléphonique peut consister
en une combinaison de quelques dispositifs, à la seule condition que la somme d’indices d’équivalence de la sonnerie
de tous les dispositifs n’exède pas 5.
ivTRITON SYSTEMS, INC.
Page 5

SINGLE-CASSETTE CASH DISPENSER OPERATION MANUAL - MODEL 9610
Contents
SECTION 1 - INTRODUCTION............................................................................................................................ 1-1
What’s in This Manual .......................................................................................................... ................................ 1-2
Business Hours Service ....................................................................................................................................... 1-2
Single-Cassette Cash Dispenser Features .......................................................................................................... 1-2
Standard Features................................................................................................................................................1-3
Improved Monochrome Graphic Display Support................................................................................................. 1-3
256-Color Ad Graphic Display Support ................................................................................................................ 1-3
MAC Data Encryption Support ............................................................................................................................. 1-3
SPED PIN Entry Device Support.......................................................................................................................... 1-3
DATAPAK 3000 Communications Protocol Support ............................................................................................. 1-4
Standard Features of the Single-Cassette Cash Dispenser ................................................................................. 1-4
Close Scheduling ................................................................................................................................................. 1-4
Exit Message........................................................................................................................................................ 1-4
Predial Capability ................................................................................................................................................. 1-4
Alarm Thresholds ................................................................................................................................................. 1-4
Transaction and Account Type Configuration....................................................................................................... 1-5
Electronic Journal................................................................................................................................................. 1-5
Distributor EPROM Access With Challenge ......................................................................................................... 1-6
Status Monitoring ................................................................................................................................................. 1-6
Language Option.................................................................................................................................................. 1-6
International Monetary Support ............................................................................................................................ 1-6
Six-Digit Amount Entry Fields............................................................................................................................... 1-7
Receipt Printer Paper Low Option ........................................................................................................................ 1-7
Quad-Port Module ................................................................................................................................................ 1-7
Memory Expansion Modules ................................................................................................................................ 1-7
Jumper Settings ................................................................................................................................................... 1-7
Formatting a Memory Module............................................................................................................................... 1-8
Formatting a Memory Expansion Module from a Triton Connect Host Computer ................................................ 1-8
Formatting a Memory Expansion Module at the Local Terminal........................................................................... 1-8
AD Screens .......................................................................................................................................................... 1-8
Text-Based AD Screens ....................................................................................................................................... 1-9
Receipt Printer Graphics ...................................................................................................................................... 1-9
Prize Coupons Option .......................................................................................................................................... 1-9
Receipt Option ................................................................................................................................................... 1-10
Color Display Option .......................................................................................................................................... 1-10
Triton Connect.................................................................................................................................................... 1-10
Extended Amounts ............................................................................................................................................. 1-11
LED Sign Option ................................................................................................................................................ 1-11
Date/Time Format .............................................................................................................................................. 1-11
Dispense Counter............................................................................................................................................... 1-11
SECTION 2 - BASIC OPERA TION ...................................................................................................................... 2-1
Introduction .......................................................................................................................................................... 2-2
Menu-based Operation......................................................................................................................................... 2-2
Keypad Operation ................................................................................................................................................ 2-3
Accessing Management Functions ...................................................................................................................... 2-4
TRITON SYSTEMS, INC.
v
Page 6

SINGLE-CASSETTE CASH DISPENSER OPERATION MANUAL - MODEL 9610
SECTION 3 - INITIAL SETUP.............................................................................................................................. 3-1
Initial Setup Parameters ....................................................................................................... ................................ 3-2
Other Required Parameters ................................................................................................................................. 3-4
Setup Parameter List............................................................................................................................................ 3-6
SECTION 4 - CURRENCY HANDLING ............................................................................................................... 4-1
Media Condition ................................................................................................................................................... 4-2
Unacceptable Notes ............................................................................................................. ................................ 4-2
Preparing New or Uncirculated Notes .................................................................................................................. 4-2
Preparing Used Notes .......................................................................................................................................... 4-2
Removing the Note Tray....................................................................................................................................... 4-3
Removing Rejected Notes.................................................................................................................................... 4-3
Loading the Note Tray.......................................................................................................................................... 4-3
SECTION 5 - MANAGEMENT FUNCTIONS ....................................................................................................... 5-1
Introduction .......................................................................................................................................................... 5-2
Accessing the Management Functions Menu....................................................................................................... 5-2
Function Availability.............................................................................................................................................. 5-2
Management Functions Chart .............................................................................................................................. 5-3
Function: MANAGEMENT FUNCTIONS.............................................................................................................. 5-6
Function: CLOSE ................................................................................................................................................. 5-7
Function: SCHEDULE CLOSE ............................................................................................................................ 5-8
Function: CHANGE SCHEDULE ......................................................................................................................... 5-9
Function: TRIAL CASSETTE BALANCE ........................................................................................................... 5-10
Function: TRIAL CLOSE ........................................................................................................... ......................... 5-11
Function: DAY CLOSE....................................................................................................................................... 5-12
Function: SEND TERMINAL TOTALS ............................................................................................................... 5-13
Function: ENTER QTY. IN CASSETTE.............................................................................................................. 5-14
Function: CASSETTE CLOSE ........................................................................................................................... 5-15
Function: DIAGNOSTICS .................................................................................................................................. 5-16
Function: STATUS ............................................................................................................................................. 5-17
Function: PURGE .............................................................................................................................................. 5-18
Function: TEST DISPENSE ......................................................................................................... ...................... 5-19
Function: FORMAT MEMORY EXP. CARD ....................................................................................................... 5-20
Function: TEST RECEIPT PRINTER................................................................................................................. 5-21
Function: VERSION #’S ..................................................................................................................................... 5-22
Function: MORE DIAGNOSTICS....................................................................................................................... 5-23
Function: RESET/TEST MODEM ...................................................................................................................... 5-24
Function: SCAN CARD ...................................................................................................................................... 5-25
Function: LANGUAGE/IDIOMA ......................................................................................................................... 5-26
Function: ENGLISH/INGLES ............................................................................................................................. 5-27
Function: SPANISH/ESPANOL .......................................................................................................................... 5-28
Function: ENABLE/DISABLE CUST. OPTION ........................................................................................... ........ 5-29
Function: JOURNAL .......................................................................................................................................... 5-30
Function: PRINT JOURNAL............................................................................................................................... 5-31
Function: CLEAR JOURNAL ......................................................................................................... .................... 5-32
Function: PRINT LAST X ENTRIES.................................................................................................. ................. 5-33
Function: PASSWORD MAINTENANCE ........................................................................................................... 5-34
Function: MASTER PASSWORD ....................................................................................................................... 5-35
viTRITON SYSTEMS, INC.
Page 7

SINGLE-CASSETTE CASH DISPENSER OPERATION MANUAL - MODEL 9610
Function: ADMINISTRATION PASSWORD ....................................................................................................... 5-36
Function: TERMINAL CONFIGURATION .......................................................................................................... 5-37
Function: PRINTER SETTINGS ........................................................................................................................ 5-38
Function: SET PRINT LENGTH ......................................................................................................................... 5-39
Function: LOW RECEIPT PAPER ..................................................................................................... ................. 5-40
Function: PRINTER GRAPHICS........................................................................................................................ 5-41
Function: RANDOM/LEVEL PRIZE COUPONS ............................................................................................ .... 5-42
Function: ENTER LEVEL PRIZE MSG. ................................................................................................ ............. 5-43
Function: ENTER RANDOM PRIZE MSG. ........................................................................................................ 5-44
Function: ENABLE/DISABLE COUPON AWARDS............................................................................................ 5-45
Function: SET LEVEL PRIZE AMOUNT ............................................................................................................ 5-46
Function: SET RANDOM WINNING % .............................................................................................................. 5-47
Function: CHANGE MESSAGES....................................................................................................................... 5-48
Function: MARKETING MESSAGE ................................................................................................................... 5-49
Function: SURCHARGE MESSAGES .................................................................................................... ........... 5-50
Function: WELCOME MESSAGE ...................................................................................................................... 5-52
Function: SURCHARGE OWNER....................................................................................................... ............... 5-53
Function: EXIT MESSAGE ................................................................................................................................ 5-54
Function: STORE MESSAGE ............................................................................................................................ 5-55
Function: TERMINAL OWNER .......................................................................................................................... 5-56
Function: TERMINAL PARAMETERS ................................................................................................................ 5-57
Function: SET TERMINAL # .............................................................................................................................. 5-58
Function: RESET SEQ #.................................................................................................................................... 5-59
Function: SURCHARGE MODE........................................................................................................ ................. 5-60
Function: SURCHARGE PERCENT .................................................................................................................. 5-61
Function: ENABLE/DISABLE SURCHARGE ..................................................................................................... 5-62
Function: SURCHARGE LOCATION ................................................................................................................. 5-63
Function: BLOCK ISO’S..................................................................................................................................... 5-64
Function: SURCHARGE AMOUNT.................................................................................................................... 5-66
Function: CASSETTE SETUP ........................................................................................................................... 5-67
Function: LOW CURRENCY .............................................................................................................................. 5-68
Function: INTERNATIONAL CURRENCY.......................................................................................................... 5-69
Function: MAXIMUM AMOUNT ......................................................................................................................... 5-70
Function: MULTIPLE AMOUNT ......................................................................................................................... 5-71
Function: EXTENDED AMOUNT ....................................................................................................... ................ 5-72
Function: FAST CASH AMOUNT....................................................................................................................... 5-73
Function: KEY MANAGEMENT ......................................................................................................................... 5-74
Function: ENTER MAC MASTER KEY .............................................................................................................. 5-75
Function: ENTER PIN MASTER KEY ................................................................................................................ 5-77
Function: INJECT MASTER KEYS .................................................................................................... ................ 5-79
Function: ENTER MAC WORKING KEY ........................................................................................................... 5-80
Function: ENTER PIN WORKING KEY ............................................................................................................. 5-82
Function: DOWNLOAD WORKING KEYS ......................................................................................................... 5-84
Function: TELEPHONE ..................................................................................................................................... 5-85
Function: PRIMARY NUMBER .......................................................................................................................... 5-86
Function: BACKUP NUMBER ............................................................................................................................ 5-87
Function: DATAPAK ACCESS CODE ................................................................................................... ............. 5-88
Function: PREDIAL ON/OFF ............................................................................................................................. 5-89
Function: COMPUSERVE ID ............................................................................................................................. 5-90
TRITON SYSTEMS, INC.
vii
Page 8

SINGLE-CASSETTE CASH DISPENSER OPERATION MANUAL - MODEL 9610
Function: MODEM SETUP ................................................................................................................................ 5-91
Function: DIAL MODE ....................................................................................................................................... 5-92
Function: DIAL RATE......................................................................................................................................... 5-93
Function: BAUD RATE....................................................................................................................................... 5-94
Function: MODEM SETUP STRING .................................................................................................................. 5-95
Function: RESET/TEST MODEM ...................................................................................................................... 5-96
Function: MORE (TERMINAL PARAMETERS)............................................................................................ ...... 5-97
Function: ADJUST VOLUME/CONTR ............................................................................................................... 5-98
Function: RECEIPT OPTION ............................................................................................................................. 5-99
Function: TRITON CONNECT ......................................................................................................................... 5-100
Function: PRIMARY NUMBER ........................................................................................................................ 5-101
Function: BACKUP NUMBER .......................................................................................................................... 5-102
Function: ALARM NUMBERS .......................................................................................................................... 5-103
Function: PRIMARY ALARM NUMBER ........................................................................................................... 5-104
Function: BACKUP ALARM NUMBER............................................................................................................. 5-105
Function: ENABLE/DISABLE CALL BACK ...................................................................................................... 5-106
Function: ENABLE/DISABLE TRITON CONNECT .......................................................................................... 5-107
Function: ATM MONITORING........................................................................................................ .................. 5-108
Function: STATUS MONITORING ..................................................................................................... .............. 5-109
Function: HEARTBEAT MESSAGE ................................................................................................................. 5-110
Function: AD SCREENS ............................................................................................................ ...................... 5-113
Function: COMMUNICATION HEADER .......................................................................................................... 5-114
Function: MORE (TERMINAL PARAMETERS)............................................................................................ .... 5-115
Function: ALARM THRESHOLDS ................................................................................................................... 5-116
Function: SET LOW CASH THRESHOLD ....................................................................................................... 5-117
Function: SET JOURNAL THRESHOLD ......................................................................................................... 5-118
Function: SET SCHEDULED JOURNAL ......................................................................................................... 5-119
Function: VIEW/MODIFY OPTIONS ................................................................................................................ 5-120
Function: ACTIVATE ........................................................................................................................................ 5-121
Function: DEACTIVATE ................................................................................................................................... 5-122
Function: SELECT FEATURE NUMBER ......................................................................................................... 5-123
Function: DATE / TIME FUNCTIONS ................................................................................................. ............. 5-124
Function: SET DATE FORMAT ........................................................................................................................ 5-125
Function: SET DATE / TIME ............................................................................................................................ 5-126
Function: SET DATE........................................................................................................................................ 5-127
Function: SET TIME.............................................................................................................. ........................... 5-128
Function: TRANSACTION TYPES ................................................................................................................... 5-129
Function: ACCOUNT TYPES........................................................................................................................... 5-130
SECTION 6 - MAINTENANCE ............................................................................................................................. 6-1
Introduction .......................................................................................................................................................... 6-2
Cleaning the Enclosure ........................................................................................................................................ 6-2
Cleaning the Display ............................................................................................................................................ 6-3
Replenishing the Receipt Paper........................................................................................................................... 6-3
Card Reader Cleaning.......................................................................................................................................... 6-5
Card Reader Problems......................................................................................................................................... 6-5
Can’t Insert Card Fully.......................................................................................................................................... 6-5
Communication Problems .................................................................................................................................... 6-6
viiiTRITON SYSTEMS, INC.
Page 9

SINGLE-CASSETTE CASH DISPENSER OPERATION MANUAL - MODEL 9610
SECTION 7 - JOURNAL ENTRIES ..................................................................................................................... 7-1
Journal Entries ..................................................................................................................................................... 7-2
SECTION 6 - MAINTENANCE ............................................................................................................................. 8-1
Introduction .......................................................................................................................................................... 8-2
Error Recovery ..................................................................................................................................................... 8-2
Resetting the Cash Dispenser.............................................................................................................................. 8-2
Miscellaneous Error Codes .................................................................................................................................. 8-3
APPENDIX A - MECHANICAL LOCK .................................................................................................................A-1
About the Dial.......................................................................................................................................................A-2
To Lock.................................................................................................................................................................A-2
Changing the Combination...................................................................................................................................A-2
APPENDIX B - ELECTRONIC LOCK ................................................................................................................. B-1
APPENDIX C - WARRANTY POLICY ................................................................................................................ C-1
TRITON SYSTEMS, INC.
ix
Page 10

Page 11
SECTION 1
INTRODUCTION
Page 12

What’s in This Manual
This manual describes all operating features of the Model 9610
Single-Cassette Cash Dispenser.
The setup and operating procedures given in this manual are applicable to the Model 9610 Single-Cassette Cash Dispenser. If your
Cash Dispenser does not have the ability to perform some of the
features described in this manual, it is because your processor
does not support the feature or the dispenser was purchased without that particular option.
In this manual, the terms Cash Dispenser, Dispenser, or Terminal
are used interchangeably .
Business Hours Service
The Model 9610 is certified for Business Hours Service. This means
that the currency should be removed from the dispenser and stored
in a safe location when the business is closed to the public.
SECTION 1 - INTRODUCTIONOPERATION MANUAL - MODEL 9610
Single-Cassette Cash Dispenser Features
The general features of the Model 9610 Single-Cassette Cash Dispenser are summarized in the following list:
• Uses an ordinary dial-up telephone line, instead of an expensive
leased line.
• 2400 bps (bits-per-second) modem standard (optional 14400
and 33600 bps modems available).
• Note tray holds approximately 750-1000 notes (average 800
notes). Actual capacity depends upon currency quality and
thickness.
• Storage compartment integrated into note tray holds rejected
notes for safekeeping and ease of accountability.
• Reliable friction-feed cash dispensing mechanism.
• High-capacity electronic journal can store up to 2045 of the
most recent transactions for later printout.
• Intuitive, user-friendly keypad and display interface.
• 320 x 240 dot resolution gray-scale (16 shades of gray) backlit
Liquid Crystal Display (LCD). Optional Color LCD display
available.
TRITON SYSTEMS, INC.
1-2
Page 13

• Flush-mounted magnetic dip-style card reader.
• Fixed-head thermal printer designed for quiet operation.
• Modular design for ease of maintenance.
Standard Features
The standard features of the 9610 Cash Dispenser are summarized in the following paragraphs.
Improved Monochrome Graphic Display Support
The rendering of gray-scale images has been improved significantly . The availability of a more life-like rendering of monochrome
graphics can make the use of these images a more appealing option in certain applications.
256-Color Ad Graphic Display Support
SECTION 1 - INTRODUCTIONOPERATION MANUAL - MODEL 9610
ATM Software Release 4.1 (and higher) delivers support for the
new 256-color display feature of Triton Systems A TMs. Ad Graphic
screens can now be displayed using a richer palette of 256 colors.
MAC Data Encryption Support
ATM Software Release 4.1 (and higher) implements support for
the Message Authentication Code (MAC) data encryption protocol. This capability is typically referred to as “MAC-ing”. NOTE:
This feature is currently only available in the Triton Standard version of ATM Software Release 4.1. Also, the SPED option (described below) is required to support MACing.
MACing Provides increased protection for message traffic to and
from the ATM.
SPED PIN Entry Device Support
The newest ATM EPROM upgrade, along with Software Release
4.1, support an optional feature of Triton Systems ATMs known as
the Secure PIN Entry Device, or SPED. Note that the SPED option
is required in order to support MACing.
SPED is an encryption system that offers additional protection for
the customer PIN during entry at the ATM keypad.
TRITON SYSTEMS, INC.
1-3
Page 14

DATAPAK 3000 Communications Protocol Support
ATM Software Release 4.1 is DATAPAK 3000 protocol-compliant.
This new capability enables the ATM to interface with designated
DATAPAK intermediaries (in the Canadian market region), who in
turn provide connectivity to the appropriate transaction processor.
NOTE: This feature is only available for use in the Canadian market.
DATAPAK 3000 connectivity is typically faster and more cost-effective than a direct dial-up connection between the ATM and the
transaction processor.
Standard Features of the Single-Cassette Cash
Dispenser
The following paragraphs provide descriptions of the standard features of the Cash Dispenser.
SECTION 1 - INTRODUCTIONOPERATION MANUAL - MODEL 9610
Close Scheduling
This function enables the operator of the terminal to establish a
time at which the terminal will automatically initiate a close operation with the processor. If only manual initiation of a close is desired, this feature can be turned off.
Exit Message
This feature allows a message to be displayed to the customer at
the conclusion of a transaction. The content of the message is
determined by the operator.
Predial Capability
By initiating the call to the processor immediately after the PIN is
keyed in, the actual transaction, once selected, can be completed
more quickly. If desired, the predial capability can be disabled, in
which case the call to the processor will not be made until after the
customer actually chooses a transaction.
Alarm Thresholds
NOTE: This feature must be used in conjunction with Triton Connect version 3.0 or later.
This feature enables the terminal to detect and automatically report the following conditions to a remote personal computer (PC)
that is running Triton Connect (version 3.0 or later):
TRITON SYSTEMS, INC.
1-4
Page 15

1.) The level of cash in the cassette has fallen below a pre-defined
threshold.
2.) The number of journal entries has risen above a pre-defined
threshold.
3.) Scheduled transfer of electronic journal data to a remote Triton
Connect host computer. This time can be set at the terminal or
via Triton Connect
Transaction and Account Type Configuration
This feature enables the terminal operator to select the types of
transactions (transfers or balance inquiries) or accounts (savings
or credit card) that will be presented to the customer. This feature
does not affect the availability of checking account withdrawal transactions, which are always presented.
Electronic Journal
The Cash Dispenser features a solid state electronic journal, instead of the traditional mechanical journal printer. The electronic
journal is based on proven Triton technology and provides improved
reliability and ease of use.
SECTION 1 - INTRODUCTIONOPERATION MANUAL - MODEL 9610
The details of each transaction are stored in the journal’s memory ,
and can be retrieved at a later date. When needed, just the information desired can be recalled and a printout of the records made.
Normally, journal data is printed by the unit’s receipt printer, but
with the optional Triton Connect software package the information
can be sent to a remote PC (Personal Computer) for storage and
subsequent analysis.
The information in the electronic journal is maintained in a safe
and secure environment. The journal is physically located in the
lower security cabinet of the unit, making it as secure as the cash
itself. Even after a transaction record has been printed to the receipt printer, it can still be read and printed again. Old records are
retained in the electronic journal until 2045 records have been
stored, at which time the journal must be printed or cleared.
The software on the terminal makes it easy to retrieve stored information as often as necessary . From the operator’s standpoint, use
of the journal is simple. All that is required of the operator is to do
a PRINT JOURNAL command on a regular basis.
Typically , the journal should be printed out whenever a DA Y CLOSE
is completed, although this is not a requirement.
TRITON SYSTEMS, INC.
1-5
Page 16

When the PRINT JOURNAL command is selected, only the records
acquired since the last PRINT JOURNAL command will be printed.
Therefore, you don’t have to keep track of what record was printed
last, because the terminal does it for you.
If the printed copy of a group of records is accidentally lost or destroyed, or the receipt printer runs out of paper before completely
printing a group of records, it is a simple matter to reprint them,
since they remain stored in the journal (until overwritten, as explained earlier).
Distributor EPROM Access With Challenge
This feature provides increased security by allowing each distributor to select their own unique EPROM access code for each terminal they sell or service. Procedures for entering and changing the
EPROM Access Code are contained in the Cash Dispenser Installation and Service Manual.
SECTION 1 - INTRODUCTIONOPERATION MANUAL - MODEL 9610
Status Monitoring
This feature (not available with all versions of the terminal’s operating software) allows information about the operational status of
the terminal to be provided to the processor. The feature is activated using the terminal’s Management Functions.
Language Option
The Cash Dispenser has a screen language option. This option
allows the terminal user to select a preferred language (such as
Spanish) when beginning an ATM transaction.
International Monetary Support
This feature allows installation and service personnel to select one
of a number of monetary symbols (such as C, ¢, $, ƒ, L, Pt., £, Q,
¥) that describe the type of currency that will be dispensed by the
Cash Dispenser. The default symbol can be viewed and changed
through the Management Functions.
Six-Digit Amount Entry Fields
U.S. domestic versions of the terminal operating software allow up
to six digits to be entered in all fields where a cash amount is expected. Some international versions of the software allow extended
field-lengths (see Extended Fields).
TRITON SYSTEMS, INC.
1-6
Page 17

Receipt Printer Paper Low Option
This features allows the end user to determine whether or not the
terminal is allowed to continue processing transactions when the
receipt printer paper is low.
Quad-Port Module
The Quad-Port Module is a serial interface board that provides
four independently assignable and software configurable serial I/
O ports. These ports are RS-232C compliant interfaces that can
support baud rates through 33,600 baud.
The capabilities of the module are such that new Cash Dispenser
features that require serial interfaces can readily be supported.
The LED Sign is an example of an option that requires the QuadPort Module.
Memory Expansion Modules
SECTION 1 - INTRODUCTIONOPERATION MANUAL - MODEL 9610
To take advantage of the new graphics handling features of the
Cash Dispenser, the terminal must be equipped with at least one
Memory Expansion Module. Memory Expansion Modules are available with the following memory capacity:
1 Megabyte (Part Number 9600-0004)
2 Megabytes (Part Number 9600-0031)
4 Megabytes (Part Number 9600-0032)
Two Memory Expansion Modules can be installed in slots four and
five of the terminal’s Electronic Enclosure.
Jumper Settings
Memory Expansion Modules have jumpers that must be installed
in the right position to operate correctly. The Memory Expansion
Module installed in slot 4 of the card cage must have the jumpers
across pins 1 and 2 of J1 and J2. If a second Memory Expansion
Module is installed, it will be put in slot 5 of the card cage. The
jumpers on the second Module must be installed across pins 2
and 3 of J1 and J2.
Formatting a Memory Module
A Memory Expansion Module is formatted so that it is ready to
accept downloaded files from the Triton Connect Host Computer.
All Single-Cassette Cash Dispenser Memory Expansion Modules
are shipped from the factory formatted. If it becomes necessary to
format a Memory Expansion Module, it can be accomplished by
two methods.
TRITON SYSTEMS, INC.
1-7
Page 18
Formatting a Memory Expansion Module from a
Triton Connect Host Computer
The first method uses Triton Connect to send a message to the
terminal from the Triton Connect Host Computer that tells it to format a Memory Expansion Module. It uses the Reformat Memory
Options found in the Ad Graphics/File Manager folder of the T erminal Parameters Option in the Triton Connect Terminal Manager to
format the Module. There are separate options to format memory
modules 1 and 2.
Formatting a Memory Expansion Module at the
Local Terminal
The Memory Expansion Modules can also be formatted from the
local terminal through the Management Functions. Refer to Section 5, Management Functions, for procedures.
SECTION 1 - INTRODUCTIONOPERATION MANUAL - MODEL 9610
AD Screens
An Ad Screen is a promotional or advertising graphic that is displayed on the Cash Dispenser LCD screen. It is displayed alternately with the Customer Welcome screen graphic (while the terminal is idle) and while a customer transaction is being processed.
Triton Connect Software Release 1.8 or higher is required to support the use of AD Screens.
Triton Connect has the ability to format 16-bit color graphics for
use in AD Screens (this requires the optional 16-color LCD display), to format monochrome graphics for use in receipt printouts,
and to create text-based messages.
Once formatted, the graphics and text-based messages can be
downloaded to a terminal by the Triton Connect host computer.
The time of day a specific Ad Screen is displayed and the duration
it will be displayed can also be controlled.
To display AD Screens a terminal must have at least one optional
Memory Expansion Module installed. All Cash Dispensers can
display text-based Ad Screens with no additional hardware.
TRITON SYSTEMS, INC.
1-8
Page 19

Text-Based AD Screens
Text-based AD Screens can be displayed to the customer while
the terminal is performing a transaction. A maximum of four textbased ads can be displayed during the interval that the “Transac-
tion Processing - Please Wait” message screen is being shown to
the customer. Each ad consists of up to eight lines of text, and
each ad can be displayed for an operator-specified duration. The
messages are created and downloaded to the terminal using Triton Connect Software Release release 1.8 or above.
Receipt Printer Graphics
Triton Connect Software Release 1.8 or higher allows a bit-mapped
graphic image in “.bmp” format to be downloaded to the terminal.
This graphic is printed on the receipt when the PRINTED GRAPHIC
option is enabled through the Management Functions. This feature requires the addition of a Memory Expansion Module.
SECTION 1 - INTRODUCTIONOPERATION MANUAL - MODEL 9610
Prize Coupons Option
The Cash Dispenser may be configured to award “prize coupons”
to customers on a random chance or a withdrawal amount-determined basis. Coupons are awarded as printed messages presented to the customer on a separate receipt. The messages consist of four lines of text, with up to 40 characters in each line. The
text of the message is entered from the terminal’s keypad.
There are two methods of awarding coupons. The RANDOM approach awards coupons randomly within a specified percentage
range (such as 3% of transactions) set in the management Functions.
The LEVEL approach awards a coupon to each customer that withdraws an amount equal to or greater than a specific dollar value
that is set in the Management Functions.
When a coupon is awarded, the cash dispenser beeps a distinctive tone, displays a message to alert the customer and prints a
coupon after the money is dispensed (but before the customer receipt is printed). The prize coupon is printed on a separate receipt
and a full cut is made between the coupon and the customer receipt.
TRITON SYSTEMS, INC.
1-9
Page 20

Receipt Option
This feature gives customers the option of receiving or not receiving a receipt after completing a withdrawal transaction. The factory default for the RECEIPT OPTION is disabled, meaning a receipt will always be issued after each withdrawal transaction.
If the RECEIPT OPTION is enabled, the customer is given the
option of choosing to receive or not receive a printed receipt at the
end of the withdrawal transaction. If the customer fails to make a
choice, the receipt will be printed automatically after a 40-second
delay.
Color Display Option
The Cash Dispenser can be equipped with an optional 16-color
LCD display . As with the standard gray-scale display , the customer
is guided through a transaction by selecting various options from
menus that are presented on the LCD. Additionally, the terminal
has the capability of displaying promotional information (AD
Screens) in color while it is idle or when the customer is waiting for
a transaction to be completed.
SECTION 1 - INTRODUCTIONOPERATION MANUAL - MODEL 9610
Triton Connect
Triton Connect is an optional software package available through
your service provider that facilitates remote data retrieval and monitoring of your Triton Systems Cash Dispenser. The advantages of
this feature are reduced service calls and simplified terminal configuration changes, which in turn provides more immediate and
economical service for you.
The Triton Connect software runs on a remote host computer , and
uses standard dial-up telephone lines to access and monitor the
terminal. Triton Connect operates by dialing up the terminal and
retrieving its data.
The Triton Connect host computer can monitor your Cash Dispenser
24 hours a day , seven days a week, and can receive an incoming
call from the Cash Dispenser if there is a system error or service is
required.
The Terminal Configuration options in the Management Functions
area enable you to activate or deactivate Triton Connect access to
the terminal.
Key information about the status of the terminal is collected and
stored at a central location by your service provider.
TRITON SYSTEMS, INC.
1-10
Page 21

With this data, customer transaction reports can be developed that
make it easy to monitor your Cash Dispenser’s performance, schedule cash replenishment, and provide instant status for service dispatch should a problem occur.
Extended Amounts
The standard length of a currency amount entry field is 6 characters in U. S. domestic versions of the terminal operating software.
In some international applications this length is insufficient to allow
the entry of the full range of monetary values available in the local
currency type. The Extended Amounts feature allows the selection
of 12-character currency amount entry fields for those applications
that require it.
Once selected, the Cash Dispenser can accept the entry of extended amounts for customer withdrawal and transfer transactions.
The feature is activated using the terminal’s Management Functions.
SECTION 1 - INTRODUCTIONOPERATION MANUAL - MODEL 9610
LED Sign Option
This option consists of a display panel and associated hardware
and firmware that enables a Cash Dispenser to display messages
and animated themes using a variety of special effects. The LED
Sign is available in either Lowtopper or Hightopper versions.
The LED Sign requires version 3.0 (or higher) Terminal Software,
a Quad-Port Module, and a version SD01.04 (or higher) EPROM.
T o control the LED Sign, you will need T riton Connect for Windows
95, version 1.9.1 or later. The LED Sign can also be operated using an optional hand-held infrared remote control.
Specific instructions for operating the LED Sign are contained in
the Triton Connect User Manual, or the LED Sign Remote Control
Operation Manual, as applicable.
Date/Time Format
This option allows the operator to select either MM/DD/YY or DD/
MM/YY as the format the terminal will use when printing receipts
and other reports.
Dispense Counter
This features counts the number of bills that have been dispensed
from the currency cassette and prints the total on the Receipt Printer
Test report
TRITON SYSTEMS, INC.
1-11
Page 22

Page 23

SECTION 2
BASIC OPERATION
Page 24

Introduction
This chapter describes the basic operation of the terminal. The
following topics are covered:
1.) Menu-Based Operation. This section gives a general overview
of the terminal display interface.
2.) Keypad Operation. Describes the layout and use of the display
and alphanumeric keypads.
3.) Changing to Management Functions. Describes how to
access the terminal’s Management Functions.
Menu-based Operation
The terminal operates as a menu driven system. Messages and
menu options presented on the LCD display screen guide the user’s
actions. The desired menu option is selected by pressing one of
the screen keys located to the left and right of the display . For the
purpose of security many screens timeout after a preset time interval, usually 30 seconds. The timeout length may vary depending
on the function being performed.
SECTION 2 - BASIC OPERATIONOPERATION MANUAL - MODEL 9610
When a screen timeout occurs, a screen is presented which asks
the user if more time is needed. If the user chooses NO, the Customer Welcome screen will be presented. If YES is chosen, the
user is returned to the function that was active prior to the timeout.
If the user does not make a selection within an additional 30second countdown period the terminal will automatically go to the
Customer Welcome screen.
When the unit is turned on, the dispenser will beep once and the
Top Menu, shown in Figure 2-1, will appear on the display screen
after a few seconds. From the Top Menu, you can either:
1.) Activate the terminal to perform customer transactions by
pressing the key next to CUSTOMER TRANSACTIONS.
2.) Enter the terminal system management area by pressing the
key next to MANAGEMENT FUNCTIONS.
If you do not select a menu choice within 30 seconds the terminal
will automatically default to the Customer Welcome screen (a benefit of this feature is that in the event of a power interruption the
terminal will automatically begin accepting customer transactions
shortly after power is restored).
TRITON SYSTEMS, INC.
2-2
Page 25
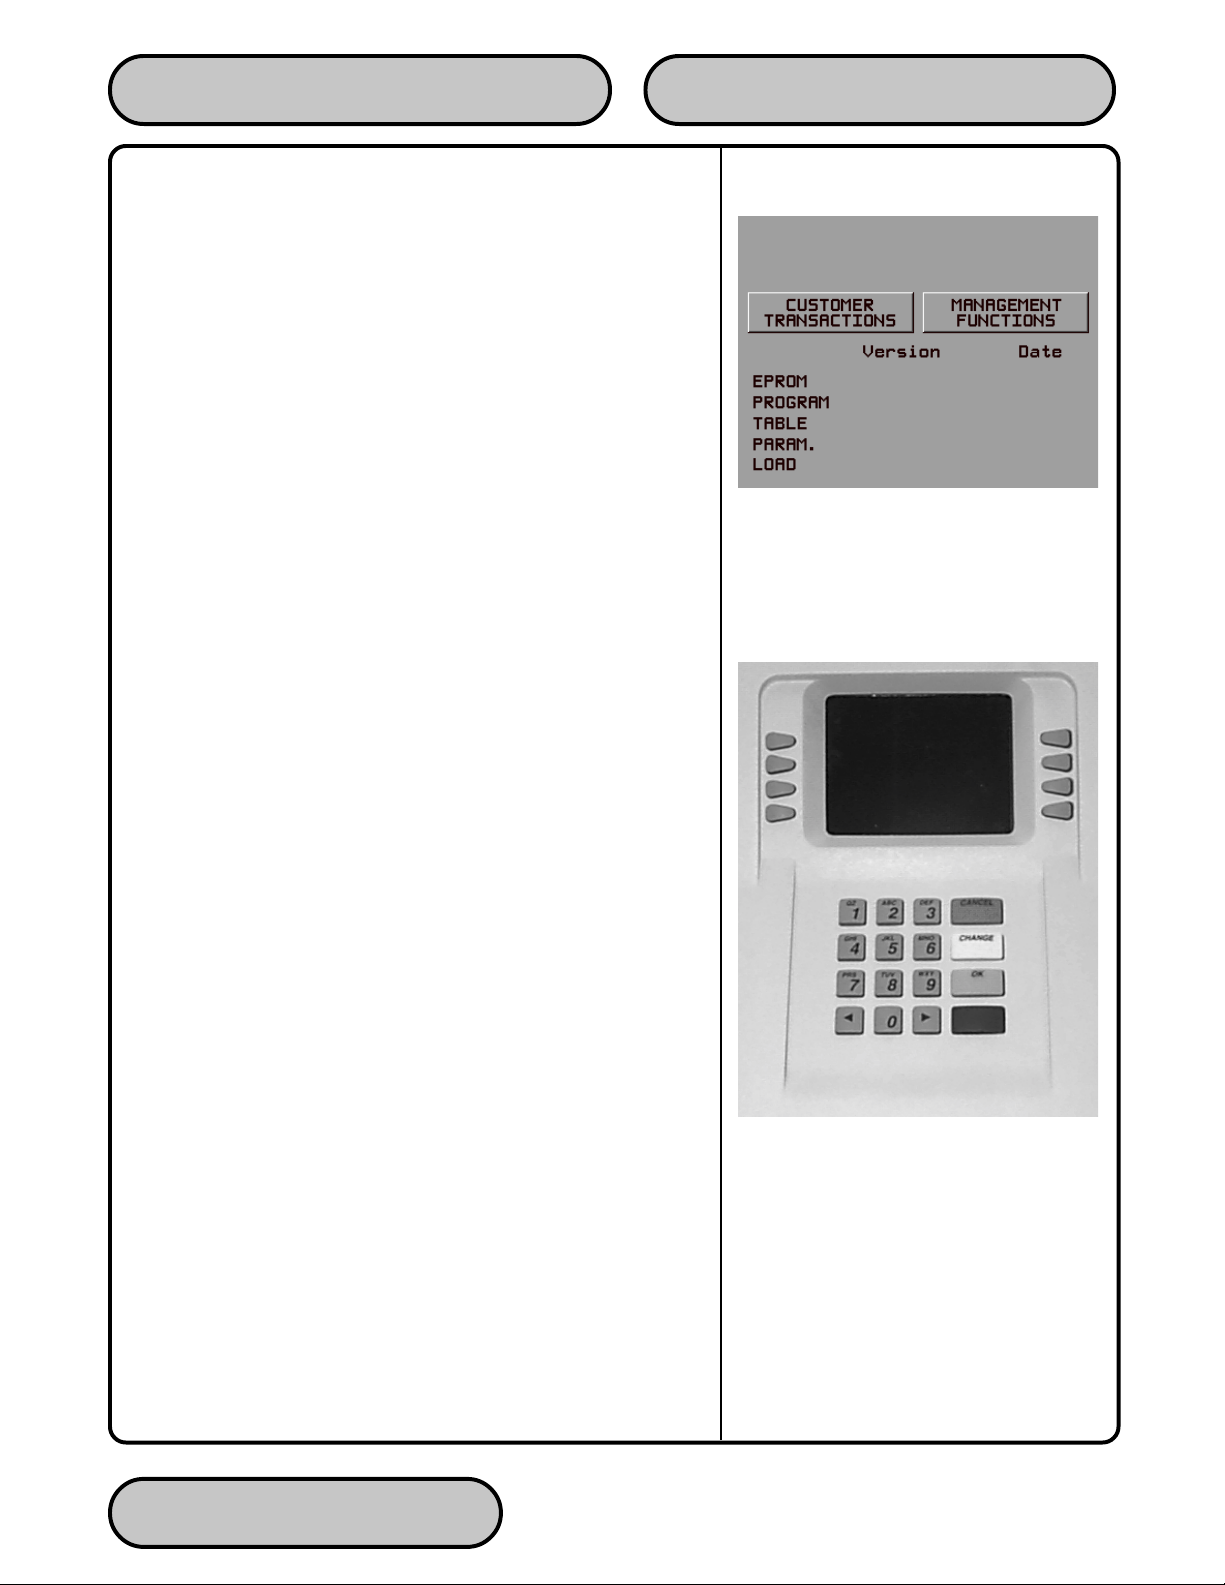
Keypad Operation
See Figure 2-2. The user interface of the terminal consists of the
LCD display and 24 rubber keys on three keypads. The primary
menu navigation keys are arranged in two four-key groups, one
group on either side of the LCD display . The main keypad consists
of 10 alphanumeric keys, two arrow keys and four large control
keys, all located in a 16-key group beneath the LCD display.
All of the keys that a customer would use to conduct transactions
have an integral raised Braille symbol to conform to the requirements of the Americans with Disabilities Act. To activate a key,
press it until a beep is heard. If the key does not beep, it means
that the key is not active for the current function, or the key was not
pressed firmly enough.
The entry of numeric characters via the keypad is straightforward:
simply press the desired key. However, in certain management
function screens it may be necessary to enter alphabetic characters, a procedure that requires a little more explanation. On such
screens a flashing cursor will be evident on the display , representing the location where the next character you enter will be displayed. To enter a letter or punctuation mark, you will first press
the <BLUE> key, and then you will press the number that has the
letter or other character you want.
SECTION 2 - BASIC OPERATIONOPERATION MANUAL - MODEL 9610
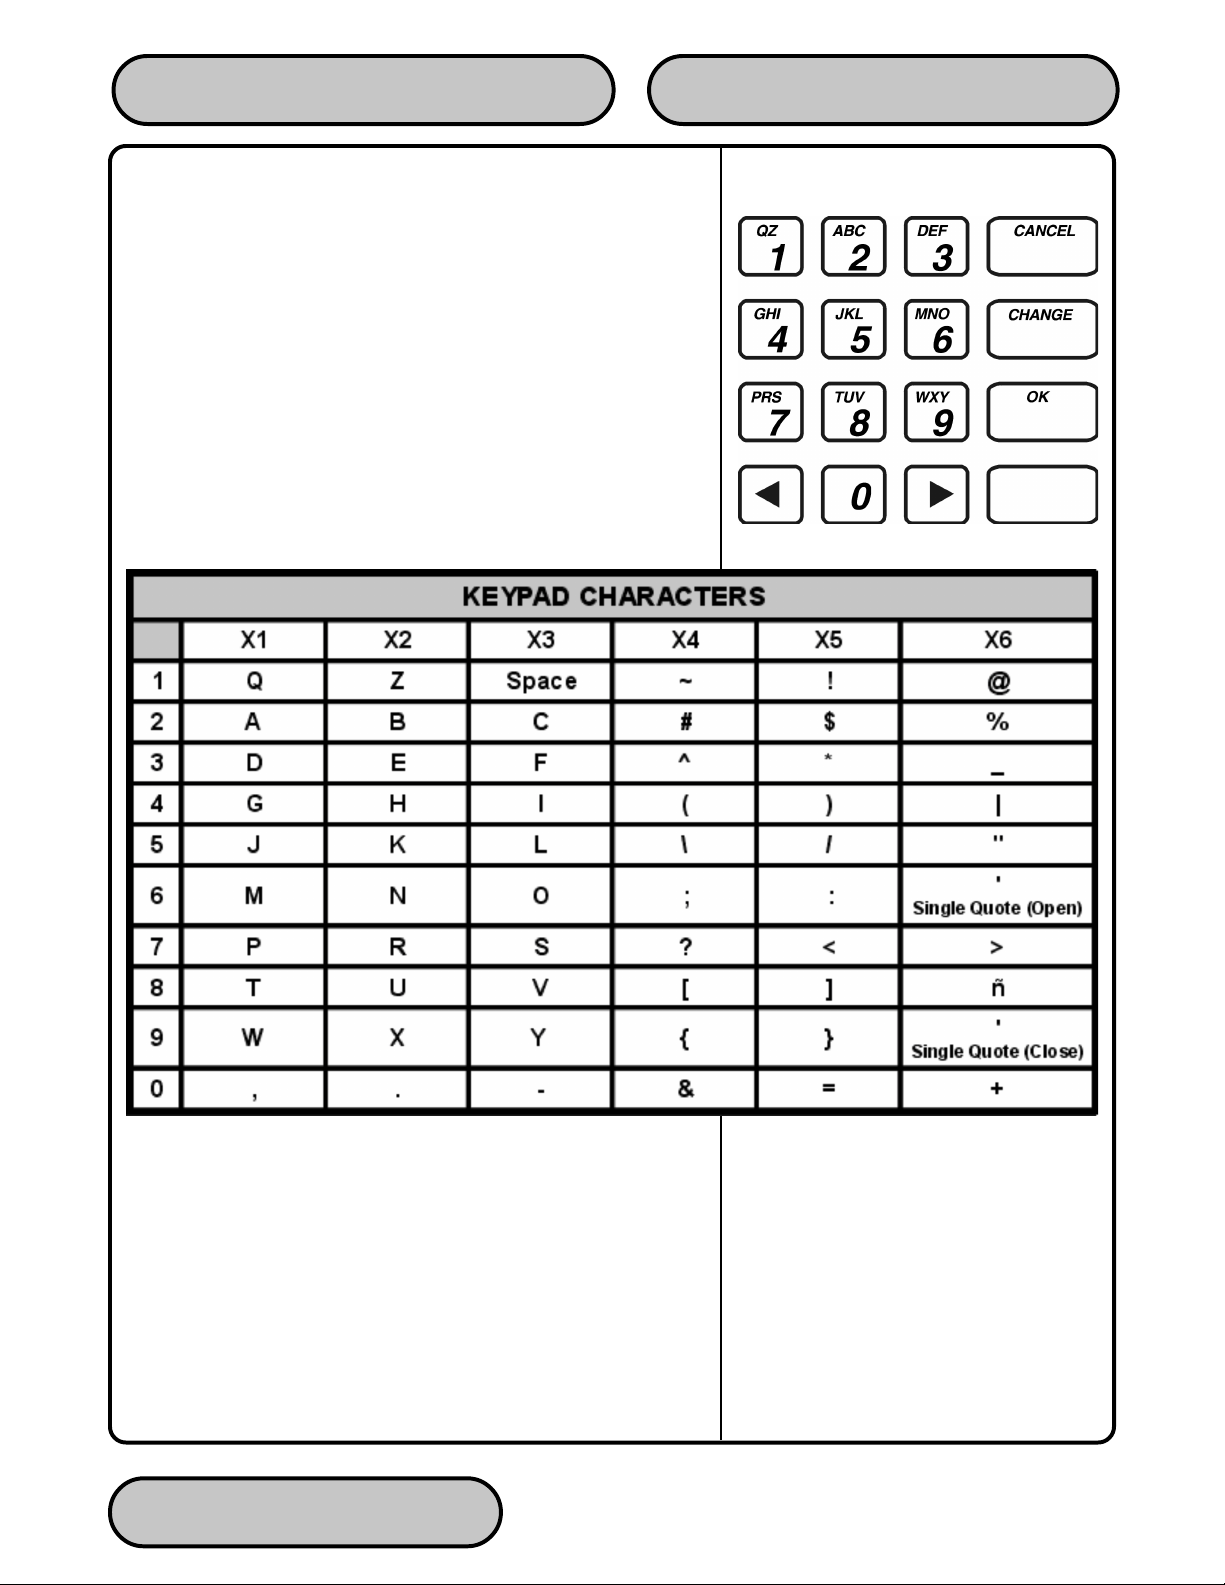
Each of the numbered keys (<0> through <9>) has six characters
available. See Figure 2-3, Alphanumeric Keypad, and Table 2-1,
Keypad Characters. On most of these keys (<2> through <9>), the
first three of the available characters are alphabetic, and are printed
on the keycap above the number character. T wo keys, the <0> and
<1>, are different. The <0> key does not show any additional characters, while the <1> key shows two alphabetic characters (‘QZ’).
The first character on the first key (0-9) you press after the <BLUE>
key will be displayed at the current cursor position. Pressing the
same key repeatedly will cycle the displayed letter through the available character choices for that key (X1-X6). When the desired
character is displayed, press the <RIGHT ARROW> key to ‘lock it
in’ and move the cursor to the next position. Repeat these steps to
enter the next character.
The <RIGHT ARROW> and <LEFT ARROW> keys are used in
most alphanumeric data entry situations. The <LEFT ARROW> is
used to back up and erase a character. The <RIGHT ARROW> is
used to lock in a character. These keys will auto-repeat if held
down for more than one second.
TRITON SYSTEMS, INC.
2-3
Page 26
The <CHANGE> key can be used to clear an entry and start over.
The <CANCEL> key will abort the current transaction.
The keys located beside the display are called the Screen Keys.
They are used in the selection of menu functions. A Screen Key is
only active when a function or menu option name is displayed beside the key.
SECTION 2 - BASIC OPERATIONOPERATION MANUAL - MODEL 9610
Accessing Management Functions
You can enter the terminal MANAGEMENT FUNCTIONS main
menu screen by performing any one of the three procedures listed
below:
1. If the Customer Welcome screen is being displayed, press and
hold down the <BLUE> key; while holding down the <BLUE>
key, press the <1> key. Release both keys. After a moment
the Top Menu screen (shown in Figure 2-1) will be displayed.
Select the MANAGEMENT FUNCTIONS option.
TRITON SYSTEMS, INC.
2-4
Page 27
2. Reset the terminal by removing and reapplying power to the
terminal. When the Top Menu is displayed select
MANAGEMENT FUNCTIONS.
3. Remove and then reapply power to the terminal using the ON/
OFF switch located on the right side of the card cage inside
the upper enclosure of the terminal. When the Top Menu is
displayed select MANAGEMENT FUNCTIONS.
The Top Menu allows you to choose one of two options, CUSTOMER TRANSACTIONS or MANAGEMENT FUNCTIONS. Selecting CUSTOMER TRANSACTIONS changes the display to the
Customer Welcome screen so the terminal is ready to perform
customer transactions. Selecting MANAGEMENT FUNCTIONS
opens the password screen, which in turn provides access to menus
that are used for changing or viewing terminal parameters.
Whenever the MANAGEMENT FUNCTIONS choice is selected,
the terminal will ask for a password to be entered. For a first-time
configuration, enter the default MASTER P ASSWORD of ’123456’
on the keypad and then press the <OK> key. This ‘default’ password will be valid until it is changed.
SECTION 2 - BASIC OPERATIONOPERATION MANUAL - MODEL 9610
**NOTE**
The operator of the terminal must change the MASTER PASSWORD to a new password when the installation is complete.
The Top Menu serves an alternative purpose in the event of a machine malfunction or other error condition. Such conditions are normally reported by an “OUT OF SERVICE” message screen. The
typical response to this message is to reset the terminal. After resetting the terminal the Top Menu screen will display any applicable status messages and error code numbers.
The two options presented in such instances will be RESET ERROR and MANAGEMENT FUNCTIONS. Press RESET ERROR
to attempt to clear the error, or enter the MANAGEMENT FUNCTIONS area, as desired. See Section 8, Error Recovery, for more
information.
TRITON SYSTEMS, INC.
2-5
Page 28

Page 29
SECTION 3
INITIAL SETUP
Page 30

Initial Setup Parameters
There are a number of configuration parameters that must be set
when a Cash Dispenser is installed. These parameters do not need
to be set in any particular order, but they MUST be entered into the
Cash Dispenser to enable customer transactions to take place.
Once they are set, they are retained internally , even when the Cash
Dispenser is turned off.
Detailed procedures describing the step-by-step setup of each terminal parameter are located in Section 5 of this manual.
Terminal Number
The Terminal Number is a unique string of alphanumeric characters (numbers and/or letters) that identifies your Cash Dispenser
to the processor. The Terminal Number is assigned to your Cash
Dispenser by your processor
SECTION 3 - INITIAL SETUPOPERATION MANUAL - MODEL 9610
The Terminal Number and TELEPHONE NUMBER MUST be set
before the Cash Dispenser can go on-line and before the communications key can be downloaded.
Telephone Number
The Cash Dispenser communicates to your host processor over a
dial up phone line. The phone number of the processor must be
entered before live transactions can be performed.
Surcharge Mode
Some networks allow a surcharge, or terminal fee, to be imposed
on withdrawal transactions. If surcharges are in use on your network, you are required to notify the customer of the possibility of
an additional fee before the transaction is processed. The customer must be given a chance to cancel the transaction.
Setting the SURCHARGE MODE to ENABLED will cause the surcharge warning screen to be displayed after the customer’s card is
inserted. The surcharge warning screen notifies the customer of a
possible fee and its amount. The customer is given the opportunity to cancel the transaction at no charge or to accept the surcharge and continue with the transaction.
If your network does not allow surcharges, the SURCHARGE
MODE must be set to DISABLED.
TRITON SYSTEMS, INC.
3-2
Page 31

The amount of the surcharge is stored in the Cash Dispenser and
displayed to the customer. The surcharge amount displayed on
the screen can be set manually via the SURCHARGE AMOUNT
menu. In some cases this value is downloaded from the processor
at the same time the communications key is downloaded.
Manually changing the surcharge amount to a different value does
not automatically change the surcharge collected by the processor
for a transaction. It will only change the surcharge in the surchargewarning message shown to the customer and NOT the actual fee
collected for the transaction, so be sure the values are the same
AND are accurate!
Multiple Amount
This is the value of the denomination of the cash in the currency
cassette. It must be set to a value that is at least 1/50th of the
MAXIMUM AMOUNT. For example, if the MAXIMUM AMOUNT is
500.00, then the MULTIPLE AMOUNT must be at least $10.00
($20.00 would also work). A value of $5.00, however, could not be
used unless the maximum amount was set no greater than $250.00
($5.00 X 50=250).
SECTION 3 - INITIAL SETUPOPERATION MANUAL - MODEL 9610
The factory default for the MULTIPLE AMOUNT is $0.00.
MAC Master/Working Keys
The MAC Master and Working keys are only used if an optional
Secure Pin Entry Device (SPED) keypad has been installed and
MAC-ing is being implemented.
The MAC MASTER KEY is used to decrypt the MAC WORKING
KEY. Each key is a 16-character string, consisting of a combination of the digits 0-9 and the letters A-F. The MAC MASTER KEY
may be injected from a personal computer (using a special floppy
disk), or entered manually at the keypad.
PIN Master/Working Keys
The PIN MASTER KEY is used to decrypt the PIN WORKING KEY .
The Pin MASTER KEY was referred to as the MASTER KEY in
previous versions of A TM operating software. The PIN WORKING
KEY was referred to as the COMMUNICATIONS (COMMS) KEY.
Each key is a 16-character string, consisting of a combination of
the digits 0-9 and the letters A-F. The PIN MASTER KEY may be
entered manually, or may be injected from a personal computer,
using a special floppy disk. The PIN WORKING KEY may be entered manually or downloaded from the processor.
TRITON SYSTEMS, INC.
3-3
Page 32

Other Required Parameters
In addition to the configuration parameters described in the previous paragraphs, there are several other parameters that will need
to be entered into the Cash Dispenser to complete its setup. The
procedures for setting each of these parameters are found in Section 5 of this manual. Some parameters are processor-specific and
may not be available for all locations.
Maximum Amount
The maximum withdrawal limit must be entered into the Cash Dispenser before any transactions can be completed. This number is
the largest dollar amount allowed for a single withdrawal transaction. The maximum amount may be set from $1 to $999 in increments of $1 and must be set to a multiple of the denomination of
the currency in the cassette. Factory default is set to $500.00.
The value must be a whole dollar amount only.
SECTION 3 - INITIAL SETUPOPERATION MANUAL - MODEL 9610
Whenever a withdrawal transaction is processed, the amount entered or selected is compared to the maximum amount parameter. If the entry is larger, an error message warns the user and
displays the maximum allowable amount. Additionally, the Maximum Amount cannot be more than 50 times greater than the denomination of the currency in the cassette.
The Maximum Amount entered into the Cash Dispenser DOES
NOT override any maximum set by a network. The transaction will
be sent to the network if the amount entered or selected is less
than the maximum. The network must still approve the requested
amount.
Store Message
The Store Message consists of up to four lines of text that are
printed at the top of each receipt and report. This message is
typically used to print the store name, address and phone number.
Marketing Message
The Marketing Message consists of up to four lines of text that are
printed at the top of each receipt and report (if a Store Message is
used, the Marketing Message is printed below it).
This message can be used for advertising purposes, sales notifications, promotions, or other purposes.
TRITON SYSTEMS, INC.
3-4
Page 33

Surcharge Owner
The name of the surcharge owner is stored in the terminal and
printed on the receipt.
Terminal Owner
The name of the Terminal Owner is stored in the terminal and displayed to the customer in the surcharge-warning message.
Welcome Message
The Welcome Message consists of three lines of text that are displayed on the Customer Welcome screen.
Language Option
This feature allows the terminal operator to select the language
that is displayed to the customer during a transaction, as well as
the language in which the Management Functions are presented.
A feature is also provided that gives the customer the option of
selecting a preferred language. Also, some terminal software versions allow receipts to be printed using the non-English language
choice.
SECTION 3 - INITIAL SETUPOPERATION MANUAL - MODEL 9610
Receipt Option
This feature allows the customer to select the option of receiving
or not receiving a receipt at the completion of a transaction.
Coupon Options
Coupons are used for promotional purposes. The owner of the
Cash Dispenser can use the Coupon Options feature to issue
printed coupons from the receipt printer. Coupons are issued randomly (based on percentage) or whenever a customer uses the
Cash Dispenser to withdraw more than a predetermined minimum
amount of cash.
Date/Time Format
This option allows the operator to select either MM/DD/YY or DD/
MM/YY as the format the terminal will use when printing receipts
and other reports.
TRITON SYSTEMS, INC.
3-5
Page 34

Setup Parameter List
Table 3-2, Terminal Setup Parameters, lists all of the operatorconfigurable parameters accessible through the Management Functions. The parameters described in the section on Intial Setup Parameters have been highlighted for ease of reference. References
to the specific pages in Section 5, Management Functions, are
provided to help quickly locate the description and applicable setup
instructions for each parameter. In most cases the factory default
value of each parameter is also provided.
Although many of the parameters have been set at the factory , it is
important to verify that the settings are appropriate. Factory default values should be changed to reflect the actual settings and
values required. Once the initial setup has been accomplished,
take the time to review the table and make any additional configuration changes needed to customize the terminal for your application.
SECTION 3 - INITIAL SETUPOPERATION MANUAL - MODEL 9610
TRITON SYSTEMS, INC.
3-6
Page 35

SECTION 3 - INITIAL SETUPOPERATION MANUAL - MODEL 9610
SRETEMARAPPUTESRESNEPSIDHSACETTESSAC-ELGNIS
YROTCAF
RETEMARAP/NOITCNUF
ESOLC63
1
2
3
4
5
6
7
8
9
01
11
21
31
41
51
61
71
81
91
02
12
22
32
42
52
62
72
82
92
03
13
23
33
43
53
ESOLCELUDEHCSFFO8-5
ELUDEHCSEGNAHC*9-5
SLATOTLANIMRETDNESFFO31-5
ETTESSACNI.YTQRETNE041-5
AMOIDI/EGAUGNAL14
SELGNI/HSILGNE*72-5
LONAPSE/HSINAPS*82-5
NOITPO.TSUCELBASID/ELBANEDELBASID92-5
ECNANETNIAMDROWSSAP44
DROWSSAPRETSAM65432153-5
DROWSSAPNOITARTSINIMDA45678963-5
SGNITTESRETNIRP64
HTGNELTNIRPTES5393-5
REPAPTPIECERWOLFFO04-5
SCIHPARGRETNIRPDELBANE14-5
SNOPUOCEZIRPLEVEL/MODNAR05
EGASSEMEZIRPLEVELRETNE*34-5
.EGASSEMEZIRPMODNARRETNE*44-5
DRAWANOPUOCELBASID/ELBANEDELBASID54-5
TNUOMAEZIRPLEVELTES00.0$64-5
%GNINNIWMODNARTES%074-5
SEGASSEMEGNAHC55
EGASSEMGNITEKRAM*94-5
SEGASSEMEGRAHCRUS*05-5
EGASSEMEMOCLEW*25-5
RENWOEGRAHCRUS*35-5
EGASSEMTIXE*45-5
EGASSEMEROTS*55-5
RENWOLANIMRET*65-5
SRETEMARAPLANIMRETTES36
#LANIMRETTESENON75-5
TNECREPEGRAHCRUS%006-5
NOITCELESRETAERG/RESSELRESSEL06-5
EGRAHCRUSELBASID/ELBANEDELBASID16-5
NOITACOLEGRAHCRUSGNINNIGEB26-5
S'OSIKCOLBENON36-5
TNUOMAEGRAHCRUS00.0$56-5
YCNERRUCWOLDELBANE76-5
YCNERRUCLANOITANRETNI*86-5
TNUOMAMUMIXAM00.005$96-5
TNUOMAELPITLUM00.0$07-5
EGAP
.ON
TLUAFED
TNUOMADEDNETXEDELBASID27-5
73
83
93
04
24
34
34
54
54
74
84
94
15
25
35
45
65
75
85
95
06
16
26
REDAEH
46
56
66
76
86
96
07
17
27
37
TNUOMAHSACTSAF*37-5
SYEKRETSAMTCEJNI*97-5
FFO/NOLAIDERPFFO98-5
DIEVRESUPMOC*09-5
EDOMLAIDFMTD29-5
ETARLAIDTSAF39-5
ETARDUAB002149-5
NOITPOTPIECERDELBASID99-5
GNIROTINOMSUTATSDELBASID901-5
SNEERCSDADELBANE311-5
SNOITPOYFIDOM/WEIV*021-5
TAMROFETADTESYY/DD/MM521-5
ETADTESA/N721-5
EMITTESA/N821-5
SEPYTNOITCASNARTNO921-5
SEPYTTNUOCCANO031-5
RETEMARAP/NOITCNUF
YEKRETSAMCAMRETNE*57-5
YEKRETSAMNIPRETNE*77-5
YEKGNIKROWCAMRETNE*08-5
YEKGNIKROWNIPRETNE*28-5
SYEKGNIKROWDAOLNWOD*48-5
)ENOHPELET(REBMUNYRAMIRPENON68-5
)ENOHPELET(REBMUNPUKCABENON78-5
EDOCSSECCAKAPATADENON88-5
GNIRTSPUTESMEDOM*59-5
TSARTNOC/EMULOVTSUJDA*89-5
)TCENNOCNOTIRT(REBMUNYRAMIRPENON101-5
)TCENNOCNOTIRT(REBMUNPUKCABENON201-5
REBMUNMRALAYRAMIRPENON401-5
REBMUNMRALAPUKCABENON501-5
KCABLLACELBASID/ELBANEDELBANE601-5
TCENNOCNOTIRTELBASID/ELBANEDELBASID701-5
EGASSEMTAEBTRAEH*011-5
NOITAC-INUMMOCELBASID/ELBANE
REDAEHNOITACINUMMOCEGNAHC*411-5
FFO/NOSDLOHSERHTMRALAFFO611-5
DLOHSERHTHSACWOLTES*711-5
DLOHSERHTLANRUOJTES*811-5
LANRUOJDELUDEHCSTES*911-5
NOITARUGIFNOCLANIMRET
.SNOITCNUFESEHTROFSTLUAFEDYROTCAFEHTNONOITAMROFNIROF,SNOITCNUFTNEMEGANAM,5NOITCESOTREFER*
YROTCAF
EGAP
.ON
TLUAFED
SRETEMARAPLANIMRETEROM
DELBASID411-5
TRITON SYSTEMS, INC.
3-7
Page 36

Page 37

SECTION 4
CURRENCY HANDLING
Page 38

OPERATION MANUAL - MODEL 9610
SECTION 4 - CURRENCY HANDLING
Media Condition
If possible, store currency at room temperature for at least eight
hours before dispensing from the trays.
The number of rejects can be directly influenced by the technique
used to load the trays and the quality of the currency . Notes loaded
into the mechanism trays must be in “fit” condition if a high level of
performance (low reject and failure rate) is expected from the unit.
“Fit” notes are defined as those that do not possess any of the
defects listed here:
Unacceptable Notes
• Adhesive or “sticky” substances on the surface of the paper.
• Tears extending more than 1/2” from the edge of the currency.
• Tears, holes, or missing sections in the body of the currency.
• T ape on the surface of the currency used for repairing, patching
or any other purpose.
• Staples, pins, or any other foreign body attached to the notes.
• Corner folds of a size greater than 1/2” on either axis.
• Two or more notes joined by any means.
• Excessively crumpled or crinkled.
Preparing New or Uncirculated Notes
Remove the band around each bundle of notes. Separate the notes
from each other by:
• Striking the bundle hard against the edge of a table or similar
object.
• Flipping through each bundle of notes in both directions at each
end.
• Using a Note Counter.
Preparing Used Notes
Note: Used notes should not be limp and should be reasonably
clean.
• Remove the band around each bundle of notes.
• Remove foreign objects (e.g. pins, paper clips, crumbs, etc).
• Remove torn or very worn notes.
• Straighten any folded notes.
Figure 4-1. The orientation of
bowed notes.
TRITON SYSTEMS, INC.
4-2
Page 39

OPERATION MANUAL - MODEL 9610
SECTION 4 - CURRENCY HANDLING
Removing the Note Tray
1. Ensure the terminal is not in use before removing the note
tray! Removing the note tray while the machine is in operation
(processing customer transactions, performing close
operations, etc.) can cause the terminal to enter an “Out of
Service” condition!
2. Open the outer fascia panel to gain access to the security
container door, using the key lock on the front of the panel.
Open the combination lock on the security container door and
open the door to gain access to the dispensing mechanism.
3. To remove the note tray, grasp the tray handle and slide the
tray out of the mechanism (See Figure 4-2).
Removing Rejected Notes
Figure 4-2. Removing a note tray
from the dispensing mechanism.
The reject compartment is located nearest the handle side of the
note tray . Check the compartment for rejected notes. Remove any
notes present.
Y ou may wish to record the denomination and number of notes for
use when balancing the note tray against the tray/day close records.
Loading the Note Tray
1. Move the pusher plate to the rear of the tray (toward the handle).
Ensure the pusher plate is fully back. Maintain pressure on the
pusher plate as needed while loading notes.
2. IMPORTANT: The shape of some notes may be affected by
conditions of storage or bundling, preventing them from forming
neat, even piles. If not corrected, such conditions may cause
notes to be rejected by the dispensing mechanism.
To compensate for the most common conditions of slanting or
cupped note piles, follow the directions given next.
Notes with no apparent shape problems are referred to as
“common” notes.
Figure 4-3. Removing r ejected notes.
Figure 4-4. Loading note tray with
currency.
TRITON SYSTEMS, INC.
4-3
Page 40

OPERATION MANUAL - MODEL 9610
• Slanting pile
To avoid dispensing problems caused by a “slanting” pile, put
the notes in neat bundles of no more than ½ to ¾ inches in
thickness (100-200 notes). Turn every other bundle around to
minimize slanting of the pile (bundle should have the same
height on both sides, if possible).
• Cupped bundle
SECTION 4 - CURRENCY HANDLING
Alternate slanted
bundles.
T o avoid dispensing problems caused by cupped bundles, turn
all the bundles with the cupped side towards the dispense
opening of the note tray (opposite end from the handle).
• Mixed (Slanting and Cupped) bundles
Separate the mixed currency into neat bundles of 100-200 notes
of each type. Place the cupped bundles nearest the dispense
opening of the tray, with the cupped side facing the opening.
Turn every other slanted bundle around to give the bundles
the same height on both sides and place after the cupped
bundles.
• Old and New Notes
Always place the bundles containing old notes into the cassette
first (nearest the handle) and bundles containing new notes
last (nearest the dispense opening).
• Common notes
Simply place the prepared bundles in the tray.
Turn cupped sides
toward dispense
opening.
TRITON SYSTEMS, INC.
Place old notes
together.
Figure 4-5. Compensating for
various note conditions.
4-4
Page 41

OPERATION MANUAL - MODEL 9610
3. Release the pusher plate against the notes.
4. Level the note pile. Compress the note pile slightly by hand.
Single notes must not protrude from the bundle.
Note: When loading the note tray to full capacity, make sure
that the pusher plate has a leeway of approximately 1/4-inch
(5 mm) between the wall plate and the pusher plate .
5. Using the handle, slide the note tray into the dispensing
mechanism. Make sure the note tray is fully inserted!
SECTION 4 - CURRENCY HANDLING
Figure 4-6. Release packer plate.
Figure 4-7. Level the note pile.
Figure 4-8. Slide note tray into
dispenser mechanism.
TRITON SYSTEMS, INC.
4-5
Page 42

Page 43

SECTION 5
MANAGEMENT FUNCTIONS
MANAGEMENT FUNCTIONS
CLOSE
DIAGNOSTICS
LANGUAGE
IDIOMA
JOURNAL
PASSWORD
MAINTENANCE
TERMINAL
CONFIGURATION
EXIT
Page 44

SECTION 5 - MANAGEMENT FUNCTIONSOPERATION MANUAL - MODEL 9610
INTRODUCTION
This section describes the Management Functions available for
controlling the Cash Dispenser. When the CUST OMER WELCOME
screen is displayed, you can access the MANAGEMENT FUNCTIONS menu by following the procedure described next.
ACCESSING THE MANAGEMENT FUNCTIONS MENU
1.) Press and hold down the <BLUE> key; while holding down the
<BLUE> key, press the <1> key. Release both keys. After a
moment the Top Menu will be displayed.
2.) At the Top Menu (see figure below), select MANAGEMENT
FUNCTIONS.
3.) Enter the Master or Administration password at the Password
Entry display (see figure below). The factory default MASTER
PASSWORD is ‘123456’. The factory default
ADMINISTRATION PASSWORD is ‘987654’.
When a valid password is entered, the Management Functions
menu (see the figure on the next page) will be displayed. Once
you have entered the Management Functions Menu you may perform any of the functions allowed by the type of password used.
The ADMINISTRA TION password allows access to a limited group
of functions such as CLOSE, DIAGNOSTICS, etc. The MASTER
PASSWORD allows access to all functions performed with the
ADMINISTRATION password plus access to the Cash Dispenser
configuration functions.
Each MANAGEMENT FUNCTION description will include the function name, instructions for accessing the function, a factory default
value (if applicable) and any error conditions associated with the
use of the function.
FUNCTION AVAILABILITY
Some function screens or options described on the following pages
may be present but not accessible on your Cash Dispenser. In
these cases when you attempt to access the function you will receive a message informing you that the feature or hardware required to support it is not available.
TRITON SYSTEMS, INC.
5-2
Page 45

OPERATION MANUAL - MODEL 9610 SECTION 5 - MANAGEMENT FUNCTIONS
In other cases a function screen or option described here may not
even be present in the Management Functions for your particular
Cash Dispenser. In such cases this is because the function is not
available in the version of terminal operating software currently
loaded in the unit.
You may also notice that the factory default values for some functions on your terminal may differ from the values shown in this
manual. Again, this is because versions of the terminal operating
software customized for a particular processor may require nonstandard default values for some parameters.
MANAGEMENT FUNCTIONS CHART
The chart on the next page shows the organization of the various
Management Functions. Y ou can use this chart to quickly navigate
to a particular function, or simply to see how functions are grouped
and related together at different “levels” of the menu structure.
TRITON SYSTEMS, INC.
5-3
Page 46

SECTION 5 - MANAGEMENT FUNCTIONSOPERATION MANUAL - MODEL 9610
MANAGEMENT FUNCTIONS LOOK-UP TABLE
1
2
3
4
5
6
7
CLOSE
5-7
SCHEDULE CLOSE TRIAL CASSETTE BALANCE
5-8 5-10
STATUS
5-17
RESET/TEST MODEM SCAN CARD
5-24 5-25
ENGLISH / INGLES
5-27 5-28
PRINT THE JOURNAL CLEAR JOURNAL PRINT THE LAST X ENTRIES
5-31
MASTER PASSWORD
5-35
DIAGNOSTICS LANGUAGE/IDIOMA
2
5-16
PURGE
5-18 5-19 5-20 5-21 5-22
SPANISH / ESPANOL
5-32
ADMINISTRATION PASSWORD
5-36
3 5
ENABLE CUSTOMER OPTION
MANAGEMENT FUNCTIONS
JOURNAL
5-26
5-30
CLOSE
TRIAL CLOSE DAY CLOSE
5-11
5-12 5-13
DIAGNOSTICS
TEST DISPENSE FORMAT MEMORY EXP. CARD
MORE DIAGNOSTICS
LANGUAGE / IDIOMA
5-29
DISABLE CUSTOMER OPTION
5-29
JOURNAL
5-33
PASSWORD MAINTENANCE
PASSWORD MAINTENANCE
6 87
5-34
SEND TERMINAL TOTALS
TEST RECEIPT PRINTER
TERMINAL CONFIGURATION
5-37
ENTER QTY IN CASSETTE CASSETTE CLOSE
5-14 5-15
VERSION #’S
MORE DIAGNOSTICS
5-23
4
PRINTER SETTINGS
8
9
10
11
12
13
14
5-38
SET PRINT LENGTH
5-39
ENTER LEVEL PRIZE MSG. ENTER RANDOM PRIZE MSG.
5-43
MARKETING MESSAGE SURCHARGE MESSAGES
5-49 5-50
SET TERMINAL # RESET SEQ #
5-58 5-59
SURCHARGE PERCENT ENABLE/DISABLE SURCHARGE
5-61
LOW CURRENCY
5-68
RANDOM/LEVEL COUPONS
9
LOW RECEIPT PAPER PRINTER GRAPHICS
INTERNATIONAL CURRENCY MAXIMUM AMOUNT MULTIPLE AMOUNT EXTENDED AMOUNT
5-42
5-40
5-44
5-62
5-69
TERMINAL CONFIGURATION
CHANGE MESSAGES
10 11
5-48
TERMINAL PARAMETERS DATE/TIME FUNCTIONS
PRINTER SETTINGS
5-41
RANDOM / LEVEL PRIZE MESSAGE
ENABLE/DISABLE COUPONS SET LEVEL PRIZE AMOUNT
5-45 5-46 5-47
CHANGE MESSAGES
WELCOME MESSAGE SURCHARGE OWNER
5-52
TERMINAL PARAMETERS
SURCHARGE MODE CASSETTE SETUP
5-60
13 14 15 16
SURCHARGE MODE
SURCHARGE LOCATION BLOCK ISO’S
5-63 5-64 5-66
CASSETTE SETUP
5-70
12
5-57
5-53 5-54
5-67 5-74
5-71
5-124
SET RANDOM WINNING %
EXIT MESSAGE
KEY MANAGEMENT
SURCHARGE AMOUNT
5-72
TRANSACTION TYPES
25
5-129
STORE MESSAGE TERMINAL OWNER
TELEPHONE MORE
FAST CASH AMOUNT
27 28
5-55 5-56
5-85 5-97
5-73
ACCOUNT TYPES
5-130
18
TRITON SYSTEMS, INC.
5-4
Page 47

OPERATION MANUAL - MODEL 9610 SECTION 5 - MANAGEMENT FUNCTIONS
MANAGEMENT FUNCTIONS LOOK-UP TABLE
ENTER MAC MASTER KEY
15
16
17
18
19
20
21
5-75
PRIMARY NUMBER BACKUP NUMBER
5-86
DIAL MODE DIAL RATE
5-92
ADJUST VOLUME/CONTRAST
5-98
PRIMARY NUMBER
5-101 5-102
PRIMARY
5-104
STATUS MONITORING
5-109
ENTER PIN MASTER KEY INJECT MASTER KEY ENTER MAC WORKING KEY ENTER PIN WORKING KEY
5-77
5-79
5-80
5-82
TELEPHONE
KEY MANAGEMENT
DATAPAK ACCESS CODE PREDIAL ON/OFF COMPUSERVE ID
5-87
5-88 5-89 5-90
MODEM SETUP
BAUD RATE MODEM SETUP STRING RESET/TEST MODEM
5-93
5-94 5-95 5-96
MORE (TERMINAL PARAMETERS)
RECEIPT OPTION
5-99
TRITON CONNECT
5-100
ATM MONITORING AD SCREENS
19 21
5-108
5-113
TRITON CONNECT
BACKUP NUMBER
ALARM NUMBERS
5-103
ENABLE/DISABLE CALL BACK ENABLE/DISABLE T. CONNECT
20
5-106
5-107
ALARM NUMBERS
BACKUP
5-105
ATM MONITORING
HEARTBEAT MESSAGE
5-110
DOWNLOAD WORKING KEYS
5-84
MODEM SETUP
5-91
COMMUNICATION HEADER
5-114
17
MORE
5-115
22
22
23
24
25
26
27
28
ALARM THRESHOLDS
5-116
LOW CASH THRESHOLD
5-116
ACTIVATE
5-121
SET DATE FORMAT
5-125
SET DATE
5-127 5-128
TRANSFERS
5-129 5-129
SAVINGS
5-130 5-130
23
VIEW/MODIFY OPTIONS
5-120
SET LOW CASH THRESHOLD JOURNAL THRESHOLD
5-117
DEACTIVATE SELECT FEATURE NUMBER
5-122
SET DATE/TIME
5-126
SET TIME
BALANCE INQUIRIES
CREDIT CARD
24
5-116 5-118
5-123
26
MORE (MORE TERMINAL PARAMETERS)
ALARM THRESHOLDS
SET JOURNAL THRESHOLD
VIEW / MODIFY OPTIONS
DATE/TIME FUNCTIONS
SET DATE/TIME
TRANSACTION TYPES
ACCOUNT TYPES
SCHEDULE JOURNAL
5-116
SET SCHEDULED JOURNAL
5-119
TRITON SYSTEMS, INC.
5-5
Page 48

SECTION 5 - MANAGEMENT FUNCTIONSOPERATION MANUAL - MODEL 9610
FUNCTION: MANAGEMENT FUNCTIONS
FACTORY DEFAUL T: N/A
ACCESS INSTRUCTIONS:
Select the MANAGEMENT FUNCTIONS option from the T op Menu
(see page 5-2 for instructions on how to access the Top menu).
DESCRIPTION:
The MANAGEMENT FUNCTIONS menu allows the terminal operator to access the following functions:
1.) CLOSE
2.) DIAGNOSTICS
3.) LANGUAGE/IDIOMA
4.) JOURNAL
5.) PASSWORD MAINTENANCE
6.) TERMINAL CONFIGURATION
E
RROR CONDITIONS:
There are no error conditions directly associated with this function.
TRITON SYSTEMS, INC.
5-6
Page 49

OPERATION MANUAL - MODEL 9610 SECTION 5 - MANAGEMENT FUNCTIONS
FUNCTION: CLOSE
FACTORY DEFAUL T: N/A
ACCESS INSTRUCTIONS:
Select the CLOSE option from the MANAGEMENT FUNCTIONS
screen to view the options available from the SELECT CLOSE
FUNCTION menu.
DESCRIPTION:
The SELECT CLOSE FUNCTION menu allows the terminal operator to perform the following functions:
1.) SCHEDULE CLOSE
2.) TRIAL CASSETTE BALANCE
3.) TRIAL CLOSE
4.) DAY CLOSE
5.) SEND TERMINAL TOTALS
6.) ENTER QTY. IN CASSETTE
7.) CASSETTE CLOSE
E
RROR CONDITIONS:
There are no error conditions directly associated with this function.
TRITON SYSTEMS, INC.
5-7
Page 50

SECTION 5 - MANAGEMENT FUNCTIONSOPERATION MANUAL - MODEL 9610
FUNCTION: SCHEDULE CLOSE
FACTORY DEFAUL T: OFF
ACCESS INSTRUCTIONS:
1.) Select CLOSE from the MANAGEMENT FUNCTION screen.
2.) Select SCHEDULE CLOSE.
DESCRIPTION:
NOTE: ATM Software Version 4.0 (or later) is required to support
the Schedule Close function.
This function allows you to turn on or off the SCHEDULE CLOSE
feature. It also provides access to the CHANGE SCHEDULE function, which allows you to specify the time of day when a CLOSE
process will be automatically initiated (if the SCHEDULE CLOSE
feature is turned ON). When the feature is turned OFF, the close
procedure must be initiated manually.
The current state of the SCHEDULE CLOSE feature is shown as
either ON or OFF in the label on the left-hand side of the display.
Press the button next to this label to toggle the state of the feature
between ON and OFF.
The close information will be written to the Electronic Journal, allowing it to be printed out, or retrieved by a remote computer
equipped with Triton Connect software (version 3.0 or later). Day
Close reports initiated by this function will not be printed by the
receipt printer.
E
RROR CONDITIONS:
There are no error conditions directly associated with this function.
TRITON SYSTEMS, INC.
5-8
Page 51

OPERATION MANUAL - MODEL 9610 SECTION 5 - MANAGEMENT FUNCTIONS
FUNCTION: CHANGE SCHEDULE
FACTORY DEFAUL T: N/A
ACCESS INSTRUCTIONS:
1.) Select CLOSE from the MANAGEMENTFUNCTION screen.
2.) Select SCHEDULE CLOSE.
3.) Select CHANGE SCHEDULE.
DESCRIPTION:
This function is used to set the time, in hours and minutes, at which
the terminal will automatically initiate contact with the processor
and perform a close operation. The time is entered in the form
‘HH:MM:SS’ (hours, minutes, seconds). Do not enter the ‘:’ characters separating the fields, just the fields themselves.
Press the ‘2’ key on the keypad to change the AM/PM setting to
‘AM’; press the ‘7’ key to change the setting to ‘PM.’
Press CLEAR to erase everything and start over. Press the BACKSP ACE key to back up and erase a single character. Press QUIT
to escape without doing anything. Press SET TIME to load the
entered time into the clock.
The Cash Dispenser will not let you enter an invalid number for
hours or minutes. The clock will properly handle the rollover to the
year 2000.
E
RROR CONDITIONS:
There are no error conditions directly associated with this function.
TRITON SYSTEMS, INC.
5-9
Page 52

SECTION 5 - MANAGEMENT FUNCTIONSOPERATION MANUAL - MODEL 9610
FUNCTION: TRIAL CASSETTE BALANCE
FACTORY DEFAUL T: N/A
ACCESS INSTRUCTIONS:
1.) Select CLOSE from the MANAGEMENT FUNCTION screen.
2.) Select TRIAL CASSETTE BALANCE.
DESCRIPTION:
Selecting this function prints a receipt summarizing activity on the
cassette since the last CASSETTE CLOSE was performed. The
totals are not cleared (set to zero) or reported to the host during a
trial cassette close.
The following information is provided:
** THIS IS LINE 1 OF THE STORE MESSAGE *
** THIS IS LINE 2 OF THE STORE MESSAGE *
** THIS IS LINE 3 OF THE STORE MESSAGE *
** THIS IS LINE 4 OF THE STORE MESSAGE *
1.) ST ART. Includes the starting quantity of notes in the cassette,
and the total value of this quantity.
2.) DISPENSED. Shows the number of notes that have been
dispensed and the value of this quantity of notes.
3.) REMAINING. Shows the number of notes remaining in the
cassette, and the total value of these notes.
4.) V ALUE OF EACH DOC. The denomination of the notes in the
cassette.
5.) TRANSACTIONS. The number of transactions that have
occurred since the last.
6.) REJECTS. The number of reject events. Rejects can involve
more than a single note per event.
E
RROR CONDITIONS:
There are no error conditions directly associated with this function.
Term# 000000000000000
Date: Time:
03/11/01 10:04:45 AM
TRIAL CASSETTE CLOSE
QTY
____ ______
START
DISPENSED
REMAINING
VALUE OF EACH DOC. $10.00
TRANSACTIONS: 100
REJECTS: 0
500
100
____ ______
400
AMT
5000
1000
4000
Sample TRIAL CASSETTE CLOSE
receipt.
TRITON SYSTEMS, INC.
5-10
Page 53

OPERATION MANUAL - MODEL 9610 SECTION 5 - MANAGEMENT FUNCTIONS
FUNCTION: TRIAL CLOSE
FACTORY DEFAUL T: N/A
ACCESS INSTRUCTIONS:
1.) Select CLOSE from the MANAGEMENT FUNCTIONS screen.
2.) Select TRIAL CLOSE.
DESCRIPTION:
The TRIAL CLOSE function is used during the daily close procedure. It does the same thing as DAY CLOSE, except that the totals are not cleared.
The report printed by the TRIAL CLOSE is used to balance your
Cash Dispenser before you actually balance with your processor.
It contains information obtained from the processor and information that is obtained from the terminal itself.
Typically, you would do a TRIAL CLOSE to get the totals from the
Cash Dispenser.
The report shows the total number of customer transactions (Withdrawals, Inquiries and Transfers) recorded by the host processor
and the terminal since the last Day Close was performed. The twocolumn format allows the host and terminal totals in each category
to be easily compared. The ‘Settlement $’ value is the host
processor’s record of the total currency dispensed from the terminal since the last Day Close was performed.
** THIS IS LINE 1 OF THE STORE MESSAGE *
** THIS IS LINE 2 OF THE STORE MESSAGE *
** THIS IS LINE 3 OF THE STORE MESSAGE *
** THIS IS LINE 4 OF THE STORE MESSAGE *
Term# 000000000000000
Date: Time:
03/11/01 10:04:45 AM
TRIAL DA Y CLOSE
Withdrawals
Inquiries
Transfers
SETTLEMENT $
HOST
__________ __________
1000.00
100
0
0
TERMINAL
100
1000.00
0
0
E
RROR CONDITIONS:
A call to the processor host computer is required to complete the
operation. If the call to the host is not completed successfully, a
warning (***HOST TOT ALS NOT RECEIVED***) will be printed on
the report.
TRITON SYSTEMS, INC.
Sample TRIAL DAY CLOSE receipt.
5-11
Page 54

SECTION 5 - MANAGEMENT FUNCTIONSOPERATION MANUAL - MODEL 9610
FUNCTION: DAY CLOSE
FACTORY DEFAUL T: N/A
ACCESS INSTRUCTIONS:
1.) Select CLOSE from the MANAGEMENT FUNCTIONS screen.
2.) Select DAY CLOSE.
DESCRIPTION:
The DAY CLOSE Function is used to complete daily balancing of
the Cash Dispenser with the processor. The DAY CLOSE is performed to clear the totals and switch to the next business day . This
function prints a report summarizing all of the activity done by the
Cash Dispenser since the last DAY CLOSE was completed. The
information includes a total of all transactions.
** THIS IS LINE 1 OF THE STORE MESSAGE *
** THIS IS LINE 2 OF THE STORE MESSAGE *
** THIS IS LINE 3 OF THE STORE MESSAGE *
** THIS IS LINE 4 OF THE STORE MESSAGE *
This function also calls your host processor’s computer and commands it to download the totals it has accumulated for the current
business day.
The DAY CLOSE is normally completed as the final step in the
daily balancing process. The DA Y CLOSE report is printed to the
receipt printer. The TRIAL CLOSE function does the same thing
as the DA Y CLOSE, except that the totals are not cleared. See the
TRIAL CLOSE function for more information.
NOTE: If the DA Y CLOSE is not performed at the same time as the
processors’ day close, the host and terminal totals may not match.
E
RROR CONDITIONS:
A call to the processor host computer is required to complete the
operation. If the call to the host is not completed successfully, a
warning (***HOST TOT ALS NOT RECEIVED***) will be printed on
the report.
Term# 000000000000000
Date: Time:
03/11/01 10:04:45 AM
DAY CLOSE
Withdrawals
Inquiries
Transfers
SETTLEMENT $
HOST
__________ __________
1000.00
100
0
0
TERMINAL
1000.00
Sample DAY CLOSE receipt.
100
0
0
TRITON SYSTEMS, INC.
5-12
Page 55

OPERATION MANUAL - MODEL 9610 SECTION 5 - MANAGEMENT FUNCTIONS
FUNCTION: SEND TERMINAL TOTALS
FACTORY DEFAUL T: OFF
ACCESS INSTRUCTIONS:
1.) Select CLOSE from the MANAGEMENT FUNCTION screen.
2.) Select SEND TERMINAL TOTALS.
DESCRIPTION:
This function allows you to turn on or off the REPORT TERMINAL
TOTALS feature. When the feature is turned ON, the terminal will
send accumulated totals information to the processor during the
close operation. Terminal totals include the total value of all
withdawal, inquiry and transfer transactions that have occurred
since the last close operation (see the description of the DAY
CLOSE function for additional information).
The current state of the SEND TERMINAL TOTALS feature is
shown as either ON or OFF in the label on the left-hand side of the
display . Press the button next to this label to toggle the state of the
feature between ON and OFF.
E
RROR CONDITIONS:
There are no error conditions directly associated with this function.
TRITON SYSTEMS, INC.
5-13
Page 56

SECTION 5 - MANAGEMENT FUNCTIONSOPERATION MANUAL - MODEL 9610
FUNCTION: ENTER QTY. IN CASSETTE
FACTORY DEFAUL T: ‘0’
ACCESS INSTRUCTIONS:
1.) Select CLOSE from the MANAGEMENT FUNCTION screen.
2.) Select ENTER QTY. IN CASSETTE.
DESCRIPTION:
The ENTER QTY. IN CASSETTE function allows entry of the number of documents in the cassette. This number is used as a starting point for the cassette close report, the Dispense Counter value
on the Receipt Printer Report and the Low Cash Threshold feature. Enter the total number of documents in the cassette and press
<OK>.
NOTE: Enter the number of documents placed in a cassette, not
the value of those documents.
E
RROR CONDITIONS:
There are no error conditions directly associated with this function.
TRITON SYSTEMS, INC.
5-14
Page 57

OPERATION MANUAL - MODEL 9610 SECTION 5 - MANAGEMENT FUNCTIONS
FUNCTION: CASSETTE CLOSE
FACTORY DEFAUL T: N/A
ACCESS INSTRUCTIONS:
1.) Select CLOSE from the MANAGEMENT FUNCTION screen.
2.) Select CASSETTE CLOSE.
DESCRIPTION:
The CASSETTE CLOSE function is used to complete the balancing of a specific currency cassette of the Cash Dispenser. This
function prints a report summarizing all activity on the Cash Dispenser for the selected cassette since the last CASSETTE CLOSE
was completed. The report includes a total of all transactions.
The CASSETTE CLOSE is normally completed as the final step in
balancing the currency cassette before removing it to be replenished. The CASSETTE CLOSE report is printed to the Receipt
Printer. Completing a CASSETTE CLOSE clears the cassette total from the Cash Dispenser.
** THIS IS LINE 1 OF THE STORE MESSAGE *
** THIS IS LINE 2 OF THE STORE MESSAGE *
** THIS IS LINE 3 OF THE STORE MESSAGE *
** THIS IS LINE 4 OF THE STORE MESSAGE *
Term# 000000000000000
Date: Time:
03/11/01 10:04:45 AM
NOTE: The Cassette Close operation also resets the number of
bills loaded in the cassette to zero (0). After performing a cassette
close, use the “ENTER QTY IN CASSETTE” function to enter the
number of bills in the cassette.
E
RROR CONDITIONS:
There are no error conditions directly associated with this function.
CASSETTE CLOSE
QTY
____ ______
START
DISPENSED
REMAINING
VALUE OF EACH DOC. $10.00
TRANSACTIONS: 100
REJECTS: 0
500
100
____ ______
400
AMT
5000
1000
4000
Sample CASSETTE CLOSE receipt.
TRITON SYSTEMS, INC.
5-15
Page 58

SECTION 5 - MANAGEMENT FUNCTIONSOPERATION MANUAL - MODEL 9610
FUNCTION: DIAGNOSTICS
FACTORY DEFAUL T: N/A
ACCESS INSTRUCTIONS:
Select DIAGNOSTICS from the MANAGEMENT FUNCTIONS
screen.
DESCRIPTION:
Select one of the following to perform the appropriate DIAGNOSTICS test:
1.) Select ST A TUS to determine the operational status of the Cash
Dispenser.
2.) Select PURGE to complete a PURGE cycle on the dispensing
mechanism.
3.) Select TEST DISPENSE to perform a combined dispense and
reject operation on the dispensing mechanism.
4.) Select FORMAT MEMORY EXPANSION CARD to erase the
contents of a memory Expansion Card and to prepare the card
to receive new data.
5.) Select the TEST RECEIPT PRINTER option to test the
operation of the Receipt Printer.
6.) Select the VERSION #’S option to display a screen that
provides version numbers for the various
components of the terminal operating software.
7.) Select the MORE DIAGNOSTICS option to access the following
diagnostic functions:
RESET/TEST MODEM. Select this option to verify that a
modem is installed and that it is capable of being configured.
SCAN CARD. Select this option to to verify that a customer’s
ATM or credit card can be read by the terminal card reader.
NOTE: The diagnostics options do not have a time-out associated
with them. You must manually exit the diagnostics mode when
you are finished.
E
RROR CONDITIONS:
There are no error conditions directly associated with this function.
TRITON SYSTEMS, INC.
5-16
Page 59

OPERATION MANUAL - MODEL 9610 SECTION 5 - MANAGEMENT FUNCTIONS
FUNCTION: STATUS
FACTORY DEFAUL T: N/A
ACCESS INSTRUCTIONS:
1.) Select DIAGNOSTICS from the MANAGEMEN FUNCTIONS
screen.
2.) Select the STATUS option.
DESCRIPTION:
The STATUS command is used to check the status of four functional areas of the dispensing mechanism. These areas are the
current Status of Count Sensors, the current Double Detect status, the current average thickness of the documents being dispensed, and the current average length of the documents being
dispensed. Any of the following sets of return codes will indicate
that all of the areas are operating normally:
1.) ‘40 40/50 40 36’
2.) ‘50 40/50 40 36’
3.) ‘44 40/50 40 36’
4.) ‘54 40/50 40 36’
Note that the value of the second number in a set of return codes
may be either 40 or 50 (40/50). The cancel button must be pressed
to return to the diagnostic’s menu.
E
RROR CONDITIONS:
If any code other than what is indicated above is displayed contact
your service provider for assistance.
TRITON SYSTEMS, INC.
5-17
Page 60

SECTION 5 - MANAGEMENT FUNCTIONSOPERATION MANUAL - MODEL 9610
FUNCTION: PURGE
FACTORY DEFAUL T: N/A
ACCESS INSTRUCTIONS:
1.) Select DIAGNOSTICS from the MANAGEMENT FUNCTIONS
screen.
2.) Select the PURGE option.
DESCRIPTION:
The purge command instructs the dispenser to remove all documents from the feed path. When the purge command is used to
clear the feed path following a jam or failure of the dispenser, some
or all of the notes may pass out of the exit slot depending on their
location and the fault condition. The return code for a successful
Purge is ‘20 20 20’. Press the cancel key to return to the diagnostics menu.
E
RROR CONDITIONS:
If any code other than ‘20, 20, 20’ is displayed contact your service
provider for assistance.
TRITON SYSTEMS, INC.
5-18
Page 61

OPERATION MANUAL - MODEL 9610 SECTION 5 - MANAGEMENT FUNCTIONS
FUNCTION: TEST DISPENSE
FACTORY DEFAUL T: N/A
ACCESS INSTRUCTIONS:
1.) Select DIAGNOSTICS from the MANAGEMENT FUNCTIONS
screen.
2.) Select the TEST DISPENSE option.
DESCRIPTION:
This command instructs the dispensing mechanism to dispense
one note from the cassette into the reject box. This test exercises
the dispenser without sending notes out the exit. A return code of
‘20 20 21’ indicates a successful test dispense. Press the cancel
key to return to the diagnostics menu.
E
RROR CONDITIONS:
If any code other than ‘20 20 21’ is displayed contact your service
provider for assistance.
TRITON SYSTEMS, INC.
5-19
Page 62

SECTION 5 - MANAGEMENT FUNCTIONSOPERATION MANUAL - MODEL 9610
FUNCTION: FORMAT MEMORY EXP. CARD
FACTORY DEFAUL T: N/A
ACCESS INSTRUCTIONS:
1.) Select DIAGNOSTICS from the MANAGEMENT FUNCTIONS
screen.
2.) Select the FORMAT MEMORY EXPANSIONCARD option.
DESCRIPTION:
All Memory Expansion Cards are shipped from the factory formatted and ready to accept downloaded Ad Graphics files. Normally ,
it will only be necessary to format a memory Expansion cardto
erase the existing files, or in the event a file becomes corrupted. If
it becomes necessary to format a Memory Expansion Card, it can
be accomplished from either the local terminal or through commands downloaded from a Triton Connect Host Computer.
CAUTION: Formatting a Memory Expansion Card will erase all
files stored on the card. Do not format a Memory Expansion Card
unless you have the capability to download files to the terminal.
When the SELECT MEMORY CARD TO FORMAT screen is displayed, the options that are made available are MEMORY CARD 1
or MEMORY CARD 2. Selecting either will begin the formatting
process.
E
RROR CONDITIONS:
There are no error conditions directly associated with this function.
TRITON SYSTEMS, INC.
5-20
Page 63

OPERATION MANUAL - MODEL 9610 SECTION 5 - MANAGEMENT FUNCTIONS
FUNCTION: TEST RECEIPT PRINTER
FACTORY DEFAUL T: N/A
ACCESS INSTRUCTIONS:
1.) Select DIAGNOSTICS from the MANAGEMENT FUNCTIONS
screen.
2.) Select the TEST RECEIPT PRINTER option.
DESCRIPTION:
This command will print two lines of text on the receipt printer and
then advance and cut the paper. The text should be 42 characters
wide. The remainder of the information on the TEST RECEIPT
PRINTER print out is terminal configuration data. If the printer test
fails to print two lines of 42 characters, fails to advance the paper,
or fails to cut the paper, contact your service provider for assistance. A return code of ‘00’ indicates a successful printer test.
E
RROR CONDITIONS:
If any code other than ‘00’ is displayed contact your service provider for assistance.
12345678901234567890123456789012
12345678901234567890123456789012
Date: Time:
03/11/01 10:05:51 AM
Mode:Demo
Term# 000000000000000
Terminal Owner:
Eprom Version: SD02.02B60 05/24/99
Program Version: SA-DEMO.14 10/19/99
Table V ersion: ST-9610.14 10/12/99
SPED version: SP-01.00
MACing is Disabled
Printed date format: MMDDYY
Language is ENGLISH
Quad serial board is installed
EPROM does support quad serial board
LED sign is not installed
Mkey index: 0
PIN Master Key Check Digits: E72B0A
PIN Working Key Check Digits: 8CA64D
Primary Phone Number: 5555555
Secondary Phone Number:
Compuserve Routing ID:
Touch Tone, 1200 Baud, Dial Rate: 70
7 data bits, even parity
Surcharging is disabled
Surcharge Owner:
Surcharge Amount: 1.00 % 0
Bill Size: 10.00
Maximum Withdrawal Amount: 500.00
Cassette Low Checking is disabled
Fast Cash Amounts:
Prize Coupon printing is disabled
Level prize amount: 50.00
Random prize %: 100
Minimum lines per receipt: 35
10.00
20.00
30.00
40.00
50.00
CHECKING is spelled: CHECKING
Dispense Counter: 2193
Double Encryption is disabled
Optional Receipt Printing is disabled
Low paper checking is disabled
Bill size checking is enabled
Extended amount is disabled
Status monitoring is disabled
Heartbeat is disabled
AD screens are enabled
Eeceipt graphics are enabled
Latin-American syle receipt is disabled
Scheduled day close is disabled
Sample RECEIPT PRINTER test results.
TRITON SYSTEMS, INC.
5-21
Page 64

SECTION 5 - MANAGEMENT FUNCTIONSOPERATION MANUAL - MODEL 9610
FUNCTION: VERSION #’S
FACTORY DEFAUL T: N/A
ACCESS INSTRUCTIONS:
1.) Select DIAGNOSTICS from the MANAGEMENT FUNCTIONS
screen.
2.) Select the VERSION #’S option.
DESCRIPTION:
This function displays the version information for the terminal software that is running in the Cash Dispenser. Normally you do not
need to access this function unless you are asked to by service
personnel.
E
RROR CONDITIONS:
There are no error conditions directly associated with this function.
TRITON SYSTEMS, INC.
5-22
Page 65
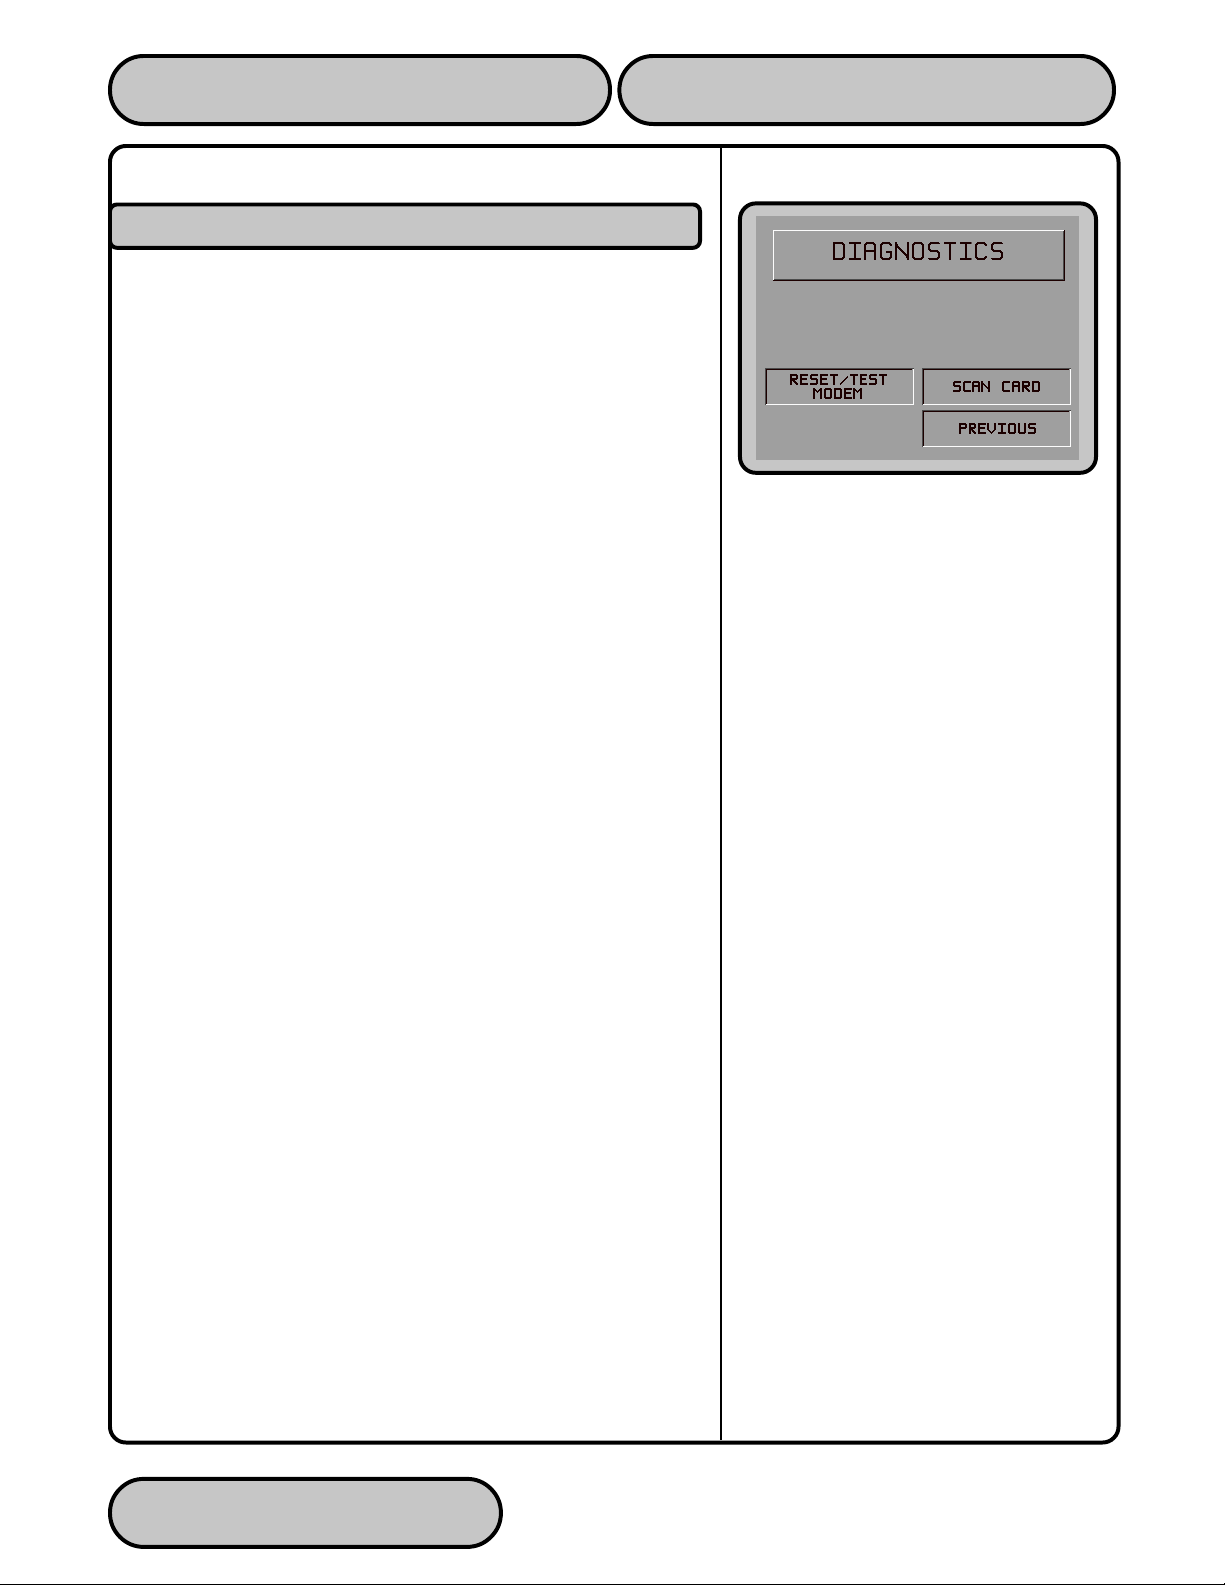
OPERATION MANUAL - MODEL 9610 SECTION 5 - MANAGEMENT FUNCTIONS
FUNCTION: MORE DIAGNOSTICS
FACTORY DEFAUL T: N/A
ACCESS INSTRUCTIONS:
1.) Select DIAGNOSTICS from the MANAGEMENT FUNCTIONS
screen.
2.) Select the MORE DIAGNOSTICS option.
DESCRIPTION:
This screen allows you to select additional diagnostics functions.
The functions available are RESET/TEST MODEM, which performs
a functional test of the modem hardware, and SCAN CARD, which
enables you to test a customer’s ATM or credit card for proper
operation in the terminal card reader.
E
RROR CONDITIONS:
There are no error conditions directly associated with this function.
TRITON SYSTEMS, INC.
5-23
Page 66

SECTION 5 - MANAGEMENT FUNCTIONSOPERATION MANUAL - MODEL 9610
FUNCTION: RESET/TEST MODEM
FACTORY DEFAUL T: N/A
ACCESS INSTRUCTIONS:
1.) Select DIAGNOSTICS from the MANAGEMENT FUNCTIONS
screen.
2.) Select MORE DIAGNOSTICS.
3.) Select the RESET/TEST MODEM option.
DESCRIPTION:
This test confirms that the CPU Module can communicate with the
modem and that the modem can be configured. This test does not
test the ability of the modem to communicate on the phone line. If
the RESET/TEST MODEM TEST fails, contact your service provider for assistance. Press the cancel key to return to the
diagnostic’s menu.
If the test is successful, the following message screen will be displayed:
E
RROR CONDITIONS:
If the test fails, an error message will be displayed.
TRITON SYSTEMS, INC.
5-24
Page 67

OPERATION MANUAL - MODEL 9610 SECTION 5 - MANAGEMENT FUNCTIONS
FUNCTION: SCAN CARD
FACTORY DEFAUL T: N/A
ACCESS INSTRUCTIONS:
1.) Select DIAGNOSTICS from the MANAGEMENT FUNCTIONS
screen.
2.) Select MORE DIAGNOSTICS.
3.) Select the SCAN CARD option.
DESCRIPTION:
The SCAN CARD function reads a card and displays the information imprinted on its magnetic strip. This can be done on a customer card that doesn’t seem to work in the Cash Dispenser. If the
customer complains of card read errors, first make sure that he or
she is inserting the card correctly. Then try to read the card with
SCAN CARD. If the card can be read properly, the information
from track 1 and track 2 will be displayed. A card need only have
a readable track 2 to operate successfully in the Cash Dispenser.
A series of prompt screens direct the user to first INSERT the card
to be scanned (shown above) and then to REMOVE it, after which
the results of the scan are presented, as shown in the following:
E
RROR CONDITIONS:
If the card is damaged or not a standard format, the screen will
display an error message. If this happens, the card cannot be
used for transactions on the Cash Dispenser.
TRITON SYSTEMS, INC.
5-25
Page 68

SECTION 5 - MANAGEMENT FUNCTIONSOPERATION MANUAL - MODEL 9610
FUNCTION: LANGUAGE/IDIOMA
FACTORY DEFAUL T: COUNTRY-SPECIFIC
ACCESS INSTRUCTIONS:
Select the LANGUAGE/IDIOMA option from the MANAGEMENT
FUNCTIONS screen to view the additional options available.
DESCRIPTION:
This function provides access to the options that control the language that is displayed on the Cash Dispenser LCD Display . Current language options include English or Spanish (certain international versions of terminal software provide a French option instead of Spanish), and a customer option feature enables or disables customer-selection of the language in which text is presented
on the LCD display.
1.) ENGLISH / INGLES
2.) SPANISH / ESPANOL
3.) ENABLE CUST. OPTION
4.) DISABLE CUST. OPTION
E
RROR CONDITIONS:
There are no error conditions directly associated with this function.
TRITON SYSTEMS, INC.
5-26
Page 69

OPERATION MANUAL - MODEL 9610 SECTION 5 - MANAGEMENT FUNCTIONS
FUNCTION: ENGLISH/INGLES
FACTORY DEFAUL T: N/A
ACCESS INSTRUCTIONS:
1.) Select the LANGUAGE/IDIOMA option from the
MANAGEMENT FUNCTIONS screen.
2.) Select the ENGLISH/INGLES option.
DESCRIPTION:
Choosing this function when the DISABLE CUST. OPTION is selected will set the LCD screen to display only English text during a
transaction.
Choosing this function when the ENABLE CUST. OPTION is selected will present customer transaction text in English initially , but
will allow the customer to choose English or Spanish (or French
for some versions of terminal software).
In addition to the customer transactions taking place in the English
language, all Management Functions will be presented in English.
All receipts will be printed in English text, as well.
E
RROR CONDITIONS:
There are no error conditions directly associated with this function.
TRITON SYSTEMS, INC.
5-27
Page 70

SECTION 5 - MANAGEMENT FUNCTIONSOPERATION MANUAL - MODEL 9610
FUNCTION: SPANISH/ESPANOL
FACTORY DEFAUL T: N/A
ACCESS INSTRUCTIONS:
1.) Select the LANGUAGE/IDIOMA option from the
MANAGEMENT FUNCTIONS screen.
2.) Select the SPANISH/ESPANOL option.
DESCRIPTION:
NOTE: Some versions of international software replace the Spanish language option with French.
Choosing this option when the DISABLE CUST. OPTION is selected will display only Spanish text during a transaction.
Choosing this option when the ENABLE CUST. OPTION is selected will give the customer the option of completing the transaction in either English or Spanish.
In addition to the transaction taking place in the Spanish language,
all Management Functions will be presented in Spanish.
Some terminal software versions support the printing of receipts
in Spanish.
E
RROR CONDITIONS:
There are no error conditions directly associated with this function.
TRITON SYSTEMS, INC.
5-28
Page 71

OPERATION MANUAL - MODEL 9610 SECTION 5 - MANAGEMENT FUNCTIONS
FUNCTION: ENABLE/DISABLE CUST. OPTION
FACTORY DEFAULT: ‘OPTION IS: DISABLED’
ACCESS INSTRUCTIONS:
1.) Select the LANGUAGE/IDIOMA option from the
MANAGEMENT FUNCTIONS screen.
2.) Select either option, as appropriate:
ENABLE CUST. OPTION.
DISABLE CUST. OPTION.
D
ESCRIPTION:
If the mode is ENABLED, the customer will be offered a bilingual
screen instructing them to select a desired language (currently
English and either Spanish or French depending upon software
version) for the transaction. If the mode is DISABLED, the customer will not be offered this option.
ERROR CONDITIONS:
There are no error conditions directly associated with this function.
TRITON SYSTEMS, INC.
5-29
Page 72

SECTION 5 - MANAGEMENT FUNCTIONSOPERATION MANUAL - MODEL 9610
FUNCTION: JOURNAL
FACTORY DEFAUL T: N/A
ACCESS INSTRUCTIONS:
Select JOURNAL from the options available at the MANAGEMENT
FUNCTIONS screen.
DESCRIPTION:
Select the JOURNAL function from the MANAGEMENT
FUNCTIONS screen to:
1.) PRINT THE JOURNAL
2.) CLEAR JOURNAL
3.) PRINT THE LAST X ENTRIES
E
RROR CONDITIONS:
There are no error conditions directly associated with this function.
TRITON SYSTEMS, INC.
5-30
Page 73

OPERATION MANUAL - MODEL 9610 SECTION 5 - MANAGEMENT FUNCTIONS
FUNCTION: PRINT JOURNAL
FACTORY DEFAUL T: N/A
ACCESS INSTRUCTIONS:
1.) Select JOURNAL from the options available at the
MANAGEMENT FUNCTIONS screen.
2.) Select the PRINT JOURNAL option to print all unaudited
records stored in the Electronic Journal.
DESCRIPTION:
The PRINT JOURNAL command is used to automatically print out
any journal entries collected since the last time the journal was
printed. ALL journal records will be printed, whether there are 1 or
2045 records. This command should be used regularly to print the
audit trail of the terminal. This information should be maintained in
case of an inquiry by a customer, and can also be useful in certain
troubleshooting situations.
When this command is run, all unaudited records in the Electronic
Journal are immediately sent to the receipt printer, and subsequently
marked as audited. Any record printed in this fashion will not be
printed again by this command, although it can be printed using
the PRINT LAST X ENTRIES command. When the journal has
finished printing, the SELECT JOURNAL FUNCTION screen will
be displayed.
E
RROR CONDITIONS:
If the operation fails, an error message will be displayed.
TRITON SYSTEMS, INC.
5-31
Page 74

SECTION 5 - MANAGEMENT FUNCTIONSOPERATION MANUAL - MODEL 9610
FUNCTION: CLEAR JOURNAL
FACTORY DEFAUL T: N/A
ACCESS INSTRUCTIONS:
1.) Select JOURNAL from the options available at the
MANAGEMENT FUNCTIONS screen.
2.) Select the CLEAR JOURNAL option to markall journal entries
stored in the Electronic Journal since the last time the CLEAR
JOURNAL or PRINT JOURNAL functions were completed.
DESCRIPTION:
The CLEAR JOURNAL command is used to mark all unprinted
records in the journal as ‘audited’. This means that they will not be
printed out the next time a PRINT JOURNAL command is performed. Audited records are not erased. They are marked as if
they had been printed. When this function is selected, a confirmation screen prompts the user to answer YES, CLEAR to continue
with operation or NO, CANCEL to quit. If the user answers YES,
CLEAR, the following screen will be displayed:
When the journal has been cleared, the SELECT JOURNAL FUNCTION screen will be displayed. Note that even after this command
has been completed, records are still available for printing by using the PRINT LAST X ENTRIES command.
E
RROR CONDITIONS:
If the operation fails, and error message will be displayed.
TRITON SYSTEMS, INC.
5-32
Page 75

OPERATION MANUAL - MODEL 9610 SECTION 5 - MANAGEMENT FUNCTIONS
FUNCTION: PRINT LAST X ENTRIES
FACTORY DEFAUL T: N/A
ACCESS INSTRUCTIONS:
1.) Select JOURNAL from the options available at the
MANAGEMENT FUNCTIONS screen.
2.) Select the PRINT LAST X ENTRIES option to print the last X
(where ‘X’ is a number from 1 to 2045) entries stored in the
Electronic Journal.
DESCRIPTION:
This command is used to reprint records from the Electronic Journal, either before or after they have been audited using the CLEAR
JOURNAL or PRINT JOURNAL commands. Records printed out
using this command are not marked in any way. This command
will not affect the operation of the PRINT JOURNAL command.
This command is used for several purposes. It can be used to
reprint records for which the paper trail has been lost or destroyed.
It can also be used to print out records before they are audited, for
diagnostic purposes.
When using this command, the user is prompted to enter the number of the most recently collected records to be printed. It always
operates on the last ‘X’ entries. If an operator needs to see a
transaction that happened about 10 records earlier, entering ‘l3’ a
the prompt will cause the last 13 records to be printed, but not
cleared, from the buffer. This will ensure that the transaction in
question is printed.
Subsequent uses of this command are not cumulative. No pointer
is maintained that ‘moves’ each time this command is run. It always operates on the LAST X ENTRIES.
E
RROR CONDITIONS:
Entering a number greater than the number of records in the buffer
memory of the journal will cause all records to be printed. The
buffer memory can contain up to 2045 records at any one time.
TRITON SYSTEMS, INC.
5-33
Page 76

SECTION 5 - MANAGEMENT FUNCTIONSOPERATION MANUAL - MODEL 9610
FUNCTION: PASSWORD MAINTENANCE
FACTORY DEFAUL T: N/A
ACCESS INSTRUCTIONS:
Select the PASSWORD MAINTENANCE option from the MANAGEMENT FUNCTIONS screen.
DESCRIPTION:
The PASSWORD MAINTENANCE Function of MANAGEMENT
FUNCTIONS menu allows access to menus for viewing and changing the following:
1.) MASTER PASSWORD
2.) ADMINISTRATION PASSWORD
E
RROR CONDITIONS:
There are no error conditions directly associated with this function.
TRITON SYSTEMS, INC.
5-34
Page 77

OPERATION MANUAL - MODEL 9610 SECTION 5 - MANAGEMENT FUNCTIONS
FUNCTION: MASTER PASSWORD
FACTORY DEFAUL T: ‘123456’
ACCESS INSTRUCTIONS:
1.) Select the PASSWORD MAINTENANCE option from the
MANAGEMENT FUNCTIONS screen.
2.) Select the MASTER PASSWORD option.
DESCRIPTION:
The MASTER PASSWORD is the highest level password on the
Cash Dispenser. It allows access to all functions except downloading of new software. The MASTER P ASSWORD must be entered in order to change the ADMINISTRATION password. The
factory default MASTER PASSWORD is ‘123456’ and should be
changed when the Cash Dispenser is installed.
To change the MASTER PASSWORD, select this function. You
will be prompted to enter your new password. An asterisk (*) will
be displayed in place of the actual digits entered; therefore, you
must enter the password a second time when prompted to confirm
it.
The password can be from 4 to 12 digits long and can contain only
numbers; letters are not allowed.
E
RROR CONDITIONS:
A number of feedback screens may appear during password entry .
These screens can appear if the second password entry did not
match the first, you entered an invalid password, or the password
you entered was too short (less than 4 characters).
TRITON SYSTEMS, INC.
5-35
Page 78

SECTION 5 - MANAGEMENT FUNCTIONSOPERATION MANUAL - MODEL 9610
FUNCTION: ADMINISTRATION PASSWORD
FACTORY DEFAUL T: ‘987654’
ACCESS INSTRUCTIONS:
1.) Select the PASSWORD MAINTENANCE option from the
MANAGEMENT FUNCTIONS screen.
2.) Select the ADMINISTRATION PASSWORD option.
DESCRIPTION:
The ADMINISTRATION PASSWORD is used to perform daily
management functions. This password DOES NOT allow access
to the TERMINAL CONFIGURATION menu.
This password can only be changed when the MASTER PASSWORD is used to enter the Management FUNCTIONS area. Use
the options provided to VIEW or CHANGE the password, as shown
in the figures below. When the VIEW option is selected, the current password will be displayed for a few seconds. When changing
the password, it must be entered twice, because the characters
entered are not displayed (an asterisk (*) is displayed in place of
each character, for security reasons). The password length can
range from 4 to 12 characters.
E
RROR CONDITIONS:
A number of feedback screens may appear during password entry .
These screens can appear if the second password entry did not
match the first, you entered an invalid password, or the password
you entered was too short (less than 4 characters).
VIEW
CHANGE
TRITON SYSTEMS, INC.
5-36
Page 79

OPERATION MANUAL - MODEL 9610 SECTION 5 - MANAGEMENT FUNCTIONS
FUNCTION: TERMINAL CONFIGURATION
FACTORY DEFAUL T: N/A
ACCESS INSTRUCTIONS:
Select the TERMINAL CONFIGURATION option from the MANAGEMENT FUNCTIONS screen.
DESCRIPTION:
The TERMINAL CONFIGURA TION option provides access to functions that allow the following parameters to be viewed and changed:
1.) PRINTER SETTINGS
2.) RANDOM/LEVEL PRIZE COUPONS
3.) CHANGE MESSAGES
4.) SET TERMINAL PARAMETERS
5.) DATE / TIME FUNCTIONS
6.) TRANSACTION TYPES
7.) ACCOUNT TYPES
E
RROR CONDITIONS:
There are no error conditions directly associated with this function.
TRITON SYSTEMS, INC.
5-37
Page 80

SECTION 5 - MANAGEMENT FUNCTIONSOPERATION MANUAL - MODEL 9610
FUNCTION: PRINTER SETTINGS
FACTORY DEFAUL T: N/A
ACCESS INSTRUCTIONS:
1.) Select the TERMINAL CONFIGURATION option from the
MANAGEMENT FUNCTIONS screen.
2.) Select the PRINTER SETTINGS option.
DESCRIPTION:
This menu provides access to the following functions:
1.) SET PRINT LENGTH
2.) LOW RECEIPT PAPER
3.) PRINTER GRAPHICS
E
RROR CONDITIONS:
There are no error conditions directly associated with this function.
TRITON SYSTEMS, INC.
5-38
Page 81

OPERATION MANUAL - MODEL 9610 SECTION 5 - MANAGEMENT FUNCTIONS
FUNCTION: SET PRINT LENGTH
FACTORY DEFAUL T: ‘35’
ACCESS INSTRUCTIONS:
1.) Select the TERMINAL CONFIGURATION option from the
MANAGEMENT FUNCTIONS screen.
2.) Select the PRINTER SETTINGS option.
3.) Select SET PRINT LENGTH.
DESCRIPTION:
This function sets the minimum length of the receipt provided to
the customer after each transaction.
E
RROR CONDITIONS:
Changing the Print Length to less than 35 lines will prevent the
receipt from exiting the front of the Cash Dispenser. This may
cause paper jams that could result in printer damage.
TRITON SYSTEMS, INC.
5-39
Page 82

SECTION 5 - MANAGEMENT FUNCTIONSOPERATION MANUAL - MODEL 9610
FUNCTION: LOW RECEIPT PAPER
FACTORY DEFAULT: ‘OUT OF SERVICE’
ACCESS INSTRUCTIONS:
1.) Select TERMINAL CONFIGURATION from the
MANAGEMENT FUNCTIONS menu.
2.) Select the PRINTER SETTINGS option.
3.) Choose the LOW RECEIPT PAPER option.
DESCRIPTION:
After selecting the LOW RECEIPT P APER ON/OFF option, a screen
displaying,” WHEN RECEIPT P APER BECOMES LOW , THE A TM
WILL BE OUT OF SERVICE” (or IN SERVICE depending on terminal setup). Change to IN SERVICE or OUT OF SERVICE by
pressing the Screen Key next to the appropriate text and pressing
the EXIT key.
Selecting the IN SERVICE options will allow the terminal to continue to operate after it senses a Receipt Printer Paper Low condition (Error Code 183). Selecting this option will allow the terminal
to operate with low or no receipt paper in the terminal.
Selecting the OUT OF SERVICE option will allow the terminal to
report a Receipt Printer Paper Low condition (Error Code 183),
and will place the terminal in an OUT OF SERVICE condition until
the receipt paper is replenished.
E
RROR CONDITIONS:
Error Code 183 – Receipt Printer Paper Low will take the terminal
OUT OF SERVICE. To restore the terminal to normal operation
the paper must be replenished and the Reset Error button pressed
after the terminal has been reset and is displaying the OUT OF
SERVICE screen.
TRITON SYSTEMS, INC.
5-40
Page 83

OPERATION MANUAL - MODEL 9610 SECTION 5 - MANAGEMENT FUNCTIONS
FUNCTION: PRINTER GRAPHICS
FACTORY DEFAULT: ENABLED
ACCESS INSTRUCTIONS:
1.) Select TERMINAL CONFIGURATION option from the
MANAGEMENT FUNCTIONS screen.
2.) Select the PRINTER SETTINGS option.
3.) Select PRINTER GRAPHICS.
DESCRIPTION:
The Printed Graphics feature can only be used when an optional
Memory Expansion Card is installed in the terminal. Triton Connect Software Release 1.8 (or above) allows bit mapped graphics
(in ‘.bmp’ format) to be downloaded to the terminal. This graphic
will be printed on the receipt when the PRINTER GRAPHICS option has been ENABLED. This feature cannot be supported with
out the addition of an Expansion Memory Card.
T o turn on the PRINTER GRAPHICS feature, choose the ENABLE
option on this screen. To inhibit the PRINTER GRAPHICS feature, press the DISABLE key.
E
RROR CONDITIONS:
If PRINTER GRAPHICS is enabled and there are no graphic images loaded into the Expansion Memory Card, the receipt printer
will print normal receipts without graphics. There are no error conditions associated with this function.
TRITON SYSTEMS, INC.
5-41
Page 84

SECTION 5 - MANAGEMENT FUNCTIONSOPERATION MANUAL - MODEL 9610
FUNCTION: RANDOM/LEVEL PRIZE COUPONS
FACTORY DEFAUL T: N/A
ACCESS INSTRUCTIONS:
1.) Select TERMINAL CONFIGURATION from the
MANAGEMENT FUNCTIONS menu.
2.) Select RANDOM/LEVEL PRIZE COUPONS from the
TERMINAL CONFIGURATION menu.
DESCRIPTION:
This function provides access to the following options, which will
set up terminal operations for issuing printed and dispensed prize
coupons:
1.) ENTER LEVEL PRIZE MESSAGE.
2.) ENTER RANDOM PRIZE MESSAGE.
3.) ENABLE/DISABLE COUPON AWARDS.
4.) SET LEVEL PRIZE AMOUNT.
5.) SET RANDOM WINNING %.
E
RROR CONDITIONS:
There are no error conditions directly associated with this function.
TRITON SYSTEMS, INC.
5-42
Page 85

OPERATION MANUAL - MODEL 9610 SECTION 5 - MANAGEMENT FUNCTIONS
FUNCTION: ENTER LEVEL PRIZE MSG.
FACTORY DEFAUL T: NONE
ACCESS INSTRUCTIONS:
1.) Select TERMINAL CONFIGURATION from the
MANAGEMENT FUNCTIONS menu.
2.) Select RANDOM/LEVEL PRIZE COUPONS from the
TERMINAL CONFIGURATION menu.
3.) Select ENTER LEVEL PRIZE MSG.
DESCRIPTION:
1
The LEVEL PRIZE MESSAGE consists of four lines of text that
are printed on the Level Prize receipt and report. The text can be
full alphanumeric text. Enter letters, numbers and punctuation as
follows:
The keys along either side of the display are used with the numeric
keys on the main keypad to permit entry of alphanumeric characters. The keys on the left side of the display are designated <F1>
through <F4>. The keys on the right side of the display are <F6>
through <F8>. The <F1> key centers the text on the line where the
cursor appears. The <F2> key erases all text in the current message. <F3> clears the text on the line the cursor is currently appearing.
YEK
4F
REPPU
tfihSoN 1234567890
tfeL6FQADGJMPTW,
4F
REWOL
tfihSoN!@#$%^&*()
tfeL6Fqadgjmptw’
2 3 4 5 6 7 8 9 0
retneC7F ZBEHKNRUX .
thgiR8FpSCFILOSVY-
retneC7Fzbchknrux+
thgiR8F&cfilosvy=
The <F4> Key is used similarly to a CAPS LOCK key on a computer keyboard. Pressing the <F4> key toggles between uppercase and lowercase. To enter an alphabetic or punctuation character, one of the <F6> through <F8> keys must be pressed, followed by one of the numeric keys. The resultant character will be
as indicated in the table. Press the <OK> key to save the changes
made. If you make a mistake and want to start over, press the
CANCEL key to discard any changes made to that point.
E
RROR CONDITIONS:
There are no error conditions directly associated with this function.
TRITON SYSTEMS, INC.
5-43
Page 86

SECTION 5 - MANAGEMENT FUNCTIONSOPERATION MANUAL - MODEL 9610
FUNCTION: ENTER RANDOM PRIZE MSG.
FACTORY DEFAUL T: NONE
ACCESS INSTRUCTIONS:
1.) Select TERMINAL CONFIGURATION from the
MANAGEMENT FUNCTIONS menu.
2.) Select RANDOM/LEVEL PRIZE COUPONS from the
TERMINAL CONFIGURATION menu.
3.) Select ENTER RANDOM PRIZE MSG.
DESCRIPTION:
The RANDOM PRIZE MESSAGE consists of four lines of text that
are printed on the Random Coupon receipt and report. The text
can be full alphanumeric text. Enter desired letters, numbers and
punctuation as follows:
The keys along either side of the display are used with the numeric
keys on the main keypad to permit entry of alphanumeric characters. The keys on the left side of the display are designated <F1>
through <F4>. The keys on the right side of the display are <F6>
through <F8>. The <F1> key centers the text on the line where the
cursor appears. The <F2> key erases all text in the current message. <F3> clears the text on the line the cursor is currently appearing.
1
YEK
4F
REPPU
tfihSoN 1234567890
tfeL6FQADGJMPTW,
4F
REWOL
tfihSoN!@#$%^&*()
tfeL6Fqadgjmptw’
2 3 4 5 6 7 8 9 0
retneC7F ZBEHKNRUX .
thgiR8FpSCFILOSVY-
retneC7Fzbchknrux+
thgiR8F&cfilosvy=
The <F4> Key is used similarly to a CAPS LOCK key on a computer keyboard. Pressing the <F4> key toggles between uppercase and lowercase. To enter an alphabetic or punctuation character, one of the <F6> through <F8> keys must be pressed, followed by one of the numeric keys. The resultant character will be
as indicated in the table. Press the <OK> key to save the changes
made. If you make a mistake and want to start over, press the
CANCEL key to discard any changes made to that point.
E
RROR CONDITIONS:
There are no error conditions directly associated with this function.
TRITON SYSTEMS, INC.
5-44
Page 87

OPERATION MANUAL - MODEL 9610 SECTION 5 - MANAGEMENT FUNCTIONS
FUNCTION: ENABLE/DISABLE COUPON AWARDS
FACTORY DEFAULT: DISABLED
ACCESS INSTRUCTIONS:
1.) Select TERMINAL CONFIGURATION from the
MANAGEMENT FUNCTIONS menu.
2.) Select RANDOM/LEVEL PRIZE COUPONS from the
TERMINAL CONFIGURATION menu.
3.) Select the ENABLE/DISABLE COUPON AWARDS option.
4.) Select ENABLE OR DISABLE from the menu displayed.
D
ESCRIPTION:
This function provides access to a menu that allows the operator
to ENABLE or DISABLE all printed coupon awards. If ENABLED,
eligible transactions will be checked for award. If DISABLED, no
coupons will be issued.
ERROR CONDITIONS:
There are no error conditions directly associated with this function.
TRITON SYSTEMS, INC.
5-45
Page 88

SECTION 5 - MANAGEMENT FUNCTIONSOPERATION MANUAL - MODEL 9610
FUNCTION: SET LEVEL PRIZE AMOUNT
FACTORY DEFAUL T: ‘$0.00’
ACCESS INSTRUCTIONS:
1.) Select TERMINAL CONFIGURATION from the
MANAGEMENT FUNCTIONS menu.
2.) Select RANDOM/LEVEL PRIZE COUPONS from the
TERMINAL CONFIGURATION menu.
3.) Select the SET LEVEL PRIZE AMOUNT option.
4.) Enter the amount in dollars and press “<OK>”.
D
ESCRIPTION:
This function sets the threshold level at which the level prize coupon will be printed. Withdrawing an amount equal to or greater
than the value set here will print the level prize coupon.
NOTE: If the level coupon is awarded, the random coupon parameter will not be tested for award.
ERROR CONDITIONS:
There are no error conditions directly associated with this function.
TRITON SYSTEMS, INC.
5-46
Page 89

OPERATION MANUAL - MODEL 9610 SECTION 5 - MANAGEMENT FUNCTIONS
FUNCTION: SET RANDOM WINNING %
FACTORY DEFAULT: ‘0%’
ACCESS INSTRUCTIONS:
1.) Select TERMINAL CONFIGURATION from the
MANAGEMENT FUNCTIONS menu.
2.) Select RANDOM/LEVEL PRIZE COUPONS from the
TERMINAL CONFIGURATION menu.
3.) Select the SET RANDOM WINNING % option.
4.) Select the CHANGE option.
5.) Enter the new random percentage and press <OK>.
D
ESCRIPTION:
This function sets the frequency at which the random prize coupons will be printed. The random coupon is won by a random
number of transactions of any type. The winning percentage can
be set from 0 to 100%. For example, if the winning percentage is
set to 10%, then 1 out of every 10 transactions will be awarded a
prize.
ERROR CONDITIONS:
There are no error conditions directly associated with this function.
TRITON SYSTEMS, INC.
5-47
Page 90

SECTION 5 - MANAGEMENT FUNCTIONSOPERATION MANUAL - MODEL 9610
FUNCTION: CHANGE MESSAGES
FACTORY DEFAUL T: N/A
ACCESS INSTRUCTIONS:
1.) Select TERMINAL CONFIGURATION from the
MANAGEMENT FUNCTIONS menu.
2.) Select CHANGE MESSAGES.
DESCRIPTION:
The CHANGE MESSAGES option of the TERMINAL CONFIGURATION menu allows information for the following screens to be
changed by the terminal operator or a service technician:
1.) MARKETING MESSAGE
2.) SURCHARGE MESSAGES
3.) WELCOME MESSAGE
4.) SURCHARGE OWNER
5.) EXIT MESSAGE
6.) STORE MESSAGE
7.) TERMINAL OWNER
E
RROR CONDITIONS:
There are no error conditions directly associated with this function
TRITON SYSTEMS, INC.
5-48
Page 91

OPERATION MANUAL - MODEL 9610 SECTION 5 - MANAGEMENT FUNCTIONS
FUNCTION: MARKETING MESSAGE
FACTORY DEFAUL T: NONE
ACCESS INSTRUCTIONS:
1.) Select TERMINAL CONFIGURATION from the
MANAGEMENT FUNCTIONS menu.
2.) Select CHANGE MESSAGES.
3.) Select MARKETING MESSAGE.
DESCRIPTION:
The MARKETING MESSAGE function allows you to compose a
message that will appear on any printed products that include the
store message (e.g. customer receipts, day closes, coupons, etc.).
The message can be up to four lines long. Enter letters, numbers
and punctuation as follows:
The keys along either side of the display are used with the numeric
keys on the main keypad to permit entry of alphanumeric characters. The keys on the left side of the display are designated <F1>
through <F4>. The keys on the right side of the display are <F6>
through <F8>. The <F1> key centers the text on the line where the
cursor appears. The <F2> key erases all text in the current message. <F3> clears the text on the line the cursor is currently appearing.
The <F4> Key is used similarly to a CAPS LOCK key on a computer keyboard. Pressing the <F4> key toggles between uppercase and lowercase. To enter an alphabetic or punctuation character, one of the <F6> through <F8> keys must be pressed, followed by one of the numeric keys. The resultant character will be
as indicated in the table. Press the <OK> key to save the changes
made. If you make a mistake and want to start over, press the
CANCEL key to discard any changes made to that point.
E
RROR CONDITIONS:
1
YEK
4F
REPPU
tfihSoN 1234567890
tfeL6FQADGJMPTW,
4F
REWOL
tfihSoN!@#$%^&*()
tfeL6Fqadgjmptw’
2 3 4 5 6 7 8 9 0
retneC7F ZBEHKNRUX .
thgiR8FpSCFILOSVY-
retneC7Fzbchknrux+
thgiR8F&cfilosvy=
There are no error conditions directly associated with this function.
TRITON SYSTEMS, INC.
5-49
Page 92

SECTION 5 - MANAGEMENT FUNCTIONSOPERATION MANUAL - MODEL 9610
FUNCTION: SURCHARGE MESSAGES
FACTORY DEFAULT: ‘STANDARD’
ACCESS INSTRUCTIONS:
1.) Select TERMINAL CONFIGURATION from the
MANAGEMENT FUNCTIONS menu.
2.) Select CHANGE MESSAGES.
3.) Select SURCHARGE MESSAGES
DESCRIPTION:
This function is used to select the surcharge message that will be
displayed to the customer. Press the button next to the desired
message to select it. Message options STANDARD, A, B and C
are accessed from the first SURCHARGE OPTION SCREEN. The
MORE option leads to a second screen containing message options D, E, F, G, and H.
E
RROR CONDITIONS:
There are no error conditions directly associated with this function.
STANDARD
CUSTOM-A
CUSTOM-B
TRITON SYSTEMS, INC.
5-50
Page 93

OPERATION MANUAL - MODEL 9610 SECTION 5 - MANAGEMENT FUNCTIONS
CUSTOM-C
CUSTOM-D
CUSTOM-F
CUSTOM-G
CUSTOM-E
TRITON SYSTEMS, INC.
CUSTOM-H
5-51
Page 94

SECTION 5 - MANAGEMENT FUNCTIONSOPERATION MANUAL - MODEL 9610
FUNCTION: WELCOME MESSAGE
FACTORY DEFAULT: ‘WELCOME T O MINIATM’
ACCESS INSTRUCTIONS:
1.) Select TERMINAL CONFIGURATION from the
MANAGEMENT FUNCTIONS menu.
2.) Select CHANGE MESSAGES.
3.) Select Welcome Message.
DESCRIPTION:
The Welcome Message consists of three lines of text that are printed
at the top of the customer welcome screen. The text can be full
alphanumeric text. Enter letters, numbers and punctuation as follows:
The keys along either side of the display are used with the numeric
keys on the main keypad to permit entry of alphanumeric characters. The keys on the left side of the display are designated <F1>
through <F4>. The keys on the right side of the display are <F6>
through <F8>. The <F1> key centers the text on the line where the
cursor appears. The <F2> key erases all text in the current message. <F3> clears the text on the line the cursor is currently appearing.
The <F4> Key is used similarly to a CAPS LOCK key on a computer keyboard. Pressing the <F4> key toggles between uppercase and lowercase. To enter an alphabetic or punctuation character, one of the <F6> through <F8> keys must be pressed, followed by one of the numeric keys. The resultant character will be
as indicated in the table. Press the <OK> key to save the changes
made. If you make a mistake and want to start over, press the
CANCEL key to discard any changes made to that point.
E
RROR CONDITIONS:
1
YEK
4F
REPPU
tfihSoN 1234567890
tfeL6FQADGJMPTW,
4F
REWOL
tfihSoN!@#$%^&*()
tfeL6Fqadgjmptw’
2 3 4 5 6 7 8 9 0
retneC7F ZBEHKNRUX .
thgiR8FpSCFILOSVY-
retneC7Fzbchknrux+
thgiR8F&cfilosvy=
There are no error conditions directly associated with this function.
TRITON SYSTEMS, INC.
5-52
Page 95

OPERATION MANUAL - MODEL 9610 SECTION 5 - MANAGEMENT FUNCTIONS
FUNCTION: SURCHARGE OWNER
FACTORY DEFAUL T: NONE
ACCESS INSTRUCTIONS:
1.) Select TERMINAL CONFIGURATION from the
MANAGEMENT FUNCTIONS menu.
2.) Select CHANGE MESSAGES.
3.) Select SURCHARGE OWNER.
DESCRIPTION:
The name of the SURCHARGE OWNER is stored in the terminal
and printed on the Receipt Printer Test Report. The name of the
SURCHARGE OWNER is entered directly into the terminal.
To enter a digit 0-9, simply press the key that has that digit. To
enter a letter, first press the <BLUE> key, then press the key that
has the letter you want on it. The first press of the key will display
the first character above the number. Subsequent presses will
display the characters in sequence. When the character you want
is displayed, press the <RIGHT ARROW> key to ‘lock in’ the letter.
If your next character is a letter, you must press the <BLUE> key
again.
The name can be up to 18 characters long.
E
RROR CONDITIONS:
There are no error conditions directly associated with this function
TRITON SYSTEMS, INC.
5-53
Page 96

SECTION 5 - MANAGEMENT FUNCTIONSOPERATION MANUAL - MODEL 9610
FUNCTION: EXIT MESSAGE
FACTORY DEFAULT: ‘THANK’S FOR USING MINIATM’
ACCESS INSTRUCTIONS:
1.) Select TERMINAL CONFIGURATION from the
MANAGEMENT FUNCTIONS menu.
2.) Select CHANGE MESSAGES.
3.) Select EXIT MESSAGE.
DESCRIPTION:
The Exit Message consists of three lines of text that are printed on
the terminal display at the conclusion of a transaction. The text
can be full alphanumeric text. Enter letters, numbers and punctuation as follows:
The keys along either side of the display are used with the numeric
keys on the main keypad to permit entry of alphanumeric characters. The keys on the left side of the display are designated <F1>
through <F4>. The keys on the right side of the display are <F6>
through <F8>. The <F1> key centers the text on the line where the
cursor appears. The <F2> key erases all text in the current message. <F3> clears the text on the line the cursor is currently appearing.
The <F4> Key is used similarly to a CAPS LOCK key on a computer keyboard. Pressing the <F4> key toggles between uppercase and lowercase. To enter an alphabetic or punctuation character, one of the <F6> through <F8> keys must be pressed, followed by one of the numeric keys. The resultant character will be
as indicated in the table. Press the <OK> key to save the changes
made. If you make a mistake and want to start over, press the
CANCEL key to discard any changes made to that point.
E
RROR CONDITIONS:
1
YEK
4F
REPPU
tfihSoN 1234567890
tfeL6FQADGJMPTW,
4F
REWOL
tfihSoN!@#$%^&*()
tfeL6Fqadgjmptw’
2 3 4 5 6 7 8 9 0
retneC7F ZBEHKNRUX .
thgiR8FpSCFILOSVY-
retneC7Fzbchknrux+
thgiR8F&cfilosvy=
There are no error conditions directly associated with this function.
TRITON SYSTEMS, INC.
5-54
Page 97

OPERATION MANUAL - MODEL 9610 SECTION 5 - MANAGEMENT FUNCTIONS
FUNCTION: STORE MESSAGE
FACTORY DEFAULT: SEE NOTE
ACCESS INSTRUCTIONS:
1.) Select TERMINAL CONFIGURATION from the
MANAGEMENT FUNCTIONS menu.
2.) Select CHANGE MESSAGES.
3.) Select STORE MESSAGE.
DESCRIPTION:
The STORE MESSAGE consists of four lines of text that are printed
on the customer receipt. The text can be full alphanumeric text.
Enter letters, numbers and punctuation as follows:
The keys along either side of the display are used with the numeric
keys on the main keypad to permit entry of alphanumeric characters. The keys on the left side of the display are designated <F1>
through <F4>. The keys on the right side of the display are <F6>
through <F8>. The <F1> key centers the text on the line where the
cursor appears. The <F2> key erases all text in the current message. <F3> clears the text on the line the cursor is currently appearing.
The <F4> Key is used similarly to a CAPS LOCK key on a computer keyboard. Pressing the <F4> key toggles between uppercase and lowercase. To enter an alphabetic or punctuation character, one of the <F6> through <F8> keys must be pressed, followed by one of the numeric keys. The resultant character will be
as indicated in the table. Press the <OK> key to save the changes
made. If you make a mistake and want to start over, press the
CANCEL key to discard any changes made to that point.
NOTE: ‘*THIS IS LINE (1-4) OF THE STORE MESSAGE*’
E
RROR CONDITIONS:
1
YEK
4F
REPPU
tfihSoN 1234567890
tfeL6FQADGJMPTW,
4F
REWOL
tfihSoN!@#$%^&*()
tfeL6Fqadgjmptw’
2 3 4 5 6 7 8 9 0
retneC7F ZBEHKNRUX .
thgiR8FpSCFILOSVY-
retneC7Fzbchknrux+
thgiR8F&cfilosvy=
There are no errors directly associated with this function.
TRITON SYSTEMS, INC.
5-55
Page 98

SECTION 5 - MANAGEMENT FUNCTIONSOPERATION MANUAL - MODEL 9610
FUNCTION: TERMINAL OWNER
FACTORY DEFAUL T: NONE
ACCESS INSTRUCTIONS:
1.) Select TERMINAL CONFIGURATION from the
MANAGEMENT FUNCTIONS menu.
2.) Select CHANGE MESSAGES.
3.) Select TERMINAL OWNER.
DESCRIPTION:
The name of the TERMINAL OWNER is stored in the terminal and
displayed to the customer in the surcharge warning message. The
name is entered directly into the terminal.
To enter a digit 0-9, simply press the key that has that digit. To
enter a letter, first press the <BLUE> key, then press the key that
has the letter you want on it. The first press of the key will display
the first character above the number. Subsequent presses will
display the characters in sequence. When the character you want
is displayed, press the <RIGHT ARROW> key to ‘lock in’ the letter.
If your next character is a letter, you must press the <BLUE> key
again.
The name can be up to 18 characters long.
E
RROR CONDITIONS:
There are no error conditions directly associated with this function.
TRITON SYSTEMS, INC.
5-56
Page 99

OPERATION MANUAL - MODEL 9610 SECTION 5 - MANAGEMENT FUNCTIONS
FUNCTION: TERMINAL PARAMETERS
FACTORY DEFAUL T: N/A
ACCESS INSTRUCTIONS:
1.) Select TERMINAL CONFIGURATION from the
MANAGEMENT FUNCTIONS menu.
2.) Select SET TERMINAL PARAMETERS.
DESCRIPTION:
Selecting SET TERMINAL PARAMETERS from the TERMINAL
CONFIGURA TION menu allows the following Cash Dispenser operating parameters to be viewed or changed:
1.) SET TERMINAL #
2.) RESET SEQ #
3.) SURCHARGE MODE
4.) CASSETTE SETUP
5.) KEY MANAGEMENT
6.) TELEPHONE
7.) MORE
E
RROR CONDITIONS:
There are no error conditions directly associated with this function.
TRITON SYSTEMS, INC.
5-57
Page 100
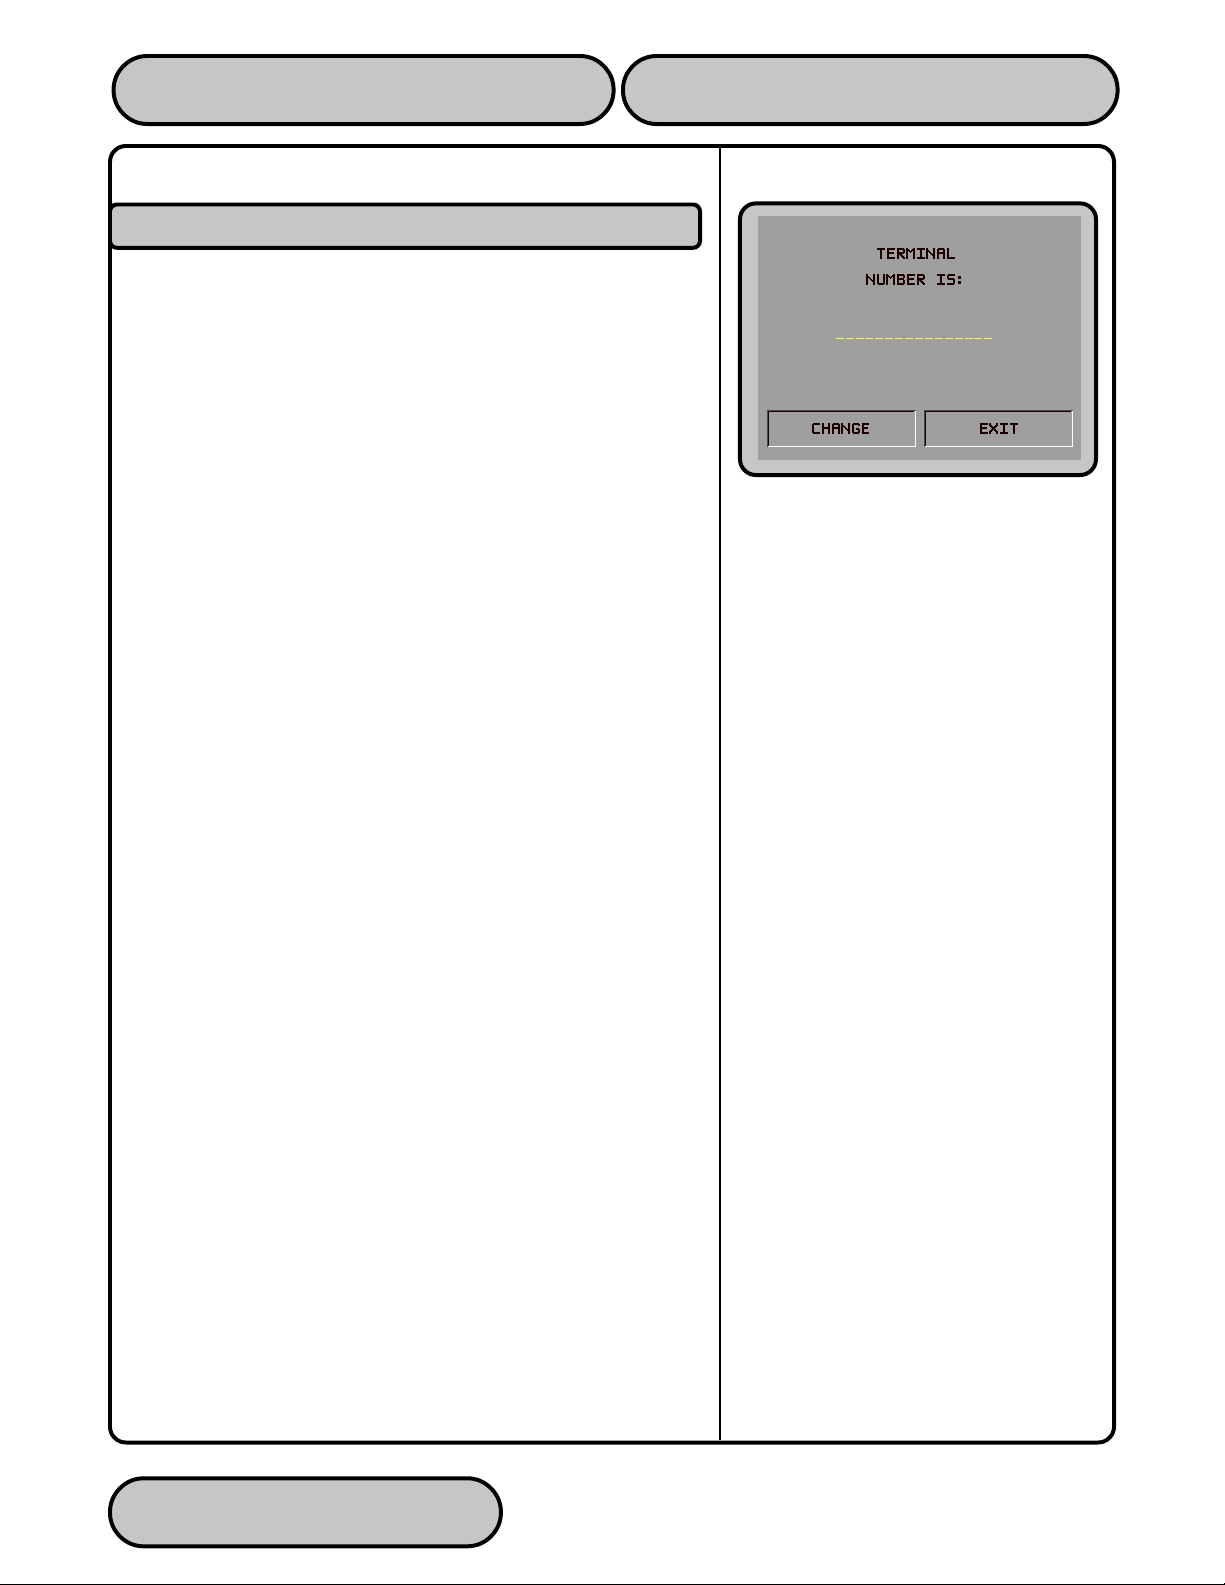
SECTION 5 - MANAGEMENT FUNCTIONSOPERATION MANUAL - MODEL 9610
FUNCTION: SET TERMINAL #
FACTORY DEFAUL T: NONE
ACCESS INSTRUCTIONS:
1.) Select TERMINAL CONFIGURATION from the
MANAGEMENT FUNCTIONS menu.
2.) Select SET TERMINAL PARAMETERS.
3.) Choose the SET TERMINAL # option.
DESCRIPTION:
The TERMINAL # is a unique string of characters provided by your
processor to identify the Cash Dispenser when a transaction is
taking place. It can contain numbers and letters. The minimum
number of characters is 6 and the maximum is 16.
This parameter MUST be set before the Cash Dispenser can go
on-line AND before the communications key can be downloaded.
When this function is selected, the current TERMINAL # is displayed. If it is to be changed, select CHANGE.
To enter a digit 0-9, press the key that has that digit. To enter a
letter, first press the <BLUE> key, then press the key that has the
letter you want on it. The first press of the key will display the first
character above the number. Subsequent presses will display the
characters in sequence. When the character you want is displayed,
press the <RIGHT ARROW> key to ‘lock in’ the letter. If your next
character is a letter, you must press the <BLUE> key again.
When you have entered all of the characters, press the <OK> key .
E
RROR CONDITIONS:
The Cash Dispenser will not function on-line without a valid TERMINAL #.
TRITON SYSTEMS, INC.
5-58
 Loading...