

Page 1
INSTALLATION, OPERATION AND MAINTENANCE
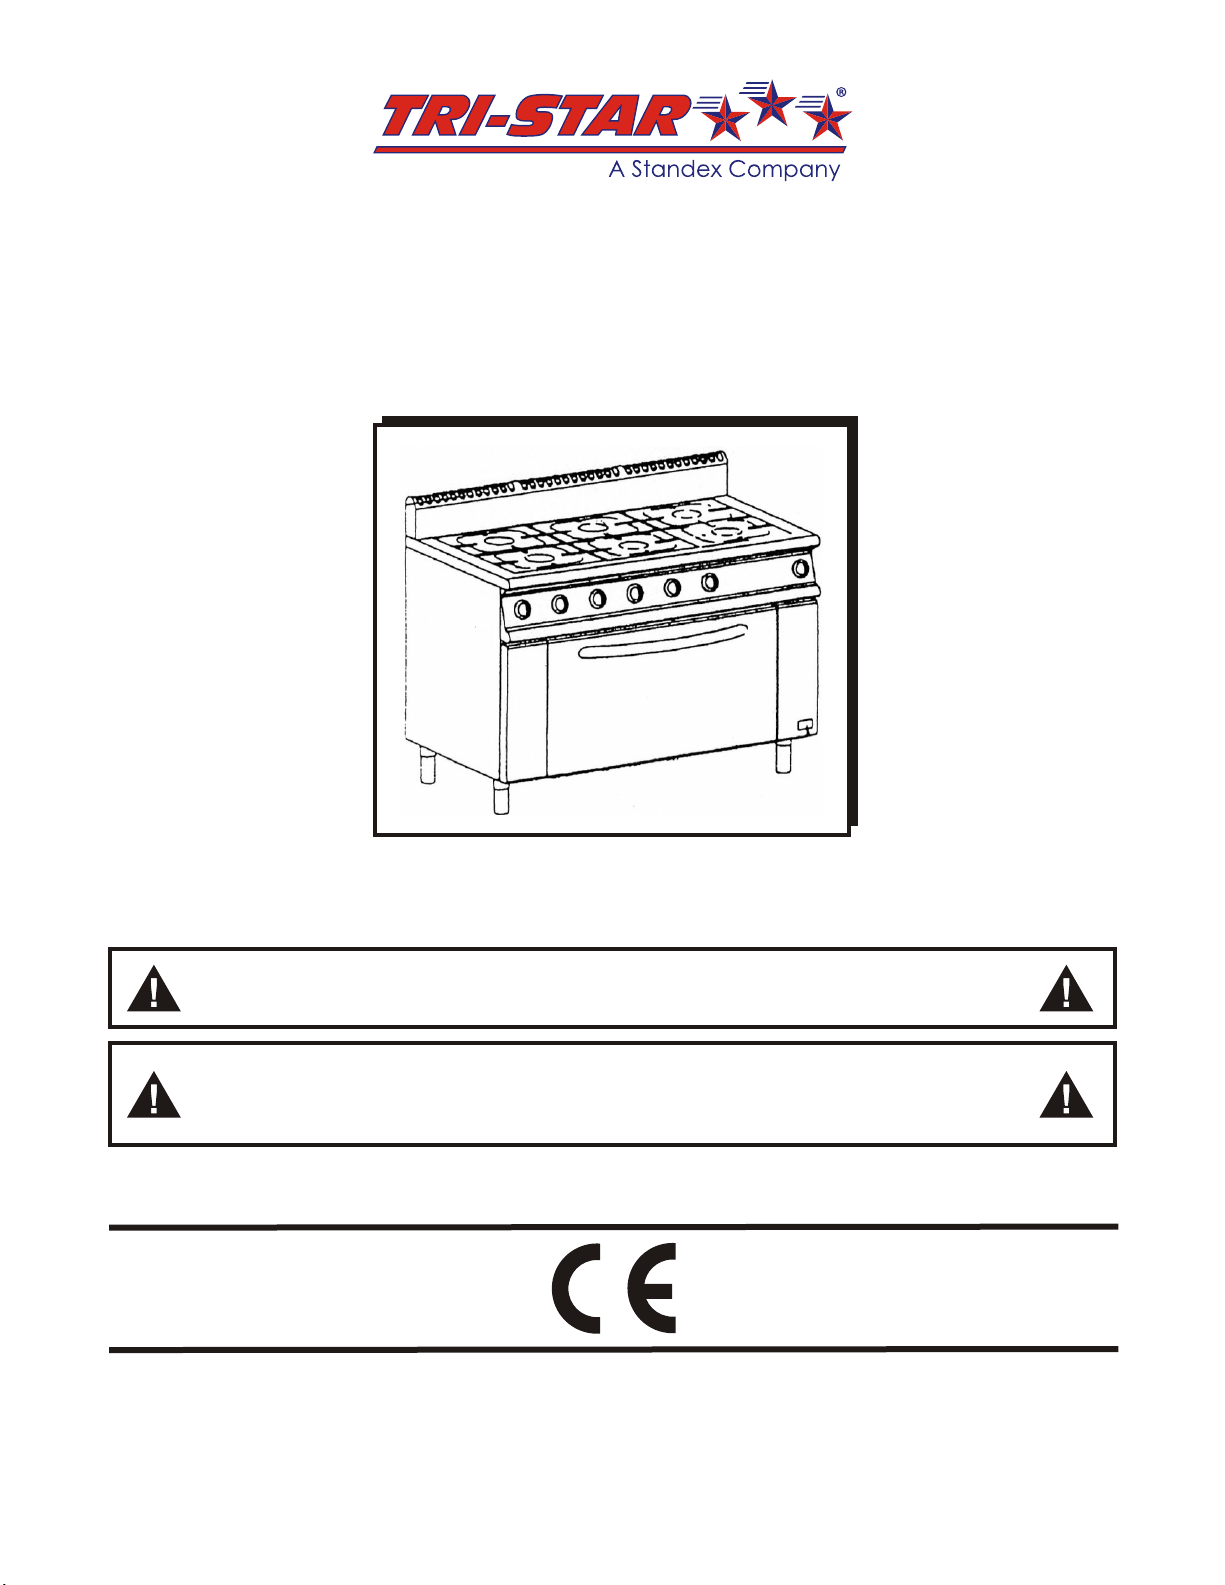
TSR - RANGE SERIES OWNERS MANUAL
Models: TSR4, TSR6, TSR8, TSR10, TSR12
INTENDED FOR OTHER THAN HOUSEHOLD USE
RETAIN THIS MANUAL FOR FUTURE REFERENCE
FOR YOUR SAFETY: Do not store or use gasoline or other flammable vapours or
liquids in the vicinity of this or any other appliance.
WARNING: Improper installation, adjustment, alteration, service or maintenance can
cause property damage, injury or death. Read the Installation, Operating and
Maintenance Instructions thoroughly before installing or servicing this equipment.
Instruction to be followed in the event the user smells gas shall be posted in a prominent location. This
information shall be obtained by consulting the local gas supplier.
P/N 311020 11/10
Phone: +1
Fax: +1 (714) 424-9385
Toll Free: +1 (866) 782-7462
Website: www.tri-starmfg.com
E-mail: tristarmfg@sbcglobal.net
(714) 424-9380
TRI-STAR MANUFACTURING
2205 S0. Standard Ave.
Santa Ana CA 92707-3036.
1
Page 2

TABLE OF CONTENTS
Installation Instruction-------------------------------------------------------------------------------------------------------- 4
Operating Instructions ------------------------------------------------------------------------------------------------------- 8
Maintenance Instructions --------------------------------------------------------------------------------------------------- 10
Warranty------------------------------------------------------------------------------------------------------------------------- 14
Thank you for buying a TSI appliance, with proper use this cooking range will give you years of
service - please read the instructions in full.
Description:
This appliance is designed for the use in the gastronomy and confectionary industries, it is not designed for
domestic use. These appliances are fitted with gas open burners and gas ovens as follows:
TSR4 - 4 open burners one gas oven.
TSR6 - 6 open burners one gas oven.
TSR8 - 8 open burners two gas ovens .
TSR10 - 10 open burners two gas ovens.
TSR 12 - 12 open burners two gas ovens.
Construction:
Heavy duty steel base, with visible surfaces of brushed stainless steel (galvanised sheet steel to rear).
Oven liner is of black enamel to sides and floor. Open burner pan supports are of heavy duty cast iron.
Safety:
Being an appliance designed only for professional use, it should be operated by qualified personnel only.
Never leave the appliance unattended while it is on.
If you smell gas -- do not light appliance -- switch off at Isolating valve and contact your gas supplier or Corgi
engineer. (Must be Commerical Catering equipment registered).
Preparing the appliance for use:
Unpack appliance and inspect for any damage . All damage must be reported within 24 hours of delivery.
Fit legs or casters depending on your order requirement -- using the large self tapping screws supplied.
Fit burner and oven knobs (supplied loose) accordingly.
Fit backsplash with shelf -- see drawing on next page
2
Page 3
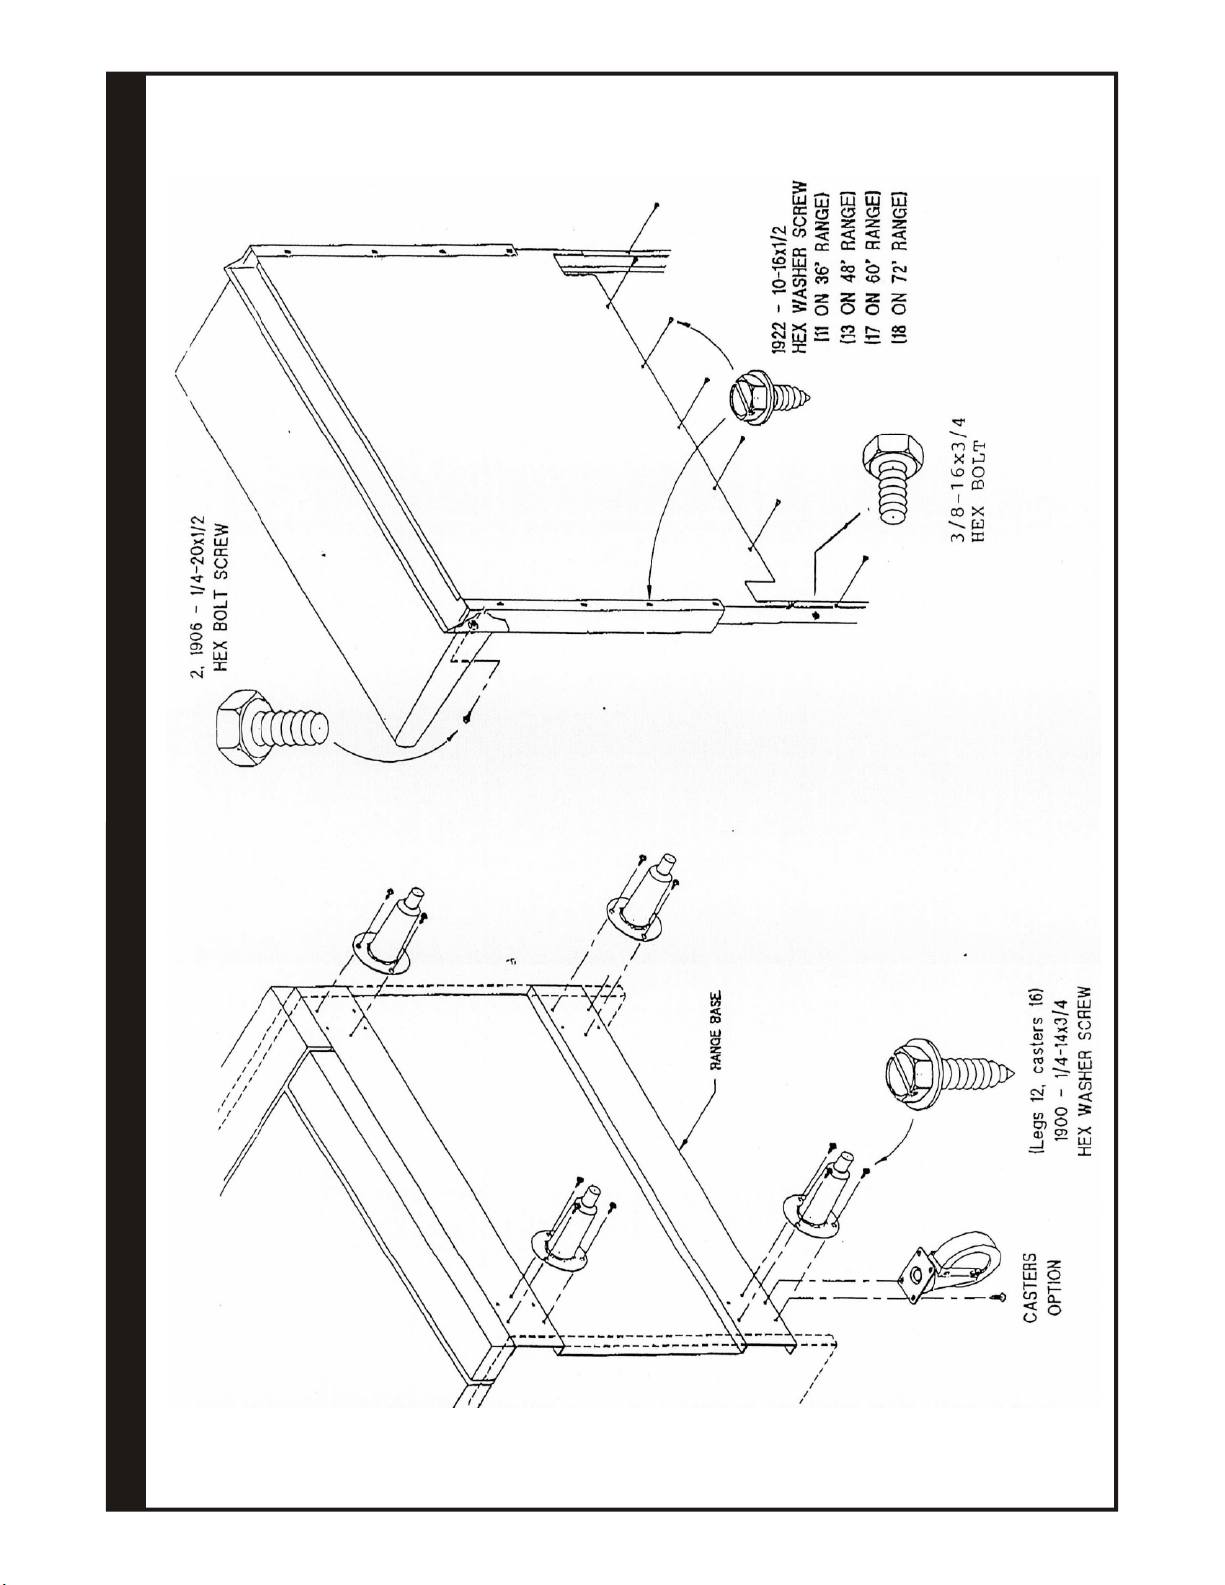
INSTRUCTIONS INSTALLATION OF RANGE LEG AND BACKGUARD
Page 4
INSTALLATION INSTRUCTION
This appliance must be installed to current gas regulations set out by Corgi and must be only Installed by
Corgi Registered (in Commercial Catering equipment) Engineers - failure to do so will render the
installer liable to prosecution and invalidate all warranties.
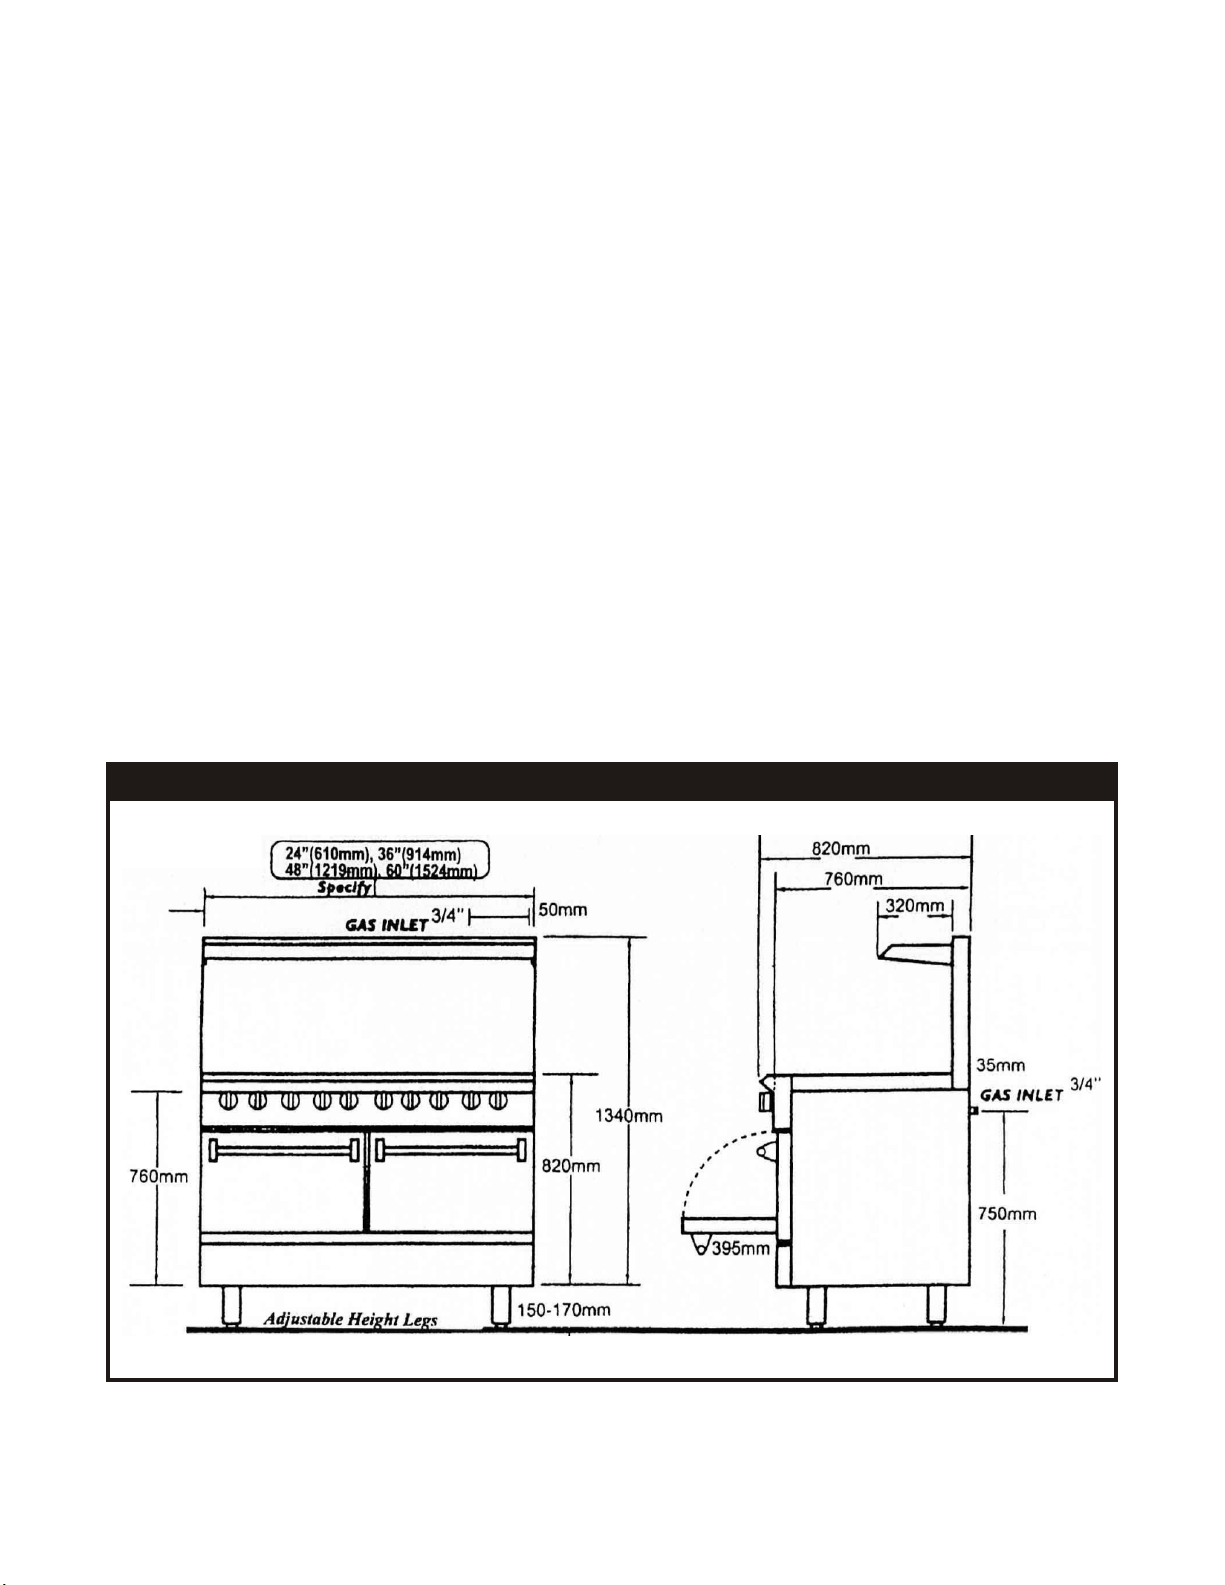
Siting of appliance:
The appliance must be installed in a well ventilated area, under an extraction canopy that conforms to
current regulations. Adequate supply of fresh air is required to allow proper combustion. (inadequate air
will result in poor performance of appliance and will Invalidate the warranty).
Minimum c1earnaces from combustible walls
Back 100mm (4 inches)
Sides 305mm (12 inches)
Minimum clearances from non combustible walls
Back 0mm (0 inches)
Sides 0mm (0 inches)
This appliance should only be fitted on a level floor of a non combustible, heat resistant fireproof
material.
This appliance must be Levelled using a Spirit level.
Gas Connection
FIGURE A:
4
Page 5

Gas Connection Pipework:
The size of the supply pipe for Natural gas should not be less than ¾" B.S.P. An easily accessible Shut Off
valve must be fitted in the gas supply adjacent to the appliance. The gas governor regulator supplied with
the appliance must always be fitted (including Lpg use) and should be sited between the Shut off valve
and appliance .
Before installing appliance always check, using a qualified engineer, that your gas pipe is of large enough
size for the appliance -- Warranty will be invalidated if undersized o pipe work is used.
Set up gas pressure:
When installing on natural gas (G20) -- the manifold pressure should be 5" WC (12.45 mbar) .
When installing on Lpg (G31) -- the manifold pressure should be 10" WC (24.9 mbar) .
When the pressure is being set all burners and Oven(s) should be on at maximum setting.
Technical specification:
Open burners are 35000 btu's each (10.25 kw) = .94 cu mtrs/hour = .67 kg/hr
Ovens -- TSR4 and TSR8 are 30000 btu's (8.79kw) each = .79 cu mtrs/hour = .56kg/hr
Ovens -- TSR6 , TSR10 and TSR12 are 40000 btu's (11.72 kw) each = 1.025 cu mtrs/hour = .73kg/hr
Total gas power:
TSR4 = 49.81kw. TSR6 = 73.27kw. TSR8 = 99.64
(170,000 Btu/Hr) (250,000 Btu/Hr) (310,000 Btu/Hr)
TSR10 = 123.06kw. TSR12 = 146.5kw.
5
Page 6

Injector sizes:
Open burner Natural gas injector = 2.6mm / Size 37
Open burner LPG injector = 1.6mm / Size 52
TSR4, TSR8 Natural gas Oven burner injector = 1.8mm / Size 50
TSR6, TSRI 0, TSRl2 Natural gas oven burner injector = 2.1mm / Size 46
TSR4, TSR8 LPG gas Oven burner injector = 1.2mm / Size 56
TSR6, TSRIO, TSRl2 LPG gas oven burner injector = 1.3mm / Size 55
Oven - Natural gas pilot injector = 3.7mm / Size 26
Oven - LPG gas pilot injector = 4.3mm / Size 18
Adjusting minimum output on open burner:
To adjust the flame when on minimum setting, remove the control knob, insert a screwdriver through the
hole and adjust the screw I, until a stable and even flame is achieved.
1. Screw to adjust minimum output
2. Gas inlet pipe fitting
3. Thermocouple pipe fitting
4. Gas outlet pipe fitting
6
Page 7

Final Checks:
• Start appliance by following operating instructions
• Check for leaks
• Check for flame stability throughout the ON-OFF-ON control range
• Check the lighting process along the main burner and check flames are even
• Check that flame on open burner keeps in touch with the thermocouple (adjust as above)
• Check for proper operation of oven pilot flame
• Check there is a good inflow of fresh air
7
Page 8

OPERATING INSTRUCTIONS
Turning the open burners on and off:
• To light the burner, push in the required knob and turn it anti clockwise to the position shown in Fig 2.
• Whilst pushing in the knob, light the burner, and hold in for a further 15 seconds, to allow the
thermocouple to activate . If the flame goes out repeat this operation.
• The burner flame can be adjusted by setting the knob position at a point between Fig. 2 and Fig. 3.
• To turn off the flame -- turn the knob in a clockwise direction to the "OFF" position. Fig. 1
Fig. 1 - Off Fig. 2 - Ignition &
Low Flame
Fig. 3 - High Flame
8
Page 9

Turning on the Oven Burner - using the Oven knob:
• To light the gas oven pilot flame - push in and turn the knob in an counter clockwise direction to the
position shown in Fig. 5.
• Whilst pushing in the knob - push in and release the ignition button several times. The ignition button is
found by dropping down the small flap below the oven door.
• Check the pilot is lit, by looking through the hole located to the left of the ignition button, continue to push
in the oven knob for 15 seconds to allow thermocouple to activate. If the pilot flame goes out repeat
above procedures.
• Set oven temperature by selecting required temperature shown on the knob, turn knob in an counter
clockwise direction - these temperatures are in degrees Centigrade. Fig. 6.
• To turn off the main burner and leave on pilot, turn the knob in a clockwise direction to the ignition
position, Fig. 5. If you leave the oven on pilot, the main burner will automatically re-light when you select
the temperature.
• To turn off oven and pilot - turn the oven knob in a clockwise direction to the "OFF" position. Fig. 4.
Fig. 4 - Off
Fig. 2 - Ignition &
Pilot
Fig. 3 - Temperature
Setting C
o
9
Page 10

MAINTENANCE INSTRUCTIONS
Open Burners:
Daily:
1. Clean top grates with warm water, mild cleanser and wire brush
2. Clean and brush off debris from and around the burner
3. Empty and clean grease pan
Periodic:
1. Remove burner and clean with warm water and wire brush. Make sure burner holes are not clogged.
Tristar 6 Burner
NOTE: If pilot light fails to remain lit. Check that the flame is touching the thermocouple, check for debris
from spillages.
Incorrectly positioned or blocked pilot lights and loose thermocouple connections are not classed as
warranty issues.
Care must be taken when replacing pan supports to ensure that they are the correct way around which
gives clearance to the pilot light.
Oven - Daily:
1. Wipe clean the inside of the oven - making sure you do not touch the thermostat probe on the oven
ceiling. Scrape any food deposits of the base of the oven with a Nylon or non abrasive scraper.
2. Remove oven shelf and clean with soapy water.
Gas valves must not be touched unless by an authorised engineer.
Stainless Steel Parts:
Do not use steel wool, abrasive cloths, cleansers or powders to clean stainless steel surfaces, only use hot
soapy water during the day and a stainless steel liquid cleaner at the end of the day. To remove encrusted
materials, soak in hot water to loosen the material then use a wood or nylon scraper.
Please note - If equipment is not regularly cleaned or looked after your Warranty will be invalidated.
All gas appliances should be serviced at least once a year.
10
Page 11

TRI-STAR - RANGE SERIES
11
Page 12

ITEM NO. PART NO. DESCRIPTION
1 TS-1233 TOP GRATE -12" x 12”
2 TS-1230 BURNER HEAD (ANTI-CLOG)
3 TS-1232 VENTURI - REAR
4 TS-1231 VENTURI - FRONT
5 TS-l007 AIR SHUTTER
6 TS-21015 BURNER HANGER
7 TS-20002 24" CRUMB TRAY
TS-20003 36" CRUMB TRAY
TS-20004 48" CRUMB TRAY
8 TS-20009 RACK GUIDE - RlH
TS-20000 RACK GUIDE - UH
9 TS-1360 24" MANIFOLD PIPE
TS-1361 36" MANIFOLD PIPE
TS-1362 48" MANIFOLD PIPE
TS-1363 60" MANIFOLD PIPE
TS-1364 72" MANIFOLD PIPE
10 TS-21070 PILOT BURN.ER ASSY COMPLETE FRONT & BACK
11 TS-1609 PILOT VALVE· 1/0 NPT x 3/16 CC x 900
TS-1630 FERRULE - 3/16 CC
TS-1636 COMPRESSION FITTING - 3/16 CC
12 TS-13010 24" VALVE COVER ,
TS -13012 36" VALVE COVER
TS -13013 40" VALVE COVER
TS-13014 60" VALVE COVER
TS-13015 72" VALVE COVER
13 TS-20091 30" OVEN DOOR ASSY
TS-20090 20" OVEN DOOR ASSY
14 TS-20153 30" OVEN DOOR HANDLE
TS-20152 20" OVEN DOOR HANDLE
15 T5-1204 LOGO (TRI-STAR)
16 TS-20143 30" KICK PLATE
TS-20142 20" KICK PLATE
17 TS-20159 30" OVEN BOTTOM
TS-20150 20" OVEN BOTTOM
18 TS-2021 30" OVEN RACK
TS-2020 20" OVEN RACK
19 TS-1106 KNOB - THERMOSTAT
20 TS-1105 BEZEL - THERMOSTAT
21 TS-2720 KNOB - GAS VALVE (3 STAR PLASTIC)
TS-27051 KNOB - GASVALVE (CHROME wIser SCREW)
22 TS-1610 GAS VALVE
23 TS-1700-37 ORIFICE HOOD - 2.6mm (35,000 BTU - NAT)
TS-1700-51 ORIFICE HOOD - 1.7mm (35,000 BTU - PROP)
TS-1700-34 ORIFICE HOOD - 2.8mm (40,000 BTU - NAT) OPTIONAL
TS-1700-50 ORIFICE HOOD - 1.8mm (40,000 BTU - PROP) OPTIONAL
24 TS-1104 THERMOSTAT FLANGE I (SADDLE)
25 TS-1150R OVEN THERMOSTAT FACING IT RIGHT INLET
TS-1150L OVEN THERMOSTAT FACING IT LEFT INLET
25A TS-1100 GRIDDLE THERMOSTAT
12
Page 13

ITEM NO. PART NO.
26 TS-1013 PLUG - 1/8 NPT
27 TS-1605 FITTING (STRAIGHT) - 1/4 NPT x 3/8 CC
28 T5-23039 OVEN MANIFOLD PIPE
29 TS-23094 ORIFICE HOOD ADAPTER - 3/8
30 TS-1700-46 30" OVEN - ORIFICE HOOD - 2.1mm (NAT)
TS-1700-55 30" OVEN - ORIFICE HOOD - 1.3mm (PROP)
TS-1700-50 20" OVEN - ORIFICE HOOD - 1.8mm (NAT)
TS-1700-56 20" OVEN - ORIFICE HOOD - 1.2mm (PROP)
31 T8-1020 OVEN BURNER
32 TS-10979 PILOT- OVEN (NAT)
TS-10989 PILOT- OVEN (LP)
T8-1025-26 PILOT BELL ORIFICE - 4.9mm (NAT)
TS-1025-16 PILOT BELL ORIFICE - 4.3mm (LP)
TS-1630 PILOT FERRU LE (3/16 CC)
TS-1636 PILOTNUT (3/16CC)
33 TS-1075 PIEZO
34 TS-1110 SAFETY VALVE
35 TS-1061 CASTER W/BRAKE (FRONT)
TS-1060 CASTER WINO BRAKE (REAR)
36 TS-20130 LEG - 6”
37 TS-21012 12" LANDING LEGDE
TS-21000 24" LANDING LEGDE
TS-21001 36" LANDING LEGDE
TS-21002 48" LANDING LEGDE
TS-21003 60" LANDING LEGDE
TS-21004 72" LANDING LEGDE
38 TS-1050 REGULATOR (NAT)USED ON 24" 36" UNITS
TS-1051 REGULATOR (LP) US~D 'ON 24" 36" UNITS
TS-1053 REGULATOR (NAT) HIGH CAPACITY USED ON 48" 60" 72" UNITS
TS-1053L REGULATOR (L.P.) HIGH CAPACITY USED ON 48" 60" 72" UNITS
39 TS-20030R HI-SELF SUPPORT CHANNEL - R/H
TS-20030L HI-SELF SUPPORT CHANNEL - L/H
40 TS-20100 24" HI-SHELF FRONTPANEL
TS-20101 36" HI-SHELF FRONTPANEL
TS-20102 40" HI-SHELF FRONTPANEL
TS-20103 60" HI-SHELF FRONT PANEL
TS-20104 72" HI-SHELF FRONTPANEL
41 TS-20190 24" HI-SHELF
TS-20191 36" HI-SHELF
TS-20192 40" HI-SHELF
TS-20193 60" HI-SHELF
TS-20194 72" HI-SHELF
42 TS-21085 24" HI-SHELF BACK PANEL
TS-21086 36" HI-SHELF BACK PANEL
TS-21007 48" HI-SHELF BACK PANEL
TS-21000 60" HI-SHELF BACK PANEL
TS-21089 72" HI-SHELF BACK PANEL
43 TS-20135 OVEN FLAME SPREADER
DESCRIPTION
13
Page 14

TRI-STAR TERMS OF SALE & LIMITED WARRANTY FOR U.S.A. INSTALLATION
TERMS - 1%-10 days, n/30 days subject to credit approval. All accounts past due are subject to 1-1/2% per month
service charge.
FOB - Factory / Santa Ana, CA 92707
PRICES - Prices are subject to change without notice. Prices do not include sales tax. All prices are in U.S. Dollars.
POSSESSION - of this price list does not constitute an agreement or an offer to sell.
NOTE - The company reserves the right, without prior notice, to make changes and revisions in product specifications,
design and material; which in the opinion of the company will provide greater performance, efficiency, and durability.
SHIPMENTS - The Company's responsibility ceases with delivery of goods to the transportation company after
receiving a receipt for them in "Good Order". In case of freight damage, do not refuse shipment, but call agents
attention to its condition and make a careful note of details on freight bill before charges are paid. In case of concealed
damages, immediately notify freight agent in writing ( retaining a duplicate copy) notifying them of your intention to
file claim, so that they may inspect shipment and provide necessary forms for filing claim . Retain all packaging and do
not remove from delivery site.
RETURNED GOODS - Returned goods are subject to a 20% restocking charge and the cost of reconditioning. Prior to
shipping, a Return Goods Authorization (RA) number must be granted by Tri-Star all returned goods must be shipped
freight prepaid. Shipments without RA number will be refused. Custom units built to buyer specifications may not be
returned or canceled.
LIMITED WARRANTY
TRI-STAR warrants its new Product (s) to be free from defects in material and workmanship for a period of one (1) year
from the original date of installation not to exceed 18 months from date of shipment from our factory. Equipment sold
and installed for residential use, or outside the continental United States is excluded from this warranty.
This warranty is limited to Product(s) sold to the original commercial user. The liability of TRI-STAR is limited to, at
TRI-STAR's option, the repair or replacement of any part found by TRI-STAR to be warranted herein. TRI-STAR shall
bear the normal labor charges for repair of replacement to the extent that such repair or replacement is performed
within 35 miles of the office of an authorized service agency, within the continental United States and during regular
(straight time) hours. Travel outside of the 35 miles and any work performed at overtime or weekend rates would be
the responsibility of the owner/user. Defective parts must be returned to TRI-STAR, fright prepaid, for Warranty
Inspection.
TRI-STAR assumes no responsibility for any product not installed properly in accordance with the instructions
supplied with the equipment. Any equipment which has been modified by unauthorized personnel or changed from
our original design is not covered under this Warranty. Furthermore, TRI-STAR assumes no obligation for any product
which has been subject to misuse, abuse or harsh chemicals. Normal maintenance as outlined in the instructions is
the responsibility of the owner-user and is not a part of this warranty. Ninety days on Cast Iron Parts.
Light bulbs, porcelain, and glass components are excluded from this warranty.
Fryers: one year parts and labor, Limited Warranty on the fry tank: 5 years, prorated on stainless steel fry tank. Normal
parts wear and maintenance is also not covered by this warranty. This warranty is in lieu of any other agreement,
expressed or implied, and constitutes the only warranty of TRI-STAR with respect to the products.
This states the exclusive remedy against TRI-STAR relating to the product(s) whether in contract or in tort or under any
other legal, theory, and whether arising out of warranties, representations, instruction, installation or defects from
any cause.
TRI-STAR shall not be liable whether in contract or in tort or under any other legal theory, for loss of revenue or profit,
or for any substitute use or performance, or for incidental, indirect, special or consequential damages, or for any
other loss or cost of similar type.
Proper installation, initial check out, air shutter adjustments, or normal maintenance such as lubrication,
adjustment or calibration of controls is the responsibility of the dealer, owner-user or installing contractor and is not
covered by this warranty.
*
Prices listed in th is catalog are in U.S. Dollars. All Pricesare subject to change without prior notification. TRI-STAR is not
responsible for printing errors in pricing or specifications.
14
 Loading...