

Page 1
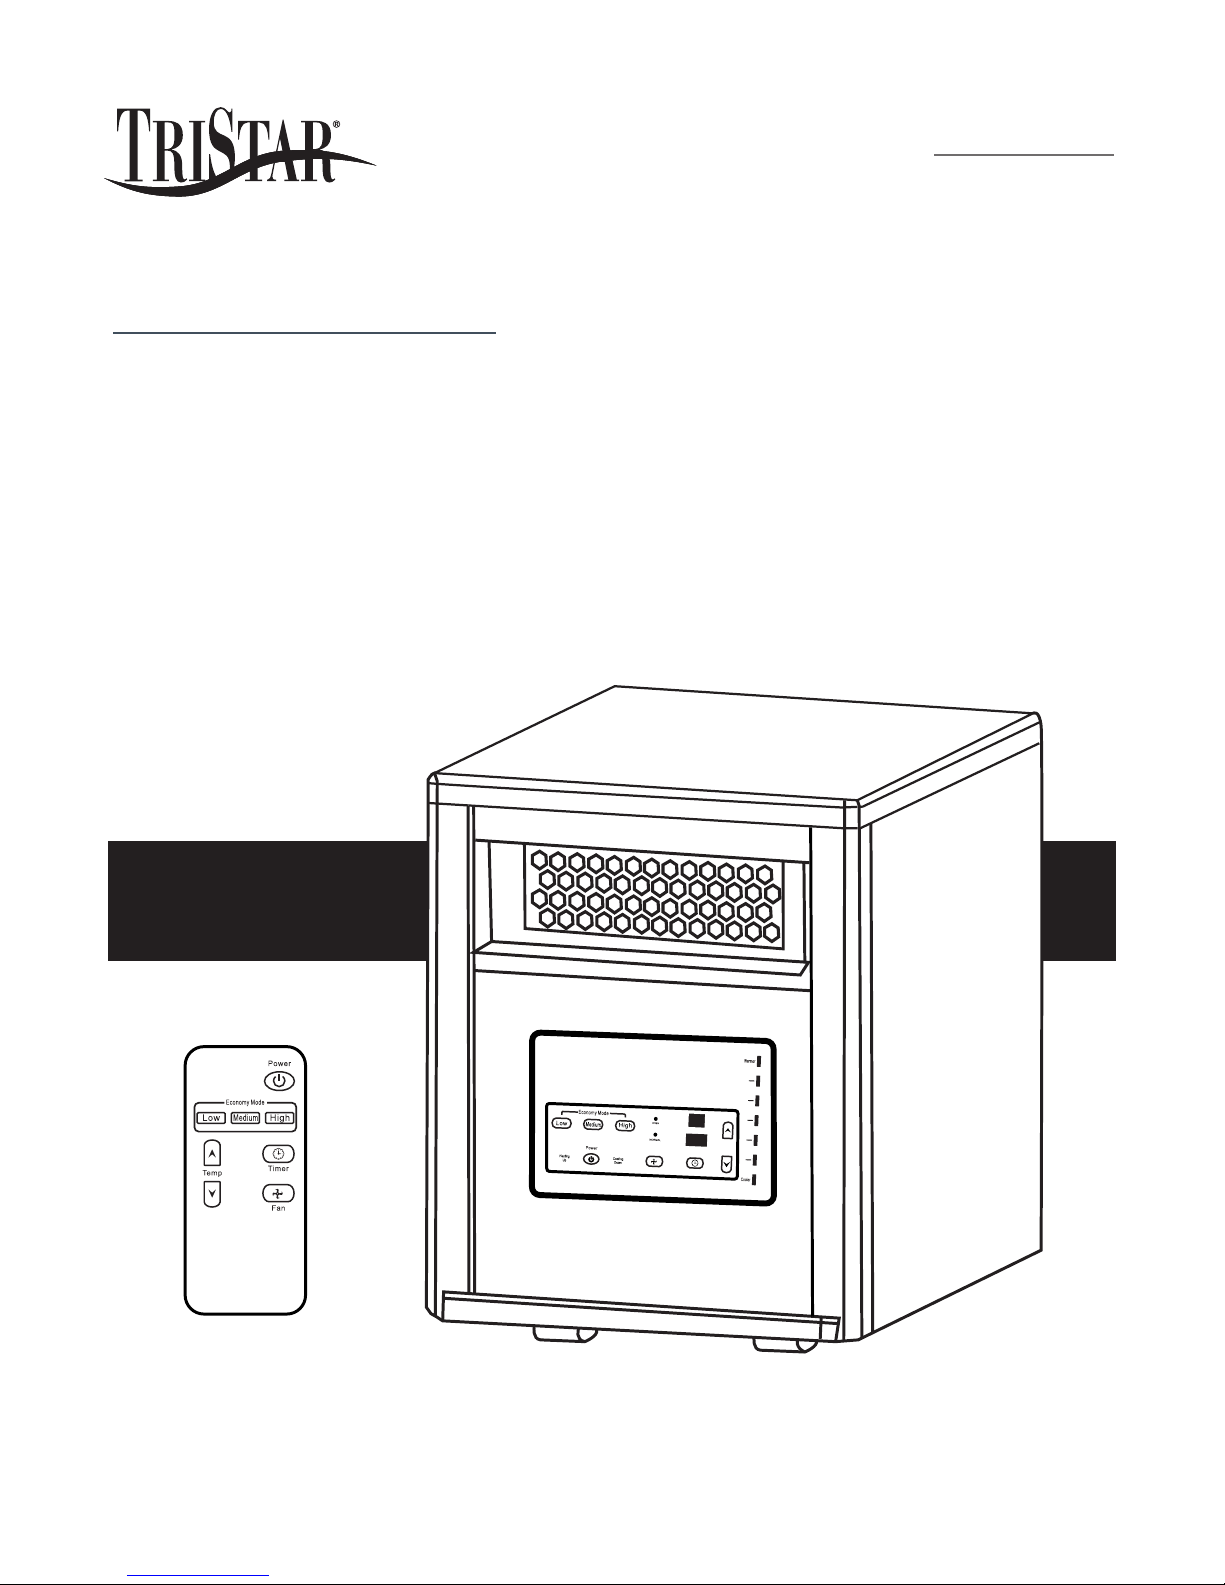
PURESTAR
H E A T E R
PORTABLE HEATING SYSTEM
WITH ACTIVESTAR™ TECHNOLOGY
SYSTÈ ME DE CHAUFFAGE PORTATI F AVEC
TECHN OLOGIE ACTIVESTAR
• Installation
• Operation
• Specifications
• Warranty
ACTIVESTAR
T E C H N O L O G Y
• Installation
• Fonctionnement
• Spécifications
• Garantie
USER’S MANUAL
MANUEL DE L’UTILISATEUR
Fan
947-1800 EA-03380
CAUTION: Read manual carefully for proper procedures and operation.
ATTENTION: Lisez attentivement le manuel des procédures et fonctionnement.
Page 2

IMPORTANT INSTRUCTIONS
WARNING! - WHEN USING ELECTRICAL APPLIANCES, BASIC PRECAUTIONS SHOULD ALWAYS BE FOLLOWED
TO REDUCE RISK OF FIRE, ELECTRIC SHOCK, AND INJURY TO PERSONS, INCLUDING THE FOLLOWING:
WARNING! - The filter and ActiveStar™ Cell must be properly installed. DO NOT OPERATE THIS APPLIANCE WITH THE
FILTER OR BACK COVER REMOVED. Failure to follow these instructions may result in exposure to UV light or personal injury.
• CAUTION: Risk of Electric Shock. DO NOT open or try
to repair the heater yourself.
• This heater may get hot when in use. To avoid burns,
DO NOT let bare skin touch hot surfaces. Use caution
when moving this heater.
• Keep combustible materials, such as furniture, pillows,
bedding, paper, clothes, and curtains at least 3 ft from
the front of the heater and keep them away from the
sides, top, and rear. DO NOT place towels or other
objects on the heater.
• Extreme caution is necessary when any heater is used
by or near children or the disabled, or when the heater
is left operating and unattended.
• DO NOT operate any heater with a damaged cord or
after the heater malfunctions, has been dropped or
damaged in any manner. Return heater to authorized
service facility for examination, electrical or mechanical
adjustment, or repair.
• This heater is not intended for use in bathrooms,
laundry areas and similar indoor locations. NEVER
locate heater where it may fall into a bathtub or other
water container. To protect against electrical hazards,
DO NOT immerse in water or other liquids.
• DO NOT touch the control panel or plug with a wet hand.
• DO NOT run cord under carpeting. DO NOT cover cord
with throw rugs, runners, or similar coverings. Arrange
cord away from traffic area and where it will not be
tripped over.
• To avoid fire or shock hazard, plug the unit directly into
a 120 V AC electrical outlet.
• To disconnect heater, turn controls to OFF, then remove
plug from outlet. Pull firmly on the plug, DO NOT unplug
by pulling on the cord.
• Always unplug the unit before moving or cleaning, or
whenever the heater is not in use.
• Use only for intended household use as described in
this manual. Any other use not recommended by the
manufacturer may cause fire, electric shock, or injury
to persons. The use of attachments not recommended
or sold by unauthorized dealers may cause hazards.
• Use only on a floor that is a dry, level surface.
• DO NOT use outdoors or on wet surfaces.
• DO NOT attempt to repair or adjust any electrical or
mechanical functions on this unit. Doing so will void
your warranty. The inside of the unit contains no user
serviceable parts. Qualified personnel should perform
all servicing only.
• Connect to properly grounded outlets only.
• Check your heater cord and plug connections.
a) Faulty wall outlet connections or loose plugs can
cause the outlet or plug to overheat. Be sure the
plug fits tight in outlet.
b) Heaters draw more current than small appliances.
Overheating of the outlet may occur even if it has
not occurred with the use of other appliances.
• DO NOT insert or allow foreign objects to enter any
ventilation or exhaust opening as this may cause an
electric shock or fire, or damage the heater.
• To prevent a possible fire, DO NOT block the air intakes
or exhaust in any manner. DO NOT use on soft surfaces,
like a bed, where openings may become blocked.
• The heater has hot parts inside. Do not use it in areas where
gasoline, paint, or flammable liquids are used or stored.
• Always plug heaters directly into a wall outlet/
receptacle. Never use with an extension cord or
relocatable power tap (outlet/power strip).
• Never operate heater without filter in place
SAVE THESE INSTRUCTIONS
2
c) During use, check frequently to determine if your
plug outlet or faceplate is HOT!
d) If so, discontinue use of the heater and have a
qualified electrician check and/or replace faulty
outlet(s).
• To reduce the risk of electrical shock, this appliance
has a grounded plug (with a third prong). This plug
will fit in a grounded outlet only one way. If it does not
fit, contact a qualified electrician to install the proper
outlet. Do not change the plug in any way. Do not use
adaptors.
Page 3
CAUTION
RISK OF ELECTRIC SHOCK
DO NOT OPEN
NO USER-SERVICEABLE PARTS INSIDE
WARNING! - EYE DAMAGE MAY RESULT FROM DIRECTLY VIEWING THE LIGHT PRODUCED BY THE
LAMP USED IN THIS PRODUCT. ALWAYS TURN OFF & UNPLUG UNIT BEFORE OPENING THE BACK
COVER OF THE ACTIVESTAR™ ASSEMBLY.
INTRODUCTION
Congratulations, your new PureStar Heater is designed
to provide years of trouble-free, low maintenance
operation. Be sure to read and follow all service
procedures outlined in this owner’s manual, and use only
genuine TriStar replacement parts available from your
TriStar Distributor.
If you have any questions concerning this, or any TriStar
product, contact TriStar Customer Service or your
TriStar Distributor.
Please record the name and phone number of your
TriStar Distributor:
Name _______________________________________
Phone _______________________________________
Please record the serial number of your
PureStar Heater:
Serial # _____________________________________
CAUTIO N: Do not power off the heater using
the main power switch or unplugging it, except
in an emergency. A cool down period prevents
damage to the heater before turning off the fan.
By turning off the heater using the main power
switch or unplugging it from the power source, it
does not cool down properly.
SPECIFICATIONS
Electrical:
• Voltage: 120V ~ 60Hz
• Power consumption: 1000–1500 Watts.
• Heat output: rated at 5,100 BTU
• Automatic on/off: heat can be set to automatically
turn off or on up to 12 hours
• Expected lifecycle: up to 80,000 hours
• Air purification: ActiveStar Technology
Coverage:
• Coverage: Up to 1000 sq. ft.
Size:
• Dimensions: 16 4/5" high x 13" wide x 16 3/5" deep
• Weight: 25 pounds
Warranty
• 3 year limited Warranty.
Safety Protection:
• Overheat safety feature
• Tip-over safety feature
Other Features:
• Replaceable filter
• Remote control
When not in use, unit should be stored in a clean/dry
environment (60 - 80º F (15 - 27º C)) and 50 - 60% RH.
*
* Variables such as your insulation, type and
number of windows, number of stories,
construction type, etc. will greatly affect the
required Btu’s per square foot for heating
3
Page 4
SAFETY FEATURES
TIP-OVER SAFETY FEATURE
This heater is equipped with a tip-over safety feature.
Once the heater is tipped over, an internal switch will
automatically shut the heater off. Once the heater is
restored to an upright position, the heater will reset.
To continue operation, turn on the heater using the
supplied remote control or the control panel on the
heater.
OVERHEAT SAFETY FEATURE
This heater is equipped with a overheat safety feature.
When the heater’s internal components reach a certain
temperature that could cause overheating and possible
fire, the heater will automatically shut off.
NOTE: It is normal for the power cord to feel warm
to the touch; however, a loose fit between the outlet
and the plug may cause overheating of the plug. If this
occurs, try inserting the plug into a different outlet.
Contact a qualified electrician to inspect the original
outlet for damage.
IN THE BOX
• PureStar Heater Portable Heating System
• Remote Control with battery installed
• Owner’s Manual
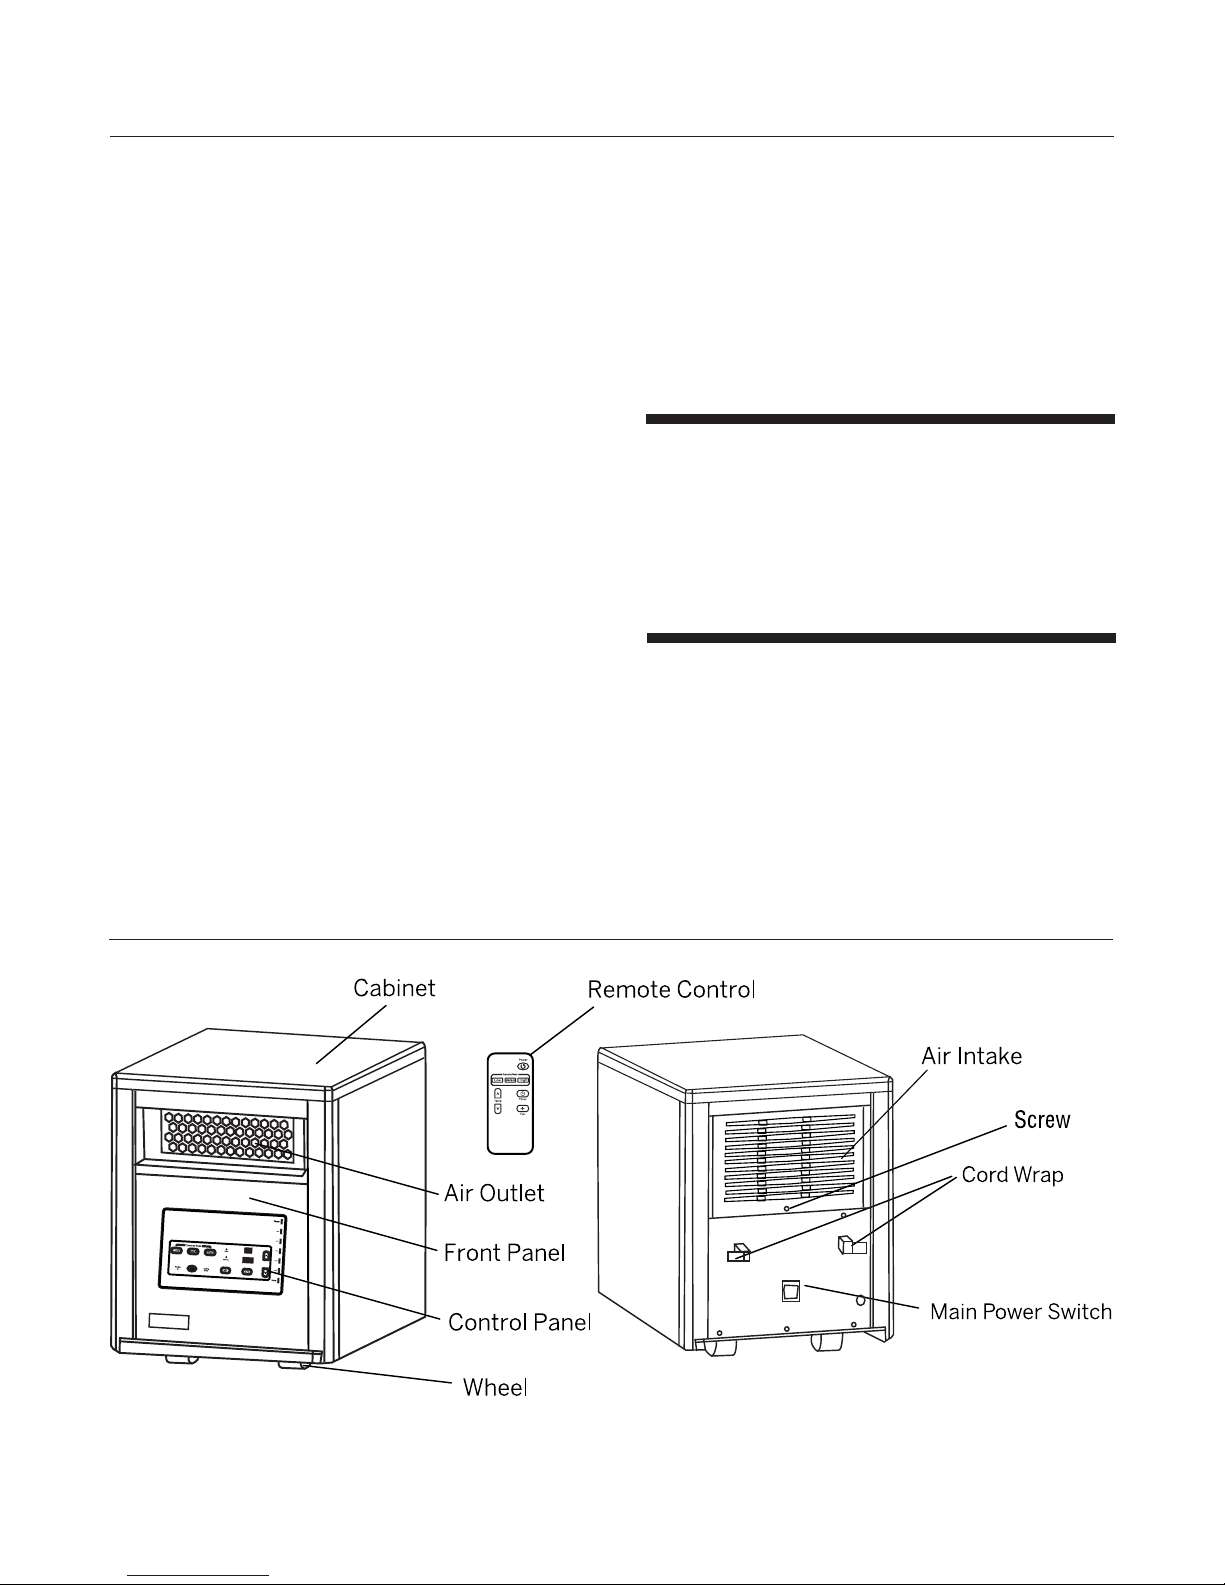
PRODUCT DIAGRAM
Fan
4
Page 5
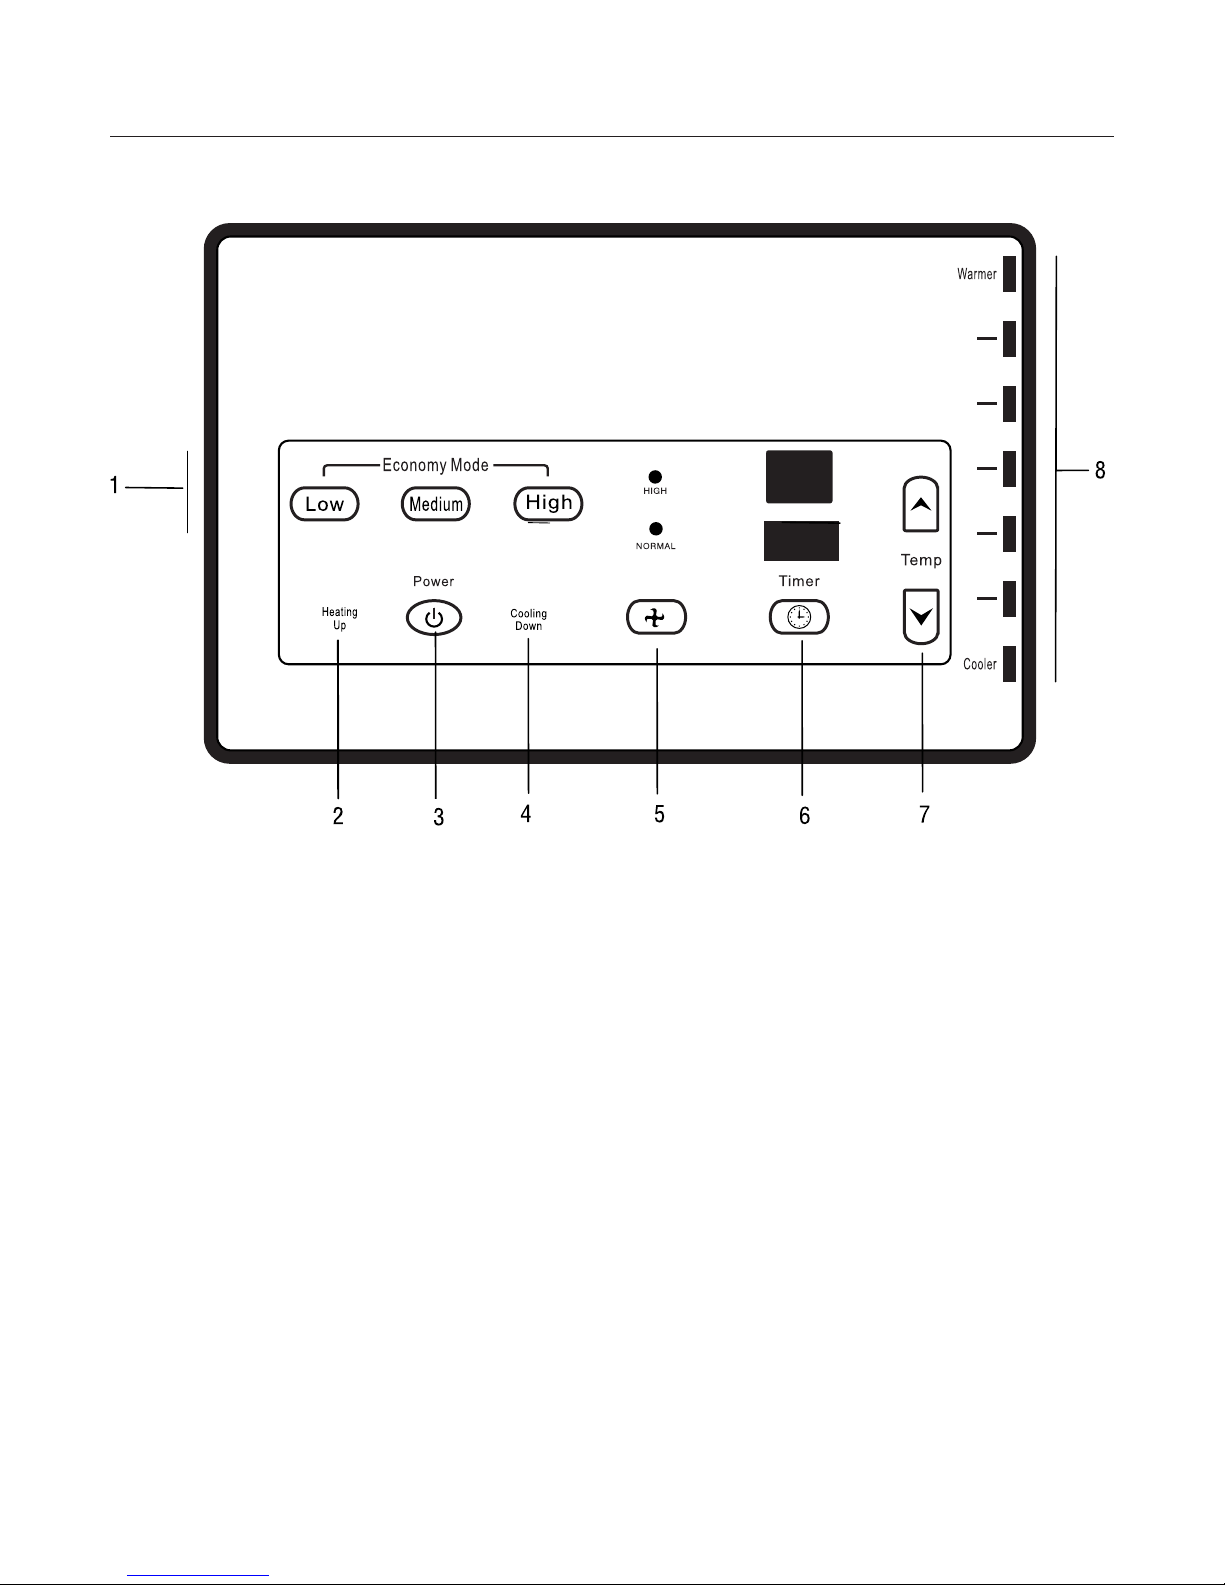
CONTROL PANEL
Fa n
1. 、 Economy Mode Settings – Control the power output
according to the room size to conserve energy.
Low – covers up to 300 sq ft
Medium – covers 300-600 sq ft
High – covers 600-1000 sq ft
2. 、 Heating Up Light – When the Heater is turned on, the
fan will gradually increase speed. The light will turn off
when the fan has reached the set speed.
3. 、 Power Button – Press for Power On or Off.
4. 、 Cooling Down Light – When the Heater is turned off,
the fan will gradually decrease speed until it stops.
When the fan stops, the light will turn off. This cools the
heating element completely.
5. 、 Fan Control Button – Switch the fan speed between
Normal and High.
6. 、 Timer Button – Press the Timer Button when the heater
is on to set the hours until the unit turns off. Or press
the Timer Button when the heater is off to set a time for
the unit to turn on automatically. Time can be set for up
to 12 hours.
7. 、 Temperature Control – Use the up button to set a
warmer temperature and the down button to lower the
heat.
8. 、 Temperature Indicator Lights – As you set the
temperature higher or lower, the lights will indicate the
desired warmth.
5
Page 6

REMOTE PANEL
Fan
Power button – for power on or off
Economy Mode Settings – Control the power output according to the room size to
conserve energy.
• Low – covers up to 300 sq ft
• Medium – covers 300-600 sq ft
• High – covers 600-1000 sq ft
Timer Button – Press the Timer Button when the heater is on to set the hours until the
unit turns off. Or press the Timer Button when the heater is off to set a time for the
unit to turn on automatically.
Fan Control Button – Switch the fan speed between Normal and High.
Temperature Control – Use the up button to set a warmer temperature and the down
button to lower the heat.
PREPARATION
Place the heater on a firm, level surface and plug into a grounded 120V 60Hz power outlet. Turn on the power switch
in the rear of the unit. Only operate heater in an upright position with caster wheels attached.
When using remote control, please pull out the insulating film as illustrated below.
6
Page 7

OPERATING INSTRUCTIONS
Start and select working mode
Turn the heater on by pressing the Power button on the control
panel or by pressing the Power button on the supplied remote
control. The Heating Up light will glow until the fan has reached
the set speed.
Select the size of room you will be heating to control the power
output and conserve energy. Press Low to use in a room up to
300 sq ft, Medium to use in a room 300-600 sq ft or High for a
room 600-1000 sq ft.
Press Fan button either on the control panel or remote control to
select fan speed. Choose either Normal speed or High speed.
Use Normal speed for typical, consistent use. Use High speed
to diffuse heat at an increased speed.
Setting room temperature
Adjust the thermostat by pressing the arrows on the control
panel or remote control.
Once you have chosen the desired temperature, the heater
will remain on until the room temperature increases to the set
temperature. The heater will cycle on and off to maintain the
desired room temperature.
7
Page 8
SETTING THE TIMER
00
Press Timer button either on the control panel
or remote control.
To set the Heater to automatically turn off, press
the Timer button with the unit ON. To set the
Heater to automatically turn on, press the Timer
button with the unit OFF. Press continuously
until the LED on the control panel displays
the desired length of time. Time can be set in
1–12 hour increments. The Timer will begin
immediately.
UNIT CLEANING
WARNING:
• Turn off the power switch in the rear of the unit.
• Unplug the unit and let it cool completely.
• To keep the heater clean, the outer shell may be cleaned with a soft cloth.
CAUTIO N: DO NOT let liquid enter the heater. DO NOT put liquids inside the heater.
• DO NOT use alcohol, gasoline, abrasive powders, furniture polish, or rough brushes to clean the heater. This may cause
damage or deterioration to the surface of the heater.
• DO NOT immerse the heater in water.
• If unit should become wet, wait until unit is completely dry before using.
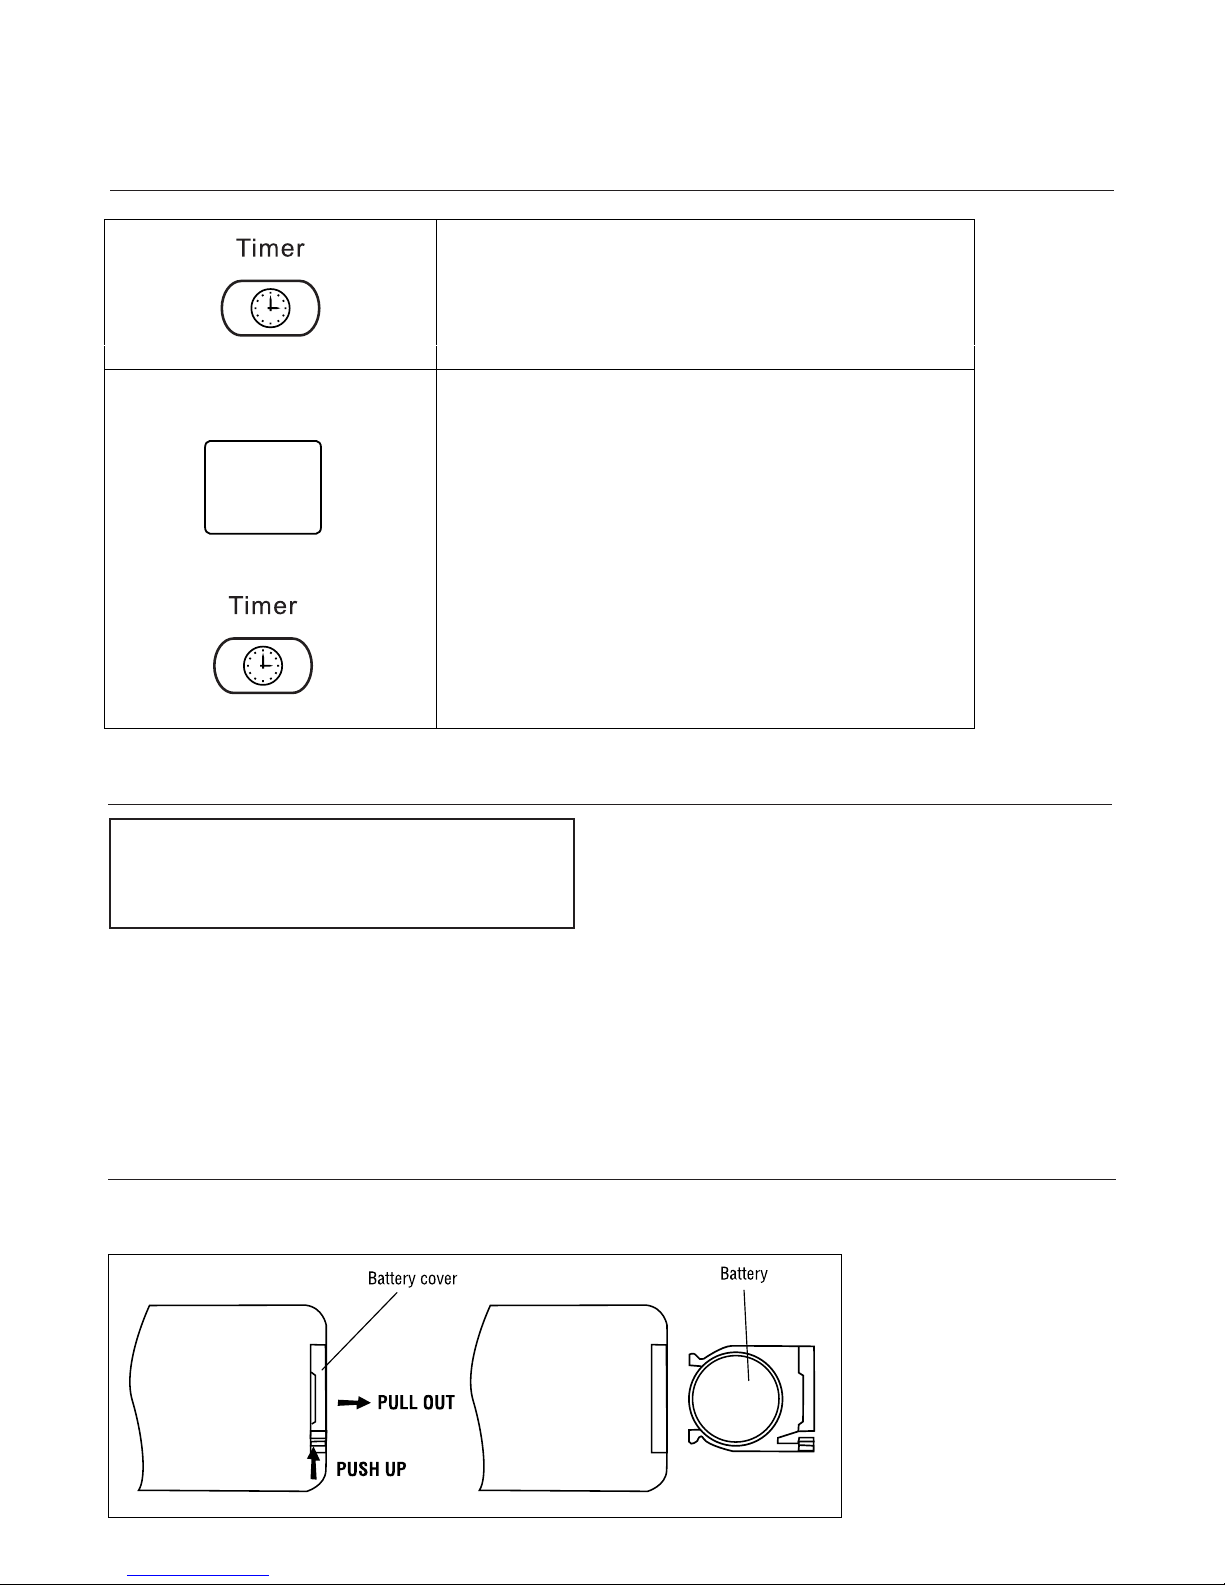
REMOTE CONTROL CARE
When remote control will not be in use for a long period of time, remove the battery according to the following steps.
Push battery cover lock
up then pull cover out as
indicated in the diagram
+
above. When replacing
the battery, positive side
faces up.
8
Page 9

ACTIVESTAR™ CELL & AIR FILTER CLEANING & REPLACEMENT
WARNING:
• Turn off the power switch in the rear of the unit.
• Unplug the unit and let it cool completely.
• Air filter requires cleaning after every 3-6 months of use, and
replacement as needed. Please remove the old filter and replace with a
new filter following the steps below.
• ActiveStar™ requires cleaning on a monthly basis and requires
replacement after every 2 years (based on normal heating season use).
1. Remove the screw from the back cover of the ActiveStar™ assembly.
Remove the screw and depress the two latches beneath the filter
housing, then lift up to remove.
2. Disconnect the ActiveStar™ cell plug.
3. To remove the ActiveStar™ assembly from the housing.
Spread the 4 retaining tabs that hold the ActiveStar Cell in place and
slide the Cell out of the housing. (A)
Depress latches
4. To remove the filter from the housing, spread
2 retaining tabs that hold the filter in place (B),
then slide the filter out of the housing (C).
5. The ActiveStar™ cell and filter can now be
replaced or cleaned. To clean, carefully vacuum
or brush the ActiveStar™ cell and filter. If
damaged, worn, or difficult to clean, replace the
filter and/or ActiveStar™ cell.
6. Reassemble the ActiveStar™ cell, filter, back
cover, and holder assembly as shown.
7. Insert the ActiveStar™ cell plug into the receptacle in the
back of the unit.
8. Replace the back cover screw removed in step 1.
2 Tabs that hold
the filter in place (B)
Filter Removal (C)
ActiveStar
Cell
Housing
4 Tabs that hold the ActiveStar Cell in place (A)
9. Reconnect power.
WARNING! - The filter and ActiveStar™ Cell must
be properly installed. DO NOT OPERATE THIS
APPLIANCE WITH THE FILTER OR BACK COVER
REMOVED. Failure to follow these instructions may
result in exposure to UV light or personal injury.
9
Page 10

STORAGE
Store the heater in a cool, dry location when not in use. To prevent dust and dirt build-up, use the original packaging to repack the unit.
TROUBLESHOOTING
If the heater will not operate, please check the following before calling for repair:
1. Check if the power cord is plugged into an electrical outlet, if not, plug in.
2. Check the outlet for electricity.
3. Check that main power switch on rear is on. Switch will illuminate when on.
4. Check if the battery in remote control is operational, and if the insulating film is removed.
NOTE: The heater may not be operating if the thermostat is set lower than the room temperature. To begin operation, increase
the thermostat temperature for a higher heat setting.
LIMITED THREE YEAR WARRANTY
What is Covered by this Warranty - TriStar warrants the PureStar Heater, to the consumer subject to the conditions below, against
defects in workmanship or material, provided that the products are returned to an TriStar location within 3 years of date of
purchase.
Maintenance Requirements - Failure to use and maintain your PureStar Heater in accordance with your Owner’s Manual will void
this warranty. Servicing your PureStar Heater by parties other than an authorized TriStar location and/or using parts other than
genuine TriStar parts will also void this warranty.
How to Obtain Warranty Service - Upon contacting and returning, at consumer’s sole cost and expense, the product with proof
of purchase (including purchase date) to an TriStar location within the above time period, TriStar will repair or replace and
return the product, without charge and within a reasonable period of time, if its examination discloses any part to be defective
in workmanship or material. If TriStar is unable to repair the product after a reasonable number of attempts, TriStar will provide
either a refund of the purchase price or a replacement unit, at TriStar’s option.
What is Not Covered by this Warranty - This product is intended for household use only. Ordinary wear and tear shall not be
considered a defect in workmanship or material. These warranties do not apply for loss or damage caused by accident, fire, abuse,
misuse, modification, misapplication, commercial use, or by any repairs other than those provided by an authorized TriStar location.
Missing Serial Numbers and Unauthorized Channels. - If a valid serial number is missing from the product, this warranty will be
voided. TriStar products are authorized for sale through TriStar locations and authorized TriStar representatives only. Warranties
are voided if a product is pruchased through unauthorized channels; this includes websites that are not authorized to use TriStar’
trademarked names, images and logos as well as Internet auction sites (e.g. eBay and cragslist.com). The only approved Internet
presence for TriStar products is www.TriStarhome.com. To confirm warranty coverage prior to purchasing a product, contact
TriStar Customer Services at 800-243-9078 with the serial number located on the back of ths unit.
Exclusion of Other Warranties and Conditions - EXCEPT AS PROVIDED HEREIN, TriStar MAKES NO REPRESENTATION OR
WARRANTY OF ANY KIND. ALL OTHER WARRANTIES OF ANY KIND, EXPRESS OR IMPLIED, ARE HEREBY EXPRESSLY
DISCLAIMED, INCLUDING ANY IMPLIED WARRANTY OF MERCHANTABILITY OR FITNESS FOR A PARTICULAR PURPOSE.
Limitation of Liability for Special, Incidental or Consequential Damages - TriStar SHALL NOT IN ANY CASE BE LIABLE FOR
SPECIAL, INCIDENTAL OR CONSEQUENTIAL DAMAGES ARISING FROM BREACH OF EXPRESS OR IMPLIED WARRANTIES,
CONDITIONS, GUARANTEES OR REPRESENTATIONS, BREACH OF CONTRACT, NEGLIGENCE OR ANY OTHER LEGAL THEORY.
Such excluded damages include, but are not limited to, loss of profits or revenue and loss of the use of the products.
For U.S. Application Only - This warranty gives you specific legal rights, and you may also have other rights which vary from state
to state. Some states do not allow limitations on warranties, or on remedies for breach. In such states, the above limitations may
not apply to you.
For Canadian Application Only - Exclusion of Subsequent Owners: Except as otherwise required by applicable legislation, this
warranty is not transferable. This warranty gives you specific legal rights and you may also have other rights which vary from
province to province. Some provinces and territories do not allow limitations on warranties, or on remedies for breach. In such
provinces or territories, the above limitations may not apply to you.
If any provision of this warranty or part thereof is held by a court of competent jurisdiction to be invalid, illegal or unenforceable,
the validity, legality and enforceability of the remaining provisions or parts thereof will not in any way be affected or impaired
within the jurisdiction of that court. This entire warranty shall continue to be valid, legal and enforceable in any jurisdiction where a
similar determination has not been made.
10
Page 11

FCC DECLARATION OF CONFORMITY
Name: TriStar, LLC
Model: PureStar Heater
This device complies with Part 15 of the FCC
Rules.
RESPONSIBLE PARTY
TriStar, LLC
5420 LBJ Freeway
Dallas, TX 75240
(800)989-2299
Printed Name: Andrew Eide
Title: Vice President Product Development
& Research
Date: 5/1/11
This equipment has been tested and found to comply with the limits
for Industrial, Scientific, and Medical Equipment (ISM), pursuant
to Part 15 of the FCC Rules. These limits are designed to provide
reasonable protection against harmful interference in a residential
installation. This equipment generates, uses, and can radiate radio
frequency energy, and if not installed and used in accordance
with the instructions, may cause harmful interference to radio
communications. However, there is no guarantee that interference
will not occur in a particular installation. If this equipment does
cause harmful interference to radio or television, which can be
determined by turning the equipment off and on, the user is
encouraged to try to correct the interference by one or more of the
following measures:
Reorient or relocate the receiving antenna.
Increase the separation between the equipment and receiver.
Connect the equipment into an outlet on a circuit different from that
to which the receiver is connected.
Consult the Distributor or an experienced radio/TV technician for
help.
11
Page 12

INSTRUCTIONS IMPORTANTES
ATTENTION! - LORS DE L’UTILISATION D’APPAREILS ÉLECTRIQUES, DES PRÉCAUTIONS DE BASE DEVRAIENT TOUJOURS ÊTRE
SUIVIES POUR RÉDUIRE LES RISQUES D’INCENDIE, DE CHOC ÉLECTRIQUE ET DE BLESSURES, Y COMPRIS LES SUIVANTES:
MISE EN GARDE! - Le filtre et la cellule ActiveStar doivent être installés correctement. NE PAS FAIRE
FONCTIONNER CET APPAREIL LORSQUE LE COUVERCLE ARRIÈRE DU FILTRE EST RETIRÉ. Le non-respect de
ces instructions peut entraîner une exposition à la lumière UV ou des blessures.
• ATTENTION: Risque de choc électrique. NE PAS ouvrir ou
tenter de réparer l’appareil de chauffage vous-même.
• Cet appareil de chauffage peut être chaud lorsque utilisé. Pour
éviter les brûlures, NE LAISSEZ PAS la peau nue toucher aux
surfaces chaudes. Soyez attentif lorsque vous bougez cet
appareil de chauffage.
• Garder toute matière combustible, telle que les meubles, les
oreillers, la literie, le papier, les vêtements et les rideaux à
trois pieds (plus ou moins un mètre) de distance du devant
de l’appareil de chauffage, les garder à distance des côtés, du
dessus et de l’arrière. NE PAS placer des serviettes ou autres
objets sur le dessus de l’appareil de chauffage.
• Il est nécessaire d’être extrêmement attentif lorsque
l’appareil de chauffage est utilisé près des enfants ou les
gens handicapés ou lorsque l’appareil fonctionne et n’est pas
surveillé.
• NE PAS faire fonctionner tout appareil de chauffage ayant un
cordon d’alimentation endommagé ou lorsqu’une défaillance
se produit, lorsque l’appareil a été échappé ou endommagé de
quelque manière que ce soit. Retourner l’appareil de chauffage
à un centre de service autorisé pour une vérification, un
ajustement électrique ou mécanique ou une réparation.
• Cet appareil de chauffage n’a pas été conçu pour être utilisé
dans les salles de bain, salles de lessive et des endroits
semblables à l’intérieur. NE JAMAIS placer l’appareil de
chauffage près d’une baignoire ou près d’autres contenants
d’eau. NE PAS immerger l’appareil dans l’eau ou autres
liquides pour éviter les risques de chocs électriques.
• NE PAS toucher au panneau de contrôle ou la prise électrique
avec les mains trempes.
• NE PAS faire suivre le cordon d’alimentation sous un tapis ou
carpette, NE PAS couvrir le cordon d’alimentation avec une
carpette ou d’objets semblables. Faire en sorte pour que le
cordon d’alimentation ne soit pas placé dans un endroit où
il y a beaucoup de circulation, le placer là où on ne peut faire
trébucher les gens.
• NE PAS insérer ou permettre d’objets étrangers de s’introduire
dans toute sortie ou d’entrée d’air puisque cela peut causer
des chocs électriques ou des feux ou endommager l’appareil
de chauffage.
• Pour empêcher la possibilité d’incendie : NE PAS bloquer
l’entrée ou la sortie d’air de quelque façon que se soit. NE PAS
faire fonctionner sur une surface molle, là où les ouvertures
peuvent être bloquées.
• L’appareil de chauffage contient des pièces chaudes à l’intérieur.
Ne pas utiliser là où vous utilisez ou entreposez des liquides
inflammables, de la gazoline ou de la peinture.
• Toujours brancher l’appareil de chauffage à un(e) prise/
réceptacle au mur. Ne jamais utiliser branché à un cordon de
rallonge ou une prise à multiple sorties.
• Ne jamais utiliser l’appareil de chauffage sans que le filtre soit
en place.
• Pour éviter les feux et les risques de chocs électriques,
brancher l’unité directement dans une prise à 120 Volt,
courant alternatif.
• Pour débrancher l’appareil de chauffage, placer
l’interrupteur principal à la position OFF, ensuite
débrancher le cordon d’alimentation de la prise. Tirer
fermement sur la fiche, ne pas débrancher en tirant sur le
cordon d’alimentation.
• Toujours débrancher l’unité avant de le bouger ou de le
nettoyer ou lorsque l’appareil de chauffage n’est pas en
fonction.
• À utiliser seulement pour usage domestique tel que décrit
dans ce manuel. Toute autre utilisation non recommandée
par le manufacturier peut causer des incendies, des chocs
électriques et des blessures corporelles. L’utilisation
d’accessoires non recommandés ou vendus par des
représentants non-autorisés peut causer des risques.
• Utiliser seulement sur un plancher à niveau et sec.
• NE PAS utiliser l’appareil à l’extérieur ou sur des surfaces
mouillées.
• Ne pas tenter de réparer ou de régler un composant
électrique ou mécanique de cet unité. Ce faisant, la garantie
sera révoquée. L’intérieur de cet appareil utilise des pièces
qui sont non-réparables par l’utilisateur. Seulement le
personnel autorisé est qualifié pour réparer cet appareil.
• Brancher à une sortie dont la prise est branchée à la terre.
• Vérifier les branchements du cordon d’alimentation et la
fiche de l’appareil de chauffage.
a) Une sortie de prise au mur qui est défectueuse ou
des fiches desserrées peuvent causer la surchauffe au
niveau des prises et des fiches. S’assurer que la fiche est
fermement installée dans la prise.
b) Les appareils de chauffage tirent plus de courant
que les petits appareils. Une surchauffe de la prise
peut se produire même si celle-ci n’a jamais surchauffé
auparavant avec l’utilisation d’autres appareils.
c) Durant l’utilisation, vérifier fréquemment pour
déterminer si la prise ou la fiche sont CHAUDES!
d) Si tel est le cas, arrêter l’utilisation de l’appareil
et demander à un électricien agréé de vérifier et/ou
remplacer la ou les prise(s) défectueuse(s).
• Cet appareil est doté d’une fiche mise à la terre (à trois
broches), afin de réduire les risques de choc électrique.
Cette fiche ne pourra être introduite dans une prise de
courant mise à la terre que dans un seul sens. S’il n’est pas
possible d’entrer la fiche dans la prise, communiquer avec
un électricien qualifié afin qu’il installe la prise appropriée.
Ne tenter en aucune façon de modifier la fiche. Ne pas
utiliser des adaptateurs.
12
CONSERVEZ CES CONSIGNES
Page 13

ATTENTION
RISQUE DE CHOC ÉLECTRIQUE
NE PAS OUVRIR
AUCUNE PIÈCE DE SERVICE À L’INTÉRIEUR POUR
L’UTILISATEUR
ATTENTION! - VOUS POURRIEZ ENDOMMAGER VOS YEUX EN OBSERVATION DIRECTE DE LA LUMIÈRE
PRODUITE PAR LA LAMPE UTILISÉE À L’INTÉRIEUR DE CE PRODUIT. TOUJOURS ÉTEINDRE ET DÉBRANCHEZ
L’UNITÉ AVANT L’OUVERTURE DU CAPOT ARRIÈRE DE L’ASSEMBLAGE DE LA CELLULE ACTIVESTAR.
INTRODUCTION
Félicitations, votre nouvel appareil de chauffage PureStar
Heater a été conçu pour vous procurer des années
d’utilisation sans problèmes et un fonctionnement de
faible entretien. Assurez-vous de lire et de suivre toutes
les procédures de service énoncés dans le manuel du
propriétaire et d’utiliser uniquement des pièces de
rechange TriStar disponibles auprès de votre distributor
TriStar. Si vous avez des questions à propos de ceci ou
tout produit de TriStar, veuillez communiquer avec le
service à la clientèle TriStar ou votre distributor TriStar.
Veuillez s’il vous plaît inscrire le nom et le numéro de
téléphone de votre distributor TriStar:
Nom ________________________________________
Téléphone ___________________________________
Veuillez s’il vous plaît inscrire le numéro de série de votre
PureStar Heater:
# de série __________________________________
SPÉCIFICATIONS
Électriques:
• Voltage: 120V ~ 60Hz
• Puissance de consommation d’énergie : 1000 à 1500
Watts.
• Rendement calorifique: évalué à 5,100 BTU.
• Marche / arrêt automatique: la chaleur peut être
réglée pour être désactivée automatiquement ou en
marche Jusqu’à 12 heures.
• On peut s’attendre à un cycle de vie jusqu’à 80,000
heures
• Purification d’air : Technologie ActiveStar
Surface d’opération:
• Surface d’opération: jusqu’à 1000 pieds carrés
Dimensions:
• Dimensions: 16 4/5” de hauteur x 13” de largeur x 16
3/5” de profondeur (42.7 cm x 33 cm x 42.2 cm)
• Poids: 25 lbs (approximativement 11.4 kg)
Garantie
• Garantie limitée de 3 ans
*
ATTENTION: Ne pas fermer l’appareil à l’aide
de l’interrupteur principal ou le débrancher par
la fiche, à l’exception d’une urgence. Une période
d’abaissement de la température prévient
les dommages causés à l’élément chauffant
avant que le ventilateur cesse de fonctionner.
En utilisant l’interrupteur principal ou en
débranchant la fiche de la prise pour fermer
l’appareil de chauffage il n’est pas possible
d’abaisser convenablement la température.
Protection au niveau de la sécurité:
• Caractéristique de protection contre la surchauffe
• Caractéristique anti-bascule
Autres caractéristiques:
• Filtre remplaceable
• Contrôle à distance
Lorsque l’appareil n’est pas en usage, il devrait être
entreposé dans un environnement propre et sec à 60 80º F (15 - 27º C)) et 50 - 60% RH.
* Des variables telles que l’isolation de votre type et le
nombre de fenêtres, le nombre d’étages, de type de
construction, etc. affectera grandement le nombre de
BTU requis par pieds carrés pour le chauffage.
13
Page 14

CARACTÉRISTIQUES DE SÉCURITÉ
CARACTÉRISTIQUE DE SÉCURITÉ ANTI-BASCULE
Cet appareil de chauffage est doté d’une fonction de
sécurité anti-bascule. Lorsque l’appareil de chauffage
bascule, un interrupteur interne va automatiquement
mettre l’appareil en position Off. Une fois que l’appareil
est remis en position debout, l’appareil de chauffage va
se réinitialiser. Pour poursuivre l’utilisation de l’appareil,
mettre l’appareil de chauffage en position ON en utilisant
le contrôle à distance ou le panneau de contrôle de
l’appareil.
CARACTÉRISTIQUE SÉCURITAIRE DE SURCHAUFFE
Cet appareil de chauffage est doté d’une fonction
sécuritaire de surchauffe. Lorsque les composantes
internes de l’appareil atteignent une certaine
température qui pourrait causer une surchauffe et la
possibilité d’un incendie, l’appareil de chauffage va
automatiquement se mettre en arrêt.
PRENDRE NOTE: Il est normal que le cordon
d’alimentation soit tiède au touché; toutefois, si le
branchement n’est pas suffisamment serré, cela pourrait
causer une surchauffe à la fiche. Si cela se produit,
essayer de brancher la fiche dans une autre prise.
Communiquer avec un électricien qualifié pour faire
l’inspection de la prise originale pour des dommages.
À L’INTÉRIEUR DE LA BOÎTE
• Système de chauffage portatif PureStar Heater
• Contrôle à distance avec pile installée
• Manuel du propriétaire
SCHÉMA DU PRODUIT
Fan
Cabinet Contrôle à distance
Sortie d’air
Panneau
avant
Panneau De
Contrôl
Roulette
Prise d’entrée d’air
Vis
Crochets
d’enroulement
du cordon
d’alimentation
Interrupteur
principal
14
Page 15

PANNEAU DE CONTRÔLE
Fa n
1. 、 Indicateur du mode économique de chauffage :
commande la sortie de puissance selon la taille de la
pièce pour économiser l’énergie.
Faible puissance couvre jusqu’à 300 pieds carrés
Puissance moyenne couvre 300-600 pieds carrés
Puissance élevée couvre 600-1000 pieds carrés
2. 、 Bouton de mode de chauffage: Lorsque le chauffage est
allumé, le ventilateur va augmenter progressivement
la vitesse. La lumière s’éteint lorsque le ventilateur a
atteint la vitesse pré établie.
3. 、 Bouton de puissance: appuyer pour mettre l’appareil en
marche ou en arrêt
4. 、 Indicateur lumineux de refroidissement : lorsque
l’appareil de chauffage est éteint, le ventilateur
va progressivement diminuer la vitesse jusqu’à
ce qu’il s’arrête. Lorsque le ventilateur s’arrête, la
lumière s’éteint. Cela refroidit l’élément chauffant
complètement.
5. Bouton de commande de ventilateur : indique la vitesse
du ventilateur entre Normal et High (élevée).
6. 、 Bouton timer (de minuterie): appuyer sur le bouton
Timer lorsque le chauffage est en marche pour ajuster
le nombre d’heures jusqu’à ce que l’appareil s’éteint. Ou
appuyez sur le bouton Timer lorsque le chauffage est
coupé pour définir un temps pour que l’unité s’allume
automatiquement. Le nombre d’heures peut être réglé
jusqu’à 12.
7. 、 Contrôle de la température: utiliser le bouton vers le
haut pour définir une température plus élevée et le
bouton vers le bas pour diminuer la chaleur.
8. 、 Indicateurs lumineux de température: tout en réglant
la température élevée ou faible, les voyants lumineux
indiquent le niveau de chaleur désirée.
15
Page 16

CONTRÔLE À DISTANCE
Fan
Commutateur de puissance marche ou arrêt
Indicateur du mode économique de chauffage – contrôle de la puissance de sortie en
fonction de la taille de pièce pour économiser l’énergie.
• Faible puissance couvre jusqu’à 300 pieds carrés
• Puissance moyenne couvre 300-600 pieds carrés
• Puissance élevée couvre 600-1000 pieds carrés
Bouton timer (de minuterie) – appuyer sur le bouton Timer lorsque l’appareil de
chauffage est en marche pour ajuster le nombre d’heures jusqu’à ce que l’appareil se
positionne en arrêt. Ou appuyez sur le bouton Timer lorsque l’appareil de chauffage
est en position arrêt pour qu’il se mette en marche à l’heure que vous désirez
automatiquement.
Bouton de contrôle du ventilateur – appuyer sur le commutateur pour changer la
vitesse du ventilateur entre Normal et High (élevée).
Contrôle de la température – utiliser le bouton température élevée pour définir une
température plus élevée et le bouton vers le bas pour baisser le chauffage.
PRÉPARATION
Placer l’appareil de chauffage sur une surface plane et rigide et brancher dans une prise mise à la terre de 120 V
60Hz. Mettre l’interrupteur de puissance, situé à l’arrière de l’unité en position ON. Faire fonctionner l’appareil de
chauffage en position debout seulement avec les roulettes installées.
Lorsque vous utilisez le contrôle à distance, veuillez s’il vous plaît retirer la pellicule isolante tel qu’illustré ci-dessous.
Couvercle de
Contrôle à distance Pellicule isolante
pile
Tirer
16
Page 17

GUIDE D’UTILISATION
Commencer et sélectionner le mode de fonctionnement
Mettre l’appareil de chauffage en marche en appuyant sur le
bouton de puissance (Power) sur le panneau de contrôle ou sur
le contrôle à distance. Le voyant de réchauffement va scintiller
jusqu’à ce que le ventilateur atteigne la vitesse désirée.
Sélectionner la taille de la pièce que vous désirez chauffer pour contrôler
la puissance et économiser l’énergie. Appuyer sur Low (faible) lorsque
vous utilisez l’appareil dans une pièce jusqu’à 300 pi ², Medium
(température moyenne) dans une pièce de 300 à 600 pi ² ou High
(température élevée) pour une pièce de 600-1000 pi ².
Appuyer sur le bouton Fan (ventilateur) soit sur le panneau de
commande ou la télécommande pour sélectionner la vitesse
du ventilateur. Choisissez la vitesse Normal (normale) ou High
(Haute).
Utiliser la vitesse normale (Normal) pour une utilisation typique
constante. Utiliser une vitesse élevée (High) pour diffuser la
chaleur à une vitesse accrue.
Ajustement de la température de la pièce
Ajuster le thermostat en appuyant sur les flèches sur le
panneau de contrôle ou sur le contrôle à distance.
Une fois la température choisie, l’appareil de chauffage va
demeurer en marche jusqu’à ce que la pièce atteigne la
température indiquée sur l’afficheur numérique. L’appareil de
chauffage va adopter un cycle d’arrêt et de marche pour maintenir
la température désirée.
17
Page 18

L’AJUSTEMENT DE LA MINUTERIE
00
Appuyer sur le bouton de minuterie (Timer) ou
à partir du panneau de contrôle ou contrôle à
distance.
Pour régler le chauffage pour qu’il s’éteigne
automatiquement, appuyer sur le bouton de
minuterie lorsque l’appareil est à ON. Pour régler
le chauffage pour qu’il s’allume automatiquement,
appuyer sur le bouton de minuterie lorsque
l’appareil est à OFF. Appuyer continuellement
jusqu’à ce que le voyant LED sur le panneau de
contrôle affiche la durée souhaitée. Le temps peut
être ajusté en périodes additionnelles de 1- 12
heures. Le décompte de la minuterie commencera
immédiatement.
18
NETTOYAGE DE L’UNITÉ
MISE E N GARDE:
• Placer l’interrupteur en position d’arrêt à l’arrière de l’unité
• Débrancher l’unité et le laisser se refroidir complètement.
• Pour garder l’unité de chauffage propre, l’enveloppe extérieur peut être nettoyée à l’aide d’un chiffon doux.
AVERTISSEMEN T: Ne pas laisser de liquide entrer à l’intérieur de l’appareil. NE PAS mettre aucun liquide à l’intérieur de
l’appareil de chauffage
• NE PAS utiliser d’alcool, de gazoline, de poudre à récurer, du poli à meubles ou des brosses rugueuses pour nettoyer
l’appareil de chauffage. Cela peut causer des dommages ou de la détérioration à la surface de l’appareil de chauffage.
• Ne pas immerger l’appareil de chauffage dans l’eau.
• Si l’appareil devient humide, attendez que l’unité soit complètement sec avant de l’utiliser.
ENTRETIEN DU CONTRÔLE À D ISTANCE
Lorsque le contrôle à distance ne sera pas utilisé pour une longue période, retirer la pile en suivant les étapes ci-dessous
Couvercle de la pile
Retirer vers
l’extérieur
Pousser vers
Pile
+
Pousser le loquet du couvercle
de la pile vers le haut, ensuite
tirer le couvercle vers l’extérieur
tel qu’indiqué au diagramme
ci-dessus. Lorsque vous
remplacez la pile, le côté positif
fait face vers le haut.
le haut
Page 19

NETTOYAGE ET REMPLACEMENT DE LA CELLULE D’OXYDATION PHOTOCATALYTIQUE
ACTIVESTAR ET DU FILTRE À AIR.
MISE E N GARDE:
• Mettre en position OFF l’interrupteur d’alimentation à l’arrière de l’appareil.
• Débrancher l’appareil et le laisser refroidir complètement.
• Le filtre à air nécessite un nettoyage à chaque 3-6 mois d’utilisation et son
remplacement si nécessaire. S’il vous plaît, veuillez supprimer l’ancien filtre
et le remplacer par un nouveau filtre en suivant les étapes ci-dessous.
• La cellule ActiveStar nécessite un nettoyage sur une base mensuelle et
doit être remplacée à chaque 2 ans (basé sur l’utilisation lors de saison
de chauffage normal).
1. Retirer la vis du capot arrière de l’assemblage de la cellule ActiveStar.
Retirer la vis et relâcher les deux loquets sous le boîtier du filtre, puis
soulevez pour le retirer.
2. Débrancher la fiche de la cellule ActiveStar.
3. Pour retirer l’assemblage de la cellule ActiveStar du boîtier: écarter les 4
languettes de retenue, qui maintiennent la cellule ActiveStar en place et
faire glisser la cellule vers l’extérieur du boîtier. (A)
Relâcher les languettes
Vis
4. Pour retirer le filtre du boîtier: écarter les 2 languettes
de retenue qui maintiennent le filtre en place (B), puis
faire glisser le filtre du boîtier (C).
5. La cellule ActiveStar et le filtre peuvent maintenant
être remplacés ou nettoyés. S’il sont endommagés,
usés ou difficiles à nettoyer, remplacer le filtre et
/ ou la cellule ActiveStar. Pour nettoyer, passer
soigneusement l’aspirateur ou une brosse sur la
cellule ActiveStar et sur le filtre.
6. Assembler la cellule ActiveStar, le filtre, le
couvercle arrière, et l’assemblage de retenue à
nouveau tel qu’illustré.
7. Insérer la fiche de la cellule ActiveStar dans le réceptacle
à l’arrière de l’appareil.
8. Placer à nouveau la vis du couvercle arrière retirée lors
de l’étape 1.
9. Rebrancher la puissance.
Cellule
ActiveStar
2 Languettes qui maintiennent
le filtre en place (B).
Enlèvement du filtre (C)
Boîtier
4 Languettes qui maintiennent la cellule
ActiveStar en place (A)
MISE EN GARDE! - Le filtre et la cellule ActiveStar
doivent être installés correctement. NE PAS FAIRE
FONCTIONNER CET APPAREIL LORSQUE LE
COUVERCLE ARRIÈRE DU FILTRE EST RETIRÉ. Le
non-respect de ces instructions peut entraîner une
exposition à la lumière UV ou des blessures.
19
Page 20

ENTRPOSAGE
Entreposer l’appareil de chauffage dans un endroit frais et sec lorsqu’il n’est pas utilisé. Pour prévenir l’accumulation de poussières et saletés,
utiliser son carton d’emballage original pour emballer l’unité à nouveau.
DÉPISTAGE DES PROBLÈMES
Si l’appareil de chauffage ne fonctionne pas, veuillez s’il vous plaît vérifier la liste suivante avant d’appeler pour le service:
1. Vérifier si la fiche est branchée à une prise de courant, si non, veuillez la brancher.
2. Vérifier si la prise d’alimentation est sous tension.
3. Vérifier à ce que l’interrupteur principal soit à la position ON. L’interrupteur s’illuminera s’il est en marche.
4. Vérifier si la pile dans le contrôle à distance est fonctionnelle et si la pellicule isolante a été retirée.
PRENDRE NOTE: L’appareil de chauffage peut ne pas fonctionner si le thermostat est ajusté à une température plus basse que celle de
la pièce. Pour débuter l’opération, augmenter la température du thermostat pour un ajustement de température plus élevée.
GARANTIE LIMITÉE DE 3 ANS
Ce qui est couvert par la garantie - TriStar garantit le PureStar Heater au consommateur contre tout défaut de matériau ou de fabrication,
sous réserve des conditions ci-dessous et que le produit visé soit retourné à un établissement TriStar dans les 3 années suivant la date
d’achat.
Entretien requis - Si vous êtes fautif quant à l’utilisation et l’entretien de votre appareil PureStar Heater en rapport avec le manuel
d’utilisation, ce geste de votre part annulera cette garantie. Si vous laissez le service et l’entretien à des gens qui ne sont pas reliés
directement à des établissement autorisés de TriStar et/ou qui utilisent des pièces autre que les pièces authentiques de TriStar, ce geste de
votre part annulera également cette garantie.
Comment exercer cette garantie - Sur appel à un établissement TriStar et retour du produit à ce dernier, avec preuve d’achat (comportant la
date de cet achat), aux frais exclusifs du consommateur et dans le délai prescrit ci-dessus et ci-dessous, TriStar réparera ou remplacera et
retournera le produit sans frais et dans un délai normal, si son examen révèle un défaut de matériau ou de fabrication. Si, après un nombre
raisonnable de tentatives, TriStar n’est pas en mesure de réparer le produit, elle en remboursera le prix d’achat ou elle le remplacera, à son
gré.
Ce qui n’est pas couvert par cette garantie - Ce produit est destiné à un usage domestique seulement. L’usure normale n’est pas considérée
comme un défaut de matériau ou de fabrication. Cette garantie ne s’applique pas en cas de pertes ou de dommages résultant d’un accident,
d’un incendie, d’un usage impropre, abusif ou anormal, d’une modification, d’un usage commercial, ou encore de toute réparation faite
ailleurs qu’à un établissement TriStar agréé.
Numéros de série manquants et achats non conformes à nos politiques - Si le numéro de série valide se trouve à être manquant du
produit, la garantie sera nulle. La vente des produits TriStar est autorisée seulement qu’à partir d’établissements authentiques d’TriStar et
de représentant(es) autorisé(es) d’TriStar. Les garanties seront annulées si l’achat du produit est non conforme à nos politiques; incluant
des sites Internet qui ne sont pas autorisés pour faire l’utilisation de la marque de commerce TriStar, les images et les logos de TriStar,
incluant également les ventes aux enchères sur site Internet (exemple: ebay et Craigslist). La seule présence des produits TriStar sur site
Internet autorisée est le www.TriStarhome.com. Pour confirmer la couverture de la garantie avant de faire l’acquisition d’un produit, veuillez
communiquer avec le service à la clientèle de TriStar au 1-800-243-9078 en ayant le numéro de série du produit en main, celui-ci situé à
l’arrière de cet l’unité.
Exclusion d’autres garanties et conditions - SOUS RÉSERVE DES DISPOSITIONS PRÉVUES AUX PRÉSENTES, TriStar N’ÉNONCE AUCUNE
REPRÉSENTATION OU GARANTIE ET, EN OUTRE, DÉCLINE EXPRESSÉMENT TOUTE AUTRE GARANTIE DE QUELQUE NATURE QUE CE
SOIT, EXPRESSE OU IMPLICITE, Y COMPRIS TOUTE GARANTIE IMPLICITE DE QUALITÉ MARCHANDE OU DE CONVENANCE À UN USAGE
PARTICULIER.
Limite de responsabilité à l’égard des dommages particuliers, accessoires ou indirects - TriStar DÉCLINE TOUTE RESPONSABILITÉ
À L’ÉGARD DES DOMMAGES PARTICULIERS, ACCESSOIRES OU INDIRECTS RÉSULTANT DU NON-RESPECT DES GARANTIES,
CONDITIONS OU REPRÉSENTATIONS EXPRESSES OU IMPLICITES, D’UNE VIOLATION DE CONTRAT, DE NÉGLIGENCE OU D’AUTRES
THÉORIES JURIDIQUES. Ces dommages exclus comprennent, sans s’y limiter, la perte de profits ou de revenus, et la perte de jouissance du
produit.
Dispositions applicables aux États-Unis seulement - Cette garantie confère des droits juridiques précis qui peuvent être complétés par
d’autres droits variant d’un État à l’autre. Certains États ne permettent pas de limiter les garanties ou les recours en cas de non-respect.
Dans ces États, les dispositions limitatives ci-dessus peuvent être sans effet.
Dispositions applicables au Canada seulement - Exclusion des propriétaires subséquents : sauf disposition contraire dans les lois
applicables, cette garantie n’est pas transférable. Cette garantie confère des droits juridiques précis qui peuvent être complétés par d’autres
droits variant d’une province à l’autre. Certaines provinces et certains territoires ne permettent pas de limiter les garanties ou les recours en
cas de non-respect. Dans ces provinces ou territoires, les dispositions limitatives ci-dessus peuvent être sans effet. Si une cour compétente
prononce quelque disposition de cette garantie totalement ou partiellement invalide, illégale ou inapplicable, les autres dispositions
demeurent valides, légales et applicables, et ne sont en aucun cas modifiées ou atténuées dans le cadre de la compétence de cette cour. La
garantie entière continue d’être valide, légale et applicable dans toute juridiction ne s’étant pas prononcée de façon similaire.
20
Page 21

DÉCLARATION DE CONFORMITÉ FCC
NOM: TriStar, LLC
Modèle: PureStar Heater
Cet appareil répond aux normes à la partie
15 des règles appliquées par le FCC.
LA PARTI RESPONSABLE
TriStar, LLC
5420 LBJ Freeway
Dallas, TX 75240
(800)989-2299
Nom inscrit en lettres détachées:
Andrew Eide
Titre: Vice-président du développement de
produits et recherches
Date: 5/1/11
Cet équipement a été testé et sa confirmité a été établie aux
limites d’un équipement industriel, scientifique et médical (ISM),
conformément à la Partie 15 des règlements de la FCC. Ces limites
sont conçues pour fournir une protection raisonnable contre les
interférences nuisibles dans une installation résidentielle. Cet
équipement génère, utilise et peut émettre des fréquences radio et
s’il n’est pas installé et utilisé conformément aux instructions, peut
provoquer des interférences nuisibles aux communications de radio.
Cependant, il n’existe aucune garantie que ces interférences ne se
produiront pas dans une installation particulière. Si cet équipement
cause des interférences nuisibles à la radio ou à la télévision, qui
peut être déterminé en mettant l’équipement hors et sous tension,
l’utilisateur est encouragé à essayer de corriger l’interférence par
une ou plusieurs des mesures suivantes:
Réorienter ou déplacer l’antenne réceptrice. Augmenter
la séparation entre l’équipement et le récepteur. Brancher
l’équipement à une sortie sur un circuit différent de celui auquel le
récepteur est branché. Consulter un distributeur ou un technicien
radio / TV qualifié.
21
Page 22

NOTES
22
Page 23

NOTES
23
Page 24

TriStar, LLC
5420 LBJ Freeway Suite 1010
Dallas, TX 75240
(800)989-2299
www.TriStar.com
©2011 TriStar, LLC. All rights reserved.
 Loading...