

TriStar OPTIMA 28 SB, OPTIMA 28 CB, Tristar OPTIMA 28 SB, Tristar OPTIMA 28 CB Installation Instructions Manual
Page 1

OPTIMA 28 CB AND 28 SB
WALL MOUNTED GAS BOILERS
INSTALLATION
INSTRUCTIONS
Page 2

pag. 2
8 Control panel
. . . . . . . . . . . . . . . . . . . . . . . . . . . . . . . . . . . . . . . . . . . . .
pag. 17
8.1 Starting the appliance
. . . . . . . . . . . . . . . . . . . . . . . . . . . . . . . . . . .
pag. 17
8.2 Use of controls
. . . . . . . . . . . . . . . . . . . . . . . . . . . . . . . . . . . . . . . . . . . .
pag. 17
8.3 Reading and setting boiler parameters
. . . . . . . . . . . . . . . .
pag. 19
9 Operation with external probe
. . . . . . . . . . . . . . . . . . . . . . . . . .
pag. 20
9.1 Installing and connecting external probe
. . . . . . . . . . . . . . . .
pag. 20
9.2 Setting heating curve
. . . . . . . . . . . . . . . . . . . . . . . . . . . . . . . . . . . .
pag. 20
9.3 Adjusting heating curve
. . . . . . . . . . . . . . . . . . . . . . . . . . . . . . . . . .
pag. 20
10 Combustion analysis
. . . . . . . . . . . . . . . . . . . . . . . . . . . . . . . . . . . . .
pag. 21
10.1 Conversion from natural gas to propane
or viceversa (with KITGPL02)
. . . . . . . . . . . . . . . . . . . . . . . . . . . .
pag. 22
11 Adjusting maximum working capacity
of boiler in heating function
. . . . . . . . . . . . . . . . . . . . . . . . . . . .
pag. 23
12 Checking boiler safety equipment
. . . . . . . . . . . . . . . . . . . . . .
pag. 23
13 Useful tips
. . . . . . . . . . . . . . . . . . . . . . . . . . . . . . . . . . . . . . . . . . . . . . . . .
pag. 23
14 Temporary failure and blockage of appliance
. . . . . . . . .
pag. 24
14.1
Identification codes of irregularities causing a
temporary failure or fault
. . . . . . . . . . . . . . . . . . . . . . . . . . . . . . .
pag. 24
14.2 List of fault codes
. . . . . . . . . . . . . . . . . . . . . . . . . . . . . . . . . . . . . . . .
pag. 25
15 Examples of installation
. . . . . . . . . . . . . . . . . . . . . . . . . . . . . . . . . .
pag. 26
16 Accessories
. . . . . . . . . . . . . . . . . . . . . . . . . . . . . . . . . . . . . . . . . . . . . . . .
pag. 27
17 Periodic appliance maintenance and cleaning
. . . . . . . . .
pag. 28
18 Short parts list
. . . . . . . . . . . . . . . . . . . . . . . . . . . . . . . . . . . . . . . . . . . .
pag. 31
19 Balanced flue kits
. . . . . . . . . . . . . . . . . . . . . . . . . . . . . . . . . . . . . . . . .
pag. 33
1 Warnings
. . . . . . . . . . . . . . . . . . . . . . . . . . . . . . . . . . . . . . . . . . . . . . . . . .
pag. 3
1.1 Use of anti-freeze liquid
. . . . . . . . . . . . . . . . . . . . . . . . . . . . . . . . .
pag. 4
1.2 Features under floor heating system
. . . . . . . . . . . . . . . . . . .
pag. 4
1.3 Safety advice
. . . . . . . . . . . . . . . . . . . . . . . . . . . . . . . . . . . . . . . . . . . . . .
pag. 4
2 General features
. . . . . . . . . . . . . . . . . . . . . . . . . . . . . . . . . . . . . . . . . . .
pag. 5
2.1 Winter operation
. . . . . . . . . . . . . . . . . . . . . . . . . . . . . . . . . . . . . . . . . .
pag. 5
2.2 Summer operation (CB models)
. . . . . . . . . . . . . . . . . . . . . . . .
pag. 5
2.3 Hard water areas
. . . . . . . . . . . . . . . . . . . . . . . . . . . . . . . . . . . . . . . . .
pag. 5
3 Technical features of the appliance
. . . . . . . . . . . . . . . . . . .
pag. 6
3.1 Overall dimension and connections
. . . . . . . . . . . . . . . . . . . . .
pag. 7
3.2 Hydraulic diagram
. . . . . . . . . . . . . . . . . . . . . . . . . . . . . . . . . . . . . . . .
pag. 7
3.3 Features of circulator/generator load loss
. . . . . . . . . . . . .
pag. 8
4 Unit assembly
. . . . . . . . . . . . . . . . . . . . . . . . . . . . . . . . . . . . . . . . . . . . .
pag. 8
4.1 Hydraulic connection
. . . . . . . . . . . . . . . . . . . . . . . . . . . . . . . . . . . . .
pag. 8
4.2 Flue system
. . . . . . . . . . . . . . . . . . . . . . . . . . . . . . . . . . . . . . . . . . . . . . . .
pag. 9
5 Access to boiler
. . . . . . . . . . . . . . . . . . . . . . . . . . . . . . . . . . . . . . . . . . . .
pag. 14
6 Electrical connections
. . . . . . . . . . . . . . . . . . . . . . . . . . . . . . . . . . . . .
pag. 15
7 Preliminary checks to be carried out before appliance
start-up
. . . . . . . . . . . . . . . . . . . . . . . . . . . . . . . . . . . . . . . . . . . . . . . . . . . . .
pag. 16
7.1 Loading the system
. . . . . . . . . . . . . . . . . . . . . . . . . . . . . . . . . . . . . . . .
pag. 16
7.2 Starting the circulating pump
. . . . . . . . . . . . . . . . . . . . . . . . . . . .
pag. 16
7.3 Checking system pressure and possible
water recovery
. . . . . . . . . . . . . . . . . . . . . . . . . . . . . . . . . . . . . . . . . . .
pag. 16
Page 3

pag. 3
1 WARNINGS
This booklet, together with the user and service
manual should be kept by the user and must always
accompany the boiler even when passed on to another owner or user and/or when transferred to another system. Read the instructions and warnings in
this booklet and in the user manual carefully, as they
provide important directions for safe installation,
usage and maintenance.
- This boiler is used to heat water at a temperature lower
than boiling point at atmospheric pressure. It must be
connected to a heating system and/or a domestic hot
water system at the limits of its performance and its
power. Any other use of this boiler must be considered
incorrect and therefore hazardous.
- Installation, maintenance and repair must be carried out
by a CORGI Registered Installer and be in accordance
with the relevant requirements of the current Gas Safety
(Installation and Use) Regulations, the Building
Regulations (Scotland)(Consolidation), the Local
Building Regulations, the current I.E.E.Wiring
Regulations and the bye laws of the Local Water
Undertaking. Where no specific instruction is given reference should be made to the relevant BRISITH STANDARDS CODES OF PRACTICE. For Ireland install in
accordance with IS 813 “Installation of Gas Appliance”
B.S. Codes of Practice
Standard Scope
BS 6891 Gas Installation
BS 5546 Installation of hot water supplies for
domestic purposes.
BS 5449 Part.1 Forced circulation hot water systems.
BS 6798 Installation of gas fired hot water boilers.
BS 5440 Part 1 Flues.
BS 5440 Part 2 Ventilation.
BS 7074 Expansion vessels and ancillary
equipment for sealed water systems.
BS 7593 Treatment of water in domestic hot water
centrai heating systems.
W
ARNING – The addition of anything that may interfere with
the normal operation of the appliance without the express
written permission of Trianco Ltd could invalidate the
appliance warranty and infringe the Gas Safety
(Installation and Use) Regulations.
Incorrect installation may cause harm to people, animals and pro-
perty. The manufacturer is not liable for damage caused by
incorrect installation and by non-observance of the instructions
accompanying the boiler
Installation, maintenance and any other operation must be carried
out in compliance of current regulations and instructions supplied
by the manufacturer.
Installation is the purchaser's responsibility.
The boiler is supplied in a carton pack; when it is removed, ensure
that the appliance is complete and that all the parts are supplied.
The packing components (clips, plastic bags, polystyrene foam,
etc) must be kept out of reach of children, since they are a hazard
for them.
The technical notes and instructions contained in this document
are to help fitters install the system correctly.
Any repair should be carried out using solely original spares and
operations involving the removal of the appliance must only be carried out by qualified engineers. Failure to abide by the above
exempts the manufacturer from any liability and may jeopardise the
the safety of the unit.
It is forbidden to climb on to the unit.
INSTALLATION AND INITIAL START-UP OF THE BOILER MUST
BE CARRIED OUT BY QUALIFIED PERSONNEL, IN ACCORDANCE WITH CURRENT NATIONAL REGULATIONS ON
INSTALLATION AND ANY DIRECTIONS FROM LOCAL AUTHORITIES AND PUBLIC HEALTH BODIES.
When turning the boiler on or off, the fan may make a slightly louder noise because of the rapid increase or reduction in the number
of rotations.
The expansions of the materials that make up the unit, due to rises
or falls in temperature, may cause slight tapping noises. This may
normally occur after the boiler is turned off or on.
An excessively high flow-rate of domestic hot water may cause a
slight noise in the circuit and a drop in temperature at the domestic
water outlet.
Page 4

pag. 4
1.1 USE OF ANTIFREEZE LIQUID
1.2 FEATURES OF UNDER FLOOR
HEATING SYSTEMS
● If you smell gas:
- do not operate electrical appliances
- extinguish any fires
- close the stopcock upstream of the meter
- open the windows and ventilate the room
- call your local authorised engineer
● Do not store or use flammable materials near the boiler.
● Do not obstruct intake/exhaust terminals.
● To guarantee boiler efficiency and correct operation, it is
imperative to have yearly maintenance, and combustion
analysis every two years, carried out by qualified
engineers, and to have the system booklet prepared, as
stipulated by law.
● It is forbidden to touch the boiler either with bare feet
and/or with wet parts of the body.
● In order to clean the outside parts, turn off the boiler turn
off the power at the isolating switch. Clean with a damp
cloth. Do not use detergents and/or harsh liquids, or toxic
products.
● In order to carry out any work on the boiler, do not mount
it on chairs, stools, ladders or unstable stands.
● Before carrying out any work on the boiler always turn
the power off at the isolating switch
● The user is forbidden to carry out any maintenance work
on the boiler that must be carried out by a specialised
engineer.
● In the case of structural work or maintenance near the
pipes, flue systems or any accessories, switch off the
appliance and, when the work is completed, have the
system checked by a qualified engineer to ensure the
system is in good working order.
1.3 SAFETY ADVICE
In floor systems, the use of plastic pipes without
protection against penetration of oxygen through
the walls can cause corrosion of the system's
metal parts (metal piping, boiler, etc), the formation of oxides and bacterial agents.
To prevent this problem, it is necessary to use pipes with an
"oxygen-proof barrier", in accordance with standards DIN
4726/4729.
If pipes of this kind are not used, keep the system separate by installing heat exchangers or those with a specific
system water treatment.
In floor systems, a system safety thermostat must
be installed to protect against overtemperature
calibrated at around 45°C (see wiring diagram on
page 14).
TRIANCO is not liable for damage caused to the unit or the
system due to failure to comply with the above.
If antifreeze substances are used in the
system, check carefully that they are compatible with the aluminium that forms the body of
the boiler.
In particular, DO NOT USE ordinary ETHYLENE
GLYCOL, since it is corrosive in relation to aluminium
and its alloys, as well being toxic.
Trianco suggests the use of suitable antifreeze products
and in the correct dose, which will prevent rust and
incrustation taking place.
Periodically check the pH of the water-antifreeze mixture of the boiler circuit and replace it when the amount
measured is lower than the limit stipulated by the manufacturer.
DO NOT MIX DIFFERENT TYPES OF ANTIFREEZE
TRIANCO is not liable for damage caused to the boiler
or system as a result of the use of incorrect antifreeze or
additive substances.
Page 5

pag. 5
The TriStar OPTIMA boiler is a sealed-type electronic
condensing gas wall mounted boiler with high seasonal
efficiency.
The burner, of premix type, guarantees high efficiencies
and safe combustion at all power ratings, with minimal
pollutant emissions.
The electronic board provides for a periodic selfdiagnostic of the functions, with indications of any irregularities
or failures by means of a code that appears on the control panel display.
It is simple to use and has fully automatic operation, and
thus user operations are reduced to the basic simple
operations.
The production of domestic hot water is always activated and has priority over the heating function.
The external temperature probe (OPTIMAZER) must be
fitted to ensure maximum running efficency.
The boiler is started and regulated automatically so as
to meet the requirement of the heating system.
With the outside temperature probe, the system’s water
temperature is regulated automatically according to the
heating curve set, guaranteeing maximum comfort in all
conditions.
DOMESTIC HOT WATER DRAW OFF (CB MOD.)
When calling for domestic hot water, the boiler, by
means of an appropriate sensor, automatically switches
over in order to guarantee supply of the correct amount
of water at the desired temperature.
Regulation of the domestic water temperature is also
carried out precisely and automatically by the boiler’s
electronics.
The domestic hot water comfort function is activated
automatically at the end of every withdrawal and guarantees a quick response for subsequent withdrawals
for the programmed time.
2 GENERAL FEATURES
2.1 WINTER OPERATION
The boiler is started and regulated automatically so as
to meet the domestic water requirement.
Switching from summer to winter operation and viceversa may be carried out by hand or automatically (if external probe present) depending on the outside temperature set.
2.2
SUMMER OPERATION (CB MODELS)
If the boiler is to be installed in a area recognised for
having hard water, it is recommended that a suitable
water treatment device is installed in the mains supply
to the boiler.
The water hardness can be determined by using the
standard test paper or by contacting your local water
authority.
2.3
HARD WATER AREAS
Page 6
pag. 6
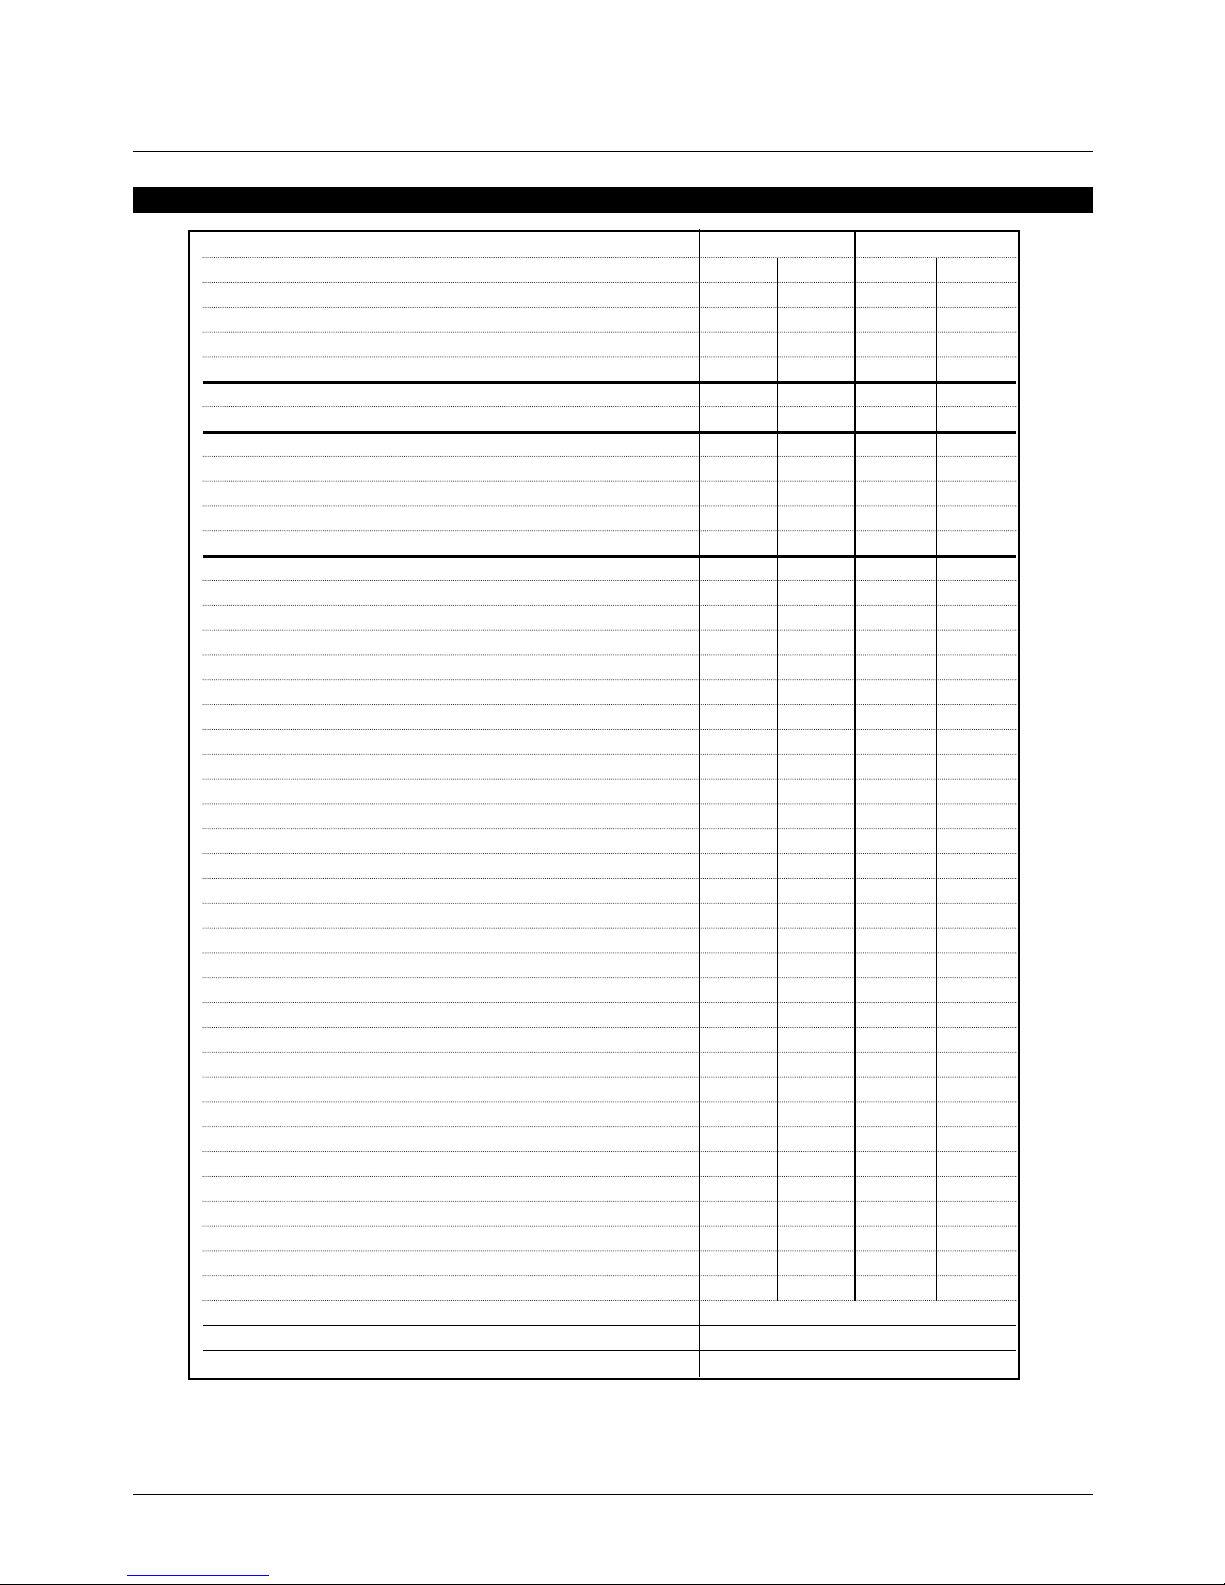
3 TECHNICAL FEATURES OF THE APPLIANCE
Key to boiler models
CB = Combi Boiler
SB = System Boiler
Operating gas NAT. GAS (G20) LPG (G31)
OPTIMA model CB SB CB SB
Maximum heat output Qmax (80°/60°C) kW 28,0 28,0 28,0 28,0
Minimum heat output Qmin (80°/60°C) kW 5,6 5,6 7,3 7,3
Maximum heat output (50°/30°C) kW 29,7 29,7 29,7 29,7
Minimum heat output (50°/30°C) kW 6,1 6,1 8 8
Maximum heat range kW 28,7 28,7 28,7 28,7
Minimum heat range kW 5,7 5,7 7,5 7,5
Working efficiency at max output (80°/60°C) % 97,6 97,6 97,6 97,6
Working efficiency at max output (50°/30°C) % 103,5 103,5 103,5 103,5
Working efficiency at 30% max output (Average T=50°C) % 107,0 107,0 107,0 107,0
Working efficiency at min output (80°/60°C) % 98,2 98,2 97,3 97,3
Working efficiency at min output (50°/30°C) % 107,0 107,0 106,7 106,7
Flue losses with burner in operation % 2,1 2,1 2,1 2,1
Flue losses with burner extinguished % <0,1 <0,1 <0,1 <0,1
Shell losses % 0,3 0,3 0,3 0,3
Flue Gas temperature °C 73,0 73,0 73,0 73,0
%CO2 in dry fumes % vol 9,8 9,8 11,5 11,5
Class of NOx emissions (EN 483) Cl. 5 5 5 5
Combustion efficiency % 97,9 97,9 97,9 97,9
Flue Gas mass range at nominal capacity kg/h 43,5 43,5 43,5 43,5
Residual flue gas discharge head Pa 73 73 73 73
Gas consumption (15°C, 1013 mbar) m3/h 3,0 3,0 1,17 1,17
Max. production of condensation water l/h 2,4 2,4 2,4 2,4
Water content l 2,4 2,4 2,4 2,4
Available head (∆T=20°C) kPa 28 28 28 28
Max. operating pressure bar 3 3 3 3
Expansion vessel volume l 10 10 10 10
Expansion vessel preload press. bar 1 1 1 1
Nominal G20 natural gas press. mbar 20 20 -- -Nominal G31 LPG gas press. mbar -- -- 37 37
Max. heating temperature °C 90 90 90 90
Min. heating temperature °C 20 20 20 20
Specific domestic water range (∆T=30°C) l/min 13,4 – 13,4 –
Max. domestic circuit pressure bar 8 – 8 –
Min.domestic water withdrawal l/min 2,3 – 2,3 –
Max. domestic hot water temperature °C 60 – 60 –
Min. domestic hot water temperature °C 30 – 30 –
Power supply V/Hz 230/50 230/50 230/50 230/50
Max. power consumed W 110 110 110 110
Degree of electrical protection IPX4D IPX4D IPX4D IPX4D
Weight kg 56,5 52 56,5 52
Noise at 1m at nominal capacity dB(A) 41,8 41,8 41,8 41,8
Appliance class ΙΙ 2H 3P
Appliance type
B23, C13, C33, C43,C53, C83
Appliance CE Certificate No.
Page 7
pag. 7
65
465
365
221
181
67 67 65
==
120
==
155
31
*
175 (gas)
A
F
E
C
G
D
B
890
827
HH
37545 45
*
- posizione attacchi con
gruppo idraulico installato
bar
0
1
3
2
4
M
1
2
3
5
4
11
9
10
12
13
14
18
19
17
15
8
6
7
16
AC G D B
12
19
1
2
3
5
4
11
bar
0
1
3
2
4
10
9
16
13
17
8
6
7
AG D B
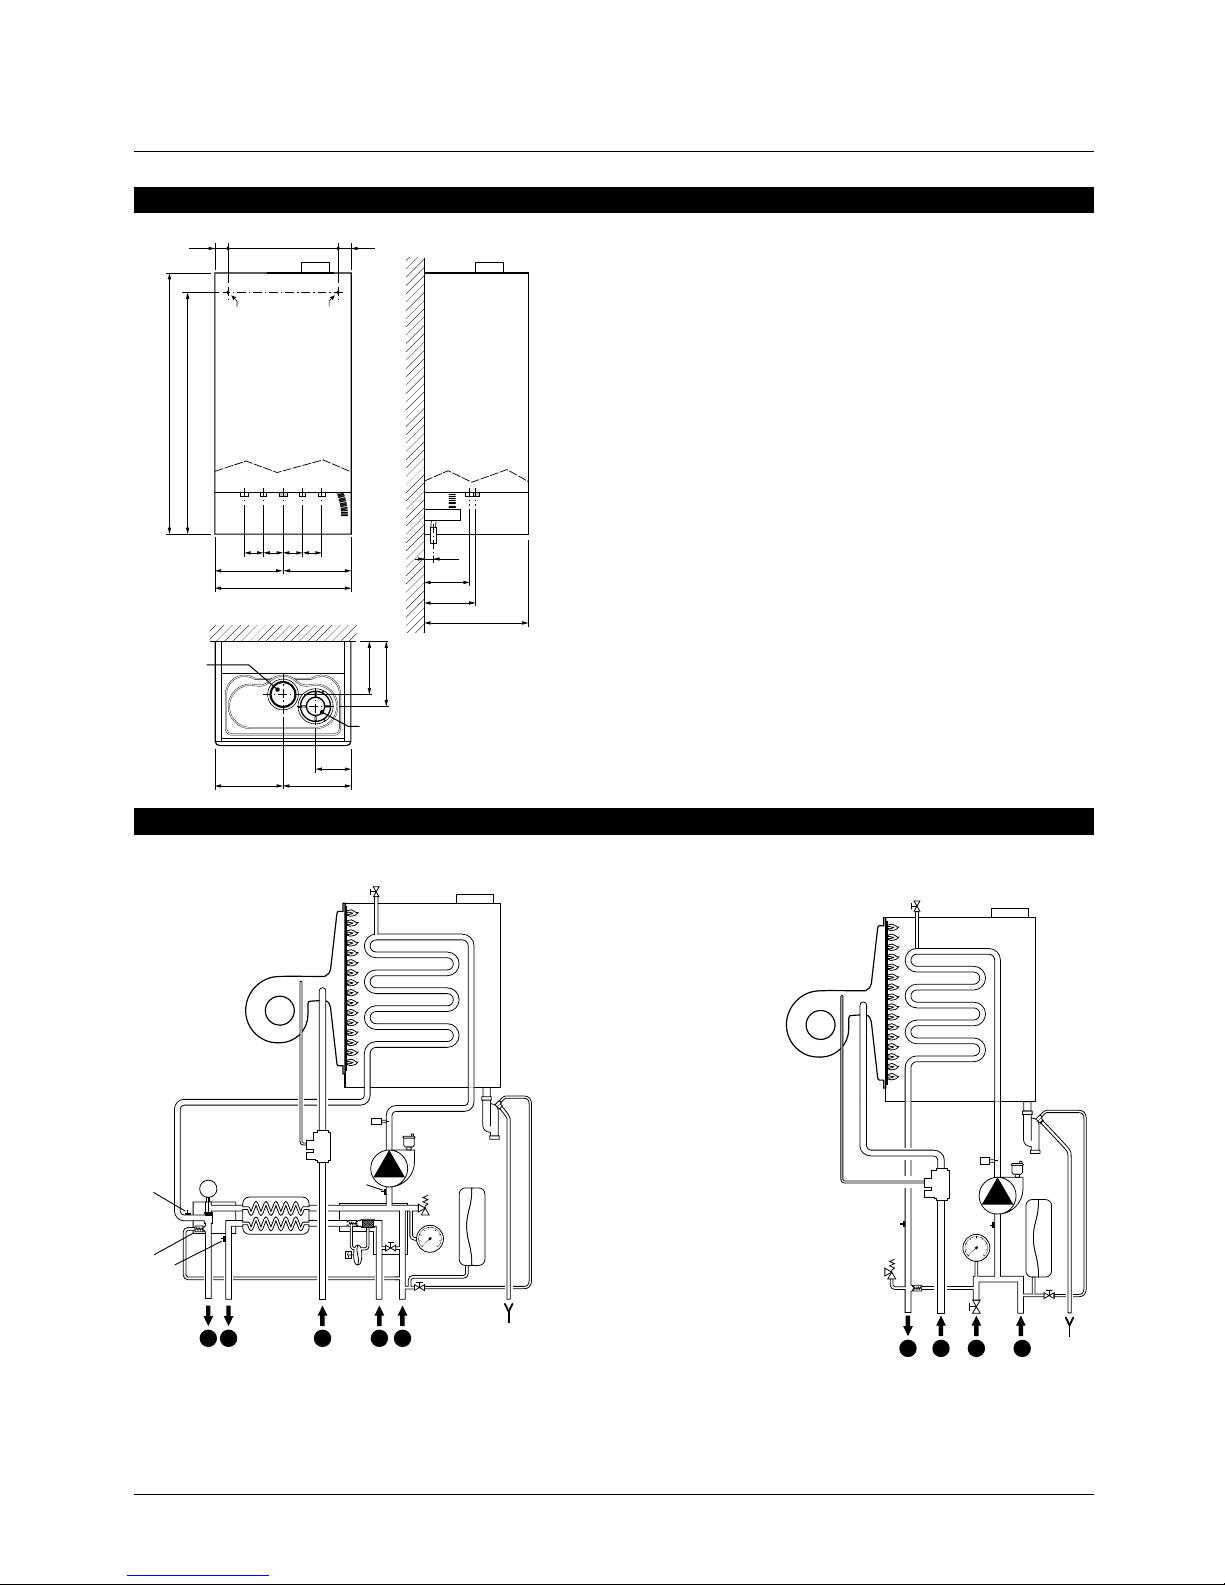
KEY:
1 - Burner
2 - Manual air valve
3 - Boiler shell
4 - Gas valve
5 - Boiler water pressure sensor
6 - Automatic air valve
7 - Pump
8 - Return temperature sensor
9 - Safety valve
10 - Pressure gauge
11 - Expansion vessel
12 - Drain tap
13 – System Filling Valve
14 - Domestic water pressure switch
15 - Domestic water temperature sensor
16 - Bypass
17 - Delivery temperature sensor
18 - Three-way valve
19 – Condensation Trap
A - Heating Flow
B - Domestic hot water Flow
C - Gas inlet
D - Domestic cold water inlet
E - Heating return
A - Heating delivery . . . . . . . . . . . . . . . . . . . . . . . . . . . . . . . . . . . 3/4”
B - Heating Return
. . . . . . . . . . . . . . . . . . . . . . . . . . . . . . . . . . . 3/4”
C - Domestic hot water flow**
. . . . . . . . . . . . . . . . . . . . . . . 1/2”
D - Domestic cold water inlet ** . . . . . . . . . . . . . . . . . . . . . 1/2”
E - Precut for air intake pipe
. . . . . . . . . . . . . . . . . . . . . . . . ø80 mm
F - Collar for concentric fume pipe
. . . . . . . . . . . . . . . . . ø60/100mm
G - Gas Inlet
. . . . . . . . . . . . . . . . . . . . . . . . . . . . . . . . . . . . . . . . . . 3/4”
H - Holes for mounting plate to wall . . . . . . . . . . . . . . . . ø8mm
** = present on CB models only
3.2 HYDRAULIC DIAGRAM
3.1 OVERALL DIMENSIONS AND CONNECTIONS
OPTIMA CB
OPTIMA SB
fig. 3.1-1
fig. 3.2-1
fig. 3.2-2
* position of connections
with hydraulic unit installed
Page 8
pag. 8
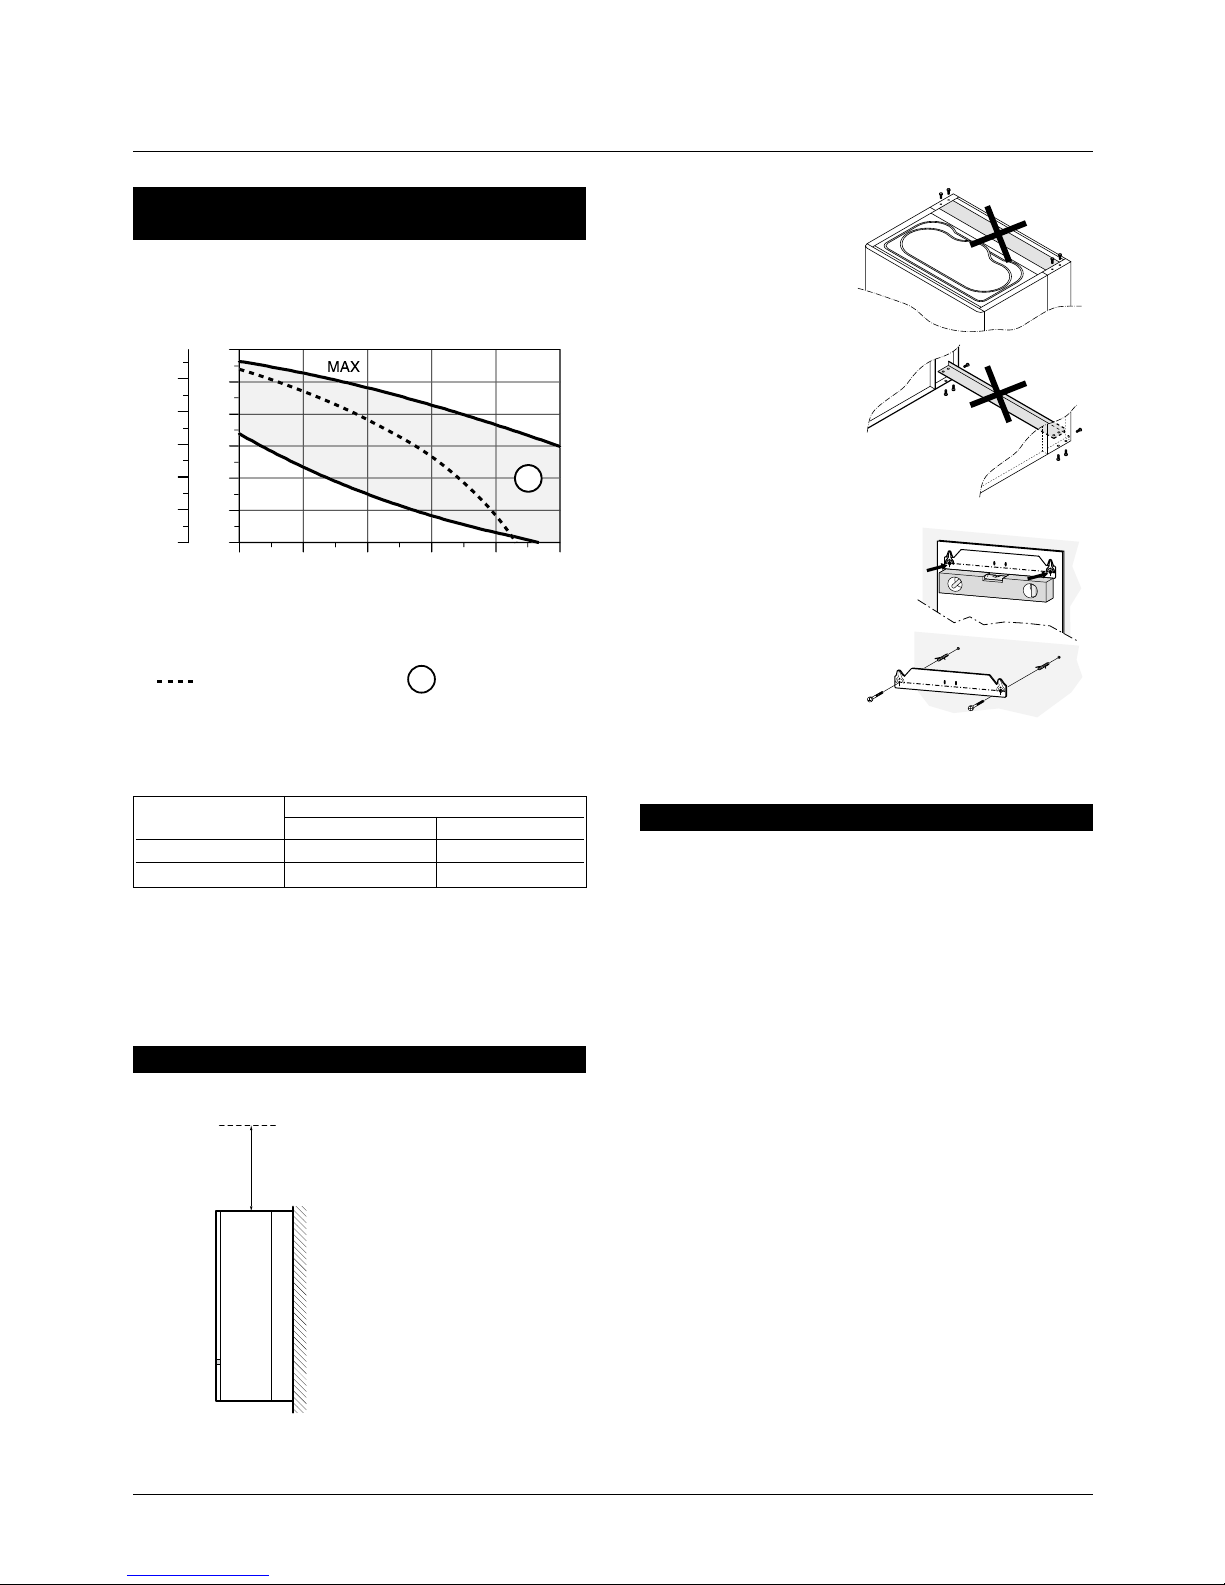
The boiler must be installed in
an accessible position that
complies with the dimensions
set out in the drawing below,
so as to make any maintenance and cleaning operations easier.
For positioning use the template included in the pack
and, with a spirit level check
the boiler is horizontal. Then
mark and drill the holes for
mounting the wall plate and
the hydraulic connections.
Then mark and drill the
holes for the boiler mounting plate, insert appropriate
rawlplugs in them, fix the
plate in position and attach
the boiler to it.
Caution:
Before mounting the boiler, remove rear cross
pieces shown in figure 4-
2.
For optimum performance after installation this Boiler and its
associated central heating system must be flushed in accordance with the guidelines given in BS7593 “Treatment of
water in domestic hot water central heating systems. It is
also advisable to install suitable stop gate valves on the
systems delivery and return piping.
DIMA DI CARTONE
4.1 HYDRAULIC CONNECTION
3.3 FEATURES OF CIRCULATOR / GENERATOR
LOAD LOSS
4 UNIT ASSEMBLY
400
Caution: the pressure relief valve is set at 3 bar therefore all
pipework, fittings, etc. should be suitable for pressures in
excess of 3 bar.
The pressure relief discharge pipe should be not less than
15mm dia, run continuously downward and preferably over a
drain. It should be routed in such a manner that no hazard
occurs to occupants or causes damage to wiring or electrical
components. The end of the pipe should terminate facing
down and towards the wall.
The discharge must not be above a window, entrance or other
public access. Consideration must be given to the possibility
that boiling water / steam could discharge from the pipe.
For hydraulic connection of the boiler, use the equipment kit
and follow the directions given on the attached instruction
sheet.
The 10 Ltr expansion vessel supplied with the boiler is suitable for a system volume of approx. 140 Ltr.
An additional vessel will be required for system volumes
above this, following this formula:
V= 0,07 x C
V = Expansion vessel volume (Ltr)
C = Water system volume (Ltr)
fig. 4-1
fig. 4-2
fig. 4-3
0,0 0,4 0,8 1,2 1,6 2,0
Q [m3/h]
0
1
2
3
4
5
6
H
[m c.a.]
0
10
20
30
40
50
p
[kPa]
Prevalenza disponibile
all’impianto alla
massima velocita’ del
circolatore
Area di lavoro del
circolatore
MAX
A
TECHNICAL FEATURES OF STANDARD CIRCULATOR INSTALLED
Capacity absorbed
max (W) min (W)
Maximum speed 91 73
Minimum speed 49 40
Note: Circulator speed is regulated automatically by boi-
ler control board
Head available to
system at maximum
circulator speed
Circulator working
area
TEMPLATE
Page 9
pag. 9
A
M
B,C
D
E
F
R
G
J
K
H,I
L
Q
N
S
G
P
F
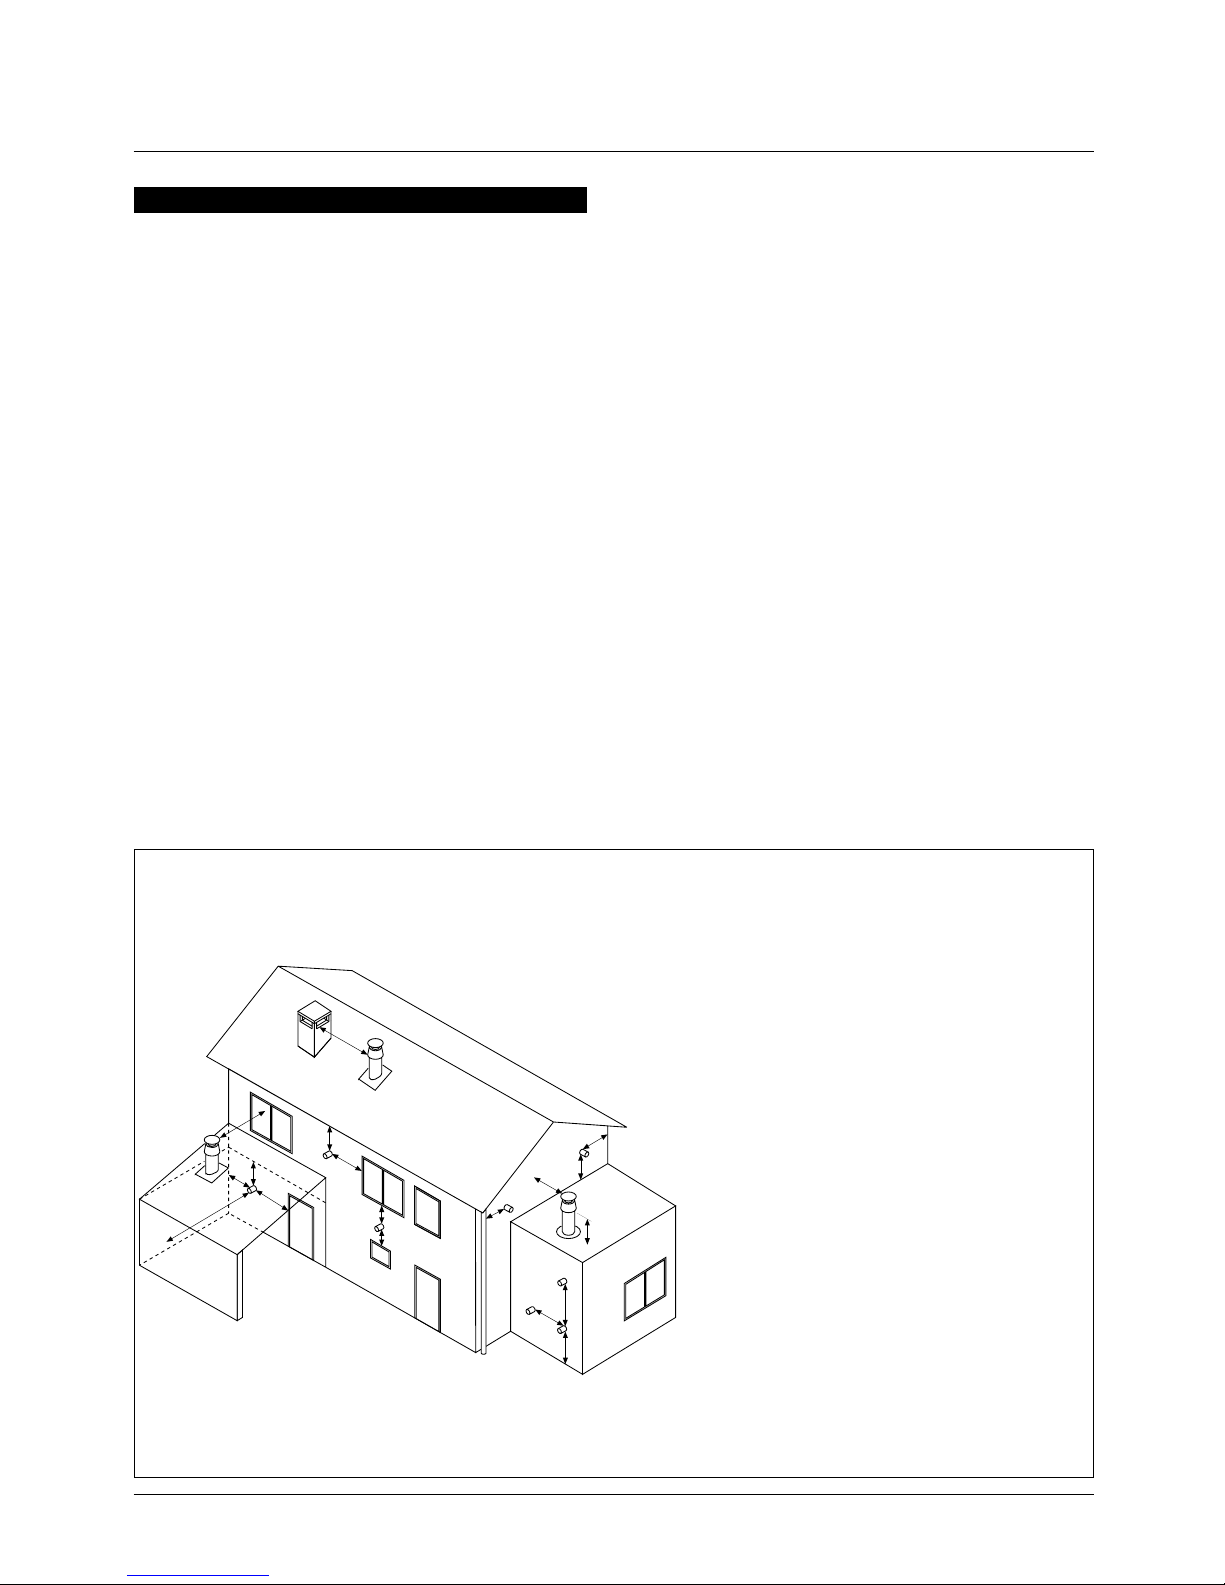
The following guidelines indicate the general require-
ments for siting balanced flue terminals.
Recommendations for flues are given in BS 5440
Pt.1.
If the terminal discharges onto a pathway or passage-
way, check that combustion products will not cause
a nuisance and that the terminal will not obstruct
the passageway.
If a terminal is less than 2 metres above a balcony,
above ground or above a flat roof to which people
have access, then a suitable terminal guard must
be provided.
4.2 FLUE SYSTEM
Terminal position with minimum distance mm
A Directly below an openable window, air vent
or any other ventilation opening. 300
B Below gutter, drain/soil pipe. 150
C Below eaves. 200
D Below a balcony/car port roof. 200
E From vertical drain pipes and soil pipes. 75
F From internal or external corners. 300
G Above adjacent ground or balcony level. 300
H From a surface facing a terminal. 600
I Facing a terminal. 1200
J From opening (door/window) in carport
into dwelling. 1200
K Vertically from a terminal on the same wall. 1500
L Horizontally from a terminal on the same wall. 300
M Above an opening, air brick, opening
window etc. 300
N Horizontally to an opening, air brick,
opening window etc. 300
Vertical Flues - minimum distance to edge
of terminal mm
P Above the roof level (to base of terminal). 300
Q From adjacent wall to flue. 300
R From adjacent opening window. 1000
S From another terminal. 600
Important: since the TRISTAR OPTIMA is a condensing boiler, exhaust temperature is very low; therefore
it is normal for part of the residual water vapour in the
exhaust fumes to be capable of condensing in the flue
pipe
You are advised to pay attention to the following:
a - to the positioning of the exhaust terminals (they
may drip and also produce a ploom of condensation)
b - to the incline of the flue pipe so as to avoid con-
densation becoming stagnant;
c - to the correct positioning of the condensation col-
lection parts;
d - to connecting the condensation drain correctly.
The TRISTAR OPTIMA boiler is a type C certified
Appliance (sealed boiler).
Connection of the flue exhaust pipes is made according to the diagrams attached.
For the parts to use, please refer to the TRIANCO
catalogue of boiler installation accessories.
IMPORTANT: As with all flues the kit must be installed
taking due account of the current issue of BS5440
parts 1 & 2 and timber frame housing REF
IGE/UP/7/1998.
Also note that the requirements will vary depending
upon the kit being installed. Guidance is provided but
unless otherwise stated, always comply with recommendations of the relevant codes of practice.
Page 10
pag. 10
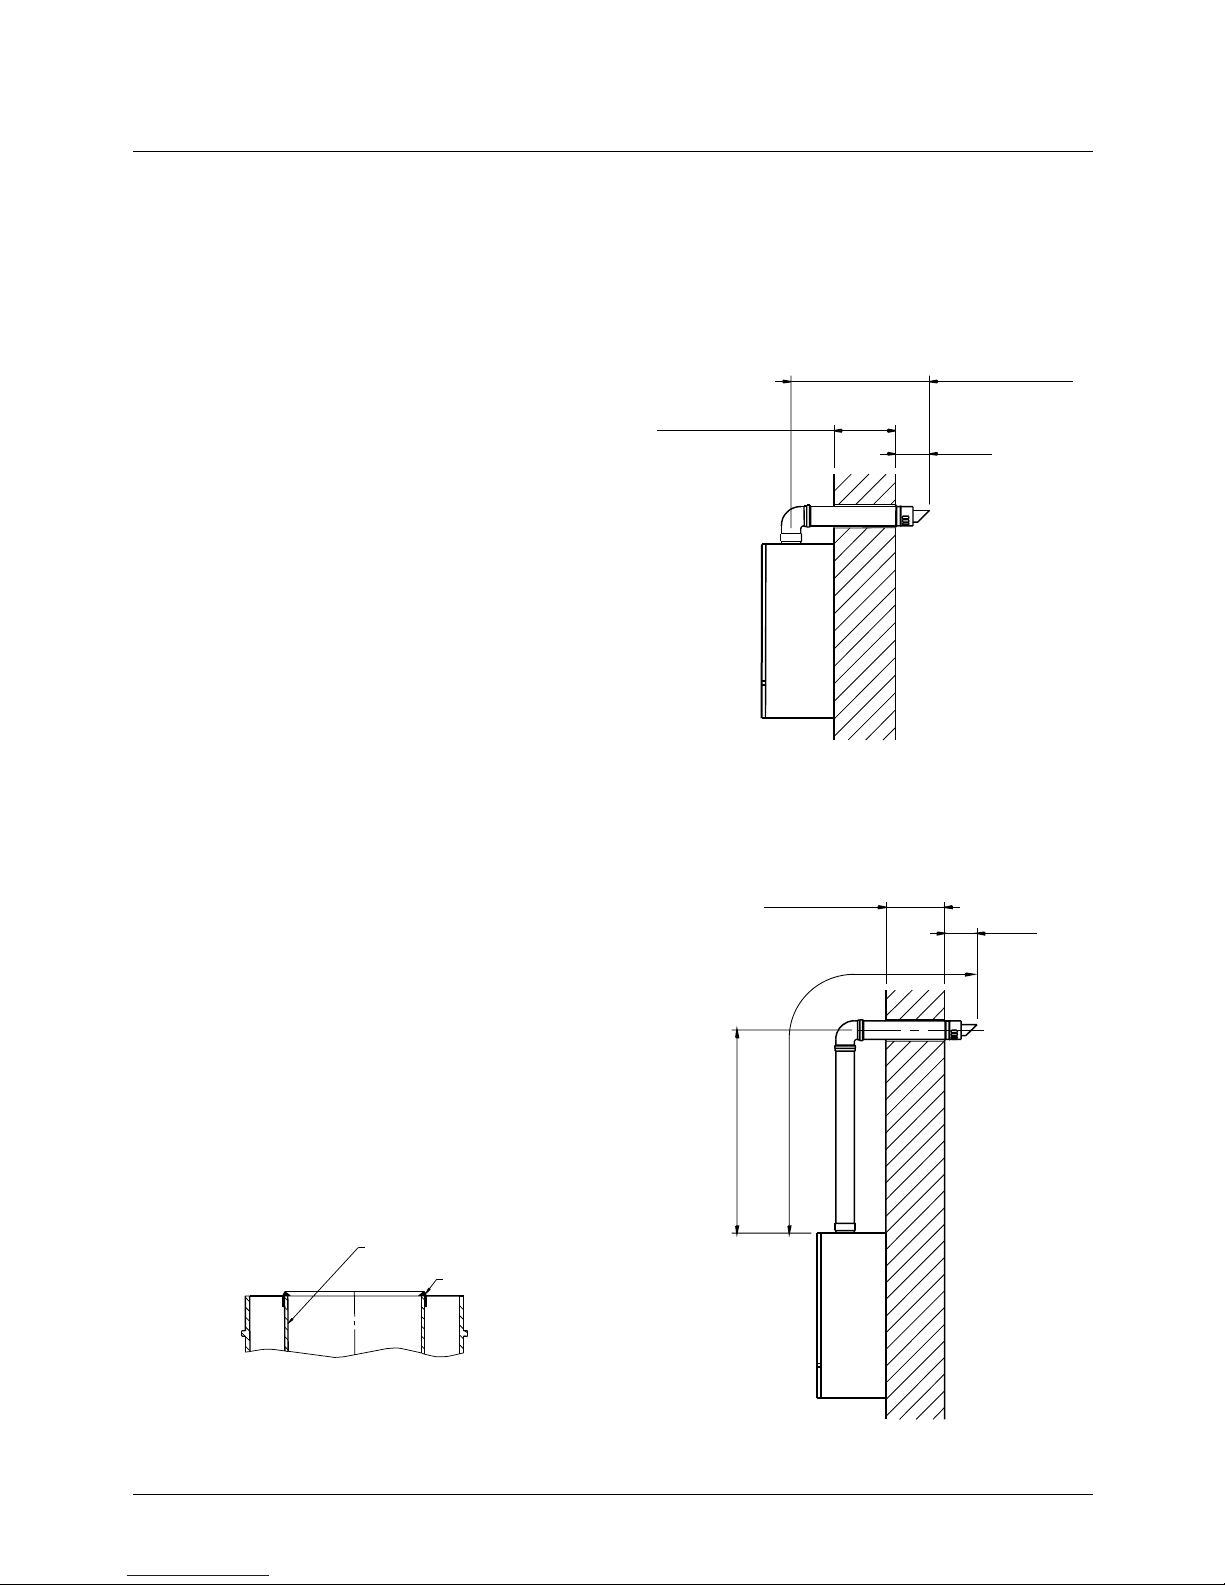
REAR OUTLET
HORIZONTAL BALANCED FLUE
HIGH LEVEL HORIZONTAL BALANCED FLUE
765mm 30" MAX
315mm 12.5" MIN
175 MIN
4000mm (SEE NOTE)
MAX/MIN WALL THICKNESS IS WITH KIT SUPPLIED
EXTRA PIPES CAN BE PURCHASED TO EXTEND TO 4 MTRS
765mm 30" MAX
315mm 12.5" MIN
175 MIN
1095 MAX
4000 mm
MAX/MIN WALL THICKNESS AND HEIGHT IS WITH KIT SUPPLIED
EXTRA PIPES CAN BE PURCHASED TO EXTEND TO 4 MTRS
HORIZONTAL BALANCED FLUE KIT (SEE PAGE 32)
IMPORTANT: As with all flues the kit must be installed taking
due account of the current issue of BS 5440 parts 1 & 2 and timber frame housing REF IGE/UP/7/1998.
Also note that the requirements will vary depending upon the kit
being installed. Guidance is provided but unless otherwise stated, always comply with the recommendations of the relevant
codes of practice.
EXPOSED PIPE: any pipe exposed to the elements should be
protected with a suitable material, and maintained regularly.
Installing the Balanced Flue Kit
1 Having decided the position of the boiler, accurately mark
out the position of the terminal and boiler fixing holes using
the template provided. Cut a ø120mm hole through the wall
to accept the terminal, and drill 2 ø8mm holes to accept
rawlplugs and mounting bolts.
2 Fix the boiler to the wall using the wall-mounting bracket.
3 Pass the terminal through the wall, and fit the internal wall
seal to the terminal.
4 Fit the ø60mm (black) seal to the inner spigot on the boiler
flue off-take (Fig. 1).
5 Fit the ø100mm and Ø60mm (blue) seal into the 90° con-
centric bend.
6 Fit the 90° concentric bend into the boiler flue off-take, and
secure in position with clamp.
7 Slide the terminal into the 90° bend ensuring it is pushed
home firmly, and ensure wall seal is fitted against wall.
8 Fit the external wall seal to the terminal.
9 To extend the terminal length, use the 500mm concentric
pipe and cut to length, ensuring the inner is cut 20mm longer than the outer.
NOTE: For High Level Balanced flue Kit
1 Measure vertically 950mm (max) from position of the cut-
out on the template to give position of terminal required.
2 Cut the 1000mm concentric pipe to required length. Fit the
ø100mm and ø60mm (blue) seal into the pipe.
3 Fit the concentric pipe into the boiler flue off-take, and secu-
re in position with clamp.
4 Fit 90° concentric bend into pipe, and fit remaining compo-
nents as above.
IMPORTANT:
When installing the flue system, it is important that the flue
assembly inclines slightly up from the boiler. This will allow
any condensation formed to run back to the condense drain
BOILER OFF-TAKE INNER SPIGOT
ø60mm SEAL (BLACK)
Fig. 1
Page 11
pag. 11
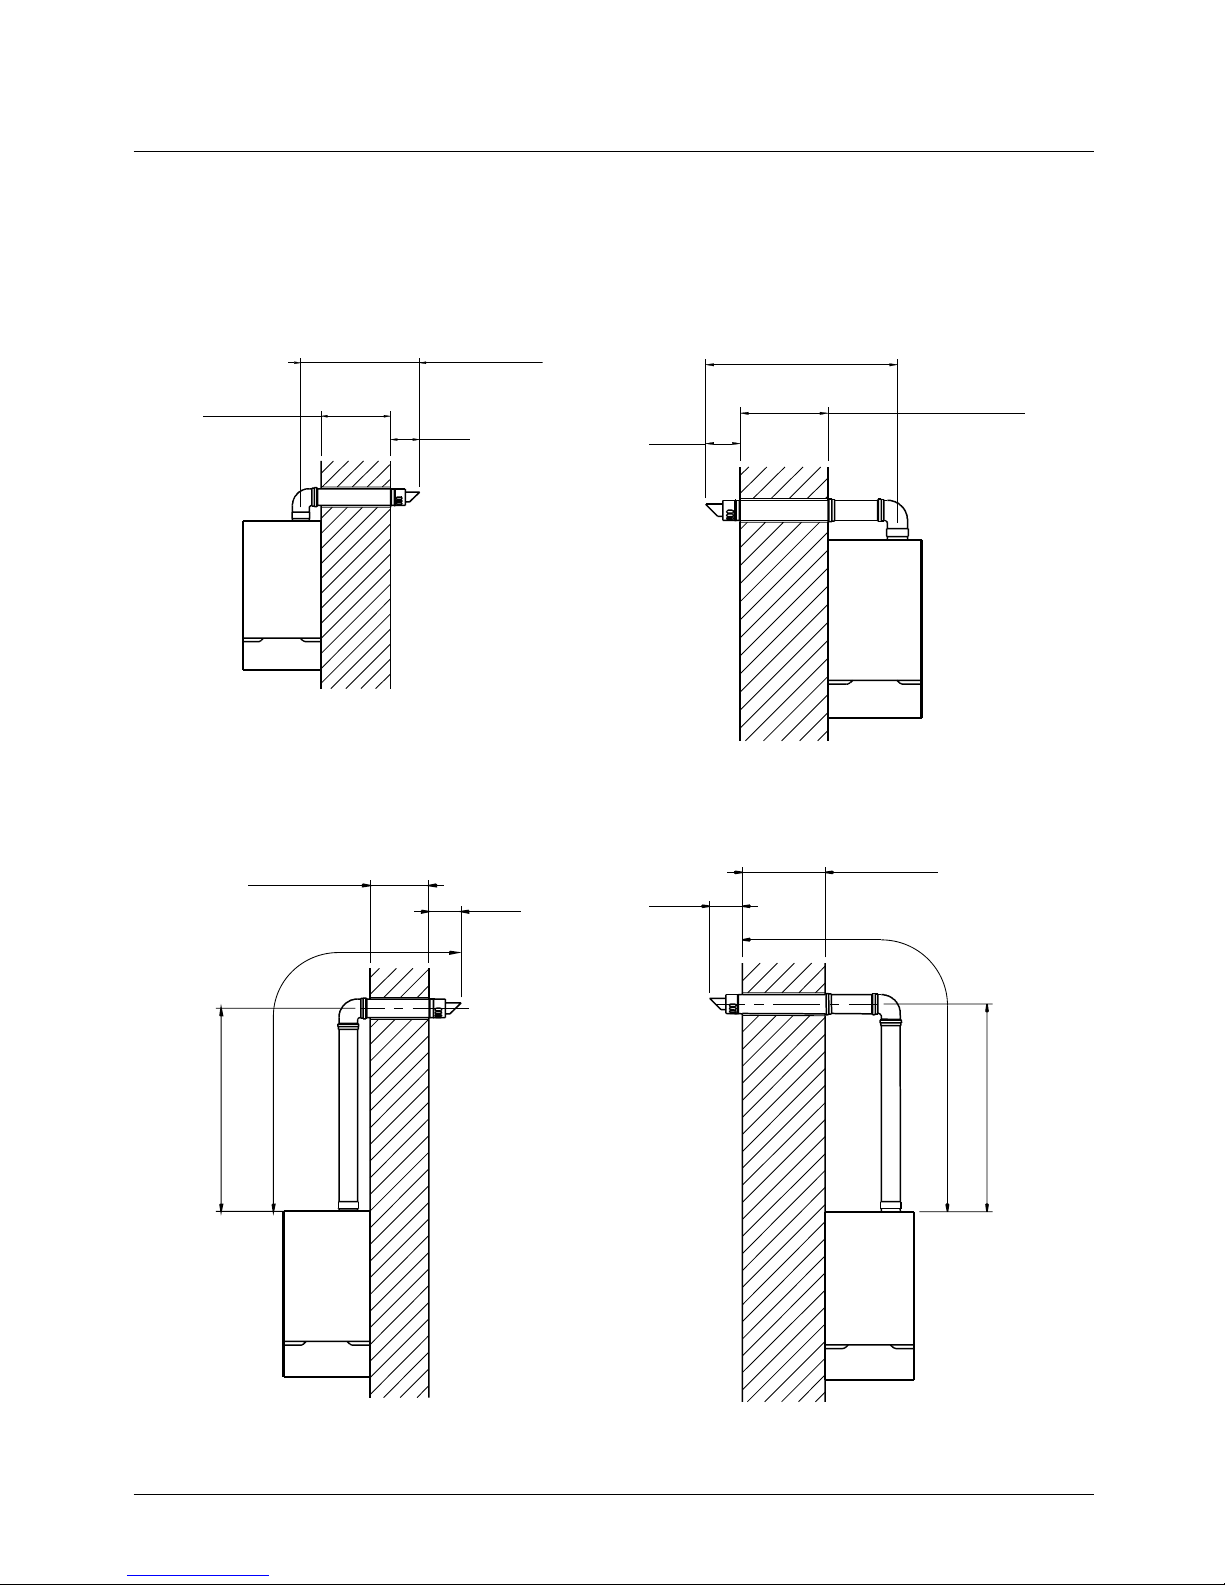
R/H SIDE OUTLET
HORIZONTAL BALANCED FLUE
HIGH LEVEL HORIZONTAL BALANCED FLUE
MAX/MIN WALL THICKNESS IS WITH KIT SUPPLIED
EXTRA PIPES CAN BE PURCHASED TO EXTEND TO 4 MTRS
687mm 34" MAX
417mm 16.5" MIN
4000mm (SEE NOTE)
175 MIN
765mm 30" MAX
315mm 12.5" MIN
175 MIN
1095 MAX
4000 mm
MAX/MIN WALL THICKNESS AND HEIGHT IS WITH KIT SUPPLIED
EXTRA PIPES CAN BE PURCHASED TO EXTEND TO 4 MTRS
L/H SIDE OUTLET
HORIZONTAL BALANCED FLUE
HIGH LEVEL HORIZONTAL BALANCED FLUE
MAX/MIN WALL THICKNESS IS WITH KIT SUPPLIED
EXTRA PIPES CAN BE PURCHASED TO EXTEND TO 4 MTRS
650mm 25.5" MAX
437mm 17" MIN
4000mm (SEE NOTE)
175 MIN
437mm 17" MAX
175 MIN
1095 MAX
4000 mm
MAX/MIN WALL THICKNESS IS WITH KIT SUPPLIED
EXTRA PIPES CAN BE PURCHASED TO EXTEND TO 4 MTRS
Note:
500mm Extension
pipe must be
used for left-hand
side
Note:
500mm Extension
pipe must be
used for left-hand
side
Page 12

pag. 12
VERTICAL BALANCED FLUE
6000mm MAX
VERTICAL BALANCED FLUE KIT (SEE PAGE 32)
Installing the Balanced Flue Kit
1 Having decided the position of the boiler, accurately mark
out the position of the boiler fixing holes using the template
provided. Drill 2 Ø8mm holes to accept rawlplugs and
mounting bolts.
2 Cut a Ø150mm hole in the ceiling and roof.
3 Determine the flue length required, ensuring the maximum
permissible flue length is not exceeded. If it is necessary to
cut one of the pipes to achieve the required ensure the inner
is cut 20mm longer than the outer, and both inner and outer
are de-burred.
4 Fit Ø60mm (black) seal to the inner spigot on the boiler flue
off-take (Fig. 1).
5 Fit the Ø100mm and Ø60mm (blue) seal into the concentric
flue pipes.
6 If possible, pre-assemble the entire flue on a flat surface,
ensuring all sections are pushed firmly home. Secure bottom section to boiler with clamp.
7 Fit a roof flashing sleeve to the roof (not supplied), and
insert Vertical Flue Terminal through flashing from the outside.
8 Starting at the appliance end assemble the extension pipes,
ensuring each joint is pushed firmly home. Ensure none of
the flue joints are situated within the joist space.
9 Fit ceiling plate centrally around pipe, ensuring that the
outer flue pipe has a minimum clearance of 25mm from any
combustible material. Pack space with glass fibre insulation.
10 Fit wall clamp around terminal and secure to roof member,
ensure weight of terminal is carried by the wall clamp and
not the roof flashing sleeve.
11 Ensure flue is adequately supported.
IMPORTANT: FLUE SEALING
TO FIT FLUE PIPES TOGETHER, IT IS ESSENTIAL TO
APPLY A THIN BEAD OF LUBRICANT (E.G. WASHING UP
LIQUID, VASELINE) AROUND ALL RUBBER SEALING
RINGS.
AS THE FLUE SYSTEM OPERATES UNDER POSITIVE
PRESSURE, IT IS ESSENTIAL TO ACHIEVE A TOTAL SEAL
ON ALL FLUE JOINTS.
Page 13

pag. 13
A
B
C
D
A+B = 2500mm MAX
C+D = 4000mm MAX
NOTE:
For each additional elbow reduce straight lengths by
the relevant elbow dimension 90° 1500mm and 45°
750mm
90° BEND = 1000mm
45° BEND = 750mm
Page 14

pag. 14
In order to access the electrical panel, proceed as
follows:
- disconnect voltage to appliance
- open boiler front control panel cover
- remove upper screws A from front cover
- gently lift cover and pull towards you.
- remove screws V1 and V2 that secure control
panel (fig 5-2)
- Lower the control panel until it stops approximately 45°
- - To unlock it and bring it down completely, lift up
front control panel cover until it is supported on
control panel and lower them both together (fig.
5-3)
5 ACCESS TO ELECTRICAL PANEL FOR CON-
NECTING ADDITIONAL UNITS
CONTROL
PANEL
BOILER
CONTROL
PANEL COVER
fig. 5-2
fig. 5-3
V2
V1
fig. 5-1
In order to connect any external controls and wire the
controls into the specific terminals on terminal board M
(fig. 5-5).
The wires must pass under panel P and retained using
cable clips F.
fig. 5-4
H
F
P
F
M
fig. 5-5
To wire in any external valves it is necessary to gain
access to the inside of the control panel. To do this,
remove rear screws C and take off protection panel P.
For electrical assembly and connection, follow the
directions given on the instruction sheets attached
fig. 5-6
Page 15

pag. 15
After having fixed the boiler to the wall and connected all the
hydraulic connections from the system, make the electrical
connections.
To gain access to the board, follow the directions in paragraph
5, “Access to boiler”, pass all electrical cables through one of
the cable ducts.
For related connections to the board, consult the wiring diagram below.
IMPORTANT:
In connecting the appliance to the mains, strictly observe the phase-neutral polarity stated in the diagram.
Electrical wiring to the boiler must be in accordance with
current I E E wiring regulations.
NOTE The method of connection to the electricity supply
must facilitate complete electrical isolation of the
appliance.
Connection may be via a fused double-pole isolator with
a contact separation of at least 3mm in all poles and servicing the boiler and system controls only.
In the event of replacement, use a cable with the same
features as that fitted (section 3 x 0.75 - maximum external ø8mm)
X50
X40
X30
X15
X14X13X12X11
X10
X3
X2 X1
Boiler pump
230 VAC
Diverting valve
230 VAC
Configurable connection (230 VAC)
Ionisation probe
Gas valve mains
gas 230 VAC
Ignition
electrode
Ignition
transformer
230 VAC
AC 24V
Transformer
Fan motor
2
3
1
2
3
1
4
2
3
1
4
5
2
3
1
4
5
6
2
3
1
4
5
6
7
8
9
10
11
12
earth
Fuse
electrical supply
~ 230V 50 Hz
high-temp. safety
therostat
for floor heating
N
L
N
M
N
L
N
L
230V 24V
GND
HALL
+UB
PWM
heating
BROWN
WHITE
BLACK/RED
Domestic Hot water
1
2
3
L
N
USER
INTERFACE
BOILER BOARD
AGU 2.303A153
LMU 54.030A153
❶
= Accessories available on request
To be fitted by the installer
main
switch
L
N
L
N
Warning: respect the indicated polarity phase/neutral when connecting the mains
To be fitted only with
floor heating
X10-01 X10-02 X10-03 X10-04 X10-05 X10-06
X3-01X3-02X3-03X3-04 X2- 0 1X2-02X2-03X2-04X2- 05
12121212311212121
212121212121
X1-01X1-02
12312
DHW pressure
switch (CB model)
or DHW tank
thermostat (SB model)
DHW tank thermostat
(SB model)
DHW temperature
probe (CB model)
Return flow temp. probe
Boiler temp. probe
Room
thermostat
Programmer
QAA73
DHW tank
NTC temperature
sensor
❶
P
P
External probe
QAC34/101
❶
❶
❶
CR TA SB SE TB
PWM boiler
pump
Avaiable only for SB models
Warning: they cannot be used
at the same time
*
*
*
6 ELECTRICAL CONNECTIONS
fig. 6-1
Page 16

pag. 16
Before starting the boiler, check that:
- the gas line is not closed upstream of the appliance;
- the gas and water stopcocks are open;
- the appliance has been correctly connected to the
mains electricity and in such a way that the phaseneutral polarity is observed;
- the system has been correctly filled with water (see
point 7.1).
In order to fill the system, gain access to the inside of
the sealed chamber, loosen the automatic escape
valve cap on the automatic air vent (fig. 7.1-1) and
screw V of the manual escape cock on the top of the
exchanger (fig.7.1-2) and gradually open the filling
valve tap.
The boiler operates correctly at a water pressure between 1 and 1.5 bar this should be checked on the
pressure gauge located on the lower side of the boiler.
Once all the air has been vented from the system,
close the escape cocks and, when the desired pressure has been reached, close the filling valve tap.
Control pressure gauge
manual air vent
automatic air vent
7.1 LOADING THE SYSTEM
7 PRELIMINARY CHECKS TO BE CARRIED
OUT BEFORE APPLIANCE START-UP
The water pressure is checked periodically on the
pressure gauge described in paragraph 7.1.
In order to reset the pressure to within the preset
values, gradually open the filling valve; when the desired pressure has been reached, close the tap.
If, during normal operation, the appliance
frequently looses pressure or the boiler
safety valve comes into operation, consult your installer or service engineer.
7.3 CHECKING SYSTEM PRESSURE AND POSSIBLE WATER RECOVERY
On initial start-up, the pump may be slightly noisy.
This may be caused by a small amount of air still trapped in the pump. In order to let it out, proceed as follows:
- Loosen cap A (adjacent fig.) and
let out any air present.
- fasten cap A.
If pump not turning:
- remove screw A
- attempt to turn rotator knob using the
device on the shaft, taking care not to apply excessive force so as not to damage it
- replace cap A checking that there are no water losses
Before proceeding, take suitable precautions to avoid possible scalds from hot
water and risks of damage to components due to water losses from pump.
7.2 STARTING THE CIRCULATING PUMP
A
fig. 7.1-2fig. 7.1-1
fig. 7.1-4
fig. 7.2-1
Page 17

pag. 17
Press switch A: the switch pilot light
and the display will go on; after a few
seconds the boiler is ready for operation.
The boiler temperature appears on
the display.
HEATING TEMPERATURE REGULATION KNOB (B)
When the heating is activated, with
this knob the heating circuit water
temperature is set.
The figure set is displayed for a few
seconds directly on the display,
after which the boiler temperature
reappears.
If the external probe is fitted, by operating knob B the
calculated ambient temperature is displayed for a few
seconds, after which the boiler temperature reappears.
DOMESTIC HOT WATER TEMPERATURE REGULATION KNOB (C)
For models CB and for the SB ones
with a boiler unit with NTC sensor
connected, domestic hot production
is always activated.
The figure set is displayed for a few
seconds directly on the display, after
which the boiler temperature reappears.
In model SB used for heating only, regulation has no
effect.
Note: The settings made with knobs B and C
(Heating and domestic hot water temperatures)
remain unchanged even after power supply failure.
MODE
BUTTON
The MODE button makes it possible to switch from summer to winter
operation, and viceversa.
Pressing the button activates or
deactivates the heating indicated by
the LED F going on.
If the external temperature probe is connected to the
boiler, switching from winter operation (heating + domestic hot water) to summer operation (domestic hot
water) is made automatically when the outside temperature is higher than 20°C.
A
B
C
Mode
Auto
F
8 CONTROL PANEL
A - On/off switch
B - Heating temperature setting control knob
C - Domestic hot water temperature setting
control knob
D - MODE button
E - Boiler automatic operation indicator LED
F - Heating operation indicator LED
G - RESET button
H - Burner operation indicator LED
I - Fault alarm LED
L - SELECT button
M -Boiler temperature reading indicator LED
N - Boiler operating/diagnostic phase reading
indicator LED
O - MAINTENANCE button
P - Display
°C
bar
Reset
Select
Mode
Auto
A
O
D
L
G
H
I
M
N
E
F
P
BC
8.1 STARTING THE APPLIANCE
8.2 USE OF THE CONTROLS
fig. 8-1
fig. 8.1-1
fig. 8.2-1
fig. 8.2-2
fig. 8.2-3
Page 18

pag. 18
In this case the LED AUTO lights up, while the LED F, if
lit, indicates winter operation; if not lit, it indicates summer operation. In the case where you wish to deactivate automatic switching, press the MODE button (the
LED AUTO goes out).
SELECT
BUTTON
When in operating phase, the
digital display indicates the
boiler delivery temperature
(LED °C lit and continuous).
As well as this, by repeatedly
pressing the SELECT button, the following can be displayed in rotation:
1 - reading of domestic hot water temperature (flas-
hing LED °C)
2-–.–
3-
boiler operating phase reading (LEDS °C and bar
off); at that moment the active phase is shown by
codes that have the following meanings:
0 - pause, no heat request
10 - system heating mode
11 - domestic hot water production mode
4 - Fault code or information on boiler operating sta-
tus (alternating flashing between LEDS °C and
bar).
By pressing the SELECT button once again, the display returns to reading 1; in all cases, after some
minutes the boiler temperature display is reset.
RESET
BUTTON
(RESETTING THE APPLIANCE)
After an operating irregularity,
the boiler stops for safety reasons (fault: the red LED I goes
on). To reset the operation,
action must be taken by holding down the fault RESET button for around 2
seconds.
If the fault has to be checked again, check that the gas
stopcock and those possibly fitted on the heating delivery and return pipes and domestic water inlet and
outlet pipes are open and that the boiler water pressure is correct; if the fault persists, call your installer or
service engineer.
°C
bar
Select
MAINTENANCE
BUTTON
The maintenance button is
used by the maintenance
engineer to perform the calibration and required for correct operation of the appliance and UNDER NO CIRCUMSTANCES MUST IT BE OPERATED BY THE
USER.
If it is accidentally pressed, do not press any other button and switch off and relight the boiler using button A.
Further uses of the maintenance button are described
in paragraphs 10 and 12.
Reset
H
I
fig. 8.2-4
fig. 8.2-5
fig. 8.2-6
Page 19

pag. 19
In order to read and set the values of some boiler
parameters the SELECT button is used. By keeping it
pressed, a series of letters (A, b, C, d and P) appear
in rotation on the display.
By releasing the button when the letter appears and
pressing it again briefly the desired parameter is activated (a number appears to the right of the letter).
In order to return the display to standard parameter (1)
(boiler delivery temperature), enable parameter 1.
After approximately 8 minutes from the last operation
performed. The display will return to parameter 1.
The series of parameters which can be accessed are
as follows:
One letter only:
A1 - letter of boiler delivery temperature (°C)
A2 - letter of domestic hot water temperature (°C)
A3 - not used
A4 - letter of boiler operating phase
A0 - Technical value according to programming of the
board
b1 - letter of boiler return temperature (°C)
b2 - not used
b3 - not used
b4 - letter of outside temperature (°C)
b5 - not used
b6 - not used
b7 - second zone circuit temperature (°C)
C1 - letter of ionisation current value (µA)
C2 - letter of number of fan revolutions (thousands
and hundreds)
C3 - fan PWM (%)
C4 - letter of boiler relative heat output value (%)
C5 - not used
C6 - not used
d1 - Setpoint calculated on basis of operation in
domestic hot water or heating
d2 - value of calculated temperature of boiler
delivery (°C)
d3 - Display of value of ambient temperature set (°C);
If external probe is not present, value is fixed at
20°C.
d4 - setting of value of domestic hot water temperatu-
re (°C)
d5 - not used
d6 - maximum fan speed in heating function
Parameters that can be set:
In order to alter the value of the parameter, use at the
buttons SELECT (to increase it) and MAINTENANCE
(to decrease it). In order to store the new value in the
memory, hold down the SELECT button until the display value flashes twice, and then release the button.
P3 - not used
P4 - not used
P5 - Value of slope of heating curve
P6 -Value of parallel shift of heating curve
8.3 READING AND SETTING BOILER
PARAMETERS
Page 20

pag. 20
9 EXTERNAL PROBE
9.1 INSTALLING AND CONNECTING
EXTERNAL PROBE
9.2 SETTING HEATING CURVE
9.3 ADJUSTING HEATING CURVE SET
When the external probe is used, the electronic board
calculates the boiler delivery temperature according to
the outside temperature.
The ratio of these temperatures is summarised in the
diagram in figure 9.2-1.
THIS MUST BE FITTED OTHERWISE BOILER WILL NOT PERFORM
AT THE MAXIMUM EFFICENCY.
The most suitable curve should be chosen according
to the design temperature and the type of building.
To set a new curve (see “parameters that can be set”
in paragraph above):
- access parameter P5
- set the preselected value
- store to set value in memory
To mount the external probe:
- remove protective cover as
shown here
- insert probe cable through
hole intended to be used. We
recommend mounting a rubber
cable duct if the rear route is
used (see ref. 1), a suitable
cable holder if the lower one is
used (see ref. 2); cable duct
and cable holder are not supplied.
.
If solution 2 is used, remove
the lower section the protective cover.
- connect the wires to the probe
and the boiler following the
wiring diagram on page 14.
20
-20 -15 -10 -5 0 5 10 15 20
30
40
50
60
70
80
90
2
n
4
6
8
10
12
14
16
18
20
Temperatura esterna mediata (°C)
Valore della pendenza della curva di riscaldamento
Curve di riscaldamento
Valore della pendenza della curva di riscaldamento
impostato in fabbrica= 15
24
22
28
32
36
40
25
1
2
3
H
1/2 H
min. 2,5 m
In order to adjust the heating curve, parameter P6 is
used. In this mode, the heating curve is shifted in
parallel so as to change the delivery temperature calculated (see example in fig. 9.2-2).
To set the shift, proceed as follows (see “parameters
that can be set” in paragraph above):
- access parameter P6
- set preselected value
- store set value in memory
fig. 9.1-1
fig. 9.1-2
fig. 9.1-3
fig. 9.2-1
DO NOT INSTALL EXTERNAL PROBE IN POSITIONS INDICATED
BELOW:
CORRECT INSTALLATION POSITION:
PROBE SHOULD BE INSTALLED ON
A NORTH ORNORTH EAST FACING
WALL AND SHELTERED FROM THE
EFFECT OF THE SUN’S RAYS AND
FROM OTHER HEAT SOURCES
value of slope of heating curve
heating curve
Factory-set value of slope of heating curve = 15
Mean outside temperature (°C)
Calculated flow temperature (°C)
Page 21

pag. 21
Analysis of maximum heat capacity:
Run the boiler in maximum operation capacity by holding
down MAINTENANCE button for slightly over 7 seconds (the
display changes the presentation flashing alternately the boiler delivery temperature and the number 1 00 while the fault
red LED l flashes); from this moment the boiler will operate at
maximum in heating mode
.
T - Capacity regulator clo-
sure cap
1 - Pressure regulator
2 - Capacity regulator
In order to perform combustion analysis, a particular function must be activated by means of the MAINTENANCE
button. When this is activated, the
three-way valve switches towards the system (CB
models), the boiler temperature limits are inhibited and
the single maximum safety temperature (85°C)
remains activated. if a second mixed zone is present the
set value is 55°C.
In cases of floor radiant panel systems, for CB
models, in order to feed the circuit with hightemperature water, it is necessary to discharge
the heat in the domestic hot-water circuit (see
below). In the SP models (heating only), stop
boiler operation when temperature exceeds
45°C and resume when system has cooled.
THE BOILER IS ALREADY PRESET: THIS INFORMATION IS ONLY FOR CHECK ONLY
Combustion analysis is carried out in heating mode; if however
there is a situation in which it is difficult to use the heating system
(eg. in summer or with a floor radiant panel system), it is possible
to use the domestic hot water circuit by proceeding as follows:
- rotate the control panel forward
(para. 5“access to boiler”)
- with a screwdriver, release the
three-way valve motor M fastening spring, taking care to hold
the motor in one hand (fig. 10-2)
- remove the motor, open one or
more hot water taps in order to
discharge the heat produced by
the boiler in calibration and perform analysis, following the directions below.
On completion of the analysis, close the taps, replace the motor,
push it downwards and insert the fastening spring back in its housing.
10 COMBUSTION ANALYSIS
To make a further adjustment of the heating curve, use heating
knob B.
With the knob in intermediate position, the calculated
ambient temperature is 20°C.
In relation to this position, by rotating the knob a variation of
±1 0°C in the calculated ambient temperature is produced
(see example in fig. 9.2-3).
Tamb= 10°C
Tamb= 30°C
20
-20 -15 -10 -5 0 5 10 15 20
30
40
50
60
70
80
90
Tamb= 20°C
18
- 31°C
+ 31°C
20
-20 -15 -10 -5 0 5 10 15 20
30
40
50
60
70
80
90
fig. 9.2-2
fig. 10-3
fig. 10-2
fig. 9.2-3
fig. 10.1
Preparations for performing analysis:
Remove screw V in figure, plate and corresponding
gasket in order to access the sockets for analysis
analysis and connect the fume analyser probe therein
(fig. 10-1).
Mean outside temperature (°C)
Calculated flow temperature (°C)
Mean outside temperature (°C)
Calculated flow temperature (°C)
Exhaust
Gases
Air
Page 22

pag. 22
Analysis at minimum heat capacity:
From the above situation, to run boiler
operation to minimum capacity, rotate
domestic hot water temperature regulation knob C anticlockwise up to end of
stroke (the display changes the presentation flashing alternately boiler delivery
temperature and the number 0): from
this moment the boiler will operate at minimum.
Wait for the boiler to stabilise, perform combustion analysis
by checking to the settings shown below:
If the values found are different, proceed as follows:
- Turn gas valve pressure regulator 1 (figure 10-3): clockwise to increase, anticlockwise to decrease value of CO
2
read
(given the sensitivity of the screw, minimal adjustments
will be sufficient);
- wait several seconds until the CO
2 is stabilised, then check its
value and if necessary repeat theoperations.
On completion of calibration, recheck CO2values at
maximum output.
If the values found remain between the limits shown in the
table, no further calibration must be made.
After these operations, it is advisable to check the gas capacity at the meter, following the directions stated in the table
of technical details.
N.B.: After completing the checks, the boiler must be returned manually to normal operation by holding down MAINTENANCE button for approximately 2 seconds.
Wait for the boiler to stabilise and perform combustion
analysis by checking what is described below:
If the values found are different, proceed as follows:
- Turn gas valve capacity regulator 2 (figure 10-3): clockwise to
increase, anticlockwise to decrease value of CO
2 reading
(given the sensitivity of the screw, minimal adjustments will
be sufficient);
- wait several seconds until the CO
2 is stabilised, then check its
value and if necessary repeat theoperations.
To convert boiler FROM NATURAL GAS TO PROPANE GAS,
proceed as follows:
- disconnect voltage to appliance
- close gas tap
- access internal parts in sealed chamber (see para. 5 “access
to boiler”)
- unscrew ring nut A shown in figure and loosen threaded connection
- insert capacity reducer B as shown in figure below
- check condition of gasket and, if necessary replace it.
- reconnect gas pipe and open gas tap
- reconnect voltage to appliance
- start boiler, check tightness of gas pipe and make gas valve
calibration, observing the figures given in the tables shown in
the paragraph above.
- refit the cover of the sealed chamber and the other parts of
the boiler covering
- replace the gas identification plate showing new settings
To convert the boiler FROM LPG GAS TO NATURAL
GAS, proceed as described above and remove capacity
reducer B.
10.1 CONVERSION FROM NATURAL GAS TO
PROPANE OR VICE VERSA (WITH
KITGPL02)
B
Nominal heat capacity kW 28,7
Check calibrations values natural gas
G20 % vol 9,3÷9,7
CO
2
at
MAXIMUM OUTPUT
LPG
G31 % vol
10,8÷11,3
Minimum heat capacity kW 5,7
Check calibrations values natural gas
G20 % vol 8,8÷9,2
CO
2
at
MINIMUM OUTPUT
LPG
G31 % vol
10,4÷10,8
fig. 10.1-1
fig. 10.1-2
C
fig. 10-4
Page 23

pag. 23
To check the boiler’s safety equipment the MAINTENANCE button is used.
By holding it down for around 4 seconds, the letters SF
and the boiler delivery temperature appear alternately
on the display. From this moment, the appliance will
operate at the maximum capacity set in heating function (see paragraph above) until boiler safety devices
come into operation (boiler goes into fault, red LED l
on).
To reset operation, hold RESET button down for
around three seconds.
12 CHECKING BOILER SAFETY EQUIPMENT
In order to guarantee production of domestic hot water
at all times, do not turn off the boiler but use the room
thermostat (or timer thermostat) or deactivate the heating by pressing the MODE button (LED F goes out).
This will ensure that the antiseize function and other
functions designed for the appliance safety and comfort still operate.
Note: the boiler’s main exchanger is made of aluminium alloy. Only use additives in the water circuit with
this type of material.
If the system is to remain off for long periods at temperatures below zero, it is advisable to drain off the
water. This operation is essential if there are no antifreeze additives in the system.
13 USEFUL TIPS
The boiler is modulating in type, and therefore the capacity of the boiler does not need adjustment since it self
regulates in an optimum way in terms of heat required,
detected by means of the appliance’s temperature sensors.
11 ADJUSTING MAXIMUM HEAT CAPACITY OF
THE BOILER IN HEATING FUNCTION
Page 24

pag. 24
TEMPORARY FAILURE
Temporary failures are due to some operating parameters
being momentarily exceeded and are different from those of
faults in that manual reset by means of the RESET button is
not necessary.
Temporary failure is indicated by the alternating flashing of
the LEDS °C and bar.
If the operating conditions return to normal figures, the
appliance is reset and resumes normal operation, otherwise
the status of the fault is checked (LED I on).
The resetting of the functions may be automatic or may
require the operator to do it, depending on the case. For
example, if the system pressure falls below the minimum
figure (see para. 7.3), once restored, the boiler resumes its
functions.
FAULT WITH THE APPLIANCE
When an operating irregularity occurs, the boiler stops and
goes into “fault”, displaying this condition by the red LED I
going on and the LED °C and bar alternately flashing.
Numbers appear on the diplay representing the fault code
(see below).
An attempt may be made to reset the operation by holding
down the RESET button for around 2 seconds, after which
the boiler performs a self-diagnostic cycle and possible
restart; if the fault persists, call your local installer or service
engineer.
FAULT/TEMPORARY FAILURE CODE DISPLAY
A fault or temporary failure is indicated by a three-figure
code appearing on the display. Two of them can be presented on the display and then the code is indicated, showing
alternatively the first figure and then the other two (eg. for the
code 154, the display will be shown indicating first 1 and
then 54).
The display is also accompanied by the alternate flashing of
the LEDS °C and bar.
This display is repeated twice followed by an interval of
around 7 seconds in which the delivery temperature is indicated.
The code and delivery temperature are displayed in turn
continuously.
14 TEMPORARY FAILURE AND FAULT WITH
APPLIANCE
They indicate the type of irregularity by means of a three-figure number
14.1 IDENTIFICATION CODES OF THE IRREGULARITIES CAUSING A TEMPORARY FAILURE OR FAULT
CODE CAUSE EFFECT / REMEDY
1 11 Delivery T°C > Max T°C permitted burner turned off, circulator in post-circulation
1 19 Boiler water pressure too low Restore pressure by following directions in para. 7.3
(in SB models only)
1 33 does not light or show flame attempt to restart boiler; after three attempts goes to ‘fault’
1 54 Return T°C > delivery T°C or
difference in temperature boiler turned off, circulator in post-circulation
between delivery and return too
high or boiler temperature
increase too rapid
1 64
No water circulation in boiler -Air in system; blow it out (para. 7.1)
-Circulator blocked; follow directions in para. 7.2
Page 25

pag. 25
14.2 LIST OF FAILURE OR FAULT CODES
Code Description
10 Short-circuit of external probe
20 Delivery probe:
Display 20 alternating to oo = probe short-circuit
Display 20 alternating to - - = probe disconnected
28 Incorrect setting made by means of remote control QAA73 (fume probe, not used)
40 Return probe:
If display in b1 = oo : probe short-circuit
If display in b1 = - - : probe disconnected
50 DHW probe: boiler does not produce domestic hot water (CB mod. and SB mod. with boiler unit with NTC sensor)
Display domestic hot water temperature (see use of SELECT button in para.8.2);
If display = oo : probe short-circuit
If display = - - : probe disconnected
61 Disturbances in remote control
62 Line or remote control breakdown
78 Incorrect configuration of pressure sensor
81 Bus line short-circuit or disconnected (not used)
82 Incompatible LPB address (not used)
91 Fault inside board
92 Fault inside board
100 Incorrect configuration of clocks in connection with RVA (not used)
110 Fault due to overtemperature
111 Temporary failure due to overtemperature
119 Boiler water pressure too low (for SB models only)
133 No flame after end of safety time (repeats attempt to light three times then goes to fault)
134 Flame disappears during operation
135 Fan malfunction
140 Incorrect setting of segment in connection with RVA (not used)
148 Incompatibility of parts in connection via LPB (not used)
151 Fault inside board
152 Incompatible setting of parameter values (not used)
153 Manually activated safety fault (reset boiler by holding down RESET button for two seconds)
154 Return temperature higher than delivery temperature or boiler temperature increase too rapid
160 Fan does not reach required speed
161 Fan exceeds maximum speed set
164 No water circulation in boiler (for CB models only)
Page 26

pag. 26
CR / TA
SI
SE
CR TA
CR
SE
SE
Togliere
il ponte
TA
SE
SE
TA
15 EXAMPLES OF INSTALLATION
SE
CR / TA
OPTIMA CB AND SB MOD.
SE = external probe
CR / TA = QAA73 programmer / room thermostat
SI = high-temp. safety therostat for floor heating
SINGLE HEATING CIRCUIT CONNECTION WITH AMBIENT THERMOSTAT OR QAA73 PROGRAMMER
fig. 15-1
WITH ROOM THERMOSTAT WITH QAA73 PROGRAMMER
SE
CR / TA
YD
TB
M
SE
YD
TB
M
CR / TA
SI
OPTIMA SB MOD.
SE = External probe
CR/TA = QAA73 programmer / room thermostat
YD = 3-way valve for hot water production
TB = Domestic hot water tank temperature probe
SI = high-temp. safety therostat for floor heating
SINGLE HEATING CIRCUIT CONNECTION WITH ROOM THERMOSTAT OR QAA73 PROGRAMMER AND AN
EXTERNAL TANK FOR DOMESTIC HOT WATER PRODUCTION
fig. 15-2
WITH ROOM THERMOSTAT WITH QAA73 PROGRAMMER
CR TA
CR
SE
SE
Togliere
il ponte
TB
TB
SE
TB
SE
TA
TA
TB
Remove
link
Remove
link
terminal board
(see para. 5)
terminal board
(see para. 5)
terminal board
(see para. 5)
terminal board
(see para. 5)
Page 27

pag. 27
16 ACCESSORIES
QAA73 P
ROGRAMMER
cod. E1226/92
Modern remote control,
according to weekly and
hourly setting (with yearly
date setting), which has
functions of monitoring boiler and programming, zone
sensor, alarm indicators and
advanced diagnostics.
fig. 16-1
NATURAL GAS TO PROPANE CONVERSION KIT
cod. KITGPL02
fig. 16-2
Page 28

pag. 28
CONTROL
PANEL
BOILER
CONTROL
PANEL COVER
A
A
CCESS
CCESSTTOO
BOILER
BOILER
To access internal parts of the boiler, proceed as follows:
- isolate electrical supply to boiler
- open boiler front control box cover
- remove upper screws A from front cover
- gently lift up cover and pull towards you.
fig. 17-1
Annual Servicing
For reasons of safety and economy, it is recommended that the boiler is serviced annually.
Servicing must be performed by a competent person.
Ensure that the boiler is cool
Ensure that both the gas and electrical supplies to the
boiler are isolated.
Caution:
All gaskets removed must be checked and possibly
replaced if they are damaged or worn.
To access inside of sealed chamber, remove screws D
and take off front panel D1.
When replacing front panel D1, first attach the top side
of panel on to sealed chamber and then move panel
into position and replace screws.
fig. 17-2
17 SERVICING THE BOILER
D1
- remove screws V1 and V2 that hold control panel
in position (fig. 17-3)
- to lower control panel completely lift up front control box cover until it is supported on the control
panel and then lower both panels together (fig.
17-4)
fig. 17-3
fig. 17-4
V2
V1
Page 29

pag. 29
- Distributor D is fixed to conveyor B; if necessary,
distributor can be removed and cleaned (fig. 17-7);
- Remove screws F1, remove mixer G from fan and
clean it inside, using a brush or compressed air
(fig. 17-8).
- If it is deemed necessary, clean fan F with a brush..
To prevent dust possibly infiltrating the fan
motor bearing, it is advisable NOT TO USE
compressed air.
B
D
C
E
F
F1
fig. 17-7
fig. 17-8
- Remove pneumatic and electrical fan connections
and disconnect gas pipe.
- Remove nuts E1, unthread MIXER (E) - FAN (F)
unit (fig. 17-6).
- Extract internal choke G and inspect O-ring; with
the aid of a brush or compressed air, clean the
choke (fig. 17-6).
- Remove nuts A1, loosen nuts A2, remove conveyor B and extract burner C (fig. 17-6).
- With the aid of a brush, clean burner as shown in
fig. 17-7; take care not to damage outside of burner.
E1
B
C
D
A
A1
A2
G
E
F
H
fig. 17-6
- Gently push the left-hand side of the sealed
chamber until it detaches
fig. 17-5
B
B
OILER
OILER
SHELL
SHELL
MAINTENANCE
MAINTENANCE
Page 30

pag. 30
- remove connection of condensation drain from sea-
led chamber
- remove siphon load pipe from boiler drain cock
- unscrew fixing screw S from siphon support clamp
- extract siphon from bottom of boiler
- When siphon has been
removed, undo parts 1, 2
and 3 (fig. 17-15); check
that in cap 2 there are no
deposits, and if necessary
remove them
With a brush clean siphon
channels.
- Remove flue H from boiler
shell (fig. 17-6) and with
the aid of a brush and
vacuum cleaner, clean
between the exchange
rungs (fig. 17-9)
When the parts are replaced, take care to reinsert them
in the correct order; pay special attention to inserting the
choke correctly in the mixer (the side recess of the
choke should match the mixer guide, see fig 17-10).
A
1
3
2
fig. 17-9
Injector
Location
slot
O-ring
Location
rail
Gas mixer unit
B
l
u
e
t
t
e
+
fig. 17-15
fig. 17-10
fig. 17-11
S
M
M
AINTENANCE
AINTENANCEOFOF
CONDENSA
CONDENSA
TION
TION
DRAIN
DRAIN
SIPHON
SIPHON
fig. 17-12
fig. 17-13
fig. 17-14
Page 31

pag. 31
18 SHORT PARTS LIST
OPTIMA CB
23 40 45
21 19 32
61 16 41
49 36 37
39
10
12
POS. DESCRIPTION CODE
10 BOILER BOARD A160/1
12 USER BOARD A161
16 TRANSFORMER CFE01001
19 IGNITION ELECTRODE BFE01019
21 DETECTION ELECTRODE BFE01064
23 CENTRIFUGE FAN W150/4
32 IMMERSION SENSOR S300/1
36 CIRCULATOR P158
37 AUTOMATIC ESCAPE VALVE G207/1
39 WATER GAUGE G603/3
40 GAS VALVE UNIT GRVAL001
41 CIRCULATOR CONSENSUS
DIFFERENTIAL PRESSURE GAUGE L998099
45 ACTUATOR M227
46 HEAT EXCHANGER G1325/4
49 DOMESTIC WATER DIFFERENTIAL
PRESSURE GAUGE CFM01043
61 IGNITION TRANSFORMER T134
00 EXTERNAL PROBE S736/1
SHORT PARTS LIST
46 00
Page 32

pag. 32
OPTIMA SB
21 19
23 39
32
56 16 36
35 35/1
10 12 00
38
POS. DESCRIPTION CODE
10 BOILER BOARD A160/1
12 USER BOARD A161
16 TRANSFORMER CFE01001
19 IGNITION ELECTRODE BFE01019
20 ELECTRODE GASKET CFG01009
21 DETECTION ELECTRODE BFE01064
23 CENTRIFUGE FAN W150/4
32 SENSOR S300/1
35 CIRCULATOR P158
35/1 AUTOMATIC ESCAPE VALVE G207/1
36 MINIMUM PRESSURE GAUGE Q122
38 WATER GAUGE G603/3
39 GAS VALVE UNIT GRVAL001
56 IGNITION TRANSFORMER T134
00 EXTERNAL PROBE S736/1
SHORT PARTS LIST
Page 33

pag. 33
19 BALANCED FLUE KITS
1
1
72356567
4
1 23
12
1 23
1
2
3
1 23
Item Part No. Description Qty
1 510021 terminal 1
2 510023 90° concentric bend 1
3 510031 clamp with seal 1
4 510029 ø60mm seal (Black) 1
5 510027 ø60mm seal (Blue) 2
6 510028 ø100mm seal 2
7 510033 Wall seal 2
8 510026 500mm concentric flue pipe 1
Item Part No. Description Qty
1 510025 1000mm concentric flue pipe 1
2 510027 ø60mm seal (Blue) 1
3 510028 ø100mm seal 1
Item Part No. Description Qty
1 510023 90° concentric bend 1
2 510027 ø60mm seal (Blue) 1
3 510028 ø100mm seal 1
Item Part No. Description Qty
1 510024 45° concentric bend 1
2 510027 ø60mm seal (Blue) 1
3 510028 ø100mm seal 1
Item Part No. Description Qty
1 510026 500mm concentric flue pipe 1
2 510027 ø60mm seal (Blue) 1
3 510028 ø100mm seal 1
Item Part No. Description Qty
1 510022 terminal with cap 1
2 510032 wall clamp 1
5010 - HORIZONTAL BALANCED FLUE KIT
5011 - 1000mm CONCENTRIC FLUE PIPE
5012 - VERTICAL BALANCED FLUE KIT
5013 - 90° CONCENTRIC BEND
5014 - 45° CONCENTRIC BEND
5015 - 500mm CONCENTRIC FLUE PIPE
Page 34

Page 35

Page 36

TRIANCO
Thorncliffe, Chapeltown, Sheffield S35 2PZ
Tel: Sheffield (0114) 257 2300
Fax: (0114) 257 1419
www.trianco.co.uk
Guarantee
Our service division will repair or replace free of charge any defect or component that is due to faulty material or
workmanship, provided that such a defect occurs within the guarantee period:
1 Our service division is notified promptly of any defects. Under the terms of guarantee the appliance must
be made available for service during normal working hours Monday to Friday (weekend work not accepted).
2 The Flue Kit is installed in accordance with these instructions.
3 The guarantee does not apply if the Flue Kit is repaired or modified by any person other than a member
of your service division. The guarantee does not cover misuse or improper installation.
Issue 1 - Rev. 0 October 2003 Item No. 510005
LB1301 - 20/10/2003
 Loading...