

Page 1

EN
NL
FR
DE
ES
PT
PL
IT
SV
Instruction manual
Gebruiksaanwijzing
Mode d'emploi
Bedienungsanleitung
Manual de usuario
Manual de utilizador
Instrukcja obsługi
Manuale utente
MW-2897
Bruksanvisning
Page 2
2
Page 3

Oven
3
EN
Read these instructions carefully before using your microwave oven,
and keep it carefully.
If you follow the instructions, your oven will provide you with many years
of good service.
SAVE THESE INSTRUCTIONS CAREFULLY
PRECAUTIONS TO AVOID POSSIBLE EXPOSURE TO EXCESSIVE
MICROWAVE ENERGY
(a) Do not attempt to operate this oven with the door open since this can
result in harmful exposure to microwave energy. It is important not to
break or tamper with the safety interlocks.
(b) Do not place any object between the oven front face and the door or
allow soil or cleaner residue to accumulate on sealing surfaces.
(c) WARNING: If the door or door seals are damaged, the oven must not be
operated until it has been repaired by a competent person.
ADDENDUM
If the apparatus is not maintained in a good state of cleanliness, its surface
could be degraded and aect the lifespan of the apparatus and lead to a
dangerous situation.
SPECIFICATIONS
Model: MW-2897
Rated Voltage: 230V~50Hz
Rated Input Power(Microwave): 1300W
Rated Output Power(Microwave): 800W
Rated Input Power(Grill): 1200W
Rated Input Power(Convection): 1200W
Oven Capacity: 23L.
Turntable Diameter: Ф270mm
External Dimensions(LKWxH): 485x410x292.5mm
Net Weight: Approx. 13.25 kg
IMPORTANT SAFETY INSTRUCTIONS WARNING
To reduce the risk of re, electric shock, injury to persons or exposure
to excessive microwave oven energy when using your appliance,
follow basic precautions, including the following:
• Warning: Liquids and other foods must not be heated in sealed
containers since they are liable to explode.
• Warning : it is hazardous for anyone other than a competent
person to carry out any service or repair operation that involves
the removal of a cover which gives protection against exposure to
microwave energy.
• Warning: Only allow children to use the oven without supervision when
adequate instructions have been given so that the child is able to use
the oven in a safe way and understand the hazards of improper use.
• Warning: When the appliance is operated in the combination
mode, children should only use the oven under adult supervision
due to the temperatures generated. (only for grill series)
• Only use utensils suitable for use in microwave ovens.
• The oven should be cleaned regularly and any food deposits
should be removed.
• Read and follow the specic: "PRECAU-TIONS TO AVOID POSSIBLE
EXPOSURE TO EXCESSIVE MICROWAVE ENERGY".
• When heating food in plastic or paper containers, keep an eye on
the oven due to the possibility of ignition.
• If smoke is observed, switch o or unplug the appliance and keep
the door closed in order to stie any ames.
• Do not overcook food.
• Do not use the oven cavity for storage purposes. Do not store
items, such as bread, cookies, etc. inside the oven.
Page 4
4
Instruction manual
• Remove wire twist-ties and metal handles from paper or plastic
containers/bags before placing them in the oven.
• Install or locate this oven only in accordance with the installation
instructions provided.
• Eggs in the shell and whole hard-boiled eggs should not be heated
in microwave ovens since they may explode, even after microwave
heating has ended.
• Use this appliance only for its intended uses as described in
manual. Do not use corrosive chemicals or vapors in this appliance.
This oven is especially designed to heat. It is not designed for
industrial or laboratory use.
• If the supply cord is damaged, it must be replaced by the
manufacturer, its service agent or similarly qualied persons in
order to avoid a hazard.
• Do not store or use this appliance outdoors.
• Do not use this oven near water, in a wet basement or near a
swimming pool.
• The temperature of accessible surfaces may be high when the
appliance is operating. The surfaces are liable to get hot during
use. Keep cord away from heated surface, and do not cover any
events on the oven.
• Do not let cord hang over edge of table or counter.
• Failure to maintain the oven in a clean condition could lead to
deterioration of the surface that could adversely aect the life of
the appliance and possibly result in a hazardous situation.
• The contents of feeding bottles and baby food jars shall be stirred
or shaken and the temperature checked before consumption, in
order to avoid burns.
• Microwave heating of beverages can result in delayed eruptive
boiling, therefore care must be taken when handling the container.
• The appliance is not intended for use by persons (including
children) with reduced physical , sensory or mental capabilities, or
lack of experience and knowledge, unless they have been given
supervision or instruction concerning use of the appliance by a
person responsible for their safety.
• Children should be supervised to ensure that they do not play with
the appliance.
• The appliances are not intended to be operated by means of an
external timer or separate remote-control system.
• WARNING: Ensure that the appliance is switched o before
replacing the lamp to avoid the possibility of electric shock.
• Accessible parts may become hot during use. Young children
should be kept away. 29.Steam cleaner is not to be used.
• Do not use harsh abrasive cleaners or sharp metal scrapers to clean
the oven door glass since they can scratch the surface, which may
result in shattering of the glass.
• During use the appliance becomes hot. Care should be taken to
avoid touching heating elements inside the oven.
• Only use the temperature probe recommended for this oven.(for
ovens provided with a facility to use a temperature-sensing probe.)
• The rear surface of appliance shall be placed against a wall.
DANGER
Electric Shock Hazard
Touching some of the internal components can cause serious personal
injury or death. Do not disassemble this appliance.
WARNING
Electric Shock Hazard Improper use of the grounding can result in electric shock.
Do not plug into an outlet until appliance is properly installed and grounded.
CLEANING
Be sure to unplug the appliance from the power supply.
• Clean the inside of the oven after using with a slightly damp cloth.
• Clean the accessories in the usual way in soapy water.
Page 5
5
EN
Microwave-grill
• The door frame and seal and neighbouring parts must be cleaned
carefully with a damp cloth when they are dirty.
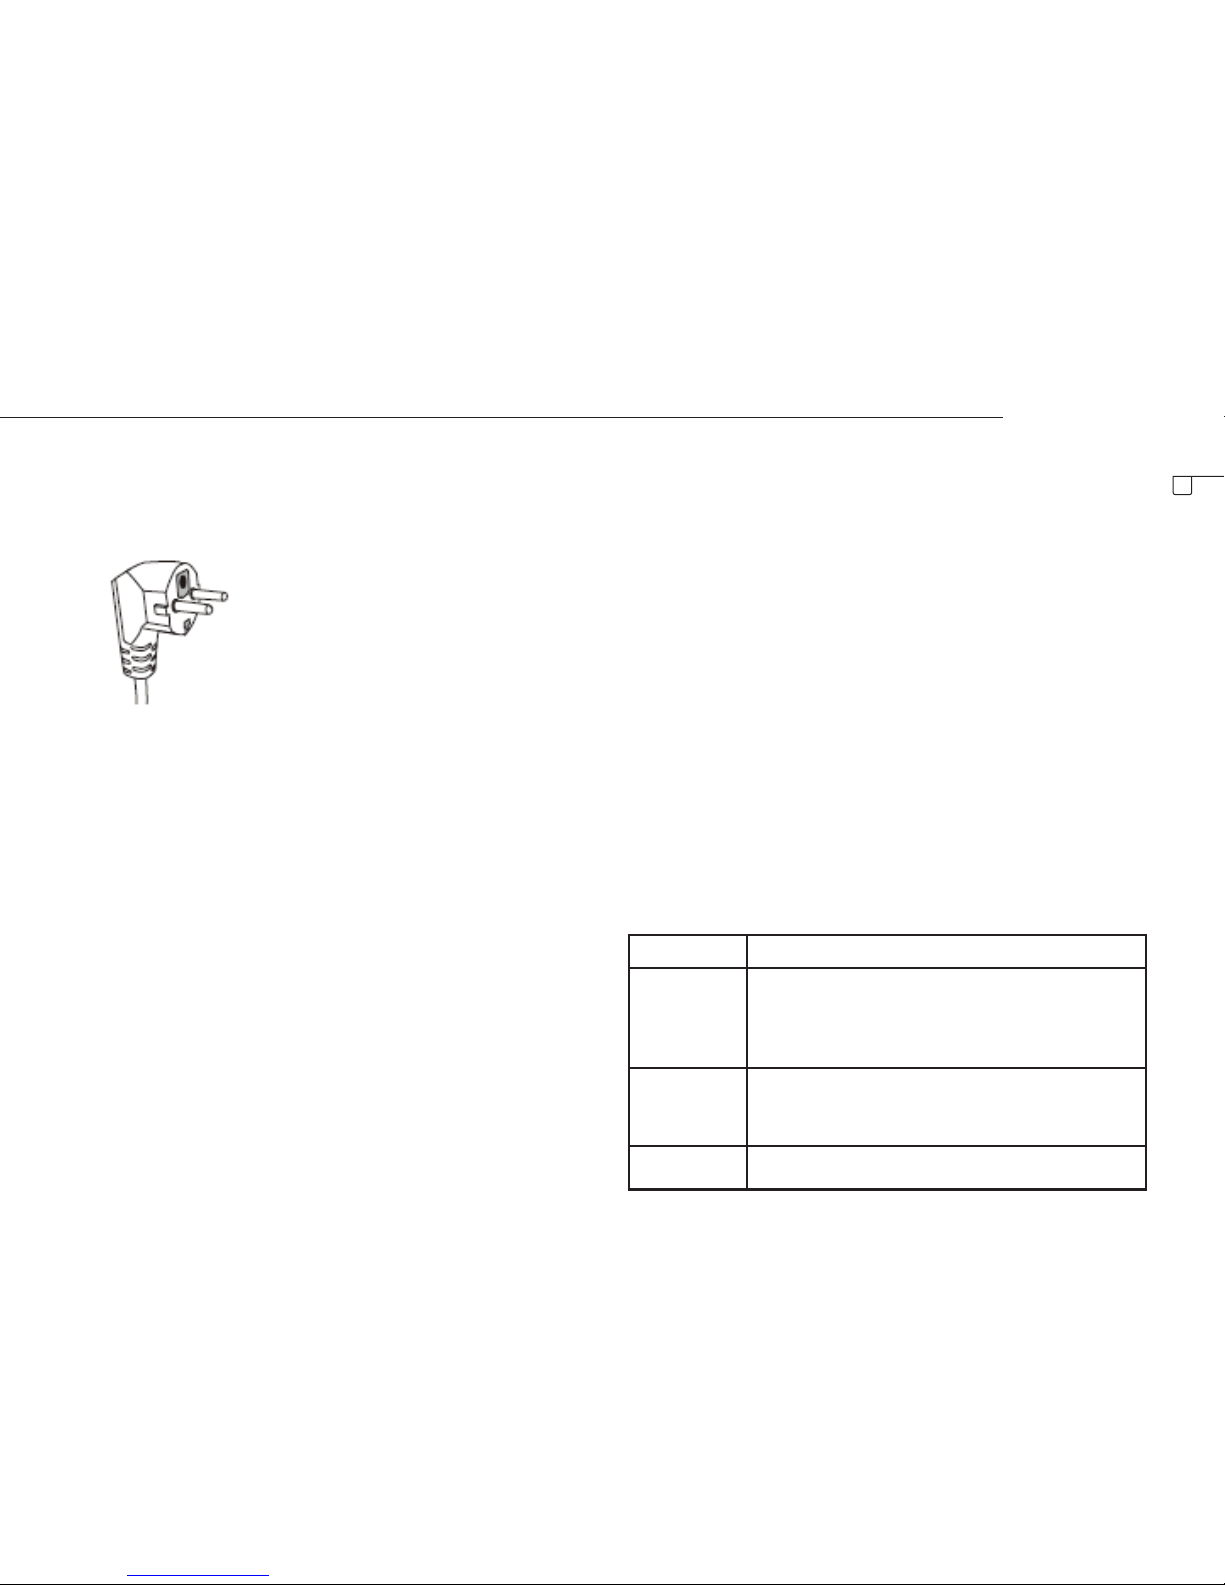
Two-round-pin plug
This appliance must be grounded. In the event of an electrical short circuit,
grounding reduces the risk of electric shock by providing an escape wire
for the electric current. This appliance is equipped with a cord having a
grounding wire with a grounding plug. The plug must be plugged into
an outlet that is properly installed and grounded. Consult a qualied
electrician or serviceman if the grounding instructions are not completely
understood or if doubt exists as to whether the appliance is properly
grounded. If it is necessary to use an extension cord , use only a 3-wire
extension cord.
• A short power-supply cord is provided to reduce the risks resulting
from becoming entangled in or tripping over a longer cord.
• If a long cord set or extension cord is used:
• The marked electrical rating of the cord set or extension cord should be
at least as great as the electrical rating of the appliance.
• The extension cord must be a grounding-type 3-wire cord.
• The long cord should be arranged so that it will not drape over the
counter top or tabletop where it can be pulled on by children or
tripped over unintentionally.
UTENSILS
CAUTION
Personal Injury Hazard
• It is hazardous for anyone other than a compentent person to carry
out any service or repair operation that involves the removal of a cover
which gives protection against exposure to microwave energy.
• See the instructions on "Materials you can use in microwave oven or
to be avoided in microwave oven." There may be certain non-metallic
utensils that are not safe to use for microwaving. If in doubt, you can
test the utensil in question following the procedure below.
Utensil Test:
• Fill a microwave-safe container with 1 cup of cold water (250ml) along
with the utensil in question.
• Cook on maximum power for 1 minute.
• Carefully feel the utensil. If the empty utensil is warm, do not use it for
microwave cooking.
• Do not exceed 1 minute cooking time.
MATERIALS YOU CAN USE IN MICROWAVE OVEN
Utensils Remarks
Aluminum foil Shielding only. Small smooth pieces can be used to cover
thin parts of meat or poultry to prevent overcooking.
Arcing can occur if foil is too close to oven walls. The foil
should be at least 1 inch (2.5cm) away from oven walls.
Browning dish Follow manufacturer's instructions. The bottom of browning
dish must be at least 3/16 inch (5mm) above the turntable.
Incorrect usage may cause the turntable to break.
Dinnerware Microwave-safe only. Follow manufacturer's instructions. Do not
use cracked or chipped dishes.
Page 6
6
Utensils Remarks
Glass jars Always remove lid. Use only to heat food until just warm. Most
glass jars are not heat resistant and may break.
Glassware Heat-resistant oven glassware only. Make sure there is no metallic
trim. Do not use cracked or chipped dishes.
Oven cooking
bags
Follow manufacturer's instructions. Do not close with metal tie.
Make slits to allow steam to escape.
Paper plates and
cups
Use for short-term cooking/warming only. Do not leave oven
unattended while cooking.
Paper towels Use to cover food for reheating and absorbing fat. Use with
supervision for a short-term cooking only.
Parchment paper Use as a cover to prevent splattering or a wrap for steaming.
Plastic Microwave-safe only. Follow the manufacturer's instructions.
Should be labeled "Microwave Safe". Some plastic containers
soften, as the food inside gets hot. "Boiling bags" and tightly
closed plastic bags should be slit, pierced or vented as directed
by package.
Plastic wrap Microwave-safe only. Use to cover food during cooking to retain
moisture. Do not allow plastic wrap to touch food.
Thermometers Microwave-safe only (meat and candy thermometers).
Wax paper Use as a cover to prevent splattering and retain moisture.
MATERIALS TO BE AVOIDED IN MICROWAVE OVEN
Utensils Remarks
Aluminum tray May cause arcing. Transfer food into microwave-safe dish.
Food carton with
metal handle
May cause arcing. Transfer food into microwave-safe dish.
Metal or metaltrimmed utensils
Metal shields the food from microwave energy. Metal trim
may cause arcing.
Utensils Remarks
Metal twist ties May cause arcing and could cause a re in the oven.
Paper bags May cause a re in the oven.
Plastic foam Plastic foam may melt or contaminate the liquid inside
when exposed to high temperature.
Wood Wood will dry out when used in the microwave oven and
may split or crack.
SETTING UP YOUR OVEN
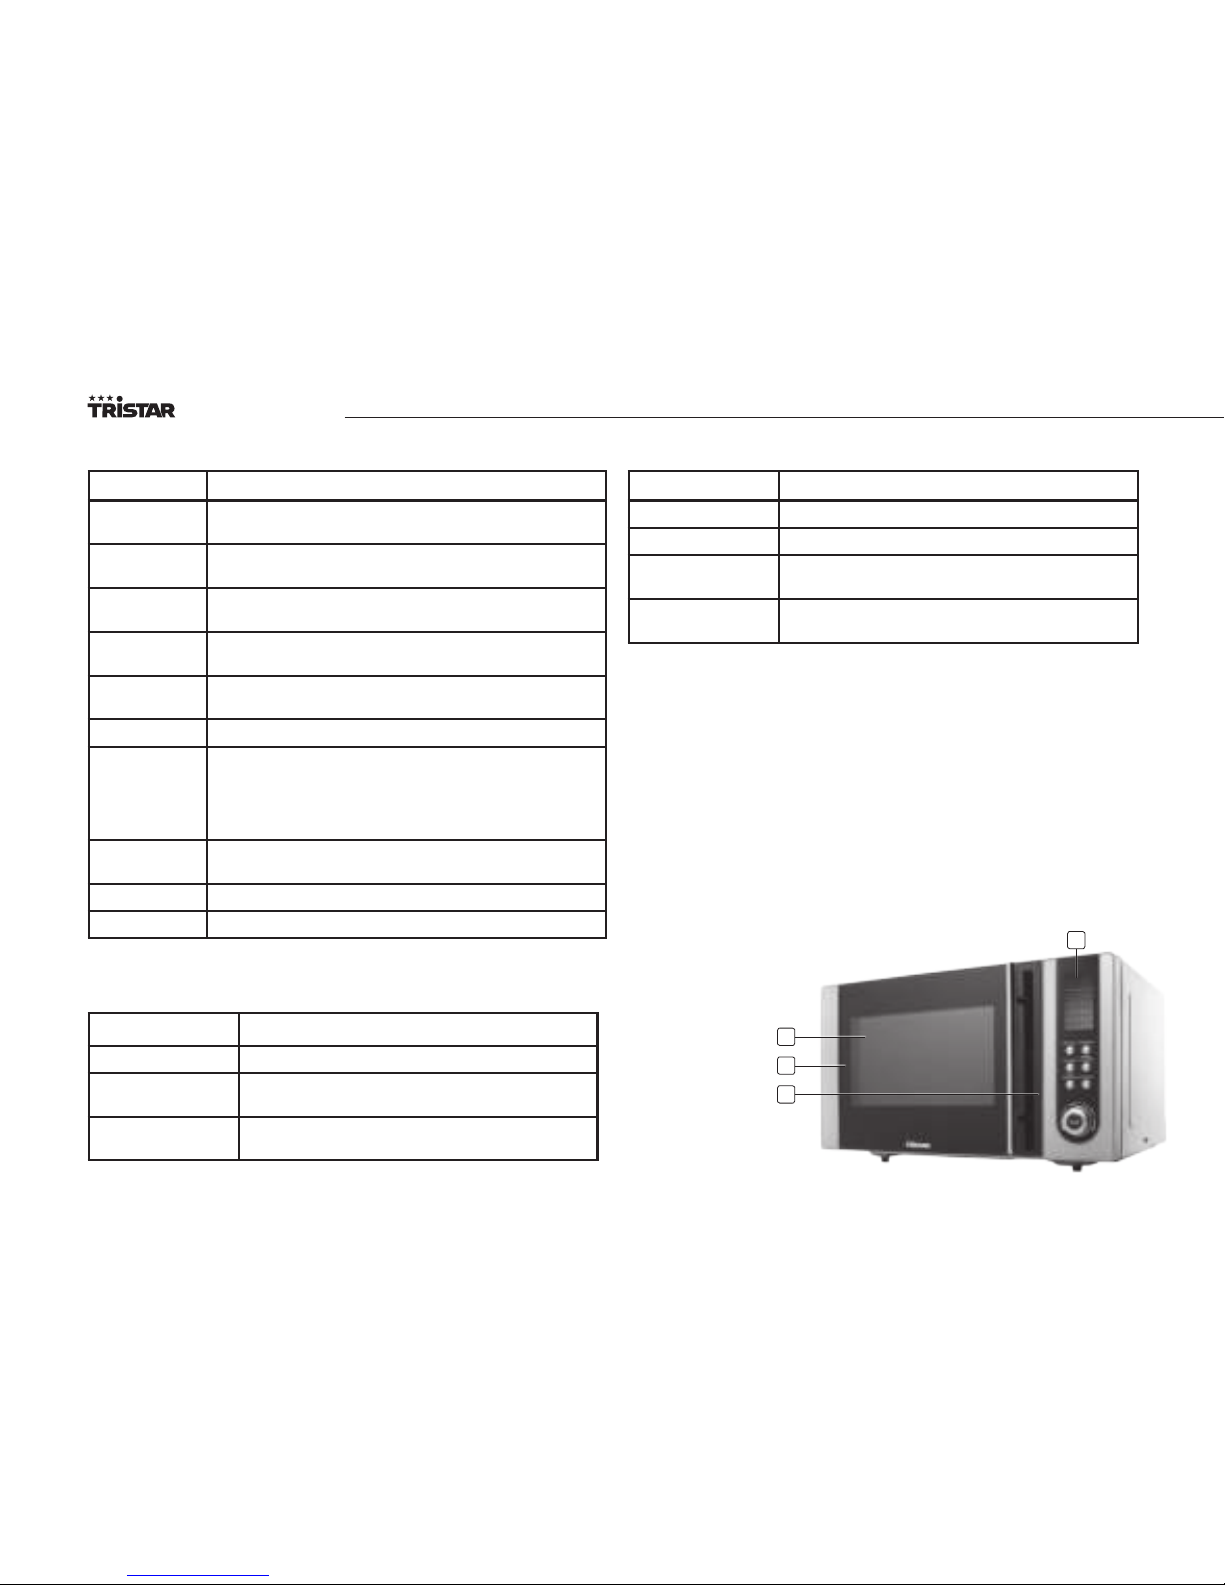
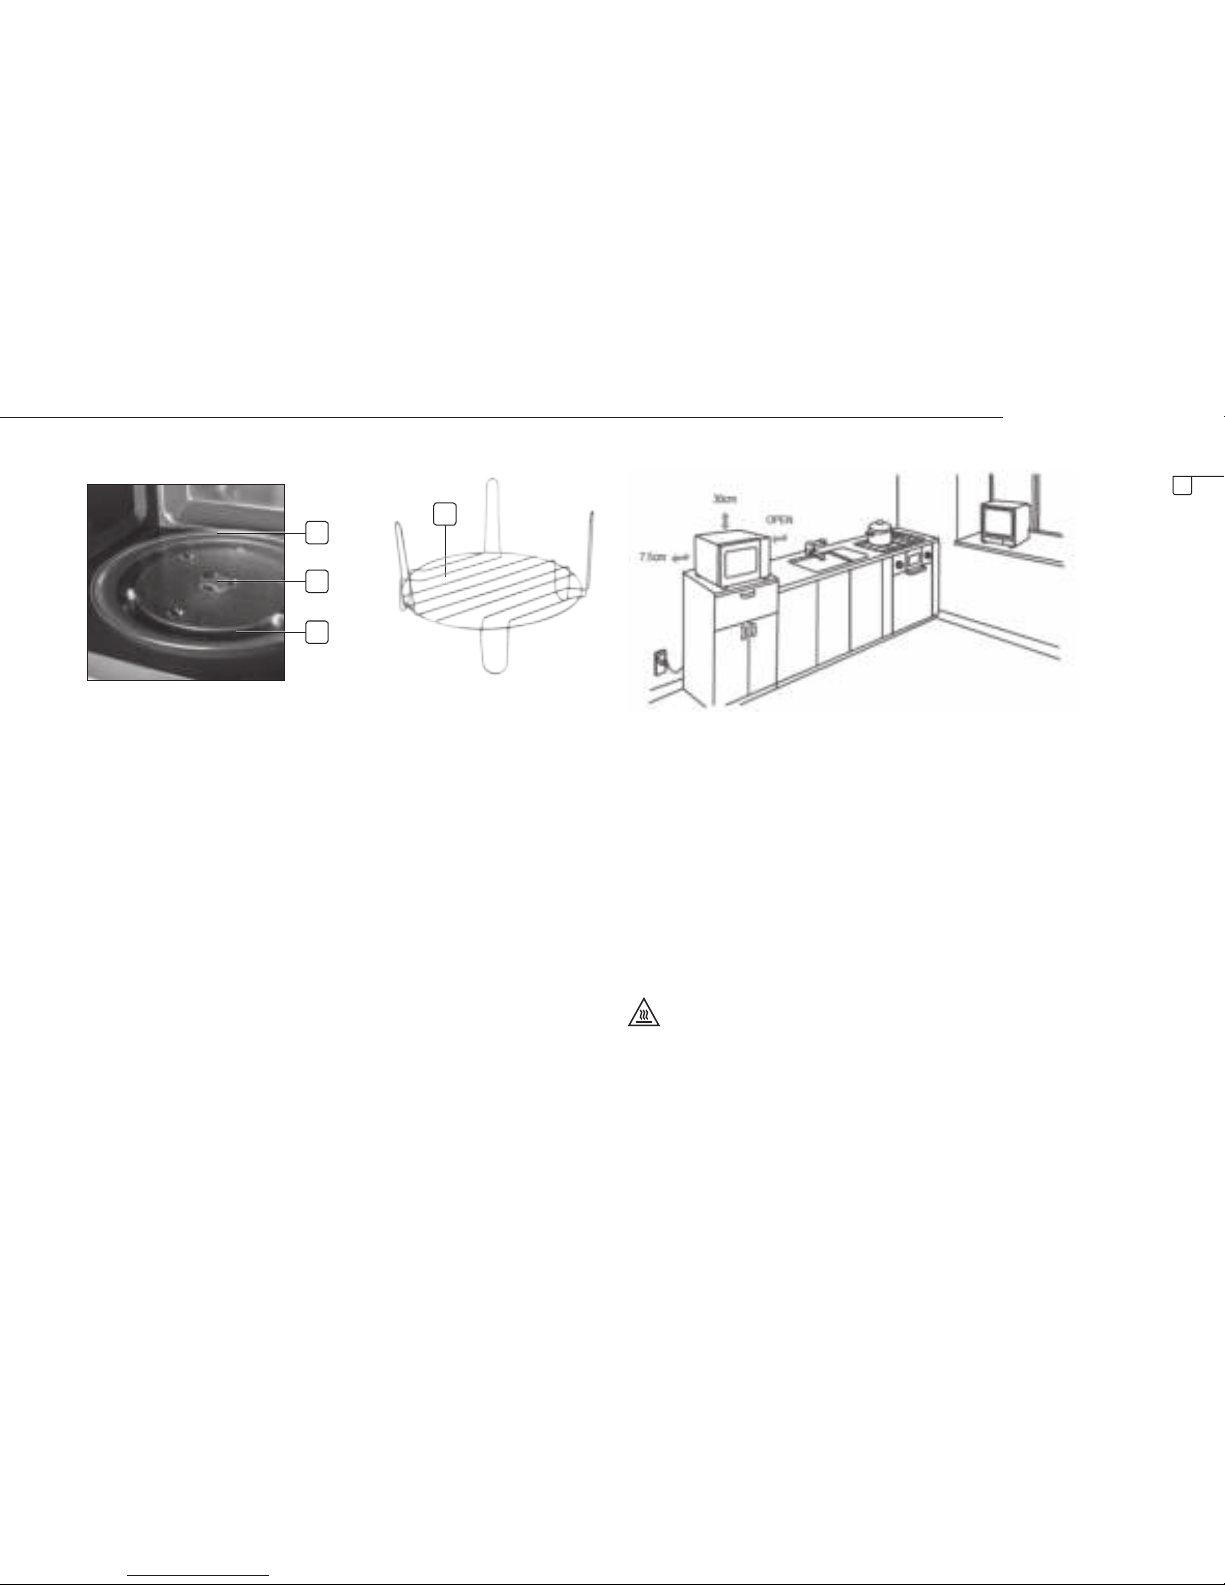
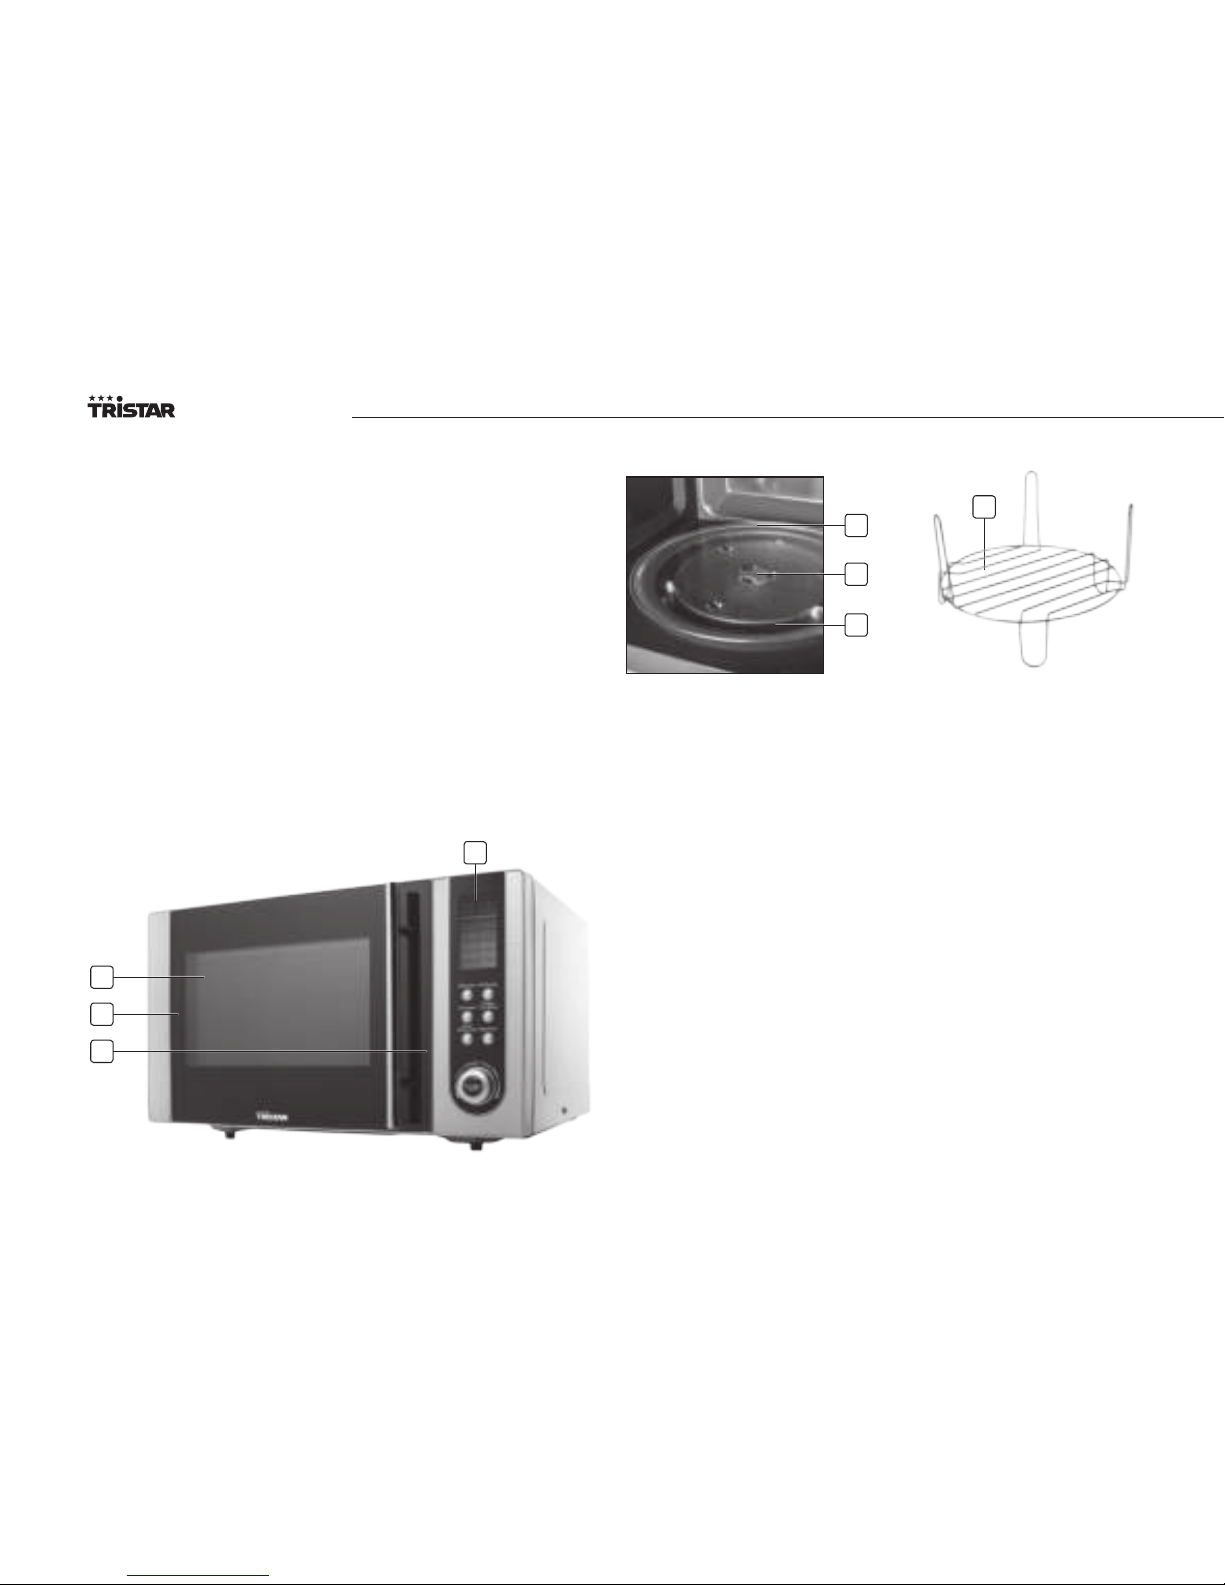
Names of Oven Parts and Accessories
Remove the oven and all materials from the carton and oven cavity.
Your oven comes with the following accessories:
Glass tray 1
Turntable ring assembly 1
Instruction Manual 1
1. Control panel
2. Turntable shaft
3. Turntable ring
assembly
4. Glass tray
5. Observation
window
6. Door assembly
7. Safety interlock
system
8. Grill Rack
1
5
6
7
Instruction manual
Page 7
7
EN
Turntable Installation
• Never place the glass tray upside down. The glass tray should never be
restricted.
• Both glass tray and turntable ring assembly must always be used
during cooking.
• All food and containers of food are always placed on the glass tray for
cooking.
• If glass tray or turntable ring assembly cracks or breaks, contact your
nearest authorized service center.
INSTALLATION AND CONNECTION
• Remove all packing material and accessories. Examine the oven for any
damage such as dents or a broken door. Do not install if the oven is damaged.
• Remove any protective lm, found on the microwave oven cabinet surface.
• Do not remove the light brown Mica cover that is attached to the oven
cavity to protect the magnetron.
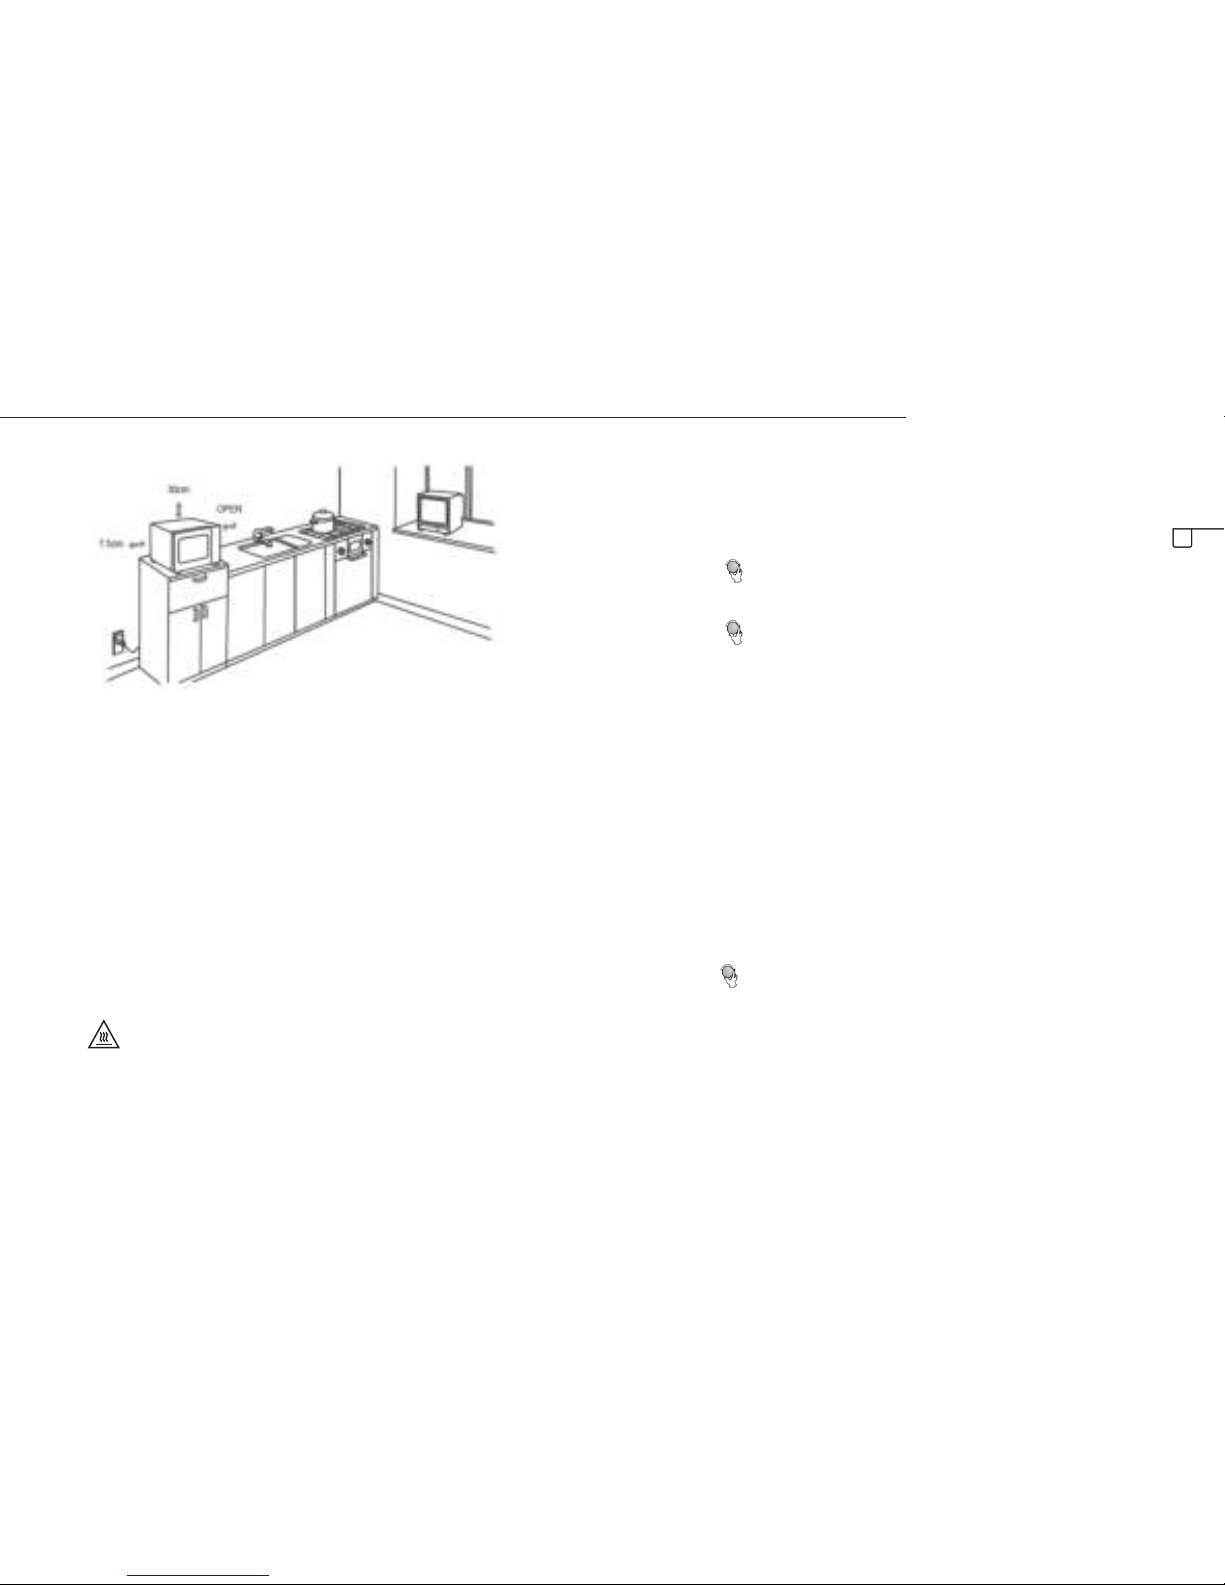
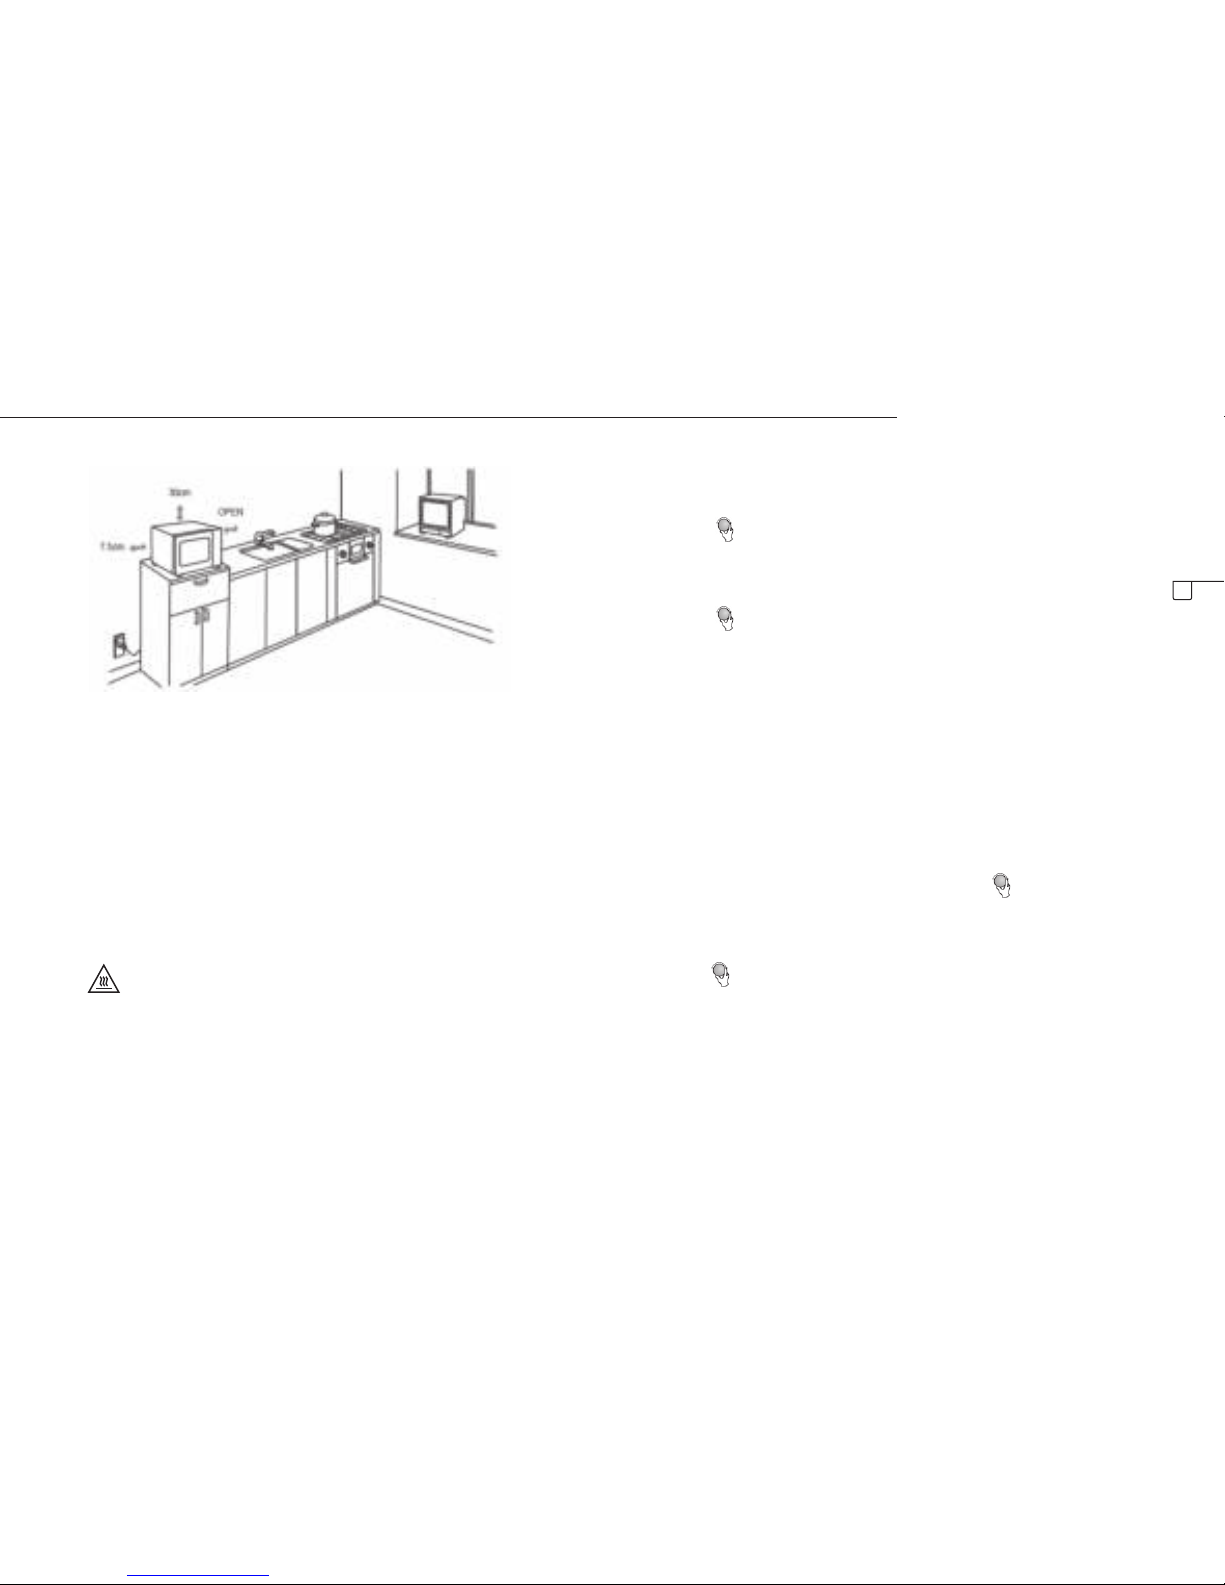
• Select a level surface that provide enough open space for the intake
and/or outlet vents.
• The rear surface of appliance shall be placed against a wall. A minimum
clearance of 7.5cm is required between the oven and any adjacent
walls. One side must be open. Leave a minimum clearance of 30cm
above the oven. Do not remove the feet from the bottom of the oven.
• Blocking the intake and/or outlet openings can damage the oven.
• Place the oven as far away from radios and TV as possible. Operation of
microwave oven may cause interference to your radio or TV reception.
• Plug your oven into a standard household outlet. Be sure the voltage and the
frequency is the same as the voltage and the frequency on the rating label.
• Do not install the oven over a stove or other heat-producing appliance.
If installed near or over a heat source, the oven could be damaged and
the warranty would be void.
The accessible surface may be hot during operation.
OPERATION INSTRUCTION
This microwave oven uses modern electronic control to adjust cooking
parameters to meet your needs better for cooking.
Clock Setting
When the microwave oven is electried, the oven will display "0:00", buzzer
2
3
4
8
Microwave-grill
Page 8
8
will ring once.
• Press "CLOCK/KITCHEN TIMER" to choose 12-hour or 24-hour.
• Turn "
" to adjust the hour gures, the input time should be within
0--23(24-hour) or 1--12(12-hour).
• Press "CLOCK/KITCHEN TIMER", the minute gures will ash.
• Turn "
" to adjust the minute gures, the input time should be within 0--59.
• Press "CLOCK/KITCHEN TIMER" to nish clock setting. ":" will ash.
Note:
• If the clock is not set, it would not function when powered.
• During the process of clock setting, if you press "STOP/CLEAR ", the
oven will go back to the previous status automatically.
Microwave Cooking
• Press the "MICROWAVE" key once, and "P100" display.
• Press "MICROWAVE" for times or turn "
" to select the microwave power
from 100% to 10%. "P100", "P80", "P50", "P30", "P10" will display in order.
• Press "START/+30SEC./CONFIRM" to conrm.
• Turn "
" to adjust the cooking time. (The time setting should be 0:05- 95:00.)
• Press "START/+30SEC./CONFIRM" to start cooking.
NOTE: the step quantities for the adjustment time of the coding switch are
as follow:
0--- 1 min : 5 seconds
1—5 min : 10 seconds
5---10 min : 30 seconds
10---30 min : 1 minute
30---95 min : 5 minutes
Microwave Power Chart
Press Once Twice Thrice 4 times 5 times
Microwave Power 100% 80% 50% 30% 10%
Grill Cooking
• Press the "GRILL/COMBI" key once, and "G-1" display.
• Turn "
" to select the grill power. Stop turning when "G-1" displays.
• Press "START/+30SEC./CONFIRM " to conrm.
• Turn "
" to adjust the cooking time. (The time setting should be 0:05- 95:00.)
• Press "START/+30SEC./CONFIRM" to start cooking.
Note:
If half the grill time passes, the oven will sound twice to tell you to turn the
food over. You can just leave it continue cooking. But in order to have a
better eect of grilling food, you should turn the food over, close the door,
and then press "START/+30SEC./CONFIRM" to continue cooking.
Combination Cooking
• Press the "GRILL/COMBI" key once, and "G-1" display.
• Press " GRILL/COMBI " for times or turn "
" to select the grill power.
Stop turning when "C-1","C-2","C-3" or "C-4" displays.
• Press "START/+30SEC./CONFIRM" to conrm.
• Turn "
" to adjust the cooking time. (The time setting should be 0:05- 95:00.)
• Press "START/+30SEC./CONFIRM" to start cooking.
Instructions Display Microwave Grill Convection
1 C-1 • •
2 C-2 • •
3 C-3 • •
4 C-4 • • •
Convection Cooking(With preheating funtion)
The convection cooking can let you to cook the food as a traditional oven.
Microwave is not used. It is recommended that you should preheat the
oven to the appropriate temperature before placing the food in the oven.
• Press the "CONVECTION" key once, "100" ash.
Instruction manual
Page 9

9
EN
• Keep pressing "CONVECTION" or turn " " to select the convection function.
Note: the temperature can be chosen from 100 degrees to 190 degrees.
• Press the "START/+30SEC./CONFIRM" to conrm the temperature.
• Press the "START/+30SEC./CONFIRM" to start preheating. When the
preheating temperature arrives, the buzzer will sound twice to remind
you to put the food into the oven. And the preheated temperature is
displayed and ash.
• Put the food into the oven and close the door.
• Turn "
" to adjust the cooking time. (The maximum setting time is 95
minutes.)
• Press the "START/+30SEC./CONFIRM" key to start cooking.
Note:
• Cooking time cannot be input until the preheating temperature arrives.
• If the temperature arrives, door must be opened to input the cooking time.
• If the time not input in 5 minutes, the oven will stop preheating. The
buzzer sound ve times and turn back to waiting states.
Convection Cooking( Without pre-heating function)
• Press the "CONVECTION" key once, "100" ash.
• Keep pressing "CONVECTION" or turn "
" to select the convection function.
Note: the temperature can be chosen from 100 degrees to 190 degrees.
• Press the "START/+30SEC./CONFIRM" to conrm the temperature
• Turn "
" to adjust the cooking time. (The maximum setting time is 95
minutes.)
Kitchen Timer
• Press " CLOCK/KITCHEN TIMER " twice, LED will display 00:00.
• Turn " " to enter the correct timer. (The maximum cooking time is 95
minutes.)
• Press "START/+30SEC./CONFIRM " to conrm setting.
• When the kitchen time is reached, clock indicator will go out. The
buzzer will ring 5 times. If the clock has been set(24-hour system), LED
will display the current time. Note: The kitchen Time is dier from 24-
hour system Kitchen Timer is a timer.
Defrost By weight
• Press "W.T./Time Defrost " to choose the defrosting by weight function.
"dEF1" will be displayed.
• Turn "
" to input the weight."100","200","300","400","500","600","800",
"1000", "1200","1400","1600","1800 and "2000" will be displayed in order.
• Press "Start/+30Sec./Conrm" to start defrosting. If "Stop/Clear"
is pressed, it will go back to waiting state. At this time, press
"Start/+30Sec./Conrm" again or the time for pause is more than 5
minutes, it will turn back to the waiting state. Press "Start/+30Sec./
Conrm" in 5 minutes, the unit goes on working and time counts
down. When it is nished, the buzzer sounds ve times and turn back
to the waiting state.
• When half the defrost time pass, the buzzer will sound twice remind
you to turn the food over, if no action is taken, the unit will continue
working and the defrost result is not well.
Defrost By time
• Press "W.T./Time Defrost" twice to choose the function of defrost by
time. "dEF2" will be displayed.
• Turn "
" to input the cooking time. The MAX. time is 95 minutes.
• Press "Start/+30Sec./Conrm" to start defrosting. If "Stop/Clear" is
pressed, it will go back to waiting state. At this time, press "Start/+30Sec./
Conrm" again or the time for pause is more than 5 minutes, it will turn
back to the waiting state. Press "Start/+30Sec./Conrm" within 5 minutes,
the unit goes on working and time counts down.
Auto Menu
• In waiting state, turn "
" right to choose the function wanted, and
"A1","A2","A3"...."A10" will be displayed.
• Press "START/ +30 SEC./CONFIRM" to conrm the menu you need.
• Turn "
" to choose the weight of menu, and "g" indicator will light.
Microwave-grill
Page 10
10
• Press "START/ +30 SEC./CONFIRM" to start cooking.
Note 1: When you choose A8 cake, please do not put the cake into the oven at
the beginning. The oven needs to be preheated to 160 degree rst. After several
minutes, the buzzer sounds twice to remind you to put the cake into the oven.
After putting the cake in the oven, please press "Start/+30Sec./Conrm" again.
The timer will count down, and the cake will be cooked perfectly.
Note 2: During A10 Roast chicken cooking, the oven sounds twice, and this
is normal. In order to have a better eect of grilling food, you should turn
the food over, close the door, and then press "START/ +30SEC./ Conrm" to
continue cooking. If no operation, the oven will continue working.
AUTO MENU CHART
Menu Weight(g) Power
A1
Pizza
• 300
• 400
100%
A2
Potato
• 1 (about 230g)
• 2 (about 460g)
• 3 (about 690g)
100%
A3
Meat
• 200
• 300
• 400
• 500
100%
A4
Fish
• 200
• 300
• 400
• 500
80%
A5
Vegetable
• 200
• 300
• 400
• 500
100%
Menu Weight(g) Power
A6
Beverage
• 1(about 240 ml)
• 2(about 480 ml)
• 3(about 720 ml)
100%
A7
Pasta
• 50(add cold water 450 ml)
• 100(add cold water 800 ml)
• 150(add cold water 1200 ml)
80%
A8
Popcorn
• 50
• 100
100%
A9
Cake
• 475 Preheat at 160
degrees
A10
Roast Chicken
• 750
• 1000
• 1250
• C-2
• C-2
• C-2
Speedy Cooking
• In waiting state, press "START/+30SEC./CONFIRM" key to cook with
100% power level for 30 seconds. Each press on the same key can
increase 30 seconds. The maximum cooking time is 95 minutes.
• During microwave, grill, convection and combination states, press
"START/+30SEC./CONFIRM" key to cook with 100% power level for 30
seconds. Each press on the same key can increase 30 seconds.
Note: this function cannot work under defrost, auto menu and multi-stage
cooking.
Lock-out Function for Children
• Lock: In waiting state, press "STOP/CLEAR" for 3 seconds, there will be
a long "beep" denoting entering into the children-lock state and "
"
indicator will light. LED will display current time or 0:00.
• Lock quitting: In locked state, press "STOP/CLEAR" for 3 seconds, there
will be a long "beep" denoting that the lock is released, and "
"
indicator will disappear.
•
Instruction manual
Page 11
11
EN
Special Specications
• The maximum cooking time of "Microwave", "Grill", "Defrost by time",
"Convection" and "Combine" is 95 minutes.
• When the door is open, the lamp will light. If it keeps opening in 10
minutes, the lamp will be o and the display will change to waiting states .
• When open the door in waiting states or during setting process, the
initial display will stay the same. It can change and set too. But the
"START" key will not work.
• Close the door, the lamp will be o. The setting can be changed. And
the "START" key can work too.
TROUBLE SHOOTING
Normal
Microwave oven interfering
TV reception
Radio and TV reception may be iterfered when
microwave oven operating. It is similar to the
interference of small electrical appliances, like mixer,
vacuum cleaner, and electric fan. It is normal.
Dim oven light In low power microwave cooking, oven light may
become dim. It is normal.
Steam accumulating on
door, hot air out of vents
In cooking, steam may come out of food. Most will
get out from vents. But some may accumulate on
cool place like oven door. It is normal.
Oven started accidentally
with no food in.
It is forbidden to run the unit without any food
inside. It is very dangerous.
Trouble Possible Cause Remedy
Oven can not be
started.
1) Power cord not
plugged in tightly.
2) Fuse blowing or
circuit breaker works.
3) Trouble with outlet.
• Unplug. Then plug again after 10
seconds.
• Replace fuse or reset circuit breaker
(repaired by professional personnel of
our company)
• Test outlet with other electrical
appliances.
Oven does not
heat.
4) Door not closed
well.
Close door well.
Glass turntable
makes noise when
microwave
oven operates
(5) Dirty roller rest
and oven bottom.
Refer to "Maintenance of Microwave"
to clean dirty parts.
Microwave-grill
Page 12

12
Gebruiksaanwijzing
Lees deze instructies aandachtig door voordat u uw magnetronoven
gebruikt en bewaar het zorgvuldig.
Als u de instructies opvolgt, zal uw oven u vele jaren goede diensten opleveren.
BEWAAR DEZE INSTRUCTIES ZORGVULDIG
VOORZORGSMAATREGELEN OM MOGELIJKE BLOOTSTELLING AAN
OVERMATIGE MICROGOLVEN TE VOORKOMEN
(a) Probeer niet om deze oven met de deur open te bedienen, omdat dit tot
blootstelling aan schadelijke microgolven kan leiden. Het is belangrijk
om niet de veiligheidssloten te verbreken of ermee te knoeien.
(b) Plaats geen voorwerpen tussen voorkant van de oven en de deur en laat
geen vuil of reinigingsmiddelresten op de afdichtingvlakken verzamelen.
(c) WAARSCHUWING: Als de deur of de afdichtingen beschadigd is, mag de oven
niet gebruikt worden totdat het door een bevoegd persoon is gerepareerd.
APPENDIX
Als het apparaat niet in een schone staat wordt bijgehouden, kan het
oppervlak verontreinigen en de levensduur van het apparaat beïnvloeden
en tot een gevaarlijke situatie leiden.
SPECIFICATIES
Model: MW-2897
Nominaal spanning: 230V ~ 50Hz
Nominaal ingangsvermogen (magnetron): 1300W
Nominaal uitgangsvermogen (magnetron): 800W
Nominaal ingangsvermogen (Grill): 1200W
Nominaal ingangsvermogen (convectie): 1200W
Ovencapaciteit: 23L.
Diameter van de draaitafel: Ф270mm
Buitenafmetingen (LxBxH): 485x410x292.5mm
Netto gewicht: ca. 13.25 kg
BELANGRIJKE WAARSCHUWNGEN
VEILIGHEIDSINSTRUCTIES
Om het risico van brand, elektrische schokken, letsel bij personen of
blootstelling aan overmatige microgolven bij het gebruik van uw apparaat,
volg elementaire voorzorgsmaatregelen, waaronder de volgende:
• Waarschuwing: Vloeistoen en andere voedingsmiddelen mogen
niet in afgesloten containers verwarmd worden, omdat ze kunnen
ontploen.
• Waarschuwing: het is voor iedereen, behalve een bevoegd
persoon, gevaarlijk om onderhouds- of reparatiewerkzaamheden
uit te voeren waarbij het verwijderen van een afdekking die
bescherming biedt tegen blootstelling aan microgolven.
• Waarschuwing: Laat kinderen alleen de oven zonder toezicht
gebruiken wanneer voldoende instructies zijn gegeven zodat het
kind in staat is om de oven op een veilige manier te gebruiken en
de gevaren van onjuist gebruik begrijpt.
• Waarschuwing: Wanneer het apparaat in de combinatiemodus
wordt gebruikt, mogen kinderen wegens de gegenereerde
temperaturen alleen onder toezicht van volwassenen de oven
gebruiken. (alleen voor de grillserie)
• Gebruik alleen gebruiksvoorwerpen die geschikt zijn voor gebruik
in de magnetron.
• De oven moet regelmatig worden schoongemaakt en alle
voedselresten moeten worden verwijderd.
• Lees en volg de specicaties: “VOORZORGSMAATREGELEN OM
MOGELIJKE BLOOTSTELLING AAN OVERMATIGE MICROGOLVEN TE
VOORKOMEN”.
• Bij het verwarmen van voedsel in plastic of papier containers, houd
de oven op mogelijke ontbranden in de gaten.
• Als er rook wordt waargenomen, schakel het apparaat uit of trek
de stekker uit het stopcontact en houd de deur dicht om eventuele
vlammen te doven.
Page 13

13
NL
Magnetron met Grillfunctie
• Bereid het voedsel niet te gaar.
• Gebruik de ovenruimte niet voor opslagdoeleinden. Bewaar geen
artikelen, zoals brood, koekjes, etc. in de oven.
• Verwijder de draad twistbandjes en metalen handgrepen van papier
of plastic containers/zakken voordat u ze in de oven plaatst.
• Installeer of plaats deze oven alleen in overeenstemming met de
meegeleverde installatie-instructies.
• Eieren in de schaal en hele hardgekookte eieren mogen niet in de
magnetron worden opgewarmd, omdat ze kunnen ontploen,
zelfs nadat het verwarmen in de magnetron is voltooid.
• Gebruik dit apparaat alleen voor de beoogde toepassingen, zoals
beschreven in de handleiding. Gebruik geen bijtende chemicaliën of
dampen in dit apparaat. Deze oven is speciaal ontworpen om op te
warmen. Het is niet ontworpen voor industrieel- of laboratoriumgebruik.
• Als de het netsnoer beschadigd is, moet deze door de fabrikant,
zijn vertegenwoordiger, of door een vergelijkbaar bevoegd
persoon worden vervangen, om gevaar te voorkomen.
• Gebruik dit apparaat niet buitenshuis.
• Gebruik deze oven niet in de buurt van water, in een vochtige
kelder of in de buurt van een zwembad.
• De temperatuur van de bereikbare oppervlakken kan hoog zijn
wanneer het apparaat in gebruik is. De oppervlakken neigen ertoe om
tijdens het gebruik heet te worden. Houd het netsnoer uit de buurt
van het verwarmde oppervlak, en leg in geen geval iets op de oven.
• Laat het netsnoer niet over de rand van tafel of balie hangen.
• Als de oven niet in een schone staat wordt gehouden kan dat tot
verontreiniging van het oppervlak leiden wat de levensduur van
het apparaat negatief zou kunnen beïnvloeden en mogelijk tot een
gevaarlijke situatie resulteert.
• De inhoud van zuigessen en potjes babyvoeding moet worden
geroerd of geschud en de temperatuur vóór consumptie worden
gecontroleerd, om brandwonden te voorkomen.
• Verwarmen in de magnetron van drank tot vertraagd eruptief
koken kan leiden, daarom is voorzichtigheid geboden bij het
hanteren van de container.
• Dit apparaat is niet bedoeld voor gebruik door personen (met inbegrip
van kinderen) met verminderde lichamelijke, zintuiglijke of psychische
capaciteiten, of met een gebrekkige ervaring en kennis, tenzij ze m.b.t.
het gebruik van dit apparaat onder toezicht staan van of geïnstrueerd
zijn door een persoon verantwoordelijk voor hun veiligheid.
• Kinderen dienen onder toezicht te staan om te garanderen dat ze
niet met het apparaat spelen.
• Het apparaat is niet geschikt om bediend te worden door middel van
een externe timer of een afzonderlijk afstandsbedieningsysteem.
• WAARSCHUWING: Zorg ervoor dat het apparaat is uitgeschakeld
voordat u de lamp vervangt om de mogelijkheid van elektrische
schokken te voorkomen.
• Toegankelijke onderdelen kunnen tijdens gebruik heet worden.
Kinderen moeten uit de buurt worden gehouden.
• Een stoomreiniger mag niet worden gebruikt om de magnetron te
reinigen.
• Gebruik geen agressieve schuurmiddelen of scherpe metalen
schrapers om de ovendeurglas schoon te maken, omdat zij het
oppervlak kunnen krassen, wat tot het breken van het glas kan leiden.
• Tijdens het gebruik wordt het apparaat heet. Zorg moet worden
genomen om het aanraken van de verwarmingselementen in de
oven te voorkomen.
• Gebruik alleen de temperatuursonde aanbevolen voor deze oven.
(voor ovens voorzien van een inrichting om een temperatuursonde
te gebruiken.)
• De achterzijde van het apparaat moet tegen een muur worden
geplaatst.
Page 14
14
Gebruiksaanwijzing
GEVAAR
Elektrisch schokgevaar
Het aanraken van sommige interne onderdelen kan tot ernstig lichamelijk
letsel of de dood leiden. Demonteer dit apparaat niet.
WAARSCHUWING
Gevaar voor elektrische schokken - Onjuist gebruik van de aarding kan tot een
elektrische schok leiden. Steek de stekker niet in een stopcontact totdat het
apparaat goed geïnstalleerd en geaard is.
REINIGING
Zorg ervoor dat u de stekker van het apparaat uit het stopcontact trekt.
• Reinig de binnenkant van de oven met een licht bevochtigde doek.
• Reinig de accessoires op de gebruikelijke wijze in zeepwater.
• De deurlijst en de afdichting en de aangrenzende onderdelen moeten
zorgvuldig met een vochtige doek worden gereinigd als ze vuil zijn.
Stekker met twee ronde pennen
Dit apparaat moet geaard worden(16 ampère traag). In het geval van een
elektrisch kortsluiting, vermindert aarding het risico van een elektrische
schok door het voorzien van een afvoerdraad voor de elektrische stroom.
Dit apparaat is uitgerust met een snoer met een aardedraad en een
geaarde stekker. De stekker moet in een stopcontact worden gestoken
dat correct geïnstalleerd en geaard is. Raadpleeg een elektricien of
monteur als de instructies m.b.t. de aarding niet helemaal duidelijk zijn of
als er twijfel bestaat over de vraag of het apparaat correct is geaard. Als
het nodig is om een verlengsnoer te gebruiken, gebruik dan alleen een
3-aderige verlengsnoer.
• Een kort netsnoer is voorzien om de risico's van verstrikt raken in of
struikelen over een langer snoer te verminderen.
• Als een lang snoer of verlengsnoer wordt gebruikt:
• Het aangemerkte nominale vermogen van het snoer of verlengsnoer moet
minstens even groot zijn als het nominale vermogen van het apparaat.
• Het verlengsnoer moet een geaarde 3-aderige kabel zijn.
• Het lange snoer moet zodanig worden gelegd, zodat het niet over de
toonbank of tafel zal hangen waar kinderen het er aan kunnen trekken
of per ongeluk over gestruikeld kan worden.
GEBRUIKSVOORWERPEN
VOORZICHTIG
Persoonlijk letselgevaar
• Het is voor iedereen, behalve een bevoegd persoon, gevaarlijk om
onderhouds- of reparatiewerkzaamheden uit te voeren waarbij
het verwijderen van een afdekking die bescherming biedt tegen
blootstelling aan microgolven.
• Zie de instructies over “Materialen die u in de magnetron kunt
gebruiken of moet vermijden.” Er zijn bepaalde niet-metalen
gebruiksvoorwerpen die niet veilig te gebruiken zijn voor de
magnetron. Als u twijfelt, kunt u het betreende gebruiksvoorwerp
volgens de onderstaande procedure testen.
Testen van het gebruiksvoorwerp:
• Vul een magnetronveilige container met een beker koud water (250ml)
samen met het betreende gebruiksvoorwerp.
• Koken gedurende 1 minuut op maximaal vermogen.
• Voel voorzichtig het gebruiksvoorwerp. Als het lege gebruiksvoorwerp
warm is, gebruik het niet voor het koken met de magnetron.
• Neem niet langer dan een minuut kooktijd.
Page 15
15
NL
MATERIALEN DIE U IN MAGNETRON KUNT
GEBRUIKEN
Gebruiksvoorwerpen Opmerkingen
Aluminiumfolie Alleen afscherming. Kleine gladde stukken kunnen
worden gebruikt om de dunne delen van vlees of
gevogelte af te dekken om overkoken te voorkomen.
Vonkvorming kan optreden als folie te dicht bij de
ovenwand is. De folie moet minimaal een inch (2,5cm) uit
de buurt van de ovenwand blijven.
Bruineringsschaal Volg de instructies van de fabrikant. De onderkant van
bruineringsschaal moet minstens 3/16 inch (5mm) boven de
draaitafel worden geplaatst. Onjuist gebruik kan leiden tot
het breken van de draaitafel.
Serviezen Alleen magnetronveilig. Volg de instructies van de
fabrikant. Gebruik geen gebarsten of gebroken schalen.
Glazen potten Verwijder altijd het deksel. Gebruik alleen om voedsel tot
net warm op te warmen. De meeste glazen potten zijn
niet hittebestendig en kunnen breken.
Glaswerk Alleen hittebestendig glaswerk voor de oven. Zorg
ervoor dat er geen metalen afwerking aanwezig is.
Gebruik geen gebarsten of gebroken schalen.
Oven kookzakken Volg de instructies van de fabrikant. Niet met metalen
binder afsluiten. Maak sneden zodat stoom kan
ontsnappen.
Papieren borden en
kopjes
Gebruik alleen voor kortdurend koken/opwarmen. Laat
de oven tijdens het koken niet onbewaakt achter.
Papieren handdoeken Gebruiken om voedsel af te dekken voor het opwarmen
en absorberen van vet. Gebruik onder toezicht voor
alleen kortdurend koken.
Perkamentpapier Gebruik als afdekking om spatten te voorkomen of als
verpakking voor het stomen.
Gebruiksvoorwerpen Opmerkingen
Plastic Alleen magnetronveilig. Volg de instructies van de
fabrikant. Moet “Magnetronveilig” gelabeld zijn.
Sommige plastic containers te verweken, wanneer het
eten erin heet wordt. “Kookzakken” en goed afgesloten
plastic zakken moet worden gesneden, doorboord of
ontlucht zoals voorgeschreven op de verpakking.
Plasticfolie Alleen magnetronveilig. Te gebruiken om voedsel tijdens
het koken af te bedekken om vocht vast te houden. Laat
plasticfolie niet in contact komen met het voedsel.
Thermometers Alleen magnetronveilig (vleesthermometers).
Vetvrij papier Gebruik als afdekking om spatten te voorkomen en
vocht vasthouden.
TE VERMIJDEN MATERIALEN IN MAGNETRON
Gebruiksvoorwerpen Opmerkingen
Aluminium schaal Kan vonken veroorzaken. Breng voedsel in een
magnetronveilige schaal over.
Etendoos met metalen
handvat
Kan vonken veroorzaken. Breng voedsel in een
magnetronveilige schaal over.
Metaal of met
metaal bekleed
gebruiksvoorwerpen
Metaal schermt het voedsel af van de magnetrongolven.
Metalen afwerking kan vonken veroorzaken.
Metalen twistbandjes Kunnen vonken en een brand in de oven veroorzaken.
Papieren zakken Kan tot een brand in de oven leiden.
Schuimplastic Plastic schuim kan smelten of de vloeistof erin
besmetten wanneer het aan hoge temperaturen wordt
blootgesteld.
Hout
Hout zal bij gebruik in de magnetron uitdrogen en kan
splijten of breken
Magnetron met Grillfunctie
Page 16
16
Gebruiksaanwijzing
UW OVEN INSTELLEN
Namen van ovenonderdelen en -accessoires
Verwijder de oven en alle materialen uit de doos en de ovenruimte.
Uw oven wordt met de volgende accessoires geleverd:
Glazen schaal 1
Draaitafel montagering 1
Gebruiksaanwijzing 1
1. Bedieningspaneel
2. Draaitafelas
3. Draaitafel montagering
4. Glasschaal
5. Kijkvenster
6. Deurmontage
7. Veiligheidsvergrendeling-systeem
8. Grill rek
Draaitafel Installatie
• Plaats nooit het glazen draaiplateau op zijn kop. De glazen schaal mag
nooit worden gehinderd.
• Zowel de glazen schaal als de montagering van de draaitafel moeten
tijdens het koken altijd gebruikt worden.
• Alle levensmiddelen en voedselcontainers moeten voor het koken
altijd op het glazen draaiplateau worden geplaatst.
• Als glazen schaal of montagering van de draaitafel scheurt of
breekt, neem dan contact op met de dichtstbijzijnde geautoriseerde
servicecenter.
INSTALLEREN EN AANSLUITEN
• Verwijder al het verpakkingsmateriaal en accessoires. Controleer de
magnetron voor mogelijke schade zoals deuken of een kapotte deur. Niet
installeren als de magnetron is beschadigd.
• Verwijder eventuele beschermfolie aangebracht op de behuizing van de
magnetron.
• De lichtbruine Mica-kap, aangebracht op de binnenruimte van de
magnetron om de magnetron te bescherming, niet verwijderen.
• Kies een vlakke ondergrond die voldoende open ruimte heeft voor de
ventilatieopeningen.
1
5
6
7
2
3
4
8
Page 17
17
NLNL
• De achterkant van het apparaat moet tegen een muur worden geplaatst.
Een minimale vrije ruimte van 7,5cm is nodig is tussen de magnetron en
eventuele aanwezige muren. Een kant moet vrij blijven. Laat minimaal
een ruimte van 30 cm boven de magnetron vrij. Verwijder De pootjes van
de magnetron nooit.
• Het blokkeren van de inlaat- en/of uitlaatopeningen kan de magnetron
beschadigen.
• Plaats de magnetron zo ver mogelijk uit de buurt van radio en TV. Gebruik
van de magnetron kan storingen veroorzaken bij radio- of TV-ontvangst.
• Sluit uw magnetron aan op een standaard stopcontact. Zorg ervoor dat de
spanning en de frequentie hetzelfde zijn als de spanning en de frequentie
op het typeplaatje.
• Plaats de magnetron niet op een kachel of ander warmteopwekkend
apparaat. Als het apparaat vlakbij of boven een warmtebron wordt geplaatst,
kan de magnetron worden beschadigd en de garantie zou vervallen.
De toegankelijke oppervlakken kunnen tijdens het gebruik
zeer heet worden.
BEDIENINGSINSTRUCTIE
Deze oven maakt gebruik van moderne elektronische regeling om
kookparameters aan te passen om beter aan uw behoeften voor het koken
te voldoen.
Klokinstelling
Als de magnetron is ingeschakeld, zal de oven "0:00" weergeven, en
zoemer zal een keer rinkelen.
• Druk op “KLOK/KEUKEN-TIMER” om 12-uurs of 24-uurs weergave te kiezen.
• Draai aan "
" om de urencijfers aan te passen, de invoertijd moet
tussen 0 - 23(24 uur) of 1 - 12(12-uur) zijn.
• Druk op “KLOK/KEUKEN-TIMER”, de minuutcijfers zullen knipperen.
• Draai aan " " om de minuutcijfers aan te passen, de invoertijd moet
tussen 0 – 59 zijn.
• Druk op “KLOK/KEUKEN-TIMER” om de klokinstelling te voltooien. De “:”
zal knipperen.
Opmerking:
• Als de klok niet is ingesteld, zal het niet werken wanneer het
ingeschakeld wordt.
• Tijdens het instellingsproces van de klok, als u op “STOP/WISSEN” drukt,
zal de oven automatisch naar de vorige status terugkeren.
Koken met de magnetron
• Druk één keer op de “MAGNETRON” knop, en “P100” wordt weergegeven.
• Druk vier keer op “MAGNETRON” of draai aan “ ” om het
magnetronvermogen kiezen van 100% naar 10% te selecteren. “P100”, “P80”,
“P50”, “P30”, “P10” wordt in volgorde weergegeven.
• Druk op “START/+30SEC./BEVESTIGEN” om te bevestigen.
• Draai aan "
"om de kooktijd aan te passen. (De tijdinstelling moet tussen
0:05 - 95:00 liggen.)
• Druk op “START/+30SEC./BEVESTIGEN” om het koken te starten.
OPMERKING: de stapgrootte voor het aanpassen van de tijd van de
coderingschakelaar zijn als volgt:
0--- 1 min : 5 seconden
1—5 min : 10 seconden
5---10 min : 30 seconden
10---30 min : 1 minuut
30---95 min : 5 minuten
Magnetron met Grillfunctie
Page 18
18
Gebruiksaanwijzing
Magnetron-vermogengraek
Drukken 1 keer 2 keer 3 keer 4 keer 5 keer
Magnetronvermogen 100% 80% 50% 30% 10%
Koken met de grill
• Druk één keer op de “GRILL/COMBI” knop, en “G-1” wordt weergegeven.
• Draai aan “
" om het grillvermogen te selecteren. Stop met draaien
wanneer “G-1” wordt weergegeven.
• Druk op “START/+30 SEC./BEVESTIGEN” om te bevestigen.
• Draai aan “
" om de kooktijd aan te passen. (De tijdinstelling moet tussen
0:05 - 95:00 liggen.)
• Druk op “START/+30SEC./BEVESTIGEN” om het koken te starten.
Opmerking:
Als de helft van de grilltijd verstrijkt, zal de oven twee keer een alarm
geven om u te vertellen het voedsel te draaien. U kunt het gewoon verder
laten koken. Maar om een beter grilleect van het voedsel te bereiken,
moet u het voedsel omdraaien, sluit de deur en druk vervolgens op
“START/+30SEC./BEVESTIGEN” om met het koken verder te gaan.
Combinatie koken
• Druk één keer op de “GRILL/COMBI”-knop, en “G-1” wordt weergegeven.
• Druk vier keer op “GRILL/COMBI” of draai aan “
" om van het
vermogen van de grill te selecteren. Stop met draaien wanneer “C-1”,
“C-2”, “C-3” of “C-4” wordt weergegeven.
• Druk op “START/+30SEC./BEVESTIGEN” om te bevestigen.
• Draai aan "
" om de kooktijd aan te passen. (De tijdinstelling moet
tussen 0:05 - 95:00 liggen.)
• Druk op “START/+30SEC./BEVESTIGEN” om het koken te starten.
Instructies Display Magnetron Grill Convectie
1 C-1 • •
2 C-2 • •
3 C-3 • •
4 C-4 • • •
Convectiekoken (met voor-verwarmingsfunctie)
Het convectiekoken stelt u in staat het voedsel koken als een traditionele
oven te koken. De magnetron wordt niet gebruikt. Het wordt aanbevolen
dat u de oven op de juiste temperatuur voorverwarmt alvorens het
voedsel in de oven te plaatsen.
• Druk eenmaal op de “CONVECTIE”-knop, “100” zal knipperen.
• Blijf op “CONVECTIE” drukken of draai aan “
" om de convectiefunctie
te selecteren. Opmerking: de temperatuur kan van 100 graden tot 190
graden worden gekozen.
• Druk op “START/+30SEC./BEVESTIGEN” om de temperatuur te bevestigen.
• Druk op “START/+30SEC./BEVESTIGEN” om het voorverwarmen te starten.
Als de voor-verwarmingstemperatuur bereikt is, zal de zoemer twee keer
luiden om u eraan te herinneren het voedsel in de oven te plaatsen. En de
voorverwarmde temperatuur wordt weergegeven en knippert.
• Leg het voedsel in de oven en sluit de deur.
• Draai aan “
" om de kooktijd aan te passen. (De maximale instelling is
95 minuten.)
• Druk op “START/+30SEC./BEVESTIGEN” om het koken te starten.
Opmerking:
• De kooktijd kan niet worden ingevoerd totdat de voorverwarmingtemperatuur bereikt is.
• Als de temperatuur bereikt is, moet de deur worden geopend om de
kooktijd in te voeren.
Page 19
19
NL
• Als de tijd niet binnen 5 minuten wordt ingevoerd, zal de oven het
voorverwarmen stoppen. De zoemer zal vijf keer luiden en naar de
wachtmodus terugkeren.
Convectiekoken (zonder voorverwarmingfunctie)
• Druk eenmaal op de “CONVECTIE”-knop, “100” zal knipperen.
• Blijf op “CONVECTIE” drukken of draai aan “
" om de convectiefunctie te
selecteren. Opmerking: de temperatuur kan van 100 graden tot 190 graden
worden gekozen.
• Druk op “START/+30SEC./BEVESTIGEN” om de temperatuur te bevestigen
• Draai aan “
" om de kooktijd aan te passen. (De maximale instelling is 95
minuten.)
Keuken-timer
• Druk tweemaal op “KLOK/KEUKEN-TIMER”, de LED zal 00:00 weergegeven.
• Draai aan “
" om de juiste kooktijd in te stellen. (De maximale kooktijd
is 95 minuten.)
• Druk op de “START/+30SEC./BEVESTIGEN” om de instelling te bevestigen.
• Wanneer de kooktijd is bereikt, zal de klokindicator uit gaan. De
zoemer zal 5 keer luiden. Als de klok is ingesteld (24-uurs systeem),
wordt de huidige tijd in de LED weergegeven.
Ontdooien op gewicht
• Druk op “W.T./Ontdooitijd” om de functie voor het ontdooien op
gewicht te kiezen. “dEF1” zal worden weergegeven.
• Draai aan “
" om het gewicht in te stellen. “100”, “200”, “300”, “400”,
“500”, “600”, “800”, “1000”, “1200”, “1400”, “1600”, “1800” en “2000” zal in
volgorde worden weergegeven.
• Druk op de “START/+30Sec./BEVESTIGEN” om het ontdooien te starten.
Als op “Stop/Wissen” wordt ingedrukt, zal het naar de stand-bymodus
terugkeren. Druk op dat moment nogmaals op “Start/+30Sec./
Bevestigen” of de duur van de pauze meer dan 5 minuten is, zal het
weer naar de stand-bymodus terugkeren. Druk binnen 5 minuten op
“Start/+30Sec./Bevestigen”, het apparaat zal gaan werken en zal de tijd
aftellen. Als het klaar is, zal de zoemer vijfmaal te horen zijn en weer
naar de stand-bymodus terugkeren.
• Wanneer de helft de ontdooitijd is verlopen, zal de zoemer tweemaal
te horen zijn om u eraan te herinneren om het voedsel om te draaien.
Als geen actie wordt ondernomen, zal het apparaat blijven werken en
zal het resultaat niet goed zijn.
Ontdooien op tijd
• Druk tweemaal op “W.T./Ontdooitijd” om de functie voor het ontdooien
op tijd te kiezen. “dEF2” zal worden weergegeven.
• Draai aan "
" om de kooktijd aan te passen. De maximale insteltijd is
95 minuten.
• Druk op de “START/+30Sec./BEVESTIGEN” om het ontdooien te starten.
Als op “Stop/Wissen” wordt ingedrukt, zal het naar de stand-bymodus
terugkeren. Druk op dat moment nogmaals op “Start/+30Sec./Bevestigen”
of de duur van de pauze meer dan 5 minuten is, zal het weer naar de
stand-bymodus terugkeren. Druk binnen 5 minuten op “Start/+30Sec./
Bevestigen”, het apparaat zal gaan werken en zal de tijd aftellen.
Automatisch menu
• Draai in de stand-bymodus op “ ” naar rechts om de geweste functie te
kiezen en “A1”, “A2”, “A3”...“A10” zal worden weergegeven.
• Druk op “START/+30SEC./BEVESTIGEN” om het gewenste menu te
bevestigen.
• Draai aan " " om het gewicht uit het menu te kiezen en de indicator
“g” zal gaan branden.
• Druk op “START/+30SEC./BEVESTIGEN” om met koken te starten.
Opmerking 1: Wanneer u A8 cake kiest, plaats de cake niet in het begin in
de oven. De oven moet eerst tot 160 graden worden voorverwarmd. Na een
aantal minuten, klinkt de zoemer twee keer om u eraan te herinneren de cake
in de oven te plaatsen. Nadat de cake in de oven is geplaatst, druk opnieuw
Magnetron met Grillfunctie
Page 20
20
Gebruiksaanwijzing
op “START/+30SEC./BEVESTIGEN”. De klok zal aftellen, en de cake zal perfect
worden gebakken.
Opmerking 2: Tijdens het koken van A10 gebraden kip, zal de oven twee
keer geluid produceren en dit normaal. Om een beter grilleect van voedsel
te behalen, moet u het eten omdraaien, de deur sluiten en vervolgens op op
“Start/+30SEC./Bevestigen” drukken om met koken door te gaan.
Wanneer geen bediening plaatsvindt, zal de oven blijven werken.
TABEL AUTOMATISCH MENU
Menu Weight(g) Power
A1
Pizza
• 300
• 400
100%
A2
Aardappel
• 1 (ongeveer 230 gram)
• 2 (ongeveer 460 gram)
• 3 (ongeveer 690 gram)
100%
A3
Vlees
• 200
• 300
• 400
• 500
100%
A4
Vis
• 200
• 300
• 400
• 500
80%
A5
Groenten
• 200
• 300
• 400
• 500
100%
Menu Weight(g) Power
A6
Drank
• 1(ongeveer 240 ml)
• 2(ongeveer 480 ml)
• 3(ongeveer 720 ml)
100%
A7
Pasta
• 50(voeg 450 ml koud water toe)
• 100(voeg 800 ml koud water toe)
• 150(voeg 1200 ml koud water toe)
80%
A8
Popcorn
• 50
• 100
100%
A9
Cake
• 475 Voorverwarmen op
160 graden
A10
Gebraden
kip
• 750
• 1000
• 1250
• C-2
• C-2
• C-2
Snelkoken
• Druk in de wachtmodus op de “START/+30SEC./BEVESTIGEN”-knop
om gedurende 30 seconden met 100% vermogen te koken. Elke druk
op dezelfde knop verhoogt de duur met 30 seconden. De maximale
kooktijd is 95 minuten.
• Druk in de magnetron-, gril-, convectie- of de combinatiemodus op de
“START/+30SEC./BEVESTIGEN”-knop om gedurende 30 seconden met
100% vermogen te koken. Elke druk op dezelfde knop verhoogt de
duur met 30 seconden.
Opmerking: deze functie werkt niet onder ontdooien, auto-menu en
multi-fase koken.
Vergrendelingfunctie voor kinderen
• Vergrendeling: Druk in de wachtmodus 3 seconden lang op “STOP/
WISSEN”, een lange “pieptoon” zal te horen zijn ter aanduiding dat
de kinder-vergrendelingsmodus wordt ingeschakeld en de “
"
-indicator licht op. De LED geeft de huidige tijd of 00:00 weer.
Page 21

21
NL
• Vergrendeling uitschakelen: Druk in de vergrendelingsmodus 3 seconden
lang op “STOP/WISSEN”, een lange “pieptoon” zal te horen zijn ter aanduiding
dat de vergrendeling wordt uitgeschakeld en de “
”-indicator zal
verdwijnen.
Bijzondere specicaties
• De maximale kooktijd van “Magnetron”, “Grill”, “Ontdooien op tijd”,
“Convectie” en “Combinatie” is 95 minuten.
• Wanneer de deur geopend is, zal de lamp branden. Als het voor 10
minuten geopend blijft, zal de lamp worden uitgeschakeld en de
display zal in de stand-bymodus schakelen.
• Bij het openen van de deur in de stand-bymodus of tijdens het instellen
van het proces, zal de beginscherm hetzelfde blijven. Het kan gewijzigd
en ook ingesteld worden. Maar de “START”-toets zal niet werken.
• Sluit de deur, de lamp zal worden uitgeschakeld. De instelling kan
worden gewijzigd. En de “START”-toets kan ook werken.
PROBLEMEN OPLOSSEN
Normaal
De magnetron stoort de
TV-ontvangst
Radio- en TV-ontvangst kunnen worden
verstoord als de magnetron werkt. Het is
vergelijkbaar met de storing van kleine
elektrische apparaten, zoals mixer, stofzuiger
en elektrische ventilator. Het is normaal.
Gedimd ovenlicht Bij het koken met laag magnetronvermogen,
kan het ovenlicht worden gedimd. Het is
normaal.
Stoomophoping op de
deur, hete lucht uit de
ventilatieopeningen
Bij het koken kan stoom uit het
voedsel komen. Het meeste zal via de
ventilatieopeningen ontsnappen. Maar een
klein beetje kan op koele plaatsen zoals de
ovendeur verzamelen. Het is normaal.
Normaal
Oven startte per ongeluk
zonder voedsel erin
Het is verboden om het apparaat te
gebruiken zonder voedsel. Het is erg
gevaarlijk.
Probleem Mogelijke oorzaak Oplossing
Oven kan niet
worden gestart.
1) Netsnoer niet
stevig aangesloten.
2) Zekering
doorgeslagen of
stroomonderbreker
ingetreden.
3) Problemen met het
stopcontact.
• Haal de stekker uit het
stopcontact. Steek
het vervolgens na 10
seconden weer in het
stopcontact terug.
• Vervang de
zekering of reset de
stroomonderbreker
(herstellen door
professionele
medewerkers van ons
bedrijf )
• Test het stopcontact
met andere elektrische
apparaten.
Oven verwarmt
niet.
4) Deur niet goed
gesloten.
Sluit de deur goed.
Glazen
draaiplateau
maakt lawaai als
magnetron werkt
5) Vuile wielsteuntjes
en ovenbodem.
Zie “Onderhoud van de
Magnetron” om vuile
onderdelen schoon te
maken.
Magnetron met Grillfunctie
Page 22
22
Lisez attentivement ces instructions avant d’utiliser votre four à
micro-ondes et conservez-les soigneusement.
Si vous suivez les instructions, votre four vous garantira un service
excellent pendant de longues années
CONSERVEZ SOIGNEUSEMENT CES INSTRUCTIONS
PRÉCAUTIONS POUR ÉVITER UNE EVENTUELLE EXPOSITION
EXCESSIVE À L’ENERGIE DES MICRO-ONDES
(a) N’essayez pas d’utiliser ce four en laissant la porte ouverte, ceci pourrait
provoquer une exposition excessive dangereuse à l’énergie des microondes. Il est important de ne pas forcer ou rompre les fermetures de sécurité.
(b) Ne placez aucun objet entre la partie antérieure du four et la porte ou
ne laissez pas s’accumuler des résidus de graisse ou de détergents sur
les surfaces des joints d’étanchéité.
(c) AVERTISSEMENT : Si la porte ou les joints sont endommagés, le four ne
doit pas être utilisé tant que n’est pas eectuée la réparation par un
personnel compétent.
INDEX
Si l’appareil n’est pas bien nettoyé, sa surface peut être endommagée et ainsi
réduire la durée de vie de l’appareil et l’exposer à des situations dangereuses.
CARACTÉRISTIQUES
Modèle : MW-2897
Tension standard : 230 V~50 Hz
Puissance nominale en entrée (Micro-ondes) : 1300W
Puissance nominale en sortie (Micro-ondes) : 800W
Puissance nominale en entrée (Grill): 1200W
Puissance nominale en entrée (Convection) : 1200W
Capacité du four : 23L.
Diamètre du plat tournant : Ф270 mm
Dimensions externs (LxPxH) : 485 mm x 410 mm
x 292,5 mm
Poids net : Environ 13,5 kg
AVERTISSEMENTS IMPORTANTS SUR LA SÉCURITÉ
An de diminuer le risqué d’incendie, de choc électrique, de
dommages aux personnes ou d’une exposition à l’énergie excessive
dur four à micro-ondes pendant l’utilisation de votre appareil, suivez
les précautions de base suivantes :
• Avertissement : Les liquides et autres aliments ne doivent pas
être réchaués dans des acons fermés hermétiquement car ils
peuvent exploser.
• Avertissement : Il est dangereux pour tout personnel non
spécialisé d’eectuer un entretien ou une réparation qui implique
le retrait d’un couvercle prévu pour garantir la protection contre
l’exposition à l’énergie des micro-ondes.
• Avertissement : Ne permettez l’utilisation du four à des enfants
qu’après leur avoir donné des instructions pour une bonne
utilisation du four et après les avoir mis en garde contre les risques
encourus en cas de mauvaise utilisation.
• Avertissement : Lorsque vous utilisez le four en mode combiné, les
enfants ne peuvent l’utiliser qu’en présence d’un adulte en raison
de la température émise. (Uniquement pour le modèle avec grill)
• Utilisez uniquement des ustensiles appropriés pour l’utilisation en
four à micro-ondes.
• Le four doit être nettoyé régulièrement, tout dépôt d’aliments doit
être éliminé.
• Lisez et suivez les données spéciques : "PRÉCAUTIONS POUR
ÉVITER UNE EVENTUELLE EXPOSITION EXCESSIVE À L’ ENERGIE DES
MICRO-ONDES ".
• Lorsque vous réchauez des aliments dans des récipients en
plastiquer ou en carton, veuillez contrôler le four en raison du
Mode d’emploi
Page 23

23
FR
risque d’incendie.
• Si vous constatez la presence de fume, éteignez ou débranchez et
laissez la porte du four fermée pour étouer toute amme.
• Ne faites pas trop cuire les aliments.
• N'utilisez pas la cavité du four comme récipient. Ne laissez pas des
produits comme du pain, des biscuits, etc. dans le four.
• Enlevez les fermetures en métal et les poignées métalliques des
récipients/sacs en plastique ou en carton avant de les mettre dans le four.
• Installez ou placez uniquement ce four conformément aux
consignes fournies pour l’installation.
• Les œufs durs ou avec leur coquille ne doivent pas être réchaués
dans le four à micro-ondes car ils peuvent exploser même une fois
la cuisson terminée.
• Utilisez cet appareil uniquement selon l’usage indiqué par
le présent manuel. N’utilisez pas de produits ou de vapeurs
corrosives dans cet appareil. Ce four est particulièrement conçu
pour réchauer. Il n’est pas conçu pour des utilisations industrielles
ou en laboratoire.
• Si le cordon d’alimentation est endommagé, remplacez-le auprès
du fabricant, de son service d’entretien ou d’une personne
analogue qualiée pour éviter tout risque.
• Ne rangez ni utilisez pas cet appareil à l’extérieur.
• N’utilisez pas ce four à proximité d’eau, dans un évier humide ou
près d’une piscine.
• La température des surfaces accessible peuvent être élevées
pendant le fonctionnement de l’appareil. Les surfaces sont
chaudes pendant utilisation. Éloignez le cordon de toute surface
de chaleur et, en aucun cas, ne couvrez jamais le four.
• Ne laissez jamais le cordon suspendu sur le bord d’une table ou
d’un plan de travail.
• La non observation des conditions d’entretien du four pourrait
endommager la surface, causer une réduction de la durée de vie
de l’appareil et provoquer aussi des situations dangereuses.
• Le contenu des biberons et des acons d’aliments doivent être
mélanges ou agités et la température doit être vériée avant
consommation an d’éviter toute brûlure.
• Le réchauement de boissons au micro-ondes peut provoquer
un processus d’ébullition retardé, par conséquent, faites attention
lorsque vous manipulez le récipient.
• L’appareil n’est pas conçu pour être utilisé par des personnes
(y compris les enfants) à capacités physiques, sensorielles
ou mentales réduites, ou manquant d’expérience ou de
connaissances, sauf s’il leur a été donné par une personne
responsable de leur sécurité une supervision ou une instruction
concernant l’emploi de l’appareil.
• Les enfants doivent être surveillés pour s’assurer qu’ils ne jouent
pas avec l’appareil.
• Les appareils ne sont pas conçus pour être utilisés par
l’intermédiaire d’un minuteur externe ou d’un système de
commande à distance séparé.
• AVERTISSEMENT : Veillez à ce que l’appareil soit éteint avant de
remplacer l’ampoule pour éviter un éventuel choc électrique.
• Les pièces accessibles peuvent être chaudes pendant utilisation.
Tenez les jeunes enfants éloignés.
• N’utilisez pas de produits nettoyants abrasifs ou d’éponges
métalliques pour nettoyer la porte vitrée du four car ils peuvent
rayer la surface et ainsi briser la vitre.
• Pendant utilisation, l’appareil devient chaud. Faites attention et
évitez de toucher les éléments chauants dans le four.
• Utilisez uniquement la sonde thermique conseillée pour ce four.
(Pour les fours avec fonction sonde thermique.)
• Placez la surface arrière de l’appareil contre un mur.
Four à micro-ondes avec grill
Page 24

24
DANGER
Risque de choc électrique
Toucher des composants internes peut causer des dommages corporels
graves ou la mort. Ne démontez pas cet appareil.
AVERTISSEMENT
Risque de choc électrique Une mauvaise utilisation de la mise à la terre peut
causer un choc électrique. Ne branchez que si l’appareil est correctement
installé et mis à la terre.
ENTRETIEN
Veillez à débrancher l’appareil de l’alimentation.
• Nettoyez l’intérieur du four après utilisation d’un tissue légèrement humide.
• Nettoyez les accessoires de façon habituelle dans de l’eau savonneuse.
• En cas de salissures, le cadre et le joint de la porte ainsi que les pièces
adjacentes doivent être soigneusement nettoyées à l’aide d’un tissu humide.
Connecteur à deux broches
Cet appareil doit être relié à la terre. En cas de court-circuit électrique,
la mise à la terre réduit le risque de choc électrique grâce à un l
d’évacuation pour le courant électrique. Cet appareil est équipé d’un
cordon muni d’un conducteur de terre avec prise de mise à la terre. La
che doit être branchée à une prise correctement installée et reliée à la
terre. Contactez un électricien qualié ou un dépanneur si les consignes
de mise à la terre ne sont pas entièrement comprises ou en cas de doute
sur la bonne mise à la terre de l’appareil. Si vous devez utiliser une
rallonge, utilisez une rallonge à 3 ls.
• Un cordon d’alimentation court est fourni pour réduire les risques
d’enchevêtrement ou de trébuchement avec un cordon plus long.
• En cas d’utilisation d’un cordon amovible long ou d’une rallonge :
• Les caractéristiques électriques du cordon amovible ou de la rallonge
doivent être au moins aussi grandes que celles de l’appareil.
• La rallonge doit être un cordon de mise à la terre à 3 ls.
• Installez le long cordon pour qu’il n’enveloppe pas la partie supérieure
du plan de travail ou le dessus de table, là où les enfants pourraient
tirer dessus ou trébucher involontairement.
USTENSILES
ATTENTION
Risque de dommages corporels
• Il est dangereux pour tout personnel non spécialisé d’eectuer un
entretien ou une réparation qui implique le retrait d’un couvercle prévu
pour garantir la protection contre l’exposition à l’énergie des micro-ondes.
• Consultez les instructions dans "Matériel à utiliser ou non dans un four
à micro-ondes." Il existe peut-être des ustensiles non métalliques sans
risque pour la cuisson au four à micro-ondes. En cas de doute, testez
l’ustensile en question en suivant la procédure ci-dessous.
Test d’ustensile :
• Versez 1 tasse d’eau froide (250ml) dans un récipient qui convient au
four à micro-ondes avec l’ustensile en question.
• Faites cuire à puissance maximale pendant 1 minute.
• Examinez bien l’ustensile. Si l’ustensile vide est chaud, ne l’utilisez pas
pour la cuisson au micro-ondes.
• Ne dépassez pas 1 minute de temps de cuisson.
Mode d’emploi
Page 25
25
FR
MATÉRIEL POUR FOUR À MICROONDES
Ustensiles Remarques
Aluminium Protection uniquement. De petits morceaux lisses peuvent
être utilisés pour couvrir des morceaux épais de viande ou
de volaille pour empêcher une cuisson excessive. Un arc
électrique peut se produire si l’aluminium est trop près des
parois du four. L’aluminium doit être situé à au moins 1 pouce
(2,5 cm) des parois du four.
Plat brunisseur Suivez les consignes du fabricant. Le bas du plat brunisseur doit
être situé à au moins 3/16 pouce (5 mm) au-dessus du plateau
tournant. Un mauvais usage peut briser le plateau tournant.
Vaisselle de table Qui convient uniquement au four à micro-ondes. Suivez les
consignes du fabricant. N’utilisez pas de la vaisselle cassée
ou ébréchée.
Bocaux en verre Enlevez toujours le couvercle. Utilisez uniquement pour
chauer des aliments an qu’ils chauent légèrement. De
nombreux bocaux en verre ne résistent pas à la chaleur et
peuvent casser.
Objet en verre Uniquement des objets en verre qui résistent à la chaleur et
qui conviennent au four. Veillez à ce qu’il n’y ait pas de nitions
métalliques. N’utilisez pas de la vaisselle cassée ou ébréchée.
Sacs brunisseurs qui
conviennent au four
Suivez les consignes du fabricant. Ne fermez pas avec un lien
métallique. Faites des trous pour permettre à la vapeur de
s’échapper.
Tasses et assiettes en
carton
Uniquement pour une cuisson/un chauage de courte durée.
Ne laissez pas le four sans surveillance pendant la cuisson.
Serviettes en papier Elles servent à couvrir les aliments pour réchauer ou
absorber les matières grasses. Utilisez sous surveillance pour
une cuisson de courte durée uniquement.
Papier sulfurisé Utilisation comme couvercle pour empêcher les
éclaboussures ou comme emballage pour la vapeur.
Ustensiles Remarques
Plastique Qui convient uniquement au four à micro-ondes. Suivez les
consignes du fabricant. Inscription obligatoire "Convient au
four à micro-ondes". Des récipients en plastique ramollissent
car les aliments à l’intérieur chauent. "Sacs à ébullition" et
des sacs en plastique bien fermés doivent être troués, percés
ou ventilés comme indiqué sur l’emballage.
Emballage en
plastique
Qui convient uniquement au four à micro-ondes. Utilisez pour
couvrir des aliments pendant la cuisson pour garder l’humidité.
Evitez que l’emballage en plastique ne touche les aliments.
Thermomètres Qui convient uniquement au four à micro-ondes
(Thermomètres à viande et à bonbons).
Papier ciré Utilisation comme couvercle pour empêcher les
éclaboussures et garder l’humidité.
MATÉRIEL À ÉVITER AU FOUR À MICROONDES
Ustensiles Remarques
Plateau en aluminium Risque d’arc électrique. Déplacez les aliments dans un plat
qui convient au four à micro-ondes.
Carton d’aliments avec
poignée en métal
Risque d’arc électrique. Déplacez les aliments dans un plat
qui convient au four à micro-ondes.
Ustensiles en métal ou
ornés de métal
Le métal protège les aliments de l’énergie des micro-ondes.
Les nitions métalliques peuvent causer un arc électrique.
Ligatures métalliques Risque d’arc électrique et d’incendie dans le four.
Sacs en papier Risque d’incendie dans le four.
Mousse plastique La mousse plastique peut fondre ou contaminer les
liquides à l’intérieur lorsqu’elle est exposée à une
température élevée.
Bois Le bois se dessèche en cas d’utilisation au four à micro-
ondes et peut se déchirer ou se casser.
Four à micro-ondes avec grill
Page 26

26
INSTALLATION DE VOTRE FOUR
Noms des pièces et accessoires du four
Enlevez le four et tout le matériel du carton d’emballage et de la cavité du four.
Votre four s’accompagne des accessoires suivants :
Plateau en verre 1
Anneau du plateau tournant 1
Mode d’emploi 1
1. Panneau de commande
2. Axe du plateau tournant
3. Anneau du plateau tournant
4. Plateau en verre
5. Fenêtre d’observation
6. Porte
7. Système de verrouillage de sécurité
8. Grille
Installation du plateau tournant
• Ne placez jamais le plateau en verre à l’envers. Il ne doit jamais être bloqué.
• Utilisez toujours le plateau en verre et l’anneau du plateau tournant
pendant la cuisson.
• Placez toujours tous les aliments et les récipients de nourriture sur le
plateau en verre pour la cuisson.
• Si le plateau en verre ou l’anneau du plateau tournant se déchire ou se
casse, contactez un centre d’entretien agrée le plus proche.
INSTALLATION ET BRANCHEMENT
• Retirez tous les emballages et accessoires. Vériez que le four ne soit pas
endommagé comme par exemple, des bosselures ou une porte cassée.
N’installez pas si le four est endommagé.
• Retirez les pellicules de protection qui se trouvent sur la surface extérieure du
micro-ondes.
• Ne retirez pas le cache Mica marron clair qui est attaché à la cavité du four
pour protéger le magnétron.
• Choisissez une sur face plate procurant susamment d’espace pour les
orices d’entrée et/ou de sortie.
1
5
6
7
2
3
4
8
Mode d’emploi
Page 27
27
FR
• La surface arrière de l’appareil sera mise contre un mur. Un espace minimum
de 7,5 cm est requis entre le four et tout mur de côté. Un côté doit être ouvert.
Laissez un espace minimum de 30 cm au-dessus du four. Ne retirez pas les
pieds du bas du four.
• Bloquez les orices d’entrées et/ou de sortie peut endommager le four.
• Posez le four aussi loin que possible de toute radio et TV. Le fonctionnement
du four à micro-ondes peut provoquer des interférences à la réception de
votre radio ou TV.
• Branchez votre four sur une prise normale domestique. Veillez à ce que la
tension et la fréquence soit identiques à celles sur la plaque signalétique.
• N’installez pas le four sur une cuisinière ou un autre appareil chauant. Si
installé à proximité ou au-dessus d’une source de chaleur, le four pourrait être
endommagé et rendre la garantie caduque.
La surface accessible peut être chaude pendant utilisation.
CONSIGNES D’UTILISATION
Ce four à micro-ondes utilise une commande électronique modern pour régler
les paramètres de cuisson an de satisfaire au mieux vos besoins de cuisson.
Paramètre de l’heure
Lorsque le four à micro-ondes est branché, le four achera "0:00", un
avertisseur retentira une fois.
• Appuyez sur "CLOCK/PROGRAMMATEUR CUISSON" pour sélectionner
le format 12 heures ou 24 heures.
• Tournez "
" pour régler les chires des heures, l’heure saisie doit être
entre 0—23 (24 heures) ou 1—12 (12 heures).
• Appuyez sur "CLOCK/PROGRAMMATEUR CUISSON", the minute gures
will ash.
• Tournez "
" pour régler les chires des minutes, les minutes saisies
doivent être entre 0--59.
• Appuyez sur "CLOCK/PROGRAMMATEUR CUISSON" pour mettre n au
réglage de l’heure. ":" clignote.
Note :
• Si l’heure n’est pas réglée, l’appareil ne fonctionnera pas lorsque vous
le brancherez.
• Pendant le réglage de l’heure, si vous appuyez sur "ARRETER/EFFACER",
le four revient automatiquement à la position précédente.
Cuisson au four à micro-ondes
• Appuyez une fois sur la touche "MICRO-ONDES", et "P100" s’ache.
• Appuyez quatre fois sur "MICRO-ONDES" ou tournez "
" pour régler la
puissance du micro-ondes de 100% à 10%. "P100", "P80", "P50", "P30", "P10"
s’achent dans l’ordre.
• Appuyez sur "DEMARRER/+30SEC./CONFIRMER" pour conrmer.
• Tournez "
" pour régler le temps de cuisson. (Le réglage du temps doit être
de 0:05- 95:00.)
• Appuyez sur "DEMARRER/+30SEC./CONFIRMER" pour démarrer la cuisson.
NOTE: voici les niveaux pour le réglage de la durée du commutateur-codeur :
0--- 1 min : 5 secondes
1—5 min : 10 secondes
5---10 min : 30 secondes
10---30 min : 1 minute
30---95 min : 5 minutes
Four à micro-ondes avec grill
Page 28
28
Tableau des puissances du four à micro-ondes
Appuyer 1 fois 2 fois 3 fois 4 fois 5 fois
Puissance du micro-ondes 100% 80% 50% 30% 10%
Cuisson avec grill
• Appuyez une fois sur la touche "GRILL/COMBI", et "G-1" s’ache.
• Tournez " " pour sélectionner la puissance du grill. Arrêtez de tourner
lorsque 'G-1' s'ache.
• Appuyez sur "DEMARRER/+30SEC./CONFIRMER" pour conrmer.
• Tournez "
" pour régler le temps de cuisson. (Le réglage du temps doit être
de 0:05- 95:00.)
• Appuyez sur "DEMARRER/+30SEC./CONFIRMER" pour démarrer la cuisson.
Note:
Une fois la moitié du temps de cuisson au grill écoulée, le four émettra
deux sons pour vous avertir de remuer les aliments. Vous pouvez laisser
la cuisson se poursuivre. Mais, pour bien griller les aliments, remuez
les aliments, fermez la porte puis appuyez sur "DEMARRER/+30SEC./
CONFIRMER" pour poursuivre la cuisson.
Cuisson Combinée
• Appuyez une fois sur la touche "GRILL/COMBI", et "G-1" s’ache.
• Appuyez plusieurs fois sur " GRILL/COMBI " ou tournez "
" pour
sélectionner la puissance du grill. Arrêtez de tourner lorsque ‘C-1’,’C2’,’C-3’ ou ‘C-4’ s’ache
• Appuyez sur "DEMARRER/+30SEC./CONFIRMER" pour conrmer.
• Tournez "
" pour régler le temps de cuisson. (Le réglage du temps doit
être de 0:05- 95:00.)
• Appuyez sur "DEMARRER/+30SEC./CONFIRMER" pour démarrer la cuisson.
Instructions Achage Micro-ondes Grill Convection
1 C-1 • •
Instructions Achage Micro-ondes Grill Convection
2 C-2 • •
3 C-3 • •
4 C-4 • • •
Cuisson par convection (avec fonction de préchauage)
La cuisson par convection vous permet de cuire les aliments comme
dans un four traditionnel. La fonction micro-ondes n’est pas utilisée. Il
est conseillé de préchauer le four à la température appropriée avant de
placer les aliments dans le four.
• Appuyez une fois sur la touche "CONVECTION", "100" clignote.
• Maintenez la touche "CONVECTION" appuyée ou tournez "
" pour
sélectionner la fonction convection. Note : vous pouvez sélectionner la
température de 100 à 190 degrés.
• Appuyez sur "DEMARRER/+30SEC./CONFIRMER" pour conrmer la
température.
• Appuyez sur "DEMARRER/+30SEC./CONFIRMER" pour démarrer le
préchauage. Lorsque la température de préchauage est atteinte,
l’avertisseur retentit deux fois pour vous rappeler de mettre les aliments
dans le four. Puis, la temperature de préchauage s’ache et clignote.
• Placez les aliments dans le four et fermez la porte.
• Tournez "
" pour régler le temps de cuisson. (Le temps de réglage
maximal est de 95 minutes.)
• Appuyez sur la touche "DEMARRER/+30SEC./CONFIRMER" pour
démarrer la cuisson.
Note:
• Vous ne pouvez pas saisir le temps de cuisson avant que la température
de préchauage ne soit atteinte. Si la température est atteinte, ouvrez
la porte pour saisir le temps de cuisson.
• Si vous ne saisissez pas le temps au bout de 5 minutes, le four s’arrêtera de
préchauer. L’avertisseur retentira cinq fois et revient en position d’attente.
Mode d’emploi
Page 29

29
FR
Cuisson par convection (sans fonction de préchauage)
• Appuyez une fois sur la touche "CONVECTION", "100" clignote.
• Maintenez la touche "CONVECTION" appuyée ou tournez "
" pour
sélectionner la fonction convection. Note : vous pouvez sélectionner la
température de 100 à 190 degrés.
• Appuyez sur "DEMARRER/+30SEC./CONFIRMER" pour conrmer la
température.
• Tournez "
" pour régler la durée de cuisson (La durée de réglage
maximum est de 95 minutes).
Programmateur Cuisson
• Appuyez deux fois sur 'HORLOGE/PROGRAMMATEUR', le LED achera 0h00.
• Tournez "
" pour saisir la bonne programmation (la durée maximum
de cuisson est de 95 minutes).
• Appuyez sur ‘DEMARRER/+30SEC./CONFIRMER' pour valider le réglage.
• Lorsque l'heure de programmation est atteinte, le voyant de l'heure
s'éteindra. La sonnerie retentira 5 fois. Si l’horloge a été réglée (format
de 24 heures), le LED achera l’heure en cours. Remarque : L'horloge
de cuisson est diérente du format de 24 heures, le Programmateur
Cuisine est un programmateur.
Décongélation par poids
• Appuyez sur ‘W.T/Heure Décongéler’ pour sélectionner la
décongélation en fonction du poids, ‘dEF1’ s’achera.
• Tournez "
" pour saisir le poids. ‘‘100’, ’200’, ’300’, ’400’, ’500’, ’600’, ’800’,
‘1000’, ‘1200’, ’1400’, ’1600’, ’1800’ et ‘2000’ s’acheront dans l’ordre.
• Appuyez sur ‘DEMARRER/+30SEC./CONFIRMER’ pour commencer
la décongélation si ‘ARRETER/EFFACER’ est appuyé, il se remettra
en état d'attente. A ce moment-là, appuyez à nouveau sur
‘DEMARRER/+30SEC./CONFIRMER’ ou si la durée de pause est
supérieure à 5 minutes, il se remettra en état d'attente. Appuyez
sur ‘DEMARRER/+30SEC./CONFIRMER’ dans les 5 minutes suivantes,
l’appareil continue de fonctionner et la durée diminue. Lorsque
terminé, la sonnerie retentit cinq fois et il se remet en état d’attente.
• A la moitié de la durée de décongélation, la sonnerie retentit deux fois pour
vous rappeler de retourner l’aliment, si rien n’est fait, l’appareil continuera de
fonctionner et le résultat de décongélation ne sera pas satisfaisant.
Décongélation par durée
• Appuyez deux fois sur ‘W.T/Heure Décongeler’ pour sélectionner la
décongélation en fonction de la durée. ‘dEF2’ s’achera.
• Tournez "
" pour saisir la durée de cuisson. La durée MAX est de 95
minutes.
• Appuyez sur ‘DEMARRER/+30SEC./CONFIRMER’ pour commencer
la décongélation si ‘ARRETER/EFFACER’ est appuyé, il se remettra
en état d'attente. A ce moment-là, appuyez à nouveau sur
‘DEMARRER/+30SEC./CONFIRMER’ ou si la durée de pause est
supérieure à 5 minutes, il se remettra en état d'attente. Appuyez
sur ‘DEMARRER/+30SEC./CONFIRMER’ dans les 5 minutes suivantes,
l’appareil continuera de fonctionner et la durée diminuera.
10. Menu automatique
• En état d’attente, tournez ‘ ’ vers la droite pour choisir la fonction
désirée, et ‘A1’, ‘A2’, ‘A3‘…’A10’ s’achera.
• Appuyez sur ‘DEMARRER/+30 SEC./CONFIRMER’ pour valider le menu requis
• Tournez " " pour sélectionner le poids du menu et le voyant ‘g’ s’allumera.
• Appuyez sur ‘DEMARRER/+30 SEC./CONFIRMER’ pour commencer la cuisson
Note 1: En choisissant A8 gâteaux, ne commencez pas par placer le gâteau
dans le four. Le four doit d’abord être préchaué à 160 degrés. Après plusieurs
minutes, l’avertisseur retentit deux fois pour vous rappeler de mettre le
gâteau dans le four. Une fois le gâteau enfourné, appuyez à nouveau sur
"DEMARRER/+30SEC./ CONFIRMER". Le minuteur commencera le compte à
rebours et le gâteau sera parfaitement cuit.
Note 2: Durant la cuisson A10 Poulet Rôti, le four sonnera deux fois, et ceci
est normal. An d’obtenir un meilleur résultat de grillade, il vous faudra
retourner l’aliment, refermer la porte, et puis appuyer sur ‘DEMARRER/+30 SEC./
Four à micro-ondes avec grill
Page 30

30
CONFIRMER' pour continuer la cuisson. Si aucune action n’est eectuée, le four
continuera de fonctionner.
TABLEAU DU MENU AUTOMATIQUE
Menu Poids Puissance
A1
Pizza
• 300
• 400
100%
A2
Pomme de
terre
• 1 (environ 230 g)
• 2 (environ 460 g)
• 3 (environ 690 g)
100%
A3
Viande
• 200
• 300
• 400
• 500
100%
A4
Poisson
• 200
• 300
• 400
• 500
80%
A5
Légume
• 200
• 300
• 400
• 500
100%
A6
Boisson
• 1(environ 240 ml)
• 2(environ 480 ml)
• 3(environ 720 ml)
100%
A7
Pâtes
• 50(ajouter 450 ml d’eau froide)
• 100(ajouter 800 ml d’eau froide)
• 150(ajouter 1200 ml d’eau froide)
80%
Menu Poids Puissance
A8
Popcorn
• 50
• 100
100%
A9
Gâteau
• 475 Préchauer à 160
degrés
A10
Poulet Rôti
• 750
• 1000
• 1250
• C-2
• C-2
• C-2
Cuisson rapide
• En position d’attente, appuyez sur la touche "DEMARRER/+30SEC./
CONFIRMER" pour cuire à un niveau de puissance de 100% pendant 30
secondes. A chaque fois que vous appuyez sur la même touche, le temps
augmente de 30 secondes. Le temps de cuisson maximal est de 95 minutes.
• En positions micro-ondes, grill, convection et combiné, appuyez sur
la touche "DEMARRER/+30SEC./CONFIRMER" pour cuire à un niveau
de puissance de 100% pendant 30 secondes. A chaque fois que vous
appuyez sur la même touche, le temps augmente de 30 secondes.
Note : Cette fonction ne s’active pas si vous avez opté pour la
décongélation, le menu auto et la cuisson à phases multiples.
Fonction verrouillage sécurité pour enfants
• Verrouillage : En position d’attente, appuyez sur "ARRETER/EFFACER"
pendant 3 secondes, un long "bip" retenti indiquant le verrouillage
pour enfants et l’indicateur "
" s’allume. Le voyant LED ache le
temps actuel ou 0:00.
• Déverrouillage : En position de verrouillage, appuyez sur "ARRETER/
EFFACER" pendant 3 secondes, un long "bip" retenti indiquant
l’annulation du verrouillage pour enfants et l’indicateur"
"
disparaîtra.
Mode d’emploi
Page 31

31
FR
Caractéristiques particulières
• La durée maximum de cuisson des positions ‘Micro-onde’, ‘Grill’,
‘Décongélation’ par durée’, ‘Convection’ et ‘Combiné’ est de 95 minutes.
• Lorsque la porte est ouverte, la lumière s’allumera. Si elle reste ouverte
durant 10 minutes, la lumière s’éteindra et l’achage se mettra en état
d'attente.
• Lorsque la porte est ouverte en état d’attente ou durant le processus
de réglage, l’achage initial restera le même. Il peut changer et aussi
se régler. Mais la touche 'MARCHE' ne fonctionnera pas.
• Fermez la porte, la lumière s’éteindra. Le réglage peut être modié. Et la
touche ‘MARCHE’ peut aussi fonctionner.
DÉPANNAGE
Normal
Interférence du four
à micro-ondes sur la
réception de la TV
Des interférences peuvent intervenir sur
la réception de radio et de TV pendant le
fonctionnement du four à micro-ondes. Ce sont
des interférences courantes qui interviennent
avec de petits appareils électriques tels que
mixer, aspirateur et ventilateur électrique. C’est
un phénomène normal.
Faible éclairage Pendant la cuisson au four à micro-ondes
à faible puissance, la lumière du four peut
diminuer. C’est un phénomène normal.
De la vapeur s’accumule
sur la porte, de l’air
chaud sort des orices
d’aération
Pendant la cuisson, la vapeur peut s’échapper
des aliments. Une bonne partie de cette
vapeur s’évacue par les orices d’aération.
Mais, le reste de la vapeur peut s’accumuler
sur les surfaces froides telles que la porte du
four. C’est un phénomène normal.
Le four est
accidentellement allumé
sans présence d’aliments
à l’intérieur.
Il est interdit d’utiliser l’appareil sans
aliments à l’intérieur. Cette situation est très
dangereuse.
Problème Raison possible Solution
Le four ne
s’allume pas.
1) Le cordon
d’alimentation
n’est pas
correctement
inséré.
2) Le fusible saute
ou le disjoncteur
s’est activé.
3) Problème avec
la sortie.
• Débranchez. Puis, branchez
à nouveau au bout de 10
secondes.
• Remplacez le fusible ou
rétablissez le disjoncteur (la
réparation doit être eectuée
par le personnel qualié de
notre société)
• Vériez la sortie avec un autre
appareil électrique.
Le four ne
réchaue pas.
4) La porte n’est
pas bien fermée.
Fermez bien la porte.
Le plateau en
verre fait du
bruit pendant le
fonctionnement
du four à microondes
5) Les roulements
sont sales et
présence de résidus
au fond du four.
Référez-vous au paragraphe
"Entretien du mirco-ondes" pour
nettoyer les pièces sales.
Four à micro-ondes avec grill
Page 32

32
Bitte lesen Sie diese Anleitungen aufmerksam durch, bevor Sie die
Mikrowelle in Betrieb nehmen. Bewahren Sie die Anleitungen für
späteres Nachschlagen auf.
Bei Befolgung aller Anleitungen erweist Ihnen Ihre neue Mikrowelle für
viele Jahre gute Dienste.
BEWAHREN SIE DIESE ANLEITUNGEN AUF
SICHERHEITSHINWEISE ZUR VERMEIDUNG ÜBERMÄßIGER
BELASTUNGEN DURCH MIKROWELLENSTRAHLUNG
(a) Betreiben Sie die Mikrowelle nicht mit geöneter Tür, das kann Sie
gefährlicher Mikrowellenstrahlung aussetzen. Beschädigen und
umgehen Sie nicht die Sicherheitsmechanismen.
(b) Führen Sie keine Gegenstände zwischen Vorderseite und Tür ein und
achten Sie darauf, dass sich auf den Dichtungen keine Schmutz- oder
Reinigungsmittelrückstände ansammeln.
(c) WARNUNG: Betreiben Sie die Mikrowelle nicht mit beschädigten
Dichtungen, wenden Sie sich zur Reparatur an einen autorisierten
Kundendienst.
NACHTRAG
Unsachgemäße Pege und Reinigung kann zur Degenerierung der
Oberächen und damit zu einer Verkürzung des Lebensdauer des Geräts
und Gefahren führen.
SPEZIFIKATIONEN
Modell: MW-2897
Netzspannung: 230 V, 50 Hz
Leistungsaufnahme (Mikrowelle): 1300W
Leistung (Mikrowelle): 800W
Leistungsaufnahme (Grill): 1200W
Leistungsaufnahme (Umluft): 1200W
Garraum: 23L.
Durchmesser Drehteller: Ф270mm
Abmessungen (LxBxH): 485x410x292,5mm
Gewicht (Netto): Ca. 13,25 kg
WICHTIGE SICHERHEITSHINWEISE
Zur Vermeidung von Feuer, Stromschlag und Verletzungen und
übermäßiger Strahlenbelastung durch Mikrowellen folgen Sie bitte
den nachstehenden Sicherheitshinweisen:
• Warnung Erhitzen Sie Flüssigkeiten und Lebensmittel nicht in
geschlossenen Behältern, sie können explodieren.
• Warnung Reparaturen, bei denen das Abdeckblech im Gerät
entfernt wird, dürfen nur durch einen autorisierten Kundendienst
durchgeführt werden.
• Warnung Erlauben Sie Kindern die selbstständige Benutzung des
Geräts nur, wenn sie korrekt eingewiesen wurden, in der Lage sind,
das Gerät sicher zu bedienen und die Gefahren unsachgemäßer
Benutzung kennen.
• Warnung Bei Benutzung des Geräts im Kombinationsbetrieb
dürfen Kinder das Gerät aufgrund hoher Temperaturen nur unter
Aufsicht Erwachsener bedienen (Grill-Serie).
• Benutzen Sie nur Utensilien, die für Mikrowellen zugelassen sind.
• Reinigen Sie das Gerät regelmäßig und entfernen Sie
Speiserückstände.
• Lesen und beachten Sie die besonderen „SICHERHEITSHINWEISE
ZUR VERMEIDUNG ÜBERMÄßIGER BELASTUNGEN DURCH
MIKROWELLENSTRAHLUNG“.
• Bei der Erwärmung von Lebensmitteln in Kunststobehältern
behalten Sie diese im Auge, da sie sich entzünden können.
• Nehmen Sie Rauchentwicklung wahr, so schalten Sie das Gerät aus
und ziehen Sie den Netzstecker, lassen Sie die Tür geschlossen, um
Flammen zu ersticken.
Bedienungsanleitung
Page 33

33
DE
• Überkochen Sie die Speisen nicht.
• Benutzen Sie den Garraum nicht zur Aufbewahrung. Lagern Sie
dort keine Artikel wie Brot, Kekse usw.
• Entfernen Sie alle Verschlüsse von Papier- oder Kunststobehältern
und Tüten, bevor Sie sie in das Gerät geben.
• Installieren Sie das Gerät entsprechend der mitgelieferten
Installationsanleitung.
• Erhitzen Sie Eier in der Schale und hartgekochte Eier nicht in
der Mikrowelle, sie können explodieren, selbst nachdem die
Mikrowelle ausgeschaltet wurde.
• Benutzen Sie das Gerät nur zu seinem Bestimmungszweck.
Benutzen Sie keine korrosiven Chemikalien oder Dämpfe im Gerät.
Dieses Gerät ist zum Erhitzen konzipiert. Es ist nicht für industrielle
oder Labornutzung bestimmt.
• Ein beschädigtes Netzkabel muss vom autorisierten Kundendienst
ausgetauscht werden, um Gefahren zu vermeiden.
• Benutzen und lagern Sie das Gerät nicht im Freien.
• Benutzen Sie das Gerät nicht in unmittelbarer Nähe von Wasser, in
feuchten Kellern oder in der Nähe eines Schwimmbades.
• Die Oberächen des Geräts können während des Betriebs heiß
sein. Schützen Sie das Netzkabel vor heißen Flächen und decken
Sie Lüftungsönungen nicht ab.
• Lassen Sie das Kabel nicht von der Arbeitsäche herunter hängen.
• Unsachgemäße Pege und Reinigung kann zur Degenerierung der
Oberächen und damit zu einer Verkürzung des Lebensdauer des
Geräts und Gefahren führen.
• Rühren Sie den Inhalt von Babyäschchen um und überprüfen Sie
die Temperatur vor dem Füttern, um Verbrennungen zu vermeiden.
• Das Erhitzen von Getränken kann zu einem verspäteten Aufkochen
führen; seien Sie bei der Handhabung des Behälters vorsichtig.
• Dieses Gerät ist nicht zur Benutzung durch Personen
(einschließlich Kinder) mit verminderten körperlichen,
sensorischen oder geistigen Fähigkeiten oder fehlender Erfahrung
und Kenntnis geeignet, es sei denn, sie wurden zum Gebrauch
des Geräts von einer für ihre Sicherheit verantwortlichen Person
angeleitet und beaufsichtigt.
• Kinder müssen beaufsichtigt werden, um sicherzustellen, dass sie
nicht mit dem Gerät spielen.
• Das Gerät ist nicht zur Steuerung durch eine externe Zeitschaltuhr
oder ähnliche Fernwirkeinrichtungen ausgelegt.
• WARNUNG: Zur Vermeidung von Stromschlag schalten Sie das
Gerät aus, bevor Sie die Lampe austauschen.
• Teile des Geräts können sehr heiß werden. Halten Sie Kinder fern.
• Benutzen Sie zur Reinigung kein Dampfstrahlgerät.
• Benutzen Sie keine aggressiven Reinigungsmittel oder scharfe
Metallkratzer, um das Glas der Tür zu reinigen. Das kann zu
Kratzern und Glasbruch führen.
• Das Gerät wird während des Betriebs heiß. Berühren Sie keine
Heizelemente im Gerät.
• Benutzen Sie die für dieses Gerät empfohlene Temperatursonde
(Geräte mit Vorrichtung für Temperatursonde).
• Stellen Sie das Gerät mit der Rückseite zur Wand auf.
GEFAHR
Stromschlaggefahr
Das Berühren interner Komponenten kann zu schweren Verletzungen oder
Tod führen. Zerlegen Sie das Gerät nicht.
WARNUNG
Stromschlaggefahr
Unkorrekte Erdung kann zu Stromschlag führen. Schließen Sie das Gerät nur an
einer geerdeten Steckdose an.
Mikrowelle-Grill
Page 34

34
REINIGUNG
Ziehen Sie vor der Reinigung stets den Netzstecker.
• Reinigen Sie das Gerät innen mit einem leicht angefeuchteten Tuch.
• Waschen Sie Zubehörteile in Abwaschwasser ab.
• Reinigen Sie den Rahmen der Tür, Dichtungen und deren Umgebung
vorsichtig mit einem feuchten Tuch
Schukostecker
Dieses Gerät muss geerdet sein. Bei Kurzschluss verringert die Erdung die
Gefahr eines Stromschlags. Dieses Gerät ist mit einem geerdeten Stecker
ausgestattet. Es darf nur an einer geerdeten Steckdose angeschlossen
werden. Wenden Sie sich im Zweifel an einen Elektriker. Bei Benutzung
eines Verlängerungskabels muss dieses ebenfalls geerdet sein.
• Das kurze Netzkabel dient der Vermeidung, sich zu verheddern oder
zur Stolperfalle zu werden.
• Bei Benutzung eines Verlängerungskabels beachten Sie:
• Die Kapazität des Kabels muss wenigstens der Kapazität des Geräts
entsprechen.
• Das Kabel muss einen Erdungsleiter haben.
• Das Kabel muss so verlegt werden, dass es nicht von der Arbeitsäche
herunter hängt und von Kindern herunter gezogen oder zur
Stolperfalle werden kann.
UTENSILIEN
VORSICHT
Verletzungsgefahr
• Reparaturen, bei denen das Abdeckblech im Gerät entfernt wird, dürfen
nur durch einen autorisierten Kundendienst durchgeführt werden.
• Siehe Anleitungen unter „Zugelassene Materialien für die Mikrowelle“
oder „Nicht zugelassene Materialien für die Mikrowelle“. Es gibt
bestimmte nichtmetallische Materialien, die in der Mikrowelle nicht
sicher sind. Im Zweifel testen Sie die Utensilien wie folgt:
Utensilientest:
• Füllen Sie einen mikrowellengeeigneten Behälter mit 1 Tasse kaltem Wasser
(250ml) und geben Sie sie mit den fraglichen Utensilien in die Mikrowelle.
• Kochen Sie für 1 Minute auf Höchstleistung.
• Fassen Sie die Utensilien vorsichtig an. Haben sich die Utensilien
erwärmt, so sind sie nicht mikrowellengeeignet.
• Überschreiten Sie nicht 1 Minute Kochzeit.
ZUGELASSENE MATERIALIEN FÜR DIE MIKROWELLE
Utensils Remarks
Alufolie Nur zum Abschirmen. Kleine glatte Stücke können zum Abdecken
von Hähnchenteilen zum Schutz vor Überhitzung benutzt werden.
Kann zu Funkenbildung führen, wenn zu dicht an Wandungen.
Folie muss min. 2,5 cm von Wandungen entfernt sein.
Geschirr zum
Überbacken
Folgen Sie den Anleitungen des Herstellers. Boden muss min. 5 mm
über dem Drehteller sein. Falsche Benutzung kann zum Brechen des
Drehtellers führen.
Essgeschirr Nur mikrowellengeeignet. Folgen Sie den Anleitungen des
Herstellers. Kein gesprungenes oder beschädigtes Geschirr
benutzen.
Bedienungsanleitung
Page 35

35
DE
Utensils Remarks
Glaskrug Stets Deckel abnehmen. Speisen nur aufwärmen. Die meisten
Glaskrüge sind nicht hitzebeständig und können brechen.
Gläser Nur hitzebeständige Gläser ohne Metallverzierungen. Kein
gesprungenes oder beschädigtes Geschirr benutzen.
Ofenbeutel Folgen Sie den Anleitungen des Herstellers. Nicht mit
Metallklemmen verschließen. Schlitze zum Entweichen von
Dampf einstechen.
Papierteller und
Tassen
Nur für kurzes Kochen/Aufwärmen benutzen. Während der
Zubereitung nicht unbeaufsichtigt lassen.
Papiertücher Zum Abdecken von Speisen beim Aufwärmen und zum
Aufsaugen von Fett. Während der Zubereitung nicht
unbeaufsichtigt lassen.
Backpapier Zum Abdecken als Spritzschutz oder zum Einwickeln beim
Dünsten.
Kunststo Nur mikrowellengeeignet. Folgen Sie den Anleitungen des
Herstellers. Muss als „mikrowellengeeignet“ markiert sein. Einige
Kunststobehälter weichen auf, während sich die Speisen
erwärmen. „Kochbeutel“ und fest geschlossene Kunststotüten
müssen entsprechend den Anleitungen auf der Packung
eingestochen werden.
Frischhaltefolie Nur mikrowellengeeignet. Zum Abdecken von Speisen, um
die Feuchtigkeit zu halten. Frischhaltefolie darf Speisen nicht
berühren.
Thermometer Nur mikrowellengeeignet (Fleisch- und
Süßspeisenthermometer).
Wachspapier Zum Abdecken als Spritzschutz und um die Feuchtigkeit zu
halten.
NICHT ZUGELASSENE MATERIALIEN FÜR
DIE MIKROWELLE
Utensilien Anmerkung
Aluminiumschale Kann zu Funkenbildung führen. Speisen in
mikrowellengeeignetes Geschirr geben.
Speisenkarton mit
Metallgri
Kann zu Funkenbildung führen. Speisen in
mikrowellengeeignetes Geschirr geben.
Metallische oder
metallverzierte
Utensilien
Metall schirmt die Speisen von Mikrowellenstrahlen ab.
Metallverzierung kann zu Funkenbildung führen.
Metallverschlüsse Kann zu Funkenbildung und Feuer im Gerät führen.
Papiertüten Kann zu Feuer im Gerät führen.
Kunststoschaum Kunststoschaum kann schmelzen und den Inhalt bei zu
hohen Temperaturen verunreinigen.
Holz Holz trocknet in der Mikrowelle aus und kann splittern
oder reißen.
MIKROWELLE AUFSTELLEN
Lieferumfang
Nehmen Sie die Mikrowelle und alle Materialien aus der Verpackung bzw.
aus dem Garraum.
Ihre Mikrowelle wird mit folgendem Zubehör geliefert:
Glasteller 1
Drehtellerring 1
Bedienungsanleitung 1
Mikrowelle-Grill
Page 36

36
1. Bedienfeld
2. Schaft Drehteller
3. Drehtellerring
4. Glasteller
5. Sichtfenster
6. Tür
7. Sicherheitsverschluss
8. Grillständer
Installation des Drehtellers
• Benutzen Sie den Glasteller nur richtig herum. Der Glasteller muss sich
frei drehen können.
• Glasteller und Drehtellerring müssen stets benutzt werden.
• Alle Speisen und Behälter müssen zur Zubereitung auf den Glasteller
gestellt werden.
• Sorgen Sie für Ersatz, falls Ihr Drehtellerring bricht.
INSTALLATION UND ANSCHLUSS
• Entfernen Sie alle Verpackungsmaterialien und das Zubehör. Prüfen
Sie das Gerät auf Schäden wie Dellen oder eine gebrochene Tür. Bei
Beschädigungen nicht installieren.
• Entfernen Sie die Schutzfolie von der Oberäche der Innenseiten der
Mikrowelle.
• Entfernen Sie nicht die hellbraune Mica-Abdeckung, die am Garraum
befestigt ist, um den Magnetron zu schützen.
• Wählen Sie eine ebene Fläche, die ausreichend oenen Raum für
Eintritts- und/oder Austrittsentlüftungen bietet.
1
2
3
4
5
6
7
8
Bedienungsanleitung
Page 37

37
DE
• Die Rückwand des Geräts sollte an einer Wand platziert werden.
Zwischen der Mikrowelle und den angrenzenden Wänden ist ein
Mindestspielraum von 7,5cm erforderlich. Eine Seite muss oen sein.
Lassen Sie einen Mindestspielraum von 30cm über der Mikrowelle.
Entfernen Sie nicht die Füße vom Boden der Mikrowelle.
• Eine Blockierung der Eintritts- und/oder Austrittsönungen kann die
Mikrowelle beschädigen.
• Platzieren Sie die Mikrowelle soweit wie möglich von Radios und
Fernsehgeräten entfernt. Beim Betrieb der Mikrowelle kann es zu
Interferenzen mit dem Radio- und Fernsehempfang kommen.
• Stecken Sie die Mikrowelle in eine Standard-Steckdose. Stellen Sie
sicher, dass die Spannung und die Frequenz mit der Spannung und der
Frequenz auf dem Typenschild übereinstimmen.
• Installieren Sie die Mikrowelle nicht über einem Herd oder einem
anderen Gerät, das Wärme produziert. Wenn die Mikrowelle über einer
Wärmequelle installiert wird, kann sie beschädigt werden und die
Garantie wäre nichtig.
Die Oberäche kann sich während der Benutzung erhitzen.
BEDIENUNGSHINWEISE
Diese Mikrowelle benutzt eine moderne elektronische Steuerung zum Einstellen
der Zubereitungsparameter, um Ihnen die Zubereitung zu erleichtern.
Uhr einstellen
Bei Netzanschluss der Mikrowelle wird im Display „0:00“ angezeigt und der
Summer gibt einen Signalton ab.
• Drücken Sie „CLOCK/KITCHEN TIMER“, um zwischen 12- und
24-Stundenformat umzuschalten.
• Drehen Sie "
" zum Einstellen der Stunden, Eingabe als 0-23
(24-Stundenformat) oder 1-12 (12-Stundenformat).
• Drücken Sie „CLOCK/KITCHEN TIMER“, die Minuten blinken.
• Drehen Sie "
" zum Einstellen der Minuten, Eingabe als 0-59.
• Drücken Sie „CLOCK/KITCHEN TIMER“, um die Einstellung zu beenden,
„:“ blinkt.
Hinweis:
• Wird die Uhr nicht eingestellt, dann stehen Ihnen nicht alle Funktionen
zur Verfügung.
• Während der Uhrzeiteinstellung drücken Sie „STOP/CLEAR“, um das
Gerät zurückzusetzen.
Kochen mit Mikrowelle
• Drücken Sie einmal „MICROWAVE“, „P100“ wird angezeigt.
• Drücken Sie mehrmals „MICROWAVE“ oder drehen Sie "
" zur Auswahl der
Mikrowellenleistung zwischen 100 % und 10 %. „P100“, „P80“, „P50“, „P30“,
„P10“ wird der Reihe nach angezeigt.
• Drücken Sie „START/+30SEC./CONFIRM“ zur Bestätigung.
• Drehen Sie "
" zum Einstellen der Zubereitungszeit (Zeiteinstellung
0:05 - 95:00).
• Drücken Sie „START/+30SEC./CONFIRM“, um die Zubereitung zu starten.
HINWEIS: Die Schritte für die Einstellzeit des Codierschalters sind wie folgt:
0--- 1 min : 5 Sekunden
1—5 min : 10 Sekunden
5---10 min : 30 Sekunden
10---30 min : 1 Minute
30---95 min : 5 Minutes
Tabelle Mikrowellenleistung
Drücken Sie einmal zweimal dreimal viermal fünfmal
Mikrowellenleistung 100% 80% 50% 30% 10%
Mikrowelle-Grill
Page 38

38
3. Grillen
• Drücken Sie einmal „GRILL/COMBI“, „G-1“ wird angezeigt.
• Drehen Sie "
" zum Einstellen der Zubereitungszeit (Zeiteinstellung
0:05 - 95:00).
• Drücken Sie „START/+30SEC./CONFIRM“, um die Zubereitung zu starten.
Hinweis:
Nach der Hälfte der Zubereitungszeit hören Sie zwei Signaltöne zur
Anzeige, dass Sie die Speisen umdrehen sollten. Sie können allerdings
auch gleich weiter kochen. Mit dem Umdrehen erzielen Sie jedoch einen
besseren Grilleekt. Dann schließen Sie die Tür wieder und drücken Sie
„START/+30SEC./CONFIRM“, um die Zubereitung fortzusetzen.
Kombiniertes Kochen
• Drücken Sie einmal „GRILL/COMBI“, „G-1“ wird angezeigt.
• Drücken Sie „GRILL/COMBI“ viermal oder drehen Sie "
" , um die
Leistung des Grills auszuwählen. Drehen Sie nicht weiter, wenn „C-1“,„C2“,„C-3“ oder „C-4“ angezeigt wird.
• Drücken Sie „START/+30SEC./CONFIRM“ zur Bestätigung.
• Drehen Sie "
" zum Einstellen der Zubereitungszeit (Zeiteinstellung
0:05 - 95:00).
• Drücken Sie „START/+30SEC./CONFIRM“, um die Zubereitung zu starten.
Anweisungen Display Mikrowelle Grill Umluft
1 C-1 • •
2 C-2 • •
3 C-3 • •
4 C-4 • • •
Kochen mit Umluft (mit Vorheizfunktion)
Beim Kochen mit Umluft können Sie die Mikrowelle wie einen
herkömmlichen Backofen benutzen. Die Mikrowelle wird nicht benutzt.
Der Backofen sollte auf die gewünschte Temperatur vorgeheizt werden,
bevor Sie die Speisen hineingeben.
• Drücken Sie einmal „CONVECTION“, „100“ blinkt.
• Drücken Sie mehrmals „CONVECTION“ oder drehen Sie "
" zur Auswahl der
Umluftfunktion. Hinweis: Die Temperatur kann zwischen 100 °C und 190 °C
eingestellt werden.
• Drücken Sie „START/+30SEC./CONFIRM“ zur Bestätigung der Temperatur.
• Drücken Sie „START/+30SEC./CONFIRM“, um vorzuheizen. Nach
dem Erreichen der Vorheiztemperatur ertönt der Summer zweimal
und Sie können nun die Speisen in den Backofen stellen. Die
Vorheiztemperatur blinkt.
• Geben Sie Ihre Speisen in den Backofen und schließen Sie die Tür.
• Drehen Sie "
" zum Einstellen der Zubereitungszeit (max. 95 Minuten).
• Drücken Sie „START/+30SEC./CONFIRM”, um die Zubereitung zu starten.
Hinweis:
• Die Zubereitungszeit kann nicht eingegeben werden, bevor die
Vorheiztemperatur erreicht ist.
• Beim Erreichen der Temperatur muss die Tür vor der Eingabe der
Zubereitungszeit geönet werden.
• Wird die Zeit nicht innerhalb von 5 Minuten eingegeben, beendet das Gerät
die Vorheizung. Der Summer ertönt fünfmal, das Gerät stellt sich zurück.
Kochen mit Umluft (ohne Vorheizfunktion)
• Drücken Sie einmal „CONVECTION“, „100“ blinkt.
• Drücken Sie mehrmals „CONVECTION“ oder drehen Sie "
" zur Auswahl
der Umluftfunktion. Hinweis: Die Temperatur kann zwischen 100 und 190 °C
eingestellt werden.
Bedienungsanleitung
Page 39

39
DE
• Drücken Sie „START/+30SEC./CONFIRM“ zur Bestätigung der Temperatur
• Drehen Sie "
", um die Kochzeit einzustellen. (Die maximal
einstellbare Zeit beträgt 95 Minuten.)
Küchen-Timer
• Drücken Sie „CLOCK/KITCHEN TIMER“ zweimal, dann zeigt die LED 00:00 an.
• Drehen Sie "
", um den richtigen Timer einzugeben.(Die maximale
Kochzeit beträgt 95 Minuten.)
• Drücken Sie „START/+30SEC./CONFIRM “, um die Einstellung zu bestätigen.
• Wenn die Kochzeit erreicht wurde, erlischt die Uhrenanzeige. Der
Summer ertönt 5 Mal. Wenn die Uhr eingestellt wurde (24-StundenSystem), zeigt das LED-Display die aktuelle Zeit.
Auftauen nach Gewicht
• Drücken Sie „W.T./Time Defrost “, um die Funktion Auftauen nach
Gewicht auszuwählen. „dEF1” wird angezeigt.
• Drehen Sie "
", um das Gewicht einzugeben. „100“,„200“,„300“,„400“,„
500“,„600“,„800“, „1000“, „1200“,„1400“,„1600“,„1800“ und „2000“ werden
der Reihe nach angezeigt.
• Drücken Sie „Start/+30Sec./Conrm“, um mit dem Auftauvorgang zu
beginnen. Wenn „Stop/Clear“ gedrückt wird, geht das Gerät zurück in
den Wartestatus. Wenn Sie zu diesem Zeitpunkt "Start/+30Sec./Conrm"
erneut drücken, oder wenn die Wartezeit 5 Minuten überschreitet, geht
das Gerät zurück in den Wartestatus. Wenn Sie „Start/+30Sec./Conrm“
innerhalb von 5 Minuten drücken, setzt das Gerät den Vorgang fort und
die Zeit läuft rückwärts ab. Nach Abschluss ertönt der Summer fünf Mal
und das Gerät kehrt in den Wartestatus zurück.
• Nach Ablauf der Hälfte der Auftauzeit ertönt der Summer zweimal, um
Sie daran zu erinnern, dass Sie das Lebensmittel umdrehen, wenn Sie
nichts tun, setzt das Gerät den Vorgang fort und das Auftauergebnis ist
nicht zufriedenstellend.
Auftauen nach Zeit
• Drücken Sie „W.T./Time Defrost“ zweimal, um die Funktion Auftauen
nach Zeit auszuwählen. „dEF2“ wird angezeigt.
• Drehen Sie "
", um die Kochzeit einzustellen. Die maximale Zeit
beträgt 95 Minuten.
• Drücken Sie „Start/+30Sec./Conrm“, um mit dem Auftauvorgang zu
beginnen. Wenn „Stop/Clear“ gedrückt wird, geht das Gerät zurück
in den Wartestatus. Wenn Sie zu diesem Zeitpunkt „Start/+30Sec./
Conrm“ erneut drücken, oder wenn die Wartezeit 5 Minuten
überschreitet, geht das Gerät zurück in den Wartestatus. Drücken Sie
„Start/+30Sec./Conrm“ innerhalb von 5 Minuten, dann setzt das Gerät
den Vorgang fort und die Zeit läuft rückwärts ab.
Automatik-Menü
• Im Wartestatus drehen Sie "
", nach rechts, um die gewünschte
Funktion auszuwählen und „A1“,„A2“,„A3“....„A10“ wird angezeigt.
• Drücken Sie „START/ +30 SEC./CONFIRM“, um das Menü, das Sie
benötigen, zu bestätigen.
• Drehen Sie "
", um das Gewicht des Menüs auszuwählen, und die
Anzeige „g“ leuchtet auf.
• Drücken Sie „START/ +30 SEC./CONFIRM", um mit dem Kochen zu beginnen.
Hinweis 1: Bei Auswahl von A8 Kuchen geben Sie den Kuchen nicht gleich zu
Beginn ein. Der Backofen muss zunächst auf 160 °C vorheizen. Nach einigen
Minuten ertönt der Summer zweimal, nun können Sie den Kuchen in den
Backofen geben. Drücken Sie nun erneut „START/+30SEC./CONFIRM“. Der Timer
startet und Ihr Kuchen wird perfekt gebacken.
Hinweis 2: Bei der Auswahl von A10 Zubereitung von Brathähnchen, ertönt die
Mikrowelle zweimal; das ist normal. Um einen besseren Eekt beim Grillen von
Lebensmitteln zu erzielen, sollten Sie das Produkt umdrehen, dann schließen
Sie die Tür und drücken „START/ +30SEC./ Conrm“, um den Kochvorgang
fortzusetzen. Wenn Sie nichts tun, setzt das Gerät den Vorgang fort.
Mikrowelle-Grill
Page 40

40
TABELLE FÜR AUTOMATIKMENÜS
Menü Gewicht (g) Leistung
A1
Pizza
• 300
• 400
100%
A2
Kartoeln
• 1 (ca. 230g)
• 2 (ca. 460g)
• 3 (ca. 690g)
100%
A3
Fleisch
• 200
• 300
• 400
• 500
100%
A4
Fisch
• 200
• 300
• 400
• 500
80%
A5
Gemüse
• 200
• 300
• 400
• 500
100%
A6
Getränke
• 1(ca. 240 ml)
• 2(ca. 480 ml)
• 3(ca. 720 ml)
100%
A7
Pasta
• 50(geben Sie 450 ml kaltes
Wasser hinzu)
• 100(geben Sie 800 ml
kaltes Wasser hinzu)
• 150(geben Sie 1200 ml
kaltes Wasser hinzu)
80%
Menü Gewicht (g) Leistung
A8
Popcorn
• 50
• 100
100%
A9
Kuchen
• 475 Auf 160 Grad
vorheizen
A10
Brathähnchen
• 750
• 1000
• 1250
• C-2
• C-2
• C-2
Schnellkochen
• Drücken Sie „START/+30SEC./CONFIRM“, um mit 100 % Leistung für
30 Sekunden zu kochen. Mit jedem Tastendruck verlängern Sie die
Zubereitungszeit um 30 Sekunden. Die Höchst-Zubereitungszeit
beträgt 95 Minuten.
• Während des Kombinationsbetriebs Mikrowelle, Grill und Umluft
drücken Sie „START/+30SEC./CONFIRM“, um mit 100 % Leistung für
30 Sekunden zu kochen. Mit jedem Tastendruck verlängern Sie die
Zubereitungszeit um 30 Sekunden.
Hinweis: Diese Funktion haben Sie nicht für Auftauen, Auto-Menü und
mehrstuges Kochen.
Kindersicherung
• Sperren: Halten Sie für 3 Sekunden „STOP/CLEAR“ gedrückt, ein langer
Signalton zeigt die Aktivierung der Kindersicherung an und "
" wird
angezeigt. Im LED wird die Uhrzeit oder 0:00 angezeigt.
• Entsperren: Halten Sie für 3 Sekunden „STOP/CLEAR“ gedrückt, ein langer
Signalton zeigt die Deaktivierung der Kindersicherung an und "
" erlischt.
Besondere Spezikationen
• Die maximale Kochzeit von „Mikrowelle“, "Grill“, „Auftauen nach Zeit“,
„Umluft“ und „Kombination“ beträgt 95 Minuten.
• Wenn die Tür oen ist, leuchtet die Lampe. Wenn Sie 10 Minuten
lang geönet bleibt, erlischt die Lampe und das Display kehrt in den
Bedienungsanleitung
Page 41

41
DE
Wartezustand zurück.
• Wenn die Uhr im Wartestatus oder während des Einstellungsvorgangs
geönet wird, ändert sich das Display nicht. Es kann geändert und
eingestellt werden, allerdings funktioniert die „START“-Taste nicht.
• Schließen Sie die Tür und die Lampe erlischt. Die Einstellung kann
geändert werden. Die „START“-Taste funktioniert jetzt.
STÖRUNGSERKENNUNG
Normal
Mikrowelle stört
Fernsehempfang.
Radio- und Fernsehempfang können
während des Betriebs der Mikrowelle gestört
sein. Das entspricht etwa der Störung durch
kleinere Hausgeräte wie Mixer, Staubsauger
oder Ventilator und ist völlig normal.
Gedimmte
Innenbeleuchtung.
Beim Kochen mit geringer
Mikrowellenleistung verdunkelt sich die
Innenbeleuchtung, das ist völlig normal.
Dampf setzt sich innen
an der Tür ab, heiße Luft
tritt aus den Önungen
aus.
Während des Kochens kann Dampf aus den
Speisen entweichen. Der meiste Dampf
entweicht dann über die Lüftungsschlitze.
Etwas Dampf kann sich auch an kühlen
Stellen wie der Tür absetzen, das ist völlig
normal.
Gerät wird ohne Speisen
gestartet.
Lassen Sie das Gerät keinesfalls ohne
Speisen laufen, das ist sehr gefährlich.
Problem Mögliche Ursache Lösungsvorschlag
Gerät kann
nicht gestartet
werden.
1) Netzstecker nicht
richtig in der Steckdose.
2) Sicherung
durchgebrannt.
3) Probleme mit der
Steckdose.
• Ziehen Sie den
Netzstecker und
schließen Sie ihn nach
10 Sekunden wieder an.
• Tauschen Sie die
Sicherung aus bzw.
stellen Sie den
Trennschalter zurück
(Reparatur nur durch
Elektriker).
• Testen Sie die
Steckdose mit einem
anderen Gerät.
Gerät heizt
nicht auf.
4) Tür nicht richtig
geschlossen.
Schließen Sie die Tür
richtig.
Glasteller macht
während des
Mikrowellenbetriebs
Geräusche.
5) Ringauage und
Boden des Geräts
verschmutzt.
Siehe Abschnitt
„Reinigung“ und reinigen
Sie verschmutzte Teile.
Mikrowelle-Grill
Page 42

42
Lea atentamente estas instrucciones antes de usar el horno
microondas, y consérvelas cuidadosamente.
Si sigue las instrucciones, su horno le ofrecerá muchos años de servicio.
CONSERVE CUIDADOSAMENTE ESTAS INSTRUCCIONES
PRECAUCIONES PARA EVITAR UNA POSIBLE EXPOSICIÓN A UNA
ENERGÍA DE MICROONDAS EXCESIVA
(a) No intente usar este horno con la puerta abierta, podría provocar una
exposición dañina a energía de microondas. Es importante no romper
ni manipular los bloqueos de seguridad.
(b) No ponga ningún objeto entre la parte delantera del horno y la
puerta ni deje que se acumule suciedad o restos de limpiadores en las
supercies sellantes.
(c) ATENCIÓN: Si la puerta o su sellado están dañados, el horno no debe
usarse hasta que haya sido reparado por una persona capacitada.
ADENDO
Si el aparato no se mantiene en un estado de limpieza correcto, su
supercie puede degradarse y afectar a la vida útil del aparato, además de
provocar situaciones de riesgo.
ESPECIFICACIONES
Modelo: MW-2897
Tensión nominal: 2 30V~50Hz
Potencia nominal de entrada (microondas): 1300 W
Potencia nominal de salida (microondas): 800 W
Potencia nominal de entrada (asado): 1200 W
Potencia nominal de entrada (convección): 1200 W
Capacidad del horno: 23 L.
Diámetro de bandeja: Ф270 mm
Dimensiones externas (LxPxA): 485x410x292.5 mm
Peso neto: Aprox. 13.25 kg
ADVERTENCIAS IMPORTANTES DE
INSTRUCCIONES DE SEGURIDAD
Para reducir el riesgo de incendio, electrocución, daños personales
o una exposición excesiva a energía del horno microondas al usar el
aparato, obedezca precauciones elementales, incluyendo las siguientes:
• Atención: Los líquidos y otros alimentos no deben calentarse en
recipientes cerrados porque pueden explotar.
• Atención: Es peligroso para cualquier persona no capacitada realizar
cualquier operación de servicio o reparación que implique retirar la
cubierta que protege contra la exposición a energía de microondas.
• Atención: Los niños solamente pueden usar el horno sin
supervisión cuando hayan recibido instrucciones adecuadas
de forma que puedan usarlo con seguridad y comprendan los
peligros de un uso inadecuado.
• Atención: Cuando se use el aparato en modo combinación, los niños
solamente deben usar el horno bajo la supervisión de un adulto debido
a las temperaturas generadas. (solamente para la gama con asado).
• Use utensilios adecuados para hornos microondas.
• El horno debe limpiarse con regularidad, eliminando cualquier
resto de alimentos.
• Lea y obedezca las: “PRECAUCIONES PARA EVITAR UNA POSIBLE
EXPOSICIÓN A UNA ENERGÍA DE MICROONDAS EXCESIVA”.
• Al calentar alimentos en recipientes de plástico o papel, debe
vigilar el horno por la posibilidad de ignición.
• Si observa humo, apague o desenchufe el aparato y mantenga la
puerta cerrada para apagar cualquier llama presente.
• No cocine en exceso los alimentos.
• No use la cavidad del horno para nes de almacenamiento. No
Manual de usuario
Page 43

43
ES
guarde productos como pan, galletas, etc. dentro del horno.
• Saque los alambres y asas metálicas de los recipientes/bolsas de
papel o plástico antes de ponerlas en el horno.
• Instale o ubique el horno de acuerdo con las instrucciones de
instalación proporcionadas.
• Los huevos con cáscara y huevos hervidos enteros no deben
calentarse en un horno microondas porque podrían explotar,
aunque el calentamiento por microondas haya nalizado.
• Use este aparato solamente para su nalidad según se describe
en este manual. No use químicos ni vapores corrosivos en este
aparato. Este horno está especialmente diseñado para calentar. No
está diseñado para uso industrial o en laboratorios.
• Si el cable de alimentación está dañado, debe ser reemplazado por
el fabricante, su agente de servicio o una persona con calicación
similar para evitar riesgos.
• No guarde ni use este aparato en exteriores.
• No use este horno cerca del agua, en un sótano húmedo ni cerca
de una piscina.
• La temperatura de las supercies accesibles puede ser elevada
cuando el aparato esté funcionando. Las supercies se calientan
durante el uso. Mantenga el cable alejado de las supercies
calientes, y evite cubrir cualquier parte del horno.
• No deje que el cable cuelgue por el borde de la mesa o encimera.
• No mantener el horno limpio puede provocar un deterioro de
las supercies que puede afectar negativamente a la vida útil del
aparato y posiblemente provocar una situación de peligro.
• El contenido de biberones y recipientes de papillas debe
removerse o agitarse, y comprobar su temperatura, antes del uso
para evitar quemaduras.
• El calentamiento por microondas de bebidas puede provocar un
hervor explosivo con retraso, por lo que debe tener cuidado al
manipular el recipiente.
• Este aparato no está diseñado para ser usado por personas
(incluyendo niños) con capacidades físicas, sensoriales o mentales
reducidas, falta de experiencia o conocimientos, a menos que
reciban supervisión e instrucciones sobre el uso del aparato por
una persona responsable de su seguridad.
• Los niños deben ser vigilados para garantizar que no jueguen con
el dispositivo.
• Los aparatos no están diseñados para ser usados mediante un
temporizador externo o sistema de control remoto independiente.
• ATENCIÓN: Asegúrese de que el aparato esté apagado antes de
sustituir la luz para evitar la posibilidad de electrocución.
• Las partes accesibles pueden calentarse durante el uso. Los niños
pequeños deben mantenerse alejados del horno. 29. No use
limpiadores a vapor.
• No use limpiadores abrasivos potentes ni raspadores metálicos
alados para limpiar el cristal de la puerta del horno, podrían rayar
la supercie y provocar la rotura del cristal.
• Durante el uso el aparato se calienta. Tenga cuidado para evitar
tocar los elementos calentadores del interior del horno.
• Use exclusivamente la sonda de temperatura recomendada para
este horno (para hornos con posibilidad de usar una sonda de
detección de temperatura).
• La supercie posterior del aparato debe colocarse contra una pared.
PELIGRO
Riesgo de electrocución
Tocar algunos de los componentes internos puede provocar daños
personales graves o muerte. No desmonte este aparato.
ATENCIÓN
Riesgo de electrocución. El uso incorrecto de la toma de tierra puede
provocar una electrocución. No enchufe el aparato a una toma hasta que esté
correctamente instalado y conectado a tierra.
Horno microondas-grill
Page 44

44
LIMPIEZA
Asegúrese de desenchufar el aparato de la alimentación.
• Limpie el interior del horno tras usarlo con una gamuza ligeramente
humedecida.
• Limpie los accesorios del modo habitual en agua jabonosa.
• El marco de la puerta, el sellado y las piezas adyacentes deben
limpiarse cuidadosamente con una gamuza húmeda si están sucios.
Enchufe de dos patillas redondas
Este aparato debe conectarse a tierra. En caso de cortocircuito eléctrico, la toma
de tierra reduce el riesgo de electrocución proporcionando un hilo de salida
para la corriente eléctrica. Este aparato está equipado con un cable con hilo
de tierra y un enchufe con toma de tierra. El enchufe debe conectarse a una
toma correctamente instalada y con salida de tierra. Consulte a un electricista
cualicado si no comprende plenamente las instrucciones de conexión a tierra
o si tiene dudas sobre si el aparato está correctamente conectado a tierra. Si
necesita usar un cable extensor, use exclusivamente un cable de 3 hilos.
• Se incluye un cable de alimentación corto para reducir los riesgos de
captura o tropiezos de un cable largo.
• Si usa un cable largo o un cable extensor:
• La clasicación eléctrica indicada del cable o extensor debe ser al
menos igual a la clasicación eléctrica del aparato.
• El cable extensor debe ser un cable de 3 hillos con toma de tierra.
• El cable largo debe colocarse de forma que no cuelgue de la encimera
o mesa, donde pueda ser agarrado por niños o tropezarse con él.
UTENSILIOS
CAUTION
Riesgo de daños personales
• Es peligroso para cualquier persona no capacitada realizar cualquier
operación de servicio o reparación que implique retirar la cubierta que
protege contra la exposición a energía de microondas.
• Consulte las instrucciones “Materiales que puede usar en el horno
microondas o a evitar en un horno microondas”. Ciertos utensilios no
metálicos pueden no ser seguros para usarse en el microondas. Si tiene
dudas, puede probar el utensilio siguiendo el procedimiento siguiente.
Prueba de utensilio:
• Llene un recipiente adecuado para microondas con 1 vaso de agua fría
(250 ml) junto con el utensilio.
• Cocina a máxima potencia durante 1 minuto.
• Toque con cuidado el utensilio. Si el utensilio está caliente, no lo use
para cocinar en el microondas.
• No exceda 1 minuto de tiempo de cocción.
MATERIALES QUE PUEDEN USARSE EN EL HORNO
MICROONDAS
Utensilios Observaciones
Papel de
aluminio
Solo para protección. Puede usar trozos pequeños lisos para
cubrir zonas delgadas de carne o aves para evitar una cocción
excesiva. Pueden producirse arcos eléctricos si el papel de
aluminio está demasiado cerca de las paredes del horno. El papel
de aluminio debe estar al menos a una pulgada (2,5 cm) de las
paredes del horno.
Bandeja de
tostado
Siga las instrucciones del fabricante. El fondo de la bandeja de
tostado debe estar al menos a 3/16 pulgadas (5 mm) sobre la
bandeja rotatoria. Un uso incorrecto puede hacer que se rompa la
bandeja giratoria.
Manual de usuario
Page 45

45
ES
Utensilios Observaciones
Vajilla Solamente la adecuada para microondas. Siga las instrucciones
del fabricante. No use platos agrietados o astillados.
Jarras de cristal Saque siempre la tapa. Úselas exclusivamente para calentar
alimentos hasta que estén calientes. La mayoría de jarras de
cristal no son resistentes al calor y pueden romperse.
Cristalería Solamente cristal para horno resistente al calor. Asegúrese de
que no tenga bordes metálicos. No use platos agrietados o
astillados.
Bolsas para
cocinar en horno
Siga las instrucciones del fabricante. No las cierre con un alambre
metálico. Produzca agujeros para dejar salir el vapor.
Platos y tazas de
papel
Úselos solamente para cocción/calentamiento a corto plazo. No
deje el horno sin supervisión durante la cocción.
Servilletas de
papel
Úselas para cubrir alimentos para recalentar y absorber grasa.
Úselas con supervisión exclusivamente para cocciones a corto
plazo.
Papel de
pergamino
Úselo como cubierta para evitar salpicaduras o como envoltorio
para cocinar al vapor.
Plástico Solamente el adecuado para microondas. Siga las instrucciones
del fabricante. Debe estar marcado “Seguro para microondas”.
Algunos recipientes de plástico se ablandan a medida que los
alimentos de su interior se calientan. Las “Bolsas para hervir” y
las bolsas de plástico cerradas muy apretadas deberían cortarse,
perforarse o ventilarse como se indique en el embalaje.
Película de
plástico
Solamente el adecuado para microondas. Úselo para cubrir
alimentos durante la cocción para conservar su humedad. No
deje que la película dé plástico toque los alimentos.
Termómetros Solamente los seguros para microondas (termómetros para
carne y caramelo).
Papel encerado Úselo como cubierta para evitar salpicaduras y conservar la
humedad.
MATERIALES QUE DEBEN EVITARSE EN EL HORNO
MICROONDAS
Utensilios Observaciones
Bandeja de aluminio Puede provocar arcos eléctricos. Transera los alimentos a
un plato adecuado para microondas.
Caja de alimentos con
asas metálicas.
Puede provocar arcos eléctricos. Transera los alimentos a
un plato adecuado para microondas.
Utensilios metálicos o
con bordes metálicos
El metal protege los alimentos de la energía de microondas.
Los bordes metálicos pueden provocar arcos eléctricos.
Alambres metálicos
para cerrar bolsas
Puede provocar arcos eléctricos y causar un incendio en
el horno.
Bolsas de papel Pueden causar un incendio en el horno.
Poliuretano La espuma de poliuretano puede fundirse o contaminar
los líquidos de su interior cuando se expone a
temperaturas elevadas.
Madera La madera se secará cuando se use en el horno
microondas y puede partirse o agrietarse.
INSTALACIÓN DEL HORNO
Nombre de piezas del horno y accesorios
Saque el horno y todo el material de la caja y de la cavidad del horno.
Su horno incluye los accesorios siguientes:
Bandeja de cristal 1
Estructura de aro de la bandeja giratoria 1
Manual de instrucciones 1
Horno microondas-grill
Page 46

46
1. Panel de control
2. Eje de bandeja giratoria
3. Estructura de aro de bandeja giratoria
4. Bandeja de cristal
5. Ventana de observación
6. Estructura de puerta
7. Sistema de bloqueo de seguridad
8. Rejilla para asado
Instalación de la bandeja giratoria
• No ponga nunca la bandeja de cristal al revés. La bandeja de cristal no
debe restringirse nunca.
• La bandeja cristal y la estructura de aro de la bandeja giratoria deben
usarse siempre al cocinar.
• Todos los alimentos y recipientes de alimentos se colocan siempre
sobre la bandeja de cristal para cocinar.
• Si la bandeja de cristal o la estructura de aro de la bandeja giratoria se rompe
o agrieta, contacte con su centro de servicio autorizado más cercano.
INSTALACIÓN Y CONEXIÓN
• Retire todo el material de embalaje y los accesorios. Examine el horno para
comprobar que no haya daños como muescas o una puerta rota. No instale el
horno si presenta daños.
• Quite las películas de protección que se encuentran en la supercie de la
cabina del horno microondas.
• No retire la cubierta de Mica color marrón claro que está acoplada a la
cavidad del horno para proteger el magnetrón.
• Seleccione una supercie nivelada donde haya espacio suciente para las
ventilaciones de entrada/salida.
• La supercie trasera del horno debe estar colocada frente a una pared. Es
necesario mantener un espacio mínimo de 7,5 cm libre entre el horno y las
paredes adyacentes. Un lateral debe quedar en un espacio abierto. Debe
dejar un espacio libre mínimo de 30 cm por encima del horno. No quite los
pies de la parte inferior del horno.
• Bloquear las aperturas de entrada y/o salida puede causar daños en el horno.
• Coloque el horno lo más alejado posible de la radio y la televisión. El
funcionamiento del horno microondas puede causar interferencias en la
recepción de su radio o TV.
• Enchufe el horno a una toma eléctrica estándar. Asegúrese de que el voltaje
y la frecuencia sean los mismos que el voltaje y la frecuencia en la etiqueta de
clasicación.
1
2
3
4
5
6
7
8
Manual de usuario
Page 47

47
ES
• No instale el horno sobre una estufa o cualquier otro electrodoméstico que
genere calor. Si instala el horno cerca de una fuente de calor, el horno podría
dañarse y se anularía la garantía.
Las supercies accesibles pueden calentarse durante el funcionamiento.
INSTRUCCIONES DE USO
Este horno microondas usa un control electrónico moderno para ajustar
los parámetros de cocción según sus necesidades y cocinar mejor.
Conguración del reloj
Cuando se conecte el microondas a la corriente, el horno mostrará "0:00" y
el timbre sonará una vez.
• Pulse “RELOJ/COCINA PREDETERMINAR" para elegir entre 12 horas y 24 horas.
• Gire "
" para ajustar la hora, la hora introducida debe estar entre 0-23
(24 horas) o 1-12 (12 horas).
• Pulse “RELOJ/COCINA PREDETERMINAR" y parpadearán los minutos.
• Gire "
" para ajustar los minutos, los minutos introducidos deben
estar entre 0-59.
• Pulse “RELOJ/COCINA PREDETERMINAR" para terminar de congurar el
reloj. ":" parpadeará.
Nota :
• Si no se ha congurado el reloj, no funcionará al encenderlo.
• Durante el proceso de conguración del reloj, si pulsa “DETENER/
BORRAR”, el horno volverá automáticamente a su estado anterior.
Cocción con microondas
• Pulse una vez la tecla "MICROONDAS", se mostrará “P100”.
• Pulse “MICROONDAS” varias veces o gire "
" para seleccionar la potencia de
microondas entre 100% y 10%. Se mostrarán en orden "P100", "P80", "P50",
"P30", "P10".
• Pulse “INICIO/+30S./CONFIRMAR” para conrmar.
• Gire "
" para seleccionar el tiempo de cocción. (La conguración de tiempo
debe ser entre 0:05- 95:00.)
• Pulse “INICIO/+30S./CONFIRMAR” para iniciar la cocción.
NOTA: los pasos de ajuste de tiempo de cocción del conmutador son los
siguientes:
0 - 1 min. : 5 segundos
1-5 min. : 10 segundos
5 - -10 min. : 30 segundos
10 - -30 min. : 1 minuto
30 - -95 min. : 5 minutos
Tabla de potencia de microondas
Pulsar 1 vez 2 veces 3 veces 4 veces 5 veces
Potencia microondas 100% 80% 50% 30% 10%
Cocción con asado
• Pulse una vez la tecla "GRILL/COMBI", se mostrará “G-1”.
• Gire " " para ajustar el tiempo de cocción. (La conguración de
tiempo debe ser entre 0:05- 95:00.)
• Pulse “INICIO/+30S./CONFIRMAR” para iniciar la cocción.
Nota :
Si ha pasado la mitad del tiempo de asado, el horno emitirá dos pitidos para
avisarle para que gire los alimentos. Puede dejarlo seguir cociendo. Para
obtener un mejor resultado en la cocción, debería girar los alimentos, cerrar
la puerta, y pulsar “INICIO/+30 S/CONFIRMAR” para continuar cocinando.
Cocinado combinado
• Pulse una vez la tecla "GRILL/COMBI", se mostrará"G-1".
• Pulse varias veces "GRILL/COMBI" o gire "
" para seleccionar la
potencia del grill. Deja de girar cuando se muestra "C-1","C-2","C-3" o
"C-4".
Horno microondas-grill
Page 48

48
• Pulse “INICIO/+30S./CONFIRMAR” para conrmar.
• Gire "
" para ajustar el tiempo de cocción. (La conguración de
tiempo debe ser entre 0:05- 95:00.)
• Pulse “INICIO/+30S./CONFIRMAR” para iniciar la cocción.
Cocción con microondas + convección
• Pulse una vez la tecla "MICRO+CONV.", se mostrará “G-1”.
• Pulse “MICRO.+CONV. “ varias veces o gire "
" para seleccionar "C-1","C-
2","C-3" o "C-4".
• Pulse “INICIO/+30S./CONFIRMAR” para conrmar.
• Gire "
" para ajustar el tiempo de cocción. (La conguración de
tiempo debe ser entre 0:05- 95:00.)
• Pulse “INICIO/+30S./CONFIRMAR” para iniciar la cocción.
Nota: Instrucciones de combinación
Instrucciones Pantalla Microondas Grill Convección
1 C-1 • •
2 C-2 • •
3 C-3 • •
4 C-4 • • •
Cocción por convección (con función de precalentamiento)
La cocción por convección le permite cocinar los alimentos como en un
horno tradicional. No se usan microondas. Se recomienda que precaliente
el horno a una temperatura adecuada antes de introducir los alimentos.
• Pulse la tecla “CONVECCIÓN” una vez, parpadeará “100”.
• Mantenga pulsado “CONVECCIÓN” o gire "
" para seleccionar la
función de convección. Nota : puede elegir la temperatura entre 100
grados y 190 grados.
• Presione "INICIAR/+30seg/CONFIRMAR" para conrmar la conguración.
• Cuando se alcanza el tiempo de cocinado, el indicador del reloj
desaparecerá. El timbre sonará 5 veces. Si se ha congurado el reloj
(sistema de 24 horas), el LED mostrará la hora actual.
Descongelar por peso
• Pulse "W.T./Tiempo de descongelado" para seleccionar la opción de
descongelar en función del peso. Se mostrará "dEF1"
• Gire "
" para introducir el peso, se mostrará en or
den:"100","200","300","400","500","600","800", "1000",
"1200","1400","1600","1800 y "2000".
• Presione "Iniciar/+30seg/CONFIRMAR" para comenzar a descongelar. Si
se presiona "Detener/Borrar", el horno entrará en modo espera. En este
momento, presione de nuevo "Iniciar/+30 seg/Conrmar" o , si no lo
hace durante un periodo superior a 5 minutos, el horno volverá a entrar
en modo espera. Pulse "Iniciar/+30 seg/Conrmar" en un periodo
inferior a 5 minutos, la unidad volverá a ponerse en funcionamiento
y también la cuenta regresiva. Una vez nalizada la cuenta atrás, el
timbre sonará cinco veces y volverá al modo de espera.
• Cuando ha transcurrido la mitad del tiempo de descongelado, el
timbre sonará dos veces para recordarle que le de la vuelta a los
alimentos, si no se realiza ninguna acción, la unidad continuará
funcionando, pero el resultado no será igual de bueno.
Descongelar por tiempo
• Pulse dos veces "W.T./Descongelar por tiempo" para seleccionar la
función de descongelar por tiempo. Se mostrará "dEF2"
• Gire "
" para introducir el tiempo de cocción. El tiempo máximo es de
95 minutos.
• Presione "Iniciar/+30seg/CONFIRMAR" para comenzar a descongelar. Si
se presiona "Detener/Borrar", el horno entrará en modo espera. En este
Manual de usuario
Page 49

49
ES
momento, presione de nuevo "Iniciar/+30 seg/Conrmar" o , si no lo
hace durante un periodo superior a 5 minutos, el horno volverá a entrar
en modo espera. Pulse "Iniciar/+30 seg/Conrmar" en un periodo
inferior a 5 minutos, la unidad volverá a ponerse en funcionamiento y
también la cuenta regresiva.
Menú automático
• En modo espera, gire "
" a la derecha para seleccionar la función
deseada, se mostrará en pantalla "A1","A2","A3"...."A10".
• Pulse"INICIAR/ +30 SEG./CONFIRMAR" para conrmar el menú que
necesita.
• Gire "
" para seleccionar el peso del menú, y la luz indicadora "g" se
encenderá.
• Pulse "INICIAR/ +30 SEG./CONFIRMAR" para comenzar a cocinar.
Nota 1: Cuando elija A8 pastel, no ponga el pastel en el horno al principio.
El horno debe precalentarse primero a 160 grados. Pasados varios
minutos, el timbre sonará dos veces para recordarle que ponga el pastel en
el horno. Tras poner el pastel en el horno, pulse “Inicio/+30 s./Conrmar”
de nuevo. El temporizador realizará una cuenta atrás y se cocinará el pastel
a la perfección.
Nota 2: Durante el cocinado de pollo asado A10, el horno sonará dos
veces, y esto es normal. Para conseguir un mejor resultado al asar la
comida, debe dar la vuelta a la comida, cerrar la puerta, y a continuación
presionar "INICIAR/ +30SEG./ Conrmar" para continuar cocinando.
Si no realiza ninguna acción, el horno seguirá funcionando.
GRÁFICO DEL MENÚ AUTOMÁTICO
Menú Peso (g) Potencia
A1
Pizza
• 300
• 400
100%
A2
Patatas
• 1 (aproximadamente 230 g)
• 2 (aproximadamente 460 g)
• 3 (aproximadamente 690 g)
100%
A3
Carne
• 200
• 300
• 400
• 500
100%
A4
Pescado
• 200
• 300
• 400
• 500
80%
A5
Vegetales
• 200
• 300
• 400
• 500
100%
A6
Bebidas
• 1(aproximadamente 240 ml)
• 2(aproximadamente 480 ml)
• 3(aproximadamente 720 ml)
100%
A7
Pasta
• 50(añadir agua fría, 450 ml)
• 100(añadir agua fría, 800 ml)
• 150(añadir agua fría, 1200 ml)
80%
A8
Palomitas
• 50
• 100
100%
Horno microondas-grill
Page 50

50
Menú Peso (g) Potencia
A9
Pastel
• 475 Precalentar a 160
grados
A10
Pollo asado
• 750
• 1000
• 1250
• C-2
• C-2
• C-2
Descongelar por peso
• Pulse "DESCONGELACIÓN PESO/TIEMPO” una vez, la pantalla mostrará
“dEF1”.
• Gire "
" para seleccionar el peso de los alimentos. Al mismo tiempo se
iluminará “g”, el peso debe estar entre 100-2000g.
• Pulse “INICIO/+30S./CONFIRMAR” para iniciar la descongelación.
• Los indicadores " " y " " parpadearán y se apagará el indicador “g
Descongelación por tiempo
• Pulse "DESCONGELACIÓN PESO/TIEMPO” dos veces, la pantalla
mostrará “dEF2”.
• Gire " " para seleccionar el tiempo de cocción. El tiempo máximo es de
95 minutos.
• Pulse “INICIO/+30S./CONFIRMAR” para iniciar la descongelación.
• Parpadearán los indicadores " " y " ".
• Nota : si el peso de los alimentos no es superior a 200 gramos,
póngalos en el borde de la bandeja giratoria de cristal, no en el centro,
para descongelarlos.
Especicaciones especiales
• El tiempo máximo de cocinado para "Microondas", "Asado", "Descongelar
por tiempo", "Convección" y "Combinado" es de 95 minutos.
• Cuando la puerta está abierta, la lámpara se enciende. Si queda abierta
durante 10 minutos, la lámpara se apagará y la pantalla pasará a modo
espera.
• Al abrir la puerta en estados de espera o durante el proceso de
conguración, la pantalla inicial no cambia. Se puede realizar la
conguración igualmente. Pero la tecla "INICIAR" no funcionará.
• Cierre la puerta y se apagará la lámpara. Puede cambiar la
conguración. Ahora la tecla "INICIAR" funcionará.
Cocción rápida con microondas
En estado de espera, gire a la izquierda para elegir directamente el tiempo
de cocción y pulse la tecla “INICIO/+30 S./CONFIRMAR” para cocinar con el
100% de potencia de microondas.
Este programa puede establecerse como parte de multi estadio.
Función de consulta
• En estado de cocción, pulse “Microondas”, “Asado”, "Micro. / Asado”,
“Micro. / Conv.”, o “Convección”, se mostrará la potencia actual durante
2-3 segundos.
• En estado preestablecido, pulse “RELOJ/PREESTABLECER” para solicitar
el tiempo de inicio de cocción con retraso. El tiempo preestablecido
parpadeará durante 2-3 segundos, y el horno volverá a la indicación de hora.
• Durante el estadio de cocción, pulse “RELOJ/PREESTABLECER” para
comprobar la hora actual. Se mostrará durante 2-3 segundos.
Función de bloqueo infantil
• Bloquear: En estado de espera, pulse “DETENER/BORRAR" durante 3
segundos, se emitirá un pitido largo que indica que se accede al estado
de bloqueo infantil. La pantalla mostrará "
". El LED mostrará la hora
actual o 0:00.
• Salir del bloqueo: En estado de bloqueo, pulse “DETENER/BORRAR”
durante 3 segundos, se emitirá un pitido largo que indica que se ha
quitado el bloqueo y el indicador "
" desaparecerá.
Especicaciones
• El timbre sonará una vez cuando gire el mando al principio.
• Debe pulsar “INICIO/+30S/CONFIRMAR” para continuar la cocción si se
abre la puerta durante el proceso.
Manual de usuario
Page 51

51
ES
• Cuando se haya establecido el programa de cocción, si no se pulsa
“INICIO/+30S/CONFIRMAR” en 5 minutos, se mostrará la hora actual. El
programa se cancelará.
• El timbre sonará una vez cuando se pulse correctamente, una
pulsación incorrecta no recibirá respuesta.
• El timbre sonará cinco veces para recordarle que la cocción ha terminado.
SOLUCIÓN DE PROBLEMAS
Normal
El horno microondas
interere en el
funcionamiento de una TV
La recepción de radio y TV pueden tener
interferencias cuando se use el horno
microondas. Es parecido a las interferencias de
electrodomésticos, como batidoras, aspiradoras y
ventiladores. Es normal.
La luz del horno se atenúa En cocción por microondas de baja potencia puede
atenuarse la luz del horno. Es normal.
Se acumula vapor en la
puerta y sale aire caliente de
los respiraderos
Durante la cocción puede salir vapor de los
alimentos. La mayoría saldrá por los respiraderos.
Puede acumularse en zonas más frías, como la
puerta del horno. Es normal.
El horno se ha encendido
accidentalmente sin
alimentos dentro.
Está prohibido usar la unidad sin alimentos dentro.
Es muy peligroso.
Problema Causa posible Solución
El horno no
puede arrancar.
1) Cable de
alimentación
no conectado
rmemente.
2) Ha saldado un
fusible o interruptor de
corriente.
3) Problemas con la
toma.
• Desenchufe. Vuelva a enchufar
pasados 10 segundos.
• Cambie el fusible o reinicie el
interruptor (hágalo reparar por
profesionales de nuestra empresa)
• Pruebe la toma con otros
electrodomésticos.
El horno no
calienta.
4) Puerta mal cerrada. Cierre bien la puerta.
La bandeja
giratoria de
cristal hace ruido
al funcionar el
microondas.
5) Suciedad en los
rodamientos y el
fondo del horno.
Consulte “Mantenimiento del
microondas” para limpiar las piezas
sucias.
Horno microondas-grill
Page 52

52
Leia estas instruções cuidadosamente antes de utilizar o seu forno
micro-ondas e, em seguida, guarde-as.
Se seguir as instruções, o seu forno irá proporcionar-lhe muitos anos de
utilização.
GUARDE ESTAS INSTRUÇÕES CUIDADOSAMENTE
PRECAUÇÕES PARA EVITAR POSSÍVEL EXPOSIÇÃO A ENERGIA DE
MICRO-ONDAS EXCESSIVA
(a) Não tente utilizar este forno com a porta aberta dado que isso
pode resultar em exposição prejudicial a energia de micro-ondas. É
importante não quebrar ou alterar os bloqueios de segurança.
(b) Não coloque qualquer objecto entre a face anterior do forno e a porta
nem permita que se acumulem resíduos ou produtos de limpeza na
superfície dos vedantes.
(c) AVISO: Se a porta ou os vedantes estiverem danicados, o forno não
deve ser utilizado até ter sido reparado por um técnico qualicado.
ADENDA
Se o aparelho não for mantido em boa condição de limpeza, a sua
superfície pode car degradada, o que pode afectar o tempo de vida útil
do aparelho e levar a uma situação perigosa.
ESPECIFICAÇÕES
Modelo: MW-2897
Tensão nominal: 230V~50Hz
Potência nominal de entrada (Micro-ondas): 1300W
Potência nominal de saída (Micro-ondas): 800W
Potência nominal de entrada (Grill): 1200W
Potência nominal de entrada (Convexão): 1200W
Capacidade do forno: 23L.
Diâmetro do prato rotativo: Ф270mm
Dimensões externas (CxLxA): 485x410x292.5mm
Peso líquido: Aprox. 13,25 kg
AVISO DE IMPORTANTES INSTRUÇÕES DE
SEGURANÇA
Para reduzir o risco de incêndio, choque eléctrico, lesões em pessoas ou
exposição a energia de micro-ondas excessiva ao utilizar o seu aparelho,
siga precauções básicas de segurança, incluindo as seguintes:
• Aviso: Líquidos e outros alimentos não devem ser aquecidos em
recipientes selados, dado que podem explodir.
• Aviso: É perigoso que alguém sem as competências necessárias
efectue algum serviço de reparação que envolva a remoção de uma
cobertura de protecção contra a exposição a energia de micro-ondas.
• Aviso: Permita que crianças utilizem o forno sem supervisão
apenas quando tiverem sido fornecidas instruções adequadas para
que a criança possa utilizar o forno em segurança e compreenda os
perigos de uma utilização desadequada.
• Aviso: Quando o aparelho for utilizado no modo de combinação, as
crianças devem utilizar o forno apenas sob supervisão de um adulto
devido às tmeperaturas geradas. (Apenas para a série com grill)
• Utilize apenas utensílios adequados para utilização em fornos
micro-ondas.
• O forno deve ser limpo regularmente e devem ser removidos
quaisquer resíduos alimentares.
• Leia e siga o seguinte: "PRECAUÇÕES PARA EVITAR POSSÍVEL
EXPOSIÇÃO A ENERGIA DE MICRO-ONDAS EXCESSIVA".
• Quando aquecer alimentos em recipientes de plástico ou papel,
mantenha-se atento ao forno devido à possibilidade de combustão.
• Se observar fumo, desligue ou retire a cha da tomada e mantenha
a porta fechada para abafar quaisquer chamas.
Manual de utilizador
Page 53

53
• Não cozinhe demasiado os alimentos
• Não utilize o espaço interior do forno para armazenamento. Não
guarde itens, como pão, biscoitos, etc. dentro do forno.
• Remova as pegas e os atilhos metálicos dos recipientes/sacos de
papel ou plástico antes de os colocar no forno.
• Instale ou situe este forno apenas de acordo com as instruções de
instalação fornecidas.
• Ovos crus e cozidos não devem ser aquecidos em fornos microondas porque podem explodir mesmo depois do aquecimento ter
terminado.
• Utilize este aparelho apenas para o seu m pretendido, tal como
descrito no manual. Não utilize químicos ou gases corrosivos neste
aparelho. Este forno foi concebido especialmente para aquecer.
Não foi concebido para utilização industrial ou laboratorial.
• Se o cabo de alimentação fornecido estiver danicado, deve ser
substituído pelo fabricante, pelo serviço de assistência autorizado
ou por alguém com competências similares para evitar perigos.
• Não guarde ou utilize este aparelho ao ar livre.
• Não utilize este forno perto de água, numa cave húmida ou junto
a uma piscina.
• A temperatura das superfícies acessíveis pode ser elevada quando
o aparelho estiver em funcionamento. As superfícies podem
tornar-se quentes durante a utilização. Mantenha o cabo de
alimentação afastado das superfícies quentes e não tape as saídas
de ventilação do forno.
• Não permita que o cabo de alimentação penda de uma mesa ou
de um balcão.
• Falhas na manutenção do forno em condições de limpeza
adequadas podem levar à deterioração da superfície, o que pode
afectar de forma negativa o tempo de vida útil do aparelho e,
possivelmente, resultar numa situação perigosa.
• O conteúdo de biberões e boiões de alimentos para bebé deve ser
mexido ou abanado para evitar queimaduras.
• O aquecimento de líquidos por micro-ondas pode resultar em
posterior erupção de fervura, portanto tenha cuidado quando
manusear o recipiente.
• O aparelho não foi concebido para ser utilizado por pessoas
(incluindo crianças) com capacidades físicas, sensoriais ou mentais
reduzidas ou sem experiência ou conhecimento, a não ser que
exista supervisão ou instruções relativamente à utilização do
aparelho por parte de alguém responsável pela sua segurança.
• As crianças devem ser supervisionadas para garantir que não
brincam com o aparelho.
• O aparelho não foi concebido para ser utilizado através de um
temporizador externo ou um sistema de controlo remoto separado.
• AVISO: Certique-se de que o aparelho está desligado antes
de substituir a lâmpada para evitar a possibilidade de choque
eléctrico.
• As partes acessíveis podem aquecer durante o funcionamento. As
crianças pequenas devem ser mantidas afastadas.
• Não utilize produtos de limpeza abrasivos ou esfregões metálicos
para limpar a porta do forno, dado que a poderiam arranhar,
resultando na possível quebra do vidro.
• Durante o funcionamento, o aparelho aquece. Deve ter cuidado para
não tocar nos elementos de aquecimento no interior do forno.
• Utilize apenas a sonda de temperatura recomendada para este
forno. (Para fornos que possuem a possibilidade de utilização de
uma sonda de temperatura)
• A superfície posterior do aparelho deve ser encostada a uma
parede.
PT
Microondas-Grill
Page 54

54
PERIGO
Risco de choque eléctrico
Tocar em alguns dos componentes internos pode provocar lesões sérias
ou morte. Não desmonte este aparelho.
AVISO
Risco de choque eléctrico – a utilização desadequada da terra pode resultar
em choque eléctrico. Não coloque a cha numa tomada até o aparelho estar
devidamente instalado e com terra.
LIMPEZA
Certique-se de que desliga a cha de alimentação da tomada eléctrica.
• Limpe o interior do forno utilizando um pano ligeiramente húmido.
• Limpe os acessórios da forma habitual, com água e sabão.
• A estrutura da porta, o vedante e as partes circundantes devem ser limpos
cuidadosamente com um pano húmido quando se encontram sujos.
Ficha com dois pinos redondos
Este aparelho deve estar ligado a terra. Caso ocorra um curto-circuito
eléctrico, a terra reduz o risco de choque eléctrico fornecendo uma forma
de escape para a corrente eléctrica. Este aparelho está equipado com
um cabo e uma cha com terra. A cha deve ser inserida numa tomada
devidamente instalada e com terra. Consulte um electricista qualicado
se não compreender totalmente as instruções de terra ou se tiver alguma
dúvida se o aparelho está ou não com terra. Se for necessário utilizar uma
extensão, utilize apenas uma com três os.
• É fornecido um cabo de alimentação curto para reduzir o risco de ser
enrolado ou de alguém tropeçar nele.
• Se for utilizado um cabo de alimentação longo ou uma extensão:
• A tensão nominal do cabo de alimentação ou da extensão deve ser
pelo menos igual à tensão nominal do aparelho.
• A extensão deve ser com terra e de três os.
• O cabo de alimentação longo deve ser colocado de forma que não
penda de nenhuma superfície, de onde possa ser puxado ou onde seja
possível alguém tropeçar nele por acidente.
UTENSÍLIOS
CUIDADO
Risco de lesões
• É perigoso para alguém sem as competências necessárias efectuar
qualquer serviço de reparação que envolva a remoção de uma cobertura
de protecção contra a exposição a energia de micro-ondas.
• Consulte as instruções em "Materiais que pode utilizar ou que devem
ser evitados em fornos micro-ondas." Podem existir certos utensílios
não-metálicos que não são seguros para utilização com micro-ondas.
Se tiver dúvidas, é possível testar o utensílio em questão seguindo o
procedimento seguinte.
Teste a um utensílio:
• Encha um recipiente seguro para micro-ondas com uma chávena de
água fria (250ml) juntamente com o utensílio em questão.
• Cozinhe na potência máxima durante um minuto.
• Toque cuidadosamente no utensílio. Se este se encontrar quente, não o
utilize com micro-ondas.
• Não exceda um minuto de tempo de cozedura.
Manual de utilizador
Page 55

55
MATERIAIS QUE PODE UTILIZAR EM FORNOS
MICROONDAS
Utensílios Observações
Folha de
alumínio
Apenas como cobertura. Podem ser utilizados pequenas tiras
para cobrir pedaços nos de carne ou de aves e evitar que
cozinhem demasiado. Podem ocorrer arcos eléctricos se a folha
se encontrar demasiado perto das paredes do forno. A folha deve
estar pelo menos a 2,5cm das paredes do forno.
Prato para dourar Siga as instruções do fabricante. O fundo do prato para dourar deve
situar-se pelo menos 5 mm acima do prato rotativo. Uma utilização
incorrecta pode provocar danos no prato rotativo.
Serviço de jantar Apenas seguro para micro-ondas. Siga as instruções do
fabricante. Não utilize pratos lascados ou rachados.
Frascos de vidro Retire sempre a tampa. Utilize apenas para aquecer os alimentos
até carem apenas quentes. A maioria dos frascos de vidro não
são resistentes ao calor e podem partir-se.
Serviços de vidro Utilize apenas serviços resistentes ao calor. Certique-se de que não
possuem partes metálicas. Não utilize pratos lascados ou rachados.
Sacos para
cozinhas no
forno
Siga as instruções do fabricante. Não os feche com um atilho de
metal. Faça pequenos buracos para permitir que o vapor saia.
Pratos e copos
de papel
Utilize apenas para cozinhar/aquecer em curtos períodos de
tempo. Não deixe o forno sem supervisão durante a cozedura.
Papel de cozinha Utilize para cobrir alimentos durante o aquecimento e para
absorver gordura. Utilize com supervisão e apenas durante
curtos períodos de tempo.
Papel
pergaminho
Utilize como cobertura para impedir salpicos ou como cobertura
para o vapor.
Plástico Utilize apenas plástico que seja seguro para ser utilizado no micro-
ondas. Siga as instruções do fabricante. Deverá ter a etiqueta
“Seguro para o micro-ondas”. Alguns recipientes de plástico cam
moles enquanto os alimentos no interior cam quentes. Os sacos
de aquecimento e os sacos de plástico herméticos deverão ter
pequenos buracos, conforme indicado na caixa.
Utensílios Observações
Embrulho de
plástico
Utilize apenas plástico que seja seguro para ser utilizado no
microondas. Utilize para cobrir os alimentos durante a cozedura,
para manter a humidade. Não permita que o embrulho toque
nos alimentos.
Termómetros Apenas dos que sejam seguros para serem utilizados no micro-
ondas (termómetros para a carne e doces).
Papel de cera Utilize como cobertura para impedir salpicos e manter a
humidade.
MATERIAIS QUE NÃO DEVEM SER UTILIZADOS EM
FORNOS MICROONDAS
Utensílios Observações
Bandeja de alumínio Pode provocar arcos eléctricos. Transra os alimentos para
um recipiente seguro para ir ao micro-ondas.
Caixa de comida com
pega de metal
Pode provocar arcos eléctricos. Transra os alimentos para
um recipiente seguro para ir ao micro-ondas.
Utensílio de metal ou
com ornamentos de
metal
O metal protege os alimentos da energia de micro-ondas.
Os ornamentos de metal podem provocar arcos eléctricos.
Atilho metálico Pode provocar arcos eléctricos e combustão no forno.
Saco de papel Pode provocar combustão no forno.
Espuma plástica Pode derreter ou contaminar o líquido no interior quando
exposta a altas temperaturas.
Madeira A madeira seca quando é utilizada no micro-ondas e pode
rachar ou ganhar fendas.
PT
Microondas-Grill
Page 56

56
PREPARAR O SEU MICROONDAS
Nomes das peças e acessórios do micro-ondas
Retire o micro-ondas e todos os materiais da embalagem e do interior do
micro-ondas. O micro-ondas é fornecido com os seguintes acessórios:
Prato de vidro 1
Conjunto de anel rotativo 1
Manual de instruções 1
1. Painel de controlo
2. Veio rotativo
3. Conjunto de anel rotativo
4. Prato de vidro
5. Janela de observação
6. Conjunto da porta
7. Sistema de bloqueio de segurança
8. Grelha
Instalação do prato rotativo
• Nunca coloque o prato de vidro de pernas para o ar. O prato de vidro
nunca deve car preso.
• Tanto o prato de vidro como o conjunto do anel rotativo devem ser
sempre utilizados durante a cozedura.
• Os alimentos e os respectivos recipientes devem ser sempre colocados
sobre o prato de vidro para serem cozinhados.
• Se o prato de vidro ou o conjunto do anel rotativo se rachar ou partir,
entre em contacto com o centro de assistência autorizado mais próximo.
INSTALAÇÃO E LIGAÇÃO
• Remova todos os acessórios e material de embalagem. Examine o forno
para ver se tem algum dano, por exemplo, amolgadelas ou a porta
partida. Não instale se o forno tiver qualquer dano.
• Retire a película de proteção da superfície do forno microondas.
• Não retire a cobertura de Mica castanha clara que está colada dentro
forno para proteger a válvula eletrónica (magnetrão).
• Escolha uma superfície que tenha espaço livre suciente para a
ventilação.
1
5
6
7
2
3
4
8
Manual de utilizador
Page 57

57
PT
• A parte de trás do aparelho deve estar voltada para uma parede. Deve ser
deixado um espaço mínimo de 7,5 cm entre o forno e as paredes adjacentes.
Um dos lados deve permanecer desobstruído. Deixe um espaço mínimo de
30 cm por cima do forno. Não remova os pés da base do forno.
• Se as fendas de ventilação estiverem obstruídas, o microondas pode
avariar-se.
• Se possível, coloque o microondas o mais longe possível do rádio e da
TV. O funcionamento do microondas pode causar interferências no seu
rádio ou TV.
• Ligue o microondas a uma tomada de parede. Assegure-se de que a
voltagem e a frequência são as mesmas das mencionadas na embalagem.
• Não instale o microondas sobre um fogão ou sobre outro aparelho
que produza calor. Se for instalado perto de uma fonte de calor, o
microondas pode avariar-se e a garantia será anulada.
A superfície acessível pode aquecer durante o funcionamento.
INSTRUÇÕES DE FUNCIONAMENTO
Este forno micro-ondas utiliza um moderno controlo electrónico para
ajustar os parâmetros de cozedura e melhor ir ao encontro das suas
necessidades.
Acertar o relógio
Quando o micro-ondas estiver ligado à corrente eléctrica, o visor
apresentará "0:00" e a campaínha soará uma vez.
• Prima "CLOCK/KITCHEN TIMER" para seleccionar 12 horas ou 24 horas.
• Rode "
" para ajustar os dígitos das horas, o valor inserido deve estar
entre 0-23 (24 horas) ou 1-12 (12 horas).
• Prima "CLOCK/KITCHEN TIMER", os dígitos dos minutos piscarão.
• Rode "
" para ajustar os dígitos dos minutos, o valor inserido deve
estar entre 0-59.
• Prima "CLOCK/KITCHEN TIMER" para concluir o acerto do relógio. ":" piscará.
Nota:
• Se o relógio não for acertado, não funcionará.
• Durante o processo de acerto do relógio, se premir "PARAR/LIMPAR", o
micro-ondas regressará automaticamente ao estado anterior.
Cozinhar com micro-ondas
• Prima uma vez o botão "MICRO-ONDAS" e aparecerá "P100".
• Prima "MICRO-ONDAS" quatro vezes ou rode "
" para seleccionar a
potência do micro-ondas, de 100% a 10%. "P100", "P80", "P50", "P30", "P10"
aparecerão, por ordem.
• Prima "INICIAR/+30SEG./CONFIRMAR" para conrmar.
• Rode "
" para ajustar o tempo de cozedura. (A denição do tempo deverá
entre 0:05 e 95:00.)
• Prima "INICIAR/+30SEG./CONFIRMAR" para iniciar a cozedura.
NOTA: as quantidades de cada intervalo do ajuste do tempo do
interruptor de codicação são as seguintes:
0--- 1 min : 5 segundos
1—5 min : 10 segundos
5---10 min : 30 segundos
10---30 min : 1 minuto
30---95 min : 5 minutos
Microondas-Grill
Page 58

58
Microwave Power Chart
Prima 1 vez 2 vezes 3 vezes 4 vezes 5 vezes
Potência do micro-ondas 100% 80% 50% 30% 10%
Cozinhar com grill
• Prima o botão "GRILL/COMBI" uma vez e aparecerá "G-1".
• Gire " " para selecionar a potência do grelhador. Pare de grill quando
exibir "G-1"
• Prima "INICIAR/+30SEG./CONFIRMAR" para conrmar.
• Rode "
" para ajustar o tempo de cozedura. (A denição do tempo deverá
entre 0:05 e 95:00.)
• Prima "INICIAR/+30SEG./CONFIRMAR" para iniciar a cozedura.
Nota:
Quando o tempo de grill chegar a metade, o micro-ondas fará soar
a campaínha para o avisar de voltar os alimentos. É possível ignorar
e continuar a cozinhar, mas para obter um melhor efeito do grill nos
alimentos, deve voltá-los, fechar a porta e, em seguida, premir em
"INICIAR/+30SEG./CONFIRMAR" para continuar a cozinhar.
Combinados
• Prima o botão "GRILL/COMBI" uma vez e aparecerá "G-1".
• Prima " GRILL/COMBI " quatro vezes ou rode "
" para ajustar a
potência da placa de grill. Pare de girar quando "C-1","C-2","C-3" or "C-4"
aparecerem.
• Prima "INICIAR/+30SEG./CONFIRMAR" para conrmar.
• Rode "
" para ajustar o tempo de cozedura. (A denição do tempo deverá
entre 0:05 e 95:00.)
• Prima "INICIAR/+30SEG./CONFIRMAR" para iniciar a cozedura.
Instruções Visor Microondas Grill Aquecimento
1 C-1 • •
2 C-2 • •
3 C-3 • •
4 C-4 • • •
Cozinhar com convexão (com função de pré-aquecimento)
Cozinhar com convexão permite-lhe cozinhar os alimentos como num
forno tradicional. Não são utilizadas micro-ondas. É recomendado que
pré-aqueça o forno para a temperatura apropriada antes de colocar os
alimentos no forno.
• Prima o botão "CONVEXÃO" uma vez e piscará "100".
• Mantenha "CONVEXÃO" premido ou rode "
" para seleccionar a função de
convexão.
• Nota: a temperatura pode ser seleccionada entre 100 e 190 graus.
• P3) Prima "INICIAR/+30SEG./CONFIRMAR" para conrmar a temperatura.
• Prima "INICIAR/+30SEG./CONFIRMAR" para iniciar o pré-aquecimento.
Quando a temperatura do pré-aquecimento for atingida, a campaínha
soará duas vezes para o lembrar de colocar os alimentos no forno. A
temperatura de pré-aquecimento é apresentada e pisca.
• Coloque os alimentos no forno e feche a porta.
• Rode "
" para ajustar o tempo de cozedura. (O tempo máximo é de
95 minutos.)
• Prima "INICIAR/+30SEG./CONFIRMAR" para iniciar a cozedura.
Nota:
• Não é possível inserir o tempo de cozedura até a temperatura de préaquecimento ter sido atingida.
• Quando a temperatura for atingida, a porta tem de ser aberta para
inserir o tempo de cozedura.
Manual de utilizador
Page 59

59
PT
• Se o tempo de cozedura não for inserido no espaço de cinco minutos,
o forno parará o pré-aquecimento. A campaínha soará cinco vezes e,
em seguida, regressará ao estado de espera
Cozinhar com convexão (sem a função de pré-aquecimento)
• Prima o botão "CONVEXÃO" uma vez e piscará "100".
• Mantenha "CONVEXÃO" premido ou rode "
" para seleccionar a função de
convexão.
Nota: a temperatura pode ser seleccionada entre 100 e 190 graus.
• Prima "INICIAR/+30SEG./CONFIRMAR" para conrmar a temperatura.
• Gire "
" para ajustar o tempo de confeção. (O tempo máximo do
relógio é de 95 minutos.)
7. Relógio de Cozinha
• Prima duas vezes " CLOCK/KITCHEN TIMER ", irá aparecer 00:00 no LED.
• Gire "
" para inserir o tempo correto. (O tempo máximo do relógio é
de 95 minutos.)
• Prima "START/+30SEC./CONFIRM " para conrmar.
• Quando o tempo de confeção marcado for atingido, o relógio irá
apagar-se. O alarme irá tocar 5 vezes. Se a função de relógio tiver sido
previamente ajustado (sistema de 24h), o LED irá marcar a hora atual..
Note: O Relógio de Cozinha é uma função diferente do relógio normal
das 24h, o Relógio de Cozinha é um cronómetro.
Descongelar em função do peso
• Prima "W.T./Time Defrost " para escolher a função de descongelar em
função do peso. Irá aparecer "dEF1".
• Gire "
" para ajustar o peso. Aparecerão por ordem: "100","200","300","4
00","500","600","800", "1000", "1200","1400","1600","1800 and "2000".
• Prima "Start/+30Sec./Conrm" para iniciar a descongelação. Se premir
"Stop/Clear", o aparelho irá regressar ao modo de espera. Então,
prima novamente "Start/+30Sec./Conrm", se o tempo de pausa for
superior a 5 minutos irá novamente regressar ao modo de espera.
Prima "Start/+30Sec./Conrm" no espaço de 5 minutos, o aparelho irá
continuar a funcionar e o tempo vai começar a contar. Quando terminar,
a alarme toca 5 vezes e o aparelho regressa ao modo de espera.
• Quando tiver passado metade do tempo de descongelação, o alarme
irá soar duas vezes para o lembrar de virar os alimentos; se não for
tomada qualquer ação, o aparelho continuará a funcionar, mas os
alimentos podem não car bem descongelados.
Descongelar em função do tempo
• Prima "W.T./Time Defrost " duas vezes para escolher a função de
descongelar em função do tempo. Irá aparecer "dEF2".
• Gire "
" para ajustar o tempo de confeção. (O tempo MÁX. é de 95 minutos.)
• Prima "Start/+30Sec./Conrm" para iniciar a descongelação. Se premir
"Stop/Clear", o aparelho irá regressar ao modo de espera. Então,
prima novamente "Start/+30Sec./Conrm", se o tempo de pausa for
superior a 5 minutos irá novamente regressar ao modo de espera.
Prima "Start/+30Sec./Conrm" no espaço de 5 minutos, o aparelho irá
continuar a funcionar e o tempo vai começar a contar.
10. Menú Automático
• No modo de espera, gire "
" para a direita para escolher a função
desejada, e irá aparecer "A1","A2","A3"...."A10".
• Pima"START/ +30 SEC./CONFIRM" para conrmar o menú desejado.
• Gire "
" para escolher o peso do menú, e o indicador "g" irá acender-se.
• Prima "START/ +30 SEC./CONFIRM" para começar a cozinhar
Note 1: Quando seleccionar A8 Bolo, não coloque o bolo no forno logo
no início. O forno deve ser aquecido primeiro a 160 graus. Após vários
minutos, a camaínha soará duas vezes para o lembrar de colocar o bolo no
forno. Prima novamente "INICIAR/+30SEG./CONFIRMAR". O temporizador
decrescerá e o bolo cará perfeitamente cozido.
Nota 2: During A10, Frango Assado, o alarme do forno irá apitar duas vezes, é
normal. Para obter melhores resultados nos grelhados, deve rodar os alimentos,
feche a porta e prima "START/ +30SEC./. Conrme " para continuar. Se nada for
feito, o forno continuará a funcionar.
Microondas-Grill
Page 60

60
CARTA MENÚ AUTOMÁTICO
Menú Peso(g) Potência
A1
Pizza
• 300
• 400
100%
A2
Batatas
• 1 (cerca de 230g)
• 2 (cerca de 460g)
• 3 (cerca de 690g)
100%
A3
Carne
• 200
• 300
• 400
• 500
100%
A4
Peixe
• 200
• 300
• 400
• 500
80%
A5
Legumes
• 200
• 300
• 400
• 500
100%
A6
Bebidas
• 1(cerca de 240 ml)
• 2(cerca de 480 ml)
• 3(cerca de 720 ml)
100%
A7
Massas
• 50(adicione cerca de 450
ml de água fria)
• 100(adicione cerca de 800
ml de água fria)
• 150(adicione cerca de 1200
ml de água fria)
80%
Menú Peso(g) Potência
A8
Pipocas
• 50
• 100
100%
A9
Bolos
• 475 Pré-aquecer a 160º
A10
Frango
Assado
• 750
• 1000
• 1250
• C-2
• C-2
• C-2
Cozinhar rapidamente
• No estado em espera, prima "INICIAR/+30SEG./CONFIRMAR" para
cozinhar com 100% do nível de potência durante 30 segundos. De
cada vez que premir o mesmo botão o tempo aumenta 30 segundos. O
tempo máximo é de 95 minutos.
• Durante os estados de micro-ondas, grill, convexão e combinação,
prima "INICIAR/+30SEG./CONFIRMAR" para cozinhar com 100% do
nível de potência durante 30 segundos. De cada vez que premir o
mesmo botão o tempo aumenta 30 segundos.
Nota: esta função não funciona com o descongelamento, o menu
automático e a cozedura em várias fases.
Função de bloqueio para crianças
• Bloqueio: no estado em espera, prima "PARAR/LIMPAR" durante três
segundos, soará um longo ruído indicativo de que entrou no estado
de bloqueio de crianças e o indicador "
" acender-se-á. O visor
apresentará as horas actuais ou 0:00.
• Desbloqueio: no estado bloqueado, prima "PARAR/LIMPAR" durante
três segundos, soará um longo ruído indicativo de queo bloqueio foi
libertado e o indicador "
" desaparecerá.
Manual de utilizador
Page 61

61
PT
Instruções especiais
• A duração máxima das funções "Microondas", "Grill", "Descongelar",
"Aquecer" e "Combinados" é de 95 minutos.
• A luz acende-se sempre que a porta se abre. Se a porta se mantiver
aberta mais de 10 minutos, a luz apaga-se e o visor volta ao modo de
espera.
• Quando a porta se abre no modo de espera ou durante a seleção de
função, o visor mantém-se na mesma. Pode ser mudado e selecionado.
Mas o botão "START" não irá funcionar.
• Feche a porta, a luz irá apagar-se. O seletor pode então ser mudado. E o
botão "START" também irá funcionar.
RESOLUÇÃO DE PROBLEMAS
Normal
Micro-ondas interfere com a
recepção de TV
A recepção de rádio e TV poderá sofrer
interferências quando o micro-ondas estiver em
funcionamento. É semelhante à interferência de
pequenos electrodomésticos, como a misturadora, o
aspirador ou a ventoinha. É normal.
Luz do forno fraca Durante a cozedura com baixa potência do micro-
ondas, a luz do forno pode estar fraca. É normal.
Acumula-se vapor na porta
e sai ar quente das aberturas
de ventilação
Durante a cozedura, os alimentos podem libertar
vapor. A maior parte sairá através das aberturas de
ventilação, mas algum pode acumular-se num local
mais fresco como a porta do micro-ondas. É normal.
Micro-ondas começou a
funcionar acidentalmente
sem alimentos no interior.
É proibido utilizar o aparelho sem alimentos no
interior, é muito perigoso.
Problema Possível causa Solução
O micro-ondas
não funciona.
1) Cabo de
alimentação mal
ligado.
2) Fusível queimado
ou disjuntor activado.
3) Problema com a
tomada.
• Retire a cha da tomada e ligue
novamente após 10 segundos.
• Substitua o fusível ou reponha o
disjuntor (reparado por um técnico
qualicado ou pela nossa empresa)
• Teste a tomada com outros
aparelhos eléctricos.
O micro-ondas
não aquece.
4) Porta mal fechada. Feche bem a porta.
O prato de vidro
rotativo faz ruído
quando o microondas está em
funcionamento.
5) Rolamento e/ou
fundo do microondas sujos
Consulte "Manutenção do microondas” para limpar partes sujas.
Microondas-Grill
Page 62

62
Należy dokładnie przeczytać instrukcje przed rozpoczęciem
użytkowania kuchenki i zachować je do wglądu.
Jeśli będą państwo przestrzegać instrukcji, kuchenka zapewni wiele lat
dobrej pracy.
ZACHOWAĆ NINIEJSZĄ INSTRUKCJĘ DO WGLĄDU
ŚRODKI POZWALAJĄCE UNIKNĄĆ NARAŻENIA NA NADMIAR ENERGII
MIKROFALOWEJ
(a) Nigdy nie korzystać z kuchenki, jeśli drzwi są otwarte, jako że w tej sytuacji
może dojść do szkodliwego narażenia na energię mikrofalową. Ważne jest,
aby nie uszkodzić ani nie manipulować przy blokadach bezpieczeństwa.
(b) Nie umieszczać żadnych przedmiotów między przednią częścią kuchenki
a drzwiami ani nie pozwolić, aby kurz czy pozostałości po środkach
czyszczących nie zbierały się na powierzchniach uszczelniających.
(c) OSTRZEŻENIE: W przypadku uszkodzenia drzwiczek lub uszczelek w
drzwiczkach, nie wolno korzystać z kuchenki dopóki nie będzie ona
naprawiona przez osobę kompetentną.
UZUPEŁNIENIE
Jeśli urządzenie nie jest utrzymane w dobrym stanie czystości, jego
powierzchnia może być zniszczona, a żywotność urządzenia naruszona, co
prowadzi do sytuacji niebezpiecznych.
SPECYFIKACJE
Model: MW-2897
Napięcie szacunkowe: 230V~50Hz
Szacunkowa moc wejściowa (mikrofala): 1300 W
Szacunkowa moc wyjściowa (mikrofala): 800 W
Szacunkowa moc wejściowa (grill): 1200 W
Szacunkowa moc wejściowa (konwekcja): 1200 W
Pojemność kuchenki: 23 l
Średnica płyty obrotowej: Ф 270 mm
Zewnętrzne wymiary (DxSxW): 485 x 410 x 292,5 mm
Waga netto: Około 13,25 kg
WAŻNE INSTRUKCJE BEZPIECZEŃSTWA
OSTRZEŻENIA
Aby zredukować ryzyko pożaru, porażenia prądem, obrażeń ludzi lub
narażenia na nadmierną energię z kuchenki mikrofalowej podczas
korzystania z urządzenia, należy przestrzegać podstawowych środków
ostrożności w tym:
• Ostrzeżenie: Nie wolno podgrzewać płynów ani innych rodzajów
żywności w szczelnie zamkniętych naczyniach ze względu na
ryzyko gwałtownego wykipienia.
• Ostrzeżenie: Niebezpieczne jest dokonywanie napraw lub innych
rodzajów serwisu przez osoby niewykwalikowane, jeśli wiążą
się one ze zdjęciem obudowy, chroniącej przed narażeniem na
kontakt z energią mikrofali.
• Ostrzeżenie: Dzieci mogą korzystać z kuchenki bez nadzoru
wyłącznie, gdy otrzymały stosowne instrukcje bezpiecznego
użytkowania, i jeśli dziecko jest zdolne do użytkowania kuchenki
w bezpieczny sposób i zdaje sobie sprawę z ryzyka, jakie niesie
niewłaściwe zastosowanie urządzenia.
• Ostrzeżenie: Kiedy urządzenie użytkowane jest w trybie
kombinacji, dzieci powinny korzystać z kuchenki tylko pod
nadzorem dorosłych z powodu generowanych temperatur. (tylko
dla serii grill)
• Korzystać wyłącznie z naczyń, które są odpowiednie do kuchenek
mikrofalowych.
• Kuchenkę należy czyścić regularnie i usuwać wszystkie resztki jedzenia.
• Należy przeczytać i korzystać z działu: "ŚRODKI POZWALAJĄCE
UNIKNĄĆ NARAŻENIA NA NADMIAR ENERGII MIKROFALOWEJ".
• Podczas podgrzewania jedzenia w plastikowych lub papierowych
Instrukcja obsługi
Page 63

63
PL
pojemnikach, pilnować kuchenki z uwagi na ryzyko zapalenia.
• W przypadku pojawienia się dymu, wyłączyć lub odłączyć
urządzenie od zasilania i trzymać drzwi zamknięte, aby zdławić
płomienie.
• Nie przegotowywać potraw.
• Nie korzystać z wnęki kuchenki w celach składowania. Nie
przechowywać na przykład chleba, ciastek, itp., wewnątrz kuchenki.
• Zdjąć druciane wiązadła i metalowe uchwyty z papierowych lub
plastikowych pojemników/torebek przed umieszczeniem ich w
kuchence.
• Instalować lub umieszczać kuchenkę na miejscu wyłącznie zgodnie
z dostarczonymi instrukcjami instalacji.
• Nie należy podgrzewać w kuchence jajek w skorupach ani
ugotowanych na twardo, ponieważ grozi to pęknięciem nawet po
zakończeniu pracy kuchenki.
• Korzystać z urządzenia wyłącznie w celu, do którego jest
przeznaczone, zgodnie z opisem podręczniku. Nie używać
korozyjnych środków chemicznych ani rozpylaczy do tego urządzenia.
Ta kuchenka przeznaczona jest specjalnie do podgrzewania. Nie jest
przeznaczona do użytku przemysłowego ani laboratoryjnego.
• Jeśli przewód zasilania jest uszkodzony należy go wymienić u
producenta, przedstawiciela serwisu lub wykwalikowaną osobę w
celu uniknięcia zagrożenia.
• Nie wolno przechowywać ani używać urządzenia na zewnątrz.
• Nie używać kuchenki w pobliżu wody, w wilgotnej piwnicy ani w
pobliżu basenu.
• Temperatura dostępnych części urządzenia może być wysoka
podczas jego pracy. Powierzchnie mogą nagrzać się podczas
użytkowania. Trzymać przewód z dala od nagrzanej powierzchni,
nie przykrywać niczego na kuchence.
• Nie pozwolić, aby przewód zwisał z krawędzi stołu bądź blatu.
• Nieutrzymywanie kuchenki w czystości prowadzi do niszczenia jej
powierzchni, co niekorzystnie wpływa na żywotność urządzenia i
prowadzi do sytuacji zagrożenia.
• Zawartość butelek do karmienia lub słoiczków z jedzeniem dla
dzieci należy wstrząsnąć lub zamieszać i dokładnie sprawdzić
temperaturę przed podaniem do spożycia, aby uniknąć poparzeń.
• Podgrzewanie mikrofalowe napojów może doprowadzić do
późniejszego wykipienia; dlatego należy zachować ostrożność
podczas przenoszenia pojemnika.
• Urządzenie nie jest przeznaczone dla osób (w tym dzieci)
niepełnosprawnych zycznie, sensorycznie lub psychicznie,
nieposiadających doświadczenia ani wiedzy, chyba że są kontrolowane
lub zostały dokładnie poinstruowane na temat użytkowania urządzenia
przez osoby odpowiedzialne za ich bezpieczeństwo.
• Należy dokładnie sprawdzać i nadzorować, czy dzieci nie bawią się
urządzeniem.
• Tych urządzeń nie należy obsługiwać za pomocą zewnętrznego
timera lub osobnego systemu zdalnego sterowania.
• OSTRZEŻENIE: Sprawdzić, czy urządzenie jest wyłączone przed
wymianą lampki, aby uniknąć porażenia prądem.
• Dostępne części mogą nagrzewać się podczas użytkowania. Małe
dzieci należy trzymać z dala od urządzenia.
• Nie wolno korzystać z czyszczenia parowego.
• Nie używać ostrych środków żrących ani ostrych metalowych drapaków
w celu czyszczenia szyby w drzwiach kuchenki, ponieważ mogą one
zadrapać powierzchnię, co może doprowadzić do rozbicia szkła.
• Podczas użytkowania urządzenie nagrzewa się. Należy zachować
szczególną ostrożność, aby nie dotykać elementów grzewczych
wewnątrz kuchenki.
• Korzystać z czujnika temperatury zalecanego wyłącznie dla tej
kuchenki. (dla kuchenek z urządzeniem pozwalających na użycie
czujnika temperatury.)
• Tylna powierzchnia urządzenia powinna być ustawiona na ścianie.
Mikrofalówka z funkcją grila
Page 64

64
NIEBEZPIECZEŃSTWO!
Niebezpieczeństwo porażenia prądem
Dotykanie niektórych wewnętrznych komponentów może prowadzić do
poważnych obrażeń ciała lub śmierci. Nie rozmontowywać urządzenia.
OSTRZEŻENIE
Ryzyko porażenia prądem Nieprawidłowe użycie uziemienia może prowadzić
do porażenia prądem. Nie wkładać wtyczki do gniazdka dopóki urządzenie nie
będzie prawidłowo zainstalowane oraz uziemione.
CZYSZCZENIE
Przede wszystkim wyjąć wtyczkę z gniazda.
• Czyścić wnętrze kuchenki po użyciu za pomocą delikatnie wilgotnej szmatki.
• Wyczyścić akcesoria w sposób normalny za pomocą wody ze środkiem
myjącym.
• Rama drzwi oraz uszczelka i sąsiadujące części muszą być czyszczone z
ostrożnością za pomocą wilgotnej szmatki, kiedy są brudne.
Okrągła wtyczka z dwoma bolcami
To urządzenie musi być uziemione. W razie zwarcia w gniazdku
elektrycznym, uziemienie redukuje ryzyko porażenia prądem, dostarczając
przewód ucieczki dla prądu. Urządzenie wyposażone jest w przewód,
wyposażony w kabel uziemiający z wtyczką uziemiającą. Wtyczkę
należy włożyć do gniazda, które jest prawidłowo zainstalowane i
uziemione. Należy skonsultować się z wykwalikowanym elektrykiem
lub pracownikiem serwisu, jeśli instrukcje uziemienia nie są całkowicie
jasne lub jeśli istnieją wątpliwości dotyczące prawidłowego uziemienia
urządzenia. Jeśli konieczne jest użycie przewodu przedłużającego,
korzystać tylko z przewodu przedłużającego na 3 wtyczki.
• W zestawie znajduje się krótki przewód zasilający w celu zredukowania
ryzyka wynikającego z potknięcia się lub oplątania w długi przewód.
• W razie użycia długiego kabla lub przedłużacza:
• Parametry elektryczne przewodu lub przedłużacza powinny być co
najmniej tak wysokie jak parametry elektryczne urządzenia.
• Przedłużacz musi być typu uziemionego przewodu na 3 wtyczki.
• Należy tak ułożyć długi przewód, aby nie zwisał z blatu albo stołu, skąd
mogą go ściągnąć dzieci lub istnieje ryzyko niezamierzonego potknięcia.
NACZYNIA
UWAGA
Ryzyko obrażeń ciała
• Niebezpieczne jest dokonywanie napraw lub innych rodzajów serwisu
przez osoby niewykwalikowane, jeśli wiążą się one ze zdjęciem
obudowy, chroniącej przed narażeniem na kontakt z energią mikrofali.
• Należy sprawdzić instrukcje w rozdziale "Materiały, których należy
lub absolutnie nie należy używać w kuchence mikrofalowej." Istnieją
pewne niemetalowe naczynia, które nie są bezpieczne do użycia w
kuchence mikrofalowej. W razie wątpliwości można sprawdzić naczynie
za pomocą poniższej procedury.
Test naczyń:
• Napełnić odpowiedni do mikrofalówki pojemnik zimną wodą o poj. 1
liżanki (250ml) razem z badanym naczyniem.
• Gotować z maksymalną mocą przez 1 minutę.
• Ostrożnie dotknąć naczynia. Jeśli puste naczynie jest ciepłe, nie używać
celem gotowania w mikrofalówce.
• Nie przekraczać 1 minuty czasu gotowania.
Instrukcja obsługi
Page 65

65
PL
MATERIAŁY, KTÓRYCH MOŻEMY UŻYĆ W
KUCHENCE MIKROFALOWEJ
Naczynia Uwagi
Folia
aluminiowa
Tylko osłony. Niewielkie gładkie kawałki mogą być użyte, aby przykryć
cienkie kawałki mięsa lub drobiu, aby uniknąć przegotowania. Może
pojawić się iskrzenie, jeśli folia znajduje się blisko ścianek kuchenki.
Folia powinna znajdować się w odległości co najmniej 1 cala (2,5cm)
od ścianek kuchenki.
Naczynia do
pieczenia
Przestrzegać instrukcji producenta. Dolna część naczynia powinna
znajdować się co najmniej 3/16 cala (5mm) powyżej płyty obrotowej.
Nieprawidłowe użycie może doprowadzić do pęknięcia płyty.
Naczynia
obiadowe
Tylko bezpieczne do zastosowania w mikrofalówce. Przestrzegać
instrukcji producenta. Nie korzystać z pękniętych czy odłamanych
naczyń.
Szklane słoiki Zawsze zdejmować szklaną pokrywkę. Korzystać tylko do lekkiego
podgrzania. Większość szklanych słoików nie jest żaroodporna i może
pękać.
Naczynia
szklane
Tylko żaroodporne naczynia szklane. Sprawdzić, czy nie mają
metalowego obrzeża. Nie korzystać z pękniętych czy odłamanych
naczyń.
Torebki do
użycia w
kuchenkach
Przestrzegać instrukcji producenta. Nie zamykać za pomocą
metalowych zapinek. Naciąć, aby umożliwić uchodzenie pary.
Papierowe
talerze i kubki
Używać wyłącznie podczas krótkiego gotowania/podgrzewania. Nie
pozostawiać kuchenki bez nadzoru podczas pracy urządzenia.
Ręczniki
papierowe
Używać do przykr ycia potraw w celu podgrzewania lub wchłaniania
tłuszczu. Używać pod nadzorem tylko podczas krótkiego gotowania.
Papier
pergaminowy
Użyć w celu przykrycia, aby zapobiec pryskaniu lub owinąć w celu
parowania.
Naczynia Uwagi
Tworzy wa
sztuczne
Tylko do zastosowania w mikrofalówce. Przestrzegać instrukcji producenta.
Powinno mieć etykietę "bezpieczne do użycia w mikrofalówkach".
Niektóre pojemniki z tworzyw sztucznych miękną, kiedy znajdująca się
wewnątrz żywność nagrzewa się. "Torebki do gotowania" oraz szczelnie
zamykane torebki plastikowe powinny być nacięte, nakłute lub posiadać
odpowietrzniki, zgodnie z instrukcjami w opakowaniu.
Opakowania
z tworzyw
sztucznych
Tylko do zastosowania w mikrofalówce. Użyć, aby przykr yć żywność
podczas gotowania, aby zatrzymać wilgoć. Nie pozwalać, aby
opakowania z tworzyw sztucznych dotykały żywności.
Termometry Tylko do użycia w mikrofalówkach (do mięsa i słodyczy).
Papier
woskowy
Użyć jako przykrycie, aby zapobiec rozpryskiwaniu i utrzymaniu
wilgoci.
MATERIAŁY, KTÓRYCH NIE WOLNO UŻYWAĆ W
KUCHENCE MIKROFALOWEJ
Naczynia Uwagi
Tacka aluminiowa Może powodować iskrzenie. Przenieść żywność na
naczynie bezpieczne do użycia w mikrofalówce.
Karton z żywnością
z metalowym
uchwytem
Może powodować iskrzenie. Przenieść żywność na
naczynie bezpieczne do użycia w mikrofalówce.
Naczynia metalowe
lub z metalowym
obrzeżem
Metal osłania żywność przed energią mikrofalową.
Metalowe obrzeża mogą powodować iskrzenie.
Metalowe zapinki Mogą powodować iskrzenie oraz wywołać pożar w kuchence
Papierowe torebki Mogą wywołać ogień w kuchence
Pianka z tworzyw
sztucznych
Pianka z tworzyw sztucznych może stopnieć lub
zanieczyścić płyn wewnątrz, kiedy narażona jest na
wysoką temperaturę.
Drewno Drewno wysuszy się podczas użytkowania w mikrofalówce
i może łamać się lub pękać.
Mikrofalówka z funkcją grila
Page 66

66
USTAWIANIE KUCHENKI
Nazwy części kuchenki i akcesoriów
Wyjąć kuchenkę i wszystkie materiały z kartonu oraz wnęki kuchenki.
Kuchenka wyposażona jest w następujące akcesoria:
Szklana tacka 1
Pierścień talerza obrotowego 1
Instrukcje użytkowania 1
1. Panel kontrolny
2. Wałek płyty obrotowej
3. Pierścień płyty obrotowej
4. Szklana tacka
5. Okienko do podglądu
6. Drzwiczki
7. System blokady bezpieczeństwa
8. Tacka grillowa
Instalacja płyty obrotowej
• Nigdy nie ustawiać szklanej tacki do góry nogami. Nie wolno blokować
szklanej tacki.
• Zarówno szklana taca jak i pierścień płyty obrotowej muszą być zawsze
użyte podczas gotowania.
• Jedzenie i pojemniki z jedzeniem są zawsze umieszczone na szklanej
tacce celem gotowania.
• Jeśli szklana tacka lub pierścień płyty obrotowej pękną lub rozbiją się, należy
skontaktować się z najbliższym autoryzowanym centrum serwisowym.
INSTALACJA I POŁĄCZENIA
• Zdjąć wszystkie materiały opakowania oraz akcesoria. Sprawdzić kuchenkę
pod katem uszkodzeń takich jak wgniecenia lub zniszczone drzwiczki. Nie
wolno instalować uszkodzonej kuchenki.
• Zdjąć wszelkie warstwy ochronne, znajdujące się na powierzchni wnętrza
mikrofalówki.
• Nie zdejmować lekkiej, brązowej pokrywki typu Mica, zamontowanej we
wnętrzu kuchenki w celu ochrony magnetronu.
• Wybrać poziomą powierzchnię, zapewniającą wystarczającą ilość wolnej
przestrzeni dla otworów wlotowych i/lub wylotowych.
1
5
6
7
2
3
4
8
Instrukcja obsługi
Page 67

67
PL
• Tylna powierzchnia urządzenia powinna być ustawiona przy ścianie.
Wymagany jest minimalny odstęp 7,5 cm pomiędzy kuchenką a
przylegającymi ścianami. Jedna strona musi pozostać otwarta.
Pozostawić minimalny odstęp 30 cm powyżej kuchenki. Nie
zdejmować nóżek z dolnej części kuchenki.
• Blokowanie otworów wlotowych i/lub wylotowych może uszkodzić
kuchenkę.
• Ustawić kuchenkę jak najdalej od odbiorników radiowych oraz TV.
Funkcjonowanie kuchenki mikrofalowej może powodować zakłócenia w
odbiorze radia lub TV.
• Włożyć wtyczkę kuchenki do standardowego w gospodarstwie domowym
gniazdka. Sprawdzić, czy napięcie oraz częstotliwość są takie same jak
napięcie oraz częstotliwość na etykiecie znamionowej.
• Nie instalować kuchenki nad piekarnikiem ani innym urządzeniem
wydzielającymi ciepło. W razie instalacji w pobliżu lub ponad źródłem
ciepła, kuchenkę można uszkodzić, przez co gwarancja utraci ważność.
Dostępna powierzchnia może nagrzać się podczas pracy.
INSTRUKCJE OBSŁUGI
Ta kuchenka mikrofalowa korzysta z nowoczesnego sterowania
elektronicznego w celu regulacji parametrów gotowania, aby lepiej
sprostać Państwa potrzebom.
Ustawianie zegara
Kiedy mikrofalówka jest pod napięciem, kuchenka wyświetla "0:00", a
sygnalizator zadzwoni raz.
• Nacisnąć "CLOCK/KITCHEN TIMER" aby wybrać 12- lub 24-godzinny tryb.
• Obrócić "
" aby wyregulować wskazówki godzin, czas wejściowy
powinien mieścić się w zakresie 0--23(24-godzinny) lub 1--12 (12-godzinny).
• Nacisnąć "CLOCK/KITCHEN TIMER", wskazówki minutowe migają.
• Obrócić "
" aby wyregulować wskazówki minutowe, czas wejścia
powinien zawierać się między 0--59.
• Nacisnąć "CLOCK/KITCHEN TIMER" aby zakończyć ustawianie zegara.
":" miga.
Uwaga:
• Jeśli zegar nie jest ustawiony, nie będzie działał, kiedy jest podłączony
do prądu.
• Podczas procedury ustawiania zegara, jeśli naciskamy "STOP/CLEAR ",
kuchenka automatycznie powraca do poprzedniego stanu.
Gotowanie mikrofalowe
• Nacisnąć przycisk "MICROWAVE" raz i pojawi się "P100".
• Nacisnąć "MICROWAVE" cztery razy lub obrócić "
" aby wybrać moc
mikrofali od 100% do 10%. "P100", "P80", "P50", "P30", "P10" pojawią się po
kolei.
• Nacisnąć START/+30SEC./CONFIRM, aby potwierdzić.
• Obrócić "
" aby wyregulować czas gotowania. (Ustawienie czasu
powinno mieścić się w zakresie 0:05- 95:00.)
• Nacisnąć START/+30SEC./CONFIRM, aby rozpocząć gotowanie.
Mikrofalówka z funkcją grila
Page 68

68
UWAGA: poszczególne ilości do regulacji czasu w przełączniku kodowania
są następujące:
0--- 1 min : 5 sekund
1—5 min : 10 sekund
5---10 min : 30 sekund
10---30 min : 1 minuta
30---95 min : 5 minut
Moc mikrofali- zestawienie
Nacisnąć 1 raz 2 razy 3 razy 4 razy 5 razy
Moc mikrofali 100% 80% 50% 30% 10%
Grillowanie
• Nacisnąć przycisk "GRILL/COMBI" raz i pojawi się "G-1".
• Obrócić "
" aby wyregulować czas gotowania. (Ustawienie czasu
powinno mieścić się w zakresie 0:05- 95:00.)
• Nacisnąć START/+30SEC./CONFIRM, aby rozpocząć gotowanie.
Uwaga:
Po upływie połowy czasu grillowania, rozlegnie się podwójny dźwięk, aby
zasygnalizować obrócenie potrawy. Można to pominąć i kontynuować
pieczenie. Ale w celu uzyskania lepszego efektu grillowania, Należy
obrócić jedzenie, zamknąć drzwiczki i nacisnąć "START/+30SEC./CONFIRM"
aby kontynuować pieczenie.
Gotowanie kombi
• Nacisnąć przycisk "GRILL/COMBI" raz i pojawi się "G-1".
• Nacisnąć "GRILL/COMBI" cztery razy lub obrócić "
", aby ustawić moc
grillowania. Przestań kręcić, gdy pokaże się "C-1", "C-2", "C-3" lub "C-4".
• Nacisnąć START/+30SEC./CONFIRM, aby potwierdzić.
• Obrócić " " aby wyregulować czas gotowania. (Ustawienie czasu powinno
mieścić się w zakresie 0:05- 95:00.)
• Nacisnąć START/+30SEC./CONFIRM, aby rozpocząć gotowanie.
Mikrofala + Konwekcja
• Nacisnąć przycisk MICRO.+CONV." raz i pojawi się "G-1".
• Nacisnąć "MICRO.+CONV. " cztery razy lub obrócić "
" aby wybrać
"C-1","C-2","C-3" lub "C-4".
• Nacisnąć START/+30SEC./CONFIRM, aby potwierdzić.
• Obrócić "
" aby wyregulować czas gotowania. (Ustawienie czasu
powinno mieścić się w zakresie 0:05- 95:00.)
• Nacisnąć START/+30SEC./CONFIRM, aby rozpocząć gotowanie.
Uwaga: Instrukcje dot. kombinacji
Instrukcje Wyświetlacz Mikrofalówka Grill Konwekcyjne
1 C-1 • •
2 C-2 • •
3 C-3 • •
4 C-4 • • •
Gotowanie konwekcyjne (funkcja nagrzewania)
Gotowanie konwekcyjne pozwala na gotowanie tradycyjne. Nie używamy
mikrofali. Zaleca się rozgrzanie kuchenki do odpowiedniej temperatury
przed wstawieniem żywności.
• Nacisnąć przycisk "CONVECTION" raz, miga "100".
• Trzymać przycisk "CONVECTION" wciśnięty lub obrócić " " aby wybrać
funkcję konwekcji. Uwaga: Można wybrać temperaturę w zakresie 100
do 190 stopni.
• Nacisnąć "START/+30SEC./CONFIRM”, aby potwierdzić temperaturę.
• Przekręcić "
", aby ustawić czas gotowania. (Maksymalne ustawienie
czasu to 95 minut.)
Instrukcja obsługi
Page 69

69
PL
Minutnik kuchenny
• Nacisnąć dwukrotnie "CLOCK/KITCHEN TIMER", wyświetlacz pokaże 00:00.
• Przekręcić "
", aby ustawić właściwy czas.(Maksymalne ustawienie
czasu to 95 minut.)
• Nacisnąć "START/+30SEC./CONFIRM ", aby potwierdzić ustawienie.
• Po upłynięciu ustawionego czasu, wskaźnik czasu zgaśnie. Rozlegnie
się sygnał dźwiękowy - 5 razy. Jeśli ustawiono zegar (system 24
godzinny), na wyświetlaczu pojawi się aktualna godzina.
Rozmrażanie wg wagi
• Nacisnąć "W.T./Time Defrost ", aby wybrać funkcję rozmrażania wg
wagi. "dEF1" pojawi się na ekranie.
• Przekręcić "
", aby wprowadzić wagę."100","200","300","400","500","600","
800", "1000", "1200","1400","1600","1800 i "2000" zostaną wyświetlone w
tej kolejności.
• Nacisnąć "Start/+30Sec./Conrm", aby potwierdzić rozmrażanie. Jeśli
naciśnięto "Stop/Clear" mikrofalówka przejdzie ponownie w stan
oczekiwania. Nacisnąć ponownie "Start/+30Sec./Conrm" lub czas,
jeśli pauza jest dłuższa niż 5 minut, mikrofalówka przejdzie ponownie
w stan oczekiwania. Nacisnąć "Start/+30Sec./Conrm" w przeciągu 5
minut, urządzenie zacznie pracować i odliczać czas. Po zakończeniu,
pięć razy rozlegnie się sygnał dźwiękowy, a mikrofalówka przejdzie
ponownie w stan oczekiwania.
• Po upłynięciu połowy czasu rozmrażania, dwa razy rozlegnie się sygnał
dźwiękowy, przypominając o obróceniu żywności na drugą stronę; jeśli
nie zostanie to zrobione, urządzenie będzie kontynuować rozmrażanie,
lecz jego efekty nie będą najlepsze.
Rozmrażanie wg czasu
• Nacisnąć dwa razy "W.T./Time Defrost ", aby wybrać funkcję
rozmrażania wg czasu. "dEF2" pojawi się na ekranie.
• Przekręcić "
", aby ustawić czas gotowania. Maksymalne ustawienie
czasu to 95 minut.
• Nacisnąć "Start/+30Sec./Conrm", aby potwierdzić rozmrażanie. Jeśli
naciśnięto "Stop/Clear" mikrofalówka przejdzie ponownie w stan
oczekiwania. Nacisnąć ponownie "Start/+30Sec./Conrm" lub czas,
jeśli pauza jest dłuższa niż 5 minut, mikrofalówka przejdzie ponownie
w stan oczekiwania. Nacisnąć "Start/+30Sec./Conrm" w przeciągu 5
minut, urządzenie zacznie pracować i odliczać czas.
Automatyczne Menu
• W trybie oczekiwania przekręcić "
" w prawo, aby wybrać żądaną
funkcję - pokaże się "A1", "A2", "A3"...."A10".
• Nacisnąć "START/ +30 SEC./CONFIRM", aby potwierdzić wybrane menu.
• Przekręcić "
", aby wybrać wagę - zaświeci się wskaźnik "g".
• Nacisnąć "START/ +30 SEC./CONFIRM", aby rozpocząć gotowanie.
Uwaga 1: Kiedy wybieramy ciasto A8, proszę nie wkładać ciasta do
kuchenki na początku. Najpierw należy rozgrzać kuchenkę do 160 stopni.
Po kilku minutach, sygnalizator zadźwięczy dwa razy, aby przypomnieć
o włożeniu ciasta do kuchenki. Po włożeniu ciasta ponownie nacisnąć
"Start/+30Sec./Conrm”. Timer rozpocznie odliczanie, a ciasto zostanie
perfekcyjnie przygotowane.
Uwaga 2: Podczas pieczenia kurczaka A10 rozlegnie się dwukrotnie sygnał
dźwiękowy - jest to normalne. Aby
lepiej zgrillować jedzenie, powinno się obrócić je na drugą stronę,
zamknąć drzwiczki i nacisnąć "START/ +30SEC./ Conrm", aby
kontynuować gotowanie.
W przypadku braku reakcji, kuchenka będzie kontynuować pracę.
Mikrofalówka z funkcją grila
Page 70

70
TABELA AUTOMATYCZNEGO MENU
Menu Waga (g) Moc
A1
Pizza
• 300
• 400
100%
A2
Ziemniaki
• 1 (około 230 g)
• 2 (około 460 g)
• 3 (około 690 g)
100%
A3
Mięso
• 200
• 300
• 400
• 500
100%
A4
Ryba
• 200
• 300
• 400
• 500
80%
A5
Warz ywa
• 200
• 300
• 400
• 500
100%
A6
Napoje
• 1(około 240 ml)
• 2(około 480 ml)
• 3(około 720 ml)
100%
A7
Makaron
• 50(dodać 450 ml zimnej wody)
• 100(dodać 800 ml zimnej wody)
• 150(dodać 1200 ml zimnej wody)
80%
A8
Popcorn
• 50
• 100
100%
A9
Ciasto
• 475 Rozgrzać w 160oC
A10
Pieczony
kurczak
• 750
• 1000
• 1250
• C-2
• C-2
• C-2
Rozmrażanie przez W.T.
• Nacisnąć "W.T./TIME DEFROST" raz, na kuchence wyświetli się "dEF1",.
• Obrócić" " aby wybrać wagę potrawy. W tym samym czasie wyświetli
się "g". waga powinna wynosić 100-2000g.
• Nacisnąć przycisk "START/+30SEC./CONFIRM" aby rozpocząć
rozmrażanie wskaźniki" " oraz " " będą migać, a wskaźnik "g" zniknie.
Rozmrażanie na podstawie czasu
• Nacisnąć ""W.T./TIME DEFROST" dwa razy, na kuchence wyświetli
się"dEF2":
• Obrócić " " aby wybrać czas gotowania. Maksymalne ustawienie wynosi
95 minut.
• Nacisnąć przycisk "START/+30SEC./CONFIRM" aby rozpocząć
rozmrażanie wskaźniki" " oraz " " będą migać.
Uwaga: jeśli waga potrawy nie przekracza 200 gram, prosimy ułożyć potrawy
w celu rozmrażania na krawędzi szklanej płyty obrotowej, a nie w środku.
Specjalne specykacje
• Maksymalny czas gotowania “mikrofalówki”, “grilla”, “rozmrażania wg
czasu”, “konwekcji” i “kombi” to 95 minut.
• Po otwarciu drzwiczek zapali się lampka. Jeśli drzwiczki pozostaną otwarte,
lampka zgaśnie po 10 minutach, a kuchenka przejdzie w stan oczekiwania.
• Otwarcie drzwiczek w stanie oczekiwania lub podczas programowania
nie zmieni wyświetlanych informacji. Można zmieniać ustawienia i
programować. Nie będzie natomiast działać przycisk “START”.
• Po zamknięciu drzwiczek, lampka zgaśnie. Można zmienić ustawienia.
Przycisk “START” będzie ponownie działać.
Szybkie gotowanie w mikrofalówce
• W stanie oczekiwania obrócić " " w lewo, aby wybrać czas gotowania
bezpośrednio, następnie nacisnąć przycisk "START/+30SEC./CONFIRM"
aby gotować z mocą 100% mikrofali.
• Ten program może być ustawiony jako jeden etap z gotowania
wieloetapowego.
Instrukcja obsługi
Page 71

71
PL
Funkcja szukania
• W trybie gotowania nacisnąć "Microwave", "GRILL", "Micro. / Grill", "Micro.
/ Conv .", lub "Convection”, bieżąca moc wyświetli się na 2-3 sekundy.
• W trybie wstępne ustawiania, nacisnąć "CLOCK/PRE-SET" aby znaleźć
czas na opóźniony start gotowania. Wstępnie ustawiony cza miga przez
2-3 sekundy, następnie kuchenka powraca do wyświetlania zegara.
• Podczas gotowania nacisnąć "CLOCK/PRE-SET" aby sprawdzić bieżący
czas. Wyświetla się przez 2-3 sekundy.
Funkcja blokady dla dzieci
• Blokada: W stanie oczekiwania Nacisnąć "STOP/CLEAR" przez
3 sekundy, pojawi się długi sygnał typu "beep" oznaczający
wprowadzenie trybu blokady dla dzieci i zapali się wskaźnik "
". LED
wyświetla bieżący czas lub 0:00.
• Zakończenie blokady: W stanie blokady Nacisnąć "STOP/CLEAR" przez
3 sekundy, pojawi się długi sygnał typu "beep" oznaczający zwolnienie
blokady, a wskaźnik "
" zniknie.
Specykacje
• Sygnalizator zadźwięczy raz podczas obracania regulatorem na samym
początku;
• Należy nacisnąć "START/+30 SEC./CONFIRM" aby kontynuować
gotowanie, jeśli podczas gotowania otwarte są drzwiczki;
• Po ustawieniu programu gotowania, nie należy naciskać "START/+30
SEC./CONFIRM" po 5 minutach. Zostanie wyświetlony bieżący czas.
Ustawienie zostanie anulowane.
• Sygnalizator zadźwięczy raz po udanym naciśnięciu, po nieudanym nie
będzie żadnej reakcji.
• Sygnalizator będzie dźwięczał pięć razy, aby przypomnieć o
zakończeniu gotowania.
USTERKI I SPOSOBY ICH ROZWIĄZYWANIA
Norma
Kuchenka mikrofalowa
zakłóca odbiór T V
Odbiór radia i TV może być zakłócony, kiedy
kuchenka mikrofalowa działa. Podobne jest to do
zakłóceń niewielkich urządzeń elektrycznych, np.
miksera, odkurzacza oraz wentylatora elektrycznego.
Jest to normalne.
Ciemnie oświetlenie
kuchenki.
Przy gotowaniu mikrofalowym o niskiej mocy,
oświetlenie może się przyciemnić. Jest to normalne.
Na drzwiczkach zbiera się
para, gorące powietrze z
otworów wentylacyjnych.
Podczas gotowania para może wydobywać się
z jedzenia. Większość wydobywa się z otworów
wentylacyjnych. Ale pewne ilości zbierają się na
zimnym miejscu, jak np. drzwiczki kuchenki. Jest to
normalne.
Kuchenka została
uruchomiona przypadkowo
bez potrawy we wnętrzu.
Niedozwolone jest uruchomienie urządzenia bez
jedzenia w środku. Jest to bardzo niebezpieczne.
Problem Możliwa przyczyna Rozwiązanie
Nie można
uruchomić
kuchenki.
1) Nie włożono
dokładnie kabla
zasilającego.
2) Przepalenie
bezpiecznika lub
odłączenie przewodu
przez główny wyłącznik.
3) Problem z gniazdkiem.
• Odłączyć. Następnie ponownie
podłączyć po 10 sekundach.
• Wymienić bezpiecznik lub zresetować
główny wyłącznik (do wykonania przez
fachowców z naszej rmy)
• Sprawdzić gniazdko z innymi
urządzeniami elektrycznymi.
Kuchenka nie
nagrzewa się.
4) Drzwiczki nie są
dobrze zamknięte.
Zamknąć dokładnie drzwiczki.
Szklana płyta
obrotowa
wydaje dźwięki
podczas pracy
mikrofalówki.
5) Brudny uchwyt
wałka i spód kuchenki.
Sprawdzić w rozdziale "Czyszczenie
mikrofalówki", aby wyczyścić brudne
elementy.
Mikrofalówka z funkcją grila
Page 72

72
Leggere attentamente queste istruzioni prima di usare il forno a
microonde e conservarle con cura.
Se seguirete le istruzioni, il vostro forno vi darà molti anni di buon servizio.
CONSERVARE QUESTE ISTRUZIONI CON CURA
PRECAUZIONI PER EVITARE UNA POSSIBILE ECCESSIVA ESPOSIZIONE
ALLE MICROONDE
(a) Non tentare di utilizzare questo forno con lo sportello aperto poiché
questo può causare una pericolosa esposizione alle microonde. È
importante non interrompere o manomettere i blocchi di sicurezza.
(b) Non posizionare alcun oggetto tra la parte frontale del forno e lo sportello
né permettere l’accumulo di sporco o residui sulle supercie di tenuta.
(c) AVVERTENZA: Se lo sportello o le guarnizioni dello sportello sono
danneggiate, il forno non deve essere utilizzato nché non è stato
riparato da una persona competente.
APPENDICE
Se non si mantiene l’apparecchio in buono stato di pulizia, la supercie si
può danneggiare inuendo sulla vita utile dell’apparecchio e portando a
situazioni pericolose.
SPECIFICHE
Modello: MW-2897
Tensione nominale: 230V~50Hz
Potenza nominale in entrata (Microonde): 1300W
Potenza nominale in uscita (Microonde): 800W
Potenza nominale in entrata (Grill): 1200W
Potenza nominale in entrata (Convezione): 1200W
Capacità del forno: 23L.
Diametro del piatto girevole: Ф270mm
Dimensioni esterne (LxPxH): 485x410x292.5mm
Peso netto: Ca. 13,25 kg
AVVERTENZA ISTRUZIONI IMPORTANTI DI
SICUREZZA
Per ridurre il rischio di incendio, scosse elettriche, lesioni a
persone o un’eccessiva esposizione alle microonde durante l’uso
dell’elettrodomestico, seguire le precauzini di base, incluso quanto segue:
• Avvertenza: I liquidi ed altri cibi non devono essere riscaldati in
contenitori sigillati poiché possono esplodere.
• Avvertenza: È pericoloso per chiunque non sia una persona
competente eettuare operazioni di manutenzione o riparazione
che comportano la rimozione di una copertura che protegge
dall’esposizione alle microonde.
• Avvertenza: Permettere ai bambini di usare il forno senza controllo
solo quando sono state date opportune istruzioni in modo che il
bambino sia in grado di usare il forno in modo sicuro e capisca i
rischi di un uso improprio.
• Avvertenza: Quando si usa l’elettrodomestico in modalità
combinata, I bambini devono usare il forno solo sotto il controllo di
un adulto a causa delle temperature generate. (solo per la serie grill)
• Usare esclusivamente utensili adatti per l’uso in forni a microonde.
• Il forno deve essere pulito regolarmente e tutti i residui di cibo
devono essere rimossi.
• Leggere e seguire le speciche: "PRECAUZIONI PER EVITARE UNA
POSSIBILE ECCESSIVA ESPOSIZIONE ALLE MICROONDE".
• Quando si riscalda il cibo in contenitori di plastica o carta, tenere
d’occhio il fono a causa della possibilità di ignizione.
• Se si nota del fumo, spegnere o scollegare l’elettrodomestico dalla presa
e tenere lo sportello chiuso in modo da soocare eventuali amme.
• Non cuocere troppo il cibo.
Manuale utente
Page 73

73
IT
• Non usare la cavità del forno per scopi di conservazione. Non
conservare elementi quali, pane, biscotti, ecc. all’interno del forno.
• Rimuovere i legacci in lo metallico e le maniglie metalliche da
contenitori/borse di carta o plastica prima di metterli nel forno.
• Installare o posizionare questo forno solo secondo le istruzioni di
installazione fornite.
• Le uova e in guscio e le uova sode intere non devono essere
scaldate in forni a microode poiché possono esplodere, anche
dopo che il riscaldamento a microonde è terminato.
• Usare questo elettrodomestico solo per l’uso previsto come descritto
nel manuale. Non usare sostanze chimiche corrosive o vapori in
questo elettrodomestico. Questo forno è appositamente concepito
per scaldare. Non è concepito per l’uso industriale o di laboratorio.
• Se il cavo di alimentazione è danneggiato, deve essere sostituito
dal costruttore, da un centro assistenza o da personale
analogamente qualicato in modo daq evitare pericoli.
• Non conservare o usare questo elettrodomestico all’aperto.
• Non usare il forno vicino all’acqua, in uno scantinato bagnato o
vicino ad una piscina.
• La temperatura delle supercie accessibili può essere alta quando
l’elettrodomestico è in funzione. Le supercie possono riscaldarsi
durante l’uso. Mantenere il cavo lontano da supercie calde e non
coprire le ventole sul forno.
• Non lasciare che il cavo penda dal bordo del tavolo o del banco.
• Il mancato mantenimento del forno in condizioni pulite potrebbe
portare al deterioramento della supercie che può inuire
negativamente sulla vita dell’elettrodomestico ed eventualmente
causare situazioni di pericolo.
• Prima del consumo, mescolare o agitare il contenuto di biberon e
dei vasetti di alimenti per bambini e controllarne la temperatura
per evitare ustioni.
• Il riscaldamento a microonde di bevande può causare schizzi
dovuti alla prolungata bollitura, pertanto bisogna fare attenzione
nel maneggiare il contenitore.
• L’elettrodomestico non è destinato all’uso da parte di persone (inclusi
i bambini) con ridotte capacità siche, sensoriali o mentali, o che
manchino di esperienza e conoscenza, a meno che non abbiano
ricevuto la supervisione o istruzioni relative all’uso dell’elettrodomestico
da una persona responsabile della loro sicurezza.
• I bambini devono essere sorvegliati per assicurarsi che non
giochino con l’elettrodomestico.
• Gli elettrodomestici non sono destinati all’uso tramite un timer
esterno o sistema di controllo a distanza.
• AVVERTENZA: Assicurarsi che l’apparecchio sia spento prima di
sostituire la lampadina per evitare l’eventualità di scosse elettriche.
• Le parti accessibili possono diventare calde durante l’uso. Tenere
lontano i ragazzi.
• Non usare un pulitore a vapore.
• Non usare detergenti abrasivi o raschietti metallici alati per
pulire il vetro dello sportello del forno, poiché possono graare la
supercie, che può causare la frantumazione del vetro.
• L’elettrodomestico diventa caldo durante l’uso. Fare attenzione a
non toccare gli elementi riscaldanti all’interno del forno.
• Usare esclusivamente la sonda di temperatura consigliata per
questo forno.(per forni dotati di uno strumento per l’uso di una
sonda di rilevamento della temperatura.)
• La supercie posteriore dell’elettrodomestico deve essere
posizionata contro una parete.
Forno a microonde con Grill
Page 74

74
PERICOLO
Pericolo di scosse elettriche
Toccare alcuni dei componenti interni può causare gravi lesioni personali o
morte. Non smontare questo elettrodomestico.
AVVERTENZA
Pericolo di scosse elettriche. L’uso improprio della messa a terra può causare
scosse elettriche. Non collegare alla presa nché l’elettrodomestico non è
correttamente collegato e riferito a massa.
PULIZIA
Assicurarsi di scollegare l’elettrodomestico dall’alimentazione.
• Pulire l’interno del forno dopo l’uso con un panno leggermente inumidito.
• Pulire normalmente gli accessori in acqua saponata.
• Quando sono sporchi, il telaio dello sportello, le guarnizioni e le parti
attigue devono essere pulite con cura con un panno umido.
Spina bipolare rotonda
Questo elettrodomestico deve essere riferito a massa. In caso di corto
circuito elettrico, la messa a terra riduce il rischio di scosse elettriche
fornendo un lo di fuga per la corrente elettrica. Questo elettrodomestico
è dotato di un cavo con un lo di massa con spina di messa a terra. La
spina deve essere inserita in una presa correttamente installata e riferita a
massa. Consultare un elettricista qualicato o un tecnico dell’assistenza le
le istruzioni per il collegamento di terra non sono chiare o in caso di dubbi
riguardo alla corretta messa a terra dell’elettrodomestico. Se è necessario
usare una prolunga, usare esclusivamente una prolunga a tre li.
• È fornito un cavo di alimentazione corto per ridurre i rischi di restare
impigliati o inciampare in un cavo più lungo.
• Se si usa un set cavo lungo o una prolunga:
• La potenza elettrica nominale marcata del set cavo o della prolunga
deve essere almeno equivalente alla potenza elettrica nominale
dell’elettrodomestico.
• La prolunga deve essere del tipo con messa a terra con cavo a 3 li.
• Il cavo lungo deve essere sistemato in modo che non penda dal piano
di lavoro o dal tavolo dove I bambini possono tirarlo o inciampare
involontariamente.
UTENSILI
ATTENZIONE
Pericolo di lesioni personali
• È pericoloso per chiunque non sia una persona competente eettuare
attività di manutenzione o riparazione che comportino la rimozione di
una copertura che protegge dall’esposizione alle microonde.
• Vedere le istruzioni su "Materiali utilizzabili nel forno a microonde o da
evitare nel forno a microonde." Ci possono essere alcuni utensili non metallici
che non sono sicuri per l’uso con microonde. In caso di dubbio, è possibile
collaudare l’utensile in questione seguendo la procedura riportata di seguito.
Collaudo utensile:
• Riempire un contenitore per microonde con 1 tazza di acqua fredda
(250ml) insieme all’utensile in questione.
• Cuocere a potenza massima per 1 minuto.
• Sentire attentamente l’utensile. Se l’utensile vuoto è caldo, non usarlo
per la cottura a microonde.
• Non superare 1 minuto di tempo di cottura.
Manuale utente
Page 75

75
IT
MATERIALI UTILIZZABILI NEL FORNO A MICROONDE
Utensili Annotazioni
Foglio
d’alluminio
Solo per protezione. È possibile utilizzarne dei piccoli pezzi per
coprire parti sottili di carne o pollame per evitare l’eccessiva
cottura. Possono vericarsi delle scintilla se il foglio è troppo
vicino alle pareti del forno. Il foglio deve essere ad una distanza di
almeno 1 pollice (2.5cm) dalle pareti del forno.
Piatto Crisp Seguire le istruzioni del costruttore. La base del piatto crisp deve
essere ad almeno 3/16 pollici (5mm) sopra il piatto girevole. L’uso non
corretto può causare la rottura del piatto girevole.
Servizio da
tavola
Solo se idoneo per microonde. Seguire le istruzioni del
costruttore. Non usare piatti incrinati o scheggiati.
Barattoli in vetro Togliere sempre il coperchio. Usare solo per scaldare il cibo nché
diventa tiepido. La maggior parte dei barattoli in vetro non sono
resistenti al calore e si possono rompere.
Vetreria Solo vetreria resistente al calore per forno. Assicurarsi che non vi
siano rivestimenti metallici. Non usare piatti incrinati o scheggiati.
Sacchetti di
cottura per forno
Seguire le istruzioni del costruttore. Non chiudere con fascette
metalliche. Fare delle fenditure per lasciare uscire il vapore.
Piatti e bicchieri
di carta
Da usare solo per cottura/riscaldamento a breve termine. Non
lasciare il forno incustodito durante la cottura.
Tovaglioli di carta Da usare per coprire il cibo per riscaldarlo ed assorbire il grasso.
Usare con supervisione solo per breve cottura.
Carta da forno Da usare come copertura per evitare schizzi o come involucro per
la cottura a vapore.
Plastica Solo se idonea per microonde. Seguire le istruzioni del
costruttore. Deve essere etichettata "Idonea per microonde".
Alcuni contenitori di plastica si ammorbidiscono quando il cibo
all’inteno diventa caldo. "Sacchetti per bollitura" e sacchetti in
plastica ben chiusi devono essere fessurati, forati o ventilati come
indicato sulla confezione.
Utensili Annotazioni
Involucri di
plastica
Solo se idonei per microonde. Da usare per coprire il cibo durante
la cottura per trattenere l’umidità. Non lasciare che l’involucro di
plastica tocchi il cibo.
Termometri Solo se idonei per microonde (termometri per carne e caramelle).
Carta cerata Da usare come copertura per evitare schizzi e trattenere
l’umidità.
MATERIALI DA EVITARE NEL FORNO A MICROONDE
Utensili Annotazioni
Vassoio in alluminio Può causare scintille. Trasferire il cibo in un piatto per forno
a microonde.
Tetrapak per alimenti
con manico in metallo
Può causare scintille. Trasferire il cibo in un piatto per forno
a microonde.
Utensili in metallo o
con bordura in metallo
Il metallo protegge il cibo dalle microonde. Una bordura
metallica può causare scintilla.
Legacci metallici Possono causare scintilla e potrebbero causare un
incendio nel forno.
Sacchetti di carta Possono causare un incendio nel forno.
Schiuma plastica La schiuma plastica può fondersi o contaminare il liquido
all’interno quando esposta ad alta temperatura.
Legno Il legno si asciuga quando viene utilizzato nel microonde e
può aprirsi o incrinarsi.
Forno a microonde con Grill
Page 76

76
INSTALLAZIONE DEL FORNO
Nomi delle parti del forno e accessori
Togliere il cartone dal forno, da tutti i materiali e dalla cavità del forno.
Il forno è dotato dei seguenti accessori:
Piastra girevole 1
Anello della parte girevole 1
Manuale di istruzioni 1
1. Pannello di controllo
2. Staa della piastra girevole
3. Anello della parte girevole
4. Piatto girevole
5. Finestra di osservazione
6. Sportello
7. Sistema blocco di sicurezza
8. Rack griglia
Installazione del piatto girevole
• Non posizionare mai il vassoio in vetro capovolto. Il vassoio in vetro
non deve mai essere limitato.
• Usare sempre sia il vassoio in vetro sia il piatto girevole durante la cottura.
• Tutti gli alimenti e i contenitori per alimenti sono sempre posizionati
sul vassoio in vetro per la cottura.
• Se il vassoio in vetro o l’anello del piatto girevole si scheggiano o si
rompono, contattare il centro di assistenza autorizzato più vicino..
INSTALLAZIONE E COLLEGAMENTI
• Rimuovere tutti i materiali di imballaggio e gli accessori. Esaminare che
non vi siano danni nel forno come ammaccature o sportello rotto. Non
installare il forno se danneggiato.
• Eliminare ogni pellicola protettiva presente sulla supercie del forno a
microonde.
• Non rimuovere la copertura marrone chiara in Mica che è attaccata alla
cavità del forno per proteggere il magnetron.
• Scegliere una supercie piana che ora spazio suciente per l'ingresso e/o
uscita delle ventole.
1
5
6
7
2
3
4
8
Manuale utente
Page 77

77
IT
• La supercie posteriore dell'apparecchio deve essere posizionata contro la
parente. E' necessaria una distanza minima di 7,5cm tra il forno e le pareti
adiacenti. Un lato deve essere aperto. Lasciare una distanza minima di
30cm sopra al forno. Non rimuovere i piedini dalla base del forno.
• ll blocco delle aperture di ingresso e/o uscita può danneggiare il forno.
• Posizionare il forno il più lontano possibile da radio e TV. L'uso del forno
a microonde può causare interferenze alla ricezione degli apparecchi
radio e TV.
• Collegare il forno in una normale presa domestica. Assicurarsi che la
tensione e la frequenza siano uguali alla frequenza ed alla tensione
riportate nelle speciche di targa.
• Non posizionare il forno su una stufa o su altri apparecchi che producono
calore. Se posizionato vicino o sopra ad una fonte di calore il forno
potrebbe subire danni e la garanzia sarebbe annullata.
La supercie accessibile può essere calda durante il funzionamento.
ISTRUZIONI DI FUNZIONAMENTO
Questo forno a microonde usa un moderno controllo elettronico per regolare i
parametri di cottura per meglio soddisfare le vostre esigenze di cottura.
Impostazione orologio
Quando il microonde è collegato alla corrente, il forno visualizza "0:00",
l’avvisatore acustico suona una volta.
• Premere "OROLOGIO/ TIMER DI COTTURA." per scegliere il formato 12
o 24 ore.
• Girare "
" per regolare le cifre dell’ora, l’input deve essere tra 0--23(24
ore) o 1--12(12-ore).
• Premere "OROLOGIO/ TIMER DI COTTURA.", I minuti lampeggiano.
• Girare " " per regolare le cifre dei minuti, l’ input deve essere tra 0--59.
• Premere "OROLOGIO/ TIMER DI COTTURA." per terminare la regolazione
dell’orologio. ":" lampeggia.
Nota:
• Se l’orologio non è impostato, non funziona quando è acceso.
• Durante il processo di impostazione dell’orologio, se si preme "STOP/
CANC", il forno tornerà automaticamente allo stato precedente.
Cottura a microonde
• Premere il tasto "MICROONDE" una volta, e "P100" viene visualizzato.
• Premere "MICROONDE" più volte o girare "
" per selezionare la potenza
microonde da 100% a 10%. "P100", "P80", "P50", "P30", "P10" verrranno
visualizzati nell’ordine.
• Premere "START/+30SEC./CONFERMA" per confermare.
• Girare " " per regolare il tempo di cottura. (L’impostazione del tempo deve
essere 0:05- 95:00.)
• Premere "START/+30SEC./CONFERMA" per iniziare la cottura.
NOTA: la quantità di passaggi per il tempo di regolazione dell’interruttore
di codica sono i seguenti:
0--- 1 min : 5 secondi
1—5 min : 10 secondi
5---10 min : 30 secondi
10---30 min : 1 minuto
30---95 min : 5 minuti
Forno a microonde con Grill
Page 78

78
Graco potenza microonde
Premere 1 volta 2 volte 3 volte 4 volte 5 volte
Potenza microonde 100% 80% 50% 30% 10%
Cottura a grill
• Premere il tasto " GRILL/COMBI " una volta, e il display "G-1".
• Girare " " per regolare il tempo di cottura. (L’impostazione del tempo
deve essere 0:05- 95:00.)
• Premere "START/+30SEC./CONFERMA" per iniziare la cottura.
Nota: Se passa metà del tempo grill, il forno suonerà due volte per dirvi di girare
gli alimenti. Potete semplicemente lasciare che continui a cuocere. Ma per avere
un migliore efetto di cibo grigliato, dovreste girare il cibo, chiudere lo sportello,
e poi premere "START/+30SEC./CONFERMA" per continuare la cottura.
Cottura combinata
• Premere il tasto "GRILL/COMBI" una volta, e "G-1" a display.
• Premere "GRILL/COMBI" più volte o girare "
" per selezionare la
potenza del grill. Smettere di ruotare quando viene visualizzato
"C-1","C-2","C-3" o "C-4".
• Premere "START/+30SEC./CONFERMA" per confermare.
• Girare "
" per regolare il tempo di cottura. (L’impostazione del tempo deve
essere 0:05- 95:00.)
• Premere "START/+30SEC./CONFERMA" per iniziare la cottura.
Istruzioni Display Microonde Grill Convezione
1 C-1 • •
2 C-2 • •
3 C-3 • •
4 C-4 • • •
Cottura a convezione (Con funzione di pre-riscaldo)
La cottura a convezione vi permette di cuocere il cibo come un forno
tradizionale. Le microonde non sono usate. Si consiglia di pre-riscaldare il
forno alla temperatura adeguata prima di mettere il cibo nel forno.
• Premere il tasto "CONVEZIONE" una volta, "100" lampeggia.
• Continuare a premere "CONVEZIONE" o girare "
" per selezionare la
funzione convezione. Nota: si può scegliere una temperatura tra 100
gradi e 190 gradi.
• Premere "START/+30SEC./CONFERMA" per confermare la temperatura.
• Premere "START/+30SEC./CONFERMA" per iniziare il pre-riscaldo.
Quando è raggiunta la temperatura di pre-riscaldo, l’avvisatore
acustico suona due volte per ricordarvi di mettere il cibo nel forno. E la
temperatua di pre-riscaldo viene visualizzata e lampeggia.
• Mettere il cibo nel forno e chiudere lo sportello.
• Girare " " per regolare il tempo di cottura. (Il tempo massimo
d’mpostazione è 95 minuti.)
• Premere il tasto "START/+30SEC./CONFERMA" per iniziare la cottura.
Nota:
• Non è possibile inserire il tempo di cottura nché non si raggiunge la
temperatura di pre-riscaldo.
• Se si raggiunge la temperatura, è necessario aprire lo sportello per
inserire il tempo di cottura.
• Se il tempo non viene inserito entro 5 minuti, il forno smetterà di preriscaldare. L’avvisatore acustico suona cinque volte e ritorna allo stato di
attesa.
Cottura a convezione (Senza funzione di pre-riscaldo)
• Premere il tasto "CONVEZIONE" una volta, "100" lampeggia.
• Continuare a premere "CONVZIONE" o girare "
" per selezionare la
funzione convezione. Nota: È possibile scegliere una temperatura tra
100 gradi e 190 gradi.
• Premere "START/+30SEC./CONFERMA" per confermare la temperatura
• Ruotare " " per regolare il tempo di cottura. (Il tempo massimo
regolabile è 95 minuti.)
Manuale utente
Page 79

79
IT
Timer di cottura
• Premere "OROLOGIO/TIMER DI COTTURA" due volte, il LED mostra 00:00.
• Ruotare "
" per inserire il tempo corretto.(Il tempo di cottura massimo
è 95 minuti.)
• Premere "START/+30SEC./CONFERMA." per confermare l'impostazione.
• Quando si raggiunge il tempo di cottura, l'indicatore dell'orologio
sparisce. Il segnalatore acustico suonerà 5 volte. Se l'orologio è stato
impostato (sistema 24 ore), il LED mostrerà l'ora corrente.
Scongelamento a peso
• Premere "W.T./Scong. tempo" per scegliere la funzione scongelamento
a peso. sarà visualizzato "dEF1".
• Ruotare "
" per inserire il peso."100","200","300","400","500","600","800", "1000",
"1200","1400","1600","1800 e "2000" saranno visualizzati in ordine.
• Premere "Start/+30Sec./Conferma." per iniziare a scongelare. Se si
preme "Stop/Canc.", si ritornerà allo stato in attesa. Ora, premere di
nuovo "Start/+30Sec./Conferma." o se il tempo di pausa è di oltre
5 minuti, si tornerà allo stato in attesa. Premere "Start/+30Sec./
Conferma." in 5 minuti, l'unità continua a funzionare e il tempo va
all'indietro. Una volta nito, il segnalatore acustico suona cinque volte
e ritorna allo stato in attesa.
• Quando è trascorsa la metà del tempo di scongelamento, il segnalatore
acustico suonerà due volte per ricordarvi di capovolgere il cibo,
se non si fa nulla, l'unità continuerà a funzionare e il risultato dello
scongelamento non sarà ottimale.
Scongelamento a tempo
• Premere "W.T./Time Defrost " per scegliere la funzione scongelamento
a tempo. sarà visualizzato "dEF2".
• Ruotare "
" per inserire il tempo di cottura. Il tempo MAX. è 95 minuti.
• Premere "Start/+30Sec./Conferma." per iniziare a scongelare. Se si preme
"Stop/Canc.", si ritornerà allo stato in attesa. Ora, premere di nuovo
"Start/+30Sec./Conferma." o se il tempo di pausa è di oltre 5 minuti, si
tornerà allo stato in attesa. Premere "Start/+30Sec./Conferma." entro 5
minuti, l'unità continua a funzionare e il tempo va all'indietro.
Menù automatico
• In stand-by, ruotare "
" verso destra per scegliere la funzione
desiderata e "A1","A2","A3"...."A10" saranno visualizzati.
• Premere "START/+30SEC./CONFERMA." er confermare.
• Ruotare "
" per selezionare il peso, e l'indicatore "g" si accenderà.
• Premere "START/+30SEC./CONFERMA." per iniziare la cottura.
Nota 1: Quando si sceglie A8, non mettere la torta in forno dall’inizio. Il
forno deve essere prima pre-riscaldato a 160 gradi. Dopo diversi minuti,
l’avvisatore acustico suona due volte per ricordarvi di mettere la torta nel
forno. Dopo aver messo la torta nel forno, premere di nuovo "Start/+30Sec./
Conferma". Il timer conterà alla rovescià, e la torta sarà cotta perfettamente.
Nota 2: Durante la cottura A10 Pollo arrosto, il forno suona due volte,
questo è normale. Per ottenere un miglior eetto griglia, è necessario
capovolgere il cibo, chiudere lo sportello, e quindi premere "START/
+30SEC./Conferma." per continuare la cottura. Se non si eettua alcuna
operazione, il forno continuerà a funzionare.
TABELLA DEL MENÙ AUTOMATICO
Menù Peso(g) Potenza
A1
Pizza
• 300
• 400
100%
A2
Patate
• 1 (circa 230g)
• 2 (circa 460g)
• 3 (circa 690g)
100%
Forno a microonde con Grill
Page 80

80
Menù Peso(g) Potenza
A3
Carne
• 200
• 300
• 400
• 500
100%
A4
Pesce
• 200
• 300
• 400
• 500
80%
A5
Verdure
• 200
• 300
• 400
• 500
100%
A6
Bevande
• 1(about 240 ml)
• 2(about 480 ml)
• 3(about 720 ml)
100%
A7
Pasta
• 50(aggiungere 450 ml di acqua fredda)
• 100(aggiungere 800 ml di acqua fredda)
• 150(aggiungere 1.200 ml di acqua fredda)
80%
A8
Popcorn
• 50
• 100
100%
A9
Tor t e
• 475 Preriscaldare a
160 gradi
A10
Pollo
arrosto
• 750
• 1000
• 1250
• C-2
• C-2
• C-2
Cottura veloce
• In stato di attesa, premere il tasto "START/+30SEC./CONFERMA"
per cuocere con il 100% del livello di potenza per 30 secondi. Ogni
pressione dello stesso tasto può aumentare 30 secondi. Il tempo
massimo di cottura è 95 minuti.
• Durante le fasi microonde, grill, convezione e combinato, premere il
tasto "START/+30SEC./CONFERMA" per cuocere con il 100% del livello
di potenza per 30 secondi. Ogni pressione dello stesso tasto può
aumentare 30 secondi.
Nota: questa funzione non può funzionare con scongelamento, menu
auto e cottura a fasi multiple.
Funzione Blocco per bambini
• Blocco: In stato di attesa, premere "STOP/CANC." per 3 secondi, ci sarà
un lungo "beep" indicante l’ingresso nello stato di blocco-bambini e
l’indicatore "
" si accenderà. Il LED visualizzerà l’ora corrente o 0:00.
• Fine Blocco: In stato bloccato, premere "STOP/CANC." per 3 secondi, ci
sarà un lungo "beep" indicante che il blocco è rilasciato, e l’indicatore
"
" sparirà.
Speciche particolari
• Il tempo massimo di cottura di "Microonde", "Grill", "Scongelamento a
tempo", "Convezione" e "Combi" è 95 minuti.
• Quando si apre lo sportello si accende la lampada. Se ti tiene aperto per
10 minuti, la lampada si spegne e il display passerà allo stato stand-by.
• Quando si apre lo sportello in stato stand-by o durante il processo
d'impostazione, il display iniziale resterà invariato. Si può anche
cambiare ed impostare. Ma il tasto "START" non funzionerà.
• Chiudere lo sportello, la lampada si spegne. L'impostazione può essere
modicata. E anche il tasto "START" funziona.
Manuale utente
Page 81

81
IT
RISOLUZIONE DEI PROBLEMI
Normale
Il forno a microonde interferisce
con la ricezione TV
La ricezione radio e TV può subire interferenze
quando il forno a microonde è in fuzione. È simile
alle interferenze di piccoli elettrodomestici, come
mixer, aspirapolvere, e una ventola elettrica. È
normale.
Luce del forno oca Nella cottura a microonde a bassa potenza, la luce
del forno puòà diventare oca. È normale.
Vapore che si accumula sullo
sportello, aria calda che
fuoriesce dalle ventole
Durante la cottura, il vapore può fuoriuscire dal
cibo. La maggior parte uscirà dalle ventole. Ma se
ne può accumulare un po’ sulle parti fredde come lo
sportello del forno. È normale.
Forno avviato accidentalmente
senza cibo all’interno.
È vietato far funzionare l’unità senza cibo all’interno.
È molto pericoloso.
Problema Possibile causa Rimedio
Il forno non si
accende.
1) Cavo alimentazione
non inserito saldamente.
2) Fusibile fuso o
interruttore automatico
in funzione.
3) Problemi con la presa
• Scollegare la spina poi ricollegarla
dopo 10 secondi.
• Sostituire il fusibile o azzerare
l’interruttore automatico (riparato da
personale professionista della nostra
azienda)
• Collaudare la presa con altri
elettrodomestici.
Il forno non
scalda.
4) Lo sportello non è ben
chiuso
Chiudere bene lo sportello.
Il piatto girevole
in vetro fa
rumore quando
il forno a
microonde è in
funzione
5) Supporto girevole e
base del forno sporchi.
Fare riferimento a "Manutenzione del
Microonde" per pulire le parti sporche.
Forno a microonde con Grill
Page 82

82
Läs anvisningarna noggrant innan du använder din mikrovågsugn,
och förvara bruksanvisningen på en säker plats.
Om du följer bruksanvisningen kommer din ugn att fungera utan problem
i många år.
FÖRVARA DENNA BRUKSANVISNING PÅ EN SÄKER PLATS
FÖRSIKTIGHETSÅTGÄRDER FÖR ATT UNDVIKA EXPONERING FÖR HÖG
MIKROVÅGSENERGI
(a) Försök inte att använda denna ugn om luckan är öppen, eftersom detta
kan medföra skadlig exponering för mikrovågsenergi. Det är viktigt att
inte ta sönder eller göra några ändringar på säkerhetslåsen.
(b) Placera inte något föremål mellan ugnens framsida och luckan, och låt
inte smuts eller rester av rengöringsmedel ansamlas på tätningsytorna.
(c) VARNING: Om luckan eller luckans tätningar har skadats får ugnen inte
användas förrän den har reparerats av en utbildad person.
TILLÄGG
Om apparaten inte hålls ordentligt ren kan ytan skadas, vilket kan påverka
ugnens livslängd och leda till en farlig situation.
SPECIFIKATIONER
Modell: MW-2897
Märkspänning: 230 V~50 Hz
Ingående märkeekt (Mikrovågsugn): 1 300 W
Utgående märkeekt (Mikrovågsugn): 800 W
Ingående märkeekt (Grill): 1 200 W
Ingående märkeekt (Konvektion): 1 200 W
Ugnens kapacitet: 23 l
Glasplattans diameter: Ф 270 mm
Yttre mått (LxBxH): 485x410x292,5 mm
Nettovikt: Cirka 13,25 kg
VIKTIGA SÄKERHETSINSTRUKTIONER OCH
VARNINGAR
För att minska risken för brand, elektriska stötar, personskador eller
exponering för hög mikrovågsenergi vid användning av ugnen, måste
du följa de grundläggande försiktighetsåtgärderna, inklusive följande:
• Varning: Vätskor och andra matvaror får inte värmas i förslutna
behållare, eftersom de kan explodera.
• Varning: Det är farligt för alla som inte har utbildning att utföra
någon typ av service eller reparation som kräver att en kåpa som
skyddar mot exponering för mikrovågsenergi tas bort.
• Varning: Låt inte barn använda ugnen utan tillsyn om de inte har
fått tillräckliga instruktioner så att de kan använda ugnen på ett
säkert sätt och förstår farorna vid felaktig användning.
• Varning: Om ugnen används i kombinationsläget bör barn endast
använda ugnen under tillsyn av en vuxen på grund av de höga
temperaturer som genereras (gäller endast modeller med grill).
• Använd endast kokkärl som är lämpliga för användning i
mikrovågsugn.
• Ugnen bör rengöras regelbundet, och alla matrester ska tas bort.
• Läs och följ anvisningarna i avsnittet ”FÖRSIKTIGHETSÅTGÄRDER
FÖR ATT UNDVIKA EXPONERING FÖR HÖG MIKROVÅGSENERGI”.
• Om du värmer mat i behållare av plast eller papper ska du hålla ett
öga på ugnen så att förpackningen inte fattar eld.
• Om rök bildas ska du stänga av apparaten eller dra ur strömkabeln
och låta luckan vara stängd för att kväva eventuella eldslågor.
• Tillaga inte maten under för lång tid.
• Använd inte ugnen som förvaringsutrymme. Förvara inte matvaror
som bröd, kakor, etc. inuti ugnen.
• Ta bort förslutningar av ståltråd och metallhandtag på behållare/
påsar av plast eller papper innan du ställer in dem i ugnen.
• Installera och placera denna ugn i enlighet med de medföljande
anvisningarna.
Bruksanvisning
Page 83

83
SV
• Råa och hårdkokta ägg med skalet kvar får inte värmas i
mikrovågsugn, eftersom de kan explodera, även efter att
mikrovågornas uppvärmning har avslutats.
• Använd endast ugnen på avsett vis, så som beskrivs i
bruksanvisningen. Använd inte korroderande kemikalier eller ångor
i ugnen. Denna ugn är särskilt konstruerad för uppvärmning. Den är
inte avsedd för industriellt bruk eller användning i laboratorium.
• Om strömkabeln är skadad måste den bytas ut av tillverkaren, en
servicetekniker eller någon annan utbildad person för att undvika
skaderisk.
• Ugnen får inte förvaras eller användas utomhus.
• Använd inte ugnen nära vatten, i en fuktig källare eller nära en
swimmingpool.
• Temperaturen på de tillgängliga ytorna kan vara hög när ugnen
är igång. Ytorna kan bli mycket heta under användning. Se till att
strömkabeln inte ligger emot någon varm yta, och täck aldrig över
någon del av ugnen.
• Låt inte strömkabeln hänga över en bords- eller bänkkant.
• Om ugnen inte hålls ordentligt ren kan det uppstå skador på ytan,
vilket kan leda till en farlig situation och en avsevärd förkortning av
apparatens livslängd.
• Innehållet i diaskor och burkar med barnmat måste skakas eller
röras om, och matens temperatur måste kontrolleras innan den
ges till barnet för att undvika brännskador.
• Upphettning av drycker i mikrovågsugn kan leda till försenad
uppkokning, och du måste därför vara mycket försiktig när du tar
ut behållaren ur ugnen.
• Mikrovågsugnen är inte avsedd för användning av personer
(inklusive barn) med nedsatt fysisk, sensorisk eller mental förmåga,
eller brist på erfarenhet och kunskap, såvida de inte övervakas
eller får anvisningar om hur ugnen fungerar av en person som är
ansvarig för deras säkerhet.
• Barn måste övervakas för att se till att de inte leker med ugnen.
• Ugnen är inte avsedd att användas tillsammans med en extern
timer eller ett separat ärrkontrollsystem.
• VARNING: Se till att ugnen är avstängd innan du byter ut lampan
för att undvika att få en elektrisk stöt.
• Tillgängliga delar kan bli mycket heta under användning. Små barn
bör hållas borta från ugnen.
• Ångtvätt får inte användas.
• Använd inte starkt slipande rengöringsmedel eller vassa
metallskrapor när du rengör ugnens glaslucka, eftersom de kan
repa ytan, vilket kan leda till att glaset spricker.
• Ugnen blir varm under användning. Var försiktig så att du inte rör
vid värmeelementen på ugnens insida.
• Använd endast den termometer som rekommenderas för denna
ugn (för ugnar som utrustats med funktionen att använda en
termometer).
• Ugnens baksida ska placeras mot en vägg.
FARA
Risk för elektriska stötar
Om någon av de interna komponenterna vidrörs kan det leda till allvarliga
personskador eller dödsfall. Montera inte isär denna apparat.
VARNING
Risk för elektriska stötar. Felaktig användning av jordningen kan resultera i en
elektrisk stöt. Stick inte in kontakten i ett eluttag förrän apparaten är korrekt
installerad och jordad.
RENGÖRING
Se till att koppla ur apparaten ur vägguttaget.
• Rengör insidan av ugnen med en lätt fuktad trasa.
• Rengör tillbehören på vanligt sätt med vatten och diskmedel.
• Luckans ram, tätning och angränsande delar måste rengöras noggrant
med en fuktig trasa när de är smutsiga
Mikrovågsugn med grill
Page 84

84
Stickkontakt med två runda stift
Denna apparat måste jordas. Vid en eventuell kortslutning minskar
jordningen risken för elektriska stötar genom att det nns en
säkerhetsledning som leder bort strömmen. Denna apparat är utrustad
med en strömkabel som har en jordledare och en jordad kontakt.
Strömkontakten måste kopplas in i ett uttag som är korrekt installerat
och jordat. Anlita en utbildad elektriker eller servicetekniker om du
inte förstår jordningsanvisningarna fullt ut eller om du inte är helt
säker på att apparaten är korrekt jordad. Om du behöver använda en
förlängningssladd måste du använda en sladd med 3 ledningar.
• Den medföljande strömkabeln är kort för att minska riskerna som kan
uppstå om någon trasslar in sig eller snubblar över en längre kabel.
• Om en lång sladd eller förlängningssladd används:
• Den angivna elektriska klassiceringen på sladden eller
förlängningssladden måste vara minst lika hög som apparatens
elektriska klassicering.
• Förlängningssladden måste vara av jordad typ med 3 ledningar.
• Den långa sladden bör dras så att den inte hänger ner över kanten
på bänken eller bordet, för att undvika att barn drar i sladden eller att
någon snubblar.
KOKKÄRL
FÖRSIKTIGHET
Risk för personskador
• Det medför allvarliga risker om någon person utan utbildning
utför service- eller reparationsarbeten som innebär att någon av
kåporna måste tas bort, eftersom dessa skyddar mot exponering för
mikrovågsenergi.
• Läs anvisningarna i avsnittet ”Material som du kan använda eller bör
undvika i en mikrovågsugn”. Det kan nnas vissa icke-metalliska kokkärl
som inte är säkra att använda i mikrovågsugn. Om du är osäker kan du
testa det aktuella kokkärlet genom att följa nedanstående procedur.
Test av kokkärl:
• Fyll en mikrovågssäker behållare med 1 kopp kallt vatten (250 ml) och
ställ i det kärl som du vill testa.
• Värm på högsta eekt i 1 minut.
• Känn försiktigt på kärlet. Om det tomma kärlet är varmt ska du inte
använda det i mikrovågsugnen.
• Värm inte i mer än 1 minut.
MATERIAL SOM DU KAN ANVÄNDA I
MIKROVÅGSUGNEN
Köksgeråd Anmärkningar
Aluminiumfolie Endast som avskärmning. Små, släta bitar kan användas för att
täcka över tunna delar av kött eller kyckling för att förhindra att
de tillagas för länge. Gnistor kan uppstå om folien är för nära
ugnens väggar. Folien bör vara minst 2,5 cm från ugnens väggar.
Bryningskärl Följ tillverkarens anvisningar. Botten på bryningskärlet måste vara
minst 5 mm ovanför den roterande plattan. Felaktig användning kan
göra att plattan går sönder.
Bruksanvisning
Page 85

85
SV
Köksgeråd Anmärkningar
Matporslin Endast mikrovågssäkert porslin. Följ tillverkarens anvisningar.
Använd inte sprucket eller kantstött porslin.
Glasburkar Ta alltid bort locket. Använd endast för att värma maten till
lagom temperatur. De esta glasburkar är inte värmetåliga och
kan gå sönder.
Glaskärl Använd endast värmetåliga glaskärl. Kontrollera så att det inte
nns någon metallkant på kärlet. Använd inte spruckna eller
kantstötta kärl.
Påsar för
ugnsstekning
Följ tillverkarens anvisningar. Stäng inte påsen med förslutningar
av ståltråd. Skär skåror i påsen så att ångan kan komma ut.
Tallrikar och
muggar av
papper
Använd endast för matlagning/uppvärmning under kort tid.
Lämna inte ugnen utan tillsyn under matlagningen.
Pappersservetter Använd för att täcka maten vid återuppvärmning och
uppsugning av fett. Använd endast vid matlagning under en kort
tid och under tillsyn.
Bakplåtspapper Använd för att täcka över maten och undvika stänk eller som
omslag vid ångkokning.
Plast Endast mikrovågssäker plast. Följ tillverkarens anvisningar. Bör
vara märkt ”mikrovågssäker”. Vissa plastbehållare blir mjuka när
maten inuti blir varm. Skär skåror eller stick hål i ”kokpåsar” och
hårt förslutna plastpåsar som ventilation enligt anvisningarna på
förpackningen.
Plastfolie Endast mikrovågssäker plastfolie. Använd för att täcka maten och
hålla kvar fuktigheten vid matlagning. Låt inte plastfolien vidröra
maten.
Termometrar Endast mikrovågssäkra termometrar (för kött och godsaker).
Vaxat papper Använd som ett lock för att förhindra stänk och bevara
fuktigheten.
MATERIAL SOM BÖR UNDVIKAS I
MIKROVÅGSUGNEN
Köksgeråd Anmärkningar
Aluminiumbricka Kan orsaka gnistbildning. Flytta över maten till en
mikrovågssäker tallrik.
Matkartong med
metallhandtag
Kan orsaka gnistbildning. Flytta över maten till en
mikrovågssäker tallrik.
Kokkärl av metall eller
med metallkant
Metall avskärmar maten från mikrovågsenergin.
Metallkanter kan orsaka gnistbildning.
Förslutningar av metall Kan orsaka gnistbildning eller brand i ugnen.
Papperspåsar Kan orsaka brand i ugnen.
Skumplast Skumplast kan smälta eller förorena vätskan inuti
behållaren om den utsätts för höga temperaturer.
Trä Trä torkar ut om det används i mikrovågsugnen och kan
spricka.
SÅ INSTALLERAR DU DIN UGN
Benämningar på ugnens delar och tillbehör
Ta upp ugnen och tillbehören ur förpackningen och ta ut allt material som
nns i ugnen.
Din ugn har följande tillbehör:
Glasplatta 1
Roterande ring 1
Bruksanvisning 1
Mikrovågsugn med grill
Page 86

86
1. Kontrollpanel
2. Roterande axel
3. Roterande ring
4. Glasbricka
5. Observationsfönster
6. Lucka
7. Säkerhetslås
8. Grillställ
Installation av den roterande plattan
• Placera aldrig glasplattan upp och ner. Glasplattan måste alltid kunna
rotera fritt.
• Både glasplattan och den roterande ringen måste alltid användas vid
matlagning.
• All mat och alla matbehållare måste alltid ställas på glasplattan vid
matlagning.
• Om glasplattan eller den roterande ringen spricker eller går sönder ska
du kontakta närmaste auktoriserade servicecenter.
INSTALLATION OCH ANSLUTNING
• Ta bort allt förpackningsmaterial och alla tillbehör. Undersök ugnen för att
kontrollera att den inte har några skador, såsom bucklor eller en skadad
lucka. Installera inte ugnen om den är skadad.
• Ta bort all skyddslm som sitter på ugnens ytor.
• Ta inte bort det ljusbruna Mica-skyddet som sitter monterat i ugnen för att
skydda magnetronen.
• Välj ut en plan yta som har tillräckligt med öppet utrymme för intags- och/
eller utloppsventilerna.
1
2
3
4
5
6
7
8
Bruksanvisning
Page 87

87
SV
• Apparatens baksida ska placeras mot en vägg. Ett fritt avstånd på minst
7,5 cm behövs mellan ugnen och alla väggar runt omkring. En sida måste
vara fri. Lämna ett fritt utrymme på minst 30 cm ovanför ugnen. Ta inte bort
fötterna på undersidan av ugnen.
• Om öppningarna för intag och/eller utlopp blockeras kan det skada ugnen.
• Ställ ugnen så långt från radio- och TV-apparater som möjligt. När
mikrovågsugnen är igång kan den skapa störningar i mottagningen till din
radio eller TV.
• Anslut din ugn till ett standarduttag för hushållsbruk. Se till att strömstyrkan
och frekvensen är samma som strömstyrkan och frekvensen på typskylten.
• Installera inte ugnen ovanför en spis eller någon annan värmeproducerande
apparat. Om ugnen installeras ovanför en värmekälla kan den skadas, och
garantin blir ogiltig.
De tillgängliga ytorna kan bli varma under användning.
ANVÄNDNINGSINSTRUKTIONER
Denna mikrovågsugn använder modern elektronisk styrning för att justera
parametrarna för matlagningen och uppfylla dina behov vid matlagningen.
Inställning av klocka
När mikrovågsugnen är inkopplad visar displayen ”0:00”, och summern
ringer en gång.
• Tryck ner ”CLOCK/KITCHEN TIMER” (KLOCKA/KÖKSTIMER) för att välja 12
eller 24 timmars visning.
• Vrid "
" för att ställa in timmarna, tiden måste ligga inom 0-23 (24
timmar) eller 1-12 (12 timmar).
• Tryck ner ”CLOCK/ KITCHEN TIMER” (KLOCKA/ KÖKSTIMER) och sirorna
för minuter kommer att blinka.
• Vrid "
" för att ställa in minuterna, tiden måste ligga inom 0-59.
• Tryck ”CLOCK/ KITCHEN TIMER” (KLOCKA/ KÖKSTIMER) för att avsluta
inställningen. ”:” blinkar.
Obs:
• Om klockan inte är inställd kommer den inte att fungera när ugnen är
inkopplad.
• Om du trycker ”STOP/CLEAR” (STOPP/RENSA) medan du ställer in klockan
kommer ugnen att återgå till sin tidigare inställning automatiskt.
Matlagning i mikrovågsugn
• Tryck ner knappen ”MICROWAVE” (MIKROVÅGSUGN) en gång, och
"P100" visas i displayen.
• Tryck ner knappen ”MICROWAVE” (MIKROVÅGSUGN) upprepade gånger
eller vrid "
" för att välja mikrovågsugnens eekt från 100 % till 10 %.
"P100", "P80", "P50", "P30", "P10" visas i tur och ordning.
• Tryck ner ”START/+30SEC./CONFIRM” (START/+30 SEK./BEKRÄFTA) för
att bekräfta.
• Vrid "
" för att ställa in tiden för matlagningen (tiden måste ligga inom 0:05-
95:00).
• Tryck ner ”START/+30SEC./CONFIRM” (START/+30 SEK./BEKRÄFTA) för
att påbörja matlagningen.
OBS: stegen för inställning av tiden på kodningsomkopplaren är följande:
0-1 min : 5 sekunder
1-5 min : 10 sekunder
5-10 min : 30 sekunder
10-30 min : 1 minut
30-95 min : 5 minuter
Eekttabell för mikrovågsugnen
Knapptryckning 1 gång 2 gånger 3 gånger 4 gånger 5 gånger
Mikrovågseekt 100% 80% 50% 30% 10%
Mikrovågsugn med grill
Page 88

88
Matlagning med grill
• Tryck ner knappen ”GRILL/KOMBI” en gång, och "G-1" visas på displayen.
• Vrid på "
" för att ställa in grilleekten. Sluta vrida när ”G1” visas.
• Tryck på ” START/+30SEC./CONFIRM” (START/+30 SEK./BEKRÄFTA) för
att bekräfta.
• Vrid "
" för att ställa in tiden för matlagningen (tiden måste ligga inom
0:05- 95:00).
• Tryck ”START/+30SEC./CONFIRM” (START/+30 SEK./BEKRÄFTA) för att
påbörja matlagningen.
Obs:
När halva grilltiden har gått kommer två ljudsignaler att ljuda från ugnen för
att påminna dig om att vända på maten. Du kan låta matlagningen fortsätta,
men för bästa grillresultat bör du vända på maten, stänga luckan och sedan
trycka ”START/+30SEC./CONFIRM” (START/+30 SEK./BEKRÄFTA) för att
fortsätta matlagningen.
Kombinationsmatlagning
• Tryck ner knappen ” GRILL/KOMBI” en gång, och "G-1" visas på displayen.
• Tryck på ”GRILL/COMBI” fyra gånger gånger eller vrid på ” ” för att välja
grilleekt. Sluta vrida när ”C-1”,”C-2”,”C-3” eller ”C-4” visas.
• Tryck ner ”START/+30SEC./CONFIRM” (START/+30 SEK./BEKRÄFTA) för
att bekräfta.
• Vrid "
" för att ställa in tiden för matlagningen (tiden måste ligga inom
0:05- 95:00).
• Tryck ner ”START/+30SEC./CONFIRM” (START/+30 SEK./BEKRÄFTA) för
att påbörja matlagningen.
Instruktioner Display Mikrovågsugn Grill Konvektion
1 C-1 • •
2 C-2 • •
Instruktioner Display Mikrovågsugn Grill Konvektion
3 C-3 • •
4 C-4 • • •
Matlagning med konvektion (med föruppvärmningsfunktion)
Matlagning med konvektion gör att du kan laga mat som i en traditionell
ugn. Mikrovågor används inte. Du rekommenderas att förvärma ugnen till
ungefärlig temperatur innan du ställer in maten i ugnen.
• Tryck ner knappen ”CONVECTION” (KONVEKTION) en gång, och ”100” blinkar.
• Fortsätt att trycka ner ”CONVECTION” (KONVEKTION) eller vrid "
" för att
välja funktion. Obs: Temperaturen kan ställas in på mellan 100 och 190 grader.
• Tryck ner ”START/+30SEC./CONFIRM” (START/+30 SEK./BEKRÄFTA) för
att bekräfta temperaturen.
• Tryck ner ”START/+30SEC./CONFIRM” (START/+30 SEK./BEKRÄFTA) för att
påbörja förvärmningen. När den inställda temperaturen för förvärmning
uppnås ljuder summern två gånger för att påminna dig om att ställa in maten
i ugnen. Temperaturen för förvärmningen visas i displayen och blinkar.
• Ställ in maten i ugnen och stäng luckan.
• Vrid "
" för att ställa in tiden för matlagningen (den maximala tiden är
95 minuter).
• Tryck ner ”START/+30SEC./CONFIRM” (START/+30 SEK./BEKRÄFTA) för
att påbörja matlagningen.
Obs:
• Tiden för matlagningen kan inte ställas in förrän temperaturen för
föruppvärmning har uppnåtts.
• När temperaturen uppnås måste luckan öppnas för att tiden för
matlagning ska kunna ställas in.
• Om ingen tid har ställts in inom 5 minuter kommer ugnen att avbryta
föruppvärmningen. Summern ljuder fem gånger, och ugnen sätts i vänteläge.
Matlagning med konvektion (utan föruppvärmningsfunktion)
• Tryck ner knappen ”CONVECTION” (KONVEKTION) en gång, och ”100” blinkar.
Bruksanvisning
Page 89

89
SV
• Fortsätt att trycka ner ”CONVECTION” (KONVEKTION) eller vrid ” " för att
välja funktion. Obs: Temperaturen kan ställas in på mellan 100 och 190
grader.
• Tryck ”START/+30SEC./CONFIRM” (START/+30 SEK./BEKRÄFTA) för att
bekräfta temperaturen.
• Vrid ”
" för att ställa in tiden för matlagningen (den maximala tiden är
95 minuter).
Kökstimer
• Tryck på "CLOCK/KITCHEN TIMER" (KLOCKA/KÖKSTIMER) två gånger.
LED:n visar 00:00.
• Vrid på "
" för att ange korrekt timer. (Den maximala
matlagningstiden är 95 minuter.)
• Tryck på "START/+30SEC./CONFIRM" (START/+30 SEK./BEKRÄFTA) för att
bekräfta inställningen.
• Klockindikatorn slocknar när tiden nås. Summern ringer 5 gånger. Om
klockan har ställts in (24-timmarssystem) visar LED:n den aktuella tiden.
Avfrostning baserat på vikt
• Tryck på "W.T./Time Defrost" (Vikt/tid avfrostning) för att välja
funktionen avfrostning baserat på vikt. "dEF1" visas.
• Vrid på "
" för att ange vikten. "100", "200", "300", "400", "500", "600",
"800", "1000", "1200", "1400", "1600", "1800" och "2000" visas i ordning.
• Tryck på "Start/+30Sec./Conrm" (Start/+30 sek./bekräfta) för att starta
avfrostningen. Om "Stop/Clear" (Stopp/rensa) trycks in återgår den
till vänteläge. Tryck nu på "Start/+30Sec./Conrm" (Start/+30 sek./
bekräfta) igen. Om inte detta görs återgår den till vänteläge efter 5
minuter. Tryck på "Start/+30Sec./Conrm" (Start/+30 sek./bekräfta)
inom 5 minuter. Enheten börjar arbeta och tiden räknas ner. När det är
slutfört ljuder summern 5 gånger och vänteläget aktiveras.
• När halva avfrostningstiden gått ljuder summern två gånger för att
påminna dig om att vända på maten. Om detta inte görs fortsätter
enheten att arbeta men avfrostningsresultatet blir inte bra.
Avfrostning baserat på tid
• Tryck på "W.T./Time Defrost" (Vikt/tid avfrostning) två gånger för att välja
funktionen avfrostning baserat på tid. "dEF2" visas.
• Vrid på "
" för att ange tillagningstiden. Den maximala tiden är 95 minuter.
• Tryck på "Start/+30Sec./Conrm" (Start/+30 sek./bekräfta) för att starta
avfrostningen. Om "Stop/Clear" (Stopp/rensa) trycks in återgår den
till vänteläge. Tryck nu på "Start/+30Sec./Conrm" (Start/+30 sek./
bekräfta) igen. Om inte detta görs återgår den till vänteläge efter 5
minuter. Tryck på "Start/+30Sec./Conrm" (Start/+30 sek./bekräfta)
inom 5 minuter. Enheten börjar arbeta och tiden räknas ner.
Automeny
• I vänteläge, vrid "
" åt höger för att välja den funktion som önskas,
och "A1", "A2", "A3" ... "A10" visas.
• Tryck på "START/ +30 SEC./CONFIRM" (START/+30 SEK./BEKRÄFTA) för
att bekräfta valet av meny.
• Vrid på " " för att välja vikt i menyn. "g"-indikatorn tänds.
• Tryck på "START/ +30 SEC./CONFIRM" (START/+30 SEK./BEKRÄFTA) för
att starta matlagningen.
Notera 1: om du väljer meny A8 för kaka ska du inte ställa in kakan i ugnen
till en början. Ugnen måste först förvärmas till 160 grader. Efter några
minuter kommer summern att ringa två gånger för att påminna dig om att
ställa in kakan i ugnen. När du har ställt in kakan i ugnen ska du tr ycka ner
”START/+30SEC./CONFIRM” (START/+30 SEK./BEKRÄFTA) igen. Timern börjar
räkna ner, och kakan kommer att tillagas perfekt.
Notera 2: Under A10 tillagning av grillad kyckling ljuder ugnen två gånger.
Detta är normalt. För att uppnå bättre eekt när mat grillas, vänd på maten,
stäng luckan, och tryck sedan på "START/ +30SEC./ Conrm" (START/+30 SEK./
BEKRÄFTA) för att fortsätta tillagningen.
Om ingen åtgärd utförs fortsätter ugnen arbeta.
Mikrovågsugn med grill
Page 90

90
TABELL FÖR AUTOMENY
Meny Vikt (g) Eekt
A1
Pizza
• 300
• 400
100%
A2
Potatis
• 1 (ungefär 230 g)
• 2 (ungefär 460g)
• 3 (ungefär 690g)
100%
A3
Kött
• 200
• 300
• 400
• 500
100%
A4
Fisk
• 200
• 300
• 400
• 500
80%
A5
Grönsaker
• 200
• 300
• 400
• 500
100%
A6
Dryck
• 1(ungefär 240 ml)
• 2(ungefär 480 ml)
• 3(ungefär 720 ml)
100%
A7
Pasta
• 50 (lägg till 450 ml kallt vatten)
• 100 (lägg till 800 ml kallt vatten)
• 150 (lägg till 1 200 ml kallt vatten)
80%
A8
Popcorn
• 50
• 100
100%
Meny Vikt (g) Eekt
A9
Kaka
• 475 Förvärm på 160
grader
A10
Grillad
kyckling
• 750
• 1000
• 1250
• C-2
• C-2
• C-2
Snabbmatlagning
• När ugnen är i vänteläget kan du trycka ner knappen ”START/+30SEC./
CONFIRM” (START/+30 SEK./BEKRÄFTA) för att laga mat med 100 %
eekt under 30 sekunder. Varje tryckning på knappen ökar tiden med
30 sekunder. Den maximala matlagningstiden är 95 minuter.
• När ugnen är inställd i något av lägena mikrovåg, grill, konvektion eller
kombination kan du trycka ner knappen ”START/+30SEC./CONFIRM”
(START/+30 SEK./BEKRÄFTA) för att laga mat med 100 % eekt under 30
sekunder. Varje tryckning på knappen ökar tiden med 30 sekunder.
Obs: Denna funktion fungerar inte vid avfrostning, automeny eller
matlagning i era steg.
Låsfunktion för barn
• Lås: I vänteläget ska du trycka ner knappen ”STOP/CLEAR” (STOPP/
RENSA) under 3 sekunder. Ett långt ”pip” ljuder för att indikera att
barnlåset har aktiverats, och indikatorlampan ”
” tänds. LED-
displayen visar aktuell tid eller 0:00.
• Upplåsning: När ugnen är låst kan du trycka ner knappen ”STOP/CLEAR”
(STOPP/RENSA) under 3 sekunder. Ett långt ”pip” ljuder för att indikera att
barnlåset har avaktiverats, och indikatorlampan ”
” släcks.
Speciella specikationer
• Den maximala tillagningstiden för "Mikrovågsugn", "Grill", "Avfrostning
baserat på tid", "Konvektion" och "Kombinerad" är 95 minuter.
Bruksanvisning
Page 91

91
SV
• Lampan lyser när luckan är öppen. Om den är öppen i 10 minuter
släcks lampan och displayen återgår till vänteläge.
• När luckan öppnas i vänteläge eller när inställning pågår ändras inte
displayen. Den kan ändras och ställas in. "START"-tangenten fungerar dock
inte.
• Stäng luckan, lampan släcks. Inställningen kan ändras. Nu fungerar
också "START"-tangenten.
FELSÖKNING
Normalt
Mikrovågsugnen stör TVmottagningen
Radio- och TV-mottagningen kan störas när
mikrovågsugnen är i gång. Detta är samma typ av
störning som kan förekomma med små elektriska
apparater som mixer, dammsugare och äkt, och är
helt normalt.
Ljuset i ugnen är svagt Vid matlagning med låg eekt kan ugnens
belysning bli svag. Detta är normalt.
Ånga ansamlas på luckan,
varm luft strömmar ur
ventilerna
Vid matlagning kan ånga uppstå från maten. Det
mesta går ut via ventilerna, men lite kan ansamlas
på en kall plats, såsom ugnsluckan. Detta är normalt.
Ugnen startades oavsiktligt
utan mat.
Det är förbjudet att använda ugnen utan någon mat
inuti. Det är mycket farligt.
Fel Möjlig orsak Åtgärd
Ugnen kan inte
startas.
1) Strömkabeln är inte
ordentligt ansluten.
2) En säkring har gått
eller kretsbrytaren har
aktiverats.
3) Problem med
eluttaget.
Dra ur kabeln och anslut den igen efter
10 sekunder.
Byt säkring eller återställ kretsbrytaren
(repareras av en professionell tekniker
från vårt företag).
Testa uttaget med andra apparater.
Ugnen värms inte
upp.
4) Luckan är inte
stängd.
Stäng luckan ordentligt.
Missljud uppstår
när glasplattan
snurrar.
5) Smuts på hjulen
eller på botten av
ugnen.
Se avsnittet ”Underhåll av
mikrovågsugnen” för information om
rengöring av delarna.
Mikrovågsugn med grill
Page 92

Quality shouldn't be a luxury!
BQ-2816
GR-2841
OV-1418
service.tristar.eu
Tristar Europe B.V. | Jules Verneweg 87 | 5015 BH Tilburg | The Netherlands
 Loading...