

Page 1

www.tripy.eu
User’s manual
14/06/2010
This manual pertains to the revision 1.3.x of the Tripy II firmware
Page 2

2
Table des matières1.
1. Tripy II, much more than a GPS 7
2. Tripy II concepts 8
2.1. Preliminary 8
2.2. Paper road book & electronic road book 10
a. What’s a road book? . . . . . . . . . . . . . . . . . . . . . . . . . . . . . . . . . . . . . . . . . 10
b. Description of a digital road book . . . . . . . . . . . . . . . . . . . . . . . . . . . . . . . . . . . 11
2.3. How does Tripy II navigate ? 12
a. Map display . . . . . . . . . . . . . . . . . . . . . . . . . . . . . . . . . . . . . . . . . . . . 12
b. road book display . . . . . . . . . . . . . . . . . . . . . . . . . . . . . . . . . . . . . . . . . . 13
c. The best of both worlds . . . . . . . . . . . . . . . . . . . . . . . . . . . . . . . . . . . . . . . 15
d. A map to position yourself or visualize an itinerary . . . . . . . . . . . . . . . . . . . . . . . . . . . . 15
e. Compass display (beacon road book) . . . . . . . . . . . . . . . . . . . . . . . . . . . . . . . . . . 16
2.4. What happens as one leaves the itinerary? 17
a. Compass mode . . . . . . . . . . . . . . . . . . . . . . . . . . . . . . . . . . . . . . . . . . . 19
b. If you leave the itinerary while Tripy II displays the map . . . . . . . . . . . . . . . . . . . . . . . . . . 19
c. Re-computing the itinerary . . . . . . . . . . . . . . . . . . . . . . . . . . . . . . . . . . . . . . 19
3. What you need to know prior to using Tripy II 20
3.1. Tripy II GPS – knob functions 20
3.2. Switching ON, switching OFF & satellites synchronization 22
a. Starting Tripy II . . . . . . . . . . . . . . . . . . . . . . . . . . . . . . . . . . . . . . . . . . . 22
b. Satellites synchronization before departing . . . . . . . . . . . . . . . . . . . . . . . . . . . . . . . 23
c. Switching Tripy II OFF . . . . . . . . . . . . . . . . . . . . . . . . . . . . . . . . . . . . . . . . 24
d. Automatic switch off . . . . . . . . . . . . . . . . . . . . . . . . . . . . . . . . . . . . . . . . . 24
3.3. Language selection 25
3.4. Connecting Tripy II to the outside world 26
a. Connecting to the battery charger . . . . . . . . . . . . . . . . . . . . . . . . . . . . . . . . . . . 27
b. Permanent connection to the vehicle power supply . . . . . . . . . . . . . . . . . . . . . . . . . . . . 27
c. Connecting to the computer . . . . . . . . . . . . . . . . . . . . . . . . . . . . . . . . . . . . . 28
Page 3

3
d. Connecting a USB memory stick . . . . . . . . . . . . . . . . . . . . . . . . . . . . . . . . . . . . 29
e. Connecting to another Tripy II . . . . . . . . . . . . . . . . . . . . . . . . . . . . . . . . . . . . . 29
3.5. Handling the batteries 30
a. Battery charging . . . . . . . . . . . . . . . . . . . . . . . . . . . . . . . . . . . . . . . . . . 30
b. Tips about how to handle the batteries . . . . . . . . . . . . . . . . . . . . . . . . . . . . . . . . . 32
3.6. Connecting to the vehicle power cable 33
3.7. Screen contrast and back lighting settings 34
a. Contrast setting . . . . . . . . . . . . . . . . . . . . . . . . . . . . . . . . . . . . . . . . . . . 34
b. Back lighting setting . . . . . . . . . . . . . . . . . . . . . . . . . . . . . . . . . . . . . . . . . 35
c. Impact of the lighting setting on the autonomy . . . . . . . . . . . . . . . . . . . . . . . . . . . . . . 35
3.8. Mounting Tripy II on the vehicle 36
3.9. Data transfer between Tripy II and PC 37
a. Favorites . . . . . . . . . . . . . . . . . . . . . . . . . . . . . . . . . . . . . . . . . . . . . . 39
b. POI’s . . . . . . . . . . . . . . . . . . . . . . . . . . . . . . . . . . . . . . . . . . . . . . . 40
c. Automatic tracks . . . . . . . . . . . . . . . . . . . . . . . . . . . . . . . . . . . . . . . . . . 40
d. Itineraries or road books . . . . . . . . . . . . . . . . . . . . . . . . . . . . . . . . . . . . . . . 41
e. Monitored POI’s (e.g. Speed traps) . . . . . . . . . . . . . . . . . . . . . . . . . . . . . . . . . . . 42
3.10. Data transfer between Tripy II and USB memory stick 43
3.11. Data transfer between two Tripy II’s 44
3.12. Firmware version and Tripy II update 45
3.13. Safe copy and Tripy II restoration 46
a. Back-up copy . . . . . . . . . . . . . . . . . . . . . . . . . . . . . . . . . . . . . . . . . . . . 46
b. Restoration of a back-up copy . . . . . . . . . . . . . . . . . . . . . . . . . . . . . . . . . . . . . 47
3.14. Access to the general RESET knob and memory card 48
a. Tripy II general RESET . . . . . . . . . . . . . . . . . . . . . . . . . . . . . . . . . . . . . . . . 49
b. Micro SD card extraction . . . . . . . . . . . . . . . . . . . . . . . . . . . . . . . . . . . . . . . 49
4. How to head for destination? 50
4.1. Preliminary 50
4.2. How to head for an address? 51
Page 4

4
a. Town introduction and use of the virtual keyboard . . . . . . . . . . . . . . . . . . . . . . . . . . . . 51
b. Street introduction . . . . . . . . . . . . . . . . . . . . . . . . . . . . . . . . . . . . . . . . . 53
c. Routing profile . . . . . . . . . . . . . . . . . . . . . . . . . . . . . . . . . . . . . . . . . . . 54
4.3. How to head for a destination recently selected? 56
4.4. How to store a « favorite » location to return to it later on? 57
a. Store the current position as a « favorite ». . . . . . . . . . . . . . . . . . . . . . . . . . . . . . . . 57
b. Compute an itinerary towards a « favorite » location . . . . . . . . . . . . . . . . . . . . . . . . . . . 58
4.5. How to head for a point of interest (hotel, gas station, a.s.o...)? 59
4.6. How to head for a GPS coordinate (longitude – latitude) ? 62
5. How to navigate an itinerary ? 64
5.1. Preliminary 64
5.2. In and out of the navigation mode 64
5.3. Toggle the road book and map displays 65
5.4. Navigate under the road book display 66
a. Standard « pictogram » display . . . . . . . . . . . . . . . . . . . . . . . . . . . . . . . . . . . . 66
b. Ribbon display . . . . . . . . . . . . . . . . . . . . . . . . . . . . . . . . . . . . . . . . . . . 67
c. « Compass » display . . . . . . . . . . . . . . . . . . . . . . . . . . . . . . . . . . . . . . . . . 68
d. Simplified pictograms . . . . . . . . . . . . . . . . . . . . . . . . . . . . . . . . . . . . . . . . 69
e. Various « info borders » . . . . . . . . . . . . . . . . . . . . . . . . . . . . . . . . . . . . . . . 70
5.5. Map navigation and displaying the itinerary computed by Tripy II 71
a. “Riding direction” orientation . . . . . . . . . . . . . . . . . . . . . . . . . . . . . . . . . . . . . 71
b. “North” orientation . . . . . . . . . . . . . . . . . . . . . . . . . . . . . . . . . . . . . . . . . 72
5.6. Additional navigation functions 74
a. Re-compute an itinerary to final destination . . . . . . . . . . . . . . . . . . . . . . . . . . . . . . . 74
b. Re-compute towards a given waypoint . . . . . . . . . . . . . . . . . . . . . . . . . . . . . . . . . 75
c. Reseting the odometers . . . . . . . . . . . . . . . . . . . . . . . . . . . . . . . . . . . . . . . 76
d. Leaving the road book and switch back to the dashboard . . . . . . . . . . . . . . . . . . . . . . . . . 76
e. Store my position . . . . . . . . . . . . . . . . . . . . . . . . . . . . . . . . . . . . . . . . . . 76
Page 5

5
6. How to look for a road book? 77
6.1. Preliminary 77
6.2. Find a road book in the library. 78
6.3. Search for one of your own road books 79
6.4. Search a road book recently ridden 79
6.5. Copy a road book from a USB memory stick 79
7. How to record a road book scouting trip ? 80
7.1. Preliminary 80
7.2. Start the recording of a scouting trip 80
8. How to immediately ride a scouting track ? 83
9. How to use the Trip Master ? 84
9.1. Preliminary 84
9.2. Reset 85
9.3. Quick reset of the partial trip counter 85
9.4. Adjusting the total 85
10. How to set the parameters ? 86
10.1. Preliminary 86
10.2. Screen settings 86
10.3. Statut de la réception GPS 86
10.4. Time zone setting 87
Page 6

6
10.5. Language setting 87
10.6. Information screen 88
10.7. Advanced settings 89
a. Sound . . . . . . . . . . . . . . . . . . . . . . . . . . . . . . . . . . . . . . . . . . . . . . . 89
b. Key sound . . . . . . . . . . . . . . . . . . . . . . . . . . . . . . . . . . . . . . . . . . . . . 89
c. Automatic dashboard . . . . . . . . . . . . . . . . . . . . . . . . . . . . . . . . . . . . . . . . 89
d. Auto power off . . . . . . . . . . . . . . . . . . . . . . . . . . . . . . . . . . . . . . . . . . . 89
e. Show help screens . . . . . . . . . . . . . . . . . . . . . . . . . . . . . . . . . . . . . . . . . 89
f. GPS Coordinates . . . . . . . . . . . . . . . . . . . . . . . . . . . . . . . . . . . . . . . . . . 90
g. Keyboard . . . . . . . . . . . . . . . . . . . . . . . . . . . . . . . . . . . . . . . . . . . . . 90
11. How to update the speed trap warning file ? 91
11.1. Preliminary 91
11.2. Updating the speed traps files 91
Page 7
7
Tripy II, much more than a GPS1.
Does a GPS represent the perfect guide for unforgettable rides?
Have you ever imagined creating your next road ride on a Tourist or Topographic digital map ?
Did you think possible the creation of a beautiful off-road ride based on a digital topographic map, or
even prepare your utmost adventurous raids on foreign exotic maps ?
You dreamed about it. Tripy did it !
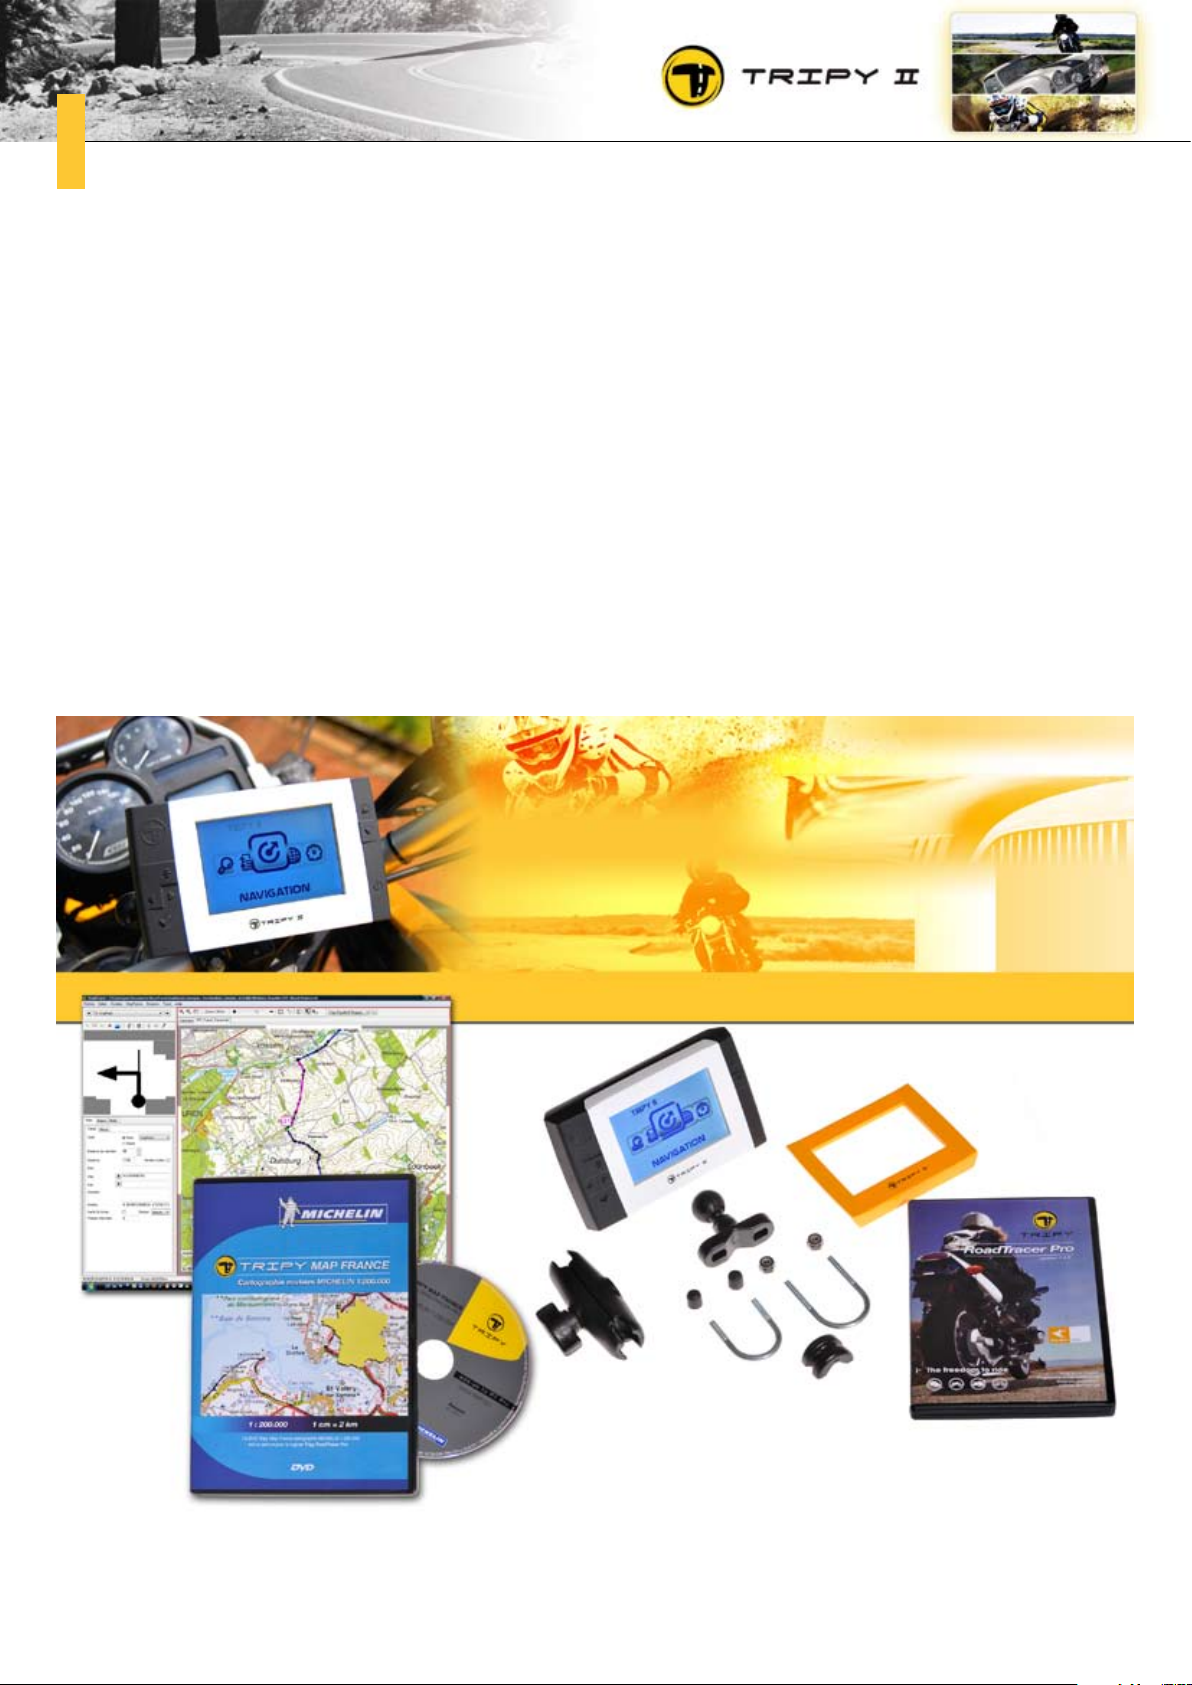
Tripy II is a unique combination of a GPS and digital road book player/recorder designed to enjoy unforgettable rides and create exclusive itineraries.
Page 8
8
Tripy II concepts2.
Preliminary2.1.
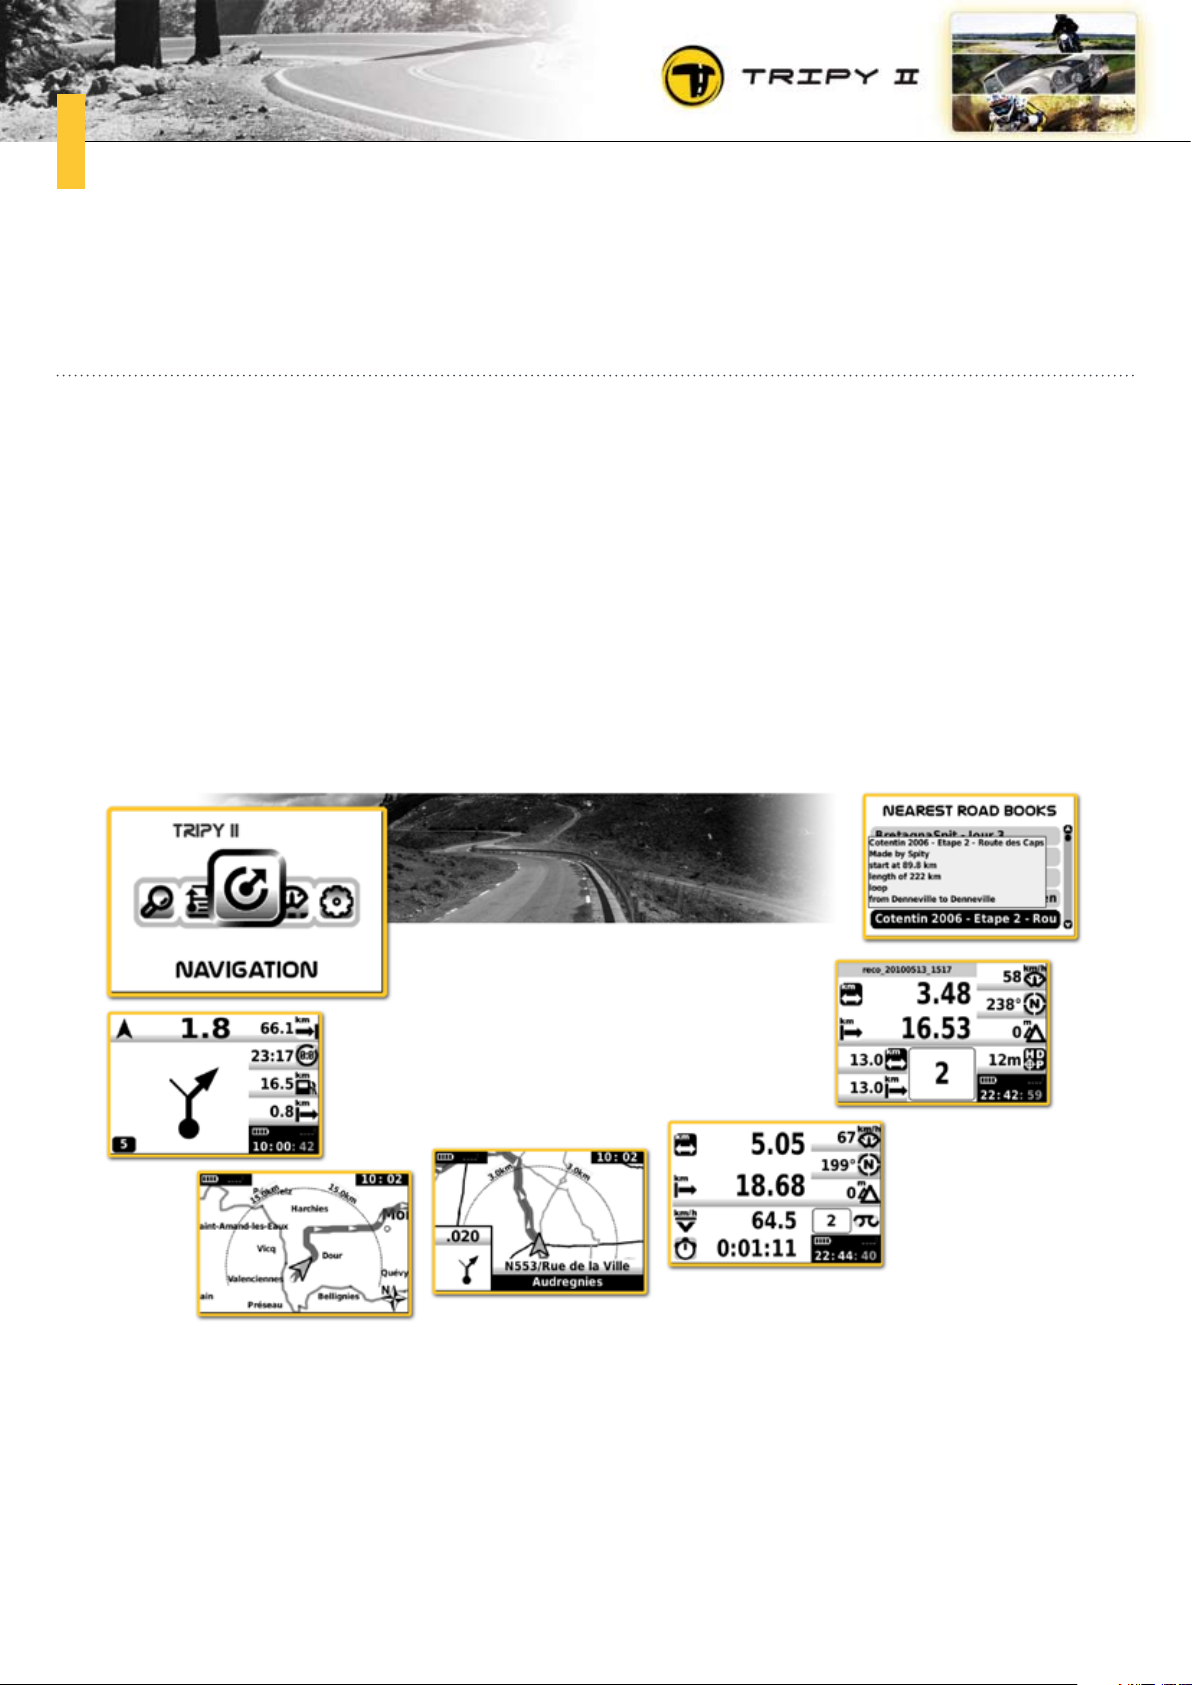
The Tripy II GPS is a stand alone navigation system allowing the computation of an A-to-B itinerary and
displaying the itinerary in a traditional fashion as a scrolling map on its screen.
Nothing revolutionary, and pretty common to all GPS’es on the market. Tripy stands out when it comes
to riding the nicest rides in the optimal safety conditions considering its ease of use (readability, speed
to grasp a concise information, battery autonomy, no intrusive and boring voice prompting, a.s.o....).
Indeed, Tripy offers a unique type of display we call « electronic road book ». The « road book » type of
display is the most relevant for usage on bike, quad, as well as in cars and off road vehicles as it requires far less attention and glancing time. This « subliminal guiding » is a non intrusive solution liberating
the pilot from tiring vocal prompting (even more tiring as it is used on small roads where frequent messages are given).
Page 9

9
The Tripy II GPS allows you to:
•rideitinerariesdirectlycomputedbythedevice(introduceyourdestinationlocationaswellasthe
preferred route profile : Fast by highways – without highways – leisure trip, and Tripy II is ready to
bring you there),
•recordascoutingtrippriortopreparingaprofessionalqualityroadbook,
•re-runapreviouslyrecordedtrack,
•discoveroneofthemanyitinerariescreatedbyotherniceridesfansandalreadyavailableinits
memory (more than 500 itineraries Tripy II presents to you by order of proximity or provider),
•ndoutthelatestitinerariesfromtheTripycommunityonthewww.tripy.euwebsite,
•createyourselfyourownitinerariesinaveryaccuratefashionthankstospeciallyrichandadapted
maps (topographic maps, Michelin™ road maps, a.s.o....). Our PC software, RoadTracer Pro, will
allow you to enhance your itineraries with comments and pictograms displayed on the Tripy II GPS
as you go along, print a paper version of your road book, display your trace on GoogleMAP/Earth™
and much more,
•rideapaperroadbookanduseTripyIIasaprofessionaltripmaster(totalodometerwithadjustment
possibility, partial counter with one touch reset, averaging,).
In short, with the Tripy II GPS, the road matters as much as the destination.
Wandering and wondering without worrying, is now an accessible luxury !
Page 10
10
Paper road book & electronic road book2.2.
What’s a road book?a.
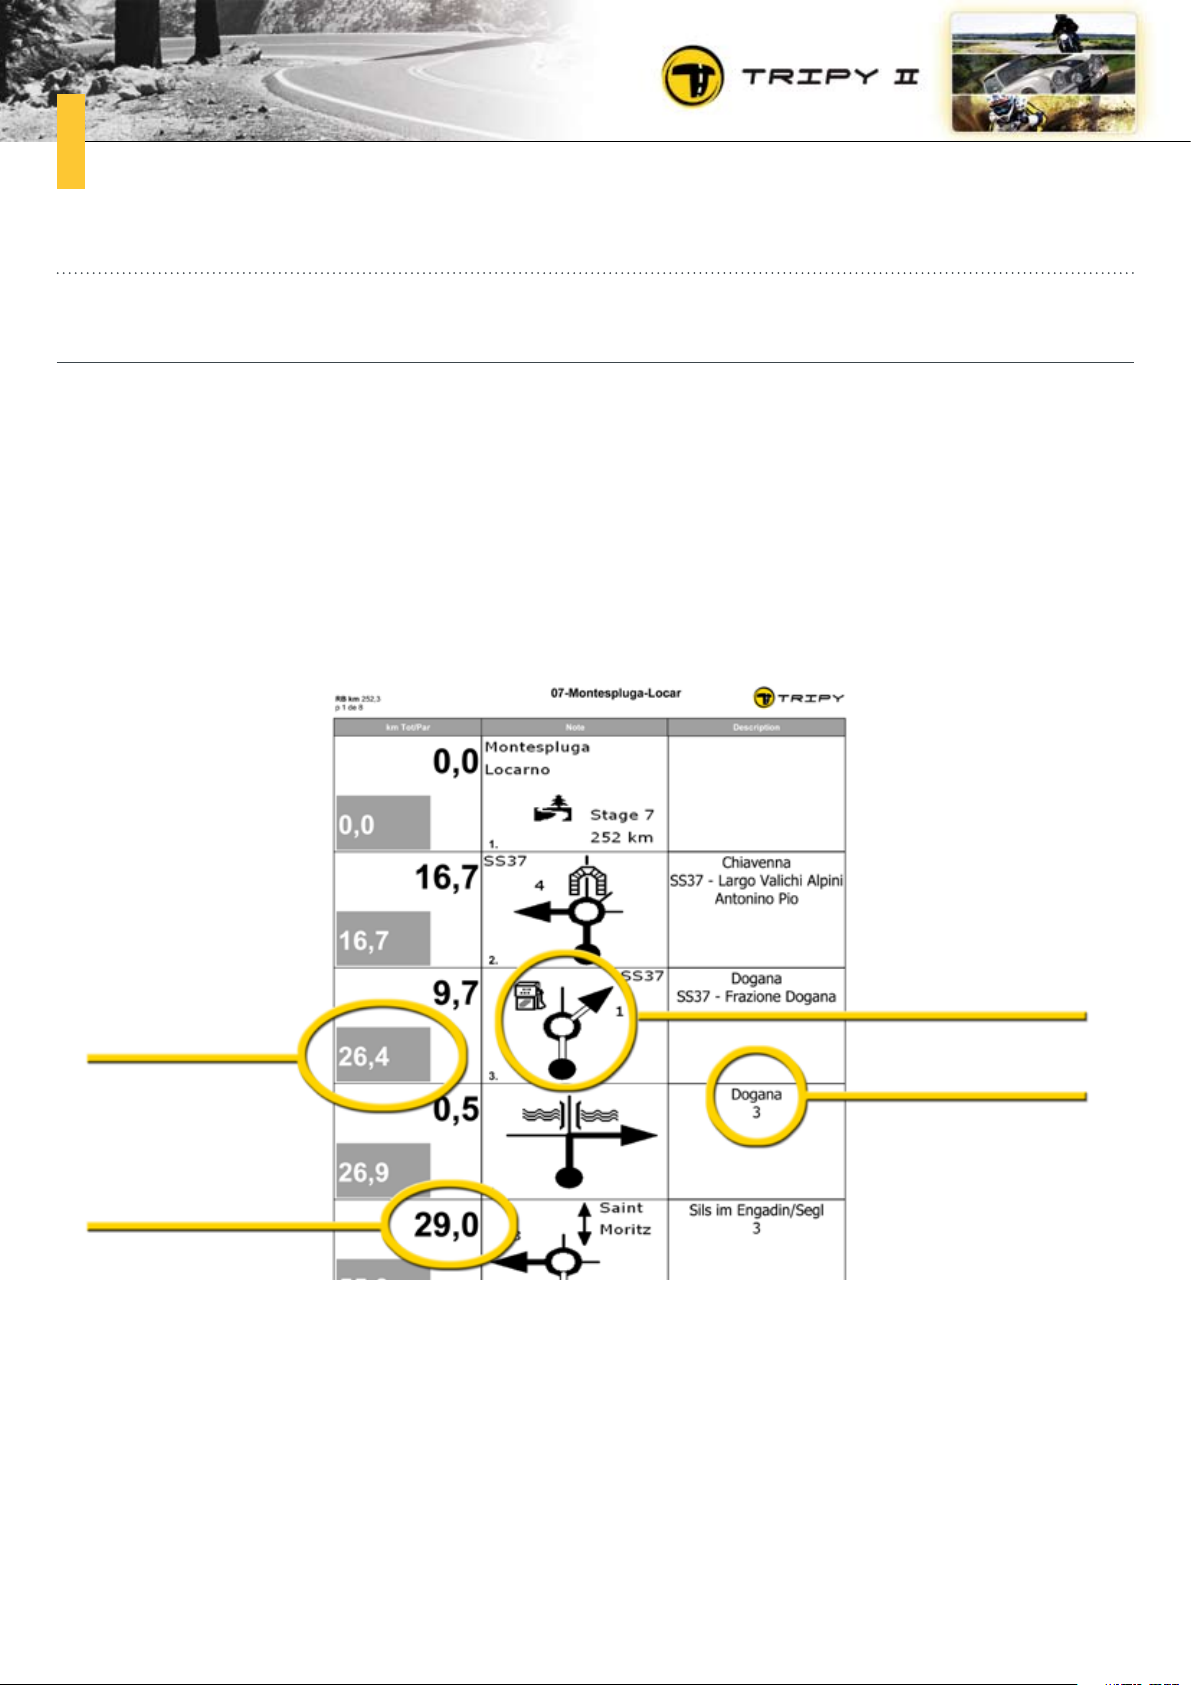
The road book is the set of instructions (typically on paper) allowing to follow a pre-defined itinerary.
Road books sophistication and their reading accessories widely differ according to the application: one
day tourism, multiple days tours, off road rides, rally’s and raids.
The simplest road book is the list of towns, often hand written with the road numbers you have sticked
over your road map.
Commonly, the road book will indicate a simplified navigation pattern, using symbolised sequential
direction changes combined with millage indications (partial and total). The typical road book handed
over at the start of an organised tour (club or other organisation).
waypoint
total
distance
partial distance
The road book is ideal to define an itinerary. It offers an accurate representation of each direction
change and provides also other added value information such as touristic, danger areas (tricky road
bend, gravel, a.s.o....), sightseeing points, quality inn’s, a.s.o...
Limiting the use of the traditional paper road book: without a co-pilot, it is difficult to read while driving;
it is not resisting the weather conditions encountered by bikers and quad riders; the measured millage
is sometimes inaccurate; having gone astray, it is difficult to return to the initial itinerary.
pictogram
waypoint
comment
Tripy has combined the advantages of the paper road book with the GPS technology to offer a unique
system: the digital road book.
Page 11
11
Description of a digital road bookb.
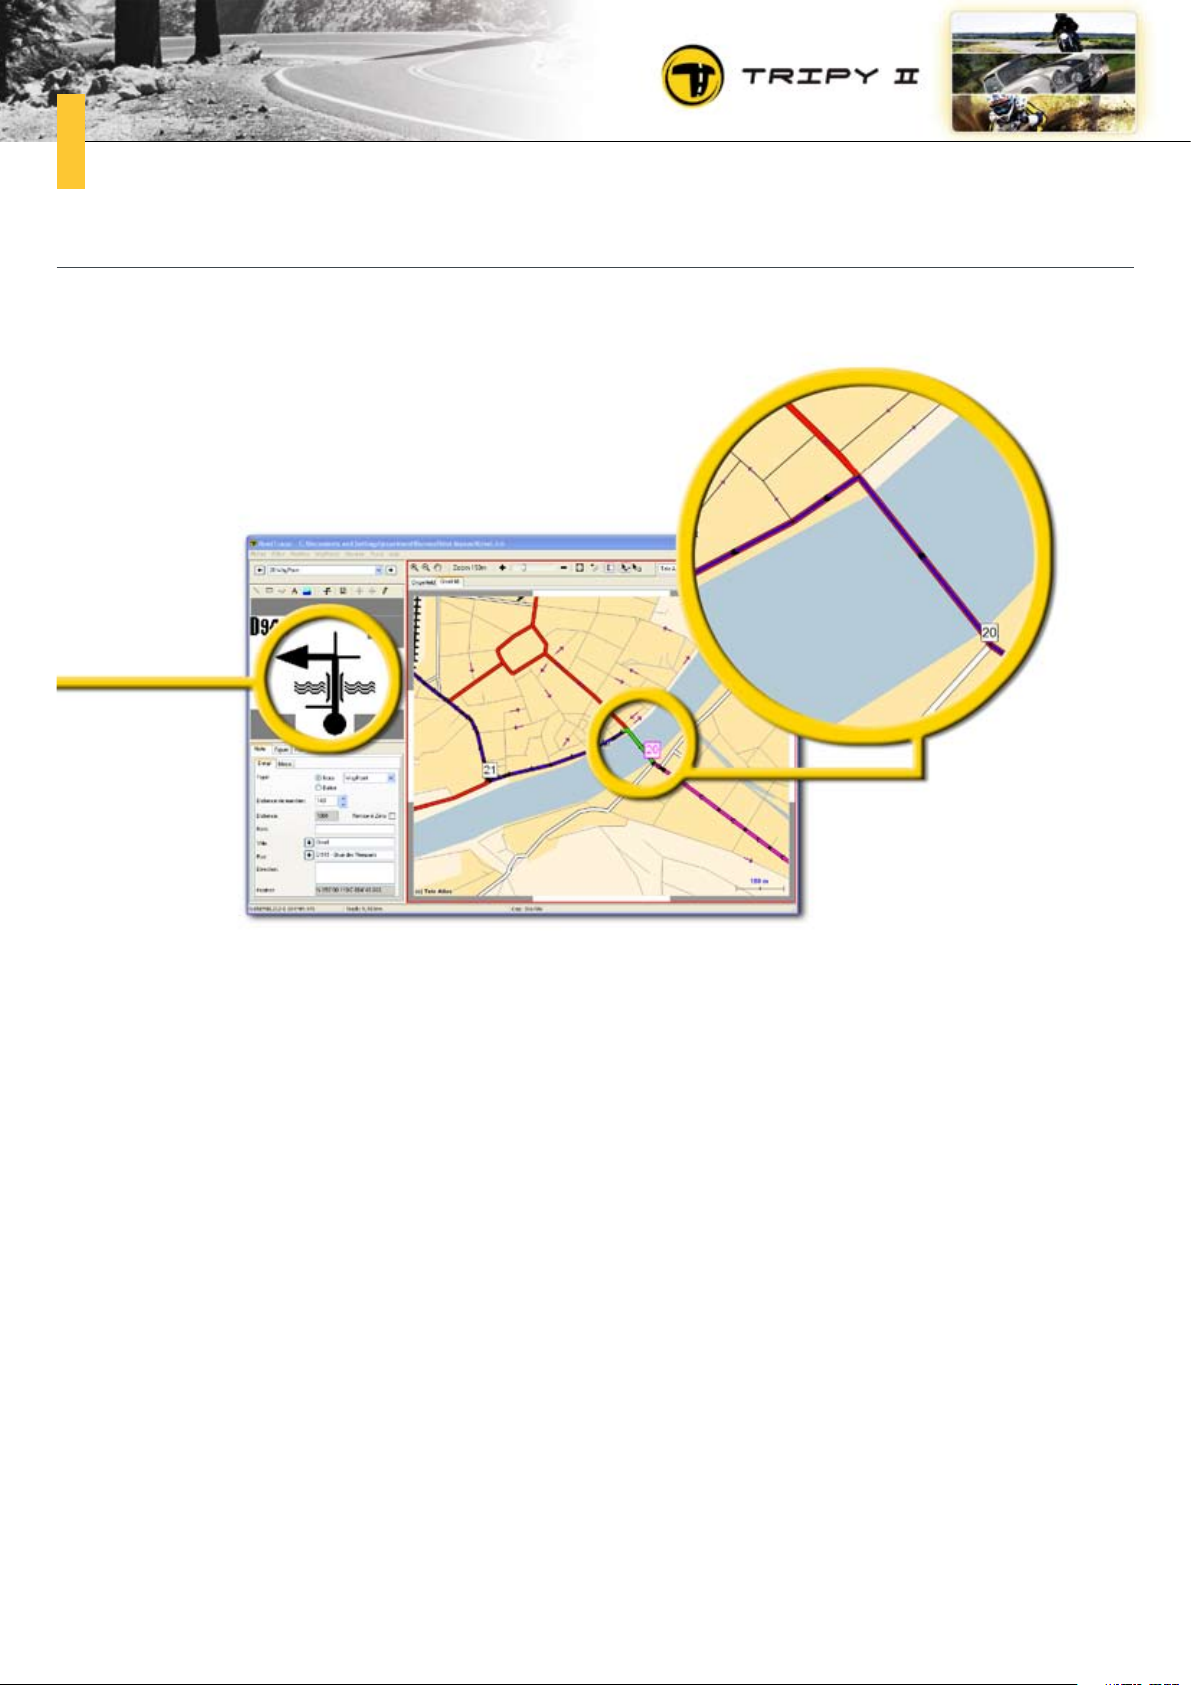
pictogram of
waypoint #20
In the RoadTracer software (supplied with Tripy II), the itinerary is represented by a trace composed of
successive points linked by straight lines (a small black arrow on each segment indicates the trace
direction). The trace is scattered with waypoints (see above waypoint # 20) usually representing direc-
tion changes (crossing, round-about, a.s.o....) but may also represent an information important to the
rider (danger, historical site to the right, worthwhile restaurant, a.s.o....).
All these information are part of the whole digital road book and are stored in a file that will be read and
interpreted by the Tripy II GPS upon riding of the itinerary. The digital road book may be crafted by
yourself by means of the RoadTracer software or automatically created by the Tripy II GPS when you ask
it to compute an itinerary towards your chosen destination.
Thanks to this precise and exhaustive definition of the itinerary, a Tripy digital road book will always be
read by all Tripy GPS models without the need for interpretation or itinerary modification as commonly
encountered with traditional GPS’es re-computing an itinerary based on a list of waypoints. In such a
way, three friends riding the same road book with Tripy are sure to meet at the same place for the lunch
pause !
Page 12
12
How does Tripy II navigate ?2.3.
Map displaya.
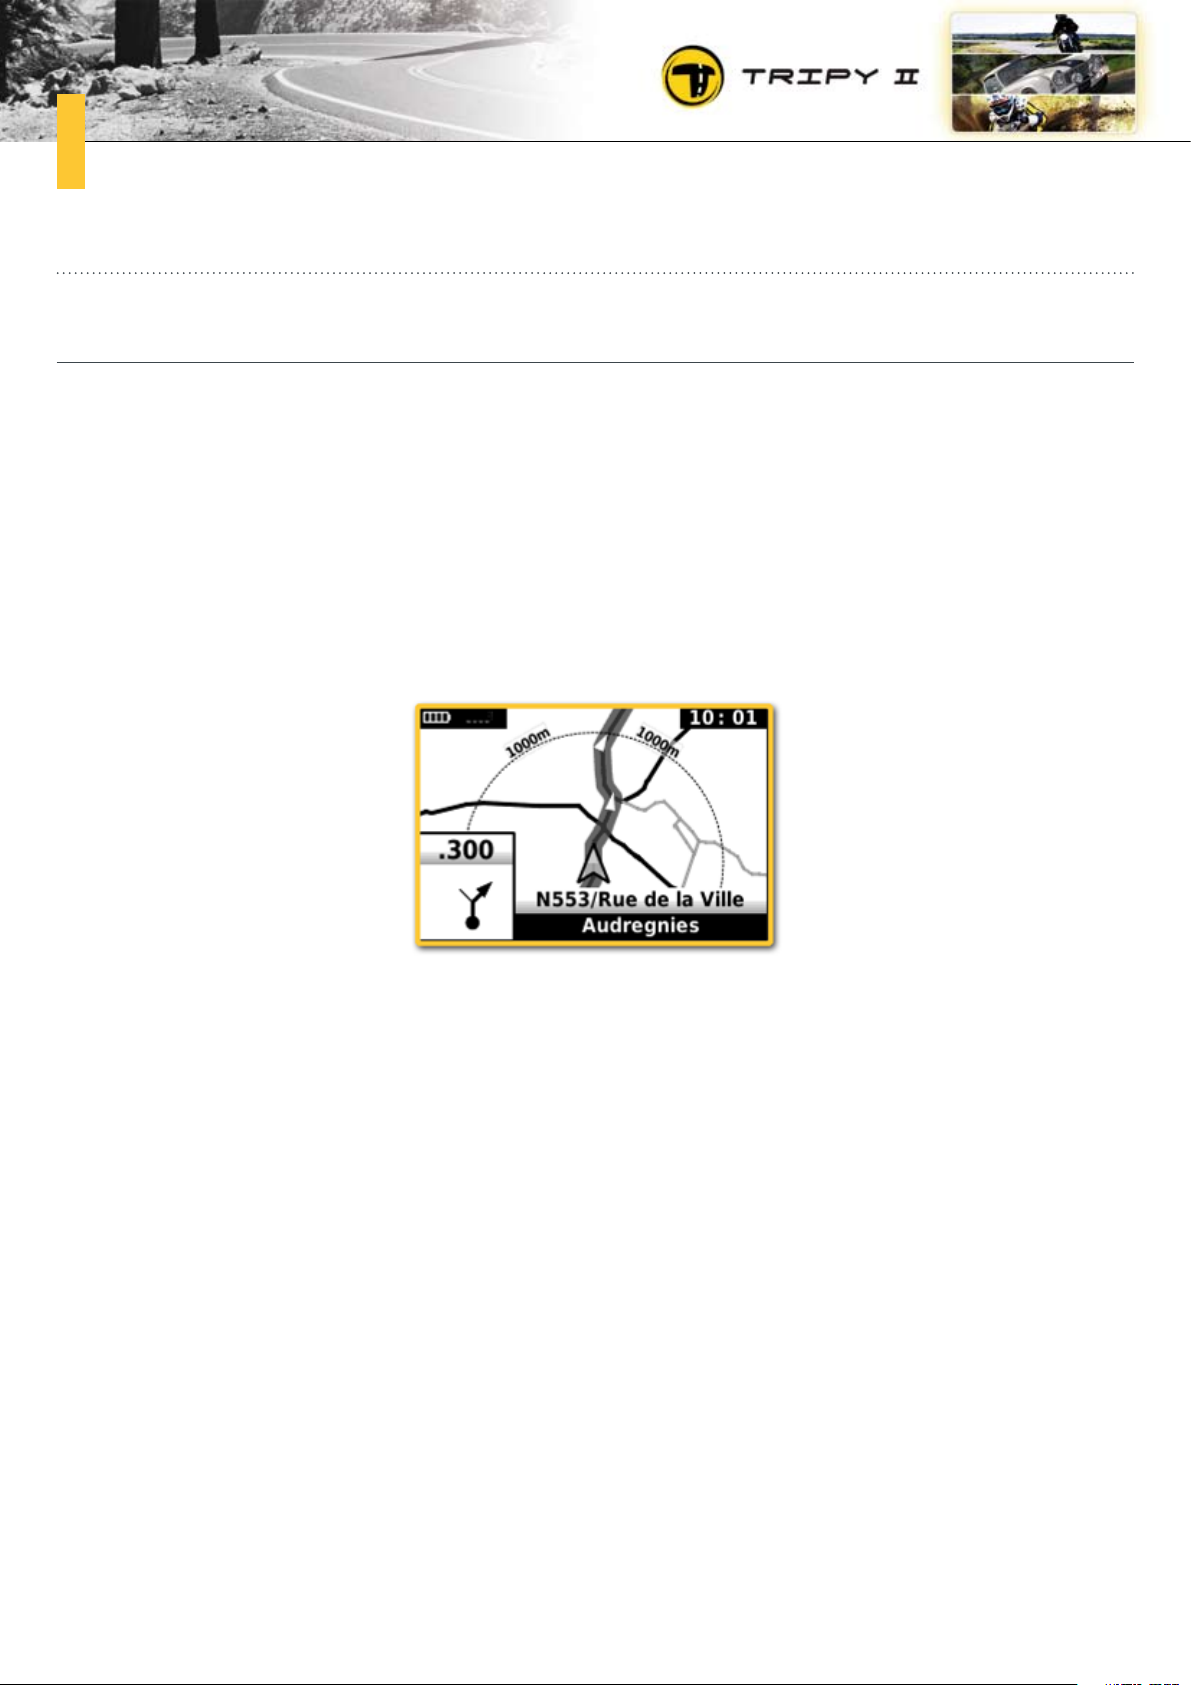
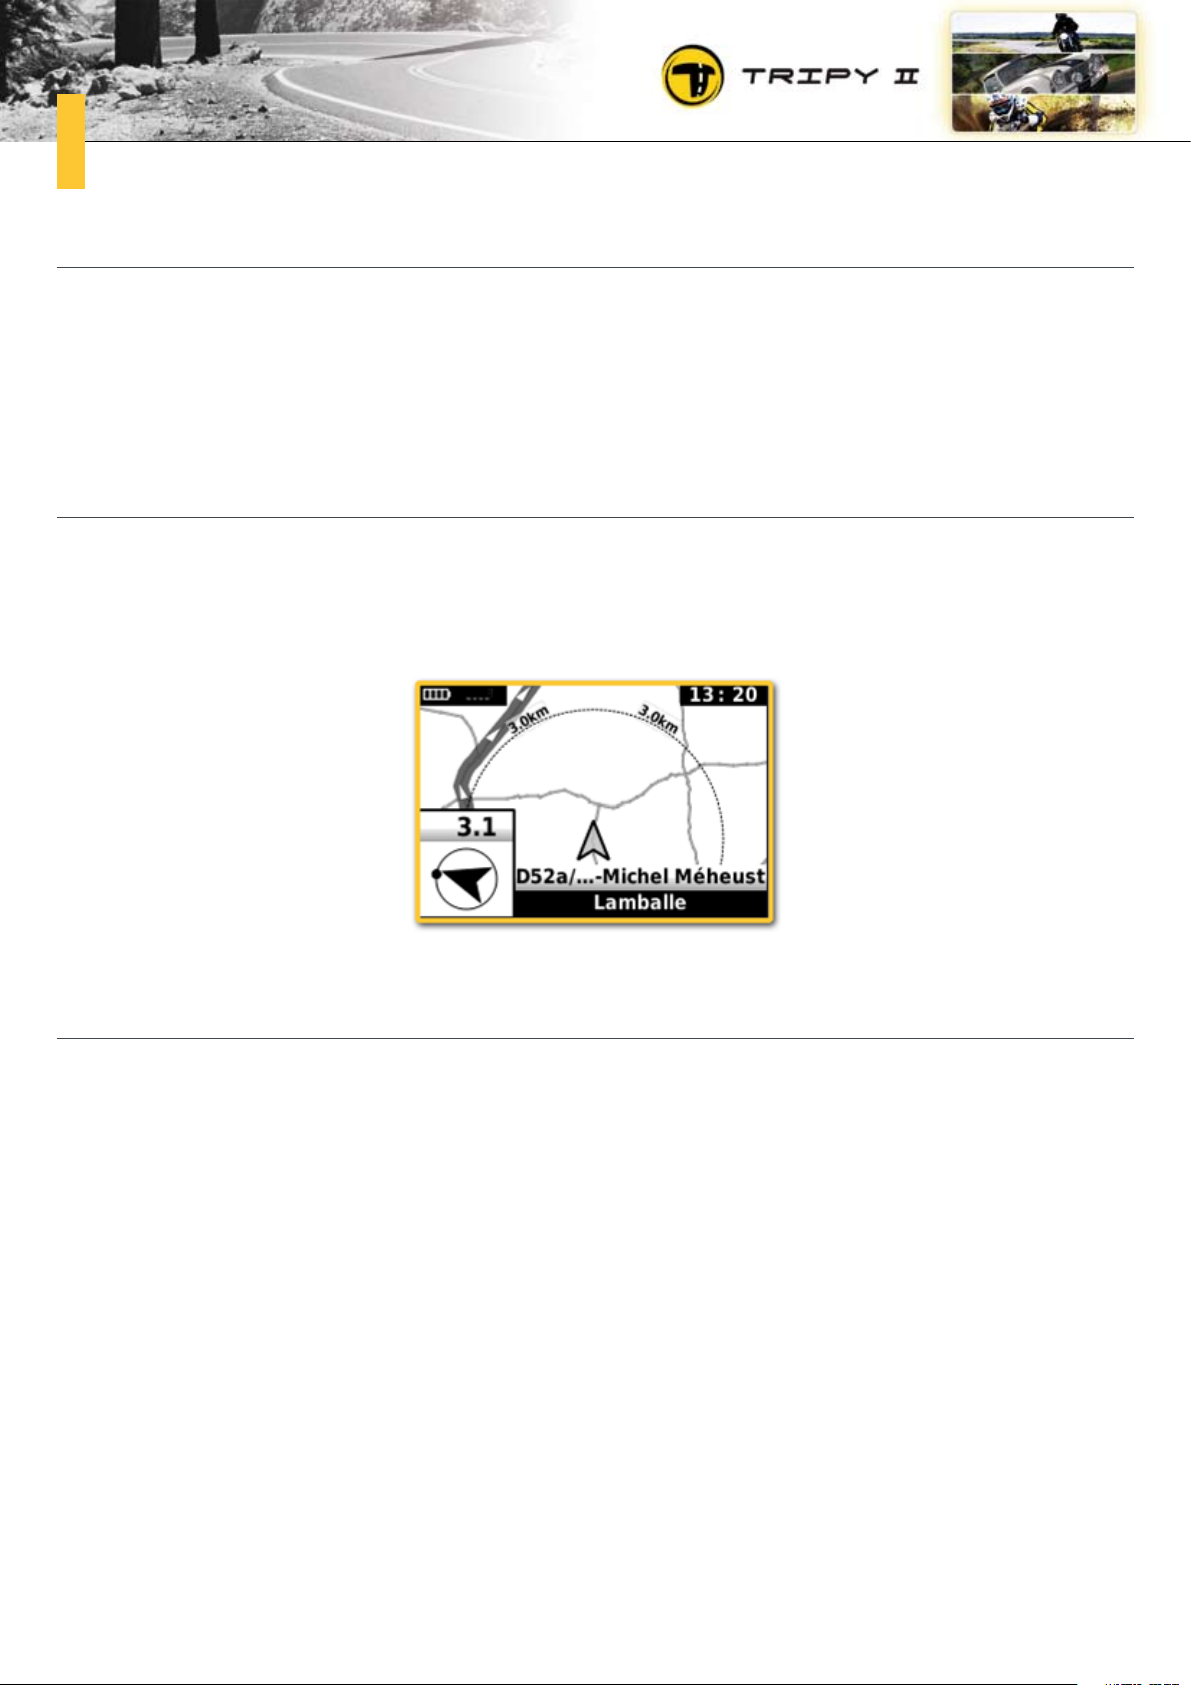
Like other GPS’es Tripy offers a « map » type of display. In this mode, it represents a proximity map
directed in the riding direction. The zoom factor is adjustable from 100 m to 3 km. In the bottom left
corner of the screen one finds the reminder of the following road book waypoint. (next direction change)
and the distance to it (300 meters in the below example). At the bottom of the screen as well, Tripy
indicates the road number or street name and location where we are. On this « map » display, the itinerary to follow is displayed as a large grey ribbon enhancing the road to follow. White arrows are
additionally superimposed on this grey line to clearly indicate the direction to follow.
Versus the « road book » type of display, the « map » display is interesting to assess more complex road
situations (in towns) yet requires additional rider attention. This mode is not recommended for bike or
quad riding.
Page 13
13
road book displayb.
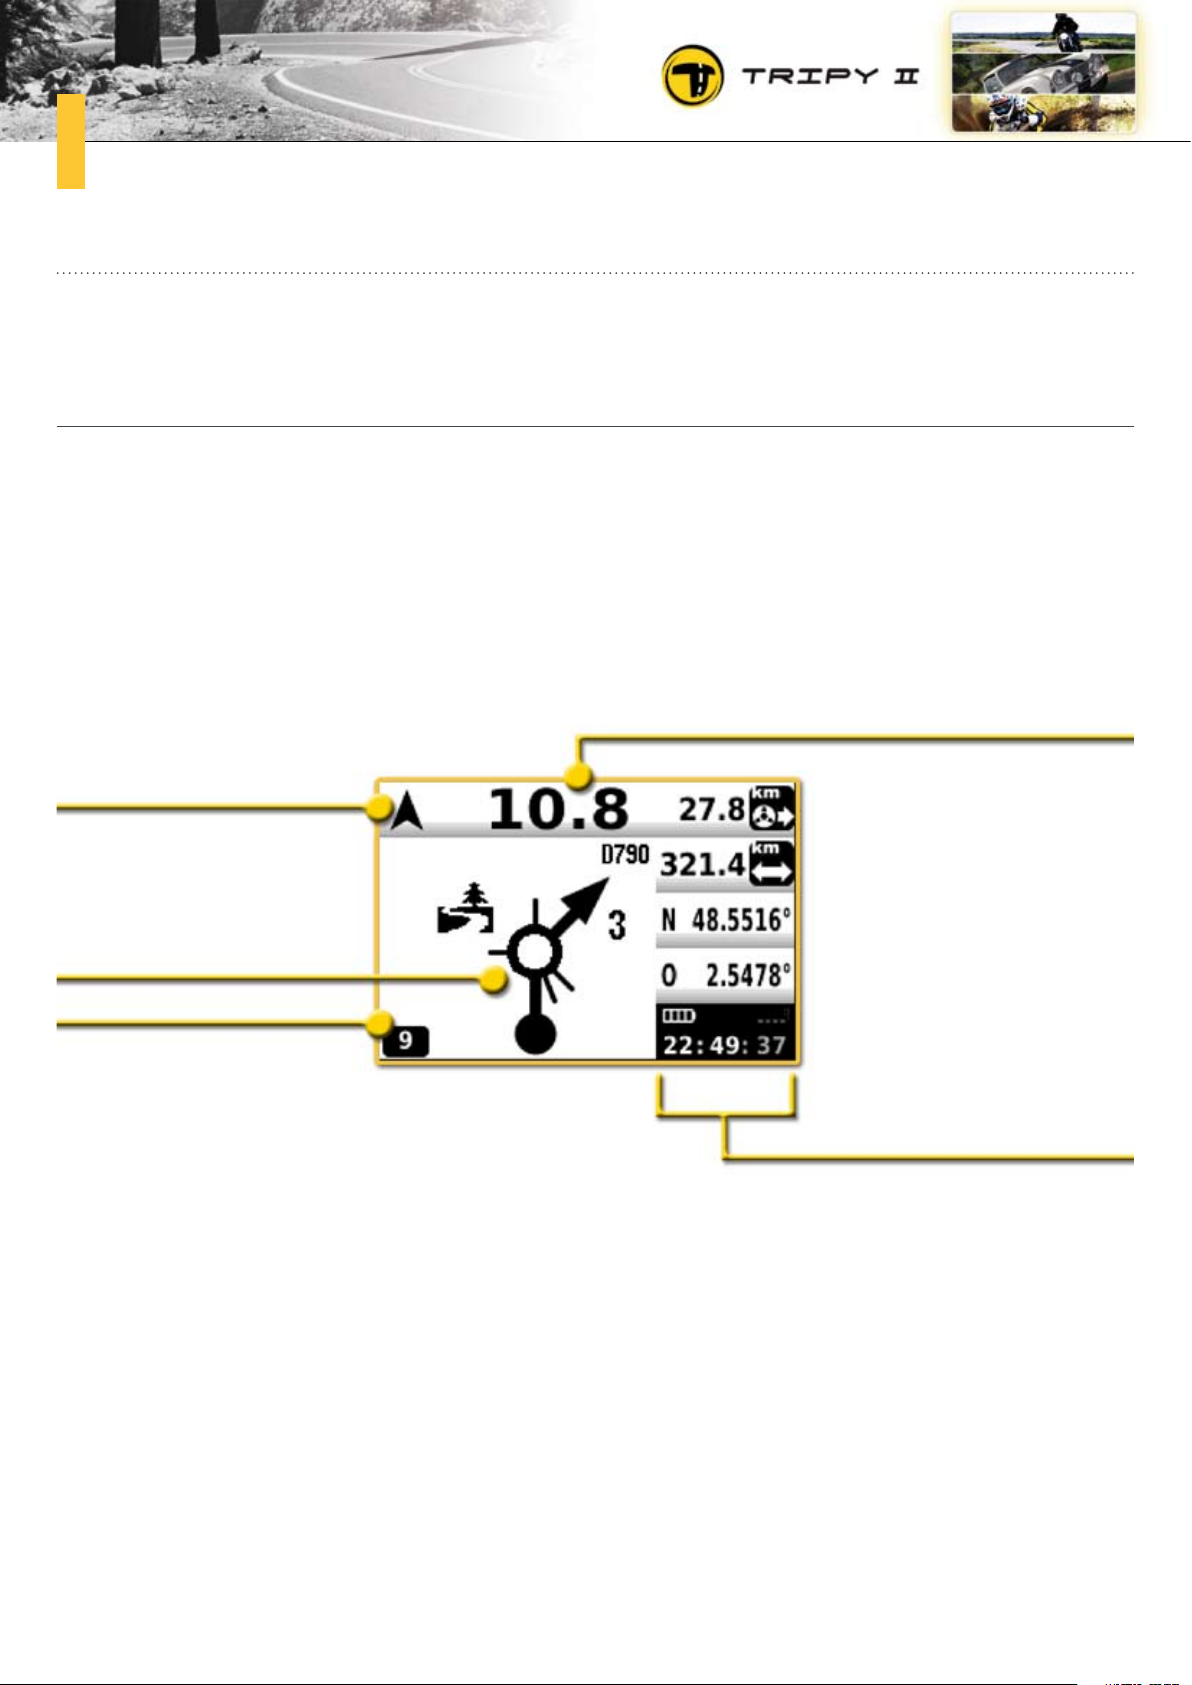
One of the characteristics of Tripy is its original display called « road book » or «tulip symbols ». Such
display type combined with the panoramic silver-back display, easily readable in full sunlight, is definitely fitted for motor sports and especially bikes and quads. On such type of vehicles, the pilot must
remain concentrated on the route and cannot afford occupying his sight with a device requiring more
than a few tenth of a second.
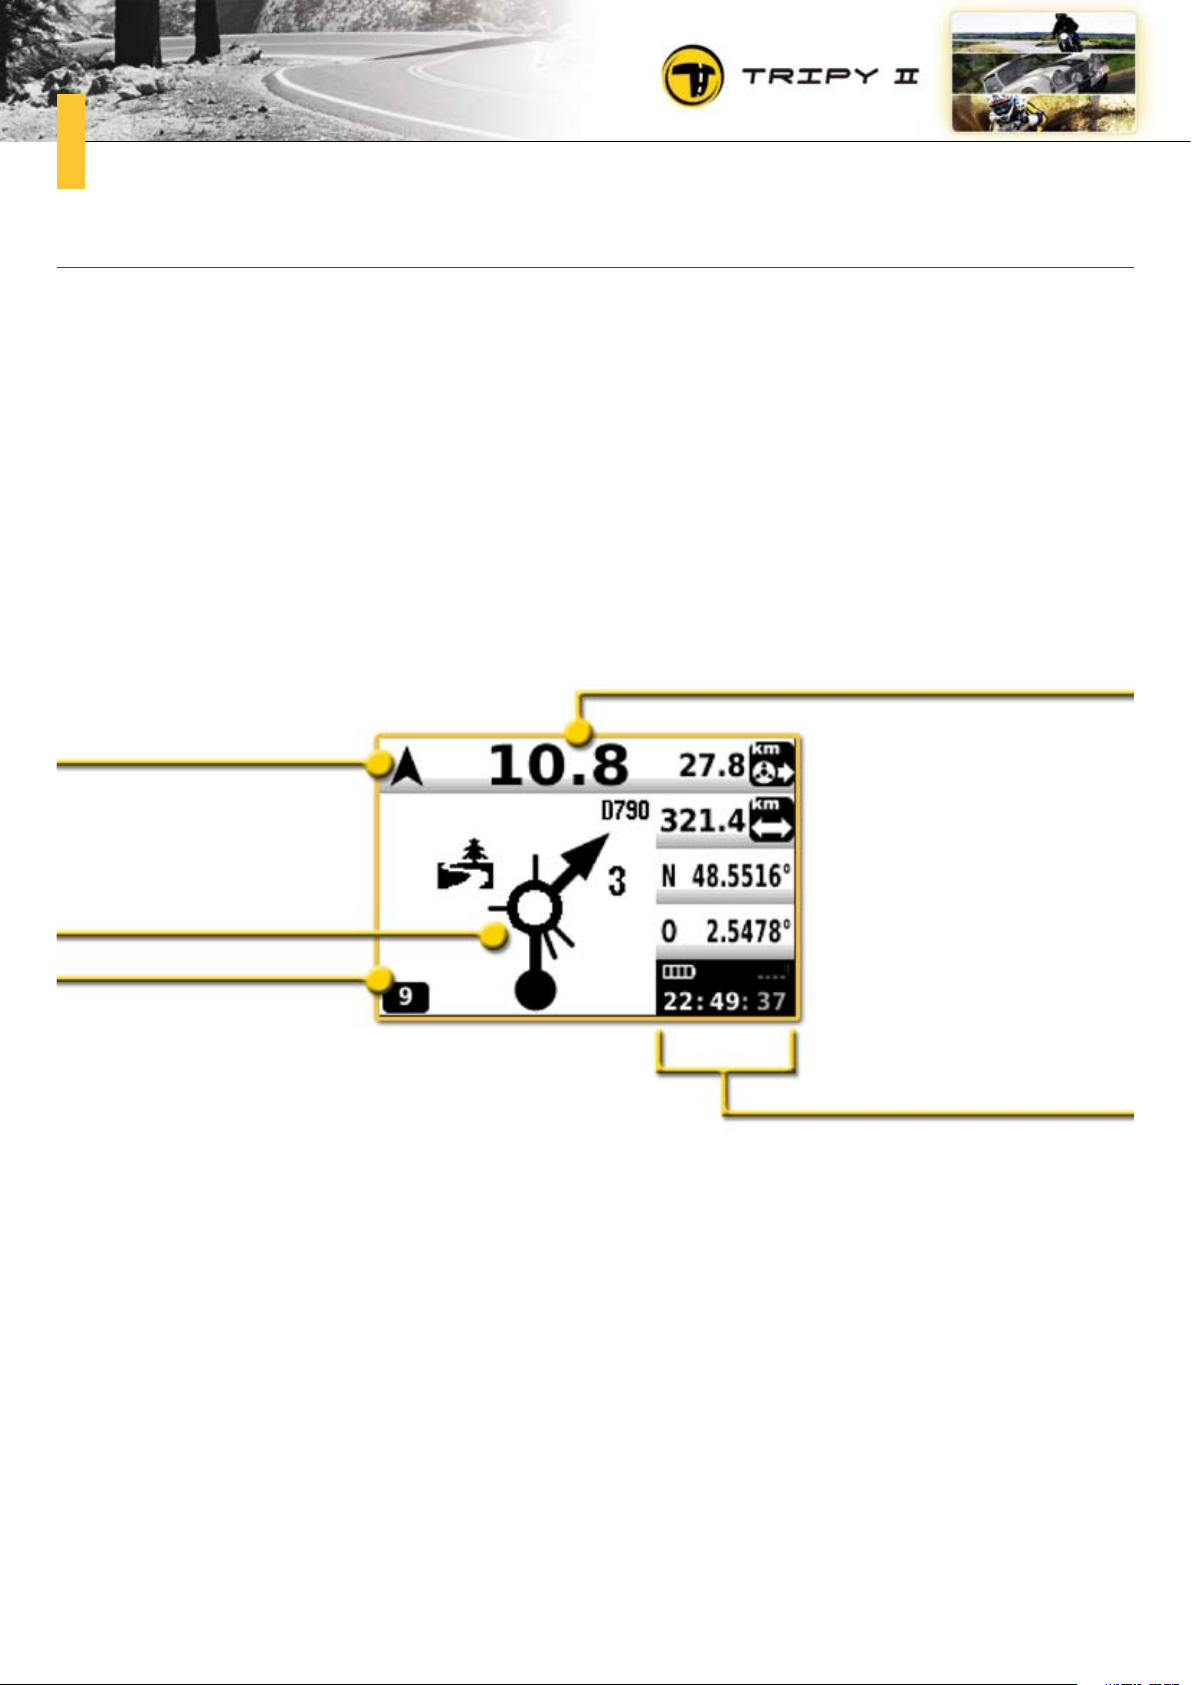
In the « road book » type of display, Tripy II indicates in a very efficient manner the partial distance to
the next waypoint and updates that distance continuously. The more you get approach the next waypoint,
the lesser the distance.
remaining distance
sniffer
Pictogram of next
waypoint
next waypoint
number
info border
Below this partial distance, Tripy II displays the pictogram of the next waypoint and inform the pilot in
such a way of the situation he will encounter when reaching the position (when the partial distance is
null). A waypoint commonly represents a direction change but can also indicate a point of interest (danger, tourist attraction, a.s.o...)
On this « road book » type of view, the pilot grasps very quickly that 10.8 km remain before the next
waypoint. This information is sufficient to understand that the only thing to do is to enjoy the landscape
and the riding for a good while.
In the upper left corner, a small directional arrow continuously confirms the track general direction a
few tens of meters ahead of the vehicle. This little arrow called « sniffer » is somehow the scout exploring the road ahead of you. It looks further ahead as you ride faster.
Page 14
14
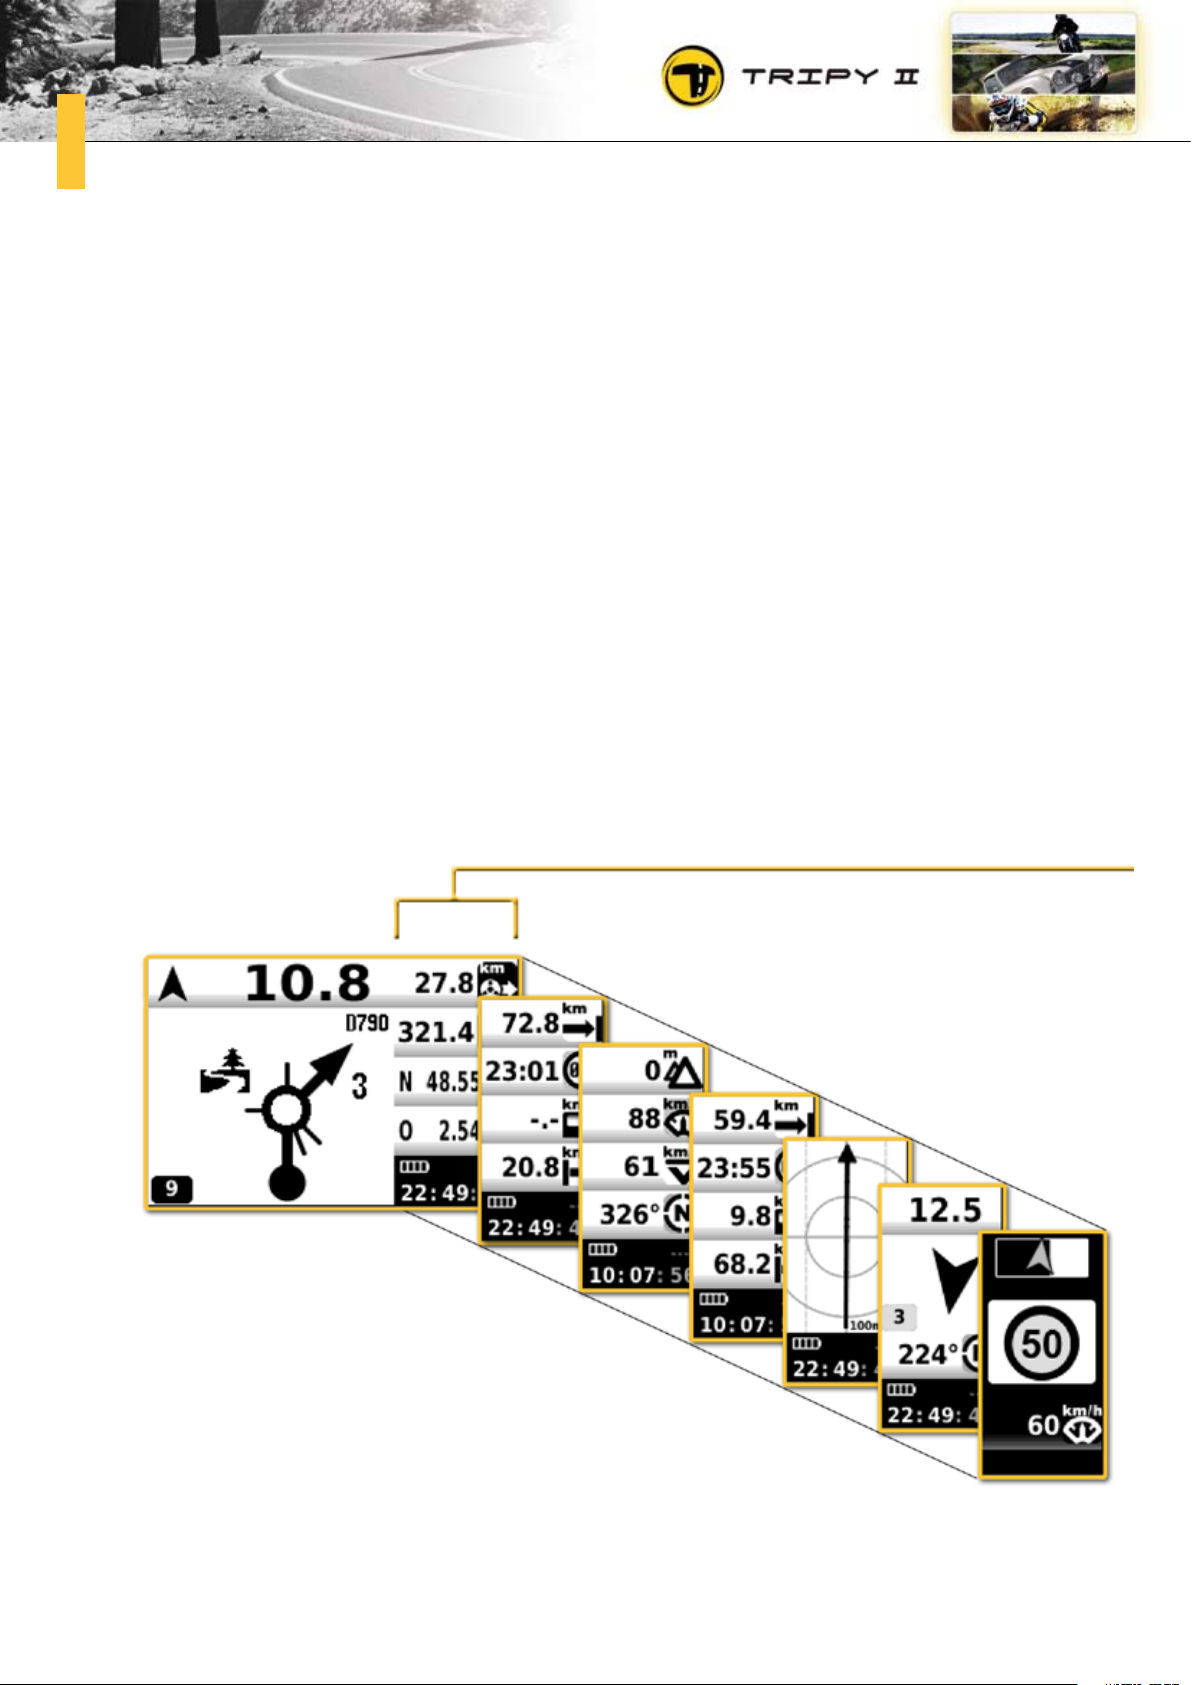
Finally, on the display right hand side, in an area called « info border », Tripy II displays different information panels. You may easily toggle between panels by means of a knob. The various information
displayed are:
remaining distance to destination,•
estimated arrival time,•
actually driven kilometers since start,•
altitude,•
instantaneous speed,•
average speed,•
bearing followed,•
partial trip counter (manually reset by the user at leisure),•
total trip counter (manually reset by the user at leisure),•
GPS position (longitude/latitude),•
compass towards the next road book waypoint,•
close track (the track you are following),•
info border
Page 15
15
The best of both worldsc.
We actively promote the usage of the « road book » type of display for the higher passive safety it provides, yet it is obvious that displaying the map is of interest in some complex situations. That is why you
may easily toggle between one type of display and the other one by a simple pressure on a knob (the OK
knob).
A map to position yourself or visualize an itineraryd.
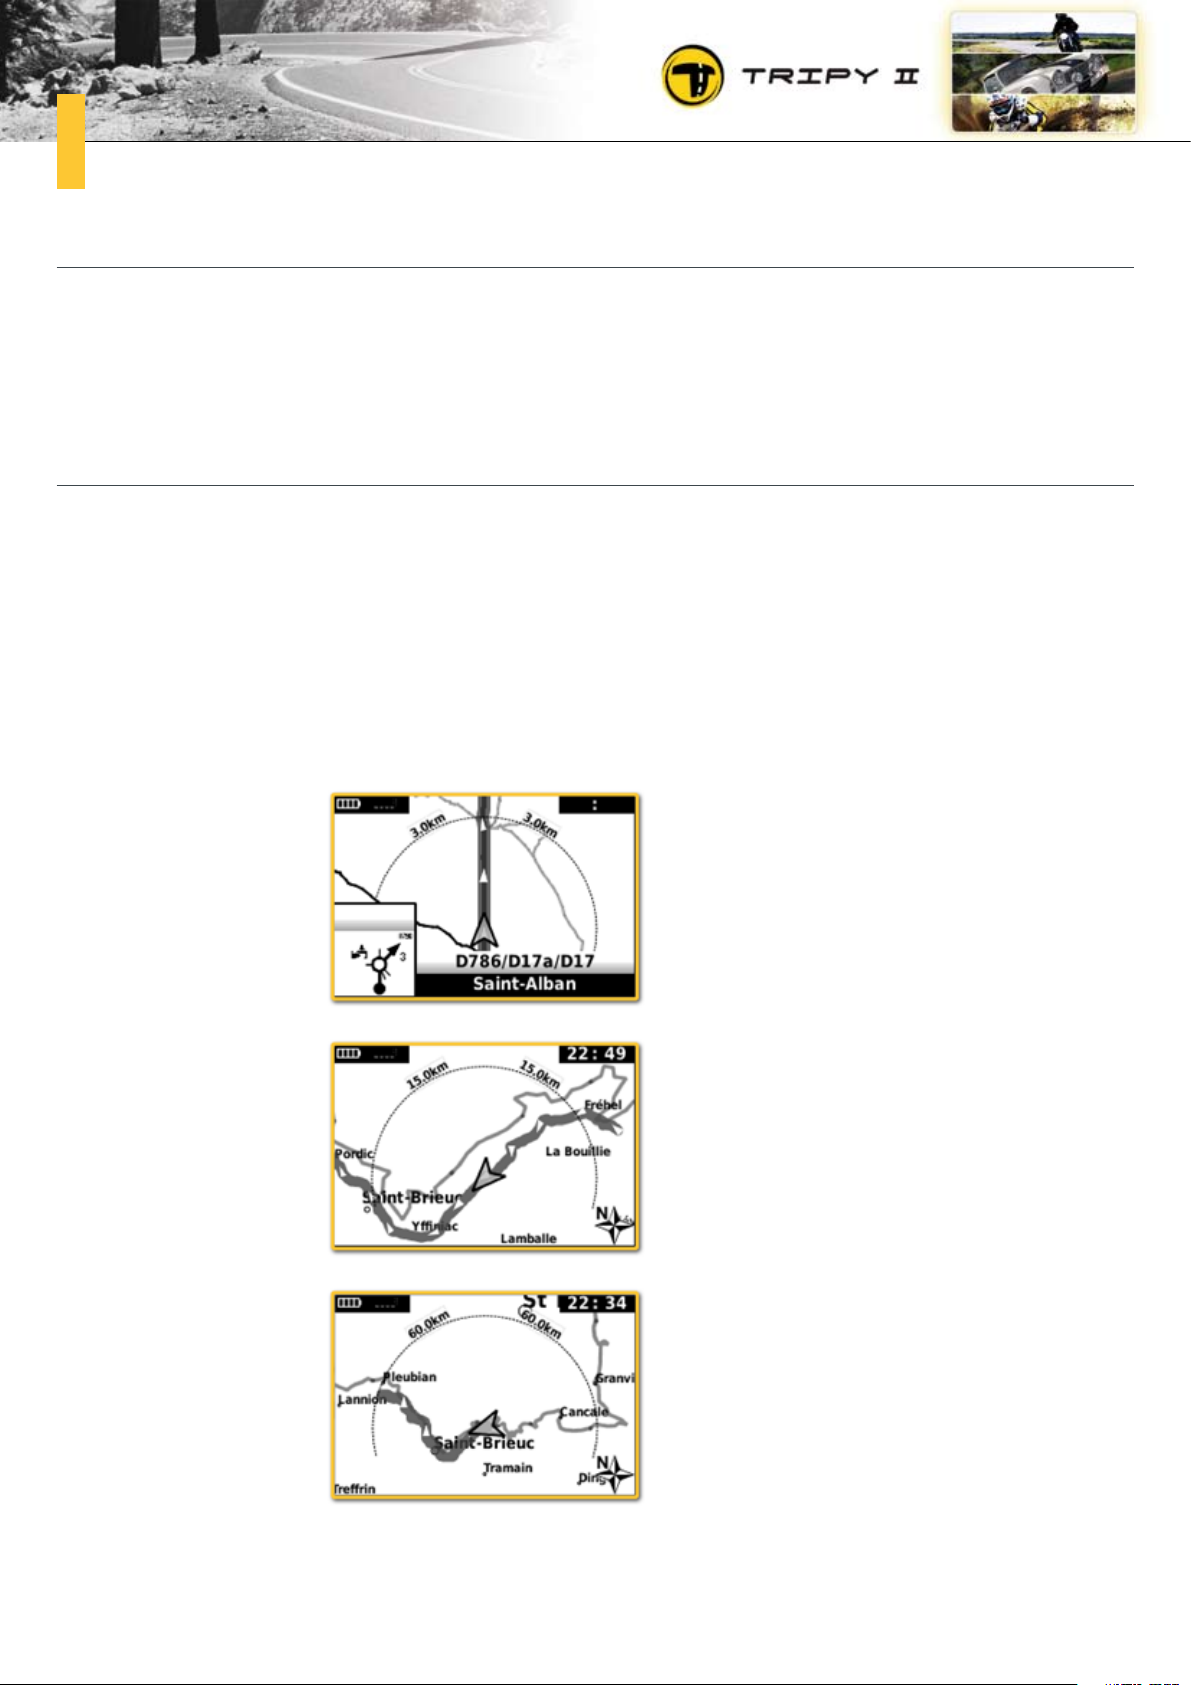
Tripy II usually displays the map oriented in the riding direction, and you may select a zoom factor from
100 m to 3 km. Beyond this proximity zoom, the map is displayed North up for zoom factors from 15 km
to 500 km. That North up map (like paper maps) displays the countries’ borders and names of towns
of importance. It allows you to visualize the itinerary to figure out its main directions. You shall then be
able to review the itinerary of a « road book » providing either from the Tripy library, or computed by the
Tripy II GPS itself.
Proximity map oriented in the
riding direction at a 3 km zoom
North up map at a 15 km zoom
North up map at a 60 km zoom
Page 16
16
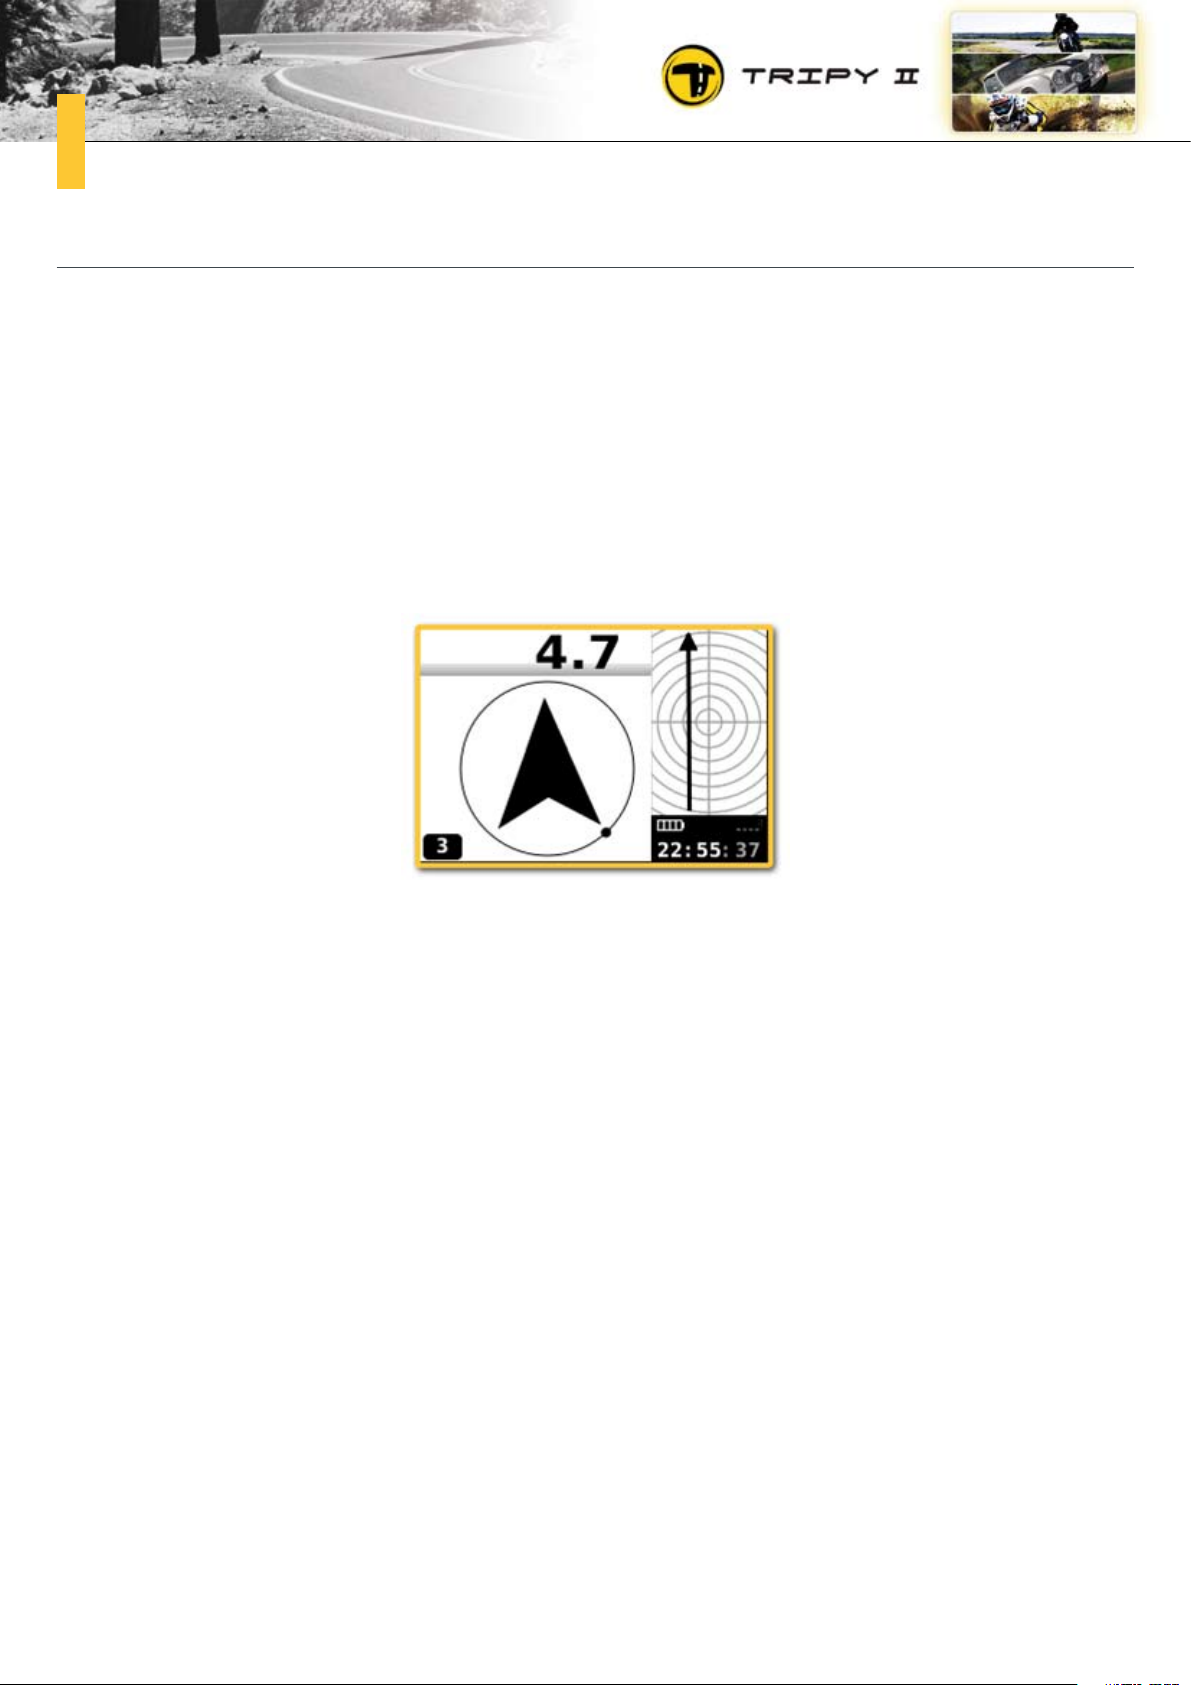
Compass display (beacon road book)e.
Outside of known paths, when one does not have accurate data to produce an actual « road book », if
one has not had the time for site scouting before starting, Tripy II offers the possibility to create « beacon »
type road books. By means of a simple list of points for which the GPS coordinates are known, or points
of interest on an exotic map of the world, the RoadTracer software allows you to produce a « beacon »
type itinerary. It may then guide you from point to point by means of a compass indicator. By means of
an arrow, the display continuously indicates the direction to follow to reach the next point as well as the
distance to it. At any time, you may also display the track to follow in the « info border » pane or toggle
to the map display.
Even in our areas, the compass type of display may be useful. It allows you to reach a destination (town,
POI or even GPS coordinate) in a funny fashion letting you choose the road to use, yet keeping an eye on
the bearing.
Ben’s motto for this type of use:
« Wandering wondering without worrying – an achievable goal »
Page 17
17
What happens as one leaves the itinerary?2.4.
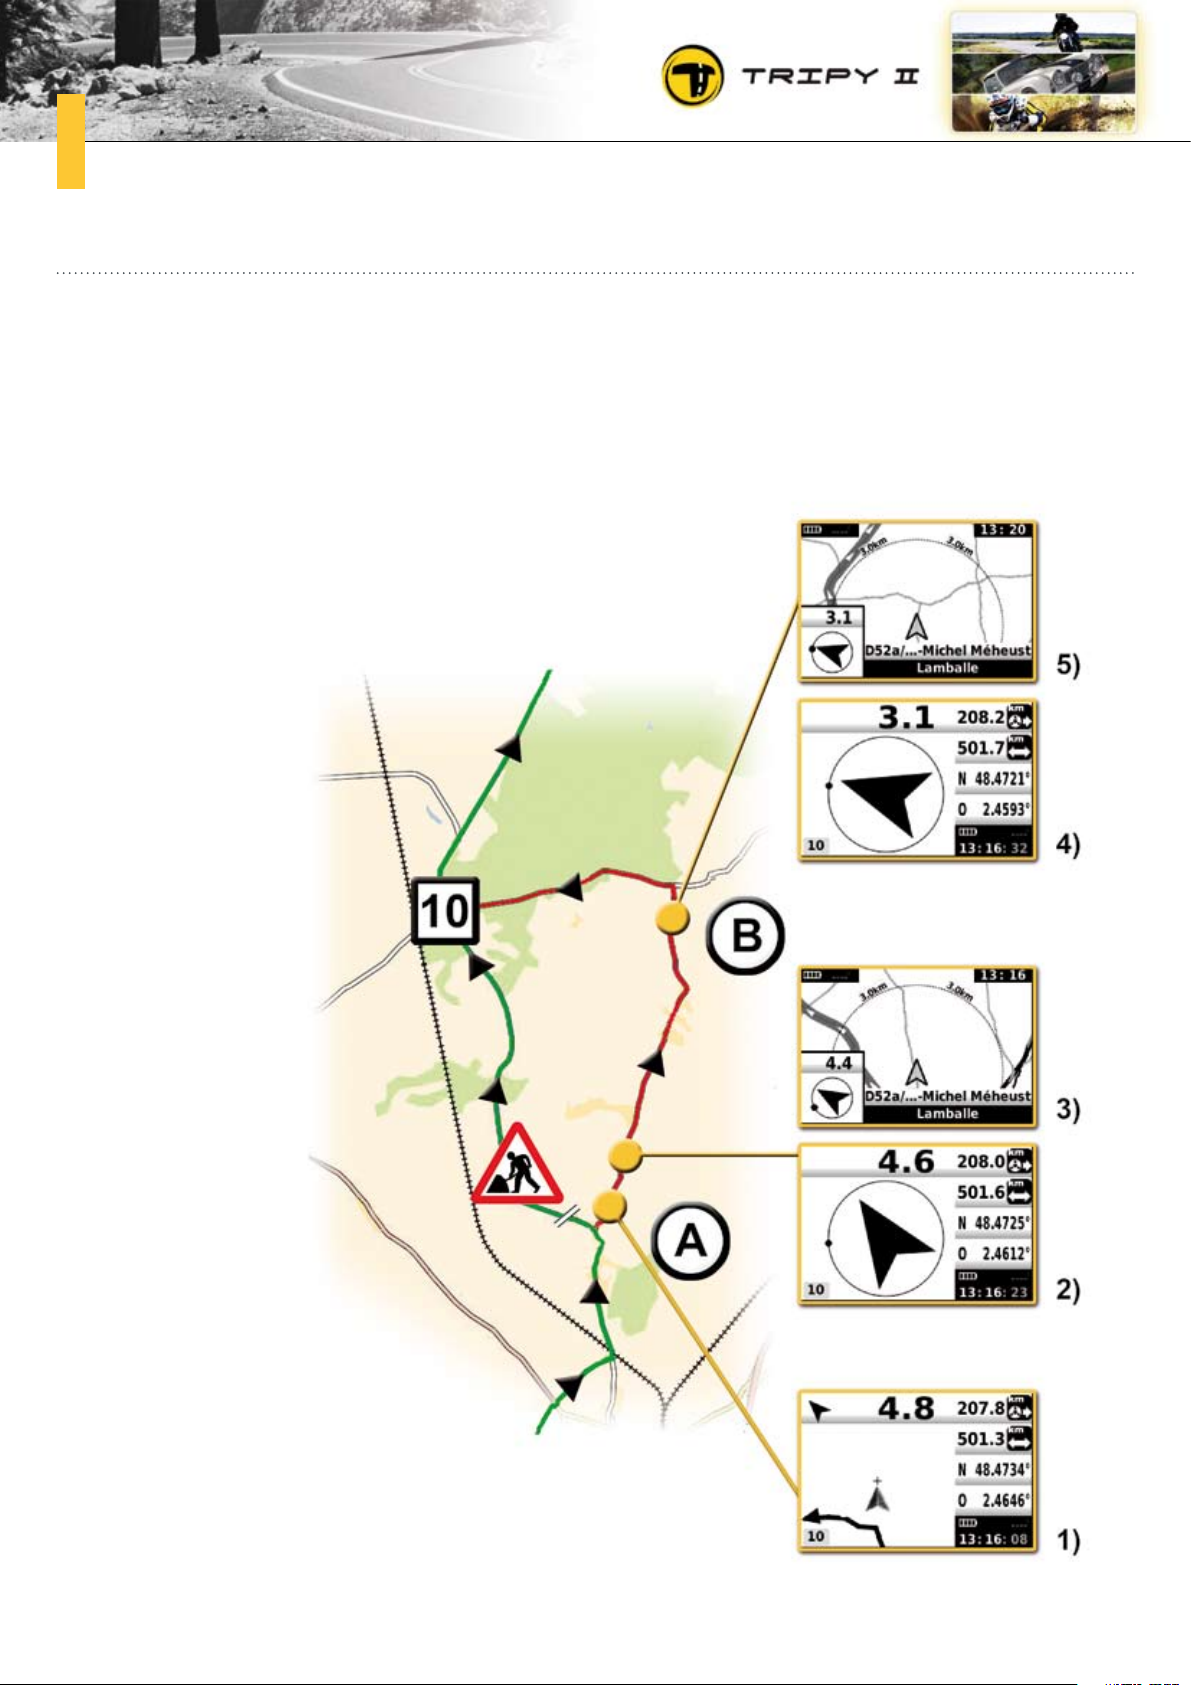
When you leave the itinerary while Tripy II displays the road book, the display changes to the « ribbon »
mode, then the « compass » mode. Under the « ribbon » mode, you see the track you should have followed versus your current position. The compass indicates the straight line distance and direction of
the next « road book » waypoint (typically the next change of direction).
Page 18

18
In the above example, you may have to leave the itinerary because of road works. At location (A), the
vehicle carries on straight ahead instead of turning left. You may see the different display types following
each other on the Tripy starting from the « ribbon » display at the bottom (1). IT will be displayed in
such a way as long as you remain close to the track. If you carry on further away, Tripy changes to the
« compass » display (2) yet may at any time toggle to the « map » display (3) by means of a short pressure on the OK knob. If you did not expressly asked for the « map » display when reaching the point (B),
the « compass » indicates a direction almost 90 degrees to the left (4) indicating clearly the need to bear
left at the next opportunity. At that same point (B), the map shows that at point (4) a road to the left will
lead you back to the itinerary (grey with white arrows).
In all cases, if you have left the itinerary, you may always decide to re-connect to it by means of the
compass or asking the Tripy II GPS to re-compute an itinerary.
Page 19
19
Compass modea.
In the compass mode, the thick black arrow indicates the direction towards the next waypoint as well
as the straight line distance to it. In the above example, the vehicle leaves the itinerary at point (A).
Reaching the next 4 road crossing (point B), the compass shall be directed 90 degrees to the left. It will
be obvious that the road to the left leads to the waypoint 10. By means of the right & left arrow knobs
it is also possible to display the other road book waypoints (straight line distance and direction).
If you leave the itinerary while Tripy II displays the mapb.
If you are displaying the map at the moment you leave the itinerary, you’ll immediately see where you
are versus the normal itinerary (you may eventually modify the map zoom factor by means of the left &
right arrow knobs).
Re-computing the itineraryc.
At any time, you may ask the Tripy II GPS to re-compute an itinerary. Contrary to most traditional GPS’es,
Tripy does not automatically re-compute an itinerary from where you stand towards the final destination.
It always leaves you the choice of the point towards which you want to re-compute a connection route.
The advantage of such way of doing is that you remain master of the device that never re-computes in
an unwanted fashion risking missing the most interesting part of an original itinerary or the lunch get
together with your friends.
Page 20
20
What you need to know prior to using Tripy II3.
Tripy II GPS – knob functions3.1.
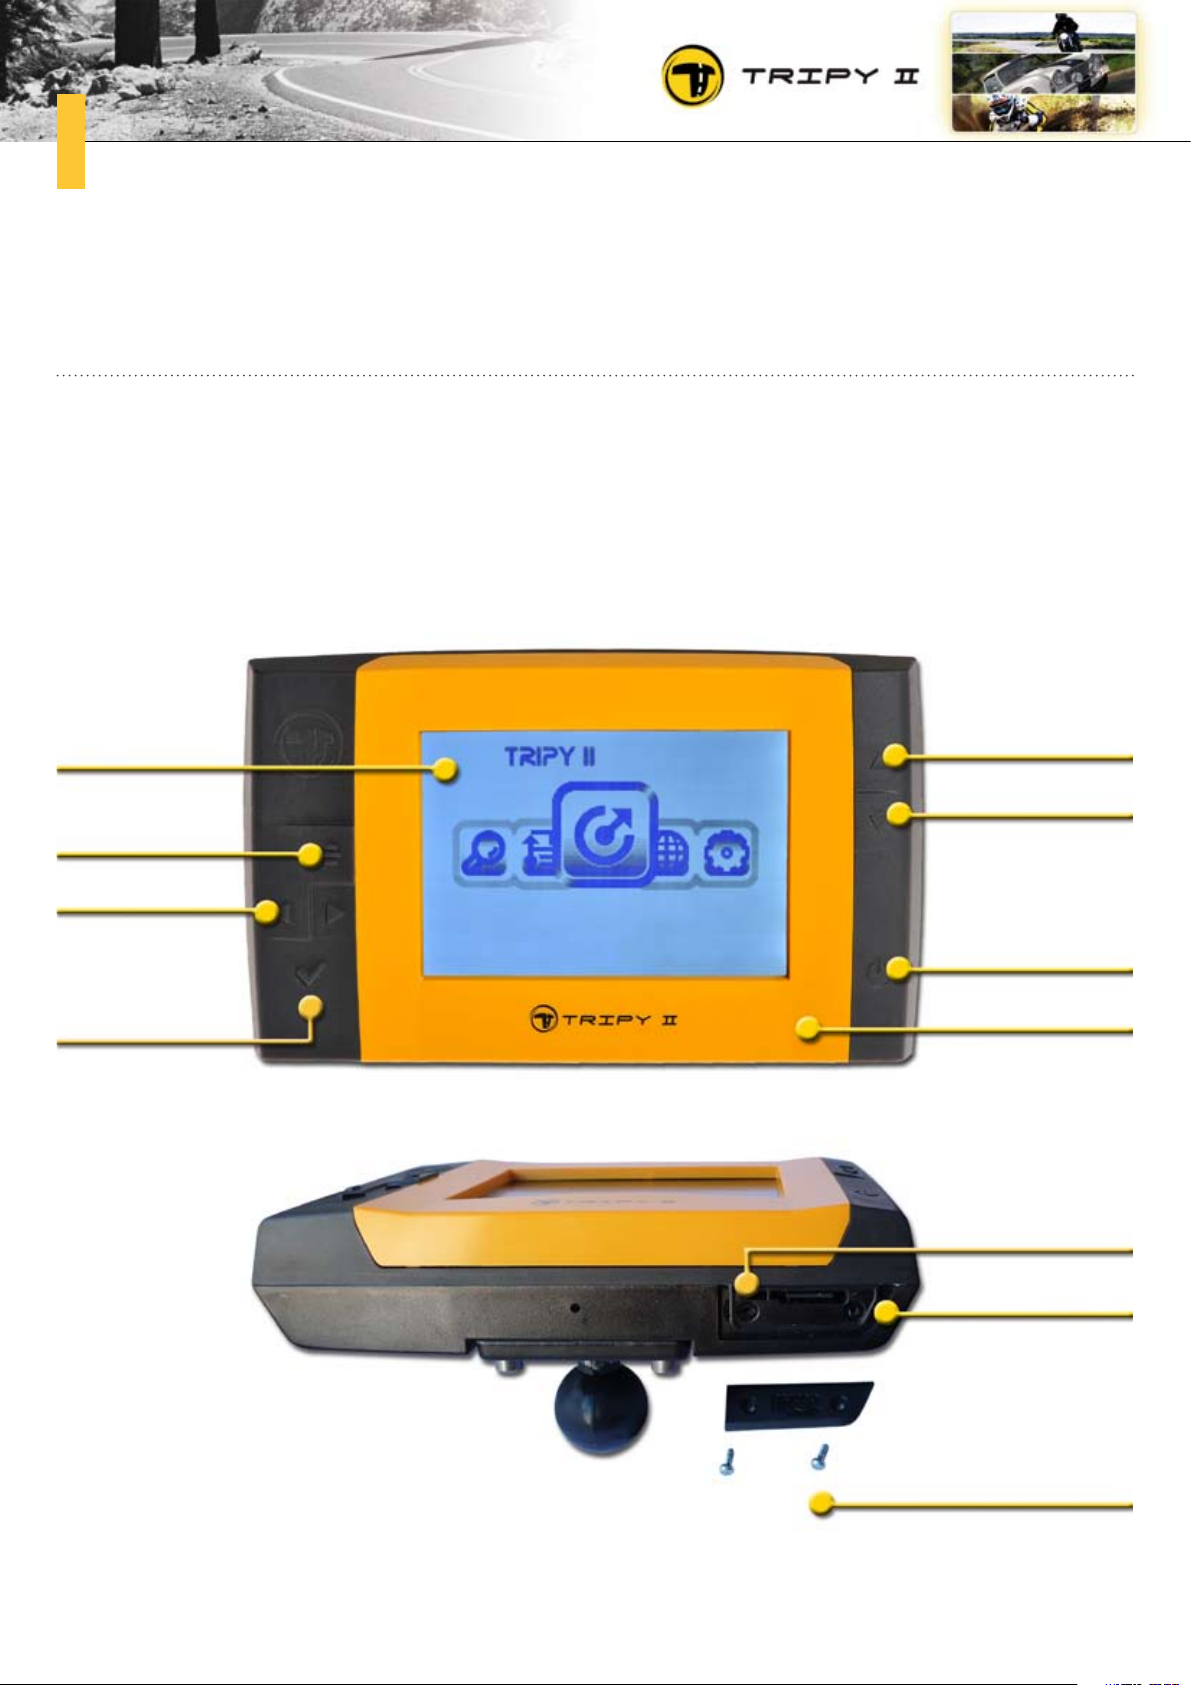
Tripy II is fitted with a large panoramic silver-back reflective display. That technology ensures a perfect
readability in full sun light and its integrated LED lighting allows you to use it at night or in the twilight.
To ensure a great sturdiness and perfect readability, the display is protected by a non-glare, scratch
proof glass.
The interchangeable screen rim is available in two colours, allowing you to taint your Tripy II at your
taste (Tripy II comes with both a white and yellow covers).
LCD
display
menu
left &
right arrow
OK
up arrow
down arrow
ON/OFF
interchangeable
colour
reset knob
SD memory slot &
reset knob access
screws for memory &
reset knob access cover
Page 21

21
Tripy II shows seven watertight knobs at the front for the following functions:
•ON/OFF:
When Tripy II is Off, a short pressure on this knob switches the device On.
When Tripy II is On, a long pressure on this knob switches the device Off.
When Tripy II is On, each short pressure on this knob allows alternatively the switching On of the
back lighting or leaving the device in the automatic back lighting.
•Arrows (right/down/up/right): a short pressure on these knobs moves the screen selection in the
menus and lists. In the map type of display, these knobs allow the zooming in/out as well as dis
placing the map.
•Menu :
A short pressure on this knob moves back one level in the menus architecture.
A long pressure on this knob, calls a contextual menu (e.g. In road book navigation)
•OK :
A short pressure on this knob validates the chosen function.
A long pressure on this knob (« Long OK ») stores the current GPS position as a new entry in the POI
favorites or stores a new waypoint position in a road book recording (if recorder activated).
Page 22
22
Switching ON, switching OFF & satellites synchronization3.2.
Starting Tripy IIa.
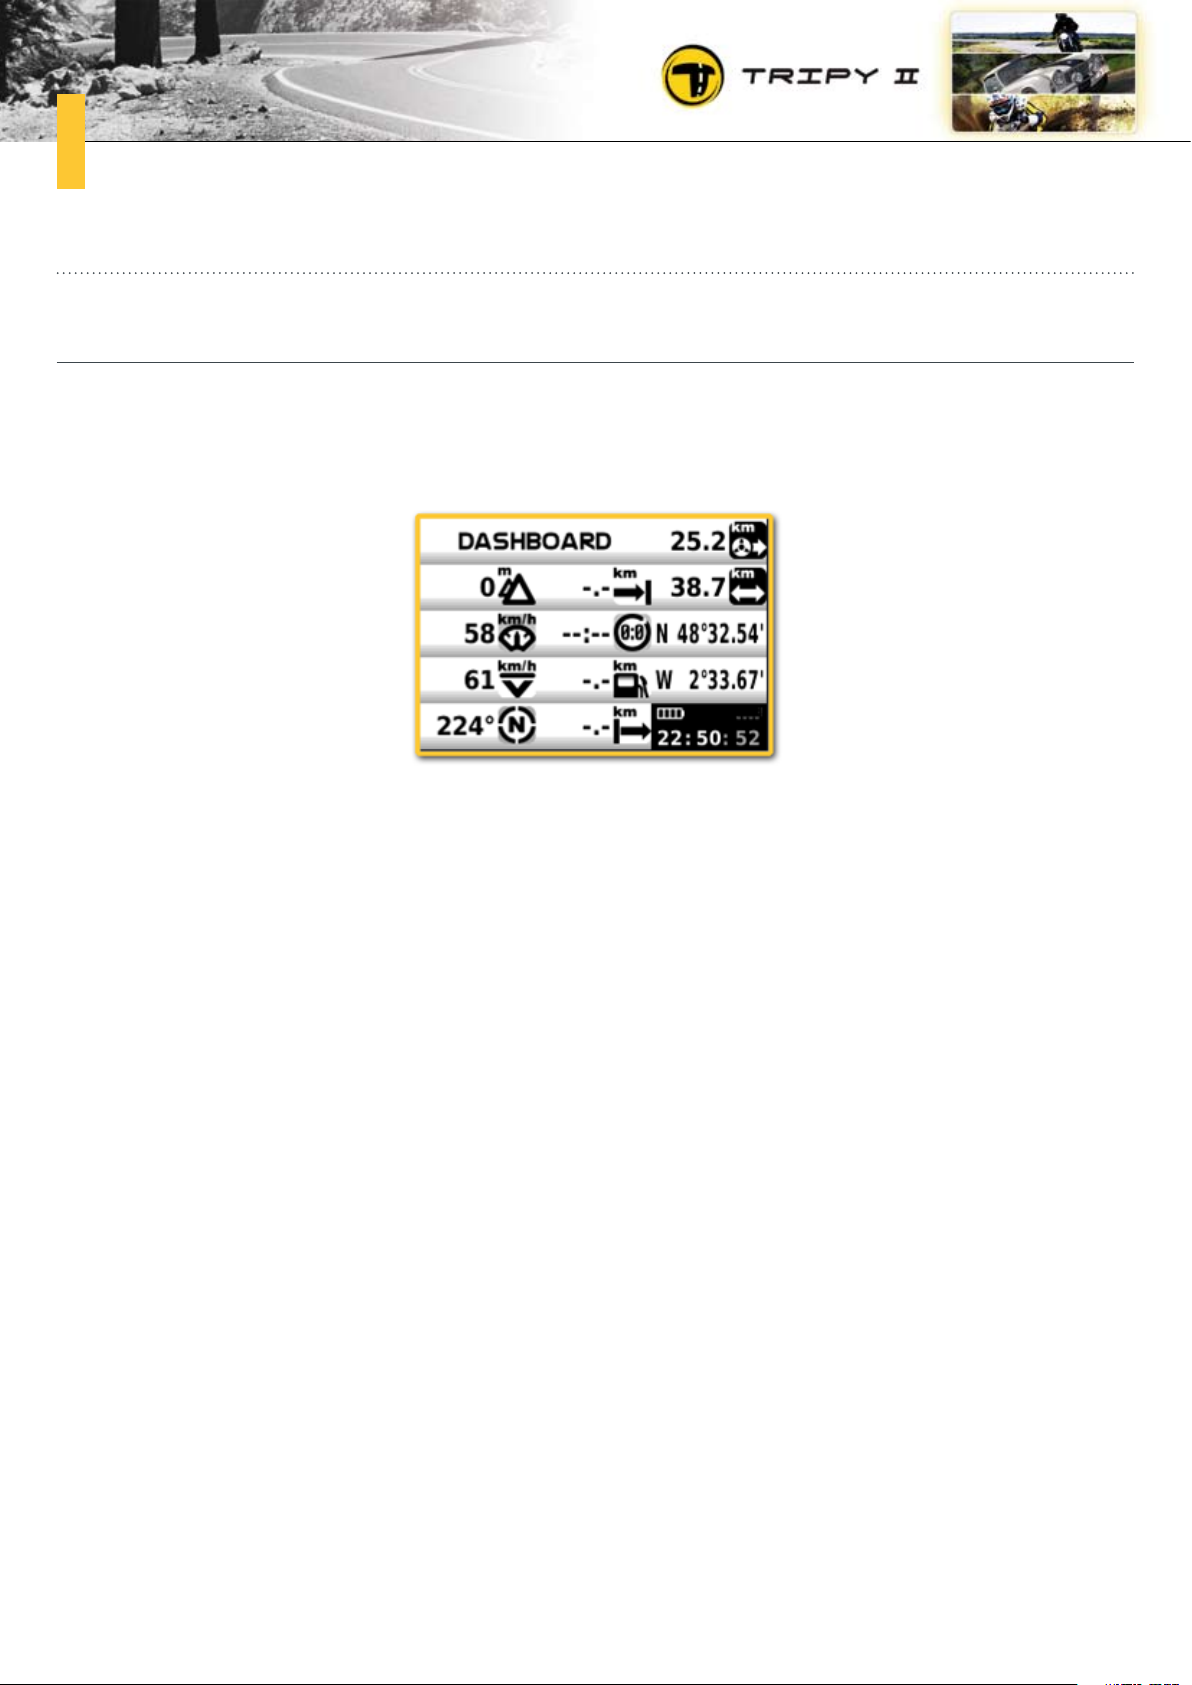
When Tripy II is Off, press shortly on the ON/OFF knob to switch the device On. The Tripy II logo is displayed for about 40 seconds, the dashboard is displayed.
If you were riding an itinerary at the time of switching Tripy II Off, Tripy II shall be ready to resume and
displays automatically the navigation screen on the same itinerary.
Page 23
23
Satellites synchronization before departingb.
The GPS receiver integrated inside Tripy II is a high sensitivity receiver able to sense a position even in
the most difficult conditions (woods, a.s.o..). However, in order for the receiver to operate properly, one
should leave it the time to recognize its satellites constellation.
It is therefore recommended to leave Tripy II On – vehicle stopped – at a location offering a broad sky
view at least 3 minutes prior to departing.
The Tripy II GPS can only display correct information (speed, bearing, map orientation, trip master,
a.s.o..) when it has synchronized on the constellation and you are moving. At a stand point, the GPS
position information is correct yet the navigation, bearing, map direction, a.s.o.. may be false.
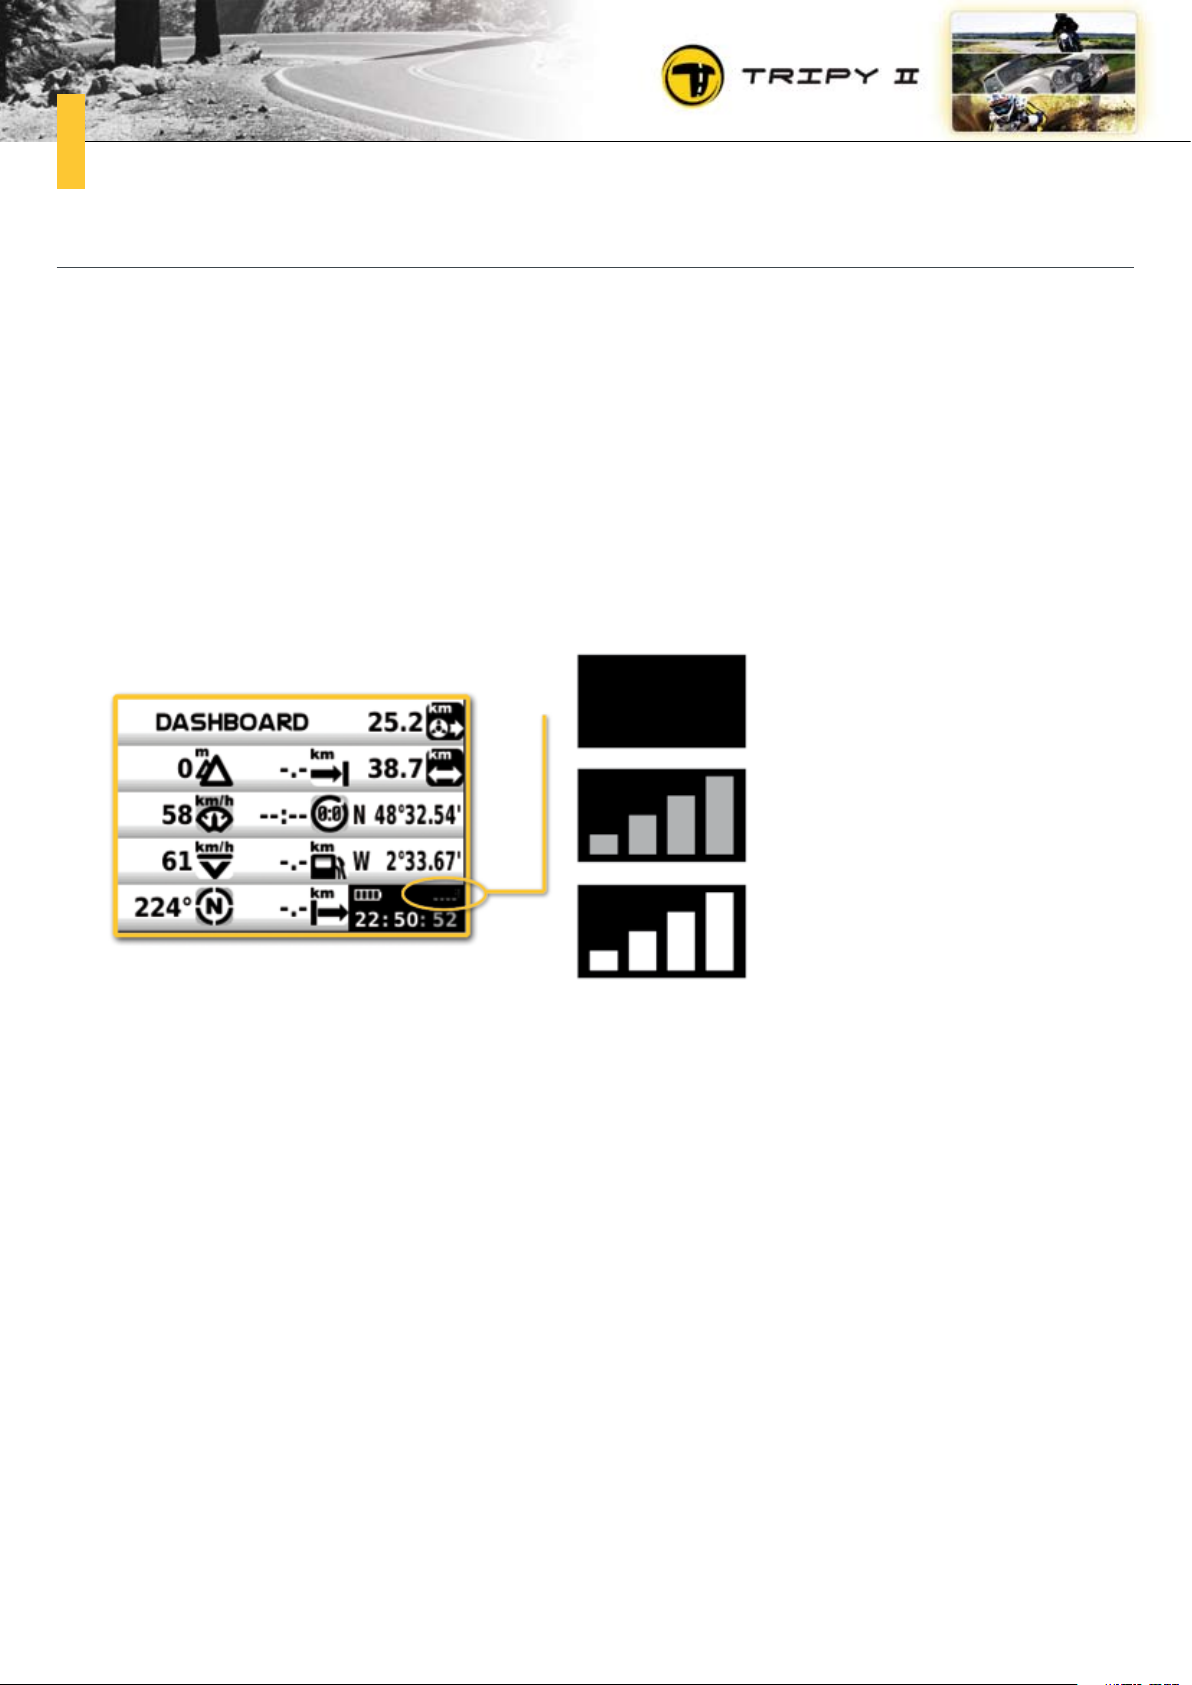
No GPS synchronization
(wait before riding)
Visible satellites
(wait before riding)
Good GPS synchronization
(ready to ride)
The GPS synchronization status is represented by a few vertical bars in stages. The more bars there is,
the better the synchronization. If no bar is displayed, it means that the receiver does not capture anything. When grey bars are displayed, it means that the receiver has detected some satellites but is not
yet in a position to use them to give a position. Once the bars are displayed in white, the receiver is
ready to operate correctly.
Page 24
24
Switching Tripy II OFFc.
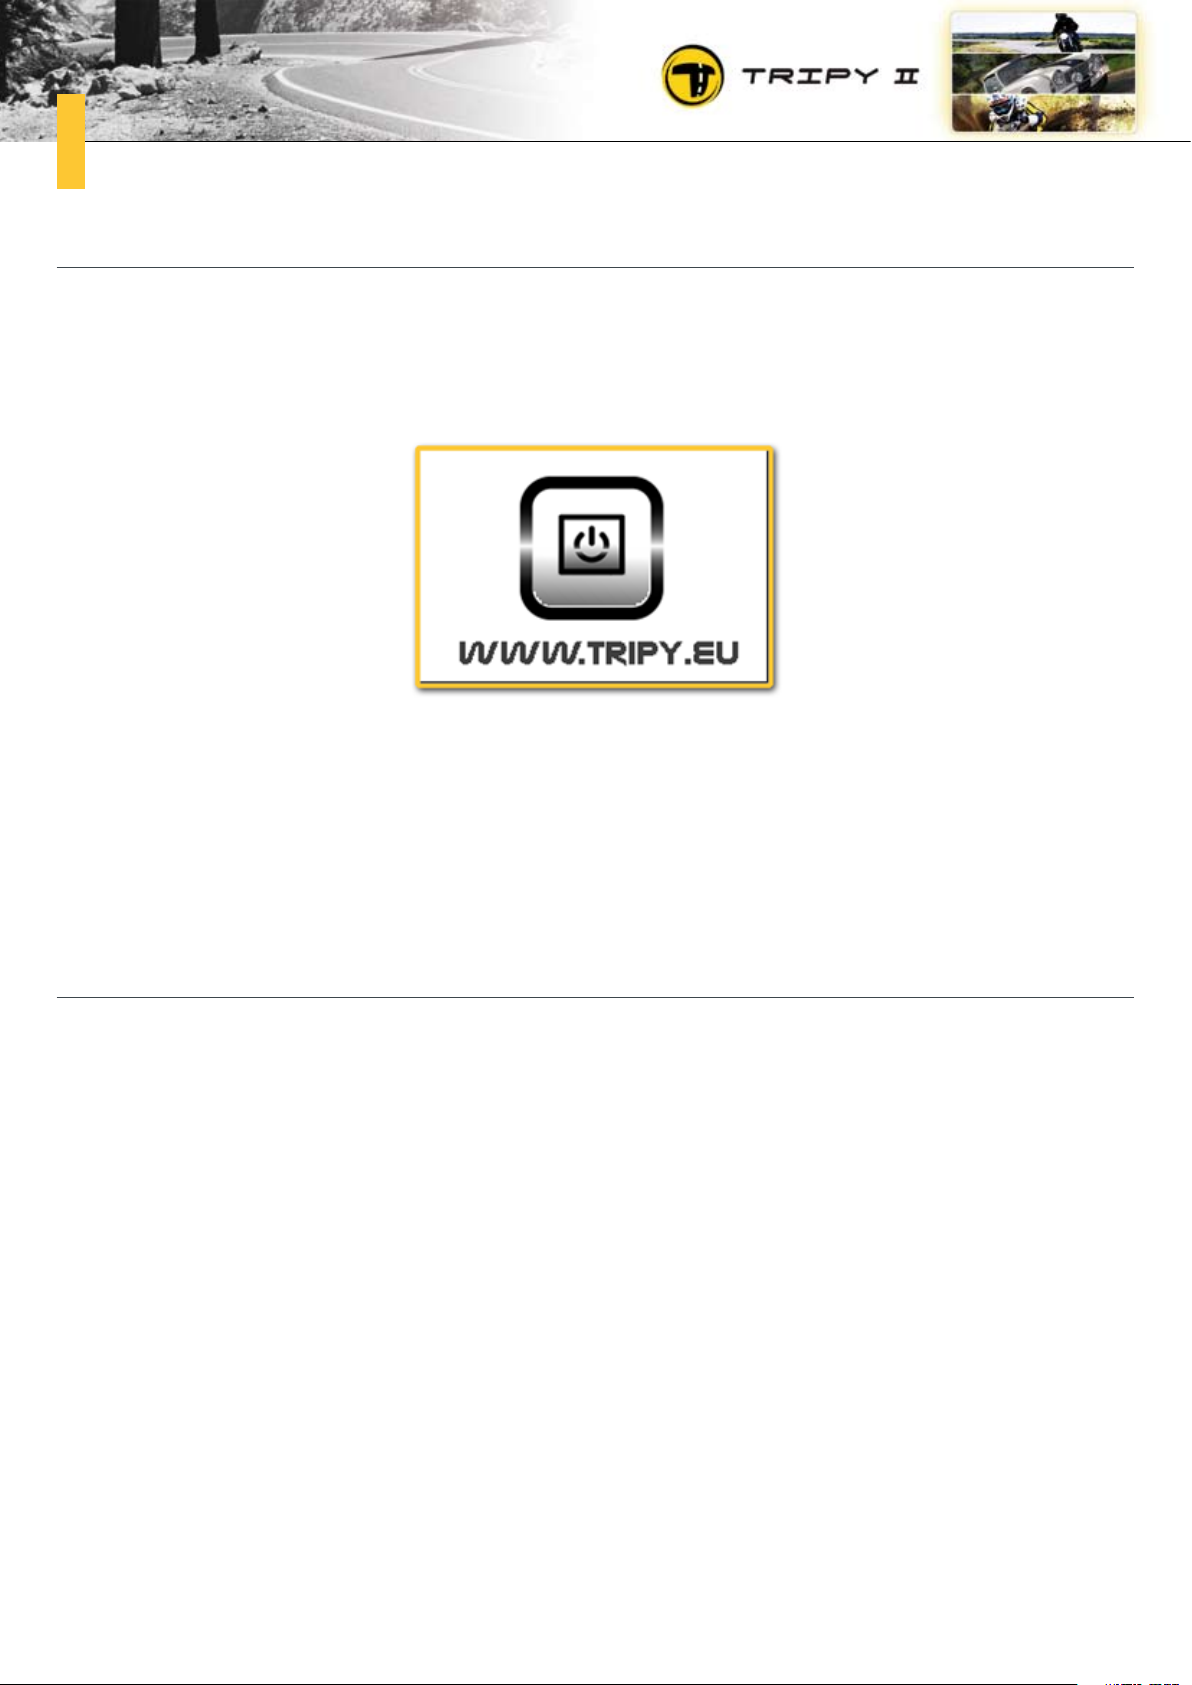
When Tripy II is operating, press the ON/OFF knob and maintain it pressed until it displays a screen
similar to the one below (press approx. 2 seconds).
The device then runs the switching off procedure and continues displaying this screen for about 10 seconds. The display is then completely switched off indicating that Tripy II is properly switched off.
If Tripy II batteries are completely unloaded, the device initiates by itself it shutting down procedure. In
this instance, it is essential to charge Tripy II as soon as possible to avoid deteriorating the batteries.
Automatic switch offd.
Tripy II is fitted with an automatic shutdown system in order to avoid unnecessary unloading the batteries when not in use. The device shall switch off automatically if you stay at the same place for a time
lapse of 30 minutes without activating any knob. This time may be modified in the « advanced settings ».
If the device is charging its batteries (connected to loader or to vehicle), the automatic switching off
procedure is not started. It will however start as soon as the batteries are completely charged.
Page 25
25
Language selection3.3.
You may set your Tripy II GPS in your usual language.
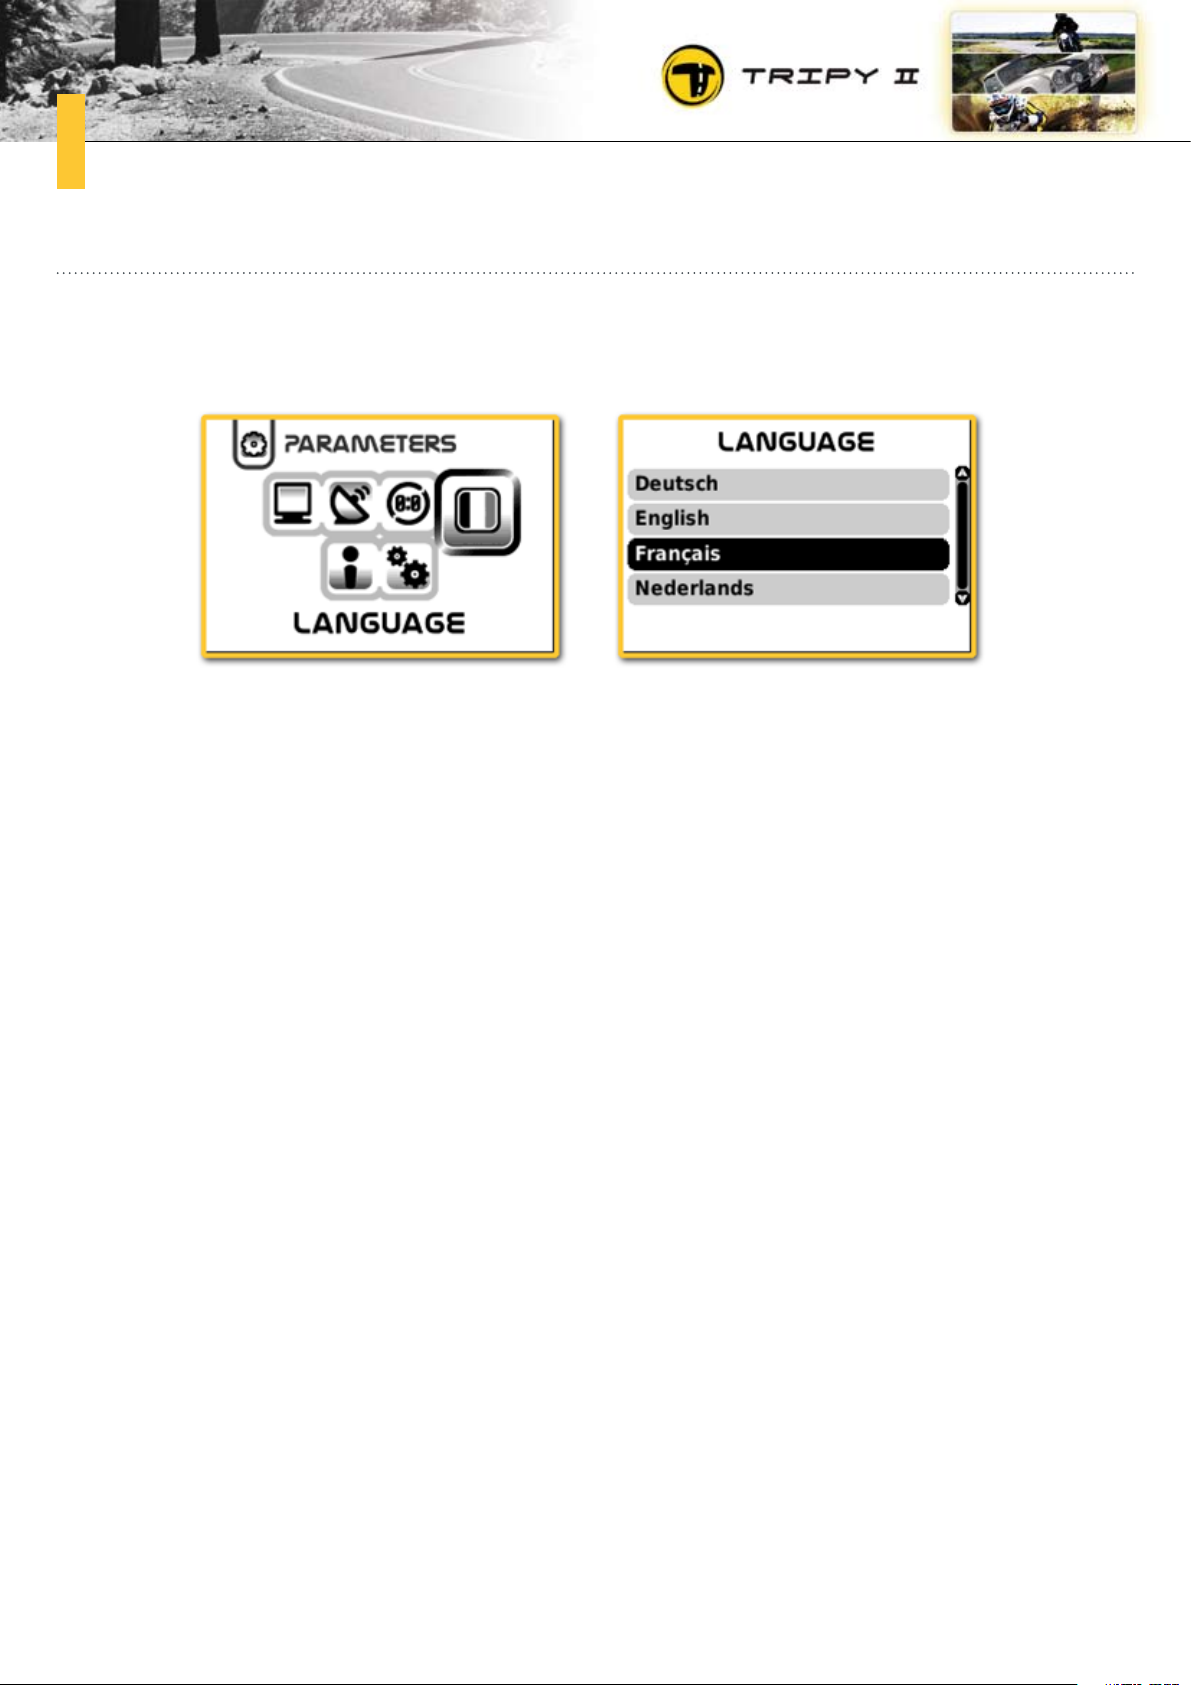
The language setting is made under « Parameters » - « Language ».
The list of available languages is displayed (as a list). Move the cursor on the desired language by means
of the up/down arrows and press the OK knob.
Tripy II indicates to you that the application should restart for the new language selection to become
active. Press the OK knob to acknowledge this message. Tripy II restarts in the new chosen language.
Page 26
26
Connecting Tripy II to the outside world3.4.
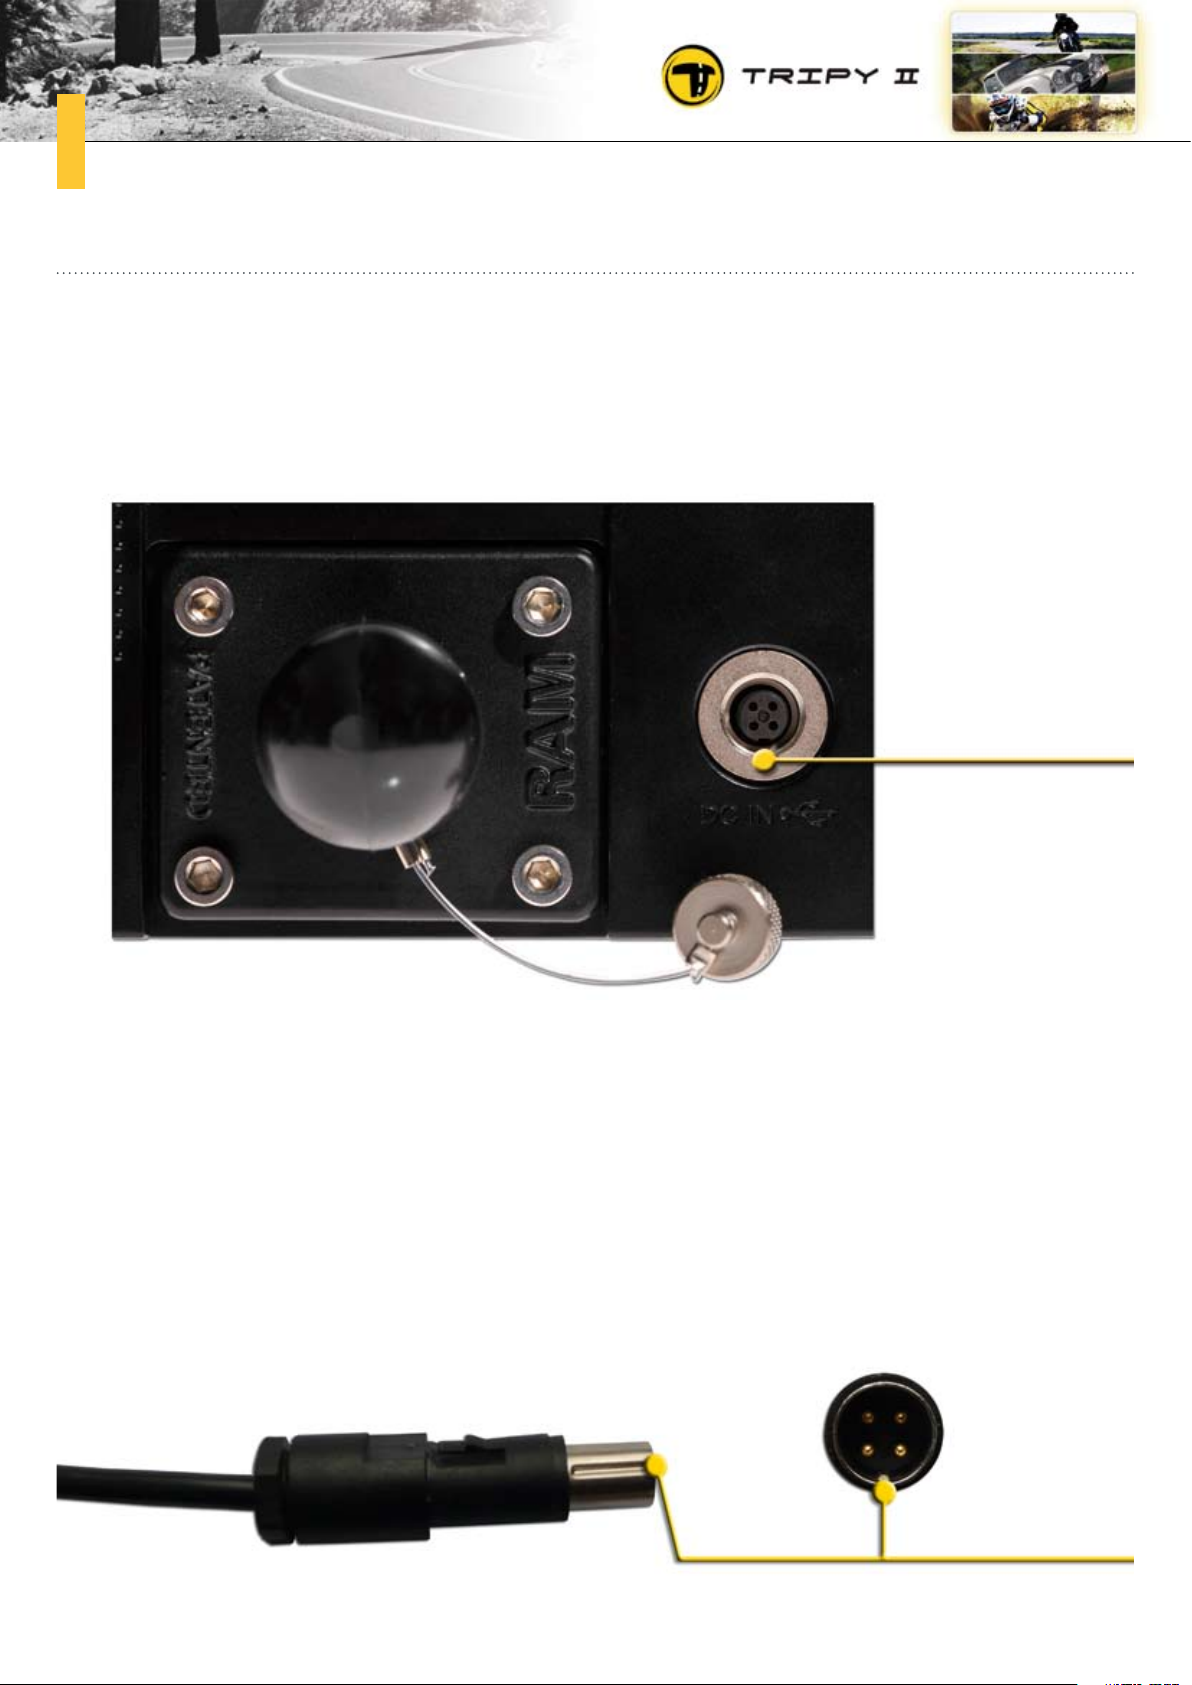
Tripy is equipped of a single connector on its rear face. This connector is closed by a metallic cover you
shall always close (screw clockwise) when you use the device as it ensures the connector remains watertight. The only instance you may use the Tripy II on your vehicle without closing the cover is when
you have connected the vehicle power cable Ref. 9020.
key
The Tripy II connector is used to recharge the device’s batteries, to connect the device to a PC by means
of a USB connection or connect Tripy II to the vehicle power cable Ref. 9020.
The USB cable delivered with your Tripy II is used both to connect Tripy II to your PC and connect Tripy
II to its battery charger. To connect the cable, unscrew the Tripy II connector’s cover and connect the
cable round male connector to the female connector at the back of Tripy II. The male connector shows
a key that should fit the corresponding key of the Tripy female connector (inserting should be easy –
never force it).
keys
Page 27
27
Connecting to the battery chargera.
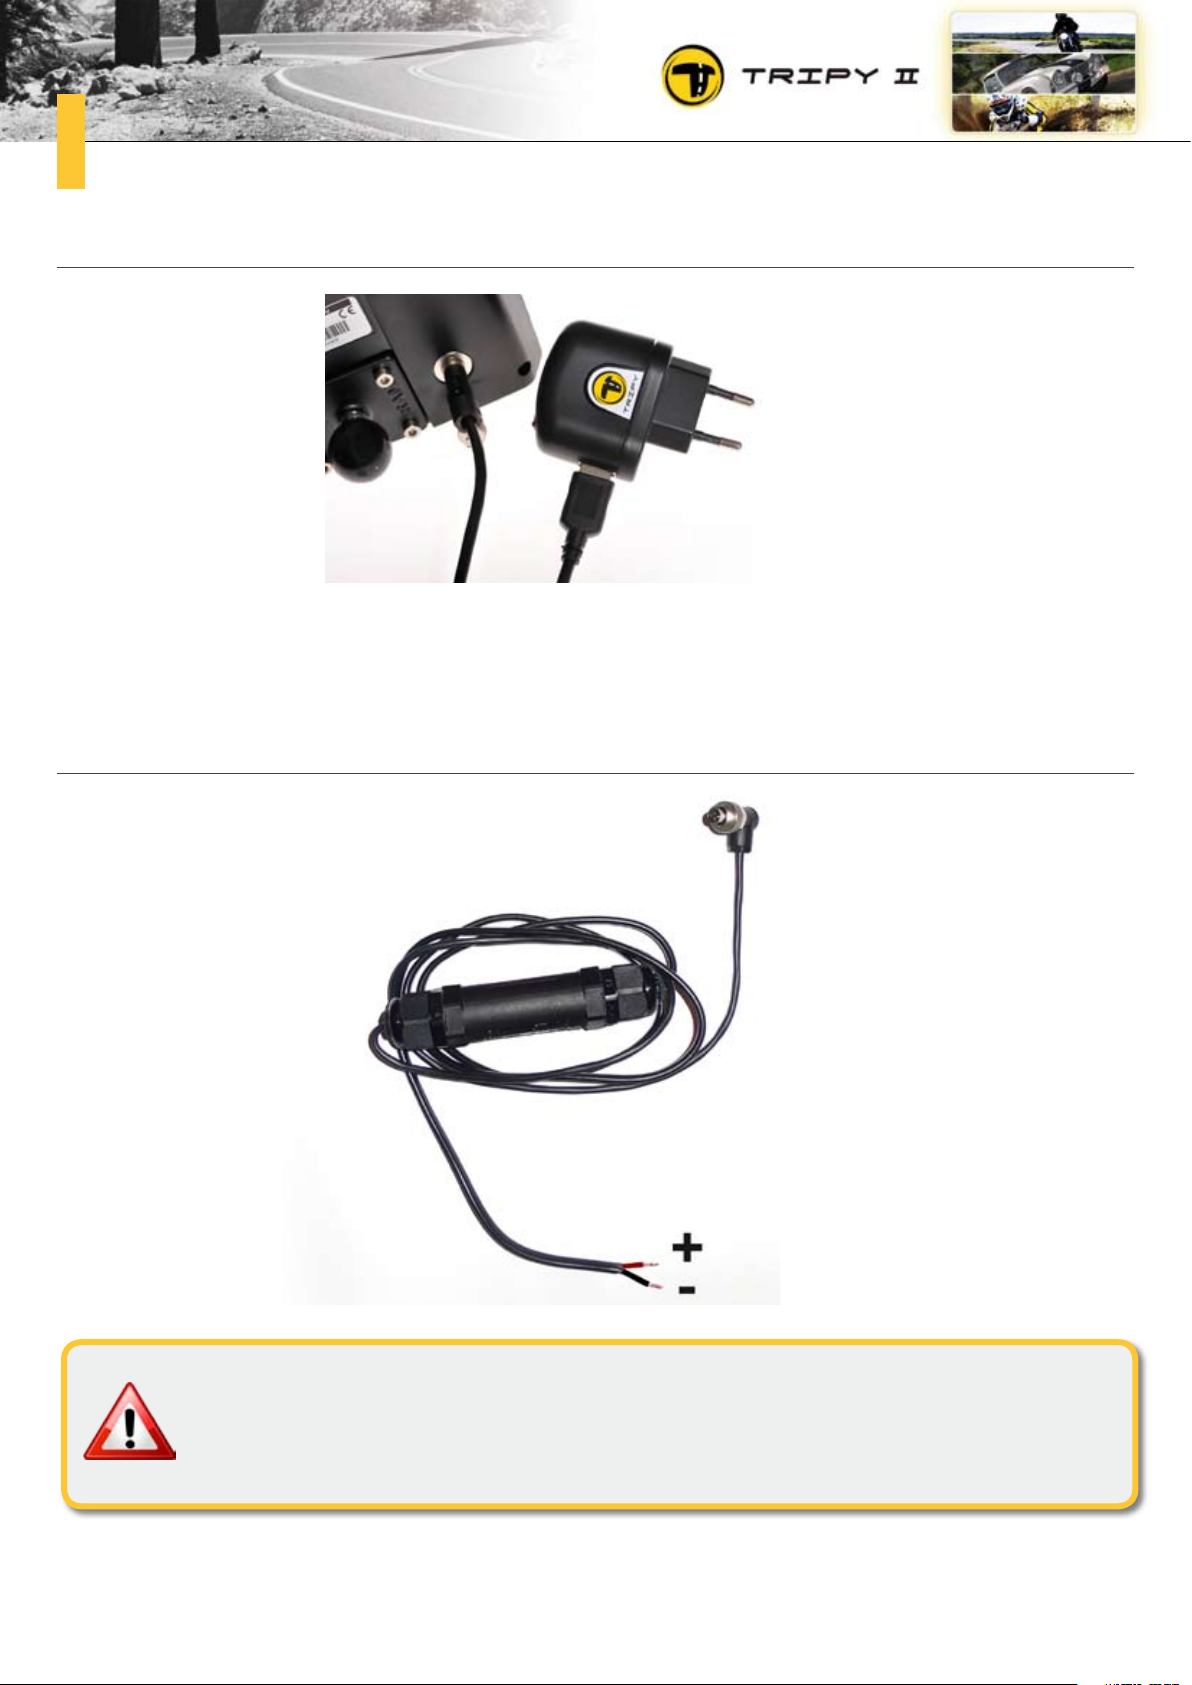
This connection is used to recharge the Tripy II batteries. See paragraph « 3.5 Handling the batteries ».
Permanent connection to the vehicle power supplyb.
Before riding with Tripy II connected to the cable Ref. 9020, it is compulsory to screw
the male connector of Ref. 9020 in the connector at the rear of Tripy II to ensure the
connection remains watertight. The other end of cable Ref. 9020 must be connected
to your vehicle’s electrical circuit according to the polarity.
Page 28
28
Connecting to the computerc.
When connecting Tripy II to a PC, the computer shall recognize Tripy II as a « removable drive » similarly to a USB memory stick. Once connected to the PC, you may copy files from the PC towards the
Tripy II and from Tripy II towards the PC using the common procedures of your computer used for USB
sticks. See paragraph « 3.9 Data transfer between Tripy II and PC »
It is compulsory to use the procedure allowing the « safe ejection of the peripheral »
prior to disconnecting the USB cable connecting Tripy II to your PC. If this procedure
is not followed, some data of the Tripy II memory may be destroyed impeding its
operation. Should such situation happen, it is necessary to return the device to the
technical services or run the « restoration » procedure (See paragraph « 3.13 Safe
copy and Tripy II restoration »).
Page 29
29
Connecting a USB memory stickd.
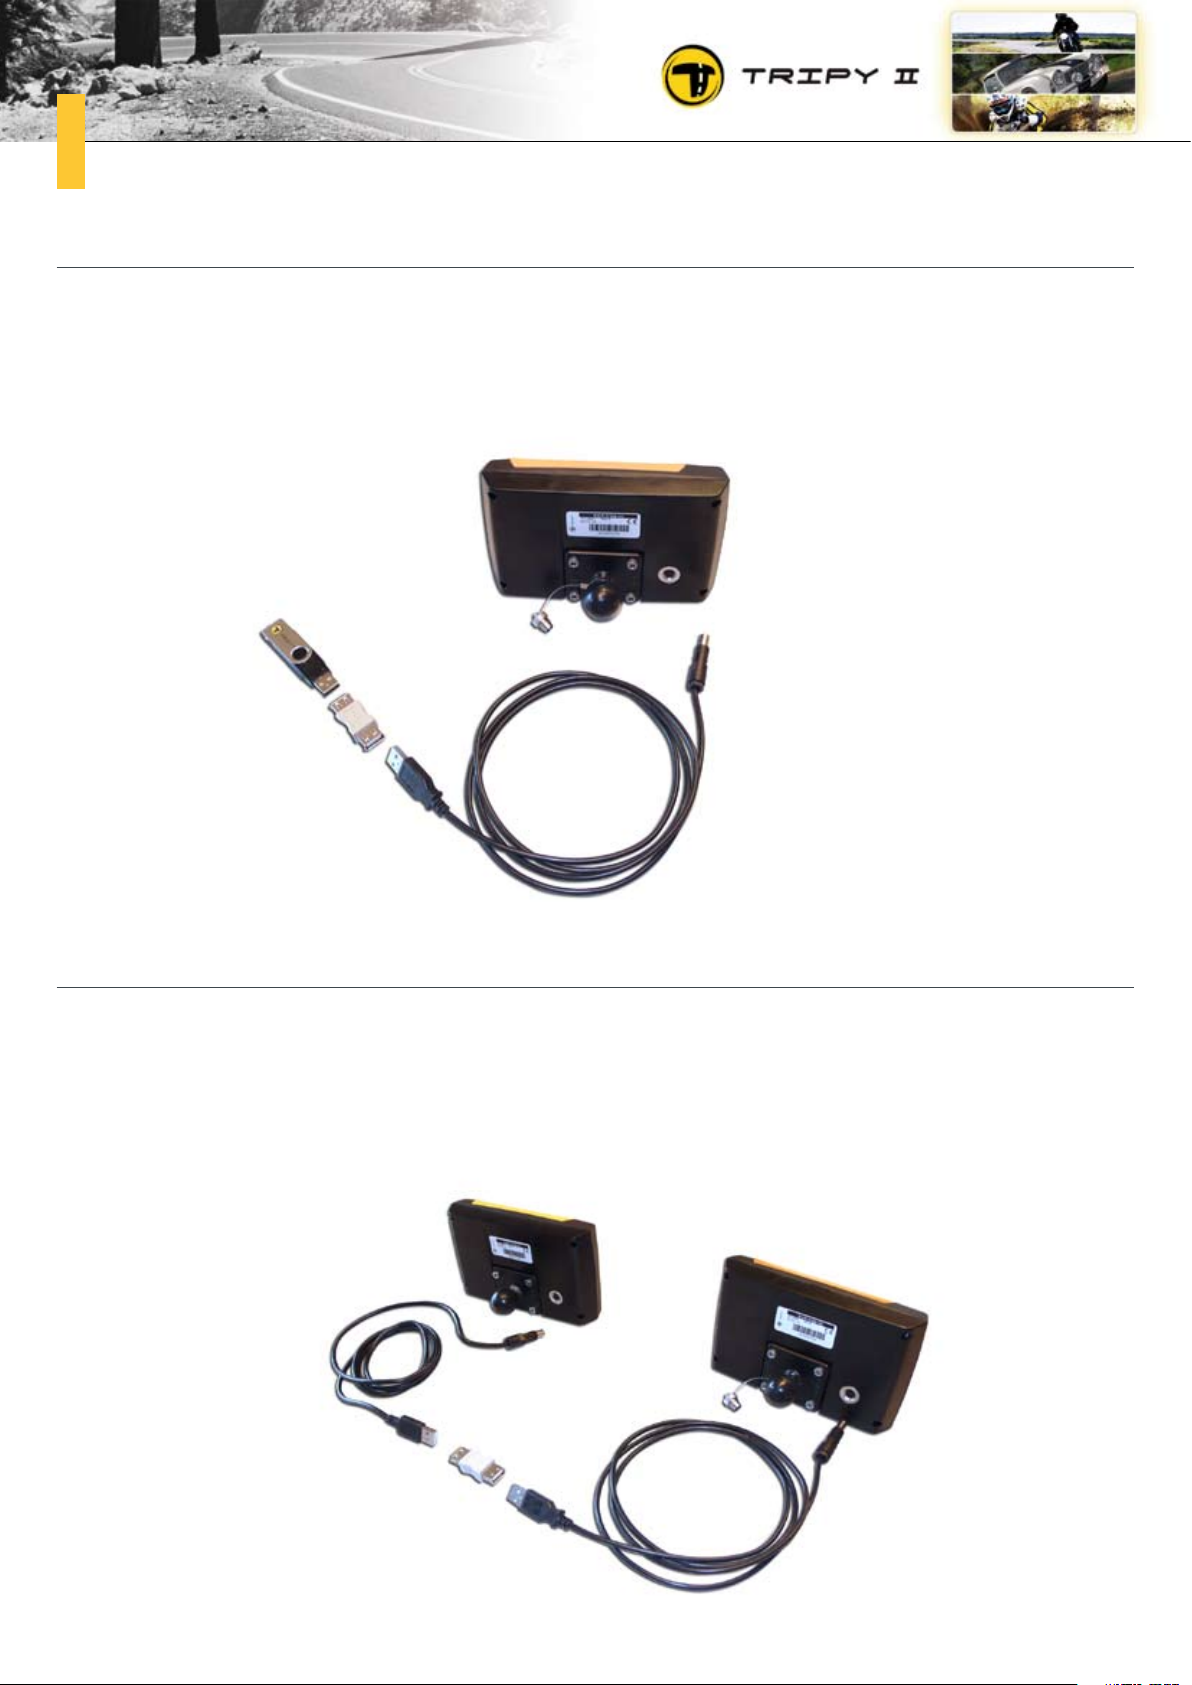
You may connect a USB memory stick to Tripy II by means of the usual USB cable and female-female
adapter. Once the memory stick connected to the Tripy II, follow the procedure described under paragraph « 3.10 Data transfer between Tripy II and USB memory stick »
Connecting to another Tripy IIe.
You may connect two Tripy II’s by means of the first Tripy USB cable, the female-female adapter and the
second Tripy II cable. Once the assembly connected you may consult the data (road books, a.s.o..) of
one Tripy by means of the other one and copy data from one to the other. See paragraph « 3.11 Data
transfer between two Tripy II’s »
Page 30
30
Handling the batteries3.5.
When you receive your Tripy II, is recommended to begin by fully charging its batteries.
Battery charginga.
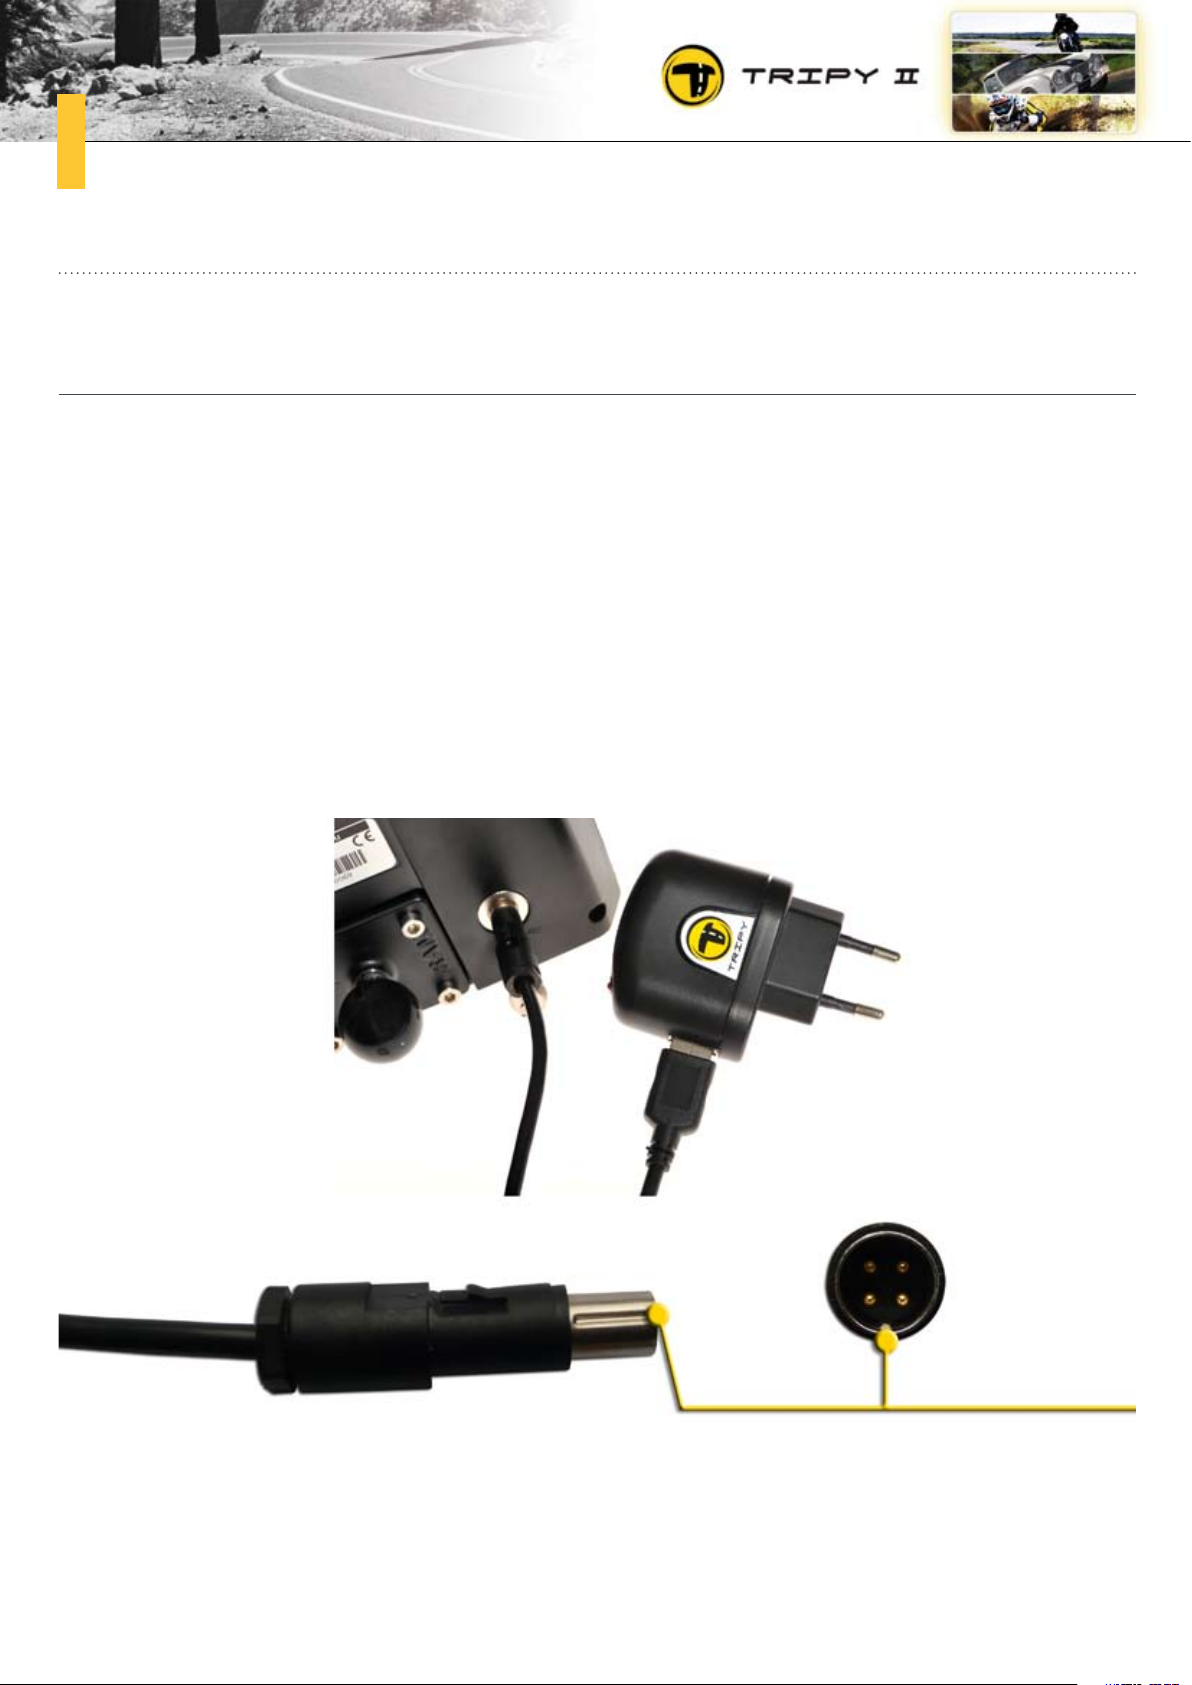
To charge the batteries, follow the procedure below:
•connecttheUSBconnectorofthecableintheUSBconnectorlocatedonthecharger
(one direction fits – never force),
•Connectthechargertoapowerplug(110Vor220V/50Hzor60Hz),
•UnscrewthemetalliccoveroftheconnectorattherearoftheTripyII,
•SwitchTripyIION(Seeparagraph«3.2SwitchingON,switchingOFF&satellites
synchronization »),
•Connecttheroundmaleconnectorattheendofthecableintotheconnectorlocatedattherearof
Tripy II. The male connector is keyed. It should fit the corresponding key located on the female
connector of Tripy II (introduction should be easy – never force).
key
Page 31
31
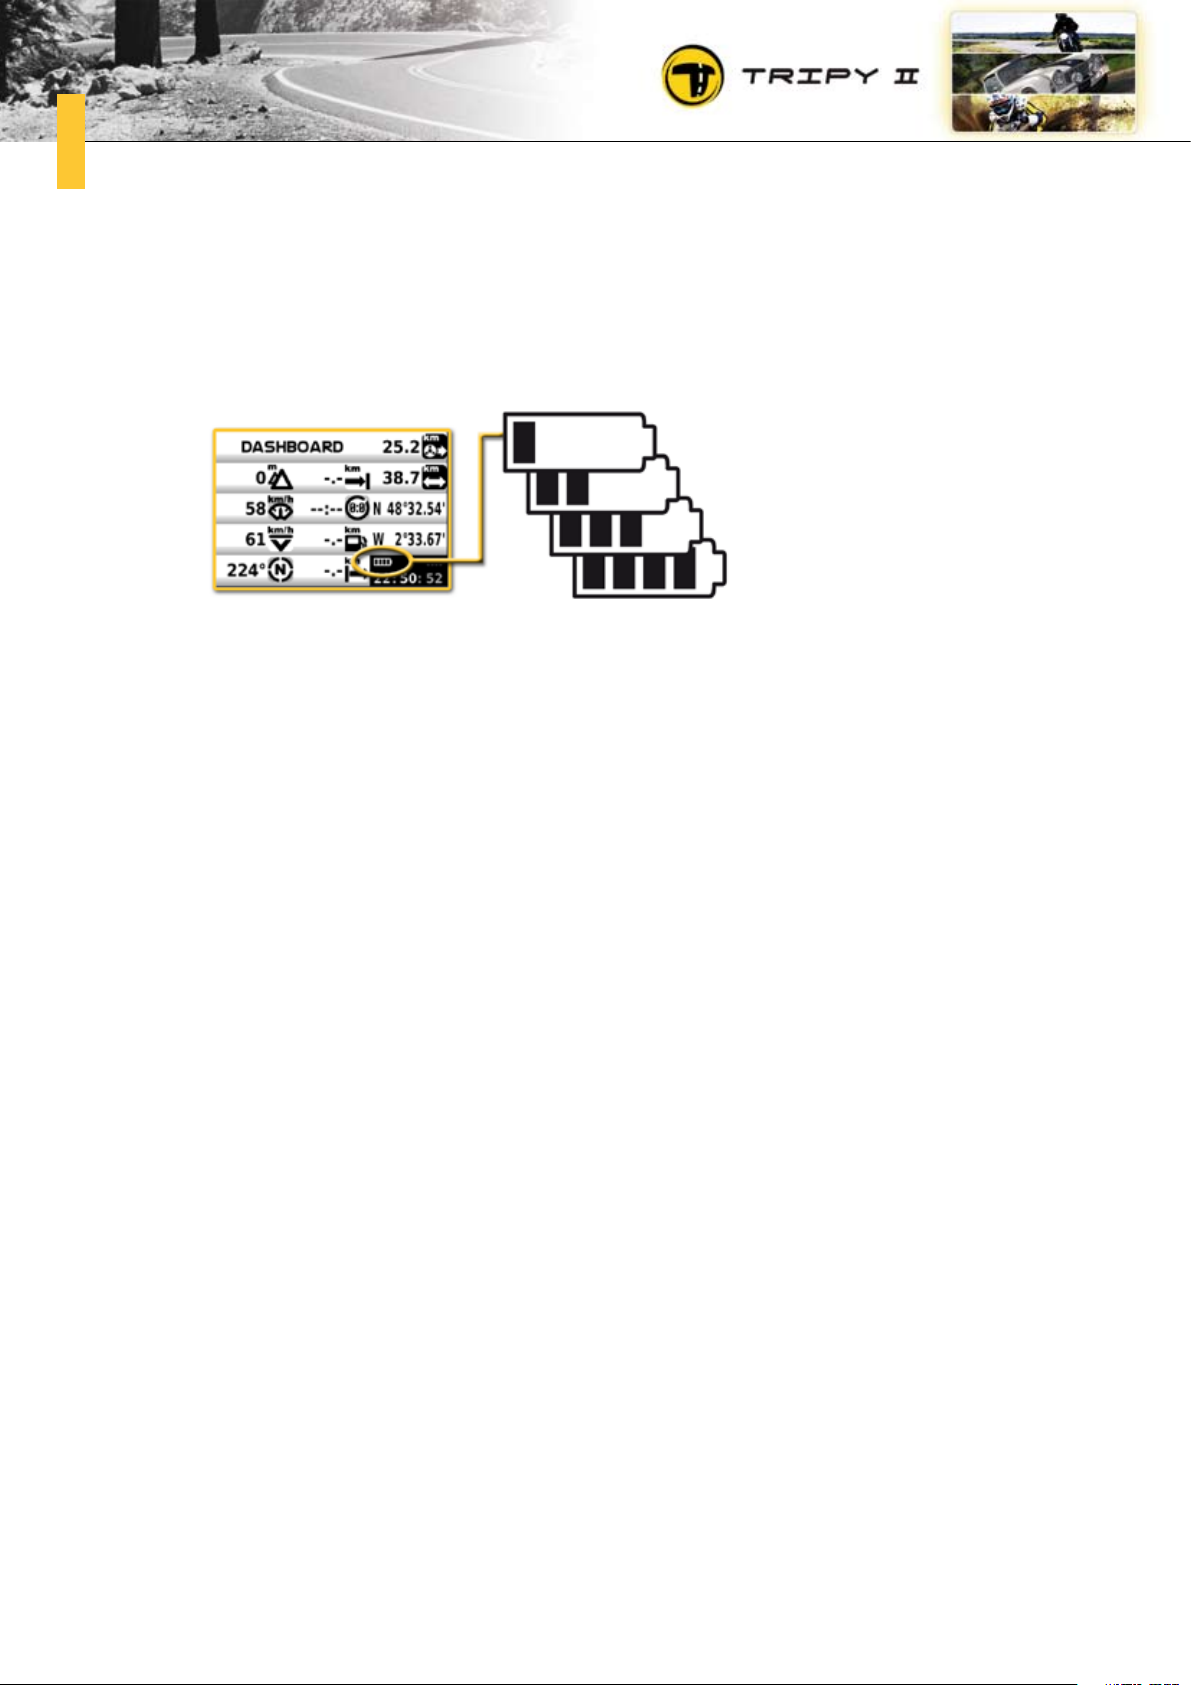
When Tripy II is charging, the four black bars displayed inside the battery level indicator (battery shape)
are sweeping from left to right.
If the four bars are displayed sequentially, it means that the battery currently being charged is completely empty. As the charging progresses, the bars to the left remain static and only the bars to the right
continue sweeping. Static bars represent the proportion of the battery already charged. Once completely charged, all bars are black and static.
When the charge is completed, Tripy II switches Off by means of its automatic switching Off procedure.
(standard after 30 minutes, or more if the automatic extinction parameter has been modified in the
« Advanced settings »).
As long as Tripy II is connected to the charger, its own power consumption is taken care of by the latter.
In this configuration, if the batteries are already fully loaded, they will remain as such.
If Tripy II is switched Off during the battery recharging operation, the charge shall continue at a slower
pace. The charging shall therefore be longer. A complete battery charge (empty battery to start with)
with Tripy switched On will last about three hours. A complete battery charge (empty battery to start
with) with Tripy switched Off will last about 24 hours.
During battery charging, the information screen (menu « Parameters » - « Information ») allows the
checking of the battery filling as well as the flow of current charging. A fully charged battery is filled at
about 2000 mAh. The flow may vary from 700 mA when the battery is depleted to less than 100 mA when
the battery is almost full.
Page 32

32
Tips about how to handle the batteriesb.
The batteries used in Tripy II are of the Lithium Polymer type. They do not have a « memory effect » and
may therefore be charged without having been beforehand completely unloaded.
In general terms, you may always charge Tripy II when you have the possibility to do so, and so, even if
the battery is still loaded. This way of doing will ensure having always the maximum capacity for your
usage of Tripy II.
It is advised against letting the Tripy II batteries completely unload (until device switching Off). As soon
as the battery indicator displays an empty battery (none of the 4 black bars is displayed in the indicator)
it is urgent to set the device to charging.
Before starting a long period of storage of the Tripy II, it is advised to recharge Tripy II at 75% of its total
capacity (3 black bars in the battery level indicator). During that period, it is recommended to check the
status of the battery every month and occasionally set the Tripy II in charge to ensure a level of 75% (3
black bars in the battery level indicator).
Page 33
33
Connecting to the vehicle power cable3.6.
Despite the fact that Tripy II’s batteries allow about 15 h of usage without re-charging, it is however
possible to connect Tripy II to the vehicle power supply. To implement such connection, you shall exclusively use the Tripy cable Ref. 9020 dedicated to this function. This cable is fitted with an electronic
module performing the voltage conversion between your vehicle electrical circuit and the voltage necessary to the Tripy II.
When the cable is connected to the Tripy II, the batteries are re-charged until full and Tripy II drains the
current from the cable without unloading the Tripy II batteries.
Before riding with Tripy II connected to the cable Ref. 9020, it is compulsory to screw
the male connector of Ref. 9020 in the connector at the rear of Tripy II to ensure the
connection remains watertight. The other end of cable Ref. 9020 must be connected
to your vehicle’s electrical circuit according to the polarity.
Page 34
34
Screen contrast and back lighting settings3.7.
Contrast settinga.
To ensure a perfect readability, the Tripy II screen must be tuned to the optimal contrast level. Once the
contrast level set, Tripy will adapt your setting according to the external temperature to maintain the
set contrast level at all temperature levels. In case of large temperature variations, it may be necessary to further adjust it manually.
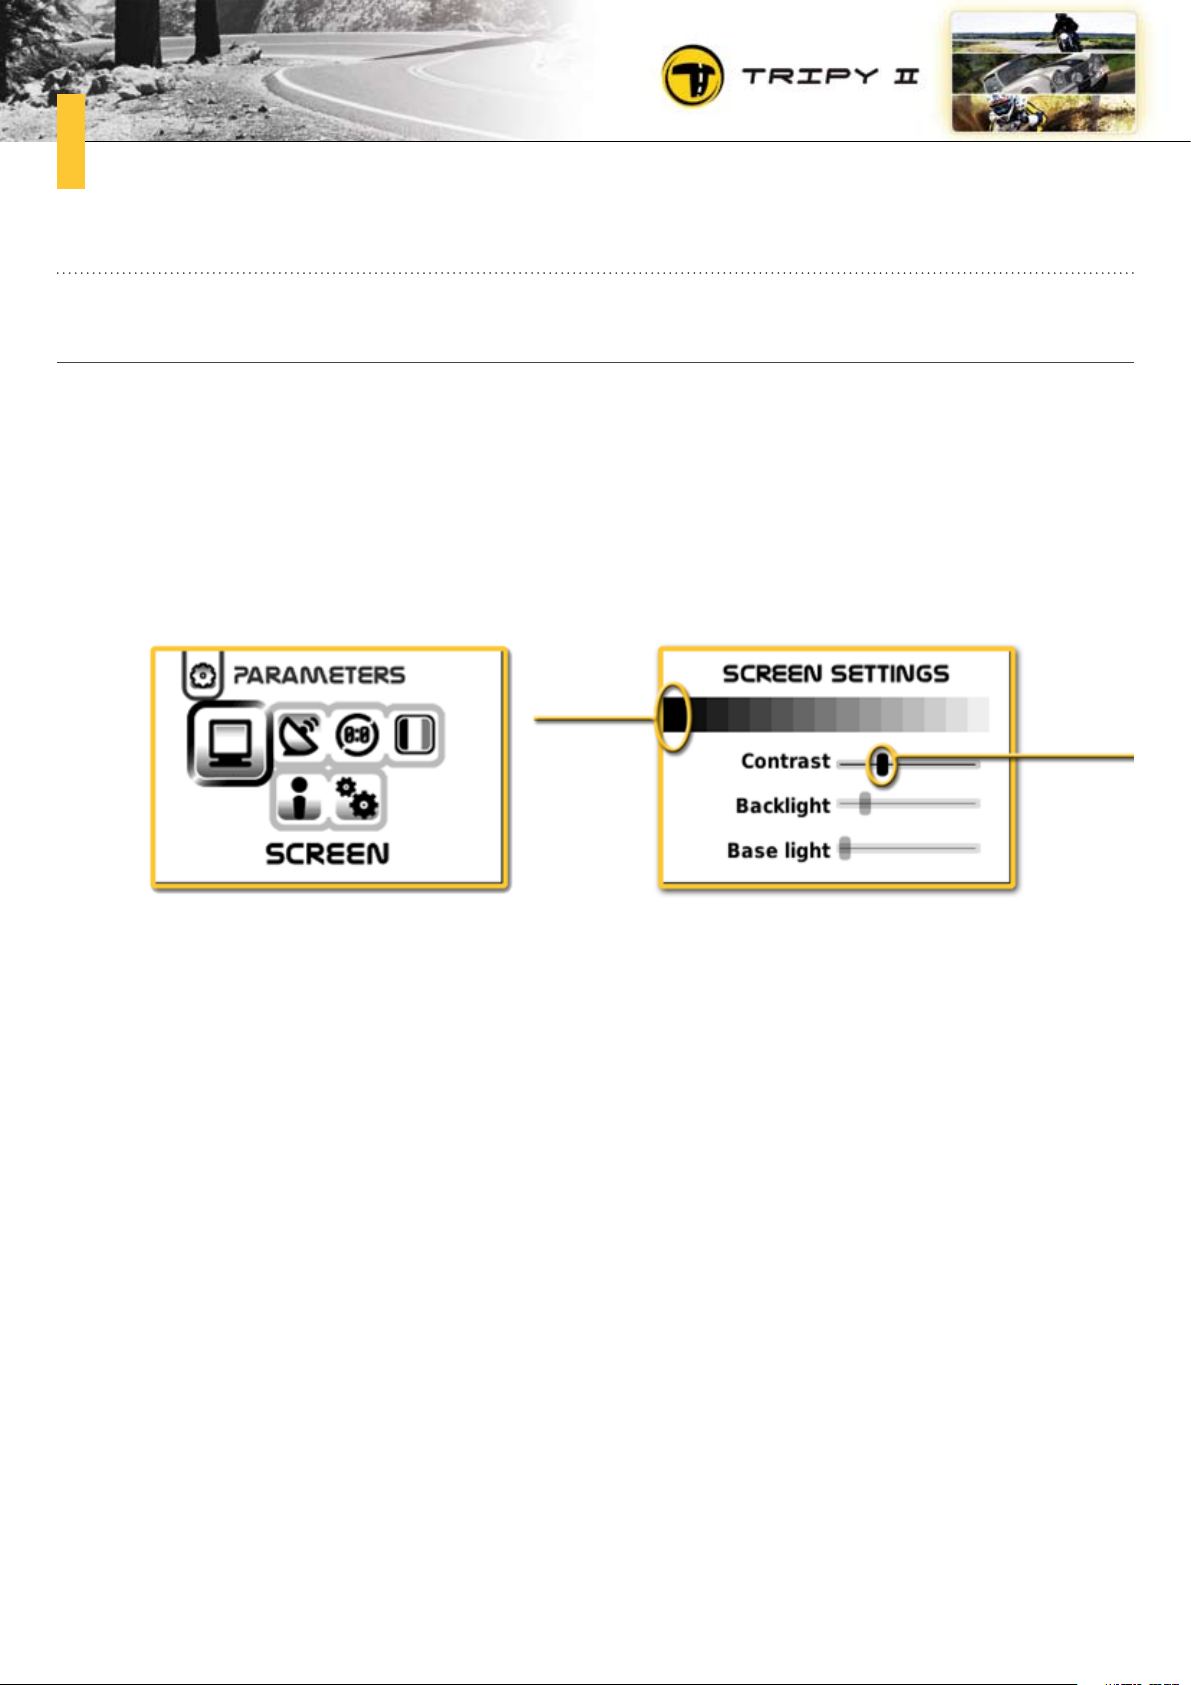
From the main menu (always accessible pressing the « MENU » knob) you may reach the contrast settings by going to « Parameters » - « Screen ».
B
A
On the above picture, the contrast setting cursor in « A » is selected and you may adjust it using the
right arrow (less contrast) and left (more contrast). To perform a good contrast setting, you shall saturate the black of the first square to the left, indicated by « B ». If the setting is correct, the second
square (to the right of the first one) shall be dark grey (almost black, yet slightly less saturated than the
square to the left).
Page 35

35
Back lighting settingb.
From the main menu (always accessible pressing the « MENU » knob) you may reach the contrast settings by going to « Parameters » - « Screen ».
Using the up & down arrow knobs you may activate the « Back light » or « Base Light ». Once the cursor activated, the right & left arrow knobs allows respectively to decrease or increase the screen back
lighting.
The « Back light » cursor is for the standard lighting. This lighting is the one you will be allowed to
toggle by means of a short pressure on the ON/OFF knob. Pressing briefly the ON/OFF knob will activate/de-activate the back lighting. When you switch the back lighting On by means of a short pressure
of the ON/OFF knob, you set the Tripy II in the permanent back lighting mode. If you switch the back
lighting Off by means of a short pressure of the ON/OFF knob, you set the Tripy II in the automatic back
lighting mode. In the automatic back lighting mode, Tripy II switches the back lighting On & Off when
the situation requires it (e.g. Back lighting is On as soon as you press a knob or when you come close
to a direction change, a.s.o..).
The « Base Light » cursor allows the setting of the minimal lighting always illuminating the screen.
This lighting offers visibility at night without blinding the driver.
Impact of the lighting setting on the autonomyc.
The more the lighting is used and the higher the level, the higher the Tripy II electrical consumption and
the lesser the autonomy. With a permanent base lighting at the maximal intensity, the autonomy may
decrease to about 10 h (with a new battery). On the other hand, if the lighting is always Off, the autonomy may reach 20h (with a new battery).
Page 36
36
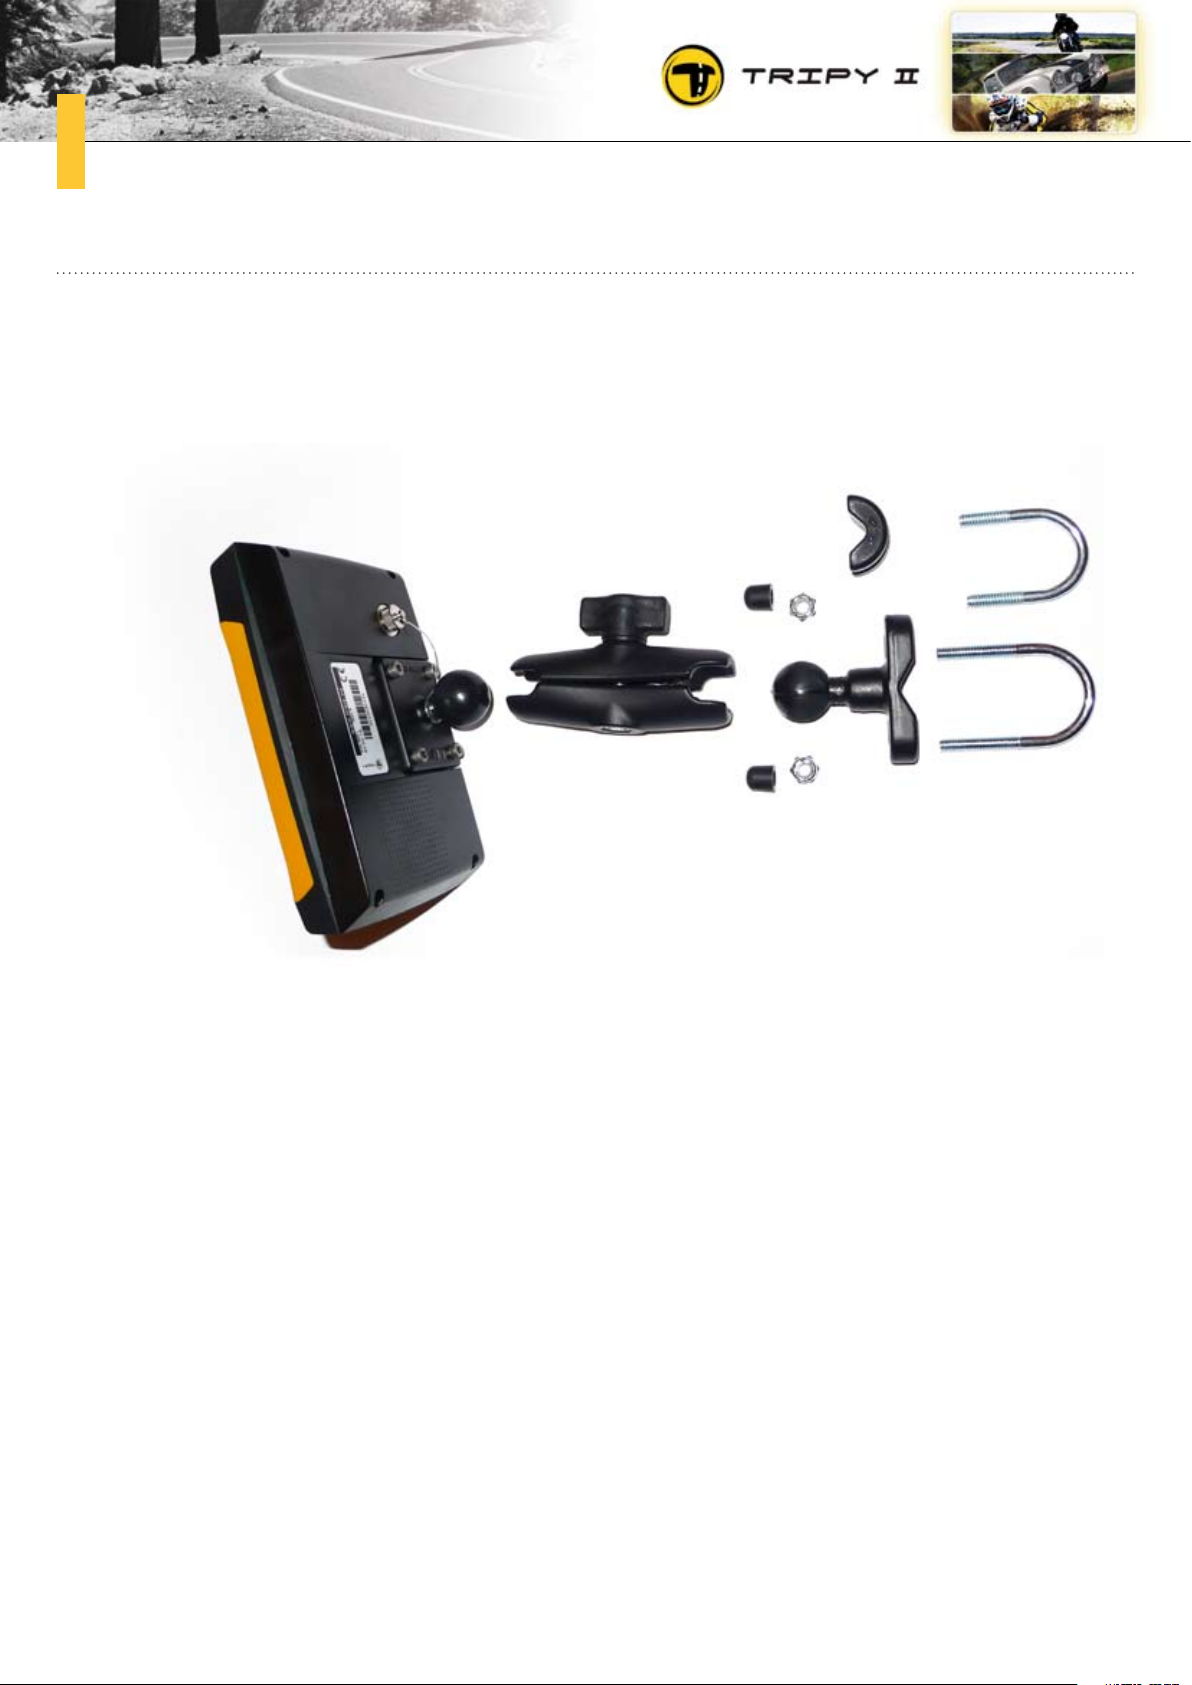
Mounting Tripy II on the vehicle3.8.
Tripy II mounting assembly is extremely simple and efficient. It is made of a rubberized ball affixed to
the device rear side, a middle size arm fitted with a butterfly screw that you may tighten on and off by
hand as well as a rubberized ball to be mounted on a vehicle side tube.
Tripy II is supplied with a base set of fixtures allowing the mounting on a tube (bike or quad steering,
safety bar in a car, a.s.o..).
If this base set is not fulfilling your requirements, you may find the list of all other fixture models on our
website www.tripy.eu in the « Products » - « Mounting & Accessories » section.
Page 37
37
Data transfer between Tripy II and PC3.9.
To transfer data between your computer and Tripy II, you shall start by switching Tripy II On and then
connect it to a PC USB port by means of the USB cable supplied with your Tripy II (See paragraph « 3.4
Connecting Tripy II to the outside world »). Once connected to the PC, Tripy II is recognized by the computer like a « removable drive » similarly as a USB memory stick or USB hard disk. Once connected to
the PC, you may copy files from the PC towards the Tripy II and from Tripy II towards the PC using the
common procedures of your computer used for USB sticks. If your computer is equipped with Windows™
operating system, you may for example, use the procedures such as « cut & paste ».
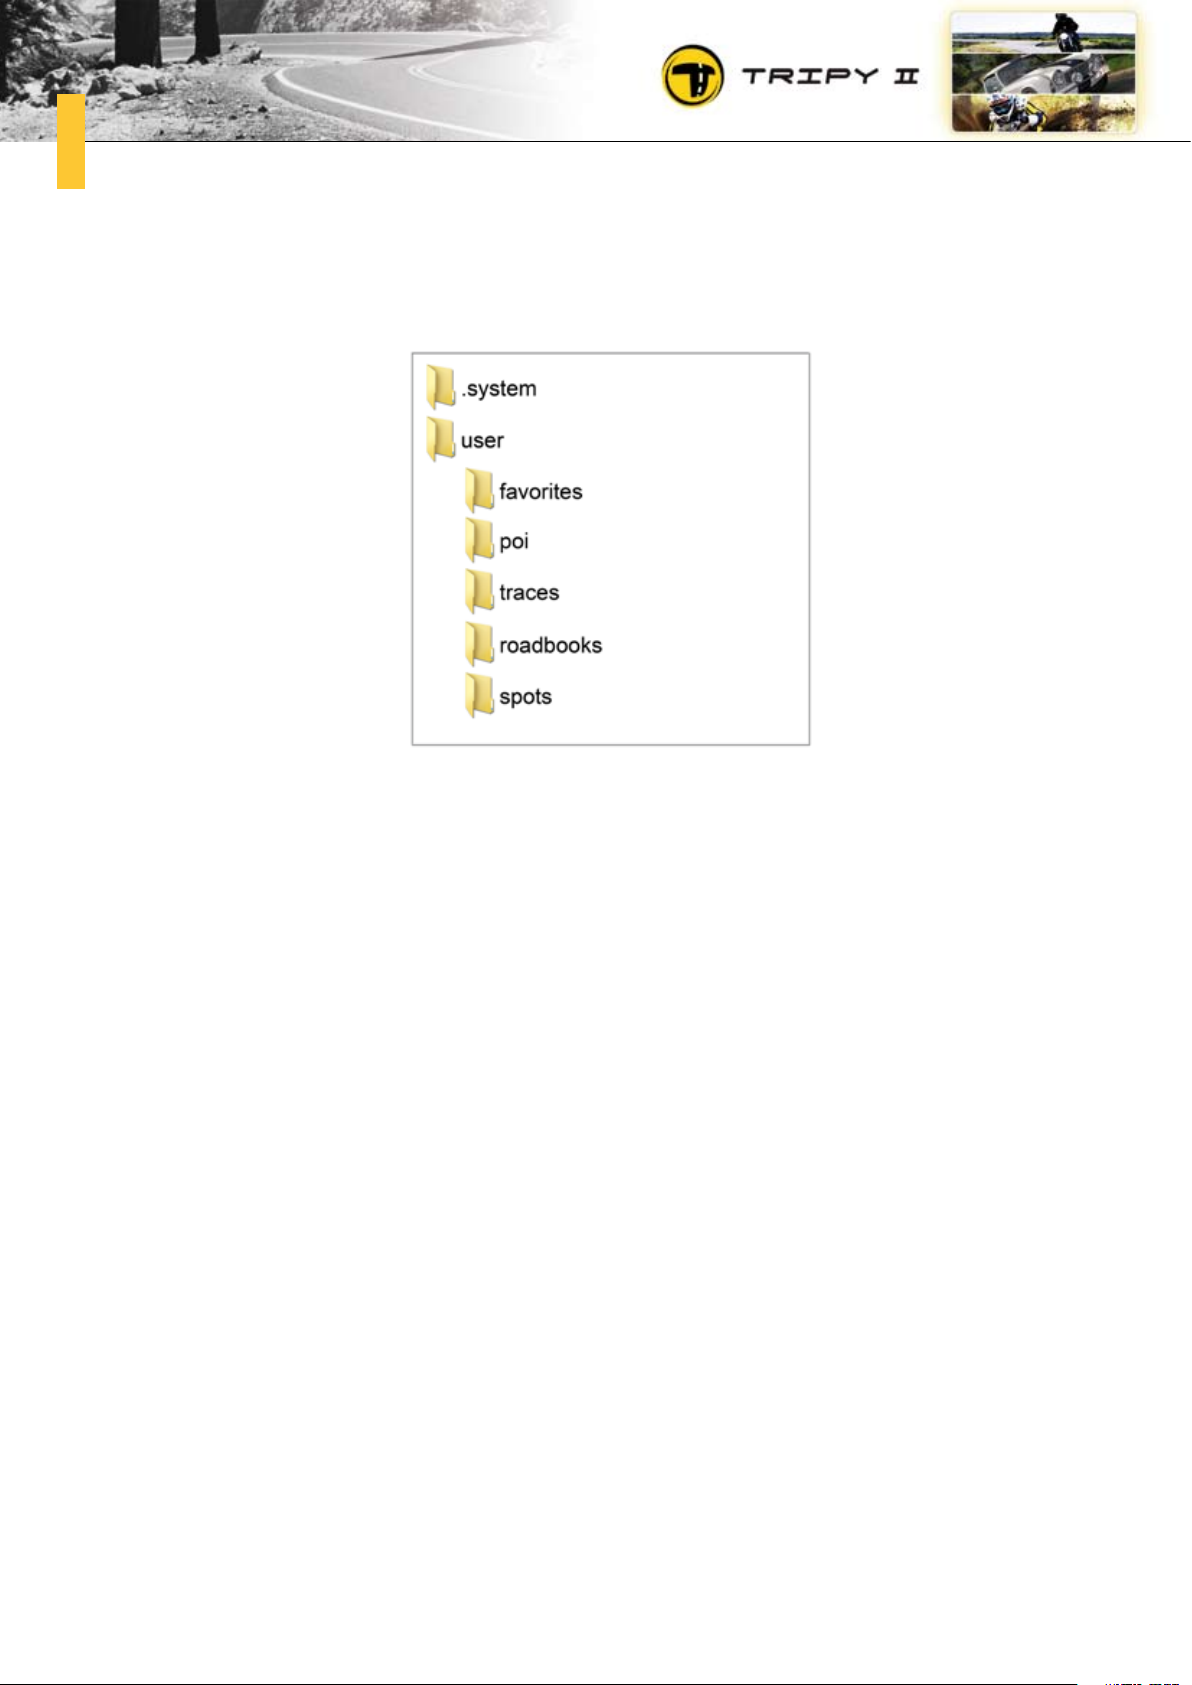
The Tripy II disk structure is made of two directories from its root:
•«system»directory
•«user»directory
The « system » directory contains the entire manufacturer’s data of your Tripy II and
may in no instance be altered without jeopardizing your Tripy II GPS operation. You
shall therefore never interfere with this directory (most importantly never delete
anything in it).
It is compulsory to use the procedure allowing the « safe ejection of the peripheral »
prior to disconnecting the USB cable connecting Tripy II to your PC. If this procedure
is not followed, some data of the Tripy II memory may be destroyed impeding its
operation. Should such situation happen, it is necessary to return the device to the
technical services or run the « restoration » procedure (See paragraph « 3.13 Safe
copy and Tripy II restoration »).
Page 38
38
The « user » directory is aimed to your usage. It is where you may store your road books, or recover
road book recordings, automatic tracks, favorites, a.s.o.. Under the « user » directory you shall find the
following tree structure:
Page 39

39
Favoritesa.
Sous le répertoire « user », vous trouvez le répertoire « favorites » qui contient un fichier nommé « userpoi.asc ». Ce fichier reprend toutes les positions favorites que vous avez mémorisées avec Tripy II. Pour
mémoriser une position favorite, il suffit de presser le bouton OK pendant au moins 2 secondes (une
pression « OK long »). A noter que si l’enregistreur de road book est actif, le « OK long » mémorisera
une position de note dans l’enregistrement en cours et non pas une position de « favoris ».
Le fichier « userpoi.asc » est un fichier texte compatible avec le logiciel « PoiEdit ». Vous pouvez utiliser
ce logiciel gratuit pour visualiser vos favoris ou pour en modifier les noms. Lorsque vous mémorisez
une position favorite, Tripy II lui donne un numéro séquentiel ainsi que la date et l’heure à laquelle vous
avez réalisé l’opération. Par exemple, un favori pourrait s’appeler « P192 18-03-10 13:32 » ce qui signifie que c’est le 192ième favori que vous mémorisez et que vous avez réalisé cette mémorisation le 18
mars 2010 à 13h32.
Si vous souhaitez donner à ce favori un nom plus représentatif, vous pouvez utiliser le logiciel gratuit
PoiEdit (http://www.poiedit.com/) et procéder comme suit :
•opentheleintheTripyIIunderthepath«user/favorites/userpoi.asc»,
•modifythenameofthefavorite(e.g.Replace«P19218-03-1013:32»by«MyHome»),
•savethele
upon disconnecting Tripy II from the PC, after having by anticipation used the procedure to «safely remove peripherals », you shall find your « My Home » favorite back on your Tripy by going through the
« Destination » - « Favorites/Preferred » menu. When you select that favorite from the list (up/down
arrow knobs to move into the list and OK knob to select one), Tripy II computes an itinerary to reach it.
An even more simple solution: by means of the Windows™ « notepad » text editor, open the « userpoi.
asc » file and modify the POI headers between brackets. Save then the file and do not forget to run the
procedure allowing to «safely remove peripherals » before disconnecting the USB cable.
Page 40

40
POI’sb.
Under the « user » directory, you shall find the «POI » directory. It is in that directory that you shall be
allowed to copy your POI (Points Of interest) files. Tripy II accepts the .nvo files (Tripy RoadTracer proprietary format) or .asc files (PoiEdit™ type of files).
Upon copying a POI file (.nvo or .asc) in the « user/poi » Tripy II directory, you may disconnect the Tripy
II from the PC after having run the procedure allowing to «safely remove peripherals ».
You shall then recover your POI lists on Tripy II by going to the « Destination » - « Points of Interest » « User » menu.
Lists of POI’s like, for example, all the stores of a given vehicle brand, all restaurants of such or such a
name, a.s.o.. may easily be found on the Internet (e.g. On sites such as http://www.gpspassion.com).
Automatic tracksc.
Under the « user » directory, you shall find the «Traces » directory containing a maximum of 61 files
called « trace0.ttr » to « trace60.ttr ». Each file contains the automatic recording of a « track » you have
driven. Indeed, as soon as it is switched On and it is synchronized, Tripy II permanently records the
tracks you ride (not to be confused with the road book recorder that shall manually be started and stopped and also stores the waypoints positions in addition to the track).
Tripy II closes an automatic recording when you switch the device for more than two hours. When Tripy
II closes an automatic track, it automatically starts the recording of a new track at the new switching
On of the device (as soon as GPS synchronization occurs). The new track shall carry the next indice’s
value in the numerical sequence « trace0.ttr », « trace1.ttr », ... »trace60.ttr », « trace0.ttr », a.s.o..
When you communicate with Tripy II (connecting Tripy II to a PC), the current track is temporarily closed
and available in the « user/traces » directory. After the communication session, the recording shall
resume in the same track file.
To recover a track, you may sort the « user/traces » directory by date and time. Once the track(s) identified, you may copy them on your PC and open them with the RoadTracer software. You may then « record them as... » in a standard .gpx format or in the Tripy road book format (.trb) if you wish.
Page 41

41
Itineraries or road booksd.
Under the « user » directory, you shall find the «roadbook» directory that is empty when you receive
your new Tripy II. It is in that « user/roadbooks » directory that you may copy your own road books. Your
personal road books are the ones you’ll have either downloaded from Internet, or received from a friend
or created yourself by means of the RoadTracer Pro software. The Tripy road book files always carry
the « .trb » extension. To better sort your personal road books, you may also organise the « user/roadbooks » directory in sub-directories. e.g. « user/roadbooks/France » for all your road books of France.
On the Tripy II, you shall go to « Road books » - « User » to find the sub-directories tree structure you
have created and the personal road books you copied.
Some directories prefixed with the « # » character may appear in the « user/roadbooks » directory.
These are Tripy II created directories after some operations:
•e.g.IfyoucopyaroadbookfromaUSBstick,thecopiedroadbookshallautomaticallybesavedin
a « user/roadbooks/#USB-Import » directory.
•Similarly,therecordsmadewiththeroadbookrecorderarelocatedinthe«user/roadbooks/#reco»
directory.
•Finally,a«user/roadbooks/#lastroutes»directoryshallappearassoonasyoushallhaveasked
Tripy II to compute an itinerary. It is indeed at that place that Tripy II stores the last 20 itineraries it
recently computed.
Page 42
42
Monitored POI’s (e.g. Speed traps)e.
Under the « user » directory, you shall find the «spots» directory. When you receive your new Tripy II,
the « spots » directory contains a set of files describing various danger and speed trap zones. These
files are offered by AlerteGPS™ upon your purchase of your Tripy. You may update these files thereafter
by going to the the http://www.alertegps.com/.
As soon as you place one or several « .nvo » files (Tripy POI’s) or « .asc » files (POI’s at the PoiEdit™
format), Tripy shall use all the POI’s contained in these files as points to be monitored.
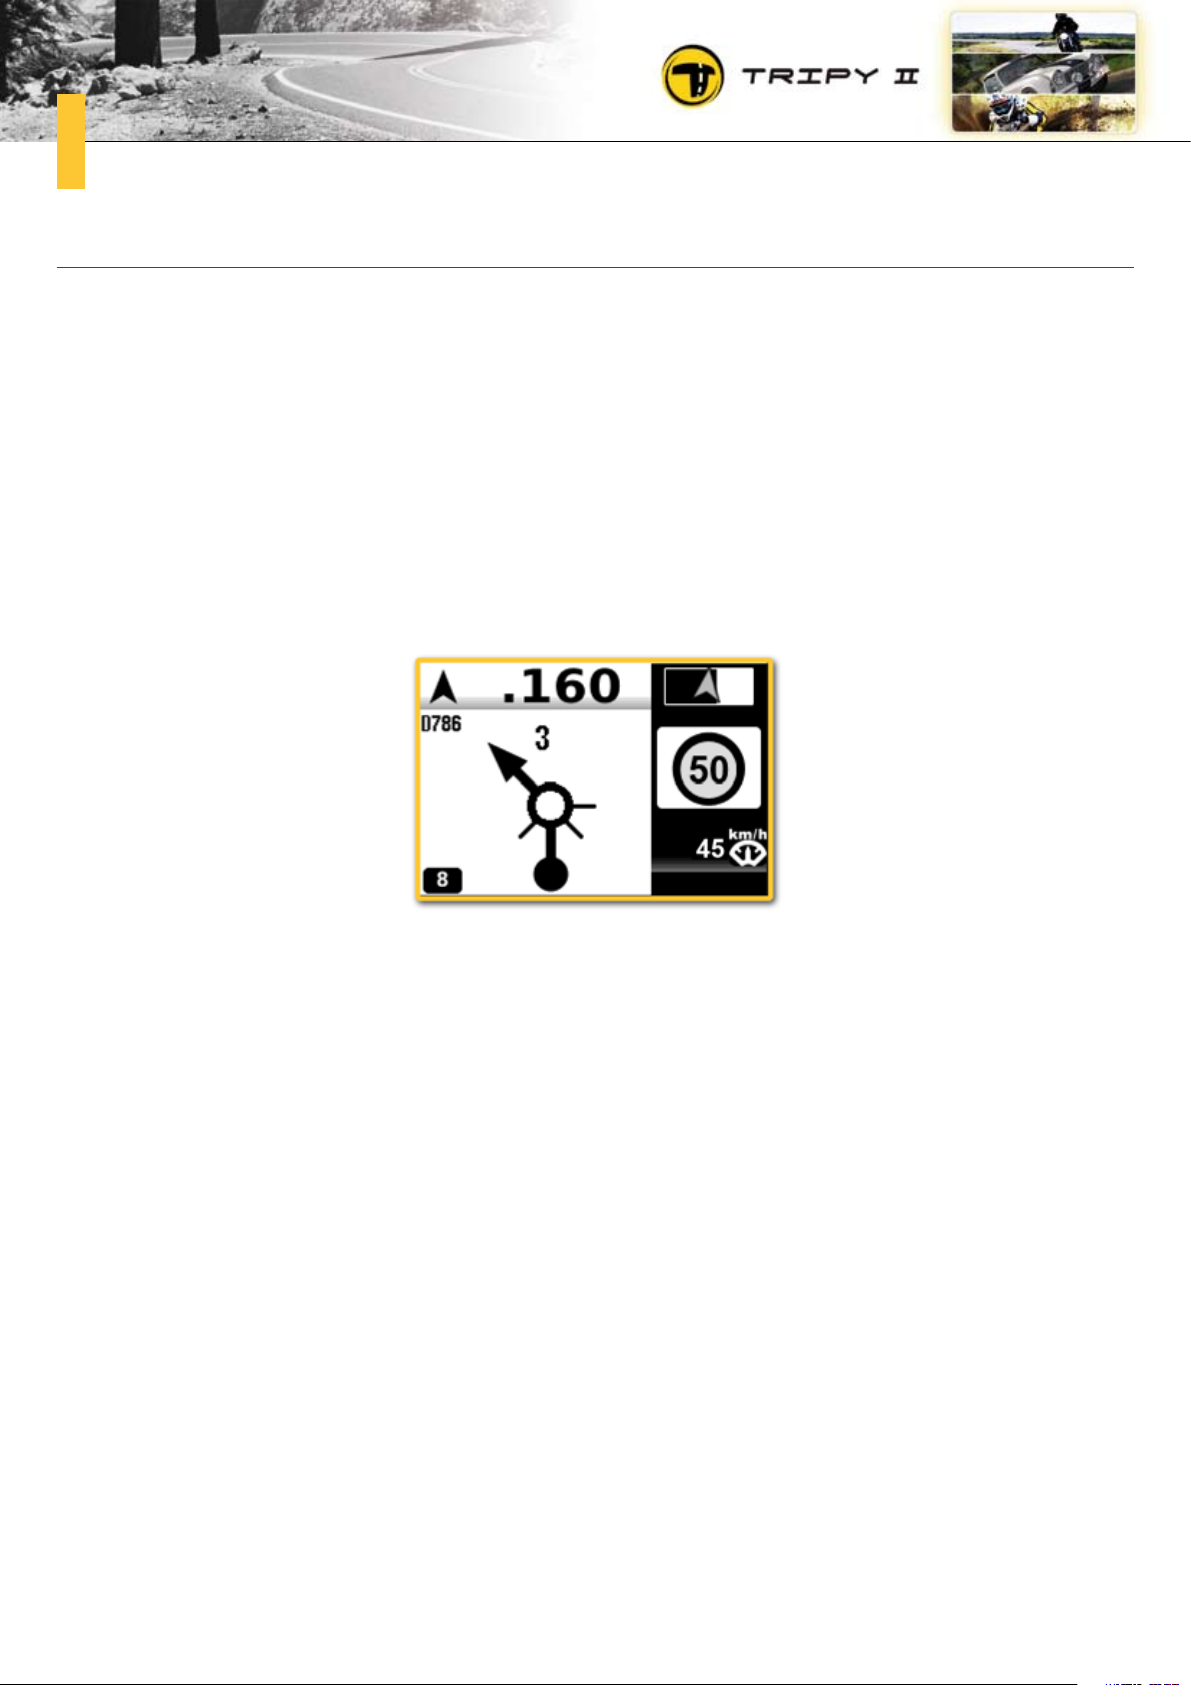
When you come closer than 500 m from one of these points, Tripy will display a warning panel indicating
you approaching this point.
In the upper part of that warning panel, a progression bar shall be darkened as you get closer to the
point. An arrow in the progression bar indicates the direction to the point. Below, a logo or text indicates the type of point you come close to (in the above example: a stationary speed trap at 50 km/h) as
well as your actual instantaneous speed.
Page 43
43
Data transfer between Tripy II and USB memory stick3.10.
To perform a data transfer between your Tripy II and a USB stick, you shall start by switching the Tripy
II On and connect it then to the USB stick (See paragraph « 3.4 Connecting Tripy II to the outside world »,
topic « d)»).
Once the connection established, manipulate the Tripy to go to the menu « Road books » - « USB ».
After a few seconds, Tripy II displays a list of all the sub-directories and road books contained in the
USB stick. By means of the arrow knobs, you may go down in the list. Use the OK knob to transfer the
road book file to the Tripy II as well as loading it to navigate it.
After completing the operation, Tripy II will automatically change to the navigation of this road book. If
you wish to navigate this road book again later on, you will find it in the menu « Road books » - « User »
- « USB-Import ».
If you browse the content of the USB memory stick without copying any road book,
you must leave the list and return to the main menu before physically disconnecting
the USB memory stick from the Tripy II cable. If this procedure is not followed, some
data of the Tripy II memory may be destroyed impeding its operation. Should such
situation happen, it is necessary to return the device to the technical services or run
the « restoration » procedure (See paragraph « 3.13 Safe copy and Tripy II restoration »).
Page 44
44
Data transfer between two Tripy II’s3.11.
To transfer data between two Tripy II’s you shall start by switching both Tripy II’s On and then connect
them together (See paragraph « 3.4 Connecting Tripy II to the outside world », topic « e ».
Once the connection established, consider the Tripy providing the data as the Slave and the Tripy receiving the road book as the Master.
No operation shall be conducted on the Slave. On the Master Tripy, go to the « Road books » - « USB »
menu. After a few seconds, the Master Tripy displays the list of all the Slave Tripy « /user » sub-directories. You shall see the « favorites », « poi », « records », « roadbooks » and « spots » directories.
To find a user road book on the Slave Tripy, go to the « roadbooks » sub-directory. Navigate the list by
means of the arrow knobs. Use the OK knob on a directory to navigate down into it and that same OK
knob on a road book file to copy it from the Slave Tripy to the Master Tripy.
After such operation, Tripy II will automatically switch to the navigation mode on that road book. If you
wish to navigate this road book again at a later stage, you will find it under « Roadbooks » - « User »
- « #USB-Import ».
If you investigate the content of the Slave Tripy without copying a road book, you must
leave the list and return to the main menu prior to disconnecting the Slave Tripy. If
you do not follow this procedure, you may destroy data in the memory of the Slave or
Master Tripy and impede its operation. Should such situation happen, it is necessary to return the device to the technical services or run the « restoration » procedure (See paragraph « 3.13 Safe copy and Tripy II restoration »).
Page 45
45
Firmware version and Tripy II update3.12.
Under the « Parameters » - « Information » menu, you will find several technical information and among
others your Tripy II firmware version and date of issue.
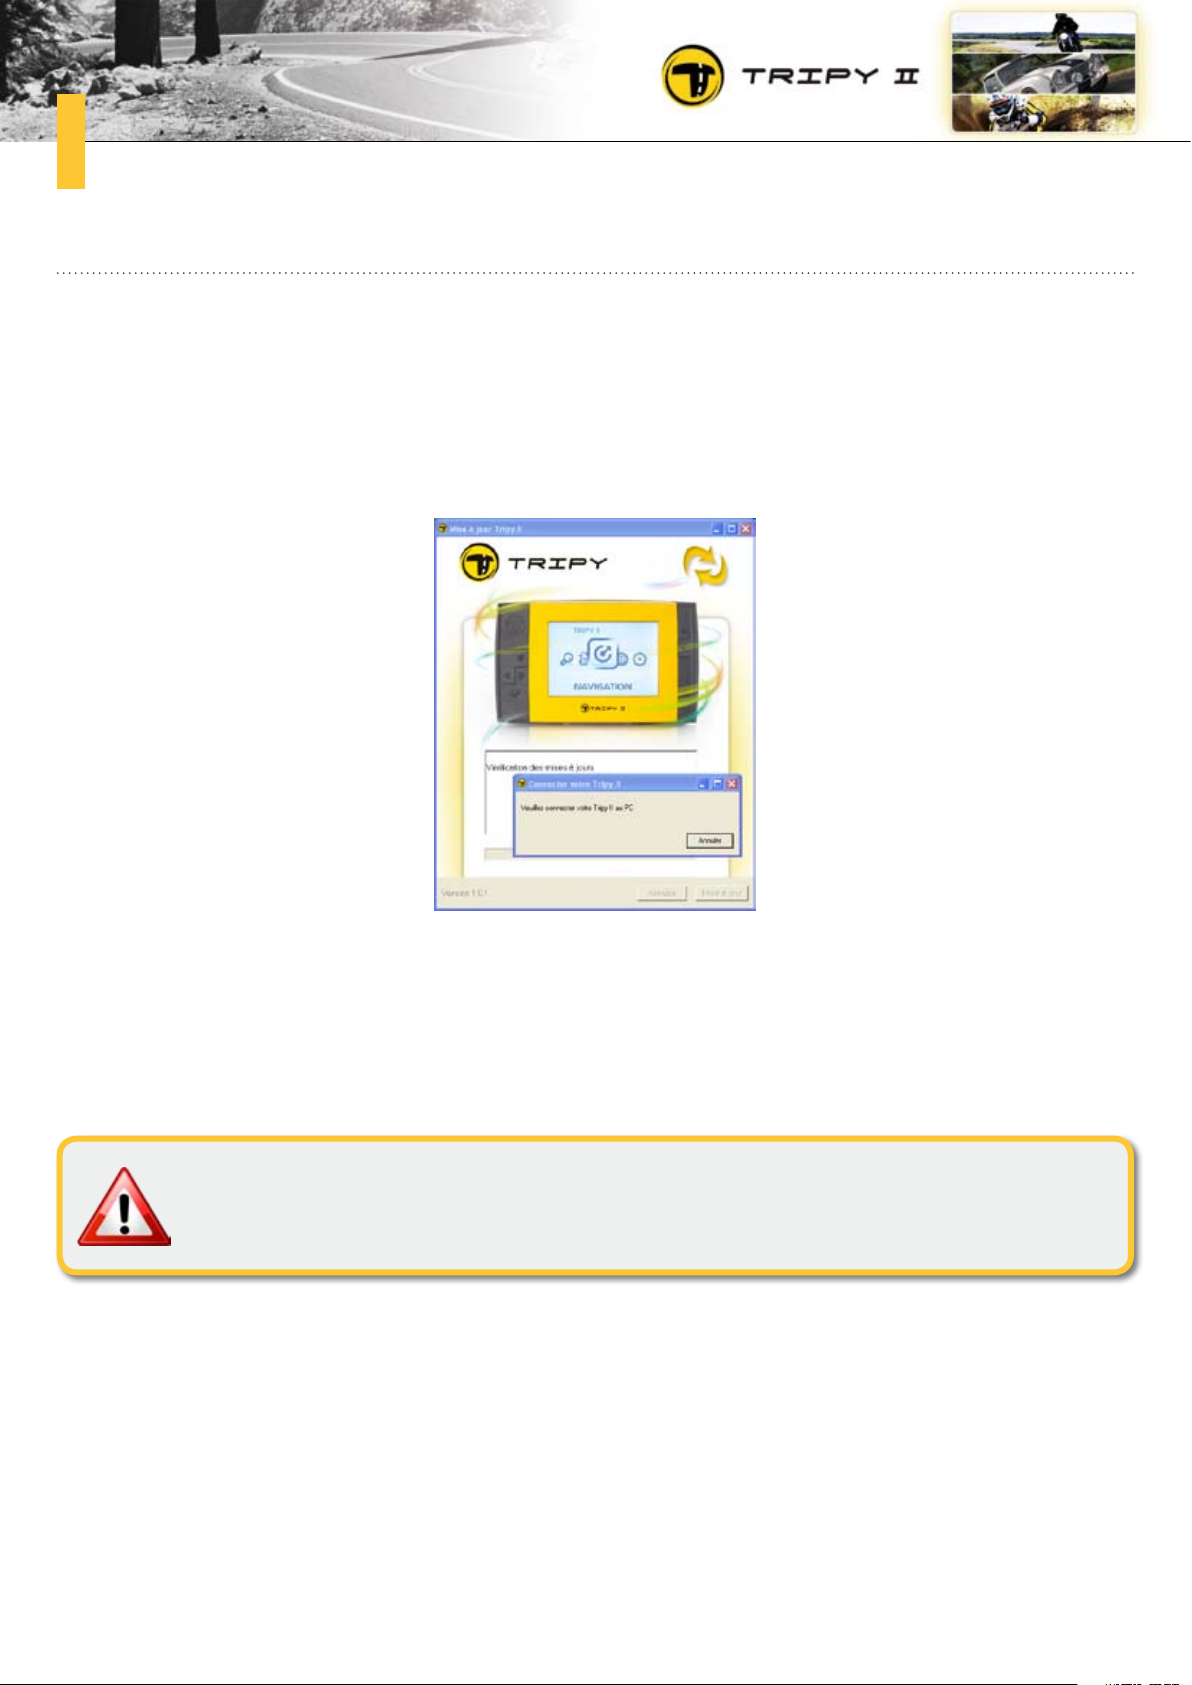
Tripy II is a professional GPS continuously improving. Firmware updates are regularly available on the
community section of the www.tripy.eu website. Upon clicking on the update link, a small program is
downloaded (« TripyUpdate.exe ») onto your computer and automatically run.
This update program will ask you to connect your Tripy II to the computer. Switch your Tripy II On and
connect the USB cable between the Tripy and the PC. (See paragraph « 3.4 Connecting Tripy II to the
outside world », topic « c. Connection to the computer »). The Tripy II update program will check the
updates available on the Tripy server. If the server has a more recent version available than the one
contained in your Tripy II, the Tripy II update program downloads the new version and install it into
Tripy II.
Certaines mises à jour sont très rapides, d’autres peuvent prendre très longtemps (parfois plus d’une
heure) si de grosses bases de données doivent être mises à jour.
When the update process is completed, the Tripy II update program will indicate whether other updates
are available. In the instance that other updates are available for your Tripy II, disconnect the cable
between Tripy II and the PC, relaunch the Tripy II update program (click once again on the link on the
ww.tripy.eu website) and repeat the process following the Tripy II update program instructions.
During this update process, do not disconnect the Tripy II and PC and let the PC operate without disruption until the end of the process.
Page 46
46
Safe copy and Tripy II restoration3.13.
As indicated in paragraph « 3.9 Data transfer between Tripy II and PC », Tripy II stores its data in a kind
of hard disk containing two partitions in its root:
« .system » directory•
« user » directory•
The « .system » directory contains all the vital information for the sound operation of the device (Linux
operating system, map database, parameter files, programs, a.s.o..).
When you receive your new Tripy, it is wise to make a safe copy of all this system environment. This
shall allow you to restore your Tripy II if a total or partial destruction of the system data was happening.
You could alter the system data through abnormal operation such as disconnecting
the Tripy II from the computer without having followed the procedure to safely disconnect the peripheral.
Back-up copya.
Connect your Tripy II to your computer by means of the USB cable (See paragraph « 3.4 Connecting
Tripy II to the outside world », topic « c . Connection to the computer »).
By means of the Windows™ explorer or any other similar software, copy the « .system » directory at the
root of the Tripy II removable drive to a chosen place on your hard disk. Beware that all the data contained in Tripy II « .system » directory represent about 2 Gbytes. Make sure you have enough disk storage
capacity on your computer prior to executing this copy. Depending on your computer performance, this
copy may last between 30 minutes and an hour.
Similarly, you may also make a back-up copy of your Tripy II « user » directory. Doing so will back up
all your personal information from the Tripy II.
Once the back-up operation completed, do not forget to follow the procedure to safely
disconnect the peripheral before disconnecting the USB cable between your Tripy II
and PC.
Page 47
47
Restoration of a back-up copyb.
Connect your Tripy II to your computer by means of the USB cable (See paragraph 3.4 Connecting
Tripy II to the outside world », topic « c . Connection to the computer »).
By means of the Windows™ explorer or any other similar software, navigate in your computer directory tree structure to find the « .system » back-up directory created upon the back-up procedure. Copy
this « .system » directory from your computer into the root directory of your Tripy II. Your computer will
probably indicate that the directory already exists, you must continue and accept replacing it. The restoration shall continue for about 30 minutes to an hour according to your computer performance.
Once the back-up operation completed, do not forget to follow the procedure to safely
disconnect the peripheral before disconnecting the USB cable between your Tripy II
and PC.
Page 48
48
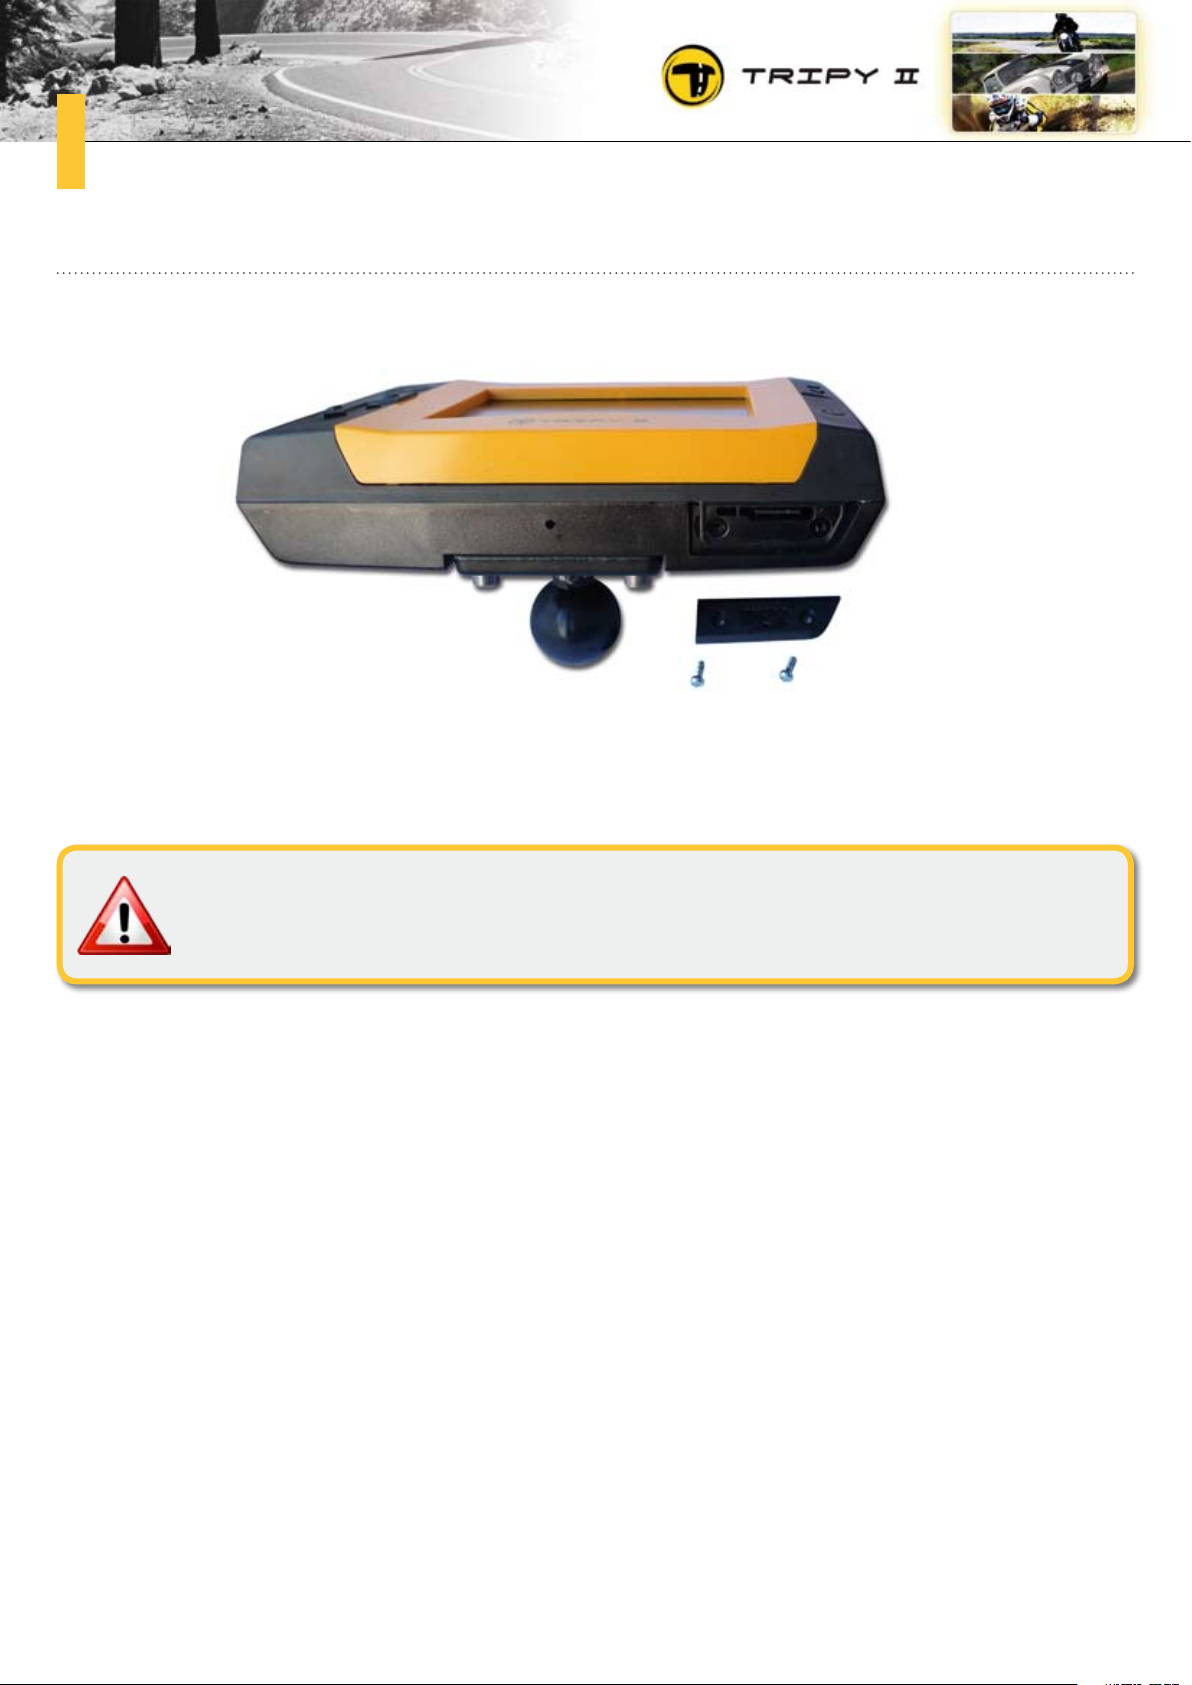
Access to the general RESET knob and memory card3.14.
The small slot located on the Tripy II lower side hosts a 4 Gbytes Micro SD memory card, acting as your
Tripy hard disk. This slot also hosts a micro switch to reset the device.
It is advised against opening this slot and you should normally never have to reach
it.
Page 49
49
Tripy II general RESETa.
It is possible to execute a Tripy II general RESET by pressing the micro switch located in the slot to the
left of the Micro SD. This operation is normally never to be used except in some extreme circumstances
when Tripy II is not reacting to any knob. Even in such a circumstance, it is recommended to wait at
least 15 minutes before proceeding to a general RESET. Indeed, Tripy II is fitted with a « watchdog »
system that shall perform such general RESET automatically in the instance the device is not responding
anymore.
If you are led to operate a RESET, unscrew the two screws holding the slot cover in place and put it
aside. By means of a thin non-metallic stick (toothpick or match), press carefully the RESET micro
switch located to the left of the Micro SD.
Tripy II should then unlock and restart. If this is not happening, return your Tripy II to after sales service for repair.
Once the RESET operation completed, you may re-install the cover. Ensure that the seal is clean before installing the cover. Tighten then the two screws with a strength of 0.3 Nm to ensure that the cover
is watertight.
It is advised against opening this slot and you should normally never have to reach
it.
Micro SD card extractionb.
The Micro SD card extraction or replacement is strongly advised against and voids the warranty.
If however you wish to extract the Micro SD memory card, you shall first, unscrew the two screws holding
the slot cover in place and put it aside. Carefully press the Micro SD until it produces a low « click »
sound. You may then release the Micro SD and extract it by means of tweezers.
Page 50
50
How to head for destination?4.
Preliminary4.1.
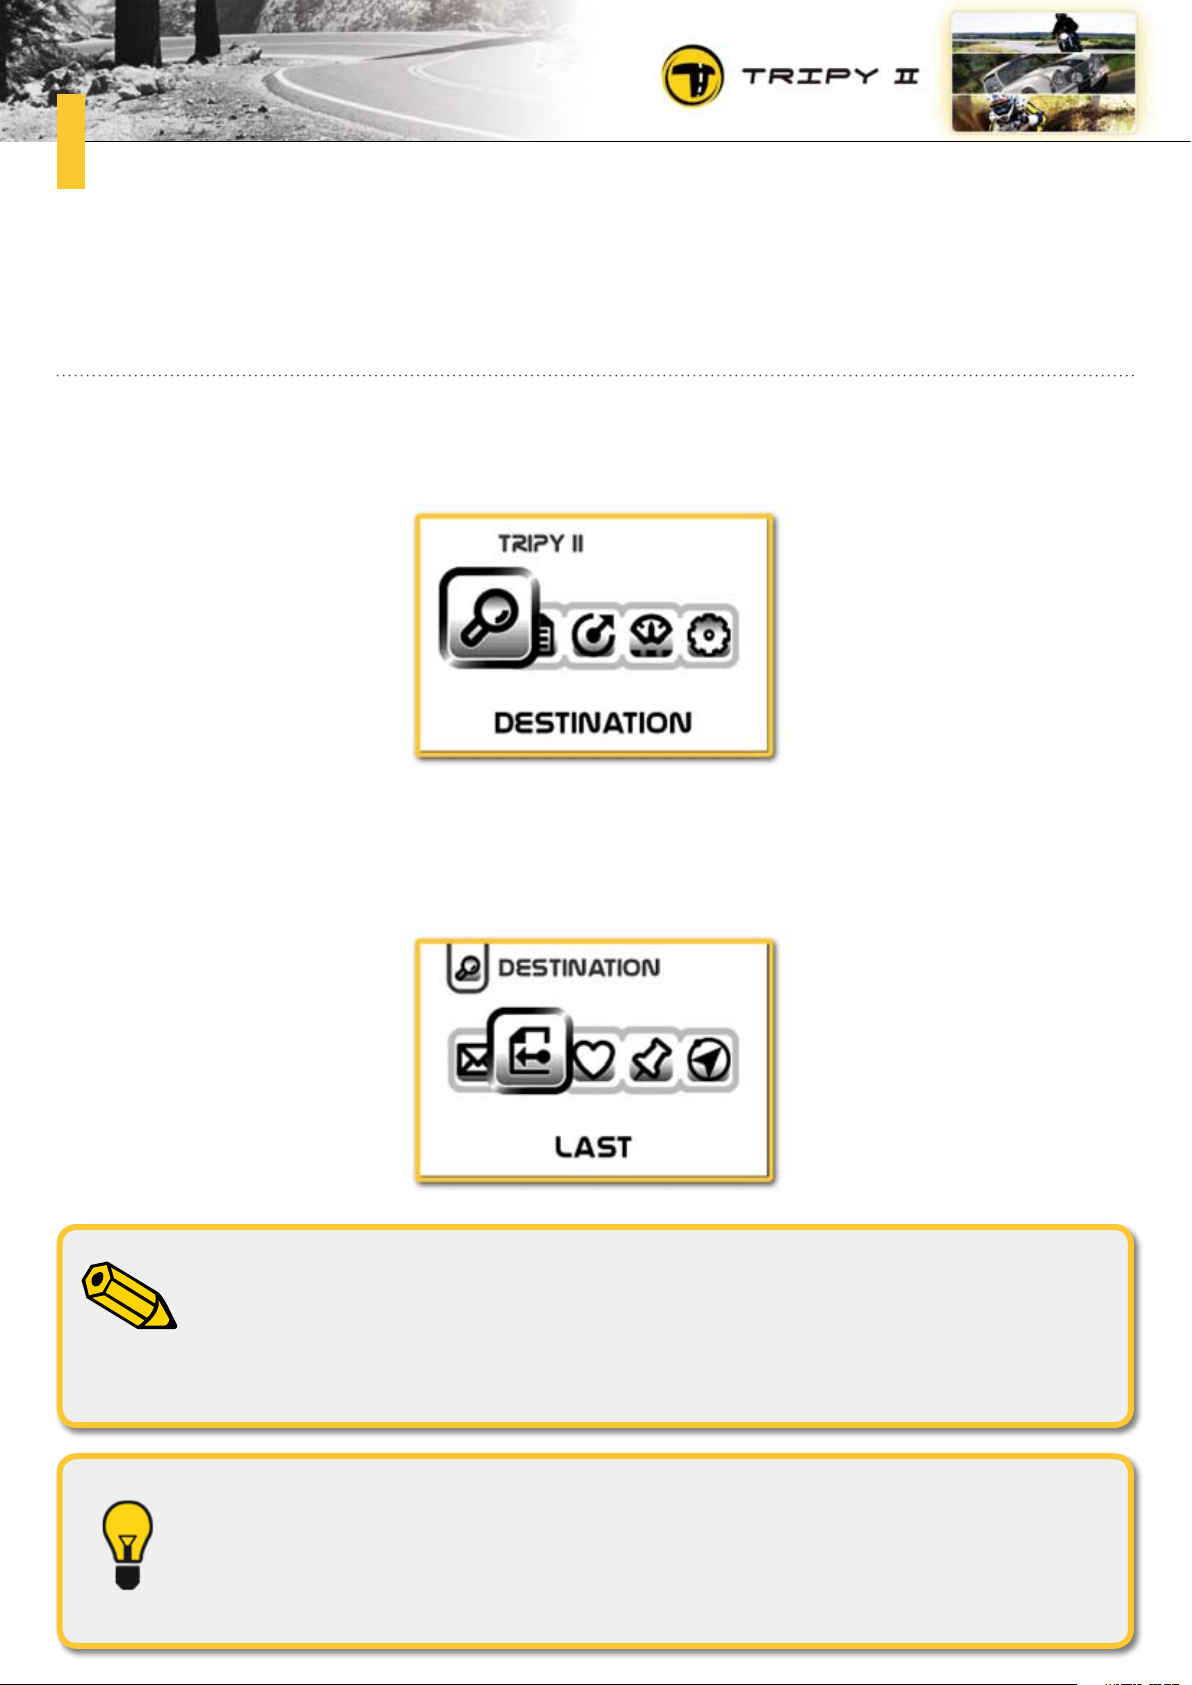
From the main menu (always accessible by pressing the « Menu » knob), you may choose the « Destination » function by means of the left/right arrow knobs. Validate by means of the « OK » knob to enter
the « Destination » function.
The « Destination » menu allows you to compute an itinerary towards an address, a recently used destination, a favorite location, a point of interest (hotel, restaurant, gas station, a.s.o...) or a GPS location
(longitude – latitude).
During the destination selection, several steps will follow each other. e.g. To head
for an address, you shall choose the country, then the town, the street and finally the
route profile. In this operation sequence you may at all times press the « Menu »
knob to step back in the selection.
In addition to all the functions dedicated to leisure riding, Tripy II offers a traditional
GPS function. For the optimal use of this function, it is however recommended to
avoid introducing very remote locations, especially if you choose the leisure type of
routing.
Page 51
51
How to head for an address?4.2.
Under « Destination », choose the « Address » function and select the country from the list by means
of the right/left or up/down arrow knobs and finally the « OK » knob. You may then introduce the destination town.
Town introduction and use of the virtual keyboarda.
By means of the arrow knobs, you may move the selection through to a specific letter on the virtual
keyboard and then press the « OK » knob to validate the choice. Repeating this operation letter by letter, the name of the destination location is completed in the field above the virtual keyboard.
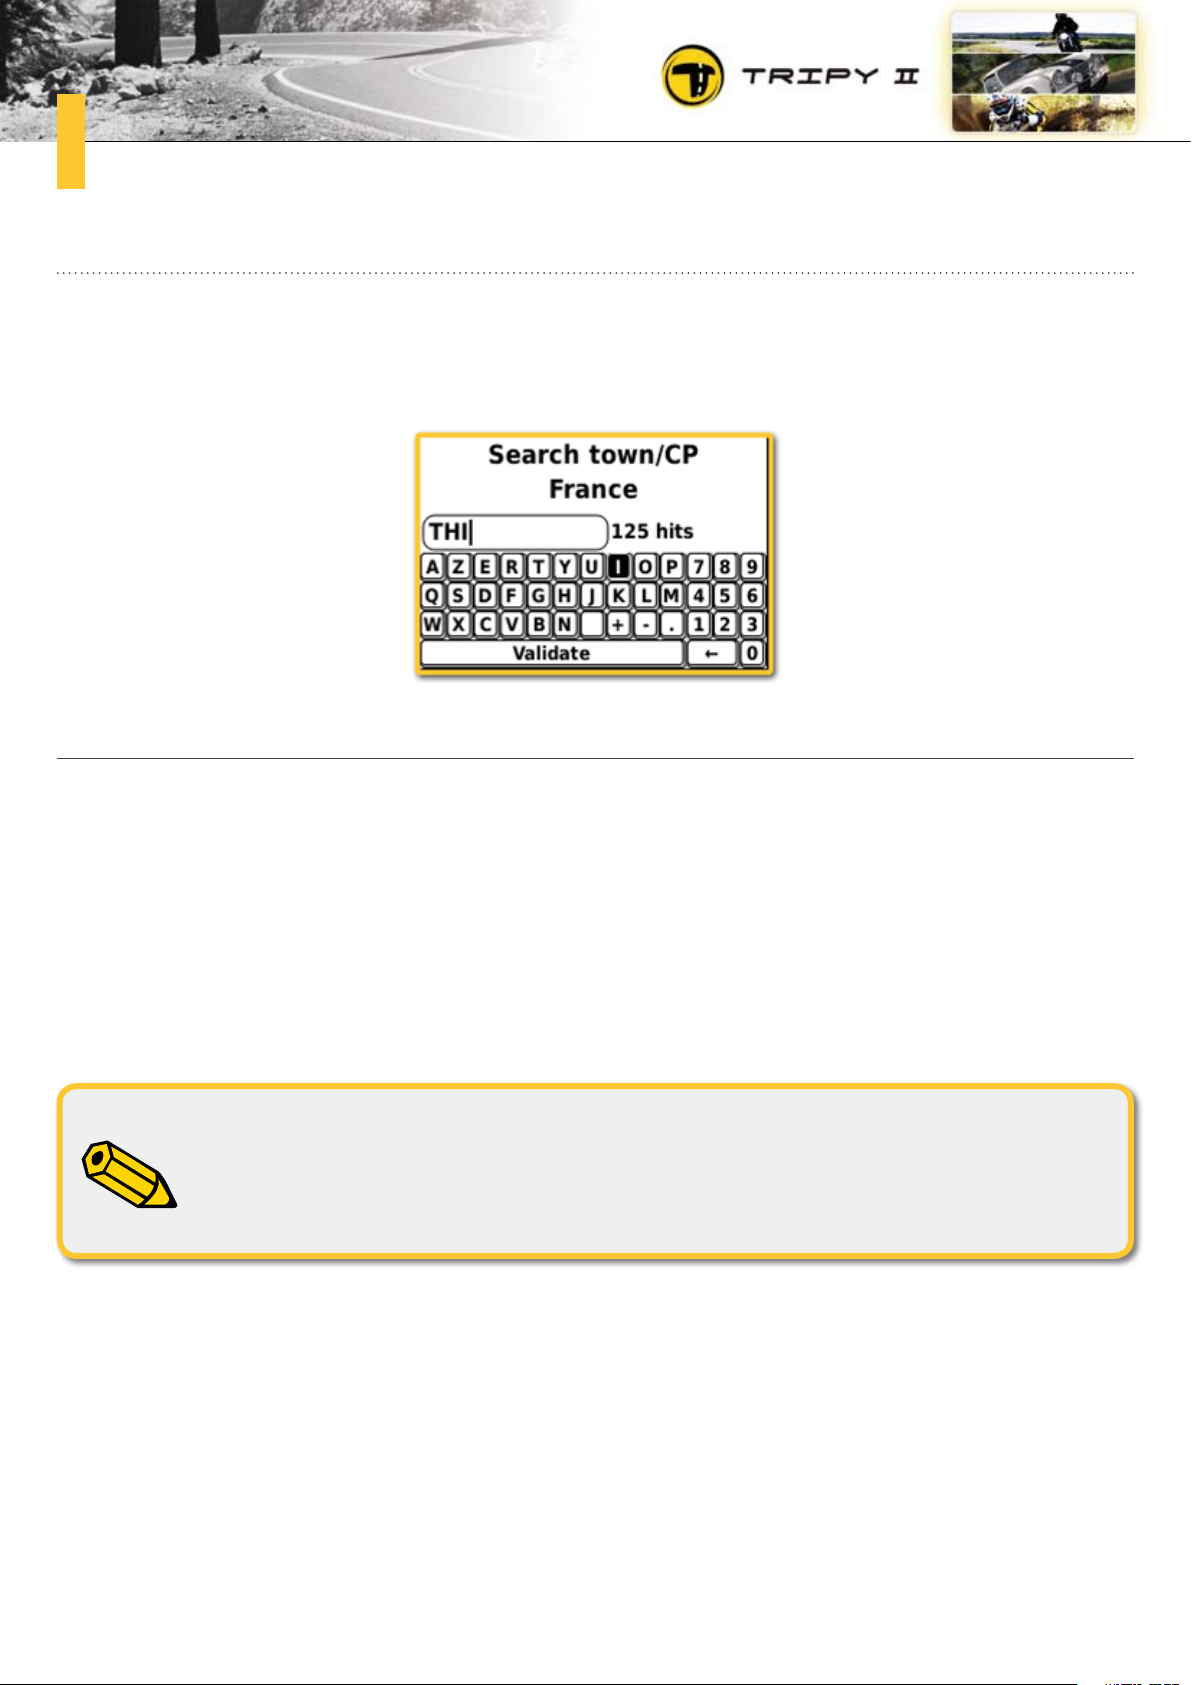
After introducing at least three letters, Tripy II displays the number locations corresponding to the introduced letters. e.g. If you select France as destination country and introduce the three letters « THI »,
Tripy will indicate having found 125 towns containing the « THI » letters. As soon as you shall have introduced enough letters for Tripy II to find less than 10 results, it will automatically present the results
list.
If you introduce an erroneous letter, you may delete it using the delete key of the
virtual keyboard. This key e-allows you to delete the last introduced character
(« backspace »). Select the delete key of the virtual keyboard then press the « OK »
knob as many times necessary to delete one or several letters.
At any time, you may select the « Validate » key on the virtual keyboard and press « OK » to go directly
to the list. In the given example, if you validate after introducing the three letters « THI », you will obtain
the list of 125 items starting with « Thiais », « Thiancourt », Thianges », a.s.o... This list will be long to
scan and it is preferable to introduce more letters to limit the amount of results. If you introduce
« THIERY », the search result will only contain 4 elements and Tripy II will automatically display the
results list in which you will find « Château-Thierry », « Le Boulay-Thierry », « Saint-Thierry » et « Thiéry ».
Page 52
52
When the name of the searched location is made of several names, it is wise to always
introduce the most relevant name. In the above example, if you wanted to find « Château-Thierry » and introduced the letters « Chateau », the search would have produced 171 results. If you introduce « Thierry », Tripy II will only find four locations
and you shall faster narrow your search down.
In the instance of a town with a name made of multiple words, it is not necessary to
leave a space or a dash between the words. You may concatenate the words like
in the example « CHATEAUT » will give only two results « Château-Thierry » and
« Château-Thébaud ».
If a name show double letters, it is not necessary to introduce both of them. « THIERY » works as well as « THIERRY ». Similarly, Tirpy II is not sensitive to accents or
dashes. This explains why introducing « THIERRY » also produces « Thiéry » with
an accentuated « é » and a single « r ».
It is possible to change the virtual keyboard’s letters arrangement (AZERTY, QWERTY or ABC) in the « Advanced Settings ».
Page 53
53
Street introductionb.
Once you have chosen the desired destination town, you may proceed with the introduction of the street
name in a similar fashion as the town introduction.
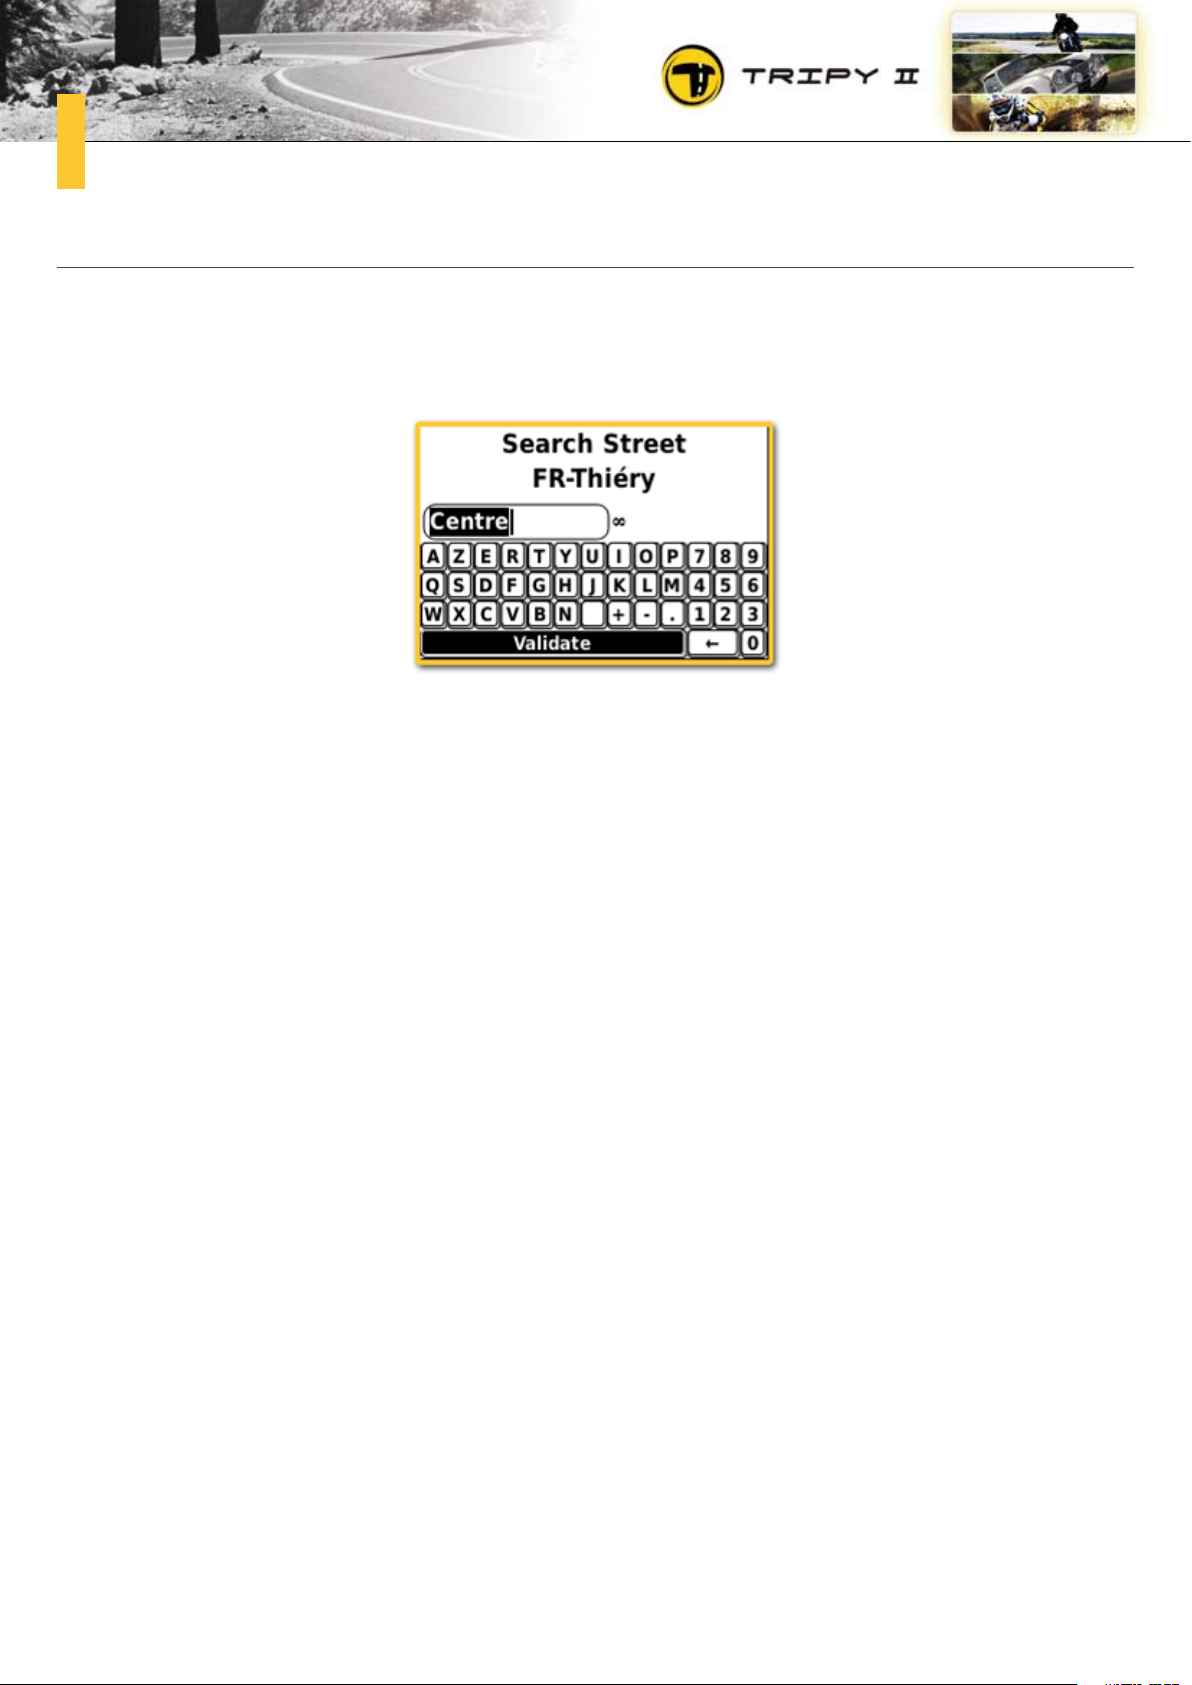
At the moment Tripy II displays the destination « street » introduction screen, it proposes by default to
head for the town centre. The « Validate » key is already selected on the virtual keyboard. If you do not
want to head for a specific street in the selected town, you may just press the « OK » knob to activate
the function and head for that town centre.
Page 54
54
Routing profilec.
At this stage, you have already selected the country, the town and street you wish to head for. Remains
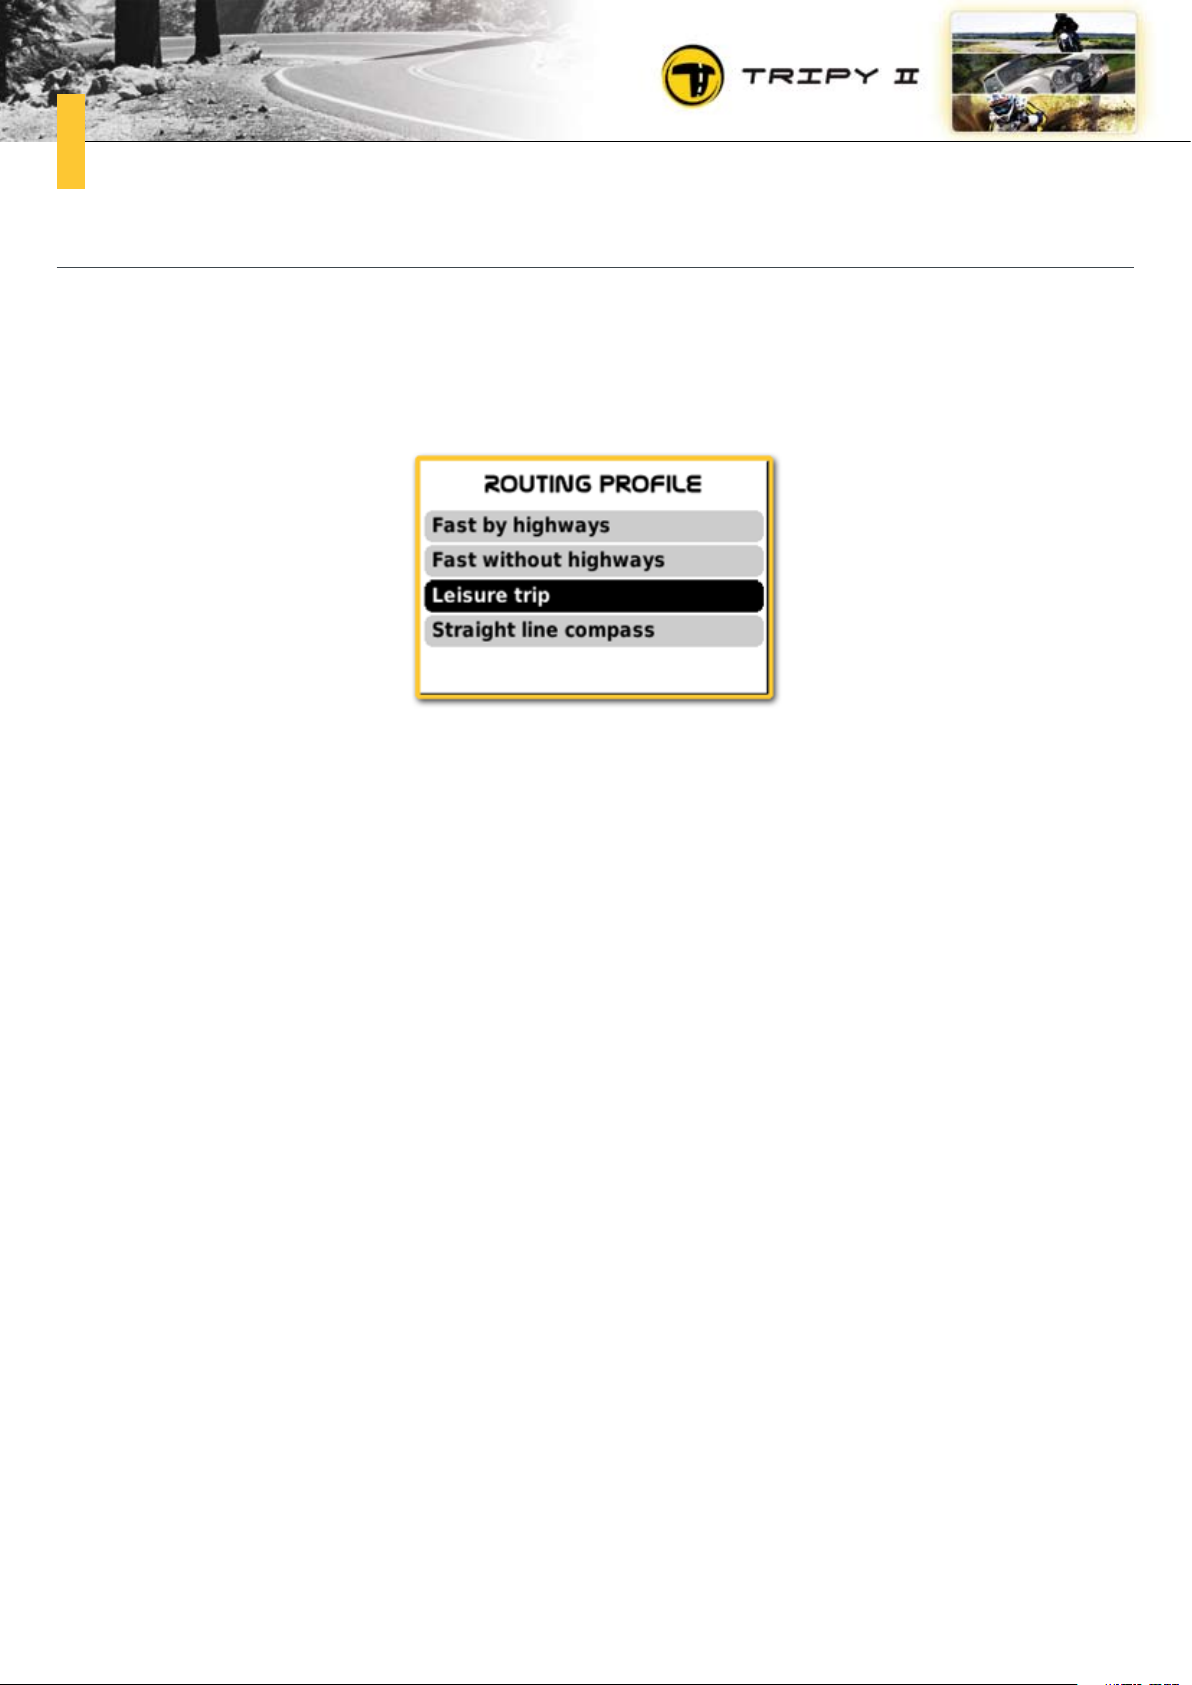
to choose the routing profile Tripy II shall use to compute the routing. You have the choice between four
profiles: « Fast by highways », « Fast without highways », « Leisure trip » and « Straight line compass ».
•« Fast by highways »:
This profile favors the use of highways. For a short distance, it is recommended not to use this
profile as, depending on the roads configuration where you are, Tripy II may tend to use a detour
using highways.
•« Fast without highways » :
This profile favors the large roads without highways. It will therefore favor National roads.
•« Leisure trip » :
This profile favors an itinerary by smaller roads. Tripy II will always use secondary roads and favor
roads tagged in its map as offering touring benefit. Of course no need to hope for a memorable
itinerary in a region where touring roads are non-existing.
•« Straight line compass »:
This profile does not compute an itinerary but offers a « straight line compass » navigation to
destination. Given the fact that no routing is computed, if you navigate such direction switching to
the map display, the straight line between start and destination may not follow actual roads. This
type of profile is however fun as it allows you to navigate according to your intuition while keeping
an eye on the general straight line direction to your destination.
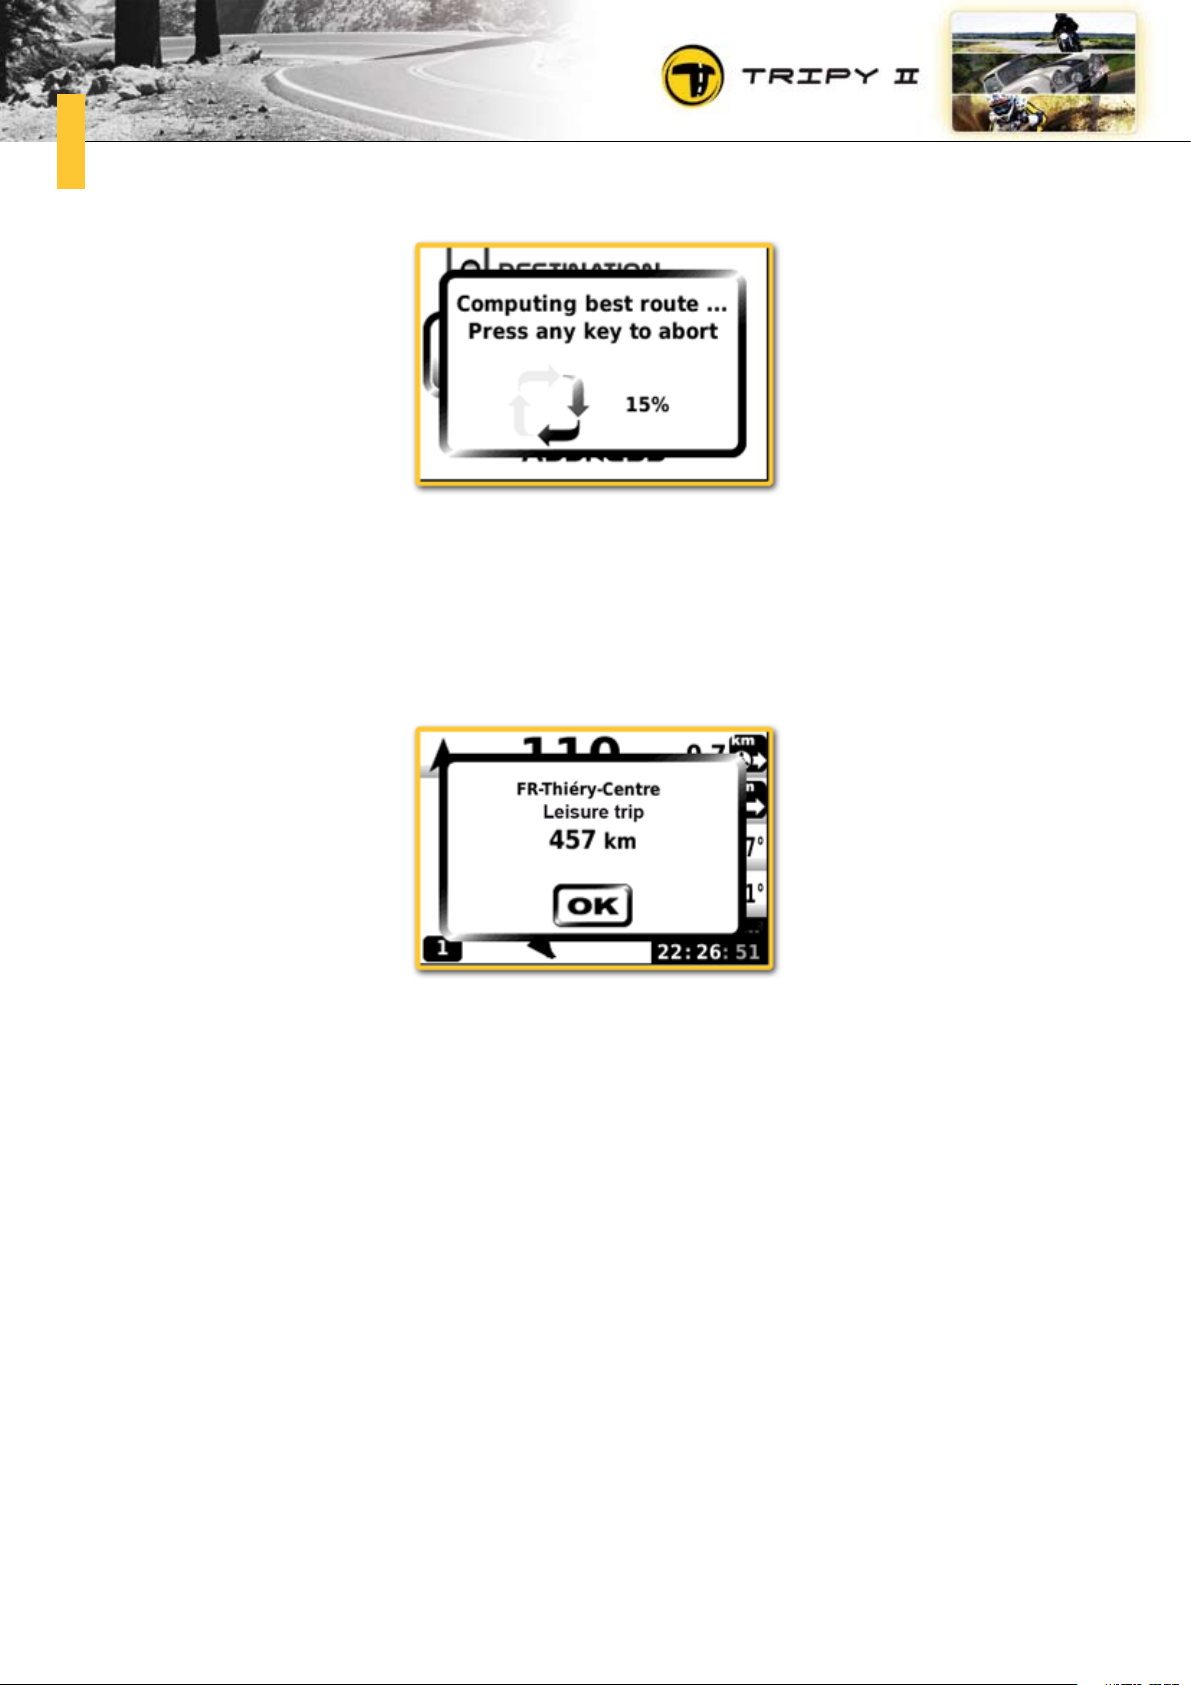
After having selected the routing profile, Tripy II displays a window indicating the computing of the
route to your chosen destination.
Page 55
55
During route computing, you may press the « Menu » knob if you wish to interrupt the computation and
return to the « Destination » menu.
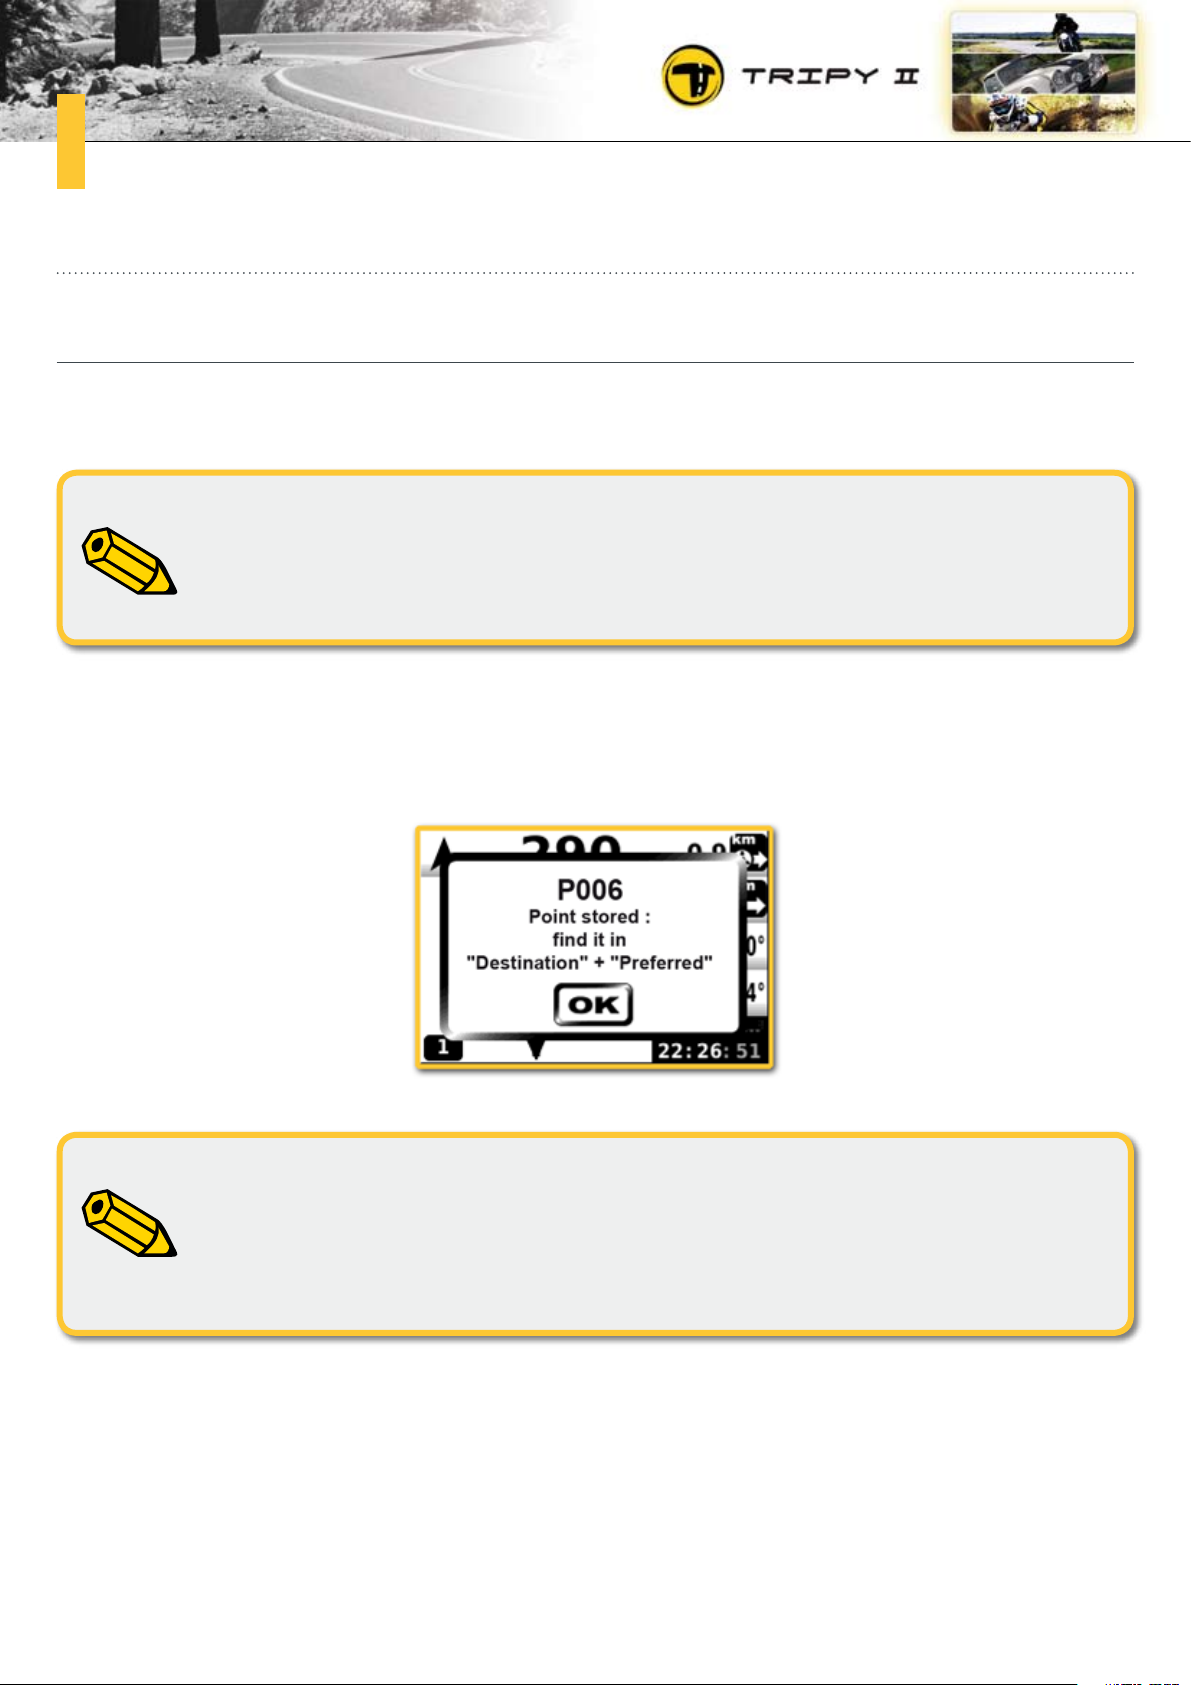
If you let the computing complete itself, Tripy II will display a route summary window indicating the
distance to destination.
If you have chosen the « Straight line compass » profile, the indicated distance is not the driven distance but the straight line distance.
At this stage, Tripy II is ready to navigate towards destination. Press the « OK » knob to close this summary window and proceed to the navigation screen.
Page 56

56
How to head for a destination recently selected?4.3.
To compute an itinerary towards a destination you recently introduced, select the « Recent » function
from the « Destination » menu. You will then find a list of the 21 last destinations introduced in the
Tripy II.
After selecting a destination from the list, Tripy II offers you to choose the routing profile. To know the
details about the routing profile, see paragraph « 4.2 How to head for an address? ».
Page 57
57
How to store a « favorite » location to return to it later on?4.4.
Store the current position as a « favorite ».a.
Tripy II allows you to store the GPS position you are at in order to be guided to it later on or to display
this position on the PC by means of the RoadTracer software.
It is not possible to store your position as a « favorite » if the road book recorder is
currently recording. In this instance, stop the road book recorder (See paragraph
« 8. How to record a road book scouting trip »).
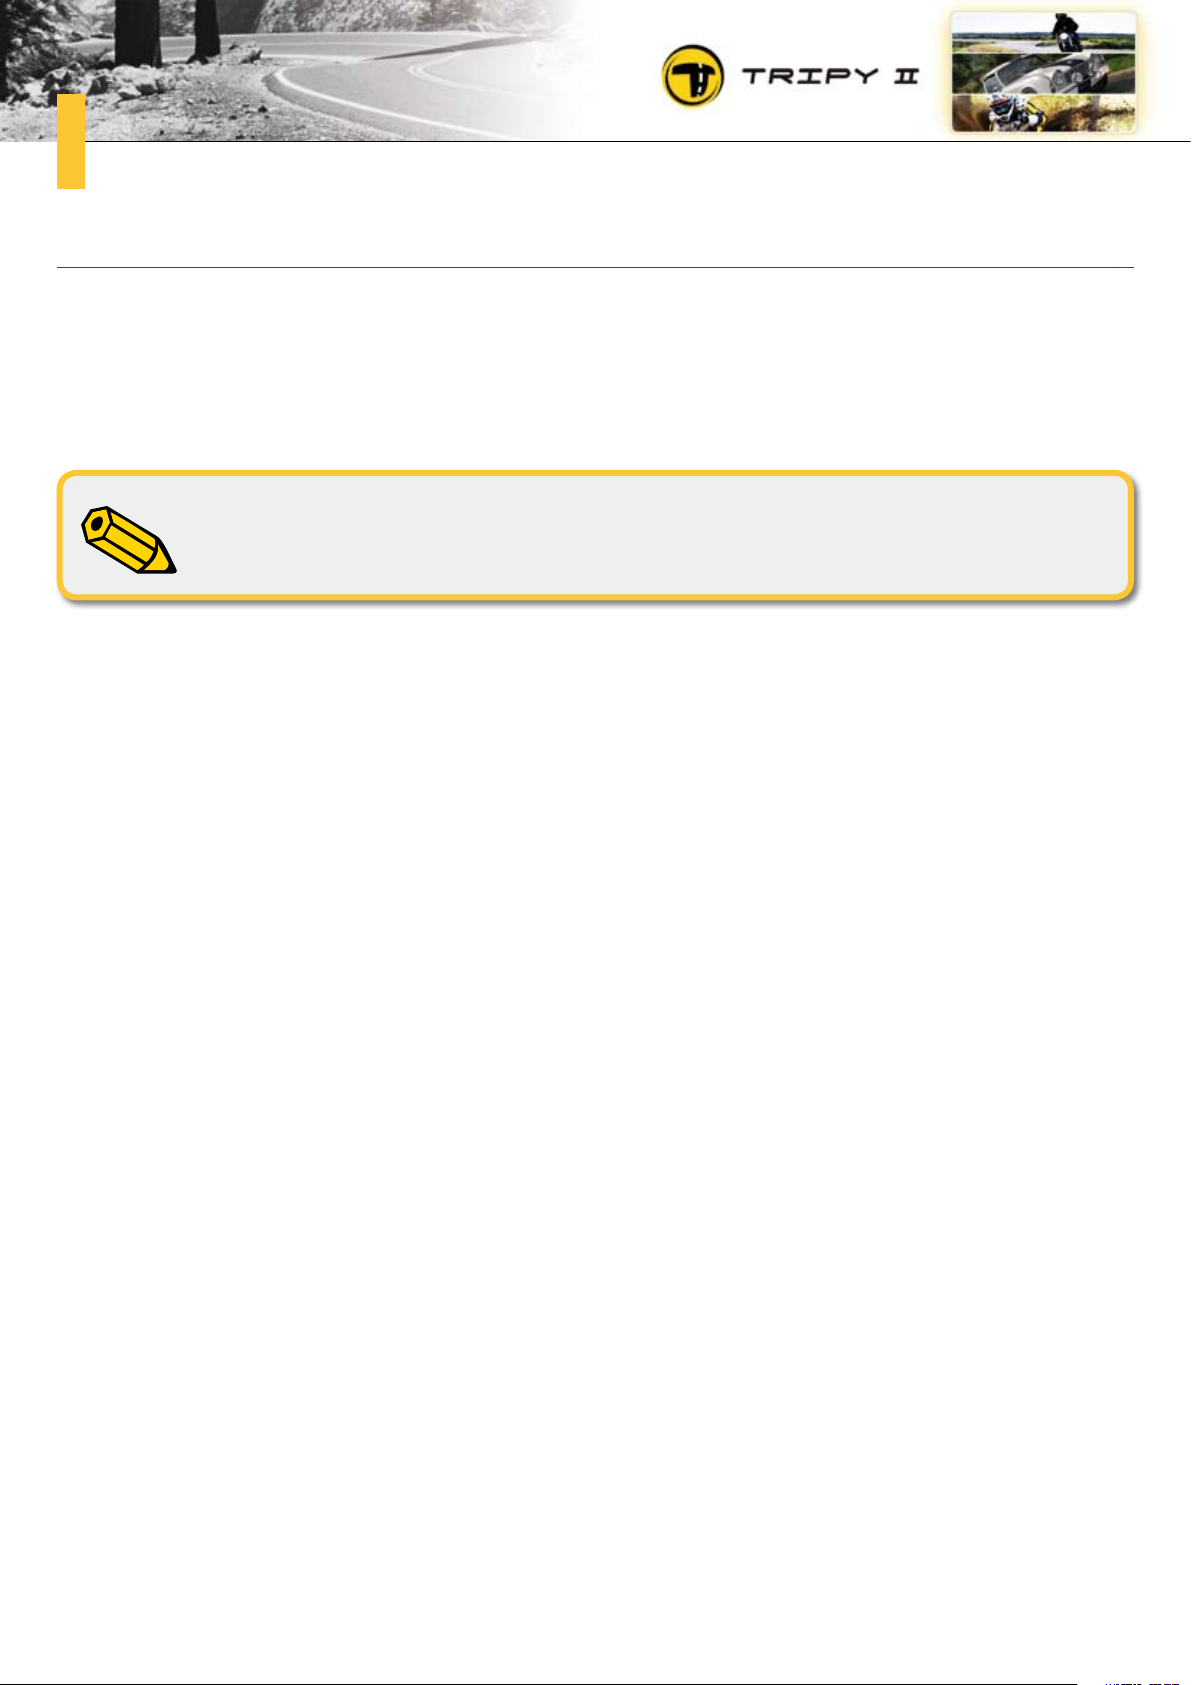
To store the current position, press the « OK » knob and maintain it pressed until obtaining from Tripy
II a confirmation window like the following:
If you store your position while away from the roads system (e.g. In the middle of a
field, at sea, in a country not included in Tripy II’s European maps, a.s.o..), only the
« Compass navigation » will allow you to navigate towards this position (the other
routing profiles require that the destination be on the roads system to find a solution
to the itinerary computation).
See also paragraph « 3.9 Data transfer between Tripy II and PC » - « c . Favorites ». You will find information about how to rename a favorite or display it on the PC.
Page 58
58
Compute an itinerary towards a « favorite » locationb.
To head for a previously stored « favorite » location, select the « Favorites/Preferred » function from the
« Destination » menu. You will then find a list of all your « favorites ». by means of the up/down (or
right/left) arrow keys select a « favorite » from the list and press « OK ». Tripy II offers you then to
choose the routing profile. To know the details about the routing profile, see paragraph « 4.2 How to
head for an address? » - « c. Routing profile ».
Only the « Compass navigation » allows heading for a « favorite » location outside of
the roads system.
Page 59
59
How to head for a point of interest (hotel, gas station, a.s.o...)?4.5.
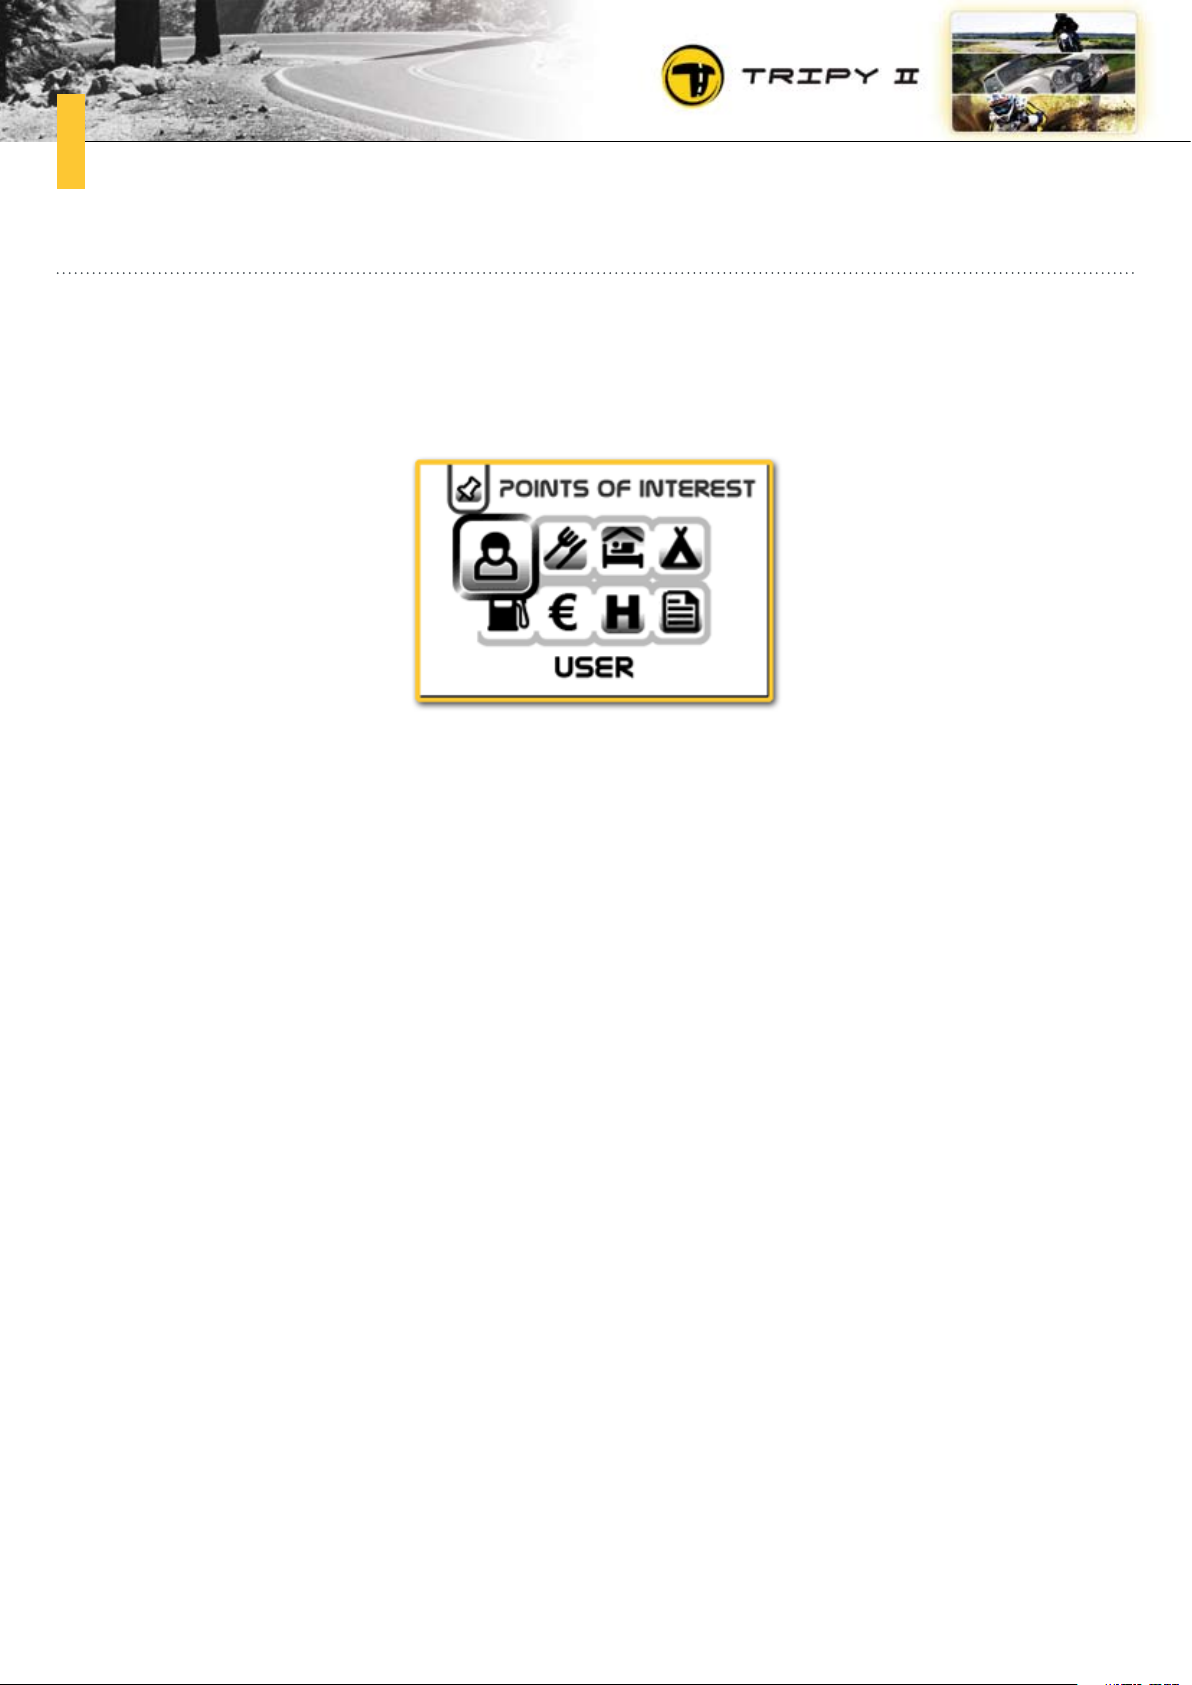
To find a point of interest and head for it, select the « Points of Interest » function from the « Destination » menu. A menu called « Points of Interests » will allow you to select the category you are looking
for.
The first category displayed in the « Points of Interest » menu is the « User ». This is where you will
find the list of points of interest you copied in the « user/roadbook/poi » directory. See also paragraph
« 3.9 Data transfer between Tripy II and PC » - « c. POI’s ».
You find then the most common categories:
Restaurants•
Hotels•
Campings•
Gas stations•
Cash dispensers•
Hospitals•
In the last category titled « All », you will find all other available categories (not solely the main ones).
The exhaustive list of these categories is the following:
Page 60
60
Airport.eu Airports
Amusement Park.eu Amusement parks
Beach.eu Beaches
Camping Ground.eu Camping grounds
Cash Dispenser.eu Cash dispensers
Cinema.eu Movie theatres
Concert Hall.eu Concert halls
Doctor.eu Medical doctors
Exhibition Center.eu Exhibition centers
Ferry Terminal.eu Ferry terminals
Golf Course.eu Golf courses
Hospital Polyclinic.eu Hospitals
Hotel or Motel.eu Hotels
Important Tourist Attraction.eu Tourist attractions (Castles, Forts, Abbays, Karting, ...)
Museum.eu Museums
Petrol Station.eu Stations de carburant
Pharmacy.eu Gas stations
Police Station.eu Police stations
Railway Station.eu Railway stations
Restaurant.eu Restaurants
Scenic_Panoramic View.eu Scenic views
Shop.eu Shops
Shopping Center.eu Commercial centres
Theatre.eu Theatres
Tourist Info Office.eu Tourism bureaus
One a category selected (either from the most common categories or the exhaustive list), you shall be
able to choose the points of interest the closest to you (option « near me ») or nearest to a location
«(option « near location »). The further you go down the list, further away are the POI’s. The distance
indicated is a straight line distance.
Page 61

61
Remains to choose from the list of points of interest and press the « OK » knob to compute an itinerary
towards this POI. Tripy II offers you then to choose the routing profile. To know the details about the
routing profile, see paragraph « 4.2 How to head for an address? » - « c. Routing profile » and starts the
navigation.
Page 62
62
How to head for a GPS coordinate (longitude – latitude) ?4.6.
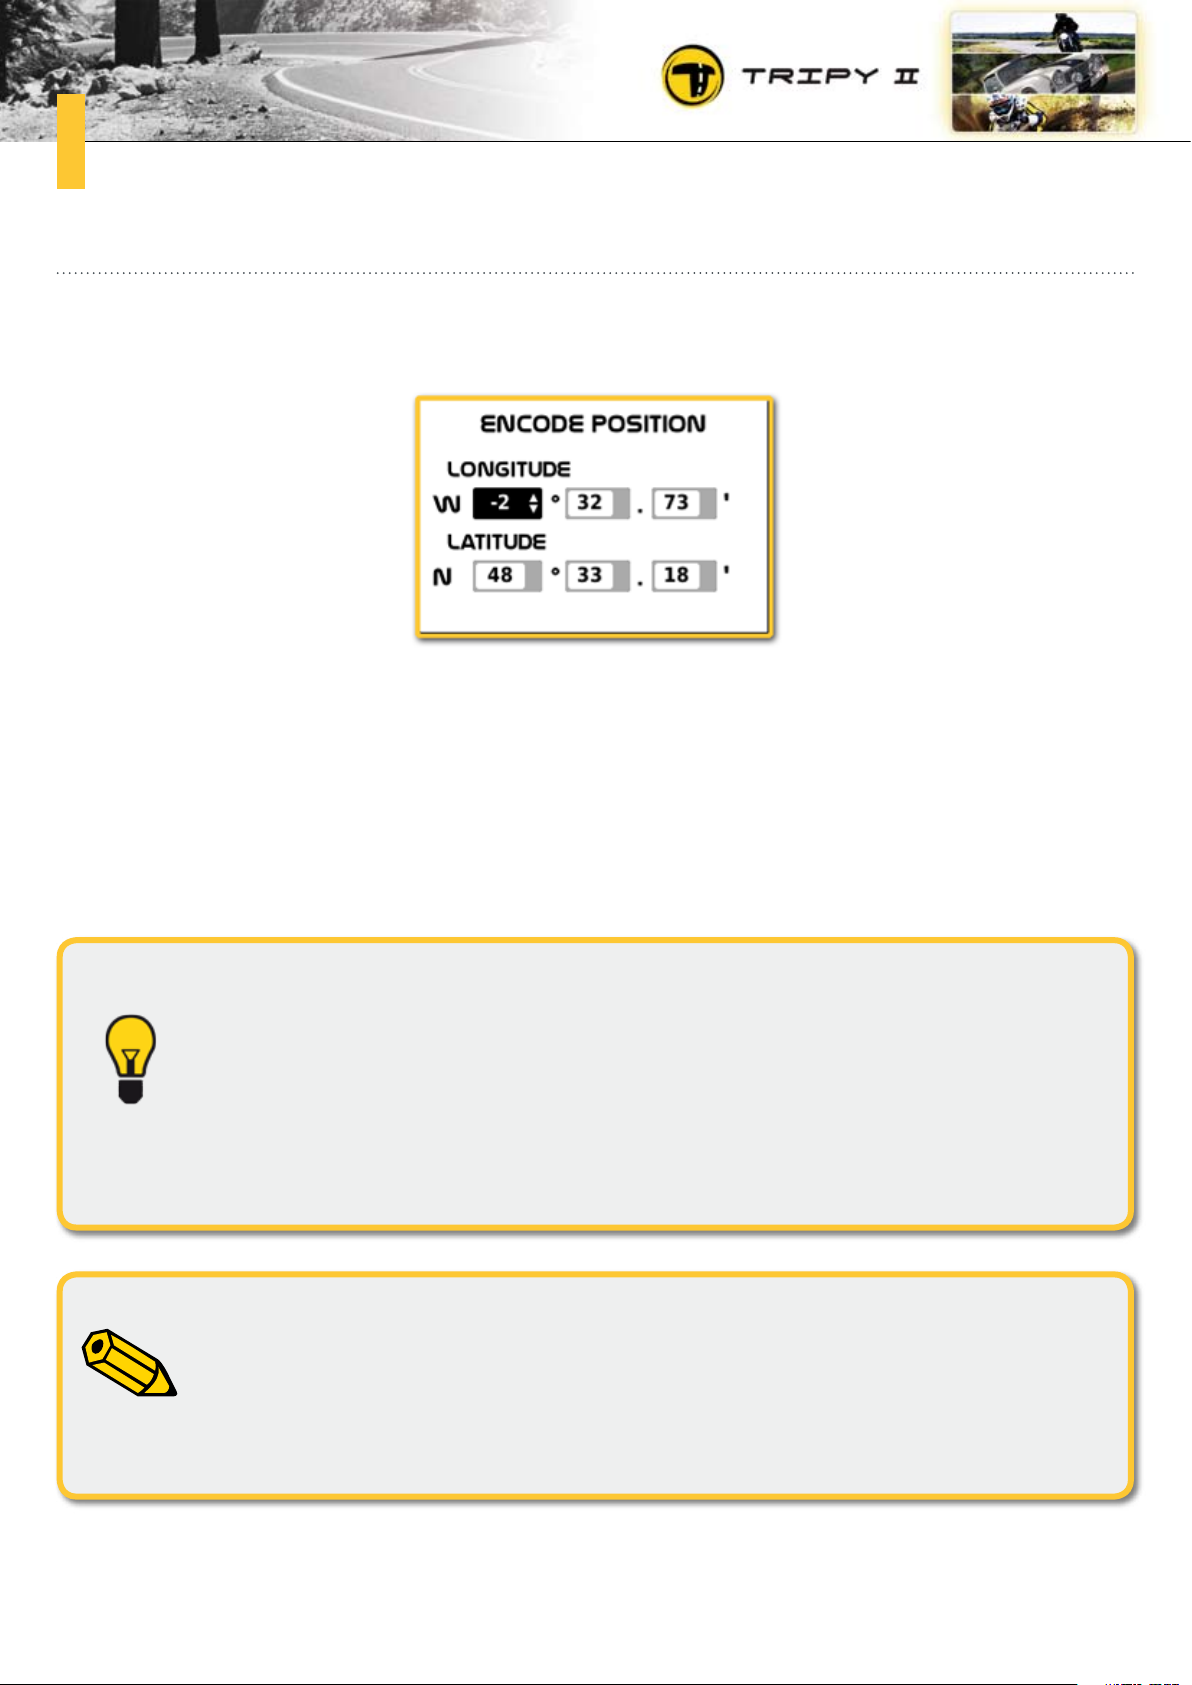
To head for a position determined by its longitude – latitude, select the « GPS position » in the « Destination » menu.
Tripy II will, by default, display the longitude and latitude of your current position. To modify it, make
use of the right/left arrow knobs to select the field you wish to modify (the active field is displayed on a
black background). Use then the up/down arrow knobs to adjust the field value. Proceed similarly for
each of the longitude and latitude fields until the desired value is displayed. Once the correct GPS position correctly set, press the « OK » knob to compute the itinerary towards that position. Tripy II offers
you then to choose the routing profile. To know the details about the routing profile, see paragraph « 4.2
How to head for an address? » - « c. Routing profile » and starts the navigation.
This function is useful, for example, to find a friend. Indeed, if the person to find can
communicate his/her longitude/latitude position by phone you will be able to head
for that position using the « Destination » - « GPS position » function. If the person
to find owns a Tripy, he/she may find his/her current longitude/latitude position in
the « Parameters » - « GPS status » screen or in one of the « info border » panes of
the road book navigation screen (See paragraph « 2.3 How does Tripy II navigate ? »
- « b. Road book display »).
If the position (longitude/latitude) you have selected is away from the roads system
(e.g. In the middle of a field, at sea, in a country not included in Tripy II’s European
maps, a.s.o..), only the « Compass navigation » will allow you to navigate towards
this position (the other routing profiles require that the destination be on the roads
system to find a solution to the itinerary computation).
Page 63

63
The GPS coordinates (longitude/latitude) may be expressed in various ways:
• in degrees and decimals of degrees
• in degrees, minutes and decimals of minutes (most commonly used)
• in degrees, minutes, seconds.
Tripy II handles all three formats and you may tune this setting in the « Advanced Settings » - « Coordinates » (See paragraph « 10.7 Advanced Settings » - « f. GPS coordinates »). Depending on the selected setting, the introduction of longitude and latitude will be done in two or three fields. In the
above example, Tripy II is set in degrees, minutes and decimals of minutes.
Page 64
64
How to navigate an itinerary ?5.
Preliminary5.1.
The way Tripy II operates in the navigation mode as well as the various display types it can offer are
explained in paragraph « 2.3 How does Tripy II navigate ? ». In this continuing paragraph we will focus
on the possible manipulations when navigating an itinerary.
In and out of the navigation mode5.2.
To navigate an itinerary, one should first have selected a road book (See paragraph « 6. How to search
and load a road book » or computed an itinerary (See paragraph « 4. How to head for destination? »).
Once this operation executed, the itinerary will remain « active » until having ridden it completely or
having left it (« Quit road book » function) or having selected another one. Even if you switch Tripy II off,
upon switching it back on, the active itinerary before switching off will be active after re-starting. In this
latter instance, after re-starting, Tripy II will automatically display the « Navigation » screen.
When in the « Navigation » mode, Tripy II presents a road book view (road book pictogram) or a map
view, or even a compass view. You may leave the « Navigation » mode at any time by means of the
« Menu » knob and so return to the main menu. By this way, you may review all the Tripy II functions
without interfering with the active itinerary. To return to the navigation display, simply select « Navigation » in the main menu.
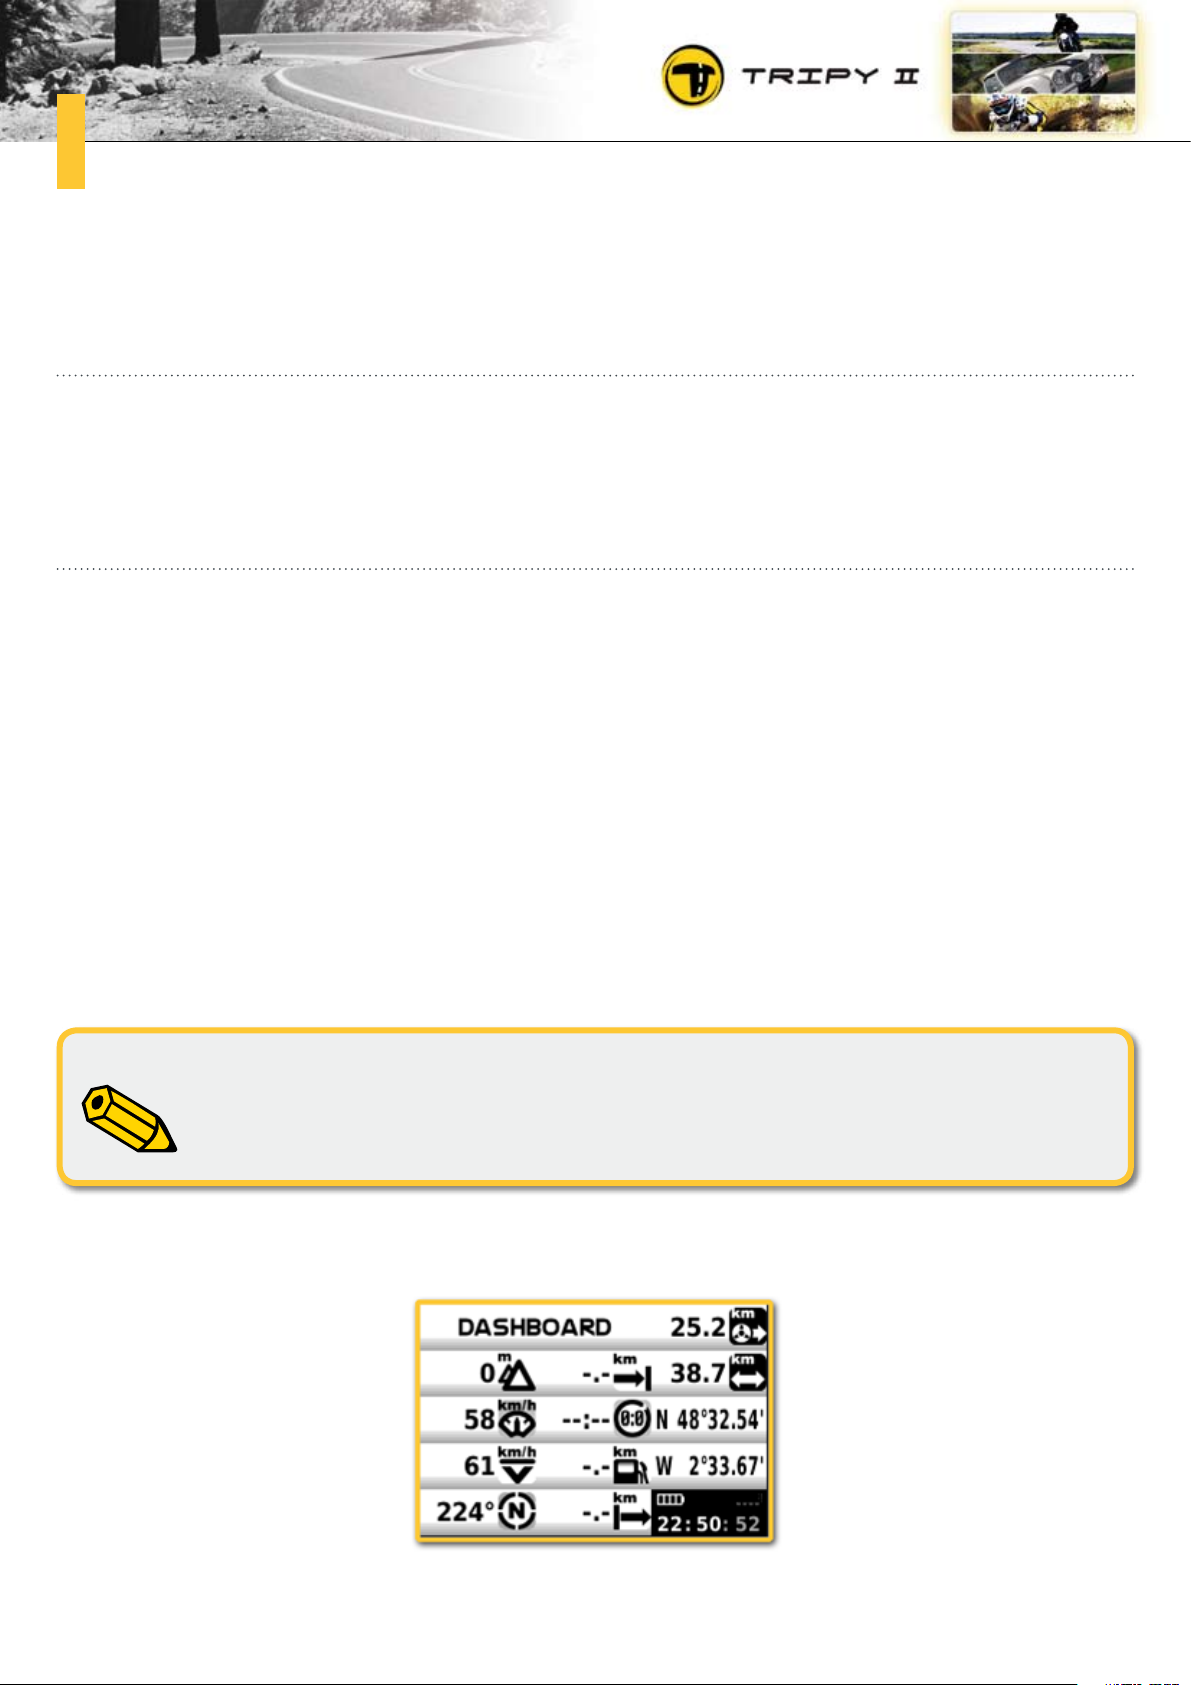
If you switch Tripy II on, or if you select the navigation screen while no itinerary is
active, Tripy II displays a « Dashboard » screen like on the picture below.
Page 65
65
Toggle the road book and map displays5.3.
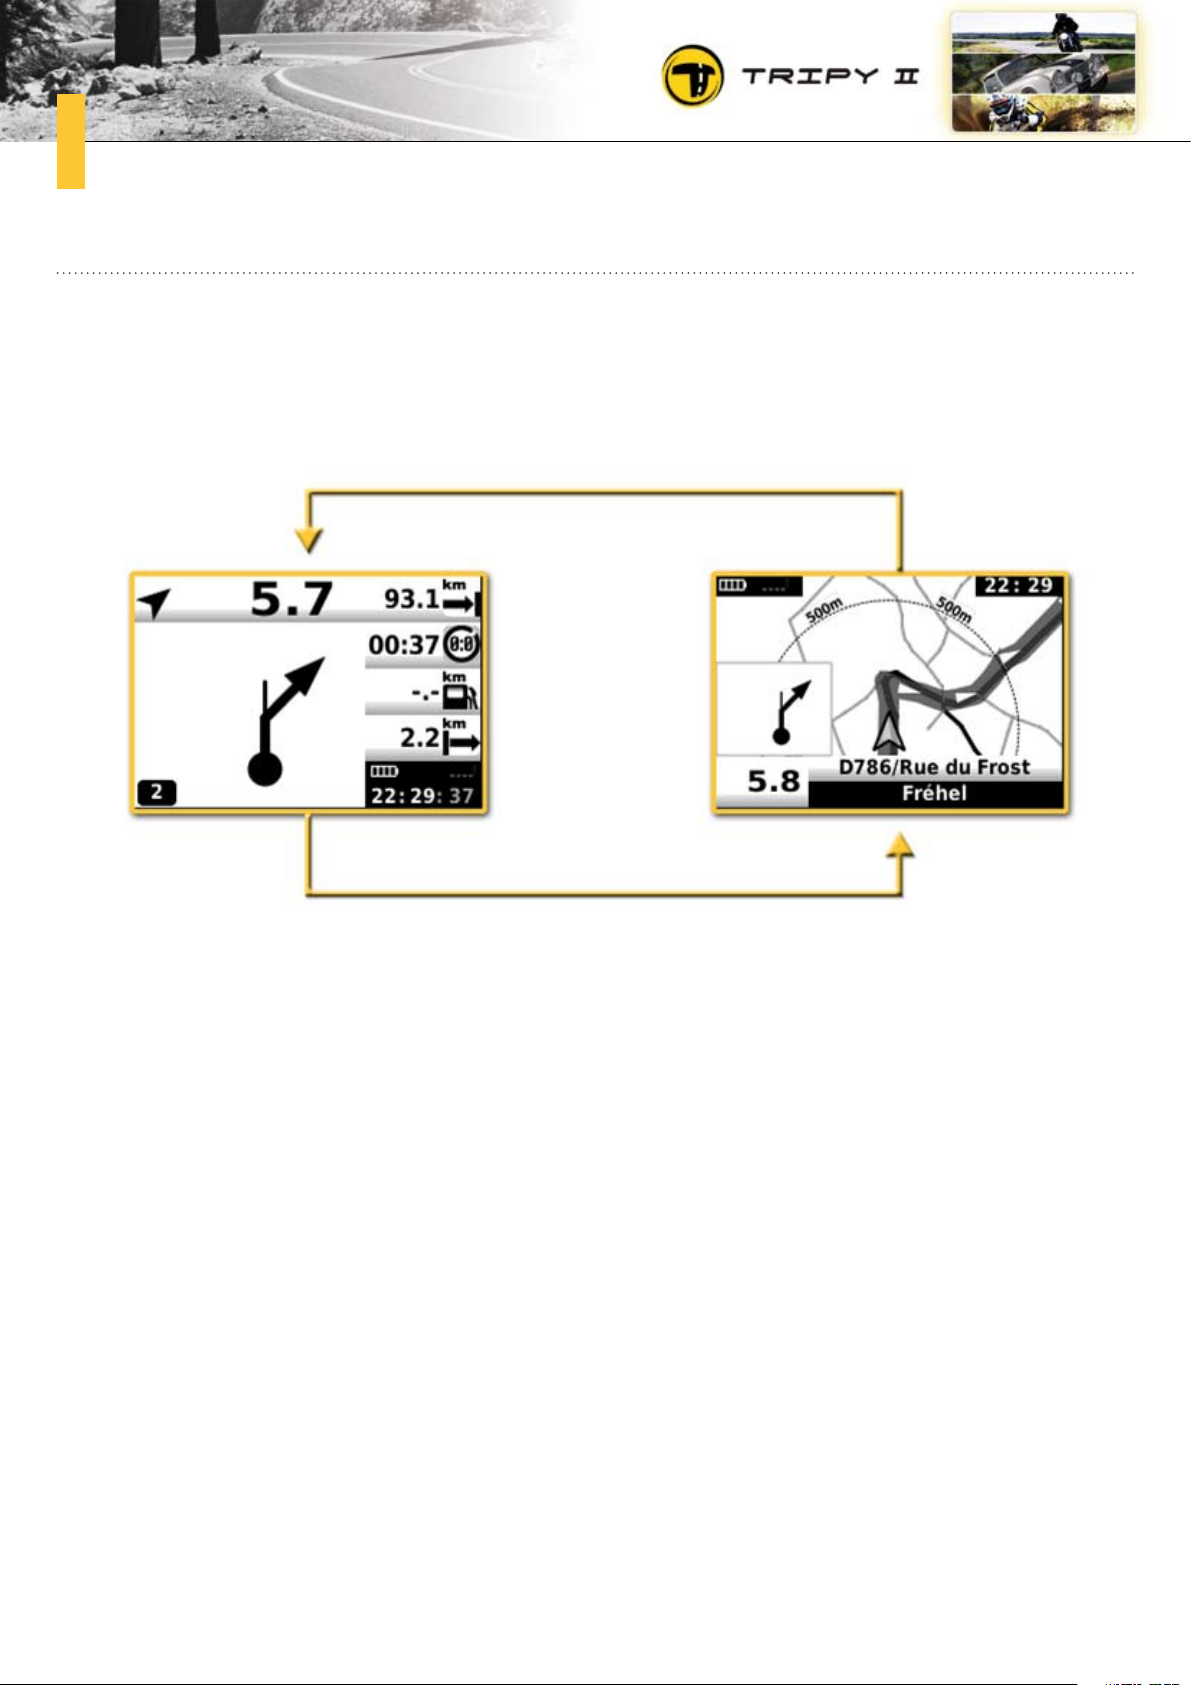
Tripy II may display the navigation information in two different ways:
•roadbookdisplay
•mapdisplay
OK
OK
To toggle between the two types, press the « OK » knob.
Page 66
66
Navigate under the road book display5.4.
The way Tripy II navigates in the road book display is explained in paragraph « 2.3 How does Tripy II
navigate ? » - « b. Road book display ».
Standard « pictogram » displaya.
If you ride normally the programmed itinerary, Tripy II displays a pictogram of the next road book waypoint. This pictogram represents the direction change you will find (following the main road) when the
partial distance will reach zero (the partial distance indication displays « --- »). Once the waypoint
crossed, the next waypoint is automatically displayed and the partial distance to it starts a new countdown.
partial distance
sniffer
next waypoint
pictogram
waypoint
number
info border
The next waypoint pictogram is normally always automatically displayed. If you wish, you may however
review the next (or preceding) waypoint pictograms using the right (or left) arrow knobs. In this instance, a small eye icon is displayed indicating that the displayed waypoint is not the one you are heading
for anymore. After a few seconds, without activating the arrow knobs, Tripy II returns to the normal
navigation mode, the eye icon disappear and the waypoint you are heading for as well as its countdown
are once again displayed.
However, under some conditions, Tripy II may display other information instead of the « next waypoint
pictogram ». See the following paragraphs for this topic.
Page 67
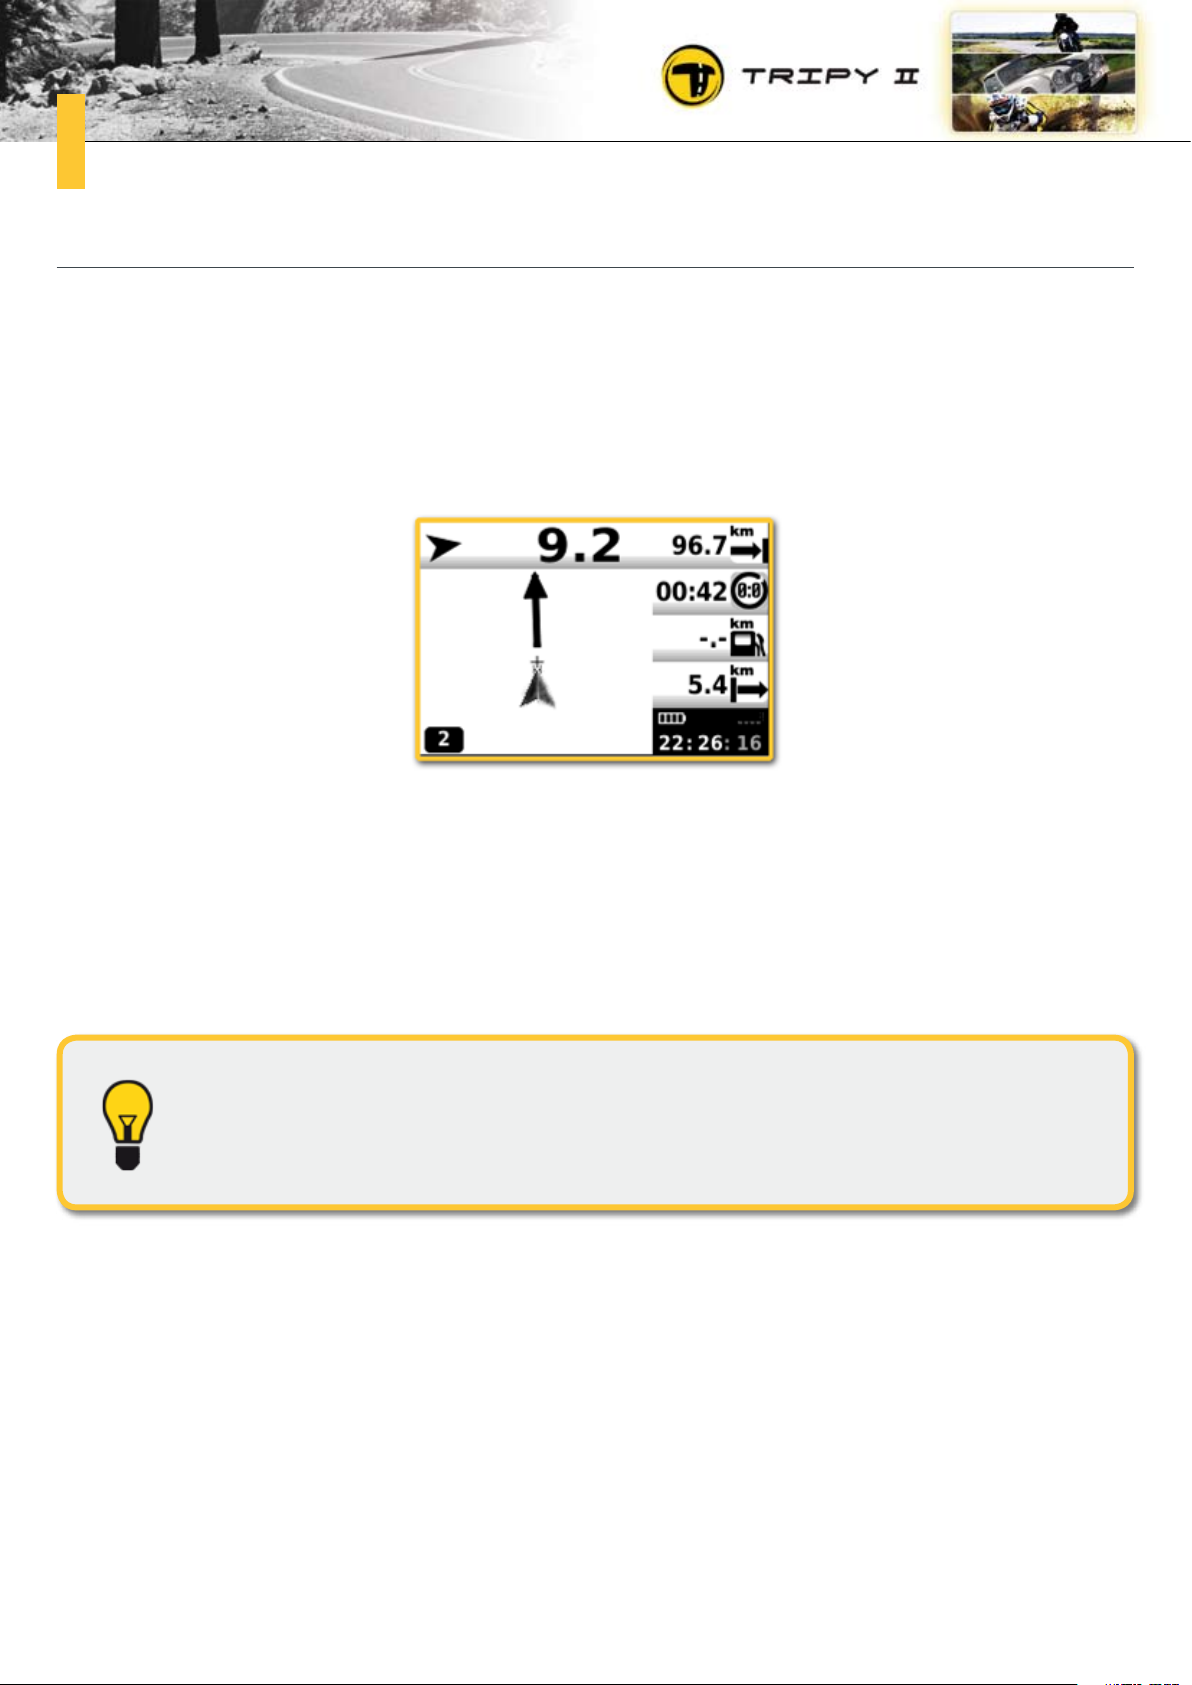
67
Ribbon displayb.
When you start riding a road book, you will find at the pictogram location, a « ribbon » type display. The
ribbon is a representation of the trace to be followed and the grey arrow in the middle of the screen,
your position versus the trace. You may then navigate in such a way that your position (the grey arrow)
meets the « ribbon ». In the example below, one understands that if one continues straight ahead, one
will actually connect to the trace.
Once on the trace, Tripy II will automatically switch to displaying the road book next waypoint pictogram
and the partial distance will be updated.
The ribbon display also occurs if you leave the itinerary. In this instance, it allows you to see where you
are versus the trace you should have followed. See also paragraph « 2.4 What happens as one leaves
the itinerary? ».
When you start a road book, it may be useful to toggle temporarily to the « map »
display to easily connect to the nearby start.
Page 68
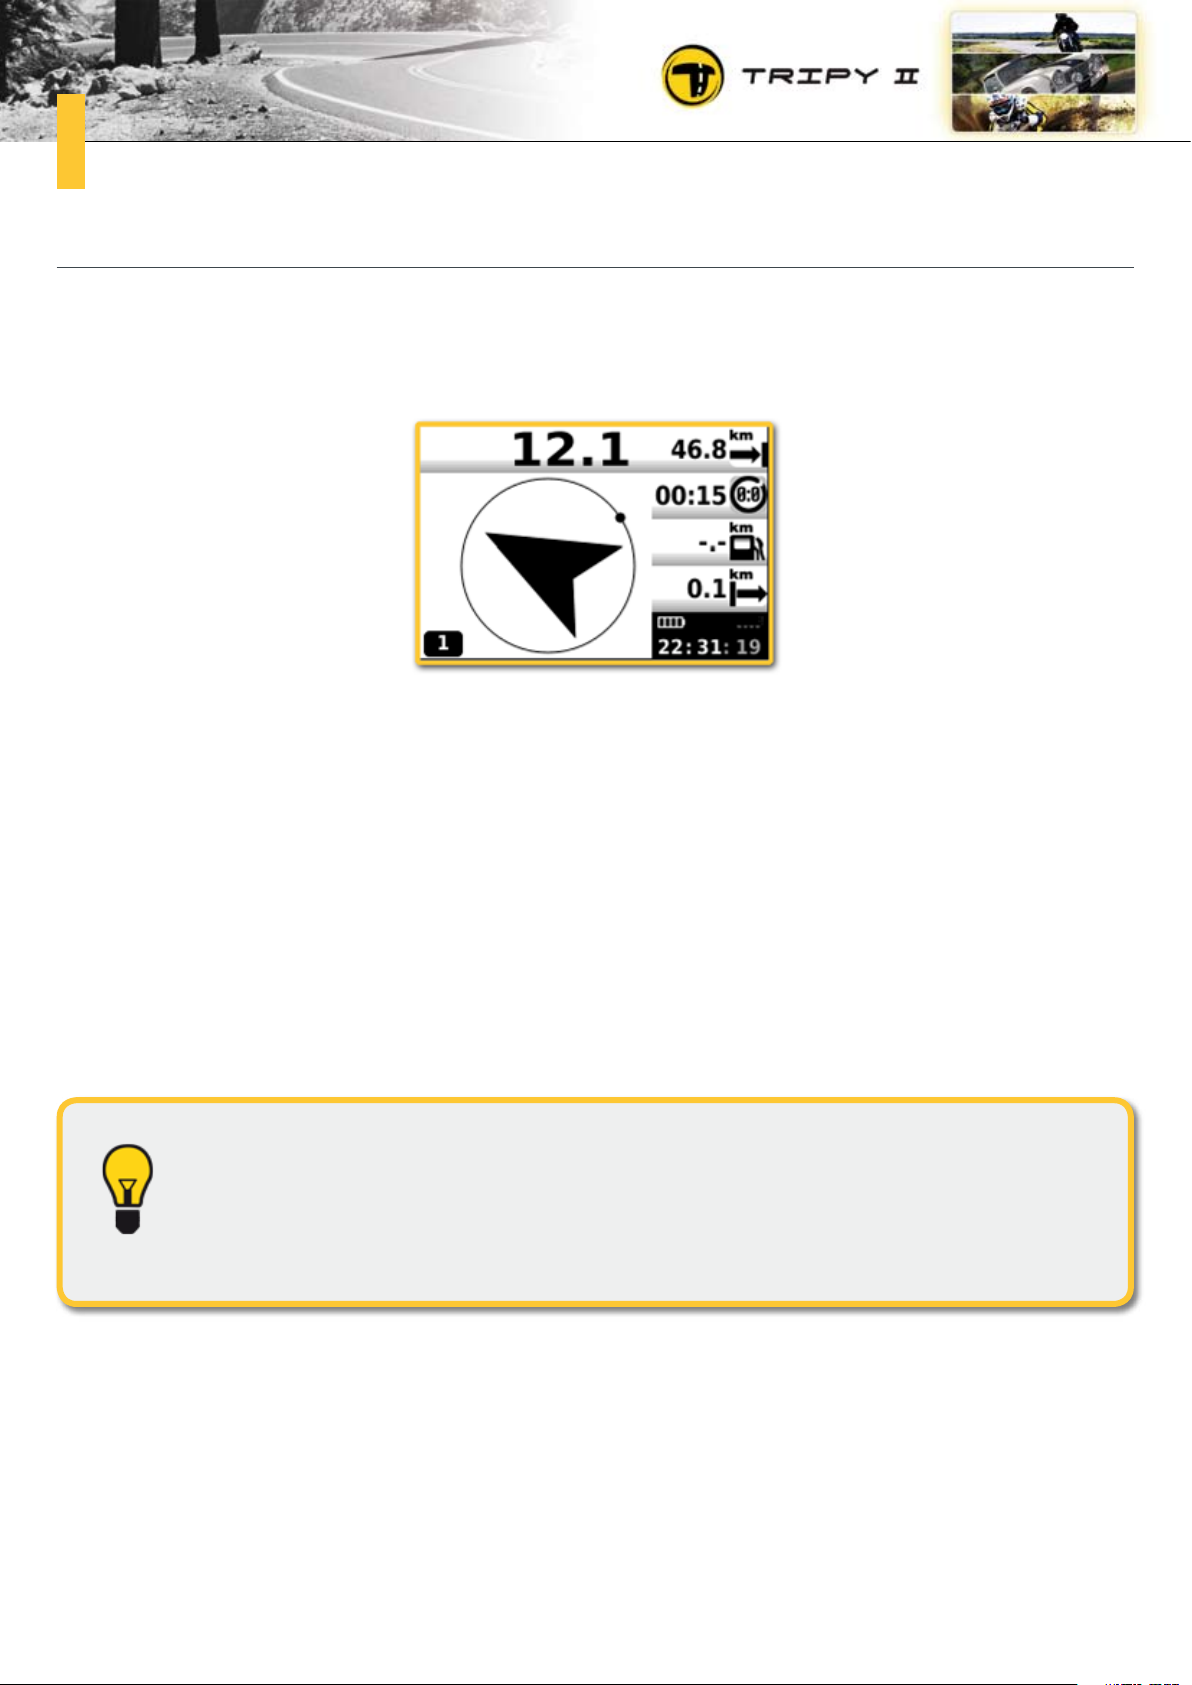
68
« Compass » displayc.
When you leave the itinerary, Tripy II displays first the « ribbon », yet if you continue further away from
the to be followed trace, Tripy II displays changes to the « compass » mode.
The compass points towards the next road book waypoint (the one towards which you were riding before leaving the itinerary). The waypoint number is displayed in the bottom left corner of the screen.
When Tripy II is in the « compass » display mode, the right/left arrow knobs allow the display modification of the targeted waypoint pictogram and straight line distance. The waypoint number displayed in
the bottom left corner is on a black background if it is the next waypoint you should headed for and on
a white background if you have modified the targeted waypoint number (by means of the left/right arrow
knobs).
If you ride a « beacon » type road book, the compass display is permanent. This special road book type
is used in « off-road » applications (see paragraph « 2.3 How does Tripy II navigate ? » - « e. Compass
display (beacon itinerary) »).
If you navigate with the road book display and the « ribbon » or « compass » suddenly show up, you shall immediately come to the conclusion that you are not on the
programmed itinerary anymore. You may the use the ribbon or compass to re-connect
to the next waypoint. You may also toggle to the « map » display or use the « recompute » function (See hereafter).
Page 69
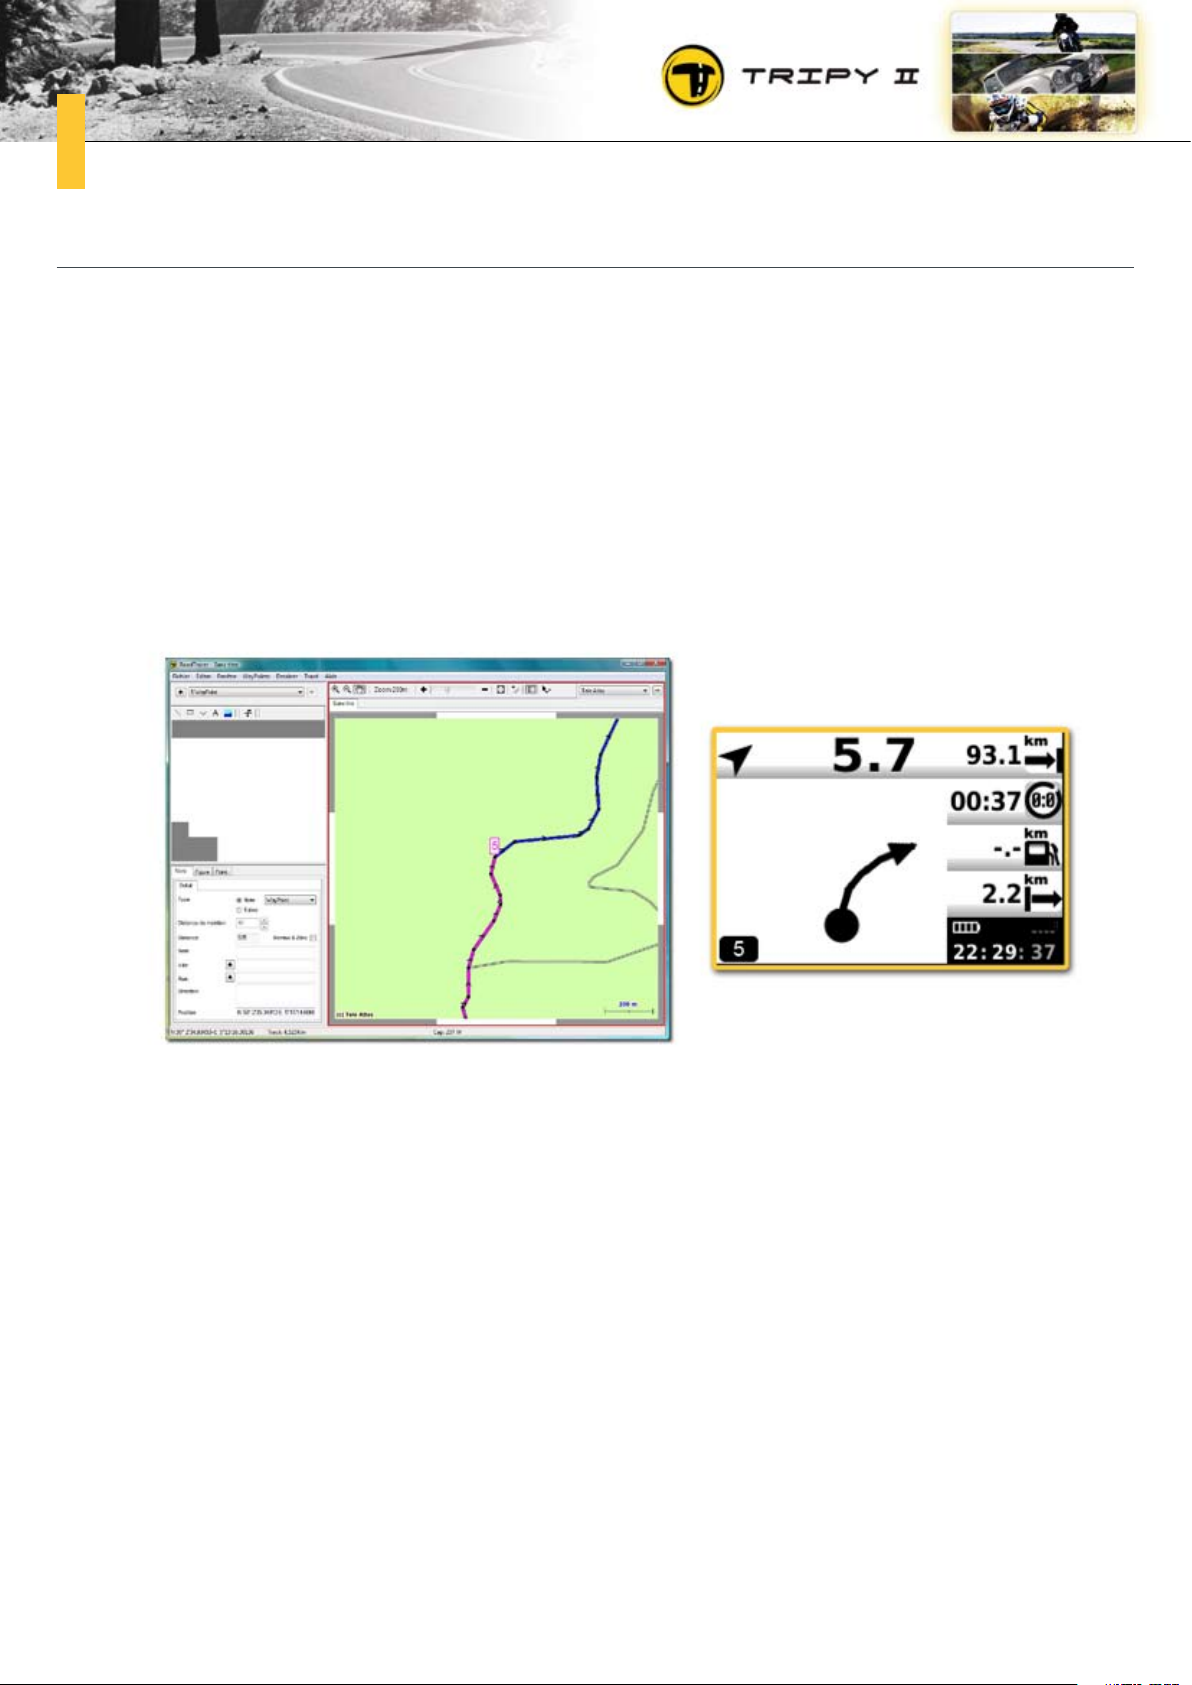
69
Simplified pictogramsd.
In some instances, it could be that a road book contains waypoints for which not pictogram has been
designed. It is the case if the person who created the road book did not draw the waypoint pictogram.
It is also the instance if you ride a road book you just recorded (See paragraph « 8. how to ride immediately a scouting trip », and in which you have marked some waypoints (these waypoints are well marked in the recorded track but do not contain any pictogram).
In this instance, as Tripy II has no pictogram to display, it will display a « simplified pictogram ». The
« simplified pictogram » is a pictogram showing the general directions of the track at the location
where the waypoint is marked.
Page 70
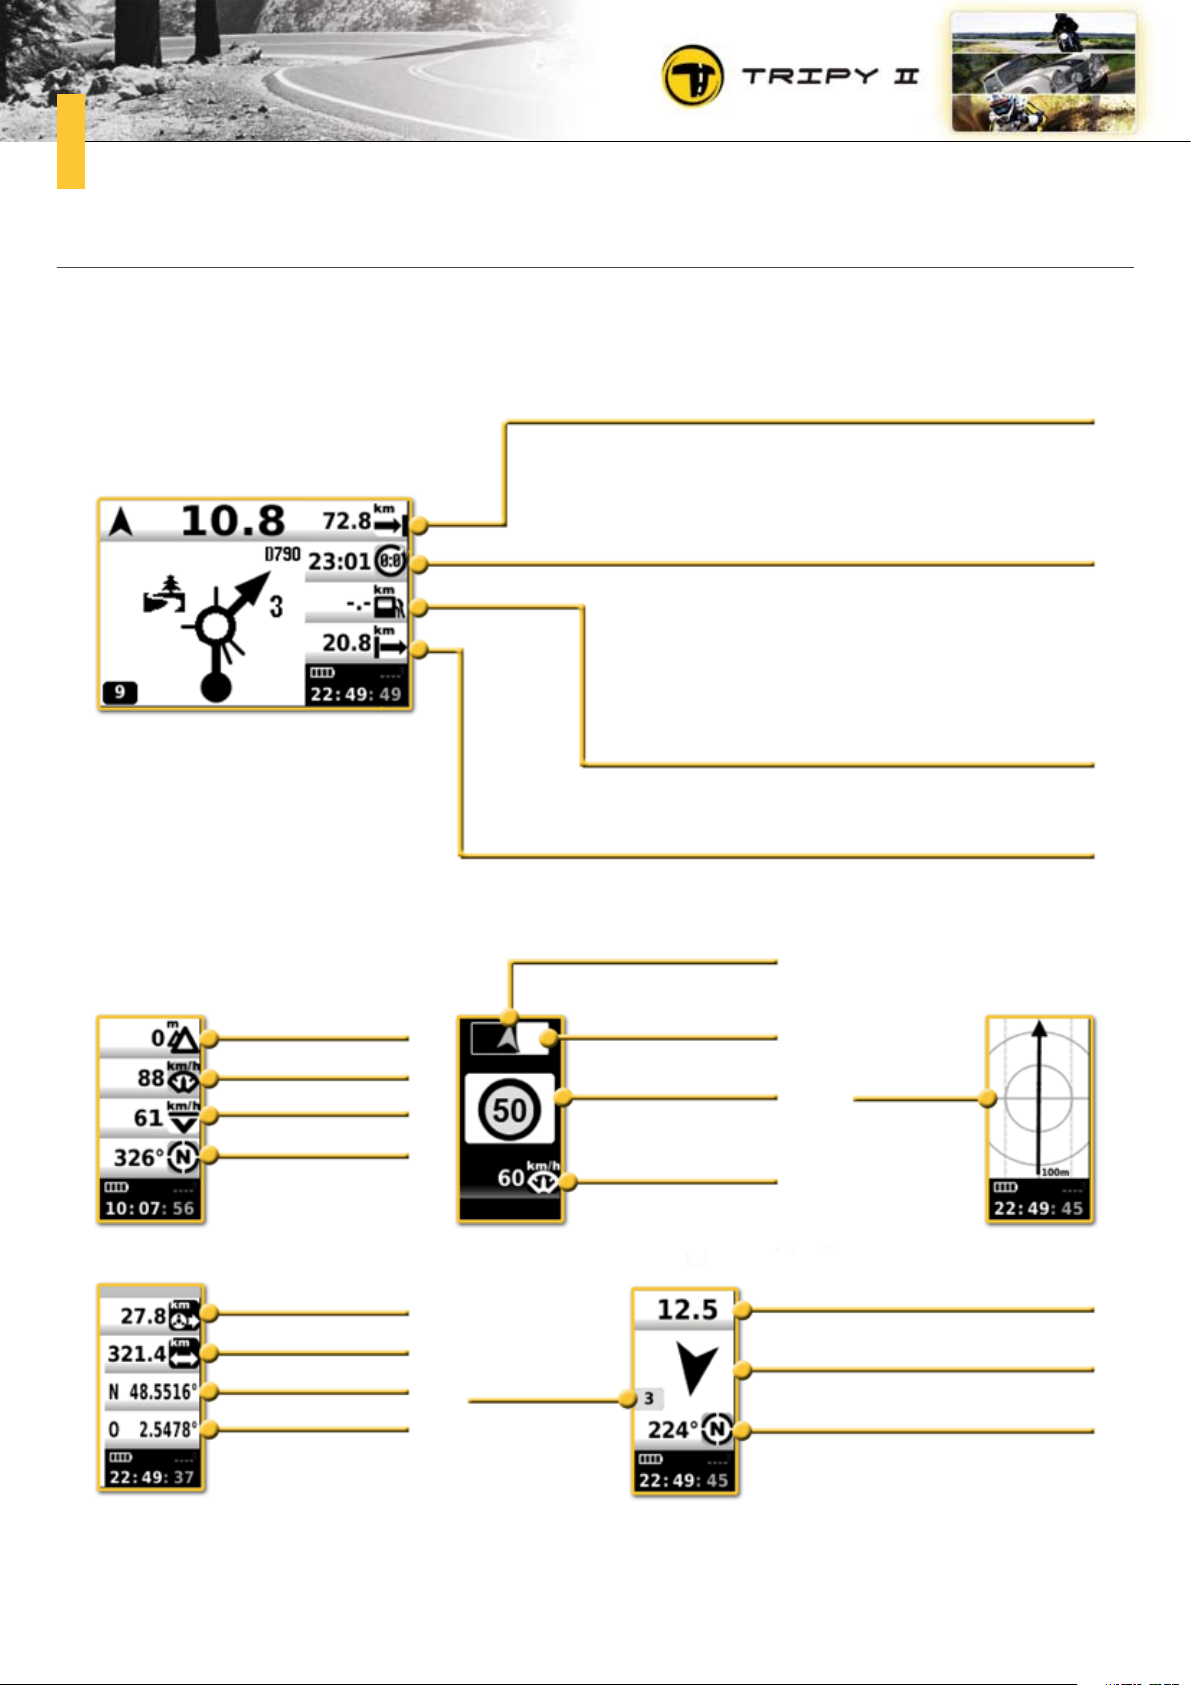
70
Various « info borders »e.
The « info border » pane may display various different information. These data are gathered on five
panes explained here below.
Estimated arrival time
This time is computed according to the average of
the last 15 minutes driven.
Distance remaining to the next gas station.
To obtain information in this field, the road
book editor must have defined a waypoint as
a gas station.
altitude
current speed
average speed
bearing
partial odometer
total odometer
latitude
longitude
Distance actually ridden since the start of the itinerary.
speed trap direction
proximity
ribbon
screen
controlled speed
current speed
distance to next waypoint
next waypoint
direction towards next waypoint
number
bearing
By means of the up/down arrow knobs, you may change the “info border” pane and choose the one you
want to display.
Page 71
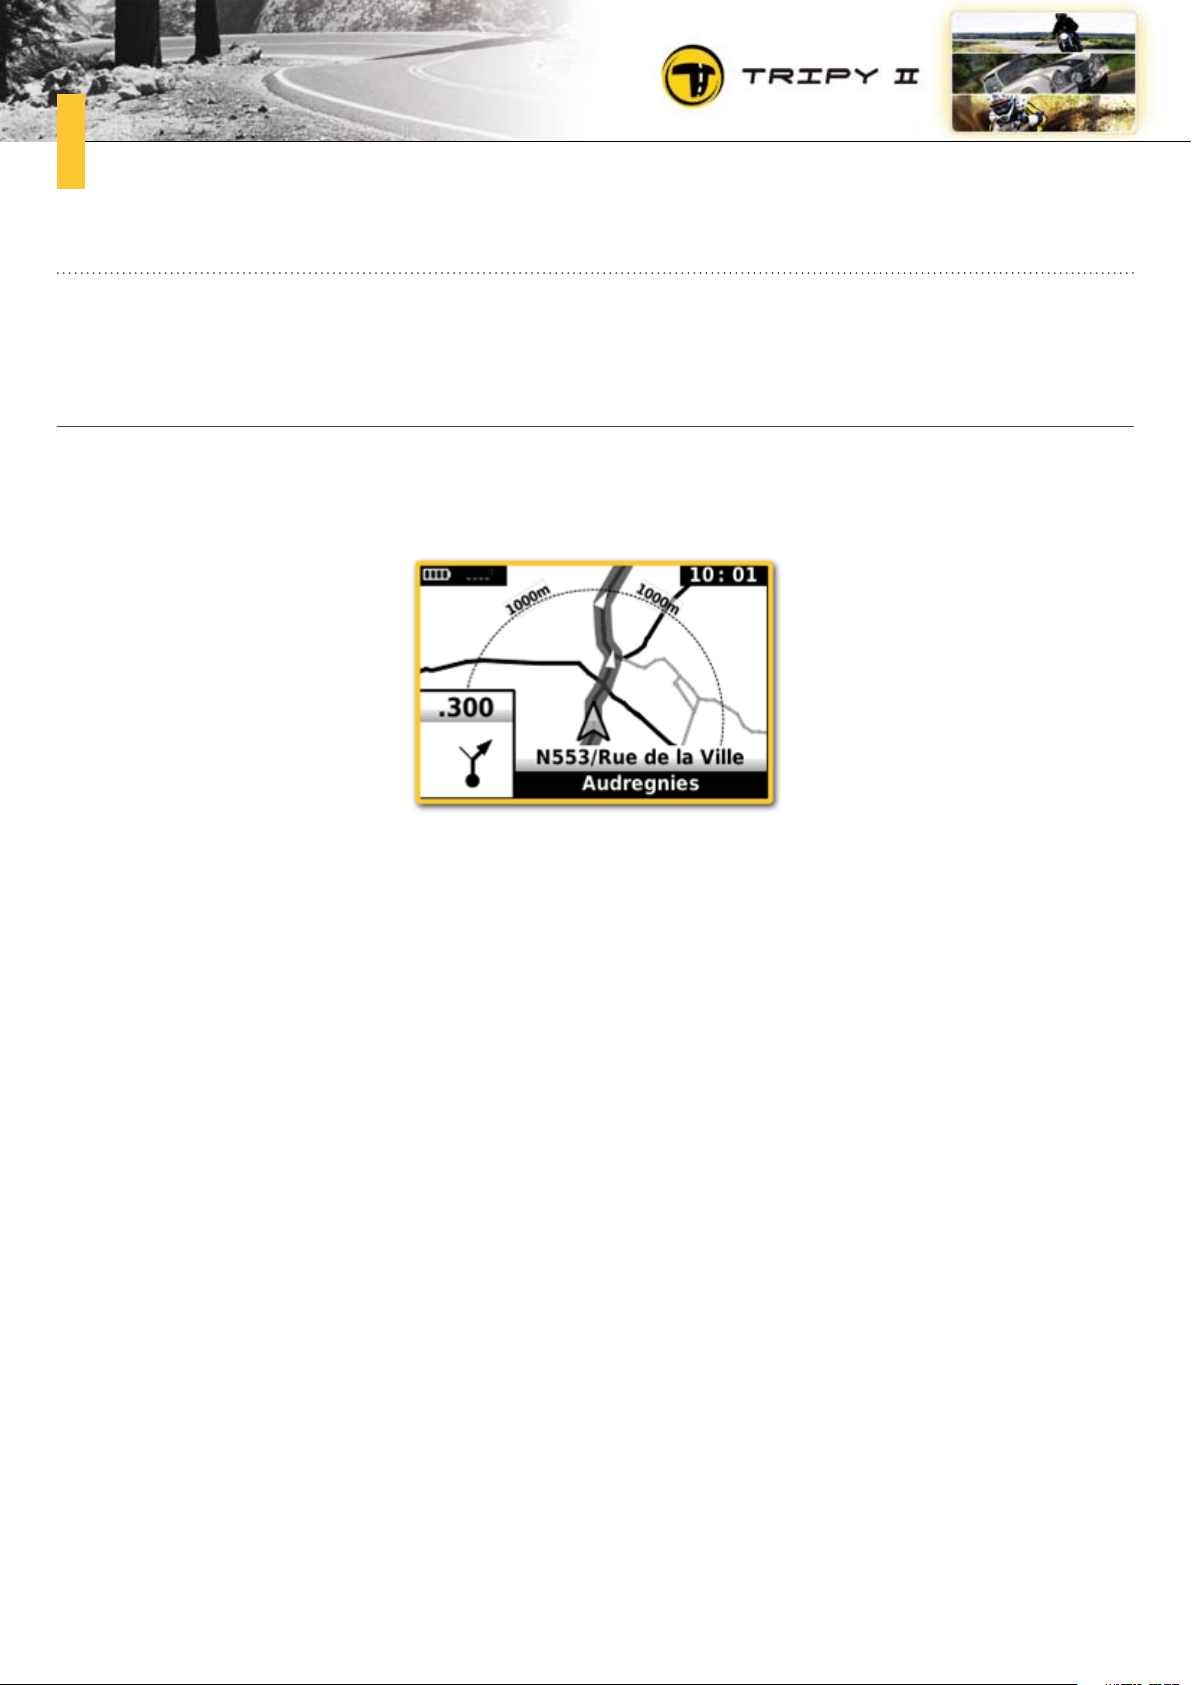
71
Map navigation and displaying the itinerary computed by Tripy II5.5.
The way Tripy II navigates in the map mode is explained in paragraph “2.3 How does Tripy II navigate ? »
- «a. Map display”.
“Riding direction” orientationa.
When the map is displayed, the right/left arrow knobs allows the change of the zoom factor. At the 100m,
250m, 500m, 1km, 2km and 3 km zoom factors, the map is displayed in the actual riding direction up.
You will find at the bottom of the screen, the street and town of your current location (only if you are on
a road existing in the Tripy II library).
In the bottom left corner, Tripy II displays the partial distance to reach the next active road book waypoint.
When you come closer than 500m from the next waypoint, the pictogram will be displayed just above
the partial down-counter.
Page 72
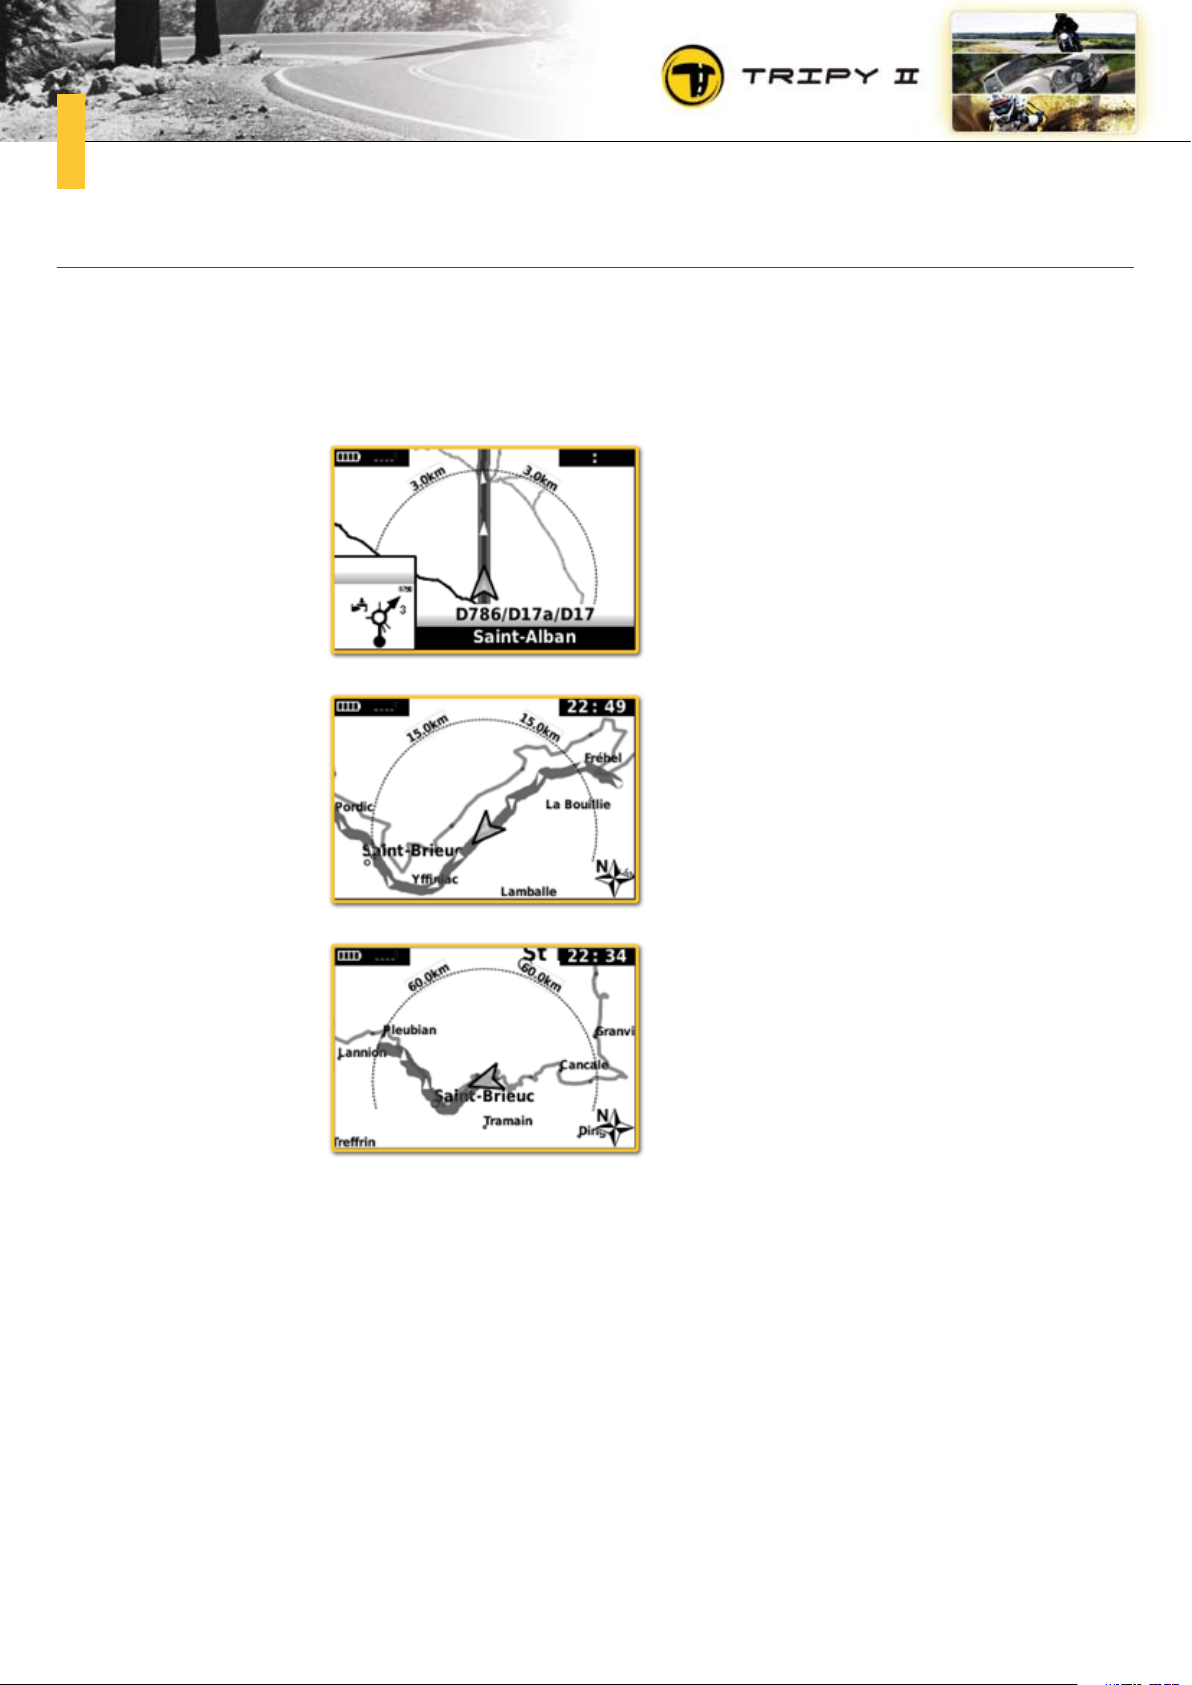
72
“North” orientationb.
At zoom factors larger than 3km, you may see a map oriented to the North containing only the country’s
borders and the names of the main towns.
proximity map oriented in the
riding direction at a 3km zoom
factor
North oriented map at a 15 km
zoom factor
North oriented map at a 60 km
zoom factor
The North oriented map gives you an idea of the path of the itinerary (the loaded road book or the Tripy
II computed itinerary).
The North oriented map is normally centered on your current position. You may however use the up/
down arrow knobs to move the map along the active itinerary and scroll through it.
As soon as you use the up/down arrow knobs, a small “eye” icon is displayed in the bottom left corner
of the screen. It means that the map is not centered anymore on your current position but well on you
itinerary. Under the “eye” icon , a number is displayed in a format xxx/yyy (e.g. “25/63”). The second
number (yyy) indicates the total track length and the first one (xxx) the millage corresponding to the
position at the centre of the screen.
Page 73

73
After a few seconds, the small “eye” disappears and the map is repositioned to the current position.
Page 74
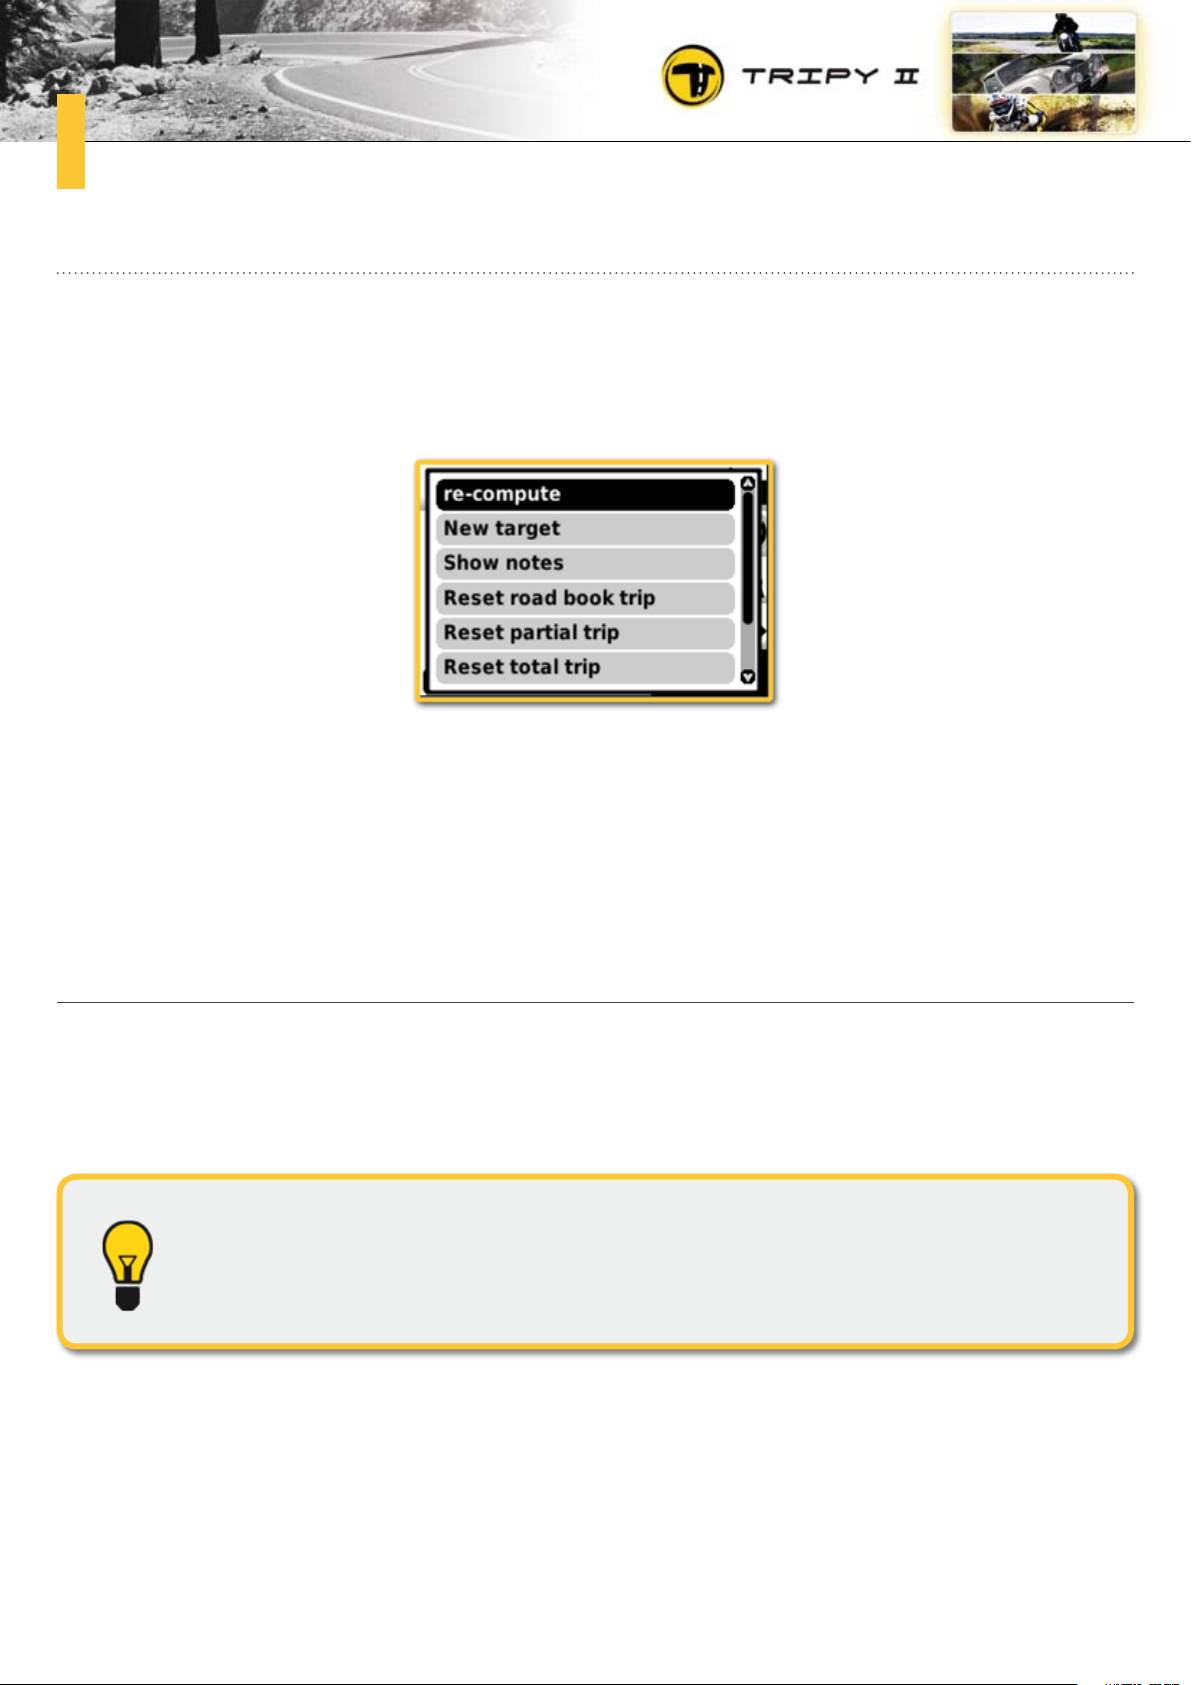
74
Additional navigation functions5.6.
When in the “Navigation” mode, either in the “road book” or “map” display, you may activate a functions
menu by means of a long pressure on the Menu knob (let the finger pressed on the menu knob until the
list of additional functions is displayed).
These functions allow you to:
re-compute an itinerary in the instance you could not follow the original one,•
display the waypoints pictograms of a road book even if you do not ride it,•
reset the odometers,•
leave the “active” road book,•
store the current position (in the favorites or in the current recording).•
Re-compute an itinerary to final destinationa.
This option runs an itinerary computation from the current location to the final destination of the navigated road book. You may use this option if you have left the itinerary and wish that Tripy computes a
new itinerary from where you are to the final destination.
If you ride a road book manually and carefully crafted, avoid this function that may
re-compute an itinerary totally different than the original one. Favor in this instance the re-computing towards a given waypoint.
Page 75
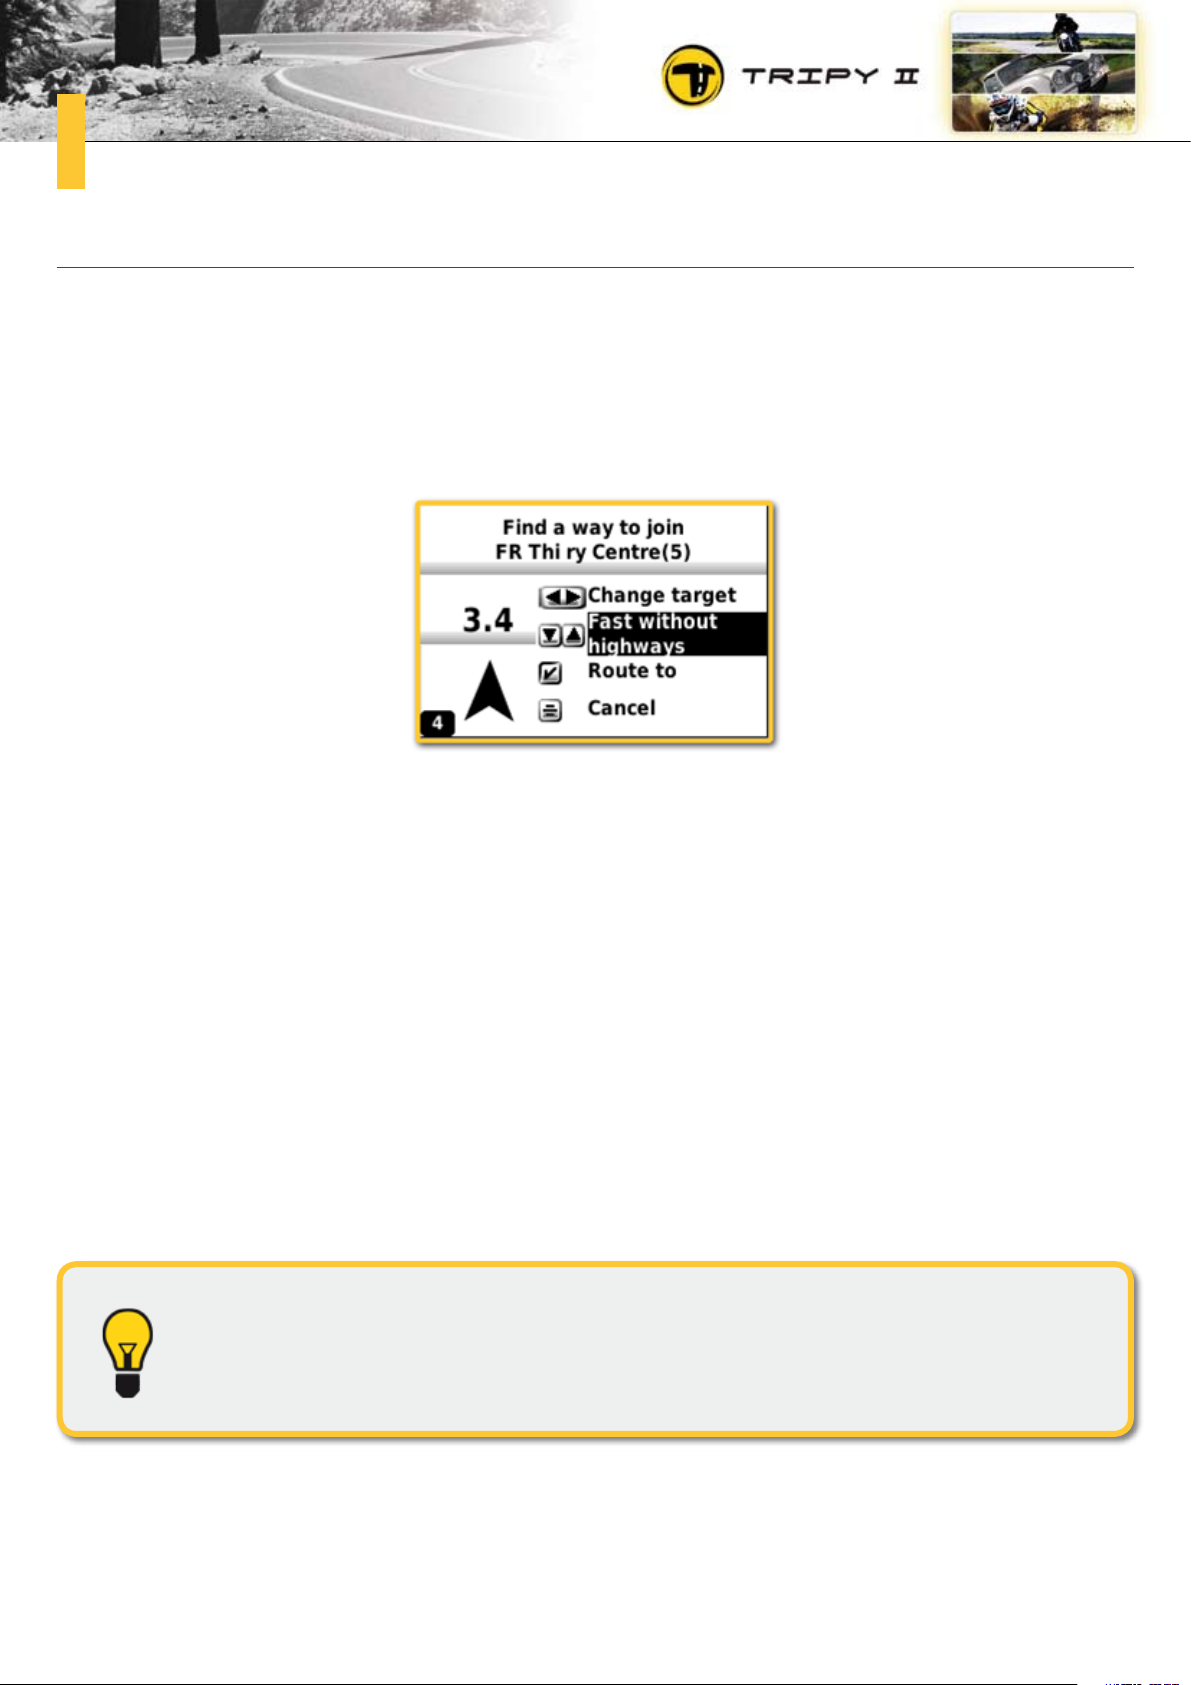
75
Re-compute towards a given waypointb.
This options runs an itinerary computation as from the current location to a given waypoint number of
the navigated road book. You may use this option if you have left the itinerary and wish that Tripy computes a new itinerary from where you are to a given note that you may select in the original road book.
After selecting the function to re-compute to a given waypoint, Tripy II displays the following screen:
By means of the left/right arrow knobs, you may set the road book waypoint number towards which you
wish to re-compute an itinerary (target waypoint). When you change of target like that, the compass
and straight line distance to that waypoint are updated on the screen. You may then choose the routing
profile by means of the up/down arrow knobs. Once these settings chosen, press the “OK” knob to start
the itinerary computation.
As soon as the computation is completed, Tripy II switches to the navigation mode and the road book
leading to the “target” waypoint is started. After riding this road book until its end, you will have reached
the “target” waypoint of the original road book. A special “connection” waypoint will be displayed and
the original road book will automatically resume.
While you ride the road book to the “target” waypoint, the distance to destination, and estimated arrival
time information pertain to this connection road book and not to the original road book.
If you are brought to leave the original itinerary, wait to be away from this one of at
least a few kilometers prior to launch the re-computing function. If you do not care
for this, Tripy II may re-compute an itinerary identical to the original one.
Page 76
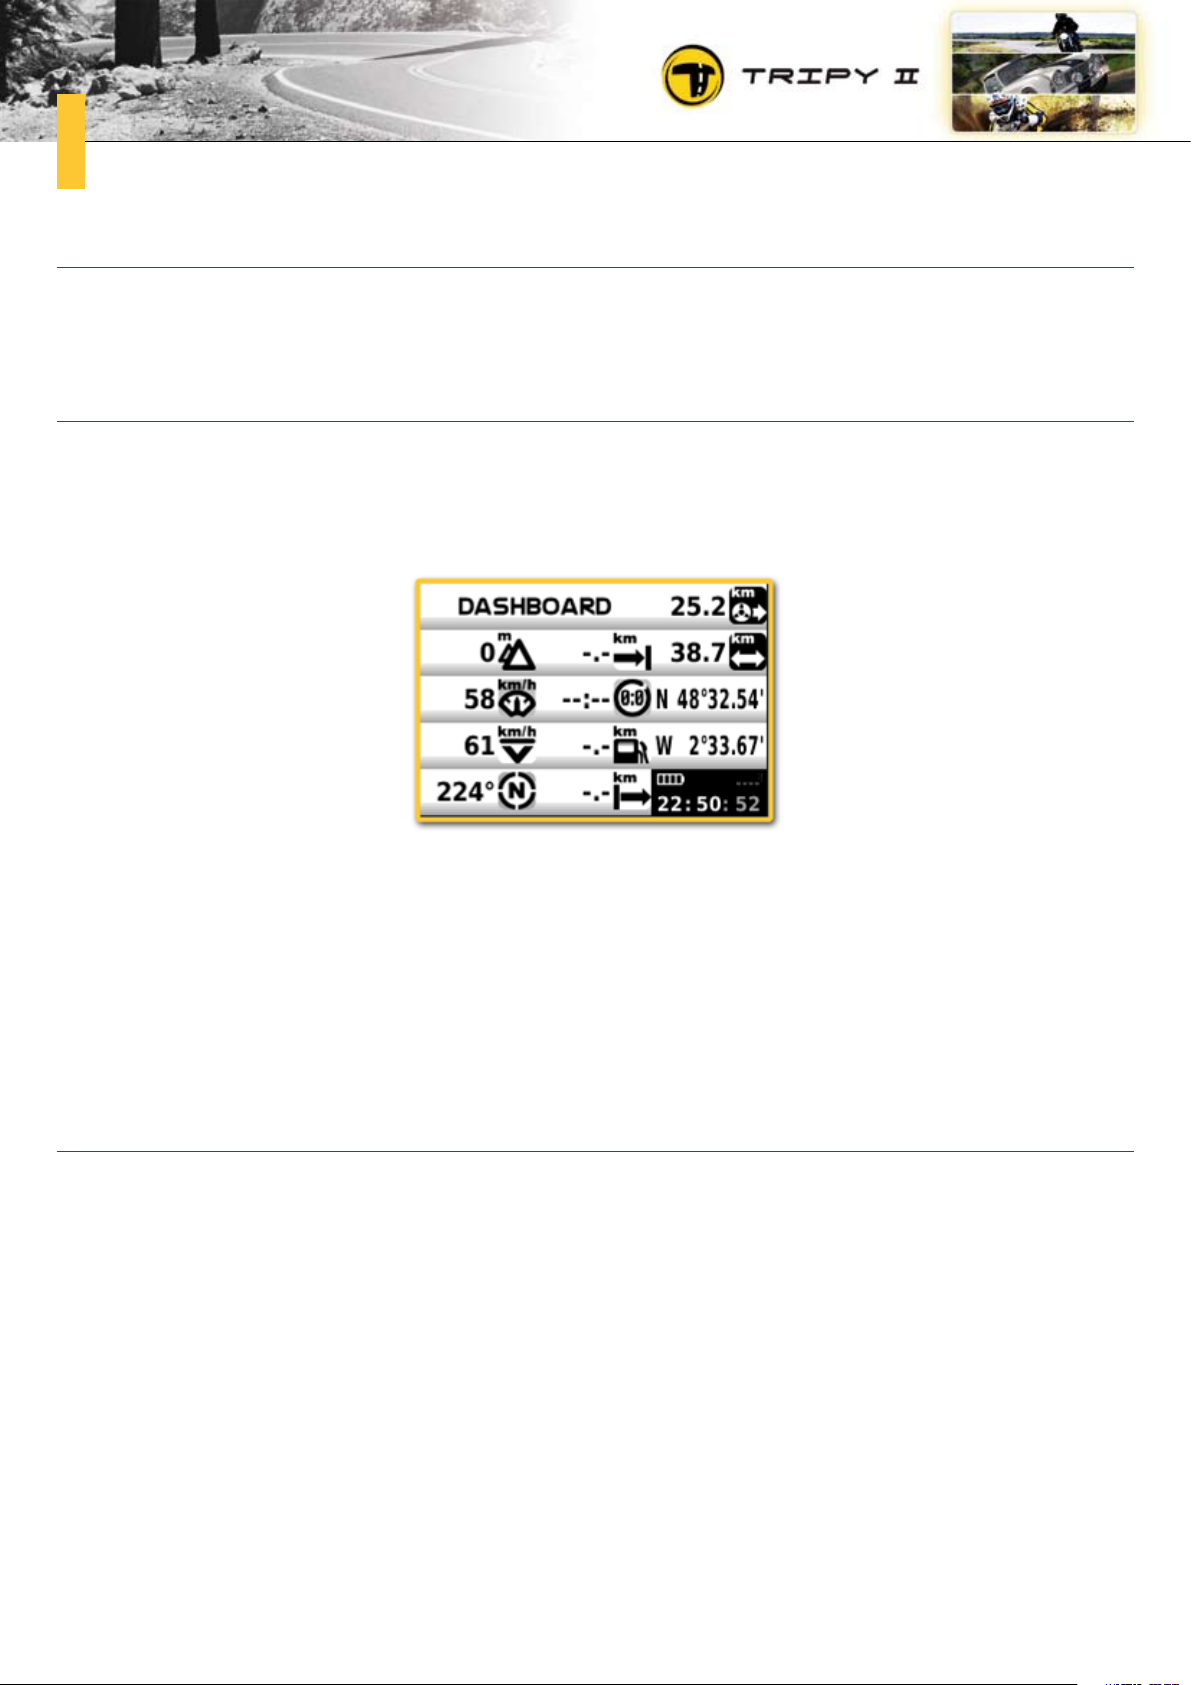
76
Reseting the odometersc.
The function “Reset Trip” allows the resetting of the road book, partial and total odometers displayed
in the various panes of the “border info”.
Leaving the road book and switch back to the dashboardd.
The function “Quit road book” allows leaving the active road book. The navigation mode will thereafter
display the dashboard as illustrated below.
When the dashboard is displayed, you may activate the functions menu by a long pressure on the Menu
knob (let the finger pressed on the menu knob until the list of additional functions is displayed). The
available functions will, in this instance, be limited to the resetting of the odometers and the storing of
the current position.
While displaying the dashboard, you may toggle to the map display by pressing the “OK” knob and return
to the dashboard by pressing the “OK” knob once again.
Store my positione.
This function allows the storage of the current position in the favorites or in the current recording (if
recorder is active). Another way of activating this function is by a long pressure on the “OK” knob, in
any of the other menus of the menu tree structure.
Page 77
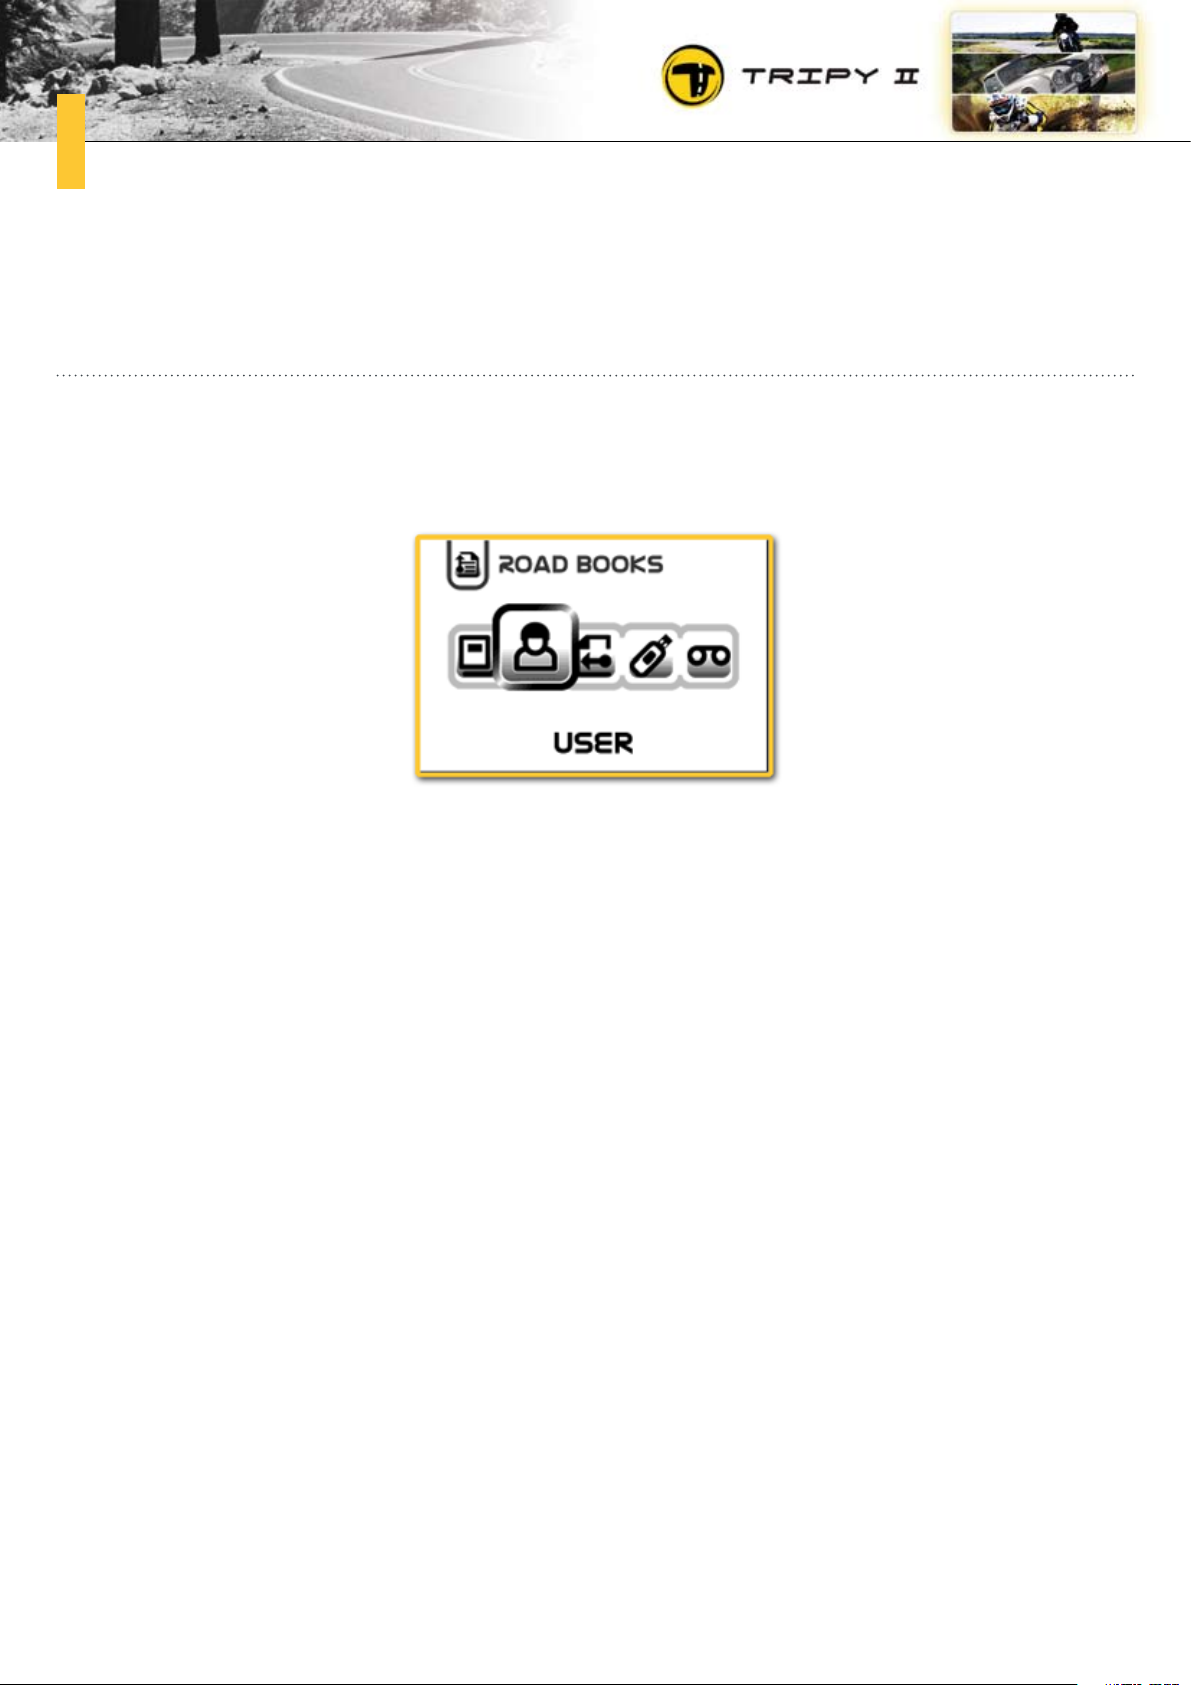
77
How to look for a road book?6.
Preliminary6.1.
Starting from the Main menu (always accessible by pressing the “Menu” knob), you may select the “Road
books” function by means of the right/left arrow knobs. Validate thereafter by means of the “OK” knob
to enter the “Road books” function.
A “Road books” menu offers the possibility to choose a road book from:
the library,•
an area reserved for your own road books•
an area reserved for the recently ridden road books,•
a USB memory stick.•
The “Road books” menu allows on the other hand to access the recorder used to capture a track (See
paragraph “7. How to record a scouting road book?”).
Page 78
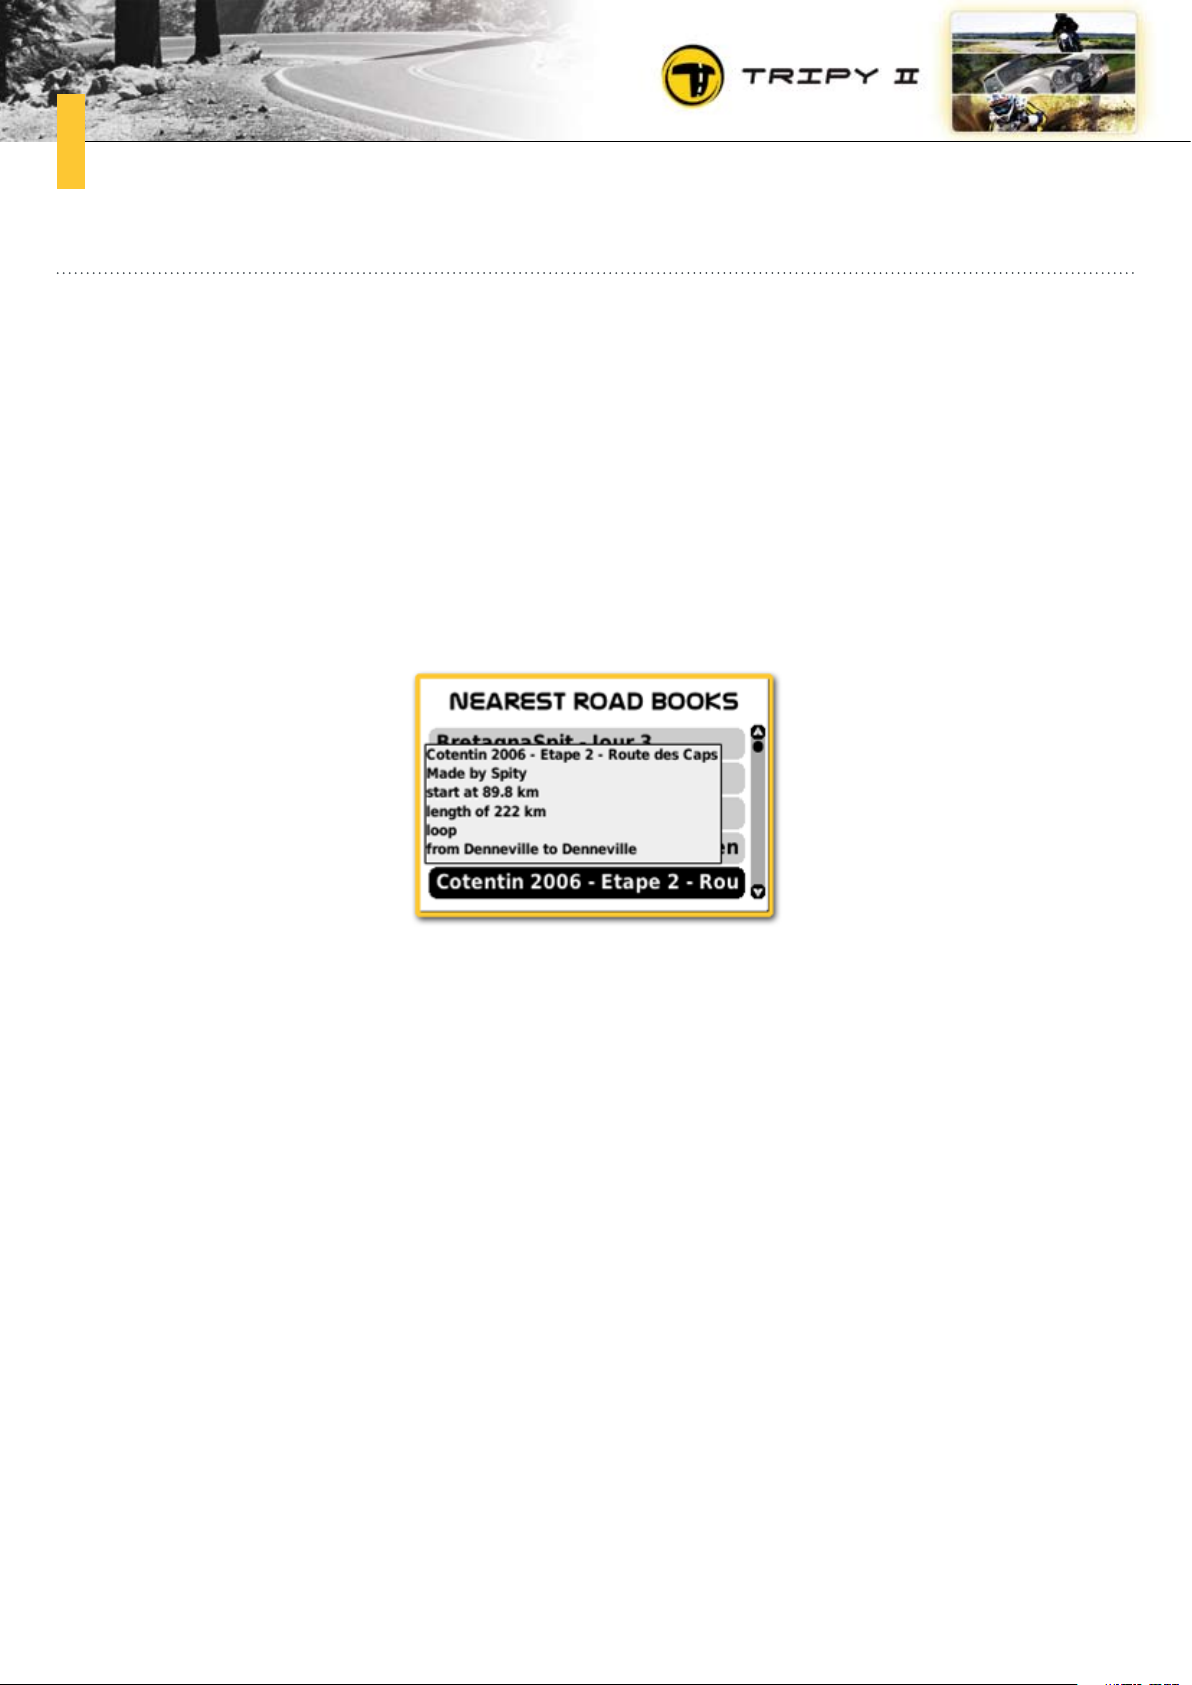
78
Find a road book in the library.6.2.
The “library” of road books gathers a large number of itineraries mostly crafted by the Tripy community (individual users, magazines, clubs, travel organisers, a.s.o..). After having selected the “Library”
icon in the “Road books” menu, Tripy II offers to search a road book starting near your current location
or close to a given location. A third option allows you to search the road books from a given supplier
(individual users, magazines, clubs, travel organisers, a.s.o..).
If you choose the “Start near me” option, Tripy II displays the list of road books starting close to your
current location. They will be sorted by proximity and by navigating along the list (up/down or left/right
arrow knobs), you will see for each road book a small summary indicating this itinerary main information.
If you choose the “Start near location” option, you will be prompted to introduce the country and town
before Tripy II can display the list of road books starting near that location.
If you choose the “by provider” option, Tripy II will display the list of suppliers sorted in alphabetical
order. Select the supplier and press the “OK” knob to see the list of road books of that supplier.
Once you will have found the road book you are interested in, press the “OK” knob to select it. Tripy II
offers to compute an itinerary between your current location and the starting point of the road book. If
you do not choose this option, Tripy II starts the navigation mode in the “Compass” mode to assist you
reaching the starting point. If you choose the option to compute an itinerary towards the starting point,
Tripy II will create and display a road book to the starting point. Upon reaching the starting point, Tripy
II will automatically switch to the selected road book.
Page 79

79
Search for one of your own road books6.3.
After selecting the “User” icon in the “Road books” menu, Tripy II displays the list of road books and
road book directories you have stored in your Tripy II GPS.
To start a road book, select the road book from the list and press the “OK” knob. Like with the library
road books, Tripy will offer you to compute or not an itinerary between your current location and the
starting point of the road book (See above paragraph).
If you have created road books sub-directories, the “OK” knob will allow you to navigate down into the
sub-directory and the “Menu” knob to navigate up to the parent directory.
To store your own road books into the memory of your Tripy II GPS, see paragraph “3.9 Data transfer
between Tripy II and PC” - “d. Itineraries or road books”
Search a road book recently ridden6.4.
After selecting the “Last” icon in the “Road books” menu, Tripy II displays the list of road books recently ridden. Select the road book from the list and press the “OK” knob to start it.
Copy a road book from a USB memory stick6.5.
To copy into Tripy II’s memory and start a road book from a USB memory stick, see paragraph “Data
transfer between Tripy II and USB memory stick”.
Page 80
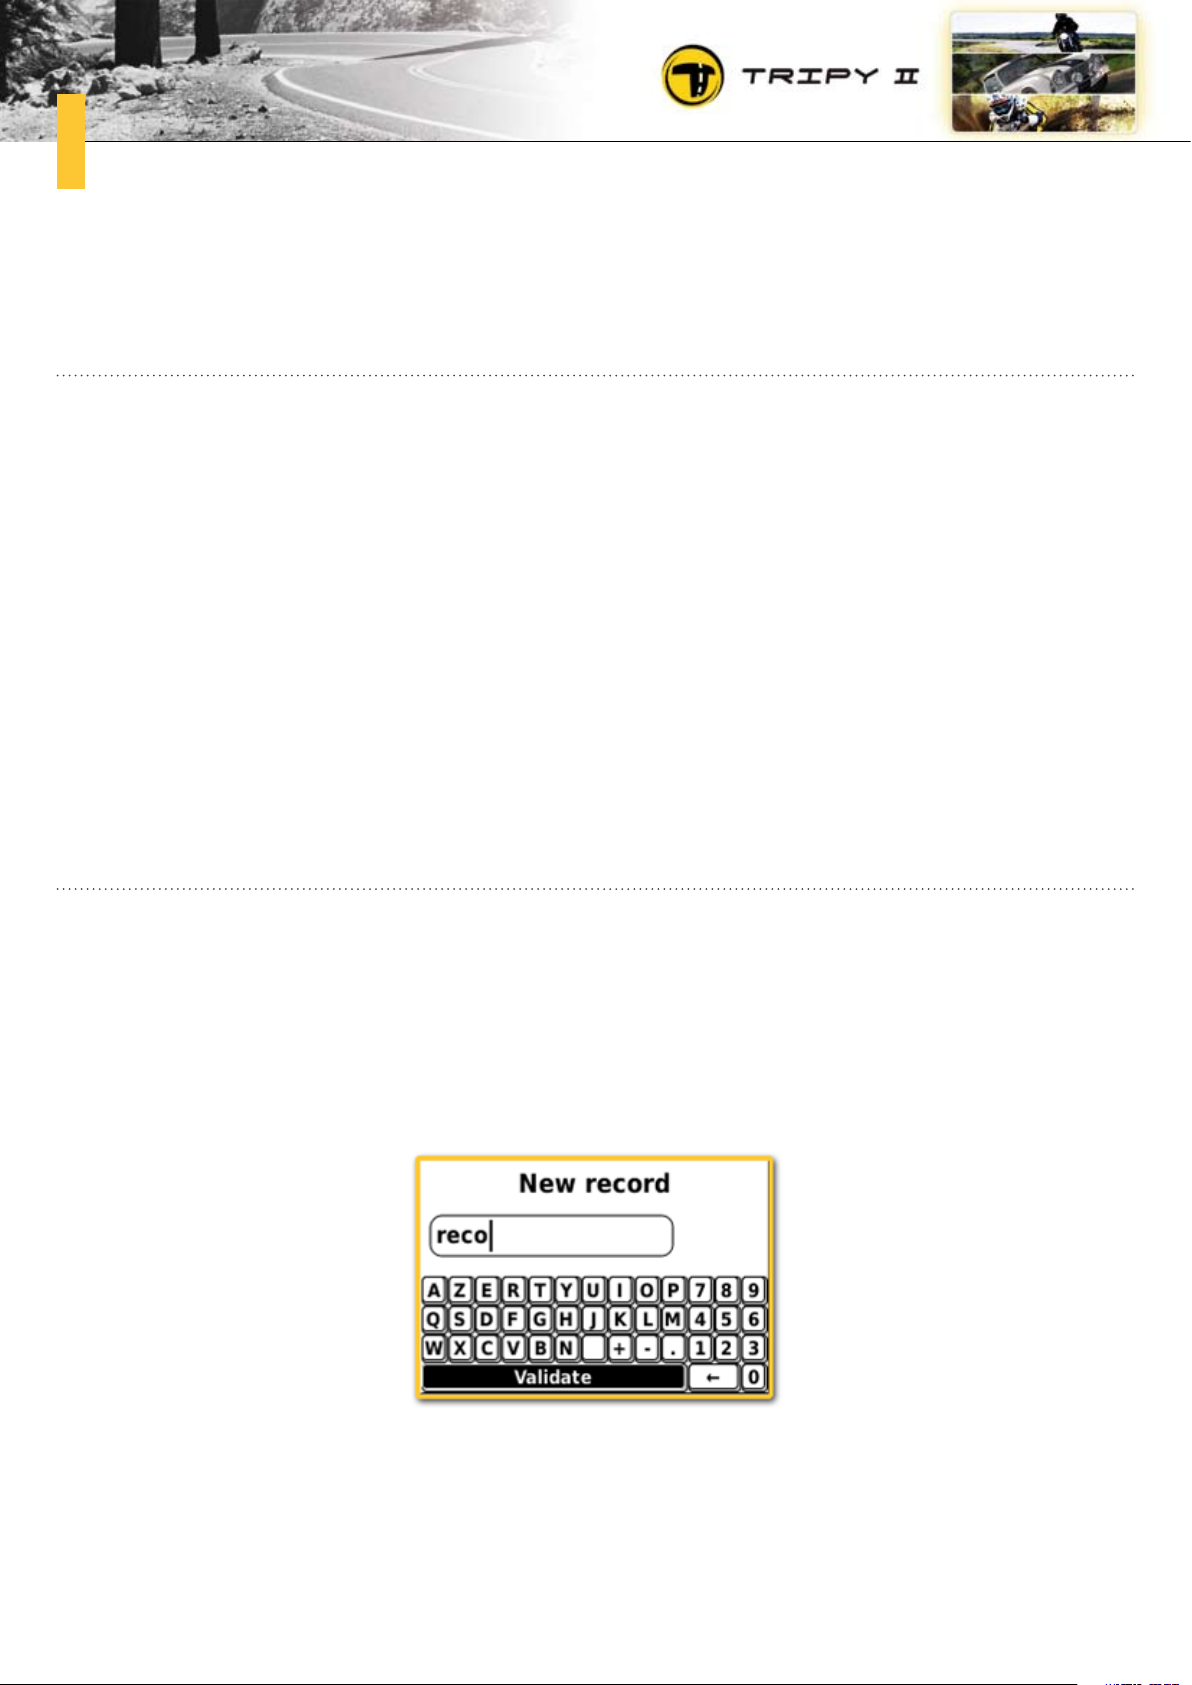
80
How to record a road book scouting trip ?7.
Preliminary7.1.
Your Tripy II is fitted with a “RECO” function allowing you to record a scouting trip prior to precisely
editing this itinerary. Once the “RECO” recorder started, you may ride the itinerary to record. Tripy II
will automatically store the track of the itinerary that you ride and you may mark each waypoint position
by pressing the “OK” knob.
Once the itinerary completed and after having stopped the “RECO” recorder, Tripy II creates a road book
file (“.trb”) of the ridden itinerary as well as a second file containing the identical itinerary in the opposite direction.
You may copy the resulting file on your PC to display it by means of the RoadTracer Pro software or ride
it immediately the recorder track in the recorder direction or the opposite direction. In this instance,
the displayed waypoints are “simplified pictograms” as no actual pictogram has been drawn (See paragraph “5.4 Navigate under the road book display” - “Simplified pictograms”).
Start the recording of a scouting trip7.2.
To access the recording function, choose the “RECO” icon in the “Road books” menu and press the “OK”
knob. If the “RECO” icon is animated (the two recorder rolls are turning), it means that the recorder is
already active.
After selecting the “RECO” function, the virtual keyboard is displayed. It allows you to introduce the file
name of the recording you are about to start.
By means of the four arrow knobs, you may move the selection one a specific letter of the virtual keyboard and press the “OK” knob to validate the chosen letter. Repeating this operation letter by letter,
the file name is completed in the field above the virtual keyboard.
If you introduce a faulty letter, you may deleted it using the delete key of the virtual keyboard (←). Select
Page 81
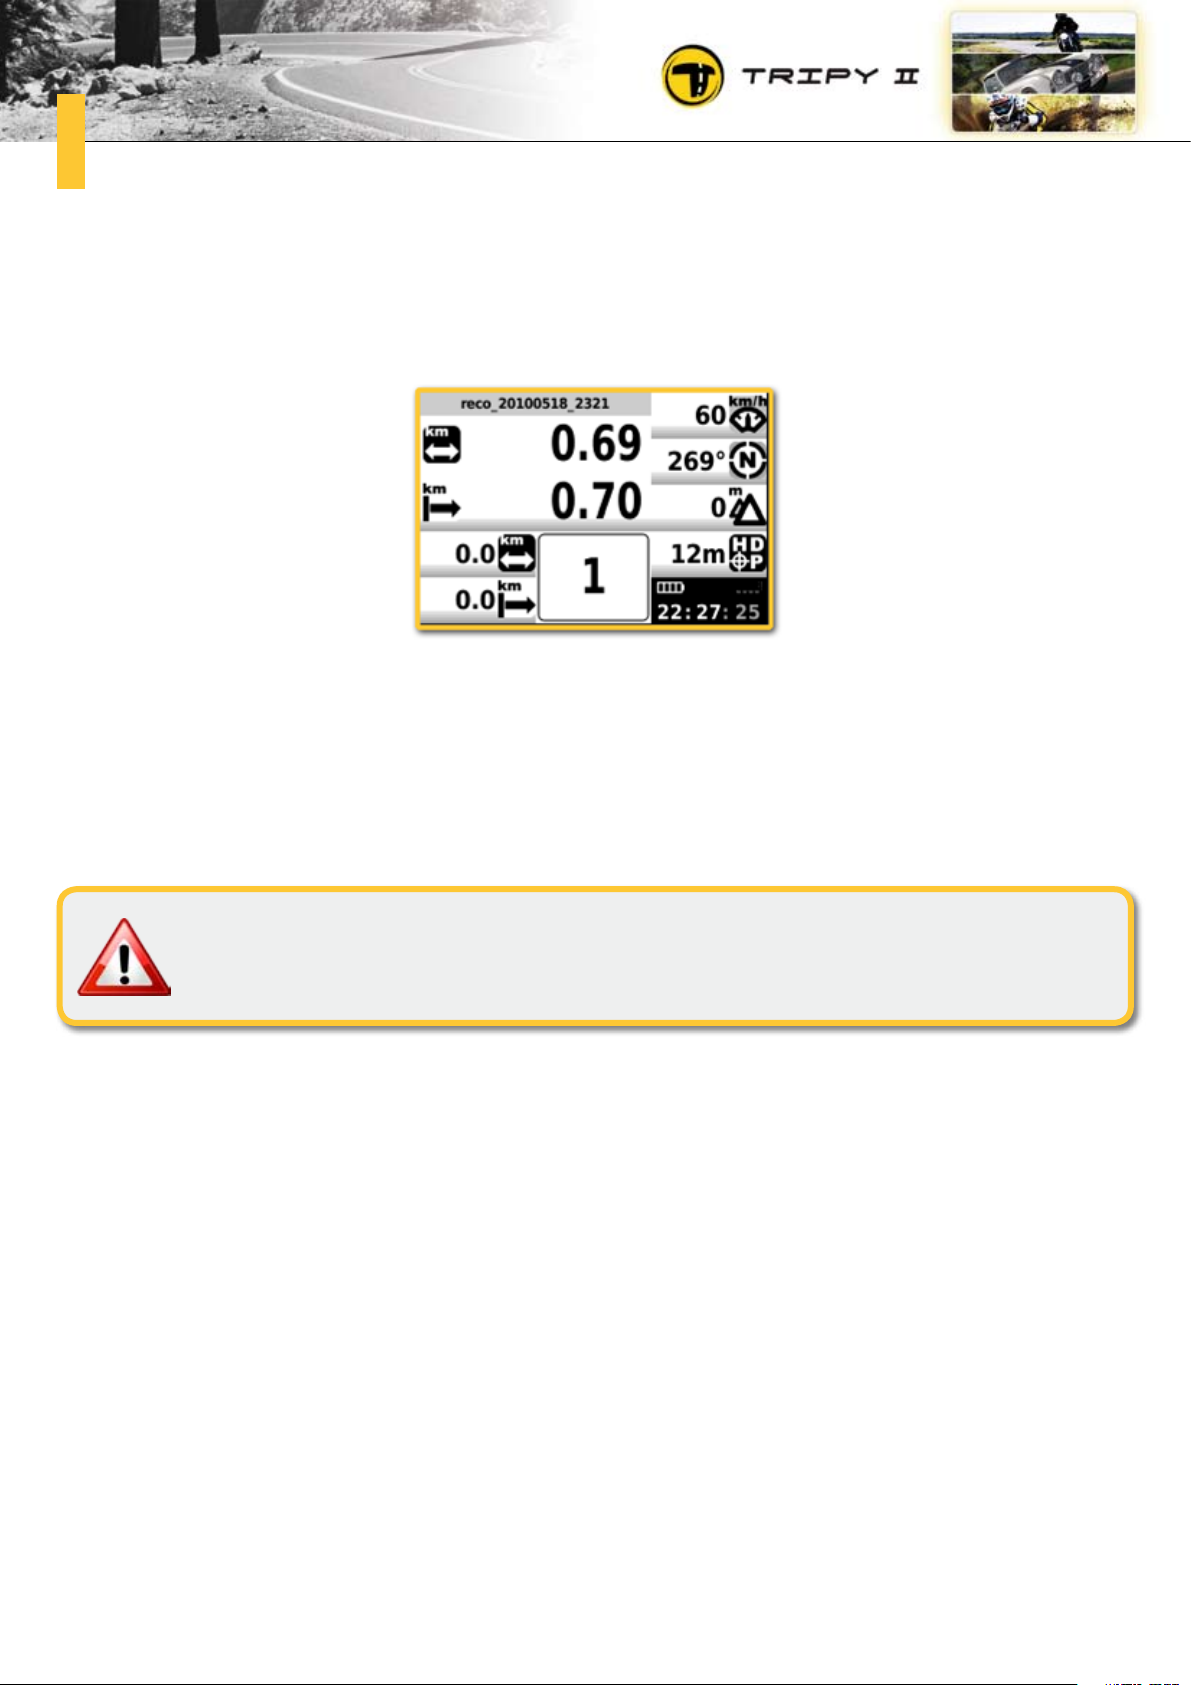
81
the delete key on the virtual keyboard and press the “OK” knob as many times as necessary to delete
one or several letters.
Once the name completed, you may select the “Validate” key on the virtual keyboard and press “OK”.
On the recorder screen, you find to the right an information pane looking like the “info border”. You may
read there (from top to bottom):
•yourinstantaneousspeed
•yourbearing
•youraltitude
•theGPSsynchronizationquality(HDOPinmeters)
The “HDOP” zone indicates the accuracy of the GPS synchronization. If that area
shows “---”, it means that the receiver does not receive a signal. In this instance,
the recorder is not in a position to capture your track.
To the left of the screen, you will find from top to bottom:
•thecurrentpartialodometer,
•thecurrenttotalodometer,
•thepartialodometerofthelaststoredwaypoint
•thetotalodometerofthelaststoredwaypoint
•thenumberofthelaststoredwaypoint(framedinthebottomofthescreen).
After starting the recorder, the partial and total are set to zero. The last stored waypoint is set to 1 as
Tripy II automatically marks a first waypoint at the start of the recording.
By pressing the “OK” knob, you may mark a waypoint at the current location you are at. The number in
the “last stored waypoint” field is increased by one and the values of the total and partial odometers to
this waypoint are stored on the screen in the two bottom fields (partial and total odometers of the last
stored waypoint).
Page 82
82
If you mark a waypoint while the GPS receiver is not synchronized (the HDOP indication shows “---”), the waypoint number is shown to the screen yet this waypoint shall
be stored only upon recovery of GPS synchronization. In this instance, the waypoint
may therefore be stored at a position not exactly corresponding to the position you
were when pressing the “OK” knob.
After starting the recorder, you may use the “Menu” knob to return to the Main menu
and navigate thereafter to any other Tripy II function. The recorder continues to
operate and you may at any time store a waypoint position by a long pressure on the
“OK” knob (keep the “OK” knob depressed for at least 1 second).
When you have finished the scouting, press the “MENU” knob and maintain it depressed until a menu
is shown where you can find the “Stop recorder” entry. Press the “OK” knob and the recording will
stop.
Once the recording completed and the recorder stopped, you may recover your record file by connecting
Tripy II to the PC and look into the “user/roadbooks/#reco” directory (See also paragraph “3.9 Data
transfer between Tripy II and PC” - “d. Itineraries or road books”).
In the “user/roadbooks/#reco” directory, you will find the file carrying the name you had given at the
start of the recorder. This name will be extended with a suffix containing the date and time of the start
of the recording. e.g. If you have called your recording “TEST”, the file will be called for example
“TEST_20100516_1022.trb” meaning that your record has started on May 16th at 10:22 am.
A second file with the same name yet with a “R” suffix (in the above example “TEST_20100516_1022_R.
trb”) is also available. This file is identical to the recorded one but Tripy II has simply reverse the itinerary’s direction. One of the uses of such reversed itinerary is the possibility to immediately ride the
recorded track backward as we will see it in paragraph “8. How to immediately ride a scouting track
?”.
Start your recorder when you are not traveling at the start of the scouting trip and
Tripy II is correctly synchronized with the GPS’es.
Page 83
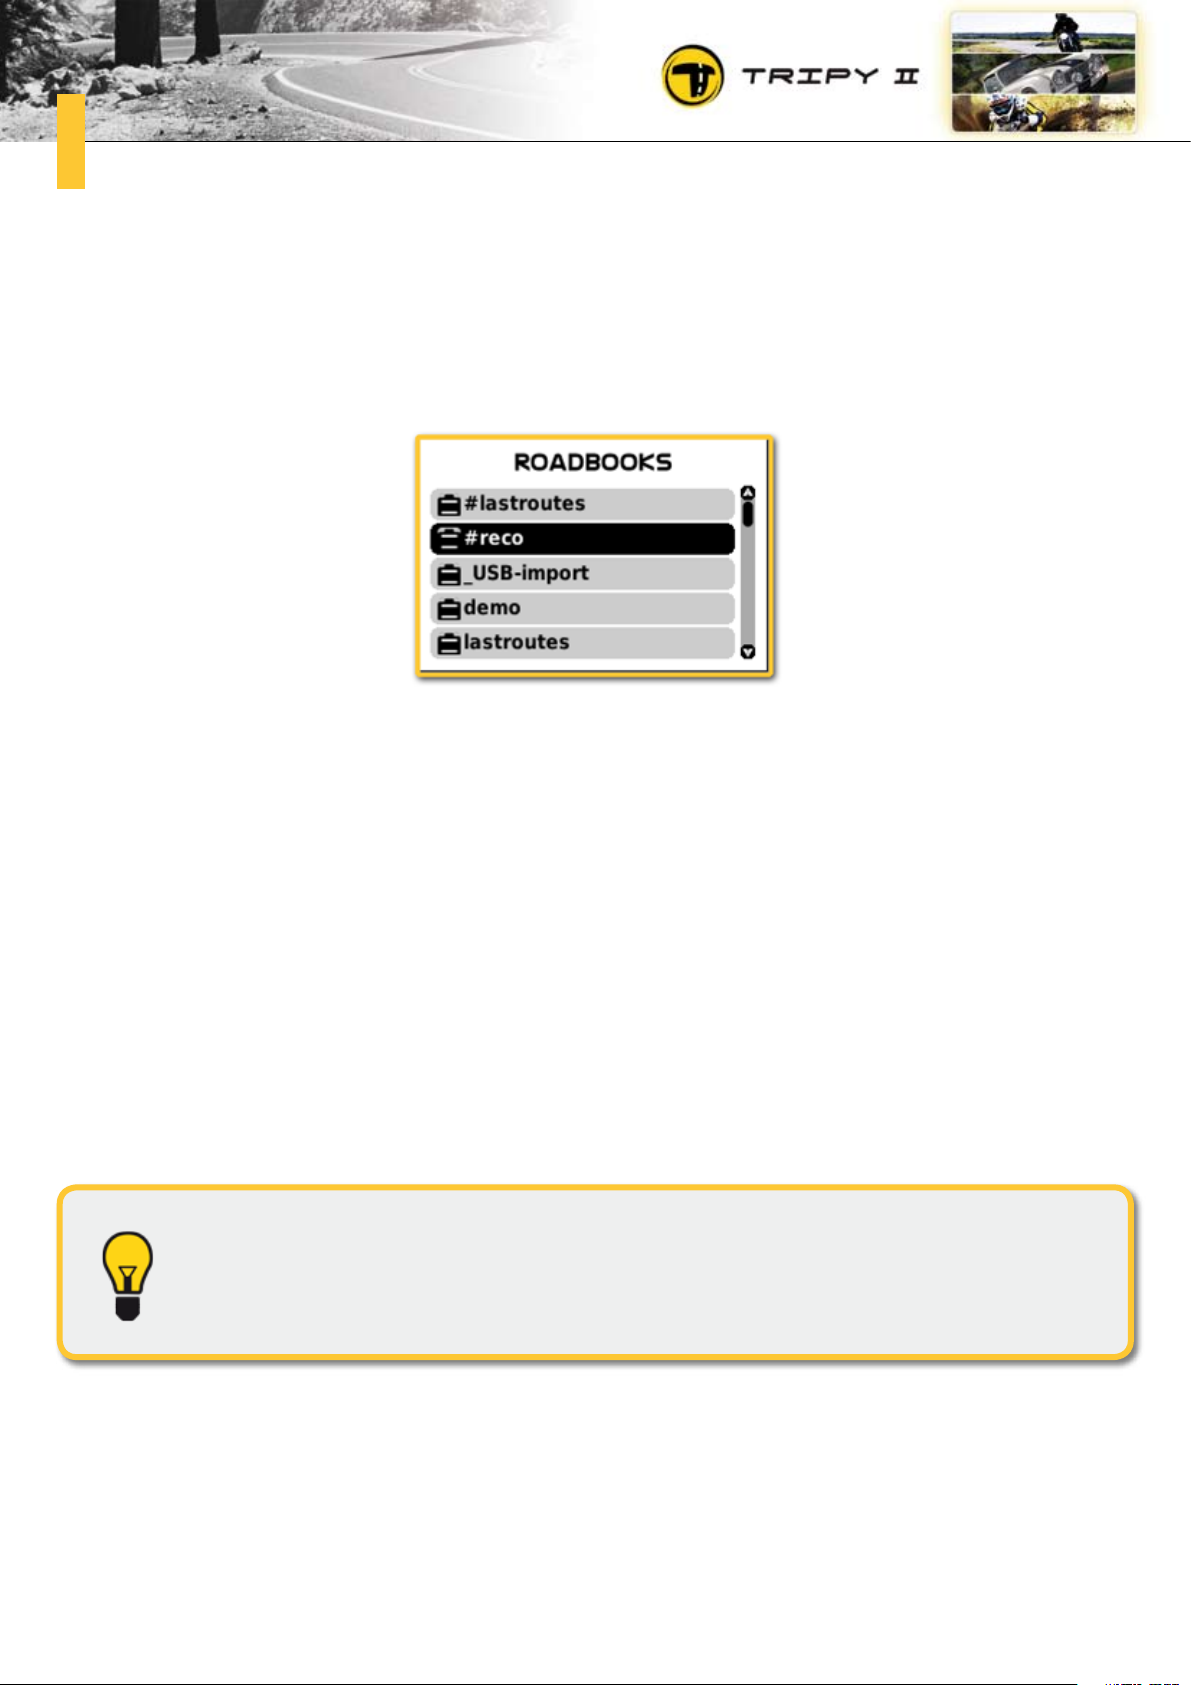
83
How to immediately ride a scouting track ?8.
When you have made a record, you may immediately use it on Tripy II by going to the “Road books” “User” menu. On top of the list of road books you will find a directory called “#reco”.
Select it and press the “OK” knob. You then see a list of all the records of the scouting trips you have
made. Each scouting trip is represented by two lines. On the first one, you find the normal record (in
the direction you rode it) and on the second line, you will find the same record suffixed with “R”. This is
the record with a reversed direction.
After selecting the record you wish to ride, press the “OK” knob. Tripy II displays a summary of the
record (its name and length in kilometers). Press the “OK” knob and you find yourself in the navigation
mode with the active recorder.
You are then ready to immediately ride the recorded itinerary and such in the same or opposite direction
you rode it depending on your selection of the record without or with the “R” suffix. The waypoints displayed are “simplified pictograms” as no pictogram has yet been drawn (See paragraph “5.4 Navigate
under the road book display” - “d. Simplified pictograms””).
As the marked waypoints of the record do not carry actual pictograms, it is common
that riding such record is easier in the “map” display mode rather than the “road
book” display mode.
Page 84
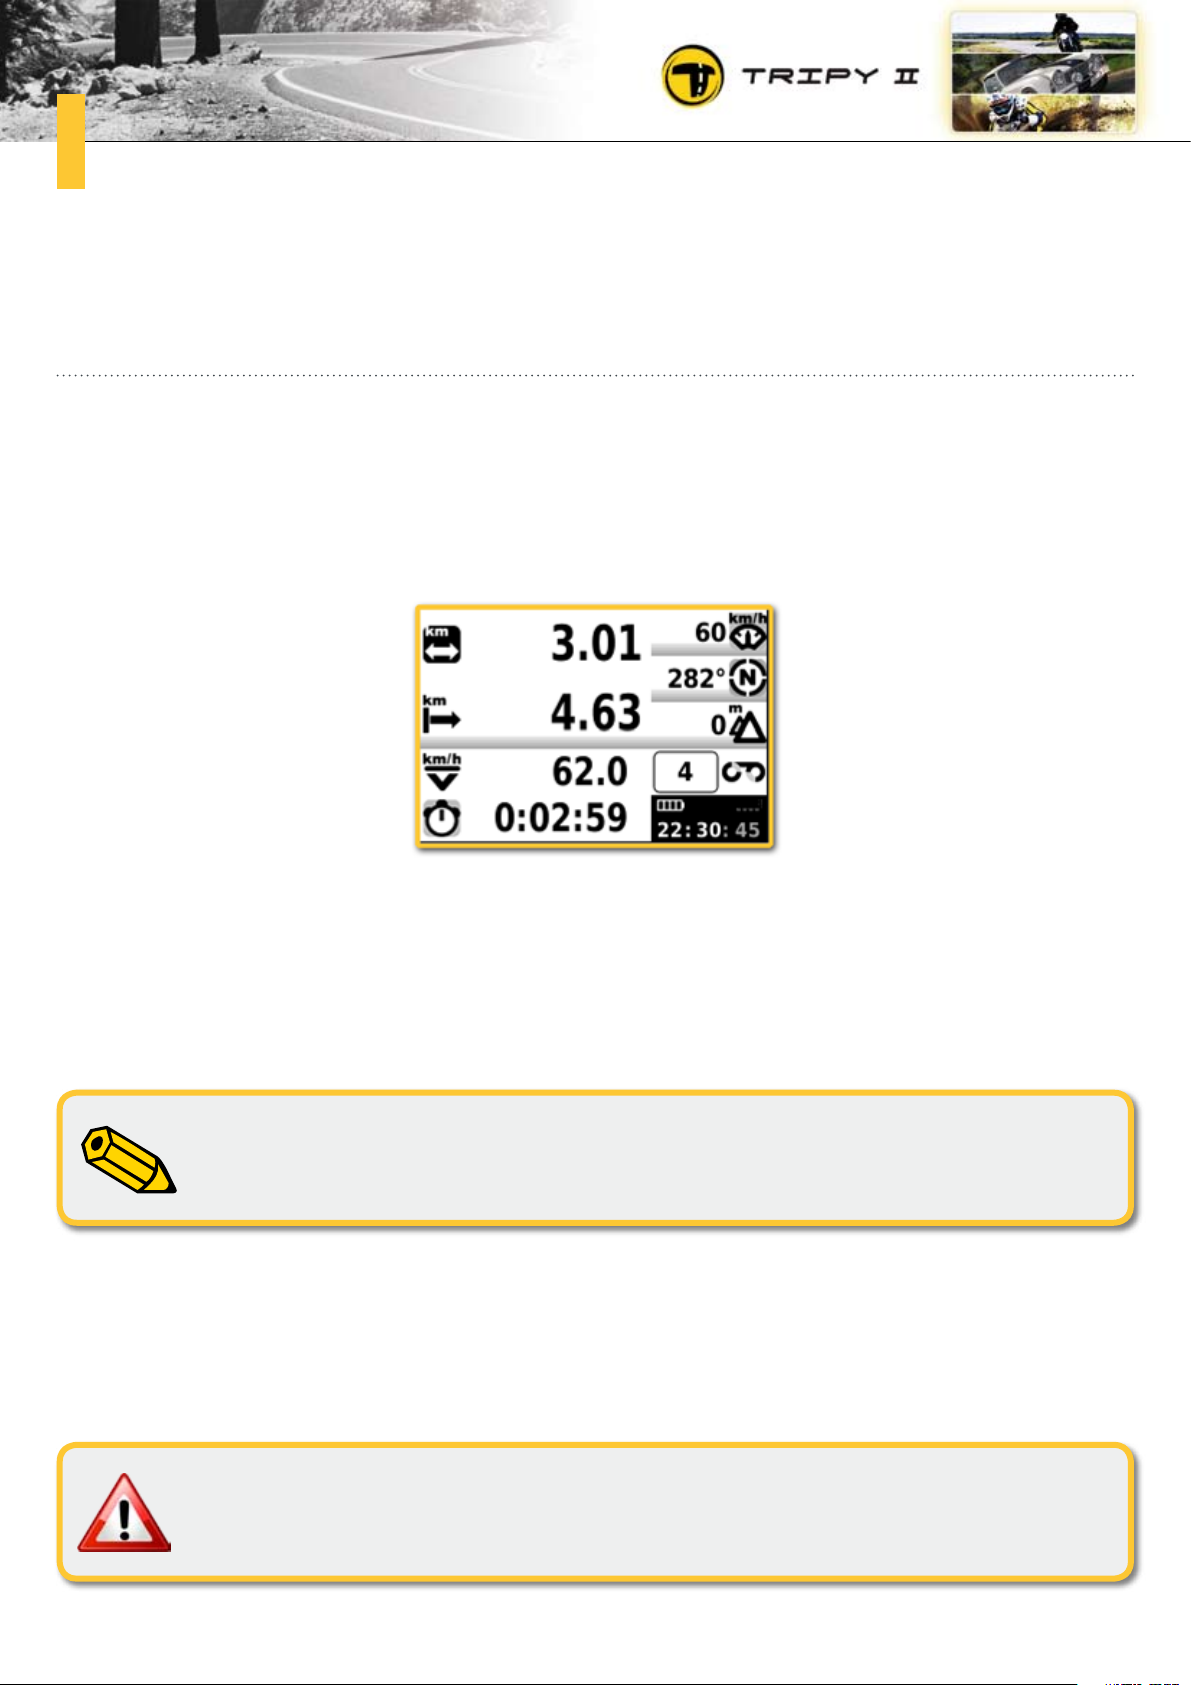
84
How to use the Trip Master ?9.
Preliminary9.1.
The “Trip Master” offers mainly two odometers as well as an average speed computation. The ‘Trip
Master” is a function mainly used to ride “paper” road books still regularly used in the classic rally
world.
You may access the Trip Master function from the Main menu. Select the “Trip Master” icon and press
the “OK” knob.
The Trip Master function displays to the right an information pane similar to the “info border”. You will
continuously read there (from top to bottom):
•yourcurrentspeed
•yourbearing
•youraltitude
•thestatusoftherecorder
When the recording function (“RECO”) is activated, the “recorder” icon in the border
info is animated and the number of the last marked waypoint is also indicated (“4”
in the above example).
To the left of the screen, you will find from top to bottom:
•thepartialodometer,
•thetotalodometer,
•theaveragespeedsincethelastreset(notanaverageriddenspeed),
•time on which the average is computed (time lapsed since the last average speed reset).
Before starting a rally with the Trip Master, always wait for a quality GPS synchronization.
Page 85
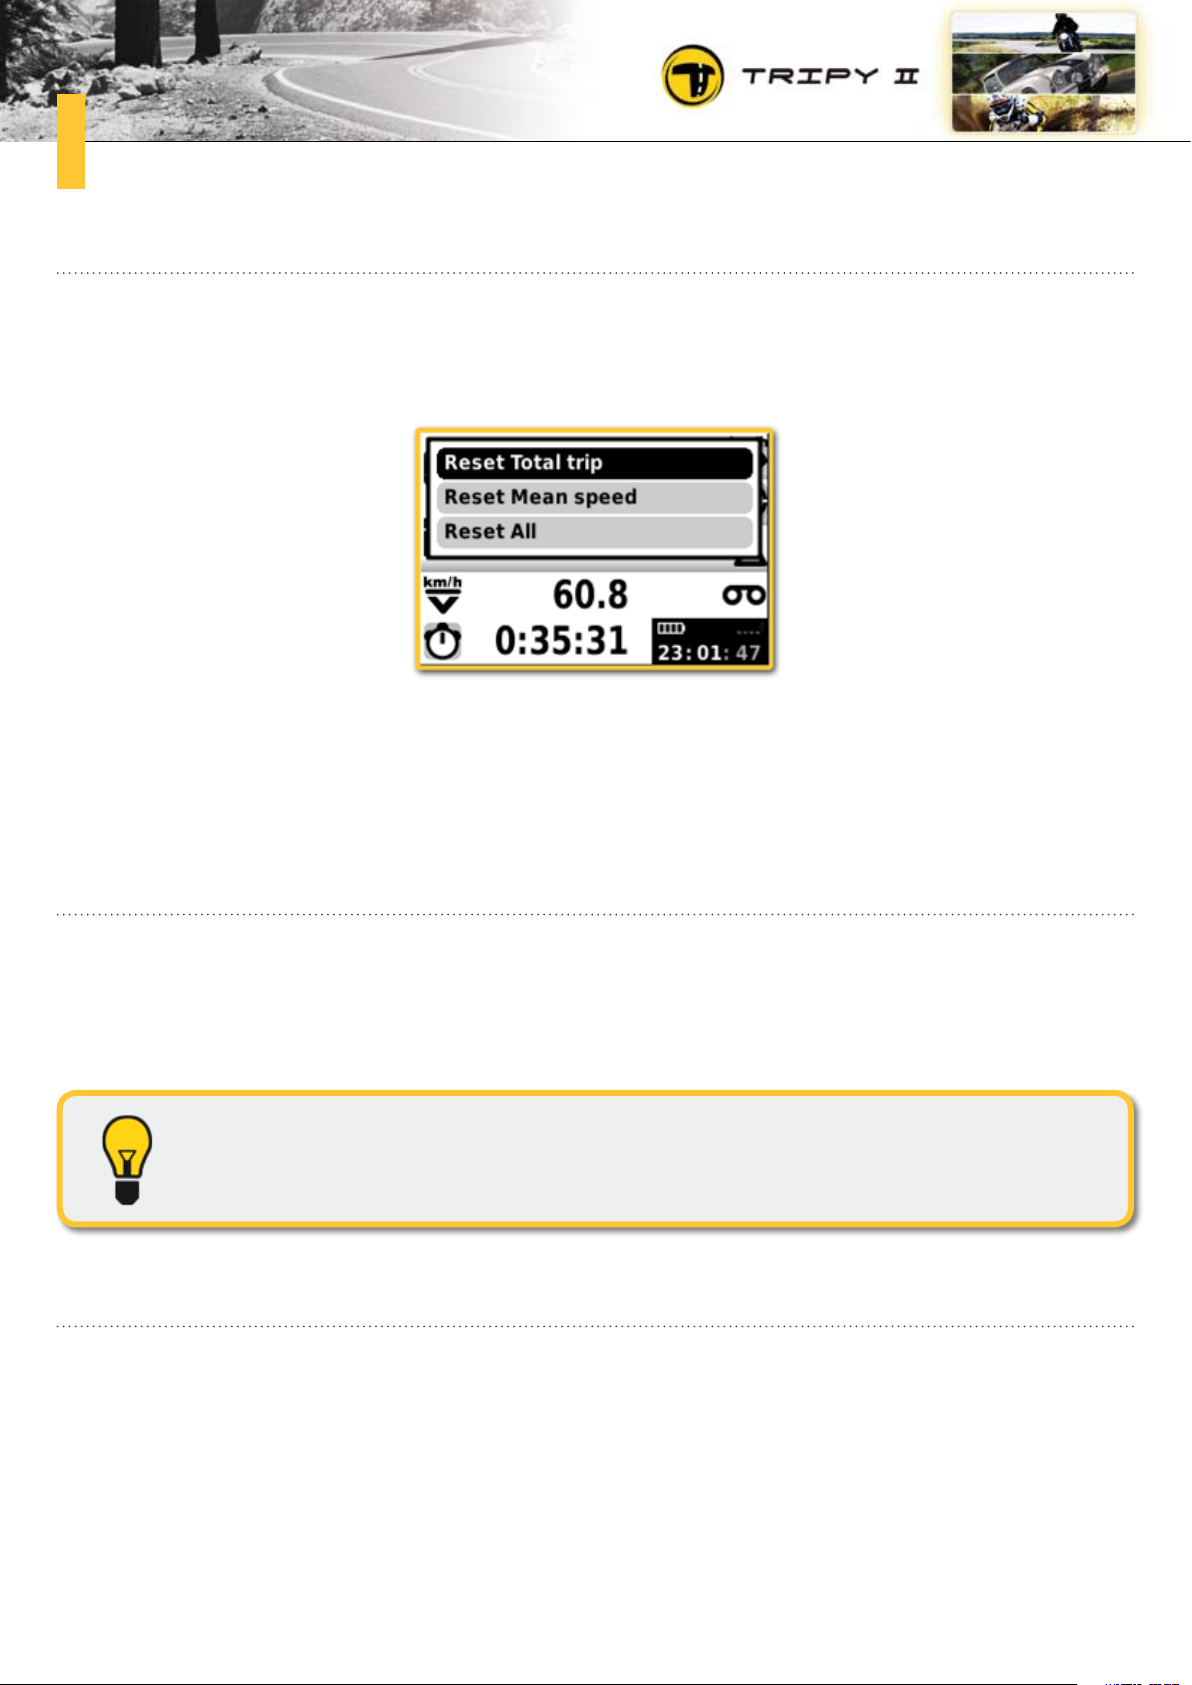
85
Reset9.2.
You may access the reset menu by means of a long pressure on the “MENU” knob. Press the “MENU”
knob until a menu like the following is displayed:
To perform the Total trip reset, select this entry from the list and press the “OK” knob.
To perform the reset of the average speed and its corresponding timer, select the “Reset Mean speed”
entry and press the “OK” knob.
To reset all counters (partial, total, average), select the “Reset All” entry and press the “OK” knob.
Quick reset of the partial trip counter9.3.
A short pressure on the “OK” knob allows you to reset the partial trip counter to zero. When you follow
a “paper” road book, you may so easily and quickly reset the partial counter upon passing at the exact
position of a waypoint. If the recorder is active, each time you set this partial counter to zero (short
pressure on the “OK” knob), a waypoint will be marked in the current recording.
If you start the recorder (“RECO”) before starting a rally, a note will be marked at
each partial trip reset. The record you will recover at the end of the rally will therefore be equivalent to the ridden road book.
Adjusting the total9.4.
If upon passing a waypoint, you may notice that the total is not exact anymore, you may adjust the total
odometer. Use the right/left arrow knobs to modify the total value. As soon as you modify the total
value, a lock icon shows up next to the total. It means that the total has been modified and the total
distance count is therefore interrupted. When you wish to resume the distance counting starting from
the value introduced on the total odometer, press the “OK” knob. The lock disappears and the counting
resumes.
Page 86
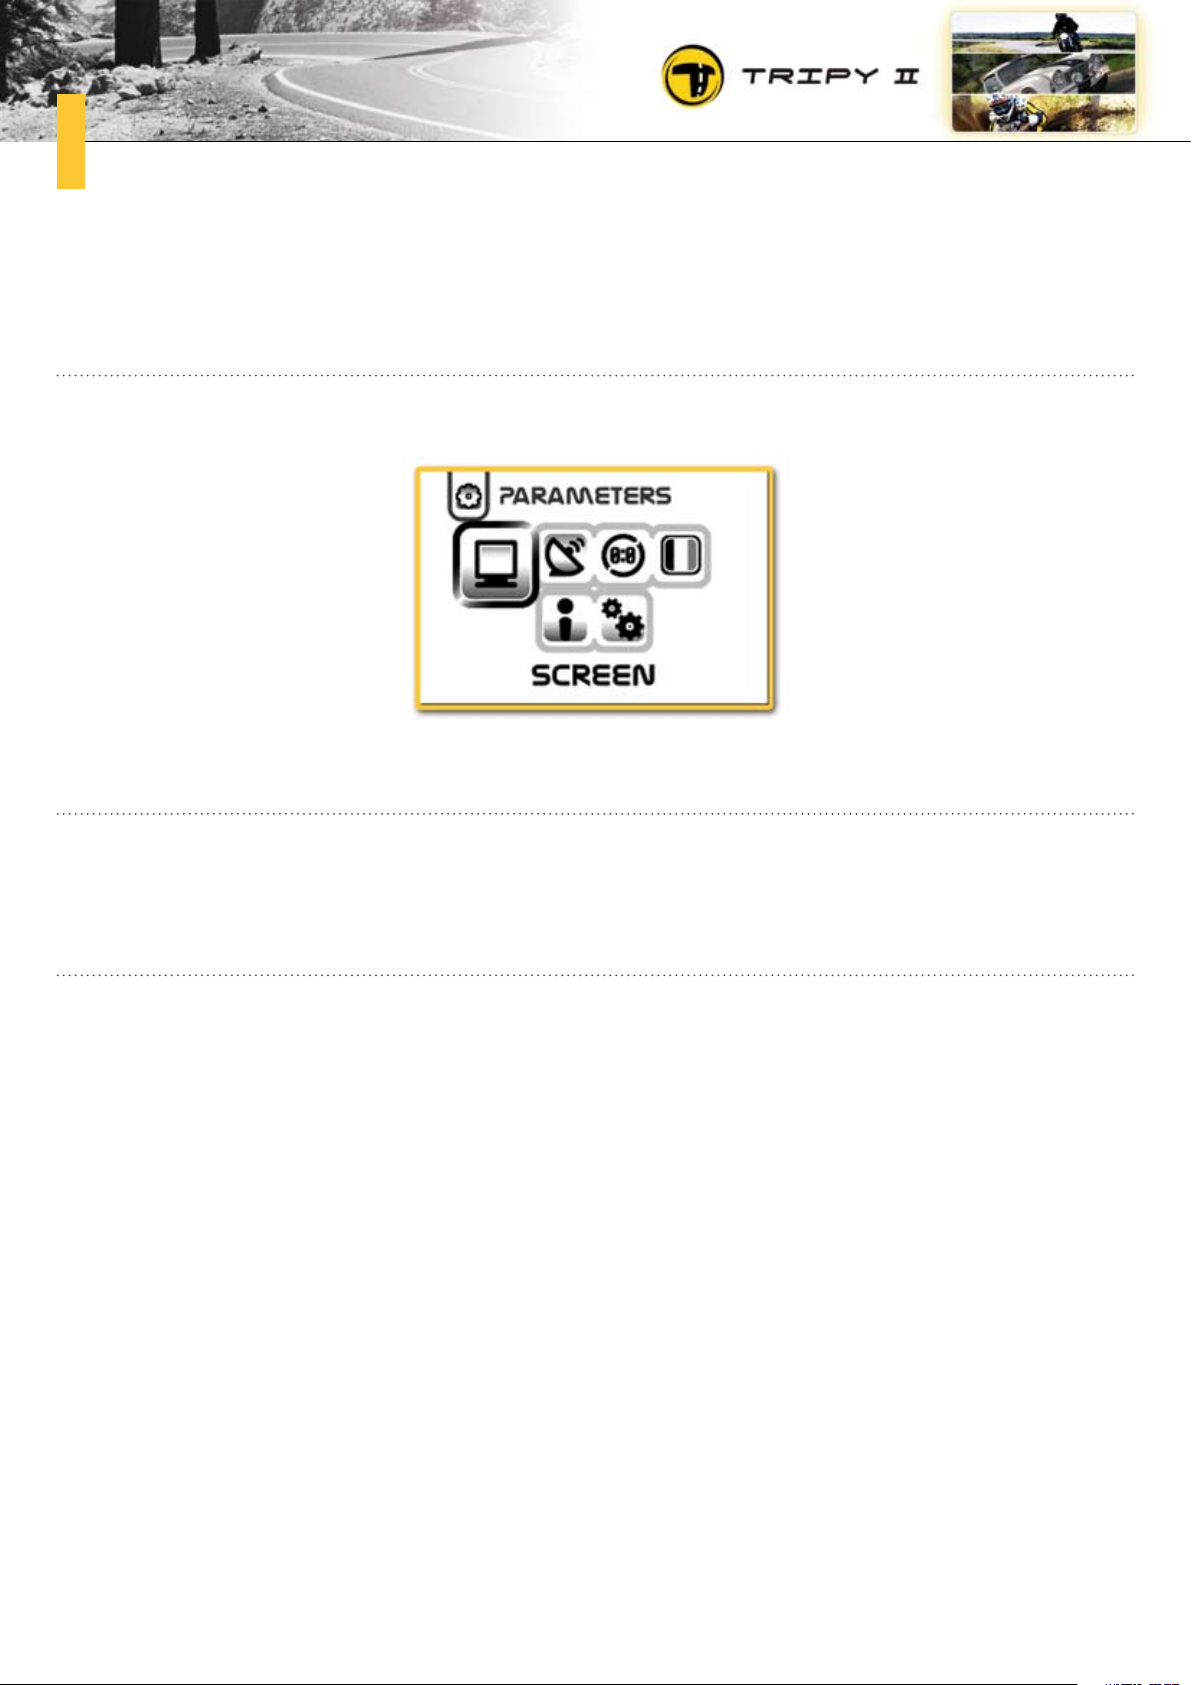
86
How to set the parameters ?10.
Preliminary10.1.
In the main menu, you will find the “Parameters” icon leading to the parameters menu shown below:
Screen settings10.2.
Tuning the screen contrast as well as the back lighting are explained in paragraph “3.7 Screen contrast
and back lighting settings”.
Statut de la réception GPS10.3.
The GPS status screen is a rather technical screen allowing consulting the synchronization details.
Next to the icon representing a satellite dish, you will find two numbers indicating the number of “synchronized” satellites on the number of satellites “seen”. e.g. The indication “5/8” means that the GPS
receiver sees 8 satellites and 5 of these are actually used to compute the position. The GPS receiver
will be correctly synchronized and produce relevant information when a minimum of 4 satellites are
synchronized.
Just above, you find the “HDOP” icon (Horizontal dilution of precision) which value is proportional to the
accuracy with which the GPS receiver may determine your position. The lower the value, better is the
precision. An “HDOP” of 1 or lower is excellent. If the “HDOP” shows a value of 50 (maximum), the
receiver is probably not synchronized yet (not ready to provide valid positions).
Page 87
87
At the top of the screen, you will find the date and time as well as your latitude/longitude. These information are only correct when the GPS receiver is correctly synchronized. To be confident that the time
displayed is accurate down to the second, you shall wait for a at least 15 minutes of synchronization.
In the bottom part of the screen, you will find a graph in which each vertical bar represents a satellite.
Under the bar, a number indicates the satellite ID number and above the bar, un number indicates the
signal level (a level of 50 is maximal and rather exceptional). A white bar means that the satellite is
visible and a black bar that the satellite is not only visible but used for synchronization. The sole “synchronized” satellites are used to compute the position.
Time zone setting10.4.
The GPS receiver is able to produce an accurate time. This time is UCT (Coordinated Universal Time).
This “universal” time does not correspond to any country specific local time. For Tripy II to display the
actual local time of the country where you are, it is necessary to set the time zone.
You will easily perform the time zone setting by indicating Tripy II what is the town nearest to your current position. When you access the time zone setting function, Tripy II offers to display the “Nearest
locations first”. Choose this option and press the “OK” knob. Tripy II displays then the list of capital
cities the closest to your position. You will normally find in the first lines of the list the name of the
capital of the country you are in. Choose the capital of the country you are in and press the “OK”
knob.
If you do not choose the “Nearest locations first” option, Tripy II will display the list of continents and
capital cities in alphabetical order.
Before selecting the time zone, make sure that your GPS receiver is correctly “synchronized” (See paragraph “10.3 GPS Status”).
Language setting10.5.
The language setting is explained at the paragraph “3.3 Language selection”.
Page 88
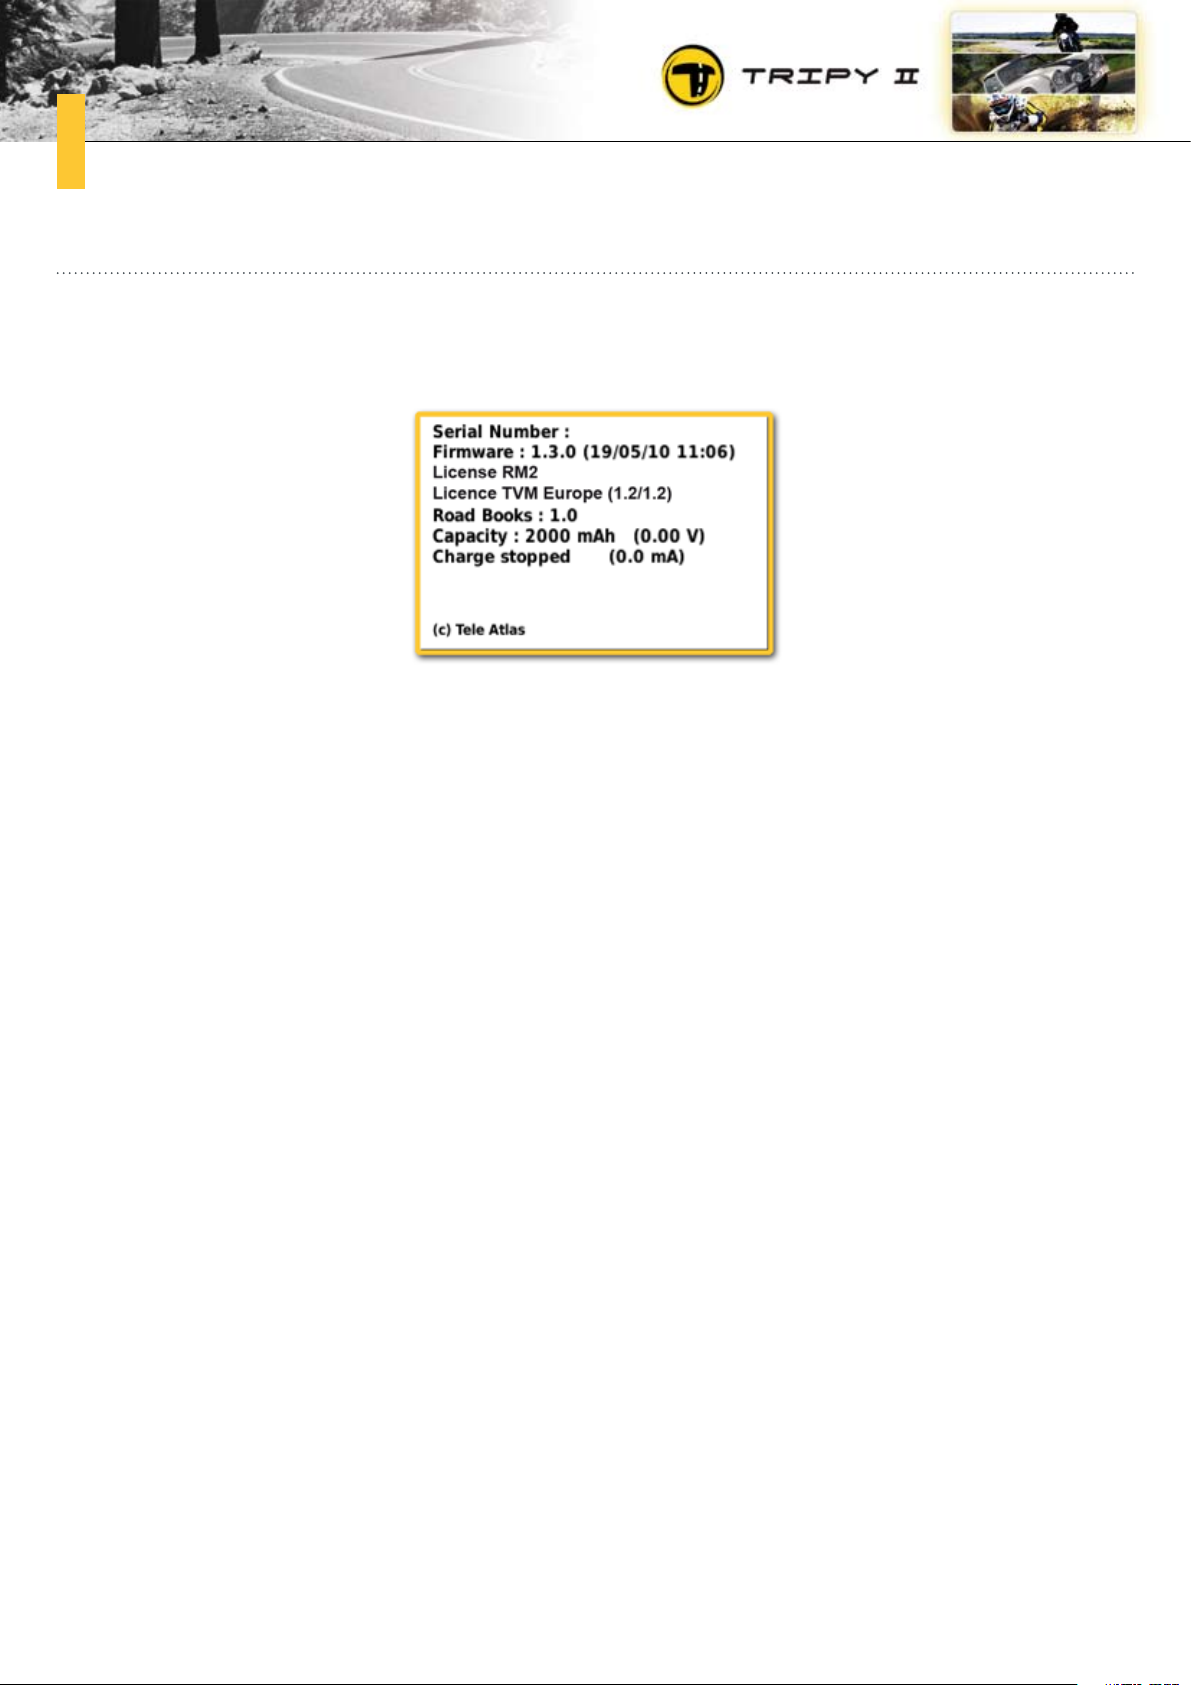
88
Information screen10.6.
The “information” screen displays several data pertaining mostly to the firmware and data base version
as loaded into your Tripy II.
You will find from top to bottom:
•theinternalserialnumber,
•thermwareversionandrevisiondate,
•theTripyapplicationlicense(LicenseRM2),
•themaplicenseandrevision(TVMEurope),
•theroadbookslibraryrevision,
you will thereafter find information pertaining to the battery charge:
•itscapacity:youmayreadthequantityofavailableenergyinthebatteryinmAh(asmeasuredby
the gauge) as well as the battery voltage,
•thechargingstatusaswellasthecurrentinjectedintothebattery(uponcharging).Anegative
current value means that Tripy II is draining current from the battery. A positive value means that
the charger is currently charging the battery.
Page 89

89
Advanced settings10.7.
f you select the “Advanced settings” icon, you find a list of several possible settings. You may navigate
through the list by means of the arrow knobs and press the “OK3 knob to access the chosen parameter
setting.
The “advanced settings” allow you to tune the following parameters:
Sounda.
It allows the setting of the warning beeper. The three following options are available:
•Nosound,
•Lowsound,
•Loudsound,
Between the “Low sound” and “Loud sound” it is the frequency of warnings that will change more than
the actual sound volume.
Key soundb.
If this parameter is active, Tripy II produces a sound each time you press a knob. The “beep” will be
produced if the “Sound” parameter is set to “Low sound” or “Loud sound”. To activate or de-activate
this parameter, simply press the “OK” knob.
Automatic dashboardc.
If this parameter is active, the dashboard will systematically cover the “road book” display in navigation
mode. The “road books” display showing the waypoint pictograms will however re-appear as you come
closer than 500m to a waypoint. Once the waypoint crossed, the dashboard is once again displayed. To
activate or de-activate this parameter, simply press the “OK” knob.
Auto power offd.
This setting allows the selection between an auto-off after 30 minutes, 3 hours or 8 hours. If Tripy II
remains stationary (without knobs activation) for a duration equal to the setting, it will automatically
switch off. Except for very special applications, it is recommended to set this parameter to “30 minutes”.
Show help screense.
If this parameter is active, help screens are displayed at various instances (upon entering the navigation
mode, the Trip Master function, a.s.o..).
Page 90

90
GPS Coordinatesf.
Tripy II may handle display and introduction of GPS coordinates in three different formats:
in degrees and decimals of degrees (two fields – D.ddd°),•
in degrees, minutes and decimals of minutes (three fields – D°MM.mm’),•
in degrees, minutes, seconds (three fields – D°MM’SS”).•
The “degrees – minutes – decimals of minutes” in three fields (D°MM.mm’) is the most commonly used
in rally’s.
To proceed with the setting, press the “OK” knob and select one of the three formats from the list.
Confirm you choice with the “OK” knob.
Keyboardg.
The “keyboard” parameter allows you to choose the keys disposition on the virtual keyboard. The virtual
keyboard is the keyboard drawn when your are requested to introduce data (e.g. destination town).
Page 91
91
How to update the speed trap warning file ?11.
Preliminary11.1.
The warning function is not solely reserved to the warning of dangers and speed traps locations. The
warning function may be used to inform when approaching any list of GPS points.
The list of monitored points must be loaded as a “.ASC” or “.NVO” file in the “user/spots” directory as
explained at the paragraph “3.9 Data transfer between Tripy II and PC” - “e. Monitored POI’s (Speed
traps)”.
Updating the speed traps files11.2.
When you receive your new Tripy II, the “spots” directory contains a number of files containing the danger and speed control zones. These files are offered by AlterteGPS™ upon the purchase of your Tripy.
Later on, you may update these files by going to http://www.alertegps.com/.
After registering on the http://www.alertegps.com/ site and subscribed you will be able to select the
type of device. Choose:
•GPStype:roadbook,
•Brand:Tripy,
•Model:TripyII,
Download the compressed speed traps file called “TripyII.zip”. After having decompressed it, you will
find a “Radars” directory in which is a list of files (“.ASC” and “.NVO”).
You may then select all these files and of this “Radars” directory and copy them in the “user/spots”
directory of your Tripy II.
When you have copied new files in the “user/spots” directory, you will execute the
procedure to safely remove the peripheral before disconnecting the USB cable between
Tripy II and the PC. Once Tripy II disconnected from the PC, you should let Tripy II on
for approximately 5 minutes before that the new files become active.
 Loading...