

Page 1
User’s Guide
Logitech® HD Pro
Webcam for Mobile
Interactive Touchscreen
(DMCSTP65CBP)
1111 W. 35th Street, Chicago, IL 60609 USA • tripplite.com/support
Copyright © 2020 Tripp Lite. All rights reserved.
Logitech and other Logitech marks are trademarks or registered trademarks of Logitech Europe S.A and/or
its affiliates in the U.S. and other countries. All other trademarks are the property of their respective owners.
1
Page 2

Table of Contents
1. Introduction 2
2. Features 3
3. Initial Setup 4
4. Video Calling 5
5. Using the Webcam with Windows® 10 6
6. Adjusting the Camera Settings 7
7. Sharing Photos and Videos 8
8. Capturing Video and Snapping Pictures 9
9. Viewing and Sharing Using the Gallery 10
10. Using Motion Detection 11
11. Fine Tuning the Webcam During a Video Call 12
1. Introduction
Use this guide to set up and begin using your Logitech HD Pro Webcam
C920.
Read and follow the Important Safety Instructions and
Warnings in the Interactive Touchscreen Owner’s Manual.
Failure to heed these warnings may cause product
damage, accident, fire, electric shock, serious injury or
death. The warranty may also be affected.
2
Page 3
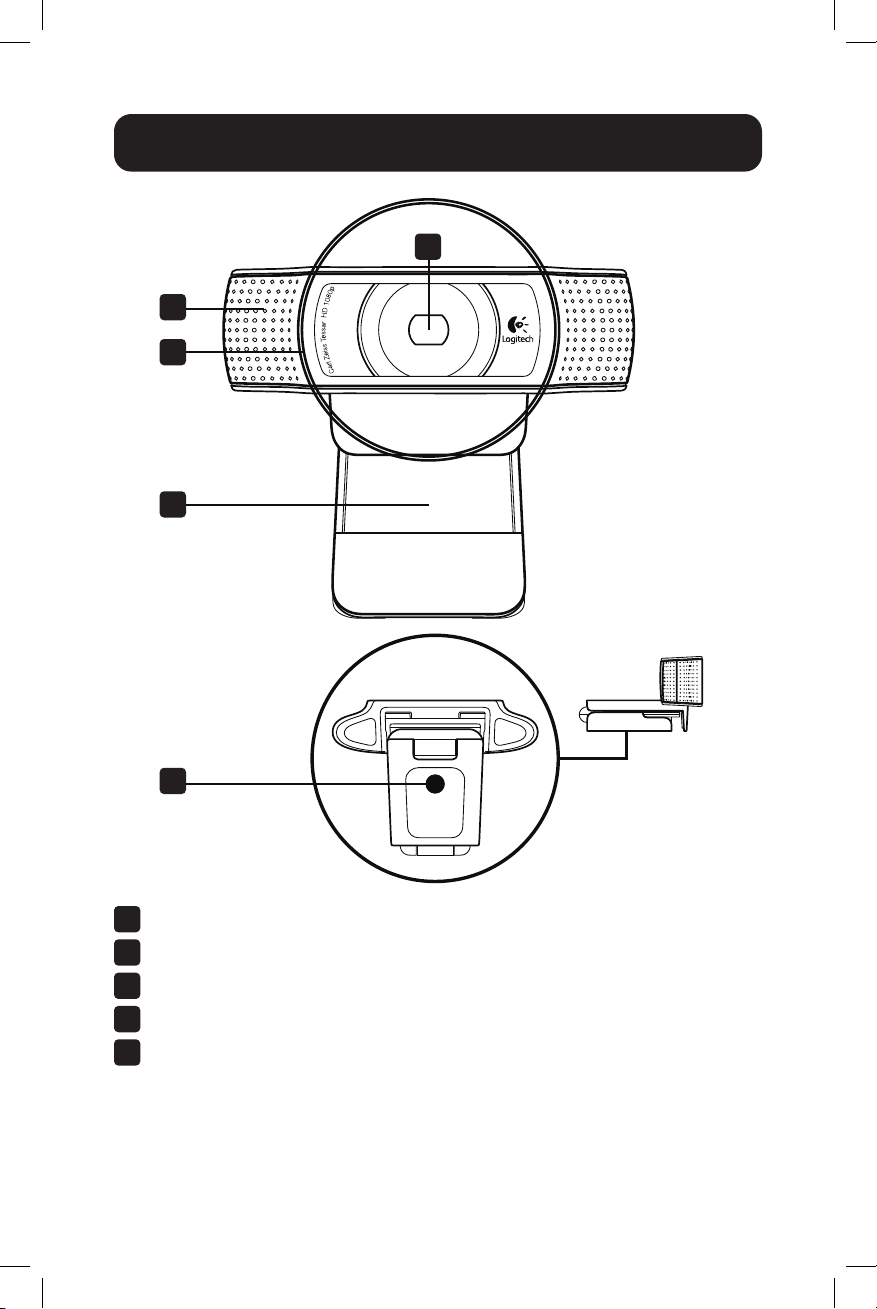
2. Features
2
3
4
1
5
Carl Zeiss® Autofocus HD 1080p Lens
1
Microphone
2
Activity Light
3
Flexible Clip/Base
4
Tripod Attachment
5
3
Page 4
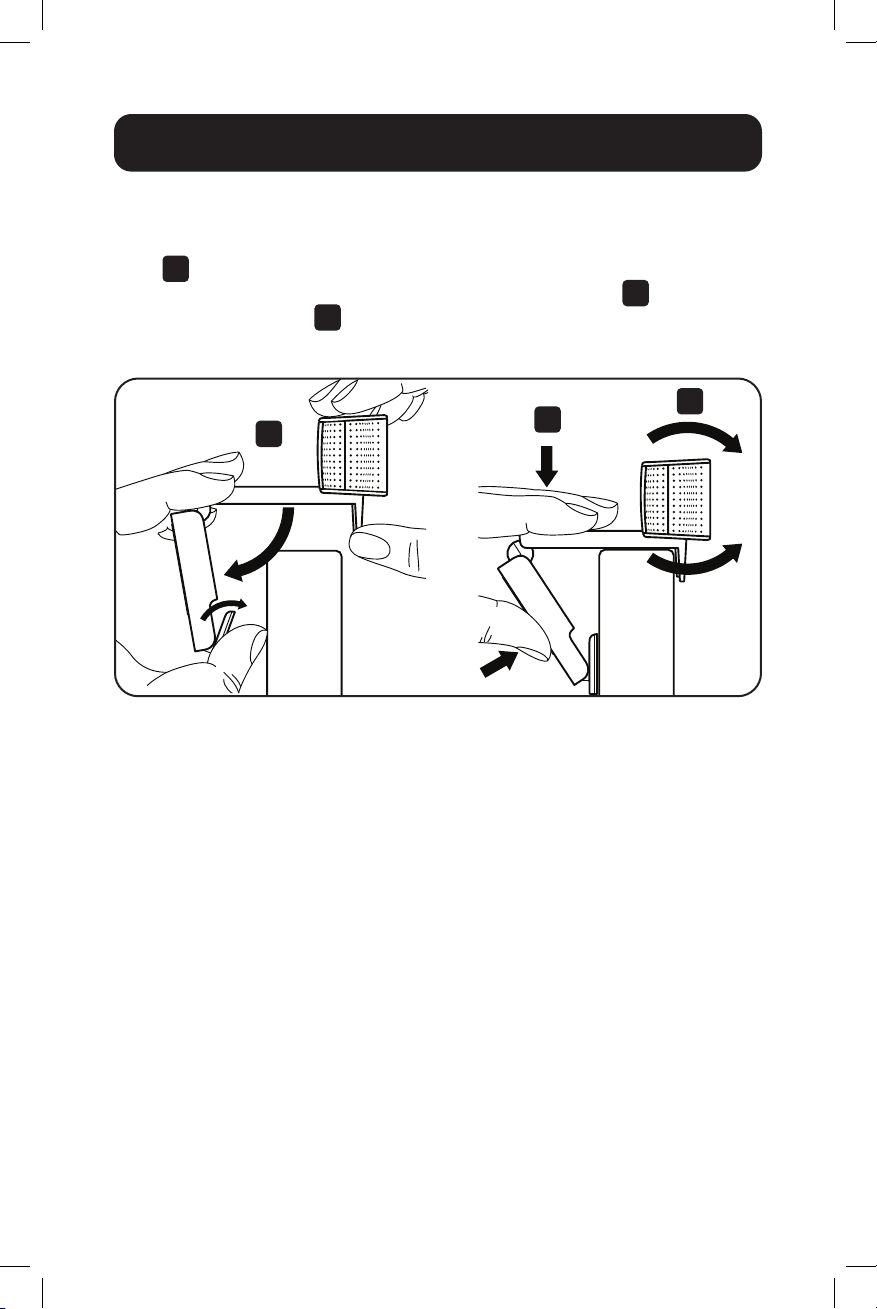
3. Initial Setup
3.1 Mounting the Webcam
Grasp the webcam as shown and open the flexible clip/base with your other
hand 1. Mount the webcam, making sure the foot on the flexible clip/base
is flush with the back of the interactive touchscreen display 2. You can
reposition it as needed 3.
Note: The webcam can also be placed on a desktop or attached to a tripod.
1
2
3
3.2 Connecting the Webcam
Using the included USB cable, connect the webcam to the camera input at
the rear of the interactive touchscreen.
3.3 Installing the Webcam Software
If you are using the webcam with Windows 10, the required software
downloads automatically when you connect the webcam for the first time
and installs silently in the background. Important: Make sure you are
connected to the Internet, so the software can download.
4
Page 5

4. Video Calling
The webcam provides full HD 1080p video calling. To take advantage of
video calling, both callers need:
• A webcam
• An installed video-calling application (e.g., Skype™, Zoom or Gmail™)
• A computer with speakers (or a headset) and a microphone; your
Logitech webcam has two built-in microphones
• A broadband Internet connection (e.g., DSL, T1 or cable)
5
Page 6

5. Using the Webcam with Windows 10
Use the Camera app, available from the Windows 10 start screen, to
operate and control the webcam.
Understanding the Camera App
1
2 3 4 5
Preview window. Click or tap to capture photos or videos (depending on
1
whether Video Mode is selected).
Change webcams (when you have more than one). The face of the
2
Logitech webcam illuminates when selected.
Adjust the camera settings.
3
Activate or deactivate the Timer feature. When activated, there is a
4
three-second countdown to capturing a photo or video.
Turn Video Mode on (to record videos) or off (to take photos).
5
Click or tap on the arrows to scroll through the photos and videos you
6
have captured. Videos are denoted by a timer and play button in the
bottom right-hand corner:
66
Tip: The Camera app lets you use the webcam’s most popular features
quickly and easily. If you want to take advantage of enhanced features,
such as motion detection, use the Logitech Webcam Software
available from logitech.com/downloads.
6
Page 7

6. Adjusting the Camera Settings
The Logitech software optimizes the settings for your environment
automatically. To adjust any of the settings, choose Camera options. This
is available from the Camera app (see Understanding the Camera App)
and from within Metro apps that support webcams.
Choose the required resolution for
1
photo capture or video capture
(when in Video Mode).
Choose the microphone you want
2
to use to record sound in your
videos (if you have more than one
microphone available).
Access More options to benefit
3
from enhanced features such as
digital Zoom and Move.
If the More options pane does
not show the Logitech logo and
offer enhanced options, it is likely
that the Logitech software did
not install correctly when you first
connected the camera. To reinstall
it, go to the Windows Store
and look for Logitech Camera
Controller.
Zoom in or out to include/exclude
4
your surroundings.
After zooming in, drag the white
5
box to pan (adjust the focus area
of the webcam).
Use Follow my face so you are
6
always in the picture.
Use noise cancellation to enjoy
7
clear conversations without
annoying background noise.
3
1
2
4
5
6
7
Depending on the features available with your camera, you can access
further advanced settings by scrolling.
7
Page 8

7. Sharing Photos and Videos
You can share photos and videos via email, Twitter®, Facebook®, YouTube®
or Microsoft OneDrive®.
Follow these steps:
1. In the Camera app, scroll to the photo or video you want to share.
2. Select Share in the Charms bar (or press Windows key + H):
3. Choose the media through which you want to share the photo or video.
8
Page 9

8. Capturing Video and Snapping Pictures
Quick Capture allows you to take photos and record videos easily. You have
easy access to webcam controls and settings:
Preview window
1
Capture mode: photo/video
2
Capture button
3
Webcam controls
4
Photo thumbnails
5
Video thumbnails
6
Click a thumbnail to enter the Gallery.
7
1
2 4
5 6
3
7
9
Page 10

9. Viewing and Sharing Using the Gallery
Clicking on an image thumbnail in the Gallery 1 opens the video or photo
in the review window 2.
You can then:
Attach the video or picture file to an email.
3
Edit the photo or splice together video.
4
Upload the picture or video to Facebook.
5
Upload a video to Twitter or YouTube.
6
You may also drag and drop a gallery image onto one of the function tiles
(3-6) to launch an editing application or to attach or upload.
3
4
5
6
10
2
1
Page 11

10. Using Motion Detection
• Set up the webcam to record video when it detects movement.
• Adjust captured video duration and detection sensitivity.
• Captured video is automatically saved to your computer.
• View content in the Gallery or upload it using the One-Touch Upload
window.
11
Page 12

11. Fine Tuning the Webcam During a
Video
Launch the Webcam Controller
1
when on a video call.
Use pan and tilt to find the best
2
angle.
Zoom in or out to include/exclude
3
your surroundings.
Use Follow my face so you are
4
always in the picture.
Enjoy clear conversations without
5
annoying background noise.
Correct for poor lighting
6
environments using RightLight.
Choose auto- or manual focus.
7
Adjust advanced webcam settings.
8
Call
1
2
3
4
5
6
7
8
Tripp Lite has a policy of continuous improvement. Specifications are subject to change without notice.
1111 W. 35th Street, Chicago, IL 60609 USA • tripplite.com/support
Photos and illustrations may differ slightly from actual products.
12
20-03-360 93-3C7D_RevA
 Loading...