

Page 1

Owner’s Manual
3-Port HDMI Switch with
Remote Control, 4K x 2K
Model: B119-003-UHD
Este manual esta disponible en español en la página de Tripp Lite:
Ce manuel est disponible en français sur le site Web de Tripp Lite :
Русскоязычная версия настоящего руководства представлена на
веб-сайте компании Tripp Lite по адресу: www.tripplite.com/support
Register your product for quicker service and ultimate peace of mind.
You could also win an ISOBAR6ULTRA surge protector—a $100 value!
1111 W. 35th Street, Chicago, IL 60609 USA • www.tripplite.com/support
www.tripplite.com/support
www.tripplite.com/support
PROTECT YOUR INVESTMENT!
www.tripplite.com/warranty
Copyright © 2018 Tripp Lite. All rights reserved.
1
Page 2

Package Contents
• B119-003-UHD
• Remote Control
• External Power Supply (Input: 100–240V, 50/60 Hz, 0.2A; Output: 5V 1A)
•
(4) International Plug Adapters (North America, Europe, U.K. and Australia)
• Mounting Hardware
• Owner’s Manual
Optional Accessories
• P569-XXX-CERT Premium High-Speed HDMI with Ethernet Cables
• P520-006 RS-232 Serial Extension Cable
System Requirements
• Source device(s) with HDMI outputs
• Display device with HDMI input
2
Page 3

Product Features
• Switch between three HDMI source devices (Blu-ray™ player, cable box,
PC, etc.) connected to a single display
• Switch devices via push button, RS-232 port control or the included
remote control
• Supports Ultra High Definition (UHD) video resolutions up to 4096 x 2160
(4K x 2K) @ 60 Hz
• Supports up to 36-bit Deep Color (12 bits per channel)
• Supports standard, DSD (Direct Stream Digital) and HD (HBR) audio
• Supports 7.1-channel surround sound, DTS-HD™ and Dolby® TrueHD
audio
• Supports 300 MHz/3.4 Gbps per channel bandwidth (10.2 Gbps total)
• Meets HDCP 2.2 and HDMI 2.0 standards
• Supports 3D and EDID
• Plug-and-play operation with no software or drivers required
3
Page 4
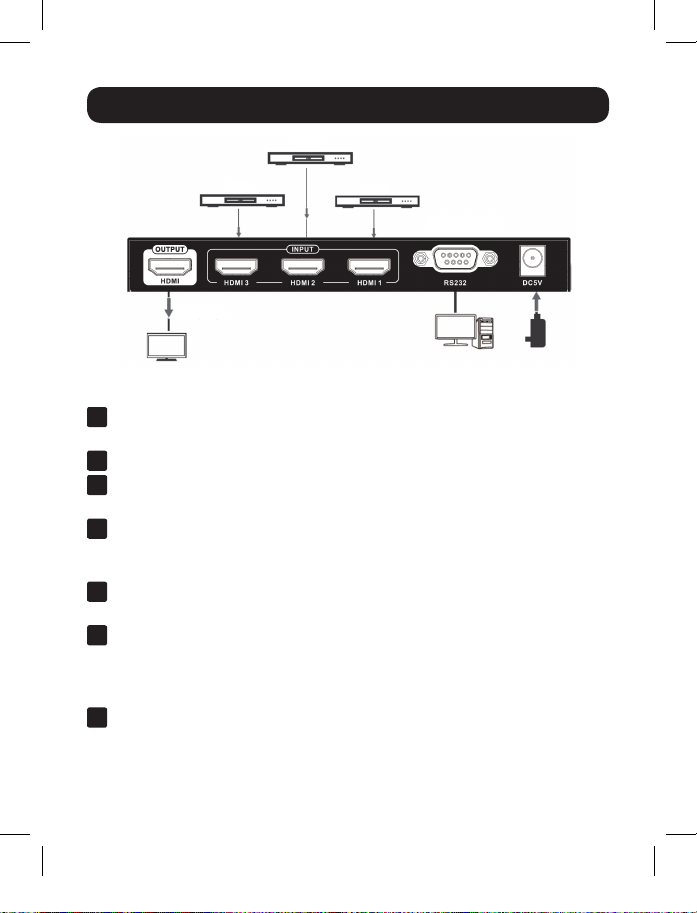
Standard Installation
DVD
DVD
Display
DVD
HDMI Switch
Connection
Optional: Attach the included mounting hardware to the unit, and
1
mount to a desired location.
Make sure power to all devices that you will be connecting is turned off.
2
Optional: Connect a DB9 cable between the RS-232 serial port on the unit
3
and the DB9 serial port on the computer you will be using to control it.
Connect an HDMI source device to an HDMI Input port on the switch.
4
Note: The length of the HDMI cable connecting the source to the switch must not
exceed 16 ft. (5 m).
Repeat step 3 to connect up to two more source devices to the
5
remaining Input ports on the switch.
Connect the HDMI Output port on the switch to the HDMI input port of
6
your display.
Note: The length of the HDMI cable connecting the switch to the display must not
exceed 16 ft. (5 m).
Connect the external power supply to the switch. Plug it into a Tripp Lite
7
surge protector, uninterruptible power supply (UPS) or power distribution
unit (PDU). The red LED on the unit will illuminate to indicate power is
being received.
4
Page 5

Standard Installation
Turn on the power to the HDMI source devices and display. The blue
8
LEDs on the unit will illuminate to indicate the signal is being received.
Switch between source devices using the Select push button on the
9
unit, RS-232 serial control or the included remote control.
See the RS-232 Serial Control section in this manual for details on
controlling the switch using Terminal Emulation Software.
RS-232 Serial Control
Before using RS-232 Serial Control, you must first go into your Terminal
Emulation Software and update the COM port settings.
Go to the Setup dropdown menu, and select the Serial Port Option.
1
5
Page 6

Standard Installation
Select the COM port that is being used, and update the remaining
2
settings as follows:
Baud Rate (9600)
Data (8 bit)
Parity (none)
Stop (1 bit)
Flow Control (Xon/Xoff)
6
Page 7

Standard Installation
Next, you will need to configure your software to allow input control. Go
3
to the Setup dropdown menu, and select the Terminal option.
7
Page 8

Standard Installation
Update the following settings:
4
Receive (AUTO)
Local Echo (enable)
The remaining settings can stay as they are.
Once these settings are updated, the Terminal Emulation Software will
5
recognize the switch, allowing you to enter commands to control it. The
following table lists the available commands. Please note that hitting the
backspace key will revise a command.
Action Command
HDMI 1 Input port0R
HDMI 2 Input port1R
HDMI 3 Input port2R
Power On poweronR
Power Off poweroffR
8
Page 9

Troubleshooting
If you are unable to get an acceptable image after following the installation
instructions, try the troubleshooting tips:
1. Is the external power supply that came with the product connected
and plugged into a working power source? For the product to function
properly, the switch must be connected to and receiving power from an
external power supply.
2. Was the power to the connected devices turned off prior to
installation? If not, restart them.
3. What resolution are you trying to reach? The B119-003-UHD is
tested to support Ultra High Definition (UHD) video resolutions up to
4096 x 2160 @ 60 Hz and 36-bit Deep Color (12 bits per channel).
4.
What length HDMI cable are you using? The shorter the cable being
used, the higher the resolution you will be able to obtain. If you are not
able to get an acceptable image, try using a shorter cable or lowering your
source’s video resolution or color depth settings. See the Installation
section in this manual for details on the maximum cable distance.
5. What type of cabling are you using? Inferior cabling can result in poor
performance, so it is important you use cables that can support the video
resolution you are trying to obtain. It is recommended that you use
Tripp Lite’s P569-XXX-CERT Premium High-Speed HDMI with Ethernet
cables, as they have been tested to work with the B119-003-UHD.
6. Test your cables to ensure they are working properly. For example,
connect your HDMI cable between a source and monitor that you know
work to see if the cable is functioning.
7. Is the unit located in an area that exposes it to higher
temperatures? If the product is overheated, it will not function properly.
8. If you are having trouble getting your Terminal Emulation Software to
recognize the switch, you may need to shut down your installation and
start from the beginning.
9.
If you are still having trouble getting your Terminal Emulation Software to
recognize the switch, check to make sure your serial settings are set according
to the instructions in the RS-232 Serial Control section of this manual
9
Page 10

Specifications
Connectors
Input (3x) HDMI (Female)
Output HDMI (Female), DB9 (Female)
Video
Maximum Resolution 4096 x 2160 @ 60 Hz
Color Depth 36-bit Deep Color (12 bits per channel)
Video Amplifier Bandwidth 10.2 Gbps / 300 MHz
Environmental
Operating Temperature 32° to 140°F (0° to 60°C)
Storage Temperature -4° to 158°F (-20° to 70°C)
Relative Humidity 0% to 95%, Non-Condensing
Physical
Unit Dimensions (H x W x D) 0.8 x 6.3 x 2.0 in. (20 x 160 x 51 mm)
Unit Weight 0.54 lb. (240 g)
Power Requirements
External Power Supply 5V 1A
Power Consumption (Max) 5W
10
Page 11

Warranty and Product Registration
1-Year Limited Warranty
Tripp Lite warrants its products to be free from defects in materials and workmanship for a period of
one (1) year from the date of initial purchase. Tripp Lite’s obligation under this warranty is limited to
repairing or replacing (at its sole option) any such defective products. To obtain service under this
warranty, you must obtain a Returned Material Authorization (RMA) number from Tripp Lite or an
authorized Tripp Lite service center. Products must be returned to Tripp Lite or an authorized Tripp Lite
service center with transportation charges prepaid and must be accompanied by a brief description
of the problem encountered and proof of date and place of purchase. This warranty does not apply to
equipment, which has been damaged by accident, negligence or misapplication or has been altered
or modified in any way.
EXCEPT AS PROVIDED HEREIN, Tripp Lite MAKES NO WARRANTIES, EXPRESS OR IMPLIED,
INCLUDING WARRANTIES OF MERCHANTABILITY AND FITNESS FOR A PARTICULAR PURPOSE. Some
states do not permit limitation or exclusion of implied warranties; therefore, the aforesaid limitation(s)
or exclusion(s) may not apply to the purchaser.
EXCEPT AS PROVIDED ABOVE, IN NO EVENT WILL Tripp Lite BE LIABLE FOR DIRECT, INDIRECT,
SPECIAL, INCIDENTAL OR CONSEQUENTIAL DAMAGES ARISING OUT OF THE USE OF THIS PRODUCT,
EVEN IF ADVISED OF THE POSSIBILITY OF SUCH DAMAGE. Specifically, Tripp Lite is not liable for any
costs, such as lost profits or revenue, loss of equipment, loss of use of equipment, loss of software,
loss of data, costs of substitutes, claims by third parties, or otherwise.
Product Registration
Visit www.tripplite.com/warranty today to register your new Tripp Lite product. You’ll be automatically
entered into a drawing for a chance to win a FREE Tripp Lite product.*
* No purchase necessary. Void where prohibited. Some restrictions apply. See website for details.
Use of this equipment in life support applications where failure of this equipment can reasonably
be expected to cause the failure of the life support equipment or to significantly affect its safety or
effectiveness is not recommended.
Tripp Lite has a policy of continuous improvement. Specifications are subject to change without
notice.
11
Page 12

1111 W. 35th Street, Chicago, IL 60609 USA • www.tripplite.com/support
12
18-01-070 93-3768_RevB
 Loading...