

Page 1
WARRANTY
Quick Start Guide
REGISTRATION:
register online today for a
chance to win a FREE Tripp Lite
product—www.tripplite.com/warranty
Table of Contents
1. System Requirements 2
1.1 Remote Console Computers 2
1.2 Connected Computer/Servers 2
1.3 Server Interface Units (SIUs) 2
2. Single Station Installation 3
NetDirector™ Cat5 IP KVM Switches
Models: B064-016-02-IP, B064-016-04-IP, B064-032-02-IP and B064-032-04-IP
3. Network Setup - IP Address Determination 4
3.1 Local Console 4
3.1.1 Redundant NIC 5
3.1.2 IP Address 5
3.1.3 DNS Server 5
3.2 IP Installer 5
3.3 Browser 6
3.4 AP Windows Client 6
4. Accessing the B064-Series KVM Switch 6
4.1 Local Console Login 6
4.2 Browser Login 7
4.3 AP Windows Client Login 7
4.4 AP Java Client Login 7
5. Warranty Registration 8
Tripp Lite World Headquarters
1111 W. 35th Street • Chicago, IL 60609 USA
(773) 869-1234 • www.tripplite.com
Copyright © 2008 Tripp Lite. All rights reserved.
Page 2
1. System Requirements
1.1 Remote Console Computers
Browsers must support 128-bit SSL encryption•
For the browser-based Java Applet and AP Java Client, the latest version of Sun’s Java Runtime Environment (JRE) 6, Update 3 or •
higher must be installed
For the Log Server, you must have the Microsoft Jet OLEDB 4.0 or higher driver installed•
For best results, we recommend that the computers used to access the switch have at least a Pentium III, 1 GHz processor, with their •
screen resolution set to 1024 x 768
For best results, a network transfer speed of at least 128 kbps is recommended•
1.2 Connected Computer/Servers
The following must be on the computer/servers to be connected to the B064-Series KVM Switch:
VGA, SVGA or Multisync port•
For USB Server Interface Unit Connections: Type A USB port and USB host controller•
For PS/2 Server Interface Unit Connections: 6-pin mini-DIN keyboard and mouse ports•
1.3 Server Interface Units (SIUs)
Cat5e/6 cable is required to connect the B064-Series KVM Switches to one of the Server Interface Units (SIUs). The following SIUs are
required for use with the B064-Series KVM Switch:
Function Server Interface Unit
Connect to a computer/server with PS/2 ports B054-001-PS2
Connect to a computer/server with USB ports B054-001-USB
2
Page 3
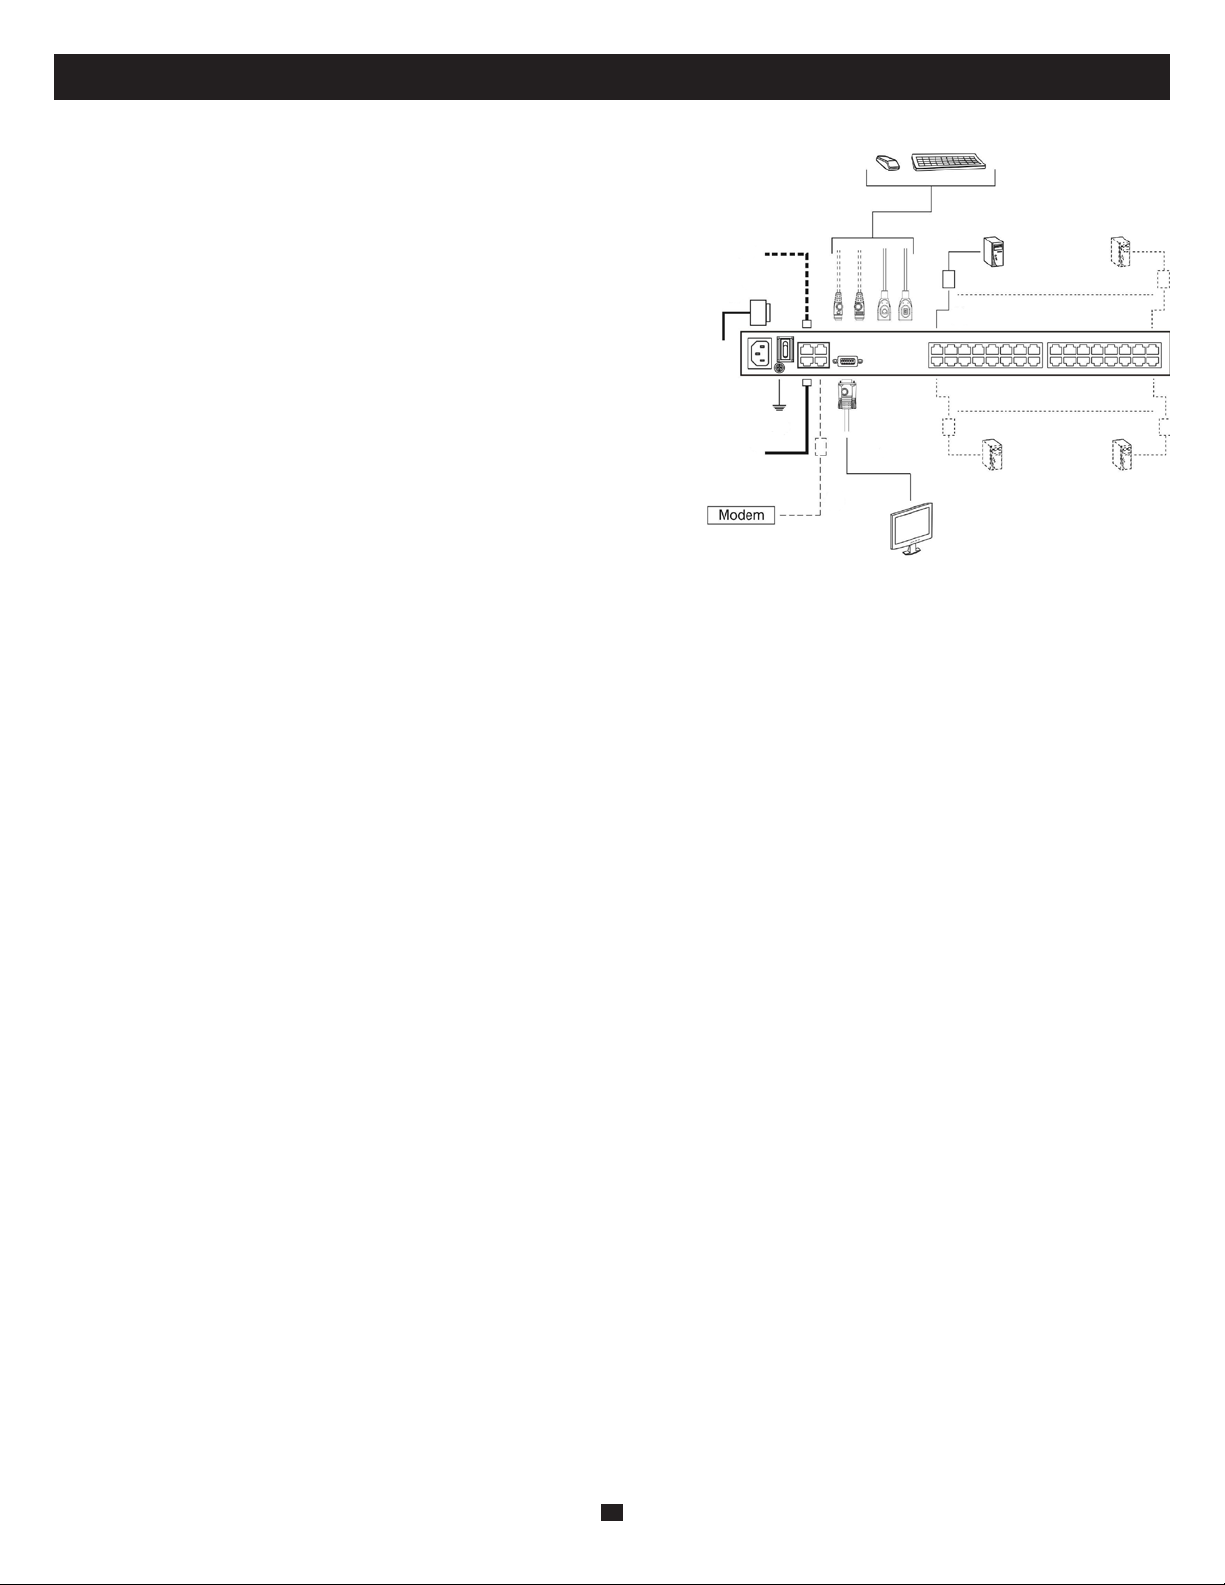
2. Single Station Installation
In a Single Stage installation, there are no additional KVM switches cascaded
and/or daisy-chained from the B064-Series KVM. To set up a single stage
installation, refer to the following instructions and the corresponding
installation diagrams.
Make sure that power to all the devices you will be connecting, including 1.
all pre-existing devices on the installation, have been turned off.
Optional:2. Plug your Local Console’s keyboard, monitor, and mouse into
the KVM’s Local Console Ports. You will need to connect the included
USB – PS/2 Console Cable Kit to the console port on the back of the unit.
Note: You can use any combination of keyboard and mouse connections.
For example, you can use a PS/2 keyboard with a USB mouse. USB
keyboards and mice can plug into the USB ports on the front panel,
as well as the ports on the USB – PS/2 Console Cable Kit. The
B064-Series KVM Switch does not support distances above 65 ft.
between the KVM and the local monitor.
Use Cat5e cable to connect any available KVM port to a B054-001-PS2 3.
(for PS/2 Servers) or B054-001-USB (for USB Servers) Server Interface
Unit.
Note: The distance between the B064-Series KVM and the Server Interface
Unit must not exceed 130 ft.
Connect the Server Interface Unit to the computer/server.4.
Connect a Cat5e cable from the network into the KVM switch’s primary network port (LAN 1).5.
Optional:6. Connect a second Cat5e cable from the network into the KVM switch’s backup (secondary) network port (LAN 2).
Optional Dial-In Modem Connection:7. Use Cat5e cable to connect the KVM switch’s modem port to a RJ45 to DB9 Adapter
(included), and connect the adapter’s DB9 connector to the modem’s DB9 port.
Use the included grounding wire to ground the unit. Connect one end of the wire to the grounding terminal, and the other end of the 8.
wire to a suitable grounded object.
Plug the included power cord into the KVM switch’s Power Socket, and then into a Tripp Lite Surge Suppressor, Uninterruptible 9.
Power Supply (UPS) or PDU.
Turn on the power to the KVM switch. Once it is powered up, turn on the power to the connected computers.10.
3
Page 4

3. Network Setup - IP Address Determination
If you are an administrator logging in for the first time, you need to access the B064-Series KVM Switch in order to give it an IP address
that users can connect to. There are four methods to choose from; Local Console, IP Installer, Browser and AP Windows Client.
3.1 Local Console
After the local console has been connected and the B064-Series KVM Switch 1.
turned on, a login prompt appears on the console monitor:
Log in using the default Username: administrator and Password: password. For 2.
security purposes, it is strongly recommended that you change these to a
unique Username and Password. (See the Owner’s Manual CD for details)
After you successfully log in, the Local Console Main Screen appears:3.
Click the Device Management icon at the top of the screen.4.
On the notebook screen that appears on the right-hand side of the page select 5.
the Network tab.
The B064-Series KVM Switch is designed with two network interfaces. The NIC Setting section of the Network tab allows you to assign
a single IP Address and DNS Server for both network interfaces, or to assign a separate address for each.
4
Page 5

3. Network Setup - IP Address Determination
(
continued
)
3.1 Local Console
3.1.1 Redundant NIC
(
continued
)
If Redundant NIC is enabled (the default), both interfaces use the IP address assigned to Network Adapter 1. Under this configuration, the
B064-Series KVM Switch will switch to the second network interface in the event there is a crash on the first network interface.
If you select Redundant NIC, the Network Interface drop-down menu will be frozen to Network Adapter 1, and you will only have to •
enter IP Address and DNS Server settings once.
If you do not select Redundant NIC, you will have to enter IP Address and DNS Server settings for both Network Adapter 1 and •
Network Adapter 2. Use the Network Interface drop-down menu to select the Network Adapter you want to configure.
3.1.2 IP Address
The B064-Series KVM Switch can either have its IP address assigned dynamically (DHCP), or it can be given a fixed IP address.
For dynamic IP address assignment, select the • Obtain IP address automatically option.
To assign an IP address yourself, select the • Set IP address manually option and fill in an IP Address, Subnet Mask and Default Gateway
appropriate for you network.
3.1.3 DNS Server
As with the IP Address, you have the option of having the DNS Server set automatically or setting it yourself.
For automatic DNS Server address assignment, select the • Obtain DNS Server address automatically option.
To specify the DNS Server address manually, select the • Set DNS server address manually option, and enter in Preferred and Alternate
DNS servers that are appropriate for your network.
Note: If you choose to enter the DNS Server manually, it is required that you specify the preferred DNS Server address. The alternate
DNS Server address is optional.
See the Owner’s Manual on the B064-Series KVM Switch CD for more information on the settings in the Network tab of the Device
Management section.
3.2 IP Installer
For computers running Windows, an IP address can be assigned with the IP Installer utility:
Obtain the IP Installer file from the CD that came with the 1.
B064-Series KVM Switch and save it to a desired location on a
computer that is on the same network as your B064-Series
KVM Switch.
Go to the IP Installer file that you just saved and run the 2.
IPInstaller.exe file. A dialog box similar to the one below
appears:
Select the B064-Series KVM Switch in the Device List.3.
Note: If the list is empty, or your device doesn’t appear, click
Enumerate to refresh the Device List. If there is more than
one device in the list, use the MAC address to pick the one
you want. The B064-Series KVM Switch’s MAC address is
located on its bottom panel.
From here you can choose to4. Obtain an IP address
automatically (DHCP), or Specify an IP address. If you choose
to assign your own address, fill in the IP Address, Subnet Mask,
and Gateway fields with information appropriate to your
network.
Click 5. Set IP.
After the IP address shows up in the Device List, click 6. Exit.
5
Page 6

3. Network Setup - IP Address Determination
3.3 Browser
On a computer/server that is on the same network as your B064-Series KVM Switch, set the computer/server’s IP address to 1.
192.168.0.XXX, where XXX represents any number or numbers except 60. (192.168.0.60 is the default address of the B064-Series
KVM Switch)
Access the B064-Series KVM Switch using the URL 192.168.0.602.
Assign a fixed IP address for B064-Series KVM Switch using the same instructions as described in the 3. Local Console section of this
chapter.
After you log out, reset your computer’s IP address to its original value.4.
3.4 AP Windows Client
For computers running Windows, the B064-Series KVM Switch’s IP
address can be determined using the AP Windows Client that comes on
the B064-Series KVM Switch CD. When you run the program it
searches the network segment for B064-Series KVM Switch devices,
and displays the results in a dialog box similar to the one below:
(
continued
)
You can use the network address found here to access the B064-Series KVM Switch. Once you login to the KVM switch, you can change
the IP Address using the instructions in the Local Server and Browser sections of this chapter.
4. Accessing the B064-Series KVM Switch
4.1 Local Console Login
The local console login dialog box is displayed once the installation is complete. When the local console is attached, and there is no user
logged in, the login screen will appear on the display. Simply key in your Username and Password and click Login to bring up the OSD
Main Page.
Note: If you supply an invalid login, the authentication routine will return an Invalid Username or Password message. If you see this
message, log in again being careful to enter the correct Username and Password.
6
Page 7

4. Accessing the B064-Series KVM Switch
4.2 Browser Login
The B064-Series KVM Switches can be accessed via Internet browser from any platform that has the Java Runtime Environment 6,
Update 3 or higher installed. If you don’t already have the required JRE installed, it is available for free download from the Java web site:
www.java.com
To access the switch via browser, do the following:
Open the browser and specify the IP address of the B064-Series KVM Switch you want to access, as given to you by your system 1.
administrator.
Note: For security purposes, a login string may have been set by the administrator. If so, you must include a forward slash and the login
string along with the IP address when you log in. (For example, a computer with a login string of B064-032-04-IP would have a
URL such as 192.168.0.100/B064-032-04-IP)
When you try to log in to the device from your browser, a Security Alert message appears to inform you that the device’s certificate 2.
is not trusted, and asks if you want to proceed. The certificate can be trusted; accept the certificate and proceed to the login screen.
(See the Owner’s Manual on the B064-Series KVM Switch CD for information on installing the certificate so it shows up as trusted)
Provide a valid Username and Password (set by the KVM switch’s administrator), and click 3. Login to bring up the OSD Main Page.
Note: If you supply an invalid login, the authentication routine will return an Invalid Username or Password message. If you see this
message, log in again being careful to enter the correct Username and Password.
4.3 AP Windows Client Login
(
continued
)
The AP Windows Client can be found in the Download Section of the OSD or on the CD that came with your B064-Series KVM Switch.
If you do not have access to the CD, and browser access to the KVM switch has already been disabled, you will need to obtain the file
from your system administrator. Once you have saved the AP Windows Client, go to its location and double-click the WinClient-AP.exe
icon to bring up the Windows Client Connection Screen.
Each time the WinClient.exe file is run, it searches the User’s LAN segment for B064-Series KVM Switches, and lists the ones it finds in
the Server List. Double-click on any of the units in this list to connect to it. You will be prompted to enter your Username and Password.
Enter your Username and Password to connect to the KVM switch.
If you are connecting to a KVM switch from a remote location, and the B064-Series KVM Switch does not show up in the Server List,
enter the KVM switches URL and Port number in the corresponding fields in the Server section. Click Connect and enter your username
and password to connect to the KVM switch.
Once connected, click Switch to Remote View to access the KVM switch.
4.4 AP Java Client Login
After downloading the AP Java Client, go to the location on your hard disk where you downloaded the program and double-click the
JavaClient.jar icon to bring up the Address Input dialog box.
Key in the IP address for the unit you want to connect to, as given to you by your system administrator. For security purposes, a 1.
login string may have been set up by the administrator. If a login string has been set up, a forward slash followed by the login string
must be specified as part of the IP address. (For example, a computer with a login string of B064-032-04-IP would have a URL such
as 192.168.0.100/B064-032-04-IP)
Click 2. OK. A Login dialog box appears.
Provide a valid Username and Password, as given to you by your system administrator, and click 3. OK to switch to the OSD Main
Page.
7
Page 8

5. Warranty Registration
Visit www.tripplite.com/warranty today to register the warranty for your new Tripp Lite product. You’ll be automatically entered into a
drawing for a chance to win a FREE Tripp Lite product!*
* No purchase necessary. Void where prohibited. Some restrictions apply. See website for details.
Copyright©2008 Tripp Lite. All rights reserved. Tripp Lite follows a policy of continuous improvement. Product specifications are
subject to change without notice.
Made in Taiwan.
Tripp Lite World Headquarters
1111 W. 35th Street • Chicago, IL 60609 USA
(773) 869-1234 • www.tripplite.com
200811138 93-2859
 Loading...