

Page 1
INSTALLATION INSTRUCTIONS – In Cabinet
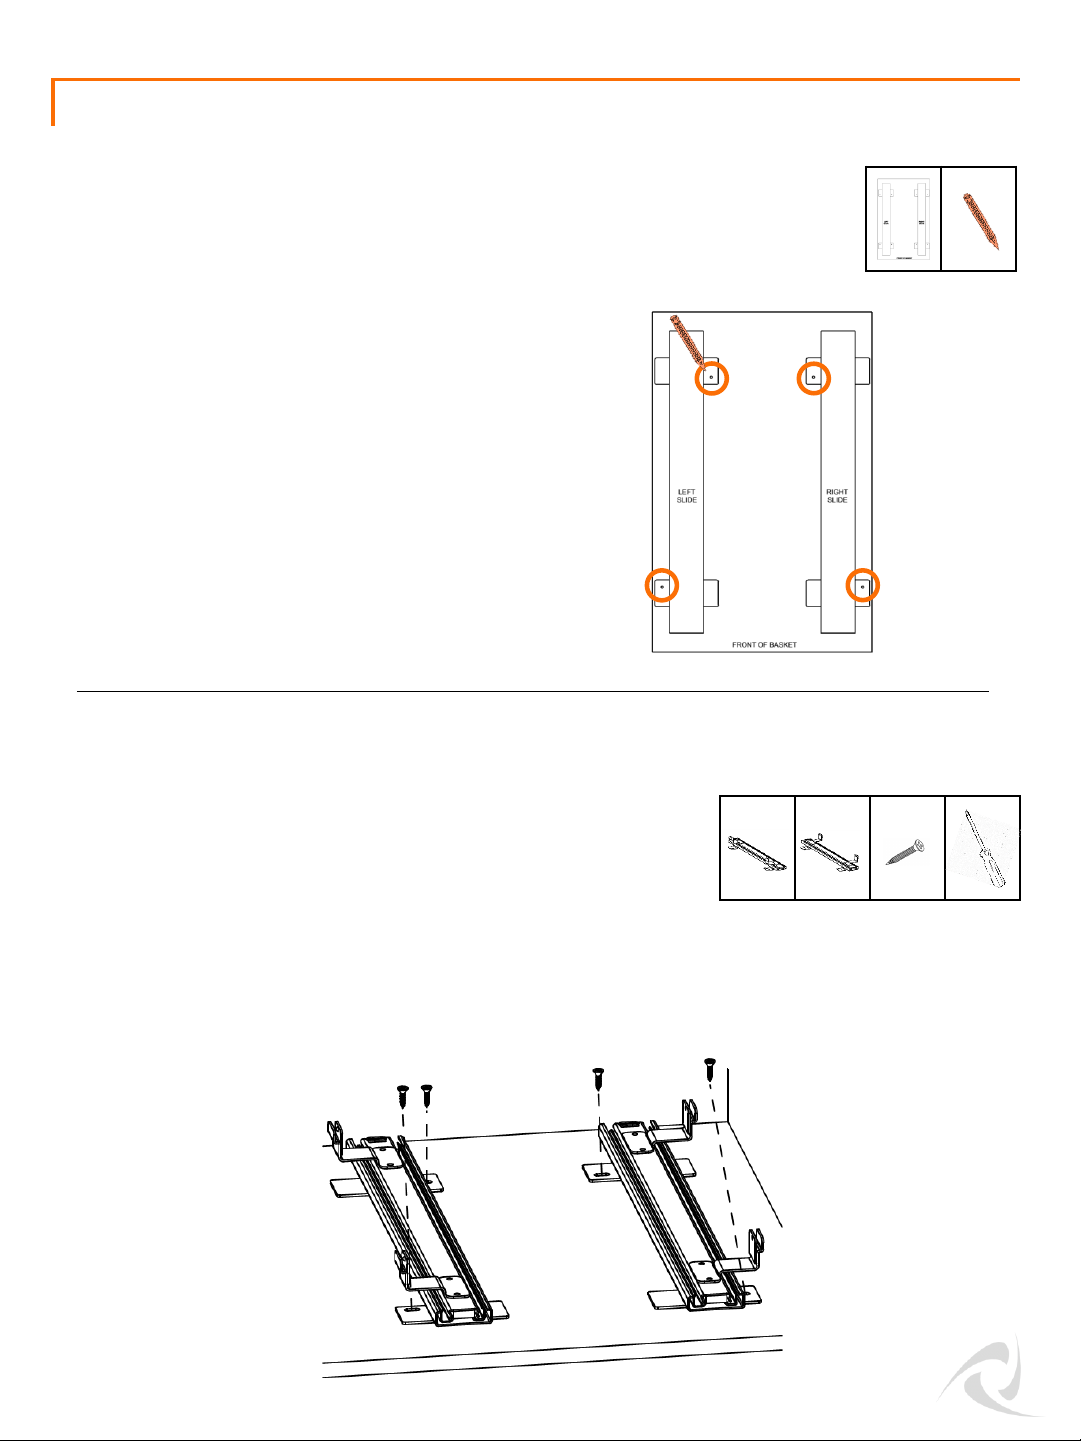
Place CABINET MOUNTING TEMPLATE (G) inside your
cabinet. Using a pencil, mark the location to install the
CABINET SCREWS (F).
• Note: To ease the installation you can pre-drill small
holes at the marked locations.
Identify LEFT & RIGHT SLIDES (B) & (C).
• Note that the BACK end of each SLIDE (B) & (C) has a black tip
and the FRONT end does NOT.
Place LEFT & RIGHT SLIDES (B) & (C) in their proper orientation
and desired position inside the cabinet.
B (1) C (1) F (4)
G (1)
STEP 1
STEP 2
Extend the SLIDES (B) & (C) slightly and align the center of the oval slots to your marking in the cabinet.
Use the self-tapping CABINET SCREWS (F) to fasten the LEFT & RIGHT SLIDES (B) & (C) in your cabinet.
FRONT
BACK
© 2018 TRINITY - 800.985.5506
2
Page 2
INSTALLATION INSTRUCTIONS – In Cabinet
A (1)
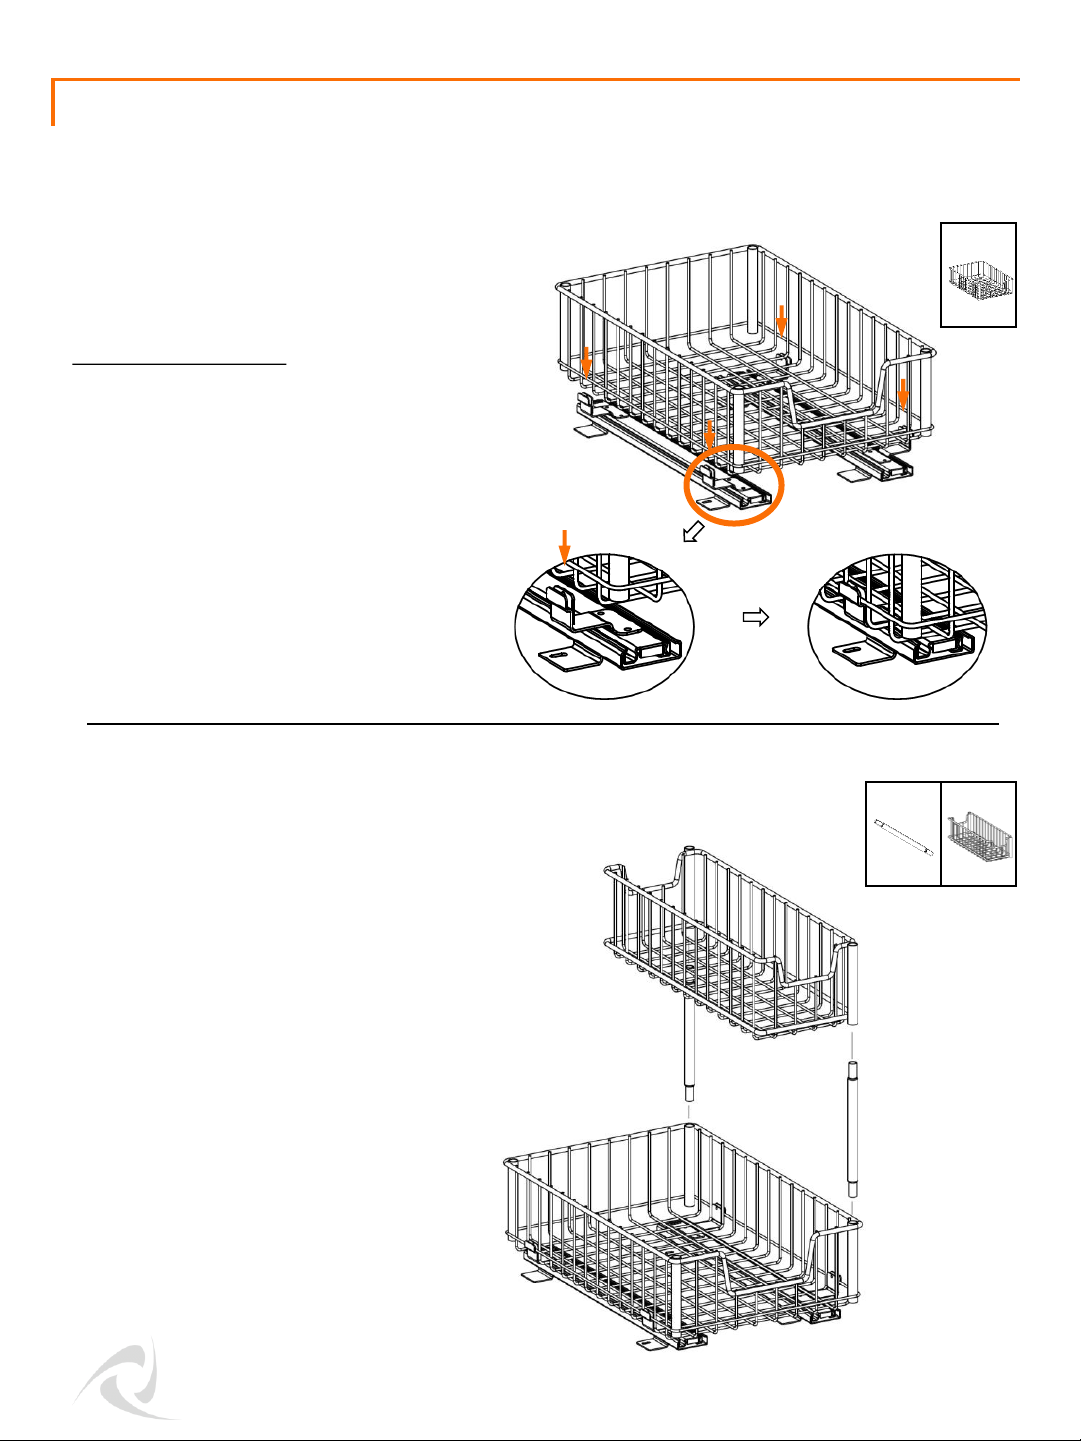
Align LOWER DRAWER (A) at the marked
location and push it into the clips of the LEFT &
RIGHT SLIDES (B) & (C).
Installation Suggestion: With the LOWER
DRAWER (A) resting on top of the clips, brace
the top of the LOWER DRAWER (A) with one
hand and, with a rubber mallet, lightly tap each
bottom corner of the LOWER DRAWER (A) to
secure the LOWER DRAWER (A) into the clips.
STEP 3
STEP 4
Remove the black caps from 2 corner posts of
the LOWER DRAWER (A). Insert the 2
CONNECTORS (H) into the posts of the bottom
basket. Place the UPPER DRAWER (I) on the
connectors.
Note: The UPPER DRAWER (I) can be
placed on the right hand side or the
left hand side.
I (1)H (2)
© 2018 TRINITY - 800.985.5506
3
Page 3
© 2018 TRINITY - 800.985.5506
INSTALLATION INSTRUCTIONS – On Wire Rack
4
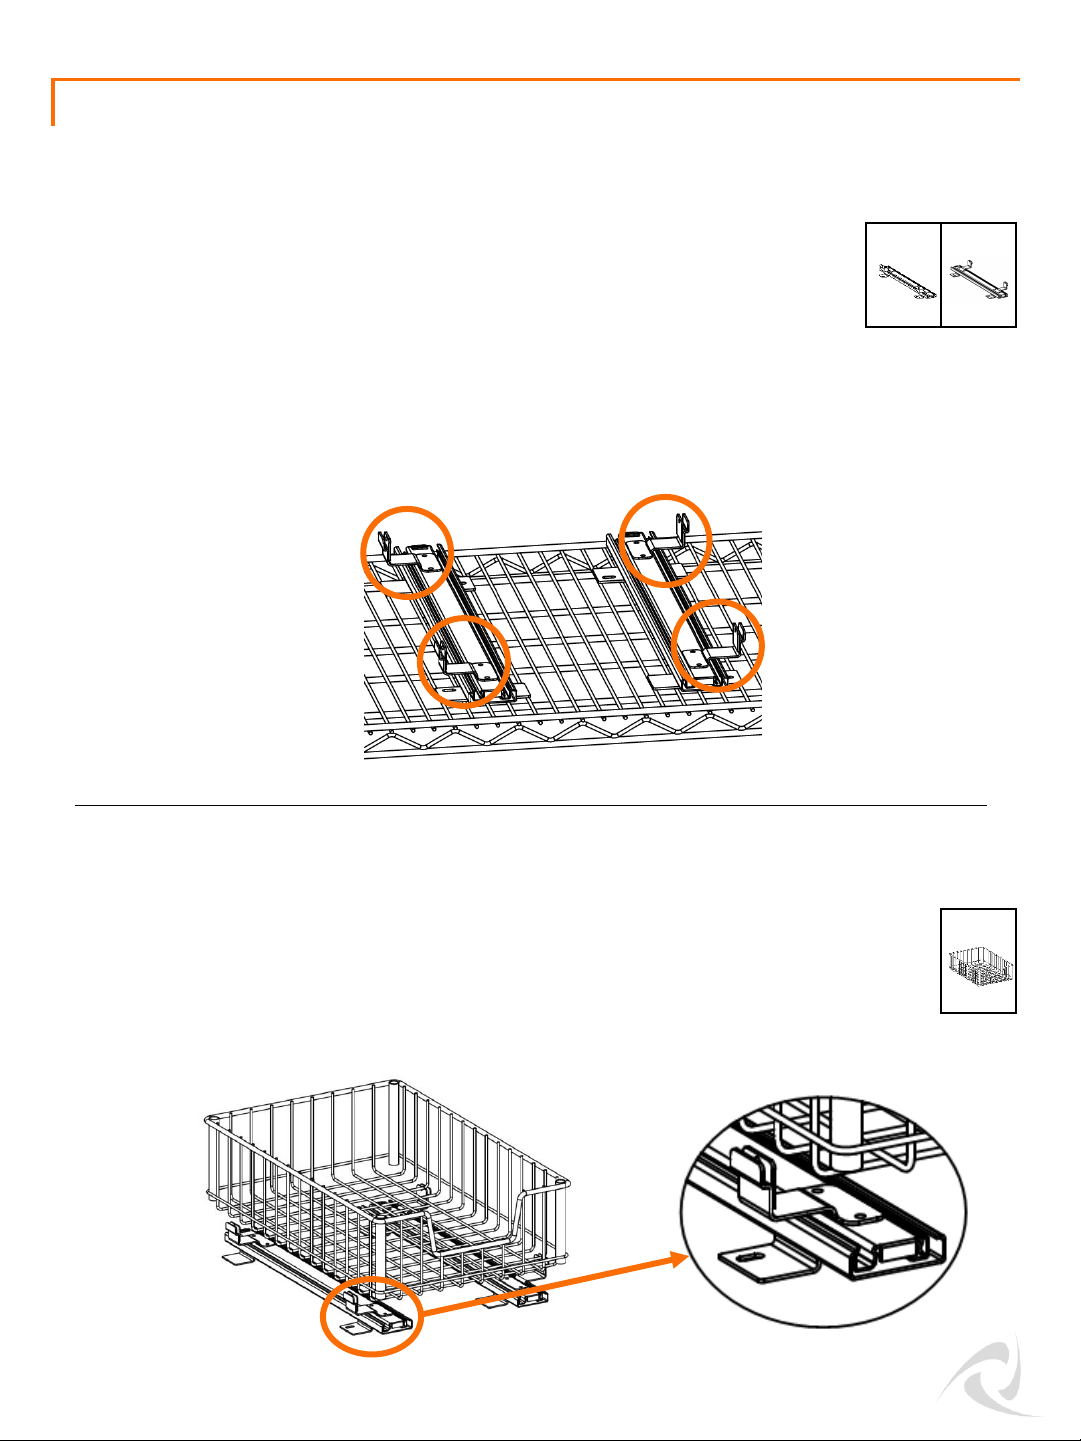
Rest LOWER DRAWER (A) on top of the CLIPS to ensure proper SLIDE spacing.
• Note: For ease of installation, do NOT clip the LOWER DRAWER (A) into the
LEFT & RIGHT SLIDES (B) & (C) until Step 4.
Position as such:
Identify LEFT & RIGHT SLIDES (B) & (C).
• Note that the BACK end of each SLIDE (B) & (C) has a black tip and the FRONT
end does NOT.
Place SLIDES (B) & (C) on desired wire shelf. Make sure the FRONT of the SLIDES
(B) & (C) is lined up with the FRONT of the shelf.
Line up the slides along the wires in the wire shelf to ensure they are straight.
Make sure the front edge of the WIRE DRAWER (A) lines up to the edge of the
shelf so they are flush.
B (1) C (1)
A (1)
STEP 1
STEP 2
FRONT
BACK
CLIPS should be on
the OUTSIDE.
Page 4
INSTALLATION INSTRUCTIONS – On Wire Rack
© 2018 TRINITY - 800.985.5506
5
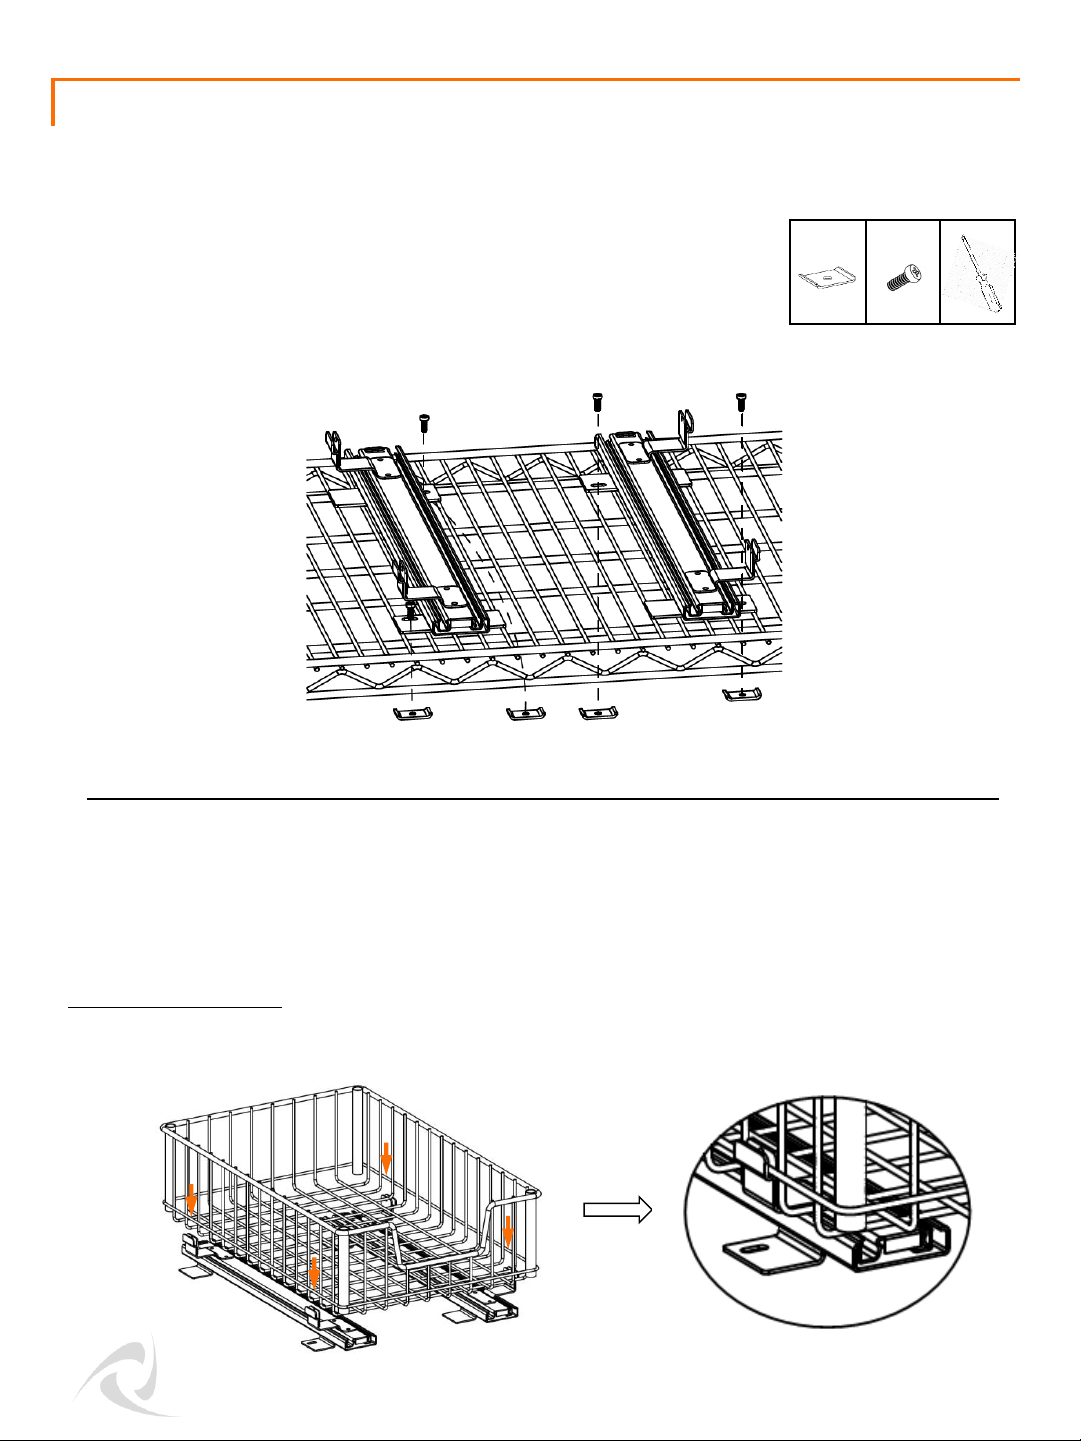
With a Phillips screwdriver, secure the SLIDES (B) & (C) to the wire shelf by
putting PLATE SCREWS (E) through the slots and fasten to the RACK
PLATES (D).
D (4) E (4)
STEP 3
Attach the LOWER DRAWER (A) to the clips in the LEFT and RIGHT SLIDES (B) & (C) until it clicks into
the clip.
Installation Suggestion: With the LOWER DRAWER (A) resting on top of the CLIPS, brace the top of the
LOWER DRAWER (A) with one hand and, with a rubber mallet, lightly tap each bottom corner of the
CLIPS to secure the LOWER DRAWER (A) into the CLIPS.
STEP 4
Page 5
INSTALLATION INSTRUCTIONS – On Wire Rack
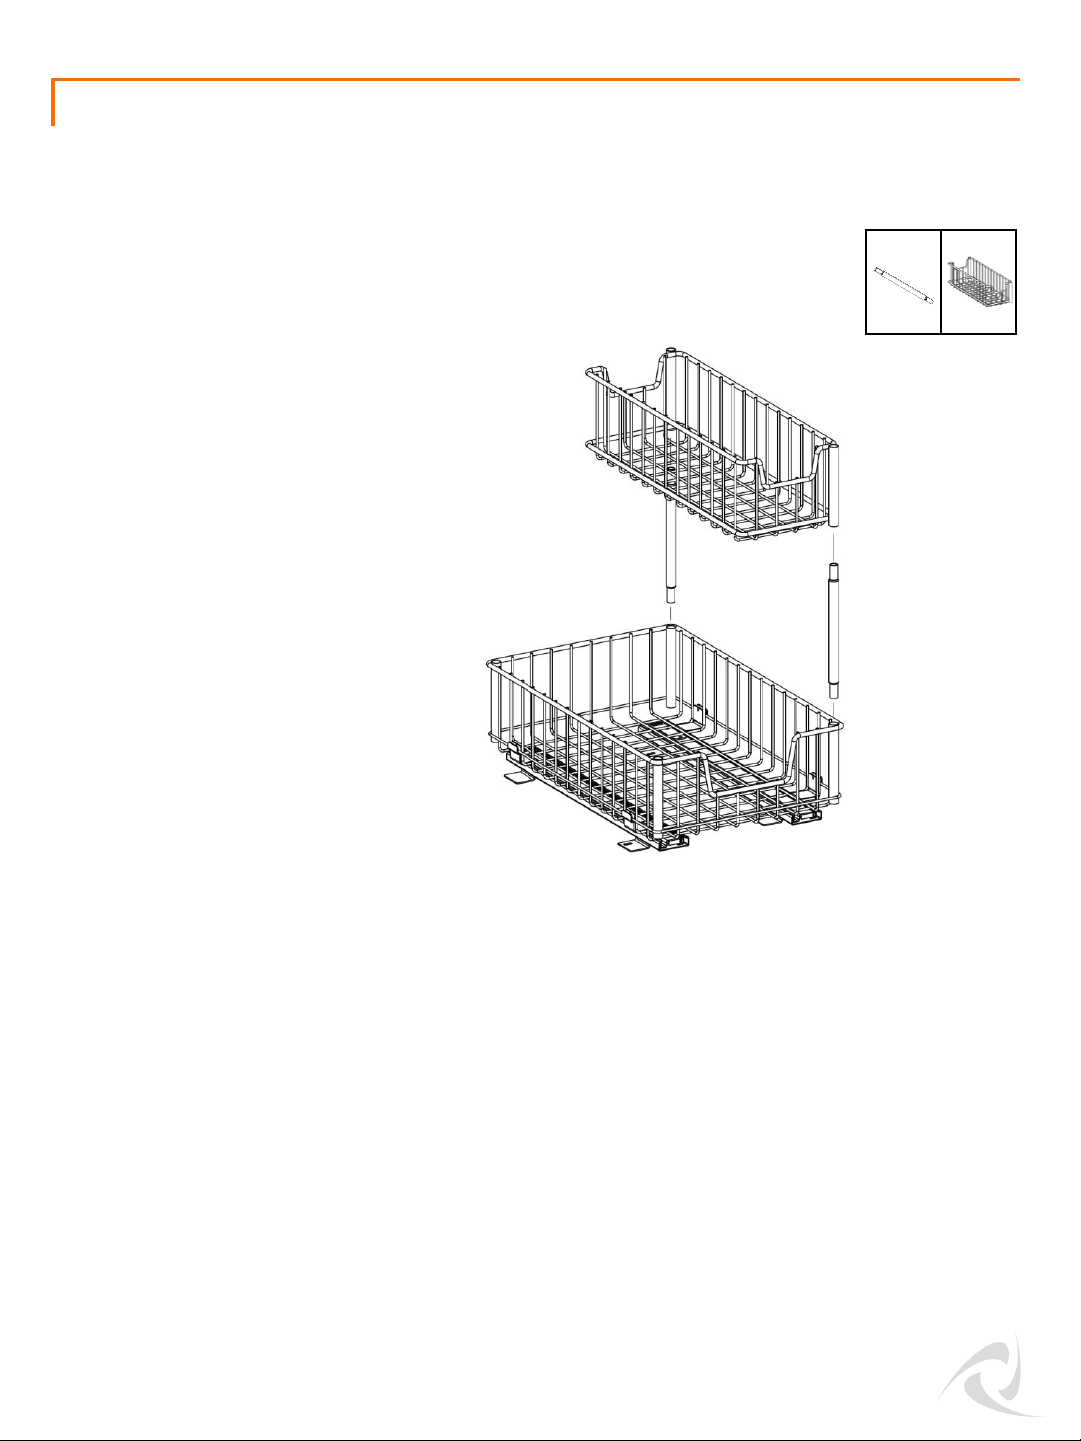
Remove the black caps from 2 corner posts of
the LOWER DRAWER (A). Insert the 2
CONNECTORS (H) into the posts of the bottom
basket. Place the UPPER DRAWER (I) on the
connectors.
Note: The UPPER DRAWER (I) can be
placed on the right hand side or the
left hand side.
I (1)H (2)
STEP 5
© 2018 TRINITY - 800.985.5506
6
 Loading...