


OWNER’S MANUAL
TRINITY 32” x 16” Stainless Steel Utility Sink
w/Pull-out Faucet
Model # THA-0310
Important / Important / Importante
FOR QUICK & EASY 3D ASSEMBLY INSTRUCTIONS
POUR DES DIRECTIVES D’ASSEMBLAGE 3D RAPIDES ET FACILES PARA INSTRUCCIONES DE ENSAMBLAJE RAPIDAS Y SENCILLAS EN 3D
Directives intelligentes Instrucciones Inteligentes
DOWNLOAD THE FREE APP | TÉLÉC HAR GE R L’APP LICATION GRA TUI TE | DES CAR GUE LA AP LICACIÓN GRA TUI TA

 PARTS LIST
Your TRINITY Stainless Steel Utility Sink w/Pull-out Faucet should include the following parts. Please inspect box contents to ensure you have received all components.
If you are missing any parts, need assistance with assembly or have questions, please contact TRINITY Customer Service: 800.985.5506 or customerservice@trinityii.com. Parts can also be requested online at www.trinityii.com (Help & More, Contact Us).
A Phillips head screwdriver is required for assembly, and a pipe wrench is recommended.
A |
B |
C |
D |
E |
SINK (1) |
LEG (4) |
FAUCET |
DRAIN |
SHORT CROSS |
|
w/ Feet Leveler |
ASSEMBLY (1) |
ASSEMBLY (1) |
BEAM (2) |
|
|
w/ Hoses |
P-trap not included |
|
F |
G |
H |
I |
J |
LONG CROSS |
2-WAY |
3-WAY |
HEX SCREW |
SCREW CAP (8) |
BEAM (1) |
CONNECTOR (2) |
CONNECTOR (2) |
(18) + (2) extra |
|
|
|
|
(8) are pre-installed on sink, |
|
|
|
|
(10) are pre-installed on connectors. |
|
K |
L |
M |
N |
|
HEX KEY (1) BRACKET (1) MOUNTING SCREW |
ANCHOR |
(2) |
(2) |
1 |
© 2019 TRINITY - 800.985.5506 |
 ASSEMBLY INSTRUCTIONS
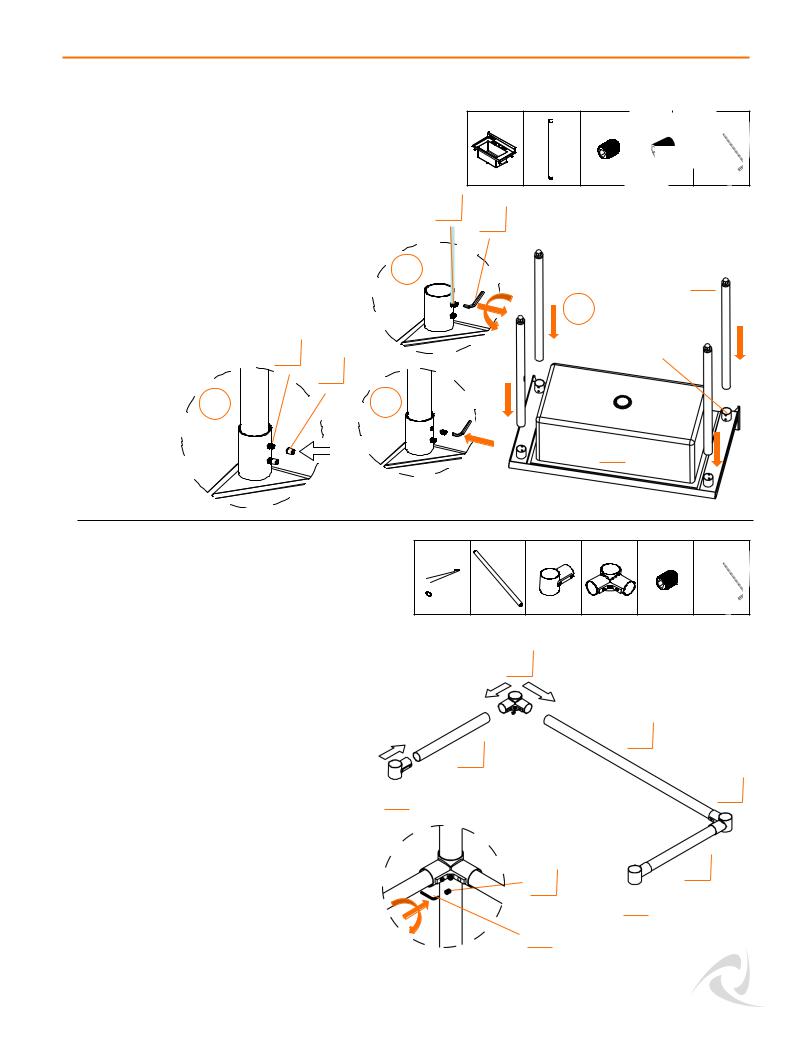
STEP 1
With two people, lay SINK (A) upside-down. Unscrew HEX SCREWS (I) that are preinstalled on Leg Collars on bottom of SINK
(A) until LEGS (B) can be fully inserted.
Insert LEGS (B) into Leg Collars. Tighten
I |
B (4) |
I (8) |
J (8) |
K (1) |
|
|
|
|
B 
2
over each HEX SCREW (I). |
I |
Leg Collar |
|
||
|
|
J |
4 |
|
3 |
A 
STEP 2 |
|
|
|
|
|
|
Unscrew HEX SCREWS (I) that are pre- |
|
|
|
|
|
|
installed on Connectors (G/H) until Cross |
E (2) |
F (1) |
G (2) |
H (2) |
I (6) |
K (1) |
Beams (E/F) can be fully inserted. |
|
|
H |
|
|
|
On a flat surface connect Connectors (G/H) |
|
|
|
|
|
|
|
|
|
|
|
|
|
and Cross Beams (E/F) into a U-shape as |
|
|
|
|
|
|
shown in diagram. |
|
|
|
|
F |
|
Make sure all Cross Beams (E/F) are pushed |
|
E |
|
|
|
|
|
|
|
|
|
all the way into the Connectors (G/H).
G  H
H
Use HEX KEY (K) to tighten HEX SCREW (I) against Cross Beams
E
I
G 
K 
© 2019 TRINITY - 800.985.5506 |
2 |

 ASSEMBLY INSTRUCTIONS
STEP 3
With two people, take Cross Beams assembly in STEP 2 and slide Connectors (G+H) over all LEGS (B).
Use Alignment Stickers to help level Cross Beams, by lowering Cross Beam
Tighten HEX SCREW (I) on each Connector
(4) |
K (1) |
I |
K |
STEP 4
With two people, carefully turn sink rightside up, standing it upright.
Unscrew large 3-3/8” Nut from bottom of DRAIN ASSEMBLY (D). From inside SINK (A), insert Drain through White Seal and opening at bottom.
From under SINK (A), first slide on Black Gasket and Paper Gasket then
3-3/8” Nut back on tightly. If necessary, use a pipe wrench to tighten.
Note: P-trap NOT included.
3
D (1)
D 
Drain
Inside |
|
the sink |
White |
|
|
|
Seal |
|
Black |
|
Gasket |
Under |
Paper |
the sink |
Washer |
|
3-3/8” |
Assembly (D)
© 2019 TRINITY 800.985.5506
 Loading...