

Page 1
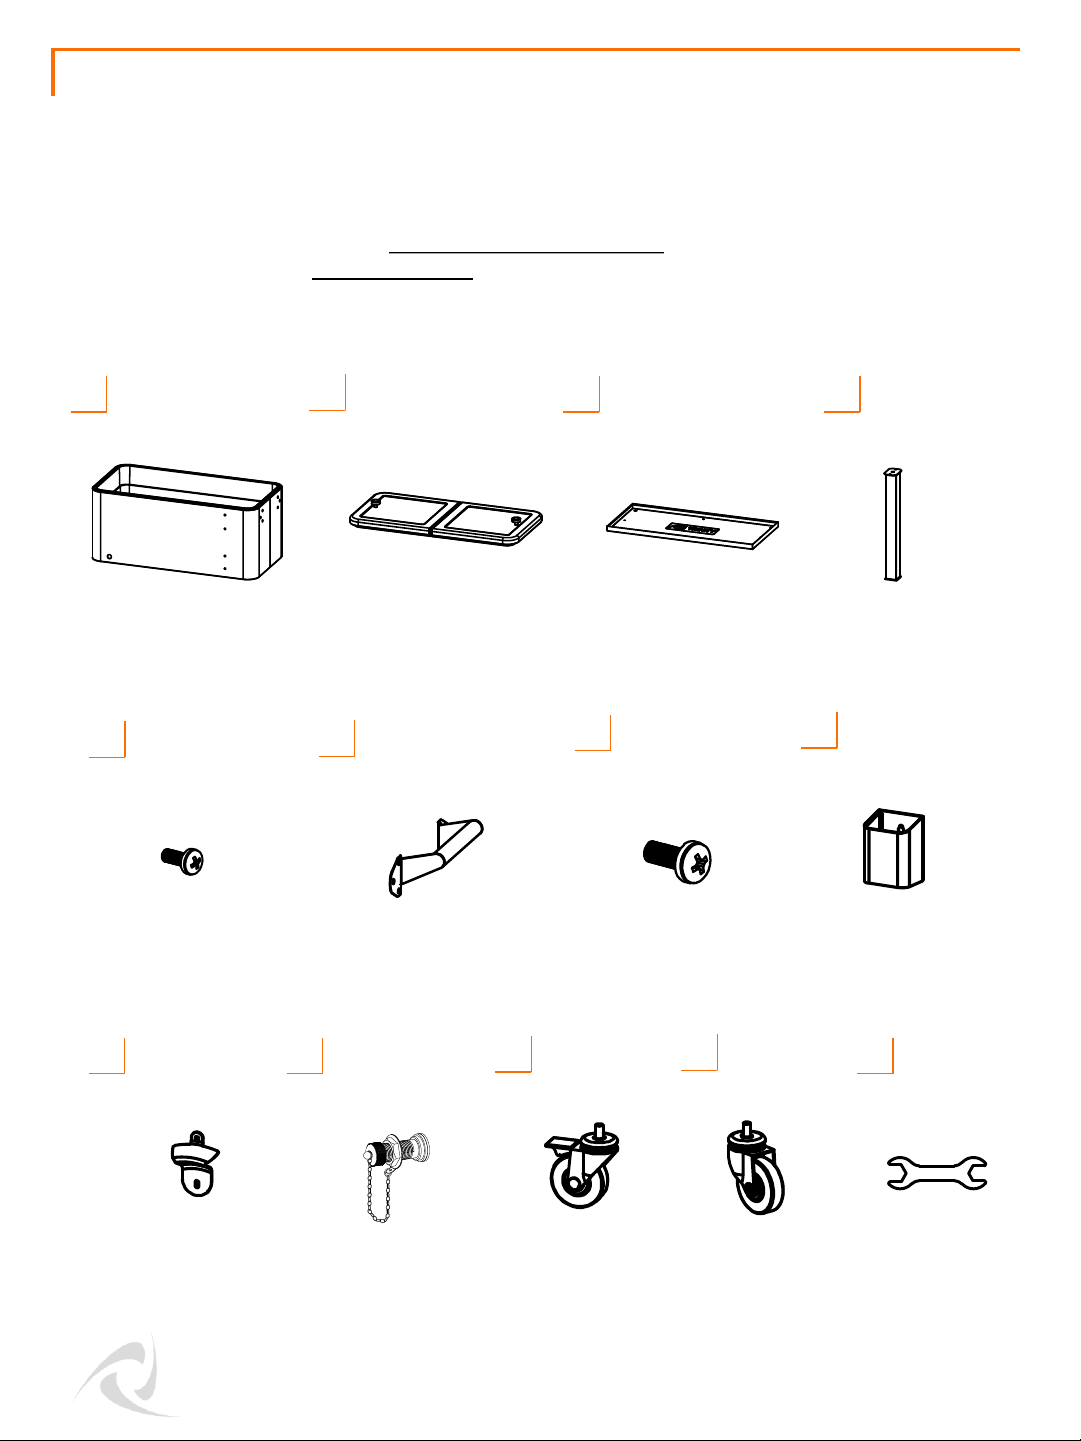
Your TRINITY Stainless Steel Cooler should include the following parts. Please inspect box contents to
ensure you have received all components.
If you are missing any parts, need assistance with assembly or have questions, please contact TRINITY
Customer Service: 800.985.5506 or [email protected]. Parts can also be requested online
via “Contact Us” section at www.trinityii.com.
You will need a Phillips screwdriver for assembly which is not provided.
PARTS LIST
TUB (1)
A
© 2020 TRINITY - 800.985.5506
1
LID (1)
B
SHELF (1)
C
LEG (4)
D
SMALL
SCREW (10)
E
HANDLE (2)
F
LARGE
SCREW (12)
G
CAP CATCHER (1)
H
BOTTLE
OPENER (1)
I J
DRAIN PLUG (1)
K
LOCKING
CASTER (2)
L
NON-LOCKING
CASTER (2)
M
WRENCH (1)
Page 2
ASSEMBLY INSTRUCTIONS
© 2020 TRINITY - 800.985.5506
2
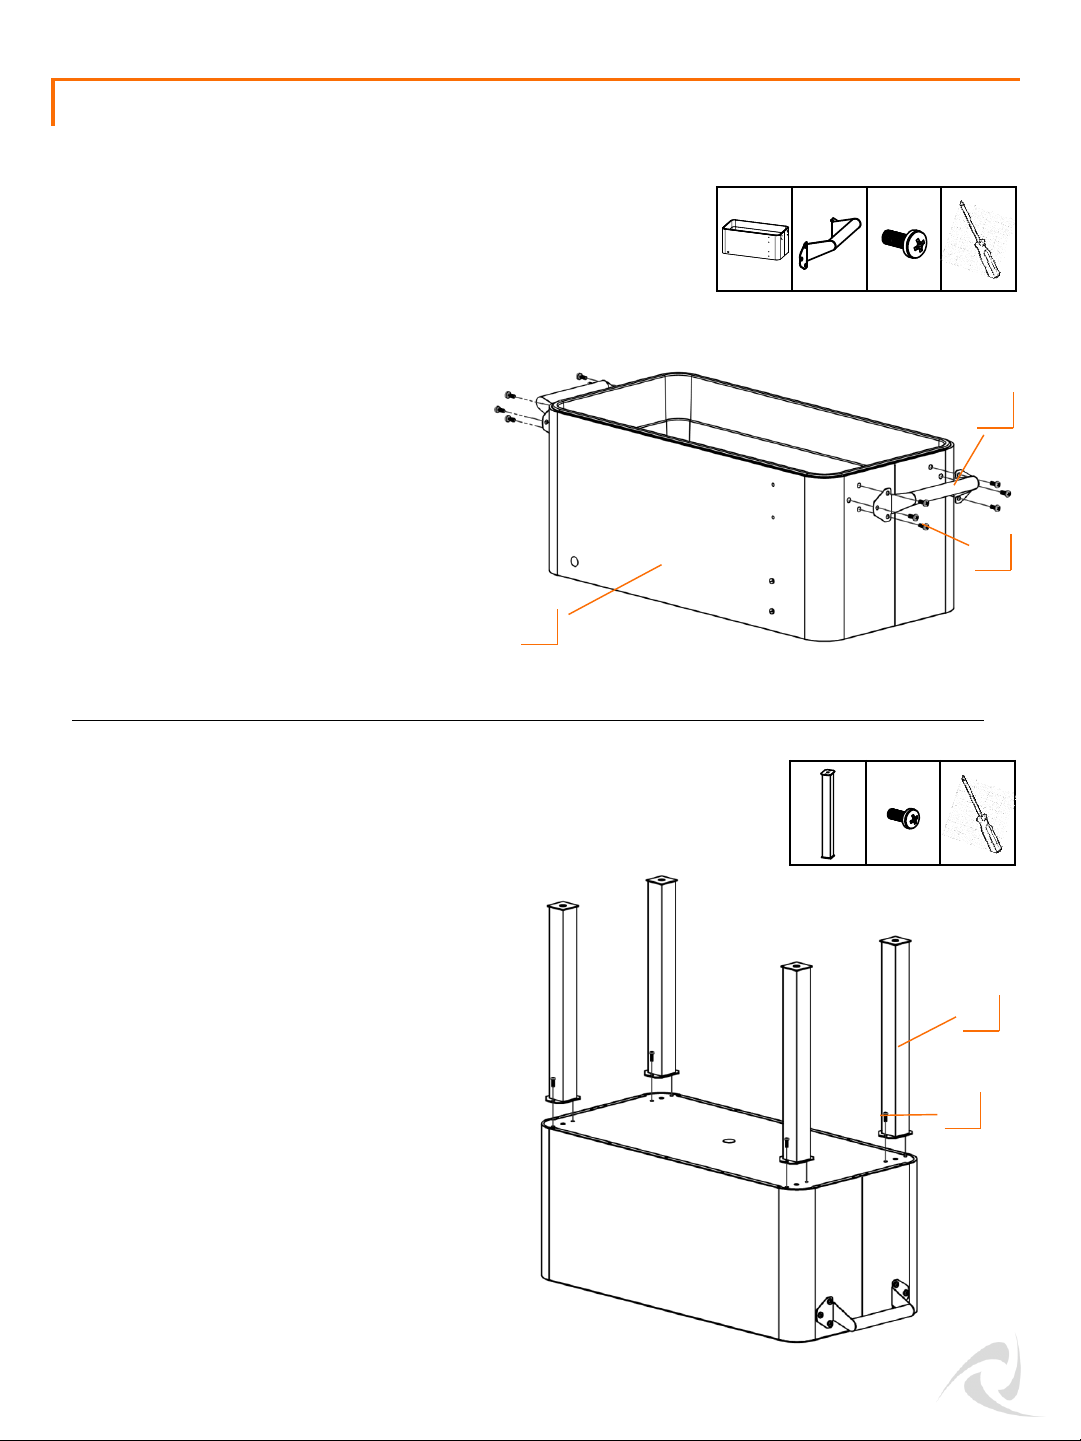
Turn Cooler upside down. Align LEG (D) with
holes on bottom of TUB (A). Attach LEG (D)
with SMALL SCREWS (E). Make sure to
tighten securely.
Align HANDLES (F) on each side of TUB (A).
Attach HANDLE (F) with LARGE SCREW (G).
Make sure to tighten securely. HANDLES (F)
can be attached either angled up or down
based on your preference.
STEP 1
STEP 2
F (2) G (12)
A (1)
D (4) E (8)
Phillips
F
A
G
D
E
Phillips
Page 3
ASSEMBLY INSTRUCTIONS
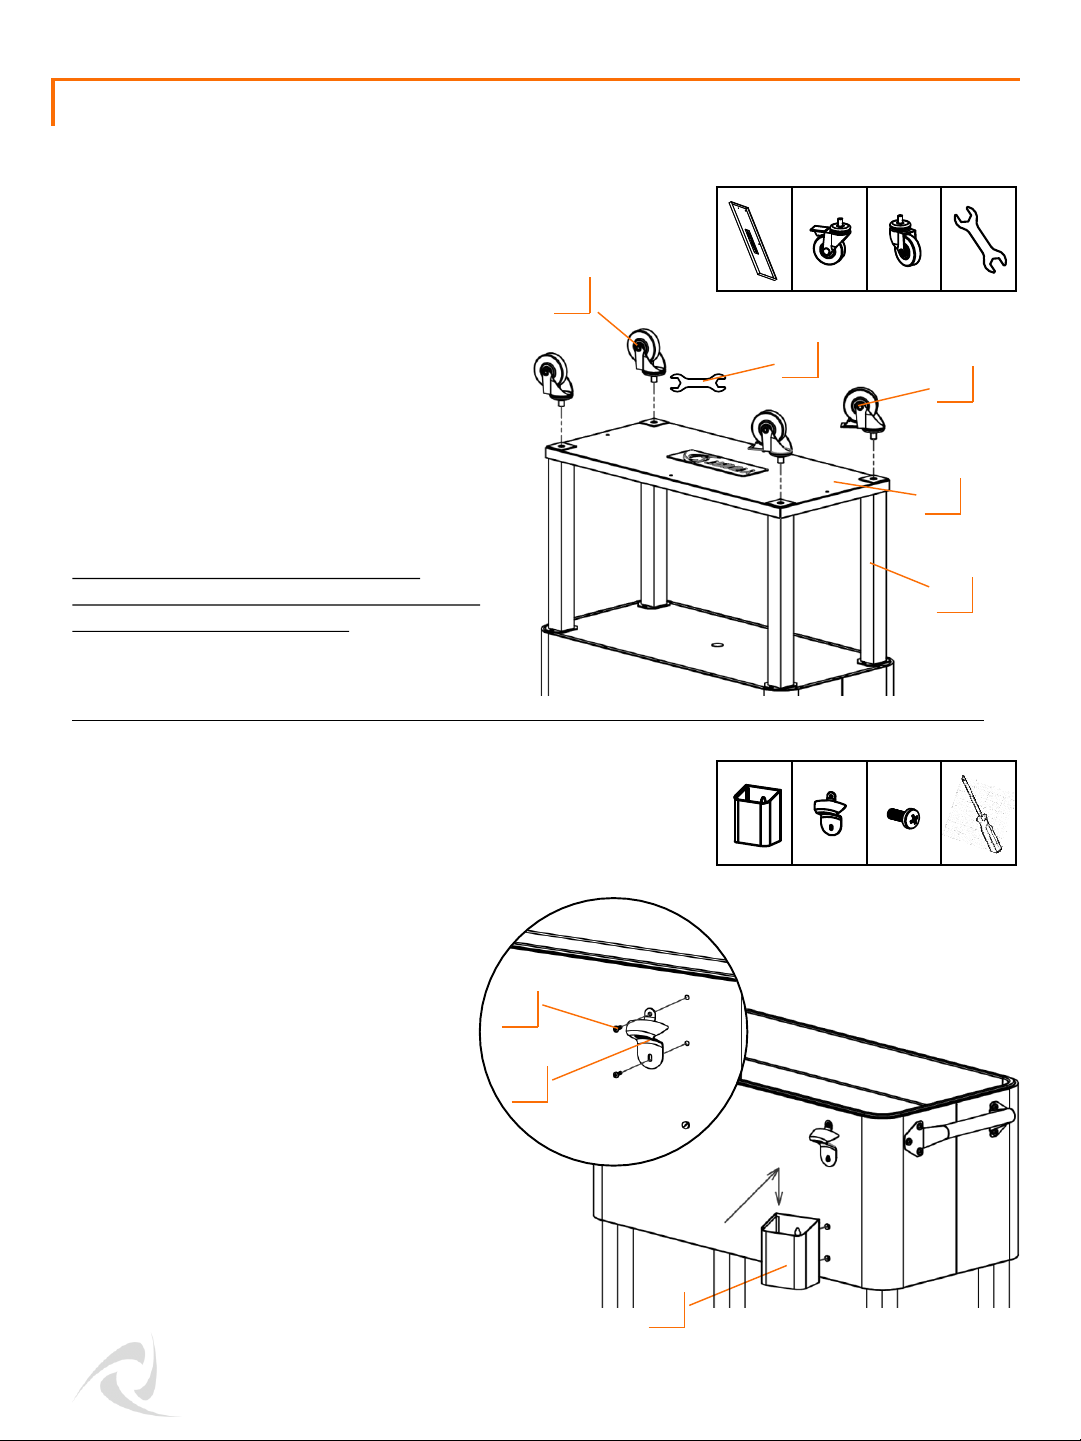
Turn the Cooler right side up.
Attach BOTTLE OPENER (I) to TUB (A) using
SMALL SCREWS (E).
Attach CAP CATCHER (H) to TUB (A) by
sliding it down on metal notch.
Align holes in SHELF (C) with bottom of LEG (D),
making sure that Shelf Lip is facing TUB (A).
Screw LOCKING CASTER (K) into bottom of LEG
(D), securing SHELF (C) in between. Make sure
LOCKING CASTERS (K) are installed on the same
side. Screw NON-LOCKING CASTER (L) into
bottom of LEG (D), securing SHELF (C) in
between. Repeat for the other NON-LOCKING
CASTER (L).
Tighten CASTERS (K, L) with the provided
WRENCH (M).
Use provided caster wrench to tighten
completely. Failure to do as instructed could
result in caster stem breaking.
© 2020 TRINITY - 800.985.5506
3
STEP 3
STEP 4
K (2) L (2)
M (1)
C (1)
Phillips
I (1) E (2)
H (1)
C
K
L
H
I
E
D
M
Page 4
© 2020 TRINITY - 800.985.5506
4
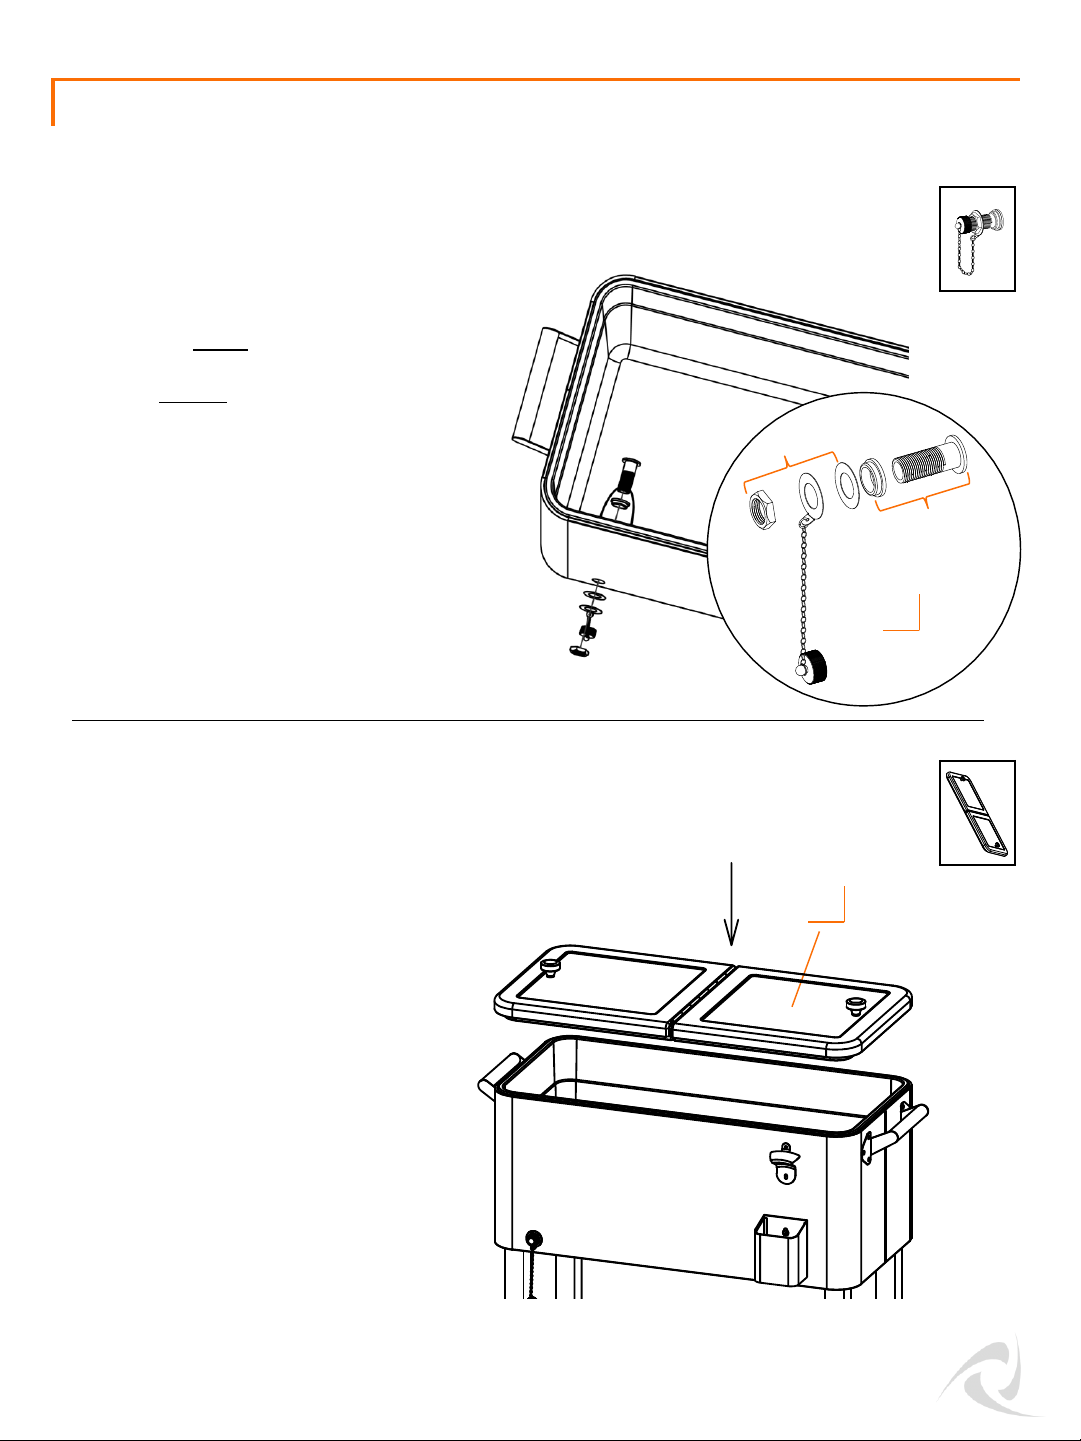
Set LID (B) on top of TUB (A).
Clean the inside of Cooler thoroughly
before use.
Unscrew DRAIN PLUG (J) assembly. Insert
DRAIN PLUG (J) through the opening in TUB
(A) from the inside. Make sure the rubber
seal is on the inside of TUB (A).
From the outside, slide the Washer on first,
then the second Washer with Chain, and
then screw on the Nut. Be sure not to
overtighten. Once DRAIN PLUG (J) is in place,
screw on the Cap.
STEP 5
STEP 6
ASSEMBLY INSTRUCTIONS
J (1)
B (1)
B
Inside the tub
Outside the tub
J
Page 5
SERVICE PARTS LIST – TXK-0802
© 2020 TRINITY - 800.985.5506
5
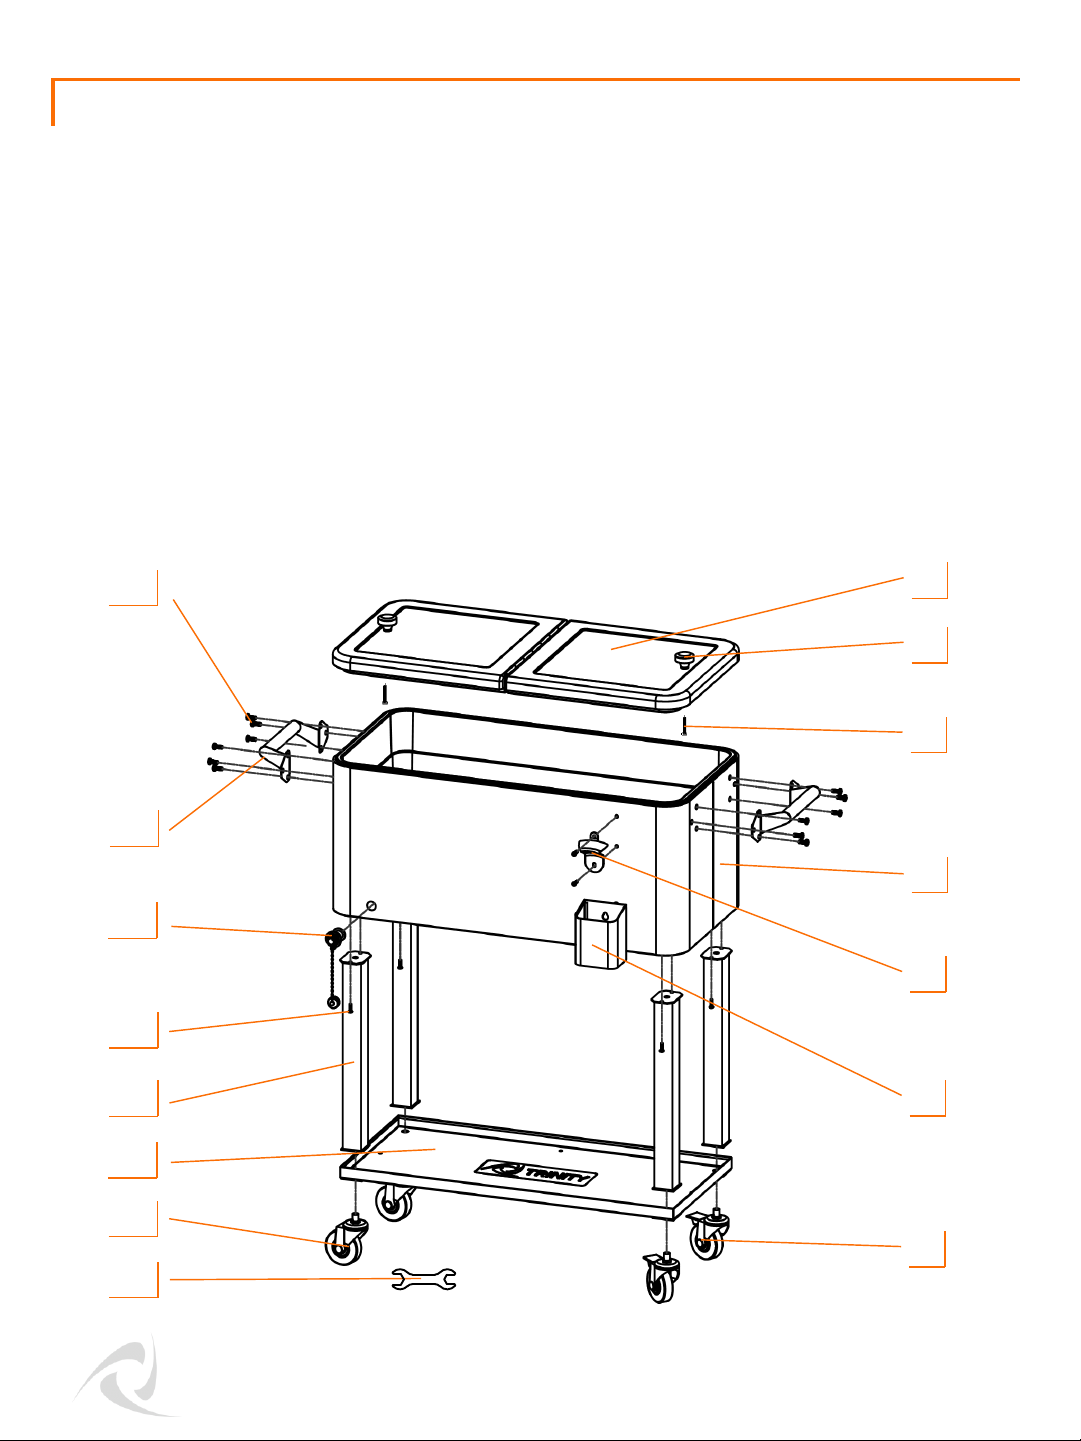
TRINITY Customer Service provides the following replacement parts:
Part Number Description Part Number Description
1) PBR-17-002-3115 Cooler Lid 9) ZSV-99-011-3010 Non-Locking Caster
2) AMA-05-005-0150 Lid Knob 10) PBR-03-028-2913 Shelf
3) XSV-01-010-0530 Knob Screw 11) PBR-04-022-1625 Leg
4) XST-18-015-3115 Cooler Tub 12) XSV-01-010-0416 Small Screw
5) XST-02-004-0001 Bottle Opener 13) CGL-02-003-0001 Drain Plug
6) XST-02-005-0002 Cap Catcher 14) XSV-05-001-0675 Handle
7) ZSV-99-012-3010 Locking Caster 15) XSV-01-010-0615 Large Screw
8) XXX-97-002-0007 Wrench
5
15
2
3
7
6
14
12
11
1
10
4
9
13
8
 Loading...