

Page 1
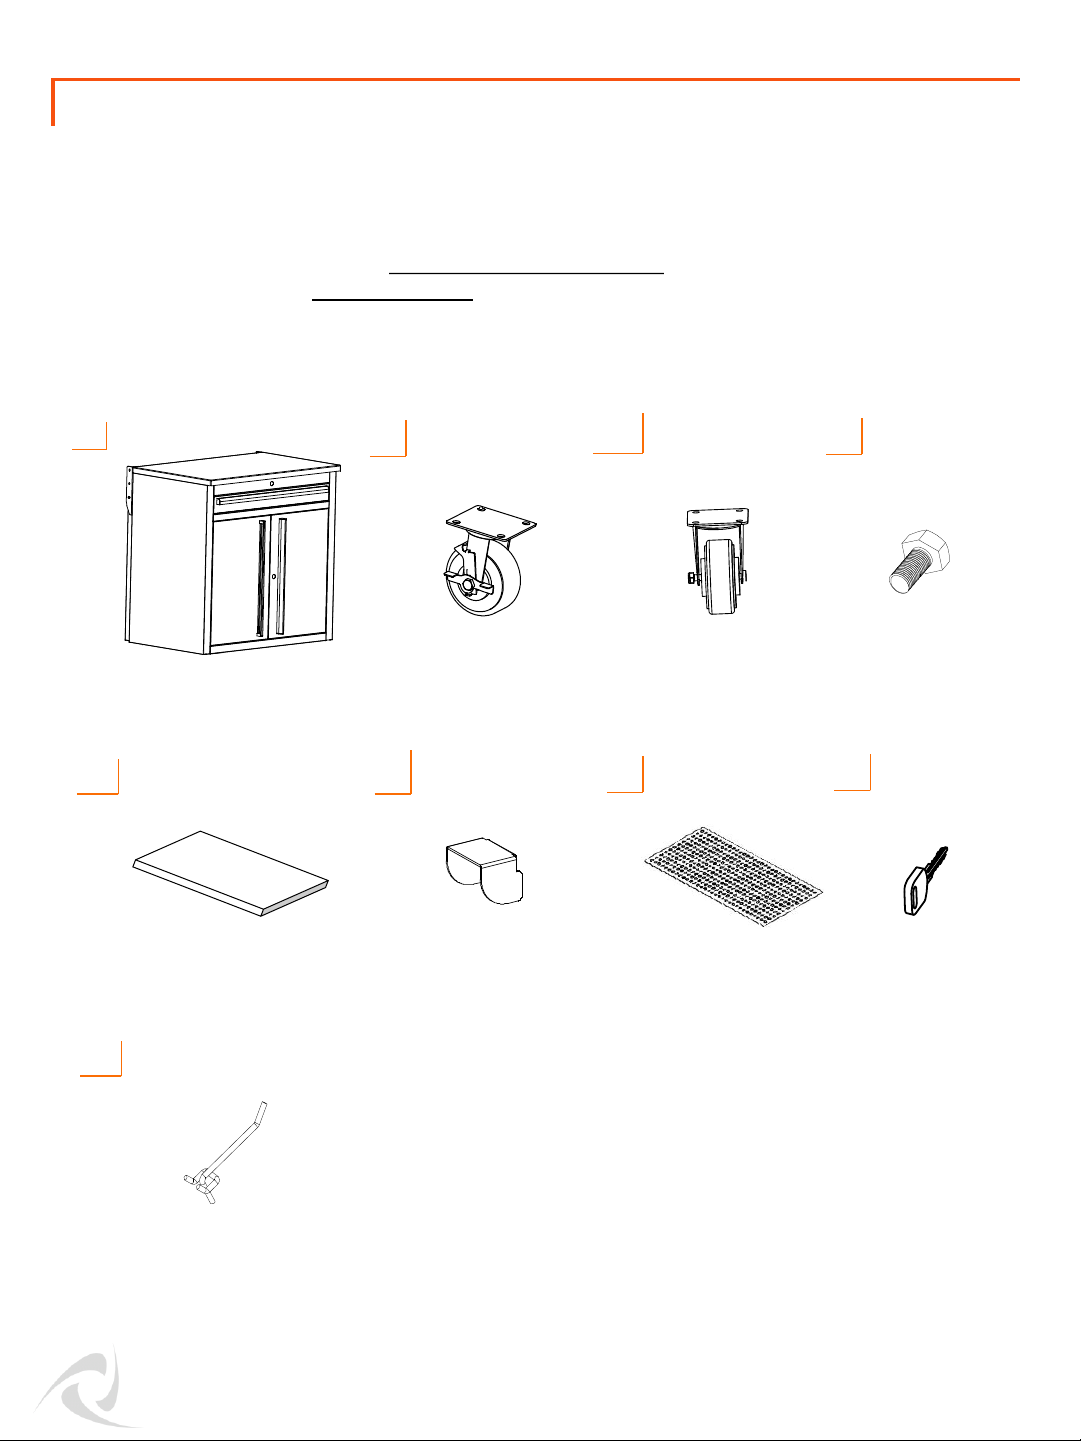
Your TRINITY Basics Stainless Steel Workbench w/ Pegboard should include the following parts. Please
inspect box contents to ensure you have received all components.
If you are missing any parts, need assistance with assembly or have questions, please contact TRINITY
Customer Service: 800.985.5506 or [email protected]. Parts can also be requested online
via “Contact Us” section at www.trinityii.com.
You will need 14mm wrench (for casters) and 12mm wrench (for pegboard) for assembly. These are
NOT included.
A
B
C
CASTER
BOLT (16)
M10
D
LINER (3)
E G H
LOCKING
CASTER (2)
F
NON-LOCKING
CASTER (2)
KEY (4)
WORKBENCH
w/PEGBOARD (1)
PARTS LIST
HOOK (10)
© 2020 TRINITY - 800.985.5506
1
I
SHELF (1) SHELF
SUPPORT (4)
Page 2
ASSEMBLY INSTRUCTIONS
STEP 1
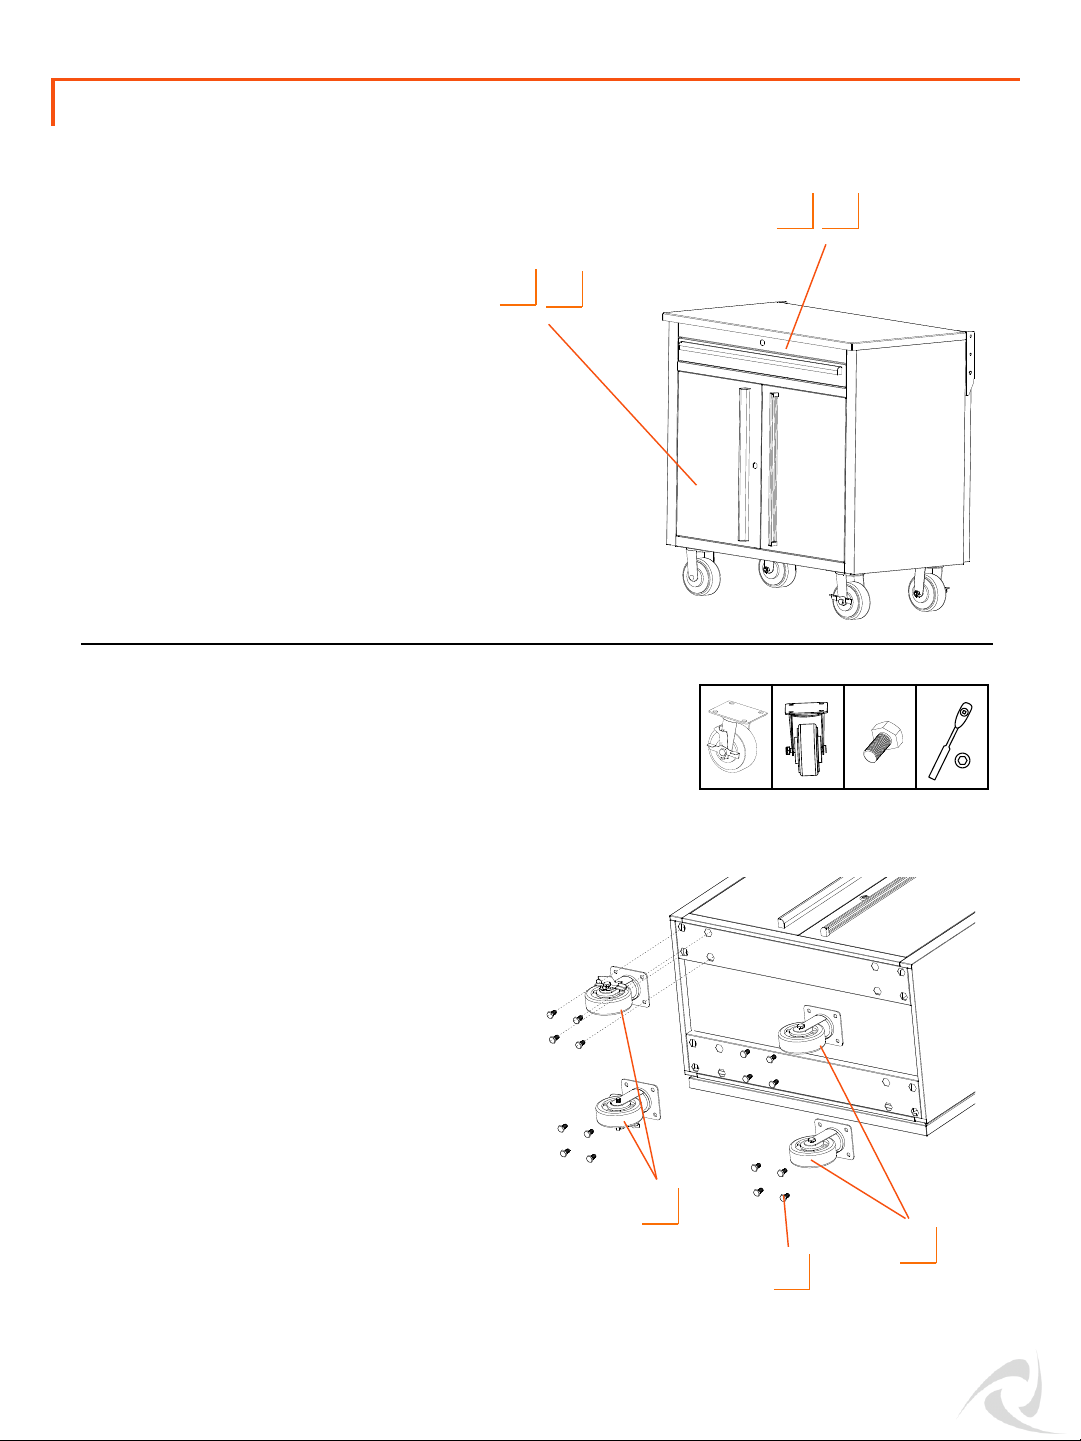
Location of parts:
1) KEYS (H) are hooked to key leash mounted
inside Drawer.
2) LINERS (G) are inside Drawer.
3) CASTERS (B/C) / CASTER BOLTS (D) / SHELF
SUPPORTS (F) and HOOKS (I) are boxed inside
Cabinet.
4) SHELF (E) is inside bottom Cabinet.
1
3
© 2020 TRINITY - 800.985.5506
2
2
4
STEP 2
With two people, carefully lay WORKBENCH (A) on
its backside. Do NOT attempt this alone.
Position LOCKING CASTERS (B) on side of
WORKBENCH (A) of your choice and align holes to
pre-installed nuts on underside of WORKBENCH
(A). Use a 14mm socket wrench to fully tighten
CASTER BOLT (D) to WORKBENCH (A).
Repeat above steps to install NON-LOCKING
CASTERS (C).
Notes:
* Make sure to install both LOCKING CASTERS (B)
on same side of workbench, either left or right
side. Do NOT install both on front or back side.
** For ease of use, place LOCKING CASTERS (B) on
side you will regularly push.
*** If you plan to push the workbench against a
wall, push NON-LOCKING CASTER (C) against the
wall first then swing LOCKING CASTERS (B) against
the wall.
B (2) C (2) D (16) 14mm
B
C
D
Page 3
ASSEMBLY INSTRUCTIONS
STEP 3
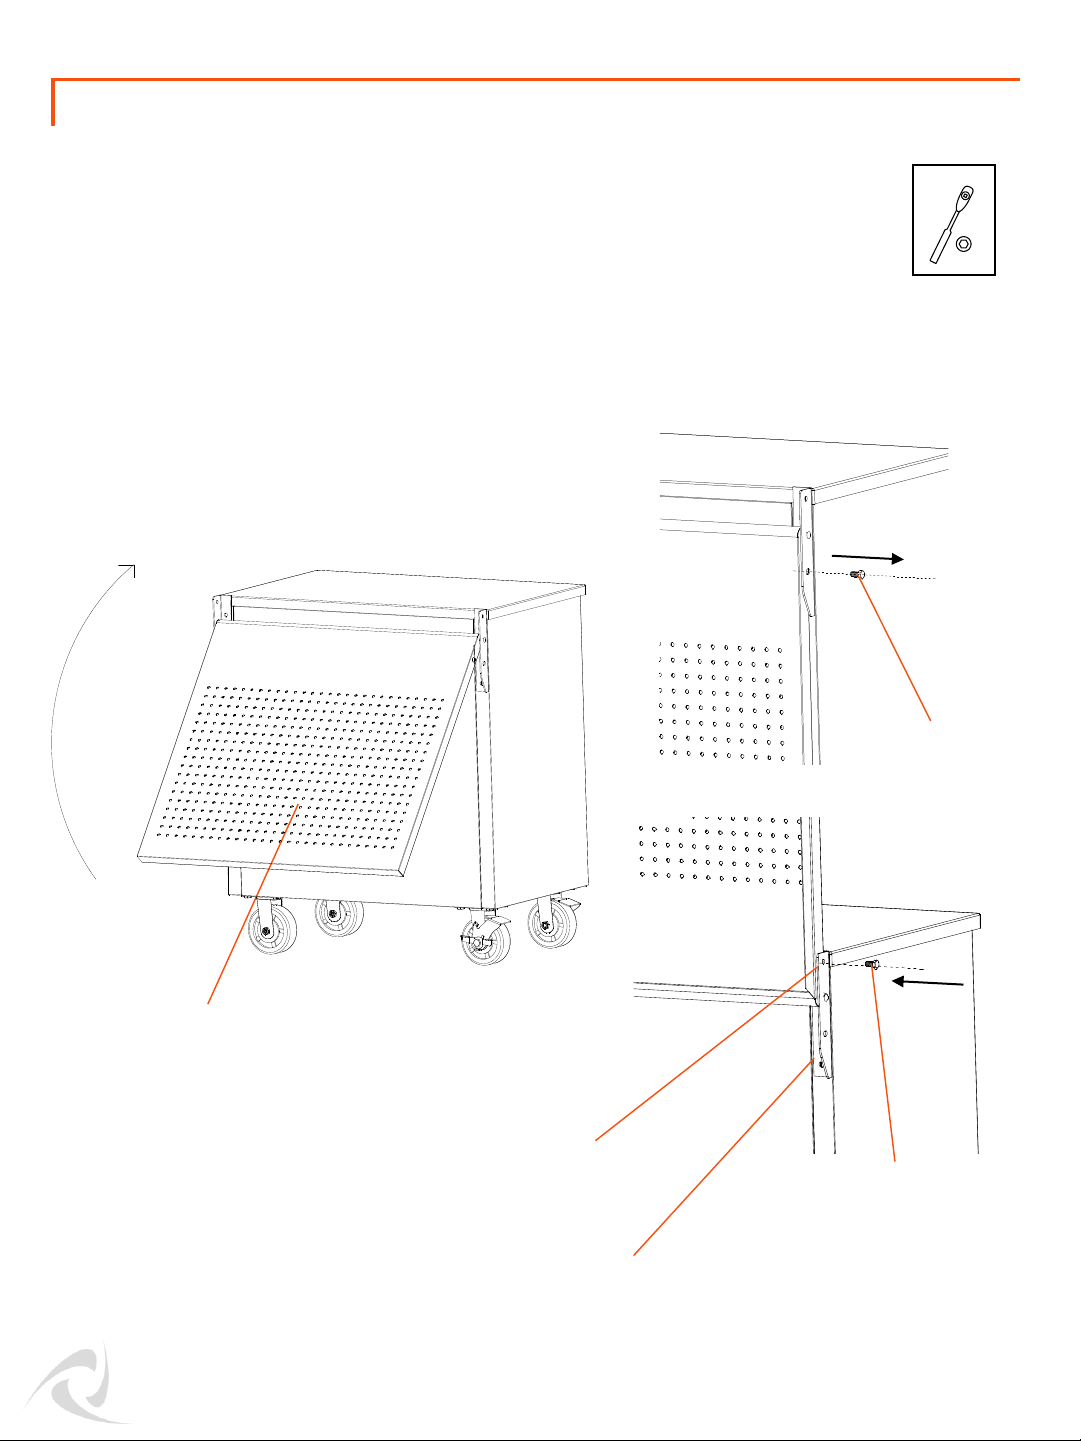
Carefully lift Workbench upright. Two people are
needed. Do NOT attempt this alone.
Unscrew bottom Bolt on left and right side of
Pegboard with a 12mm socket wrench. Lift
Pegboard upright. With one person holding
Pegboard in place, have second person insert
bottom Bolt into top hole of each bracket. Securely
tighten both Bolts back with socket wrench.
BOTTOM BOLT
TOP HOLE
BRACKET
PEGBOARD
BOTTOM BOLT
12mm
© 2020 TRINITY - 800.985.5506
3
Page 4
ASSEMBLY INSTRUCTIONS
STEP 4
E (1)
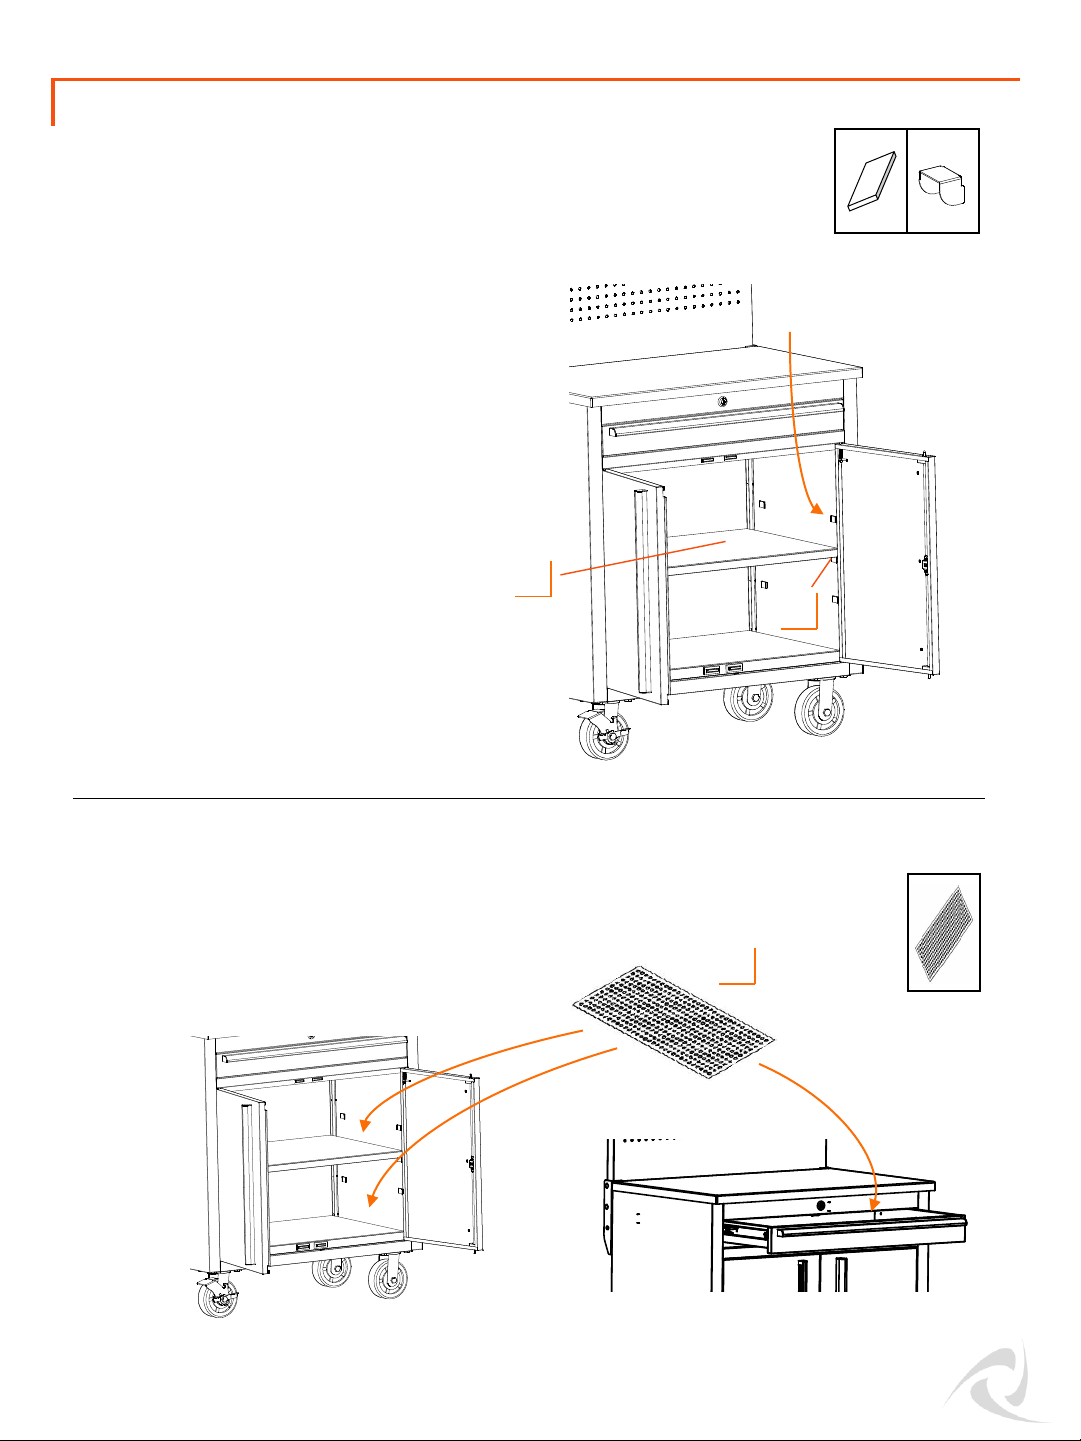
Place LINERS (G) inside drawer, on cabinet shelf and
on bottom of cabinet.
STEP 5
F
E
G (3)
G
© 2020 TRINITY - 800.985.5506
4
F (4)
SHELF (E) is shipped inside the bottom cabinet. Tilt
SHELF (E) diagonally and remove it from cabinet.
Attach SHELF SUPPORT (F) by hooking it over
position tab at desired height. Make sure all four
SHELF SUPPORTS (F) are at same level. Tilt SHELF (E)
diagonally to move it inside cabinet. Place SHELF (E)
on top of all four SHELF SUPPORTS (F).
You can adjust shelf height position by removing
shelf, re-locating shelf supports and replacing shelf.
Position Tab
Page 5
ASSEMBLY INSTRUCTIONS
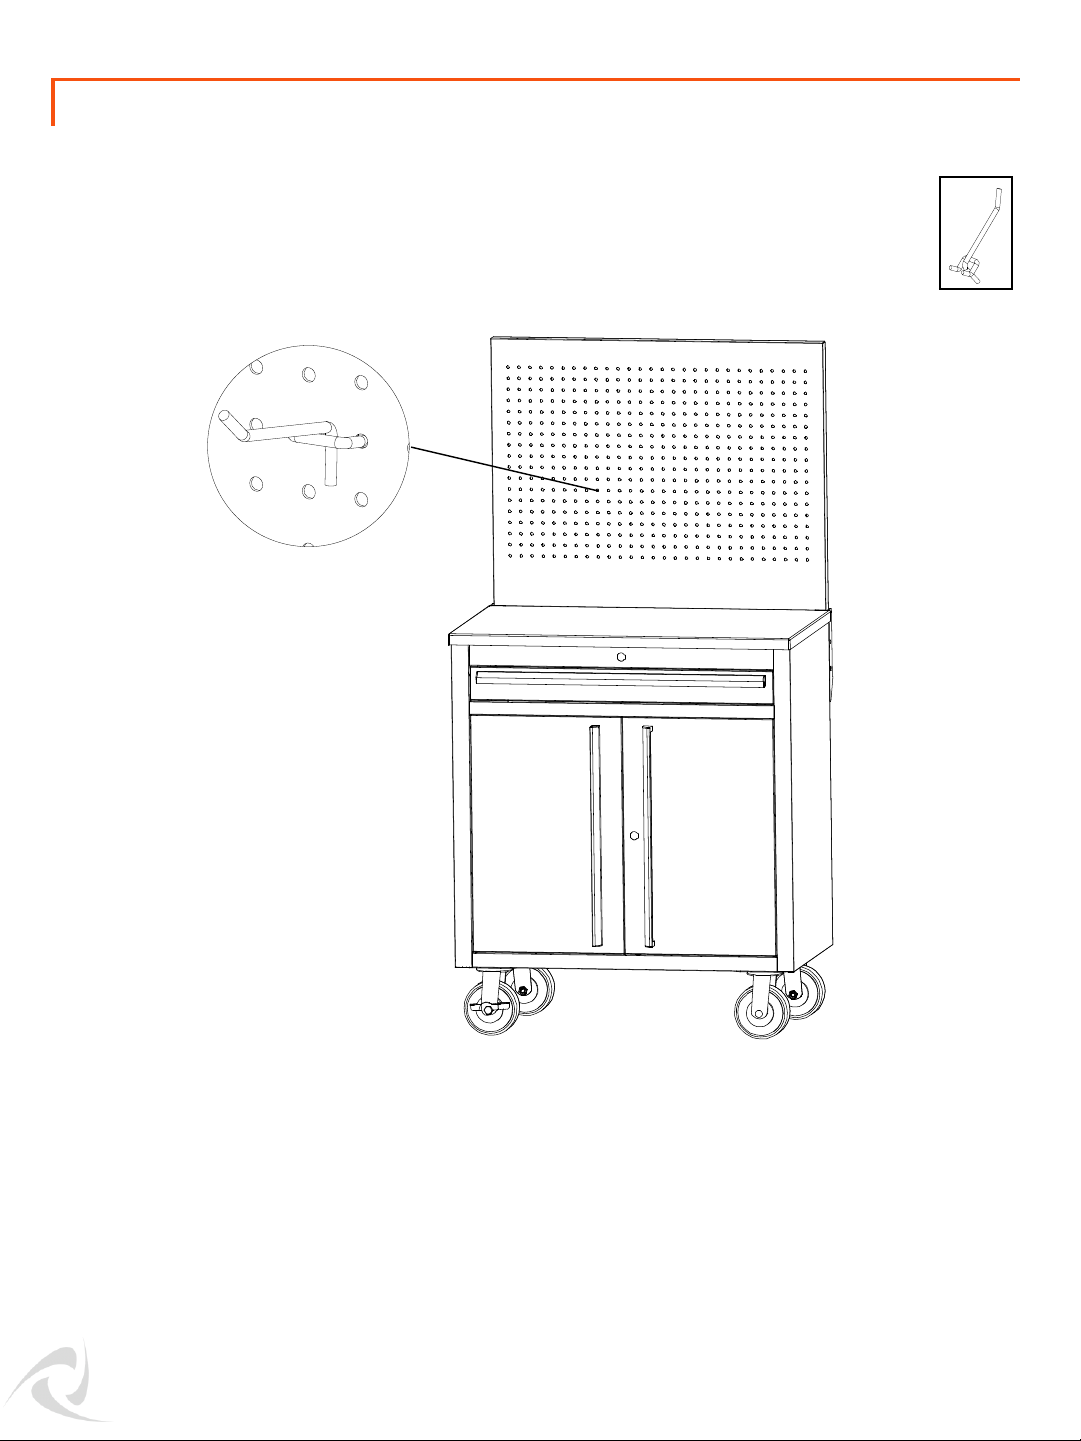
STEP 6
Hang HOOKS (I) into holes on pegboard at your
desired location.
I (10)
© 2020 TRINITY - 800.985.5506
5
Page 6
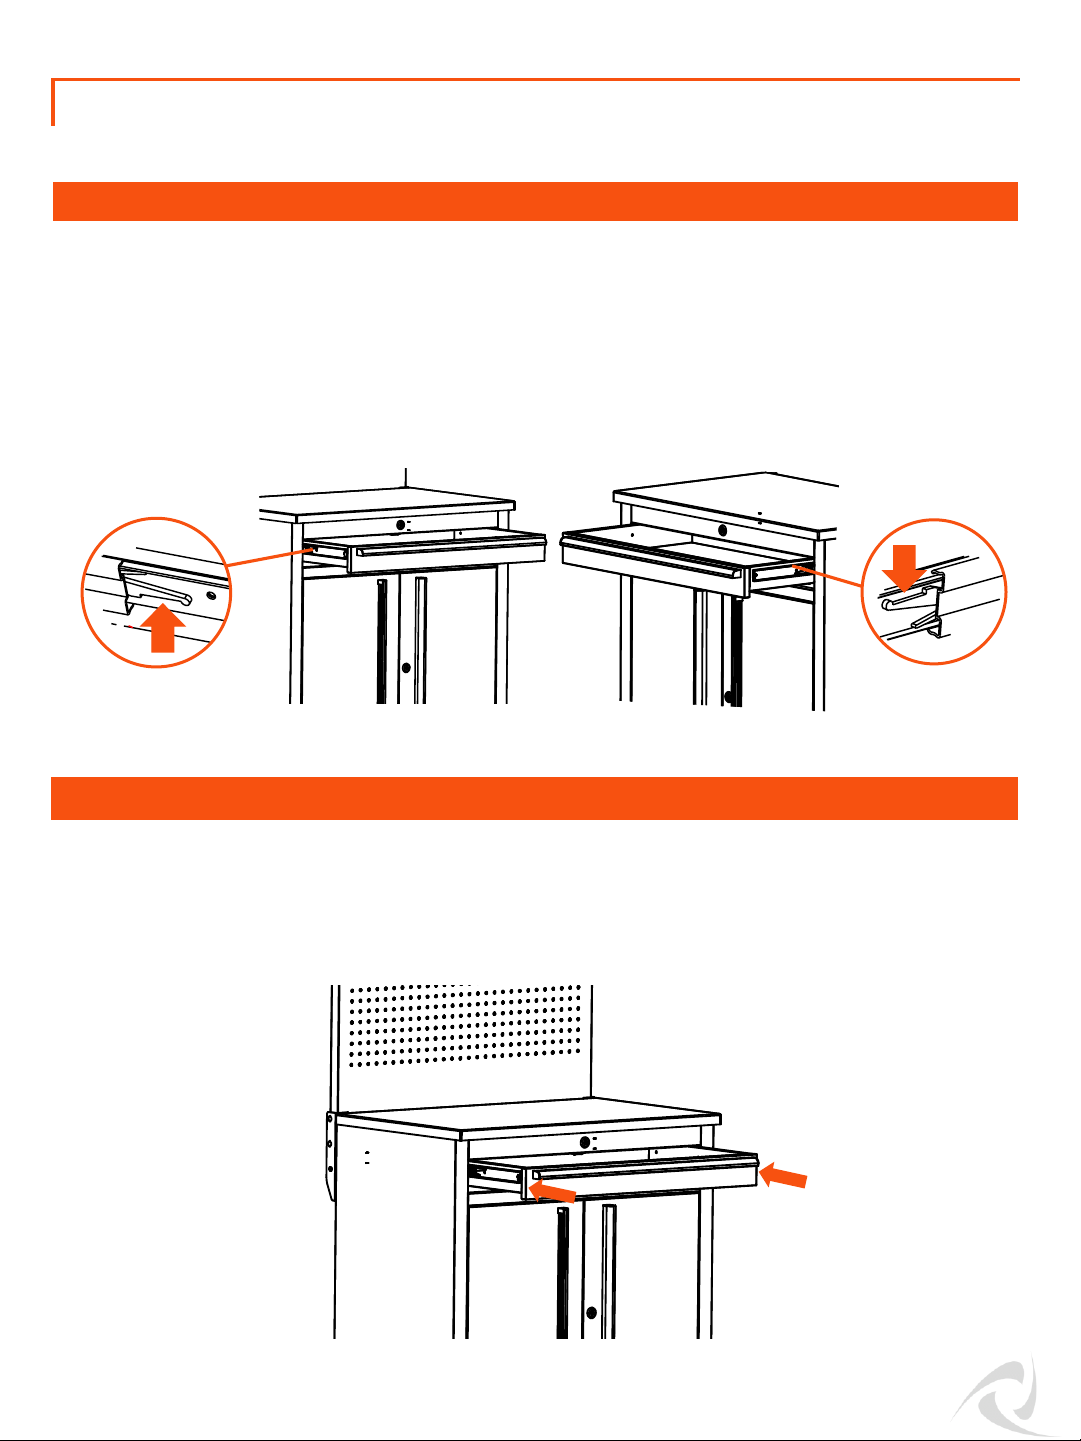
USAGE INSTRUCTIONS
DRAWER REMOVAL
DRAWER REPLACEMENT
Pull drawer out so that it is almost fully extended. On RIGHT-hand side, push black release lever DOWN.
On LEFT-hand side, pull black release lever UP. While holding levers as instructed, pull drawer forward
until released from slides attached to Workbench (“Workbench Slides”).
Note: Slides attached to drawer (“Drawer Slides”) are an integral part of drawer and must be removed
along with drawer itself.
To replace drawer, pull slides out completely. Insert brackets on each side of Drawer Slides into
corresponding slots on Workbench Slides, making sure they are properly positioned. Once brackets are
inserted into slots, completely close drawer to set all slides in their proper positions.
© 2020 TRINITY - 800.985.5506
6
Page 7

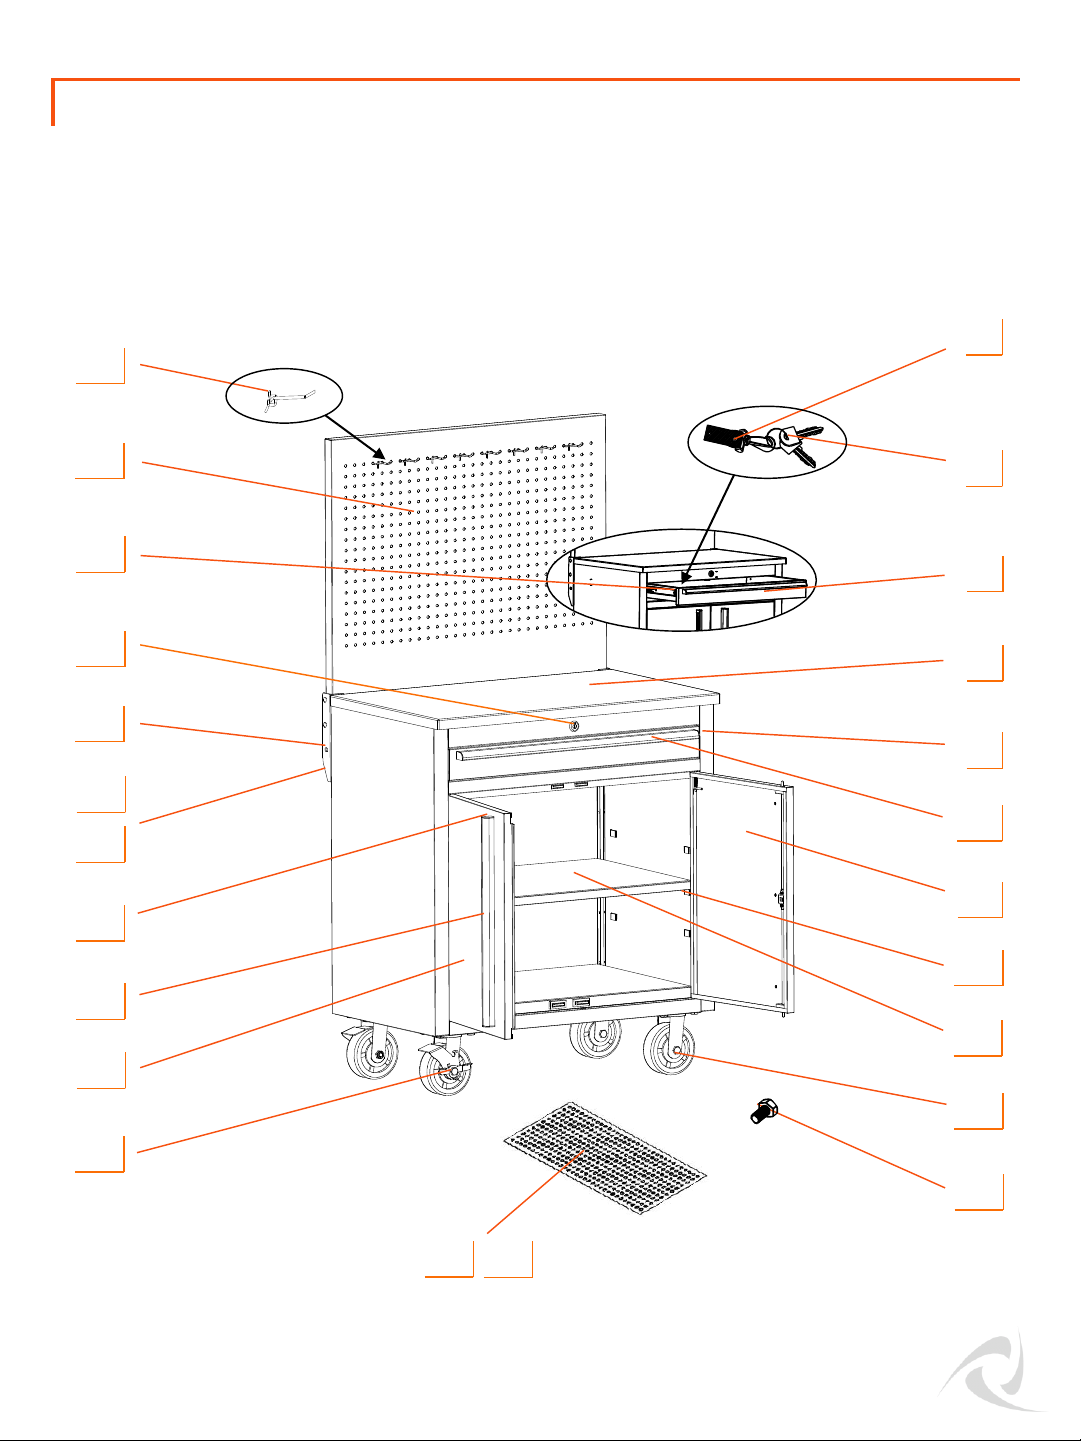
SERVICE PARTS LIST – TLS-4820
Part Number Description Part Number Description
1) XBK-02-047-0001 Key leash 13) XBK-22-007-2717 Shelf Liner
2) XBK-10-001-0XXX Key 14) ZSV-99-004-5020 Locking Caster
3) XBS-07-013-2716 Drawer 15) XBS-08-015-2114 Left Door
4) LNA-06-015-3119 Wood Top 16) AMA-05-007-2000 Door Handle
5) ZSV-12-010-1575 Slide (workbench side) 17) XBK-23-010-3012 End cap
6) AMA-05-007-2600 Drawer Handle 18) XBS-19-011-0825 Pegboard Bracket-Right
7) XBS-08-014-2114 Right Door 19) XBS-19-008-0825 Pegboard Bracket- Left
8)
XSV-02-017-0001
Shelf Support 20) XSV-01-009-0816 Pegboard Bolt
9) PBK-03-001-2717 Shelf 21) CSV-11-001-0XXX Lock
10) ZSV-99-003-5020 Non-locking Caster 22) ZSV-12-009-1575 Slide (drawer side)
11) ZSV-01-001-1020 Caster Bolt 23) PBK-15-016-3024 Pegboard
12) XBK-22-007-1626 Drawer Liner 24) ZSV-02-025-0001 Hook
TRINITY Customer Service provides the following replacement parts:
© 2020 TRINITY - 800.985.5506
7
Page 8
SERVICE PARTS LIST – TLS-4820
TRINITY Customer Service provides the following replacement parts:
3
4
2
14
17
8
18
7
1
9
12
10
NOTE: Replacement keys may be ordered using the code shown on the face of the lock.
15
20
22
19
© 2020 TRINITY - 800.985.5506
8
21
13
6
11
16
23
24
5
 Loading...