

Page 1
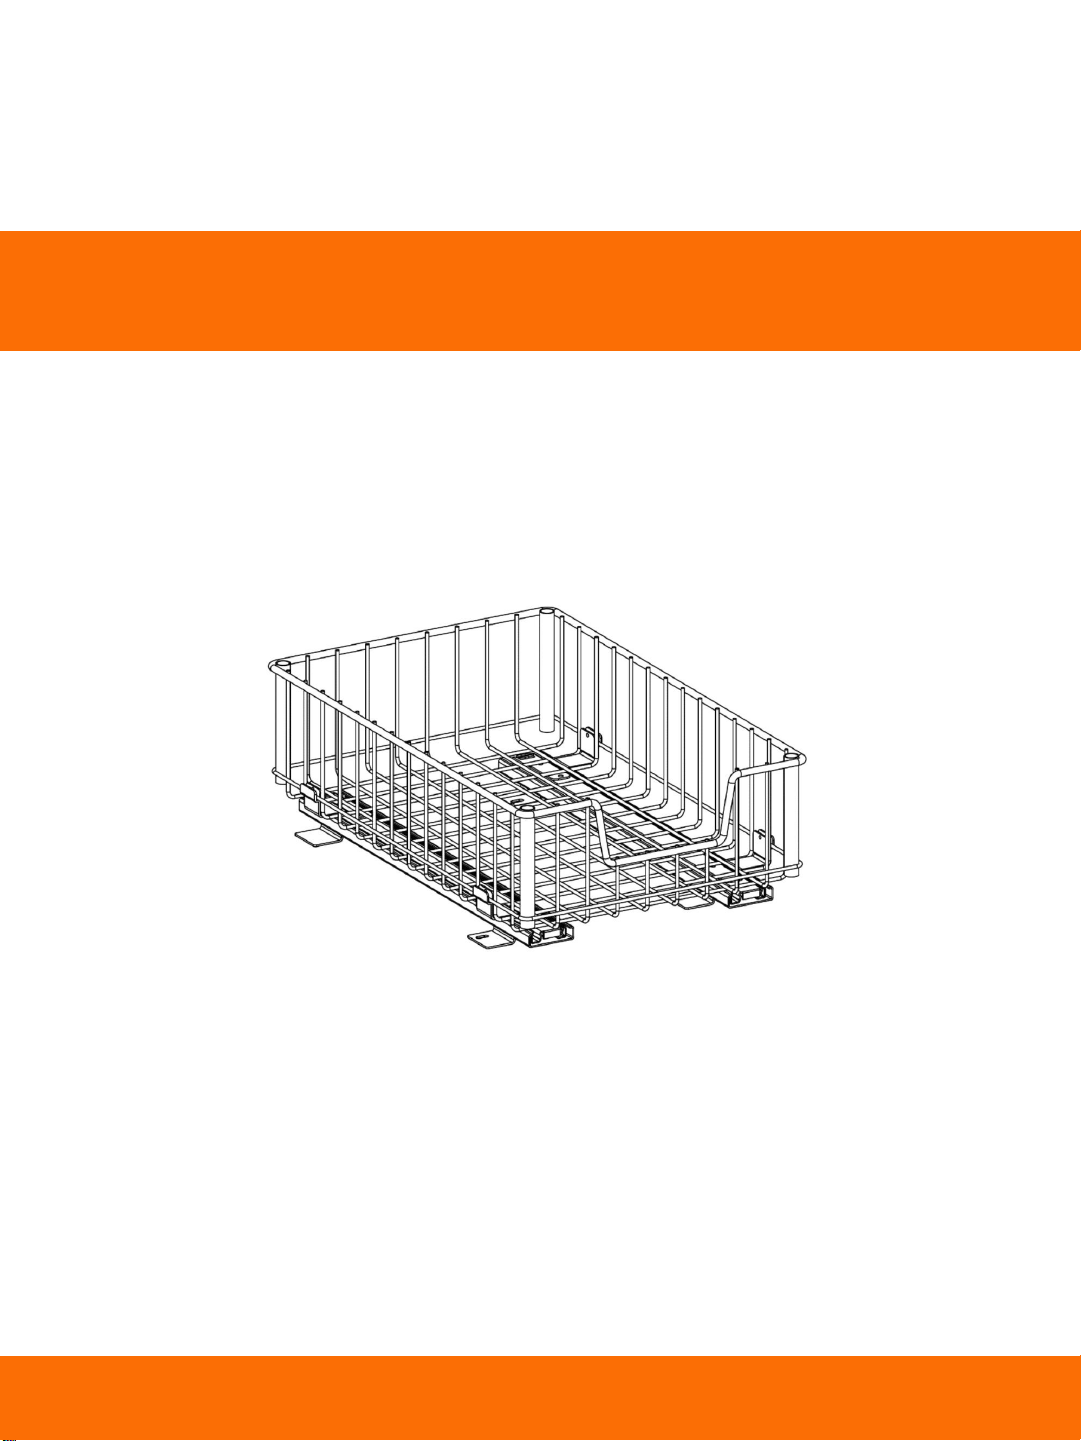
OWNER’S MANUAL
SLIDING WIRE DRAWER
2-pack
Page 2
You will need a Phillips screwdriver for assembly. A rubber mallet is also recommended.
Note: There are two options for installation:
1) In cabinet – go to page 2-3
2) On wire rack – go to page 4-5
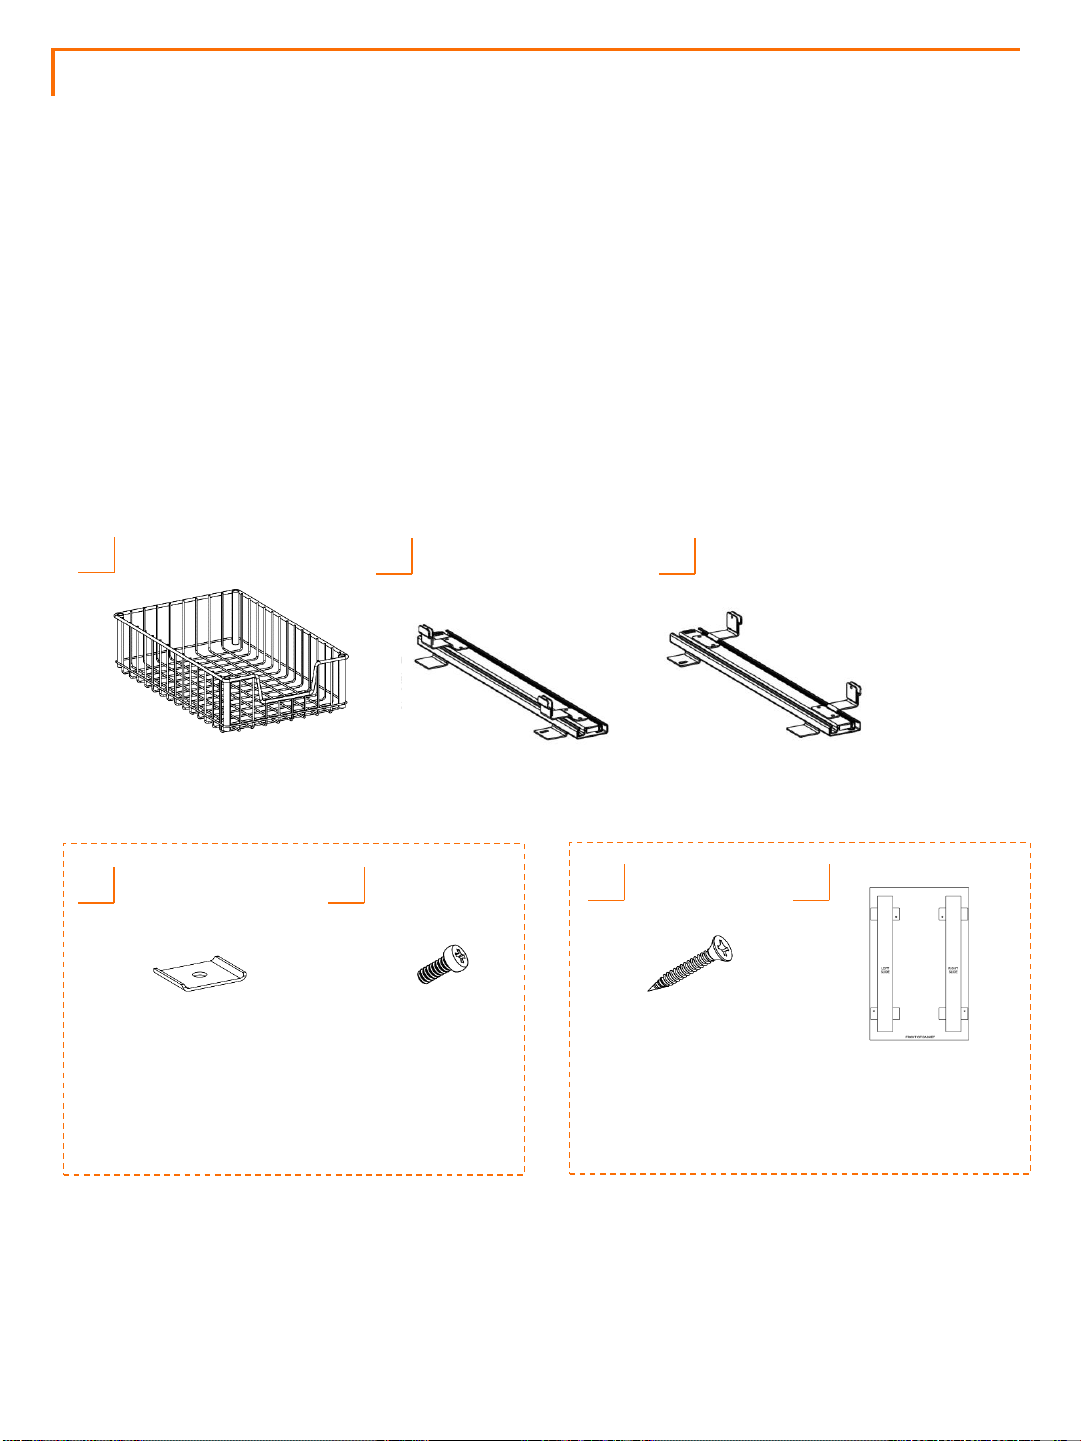
PARTS LIST
1
WIRE DRAWER (1)
A
LEFT SLIDE (1)
B
RIGHT SLIDE (1)
C
D
F
PLATE
SCREW (4)
G
CABINET
SCREW (4)
CABINET MOUNTING
TEMPLATE (1)
RACK PLATE (4)
E
Used when installing in cabinet
Used when installing on wire
rack
Your Sliding Wire Drawer should include the following parts. Please inspect box contents
to ensure you have received all components.
If you are missing any parts, need assistance with assembly or have questions, please contact
Customer Service. Parts can also be requested online at our customer center.
Page 3
FRONT
BACK
INSTALLATION INSTRUCTIONS – In Cabinet
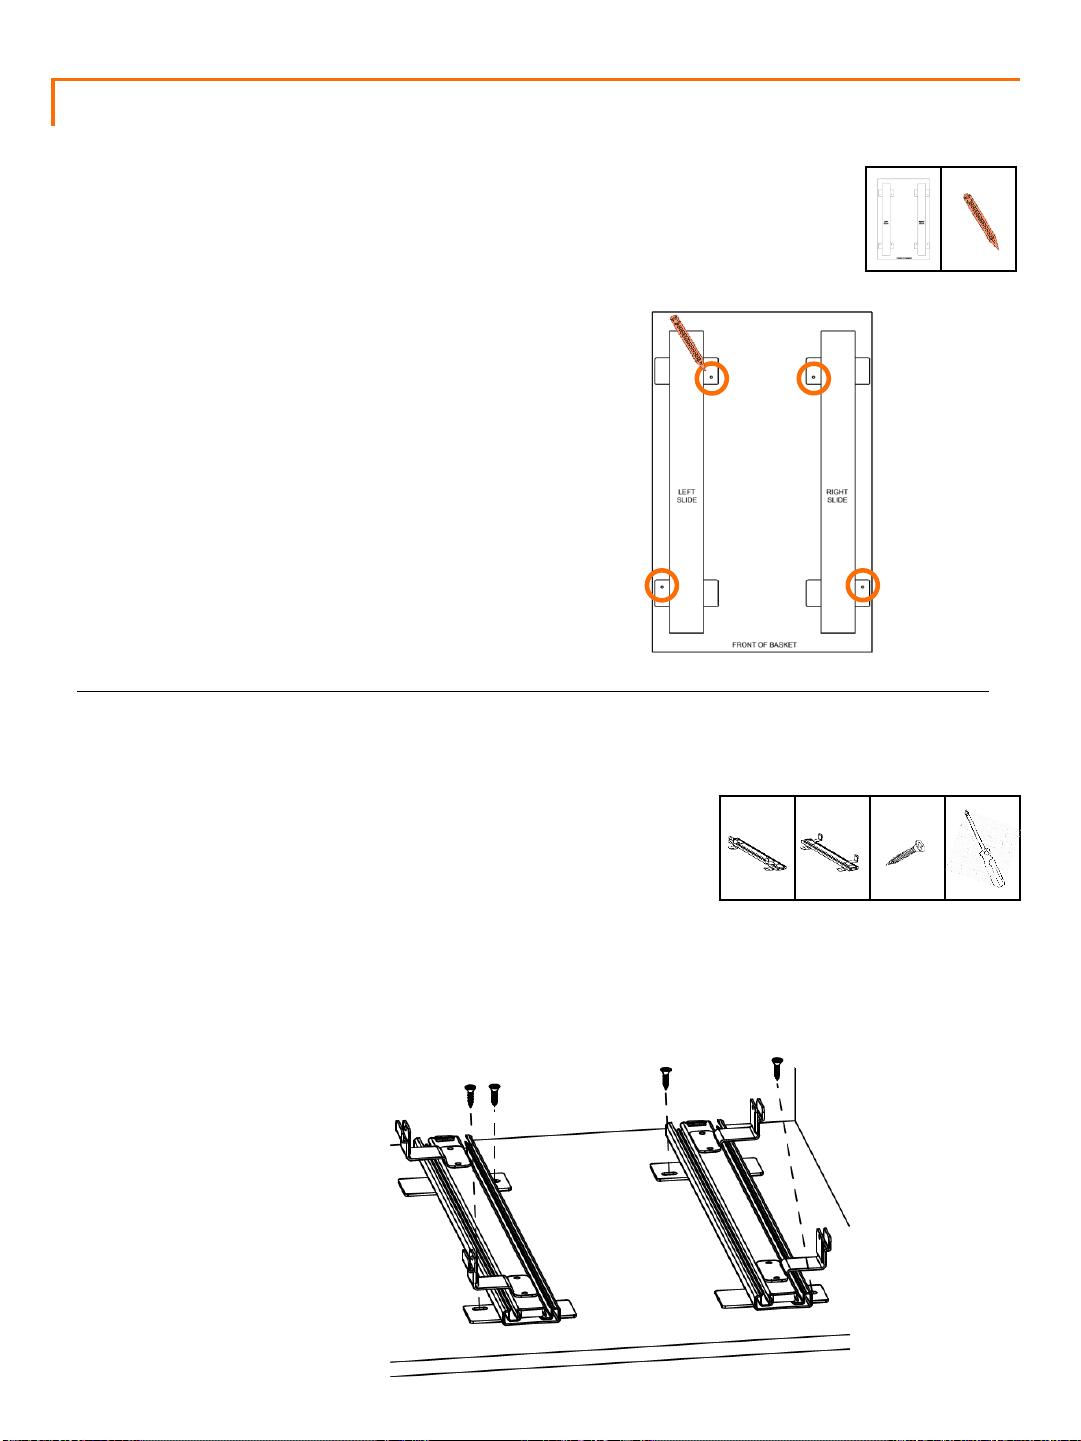
Place CABINET MOUNTING TEMPLATE (G) inside
your cabinet. Using a pencil, mark the location
where you plan to install the CABINET SCREWS (F).
• Note: To ease the installation you can pre-drill
small holes at the marked locations.
Identify LEFT & RIGHT SLIDES (B) & (C).
• Note that the BACK end of each SLIDE (B) & (C) has a
black tip and the FRONT end does NOT.
Place LEFT & RIGHT SLIDES (B) & (C) in their proper
orientation and desired position inside the cabinet.
B (1) C (1)
F (4)
G (1)
STEP 1
STEP 2
Extend the SLIDES (B) & (C) slightly and align the center of the oval slots to your marking in the
cabinet. Use the self-tapping CABINET SCREWS (F) to fasten the LEFT & RIGHT SLIDES (B)
& (C) in your cabinet.
2
Page 4
INSTALLATION INSTRUCTIONS – In Cabinet
3
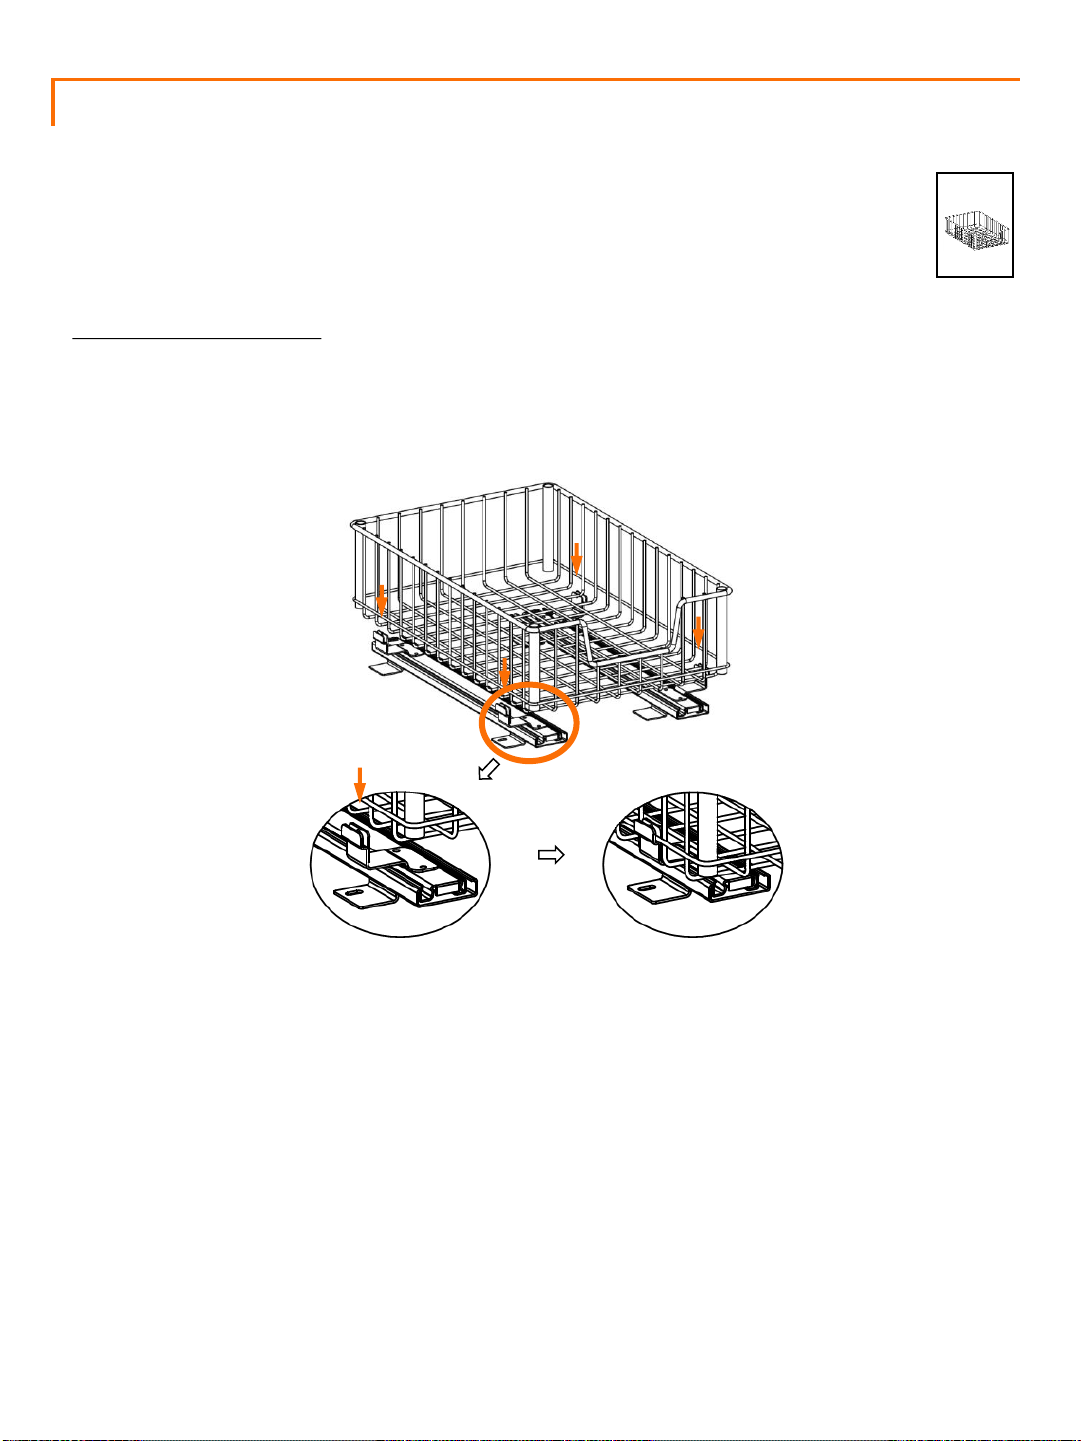
Align WIRE DRAWER (A) at the marked location and push it into the clips of
the LEFT & RIGHT SLIDES (B) & (C).
Installation Suggestion: With the WIRE DRAWER (A) resting on top of the
clips, brace the top of the WIRE DRAWER (A) with one hand and, with a
rubber mallet, lightly tap each bottom corner of the WIRE DRAWER (A) to
secure the WIRE DRAWER (A) into the clips.
A (1)
STEP 3
Page 5
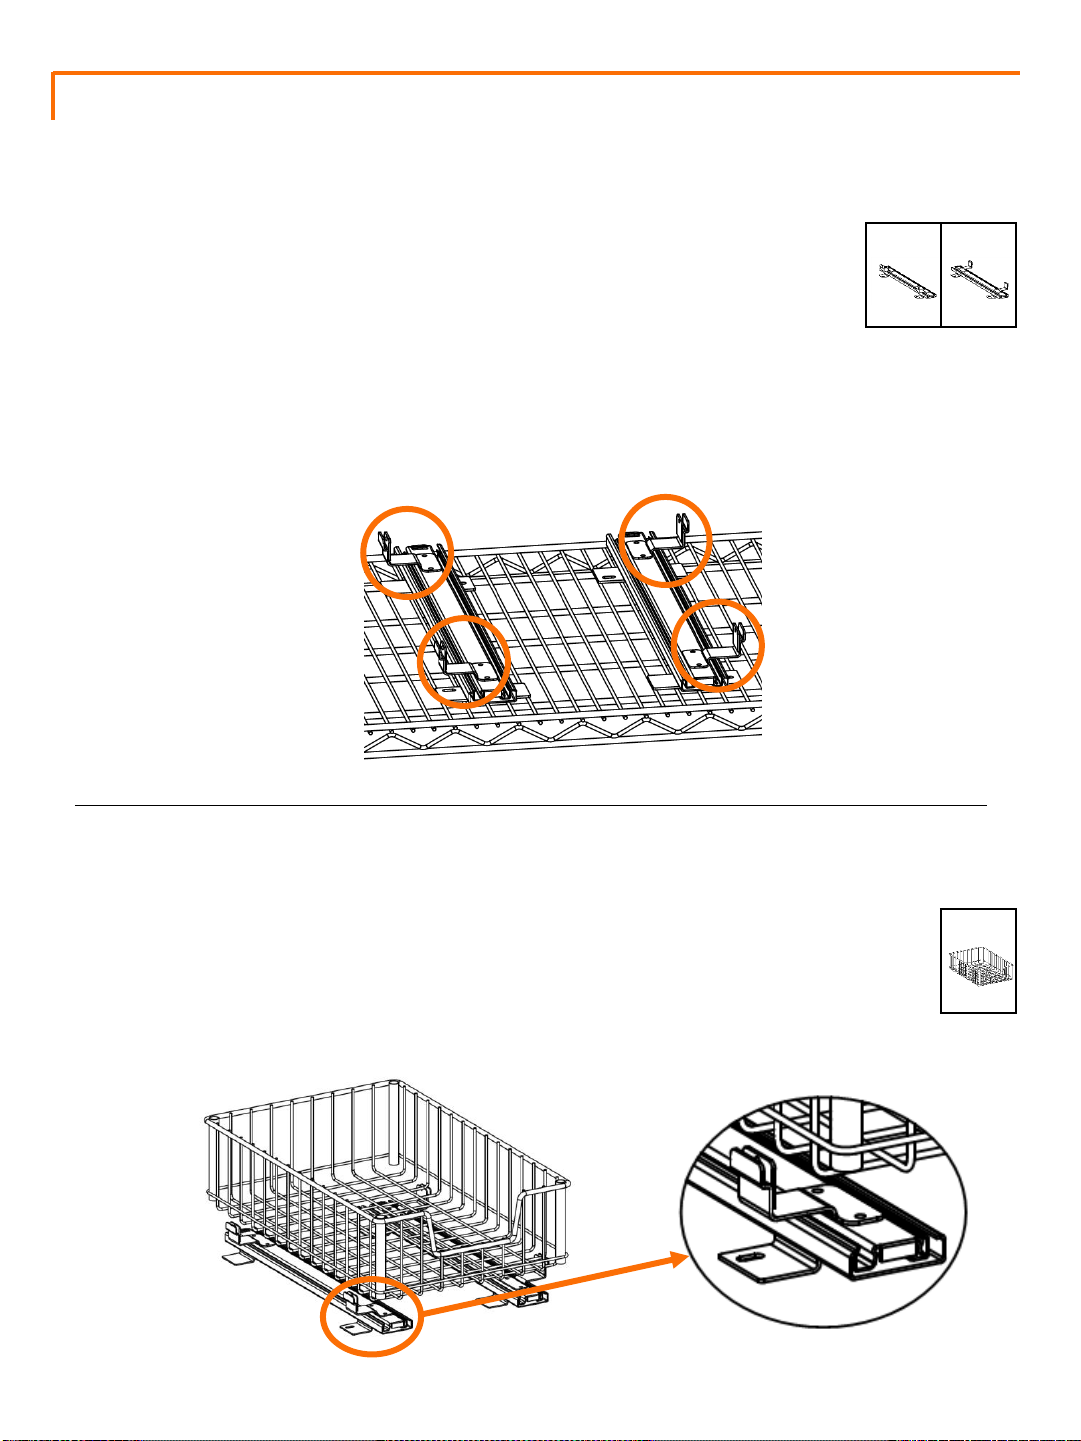
INSTALLATION INSTRUCTIONS – On Wire Rack
4
Rest WIRE DRAWER (A) on top of the CLIPS to ensure proper SLIDE
spacing.
• Note: For ease of installation, do NOT clip the WIRE DRAWER (A)
into the LEFT & RIGHT SLIDES (B) & (C) until Step 4.
Position as such:
Identify LEFT & RIGHT SLIDES (B) & (C).
• Note that the BACK end of each SLIDE (B) & (C) has a black tip and the
FRONT end does NOT.
Place SLIDES (B) & (C) on desired wire shelf. Make sure the FRONT of the
SLIDES (B) & (C) is lined up with the FRONT of the shelf.
Line up the slides along the wires in the wire shelf to ensure they are
straight. Make sure the front edge of the WIRE DRAWER (A) lines up to
the edge of the shelf so they are flush.
B (1) C (1)
A (1)
STEP 1
STEP 2
CLIPS should be
on the OUTSIDE.
FRONT
BACK
Page 6
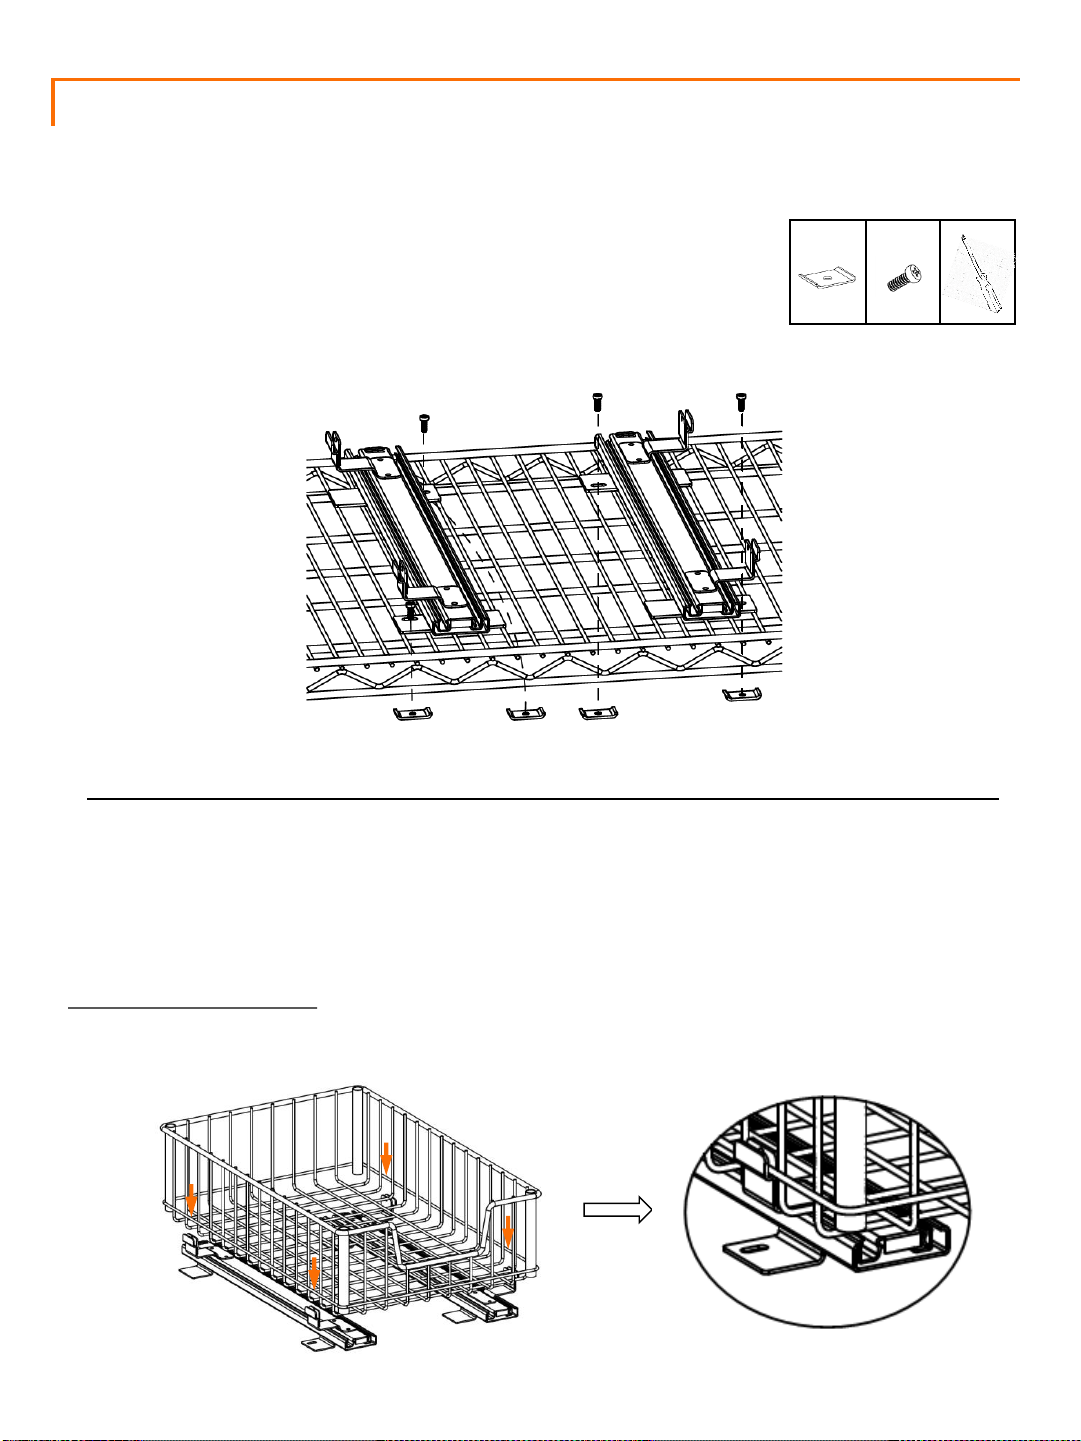
INSTALLATION INSTRUCTIONS – On Wire Rack
With a Phillips screwdriver, secure the SLIDES (B) & (C) to the wire
shelf by putting PLATE SCREWS (E) through the slots and fasten to
the RACK PLATES (D).
D (4) E (4)
STEP 3
Attach the WIRE DRAWER (A) to the clips in the LEFT and RIGHT SLIDES (B) & (C) until it
clicks into the clip.
Installation Suggestion: With the WIRE DRAWER (A) resting on top of the CLIPS, brace the
top of the WIRE DRAWER (A) with one hand and, with a rubber mallet, lightly tap each bottom
corner of the CLIPS to secure the WIRE DRAWER (A) into the CLIPS.
STEP 4
5
Page 7
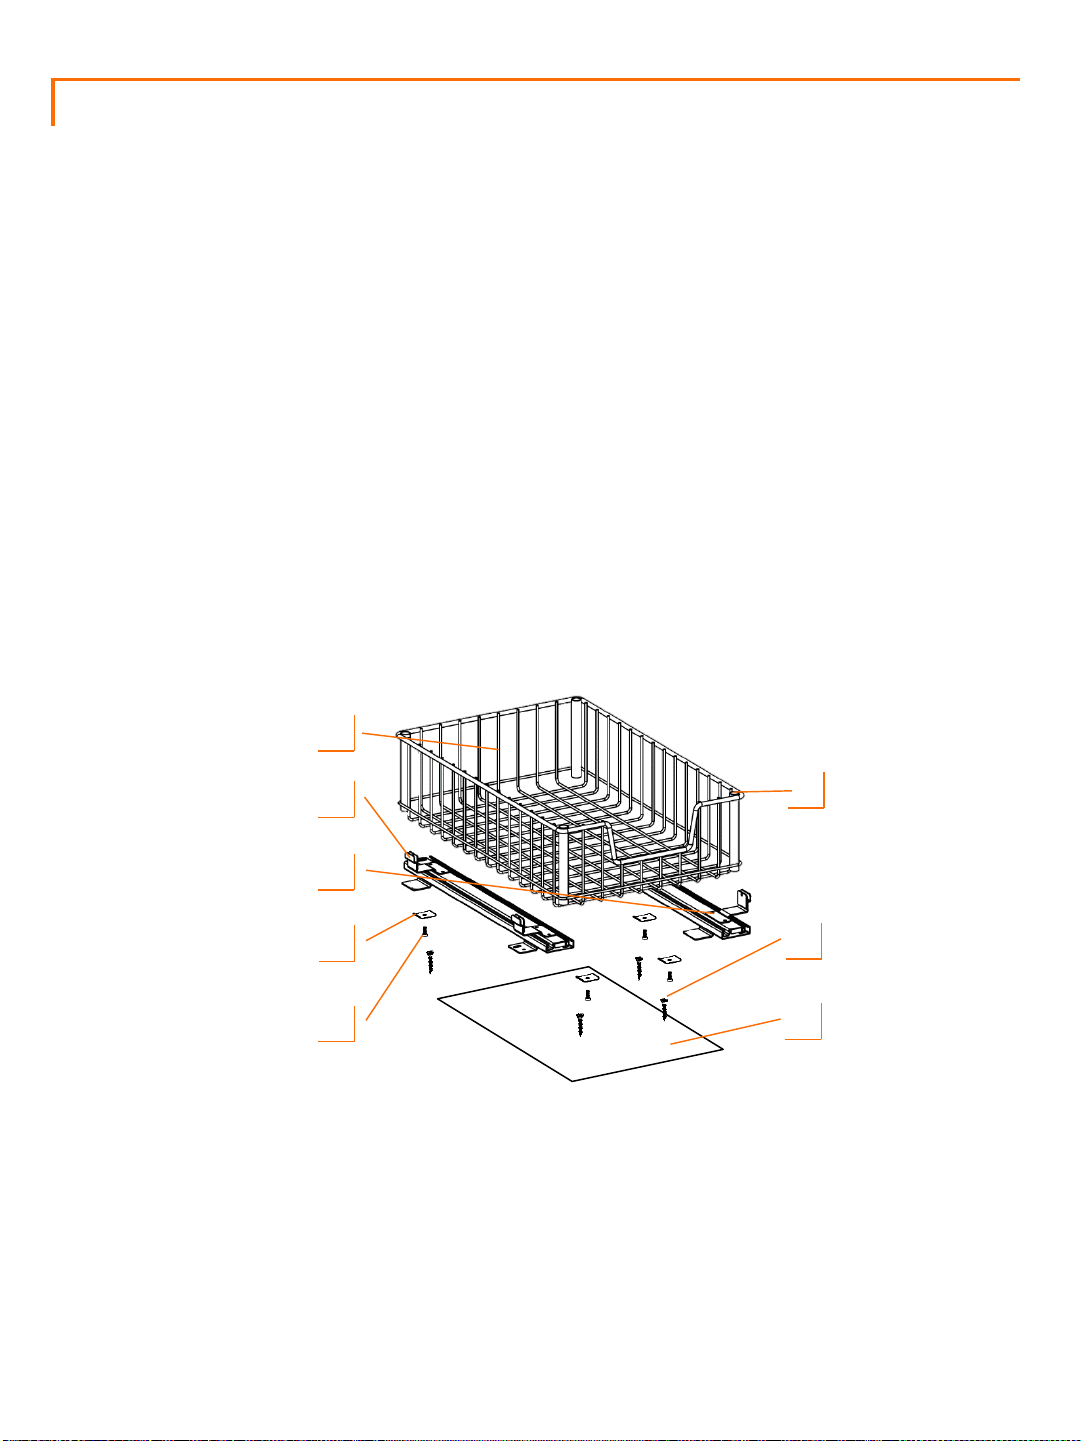
1
8
7
6
5
4
2
3
SERVICE PARTS LIST
Customer Service provides the following replacement parts:
Description
1)Plastic Cap
2)Cabinet Screw
3)Template
4)Plate Screw
5)Rack Plate
6)Right Slide
7)Left Slide
8)Wire Drawer
6
Page 8

WARNINGS
1. Read and understand all instructions. Failure to follow all instructions may result
in injury and/or damage.
2. The warnings, cautions, and instructions discussed in this manual cannot
cover all possible conditions or situations that may occur. The user must
always be aware of their environment and ensure that they use the product in a safe
and responsible manner.
3. Do NOT modify the product in any way. Unauthorized modification may impair the
function and/or safety of the product, and may affect the life of the product.
4. Check for damaged parts. Before using this product, carefully check that all parts
are in good condition, and that the product will operate properly and perform its
intended function. Check for damaged parts and any other conditions that may affect
the operation of this product. Replace damaged or worn parts, and never use this
product with a damaged part.
5. Do NOT overload the product. Each drawer holds up to 50 lb with equal weight
distribution.
6. Do NOT allow children to climb or play in the drawer.
CARE AND MAINTENANCE
• Avoid harsh, abrasive cleaners, and other corrosive chemicals
• Keep dry and avoid damp environments
7
Page 9

First Name: Last Name:
Address:
City: State: Zip Code:
Email Address: Phone:
Product Model #: Purchase Date: / /
Location of Purchase:
Please rate the importance of each feature (1=least important; 10=most important)
Quality Price Size/Capacity Appearance Other
How did you hear about our product?
Magazine Ad Catalog Salesperson Word of Mouth
Internet Store Display Other
Marital Status: Single Married
Household Income: Below $50,000 $50,000-$150,000 $150,000+
Education: High School College Graduate School
Primary Residence: Own Rent
Comments/Suggestions:
PRODUCT REGISTRATION
Thank you for purchasing a Sliding Wire Drawer. In order to register your product and receive
streamlined customer service, please fill out the following Product Registration Form and (1)
fax the form (2) complete the Product Registration Form online or (3) scan and email the form.
Include a copy of your original receipt with your submission.
8
Page 10

QUESTIONS? NEED PARTS?
WE ARE HERE TO HELP!
Please feel free to contact us. There are no questions too
small, or any problems too big. We’re committed to
providing our customers with the highest level of service.
CONTACT US
 Loading...