

Page 1
phone 0508 11 00 22 or 09 476 8052
po box 302396 north harbour north shore 0751 68d paul matthews rd north harbour north shore
fax 09 476 8059 email [email protected] www.trinitycctv.co.nz
proudly distributed by manta electronics ltd www.manta.co.nz
QUICK START GUIDE
For the Trinity DIY CCTV packs
Thank you for purchasing from the Trinity Solutions CCTV range.
This DVR has been pre-programmed for the most common set up so in most cases you can
simply plug everything in and start using your system.
Please follow the instructions in this Quick Start guide to get started.
PLEASE READ IN CONJUNCTION WITH THE USER MANUAL ON THE CD PROVIDED
Page 2
phone 0508 11 00 22 or 09 476 8052
po box 302396 north harbour north shore 0751 68d paul matthews rd north harbour north shore
fax 09 476 8059 email [email protected] www.trinitycctv.com
proudly distributed by manta electronics ltd www.manta.co.nz
2
Parts List
Please ensure you have identified all the parts before starting installation.
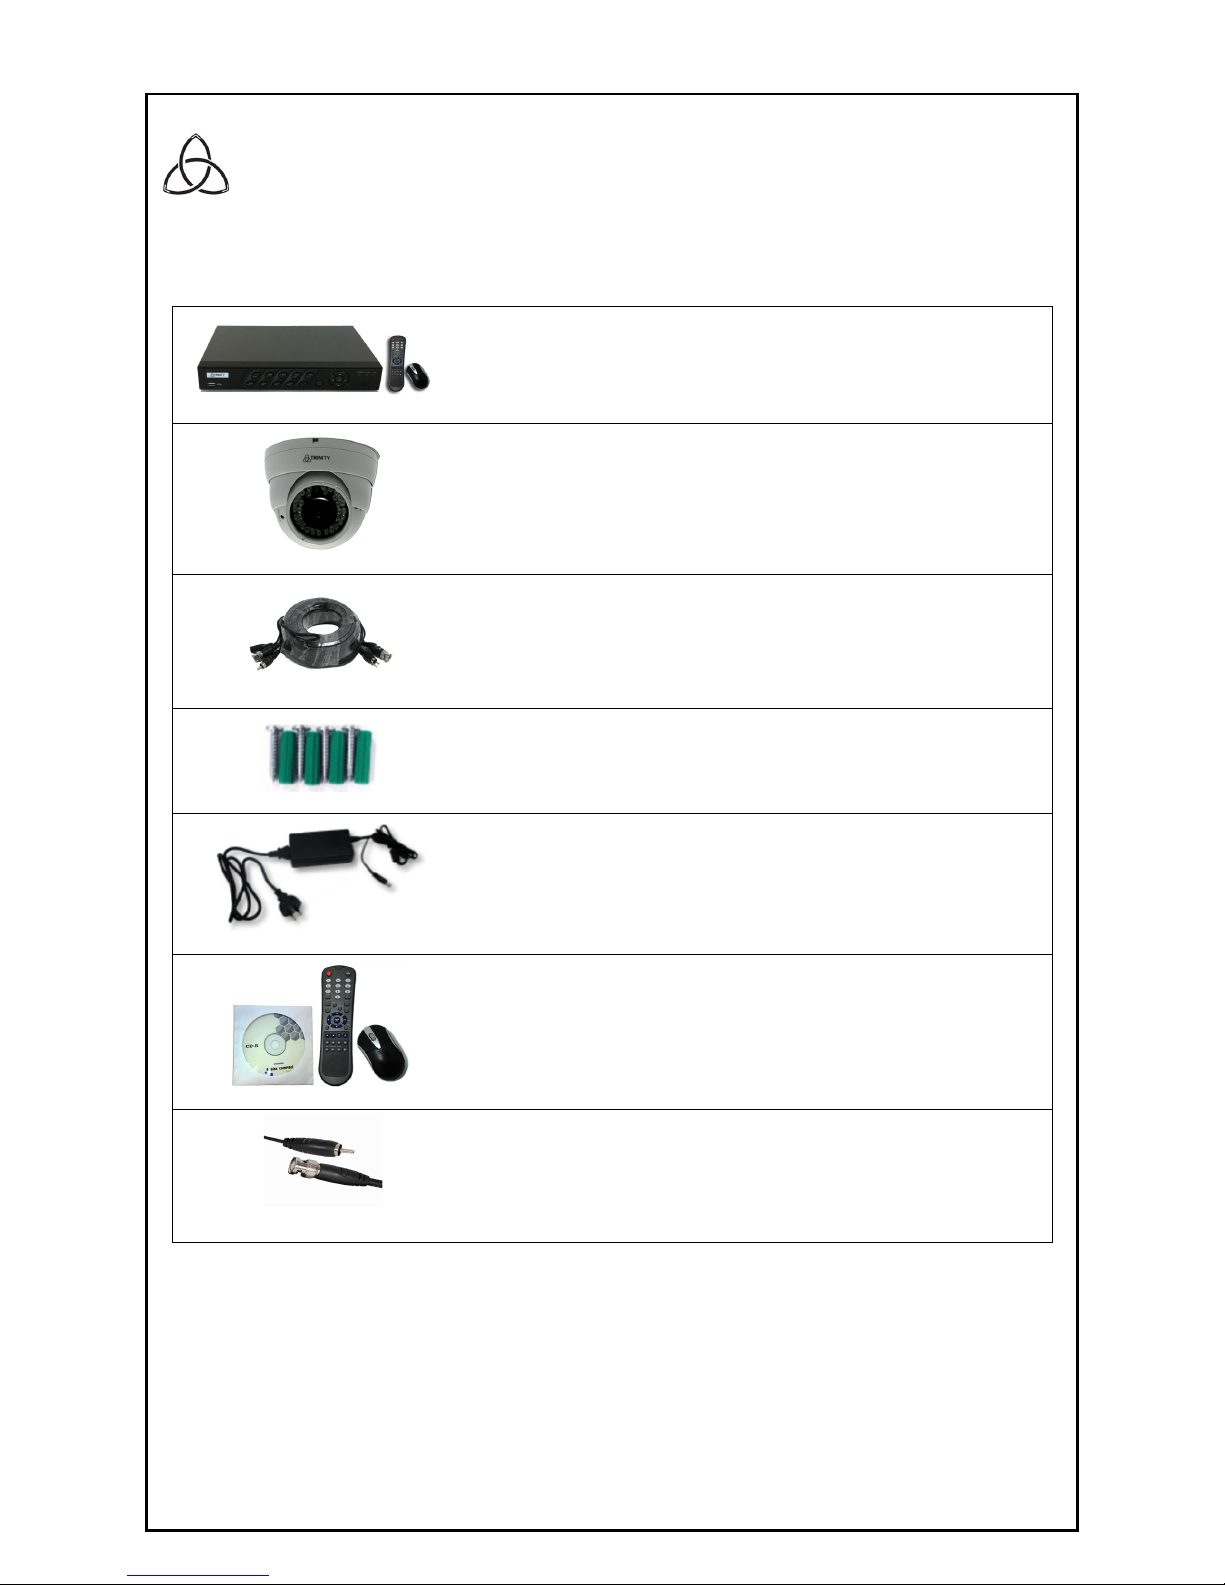
1 x Connectivity Se rie s 4 channel Digital Video Recorder (DVR)
• Records all cameras to the included 500 GB hard drive
• Pre-programmed and ready to go
Cameras
• Camera model and number of cameras is pack dependent
1 x camera cable per camera
• Each cable is pre-terminated with DC power and video plugs
• No tools required – simply plug in
• Cable lengths are pack dependent
1 x mounting ha rdware per camera
• Fixing screws etc to install each camera
Power s upplie s
• 1 x 12 volt power supply with split cable to power up to 5
cameras
• 1 x 12 volt power supply for the DVR
• 1 x infared remote control
• 1 x mouse
• 1 x CD with us er manual
Monitor/TV plug (not included)
• If you want to connect the DVR to your TV or monitor you will
need to purchase 1 x BNC to RCA video lead. These are
available from Trinity CCTV Solutions.
Page 3
phone 0508 11 00 22 or 09 476 8052
po box 302396 north harbour north shore 0751 68d paul matthews rd north harbour north shore
fax 09 476 8059 email [email protected] www.trinitycctv.com
proudly distributed by manta electronics ltd www.manta.co.nz
3
Installation
Read before installation
• Do not place cords from the AC adaptor where they can be pinched or stepped on.
• Do not place heavy objects on cords, or cover cords with rugs or carpet.
• Never immerse any component in water, and do not spray cleaners or solvents on the products.
Unplug before cleaning. When cleaning, use a damp, lint free cloth only.
• Do not expose the DVR or cameras to excessive cold, heat or moisture.
• Leave at least a 2” space between the DVR and other objects to allow air circulation around the unit.
• Service should be handled by qualified technicians.
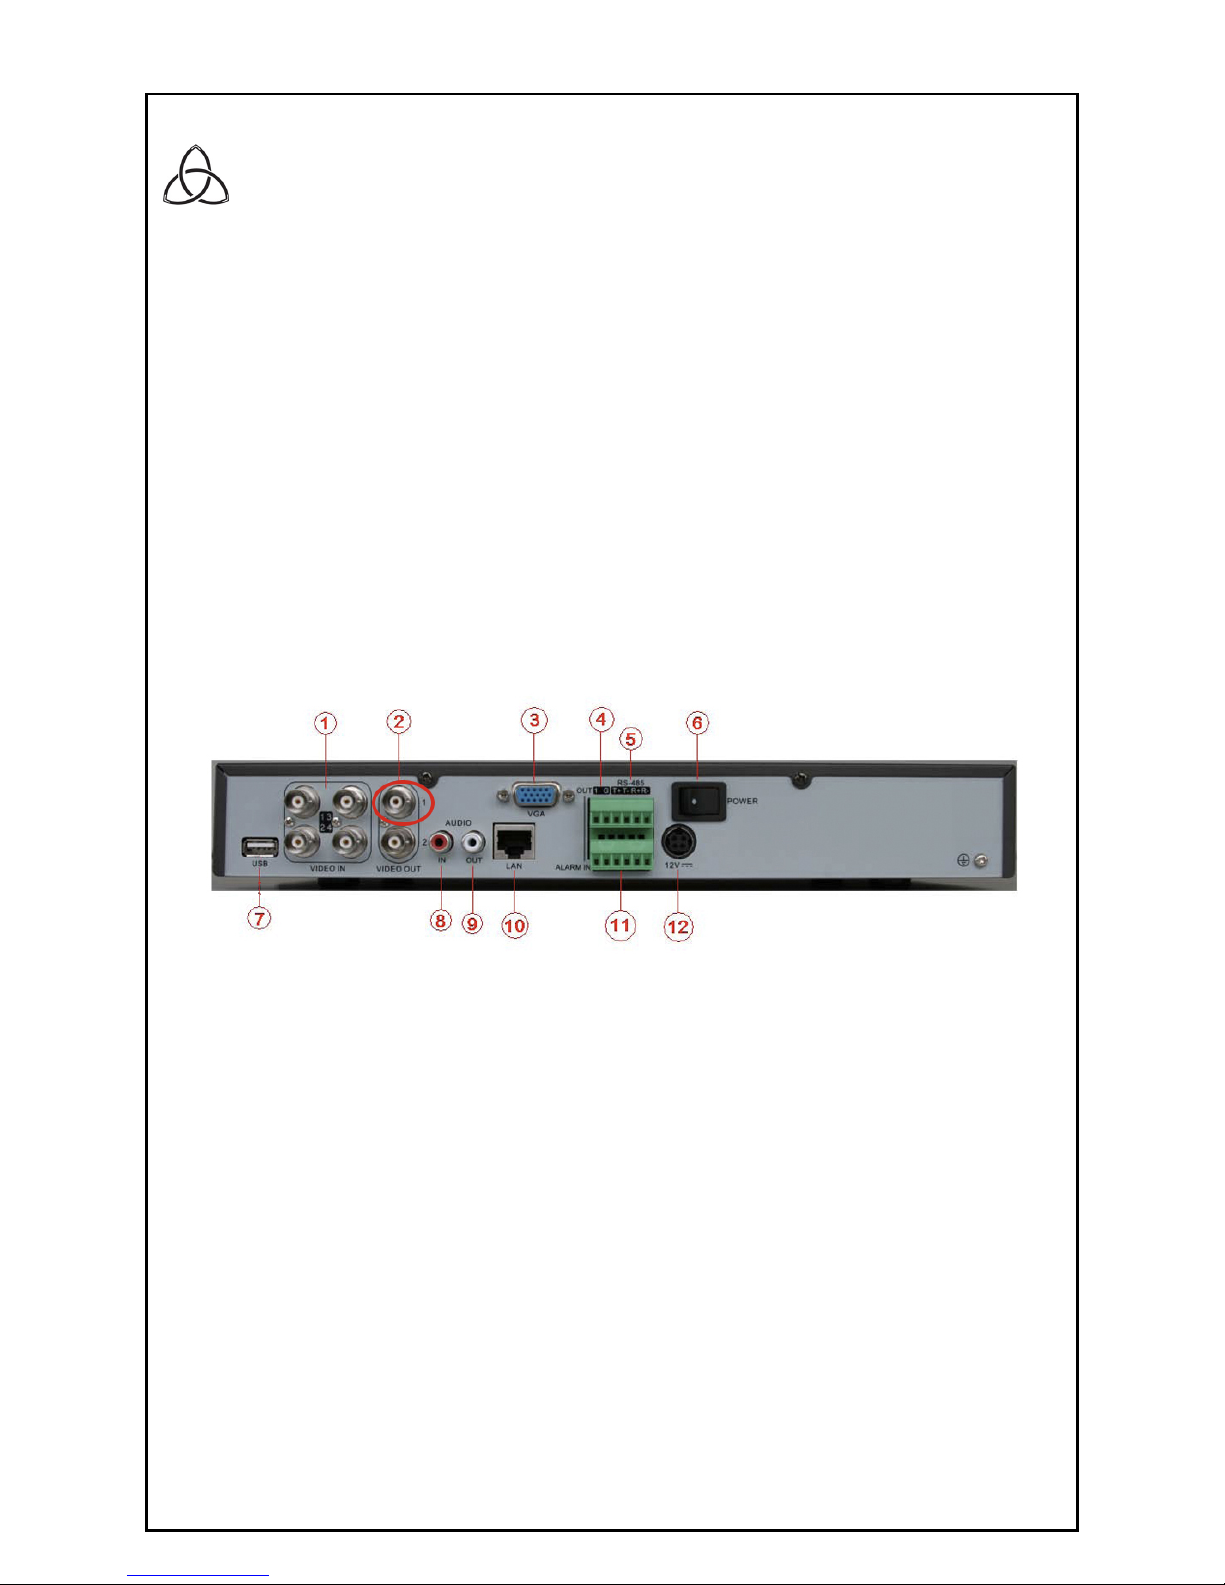
The back of your DVR
1. Video in – connects to cameras
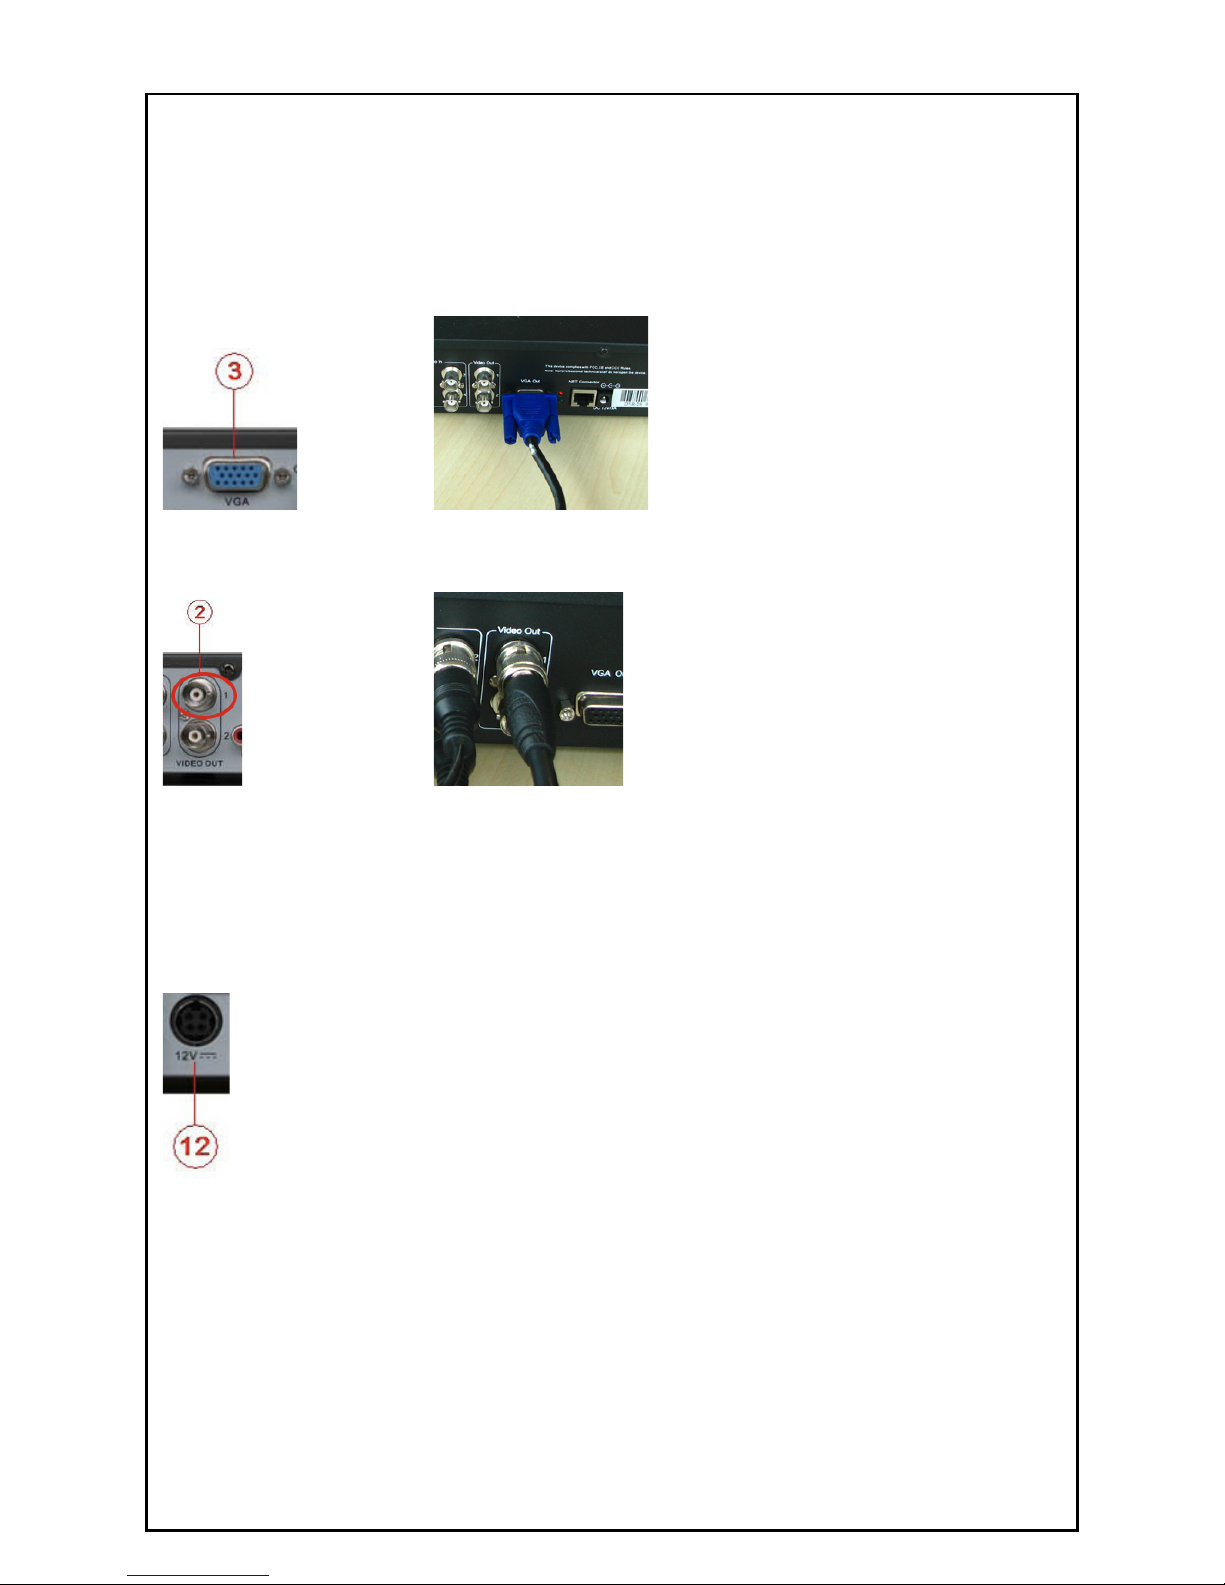
2. Video out number 1 – use to connect your DVR to your TV if you are NOT using a monitor
3. VGA interface – use to connect your DVR to a monitor
4. Alarm out
5. RS-485 T+ T- R+ R – (connect if using a PTZ camera)
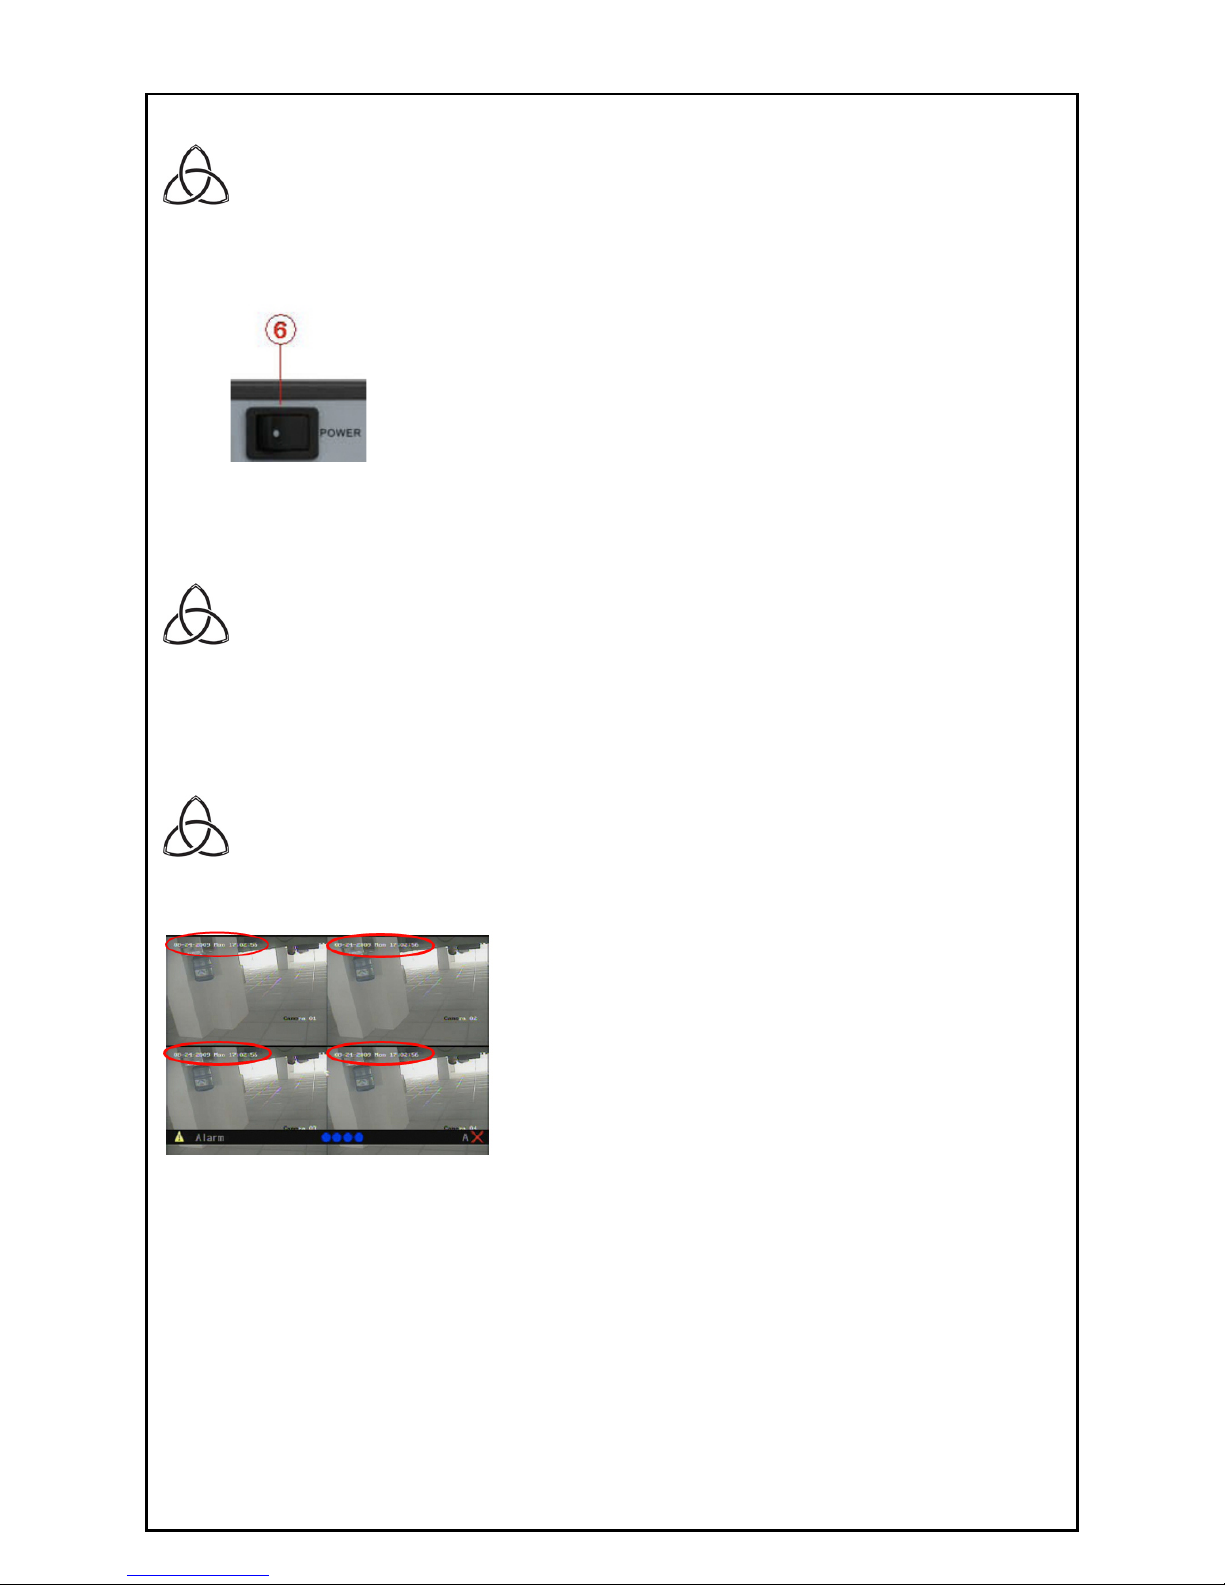
6. Power switch
7. USB interface
8. Audio in
9. Audio out
10. UTP interface – use to connect to your network/broadband router
11. Alarm in
12. +12V DC power supply input
Page 4
phone 0508 11 00 22 or 09 476 8052
po box 302396 north harbour north shore 0751 68d paul matthews rd north harbour north shore
fax 09 476 8059 email [email protected] www.trinitycctv.com
proudly distributed by manta electronics ltd www.manta.co.nz
4
Connection instructions
Step 1 – install the cameras
Fit each camera in the desired location. Use the screws provided to securely attach the camera to a solid
surface. The camera should be positioned facing away from the sun or bright light source (e.g. windows).
If using outdoor cameras, mount under an eve (if possible) to protect the camera from the weather.
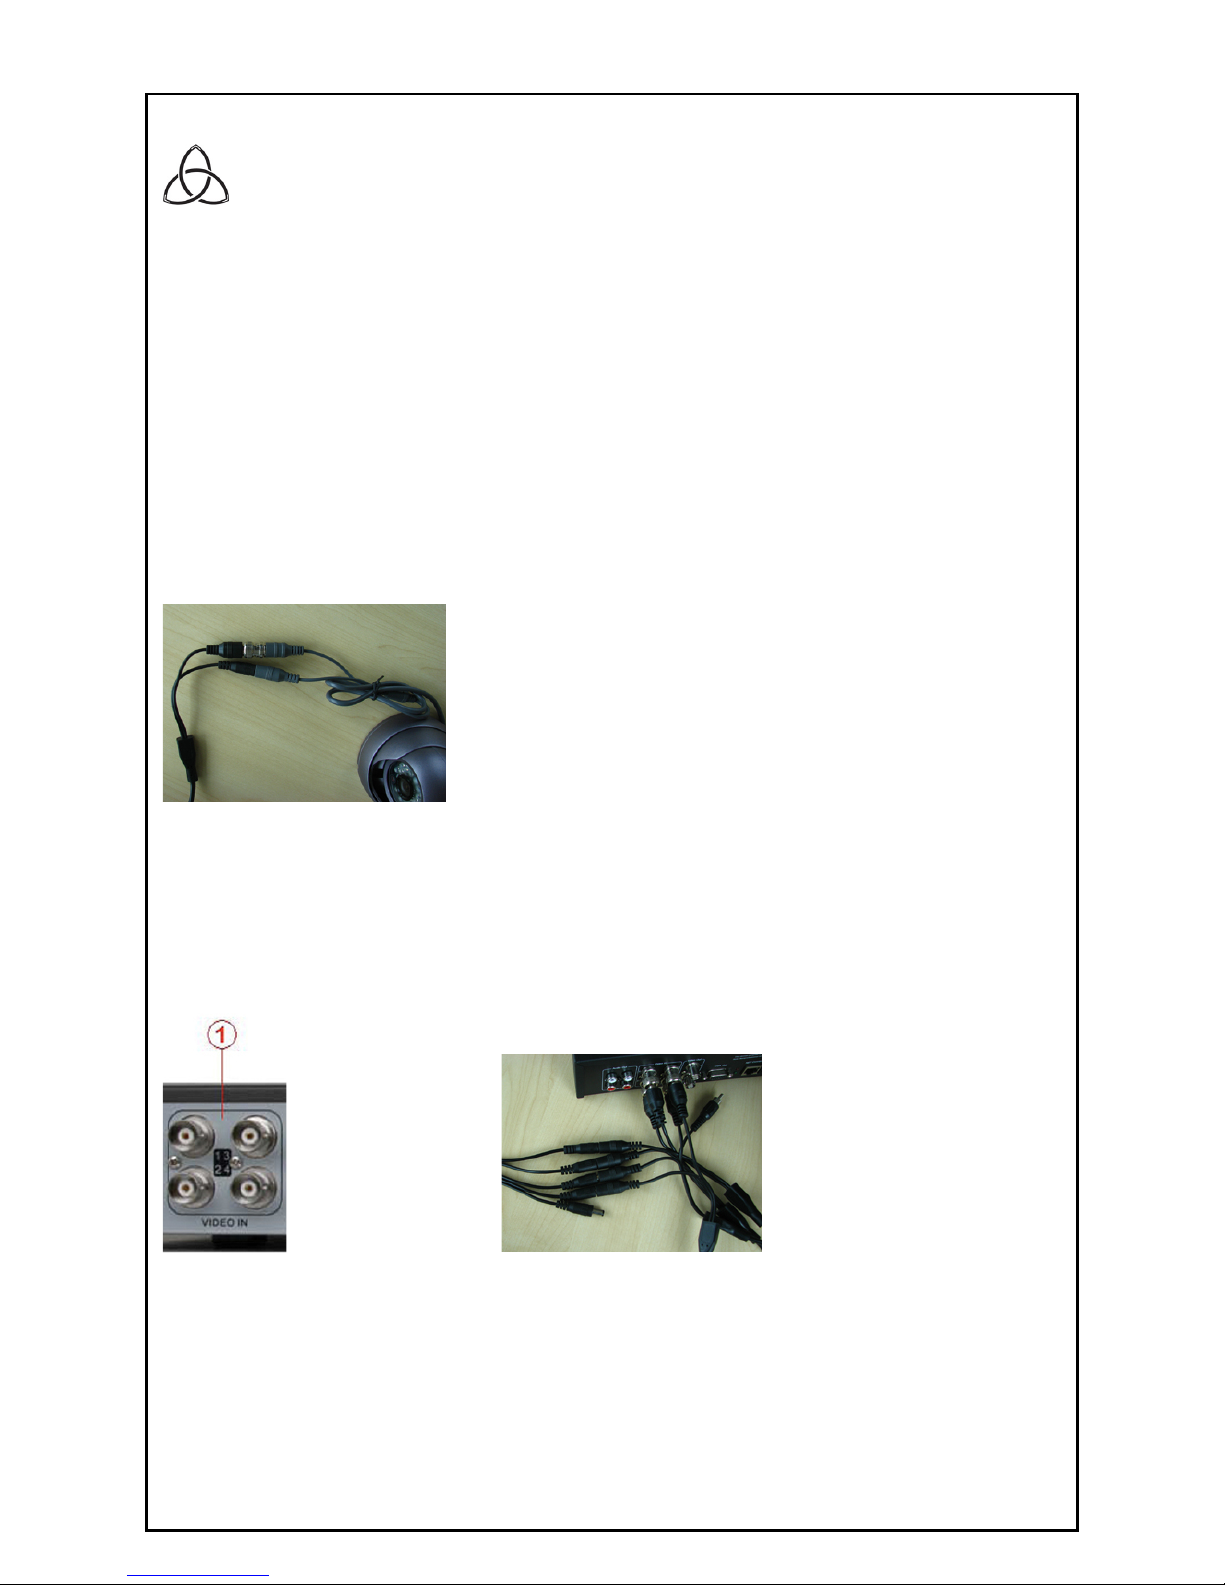
Step 2 – connect the camera cables to each camera
Connect the supplied cable to each camera, both the video (BNC) lead and the DC power lead have plugs
fitted to make connection easy.
Step 3 – connect the camera cables to the DVR and power cable
Connect each cable camera cable to the video input sockets (1) on the back of the DVR (marked with the
channel number), and connect the DC power end to the supplied power adapter split cable.
Your DVR’s video input sockets Example of a DVR with camera cables plugged in
NOTE: some models are supplied with individual plug packs for each camera.
Page 5
phone 0508 11 00 22 or 09 476 8052
po box 302396 north harbour north shore 0751 68d paul matthews rd north harbour north shore
fax 09 476 8059 email [email protected] www.trinitycctv.com
proudly distributed by manta electronics ltd www.manta.co.nz
5
Step 4 – connect the DVR to a monitor or your TV
You can view the cameras on a dedicated monitor or your TV.
If you are connecting to a monitor attach the monitor’s VGA lead (supplied with your monitor) to the VGA
interface (3) on the DVR.
Your DVR’s VGA interface Example of a DVR with a VGA lead plugged in
If you are connecting to your TV use a BNC to RCA lead to connect Video Out 1 (2) on the DVR to your TV.
Video Out 1 on your DVR Example of a DVR with the BNC to RCA lead plugged in
Step 5 – connect the power supply
Connect the single 12v DC (4 amp) power supply to the 12v in socket on the DVR (12).
Step 6 – turn the power on
Plug both DC power supplies into a 240v AC power point and switch power point on.
Page 6
phone 0508 11 00 22 or 09 476 8052
po box 302396 north harbour north shore 0751 68d paul matthews rd north harbour north shore
fax 09 476 8059 email [email protected] www.trinitycctv.com
proudly distributed by manta electronics ltd www.manta.co.nz
6
Start-up
1. Make sure your TV/monitor is ON and set to the appropriate AV channel if required.
2. Turn the power switch on the back of the DVR (6) ON.
3. The LED on the front of the DVR will light up green.
4. The images from all the cameras should now be displayed on your TV/monitor.
Default administrator password
THE FACTORY DEFAULT ADMINISTRATOR PASSWORD IS 12345. You will need to use this password
to change any of the settings on the DVR. To change or add user see the User Manual
Check the date and time
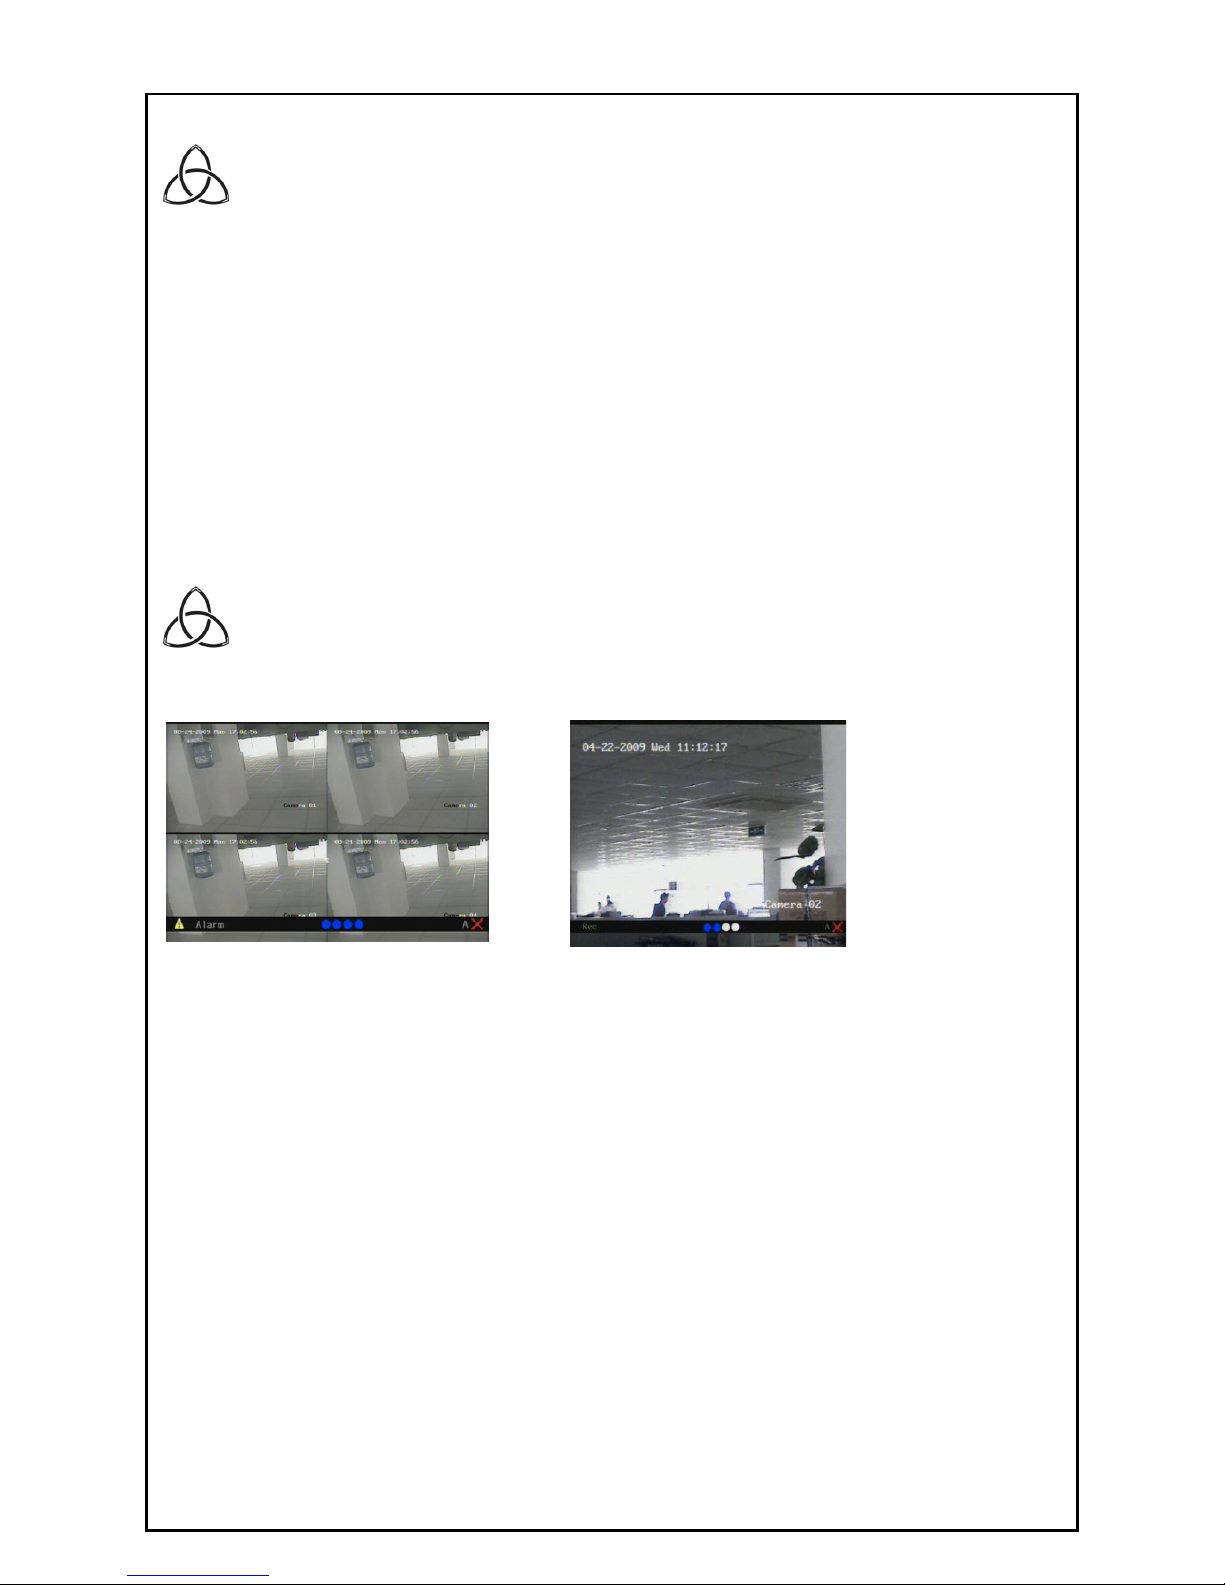
On the top left of each camera image you will see the date and time. Please make sure it is correct.
The DVR records the camera footage using this time and date. If it is incorrect finding footage at a later
date can be difficult. Incorrect time and date stamps may also hinder your ability to use the footage in
your security processes.
To change the date and time refer to the User Manual
Page 7
phone 0508 11 00 22 or 09 476 8052
po box 302396 north harbour north shore 0751 68d paul matthews rd north harbour north shore
fax 09 476 8059 email [email protected] www.trinitycctv.com
proudly distributed by manta electronics ltd www.manta.co.nz
7
Factory settings
The DVR comes pre-programmed from the factory with the most common settings:
• Liv e view (preview) mode: in live (real time) on your screen you will see what the cameras are
seeing. You can select to view all the camera images at once or one camera image in full screen.
• Motion detection recording: the DVR is set to record only when it detects motion as this gives
the most efficient use of hard disk space.
THE FACTORY DEFAULT ADMINISTRATOR PASSWORD IS 12345. You will need to use this password to
change any of the settings on the DVR.
Live view (preview mode)
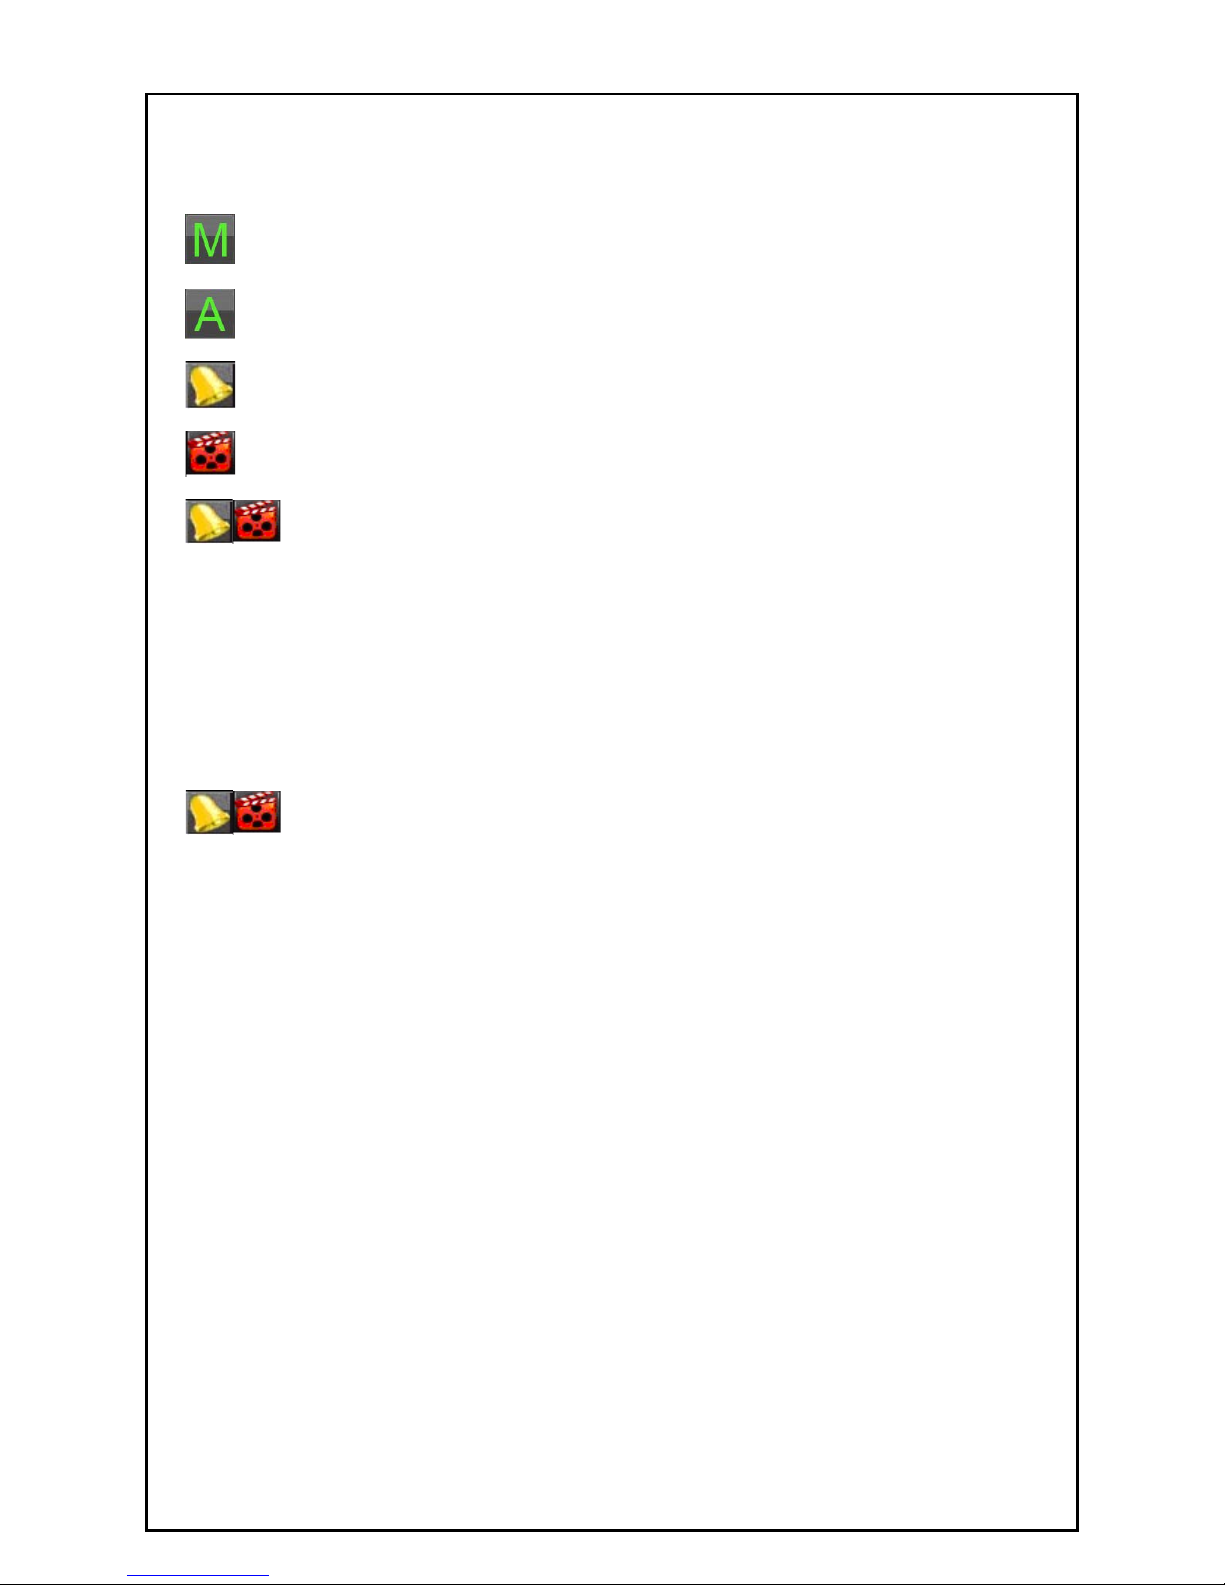
In live view (preview) mode on your screen you will see what the cameras are seeing live (in real time).
Viewing all the camera images on the screen Viewing a single camera image on the screen
View all the camera images or one camera image
By default you will view all the camera images on the screen.
To view a single camera image on the whole screen simply put the mouse cursor over your chosen
camera image and left double click. Left double click again to cancel and return to viewing all the camera
images on the screen.
Page 8
phone 0508 11 00 22 or 09 476 8052
po box 302396 north harbour north shore 0751 68d paul matthews rd north harbour north shore
fax 09 476 8059 email [email protected] www.trinitycctv.com
proudly distributed by manta electronics ltd www.manta.co.nz
8
!
Motion Detection Recording
The factory setting is to record on motion detection. The DVR will record approximately 10 seconds
before movement is detected and 30 seconds afterwards. In this mode the icon will show a
for each camera that is currently being recorded
Live Preview On-screen Display
The Live Preview mode is automatically started after the DVR boots up. It is also at the very top of the menu
hierarchy, thus hitting the ESC multiple times (depending on which menu you’re on) will bring you to the Live
Preview mode.
!"#$%&'$#"$(%)*+,-% %
Some icons are provided on screen in Live Preview mode to indicate different camera status. These icons include:
Main Output
Aux Output
Event Alarm: Indicates video loss, video tampering, motion detection or relay alarm.
Record: Indicates the current channel is recording. The recording may have been started manually,
from a schedule, and/or triggered from motion or alarm.
Event Alarm & Record
Live Preview On-screen Display
The Live Preview mode is automatically started after the DVR boots up. It is also at the very top of the menu
hierarchy, thus hitting the ESC multiple times (depending on which menu you’re on) will bring you to the Live
Preview mode.
!"#$%&'$#"$(%)*+,-% %
Some icons are provided on screen in Live Preview mode to indicate different camera status. These icons include:
Main Output
Aux Output
Event Alarm: Indicates video loss, video tampering, motion detection or relay alarm.
Record: Indicates the current channel is recording. The recording may have been started manually,
from a schedule, and/or triggered from motion or alarm.
Event Alarm & Record
Page 9
phone 0508 11 00 22 or 09 476 8052
po box 302396 north harbour north shore 0751 68d paul matthews rd north harbour north shore
fax 09 476 8059 email [email protected] www.trinitycctv.com
proudly distributed by manta electronics ltd www.manta.co.nz
9
Play back
To enter the playback screen follow these easy steps:
1. Right click the mouse and select PLAYBACK from the options shown.
2. Select your username by using the up/down blue buttons on the remote (the factory setting
username is Administrator). Press the left/right blue buttons to go to Password.
3. Enter the password (the factory setting password is 12345). Press the blue ENTER button.
4. Press the blue ENTER button to Confirm.
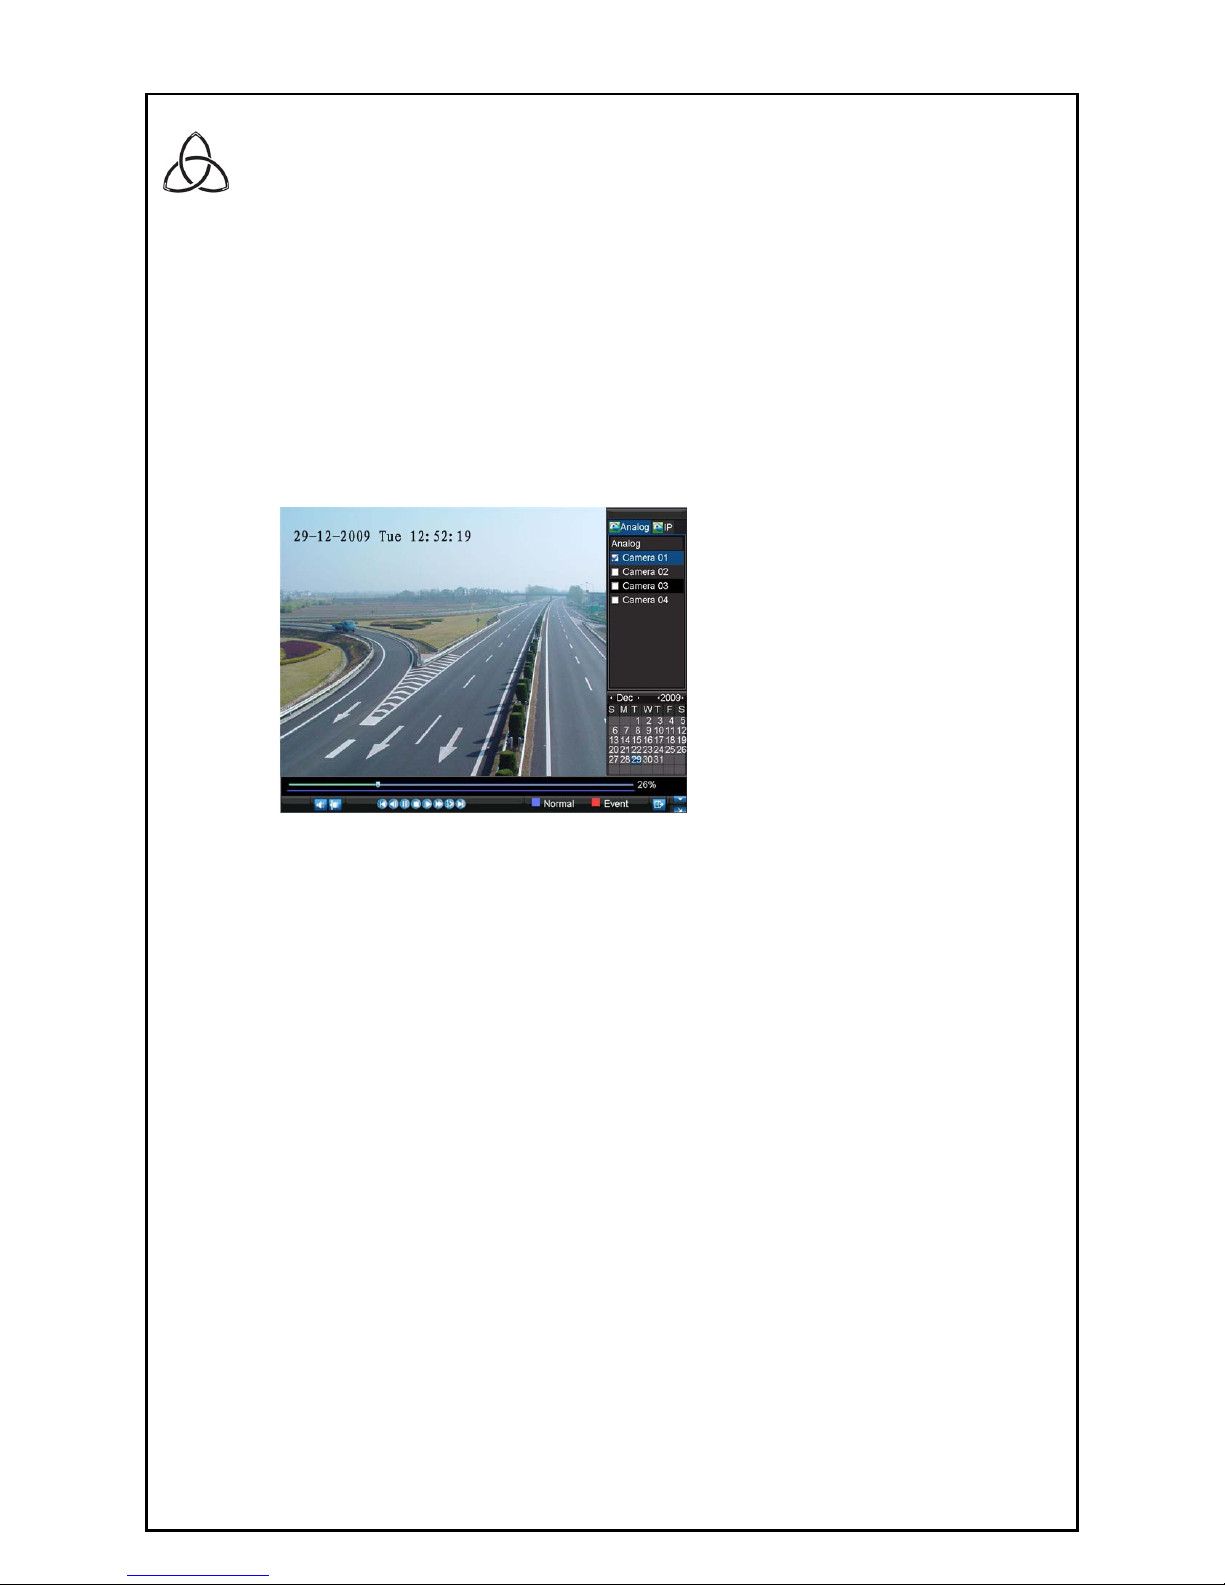
5. You will now see the playback screen.
Tick the boxes for the cameras you want to view, select the date from the calendar and click the PLAY
icon on the bottom tool bar. The DVR will start playing from the first file recorded for that day. To move to
another time simply click the cursor on time line above the toolbar (you’ll see the % on the right end
change to time) and drag the cursor to the required time.
Page 10
phone 0508 11 00 22 or 09 476 8052
po box 302396 north harbour north shore 0751 68d paul matthews rd north harbour north shore
fax 09 476 8059 email [email protected] www.trinitycctv.com
proudly distributed by manta electronics ltd www.manta.co.nz
10
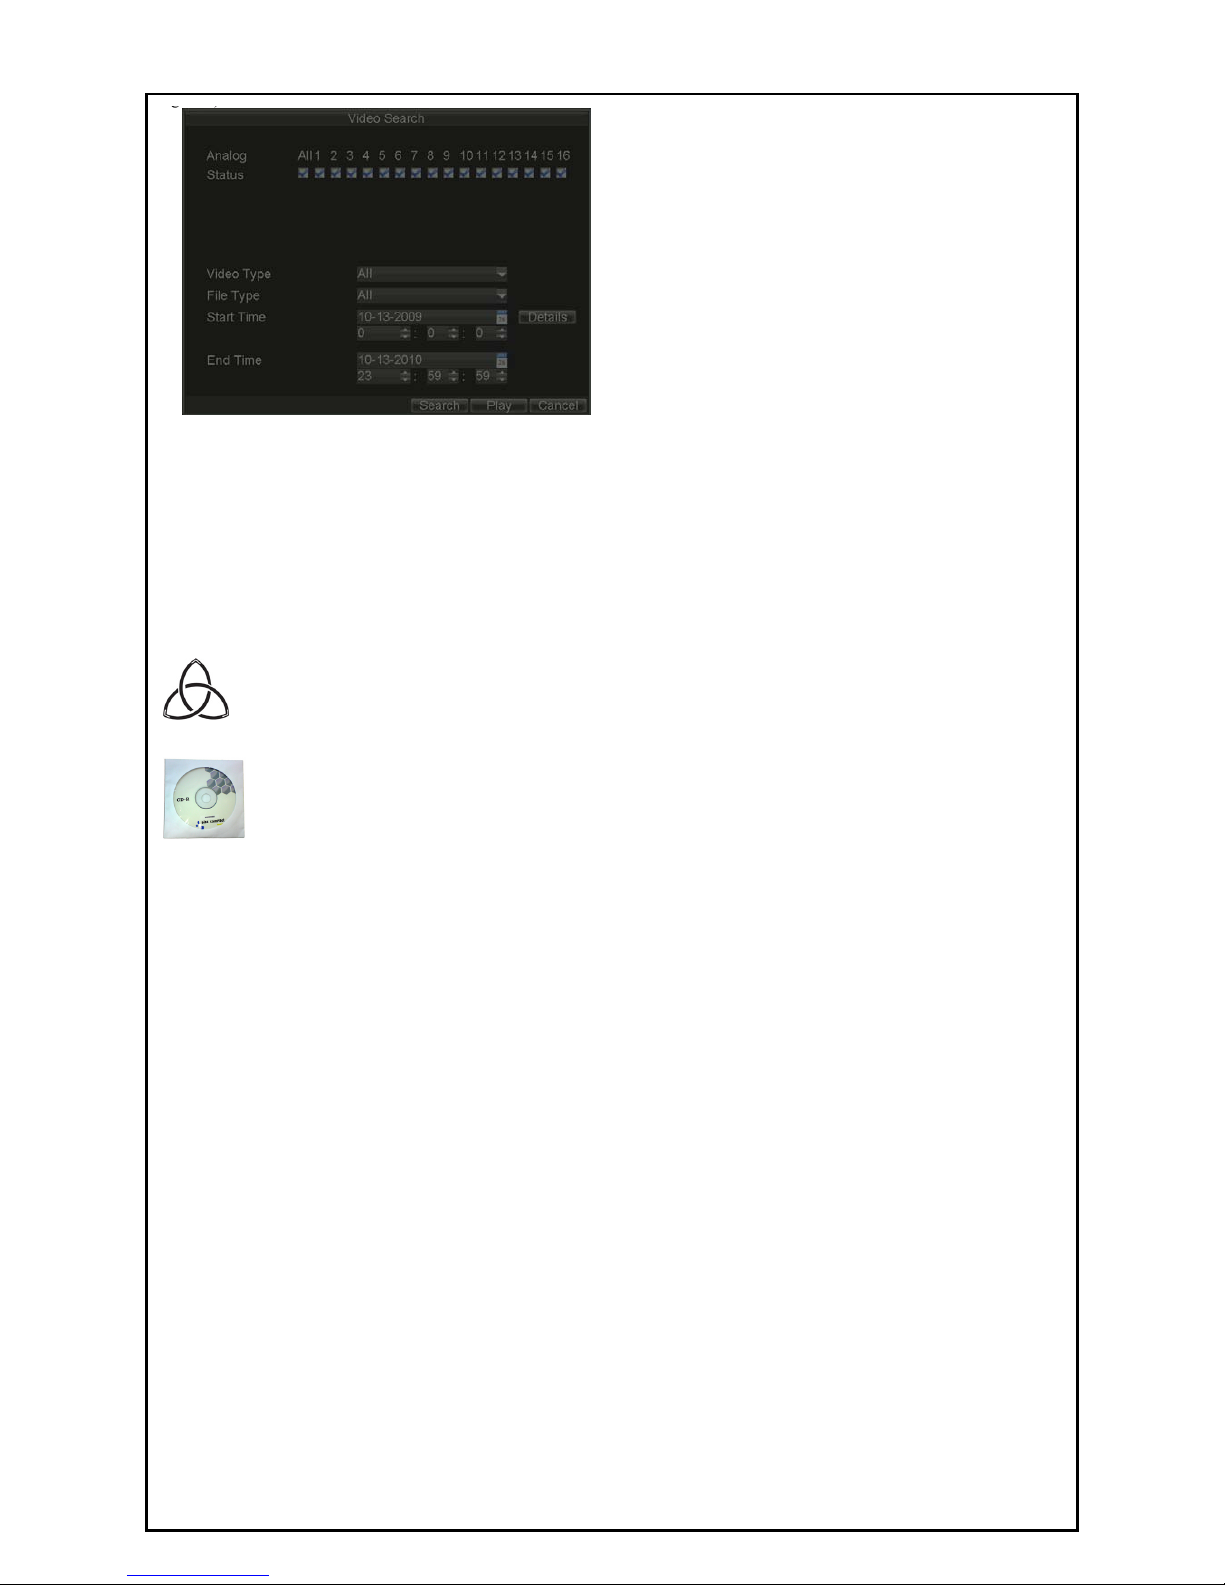
From here you can select the camera number (tick the cameras required) and the time and date range
from the drop down boxes. Clicking search will show you a list of all files with the search paramters. Click
on a file then click play.
For more information
Please refer to your user manual on the CD included with this DVR for full instructions.
 Loading...