

Page 1

TSC1 Asset Surveyor
Software User Guide
Page 2

Page 3

TSC1 Asset Surveyor
Software User Guide
Version 5.20
Part Number 34183-20-ENG
Revision A
March 2001
Page 4

Corporate Office
Trimble Navigation Limited
Mapping & GIS Systems
645 North Mary Avenue
P.O. Box 3642
Sunnyvale, CA 94088-3642
U.S.A.
Phone: +1-408-481-8940, 1-800-545-7762
Fax: +1-408-481-7744
www.trimble.com
Copyright
The followinglimited warranties give you specific
legal rights. You may have others, which vary
from state/jurisdiction to state/jurisdiction.
Hardware Limited Warranty
Trimble warrants that this Trimble hardware
product (the “Product”) shall substantially
conform to Trimble’ s applicable published
specifications for the Product for a period of one
(1) year, starting from the date of delivery. The
warranty set forth in this paragraph shall not apply
to software products.
© 1999–2001, Trimble Navigation Limited. All
rights reserved. No part of this manual may be
copied, photocopied, reproduced, translated, or
reduced to any electronic medium or machinereadable form for any use other than with the
Asset Surveyor™ product without prior written
consent from Trimble Navigation Limited.
Printed in the United States of America. Printed
on recycled paper.
Trademarks
GPS Pathfinder and the Sextant logo with Trimble
are trademarks of Trimble Navigation Limited
registered in the United States Patent and
Trademark Office.
The Globe& Trianglelogo with Trimble,4600LS,
ASPEN, Asset Surveyor, Centurion, GeoExplorer,
GPS Pathfinder Basic, GPS Pathfinder Basic Plus,
GPS Pathfinder Pro XL, GPS Pathfinder Pro XR,
GPS Pathfinder Pro XRS, GPS Pathfinder
Professional, GPS ProLite, GPS Total Station
4700, GPS Total Station 4800, Over and Up,
Pathlog, Series 4000 GPS, Site Surveyor 4400,
Supertrak, Survey Controller, TDC1, TDC2,
Trimble Reference Station (TRS), Trimble
Support Module (TSM), Trimpack III, and TSC1
are trademarks of Trimble Navigation Limited.
All other trademarks are the property of their
respective owners.
Software and Firmware Limited Warranty
Trimble warrants that this Trimble software
product (the “Software”) shall substantially
conform to Trimble’ s applicable published
specifications for the Software for a period of
ninety (90) days, starting from the date of
delivery.
Warranty Remedies
Trimble'ssole liability and your exclusive remedy
under the warranties set forth above shall be, at
Trimble’s option, to repair or replace any Product
or Software that fails to conform to such warranty
(“Nonconforming Product”) or refund the
purchase price paid by you for any such
Nonconforming Product, upon your return of any
Nonconforming Product to Trimble.
Release Notice
This is the March 2001 release (Revision A) of the
TSC1 Asset Surveyor Software User Guide,part
number 34183-20-ENG.It applies to version 5.20
of the Asset Surveyor™ software.
Page 5

Warranty Exclusions
Limitation of Liability
These warrantiesshallbeappliedonlyin the event
and to the extent that: (i) the Products and
Software are properly and correctly installed,
configured, interfaced, stored, maintained and
operated in accordance with Trimble's relevant
operator's manual and specifications, and; (ii) the
Products and Software are not modified or
misused. The preceding warranties shall not apply
to, and Trimble shall not be responsible for, any
claim of warranty infringement is based on (i)
defects or performance problems that arise from
the combination or utilization of the Product or
Software with products, information, systems or
devices not made, supplied or specified by
Trimble; (ii) the operation of the Product or
Software under any specification other than, or in
addition to, Trimble's standard specifications for
its products; (iii) the unauthorized modification or
use of the Product or Software; (iv) damage
caused by lightning, other electrical discharge, or
fresh or salt water immersion or spray; or (v)
normal wear and tear on consumable parts (e.g.,
batteries).
THE WARRANTIES ABOVE STATE TRIMBLE'S
ENTIRE LIABILITY AND YOUR EXCLUSIVE
REMEDIES PERFORMANCE OF THE PRODUCTS
AND SOFTWARE
PROVIDED IN THIS A GREEMENT
FURNISHES THE PRODUCTS AND SOFTWARE
AS
-IS, WITH NO WARRANTY, EXPRESS OR
IMPLIED
EXCLUDED THE IMPLIED WARRANTIES OF
MERCHANTABILITY AND FITNESS FOR A
PARTICULAR PURPOSE
WARRANTIES ARE IN LIEU OF ALL
OBLIGATIONS OR LIABILITIES ON THE PART
OF TRIMBLE ARISING OUT OF
CONNECTION WITH
SOFTWARE. SOME STATES AND
JURISDICTIONS DO NOT ALLOW LIMITATIONS
ON DURATION OF AN IMPLIED WARRANTY
THE ABOVE LIMITATION MAY NOT APPLY TO
YOU
, AND THERE IS EXPRESSLY
.
. EXCEPT AS EXPRESSLY
, TRIMBLE
. THE STATED EXPRESS
, OR IN
, ANY PRODUCTS OR
, SO
TO THE MAXIMUM EXTENT PERMITTED BY
APPLICABLE LAW, TRIMBLE SHALL NOT BE
LIABLE TO YOU FOR ANY INDIRECT, SPECIAL,
OR CONSEQUENTIAL DAMAGES OF ANY KIND
OR UNDER ANY CIRCUMSTANCE OR L EGAL
THEORY RELATING IN ANY WAY TO THE
PRODUCTS OR SOFTWARE
WHETHER TRIMBLE HAS BEEN ADVISED OF
THE POSSIBILITY OF ANY SUCH LOSS AND
REGARDLESS OF THE COURSE OF DEALING
WHICH DEVELOPS OR HAS DEVELOPED
BETWEEN YOUAND TRIMBLE
STATES AND JURISDICTIONS DO NOT ALLOW
THE EXCLUSION OR LIMITATION OF LIABILITY
FOR CONSEQUENTIAL OR INCIDENTAL
DAMAGES
APPLYTOYOU.
IN ANY CASE, TRIMBLE'S SOLE LIABILITY,
AND YOUR SOLE REMEDY UNDER OR FOR
BREACH OF THIS AGREEMENT
LIMITED TO THE REFUND OF THE PURCHASE
PRICE OR LICENSE FEE PAID FOR THE
PRODUCTS OR SOFTWARE
, THE ABOVE LIMITATION MAY NOT
, REGARDLESS
. BECAUSE SOME
, WILL BE
.
Page 6

Page 7

Contents
About this Manual
1 Introduction to the Asset Surveyor Software
Introduction................................2
WhatIstheAssetSurveyorSoftware?..................2
Which Computers Does the Asset Surveyor Software Run On? . . . . . 2
WhatDoestheAssetSurveyorSoftwareDo?..............3
Which GPS Receivers Does the Asset Surveyor Software Work With? . 5
2BasicsofOperation
Introduction................................8
StartingandStoppingtheAssetSurveyorSoftware...........8
AssetSurveyorMenuStructure......................9
ScreenDisplays.............................12
StatusLineDisplay........................ 14
UserInterfaceComponents....................... 16
HardKeys............................ 16
Softkeys............................. 16
Pop-upMessages.........................17
Menus .............................. 19
MenuStacks...........................20
UsingMenus..............................22
Questions.............................25
Forms...............................26
FileNamingConventions........................45
SoftwareandFirmwareVersionNumbers............... 48
TSC1 Asset Surveyor Software User Guide v
Page 8

Contents
3 Data Collection
Introduction...............................50
CollectingNewFeatures........................50
CreatingNewFiles........................51
CollectingNewFeatures.....................54
SelectingaFeaturetoCollect..................55
EnteringAttributeValues ....................58
SavingFeatures ......................... 59
Pause and Resume Logging . . . . . . . . . . . . . . . . . . . 60
RepeatingFeatures........................62
Quickmarking..........................63
NestedFeatures ......................... 66
SegmentedLineFeatures ....................69
Averaged Vertices for Line and Area Features. . . . . . . . . . 70
Offsets.............................. 72
ExternalSensors......................... 75
DataReviewandUpdate........................ 80
Opening Existing Files for Review and Update . . . . . . . . . 80
Reviewing and Updating Existing Features . . . . . . . . . . . 84
ReviewingandUpdatingAttributeData............. 87
UpdatingOffsets.........................87
UpdatingGPSData .......................89
UpdateStatus...........................91
TargetSelectionfromReviewDataList............. 94
Sorting.............................. 95
Filtering .............................102
Searching.............................112
Positions.............................115
FeatureInformation.......................124
Deleting and Undeleting Features and Notes . . . . . . . . . . 128
StartingtoLogData.......................130
ExitingRoverDataCollection..................132
vi TSC1 Asset Surveyor Software User Guide
Page 9

CreateBaseFile.............................134
AntennaHeight..........................137
ReferencePosition........................138
StatusForm............................140
Exiting Base Station Data Collection . . . . . . . . . . . . . .141
4 File Manager
Introduction...............................144
DeletingDataFiles...........................145
RenameFile...............................148
CopyFile(s)...............................150
MoveFile(s)...............................151
FileTransfer...............................152
Transferring Data Files to and from the PC . . . . . . . . . . . 154
OtherFileTypes.........................155
DataDictionaries............................157
DeletingDataDictionaries....................158
Auto-IncrementingAttributes..................159
PointFeatureSymbols......................160
Labels ..............................161
CoordinateSystemFiles........................161
Contents
5 Configuring the Asset Surveyor Software
Introduction...............................164
GPSRoverOptions...........................165
LoggingOptions.........................166
PositionFilters..........................177
Real-TimeInputOptions.....................184
AntennaOptions.........................199
InitialPosition..........................202
2DAltitude............................204
TSC1 Asset Surveyor Software User Guide vii
Page 10

Contents
GPSBaseStationOptions .......................205
Base Station Logging Options . . . . . . . . . . . . . . . . . .206
PositionFilters..........................210
Real-TimeOutputOptions....................212
ReferencePosition........................217
AntennaOptions.........................219
NMEA/TSIPOutputOptions......................220
CoordinateSystem...........................224
Selection.............................227
SiteSelection...........................236
MapDisplayOptions..........................239
LayerControl...........................239
ScaleDisplay...........................241
Coordinates............................242
Background File . . . . . . . . . . . . . . . . . . . . . . . . .243
Symbols.............................243
Labels ..............................246
NavigationOptions...........................248
DirectionDialOptions......................248
RoadOptions...........................249
UnitsandDisplay............................250
Units...............................250
AngleFormat...........................253
Order...............................254
NorthReference.........................255
MagneticDeclination ......................256
NullString............................257
Language. . . . . . . . . . . . . . . . . . . . . . . . . . . . . 258
TimeandDate..............................260
24-HourClock..........................261
Time...............................261
viii TSC1 Asset Surveyor Software User Guide
Page 11

Contents
DateFormat...........................262
Date................................262
Quickmarks...............................263
Attributes.............................263
Confirm..............................264
ConstantOffset.............................264
PointFeatures..........................265
Quickmarks,Lines,andAreas..................267
ExternalSensors ............................269
ConfiguringanExternalSensor.................270
ActivatinganExternalSensor..................282
TestinganExternalSensor....................284
ConfiguringaLaserRangefinder................289
ActivatingtheLaserRangefinder................290
Testing the Laser Rangefinder Interface . . . . . . . . . . . . . 292
TSC1Hardware.............................293
LCDContrast...........................293
Backlight.............................294
LowVoltageCharging......................294
AutoShutoff...........................294
BeepVolume...........................295
FreeSpace............................295
PCCardFreeSpace.......................295
BatteryFields...........................296
AutomaticContrast........................297
SoftwareVersion.........................297
Licenses.............................297
TSC1 Asset Surveyor Software User Guide ix
Page 12

Contents
6 Utilities
Introduction...............................300
Waypoints. . . . . . . . . . . . . . . . . . . . . . . . . . . . . . . . 300
CreatingWaypoints .......................302
EditingWaypoints........................304
DeletingWaypoints .......................305
Measuring Between Waypoints . . . . . . . . . . . . . . . . . 306
FactoryDefaults.............................308
ResetGPSReceiver...........................309
Almanac.................................310
Disconnect/Connect GPS . . . . . . . . . . . . . . . . . . . . . . . . 311
EnteringaNote.............................313
7 Navigation
Introduction...............................316
GraphicalNavigationModes......................317
DirectionDialScreen ......................318
Close-upScreen.........................319
RoadScreen...........................322
NavigationOptionsForm....................325
MapNavigation.........................326
OldNavigation..........................326
HeadingLock ..........................326
Text-BasedNavigation.........................327
DistancetoGo..........................327
InfoPanels............................328
Navigation and Waypoints . . . . . . . . . . . . . . . . . . . . . . . 331
SelectingtheStartandTarget..................331
Navigating to a Target From Your Current Position . . . . . . . 333
NavigatingfromaStarttoaTarget ...............336
WaypointOperations.......................337
x TSC1 Asset Surveyor Software User Guide
Page 13

8Map
Introduction...............................342
MapDisplay...............................342
TheMapCursor.............................345
Changing from GPS Cursor to Map Cursor . . . . . . . . . . .345
SelectingFeaturesforUpdate......................347
ZoomOperations............................350
MapDisplayOptions..........................351
BackgroundFileDisplay........................352
TextMode................................353
Filtering.................................355
NavigationintheMapScreen .....................356
SelectingaTarget ........................356
SelectingaStart.........................358
NavigatingtotheTarget.....................358
WaypointOperations.......................360
9 Receiver Status
Contents
Introduction...............................362
ReceiverStatusForm..........................362
Mode...............................362
SVs................................363
HDOP and VDOP . . . . . . . . . . . . . . . . . . . . . . . . 363
Status...............................363
CarrierTime...........................364
Battery..............................364
ReceiverType..........................364
NavigationVersion........................365
SignalProcessorVersion.....................365
LandstarID............................365
OmnistarID...........................365
DGPSStatus ..............................366
TSC1 Asset Surveyor Software User Guide xi
Page 14

Contents
DetailedStatusInformation.......................367
ServiceProvider.........................368
Frequency ............................368
State...............................369
SNR ...............................369
CorrectionAge..........................369
DGPSServiceInformation....................369
UserAccess ...........................370
DecoderState...........................370
Expiration ............................371
DiagnosticInformation......................371
AgeofSync...........................373
StationID.............................373
DecoderVersion.........................373
ErrorRate ............................373
Input Level . . . . . . . . . . . . . . . . . . . . . . . . . . . . 374
DataRate.............................374
Health ..............................374
10 Satellite Information
Introduction...............................376
TextMode................................377
GraphicalModes............................380
SkyplotGraphicalScreen....................380
SNRLevelsScreen........................382
11 Help
Introduction...............................384
GettingHelp...............................384
Getting Help in Different Languages . . . . . . . . . . . . . . . . . . 386
ExitingtheHelp.............................386
xii TSC1 Asset Surveyor Software User Guide
Page 15

A Installing the Asset Surveyor Software
Introduction...............................388
EquipmentRequiredforInstallation..................388
Installing the Asset Surveyor Version 5.20 Software
onYourTSC1Datalogger....................389
LoadingOptionsontotheTSC1Datalogger..............398
B Troubleshooting
Introduction...............................404
Troubleshooting.............................404
C Asset Surveyor Messages
Introduction...............................414
Messages................................414
D Asset Surveyor Limits
Introduction...............................456
Limits..................................456
Contents
Index
TSC1 Asset Surveyor Software User Guide xiii
Page 16

Contents
xiv TSC1 Asset Surveyor Software User Guide
Page 17

About this Manual
Welcome to the TSC1 Asset Surveyor Software User Guide.This
manual describes how to operate the Asset Surveyor™ software, in
conjunction with a range of Trimble GPS receivers for GIS data
collection and update. The Asset Surveyor software provides all the
functionality you need to efficiently collect GIS/GPS data.
Even if you have used other Global Positioning System (GPS)
products before, we recommend that you spend some time reading this
manual to learn about the special features of this product.
If you are not familiar with GPS, visit our web site for an interactive
look at Trimble and GPS at:
• www.trimble.com
TSC1 Asset Surveyor Software User Guide xv
Page 18

About this M anual
Related Information
Other manuals in this set include:
• TSC1 Asset Surveyor Operation Manual
This manual describes how to operate the Asset Surveyor
software.
• Mapping Systems General Reference
The Mapping Systems General Reference explains general GPS
and GIS concepts, as well as the Trimble Survey and Mapping
Bulletin Board.
• GPS Pathfinder Office Documentation
The GPS Pathfinder Office Getting Started Guide contains a
tutorial chapter that shows you how to use many features that
are common to the GPS Pathfinder
Asset Surveyor software.
As well as being supplied in hardcopy, these manuals are also
availablein portable document format (PDF). These files are available
from the Asset Surveyor installation CD-ROM.
®
Office software and the
• Readme.txt file – a Readme.txt file contains information added
after the documentation was completed. To read this file,
double-click it or use a text editor to open it.
• Release notes – the release notes describe new features of the
product, information not included in the manuals, and any
changes to the manuals.
• Update notes – there is a warranty activation sheet with this
product. Send it in to automatically receive update notes
containing important information about software and hardware
changes. Contact your local Trimble Dealer for more
information about the support agreement contracts for software
and firmware, and an extended warranty program for hardware.
xvi TSC1 Asset Surveyor Software User Guide
Page 19

About this M anual
• ftp.trimble.com – use the Trimble FTP site to send files or to
receive files such as software patches, utilities, service
bulletins, and FAQs. Alternatively, access the FTP sitefrom the
Trimble web site at www.trimble.com/support/support.htm.
• Trimble training courses – consider a training course to help
you use your GPS system to its fullest potential. For more
information, visit the Trimble web site at
www.trimble.com/support/training.htm
• RTCM – for information on RTCM SC-104 contact:
Radio Technical Commission for Maritime Services
P.O. Box 19 087
Washington, D.C. 20036
U.S.A.
Technical Assistance
If you have a problem and cannot find the information you need in the
product documentation, contact your local Distributor. Alternatively,
request technical support using the Trimble web site at:
• www.trimble.com/support/support.htm
TSC1 Asset Surveyor Software User Guide xvii
Page 20

About this M anual
Your Comments
Your feedback about the supporting documentation helps us to
improve it with each revision. To forward your comments, do one of
the following:
• Send an e-mail to [email protected].
• Complete the Reader Comment Form at the back of t his manual
and mail it according to the instructions at the bottom of the
form.
If the reader comment form is not available, send comments and
suggestions to the address in the front of this manual. Please mark
them Attention: Technical Publications Group.
Document Conventions
The document conventions are a s follows:
Convention Definition
Italics
Identifies software menus, menu commands,
dialog boxes, and the dialog box fields.
Helvetica Narrow
Helvetica Bold
\
[Ctrl]
d
xviii TSC1 Asset Surveyor Software User Guide
Represents messages printed on the screen.
Identifies a software command button, or
represents information that you must type in a
software screen or window.
Is an example of a hardware key (hard key) that
you must press on the TSC1 keypad.
Is an example of a hardware function key that you
must press on a personal computer (PC). If you
must press more than one of these at the same
time, this is represented by a plus sign, for
example,
Is an example of a softkey. The operation of
softkeys is explainedin the TSC1 Asset Surveyor
Operation Manual.
[Ctrl]+[C]
.
Page 21

CHAPTER
CHAPTER
1 Introduction to the Asset
Surveyor Software
In this chapter:
■ Introduction
■ What Is the Asset Surveyor software?
■ Which computers does the Asset Surveyor software run on?
■ What does the Asset Surveyor Software do?
■ Which GPS receivers does the Asset Surveyor software work with?
3
1
Page 22

1 Introduction to the Asset Surveyor Software
1.1 Introduction
Congratulations on purchasing the Trimble Asset Surveyor™
GIS/GPS data collection system. The combination of sophisticated
data collection software and GPS positioning hardware enables you to
efficiently collect and update high quality GIS data.
1.2 What Is the Asset Surveyor Software?
The Asset Surveyor software is a computer program produced by
Trimble Navigation Limited for a wide range of Geographic
Information System (GIS) data collection and data update
applications.
The Asset Surveyor software works with a range of Global
Positioning System (GPS) receivers produced by Trimble Navigation
Limited.
1.3 Which Computers Does the Asset Surveyor
Software Run On?
The Asset Surveyor software runs on the Trimble TSC1™ datalogger.
The TSC1 datalogger is an extremely rugged, lightweight, and
waterproof handheld computer. The TSC1 datalogger can be used for
GIS data collection applications in the most hostile environments. The
TSC1 datalogger also runs the Trimble Survey Controller™ software,
and a single TSC1 datalogger can be shared between GIS and Land
Survey applications. The TSC1 datalogger has 2MB of memory for
collected data, as well as a PC card slot where data storage cards can
be used for extended memory storage.
2 TSC1 Asset Surveyor Software User Guide
Page 23

Introduction to the Asset Surveyor Software 1
1.4 What Does the Asset Surveyor Software Do?
The primary function of the Asset Surveyor software is the automated
collection and/or update of information related to geographic features.
Together with a Trimble GPS receiver, the Asset Surveyor software
can quickly and accurately collect or update the attributes and GPS
position of geographic points, lines, and areas. This information is
stored in one or more data files, which you can load into the Trimble
GPS Pathfinder
®
Office software suite. After postprocessing and
editing, data can then be output in a wide range of GIS-compatible
formats.
Applications for the Asset Surveyor software include forestry
mapping, environmental and resource management, disaster
assessment, utility i nventories, and urban asset management. For
example, a power company could build an asset register of all its
power poles, record their positions (to within a meter), their condition
and structure, and any attached hardware. A maintenance crew may
later use the software’s navigation functions to locate poles requiring
repair. You can also use the data maintenance capability of the Asset
Surveyor software to update the position and attribute information for
features in the field to ensure that your GIS database is accurate and
up to date.
You can review,edit, or delete data in the field so that the data that you
collect and take back to the office is correct and complete.
The Asset Surveyor software provides convenient and powerful
control of your Trimble GPS receiver, enabling you to take full
advantage of the potential that G PS offers.
The Asset Surveyor software lets you collect carrier phase data for
points, lines, and areas to compute positions to decimeter accuracy
with version 2.00 or later of the GPS Pathfinder Office software. The
Asset Surveyor software, when used with a GPS Pathfinder Pro XR™
or a Pro XRS™ receiver, can also collect data to recorrect real-time
differential data collected in the field, for even greater accuracy.
TSC1 Asset Surveyor Software User Guide 3
Page 24

1 Introduction to the Asset Surveyor Software
Youcan operate the Asset Surveyor software as a temporary GPS base
station in situations where it is impossible or impractical to set up a
permanent base station. The Asset Surveyor software, in combination
with one of the GPS Pathfinder Pro XL™, Pro XR , or Pro XRS, G PS
Total Station 4700™, GPS Total Station 4800™, Series 4000™ or Site
Surveyor 4400™ GPS receivers, can output RTCM messages when
operating as a base station. These messages can be received by a
number of GPS Pathfinder receivers with a suitable radio link.
The Asset Surveyor software can be used in conjunction with an RTK
receiver for Real-time Kinematic (RTK) data collection.
The Asset Surveyor software lets you use your Trimble GPS receiver
for navigation to a waypoint or to a previously recorded geographic
feature.
The Asset Surveyor software provides integrated support for a number
of laser rangefinders used to record offsets to geographical features.
The use of offsets makes it possible to collect data in circumstances
where the use of GPS alone might be inconvenient or even impossible.
The Asset Surveyor software can collect data from a wide range of
external sensors equipped with an RS232 port. Each reading from the
externalsensor can be stored as an attribute of a feature, or have a GPS
position associated with it. This lets you correlate information from
instrumentssuch as depth sounders, Geiger counters, and tree calipers,
with GPS positions.
The Asset Surveyor software has been translated into a number of
languages. For each supported language (French, German,
Portuguese,Russian and Spanish) all text displayed by Asset Surveyor
appears in that language, instead of English.
4 TSC1 Asset Surveyor Software User Guide
Page 25

Introduction to the Asset Surveyor Software 1
1.5 Which GPS Receivers Does the Asset Surveyor
Software Work With?
The TSC1 Asset Surveyor software works with the following Trimble
GPS receivers:
• the GPS Pathfinder receiver family, which includes the GPS
Pathfinder Pro XRS, the GPS Pathfinder Pro XR, and the GPS
Pathfinder Pro XL
• GPS Total Station 4700
• GPS Total Station 4800
• Site Surveyor 4400
• 4600LS Surveyor
• the Series 4000 GPS receiver family, which includes the
4000SE™, 4000SSE™, and the 4000SSi™
TSC1 Asset Surveyor Software User Guide 5
Page 26

1 Introduction to the Asset Surveyor Software
6 TSC1 Asset Surveyor Software User Guide
Page 27

2 Basics of Operation
In this chapter:
■ Introduction
■ Starting and stopping the Asset Surveyor software
■ Asset Surveyor menu structure
■ Screen displays
■ User interface components
■ Using menus
■ File naming conventions
■ Software and firmware version numbers
CHAPTER
CHAPTER
3
2
Page 28

2 Basics of Operation
2.1 Introduction
This chapter describes how to use the Asset Surveyor software using
the TSC1 datalogger as a platform. It provides a description of Asset
Surveyor user interface and data entry concepts.
The Asset Surveyor software makes GIS data collection and update a
faster and more efficient process. The best way to learn how to use the
Asset Surveyor software in conjunction with the TSC1 datalogger is to
take it out into the field and practise.
2.2 Starting and Stopping the Asset Surveyor Software
You generally do not have to stop the Asset Surveyor software as you
can just turn off the TSC1 datalogger when you have finished using it
and turn it on again when you next want to use it.
|
When you turn the TSC1 datalogger on (by pressing
), the Asset
Surveyor software starts and the Main menu appears.
You can restart the Asset Surveyor software by rebooting your TSC1
datalogger. This should rarely be necessary.
When you have finished using the Asset Surveyor software, press the
|
key to stop the Asset Surveyor software and turn off the TSC1
datalogger.
If you turn the TSC1 datalogger off while a file is open or the Asset
Surveyor software is logging data to a file, the Asset Surveyor
software closes the file before shutting down.
C
8 TSC1 Asset Surveyor Software User Guide
Warning – Trimble recommends that you do not turn off the TSC1
datalogger while upgrading software, or while transferring files between
the datalogger and the PC or PC card. Otherwise your data or system files
may be corrupted.
Page 29

2.3 Asset Surveyor Menu Structure
For an overview of the entire Asset Surveyor menu structure, see the
followingsection. Keep it as a reference until you are familiar with the
menu structure.
To display the Main menu screen regardless of which window is
active, press
M
.
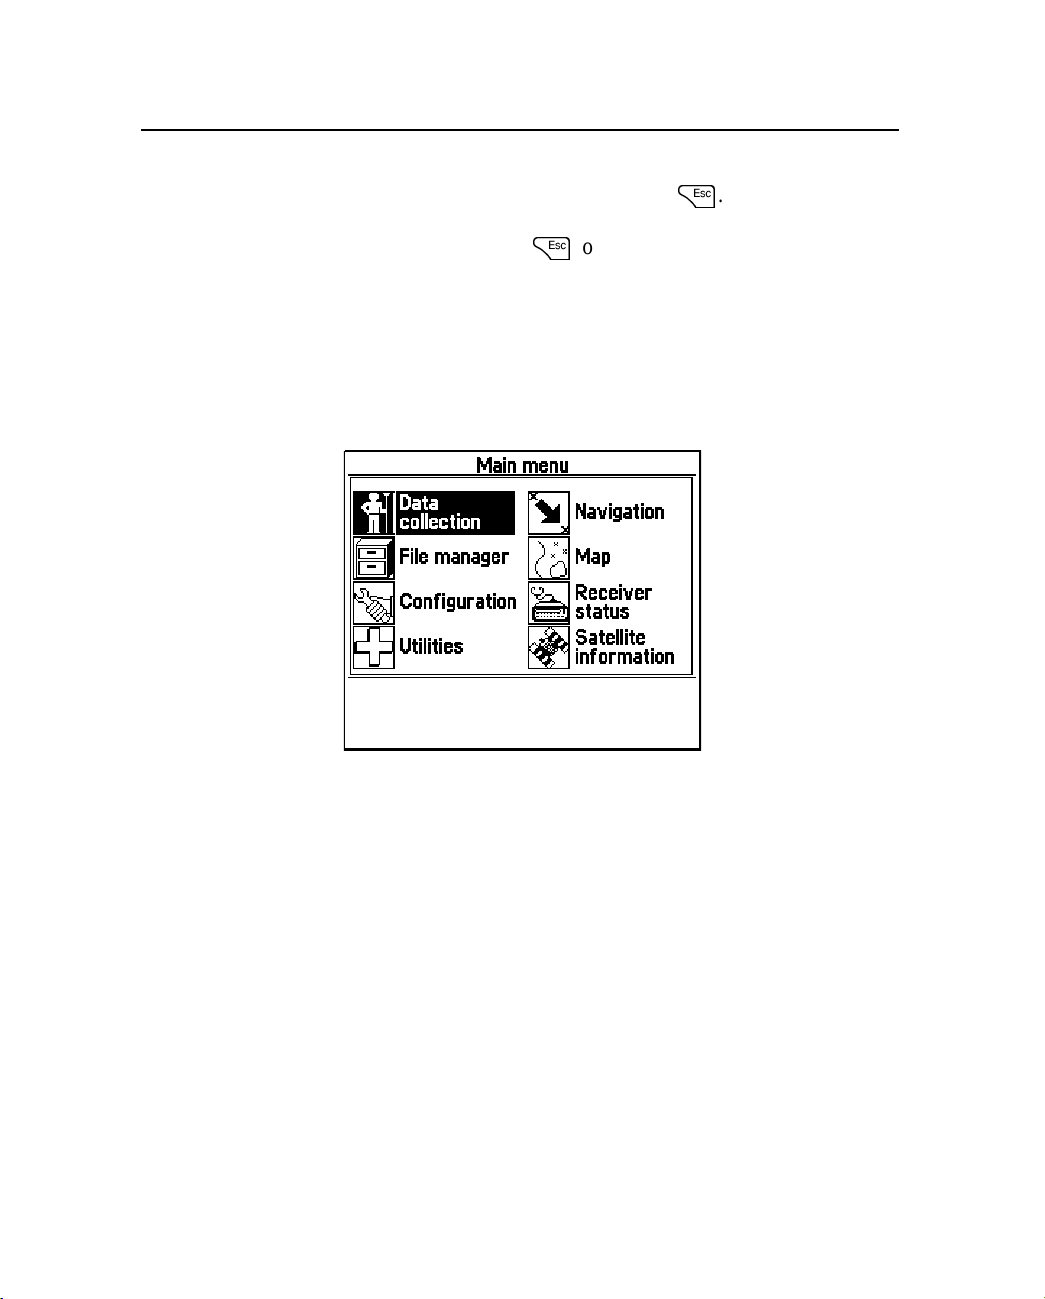
The Asset Surveyor Main menu consists of eight menu entries, each
represented by an icon:
Basics of Operation 2
To move between items on the Main menu, use the multi-directional
arrow key.To select a menu item, highlight the icon and press
\
Figure 2.1 and Figure 2.2 list the commands in each menu.
TSC1 Asset Surveyor Software User Guide 9
.
Page 30

2 Basics of Operation
Data collection
File manager
Configuration
Create new file
Open existing file
Create base file
Delete file(s)
Rename file
Copy file(s)
Move file(s)
File transfer
Data dictionaries
Coordinate system files
GPS rover options
GPS base station options
NMEA/TSIP output options
Coordinate system
Map display options
Navigation options
Logging options
Position filters
Real-time input
Antenna options
Initial position
2D altitude
Units and display
Time and date
Quickmarks
Constant offset
External sensors
Hardware (TSC1)
Figure 2.1 Data Collection, File Manager, and Configuration menu commands
10 TSC1 Asset Surveyor Software User Guide
Logging options
Position filters
Real-time output options
Reference position
Antenna options
Page 31
Utilities
Waypoints
Factory defaults
Reset GPS receiver
Almanac
Disconnect GPS
Note
Navigation (Press
Direction dial
Road
@
to switch modes)
Basics of Operation 2
Map (Press
@
to switch modes)
Map
Text mode
Receiver status
GPS
DGPS
Satellite information (Press
@
to switch modes)
Text mode
Skyplot
SNR levels
Figure 2.2 Utilities, Navigation, Map, Receiver Status, and Satellite Information menu
commands
TSC1 Asset Surveyor Software User Guide 11
Page 32
2 Basics of Operation
2.4 Screen Displays
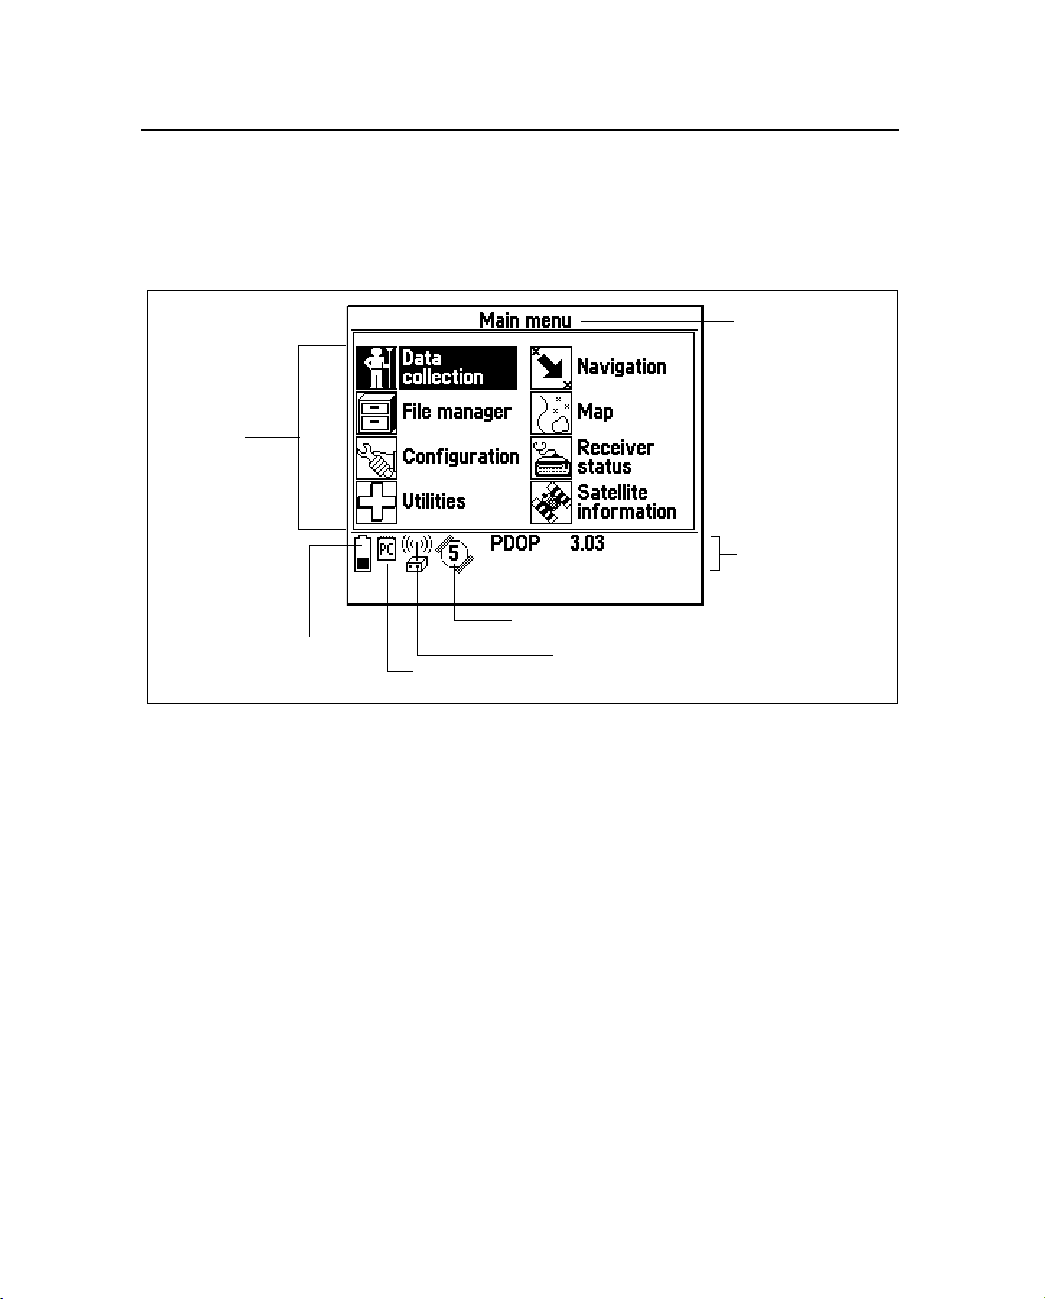
Figures 2.3 to Figure 2.5 show some of the more common TSC1
screen displays and describe some of the features in these screens.
Icons in
Main menu
Screen title
Status line
Number of SVs used to compute position
Battery
power level
Figure 2.3 Main menu screen
12 TSC1 Asset Surveyor Software User Guide
PC card indicator
Real-time corrections indicator
Page 33
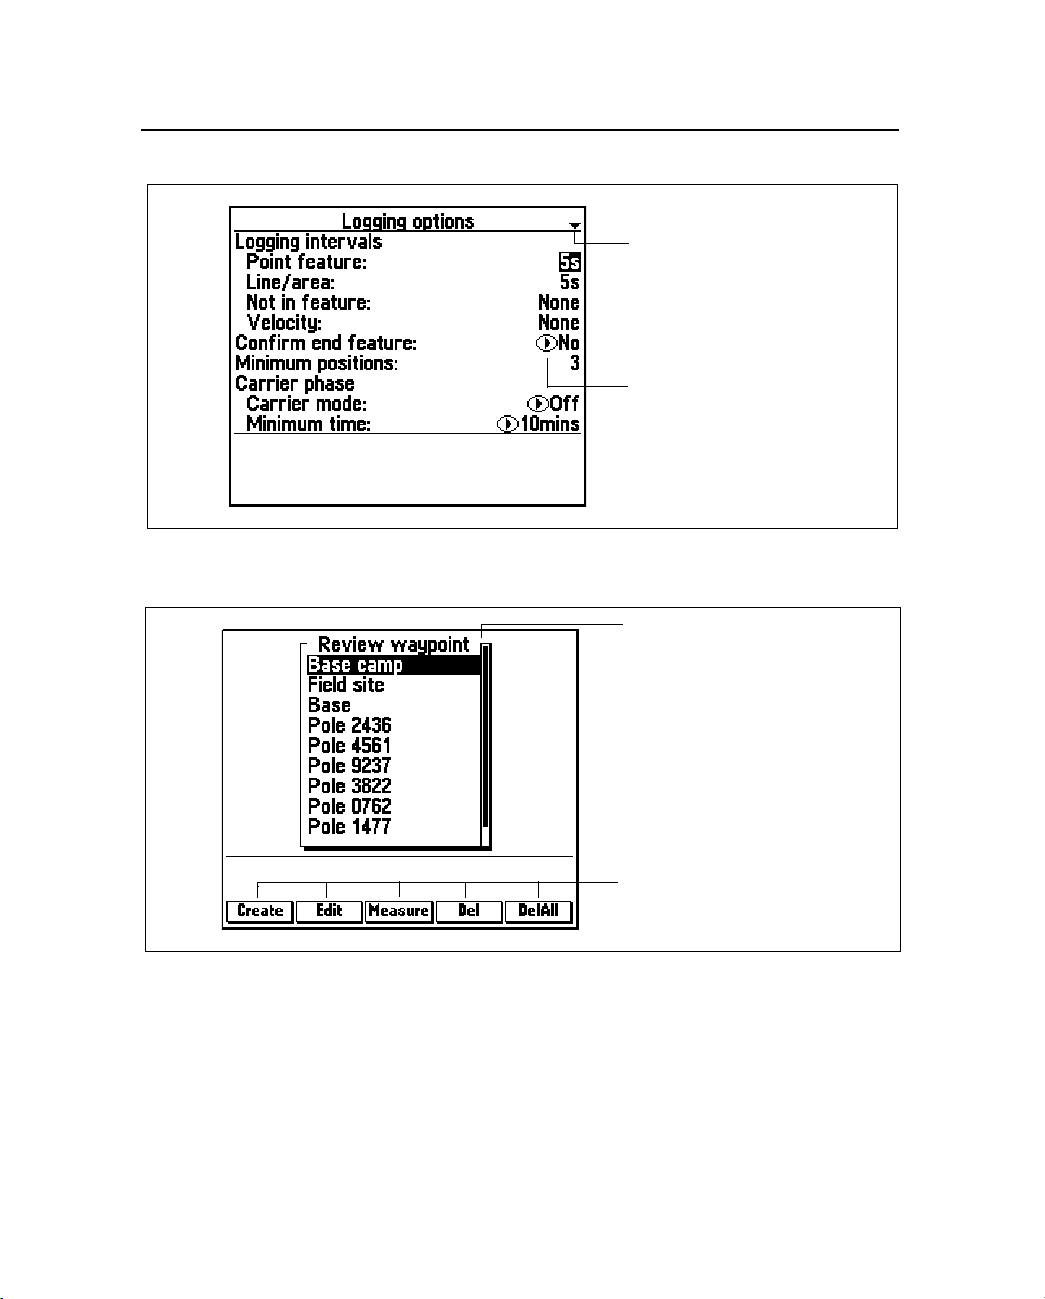
Figure 2.4 Screen indicators
Basics of Operation 2
Indicates that the current
formcontainsfurther fields
not shown in the screen
Indicates that this value
has a preset menu of
choices to select from
Scroll bar indicates that
the current menu list has
other options not shown
on the screen
Figure 2.5 Screen indicators
Softkeys
TSC1 Asset Surveyor Software User Guide 13
Page 34
2 Basics of Operation
2.4.1 Status Line Display
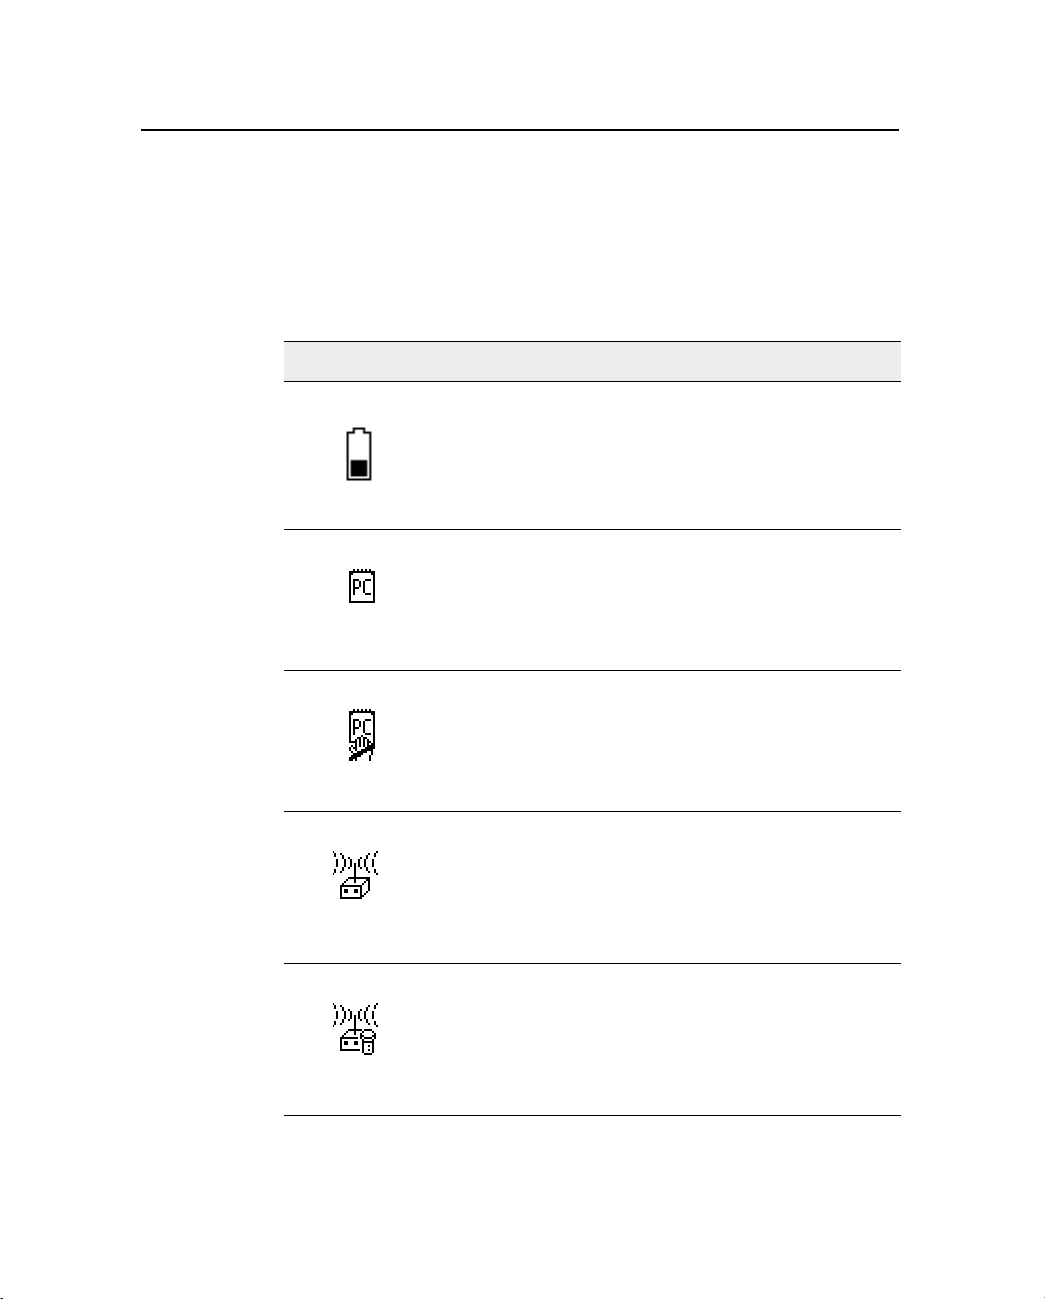
When you connect the TSC1 datalogger to a receiver, various icons
appear in the status line.
Table 2.1 lists and explains these icons.
Table 2.1 Status line icons
The icon … indicates …
the level of the power source (external or internal) in use.
In this case, the level is 40%.
that a PC card is inserted.
thataPCcardisinuseandthatyoushouldnotremoveit.
that real-time corrections are being received from an
external radio.
that real-time corrections are being received from a
Beacon-on-a-Belt (BoB) receiver.
14 TSC1 Asset Surveyor Software User Guide
Page 35
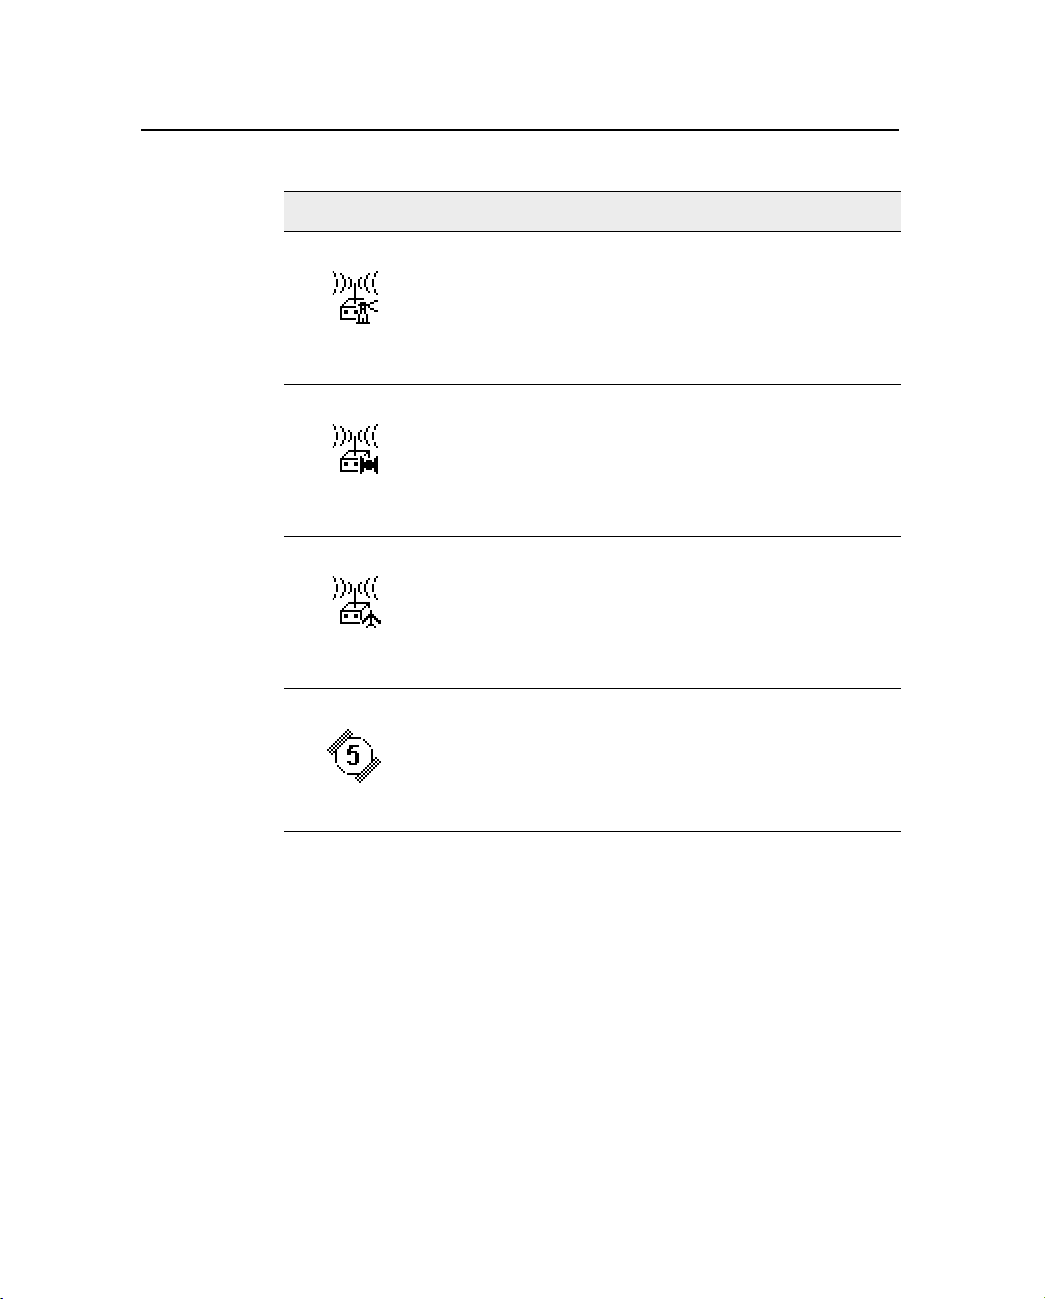
Table 2.1 Status line icons (Continued)
The icon … indicates …
that real-time corrections are being received from the
receiver’s integrated beacon receiver.
that real-time corrections are being received from a
satellite differential service, using the receiver’s
integrated satellite receiver.
that real-time corrections are being received from the
Wide Area Augmentation System (WAAS) satellite
differential service, using the receiver ’s integrated
satellite receiver.
Basics of Operation 2
the number of satellites the receiver is using to compute
GPS positions.
Note – The five real-time icons are also used in the DGPS status
summary form to indicate which real-time correction source is
currently in use. For more information, see DGPS Status, page 366.
TSC1 Asset Surveyor Software User Guide 15
Page 36
2 Basics of Operation
2.5 User Interface Components
You can interact with the Asset Surveyor software in a variety of
ways, each of which is described below.
2.5.1 Hard Keys
These are the physical keys on the TSC1 keypad. They include
alphabetic and numeric keys as well as special-purpose keys such as
\orS
2.5.2 Softkeys
.
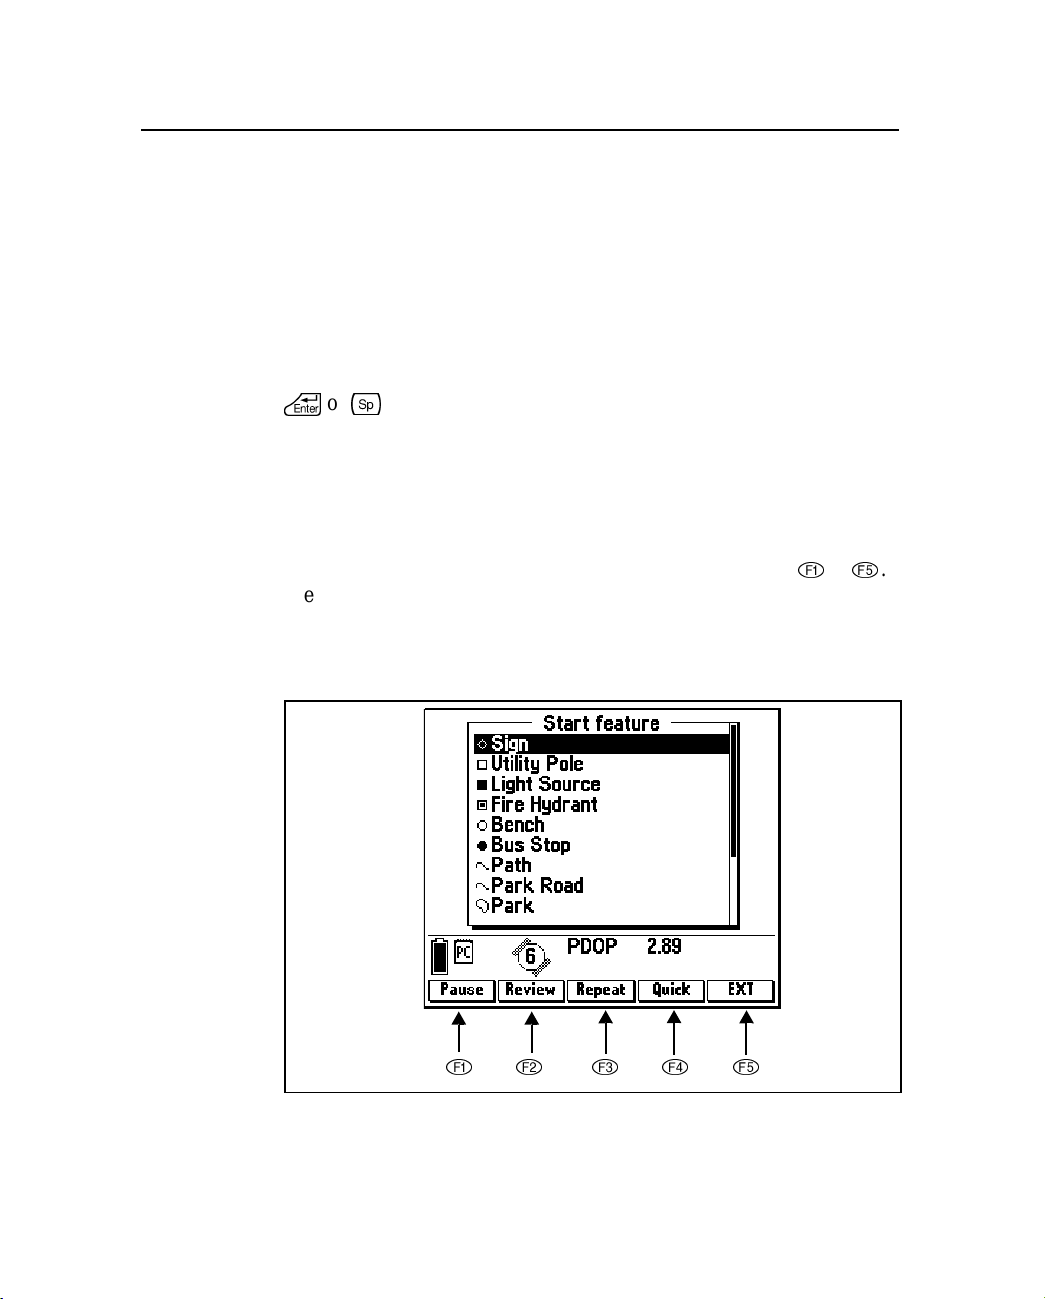
When the TSC1 datalogger is on, the bottom line of the screen shows a
number of softkeys, which vary depending on context. Each softkey
corresponds to one of the function (hard) keys, numbered
Pressing the corresponding function key activates
indicated by the softkey label. Figure 2.6
Surveyor screen with five softkeys.
!to%
.
the function
shows an example of an Asset
! @ # $ %
Figure 2.6 Softkeys
16 TSC1 Asset Surveyor Software User Guide
Page 37
Basics of Operation 2
For example, press!to activate the
activate the
{
Occasionally, there are too many softkeys on a particular form or
menu to fit on the screen. When this happens, t he fifth softkey appears
>
as
. You can press
the next. Press the softkey you require when its ‘page’ a ppears. When
there are fewer than five softkeys, the remaining function key(s)
perform no action.
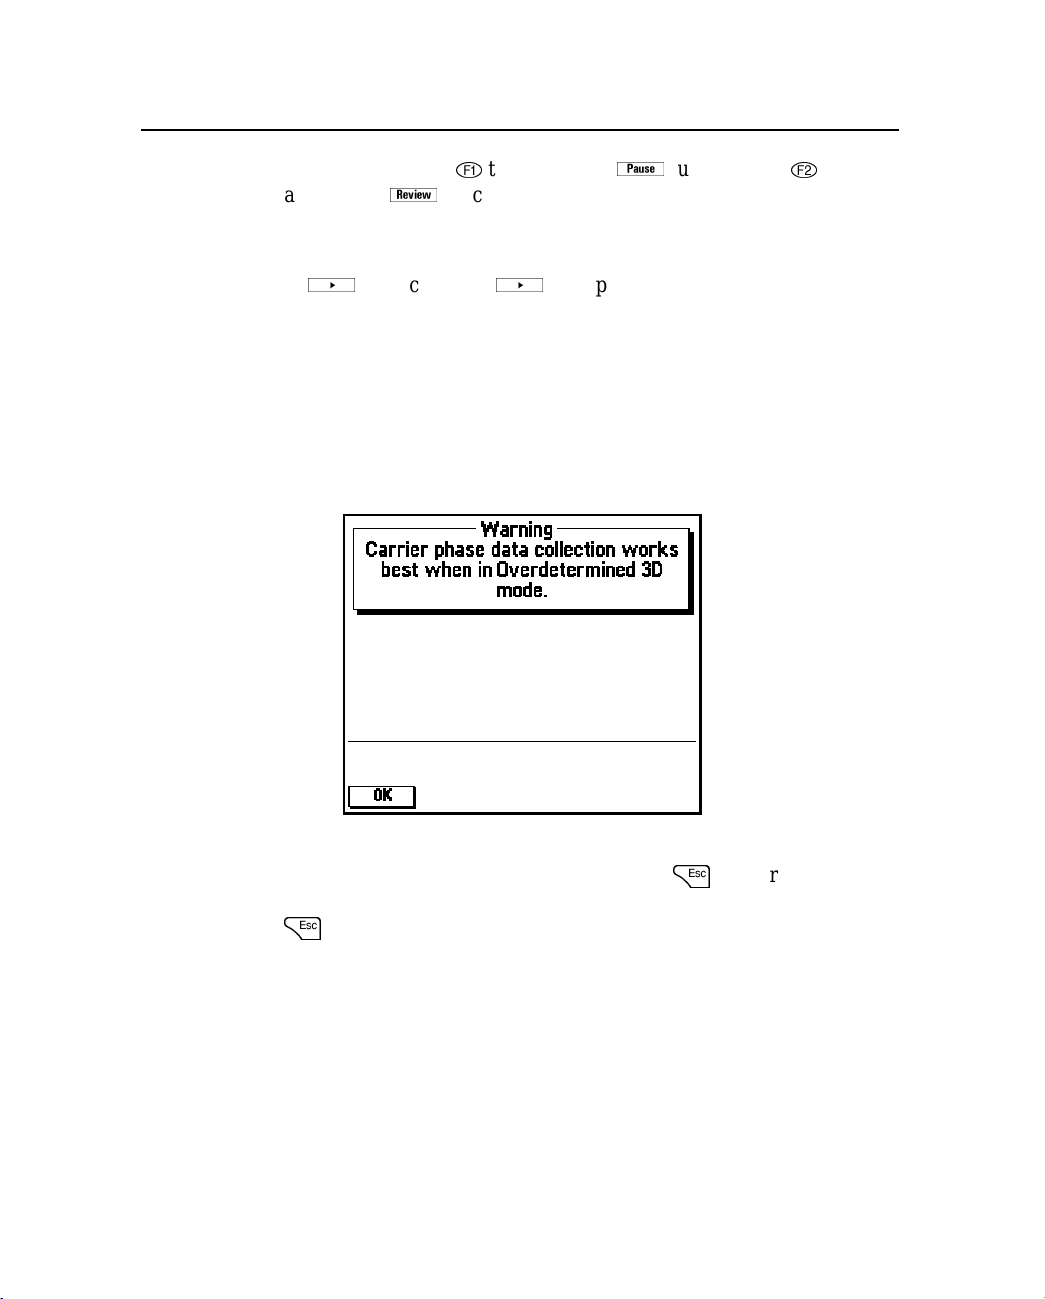
2.5.3 Pop-up Messages
Occasionally, messages pop up on the TSC1 screen. For example:
function.
>
p
function, and@to
to step from one ‘page’ of softkeys to
‘Warning’ messages automatically disappear after four seconds, but
=
can also be dismissed manually by pressing
. ‘Error’ messages
should be noted and can then be dismissed from the screen by pressing
=
.
TSC1 Asset Surveyor Software User Guide 17
Page 38
2 Basics of Operation
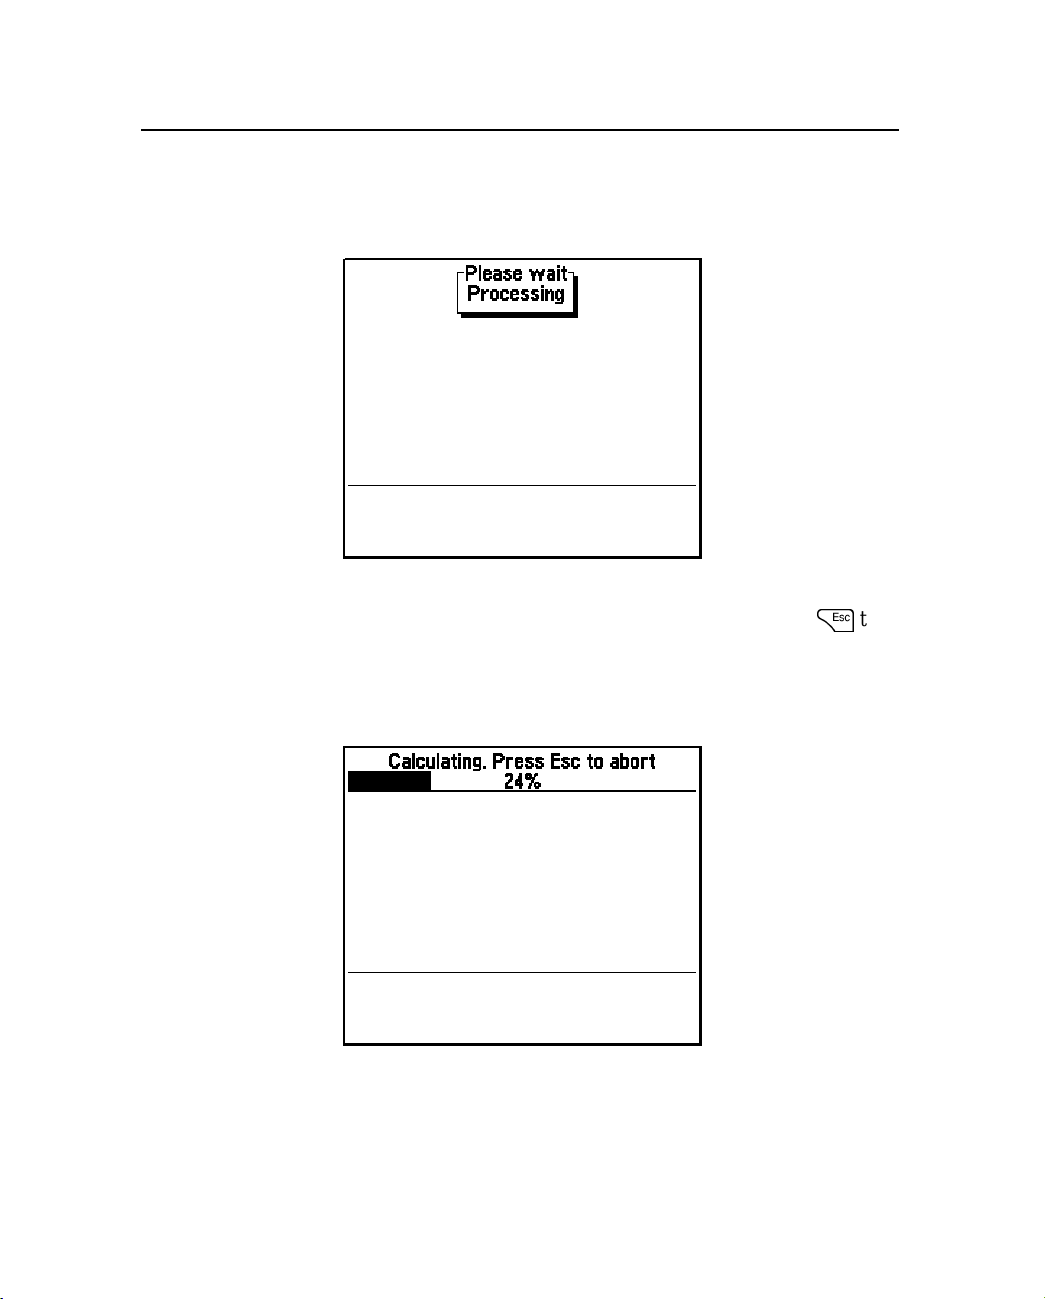
When the Asset Surveyor software is performing a lengthy task
(anything longer than about two seconds), a message appears. For
example:
When this message appears, wait until the Asset Surveyor software
has completed the task and the message disappears, or press
cancel the task.
The Asset Surveyor software may also provide a progress bar to
indicate how long the task may take to complete. For example:
=
to
18 TSC1 Asset Surveyor Software User Guide
Page 39
If you do not want to wait for the Asset Surveyor software to complete
the task, you can cancel the task by pressing
critical tasks which cannot be cancelled. If the software is performing
a critical task and you press
software simply beeps and continues with the task.
2.5.4 Menus
All of the Asset Surveyor software’s functionality can be accessed
easily by selecting menu topics. The Mainmenu is shown below:
Basics of Operation 2
=
.Thereareafew
=
to cancel it, the Asset Surveyor
TSC1 Asset Surveyor Software User Guide 19
Page 40
2 Basics of Operation
The Data collection, File M anager, Configuration,andUtilities
entries open into submenus containing further menu entriesfor you to
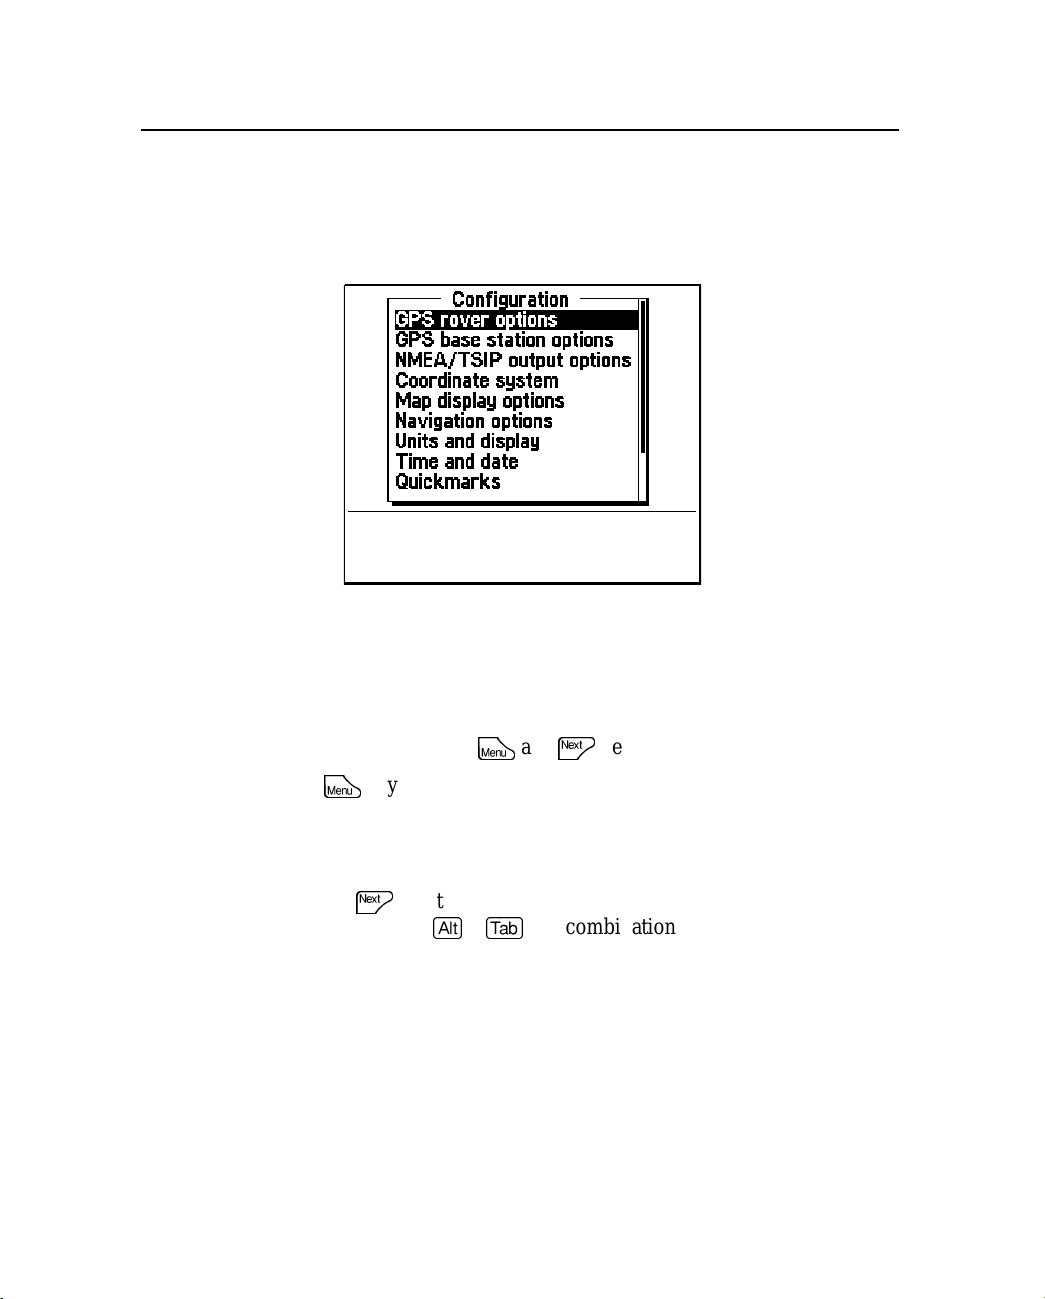
choose from. For e xample, selecting the Configuration entry takes you
to the Configuration menu:
2.5.5 Menu Stacks
The TSC1 menu system lets you open multiple screens in the Asset
Surveyor software without having to exit the screen you are currently
in.Todothis,usethe
M
The
key opens the Main menu from anywhere within the Asset
M
Surveyor software so that you can enter a new screen while leaving
your current screen open. You can have several screens open in the
Asset Surveyor software at any one time.
N
Use the
same way as the
key to view each open window. It works in much the
[Alt]+[Tab]
Windows operating system.
20 TSC1 Asset Surveyor Software User Guide
and
N
keys on the TSC1 keypad.
key combination does in the Microsoft
Page 41
Basics of Operation 2
For example, from the Main menu select File manager / Delete file(s).
Now press
information. Press
M
to return to the Main menu and select Satellite
M
againtoreturntotheMain menu and select
Configuration / Hardware.There are now three windows (Delete
file(s), Satellite information,andHardware)open at the same time. By
pressing the
N
key successively, you can quickly view all of the
screens open in a menu stack. To remove a window from this stack,
simply view the window (by pressing
and press
=
to return to the Main menu.
N
until the window appears)
Only one screen from each Main menu entry may be open in the
window stack at any one time. If you select an entry from the Main
menu that already has a screen open in the stack, the Asset Surveyor
software takes you directly to the open screen and you are not be able
to open another screen within that menu until you exit the open screen.
For example, if the Configuration / GPS rover options / Logging
options form is open in the stack, selecting Configuration from the
Main menu takes you directly to the open Logging options form. You
cannot open another screen within Configuration (for example, Units
and Display) until you exit out of GPS rover options.
TSC1 Asset Surveyor Software User Guide 21
Page 42
2 Basics of Operation
2.6 Using Menus
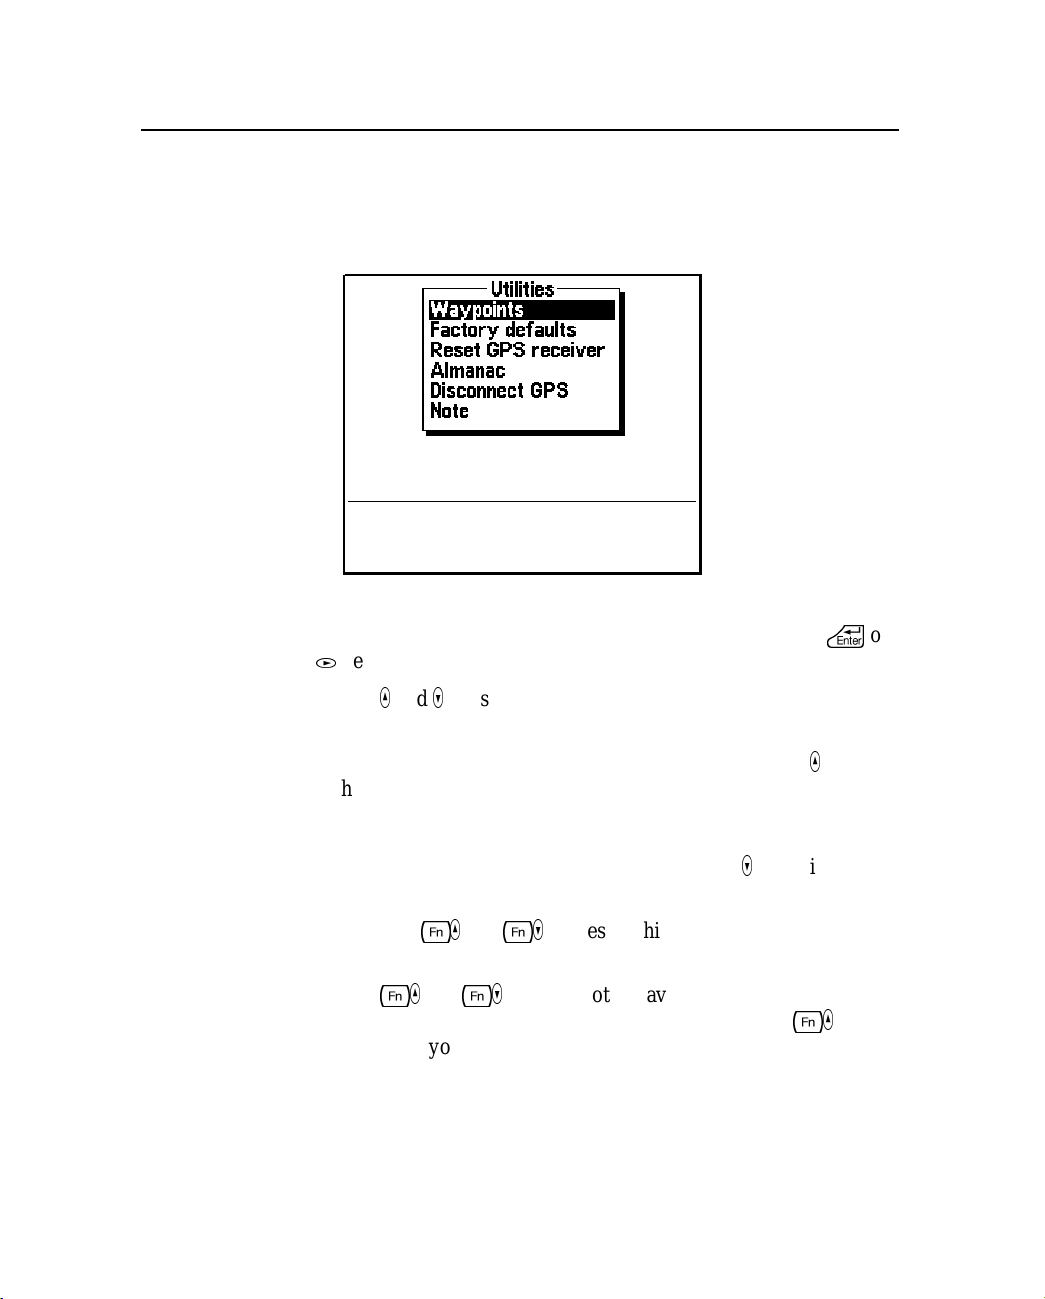
A menu has a current entry, which is highlighted. For example, the
following menu has the Waypoints option as its current entry:
You can choose a different entry from the menu by moving the
highlight to your preferred entry and selecting it (by pressing
(
key). You can move the highlight in a number of ways:
the
\
or
_
•The
and)keys move the highlight up or down the menu a
single entry at a time.
If you highlight the first entry in the menu, and press
highlight moves to the last entry in the menu. This is a
convenient way to travel quickly to the bottom of the menu and
lets you browse through a menu circularly. Similarly, if you
highlight the last entry in the m enu and press
moves to the first entry in the menu.
[_
and
• Pressing
[)
at a time. The length of a page is normally 9 entries.
[_
and
[)
The
keys do not behave circularly.Once you are
less than a page from the top of the menu, pressing
just takes you to the first entry in the menu.
22 TSC1 Asset Surveyor Software User Guide
_
,the
)
, the highlight
moves the highlight up or down a page
[_
again
Page 43
Basics of Operation 2
B
• Pressing
last entries in the menu, respectively.
• Pressing an alphanumeric key corresponding to the first letter of
a menu entry moves the highlight directly to that entry. If there
is more than one entry in the menu starting with that letter,
pressing that alphanumeric key repeatedly steps through the
entries beginning with that letter. If you highlight a menu entry
by typing the first letter of its name, and it is the only entry in
the menu which starts with that letter, the entry is selected
automatically.
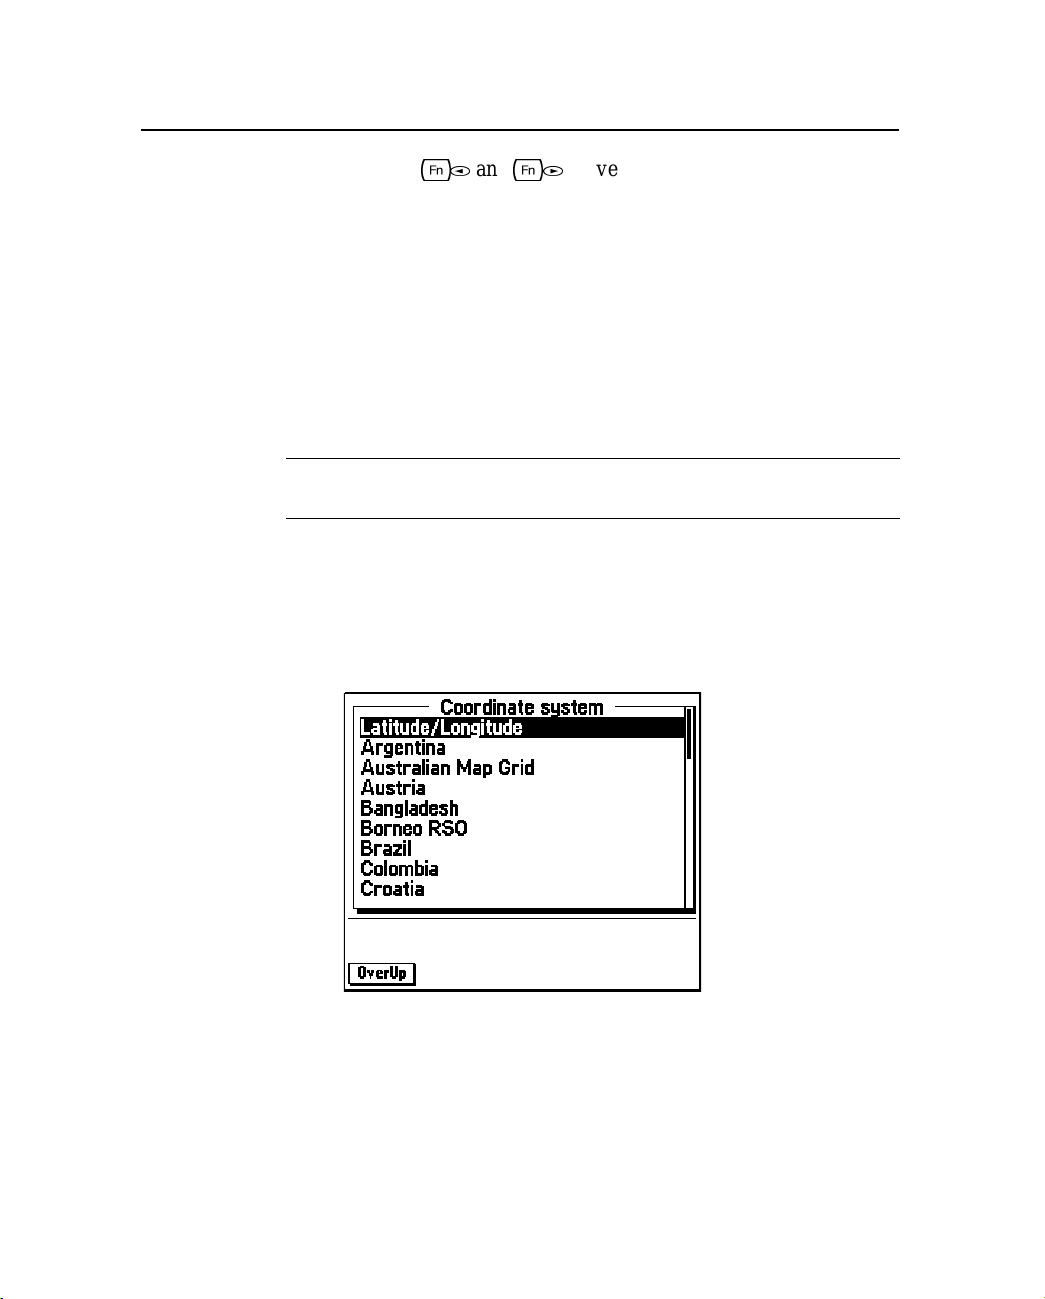
Tip – This “first-letter” method is often the fastest way of selecting an entry
from a menu.
If a menu has more entries than will fit onto the TSC1 screen at one
time, the entries in the menu scroll up a nd down within the visible
pop-up menu. If there are entries that you cannot currently see, a scroll
bar appears on the right-hand border of the menu. The following menu
has further entries below those which can currently be seen:
[*
and
[(
moves the highlight to the first and
TSC1 Asset Surveyor Software User Guide 23
Page 44
2 Basics of Operation
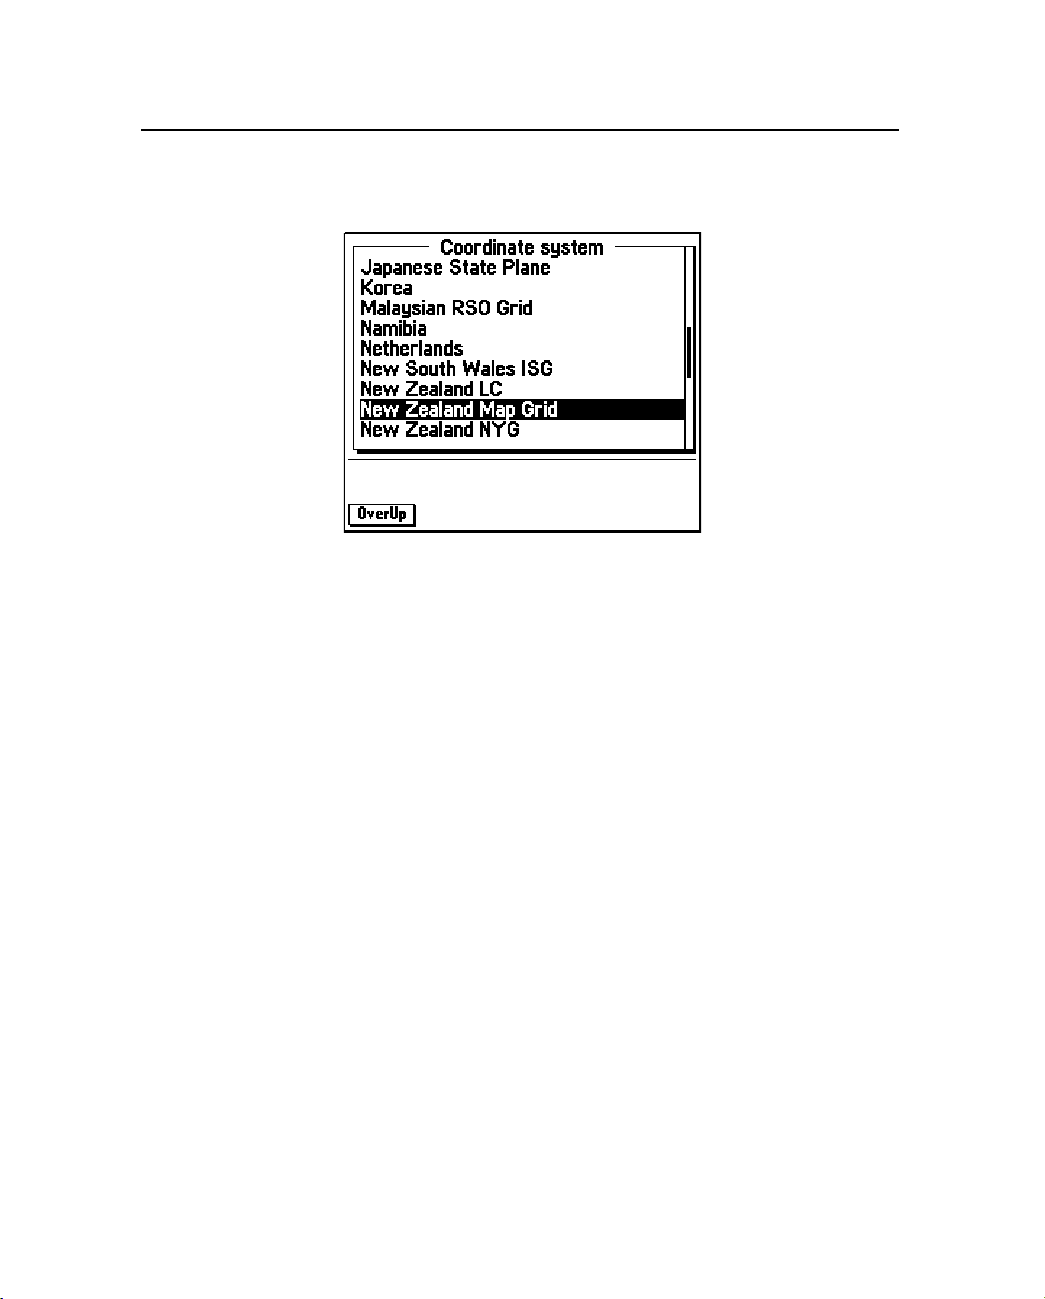
The following is a menu which has entries both above and below those
which can currently be seen:
24 TSC1 Asset Surveyor Software User Guide
Page 45
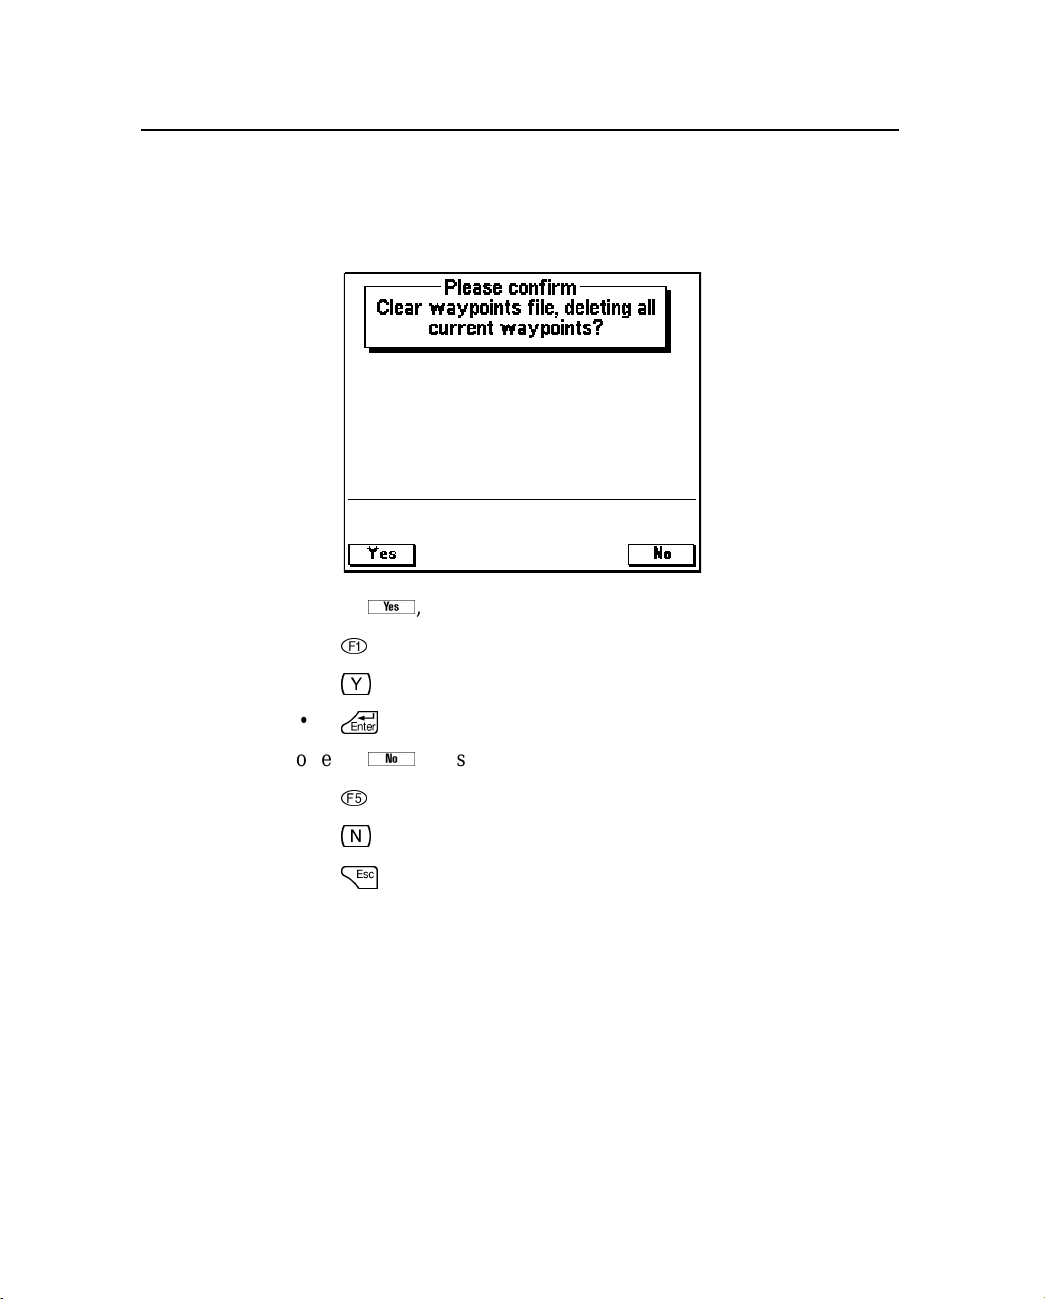
2.6.1 Questions
Whenever a question message appears, use the softkeys provided to
respond. An example of a question is:
To select
•
•
!
y
y
, press one of the following:
Basics of Operation 2
•
\
To select
%
•
•
n
•
=
n
, press one of the following:
TSC1 Asset Surveyor Software User Guide 25
Page 46
2 Basics of Operation
2.6.2 Forms
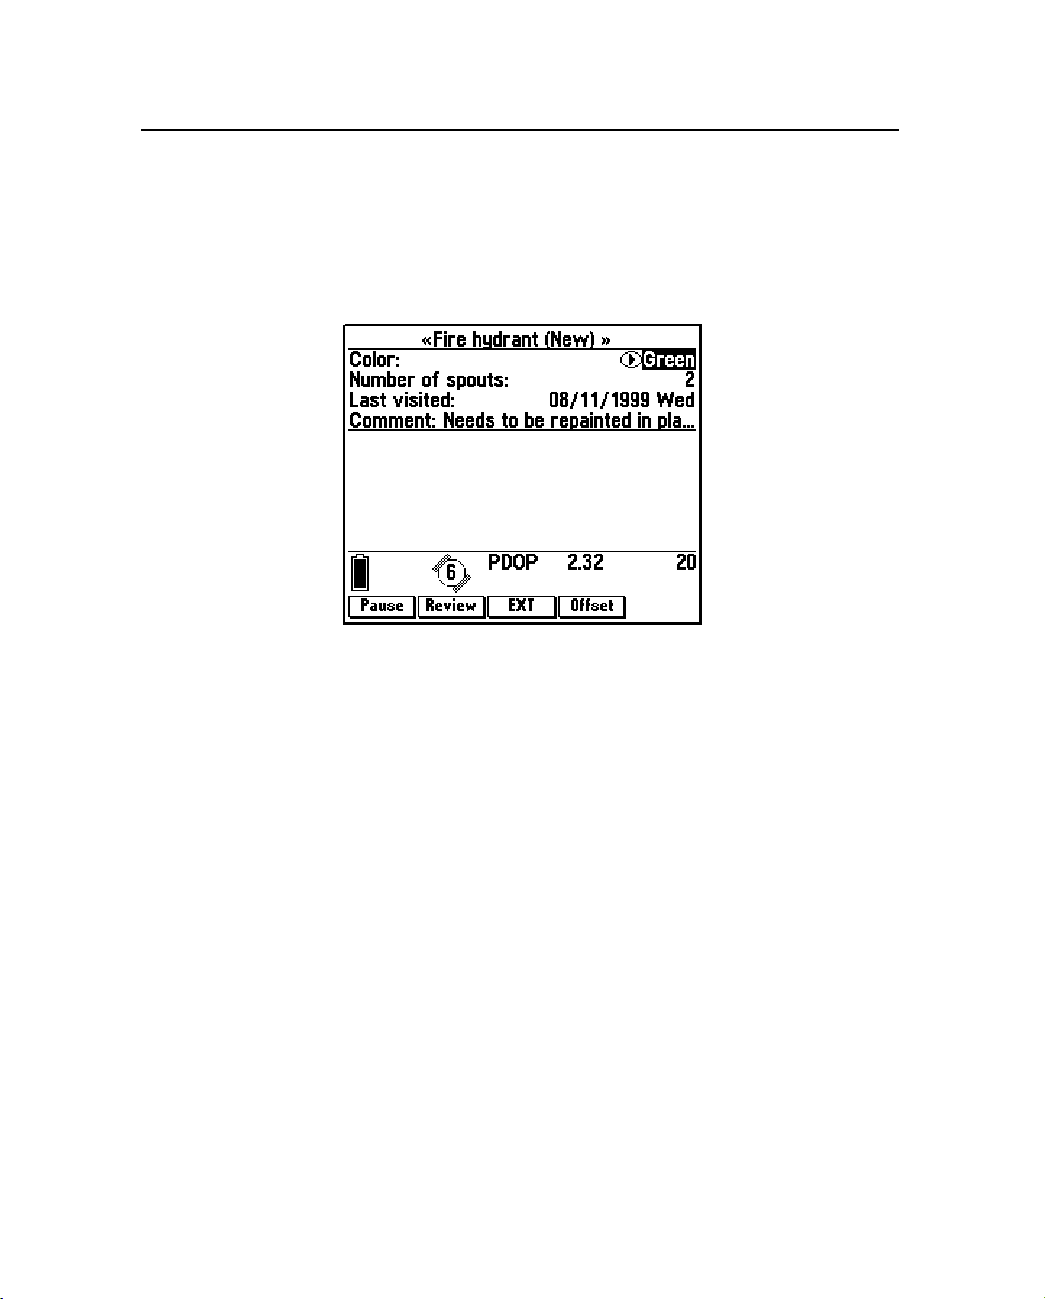
Data entry in the Asset Surveyor software takes place in forms.These
are like paper forms, because they are made up of a title and a
sequence of lines or fields. An example of an Asset Surveyor form is
the following attribute entry form, produced using a data dictionary:
Fields
Each field generally has two parts: a prompt (or name) and a value.
Each prompt is usually followed by a colon (:) to clearly separate it
from its value. Some fields are separator fields, which have no value
and serve simply to divide a form into sections.
The example form shown above has the title ‘Fire hydrant (New)’ and
four fields, each with a prompt on the left and a value on the right.
Each form has a current field, which is highlighted. Any editing
operations on a form apply to the current field. If the field’s value can
be edited, then the value is highlighted. Otherwise, the field’s prompt
is highlighted. In the example above, the current field is the Color
field.
26 TSC1 Asset Surveyor Software User Guide
Page 47

Basics of Operation 2
If a field’s value cannot be shown in full due to the limited width of
the TSC1 screen, ellipses (…) indicate that not all of the field’s value
is visible. For example, the full value of the Comments field in the
example above is ‘Needs to be repainted in places’.
Note – There is a special field value, called the null value, which
denotes no value at all. This is often supplied as the default value for a
field, to ensure that you enter a real value. The null value is usually
displayed as a ‘?’ character, but the Asset Surveyor software l ets you
configure the null value if you want.
B
Tip – You can choose the default value for each attribute, and whether
data entry is required or prohibited, when you create a data dictionary. For
more information, see the GPS Pathfinder Office Help.
TSC1 Asset Surveyor Software User Guide 27
Page 48
2 Basics of Operation
Windows
The contents of an Asset Surveyor form are displayed on the full
TSC1 screen. Forms vary in length and often a form has too many
fields (lines) to fit entirely in its window. W hen this happens, you can
scroll the fields in the form up and down by moving the highlight to
see the other fields on the form.
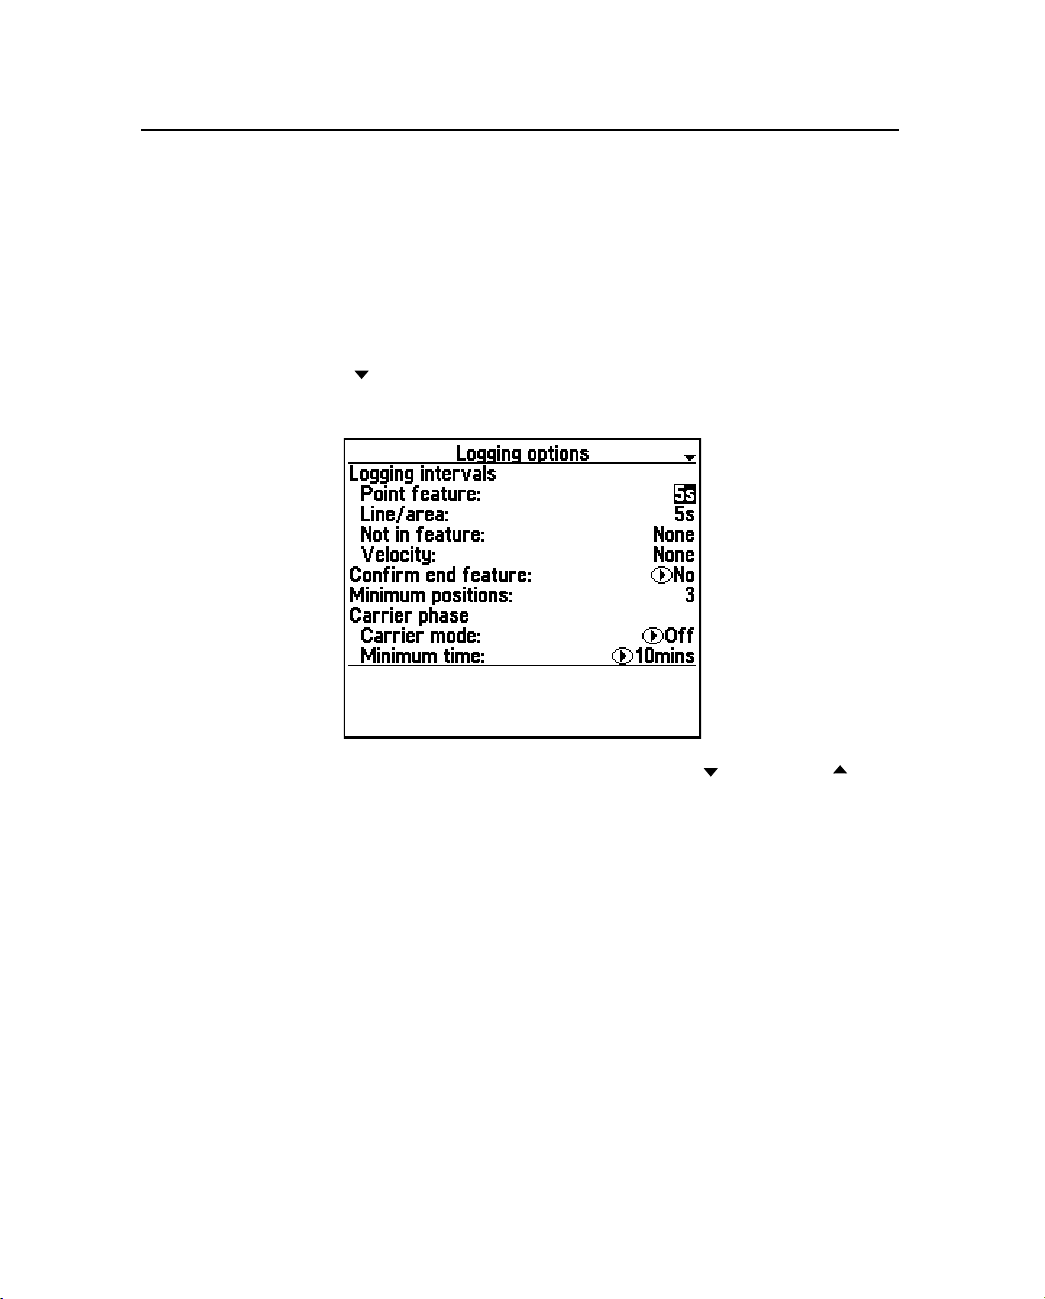
If a form contains too many fields to fit on the TSC1 screen at one
time, a appears on the right side of the form’s title line, as shown in
the following example:
When you are on the last page of the form, the changes to .
28 TSC1 Asset Surveyor Software User Guide
Page 49
Basics of Operation 2
Moving between fields
A form’s current field is distinguished by having its prompt or value
highlighted.If the field can be edited, then the value is highlighted, but
if the field is purely informative, and cannot be edited, then the prompt
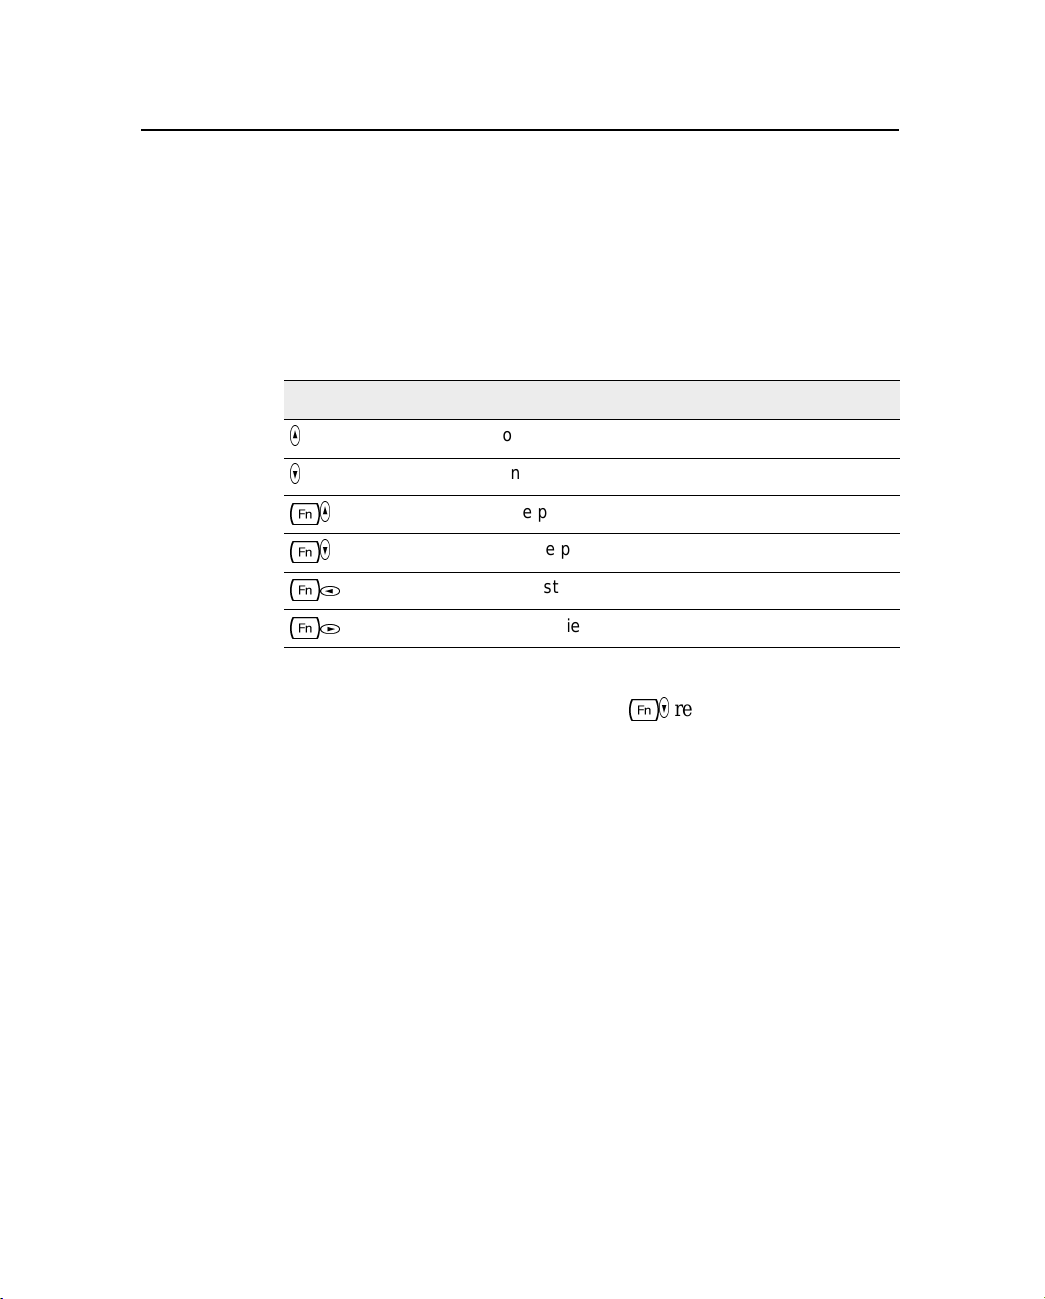
is highlighted instead. Various keystrokes can be used to move the
highlight from field to field, as s hown in Table 2.2.
Table 2.2 Moving the highlight using keys
Press ... To move the highlight ...
_
)
[_
[)
[*
[(
Up one field
Down one field
Up one page
Down one page
Tothefirstfieldintheform
To the last field in the form
A page of a form is the same size as the form’s window. This means
[)
that you can see each page by pressing
repeatedly.
TSC1 Asset Surveyor Software User Guide 29
Page 50
2 Basics of Operation
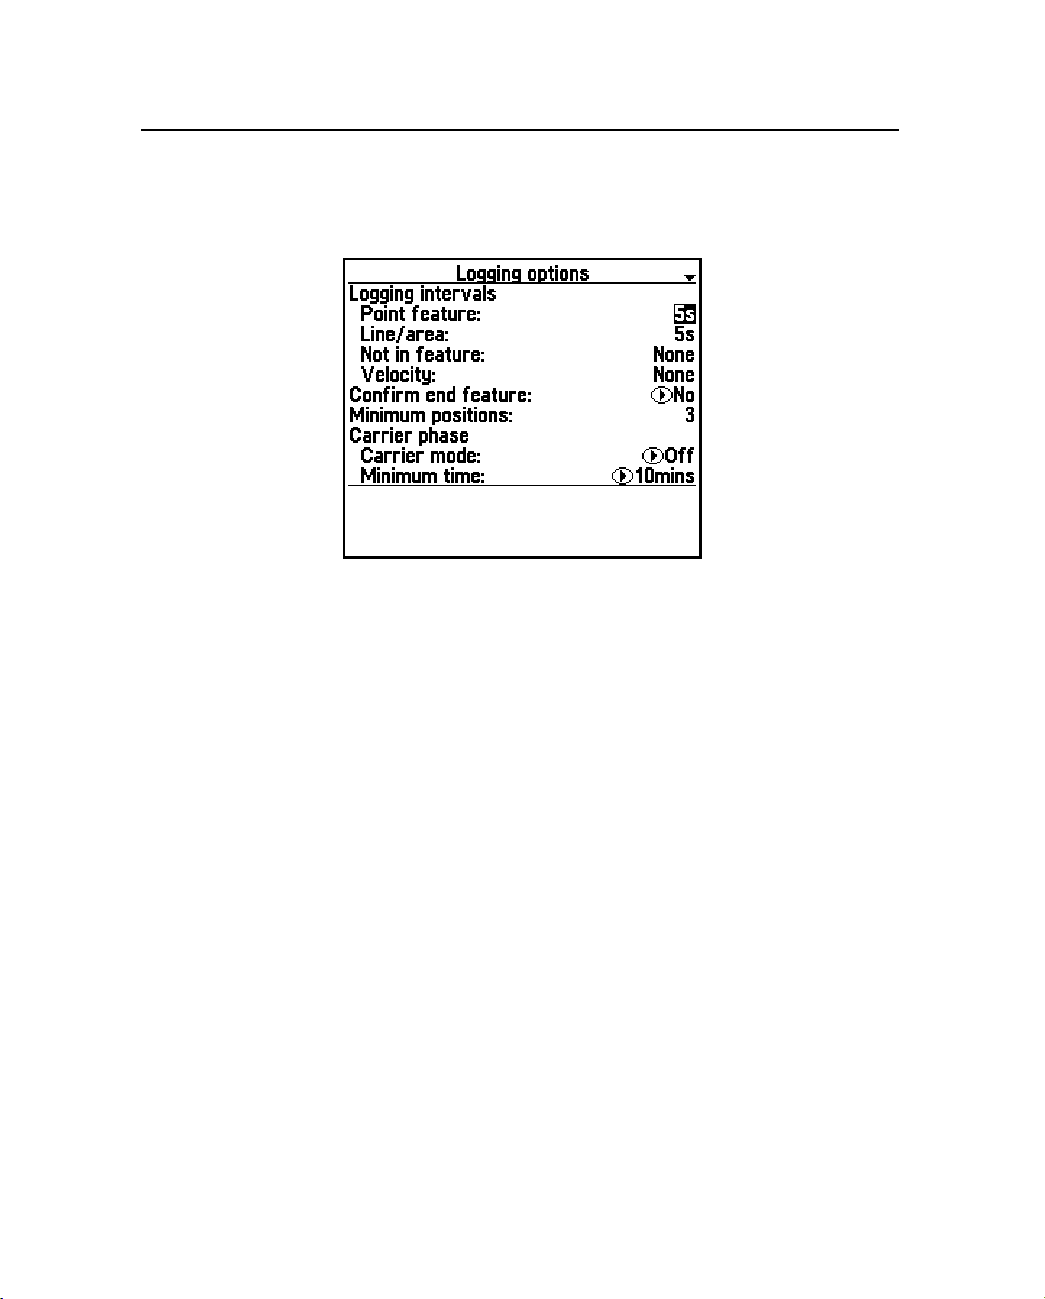
Some forms are divided into sections, where each section s tarts with a
caption field. Typically, the prompts for the fields following a caption
are indented slightly, as shown in the following example:
AcaptionfieldsuchasLogging intervals can never become the
current field and can never be edited (as it has no value).
30 TSC1 Asset Surveyor Software User Guide
Page 51
Basics of Operation 2
Leaving a form
When you have finishedviewing or editing a form, you can choose to
leave it with or without saving its (edited) contents.
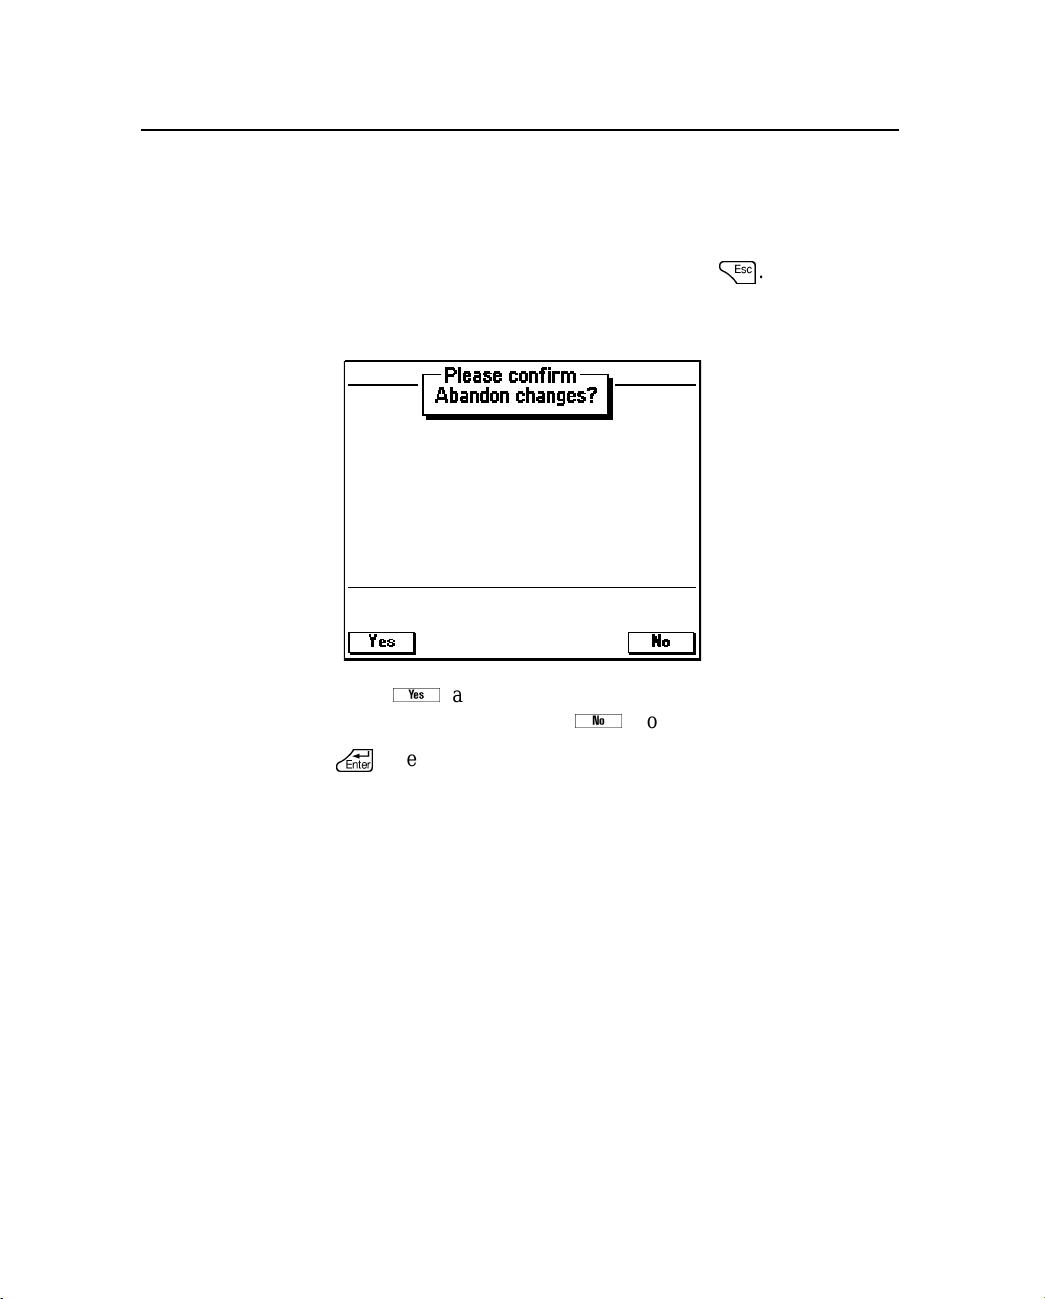
=
To leave a form without saving its contents press
. If the value of
any of the form’s fields has changed (that is, been edited), the
following message appears:
If you press
fields are discarded. If you press
Press
y
, any changes which you have made to the form’s
n
, you are returned to the form.
\
to leave a form and save its contents. When you do this, the
Asset Surveyor software validates the form, checking each field for
consistency and completeness, and then saves the form’s new
contents.
TSC1 Asset Surveyor Software User Guide 31
Page 52
2 Basics of Operation
Editing fields
Generally, each field’svalue can be changed or edited. Before you can
change the value of a particular field, you must move the highlight to
that field.
The two ways to change the value of the current field are:
• Type the complete new value into the field: Once you have
• Edit the field’s existing value: Indicate that you want to edit the
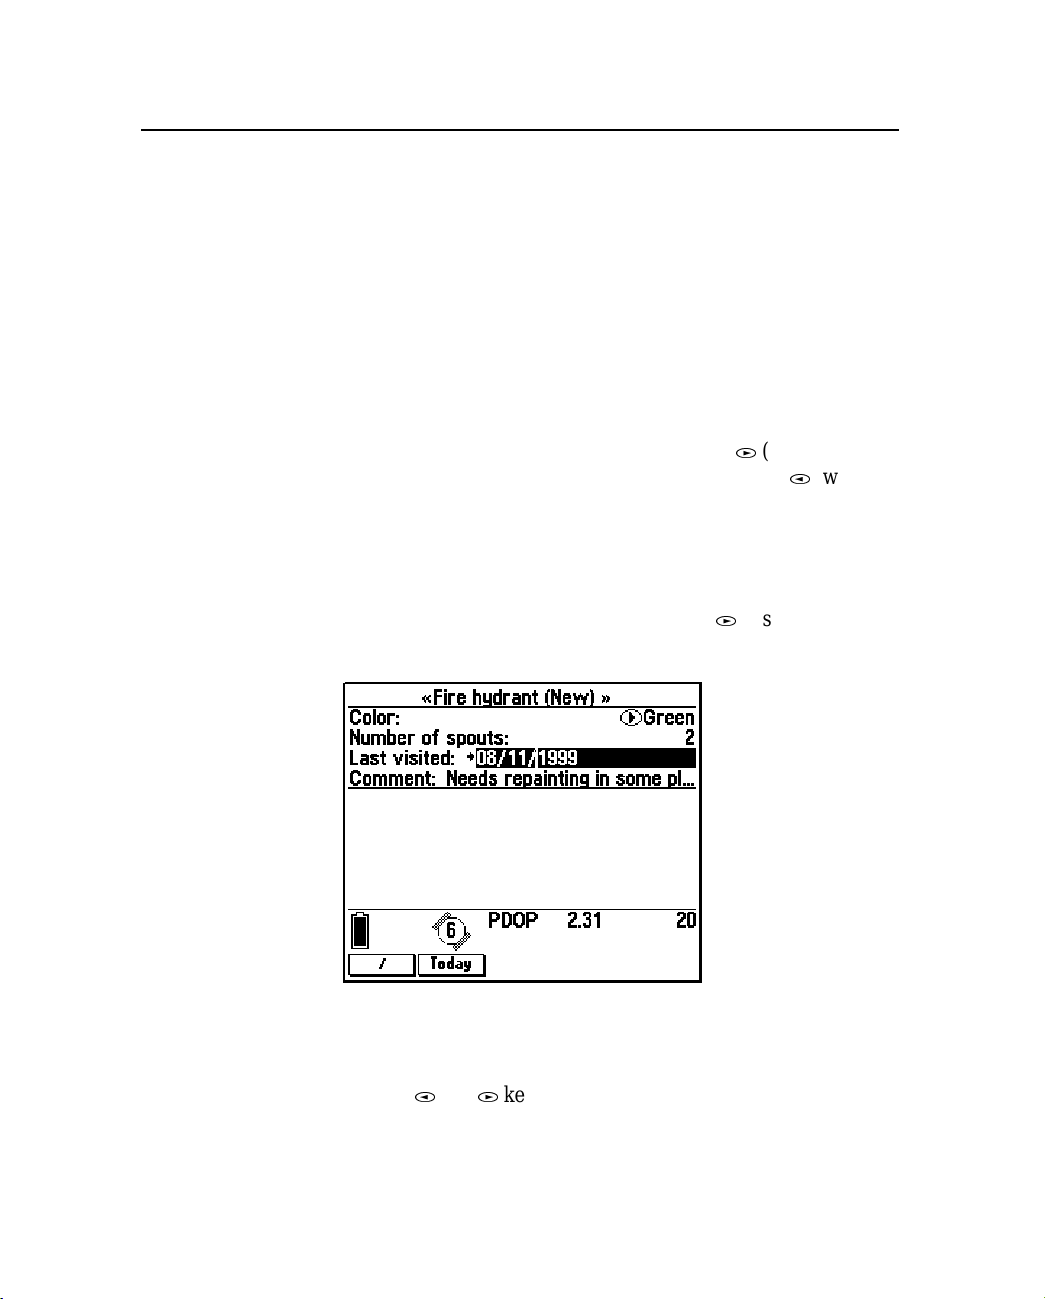
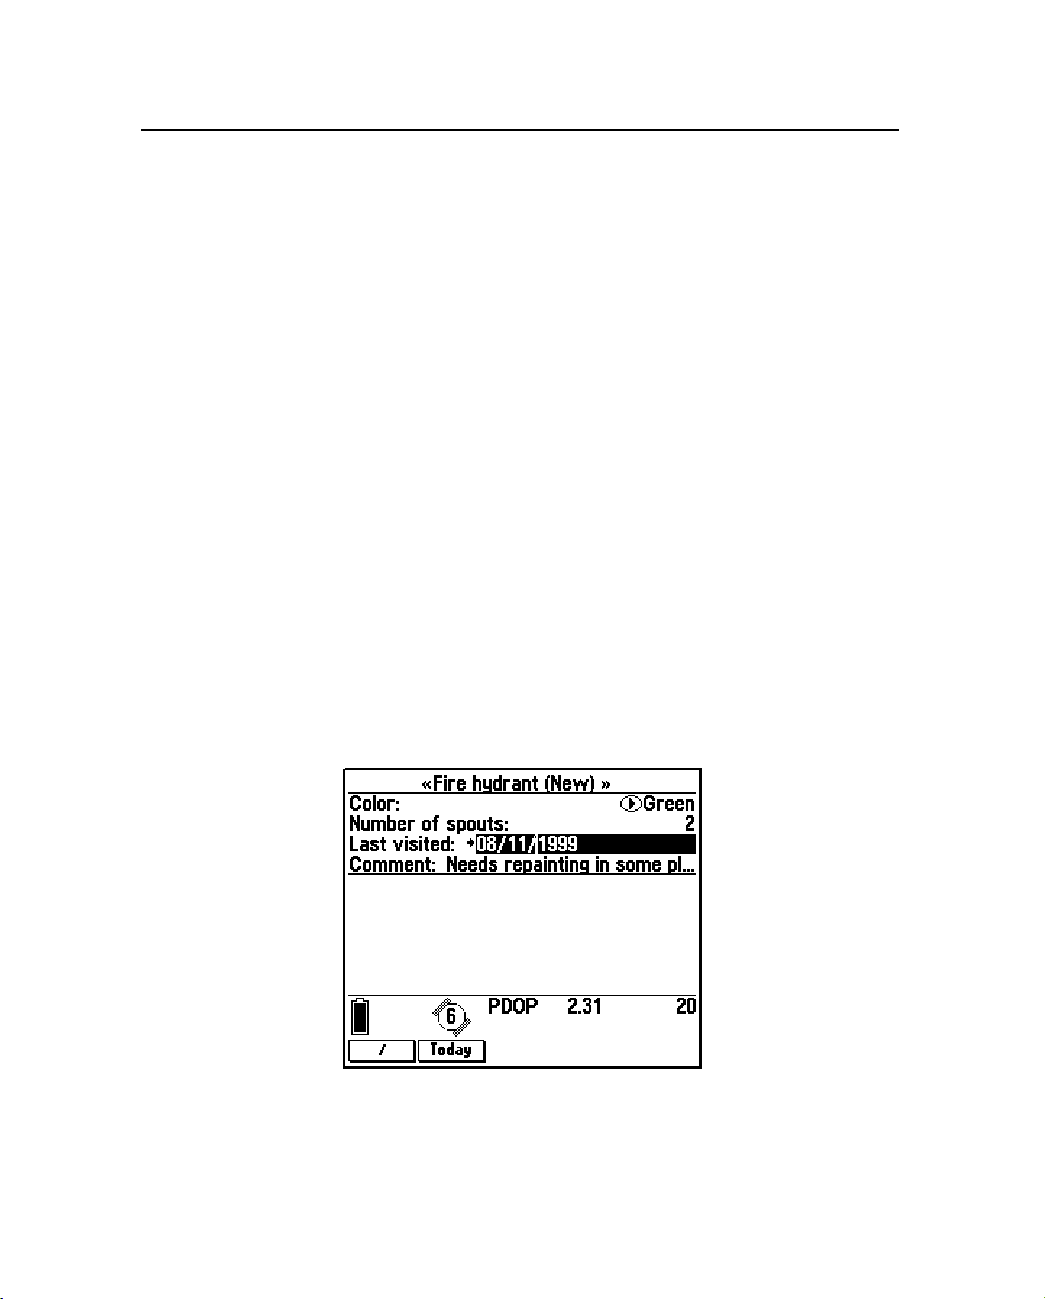
Once you have started entering a new value for a field, or editing the
existing one, the appearance of the field changes and a flashing cursor
appears. For example, if you move the highlight to the Last visited
field of the example Firehydrant form, and press
existing value of that field, the TSC1 screen looks as follows:
highlighted the appropriate field’s value, you can just type in
the new value. This replaces the field’s old value.
(
current field’s value by arrowing into it with
editing at the leftmost end of the original value) or
(which starts
*
(which
starts editing at the rightmost end of the original value).
(
to start editing the
Each character you type is inserted into the field at the location of the
cursor and the cursor moves one position to the right, ready for the
next character to be typed. You can move the cursor about within the
field using the
32 TSC1 Asset Surveyor Software User Guide
*
and(keys.
Page 53
Basics of Operation 2
You can delete the character to the left of the cursor, and move the
cursor one character to the left in the process, by pressing
B
.You
can delete the character that is to the right of the cursor (for example,
the ‘1’ in ‘1999’ in the example above) by pressing
[B
.
Insert and overwrite modes
The Asset Surveyor software operates in Insert mode,whereeach
character you type is inserted at the cursor position and pushes the
current character in that position to the right, after which the cursor
moves one position to the right as well. The Asset Surveyor software
does not operate in Overwrite mode (where each character you type
overwrites the current character at that position).
Upper and lower case letters
Press
C
to change between upper and lower case letters. When you
press the
characters typed while it is held down. The
[CapsLock]
C
key it changes modes, rather than just modifying
C
key operates like the
keyonaPC.
Leaving field entry
=
If you start to edit a field but do not want to continue, press
to
revert back to the field’s previous value.
When you are satisfied with the field’s edited value, you can do one of
the following:
_
•Press
•Press
•Press
to move to the previous field in the form.
)
to move to the next field in the form.
\
to move to the next field in the form.
TSC1 Asset Surveyor Software User Guide 33
Page 54

2 Basics of Operation
Before moving to another field, the Asset Surveyor software validates
the new value for the field which you have just changed. If the field’s
new value is inappropriate, you are informed of this fact and asked to
change it. The Asset Surveyor software does not accept an
inappropriate value for a field.
Certain fields behave in special ways when being edited, and have
special validation rules, as explained in the following section.
Field types
Each field belongs to a particular type or class, and the type of the
field determines the kind of value it can have. The types of field
supported by the Asset Surveyor software are:
• Captions or separators, which have no value. You cannot edit
• Alphanumeric character string fields, which permit the entry of
these fields.
any characters (that is, letters, digits and punctuation
characters), up to a certain maximum length. An example of an
alphanumeric string is the comment ‘Requires pruning of the
lower branches’.
• Numeric fields, which let you enter numbers, with or without
attached units. An example of a numeric value is ‘3.4’.
• Menu fields, which let you select one of a small set of specific
values. For example, a menu field might let you choose between
values of ‘Yes’, ‘No’ and ‘Maybe’.
• Date fields, which permit the entry of a calendar date. An
example of a date value is ‘09/03/99 Fri’.
• Time fields, which permit the entry of a time of day. An
example of a time value is ‘10:44:12 am’.
The following sections discuss each of the Asset Surveyor field types
in more detail.
34 TSC1 Asset Surveyor Software User Guide
Page 55
Basics of Operation 2
Alphanumeric fields
An alphanumeric field accepts values made up of almost any character
you can type (and a few you cannot). Such a field could be used for
storing a street address, a person’sname, or a description of a fault in a
piece of equipment.
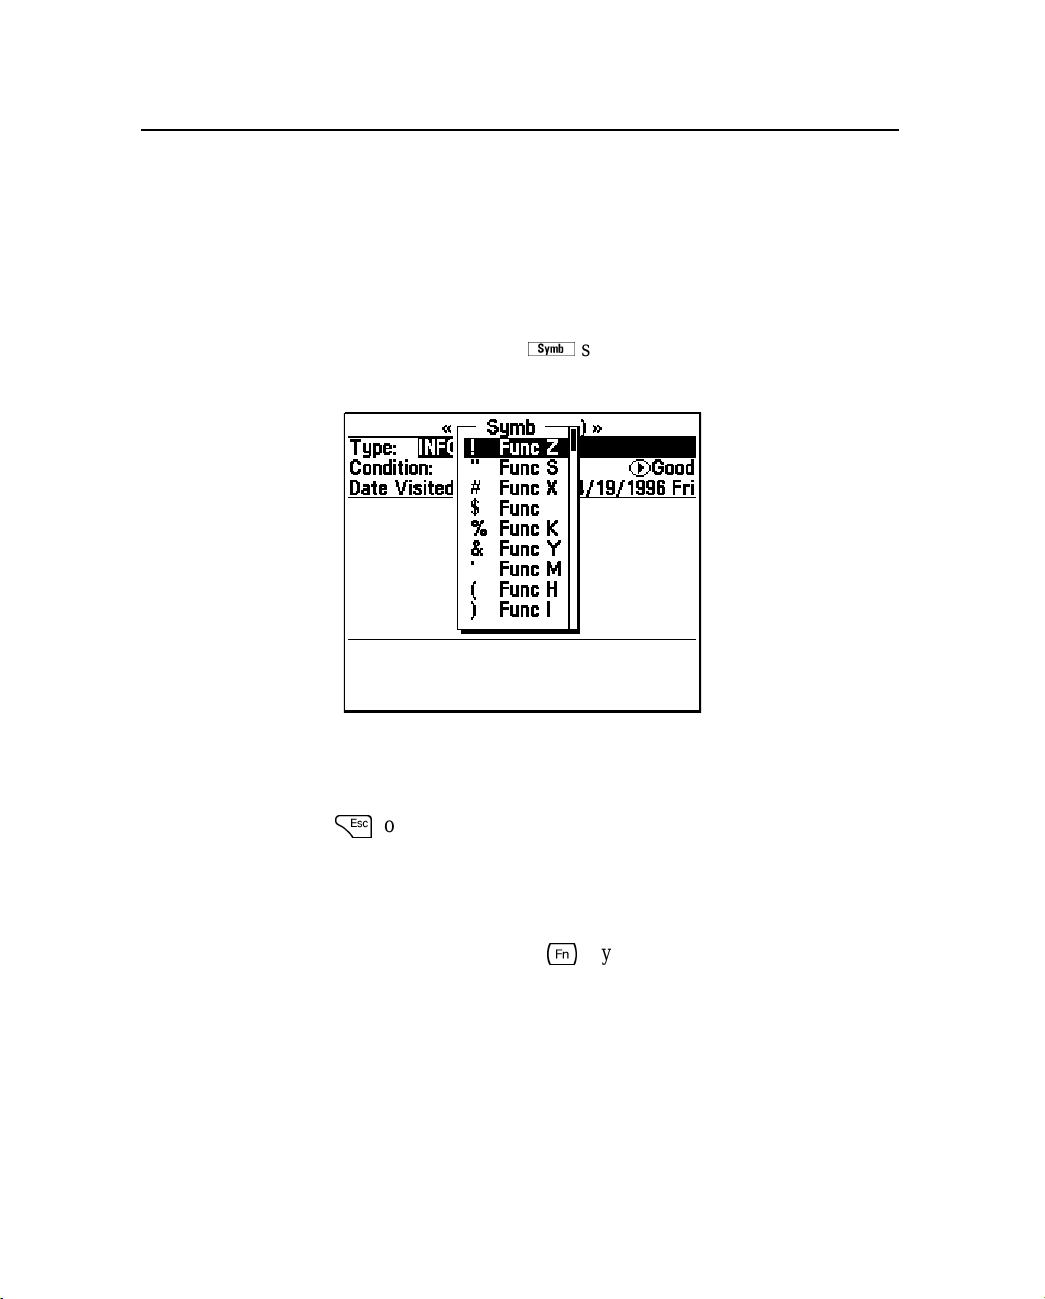
When you are entering a value into an alphanumeric field, the Asset
V
Surveyor software makes a
softkey available. Pressing this
softkey causes a menu of special punctuation symbols to pop up:
If you select an entry from this menu, the special character is inserted
into the alphanumeric field which you were editing, at the current
cursor position. If you decide not to insert a special character after all,
press
=
to dismiss the menu.
The pop-up menu of special symbols highlights the entry that you last
selected for convenient reselection.
Note – The Symbols menu also indicates which special characters can
[
also be typed directly using a
TSC1 Asset Surveyor Software User Guide 35
key sequence shortcut.
Page 56

2 Basics of Operation
B
Tip – Text attributes in data files use alphanumeric fields. A text attribute
can be set up as an auto-incrementing attribute. This automatically
generates a default value depending on the value for this attribute in the
last feature you edited, and an increment or decrement value specified in
the data dictionary. For more information on auto-incrementing attributes,
see Data Dictionaries, page 157.
Numeric fields
Numeric fields store and display numeric values in a range of formats,
separated into two main classes:
• For integer (that is, non-fractional) numeric fields, the Asset
Surveyor software only lets you enter digits and a minus (–)
sign. An integer field could be used to store the number of
wheels on a vehicle or the number of ducks on a pond.
Examples of integer numeric values are:
4, 123, –987, 0
• For non-integer numeric fields, the Asset Surveyor software lets
you type digits only, a minus (–) sign, a decimal point, and the
‘E’ (or ‘e’) convention for scientific notation. A non-integer
field could be used to store a bank account balance, or the
length of a vehicle. Examples of non-integer numeric values
are:
1.4, 0.005, –1.23, 1.2E10, 5.678e–3
Note – The notation employing ‘E’ (or ‘e’) to represent a power
of 10 is called exponential or scientific notation, and is used to
enter very largeor very small values. For example, a value such
as 12000000000.0 could either be enteredas 12000000000.0 or
as 1.2e10.
Because scientific notation is very compact, it tends to be used
by engineers and scientists, who often have to deal with very
large and very small numbers.
36 TSC1 Asset Surveyor Software User Guide
Page 57

Basics of Operation 2
Many non-integer numeric values represent a measurement of a
physical phenomenon and have associated units. Such values belong
to physical domains such as distance, speed, time, and so on. The
Asset Surveyor software recognizeseach of the base domains, and can
convert values from one unit to another within a domain.
If a non-integer numeric data field has an associated units domain, the
Asset Surveyor software prohibits the entry of values or units which
are inappropriate for that domain. Each field displays its contents in a
specific unit or sequence of units, but you can entervalues in the most
convenient unit, provided you use a unit appropriate for the domain of
the field. For example, you can type a value into an Antenna height
field in meters, feet, or inches, but not in °C or kilograms. If the
Antenna height field’s display units are meters, then values entered in
feet or inches are converted to meters and displayed that way once
they have been validated.
The Asset Surveyor software lets you configure the units used for
most numeric fields to suit your application or preference. For more
information, see Chapter 5, Configuring the A sset Surveyor Software.
Some examples of numeric fields with units are as follows:
• If a field represents a distance,and the Asset Surveyor software
has been configured to display distances in meters, entering any
of the following values yields the finalvalue 54.5 m in the field:
54.5
54.5m
0.0545km
0.0339029mi
178.82ft
2145.84in
Note – If you want to enter a value in the same units as the
field’s display units, you do not have to specify units. In the
above example, entering ‘54.5’ was the same as entering
‘54.5m’.
TSC1 Asset Surveyor Software User Guide 37
Page 58

2 Basics of Operation
• If a field represents an angle, and the Asset Surveyor software
• The location of a geographic entity on the earth’ssurface can be
has been configured to display angles in degrees, minutes and
seconds, entering any of the following values yields the final
value 20°19'58" in the field:
20.332777778
20.332777778°
20 19 58
0.354873918299 rad
Note – Some numeric values can be displayed using more than
one unit (for example, degrees,minutes and seconds for angular
values). You can enter values using a sequence of units (for
example, 20°19'58"), or you can just separate values with
spaces (for example, 20 19 58), in which case the Asset
Surveyor software applies each display unit in sequence to
successive values.
specified as a latitude and a longitude. The Asset Surveyor
software displays latitudes and longitudes in degrees, minutes
and seconds. For example, to enter the location of Trimble’s
headquarters in Sunnyvale, California, type the following
values into appropriate latitude and longitude fields:
37°23'40.09" N
122°02'16.77" W
where the ‘N’ and ‘W’ denote latitude North of the equator and
longitude West of the Greenwich meridian. When entering a
latitude or longitude, the letters N, S, E, W (for North, South,
East or West) may be entered before or after the actual latitude
or longitude value.
Note – Plus (+) or minus (–) signs may be used instead of the
letters N, S, E or W, where positive latitude is North of the
equator and positive longitude is East of Greenwich. The sign
may be entered before or after the value.
38 TSC1 Asset Surveyor Software User Guide
Page 59
Basics of Operation 2
If you enter a position as a latitude and longitude, and do not explicitly
specifythe hemisphere,then the Asset Surveyor software assumes that
you want the position to be in the hemisphere in which you are
currently operating, as determined by your most recent GPS position.
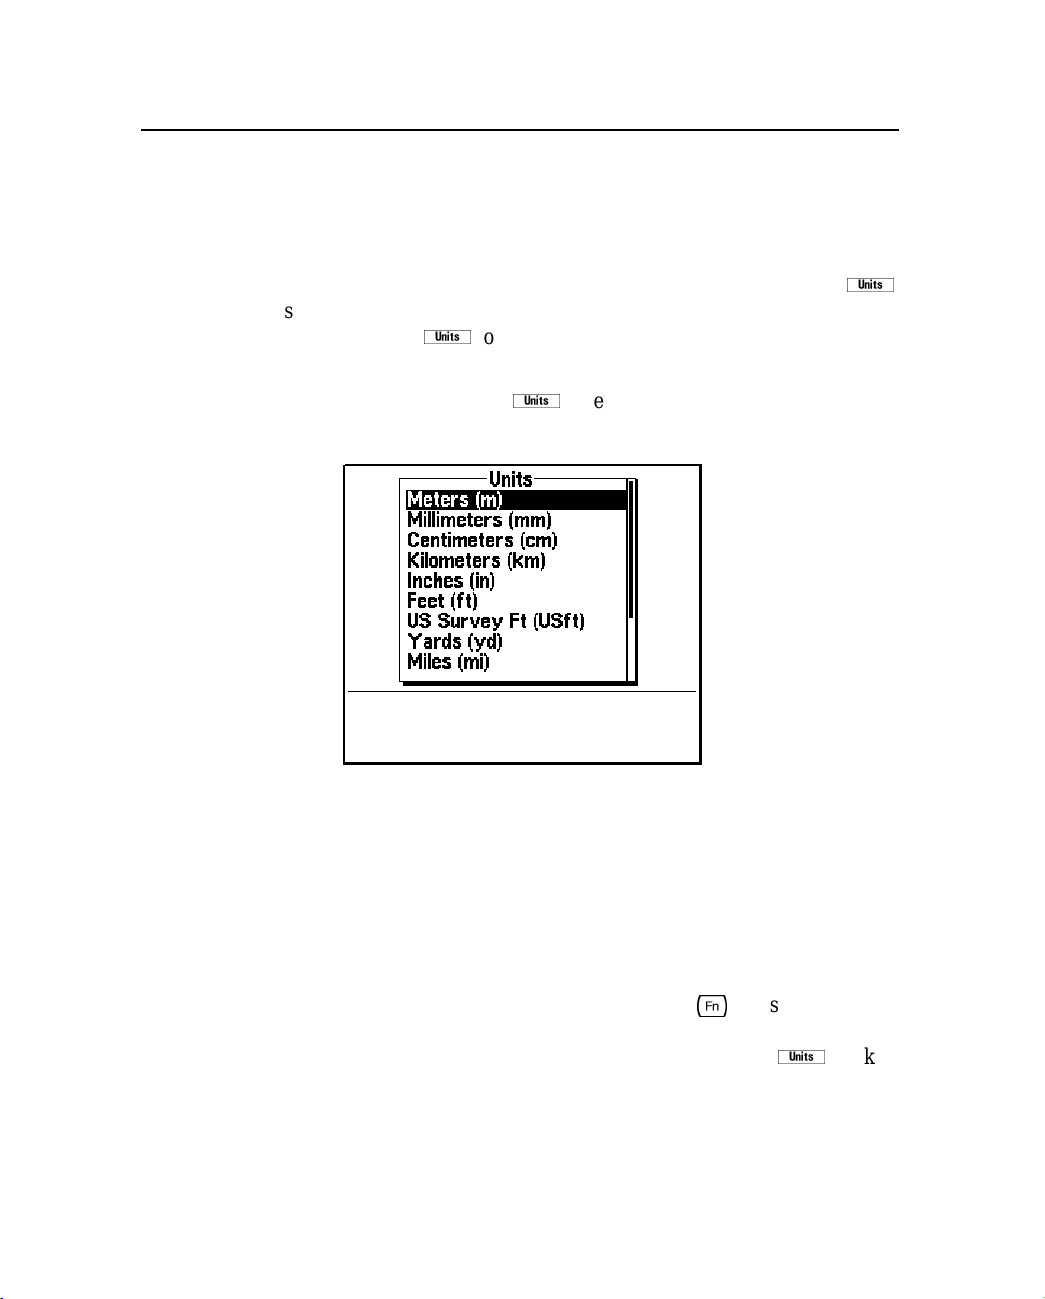
To help you enter units, the Asset Surveyor software provides a
i
softkey whenever you are entering a value into a numeric field which
has units. Press
i
to access a m enu of available units, and select
the unit(s) you want to attach to the value you are entering.
i
For example, if you press
when entering a Distance value, the
pop-up menu of available units appears as follows:
You can select a suitable unit for the Distance value you are entering
from this list.
Note – The list of available units indicates the abbreviation for each
unit in parentheses ( ). You can enter the abbreviation for a unit
directly using the keypad, if you prefer.
The TSC1 keypad does not appear to allow the entry of some of the
special characters required for specifying units (for example, °, ',
[
and "), but these characters can be typed using
key sequences.
Numeric fields are usually displayed in the appropriate units so that
you need not specify units explicitly, or you can use the
TSC1 Asset Surveyor Software User Guide 39
i
softkey.
Page 60
2 Basics of Operation
B
Tip – Numeric attributes in data files use numeric fields. A numeric
attribute can be set up as an auto-incrementing attribute, which
automatically generates a default value depending on the value entered
for this attribute in the last feature you edited, and an increment or
decrement value specified in the data dictionary. For m ore information on
auto-incrementing attributes, see Data Dictionaries, page 157.
Menu fields
Sometimes, fields in a form can also take one of a number of discrete
values, and the Asset Surveyor software uses a pop-up menu to let you
choose a value for such a field.
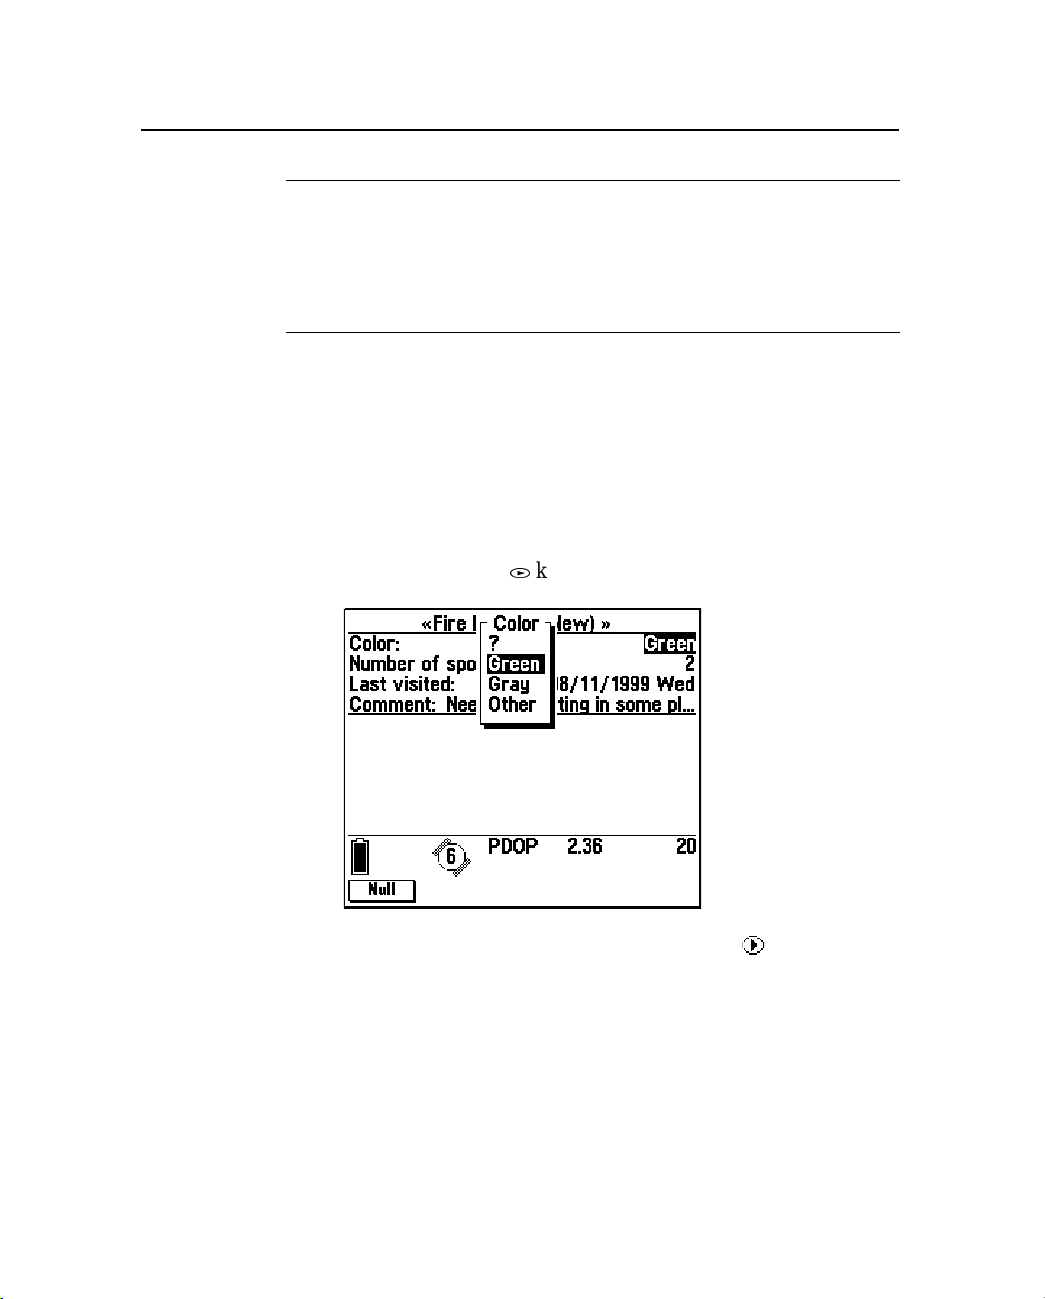
In our example form, the first field (the fire hydrant’s Color)isnowa
menu field for which a pop-up menu can be accessed by highlighting
(
the field and pressing the
key:
Note – A menu field is indicated by a menu symbol ( ) in front of the
field value.
40 TSC1 Asset Surveyor Software User Guide
Page 61

Basics of Operation 2
Toselectanewvalueforamenufield:
• Access the menu and select a value, as described for normal
Asset Surveyor pop-up menus. You can access the menu for a
menu field by positioning the highlight on that field and
(
pressing
that would appear by pressing
(the example form above shows the pop-up menu
(
when the Color field was
highlighted).
• Select a value immediately by typing its first letter. This is a
very quick way to select a value for a menu, once you know the
possible values for that menu field. If the key you press does not
correspond to the first letter of any entry in the menu, the menu
pops up so that you can see the list of possible values and then
select one. Similarly, if the key you press corresponds to the
first letter of more than one entry in the menu, the menu pops up
and lets you see the various choices.
• Step backward through the values in the menu using the
When you use this method, the menu is circular, so if you reach
the first element in the menu and press
*
,yousteptothelast
element in the menu.
*
key.
The latter two m ethods of selecting values for menu fields are
provided for the convenience of experienced Asset Surveyor users.
You may begin by accessing each menu and selecting from the
displayed list of values, but as time goes by you can use these
shortcuts to make selecting values for menu fields even faster.
TSC1 Asset Surveyor Software User Guide 41
Page 62
2 Basics of Operation
Date fields
A date field can be used to record a calendar date. Different countries
use different conventions for the entry and display of calendar dates.
The Asset Surveyor software can be configured to display dates in the
following formats:
• MM/DD/YYYY
• DD/MM/YYYY
• YYYY/MM/DD
where MM represents the month, DD the day, and YYYY the year.
For example, in MM/DD/YYYY format, the 4th of July 1976 would
be displayed as:
Note – If you enter a two-digit year between 00 and 29, the Asset
Surveyor software stores it as 20XX (for example, if you enter 15 it is
storedas 2015). If you enter a two-digit year from 30 to 99, it is stored
as 19XX. If you want to enter a date from a different century, type the
year in full with four digits.
07/04/1976
When you are entering a value into a date field, the Asset Surveyor
software provides two softkeys to assist you:
42 TSC1 Asset Surveyor Software User Guide
Page 63

Basics of Operation 2
The
/
softkeyisafasterwaytoenterthe‘/’characterthantyping
on the TSC1 keypad. You can also type the
[d
sequence on the
TSC1 keypad to obtain the ‘/’ character.
Note – The Asset Surveyor software also accepts dates entered with
spaces between the components, for example ‘7 4 76’, but always
formats and displays dates with the ‘/’ character as a separator.
The
H
softkey lets you quickly fill in the field with the current date
(as determined from the TSC1 datalogger’s internal clock). Many
Asset Surveyor date fields are filled in with the current date
automatically, and you only need to enter the date manually if this
automatic date is incorrect.
The Asset Surveyor software automatically works out the day of the
week from the date that you have entered,and displays it as a means of
checking that you have entered the correct date.
Time fields
A time field is used to store the time of day, and may either be filled in
automatically from the TSC1 datalogger’s internal clock, or entered
manually. If a GPS receiver is currently connected, the clock is
precisely a ligned to UTC time.
Note – A time field is not used for storing elapsed time (for example,
the amount of time taken for an athlete to complete a race); this is
better represented as a numeric field.
Hours, minutes and seconds are separated by a colon (:) character.
Times are displayed using either 12- or 24-hour clock format. In the
24-hour clock format, 4:30
P.M. is displayed as ‘16:30’. The Asset
Surveyor software allows the entry of time in either format. If the
entered time is less than ‘12:00’, and ‘p.m.’ is not specified, then the
software assumes the time is before noon. The Asset Surveyor
software can be configured to display times in either format.
TSC1 Asset Surveyor Software User Guide 43
Page 64

2 Basics of Operation
When you are entering a value into a time field, the Asset Surveyor
software makes four softkeys available to assist you:
•The
:
softkey is a fasterway to enter a colon than typing on
the TSC1 keypad. You can also type the
[p
sequence on the
TSC1 keypad to enter a colon.
Note – The Asset Surveyor software also accepts times entered
with spaces between the components, for example ‘4 30 00’, but
always formats and displays times w ith the ‘:’ character as a
separator. Neither minutes nor seconds need be entered, but if
minutes are desired then hours must be present, and if seconds
are desired then both hours and minutes are required. For
example, 10 o’clock in the evening could be entered as ‘10pm’,
‘22’, ‘10:00pm’, ‘22:00’, ‘10:00:00pm’, ‘22:00:00’, or
‘10:0:0pm’.
•Youcanpress
8
to fill in the field with the current time.
Many Asset Surveyor time fields are filled in with the current
time automatically and you only need to enter the time
manually if this automatic time is incorrect.
4
•Youcanpress
to insert the character sequence ‘am’ into
the field. This is generally unnecessary, as the Asset Surveyor
software presumes that a time less than 12:00 falls in the
morning, in the absence of any explicit ‘pm’ indication.
5
•Youcanpress
to insert the character sequence ‘pm’ into
the field. This is necessaryif you want to enter a time after noon
in 12-hour format.
44 TSC1 Asset Surveyor Software User Guide
Page 65

2.7 File Naming Conventions
The Asset Surveyor software is designed primarily to collect GIS and
GPS data and to store this data in files on the TSC1 datalogger. These
files can be individually named, but because you may need to collect a
vast quantity of data which is all very similar in nature, it can be
difficult to think of meaningful yet distinct names for data files. The
Asset Surveyor software automatically suggests a name for each new
data file when it is created.
For the purposes of automatic naming, Asset Surveyor data files are
divided into two classes: rover and base station files. Most data files
are rover files. The Asset Surveyor software lets you collect GIS
feature and attribute information to rover files, along with GPS
positions, and so on. The Asset Surveyor software also lets you use
your Trimble GPS receiver as a GPS base station, which results in the
creation and recording of base station files. Operating an Asset
Surveyor base station is described in detail in Chapter 3, Data
Collection.
When a rover data file is created, the Asset Surveyor software
suggests a default filename according to the following formula:
Basics of Operation 2
• R MM DD HH x
where the initial letter ‘R’ identifies the data file as being a rover file,
MM is the current month, DD is the current day of the month, and HH
is the current hour of the day. The final letter ‘x’ increments within
this hour, starting at ‘a’ for the first file in that hour, then going to ‘b’
for the second file and ‘c’ for the third file, and so on.
Note – The date and time used for naming of data files is, by default,
UTC (GMT) time. You can specify that the Asset Surveyor software
t
should use local time to name rover files by pressing
and
selecting Local from the pop-up menu. If the default filename looks
odd, check that the TSC1 datalogger’s internal time and date are set
correctly.
TSC1 Asset Surveyor Software User Guide 45
Page 66

2 Basics of Operation
B
Tip – The initial letter ‘R’ can be changed, in which case subsequent rover
data files are given the new initial letter. This lets you uniquely name data
files from a fleet of Asset Surveyor rovers, using initial letters like ‘X’, ‘Y’,
‘Z’. To change the initial letter of a filename to ‘X’, simply type ‘X’ and then
\
press
software automatically regenerates the default filename with an ‘X’ prefix.
to move on to the next field in the form. The Asset Surveyor
Some examples of default rover filenames for the morning of the 15th
of September are:
• R091510a
• R091510b
• R091511a
Remember that the default filename suggested by the Asset Surveyor
software is simply a suggestion. You can change the suggested name
or enter an entirely different name. You can use such filenames as:
• SURVEY1
• SC0090
• RONALD
Filenames can be up to eight characters long, and are composed of
letters and digits only (that is, no spaces or punctuation characters are
permitted).
Trimble suggests, however, that unless you are dealing with a small
number of data files at a time, you should consider using the automatic
filenames as these assist with identifying files by time and date.
The Asset Surveyor software suggests default names for base files
which are formatted slightly differentlyfrom those suggested for rover
files. They follow the formula:
• BYMMDDHH
where ‘B’ identifies the file as being a base station file, Y is the last
digit of the current year, MM is the current month, DD is the current
day of the month and HH is the current hour of the day.
46 TSC1 Asset Surveyor Software User Guide
Page 67

Basics of Operation 2
Note – As with rover f iles, the default base filename can be
constructed using either local or UTC (GMT) time, the default being
UTC. Press the
be used for base station filenames.
t
softkey to select which time system you w ant to
B
Tip – As with default rover filenames, the initial character ‘B’ of a default
base filename can be changed, in which case subsequent base data files
are given the new initial character. This lets you conveniently name data
files from a number of base stations separately. For example, Bases A to
C could use the initial letters ‘A’, ‘B’, and ‘C’.
Some examples of default base filenames for the morning of the 25th
of January 1995 are:
• B5012510
• B5012511
• B5012512
As with rover files, you can edit the suggested filename or replace it
entirely, but Trimble suggests that you use the default names for base
files so that they are consistent with base files from other Trimble
products and because the time and date of a base file is crucial to its
use for differentially correcting rover files.
Note – You can configure the Trimble Reference Station (TRS™)
software to use either local time or UTC (GMT) time to construct base
filenames. When matching base and rover files for differential
correction, you must be aware of the naming conventions and time
scales used by this software system.
TSC1 Asset Surveyor Software User Guide 47
Page 68

2 Basics of Operation
2.8 Software and Firmware Version Numbers
If you ever need to call Trimble Navigation Limited with questions
about the Asset Surveyor software, you should first determine the
software version you are currently running, using the above
procedure.
You can determine the version of the Asset Surveyor software you are
currently using in two ways:
1. Turn your TSC1 datalogger off and on again. When it is turned
on it briefly displays a screen showing the Trimble logo and the
software version number:
2. Select the Hardware (TSC1) option f rom the Configuration
menu.TheSoftwareversion field in this form shows the current
Asset Surveyor software version.
You can also determine which firmware version is installed in your
GPS receiver. For m ore information,see Chapter 9, Receiver Status.
48 TSC1 Asset Surveyor Software User Guide
Page 69

3 Data Collection
In this chapter:
■ Introduction
■ Collecting new features
■ Data review and update
■ Createbasefile
CHAPTER
3
Page 70

3 Data Collection
3.1 Introduction
This chapter provides information on rover data collection. The data
collection procedure can be broken up into two key operations:
• The collection of new features
• The review and/or update of existing features
The following sections provide a detailed description of how to
successfully carry out these operations using the Asset Surveyor
software.
This chapter also provides information on logging base data files.
3.2 Collecting New Features
This section describes how to use the Asset Surveyor software to
create new data files and collect new features to files.
For a description of the review and update capabilities in the Asset
Surveyor software, see Data Review and Update, page 80.
50 TSC1 Asset Surveyor Software User Guide
Page 71
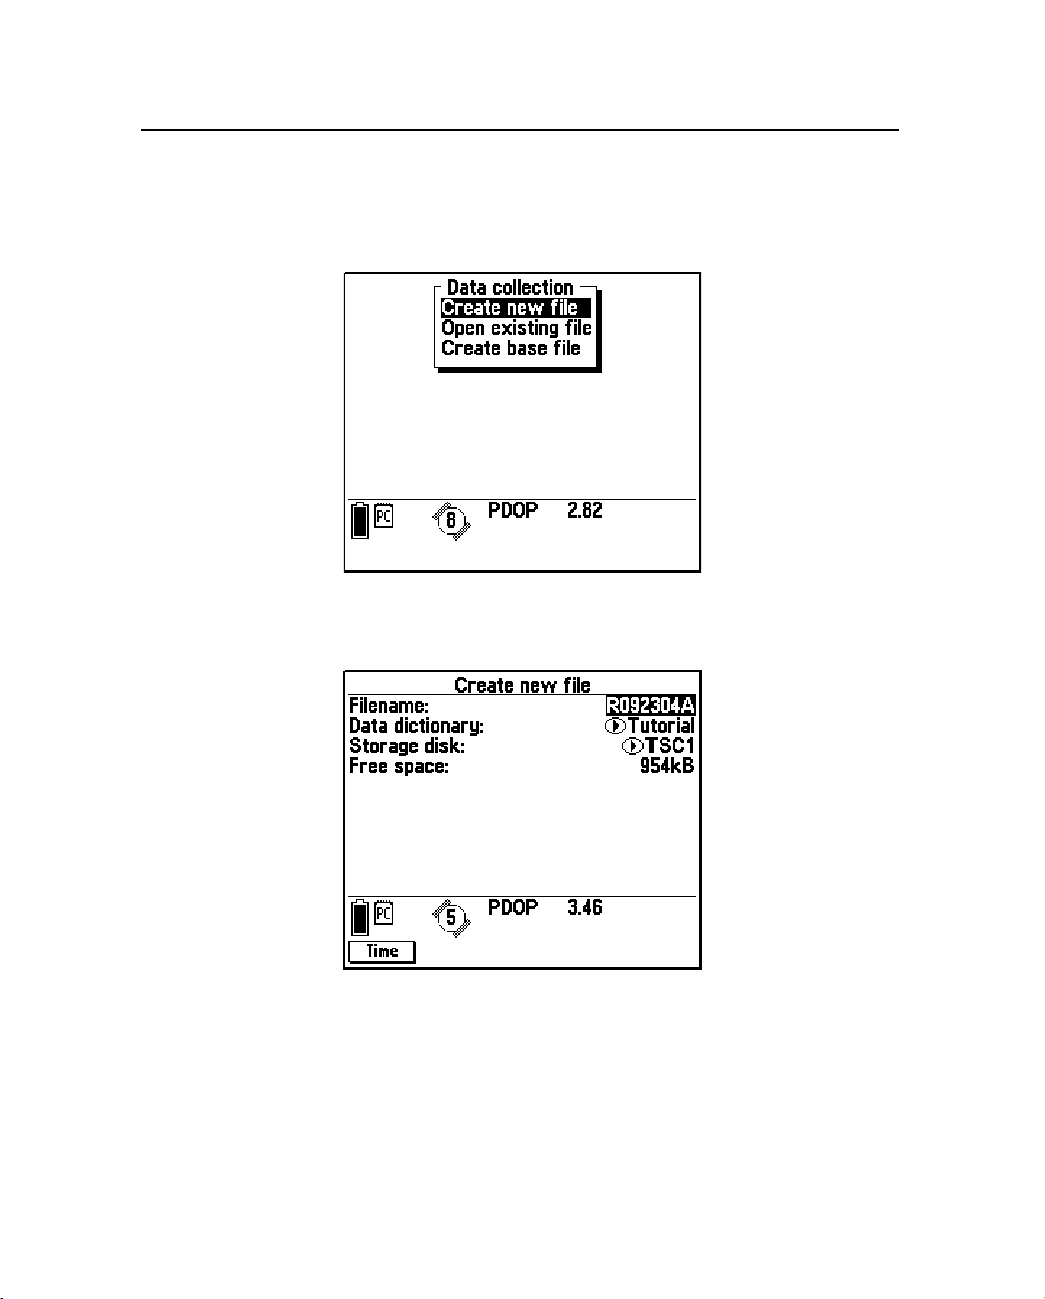
3.2.1 Creating New Files
Select Data collection from the Main menu to display the Data
collection menu:
Select Create new file from the Data collection menu. The Asset
Surveyor software displays the Create new file form:
Data Collection 3
The Asset Surveyor software suggests a default filename, as described
in File Naming Conventions, page 45.The default name appears in the
Filename field. You can accept this default name, edit it, or type in a
new name. Filenames can be up to eight characters long, and can be
composed of letters and digits only (that is, no spaces or punctuation).
TSC1 Asset Surveyor Software User Guide 51
Page 72

3 Data Collection
After accepting the default filename or entering a new one, select a
data dictionary from the menu of data dictionaries that have been
loaded onto your TSC1 datalogger. The default D ata dictionaryis the
data dictionary that was most recently used to create a data file. The
Generic data dictionary is always available. This data dictionary lets
you record point, line, and area features, each with a simple
description attribute.
Note – The data dictionary you choose when you create a data file is
associated with that file for the duration of the data file’s ‘life’. The
data dictionary determines the types of featureswhich can be recorded
to this file as well as the attributes these features can have.
The Storage disk field lets you specify the storage area that the rover
file is logged to. The options are ‘TSC1’ and ‘PC card’. You can only
set this field if a PC card is inserted into the TSC1 datalogger.
The last field of the form, Free space, informs you of the available
data file storage space remaining on your TSC1 datalogger and the PC
card, if one is present. The field name will appear as Free space
(TSC1),orFree space (PC card), depending on the selected Storage
disk. Y ou cannot edit this field.
t
Press
to switch between UTC and local time for the default
filename, as described in Chapter 2, Basics of Operation.
52 TSC1 Asset Surveyor Software User Guide
Page 73
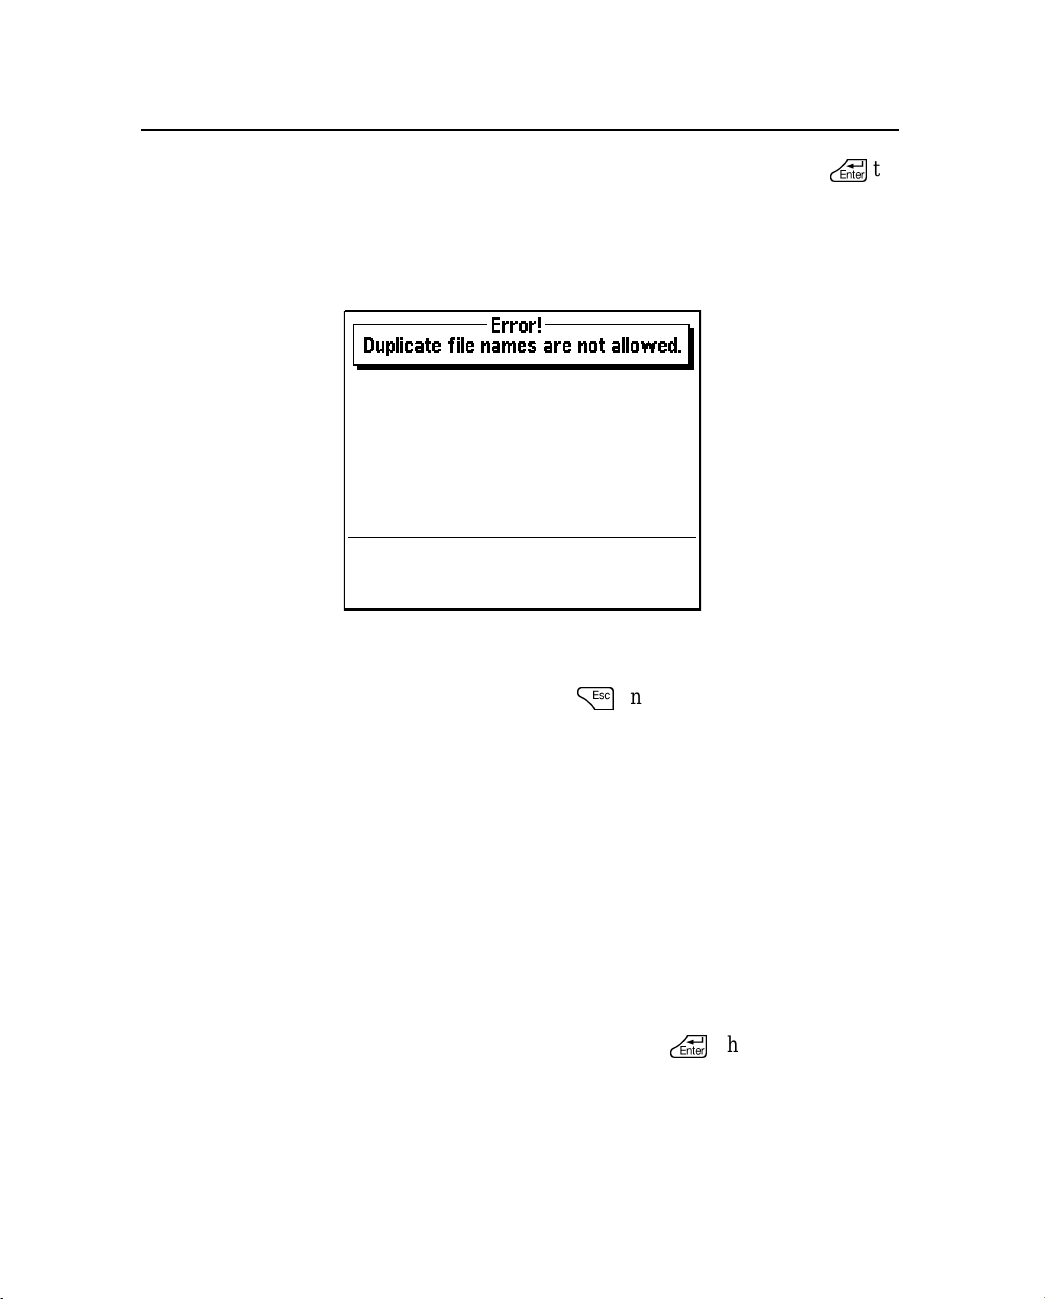
Data Collection 3
Once you have accepted a filename and data dictionary, press
\
to
create the new data file. The Asset Surveyor software checks to see
that the filename is unique before creating a file. If a file with that
name already exists, the Asset Surveyor software displays the
following message:
You must think of another name for your new file, or if you are happy
to append to the existing file with the same name then you can exit the
Create new file form by pressing
=
and just select the file with that
name from the Open existing file form.
Note – The data dictionary associated with the existing file is the data
dictionary that was selected when that file was created. It is not
necessarily the data dictionary that you selected when attempting to
create a data file with the same name.
If there is insufficient data space to create a new file, or the Asset
Surveyor software cannot create a file for some other reason, the Asset
Surveyor software displays an appropriate error message. If the
problem is simply one of insufficient space, transfer some or all data
files to your PC (or PC card if one is inserted), then delete them from
the TSC1 datalogger before attempting to create any new data files.
\
When you create a new rover file and press
, the Asset Surveyor
software automatically opens the newly created file, ready to log data
to it.
TSC1 Asset Surveyor Software User Guide 53
Page 74
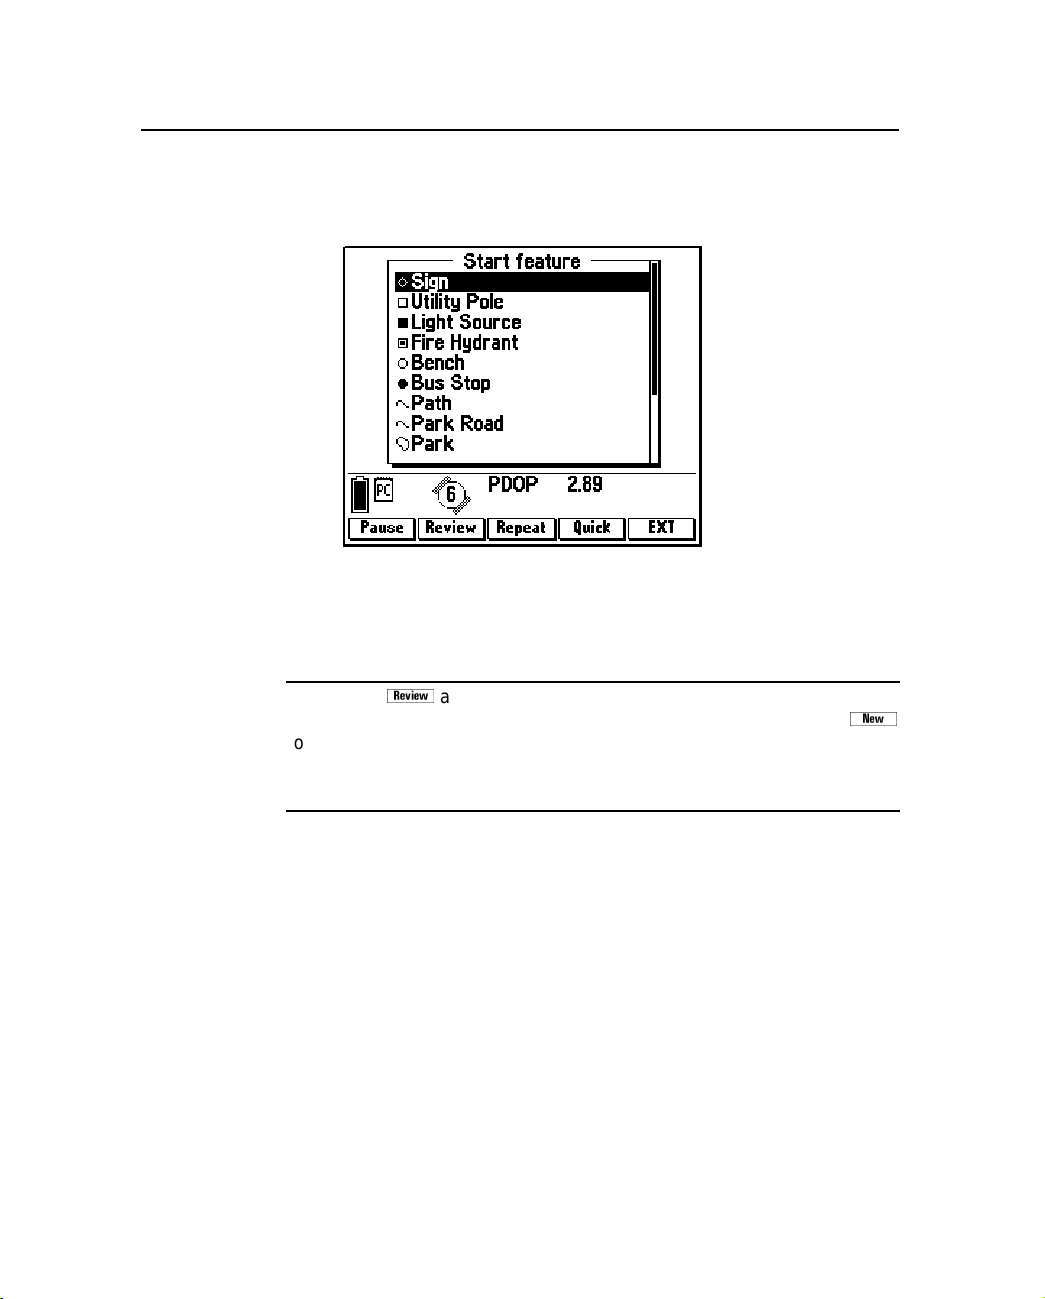
3 Data Collection
3.2.2 Collecting New Features
The Start feature menu lists features as in the following example:
You can choose a feature to collect by selecting it from the menu. You
can also perform a number of other operations using the softkeys on
the menu.
B
Tip – Press
you can view or update features that you have collected so far. The
softkey in the Review data list lets you switch back to the Start feature
menu from Review data, thus pr oviding for efficient collection and review
of new features, and also the review and update of existing features.
{
at any stage to switch to the Review data list, where
Note – Features are collected one at a time; you normally end one
feature before starting the next. A useful exception to this rule is the
embedding of point features within line or area features using nesting
(see page 66) or quickmarking (see page 63) techniques. While a
feature is open for data collection or update, you can also have a
second feature open for reference in an edit-only capacity. You can
edit its attributes or offsets, but you cannot update its GPS position.
54 TSC1 Asset Surveyor Software User Guide
b
Page 75

3.2.3 Selecting a Feature to Collect
When you select a feature from the Start feature menu, the Asset
Surveyor software starts to collect data for that feature. This includes:
• the GPS position of the feature
• an optional offset to the GPS position
• attributes of the feature (entered using the TSC1 keypad)
• any external sensor data which might be recorded for that
feature
Provided a GPS receiver is connected and operational, the Asset
Surveyor software records GPS positions automatically for the
feature, according to the way that you have configured the GPS
interface. If you have configured and activated an external sensor,
external sensor data is also recordedautomatically. If you have
configured and activated a laser rangefinder, you can record an offset
for the feature by aiming and firing the rangefinder.Alternatively, you
can measure and enter the offset manually.
By taking care of GPS and external sensor data collection, and by
integrating the recording of an optional offset to each feature, the
Asset Surveyor software lets you concentrate on entering attribute
values for the feature.
Data Collection 3
TSC1 Asset Surveyor Software User Guide 55
Page 76
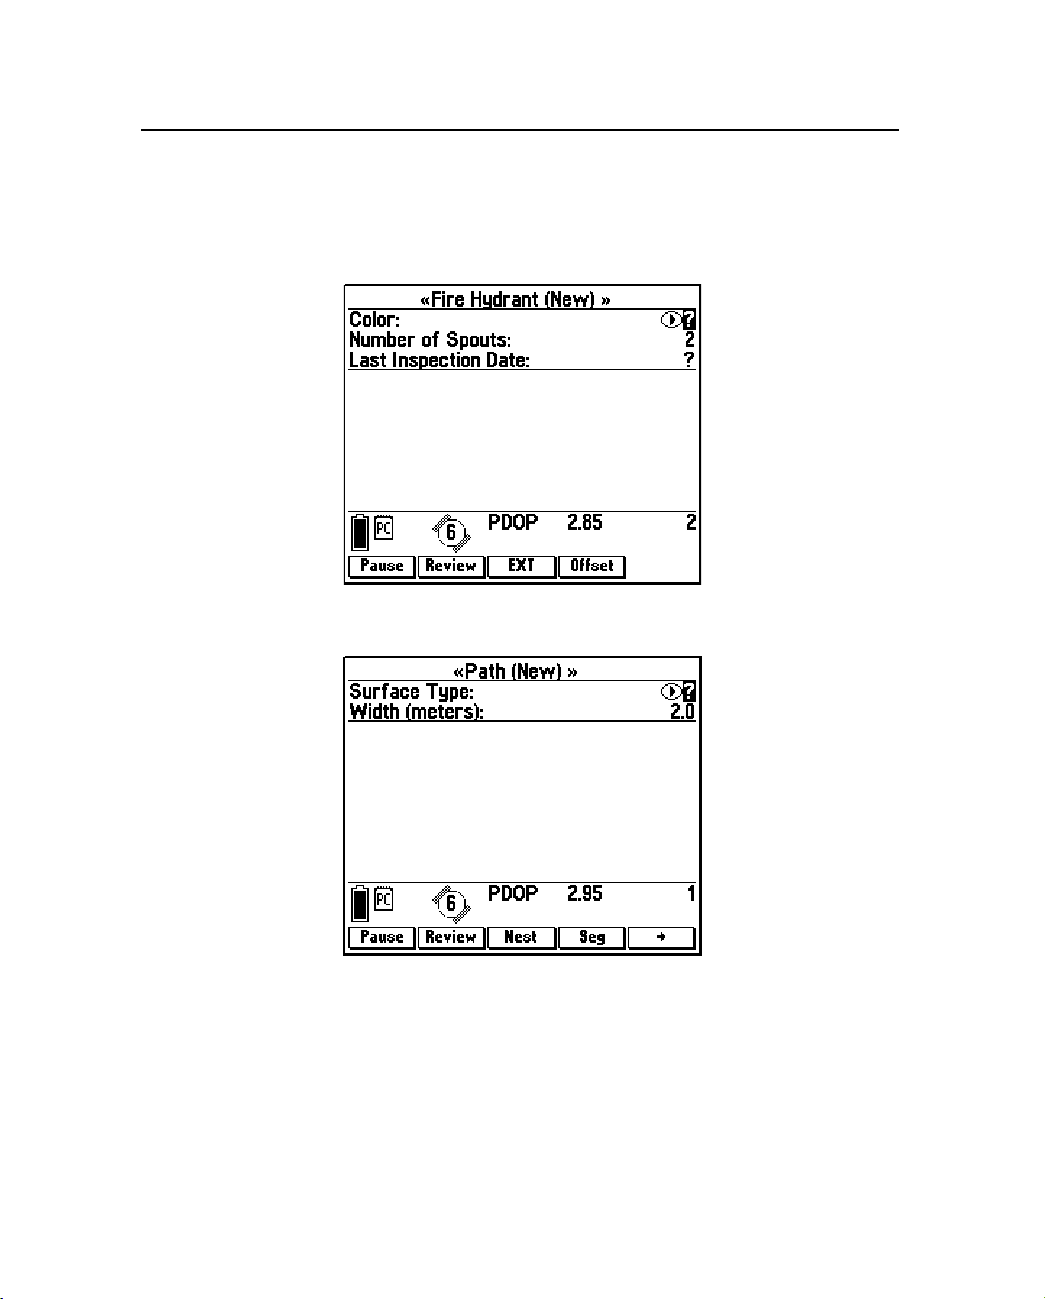
3 Data Collection
The attributes describing each feature are determined when you create
your data dictionary using the GPS Pathfinder Office software. The
following diagrams illustrate attributes for three of the features in the
menu shown above. They are a point feature:
a line feature:
56 TSC1 Asset Surveyor Software User Guide
Page 77
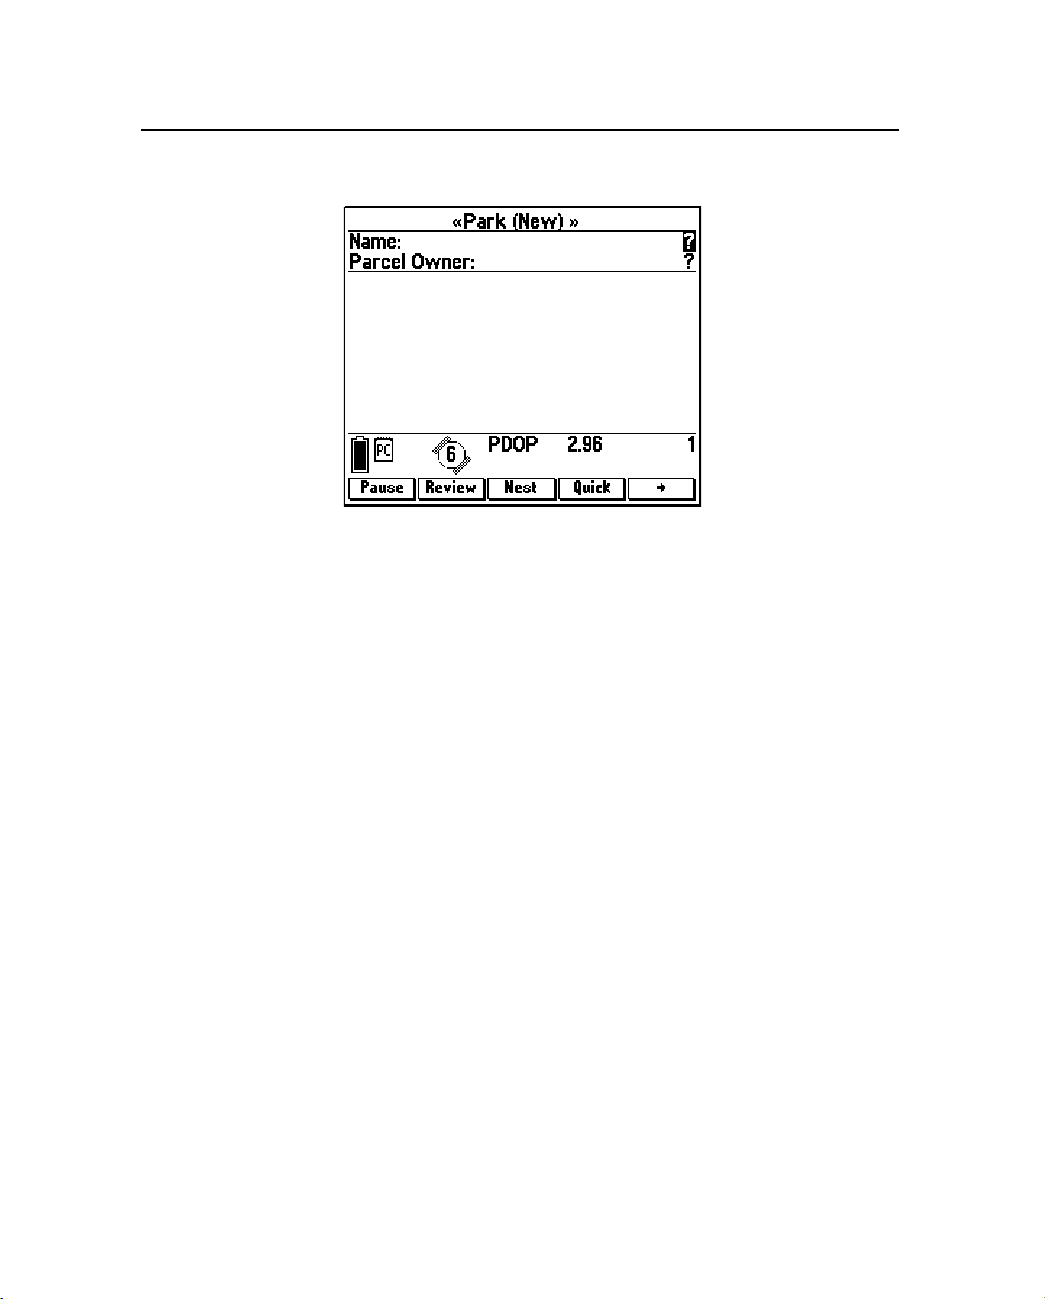
and an area feature:
Data Collection 3
TSC1 Asset Surveyor Software User Guide 57
Page 78
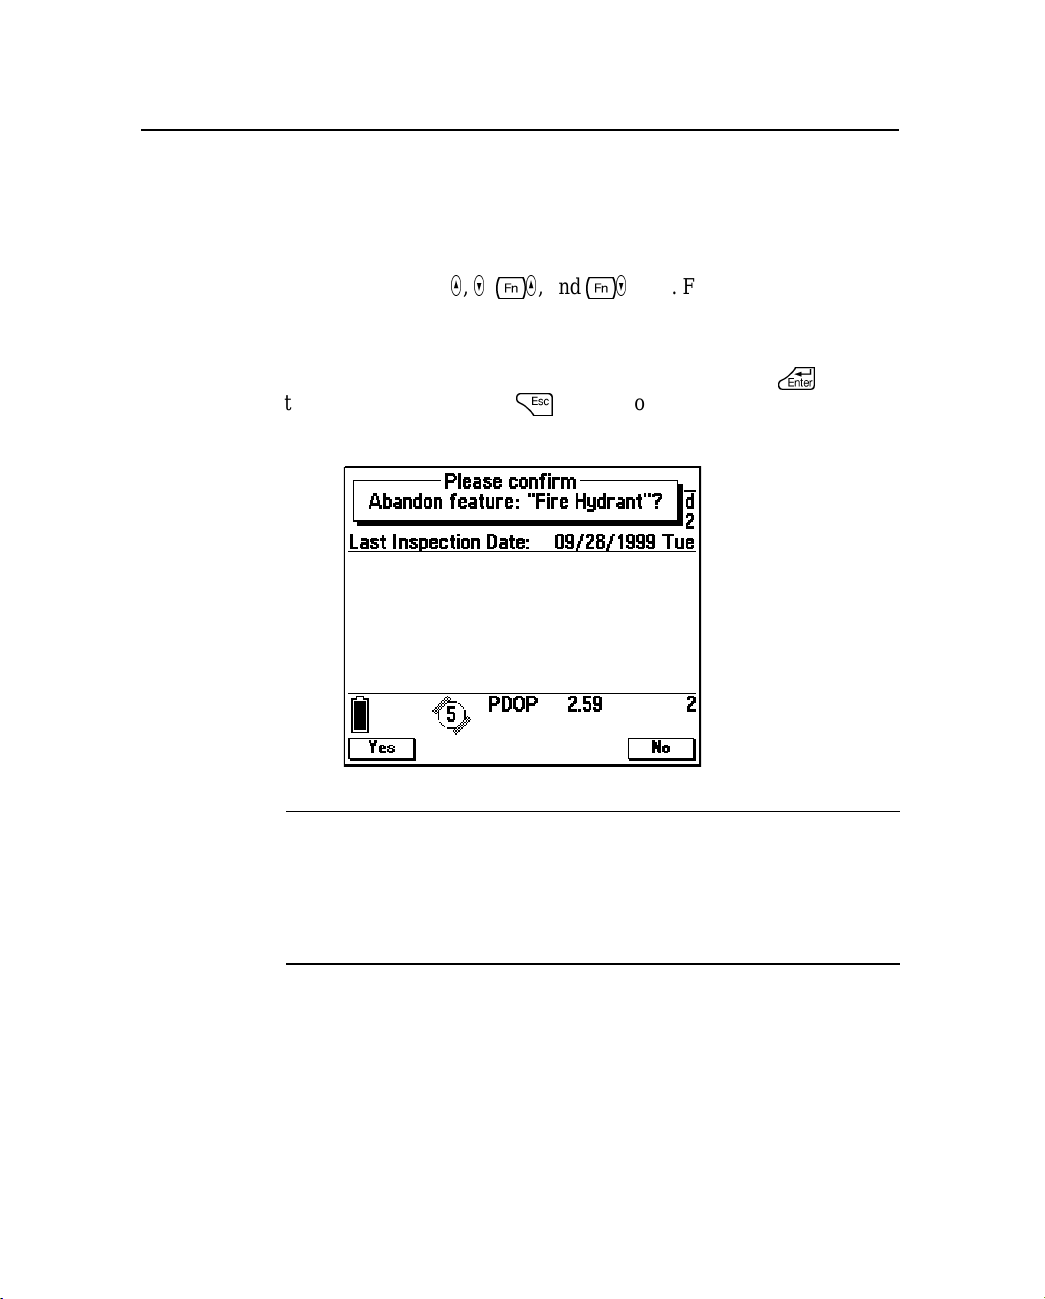
3 Data Collection
3.2.4 Entering Attribute Values
The attribute entry form for a feature behaves identically to other
Asset Surveyor forms. You enter values for each field, according to its
type (menu, numeric, character string, time, or date), and move from
fieldtofieldusing
_,),[_
on moving from one field to another, see Moving between fields,
page 29.
When you have finished entering attribute values, press
the feature. You can press
it, but the Asset Surveyor software always asks you to confirm this:
,and
[)
keys. For further instructions
\
=
to abandon the feature without saving
to save
C
58 TSC1 Asset Surveyor Software User Guide
Warning – When you abandon a feature, the Asset Surveyor software
discards not only the partially entered attribute values, but also any GPS
positions and/or external sensor data records which have been recorded
for that feature. The only exception to this rule is a line or area feature, in
which case the GPS positions are not discarded, but are treated as not-infeature positions. These provide a trail showing the path that you traveled.
Page 79
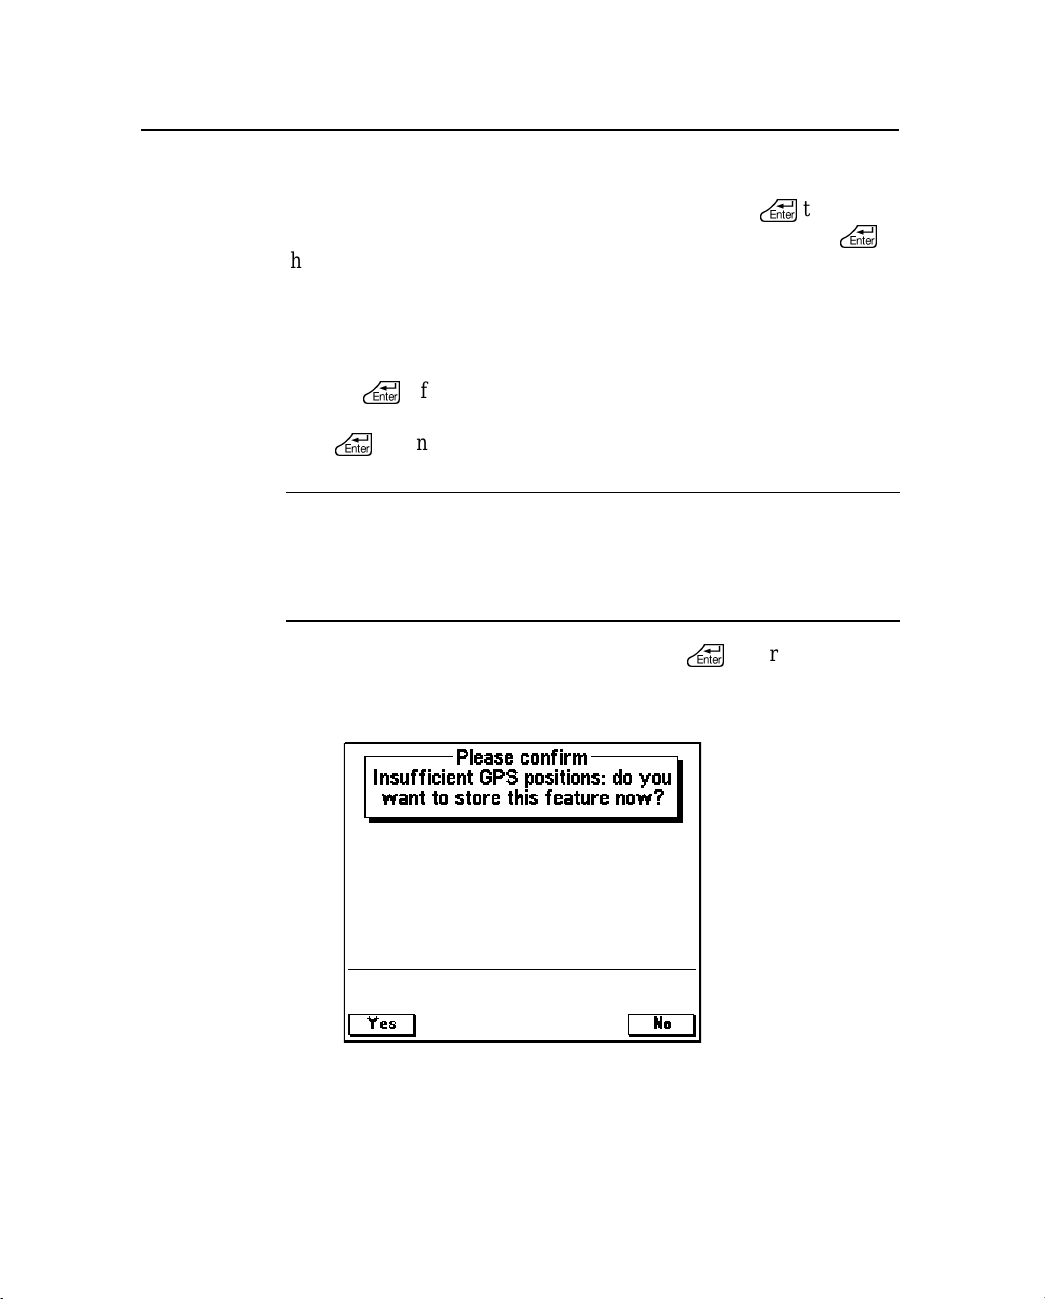
3.2.5 Saving Features
Data Collection 3
B
As with a normal Asset Surveyor form, you can press
attribute entry form’s contents, but you will probably not press
\
to save the
\
the moment you finish entering attributes for the feature. This is
because, while the feature is ‘active’, any GPS positions and external
sensor data which are logged are associated with that feature. If this is
a point feature, you should remain stationary at that feature until the
configured m inimum number of positions have been logged before
pressing
\
. If it is a line or area feature, continue to walk or drive
along the feature (or around its perimeter,if it is an area feature). Only
press
\
when you have traversed it completely.
Tip – When traversing a line or area feature you can often pass points of
interest that need to be logged or updated. The Asset Surveyor software
offers a number of convenient ways to collect point features at the same
time as you collect a line or area feature. For more information, see
Quickmarking, page 63, and Nested Features, page 66.
If you are collecting a point feature and press
\
before the
configured m inimum positions have been logged, the following
message appears:
TSC1 Asset Surveyor Software User Guide 59
Page 80
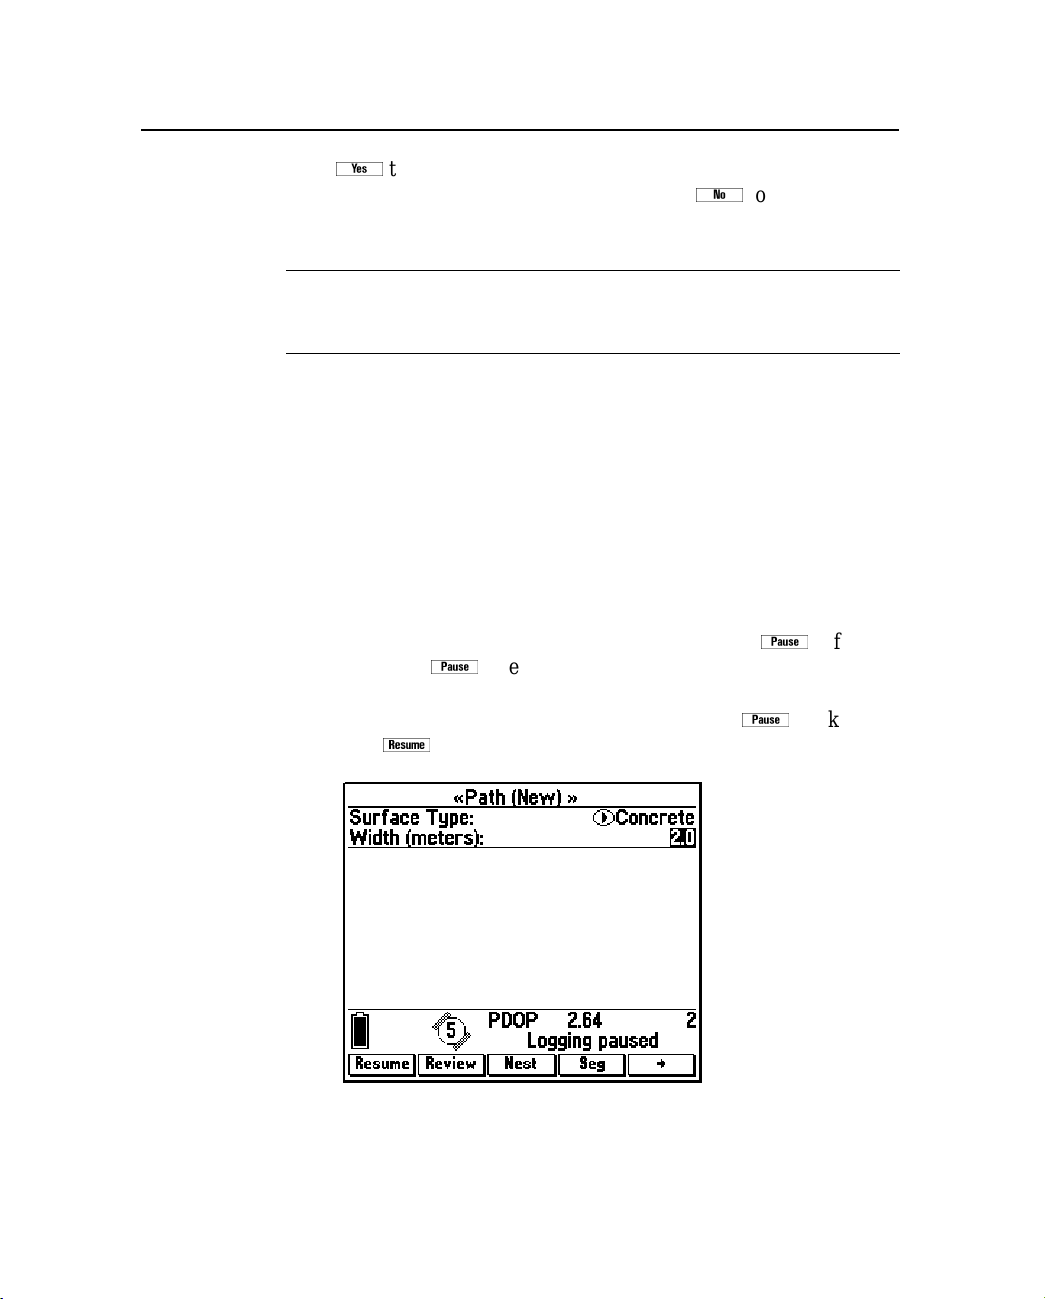
3 Data Collection
Press
the number set in Minimum positions,orpress
feature and wait for more positions to be logged.
y
to store the point feature with fewer GPS positions than
n
to return to the
B
Tip – The minimum number of positions for point features can be
specifiedintheLogging options form. For more information, see Logging
Options, page 166.
Note – When Carrier mode is set to ‘On’, the configured number of
minimum positions is not applied to the collection of point features.
The various other operations that can be performed during the
collection of features and/or the entry of attributes are described in the
following sections.
3.2.6 Pause and Resume Logging
When you are entering attributes for a feature or are at the Start
feature menu, the Asset Surveyor software provides a
When you press
p
, the Asset Surveyor software stops logging
GPS positions. While logging is paused, the message
appears periodically on the GPS status line, and the
changes to
L
:
p
softkey.
Logging paused
p
softkey
60 TSC1 Asset Surveyor Software User Guide
Page 81

Data Collection 3
C
B
When you press
and the softkey reverts back to
p
Press
L
, the Asset Surveyor software resumes logging
p
.
whenever you want to stop briefly, or if you a re collecting
a line or area feature and have to travel around some obstacle before
picking up the line or area perimeter again. You should also use
p
if you want to nest a point feature within a line or area, and the point
lies some way off the line or area perimeter. You can then nest the
point without ending up with a ‘spike’ in the line or area.
Warning – When GPS logging is paused, the Asset Surveyor software
does not record GPS positions, external sensor data, velocities, or PPRT
fields, but continues to record carrier measurements (if Carrier mode is
set to ‘On’) and certain critical GPS information that is required for
postprocessing. This additional information is relatively small, but it is
possible that even when logging is paused your TSC1 datalogger may
eventually run out of data storage space.
Each time you resume logging while collecting a line or area feature,
the Asset Surveyor software logs a GPS position (irrespective of the
logging interval for line or area features).
Tip – You can use this feature to make the Asset Surveyor software log a
GPS position when you come to a corner or a point of interest while
collecting a line or area feature. Press
current GPS position to be logged. After you press
Surveyor software continues to log GPS positions at the configured line or
area logging interval.
p
and then
L
L
to cause the
,theAsset
TSC1 Asset Surveyor Software User Guide 61
Page 82
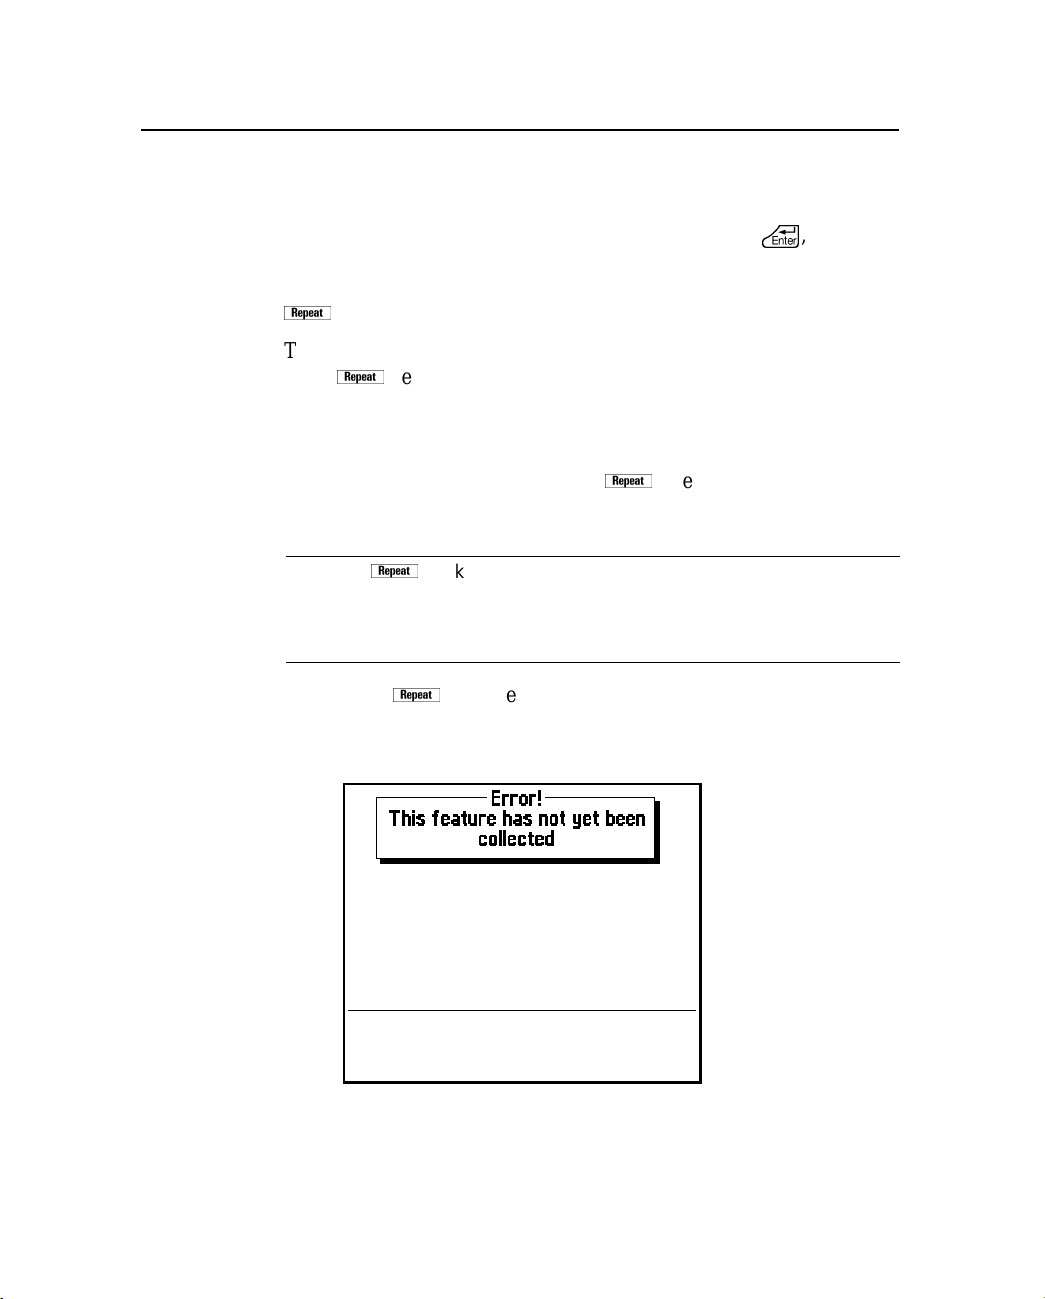
3 Data Collection
3.2.7 Repeating Features
You usually select a feature to collect using normal menu selection
techniques (that is, highlighting a feature and pressing
first-letter selection method). However, you can also select the
currently highlighted feature on the Start feature menu by pressing
J
.
The difference between normal selection of a feature and selecting
J
using
lies in the attribute values that are entered by default when
the feature is created. If you select the feature by the normal method,
the default attribute values are determined by the data dictionary,
which specifies a default value for each attribute belonging to each
feature. If you select a feature using
copied from the last recorded feature of that type.
J
, the attribute values are
\
,orusinga
B
Tip – The
very efficiently. You do not have to re-enter the values for all of the
attributes; just scroll through checking that each attribute value is correct
for the current feature, and change only those that differ.
If you press
J
softkey lets you record a sequence of similar features
J
and a feature of the currently highlighted type has
not yet been recorded to the current data file, the Asset Surveyor
software informs you that it cannot repeat this feature type:
62 TSC1 Asset Surveyor Software User Guide
Page 83

You must first log a feature using the normal m ethod before you can
repeat it.
The feature that is repeated is normally the last feature of that type that
was collected. However, you can repeat the attributes of any feature in
thefilebyhighlightingitontheReview data list and opening it for
attribute review before you press
Note – Offsets, except those configured as constant offsets, are not
repeated when
3.2.8 Quickmarking
The Asset Surveyor software provides two ways to collect the G PS
position of a point feature. The usual way is to select a point feature
from the Start feature or Nest feature menu, and to stay at that feature
long enough to log sufficient GPS positions. Another way is to record
a quickmark.
A quickmark is recorded by simply pressing a button on the TSC1
datalogger as you drive, fly, or move past a feature. With quickmarks,
the Asset Surveyor software cannot record a number of positions to
average together.In fact, the software cannot necessarilyeven record a
single GPS position at exactly the moment that youpass the feature. It
therefore records an accurate time (using the very precise GPS
satellite timers to keep the TSC1 datalogger’s clock perfectly
synchronized). This time is used to compute an interpolated position
for the quickmark based on two GPS positions: the one logged before
you passed the feature and one logged after.
J
is pressed.
J
Data Collection 3
.
B
The accuracy of quickmarks is not as high as the accuracy you can
achieve by standing at a point and logging positions for some time, but
you can use quickmarksto rapidly recordreasonably accurate GPS
positions for a large number of features.
Tip – Because quickmarks are recorded to the nearest second, if you
travel more slowly the quickmarks that you record will be more accurate.
TSC1 Asset Surveyor Software User Guide 63
Page 84
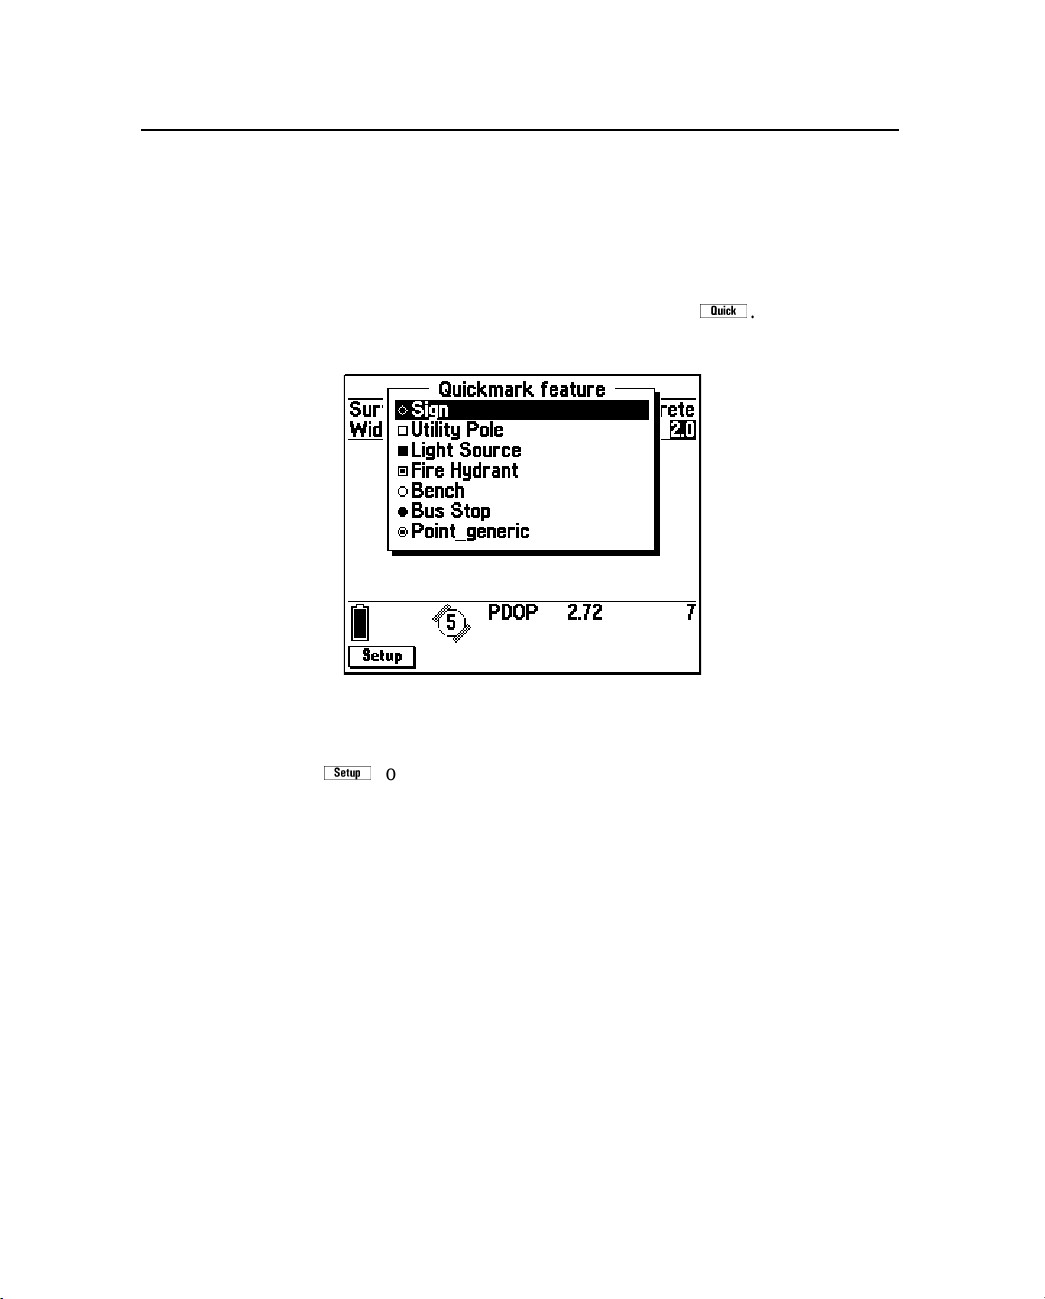
3 Data Collection
Quickmarking is especially useful if the features all lie along a road or
path, and are a reasonable distance apart, so that even with quickmark
accuracy their interpolated positions clearly identify them.
You can record quickmarked point features when not logging any
other feature, or you can nest them within line or area features. To gain
access to the quickmark recording menu, press
Surveyor software pops up a m enu containing only point features:
q
.TheAsset
Note – Youcan only quickmark point features. It makes no sense to
instantaneously record a single position for a l ine or area feature.
S
The
softkey provides a shortcut to the Quickmark options
configuration form. You can choose whether quickmarked features
should be assigned default attribute values based on the data
dictionary, or whether their attributes should be repeated from
previous features. You can also choose whether or not the Asset
Surveyor software should permit you to confirm or edit the attribute
values associated with each quickmark as it is recorded. For more
information, see Quickmarks, page 263.
64 TSC1 Asset Surveyor Software User Guide
Page 85
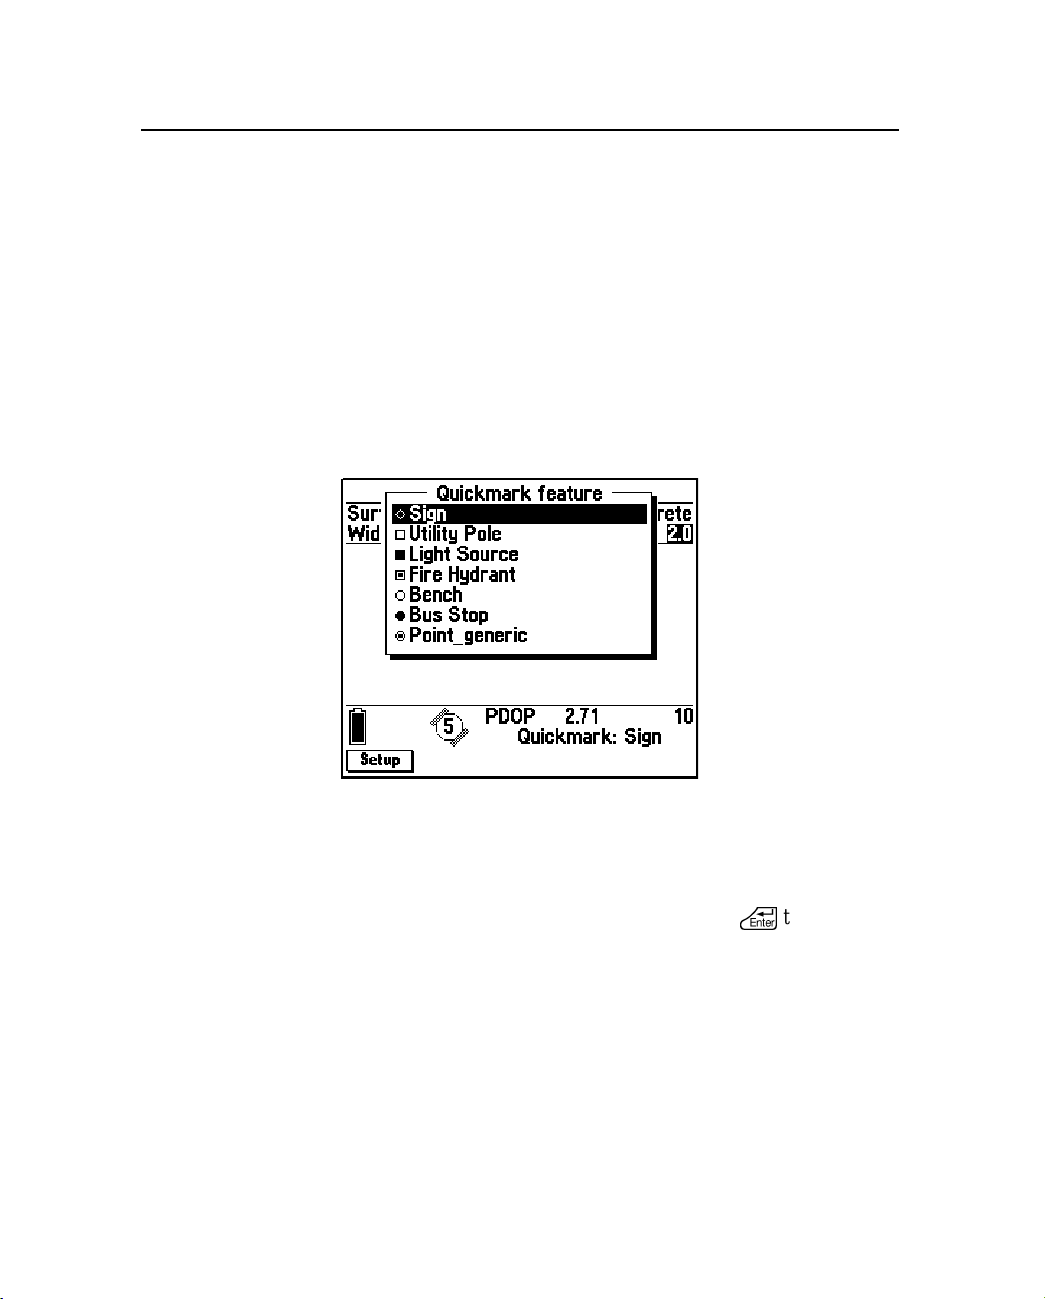
Data Collection 3
When you select a point feature from the Quickmark feature menu, the
Asset Surveyor software records the precise t ime at which you
selected that feature and makes sure that bracketing GPS positions are
logged for use when interpolating. It determines the appropriate
source for default attribute values (the data dictionary or a previous
feature) and logs the feature’s default attributes (if any).
Finally, if the Confirm configurable field has been set to ‘Yes’, the
Asset Surveyor software automatically lets you review and possibly
edit these attributes. By default, the Confirm field’s value is ‘No’, and
the Asset Surveyor software simply beeps and displays a message on
the GPS status line to confirm that it has recorded the quickmark:
Note – If you choose to confirm and edit attribute values for
quickmarks, remember that even though it takes time to confirm or
edit the attribute values, the quickmark position for the feature was
recordedthe instant you selected the feature.Even if you have traveled
some distance from that point by the time you press
\
to save the
edited attributes, the feature’s position i s not affected.
TSC1 Asset Surveyor Software User Guide 65
Page 86
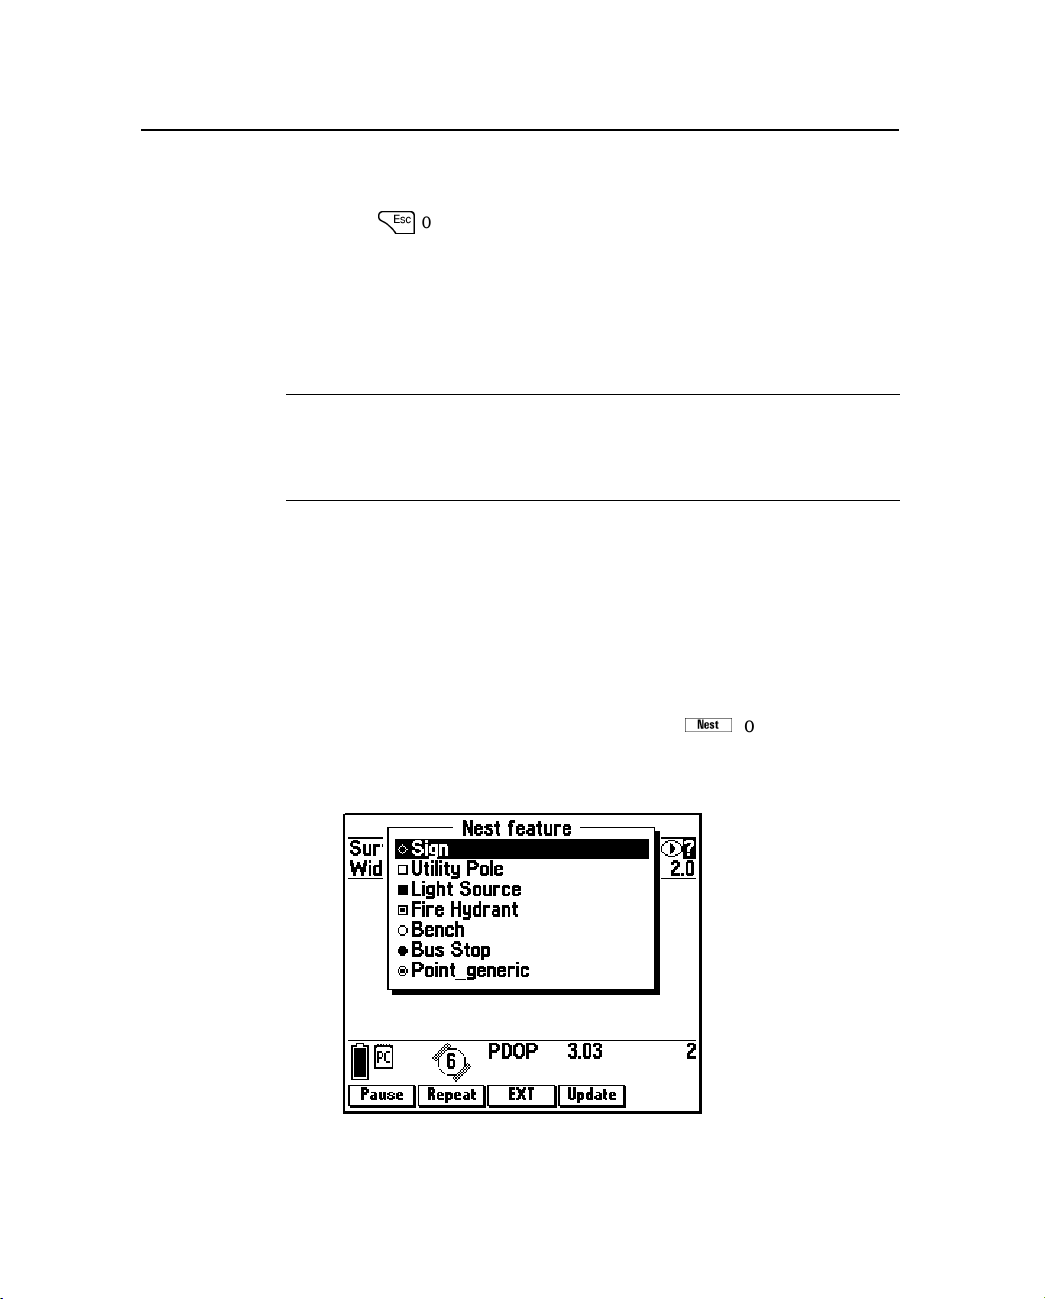
3 Data Collection
Note – The quickmark and its attributes are saved the moment you
select the feature from the menu. If you have Confirm set to ‘Yes’ but
then press
with unedited default values for its attributes. If you want to delete the
feature (perhaps because you selected it at the wrong moment), you
must review the data file and delete it from the list of recorded
features.For more information, see Reviewing and Updating Existing
Features, page 84.
=
on the attribute form, the feature is still recorded but
B
3.2.9 Nested Features
Tip – It is often not possible to drive directly over a feature, so when
collecting data in a vehicle you may want to configure a constant offset for
quickmarks. You can then drive past each feature at the pre-specified
distance and record offset quickmarks.
When recording a line or area feature, you often come across point
features that you would like to record. You do not have to complete
the whole line or area before returning to record the point features;
you can just nest the point within the line or area.
When you collect a line or area feature, press
featuremenu, which contains a list of point features that can be nested
within that line or area feature:
N
to pop up the Nest
66 TSC1 Asset Surveyor Software User Guide
Page 87
Data Collection 3
Until you actually select a point feature to nest, any GPS positions
logged belong to the outer line or area feature.
A
Press
to open the Update point featuremenu, where you can nest
the update of an existing point feature. Youcan do this while updating
an existing line or area feature, or while logging a new one. On the
Update point feature menu, the
b
to return to the Nest feature menu.
A
softkey changes to
b
.Press
To nest a point feature that lies off the perimeter of the line or area
feature:
p
1. Press
to pause logging to the line or area.
2. Travel to the point feature in question.
3. From the Nest new feature menu, select the appropriate point
A
feature, or press
and select an existing feature to update.
When you are ready to record GPS positions for this feature,
L
press
if it is a new feature, or
3
if it is an existing
feature. Logging begins and continues until you save the nested
feature or until you press
p
again.
4. When you have finished recording attributes for the point
feature and have logged sufficient GPS positions, press
save the feature.
The Asset Surveyor software automatically pauses logging and
returns you to the attribute entry form for the outer line or area
feature.
5. Do one of the following:
N
–Press
again to nest another point feature (and repeat
steps 2 to 4).
– Go back to the line or area’s perimeter and press
L
resume logging of GPS positions for the line or area.
TSC1 Asset Surveyor Software User Guide 67
\
to
to
Page 88
3 Data Collection
B
B
B
Tip – You can select the end of the line feature as the Target and use the
Asset Surveyor software’s navigation functionality to guide you back to it,
ready to continue logging.
You can nest as many point features within a line or area as necessary
(limited only by storage space on the TSC1 datalogger).
\
When you have traversed the line or area’s perimeter, press
save that feature.
Tip – If you are traveling rapidly, the points you want to nest have few
attributes, and their positions need not be as accurate as averaged point
features, consider quickmarking them instead of nesting them. Recording
quickmarks is very rapid and efficient.
If you select a point f eature to nest from the menu, it has default
attribute values as defined in the data dictionary. You can nest a point
feature with the same default attributes as the previously recorded
feature of that type by highlighting the feature in the Nest feature
menu and pressing
Tip – You can nest a pointfeature with the same attributes as any feature
in the file by highlighting the feature on the Review data list and opening
the feature for review before you press
J
.
J
.
to
68 TSC1 Asset Surveyor Software User Guide
Page 89
3.2.10 Segmented Line Features
When collecting line features, it is often convenient to divide a line
into a number of segments. Segmentation of lines lets you specify
differing attribute values for parts of the same physical line.
Segmentation also lets you end one line feature and immediately start
another (of the same type) while you are still moving. This is very
useful if you are mapping roads or highways where it can be difficult
or illegal to stop at a point where one feature ends and the next feature
starts.
Data Collection 3
B
C
C
Tip – Because the segment position is recorded to the nearest second, if
you travel more slowly the positions you record will be more accurate.
To segment a line feature, press
s
. The current line f eature is
saved and another line feature of the same type is immediately started
with the same attribute values as the previous feature. The last GPS
position of the first segment is identical to the first GPS position of the
second segment, so that adjacent segments are joined end-to-end in
your GIS.
Warning – When you press
the first line feature’s attributes. If you have not finished entering the
attributes for that line segment, the Asset Surveyor software does not let
you save the feature. You must complete attribute entry before pressing
\
or
s
again to save that feature. In the meantime, you must stop
until the first feature has been completed.
Warning – If there is no current GPS position available when you press
s
(due, for example, to a high PDOP situation), the Asset Surveyor
software does not start the new line segment with the last GPS position of
the previous line segment. Instead, the new line segment starts from the
first GPS position that becomes available after you press
Asset Surveyor software may also start the new line segment at a position
other than the precise end of the previous line segment if a satellite
constellation change occurs at the moment
s
, the Asset Surveyor software validates
s
s
is pressed.
.The
TSC1 Asset Surveyor Software User Guide 69
Page 90
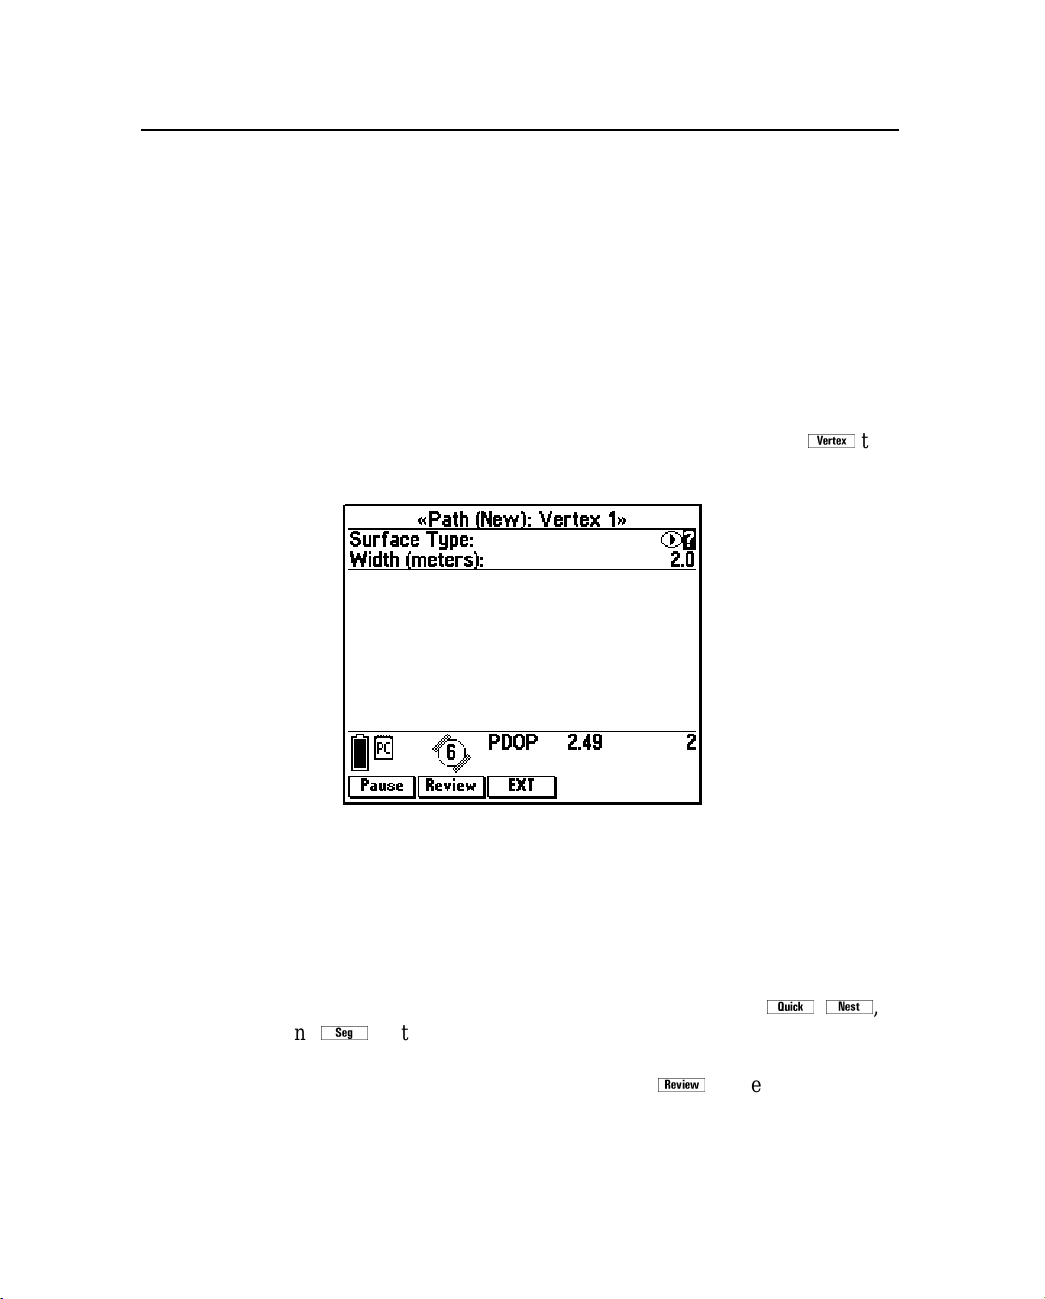
3 Data Collection
3.2.11 Averaged Vertices for Line and Area Features
A line or area feature is composed of a number of positions joined in
sequence from the first position logged to the last. Each position
represents a vertex of the feature. For more accurate recording of line
and area features, you can record several positions at each vertex, then
average these positions together to calculate the vertex position.
Logging a feature with averaged vertices is similar to logging a
number of point features, each composed of a number of averaged
positions, then joining these features together.
In the attribute entry form for the line or area feature, press
open the Vertex form:
,
to
This form contains the same fields as the attribute entry form, so you
can enter or edit attribute values for the line feature, including any
attribute whose value is supplied by input from an external sensor.
An averaged vertex is similar to a point feature, and the same
limitations that apply to a point feature apply when the Vertex form is
open. Youcannot record quickmarks, nest point features, or segment a
line feature while recording an averaged vertex, so the
and
s
softkeys are not available. Because your direction of travel
(bearing)is unknown when you are stationary, you cannot enter or edit
the feature’s offset. However, you can use
existing features in the Review data list.
70 TSC1 Asset Surveyor Software User Guide
{
to view and edit
q,N
,
Page 91

Data Collection 3
While the Vertex form is open, you must remain stationary, as though
you were recording a point feature. The messages
Vertexopen flash alternately in the status line to remind you to stay still.
Remain stationary and
The number of positions recorded for this vertex also appears in the
status line. When you have logged as many positions as you require
for this vertex, close the Vertex form. You are returned to the attribute
entry form.
A line or area feature can include both averaged vertices and positions
logged normally as you travel. If you want to record only averaged
vertices, you must pause logging before you open the feature.
Whenever you open t he Vertex form, logging starts, and when you
close the Vertex form, logging returns to its former state. This
techniqueensures that no positions are logged except those you log for
averaged vertices. While the Vertex form is open, the
p
and
L
softkeys control logging of positions for the current vertex.
TSC1 Asset Surveyor Software User Guide 71
Page 92
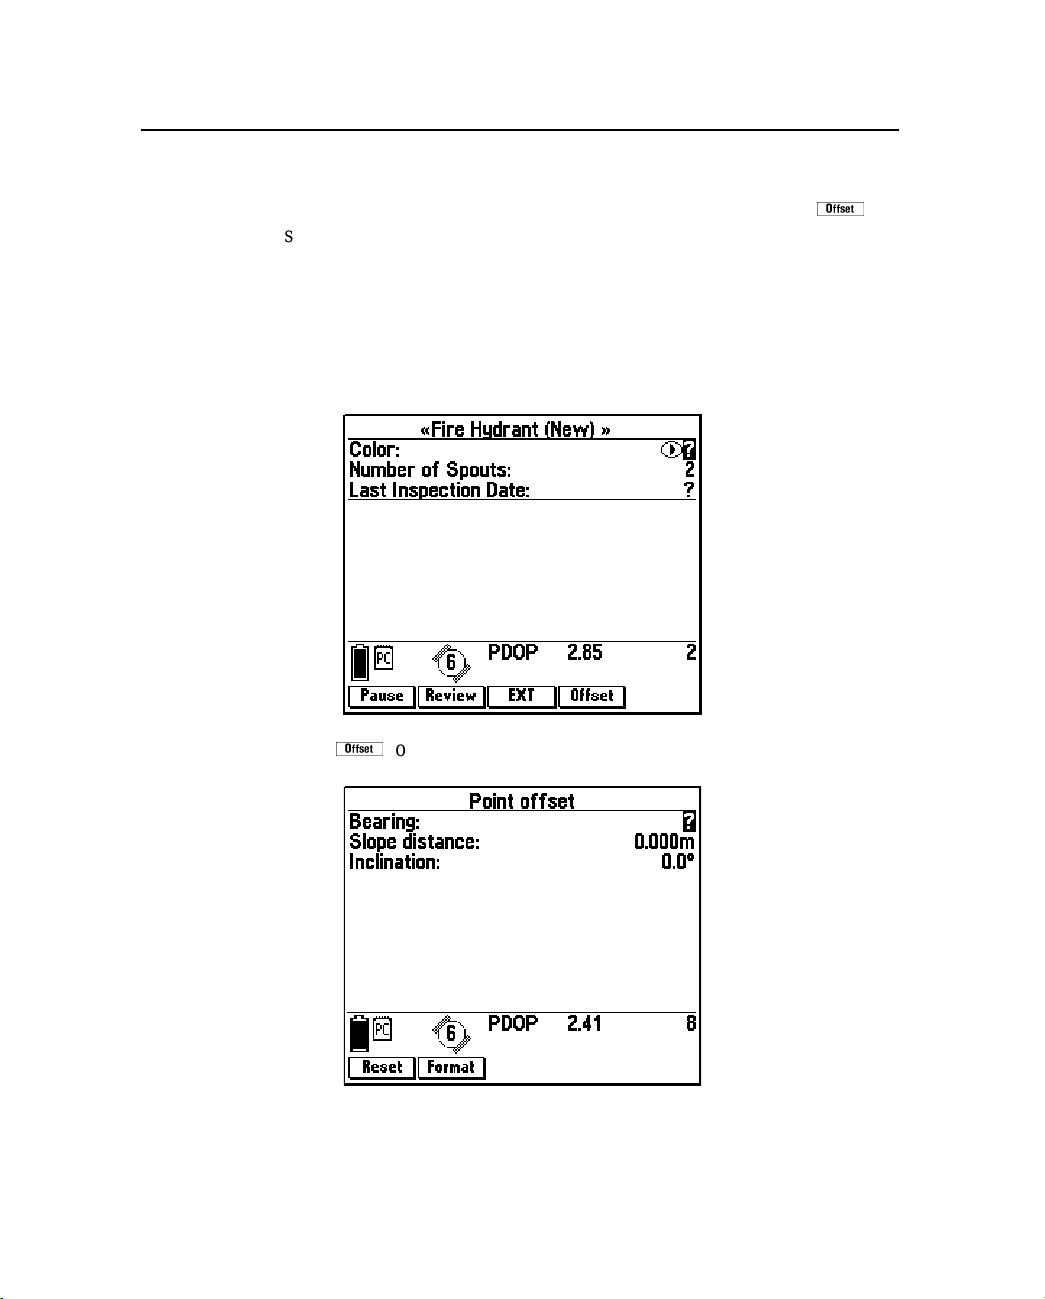
3 Data Collection
3.2.12 Offsets
The attribute entry form for each type of feature includes an
O
softkey. You can press this to view or enter the offset for the feature
being collected. If you have configured a non-zero constant offset for
the class of features being collected, then the default offset value for
that feature is as configured.
For example, the attribute entry form for a point feature might look
like:
O
Press
to access the Point offset form as follows:
72 TSC1 Asset Surveyor Software User Guide
Page 93
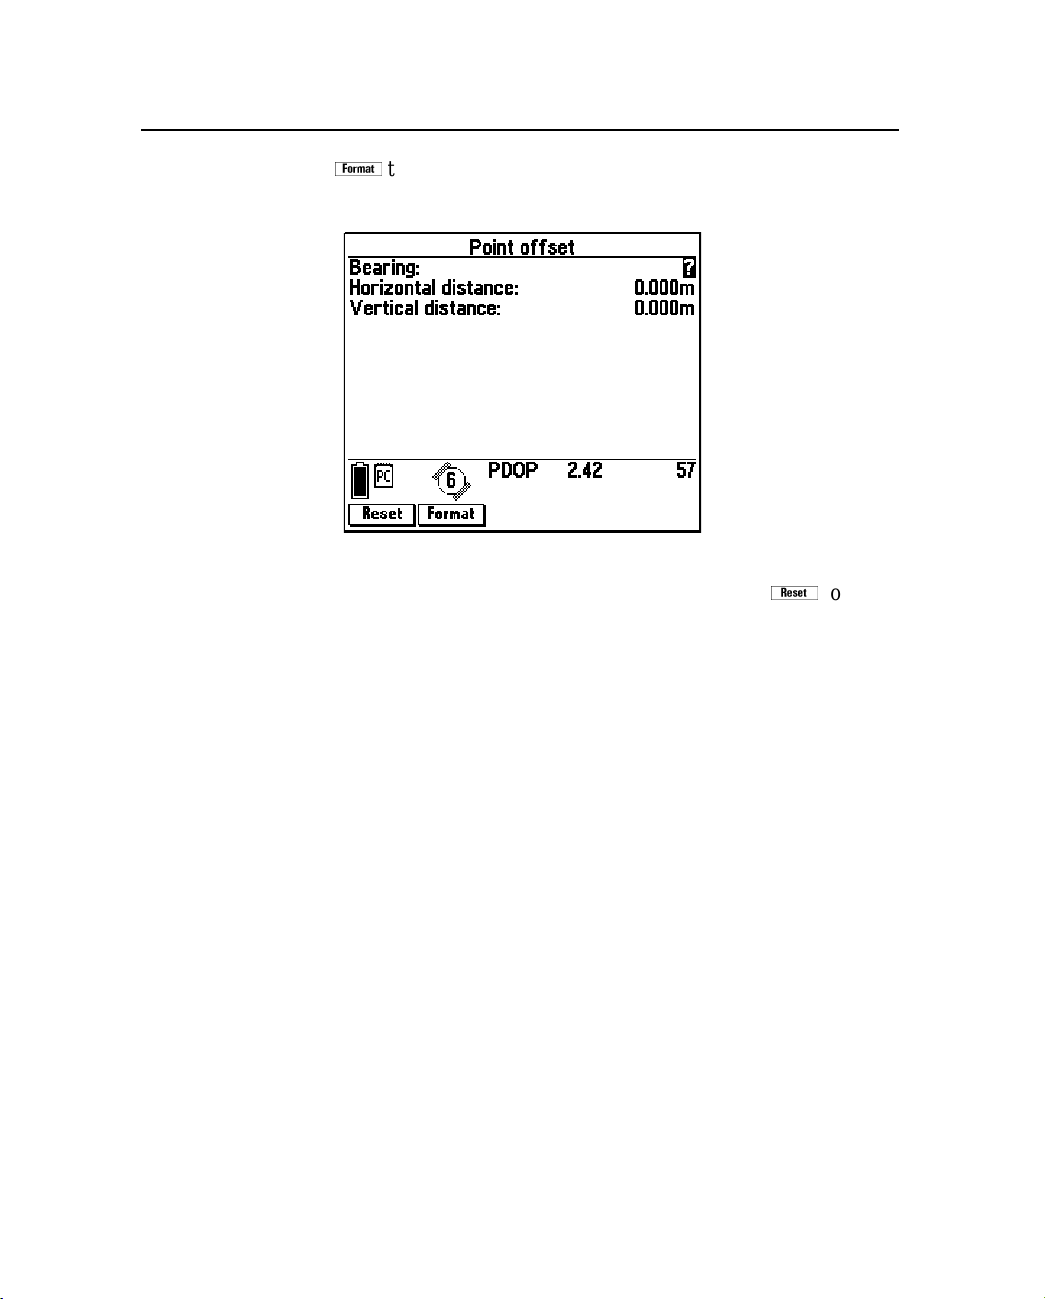
Data Collection 3
Press
f
to switch between the slope distance/inclinationmethod of
display and the horizontal/vertical distance method:
You can change the configured constant offset for the current feature
K
by measuring and entering a new offset, or by pressing
to
indicate that there is no offset to apply to this feature.
Note – AllAsset Surveyor features (points, lines, areasor quickmarks)
can have only one offset associated with them. You cannot have two or
more offsets for a single feature. In particular, this means that to
record a line feature with a given offset and then to change the offset
part-way through the line feature, you must segment the line at that
point (each segmented line feature has its own offset). You must
carefully plan how to collect an area feature using offsets, as the same
offset value must apply to the entire area feature.
You can fill in the three offset fields for a point feature using a laser
rangefinder. In the case of a line, area, or quickmark feature, a laser
rangefinder can only be used to fill in the last two fields; the first field
(Direction) must always be filled in manually.
TSC1 Asset Surveyor Software User Guide 73
Page 94

3 Data Collection
When you transfer features from the GPS Pathfinder Office software,
their offsets are transferred as well. However,unless you have updated
an offset in the same data collection session, it is reset to the current
constant offset value if the feature’s GPS position is updated. When
this happens the Asset Surveyor software shows the m essage
offset reset
When using a laser rangefinder, you do not have to visit the offset
form for a point feature; simply use the laser to record the offset and
watch for an
area, and quickmark features, however, you must visit the offset form
before you can record an offset using a laser rangefinder. This is
because you have to specify the Direction of the offset relative to your
current direction of travel.
Existing
.
Offset received message on the GPS status line. For line,
74 TSC1 Asset Surveyor Software User Guide
Page 95

3.2.13 External Sensors
You can use external sensors to collect data with the Asset Surveyor
software.
EXT softkey
Data Collection 3
When collecting data, press
X
at any time to access the menu of
external sensors. From this menu you can:
• activate or deactivate a sensor or laser
• check the status of an active sensor
• manually initiate a reading from an active sensor
• reconfigure a sensor
Automatic activation of sensors
If you have pre-configured an external sensor interface and have set
the Auto-connect configuration field to ‘Yes’, the Asset Surveyor
software automatically attempts to activate the sensor interface when
you create or reopen a rover data file.
If you have not pre-configured the sensor to automatically connect
X
(that is, activate), then you can manually activate it using
.
Automatic deactivation of sensors
X
If you press
to access the Select sensor menu, active sensors
remain active when you exit the Select sensor menu. When you exit
data collection, however, all active external sensors are automatically
deactivated.
TSC1 Asset Surveyor Software User Guide 75
Page 96

3 Data Collection
Status, reading, and configuration
When collecting data, you can check the status of a sensor, manually
take a reading from the sensor, or reconfigure the sensor using the
methods described in Testing an External Sensor, page 284.
Activation and configuration of a laser rangefinder is also accessed
using the
Automatic activation of the laser interface
If you have preconfigured the laser interface and have set the
Auto-connect configuration field to ‘Yes’, then the Asset Surveyor
software automatically attempts to activate the laser interface when
you start a data file.
If you have not preconfigured the laser interface to automatically
connect (that is, activate), you can manually activate it using
Automatic deactivation of the laser interface
If you press
interface remains active when you exit the Select sensor menu. When
you exit data collection, however, the laser interface is automatically
deactivated.
X
X
softkey.
to access the Select sensor menu, an active laser
X
.
Status, reading, and configuration
When collecting data, you can check the status of the laser, take a
reading from the laser, or reconfigure the laser interface using the
methods described for testing the laser interface in Chapter 5,
Configuring the Asset Surveyor Software.
76 TSC1 Asset Surveyor Software User Guide
Page 97
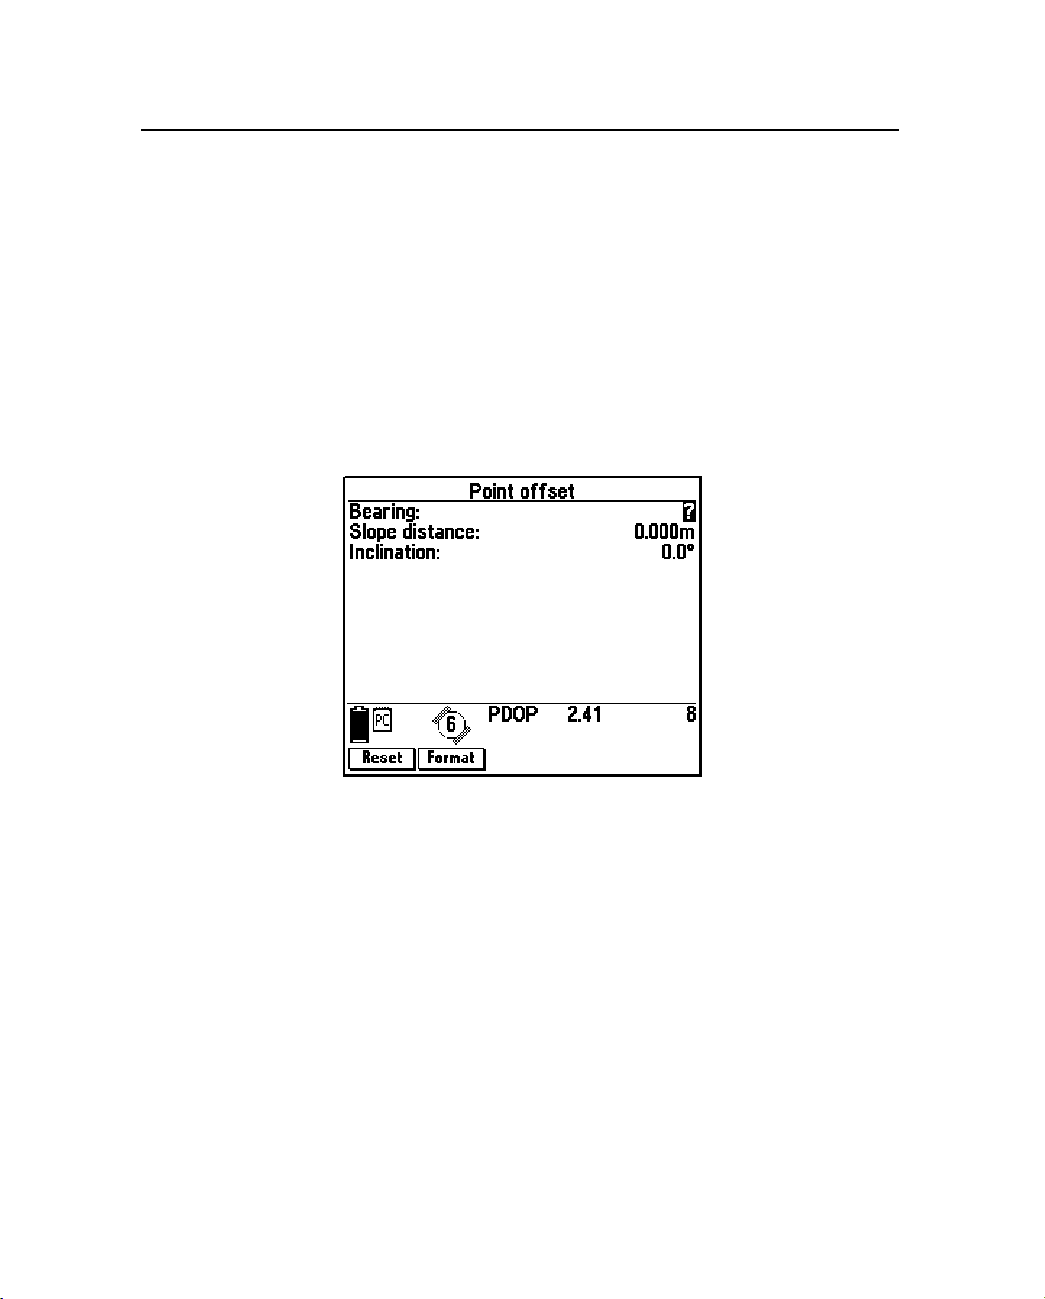
Data Collection 3
Recording laser offsets
When the laser rangefinder interface is activated within data
collection, data received from the rangefinder can be logged to the
current data file as an offset for the current feature.
If you activate a laser rangefinder within data collection and then take
a laser reading, the Asset Surveyor software responds in one of the
following ways:
• If you set the Confirm offsets configuration field to ‘Yes’, the
Offset form appears when you record an offset with a laser
rangefinder:
• If you set Confirm offsets to ‘No’, the Asset Surveyor software
displays the message
Offset received on the status line. The Offset
form also appears if:
– you need to enter a bearing for point features if your laser
rangefinder does not supply a bearing value
– you need to enter a direction (Left or Right) for quickmark,
line, or area features.
TSC1 Asset Surveyor Software User Guide 77
Page 98
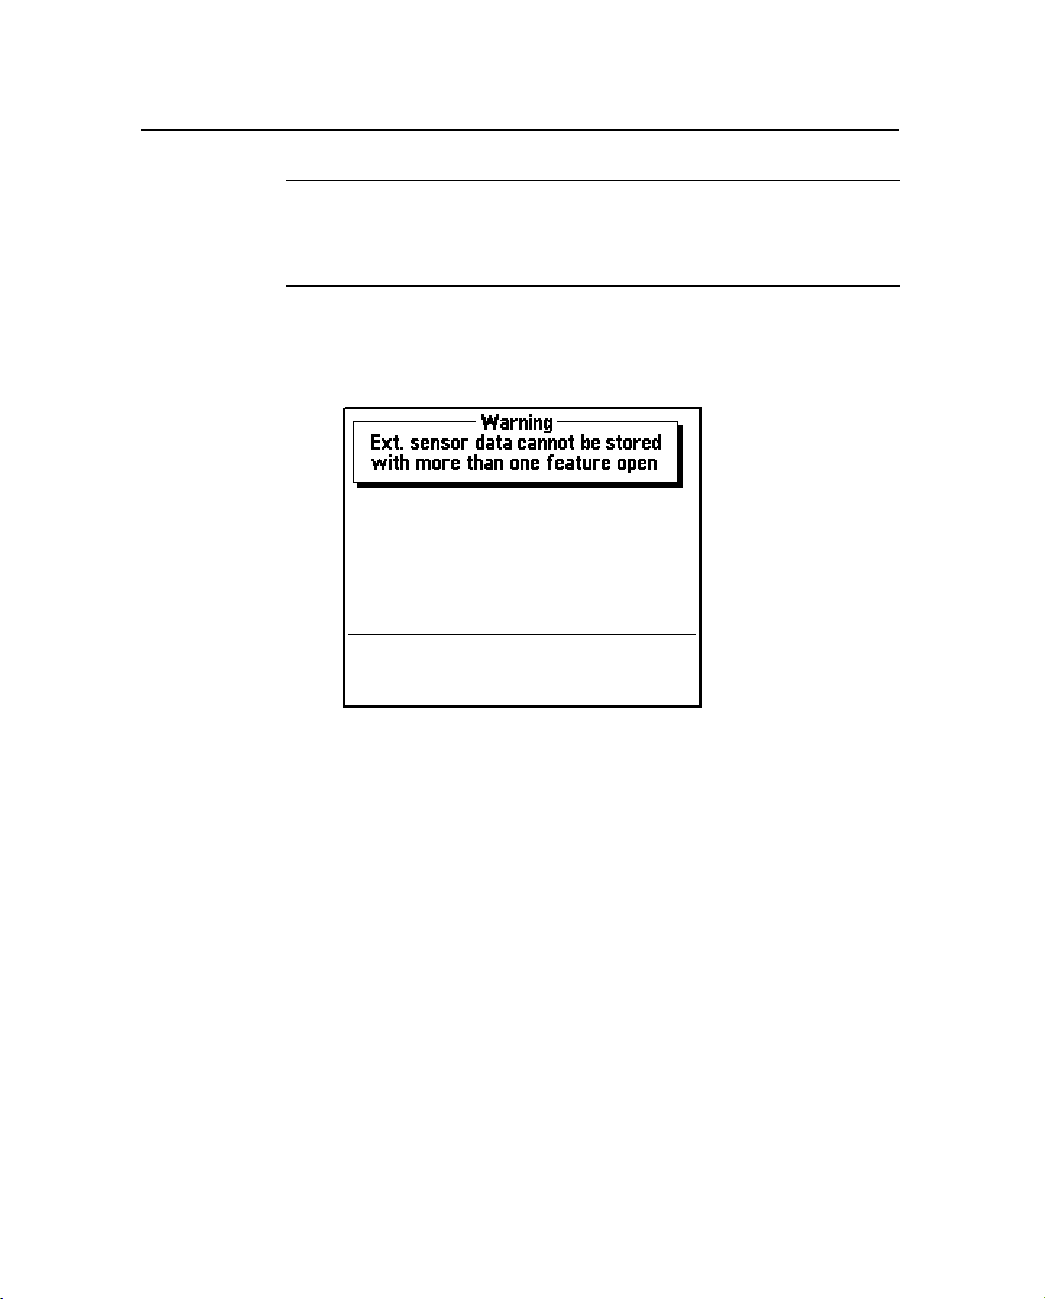
3 Data Collection
B
Tip – You can set constant offset values for eac h type of feature (point,
line, area, and quickmark). When you record an offset using a laser
rangefinder,any fields not filled by the rangefinder use the constantoffset
values.
• If you have more than one feature open (for example, if you
have an edit-only feature open for review) then the following
message appears when you try to log external sensor data.
You must close one of the features before you can log data from
the external sensor.
78 TSC1 Asset Surveyor Software User Guide
Page 99
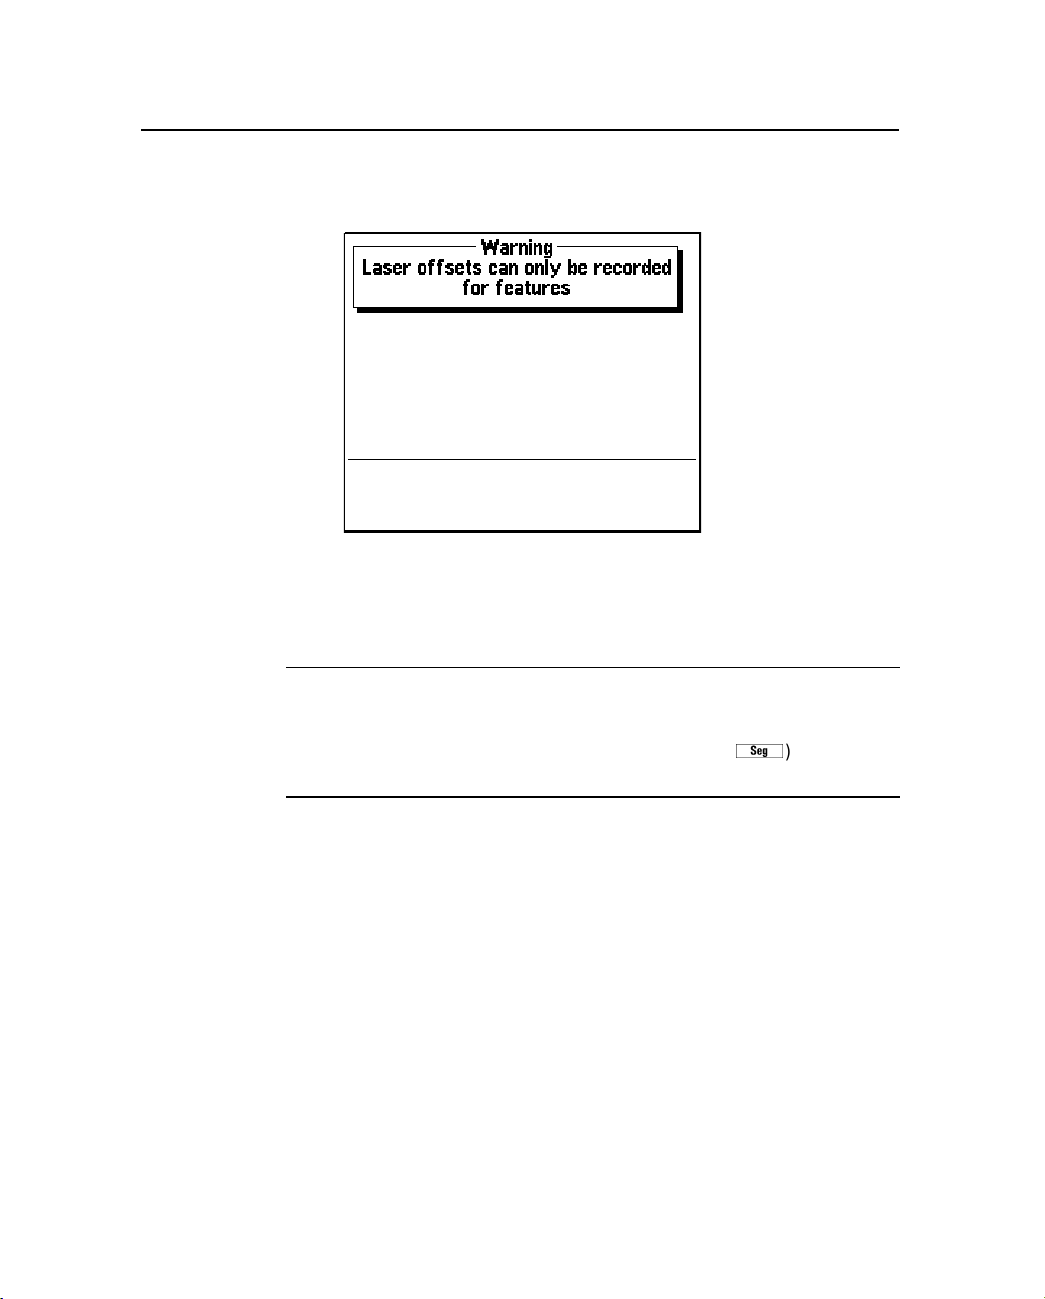
Data Collection 3
• If you are not currently collecting a feature at all, the Asset
Surveyor software displays the following warning m essage:
You can record as many offsets as you like for a feature, but
only the last offset you record is actually stored by the Asset
Surveyor software. A feature only has one associated offset.
B
Tip – If you are recording a line feature using an offset (to travel along
parallel to the line) and you reach a point where you are forced to use a
different offset (for example, you can no longer travel the same distance
from the line feature), segment the line feature (using
enter a new offset for the second segment of the line.
TSC1 Asset Surveyor Software User Guide 79
s
) and then
Page 100
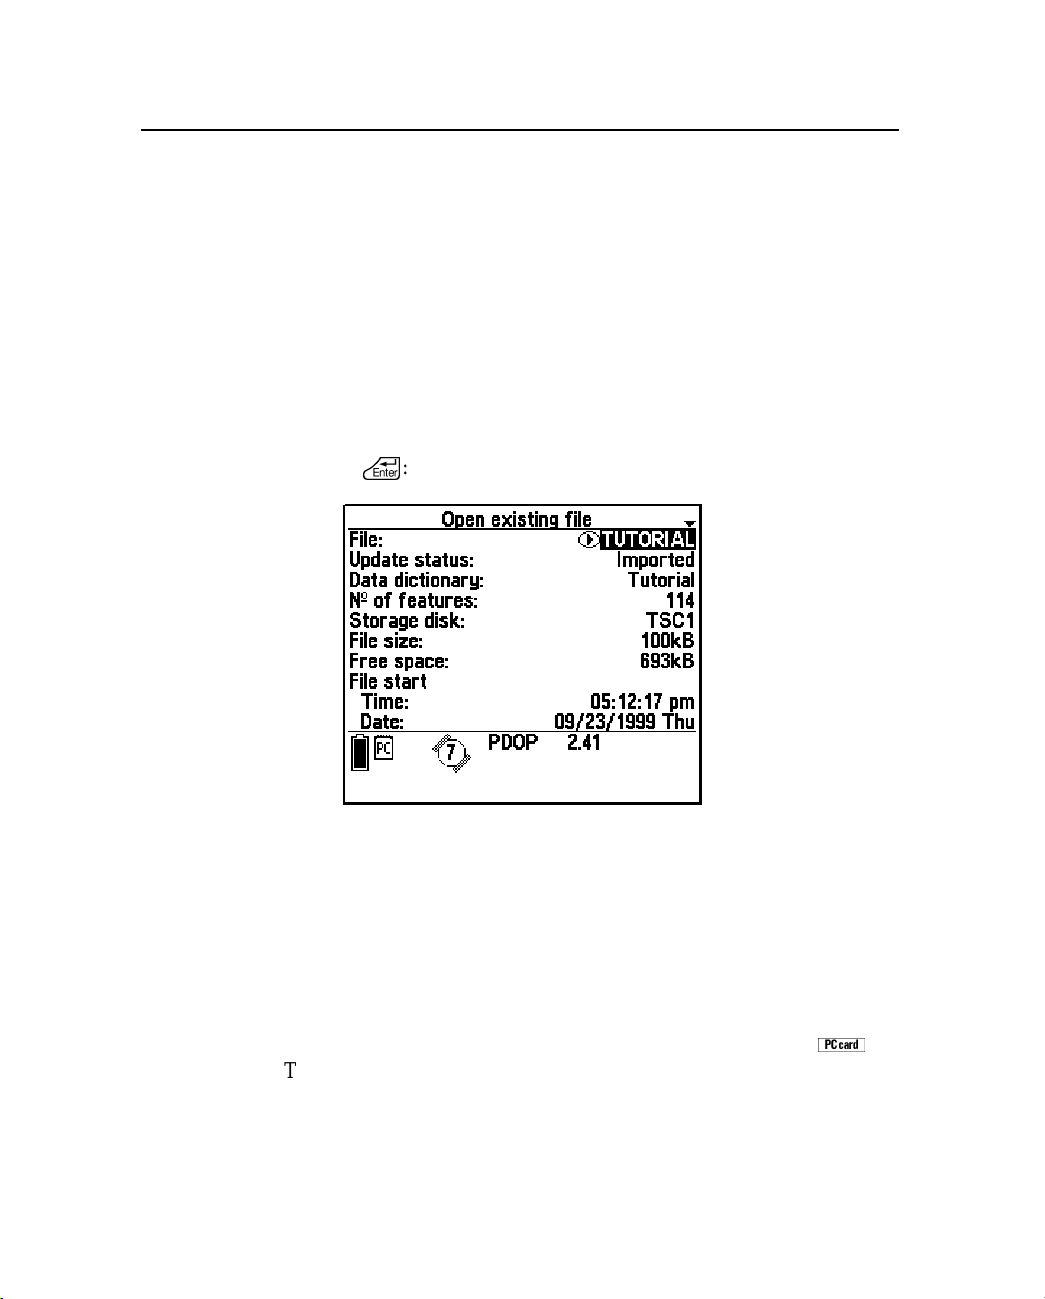
3 Data Collection
3.3 Data Review and Update
This section describes how to use the Asset Surveyor software to
review existing features and update those features if necessary.
For information on how to collect new features in the Asset Surveyor
software, see Collecting New Features, page 50.
3.3.1 Opening Existing Files for Review and Update
You can open an existing data file for review and/or update by
selecting Open existing file from the Data collection menu and
pressing
\
:
The Open existing file form appears. Select a file from the list of
available rover files in the Filename field. When you first open the
Open existing file form, the files that are available in the Filename
field are those that are stored on the TSC1 datalogger.
Note – All files, including base and background files, appear in this
list, so that you can view their file statistics. However, you can only
use this menu to open a rover file for feature review and update.
If you want to view any data files stored on a PC card, press
This softkey only appears if a PC card is inserted into the TSC1
datalogger.
80 TSC1 Asset Surveyor Software User Guide
C
.
 Loading...