

Page 1

Trimble
Rugged Tablet Computer
User’s Manual
R01
April 2009
Page 2

© 2009 Trimble Navigation Limited. All rights reserved.
TRADEMARKS
Trimble and the Globe & Triangle logo are trademarks of Trimble Navigation Limited, registered in
the United States Patent and Trademark Office and in other countries. Yuma is a trademark of
Trimble Navigation
Microsoft, Vista, and the Windows logo are either registered trademarks or trademarks of Microsoft
Corporation in the United States and/or other countries. Microsoft products are licensed to OEMs by
Microsoft Licensing, Inc., a wholly owned subsidiary of Microsoft Corporation.
The Bluetooth® word mark and logos are registered trademarks owned by Bluetooth SIG, Inc.
All other brand and product names are trademarks or registered trademarks of their respective
owners.
NOTE
Display images shown may vary slightly from actual display. Information in this manual is subject to
change without notice.
Page 3

i
Table of Contents
Preface…….. .............................................................................. iv
Chapter 1 Getting Started ................................................... 1-1
Getting the Tablet Computer Running ................................. 1-2
Unpacking ........................................................................ 1-2
Installing Battery Packs and Connecting to AC Power .... 1-3
Turning the Tablet Computer On and Off ........................ 1-6
Taking a Look at the Tablet Computer ................................ 1-8
Front Side ......................................................................... 1-8
Rear Side ........................................................................ 1-10
Bottom Side .................................................................... 1-11
Expansion Slot Side ....................................................... 1-12
Chapter 2 Operating Your Tablet Computer ..................... 2-1
Using the Touchscreen ......................................................... 2-2
Touchscreen Kit ............................................................... 2-3
Using the Input Panel ........................................................... 2-5
Using the Audio Features ..................................................... 2-6
Connecting Audio Devices............................................... 2-7
Using the Communication Features ..................................... 2-8
Using the Wireless LAN (WiFi) ...................................... 2-8
Using the Bluetooth Wireless Feature ............................ 2-12
Using the GPS ................................................................ 2-14
Using the Camera ............................................................... 2-22
Using the G-Camera Application ................................... 2-22
Chapter 3 Managing Power ................................................ 3-1
Battery Pack ......................................................................... 3-2
Charging the Battery Pack ............................................... 3-2
Initializing the Battery Pack ............................................. 3-3
Page 4

ii
Checking the Battery Level .............................................. 3-3
Replacing the Battery Pack .............................................. 3-3
Battery Low Signals and Actions ..................................... 3-4
Power Management .............................................................. 3-6
Sleep Mode....................................................................... 3-6
Hibernation Mode ............................................................ 3-7
Power-Saving Tips ............................................................... 3-8
Chaptedr 4 Expanding Your Tablet Computer .................... 4-1
Connecting a Serial Device .................................................. 4-2
Connecting a USB Device .................................................... 4-3
Using ExpressCards ............................................................. 4-4
ExpressCard Type ............................................................ 4-4
Inserting and Removing an ExpressCard ......................... 4-4
Using the SD Card Reader ................................................... 4-6
Chapter 5 Using BIOS Setup and System Utility .............. 5-1
When to Use BIOS Setup Utility ..................................... 5-2
Starting BIOS Setup Utility ............................................. 5-2
Moving Around and Making Selections .......................... 5-4
Information Menu ................................................................ 5-5
Main Menu ........................................................................... 5-6
Advanced Menu ................................................................... 5-7
Boot Menu ............................................................................ 5-8
Exit Menu ............................................................................. 5-9
Using the System Utility .................................................... 5-10
Wireless Switch ................................ .............................. 5-10
Quick Button Define ...................................................... 5-10
Help ................................................................................ 5-12
Chatper 6 Caring for the Tablet Computer ........................ 6-1
Taking Care of the Tablet Computer .................................... 6-2
Location Guidelines ......................................................... 6-2
General Guidelines ........................................................... 6-2
Cleaning Guidelines ......................................................... 6-2
Battery Pack Guidelines ................................................... 6-2
Page 5

iii
Touchscreen Guidelines ................................................... 6-3
Chatper 7 Troubleshooting ................................................ 7-1
Preliminary Checklist ........................................................... 7-2
Solving Common Issues ....................................................... 7-3
Battery Problems ................................ .............................. 7-4
Bluetooth Wireless Transmission Problems .................... 7-4
Display Problems ............................................................. 7-5
Hardware Device Problems .............................................. 7-5
Hard Disk Drive Problems ............................................... 7-5
Wireless LAN Problems .................................................. 7-6
Power Management Problems .......................................... 7-7
Software Problems ........................................................... 7-8
Sound Problems ............................................................... 7-8
Startup Problems .............................................................. 7-9
Other Problems ................................................................. 7-9
Resetting the Tablet Computer ........................................... 7-10
Warning Messages ............................................................. 7-11
G-Camera Application ................................................... 7-11
Virtual-GPS Application ................................................ 7-12
System Utility................................................................. 7-13
Appendix A Regulatory Information .................................... A-1
On the Use of the System .....................................................A-2
Class B Regulations .........................................................A-2
Safety Notices ..................................................................A-3
On the Use of the RF Device ................................................A-5
USA and Canada Safety Requirements and Notices ........A-5
European Union CE Marking and Compliance Notices ..A-7
ENERGY STAR ................................................................A-11
Earning the ENERGY STAR® ....................................... A-11
Remember, saving energy prevents pollution ................A-12
Page 6

iv
Preface
This manual contains information that will help you operate this rugged
tablet computer. It is divided into 7 chapters and 1 appendix.
Chapter 1, Getting Started, takes you through the process of setting
up the tablet computer and identifying its external components.
Chapter 2, Operating Your Tablet Computer, tells you how to use
the tablet computer’s components and features.
Chapter 3, Managing Power, provides information on power
management.
Chapter 4, Expanding Your Tablet Computer, provides
information on installing and using peripheral devices.
Chapter 5, Using BIOS Setup, describes the BIOS Setup program
that configures the tablet computer’s BIOS settings.
Chapter 6, Caring for the Tablet Computer, gives you tips on care
and maintenance.
Chapter 7, Troubleshooting, gives solutions to common problems
you may encounter when using the tablet computer.
Appendix, Regulatory Information, provides regulatory statements
and safety notices on your tablet computer.
Page 7

v
Notational Conventions
Throughout this manual, the following conventions are used to
distinguish elements of text.
NOTE: identifies additional information that requires special attention.
CAUTION: identifies important information that, if not followed, may result in loss of
data or damage to the tablet computer.
Keypad keys are shown in a bold typeset. For example:
Press the F1 key to complete.
A title, command, setup item, or button that you can see on the screen is
shown in boldface. A value or an option that you can select for a setup
item is shown in italic. For example:
Select When I press the power button, set it to Shut down, and
then tap the Save changes button.
Page 8

Page 9

Getting Started 1-1
Chapter 1
Getting Started
Congratulations on purchasing this rugged tablet computer. The rugged
design allows you to use it in harsh outdoor environments. You can use it
under blazing heat, subzero cold, driving rain or dusty surroundings –
places you could not take a consumer-grade tablet computer.
This chapter tells you step by step how to get the tablet computer up and
running. You will find instructions for the following procedures:
Unpacking
Installing Battery Packs and Connecting to AC Power
Turning the Tablet Computer On and Off
Taking a Look at the Tablet Computer (An Explanation of External
Components and their Functions)
CHAPTER
Page 10

1-2 Getting Started
Getting the Tablet Computer Running
This section guides you through the procedures for getting the tablet
computer ready for operation.
Unpacking
After unpacking the shipping carton, you should find these standard
items:
Tablet Computer
Accessories:
AC adapter and power cord
Battery pack (2)
Extended cap
Stylus
Hand strap
Tether and snap
Cleaning cloth
Screen protector film (2)
Windows Vista Certificate of Authenticity Label (COA)
Quick Start Guide
Inspect all the items. If any item is damaged or missing, notify your
dealer immediately.
Keep the shipping carton and packing materials in case you need to ship
or store the tablet computer in the future.
Page 11

Getting Started 1-3
Installing Battery Packs and Connecting to AC Power
The tablet computer operates either on the external AC power or internal
battery power. It is suggested that you use AC power when you start up
the tablet computer for the first time.
CAUTION: Use only the AC adapter included with your tablet computer. Using other
AC adapters may damage the tablet computer.
1. Fit the two battery packs into place on both sides.
Page 12

1-4 Getting Started
2. Remove the rubber cap from the included stylus to expose a Phillips
screwdriver, or use a small #1 Phillips head screwdriver to secure the
two screws on each battery taking care not to over tighten.
Page 13

Getting Started 1-5
3. Plug the DC cord of the AC adapter into the power connector ( )
of the tablet computer ().
4. Plug the female end of the AC power cord into the AC adapter and
the male end into an electrical outlet ().
5. When the AC adapter is connected, the battery pack is charging.
The battery status indicator ( ) shows three different states:
Solid green: battery is fully charged.
Solid amber: battery is charging.
Blinking red: battery capacity is below 10%.
CAUTION:
When you disconnect the AC adapter, disconnect from the electrical outlet first and
then from the tablet computer. A reverse procedure may damage the AC adapter or
the tablet computer.
When unplugging the connector, always hold the plug head. Never pull on the cord.
Page 14
1-6 Getting Started
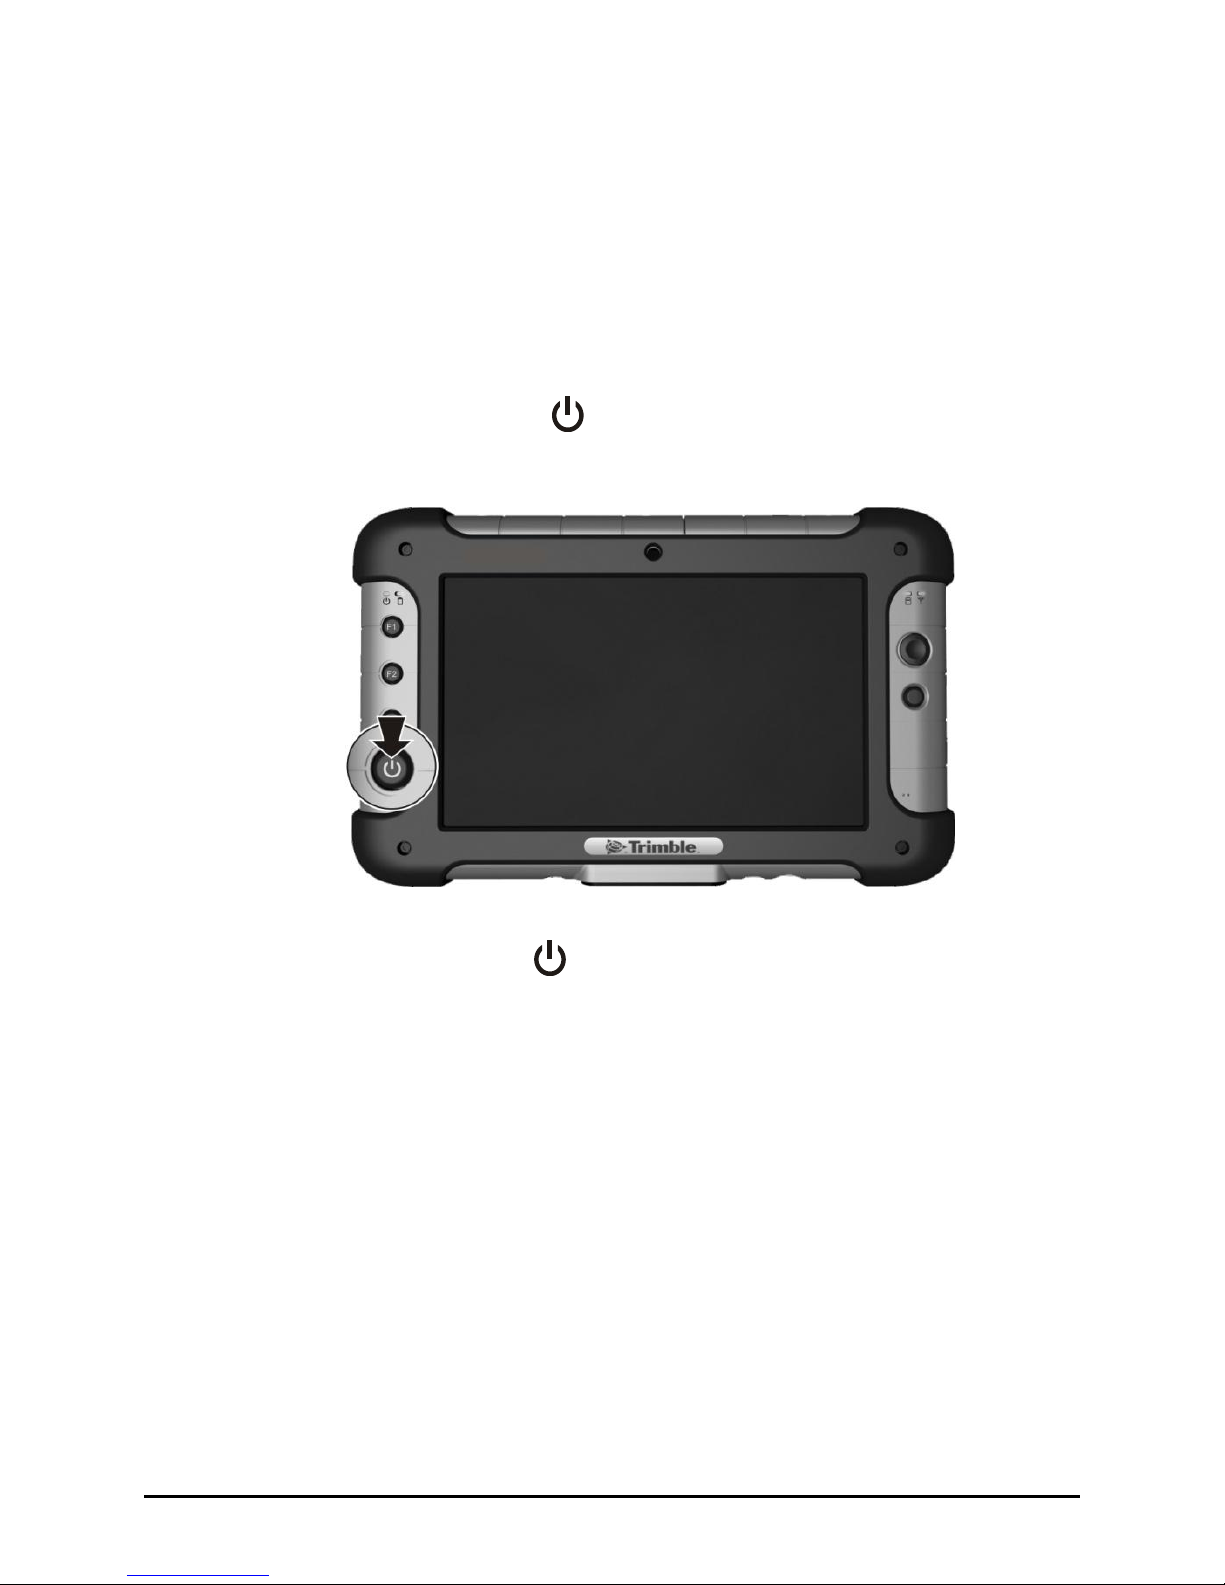
Turning the Tablet Computer On and Off
Turning On
1. Make sure that the tablet computer is either connected to AC power
or the battery is charged.
2. Press the power button ( ). Notice the screen appears blank for 8-10
seconds but the power LED lights up.
The power indicator ( ) shows 2 different states:
Solid green: tablet computer is turned on.
Blinking green: tablet computer is in sleep mode.
Page 15

Getting Started 1-7
Turning Off
To turn off the tablet computer, use the ―Shut Down‖ command of your
operating system.
CAUTION: Wait for at least five seconds after turning off the tablet computer before
turning it back on.
When you finish a working session, you can stop the tablet computer by
using the Vista Shut Down command, or leaving the tablet computer in
Sleep or Hibernation mode:
To stop in
this mode...
Do this...
Off
Shutdown the tablet computer as you would a regular PC
running Vista. (Use the Windows Start Menu in the lower
left and follow the shutdown procedure.)
You can force the tablet computer to turn off by pressing and
holding the power button for more than 6 seconds. (This is
not the recommended method for turning off your tablet
computer, but may be necessary if the system is locked up.)
Hybrid Sleep
Press the power button for less than 4 seconds or use the
Windows Start Menu to put the unit in Hybrid Sleep mode.
Hibernation
Use the Windows Start Menu to put the tablet computer in
hibernation mode.
Press the power button to resume or turn on the tablet computer from any
of these modes. (See ―Power Management‖ in Chapter 3 for more
information.)
Page 16

1-8 Getting Started
Taking a Look at the Tablet Computer
This section identifies the external components of the tablet computer and
briefly describes the function of each component.
NOTE: Depending on the model you purchased, the appearance of your tablet
computer may not be exactly the same as those shown in this manual.
Front Side
Ref
Component
Description
Webcam Lens
Allows you to use your tablet computer’s camera function.
Indicators
Shows the current status of the tablet computer’s devices.
Power
Solid green: tablet computer is turned on.
Blinking green: tablet computer is in Sleep mode.
Battery Charge
Solid green: battery is fully charged.
Solid amber: battery is charging.
Blinking red: battery’s capacity is below 10 %.
Hard Disk Drive
Blinking green: hard disk drive is in use.
WiFi and
Bluetooth
Solid green: wireless antenna is on.
NOTE: WiFi/Bluetooth on/off state is set via the OSD utility.
Page 17

Getting Started 1-9
Ref
Component
Description
F1 Button
Short press: launches Microsoft® Internet Explorer.
Long press: (>2 seconds) rotates the display orientation
from landscape (default) to portrait.
F2 Button
Short press: launches the G-Camera application.
F3 Button
Short press: launches the input panel.
Long press: (>2 seconds) first long press locks the
keypad and disables the touchscreen. The second long
press unlocks the keypad and enables the touchscreen.
Power Button
Turns the tablet computer power ON and OFF (Hybrid
Sleep mode by default).
NOTE: Depending on your settings in Windows, you can place
the tablet computer in Sleep/Hibernation/Shutdown mode with
the power button. See “Power Management” in Chapter 3 for
more information.
Directional Button
Serves as the UP / DOWN / LEFT / RIGHT arrow keys
(except pointer on screen).
F2 + UP arrow key increases the sound volume.
F2 + DOWN arrow key decreases the sound volume.
F2 + LEFT arrow key decreases the LCD brightness.
F2 + RIGHT arrow key increases the LCD brightness.
Enter Button
Serves as the Enter key.
F1 + Enter key resets the computer (same as Alt+Ctrl+Del
on a keyboard).
F2 + Enter key places the tablet computer in power saving
mode, which changes the Windows Vista Power Plan to
―Power Saver‖ mode and changes the brightness about 45
nits. Pressing F2 + Enter again turns the power saving
mode OFF. Turning OFF returns the Windows Vista
Power Plan to the setting before power saving mode.
NOTE: The power saving mode works only when using battery
power. Upon connecting AC power, your tablet computer
returns to the previous state before power saving mode.
LCD Touchscreen
Displays and receives information for the tablet
computer.
Microphone
Receives sound and voice for the tablet computer.
Page 18

1-10 Getting Started
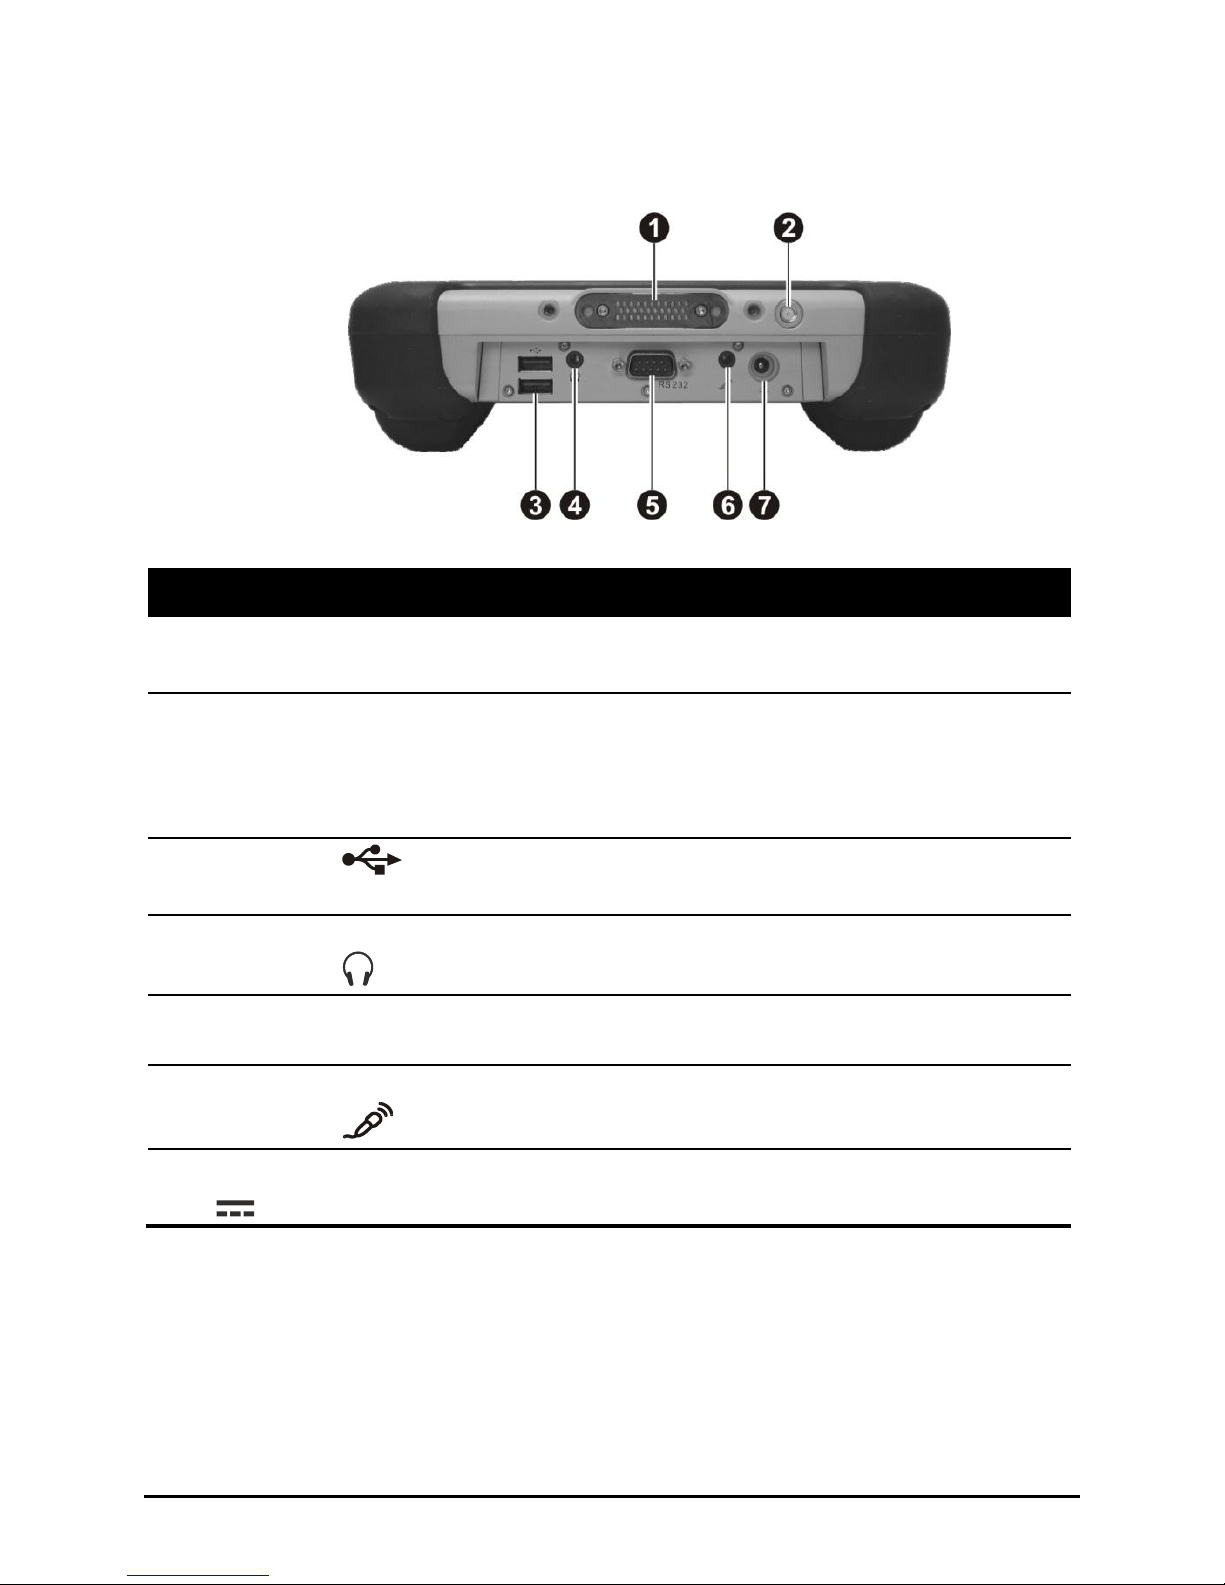
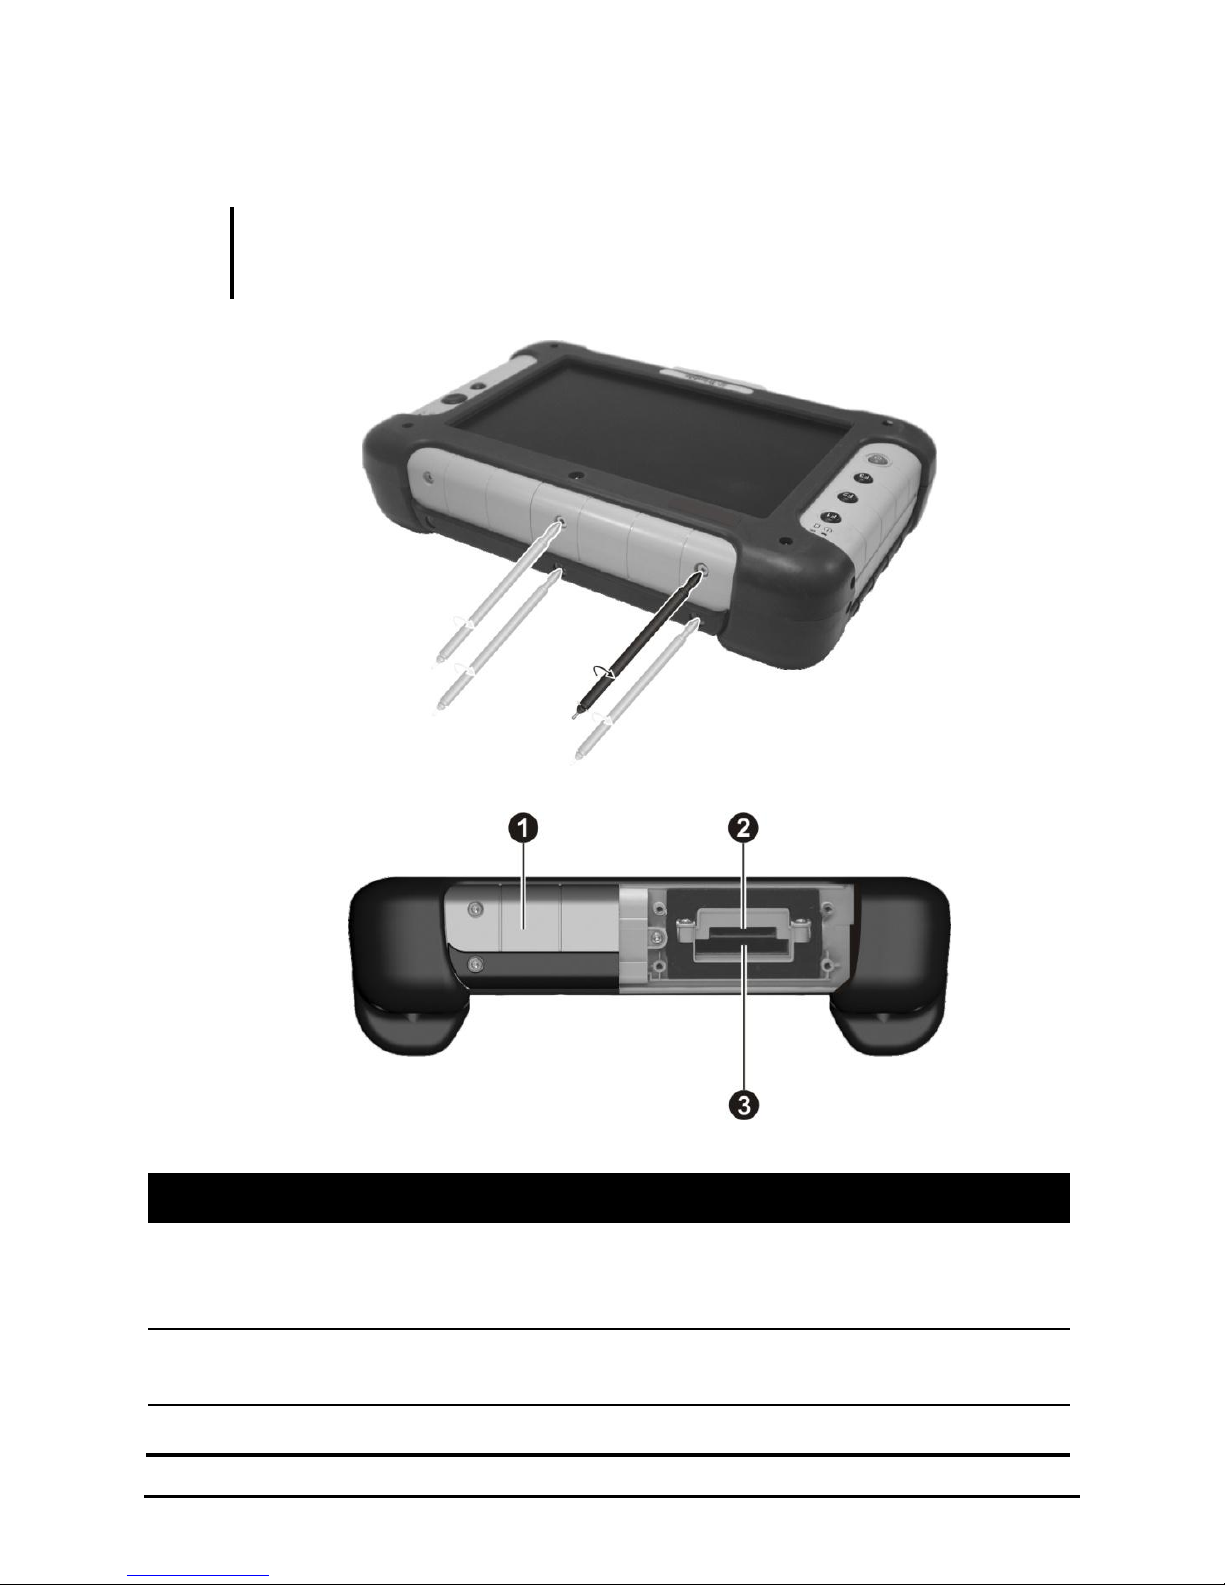
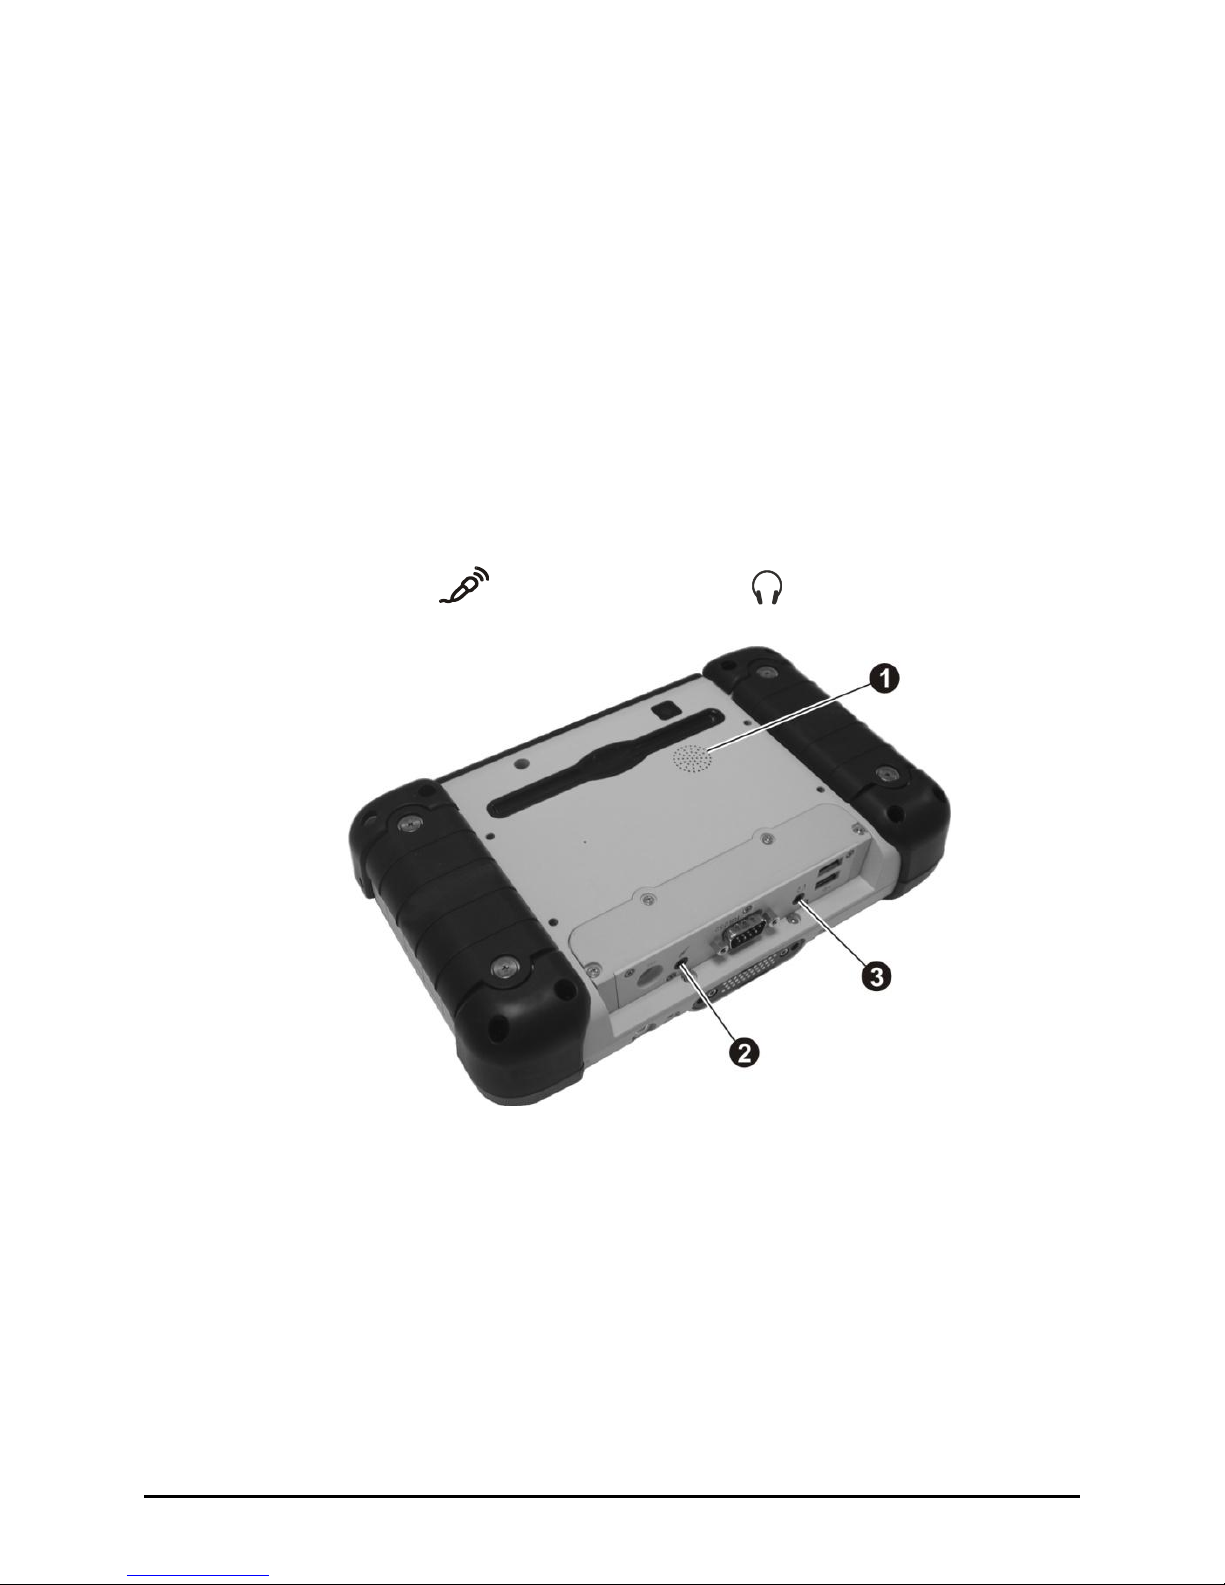
Rear Side
Ref
Component
Description
Stylus Holder
Provides a convenient place to store the stylus. Use the
stylus on the touchscreen and to loosen screws on the
battery pack and expansion slots.
NOTE: Upon unpacking your tablet computer for the first time
the stylus is packaged separately.
CMOS Camera
Lens
Allows you to use the camera function.
Speaker
Sends out sound and voice from your tablet computer.
Battery Packs
Supplies power to your tablet computer when external
power is not connected.
Page 19
Getting Started 1-11
Bottom Side
Ref
Component
Description
Docking
Connector
Connects to a docking station.
GPS Antenna
pass-through
Connector
Connects to the optional antenna for GPS receiver.
NOTE: Must be connected via a vehicle docking station. External
GPS Antenna must be enabled in the BIOS Setup for this feature
to work.
USB Ports
Each of the two ports connects a USB device, such as a
USB flash disk, printer, digital camera, joystick, and more.
Audio Output
Connector
Connects a set of headphones, external speakers with
amplifier, or an audio recording device.
Serial Connector
RS232
Connects a serial communication device.
Microphone
Connector
Connects an external microphone.
Power Connector
Connects the AC adapter.
Page 20
1-12 Getting Started
Expansion Slot Side
NOTE: To access the SDIO and ExpressCard slots, use the Phillips screwdriver end of
the stylus or a small #1 Phillips head screwdriver to release the four screws as shown
securing the compartment cover.
Ref
Component
Description
WiFi, GPS, and
Bluetooth Wireless
Antenna
Inside is the antenna for WiFi, GPS, and Bluetooth
wireless transmission.
SDIO Slot
Accepts a Secure Digital (SD) card for removable
storage media and I/O (input/output) function.
ExpressCard Slot
Accepts an ExpressCard for additional functions.
Page 21
Getting Started 1-13
CAUTION:
There are no user-serviceable parts in the antenna compartment. Disassembly of
this area will void your warranty.
Do not remove Allen screws securing the antenna compartment cover.
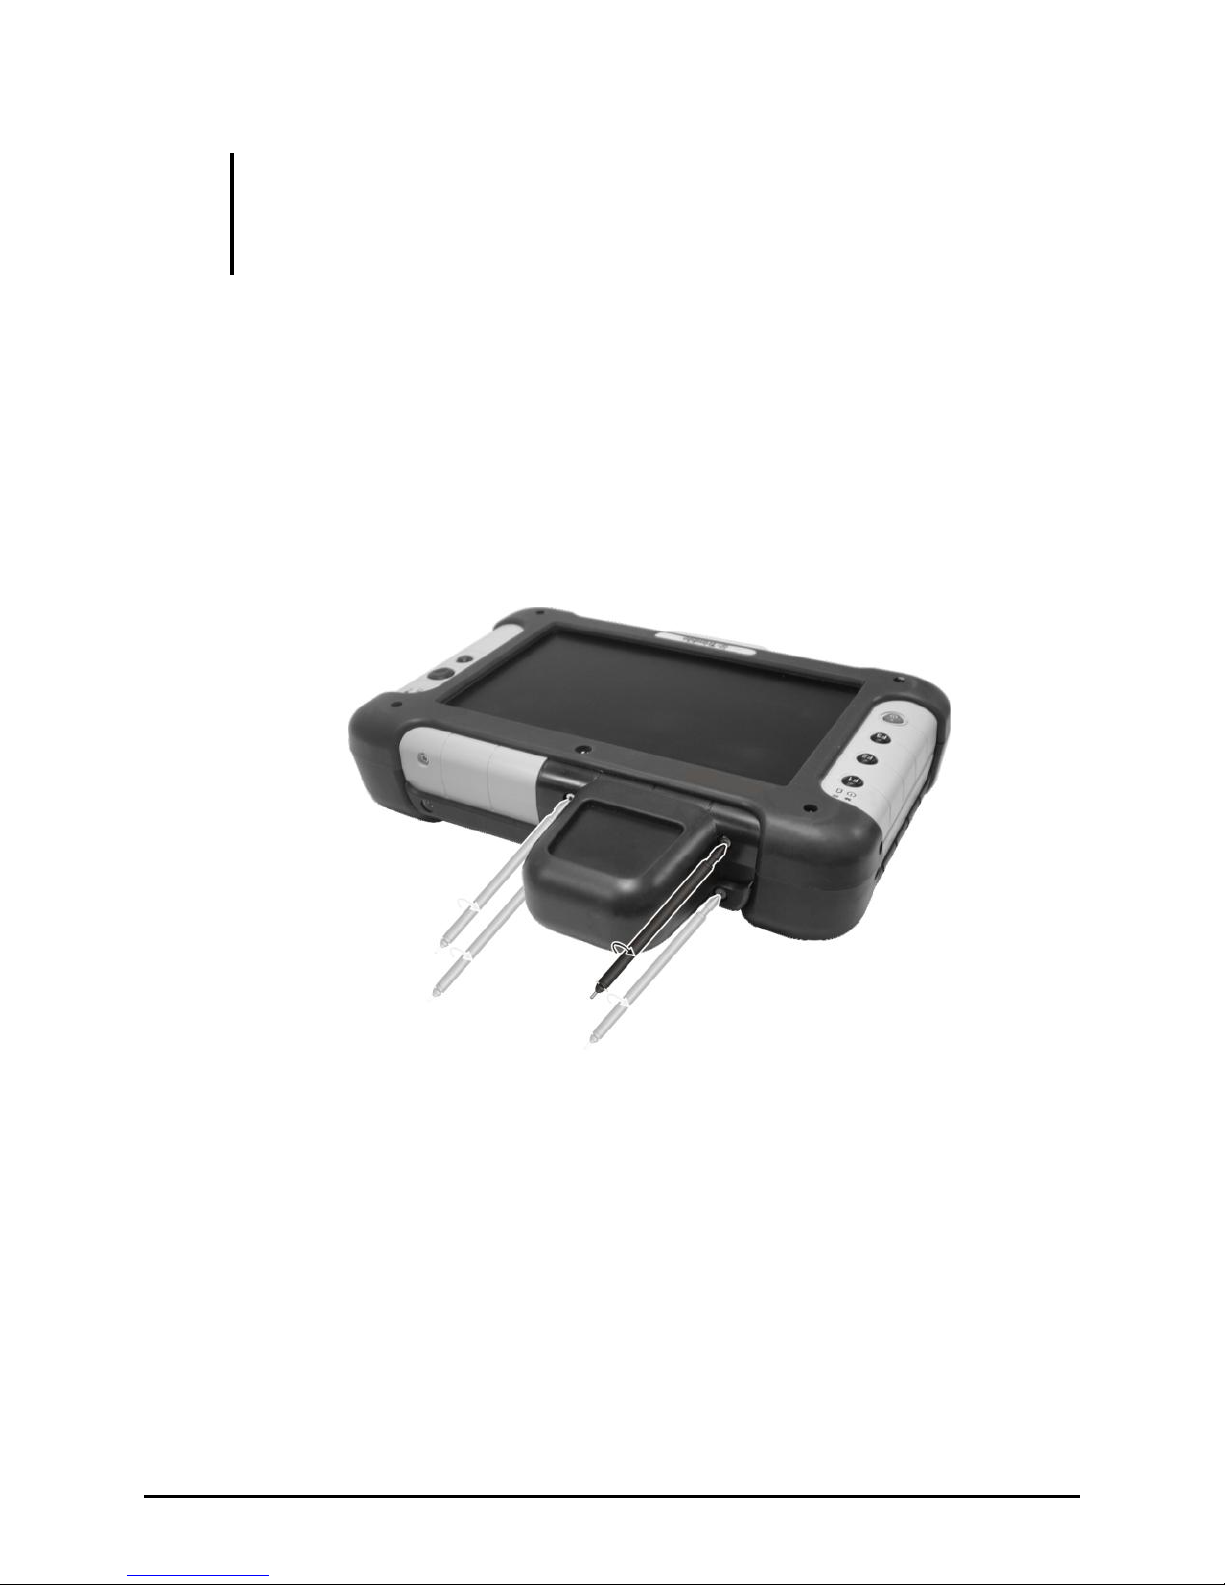
Extended Cap
The extended cap allows you to protect the tablet’s seal against dust and
water while using SDIO or ExpressCard’s. After removing the expansion
slot cover, use the Phillips screwdriver end of the stylus or a small #1
Phillips head screwdriver to screw in the four screws on the extended cap.
Page 22

Page 23

Operating Your Tablet Computer 2-1
Chapter 2
Operating Your Tablet
Computer
This chapter provides information about the use of the tablet computer.
Described in this chapter are the operating basics of these components/
features:
Touchscreen
Input Panel
Audio Features
Communication Features (WiFi, Bluetooth and GPS)
Camera
CHAPTER
Page 24

2-2 Operating Your Tablet Computer
Using the Touchscreen
The touchscreen is a touch-sensitive device that allows you to easily
communicate with the tablet computer by controlling the location of the
pointer on the screen.
NOTE: The touchscreen function is not available when running the BIOS Setup
program but you can use the buttons to move around and make selections in the BIOS
Setup utility screen.
CAUTION:
Do not use the screwdriver part of the stylus on the touchscreen or it will scratch
your screen. Use only the spring-tip end of the stylus.
Install the screen protector film to keep the touchscreen clean and protected.
Screen protectors extend the life of the display by providing a protective and
replaceable barrier between abrasive grit and the surface of the display.
Page 25
Operating Your Tablet Computer 2-3
Here are some common terms that you should know when using the
touchscreen:
Term
Action
Tap
Tap gently on the touchscreen to select or open an item.
Tapping is the same as clicking the left button on a PC
mouse.
Tap and hold
Touch and hold the stylus lightly on the display. A circle
of dots will appear to indicate that a pop-up menu will
soon appear. Lift up the stylus and a pop-up menu appears.
Select the desired function. This action is similar to a right
mouse click on a PC.
Drag
Hold the stylus on the screen and drag across the screen to
select text and images.
Touchscreen Kit
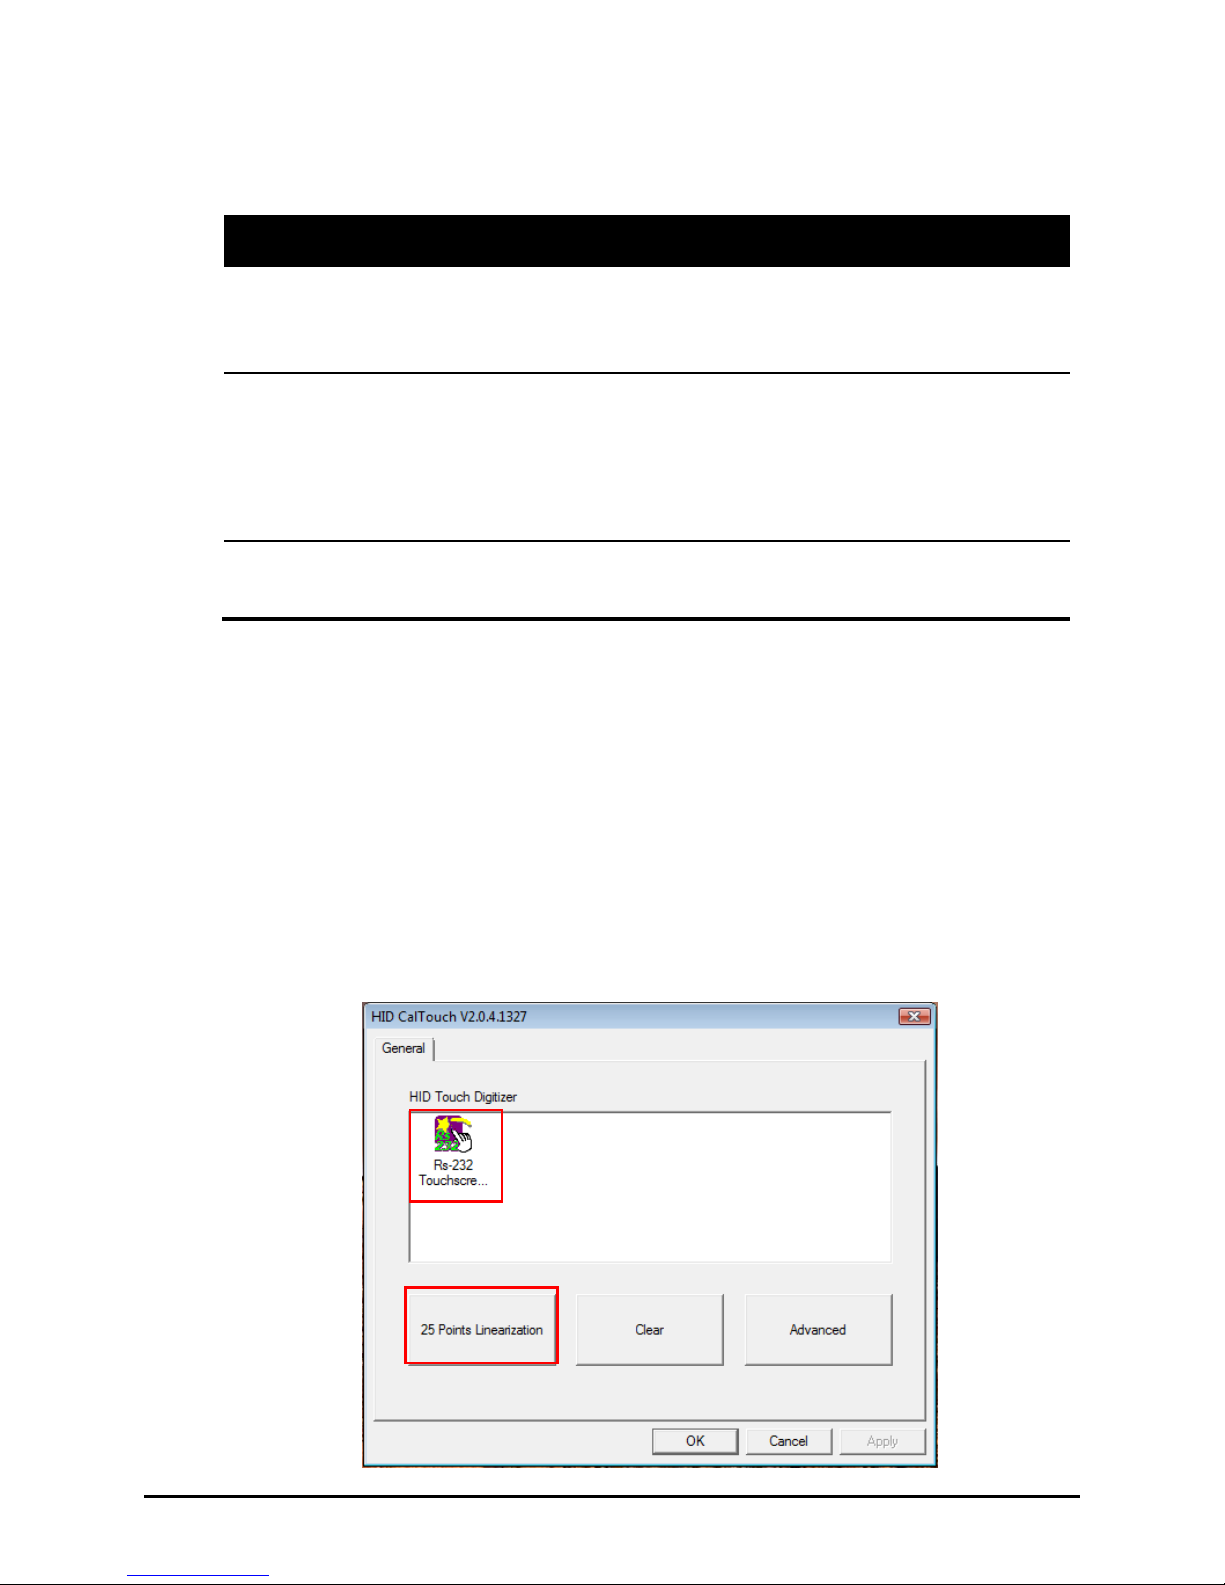
Calibration Touch Utility
When there is a noticeable discrepancy in the placement of the stylus on
the screen and the indicated position of the onscreen pointer, use the
calibration utility under Start All Programs Touchkit CalTouch to
correct the error.
Page 26

2-4 Operating Your Tablet Computer
Tap the RS-232 Touchscreen icon and then tap 25 Points Linearization. Tap
and hold each of the 25 targets to calibrate the touchsreen.
Page 27
Operating Your Tablet Computer 2-5
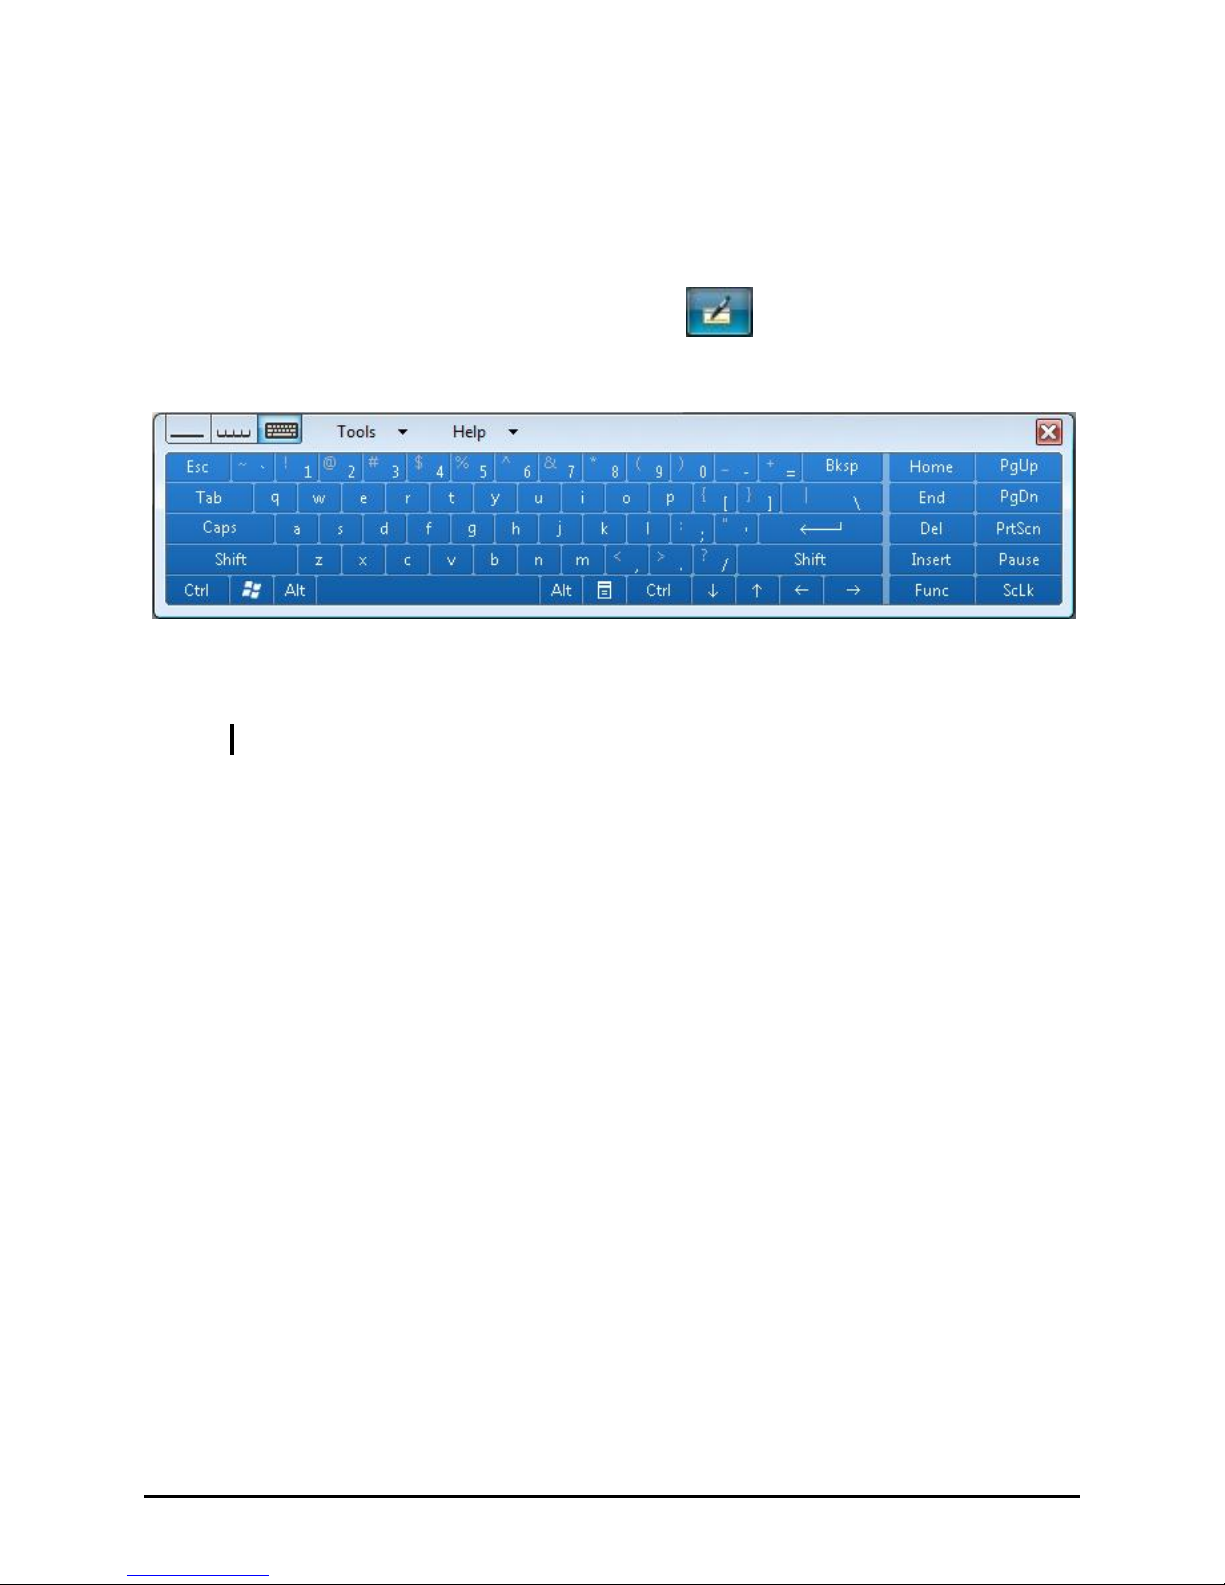
Using the Input Panel
Use the input panel to enter text and perform various keyboard functions.
1. Press F3 or tap the input panel icon located in the Windows
system tray and the input panel will appear onscreen.
2. Tap the characters on the input panel with the stylus.
NOTE: To protect the LCD display, use the stylus on your touchscreen.
Page 28
2-6 Operating Your Tablet Computer
Using the Audio Features
The audio subsystem of your tablet computer features:
Manual adjustment of the sound volume using the cursor-control UP
arrow (sound volume up) and DOWN arrow (sound volume down)
buttons
Press the F2 + UP arrow key to increase the sound volume
Press the F2 + DOWN arrow key to decrease the sound volume
Integrated speaker ()
Microphone ( ) () and audio-out ( ) () connectors
Page 29

Operating Your Tablet Computer 2-7
Connecting Audio Devices
For higher audio quality, you can send sound through external audio
devices such as speakers, headphones, or earphone set using the
audio-out connector.
NOTE:
After connecting an external audio device, make sure that you specify the use of
the correct audio device in Windows.
When using the external speakers/headphones, you cannot use the internal one.
Page 30

2-8 Operating Your Tablet Computer
Using the Communication Features
Using the Wireless LAN (WiFi)
A few of the WiFi features include:
Peer-to-Peer (Ad-Hoc) and Access Point (Infrastructure) modes
supported
WEP (Wired Equivalent Privacy) 64/128-bit data encryption
IEEE 802.11b/g standard compliance
Technology
802.11b
802.11g
Stated Maximum
Throughput (Mbps)
11
54
Band (GHz)
2.412 ~ 2.462
2.4
Modulation
Technology
DSSS (Direct
Sequence Spread
Spectrum)
OFDM (Orthogonal Frequency
Division Multiplexing)
NOTE: 802.11g mode is backward compatible with 802.11b mode.
It takes approximately 30 seconds for your tablet computer to make a
successful WiFi connection and approximately 10 seconds to disconnect.
Turning the WiFi Radio On and Off
1. Tap and hold the stylus on the icon located in the Windows
system tray until the ring appears then lift up and the menu appears.
When no wireless device(s) is currently detected, it is indicated by
the button highlighted as gray. The Wireless Switch is enabled (On)
by default.
Page 31

Operating Your Tablet Computer 2-9
NOTE: If there is no icon located in the Windows system tray, tap Start All
Programs System utility OSD.
2. Tap Wireless Switch, then the button will be highlighted as green.
NOTE: The status of wireless devices will be the same as its status before entering
Sleep mode or turning off the tablet computer.
3. Ensure that the Windows Mobility Center has Wireless turned on.
Tap Start Control Panel Mobile PC Windows Mobility Center to turn
on the WiFi radio by tapping Turn wireless on.
Page 32

2-10 Operating Your Tablet Computer
4. To turn off the WiFi radio after turning it on, tap Turn wireless off.
Connecting to a Wireless Network
To connect to a wireless network:
1. Make sure that the wireless LAN radio is ―on‖ indicated by the WiFi
LED indicator ( ) glowing in green.
2. Tap and hold the stylus on the Wireless Network Connection icon
located in the Windows system tray until the ring appears, then lift up
and select Connect to a network.
Page 33

Operating Your Tablet Computer 2-11
3. If any wireless network is detected, the following window appears on
screen. Tap the Show drop-down menu and select Wireless.
4. Tap to select a wireless network to connect to, and then tap Connect.
5. Depending on the settings, you may be asked to enter a WEP key
(refer to your Windows online help for more information on setting a
wireless network connection).
Page 34

2-12 Operating Your Tablet Computer
Using the Bluetooth Wireless Feature
Depending on your model, your tablet computer may incorporate the
Bluetooth capability for short-range (about 10 meters) wireless
communications between devices without requiring a cable connection.
With Bluetooth, data can be transmitted through walls, pockets and
briefcases as long as two devices are within range. By default, your tablet
computer’s Bluetooth feature is in the discoverable and pairable mode.
The status of the Bluetooth connection is indicated by the Bluetooth icon
located in the Windows system tray in the lower-right part of the screen.
Status
Icon
Off
® (blue with red logo)
On
®
(blue with white logo)
Connected
®
(blue with green logo)
You can use the Bluetooth Utility to configure Bluetooth connection
settings and transfer files.
Turning the Bluetooth Wireless Feature On and Off
1. Tap and hold the stylus on the icon located in the Windows
system tray until the ring appears, then lift up and the menu appears.
When no wireless device(s) is currently detected, it is indicated by
the button highlighted as gray. The Wireless Switch is enabled (On)
by default
NOTE: If there is no icon located in the Windows system tray, tap Start All
Programs System utility OSD.
Page 35

Operating Your Tablet Computer 2-13
2. Tap Wireless Switch, then the button will be highlighted as green.
NOTE: The status of wireless devices will be the same as its status before entering
Sleep mode or turning off the tablet computer.
3. Tap and hold the stylus on the icon located in the Windows system
tray until the ring appears, then lift up and the menu appears. Tap
Enable Bluetooth Radio to turn on the Bluetooth wireless feature. Note
that the Bluetooth Radio is ―Enabled‖ by default
Page 36

2-14 Operating Your Tablet Computer
4. To turn off the Bluetooth wireless feature after turning it on, tap and
hold the stylus on the icon located in the Windows system tray
until the ring appears, then lift up and the menu appears. Tap Disable
Bluetooth Radio to turn off Bluetooth wireless feature.
NOTE: The status of wireless devices will be the same as its status before entering
Sleep mode or turning off the tablet computer.
For detailed information on using the Bluetooth Utility, open the
Bluetooth Utility User Guide on your tablet computer by tapping Help.
Tap on the Contents, Index, or Search tab to browse the contents of the
User Guide.
Using the GPS
Your tablet computer has a GPS (Global Positioning System) receiver
module built in and includes the Virtual-GPS software (Start All
Programs Virtual-GPS Launch Virtual-GPS).
Using the Virtual-GPS Application
Virtual-GPS shows the GPS signal availability status of the system’s GPS
module, allowing you to check if the GPS feature is working properly.
Virtual-GPS also allows you to create virtual COM ports which can
connect to two or more GPS applications at the same time.
Page 37

Operating Your Tablet Computer 2-15
Virtual-GPS is a unified user interface utility that allows you to manage
and configure the following:
GPS information
Settings
Data view
The first time Virtual-GPS is launched it automatically scans all COM
ports. If a COM port is found, the system will open the port and GPS data
will be entered, all information will appear on the ―GPS Info.‖ tab and
will be continuously updated. The default GPS COM port is COM2 (at
9600 baud)
The GPS Info. tab provides an overview of the system status.
Upon tapping Stop V-GPS, the data feed will stop (the COM port will be
closed) and all the related information will be frozen on the screen until
you tap the Start V-GPS button to start it up again.
The next time Virtual-GPS is launched, it will remember the last state
(whether the port was open and acquiring data, or closed).
Page 38

2-16 Operating Your Tablet Computer
A summary of the values can be viewed on the upper left side of the
screen. It contains nine major values, namely:
Fix Mode (2D/3D)
Date Stamp
Time Stamp
Current Latitude
Current Longitude
Current Altitude
Current Speed
Current Course
Satellites
The signal indicator ( ) is displayed on the lower left side of the
screen that shows the 13 satellites’ signal indicator. The length of the
green bar of each satellite changes dynamically; the stronger the signal
the longer the bar shown. Below each bar is the PRN (Pseudo Random
Number) of each discovered satellite and the signal strength data is
shown on the bottom of the bar. No PRN is shown when GPS is not
functioning or no satellites are discovered. The maximum number of
signal bars displayed is 13. When the GPS signal is weak, the PRN is
displayed, but no signal indicator bar is shown.
The satellite map shows the satellites discovered and are placed on the
satellite map according to their parsed latitude and longitude. Satellites
are displayed in the following colors:
indicates the SBAS satellite with PRN
indicates the satellite is in view, in track, and in use with PRN
indicates the satellite is in view, in track, but not in use with PRN
Tap the Start V-GPS button to start the Virtual-GPS.
Tap the Stop V-GPS button to stop the Virtual-GPS.
Tap the Exit button to exit Virtual-GPS.
Page 39

Operating Your Tablet Computer 2-17
The Settings tab allows you to configure or view the following:
GPS Settings
Mask
NMEA Message
Virtual COM Port Settings
GPS Settings
Select NMEA or SiRF Binary (default is NMEA) format of message.
Turn SBAS (Satellite-Based Augmentation System; WAAS, EGNOS,
MSAS) ON/OFF (default is ON). It is a system that supports wide-area or
regional augmentation through the use of additional satellite broadcast
messages.
Turn Static Navigation ON/OFF (default is OFF). It freezes the position
of a tracking object when its speed is below the threshold.
Page 40

2-18 Operating Your Tablet Computer
Mask
Select the elevation (0 to 90 degrees) for covering some satellites with a
specific angle (default is 5 degrees).
Select Do not use DOP (Dilution Of Precision) mask (default is on) or the
Auto PDOP (Position 3D Precision) / HDOP (Horizontal Precision – 1 to 50,
default is Gray out / 8). DOP is used in geometrics engineering to
describe the geometric strength of satellite configuration on GPS
accuracy.
NMEA Message
These settings can only operate in NMEA format. Configure the data log
frequency (off, 1 to 10 seconds) of GGA (default 1 second), GSA (default
1 second), GSV (default 1 second), RMC (default 1 second), VTG
(default 1 second), and GLL (default is off).
Virtual COM Port Settings
In the Virtual COM. Settings section, select the drop-down arrow to
display a list of available virtual COM Ports. Create/delete the virtual
COM port and show the related information including the port number
and status. Status is displayed in the drop-down list to the right of the
COM port number and includes the following:
Virtual GPS in use – the COM port number is in use for
Virtual-GPS.
Free – the COM port number is not in use. Only Free can be selected
as the new virtual COM port number.
Other in use – the COM port number is used by others.
To create a virtual COM port:
1. Select a COM port number with Free status.
Page 41

Operating Your Tablet Computer 2-19
2. Tap Add and the virtual COM port is shown on the list and the status
will change to Virtual GPS in use.
Page 42

2-20 Operating Your Tablet Computer
IMPORTANT: Make sure that the COM port number used by the third-party GPS
application to connect to the Virtual-GPS COM port is the same. You can scan for COM
port or select COM port manually using the third-party’s GPS application. COM 45 in
this example is occupied if third-party’s GPS application is connected.
To remove a virtual COM port:
1. Select a COM port number with Virtual GPS in use status.
2. Tap Remove and the virtual COM port is removed and the status will
change to Free.
The available COM port numbers are from 1 to 70.
The V-COM column shows the created virtual COM port number.
The I/O column shows if the application is used (Open) or not used (----).
The B. Rate column shows the baud rate from other GPS application that
is using the virtual COM port.
16 virtual COM ports can be created. When you attempt to add the 17th
COM port a warning message will pop-up.
Tap Apply to save and execute the settings. The settings would not be
changed even if the system were returned from Sleep mode.
Page 43

Operating Your Tablet Computer 2-21
Tap Default to cancel the current settings and restore the default settings.
Tap Apply to complete the changes.
Tap Sync. to synchronize current settings and update the status of the GPS
settings.
The Data View tab shows a summary of raw data string received from
satellites which is viewable but not editable. The Data View window is
auto-scrollable and will be cleared as soon as GPS signal is disconnected.
You can start or stop as well as clear the message log.
Data will be returned in either NMEA or SiRF Binary format depending
on the selection chosen on the Settings page.
Page 44

2-22 Operating Your Tablet Computer
Using the Camera
A camera located on the front and rear side of your tablet computer
allows you to take pictures. The G-Camera software has been installed or
you can install another third-party application to use the camera feature.
Using the G-Camera Application
G-Camera is a unified user interface utility that allows you to perform the
following:
Take pictures
Record video
Path tracking and capture
GPS configuration
To open the G-camera application, tap on Start All Programs
G-Camera G-Camera. Once G-Camera is launched it automatically scans
for the camera. If the camera device is not found, G-Camera will appear
on screen without an image.
Mode buttons
Current settings
Mode setting buttons
Page 45

Operating Your Tablet Computer 2-23
Camera Mode
The Camera Mode icon is amber when selected and is selected by default.
When opening G-camera, Camera mode allows you to configure the
camera settings and take photos. The live image always appears in
640×480 resolution.
Shutter
Tap this button or press Enter to take photos. When the photo is being
taken the button will light amber and the live image will be frozen until
the image capture is complete.
Page 46

2-24 Operating Your Tablet Computer
Camera Switch
Tap this button to switch between two camera modules (The Front
Camera - 1.3 M and the Back Camera - 2 M – if available). If
using the 1.3 M module, only the following buttons are available: GPS
Info, Continuous, Self Timer, Image Size, Display, Folder Location, and
Shutter Sound. All the other buttons are grayed-out. The 1.3 M module
does not support 1600×1200 image size. When using the 2 M module
(default), all the buttons are available. When switching from 2 M module
in 1600×1200 image size to 1.3 M module, the image size will be
changed automatically to 1280×1024
The settings for Camera and Camcorder mode should be synchronous.
Macro
Tap this button and then choose Enable or Disable (default). Selecting
Enable allows G-Camera to obtain the correct focus on a subject without
requiring you to adjust the focus manually. This function is applicable for
taking pictures where the subject is only a short distance from the camera.
The following icon appears in the preview image when Macro is enabled:
.
Night Mode
Tap this button to set the light compensation in different lighting
conditions. Select Enable when using G-Camera in an environment where
light source is weak. Select Disable (default) when using G-Camera in an
environment with adequate lighting. The following icon appears on the
preview image when Night Mode is enabled: .
Page 47

Operating Your Tablet Computer 2-25
GPS Information
Tap this button to enable or disable (default) the GPS data to be displayed
and printed on the photo. The format of GPS data is: Longitude, Latitude,
Altitude, Speed, Magnetic or True Course.
Longitude – W (West) or E (East) A.aaaaaa (6-digits after the
decimal point)
Latitude – S (South) or N (North) B.bbbbbb (6-digits after the
decimal point)
Altitude - C.ccc (3-digits after the decimal point), displayed in meters
Speed – D.ddd (3-digits after the decimal point), displayed in
Kilometers
Magnetic or True course - E.eee (3-digits after the decimal point).
Virtual GPS must be running for valid GPS data to be entered in the
photo. Press the GPS Settings button in the upper tool bar and ensure that
Virtual GPS is acquiring data. (See below under ―GPS Settings.‖)
Continuous
Tap this button to enable or disable (default) the taking of 3 photos
continuously in just one tap of the Shutter button.
Self Timer
Tap this button to disable (default) or delay (5 or 10 seconds) the shutter
release upon tapping the Shutter button.
Image Size
Tap this button to set the photo’s image size and format:
640x480 (default) / 1280x1024 / 1600x1200 (available only with 2 M
module).
Page 48

2-26 Operating Your Tablet Computer
Display
Tap this button to enable (default) or disable the display of pop-up OSD
information.
Color Settings
Tap this button to configure the color of the image.
The following items can be configured by pressing the ―+‖ or ―–‖ icon on
the adjustment bar on the bottom of the screen:
Brightness = 0 to 255 levels (default is 127)
Contrast = 0 to 31 levels (default is 16)
Saturation = 0 to 31 levels (default is 19)
The configuration of the image color will be synchronized with the
settings of the live image and photo.
Folder Location
Tap this button to set the location of the folder for storing photos and
videos, as well as KML format.
The default location for storing photos and videos is C:\Users\―User’s
name‖\Pictures.
The following screen appears:
Page 49

Operating Your Tablet Computer 2-27
When the storage space of the folder location is low, a warning message
appears on screen.
When a folder that was created in G-Camera was changed outside the
G-Camera utility, the folder name will not be detected the next time
G-Camera is launched.
Shutter Sound
Tap this button to enable (default) or disable the shutter sound upon
tapping the Shutter button.
Camcorder Mode
Camcorder mode allows you to configure the camcorder settings and
video recording behavior. The preview image always appears in 640×480
resolution and only supports the WMV video format.
Page 50

2-28 Operating Your Tablet Computer
Sound Up / Down
Tap these buttons to adjust the microphone’s sound recording level (0 to
20). The sound recording level synchronizes with the system’s. When the
sound is turned off, the buttons for this function will not appear.
Record / Stop
Tap this button to start or stop the video recording process. The Record
button will flash during the recording process and the timer will record
the elapsed time (hour/minute/second). The Camera switch and Video
size button will be grayed-out.
Camera Switch
Tap this button to switch between the front - 1.3 M and the
back - 2 M (default) camera modules. The camera switch setting
synchronizes with the Camera modes’.
Page 51

Operating Your Tablet Computer 2-29
MIC
Tap this button to enable or disable the microphone. This feature only
supports the system with a microphone device. When enabled the
adjustment bar will display on top of the screen. When disabled the
adjustment bar will be grayed-out.
Video Size
Tap this button to set the video size (320x240 / 640x480 default).
Display
Tap this button to enable (default) or disable the OSD feature (includes
the timer and sound adjustment bar).
Browser Mode
Browser mode allows you to view the photo and video with the
corresponding file details created in Camera mode.
Viewing Photos
Page 52

2-30 Operating Your Tablet Computer
Previous / Next
Tap these buttons to select the previous or next file in the default photo
and video folder, or to another folder location that you have selected to
store photos and videos.
File Information
Tap this button to enable or disable (default) the EXIF data that includes:
Manufacturer, Model, Date and Time, Image Size, GPS Latitude
Reference (East or West), GPS Latitude, GPS Longitude Reference
(North or South), GPS Longitude, and Altitude.
Delete
Tap this button to remove the current photo on display. The message ―Are
you sure you want to delete this item?‖ appears. Tap OK to confirm
deletion.
Viewing Videos
Page 53

Operating Your Tablet Computer 2-31
Volume down / up
Tap this button to adjust the volume level (0 to 20). The volume level
synchronizes with the system’s.
Rewind
Tap this button to go back 5 seconds of the current video.
Play / Pause
Tap this button to start or stop viewing the video. Upon tapping Play the
timer (hour/minute/second) would start counting and you can stop the
playback temporarily anytime by tapping Pause.
Forward
Tap this button to go forward 5 seconds of the current video.
Capture
Tap this button to capture a specific image in the video that is currently
playing to be saved as a photo file.
Display
Tap this button to enable (default) or disable the OSD feature that
includes the translucent dark background for timer and volume
adjustment bar.
Delete
Tap this button to remove the current video on display. The message ―Are
you sure you want to delete this item?‖ appears. Tap OK to confirm
deletion.
Page 54

2-32 Operating Your Tablet Computer
Path Logger Mode
Path Logger mode allows you to start logging (interval of 6 seconds) the
GPS data and the photo with position information and track as a path.
After it stops tracking, it will output as KML file. You can view the path
with photophotos in Google EarthTM.
Start Tracking
Tap this button to start recording the path and photo. Tap this button
again to stop tracking and build the KML file automatically. All path log
and photos from the period will be saved in one folder.
If the data is invalid, the KML file will not be built. Check the GPS
connection status and signal strength before starting this function.
Pause / Resume
Tap this button to stop tracking and timer count temporarily. Tap the
Resume button to continue tracking and timer count.
Page 55

Operating Your Tablet Computer 2-33
GPS Settings
Upon tapping the GPS Settings button, the Virtual-GPS utility screen
appears.
NOTE: If the Virtual-GPS utility is removed or not detected, a warning message:
“Virtual-GPS program was not detected. Check if Virtual-GPS program was installed
properly” appears. If the “Stop V-GPS” button has been pushed the application will not
“see” a COM Port and you will have to restart Virtual-GPS to reopen the port.
To return to using the G-Camera application, you can tap anywhere on
the G-camera application, or you can minimize or exit the Virtual-GPS
application.
Page 56

Page 57

Managing Power 3-1
Chapter 3
Managing Power
Your tablet computer operates either on external AC power or on battery
power.
This chapter tells you how you can effectively manage power. To
maintain optimal battery performance, it is important that you use the
battery in the proper way.
The topics in this chapter include:
How to charge the battery pack
When to initialize the battery pack
How to check the battery level
How to replace the battery pack
What happens when the battery is low and what actions to take
What is Power Management
How to save power
CHAPTER
Page 58

3-2 Managing Power
Battery Pack
The operating time of a fully charged battery pack depends on how you
are using the tablet computer. When your applications often access
peripherals, you will experience a shorter operating time.
NOTE: Care and maintenance information for the battery is provided in the “Battery
Pack Guidelines” section in Chapter 6.
WARNING:
Do not disassemble the battery pack. There are no user-serviceable parts inside.
Doing so may present risk of exposure to harmful chemicals, explosion, fire or high
temperatures.
Contact your local waste disposal service provider regarding the disposal or
recycling of used battery packs.
Charging the Battery Pack
To charge the battery pack, connect the AC adapter to the tablet computer
and an electrical outlet. The Battery Status Indicator ( ) on the tablet
computer glows amber to indicate that charging is in progress. When the
battery is fully charged, the Battery Status Indicator glows green.
The charging times are as follows:
Battery Type
Charging Time
Standard × 2
Up to 5.5 hours
Extended × 2
Up to 7 hours
NOTE: The battery level may automatically lessen due to the self-discharge process
(0.21 % per day), even when the battery pack is fully charged (100 %). This discharge
occurs whether the battery pack is in or out of the tablet computer.
Page 59

Managing Power 3-3
Initializing the Battery Pack
You need to initialize when the actual operating time of a battery pack is
much less than expected.
To initialize the battery pack, fully charge, then discharge completely by
changing the Windows Power Plan to High Performance (tap the icon
in the Windows system tray) and leave the AC adapter unplugged.
Recharge the battery pack completely by plugging in the AC adapter.
Checking the Battery Level
NOTE: Any battery level indication is an estimated result. The actual operating time can
be different from the estimated time, depending on how you are using the tablet
computer.
You can check the approximate battery level using the battery meter
function of the operating system. To read the battery level, tap the icon
in the Windows system tray.
NOTE: Upon replacing the battery pack, the reading on the battery meter is not
accurate. Windows will automatically do an update every 10 seconds to get the latest
correct reading.
Replacing the Battery Pack
If you rely on battery power for a long period of time, consider
purchasing an additional set of batteries from your dealer to use for
backup.
To replace the battery packs, follow these steps:
1. Close open applications and shut down the tablet computer.
2. Make sure that the tablet computer is not connected to AC power.
3. Use the Phillips screwdriver end of the stylus, or use a small #1
Phillips head screwdriver, to remove the two screws securing each
battery pack and then lift out each battery pack.
4. Fit the replacement battery packs into place and secure each with the
two screws. Do not overtighten.
Page 60

3-4 Managing Power
NOTE: You can still operate the tablet computer on one battery while replacing the
other battery pack. However, this is not recommended because an empty battery pack
slot exposes the computer’s internal parts to environmental hazards such as dust and
water.
Battery Low Signals and Actions
The battery icon changes appearance to display the current state of the
battery so that you can see how much charge remains (Windows default
setting).
Battery Charge
Battery Icon
Above 25 %
Green
Reaches 25 %
Yellow triangle with an exclamation
point (!) appears above the green
icon
Low battery level
Red circle with a white ―X‖ appears
above the green icon
Page 61

Managing Power 3-5
The tablet computer’s Battery Status Indicator ( ) blinks red to alert
you to take actions.
Immediately save your data when the low battery indicator comes on.
Connect to the AC adapter or place the tablet computer in Hibernation
mode or shut down.
The remaining operating time depends on how you are using the tablet
computer. If you are using the audio subsystem, an ExpressCard, or a
hard or USB flash disk, the battery might run out of charge very quickly.
CAUTION:
If you are using an ExpressCard, do not access the card during battery low periods.
theThe access may take longer than the time it takes the battery to run out of
charge, thus making your access to the card unsuccessful.
Data that has not been saved will be lost when the battery is completely drained.
Page 62

3-6 Managing Power
Power Management
Your tablet computer supports ACPI (Advanced Configuration and
Power Interface) for power management. The power management feature
helps reduce the power consumption to extend the battery life.
With Windows Vista, power supply to different tablet computer
components is controlled on an as-needed basis. This allows maximum
power conservation and performance at the same time.
In general, Windows’ power management works in this way:
What...
When...
Power to the hard disk is turned off
When the hard disk has been idle for a
set period.
Power to the display is turned off
When the display has been idle for a
set period.
The tablet computer enters the Sleep
mode. (See the next subsection for
more information.)
When the entire system has been idle
for a set period.
When you press the power button. *
The tablet computer enters the
Hibernation mode. (See the next
subsection for more information.)
When the entire system has been idle
for a set period
When you press the power button. *
* Depends on your settings in Windows.
For detailed information on power management, see Windows’ Help.
Sleep Mode
You can quickly place your tablet computer in Sleep mode using the
power button on the Windows Start Menu or, if configured, using the
tablet computer’s power button.
There are two types of Sleep mode— Hybrid Sleep and normal Sleep. By
default, Hybrid Sleep is activated. Hybrid Sleep is a very low power state
that combines the quick-resume benefits of Standby with the data
protection benefits of Hibernation.
Page 63

Managing Power 3-7
Hibernation Mode
Hibernation is a very useful feature. People frequently open many
applications when they use computers. It takes some time to get all these
applications open and running, and normally they all have to be closed
before the computer can be turned off.
When you use the hibernation feature, you do not have to close the
applications. The tablet computer stores the state of your tablet computer
to a file on the hard disk and then shuts down. The next time you turn on
your tablet computer, you return to exactly where you left off.
For information on entering Hibernation mode, see Windows’ Help.
Page 64

3-8 Managing Power
Power-Saving Tips
Aside from enabling your tablet computer’s power saving mode (see
previous section), you can do your part to maximize the battery’s
operating time by following these suggestions.
Do not disable Power Management. Choose a power plan that saves
power. A power plan is a collection of hardware and system settings
that control how your tablet computer manages power.
Decrease the LCD brightness to the lowest comfortable level.
Shorten the length of time before Windows turns off the display.
Many USB devices use power just by being connected. If you use a
USB mouse, you can save power by disconnecting the mouse and
using the touchpad. If you use a USB flash drive, unplug it when you
are not using it.
If you work with an application that uses an ExpressCard, exit the
application when you finish using it.
If you have an ExpressCard installed, remove it when not in use.
Some ExpressCards drain power even while they are inactive.
Deactivate the Wireless LAN function if you are not using it.
Deactivate the Bluetooth wireless feature if you are not using it.
Turn off the tablet computer when you are not using it.
Page 65

Expanding Your Tablet Computer 4-1
Chapter 4
Expanding Your Tablet
Computer
You can expand the capabilities of your tablet computer by connecting
other peripheral devices. When using a device, be sure to read the
instructions accompanying the device together with the relevant section
in this chapter.
This chapter gives guidelines on installing and using these devices:
Serial device
USB device
ExpressCard
SD card
CHAPTER
Page 66

4-2 Expanding Your Tablet Computer
Connecting a Serial Device
Your tablet computer has a serial port for connecting a serial device such
as a serial mouse or serial communication device (modem).
Follow this procedure to connect a serial device:
1. Make sure the tablet computer is not turned on.
2. Plug the device cable to the serial port on the lower front part of the
tablet computer.
3. Turn on the tablet computer.
NOTE: Portable modems that derive power through the serial port cannot be used with
the tablet computer. Instead, use a modem that is powered by its own internal battery or
external AC power.
Page 67

Expanding Your Tablet Computer 4-3
Connecting a USB Device
Your tablet computer has two USB ports for connecting USB devices,
such as a digital camera, scanner, printer, modem, and mouse.
The USB ports support transfer rates up to 12 Mbps for USB 1.1 devices
and 480 Mbps for USB 2.0 devices.
To connect a USB device, simply plug the device cable into one of the
USB ports ( ).
Page 68

4-4 Expanding Your Tablet Computer
Using ExpressCards
NOTE: The ExpressCard interface is not compatible with the PC card interface. You
need optional adapters for using PC cards on your tablet computer.
Your tablet computer has an ExpressCard slot.
ExpressCard supports the PCI Express and USB 2.0 serial data interfaces
(supporting speeds of up to 2.5 Gbps and 480 Mbps respectively),
improving speed in data transfer while conserving power usage.
ExpressCard Type
The ExpressCard slot can accommodate a 34 mm (ExpressCard/34) wide
ExpressCard. Typical ExpressCards support a very extensive range of
applications including memory, wired and wireless communication
cards, and security devices.
Inserting and Removing an ExpressCard
To insert an ExpressCard:
1. Remove the four screws securing the compartment cover.
2. Locate the ExpressCard slot on the tablet computer.
3. Slide the ExpressCard, with its label facing up, all the way into the
slot until the rear connectors click into place.
Page 69

Expanding Your Tablet Computer 4-5
4. When a new card is seated, the tablet computer will detect it and try
to install the appropriate driver. Follow the on-screen instructions to
complete the process.
To remove an ExpressCard:
1. Double-tap the Safely Remove Hardware icon found in the
Windows system tray. The Safely Remove Hardware window will
appear on screen.
2. Select (highlight) the ExpressCard from the list and tap Stop to
disable the card.
3. Once it is safe to remove the card, push the ExpressCard slightly to
release the card.
4. Pull the card out of the slot.
5. Replace the compartment cover and secure the four screws.
Page 70

4-6 Expanding Your Tablet Computer
Using the SD Card Reader
NOTE: If your hard disk is divided into several drives, make sure that all drives have
been formatted before using the SD Card Reader. Otherwise, you may encounter
problems when using the Card Reader.
Your tablet computer has a Secure Digital Input/Output (SDIO) Card
Reader slot.
To insert a SD card:
1. Remove the four screws securing the compartment cover.
2. Locate the SD Card Reader slot on the tablet computer.
3. Align the card with its connector pointing to the slot and its label
facing up. Slide the card into the slot until it reaches the end.
4. Windows will detect the card and assign it a drive name (typically E).
To remove a storage card:
1. Tap Start, then Computer.
2. Tap and hold the stylus on the drive with the card until the ring
appears, then lift up and select Safely Remove. You can also remove
the card by double-tapping on the Safely Remove Hardware icon
found in the Windows system tray. The Safely Remove Hardware
window will appear on screen.
3. Select (highlight) the SD Memory Card from the list and tap Stop to
disable the card.
Page 71

Expanding Your Tablet Computer 4-7
4. Once it is safe to remove the card, push the SD Memory Card slightly
to release the card. Pull the card out of the slot.
5. Replace the compartment cover and secure with four screws.
Page 72

Page 73

Using BIOS Setup and System Utility 5-1
Chapter 5
Using BIOS Setup and
System Utility
BIOS Setup Utility is a program for configuring the BIOS (Basic Input/
Output System) settings of the tablet computer.
The BIOS is a layer of software, called firmware, that translates
instructions from other layers of software into instructions that the tablet
computer hardware can understand. The BIOS settings are needed by
your tablet computer to identify the types of installed devices and
establish special features.
The System utility includes the Wireless Switch, Quick Button
Definition, and Help.
This chapter describes how to use the BIOS Setup Utility and System
Utility.
CHAPTER
Page 74

5-2 Using BIOS Setup and System Utility
When to Use BIOS Setup Utility
You need to run BIOS Setup utility when:
You see an error message on the screen requesting that you to run
BIOS Setup utility.
You want to restore the factory default BIOS settings.
You want to modify some specific hardware settings.
You want to modify some specific settings to optimize the system
performance.
Starting BIOS Setup Utility
NOTE:
The BIOS Setup Utility screens shown in this chapter are for your reference only.
The actual items or settings on your tablet computer may differ.
The BIOS Setup Utility program may have been updated after the publication of this
manual.
The settings you select in your operating system might override similar settings in
BIOS Setup Utility.
To run BIOS Setup Utility, press the Enter button when the prompt
appears on the screen during system startup. The prompt shows up on the
screen for only a few seconds. You must press the Enter button quickly. A
small window appears, select Launch System Setup (by pressing the
Directional Button) and then press Enter button again. The BIOS Setup
Utility main screen appears as shown next.
Page 75

Using BIOS Setup and System Utility 5-3
The BIOS Setup Utility screen can be divided into four areas:
On the top is the menu bar containing the titles of the available
menus. Each menu title brings a specific menu.
The left column of the menu displays the menu items.
The top-right of the menu provides more detailed information when a
menu item is highlighted.
The bottom of the menu provides keyboard instructions for moving
around and making selections.
Page 76

5-4 Using BIOS Setup and System Utility
Moving Around and Making Selections
You must go through two or three levels to complete the setting for an
item. In most cases, there are three levels: menu title, pull-down menu,
and submenu.
Use the keyboard to move around and make selections. Keyboard
information can be found at the bottom of the screen. A brief description
of keyboard usage is listed next:
Button
Function
Left / right directional
Selects a menu title.
Up / down directional
Selects an item or option.
Enter
Opens or closes the option window when an item
is selected.
F1
Displays help information.
F2 + up directional
Selects next higher value.
F2 + down directional
Selects next lower value.
Page 77

Using BIOS Setup and System Utility 5-5
Information Menu
The Information menu contains the basic configuration information of
the system.
Page 78

5-6 Using BIOS Setup and System Utility
Main Menu
The Main menu contains the system date and time settings as well as
shows the basic configuration of the system.
System Time sets the system time.
System Date sets the system date.
Page 79

Using BIOS Setup and System Utility 5-7
Advanced Menu
The Advanced menu contains various system settings.
Power Button Delay allows you to set the amount of time to press power
button before turning off the tablet computer. When set at Disabled the
tablet computer will turn off immediately upon pressing the power
button.
Vehicle Antenna allows you to switch to using the external antenna
when your tablet computer is attached to the active vehicle dock.
Page 80

5-8 Using BIOS Setup and System Utility
Boot Menu
The Boot menu sets the sequence of the devices to be searched for the
operating system.
The bootable devices will be automatically detected during POST
(Power-On Self-Test) and shown here, allowing you to set the sequence
that the BIOS uses to look for a boot device from which to load the
operating system.
A brief description of keyboard usage is listed next:
Button
Function
,
Selects (highlights) a boot device.
F2 +
Moves the device up.
F2 +
Moves the device down.
F2 + Enter
Moves the highlighted boot device from the ―Boot priority
order‖ list to the ―Excluded from boot order‖ list, and vice
versa.
Page 81

Using BIOS Setup and System Utility 5-9
Exit Menu
The Exit menu displays ways of exiting BIOS Setup Utility. After you are
finished modifying your settings, you must save and exit so that the
changes can take effect.
Exit Saving Changes saves the changes you have made and exits BIOS
Setup Utility.
Exit Discarding Changes exits BIOS Setup Utility without saving the
changes you have made.
Load Setup Defaults loads the factory default values for all the items.
Discard Changes restores the previous values for all the items.
Save Changes saves the changes you have made.
Page 82

5-10 Using BIOS Setup and System Utility
Using the System Utility
Wireless Switch
The Wireless Switch allows you to manage the Wireless device(s)
(wireless LAN and Bluetooth wireless features – refer to Chapter 2 on
turning on/off wireless LAN radio and Bluetooth wireless feature). When
you receive the tablet computer, this switrch is on by default
Tap and hold the stylus on the icon located in the Windows system
tray until the ring appears. Lift up the stylus and the menu appears. When
no wireless device(s) is currently detected, it is indicated by the button
highlighted as gray.
NOTE: If there is no icon located in the Windows system tray, tap Start All
Programs System utility OSD.
Quick Button Define
The three quick buttons F1, F2, and F3 are located on the left side of the
LCD panel. The quick launch key utility allows you to re-define the F1,
F2, and F3 quick launch keys.
To start the utility, tap and hold the stylus on the icon in the Windows
system tray until the ring appears. Lift up the stylus and select the item
Quick button.
Page 83

Using BIOS Setup and System Utility 5-11
Defining the buttons:
Tap the F1, F2, or F3 folder to select the quick launch button that you
want to define.
The box in the window represents the user-definable button.
To assign a program to a button, tap the Open icon beside the box to pop
up the Open dialog box as shown next and select the desired program.
Then, tap Open to complete the process.
Box
Cancel
Open
Page 84

5-12 Using BIOS Setup and System Utility
The appropriate icon will then appear in the box. To launch the program,
press the F1, F2, or F3 quick launch keys, or, if the Quick Button
Definition window is open, tap the box containing the icon.
Help
An online Help of the System Utility is available onscreen. Tap and hold
the stylus on the icon in the Windows system tray until the ring
appears, then lift up the stylus so the menu appears and then select the
Help to access the System Utility User Guide.
Page 85

Caring for the Tablet Computer 6-1
Chapter 6
Caring for the Tablet
Computer
Taking good care of your tablet computer will ensure trouble-free
operation and reduce the risk of damage to your tablet computer.
This chapter gives you guidelines covering these areas of maintenance:
What to note when using and storing the tablet computer
How to clean the tablet computer
What to note when using the battery pack
What to note when traveling with the tablet computer
CHAPTER
Page 86

6-2 Caring for the Tablet Computer
Taking Care of the Tablet Computer
Location Guidelines
Keep the tablet computer at least 13 cm (5 inches) away from
electrical appliances that can generate a strong magnetic field such as
a TV, refrigerator, motor, or a large audio speaker.
General Guidelines
Do not place heavy objects on top of the tablet computer as this may
damage the display.
The screen surface is easily scratched. Use the screen protector film
to protect it. Do not use paper towels to clean the display but use the
included cleaning cloth. Avoid touching it with a penor pencil.
To maximize the life of the backlight in the display, allow the
backlight to automatically turn off as a result of power management.
Avoid using a screen saver or other software that prevents the power
management from working.
Cleaning Guidelines
Use a soft cloth moistened with water or a non-alkaline detergent to
wipe the exterior of the tablet computer.
Gently wipe the display with a soft, lint-free cloth. Do not use alcohol
or detergent on the display.
Battery Pack Guidelines
Recharge the battery pack when it is nearly discharged.
The battery pack is a consumable product and the following
conditions will shorten its life:
– frequently charging the battery pack
Page 87

Caring for the Tablet Computer 6-3
– using, charging, or storing the battery at high temperatures (warmer
than room temperature)
It is recommended that you do not charge the battery pack at
temperatures higher than 40 oC (104 oF). A higher environment
temperature will cause the battery pack’s temperature to rise. Avoid
charging the battery pack inside a closed vehicle and in hot weather
conditions.
To maximize the battery pack’s operating efficiency, store it in a cool
dark place removed from the tablet computer and with 30 % ~ 40 %
charge remaining.
Touchscreen Guidelines
In order to protect the LCD panel use the included screen protector
film.
Use the finger or the included stylus on the display. Using a sharp or
metallic object other than your finger or stylus may cause scratches
and damage the display, thereby causing errors.
Use a soft cloth to remove dirt on the display. The touchscreen
surface has a special protective coating that prevents dirt from
sticking to it. Not using a soft cloth may cause damage to the special
protective coating on the touchscreen surface.
To clean off hard to remove dirt, blow some steam on the particular
area and gently wipe away using a soft cloth.
Do not use excessive force on the display. Avoid placing objects on
top of the display as this may cause the glass to break thereby
damaging the display.
Using the touchscreen at low temperatures (lower than 5
o
C) may
cause a slower response time; this is normal. A normal response time
should be restored upon returning to room temperature.
When there is a noticeable discrepancy in the operation of the
touchscreen function (stylus touch does not correlate to the proper
location on the screen), recalibrate the touchscreen display (see
Chapter 2).
Page 88

Page 89

Troubleshooting 7-1
Chapter 7
Troubleshooting
This chapter tells you what actions to take when solving common tablet
computer problems. It is divided into three sections:
Preliminary checklist
Solving common problems
Resetting the tablet computer
CHAPTER
Page 90

7-2 Troubleshooting
Preliminary Checklist
Here are helpful hints to follow when you encounter any problem:
Try to isolate which part of the tablet computer is causing the
problem.
Make sure that you turn on all peripheral devices connected to the
tablet computer before turning on the tablet computer.
If an external device has a problem, make sure that the cable
connections are correct and secure.
Make sure that all the device drivers are correctly installed.
Make notes of your observations. Are there any messages on the
screen? Do any indicators light? Detailed descriptions are useful to
the service personnel when you need to consult one for assistance.
If any problem persists after you follow the instructions in this chapter,
contact an authorized dealer for help.
Page 91

Troubleshooting 7-3
Solving Common Issues
For easy reference, the problems are divided into these categories.
Problem Type
Go to
Battery Problems
P. 7-4
Bluetooth Wireless Transmission Problems
P. 7-4
Display Problems
P. 7-5
Hardware Device Problems
P. 7-5
Hard Disk Drive Problems
P. 7-5
Wireless LAN Problems
P. 7-6
Power Management Problems
P. 7-7
Software Problems
P. 7-8
Sound Problems
P. 7-8
Startup Problems
P. 7-9
Other Problems
P. 7-9
Page 92

7-4 Troubleshooting
Battery Problems
The battery does not charge (Battery Status indicator does not light
amber).
Make sure that the AC adapter is properly connected.
Make sure that the battery is not too hot or cold. Allow time for the
battery pack to return to room temperature.
Make sure that the battery pack is installed correctly.
Make sure that the battery terminals are clean.
The operating time of a fully charged battery becomes shorter.
If you often partially recharge and discharge, the battery might not be
charged to its full potential. Initialize the battery to solve the problem
(see chapter 3).
The battery operating time indicated by the battery meter does not
match the actual operating time.
The actual operating time can be different from the estimated time,
depending on how you are using the tablet computer. If the actual
operating time is much less than the estimated time, initialize the
battery.
Bluetooth Wireless Transmission Problems
I cannot connect to another device with Bluetooth wireless
technology.
Make sure that both devices have Bluetooth turned on.
Make sure that the distance between the two devices is not over 10
meters and that there are no walls or other large obstructions between
the devices.
Make sure both devices are turned on and have been configured to be
discoverable.
Make sure that both devices are compatible.
Page 93

Troubleshooting 7-5
Display Problems
Nothing appears on the screen.
During operation, the screen may automatically turn off as a result of
power management. Press any key to see if the screen comes back.
The brightness level might be too low. Increase brightness by
pressing the F2 button for more than 2 seconds, then pressing the
cursor-control button’s LEFT arrow.
The characters on the screen are dim.
Adjust the brightness and/or contrast.
Hardware Device Problems
The tablet computer does not recognize a newly installed device.
Determine if a device driver needs to be installed. (Refer to the
documentation that came with the device.)
Determine if the device needs any jumper or switch settings. (Refer
to the documentation that came with the device.)
Check the cables or power cords for correct connections.
For an external device that has its own power switch, make sure that
the power is turned on.
Hard Disk Drive Problems
The hard disk drive error message appears on the screen.
The hard disk drive has defects. Ask your dealer for help.
The hard disk drive operations seem slow.
The data files stored on the hard disk drive may be fragmented. Use a
tool such as Window’s Disk Defragmenter to defragment the files.
Page 94

7-6 Troubleshooting
The hard disk drive indicator ( ) glows without blinking.
The data files stored on the hard disk drive may be fragmented. Use a
tool such as Window’s Disk Defragmenter to defragment the files.
Wireless LAN Problems
I cannot use the wireless LAN feature.
Make sure that the wireless LAN feature is turned on.
Transmission quality is poor.
Your tablet computer may be in an out-of-range situation. Move your
tablet computer closer to the Access Point or another wireless LAN
device it is associated with.
Check to see if there are interferences in the surrounding
environment. These could include microwave ovens, cordless
telephones, wireless video cameras, medical equipment, and large
metal objects. See the next item for solving radio interference
problems.
Radio interference exists.
Move your tablet computer away from the device causing the radio
interference such as microwave oven and large metal objects.
Plug your tablet computer into an outlet on a different branch circuit
from that used by the affecting device.
Consult your dealer or an experienced radio technician for help.
I cannot connect to another wireless LAN device.
Make sure that the wireless LAN feature is turned on.
Make sure that the SSID setting is the same for every wireless LAN
device in the network.
Your tablet computer is not recognizing changes. Restart the tablet
computer.
Make sure that the IP address or subnet mask setting is correct.
Page 95

Troubleshooting 7-7
I cannot communicate with the tablet computer in the network when
Infrastructure mode is configured.
Make sure that the Access Point your tablet computer is associated
with is powered on and all the LEDs are working properly.
If the operating radio channel is in poor quality, change the Access
Point and all the wireless station(s) within the BSSID to another radio
channel.
Your tablet computer may be in an out-of-range situation. Move your
tablet computer closer to the Access Point it is associated with.
Make sure that your tablet computer is configured with the same
security option (encryption) as the Access Point.
Use the Web Manager/Telnet of the Access Point to check whether it
is connected to the network.
Reconfigure and reset the Access Point.
I cannot access the network.
Make sure that the network configuration is appropriate.
Make sure that the user name or password is correct.
You have moved out of range of the network.
Turn off power management.
Power Management Problems
The tablet computer does not enter Sleep or Hibernation mode
automatically.
If you have a connection to another computer, the tablet computer
does not enter Sleep or Hibernation mode if the connection is actively
in use.
Make sure that the Sleep or Hibernation time-out is enabled.
Page 96

7-8 Troubleshooting
The tablet computer does not enter Sleep or Hibernation mode
immediately.
If the tablet computer is performing an operation, it normally waits
for the operation to finish.
The tablet computer does not resume from Sleep or Hibernation
mode.
The tablet computer automatically enters Sleep or Hibernation mode
when the battery pack is empty. Do any one of the following:
Connect the AC adapter to the tablet computer.
Replace the empty battery pack with a fully charged one.
Software Problems
An application program does not work correctly.
Make sure that the software is correctly installed.
If an error message appears on the screen, consult the software
program’s documentation for further information.
If you are sure the operation has stopped, reset the tablet computer.
(See ―Resetting the Tablet Computer‖ later in this chapter.)
Sound Problems
No sound is produced.
Make sure that the volume control is not set too low. Increase the
volume by pressing the F2 button for more than 2 seconds, then press
the cursor-control button’s UP arrow.
Make sure that the tablet computer is not in Sleep mode.
If using an external speaker, make sure that the speaker is properly
connected.
Page 97

Troubleshooting 7-9
Distorted sound is produced.
Make sure that the volume control is not set too high or too low. In
most cases, a high setting can cause the audio electronics to distort
the sound.
The external audio device does not work.
Make sure that your tablet computer is equipped with the driver
needed.
Tap the speaker symbol on the taskbar and check the Windows
volume control.
Check the volume control of your tablet computer.
Startup Problems
When you turn on the tablet computer, it does not respond and the
Power Indicator does not light green.
If you are using external AC power, make sure that the AC adapter is
correctly and securely connected. If so, make sure that the electrical
outlet works properly.
If you are using the battery power, make sure that the battery is not
discharged.
When you turn on the tablet computer, it stops after POST.
Restart your tablet computer.
Other Problems
The date/time is incorrect.
Correct the date and time via the operating system or BIOS Setup
program.
After you have performed everything as described above and still
have the incorrect date and time every time you turn on the tablet
computer, the RTC (Real-Time Clock) battery is at the end of its life.
Call an authorized dealer to replace the RTC battery.
Page 98

7-10 Troubleshooting
Resetting the Tablet Computer
You may have to reset (reboot) your tablet computer on some occasions
when an error occurs and the program you are using hangs up.
If the tablet computer operation seems to hang up, first wait. It is possible
that the tablet computer is processing data. Periodically check the hard
disk drive in-use indicator. If it flashes irregularly, the program may be
accessing data and preventing you from using the keypad. If you are sure
the operation has stopped and you cannot use the ―restart‖ function of the
operating system, reset the tablet computer.
You can reset the tablet computer by pressing F1 + Enter on your tablet
computer. If this does not work, turn off the tablet computer with the power
button. Wait for at least five seconds and turn it on again.
CAUTION: Resetting will cause any unsaved data to be lost.
Page 99

Troubleshooting 7-11
Warning Messages
G-Camera Application
Message
Description
Unable to scan the GPS COM
port.
G-Camera will scan the GPS COM port for GPS
Information or Tracking. This message will
appear when auto-scan GPS COM port has
failed.
The available disk space is not
enough, please change to another
disk.
This message will appear when the storage space
where video and photos are saved is not enough.
The available disk space is not
enough or the folder has been
removed and does not exist.
Please change to another disk.
This message will appear when the space is not
enough or the folder which is set for saving the
file was removed.
The system is currently tracking
the GPS route. Do you really want
to exit?
When tracking the path or saving the KML file
and the user taps X to exit, this message will
appear.
The camcorder is currently
performing an operation. Do you
really want to exit?
When recording or saving the video and the user
taps X to exit, this message will appear.
The camera is currently
performing an operation. Do you
really want to exit?
After pressing the shutter button, the counter is
counting down, taking pictures continuously, or
saving the photo. At this time, the user taps X to
exit. This message will appear.
Unable to locate the front camera
device or it does not exist!
G-Camera application will scan the camera. If the
device is not found, this message will appear.
Unable to locate the rear camera
device or it does not exist!
G-Camera application will scan the camera. If the
device is not found, this message will appear.
G-Camera is used by other users.
Please close G-Camera from
other user; otherwise, function
cannot be properly performed.
G-Camera application can only be used by a
single user. If the second user wants to use the
camera, the other user needs to close the
G-Camera application.
Press the Start Tracking button to
start recording KML file.
This message will appear when entering Path
Logger mode.
Page 100

7-12 Troubleshooting
Message
Description
GPS info of path tracking is being
recorded into KML file.
This message appears when the KML file is
recording.
Saving KML file, please wait …
This message will appear when the user quits the
program, and the KML file is being saved.
Virtual-GPS program was not
detected. Please check if
Virtual-GPS program was
installed properly.
When tapping the Virtual-GPS button and the
software is not detected, this message will
appear.
Virtual-GPS Application
Message
Description
Unable to start the Virtual-GPS
service. Please try again.
Virtual-GPS service should automatically start
when system starts. If not, it may need to reboot
again.
Unable to open the GPS device.
Please check the GPS device
status.
The Virtual-GPS application will automatically
scan the real GPS COM port. If the real COM
port is occupied, does not exit, or connection
failed, this message will appear.
Virtual-GPS is unable to create
more than 16 virtual COM ports.
The Virtual-GPS application only allows the user
to create 16 virtual COM ports. When the user
adds the 17th COM port, this message will
appear.
Unable to remove it because this
COM port is being used by
another GPS application.
When the COM port is occupied by another GPS
application and the user tries to remove the COM
port, this message will appear.
Unable to execute the
Virtual-GPS program because file
may be lost. Please re-install
Virtual-GPS program again.
If the Virtual-GPS software is not functioning
properly or not found, this message will appear.
 Loading...