

Page 1

Tri-CATALOG 5
USER
HANDBOOK
Copy your serial number here: . . . . . . . . . . . . . . . . . . . . . . . .
Page 2

Licensing and Copyright Agreement
Copyright ©1998-2001 TED (TRI-EDRE DEVELOPPEMENTS)
All rights reserved
Except as permitted under copyright law, no part of the program or this manual may be
reproduced or distributed in any form or by any means without the prior written permission of TRI-EDRE
The program, and this manual, are licenced only for individual use on a single computer. you are permitted by law to make working copies of the software program, solely
for your own use. No copy (original or working) may be used while any other copy is in
use.
If you ever sell, lend or give away the original copy of this Software program, all working copies must also be sold, lent or given to the same person, or distroyed.
Trademarks
Tri-CATALOG is a trademark of TRI-EDRE.
All other products are trademarks of their respective companies.
©1998-2001 TED. All rights reserved.
Distribution by TRI-EDRE
22 Place de l’Eglise
BP 111
83510 LORGUES - France
Phone: 33 49810 1050
Fax: 33 49810 1055
Web site: www.tri-edre.com
Email : contact@tri-edre.com
Page 3

1 - Introduction. . . . . . . . . . . . . . . . . . . . . . . . . . . . . . . . . . . . . . . . . . . . . . . . . . . . 5
1.1 Welcome!. . . . . . . . . . . . . . . . . . . . . . . . . . . . . . . . . . . . . . . . . . . . . . . . . . . . . 5
1.2 Thank you for registering. . . . . . . . . . . . . . . . . . . . . . . . . . . . . . . . . . . . . . . . . 5
1.3 Latest version of the software . . . . . . . . . . . . . . . . . . . . . . . . . . . . . . . . . . . . . 5
1.4 Program Installation. . . . . . . . . . . . . . . . . . . . . . . . . . . . . . . . . . . . . . . . . . . . . 6
1.5 Tri-CATALOG first use . . . . . . . . . . . . . . . . . . . . . . . . . . . . . . . . . . . . . . . . . . . 6
1.6 Technical support. . . . . . . . . . . . . . . . . . . . . . . . . . . . . . . . . . . . . . . . . . . . . . . 6
1.7 Contacts. . . . . . . . . . . . . . . . . . . . . . . . . . . . . . . . . . . . . . . . . . . . . . . . . . . . . . 7
1.8 Updates . . . . . . . . . . . . . . . . . . . . . . . . . . . . . . . . . . . . . . . . . . . . . . . . . . . . . . 7
2 - Getting to know Tri-CATALOG . . . . . . . . . . . . . . . . . . . . . . . . . . . . . . . . . . . . . 8
2.1 Importing an existing catalog. . . . . . . . . . . . . . . . . . . . . . . . . . . . . . . . . . . . . . 8
2.2 Adding volumes to the catalog. . . . . . . . . . . . . . . . . . . . . . . . . . . . . . . . . . . . . 9
2.3 Browsing analysed volumes. . . . . . . . . . . . . . . . . . . . . . . . . . . . . . . . . . . . . . . 9
2.4 The file window . . . . . . . . . . . . . . . . . . . . . . . . . . . . . . . . . . . . . . . . . . . . . . . 10
2.5 Opening a file or a folder . . . . . . . . . . . . . . . . . . . . . . . . . . . . . . . . . . . . . . . . 11
2.6 Organising analysed volumes . . . . . . . . . . . . . . . . . . . . . . . . . . . . . . . . . . . . 11
2.7 Search functions . . . . . . . . . . . . . . . . . . . . . . . . . . . . . . . . . . . . . . . . . . . . . . 12
2.8 Watching applications . . . . . . . . . . . . . . . . . . . . . . . . . . . . . . . . . . . . . . . . . . 12
2.9 Global functions. . . . . . . . . . . . . . . . . . . . . . . . . . . . . . . . . . . . . . . . . . . . . . . 12
3 - Analysing volumes. . . . . . . . . . . . . . . . . . . . . . . . . . . . . . . . . . . . . . . . . . . . . 15
3.1 Adding volumes . . . . . . . . . . . . . . . . . . . . . . . . . . . . . . . . . . . . . . . . . . . . . . . 15
3.2 Managing the catalog. . . . . . . . . . . . . . . . . . . . . . . . . . . . . . . . . . . . . . . . . . . 16
4 - File windows. . . . . . . . . . . . . . . . . . . . . . . . . . . . . . . . . . . . . . . . . . . . . . . . . . 20
4.1 Browsing files. . . . . . . . . . . . . . . . . . . . . . . . . . . . . . . . . . . . . . . . . . . . . . . . . 20
4.2 Opening a file or folder. . . . . . . . . . . . . . . . . . . . . . . . . . . . . . . . . . . . . . . . . . 21
4.3 Toolbar . . . . . . . . . . . . . . . . . . . . . . . . . . . . . . . . . . . . . . . . . . . . . . . . . . . . . . 22
4.4 «Volume» menu . . . . . . . . . . . . . . . . . . . . . . . . . . . . . . . . . . . . . . . . . . . . . . . 23
4.5 «Item» menu . . . . . . . . . . . . . . . . . . . . . . . . . . . . . . . . . . . . . . . . . . . . . . . . . 25
4.6 Printing. . . . . . . . . . . . . . . . . . . . . . . . . . . . . . . . . . . . . . . . . . . . . . . . . . . . . . 27
4.7 Information about the selected item. . . . . . . . . . . . . . . . . . . . . . . . . . . . . . . . 27
5 - Picture windows. . . . . . . . . . . . . . . . . . . . . . . . . . . . . . . . . . . . . . . . . . . . . . . 29
5.1 Displaying pictures. . . . . . . . . . . . . . . . . . . . . . . . . . . . . . . . . . . . . . . . . . . . . 30
5.2 Selecting a volume or mark . . . . . . . . . . . . . . . . . . . . . . . . . . . . . . . . . . . . . . 31
5.3 Thumbnails display mode . . . . . . . . . . . . . . . . . . . . . . . . . . . . . . . . . . . . . . . 32
5.4 List display mode. . . . . . . . . . . . . . . . . . . . . . . . . . . . . . . . . . . . . . . . . . . . . . 32
5.5 Picture function . . . . . . . . . . . . . . . . . . . . . . . . . . . . . . . . . . . . . . . . . . . . . . . 33
5.6 Using comments . . . . . . . . . . . . . . . . . . . . . . . . . . . . . . . . . . . . . . . . . . . . . . 33
5.7 Using marks. . . . . . . . . . . . . . . . . . . . . . . . . . . . . . . . . . . . . . . . . . . . . . . . . . 34
5.8 Error display. . . . . . . . . . . . . . . . . . . . . . . . . . . . . . . . . . . . . . . . . . . . . . . . . . 36
Tri-CATALOG User Guide 3
Page 4

5.9 Printing. . . . . . . . . . . . . . . . . . . . . . . . . . . . . . . . . . . . . . . . . . . . . . . . . . . . . . 36
5.10 Information about the selected item. . . . . . . . . . . . . . . . . . . . . . . . . . . . . . . . 36
6 - Volume List . . . . . . . . . . . . . . . . . . . . . . . . . . . . . . . . . . . . . . . . . . . . . . . . . . . 37
6.1 Toolbar . . . . . . . . . . . . . . . . . . . . . . . . . . . . . . . . . . . . . . . . . . . . . . . . . . . . . . 38
6.2 Volume management . . . . . . . . . . . . . . . . . . . . . . . . . . . . . . . . . . . . . . . . . . . 38
6.3 Category management . . . . . . . . . . . . . . . . . . . . . . . . . . . . . . . . . . . . . . . . . 38
6.4 Finding a volume . . . . . . . . . . . . . . . . . . . . . . . . . . . . . . . . . . . . . . . . . . . . . . 39
6.5 Information about volumes. . . . . . . . . . . . . . . . . . . . . . . . . . . . . . . . . . . . . . . 39
6.6 Category storage on disk. . . . . . . . . . . . . . . . . . . . . . . . . . . . . . . . . . . . . . . . 39
6.7 Information about the selected item. . . . . . . . . . . . . . . . . . . . . . . . . . . . . . . . 39
7 - Searches . . . . . . . . . . . . . . . . . . . . . . . . . . . . . . . . . . . . . . . . . . . . . . . . . . . . . 40
7.1 Searching for a file. . . . . . . . . . . . . . . . . . . . . . . . . . . . . . . . . . . . . . . . . . . . . 40
7.2 Search results . . . . . . . . . . . . . . . . . . . . . . . . . . . . . . . . . . . . . . . . . . . . . . . . 42
7.3 Searching for a picture. . . . . . . . . . . . . . . . . . . . . . . . . . . . . . . . . . . . . . . . . . 43
7.4 Searching for a volume . . . . . . . . . . . . . . . . . . . . . . . . . . . . . . . . . . . . . . . . . 44
7.5 Searching for duplicates. . . . . . . . . . . . . . . . . . . . . . . . . . . . . . . . . . . . . . . . . 45
7.6 Find more. . . . . . . . . . . . . . . . . . . . . . . . . . . . . . . . . . . . . . . . . . . . . . . . . . . . 45
8 - Application list . . . . . . . . . . . . . . . . . . . . . . . . . . . . . . . . . . . . . . . . . . . . . . . . 46
8.1 Watching an application. . . . . . . . . . . . . . . . . . . . . . . . . . . . . . . . . . . . . . . . . 46
8.2 Searching the application list. . . . . . . . . . . . . . . . . . . . . . . . . . . . . . . . . . . . . 47
8.3 Menu functions. . . . . . . . . . . . . . . . . . . . . . . . . . . . . . . . . . . . . . . . . . . . . . . . 47
8.4 Importing and exporting. . . . . . . . . . . . . . . . . . . . . . . . . . . . . . . . . . . . . . . . . 47
9 - Bookmarks . . . . . . . . . . . . . . . . . . . . . . . . . . . . . . . . . . . . . . . . . . . . . . . . . . . 48
9.1 Displaying bookmarks . . . . . . . . . . . . . . . . . . . . . . . . . . . . . . . . . . . . . . . . . . 48
9.2 Activating a bookmark . . . . . . . . . . . . . . . . . . . . . . . . . . . . . . . . . . . . . . . . . . 48
9.3 Adding bookmarks. . . . . . . . . . . . . . . . . . . . . . . . . . . . . . . . . . . . . . . . . . . . . 49
9.4 Classifying bookmarks. . . . . . . . . . . . . . . . . . . . . . . . . . . . . . . . . . . . . . . . . . 49
9.5 Deleting bookmarks. . . . . . . . . . . . . . . . . . . . . . . . . . . . . . . . . . . . . . . . . . . . 49
9.6 Use examples . . . . . . . . . . . . . . . . . . . . . . . . . . . . . . . . . . . . . . . . . . . . . . . . 49
10 - Picture libraries . . . . . . . . . . . . . . . . . . . . . . . . . . . . . . . . . . . . . . . . . . . . . . 50
11 - Export . . . . . . . . . . . . . . . . . . . . . . . . . . . . . . . . . . . . . . . . . . . . . . . . . . . . . . 51
11.1 Exporting volume list or file list. . . . . . . . . . . . . . . . . . . . . . . . . . . . . . . . . . . . 51
11.2 Exporting pictures . . . . . . . . . . . . . . . . . . . . . . . . . . . . . . . . . . . . . . . . . . . . . 52
11.3 PDF export. . . . . . . . . . . . . . . . . . . . . . . . . . . . . . . . . . . . . . . . . . . . . . . . . . . 53
11.4 HTML layout files. . . . . . . . . . . . . . . . . . . . . . . . . . . . . . . . . . . . . . . . . . . . . . 54
12 - Settings . . . . . . . . . . . . . . . . . . . . . . . . . . . . . . . . . . . . . . . . . . . . . . . . . . . . . 57
4 Tri-CATALOG User Guide
Page 5

1.1 - Welcome!
1 - Introduction
1.1 Welcome!
We would like to thank you for using our product Tri-CATALOG!
With the volume cataloger Tri-CATALOG you will be able to:
• index your volumes—CDs, cartridges, hard disks, and so on,
• browse your files and pictures in these volumes, even when they are
not located on your computer,
• organize and classify your volumes into categories,
• organize and classify your pictures with marks and comments,
• search files and pictures in these volumes,
• create and distribute picture libraries,
• publish picture catalogs on the web, and
• watch your volumes to be sure that you are using the latest version of
your applications.
1.2 Thank you for registering
1 - Introduction
You will find a registration card (enclosed in the package) for your
software license.
we receive your registration card, you may call us for technical support
and we will inform you of news about and updates to this product.
Thank you for completing it and sending it back
1.3 Latest version of the software
Check our web site «
latest version of this software.
If you do not have the current version, you may download it. Use your
existing serial number when you install it.
Note: Serial numbers are compatible with all versions having the same main
version number. For example, a serial number for version 5.0 is usable with
versions 5.01, 5.02, and so on.
http://www.tri-edre.com
Tri-CATALOG User Guide 5
. Once
» to know if you have the
Page 6

1 - Introduction
1.4 Program Installation
On the CD, you will find the installer. You can also download it from our
web site:
http://www.tri-edre.com
1.5 Tri-CATALOG first use
Double-click the application icon to run it.
The application asks you to enter your serial number. You can find the
serial number on the CD sleeve. This personal serial number activates all
the functions of your software.
Keep your serial number in order to access our technical support or to
install updates of your program.
1.6 T echnical support
Our technical support is free and can be used by e-mail, by fax or by
phone. (Contact information is included below.)
You should have your serial number and the software version number
ready before calling.
1.4 - Program Installation
.
6 Tri-CATALOG User Guide
Page 7

1.7 - Contacts
1.7 Contacts
1.8 Updates
1 - Introduction
You can contact us with the information below.
If you have comments about this product, problems or questions you were
unable to answer using this user guide or with our web site, or you are
interested in obtaining a site license, please contact TRI-EDRE. Please
have your version and serial number(s) ready when you call or include
them if your write.
• E-mail:
contact@tri-edre.com
• Phone or fax:
Phone.: (33) 4 98 10 10 50
Fax: (33) 4 98 10 10 55
• Mail:
TRI-EDRE
22 Place de l’Eglise - BP 111
83510 Lorgues (France)
You can download updates from our web site:
http://www.tri-edre.com
Tri-CATALOG User Guide 7
Page 8

2 - Getting to know Tri-CATALOG
2.1 - Importing an existing catalog
2 - Getting to know Tri-CATALOG
This chapter includes the basics you will need to know to start using TriCATALOG.
Tri-CATALOG creates a catalog of the content of your volumes. Volumes
can include hard drives that are permanently installed in your Mac, and
removable drives, such as FireWire hard drives, removable disks, CDs,
network devices, and so on. You can browse and find files even when
removable volumes are not available on the desktop or on the network.
2.1 Importing an existing catalog
If you have already used an older version of Tri-CATALOG, you can keep
the previously analyzed volumes, without scaning them again.
Be careful, you should not copy old Tri-CATALOG files to the new TriCATALOG «Volumes» folder. Instead, you must use the import functions
described below.
To import a catalog, you can use one of these methods:
• When you first start Tri-CATALOG, you can import an old catalog. T o
do so, select the «Volumes» folder located next to your old Tri-CATALOG version. You can also import old application lists. For Tri-CATALOG 4: Select the file «Tri-CATALOG Applications» of folder «TriCATALOG Infos». For Tri-CATALOG 3: Select the file « ##ƒTCP3
Applications» of folder «TCP Infos».
• Any other time, you can select «Import Existing Catalog» in the
«Catalog» menu. Then, select the folder containing the existing catalog (usually the name of this folder is «Volumes»). During import,
volumes are copied in a new category named «(Import)».
Note 1: Volumes are duplicated during import, the existing catalog remains
unchanged.
Note 2: If volumes have been analyzed with Tri-CATALOG 2.0 (or an older
version), you should analyze them again with Tri-CATALOG 5. If you don’t,
information such as applications version number , v olume type , and so on, will be
missing.
8 Tri-CATALOG User Guide
Page 9

2.2 - Adding volumes to the catalog
2.2 Adding volumes to the catalog
To add a volume (that is to say, to make Tri-CATALOG analyze it), you
can:
• insert a volume (such as a CD or Zip disk) into a drive,
• select the name of a volume in the «Volume» menu,
• drag and drop a volume onto a Tri-CATALOG window,
• drag and drop a volume onto Tri-CATALOG icon.
Tri-CATALOG is also able to analyze the content of one folder (and of its
sub-folders). To catalog a folder, drag-and-drop it onto the Tri-CATALOG
window.
2.3 Browsing analyzed volumes
After analyzing a volume, you can browse its files and pictures.
File window
The first file window is opened after launching Tri-CATALOG. The file
window allows you to browse the files located on analyzed volumes.
Several file windows can be displayed at the same time.
To display a new file window, select «New File Window» in the «File»
menu.
2 - Getting to know Tri-CA TALOG
Picture window
Picture windows allow you to browse the picture thumbnails located on
analyzed volumes. Several picture windows can be displayed at the same
time.
To display a new picture window, select «New Picture Window» in the
«File» menu. You can also click this button in a file window toolbar to
activate a picture window:
Figure 1. «Picture List» button
Tri-CATALOG User Guide 9
Page 10
2 - Getting to know Tri-CATALOG
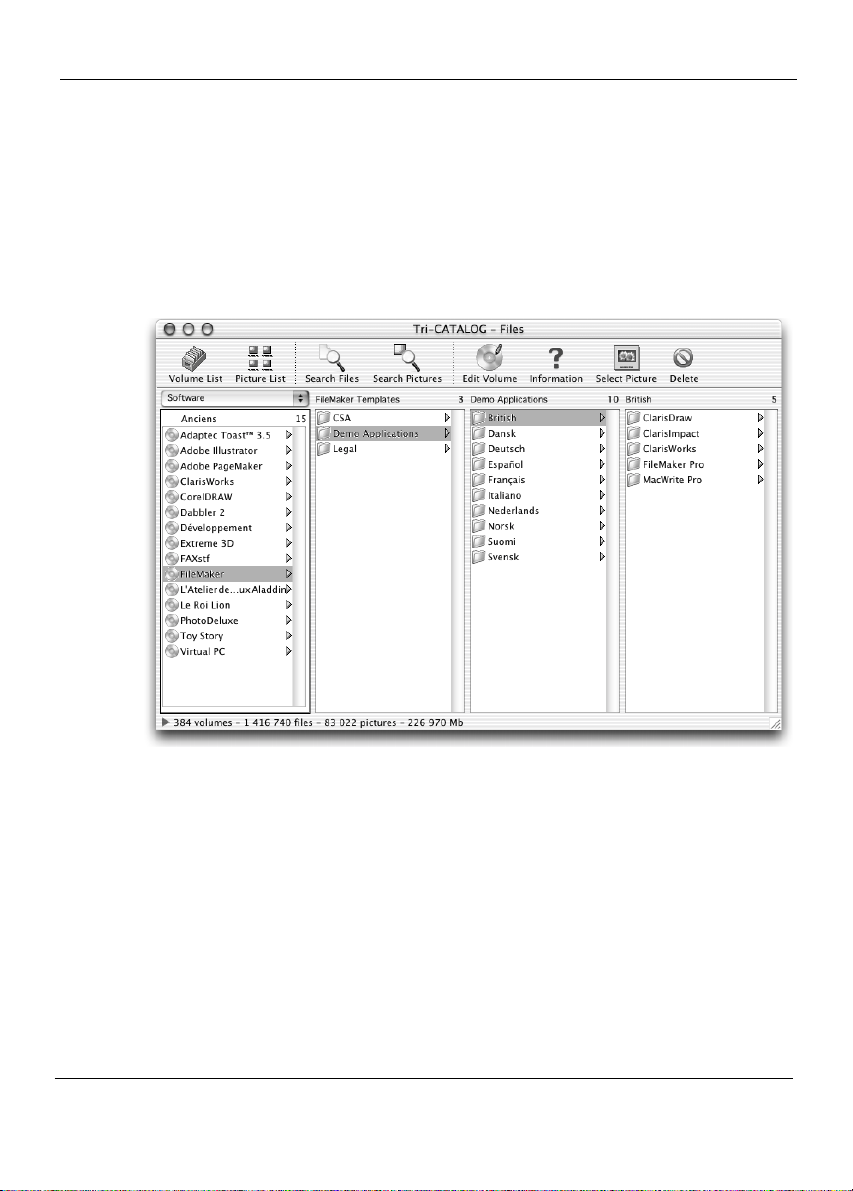
2.4 The file window
After opening Tri-CATALOG, a file window is opened. It contains:
• a «browser» to browse the content of analyzed v olumes (in the center),
• an information area about the selected file or folder (at the bottom),
• a toolbar giving access to the main functions (at the top).
2.4 - The file window
Figure 2. File window
The main part of this window is divided into hierarchic columns. Each list
displays the content of one level within the volume selected in the first
column.
The left list displays the volumes belonging to the selected category in the
popup menu located at the top of this list (for instance «Software»).
By selecting a volume or a folder, you can display its content in the next
column. Selecting an item in the right-most column adds a new column
and moves existing columns to the left.
The number of columns depends on the size of the window, but it can be
defined in the settings (see «Settings» page 57).
10 Tri-CATALOG User Guide
Page 11

2.5 - Opening a file or a folder
The sorting criterion of these lists can be modified in the «Edit» menu.
Several file windows can be displayed at the same time by selecting «New
File Window» in the «File» menu.
2.5 Opening a file or a folder
T o select a file (or a folder) in the Finder , double-click it in T ri-CATALOG.
If its volume is not mounted, a dialog asks you to insert the volume.
To open a file with its application (or to open a folder in the Finder)
double-click it while pressing the Option key.
You can also click a file (or a folder) while pressing the Control key to
display a contextual menu allowing you to select a folder in its hierarchy
(«Select parent…» submenu).
2.6 Organizing analyzed volumes
Analyzed volumes can be classified into categories. It is easier to browse
and search sorted volumes.
For instance, it can be useful to separate your bac kup CDs from y our application
and demo CDs.
To sort analyzed volumes, you must use the Catalog Edition window.
Select «Volume list…» in the «Catalog» menu to display this window.
Then you will be able to create, modify, and move categories and volumes.
Each analyzed volume is saved in a separate file inside the «Volumes»
folder on the hard disk. For example, if a catalog is composed of 10
volumes, it is saved in 10 separate files. In the same way, pictures
contained in these volumes are saved in a second separate file (the picture
file is saved next to the volume file; its name ends with «.img»).
2 - Getting to know Tri-CA TALOG
Tri-CATALOG User Guide 11
Page 12
2 - Getting to know Tri-CATALOG
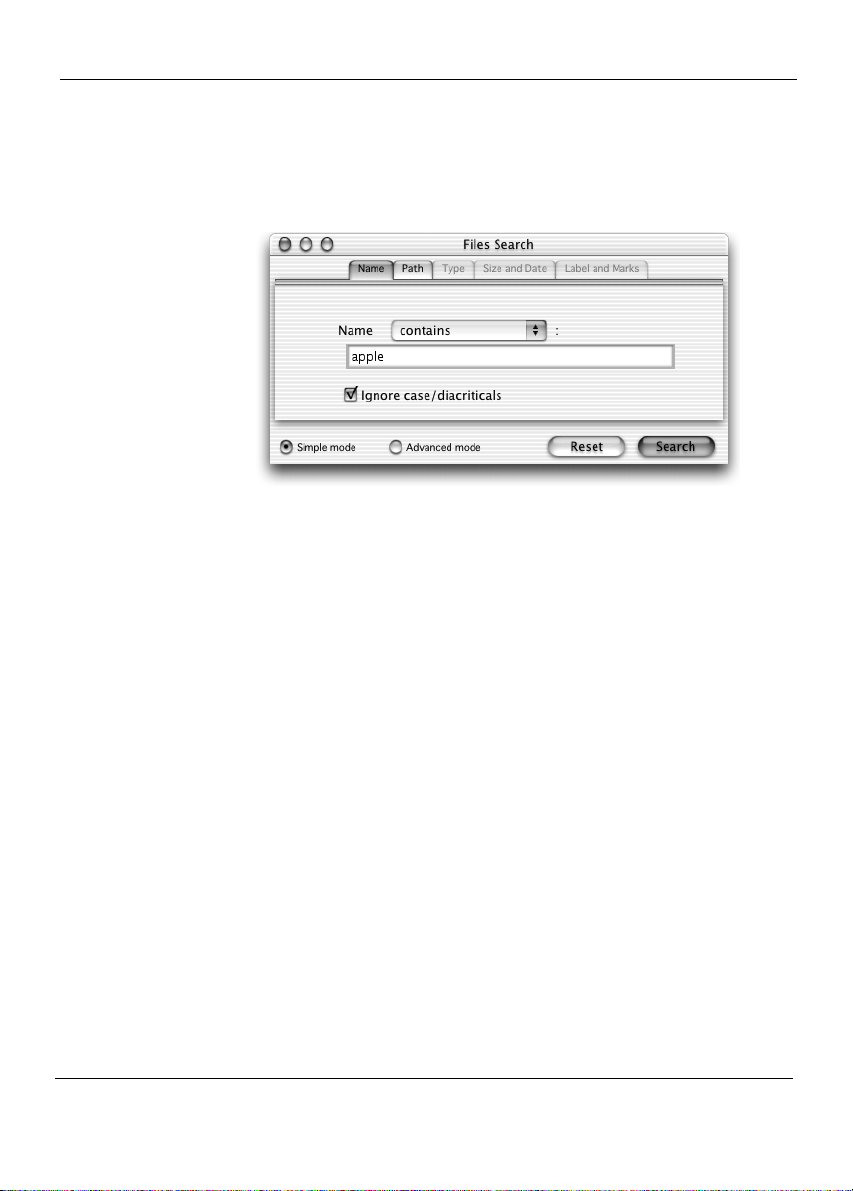
2.7 Search functions
To search files, pictures, and volumes use the «Find» menu commands.
Tri-CATALOG searches files, pictures, or volumes and displays the list of
found items at the bottom of the search window.
2.8 Watching applications
Tri-CATALOG makes it possible to watch the latest version of your
favorite applications. Tri-CATALOG can inform you, after a volume
analysis, that a new version of one of your favorite applications is present
on the volume.
This function is very useful with shareware because new versions of these
programs are often available on CDs.
T o watch an application, select «Application List» in the «W indo w» menu,
and check the applications to watch. You will be automatically informed
about any new version Tri-CATALOG finds.
2.7 - Search functions
Figure 3. File search window
2.9 Global functions
In this section, you will find very important tips that can be used in any T riCATALOG window.
12 Tri-CATALOG User Guide
Page 13

2.9 - Global functions
Information lists
Keyboard tips
Confirmation dialogs
2 - Getting to know Tri-CA TALOG
Tri-CATALOG often uses multi-column lists. If you cannot display all of
the columns on your screen, you can resize them by clicking between two
column names, then moving the mouse while pressing the mouse button.
To sort lists, click a column title.
To quickly scroll to an item, you can type the first characters of the item’s
name. You can also move through items in lists using arrow keys and the
page up and page down keys.
To delete the selected item, press the backspace key or the delete key.
To select several consecutive items, click the first one and Shift-click the
last one. To select several non-consecutive items, press the Command key
while clicking each item. When you have selected multiple items, you can
change marks or comments for all of them at the same time.
Many actions display a confirmation dialog—when you delete a volume,
for example. To bypass these dialogs, you can hold the Option key down.
Windows ordering
When many windows are opened, the «Window» menu allows you to
easily change the front window. You can also select «Order windows» to
order them in a convenient way.
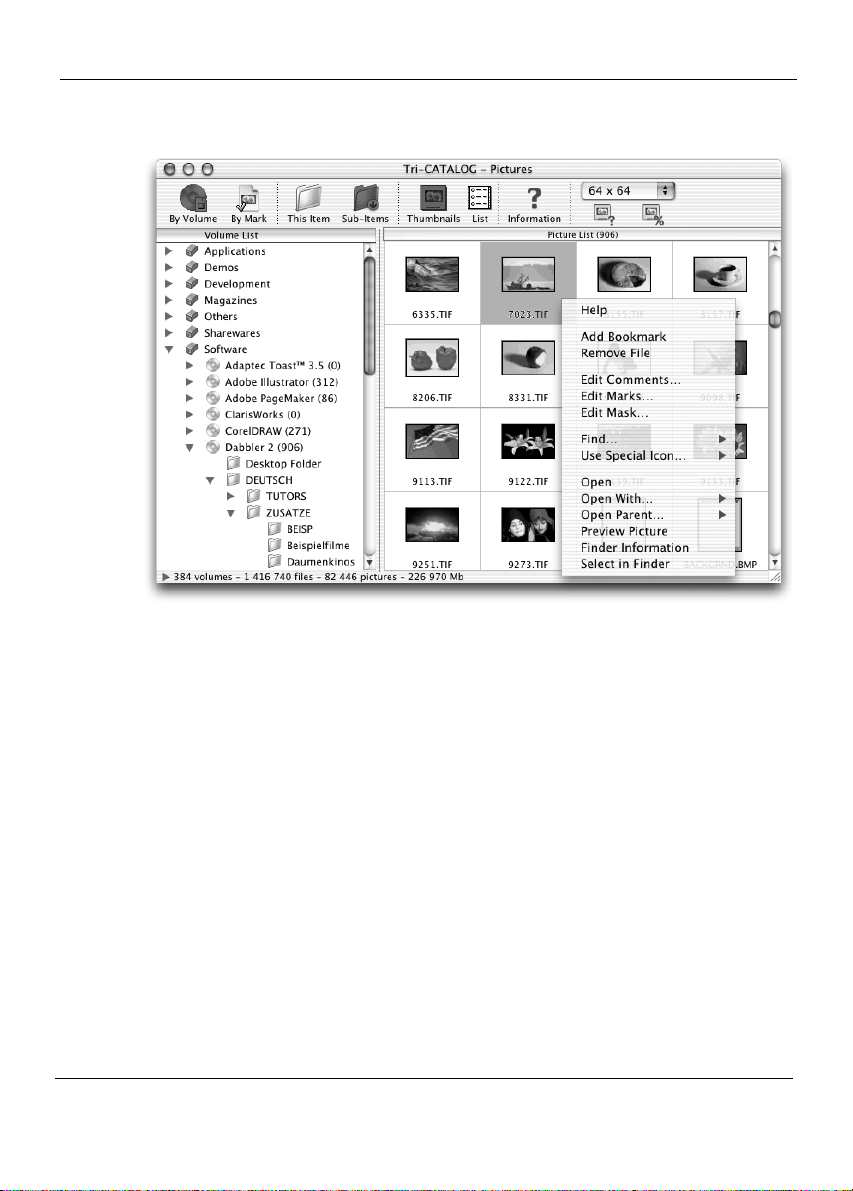
Contextual menus
To display a contextual menu on an item, click it while pressing the
Control key. Contextual menus allow you to easily perform associated
actions on the selected item(s).
Tri-CATALOG User Guide 13
Page 14
2 - Getting to know Tri-CATALOG
AppleScript
Tri-CAT ALOG is scriptable. This means that you can program AppleScript
scripts to run repetitive actions in Tri-CATALOG. To know what
AppleScript instructions Tri-CATALOG recognizes, open the program
«Script Editor», select «Open Dictionary...» in the «File» menu and select
«Tri-CATALOG».
2.9 - Global functions
Figure 4. Picture contextual menu
14 Tri-CATALOG User Guide
Page 15

3.1 - Adding volumes
3 - Analyzing volumes
Tri-CATALOG was designed to manage the large amount of data always
growing into our computers and on our shelves. The spread of large
capacity disks, such as CDs, DVDs, and removable disks, has made
finding files or information difficult and time-consuming.
Tri-CATALOG keeps the content of every volume in a highperformance database. The program includes many ways to browse
and find items. Furthermore, the catalog is always present and
accessible, even when the original volumes are not.
Tri-CATALOG also stores a reduced view thumbnail for every picture file
it encounters.
3.1 Adding volumes
The first thing to do with Tri-CATALOG is to start building a catalog by
analyzing your volumes with one of these methods:
• by inserting a volume such as a CD or a removable hard disk into a
drive. Tri-CA TALOG detects the inserted volume and analyzes it automatically. (Automatic scans can be disabled in the settings.)
• by using the «Volume» menu to analyze one of the mounted volumes.
• by drag and dropping the volume onto a Tri-CATALOG window.
• by drag and dropping the volume onto the Tri-CATALOG icon.
Tri-CATALOG is also able to analyze the content of one folder (and its
sub-folders). To catalog a folder, drag-and-drop it onto the Tri-CATALOG
window.
The content of the volume is analyzed by T ri-CATALOG and added to the
catalog. The analysis occurs in two steps. The first step sav es the content of
the volume (even the files that reside inside Compact Pro® or Stuffit®
archives). The second step, creates a thumbnail for each picture file. (You
can deactivate picture scans in the settings, see «Settings» page 57). After
analyzing an inserted volume, Tri-CATALOG automatically ejects
removable volumes. (You can override automatic ejection by holding
down the Option key at the beginning or at the end of the analysis).
3 - Analyzing volumes
Tri-CATALOG User Guide 15
Page 16

3 - Analyzing volumes
Tri-CATALOG is able to create thumbnails for JPEG, GIF, PNG, EPS,
TIFF, PICT, BMP, PCX, TARGA, QTIF, SGI, FlashPix, QuickDraw GX,
ILBM and MacPaint pictures. Tri-CATALOG is also able to read
thumbnails created by Photoshop, Illustrator, XPress, and others.
Note: Tri-CATALOG 5 has been entirely rewritten for Mac OS X, it takes
advantage of Mac OS X’s multitasking capabilities. If your computer has
sufficient memory and processing power, you can use other applications while
Tri-CATALOG is performing demanding tasks, such as analyzing a CD or
searching files.
Updating a volume
If you try to analyze a volume already in the catalog, T ri-CATALOG gives
you the choice of updating the volume or adding it a second time without
removing the first volume.
Note: Marks and comments are kept (when possible) after the update. Although
less reliable, the«Quick volume update» feature improves analysis speed. (You
can activate Quick volume updates in the settings, see «Settings» page 57).
Tri-CATALOG is also able to update only picture thumbnails. To use this
function select «Update Volume» in the «Volume» menu.
Tri-CATALOG can also automatically analyze volumes at regular intervals
(see «Settings» page 57).
3.2 - Managing the catalog
3.2 Managing the catalog
Catalog content
When you first start Tri-CATALOG, it creates a folder named «Volumes»
whose purpose is to hold catalog files for analyzed volumes.
For each volume, Tri-CATALOG creates a file whose name is the volume
name. These files reside in the folder of the active catalog. (If the volume
name already exists, Tri-CATALOG adds a number to its name.) This file
contains information about the content of the volume.
A second file containing the picture thumbnails is also created for each
analyzed volume. Its name is the volume name followed by «.img».
A file containing the catalog index («Tri-CATALOG.index») and a file
containing the marks («Tri-CATALOG.marks») are also saved in the
current catalog folder.
16 Tri-CATALOG User Guide
Page 17

3.2 - Managing the catalog
If you move the files in your catalog folder, you must select «Update
Index» in the «Catalog» menu to make Tri-CATALOG aware of your
changes.
Sorting volumes into categories
As the number of analyzed volumes grows, it can be useful to sort your
volumes into categories to make your work easier. Select «Sort
Volumes…» in the «Catalog» menu to display the Volume List window
where you can apply categories.
A category is a subgroup of catalog volumes. For example, you can create
a «Backup» category to hold your backup cartridges.
It is even better to create subcategories in the «Backup» category to sort
your volumes by year, by customer, by project, and so on.
Information about the catalog
At any time, you can read the number of analyzed volumes, the number of
analyzed files, the number of analyzed pictures, and the size of these files
at the bottom of file windows, picture windows, and the Volume List
window.
Using several catalogs
Tri-CATALOG creates a «Volumes» folder when it first runs, but you can
use several catalogs, each located in a different folder. To create a new
catalog, you simply create an empty folder to hold its volumes. Then, you
change the current catalog by selecting «Load Another Catalog…» in the
«Catalog» menu. Only one catalog can be used at a time, but one catalog
can be located inside another.
The «Recent catalogs» submenu allows you to quickly load recent
catalogs. To remove this list, select «Clear List».
3 - Analyzing volumes
Catalog size limit
The number of catalogs in unlimited. In each catalog, the number of
volumes is unlimited. In each volume, the number of items (files, pictures,
and folders) is unlimited. The only limit is the available free space on your
disk.
Tri-CATALOG User Guide 17
Page 18
3 - Analyzing volumes
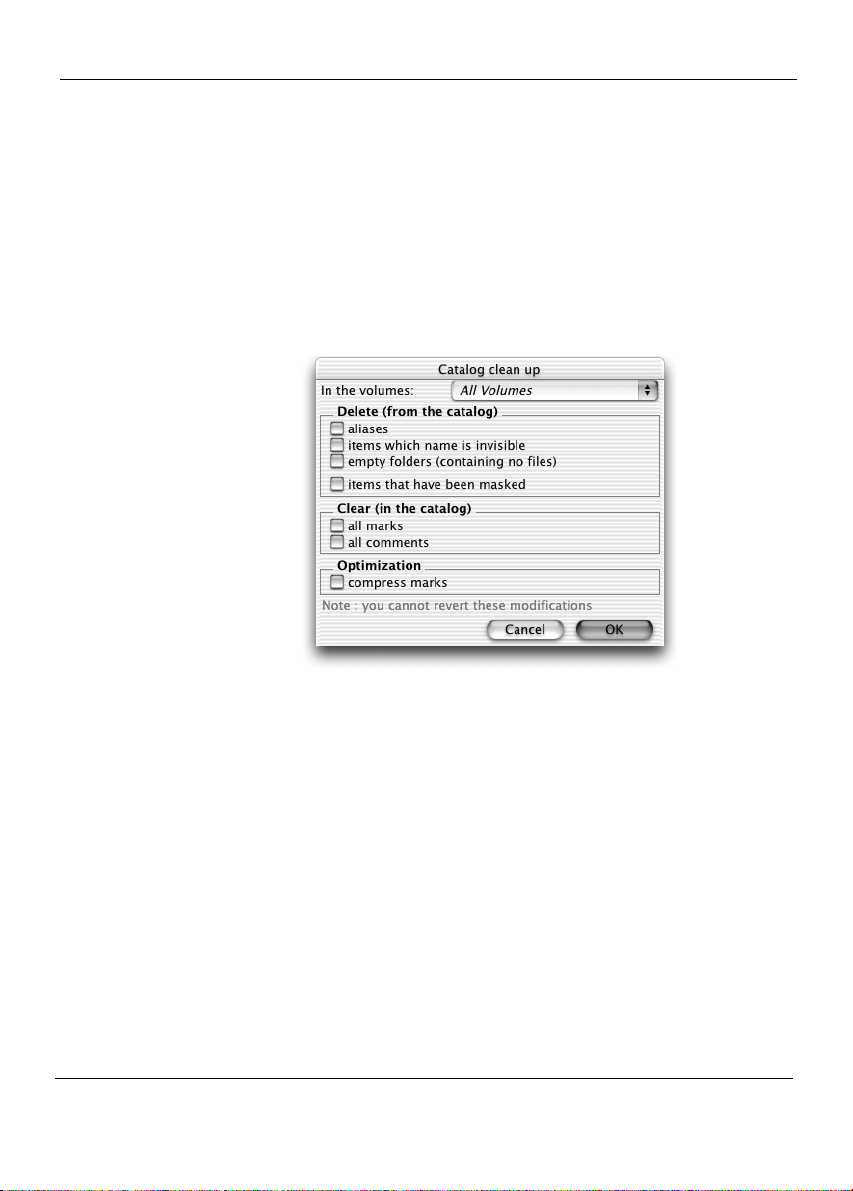
Cleaning files in the catalog
To reduce the catalog size, you can select «Clean-up Catalog…» in the
«Catalog» menu while viewing any file window. The features cleans the
content of catalog volumes.
Tri-CATALOG can clean every volume or only the ones located in a
specific category. We encourage you to create a special category to hold
the volumes you want to clean up.
3.2 - Managing the catalog
Figure 5. Clean-up dialog
When cleaning-up, you can choose to:
• delete aliases or items with invisible names,
• delete empty folders,
• delete masked files, and
• delete marks and comments associated with the file.
Caution: You cannot undo these changes. We recommend you preview your
changes by searching for these items before removing them (see «Find more»
page 45).
Cleaning pictures in the catalog
To display the picture cleaning dialog, select «Clean-up Catalog…» in the
«Catalog» menu while viewing a picture window.
18 Tri-CATALOG User Guide
Page 19

3.2 - Managing the catalog
This function allows you to permanently remove duplicate pictures located
on the same volume.
3 - Analyzing volumes
Figure 6. Picture clean-up dialog
Tri-CATALOG User Guide 19
Page 20

4 - File windows
4 - File windows
You will spend most of your time using file windows. A file window has
three parts: The browser lets you bro wse the content of your volumes. The
information area gives you details on the selected volume. And the toolbar
gives you access to Tri-CATALOG’s main functions.
Note: You can view several file windows at the same time («New File Window» in
the «File» menu).
4.1 Browsing files
The content of your volumes is displayed in file windows. The browsing
area consists of several columns in which the program hierarchically
displays the content of your volumes and folders.
4.1 - Browsing files
Figure 7. File window
The volume list appears on the left side of the window. It can show all the
volumes in a catalog or only those belonging to a specific category . Use the
category popup menu located at the top of this list to change your view.
20 Tri-CATALOG User Guide
Page 21

4.2 - Opening a file or folder
The category popup makes it easy to browse your volumes, even if the
catalog is composed of hundreds of volumes.
Browsing within a volume is easy. When you select a volume or a folder,
its contents are shown in the next column. Selecting an item in the rightmost column adds a new column and makes the existing columns move to
the left.
The number of columns automatically with the size of the window unless
you adjust the number of columns (between 3 and 5 columns) in the
settings (see «Settings» page 57).
Each list displays the items (files and folders) of the folder (or the volume)
selected in the column to its left.
By default, files are sorted by name. You can use the «Edit» menu to
change the sort order.
4.2 Opening a file or folder
To select a file or a folder in the Finder, double-click it in Tri-CATALOG.
If the volume that contains the file is not mounted, a dialog asks you to
insert it.
T o open a file with its application, or to open a folder in the Finder, doubleclick it while pressing the Option key.
If you click a file or a folder while pressing the Control key, a contextual
menu appears in which you can select a folder within its hierarchy («Open
Parent…» submenu).
This trick is particularly useful when using slow disks such as CDs. With it, you
can go directly to whatever folder you want to open on the volume.
After a double-click, Tri-CATALOG checks whether the volume
containing the file is currently mounted. If not, a dialog asks you to insert
the volume (and waits until you insert it). If another volume is already
mounted in the drive, a button allows you to eject it.
Caution: All cataloged, mounted volumes are present in the popup men u (e xcept
the one containing the active system) and this function can unmount a hard
drive, removing it from the desktop. If you mistakenly unmounted a disk, restart
your computer to remount it.
4 - File windows
Tri-CATALOG User Guide 21
Page 22

4 - File windows
4.3 T oolbar
Displaying other windows
Search functions
4.3 - T oolbar
The buttons located at the top of the file window give you quick access to
Tri-CATALOG functions.
These functions are also available in the menus and in the contextual
menus. This section describes these functions.
Click this button to open the Volume List window (same function as
the «Catalog» menu command). This window displays the list of
analyzed volumes, allows you to sort them into categories, and
displays important information about each of them, such as a
volume’s free space, which can help you decide where to save a
large file.
This button opens a new picture window.
This button opens the file search window. See «Searching for a
file» on page 40
This button opens the picture search window . See «Searching f or a
picture» on page 43
Selected item actions
This button allows you to modify the selected volume—its name in
Tri-CATALOG, its category, and its icon. For example. with this
function, you can make CD names more explicit.
This button displays an information window about the selected file .
From this window, you can change its comments and its marks.
22 Tri-CATALOG User Guide
Page 23

4.4 - «Volume» menu
4.4 «Volume» menu
The «Volume» menu can be used from any Tri-CATALOG window. It
allows you to edit and remove an analyzed volume, and it allows you to
scan new volumes.
Information window
The information window displays information about the selected volume,
such as the number of files on the volume.
4 - File windows
This button allows you to modify the selected volume—its name in
Tri-CATALOG, its category, and its icon. For example. with this
function, you can make CD names more explicit.
This button selects in a picture window the thumbnail
corresponding to the selected file.
This button removes the selected item. If the selected item is a
volume, the files containing its information in the «Volumes» folder
are moved to the Trash and the volume no longer appears in TriCATALOG. If the selected item is a file, it is moved to the Trash. (If
the volume containing this file is not mounted, Tri-CATALOG asks
you to insert it.)
Figure 8. Volume information window
Tri-CATALOG User Guide 23
Page 24

4 - File windows
Display volume hierarchy
Modify volume
4.4 - «Volume» men u
Click the triangle at bottom of this window to edit the volume marks and
comments.
To display the content of this volume in a separate window, use this
command. A search function in this window allows you to find files by
their names.
This command allows you to modify the selected volume—its name in TriCAT ALOG, its category and, its icon. F or e xample, with this fuctnion, you
can make CD names more explicit.
Figure 9. Edit volume dialog
Note: To revert to the original name, leave the «Volume name» field empty.
Update volume
This command updates the selected volume, retaining its marks and
comments. A settings option allows you to use a fast update mode (see
«Settings» page 57).
Remove volume
This button removes the selected volume. The files containing its
information in the «Volumes» folder are moved to the Trash and this
volume no longer appears in Tri-CATALOG.
24 Tri-CATALOG User Guide
Page 25

4.5 - «Item» menu
Remove pictures
Analysis
4.5 «Item» menu
Information window
4 - File windows
This command only removes pictures within a volume. After using this
function, the volume still appears in T ri-CAT ALOG and you can bro wse its
content, but its pictures and thumbnails are no longer visible.
«Scan all mounted volumes», «Automatic scan» and the mounted volume
list allow you to scan new volumes.
The «Item» menu can be used from any Tri-CATALOG window. It allows
you to edit and remove analyzed files.
This command displays an information window about the selected file.
From this window , you can also change its comments and its marks (do not
forget to click «Save» to save your modifications).
Figure 10. File information window
The content of this window depends on the type of the selected item (file
or picture). These information windows can help you compare
information, comments, and marks for different files because you can
Tri-CATALOG User Guide 25
Page 26

4 - File windows 4.5 - «Item» menu
display several information windows at the same time.
Delete item
This button removes the selected item from Tri-CATALOG and deletes it
from your disk. The selected item is moved to the Trash. If the volume
containing this file is not mounted, Tri-CATALOG asks you to insert it.
Edit comments
Comments of unlimited length can be attached to any item—file, picture,
folder or volume—in the catalog. See «Using comments» on page 33.
Edit marks
Marks can be attributed to any item—file, picture, folder or volume—in
the catalog. See «Using marks» on page 34.
Edit mask
Some files—Read Me files, for example—may be uninteresting to you. the
Edit Mask command gives you the opportunity to hide them in your
searches. (This command also lets you remove masks.)
Masked items are no longer displayed in Tri-CATALOG and are ignored
during searches. (To view masked items, you must change your settings.)
If the selected item is a folder, you can apply its mask to every item it
contains.
Note: To permanently remove masked items from the catalog, select «Clean-up
catalog» in the «Catalog» menu).
Find
The «Find…» submenu allows you to search files associated with the
selected item—for example, the application used to create this file.
Favorite marks
The «Favorite marks» submenu allows you to easily attribute marks to the
selected item using keyboard shortcuts. To define your 10 favorite marks,
see «Mark palette» on page 34.
26 Tri-CATALOG User Guide
Page 27

4.6 - Printing 4 - File windows
Use special icon
The «Special icon» submenu allows you to replace the classic icon used
for the selected file with another icon defined in Tri-CATALOG.
For example, if you select a JPEG picture created with Photoshop and
change the icon for files of this type, all JPEG pictures created with
Photoshop will display the same customized icon within Tri-CATALOG.
By selecting «Edit icons...», you can (if you wish) erase the creator code
corresponding to Photoshop so that all JPEG pictures—regardless of the
application that created them—display the same icon in Tri-CATALOG.
File commands
The last few commands focus on files. If your selection is a file, you can
open it with its creator application using the «Open» command, or you can
open with another application using the «Open with» submenu. The
applications displayed in this menu can be defined in the settings, see
«Settings» page 57). You can also select the file in the Finder using «Select
in Finder», display its Finder information window using «Finder
information», or if it is a picture, preview an image using «Preview
picture».
4.6 Printing
You can select «Print…» in the «File» menu from any active file window
to print the scanned volume list, volume contents, and so on.
4.7 Information about the selected item
To get information about the selected item, you can open the information
area in the file window either by selecting «Information Area» in the
«Window» menu, or by clicking the disclosure triangle located at the
bottom left corner of the window.
You can also display floating palettes using the «Window» menu. The
information palette provides information about the selected item. The
marks palette displays the selected item’s marks. And finally, the preview
palette displays the picture of the selected file.
Tri-CATALOG User Guide 27
Page 28

4 - File windows 4.7 - Information about the selected item
Figure 11. Preview palette
28 Tri-CATALOG User Guide
Page 29

4.7 - Information about the selected item 5 - Picture windows
5 - Picture windows
To display the first picture window, select «New Picture Window» in the
«File» menu, or click the «Picture List» button in the file window toolbar.
Figure 12. Picture widow
Tri-CATALOG User Guide 29
Page 30

5 - Picture windows 5.1 - Displaying pictures
5.1 Displaying pictures
Browsing mode
Picture windows offer two different browsing modes. You can either
browse pictures located on a volume, folder, and category, or browse
pictures according to their marks:
To display the pictures located in a volume, a folder, or a category,
click the «By Volume» button, and then select the desired item in
the left list. Its pictures will be displayed on the right.
To display all pictures, pictures with a desired mark, or pictures
with no mark at all, click the «By Mark» button, and then select the
desired item in the left list.
Display level
You can either display the pictures that are immediately located in the
selected item, or any pictures located in the selected item and in its sub-
items (sub-folders or sub-marks):
After selecting a CD, click this button to only display pictures that
are located in the top folder of the CD.
After selecting a CD, click this button to display any pictures
located in this CD or in one of its sub-folders.
Display mode
Pictures can be displayed as thumbnails or in a detailed list:
To display pictures as thumbnails, click this button.
T o displa y pictures in a detailed list (with their name, siz e, date, and
so on), click this button.
30 Tri-CATALOG User Guide
Page 31

5.2 - Selecting a volume or mark 5 - Picture windows
5.2 Selecting a volume or mark
When the volume list is displayed, the number of pictures in each volume
is displayed next to the volume name (if it contains any pictures). To
browse the category or volume content, use the disclosure triangles. By
clicking individual items, you can display just the pictures located in this
folder or its sub-folders.
Figure 13. Picture window - Volume mode
When the mark list is visible, you can select a specific mark in the list to
display pictures associated with the mark. The mark list also allows you
display all pictures, and pictures without any mark.
Figure 14. Picture window - Mark mode
Tri-CATALOG User Guide 31
Page 32

5 - Picture windows 5.3 - Thumbnails display mode
5.3 Thumbnails display mode
When the thumbnail display mode is on, new buttons are available:
Figure 15. Thumbnail options
With the popup menu in the top right corner of the picture window, you
can select the thumbnail display size (48 x 48 pixels, 64 x 64 pixels, 96 x
96 pixels, 128 x 128 pixels, 192 x 192 pixels, or 256 x 256 pixels).
Note: If you are displaying thumbnails at a resolution different than the size TriCATALOG used to create them, the thumbnails may appear jagged. For
example, if you scanned the pictures at 96 x 96 pix els and are displa ying them at
256 x 256 pixels. To change thumbnails creation size select «Settings…» in the
«File» menu..
The button with the question mark icon allows you to display an
information area inside every thumbnail.
The button with the percent icon allows you to display thumbnails
proportionally with their real size. (If this option is not activated,
thumbnails occupy the largest available space.)
Pictures can be sorted with the «Edit» menu.
5.4 List display mode
When the list display mode is on, the picture list contains many columns.
You can sort and resize the columns to fit your needs (see «Information
lists» page 13).
32 Tri-CATALOG User Guide
Page 33

5.5 - Picture function 5 - Picture windows
5.5 Picture function
To get information about a picture, edit its marks, or edit its comments,
you can click the «Information» button in the toolbar:
Figure 16. «Information» button
You can also open the Information window by pressing Command-I (see
««Item» menu» page 25).
5.6 Using comments
To make picture searches easier, you can give each picture comments.
Comments can be defined for volumes, folders, and files. Comments are
not limited to pictures. To edit an item’s comments, you can either:
• select the item and choose «Edit Comments…» in the «Item» menu, or
• select the item, display its information window (select «Information
Window…» in the «Item» menu, or in the «Volume» menu), then edit
its comments. Click «Save» to keep you changes.
To define comments for a group of pictures, select these pictures and
choose «Edit Comments…» in the «Item» menu. Each selected picture
will use the new comments.
Tip: Before defining comments for a large number of files, close any
unnecessary window. Tri-CATALOG works faster when fewer windows are open.
The comments defined for the first item are visible in the information
palette and in the item information window. Then, comments can be used
to search files or p.ictures (For instance, you can search files with «dog» or
«cat» in their comments).
Note: Comments can be used for many purposes: keywords, picture
descriptions, and the like.
Tri-CATALOG User Guide 33
Page 34

5 - Picture windows 5.7 - Using marks
5.7 Using marks
To make picture searches easier, you can also give them marks. Marks can
be defined for volumes, folders, and files. Marks are not limited to
pictures. To edit an item mark, you can:
• select the item and choose «Edit Marks…» in the «Item» menu, or
• select the item, display its information window (select «Information
Window…» in the «Item» menu, or in the «Volume» menu), edit its
marks, and finally click «Save».
To define marks for a group of pictures, select these pictures and choose
«Edit Marks…» in the «Item» menu. Each selected picture will use the
new marks.
Tip: Before defining marks for a large number of files, close any unnecessary
window.s Tri-CATALOG works faster when fewer windows are open.
The marks defined for one item are visible in the mark palette and in this
item information window. Then, marks can be used to search files or
pictures.
Mark palette
Tri-CATALOG also offers another method to edit item marks. You can
display the mark palette by choosing «Mark palette» in the «Window»
menu. Then, you simply drag and drop the item onto a mark in the mark
palette. The mark that receives the drop will be added to the item.
To remove a mark, drag and drop the item onto a mark in the mark palette
while pressing the Option key.
To remove each mark, drop the item on «No Mark».
To define marks for a group of items, select these items, drag them onto a
mark in the mark palette.
The drag and drop works from any Tri-CATALOG window, you can drag
and drop pictures from a picture window, files from a search window,
volumes from the Volume List window, and so on.
34 Tri-CATALOG User Guide
Page 35

5.7 - Using marks 5 - Picture windows
Figure 17. Mark palette
Tri-CATALOG can manage as many marks as you want, there is no limit.
To create a new mark, click the «+» button. To edit the name of a mark,
click the pencil button. To remove a mark, click the trash button. You can
also drag marks and drop them on any other mark to create sub-marks. (To
move a mark to the top or “root” level, drop it on «No Mark».)
You can also define your 10 favorite marks. Select the mark, display its
contextual menu (click the mark while pressing the Control key), and
choose «Favorite Mark 3», for instance. Now, from any Tri-CATALOG
window, you can add this mark to the selected item by using the keyboard
shortcut Command-3. See «Favorite marks» on page 26 for more
information.
The mark palette also allows you to see the marks defined for any selected
item. To enable this feature, check the box at the bottom of the mark
palette. Now marks defined for the selected item will be displayed with a
red icon.
Tri-CATALOG User Guide 35
Page 36

5 - Picture windows 5.8 - Error display
5.8 Error display
Different errors can occur while scanning pictures that prevent TriCATALOG from reading them. When an error occurs, a special icon is
displayed instead of the picture thumbnail.
An icon with a blue question mark means that the thumbnail has not been
created for this picture because you have cancelled picture analysis before
its ends. This icon may also mean that the thumbnail has not been created
because the picture file format was not recognized by Tri-CATALOG.
An icon with a read question mark means that the thumbnail was not
created for the picture because the file is damaged. (To check it, try
opening this picture with the appropriate image editing application.)
Tip: To scan large picture files with Mac OS 8 or Mac OS 9, increase the memory
allocated to Tri-CATALOG in its Finder information window.
5.9 Printing
You can select «Print…» in the «File» menu while viewing a picture
window to print every thumbnail or only selected thumbnails.
5.10 Information about the selected item
The picture window offers the same functions as the file window for
getting information about the selected item. See «Information about the
selected item» on page 27.
36 Tri-CATALOG User Guide
Page 37

5.10 - Information about the selected item 6 - V olume List
6 - Volume List
To display the Volume List window, select «Sort Volumes…» in the
«Catalog» menu (or «Volume List» in the «Window» menu), or click the
«Volume List» button in the file window toolbar.
The Volume List window lets you manage the volumes you added to the
catalog—allowing you to rename or delete volumes, move them into
categories, or get their information. You can quickly organize your
volumes by grouping them into categories and sub-categories, making
browsing and searching the catalog easier and more efficient.
Figure 18. Catalog Edition window
It is advisable to create several categories and sub-cate gories. You will find
that they are extremely useful and efficient. Leave the main level empty
(for volumes without categories). The main level will receive new
catalogued volumes that you can move later to the appropriate category.
Tri-CATALOG User Guide 37
Page 38

6 - Volume List 6.1 - T oolbar
6.1 T oolbar
This button displays the volume search window.
When this button is on, the right side list displays the content of the
selected item in the left list (including sub-categories and volumes).
When this button is on, the right list displays the full volume list
(whatever the left list selected item is). It may be slow; by default,
this button is off.
This button creates a new category.
This button edits the name of the selected category.
This button edits the selected volume.
This button removes the selected category or volume.
6.2 V olume management
To move a volume into a category, select it in the right column and drag it
onto the desired category.
6.3 Category management
You can also move categories into others (making them into subcategories) by using drag-and-drop.
38 Tri-CATALOG User Guide
Page 39

6.4 - Finding a volume 6 - V olume List
6.4 Finding a volume
In the top right corner of the window, the field next to the «Find» button
allows you to quickly search a volume by its name:
Figure 19. Quick search field
To find a volume, you can click on the «Search» button of the toolbar and
enter the name of the volume you are looking for. If the volume is
displayed among the results, click it to automatically select it in the
Volume List window.
6.5 Information about volumes
The volume list contains many useful columns: original name, used space,
free space, and so on. Y ou can sort them and resize them to adapt their size
to your screen (see «Information lists» page 13).
To get more precise information about a volume, select it in the list, and
choose «Information Window...» in the «Volume» menu.
6.6 Category storage on disk
The category and volume organization in T ri-CATALOG is the same as the
one for files (within volumes) and folders (representing categories) in the
«Volumes» folder on the hard disk.
Any modification of a category in Tri-CATALOG is passed on to folders
and sub-folders on the disk. The same way, when you move volumes into
categories, files within them are moved into the corresponding folders.
6.7 Information about the selected item
The Volume List window offers the same function as the file windows to
get information about the select item (information area, information
palette, mark palette, preview palette, and so on.) See «Information about
the selected item» on page 27.
Tri-CATALOG User Guide 39
Page 40

7 - Searches 7.1 - Searching for a file
7 - Searches
Ever-increasing amounts of data on our computers and on removable
storage media has made it harder and harder to quickly find the files we
need. Tri-CATALOG is able to manage hundreds of volumes representing
millions of files. Search functions are its raison d'être.
Every Search window offers a simple search mode (based on the name of
the items to find) as well as an advanced search mode (based on other
characteristics). The results appear at the bottom of the window.
7.1 Searching for a file
To find a file, select «Search Files...» in the «Find» menu.
Simple mode
In simple mode, you can serach for text within filenames. You can also
select the volumes where to do the search. The advanced option tabs are
disabled:
Figure 20. Search window in simple mode
The popup menu and the text field let you refine the name search. You can
ask Tri-CATALOG to find all files whose name contains, is equal to,
begins with, or ends with the entered string.
If you enter several words separated by spaces, you can search for files
whose name contains all the words (e.g., the name contains «report» and
40 Tri-CATALOG User Guide
Page 41

7.1 - Searching for a file 7 - Searches
«April») or one of them (e.g., the name contains «report» or «April»).
In simple mode, you can also indicate where to look for files. You can limit
the search to a category. You can search files according to their volume
name (the volume name you type must contain every w ord in this field) or
by their volume modification date. For example, a file modified in January
2001 cannot be located in a volume last modified before this date.
Advanced mode
The «Advanced mode» radio button lets you enter many criteria. These are
accessible through different tabs on the top of the window.
You can refine searches by limiting them to application or text files, or by
entering file types (you can use the «?» button to choose the codes of an
existing file).
Example: Looking for ClarisWorks files only.
Note: Type and creator codes are made up of 4 characters (any different code is
ignored).
If you know the modification date (even approximately) or the file size,
enter information in the dedicated fields to refine the search and decrease
the length of the results list.
You can also search using the version number of applications, by control
panels and extensions, or by Finder labels.
You can restrict searches to files which comments contains some words or
files associated with some marks. (In this case, files must be associated to
all checked marks.)
Tip: If do not need advanced search criteria, use the simple search mode.
Simple searches are faster than advanced searches.
Tips and tricks
• When you start a new search, the «Reset» button lets you empty all
fields in the dialog.
• T o search folders, uncheck «Files only» and enter «xxxx» as type (it is
unlikely that a file of this type exists).
• If too many items are found, click the «Stop» button to stop the search
process, then refine your criteria and search again.
Tri-CATALOG User Guide 41
Page 42

7 - Searches 7.2 - Search results
7.2 Search results
Found files are displayed at the bottom of the window. The list can be
sorted by name, date, size, and so on, by clicking the column headers. As
usual, columns can be resized.
Figure 21. Search results
Manipulating results
Clicking a file in the result list selects it in the file browser window.
To select the file or folder icon in the Finder, double-click the item. To
open a file with its application or to open a folder in the Finder, Option double-click the item. With the toolbar buttons you can:
• Save the find results and the criteria.
• Open saved results and criteria.
• Export the find results to a text file.
42 Tri-CATALOG User Guide
Page 43

7.3 - Searching for a picture 7 - Searches
• Print the results of your search.
• Filter the results list to include only items whose name contains the
string entered in the field in the middle of the toolbar.
• Display all found items, without considering the filter string.
7.3 Searching for a picture
Searching for pictures is done the same way as searching for files. (It, too,
provides simple and advanced mode). Found thumbnails are displayed at
the bottom of the window.
Figure 22. Picture search window
• You can search for pictures by name, type, modification date or size.
• You can also specify criteria such as width and height, color numbers
(aka bit-depth, from 1 - black and white - to 32 bits - millions of
Tri-CATALOG User Guide 43
Page 44

7 - Searches 7.4 - Searching for a volume
colors) or resolution.
• You can also consider a picture’s marks or comments.
As in the picture windows, the found pictures can either be displayed as
thumbnails, or as a detailed list. Use the button above the list, at the right,
to change the display mode.
7.4 Searching for a volume
Searching for volumes is done the same way as searching for files. Found
volumes are displayed in the result list at the bottom of the window.
Figure 23. Volume search window
7.5 Searching for duplicates
Duplicates are strictly identical files. Tri-CATALOG allows you to search
the catalog for duplicates («Find Duplicates» in the «Find» menu).
44 Tri-CATALOG User Guide
Page 45

7.6 - Find more 7 - Searches
Figure 24. Duplicate search window
You can search every volumes or a subset. Likewise, you can search all
types of files or just a few. Check boxes are available to setup the process.
It can be useful to focus on criteria other than filenames. For example, if
you duplicate a file in the Finder, the copy will have another name («copy
of file»). This file may be an exact copy, it simply has a different name.
Note: With a large catalog, searching for duplicates can take a long time.
Therefore, it is done in background and can be stopped at any time.
7.6 Find more
Some specific searches in the catalog are grouped in the function «Find
More...» of the «Find» menu:
Figure 25. Find more dialog
Tri-CATALOG User Guide 45
Page 46

8 - Application list 8.1 - Watching an application
8 - Application list
The «Application list» is accessible from the «Window» menu. This list
contains all catalogued applications (as well as extensions and control
panels). This database is always updated when you catalog a new volume
(unless you deactivate the option in the settings).
Figure 26. Application list window
8.1 Watching an application
W atching applications lets T ri-CATALOG alert you when it catalogs a new
version of a program. To watch an application, check it in the list.
Note: To sort the list, click a column title.
After a volume analysis, Tri-CATALOG checks whether new versions of
watched applications were found on the volume. If it has found a match, it
diplays a window showing the new application(s).
46 Tri-CATALOG User Guide
Page 47

8.2 - Searching the application list 8 - Application list
8.2 Searching the application list
You can search the list for applications by name. Only found items will
remain. Enter the name in the field on the top of the window and validate
with the «Magnifying Glass» button. The search is not case sensitive.
8.3 Menu functions
The menu located on the top left of the applications window allows you to:
• Only display watched applications.
• Change the watching state of an application.
• Erase the version number of an application.
• Remove an application from the list.
• Update or rebuild the application list.
Note: You can rename an application by double-clicking it in the list.
8.4 Importing and exporting
Select «Add Items (from Tri-CATALOG file)...» to import a saved
application list.
Tri-CATALOG 3 stores applications in a file named «##fTCP3
Applications» in the «TCP Infos» folder.
Tri-CATALOG 4 stores applications in a file named «Tri-CATALOG
Applications» in the «Tri-CATALOG Infos» folder.
You can also import a tab-delimited text file (contain the name, type and
creator) by selecting «Add Items (from text file)...» in the «File» menu.
Conversely, to export the list to a text file, select «Export as Text File» in
the «File» menu.
Tri-CATALOG User Guide 47
Page 48

9 - Bookmarks 9.1 - Displaying bookmarks
9 - Bookmarks
Bookmarks in Tri-CATALOG behave like bookmarks in web browsers.
They store the position of some items (files, folders, or volumes) in the
catalog so you can quickly access them at any time.
9.1 Displaying bookmarks
Bookmarks are displayed in the «Bookmarks» menu. Y ou can also display
a bookmark palette by selecting «Bookmark list» in the «Window» menu.
The menu at the top the palette allows you to display all the bookmarks or
only those contained in a specific group (or in one of its sub-groups).
Figure 27. Bookmarks palette
9.2 Activating a bookmark
To activate a bookmark, select it in the «Bookmarks» menu or in the
«Bookmarks» palette. Selecting it in the menu, while holding the Option
key, automatically opens it.
48 Tri-CATALOG User Guide
Page 49

9.3 - Adding bookmarks 9 - Bookmarks
9.3 Adding bookmarks
You can create a bookmark referencing a file or a folder by selecting the
item and choosing «Add Bookmark» in the «Bookmarks» menu. You can
also drag-drop item onto the bookmark palette.
9.4 Classifying bookmarks
Bookmarks can be classified into groups and sub-groups (as volumes are
classified into categories).
Creating and removing bookmark groups
To create and remove a group, you must click this button in the bookmark
palette. In the resulting window, you can drag-and-drop one group into
another to create a sub-group.
Classifying bookmarks in groups
To classify a bookmark in a group, select it in the bookmark palette then
choose the destination group in the pop-up menu.
9.5 Deleting bookmarks
Select the bookmark you which to delete, then click the «Trash» button.
9.6 Use examples
There are many possible uses of bookmarks:
• Keep items you want quick access to.
• Organize your work by grouping applications related to your different
activities: typing letters, desktop publishing, computation, and so on.
You can create as many groups and sub-groups you wish.
• Group documents and applications needed for a specific project.
Tri-CATALOG User Guide 49
Page 50

10 - Picture libraries 9.6 - Use examples
10 - Picture libraries
Choose «New Picture Library…» in the «File» menu to create a picture
library. Each library is stored in a file (that holds picture thumbnails) and is
independent of the catalog. So you can distribute libraries to friends,
colleagues, or customers. Anyone with a demonstration version of TriCATALOG can view these files. (The demo can be downloaded from
www.tri-edre.com).
Figure 28. Picture library
You can add pictures by dragging them onto any Tri-CATALOG window.
Pictures can be removed from the library by selecting them and clicking
the «Remove» button.
The «Search in Catalog» button displays in the main picture window the
selected picture in the library. If the v olume containing the picture is not in
the catalog, a search is automatically run over the whole catalog (trying to
find a duplicate file).
50 Tri-CATALOG User Guide
Page 51

11.1 - Exporting volume list or file list 11 - Export
11 - Export
11.1 Exporting volume list or file list
Tri-CATALOG can export the volume list, the contents of selected folders
in the file window, the contents of the current volume, or the contents of
every volume belonging to category. (Volume lists do not contain the file
or folder contents.) It is also possible to export only files. You can choose
what information to export by checking or unchecking boxes in this dialog
(except the file name, which is always exported).
Text export
If you wish to export information to a text file (a tab-delimited text file,
which you can open with a spreadsheet or database), choose «Export as
text file…» in the «File» menu while viewing a file window.
Figure 29. Export dialog
Tri-CATALOG User Guide 51
Page 52

11 - Export 11.2 - Exporting pictures
HTML export
If you wish to export information to an HTML file, choose «Export as
HTML file…» in the «File» menu while viewing a file window.
You can choose the layout file used to create the export. To export a
volume list, it is better to select a layout file whose name starts with
«Volume list». To export a file list, it is better to select a layout file whose
name starts with «Files».
11.2 Exporting pictures
Text export
If you wish to export the picture list of a picture window to a text file (a
tab-delimited text file you can open with a spreadsheet or database),
choose «Export as text file…» in the «File» menu while viewing a picture
window.
HTML export
If you wish to export the picture list of a picture window to an HTML file,
choose «Export as HTML file…» in the «File» menu while viewing a
picture window.
You can either export all pictures, or selected pictures. You can also select
the thumbnails size, the thumbnails quality, and the number of thumbnails
per row. To export a picture list, it is better to select a layout file whose
name starts with «Pictures». Then, click «Export». You will have to select
an empty folder (click «New folder» to create a new empty folder if
necessary). Tri-CATALOG will export the HTML page («index.html»
usually) to the folder you choose, as well as the pictures («.jpg» files)
associated with the HTML file. You can then publish these files on
Internet. (Note that pictures must always be in the same location relative to
the HTML page.)
52 Tri-CATALOG User Guide
Page 53

11.3 - PDF export 11 - Export
Figure 30. HTML Export dialog
11.3 PDF export
In Mac OS X, you can export lists to an Acrobat PDF files. As with other
exports, you can export the volume list, the contents of selected folders in
the file window, the contents of the current volume, pictures, or the
contents of every volume belonging to category. (Volume lists do not
contain the file or folder contents.)
Select «Print…» in the «File» menu as if you wanted to print a list, check
the desired options, then click «Preview» in the standard printing dialog.
The «Preview» application opens automatically. Finally, select «Save as
PDF…» in the «File» menu.
This creates a PDF file, which can be read by anyone who has Acrobat
Reader, a free program available at http://www.adobe.com.
Tri-CATALOG User Guide 53
Page 54

11 - Export 11.4 - HTML layout files
11.4 HTML layout files
Several HTML layout files com with Tri-CATALOG. These files are
located in the «HTML» folder located in the «Tri-CATALOG Infos».
If you are familiar with the HTML language, you can also create your own
layout files. To do so, duplicate an existing layout file and edit it.
Volume list export layout files
Layout files whose names start with «Volume list» are for exporting
volume lists. They are classic HTML files (you can insert pictures, add
text, change colors, and so on, in these files) except that you can also add
special Tri-CATALOG tags in these files:
Tableau 1 : Volume export tags
<!-- // TC_Begin_Item // -->
et
<!-- // TC_End_Item // -->
<!-- // TC_Name // --> This tag will be replaced by the name of the
<!-- // TC_Comments // --> This tag will be replaced by the comments of
File list export layout files
Layout files whose names start with «Files» are for exporting file lists.
They are classic HTML files (you can insert pictures, add text, change
colors, and so on, in these files) except that you can also add special TriCATALOG tags in these files:
These tags delimit the HTML code that will be
repeated for each exported volume.
exported volume.
the exported volume.
Tableau 2 : File export tags
<!-- // TC_Begin_Volume // -->
et
<!-- // TC_End_Volume // -->
<!-- // TC_Begin_Item // -->
et
<!-- // TC_End_Item // -->
<!-- // TC_Name // --> This tag will be replaced by the name of the
<!-- // TC_Volume_Name // --> This tag will be replaced by the name of the
These tags delimit the HTML code that will be
repeated for each exported volume.
These tags delimit the HTML code that will be
repeated for each exported item.
exported item.
volume containing the exported item.
54 Tri-CATALOG User Guide
Page 55

11.4 - HTML layout files 11 - Export
<!-- // TC_Size // --> This tag will be replaced by the size of the
exported item.
<!-- // TC_Label // --> This tag will be replaced by the label of the
exported item.
<!-- // TC_Version // --> This tag will be replaced by the version of the
exported item.
<!-- // TC_Creation_Date // --> This tag will be replaced by the creation date
of the exported item.
<!-- // TC_Modification_Date // --> This tag will be replaced by the modification
date of the exported item.
<!-- // TC_Type_Code // --> This tag will be replaced by the type code of
the exported item.
<!-- // TC_Creator_Code // --> This tag will be replaced by the creator code of
the exported item.
<!-- // TC_Comments // --> This tag will be replaced by the comments of
the exported item.
<!-- // TC_Level // --> This tag will be replaced by the level of the
<!-- // TC_Path_Name // --> This tag will be replaced by the full path name
exported item.
of the exported item.
Picture export layout files
Layout files whose names start with «Pictures» are for exporting pictures.
They are classic HTML files (you can insert pictures, add text, change
colors, and so on, in these files) except that you can also add special TriCATALOG tags in these files:
Tableau 3 : Picture export tags
<!-- // TC_Begin_RowHead // -->
et
<!-- // TC_End_RowHead // -->
<!-- // TC_Begin_Item // -->
et
<!-- // TC_End_Item // -<!-- // TC_Begin_RowFoot // -->
et
<!-- // TC_End_RowFoot // -->
<!-- // TC_Name // --> This tag will be replaced by the name of the
<!-- // TC_Picture // --> This tag will be replaced by the thumbnail of
<!-- // TC_Colors // --> This tag will be replaced by the bit depth of the
These tags delimit the HTML code that will be
repeated before each thumbnail row.
These tags delimit the HTML code that will be
repeated for each exported picture.
These tags delimit the HTML code that will be
repeated after each thumbnail row.
exported picture.
the exported picture.
exported picture.
Tri-CATALOG User Guide 55
Page 56

11 - Export 11.4 - HTML layout files
<!-- // TC_Width // --> This tag will be replaced by the width of the
exported picture.
<!-- // TC_Height // --> This tag will be replaced by the height of the
exported picture.
<!-- // TC_Horizontal_Resolution //
-->
<!-- // TC_Vertical_Resolution // --> This tag will be replaced by the vertical
<!-- // TC_Volume_Name // --> This tag will be replaced by the name of the
<!-- // TC_Size // --> This tag will be replaced by the size of the
<!-- // TC_Label // --> This tag will be replaced by the label of the
<!-- // TC_Version // --> This tag will be replaced by the version of the
<!-- // TC_Creation_Date // --> This tag will be replaced by the creation date
<!-- // TC_Modification_Date // --> This tag will be replaced by the modification
<!-- // TC_Type_Code // --> This tag will be replaced by the type code of
<!-- // TC_Creator_Code // --> This tag will be replaced by the creator code of
<!-- // TC_Comments // --> This tag will be replaced by the comments of
<!-- // TC_Level // --> This tag will be replaced by the level of the
<!-- // TC_Path_Name // --> This tag will be replaced by the full path name
This tag will be replaced by the horizontal
resolution of the exported picture.
resolution of the exported picture.
volume containing the exported picture.
exported picture.
exported picture.
exported picture.
of the exported picture.
date of the exported picture.
the exported picture.
the exported picture.
the exported picture.
exported picture.
of the exported picture.
To easily create new layout files, duplicate an existing layout, edit its
HTML code, and add some Tri-CATALOG tags listed above.
56 Tri-CATALOG User Guide
Page 57

11.4 - HTML layout files 12 - Settings
12 - Settings
To display settings, select «Settings…» in the «Tri-CATALOG» or «File»
menu.
«General» tab
Figure 31. General settings
These options allow you to:
• Modify the number of item columns in file windows.
• Save the last selected item when you quit the program.
• Display items with a label colored icon.
• Display masked items (with the «Item» menu).
• Automatically open, in picture window volume lists, the parent
volume of the picture selected in the right list. (Disable this function if
your computer is slow.)
• Display a detailed progress window while searching.
• Define programs used by the «Open with» function in the «Item»
menu.
Tri-CATALOG User Guide 57
Page 58

12 - Settings 11.4 - HTML layout files
«Scan» tab
Figure 32. Scan settings
These options allow you to:
• Automatically catalog inserted volumes while Tri-CATALOG is running.
• Read the version number of encountered applications and scan compressed file content. (Disable to speed up analysis.)
• Update the application list after every scan.
• Keep, when scanning, invisible files and aliases as well as visible files
with invisible name.
• Not to ask confirmation before replacing an existing volume. (It is
automatically updated if this option is checked).
• To use the quick volume update: only modified folders are scanned.
Note: This update method is quicker but less reliable. In some , rare cases, a
modified file can be left unchanged and can keep its previous modification date.
If you often use updates (for example, to update your disk contents when
quitting), check this option to save time.
58 Tri-CATALOG User Guide
Page 59

11.4 - HTML layout files 12 - Settings
«Picture scan» tab
Figure 33. Picture scan settings
These options allow you to:
• Scan pictures. If this option is unchecked, thumbnails of picture files
are not created and are not added to the catalog.
• Choose the picture types that will be scanned by Tri-CATALOG. (You
can tell Tri-CATALOG to only create thumbnails for some picture
types.)
• Choose the size used to create thumbnails. Bigger thumbnails are of
better quality when displayed are larger sizes, but they require much
more disk space, and can be slow to display. Generally, it is advisable
to use 96x96 or 128x128 pixel thumbnails.
Tri-CATALOG User Guide 59
Page 60

12 - Settings 11.4 - HTML layout files
«Automatic scan» tab
Figure 34. Automatic scan settings
These options allow you to:
• Automatically catalog volumes that are present when Tri-Catalog is
launched.
• Automatically catalog volumes that are present when Tri-Catalog is
shut down.
• Automatically and periodically catalog present volumes.
• Select the volumes to include in automatic scans.
60 Tri-CATALOG User Guide
 Loading...