


using freeway

Copyright and acknowledgments
Copyright © 2008 and 2013 Softpress Systems Ltd. All rights reserved. The Freeway software and this documentation are copyright materials. No part of the Freeway software may be reproduced, transmitted, transcribed, stored in a retrieval system, or translated into any language, or computer
language, in any form or by any means without the prior written permission of Softpress Systems Ltd. Additional copies of this guide may be made and distributed provided they include this copyright notice.
Softpress Systems Ltd specifically retains title to all Freeway computer software. The software described in this guide is furnished under a license agreement and may only be installed, used, or copied in accordance with the terms of that agreement.
Softpress is a trademark of Softpress Systems Ltd in the United States and other countries. Freeway is a trademark of Softpress Systems Ltd, which may be registered in some countries. Apple, Macintosh, Power Macintosh, the Universal logo and the Mac Logo are registered trademarks of Apple Computer Inc. All other product names are trademarks, or registered trademarks of their respective owners.
Limitation of liability
The information in this guide is believed to be correct as of the date of publication. However, our policy is one of continuous development and so the information in this guide is subject to change without notice, and does not represent a commitment on the part of Softpress Systems Ltd.
About this guide
This Using Freeway guide will explain some of the concepts behind Freeway. It will introduce you to the intuitive interface, menus and palettes you will use to import or create design elements and add web functionality.
There is also a step-by-step tutorial in which you will design and produce a web site in Freeway faster than you would ever have thought possible. You’ll see how easy it is to make a multi-page web site with graphics, text and links. This guide covers the use of both Freeway Express and
Freeway Pro. Both versions work in essentially the same way, but Pro includes many additional powerful features. Where the methods of working are substantially different they are highlighted in separate box panels.
Further information on working with Freeway can be found on the Softpress web site.
Three movies of the tutorial found in this guide can be found at: http://www.softpress.com/support/tutorials.html where they are called “Getting Started with Freeway”. Please note that some of the older movies were made using Freeway 5 or 6, but they are still very relevant.
System requirements
Freeway Pro and Express require an Intel Mac, and the minimum operating system requirement is Mac OS X 10.6 (Snow Leopard) or higher.
Contact details
Web: http://www.softpress.com/
Email: info@softpress.com

Foreword
Congratulations on choosing Freeway, the most design-friendly way to create web sites. Before you begin it is worth spending a little time making sure you understand how Freeway works and how you can get the very most from this software.
Freeway’s approach to web page and site design means you can concentrate on form and function, not spend most of your time tweaking code and worrying about compatibility. Because of this, if you’ve come from a code-based web production background—or even a template-bound one—you may have some unlearning to do. But relax, things will almost certainly be easier and more logical than you imagine.
The biggest thing to grasp is that Freeway is an HTML generator, not an editor. You use Freeway’s high-end layout tools to make your designs, and it deals with producing optimized web page code
from your work, on demand. This means that you’ll never have to worry about over-manipulated layouts producing awkward code, a typical problem with visual HTML editors; the output is new every time. All the necessary fixes are included to help pages work consistently across browsers, and you’re free to switch your page output from different forms of HTML and XHTML as you prefer. On top of this,
Freeway makes pages that validate as W3C-compliant code, automatically. So with those worrisome aspects banished, you can get on with thinking about more interesting matters: your web page designs.
For further details, tips and extra Freeway Actions, browse the Softpress KnowledgeBase at http://www. softpress.com/kb and http://www.actionsforge.com.
To tap into the collective experience of Freeway users around the world visit the lively Freewaytalk forum at http://freewaytalk.net/.
Freeway delivers the design freedom of high-end DTP software to the world of web production, with intelligent features that make casual users, professional designers and free-thinking programmers alike smile in delight. Make the most of it!
Keith Martin
Senior Lecturer
London College of Communication
For some more useful tips from Keith, see Thinking Design on page 19.
Foreword

Contents
Contents
Introduction and getting started |
8 |
About Softpress and Freeway |
8 |
Installing and serializing Freeway |
9 |
Registering Freeway |
10 |
Keep your serial number safe |
10 |
Freeway help and information resources |
11 |
The KnowledgeBase |
11 |
Video tutorials |
11 |
ActionsForge |
12 |
FreewayTalk.net |
12 |
Help desk |
12 |
The World Wide Web and Freeway |
13 |
The World Wide Web |
14 |
How do I get on the web? |
14 |
HTML–speaking the right language |
14 |
What are HTTP and FTP? |
15 |
How Freeway works |
15 |
Thinking design |
17 |
Design plans |
18 |
Page sizes |
18 |
Type |
18 |
Styles |
18 |
Graphics |
19 |
Optimizing |
19 |
Code |
19 |
Output |
20 |
Upload |
20 |
Quick Tour |
21 |
The main Freeway interface window |
22 |
The menu bar |
24 |
The tool bar |
25 |
The site and page panels |
27 |
The page mode buttons |
28 |
The hyperlink box and site buttons |
28 |
Contextual menus |
29 |
The Inspector |
30 |
Other palettes |
32 |
Tutorial |
33 |
Tutorial 1 |
35 |
Starting and saving the site |
35 |
Setting page dimensions and alignment |
36 |
Basic concepts and terminology of the |
|
Inspector |
36 |
Setting the page dimensions and |
|
alignment |
37 |
Setting the page background color |
37 |
Adding a page background image |
38 |
Adding a graphic text item |
39 |
Importing a graphic |
41 |
Adding HTML text |
42 |
Importing photos |
42 |
4

Duplicating items |
43 |
Importing text |
45 |
Previewing your page |
47 |
Tutorial 2 |
48 |
Basic concepts of Master pages |
48 |
The Site panel |
49 |
Setting up a Master page |
49 |
Naming pages and files in the Site panel |
50 |
Working on a Master page |
50 |
Adding pages to a site |
51 |
Title and file names for pages |
51 |
Adding content to our new pages |
52 |
Applying hyperlinks |
54 |
Previewing the site in a browser |
57 |
Tutorial 3 |
59 |
Graphic hyperlinks |
59 |
Creating a rollover navigation menu |
59 |
Creating a simple photo gallery |
62 |
Other types of Action |
66 |
Uploading your site to the web |
68 |
Different ways to upload a site |
68 |
Required information for FTP uploading |
68 |
Required information for uploading to a |
|
local server using File Copy |
69 |
Uploading your files using FTP |
69 |
Uploading using File Copy |
70 |
How files are uploaded |
70 |
Troubleshooting upload problems |
71 |
Dedicated FTP tools |
73 |
Deleting files |
74 |
Creating a directory or folder |
74 |
External files |
74 |
FTP applications |
74 |
Working with Freeway |
75 |
||
Creating a new document |
76 |
||
To create a document from a template |
76 |
||
To create a document using custom |
|
||
settings |
|
|
76 |
Pro only |
|||
The Freeway workflow, publishing, |
|
||
and previewing |
77 |
||
To upload your web site |
77 |
||
Working with pages |
77 |
||
To create a new master page |
78 |
||
To create one or more new site pages |
78 |
||
To delete a page |
78 |
||
Working with items |
78 |
||
To create an item |
78 |
||
To delete an item |
79 |
||
Parent/Child relationships |
79 |
||
To create an item that is the child of |
|
||
another item |
80 |
||
To make an existing item a child of |
|
||
another item |
80 |
||
To group several items together |
80 |
||
To ungroup items |
80 |
||
Aligning and distributing items |
80 |
||
To align several items |
80 |
||
Manipulating items |
81 |
||
To resize an item to fit its content |
81 |
||
To rotate a graphic item |
81 |
||
Changing an item’s appearance |
81 |
||
To set the background color of an item |
81 |
||
Changing how an item will output |
81 |
||
To change the type of an item |
81 |
||
To set the alt text of a graphic item |
82 |
||
Contents
5

Contents
Working with Tables |
82 |
Inserting items into a text flow |
88 |
|||||
To resize a column or row in a table |
83 |
To insert a graphic item into a text flow |
88 |
|||||
To change the number of rows or columns |
|
To insert an HTML item into a text flow |
89 |
|||||
in a table |
83 |
To center an in-flow HTML item within its |
|
|||||
To merge cells into one |
83 |
containing item |
|
|
|
|
89 |
|
|
|
Pro only |
|
|||||
To split cells |
83 |
Working with Styles |
|
|
89 |
|||
|
Pro only |
|
||||||
Working with colors |
83 |
To create a new style |
90 |
|||||
Colors in Freeway Express |
83 |
To edit an existing style |
90 |
|||||
To apply a color using the color palette |
|
To apply a style to text |
90 |
|||||
in Freeway Express |
83 |
To delete a style |
|
|
91 |
|||
Colors in Freeway Pro |
84 |
Permanent and temporary styles |
91 |
|||||
To apply a color in Freeway Pro using the |
|
Hyperlinks and anchors |
91 |
|||||
color palette |
84 |
To create a hyperlink |
91 |
|||||
To apply a color that is not already in |
|
|||||||
|
To remove a hyperlink |
92 |
||||||
your document using the color palette |
84 |
|||||||
To create an anchor |
|
|
92 |
|||||
To create a new color |
84 |
|
|
|||||
To remove an anchor |
92 |
|||||||
To edit a color |
85 |
|||||||
Working with forms |
|
|
92 |
|||||
To delete a color |
85 |
|
|
|||||
|
|
|
|
|
|
|||
Working with graphics |
85 |
|
|
|
|
|
|
|
Freeway Actions |
93 |
|||||||
To import a graphic into an existing item |
86 |
|||||||
What are Freeway Actions? |
94 |
|||||||
Manipulating graphics in graphic items |
86 |
|||||||
To position a graphic within its containing |
|
The different types of Actions |
94 |
|||||
item |
86 |
Applying Actions |
|
|
94 |
|||
To scale a graphic to the size of its |
|
The Actions palette |
|
|
95 |
|||
containing item |
86 |
Installing Actions |
|
|
96 |
|||
Working with other media |
87 |
Working with Freeway Actions |
97 |
|||||
Working with text |
87 |
The Rollover Action |
|
|
97 |
|||
To enter text into an item |
87 |
Rollover options in the Actions palette |
98 |
|||||
To import text from a file into an item |
|
Common queries with rollovers |
99 |
|||||
or page |
87 |
The Target Image Action |
99 |
|||||
Styling text |
87 |
|||||||
Target Image options in the Actions palette |
100 |
|||||||
To remove styling from text |
88 |
|||||||
New window Actions |
100 |
|||||||
Working with lists |
88 |
|||||||
|
|
|
|
|
|
|||
To create a list |
88 |
|
|
|
|
|
|
|
6

Text Link to New Window Action |
100 |
|
Link to New Window Action |
101 |
|
Pic in New Window Action |
101 |
|
Download Actions |
101 |
|
Link to PDF Action |
102 |
|
Graphic Link to PDF Action |
102 |
|
Link to File Action |
102 |
|
Graphic Link to File Action |
102 |
|
Target Show/Hide Actions |
102 |
|
Target Show/Hide Image Action |
103 |
|
Target Show/Hide Layer Action |
|
103 |
Pro only |
||
The Sequence Timer Action |
103 |
|
Graphic Actions |
104 |
|
|
|
|
Glossary |
105 |
|
|
|
|
Contents
7

Introduction and getting started
About Softpress and Freeway
Softpress Systems was founded in 1993 in Oxford, England to address the emerging needs of professional publishers and designers for cross-media authoring tools.
Freeway is the result of those efforts. It is a web site development application designed from the ground up for people to design and assemble content for the web without needing to learn HTML, or indeed any code, to build sites of the highest quality.
Freeway uses the familiar approaches and tools seen in traditional desktop publishing. Simply draw boxes on your page, fill them with text and images, make links between the pages, add dynamic content or anything else you can think of, and then ask Freeway to publish and upload your web site for you. Freeway will write all of the code required to describe your vision, and the code will always be clean, efficient, and standards compliant. You never have to deal with the code unless you want to.
With its desktop publishing origins, Freeway is a favorite of traditional print designers looking to
transfer their skills to the web. However, this is just one group within the Freeway community.
Photographers publish their portfolios online, businesses establish an online presence to sell their products, home users build web sites for their local clubs or organizations, or create personal web sites to share their thoughts and photos.
Freeway empowers everyone—design, expression, and commerce.
Enjoy Freeway!
Freeway Pro and Freeway Express
Freeway comes in two versions, Freeway Pro and Freeway Express. Freeway Express is our entry-level version, for people looking to create small web sites and who don’t need the full power of Freeway Pro. Freeway Pro provides many features for creating modern web sites not available in Freeway Express, and a huge number of productivity features.
Just some of the extra features in Freeway Pro at the time of writing include:
•Full support for responsive layouts.
•Multiple output options (HTML 4.01 Transitional and Strict, XHTML 1.0 Transitional and Strict, HTML5 and XHTML5).
•Full choice of output encodings available.
•Complete color and text style management across your entire document.
•Extended graphic import capabilities. Import Illustrator, Photoshop, TIFF, SVG files and many more.
•Accessibility reporting.
•Employ multiple style sheets for each document.
•Full CSS text styling and CSS Layout.
•Ability to specify relative and percentage positions and dimensions for layout items.
•Specify padding, wrap, margin and border (HTML items only) separately for each side of an item.
•Advanced visual effects on your web site using Scriptaculous Actions.
8

•Specify link styles on any CSS-positioned HTML item.
•Link map: overview and maintenance of all the links in your document.
•Multiple windows open for the same document at once.
•Snapping palettes for easier workspace management.
•Extended transformation options: Skew, Scale and Mirror content separately from its box.
•Freely combine and manipulate shadows, glows and other graphic effects with greater control over their appearance.
•Save items and pages as images.
•Benefit from over 100 third-party Actions, or write your own.
Installing and serializing Freeway
Installing Freeway
Installation of Freeway is as simple as opening a ZIP archive file then dragging both the Freeway and Showcase applications to your Applications folder.
To install Freeway:
1.If the ZIP archive file which was sent to you or which you downloaded has not automatically opened, double-click on it.
2.Open the unzipped folder to see the Freeway application icon and the Showcase application icon.
3.Drag both application icons into your Applications folder. You can do this by dragging and dropping them onto the Applications folder listed in the left hand pane of the Finder window (under Favorites) or by opening your Applications folder and dropping the application icons straight into that folder.
Place Freeway and Showcase |
! Tip |
in the Dock |
|
After first installing Freeway and Showcase you can speed up your workflow by placing the Freeway and Showcase applications in you computer’s Dock so you can launch it by simply clicking on its icon. To do this, open your Applications folder and drag the application files into your Dock one at a time. Move it to the position you want it to appear in the Dock and let go.
To serialize Freeway:
1.Launch Freeway for the first time by either doubleclicking the Freeway application icon in the Applications folder (or by clicking on the Freeway icon in your computer’s Dock).
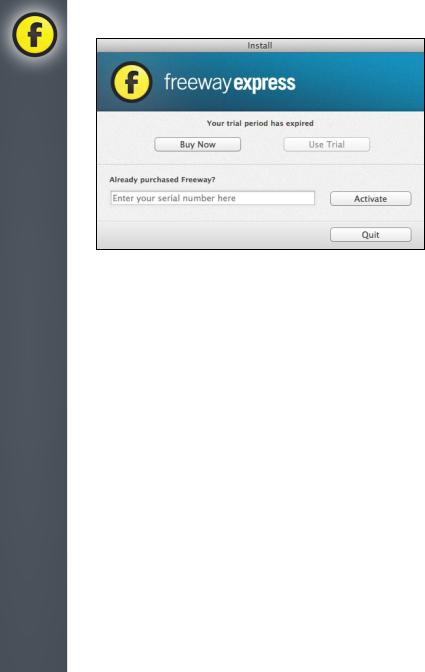
2.This will display the Install dialog where you will see a text field where you can enter the serial number sent to you by Softpress. Carefully enter your serial number (or copy and paste it from the email you received, but make sure you don’t copy any spaces before or after) and click Activate.
started getting and Introduction
9
Introduction and getting started
3.If you don’t yet have a serial number because you want to use the free 30-day trial, click Use Trial.
4.If your trial period has expired and you wish to buy Freeway to obtain a serial number, click Buy Now.
If your computer is connected to the internet, a welcome screen will appear when Freeway launches which offers links to learning resources and other relevant information. If you don’t want to see this screen on start-up in the future, deselect the Show This Dialog at Startup option.
Registering Freeway
To ensure we can offer support as efficiently as possible, it’s important that you register your copy of Freeway with Softpress.
http://www.softpress.com/support/register.html
Another advantage of registering your software is that you’ll be able to use the serial number retrieval facility on the Softpress web site (see below).
Keep your serial number safe
You should always keep your serial number safe. If you have bought a new computer or you have problems with your hard disk, you’ll need your serial number to reinstall Freeway.
If you’ve lost your serial number, we have a page on our web site which should enable you to retrieve
it—but this facility is only available to those who have registered their software with Softpress. The serial number retrieval page is found under the “Retrieve my Serial Number” heading at:
http://www.softpress.com/support/
Enter the email address you used when you registered Freeway, and you will receive an email containing your serial number or numbers.
10
Freeway help and information resources
Using Freeway
Visit http://www.softpress.com/support/tutorials.html to see three movies of the tutorial contained within this guide. By far the best way to learn Freeway, however, is to build the tutorial site in Freeway as you read through the instructions in the tutorial section which starts on page 35 of this guide. The tutorial section also offers plenty of useful tips and other notes which add to your learning experience of Freeway.
If, however, you need to clarify something, or if you need a quick refresher, the tutorial movies are there for you to watch. The movies correspond to each of the three parts of the Using Freeway tutorial in this guide.
particular effects and answers to frequently asked questions.
The Freeway Reference
http://www.softpress.com/help/ (under Manuals)
This reference manual is the ultimate guide to all things Freeway. Each aspect of working in Freeway is covered in relevant chapters (Working with page,
Working with items, etc.), and there are some in-depth tutorials—such as how to build responsive websites and how to use the new (responsive) CSS Menus Action.
You can choose to download a PDF or order a printed version which is delivered to you as a book.
The KnowledgeBase
http://www.softpress.com/kb
The Softpress web site offers an extensive, searchable KnowledgeBase containing a wide range of information on every aspect of using Freeway, including technical notes on specific features, tutorials on how to achieve
Video tutorials
http://www.softpress.com/support/tutorials.html
There are links to many video tutorials on this page which show you how to do specific tasks in Freeway,
started getting and Introduction
11

Introduction and getting started
12
along with two movie tutorials which take you through the very basics of getting started with Freeway Express and Freeway Pro.
New videos are posted from time to time, so make sure you check back every now and again—or you can use the Subscribe link to be alerted when new videos are released, which you can then watch in iTunes.
ActionsForge
http://www.actionsforge.com
All Freeway Actions not offered in the core application as it ships are available on ActionsForge. This is the place to go for additional Softpress Actions (usually ones which offer specific functionality) and third-party Actions—both free and commercial.
The version number of each Action is stated on its individual page.
ActionsForge is fully searchable to help you find suites of Actions (called ‘projects’) or individual Actions. If an Action is part of a project suite, all the Actions required for that project will be downloaded in the same zip file.
See the chapter on Freeway Actions in this guide to see how to install downloaded Actions.
FreewayTalk.net
http://freewaytalk.net
The most vibrant, exciting place to discuss Freeway! We have always been keen to have our users communicate not just with us, but with each other too.
FreewayTalk.net is a web-based bulletin board which also allows you to send and receive messages via email as well as through the web interface. The board
provides space for people to talk about Freeway, as well as about writing Actions and developing dynamic web sites.
To join FreewayTalk, you’ll need to register online.
Help desk
http://www.softpress.com/kb/contact.php
Use the above URL to contact our Support Department for free email support for working with Freeway. You’ll receive a reply within one business day.

The World Wide Web
and Freeway

The World Wide Web and Freeway
The World Wide Web
Welcome to the World Wide Web
If you’ve surfed the web but you’ve never actually set up your own web site you may think that web sites are a bit like radio stations, and using your web browser to visit a web site is like tuning your radio into a particular radio station.
This analogy is pretty good apart from one major difference; the web is totally democratic. You don’t need a license or any highly-specialized equipment to publish your site to the world—all you need is a computer connected to the internet and a centrally registered name, which costs a few dollars, so people know where to find you.
How do I get on the web?
To publish your web site on the World Wide Web and make it available to other users you simply need to run a program called a web server on your computer and give the computer a name registered with a central
authority so that other users can find it on the internet. Unless you have a permanent internet connection, and don’t mind leaving your computer switched on all the time, you will probably find it more convenient to have your web site hosted by a company specializing in this service, called an Internet Service Provider or ISP.
If you already have an email account it probably has some free web space included with it, and your ISP will provide instructions on how to upload your web pages to your free web space, and tell you what name users will need to use to connect to it.
If you don’t have free web space included with your package, or if you want extra features for your web site, you’ll need to pay for a “hosting” service from an ISP which may come in a package with a “domain name”. The domain name is the name a visitor types into
the web address field of a web browser to access a site. Domain names can have many different suffixes at the end of the address, such as .com, .net, .org, etc.
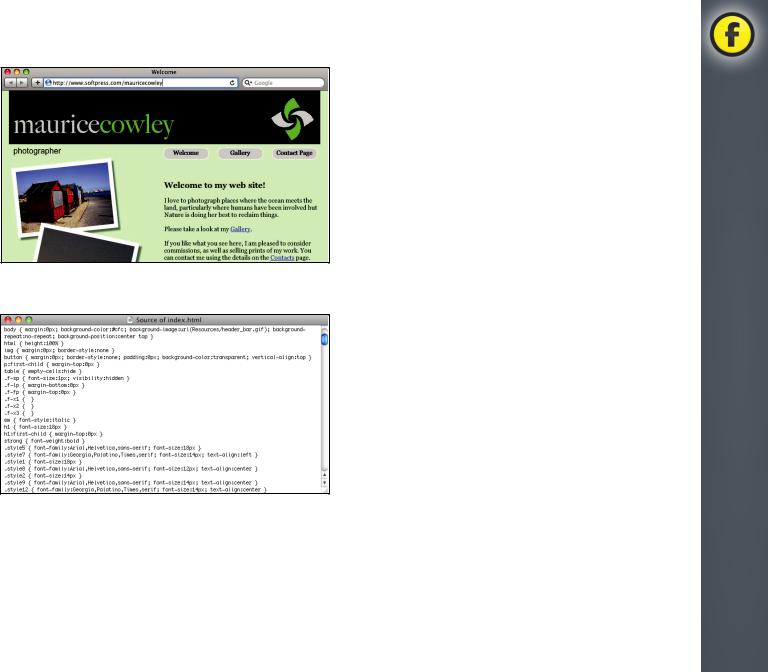
HTML—speaking the right language
At the heart of the web is a language called HTML, which stands for HyperText Markup Language. HTML performs two basic functions: it describes what the page should look like, and it provides links to other pages.
14
For example, this is what the user sees:
And this is the HTML to achieve it:
The page description part of HTML consists of a series of statements which say things like “Put this graphic at the top of the page”, “Put this text below it”. When the browser receives the HTML it reconstructs the page that the designer intended.
The second important part of HTML, called “hyperlinks”, is what makes the World Wide Web a web rather than just a notice board. Each page can link to other pages within the same web site, or to pages on other sites anywhere else on the web.
Just as you don’t need to understand the internal codes your word processor uses to store information about your document, you don’t need to know HTML to design web pages.
What are HTTP and FTP?
These are two other terms that you might encounter, and it is just as well to know what they mean.
•HTTP, or HyperText Transfer Protocol, is a set of conventions for transferring web pages between a web server and a web browser. You are reminded of this every time you surf the web by the “http://” that your web browser inserts in front of the address in the address bar.
•FTP, which stands for File Transfer Protocol, is a convention for transferring files over the internet between two computers. FTP is the standard way of uploading files to a web server, and is the method that Freeway uses to update your web site remotely on your ISP’s web space.
How Freeway works
Whether you’re new to web site design, or an experienced designer, Freeway lets you to create complex sites quickly and easily with little or no knowledge of HTML code.
Freeway works in a very similar way to DTP programs, using a WYSIWYG (What You See Is What You Get) environment. This, along with its intuitive,
Freeway and Web Wide World The
15
The World Wide Web and Freeway
user-friendly interface, lets you focus on the design and functionality you want to achieve without the distraction of having to worry about how it will be encoded into HTML.
Managing the names and locations of the resources for your site (graphics, photos, movies, etc.) is all taken care of by Freeway—the entire design of your site is contained in a single document. When you’re ready to view your web site, Freeway will generate the HTML code and resources required and place them in a location of your choosing.
Importing and optimizing graphics is also handled seamlessly by Freeway. Rather than preparing your graphics in an external application before using them in your site, Freeway imports graphics in many
different formats which will be converted to the optimum format and size when you publish your file, so your site will always keep browser loading times to a minimum.
The HTML code generated when you publish your Freeway file is 100% valid, meaning that your site should preview perfectly in different browsers while also ensuring that it adheres to accessibility guidelines for people with disabilities. Your site being valid also means that it should be reasonably future-proof.
Once you’ve published your file and the HTML code has been generated, provide Freeway with your web space details and it will upload your site and all its necessary files through FTP or you can upload your files manually using your preferred FTP application.
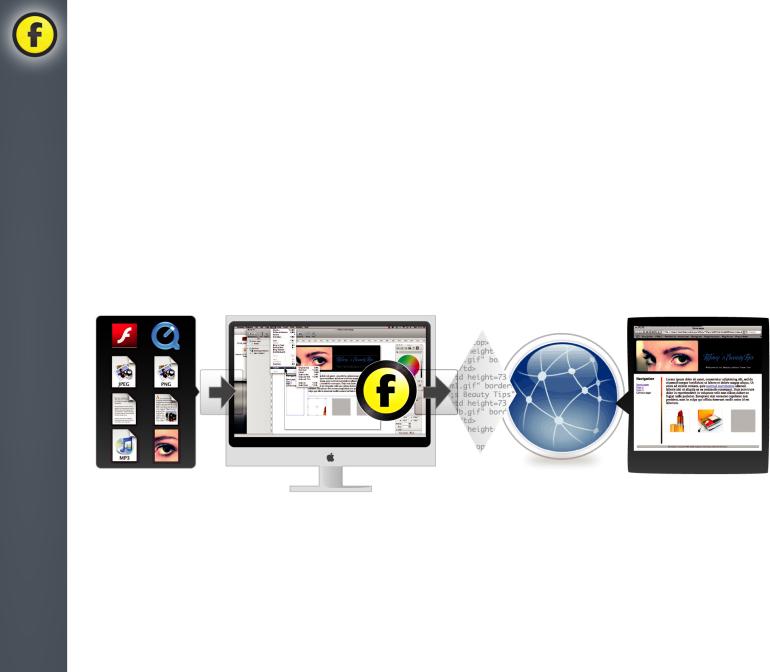
1. Gather together |
2. Design and lay out your |
3. Publish your site |
4. With Freeway, |
5. Visitors see your |
the resources for |
site in Freeway’s intuitive |
and Freeway generates |
upload your site to |
web site as you |
your web site. |
WYSIWYG environment |
the HTML code. |
the web. |
designed it. |
16

Thinking design

Thinking Design
Thinking design
Design plans
Start by thinking about your overall site design plans. Are there parts of the layout that will be repeated across multiple pages? This is ideal stuff for Master Pages, one of the keys to working fast and efficiently in Freeway.
Set up your guides, grids, HTML text boxes and graphics on a master page, then make new pages from there and modify those as required. You can have more than one master page in a site, a useful trick if you have one layout structure for some pages and a very different one for others.
But don’t worry about planning everything before you begin. Freeway is very forgiving, as any decent design-oriented tool should be.
Page sizes
Make your Freeway page widths appropriate for your typical audience. Something around 900 to 950 pixels wide is reasonable for the vast majority of web users, but if your normal visitor tends to use larger screens then try 1000 pixels or more. This doesn’t fix the
size of the visitor’s browser window, but it does give you a good design foundation to help you create a professional, consistent set of page layouts.
Use the Align option in the Inspector to align your page content to the left, center or right. Alternatively, leave the page alignment unset and explore linking the sizes and positions of boxes to the page sides, using the Dimensions pane of the Inspector palette.
by Keith Martin
Senior Lecturer, London College of Communication
With layered items in particular (which are produced as CSS-controlled DIVs) this can make page structures particularly dynamic and fluid, flexing to follow browser window sizes.
Type
Setting type is easy to do, but in Freeway you have two main choices: graphic or HTML. Graphic type—set
in graphic boxes—is turned to bitmap images of your typesetting when you publish your work. HTML type is encoded as regular web page text.
You have far fewer typeface choices with HTML text, as you are restricted to the fonts that are generally available on everyone’s computers. On the other hand, search engines ignore graphics and only read HTML text, so don’t set huge paragraphs as graphics—you may never be found!
Use graphic type when you want a precise look for a headline or something to merge with an image, otherwise you should normally choose HTML text instead. Yes, this means you have fewer options for fine-tuning your typesetting, but that’s the way life is with web design. Anyway, Freeway’s CSS-based
formatting options give you more control over regular HTML type than you might think …
Styles
Creating and using styles efficiently is an important part of modern web design, and it is a key part of how Freeway works.
18

As you format text, styles are made for you automatically and listed ready to be applied elsewhere. Amend those and your text follows suit.
You can streamline your work by making a set of styles first, then applying those as you go. You can apply custom (non-tag) styles to a container and affect all its contents in one stroke, then give selected portions of the text further styling as required.
If you want to go further you can improve your search engine chances and accessibility scores by using traditional structural styles to control different elements in your layout automatically, from tag-based paragraph, header and list structures to object IDs and so on. Start by editing the ‘p’ style in the Styles window to control how paragraphs of text with no custom formatting will appear.
Graphics
Don’t spend precious design time churning out slicedup and web-optimized graphics before you step across to Freeway. As well as ready-made GIF, JPEG and PNG files, Freeway Pro can import your original highresolution images whether they’re in TIFF, PDF, SVG or even native Photoshop or Illustrator format. (Use 24-bit PNG if you have Freeway Express.) If you have transparency in your original graphics this will be carried across into your Freeway designs.
Scale, crop and stack your images, and your
output will always be generated as a screen-resolution, web-optimized JPEG or GIF, or PNG if you prefer.
If you want sliced graphics—useful for making rollover parts of a larger graphic, for example—then uncheck the Combine Graphics option in the Inspector
palette. This produces web-ready graphics sliced along the uncombined item’s boundaries, without you having to take virtual scissors to your original images. Just move the object to adjust the slice.
Optimizing
Use the Inspector palette to tweak an image’s output format and compression levels to get the right balance between file size and visual quality. You can see how the compression controls affect the look of your graphics by turning on the Graphics Preview option in the View menu. If you have many large graphics in the layout this can slow things down a little, as Freeway reads each original image file and generates the final optimized web version on the fly. But don’t forget about this ability; you simply can’t beat seeing precisely how something will look right there in your page layout.
Code
Customizing Freeway’s output can be done using the wide selection of Actions, plugin-like tools that extend Freeway’s feature set.
You can also add custom code to specific places in a layout by dropping in Markup Item objects, using the HTML Markup window to reach specific parts of the overall code structure, or by adding extended
markup directly to elements and styles. You can even make your own Actions to simplify tasks, making even complex conditional code production a repeatable snap.
Design Thinking
19

Output
Once you have some pages set up you’ll need to check that they look right in a browser. You can look at single pages in Freeway’s internal Preview, but to check links and all it is best to preview in a regular browser. Whether you’re a sucker for Safari, a Firefox fan or an Opera buff, you should check your pages in as many modern browsers as you can. (Don’t bother with Internet Explorer for Mac, it isn’t related to the Windows versions and is long dead.) Freeway makes pages that are generally as cross-browser-compatible as is sensibly possible, but some layouts simply don’t do so well in some browsers. Microsoft’s Internet Explorer
Thinking Design
6 and 7 are the biggest offenders here, so use a PC if one is nearby, or one of the online browser rendering services if one isn’t. If you have a cyber café nearby that can be a pleasant way around the problem.
Upload
You can use any FTP software you like to upload Freeway’s output to your web site, but if you do this with Freeway itself then your files will be managed for you. Items that you remove from your page will be deleted from the site, and so on. It may seem like a
small thing, but it can save you a lot of head-scratching and wasted server space.
20
Quick Tour

Quick Tour
The main Freeway interface window
Main interface window for Freeway Express
Site Panel/
Page Panel
Menu bar
Tool bar
▲ Page
Mode Buttons
The
Inspector
Page area/
Layout view
Actions
palette
Site |
|
|
|
▲ |
|
▲ |
Hyperlink box |
buttons |
|
||
|
|
|
|
22

Main interface window for Freeway Pro
Site Panel/
Page Panel
Menu bar
Tool bar
▲Page Mode Buttons
& Media Width Buttons
The
Inspector
Page area/
Layout view
Actions
palette
Site |
|
|
▲ buttons |
▲ |
Hyperlink box |
Tour Quick
23
Quick Tour
The menu bar
This is the drop-down menu bar which appears at the top of the screen on all programs running on a Macintosh computer.
In this guide, we don’t have the space to look at every menu in detail. However, the Knowledgebase on the Softpress site at http://www.softpress.com/kb has a comprehensive list of every option and submenu accessible from the menu bar.
For now we’ll look at the types of function available from each of the menus.
Freeway menu
This is where you can set up your Preferences and hide or quit Freeway.
File menu
The menu for all functions to do with your main document, such as opening, saving, uploading, etc. It also contains options for importing text, graphics and rich media.
Edit menu
As with most Macintosh applications, this is where you can cut, copy and paste. For Freeway it is also where you can edit your URLs and resource lists, etc.
Page menu
As the name suggests, this menu is for functions which are page-specific, such as adding or deleting pages, applying a Freeway Action to a page, etc.
Item menu
The menu for item-specific functions. In here, amongst other things, you can lock items, bring items to the front or send them to the back, duplicate items, transform items (Pro-only) and apply item-specific Freeway Actions.
Style menu
This menu contains options for styling text.
Insert menu
You can insert particular types of item on your page from this menu. This menu is mainly used for inserting items into runs of text.
View menu
From this menu you can choose zoom values, toggle guides on and off, view invisible characters, etc.
Window menu
This menu allows you to open any of the Freeway palettes and switch between open document windows.
24
The tool bar
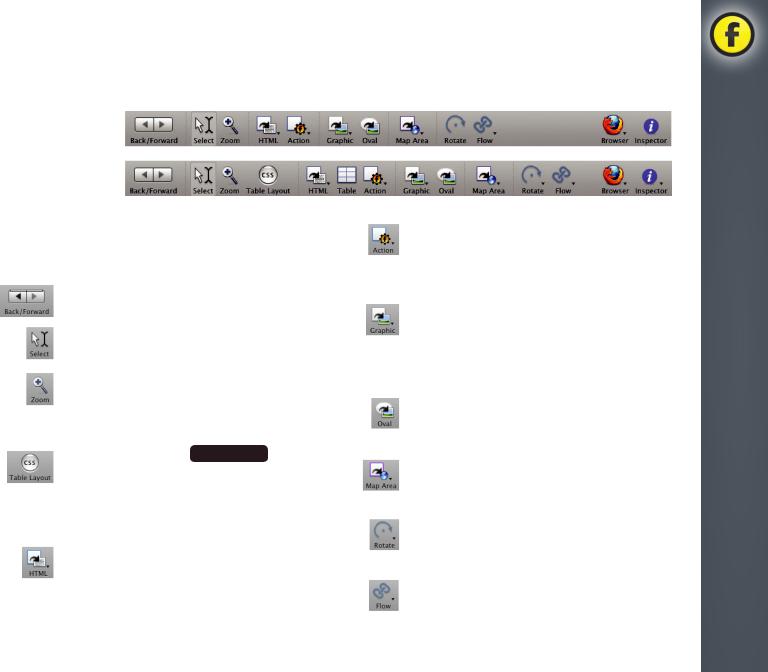
Freeway Express default tool bar
Freeway Pro default tool bar
The tools on the tool bar mainly allow you to create or edit the different types of item you work with in Freeway.
Back/Forward buttons
Steps between recently visited pages.
Select tool
Selects or manipulates items or text.
Zoom tool
Zooms in and out of the page area to change the scale of what you’re working on.
CSS Layout tool
When this button is on (blue), Freeway will always create CSS-based layout items. This only applies to items drawn while the button is on.
HTML tool
Allows you to draw an HTML item on your page, commonly used to contain the majority of the text in your web site.
Action tool
Allows you to draw a Freeway Action item on your page, such as a text rollover or navigation bar.
Graphic tool
Allows you to draw a graphic item on your page. An item drawn with this tool can contain a graphic (for example a photo) or graphic text.
Oval tool
Allows you to draw an oval or circular graphic item on your page.
Map Area tool
Allows you draw a rectangular clickable area on top of graphic items.
Rotate tool
Allows you to rotate a graphic item when it is selected on your page.
Flow tool
Links two or more HTML or graphic text items together so that text can flow between them.
Tour Quick
25

Quick Tour
Browser Preview
Click on this button to preview your site in the browser you’ve set as the default browser. Click and hold to choose a different browser, or choose Browser Setup to select a different default browser or update your list of installed browsers.
Inspector
Displays or hides the Inspector. This is a context-sensitive palette which displays different options depending on the item selected.
You can customize the Freeway tool bar by adding optional tools you frequently use. Some optional tools are available from a submenu on the tool bar, but you can place them on the main tool bar for immediate use. To do this, choose Customize Toolbar... from the
View menu and drag the tools one at a time from the optional tool palette to your tool bar in a similar way you add items to Mac OS X’s dock. Existing tools move, allowing you to place the new tool in the position you prefer.
If you want to revert to the default tool bar at any time, simply go back to your Customize Toolbar palette and drag the default tool bar into the tool bar area.
Freeway Express allows you to place an optional Colors tool button which shows or hides the Colors palette. In Freeway Pro, there is a Styles/Colors tool button which opens a palette listing document styles and colors.
Pro  Pro-only optional tools
Most of the optional tools are the same for both versions, but Freeway Pro also features skew and mirror tools.
The optional tools available from the Freeway Express Customize Toolbar palette.
26

The site and page panels
The panel to the left of the page area toggles between the site panel and the page panel by clicking on the title bar which says Site or Page at the top of the list. By default, the panel will display as the site panel.
The site panel
The site panel displays a list of all the pages and page folders which make up your site, with Master pages at the top and pages created from the Master pages below. Working with Master pages is covered in detail in the Tutorial section.
The pages in the lower part of the site panel show the name of the page and the
Master it was created from. If you make a change to any page of your site, a black dot will appear to the left of the page icon in the list—this indicates that changes have been made since the last time
the site was published. You can change the order
that the pages appear in the site panel list by clicking and
dragging them to a different place.
Clicking on the disclosure triangle to the left of a folder icon will list all the pages contained within that folder.
You can also see in this list whether a page or folder has a Freeway Action applied to it. If an Action is applied, a small Freeway Action cog icon appears on the page or folder in the list. Select the page or folder and look in the Actions palette to see which Action or Actions are applied.
The page panel
Clicking on the title bar of the site panel toggles the panel
to the page panel view. This panel only shows the page you have displayed in your page area.
The list of items and other resources on your page should display—if not, click on the disclosure triangle to the left of the page icon.
Like the site panel, a Freeway Action cog icon indicates which items have a Freeway Action applied to them. Select the item and look in the Actions palette to see which Action or Actions are applied.
Tour Quick
27

Quick Tour
The page mode buttons
There are three page mode buttons—Master, Page and Preview. The first two allow you to switch quickly and easily between the page you’re working on and the Master page it was created from. This can save a lot of time if you have a site with multiple Master pages.
When you have a Master page displayed, the page rulers turn to a tinted yellow color. This alerts you to the fact that any changes you make to the page will be applied to all pages associated with that Master.
If you have a Master page displayed, clicking on the Page button will return you to the last page you were working on that was created by that Master.
When you click on the Preview button, your page will be published if any changes have been made since it was last published. Your page will then be previewed in your Freeway window by a program which is similar to a web browser, but with reduced functionality.
There is also a Link Map button which you can click on to display a graphic representation of the links in your site.
The media width buttons
Just below the page mode buttons is the row of media width buttons. By default, the Default button will be selected—and this is how you should work when you build a website without adding responsive behavior to the layout (or to build the standard page for viewing in a desktop browser when building a responsive site).
Each of the media width buttons represents a specific pixel width (or “breakpoint”) at which point the layout of a page can be made to change when a browser window is made narrower or when a page is displayed on a mobile device with a screen of that pixel width or
less (depending on the aspect in which it’s viewed in). There is an in-depth tutorial on how to build
responsive layouts in Freeway in the Freeway Reference which you should read if you want to find out all about it—but essentially it works in such a way that you work with Default button selected, then click on the media widths you want to set up and make the required changes for each of those breakpoints.
If you are not building a responsive site you should leave these buttons alone, ensuring that the Default button is selected.
28

The hyperlink box and site buttons
The hyperlink box
If you select an item on your Freeway page, the hyperlink box shows if it has a hyperlink applied to it or not. With the item or text selected, you can click and hold on the hyperlink box to choose from an existing page of your site or an external site.
Clicking on the globe to the left of the hyperlink box displays the “Edit Hyperlink” dialog box, which allows you to link to an existing internal page or an external page on another site. You can also choose from any of the standard hyperlink protocols such as an email link.
Contextual menus
A great way to save time on your project is to use Freeway’s contextual menus. These are menus which are item-specific—showing only options relevant to that item—and they can be accessed without needing to go through a bunch of menus and submenus.
Any item on your Freeway page will generate a contextual menu when you Control-click (or right-click with a two-button mouse) on the item. If nothing is selected on your page, the contextual menu for the page will display.
Note: A different contextual menu will display if you are currently editing text inside an HTML or graphic item box.
Hyperlinks will be covered in detail in the Tutorial chapter.
The site buttons
At the bottom left of the interface window are the site buttons. The minus button lets you delete selected pages or folders from your site. Clicking and holding on the right-hand button displays a menu giving you options to add pages or folders, and change the view options for the Site/Page panel.
Tour Quick
The contextual menu |
The contextual menu |
|
displayed for an |
||
displayed when editing |
||
HTML item. |
||
HTML text. |
||
|
29

Quick Tour
The Inspector
The most common palette you’ll use in Freeway will be the Inspector—a powerful, context-sensitive palette which displays different options depending on what you currently have selected (HTML item, graphic item, text, etc.). If you have no items selected on your page, the Inspector gives you options for the page itself.
We don’t have room here to cover every combination with each type of item. However, the Inspector works in a logical way whatever the item, so we’ll guide you through the basics of the Inspector and the type of options for each kind of item. The Tutorial chapter will show you how the Inspector works in practice.
There are quite a lot of differences in the Inspector between Freeway Express and Pro, but the principles are the same for both—so feel free to experiment with your version to see what the Inspector lets you do.
If the Inspector is not displayed, click on the button on the far right-hand side of the main Freeway tool bar.
Click once on an item to select it, and the Inspector’s palette will change to show options specific only
to that type of item. The title bar at the top of the Inspector displays the item type. Below this is the Inspector’s tab bar, which usually displays an icon for each of the General, Appearance
and Output settings for that item. The first icon of the Inspector
tab bar—the General settings icon—displays a similar icon to the tool from the main Freeway tool bar you used to create the item on your page. This will change for each different item type you select.
Like the main Freeway interface window, tool tips display if you hover your mouse over the Inspector tab bar icons.
If nothing is selected on your page, the Page Inspector window will display. Clicking on the first tab displays the page’s General settings, which allows you to edit the general configuration of the page, such as setting its size, giving it a title, choosing how it aligns in the browser window, etc.
With no items selected, the second tab displays the page’s Appearance settings. This icon shows all the options available to change the physical appearance of your page, such as applying a background color, choosing a background image (with positioning and tiling options) and what color the page’s hyperlinks will be.
30
 Loading...