

Page 1

using freeway 5
Page 2

Copyright and acknowledgments
Copyright © 2008 and 2012 Softpress Systems Ltd. All rights reserved.
The Freeway software and this documentation are copyright materials. No
part of the Freeway software may be reproduced, transmitted, transcribed,
stored in a retrieval system, or translated into any language, or computer
language, in any form or by any means without the prior written permission
of Softpress Systems Ltd. Additional copies of this guide may be made and
distributed provided they include this copyright notice.
Softpress Systems Ltd specifically retains title to all Freeway computer
software. The software described in this guide is furnished under a license
agreement and may only be installed, used, or copied in accordance with
the terms of that agreement.
Softpress is a trademark of Softpress Systems Ltd in the United States and
other countries. Freeway is a trademark of Softpress Systems Ltd, which
may be registered in some countries. Apple, Macintosh, Power Macintosh,
the Universal logo and the Mac Logo are registered trademarks of Apple
Computer Inc. All other product names are trademarks, or registered
trademarks of their respective owners.
Limitation of liability
The information in this guide is believed to be correct as of the date of
publication. However, our policy is one of continuous development and so
the information in this guide is subject to change without notice, and does
not represent a commitment on the part of Softpress Systems Ltd.
About this guide
This Using Freeway 5 guide will explain some of the concepts
behind Freeway. It will introduce you to the intuitive
interface, menus and palettes you will use to import or
create design elements and add web functionality.
There is also a step-by-step tutorial in which you will
design and produce a web site in Freeway faster than you
would ever have thought possible. You’ll see how easy it is
to make a multi-page web site with graphics, text and links.
This guide covers the use of both Freeway 5 Express and
Freeway 5 Pro. Both versions work in essentially the same
way, but Pro includes many additional powerful features.
Where the methods of working are substantially different
they are highlighted in separate box panels.
Further information, in far greater depth than this short
guide allows, is available in the Freeway 5 Reference. This can
be found on your installation CD, on the disk image (.dmg)
file you downloaded or on the Softpress web site.
Three movies of the tutorial found in this guide can be
found at: http://www.softpress.com/support/tutorials.html
where they are called “Getting Started with Freeway”.
Contact details
Head Office
Softpress Systems
First Floor
25 Hanborough House
Hanborough Business Park
Witney, Oxon
OX29 8LH
Phone: 01993 882588
Fax: 01993 883970
Sales: 0800 731 3425
United States and Canada
Softpress Systems Inc.
3020 Bridgeway #408
Sausalito, CA 94965, USA
Phone: (415) 331-4820
Fax: (415) 331-4824
Sales: (800) 853-6454
System requirements
Freeway is a Universal Binary application which will run
natively on Intel and PPC Macs. The minimum operating
system requirement for Freeway 5.4 is Mac OS X 10.4 or
higher. The minimum operating system requirement for
Freeway 5.5 is Mac OS X 10.5 or higher.
2
Page 3

Foreword
Congratulations on choosing Freeway 5, the most
design-friendly way to create web sites. Before you
begin it is worth spending a little time making sure
you understand how Freeway works and how you can
get the very most from this software.
Freeway’s approach to web page and site design
means you can concentrate on form and function, not
spend most of your time tweaking code and worrying
about compatibility. Because of this, if you’ve come
from a code-based web production background—or
even a template-bound one—you may have some
unlearning to do. But relax, things will almost
certainly be easier and more logical than you imagine.
The biggest thing to grasp is that Freeway is an
HTML generator, not an editor. You use Freeway’s
high-end layout tools to make your designs, and
it deals with producing optimized web page code
from your work, on demand. This means that you’ll
never have to worry about over-manipulated layouts
producing awkward code, a typical problem with
visual HTML editors; the output is new every time.
All the necessary fixes are included to help pages
work consistently across browsers, and you’re free
to switch your page output from different forms of
HTML and XHTML as you prefer. On top of this,
Freeway makes pages that validate as W3C-compliant
code, automatically. So with those worrisome aspects
banished, you can get on with thinking about more
interesting matters: your web page designs.
For further details, tips and extra Freeway Actions,
browse the Softpress KnowledgeBase at http://www.
softpress.com/kb and http://www.actionsforge.com.
To tap into the collective experience of Freeway users
around the world visit the lively Freewaytalk forum at
http://freewaytalk.net/.
Freeway delivers the design freedom of high-end
DTP software to the world of web production, with
intelligent features that make casual users, professional
designers and free-thinking programmers alike smile in
delight. Make the most of it!
Keith Martin
Senior Lecturer
London College of Communication
For some more useful tips from Keith, see Thinking
Design on page 19.
Foreword
3
Page 4

Contents
Introduction and getting started 8
About Softpress and Freeway 8
Installing and serializing Freeway 9
Launching Freeway for the first time 10
Registering Freeway 11
Keep your serial number safe 11
Freeway help and information resources 12
Freeway Reference 12
The KnowledgeBase 12
Video tutorials 13
Freewaycast 13
Dan Jasker screencasts 13
ActionsForge 13
FreewayTalk.net 14
Help desk 14
Contents
Telephone support 14
The World Wide Web and Freeway 15
The World Wide Web 16
How do I get on the web? 16
HTML–speaking the right language 17
What are HTTP and FTP? 17
How Freeway works 17
Thinking design 19
Design plans 20
Page sizes 20
4
Type 20
Styles 20
Graphics 21
Optimizing 21
Code 21
Output 21
Upload 22
Quick Tour 23
The main Freeway interface window 24
The menu bar 26
The tool bar 27
The site and page panels 29
The page mode buttons 30
The hyperlink box and site buttons 30
Contextual menus 31
The Inspector 32
Other palettes 34
Tutorial 35
Tutorial 1 36
Starting and saving the site 37
Setting page dimensions and alignment 38
Basic concepts and terminology of the
Inspector 38
Setting the page dimensions and
alignment 39
Setting the page background color 39
Adding a page background image 40
Adding a graphic text item 41
Page 5

Importing a graphic 43
Adding HTML text 44
Importing photos 44
Duplicating items 45
Importing text 47
Previewing your page 49
Tutorial 2 50
Basic concepts of Master pages 50
The Site panel 51
Setting up a Master page 51
Naming pages and files in the Site panel 52
Working on a Master page 52
Adding pages to a site 53
Title and file names for pages 53
Adding content to our new pages 54
Applying hyperlinks 56
Previewing the site in a browser 59
Tutorial 3 61
Graphic hyperlinks 61
Creating a rollover navigation menu 61
Creating a simple photo gallery 66
Other types of Action 68
Uploading your site to the web 70
Different ways to upload a site 70
Required information for FTP uploading 70
Required information for a MobileMe account 70
Required information for uploading to a
local server using File Copy 71
Uploading your files using FTP 71
Uploading to a MobileMe account 72
Uploading using File Copy 73
How files are uploaded 73
Troubleshooting upload problems 73
Dedicated FTP tools 75
Deleting files 76
Creating a directory or folder 76
External files 76
FTP applications 76
Working with Freeway 77
Creating a new document 78
To create a document from a template 78
To create a document using custom
settings
The Freeway workflow, publishing,
and previewing 79
To upload your web site 79
Working with pages 79
To create a new master page 80
To create one or more new site pages 80
To delete a page 80
Working with items 80
To create an item 80
To delete an item 81
Parent/Child relationships 81
To create an item that is the child of
another item 82
To make an existing item a child of
another item 82
To group several items together 82
To ungroup items 82
Aligning and distributing items 82
To align several items 82
Manipulating items 83
To resize an item to fit its content 83
To rotate a graphic item 83
Changing an item’s appearance 83
To set the background color of an item 83
Pro only
78
Contents
5
Page 6

Changing how an item will output 83
To change the type of an item 83
To set the alt text of a graphic item 84
Working with Tables 84
To resize a column or row in a table 85
To change the number of rows or columns
in a table 85
To merge cells into one 85
To split cells 85
Working with colors 85
Colors in Freeway Express 85
To apply a color using the color palette
in Freeway Express 85
Colors in Freeway Pro 86
To apply a color in Freeway Pro using the
color palette 86
To apply a color that is not already in
your document using the color palette 86
To create a new color 86
To edit a color 87
To delete a color 87
Contents
6
Working with graphics 87
To import a graphic into an existing item 88
Manipulating graphics in graphic items 88
To position a graphic within its containing
item 88
To scale a graphic to the size of its
containing item 88
Working with other media 89
Working with text 89
To enter text into an item 89
To import text from a file into an item
or page 89
Styling text 89
To remove styling from text 90
Working with lists 90
To create a list 90
Inserting items into a text flow 90
To insert a graphic item into a text flow 90
To insert an HTML item into a text flow 91
To center an in-flow HTML item within its
Pro only
Pro only
91
91
containing item
Working with Styles
To create a new style 92
To edit an existing style 92
To apply a style to text 92
To delete a style 93
Permanent and temporary styles 93
Hyperlinks and anchors 93
To create a hyperlink 93
To remove a hyperlink 94
To create an anchor 94
To remove an anchor 94
Working on HTML forms 94
To set up form properties for the current page 94
Freeway Actions 95
What are Freeway Actions? 96
The different types of Actions 96
Applying Actions 96
The Actions palette 97
Installing Actions 98
Working with Freeway Actions 99
The Rollover Action 99
Rollover options in the Actions palette 100
Common queries with rollovers 101
The Target Image Action 101
Target Image options in the Actions palette 102
New window Actions 102
Page 7

Text Link to New Window Action 102
Link to New Window Action 103
Pic in New Window Action 103
Download Actions 104
Link to PDF Action 104
Graphic Link to PDF Action 105
Link to File Action 105
Graphic Link to File Action 105
Target Show/Hide Actions 105
Target Show/Hide Image Action 105
Target Show/Hide Layer Action
The Sequence Timer Action 106
Graphic Actions 106
CSS Menus 107
CSS Menu troubleshooting tips 112
Pro only
105
What’s New in Freeway 5.5 113
New Features at a Glance 114
Facebook Activity Feed Action 116
Facebook Like Box Action 118
Facebook Like Button Action 120
Facebook Recommendations Action 122
Twitter Follow Button Action 124
Tweet Button Action 126
PayPal Button Action 128
Showcase (Application and Action) 131
Building a photo gallery 132
Building a slideshow 134
Relative Page Layout
Working with Relative Page Layout 139
Other Actions in the Relative Page Layout
suite 140
Pro only
136
Create Email Action 141
Before you start 141
Using the Create Email Action 143
Getting the HTML code to use 143
Creating a plain text email 143
Sending out your email 144
Simple Site Search Actions
Applying the Folder Action 145
Creating the search form 146
Creating a search results area 146
Page titles and descriptions used in the
search results item 148
Using custom text for the search results item 148
Excluding specified content from the
Simple Site Search Action 149
Site Mapper Actions 150
Applying the Site Mapper Folder Action 150
Submitting your sitemap 151
Applying frequency and priority to
individual pages 152
Excluding specified pages from the
Sitemapper Action 152
Amazon Associates Actions 153
Text Link Action 153
Image Link Action 154
Enhanced Action 154
Showcase Application Reference Section 156
The Document window 156
The Inspector 158
Showcase Action Reference Section 161
The Showcase Action palette 161
Pro only
145
Glossary 165
Contents
7
Page 8

About Softpress and Freeway
Softpress Systems was founded in 1993 in Oxford,
England to address the emerging needs of professional
publishers and designers for cross-media authoring
tools.
Freeway is the result of those efforts. It is a web site
development application designed from the ground up
for people to design and assemble content for the web
without needing to learn HTML, or indeed any code, to
build sites of the highest quality.
Freeway uses the familiar approaches and tools seen
in traditional desktop publishing. Simply draw boxes
on your page, fill them with text and images, make
links between the pages, add dynamic content or
anything else you can think of, and then ask Freeway
to publish and upload your web site for you. Freeway
will write all of the code required to describe your
vision, and the code will always be clean, efficient, and
standards compliant. You never have to deal with the
code unless you want to.
With its desktop publishing origins, Freeway is
a favorite of traditional print designers looking to
transfer their skills to the web. However, this is just one
group within the Freeway community.
Photographers publish their portfolios online,
Introduction and getting started
businesses establish an online presence to sell their
products, home users build web sites for their local
clubs or organizations, or create personal web sites to
share their thoughts and photos.
Freeway empowers everyone—design, expression,
and commerce.
Enjoy Freeway!
Freeway Pro and Freeway Express
Freeway comes in two versions, Freeway 5 Pro and
Freeway 5 Express. Freeway 5 Express is our entrylevel version, for people looking to create small web
sites and who don’t need the full power of Freeway
Pro. Freeway 5 Pro provides many features for creating
modern web sites not available in Freeway 5 Express,
and a huge number of productivity features.
Just some of the extra features in Freeway 5 Pro at the
time of writing include:
•
Multiple output options (HTML 3.2, HTML 4.01,
XHTML Transitional and Strict).
•
Full choice of output encodings available.
• Complete color and text style management across
your entire document.
•
Extended graphic import capabilities. Import
Illustrator, Photoshop, TIFF, SVG files and many
more.
•
Accessibility reporting.
• Employ multiple style sheets for each document.
• Full CSS text styling and CSS Layout.
• Ability to specify relative and percentage positions
and dimensions for layout items.
•
Specify padding, wrap, margin and border (HTML
items only) separately for each side of an item.
8
Page 9
• Advanced visual effects on your web site using
Scriptaculous Actions.
•
Specify link styles on any CSS-positioned HTML item.
• Link map: overview and maintenance of all the links
in your document.
•
Multiple windows open for the same document at
once.
•
Snapping palettes for easier workspace management.
• Extended transformation options: Skew, Scale and
Mirror content separately from its box.
•
Freely combine and manipulate shadows, glows and
other graphic effects with greater control over their
appearance.
•
Save items and pages as images.
• Use the full range of Freeway Actions, or write your
own.
Installing and serializing Freeway
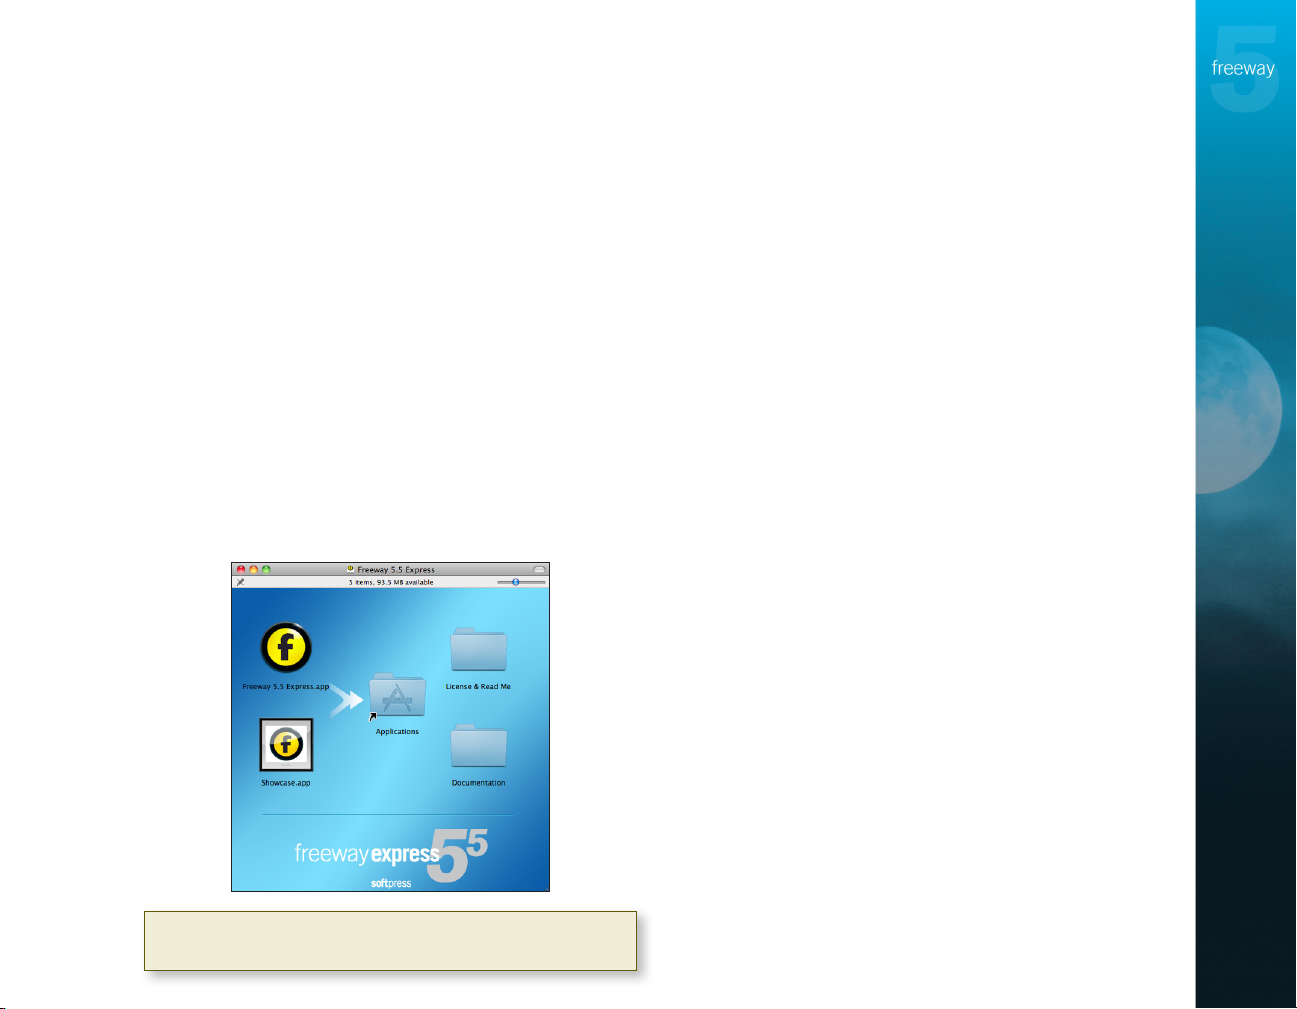
Introduction and getting started
Installing Freeway
Installation of Freeway 5.5 is as simple as dragging
both the Freeway and Showcase applications to the
Applications folder within the disk image window.
Note: Freeway 5 users only need to drag and drop the
Freeway application to the Applications folder.
If you purchased a boxed copy of Freeway:
1. Insert the CD that came in the box. The CD will
launch automatically and a window will open.
2. Drag the Freeway and Showcase applications to the
Applications icon in the disk image window. This
copies both applications to the Applications folder
on your Mac’s hard drive.
3. Close the window and eject the CD. Keep it in a safe
place in case you need to reinstall Freeway in future.
If you downloaded a copy of Freeway:
1. Once the download is complete, locate the disk
image (.dmg) file, which will be in the location set
in your web browser’s preferences. If the disk image
doesn’t mount automatically, double-click the disk
image file to mount it on your Desktop.
2. Read the license agreement and click OK to proceed.
The disk image will be mounted on your Desktop
and a window should open automatically. If it
doesn’t open, double-click its icon.
9
Page 10
3. Drag the Freeway and Showcase applications to the
Applications icon in the disk image window. This
copies both applications to the Applications folder
on your Mac’s hard drive.
4. Close the window and drag the mounted disk
image to the Trash to unmount it. You may wish to
archive or copy the disk image file to a safe place in
case you need to reinstall Freeway in the future.
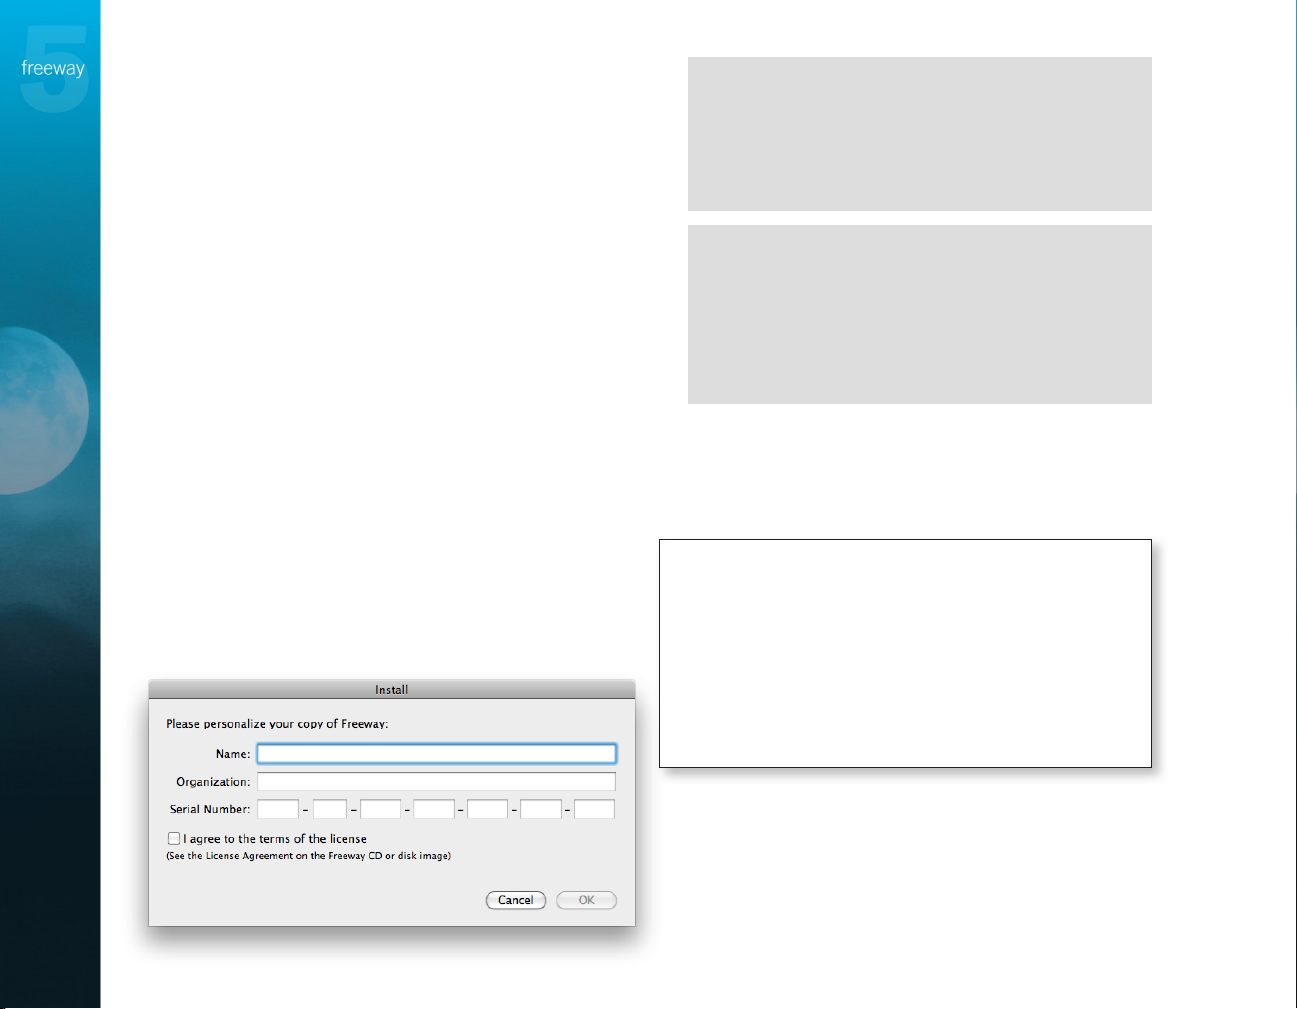
Launching Freeway for the first time
Unless you are using a trial version, the first time you
run Freeway you’ll have to enter your registration
details to unlock the program. This only needs to be
done once, although updates to Freeway will also need
to be unlocked in the same way. For this reason, you
should keep a copy of your serial number somewhere
safe so you can locate it easily.
1. Double-click the Freeway application icon in your
Applications folder, or in the Freeway folder within
your Applications folder. Freeway will launch and
will present you with a registration dialog.
2. Enter your serial number and, optionally, your
name and organization.
If you purchased a boxed copy of Freeway, the
serial number is printed on a label inside the back
cover of this guide. Be careful to enter the serial
number exactly as it is printed. As soon as you
complete each block of characters, the entry cursor
will automatically jump to the next field.
If you purchased and downloaded Freeway
from the Softpress web site, you’ll have been sent
an email containing the serial number to unlock
your copy of Freeway. You can copy and paste the
whole number from the email to the first serial
number field in the registration dialog and Freeway
will fill in all the fields automatically.
3. Once the serial number has been entered, check
the “I agree” checkbox (after reading the License
Agreement) then click
Freeway.
Note: The development of Freeway is a continual
process, and regular updates are available for free
download from the Softpress web site. We recommend
you use the most recent version.
When Freeway starts, it will check to see if you’re using
the latest version. If you aren’t, you will be offered the
choice to download the latest version.
If you downloaded your copy of Freeway, it will
generally be the latest version.
OK to continue launching
Introduction and getting started
10
4. If your computer is connected to the internet, a
“splashscreen” will appear when Freeway launches
which offers links to learning resources, such as
the complete Freeway 5 Reference manual, video
tutorials, etc. If you don’t want to see this screen
on start-up in the future, deselect the Show This
Dialog at Startup option.
Page 11
Place Freeway in
the Dock
Speed up your workflow by
placing your Freeway application
in you computer’s Dock so you
can launch it by simply clicking
on its icon. To do this, open your
Freeway folder in the Applications
folder and drag the application file
onto your Dock. Move it to the
position you want it to appear in
the Dock and let go.
!
Tip
Important
Trial versions of Freeway cannot be serialized
Please note that when you buy Freeway after using the free 30-day trial,
you need to install and serialize the full version (either from the CD or
from the download link supplied in your confirmation email from our
Sales department). It is not possible to serialize the trial version.
Launch Freeway from the icon in the Applications Folder
Freeway will not work correctly if you launch it for the first time from the
icon in the CD or Disk Image window. Once you have installed Freeway,
eject the CD or unmount the Disk Image then launch Freeway either
by double-clicking the application icon in Applications Folder or, if you
placed it there, from the Dock.
!
Introduction and getting started
Registering Freeway
To ensure we can offer support as efficiently as possible,
it’s important that you register your copy of Freeway
with Softpress. Registration also ensures you are able to
download updates from the web site.
http://www.softpress.com/support/register.html
Another advantage of registering your software is that
you’ll be able to use the serial number retrieval facility
on the Softpress web site (see below).
Keep your serial number safe
Whether you downloaded Freeway from the Softpress
web site or you purchased a retail boxed copy, you
should keep your serial number safe. If you have
bought a new computer or you have problems with
your hard disk, you’ll need your serial number to
reinstall Freeway.
If you’ve lost your serial number, we have a page
on our web site which should enable you to retrieve
it—but this facility is only available to those who have
registered their software with Softpress. The serial
number retrieval page is found under the “Retrieve my
Serial Number” heading at:
http://www.softpress.com/support/
Enter the email address you used when you registered
Freeway, and you will receive an email containing
your serial number or numbers. Make sure you keep
these numbers in a safe place this time!
11
Page 12

Freeway help and information resources
Using Freeway
Visit http://www.softpress.com/support/tutorials.html
to see three movies of the tutorial contained within
this guide. By far the best way to learn Freeway,
however, is to build the tutorial site in Freeway as you
read through the instructions in the tutorial section
which starts on page 35 of this guide. The tutorial
section also offers plenty of useful tips and other notes
which add to your learning experience of Freeway.
If, however, you need to clarify something, or if you
need a quick refresher, the tutorial movies are there for
you to watch. The movies correspond to each of the
three parts of the Using Freeway tutorial in this guide.
Freeway Reference
The most comprehensive guide to using Freeway is the
complete Freeway 5 Reference. It aims to provide clear
step-by-step instructions for using all the main features
of Freeway, including setting up, previewing, and
publishing a site, working with pages, text, graphics,
tables, and forms, and creating dynamic effects, as well
as detailed reference information about advanced Web
design features that may not be needed by all users.
It also provides a summary of the Freeway preference
Introduction and getting started
panels, palettes, and keyboard shortcuts.
You can find the Freeway 5 Reference as a PDF on the
CD or disk-image file from where you installed Freeway
or download it from the Softpress web site. You can
either print out the Reference or view it on-screen. The
PDF is hyperlinked from the Contents section, so you
mp to the relevant page of the manual.
can ju
If you view the PDF in Apple’s Preview you can use
double quotes to search for multiple words used in a
particular order. For instance, if you want to search for
instructions on how to set up the Target Show/Hide
Image Action, you can enter “Target Show/Hide Image”
(with the double quotes) to find results where those
words are used in that particular order.
The KnowledgeBase
http://www.softpress.com/kb
The Softpress web site offers an extensive
KnowledgeBase containing a wide range of information
on every aspect of using Freeway, including technical
notes on specific features, tutorials on how to achieve
particular effects and answers to frequently asked
questions.
The KnowledgeBase is fully searchable and is
extended on a regular basis to provide answers to any
questions users ask about Freeway.
This should be the first place you go to find
information on how to set up particular functionality
on your Freeway page if your can’t find it in the Using
Freeway guide or the complete Freeway 5 Reference, or if
you have problems when building your site.
It is also the place where we will post articles
on known issues with new versions of browser
applications, etc.
12
Page 13
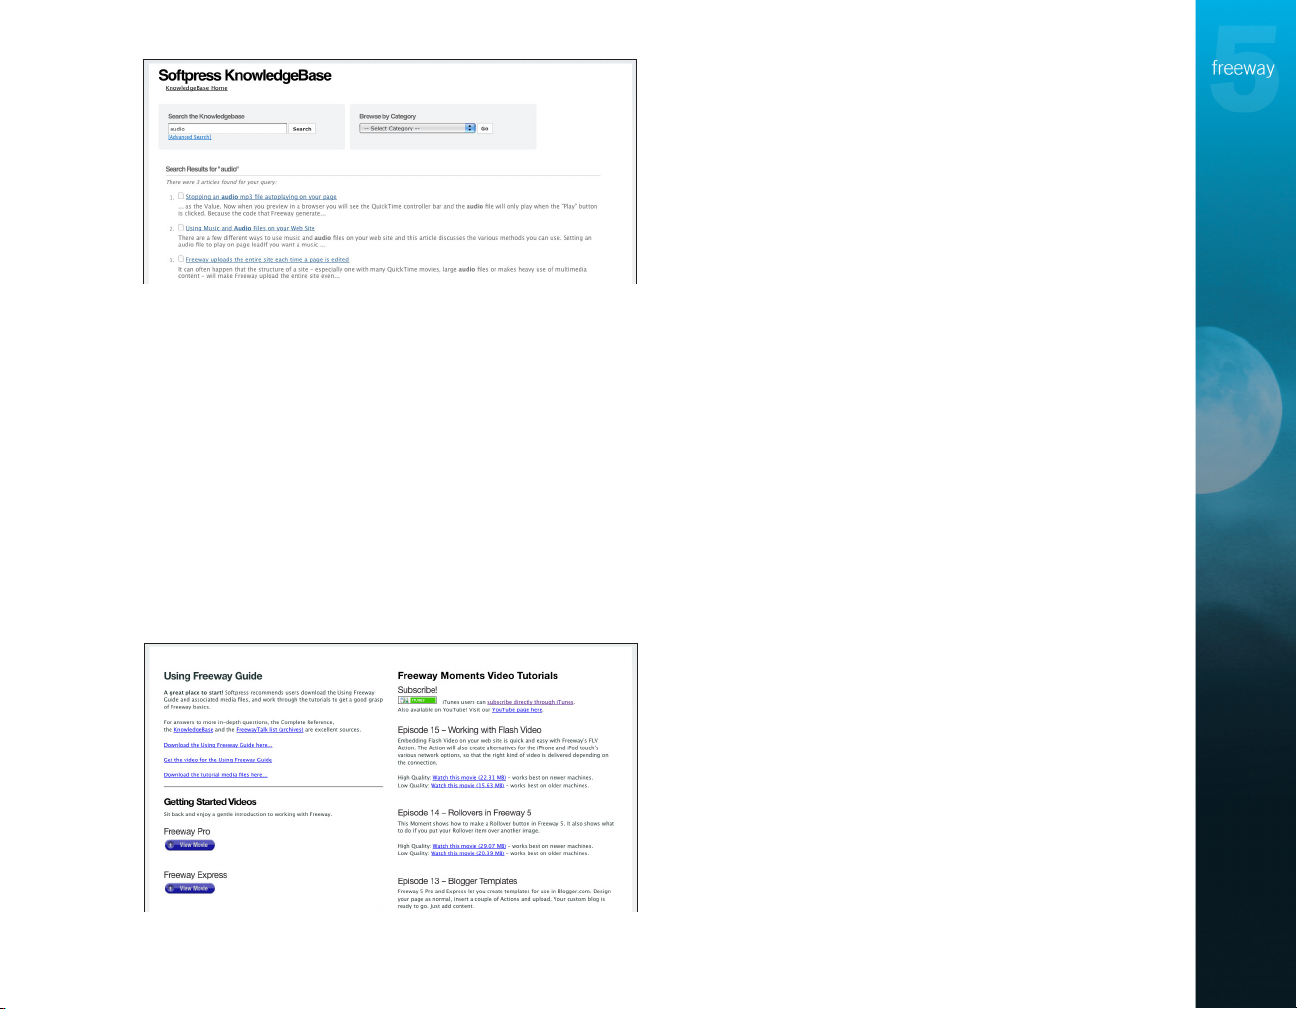
Video tutorials
http://www.softpress.com/support/tutorials.html
There are links to many video tutorials on this page—
called Freeway Moments—which show you how to
do specific tasks in Freeway, along with two movie
tutorials which take you through the very basics of
getting started with Freeway Express and Freeway Pro.
New videos are posted from time to time, so make
sure you check back every now and again—or you can
use the Subscribe link to be alerted when new videos
are released, which you can then watch in iTunes.
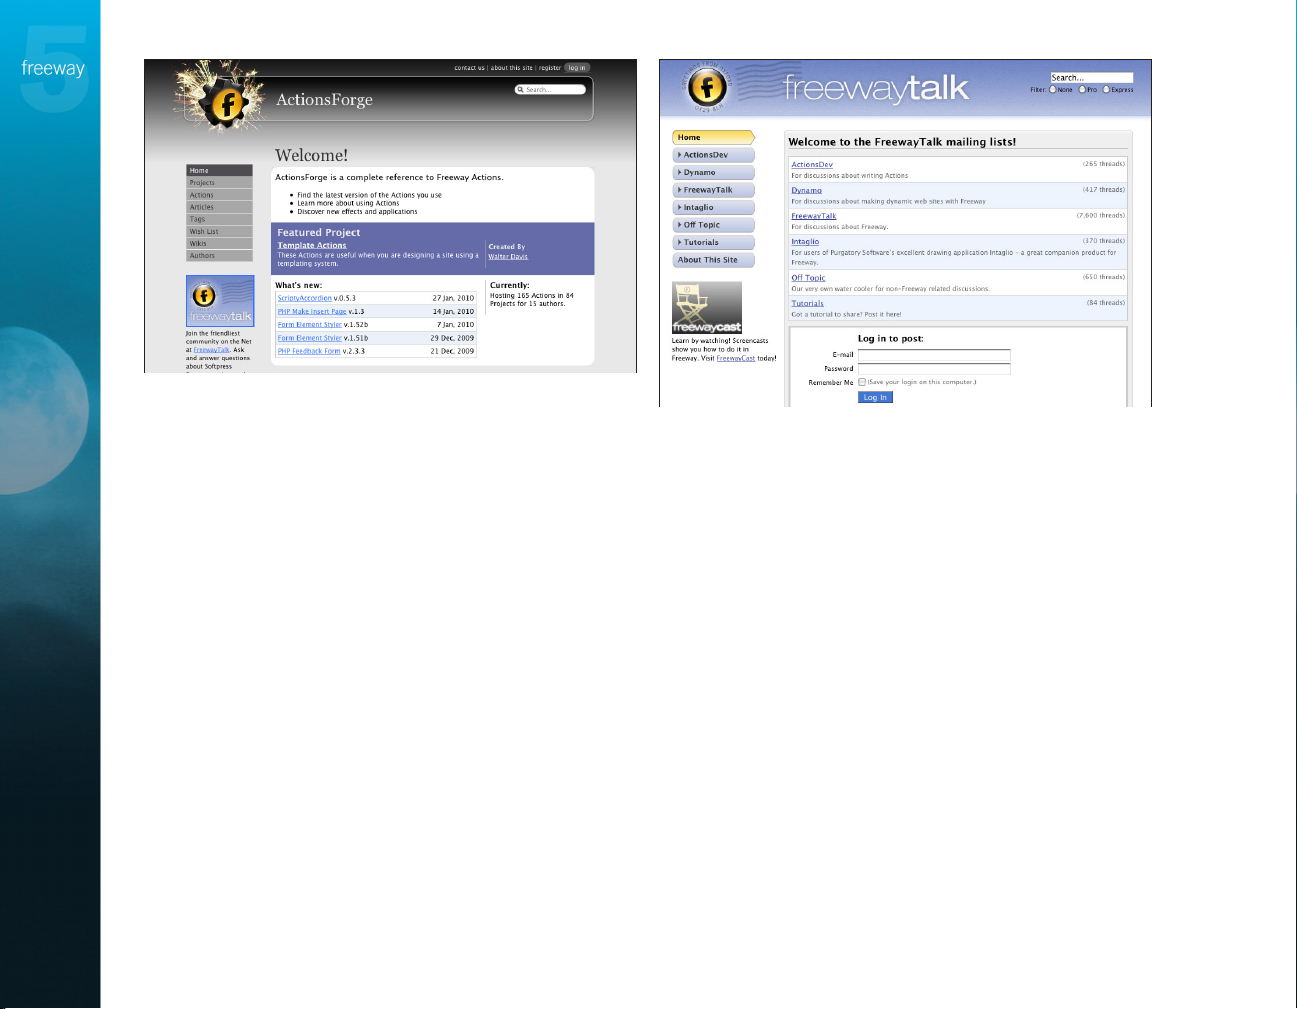
ActionsForge
http://www.actionsforge.com
All Freeway Actions not offered in the core application
as it ships are available on ActionsForge. This is the
place to go for additional Softpress Actions (usually
ones which offer specific functionality) and third-party
Actions—both free and commercial.
This is also the place to find the latest versions
of Actions not bundled in the core application.
The version number of each Action is stated on its
individual page.
ActionsForge is fully searchable to help you find
suites of Actions (called ‘projects’) or individual
Actions. If an Action is part of a project suite, all the
Actions required for that project will be downloaded in
the same zip file.
See the chapter on Freeway Actions in this guide to
see how to install downloaded Actions.
FreewayTalk.net
http://freewaytalk.net
The most vibrant, exciting place to discuss Freeway! We
have always been keen to have our users communicate
not just with us, but with each other too.
FreewayTalk.net is a web-based bulletin board which
also allows you to send and receive messages via
email as well as through the web interface. The board
provides space for people to talk about Freeway, as well
as about writing Actions and developing dynamic web
sites.
To join FreewayTalk, you’ll need to register online.
Introduction and getting started
13
Page 14
Help desk
http://www.softpress.com/kb/contact.php
Use the above URL to contact our Support Department.
You’ll receive a reply within one business day.
Telephone support
US Telephone Support (Mon–Fri, 9am–5pm Central):
AACTT will handle your telephone enquiries. Simply
dial (415) 331-4820. Please have your serial number
handy, and be near your Mac when making your call.
UK Telephone Support: If you are in the UK, you can
contact our Support Department by telephone for a
75p/minute charge. Please ring on 09067 556556.
Introduction and getting started
14
Page 15

The World Wide Web and Freeway
The World Wide Web
and Freeway
15
Page 16

The World Wide Web
Welcome to the World Wide Web
If you’ve surfed the web but you’ve never actually set
up your own web site you may think that web sites are
a bit like radio stations, and using your web browser
to visit a web site is like tuning your radio into a
particular radio station.
This analogy is pretty good apart from one major
difference; the web is totally democratic. You don’t
need a license or any highly-specialized equipment
to publish your site to the world—all you need is a
computer connected to the internet and a centrally
registered name, which costs a few dollars, so people
know where to find you.
How do I get on the web?
To publish your web site on the World Wide Web and
make it available to other users you simply need to
run a program called a web server on your computer
and give the computer a name registered with a central
authority so that other users can find it on the internet.
Unless you have a permanent internet connection,
and don’t mind leaving your computer switched on all
the time, you will probably find it more convenient to
have your web site hosted by a company specializing in
this service, called an Internet Service Provider or ISP.
If you already have an email account it probably has
some free web space included with it, and your ISP will
provide instructions on how to upload your web pages
to your free web space, and tell you what name users
will need to use to connect to it.
If you don’t have free web space included with your
package, or if you want extra features for your web site,
you’ll need to pay for a “hosting” service from an ISP
which may come in a package with a “domain name”.
The domain name is the name a visitor types into
the web address field of a web browser to access a site.
Domain names can have many different suffixes at the
end of the address, such as .com, .net, .org, etc.
The World Wide Web and Freeway
16
HTML—speaking the right language
At the heart of the web is a language called HTML,
which stands for HyperText Markup Language. HTML
performs two basic functions: it describes what the page
should look like, and it provides links to other pages.
Page 17
For example, this is what the user sees: The second important part of HTML, called
“hyperlinks”, is what makes the World Wide Web a
web rather than just a notice board. Each page can link
to other pages within the same web site, or to pages on
other sites anywhere else on the web.
Just as you don’t need to understand the internal
codes your word processor uses to store information
about your document, you don’t need to know HTML
to design web pages.
What are HTTP and FTP?
These are two other terms that you might encounter,
and it is just as well to know what they mean.
•
And this is the HTML to achieve it:
HTTP, or HyperText Transfer Protocol, is a set of
conventions for transferring web pages between a
web server and a web browser. You are reminded of
this every time you surf the web by the “http://” that
your web browser inserts in front of the address in
the address bar.
•
FTP, which stands for File Transfer Protocol, is a
convention for transferring files over the internet
between two computers. FTP is the standard way of
uploading files to a web server, and is the method
that Freeway uses to update your web site remotely
on your ISP’s web space.
The World Wide Web and Freeway
The page description part of HTML consists of a series
of statements which say things like “Put this graphic at
the top of the page”, “Put this text below it”. When the
browser receives the HTML it reconstructs the page that
the designer intended.
How Freeway works
Whether you’re new to web site design, or an
experienced designer, Freeway lets you to create
complex sites quickly and easily with little or no
knowledge of HTML code.
Freeway works in a very similar way to DTP
programs, using a WYSIWYG (What You See Is What
You Get) environment. This, along with its intuitive,
17
Page 18
user-friendly interface, lets you focus on the design
and functionality you want to achieve without the
distraction of having to worry about how it will be
encoded into HTML.
Managing the names and locations of the resources
for your site (graphics, photos, movies, etc.) is all
taken care of by Freeway—the entire design of your
site is contained in a single document. When you’re
ready to view your web site, Freeway will generate the
HTML code and resources required and place them in a
location of your choosing.
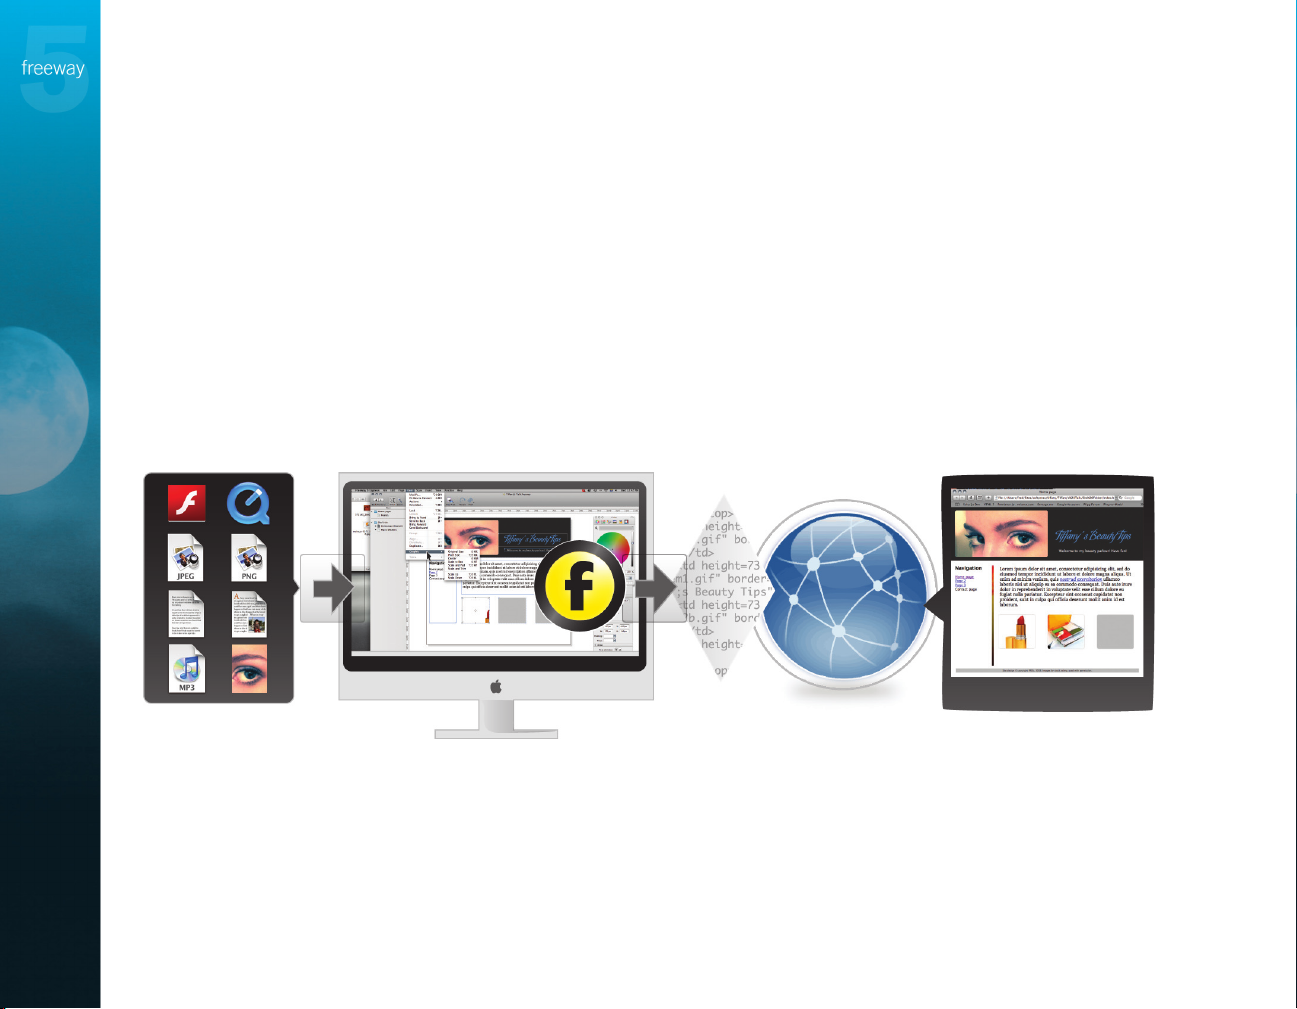
Importing and optimizing graphics is also handled
seamlessly by Freeway. Rather than preparing your
graphics in an external application before using
them in your site, Freeway imports graphics in many
different formats which will be converted to the
optimum format and size when you publish your file,
so your site will always keep browser loading times to a
minimum.
The HTML code generated when you publish your
Freeway file is 100% valid, meaning that your site
should preview perfectly in different browsers while
also ensuring that it adheres to accessibility guidelines
for people with disabilities. Your site being valid also
means that it should be reasonably future-proof.
Once you’ve published your file and the HTML
code has been generated, provide Freeway with your
web space details and it will upload your site and all
its necessary files through FTP or to your MobileMe
account.
The World Wide Web and Freeway
18
1. Gather together
the resources for
your web site.
2. Design and lay out your
site in Freeway’s intuitive
WYSIWYG environment
3. Publish your site
and Freeway generates
the HTML code.
4. With Freeway,
upload your site to
the web.
5. Visitors see your
web site as you
designed it.
Page 19

Thinking design
Tutorial
19
Page 20

Thinking design
by Keith Martin
Senior Lecturer, London College of Communication
Design plans
Start by thinking about your overall site design plans.
Are there parts of the layout that will be repeated across
multiple pages? This is ideal stuff for master pages, one
of the keys to working fast and efficiently in Freeway.
Set up your guides, grids, HTML text boxes and
graphics on a master page, then make new pages from
there and modify those as required. You can have more
than one master page in a site, a useful trick if you
have one layout structure for some pages and a very
different one for others.
But don’t worry about planning everything before
you begin. Freeway is very forgiving, as any decent
design-oriented tool should be.
Page sizes
Make your Freeway page widths appropriate for your
typical audience. Something around 700 to 750 pixels
Thinking Design
wide is reasonable for the vast majority of web users,
but if your normal visitor tends to use larger screens
then try 900 pixels or more. This doesn’t fix the
size of the visitor’s browser window, but it does give
you a good design foundation to help you create a
professional, consistent set of page layouts.
Use the Align option in the Inspector to align your
page content to the left, center or right. Alternatively,
leave the page alignment unset and explore linking
the sizes and positions of boxes to the page sides,
using the Dimensions pane of the Inspector palette.
With layered items in particular (which are produced
as CSS-controlled DIVs) this can make page structures
particularly dynamic and fluid, flexing to follow
browser window sizes.
Type
Setting type is easy to do, but in Freeway you have two
main choices: graphic or HTML. Graphic type—set
in graphic boxes—is turned to bitmap images of your
typesetting when you publish your work. HTML type is
encoded as regular web page text.
You have far fewer typeface choices with HTML text,
as you are restricted to the fonts that are generally
available on everyone’s computers. On the other hand,
search engines ignore graphics and only read HTML
text, so don’t set huge paragraphs as graphics—you
may never be found!
Use graphic type when you want a precise look for
a headline or something to merge with an image,
otherwise you should normally choose HTML text
instead. Yes, this means you have fewer options for
fine-tuning your typesetting, but that’s the way life
is with web design. Anyway, Freeway’s CSS-based
formatting options give you more control over regular
HTML type than you might think …
Styles
Creating and using styles efficiently is an important
part of modern web design, and it is a key part of how
Freeway works.
20
Page 21

As you format text, styles are made for you
automatically and listed ready to be applied elsewhere.
Amend those and your text follows suit.
You can streamline your work by making a set of
styles first, then applying those as you go. You can
apply custom (non-tag) styles to a container and
affect all its contents in one stroke, then give selected
portions of the text further styling as required.
If you want to go further you can improve your
search engine chances and accessibility scores by
using traditional structural styles to control different
elements in your layout automatically, from tag-based
paragraph, header and list structures to object IDs and
so on. Start by editing the ‘p’ style in the Styles
window to control how paragraphs of text with no
custom formatting will appear.
Graphics
Don’t spend precious design time churning out slicedup and web-optimized graphics before you step across
to Freeway. As well as ready-made GIF, JPEG and PNG
files, Freeway 5 Pro can import your original highresolution images whether they’re in TIFF, PDF, SVG
or even native Photoshop or Illustrator format. (Use
24-bit PNG if you have Freeway 5 Express.) If you have
transparency in your original graphics this will be
carried across into your Freeway designs.
Scale, crop and stack your images, and your
output will always be generated as a screen-resolution,
web-optimized JPEG or GIF, or PNG if you prefer.
If you want sliced graphics—useful for making
rollover parts of a larger graphic, for example—then
uncheck the Combine Graphics option in the Inspector
palette. This produces web-ready graphics sliced along
the uncombined item’s boundaries, without you
having to take virtual scissors to your original images.
Just move the object to adjust the slice.
Optimizing
Use the Inspector palette to tweak an image’s output
format and compression levels to get the right balance
between file size and visual quality. You can see how
the compression controls affect the look of your
graphics by turning on the Graphics Preview option
in the View menu. If you have many large graphics
in the layout this can slow things down a little, as
Freeway reads each original image file and generates
the final optimized web version on the fly. But don’t
forget about this ability; you simply can’t beat seeing
precisely how something will look right there in your
page layout.
Code
Customizing Freeway’s output can be done using the
wide selection of Actions, plugin-like tools that extend
Freeway’s feature set.
You can also add custom code to specific places in
a layout by dropping in Markup Item objects, using
the HTML Markup window to reach specific parts
of the overall code structure, or by adding extended
markup directly to elements and styles. You can even
make your own Actions to simplify tasks, making even
complex conditional code production a repeatable
snap.
Thinking Design
21
Page 22

Output
Once you have some pages set up you’ll need to
check that they look right in a browser. You can look
at single pages in Freeway’s internal Preview, but to
check links and all it is best to preview in a regular
browser. Whether you’re a sucker for Safari, a Firefox
fan or an Opera buff, you should check your pages in
as many modern browsers as you can. (Don’t bother
with Internet Explorer for Mac, it isn’t related to the
Windows versions and is long dead.) Freeway makes
pages that are generally as cross-browser-compatible as
is sensibly possible, but some layouts simply don’t do
so well in some browsers. Microsoft’s Internet Explorer
6 and 7 are the biggest offenders here, so use a PC if
one is nearby, or one of the online browser rendering
services if one isn’t. If you have a cyber café nearby
that can be a pleasant way around the problem.
Upload
You can use any FTP software you like to upload
Freeway’s output to your web site, but if you do this
with Freeway itself then your files will be managed
for you. Items that you remove from your page will
be deleted from the site, and so on. It may seem like a
small thing, but it can save you a lot of head-scratching
and wasted server space.
Thinking Design
22
Page 23

Quick Tour
Quick Tour
23
Page 24
The main Freeway interface window
Main interface window for Freeway 5 Express
Menu bar
Tool bar
▲
Page
Mode Buttons
24
Quick Tour
Site Panel/
Page Panel
Site
▲
buttons
The
Inspector
Page area/
Layout view
Actions
palette
▲
Hyperlink box
Page 25
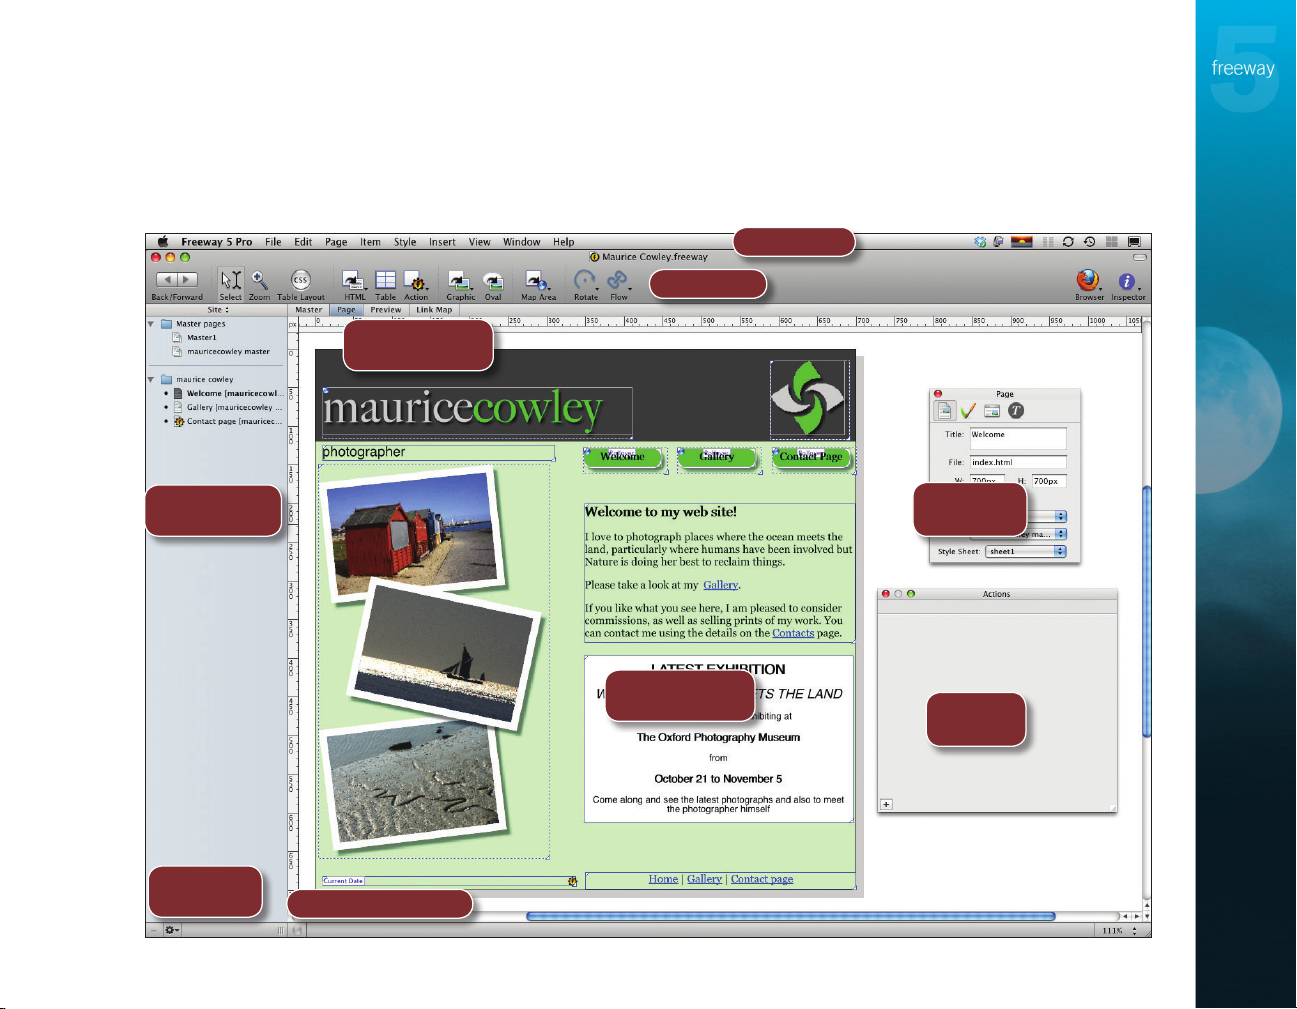
Main interface window for Freeway 5 Pro
▲
Page
Mode Buttons
Menu bar
Tool bar
Quick Tour
Site Panel/
Page Panel
Site
▲
buttons
▲
Hyperlink box
Page area/
Layout view
The
Inspector
Actions
palette
25
Page 26
The menu bar
Quick Tour
This is the drop-down menu bar which appears at
the top of the screen on all programs running on a
Macintosh computer.
In this guide, we don’t have the space to look at
every menu in detail. However, the Freeway 5 Reference
(which is on the CD or disk image file from where you
installed Freeway) has a comprehensive list of every
option and submenu accessible from the menu bar.
For now we’ll look at the types of function available
from each of the menus.
Freeway 5 menu
This is where you can set up your Preferences and hide
or quit Freeway.
File menu
The menu for all functions to do with your main
document, such as opening, saving, uploading, etc.
It also contains options for importing text, graphics
and rich media.
Edit menu
As with most Macintosh applications, this is where you
can cut, copy and paste. For Freeway it is also where
you can edit your URLs and resource lists, etc.
Page menu
As the name suggests, this menu is for functions which
are page-specific, such as adding or deleting pages,
applying a Freeway Action to a page, etc.
Item menu
The menu for item-specific functions. In here, amongst
other things, you can lock items, bring items to the
front or send them to the back, duplicate items,
transform items (Pro-only) and apply item-specific
Freeway Actions.
Style menu
This menu contains options for styling text.
Insert menu
You can insert particular types of item on your page
from this menu. This menu is mainly used for inserting
items into runs of text.
View menu
From this menu you can choose zoom values, toggle
guides on and off, view invisible characters, etc.
Window menu
This menu allows you to open any of the Freeway
palettes and switch between open document windows.
26
Page 27
The tool bar
Freeway 5 Express
default tool bar
Freeway 5 Pro
default tool bar
The tools on the tool bar mainly allow you to create
or edit the different types of item you work with in
Freeway.
Back/Forward buttons
Steps between recently visited pages.
Select tool
Selects or manipulates items or text.
Zoom tool
Zooms in and out of the page area to
change the scale of what you’re working
on.
CSS Layout tool
When this button is on (blue), Freeway
will always create CSS-based layout items.
This only applies to items drawn while the
button is on.
HTML tool
Allows you to draw an HTML item on
your page, commonly used to contain the
majority of the text in your web site.
Pro only
Action tool
Allows you to draw a Freeway Action item
on your page, such as a text rollover or
navigation bar.
Quick Tour
Graphic tool
Allows you to draw a graphic item on your
page. An item drawn with this tool can
contain a graphic (for example a photo) or
graphic text.
Oval tool
Allows you to draw an oval or circular
graphic item on your page.
Map Area tool
Allows you draw a rectangular clickable
area on top of graphic items.
Rotate tool
Allows you to rotate a graphic item when it
is selected on your page.
Flow tool
Links two or more HTML or graphic
text items together so that text can flow
between them.
27
Page 28
Browser Preview
Click on this button to preview your site in
the browser you’ve set as the default browser.
Click and hold to choose a different browser,
or choose Browser Setup to select a different
default browser or update your list of installed
browsers.
Inspector
Displays or hides the Inspector. This is a
context-sensitive palette which displays
different options depending on the item
selected.
View menu and drag the tools one at a time from the
optional tool palette to your tool bar in a similar way
you add items to Mac OS X’s dock. Existing tools move,
allowing you to place the new tool in the position you
prefer.
If you want to revert to the default tool bar at any
time, simply go back to your Customize Toolbar palette
and drag the default tool bar into the tool bar area.
Freeway Express allows you to place an optional
Colors tool button which shows or hides the Colors
palette. In Freeway Pro, there is a Styles/Colors tool
button which opens a palette listing document styles
and colors.
28
Quick Tour
You can customize the Freeway tool bar by adding
optional tools you frequently use. Some optional tools
are available from a submenu on the tool bar, but you
can place them on the main tool bar for immediate
use. To do this, choose
Customize Toolbar... from the
Pro
Most of the optional tools are the same for both
versions, but Freeway Pro also features skew and mirror
tools.
Pro-only optional tools
The optional tools
available from the
Freeway 5 Express
Customize Toolbar
palette.
Page 29
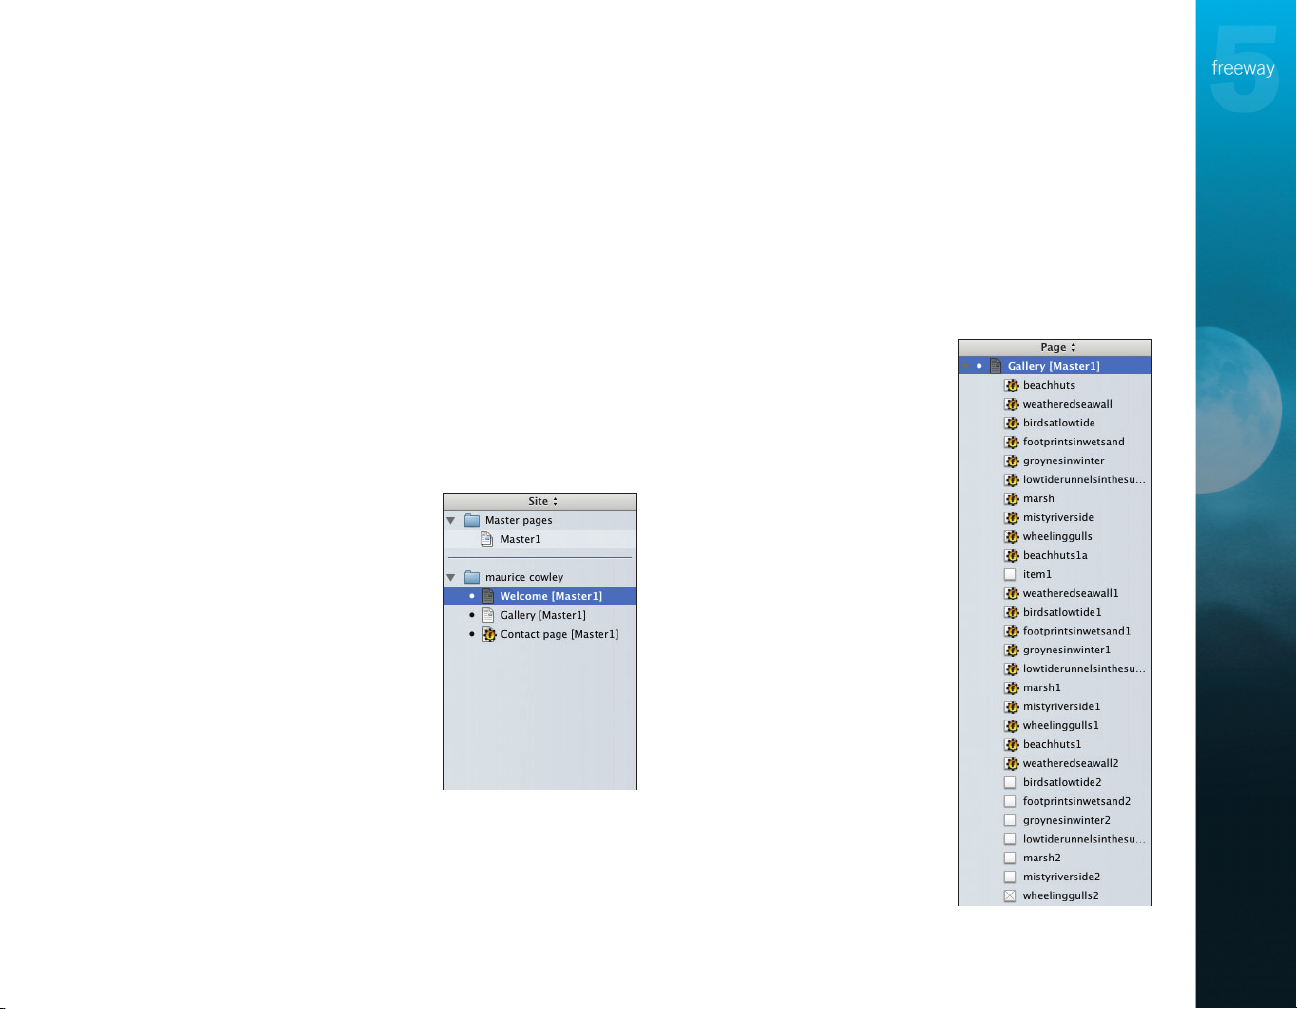
The site and page panels
The panel to the left of the page area toggles between
the site panel and the page panel by clicking on the
title bar which says
By default, the panel will display as the site panel.
Site or Page at the top of the list.
The site panel
The site panel displays a list of all the pages and page
folders which make up your site, with Master pages at
the top and pages created from the Master pages below.
Working with Master pages is covered in detail in the
Tutorial section.
The pages in the lower part of the site panel show
the name of the page and the
Master it was created from.
If you make a change to
any page of your site, a black
dot will appear to the left of
the page icon in the list—this
indicates that changes have
been made since the last time
the site was published.
You can change the order
that the pages appear in the
site panel list by clicking and
dragging them to a different
place.
Clicking on the disclosure triangle to the left of a
folder icon will list all the pages contained within that
folder.
You can also see in this list whether a page or folder
has a Freeway Action applied to it. If an Action is
applied, a small Freeway Action cog icon appears on
the page or folder in the list. Select the page or folder
and look in the Actions palette to see which Action or
Actions are applied.
The page panel
Clicking on the title bar of the
site panel toggles the panel
to the page panel view. This
panel only shows the page
you have displayed in your
page area.
The list of items and other
resources on your page should
display—if not, click on the
disclosure triangle to the left
of the page icon.
Like the site panel, a
Freeway Action cog icon
indicates which items have
a Freeway Action applied to
them. Select the item and
look in the Actions palette to
see which Action or Actions
are applied.
Quick Tour
29
Page 30

Quick Tour
The page mode buttons
Page button will return you to the last page you were
working on that was created by that Master.
There are three page mode buttons—
and
Preview. The first two allow you to switch quickly
and easily between the page you’re working on and the
Master page it was created from. This can save a lot of
time if you have a site with multiple Master pages.
When you have a Master page displayed, the page
rulers turn to a tinted yellow color. This alerts you to
the fact that any changes you make to the page will be
applied to all pages associated with that Master.
If you have a Master page displayed, clicking on the
Master, Page
When you click on the
will be published if any changes have been made since
it was last published. Your page will then be previewed
in your Freeway window by a program which is similar
to a web browser, but with reduced functionality.
Pro
Link Map
In addition to the three page mode buttons, Freeway
5 Pro also has a Link Map button which, when clicked
on, displays a graphic representation of the links in
your site.
Preview button, your page
The hyperlink box and site buttons
30
The hyperlink box
If you select an item on your Freeway page, the
hyperlink box shows if it has a hyperlink applied to
it or not. With the item or text selected, you can click
and hold on the hyperlink box to choose from an
existing page of your site or an external site.
Clicking on the globe to the left of the hyperlink box
displays the “Edit Hyperlink” dialog box, which allows
you to link to an existing internal page or an external
page on another site. You can also choose from any of
the standard hyperlink protocols such as an email link.
Hyperlinks will be covered in detail in the Tutorial
chapter.
The site buttons
At the bottom left of the interface window are the site
buttons. The minus button lets you delete selected
pages or folders from your site. Clicking and holding
on the right-hand button displays a menu giving you
options to add pages or folders, and change the view
options for the Site/Page panel.
Page 31

Contextual menus
A great way to save time on your project is to use
Freeway’s contextual menus. These are menus which
are item-specific—showing only options relevant to
that item—and they can be accessed without needing
to go through a bunch of menus and submenus.
Any item on your Freeway page will generate a
contextual menu when you Control-click (or right-click
with a two-button mouse) on the item. If nothing is
selected on your page, the contextual menu for the
page will display.
Note: A different contextual menu will display if you
are currently editing text inside an HTML or graphic
item box.
The contextual menu
displayed for a graphic item.
Quick Tour
The contextual menu
displayed for an
HTML item.
The contextual menu
displayed when editing
HTML text.
31
Page 32

The Inspector
Quick Tour
The most common palette you’ll use in Freeway will be
the
Inspector—a powerful, context-sensitive palette
which displays different options depending on what
you currently have selected (HTML item, graphic item,
text, etc.). If you have no items selected on your page,
the Inspector gives you options for the page itself.
We don’t have room here to cover every combination
with each type of item. However, the Inspector works
in a logical way whatever the item, so we’ll guide you
through the basics of the Inspector and the type of
options for each kind of item. The Tutorial chapter will
show you how the Inspector works in practice.
There are quite a lot of differences in the Inspector
between Freeway Express and Pro, but the principles
are the same for both—so feel free to experiment with
your version to see what the Inspector lets you do.
If the Inspector is not displayed, click on the
button on the far right-hand side of the main
Freeway tool bar.
Click once on an item to select it, and the Inspector’s
palette will change to show options specific only
to that type of item. The title bar at the top of the
Inspector displays the item type. Below this is the
Inspector’s tab bar, which usually
displays an icon for each of the
General, Appearance and
Output settings for that item.
The first icon of the Inspector tab bar—the General
settings icon—displays a similar icon to the tool from
the main Freeway tool bar you used to create the item
on your page. This will change
for each different item type
you select.
Like the main Freeway
interface window, tool tips
display if you hover your
mouse over the Inspector tool
bar icons.
If nothing is selected on
your page, the Page Inspector
window will display. Clicking
on the first tab displays the
page’s General settings, which
allows you to edit the general
configuration of the page, such
as setting its size, giving it a
title, choosing how it aligns in
the browser window, etc.
With no items selected, the second tab displays the
page’s Appearance settings.
This icon shows all the
options available to change
the physical appearance of
your page, such as applying a
background color, choosing
a background image (with
positioning and tiling options)
and what color the page’s
hyperlinks will be.
32
Page 33

The next screenshot shows how the Inspector
changes when an item is selected. The title bar has
changed to show the item type, and the available
options for the General settings are different to those
in the Page Inspector window.
Although the paintbrush icon for the Appearance
settings is the same as the icon for the same tab in
the Page Inspector dialog,
the options will be different
as you will now see options
specific only to an HTML or
graphic item.
Pro
Pro always displays at
least one extra icon on the
Inspector tool bar, the most
common of which is the
Style Inspector.
When editing text within
a graphic item, another Pro-only icon is displayed.
This is called Typography
settings, and contains
advanced settings for the
currently selected font.
Inspector tool bar icons in Pro
If an HTML item or graphic item is selected on
your page, clicking on it again (or double-clicking on
the item if it wasn’t originally selected) allows you
to enter text inside the box.
You’ll see that the Inspector
options have changed again
to reflect this, and the title
bar has changed to “Text”.
In most instances, the third
icon in the Inspector tool bar
is the “Output” settings icon,
which give options relating to
how the HTML code will be
generated for that particular
item when it’s published.
Quick Tour
33
Page 34

Quick Tour
Occasionally you will
need to access options
within panels of the
Inspector
currently displayed. To see
these options you will need
to click on the disclosure
triangle to the left of the
section heading in the Inspector palette.
which are not
Although the amount
of options may seem
daunting, the Inspector is
very intuitive and you will
soon appreciate its ease of
use.
The advantage of having
a context-sensitive palette
such as the Inspector is so
you only need one palette
open on your page, rather
than a different palette to
work on each type of item.
Other palettes
There are three other palettes which make up the
Freeway interface—the
(called
the
in depth in the Tutorial chapter, along with how
to select colors in both Express and Pro and the
differences between the two versions.
a frameset from a selection of pre-defined frameset
layouts. If you want to find out more about creating
and working with framesets, please refer to the Freeway
Reference.
Styles & Colors palette in Freeway Pro) and
Frames palette.
The
Actions palette and Colors palette are covered
The
Frames palette gives options of how to create
Actions palette, Colors palette
34
Pro
Freeway 5 Pro offers many options for how the code
will be written for the page. If this is applied to each
Master page of your site, it is effectively applied for the
entire site.
Among these extra options are the ability to choose
the HTML/XHTML standard for the code, language
encoding and the ability to display the code in an
easily-readable format when you view the page source.
Output settings for the page in Pro
Page 35

Tutorial
Tutorial
35
Page 36

Tutorial
36
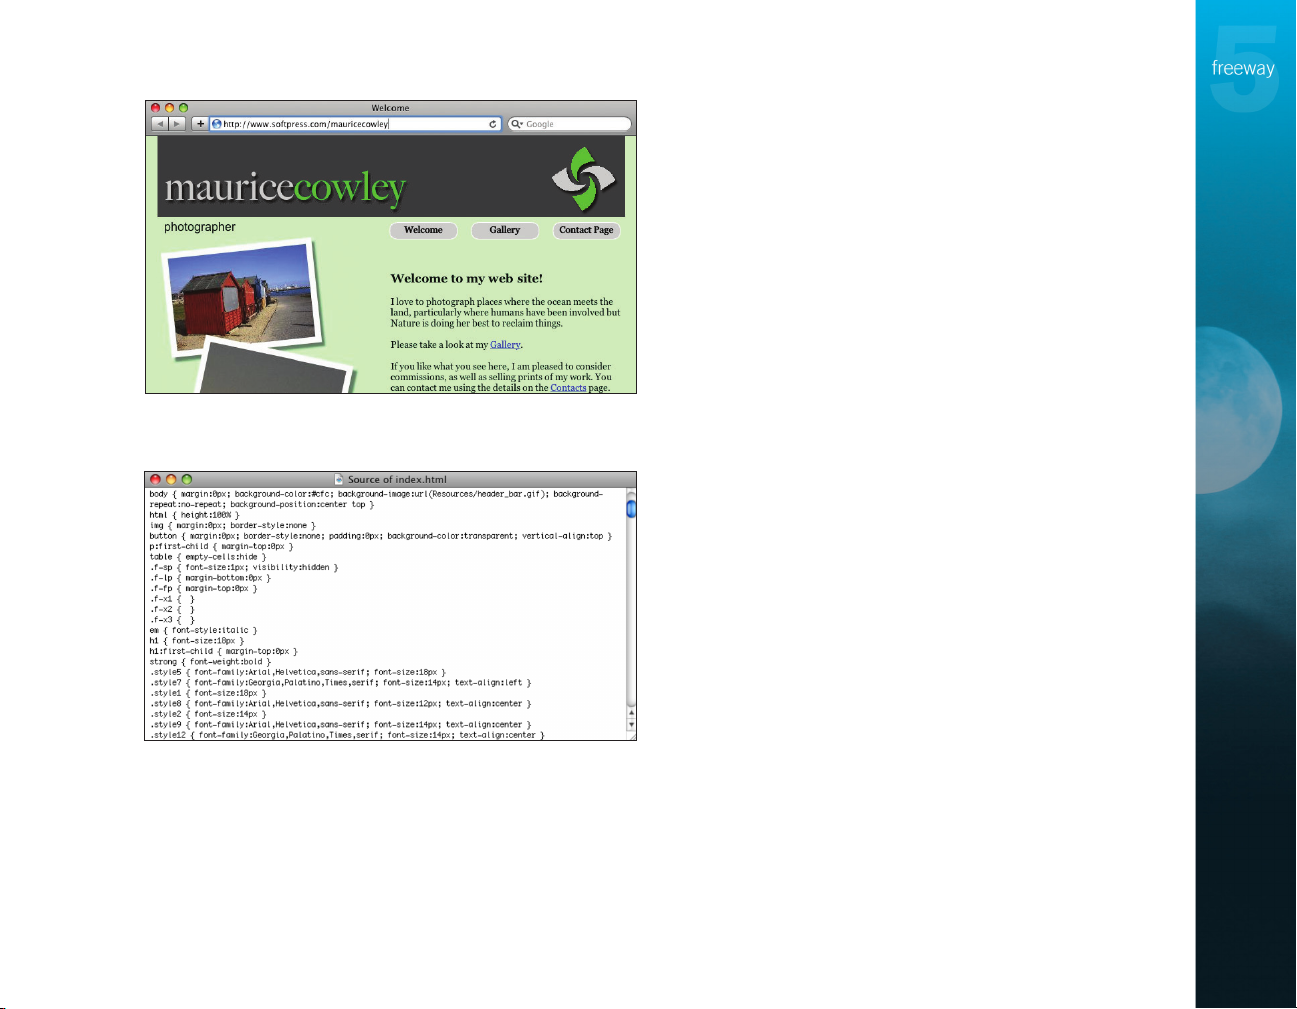
We’re going to use Freeway to create a web site for a
photographer called Maurice Cowley. This will be done
in three stages with a separate tutorial for each stage.
Everything we do in the tutorials can be done by
both Express and Pro users. If you’re using Freeway 5
Pro, you’ll notice that there are some differences in the
interface as the tutorial uses screenshots mainly from
Express. Any major differences will be pointed out as
we go.
Each tutorial is designed to take around 30 minutes if
you follow the instructions in strict order, but feel free
to experiment with different options available to you
through the various menus and palettes—this really is
one of the best ways to learn.
By the end of the third tutorial, you will have
created a fully-functioning web site. The site you’ll
build contains rollover navigation links, a gallery page
with thumbnail links to larger images and many other
features often seen on web pages. You’ll be surprised
that such a complex site could be created in Freeway
in such a short time, with little or no knowledge of
HTML.
To introduce functionality in an appropriate order,
certain aspects of the standard workflow for site
creation have changed. We strongly advise that you
plan a site beforehand.
The tutorials will guide you through the key features
of Freeway in the following stages:
Tutorial 1: Creating a new document, learning the
structure of your site folder, adding various elements to
your page and checking the page in Freeway’s Preview.
Tutorial 2: Creating the structure of a multi-page
site, using Master pages for common content, adding
links to aid the navigation throughout the site and
previewing the site in a web browser.
Tutorial 3: Adding functionality and dynamic effects
to your site, such as rollovers and target images, etc., by
using Freeway’s Actions.
Note: The image resources used for these tutorials
can be found in the Freeway folder inside the
Applications folder. They can also be downloaded
from the Softpress web site at http://www.softpress.
com/support/ below the “Manuals” heading
CONVENTIONS USED IN THE TUTORIALS
Instructional text appears in colored, bulleted sans serif
type (e.g.
box will be displayed
in the standard body text serif type.
Bold
The following modifier keys are used in the tutorials:
The Control key—sometimes marked L.
The Option key—sometimes marked O or called Alt.
The Command key—usually marked C or P.
Where a command or menu choice is within a
submenu, this is indicated with the “>” symbol, such as
“Choose
If you experience problems with this tutorial, visit
http://www.softpress.com/support/tutorials.html where
you’ll find three movies of this tutorial, called “Getting
Started with Freeway”.
Launch Freeway. The New Document dialog
). General discursive text appears
Bold text within the body text identifies a name
or label that appears on your screen (e.g. Click
OK)
Item>Action>Rollover”.
Page 37

Tutorial 1
IMPORTANT NOTE TO FREEWAY PRO USERS: If you’re using Freeway 5 Pro, please make
sure that the CSS Button on the tool bar displays as grey (off) throughout these tutorials.
Starting and saving the site
Freeway is supplied with sets of pre-prepared templates
which you can choose in the left-hand panel of the
New Document window as the starting point for a web
site.
At the top of the list is “Blank” which, although not
strictly a template, will give us a clean canvas on which
to design a site from scratch.
•LaunchFreeway.TheNew Document dialog should
automatically be displayed. If not, choose New… from
the File menu.
•Inthelistontheleft,Blankshouldbehighlighted
already, so click on the Blank template in the main
panel and click OK.
When starting a site with a template (including Blank),
Freeway will immediately prompt you to save the
new site. This ensures that you have the correct site
structure in place before you start work.
•Enter“Tutorial1”intheSave As field, and click the
Save button.
Tutorial
Pro
Freeway Pro, too, is supplied with templates, but also
has the option of custom page settings which offer
more control—such as setting the HTML level for the
document and how file names are treated.
You can switch to the Custom view by clicking on
the Custom button above the main panel of the New
Document dialog window.
Custom page settings
37
Page 38

Freeway, by default, chooses to save a web site in your
Documents folder. If you’d like to save it somewhere
else, use the Save dialog to navigate to a new location.
titled “Tutorial1”, with a blank page showing in the
layout or document view.
Setting page dimensions and alignment
In Freeway, setting up a page’s dimensions and how
it aligns in the browser window are simple tasks to
achieve using the Inspector—a powerful, context-
Basic concepts and terminology of the Inspector
Because the Inspector is such an important tool in
Freeway, it’s worth taking the time here to explain how
it works and what terminology you’ll encounter in the
instructions of the three tutorials.
Tutorial
which means that the palette’s interface and options
will change according to the type of item selected and,
A Freeway document window will be opened for you,
sensitive palette. If the Inspector isn’t open,
click once on the button titled Inspector on
the far right of the Freeway tool bar.
As stated earlier, the Inspector is “context-sensitive”,
Title bar
Tabs
Open panel header bar
Panel
Closed panel header bar
for some items, how the item is selected. With no item
selected on your page, the Inspector will show the
options for the current page.
The content of the Inspector may change, but it
always retains its familiar structure of “title bar”, “tabs”
and “panels” which allow you to work in an intuitive
way.
At the top of the Inspector is its “title bar”. This will
change according to the type of item you have selected
(“HTML Item”, “Graphic Item, etc.). If you have no
items selected, the title will display as “Page”.
Below the title bar is a row of “tabs”. Clicking once
on a tab displays a palette of options for a particular
kind of functionality—most commonly, the Inspector
displays three tabs which are called “General Settings”,
“Appearance Settings” and “Output Settings” (note that
there are some exceptions to this).
The Appearance tabThe General tab The Output tab
In Freeway Pro, there is always an extra tab called
“Style Inspector”, which appears at the end of the row.
The icon for the first tab—called
usually displays as the same tool bar icon for the tool
you used to draw the item. Anything to do with an
item’s name, size or position is applied in the General
tab.
The next tab—called
an icon like a paintbrush. In the Appearance tab you
can apply colors, borders and effects, etc.—all things to
change an item’s appearance.
The third tab—called
as an icon of a web browser. Options available in the
Appearance Settings—has
Output Settings—displays
General Settings—
38
Page 39

Output tab are specific to changing how an item’s
HTML code will be written when the file is published,
such as its file type, anti-aliasing and whether it has
“alt-text” set.
Within each tab of the Inspector are “panels”, which
are options grouped logically into specific types of
function. At the top of each panel is a header bar
which, when clicked, will open or close the panel.
Clicking a second time on an HTML or empty
graphic item allows you to type text inside. When you
do this, the Inspector’s title bar will change to “Text”.
In this mode, an HTML item will display only the
General tab and an empty graphic item will display the
General and Appearance tabs.
As stated earlier, there are other exceptions to the
standard display of tabs, but none appear in the
tutorials.
Setting the page dimensions and alignment
Let’s set the page dimensions to be 700 pixels square
and center the page horizontally in the browser
window.
•SelecttheGeneral tab of
the Inspector by clicking
on the page icon, as seen
highlighted in the screenshot
ontheright.Enter700in
the W field to give the page
a width of 700 pixels. 700px
is the default height of a
page in the Blank template.
Note: You must type either a
Return or Tab to retain the
information entered into the field.
•ChooseCenter in the Align pop-up menu.
It is not necessary to type “px” after the values entered
in the W and H fields as Freeway adds this for you.
Setting the page background color
Selecting colors works quite differently between
Freeway Express and Freeway Pro—so for this section
we’ll use methods common to both versions to choose
a color for the page background. For this tutorial we’ll
use screenshots from Freeway Express—the steps for
applying colors in Freeway Pro, while similar, are
explained in detail in the box on the following page.
• Select the
Appearance tab of
the Inspector then
click and hold on the Color
pop-up menu to view the list
of seven standard primary
and secondary colors, along
withblack,white,“None”and
“Other...”.
•SelectOther... to open the
Colors dialog. Click on the
second icon (called Color
Sliders),andchoose“RGB
Sliders”fromthepop-up
menu.Enterthevalues
“204”,“255”and“204”in
therespectiveRed,Green
and Blue fields and click OK.
•Thiscolorisa“websafe
color”,soanotherwayto
select it is to go to the center
icon of the Color palette
Tutorial
39
Page 40

•Aswealreadyknowthecode
•Clickonthecolorinthelist
Although the color of your
page in the Freeway interface
window has changed, note that this color will be
applied to the entire browser background and not just
the page itself.
When you select Other... from the page background
color menu, a grid of all 216 web safe colors is
displayed.
Tutorial
color in this tutorial, click on the color wheel in this
Color dialog window and choose the color from either
the RGB sliders or the Web Safe Colors menus in the
second and third tab of the Colors menu respectively.
Colors you’ve chosen in this way will appear in a list
in the Colors panel of the Styles & Colors palette. The
color can be applied to other objects by clicking on it in
this list.
default, which means they will appear in the Colors
palette whether they’ve been used in your design or
not.
(called Color Palettes),
choose“WebSafeColors”
from the List pop-up menu
and select CCFFCC.
for the color, we could also
type it in the Search field.
to apply it to the page and
click OK.
Pro
To follow the method of choosing the background
New colors created in Freeway Pro are permanent by
Choosing colors in Freeway Pro
Express
Freeway Express doesn’t store permanent custom
colors, but there is a way to store favorite colors using
the color palette. To do this, drag a color you’ve chosen
from the top color swatch panel into a blank thumbnail
swatch box in the drawer at the bottom of the window.
You can reveal more blank swatch boxes by dragging
the drawer down.
Tip: Create a palette of favorite colors
Adding a page background image
Much has been written about what is considered
tasteful and appropriate when it comes to background
graphics for a web site. Because it’s so easy to do, many
web design beginners fall into the trap of using a large
single graphic file for the entire page background
(which can make loading times slow) or using a “tile”
graphic which repeats over the browser background
(which can sometimes give the page an amateurish or
dated appearance).
For our page, we’ll import a small, simple yet
effective header bar graphic. The tutorials folder is
located in the Freeway folder you installed or on your
installation disk or disk image.
•SelecttheAppearance tab
of the Inspector, click on the
Image pop-up menu and
choose Select....
Navigate to the Tutorials
folder then, from the
“Tutorial1_media”folder,
choose“header_bar.gif”andclickOpen.
•TwomoreoptionsappearintheInspectorpalette
below the pop-up—Horizontal and Vertical. These
40
Page 41

control the alignment of
the graphic on your page,
sochoose“Center”for
Horizontal,and“Top”for
Vertical.
If you choose “Tile” for either
or both alignment options,
the image repeats to fill the
browser window horizontally,
vertically or both.
Another option in this panel is “Background
scrolls” (checked by default). If this is unchecked, the
background image will be fixed in the browser window
and the page content will scroll above it.
This is a good time to save our progress so far.
•ChooseSave from the File menu.
A quick word about “items”
Any box on a Freeway page is called an “item”. An item
can contain text, a graphic, a photo, etc. or it can be a
shape drawn on the page with one of Freeway’s tools.
As soon as an item has been created on the page, it
is given a unique name by Freeway—by default, this
will be “item1”, “item2”, etc. In this tutorial you’ll be
introduced to the two main types of items you will
work with in Freeway—HTML and graphic items.
PRO USERS: If you haven’t already done so,
please switch off the CSS Layout button
Adding a graphic text item
One of the strengths of Freeway is its ability to create
fully-editable graphic text on the page. Let’s create a
graphic text heading for Maurice’s web site.
Bear in mind that graphic text is published as an
image. This means that you can’t enlarge or reduce
its size in the browser, it won’t be indexed by search
engines, and may cause problems for visitors who use
accessibility aids. It’s best to use graphic text only for
elements that must be rendered in a certain font, or for
creating logos, etc.
•ClickonceontheGraphic tool in the tool bar.
When you move the cursor over the page in the
layout view, you’ll see the cursor changes to a
cross-hair. Click and hold on the page area and drag
diagonally down to the right to draw a wide rectangle.
Releasethemousebuttontonishdrawingyouritem.
•Theitemshouldbeselectedandshowingtheselection
handles around the frame. If not, click once on the
item.
•Topositionandsizetheitem,selecttheGeneral tab of
the Inspector, and go to the Dimensions panel. If the
panel is not already open, click its header bar.
•Double-clickintheX field (for Freeway Pro, see the
box below) to select the current entry and type 10px.
Press Tab to move to the Y field, and type 50px. Press
Tab again to move to the W field and type 400px,
followed by another Tab to move to the H field where
Pro
This tutorial uses positioning
according to the X and Y
values as they appear in
Express.
In Freeway Pro these are called “Left Inset” and “Top
Inset” on the top row of the panel. Below these are Pro’s
Width and Height fields.
Although we’re not using them in this tutorial, there
are also values for “Right Inset” and “Bottom Inset” in
the bottom row in the Dimensions panel.
Positioning items on the page in Pro
Tutorial
41
Page 42

Values given to the X and Y
fields (Left Inset and Top Inset
in Pro) refer to the position of
the item’s top left corner in
relation to the top left corner of
the page. This means that an X
value of 10 will position the top
left corner of the item 10 pixels
in from the left edge of the page and a Y value of 50
will position the top left corner 50 pixels from the top
of the page.
the item itself.
some text. Unlike HTML text, for graphic text you
can use any font on your computer—this is because
Tutorial
Freeway creates a graphic of the text when the item is
eventually published.
•Iftheitemisselected,clickonitagain.Ifnot,clickonit
•Type“mauricecowley”.ChooseEdit>Select All to
•Selectjusttheletters“maurice”withthecursor,goto
you should type 60px. Finish
offbytypingaReturnorTab
to ensure Freeway accepts the
last value.
The W and H values refer to the Width and Height of
With the item positioned on the page, let’s enter
twice. You’ll see a flashing text cursor inside the item.
select all the text and go to the General tab of the
Inspector.Choose“BigCaslon”fromtheFont menu
and enter 60px into the Size field. Don’t forget to press
TaborReturntoacceptthevalue
the Appearance tab of the Inspector and click on the
Color pop-up menu (in Pro, this is in the Text panel,
which you need to open). Using the same process as
before, select Other... from the Color pop-up menu
andsetthecolorwiththeRGB
sliders (using the values 204,
204, 204) or as a Web Safe
Color (using CCCCCC).
•Nowselectjusttheletters
“cowley”andapplythebright
green color (which is called
“Green”inPro)fromthe
Color menu in the Inspector.
As well as choosing fonts, sizes
and colors, Freeway also allows
you to add many different
effects to graphic text and graphic items, such as glows,
shadows and outlines. Effects can be applied in the
Appearance tab of the Inspector.
There are significant
differences in the way effects
are applied in Express and Pro,
so we’ll look at how to apply a
shadow to the logo text in each
version in turn.
Make sure you select the text
within the item and not the
item itself, as some effects can be
applied to either the item or the
text inside it.
Freeway Express
•Selectallthetext,gototheAppearancetabofthe
Inspector and select the Outer Shadow button (which
hasaniconofaletter“A”withadropshadow).
•IftheOuterShadowmenuisnotvisible,clickonitstitle
bartoopenit.Entervaluesof75%foropacityand4%
for offset.
42
Page 43

Freeway Pro
•Selectthetext,gotothe
Appearance tab of the
Inspector and select the Outer
Shadow button (note that the
“NormalTextLayer”button
will also be selected).
•IftheOuterShadowpanelis
not visible, click on its title bar
toopenit.Enterthevaluesof
75%foropacityand4%for
offset.
Because of the way Freeway works, if you want to
change the text or any of the effects you’ve applied—
even after the file has been published—this text
remains fully editable, so you can make your edits and
simply republish.
Importing a graphic
Maurice uses a logo as part of his corporate identity, so
we’ll put this logo on the right hand side of the page,
over the top of the background header bar. This time
we’ll import a graphic with transparency into a graphic
item, scale the graphic and then position it on the
page.
When you draw a new item on your page and import a
graphic, it will be imported at the same physical size it
was saved at in the original graphics application.
Using the Graphic>Scale and Pad command, the
graphic will be scaled to the largest size possible within
the item, while maintaining its proportions.
Using the Fit Box to Content command will make
the item fit the physical proportions of the graphic.
Now we need to scale the graphic and the item to the
size we want to use it on the page. We’ll use a modifier
key combination to resize the item and image as one.
Tutorial
•Drawagraphicitemonthepageasyoudidbefore,
choose File>Import,navigatetothe“Tutorial1_
media”folder,selectthelecalled“mauricecowley_
logo.gif”andclickOpen.
•Control-click(orright-clickwithatwo-buttonmouse)
on the item and select Graphic>Scale and Pad from
the contextual menu. Control-click (right-click) again
and select Fit Box to Content.
Keeping your Freeway file size small
A tip to keep the overall Freeway document size small is
to resample imported images.
To resample an image, double-click it to open the
Graphic dialog, then click the Resample button once.
Click the OK button to close the Graphic dialog.
Resampling ensures Freeway stores the minimum
information it requires for the imported image after it
has been scaled.
!
Tip
43
Page 44

•SelecttheGeneral tab of the Inspector to view the
•GototheAppearance tab of the
•ChangetotheGeneral tab of the Inspector, then click
Tutorial
item’s width and height. Hold down the Shift and
Option keys, click on a corner of the graphic item and
drag the corner handle to enlarge or reduce the
Width and Height to 95px by watching the values
change in the Inspector. Using Shift-Option-click and
drag maintains the proportions of the image as the
item is scaled.
Inspector and apply an Outer Shadow
withvaluesof75%Opacityand4px
Offset.InExpresstheOuterShadow
settings are at the top of the Appearance dialog.
In Pro the Outer Shadow settings are in the Outer
Shadow panel of the Effects panel.
and drag the item close to the top right-hand corner of
the header bar and watch the X and Y values change
(remember these are called Left Inset and Top Inset
in Pro) in the Inspector. The item needs to have values
of 590px for X and 16px for Y. You can click and drag
it into position by watching the values change, or you
can place it approximately and use your arrow keys to
nudge it to the correct position one pixel at a time.
Benefits of using HTML text on your site
It can be tempting to use graphic text in many places
so you can choose a specific font or apply effects to the
type.
However, HTML text is much faster to load in a
browser and, unlike graphic text, it is accessibilityfriendly in that screen readers and Braille displays can
read the text. This enables visually-impaired users to use
the web site.
Another advantage of using as much HTML text as
possible is that search engines will index the words of
your page so search rankings should be more favorable.
•Selectthewordbydouble-clickingonit,thenchoose
Helvetica for the font and 18px for the size in the
Inspector (there is only one tab for text). If necessary,
make the item larger by dragging one of its handles.
With the text formatted we now need to click away
from the item to deselect it and then reselect it with a
single click so we can apply values to the item rather
than the text. An alternative way to do this is to
Command-click on the item.
•Givetheitemvaluesof10pxforX, and 125px for Y,
then make the item 300px wide and 20px high.
!
Tip
44
Adding HTML text
To complete the header bar, let’s add some words to let
the world know his trade. We could use graphic text
again, but we are going to use HTML text (see the “tip”
box for the benefits of using HTML text).
•ClickonceontheHTMLbuttononthetool
bar and draw an HTML item on a blank area
of the page. Click on it again so the text
cursor flashes inside the item and type the
word“photographer”.
Importing photos
Importing a photo into Freeway is no different to the
way we imported the Maurice Cowley logo earlier.
In fact all images are imported using the same basic
methods. We imported the logo by navigating to the
file through the import dialog. This time we’re going to
“drag and drop” the file straight from the Finder onto
our Freeway page.
Page 45

•Locatethe“Tutorial1_media”folderintheFinderand
openit.Selectthele“beachhuts.jpg“,dragitfrom
the folder and drop it onto a blank area of your page.
The photo will appear on your page, already within a
graphic item sized to the photo you’ve imported.
•Scalethephotobyclickinganddraggingonthe
bottom right-hand corner while holding down ShiftOption to reduce its size to 208px wide by 139px high
(you can see the size values change in the Inspector).
Photos taken with digital cameras can be very large
and so create big, unwieldy items when placed on your
page with the drag-and-drop method. If this is the case,
you may find it easier to use the File>Import method.
We are going to add a border and shadow effect
to the photo, so we’ll look at how to do this in each
version.
Freeway Express
•Selecttheitem,clicktheAppearance
tab of the Inspector then click on the
Border with shadow button.
•IftheBorder or Shadow panels aren’t open, click
on their header bars. In Border, choose white as the
color and give it a size of 9px (check that Dash is set
to a solid line and Position
Shadow,choose50%OpacityandanOffsetvalueof
8px.
Freeway Pro
•SelecttheitemandclickontheAppearance tab of
the Inspector.
•IftheBorder panel isn’t open, click on its header bar.
Choose white as the color and give it a size of 9px,
making sure that Dash is set to a solid line and the
Position is set to Outside.
issetto“Outside”).In
Freeway Express
•IftheEffects panel isn’t open, click on its header bar,
then click on the Outer Shadow
of50%forOpacityand8pxforOffset.
Freeway Pro
button.Entervalues
Duplicating items
We are now going to make a duplicate of the photo
we’ve just imported and styled on our page. A benefit
of duplicating (or copying and pasting) an item is
that all its properties will be retained. Freeway also
remembers the scaling value along with the photo’s
position within the item and these settings will also
apply to any graphic imported into this item at a later
stage.
Tutorial
45
Page 46

A shortcut for duplicating items
A quick way to duplicate an item is to click and hold
on an item, hold down Option, then drag. This copies
the item so you can position the duplicate where you
want it to appear on your page.
“panning arrows” in the centre of a graphic item.
specify exact values to duplicate multiple items with
specified horizontal and vertical offsets in a single
operation.
•Makesurethere’snotacursorintheInspector
•Afterduplication,bothnewitemswillbeselected.
Tutorial
Let’s enlarge the image a little within the item.
•Control-click(orright-click)torevealthecontextual
We now need to position the photo within the item
to make it visually interesting. To do this, we’ll use the
“panning arrows” which are visible in the centre of the
photo when it’s selected.
Tip
!
Please note that this will not work if you click on the
Another advantage of duplicating is that you can
and that the beach huts photo is selected. Choose
Item>Duplicate to open the Duplicate dialog, set the
Number of Copies as 2, leave the Horizontal offset
as 0px, enter 170px for the Vertical offset then click
OK.
Click on the page to deselect them both. Select the
first duplicate, choose File>Import, navigate to the
“Tutorial1_media”folder,select“sailingbarge.jpg”and
click Open.
menu and choose Graphic>Scale Up. This enlarges
the photo in small steps each time it’s applied. Do this
two or three times. If you go too far, use Scale Down
to go back one step.
•Movethemouseoverthe
panning arrows so it changes
to a hand icon, then click and
drag the image freely within
the item to place the image
where you want.
When you’ve positioned the image within the item,
click elsewhere on the page, to make the mouse revert
back to a pointer.
Now let’s import the photo for the second duplicate,
but this time we’ll use another method to scale the
graphic within its item.
•Selectthesecondduplicateitem.
•ChooseFile>Import, navigate to the
“Tutorial1_media”folder,select“lowtiderunnelsinthe
sunlight.jpg”andclickOpen.
•Control-click(orright-click)ontheitemandthistime
choose Graphic>Scale and Trim.
Scale and Trim works in a similar way to Scale and Pad,
except that, whereas Scale and Pad scales a graphic
proportionally to fit its longest aspect ratio inside the
item, Scale and Trim scales it proportionally according
to its shortest aspect ratio.
With all three photos imported and scaled, we’ll
place them on the left of the page to make them look
as though they are photographs scattered randomly
on the page, as seen in the screenshot at the top of the
next page.
•Dragthephotoitemsoneatatimetotheleft
side of the page below the item containing the
“photographer”text.
46
Page 47

•Selectthetopphotoitem,
clickontheRotatetool
in the tool bar, then click
and drag one of the item’s
selection handles. As the
photo rotates, along with
its border and shadow,
you’ll also see two black
lines which give an indication of the amount of rotation
being applied.
•Rotatetheothertwophotoitemsinarandommanner
and place them so they overlap each other.
If you overlap the “photographer” HTML item with a
graphic item when you reposition or rotate it, you’ll
Drawing item boxes on your page
When you draw a new item on your page, make sure
you start to draw in a blank part of your page.
If you draw on top of another item, the new item will
become a “child” item of the original “parent” item.
For the tutorials we don’t want this to happen, but
“nesting” items inside other items can be useful, and
you can read more about this in the Freeway 5 Reference.
Also, although it’s possible to physically overlap
HTML items with other items on your page, it’s best
avoided as they may not publish or preview correctly.
notice that the words in the HTML item will disappear.
If this happens, move the graphic item away so it no
longer overlaps the HTML item. This will return the
HTML item to its previous state. When you’ve finished
rotating the photos, click on the
If you select one of the photo items and look at the
General tab of the Inspector you’ll see that the photo
items have the
by default. This means that Freeway will treat all three
items as a single graphic when it generates the HTML
code.
Combine Graphics option checked
Select tool.
!
Tip
Importing text
With the header and graphics placed, we now need to
add some text. We’ll do this as HTML text.
•ClickontheHTMLtoolinthetoolbaranddrawanew
item in a blank area to the right of the photos.
•Clickontheitemagainsoitshowsthetextcursor,
choose File>Import Text..., navigate to the text file
called“welcome.txt”inthe“Tutorial1_media”folder
and click Open.
Tutorial
47
Page 48

Tips on importing text into Freeway
Some word processing programs use invisible coding
to format and style its text. When text is imported
(or copied and pasted into Freeway), this code can be
brought in as well. We recommend that text (.txt) files
are used, rather than “rich” or formatted text files (such
as .rtf or .doc).
returns at the end of your text by placing the cursor at
the end of the text and using the Delete/Backspace key
to delete anything after the last character.
•Selectalltheimportedtext,chooseGeorgiaasthefont
With the text imported, the item needs to be
positioned on the page. To do this, you’ll need to
Command-click on the item to select it so you can
Tutorial
change the settings of the item rather than the text
inside it.
•IntheGeneral tab of the Inspector, set the X value as
Tip
!
It’s also good practice to remove any extra carriage
in the Inspector and give it a size of 14px. Select the
headingline“Welcometomywebsite”,clickonthe
Bold button in the Style panel of the Inspector and
select 18px for its size.
348px, the Y value as 200px, then the W and H values
as 350px and 180px respectively.
•Selectallthetextintheitem,gototheInspectorand
set Align to Center in the Paragraph panel. Choose
Helvetica as the font in the Character panel and 12px
for the size.
•Feelfreetoselectindividuallinesandgiveemphasisto
important lines by increasing the size and using bold or
italic in the Style panel.
•Command-clickontheitem,gototheAppearance
tab of the Inspector, and choose white as the color.
•GototheGeneral tab of the Inspector and enter
a value of 10px in the Padding field to add space
between the text and the item’s edge.
48
To finish off our page, let’s put a box panel on the page
to announce Maurice’s new exhibition. Again this will
be done as HTML text.
•SelecttheHTMLtoolinthetoolbaranddrawanew
item below the Welcome text item.
•Clickontheitemtogetatextcursor,choose
File>Import Text..., navigate to the
“Tutorial1_media”folder,selectthelecalled
“exhibition.txt”andclickOpen.
Page 49

•SetvaluesofX 348px, Y 395px and W 328px for the
item in the Dimensions panel in the General tab of
the Inspector.
•Tonish,wecanchooseItem>Fit Box to Content
to make the item fit the content exactly. As this is an
HTML item, this will only affect the height of the item.
•ChooseFile>Save to save the changes.
You’ve just created a web page in Freeway.
So far, we’ve only seen what the page looks like
within Freeway, and no HTML code has been
generated.
Previewing your page
It’s a good idea to check how things are going to
look in a browser as you work. Freeway has a built-in
function called
engine as Apple’s Safari browser.
Just below the tool bar, three buttons allow you
to switch between the
highlighted) and
•ClickthePreview
button. Freeway
switches to Preview
mode, and a progress
bar will show that it is building the page. After a
few seconds, the page will appear in the document
window.
Notice that the tool bar icons have changed. There
are buttons here that let you test your site to see if it
conforms to accessibility guidelines (to make the page
Preview which uses the same graphics
Master, Page (currently
Preview views.
accessible to people with disabilities) and how it might
appear if images or JavaScript have been disabled in a
visitor’s browser.
Using Preview, you will only be able to view the
active page in your Freeway interface window.
This is an easy way to test a page, but while it
replicates many features of a browser, it’s really just a
way to get a quick look at a single page as you work.
To check how an entire web site works, you’ll need to
preview it in a proper browser and we’ll look at that in
the next tutorial.
•ClickthePage button to return to your Freeway page.
Although you were probably unaware of it, Freeway
converted your page into HTML code when you clicked
on Preview. Every time you select
generates all the code, optimized graphics, etc., then
places everything you need for that page into your
Site Folder. This is also known as “publishing” the
page. What you’re looking at when you preview is the
information written to your disk as HTML code and
interpreted by a browser.
When you preview the page in a browser, the HTML
code for the entire site is generated, rather than just a
single page when you use
make Freeway generate the HTML code for the entire
site is to choose
Once a site has been published, further publishes
will only generate the HTML code for those pages
which have changed since the last time the site was
published.
This is the end of the first tutorial. For the next
tutorial, we’ll re-use parts of this Freeway file again
to create a multi-page site with hyperlinks in a new
document.
File>Publish Site.
Preview. Another way to
Preview, Freeway
Tutorial
49
Page 50

Tutorial 2
Tutorial
50
In the first tutorial we created a single page in Freeway.
By the end of this tutorial, we’ll have a multi-page site
with links established so users can navigate through
the entire site by clicking on hyperlinks.
If we were working on a “live” project (rather than
a tutorial) we would probably have started our site by
creating all the common items on a Master page. For
this reason, we’ll discuss the concept of Master pages
before we resume the next stage of Maurice’s site.
Basic concepts of Master pages
Freeway is similar in many ways to a Desktop
Publishing (DTP) program—and just as DTP programs
offer the facility to use multiple Master pages, so does
Freeway.
When used well, Master pages aren’t just a good way
to speed up the workflow of web design, they also help
to give a better consistency across your site.
Everything placed on a Master page, together with
any formatting and functionality applied to its items
will appear on every page created from that Master.
When changes are made to a Master page, all the
pages created from that Master will have the same
changes applied. However, it’s important to remember
when working with Master pages that if an item is
moved or edited on a page created from that Master,
those items will lose their connection to the equivalent
item on the Master page.
If this happens, subsequent changes made on the
Master page will not be applied to those items. For this
reason, it’s good practice to “lock” items on Master
pages to prevent them being moved (this will be
covered later in the tutorial).
If you have moved or edited an item that is based
on an item on a Master page, you can re-establish
the connection by turning on the
Content
Properties panel of the General tab of the Inspector for
that item.
It’s not just common items that make Master pages
so indispensable. All page settings—such as page size,
background color and any Actions applied to the
page—will also be maintained when a new page is
created from the Master.
There may also be times when you want to use more
than one Master page—for instance, different sections
of your site may have a different color scheme—in
which case, you can simply create a new Master to
work from. Freeway also allows you to duplicate an
existing Master by clicking on an existing Master page,
and choosing
Setting a universal page size for your site
You can change the page size of a Master page in
the General tab of the Inspector—however, any new
Masters you create will need to have their sizes changed
as well.
pages (including Masters) of your site, choose
File>Document Setup... and change the default size
there. This will affect all pages that haven’t had their
sizes changed manually, and all pages created from
then on.
and Use Master Settings checkboxes in the
Page>Duplicate Page....
To change the default page size for all
Use Master
!
Tip
Page 51

The Site panel
When working on multi-page sites, the Site panel—
which is to the left of the layout or document area—
becomes an invaluable aid to navigating around the
site to edit and manage your pages.
The Site panel has two distinct parts—Master pages at
the top and normal site pages below.
The Site panel doubles up as the Page panel—you can
toggle between these two states by selecting a page in
your page list, then clicking on the “Site” bar at the top
of the panel. In Page panel mode you will see a list of
all the items used on that page.
The list of items viewed in Page panel mode can
often be the simplest way to find an item to edit—for
instance when you have a stack of items on top of
each other—in which case you can select the item by
clicking once on its name in the page mode of the Site
panel.
To change the names of Master pages, pages and
items in the Site panel you need to Option-click on
either the icon or its current name.
Setting up a Master page
We started the first tutorial with a blank template and
created the whole page on a normal site page. Freeway
lets you work the way that suits you—and, whereas
some people like to plan their site before they start,
others prefer to design on the fly.
Now we’ve created our first page, we know which
items we want to use on every page, so we can place
those items on a Master page.
Of course, those who planned ahead may have
chosen to place the items common to all pages on a
Master page as a starting point when they began work
on the site. For this tutorial we’ll create a new site and
make a Master page in it with the same settings as the
page in the first tutorial, then copy the common items
across to the Master page and the page-specific items to
a site page.
•OpentheFreewayleforthersttutorialifit’snot
already open.
•ChooseFile>New... to create a new document using
theBlanktemplateandgiveitthetitleof“Tutorial2”.
•Inthenewdocument,clickontheMasterpage
“Master1”intheSitepanel,setthepagedimensionsto
700px by 700px and align the page to Center.
•Setthesamepagebackgroundcolorastherst
tutorial—CCFFCC (as a web-safe color), or 204, 255
and244(asanRGBcolor).
•Importthe“header_bar.gif”graphicasabackground
image for the page, and set Horizontalto“Center”
and Verticalto“Top”.
Tutorial
51
Page 52

•Choose Window>Tutorial1 to switch to the
•Withallthreeitemsselected,chooseEdit>Cut to cut
•ChooseWindow>Tutorial2,selectthe“Master1”
Freeway will remember the position of items cut from
the original and will place them in exactly the same
position on the Master page, so no repositioning is
necessary.
on the Master page of our new site. Now we need to
copy the page-specific items to our new site page.
•ChooseWindow>Tutorial1 again to go back to the
•ChooseEdit>Select All to select all the remaining
Tutorial
•InthenewTutorial2document,clickonthe“Untitled”
Naming pages and files in the
Site panel
Freeway, by default, names pages “Untitled1”,
“Untitled2” and so on. Let’s rename the site page so it
can be easily identified in the Site panel.
document created in the first tutorial, click once to
select the logo text, then Shift-click (which will add
to the selection) on the graphic logo item and the
“photographer”item.
the items from the page.
page in the Site panel and choose Edit>Paste.
The above procedure has placed the common items
original page made in the first tutorial.
items on the page, then Edit>Cut. Close the file by
choosing File>Close without saving the changes.
site page in the site panel and choose Edit>Paste.
You can also change the names of Master pages in the
Site panel and items in the Page panel by this method.
Working on a Master page
You’ll notice that when you are viewing a Master page,
the page rulers are displayed in a pastel yellow color.
This is a visual cue that you’re working on a Master
page.
To navigate between a normal site page and the
Master it was created from, you need only to click on
the Master and Page buttons located at the top left of
the layout/document area. When viewing a Master page,
clicking on the Page button will take you to the page
created from that Master which was last worked on.
Earlier in this tutorial we discussed how the
connection to an item on a Master page is broken if
the item is moved on the site page. To prevent this
happening, it is good practice to lock an item on a
Master page.
•Clickonceon“Master1”intheSitepanel.
•SelectoneoftheitemsandchooseItem>Lock, or
Control-click on the item and choose Lock from the
contextual menu.
•Repeatthisforalltheitemsinturn.
A locked item’s selection handles display in red.
52
•Option-clickonthe“Untitled”pageintheSitepanel
list. This will highlight the name and make it editable.
•Type“Welcome”asthetitle,thentypeaReturn.
Page 53

Freeway lets you create multiple Master pages to
ensure consistency across your site—for instance when
you want sections of your site which are visually very
different or when you need a multiple-language site.
Adding pages to a site
Now that we have created a Master page containing
the items common to all the pages of our site, we can
add some more content pages. We’ll add two pages—a
gallery page, containing examples of Maurice’s work,
and a contact page so visitors can get in touch with
him.
•ChoosePage>New Pages from the menu bar.
•TheNew Pages dialogboxwillappear.Givethepage
thetitleof“Gallery”,leavethePageseldasthedefault
of“1”,andclickOK.
•Createanothernewpage,giveitthetitleof“Contact
page”andclickOK.
The Site panel area below the Site Folder now contains
three pages—our original “Welcome” page, along with
Tip
A shortcut for adding new pages
You can also add new pages, one at a time, to your site
by clicking and dragging a Master page into the site
pages area of the Site panel.
!
the new “Gallery” and “Contact” pages. You can click
on all three pages in turn to see that the items on the
Master page display on all three site pages.
Title and file names for pages
There are two distinct
parts to naming pages in
Freeway—which you can see
in the
General tab of the
Inspector. First, there is the
Title, which is the name that
appears in your Site panel
list and in the upper title
bar of the browser window
when the page is viewed in
a browser. Second, there is the
name of the actual HTML document generated from
the page when it’s published by Freeway.
Freeway automatically handles the second, basing
the File name on the Title you enter—though you can
override this if you want.
There is one exception to the rules on naming pages,
and that is the File name of the first page of your site.
This page should most likely have a file name of
html
, so visitors to your web site only have to enter
the web address in their browsers, without needing to
File, which is the file
index.
Tutorial
53
Page 54

Naming your web site’s “Home” page
Although the name “index.html” is the most common
name for the base level page of your site, it can depend
on your web hosting service.
host may specify a particular name for the “home”
page. If it doesn’t, use “index.html”
after you’ve uploaded your site, you should contact
your web host to ask them what name you should use.
add a specific file name as
well. Freeway automatically
enters index.html as the File
name for the first page in the
Site folder for you.
the Site panel, which is our
Welcome page, and check
that “index.html” appears in
the
Tutorial
tab of the Inspector.
Adding content to our new pages
For our Contact page, we want a text block in exactly
the same place as the Welcome page. This is very
simple as Freeway remembers the position of copied
items, so they will appear in the same position when
they’re pasted.
•SelecttheWelcomepageintheSitepanel,selectthe
•ClickontheContactpageintheSitepanelandchoose
Tip
!
The documentation you received from your web
However, if you find that “index.html” doesn’t work
Select the first site page in
File field in the General
HTMLitemcontainingthe“Welcometomywebsite”
text and choose Edit>Copy.
Edit>Paste.
•Clickonthenewlypasteditemtogetatextcursor,
choose Edit>Select All and use the Backspace/Delete
key to delete all the text in the item.
•Withthetextcursorstillinsidetheitem,choose
File> Import Text..., navigate to the
“Tutorial2and3_media”folder,selectthele“contact.
txt”andclickOpen.
•Selectalltheimportedtext,thencheckthefontisstill
settoGeorgiaandthesizeto14pxintheGeneral tab
of the Inspector. Select the top line of the text then, in
the Inspector, click on the Bold button and make the
size 18px.
Let’s add some visual interest to the page.
•DrawasmallgraphicitemtotheleftoftheHTMLtext
item.GototheGeneral tab of the Inspector and give
it an X value of 10px, a Y value of 165px, a W value
of 288px and an H value of 490px. Now we need to
import a photo into the item, but to do this we’ll need
toeithertypeaReturntoacceptthelastvalueorclick
once on the item so the Inspector lets us access the
drop-downmenusinthemenubar—see“Tip”box
below.
•Withthegraphicitemselected,chooseFile>Import,
navigatetothe“Tutorial2and3_media”folder,select
Tip
Exiting the Inspector to access menus
You may notice that occasionally all of the menu items
in the menu bar are disabled after you’ve been making
changes in the Inspector. This is almost always because
the text cursor is still in a field in the Inspector.
To return the menus to normal, either type a Return
or click in the main Freeway window.
!
54
Page 55

•Command-clicktheitemtoselectitthengiveitvalues
of X 0px, Y 195px, W 700px and H 32px in the
Inspector.
The value of 40% entered in the Space field letterspaced
the word. This option is only available for graphic text.
The gallery page will eventually offer a feature where
the visitor can select a thumbnail to view a larger
version of the same photo, so let’s create the layout
ready for this functionality to be applied in the next
tutorial.
•Drawasmallgraphicitemonthepageandmakeit
60px square. Apply a border in the Appearance tab of
the Inspector—select white for the color, give it a size of
5px and change the border position to Inside.
•PositiontheitemusingvaluesofX 10px and Y 247px.
We’re going to use this item to create a row of
thumbnails across the page, which is a very simple task
in Freeway.
Tutorial
thele“backlitshells.jpg”andclickOpen. Control-click
on the photo and choose Graphic>Scale and Trim.
Now let’s add some content to the Gallery page. Note
that we’re only adding the items at this stage—in the
next tutorial we’ll add the items’ functionality.
•ClickontheGallerypageintheSitepanel,selectthe
Graphictoolanddrawagraphicitemonthepage.
•Type“GALLERY”insidetheitem.Selectallthetext,go
to the General tab of the Inspector to change the font
toHelveticaRegularandmakethesize24px.Clickon
the Center Align button to center the text.
•Withthetextstillselected,enter40%asavaluein
the SpaceeldandtypeaReturnorTab.Ifthetext
disappears, make the item larger until it reappears.
•Togainaccesstothedrop-downmenus,remember
totypeaReturnafterthelastvalueenteredinto
the Inspector or click once on the item. Choose
Item>Duplicate... or Control-click on the box and
choose Duplicate...
for the number of copies, then 77px for the horizontal
offset (set the vertical offset as 0px) and click OK.
Drawing squares and circles in Freeway
You can draw a perfect square with the HTML or
Graphic tool, or a perfect circle with the Oval tool,
by holding down the Shift key as you draw. This will
constrain the item you draw to an equal height and
width.
fromthecontextualmenu.Enter8
Tip
!
55
Page 56

On the page we should now have a row of identical
items—so let’s import a different image for each item.
•Selecteachitemintherowinturn,thenimportthe
1.“beachhuts.jpg”
2. “weatheredseawall.jpg”
3.“birdsatlowtide.jpg”
4.“footprintsinwetsand.jpg”
5.“groynesinwinter.jpg“
6.“lowtiderunnelsinthesunlight.jpg”
7.“marsh.jpg”
8.“mistyriverside.jpg”
9.“wheelinggulls.jpg”
To complete the Gallery page for this tutorial, we
need to create an item in which we’ll eventually
display a large version of each photo we used for the
thumbnails. For now, we’ll create and position just a
single item.
Tutorial
•ClickontheGraphictool,drawanitembelowthe
•Weneedtoaccessthedrop-downmenusagain,sotype
photo corresponding to the list below (from left to
right). Control-click and choose Graphic>Scale and
Trim from the contextual menu for each photo:
thumbnails then position and size the item using the
values X 145px, Y 345px, W 399px, H 266px.
aReturnafterthelastvalueenteredorclickonceonthe
item. Choose File>Import...,select“beachhuts.jpg”
fromthe“Tutorial2and3_media”folderandclickOpen.
Control-click on the item and choose Graphic>Scale
and Trim.
•IntheAppearance tab of the Inspector apply a
Border with shadow as we did for the photos on
the Welcome page. We need a 9px white border set to
Outside
of 8px.
andashadowwith50%opacityandanoffset
56
Tip
Resampling all the images in your site
In the first tutorial we gave you a tip for resampling
individual graphics to help keep the size of your
Freeway file to a minimum. If you want to resample all
the images in your site in a single operation, you can
choose Edit>Resources and click on the Resample All
button.
!
Applying hyperlinks
The World Wide Web works like a “web” because pages
have hyperlinks between them, allowing visitors to
click to navigate within a web site, or to other sites on
the web.
Page 57

Hyperlinks are one of the key features of the web.
When used well, they guide the user along a logical
and intuitive route through your web site, as well as
linking to resources on other sites. Hyperlinks can also
be used to launch an email program to display a new
mail window containing an email address you specify
and also, optionally, a subject.
For this tutorial we’ll cover basic text hyperlinks.
Other ways to create hyperlinks will be covered in the
next tutorial, when we create a dynamic navigation
bar.
Let’s apply some hyperlinks to some of the words in
the text of Maurice’s Welcome page.
•ClickonceontheWelcomepageintheSitepanel.
•ClickinsidetheWelcometextitemanddouble-clickon
theword“Gallery”inthesecondparagraph.Withthe
word highlighted, choose Edit>Hyperlink....
Tip
Internal hyperlinks and Freeway
Because Freeway manages all your site pages and files
for you, it will automatically update your links if, later
on, you decide to change the names of your internal
pages.
Please note, however, that this doesn’t apply to any
external links you use.
•AtthetopoftheEditHyperlinkdialogbox,the
Internal tab should be selected. If not, click on it.
Select“Gallery”intheinternalpagelist,thenclickOK.
You’ll notice that the word “Gallery” is now underlined
and has changed to blue. This is the default style of
hyperlinks in most web browsers.
Let’s also create a hyperlink to the Contact page.
!
Tutorial
•Double-clickon“Contacts”inthethirdparagraph.
With the word selected, Control-click on it to reveal the
contextual menu and choose Hyperlink....
•IntheEditHyperlinkdialog,clickon“Contactpage”in
the internal page list and click OK.
Now we can create hyperlinks on the Contact page.
These, however, are different types of hyperlinks to
those created on the Welcome page. The first is an
email link, the other is a link to an external web site.
•ClickontheContactpageintheSitepanel.
57
Page 58

•Select“Emailmehere”inthetextitemandmakeita
•Freewaywilladd“mailto:”inthemaintexteldofthe
Tutorial
hyperlink using either of the methods described earlier.
In the Hyperlink dialog box, click on the External tab
and choose mailto: from the Protocol pop-up menu.
dialog box, so all you need to do is add Maurice’s email
addressafter“mailto:”,withouttypingaspace.Type
“mauricecowley@softpress.com”,thenclickOK.
Now let’s create an external link to another web site.
•Selecttheword“Softpress”inthelastparagraphand
choose Edit>Hyperlink.
•Inthedialogbox,clickonExternal and, this time,
choose http: from the Protocol menu.
•Freewayautomaticallyadds“http://”inthemaintext
field of the dialog box, so click after the text and type
“www.softpress.com”.
•Becausewewantthispagetoopeninanewbrowser
window, click on the Target menu and choose
“_blank”andclickOK.
58
Tip
Adding a subject line to an email address
You can automatically add words to the “Subject” field
in a visitor’s email program when they click on an
email link.
To do this, type “?subject=yoursubject” (without
the quotes) immediately after the email address you’ve
entered in the dialog window. Substitute “yoursubject”
for whatever you want the subject field to be in the
email.
!
We now have some text links established, but you
may have noticed that so far we don’t have a way to
navigate from one page to another and back again. In
the next tutorial we’ll create a navigation bar using
Page 59

a Freeway Action which uses graphics as rollovers—
however, some visitors may have JavaScript or images
switched off in the preferences for their browser, so it’s
good practice to offer a text navigation bar as well.
As this will be a common item to all pages, we’ll
create this on our Master page.
•Clickonthe“Master1”MasterpageintheSitepanel
and draw an HTML item in a blank part of the page.
Click on it again so we can add text.
•Type“Welcome|Gallery|Contactpage”(youcan
accessthe“|”characterbytypingShift-\).Selectallthe
text,makeit14pxGeorgiausingtheGeneral tab of
the Inspector and click on the Center Align button in
the Paragraph panel.
•Selecttheword“Welcome”,opentheEdit Hyperlink
dialog and link it to the Welcome page in the list
of pages in the Internal tab. Do the same for the
“Gallery”and“Contactpage”texttolinkthemtotheir
relevant pages.
•Command-clickontheitemtoselectitthenposition
and size it using the following values: X 349px,
Y 677px, W 350px and H 22px.
If you choose any page in the Site panel, you can see
that we now have this text navigation menu on every
page and the links are underlined and shown in blue.
•SaveyourlebychoosingFile>Save.
Previewing the site in a browser
The last time the site was tested, we previewed a single
page by using the Preview button below the tool
bar. However, to test hyperlinks the site will need to
previewed using one of the real browsers you have on
your computer.
•ChooseFile>Preview in Browser and select one of
the browsers in the list.
The first time Freeway is launched after installation,
it scans your computer’s hard disk for browser
applications. The ones found on that initial scan are
listed in the menu viewed by choosing
in Browser
If you want to use a particular browser which isn’t
listed but is installed on your computer, go to the
Preview in Browser menu and select
where you can click on
the list.
.
New... to add the browser to
File>Preview
Browser Setup...
Tutorial
59
Page 60

and choose a default browser which can be accessed
Tutorial
using a keyboard shortcut.
site to generate their HTML code. Unlike Preview,
Preview in Browser will publish all pages that have
been updated.
you published the file, it may take a few seconds to
complete the operation.
site, you can test your hyperlinks by clicking on them
to navigate around the different pages.
Contact page, which should launch the default email
program on your computer. Once the program has
You can also delete browsers you don’t want to use
Previewing in a browser will publish pages in your
If there have been a lot of changes since the last time
Once the browser you chose in the list loads your
You can test the email link by clicking it on the
loaded, it will generate a new email message with
Maurice’s email address already entered as the recipient
in the “To:” field.
Next, test the external link by clicking on the
Softpress hyperlink on the same page. Because we set
the target to “_blank” in the hyperlink dialog box, this
will open in a new browser window or a new browser
tab if your browser has been configured that way.
You may have noticed that before we previewed the
site in a browser, all our pages displayed in the Site
panel with a black dot to the left of the page name.
This indicates that the pages are “dirty”—which
indicates that changes have been made since the last
time the site was published. Only the pages which have
had changes made to them will have the dot displayed
next to them—however, if a Master page is edited, all
the pages created from that Master will be marked as
dirty and in need of publishing.
This completes the second tutorial. For the next
tutorial, we’ll use this Freeway file again, and add
dynamic effects to the site using Freeway Actions.
60
Page 61

Tutorial 3
One of the great things about web sites is that, unlike
a book, the pages can be dynamic and interactive. In
this tutorial we’ll add functionality and dynamic visual
effects to enhance Maurice’s site.
Creating these effects can be quite time-consuming—
but with Freeway, they can be quickly and simply
added to your site by using Freeway Actions.
Actions are to Freeway what plug-ins are to other
programs. A core set of Actions ships with Freeway as
standard, but many more are available to download for
free from the Softpress web site. Others, usually very
complex or specialized Actions, are available to buy
from companies who offer them for sale from their web
sites.
Although Freeway Actions are written using
JavaScript, they usually require no coding knowledge
and are applied using interfaces displayed in the
Actions palette.
In this tutorial we’ll use two different types of
Actions—Item Actions and Standalone Actions. There
are also Page and Folder Actions, which you can read
more about in the Freeway Actions section to be found
later in this guide.
Graphic hyperlinks are created in the same way as
text hyperlinks. Here we’ll introduce a new method.
•Clickonthe“Master1”MasterpageintheSitepanel
andselectthegraphiccontainingthe“mauricecowley”
text. The item is locked, so it can’t be moved, but it can
still be selected.
•Withtheitemselected,click
on the hyperlink menu just
below the bottom left-hand
corner of the page area,
which currently displays the
words“NoLink”.
•Thisrevealsamenuofalltheinternalpagesofoursite
along with a submenu for external links. Choose the
Welcome page.
Now that we’ve
made the item a
hyperlink, you’ll
see that a blue
globe symbol has
appeared in the top left-hand corner of the item. This
tells us that the graphic has a hyperlink applied.
Tutorial
Graphic hyperlinks
In the last tutorial, we created some text hyperlinks.
However, graphic hyperlinks—which are simply
hyperlinks applied to graphic items—can’t be visually
identified in the same way as the blue underlined text
links. For hyperlinked graphic items, Freeway displays
a blue globe in the top left corner of the item to give a
visual cue that a link has been established on the item.
Creating a rollover navigation menu
A rollover is a graphic which changes to display
another graphic when the cursor is moved over it. It
can also trigger an “event”—in other words, it can
control the behavior of another item (or set of items)
on the page. Rollovers must be created using graphic
items.
61
Page 62

We want to create three rollovers which change color
and show a shadow on mouseover. These rollovers,
when clicked, will serve as a hyperlink to another page.
In web design terminology, this is called a “navigation
bar”.
A rollover in Freeway is a combination of at least
two graphic items. As we will see, each of the graphic
items can be assigned to one or more of three possible
rollover states. This will determine when each of the
items is visible in the browser.
The three states are: “Normal” (the user does not
have the mouse cursor over the rollover), “Mouseover”
(the user has the mouse cursor over the rollover), and
“Click” (the user has clicked on the rollover).
For our site, we’re going to use a rollover of three
elements—a graphic for each of the normal and
mouseover states, and also a graphic text item which
will display on top of the rollover graphic in both states.
•IntheAppearance tab of the Inspector, apply the
samegreyweusedfor“maurice”inthelogotextasa
background color. Because the color has already been
used on the site, Freeway will display the color in the
pop-up color list in the Inspector.
•ClickontheBorder button, set it to be white with a
size of 1px and its position as Inside. Apply rounded
corners by setting a value of 12px in the corner field of
the Shape panel of the Inspector’s Appearance tab.
•PositiontheitemwithvaluesofX 349px and Y 129px.
Now we have our first rollover element, we’re going to
duplicate it twice, edit the new elements, then align
them into a “stack” in Freeway and apply the rollover
Action.
•Selecttherollovergraphicwe’vejustcreated,then
choose Duplicate from the contextual menu.
•IntheDuplicate dialog, enter the values of 2 for
Number of copies, 50px for Horizontal Offset,
50px for Vertical Offset and click OK.
Tutorial
62
Normal state Mouseover state Graphic text
You can see from the above screenshots that the
rollover will appear as a gray box with a white border
in its normal state, then on mouseover it will change to
a green box with a white border and a drop shadow.
Because this is something which is common to all
pages, we’ll create the navigation bar on the Master
page.
Let’s create the rollover graphic for the normal state.
•Clickonthe“Master1”MasterpageintheSitepanel.
•Drawagraphicitemonablankareaofthepageand
resize it by setting the values W 100px and H 24px in
the General tab of the Inspector.
This will place the two duplicates lower down the page,
below and to the right of the original.
Now we’ll edit the middle item to make our
mouseover graphic. This will have the same white
border, but will have a green background and a drop
shadow.
•Clickonablankareaofthepage,thenclickonceon
the middle item to select it.
•IntheAppearance tab of the Inspector, apply the
greenusedforthe“cowley”logotextasabackground
color in the pop-up color list. Leave the 1px border
unchanged.
•ClickontheBorder with Shadow button, then
changetheshadow’svaluesto50%forOpacityand
6px for Offset.
Page 63

Freeway Express
Freeway Pro
Next we need to edit the bottom item so it will be a
graphic text item containing the name of the page we
want to link to.
•Clickonceonthebottomitemtoselectit.
•SetthebackgroundcolortoNoneandthebordercolor
to None in the Appearance tab of the Inspector.
•Clickontheitemagainandtype“Welcome”.Double-
click on the word to select it and go to the General
taboftheInspector.SetthefontasGeorgiaRegular
and the size as 14px, click on Bold and then on the
Center align button.
•Asthewordisn’tcentered
vertically within the item,
choose Style>Shift>Other,
enteravalueof–40%(to
move the baseline of the text
downby40%ofthedefaultlinespacing),thenclick
OK.
The three elements of the rollover now have their
colors and effects applied, so the next thing to do is to
align them perfectly on top of each other. Rather than
doing this by eye, which may result in small variations
in their positions, we’ll use Freeway to align the items.
•Clickanddragaselection
marquee around the three
items (see below) so they’re
all selected, then choose
Item>Align.
•IntheAlignment dialog box,
choose Left for Horizontal
alignment and Top for Vertical
alignment and click OK.
Because we used Left and Top align in the Alignment
dialog, they were aligned on top of the item which was
Tip
Selecting multiple items in Freeway
To select multiple items, you can select the first item,
then Shift-click on additional items to add them to
the selection. To deselect an item in a multiple-item
selection, Shift-click on the item again.
Alternatively, if the items aren’t children of another
item, you can click and drag around a group of items to
draw a “selection marquee” which will select any item
contained within it when the mouse button is released.
!
Tutorial
63
Page 64

positioned highest and furthest to the left on the page.
Note that we couldn’t centre align the items, because
one item has a drop shadow which has changed the
physical size of the item itself.
As stated earlier, it’s good practice to lock items
which appear on a Master page. With rollovers, it’s
even more important as we want to prevent them
being split apart if they’re accidentally moved on one
of the site pages.
•Drawaselectionmarqueearoundtherolloveritems
and choose Item>Lock.
You’ll see that the items which make up our rollover
are listed in the rollover dialog. By default, the
“Images” tab will be selected.
PROUSERS:Ifyou
only see one item
in the Actions
palette list, switch
OFF the CSS
Layout button
and build your
rollovers again
from page 62
Tutorial
64
Although the rollover is made up of three graphic
items placed on top of each
other, we only need to apply
a rollover Action to any one
of them because, in Freeway
terminology, the graphics are
“combined”. Select one of
the items of the rollover and
go to the
General tab of the
Inspector. You’ll see that the
option “Combine Graphics”
is checked. With this checked,
overlapping items will be
treated as a single graphic by
Freeway when it publishes the page.
Let’s apply the rollover Action to our stack of
graphics.
•IftheActionspaletteisnotalreadyopen,choose
Window>Actions to open it.
•Ifaniteminthestackisn’tselected,clickonitonce
then go to Item>Actions and select Rollover (which
is near the bottom of the Actions list).
•WiththerolloverActionapplied,atabbedRollover
dialog appears in the Actions palette.
The rollover dialog is like a table. There is a row for
each element in the rollover stack and a column for
each of the different states—Normal, MouseOver and
Click. For this tutorial we won’t be using the Click
state.
The check marks denote whether an item will be
visible in a particular state.
By default, all the elements of the rollover have a
check mark displayed in the Normal column. To make
the rollover work, you’ll need to manually check
or uncheck the items in each column to switch the
graphic on or off in that state. Click once in a blank
area to make a check mark appear or click on a check
mark to remove it.
The list of items in the Rollover dialog is in reverse
order to how they appear in the stack on the page, so
the item at the back of the stack appears at the top
of the list. By default, each time an item is created in
Freeway it will be placed in front of the previous item
on the page. This means that in the Rollover dialog list
the top item will be the first item we created (the grey
box), the middle item will be the second item created
(the green box with a shadow) and the last item created
(the graphic text box) will be at the bottom of the list.
Page 65

Tip
A tip to identify the elements of a rollover
If you find it difficult to identify your items in the
rollover dialog, consider giving them logical names.
This can be done by clicking on the “Site” header bar
at the top of the Site panel to change it to “Page” view.
You can then select an item and rename it, perhaps
with a logical naming convention such as “Normal”,
“Mouseover” and “Text”. To change an item’s name in
the list, you’ll need to Option-click on the name and
enter the new name.
•Forthetopiteminthelist,makesureit’scheckedonly
in the Normal column. This will mean that the grey box
will display when the mouse cursor isn’t over the
rollover.
•Forthemiddleiteminthedialoglist,uncheckthe
Normal column and check the MouseOver column.
Doing this will mean that the green box will appear
when the mouse cursor is moved over the rollover
when the pages is viewed in a web browser.
•Wewantthebottomiteminthelist—thegraphic
text—to display in both normal and mouseover states,
so place a check mark for the item in both columns.
This ensures that the text is always visible.
!
You can test the rollover by clicking on the Normal
and MouseOver column headers to see how the stack
of items looks on the page. You won’t be able to test
the page by using Preview as we’re working on a Master
page.
Once all the correct graphics are displaying as
they should in their appropriate states, we can now
duplicate the stack. When duplicated, the items in the
stack retain all their formatting (color, border, shadow,
etc.) along with their locked status and rollover Action
settings.
•Clickanddragaselectionmarqueearoundthestack
and choose Item>Duplicate.
•IntheDuplicatedialogbox,enterthevaluesof2for
Number of copies, 122px for Horizontal offset,
0px for Vertical Offset and click OK.
We have created two more fully functional navigation
buttons—we just need to change the text in them to
something more appropriate.
•Clickonthetopmostitemofthemiddlenavigation
buttontwice,selectallthetextandtype“Gallery”.
•Dothesamefortheright-handbuttonandtype
“ContactPage”.
Tutorial
Now we just need to set up the hyperlinks to complete
our navigation bar.
•Selectthetopmostitemoftheleft-handbutton,click
the Hyperlink menu just below the bottom left of the
page area and choose the Welcome page.
•Repeatthistolinkthe“Gallery”and“ContactPage”
buttons to their respective pages.
•SaveyourlebychoosingFile>Save. Now test the
page by choosing a browser from File>Preview in
Browser to see if the links and rollovers are working.
65
Page 66

Tutorial
66
If the rollovers are not displaying the correct item
in the Normal and MouseOver states, go back to the
Action palette and try checking and unchecking in
the appropriate columns to adjust when each item
displays.
Creating a simple photo gallery
Maurice wants visitors to see large versions of his
photos, but he wants them to appear on a single page
rather than a page for each photo. This can be done
simply and easily by applying a rollover Action to each
thumbnail on the Gallery page which will trigger a
larger photo to display in the large photo item below.
In Freeway terminology this is called a “target” image.
In addition to the visitor triggering the target image
on mouseover, it would also be a nice touch if the
visitor had a visual reference on the page to know
which thumbnail is currently selected. To do this,
we’ll add a mouseover image as a rollover on each
thumbnail.
•ClickonceontheGallerypageintheSitepanel.
•Clickanddragaselectionmarqueearoundallofthe
thumbnails, choose Item>Duplicate and enter 1 for
Number of Copies and 0px for both offsets. Click OK.
•Clickonablankareaofthepagetodeselectallthe
items, then reselect the first thumbnail.
•Thethumbnailsalreadyhavebordersapplied,soadda
shadow in the Appearance tab of the Inspector with
thevaluesof50%Opacity and an Offset of 6px.
•Dothisforeachofthethumbnailsinturn.
We’ll apply the rollover Action later, because first we
need to set up a stack of target images, as the image
number we’re going to give to each target image needs
to be entered so that each rollover will trigger the
correct target.
The target images will be created as a stack of items
containing large versions of each thumbnail. We
already have the large version of the “beach huts”
photo, which corresponds to the first thumbnail,
so let’s duplicate the large item then import a large
version of the photo used in each of the other
thumbnails. Because we need to import a different
image into each new large item, we’ll need to do this
one at a time.
•Selectthelargeimageofthebeachhutsandchoose
Item>Duplicate, ensure the values are still set to 1
copy and 0px for both offsets. Click OK.
•ChooseFile>Import, navigate to the folder
“Tutorial2and3_media”andselecttheimageusedfor
oursecondthumbnail(called“weatheredseawall.jpg”)
and click Open. Control-click on the item and choose
Graphic>Scale and Trim.
•Repeattheprocessofduplicatingthetopmostgraphic
item and importing a new graphic for each of the
remaining images in order so they correspond exactly
with the thumbnail images. We currently have two
target images imported, the others are:
3.“birdsatlowtide.jpg”
4.“footprintsinwetsand.jpg”
5.“groynesinwinter.jpg“
6.“lowtiderunnelsinthesunlight.jpg”
7.“marsh.jpg”
8.“mistyriverside.jpg”
9.“wheelinggulls.jpg”
With all large graphic items created, we can apply the
Target Image Action. This will control which image is
displayed when a particular thumbnail is clicked on.
•Selectaniteminthestackoflargegraphicitemsand
choose Item>Actions>Target Image.
Page 67

•Ifyoudon’thavetheActionspaletteopen,choose
Window>Actions to open it.
You’ll notice that the Target Image Action dialog is
quite similar to the rollover dialog, in that each photo
item appears in a list on the left and there are various
columns. There are also check marks, which are
currently all set in the Normal column.
Also, like the rollover dialog, there are two tab
buttons, the first is called
default) and the other is called
Images (which displays by
Parameters.
The image number columns are very important, as
we need to set the appropriate number in the rollover
Action dialog so it triggers the correct target. Because
we did everything in order this isn’t an issue for now,
but sometimes the numbers are worth noting down to
make identification easier.
•ClickontheParameters
button.
•SettheRestore pop-up
menuto“No”.
Tutorial
•UncheckallthecheckmarksintheNormalcolumnand
check them one at a time, in order, so a single check
mark appears in each column (see screenshot above).
•Give“beachhuts”acheckmarkintheImage1column,
“weatheredseawall”acheckmarkintheImage2
column, and so on until you give a check mark for
“wheelinggulls”intheImage9column.
•Tonishoff,alsochecktheNormalcolumnforthe
“wheelinggulls”item,asthisistheimagewewantthe
visitor to see when they first open the page.
This window may look a
little daunting, but it really
is quite simple. We can
ignore most of the options
in the Parameters window
for this tutorial but you
can read more on what the
options do in the Freeway 5
Reference.
Now we’ve assigned
image numbers to our target images we can return to
each thumbnail in turn to apply the rollover settings.
67
Page 68

Tutorial
68
•SelecttherstthumbnailandchooseItem>Actions>
Rollover.
•Givethetopitemacheckmarkinjustthe“Normal”
column and the bottom item a check mark in just the
“MouseOver”column.
•ClickontheParameters
button.
•ClickontheRestore
pop-up menu and choose
“Sticky”.
•ClickontheMouseOver #
menuandchoose“1”.
We chose “Sticky” in the
Restore menu so that the
original trigger remains active
until another rollover on the
page is triggered.
•Repeatthisprocessfortheeightremainingthumbnails
to make them rollovers. The only difference is to set the
Mouseover # to the number of the appropriate large
target image (i.e., thumbnail 2 needs Mouseover # set
to“2”,setthumbnail3’sMouseover # to“3”,etc.,up
to Image 9).
•ResampleallgraphicsbychoosingEdit>Resources...
and click on Resample All. Click Done.
•ChooseFile>Save to save the file.
•Testthesiteinabrowserbychoosingabrowserfrom
File>Preview in Browser.
When you move the mouse over a thumbnail, a
shadow will appear (which remains when the mouse is
moved away) and it also triggers a change of the large
image. If the rollover and target image don’t work as
they should, check that the correct values have been
used in the Action dialogs.
Other types of Action
So far we’ve introduced Item Actions, which are
applied by selecting the item and choosing the Action
from the
before, there are other types of Action which are not
item-specific.
Let’s create a standalone (or “insert”) Action which
displays the current date on a web page.
•Clickonthe“Master1”MasterpageintheSitepanel,
go to Insert>Action Item and select Current Date
from the list. This will place a small item on your page.
•Inthetopleft-handcorneroftheitemisabox
displayingthewords“CurrentDate”.Inthetopright-
hand corner of the item is the Freeway Action cogwheel
which signifies that this is an Action item.
•IntheGeneral tab of the Inspector, position and size
the Action item using values X 10, Y 682, W 327 and
H 12.
You’ll notice that there is no content displayed in the
item—this is because standalone Actions just generate
task-specific code in your page when it’s published.
This means that instead of you needing to add complex
HTML code yourself, Freeway does it for you. The
Current Date Action contains all the code necessary to
display today’s date on your page, so all you need to do
is position it where you want.
To see the Action working, you’ll need to preview the
site in a browser.
Item>Actions menu. However, as stated
Page 69

•OpentheActionspalettesowecanseetheCurrent
Date dialog.
•You’llnoticethattheonlyoptionavailableiswhether
or not you want to display the day of the week. Choose
“Yes”fromthepop-upmenu.
Due to the simplicity of using standalone Actions, you
may not be able to choose a particular font or type size
for the wording (as in this case)—instead it will display
in a default font and size.
When previewed in a browser, the Current Date
Action displays as shown below.
Other types of Action—which we are not going to
cover in this tutorial—include Page Actions and Folder
Actions. To apply a Page Action, you need to select a
page in the Site panel then go to
to see the list of available Actions. Folder Actions
can be applied by selecting a folder in the Site panel,
opening the Actions palette and clicking on the “+”
button in the bottom left corner. This will bring up a
list of Actions that can be applied to the folder.
Page>Page Actions
An example Page Action is the Sequence Timer
Action which, when used in conjunction with the
Target Image Action, can produce a changing sequence
of images for which you can choose the order and
timing of the sequence.
Full details of the commonly used built-in Freeway
Actions are covered later in this guide. In-depth
instructions are also available in the Freeway 5 Reference.
Third-party and additional Actions
It is often the case that there is a third-party Action
which can be used to achieve specific functionality
quickly and easily—check the Softpress KnowledgeBase
online (at http://www.softpress.com/kb) to see if there
is an article covering the subject.
Third-party Actions, plus some very specific
Actions not bundled with Freeway, can be found on
ActionsForge—see http://www.actionsforge.com.
This concludes the tutorials on how to build a site
with Freeway 5—hopefully you’ve been able to follow
all the instructions and you’re now inspired to design
a web site yourself.
The Tutorial section continues on the next page
with how to upload a site which you have built
yourself to the web so it can be seen by visitors using a
web browser.
Tutorial
69
Page 70

Uploading your site to the web
Once you’ve finished working on your site, the next
step is to upload it to the World Wide Web so that
people can visit it. In most cases, Freeway manages all
the files you’ve used on your site (as well as the pages
themselves), so it’s a simple task to upload all required
internal files using Freeway’s built-in upload facility.
have an internet connection and a web hosting
account which offers enough web space for your site.
Different ways to upload a site
There are three basic ways to upload your files so they
are available to view on the web:
•
•
Tutorial
•
Required information for FTP uploading
When you signed up with your web host, they
should have sent you all the details of how to upload
files to their server. Web hosts manage their servers
in very different ways, so you will need to enter
the information into the relevant fields exactly as
instructed. Make sure you have this information to
hand when you want to upload.
This section naturally presumes that you already
FTP (File Transfer Protocol), the most common
method, which uploads files to you web host’s server.
MobileMe (for Freeway users who have a MobileMe
account with Apple), which uses free web space
provided with the MobileMe account.
File Copy, which is used if you run your own server
on a network. Rather than uploading, this creates a
copy of your site to a specified location.
The following information should have been
supplied by your web host:
•
Server: The address to where you need to upload the
files. This is an FTP server where you will probably
place your files within a directory specific to the web
domain you wish to use as a web address.
•
Directory: The location on the server where your
files need to be uploaded. This may be at the base
level of the web domain’s directory (so it can be left
blank), or it may be located one or more levels down
(in which case you may be given a path name which
consists of different directories separated by a forward
slash symbol (“/”) for each level. Your web host may
refer to this as the “Path” in your supplied uploading
details.
•
User name: This is the User name given to you by
the web host (not your computer’s user name). This
is usually case-sensitive, so take care to enter the
information exactly as it’s supplied with capital and
lower case characters as appropriate. Your web host
may refer to this as “User ID” or “Login Name”.
•
Password: As with your User name this is specific
to your hosting account and will normally be
case-sensitive.
There are some other options available in the Upload
dialog box which we’ll cover later.
Required information for MobileMe
If you have signed up to a MobileMe account you’ll
probably have the details already set up in the
70
Page 71

Tip
Using Document Setup for upload info
If you prefer, you can set up all your upload
information at any time by choosing File>Document
Setup, then clicking on the Upload tab.
This opens the same Upload dialog as displayed
when you choose File>Upload. When you click OK,
the information will be stored ready for when you want
to upload the files to the web.
MobileMe section of your System Preferences, in which
case Freeway will automatically enter this information
when you go to the MobileMe Upload dialog box.
If you are using your MobileMe account for the first
time when you upload your files, you will need your
MobileMe member name and password.
!
Uploading your files using FTP
As stated earlier, the most common way to upload
files is to use FTP to send your files to your web host’s
server.
To do this, choose
the
Upload dialog box. In here, you’ll see the Upload
pop-up menu which, by default, displays as “FTP”. If
FTP is not displayed, choose it from the pop-up menu.
File>Upload... which will open
Required information for uploading to a local server using File Copy
If you run a web server on your computer’s local
network, you may need to enter the User name and
password as supplied by your network administrator.
You may also have been given a specific location in
which to place your site’s files.
You can also use Apple’s Personal Web Sharing to
host your site. To do this, you’ll need to switch on
Personal Web Sharing in the Sharing section of your
System Preferences so that web sites in the “Sites”
folder of your User folder can be visited on the web.
Whichever way you’ll be providing access to your
site, you simply need to know the location of the folder
that the web site should live in.
Tip
A more secure way to upload your site
Uploading your site by completing the Upload dialog
and clicking OK allows Freeway to remember your User
name and Password so it won’t be needed the next
time you upload. However, this will mean that Freeway
has stored that information (albeit encrypted) in your
document.
A more secure method is to leave the Password
field blank, which will result in a second dialog box
displaying which requests your password when you
click OK. This method ensures that only people who
know the password can upload to your web hosting
account.
!
Tutorial
71
Page 72

your web host (see “Required information for FTP
uploading” earlier in this section for more details).
Passive FTP Mode (PASV) which, by default, will
not be checked. As stated earlier, web hosts work in
different ways, so Freeway offers this facility as some
hosts allow passive mode to be switched on (which can
result in quicker upload speeds), whereas some don’t.
If you experience difficulties with uploading, the first
thing you should do is to try again with this option
checked.
called
a new dialog box. This should only be used when your
web host needs to invoke commands from their server.
switched on to generate an error log which can often
give information about why an upload has failed. If
you’re experiencing upload problems, the Softpress
Tutorial
Support department may ask you to switch this on
so you can send an FTP log for further investigation.
When checked, this saves a log file called “FTP log” in
your User/Library/Logs folder.
address
used a particular Freeway Action, such as the Freeway
Shop Actions. The instructions for the Action will tell
you if you need to enter a web address here.
to start the uploading process. Freeway will store
the values you’ve entered to be used in subsequent
uploads.
Enter the details exactly as they were supplied by
Below the Password field is a check box called
Alongside the Passive FTP Mode checkbox is a button
Script... where you can enter a login script into
Next is the
The last field of the FTP upload dialog is
When the fields have been completed, click
Save FTP log check box. This can be
Web
, which is occasionally required when you’ve
OK
Uploading to a MobileMe account
Choose File>Upload... to display the Upload dialog
box, then choose
menu.
If you have already set up the MobileMe section of
your System Preferences, Freeway will automatically
use that information in the Member name and
password fields. If not, you’ll need to enter the details
supplied by Apple.
This will automatically upload the site files to your
MobileMe web space.
If you are still using the old web space from the days
of .Mac (Dot Mac), you can choose to upload to the old
location by checking the “Upload to (old) .Mac web
space” option—you can see the different locations of
where the files will be uploaded by looking underneath
“Web Address” in the bottom left of the Upload dialog
box once Member name and Password are entered.
Click
OK to start the uploading process.
MobileMe from the Upload pop-up
72
Page 73

your site will be uploaded. If changes have been made,
Freeway will go through a republishing process before
the upload begins.
This process will also remove any files no longer
used by your site, which ensures that no unnecessary
files are uploaded to your web server. While the
republishing is taking place, Freeway displays the
Progress dialog with the words “Building site”.
Uploading using File Copy
Choose File>Upload... to display the Upload dialog
box, then choose
menu.
There are only two options available in the File Copy
dialog box.
By default, the
folder specified in the Sharing section of your System
Preferences, but you can change this by clicking on the
Select button, navigating to the location you want to
use and clicking
The Web Address field serves the same purpose as it
does for FTP upload.
Click
OK to start the uploading process.
File Copy from the Upload pop-up
Upload to option will be set to the
OK.
How files are uploaded
When you click OK in the Upload dialog, Freeway
will check all the files in your Site Folder to see if
any changes have been made since the site was last
published. This ensures that the very latest version of
When the republishing is complete, the Progress
dialog closes and the
Within this dialog, Freeway displays the number of
items remaining to be uploaded and each individual
item is specified at the foot of the dialog box.
At any time you can stop the upload by clicking on
the Stop button.
Uploading dialog appears.
Troubleshooting upload problems
The upload function built into Freeway is very reliable
and, although we receive some reported problems in
Software Support, it is rarely a Freeway issue. If you
have problems, work through the following in order:
Tutorial
73
Page 74

1. Ensure you’re using the correct upload details
The details you need to enter in the relevant fields of
the Upload dialog should have been sent to you by
your host (usually in an email).
•Server: The name of the server space where you need
•Directory: The location on the server where your files
•User name: This is the User name given to you by
Tutorial
•Password: As with your User name this is specific
that you entered them by copying and pasting from
elsewhere (such as the email sent to you by your
host) which might have also added some unnecessary
characters, such as a space. Because Freeway will
remember these details after the first time you upload,
to upload the files. This is usually your domain name
(such as www.mydomain.com), but you should check
with the details sent to you by your host.
need to be uploaded. This may be at the base level of
the web domain’s folder/directory (so it can be left
blank), or it may be located one or more levels down
(in which case you will have been given a “path”
name which consists of different folders separated
by a forward slash symbol (“/”) for each level. Your
web host may refer to this as the “Path” in your
supplied uploading details. It is quite common for
servers to use a specific folder called something like
“htmldocs”, “html” or “www” (without the quotes).
the web host (not your computer’s user name). This
is usually case-sensitive, so take care to enter the
information exactly as it’s supplied with capital and
lower case characters as appropriate. Your web host
may refer to this as “User ID” or “Login Name”.
to your hosting account and will normally be casesensitive.
If all the details appear to be correct, it might be
you only need to enter the details once—so perhaps it’s
best to enter the details manually by typing them in.
Entering incorrect details in the Upload dialog will
prevent the upload process from starting.
2. Use the Passive FTP Mode (PASV) option
Some web servers require that you use “passive mode”
for uploading. If you find that the upload process
started but then stalled, it might be that you need to
use passive mode. Try uploading again, but this time
switch on the option for “Passive FTP Mode (PASV)”
in the Upload dialog (or switch it off if it was on
previously).
3. Check to see if it’s a Freeway issue
If you have followed the first two steps and the upload
still doesn’t work correctly, it’s tempting to believe that
it is a Freeway problem—but it seldom is. There are
many reasons why the upload doesn’t work—perhaps
the server is undergoing routine maintenance or there
is a problem which your host is not aware of.
You can check to see if it is a problem with your
server and not Freeway by attempting to connect to
your server using a standalone FTP application (such
as Cyberduck, Transmit or Fetch. Launch the FTP
application of your choice) using the same details as
you used in Freeway’s upload dialog.
If you can’t connect with the FTP application, then
it is almost certainly a server issue—in which case you
need to contact your host to see if there is a problem
at their end (it’s also worth sending them the details
you used to connect, so they can check that they are
correct).
74
Page 75

If you can connect successfully, try uploading your
files with the FTP application. You can do this by
opening your Freeway file’s Site Folder (the folder
specified in the dialog if you go to File>Document
Setup in Freeway), then dragging and dropping the
contents into the FTP application’s upload window.
Alternatively, you can use the File Copy method in
Freeway’s Upload dialog to publish your site into a
specified folder on your computer then dragging and
dropping the contents of the folder to the upload
window.
If the upload process stalls or you receive an error
message, it might be because the server has “timed
out”. If you are uploading very large files (such as
QuickTime or MP3 files), a server connection may
drop, so you may want to consider making the files
smaller by using audio/video compression. Those using
a dial-up connection need to realistic about the size of
the files for upload if the server repeatedly times out.
If the problem persists, you should contact your host
to see if there is a reason for the server connection to
drop.
It is possible that there’s an issue with the connection
itself—perhaps the Broadband connection is slow or
unreliable. If this is the case, you need to report the
problem to your telecoms provider.
In the unlikely event that you can complete an
upload with an FTP application but you still can’t by
using Freeway’s Upload function, please get in contact
with our Support department at support@softpress.com
and attach your FTP log (which you will find in your
User/Library/Logs folder after switching on the “Save
FTP log option in Freeway’s Upload dialog).
4. The upload was successful but the site
can’t be found on the web
If the upload process appears to have been successful
but you can’t find the site on the web, it’s quite likely
that you are uploading your files to the wrong location
on the server. Check the details from your host again
to see if they instruct you to use a specific folder
(directory) on the server—if one is specified, enter the
name of that folder in the Directory field of the Upload
dialog.
You can use a dedicated FTP application to connect
to the server to see if there is a particular folder in
which you should be uploading your files to.
Another reason for your site not being accessible
on the web is if your Home page doesn’t have the file
name of “index.html”. Freeway by default should give
your Home page (ie, the page which you see when you
type in just your domain name in the URL address field
of a browser) the file name of “index.html”—however,
if you have been moving pages around in the Freeway
file this might not be the case. Open up your Freeway
file to see if your Home page has “index.html” in the
File field in the Page Inspector—if it doesn’t, change it
to “index.html” (without the quotes) and then upload
again.
Dedicated FTP applications
Freeway’s FTP upload option has everything you
need to upload your site to the Web server, and will
automatically manage the files and delete files which
are no longer needed. However, there are a few things
that you might need to do which require a more
comprehensive FTP tool.
Tutorial
75
Page 76

on the FTP server—it will only overwrite them where
necessary. This is because you might have some
pages on the server which have been uploaded using
another Freeway document or by someone else. When
you upload a particular Freeway document, the only
redundant files which will be deleted are those which
formerly belonged to that document. You need to use
a dedicated FTP application if you want completely
delete all the files on the server to remove an old site.
to a directory that doesn’t currently exist on the
server—in which case, you need to use Cyberduck,
Transmit or Fetch to create that directory on the FTP
site first. You might want to do this if you want to
upload a test site that doesn’t replace your own site
or if you want to store Flash files or movie resources
online.
your chosen tool. In Cyberduck go to File>Open
Tutorial
Connection, enter the details and click Connect; in
Transmit select Connect to Server from the Go menu,
enter then details then click Connect; in Fetch select
New Connection from the File menu, enter the details
and click on OK.
Freeway will not delete any files that were previously
When uploading your site, you may need to upload
The first step is to log on to the server using
the new folder. In Cyberduck and Transmit, select New
Folder from the File menu and enter the name for the
new directory. In Fetch, select Create New Directory
from the Directories menu.
External files
You might also need to use an FTP application to
upload files which are not automatically uploaded by
Freeway—for example referenced items required for a
Flash slideshow, a Java applet, or a script you need to
use on your site.
To do this, just log on to the server as described
above then drag the item(s) from the Finder into the
window for the appropriate directory to upload it.
Where to find FTP applications
There are many FTP applications available—you can
find them on sites such as http://www.pure-mac.com
or http://www.versiontracker.com/
Some of these applications are freeware—such as
Cyberduck, some are shareware—such as Captain FTP,
while others are commercial applications, such as Fetch
and Transmit. Below, we’ve added URLs to the more
well-known and well-established ones, so you can
check their use and license terms.
76
Deleting files
Once connected, you’ll see a window showing the
contents of the folder on the server. Here, you can
delete files by clicking on them and following the
deletion procedure for that particular application.
Creating a directory or folder
To create a new folder on your web server, you need to
first navigate to the location where you want to create
FTP applications.
Cyberduck (freeware): http://cyberduck.ch/
Fetch (commercial): http://fetchsoftworks.com/
Transmit (commercial): http://www.panic.com/
transmit/
Captain FTP (shareware): http://captainftp.xdsnet.de/
Page 77

Working with Freeway
Tutorial
77
Page 78

Working with Freeway
This section is designed to give you an introduction
to working with Freeway, brief instructions on how
to perform common tasks, and also some tips about
avoiding common pitfalls. As with much of the rest
of this guide, it will be based around Freeway Express.
There will also be Freeway Pro information present,
and this will be marked as such where appropriate.
To create a document from a template
1. Choose File>New…. This will open the New
Document dialog.
Pro-only New Document tabs
Pro
The New Document dialog contains two sections,
Templates and Custom. Select the Templates tab
before proceeding to the next step.
Working with Freeway
78
We will not cover such matters as starting and
serializing Freeway here. These are covered in the earlier
section of this guide entitled “Installing and Serializing
Freeway”.
Before reading this section, you should have at
least a passing familiarity with the various parts of
the Freeway interface—there will be an assumption
throughout that you are familiar with such terms as Site
panel and Inspector palette. Brief introductions to all of
these and more are present in the Quick Tour section to
be found earlier in this guide.
Creating a new document
Once Freeway has been started, the first step to making
a web site is to create a document. Generally, each
web site you make will be contained within a single
Freeway document.
New documents can be created in two different ways:
•Fromapredenedtemplate
•Fromcustomsettingsyouspecifywhenthe
document is created (Pro only)
By default, Freeway will open the New Document
dialog when it is started. If this is the case, you can skip
step 1 of the following instructions.
2. From the template group list on the left hand side of
the dialog, select the category of template you wish
to create a new document from.
3. In the area on the right, you will see all the
templates contained within the template group.
Click on the template you would like to create a new
document from.
4. Click the OK button.
5. A dialog will appear. Enter the name of your new
document in the Save As field, and then navigate to
the location in which your new Freeway document
should be created.
6. Click on the Save button.
Your new document will be created and appear in front
of you in Freeway
To create a document using custom settings
(Pro only)
1. Choose File>New…. This will open the New
Document dialog.
2. Select the Custom tab if it is not already selected.
3. Edit the settings in the various fields in the dialog, or
accept the default values. Site Folder, Resources
and
File Names are all settings related to the output
of your web site.
Default HTML and Default page
Page 79

size are default settings for all new pages you will
create in your document. All of these settings can be
changed later from the Document Setup dialog.
4. Click OK.
Your new document will appear in front of you in
Freeway. Unlike creating a new document from a
template, no file is saved to disk when creating a
custom document in this way. That will not happen
until you choose
File>Save for the first time.
The Freeway workflow, publishing,
and previewing
The basic Freeway workflow is simple. Create pages.
Add items to the pages. Insert content into the items.
Publish. Upload. Of course, in reality, there are many
more things that you’ll do within this basic framework,
but this short description covers the major areas of
activity. These are the areas we will look to cover in the
upcoming sections.
It is important to note that Freeway doesn’t generate
any HTML code until you publish your web site, and
indeed that this code and its associated resources
(for instance published graphic files) are completely
separate to the Freeway document itself.
To publish your web site, choose
This will create all of the code required for all the pages
in your site. Subsequent publishes will just update
pages that have changed since the last publish.
You can also preview the current page you are
working on within Freeway. This will automatically
publish just the current page. To do this, click on
the
Preview button in the bar between the layout
view and the tool bar. To preview your whole site in a
browser, go to
File>Preview in Browser and select
File>Publish Site.
one of the browsers listed there. This will publish your
whole site if necessary.
To upload your web site
1. Choose File>Upload….
2. Choose the upload type from the Upload pop-up
(this will depend on the type of web hosting you
have).
3. Fill in the server and/or authentication details for
the upload type you chose.
4. Click OK.
For further information pertaining to uploading,
see the uploading section, located at the end of the
tutorials; it contains much greater detail about the
upload settings, and common problems people have
with uploading.
Working with pages
Pages in Freeway are the area upon which you place
all of the content for your web site. The first and most
important thing to know about pages is that there are
two types of pages:
•Master pages. These are pages upon which other
pages in your Freeway document are based. These
pages are never output.
•Site pages. These are the pages which are actually
output by Freeway and represent web pages in your
web site. All site pages are based upon a master page.
Master and site pages can be seen in the site panel.
All master pages can be found in the Master pages
folder, above the separating line in the site panel. All
site pages can be found below the separating line. The
name of a site page in the site panel is followed in
square brackets by the name of the master page upon
which it is based.
Working with Freeway
79
Page 80

Working with Freeway
80
All items created on a master page are also created
on site pages based on that master page. Changes
to an item on a master page will be reflected in the
equivalent items on the site pages. If you edit an item
on a site page that is based on an item on a master
page, it will no longer be updated when the item
on the master page is changed. You can, however,
reconnect it fully with the item on the master page
by turning on both the
Use Master Content checkboxes in the Properties
section of the
the item on the site page.
To create a new master page
1. Choose Page>New Master….
2. Enter the name for your new master page in the
Title field.
3. Click OK.
A new master page will be created using the default
page settings for your document.
To create one or more new site pages
1. Choose Page>New Pages….
2. Enter the name for your new page in the Title field.
3. Enter the number of pages you would like to create
in the Pages field
4. Select the master page these new pages are to be
based on from the Master pop-up menu.
5. Click the OK button.
The new pages will be created using the settings of the
master page you selected.
To delete a page
Click on it in the Site panel and press the Backspace
key.
General tab in the Inspector palette for
Use Master Settings and
Working with items
When working in Freeway, a large proportion of your
time will be spent creating and modifying items.
These are the containers within which you will place
much of your content, and so it is really important
to understand the different types of items, when it’s
appropriate to use each type, and how the different
types of item interact with each other on the page.
The principal types of item that can be created are:
•HTML items. These are mostly used to contain
HTML text. This should normally comprise the bulk
of the textual content of your web pages. Using
HTML text is important for a number of reasons,
particularly the ability for search engines to read it
and use it as a way of including your site in their
search results.
•Graphic items. These have two main purposes.
Firstly, they’re often used to contain graphics, for
example photos. Secondly, they can contain text,
although this is best restricted to small amounts of
text for headings and the like.
Although the two types of item are very different, they
are created in the same way.
To create an item
1. Select the button labeled HTML or Graphic in the
tool bar
2. Move your cursor over Freeway’s layout view. You
will see that the cursor is now a cross-hair
3. Click and hold the mouse button at the position on
the page you want to start drawing your HTML item
4. Moving the cursor while continuing to hold down
the mouse button will change the size of the item
you are going to create. While doing this, Freeway
Page 81

Pro
CSS Layout (Pro Only): IMPORTANT
In Freeway Pro, it is very important to know that there
are two different layout models that you can use in
your pages, table-based layout and CSS layout. The
default type of layout used for new items that you draw
on your page is controlled by the large round button in
the tool bar containing the letters CSS.
The type of layout that you use will have a
significant effect on the way your page is output, and
also the way it behaves in the browser. Both methods
have their advantages and disadvantages. To find out
more information about these and other issues relating
to the two types of layout, see the Freeway 5 Reference.
For more precise control over the position and size
of an item, you can use the
Inspector palette.
As well as being able to create rectangular graphic
items, you can also create oval and path-based graphic
items. Rectangular graphic items can be given round
corners using the
panel in the Inspector palette. There are also buttons
in this section to convert a graphic item between
rectangular, oval and path shapes.
To delete an item
Select an item and press the Backspace key.
Shape section of the Appearance
Dimensions section of the
Working with Freeway
will show a live preview of the item as you draw it
on the page.
5. Once the item is the size you want it to be, release
the mouse button.
Freeway will create the item and select it for you. You
can tell an item is selected because it has small grey
handles at the corners and at the mid-point of each
side. These are called the
an item that is not currently selected, you can click
on it in the layout view. To select multiple items, hold
down the shift key while clicking on the other items.
You may want to change the position of the item
after creating it. To do so you can simply drag it around
in the layout view, or for finer control you can move
the item using the arrow keys. To resize the item, you
can drag one of the selection handles. If you hold
down the
be constrained to a square or a circle, or if you hold
down
proportions as it’s resized.
Shift key while doing this, the item will
Shift and Option, the item will maintain its
selection handles. To select
Parent/Child relationships
In Freeway, some items can have a hierarchical
relationship. Whether or not this is possible depends
on the types of the items involved. This allows items to
be grouped together as a single unit, and also enables
advanced users to create more complex CSS-based
layouts.
The hierarchical relationships between items on a page
can be seen in the site panel, either when in Page view
mode, or in the site view when
selected from the cogwheel pop-up below the site panel.
These relationships can also be seen more
immediately in the layout view.
When an item is selected, its
parent’s border is highlighted
with the system highlight color,
and its children’s borders are
highlighted in grey.
Items can also be a child of
the page, which is how they
are created unless you use the
following method.
Show Items has been
81
Page 82

To create an item that is the child of another
item
1. Select the item tool appropriate to the type of item
you would like to create
2. Start and finish drawing within another item that
is of a type that can be a parent of the item you’re
creating. You will see that the item that will become
the parent is highlighted while you are drawing the
item.
To make an existing item a child of another item
1. Start dragging the item you want to make a child
2. Move it over the item you want to make the new
parent of the item you are dragging
3. Press the space bar once. This will highlight the new
parent item.
4. Finish dragging by releasing the mouse button. The
item will become a child of the new parent.
If there is more than one potential parent item
underneath the item as it is being dragged, you can
cycle through the potential parents by repeatedly
pressing the space bar. Note that the page is also a
potential ancestor and will be included in this cycle.
You may also want to group a selection of items by
creating a new parent item to contain them.
Aligning and distributing items
It is very useful to be able to position several items at
the same horizontal or vertical location, or to spread
them out evenly.
To align several items
1. Select all the items you would like to align.
2. Choose Item>Align….
3. This will bring up a dialog
with several alignment
options. The left-most
button in each row
represents a choice of
no alignment. The other
buttons represent possible
horizontal or vertical
alignments. Choose a
horizontal and/or vertical alignment and click
To spread items out evenly, you can use
Distributing items is the same basic process as aligning,
but you choose
information about the settings in the
dialog can be found in the Freeway 5 Reference.
Item>Distribute… instead. Further
Distribute.
Distribute
OK.
Working with Freeway
82
To group several items together
1. Select all the items you would like to make a group.
2. Choose Item>Group.
This will create a new parent item containing all the
items you selected.
To ungroup items
1. Select the item created when the items were grouped
(their parent).
2. Choose Item>Ungroup.
Page 83

Manipulating items
As already mentioned, items can be positioned and
resized in different ways. As well as this, items can be
automatically resized to the size of their content, be it
text or graphic.
To resize an item to fit its content
1. Select the item you would like to resize.
2. Choose Item>Fit Box to Content.
There are extra manipulation options available for
graphic items, for example rotation.
To rotate a graphic item
1. Select the graphic item you would like to rotate.
2. Select the rotation tool from the tool bar.
3. Grab one of the item’s selection handles with the
rotation tool.
4. Move the cursor to rotate the item.
5. Release the mouse button to complete the rotation.
Pro
Manipulating items in Freeway Pro
Freeway Pro allows you to skew and mirror graphic
items. These transformations have their own tools
which can be accessed by clicking and holding on
the rotation tool in the tool bar and selecting the
appropriate tool from the pop-up menu. The tools,
once selected, are used in the same way as the rotation
tool.
Freeway Pro also has a
you to apply transformations more accurately. This
can be accessed by selecting an item and choosing
Item>Transform….
Transform dialog to allow
Changing an item’s appearance
There are many ways of customizing the appearance of
items in Freeway. There are also different methods of
doing so dependent on the type of item. This will be
touched on only briefly here and you should consult
the Freeway 5 Reference for more detailed information.
For both HTML and graphic items, much of the
appearance information for the item is available in
the
Appearance tab of the Inspector palette. Because
it is such a common thing to want to modify, the
background color of an item can also be changed from
the General tab of the Inspector palette.
To set the background color of an item
1. Select the item.
2. In the Properties section on the General tab of
the Inspector palette, click on the
3. Select a color from the pop-up menu, or select
Other… to use a color not already present in your
document.
Color pop-up.
Changing how an item will output
The Output tab of the Inspector palette has a number
of settings depending on the type of the item you have
selected, and it will also allow you to change the type
of the item. These settings allow you to have more
control about how a particular item will be output
when Freeway publishes it.
To change the type of an item
1. Select the item and switch to the Output tab of the
Inspector palette.
2. Choose the new type of the item from the Type
pop-up.
Working with Freeway
83
Page 84

There are three different graphic item types that can
be selected in the Type pop-up, JPEG, GIF, and PNG.
These refer to the type of graphic created when Freeway
outputs the graphic item, and each have their own
strengths and weaknesses. When you import a graphic
into a graphic item, Freeway will analyze the graphic
and make an informed decision as to which type is
best and set the graphic item to output using that type.
You can use these options to override Freeway’s default
judgement if you want.
the graphic types that will allow you to fine tune how
Freeway outputs that particular graphic.
To set the alt text of a graphic item
1. Select the graphic item and switch to the Output
2. Ensure the Alt Text
Alt text is important because
it will allow people who
cannot see the graphic to see a
description of the image. This
Working with Freeway
include people using screen
readers and also anyone using
a simple text-based browser.
There are also different settings available for each of
tab of the Inspector palette.
checkbox is on and then
enter a description of
the graphic into the field
beneath the checkbox.
Working with Tables
Tables should mainly be used for presenting tabular
data. It’s unnecessary to use them for positioning
purposes—just use Freeway’s items instead. The
tool is in the Freeway Pro tool bar by default, but in
Freeway Express you will need to customize your tool
bar, or open the pop-up menu on the
the tool bar and select the table tool from there.
After selecting the table tool, you can draw them
exactly as you would any other item. Once you’ve
finished drawing a table, you will be prompted to
choose the number of rows and columns the table
should contain.
To select the table, click on the border at the edge of
the table. You can select table cells in the same way as
you would an item, and entering text works the same
way as well. You can also select multiple table cells
in the same way as you would select multiple items.
To select a whole column or row, position the cursor
at the top of a column or to the left of a row. It will
change to be an arrow pointing at the column or row,
and clicking will select all the cells in the column or
row it is pointing to.
HTML tool on
Table
84
Page 85

To resize a column or row in a table
1. Position the cursor at the bottom of the row, or to
the right of the column, you want
to resize. It will change appearance
when you are in the correct place.
2. Click and drag to resize the column
or row.
To change the number of rows or columns
in a table
1. Select the table.
2. Switch to the General tab of the Inspector palette.
3. In the Cells panel, enter new values into the Rows
and
Cols fields.
You can also use the
delete columns.
To merge cells into one
1. Select the cells you want to combine into one.
2. Choose Item>Table>Join Cells.
To split cells
1. Select the cells you want to split
2. Choose Item>Table>Split Cells….
3. Select whether to split the cells into rows or
columns, and enter a number of rows or columns to
split them into.
4. Click on OK.
Item>Table menu to insert and
Working with colors
All Freeway documents are created with a basic set of
colors. As you assign colors to elements and text within
your document, Freeway will add these colors to the
documents color list. This means that they will then
be available in all the lists from which you can select
colors. Colors are removed from the color list once
they are no longer being used in the document.
Colors in Freeway Express
In Freeway Express, colors
do not have names and
are simply presented as
swatches in the color popups throughout the Freeway
Express user interface. The
color palette is the Mac OS
X system color palette that
you may be familiar with
from other applications, for
example TextEdit.
To apply a color using the color palette
in Freeway Express
1. Select the page, item or text you want to apply color
to.
2. Select the appropriate tab in the Color palette (for
example
3. Edit or click on the color you want to use. As you
edit or click on colors, the color of the selected
element in Freeway will change accordingly.
The
Applies To pop-up at the bottom of the color
palette indicates what will have its color changed as
you modify colors in the palette. Depending on the
current selection, the
multiple possible values; changing the value will
change what the color is being applied to.
Color Sliders).
Applies To pop-up can have
Working with Freeway
85
Page 86

Express, you will be presented with the system color
palette to choose the color from.
Colors in Freeway Pro
Freeway Pro has far more advanced color handling
than Freeway Express. Every color is named and
permanent colors can be created that exist even if
they are not applied anywhere in the document (the
concept of temporary and permanent entities will
come up again when discussing Styles in Freeway Pro).
occurrences of that color within your document. This
makes it very easy to make wide-ranging changes to the
color scheme of your web site.
the
this palette related to colors, the
and the
Working with Freeway
If you select Other… from a color pop-up in Freeway
Editing a color in Freeway Pro will change all
The
Color palette in Freeway Pro is actually part of
Styles and colors palette. There are two tabs in
Document colors tab
Web-safe colors tab.
Document colors tab contains a list of all the
The
colors within your document. This includes the default
set of colors, temporary colors created as you have
assigned colors to objects and text in your document,
and any permanent colors that you have created. The
Web-safe colors tab contains colors that should
display accurately on most color monitors.
To apply a color in Freeway Pro using
the color palette
1. Select the page, item or text you want to apply color
to.
2. Select either the Document colors or the
Web-safe colors tab.
3. Click on the color you want to use.
To apply a color that is not already in your
document using the color palette
1. Select the page, item or text you want to apply color
to.
2. Select either the Document colors or the
Web-safe colors tab.
3. Click on the cogwheel at the top of the palette and
select Color Picker… from the pop-up.
4. Choose the color you want to use from the system
color palette and click OK.
As in Freeway Express, there is an
pop-up that allows you to choose which property of
the selected object you want to apply the color to.
Applies To
86
Document colors (left) and Web-safe colors tabs in
Freeway Pro.
To create a new color
1. Select either the Document colors or the
Web-safe colors tab in the Styles and colors
palette.
Page 87

2. Click on the cogwheel at the top of the palette and
select New Color… from the pop-up.
3. Enter a name for the color in the Name field.
4. Select a color from the swatches or click on the
color wheel button near the bottom of the dialog to
choose from the system color palette.
5. Click OK.
To edit a color
1. Control-click on the color to edit in the Document
colors
2. Select Edit Color… from the pop-up.
3. Change the color using the same method as for a
new color.
4. Click OK.
To delete a color
1. Control-click on the color to delete in the
Document colors list in the Styles and colors
palette.
2. Select Delete Color from the pop-up.
list in the Styles and colors palette.
3. If the color is used in your document, you will be
asked to select a color to replace it with. Choose one
and click
It is worth noting that none of the built-in colors (the
colors available in every new document) can be edited
or deleted.
Colors can also be managed and imported in the
Edit Colors dialog which can be accessed by choosing
Edit>Colors…
OK.
Working with graphics
One of the most common tasks within Freeway is
adding and manipulating graphics within a site.
Graphics within Freeway are contained within an item.
If the item is a graphic item, Freeway will optimize
the graphic for you when you publish your site. If
the item is an HTML item, the graphic will be output
unchanged; this is called a “passthrough graphic”.
Working with Freeway
87
Page 88

also be scaled and cropped. Filters can be applied to
the graphic using a variety of graphic Actions. HTML
items that contain graphics must be at least as large as
the graphic if the graphic is to be output; if the item
is not large enough, Freeway will show
you by “overflowing” the item—placing
an X through it and not displaying the
graphic. Resizing the item appropriately
will fix this problem; an easy way to
do this is to choose
Content
To import a graphic into an existing item
1. Select the item to import a graphic into (ensure
2. Choose File>Import….
3. Locate the graphic file you would like to import and
Freeway Express can import GIF, JPEG and PNG files.
Freeway Pro can import a far greater range of graphic
types, including Photoshop and Illustrator files,
although these should only be imported into graphic
Working with Freeway
items because they need to be converted to a web-ready
format to be displayed in your web page.
onto your Freeway page. You can either drag it into
an existing item, or directly onto the page, in which
case a new graphic item will be created to contain
it. Alternatively, a new HTML item can be created to
contain the graphic if you hold down the Option key
when dropping it onto the page.
Graphics that are contained within graphic items can
Item>Fit Box to
.
it does not contain text; if you want to import a
graphic into an item containing text, you will need
to delete all the text first).
click OK.
You can also drag a graphic directly from the Finder
Manipulating graphics in graphic items
Once you have added a graphic to your page, you can
manipulate it in a variety of ways.
To position a graphic within its containing item
1. Position the cursor over the arrows in the center of
the graphic item. These
are called the
handles
will change to a hand
when it’s positioned
over them.
2. Hold down the mouse
button and drag the graphic around within the item.
3. Let go of the mouse button when the graphic is
positioned as you want it.
To scale a graphic to the size of its containing
item
1. Select the item containing the graphic.
2. Choose Item>Graphic>Scale to Box.
This will scale the graphic without maintaining its
proportions. This menu contains other options for
scaling including
both of which maintain the proportions of the graphic
but result in different sized graphics. There is also the
option to increase and decrease the size of the graphic
in increments by using
If you hold down the
while resizing a graphic item to maintain the item’s
proportions, any graphic contained within it will also
be resized maintaining its proportions.
Whenever you scale graphics, it is a good idea to
resample them afterwards. The main advantage of this
panning
and the cursor
Scale and Pad and Scale and Trim,
Scale Up and Scale Down.
Shift and Option keys
88
Page 89

is to reduce the size of Freeway’s internal version of the
graphic. This will help reduce the size of your Freeway
document.
As well as entering text directly using the keyboard,
text can be imported into an item from an existing text
file.
Working with other media
As well as being able to import graphics into HTML
items, you can also import all sorts of other media.
Other types of media that you can import include
Flash, QuickTime movies and mp3 audio files. You
import media files using the same method as if you
were importing a graphic into an HTML item.
If you’re importing Flash or QuickTime movies,
you may want to have a look at the
QuickTime Extras Actions which can modify the way
these files behave when viewed in a browser.
Flash Extras or
Working with text
As discussed earlier, text within HTML items and
graphic items are generally used for very different
purposes. However, working with the text in either
type of item is essentially the same, although you will
notice as you work with text that some of the available
options are different. It is also possible to enter text
directly into the page.
To enter text into an item
1. Select an item that does not contain a graphic by
clicking on it.
2. Click on the item again.
To import text from a file into an item or page
1. Get a text cursor in the item or page you wish to
import text into (as described earlier).
2. If there is existing text in the item, position the
cursor where you want to add the text you are
importing.
3. Choose File>Import Text….
4. Find and select the text file whose content you
would like to import and click OK.
Styling text
Applying styling to text is a fundamental part of
creating any web site. In Freeway, most styling of text is
done from one of two places. The first is the Inspector
palette, and the second is the Style menu. The options
available for styling text in the Inspector palette are a
subset of the options available in the Style menu.
Working with Freeway
This will insert a text cursor into the box, and you can
now type text freely within it. To enter text directly
into the page, double-click on it in the layout view.
Once you’ve finished editing text within an item or
the page, click outside the item or page to leave text
editing mode.
The Style menu.
The Inspector’s Style palette.
89
Page 90

Working with Freeway
90
Selecting text and applying styling in Freeway works
in the same way as most other applications. Select the
text you would like to style and change the appropriate
attribute in either the Inspector palette or the Style
menu.
Text styling attributes are divided into character
and paragraph attributes. Character attributes (for
example font and color) can be applied to any run of
text. Paragraph attributes (for example alignment) will
be applied to the whole of any paragraph contained
within the current text selection.
To remove styling from text
1. Select the text you want to remove all styling from.
2. Choose Style>Remove Styling.
This will remove all character attributes from the
selected text. Paragraph attributes will only be
removed from paragraphs that are completely
selected, including the hidden paragraph character
at the end of each paragraph—you can see hidden
characters if you choose
paragraph has no hidden paragraph character, so there
is no need to select it). The easiest way to select a
complete paragraph is to click on it four times in quick
succession (quadruple-clicking).
View>Invisibles (the last
Working with lists
As well as being useful for creating hierarchical HTML
lists within text in your document, lists are used
extensively in the CSS Menus Action. They are created
by converting paragraphs of text into list items.
To create a list
1. Select one or more paragraphs you want to make
into a list.
2. Choose Style>List>Increase indent.
To change a list item back into a paragraph, select the
list item and choose
To create a nested list, select a list item and choose
Style>List>Increase indent. The first list item in a
list cannot have its indent increased.
Style>List>Decrease indent.
Inserting items into a text flow
An important technique to know about when working
with HTML text is the ability to insert both HTML and
graphic items into the flow of the text. This means that
the items will move around as the text is reflowed by,
for example, different people having different settings
in their browsers for the text size. These are called
“in-flow items”.
To insert a graphic item into an HTML text flow
1. Select an item containing text and click again on it
to get a text cursor within it
2. Position the cursor at the point in the text where
you want to add the graphic item
3. Choose Insert>Graphic Item.
A default-sized graphic item will be inserted into the
flow of text. This item will behave just as a graphic
item you had drawn on the page would behave.
The only major difference is that you can no longer
position the item – its position is determined by the
text around it. You can of course still resize it in the
same way as an item you had drawn on the page.
There is also an
panel of the Inspector palette for in-flow graphic items.
Align setting in the Dimensions
Page 91

different setups people have in their browsers, for
example (as has already been mentioned), having
different text sizes specified, or their browser window
at different widths.
Following are just a couple of ways to modify in-flow
HTML items in Freeway Pro. Further information is
available in the Freeway 5 Reference.
This allows you to position the
graphic item vertically relative
to the rest of the line of text it
is within, or to force it to the
left or right of its containing
item and have the text flow
around it (the
Right settings in the Align pop-up).
To insert an HTML item into a text flow
1. Select an item containing text and click on it again
to get a text cursor within it.
2. Position the cursor at the point in the text where
you want to add the HTML item.
3. Choose Insert>HTML item.
A default-sized HTML item will be inserted into the
flow of text. You will notice however that in-flow
HTML items always exist within their own paragraph
in a text flow. HTML items can also be set to have the
text flow around them; simply choose
from the
the Inspector palette.
Freeway Pro provides you with many ways to create
in-flow layout. In-flow layout is important for creating
web sites that are flexible and work well with the
Left and
Left or Right
Float pop-up in the Dimensions panel in
To center an in-flow HTML item within its
containing item (Pro only)
1. Select the in-flow HTML item and switch to the
General tab of the Inspector palette.
2. In the Dimensions panel, ensure that the Float
pop-up is set to
3. Open the Margin pop-up and select Auto.
To set an in-flow HTML item to always be the
width of its containing item (Pro only)
1. Select the in-flow HTML item and switch to the
General tab of the Inspector palette.
2. In the Dimensions panel, click on the Width
button or delete the contents of the
and press the
Working with Styles
One of the major advantages of Freeway Pro is being
able to group a set of character and paragraph style
attributes into a single style. Once created, a style can
be applied to any text in your document, making it
easy to use consistent text styling across your whole
site. An extra bonus is that you can edit the style and
any changes you make will apply to all the text in your
document that is using the style.
None
Return or Tab key.
Pro only
Width field
Working with Freeway
91
Page 92

Document styles you
created are displayed in
the
Document styles tab
of the
Styles and Colors
palette. There are also some
default styles automatically
added to new documents,
and a
[No Style] that,
when clicked on, will
behave in the same way as
choosing
To create a new style
1. Switch to the Document styles tab of the Styles
2. Click on the cogwheel, and in the pop-up menu
3. In the New Style dialog, add style attributes for
Style>Remove Styling.
and Colors
select New Style….
this style by clicking on the plus button to the right
of the section for the type of attribute you want
palette.
to add, then selecting the
attribute from the pop-up
menu.
4. Set values for the attributes
after you’ve added them.
5. Name your new style by
entering text in the Name
field.
6. Click on OK.
While in the dialog, you can
remove an attribute by clicking on the minus button
next to it.
To edit an existing style
1. Switch to the Document styles tab of the Styles
and Colors
2. Control-click on the style you want to edit in the
styles list, and select Edit Style… from the pop-up
menu.
palette.
Working with Freeway
92
The
Edit Style dialog works in the same way as the
New Style dialog. There is also an Edit Styles dialog
which can be opened by choosing
dialog is much the same as the two dialogs you have
already seen, but also has a list of all document styles
on the left hand side. This allows multiple styles to be
edited at a time.
To apply a style to text
1. Select the text you want to apply the style to.
2. Switch to the Document styles tab of the Styles
and Colors
palette.
Edit>Styles…. This
Page 93

3. Click on the style in the list you want to apply.
To delete a style
1. Switch to the Document styles tab of the Styles
and Colors
2. Control-click on the style you want to edit in the
styles list, and select Delete Style from the pop-up
menu.
If the style is being used anywhere in your document,
a dialog will appear prompting you to choose another
style to replace it with. If you want to remove the style
from your document and from all the text it is used on,
choose
to items and pages so they style all the text within the
item or page. You can see which styles are active for
the current selection in the
Inspector.
Permanent and temporary styles
In Freeway Pro, when you style text using the Inspector
palette and the Style menu, temporary styles will be
created. These are styles that only exist while text exists
with their styling applied. New temporary styles will
be created and existing ones deleted as you change
the styling of text within your document using the
Inspector palette and Style menu.
better to use permanent styles when possible. These
are the styles you create manually using, for example,
the
by default, meaning that they will remain in your
document whether or not they are applied to any
text. If you have styled some text using temporary
No Style from the list in this dialog.
As well as being applied to text, styles can be applied
Although these styles can be useful, it is generally far
New Style dialog. These styles are permanent
palette
Style Inspector tab of the
styling, you can change the temporary style into a
permanent style by editing the style and turning on
the
Permanent checkbox.
Permanent styles are shown in bold text in the Styles
and Colors palette.
Hyperlinks and anchors
Hyperlinks provide a way for people visiting your site
to navigate to other pages within it, or to another web
site entirely. Anchors are a way of tagging a particular
object on a page so that when you click on a link to it,
you’ll be taken to the appropriate page and the browser
will scroll to the position of the tagged object.
To create a hyperlink
1. Select a graphic item, map area, some graphic text
or some HTML text. Choose Edit>Hyperlink….
2. Click on the Internal tab and select a page from
the list to create a link within your web site, or click
Working with Freeway
93
Page 94

Working with Freeway
94
on External and enter the URL to create a link to a
different web site.
3. Click OK.
To remove a hyperlink
1. Select a graphic item, map area, some graphic text
or some HTML text that has a link applied.
2. Choose Edit>Hyperlink….
3. Click the Remove Link button.
To create an anchor
1. Select a graphic item or some HTML text.
2. Choose Edit>Anchor….
3. Enter a name for the anchor in the Name field.
4. Click OK.
To remove an anchor
1. Select a graphic item or some HTML text that has
an anchor applied.
2. Choose Edit>Anchor….
3. Click the Remove Anchor button.
When creating an internal hyperlink, the anchors on
the page you have chosen to link to are shown in the
Anchor pop-up on the Internal tab underneath the
list of pages.
Working with HTML forms
Each site page in Freeway can have a HTML form on
it. There are two steps to setting up a form in Freeway.
Firstly, you need to place controls on the page and
secondly, you need to set up the form’s properties.
Form controls are created just as you would any
other item, but you first need to select the appropriate
drawing tool. By default, the form control drawing
tools are located in the HTML tool popup on the tool
bar.
To set up the form properties for the current
page:
1. Choose Page>Form Setup….
2. In the Form tab, select a form submission method
from the Method popup.
3. Enter the URL of the form processing script into the
Action field.
4. Click OK.
Don’t forget
that you need to
add a
Submit
button for people
to click on to
send the form to
your script for
processing. Note
also that the
the processing script entered, not the contents of the
script itself.
The simplest method for creating reply forms is to
use the PHP Feedback Form Action—see the movie
tutorial at http://www.softpress.com/support/tutorials.
html (Episode 18). Note that is you use this Action
you should not use any information in the Form Setup
dialog.
Only one form can be set up per page. If you want
more than one form on your page, use the
Form Suite
actionsforge.com/projects/view/24-multiple-form-suite
Action field should only have a URL for
Multiple
from ActionsForge at http://www.
Further information
This completes the overview of basic functionality in
Freeway. For more complete information on all of these
topics, please consult the Freeway 5 Reference.
Page 95

Freeway Actions
Freeway Actions
95
Page 96

What are Freeway Actions?
Both Freeway 5 Pro and Freeway 5 Express ship with a
comprehensive set of Actions which you can use to add
functionality and dynamic effects to Web pages—some
of which we’ve already used in the Tutorial section.
This section gives information on commonly-used
“standard” Actions which come pre-installed, however
many custom Actions can be downloaded free from
ActionsForge (http://www.actionsforge.com). Other
Actions, particularly complex ones, may be sold
commercially on a developer’s web site.
Actions are comparable to plug-in modules, allowing
you to add functionality or effects through the
simplicity of an intuitive dialog box which would
otherwise require sophisticated coding or repetitive
formatting in other programs. An Action can be used
for doing something as simple as making an image
change color when a visitor mouses over it, or as
complex as controlling forms and creating navigation
bars. Others are part of a suite of Actions allowing
you to create, for example, an on-line shop or sets of
transition effects.
As stated earlier, this section will cover the standard
Freeway Actions
pre-installed Actions, however Freeway 5 Pro allows
you to add further custom Actions which enhance the
functionality of your web pages. Freeway 5 Express
only allows you to add Actions which have been
encoded, so consult each Action’s documentation to
see if it will work with Express. The download page
for all Actions at ActionsForge gives details of which
versions of Freeway
any particular Action is
compatible with.
The different types of Actions
Because there are different types of functionality you
may want on your site, there are different ways to
apply an Action in Freeway. The different types of
Action are:
•
Item Actions: The most commonly-used Actions,
which are applied to a specific item (or group of
items) on your page. Note that some actions are
specific to HTML items and others are only for
graphic items.
•
Page Actions: These are used on individual pages to
apply functionality to the page itself.
•
Standalone Actions: Another commonly-used type
of Action, which creates a pre-coded HTML item on
your page (sometimes called “insert” Actions).
•
Folder Actions: These are used for applying an Action
on a group of pages stored in a single folder. If all
your site pages are stored in one folder, this can be
used to apply site-wide functionality.
•
Suites of Actions: Complex suites of many different
types of Action. The individual Actions within the
suite can be any of the above Action types. The
Actions work together to provide functionality in
your web site.
Applying Actions
Before you apply an Action, it’s best to have the
Actions palette open so you can see that the
Action has been applied. If it’s not open, choose
Window>Actions.
The way in which you apply an Action depends on
the type of Action you want to apply:
96
Page 97

• Item Actions: Select the item, choose Item>Action
and select an Action from the list.
•
Page Actions: Select the page you want to apply an
Action to in the Site panel, then choose
Actions
•
Standalone/Insert Actions: Click and hold on the
Action tool on the tool bar, choose the Action you
want, then draw the Action on the page in the same
way as you draw an item on the page. Alternatively,
go to
want. This method allows you to insert an Action
into a text flow.
•
Folder Actions: Select a folder in the Site panel, click
on the plus button in the bottom left corner of the
Actions palette, then choose the folder Action you
want to use.
In fact, all Actions can be applied using the plus button
in the Actions palette. Clicking on it will show a list
of all Actions which can be applied to the currently
selected object.
and select an Action from the list.
Insert>Actions and choose the Action you
Page>Page
The Actions palette
When no Actions have been applied to a selected item,
page or folder, the Actions palette will be empty. To
see how it works, let’s draw a graphic item on the page
then apply an Action.
Click on the
tool on the tool bar
and draw an item on
your page. With the
item selected, choose
Item>Actions and select
Buttons from the list.
Graphic
You will now see that a tabbed panel has appeared
under the title bar entitled “Buttons” and, within the
panel, the various options of the Action are displayed.
Depending on which Action you apply, the options
may take the form of text fields, check boxes, pop-up
menus, etc., but the options will always be specific to
that particular Action.
An item can have more than one Action applied at a
time, so let’s apply another one. Choose
and select
we now have two tabbed panels, the latest of which is
now selected.
If you want to return to the Buttons Action, you’ll
need to click on the
Let’s apply a third Action. Choose
select
the Actions palette, but this is a different type of panel
in that it has more than one window which can be
selected by clicking on the relevant button below the
Actions tabs. The Rollover Action is currently showing
the “Images” window. Clicking on the “Parameters”
button displays a second panel of options.
Although there are two separate windows, both are
specific to the Rollover
Action. This is done
because some Actions
have very different
types of options
which don’t lend
themselves to being
displayed in the same
window. In this case,
the “Images” window
displays the options in
a table-based layout,
Fade. You’ll see in the Actions palette that
Buttons tab.
Rollover. A third tabbed panel has appeared in
Item>Actions
Item>Actions and
Freeway Actions
97
Page 98

while the “Parameters” window is made up of a list of
pop-up menus.
If you want to remove an Action from an item,
simply click on the X in a circle to the left of the
Action’s name.
You may also have noticed that each time an Action
was applied to the item on the page, a label displaying
the name of the Action appeared in the top left corner
of the item’s container. With all three Actions applied,
three labels appeared underneath each other, giving
a quick visual reference to which Actions have been
applied.
If a page Action has been applied, the Actions palette
will only display the options for that Action if no items
are selected on the page.
Freeway Actions
When an Action has been used, the Action cog logo
will appear on the item, page or folder icon in the Site
panel. This is a visual cue that it has an Action applied
to it.
Installing new Actions
Once you have downloaded new Actions, they are
simple to install. Drag the Action file onto the Freeway
application icon (either in the Applications folder or
in the Dock), and Freeway will start and inform you
that you are about to install an Action. Click on the
OK button to confirm that you want to install the
new Action. Freeway will copy the Action file to the
appropriate place on your hard drive.
It is important to remember that Freeway Express can
only use encoded Actions. These are marked as being
specifically for Freeway Express on the download page
for that Action on the ActionsForge site or in the text
of a developer’s web site.
98
Page 99

Working with Freeway Actions
Because there are so many Freeway Actions, we
don’t have the space here to cover them all, so we’ll
concentrate on the most commonly-used ones. You
can find out more on Actions not mentioned here in
the Freeway 5 Reference, on the Softpress KnowledgeBase
or at ActionsForge.
Here, we’ll see how to use common Actions, what
options are available and also discuss typical problems
users may have with particular Actions.
The Rollover Action
Perhaps the most common of all Actions is the rollover.
Rollovers are graphic items in a stack which change to
display a different graphic in the stack for each of the
“normal”, “mouseover” and “click” states when the
page is previewed.
There is a full tutorial on how to create a rollover in
the Tutorial section (Tutorial 3), but because rollovers
are so common we’ll run through a basic step-by-step
here to explain the basic principles again:
1. Click on the Graphic tool in the tool bar, draw a
wide rectangular item on your page, then apply a
red background color in the Inspector.
2. Control-click (or right-click) and choose Duplicate
from the contextual menu. Set the values of 1 for
copies and 0px for horizontal and vertical offsets,
click
OK and then apply a green background color.
3. With the topmost item selected, choose
Item>Actions and select Rollover. This is the
most common place people have problems with
rollovers. If the Item>Actions menu is greyed
out at this stage, see the “Common Queries with
Rollovers” at the end of this section for advice.
4. In the Actions palette (the “Images” window shows
as default), click on one of the check marks in the
“Normal” column to remove it and click once in
the MouseOver column to create a check mark.
5. You can see which item will show for each state by
clicking once on the bar at the top of each column.
The above step-by-step creates the most simple rollover
possible. If you want further help with rollovers, read
the instructions earlier this guide in Tutorial 3.
Instead of duplicating items, we could also have
copied and pasted the different elements of the
rollover, edited them separately in different areas of
the page and then aligned them into a stack using
Freeway’s Align feature. Whichever route you take, the
principle is still the same.
You can use any graphic item in Freeway as part of a
rollover, regardless of its content.
Freeway Actions
99
Page 100

Rollover options in the Actions palette
In the step-by-step above we used only default settings
with the exception of the placing of check marks
in different columns. Let’s run through the various
options available in the Actions palette—first we’ll
look at the options in the Rollover Action’s “Images”
window.
•The
Images window has a table-based layout—a
list of all the items in the rollover on the left and a
column for each of the
Click states.
•You don’t need to use all three states, many times
you’ll use just Normal and MouseOver.
•A check mark in an item’s row for a particular
column signifies that the item will be visible in that
state. Where there is no check mark, the item will
be invisible. Click on a blank area of the table to
generate a check mark, click on an check mark to
remove it.
•If you want an item to display in all states—for
instance a graphic text item displaying the name of a
rollover hyperlink—you should check each column.
Freeway Actions
Now let’s look at the options in the Parameters
window, which is a list of pop-up menus:
•
MouseOver: This
pop-up controls the
mouseover state. “Off”
means there is no
mouseover state, and
“Items” means use the
items specified for the
mouseover state in the
images window. You can
also choose “Select”,
100
Normal, MouseOver and
which allows you to select a graphic from your
computer’s hard drive for the mouseover state.
•
Click: This menu works in the same way as the
MouseOver menu but for the Click state.
•
Restore: This pop-up menu controls whether the
rollover restores back to the Normal state when
the mouse is moved away from the rollover. “Yes”
displays as default. If you set it to “No”, the image
will only return to its Normal state when the page
is revisited. Setting the menu to “Sticky” retains
the MouseOver or Click state until you mouseover
another rollover on the page.
•
Preload: By default, this pop-up menu is set to “Yes”,
which means that all the graphics of the rollover will
load into the browser’s cache before the rollover is
displayed. This makes the transition from one state
to another smoother as the graphics for each state
don’t need to load when the transition is made.
•
Find Targets: A rollover can be used as a “trigger”
for an “event”, which means that, for instance,
moving your mouse over a rollover can make Target
Images appear elsewhere on your page. This pop-up
menu is only used when your page is a “frameset”
and you need to control which frame the targets
appear in.
•
Target Group: When using the Rollover as a trigger,
you can set different groups of targets to be triggered
when a different trigger is activated. Target Groups
have color names (such as Indigo and Cobalt). Indigo
is the default target group.
•
MouseOver #: When using a rollover as a trigger,
this sets a specific target number (which corresponds
to an item’s target number in the specific target’s
Action dialog) to appear when the rollover is
mouseovered.
 Loading...