

Page 1

Clone X 3
USER GUIDE
Your Serial Number: . . . . . . . . . . . . . . . . . . . . . . . . . . . . . . . . . . . . .
Page 2

Licensing and Copyright Agreement
This software is Copyright ©2002-2007 TED and ©TRI-EDRE.
Except as permitted under copyright law, no part of the Tri–BACKUP program (the «Software»)
or this user guide (the «Guide») may be reproduced or distributed in any form or by any means
without the prior written permission of TRI-EDRE.
The Software, and this Guide, are licensed only for individual use on a single computer. You
are permitted to make working copies of the Software, solely for your own use. Only one copy
(original or working) may be in use at any time.
If you ever sell, lend or give away the original copy of the Software, all working copies must also
be sold, lent or given to the same person, or destroyed.
Limited Warranty
TRI-EDRE warrants to you that the Software will perform substantially in accordance with the
documentation for the ninety (90) day period following the date of delivery of the Software to
you. If the Software fails to meet the specifications of the warranty set forth above, TRI-EDRE’s
liability and your exclusive remedy will be replacement of the CD or a reasonable effort to
make the product meet the above warranty specification. Except for the above express limited
warranties, TRI-EDRE makes and you receive no warranties or conditions, express, implied,
statutory or in any communication with you, and specifically disclaims any implied warranty
of non-infringement, merchantability or fitness for a particular purpose. TRI-EDRE does not
warrant that the operation of the program will be uninterrupted or error-free.
In no event will TRI-EDRE be liable for any loss of use, loss of profits, interruption of business,
or indirect, special, incidental or consequential damages of any kind, however caused and
under any head of liability, arising out of use of or in connection with the Software.
Trademarks
Clone X is a trademark of TRI-EDRE.
Apple, Macintosh and Mac OS are trademarks of Apple Computer Inc, registered in the United
States and other countries. Adobe, Reader and Photoshop are trademarts of Adobe Systems
Inc., registered in the United States and other countries. StuffIt Expander is a trademark of
Allume Systems Inc., registered in the United States and other countries. All other trademarks
are the property of their respective owners.
©TRI-EDRE DEVELOPPEMENTS (TED). All Rights Reserved.
Email address : contact@tri-edre.fr • contact@tri-edre.com
©TRI-EDRE. All Rights Reserved.
TRI-EDRE
22 Place de l’Église - BP 111
83510 LORGUES (FRANCE)
Phone +33 4 9810 1050
Fax +33 4 9810 1055
Web site: www.tri-edre.fr • www.tri-edre.com
Page 3

Table of Contents
Introduction ........................................................................................................... 5
Welcome! ................................................................................................................... 5
Overview .....................................................................................................................5
System Requirements .................................................................................................. 6
Thank you for registering ..............................................................................................6
Updates .....................................................................................................................6
Installation ..................................................................................................................6
Uninstalling ................................................................................................................. 6
Launching and Registering the Software .........................................................................6
Technical support ........................................................................................................7
Contacts .....................................................................................................................7
Preferences ........................................................................................................... 8
Main Window ......................................................................................................... 9
Clone a Disk ........................................................................................................ 10
Choosing a clone mode ..............................................................................................11
Choosing source and destination volumes .................................................................... 12
Options ....................................................................................................................12
Clone a disk (creates an exact copy of a volume) .......................................................... 14
Copy to a disk containing other data ............................................................................15
Copy a disk into a folder .............................................................................................16
Restore a disk ..................................................................................................... 17
Restore Modes ..........................................................................................................18
Restore options ......................................................................................................... 18
Restore a disk from a copy .........................................................................................19
Restore a disk from a copy into a folder ....................................................................... 19
Advanced restore ...................................................................................................... 19
Tools ................................................................................................................... 23
Bootable DVD ........................................................................................................... 24
Disk Comparison ...................................................................................................... 27
Create a minimal System disk .....................................................................................28
F.A.Q. .................................................................................................................. 29
Clone X 3 User Guide 3
Page 4

4 Clone X 3 User Guide
Page 5

Introduction
Welcome!
Thank you for purchasing Clone X !
Clone X is the quick and simple way to create copies of your disks, to restore your disks,
as well as to create your own bootable CD.
Overview
Clone X is built to copy an entire disk to another disk, while preserving all its caracteristics. Thus, you can create a copy of your bootable volume, and then it will be possible
to startup from this copy.
Clone X also includes features to create your own personal bootable Mac OS X DVD.
Note: Clone X copies an entire volume. It is not possible to backup only a part of a
volume. To do that, you should use backup software, such as Tri-BACKUP. For the restoration process, Clone X allows to restore a selection of files or folders if you need to
restore a part of the data.
Clone X can copy any volume mounted on the Desktop of your Mac: internal disks, external disks (FireWire, USB, etc.), cartridges, DVDs, etc. You can boot on copies made
with Clone X (except when the disk is copied into a folder).
Important! Some disk may not boot depending on the machine you have. PPC
machines (G4 and G5) needs Firewire connections to boot on external disk. Intel
machines can boot on USB and Firewire Disks. See Apple’s documentation and
disks manufacturers documentations.
Disks mounted through a network (server) are not handled by Clone X, because it is not
possible to preserve the caracteristics of a volume and its files when copied through a
network.
Note: To transfer the contents of a disk via a Network, first make a clone into a disk
image with Clone X, and transfer the disk image via the Network. Then restore (or copy)
the disk image to the desired disk using Clone X.
With Clone X, you can easily:
• Duplicate and copy your volumes, including your startup disk.
• Restore your hard disks.
• Create a minimal Mac OS X System disk.
• Create bootable Mac OS X DVD.
• Compare the contents of two volumes.
Clone X 3 User Guide 5
Page 6

System Requirements
NOTE! Clone X runs only under Mac OS X 10.4 or later.
Clone X requires Mac OS 10.4 or later, 512MB of RAM, a DVD burner if you want to
create bootable DVDs.
Thank you for registering
A registration card is included in the software package. Please complete and submit the
form to enable your access to technical support and timely notification of updates and
product news from TRI-EDRE.
Updates
Visit our web site at http://www.tri-edre.com to ensure you are always running the most
up-to-date version of Clone X. Updates can be downloaded directly from the site using
your assigned serial number. There is no charge for updates to the same main version
number—your Clone X 3 license includes all updates from 3.01 through 3.99 as they
become available.
Installation
Simply drag the Clone X application to your Applications folder. If you downloaded
your copy of Clone X, open the disk image and copy Clone X to your Applications
folder.
Uninstalling
To completely remove Clone X 3 from your hard drive, quit the application and drag the
following items to the Trash:
• The Clone X 3 application.
• The com.ted.Clone X 3.plist file from your user ~/Library/Preferences folder.
• The Clone X 3 folder from your user ~/Library/Application Support folder.
Also delete the disk images remaining in the folder you selected in Preferences for the
DVD creation.
Launching and Registering the Software
Double-click the application icon to launch Clone X. You will be asked to enter your
Administrator password.
At first launch, enter your serial number at the prompt (sent to you by email, or located
on a sticker on your CD) to activate all of the features of Clone X. Be sure to keep your
serial number in a safe place.
6 Clone X 3 User Guide
Page 7

Technical support
First of all, you should examine this manual, and the FAQ at the end of this manual. The
latest FAQ is available on our web site.
If you do not find the answer to your questions, free technical support can be accessed
by email, fax or phone. Please have your serial number and software version number
handy before calling, and be sitting in front of your computer with Clone X running.
Contacts
Please contact TRI-EDRE directly if you have comments, problems or questions about
Clone X, this user guide or the TRI-EDRE web site, or require additional licenses or a
site license.
TRI-EDRE
22 Place de l’Église - BP 111
83510 Lorgues (France)
Email: contact@tri-edre.com or contact@tri-edre.fr
Phone: +33 4 98 10 10 50
Fax: +33 4 98 10 10 55
Web site: http://www.tri-edre.fr or http://www.tri-edre.com
Clone X 3 User Guide 7
Page 8
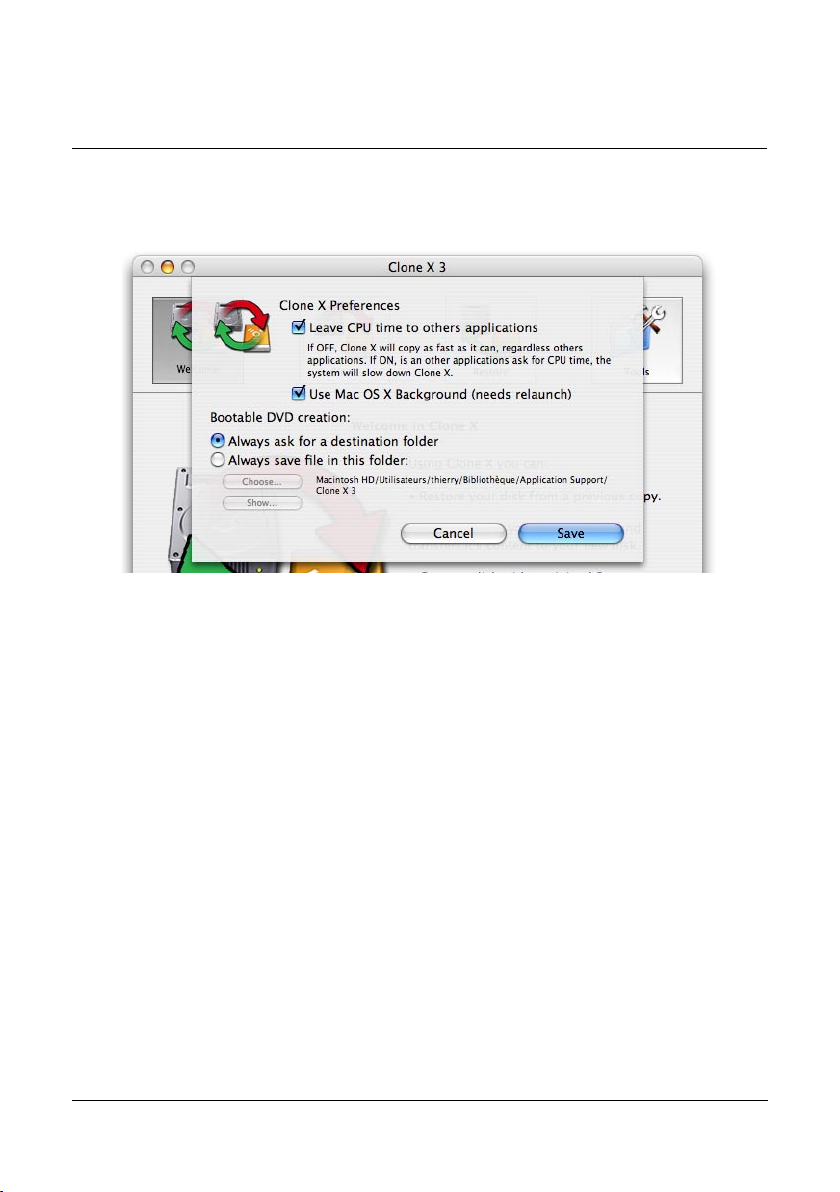
Preferences
You can access Clone X preferences in the Clone X 3 menu. You can change the following settings.
Leave CPU time to others applications
Default settings is ACTIVATED. When this setting is activated, Clone X will run with
a lower priority than other programs. This allows you to continue working while Clone
X is working in the background. When deactivated, all programs will share resources
equally.
Use Mac OS X Background
Default setting is ACTIVATED. When this setting is activated, Clone X will use default
aqua color for windows background. When not activated, Clone X will use a unified
gray for all windows, except sheets, dialogs and warning messages.
Bootable DVD creation
With default setting, Clone X will ask for a destination folder for disk images each
time you create a new DVD. If you want to always store disk images at the same place,
change this setting and choose the folder where you want to create files (Clone X will
no more ask you each time).
8 Clone X 3 User Guide
Page 9
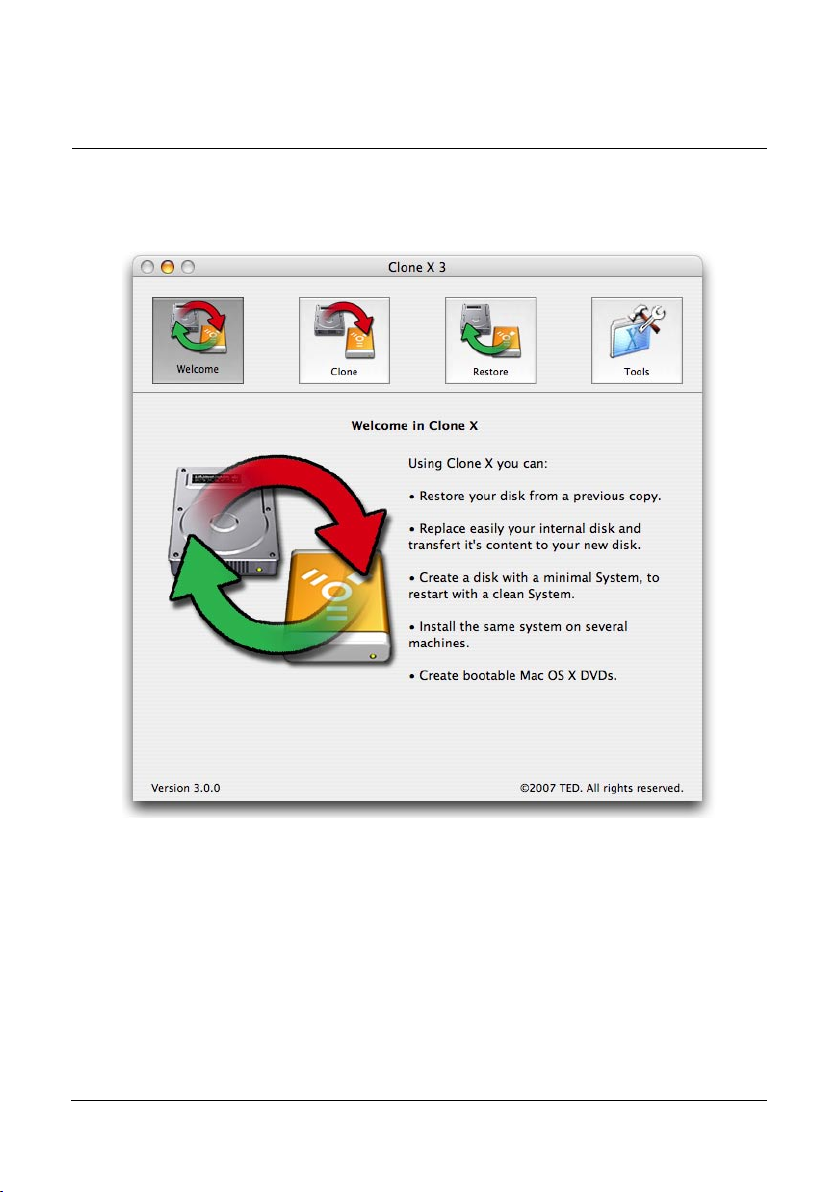
Main Window
After launching Clone X, the main window appears. This window is divided into several sections, which provide access to all features.
Features are organized into three groups. Click the buttons on the top of the window to
access each group:
• Clone shows the various modes to copy a disk to another disk, or within a folder.
• Restore can put a disk back to a previous state and contents.
• Tools access other functions: disk comparison, bootable CD creation, minimal
System installation.
Clone X 3 User Guide 9
Page 10
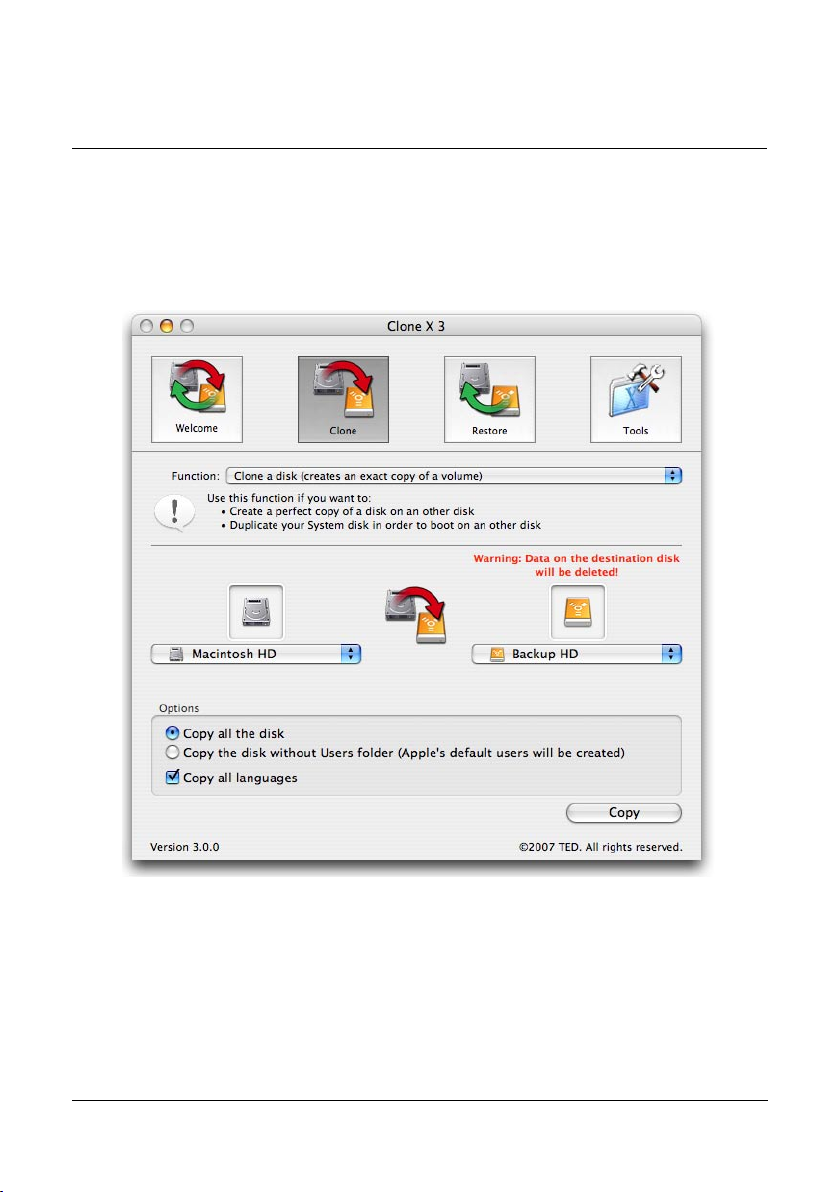
Clone a Disk
The first panel is dedicated to the copy of your hard disks (internal and external). Various modes are available to fit your needs.
IMPORTANT: The clone functions of Clone X erase the contents of the destination
disk or folder.
Clone X is dedicated to copying your hard disk. The copy done on a second hard disk
(called destination or target) is strictly identical to the source disk. The copy contains all
the files and folders of the source volume. Characteristics (visibility, protection, etc.),
owner and permissions are preserved for each item.
For example, a System disk copy will contain the System, all Applications, all users
accounts, and all documents and settings for each user.
10 Clone X 3 User Guide
Page 11

Once completed, a copy allows you to:
• Have a copy of your disk ready and available to start from in case of problems
with your main disk.
• Restore your hard disk and put it back to a clean state and contents (as it was when
the initial copy was done).
• Be able to reformat your disk and copy back its entire contents: System, Applications, documents, and settings.
• Change your hard disk to a new larger disk without needing to reinstall System,
upgrades, applications, and documents, or to redo all your settings.
When making a copy of a disk (the source disk) to a second disk (the destination or
target disk), Clone X copies all files and folders. If a copy was previously made on the
destination disk, it will be updated to exacly reflect the contents of the source disk: new
items are added, modified items are replaced, and items that are no longer in the source
disk are removed from the target disk.
Note: Only new or changed files are copied. Unchanged files are ignored. Thus, the
update of a previous copy is much quicker than the initial copy.
IMPORTANT: The destination disk may be partially or totally erased when you
run a copy. Before running a copy, check that the target disk does not contain any
important data that could be deleted and lost. Be sure to backup or copy such data
before running a copy, or use a copy mode that does not erase the entire disk contents (copy to a folder mode).
Choosing a clone mode
The Function popup menu selects one of the available clone modes, defining how the
source disk will be copied.
• To create an exact copy of a disk, use the «Clone a disk» mode.
• To make a copy in a disk used for other purpose (like an iPod), use the «Copy to
disk containing other data» mode.
• To copy multiple disks into a large backup disk, or to make a copy without erasing
the destination disk, use the «Copy to a folder» mode.
Each of these modes is described in the next pages.
Clone X 3 User Guide 11
Page 12
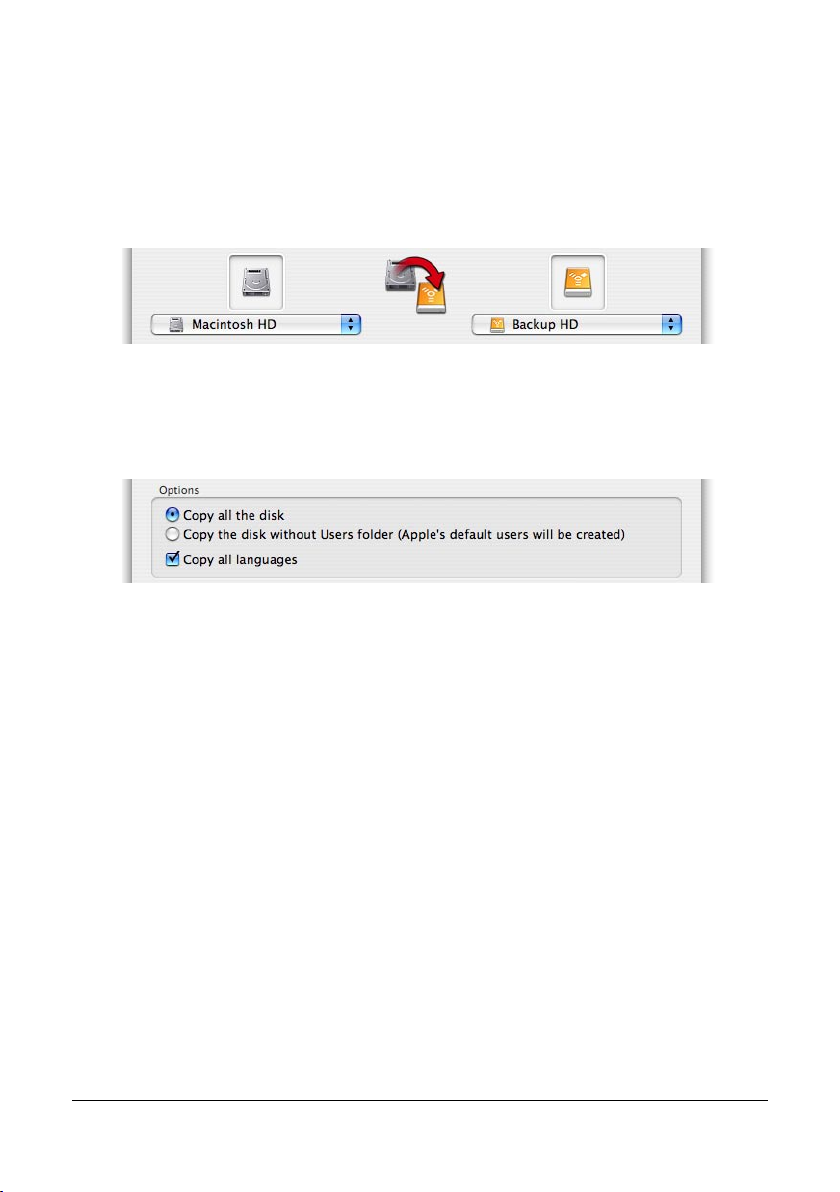
Choosing source and destination volumes
Source and destination are selected using the pop-up menus.
Select the source volume (the volume that will be copied) in the left part. Select the
destination volume (the volume to where the copy is done) in the right part.
Options
The various cloning modes share the same settings.
Copy all the disk
Clone X will duplicate everything.
Copy the disk without Users folder
Clone X will copy everything, but will ignore Users folder. If you boot on such a copy,
Mac OS X will create default folders when it will boot the first time.
Warning: If a Users folder already exists on the destination disk, it will not be
updated or deleted. Make sure to copy it later if you want an up-to-date clone.
Copy all languages
With Mac OS X, each application, extension and other piece of the System can contain
resources for several languages. Clone X allows you to choose a selection of the available languages, for example to reduce the size of the clone.
When this option is checked, all languages resources will be copied.
When this option is unchecked, Clone X will propose you to choose the languages you
want to be copied. When you start a copy with this option unchecked, Clone X will
first search for existing languages in the source disk, and list them in a dialog. Check
any language you want to be copied (if available), and uncheck those that will not be
12 Clone X 3 User Guide
Page 13
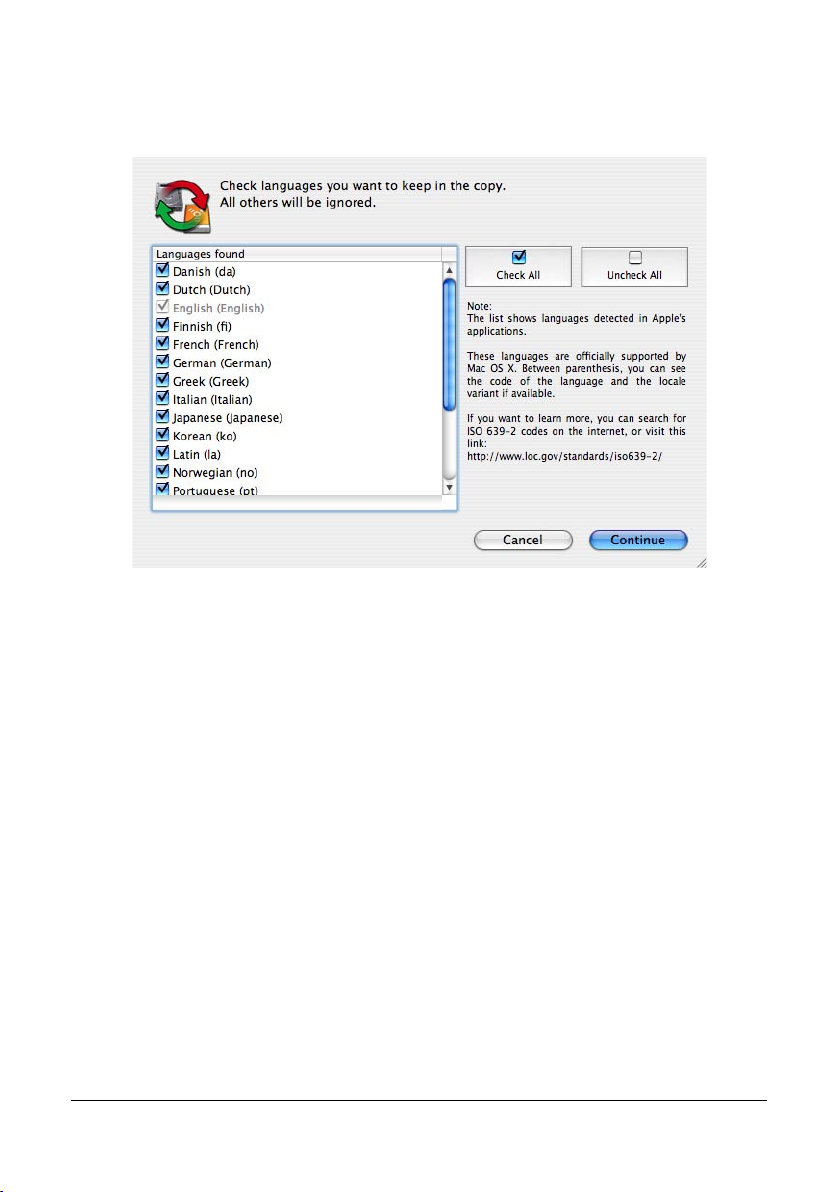
copied.
Note: English and all his local variant are always copied.
CAUTION! If a copy has already be done with all languages, and that you update
this copy with a set of languages, languages that are in the destination are not removed. To remove all undesired languages, you need to clear the disk and restart
a new copy.
Clone X 3 User Guide 13
Page 14

Clone a disk (creates an exact copy of a volume)
Use this mode to create a copy of a disk.
This mode will result in an exact copy of the source disk contents into the destination
disk. Missing items are copied. Modified items are replaced. Items that exist in the target disk but are not in the source disk are removed from the destination disk.
Available options can be used to copy (or not):
• The Users folder, containing accounts, documents and settings of the users. Thus,
you can obtain a copy of the System and the Applications only.
• Resources for all or a selection of languages (for example to limit the size of the
copy).
Note: if the Users folder or languages resources have been previously copied, they are
not removed from the copy.
Looking at the example below, the folder «My Data» that was initially in the «Copy»
disk will be deleted (as well as its contents) because there is no «My Data» folder in the
«Macintosh HD» source disk. The contents of «Macintosh HD» will be entirely copied
into the «Copy» disk.
CAUTION! If the destination volume is not initially empty, its contents can be
erased (at least items that are not present in the source volume. You should verify
that the destination volume does not contain any important data that could be lost
before running the copy.
14 Clone X 3 User Guide
Page 15

Copy to a disk containing other data
Use this mode to copy a disk without entirely erasing the destination disk.
This mode adds the data of a disk into another disk. It accomplishes a copy of the whole
contents of the source disk into the destination disk, without deleting the contents of the
root folders in the destination disk (if they do not exist in the source disk).
Folders that were initially existing at the root of the destination disk remain unchanged
if same folders (with the same name) are not at the root of the source disk. Folders existing in both source and destination disks are updated.
Available options can be used to copy (or not) the Users folder, and various languages.
In the above example:
• The «Documents» folder in the «iPod Photo» disk will be updated: its contents
will be modified to exactly reflect the contents of the «Documents» folder in «Macintosh HD», including the removing of the folders and files that are only present
in the «Documents» folder of the destination «iPod Photo» disk.
• «Calendars», «Contacts», «Notes» and «Photos» folders (as well as the hidden
folder containing music) will remain unchanged, because such folders do not exist
in «Macintosh HD».
• The contents of «Macintosh HD» will be entirely copied into «iPod Photo».
CAUTION! The contents of the destination disk can be partially erased if folders
with the same name exist at the root of both disks. In such a case, folders will be
strictly updated in the destination disk: the contents of these folders in the destination will become strictly identical to the related folders of the source disk.
For example, you want to clone your System disk to an other one, which already contains a folder named “Applications” at the root of the disk. Clone X will replace this
folder’s contents by the one in your System disk. If the folder on the destination disk is
renamed “My Applications” (and if there is not such a folder in the source disk), it will
not be deleted.
Clone X 3 User Guide 15
Page 16

Copy a disk into a folder
Use this mode to copy multiple disks into a large backup disk.
This mode runs a copy of the entire source disk into a subfolder in the destination disk.
This will not produce a bootable disk, as Mac OS X needs to be at the root of the disk
to be able to boot.
The destination folder is always located at the root of the destination disk. The destination disk must be another disk than the source disk. The folder’s name can be edited in
the field (initially set with the source disk name).
If the destination folder does not exist, it is created when performing the copy.
If the destination folder was not initially empty, its contents are updated to exactly re-
flect the contents of the source disk.
Available options can be used to copy (or not) the Users folder, and the resources for
various languages.
Note: if the Users folder or languages resources have been previously copied, they are
not removed from the copy.
CAUTION! The contents of the destination folder can be partially erased to reflect
the contents of the source disk. Be sure to create a new folder name to avoid deleting existing data in the destination disk.
16 Clone X 3 User Guide
Page 17

Restore a disk
The restore functions copy back to a disk the contents of a previous copy, in order to
return the disk to the state and contents it had when the copy was created.
IMPORTANT: The restore functions of Clone X do not erase the contents of the
destination disk (the disk to be restored). Use the expert advanced mode if you
need to delete data.
Click the Restore button in the main window to access the Restore modes.
IMPORTANT: It is not recommended to directly restore the running System (copy
back from another disk to the startup disk). To restore the startup disk:
• Boot on the backup.
• Eventually, prepare your “old source” disk. For example, you can reformat it.
Clone X 3 User Guide 17
Page 18

• Launch Clone X and clone data from your backup to your disk to be restored.
Note: Use the restore mode to restore any disk (except the startup disk), to restore from
a clone in a folder, or to restore specific files and folders.
Restore Modes
Various modes are available to restore a disk with the data from another disk, or from a
folder’s contents. You can also restore a specific file or folder.
The destination disk (disk to be restored) is selected in the left pop-up menu. The reference disk (the one containing the data that will be copied into the disk to be restored)
is selected in the right pop-up menu.
For example, in the screen copy above, the contents of «Backup HD» will be copied
into «Macintosh HD».
CAUTION! When restoring, the contents of the disk to be restored will be overwritten and replaced. All the data that have been modified since the copy can be
lost. For security reasons, we strongly advise you to verify the contents of a disk
before restoring it, and to backup important data that could be deleted.
Restore options
Copy all the disk
Clone X will restore and copy everything to the disk to restore.
Copy without the Users folder
This allows you to restore all except the Users accounts. If a Users folder already exists,
the contents of this folder remain unchanged in the restored disk (nor deleted nor updated).
18 Clone X 3 User Guide
Page 19

Restore a disk from a copy
Use this mode to restore from a standard clone.
Clone X will restore all data, and eventually the Users folder (depending of your set-
tings). Files are copied from the clone to the destination (the disk to be restored). Any
previous contents of the disk to restore will be replaced if they have their counterpart in
the source disk, or will be ignored if there is no such files in the source disk.
Once the disks selected, click the Restore button. After confirmation, the restoration is
executed, filling the disk to be restored with the data of the clone.
Note: Clone X will not copy in the restored disk any pre-existing file that does not need
to be updated.
CAUTION! When restoring, the files of the disk to be restored will be over-written
and replaced.
Restore a disk from a copy into a folder
Use this mode to restore data from a clone copied into a subfolder.
This mode copy data from a folder to the destination disk (the disk to be restored). Data
will be copied at the root level of the destination disk.
Clone X will restore all data from this folder, depending on options described above.
Files are copied from the clone in the folder to the disk to be restored. Any previous
contents of the disk to restore will be replaced or removed (except the Users folder if
the related option is selected).
Once the source folder and destination disk selected, click the Restore button. After
confirmation, the restoration is executed.
Note: Clone X will not copy any pre-existing file in the restored file that does not need
to be updated.
CAUTION! When restoring, the files of the disk to be restored will be over-written
and replaced.
Advanced restore
Use this function to restore a selection of files and folders.
This function allows you to choose what you want to restore. First, start by choosing
the source and the destination disk. Then, click the “Restore...” button to access the
restoration dialog. Two modes are available in advanced restoration, simple and expert
modes.
Clone X 3 User Guide 19
Page 20

Simple Mode
The simple mode offers different predefined sets. You can easily choose what part of the
disk will be restored.
IMPORTANT: For each set, Clone X will restore the desired item only. The other
contents of the destination (disk to be restored) will remain untouched. For example, if you select the «Applications only» set, the contents of the Applications folder
of the disk to be restored will be updated. The other parts of the disk to be restored
(System, Users, etc.) are not modified.
The predefined sets in the list are:
• System Only: Clone X will copy everything except the Applications and Users
folder.
• Applications Only: Clone X will copy the Applications folder only.
20 Clone X 3 User Guide
Page 21

• Users Only: Clone X will copy the Users folder only.
• System & Applications: Combo of first and second presets.
• Users & Applications: Combo of second and third presets.
To restoredata in the destination disk, select one of the predefined sets in the list, and
click the “Restore” button.
Expert Mode
Clone X lists all items in the source disk (in this example, the contents of the «Backup
HD» disk). You can choose exactly which file or folder to copy.
To restore a file or a folder, select it in the list and click the «Restore» button.
If you select a folder which already exists in the destination, Clone X will ask you if you
want to add data to the destination (without removing data in the destination) or if you
want to do an exact copy. If you choose the second, you will have a perfect copy of the
Clone X 3 User Guide 21
Page 22

folder, data present in the destination and not in the source will be deleted.
Warning! This feature is for advanced users, if you are not aware of what you are
doing, you can corrupt your System copying partial or corrupted parts of Mac OS
X.
22 Clone X 3 User Guide
Page 23

Tools
The Tools button accesses additional features available in Clone X.
Available functions are:
• Create a bootable DVD: this function offers you an easy way to create your own
bootable DVD containing the applications of your choice.
• Compare the contents of two disks.
• Create a minimal System: you might need a disk with a minimal System for your
tests, or to have a low size System, or to start with a clean System to properly
reinstall your environment.
Clone X 3 User Guide 23
Page 24

Bootable DVD
This function provides an easy way to build a customized bootable Mac OS X DVD
that includes one or more applications. Such DVDs are generally dedicated to utilities
that repair disks, partition disks, backup data, or recover data. Such DVDs can be usefull when it is necessary to restart from another disk to run operations on the main hard
disk.
The DVD is related to the hardware it is created on, so it’s compatibility may vary depending on the machine used. For example, a DVD created on a PPC machine will not
boot an Intel Mac.
Contrary to previous version of Clone X, the System includes more libraries and frameworks to try to be the most compatible possible with applications. The drawback is
that data will not fit on a CD-ROM anymore. You must use DVD.
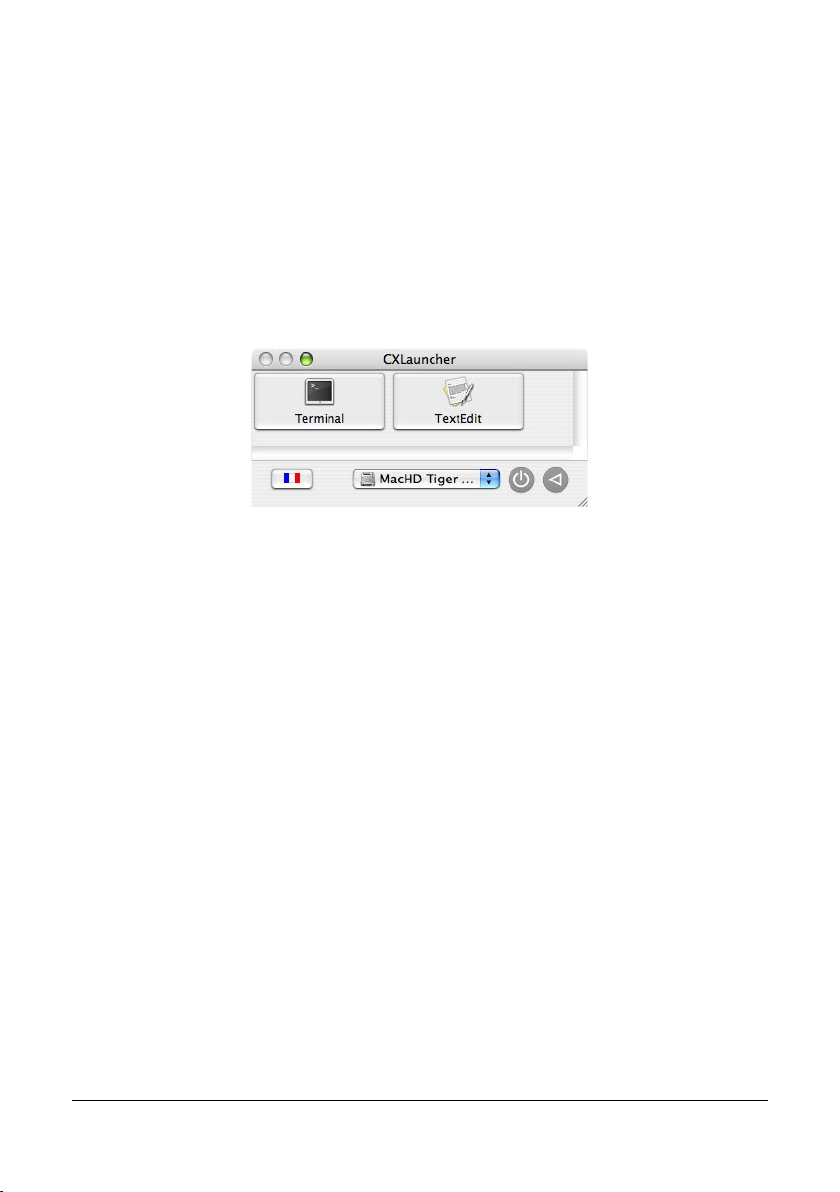
The System on the DVD is a limited one, and there is no Finder available on DVDs
created by Clone X. But Clone X installs a special launcher, CXLauncher, to run any of
the applications copied in the DVD.
Creating the DVD
First, you can choose the size of the DVD you want to create.
Click the “Create a bootable DVD” button. Depending on preferences, Clone X may ask
for a folder where the disk image used to create the DVD will be saved. Then, Clone X
will create a disk image and copy necessary files to this disk image.
When done, Clone X will display a list of the applications installed in your Applications
folder and subfolders.
24 Clone X 3 User Guide
Page 25

Select any application you desire, and click the arrow button to move it to the list on the
right side of the window. Clone X displays the available free space on the DVD, so that
you can select the applications you can add.
To remove one application from the DVD, select it in the right list and click the right
arrow button.
Note: Some applications might need additional files installed on the DVD to work correctly. If an application does not work from the DVD, please check its documentation.
The «•••» button lets you add specific files. These files are added in a folder named
«Custom Files» within the Applications folder.
The «red cross» button remove the selected file.
If your System is not an English System, you can use the checkbox to create an English
DVD. This can improve the compatibility with certain applications.
When you have chosen all applications you need, click “Finish Install” button. Clone X
Clone X 3 User Guide 25
Page 26
will copy applications, and ask you if you want to burn the DVD.
You can cancel and burn the disk image later with Disk Utility, or insert a blank DVD
(you could use rewritable ones if you want to make tests).
DVD test and usage
Now, test your DVD! You can boot on it holding the C key or Option key at startup. Wait
a few minutes (be patient it could take a long time, depending on burn speed, optical
drive...), and the CXLauncher software will appear, allowing you to launch any of the
installed applications.
The flag icon at the bottom left corner of the window indicates the current keyboard in
use. If needed, click on it to display the Mac OS virtual keyboard, allowing you to type
characters.
The popup menu will display available boot disk to restart.
On the bottom right part of the window are a Shutdown and a Restart buttons.
26 Clone X 3 User Guide
Page 27

Disk Comparison
Select two disks to compare, then click the “Compare disks” button. Clone X will show
you the differences only. Identical items are not shown except folders at the root level.
Icons and colors show the differences. See the top right part of the window for explainations.
If you select a line in the window, detailed informations will be displayed for the current
selected item.
Clone X 3 User Guide 27
Page 28
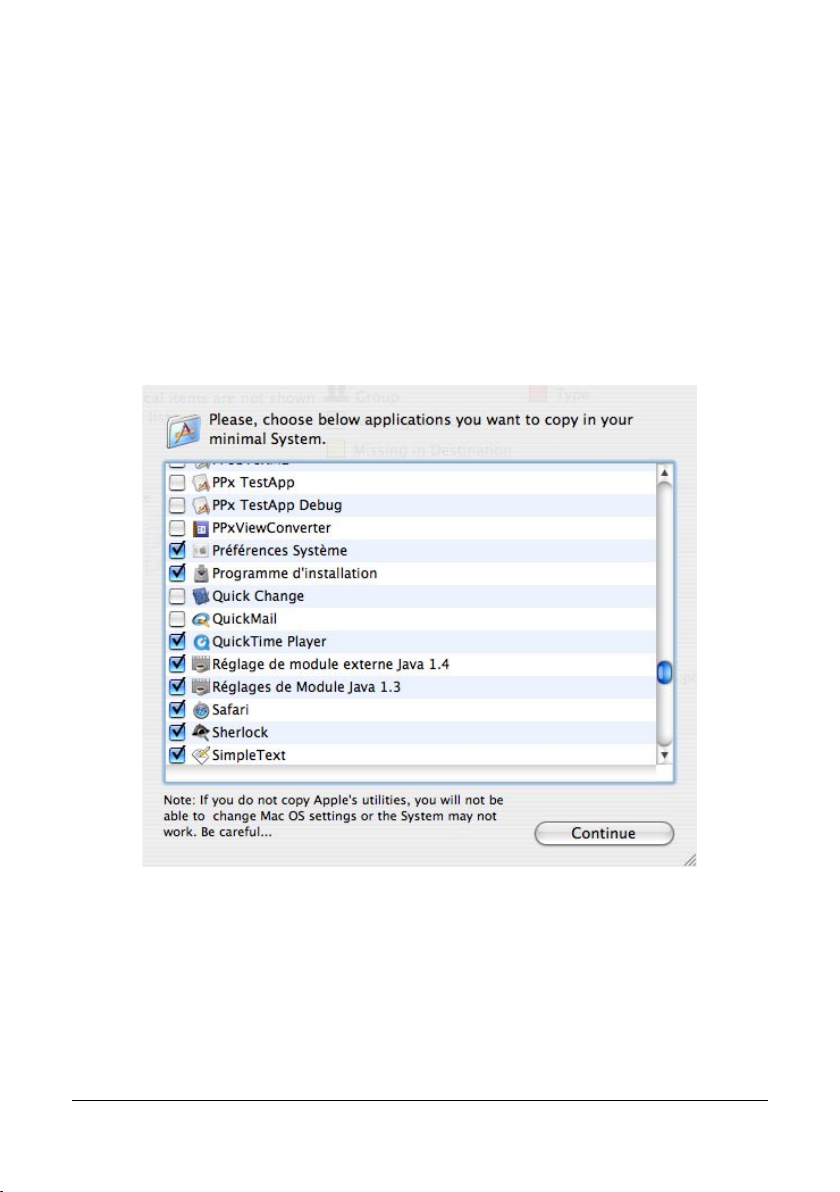
Create a minimal System disk
It might be necessary to have a basic System volume for testing purposes, when you
want to install a System in a small volume, or when you want to restart from a clean
System.
Clone X will create a usable System, but the lighter possible. All Systems files will be
copied in order to have a full working System. Users data are not copied.
Warning: The destination disk will be completely erased!!!
When the copy is done, Clone X will show the complete list of applications that can be
copied to the destination disk.
It is recommended to let the default settings defined by Clone X.
However, if you desire, you can uncheck non necessary applications, or check new ap-
plications to add them. Default settings will select all Apple’s applications.
Once your selection ready, click the “Continue” button to finish the copy. Your new
bootable disk is now ready.
28 Clone X 3 User Guide
Page 29

F.A.Q.
Q: How can I access Help?
A: The Help menu opens the PDF version of the manual.
Q: Can Clone X create a bootable copy of my hard disk?
A: Yes. The «Clone» function results in bootable copies.
Q: Can I create a bootable DVD that will start up my Mac?
A: Yes. The bootable DVD will contain a reduced version of your own System installation, and hence will be compatible with your machine. Note that starting from a DVD is
much slower than starting from a hard disk.
Q: Can I start up any Mac with the bootable DVD I created?
A: Generally yes, provided that the version of your System (and thus the System on the
CD) is compatible with the machines, and that they have the same processor (a DVD
created on a Mac Intel will not boot a PPC machine, and vice versa).
Q: Can I put more than one application on my bootable DVD?
A: Yes, as long as there is enough free space. Bootable DVDs created with Clone X
contain a special application that can launch any of the applications installed on them.
Q: Why is it not possible to copy to/from a server?
A: Volumes mounted through a network do not allow for the correct copying of owner
and permissions of folders and files. This prevents the copy from being correct. That’s
why servers are disabled in the volumes pop-up menus.
Q: How could I transfer the contents of a volume to a server?
A: First copy the contents of the disk to a disk image (use the Clone function). Once
completed, you can copy the disk image through the network.
Q: Can I burn the disk images created by Clone X with my favorite software?
A: Yes. Clone X can directly burn the DVD, but you can burn the disk image using
another software.
Q: Can I backup or copy a specific file or folder with Clone X?
A: No. Clone X copies an entire disk. You can copy a particular item using the Finder
or a backup application such as Tri-BACKUP.
Q: Can I restore a specific file or folder with Clone X?
A: Yes. Use the Expert restoration mode of Clone X.
Clone X 3 User Guide 29
Page 30

Q: Clone X creates a log file «Clone X Log.clxlog» in the destination. Why?
A: Clone X saves in this file the result of the action and, if necessary, the number and the
type of the errors. To open it, launch Clone X and double-click this file.
30 Clone X 3 User Guide
 Loading...