

Page 1

Clone’X
USER
HANDBOOK
Copy your serial number here: . . . . . . . . . . . . . . . . . . . . . . . .
Page 2

Licensing and Copyright Agreement
Copyright ©2002 TED (TRI-EDRE DEVELOPPEMENTS)
All rights reserved
Except as permitted under copyright law, no part of the program or this manual may be
reproduced or distributed in any form or by any means without the prior written permission of TRI-EDRE
The program, and this manual, are licenced only for individual use on a single computer. you are permitted by law to make working copies of the software program, solely
for your own use. No copy (original or working) may be used while any other copy is in
use.
If you ever sell, lend or give away the original copy of this Software program, all working copies must also be sold, lent or given to the same person, or distroyed.
Trademarks
Clone’X is a trademark of TRI-EDRE.
All other products are trademarks of their respective companies.
©2002 TED. All rights reserved.
Distribution by TRI-EDRE
22 Place de l’Eglise
BP 111
83510 LORGUES - France
Phone: 33 498101050
Fax: 33 498101055
Web site: www.tri-edre.com
Email : contact@tri-edre.com
Page 3

-
1 - Introduction. . . . . . . . . . . . . . . . . . . . . . . . . . . . . . . . . . . . . . . . . . . . . . . . . . . . 5
1.1 Welcome!. . . . . . . . . . . . . . . . . . . . . . . . . . . . . . . . . . . . . . . . . . . . . . . . . . . . . 5
1.2 Registration . . . . . . . . . . . . . . . . . . . . . . . . . . . . . . . . . . . . . . . . . . . . . . . . . . . 5
1.3 Latest version. . . . . . . . . . . . . . . . . . . . . . . . . . . . . . . . . . . . . . . . . . . . . . . . . . 5
1.4 Program installation. . . . . . . . . . . . . . . . . . . . . . . . . . . . . . . . . . . . . . . . . . . . . 5
1.5 Clone’X first use. . . . . . . . . . . . . . . . . . . . . . . . . . . . . . . . . . . . . . . . . . . . . . . . 6
1.6 Technical support. . . . . . . . . . . . . . . . . . . . . . . . . . . . . . . . . . . . . . . . . . . . . . . 6
1.7 Updates . . . . . . . . . . . . . . . . . . . . . . . . . . . . . . . . . . . . . . . . . . . . . . . . . . . . . . 7
1.8 Contacts. . . . . . . . . . . . . . . . . . . . . . . . . . . . . . . . . . . . . . . . . . . . . . . . . . . . . . 7
2 - Getting to know Clone’X . . . . . . . . . . . . . . . . . . . . . . . . . . . . . . . . . . . . . . . . . 8
2.1 Creating clones . . . . . . . . . . . . . . . . . . . . . . . . . . . . . . . . . . . . . . . . . . . . . . . . 8
2.2 Complete System copy . . . . . . . . . . . . . . . . . . . . . . . . . . . . . . . . . . . . . . . . . . 8
2.3 Repairing a damaged System . . . . . . . . . . . . . . . . . . . . . . . . . . . . . . . . . . . . . 8
2.4 Installing Mac OS on another computer. . . . . . . . . . . . . . . . . . . . . . . . . . . . . . 9
3 - Creating clones. . . . . . . . . . . . . . . . . . . . . . . . . . . . . . . . . . . . . . . . . . . . . . . . 10
3.1 Creating a new clone. . . . . . . . . . . . . . . . . . . . . . . . . . . . . . . . . . . . . . . . . . . 10
3.2 Which files are cloned? . . . . . . . . . . . . . . . . . . . . . . . . . . . . . . . . . . . . . . . . . 11
3.3 Where can clones be saved?. . . . . . . . . . . . . . . . . . . . . . . . . . . . . . . . . . . . . 12
3.4 How to create clones? . . . . . . . . . . . . . . . . . . . . . . . . . . . . . . . . . . . . . . . . . . 14
-
4 - Updating clones . . . . . . . . . . . . . . . . . . . . . . . . . . . . . . . . . . . . . . . . . . . . . . . 16
4.1 Updating existing clones . . . . . . . . . . . . . . . . . . . . . . . . . . . . . . . . . . . . . . . . 16
4.2 How to update existing clones?. . . . . . . . . . . . . . . . . . . . . . . . . . . . . . . . . . . 16
5 - Managing clones . . . . . . . . . . . . . . . . . . . . . . . . . . . . . . . . . . . . . . . . . . . . . . 18
5.1 Clones visibility in the Finder . . . . . . . . . . . . . . . . . . . . . . . . . . . . . . . . . . . . . 18
5.2 Browsing clones. . . . . . . . . . . . . . . . . . . . . . . . . . . . . . . . . . . . . . . . . . . . . . . 19
5.3 Damaged clones . . . . . . . . . . . . . . . . . . . . . . . . . . . . . . . . . . . . . . . . . . . . . . 20
5.4 Deleting clones . . . . . . . . . . . . . . . . . . . . . . . . . . . . . . . . . . . . . . . . . . . . . . . 21
5.5 Renaming clones. . . . . . . . . . . . . . . . . . . . . . . . . . . . . . . . . . . . . . . . . . . . . . 21
5.6 Making clones visible or invisible. . . . . . . . . . . . . . . . . . . . . . . . . . . . . . . . . . 21
Clone’X User Guide 3
Page 4

6 - Restoring clones . . . . . . . . . . . . . . . . . . . . . . . . . . . . . . . . . . . . . . . . . . . . . . 22
6.1 Restoring the System using clones . . . . . . . . . . . . . . . . . . . . . . . . . . . . . . . . 22
6.2 Which files are restored?. . . . . . . . . . . . . . . . . . . . . . . . . . . . . . . . . . . . . . . . 23
6.3 How to restore clones? . . . . . . . . . . . . . . . . . . . . . . . . . . . . . . . . . . . . . . . . . 24
6.4 How to restore the System from clones saved on CDs? . . . . . . . . . . . . . . . . 25
6.5 Using the restored disk . . . . . . . . . . . . . . . . . . . . . . . . . . . . . . . . . . . . . . . . . 26
6.6 History file . . . . . . . . . . . . . . . . . . . . . . . . . . . . . . . . . . . . . . . . . . . . . . . . . . . 28
6.7 Cancelling the restoration . . . . . . . . . . . . . . . . . . . . . . . . . . . . . . . . . . . . . . . 28
7 - How to copy a disc with Clone’X. . . . . . . . . . . . . . . . . . . . . . . . . . . . . . . . . . 30
7.1 Before starting to copy. . . . . . . . . . . . . . . . . . . . . . . . . . . . . . . . . . . . . . . . . . 30
7.2 How to copy a System Disc. . . . . . . . . . . . . . . . . . . . . . . . . . . . . . . . . . . . . . 30
7.3 Copy on a disc containing data . . . . . . . . . . . . . . . . . . . . . . . . . . . . . . . . . . . 30
8 - Troubleshooting . . . . . . . . . . . . . . . . . . . . . . . . . . . . . . . . . . . . . . . . . . . . . . . 31
8.1 At startup, Clone’X asks a password, why?. . . . . . . . . . . . . . . . . . . . . . . . . . 31
8.2 Errors have occurred during cloning or restoration, why? . . . . . . . . . . . . . . . 31
8.3 The restored System does not properly work, why? . . . . . . . . . . . . . . . . . . . 32
4 Clone’X User Guide
Page 5

1.1 - Welcome!
1 - Introduction
1.1 Welcome!
We would like to thank you for using our product Clone’X!
Clone’X is a Macintosh utility that allows you to:
• create System clones.
• easily repair the System if it gets damaged.
• easily copy the System to other disks or computers.
1.2 Registration
You will find a registration card, enclosed in the package, for your
software license.
receive your registration card, you will be entitled to free technical
support. We may also send you information about product news or product
updates.
1.3 Latest version
Please fill this card and send it back
1 - Introduction
. As soon as we
Check our web site at
to know if you are currently using the latest version of this program. If you
do not have the latest version, you may download it. Use your existing
serial number to install it.
Note: Serial numbers are compatible with all versions having the same main
version number. For example, a serial number for version 1.0 is usable with
versions 1.01, 1.02, and so on.
1.4 Program installation
To install Clone’X, insert the installation CD and copy the «Clone’X»
folder to your hard disk (you can also download it at
edre.com or http://www.tri-edre.fr
If you are using Mac OS X, it is advisable to install Clone’X in the
«Applications» folder.
Clone’X User Guide 5
http://www.tri-edre.com
).
or
http://www.tri-edre.fr
http://www.tri-
Page 6
1 - Introduction
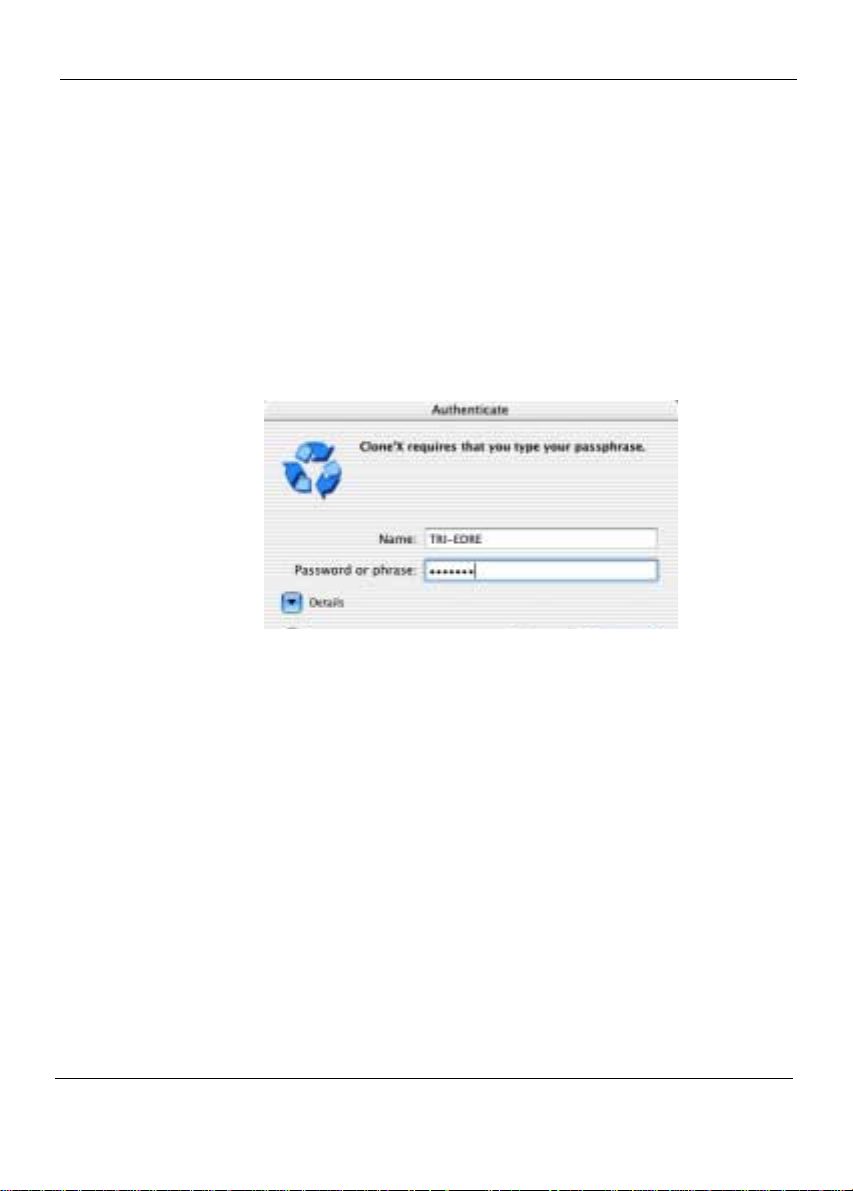
1.5 Clone’X first use
Double-click the application icon to run Clone’X.
Under Mac OS X, you must type in your password in order to open
Clone’X. Indeed, under Mac OS X, normal users cannot modify the
System therefore they cannot use Clone’X to clone or restore the current
System. Therefore, in order to use Clone’X, you must type in an
administrator password (this is the password you have defined when have
installed Mac OS X on your computer). W ithout this password, you cannot
use Clone’X.
1.5 - Clone’X first use
Picture 1. Authentication
Then, the application asks you to enter your serial number. You can find
the serial number on the CD sleeve. This personal serial number activates
all the functions. Keep your serial number in a safe place in order to be
eligible for free updates and free technical support.
If you have not yet bought Clone’X and want to try it, click the «Trial
Mode» button. The Trial mode is limited to 30 days. During the Trial
period, all features are available. But after 30 days, you will no longer be
able to use Clone’X.
1.6 T echnical support
Our technical support is free. You can contact us by e-mail, fax, and phone.
(Contact information is included below.)
You should mention your serial number and the application version
number when you contact us.
6 Clone’X User Guide
Page 7

1.7 - Updates
1.7 Updates
1.8 Contacts
1 - Introduction
You can download free updates from our web site:
http://www.tri-edre.com or http://www.tri-edre.fr
You can contact us with the information below. If you have comments
about this product, problems or questions you were unable to answer using
this user guide or with our web site, or you are interested in obtaining a site
license, please contact TRI-EDRE.
Please have your version and serial numbers ready when you call or
include them if your write.
• E-mail:
contact@tri-edre.com or contact@tri-edre.fr
• Phone or fax:
Phone: 33 498 101 050
Fax: 33 498 101 055
• Mail:
TRI-EDRE
22 Place de l’Eglise
BP 111
83510 Lorgues
France
Clone’X User Guide 7
Page 8

2 - Getting to know Clone’X
2 - Getting to know Clone’X
Clone’X is a Macintosh utility that allows you to easily clone the System
(Mac OS X, Mac OS 9, or Mac OS 8.6) that runs your computer.
2.1 Creating clones
The first thing to do with Clone’X is to clone your current System. Clones
can be saved on internal hard disks, external hard disks, and CDs. Each
clone contains a copy of every file used by Mac OS to run your computer.
However, the clone itself is not a System Folder, its content is hidden in the
Finder and cannot be used in the Finder. But thanks to the clone data,
Clone’X will be able to restore and repair your System if it gets damaged.
Clones can also be used to install a copy of your System on another disk or
computer.
2.2 Complete System copy
Copy differs from cloning on differents points:
• Copy is not compressed;
• Copy moves all data of the disc.
This function allows Clone’X to «move» all data of a disc on an other one.
Visible and invisibles System’s files are copied. If you copy a disc
containing a Mac Os X System, you will be able to boot on your copy . Y ou
can obviously do the same thing with 8 and 9 Systems.
2.1 - Creating clones
2.3 Repairing a damaged System
If crashes damage your System, you won’t have to reinstall it from scratch
using Apple installations CDs. You won’t have to do wnload again Mac OS
updates and you won’t have to install them. Clone’X allows you to easily
restore and repair your System using clones.
8 Clone’X User Guide
Page 9

2.4 - Installing Mac OS on another computer
2.4 Installing Mac OS on another computer
If you own several computers, you can clone your current System, and
then use Clone’X to install the same System on other computers. You do
not have to download and install Mac OS updates on each computer.
Clone’X allows you to easily standardise your Systems.
You can also use the Copy function, in order to have a complete System on
a disc, for maintenance operations for example. On a machine where the
Sytem and the applications are damaged, you can make the «copy of your
copy» in order to restore a safe situation on your machine, for example
with a default System.
2 - Getting to know Clone’X
Clone’X User Guide 9
Page 10
3 - Creating clones
3 - Creating clones
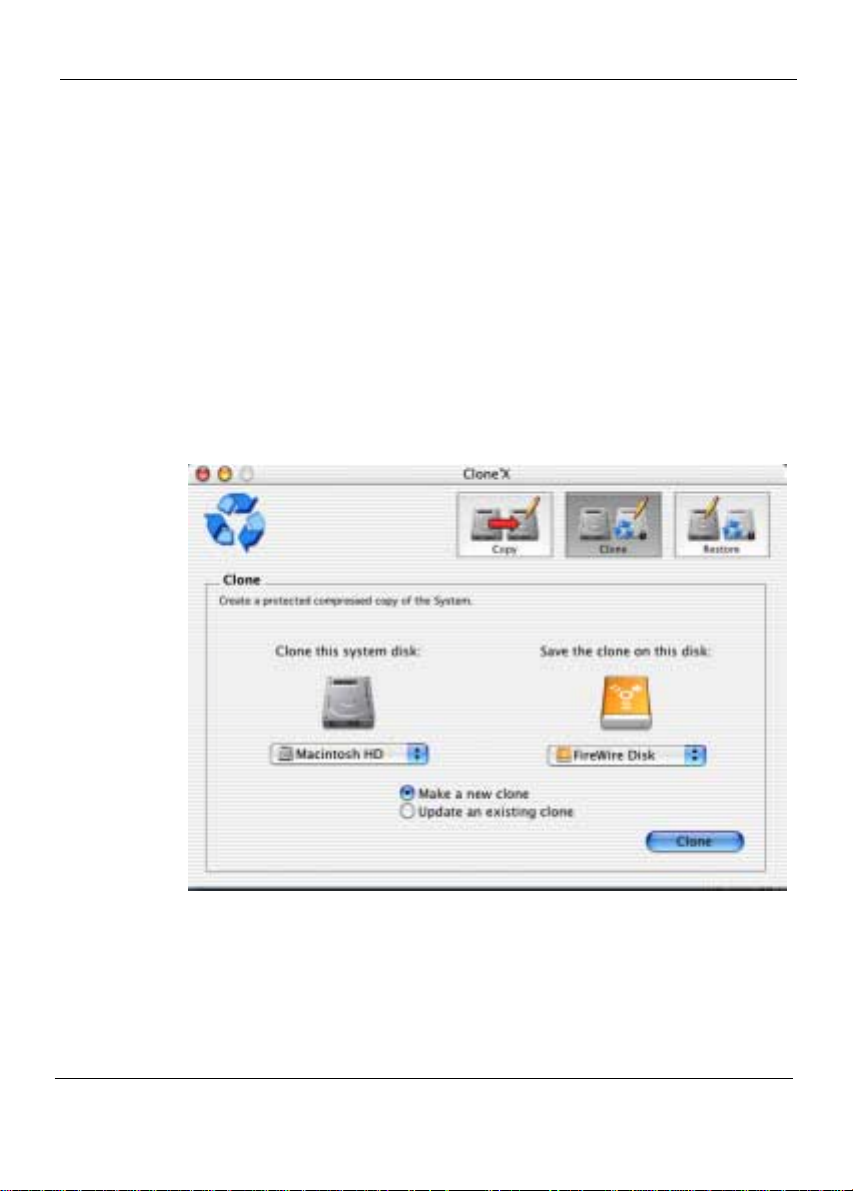
3.1 Creating a new clone
The first thing to do with Clone’X consists in cloning your current System.
Thanks to clones, your System can be restored if it gets damaged and can
be installed on other computers.
Each clone contains a copy of every file used by Mac OS to run your
computer. However, the clone itself is not a System Folder, its content is
hidden in the Finder and cannot be used in the Finder.
It is advisable to create new clones each time you update Mac OS.
3.1 - Creating a new clone
Picture 2. Creating a new clone
10 Clone’X User Guide
Page 11

3.2 - Which files are cloned?
3.2 Which files are cloned?
System files
Each clone contains a copy of your System.
Under Mac OS X, items located in the «System», «Library» and
«Network» folders are included in clones (these folders are located at the
root of your disk).
Under Mac OS 8.6 and Mac OS 9, items located in the «System Folder»
folder are included in clones (this folder is located at the root of your disk).
Be careful: if some of these folders have been renamed or moved, Clone’X
won’t be able to find them and they won’t be included in clones.
Folders not mentioned in the previous paragraphs are not included in
clones. For instance, under Mac OS X, Clone’X won’t include the «Mac
OS 9» folder (located at the root of your disk) in clones.
Applications
When creating new clones, you can either only clone the System or clone
the System and the applications.
If you choose to clone the System and the applications, the
«Applications», «Applications (Mac OS 9)» and «Developer» folders are
included in the clone (these folders are located at the root of your disk).
Be careful: if some of these folders have been renamed or moved, Clone’X
won’t be able to find them and they won’t be included in clones.
Applications located in other folders, won’t be included in clones.
Under Mac OS X, we encourage you to clone both the System and the
applications. If you only clone the System and restore it to an empty hard
disk, this hard disk won’t contain any «Applications» folder. Therefore,
you will be able to boot from this disk but you won’t be able to open any
application (you won’t be able to launch TextEdit, System Preferences,
Terminal, and so on). It could also be dangerous to restore Mac OS X
10.1.5 System on a disk containing Mac OS X 10.1.4 applications for
instance. We encourage you to clone both the System and the applications
in order to always keep the applications associated with your System.
3 - Creating clones
Clone’X User Guide 11
Page 12

3 - Creating clones
Documents
Clone’X is only able to clone the System, with or without the applications.
Clone’X cannot backup your personal documents.
Documents are never included in clones. For instance, under Mac OS X,
the «Users» folder (located at the root of your disk) is not included in
clones. Under Mac OS 8.6 and Mac OS 9, the «Documents» folder
(located at the root of your disk) is not included in clones.
3.3 Where can clones be saved?
Clones created by Clone’X are compressed. In average, clones take two
times less space than original Systems. For instance, if Mac OS X takes 1.6
GB on your hard disk, its clone must be saved on a disk with at least 800
MB free.
In order to prevent problems, we encourage you to save clones on disks
having ever more free space. Each time you install a new Mac OS update,
the System gets bigger. It means that you won’t be able to update an
existing clone with the bigger updated System if the disk containing the
clone is already full.
Saving clones on hard disks and removable media
Clones can be saved on any disks mounting on the Desktop: internal hard
disks, hard disk partitions, external hard disks, removable cartridges,
DVD-RAMs, and so on.
Note: you can either clone the System and save the clone on the same disk
as the System, or clone the System and save the clone on another disk.
Clones can only be saved on Mac OS Standard (HFS) and Mac OS
Extended (HFS+) formatted disks. Other formats are not supported. We
discourage you to save clones on servers via networks because it is slow.
Clones cannot be saved on disks that do not mount on the Desktop (DAT,
DLT, and so on). Clones cannot be split on multiple disks (for example,
clones be saved on multiple Zip cartridges), except for CDs (see the next
paragraph).
Trick: if you want to save clones on removable media (Jaz, DVD-RAMs,
and so on) under Mac OS X, we encourage you to select this disk in the
3.3 - Where can clones be sav ed?
12 Clone’X User Guide
Page 13

3.3 - Where can clones be saved?
«Finder», select «Show info» in the «File» menu and uncheck the «Ignore
privileges for this volume» box. We also encourage you to format this disk
in Mac OS Extended (HFS+) format, it is better than Mac OS Standard
(HFS) format.
Saving clones on CDs
If your CD burner works with Disc Burner, Clone’X can use Disc Burner
to save clones on CDs. If your CD burner cannot be used with Disc Burner ,
Clone’X cannot use your CD burner.
When a clone takes more than 640 MB, Clone’X asks you to insert new
blank CDs until the clone is entirely saved. To prevent confusion, we
encourage you to write on each CD: the name of the clone saved on this
CD, the clone creation date, and the number of this CD. If your CDs are
not correctly sorted, it will be very hard for you to restore and repair your
System using these CDs.
In order to save clones on CDs, during the clone creation, you must select
«Burn on CDs» in the right popup menu.
3 - Creating clones
Clone’X User Guide 13
Page 14
3 - Creating clones
3.4 How to create clones?
To create new clones, follow these steps:
• Open Clone’X (under Mac OS X, type in your password in order to
open Clone’X).
• Click the «Clone» button located at the top right corner of the window.
3.4 - How to create clones?
Picture 3. Clone creation - step 1
• Select the disk containing the System to clone in the left popup menu.
• Select the disk where you want to save the clone in the right popup
menu (see «Where can clones be saved?» page 12).
• Click the «Make a new clone» button (if this b utton is hidden, jump to
the next step).
• Click the «Clone» button located at the bottom right corner of the window.
14 Clone’X User Guide
Page 15

3.4 - How to create clones?
• Give a name to this clone.
• Determine if you want to clone the System with or without the applications and check the appropriate box (see «Which files are cloned?»
page 11).
• Determine if you want the clone to be visible in the Finder and check
the appropriate box.
• Click the «Clone» button located at the bottom right corner of the window to begin the clone creation.
The time required to clone the System mainly depends on two factors: the
cloned item sizes (it is faster to only clone the System) and the disk
performance (DVD-RAMs are very slow for instance). On recent
PowerMacs, it usually takes 45 minutes to clone Mac OS X.
When the clone creation is complete, Clone’X tells you if it has been
successfully created or not. If Clone’X has detected some errors during the
clone creation, select «Save Errors…» in the «File» menu and read «Errors
have occurred during cloning or restoration, why?» page 31. If you have
cancelled the clone creation by clicking the «Stop» button, the clone has
been moved to the Trash, now you can empty the Trash to delete it.
3 - Creating clones
Picture 4. Clone creation - step 2
Clone’X User Guide 15
Page 16

4 - Updating clones
4 - Updating clones
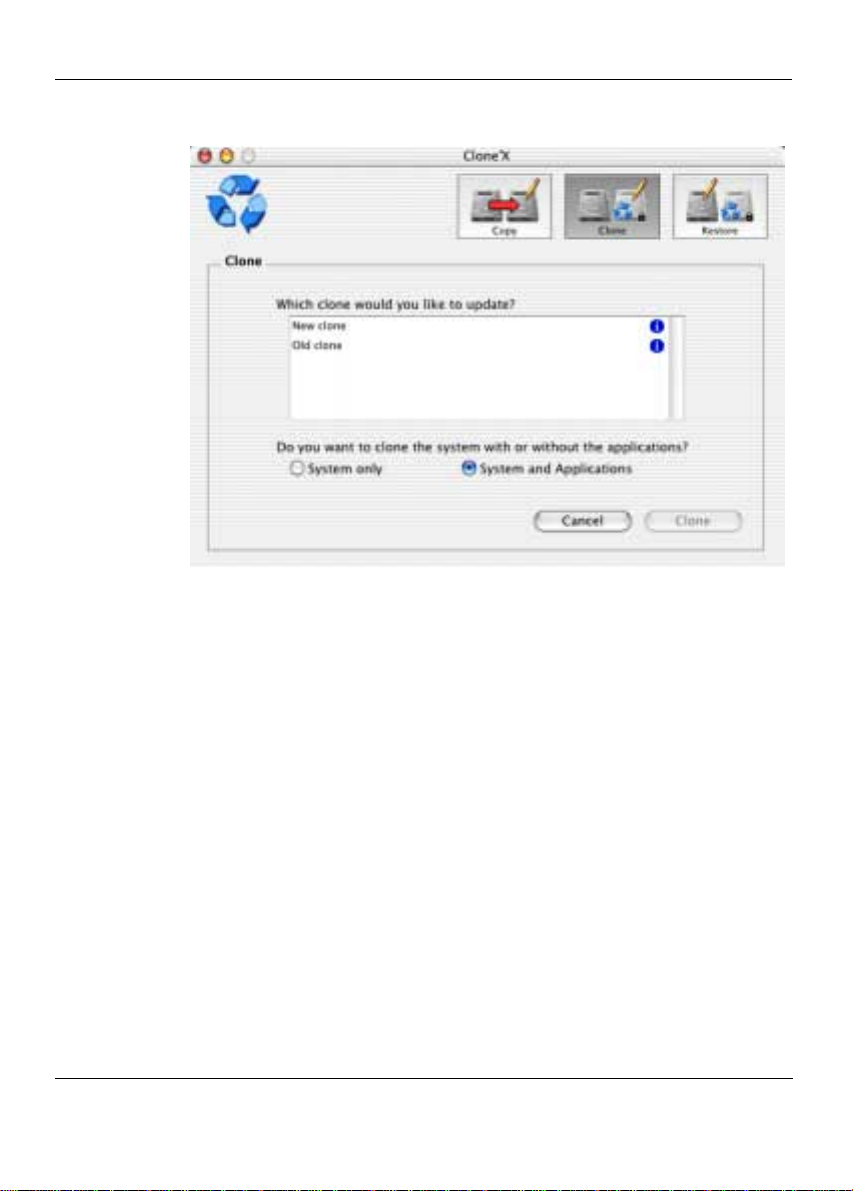
4.1 Updating existing clones
After updating Mac OS, you can either create a new clone for this new
Mac OS version (and keep the previous clones containing the older Mac
OS versions), or update an existing clone with the new Mac OS v ersion (in
order to only keep one clone).
This chapter explains how to update existing clones. If you prefer to create
new clones, read «Creating clones» page 10.
Note: only the clones saved on read/write media can be updated. For
example, clones saved on hard disks can be updated but clones saved on
CDs cannot be updated.
Before updating an existing clone, make sure that there is enough free
space on the disk containing this clone.
4.2 How to update existing clones?
To update existing clones, follow these steps:
• Open Clone’X (under Mac OS X, type in your password in order to
open Clone’X).
• Click the «Clone» button located at the top right corner of the window.
• Select the disk containing the System to clone in the left popup menu.
• Click the «Update an existing clone» button.
• Click the «Clone» button located at the bottom right corner of the window.
4.1 - Updating existing clones
16 Clone’X User Guide
Page 17
4.2 - How to update existing clones?
• Select the clone you want to update (to get more information about
any clone, click the blue «i» icon in the clone list).
• Determine if you want to update the System with or without the applications and check the appropriate box (see «Which files are cloned?»
page 11).
• Click the «Clone» button located at the bottom right corner of the window to begin the clone creation.
If few items have been modified since the clone creation, the clone
updating is very fast.
When the clone updating is complete, Clone’X tells you if it has been
successfully updated or not. If Clone’X has detected some errors during
the clone updating, select «Save Errors…» in the «File» menu and read
«Errors have occurred during cloning or restoration, why?» page 31. If you
have cancelled the clone updating by clicking the «Stop» button, the clone
has been moved to the Trash, now you can empty the Trash to delete it.
4 - Updating clones
Picture 5. Clone updating
Clone’X User Guide 17
Page 18

5 - Managing clones
5 - Managing clones
5.1 Clones visibility in the Finder
Each time you create a new clone, this clone can either be visible or
invisible in the Finder. In both cases, the clone is saved in a new folder
created at the root of the selected disk. This folder, which contains the
clone data, is either visible or invisible.
To avoid confusing your personal folders with clone folders and to avoid
inadvertently deleting clone folders, it is advisable to create invisible
folders.
If you are an experienced user and if you prefer to see the clones in the
Finder, you can create visible clones. For instance, if your clone «My Disk
1», call this clone «My clone», and save it to «My Disk 2», Clone’X will
create a «My clone» folder in the «My Disk 2» disk. This folder only
contains one visible file called «Launch Restoration» (by double-clicking
this file, you can restore this clone, see «Restoring clones» page 22). This
clone also contains numerous invisible files containing the clone data, you
cannot see these files, they are invisible and compressed. If you move this
folder to the Trash, you delete the clone.
Picture 6. Sample folder containing a clone in the Finder
5.1 - Clones visibility in the Finder
Be careful: if you decide to make clones visible in the Finder, you should
never rename clone folders, add files in these folder s, remove the «Launch
Restoration» files, rename the «Launch Restoration» files, or do anything
else that could severely damag e clones. If you are not an experienced user,
we encourage you to create invisible clones.
Since the clone is saved in this folder, if you want to move the clone from
one disk to another, you just have to move this folder. However, clones
18 Clone’X User Guide
Page 19
5.2 - Browsing clones
should always be located at the root level of disks. Otherwise Clone’X
won’t find them and they won’t be displayed in the «Restoration» and
«Clone List» windows.
To make existing clones visible or invisible, read «Making clones visible
or invisible» page 21.
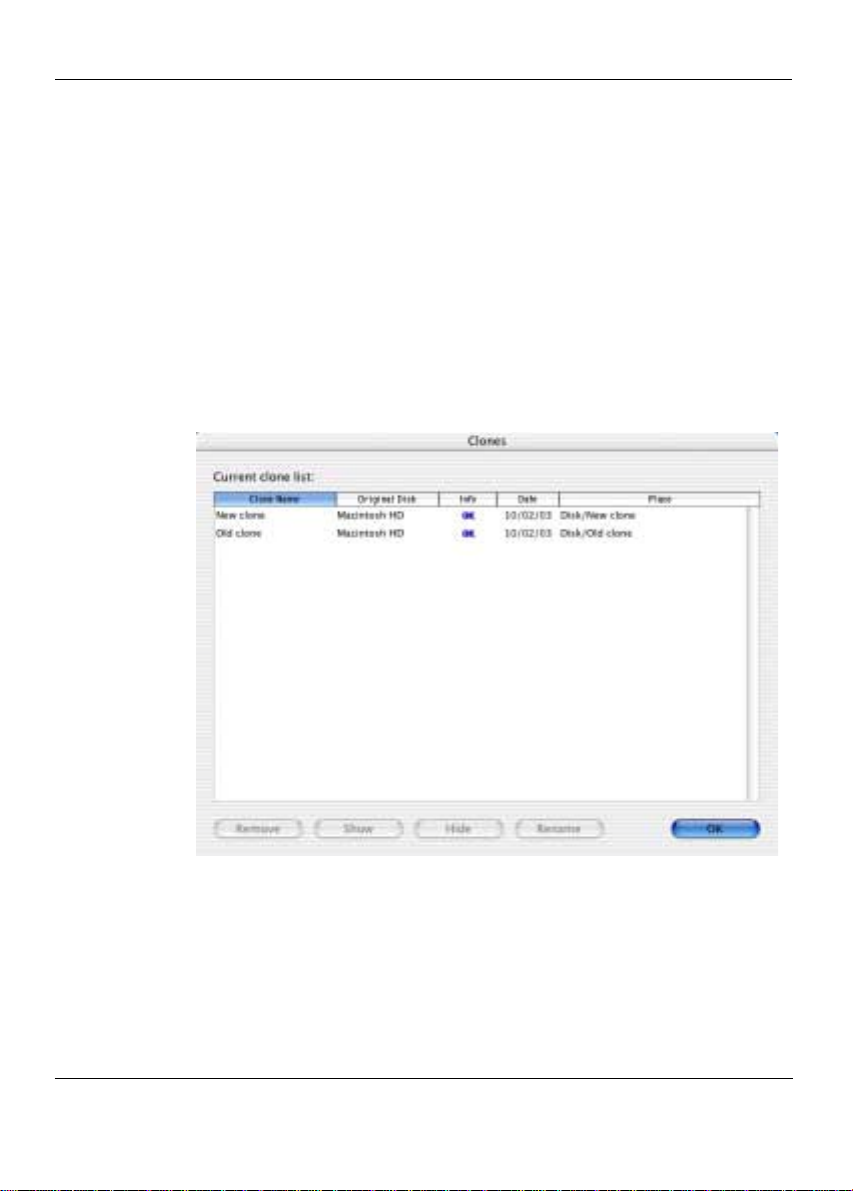
5.2 Browsing clones
At any time, you can select «Clone List» in the «File» menu in order to see
the list of clones created by Clone’X. This window lists both visible and
invisible clones.
Picture 7. «Clone List» window
5 - Managing clones
This window only lists the clones which are currently available in your
computer. For instance, clones saved on CDs or on external FireWire hard
disks are not displayed in this window if the clone CD is not in the CD
drive or if the FireWire hard disk is unplugged. If you want to use these
clones with Clone’X (to update them or restore them for instance), you
must put the CD in the CD drive or plug in the FireWire hard disk.
Clone’X User Guide 19
Page 20

5 - Managing clones
You can double-click any clone to know the folders it contains:
5.3 Damaged clones
The «Clone List» window also tells you whether clones are in good shape
or damaged. Before restoring any clone, you can select «Clone List» in the
«File» menu and make sure that the clone you are planing to restore is not
damaged (Clone’X should display «OK» in the «Info» column).
If the clone is damaged, Clone’X displays «Err» in the «Info» column
(«Err» means «Error»). For example, if you have cancelled the clone
creation (or if Clone’X has detected some errors during the clone
creation), «Err» is displayed in the «Info» column. If you try to restore a
damaged clone, you will get a damaged System. To remove a damaged
clone, select it, click the «Delete» button, and empty the Trash.
Each time, you want to update an existing clone or restore a clone, you will
have to select this clone in a clone list. By clicking the blue «i» icon
located in these list, you can easily get information about each clone and
immediately know if they are damaged or not.
5.3 - Damaged clones
Picture 8. Clone information window
20 Clone’X User Guide
Page 21
5.4 - Deleting clones
5.4 Deleting clones
To delete an existing clone, select «Clone List» in the «File» menu, select
the clone that you want to delete, and click the «Delete» button. The clone
will be moved to the Trash, now you can empty the Trash to delete it.
5.5 Renaming clones
T o rename an existing clone, select «Clone List» in the «File» menu, select
the clone that you want to rename, and click the «Rename» button.
5.6 Making clones visible or invisible
5 - Managing clones
Picture 9. Restore clone list
If you wish to make any clone visible in the Finder, select «Clone List» in
the «File» menu, select the clone, and click the «Show» button. Now this
clone should be visible in the Finder. To get more information about
visible clones, read «Making clones visible or invisible» page 21.
If you wish to make any clone invisible in the Finder, select «Clone List»
in the «File» menu, select the clone, and click the «Hide» button. Now this
clone should be invisible in the Finder.
Clone’X User Guide 21
Page 22

6 - Restoring clones
6 - Restoring clones
6.1 Restoring the System using clones
If crashes have damaged your System, you don’t have to reinstall it from
scratch using Apple installations CDs. You don’t have to download again
Mac OS updates and you won’t have to install them. Clone’X allows you
to easily restore, repair, and rebuild your System using clones.
This operation entirely erases the System which is currently installed in
your computer. The current System is replaced by the System which has
been saved in the clone. This is a full restoration, clones cannot partly be
restored.
Picture 10. Restoring clones
6.1 - Restoring the System using clones
Before restoring the System, make sure that there is enough free space on
the disk where you want to restore the System and quit any opened
applications. During restoration, only Clone’X should be opened, you
should not use it for anything else.
22 Clone’X User Guide
Page 23

6.2 - Which files are restored?
After running the restoration, you will be able to restart your computer and
use the restored System. If you change your mind, Clone’X also allows
you to cancel the last restoration. This function allows you to uninstall the
restored System and revert to the previous one (see «Cancelling the
restoration» page 28).
Note: before restoring any clone, you can check if it is a correct or
damaged clone (see «Damaged clones» page 20). If you try to restore this
System, you will get a damaged System.
6.2 Which files are restored?
System files
This operation entirely erases the System which is currently installed in
your computer and replaces it by the System which has been saved in the
clone.
Under Mac OS X, Clone’X removes the «System», «Library», and
«Network» folders (these folders are located at the root of your disk), and
then replaces them by those saved in the clone.
Under Mac OS 8.6 and Mac OS 9, Clone’X removes the «System Folder»
folder (this folder is located at the root of your disk), and then replaces it
by the one saved in the clone.
Be careful: if some of these folders have been renamed or moved, Clone’X
won’t be able to find them. New folders will be created during restoration.
6 - Restoring clones
Applications
If the restored clone also contains applications, Clone’X also removes the
currently installed applications and replaces them by those saved in the
clone.
Clone’X removes the «Applications», «Applications (Mac OS 9)», and
«Developer» folders (these folders are located at the root of your disk), and
then replaces them by those saved in the clone.
Be careful: if some of these folders have been renamed or moved, Clone’X
won’t be able to find them. New folders will be created during restoration.
Clone’X User Guide 23
Page 24

6 - Restoring clones
Documents
Clone’X is only able to clone the System, with or without the applications.
Clone’X cannot backup your personal documents.
Documents are never included in clones therefore documents are never
restored. For instance, under Mac OS X, the «Users» folder (located at the
root of your disk) won’t be restored. Under Mac OS 8.6 and Mac OS 9, the
«Documents» folder (located at the root of your disk) won’t be restored.
6.3 How to restore clones?
Restoring clones from Clone’X
To restore clones, follow these steps:
• Plug in the hard disk containing the clone or put the CD containing the
clone in the CD drive if needed.
• Open Clone’X (under Mac OS X, type in your password in order to
open Clone’X).
• Click the «Restore» button located at the top right corner of the window.
6.3 - How to restore clones?
Picture 11. Restoring clones
24 Clone’X User Guide
Page 25

6.4 - How to restore the System from clones saved on CDs?
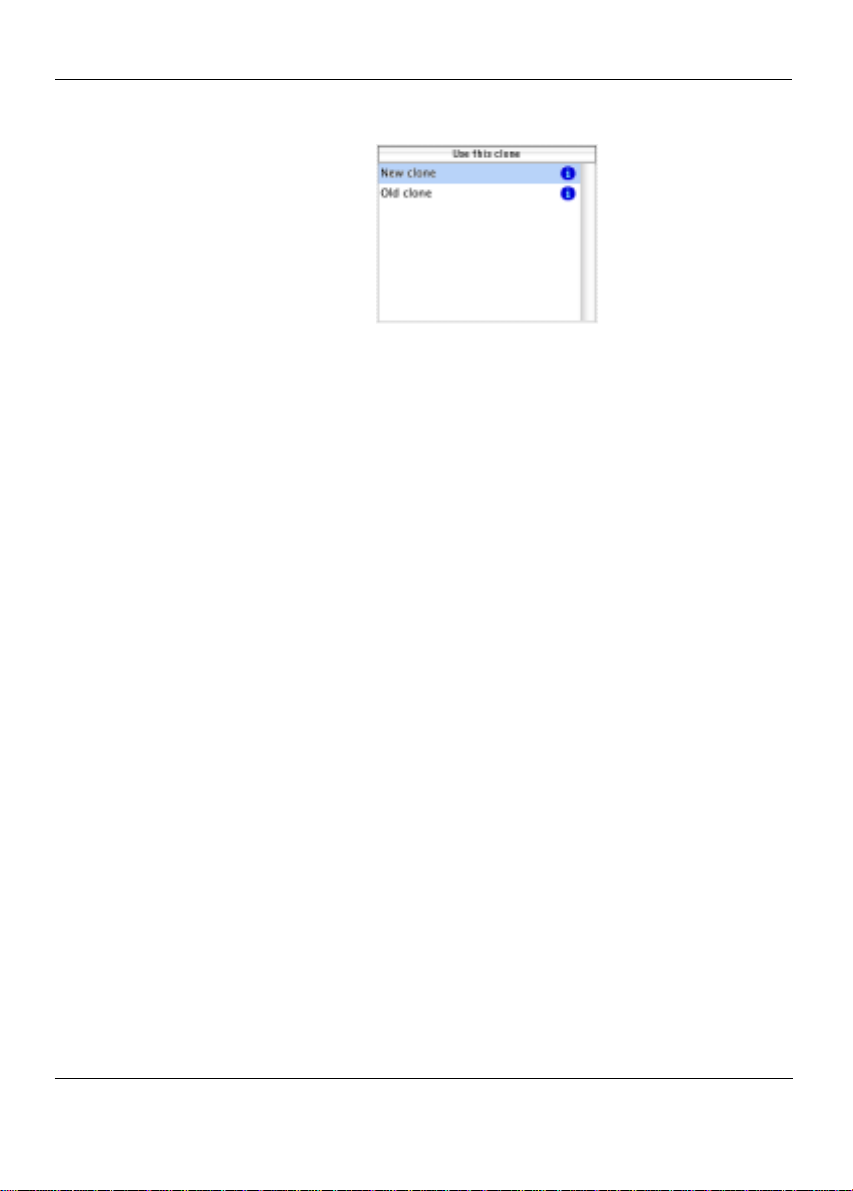
• Select the clone you want to restore (to get more information about
one clone, click the blue «i» icon in the clone list).
• Select the disk where you want to restore the clone System in the right
popup menu.
• Click the «Restore» button located at the bottom right corner of the
window to begin the clone restoration.
Restoring clones from the Finder
If the clone that you want to restore is visible in the Finder, you can also
follow these steps:
• Double-click the «Launch restoration» file located in the clone folder
(under Mac OS X, type in your password in order to open Clone’X).
• Select the disk where you want to restore the clone System in the right
popup menu.
• Click the «Restore» button located at the bottom right corner of the
window to begin the clone restoration.
Details about restoration
The time required to restore the System mainly depends on two factors: the
number of items to restore and the disk performance (DVD-RAMs are
very slow for instance). On recent PowerMacs, it usually takes 20 minutes
to restore a full Mac OS X.
During the System restoration, Clone’X creates an history file (see
«History file» page 28) as well as a cancellation folder which allows you to
cancel this restoration (see «Cancelling the restoration» page 28).
When the System restoration is complete, Clone’X tells you if it has been
successfully restored or not. If it has been successfully restored, read
«Using the restored disk» page 26 in order to use this disk. If some errors
have been detected, read «History file» page 28.
6 - Restoring clones
6.4 How to restore the System from clones saved on CDs?
If you are planning to restore a clone which is saved on several CDs, be
ready to insert every CD containing the clone. If you hav e lost one of these
CDs, Clone’X won’t be able to complete the restoration and you will get a
damaged System.
Clone’X User Guide 25
Page 26

6 - Restoring clones
First you must put the last clone CD in the CD drive, then you can restore
this clone (see «How to restore clones?» page 24). The restoration is
composed of two steps. During the first step, Clone’X copies the CD
contents on your computer in order to regroup the clone. During the
second step, Clone’X uses the regrouped clone in order to restore the
System.
When the System restoration is complete, the restored disk contains both
the restored System and the regrouped clone. If you do not want to keep
this clone in your computer, you can move it to the Trash.
6.5 Using the restored disk
If the restoration has been successfully completed, you can restart your
computer using the restored System.
The «Applications» folder
Under Mac OS X, applications are stored in a folder called «Applications»
which is located at the root of your disk.
If the restored disk does not contain any «Applications» folder, when you
restart your computer using the restored System, you won’t be able to use
any application (you won’t be able to open TextEdit, System Preferences,
Terminal, and so on).
For example, if you restore a clone which only contains a copy of your
previous System (without any application) to an empty disk, the restored
disk won’t contain any «Applications» folder. Before restarting your
computer using the restored System, you should reinstall an
«Applications» folder on this disk. If you have not cloned the
«Applications» folder with Clone’X, you will have to reinstall this folder
by hand.
If you restore a clone which contains both the System and some
applications, or if the restored disk already contained an «Applications»
folder before performing the restoration, you can immediately restart your
computer using the restored System because there is already an
«Applications» folder in this disk.
6.5 - Using the restored disk
26 Clone’X User Guide
Page 27
6.5 - Using the restored disk
The «Users» folder
Under Mac OS X, your personal files are stored in a folder called «Users»
which is located at the root of your disk.
If the restored disk does not contain any «Users» folder, when you restart
your computer using the restored System, you won’t be able to open your
usual files (your «Home» folder will be empty).
For example, if you restore a clone to an empty disk, the restored disk
won’t contain any «Users» folder. Before restarting your computer using
the restored System, you should reinstall a «Users» folder on this disk.
Clone’X never clones your personal files, you will have to reinstall this
folder by hand.
Clone’X is only able to clone the System, with or without the applications.
Clone’X cannot backup your personal documents.
If the restored disk already contained a «Users» folder before performing
the restoration, you can immediately restart your computer using the
restored System because there is already a «Users» folder in this disk.
Booting from the restored System
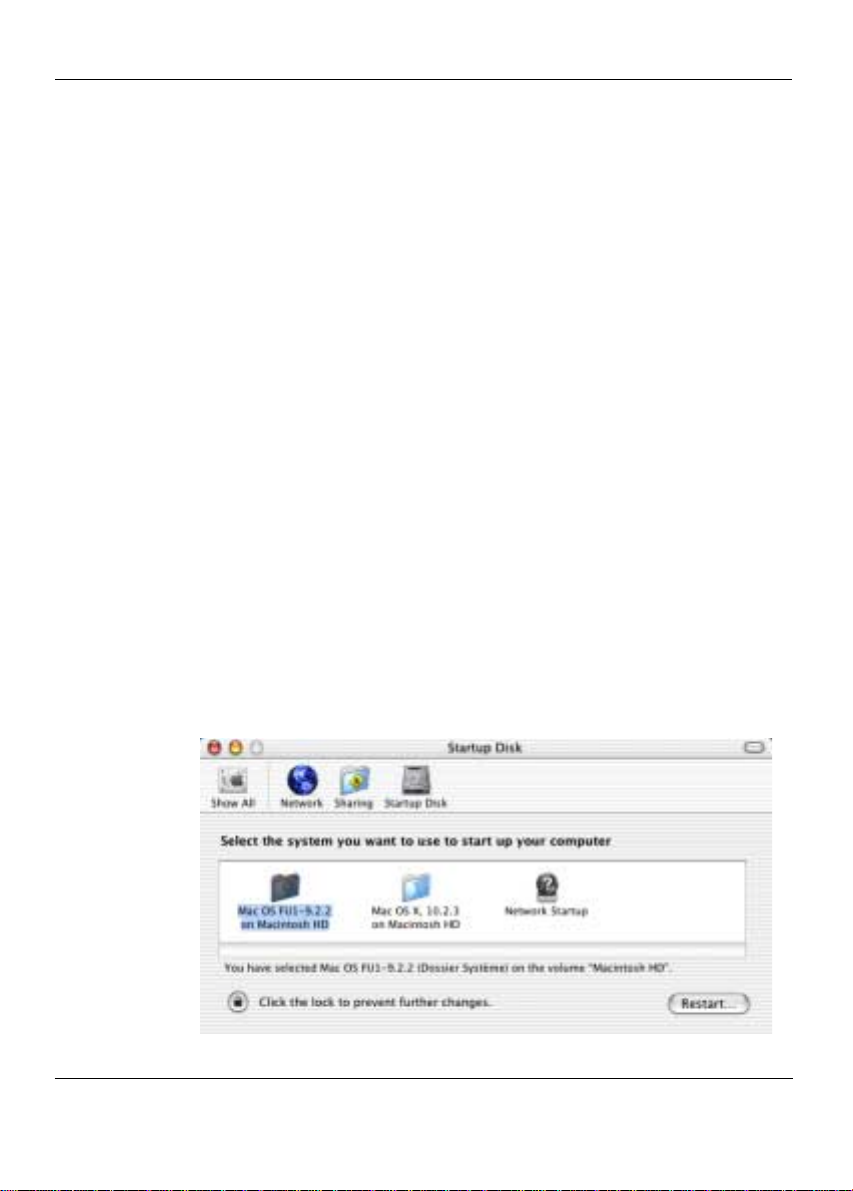
Under Mac OS X, select «System Preferences» in the Apple menu, click
«Startup Disk», and select the restored disk. Under Mac OS 8.6 or Mac OS
9, select «Startup Disk» in the «Control Panels» sub menu in the Apple
menu, and select the restored disk.
6 - Restoring clones
Picture 12. «Startup Disk» panel in the System Preferences
Clone’X User Guide 27
Page 28

6 - Restoring clones 6.6 - History file
If you have any problems booting from the restored System, see «The
restored System does not properly work, why?» page 32.
If you would like to reinstall files which have been removed during the
System restoration, or if you would like to entirely cancel the restoration,
see «Cancelling the restoration» page 28.
After a few days, if the restoration has been successful and you want to
keep the restored System, you can move to the Trash the «ƒ Cancel…»
folder which is located at the root of the restored disk (the «…» are
replaced by the restoration date and time). This folder is no longer
necessary, it contained the files which have been removed or replaced
during the restoration, as well as the history of the operations performed
during the restoration.
6.6 History file
When the System restoration is complete, Clone’X creates a «ƒ Cancel…»
folder at the root of the restored disk (the «…» are replaced by the
restoration date and time).
If you want to know the operations performed during the restoration, you
can open the «History» file located in this folder (see figure in next
paragraph).
Note: if the restoration has modified numerous files, only the first 150 files
are mentioned in the history file. If you want Clone’X to always save a full
history, select «Preferences» in the «Clone’X» menu and check the
«Always save a full history» box.
If Clone’X has detected some errors during the clone restoration, the error
list is mentioned at the end of the history file. You can open the history file
and see which files are concerned by the errors. In order to solve these
problems, you can read «Errors have occurred during cloning or
restoration, why?» page 31.
6.7 Cancelling the restoration
When the System restoration is complete, Clone’X creates a «ƒ Cancel…»
folder at the root of the restored disk (the «…» are replaced by the
restoration date and time).
28 Clone’X User Guide
Page 29

6.7 - Cancelling the restoration 6 - Restoring clones
This folder contains a «Launch Restoration» file as well as a folder
containing the files replaced or removed during the restoration.
Picture 13. Sample cancel folder in the Finder
If you would like to reinstall a specific file which has been removed during
the restoration, open the sub folder, copy the concerned file, and mov e this
file to the desired folder.
If you would like to entirely cancel the restoration, double-click the
«Launch Restoration» file. Before performing this operation, you can open
the «History» file and see which files were modified during the restoration,
see «History file» page 28.
Be careful: the «Launch Restoration» file only allows you to cancel the
most recent r estor ation. If you have alr eady restarted your computer using
the restored System and modified the restored System, Clone’X won’t be
able to cancel the restoration.
If the restoration has been successful and you want to keep the restored
System, you can move to the Trash the «ƒ Cancel…» folder. This folder is
no longer necessary, it contained the files which have been removed or
replaced during the restoration, as we as the history of the operations
performed during the restoration.
Clone’X User Guide 29
Page 30

7 - How to copy a disc with Clone’X 7.1 - Before starting to copy
7 - How to copy a disc with Clone’X
7.1 Before starting to copy
If you are running a 8 or 9 System, there is nothing to don before using the
copy. If you are running a Mac Os X Sytem, you have to check a few
points:
In the Finder, select the destination disc of your copy. execute the «Get
Info» command (in File menu, or command-i) and look into the section
named «Ownership & Permissions». You should find a check box labelled
«Ignore ownership on this volume». If you are running a 10.1.x System,
check this box, but if you are running a 10.2.x System, uncheck this box.
You can close the Get Info window.
You can also erase the content of your destination disc if you want to do
your copy on a clean disc without data. You should use Disc Utility to
erase the disc. If you just drag and drop files to the trash, you will not
remove invisible System’s files.
7.2 How to copy a System Disc
If you want to copy a disc containing a Mac OS X System, you have to
start your machine with the System you want to copy . Do not for get to read
previous section of this document. If you copy a disc containing a X
System, starting your machine with a 9.x System, the X System in the
copy will not boot, because Mac OS 9 ignore all UNIX permissions and
settings. There is no specific setting for the copy in Clone’X. Just choose
your origin disc on the left and the destination disc on the right.
7.3 Copy on a disc containing data
You can copy a disk on an other containing data (you do not want to erase
the content of your destination disk for example). A file will be replaced
only if a similar file at the same place with same name on the original disc
is found. Other files and folder will not be touched.
30 Clone’X User Guide
Page 31

8.1 - At startup, Clone’X asks a password, why? 8 - T roubleshooting
8 - Troubleshooting
8.1 At startup, Clone’X asks a password, why?
Under Mac OS X, normal users cannot modify the System therefore they
cannot use Clone’X to clone or restore the current System. In order to use
Clone’X, you must type in an administrator password (this is the password
you have defined when have installed Mac OS X on your computer).
Without this password, you cannot use Clone’X.
8.2 Errors have occurred during cloning or restoration, why?
Required configuration
First, make sure that your computer can run Clone’X. Clone’X requires
Mac OS 8.6 or later.
Under Mac OS 8.6 or Mac OS 9.x, Clone’X needs the CarbonLib
extension. Open the System Folder , open the «Extensions» folder , click the
«CarbonLib» extension, select «Get Infos…» in the «File» menu. If the
CarbonLib extension is older than CarbonLib 1.4, you may have problems.
You should better download CarbonLib 1.6 or later from www.apple.com
(«Support» section) or www.tri-edre.com («Technical Support» section,
«Clone’X» page). It improves the stability of Mac OS X applications.
Available space
Make sure that there is enough available free space on the cloned disk, the
disk containing the clone, and the restored disk. If one of these disks is
full, Clone’X won’t be able to complete the current job.
Files
If Clone’X is unable to clone or restore some files, these files are probably
damaged (the disk may have damaged blocks). To solve this problem,
check the cloned disk, the disk containing the clone, and the restored disk
with Disk First Aid, Disk Utility, TechTool Pro, Drive 10, or any other
diagnostic application in order to identify and repair the damaged files.
Then run again the cloning or restoration operation.
Clone’X User Guide 31
Page 32

8 - Troubleshooting 8.3 - The restored System does not properly work, why?
Contacting TRI-EDRE
If Clone’X has detected some errors during System cloning, select «Save
Errors…» in the «File» menu and send this file by e-mail to support@triedre.com or support@tri-edre.fr. Using this file, we will help you to solve
these problems.
If Clone’X has detected some errors during System restoration, send the
«History» file (this file is located in the «ƒ Cancel…» folder located at the
root of the restored disk) by e-mail to support@tri-edre.com or
support@tri-edre.fr. Using this file, we will help you to solve these
problems.
8.3 The restored System does not properly work, why?
Bootable hard disk
Mac OS X does not work on some hard disks. If you have restored Mac OS
X on a disk which is not supported by Apple, you won’t be able to boot
your computer from this disk. Apple also advises to install Mac OS on the
first hard disk partition and on partitions smaller than 8 GB.
Contacting TRI-EDRE
To get technical support, send the «History» file (this file is located in the
«ƒ Cancel…» folder located at the root of the restored disk) by e-mail to
support@tri-edre.com or support@tri-edre.fr. Using this file, we will help
you to solve these problems.
32 Clone’X User Guide
 Loading...