

Page 1

Back-In-Time 3
USER HANDBOOK
Back-In-Time 3 - User Handbook! 1 / 45
Page 2

! Licensing and Copyright Agreement
This software is Copyright ©2008-2013 TED and ©TRI-EDRE.
Except as permitted under copyright law, no part of the program or this manual may be reproduced or distributed in any form or by any means without the prior written
permission of TRI-EDRE.
The program, and this manual, are licensed only for individual use on a single computer. You are permitted by law to make working copies of the software program, solely for
your own use. No copy (original or working) may be used while any other copy is in use.
If you ever sell, lend, or give away the original copy of this Software program, all working copies must also be sold, lent, or given to the same person, or destroyed.
Limited Warranty
TRI-EDRE warrants to you that the Software will perform substantially in accordance with the Documentation for the ninety (90) day period following the date of delivery of the
Software to you. If the Software fails to meet the specications of the warranty set forth above, TRI-EDRE liability and your exclusive remedy will be replacement of the CD or a
reasonable effort to make the product meet the above warranty specication. Except for the above express limited warranties, TRI-EDRE makes and you receive no warranties or
guarantees, express, implied, statutory or in any communication with you, and specically disclaims any implied warranty of non infringement, merchantability or tness for a
particular purpose. TRI-EDRE does not warrant that the operation of the program will be uninterrupted or error free.
In no event will TRI-EDRE be liable for any loss of use, loss of prots, interruption of business, or indirect, special, incidental or consequential damages of any kind, however
caused and under any head of liability, arising out of use of or in connection with the software.
Trademarks
Back-In-Time is a trademark of TRI-EDRE.
All other products are trademarks of their respective companies.
©TRI-EDRE. All Rights Reserved.
TRI-EDRE
22 Place de l’Eglise - BP 111
83510 LORGUES (FRANCE)
Web site: www.tri-edre.fr • www.tri-edre.com
Email address: contact@tri-edre.fr • contact@tri-edre.com
Back-In-Time 3 - User Handbook! 2 / 45
Page 3

Table of contents
.............................................................................................................................................................................................................................Introduction 6
....................................................................................................................................................................................................................................................................Welcome! 6
.....................................................................................................................................................................................................................................Thank you for registering 6
............................................................................................................................................................................................................................Latest version of the software 6
..............................................................................................................................................................................................................................................Software Installation 6
............................................................................................................................................................................................................................................Uninstalling Software 6
...........................................................................................................................................................................................................................Launch and Register Software 7
................................................................................................................................................................................................................................................................Trial version 7
....................................................................................................................................................................................................................................................Technical support 7
......................................................................................................................................................................................................................................................................Contacts 7
..........................................................................................................................................................................................................................................Basics 8
.........................................................................................................................................................................................................................................Time Machine Backups 8
............................................................................................................................................................................................................................................Back-In-Time Purpose 8
...............................................................................................................................................................................................................................Preferences 9
.......................................................................................................................................................................................................................................................................Updates 9
...........................................................................................................................................................................................................Automatic Time Machine deactivation 9
..................................................................................................................................................................................................................................................Automatic Mount 10
............................................................................................................................................................................................................................................Unmount when quit 10
.......................................................................................................................................................................................................................................Time Machine Volumes 10
...............................................................................................................................................................................................................................................Time Machine Data 10
........................................................................................................................................................................................................................Main Window 11
...........................................................................................................................................................................................................................................Time Machine Status 12
....................................................................................................................................................................................................................Available Time Machine Volumes 12
Back-In-Time 3 - User Handbook! 3 / 45
Page 4

.......................................................................................................................................................................................................Organization of Time Machine backups 13
...........................................................................................................................................................................................................................Available Time Machine Data 13
......................................................................................................................................................................................Time Machine data related to a particular folder 15
....................................................................................................................................................................................................................Restore data from Time Machine 16
.........................................................................................................................................................................................................Back-In-Time Browser 18
..............................................................................................................................................................................................................Display Modes and Display Options 19
......................................................................................................................................................................Display data backed up on multiple Time Machine disks 20
.......................................................................................................................................................................................................................Linking a disk to other backups 21
......................................................................................................................................................................................................................................Combine multiple disks 21
....................................................................................................................................................................................................................................................................Example 22
..........................................................................................................................................................................................................................................The Backup Selection 23
...............................................................................................................................................................................................................................................The list of contents 24
........................................................................................................................................................................................................................Refresh the contents of the list 25
.....................................................................................................................................................................................................................................................................Preview 25
............................................................................................................................................................................................................................................Information window 26
...........................................................................................................................................................................................................................Contents Comparison Dialog 26
.....................................................................................................................................................................................................................................................Display Options 26
...................................................................................................................................................................................................................................Drag and drop to restore 27
..............................................................................................................................................................................................................................................................Restoration 27
..............................................................................................................................................................................................Time Machine Virtual Disks 28
..............................................................................................................................................................................................................................................Create a virtual disk 28
.............................................................................................................................................................................................................................................Virtual Disks display 28
.........................................................................................................................................................................................................Navigation and search in a virtual disk 29
........................................................................................................................................................................................................................................Updating a virtual disk 30
......................................................................................................................................................................................................................................Location of virtual disks 30
................................................................................................................................................Space occupied on the Time Machine backup disk 31
................................................................................................................................................................................................Disk occupation by the Time Machine data 31
........................................................................................................................................................................................................................................Size of a le or a folder 31
Back-In-Time 3 - User Handbook! 4 / 45
Page 5

................................................................................................................................................................................................Occupied space displayed by Back-In-Time 32
.................................................................................................................................................................................................................................................Practical Example 34
................................................................................................................................................................................................Example of optimizing the occupied space 34
..................................................................................................................................................................................................................Browser Features 36
...................................................................................................................................................................................................................................................Open a subfolder 37
............................................................................................................................................................................................................................................Drag and Drop Copy 37
...............................................................................................................................................................................................................................Open with a drag and drop 37
..................................................................................................................................................................................................Back-In-Time Restoration 38
...................................................................................................................................................................................................................................................What is restored? 39
...................................................................................................................................................................................................................................The Destination Location 39
.............................................................................................................................................................................................................................................Restoration Options 39
.............................................................................................................................................................................................................Preview the result of the restoration 39
......................................................................................................................................................................................................................Other Features 41
.......................................................................................................................................................................................................................................List of items backed up 41
.................................................................................................................................................................................................................................Delete Time Machine data 42
..................................................................................................................................................................................................Protect a particular Time Machine backup 44
..........................................................................................................................................................................................................................................F.A.Q 45
Back-In-Time 3 - User Handbook! 5 / 45
Page 6

Introduction
Welcome!
Thank you for your condence in purchasing our software Back-In-Time 3! We are certain that you will nd Back-In-Time 3 to be the essential companion to Time Machine for
Macintosh. Back-In-Time 3 allows you to:
• Restore your backups easily.
• Copy and restore Time Machine data to anywhere on your Mac using drag and drop, or with the build-in restore function of Back-In-Time.
• Copy data from Time Machine backups made on other Macs or drives.
Thank you for registering
Thank you for registering. You can receive free technical support and be informed of updates and developments of this product, and all the innovations of our production.
If you purchased our software on TRI-EDRE’s web store (download purchase), you are automatically registered, and you do not need to register again.
If you purchased our software from a reseller or within a bundle, please use the registration page on our web site http://www.tri-edre.com.
Latest version of the software
Check our website http://www.tri-edre.com to verify that you have the latest version of this software. If this is not the case, you may download the latest version which allows
you to use your serial number.
Note: serial numbers are compatible with all versions of the same main version number: a serial number for version 3.0 can be used with versions 3.1, 3.2, etc.
Note: Back-In-Time can check the latest available version and download it. See Preferences.
Software Installation
In the disk image you downloaded, the application is «Back-In-Time 3». Drag this application in the Applications folder on your startup disk.
Uninstalling Software
To completely uninstall Back-In-Time 3, drag the application Back-In-Time 3 to the Trash, and delete the ~/Library/Application Support/Back-In-Time 3 folder.
Back-In-Time 3 - User Handbook! 6 / 45
Page 7

Launch and Register Software
Double-click the application icon to launch it. At rst launch, the application will ask you to enter the Administrator password (the one you use for each update of the system or
applications). Then, a dialog asks you to enter your serial number (found on a sticker on the CD sleeve, or provided by e-mail or mail).
This serial number, that is personal, actives all the features of your software.
Keep your serial number in case you need to access technical support or updates.
Trial version
At each launch, you will be asked for a serial number if your version is not registered. To use Back-In-Time in demo mode, wait until the demo button is active. The demo version
is fully useable, but is limited to copying and restoring the last Time Machine backup.
You can enter the serial number at any time by selecting About Back-In-Time 3 from the Back-In-Time 3 menu.
Technical support
Above all, use this guide and our website to check all information on this product and its use. If you do not nd the answer to your questions, please contact our technical
support by e-mail (see contact information below).
Please have your serial number, your version number, and characteristics of your system ready before initiating contact.
Contacts
If you have comments about this program, problems or issues that are not answered in this manual or on our website - or if you are interested in site licenses of software please contact TRI-EDRE (specifying the version and serial number of your copy):
by e-mail address:
contact@tri-edre.com or support@tri-edre.com
by mail:
TRI-EDRE
22 Place de l’Eglise - BP 111
83510 Lorgues - France
Web site:
http://www.tri-edre.fr
http://www.tri-edre.com
Back-In-Time 3 - User Handbook! 7 / 45
Page 8

Basics
Time Machine Backups
Time Machine is the backup function integrated in the Mac OS X System. It automatically performs a copy of your disks to an internal or external drive or network - for example,
on a Time Capsule or AirPort, or a NAS compatible with Time Machine.
Time Machine provides a restoration function, but has limited options.
Back-In-Time Purpose
Back-In-Time uses your existing Time Machine data, but greatly enhances your restoration capabilities.
Back-In-Time is designed to restore, copy and recover data backed up by Time Machine. Back-In-Time analyzes the contents of Time Machine data and offers options that are
not available with Time Machine:
• Restoration or copy by drag and drop to their original location, or any other place of your Mac.
• A view of your backups and the available data: display the number of different versions available for each document, the elements that have been deleted but Time
Machine has preserved, etc..
• A Powerful browsing of the backups of your data, both through disk space and time.
• The ability to retrieve data that Time Machine has created on other drives or other Macs.
• The ability to display a list of all the elements that have been saved during a Time Machine backup.
And much more...
•
In addition, Back-In-Time brings new features to help you best manage the Time Machine data, such as the ability to know the space actually occupied on the Time Machine
disk by the backups of the different versions of a document, a le or an application.
Back-In-Time 3 - User Handbook! 8 / 45
Page 9

Preferences
Select Preferences in the Back-In-Time menu. The dialog has two pages (General and Time Machine Data).
Updates
You can set how Back-In-Time handles updates. Check the box to automatically search for updates.
Automatic Time Machine deactivation
It is recommended to disable Time Machine if you want to modify and restore data from Time Machine backups. Check this option if you want Time Machine to be
automatically disabled when you run Back-In-Time.
Important: The behavior of Time Machine can be modied according to the Mac OS X System version. You can directly disable Time Machine in System Preferences if
you encounter an incorrect behavior.
Back-In-Time 3 - User Handbook! 9 / 45
Page 10

Note: Time Machine will automatically be reactivated when you leave Back-In-Time.
Automatic Mount
If your Time Machine disk is not mounted (for example if you use Time Capsule), make an alias of this disk and it will be mounted automatically when you launch Back-In-Time.
Note: It will be ejected automatically when Back-In-Time quits.
Unmount when quit
Check this option if you want that Time Machine remote volumes are ejected when Back-In-Time quits.
Time Machine Volumes
The options allow you to use the data of MobileBackups (these are temporary data that Time Machine stores on your boot disk if the Time Machine disk is not present) and
virtual disks (copy of Time Machine disks).
Time Machine Data
Back-In-Time automatically displays the list of Time Machine data present on the disk used for Time Machine backups. You can choose to display only certain data.
Back-In-Time 3 - User Handbook! 10 / 45
Page 11

Main Window
The main window is displayed when you launch Back-In-Time.
It has on the left an area of information and access to Time Machine backups, and on the right a navigation area to browse inside these backups.
Back-In-Time 3 - User Handbook! 11 / 45
Page 12

Time Machine Status
The top part of the list shows the status of Time Machine:
Select the row of the status (with a yellow background) to display more information. You can activate or deactivate Time Machine at any time (you can also open the Time
Machine preferences in System Preferences).
Time Machine Activated: When Time Machine is activated, it may at any time choose to backup and modify data that is used by Back-In-Time. This is generally not a
problem for short operations, but if you plan to restore an entire disk or a large amount of data, it is advisable to stop Time Machine during the operation.
Available Time Machine Volumes
Time Machine backs up your Mac on a volume that can be an internal or external disk connected directly to the Mac, or a Time Capsule or a network drive (in this case, the Time
Machine data are saved for every Mac in a specic disk image).
Back-In-Time is able to simultaneously take into account multiple disks containing Time Machine backups, for example your current Time Machine disk, old Time Machine disks,
the Time Machine disks used on other Macs or Time Machine backups located on remote disks, Time Capsule, NAS, etc.
Volumes containing Time Machine data are displayed in the "Time Machine Volumes" part of the list:
Remote Time Machine Volumes: A remote disk containing disk images (Time Capsule, etc.) is displayed with a blue background (as in the screencopy for «TM_Network»).
Note: Select one of these disks and Back-In-Time will display the disk images «sparsebundle» located at the root of the disk. Double-clicking will mount the disk image, and Back-InTime allows you to view, search and retrieve Time Machine data contained in the disk image.
Time Machine Volumes: The mounted disks and disk images containing Time Machine data are displayed with a green background. Select to display more information about
the disk and the backups.
Back-In-Time 3 - User Handbook! 12 / 45
Page 13

Virtual Time Machine Volumes: Virtual disks are displayed with an orange background. Select to display more information about the disk and the backups.
Note: Virtual disks are images of Time Machine disks that can be created by Back-In-Time. They have a much smaller size than the original disks because they contain only the
directory of the disk without le contents. Virtual disks are used by Back-In-Time to browse and search in Time Machine data without the original disk is mounted. Virtual disks are
convenient to view other Mac or remote disks backups without having the original data. Once you nd the document you are looking for, you will need the real disk to recover the
original le.
Organization of Time Machine backups
This section gives some indicative information on the operation of Time Machine. The organization could possibly be changed by Apple in a future version of Mac OS
X.
In a Time Machine disk, backups are organized in a «Backups.backupdb» folder at the root of the disk (or disk image). From the Finder, if you open a Time Machine disk, you can
see something as follows:
The «Backups.backupdb» folder contains a folder by machine ("MacBook Pro Thierry" in the example above). In general, there is only one machine but if you have changed your
machine and continue using the same Time Machine disk, you can have multiple machines stored on your Time Machine disk.
For each machine, there is a folder for each backup. The name of this folder is created with the date and time of the backup.
In each of these backups, there is a folder for each of the saved disks. We nd in this folder a copy of the original disk (with the same folders organization).
Available Time Machine Data
Back-In-Time automatically analyzes the content of any Time Machine drive which is mounted, and adds the available data in the list. Generally, this list will contain your Home,
Documents and Applications folders, your startup disk and other specic data (Mail, Address Book, etc..).
Back-In-Time 3 - User Handbook! 13 / 45
Page 14

You can specify in Preferences the predened data from the startup disk to display in the list. Back-In-Time locates in the Time Machine backups the corresponding data of your
internal disk backed up by Time Machine. Any other data stored on other disks used by Time Machine is also displayed.
Important: If Time Machine makes its backups to a remote drive (Time Capsule, etc..), You must mount the disk for Back-In-Time can use the data it contains. Mount
this volume, and then open the disk image (of type .sparsebundle).
You can refresh the list of Back-In-Time with the button located above the list:
Multiple backup disks for a single disk: If Back-In-Time detects multiple Time Machine disks containing backups of your data, they are noted in the restoration and navigation
list (as shown below the disk MacPro HD was backed up by Time Machine onto two disks «TM Backup» and «TM Backup 750 Go»).
Note: This can be very useful if you replace the disk for Time Machine. In this case, Time Machine does not know about the data backed up in the old drive (it starts again from zero
with the new disk). Back-In-Time can search and retrieve data in the old disk (if still connected and mounted) in addition to data on the new disk.
Backups of other disks and other machines: If Back-In-Time detects extra disks saved in the Time Machine disks connected to your Mac, they are displayed in the list and
grouped by machine.
Back-In-Time 3 - User Handbook! 14 / 45
Page 15

At the end of the list are your favourite and the recent items. This list is retained when you leave Back-In-Time.
Time Machine data related to a particular folder
The browser on the right side of the window displays the data corresponding to a particular folder or le. You can search for old versions of your data, and copy and restore les
and folders.
Back-In-Time 3 - User Handbook! 15 / 45
Page 16

You can access the data through one of the following methods:
• Select one of the items of the list.
• Drag and drop a folder on the Back-In-Time window or its icon in the Dock.
• Use the Open File menu (Command-O).
Restore data from Time Machine
You can restore a folder or a particular le, either by drag and drop, or with the button "Copy Selection...".
Back-In-Time 3 - User Handbook! 16 / 45
Page 17

You can also directly restore the contents of a folder or a drive to the state it was at an earlier time.
Select one of the items in the list and click «Restore / Copy all», or select «Restore» from the File menu.
Back-In-Time 3 - User Handbook! 17 / 45
Page 18

Back-In-Time Browser
You access the Back-In-Time browser by selecting an item from the list on the left, the Open function from the File menu, or if you drag and drop a disk, folder or le directly on
the icon of Back-In-Time or its window.
Back-In-Time 3 - User Handbook! 18 / 45
Page 19

Back-In-Time analyzes the disk(s) Time Machine and searches data corresponding to the selected item. It reconstructs the history found in the contents of all backups and
recreates the historical content backed up. The data saved by Time Machine are displayed as a list.
At the top you can select the date of the current backup by moving the cursor (default is the most recent backup displayed). The list displays the contents at this date.
Display Modes and Display Options
The Simple Mode hides most of the options and provides settings to their default values. You have an option to show or hide deleted items (those that do not exist in the
current backup, but were present in a previous backup) and a search eld.
The More Options mode shows all options.
You can show or hide in the list the invisible les and folders, as well as the contents of packages and applications (which are more like folders containing les and subfolders).
When Back-In-Time detects in all backups several different versions of the same document, it shows the version number in a red circle. Option Multiple versions only facilitates
the identication of these documents.
Deleted items (those that are not displayed in the backup, but were present in a previous backup) are displayed with a "Trash" icon. The Deleted Items only option displays
only those items in the list.
You can also view more information on the list, such as the size of the items and color codes on the status of the item for each backup (modied - red - or unchanged - yellow).
Back-In-Time 3 - User Handbook! 19 / 45
Page 20

Other display options shows the space used in backups by all the different versions of a document or le.
Display data backed up on multiple Time Machine disks
If your data was backed up on multiple Time Machine disks (for example because you have changed your Time Machine disk), Back-In-Time automatically displays versions of
data backed up using the different disks (mounted disks or virtual disks). You can view and restore versions of documents backed up in these disks (just as if it were a single
disk).
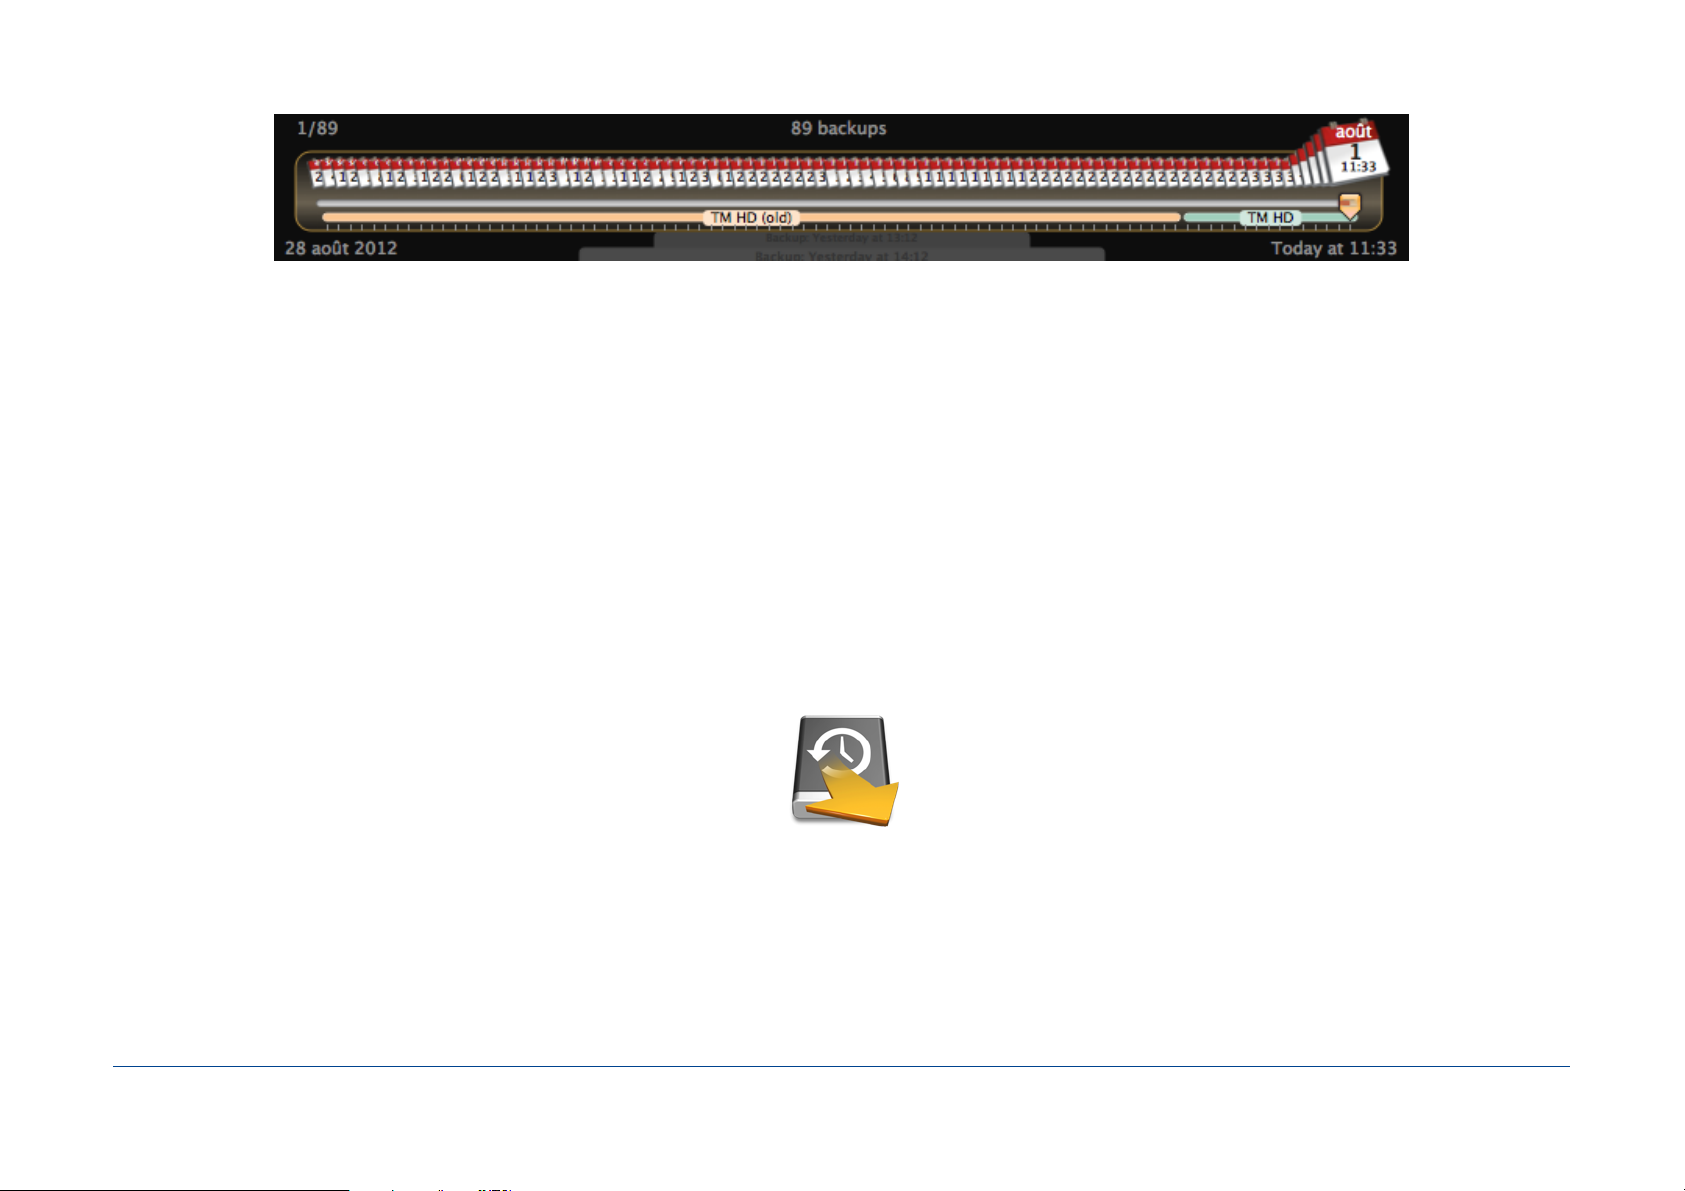
Backups for each Time Machine disk is indicated here as "TM HD (old)" (Time Machine disk for older backups) and "TM HD" (for the last backups).
Note: "TM HD (old)" is a virtual disk, shown in orange. The normal Time Machine disks are shown in green.
In the example below, Back-In-Time found two backup disks ("TM HD" and "HD TM (old)") for the folder analyzed, for a total of 89 backups. The different versions of the same le
are searched on the two Time Machine disks.
Back-In-Time 3 - User Handbook! 20 / 45
Page 21

Linking a disk to other backups
Time Machine organizes its backup by machine and disk. If you change your startup disk or change its name, if you replace your motherboard or your Mac, or if you change the
disk used by Time Machine, Time Machine creates a new different backup unconnected with the previous ones.
Back-In-Time displays in the left the list of the various machines detected on the disks containing Time Machine backups. Back-In-Time also displays the disks of each of these
machines. You can navigate through each disk and retrieve data.
But if you have changed your disk or computer, it's a shame not to be able to access your current disk and its predecessor, as if it were a single disk.
Combine multiple disks
Back-In-Time provides a unique solution to this problem.
Back-In-Time can link to a disk the Time Machine backups of other disks or other machines, and display their content in the browser like a single disk.
To associate these disks, double-click a disk in the left list (or select it and click on the Links button , or choose "Link disk to other backups" in the Browser menu).
A links editor is then displayed:
Back-In-Time 3 - User Handbook! 21 / 45
Page 22

You add the desired disk with the popup menu located below the list:
To remove a disk from the list, select it and click the button .
The disks linked to other backups are indicated by a double disks icon showing the number of disks (including the disk itself).
Note: You can disable or enable at any time the display of disks linked with the function "Enable concatenation" in the Browser menu. When disabled, the red dot is replaced by a gray
dot.
Example
Here is an example of using this function if the main disk of the Mac has been replaced. We changed the disk and reinstalled all the data from the old disk on the new disk. The
Time Machine backup disk has not been changed. We have now two separate sets of backups and we have to switch from one to another to retrieve data.
Back-In-Time 3 - User Handbook! 22 / 45
Page 23

For this example, the screen copies show the folder containing the VLC application.
Below on the left is the content of the backups of the old disk, ending at the beginning of September, when we changed the disk (in the graph, the period when there is no
Time Machine backups is indicated by a dark gray background). We replaced the old Mac's hard disk and Time Machine has begun new backups for the new disk (new backups
start in September) as displayed on the right, below.
With Back-In-Time we can link the Time Machine backups of both disks. Back-In-Time displays the content as if we had a single backup. We can now easily search and retrieve
data over the entire period of Time Machine backups.
Note: In the above example, Time Machine has saved ve versions of the VLC application for the old disk, and 6 for the new. In reality, there are two identical versions (the rst version
in the new disk is the same as the last of the old disk) and Back-In-Time clearly indicates the 10 different versions found in the backups.
The Backup Selection
The top area displays the dates of all backups that Back-In-Time has detected for the data to analyze. These are the Time Machine backups, represented by their execution dates.
Back-In-Time 3 - User Handbook! 23 / 45
Page 24

The backup date is selected with the cursor. The total number of backups detected for the analyzed le is displayed in the upper top (67 backups in the example above). The
dates of the most recent backup and the oldest are displayed under the cursor.
You can change the reference date for the backup that is currently displayed by moving the cursor of the calendar, via the menu in the toolbar or with the Browser menu and
keyboard shortcuts.
The list of contents
The list displays the folder contents analyzed. The contents of folders, or the different versions of a document are found by clicking on the triangle to the left of each item in the
list.
Back-In-Time displays all versions of the document kept by Time Machine, including the number of versions (in a red, right on the line) and the total size of all versions (in a blue
background for les, and a green background for folders, applications and packages) from the beginning to the selected current backup.
Note: An option in the drawer lets you display or not the size. The list can be sorted by size in the Browser menu.
Note: The size is the sum of all different versions of the les (it is the real space occupied by all the backups of this le or folder in the Time Machine disk).
Note: The size of folders requires much more calculations and analysis, and can be long for large folders. It is disabled by default but you can activate the option of calculating the
size of folders. You can also obtain the size occupied by a particular folder by selecting it and using the Browser menu (or the contextual menu).
Back-In-Time 3 - User Handbook! 24 / 45
Page 25

By opening the triangle to the left, Back-In-Time displays the different versions of the document (highlighted with a green background), with their size and date.
The cursor also displays, by color codes, information about the selected item in the list. For each backup, you can tell if the le exists or not (in this case the area of the cursor is
blue-gray), and whether a new version (in red) or a version which did has not been modied (yellow).
You can choose to display, as a background for each item, the backup that corresponds to each new version. As you can see below, each red bar corresponds to the backup of a
new version.
Deleted items (which are no longer in the selected backup, but a version of which exists in an older backup) are displayed on a gray background with a trash can icon.
In this case the slider indicates how many backups may be found. Move the mouse cursor at the location to display the date of the backup that contains this element.
Refresh the contents of the list
Click the button on the top right of the list to refresh its contents:
Preview
You can view a QuickLook preview of each document and each of its versions. Select the document and press the space bar to view its contents (or use the Browser menu, or
the contextual menu).
Back-In-Time 3 - User Handbook! 25 / 45
Page 26

Information window
You can view an information dialog for each document and each of its versions. Select the document and use the Browser menu (Cmd-I), or the contextual menu.
Contents Comparison Dialog
Select two les or two versions of the same le and use the Browser menu (Cmd-Option-I). Back-In-Time graphically display the identical parts (green) and differences (in red).
Display Options
Display options modify the list of displayed items and the presentation. These options are available in the "Browser" menu and in the main window (mode «More Options...»).
Back-In-Time 3 - User Handbook! 26 / 45
Page 27

Options can display:
• Deleted items: If the box is checked, items that are unavailable in the selected backup but that exist in an old backup, are shown with gray background and a trash can
icon to the right.
• Search eld: The only elements whose name matches the letters entered in the search box.
Note: The space is used as separator. Example: Type "sept 2009" to display only les and folders whose name contains "sept" and "2009".
• Invisible items. They are displayed with an orange background.
Package contents: If the box is checked, the content of applications, bundles and other packages is displayed.
•
Items that have multiple versions only.
•
• Deleted items only.
Size of items: Display the size of each le and folder in the current backup.
•
• The status in backups: Each row is displayed with a background which indicates with colors the backups containing a new version of the item.
Size of Backups: Display the size used on the backup disk by all the different versions of the le.
•
• Calculation of the space occupied by each folder in the backup disk for all the backups of this folder).
Drag and drop to restore
To copy or restore a le, document or a version available, you drop from the Back-In-Time window to the desired position on the desktop or a folder.
You can copy any le or folder available, even the previous versions of backups or items that have been deleted but you can nd an older version.
Restoration
You can also restore the entire folder or selected items by using the buttons at the bottom of the window.
Previously, you can choose the backup that will be used for the restoration.
Back-In-Time 3 - User Handbook! 27 / 45
Page 28

Time Machine Virtual Disks
Back-In-Time allows you to create virtual disks. Virtual disks are "images" of Time Machine disk, containing the list of contents (hierarchical folders structure and les list) with
the modication date and the size of each le.
The contents of a virtual disk is displayed in the main window like a Time Machine disk. You can browse and search a virtual disk.
A virtual disk has a very small size compared to the original. By cons, it contains no data (document content). The virtual disk is used to determine where are the data you want.
To retrieve the data, you need the original disk.
Note: You can create as many virtual disks as needed, for example for old Time Machine disks, disk images of a Time Capsule, backups of other Macs, etc. A virtual disk can be created
on a Mac and copied to another Mac for use.
Create a virtual disk
To create a virtual disk, mount the Time Machine disk you want to copy. It will be displayed in the list of volumes of Back-In-Time (possibly refresh the contents of the list):
Select the disk (eg "TM Backup" in our example) and open the menu Tools> Create Virtual Time Machine Disk....
A dialog asks for conrmation and a progress window shows you the progress of the copy.
Note: You can stop the creation of the virtual disk at any time. It will contain the data already analyzed and you can resume its creation later.
Important! Let Back-In-Time open during the creation of the virtual disk.
Virtual Disks display
Virtual disks are displayed in the list on the left, like normal Time Machine disks. Their name is in italics and the background color is orange.
Back-In-Time 3 - User Handbook! 28 / 45
Page 29

Important: A virtual disk is displayed only if the original disk it replaces is not mounted.
Note: If the virtual disks are not displayed, check in the Preferences if the option is checked.
Navigation and search in a virtual disk
Navigation and search the contents of a virtual disk is identical to that of a normal Time Machine disk.
A virtual disk can be combined with a normal Time Machine disk. For example, if you changed the Time Machine disk, and you create a virtual disk from the old disk, Back-InTime automatically detect that these backups are for the same machine and you can navigate through all the backups of these two disks.
Back-In-Time 3 - User Handbook! 29 / 45
Page 30
Note: In this example, the "TM HD (old)" disk is a virtual disk. It is displayed in orange.
Important: You can not copy data from one virtual disk. It contains no actual les are saved, only the list of contents.
Updating a virtual disk
It may be necessary to update a virtual disk if its creation was interrupted, or if new backups have been added to the original Time Machine disk.
To update a virtual disk, mount the corresponding Time Machine disk and select it in the list.
Open the menu Tools> Create Virtual Time Machine Disk...
A dialog will prompt you to update the virtual disk by adding new backups (backups already analyzed remain unchanged in the virtual disk).
Important! Let Back-In-Time open during the update of the virtual disk.
Location of virtual disks
Virtual disks created by Back-In-Time are stored in the ~/Library/Application Support/Back-In-Time 3/Virtual Time Machine Disks/ folder. They have the same name as the
original disk.
Back-In-Time 3 - User Handbook! 30 / 45
Page 31

Space occupied on the Time Machine backup disk
It can be very useful to know the space occupied on the disk by all the Time Machine backups of a le, an application or a folder:
• To optimize the space occupied on a Time Machine disk that becomes too full.
• To know the items that take up more space on the disk.
• To nd whether it is wise to keep all old versions of applications.
To get an idea of the occupation of a large le (or a set of data) that is modied regularly.
•
Back-In-Time offers powerful features to meet those needs. But rst, let's see how Time Machine organizes the data it has stored.
Disk occupation by the Time Machine data
When Time Machine makes the backup of a disk, it creates a new full backup with the entire contents of this disk. All the unchanged les exist therefore in the two backups, as
you can see by looking at how is organized a Time Machine disk.
To optimize the space occupied, Time Machine physically records on the disk only one version of each le. Thus, if an unchanged version of a 10 MB le is saved in 25 successive
backups, it will occupy in reality only 10 MB on the disk. To simplify, the duplicates are links to an unique location (the reality is somewhat more complex).
Size of a le or a folder
Each item has a size. If the item has not been modied, it will be the same size in each backup (but it will only occupy a single space on the disk).
In the graph, the size of an item is specied for each backup by a dotted line.
To get the size of an item in the current backup, click on this item. The size is displayed at the bottom of the list, possibly with the number of les if it is a folder or an application.
Note: The size displayed is for the element in the current backup. This size does not account for possible duplicates in other backups.
Back-In-Time 3 - User Handbook! 31 / 45
Page 32

Occupied space displayed by Back-In-Time
As we have already seen, the space occupied by the different versions of a le, a folder or an application can be displayed for each item.
In the example below, the backups contain six different versions of the le "Read Me" (the total of the 6 versions occupies 72 KB), and 6 versions of the application "VLC", for a
total space occupying 686 MB
The le "Goodies" contains different items for a total of 7.85 MB.
Note: An application, like a folder contains subfolders and les. Files may be identical from one version to another. Back-In-Time calculates the actual space occupied by taking
account of any unchanged les.
Note: Back-In-Time does not show the number of versions for the folders, but you can see the modication dates of the various versions of the folder "Goodies" represented by a red
bar.
Back-In-Time also displays the size occupied by each version, as in the example below:
Back-In-Time 3 - User Handbook! 32 / 45
Page 33

You can obtain the space occupied by only some versions. Simply move the cursor to the desired backup date, as in the example below, for the space occupied by the three
earliest versions of "VLC" installed before 2010. These three versions occupy a total of 332 MB:
The buttons at the top left of the list are displaying a graph that gives with red bars, the space used for each backup, as above. We see that no additional space is occupied
between installations of a new version (the backups do not occupy space if the les are unchanged).
You can also display the evolution of the space occupied release after release, as below:
To get the size of an item at a particular time and the space occupied on the backups disk, move the mouse cursor on the graph. In the example below, the version had a size of
101 MB the 20th of July and the backups of all versions until July 20 occupied a space of 436 MB on the disk:
Back-In-Time 3 - User Handbook! 33 / 45
Page 34

Practical Example
In the screenshot below, Back-In-Time provides a wealth of information about the backups folder "Back-In-Time U.S. (user's guide).
Firstly, if you select this folder, Back-In-Time displays, at the bottom of the list, its size (10.13 MB) and the number of items (4) in the current backup (the one selected by the
cursor of the dates of backups).
This folder is found in 30 successive backups but we see that the actual space occupied on the Time Machine disk is 23.61 MB. Indeed, there is only one version of the le "BackIn-Time. indd ", then 30 identical versions of this le in the backups occupy only the size of a single copy (5.79 MB).
By cons, there are 5 different versions of the le "Back-In-Time.pages", whose size is approximately 3 MB, for a total space occupied on disk of 13.65 MB.
Example of optimizing the occupied space
We take the example of an application in the /Applications/ folder of our startup disk.
There are regular updates of the application GraphicConverter. Time Machine backup each of these new versions.
Back-In-Time indicates that all the backups of GraphicConverter occupies 554 MB on the Time Machine disk. Back-In-Time also indicates that the folder has a size of 180 MB in
the last backup (just click on the folder to get its size, or move the mouse on the graph).
By removing the previous versions, we can free 380 MB on the Time Machine disk.
This analysis can be repeated throughout the /Applications/ folder to free up a considerable amount of space.
Back-In-Time 3 - User Handbook! 34 / 45
Page 35

To get an idea, we can select the /Applications/ folder in Back-In-Time, and let it calculate the space occupied on the backup disk. You will get a result like below. By moving the
cursor on the graph, you can have the size of this folder when the last backup was done, and the space occupied by all the backups of this folder:
In this example, the size of the /Applications/ folder is 15.58 GB and the backups occupy 26 GB on the backups disk. By keeping only the latest versions of the applications, it is
possible to free more than 10GB on the Time Machine disk.
Note: Very often, applications can be downloaded again if lost. It may be useful to keep the previous version in the backups (in case the latest update has problem), but it is
unnecessary to keep all versions of all applications.
This use of Back-In-Time can be applied to many of your data backed up by Time Machine. Keep in mind that backups are a security, but useless backups merely fulll your Time
Machine disk.
Remember that when the disk is full, Time Machine deletes the oldest backups. It is better to anticipate this by optimizing the contents of the backup disk.
Back-In-Time 3 - User Handbook! 35 / 45
Page 36

Browser Features
You have access to various tools from the Browser menu (some functions are also accessible through the contextual menu).
The rst group changes the display options (invisible items and deleted, and the contents of packages).
The second group manages the display of the size occupied by the backups.
The third group can manage the relationship of a disk with several backups.
Then, various functions are available for the selected item:
• Preview (Quick Look), also accessible by the spacebar.
Back-In-Time 3 - User Handbook! 36 / 45
Page 37

• Information (displays the information dialog).
• Reveal in Finder.
• Open (by its default application).
• Copy (with the copy/restore function).
• Delete (from the Time Machine backup).
The latest features in this menu allow you to move through the backups with the keyboard shortcuts.
Open a subfolder
You can open and view the contents of a le from the list by clicking on the triangle.
You can also double-click a folder to open it in the browser.
Drag and Drop Copy
You can copy any item by dragging and dropping at the location of your choice (on the desktop, in a folder, etc..).
Open with a drag and drop
You can open a document in the application of your choice by dragging it to the icon of the application.
Note: If you modify this document, you cannot save it to its current location. You need to save it to another location.
Back-In-Time 3 - User Handbook! 37 / 45
Page 38

Back-In-Time Restoration
To restore data, select one or more items in the browser window and click the «Copy selection ...» button, or click «Copy All» to restore the entire folder. This is the window
where you set up and launch a restoration:
Back-In-Time 3 - User Handbook! 38 / 45
Page 39

Note: You can also copy / restore a le or folder by dragging from the Back-In-Time browser and dropping to the location of your choice on the Desktop or a folder.
What is restored?
The selected items are shown at the top of the window.
If available, you can choose the date of the backup to restore. Available dates are the dates of backups detected by Back-In-Time in the disk used by Time Machine for backups.
The data will be restored as they were at the chosen date.
The Destination Location
You have to choose where the restoration will copy the les and folders. It can be either the original location, or any location in one of the available disks.
Caution! Items that were not in the backup at the date chosen will be removed from the destination (if they exist there). The different items (newer or older) will be
replaced. The les that were not amended remain unchanged (they are not copied).
Restoration Options
The restoration will modify the contents of the destination folder if it is not empty.
Use the options available to choose what should be made of elements found in the destination before the restoration. These can be removed, put in the Trash, renamed (with
adding a suffix to their name) or left to their location (if not overwritten by les restored).
Preview the result of the restoration
The top list in the drawer displays the items that will be copied to the destination.
Below, you have two columns representing the destination before and after restoration. The color codes indicate what will happen to each item, depending on options
selected.
Back-In-Time 3 - User Handbook! 39 / 45
Page 40

Important! Be sure to check out the expected result before starting the restoration. All items deleted or overwritten can not be recovered. Optionally, run a Time
Machine backup before the restore operation to have a backup of the current status.
Back-In-Time 3 - User Handbook! 40 / 45
Page 41

Other Features
List of items backed up
Back-In-Time can search and view all the les that were saved in a special Time Machine backup. You can search the entire disk backups, but backups in a particular folder.
To perform a search:
• For a disk or a particular backup, open the Time Machine Data information window, select the desired backup in the list and click the button at the bottom of the window.
• You can also, in the Back-In-Time browser, select an item from the list on the left or open a particular folder. Then select «Show Items Backed Up» from the File menu.
The settings dialog is displayed.
• Choose the date of the backup to scan in the pop-up menu.
• Also choose the method: either searching for items that were saved during a particular backup, or a comparison of differences in the two selected backups.
Once your settings are correct, launch the search.
Note: The search can be quite long. You can interrupt it at any time, or skip the folder being analyzed.
Back-In-Time displays the items found in the form of a hierarchical list. Only different les are displayed (those that Time Machine has saved specically).
Back-In-Time 3 - User Handbook! 41 / 45
Page 42

To the right of each folder is shown the number of les and size of saved items, and the size of each le.
You can restart a new search by clicking the Search... button.
Delete Time Machine data
IMPORTANT! It is advisable to delete data in backups directly with Time Machine after using Back-In-Time to detect the data to be deleted (those that can free up
space).
To do this:
- Enter in Time Machine from the Finder.
Back-In-Time 3 - User Handbook! 42 / 45
Page 43

- Select the items you want to delete.
- Use the popup menu with this icon and select the Delete function.
With Back-In-Time, you can delete data stored in backups on the Time Machine disk.
You can delete a single version of a le in a particular backup, or all versions of one or more les or folders in all Time Machine backups.
This is a great way to clean the Time Machine disk by removing data that had been saved but you're denitely not going to need. It is also a way to make room on the Time
Machine disk.
WARNING! Any removal of data in a Time Machine disk is irreversible. Be very careful using this function.
Note: Data are suppressed only in the Time Machine backups. The originals of your disks are not affected by this function.
To delete data, select the les and folders to delete in the browser and use the Remove function in the Browser menu (or in the contextual menu). A dialog opens:
You can choose to delete:
• A single version only: removes only the version found in the backup currently displayed in the browser.
Back-In-Time 3 - User Handbook! 43 / 45
Page 44

Note: If no version is in the current backup (item indicated by a Trash icon), the version displayed in the list will be removed (it corresponds to an older backup).
• All versions: delete all versions of the selected item in the Time Machine backup in progress and in all Time Machine backups older.
Note: If the current backup is the last backup performed by Time Machine, all versions of les and folders will be removed from Time Machine backups.
• In a set of backups: delete all items in a set of Time Machine backups from the current backup to that of a chosen date.
Note:If you delete all backups of an item always present on your hard disk, it will be backed up again at the next Time Machine backup, and then appear again in Back-In-Time (but
the latest version only).
Be aware of: To save space on the disk by successive backups, Time Machine saves once (in a single physical disk location) each new version of a le, although if this version
seems even recorded in each subsequent backups.
To free disk space, you must delete all occurrences of a version of a le. As long as one of the backups contains this le, physical space occupied by the le will not be released.
Protect a particular Time Machine backup
Time Machine will automatically delete backups when the Time Machine disk is full. Time Machine also deletes recent backups to keep only one backup per week (one per day
for the last month). You can not decide what backups are removed or retained by Time Machine. It would be nice to be able to keep a full backup at a particular date from which
to restore if necessary, and to be sure it will not be deleted by Time Machine.
Back-In-Time can lock and protect a backup made at a specic date to avoid it can be deleted by Time Machine. You can lock multiple backups if necessary.
To lock a backup in a Time Machine disk, select the backup disk in the left list (items with a green background), and select the backup that you want to protect. Click the "Lock
Backup" button in the bottom left of the list. A conrmation will be requested before the action is executed.
To unlock a backup and restore it to its original state, select the backup locked (indicated by a locker) from the list and click "Unlock".
Note: To make a backup inaccessible to Time Machine, Back-In-Time moves it in a different location on the Time Machine disk. This backup will not be accessible by Time Machine.
You will need Back-In-Time to access its content.
CAUTION: The Time Machine backups are security for your data. It is recommended not to change these backups, except in case of real need.
Back-In-Time 3 - User Handbook! 44 / 45
Page 45

F.A.Q
Q: Why do I have a message indicating that the Time Machine data is not available?
A: In handling the data corresponding to the Time Machine disk or folder to analyze, Back-In-Time search in the mounted disks recognized to be used by Time Machine.
If the folder that you do scan has not been backed up by Time Machine (for excluded, or being on a volume that is not backed up), you get this message.
Similarly, if Time Machine uses a remote drive for its backups (Time Capsule, etc..), you must mount the disk and then mount the disk image used by Time Machine.
Q: Why is it that Back-In-Time advises me to turn off Time Machine for the restoration?
A: When Time Machine is active and running a backup, it modies its data, adding features and deleting others. If you copy a le or folder by dragging and dropping, there is
usually no problem. By cons, if you restore or copy a disk or a large amount of data, it is better to stop Time Machine for this operation.
Q: I changed the Time Machine disk to a larger one. Is it possible with Back-In-Time to recover data residing on the old disk?
A: Yes. Back-In-Time search all mounted disks containing data Time Machine, and presents the contents of the old and the new disk. You can retrieve and copy data from both
the old and the new disk.
Back-In-Time 3 - User Handbook! 45 / 45
 Loading...