

Page 1
TMC209
Convection Microwave Oven with Grill
Instruction Manual
Page 2
Important Safety Instructions
WARNING
RISK OF ELECTRIC SHOCK. DO NOT DISMANTLE
Please follow all the precautions listed below for safety
and to reduce the risk of injury or electrical shock.
$Read all the instructions and retain them.
$Before use check that the voltage stated on the rating plate on
the rear of your microwave oven corresponds to your mains
voltage.
$The mains socket must be well earthed. Do not plug the oven
into a mains adaptor into which other units are connected.
$WARNING: If the door or door seals are damaged, the oven must
not be operated until it has been repaired by a competent
person.
$ WARNING: It is hazardous for anyone other than a competent
person to carry out any service or repair operation that involves
the removal of a cover which gives protection against exposure
to microwave energy;
$Do not use the microwave oven with a damaged cord or plug or
after the appliance has malfunctioned or is damaged. Seek
expert assistance.
$Do not touch hot surfaces. Use handles or buttons only. Allow
the appliance to cool before cleaning.
$ : Do not operate the microwave oven empty. This
WARNING
could cause damage to the oven.
$Do not immerse the body of the microwave oven or the
electrical cord or plug in water or liquids.
$Do not place the microwave oven on or near a hot gas or electric
burner.
$Use the appliance on a stable heat-resistant surface.
$Never leave the microwave oven unattended when it is
operational.
$Make sure that the power cable does not touch any hot surface
or overhang a table edge.
$Do not use the microwave oven outdoors.
$Unplug the oven when not in use and before cleaning.
$Do not obstruct the ventilation slots or place objects on top of
the oven.
$Do not use attachments or accessories not recommended by $
the manufacturer.
$ WARNING: Only allow children to use the oven without
supervision when adequate instructions have been given so
$Items such as potatoes, sausages and chestnuts must be peeled
that the child is able to use the oven in a safe way and
understands the hazards of improper use.
$This appliance is not intended for use by persons (including
$The contents of feeding bottles and baby food jars shall be
children) with reduced physical, sensory or mental capabilities,
or lack of experience and knowledge, unless they have been
$Microwave heating of beverages can result in delayed eruptive
given supervision or instruction concerning use of the
appliances by a person responsible for their safety
$Children should be supervised to ensure that they do not play
$Food can burn if overcooked. If you are unsure about how long
with the appliance.
$Heat-insulation (oven) gloves should be used when removing a
hot container from the oven.
$Do not use the microwave oven for any purpose not expressly
specified in this manual.
$When not in use, do not store utensils, food or other objects in
$Clean the inside of your microwave regularly and remove any
$Failure to maintain the oven in a clean condition could lead to
the oven.
$There are no user serviceable parts in your microwave oven.
$ If smoke is observed, switch off or unplug the appliance and
Unauthorised dismantling or servicing will void the product
warranty.
When cooking with your oven:
$ Only use utensils that are suitable for use in microwave ovens.
$When heating food in plastic or paper containers, keep an eye
CAUTION: When Using the Convection Oven or Grill:
$Use oven gloves when inserting and removing utensils when
$When you remove utensils from the oven, place them on a
on the oven due to the possibility of ignition.
$If you use plastic film when re-heating or cooking food use only
film designed for microwave ovens and ensure that the film
$Keep small children away from the grill and hot dishes
$Children should only use the oven under adult supervision due
does not touch the food. If necessary, prick the film all over to
allow steam to escape.
$Grill & microwave/grill cooking: Do not use paper or plastic
containers, or plastic film. Utensils for combination-cooking
should be heatproof and microwave safe.
$Use your microwave oven only to heat food.
$Do not heat oil for frying, or try to fry food in the microwave
oven. The oil could catch fire.
$Liquids and other foods must not be heated in sealed containers
since they are liable to explod .
e If covered containers are used,
the covers should be loose. Move such containers to and from
ELECTRICAL INFORMATION
Before using this appliance ensure that the voltage of your
electricity supply is the same as that indicated on the rating
plate of the appliance
THIS APPLIANCE MUST BE EARTHED.
The disconnect device for this appliance is the mains plug.
The mains plug must not be obstructed in any way and must
remain readily removeable from the mains supply.
the oven with care as food may splash and the lid may fall.
Eggs in their shells (whether raw or cooked), fruits in thick skins
and nuts in their shells should not be heated in the microwave as
they may explode d.
even after microwave heating has ende
or pierced thoroughly before cooking.
stirred or shaken and the temperature checked before
consumption, in order to avoid burns.
boiling, therefore care must be taken when handling the
container.
to cook a food for, start with a short cooking time, and check the
food regularly.
food deposits.
deterioration of the surface that could adversely affect the life of
the appliance and possibly result in a hazardous situation.
keep the door closed in order to stifle any flames.
the grill or convection oven is on. DANGER OF BURNS.
heatproof surface, or on an insulating mat.
to the temperatures generated.
Cautions
Page 2
Page 3
Useful Information
About Your Microwave Oven Tips for good microwave cooking
Microwave cooking is very quick and efficient. Microwave Arrange food in the dish so that the thicker part is on the outside
cooking can also help preserve the minerals and vitamins in and the thinner part inside for more even cooking. Fold under the
many foods. thin edges of fish fillets and other tapered foods. Where it is
The microwave power output of your oven is 800 watts.
Because the temperature in a microwave oven is relatively cool
(unlike a normal oven) you have to remember that the food can
be extremely hot. Always take precautions when handling
containers.
Radio Interference:
Operation of the microwave oven can cause interference to your
radio, TV or similar equipment. When there is interference, it may
be reduced or eliminated by taking the following measures:
$Clean the door and sealing surface of the oven.
$Reorient the receiving antenna of radio or television.
$Relocate the microwave oven with respect to the receiver.
$Move the microwave oven away from the receiver.
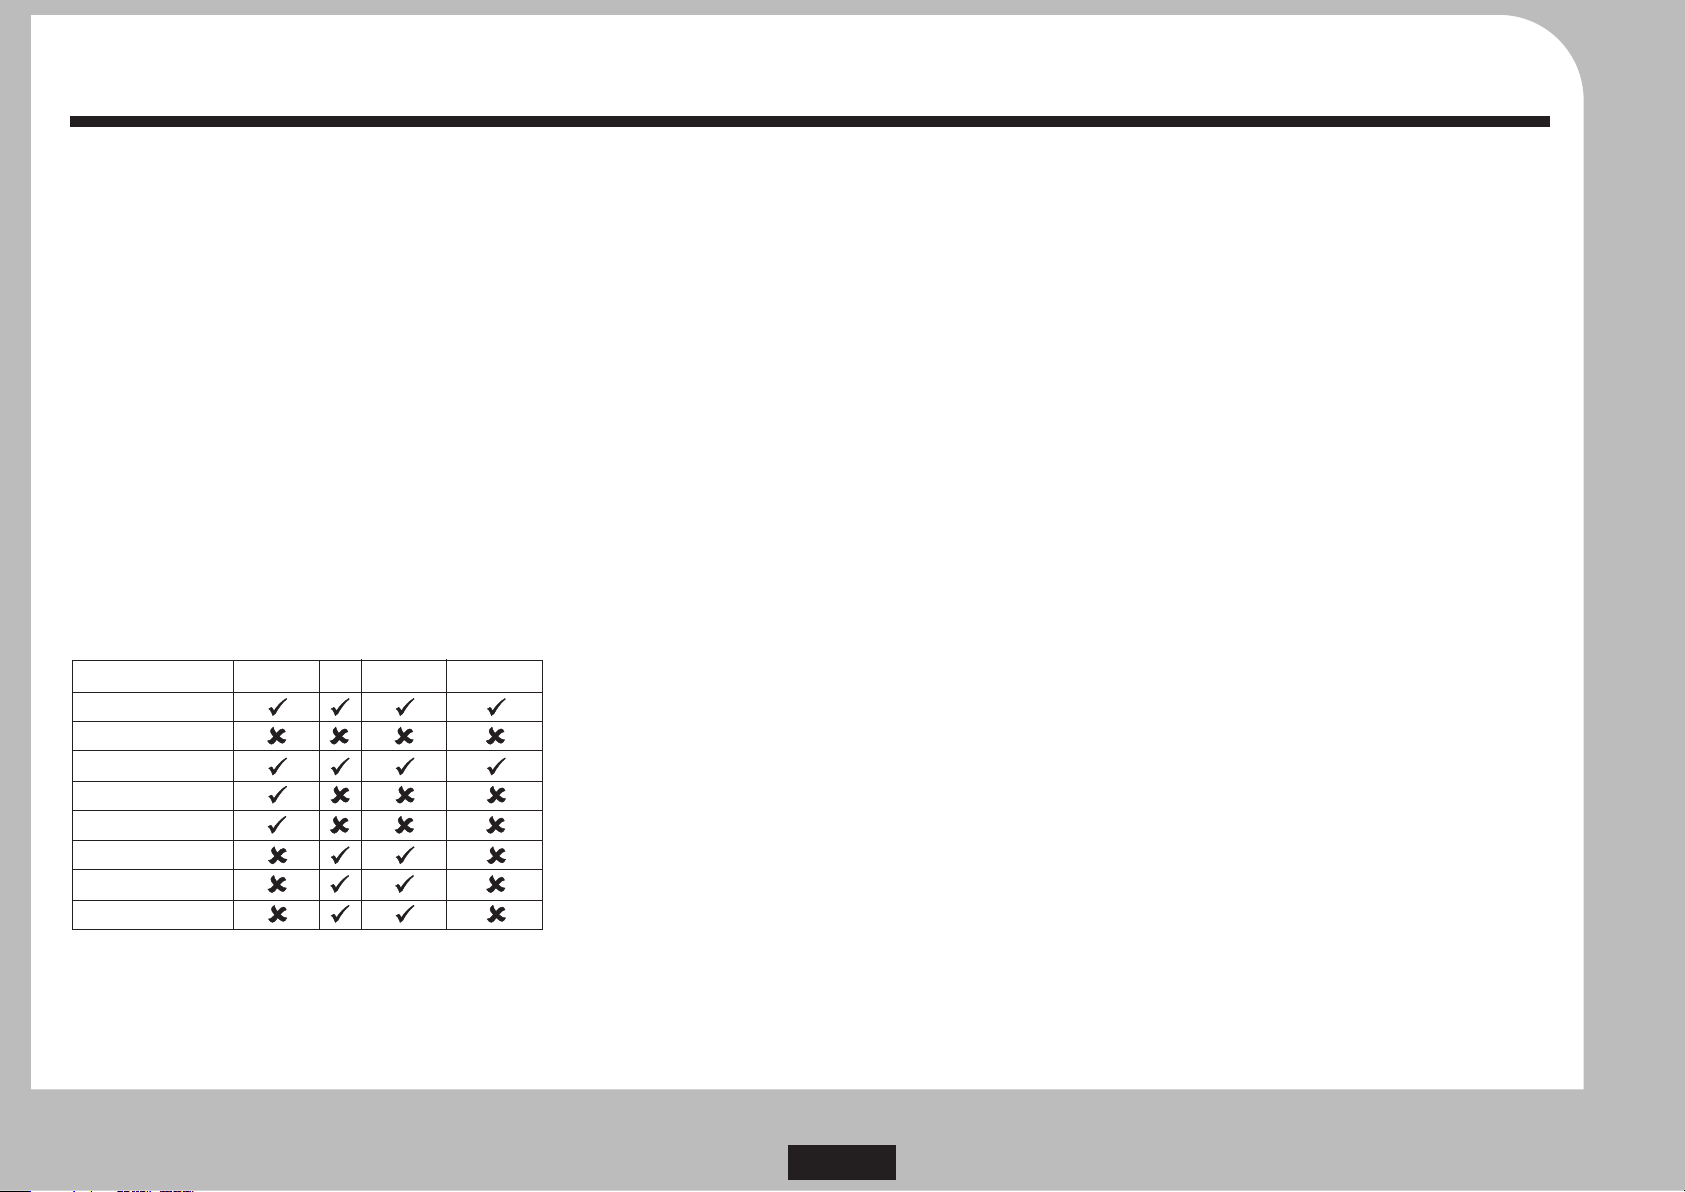
Suitable and unsuitable containers:
Some basic guidelines are given in the table below.
(*Combination refers to microwave + grill and microwave +
convection cooking)
Cookware
Heat–Resistant Glass
Non Heat–Resistant Glass
Heat–Resistant Ceramics
Microwave–Safe Plastics
Kitchen Paper
Metal Trays / Metal Racks
Aluminium Foil
Metal Foil Containers
Use heat resistant porcelain, glass or plastic containers made for
microwave ovens, otherwise there is a risk of shrinking,
deforming or burning. Metal containers, or containers having
metal decoration or trim are not suitable for use with your
microwave oven.
Microwave Grill Convection Combination*
When you are combination cooking, the container must be fully
heatproof as well as suitable for microwave cooking.
Avoid containers which narrow at the top as these may cause the
contents to erupt when removed from the oven.
Tesco stores stock a wide range of microwave containers and
wraps designed for microwave ovens. Plastic films should not
touch food as they may gas, melt or break down when hot and
contaminate food.
Wax paper, oven cooking bags, parchment paper and white
microwave paper towels are safe for microwave use. Wooden
objects may catch fire - so avoid their use.
Do not use aluminium foil for microwave cooking unless the
recipe requires it. Keep foil at least 25mm away from the oven
walls. Metal skewers, ties, etc. should be removed from food
before cooking.
Cooking In your Oven
Your oven can carry out a number of cooking processes.
$Basic Microwave Cooking
$Basic Grilling
$Convection Cooking ( standard convection oven)
$Microwave/Grill combination cooking
$Microwave/Convection combination cooking
In these above two processes, food is partially cooked by
microwaves and then finished by either grilling or oven cooking.
This accelerates the cooking process whilst maintaining the
finish and texture of traditionally cooked foods. There is also a
programme that enables you to defrost frozen food and then
combination cook it thus completing the entire cooking process
in one operation.
Preset cooking programmes
Your oven has 10 preset programmes. Some programmes use
one cooking method, others use combination cooking.
These programmes allow you to automate the cooking of a range
of standard foods for greater convenience.
In addition to the preset cooking programmes there are four
programmes to reheat food and four defrost programmes.
possible to control the shape, e.g. by tying a meat roast into a
cylinder, more uniform results will be obtained.
$5-6 minutes per 500 g. will cook most diced foods including
meat, poultry fruit and vegetables. Seafood takes less time.
$Different foods require different temperatures to cook
properly. Add more minutes as you drop the power.
$About 20% of the cooking takes place after the oven turns off
so your food will continue cooking after you've removed it.
$Food that takes an hour in to cook in a regular oven should
take around15 minutes in the microwave.
$Foods such as cakes with baking powder should stand a few
minutes before cooking to allow the leavening agents to
work.
$If a recipe calls for milk and water, reduce the water.
$Stir liquids and purees before during and after cooking.
$Rotate large items of food occasionally during cooking to
encourage even heat distribution.
$Food cooks better in a dish with round or curved sides.
$Salt attracts microwaves. Don't just sprinkle it on food before
cooking, stir it in or add it later.
$To ensure better distribution of heat when cooking large
pieces of meat in the microwave, remove the bone, cook on
medium power for longer periods of time, rotate twice
during cooking .
$Stuffing in poultr y does not have an opportunity to
completely cook, because the meat outside is heated quickly.
Stuffing for poultry should be cooked beforehand and
inserted later.
$Fats and sugars attract microwaves - thoroughly mix sugar
with other ingredients. Take care when cooking foods with
high sugar or fat contents as they can reach very high
temperatures.
$Handle pastry-wrapped foods like mince pies carefully as the
filling gets hotter than the pastry.
Always follow the advice in the Safety Guide on Page 2.
Page 3
Before You Start
Page 4
Unpacking and Assembly
Getting Started
Please make sure you read all the instructions and the safety
notes carefully and that you familiarise yourself with the features
and operation of your oven before use.
Unpacking the Microwave Oven
Remove the polystyrene top packing pieces and lift out the oven.
Unpack the oven completely removing all the protective tape.
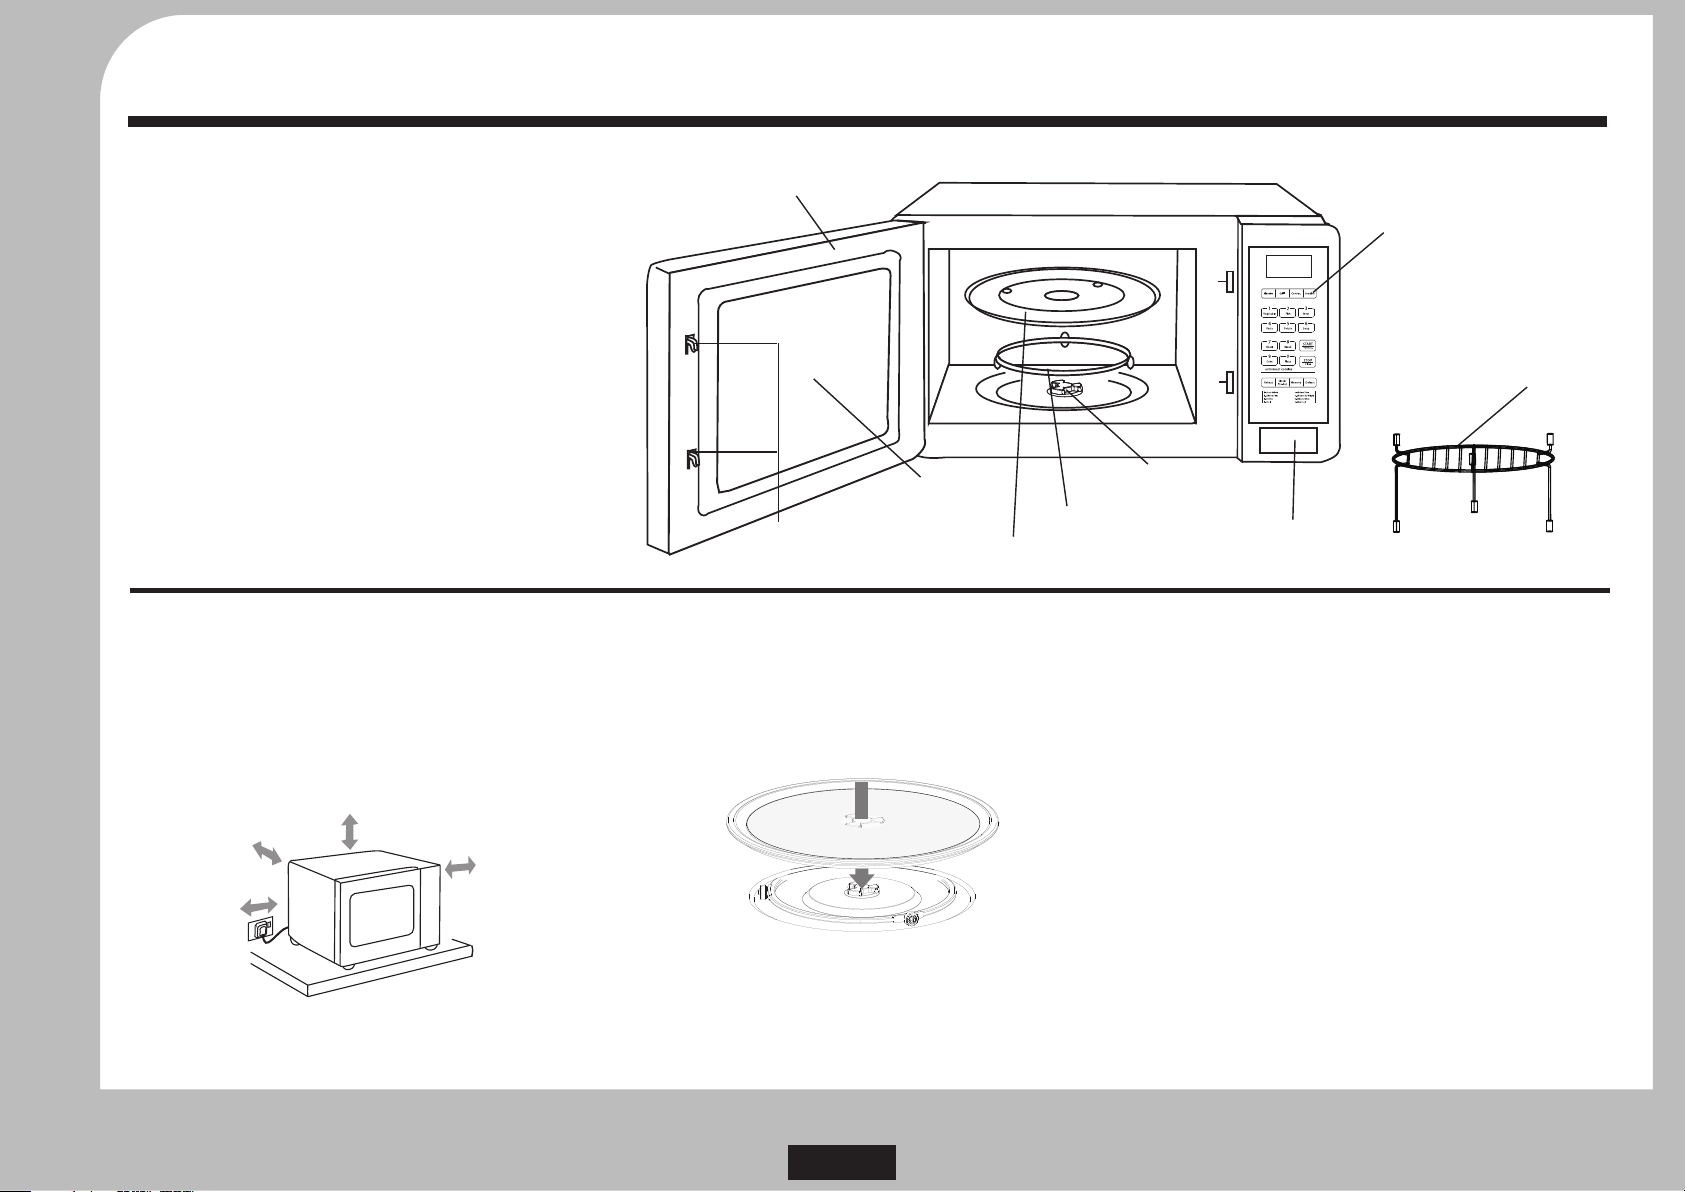
Open the oven door. In the oven compartment you should find
the turntable and rotating support ring, and the grill rack.
Unpack all these items .
Check the oven carefully, especially the door, door seals and the
locking mechanism. If any items are missing or damaged, contact
your nearest Tesco store for assistance.
If possible retain the packaging. If you dispose of the packaging,
do so having regard to recycling provisions in your area.
Assembly and Placement
Place your microwave oven on a flat, level stable work surface
away from sources of cold, heat and damp.
good ventilation, the rear of the oven should have a clearance
For
of at least 10 cm from the wall, the free distance above the top
should be at least 20 cm and there should be a gap of at least 5cm
at both sides.
20cm
10cm
5cm
Oven Door
Turntable Rotor
Door Interlocks
Viewing Window
Support Ring
Turntable
Installing the Turntable
$Open the oven door. (To open the door press the Oven
Release button firmly).
$Place the Turntable Support Ring in the oven
$Lower the turntable onto the Rotor. There is a recess in the
turntable to lock securely on the rotor.
Features and Controls
Control Panel
Grill Rack
Door Release
5cm
The oven should be plugged directly into the wall socket and not
via an adaptor or any other power sharing device.
Installation
$Close the door. Ensure it latches securely and that the oven
light goes off.
$You must always operate your microwave oven with the
turntable assembly properly in place.
Page 4
Page 5
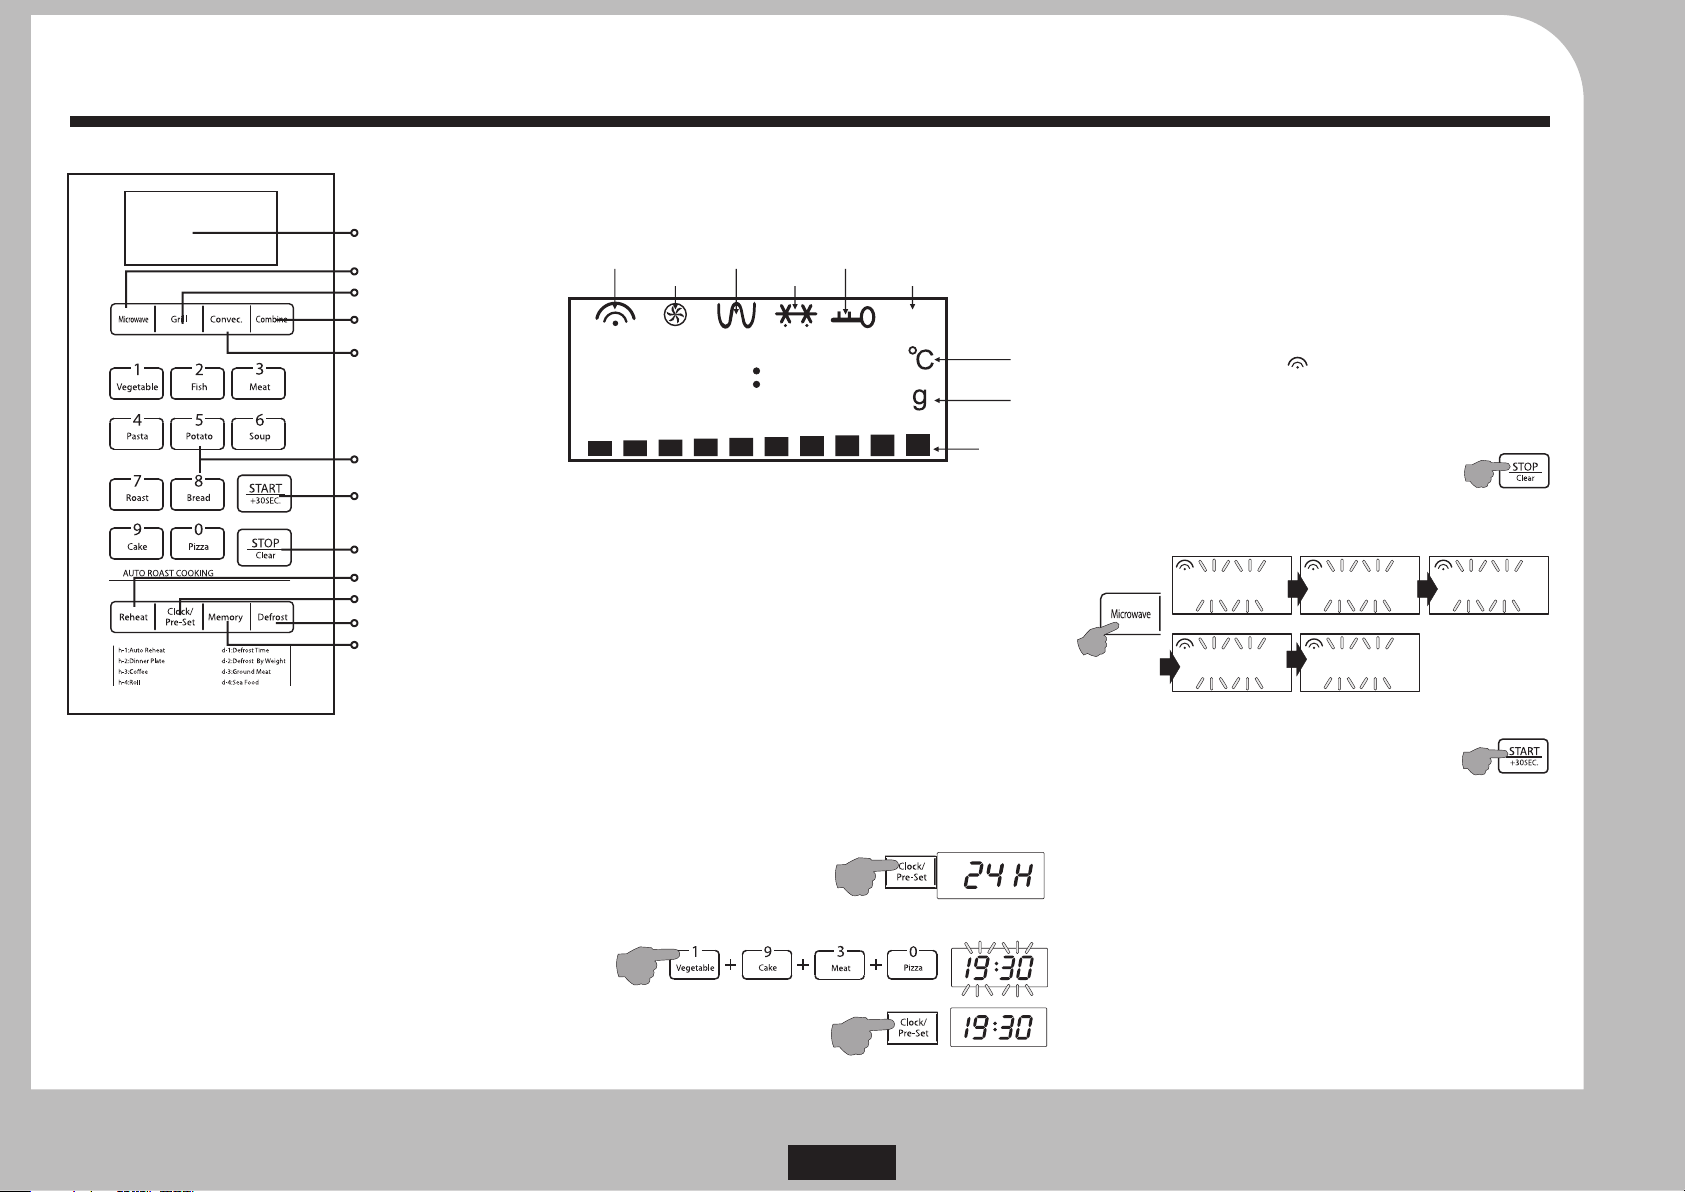
Basic Procedures
The Control Panel
Display Screen
Microwave Button
Grill Button
Combination Button
Convection Button
Number keypad
Auto_Cook Selector
Start/+30 Sec Button
STOP/Clear Button
Reheat Button
Clock/Pre-Set Button
Defrost Button
Memory Button
MICROWAVE/GRILL/CONVECTION/COMBINATION: Press the
relevant button to select the required process.
NUMBER KEYPAD: Enter the time: Enter the weight of food to be
cooked: Use to select an Auto Cook process.
START/+30 SEC: Press to start the oven. During cooking, press to
add time in 30 sec increments.
STOP/Clear: Press to stop the oven, clear or cancel a programme.
Reheat: Press to choose one of four Auto-Reheat programmes.
Memory: Use to set/recall one of three user-settable cooking
processes.
Clock/Preset: Press to Set the clock, set a preset cooking time.
During cooking, press to check the clock or preset cooking time.
Defrost: Press to choose one of four Auto-Defrost programmes.
The Display Screen
Around the perimeter of the screen there are icons. These icons,
singly or in combination give you a visual indication of the
process which the oven is carrying out.
Microwave
Convection
Grill
Defrost
Child Lock
Auto Cook
AUTO
Temperature
in ºC
Food Weight
88 88
in g.
Temperature
indicator
When executing a program the digital display indicates the
amount of cooking time remaining on the program.
USING THE OVEN
SWITCHING ON
$Unwrap and uncoil the power cord fully.
$Plug the mains plug into a suitable wall socket.
$Switch the mains power on.
$Your oven is now ready to be programmed
SETTING THE CLOCK
When first switched on the display will indicate “0:00". You can
choose either a 12 or 24 hour clock. If you choose the 12 hour
clock, AM and PM are not indicated.
To enter a time of 19:30 (7:30pm)
$Press the Clock/Preset button:
Once to select a 24 hour clock
(Twice selects a 12 hr clock )
$Enter the time directly using the number keys.
$Press the Clock/Preset button:
The time is now set
BASIC MICROWAVE COOKING
Press the Door Release to open the oven door. Place the food in
the centre of the oven on the turntable. Close the door.
Procedure: Select the microwave option: Set the microwave
power: Select the cooking time: Start the cooking process.
Method:
$Press STOP/Clear to clear any previous setting
$Press the Microwave Button one or more times to select a
microwave power. The “ “indicator on the display lights to
show the microwave function. The power level is also indicated.
$Set the cooking time with the number keys.
$Push the START/+30SEC button to start the oven.
1: Press STOP Clear to clear any program.
2: Set the Microwave power level
Repeatedly press the button to select the power level.
Microwave
x1 x2 x3
:
p
00
i
AUTO
g
COOK
x4
p i:30
AUTO
g
COOK
3: Set the cooking time.
4: Push START/+30SEC to start the oven.
ENTERING COOKING TIMES
You can enter times up to a maximum of 99 minutes and 99
seconds. So an entry of 99 seconds will display “99" and the
cooking time will be 1min 39 sec.
If you enter “100", the time will be recorded as 1:00 and cooking
time will be one minute exactly. So an entry of “99" will actually
set a cooking time 39 seconds longer than an entry of“100".
The maximum cooking time you can set is 100 min:39 seconds.
This is indicated on the display as 99 min: 99 seconds.
ML
p i:80
AUTO
COOK
g
ML
p i:50
AUTO
COOK
g
x5
p i:i 0
AUTO
ML
Enter the time using the number keys.
g
ML
COOK
ML
Page 5
Getting Started
Page 6
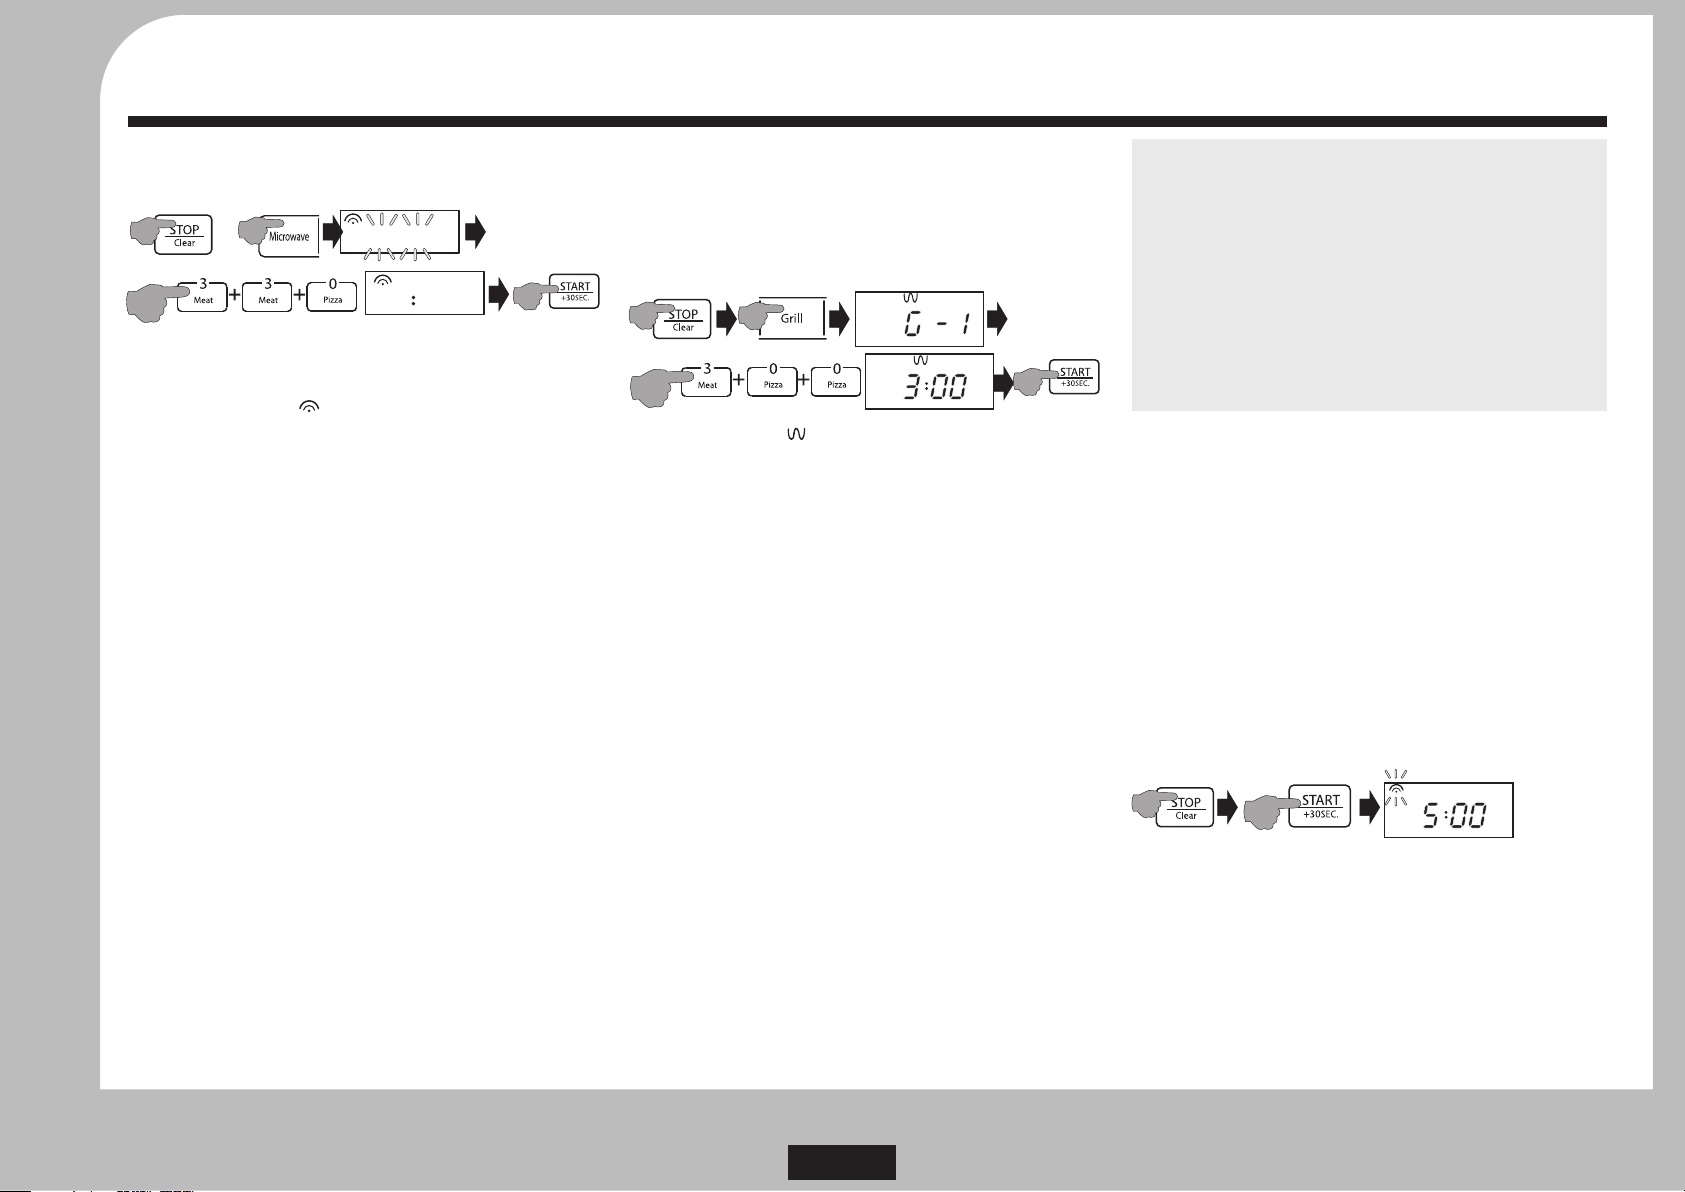
Power Microwaving and Grilling
Example: Cook food for 3minutes 30 seconds at 80 % power: Example: To grill food for 3 minutes:
Open the door, place the food on the turntable, Close the door. Then:
x2
p i:80
AUTO
g
ML
COOK
p3 0
3
Cooking starts and the clock will now count down the cooking time
remaining on the programme.
During cooking the “ “ icon flashes to indicate that the
microwave is operational.
When the cooking cycle is over: The oven will ‘beep’ five times,
and reset to the clock time.
$Wait a short time and then open the door and remove the
cooked food. Close the door.
During Cooking:
$To interrupt cooking: Open the oven door or press
STOP/Clear once.
$To resume cooking: Close the door (if open); press the
START/+30SEC button.
$To check the clock time during cooking: Press the
Clock/Preset button.
$To add time onto a program: Press the START/+30SEC
button. Each press adds 30 seconds to the cooking time.
$To cancel a program: Press STOP/Clear twice.
Important note: When carrying out any procedure, if you fail to
complete the procedure the oven will wait indefinitely for you to
either cancel or complete the procedure.
USING THE GRILL
The grill is useful for cooking thin slices of meat, steaks, kebabs,
sausages and pieces of chicken. It is also suitable for hot
sandwiches and au gratin dishes. Grilling takes place at full power.
The maximum time available for grilling is 100 min: 39 sec
1: Press STOP/Clear to clear any program.
2: Press the Grill button “G - 1” (Grill) appears and the grill icon
lights on the display..
3: Set the cooking time with the number keys.
4: Push the START/+30SEC button to start the oven.
During cooking the “ “ icon flashes to indicate that the grill is
operational.
Half way through the cooking cycle, the oven will emit two beeps
to remind you that you may need to turn the food over.
Open the door, turn the food with heatproof tongs and close the
door and press the START/+30SEC button to continue.
When the cooking cycle is over: The oven will ‘beep’ five times,
and reset to the clock time.
.Points to remember when grilling:
$Use a metal grill rack (supplied) so that food can drain.
$Do not overload the grill rack. Space the food out.
$Brushing the grill rack very sparingly with vegetable oil will
stop food adhering to it and make washing up easier.
$Always stand the grill rack in a heatproof ceramic dish. This
will catch drips and help keep the oven clean.
$Do not use the grill without the turntable in place. The
turntable helps the food to cook evenly.
$The grill rack has a “high” side and a “low” side. The “high” side
is for grilling very thin slices of food. Make sure that there is
sufficient clearance between the food and the grill bars and
remember the closer to the grill bars the food id the hotter it
will get.
$When removing or turning over food use heatproof tongs or
a similar implement.
$When removing or inserting the provided grill rack into a hot
oven use a suitable heatproof implement.
CAUTION:
When you use the grill, the cooking utensils and the interior of
the oven get very hot, much hotter than when you are using the
oven as a regular microwave.
Always stir food with long handled implements, tongs, etc.
Always use oven gloves when removing or placing utensils in
an oven where the grill has recently been on. When you set
utensils down on a surface make sure it is heatproof or use an
insulating mat.
After use allow an extra long period for the oven to cool down
before cleaning or re-use.
EXPRESS COOKING
Express cooking is a very good way of rapidly heating small
portions of food, or easily adding a small amount of cooking time
to finish dishes that are slightly undercooked.
By pressing the repeatedly you can
program the oven for Express cooking at FULL (100%) microwave
power.
$The oven will start immediately so be prepared!
Points to remember with the Express cooking program
$Each press of the button increases the time
in 30 second intervals up to 95 minutes (maximum).
$Express Cooking always takes place at full power.
Example: To express cook food for 5 minutes
START/+30SEC button
START/+30SEC
x10
Operation
Page 6
Page 7
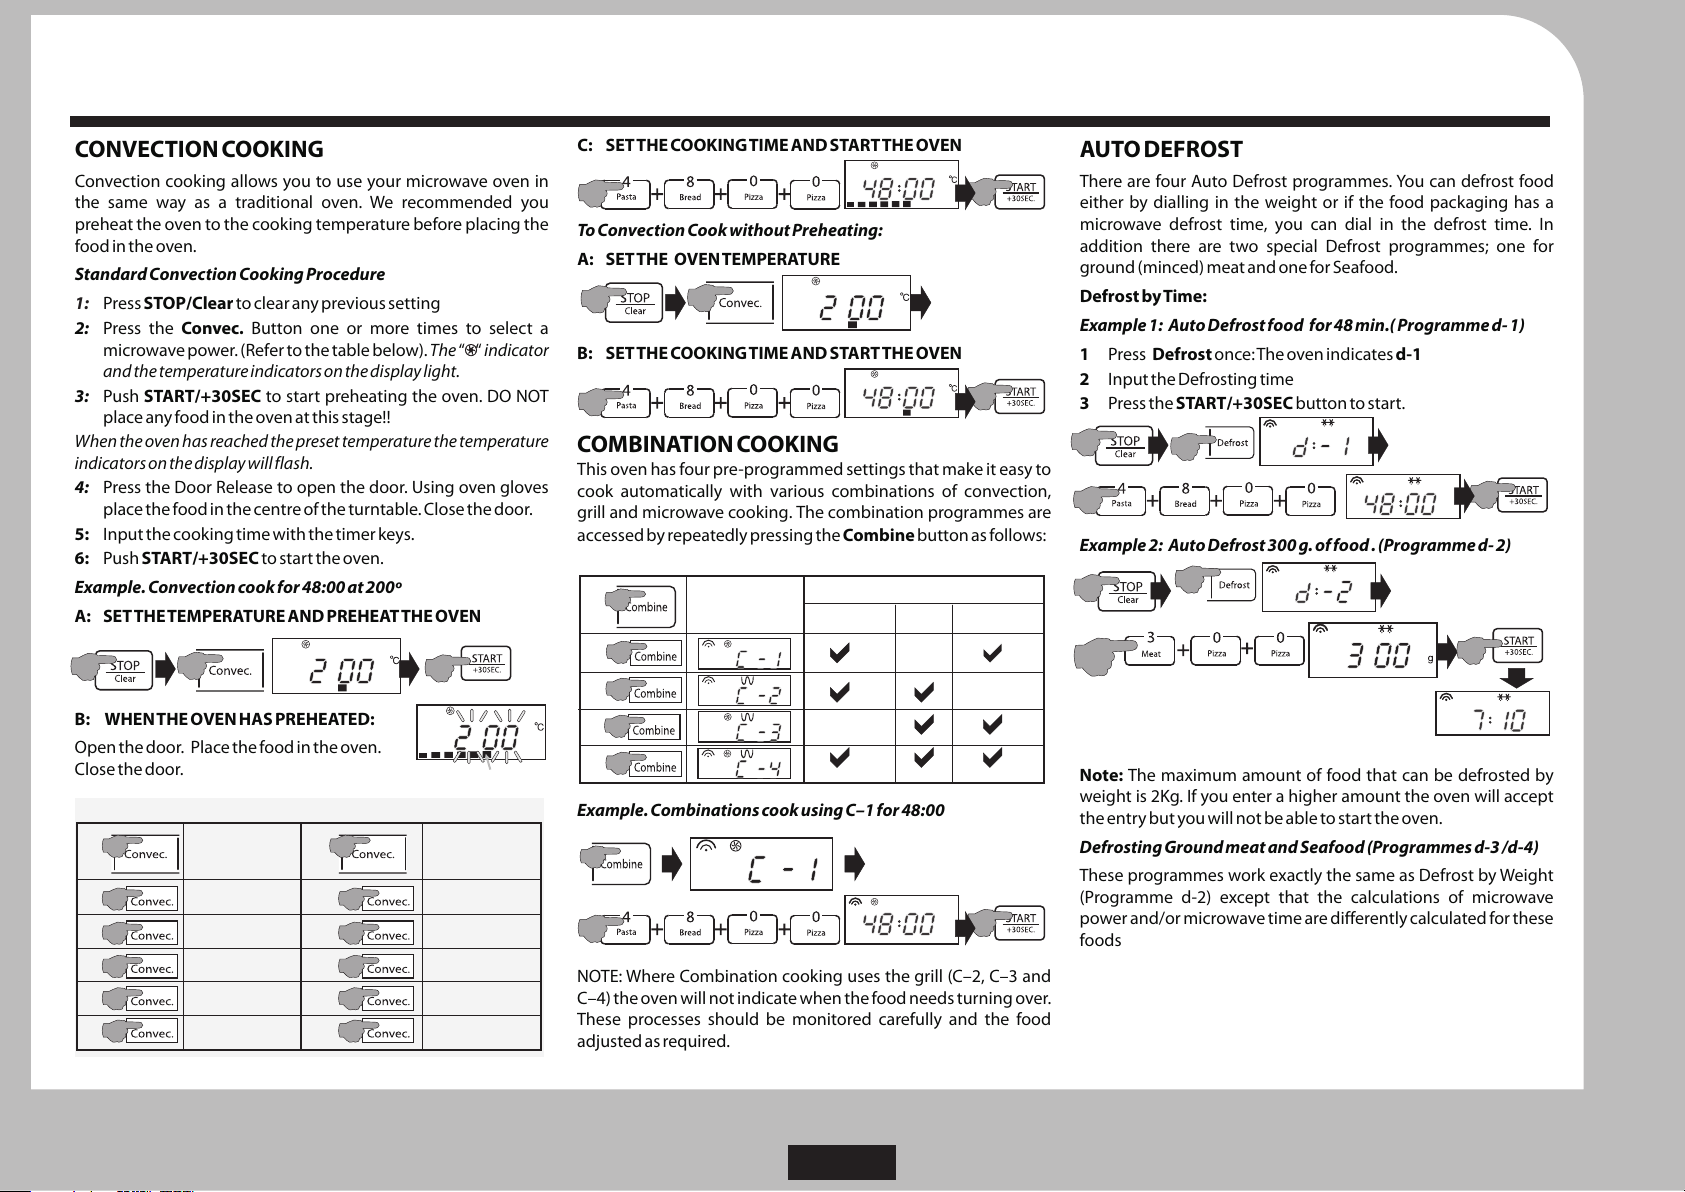
Convection Cooking and Defrosting
CONVECTION COOKING AUTO DEFROST
Convection cooking allows you to use your microwave oven in There are four Auto Defrost programmes. You can defrost food
the same way as a traditional oven. We recommended you either by dialling in the weight or if the food packaging has a
preheat the oven to the cooking temperature before placing the microwave defrost time, you can dial in the defrost time. In
food in the oven. addition there are two special Defrost programmes; one for
Standard Convection Cooking Procedure
1:
Press STOP/Clear to clear any previous setting
2: Press the Convec. Button one or more times to select a
microwave power. (Refer to the table below). The “ “ indicator
and the temperature indicators on the display light.
3: Push START/+30SEC to start preheating the oven. DO NOT
place any food in the oven at this stage!!
When the oven has reached the preset temperature the temperature
indicators on the display will flash.
4: Press the Door Release to open the door. Using oven gloves
place the food in the centre of the turntable. Close the door.
5: Input the cooking time with the timer keys.
6: Push START/+30SEC to start the oven.
Example. Convection cook for 48:00 at 200º
A: SET THE TEMPERATURE AND PREHEAT THE OVEN
x6
B: WHEN THE OVEN HAS PREHEATED:
Open the door. Place the food in the oven.
Close the door.
CONVECTION OVEN TEMPERATURE SETTING TABLE
Oven
PRESSES
X1
X2
X3
X4
X5
Temperature
150 ºC
160 ºC
170 ºC
180 ºC
190 ºC
PRESSES
X6
X7
X8
X9
X10
OVEN TEMPERATURE
Oven
Temperature
200 ºC
210 ºC
220 ºC
230 ºC
240 ºC
C: SET THE COOKING TIME AND START THE OVEN
To Convection Cook without Preheating:
A: SET THE OVEN TEMPERATURE
x6
B: SET THE COOKING TIME AND START THE OVEN
COMBINATION COOKING
This oven has four pre-programmed settings that make it easy to
cook automatically with various combinations of convection,
grill and microwave cooking. The combination programmes are
accessed by repeatedly pressing the Combine button as follows:
COMBINATION COOKING TABLE
PROGRAMME
PRESSES
DISPLAY
X1
X2
X3
X4
Example. Combinations cook using C–1 for 48:00
NOTE: Where Combination cooking uses the grill (C–2, C–3 and
C–4) the oven will not indicate when the food needs turning over.
These processes should be monitored carefully and the food
adjusted as required.
COMBINATION PROCESSES USED
MICROWAVE GRILL CONVECTION
ground (minced) meat and one for Seafood.
Defrost by Time:
Example 1: Auto Defrost food for 48 min.( Programme d- 1)
1 Press Defrost once: The oven indicates d-1
2 Input the Defrosting time
3 Press the START/+30SEC button to start.
Example 2: Auto Defrost 300 g. of food . (Programme d- 2)
X2
The programme automatically
calculates the time required.
Note: The maximum amount of food that can be defrosted by
weight is 2Kg. If you enter a higher amount the oven will accept
the entry but you will not be able to start the oven.
Defrosting Ground meat and Seafood (Programmes d-3 /d-4)
These programmes work exactly the same as Defrost by Weight
(Programme d-2) except that the calculations of microwave
power and/or microwave time are differently calculated for these
foods
Page 7
Operation
Page 8
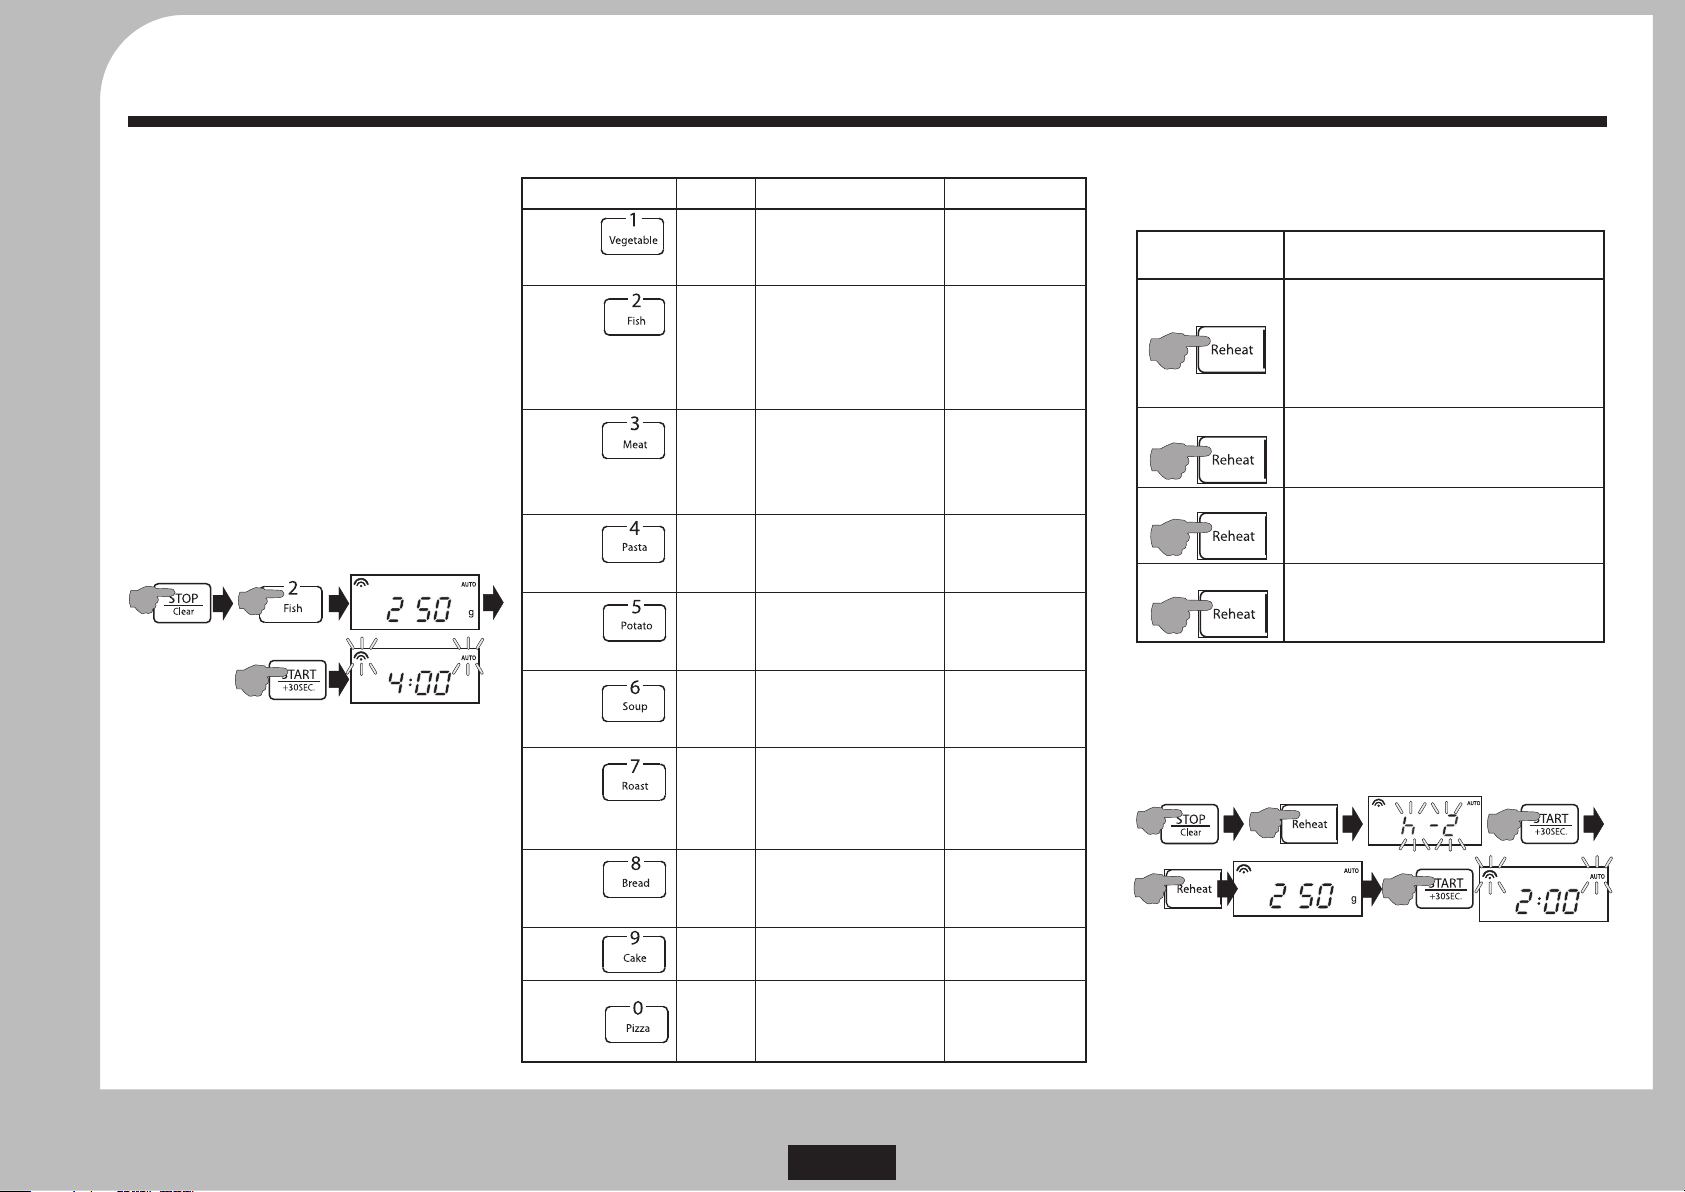
Auto Cooking and Reheating Menus
AUTO-COOKING REHEAT
Auto Cooking automates the cooking of common There are four Reheat menus. Each menu has further options.
basic foods. There are 10 settings. Each key on the They are all accessed in the same manner:
keypad accesses a different Auto-Cook menu.
Once set, you cannot alter or add time on to an
Auto-Cook menu.
All Auto Cook menus are set up in the same way:
1: Press STOP/ Clear to clear any program.
2: Select an Auto Cook menu by pressing a number
key.
3: Further presses of the key will select different
amounts. (Refer to the table opposite)
4: Press the START/+30SEC button to start. The
program will automatically determine the
cooking method and time.
Example: Auto Cook 250g. of fish:
X2
Notes:
1: Food should be at room temperature.
2: The cake menu is a special case. This requires the
oven to preheat. Start with an empty oven.
When the oven has reached the correct
temperature (160°) it will beep twice. Open the
door, insert the cake and close the door. Press
the START/enter button to continue with the
cycle.
Menu
Vegetable
Two
Three
Fish
Two
Three
Four
Five
Meat
Two
Three
Four
Pasta
Two
Three
Potato
Two
Three
Soup
Two
Three
Roast
(Chicken)
Two
Three
Four
Bread
Two
Three
Cake
Pizza
Two
Three
AUTO COOK MENU TABLE
Presses
One
Two
Three
One
Two
Three
Four
Five
One
Two
Three
Four
One
Two
Three
One
Two
Three
One
Two
Three
One
Two
Three
Four
One
Two
Three
One
One
Two
Three
Quantity
150 g
350 g
500 g
150 g
250 g
350 g
450 g
650 g
150 g
300 g
450 g
600 g
50 g (+ 450ml cold water)
100 g (+ 800ml cold water)
150 g (+ 1.2 l cold water)
1 (c. 230g)
2 (c. 460g)
3 (c. 690g)
200 ml
400 ml
600 ml
500 g
750 g
1000 g
1200 g
50 g
100 g
150 g
475 g
200 g
300 g
400 g
Cooking Time
3:00 min
4:30 min
6:00 min
3:00 min
4:00 min
5:30 min
7:00 min
8:30 min
2:30 min
4:00 min
5:40 min
7:30 min
18:00 min
20:00 min
22:00 min
6:00 min
8:30 min
12:00 min
2:00 min
3:30 min
5:00 min
28:00 min
32:00 min
39:00 min
45:00 min
7:00 min
7:30 sec
8:00 min
45:00 min
(+ oven warmtime)
10:30 min
12:30 min
14:00 min
Press to Select
a Reheat Menu
Auto-Reheat (h-1)
Two
Three
X1
Fish
Two
Dinner Plate (h-2)
Four
X2
Five
Coffee (h-3)
Two
X3
Three
Rolls (h-4)
Pasta
X4
1: Press the Reheat key one or more times to select a menu.
2: Press the START/+30SEC button.
3: Press Reheat key one or more times to select the amount..
4: Press the START/+30SEC button to start.
Example: Reheat a “dinner plate” of food weighing 250g (h-2)
Further
Presses
One
Two
Three
Four
Five
One
Two
Three
One
Two
Three
One
Two
Three
Amount
150 g
250 g
350 g
450 g
600 g
250 g
350 g
450 g
1(c. 240 ml)
2(c. 480 ml)
3(c. 720 ml)
1(c. 70 g)
2(c. 140 g)
3(c. 210 g)
COOK
g
AUTO
Time
3:00 min
4:30 min
6:00 min
3:00 min
4:00 min
5:30 min
7:00 min
8:30 min
2:30 min
4:00 min
5:40 min
7:30 min
18:00 min
20:00 min
X2
X1
Coffee (h-3) can be used to heat beverages and soup
Dinner Plate (h-2) refers to the food content on a plate. Plates
must be microwave oven safe.
Rolls (h-4)can be used to reheat savoury buns etc. but they must
not contain sugar, icing etc.
Operation
Page 8
Page 9
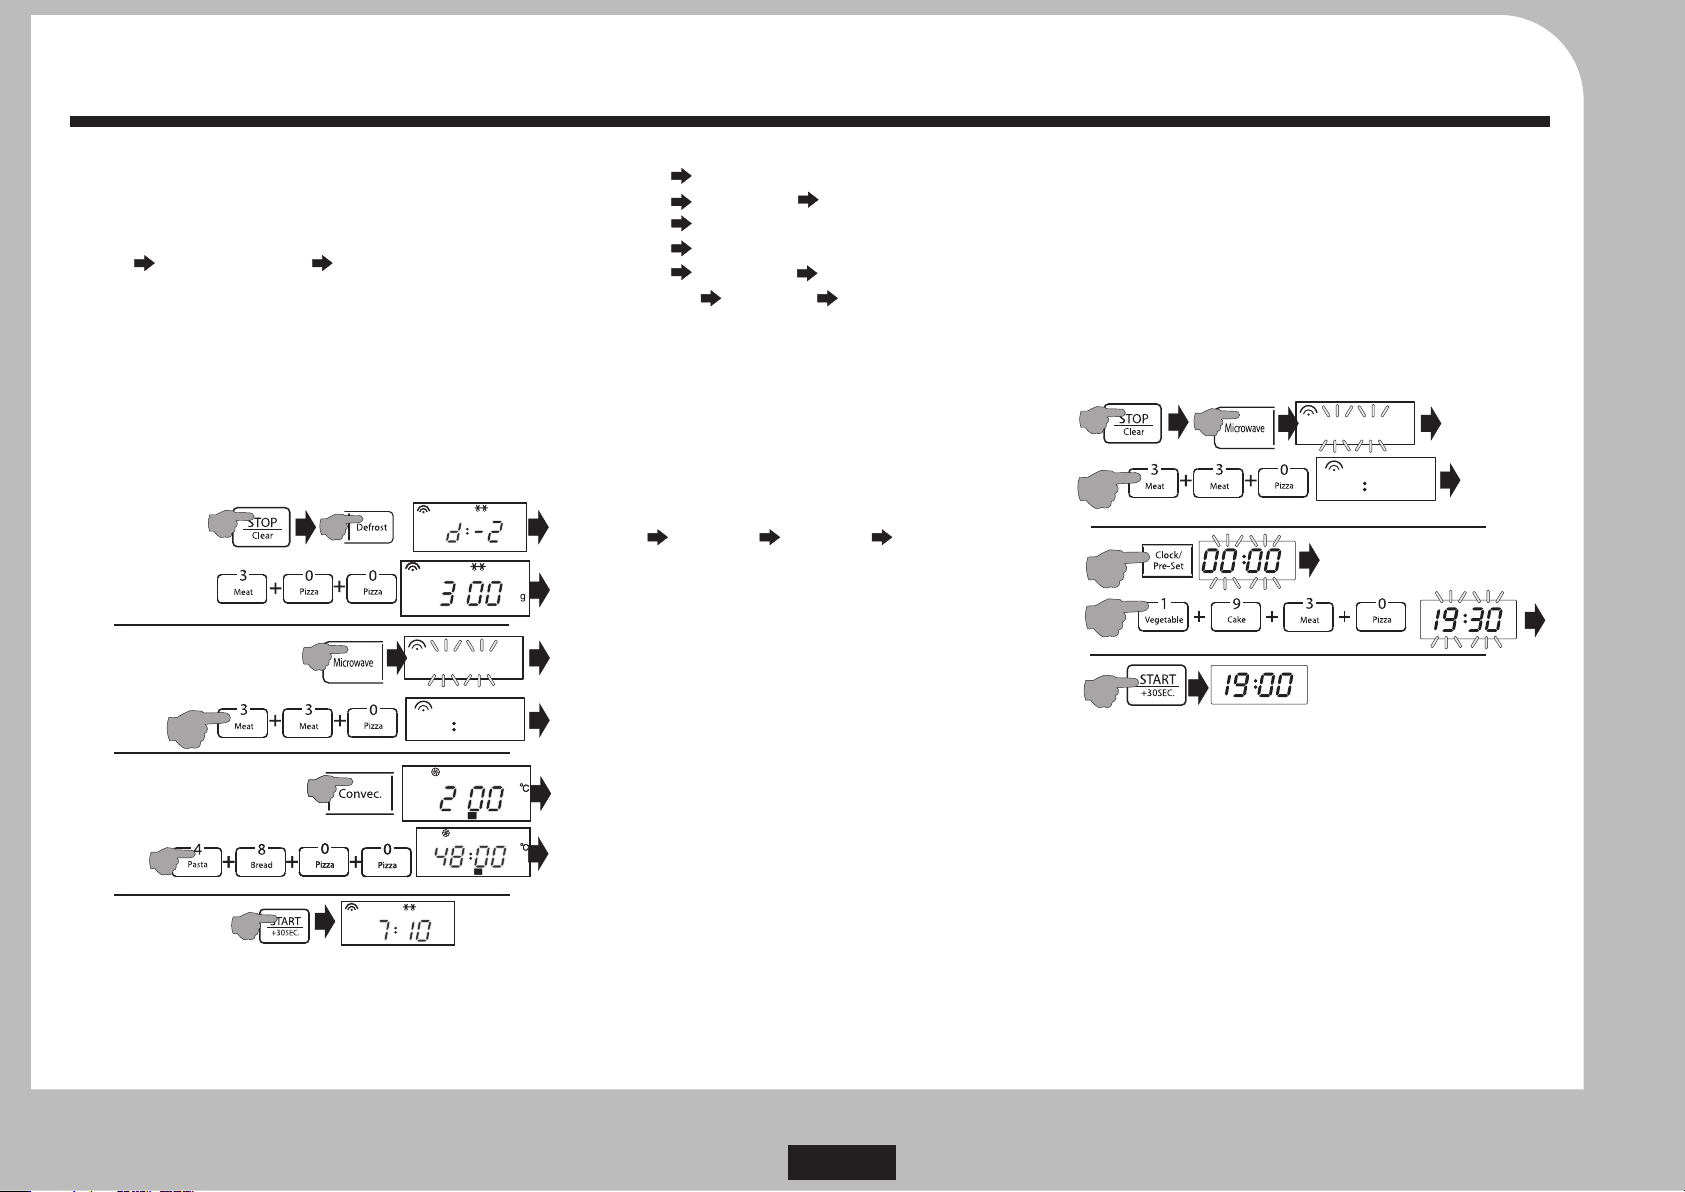
Mulii-Stage and Time Delayed Cooking
MULTI-STAGE COOKING
Your oven can be programmed for up to 3 cooking sequences.
DEFROST is the logical first stage in this program.
Suppose you want to set the following 3 stage cooking program.
Defrost Microwave cooking Convection cooking
1. Press the Defrost key to select a Defrost programme (d-1/d-4)
2. Use the Number keys to input the defrost time/weight.
3. Press the Microwave key to select a microwave power level.
4. Use the Number keys to input the microwave cooking time.
5. Press Convec. to set the convection temperature.
6. Use the Number keys to input the convection cooking time..
7: Press the START/+30SEC button to start cooking.
Example: Defrost 300g of food, microwave at 80% for 3 min. 30
sec. and finally convection cook at 200ºC for 48 min.
x2
X2
p i:80
AUTO
COOK
g
ML
Stage 1:
Set Defrost Cycle
Stage 2:
Set Microwave Cycle
Using this procedure you can set additional programs e.g.
$Defrost grill
$Defrost microwave grill
$Defrost microwave
$Defrost convection
$Defrost convection grill
$Microwave convection grill
$To do this just join the flow sequences for the various processes
as shown in the relevant sections of this manual.
IMPORTANT: It is possible to set
$Multi-cooking processes that include auto cooking
$Multi-cooking processes that do not start with defrost
$Multi-cookingwith grill or convection before microwaving.,
$Multi cooking with grill before convection.
All such settings must not be used.
The sequence with multi-cooking process must always be
Defrost Microwave Convection Grill
TIME-DELAYED COOKING
The oven can be set to switch on at a pre-set time. The oven clock
needs to be set before you can carry out this procedure - see P 5.
CAUTION: Lengthy time delayed cooking should not be used
with fresh milk or perishables. Be extra careful in hot weather.
You can select any single process menu or any multi-stage menu
for time delayed cooking as long as it .does not include a Defrost
cycle. You cannot time delay any Defrost programme.
Example: The time is 7:00 PM(19:00). Set a time of 7:30 PM
(19:30) to start microwaving food for 3 min 30sec at 80%
x2
The oven reverts to clock time.
p i:80
AUTO
COOK
p3 0
3
g
ML
p3 0
3
Stage 3:
Set Convection Cycle
Stage 4: Operation
The defrost cycle will start. When this has ended the oven will
beep and move on to the microwave cycle and then when this is
finished the oven will beep and move on to the final stage.
You cannot add time on to any process during multi-stage cooking.
x6x6
When the programmed time arrives the oven will beep twice and
execute the programme.
Operation
Page 9
Page 10
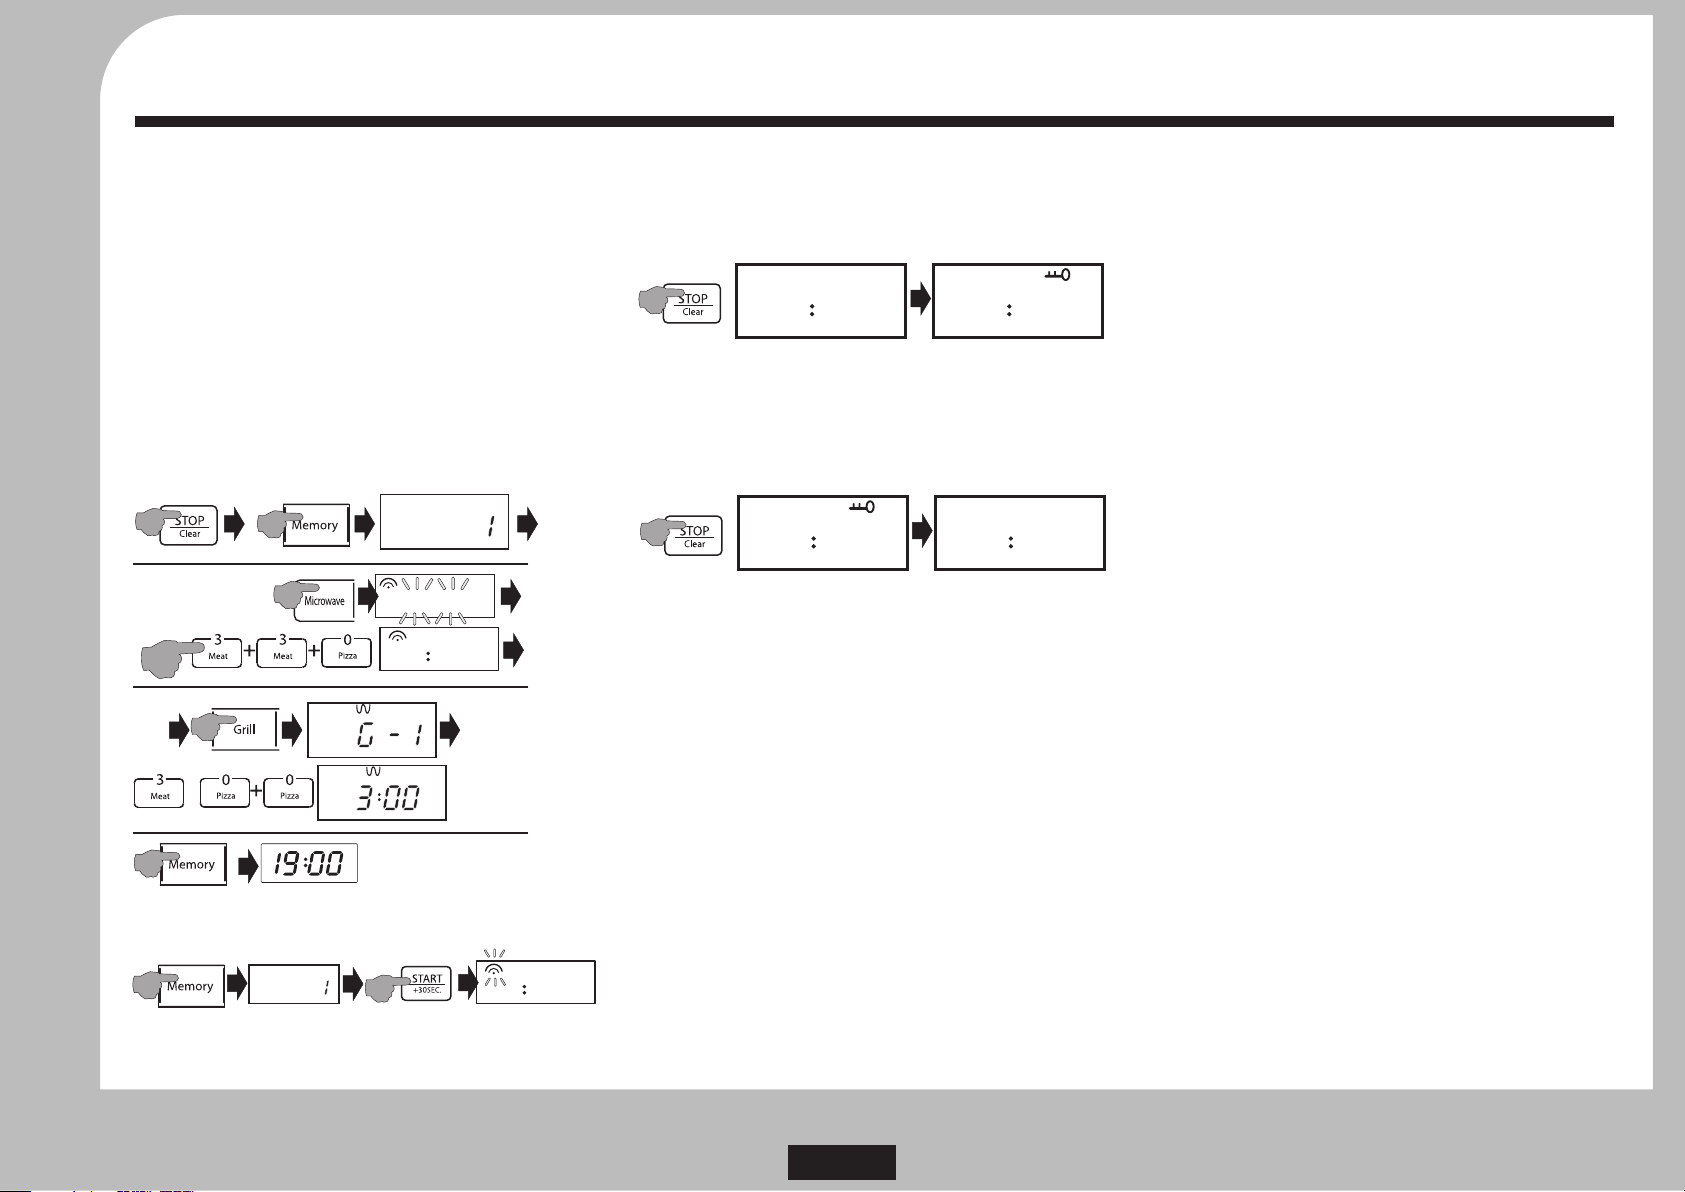
Memory and Child Lock Functions
THE MEMORY FUNCTION SETTING THE CHILD LOCK
If there is a cooking procedure you regularly use you can store it The child lock disables all the oven functions.
in the oven memory and recall it at the press of a button. The oven
has three memory settings.
You can set any valid single or two-part procedure. You cannot
store a defrost cycle or any process that has a defrost element.
Example Microwave at 80% power for 3 min 30 sec and then
grill for 3 min. Store the procedure in Memory 1.
Storage Procedure
1: Press the Memory key once. (Press twice for Memory 2 and
three times for Memory 3)
2: Input the Microwave program
3: Input the Grill program
4 Press the Memory key once to store the procedure.
x1
To set the Child lock:
$Press and hold the STOP/Clear button
AUTO
22 08
After a few seconds the oven will ‘beep’ and the ‘LOCK’ symbol will
appear in the display.
In Child Lock mode only the clock time is displayed and all
controls are disabled.
To remove the Child lock:
$Press and hold the STOP/Clear button
22 08
AUTO
AUTO
AUTO
x2
x1
The oven reverts to clock time.
To recall the preset:
Press Memory once to recall the preset and then START/+30sec.
x1
Program Memory 2 and Memory 3 using the same procedure.
p i:80
AUTO
COOK
p3 0
3
g
Operation
ML
p3 0
22 08
After a few seconds the oven will ‘beep’ and the ‘LOCK’ symbol will
disappear from the display. The oven controls will now operate
normally.
22 08
3
Page 10
Page 11
Hints and Tips
TIPS FOR GOOD COOKING CLEANING AND CARE
Please read this section in conjunction with the Safety Guide on
Page 2.
$Stir liquids and purees before during and after cooking to
distribute the heat evenly. Mashed potato will cook more
evenly and more thoroughly if lightly covered.
$ Never tightly cover food. Always cover it loosely.
$Do not allow plastic film to touch food as it may chemically
break down or melt or even catch fire and contaminate the
food.
$Arrange food in the dish so that the thicker part is on the
outside and the thinner part inside for more even cooking.
Fold under the thin edges of fish fillets and tapered foods.
$6-7 minutes per 500 gr. will cook most fruit and vegetables.
Seafood takes less time.
$Different foods require different temperatures to cook. Add
more minutes as you drop the power.
$Up to 20% of the cooking takes place after the oven turns off
so always remember that your food will continue cooking
after you've removed it.
$Food that takes an hour in to cook in a regular oven should
take around 15 minutes in the microwave.
$Foods with baking powder should stand a few minutes
before cooking to allow the leavening agents to work.
$If a recipe calls for milk and water, reduce the water.
$Rotate large items of food occasionally during cooking to
encourage even heat distribution.
$Food cooks best and reheats better in a round dish or a dish
with curved sides.
$Salt attracts microwaves. Don't just sprinkle it on food before
cooking, stir it in or add it later.
$Fats and sugars attract microwaves - thoroughly mix sugar
with other ingredients. Care should be taken when cooking
foods with high sugar or fat contents as they can reach very
high temperatures.
$Handle pastry-wrapped foods like mince pies carefully as the
filling gets hotter than the pastry.
Hints for reheating food
$Heat leftovers and pre-cooked food to at least 70°C. Food
should be hot and steaming before it is served.
$When re-heating liquids such as meat stews see that the
liquid boils for around 3-5 minutes to ensure the pieces of
meat are completely heated through.
Hints for defrosting
$Only defrost food in the microwave if you plan to cook the
food immediately after it has thawed. Some areas of the food
may begin to cook during defrosting, which can allow
bacteria can flourish.
$Remove the food from the wrapping, place it on a microwave
safe dish. Rotate and re-arrange food during defrosting.
Where appropriate, stir the food and if possible, separate the
food items and remove those which have already defrosted.
Steam and Smoke
$Steam is a natural product of microwave cooking. It escapes
from the vents in the top and rear of the appliance. These
vents should never be blocked.
$Steam may condense in and around the oven during cooking
and should be dried off after use.
$If during cooking, smoke starts to come from the oven do
NOT open the oven door! Immediately switch off at the
mains, unplug the oven and wait for the smoke to completely
subside and the oven to fully cool down before removing the
food.
$Before you use your microwave oven again, consult a service
technician and have the oven tested .
Testing Your Oven
Place a cup of water in the oven and heat it on full power for 2
minutes. If the water gets hot the oven is working.
If the oven fails to work or will not respond to commands.
Unplug the oven and inspect the plug fuse. If this is intact, leave
the oven for 30 minutes and then plug the oven in again. The
oven should now work normally.
These steps should be taken after every use.
$Disconnect the power supply and wait for the appliance to
completely cool down.
$Remove the turntable support ring and the turntable and
wash then in warm soapy water.
$Clean the oven cavity, the outer edge of the cavity, and the
oven door with water and a mild detergent. A special
microwave oven cleaner is not necessary. Do not use
scouring pads, or other abrasives.
$Wipe outer surfaces and control panel with a damp soft cloth.
$If liquids have been splashed on the wall of the oven cavity,
they must be fully removed otherwise smoke may occur
when the appliance is next used.
$If the cavity emits odours, boil a cup of water with a squeeze
of lemon juice for 5-7 min. to remove them.
$Dry all parts thoroughly and replace them.
Page 11
Further Information
Page 12
Warranty and Specifications
APPROXIMATE COOKING TIMES FOR FISH (ON FULL POWER)
Item Weight Cooking Time StandingTime
Cod fillets 450g 2.5-3.5 minutes 4-10 minutes
Cod steaks 225g 2.5-3.5 minutes 4-10 minutes
Haddock fillets 225g 2.5-3.5 minutes 4-10 minutes
Kipper fillets 450g 2.5-3.5 minutes 4-6 minutes
Plaice fillets 225g 2.5-3.5 minutes 6-8 minutes
Trout (2 fish, gutted but whole) turn fish over half way through 3.0-4.5 minutes 4-6 minutes
The times given above are approximate and should be adjusted to suit portion sizes and individual taste. The average cooking time for
fish is around 3.5 minutes per 450 g (1 lb). The fish should be lightly covered during the standing period.
Is it cooked? Temperature should reach 70º C for fish. Fish should be opaque and flake easily.
APPROXIMATE COOKING TIMES FOR FRESH VEGETABLES (ON FULL POWER)
Item Weight Added water Cooking Time
Aubergines (peeled and diced) 450g 30-40 ml 4.0-5.0 minutes
Broccoli (trimmed and sliced into spears) 225g 50 ml 3.0-4.0 minutes
Brussels Sprouts(peeled) 225g 50 ml 5.0-6.5 minutes
Carrots (diced) 225g 30 ml 2.5-3.5 minutes
Cauliflower (in florets) 450g 50-60 ml 7-9 minutes
Courgettes (diced or sliced) 450g 10 ml 5.5-7.5 minutes
Peas (removed from pods) 225g 40-50 ml 4.5-5.5 minutes
Potatoes, jacket ( 2, scrubbed and pierced all round) 225g None 6.5-8.5 minutes
Potatoes, (in 40mm pieces) 450 g 40-50 ml 5.5-6.5 minutes
Spinach (shredded) 225g None 3..0-5.0 minutes
The times given above are approximate and should be adjusted to suit quantities, portion sizes and individual taste. The average
cooking time for vegetables is around 5.5 minutes per 450 g (1 lb). When adding salt, mix it with the water or add it after cooking.
To cook vegetables: Mix them with the water in a ceramic curved bottomed bowl and cover lightly. After cooking leave the vegetables
to stand for 2-3 minutes before straining (if necessary) and serving.
Conclusion
WARRANTY
Your Tesco appliance is covered by a warranty for 12 months
from the date of purchase. If a fault develops during this
period, please contact the TESCO electrical help line on 0845
456 6767. Please have your original purchase receipt with you
when you call. This warranty in no way affects your consumer
rights.
SPECIFICATIONS
Rated Voltage: 230V~50Hz
Rated Input Power(Microwave): 1500W
Rated Output Power(Microwave): 900W
Rated Input Power(Grill): 1400W
Rated Input Power(Convection): 2400W
Oven Capacity: 25L
Turntable Diameter: 315 mm
Net Weight: 12.8Kg
THIS APPLIANCE MUST BE EARTHED.
Tesco Stores Ltd, Delamare Road,
Cheshunt, Herts, EN8 9SL
UK: Waste electrical products should not be disposed of with
household waste.
facilities see www.recycle-more.co.uk or in-stor
ROI: Produced after 13th August 2005. Waste electrical products should
not be disposed of with household waste. Please recycle where facilities
exist. Check with your Local Authority or retailer for recycling advice.
Separate disposal facilities exist, for your nearest
e for details.
 Loading...