

Page 1

TriBrer
RR
USER'S GUIDE
Handheld measuring instrument
Optical power meter
Optical laser source
Optical multi meter
English
English
English
Page 2

Page 3

USER'S GUIDE
Handheld measuring instrument
Optical power meter
Optical laser source
Optical multi meter
English
English
English
Page 4

Page 5

USER'S GUIDE
Optical Power Meter
English
Page 6

WARNING
Any undefined change or modification of this manual will deprive
you of the right to operate the equipment.
To reduce the risk of fire or electric shock, do not expose the
equipment to rain or humidity.
To prevent electric shock, please do not open the shell, and it
must be repaired by qualified personnel.
NOTE
As the laser is harmful to the eyes, don't look directly at the laser
outlet and don't attempt to disassemble the cabinet.
PRECAUTIONS FOR USE
Using the battery:
The equipment can use a disposable alkaline battery or rechargeable battery, and can not be mixed with different types or different
capacity batteries. Only rechargeable batteries can be charged.
Avoiding condensation:
Sudden changes in temperature should be avoided. Do not use
the device immediately after moving the device from the cold area
to the hot area, or when the room suddenly heats up, because the
device may have condensation phenomenon. If the temperature
changes abruptly, stop using it and take out the battery, and the
power can be switched on after at least an hour.
Storage:
When the device is not used for a long time, please take out the
battery to avoid the damage caused by battery leakage .
1
Page 7
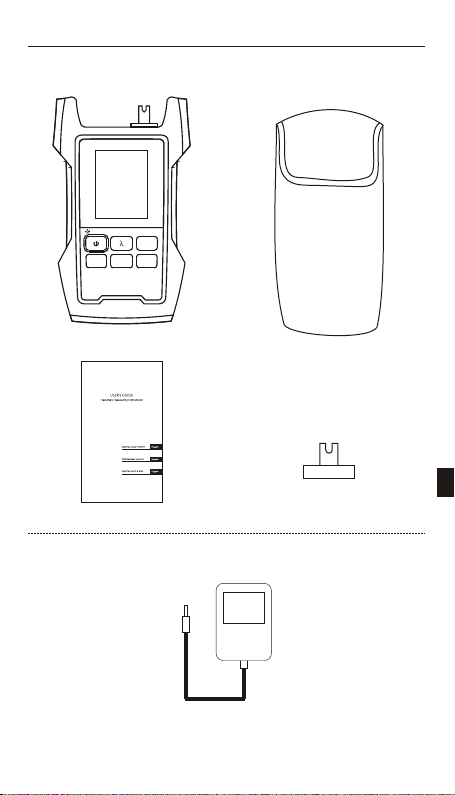
Optical Power Meter
>2s PERM
Save
Standard
VFL
Unit
REF
Host
Manual
Bag
FC/SC Adapter
Optional
Charging
2
Page 8
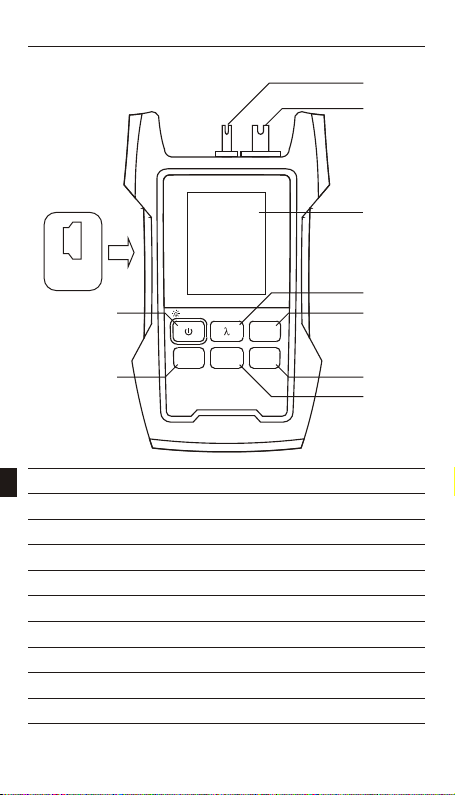
Description
1
2
8
USB
Optical Power Meter
9
>2s PERM
Save
Unit
VFL
REF
10
1-VFL connector( )optional
2-OPM connector
3-LCD
4-OPM wavelength shift/WAVE ID key
5-VFL on/off key
6-Reference check/set key
7-Unit shift key
8-USB
9-Power/backlight key
10-Data save/recall key
3
3
4
5
6
7
Page 9
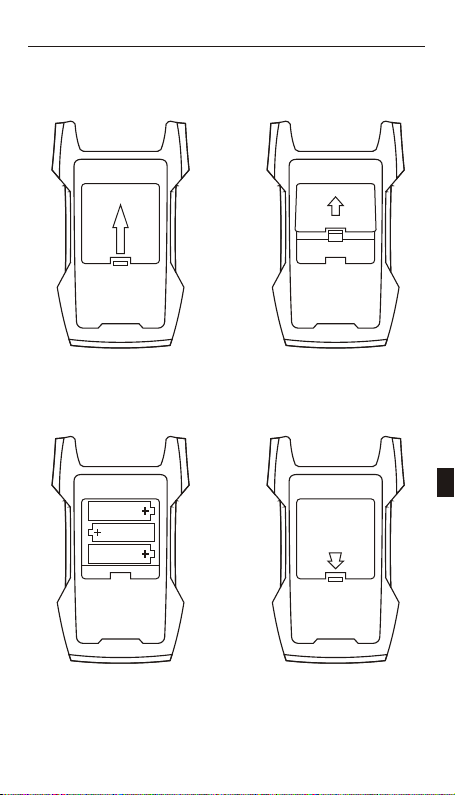
Install the Batteries
1.Press and push up
3.Install the batteries
2.Open the lid
4.Push down and press
4
Page 10
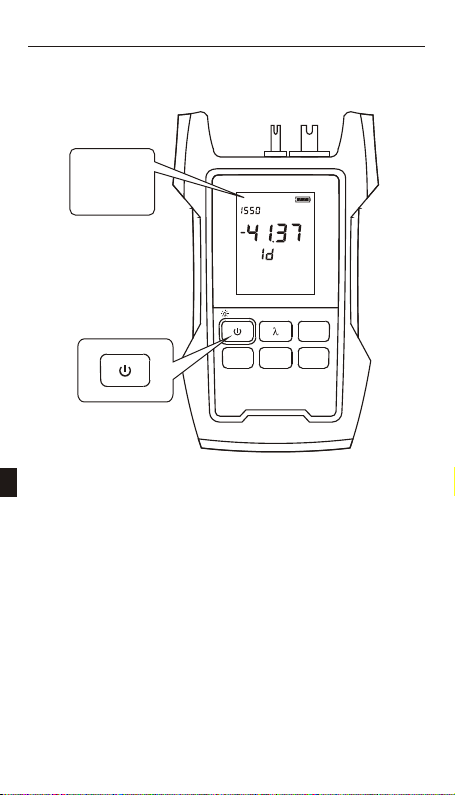
Power On/Off, Auto Power Off
PERM
PERM
nm
dBm
VLS
GLINT
Optical Power Meter
>2s PERM
Save
Unit
VFL
REF
Press the power key to turn on the device with auto
power off. (After 10 minutes no key pressed, it will auto
power off.)
Press power key for 2 seconds when turn on the
device, the auto power off will be cancelled, and the LCD
will show " " .
PERM
Also press it for 2 seconds to shut the device.
5
Page 11
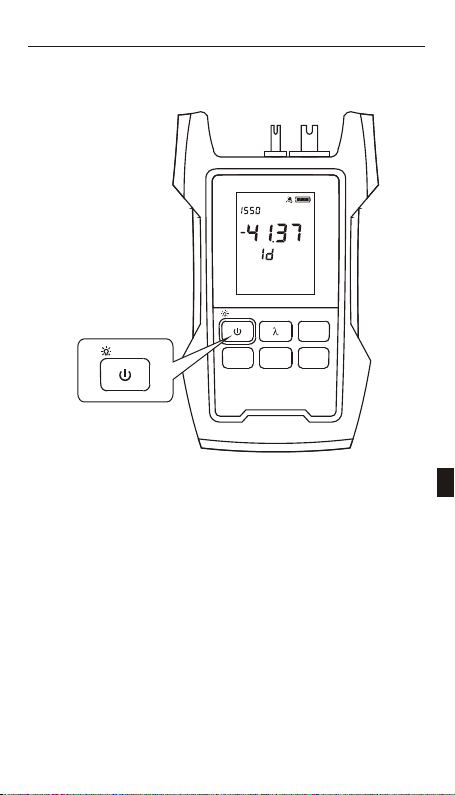
Backlight
PERM
nm
dBm
VLS
GLINT
Optical Power Meter
>2s PERM
>2s PERM
Save
When the device power on, press the power key to turn
on or turn off the backlight.
Unit
VFL
REF
6
Page 12
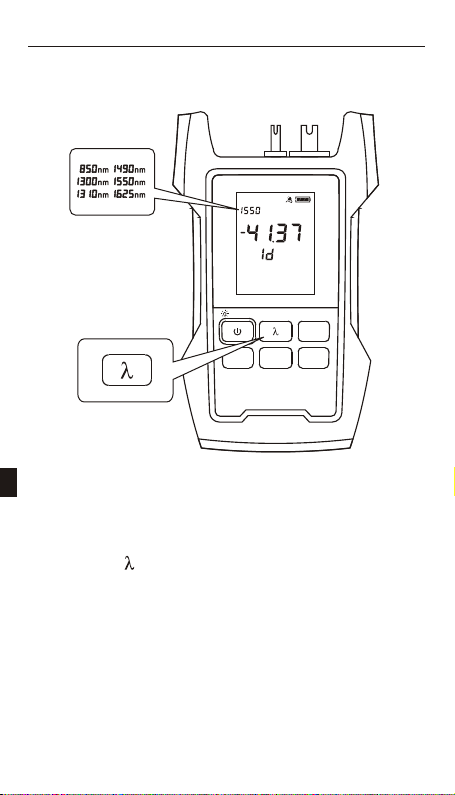
Wavelength Select
PERM
nm
dBm
VLS
GLINT
Optical Power Meter
>2s PERM
Save
When testing, you must select the right wavelength.
Press the " key for shifting the wavelength from:
850nm,1300nm,1310nm,1490nm,1550nm,1625nm.
"
Unit
VFL
REF
7
Page 13
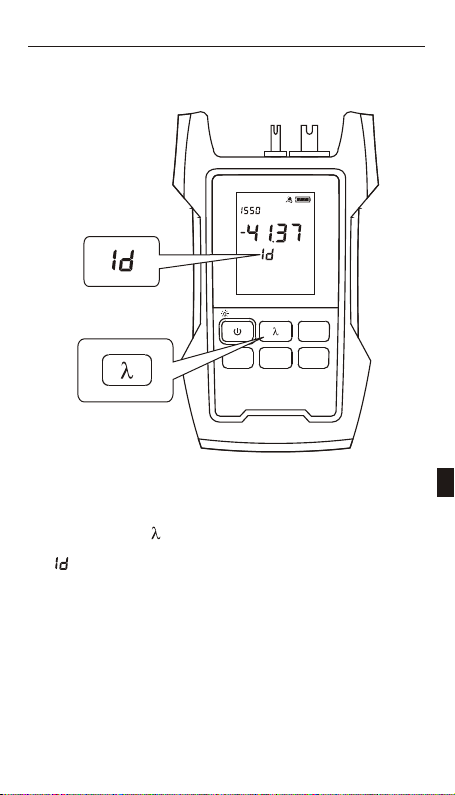
WAVE ID( )optional
PERM
nm
Optical Power Meter
>2s PERM
Unit
Save
GLINT
dBm
VLS
VFL
REF
Long press to turn on the WAVE ID and display
" "
" "
at the same time.
Long press again to exit the WAVE ID.
8
Page 14
nW
mW
dBm
Unit
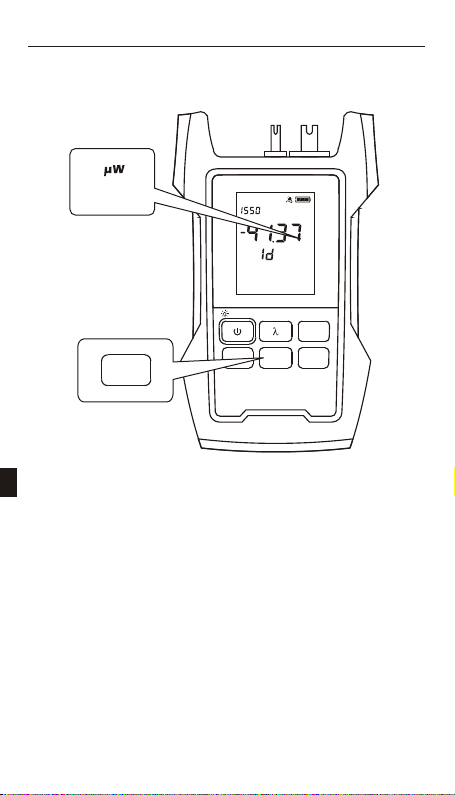
Unit Select
PERM
Optical Power Meter
>2s PERM
Save
nm
dBm
VLS
GLINT
VFL
Unit
REF
Press the " " key for shifting the unit from: dBm,
mW/uW, after pressing dB. After power
off, .
the current unit will be saved
Unit
" ", it shift to
REF
mW/uW: 1mW=1000uW, 1uW=1000nW
dBm: (dBm)=10*log(mW)
dB: (dB)=REF-dBm
9
Page 15
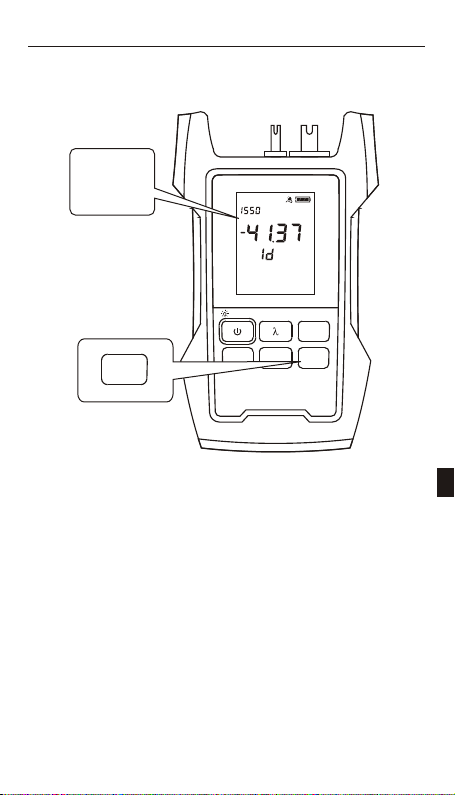
Reference
REF
REF
Press " " key to check the reference value you
REF
PERM
nm
REF
Optical Power Meter
>2s PERM
Unit
Save
GLINT
dBm
VLS
VFL
REF
set last time.
And if keep pressing for 2 seconds, you can store the
current dBm as a new reference value. Then it automatically
shift to dB.
dB=REF-dBm
You can store the REF value for each wave.
10
Page 16
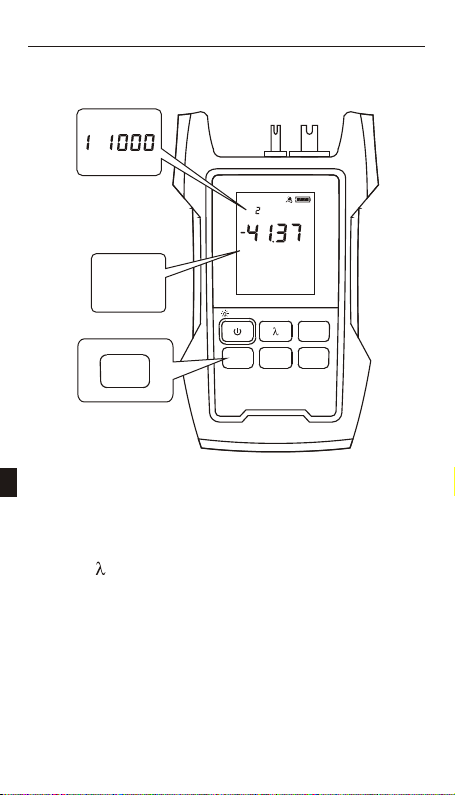
Data Storage
~
PERM
Unit
dBm
VFL
REF
Save
Save
Save
S " " .
hort press key to check the data storage
P " " " "
ress and to change previous/next record.
Long press key to save current value.
SAVE
Unit
" "
SAVE
Optical Power Meter
>2s PERM
Save
11
Page 17
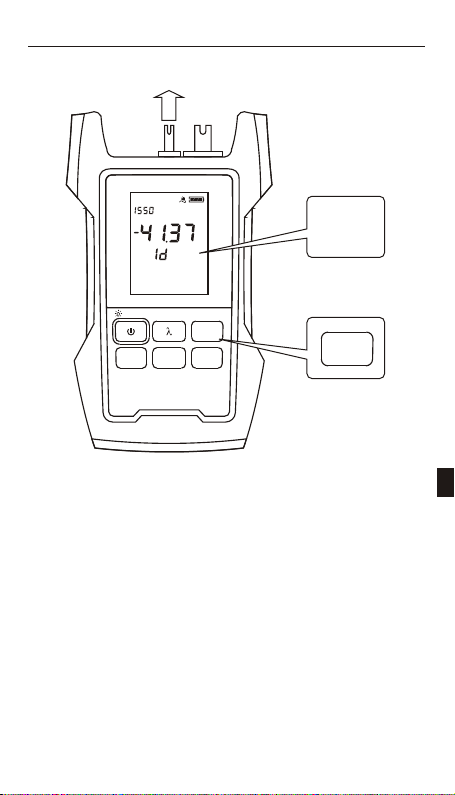
Visual Fault Locator (optional)
PERM
nm
dBm
VLS
GLINT
Optical Power Meter
>2s PERM
Save
,
The device can be built in an optional VFL module
Unit
VFL
REF
press the VFL key to shift the conditions: on-> glint->off
VLS
GLINT
VFL
12
Page 18
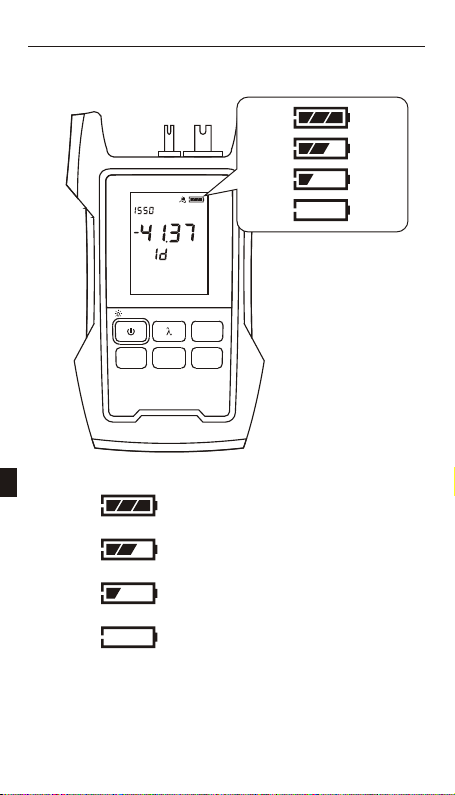
Battery Energy Detect
PERM
nm
dBm
VLS
GLINT
Optical Power Meter
>2s PERM
Save
VFL
Unit
REF
Sufficient power
More power
Less power
Insufficient battery power
13
Page 19
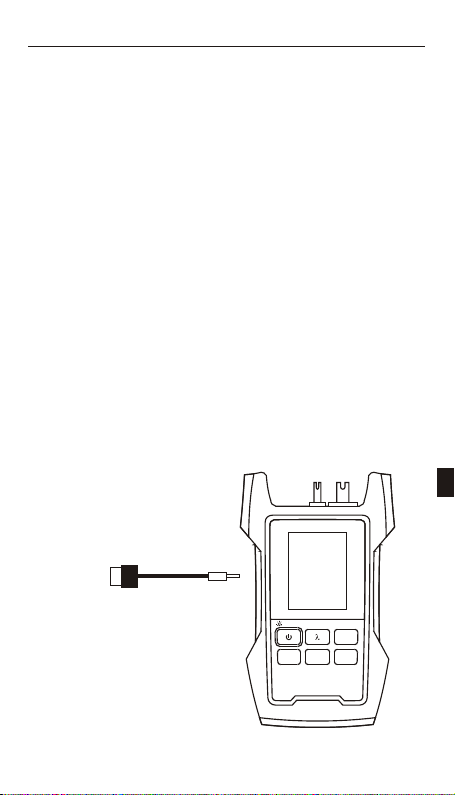
Battery Charge
When you use rechargeable batteries and the meter
indicates insufficient power, it should be turned off and
charged. Long time undervoltage will cause the life of the
battery to be shortened.
When charging, the battery indication on LCD will flash.
After charging fully, the indication will stop flashing and
show full. Don't charge for more than 48 hours. If charging
while using the device, the time will be longer.
The rechargeable batteries must be in device when you
use the AC/DC adaptor for charging. And do not charge the
non-rechargeable batteries, or the device will be destroyed
and also lose the guarantee.
5V_500mA
Optical Power Meter
>2s PERM
VFL
Unit
Save
REF
14
Page 20
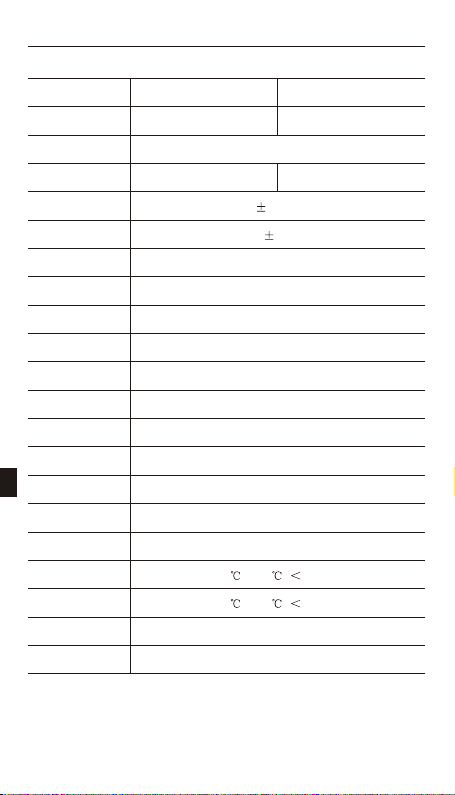
Measuring range
Calibrated
wavelengths
Resolution
Accuracy
Linearity
PD Type
Connector
Date storage
VFL part
Wavelength
Output power
Connector
Detailed
T C
0.2dB
2%
InGaAs
Yes
650nm
-50~+26dBm
+26~-40dBm(0.01dB)
-40~-50dBm(0.1dB)
-70~+10dBm
850nm,1300nm,1310nm,1490nm,1550nm,1625nm
+10~-60dBm(0.01dB)
-60~-70dBm(0.1dB)
FC(or SC) & 2.5mm UPP
1mW or 10mW
2.5mm UPP
Auto power off
Power supply
Battery life
Operating temp
Storage temp
Size(H*W*D)
Weight
Yes
AAX3
>160H
-10 ~+50 , 90%RH
-20 ~+60 , 90%RH
168mm*95mm*38mm
330g
15
Page 21

USER'S GUIDE
Optical Laser Source
English
Page 22

WARNING
Any undefined change or modification of this manual will deprive
you of the right to operate the equipment.
To reduce the risk of fire or electric shock, do not expose the
equipment to rain or humidity.
To prevent electric shock, please do not open the shell, and it
must be repaired by qualified personnel.
NOTE
As the laser is harmful to the eyes, don't look directly at the laser
outlet and don't attempt to disassemble the cabinet.
PRECAUTIONS FOR USE
Using the battery:
The equipment can use a disposable alkaline battery or rechargeable battery, and can not be mixed with different types or different
capacity batteries. Only rechargeable batteries can be charged.
Avoiding condensation:
Sudden changes in temperature should be avoided. Do not use
the device immediately after moving the device from the cold area
to the hot area, or when the room suddenly heats up, because the
device may have condensation phenomenon. If the temperature
changes abruptly, stop using it and take out the battery, and the
power can be switched on after at least an hour.
Storage:
When the device is not used for a long time, please take out the
battery to avoid the damage caused by battery leakage .
1
Page 23
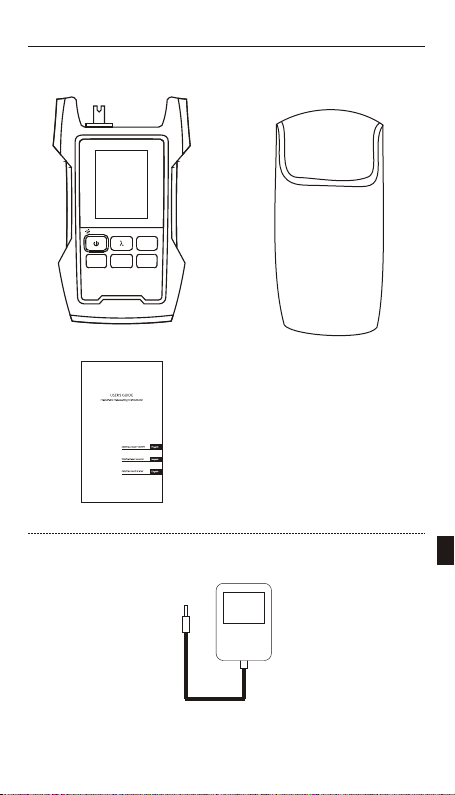
Optical Laser Source
>2s PERM
Laser
ON
Standard
VFL
MOD
ID
Host
Manual
Bag
Optional
Charging
2
Page 24
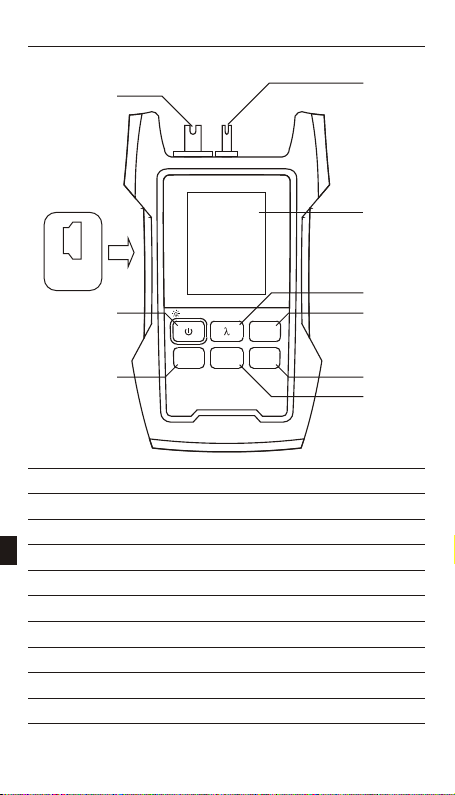
Description
2
1
8
USB
Optical Laser Source
9
>2s PERM
Laser
ON
VFL
MOD
ID
10
1-VFL connector( )optional
2-Laser Source connector
3-LCD
4-Laser source wavelength shift key
5-VFL on/off key
6-Laser source modulation key
7-Laser source WAVE ID key
8-USB
9-Power/backlight key
10-Laser source on/off key
3
3
4
5
6
7
Page 25
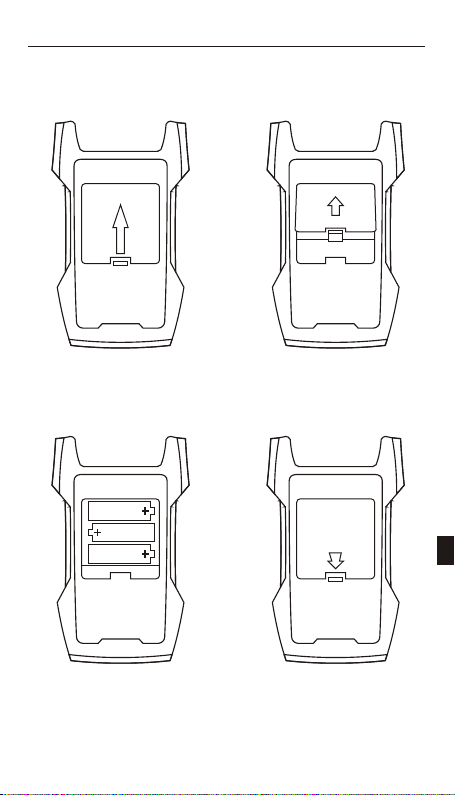
Install the Batteries
1.Press and push up
3.Install the batteries
2.Open the lid
4.Push down and press
4
Page 26
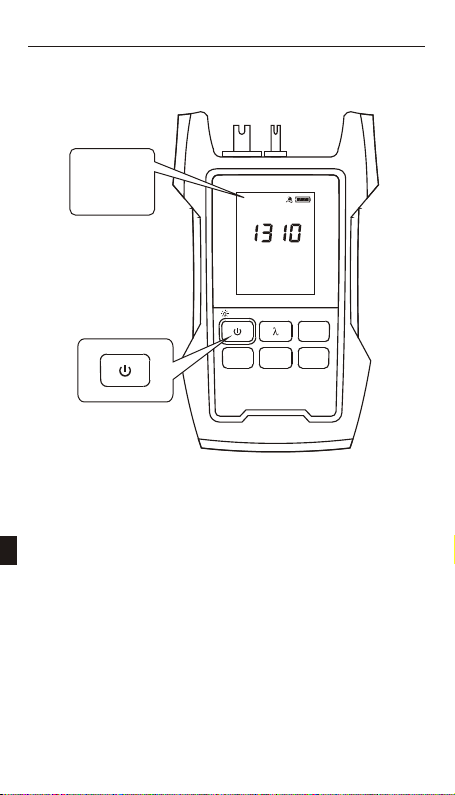
Power On/Off, Auto Power Off
PERM
PERM
Optical Laser Source
>2s PERM
Laser
ON
Press the Power key to turn on the device with auto
1Hz
nm
VLS
GLINT
VFL
MOD
ID
power off. (After 10 minutes no key pressed, it will auto
power off.)
Press power key for 2 seconds when turn on the
device, the auto power off will be cancelled, and the LCD
will show "PERM " .
Also press it for 2 seconds to shut the device.
5
Page 27
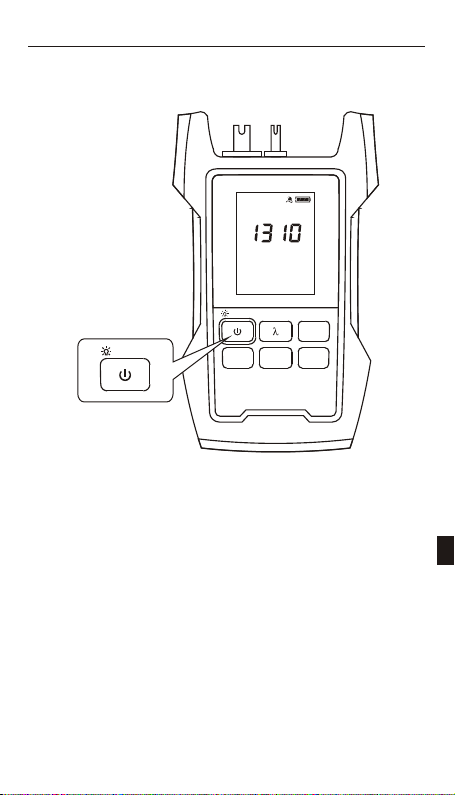
Backlight
>2s PERM
PERM
Optical Laser Source
>2s PERM
Laser
ON
1Hz
nm
VLS
GLINT
VFL
MOD
ID
When the device power on, press the power key
to turn on or turn off the backlight.
6
Page 28
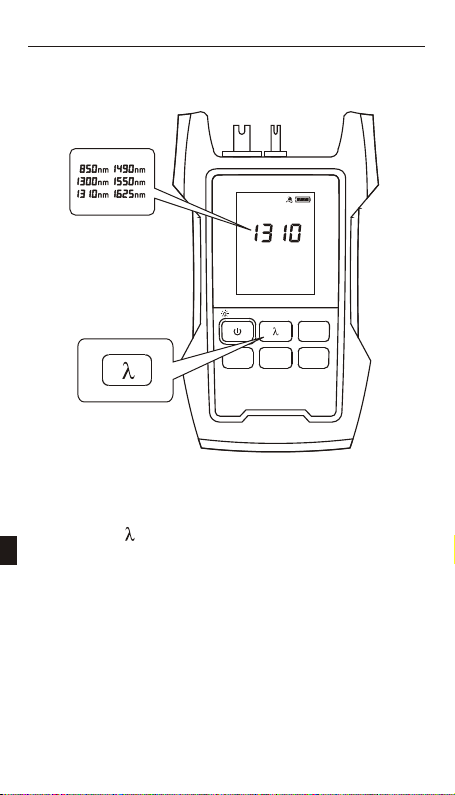
Wave Select
PERM
Optical Laser Source
>2s PERM
Laser
ON
1Hz
nm
VLS
GLINT
VFL
MOD
ID
" " .Press key to change the wavelength
7
Page 29
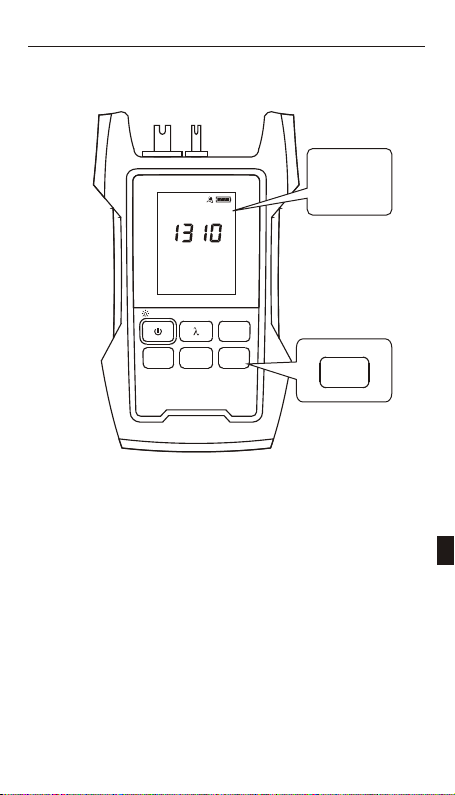
Modulation Select
PERM
Optical Laser Source
>2s PERM
Laser
ON
1Hz
nm
VLS
GLINT
VFL
MOD
ID
270Hz
MOD
1KHz
2KHz
Press the " " key to shift from CW, 270Hz, 1KHz,
MOD
2KHz.
8
Page 30
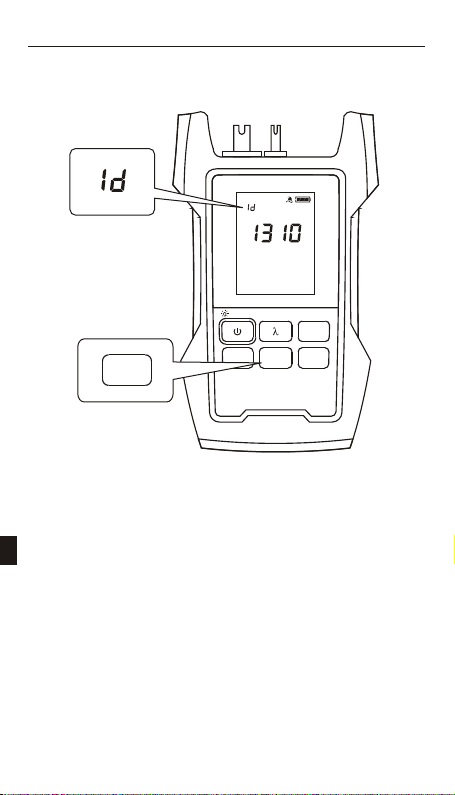
WAVE ID
ID
PERM
Optical Laser Source
>2s PERM
Laser
ON
1Hz
nm
VLS
GLINT
VFL
MOD
ID
Press " ID " to open the function of wavelength
identification, on the LCD, it will displays "ID " , then the
optical power meter which also has this function can
identify the current wavelength in fiber, and the power
meter will shift to the same wavelength automatically.
Press again this key to close the function.
9
Page 31
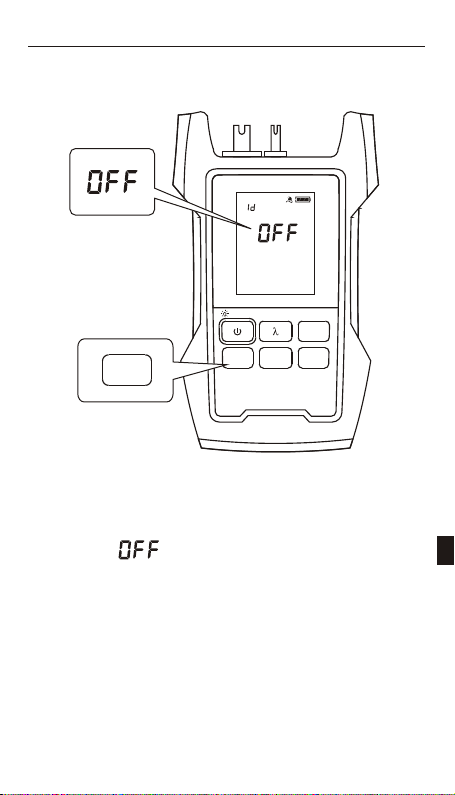
Laser Source On/Off
Laser
ON
PERM
Optical Laser Source
>2s PERM
Laser
ON
1Hz
VLS
GLINT
VFL
MOD
ID
Press the key to turn on/off the laser source
output. " " .on the LCD means laser
output off
10
Page 32
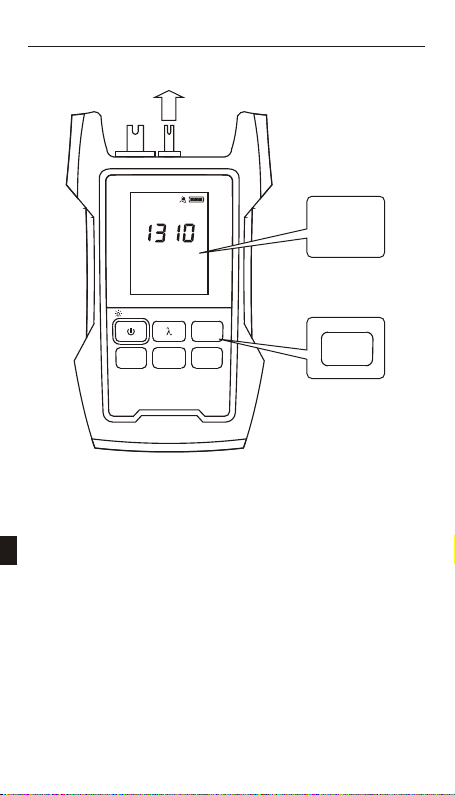
Visual Fault Locator (optional)
PERM
Optical Laser Source
>2s PERM
Laser
ON
,
The device can be built in an optional VFL module
1Hz
nm
VLS
GLINT
VFL
MOD
ID
VLS
GLINT
VFL
press the VFL key to shift the conditions: on-> glint->off.
11
Page 33
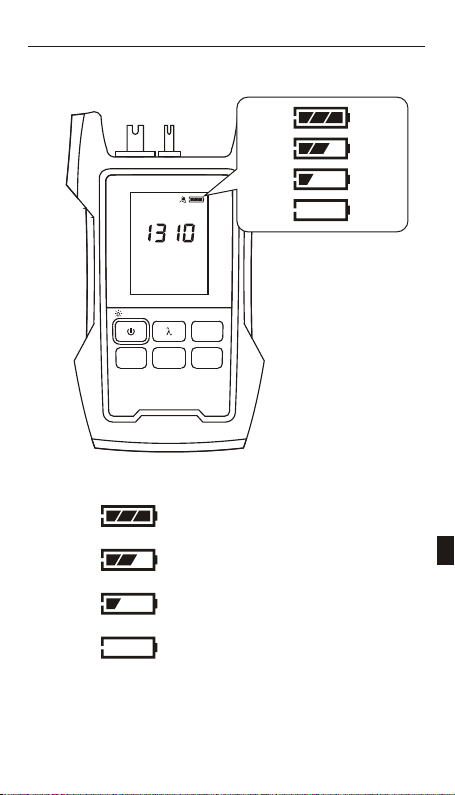
Battery Energy Detect
PERM
Optical Laser Source
>2s PERM
Laser
ON
1Hz
nm
VLS
GLINT
VFL
MOD
ID
Sufficient power
More power
Less power
Insufficient battery power
12
Page 34
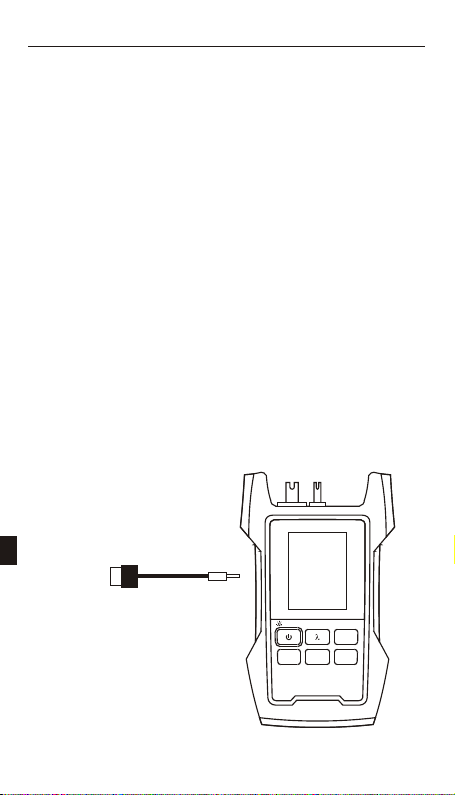
Battery Charge
When you use rechargeable batteries and the meter
indicates insufficient power, it should be turned off and
charged. Long time undervoltage will cause the life of the
battery to be shortened.
When charging, the battery indication on LCD will flash.
After charging fully, the indication will stop flashing and
show full. Don't charge for more than 48 hours. If charging
while using the device, the time will be longer.
The rechargeable batteries must be in device when you
use the AC/DC adaptor for charging. And do not charge the
non-rechargeable batteries, or the device will be destroyed
and also lose the guarantee.
5V_500mA
Optical Laser Source
>2s PERM
VFL
Laser
MOD
ID
ON
13
Page 35
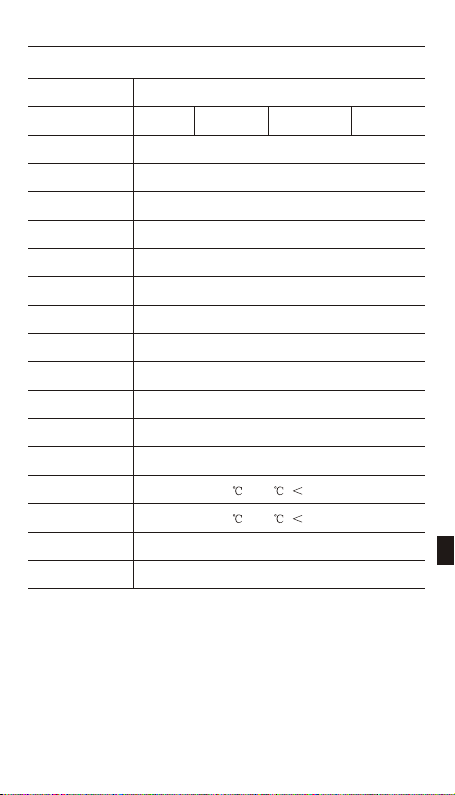
Detailed
Wavelength
Output power
Laser type
Frequency
OP Adapter
VFL part
Wavelength
Output power
Connector
Auto power off
Power supply
Battery life
Operating temp
Storage temp
Size
Weight
850/1300 1310/1550
1300nm,1310nm,1550nm,1490nm,1625nm>-6dBm
850nm,1300nm,1310nm,1550nm@FP
1310/1490/
1550
850nm>-10dBm
1490nm,1625nm@DFB
270Hz/1KHz/2KHz
FC/PC or customize
650nm
1mW or 10mW
2.5mm UPP
Yes
AAX3
>50H
-10 ~+50 , 90%RH
-20 ~+60 , 90%RH
168mm*95mm*38mm
330g
Customize
14
Page 36

15
Page 37

USER'S GUIDE
Optical Multi Meter
English
Page 38

WARNING
Any undefined change or modification of this manual will deprive
you of the right to operate the equipment.
To reduce the risk of fire or electric shock, do not expose the
equipment to rain or humidity.
To prevent electric shock, please do not open the shell, and it
must be repaired by qualified personnel.
NOTE
As the laser is harmful to the eyes, don't look directly at the laser
outlet and don't attempt to disassemble the cabinet.
PRECAUTIONS FOR USE
Using the battery:
The equipment can use a disposable alkaline battery or rechargeable battery, and can not be mixed with different types or different
capacity batteries. Only rechargeable batteries can be charged.
Avoiding condensation:
Sudden changes in temperature should be avoided. Do not use
the device immediately after moving the device from the cold area
to the hot area, or when the room suddenly heats up, because the
device may have condensation phenomenon. If the temperature
changes abruptly, stop using it and take out the battery, and the
power can be switched on after at least an hour.
Storage:
When the device is not used for a long time, please take out the
battery to avoid the damage caused by battery leakage .
1
Page 39
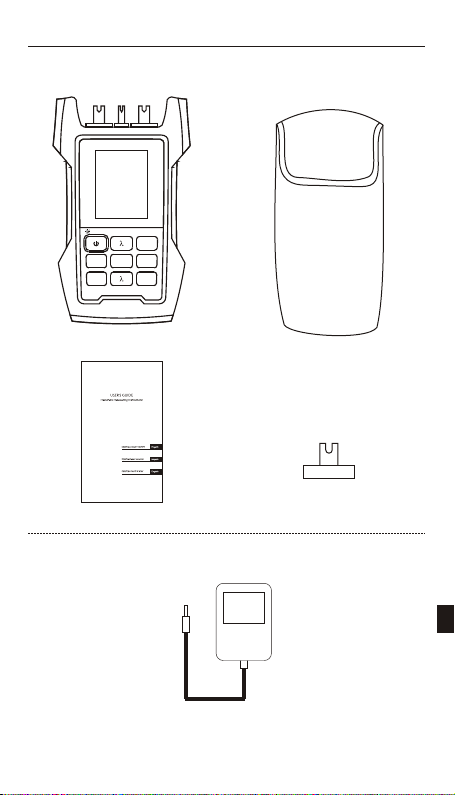
Optical Multi Meter
>2s PERM
Save
Laser
ON
Standard
VFL
Unit
REF
MOD
Host
Manual
Bag
FC/SC Adapter
Optional
Charging
2
Page 40
10
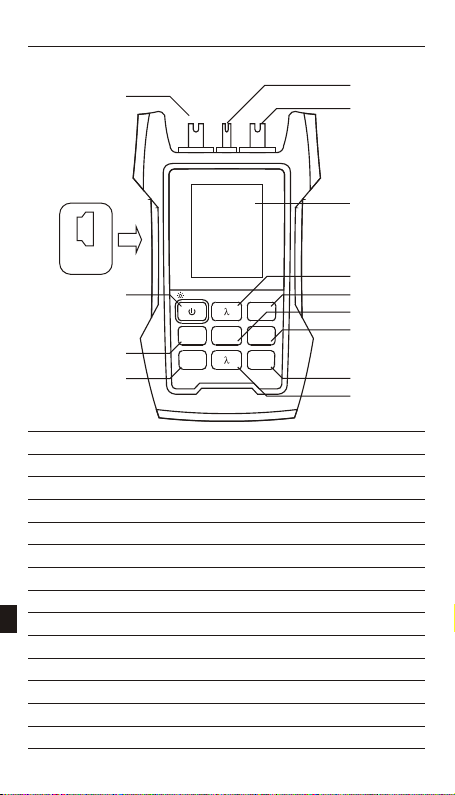
Description
1
2
11
USB
Optical Multi Meter
12
13
>2s PERM
Save
Laser
ON
VFL
Unit
REF
MOD
14
1-VFL connector
2-OPM connector
3-LCD
4-OPM wavelength shift/WAVE ID key
5-VFL on/off key
6-OPM unit shift key
7-OPM reference check/set key
8-Laser source modulation key
9-Laser source wavelength shift key
10-Laser source connector
11- USB
12-Power/backlight key
13-OPM data save/recall key
14-Laser source on/off key
3
3
4
5
6
7
8
9
Page 41
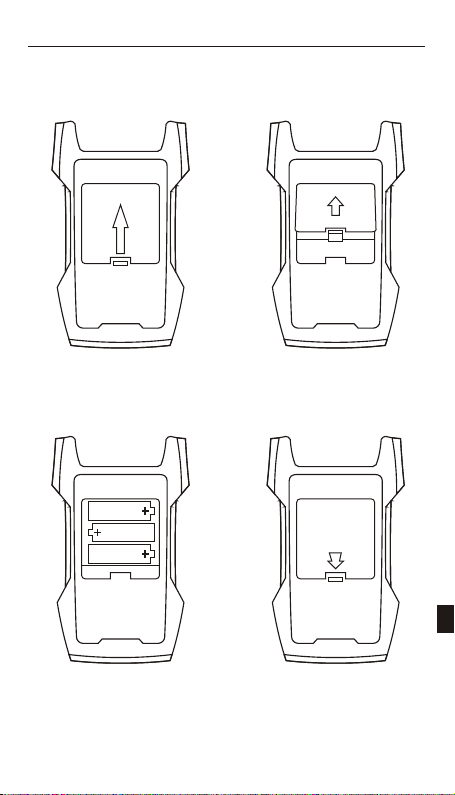
Install the Batteries
1.Press and push up
3.Install the batteries
2.Open the lid
4.Push down and press
4
Page 42
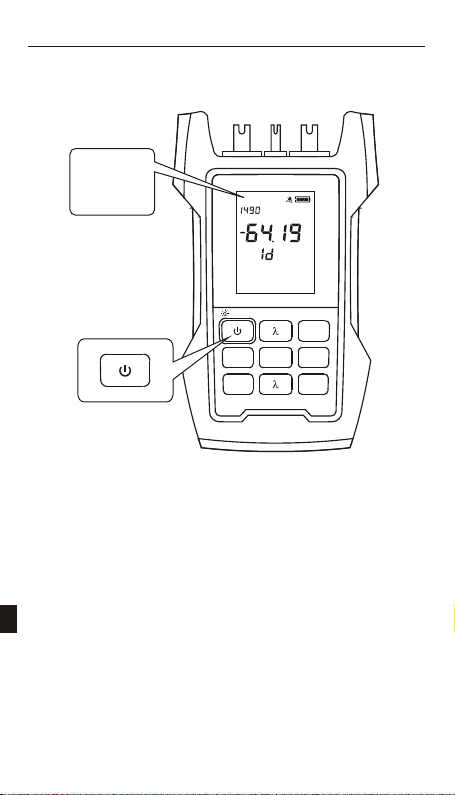
Power On/Off, Auto Power Off
PERM
PERM
nm
dBm
VLS
GLINT
1310nm
1KHz
Optical Multi Meter
>2s PERM
Save
Laser
ON
Press the Power key to turn on the device with auto
Unit
VFL
REF
MOD
power off. (After 10 minutes no key pressed, it will auto
power off.)
Press Power key for 2 seconds when turn on the
device, the auto power off will be cancelled, and the LCD
will show "PERM " .
Also press it for 2 seconds to shut the device.
5
Page 43
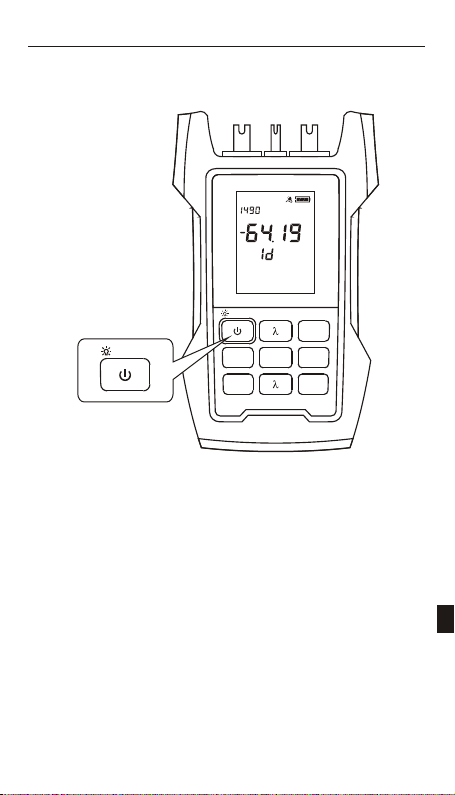
Backlight
PERM
nm
dBm
VLS
GLINT
1310nm
1KHz
Optical Multi Meter
>2s PERM
>2s PERM
Save
Laser
ON
When the device power on, press the power key to turn
on or turn off the backlight.
Unit
VFL
REF
MOD
6
Page 44
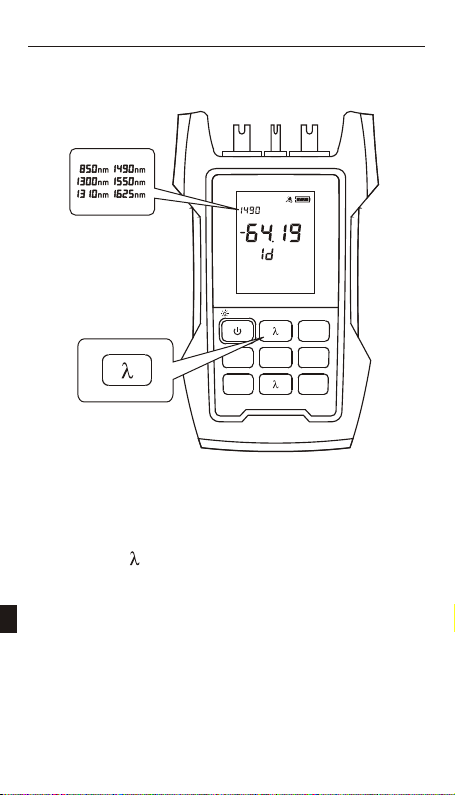
OPM Wavelength Select -
PERM
nm
dBm
VLS
GLINT
1310nm
1KHz
Optical Multi Meter
>2s PERM
Save
Laser
ON
When testing, you must select the right wavelength.
Press the " key for shifting the wavelength from:
850nm,1300nm,1310nm,1490nm,1550nm,1625nm.
"
Unit
VFL
REF
MOD
7
Page 45
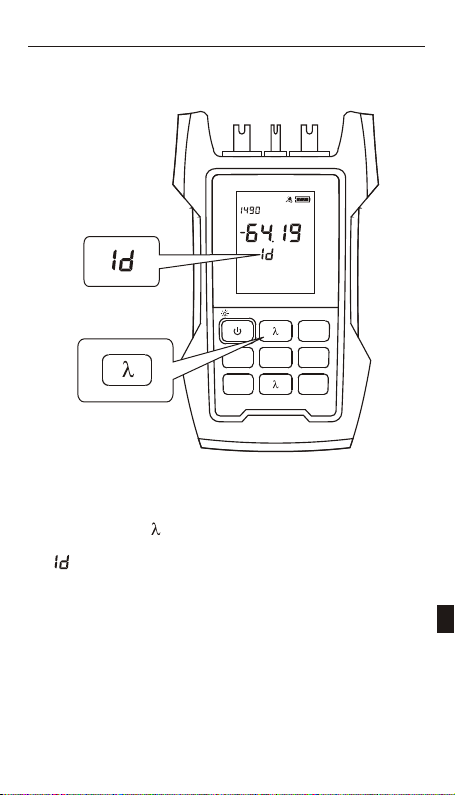
OPM - WAVE ID(optional)
PERM
nm
dBm
VLS
GLINT
1310nm
1KHz
Optical Multi Meter
>2s PERM
Save
Laser
ON
Unit
VFL
REF
MOD
Long press to turn on the WAVE ID and display
" "
" "
at the same time.
Long press again to exit the WAVE ID.
8
Page 46
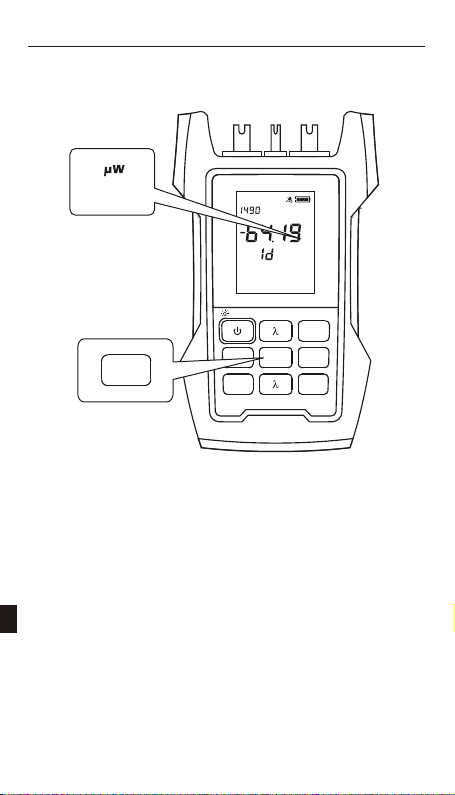
nW
mW
dBm
OPM - Unit Select
Unit
PERM
nm
1310nm
1KHz
Optical Multi Meter
>2s PERM
Save
Laser
ON
Unit
GLINT
dBm
VLS
VFL
REF
MOD
Press the " " key for shifting the unit from: dBm,
mW/uW, after pressing dB. After power
off, .
the current unit will be saved
Unit
" ", it shift to
REF
mW/uW: 1mW=1000uW, 1uW=1000nW
dBm: (dBm)=10*log(mW)
dB: (dB)=dBm-REF
9
Page 47
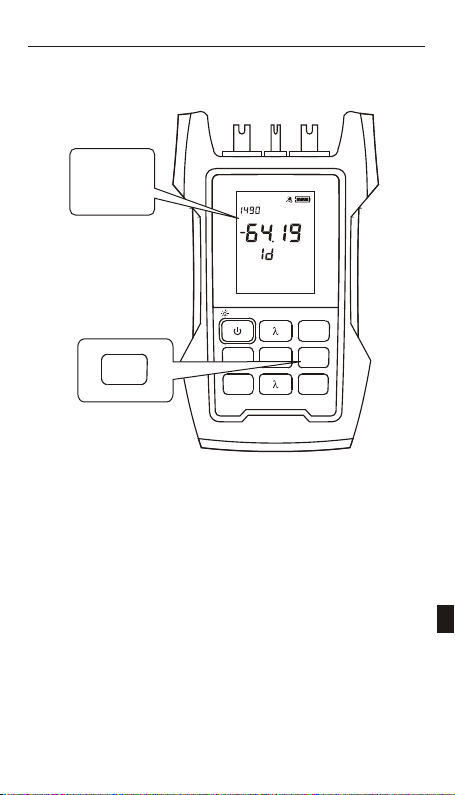
OPM - Reference
REF
REF
Press " "key to check the reference value
REF
PERM
nm
REF
1310nm
1KHz
Optical Multi Meter
>2s PERM
Save
Laser
ON
Unit
GLINT
dBm
VLS
VFL
REF
MOD
you set last time.
And if keep pressing for 2 seconds, you can store the
current dBm as a new reference value. Then it automatically
shift to dB.
dB=dBm-REF
You can store the REF value for each wave.
10
Page 48
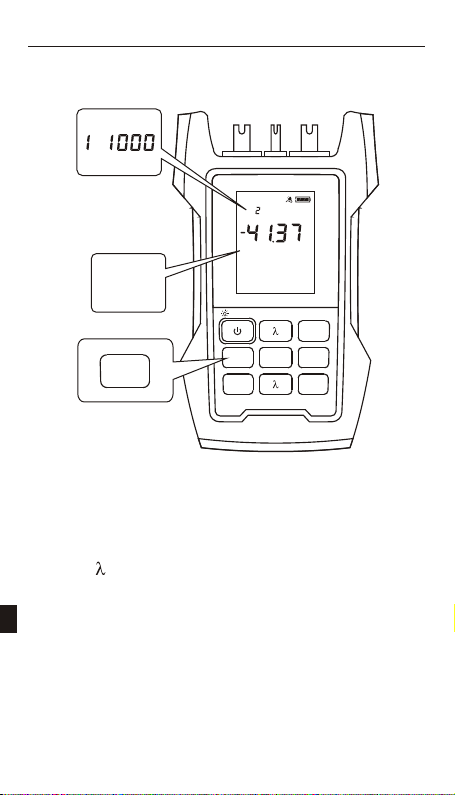
OPM - Data Storage
~
PERM
Optical Multi Meter
Unit
dBm
VFL
REF
MOD
Save
Save
>2s PERM
Save
S " " .
hort press key to check the data storage
P " " " "
ress and to change previous/next record.
Long press key to save current value.
SAVE
Unit
" "
SAVE
Save
Laser
ON
11
Page 49
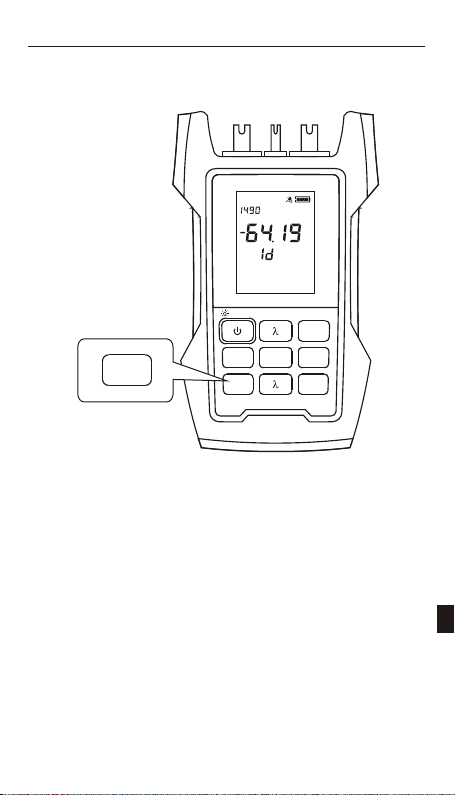
Laser Source On/Off
PERM
nm
dBm
VLS
GLINT
1310nm
1KHz
Optical Multi Meter
>2s PERM
Laser
ON
Save
Laser
ON
Press the key to turn on/off the laser source output.
Unit
VFL
REF
MOD
12
Page 50
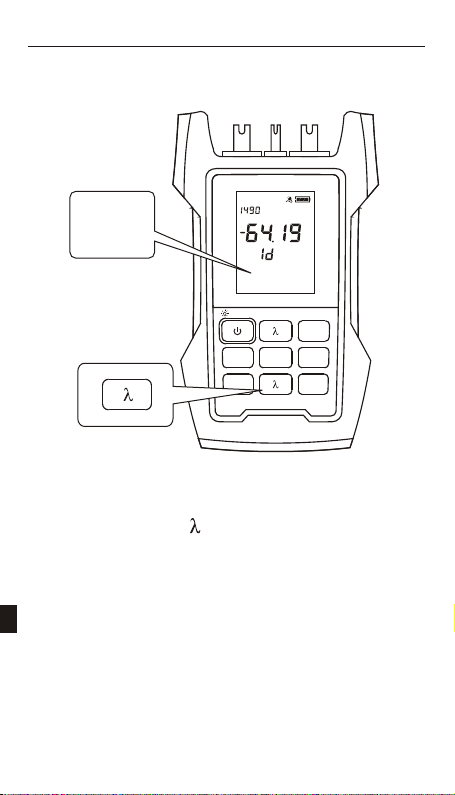
Laser Source - Wavelength Select /
WAVE ID
PERM
850nm
1300nm
1490nm
1310nm
1550nm 1625nm
Short press the key to shift the wavelength.
" "
Long press(>2s) the key to turn on WAVE ID function,
the wavelength glints on LCD. Long press again to turn
off the function.
nm
1310nm
1KHz
Optical Multi Meter
>2s PERM
Save
Laser
ON
dBm
VLS
GLINT
VFL
Unit
REF
MOD
" "
13
Page 51
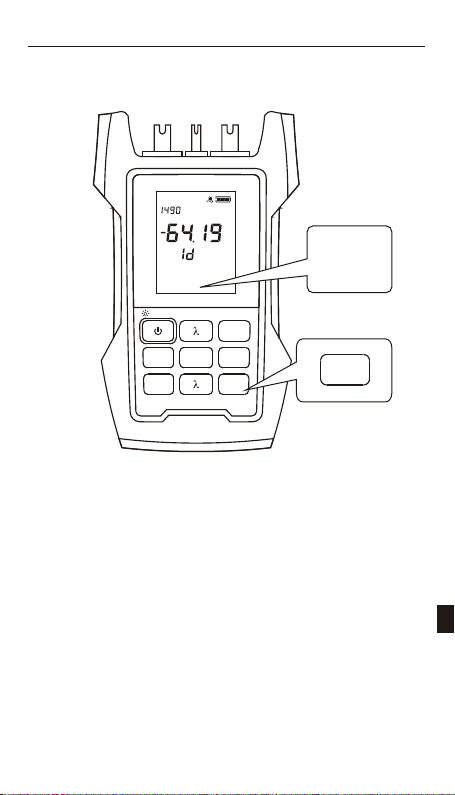
Laser Source Modulation Select -
PERM
nm
1310nm
1KHz
Optical Multi Meter
>2s PERM
Unit
Save
Laser
ON
GLINT
dBm
VLS
VFL
REF
MOD
270Hz
1KHz
2KHz
MOD
Press the " " key to shift from CW, 270Hz, 1KHz,
MOD
2KHz.
14
Page 52

Visual Fault Locator (optional)
PERM
nm
dBm
VLS
GLINT
1310nm
1KHz
Optical Multi Meter
>2s PERM
Save
Laser
ON
,
The device can be built in an optional VFL module
Unit
VFL
REF
MOD
press the VFL key to shift the conditions: on-> glint->off.
VLS
GLINT
VFL
15
Page 53
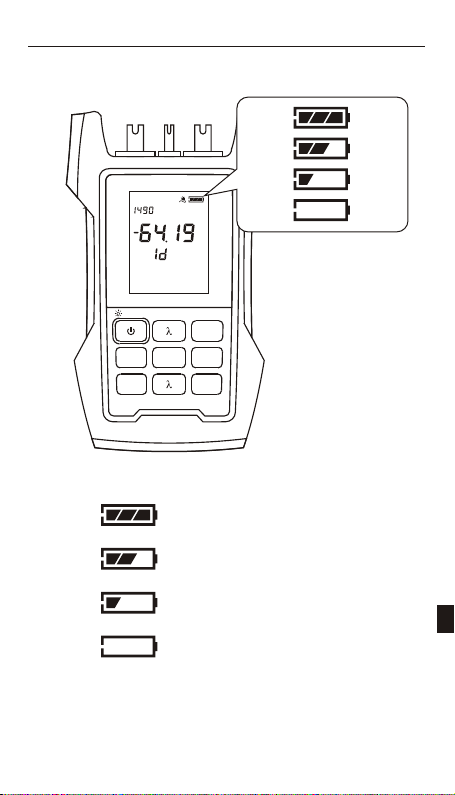
Battery Energy Detect
PERM
nm
dBm
VLS
GLINT
1310nm
Optical Multi Meter
>2s PERM
Save
Laser
ON
VFL
Unit
REF
MOD
Sufficient power
More power
Less power
Insufficient battery power
16
Page 54

Battery Charge
When you use rechargeable batteries and the meter
indicates insufficient power, it should be turned off and
charged. Long time undervoltage will cause the life of the
battery to be shortened.
When charging, the battery indication on LCD will flash.
After charging fully, the indication will stop flashing and
show full. Don't charge for more than 48 hours. If charging
while using the device, the time will be longer.
The rechargeable batteries must be in device when you
use the AC/DC adaptor for charging. And do not charge the
non-rechargeable batteries, or the device will be destroyed
and also lose the guarantee.
5V_500mA
Optical Multi Meter
>2s PERM
VFL
Unit
Save
REF
Laser
MOD
ON
17
Page 55
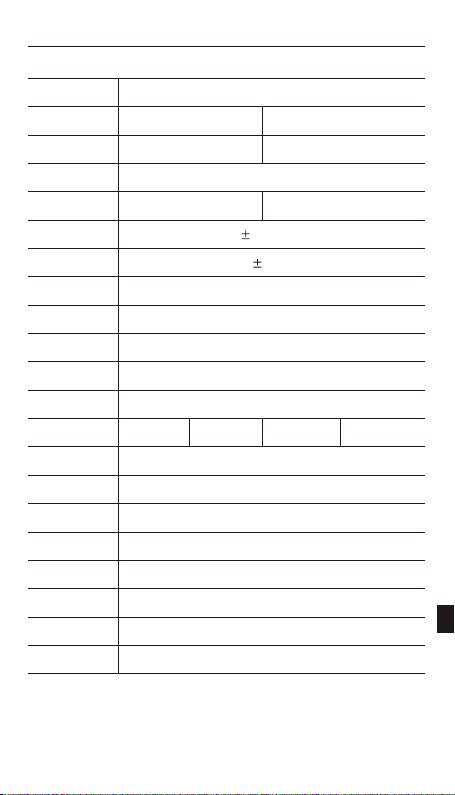
OPM part
Measuring range
Calibrated
wavelengths
Resolution
Accuracy
Linearity
PD Type
Connector
Data Storage
OLS part
Wavelength
Output power
Laser type
Frequency
Connector
VFL part
Wavelength
Output power
Detailed
T C
-70~+10dBm -50~+26dBm
850nm,1300nm,1310nm,1490nm,1550nm,1625nm
+10~-60dBm(0.01dB)
-60~-70dBm(0.1dB)
FC(or SC) & 2.5mm UPP
850/1300 1310/1550
1300nm,1310nm,1550nm,1490nm,1625nm>-6dBm
850nm>-10dBm
850nm,1300nm,1310nm,1550nm@FP
1490nm,1625nm@DFB
270Hz/1KHz/2KHz
FC/PC or customize
1mW or 10mW
0.2dB
2%
InGaAs
Yes
650nm
+26~-40dBm(0.01dB)
-40~-50dBm(0.1dB)
1310/1490/
1550
Customize
18
Page 56

Power supply
Battery life
Operating temp
Storage temp
Size
Weight
Detailed
AAX3
>50H
-10 ~+50 , 90%RH
-20 ~+60 , 90%RH
168mm*95mm*38mm
330g
19
Page 57

20
Page 58

Page 59

Page 60

P/N40331 Rev.1005
 Loading...