

Page 1

User Manual
Of Digital Set Top Box
Please read this User Manual carefully to ensure proper use of this product and keep this manual for future reference.
ADT110
* Caution
- This settop box is used for PAL TV (PAL B/G :Germany, Italy, Belgium, PAL-I : UK) and
Multi-system TV only.
- In case the picture is not correctly shown up on your TV, please adjust your COLOR
SYSTEM setting to AUTO or PAL.
Page 2

1) Read these instructions.
2) Keep these instructions.
3) Heed all warnings.
4) Follow all instructions.
5) Do not use this apparatus near water.
6) Clean only with dry cloth.
7) Do not block any ventilation openings, install in accordance with the instructions.
8) Do not install near any heat sources such as radiations, heat registers, stoves, or
other apparatus (including amplifiers) that produce heat.
9) Do not defeat the safety purpose of the polarized plug. If the provided plug does
not fit into your outlet, consult an electrician for replacement of the obsolete outlet.
10) Protected the power cord from being walked on or pinched particularly at plugs,
convenience receptacles, and the point where they exit from the apparatus.
11) Only use attachments/accessories specified by the manufacturer.
12) Unplug this apparatus during lighting storms or when unused for long periods of
time.
13) Refer all servicing to qualified service personnel. Servicing is required when the
apparatus has been damaged in any way, such as power-supply cord or plug is
damaged, liquid has been spilled or objects have fallen into the apparatus, the
apparatus has been exposed to rain or moisture, does not operate normally, or
has been dropped.
14) Mains plug is used as the disconnect device, the disconnect device shall remain
readily operable.
15) The ventilation should not be impeded by covering the ventilation openings with
items, such as newspapers, table-cloth, curtains, etc.
16) No naked flame sources, such as lighted candles, should be placed on the apparatus.
17) Attention should be drawn to the environmental aspects of battery disposal.
18) The use of apparatus in moderate climate.
WARNING: To reduce the risk of fire or electric shock, do not expose this apparatus to
rain or moisture.
WARNING: The batteries shall not be exposed to excessive heat such as sunshine,
fire or the like.
The symbol indicates that there are important operating and maintenance
instructions in the literature accompanying this unit.
The symbol indicates that dangerous voltages constituting a risk of electric
shock are present within this unit.
The symbol indicates that this product incorporates double insulation between
hazardous mains voltage and user accessible parts.
When servicing use only identical replacement parts.
Table of Contents
Important Safety Instructions
Front and Rear Panel Illustration ...................................................1
Remote Controller ........................................................................1
Connections.................................................................................2
User Interface..............................................................................3
Troubleshooting .........................................................................12
Specifications.............................................................................13
Warning: The USB memory stick should be plug in the unit directly. USB extension
cable should not be used to avoid failing of data transferring and interference
caused.
When the apparatus was in electrostatic circumstance, it may be malfunction and
need to reset by user.
Accessories
User's Manual x 1
Remote Control x 1
Scart conversion AV Adapter x1
Batteries for remote controller (2 x AAA).
110V power socket
Page 3
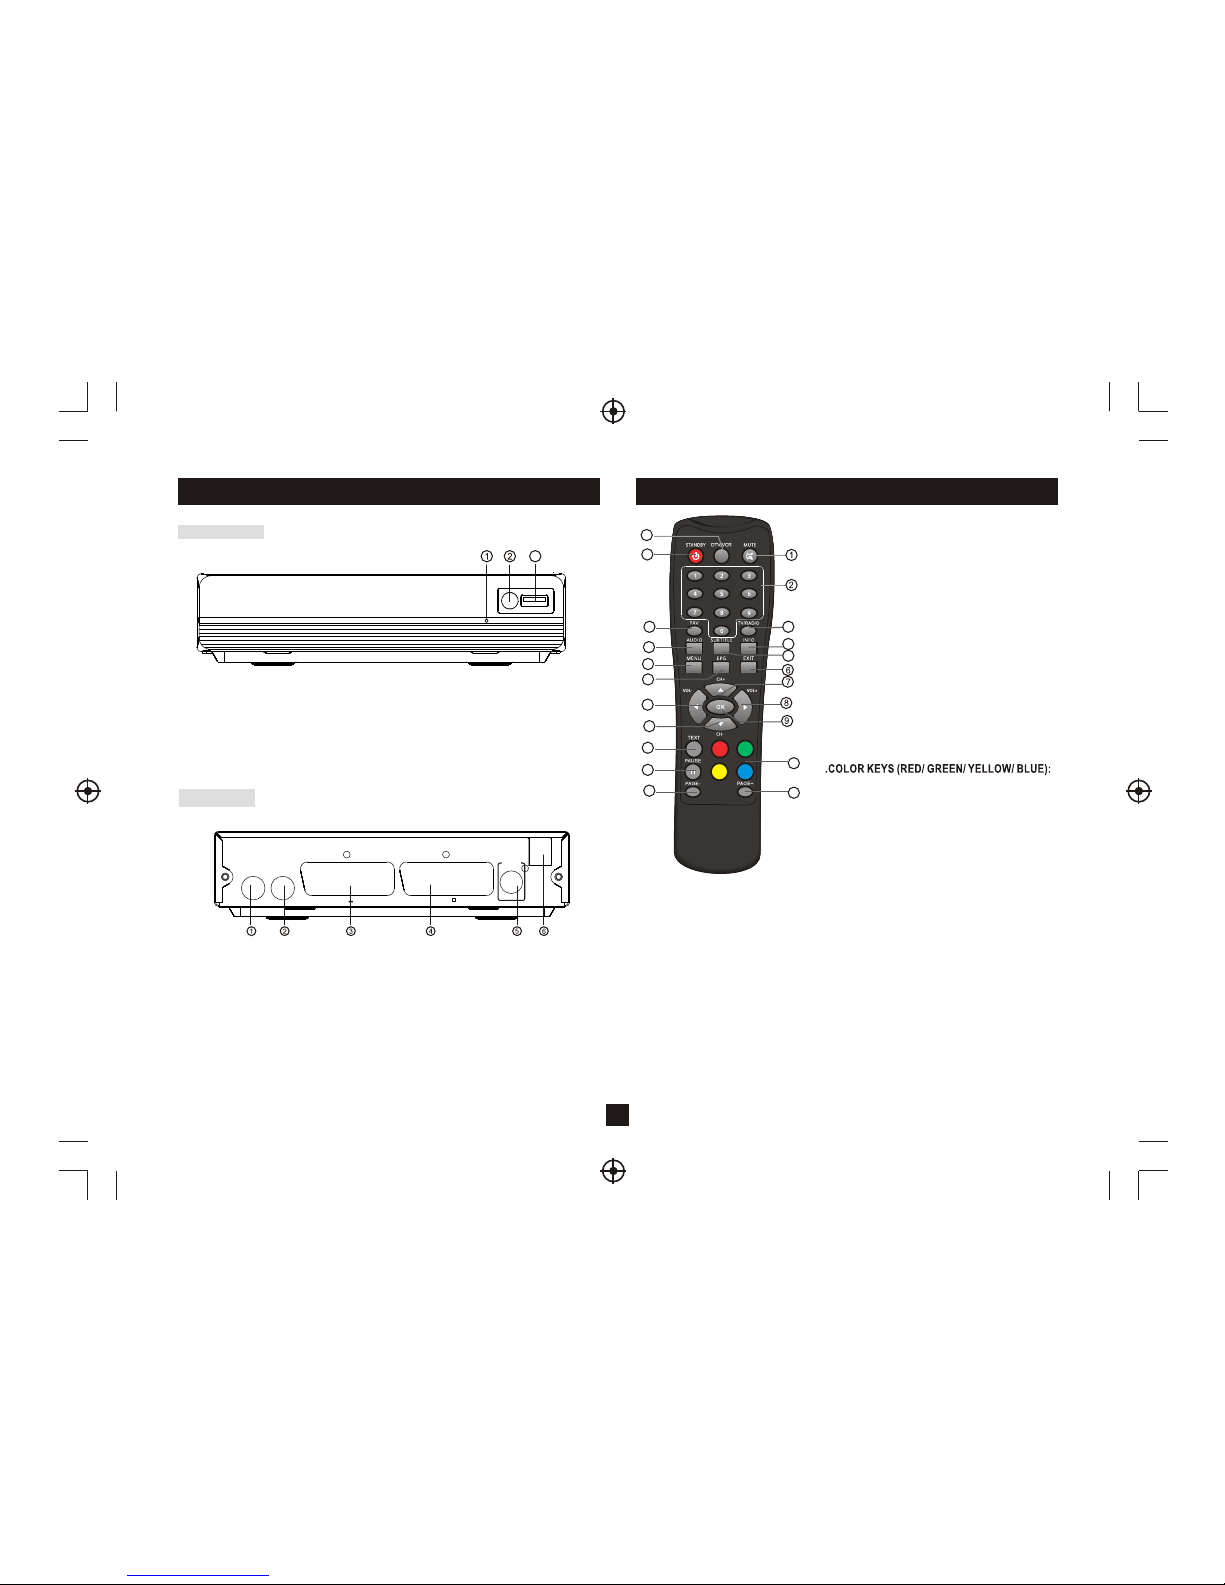
Front and Rear Panel Illustration
1. Front Panel
1.RF IN : This socket connects to your external aerial.
2.RF LOOP THROUGH: This socket will bypass the RF signal to either your TV or
another video system.
3.VCR SCART IN: This socket connects to either a DVD or other video system.
4.TV SCART OUT: If your TV has SCART input,please connect this set top box with
your TV using scart cabel.
If your TV has AV input , please connect this set top box with your TV by using RAC(AV)
cabel and included “ Scart to AV adapter”.
5.COAXIAL: This socket connects to a coaxial socket on your surround sound system.
6.MAINS CABLE: This is used to connect to your main power supply.
Remote Controller
1
Remote Key Function:
1. MUTE:Turn the sound on or off.
2. NUMBER KEYS:Select channel numbers or
input numbers in menus.
3.TV/RADIO: Switch between TV channels and
Radio stations.
4. INFO: Display information about the channel
being viewed or further information about the program
when in small EPG screen.
5. SUBTITLE: Switch between different subtitles
that are broadcasted
6. EXIT: Clean all menu and return to non-menu
state for norm playing.
7. CH+: Move around the menu screens or
selecting the channels in non-menu state.
8. VOL+: Move around the menu screens or
changing the volume in non-menu state.
9. OK: confirm a selection within a menu.
11. PAGE+: Page up, when there are pages
(i.e.channel list).
12. DTV/VCR: Switch between the VCR SCART
input and the DTV output mode.
13.STANDBY: Switch the set top box to on or
standby.
14. FAV: Switch access your favourite channels.
Note: SUBTITLE/TEXT/LANGUAGE may not be available for all channels.
16. MENU: Open the main menu or return to the previous menu.
17. EPG: Display information about the program being viewed and what's on next.
18. VOL-: Move around the menu screens or changing the volume in non-menu state.
19. CH- : Move around the menu screens or selecting the channels in non-menu state.
20. TEXT: Open the interactive digital teletext if available.
21. PAUSE: Pause or playback the program being viewed .
22.PAGE-: Page down, when there are pages(i.e.channel list).
2. Rear Panel
IN
INRF
LOOPRF
THROUGH
THROUGH
Digital
Audio
Coaxial
VCR O O
VCR O O
TV
TV
100-240V~
50/60Hz
15. AUDIO: Select the audio language, and set the audio out type, Stereo, Left, Right, Mono.
10
4
5
11
12
13
15
16
17
18
19
20
21
22
10
3
14
Operate differnt functions in teletext.
1. Standby Indicator:Used to visually show power state of the set top box, the green
LED will show if turned on the set top box and the red LED will be light if the set top
box entered standby mode.
2. REMOTE CONTROL SENSOR:Used to receive the signal from the remote control.
3.USB JACK:Used to connect to an external USB 2.0 device.
3
Page 4
BASS
TREBLE
ECHO
DOWN
UP
VOLUME
INPUT SELECTOR
MUTE
KARAOKE
CHANNEL
TEST
MODE
3 STEREO
PRO LOGIC
BYPASS
EXCITE
POWER
MIC
211
MIC VOL
2
MIC
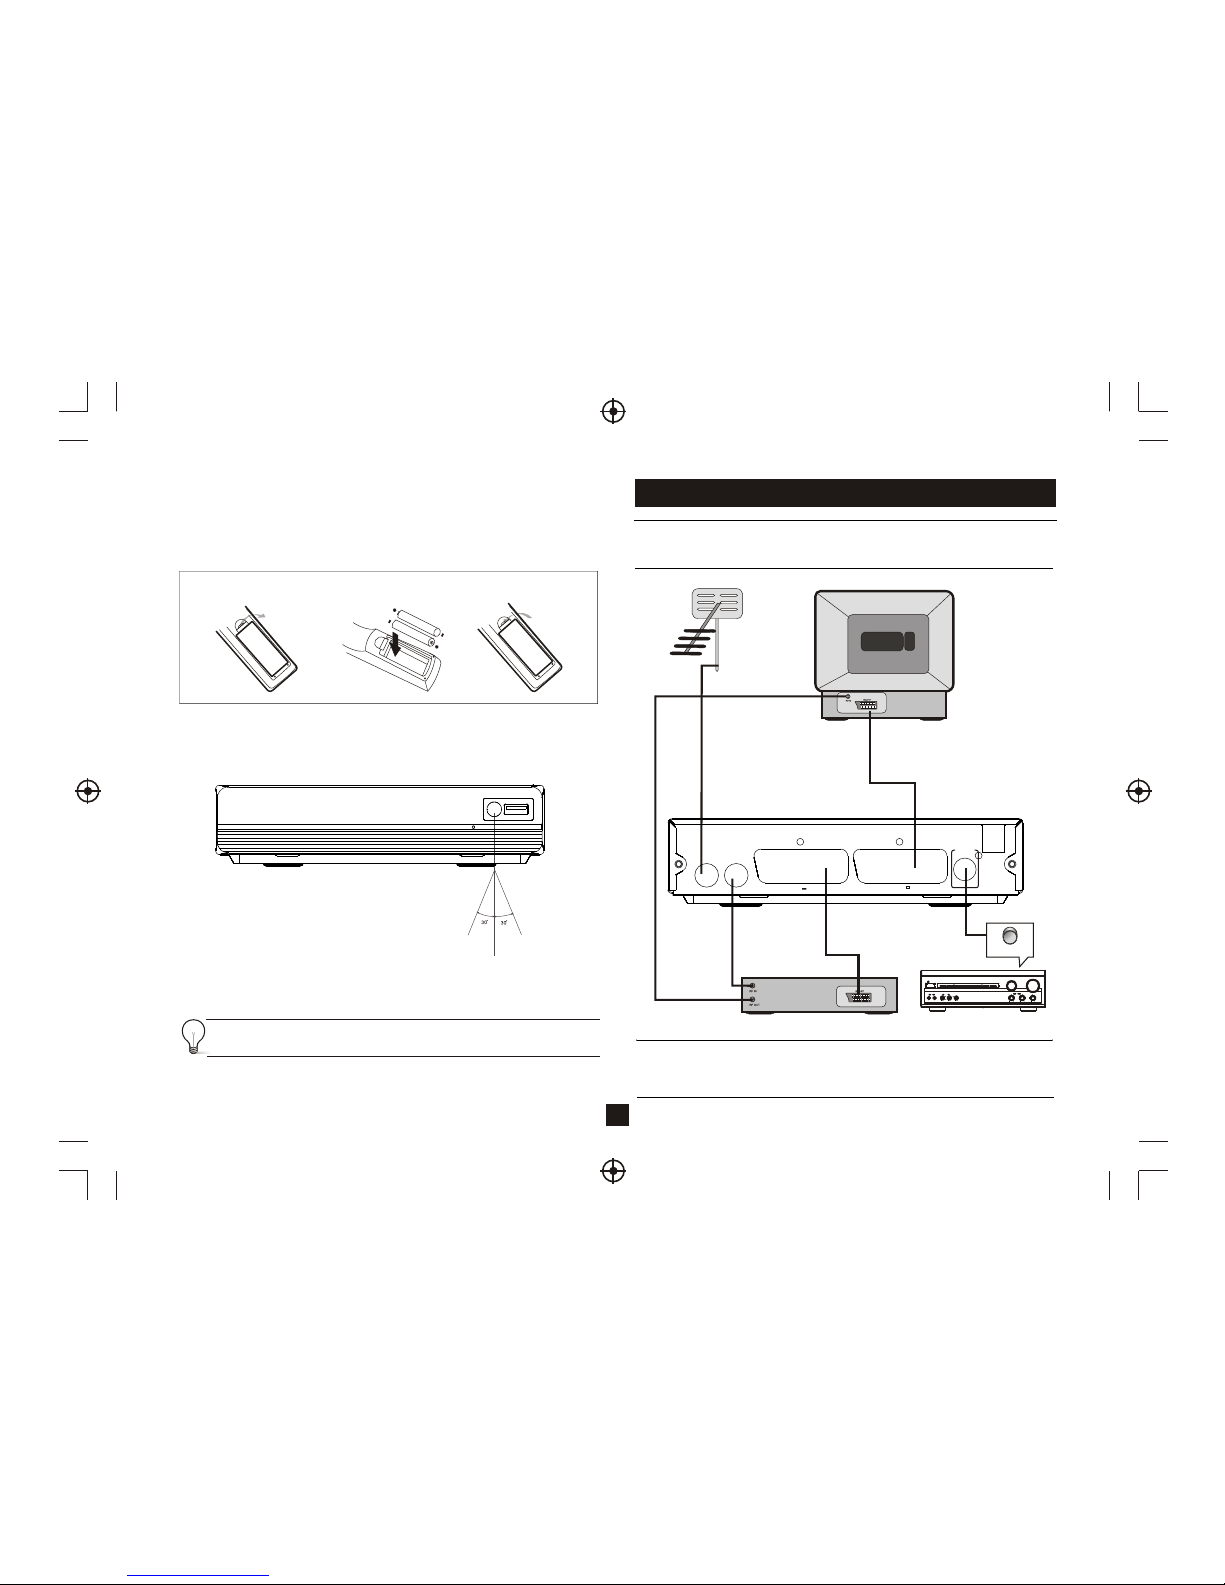
Remove the battery cover from the remote control and put 2xAAA size batteries inside
the compartment.
The diagram inside the battery compartment shows the correct way to install the
batteries.
O
PE
N
O
P
E
N
1.Open the cover
2.Install batteries
3.Close the cover
Using the Remote Control
To use the remote control, point it towards the front of the digital set top box The remote
control has a range of up to 7 metres from the set top box at an angle of up to 60 degrees.
The remote control will not operate if its path is blocked.
Sunlight or very bright light will decrease the sensitivity of the remote
control.
Connections
Caution: Make sure to check the voltage specification of the wall outlet is the same
rating with the receiver. To prevent the risk of electric shock, do not open the cover or
the back of the receiver.
2
Note: When connecting the receiver to other equipment, e.g., TV, VCR and amplifier,
make sure to refer to relevant user manual for instruction. Also, make sure you
disconnect all the equipments from the mains supply before the connection.
TV
Installing the Batteries
TV Aerial
VCR
Amplificador Digital
Coaxial Cable
Coaxial
INRF
LOOP
LOOPRF
THROUGH
THROUGH
Digital
Audio
Coaxial
VCR O O
VCR O O
TV
100-240V~
50/60Hz
Page 5

3
User Interface
2) Volume Control
A bar is to be displayed when volume is changed by pressing Vol+ or
Vol-. The bar will disappear after a predefined time following the last
Vol+ or Vol- key press.Automatically removed after 2 seconds.
3) Mute Symbol
Pressing the Mute key mutes the sound and a symbol is displayed,
Automatically removed after 2 seconds.
4) Screen Freeze
Pressing the Pause key to Freeze the Screen and a pause symbol is
displayed. Press the Pause key again to exit Freezing.
5) Direct Digit Entry
This graphic is seen when the user initiates a channel change using
the number keys. The user can press the OK key to force the channel
change before all 3 digits have been entered. If all 3 digits are entered
then the channel change will occur.
5 seconds after the last key press, the channel change will be initiated
if all digits have not been entered.
6) TV/Radio Switch
Press TV/Radio key on the remote to toggle between TV and Radio
mode.
Press to set-up services on your receiver
OK
The 'Exit ' key will remove all digital menus.
The exception to this is for persistant banners i.e. encrypted service
etc and for service locked/censorship PIN entry OSDs.
All menus will automatically be removed after 30 seconds unless
otherwise stated.
The menus use a 256-colour palette.
The menus will currently support just English language.
1)Welcome Screen
When the STB is powered up for the first time or is brought out of
standby with no services, then a welcome screen will be displayed.
This will tell the user to press the OK key to start a full frequency
service scan.
7) DTV/VCR Switch
Press DTV/VCR key on remote to toggle between DTV and VCR mode.
8)D igitalInformation
Whenv iewingad igitalpr ogram,asi nglep ressofth ein fok eyw illbr ing
upth efirstle velofp rogrami nformationshownb elow.T hiss howsth e
time,lo gicalchannelnu mber,ch annelna mea nd'N ow'pr ogram
information.Ita lsos howsth ecurrentfa vouritel istth atisb een
used/selected.T hein formationb annera ppearsa tth eb ottomo fth e
screen.
The user can scroll through information for other channels in the
currently selected favourites list or the full service list if a favourites list
is not enabled. This is done using the up and down keys. Whilst
information for other channels is displayed the actual channel being
viewed will not change. The OK key will jump to the new channel. After a
channel change, the information banner will be removed after 4
seconds. In addition the user can toggle between 'Now' and 'Next'
information using the left and right keys. To display 'Next' information
from the 'Now' banner, the user presses the right key. This osd will be
semi-transparent.
8.2) Small Next Information
Now Information Next Information
8.3) Large Now Information
Large Information
8.1) Small Now Information
The user can return from 'Next' to 'Now' Information using the left
arrow key.
A second press of the INFO key will bring up the extended program
information, and example is shown below.
Page 6

4
SUB DVB subtitles are available for this event.
TXT An MHEG application is available for this event.
CA This event is Encrypted. Even if a CAM module is decrypting the
event .
SUB DVB subtitles are NOT available for this event.
TXT An MHEG application is NOT available for this event.
C A T his e ve nt is N OT E ncr yp ted .
If none of the above are being displayed then if the service is audio or
data only, the following will be displayed.
Event can be classified by the broadcaster and will show an icon to tell
the user the age restrictions.
TXT Service is data/txt only.
Servi ce i s aud io o nly.
18 The event has an adult content age rating. Broadcast age
ratin g 18 +.
15 The event is not suitable for children under the age of 15.
Broadcast age rating 15-17.
12 The event is not suitable for children under the age of 12.
Broadcast age rating 12-14.
6 The event is not suitable for children under the age of 6.
Broadcast age rating 6-11.
0
The event is suitable for all ages. Broadcast age rating 0-5.
The event has NOT been given an age rating and may contain
?
unsui ta ble c on ten t.
Icons are used to notify the user of some information about the displayed
event:
Again, the user will be able to scroll through information for other channels
whilst still watching the current program by using the
CH+/-
keys. In addition,
the left and right cursor keys will toggle extended info for 'Now' and “Next”.
A third press of the INFO key clears all on screen information. This OSD will
be semi-transparent.
9) Channel Change OSD
This banner will stay persistent when no video can be watched on the
TV. This banner will also display the current favourite list enabled. The
following messages will be displayed under various circumstances:
Channel Change Banner
This service is encrypted
No services are stored in the receiver
This is a data/MHEG only service
This is a audio only service No Signal
10) Audio
Pressing the audio key will display the following menu. This menu
displays all the audio streams available on the current service. The
selection is done using the up/down keys. Pressing the OK key selects
the new audio. This selection is only valid until power-down or service
change. This menu will be automatically removed after 5 seconds.
Audio menu
Subtitle menu
This is the graphic seen after using CH+/- or when a direct digit entry
channel change is completed. It times out after 4 seconds If CH+/- is
used then the new service will be the next/previous service in the
currently selected favourites list. If no favourites list is selected/enabled
then the full service list will be sued. Direct digit entry will tune to a
service using its LCN. This may not be in a favourite list. This OSD will be
semi-transparent and will automatically timeout after 3 seconds.
Page 7

5
The graphic is displayed in the center of the screen.
This will be automatically removed when the MHEG application acquires
the display or will timeout after 60 seconds if the MHEG application fails
to launch.
ENCRYPTED SERVICE DATA SERVICE
AUDIO SERVICE CENSORED SERVICE
PARENTAL LOCKED NO SERVICE
NO SIGNAL
The user can scroll through the service list, select between now or next
information and also use the RED key to add a timer programming event.
If the video cannot be displayed then one of the following messages will
be displayed in the preview area:
11) Subtitle
Pressing the subtitle key will display the following menu. This menu
displays all the subtitle streams available on the current service and a
subtitle off option. The selection is done using the up/down keys.
Pressing the OK key selects the new subtitle language. This selection
is only valid until power-down or service change. Enhanced subtitle
streams are indicated by an ICON. This menu will be automatically
removed after 5 seconds.
12) Data Service Loading
If the Teletext key is pressed on a service that contains an MHEG data
application and data services have been enabled in the languages
menu, then before the application has been fully loaded, this display
will be presented.
13) TV Guide
Pressing the EPG key displays the following guide menu. The guide
contains all the channels in the service list rather than just the favourites
list. This allows the user to view the now and next event information for
every service as well as the extended information for a selected event.
Also a video/audio preview is given which shows the program that is
currently being watched.
EPG menu
Main Menu
14) Main Menu
The Main Menu contains 5 options.
1. Service Organiser
Accessed from the main menu, the service list contains the details of the
services that have been added into the system. The list can be scrolled
through using up and down. The selected channel appears with a white
border. Channels can be selected by pressing the OK button Channels can
be deleted with the 'Red' button(however, a full-scan will delete and replace
all the channels). The user will be asked for the PIN number each time they
delete a channel. The 'Green' button is used to allow service re-ordering
the 'Yellow' will allow the user to edit the service name.
Service Organiser
PIN requested for deletion
The UHF column showing the frequency channel that the service is on.
Page 8

6
2. Favourites
1. Select main menu.
2.Scroll to favourites.
3.Press green button to create favourite list.
4.Press yellow to show edit list.
5.Sroll up/down to select channel.
6.Press OK to add to list.
7.Repeat process to add further channels.
Favourite Menu Favorite Edit
Right List (Favourite List)
Depending on which list the user has selected the help will Change:
Left List (Service List)
Left List Help Info
Right List Help Info
2.1) Favourites Edit
Accessed from the favourites menu. The order of the Favourite list
determines the order the programs appear when the user surfs up and
down the channels with the P+/P- keys. The full service list and the
favourite list can be scrolled through using up and down. The two lists
are selected by using the left/right keys. The selected channel appears
with a white border. The favourite list can be re-ordered using the
'Green' key. The favourite list name can be changed by pressing the
'Yellow' key which will bring up the edit menu.
To re-order a favourite service the user must select the required service
using the up/down key and then use the green key to enter re-order mode.
When the green re-order is selected the user will be presented with
another help:
If the user selects to delete a service, then the first time this is selected
the user must enter the PIN. This is to prevent deletion of services
without a parent's consent.
Re-order Menu
Favourite Name Edit Menu
Timer Programming Menu
3.1) Enter Details
When the Select key is pressed, the following menu is displayed:
3. Timer Programming
This menu is arrived by selecting the timer programming option in the
main menu.
Note: The DVR option is not available with this model.
Timer Details Edit Menu
Enter PIN to remove parental locking
2.2) Name Editor
This name editor menu is used for allowing the user to rename a favourite
group. The character selection is done by moving the highlight around a
character matrix and using OK to choose the character. The new name is
displayed at the top of the menu. 'CAPS' is used to toggle the letters
between upper-case and lower-case and 'Delete' is used to
backspace/delete the last character. When complete the 'Green' key
saves the new name and exits the menu. The 'Yellow' key will cancel the
current edit and return to previous menu with no name change.
Page 9

7
The options are:
CN Three digit channel number.
Date Start date in DD/MM/YYYY format.
Time Start time in HH:MM format.
Duration Duration in HH:MM format.
DVR Set to Yes if to save event to internal hard drive if DVR
option enabled.
Repeat Event repeat mode. Options are No, Weekly, Daily, Mon Fri and Mon-Sat.
Subtitles This Options are Yes to use the current subtitle language
mode as set in the “languages” menu. No will turn off
subtitles during the timed event if enabled in the “languages”
menu.
When the user presses 'Select', the entered items are validated. If an
error is detected a message is displayed such as:
Error message that can occur:
ERROR -Time overlaps with another entry
ERROR -Invalid service
ERROR -Invalid date
ERROR - Invalid time
ERROR - Invalid duration
ERROR - Current time not available
If the PIN is not entered before a timeout, or it is cancelled, then the
event will NOT be added and the display will return to the enter details
menu.
If the censorship level has been set above no-block then the TV will
ask the user to enter the PIN number to remove viewing restrictions
with the following menu:
3.2) Viewing Restrictions
When the user presses 'Select' and the items are validated successfully,
the TV will check if censorship is enabled or the channel is parentally
locked.
If the service is parentally locked, the TV will ask the user to enter the
PIN number to remove viewing restrictions with the following menu:
Enter PIN to remove censorship locking
The restricted program added in the timer list
If the PIN is not entered before a timeout or it is skipped then the event
will still be added and viewing restrictions will apply to the event
depending on its censorship level. This is because the censorship
value of the event is not known at the time of entering the timed event.
Timer entries that have had a valid PIN entered are displayed with an
icon at the end of the line:
4. Setup Menu
This menu options allow the user to set up the system.
Setup Menu
Languages Menu
4.1) Languages
This menu allows the user to set-up default languages for subtitles,
data services and audio. The values are used on power up. In addition,
the 'Data Services' and 'Audio' values are used on channel change.
The subtitle value is also used on a channel change, but only if it hasn't
been over-ridden by the subtitle key.
The options are:
Subtitles Selects the default text language to be used for DVB subtitles.
The o pt ion s ar e OFF, Engl is h, We ls h and G ae lic.
Data Services Selects the default text language to be sued for MHEG
data se rv ice s. The op ti ons a re O FF, En gli sh , Wel sh a nd
Gaeli c.
Audio Selects the default audio language to be used on power-up
and service change. The options are English, Welsh and Gaelic.
OSD Select s th e def au lt text l an gua ge t o be u sed i n th e menus a nd
off -a ir se rv ic e inf or matio n. Th is o pt ion s ju st Engl is h cur re ntly.
4.2) TV Setup
The TV menu will have the following options:
Page 10

8
TV Setup Menu
The options are:
Television type Selects the type of tube that the set-top-box is
connected to. The options are 4:3 and 16:9.
Widescreen This option is only available when 4:3 is selected in
the sha pe o pti on . It is use d to s ele ct w ha t the u se r
requi re s to be d is playe d fo r 16: 9 tr an smi ss ions.
The o pt ion s ar e Le tte rb ox, Cen te r Cut ou t and Ful l
Frame .
Standard This o pt ion s et s th e SCA RT ou tp ut mode . The o pt ions
are CVB S, R GB.
4.3) Parental control
The default Parental control PIN is “ 0000”.
4.3.1) Viewing a Locked Cannel
Selecting a channel that is locked results in the following OSD being
displayed:
Entering a valid PIN will give access to the required service. Locking is
on a per-channel basis, so if the user switches to another locked
channel they will have to re-enter the PIN to view it. The channel will
remain unlocked until power-down. If the PIN is not entered then this
OSD will be displayed at all normal viewing times. i.e. After leaving the
menus this display will return.
4.3.2) Parental Locking via Menu Selection
The PIN must be entered to access the Parental Control menu:
Enter PIN for locked channel
Enter PIN to access Menu
Parental Control Menu
System benefit from being supplied with a default PIN and a master
PIN. The master PIN is intended to be used to over-ride the user
supplied PIN if it is lost or forgotten.
4.3.3) Parental Control Menu
Entering a valid PIN gives access to a sub menu that provides options
to change the PIN, Lock and Unlock services or adjust Censorship.
The Censorship option allows the user to select a blocking age on
service programs.
The options are:
18
Block
Total block. Will block all service events.
Age rating 18. Will block service events with age rating 18+.
Age rating 15. Will block service events with age rating 15+.
Age rating 12. Will block service events with age rating 12+.
6 Age rating 6. Will block service events with age rating 6+.
OFF No block. Will not block any service events.
15
12
When “ Change PIN” or “Lock/Unlock Services” is selected then the
help will change to the following:
4.3.4) Censorship
The Television has a global censorship rating, which is set to the
Censorship block level in the above menu at power-up. If the user tries
to watch a program that has a broadcast rating above the global rating,
the user must raise the global censorship rating of the TV to match the
broadcast program.
The following OSD is displayed when a censored program is
encountered:
Enter PIN to view the censored service
Change PIN
The limit is raised to that of the broadcast program until the TV is put
into standby. If the PIN is not entered then this OSD will be displayed
at all normal viewing times. i.e. After leaving the menus this display
will return.
Page 11

9
4.3.5) Parental Locking Change PIN
Selecting the option to change the PIN takes the user to a further sub
menu that handles the confirmation and storing of the new PIN.
The menu prompts for a new PIN. The select option allows the user to edit
the numbers being entered. As each number is entered, the “ -” in the
display is replaced by a “-”. Pressing the OK key causes the confirmation
input line to be highlighted and the process to be repeated. If the entered
numbers are not identical, “Numbers no identical” is displayed in the gray
area.
4.3.6) Parental Control Lock/Unlock Services
Selecting the Lock/Unlock Services option gives access to the service
locking menu ad shown below. The program list is displayed and the user
can scroll through it, using the up and down keys. The 'Select' key is used
to lock and unlock access.
The 'LOCK' Icon indicates that the channel is locked.
Lock or Unlock Services
Service Setup Menu
4.4) Service Setup
4.4.1) Full Scan Add New Services
When the 'Full Scan Add New Services' option is selected, the end of the
service list is displayed. When new services are found , they are displayed
at the end of the existing list in a highlighted yellow colour. During the scan
a progress bar is displayed and a message giving the estimated time
remaining to complete the scan.
Full Scan Add New Services
When the scan is complete the progress bar will show 100% and a message
stating how many new services have been found is displayed.
Show how many services added
4.4.2) Full Scan Replace Existing Services
When 'Full Scan Replace Existing Services' option is selected, the
same as the 'Full Scan Add New Services' menu is displayed except
that the existing services in the system are deleted before the scan
starts.
Full Scan Replace Existing Services
Manual Scan Menu
4.4.3) Manual Scan
This menu allows the user to manually tune in services. Depending on
the platform Front-End this menu will have different parameters.
This menu is full screen.
Editable options are:
Channel Sets the required UHF channel. This will automatically
fill in the frequency entry.
Frequency Overrides and set the frequency in kHZ.
Tx Mode Selects the required transmission mode. The options are
2K and 8K .
Guard Interval
Selects the required guard interval. The options are 1/4,
1/8, 1/ 16 , and 1 /3 2.
Scan Starts o r st ops a s er vice sc an .
Information:
Modulation The modulation type of the locked stream. The values can
be QPSK, QAM16 or QAM64.
FEC The FEC rate of the locked stream. The values can be 1/2,
2/3, 3/ 4, 5 /6 or 7 /8 .
Network ID The network id of the locked stream.
Transport ID The transport id of the locked stream.
Services Found Number of services found on the locked stream after
a scan.
Services Added Number of services added to the system after a scan.
If some o f th e ser vi ces fou nd a re al re ady sto re d the n
they will not be re-added.
Page 12

10
Signal Level Bar indicator to show the current signal level.
Thi s ba r wil l ha ve 3 c olo ur s to dist in gui sh h ow good t he
signa l is , RED =B ad, YEL LOW=M ed ium a nd G REEN= Go od.
Text al so d iplay ed t o sta te i f the FE is l oc ked .
Quali ty Bar indicator to show the current bit-error-ratio and text
displ ay ing t he q ualit y. Thi s ba r als o ha ve 3 colo ur s
indic at ing :
GREEN N o fr ont e nd e rrors .
YEL LO W Err or s de tec te d but cor re cte d.
RED Un- co rre ct able er ro rs.
When entering the menu the current service will be viewed in the preview
window and the following will be set as defaults:
Channel “Current transport UHF channel”
Frequency “Current transport frequency”
TX Mode “ Current transport TX mode”
Before a scan is started or when a scan is started and waiting for SI
information the in formation parameters will be filled with “----” (dashes) .
Guard Interval “Current transport Guard Interval”
Scan Stoppe d
4.4.4) Info For Manual Scan Menu
When changing the connection settings, the FE connection settings
will be change and the bars updated to show the current FE
information.
To start a service scan the SCAN option must be selected and toggled
to “ Started”. The user must then wait for the service information to be
found and displayed.
While waiting for the service information and the services to be added
the following will be displayed in the preview windows:
PLEASE WAIT …
After the scan has completed the scan option will automatically toggle
back to “ Stopped”.
The quarter screen preview will show the first service from the new
services that have been added, along with the service name and
provider name of the previewing service.
The user can then skip through the found services by using the P+ and
P- keys.
If no new services are added then the preview window will stay blanked
and no service or provider name will be displayed. The following will be
displayed in the preview windows:
NO SERVICES ADDED
The options are:
Transmission Mode:
2K Yes/No
8K Yes/No
Guard Interval:
1/32 Yes/No
1/16 Yes/No
1/8 Yes/No
1/4 Yes/No
Press OK key to delete all channels and settings, the following menu
will displayed:
4.4.5) Full Scan Setup
When the “ Full Scan Setup” option is selected, and option list will
be displayed allowing the user to modify what parameters will be
used during the full scan procedure. Depending on the platform
Front-End this menu will have different parameters.
Full Scan Setup Menu
First Time Setup
After initialize, the welcome screen will show.
If the video can't be displayed then one of the following messages will
be displayed in the preview area:
ENCRYPTEDSERV ICE
AUDIO SERVICE
PARENTAL LOCKED
NO SIGNAL
4.4.6) First Time Setup
This menu used to delete all channels and setting to the first time
installation, include Language, TV set, Service, Parental Control set,
and then show the First time welcome screen.
The default settings will be for the UK DTT network which is 'Yes' for
2K TX mode and 1/32 guard interval.
Page 13

4.5) Check For Download
4.5.1) Update By USB
This menu for the SW upgrading by USB jack.
(1) First Copy the provided *.ssu(for example, CT216T-M.ssu)
upgrade file to the root directory of the USB disk and then insert the
USB to the USB port of the box, you should see USB indicator flashing
while reading.
(2) Select the upgrading file and press ok to start upgrading.
(3) The upgrade progress will last for about 20 seconds as below,
please don't shut down the power during update, otherwise it will
destroy the box.
4.5.2) Over Air Download (OAD)
(1) Notification
The option allows the user to update the software.
Check For Download
Software Upgrading
(4) The USB upgrade will clear the user setting and erase the channel
list database also.
Note: The update file must have *.ssu postfix, otherwise it can't be
recognised.
This menu is displayed when a new over air download is detected after
power-up. This allows the user to select whether to start the download
now or download later by adding the event to the timer programming table.
If the event cannot be added, then an error message will be displayed.
The user can refuse the download at this time by pressing exit (however,
the download may be re-detected and indicated at next power-up).
If a download is not available when manually checking for a download
or the download becomes not available while the above menu is being
shown, then the following menu will be displayed.
(2) Progress
During the download progress a message will be displayed which
details to the user any message that the manufacturer requires this
message is broadcast as part of the download and isn't hard-coded into
the interface. The message may describe new features of the download
or a contact number in case of download failure. A progress bar and a
time remaining countdown is displayed during the download.
If the download fails the following error message will be displayed.
Some downloads may be signaled as high priority which means the
manufacturer of the receiver wants the user to perform the download.
In this case the download will automatically start when detected or
after leaving standby.
Download Available No Download
Downloading
Download Fail
If the television uses one FLASH chip, the new images is download
into another memory space and then written to FLASH when the new
images has been verified.
During this period the user must not turn off the receiver and the
following message is displayed. While this message is displayed the
television will not respond to any key presses.
11
Page 14
Don't Switch Off the Receiver
Download Completed
12
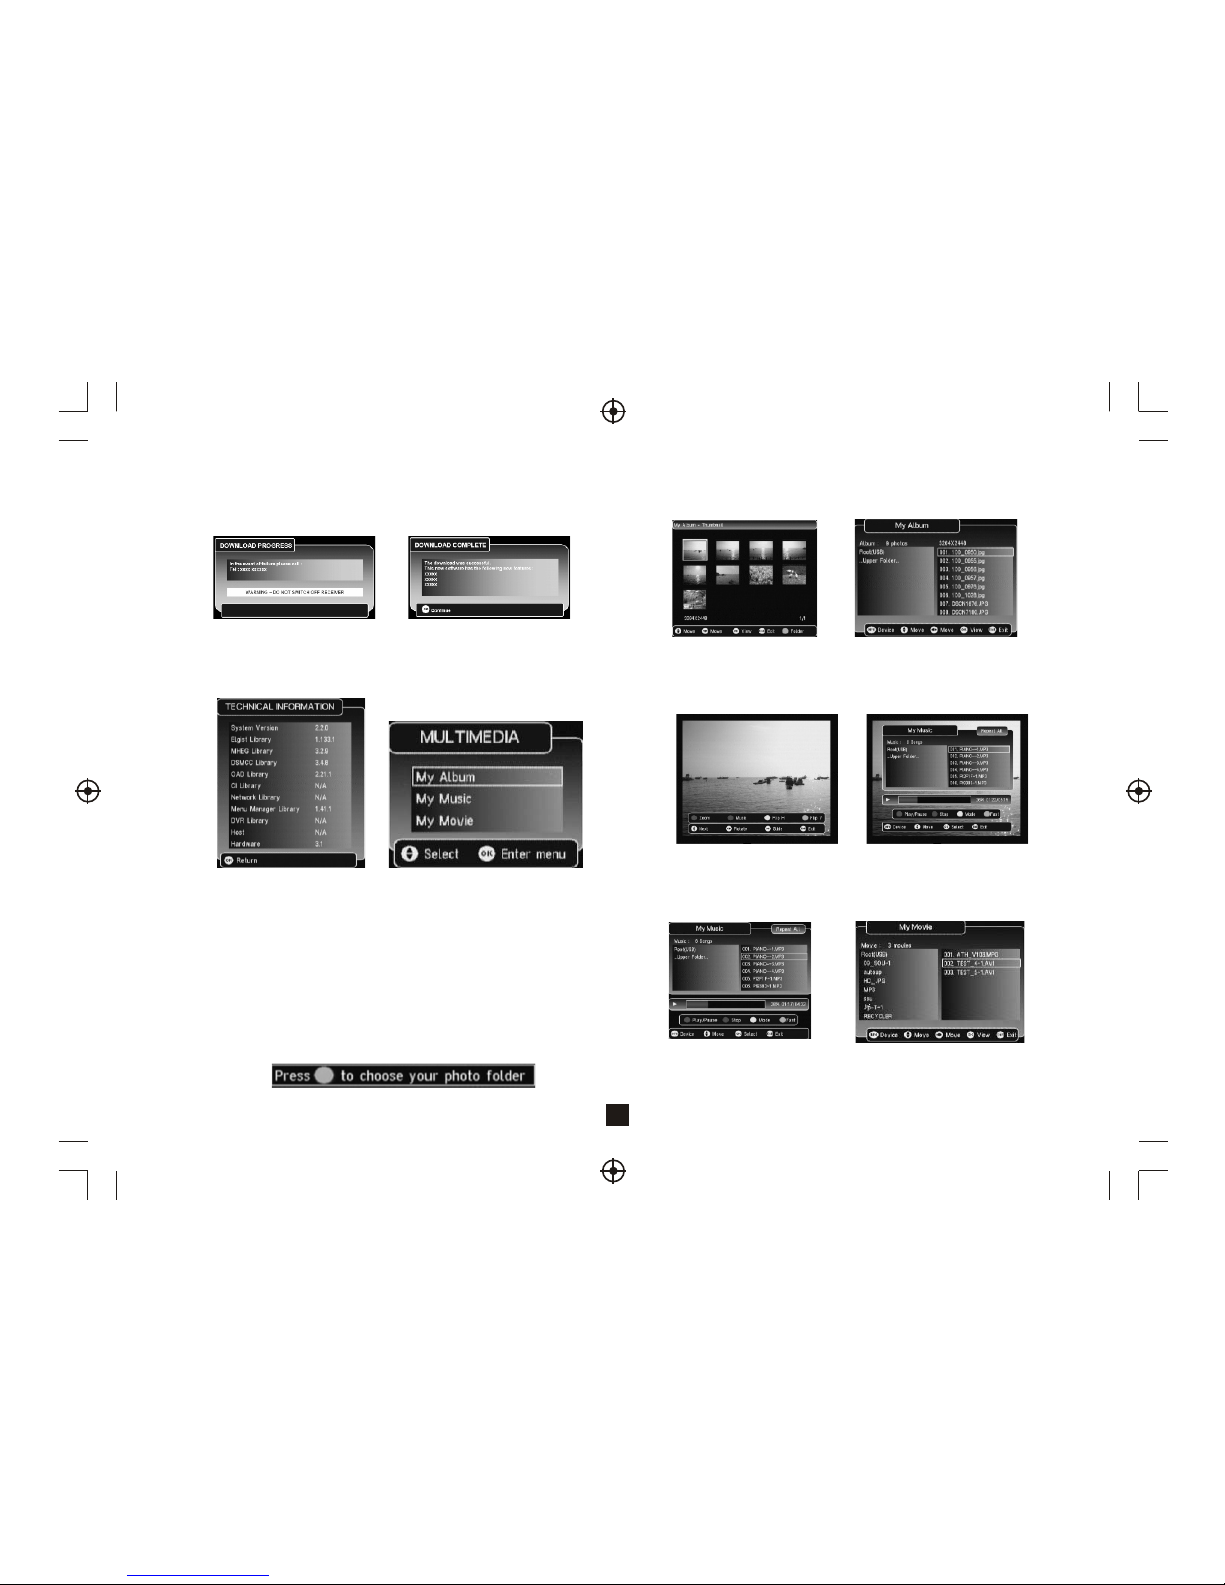
5. Multimedia
This menu for the media playback, Mulitimedia must be used with
external USB device, otherwise the message “Device is not ready!”
will be displayed, remove device when playing, the message “Device
is removed!” will be displayed.
Technical Information Multimedia
5.1) My Alblum
My Alblum can play JPG/BMP/GIF photos and operate it, if there are
photos in device root folder, it will start at Thumbnail mode, otherwise
it will start at Folder mode, and ask you to select a folder as below.
Thumbnail/Folder
The info(Width x Height and date) of selected photo will be displayed
at the left bottom at Thumbnail mode.
My Album-Thumbnai My Album-Browser
Photo playing
Play music during Photo playing
5.2) My Music
My Music can play most MP3/WMA files, It displays progress bar,
audio sprctrum, current playing time and total time while playing,
Press Info button you can select device.
During playing, you can Zoom, Flip, Rotate, Slide the pictures
according to the operation help info, press Info key you can get the
help info. You can even play the background music during the photo
playing.
Music Playing
5.3) My Movie
My Movie can play some free Divx movies.
My Movie
4.7) Antenna Setup
The Antenna Setup menu allows the user to enable or disable the
antenna power supply for external active antenna.
(3) Download message after restart
When the receiver restarts after a download, the following menu will be
displayed. This can contain either a success or failure message and
any other information about the new software.
4.6) Technical Information
The Technical Information screen displays the hardware version
number and software version numbers. The software version numbers
depend on what modules are built into the software.
Page 15

13
Specifications
If you experience problems with this receiver or its installation,
in the first instance please read carefully the relevant sections
of this User Manual and this Troubleshooting section.
Troubleshooting
 Loading...