

Page 1
User Manual
Bedienungsanleitung - Mode d’emploi
TRIAX DVB-S2 Receiver S-HD11
Model Item no.
TRIAX DVB-S2 Receiver S-HD11 305216
Version D Date 05/2017
EN, DE, FR
Page 2

User manual
EN
2
Attention! / Achtung! / Consignes de sécurité!
EN
Failure to comply with the specified precautionary measures may cause serious injury to persons or damage to property. The
installation and commissioning may only be performed by suitably qualified persons, technicians or installers in compliance with
safety regulations.
Damage due to improper installation and commissioning, defective connectors on cables or any other incorrect handling will void
the warranty.
CAUTION: The safety requirements are according to EN 60728-11 and must be observed.
• Disconnect mains power before working on electrical systems.
• Any additional electrical wiring requirements should always be installed by a suitably qualified person(s).
Installation or service work should NEVER be undertaken during electrical / thunderstorms.
DE
Gewährleistung
Die gesetzliche Gewährleistung nach Paragraph 437 BGB beträgt 24 Monate.
Bei unsachgemäßer Installation und Handhabung erlischt jeglicher Garantieanspruch.
Bestimmungsgemäße
Und sachwidrige Verwendung
Die Montage und Inbetriebnahme darf nur von eingewiesenen Personen, Technikern
oder Installateuren unter Beachtung der Sicherheitsbestimmungen durchgeführt werden.
Schaden durch falsche Montage und Inbetriebnahme sowie durch unsachgemaβe Handhabung fuhren zum Erlöschen des
Garantieanspruchs.
FR
Veillez à bien respecter les consignes de sécurité ci
-
dessous. Leur non
-
respect peut provoquer des dommages matériels ou
corporels.
L’installation et la mise en route ne peuvent être effectués que par des techniciens ou des installateurs qualifiés en respectant les
consignes de sécurité.
La garantie ne sera pas appliquée lors de dégâts causés par une erreur de montage, de mise en route ou par un mauvais
raccordement ou toute autre manipulation incorrecte.
PRUDENCE : avant toute intervention, votre installation doit être conforme aux exigences définies par les dispositions Européennes
EN 50083 (conformité des installations collectives) et EN 60065 (normes en vigueur pour la protection électrique).
• Débranchez l’appareil avant toute intervention, car certains composants sous tension sont dangereux (risque
d’électrocution).
Toute intervention sur l’installation ou travaux de maintenance sont à proscrire en cas d’orage.
Table of contents / Inhaltsverzeichnis / Sommaire
Attention! / Achtung! / Consignes de sécurité! ....................................................................................................... 2
1. Remote controller ........................................................................................................................................ 4
2. DTV mode .................................................................................................................................................... 6
2.1 System Initialization ................................................................................................................................................................................ 6
2.2 Entering the DVB System and Power On/Off ............................................................................................................................................ 7
2.3 Volume Adjustment and Mute Control ..................................................................................................................................................... 7
2.4 TV/Radio Switching ................................................................................................................................................................................. 7
2.5 Channel Switching ................................................................................................................................................................................... 7
2.6 Program info display ............................................................................................................................................................................... 9
2.7 Program BACK (Back to the previous channel) ........................................................................................................................................ 9
2.8 Program Language and Left/Right Channels Switching ........................................................................................................................... 9
2.9 Screen Scaling (V-FMT) ......................................................................................................................................................................... 10
2.10 Electronic Program Guide (EPG) ....................................................................................................................................................... 10
Electronic Program Guide (EPG) - continued .................................................................................................................................................... 11
2.11 Teletext ............................................................................................................................................................................................. 11
2.12 Subtitle.............................................................................................................................................................................................. 12
2.13 TTX Subtitle ...................................................................................................................................................................................... 12
Page 3

User manual
3
EN
3. Multimedia mode ....................................................................................................................................... 13
3.1 Multimedia and USB .............................................................................................................................................................................. 13
3.2 USB storage device ............................................................................................................................................................................... 14
3.3 Movie .................................................................................................................................................................................................... 15
3.4 Music .................................................................................................................................................................................................... 16
3.5 Image .................................................................................................................................................................................................... 17
3.6 Record manager .................................................................................................................................................................................... 18
4. Main menu ................................................................................................................................................. 19
4.1 Installation ............................................................................................................................................................................................ 19
4.1.1 Antenna setup ................................................................................................................................................................................... 20
4.1.2 Satellite list ....................................................................................................................................................................................... 20
4.1.3 Transponder list (TP) ........................................................................................................................................................................ 21
4.1.4 Motor setting .................................................................................................................................................................................... 22
4.1.5 Limit setup ........................................................................................................................................................................................ 22
4.1.6 Search example ................................................................................................................................................................................ 22
4.2 Channel ................................................................................................................................................................................................. 23
4.2.1 Channel manager .............................................................................................................................................................................. 23
4.2.2 Favorite ............................................................................................................................................................................................. 24
4.2.3 Delete all channels ............................................................................................................................................................................ 25
4.3 Preference ............................................................................................................................................................................................. 25
4.3.1 Language .......................................................................................................................................................................................... 26
4.3.2 OSD transparency ............................................................................................................................................................................. 26
4.3.3 Preferred audio ................................................................................................................................................................................. 27
4.3.4 DVR configuration ............................................................................................................................................................................. 27
4.4 Setting ................................................................................................................................................................................................... 28
4.4.1 Timers ............................................................................................................................................................................................... 29
4.4.2 Parental lock ..................................................................................................................................................................................... 30
4.4.3 Local time setting ............................................................................................................................................................................. 30
4.4.4 Factory setting .................................................................................................................................................................................. 31
4.4.5 Upgrade ............................................................................................................................................................................................ 31
4.4.6 Version.............................................................................................................................................................................................. 31
4.4.7 Auto shut down ................................................................................................................................................................................. 31
4.5 AV ......................................................................................................................................................................................................... 32
4.5.1 Contrast ............................................................................................................................................................................................ 32
4.5.2 Brightness ......................................................................................................................................................................................... 32
4.5.3 Saturation ......................................................................................................................................................................................... 33
4.5.4 HUE ................................................................................................................................................................................................... 33
4.5.5 S/PDIF mode ..................................................................................................................................................................................... 33
4.5.6 Aspect mode ..................................................................................................................................................................................... 34
4.5.7 Aspect mode ..................................................................................................................................................................................... 34
5. Record & Timeshift .................................................................................................................................... 35
5.1.1 Record .............................................................................................................................................................................................. 35
5.2 Timeshift ............................................................................................................................................................................................... 36
5.2.1 Timeshift: Auto ................................................................................................................................................................................. 36
5.2.2 Timeshift: Pause ............................................................................................................................................................................... 36
5.2.3 Timeshift: Off .................................................................................................................................................................................... 36
6. Upgrade ..................................................................................................................................................... 37
6.1 Upgrade by USB / OTA ........................................................................................................................................................................... 37
6.2 Upgrade by USB ..................................................................................................................................................................................... 37
Page 4
User manual
EN
4
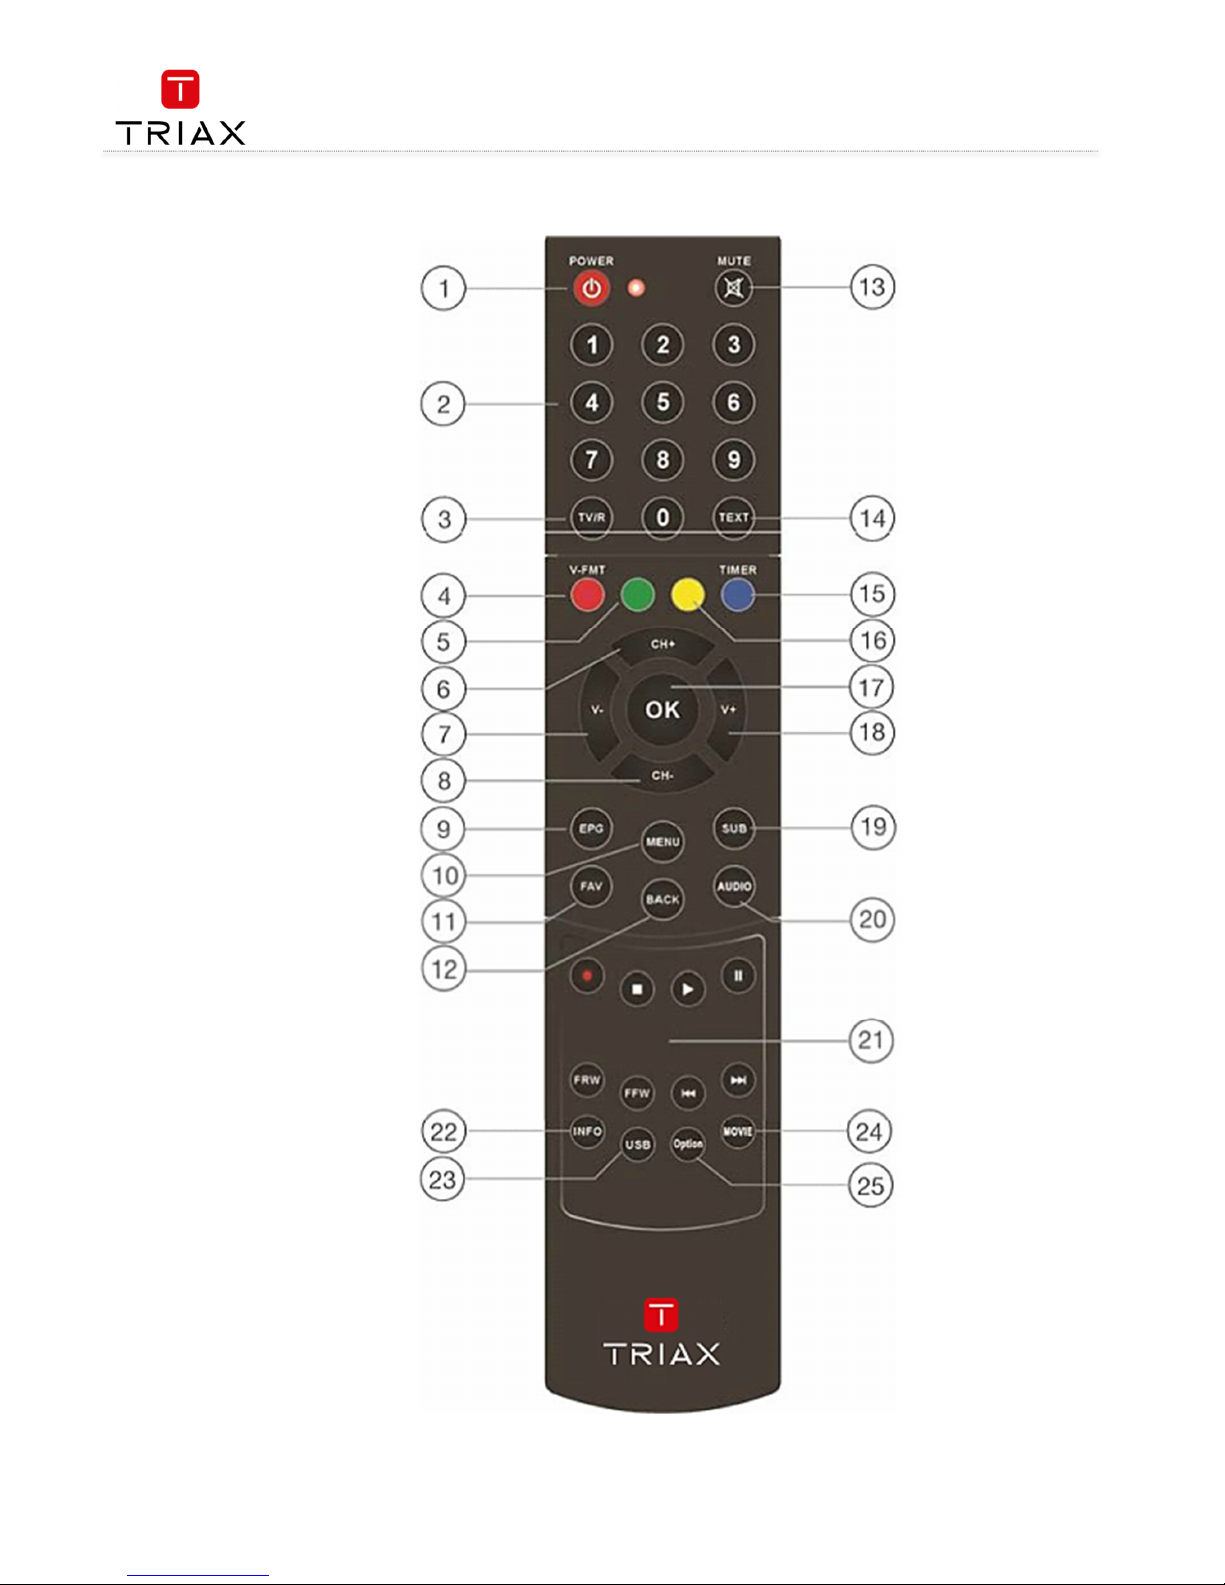
1. Remote controller
Page 5
User manual
5
EN
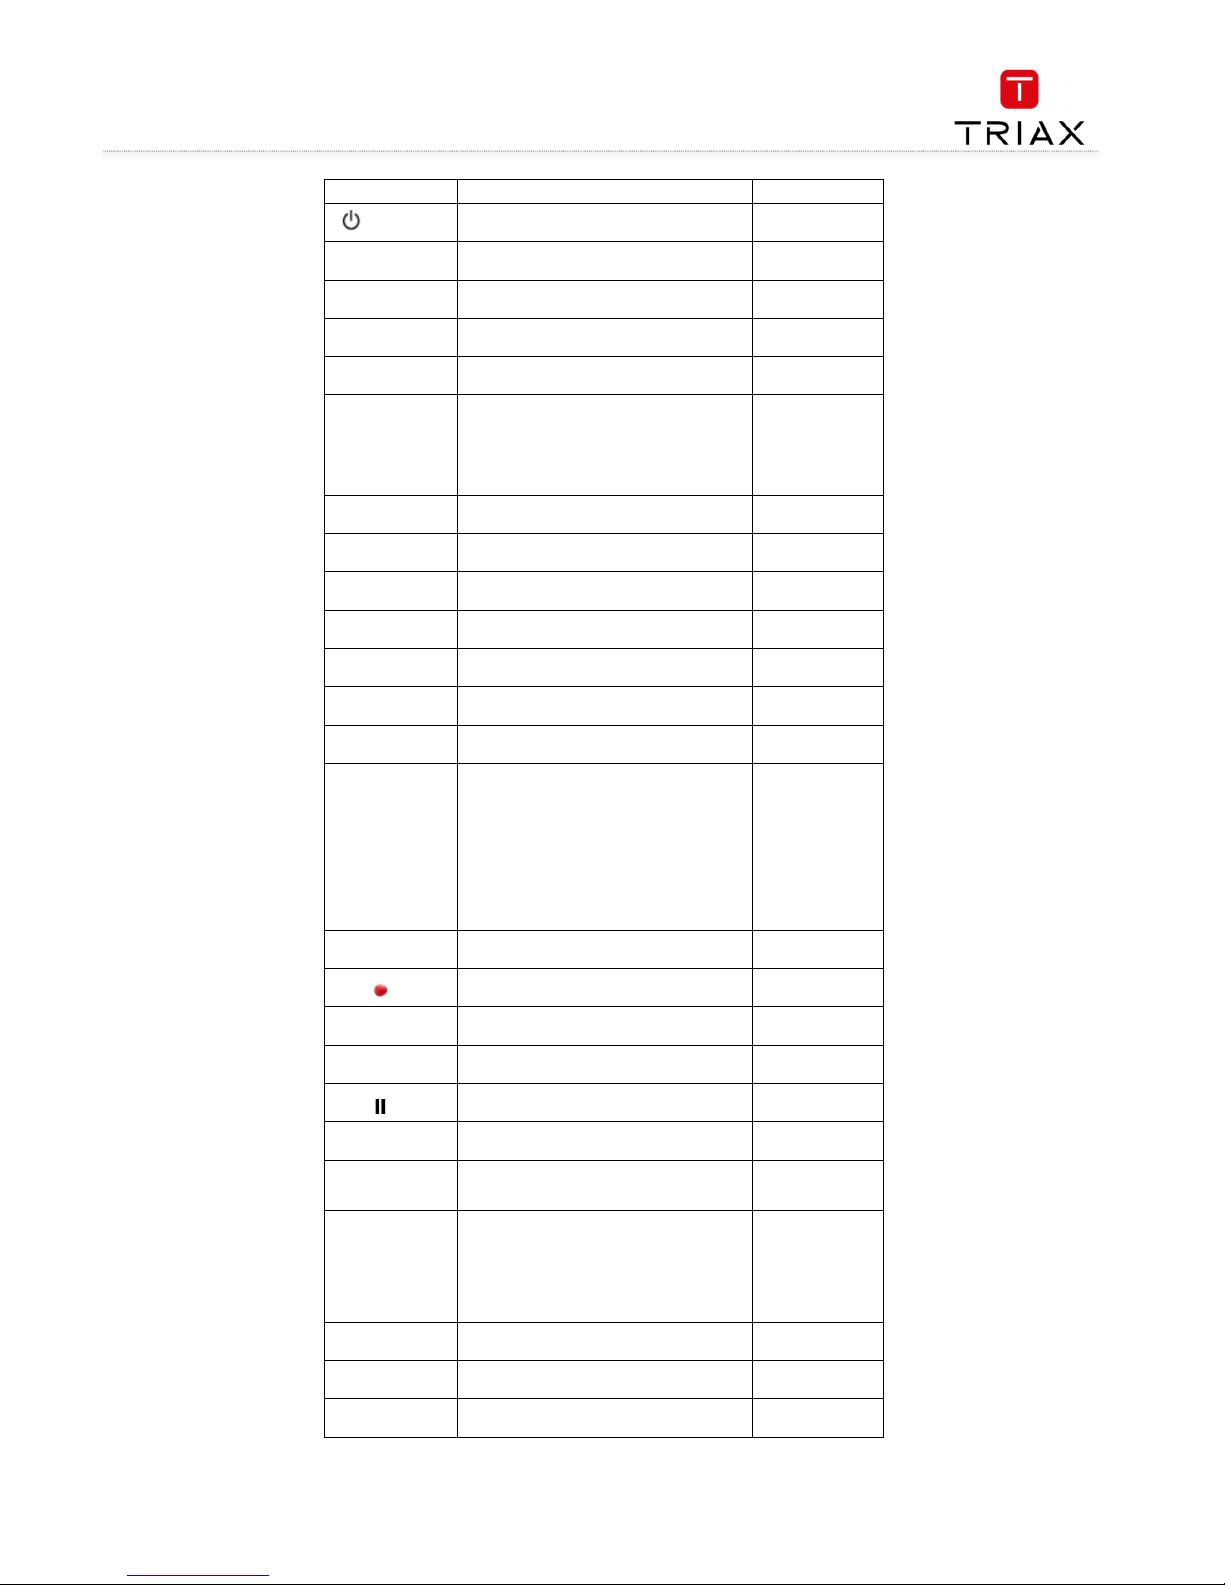
Button Function Nr
Power
Switch STB on/standby
1
MUTE
Turn sound off/on
13
0…9
Enter numeric values and select the channel
directly by entering it's number
2
TV/R
Switch between TV and Radio mode
3
TEXT
Open interactive service
14
RED/GREE
N/
YELLOW/
BLUE
For interactive function/Submenu
function buttons
4,5,
15,16
V +/-
Volume up/down
7, 18
Ch +/-
Channel up/down
6,8
OK
Enter Main menu or confirm selected
17
EPG
Open up Electronic Program Guide Menu
9
MENU
Open and close the menu screen
10
SUB
Enter the program subtitle selection menu.
19
FAV
Open favorite list
11
BACK
•
Return to the upper level menu.
• Return to the previously played
program while in full screen playing
state.
• Return to the media type switch menu
while in Multi-media mode (The Multimedia mode is for viewing information
on a USB device)
• Exit the current menu.
12
AUDIO
Select audio mode to change
language / channel
20
Record the TV program
21
■
Stop program playback or recording
21
►
PLAY
21
Pause timeshift function or multimedia
playback
21
FRW/FFW
Search backward /forward
zoom images in/out
21
►►I
/
I◄◄
In multimedia, go to previous or next file
21
INFO
•
Show or hide program info.
• Show the information of the selected
item while in EPG state.
• Show the detailed information of the
being played media file while in
multimedia playback state.
22
USB
Select and show information about
USB device
23
MOVIE
Switch between multimedia / DTV
24
OPTION
Not used
25
Page 6
User manual
EN
6
2. DTV mode
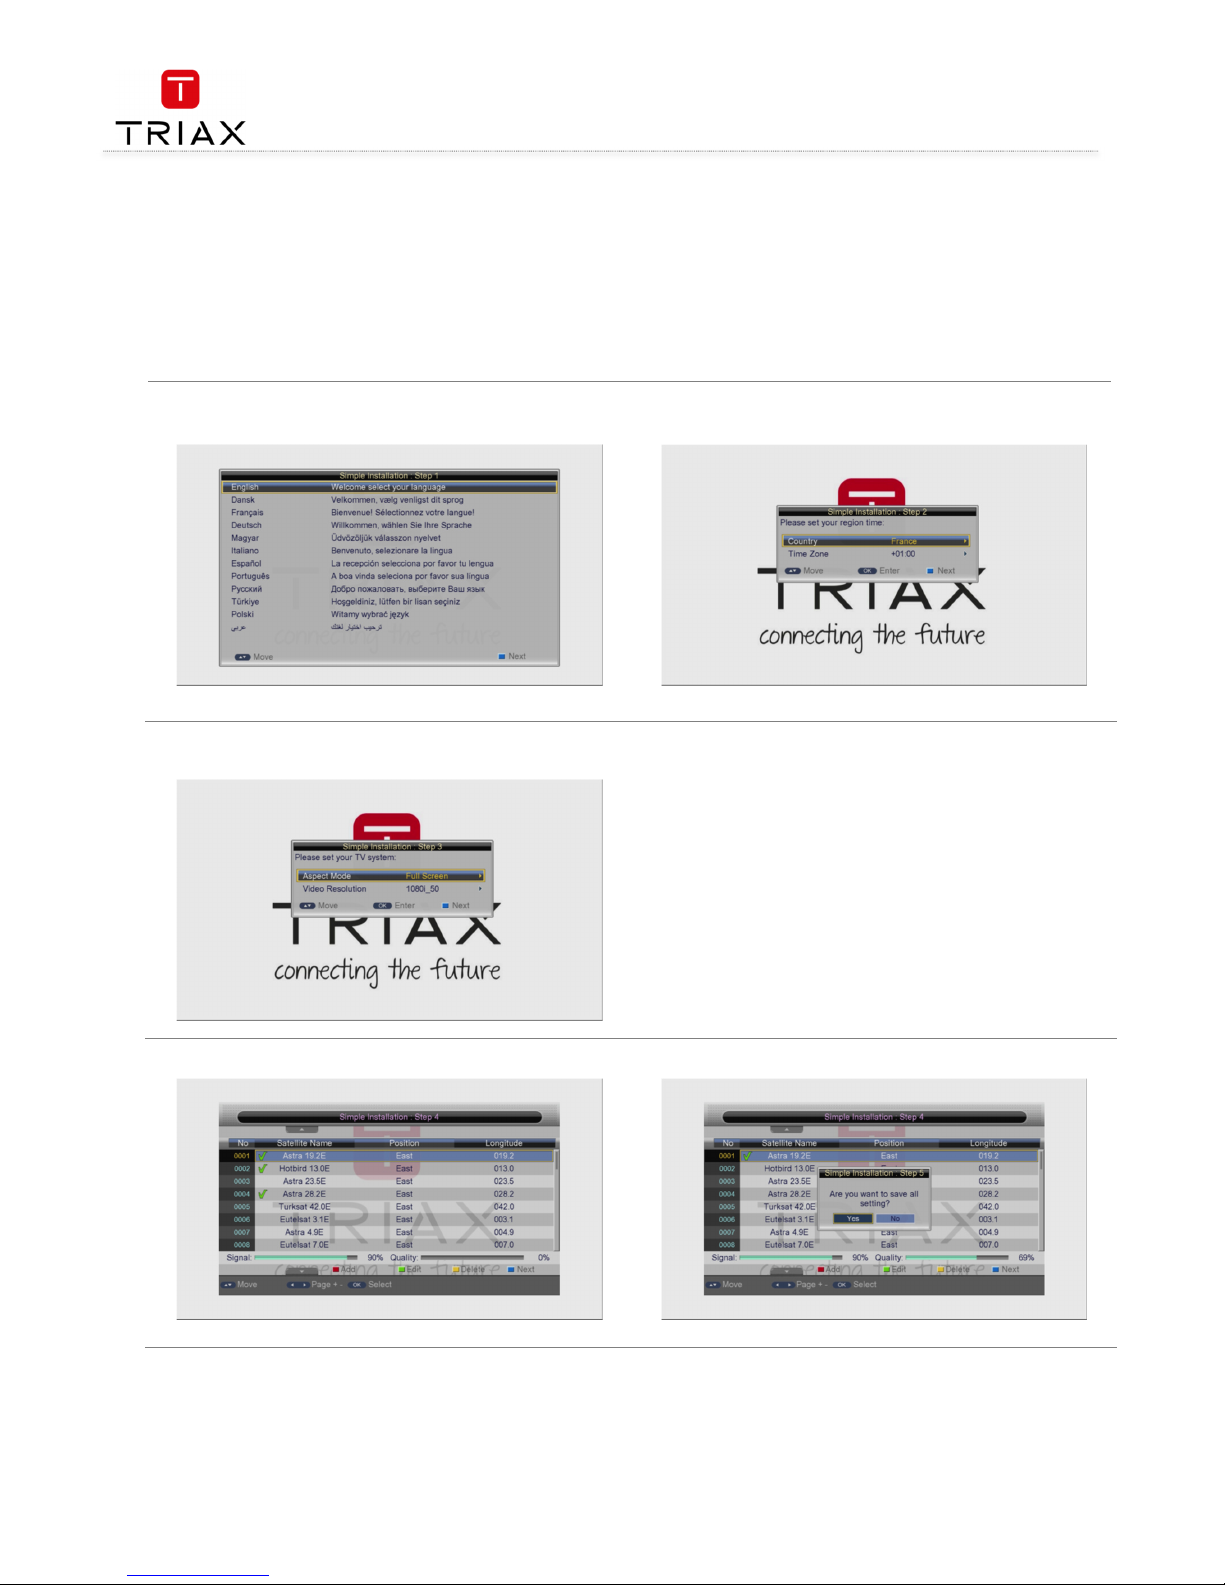
2.1 System Initialization
When entering the system for the first time, you should do some initialization settings on the system including language, country (region), time
zone, active antenna and logical channel number, etc. See the figure below for the setting menu.
After setting, select the blue funtion key option and then press OK key to start auto scan. When the scan completes, the scanned programs can
be auto saved.
Page 7
User manual
7
EN
2.2 Entering the DVB System and Power On/Off
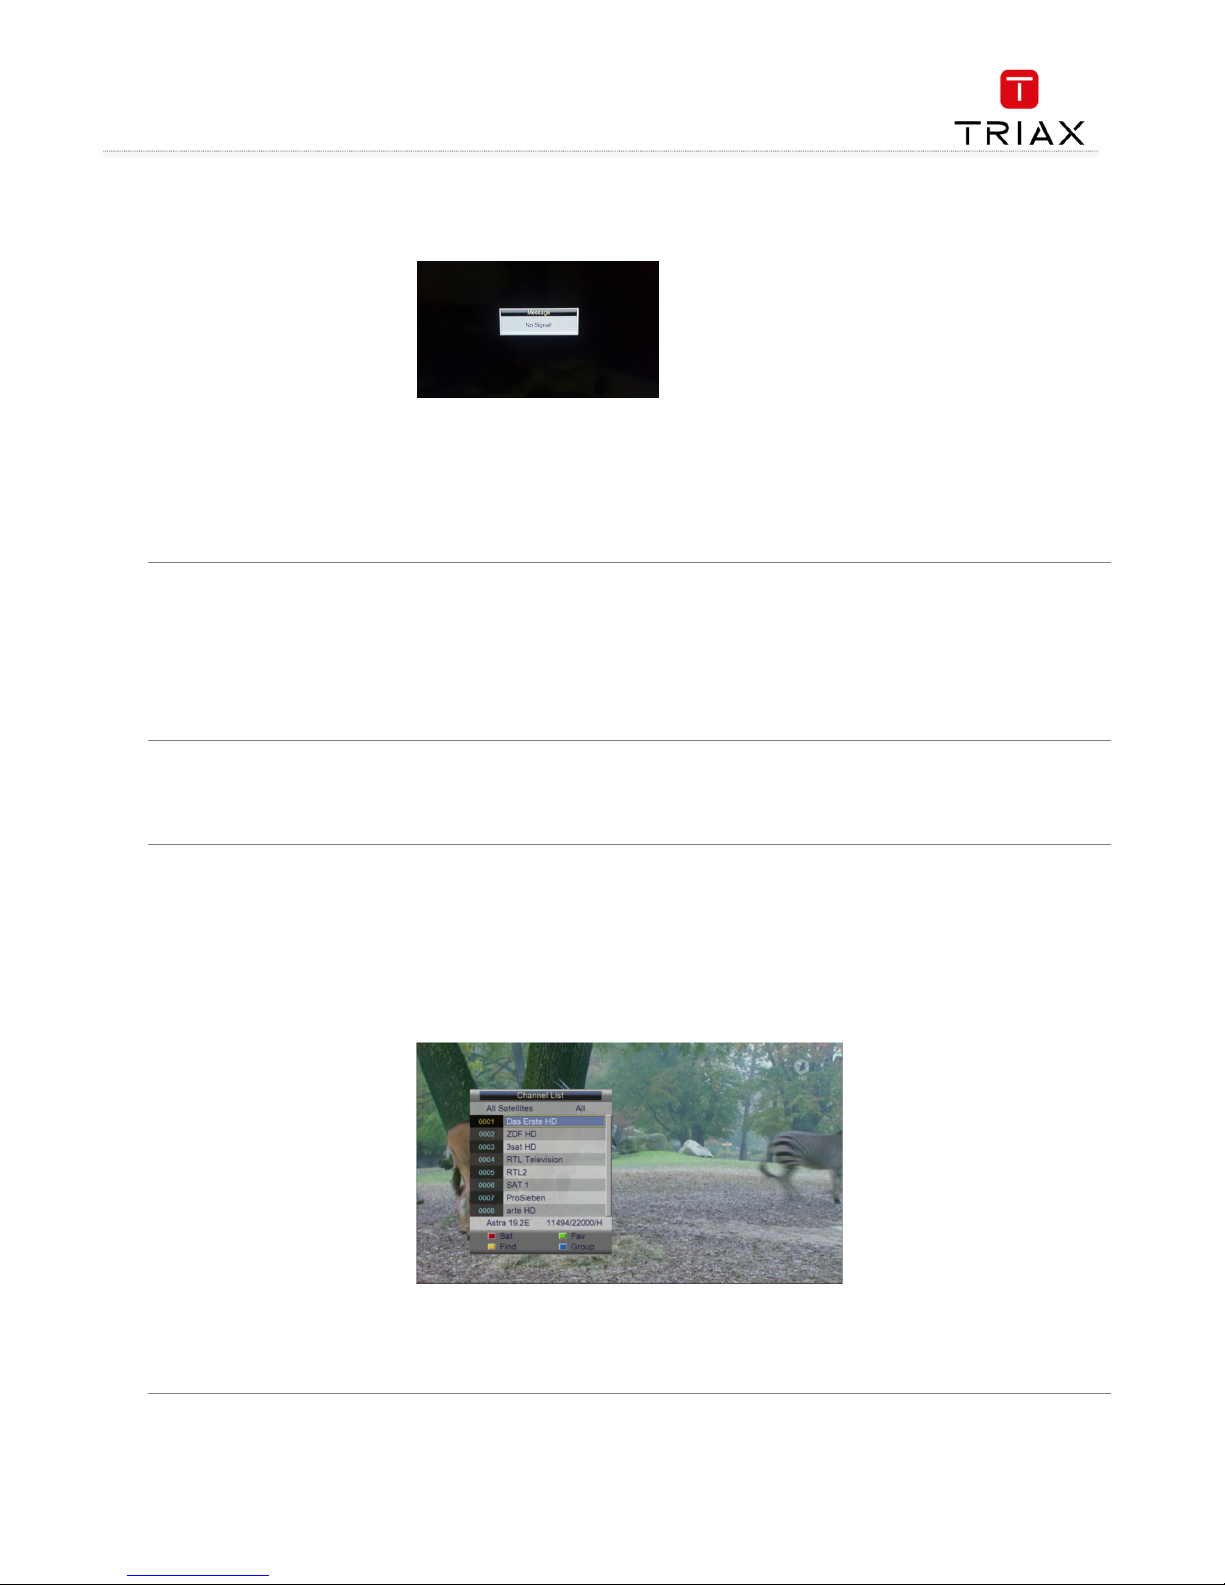
After power on, the system will enter the DVB mode. If there is no program data in the database, the following message will appear:
Otherwise, the last program being played before the previous power off will be played. If the system fails to play the progra
m, please check the
power connection and antenna connection.
• Power on
Power onPower on
Power on
When the machine is in Standby mode, press POWER
POWERPOWER
POWER key to turn it on.
• Power off
Power offPower off
Power off
When the machine is running, pressing POWER
POWERPOWER
POWER key at any time can make it into the Standby mode.
2.3 Volume Adjustment and Mute Control
• Volume Adjustment
Volume AdjustmentVolume Adjustment
Volume Adjustment
While in playing state without menu display, press V+/
V+/V+/
V+/---- keys to adjust the volume. A volume bar will appear, which has 0~100 levels.
• Mute Control
Mute ControlMute Control
Mute Control
While in playing state without menu display, press MUTE
MUTEMUTE
MUTE key to enter the mute state. Pressing MUTE
MUTEMUTE
MUTE key again can exit the mute
state.
2.4 TV/Radio Switching
While in full screen playing state, press TV/R
TV/RTV/R
TV/R key to switch between the TV mode and the Radio mode.
2.5 Channel Switching
The system provides many methods to switch channels. See the descriptions below:
• Method 1:
Method 1: Method 1:
Method 1: While in full screen playing state, press CH+/
CH+/CH+/
CH+/---- keys to play the next or previous TV program channels or radio stations.
• Method 2:
Method 2: Method 2:
Method 2: While in full screen playing state, press OK
OKOK
OK key to enter the Channel List menu (see the figure below) to quickly select a
channel you want to play. In which you can press V+/
V+/V+/
V+/---- keys to select a channel group and then press CH+/
CH+/CH+/
CH+/---- keys to choose a desired
channel.
Press
OK
OKOK
OK key to confirm your selection and switch to the selected channel to play. Pressing
BACK
BACKBACK
BACK key can exit the menu.
• Method 3:
Method 3: Method 3:
Method 3: Press number keys to input the number of the channel you want to play (TV: 0~674; Radio: 0~228).
• Method 4:
Method 4: Method 4:
Method 4: Press the red function key
red function keyred function key
red function key to select another satellite to play, see the figure below on next page:
Page 8

User manual
EN
8
After power on, the system will enter the DVB mode. If there is no program data in the database, the following message will appear:
•
Method 5:
Method 5: Method 5:
Method 5: If you have set favorite programs, press the green function key
green function keygreen function key
green function key and a Favorite list will appear (see the figure below). At this
point, you can press CH+/
CH+/CH+/
CH+/---- keys to select a FAV item and then press OK
OKOK
OK key to enter its program list.
Pressing back exits the menu
• Method 6:
Method 6: Method 6:
Method 6: Press the yellow function key while in the state of Fejl! Henvisningskilde ikke fundet.
Fejl! Henvisningskilde ikke fundet.Fejl! Henvisningskilde ikke fundet.
Fejl! Henvisningskilde ikke fundet., and you can search for a channel by
name.
The figure below will appear:
Press CH+/
CH+/CH+/
CH+/---- / V+/
/ V+// V+/
/ V+/---- keys to select a character and then press OK
OKOK
OK key to input. When you have finished inputting a channel name, press the blue
blue blue
blue
function key
function keyfunction key
function key to confirm your input. (Pressing the red function key
red function keyred function key
red function key can change case. Number keys cannot be used to input numbers here.)
• Method 7
Method 7Method 7
Method 7: Press the blue function key while in the state of Fejl! Henvisningskilde ikke fundet.
Fejl! Henvisningskilde ikke fundet.Fejl! Henvisningskilde ikke fundet.
Fejl! Henvisningskilde ikke fundet., and the channel group list appears (see
the figure below), which includes free, scramble and so on.
Page 9
User manual
9
EN
2.6 Program info display
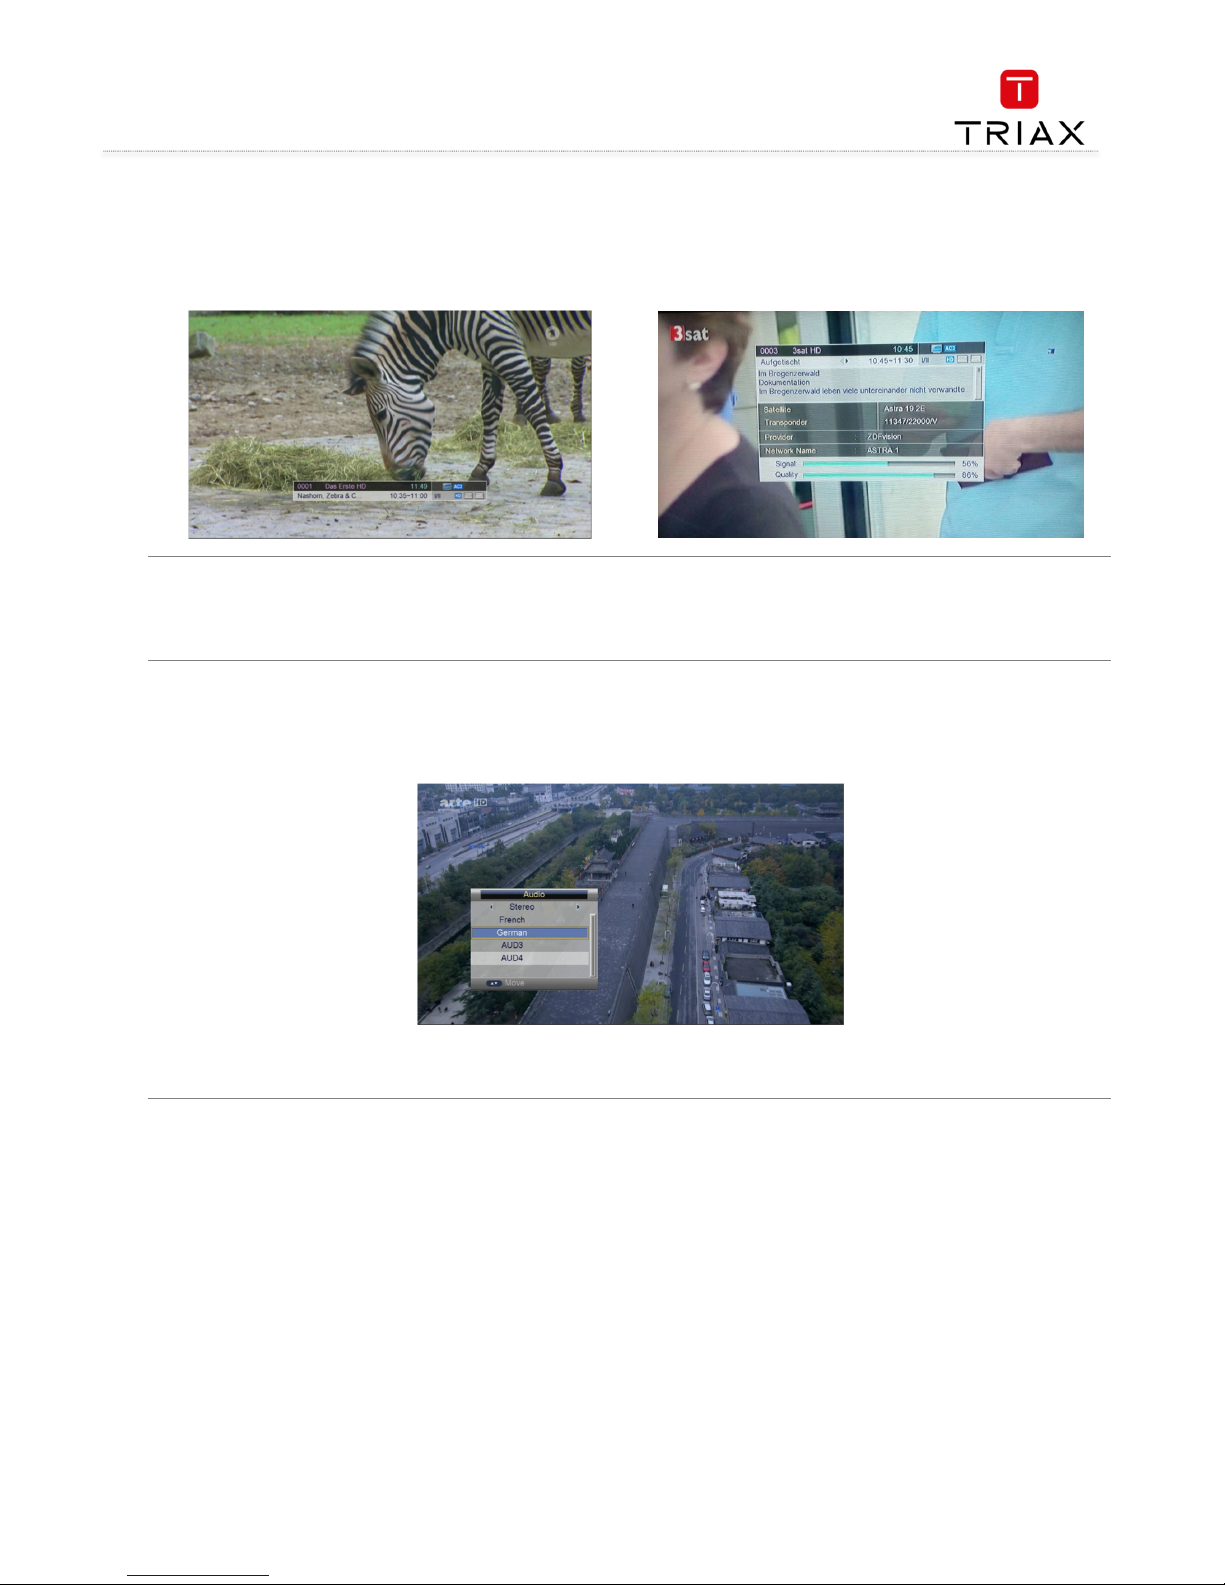
While in full screen playing state, press INFO
INFOINFO
INFO key to show the brief information of the being played program. See left figure.
Press INFO
INFOINFO
INFO key again, and the detailed information of the program can be found. See right figure.
2.7 Program BACK (Back to the previous channel)
While in full screen playing state, press BACK
BACKBACK
BACK key to return to the previously played TV program channel or radio station.
2.8 Program Language and Left/Right Channels Switching
While in full screen playing state, press AUDIO
AUDIOAUDIO
AUDIO key to call out the following menu to change the audio language and sound channels.
•
• Press V+/- keys to change sound channels among Left, Right and Stereo; press CH+/- keys to choose audio language.
• Press OK key to confirm the setting and return to the program playing state.
Page 10
User manual
EN
10
2.9 Screen Scaling (V-FMT)
At present the screen scaling function is invalid in the DTV mode, and valid only when playing images in the Multimedia mode.
2.10 Electronic Program Guide (EPG)
To get the information of programs being played or to be played in coming days, press EPG key to enter the electronic program guide (EPG).
EPG info has three modes: Now/Next Mode
Now/Next ModeNow/Next Mode
Now/Next Mode, Daily Mode
Daily ModeDaily Mode
Daily Mode and Weekly Mode
Weekly ModeWeekly Mode
Weekly Mode. The system will enter the Now/Next mode by default, and you can
press the red function key
red function keyred function key
red function key to change to other modes. Press BACK
BACKBACK
BACK or EPG
EPGEPG
EPG keys to exit EPG.
Now / Next mode
Now / Next modeNow / Next mode
Now / Next mode::::
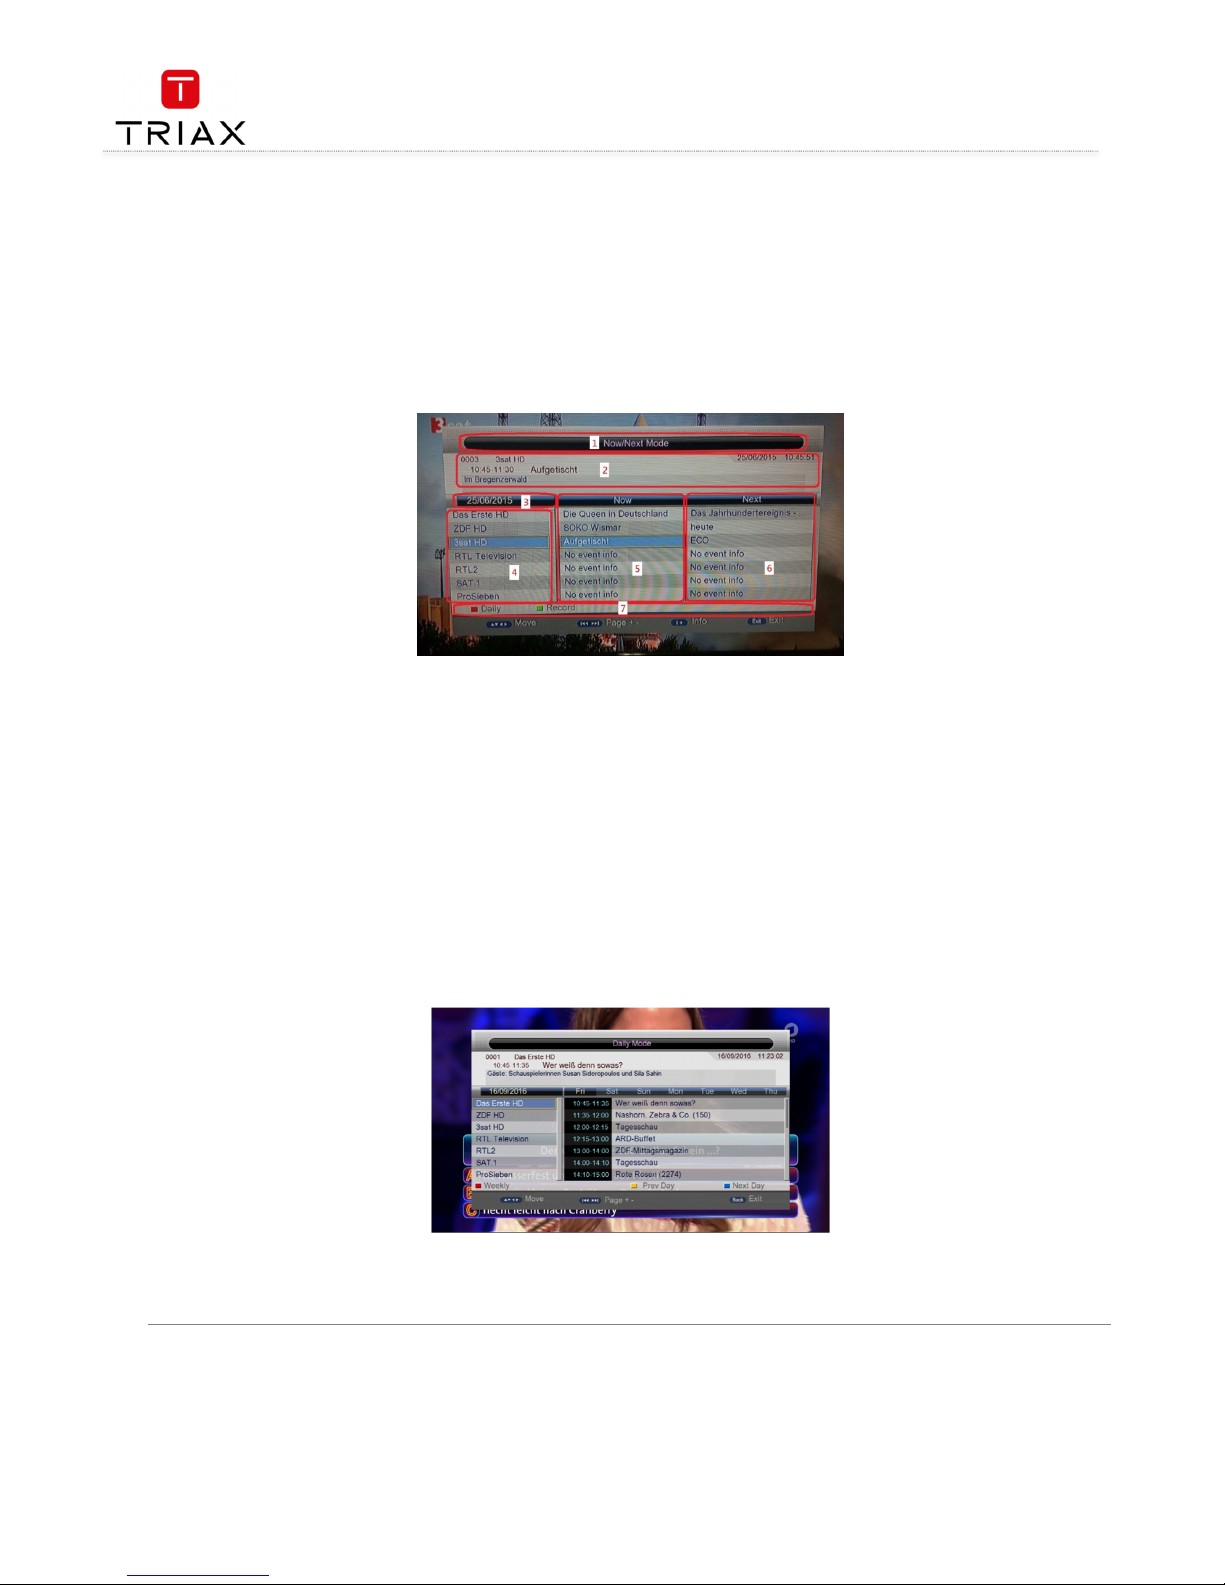
• Area 1 – Current EPG mode
• Area 2 – Current system time and date as well as the name and information of the being-played program.
• Area 3 – Program date
• Area 4 – Channel list. When the highlight is in this area, you can press CH+/
CH+/CH+/
CH+/---- keys to switch among the channels listed in this area;
press PAGE
PAGEPAGE
PAGE----/+
/+/+
/+ keys to turn pages.
• Area 5 – Being-played program list corresponding to channels in Area 4 (Now Event). When the highlight is in this area, you can press
CH+/
CH+/CH+/
CH+/---- keys to switch among the channels listed in Area 4; press V+/
V+/V+/
V+/---- keys to switch between the Now and Next lists.
• Area 6 – To-be-played program list corresponding to channels in Area 4 (Next Event).
• Area 7 – Key operation tips, corresponding to color function keys on the remote control:
• Red
RedRed
Red function key: Enter the Daily Mode.
• Green
GreenGreen
Green function key: When the highlight is in Area 5, press this key to record the selected program. When the highlight is in Area 6,
press this key to schedule to record the selected program (Scheduled Record).
• In addition, press INFO key to show the detailed information of the selected program.
Daily mode:
Daily mode:Daily mode:
Daily mode:
In Daily Mode, you can find the information of the programs on a day. See the figure below:
• Red
RedRed
Red function key: Enter the Weekly Mode.
• Yellow
YellowYellow
Yellow or blue
blueblue
blue function keys: Press one of the two keys to switch days from Monday to Sunday.
Page 11
User manual
11
EN
Electronic Program Guide (EPG) - continued
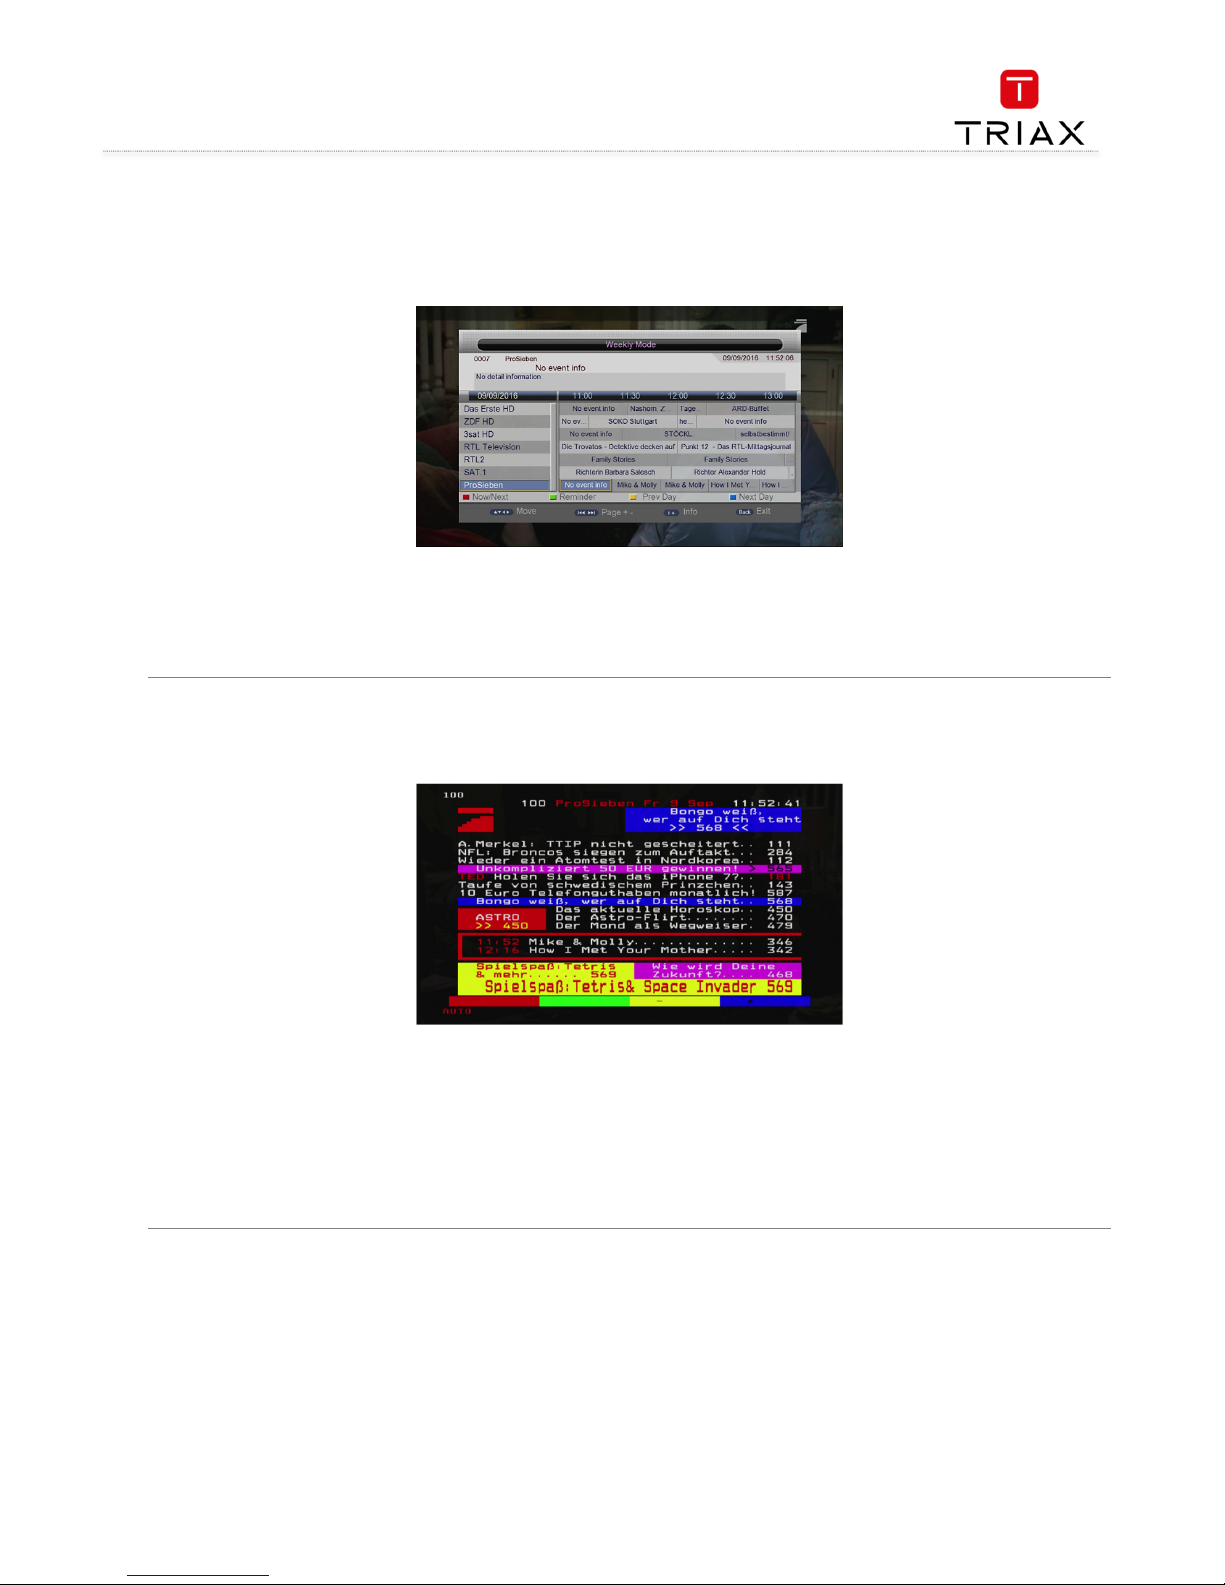
Weekly mode:
Weekly mode:Weekly mode:
Weekly mode:
In Weekly Mode, you can find the information of the programs within a week. See the figure below:
• Press V+/
V+/V+/
V+/---- keys to switch the highlight between the two list windows.
• Press the red
redred
red function key to enter the Now/Next Mode.
• Press the yellow
yellowyellow
yellow or blue
blueblue
blue function keys to switch to the page of the previous or next days.
• If the selected program is being played, pressing the green
greengreen
green function key can record the program. If the selected program has not been
played yet, pressing this key can schedule to play or record the program.
2.11 Teletext
Press TEXT key to enter the Teletext mode. See the figure below:
Basic Operations
Basic OperationsBasic Operations
Basic Operations
• At the bottom of a Teletext page, enter a page number (range: 100~899) to go to corresponding page.
• Press CH+/
CH+/CH+/
CH+/---- keys to turn to the previous or next pages. The pages that have no teletext contents will be auto skipped.
• Long press CH+/
CH+/CH+/
CH+/---- keys to quickly turn pages.
• Press OK
OKOK
OK key to change the transparency of the background.
• Press V+/
V+/V+/
V+/---- keys to enter the previous or next sub pages of the current page if there exists. If the AUTO option is selected, the sub
pages will be auto turned.
• The four color function keys are navigation keys. Their concrete functions depend on the streaming.
Press TEXT
TEXTTEXT
TEXT or BACK
BACKBACK
BACK keys to exit the teletext mode.
Page 12
User manual
EN
12
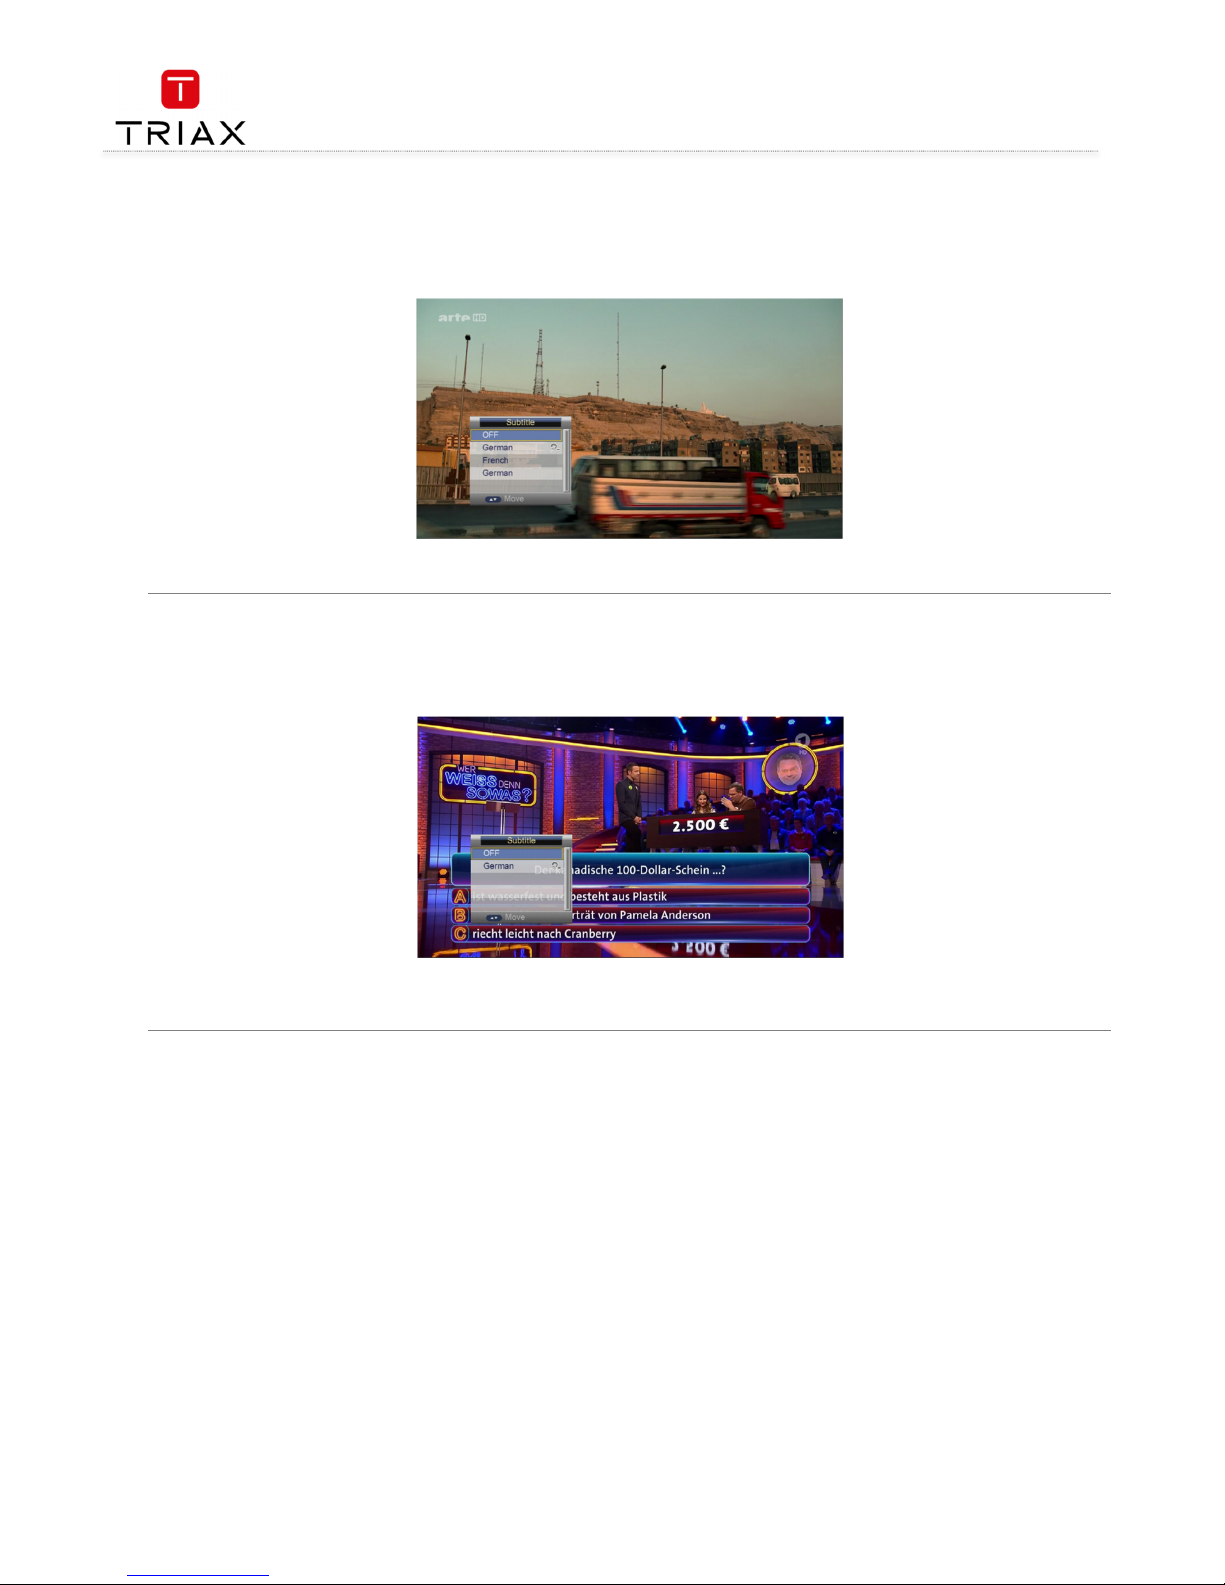
2.12 Subtitle
Subtitle is closed by default. To open it:
• Press SUB
SUBSUB
SUB key to enter the Subtitle menu. See the figure below:
• Press CH+/
CH+/CH+/
CH+/---- keys to select a subtitle language to play.
2.13 TTX Subtitle
Subtitle is closed by default. To open it:
• Press SUB
SUBSUB
SUB key to enter the Subtitle menu. See the figure below:
Note that, in the above figure, there is an icon behind the language menu item. This icon indicates that the item is a TTX subtitle language.
• Press CH+/
CH+/CH+/
CH+/---- keys to select a subtitle language to play.
Page 13
User manual
13
EN
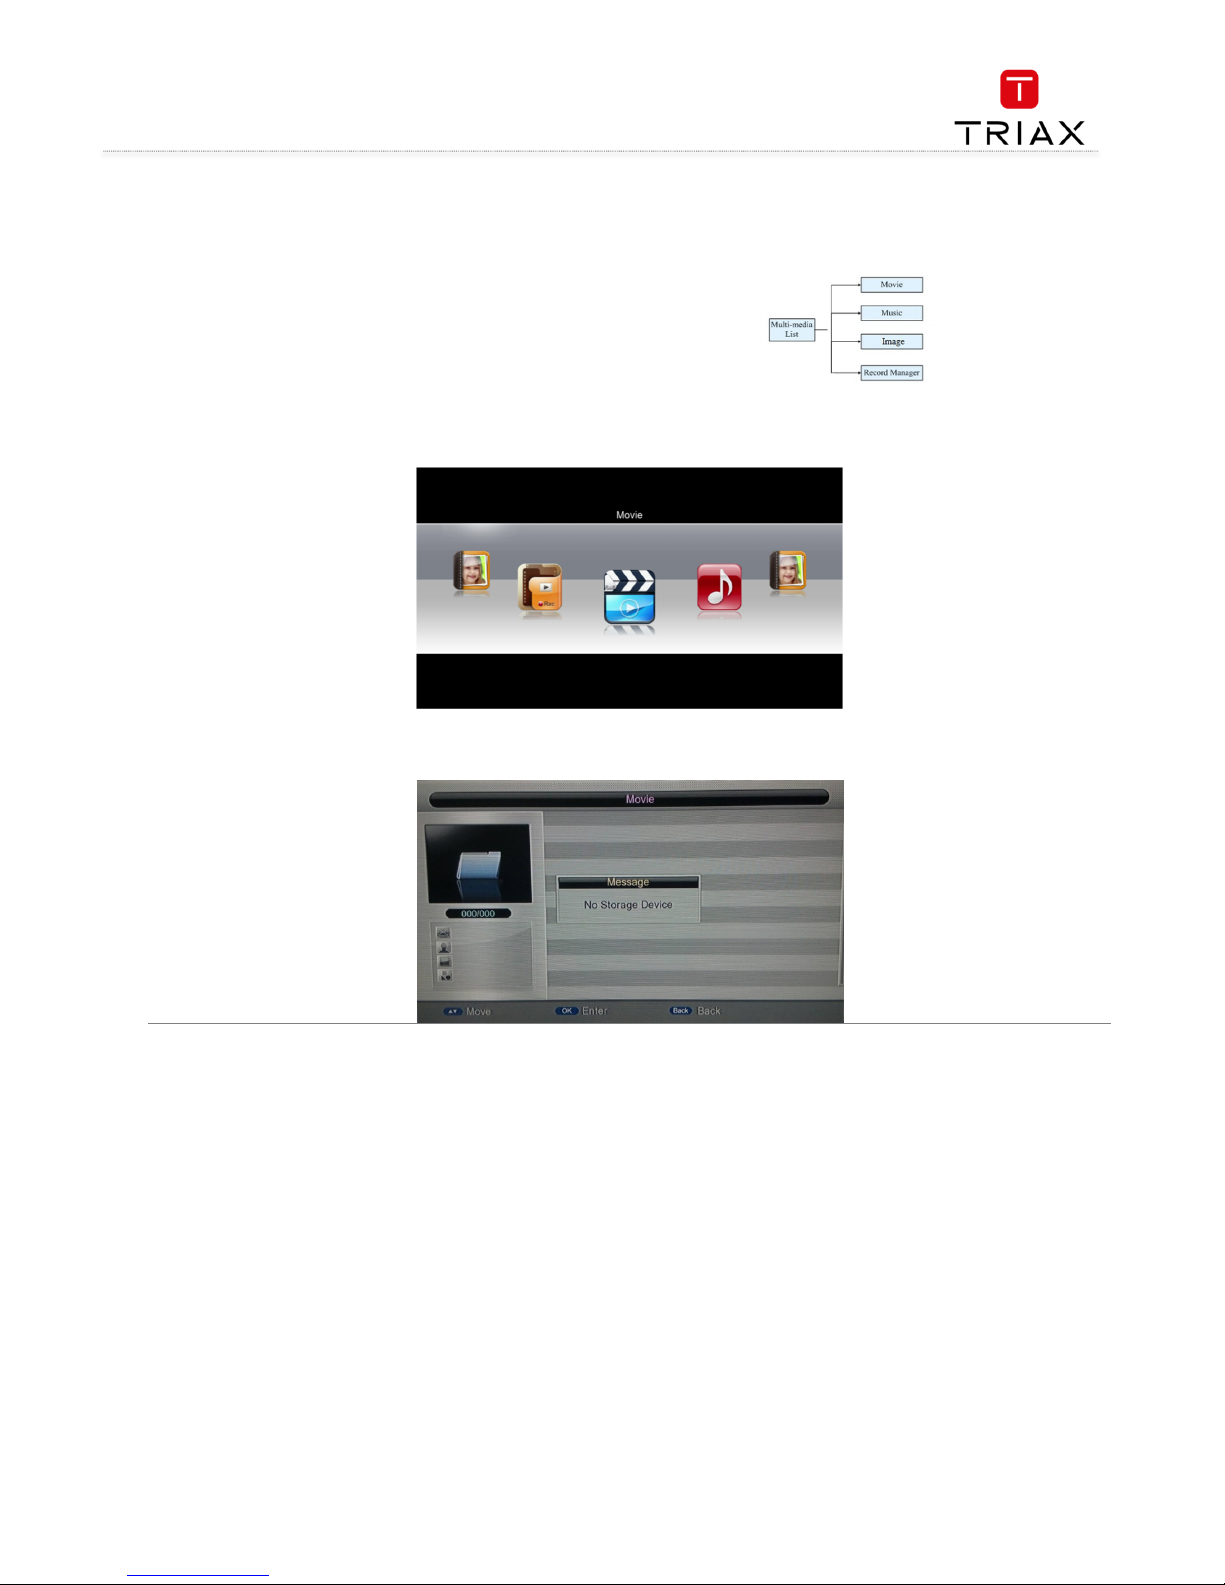
3. Multimedia mode
3.1 Multimedia and USB
In Multimedia mode, you can play multimedia files and games; also
can carry out record management and disk management.
See the figure :
Module Select :displays the current multimedia type: Movie, Music, Image, Record Manager. The ‘Home’ menu as figure below:
When the system has started, press OK
OKOK
OK key to switch to the Multimedia mode. The system will auto check whether there is a storage device
(USB). If there is no USB device, the following message will appear:
Page 14
User manual
EN
14
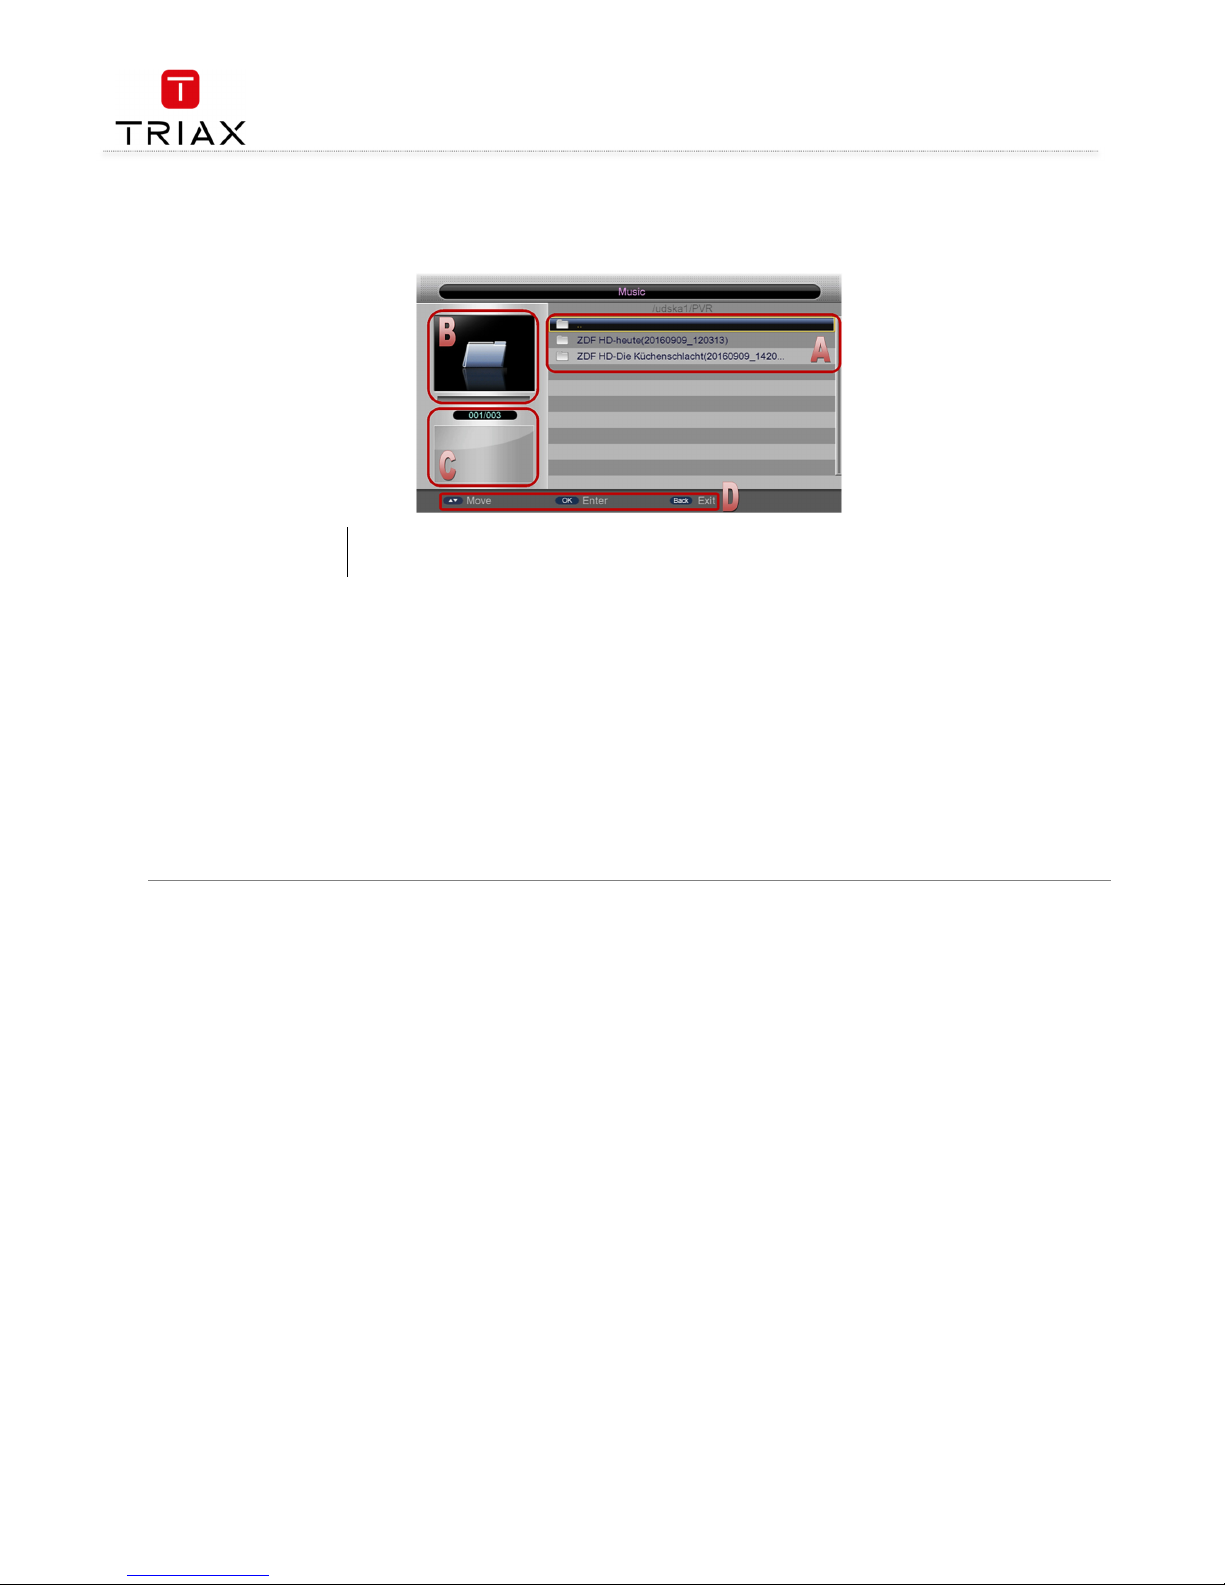
3.2 USB storage device
Once a USB device is found, the system will initialize the USB device. When complete, the following interface will appear:
If the USB device has more than one partition, all the partitions can be displayed. At present the system support the following partition formats:
FAT and FAT32.
In Multimedia Mode, the interface can be divided into 4 areas (see the figure above):
• List Ar
List ArList Ar
List Area (A)
ea (A)ea (A)
ea (A) displays the file and folder list of the current partition or directory.
• Preview Area (B)
Preview Area (B)Preview Area (B)
Preview Area (B) is used to preview photos.
• File Info Area (C)
File Info Area (C)File Info Area (C)
File Info Area (C) shows the information of the selected media file.
• User Operation Tips Area (D)
User Operation Tips Area (D)User Operation Tips Area (D)
User Operation Tips Area (D) shows the available keys and their functions.
After entering the Multimedia mode, the highlight is in the area A by default. You can -
• Press V+/
V+/V+/
V+/---- keys to switch among the multimedia types to operate.
• Press CH
CHCH
CH---- key to enter the List Area (A).
In the List Area,
• press OK
OKOK
OK or V+
V+V+
V+ keys to enter the current partition or directory;
• press VVVV---- key to go to the upper level directory;
• press BACK
BACKBACK
BACK key to move the highlight back to the area A to select other media type.
A – List Area B – Preview Area
C –
File Info
D – User Operation Tips
Page 15
User manual
15
EN
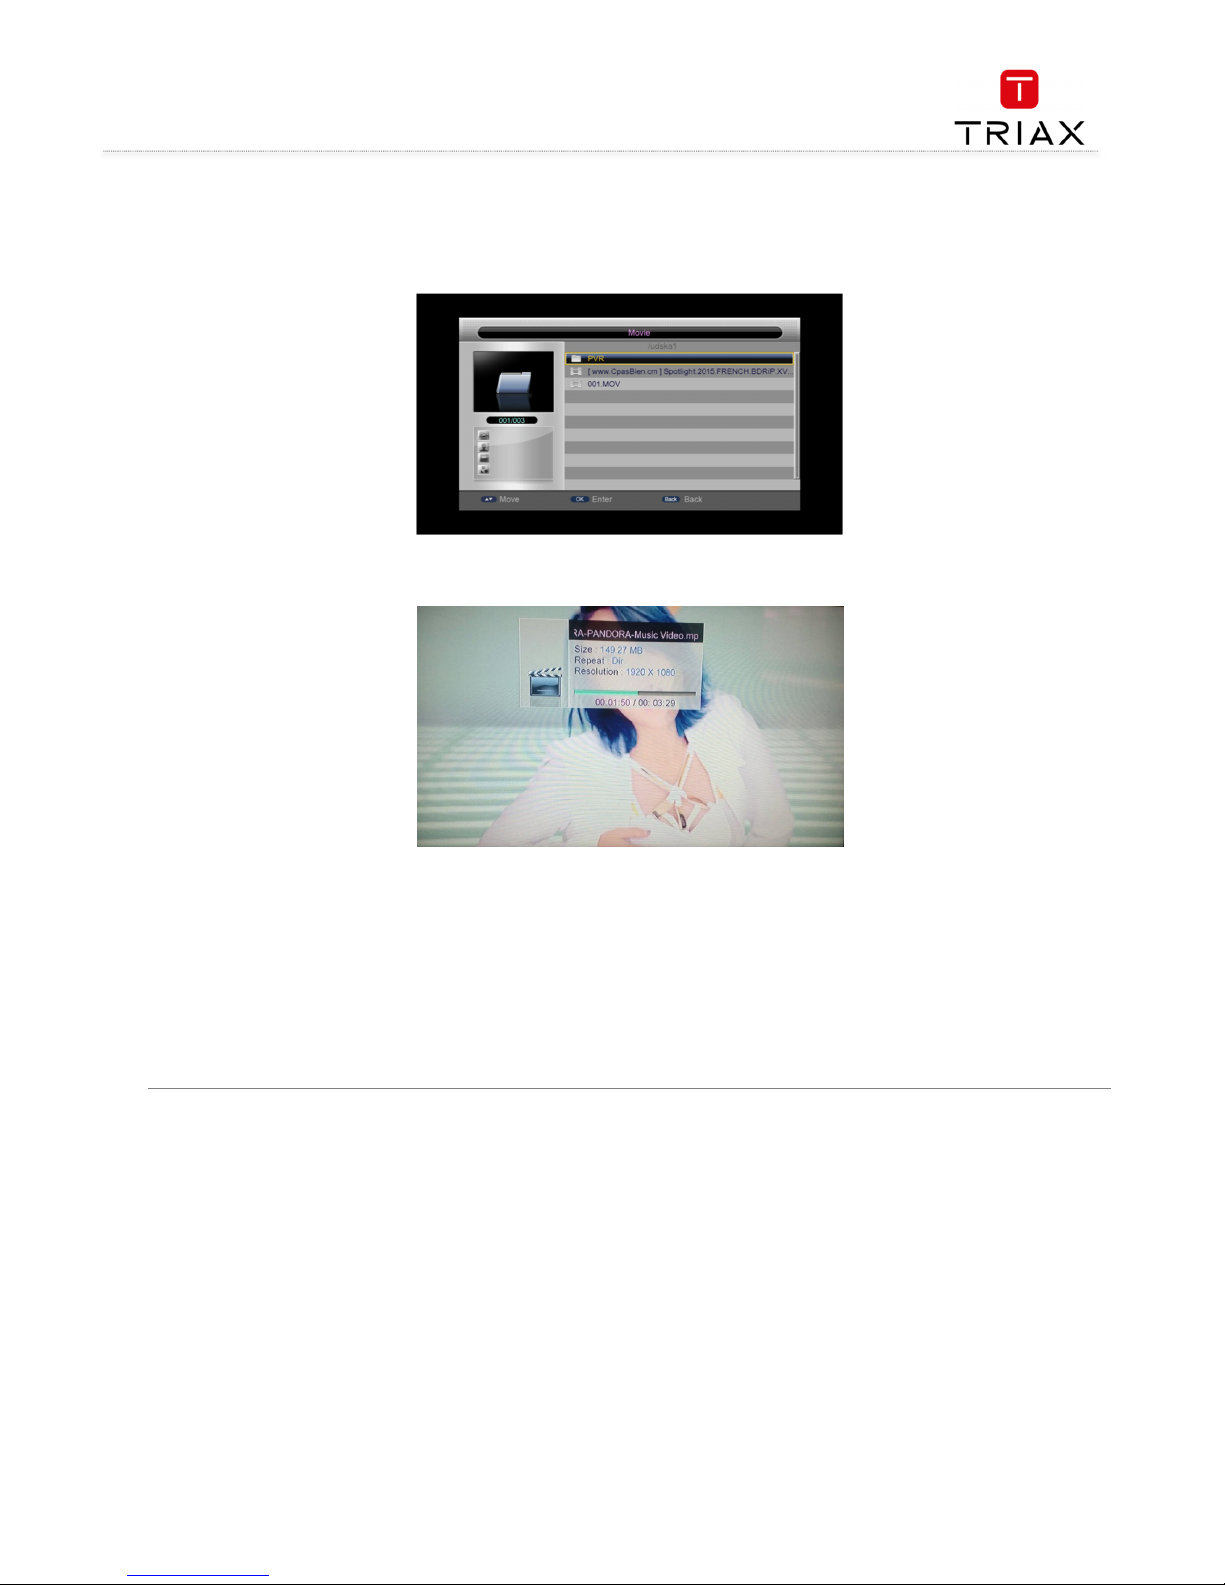
3.3 Movie
The Movie module is for playing video files stored on the USB device. In the Module Select Area, press V+/
V+/V+/
V+/---- keys to select the Movie type, then
press OK
OKOK
OK or CH
CHCH
CH---- keys to enter the video file list area. If there is no video file, the screen will appear. See the figure below:
After selecting a movie, you can press OK
OKOK
OK key to play it. The play interface is as below:
• Press CH+/
CH+/CH+/
CH+/---- keys to select the previous or next video files.
• Press OK/V+
OK/V+OK/V+
OK/V+ keys to play the selected video file. (If the video file is under a folder, pressing VVVV---- key can exit the folder.)
• Video Info:
Video Info: Video Info:
Video Info: When a video playback starts, the information of the video file will be shown for 3 seconds. You can press INFO
INFOINFO
INFO key to
show the information again after it disappears.
• Fast Play:
Fast Play: Fast Play:
Fast Play: Press FRW/FFW
FRW/FFWFRW/FFW
FRW/FFW keys to fast move forward or backward through the video. The max fast play speed is x32. Press ► key to
resume the normal playback.
• Switch Video:
Switch Video: Switch Video:
Switch Video: Press∣∣∣∣◄◄////►►∣∣∣∣keys to go to the previous or next video files to play.
• Stop:
Stop: Stop:
Stop: Press █ key to stop the current playback and return to the Multimedia Mode interface.
• Pause:
Pause: Pause:
Pause: Press‖key to pause the current playback. Pressing ► key can resume the playback.
• Exit:
Exit: Exit:
Exit: Press MENU
MENUMENU
MENU or BACK
BACKBACK
BACK keys to exit the playback state.
Page 16
User manual
EN
16
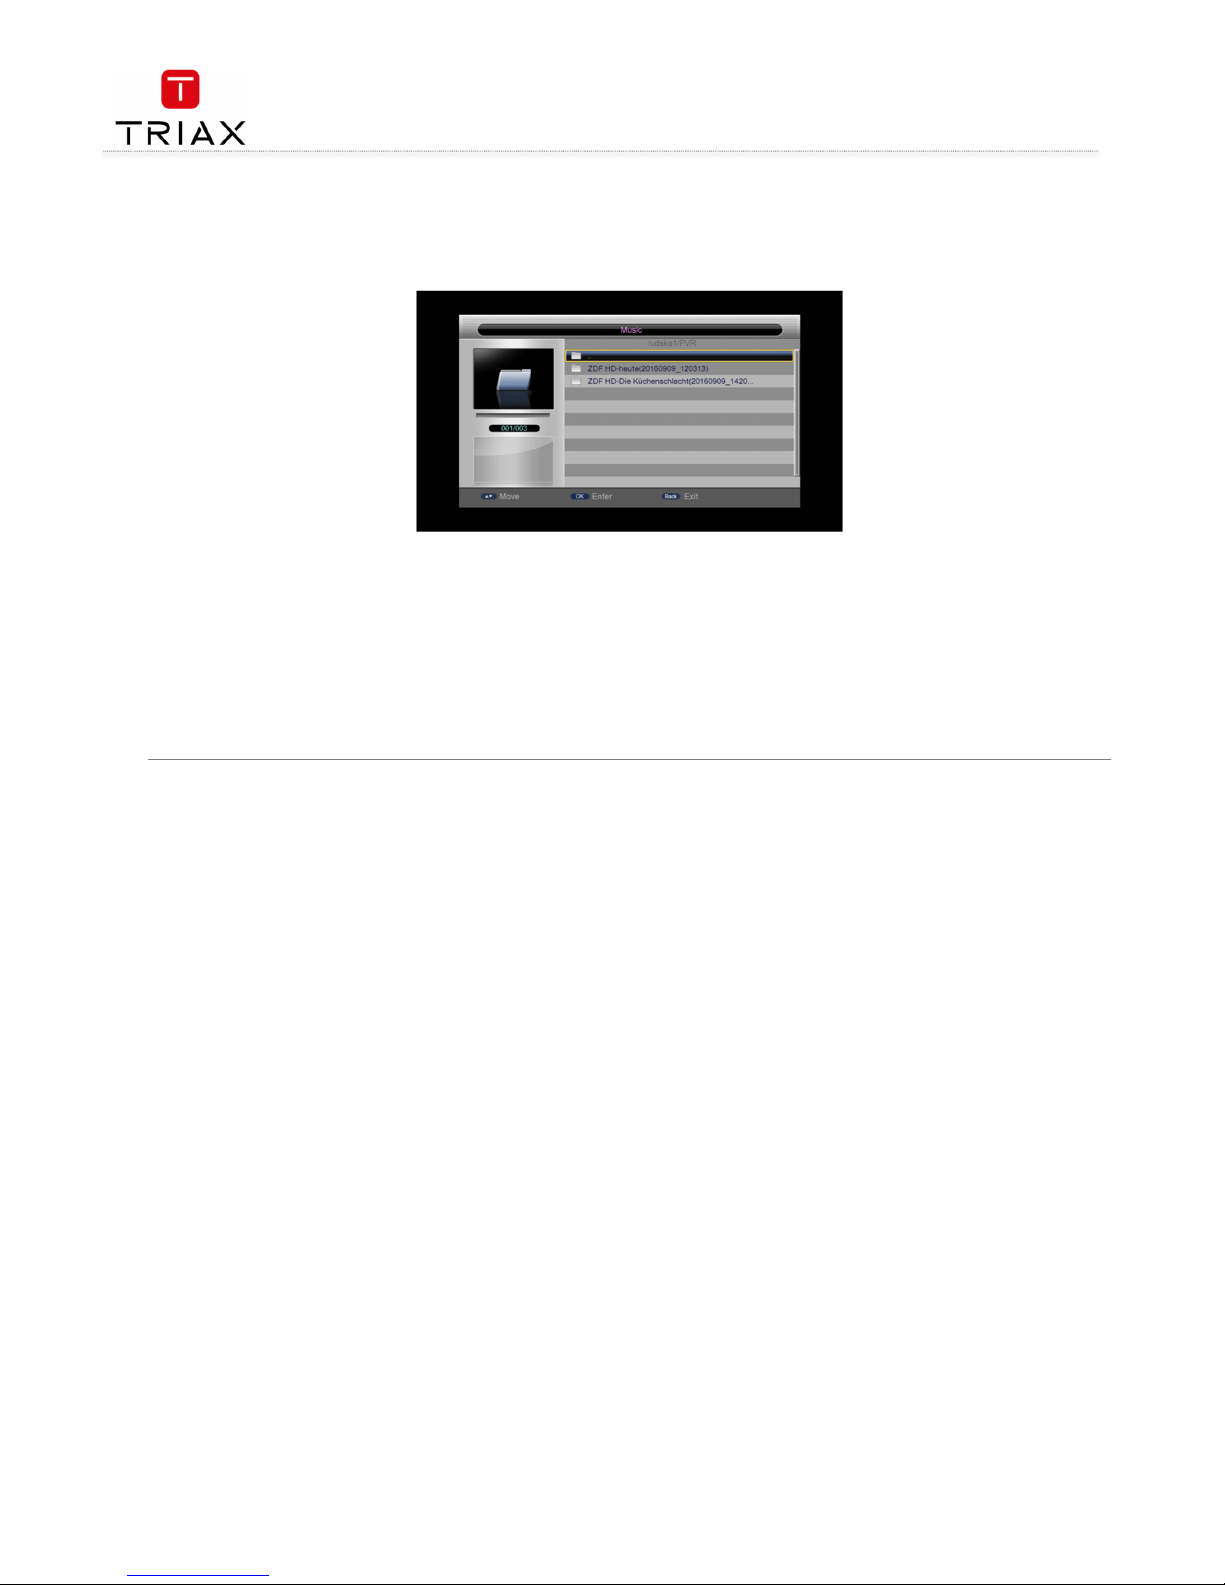
3.4 Music
The Music module is for playing audio files stored on the USB device. Most popular audio formats are all supported. In the Module Select Area,
press V+/
V+/V+/
V+/---- keys to select the Music type, then press OK
OKOK
OK or CH
CHCH
CH---- keys to enter the audio file list area. See the figure below:
• Press CH+/
CH+/CH+/
CH+/---- keys to select the previous or next audio files.
• Press OK/V+
OK/V+OK/V+
OK/V+ keys to play the selected audio file. (If the audio file is under a folder, pressing VVVV---- key can exit the folder.)
• Fast Play:
Fast Play: Fast Play:
Fast Play: Press FRW/FFW
FRW/FFWFRW/FFW
FRW/FFW keys to fast move forward or backward through the audio file. The max fast play speed is x32. Press ►
key to resume the normal playback.
• Switch Audio:
Switch Audio: Switch Audio:
Switch Audio: Press∣∣∣∣◄◄////►►∣∣∣∣keys to go to the previous or next audio files to play.
• Stop:
Stop: Stop:
Stop: Press █ key to stop the current playback.
• Pause:
Pause: Pause:
Pause: Press ‖ key to pause the current playback. Pressing ► key can resume the playback.
• Exit:
Exit: Exit:
Exit: Press MENU
MENUMENU
MENU or BACK
BACKBACK
BACK keys to exit the playback interface and return to the multimedia type select interface. (Note that if the
background play function has been turned on, the music will not stop but become background music.)
Page 17
User manual
17
EN
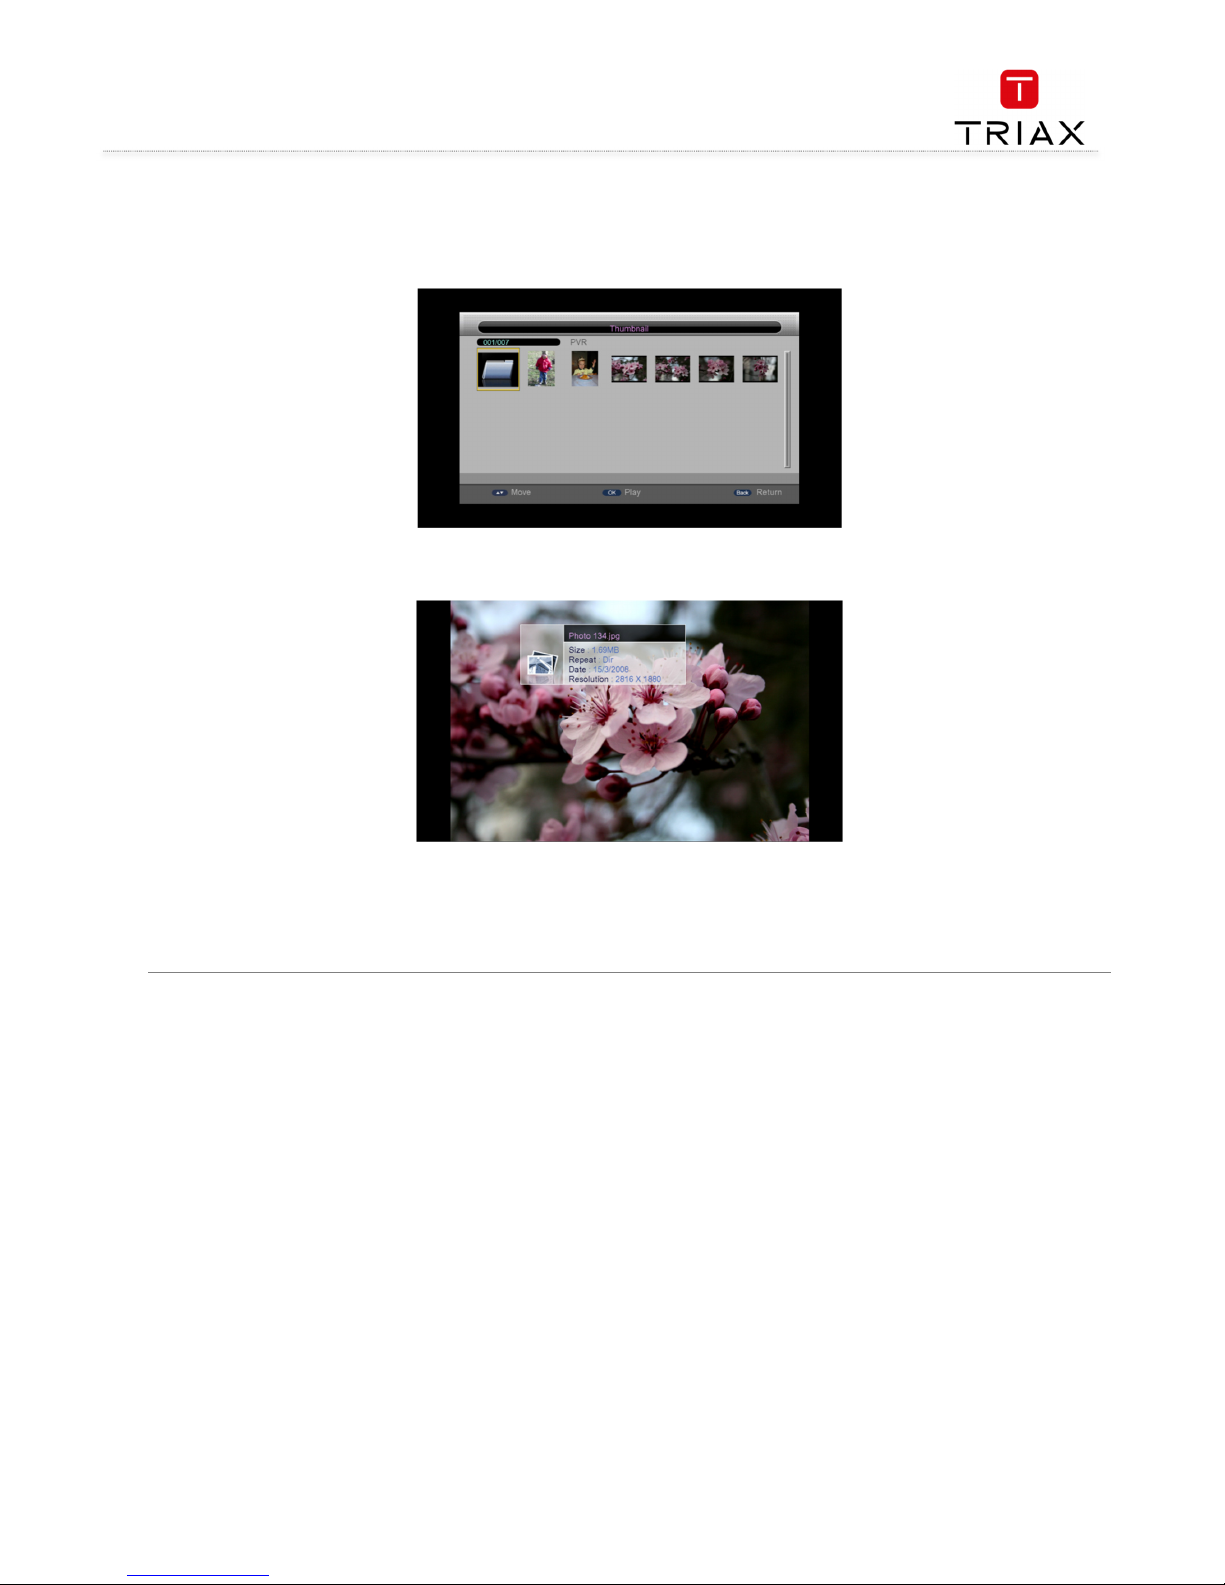
3.5 Image
The Image module is for playing image files stored on the USB device. Most popular image formats are all supported. In the Module Select Area,
press V+/
V+/V+/
V+/---- keys to select the Photo type, then press OK
OKOK
OK or CH
CHCH
CH---- keys to enter the image file list area. See the figure below:
• Press OK/V+
OK/V+OK/V+
OK/V+ keys to play the selected image in full screen mode. By default the system will enable the slideshow function to play all
the images in the current directory. See the figure below:
•
Switch Image:
Switch Image: Switch Image:
Switch Image: Press
∣∣∣∣
◄◄////►►
∣∣∣∣
keys to play the previous or next images.
• Image Info:
Image Info: Image Info:
Image Info: Press INFO key to show the detailed information of the image.
• Rotate:
Rotate: Rotate:
Rotate: Press V+/
V+/V+/
V+/---- keys to rotate the image 90° anticlockwise or clockwise.
• Flip:
Flip: Flip:
Flip: Press CH+/
CH+/CH+/
CH+/---- keys to flip the image up or down.
• Exit:
Exit: Exit:
Exit: Press EXIT or RECALL keys to exit the playback state.
Page 18
User manual
EN
18
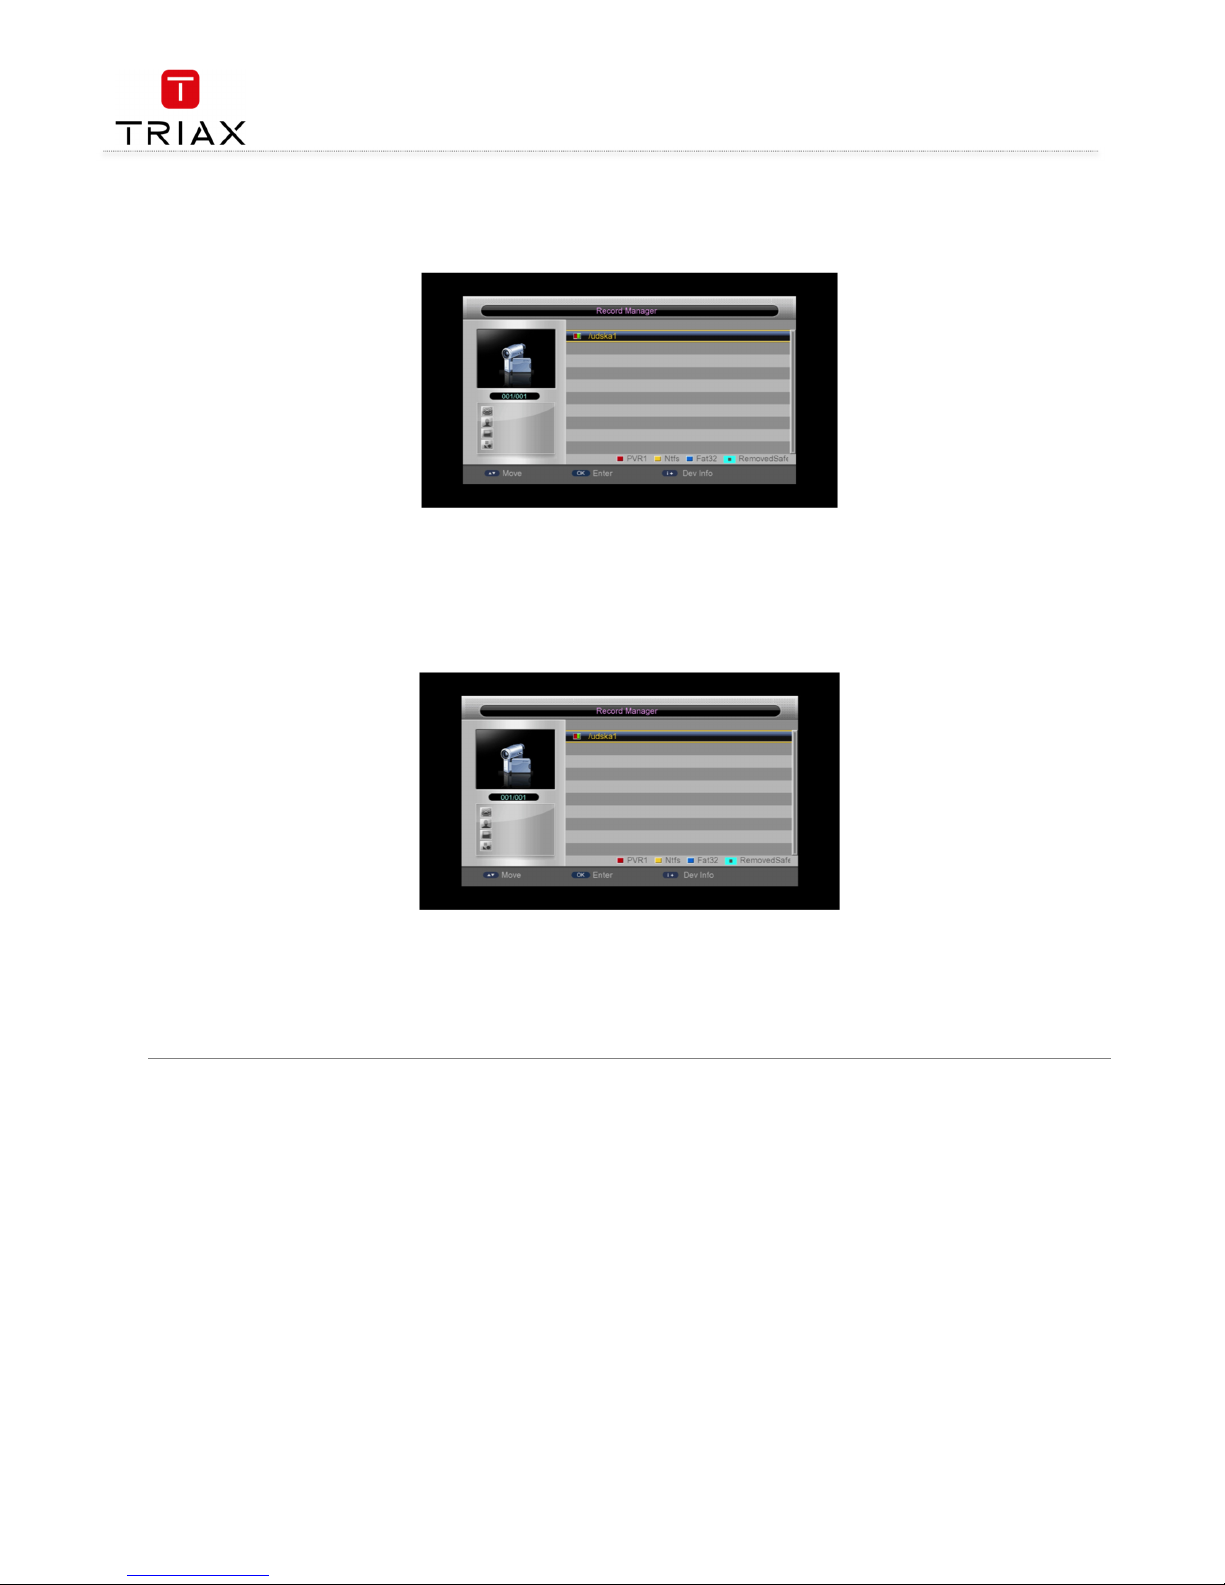
3.6 Record manager
The Record Manager module is for users to carry out record setting and view the programs recorded. See the figure below:
If the USB device has more than one partition, you should manually set the partition in which record files will be saved.
• Red function key: Set the selected partition as the default record partition.
• Yellow function key: Format the selected partition into NTFS format.
• Blue function key: Format the selected partition into FAT32 format
To view record files, select the partition that stores the record files and then press ENTER key to enter it. The system will auto list all the
recorded programs, see below:
•
To play a record file: press CH+/- keys to select the record file first and then press OK/V+ keys to play it.
• During playback, the things you can do only include to press FRW/FFW keys to fast backward or forward play the file, and to press
BACK key to return to the record file list. Both file switching and repeat mode setting cannot be done.
• When the playback completes, the system will auto return to the record file list.
• To delete a record file: select it first and then press the red function key.
• To rename a record file: select it first and then press the green function key.
Page 19
User manual
19
EN
4. Main menu
The Main Menu has six items: Installation, Channel, Preference, Setting, and AV, which include all setting items of the syste
m.
Press MENU key to enter the Main Menu, see the figure below:
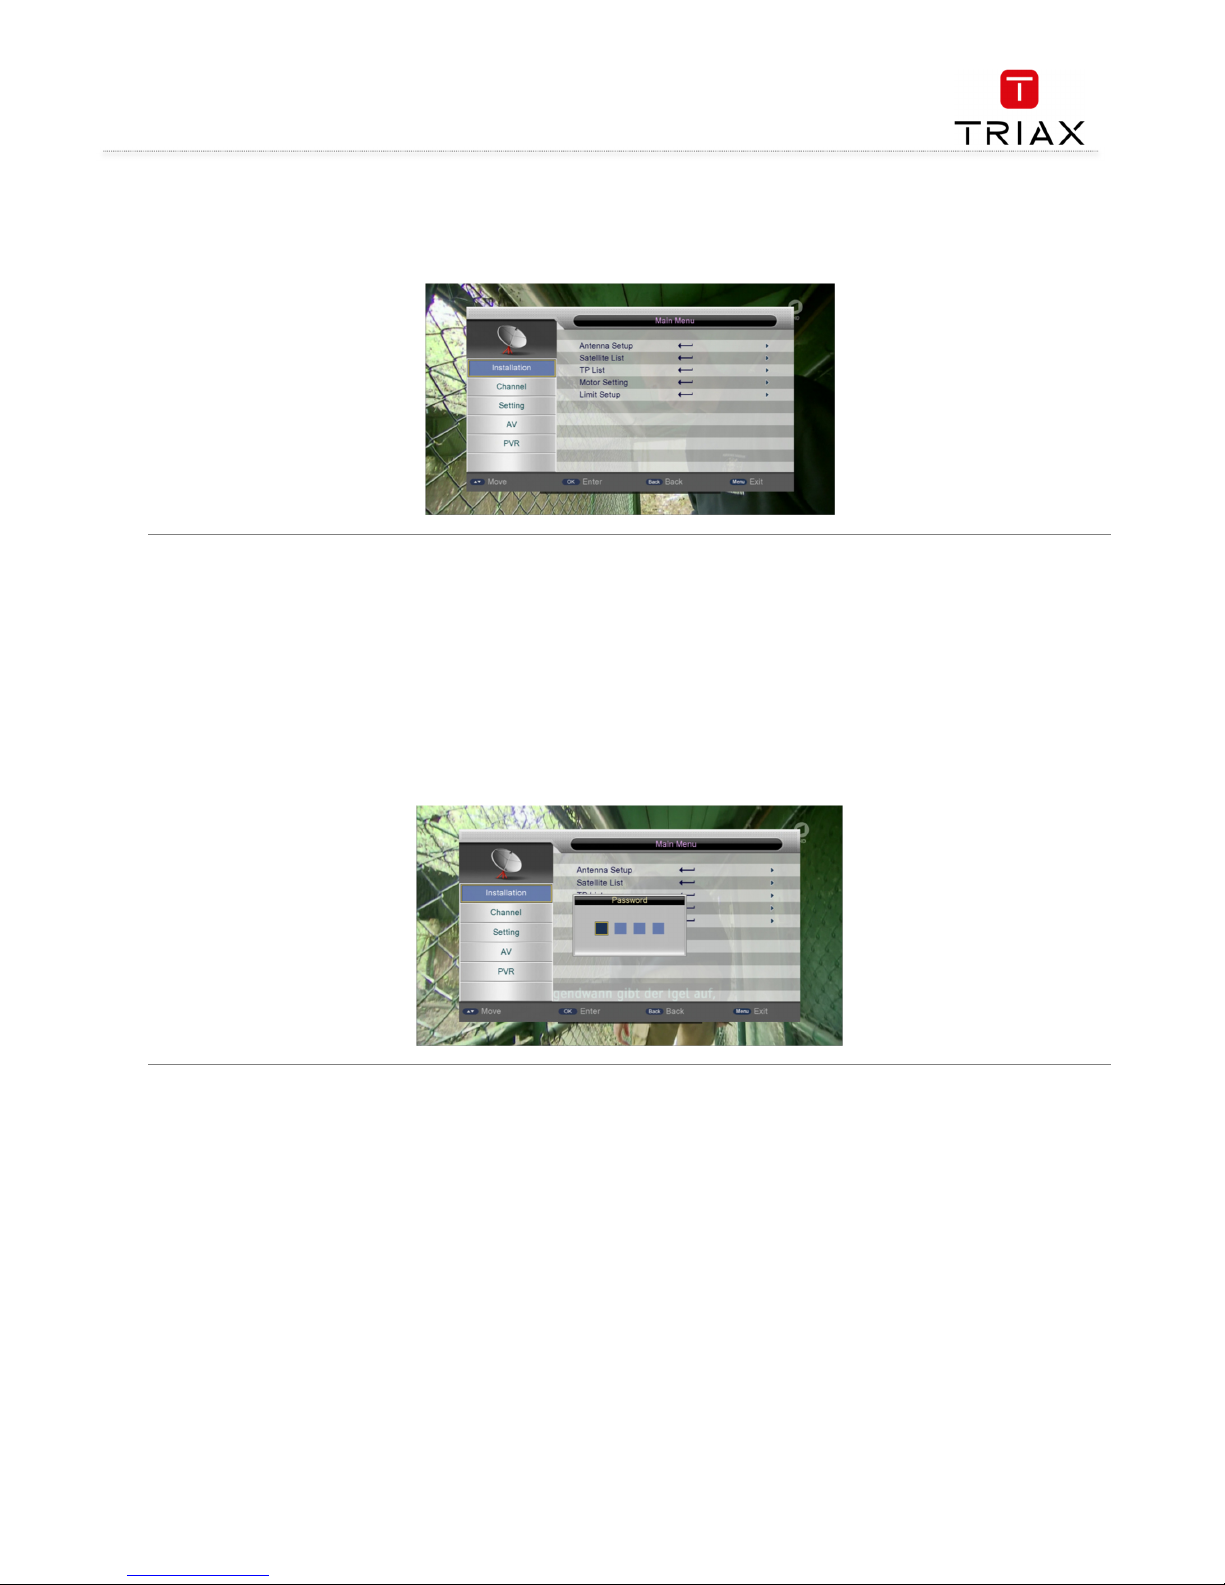
4.1 Installation
There are five sub items:
• Antenna Setup:
Antenna Setup:Antenna Setup:
Antenna Setup: Antenna and LNB settings
• Satellite List:
Satellite List:Satellite List:
Satellite List: Satellite list setting
• TP List:
TP List:TP List:
TP List: Transponder list setting
• Motor Setting:
Motor Setting:Motor Setting:
Motor Setting: Polar axis motor setting
• Limit Setup:
Limit Setup:Limit Setup:
Limit Setup: Polar axis move limit setting
To search for programs or add new programs, you should enter the Installation menu.
To enter the Installation menu, press CH+/
CH+/CH+/
CH+/---- keys in the Main Menu to highlight the Installation item and then press OK
OKOK
OK or V+
V+V+
V+ keys. A password
input dialog pops out. After entering a correct password (default password is ‘0000’), the Installation menu appears. See the figure below.
Page 20
User manual
EN
20
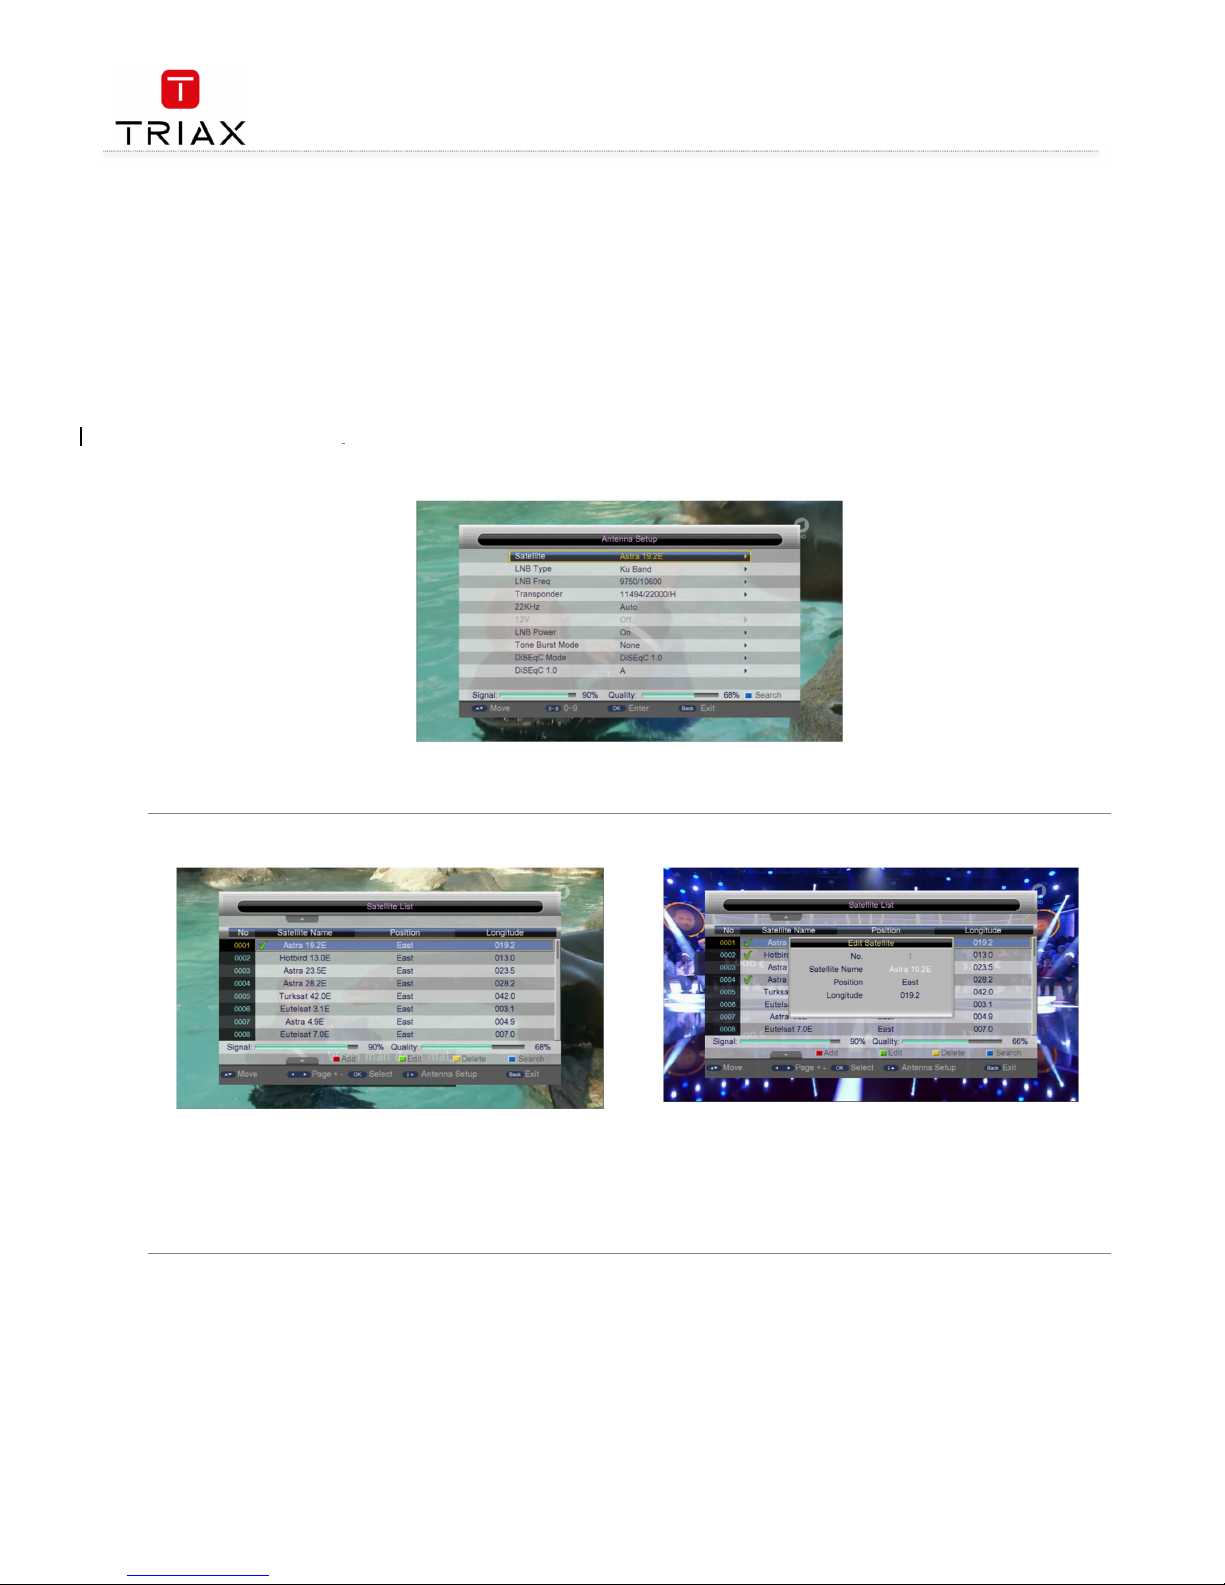
4.1.1 Antenna setup
In the Installation menu press CH+/
CH+/CH+/
CH+/---- keys to highlight the Antenna Setup sub item and then press OK
OKOK
OK or V+
V+V+
V+ keys to enter the Antenna Setup
page (See Fejl! Henvisningskilde ikke fundet.
Fejl! Henvisningskilde ikke fundet.Fejl! Henvisningskilde ikke fundet.
Fejl! Henvisningskilde ikke fundet.).
There are these setting items:
• Satellite:
Satellite:Satellite:
Satellite: Select a satellite from the existing satellite list.
• LNB Type:
LNB Type:LNB Type:
LNB Type: Set the working frequency band for LNB (three options: Ku Band, C Band User, Unicable and JESS).
• LNB Frequency:
LNB Frequency:LNB Frequency:
LNB Frequency: Set the local oscillation frequency of LNB.
• Transponder:
Transponder:Transponder:
Transponder: Select a transponder from the existing transponder list.
• 22KHz:
22KHz:22KHz:
22KHz: Turn on or off the 22KHz switch (On, Off).
• LNB Power:
LNB Power:LNB Power:
LNB Power: Set whether or not there is a STB to supply power to LNB.
• Tone Burst Mode:
Tone Burst Mode:Tone Burst Mode:
Tone Burst Mode: Select tone burst mode (three potions: Tone Burst A, Tone Burst B, NONE).
• DiSEqC
DiSEqCDiSEqC
DiSEqC (Digital Satellite Equipment Control) Mode:
Mode:Mode:
Mode: Select input signal. When more than one LNB is used, DiSEqC can be used to
select one LNB to input.
In the Antenna Setup page, you can press
CH+/
CH+/CH+/
CH+/
---- keys to highlight a setting item and then press
OK
OKOK
OK key to enter corresponding editing state.
I
n
the editing state press CH+/
CH+/CH+/
CH+/---- keys to select an option and then press OK
OKOK
OK key to exit editing.
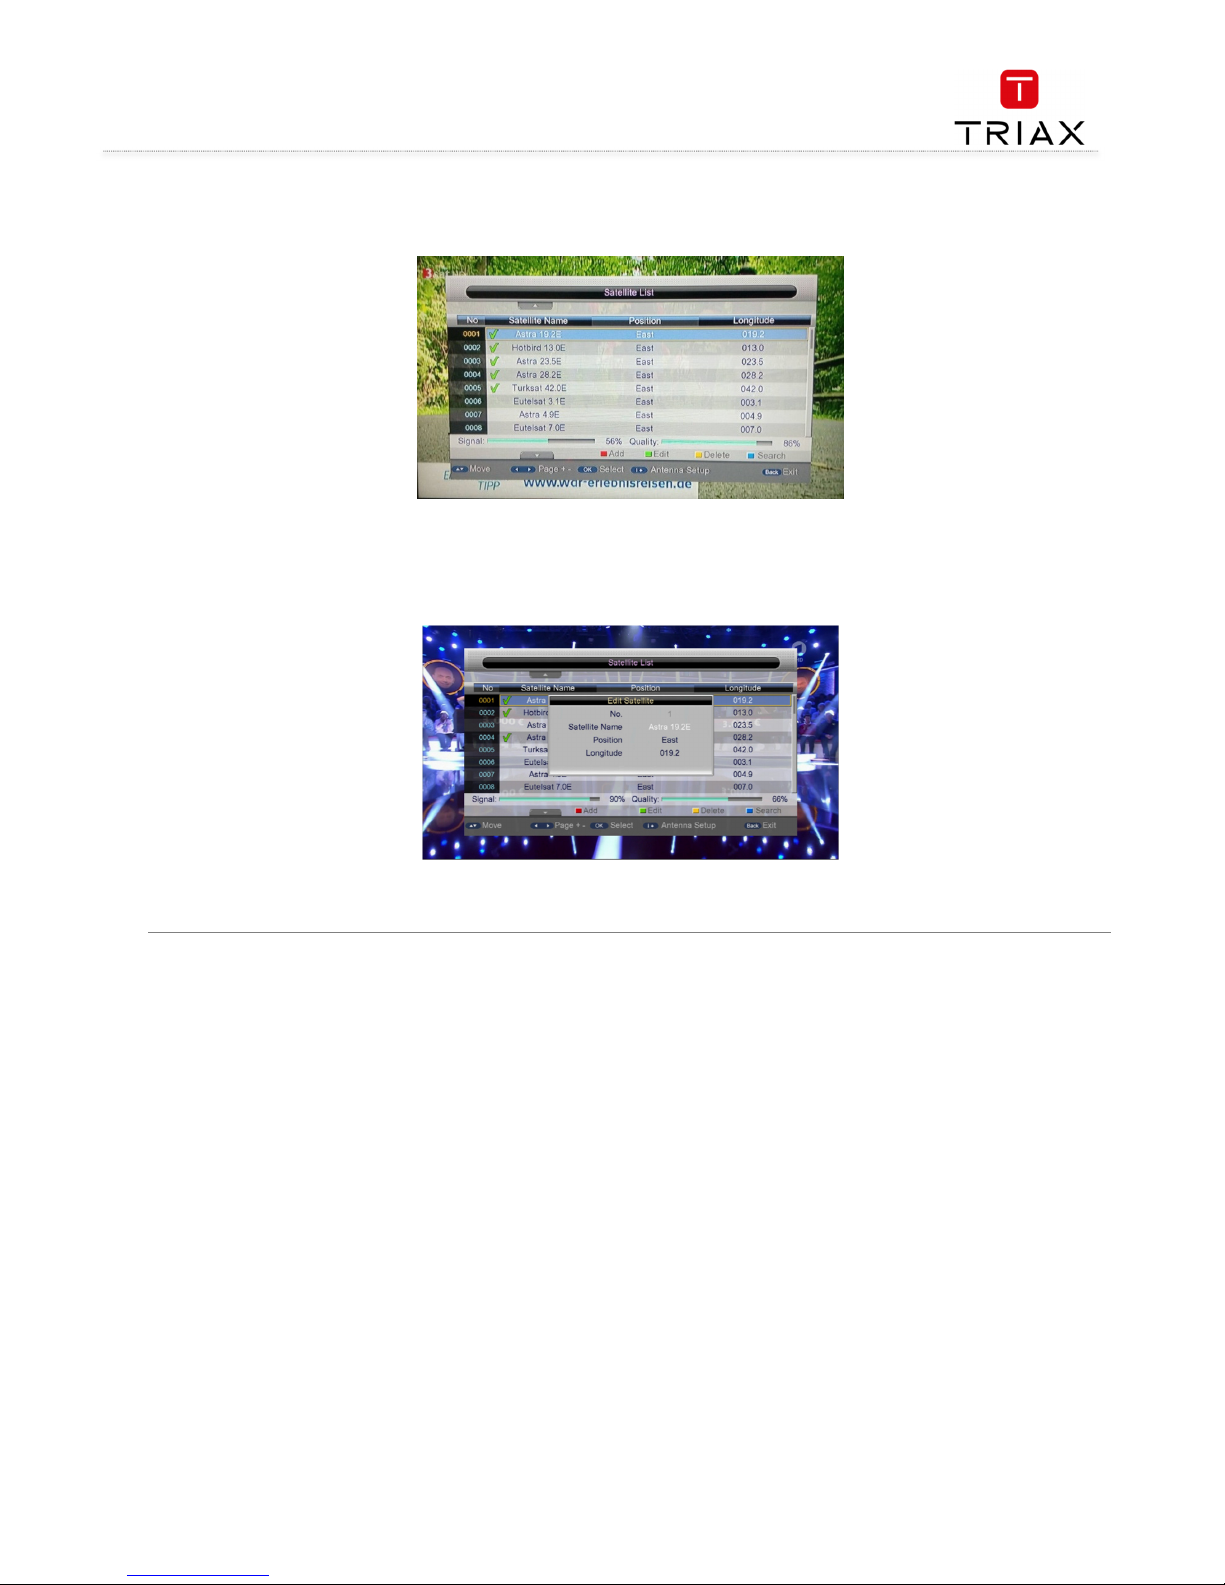
4.1.2 Satellite list
The Satellite List (see figure left) shows all the satellites, the system has stored. Users can press color function keys on the remote controller to
edit the list, for example to add a satellite (by pressing the red function key), to delete a satellite (by pressing the yellow function key), to search
the selected satellite (by pressing the blue function key), etc.
Also you can press the green function key to edit the detailed information of the selected satellite: Satellite Name, Position and Longitude. See
the figure to the right.
Page 21
User manual
21
EN
4.1.3 Transponder list (TP)
In the Installation menu, press
CH+/
CH+/CH+/
CH+/
---- keys to highlight the Transponder List item and then press
OK
OK OK
OK
or
V+
V+V+
V+ keys to enter the Transponder List
page. See the figure below:
The TP List stores the transponders of current satellite of current system. Each transponder may have multiple frequencies. You can press color
function keys on the remote controller to edit the list, for example to add a transponder (by pressing the red function key), to edit a transponder
(by pressing the green function key), to delete a transponder (by pressing the yellow function key), to search transponders (by pressing the blue
function key), etc.
After pressing the green function key, you can edit the selected transponder
’
s detailed information such as frequency, symbol rate and
polarisation. When finished, press OK
OKOK
OK key to exit the editing state.
Page 22
User manual
EN
22
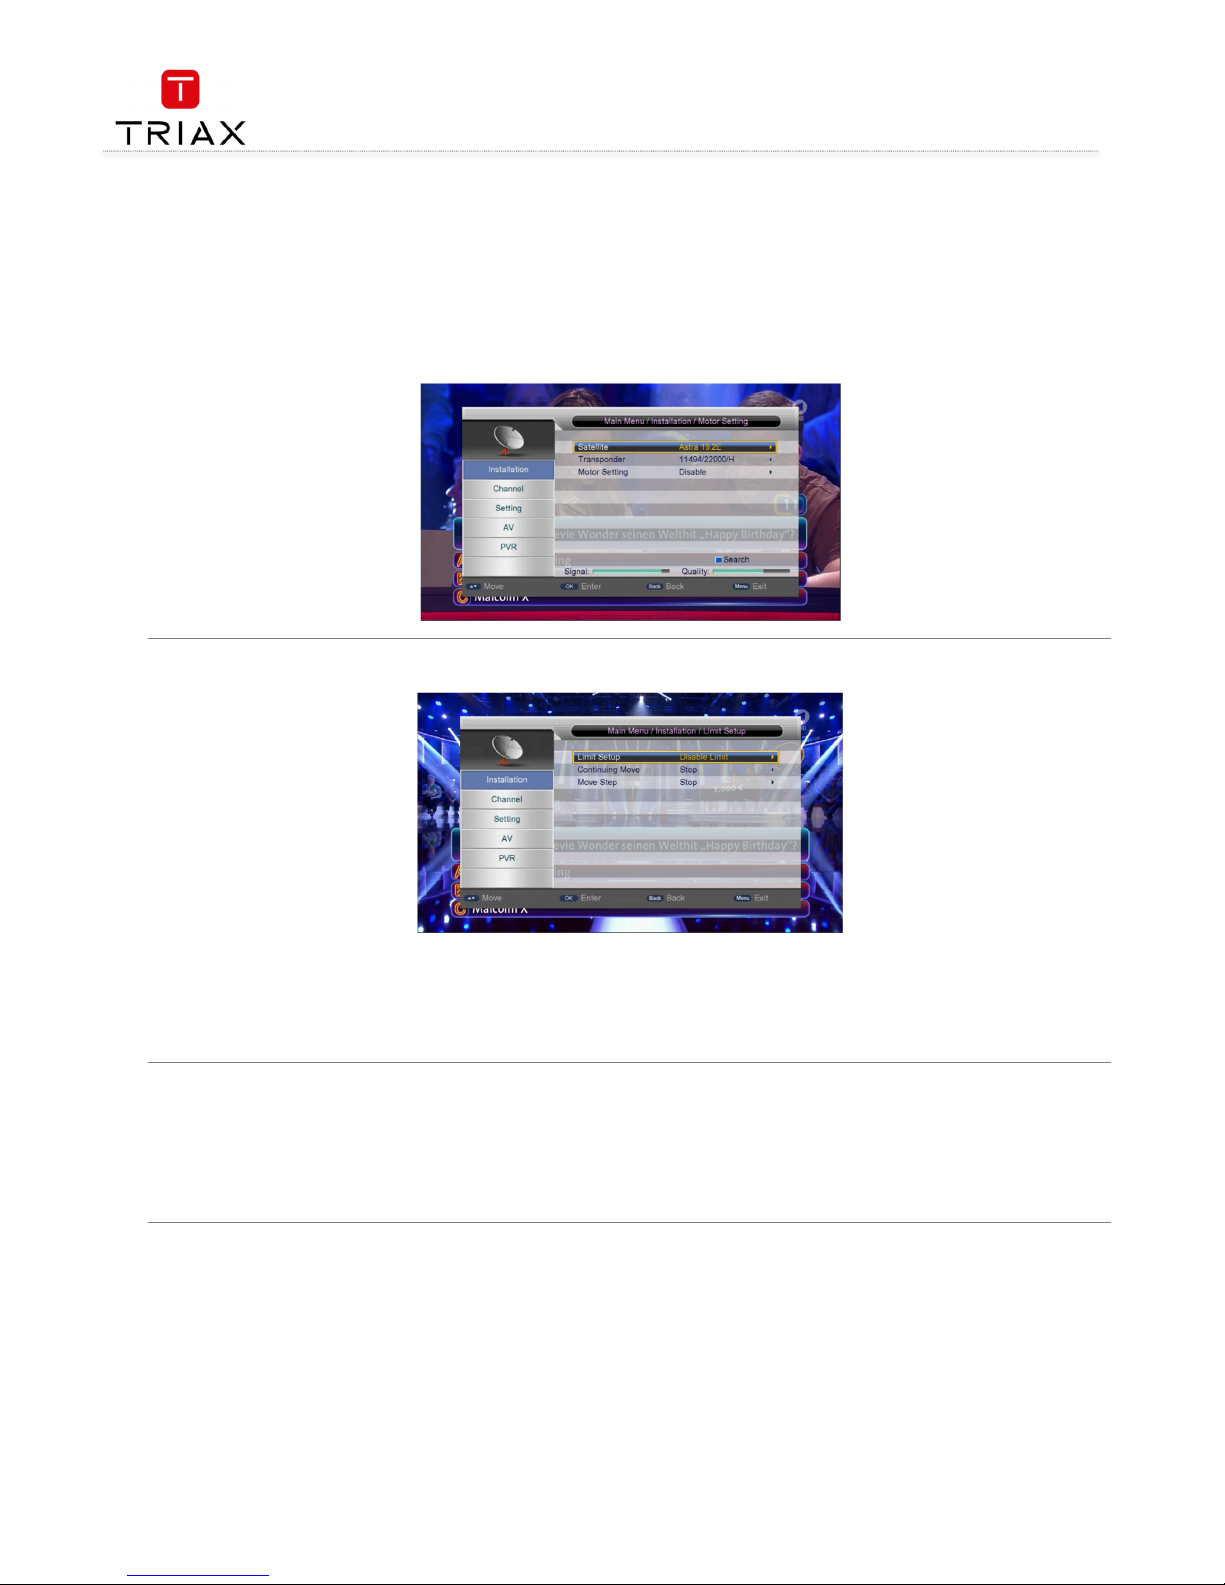
4.1.4 Motor setting
Through the Motor Setting page you can control the polar axis motor to adjust the direction of antenna so as to make the antenna accurately
point to the satellite. There are these setting items in this page (see Fejl! Henvisningskilde ikke fundet.
Fejl! Henvisningskilde ikke fundet.Fejl! Henvisningskilde ikke fundet.
Fejl! Henvisningskilde ikke fundet.):
• Satellite:
Satellite:Satellite:
Satellite: Select a satellite.
• Transponder:
Transponder:Transponder:
Transponder: Select a transponder.
• Motor setting:
Motor setting:Motor setting:
Motor setting: Set the polar axis motor.
If you have already selected a satellite and a transponder, when moving the polar axis you will find the signal strength and quality indicators at
the bottom of the page..
4.1.5 Limit setup
There are three sub items:
• Limit Setup:
Limit Setup:Limit Setup:
Limit Setup: Polar axis move limit setting.
• Continuing Move:
Continuing Move:Continuing Move:
Continuing Move: Enable polar axis continuous move.
• Move Step:
Move Step:Move Step:
Move Step: Enable polar axis step move. After setting, you can press V+/
V+/V+/
V+/---- keys to move the polar axis east or west step by step.
4.1.6 Search example
• Press MENU
MENUMENU
MENU key to enter the Main Menu and then directly press OK
OKOK
OK key. Key in a correct four-digit password (default password: 0000)
in the pop-up dialog to enter the Installation menu.
• Enter the Satellite List item. If there are satellites, press CH+/
CH+/CH+/
CH+/---- keys and OK
OKOK
OK key to select a satellite. Before the selected satellite name,
a green check mark appears. Press the blue function key to pop out the Search menu and then press OK
OKOK
OK key with default settings. The
system will then start to auto scan.
Page 23
User manual
23
EN
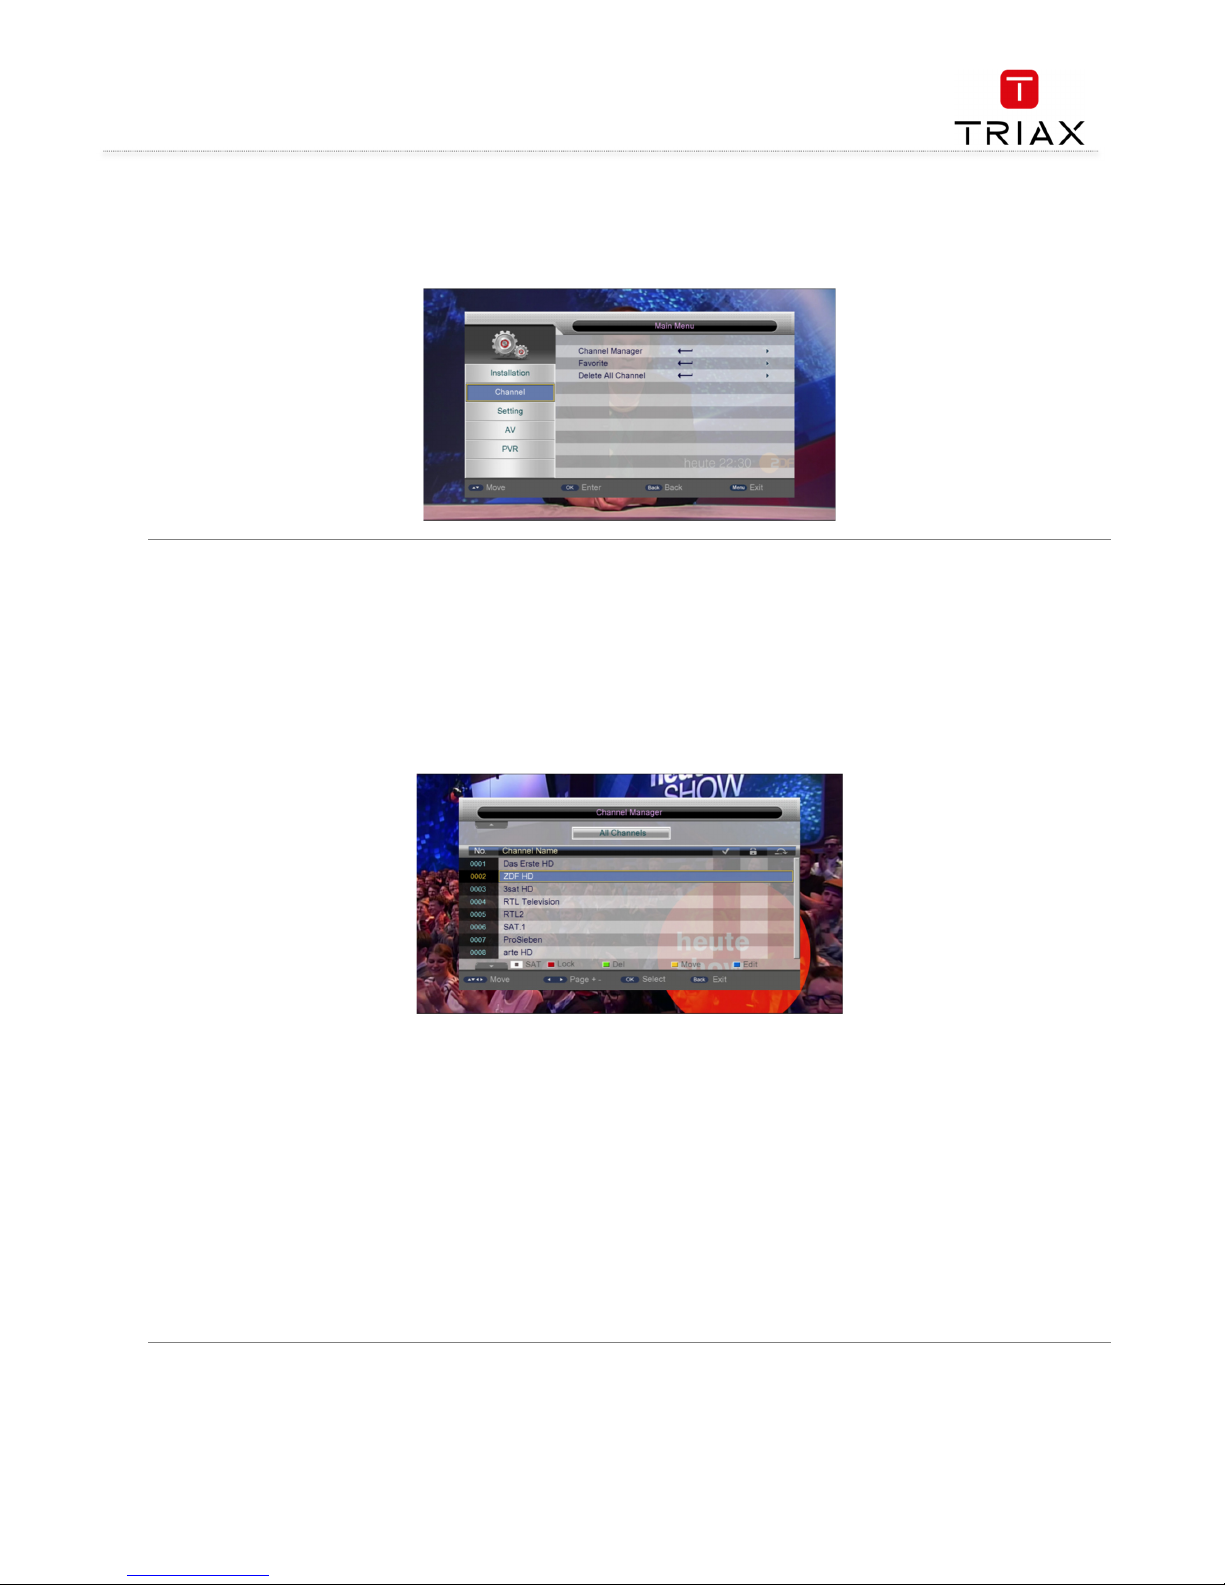
4.2 Channel
The Channel menu has three items: Channel Manager, Favorite and Delete All Channel. To enter the Channel menu, press CH+/
CH+/CH+/
CH+/---- keys in the Main
Menu to highlight the Channel item and then press OK
OKOK
OK or V+
V+V+
V+ keys. The Channel menu is shown as below:
4.2.1 Channel manager
The system provides powerful channel management function. You can through the Channel Manager menu to manage your channels such as
deleting, locking, sorting, skipping or renaming.
To enter the Channel Manager menu, in the Channel menu press CH+/
CH+/CH+/
CH+/---- keys to select the Channel Manager item and then press OK
OKOK
OK key. See the
figure below:
If there is no program channel data in the database,
‘
No Program
’ message will appear and both the Channel Manager and Favorite List menus
cannot be accessed.
The Channel Manager menu contains these functions: Channel Delete, Channel Skip, Channel Lock and Channel Rename. Press CH+/
CH+/CH+/
CH+/---- keys to
select the channel and then press the four color function keys on the remote control to manage it: press the red function key to lock or unlock
the selected channel; the green function key to delete the selected channel; the yellow function key to skip or cancel skipping the selected
channel; the blue function key to rename the selected channel. After setting, corresponding icons will appear.
• To delete a channel, press CH+/
CH+/CH+/
CH+/---- keys to select the channel and then press the green function key. Key in a correct four-digit
password (default password: 0000) in the pop-up dialog, a green check mark will appear in the delete column of the selected channel.
When exiting the Channel Manager menu, you will be asked to confirm the deletion. Select YES and enter the correct password
(default password: 0000), and the channel will be deleted. To cancel the deletion state on a channel, select the channel first and then
press the green function key again.
• To change a channel’s number or resort the channels list, press CH+/
CH+/CH+/
CH+/---- keys to select the channel you want to move, then press OK
OKOK
OK
key. The selected channel item will flicker. Next, press CH+/
CH+/CH+/
CH+/---- keys to the destination position, then press OK
OKOK
OK key again. Thus the
channel’s position in the list is changed.
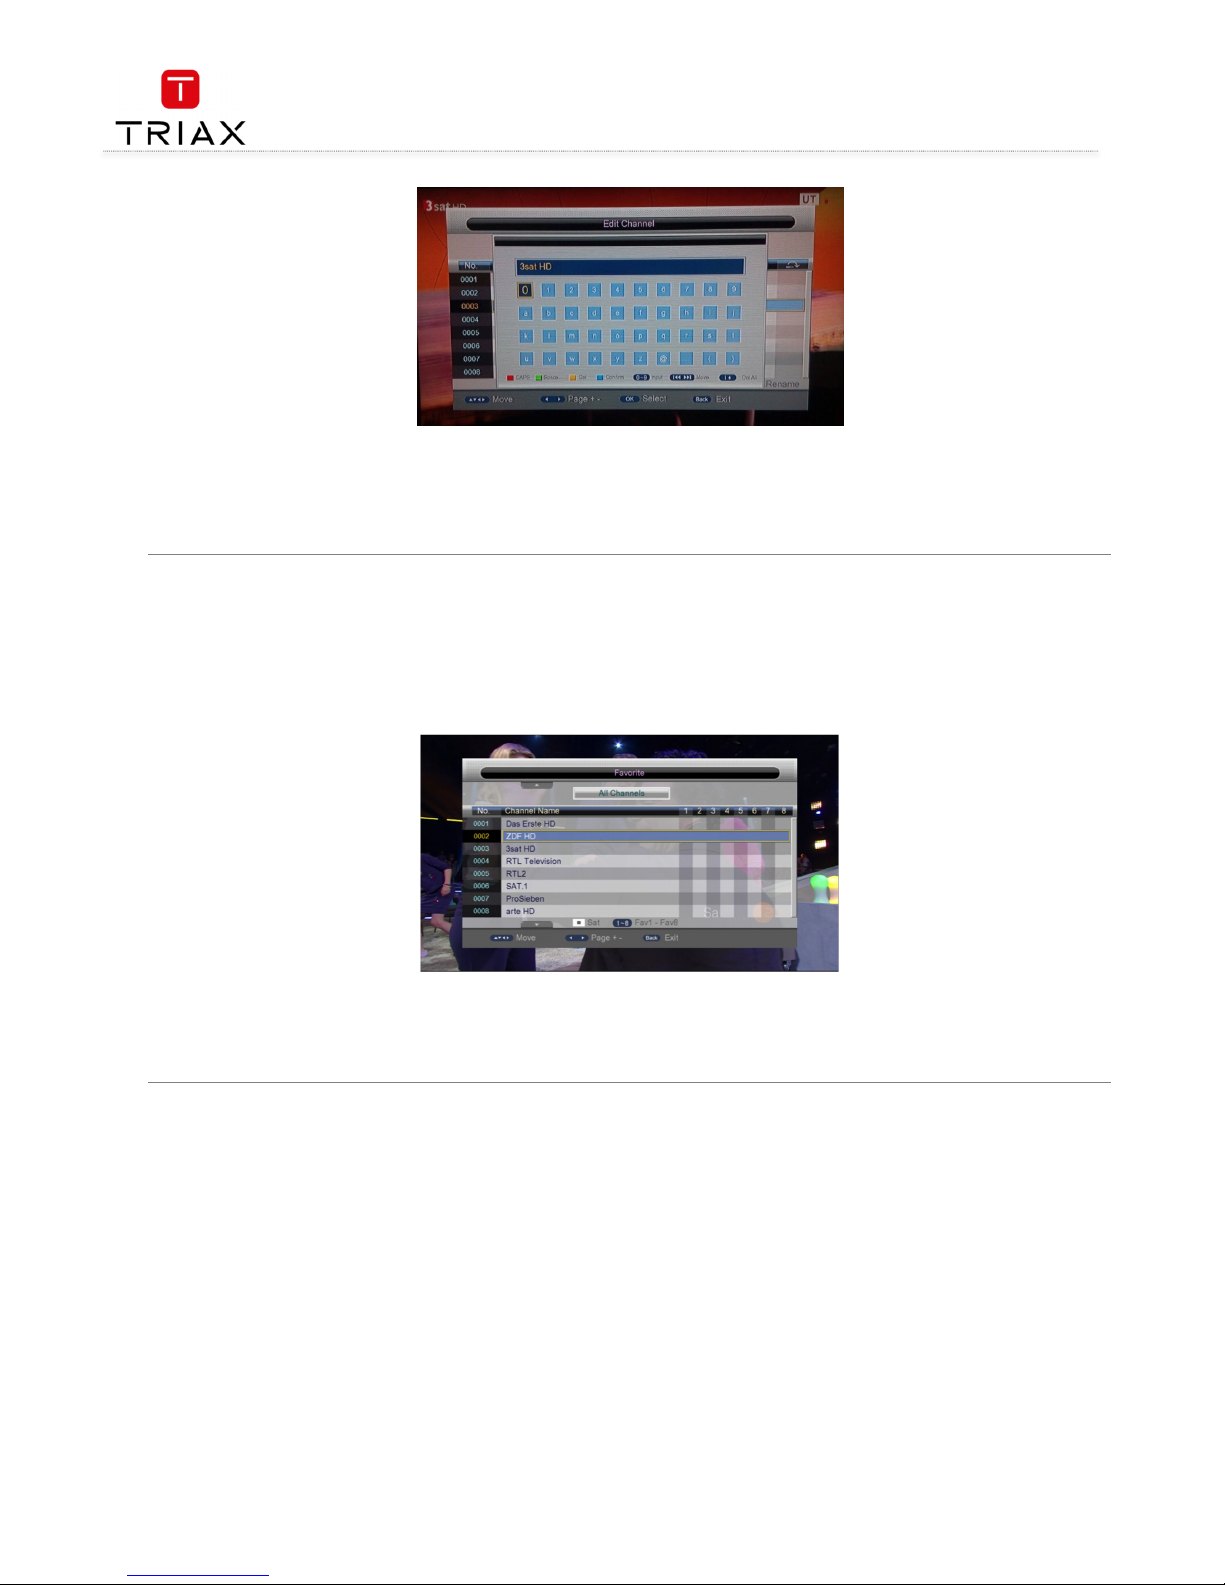
• To rename a channel, press CH+/
CH+/CH+/
CH+/---- keys to select the channel, then press the blue function key to enter the channel name edit page.
See the figure below:
Page 24
User manual
EN
24
After editing, press
OK
OKOK
OK key to confirm.
• To lock a channel, after selecting the channel press the red function key, and then key in a correct four-digit password (default
password: 0000) in the pop-up dialog. When switching to the locked channel you will be asked to give a correct password to watch it.
• Press BACK
BACKBACK
BACK key to exit the Channel Manager menu.
• Press BACK
BACKBACK
BACK key to go back to the channel play state.
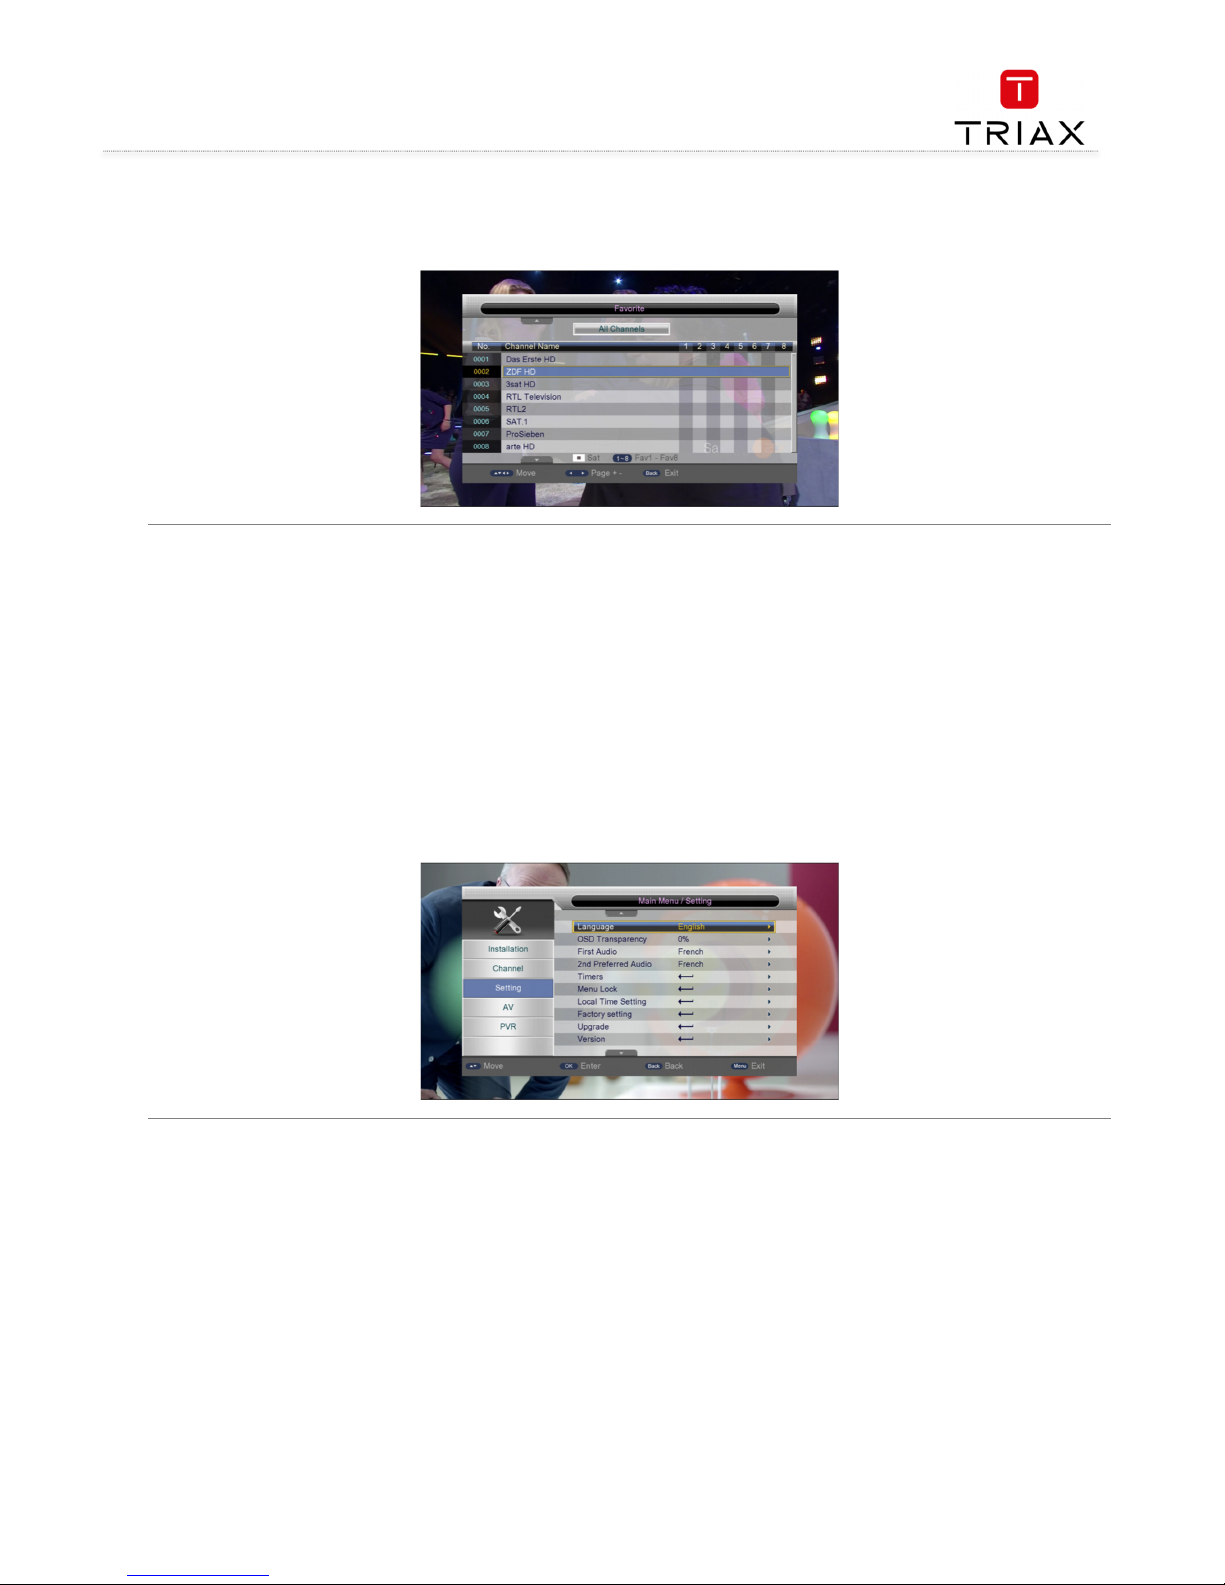
4.2.2 Favorite
The system provides a favorite channels list function. You can through the Favorite menu to add, delete or group your favorite channels.
To enter the Favorite menu, in the Channel menu press CH+/
CH+/CH+/
CH+/---- keys to select the Favorite item and then press number keys.
See the figure below:
•
There are total 8 favorite lists. You can press the four color function keys to add channels to corresponding favorite list. One channel
can be added into multiple favorite lists.
• Press BACK
BACKBACK
BACK key to exit the Favorite menu.
• Press BACK
BACKBACK
BACK key to go back to the channel play state.
Page 25
User manual
25
EN
4.2.3 Delete all channels
Press OK
OKOK
OK key to confirm to delete all channels. See the figure below::
4.3 Preference
The Preference menu is mainly used to change language and audio settings.
To enter the Preference menu, in the Main Menu press CH+/
CH+/CH+/
CH+/---- keys to select the Preference item and then press OK
OKOK
OK or V+
V+V+
V+ keys.
See the figure below:
Page 26
User manual
EN
26
4.3.1 Language
The Language item defines the language of menu and prompts. To change the language, press CH+/
CH+/CH+/
CH+/---- keys to highlight this item and then press
OK
OKOK
OK or V+
V+V+
V+ keys to pull down a language list. In this list, you can press CH+/
CH+/CH+/
CH+/---- keys to select a language and then press OK
OKOK
OK key to confirm. See the
figure below:
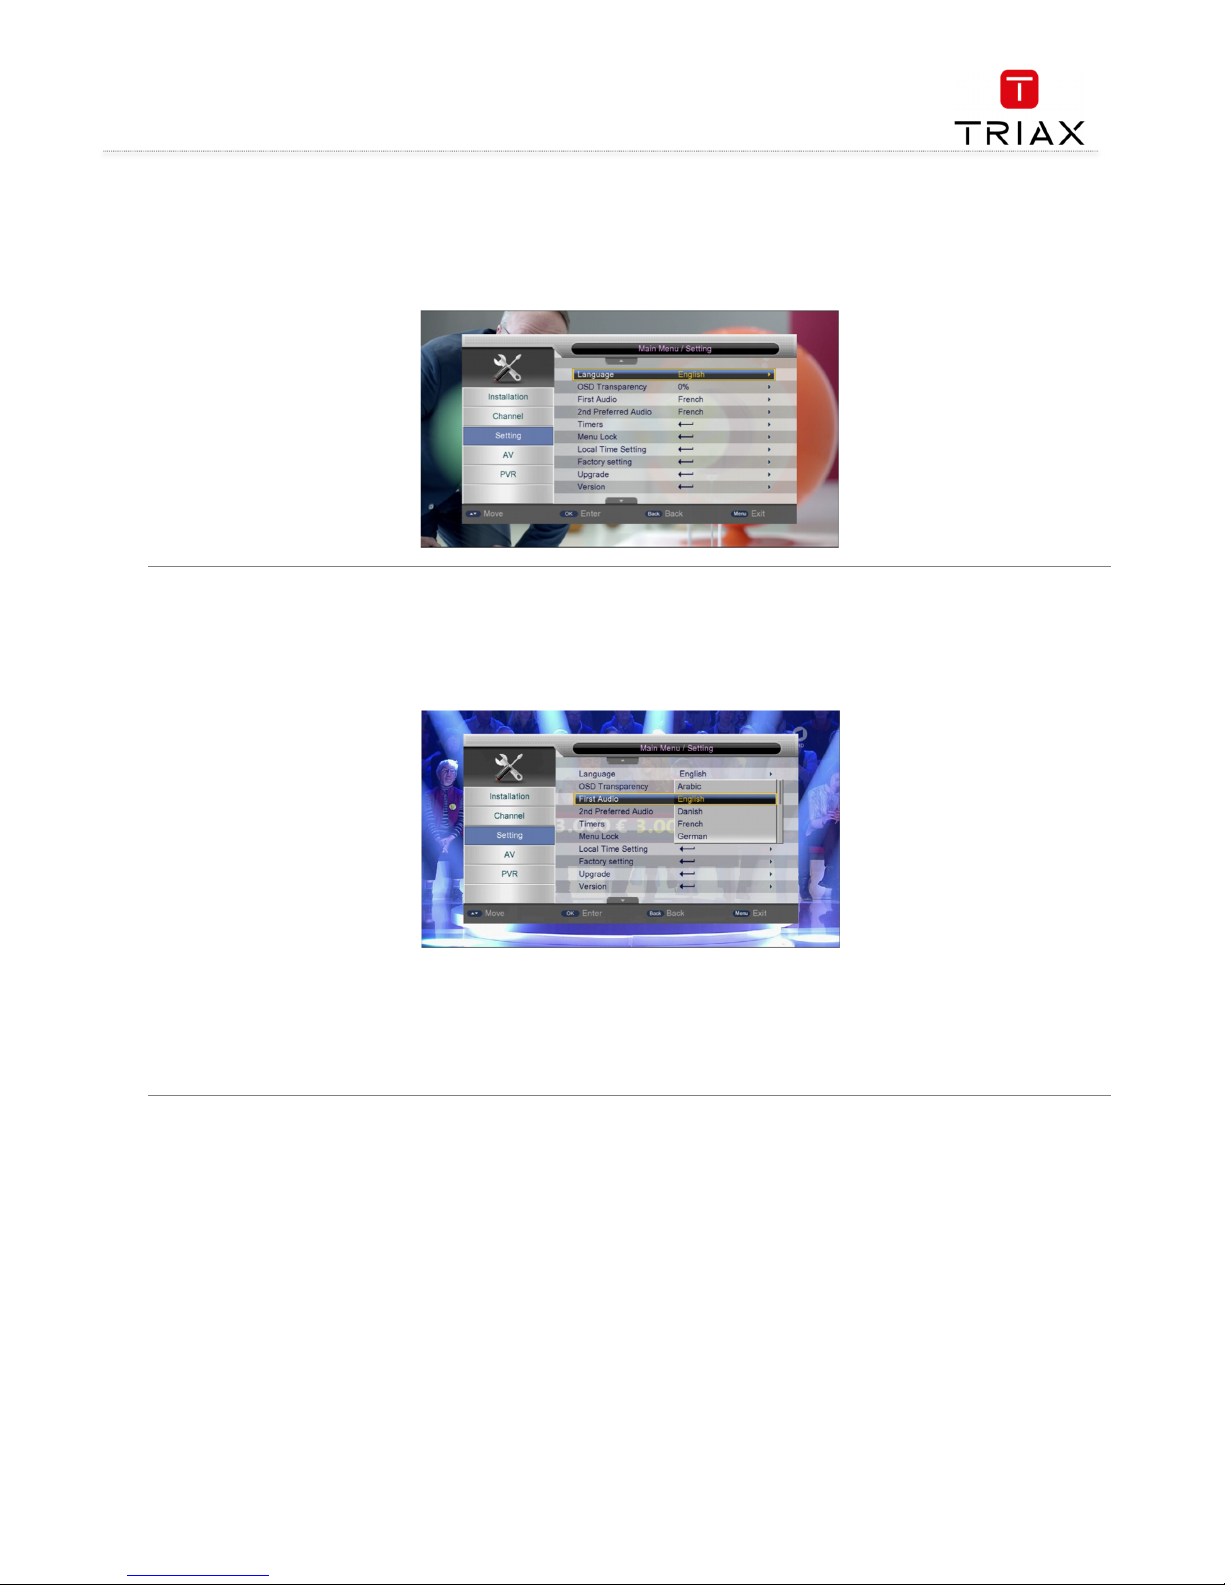
4.3.2 OSD transparency
Through the OSD Transparency item you can adjust the transparency of OSD display in the Main Menu.
To change the OSD transparency, in the Preference menu press CH+/
CH+/CH+/
CH+/---- keys to highlight the OSD Transparency item and then press OK
OKOK
OK or V+
V+V+
V+
keys to pull down a transparency list. The list has seven transparency levels from 0% to 60%. The bigger the level value is, the higher the
transparency is. After selecting a transparency, press OK
OKOK
OK key to confirm. See the figure below:
Page 27
User manual
27
EN
4.3.3 Preferred audio
The Preferred Audio item is used to set the default audio language. When a program has audios of multiple languages, the system will auto
search the matched audio to play according to the settings here. Two preferred audios can be set and the first one has a higher priority. See the
figure below:
4.3.4 DVR configuration
Through the DVR Configuration item you can do some settings on Timeshift and Record functions. See the figure below for the DVR
Configuration setting menu.
•
Timeshift:
Timeshift:Timeshift:
Timeshift: Set a method to start the timeshift function. Three options: Auto, Pause and Off.
• Timeshift to Record:
Timeshift to Record:Timeshift to Record:
Timeshift to Record: Set that during timeshift if you press REC
RECREC
REC key the system will whether or not to record the data that have been
buffered by timeshift. If On is selected, after you press REC
RECREC
REC key the data that have been buffered by timeshift will be saved into a file
first and new data will then be saved into another file. If Off is selected, the buffered data will be removed first and then the system
will start to record new data.
Page 28

User manual
EN
28
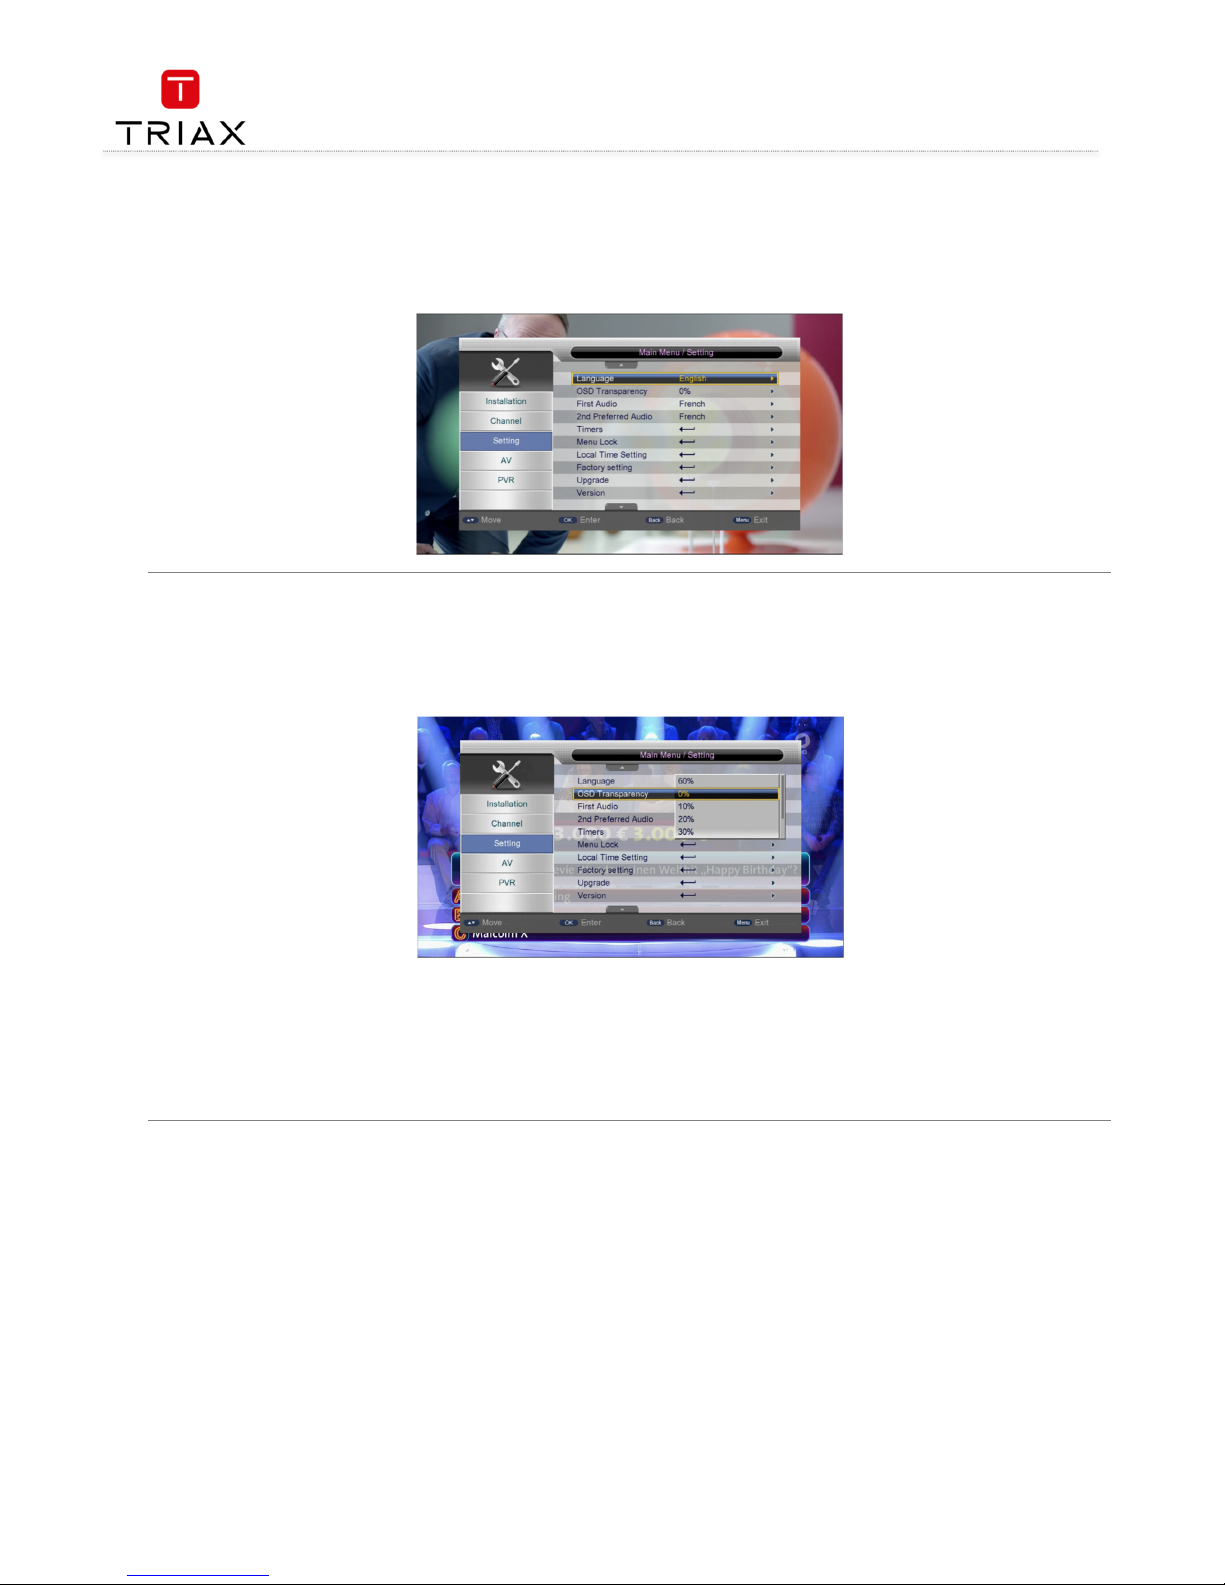
4.4 Setting
Through the Setting menu you can configure and upgrade the system. After entering the Setting menu, the following interface appears:
Page 29
User manual
29
EN
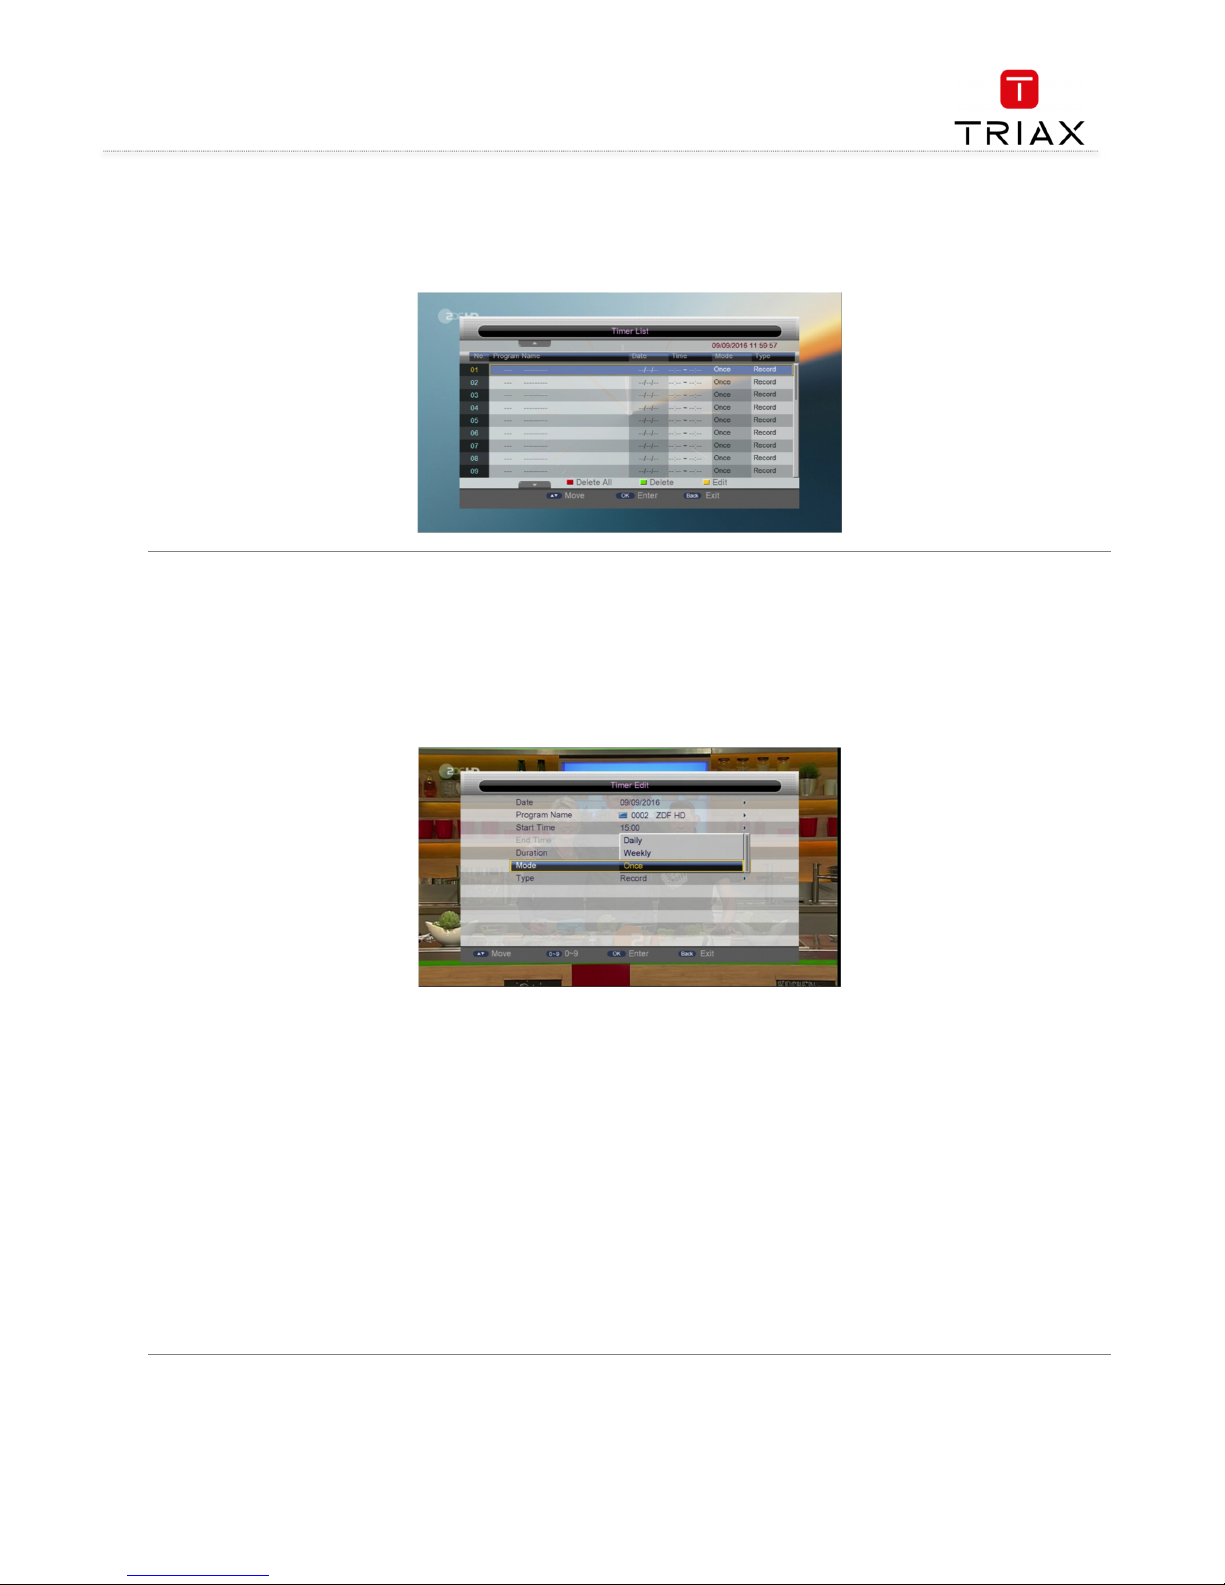
4.4.1 Timers
Through the Timers item, you can manage scheduled programs. In the Timers menu you can view and edit the scheduled program’s name, start
time, schedule type and so on. See the figure below:
In the above figure the fields from left to right are: Timer No., Program Name, Date, Time, Mode and Type. Program Name
Program NameProgram Name
Program Name indicates the
scheduled program. Data
DataData
Data and Time
TimeTime
Time indicate the scheduled time. Mode
ModeMode
Mode indicates the schedule mode: Once, Daily, or Weekly. Type
TypeType
Type indicates the
behaviors after the scheduled time is reached.
In this list, you can -
• Press the red
redred
red function key to delete all timers in the list.
• Press the green
greengreen
green function key to delete the selected timer.
• Press the yellow
yellowyellow
yellow function key or OK
OKOK
OK key to edit the selected timer. The following edit menu will appear.
•
Date:
Date:Date:
Date: Scheduled date. To edit it, highlight the Date item first and then press V+
V+V+
V+ key to enter its editing state.
• Program Name:
Program Name:Program Name:
Program Name: Scheduled program. To edit it, highlight the Program Name item first and then press V+
V+V+
V+ key to enter its editing state.
• Start Time:
Start Time:Start Time:
Start Time: Start time of schedule. To edit it, highlight the Start Time item first and then press V+
V+V+
V+ key to enter its editing state.
• End Time:
End Time:End Time:
End Time: Cannot be set by hand. When the Type item is set as ‘Record’, this parameter will auto change according to the Start Time
and Duration settings; when the Type item is set as others, this parameter is the same with the Start Time.
• Duration:
Duration:Duration:
Duration: Schedule duration. Available only when the Type item is set as ‘Record’. To edit it, highlight the Duration item first and then
press V+
V+V+
V+ key to enter its editing state.
• Mode:
Mode:Mode:
Mode: Schedule mode. Three options: Once, Daily and Weekly.
- Once:
In this mode, the scheduled behavior will happen only once at the specified time. After that, the timer will be deleted.
- Daily:
In this mode, the scheduled behavior will happen at the specified time every day.
- Weekly:
In this mode, the scheduled behavior will happen at the specified time every week.
• Type:
Type:Type:
Type: Schedule type. Five options: Record and Channel.
- Record:
The system will record the scheduled program when the scheduled time is reached. Users can select whether or not to
record AD, TTX and Subtitle.
- Channel:
The system will auto switch to the scheduled program to play when the scheduled time is reached.
• AD Record, Subtitle Record, Teletext Record:
AD Record, Subtitle Record, Teletext Record:AD Record, Subtitle Record, Teletext Record:
AD Record, Subtitle Record, Teletext Record: Set whether to record AD, TTX and Subtitle or not. Available only when the Type item is
set as ‘Record’.
Page 30

User manual
EN
30
4.4.2 Parental lock
The Parental Lock item is to set a program lock in order to protect children from watching some improper programs to their ages.
After highlighting the Parental Lock item in the Setting menu press OK
OKOK
OK key, and a password input dialog will appear. Input a correct password
(default: 0000) to enter the Parental Lock menu. See the figure below:
There are three menu items:
•
System Lock:
System Lock:System Lock:
System Lock: Turn on or off the parental lock function.
•
Parental Rating:
Parental Rating:Parental Rating:
Parental Rating: Set rating from 4 ages to 18 ages. If set as 0, no limit.
•
Change Pin Code:
Change Pin Code:Change Pin Code:
Change Pin Code: Change the password of the parental lock. When this item gets the highlight, press OK
OKOK
OK key to call out the
Change Pin Code dialog.
See the figure below:
In this dialog, enter the correct old password first and then give a new password twice. Thus the
password is changed completely.
4.4.3 Local time setting
Through the Local Time Setting item you can set the system time and time zone. To enter the Local Time Setting menu, highlight the Date Time
item in the Setting menu and then press OK
OKOK
OK key.
Page 31

User manual
31
EN
If the Date Time Mode item is set as
‘
Auto’, both the Date and Time items will be grayed (cannot be set by hand). If the Date Time Mode item is
set as ‘Manual’, users can set the Date and Time items by hand, but other items cannot be set.
If the Time Zone item is set as ‘Auto’, the Day Light Saving item will be grayed (cannot be set by hand). If the Time Zone item is set as a concrete
time zone, you can set whether or not to use the daylight saving time according to the selected time zone.
4.4.4 Factory setting
Through the Factory Setting item you can reset the system to factory settings.
Press CH+/
CH+/CH+/
CH+/---- keys to highlight this item and then press OK
OKOK
OK key, and a password input dialog will appear. Input a correct password (default: 0000),
and the system will then start to reset to factory settings. When finished, the Init Install menu (see FFFFejl! Henvisningskilde ikke fundet.
ejl! Henvisningskilde ikke fundet.ejl! Henvisningskilde ikke fundet.
ejl! Henvisningskilde ikke fundet.) will show,
through which you can re-initialize the system.
4.4.5 Upgrade
The Upgrade item is for software upgrade. See chapter Fejl! Henvisningskilde ikke fundet.
Fejl! Henvisningskilde ikke fundet.Fejl! Henvisningskilde ikke fundet.
Fejl! Henvisningskilde ikke fundet. for details about software upgrade.
4.4.6 Version
Through the Version item you can view the version information of system hardware and software as well as the build date of the system.
See the figure below:
4.4.7 Auto shut down
The Auto Shut Down item sets whether the system will enter the standby mode if there is no any operation for a certain time period.
If the Auto Shut Down item is set as ‘On’, the system will auto enter the standby mode after one, two or three hours of no operations.
Page 32

User manual
EN
32
4.5 AV
The AV menu is to carry out video output related settings such as brightness, resolution and output format. In the Main Menu, press CH+/
CH+/CH+/
CH+/---- keys
to highlight the AV menu item and then press OK
OKOK
OK key to enter the AV menu. See the figure below:
4.5.1 Contrast
The Contrast item determines the contrast level of the system. After highlighting the Contrast item, press OK
OKOK
OK key to enter its setting interface,
see the figure below:
Press
V+/
V+/V+/
V+/
---- keys to adjust the contrast level from 0 to 24. After setting, press
OK
OKOK
OK key or just wait for 3 seconds to return to the AV menu. In
addition, in this interface pressing CH+/
CH+/CH+/
CH+/---- keys can switch between the contrast setting and brightness setting interfaces.
4.5.2 Brightness
The Brightness item is to adjust the brightness level of the system. After highlighting the Brightness item, press OK
OKOK
OK key to enter its setting
interface, see the figure below:
Press
V+/
V+/V+/
V+/
---- keys to adjust the brightness level from 0 to 24. After setting, press
OK
OKOK
OK key or just wait for 3 seconds to return to the AV menu. In
addition, in this interface pressing CH+/
CH+/CH+/
CH+/---- keys can switch between the contrast setting and brightness setting interfaces.
Page 33

User manual
33
EN
4.5.3 Saturation
The Saturation item is to adjust the saturation level of the system from 0 to 24. See the figure below:
4.5.4 HUE
The HUE item is to adjust the hue level of the system from -30 to 30. After highlighting this item, press ENTER key to enter its setting interface,
see the figure below:
4.5.5 S/PDIF mode
The S/PDIF mode item is to set the output format of digital audios. After highlighting this item, press OK
OKOK
OK key to pop out an option list, see the
figure below:
The list has three
options: PCM, Bitstream and Mute.
Page 34

User manual
EN
34
4.5.6 Aspect mode
The Aspect mode item is to set the proportion between the length and width of output videos. After highlighting this item, press OK
OKOK
OK key to pop
out an option list, see the figure below:
The list
has four options: 16: 9, Full Screen, 4: 3 LB (Letter Box) and 4: 3 PS (Pan Scan).
The list has three options: YUV, RGB and SVideo.
4.5.7 Aspect mode
The Video Resolution item is to set the resolution (up to 1080p_60 (Full HD)) and refresh rate of video output. After highlighting this item, press
OK
OKOK
OK key to pop out an option list, see the figure below:
The list has following options (
‘p’ indicates p
rogressive scan;
‘
i' indicates interlaced scan):
Auto Detect
• 480p_60, 480i_30
• 576p_50, 576i_25
• 720p_60, 720p_50
• 1080p_60, 1080p_50, 1080i_30, 1080i_50
.
Page 35

User manual
35
EN
5. Record & Timeshift
5.1.1 Record
In full screen mode, if you want to record the being-played program, just press REC
RECREC
REC key. If there is no USB device inserted, corresponding
message will appear. See the figure below:
If there has been a USB device, the system will initialize the USB
device and then start to record. See the figure below.
During recording, to pause the recording, press
‖
key. During recording, to stop recording, press
█
key. A confirmation dialog will appear.
S
ee the
figure below left:
During recording, pressing
INFO
INFOINFO
INFO key can show the recording information. Pressing
INFO
INFOINFO
INFO key again will show the record file list.
See the figure top right.
Page 36

User manual
EN
36
5.2 Timeshift
The Timeshift function is to play the programs that have already been played just before. At present there are three methods to start the
Timeshift function, which can be set through Main
MainMain
Main Menu
MenuMenu
Menu -> Preference
PreferencePreference
Preference -> DDDDVR Config
VR ConfigVR Config
VR Configuration
urationuration
uration. See the figure below:
Three options
of the Timeshift item:
• Auto
AutoAuto
Auto:::: Auto start the Timeshift function 5 seconds after entering any channel.
• Pause
PausePause
Pause:::: During full-screen playing, press ‖ key to start the Timeshift function.
• Off
OffOff
Off:::: During program recording, press ‖ or ► keys to start the Timeshift function.
5.2.1 Timeshift: Auto
If you choose the ‘Auto’ method for the Timeshift item, you should also configure the Timeshift Length and Timeshift to Record items to set the
time length of timeshift and whether or not to turn on the record function during timeshift. After setting, the Timeshift function will auto work 5
seconds after entering any channel.
To watch the program content before current time, press FRW
FRWFRW
FRW key to go back to the desired time period. Press █ key to exit the timeshift play.
5.2.2 Timeshift: Pause
If you choose the ‘Pause’ method for the Timeshift item, you should also configure the Timeshift Length and Timeshift to Record items. After
that, while watching a program if you want to start the Timeshift function, just press‖key. The system will then start to save a video piece from
the current time for you to watch later.
5.2.3 Timeshift: Off
If you choose the ‘Off’ method for the Timeshift item, the Timeshift Length and Timeshift to Record items are unavailable. In this case, you can
press‖or ► keys to start the Timeshift function only when recording program. The timeshift length depends on the free space of the USB device.
Page 37

User manual
37
EN
6. Upgrade
6.1 Upgrade by USB / OTA
You can carry out system software upgrade through Main Menu
Main Menu Main Menu
Main Menu ----> Setting
> Setting > Setting
> Setting ----> Upgrade
> Upgrade> Upgrade
> Upgrade. See the figure below:
At present the system supports two methods to upgrade the system software: Upgrade
by USB and S/W Upgrade by OTA.
6.2 Upgrade by USB
Highlight the Upgrade by USB item and then press OK
OKOK
OK key to enter the following USB Upgrade interface. If there is no USB device inserted,
corresponding prompt will appear.
Select the partition in which rom.bin is stored, then press
OK
OKOK
OK key to enter a file list. From the file list, select rom.bin and then press
OK
OKOK
OK key to
start the USB upgrade. The interface will be as below:
When the USB Upgrade completes, the system will
auto restart.
Page 38

Bedienungsanleitung
TRIAX DVB-S2 Receiver S-HD 11
Artikel Artikel-Nr.
TRIAX DVB
-
S2 Recei
ver S-HD 11
305216
Version
D
Date
05/201
7
DE
Page 39

Bedienungsanleitung
DE
2
Vorwort / Sicherheitshinweise / Service und Umwelt
Diese Bedienungsanleitung hilft Ihnen beim
• bestimmungsgemäßen
• sicheren und
• Vorteilhaften
• Gebrauch des digitalen DVB-S 2 Receivers, S-HD 11
Wir setzen voraus, dass der Bediener des Receivers allgemeine Kenntnisse im Umgang mit Geräten der Unterhaltungselektronik hat.
Jede Person, die diesen Receiver
• montiert
• anschließt
• bedient
• reinigt
• oder entsorgt
Muss den vollständigen Inhalt dieser Bedienungsanleitung zur Kenntnis genommen haben.
Bewahren Sie diese Bedienungsanleitung immer in der Nähe des Receivers auf.
D
E
Gewährleistung:
Gewährleistung:Gewährleistung:
Gewährleistung:
Die gesetzliche Gewährleistung nach Paragraph 437 BGB beträgt 24 Monate.
Bei unsachgemäßer Installation und Handhabung erlischt jeglicher Garantieanspruch.
Die Montage und Inbetriebnahme darf nur von eingewiesenen Personen, Technikern
oder Installateuren unter Beachtung der Sicherheitsbestimmungen durchgeführt werden.
Schäden durch falsche Montage und Inbetriebnahme sowie durch unsachgemäße Handhabung fuhren zum Erlöschen des
Garantieanspruchs.
Grundlegende Sicherheitshinweise
Elektrischer Anschluss
Elektrischer AnschlussElektrischer Anschluss
Elektrischer Anschluss::::
• Trennen Sie bei Betriebsstörungen den Receiver von der Stromquelle.
• Hinweis: trotz Ausschaltens am rückseitigen Netzschalter ist der Receiver noch unter Spannung.
• Um Feuergefahr und die Gefahr eines elektrischen Schlags zu vermeiden,
• setzen Sie den Receiver weder Regen noch sonstiger Feuchtigkeit aus.
• Öffnen Sie niemals das Gehäuse. Andernfalls besteht die Gefahr eines elektrischen Stromschlags.
• Schließen Sie den Receiver nur an eine fachgerecht installierte Netz-Steckdose von 100–240 V, 50–60 Hz an.
• Die Gesamt-Stromaufnahme am Antennen-Anschluss des Receivers „LNB IN“ darf 300 mA nicht überschreiten.
• Ziehen Sie bei Gewitter den Netzstecker des Receivers aus der Steckdose.
• Knicken oder quetschen Sie das Netzkabel nicht.
• Überlassen Sie Wartungsarbeiten stets qualifiziertem Fachpersonal.
Andernfalls gefährden Sie sich und andere.
Richtiger Standort
Richtiger StandortRichtiger Standort
Richtiger Standort::::
• Stellen Sie den Receiver auf eine feste, ebene Unterlage.
• Vermeiden Sie die Nähe von:
- Wärmequellen, wie z. B. Heizkörpern,
- offenem Feuer, wie z. B. Kerzen,
- Geräten mit starken Magnetfeldern, wie z. B. Lautsprechern.
- Stellen Sie keine Gefäße mit Flüssigkeit (zum Beispiel Vasen) auf den Receiver.
• Vermeiden Sie direkte Sonneneinstrahlungen und Orte mit außergewöhnlich viel Staub.
• Decken Sie niemals die Lüftungsschlitze ab. Sorgen Sie für ausreichende Belüftung des Receivers.
• Stellen Sie keine schweren Gegenstände auf den Receiver.
• Wenn Sie den Receiver von einer kalten in eine warme Umgebung bringen,
• kann sich im Inneren des Receivers Feuchtigkeit bilden. Warten Sie in diesem Fall etwa eine Stunde,
bevor Sie ihn in Betrieb nehmen.
Page 40

Bedienungsanleitung
3
DE
Service und Umwelt
Servicefall:
Servicefall:Servicefall:
Servicefall:
Führen Sie Reparaturen niemals selbst durch, bitte überlassen Sie dies immer qualifiziertem Personal.
• Kontaktieren Sie den Reparaturdienst bei folgenden Fehlern:
a. Wenn das Netzteil oder Netzkabel defekt ist.
b. Wenn Gegenstände in das Gerät gefallen sind.
c. Wenn das Gerät mit Wasser in Berührung gekommen ist.
d. Wenn das Gerät trotz richtiger Anwendung nicht funktioniert.
Kontakt mit dem TRIAX
Kontakt mit dem TRIAX Kontakt mit dem TRIAX
Kontakt mit dem TRIAX Service aufnehmen:
Service aufnehmen:Service aufnehmen:
Service aufnehmen:
Unsere Erfahrung hat gezeigt, dass sich viele Reklamationsgründe durch ein einfaches Telefongespräch lösen lassen.
Sollten Sie Probleme mit Ihrem Gerät haben, kontaktieren Sie bitte Ihren Fachinstallateur oder unsere Supportline.
Diese Vorgehensweise erspart Ihnen Zeit und eventuellen Ärger.
Triax GmbH
Triax GmbHTriax GmbH
Triax GmbH
Karl-Benz-Strasse 10
72124 Pliezhausen
www.triax-gmbh.de
Technik
TechnikTechnik
Technik----Hotline
HotlineHotline
Hotline
+49 (0) 900 100 15 55
+49 (0) 900 100 15 55+49 (0) 900 100 15 55
+49 (0) 900 100 15 55
(0,49 € / min aus dem deutschen Festnetz. Anrufe aus Mobilfunknetzen können von diesem Preis abweichen).
Geschäftszeiten: Mo-Fr: 8 - 16.30 Uhr
Gerne können Sie uns auch per Mail kontaktieren.
support_de@triax.com
support_de@triax.comsupport_de@triax.com
support_de@triax.com
Wir helfen Ihnen gerne bei Fragen zur Bedienung oder falls Probleme mit Ihrem Gerät auftreten.
Wiederverwertung von Elektrogeräten
Wiederverwertung von ElektrogerätenWiederverwertung von Elektrogeräten
Wiederverwertung von Elektrogeräten
Das Produkt wurde aus hochwertigen Materialien und Komponenten hergestellt, diese sind
recyclingfähig und können wiederverwendet werden. Das Produkt entspricht der Europäischen
Richtlinie 2002/96/EC. Informieren Sie sich über die vor Ort geltenden Bestimmungen zur separaten
Entsorgung elektronischer Geräte. Beachten Sie die örtlichen Bestimmungen und entsorgen Sie
keine alten Produkte mit dem normal en Hausmüll. Durch eine richtige Entsorgung alter Produkte
tragen Sie zum Umweltschutz und zur Gesundheit der Menschen bei.
Wiederverwertung von Papier und Pappe
Wiederverwertung von Papier und PappeWiederverwertung von Papier und Pappe
Wiederverwertung von Papier und Pappe
Das Materialwiederverwertungssymbol auf dem Verpackungskarton und dem
Benutzerhandbuch bedeutet, dass diese recyclingfähig sind. Entsorgen Sie die Verpackung nicht
mi t dem normalen Hausmüll.
Wiederverwertung von Kunststoffen
Wiederverwertung von KunststoffenWiederverwertung von Kunststoffen
Wiederverwertung von Kunststoffen
Das Materialwiederverwertungssymbol auf Kunststoffteilen bedeutet, dass diese recyclingfähig
sind. Entsorgen Sie die Kunststoffe nicht mi t dem normalen Hausmüll.
Der Grüne Punkt
Der Grüne PunktDer Grüne Punkt
Der Grüne Punkt
der Grüne Punkt auf Kartons bedeutet, dass eine Abgabe an die Gesellschaft für
Abfallvermeidung und Sekundärrohstoffgewinnung bezahlt wird.
Batterien
BatterienBatterien
Batterien
Jeder Verbraucher ist gesetzlich verpflichtet, Batterien bei einer Sammelstelle seiner Gemeinde
oder im Handel abzugeben, damit sie einer umweltschonenden Entsorgung zugeführt werden
können. Bitte entsorgen Sie Batterien nicht im Hausmüll.
Page 41

Bedienungsanleitung
DE
4
Inhaltsverzeichnis
Vorwort / Sicherheitshinweise / Service und Umwelt .............................................................................................. 2
1.
Einleitung .................................................................................................................................................... 5
1.1 Lieferumfang.......................................................................................................................................................................................... 5
1.2 Beschreibung S-HD 11 ........................................................................................................................................................................... 5
1.3 Bedienelemente und Anschlüsse – Vorderseite / Rückseite................................................................................................................... 6
1.4 Fernbedienung ....................................................................................................................................................................................... 7
1.5 In Betrieb nehmen .................................................................................................................................................................................. 8
1.6 Ein- und Ausschaltvorgang / Standby Modus ......................................................................................................................................... 8
1.7 In den Menüs navigieren ........................................................................................................................................................................ 8
1.8 Erstinstallation ....................................................................................................................................................................................... 9
2.
Bedienung im TV- und Radiobetrieb .......................................................................................................... 10
2.1 Lautstärkeregelung und Stummschaltung ............................................................................................................................................ 10
2.2 Programme umschalten ....................................................................................................................................................................... 10
2.3 Satellitenliste wechseln / Favoritenliste auswählen / Programmgruppen / Suchfunktion..................................................................... 11
2.4 TV und Radiomodus ............................................................................................................................................................................. 12
2.5 Programminformationen ...................................................................................................................................................................... 12
2.6 Programmsprache / Audioeinstellungen .............................................................................................................................................. 13
2.7 Farbige Tasten und deren Funktion während des TV- und Radiobetriebs ............................................................................................. 13
2.8 Elektronischer Programmführer (EPG – Electronic Program Guide) .................................................................................................... 14
2.9 Teletext ................................................................................................................................................................................................ 16
2.10 Untertitel .............................................................................................................................................................................................. 16
3
Hauptmenü ............................................................................................................................................... 17
3.1 Installation (Symbol: Antenne) ............................................................................................................................................................. 17
3.2 Antenneneinstellungen ........................................................................................................................................................................ 18
3.2.1 Antenneneinstellungen - Unicable ................................................................................................................................................... 18
3.2.2 Antenneneinstellungen – Suchlauf durchführen .............................................................................................................................. 18
3.2.3 Satellitenliste .................................................................................................................................................................................. 19
3.2.4 Transponder-Liste ........................................................................................................................................................................... 19
3.2.5 Motoreinstellung ............................................................................................................................................................................. 20
3.2.6 Motor Begrenzung ........................................................................................................................................................................... 20
3.3 Programm (Symbol: Zahnräder) ........................................................................................................................................................... 21
3.3.1 Kanal-Manager (Senderliste verwalten) ........................................................................................................................................... 21
3.3.2 Favorit (Favoritenlisten verwalten) .................................................................................................................................................. 22
3.3.3 Alle Kanäle löschen ......................................................................................................................................................................... 22
3.4 Systemeinstellungen ............................................................................................................................................................................ 23
3.4.1 Sprache ........................................................................................................................................................................................... 23
3.4.2 OSD Transparenz ............................................................................................................................................................................ 23
3.4.3 Erster Audiokanal / Zweiter Audiokanal........................................................................................................................................... 24
3.4.4 Menü sperren (Kindersicherung) ..................................................................................................................................................... 24
3.4.5 Lokale Zeiteinstellungen ................................................................................................................................................................. 24
3.4.6 Werkseinstellung ............................................................................................................................................................................. 25
3.4.7 Software Upgrade............................................................................................................................................................................ 25
3.4.8 Version ............................................................................................................................................................................................ 25
3.4.9 Auto Aus ......................................................................................................................................................................................... 26
3.5 AV - Audio / Videoeinstellungen (Symbol: Chinch-Stecker) .................................................................................................................. 26
3.5.1 Digitaler Audioausgang ................................................................................................................................................................... 26
3.5.2 Bildschirm-Format ........................................................................................................................................................................... 26
3.5.3 Bildschirmauflösung ....................................................................................................................................................................... 26
4
Aufnahme / Multimedia ............................................................................................................................ 27
4.1 Aufnahme ............................................................................................................................................................................................ 27
4.2 Timeshift .............................................................................................................................................................................................. 28
4.3 Wiedergabe von Aufnahmen ................................................................................................................................................................ 28
4.4 Multimedia Menü und USB-Speichermedium ....................................................................................................................................... 29
4.5 Multimedia Menü – Menüpunkt “Film” ................................................................................................................................................. 29
4.6 Multimedia Modus – Menüpunkt “Aufnahmemanager” ........................................................................................................................ 30
4.7 Multimedia Modus – Menüpunkt “Bild” ................................................................................................................................................ 30
Page 42

Bedienungsanleitung
5
DE
4.8 Multimedia Modus – Menüpunkt “Musik” ............................................................................................................................................ 31
5.
Tips und Tricks / Probleme lösen .............................................................................................................. 31
6.
Entsorgung ............................................................................................................................................... 33
7.
Technische Daten ..................................................................................................................................... 33
1. Einleitung
1.1 Lieferumfang
Anzahl
AnzahlAnzahl
Anzahl Beschreibung
BeschreibungBeschreibung
Beschreibung
1 Receiver
1 Fernbedienung
2 Batterien
1 Bedienungsanleitung
1.2 Beschreibung S-HD 11
Mit dem Receiver können Sie unverschlüsselte digitale Satelliten-Programme (free-to-air) über eine Satelliten-Antenne empfangen.
Die wichtigsten Sender und Satelliten sind vorprogrammiert.
Die wichtigsten Sender und Satelliten sind vorprogrammiert. Die wichtigsten Sender und Satelliten sind vorprogrammiert.
Die wichtigsten Sender und Satelliten sind vorprogrammiert. Die Satelliten-Antenne muss auf den gewünschten Satelliten
ausgerichtet sein. Nicht vorprogrammierte Satelliten können hinzugefügt werden. Alle Receiver-Einstellungen können Sie leicht über die
Benutzer-Oberfläche (Menü) auf dem TV-Bildschirm vornehmen.
Die Mehrsprachige Benutz
Die Mehrsprachige BenutzDie Mehrsprachige Benutz
Die Mehrsprachige Benutzer
erer
er----Oberfläche unterstützt 12
Oberfläche unterstützt 12Oberfläche unterstützt 12
Oberfläche unterstützt 12 Sprachen:
Sprachen: Sprachen:
Sprachen:
Deutsch, Französisch, Dänisch, Englisch, Arabisch, Polnisch , Türkisch, Russisch, Portugisisch, Spanisch, Italienisch, Ungarisch
Weitere Ausstattungsmerkmale:
Weitere Ausstattungsmerkmale:Weitere Ausstattungsmerkmale:
Weitere Ausstattungsmerkmale:
• Volle HD-Auflösung über DVB-S2 -Standard
• Upscaling von SDTV-Programmen (senderabhängig)
• Software-Update über USB
• LNB-Steuerlogik (Ton 0/22 kHz), max. Stromabgabe für LNB 300 mA
• 3 Bedientasten an der Frontblende
• Plug and Play
• unterstützt Unicable-Standard 1 und 2
• Leistungsaufnahme im Standby-Betrieb weniger als 0,5 Watt
• Netzanschluss 100–240 V, 50/60 Hz
• Netzschalter
• 4000 Programmspeicherplätze (TV+Radio)
• Kindersicherung (voreingestelltes Passwort: 0000)
• 8 Favoritenlisten
• Automatischer Sender-Suchlauf
• Digitaler Audio-Ausgang für Dolby Digital Sound (koaxial)
• 1 TV-Scart-Ausgang
• HDMI-Ausgang
• Super-Fast-Videotext
• Digitaler DVB-Radio-Empfang
• Beim Programmwechsel erhalten Sie in einer Anzeige weitere Programminformationen.
• DiSEqC 1.0, 1.1,1.2, USALS wird unterstützt, wenn eine entsprechende Antennen-Anlage angeschlossen wird
• Bildschirm-Formate einstellbar auf 4:3, 16:9 und Vollbild
• Multi-Funktionstimer, 8-fach und an EPG gekoppelt
• Elektronische Programmzeitschrift EPG
Page 43

Bedienungsanleitung
DE
6
1.3 Bedienelemente und Anschlüsse – Vorderseite / Rückseite
1.
1.1.
1. Ein-/Ausschaltknopf (Standby)
2.
2.2.
2. Programm hochschalten
3.
3.3.
3. Programm runterschalten
4.
4.4.
4. USB-Speichermedium Eingang
Bedienelemente und Anschlüsse – Rückseite
1.
1.1.
1. LNB-IN Eingangsbuchse Antennensignal
2.
2.2.
2. Antennen Ausgang
3.
3.3.
3. HDMI Ausgang zum Anschluss eines TV-Gerätes
4.
4.4.
4. SCART Ausgang zum Anschluss eines TV-Gerätes
5.
5.5.
5. Digitaler Koaxialausgang zum Anschluss einer Stereoanlage
6.
6.6.
6. Netzschalter
Page 44

Bedienungsanleitung
7
DE
1.4 Fernbedienung
Taste Funktion Nr.
Power
Gerät Ein-/Ausschalten (Standby)
1
0…9
Zahleneingabe
2
TV/R
wechsel zwischen TV-/-Radiomodus
3
rot, grün,
gelb, blau
diverse interaktive Funktionen
(Menüabhängig)
4,5,
15,16
Ch +/-
Sender umschalten
6,8
V +/-
Lautstärke ändern
7, 18
EPG
elektronischer Programmführer
9
MENU
Hauptmenü öffnen/schließen
10
FAV
Favoritenliste
11
BACK
Menü schließen
Umschaltung auf voriges Programm
12
MUTE
Stummschaltung
13
TEXT
Teletext
14
OK
Auswahl bestätigen
17
SUB
Untertitelauswahl
19
AUDIO
Audioeinstellungen, Tonspur ändern
20
Aufnahme starten
21
■
Wiedergabe beenden
21
►
Abspielen, Wiedergabe fortsetzen
21
aktuelle Sendung pausieren (Timeshift),
Wiedergabe Pausieren
21
FRW/FFW
vorspulen/zurückspulen
21
►►I
/
I◄◄
vorige/nächste Aufhahme wählen
21
INFO
Programminfo aufrufen im TV-, EPG-
und Wiedergabemodus
22
USB
Information/Zugriff auf angeschlossenes
Speichermedium
23
MOVIE
Multimedia Menü öffnen
24
OPTION
nicht belegt
25
Page 45

Bedienungsanleitung
DE
8
1.5 In Betrieb nehmen
Fernbedienung
FernbedienungFernbedienung
Fernbedienung
• Legen Sie zwei Batterien unter Beachtung der vorgegebenen Polarität in das Batteriefach ein und schließen Sie den
Batteriefachdeckel wieder sorgfältig, bis der Deckel einrastet.
• Die Fernbedienung übermittelt Infrarot-Signale an den Receiver.
• Die Funktion der Tasten entnehmen Sie bitte der Übersicht der Fernbedienung.
Reciever Achtung
Reciever AchtungReciever Achtung
Reciever Achtung
Kontrollieren Sie den ordnungsgemäßen Anschluss aller Geräte und der Antenne, bevor Sie den Receiver mit dem Stromnetz verbinden.
• Verbinden Sie den Receiver über ein SCART- oder HDMI Kabel mit Ihrem Fernsehgerät
(für Bildsignale in HD-Qualität muss das Gerät über ein HDMI Kabel mit dem TV verbunden werden)
• Stecken Sie die Netz-Stecker der angeschlossenen Geräte in die Netz-Steckdose und schalten Sie die angeschlossenen Geräte ein.
• Schalten Sie den richtigen AV-Kanal am TV-Gerät ein.
• Stecken Sie den Netz-Stecker des Receivers in die Netz-Steckdose.
• Schalten Sie an der Receiver-Rückseite den Netz-Schalter ein. Das Gerät startet nun.
• Der Receiver wird mit vorprogrammierten Fernseh-Programmen ausgeliefert und kann direkt benutzt werden.
Um in den Standby-Modus zu gelangen drücken Sie die rote Taste oben in der Mitte auf der Fernbedienung.
Die momentane Uhrzeit wird angezeigt. Das Gerät verbraucht dabei weniger als 0,5 Watt. Dies ist aktuell ein sehr
niedriger Stromverbrauchs-Wert.
1.6 Ein- und Ausschaltvorgang / Standby Modus
• Netzschalter
NetzschalterNetzschalter
Netzschalter
Der Receiver verfügt auf der Geräterückseite über einen Netzschalter.
Darüber lässt sich das Gerät komplett stromlos stellen, Schalterposition „OFF“
„OFF“„OFF“
„OFF“
Das Gerät lässt sich in diesem Zustand nicht einschalten!
Vor Inbetriebnahme muss der der Schalter auf „ON“
„ON“„ON“
„ON“ gestellt werden.
(Verwenden Sie diesen Schal
(Verwenden Sie diesen Schal(Verwenden Sie diesen Schal
(Verwenden Sie diesen Schalter nicht um das Gerät aus dem laufenden Betrieb auszuschalten!
ter nicht um das Gerät aus dem laufenden Betrieb auszuschalten!ter nicht um das Gerät aus dem laufenden Betrieb auszuschalten!
ter nicht um das Gerät aus dem laufenden Betrieb auszuschalten!
Wenn Sie das Gerät stromlos schalten wollen
Wenn Sie das Gerät stromlos schalten wollenWenn Sie das Gerät stromlos schalten wollen
Wenn Sie das Gerät stromlos schalten wollen, versetzen Sie es
, versetzen Sie es , versetzen Sie es
, versetzen Sie es zuvor in den Standby
zuvor in den Standbyzuvor in den Standby
zuvor in den Standby----Modus!)
Modus!)Modus!)
Modus!)
•
Ein
EinEin
Ein----/Ausschaltknopf (Power)
/Ausschaltknopf (Power)/Ausschaltknopf (Power)
/Ausschaltknopf (Power)
Befindet der Receiver sich im Standby-Modus, drücken Sie den Ein
EinEin
Ein----/Ausschaltknopf
/Ausschaltknopf/Ausschaltknopf
/Ausschaltknopf um das Gerät einzuschalten
(die Meldung „boot“ erscheint im Display, nach erfolgreichem Startvorgang befindet sich der Receiver auf dem
zuletzt geschauten Sender). Wird die Taste während des Betriebs betätigt, geht der Receiver in den Standby-Modus.
Die jeweiligen Tasten und Anschlüsse des Gerätes und der Fe
Die jeweiligen Tasten und Anschlüsse des Gerätes und der FeDie jeweiligen Tasten und Anschlüsse des Gerätes und der Fe
Die jeweiligen Tasten und Anschlüsse des Gerätes und der Fernbedienung sind auf Seite 7 und 8
rnbedienung sind auf Seite 7 und 8rnbedienung sind auf Seite 7 und 8
rnbedienung sind auf Seite 7 und 8 beschrieben!
beschrieben!beschrieben!
beschrieben!
1.7 In den Menüs navigieren
In den Menüs navigieren Sie mit den Tasten
CH+, CH
CH+, CHCH+, CH
CH+, CH
----
, V+, V
, V+, V, V+, V
, V+, V
----
.
Gewählte Menüpunkte werden damit ausgewählt, geändert,
oder markiert.
Mit der OK
OKOK
OK-Taste erfolgt die Auswahl/Bestätigung. Mit der
Back
BackBack
Back-Taste können Sie das Menü verlassen. Änderungen
müssen bei verlassen mancher Menüs zusätzlich bestätigt
werden. In weiteren Untermenüs werden teilweise die
Zahlentasten
ZahlentastenZahlentasten
Zahlentasten benötigt.
So können Sie sich in den Menüs orientieren
So können Sie sich in den Menüs orientierenSo können Sie sich in den Menüs orientieren
So können Sie sich in den Menüs orientieren
• Oben:
Oben:Oben:
Oben: Menü-Name (in der schwarzen Leiste)
• links:
links:links:
links: Hauptmenüs (jedes Menü ist gekennzeichnet
durch ein eigenes Bild welches Sie links oben
erkennen)
• rechts:
rechts:rechts:
rechts: Untermenüs
• Unten:
Unten:Unten:
Unten: eine Informationsleiste die Ihnen zeigt
welche Funktion die jeweilige Taste im aktuellen
Menü hat
Page 46

Bedienungsanleitung
9
DE
1.8 Erstinstallation
Bei der ersten Inbetriebnahme des TRIAX S
-
HD 11
erscheint auf dem TV
-
Bildschir
m der Installationsassistent.
Wählen Sie hier Ihre bevorzugten Einstellungen, mit der blauen Taste auf der Fernbedienung gelangen Sie zum nächsten Menüpunkt.
Erstinstallation Schrit
Erstinstallation SchritErstinstallation Schrit
Erstinstallation Schrittttt 1:
1:1:
1:
wählen Sie Ihre bevorzugte Sprache.
Erstinstallation Schritt 2:
Erstinstallation Schritt 2:Erstinstallation Schritt 2:
Erstinstallation Schritt 2:
wählen Sie die entsprechende Zeitzone (GMT +01:00 = Sommerzeit für Mitteleuropa / GMT +00:00 = Winterzeit für Mitteleuropa).
Erstinstallation Schritt 3:
Erstinstallation Schritt 3:Erstinstallation Schritt 3:
Erstinstallation Schritt 3:
wählen Sie passendes Bildschirmformat (empfohlene Einstellung = Vollbild)
und Bildauflösung (empfohlene Einstellung = automatisches erkennen).
Erstinstallation Schritt 4:
Erstinstallation Schritt 4:Erstinstallation Schritt 4:
Erstinstallation Schritt 4:
Mit der „OK“ Taste wählen Sie hier Ihre bevorzugten Satelliten aus. Ausgewählte Satelliten sind mit einem grünen Häckchen markiert.
(Der Receiver hat im Auslieferungszustand die Programmlisten von Astra 19,2°E / Eutelsat 16°E / Hotbird 13°E / Türksat 42E
vorprogrammiert)
Nach betätigen der blauen Taste fragt das Gerät ob die Einstellungen gespeichert werden sollen. Mit Auswahl von und Bestätigung von „Ja“
werden die zuvor festgelegten Daten gespeichert und die Erstinstallation ist beendet. Der Receiver befindet danach im TV Modus.
Page 47

Bedienungsanleitung
DE
10
2. Bedienung im TV- und Radiobetrieb
In nachfolgenden Kapiteln
we
rden die grundlegenden Funktionen und die Bedienung im TV
- und
Radiomodus beschrieben.
2.1 Lautstärkeregelung und Stummschaltung
• Lautstärkeregelung
LautstärkeregelungLautstärkeregelung
Lautstärkeregelung
Während des TV-Betriebs regeln Sie die Lautstärke mit der V- und V+ Taste der Fernbedienung.
Die Lautstärke wird über eine Anzeige von 0-100 dargestellt.
• Stummschaltung
StummschaltungStummschaltung
Stummschaltung
Mit der MUTE
MUTEMUTE
MUTE Taste lässt sich das Gerät stumm schalten. Es erfolgt dann keine Tonausgabe, gekennzeichnet durch einen
durchgestrichenen Lautsprecher. Nochmaliges betätigen der Taste beendet die Stummschaltung.
2.2 Programme umschalten
Nachfolgend wird Ihnen erklärt wie Sie beim S-HD 11 die Programme umschalten.
• betätigen Sie während des TV-Betriebes die CH+
CH+CH+
CH+ Taste um ein Programm hoch schalten und CH
CHCH
CH---- um ein Programm
herunter zu schalten.
• betätigen Sie während des TV Betriebes die OK
OKOK
OK Taste um die Kanalliste anzuzeigen.
Mit CH+
CH+ CH+
CH+ und CH
CHCH
CH---- können Sie die einzelnen Programme anwählen, mit V+ und V- können Sie seitenweiße in der Liste blättern.
Mit OK
OK OK
OK wählen Sie das entsprechende Programm aus, mit BACK
BACKBACK
BACK verlassen Sie die Kanalliste.
.
•
geben Sie über das Ziffernfeld der Fernbedienung den gewünschten Kanal ein. Nach Eingabe schält das Gerät in ca. 3 Sekunden
auf den gewünschten Kanal. Während dieses Zeitfensters ist eine Korrektur noch möglich falls man sich vertippt hat. Betätigen Sie
OK nach Eingabe des gewünschten Senders damit das Gerät sofort umschaltet.
• Mit der BACK
BACKBACK
BACK Taste können Sie auf das zuletzt angeschaute Fernsehprogramm zurück schalten
Page 48

Bedienungsanleitung
11
DE
2.3 Satellitenliste wechseln / Favoritenliste auswählen / Programmgruppen / Suchfunktion
Satellitenliste wechseln:
Satellitenliste wechseln: Satellitenliste wechseln:
Satellitenliste wechseln:
Betätigen Sie während des TV Betriebes die OK
OKOK
OK Taste um die Kanalliste anzuzeigen.
Mit der roten
rotenroten
roten Taste öffnet sich die Satellitenliste. Wählen Sie mit CH+
CH+CH+
CH+ und CH
CHCH
CH---- den gewünschten Satelliten und bestätigen Sie mit OK
OKOK
OK.
Es befinden sich nun nur die Programme vom jeweilig ausgewählten Satelliten in der Kanalliste.
Wenn Alle Satelliten gewählt ist, befinden sich die wichtigsten Programme aller vorinstallierten Satelliten in der Kanalliste.
Favoritenliste wählen:
Favoritenliste wählen: Favoritenliste wählen:
Favoritenliste wählen:
Betätigen Sie während des TV Betriebes die OK
OKOK
OK Taste um die Kanalliste anzuzeigen.
Mit der grünen
grünengrünen
grünen Taste öffnet sich ein Fenster in welchem die angelegten Favoritenlisten anwählbar sind.
Sie navigieren mit CH+
CH+CH+
CH+ und CH+
CH+CH+
CH+ und wählen mit OK
OKOK
OK aus.
(Sollte eine Liste ausgewählt werden in dem keine Sender als Favorit hinterlegt sind, meldet das Gerät „kein Programm“!
(Sollte eine Liste ausgewählt werden in dem keine Sender als Favorit hinterlegt sind, meldet das Gerät „kein Programm“!(Sollte eine Liste ausgewählt werden in dem keine Sender als Favorit hinterlegt sind, meldet das Gerät „kein Programm“!
(Sollte eine Liste ausgewählt werden in dem keine Sender als Favorit hinterlegt sind, meldet das Gerät „kein Programm“!
Wie Sie Favoritenlisten verwalten und anlegen
Wie Sie Favoritenlisten verwalten und anlegen Wie Sie Favoritenlisten verwalten und anlegen
Wie Sie Favoritenlisten verwalten und anlegen kann in Kapitel 3.3.2
kann in Kapitel 3.3.2 kann in Kapitel 3.3.2
kann in Kapitel 3.3.2 nachgelesen werden)
nachgelesen werden)nachgelesen werden)
nachgelesen werden)
Programmgruppen
ProgrammgruppenProgrammgruppen
Programmgruppen:
Mit betätigen der blauen
blauenblauen
blauen Taste öffnet sich ein Fenster in welchem Prgrammgruppen ausgewählt werden können.
Wird hier eine Auswahl getroffen filtert das Gerät die Kanalliste entsprechend. Wählen Sie hier z.B. FTA
FTAFTA
FTA und das Gerät sortiert alle
verschlüsselten Programme aus der Kanalliste aus
Page 49

Bedienungsanleitung
DE
12
Suchfunktion:
Suchfunktion:Suchfunktion:
Suchfunktion:
Mit betätigen der gelben Taste öffnet sich ein Fenster in welchem Sie nach spezifischen Sendern in der Kanalliste suchen können.
Wählen Sie mit CH+ CH
CH+ CHCH+ CH
CH+ CH---- V+ V
V+ VV+ V
V+ V---- und bestätigen Sie mit OK
OKOK
OK. Am unteren Rand des Fensters werden die Funktionen der farbigen Tasten
beschrieben. Die Eingabe wird oben in der blauen Leiste dargestellt, links aktualisiert sich die Kanalliste entsprechend der Eingaben.
2.4 TV und Radiomodus
Mit der TV/R
TV/RTV/R
TV/R Taste können Sie zwischen Fernseher und der Radio-Modus umschalten
Der Receiver überträgt bei der Radio-Übertragung ein Radioprogramm und zeigt ein Hintergrundbild an.
Um vom der Radio-Modus zum Fernsehprogramm zurück zu schalten betätigen Sie erneut die TV/R
TV/RTV/R
TV/R Taste
TV/Radio-Taste.
2.5 Programminformationen
Betätigen Sie während des TV Betriebs die INFO Taste um Informationen zum aktuellen Programm aufzurufen.
Diese Informationsleiste erscheint auch bei einem Programmwechsel. (siehe linkes Bild)
Betätigen Sie INFO nochmals um detaillierte Programminformationen aufzurufen. (siehe rechtes Bild)
Page 50

Bedienungsanleitung
13
DE
2.6 Programmsprache / Audioeinstellungen
Mit der AUDIO
AUDIOAUDIO
AUDIO Taste öffnet sich ein Menü wo Sie die Audiospur/Sprache des jeweilig laufenden Programms ändern können
(Wenn vom Sender angeboten). Des Weiteren kann hier mit V+ V
V+ VV+ V
V+ V---- der Tonmodus auf Stereo oder Mono (links/rechts) gestellt werden.
2.7 Farbige Tasten und deren Funktion während des TV- und Radiobetriebs
• rrrrote Taste
ote Taste ote Taste
ote Taste –––– ändert die Bildschirmauflösung.
Achtung! Sollten Sie eine Auflösung wählen die Ihr TV Gerät nicht unterstützt kann dies zum Bildverlust führen.
Achtung! Sollten Sie eine Auflösung wählen die Ihr TV Gerät nicht unterstützt kann dies zum Bildverlust führen.Achtung! Sollten Sie eine Auflösung wählen die Ihr TV Gerät nicht unterstützt kann dies zum Bildverlust führen.
Achtung! Sollten Sie eine Auflösung wählen die Ihr TV Gerät nicht unterstützt kann dies zum Bildverlust führen.
Betätigen Sie in diesem
Betätigen Sie in diesem Betätigen Sie in diesem
Betätigen Sie in diesem Fall die Taste nochmals und warten Sie einen Moment. Sollte sich das Bild immer noch nicht wieder aufbauen
Fall die Taste nochmals und warten Sie einen Moment. Sollte sich das Bild immer noch nicht wieder aufbauen Fall die Taste nochmals und warten Sie einen Moment. Sollte sich das Bild immer noch nicht wieder aufbauen
Fall die Taste nochmals und warten Sie einen Moment. Sollte sich das Bild immer noch nicht wieder aufbauen
wiederholen Sie den Vorgang
wiederholen Sie den Vorgangwiederholen Sie den Vorgang
wiederholen Sie den Vorgang.
• grüne Taste
grüne Taste grüne Taste
grüne Taste –––– nicht belegt.
• gelbe Taste
gelbe Taste gelbe Taste
gelbe Taste –––– nicht belegt.
• blaue Taste
blaue Taste blaue Taste
blaue Taste –––– öffnet das Timermenü in dem Aufnahmen programmiert werden können (Aufnahmen können nur programmiert
werden wenn die PVR-Funktion erworben und aktiviert wurde. Das Gerät kann im Auslieferungszustand nicht
nichtnicht
nicht aufnehmen, weitere
Infos finden Sie in Kapitel 4 !)
Page 51

Bedienungsanleitung
DE
14
2.8 Elektronischer Programmführer (EPG – Electronic Program Guide)
EPG liefert Programminformationen in Tabellenform, falls diese vom Sender zur Verfügung gestellt werden.
Es werden Informationen zur Sendezeit und zum Programminhalt geliefert. Mit den Tasten V+, V
V+, VV+, V
V+, V-, und CH+, CH
CH+, CHCH+, CH
CH+, CH---- navigieren Sie in der EPG-
Tabelle. Zusätzliche Informationen über eine Sendung/Programm erhalten Sie, indem Sie die jeweilige Sendung markieren und dann die INFO
INFOINFO
INFO
Taste drücken. Es öffnet sich dann ein Informationsfenster mit detaillierten Angaben zur jeweiligen Sendung. Sollten auf bestimmten
Programmen keine Informationen zu den Sendungen stehen muss auf das jeweilige Programm gewechselt werden,
die Daten werden dann automatisch geladen.
1.
1.1.
1. Beschreibung der aktuellen Ansicht
2.
2.2.
2. Programminformationen (aktueller Sender, Laufzeit der Sendung, Name der Sendung, Datum und aktuelle Uhrzeit)
3.
3.3.
3. Aktuell gewählte Sendung
4.
4.4.
4. Aktuell gewählter Sender
5.
5.5.
5. Funktionen der farbigen Tasten
Ansicht wechseln:
Ansicht wechseln:Ansicht wechseln:
Ansicht wechseln:
Der EPG-Modus des S-HD 11 bietet verschiedene Ansichtsoptionen die mit der roten Taste gewechselt werden können.
Die Navigation und Bedienung erfolgt nach dem gleichen Schema wie weiter oben bereits beschrieben.
Jetzt/Danach Ansicht:
Jetzt/Danach Ansicht:Jetzt/Danach Ansicht:
Jetzt/Danach Ansicht:
In diesem Modus wird tabellarisch übersichtlich dargestellt welche Sendung aktuell läuft und welche im Anschluss danach folgt.
Page 52

Bedienungsanleitung
15
DE
Elektronischer Programmfüher – Fortsetzung
Wochenansicht:
Wochenansicht:Wochenansicht:
Wochenansicht:
In diesem Modus kann Tageweiße geblättert werden und Programminformationen von künftig laufenden Sendungen abgerufen werden.
Mit der blauen
blauenblauen
blauen Taste blättern Sie einen Tag vor, mit der gelben
gelbengelben
gelben einen Tag zurück.
Tagesansicht:
Tagesansicht: Tagesansicht:
Tagesansicht:
In diesem Modus wird das Tagesprogramm eines jeweiligen Senders tabellarisch übersichtlich dargestellt.
Mit der gelben
gelbengelben
gelben und bla
blabla
blauen
uenuen
uen Taste kann ebenfalls Tageweiße geblättert werden.
Mit CH+
CH+CH+
CH+ und CH
CHCH
CH---- wechseln Sie zwischen Senderspalte und Sendungsinformations-Spalte.
Page 53

Bedienungsanleitung
DE
16
2.9 Teletext
Mit der TEXT
TEXTTEXT
TEXT Taste der Fernbedienung gelangen Sie in den Teletext Modus.
Bedienung im Teletext Modus
Bedienung im Teletext ModusBedienung im Teletext Modus
Bedienung im Teletext Modus
• Über die Zifferntasten
ZifferntastenZifferntasten
Zifferntasten kann eine individuelle Teletextseite aufgerufen werden. Ihre Eingabe wird oben am Rand dargestellt.
• Mit der CH+
CH+ CH+
CH+ und CH
CHCH
CH---- Taste können einzelne Seiten geblättert werden.
• Drücken Sie die OK
OKOK
OK Taste um die Transparenz des Teletext einzustellen.
• Manche Teletextseiten beinhalten noch Unterseiten. Diese können mit V+
V+ V+
V+ und VVVV---- gewechselt manuell gewechselt werden.
• Die farbigen
farbigenfarbigen
farbigen Tasten dienen ebenfalls der Navigation, die Funktionen sind senderabhängig und werden im unter Rand angezeigt.
• Mit nochmaligem betätigen der TEXT
TEXTTEXT
TEXT Taste verlassen Sie den Teletext.
2.10 Untertitel
Untertitel sind werksseitig deaktiviert beim S
-HD 11. Um diese zu aktivieren betätigen Sie die SUB
SUBSUB
SUB Taste der Fernbedienung.
- navigieren Sie, mit OK treffen Sie die Auswahl.
(Ob ein Untertitel angeboten wird ist senderabhängig. Teilweise sind auch mehrere Sprachen auswählbar.)
Page 54

Bedienungsanleitung
17
DE
3 Hauptmenü
Über das Hauptmenü lassen sich sämtliche Einstellung vom Gerät vornehmen, drücken Sie die MENU
MENUMENU
MENU Taste aus dem laufenden TV- oder
Radiobetrieb um dorthin zu gelangen. In nachfolgenden Kapiteln werden alle Menüpunkte und Einstellungen beschrieben.
3.1 Installation (Symbol: Antenne)
.
Das Installationsmenü umfasst Optionen die hauptsächlich die Empfangseinstellungen festlegen.
Das Menü ist werksseitig mit einem Passwort geschützt (0000) welches unter „Systemeinstellungen/Menüs sperren“
geändert oder deaktiviert werden kann.
• Antenneneinstellungen
Antenneneinstellungen Antenneneinstellungen
Antenneneinstellungen – festlegen der empfangsrelevanten Einstellungen und Sendersuchlauf
• Satellitenliste
Satellitenliste Satellitenliste
Satellitenliste –––– Auswahl der Satelliten
• Transponder Liste
Transponder Liste Transponder Liste
Transponder Liste –––– Transponder hinzufügen/bearbeiten, Transpondersuchlauf
• Motorein
MotoreinMotorein
Motoreinstellung
stellung stellung
stellung –––– Einstellungen bei Verwendung eines Motors zum Mehrsatellitenempfang
• Begrenzung
Begrenzung Begrenzung
Begrenzung –––– erweiterte Einstellungen bei Verwendung eines Motors zum Mehrsatellitenempfang
Page 55

Bedienungsanleitung
DE
18
3.2 Antenneneinstellungen
Erklärung der einz
Erklärung der einzErklärung der einz
Erklärung der einzeeeelnen Menüpunkte:
lnen Menüpunkte: lnen Menüpunkte:
lnen Menüpunkte:
• Satellit
Satellit Satellit
Satellit –––– Satellitenauswahl. Hier werden die Satelliten gelistet, welche im Untermenü Satellitenliste aktiviert sind.
• LNB Typ
LNB Typ LNB Typ
LNB Typ –––– Auswahl des LNB Typs, Standard und für die meisten Empfangsarten geeignet ist „Ku Band“
• LNB Frequenz
LNB Frequenz LNB Frequenz
LNB Frequenz –––– Auswahl der LOF-Frequenz, Standard und für die meisten Empfangsarten geeignet ist 9750/10600
• Transponder
TransponderTransponder
Transponder –––– Liste der programmierten Transponder
• 22KHz
22KHz22KHz
22KHz –––– ein-/ausschalten des 22 Khz Signals für Multischalterbetrieb
• LNB
LNB LNB
LNB Stromversorgung
Stromversorgung Stromversorgung
Stromversorgung – ein-/ausschalten der LNB-Versorgungsspannung
• Tone Burst Mode
Tone Burst ModeTone Burst Mode
Tone Burst Mode –––– Auswahl des Tone Burst Modus zur Satellitenumschaltung
• DiSEqC
DiSEqCDiSEqC
DiSEqC – Einstellungen für Mehrsatelliten-Empfang
3.2.1 Antenneneinstellungen - Unicable
Der S-HD 11 unterstützt sowohl Unicable 1 (EN50494) als auch den Unicable 2 (EN 50607) Standard. Bei Verwendung eines Unicable
Systems muss der Receiver entsprechend programmiert werden, mit den werksseitigen Einstellungen lässt sich sonst kein Signal
empfangen.
Unicable Einstellung:
Unicable Einstellung: Unicable Einstellung:
Unicable Einstellung:
• wählen Sie bei „LNB Typ“
„LNB Typ“„LNB Typ“
„LNB Typ“ Unicable, bzw. Jess, je nach angewendetem System
• nun erscheint weiter unter ein Menüpunkt „ZF Freq“
„ZF Freq“„ZF Freq“
„ZF Freq“, wählen sie diesen an und öffnen Sie mit OK
OK OK
OK oder V+
V+ V+
V+ die Unicable-Einstellungen
• wählen Sie hier den entsprechenden Kanal bei „ZF Index“
„ZF Index“„ZF Index“
„ZF Index“ und die dazugehörige Frequenz bei „ZF Frequenz“
„ZF Frequenz“„ZF Frequenz“
„ZF Frequenz“
Bei Unicable Systemen bekommt jeder Receiver seinen Kanal und seine Frequenz zugeordnet. Die verwendeten Frequenzen unterscheiden
sich je nach Hersteller des Unicable Systems. Die voreingestellten ersten 8 Frequenzen passen in Verbindung mit Triax Unicable Systemen.
3.2.2 Antenneneinstellungen – Suchlauf durchführen
Wenn die Antenneneinstellungen entsprechend richtig eingestellt sind zeigt Ihnen das Gerät anhand von zwei Balken und einer
Prozentanzeige
an, ob Signal empfangen wird (Qualität) und in welcher Stärke (Signal).
Durch betätigen der blauen
blauenblauen
blauen Taste können Sie einen Programmsuchlauf starten.
Es öffnet sich ein Fenster mit folgenden Einstellmöglichkeiten:
Es öffnet sich ein Fenster mit folgenden Einstellmöglichkeiten: Es öffnet sich ein Fenster mit folgenden Einstellmöglichkeiten:
Es öffnet sich ein Fenster mit folgenden Einstellmöglichkeiten:
• Polarisation
Polarisation Polarisation
Polarisation –es kann festgelegt werden ob der Receiver das horizontale- oder vertikale Band absuchen soll, oder beide
• Netzwerk Suchlauf
Netzwerk Suchlauf Netzwerk Suchlauf
Netzwerk Suchlauf – intelligenter Suchlauf ein- ausschalten, Gerät frägt beim Suchlauf Daten ab um zusätzliche Transponder zu
finden die nicht im Gerät abgespeichert sind wenn aktiviert
• Programmtyp
ProgrammtypProgrammtyp
Programmtyp – FTA = nur frei empfangbare Programme werden gesucht, Alles = auch verschlüsselte Sender werden gesucht
• Suchmodus
Suchmodus Suchmodus
Suchmodus – Sat-Voreinstellung = Receiver sucht alle Transponder ab welche im Gerät hinterlegt sind
Automatischer Suchlauf = Blindscan, Receiver sucht komplettes Sat-Band durch
Sat-Voreinstellung = Receiver sucht alle Transponder ab welche im Gerät hinterlegt sind
Transponder Suche = Receiver sucht nur den Transponder ab welcher bei Antenneneinstellung aktuell angewählt ist
Wenn Sie Ihre Einstellungen getroffen haben starten Sie den Suchlauf mit der OK
OKOK
OK Taste.
Page 56

Bedienungsanleitung
19
DE
3.2.3 Satellitenliste
Die Satellitenliste zeigt alle Satelliten auf die im Gerät hinterlegt sind. Sie können nun mit der OK
OKOK
OK Taste die gewünschten Satelliten aktivieren
oder deaktivieren. Die Markierung wird durch ein Häkchen dargestellt.
Mit den farbigen Tasten lassen sich folgende Eistellungen durchführen:
Mit den farbigen Tasten lassen sich folgende Eistellungen durchführen: Mit den farbigen Tasten lassen sich folgende Eistellungen durchführen:
Mit den farbigen Tasten lassen sich folgende Eistellungen durchführen:
• rote Taste
rote Tasterote Taste
rote Taste – wenn gewünschter Satellit nicht in der Liste ist können Sie diesen hier hinzufügen
• grüne Taste
grüne Tastegrüne Taste
grüne Taste – vorhandenen Satelliten ändern/bearbeiten
• gelbe Taste
gelbe Tastegelbe Taste
gelbe Taste – vorhandenen Satelliten löschen
• blaue Taste
blaue Taste blaue Taste
blaue Taste – Programmsuche auf den zuvor markierten Satelliten
3.2.4 Transponder-Liste
Die Transponderliste beinhaltet alle im Gerät hinterlegten Transponder.
folgende Einstellungen lassen sich vornehmen:
folgende Einstellungen lassen sich vornehmen: folgende Einstellungen lassen sich vornehmen:
folgende Einstellungen lassen sich vornehmen:
• ■ Taste
Taste Taste
Taste –––– Auswahl des Satelliten.
• rote Taste
rote Tasterote Taste
rote Taste – Transponder hinzufügen, ein Fenster öffnet sich in dem die entsprechenden Empfangsparameter eingegeben werden.
• Mit betätigen der OK Taste wird der Transponder hinzugefügt.
• grüne Taste
grüne Tastegrüne Taste
grüne Taste – einen vorhandenen Transponder abändern.
• gelbe Taste
gelbe Tastegelbe Taste
gelbe Taste – einen vorhandenen Transponder löschen.
• blaue Taste
blaue Tasteblaue Taste
blaue Taste – auf aktuell angewähltem Transponder Suchlauf durchführen. Es öffnet sich ein Fenster nach gleichem Schema wie
in Kapitel 3.1.3 beschrieben. Polarisation und Suchmodus sind hier nicht verfügbar da dies bereits durch Auswahl des
Transponders festgelegt wird.
Page 57

Bedienungsanleitung
DE
20
3.2.5 Motoreinstellung
Wenn Ihre Satellitenanlage über einen Motor zum Empfang unterschiedlicher Satelliten ausgestattet ist kann dies hier konfiguriert werden.
• Satellit
SatellitSatellit
Satellit –––– wählen Sie den gewünschten Satelliten
• Transponder:
Transponder:Transponder:
Transponder: Auswahl des Transponders
• Motor
MotorMotor
Motoreinstellung
einstellung einstellung
einstellung –––– USALS oder Diseq 1.2 anwählbar
3.2.6 Motor Begrenzung
Einstellung der Begrenzung
Einstellung der BegrenzungEinstellung der Begrenzung
Einstellung der Begrenzung
• Begrenzung
BegrenzungBegrenzung
Begrenzung:::: zu Festlegung der östlichen und westlichen Begrenzung des Drehradius
• Verschieben fortsetzen
Verschieben fortsetzen Verschieben fortsetzen
Verschieben fortsetzen –––– mit VVVV---- und V+
V+V+
V+ wählen Sie östliche oder Westliste Drehrichtung (dreht kontinuierlich bis Stop
StopStop
Stop gewählt wird)
• Schritt Bewegen
Schritt Bewegen Schritt Bewegen
Schritt Bewegen –––– mit VVVV---- und V+
V+V+
V+ wählen Sie Östliche oder Westliste Drehrichtung (jeder Tastendruck dreht Antenne ein Stück)
Page 58

Bedienungsanleitung
21
DE
3.3 Programm (Symbol: Zahnräder)
Im Folgenden werden die Menüpunkte des Hauptmenüpunkts „Programm“ beschrieben.
Das Menü umfasst sämtliche Einstellungen zum Verwalten der Programme.
3.3.1 Kanal-Manager (Senderliste verwalten)
Über den Kanalmanager lassen sich die gespeicherten Programme verwalten.
Sie navigieren mit CH+/- die einzelnen Programme hoch und runter, mit V+/- kann seitenweiße geblättert werden.
Folgende Funktionen stehen dabei zur Auswahl:
Folgende Funktionen stehen dabei zur Auswahl: Folgende Funktionen stehen dabei zur Auswahl:
Folgende Funktionen stehen dabei zur Auswahl:
■
Taste – Auswahl des Satelliten.
rote Taste
rote Tasterote Taste
rote Taste – Das ausgewählte Programm mit einer Sperre versehen. Das Gerät fragt das aktuell hinterlegte Kennwort ab (Im Werkszustand
0000). Bei Auswahl des Programms im TV Betrieb muss nun das Kennwort eingegeben werden um den Sender zu entsperren.
Gesperrte Programme werden mit einem roten Häckchen markiert.
grüne Taste
grüne Tastegrüne Taste
grüne Taste – ausgewähltes Programm löschen.
gelbe Taste
gelbe Tastegelbe Taste
gelbe Taste – Programme versschieben. Wählen Sie das entsprechende Programm mit OK
OKOK
OK an, die Auswahl wird durch ein gelbes Häckchen
markiert. Wählen Sie nun die Stelle wohin es verschoben werden soll. Mit betätigen der gelben Taste
gelben Tastegelben Taste
gelben Taste wird das Programm dorthin verschoben.
blaue Taste
blaue Tasteblaue Taste
blaue Taste – ermöglicht weitere Funktionen wie Sortierung der Programme, überspringen von Programmen, eine Suchfunktion (Finden) und
die Umbenennung einzelner Programme.
Page 59

Bedienungsanleitung
DE
22
3.3.2 Favorit (Favoritenlisten verwalten)
Der Receiver ermöglicht das Anlegen von insgesamt 8 unterschiedlichen Favoritenlisten. Im Menü Favorit können Sie Ihre Favoriten
festlegen, löschen, oder umgruppieren. Sie navigieren mit CH+/
CH+/CH+/
CH+/---- die einzelnen Programme hoch und runter, mit V+/
V+/V+/
V+/---- kann seitenweiße
geblättert werden.
Wählen Sie das gewünschte Programm und legen Sie mit den Zifferntasten 1
Zifferntasten 1Zifferntasten 1
Zifferntasten 1----8888 fest in welche Favoritenliste das Programm übernommen
werden soll. Die Auswahl wir durch ein rotes Häckchen an entsprechender Stelle dargestellt.
Mit der ■ Taste kann der gewünschte Satellit gewählt werden.
3.3.3 Alle Kanäle löschen
Unter diesem Menüpunkt können Sie sämtliche gespeicherten Kanäle löschen.
Nach Anwahl über die OK
OKOK
OK Taste folgt nochmals ein Hinweis ob die Kanäle wirklich gelöscht werden sollen.
Treffen Sie V+/
V+/V+/
V+/---- Ihre Wahl und bestätigen Sie mit OK
OKOK
OK.
Page 60

Bedienungsanleitung
23
DE
3.4 Systemeinstellungen
Unter den Systemeinstellungen lassen sich grundlegende Einstellungen vornehmen.
Nachfolgende Kapitel beschreiben Ihnen die Einstellungsmöglichkeiten.
3.4.1 Sprache
Legen Sie hier die Menüsprache fest. Mit Betätigung von OK
OKOK
OK oder V+
V+V+
V+ öffnet sich die Liste in der die gewünschte Sprache gewählt werden
kann.
Der Receiver unterstützt folgende Sprachen:
Der Receiver unterstützt folgende Sprachen:Der Receiver unterstützt folgende Sprachen:
Der Receiver unterstützt folgende Sprachen:
Deutsch, Französisch, Dänisch, Englisch, Arabisch, Polnisch , Türkisch, Russisch, Portugiesisch, Spanisch, Italienisch, Ungarisch
3.4.2 OSD Transparenz
Hier kann die Menütransparenz eingestellt werden.
Mit Betätigung von OK
OKOK
OK oder V+
V+V+
V+ öffnet sich die Liste in der die gewünschte Transparenz gewählt werden kann.
Je höher der gewählte Wert desto transparenter wird das Menü dargestellt.
Page 61

Bedienungsanleitung
DE
24
3.4.3 Erster Audiokanal / Zweiter Audiokanal
Manche Sender bieten Tonspuren in unterschiedlichen Sprachen an. Die Auswahl der Sprache bei “Erster Audiokanal” wird grundsätzlich
bevorzugt. Wenn diese Sprache nicht gesendet wird greift die Sprache welche bei „Zweiter Audiokanal“ eingestellt ist.
3.4.4 Menü sperren (Kindersicherung)
Hier können Sie das Sicherheitskennwort aktivieren/deaktivieren. Standardmäßig ist das Kennwort aktiviert. Das Kennwort ist erforderlich bei
diversen Aktionen welche Einfluss auf die Funktionalität des Gerätes haben können. Dazu gehört z.B. der Menüpunkt Installation in welchem
die Grundlegenden Empfangseinstellungen festgelegt sind. Außerdem wird das Kennwort bei gesperrten Sendern abgefragt, welche im
Kanalmanager (Siehe Kapitel 3.3.1) entsprechend markiert wurden.
Wenn Sie das Kennwort ändern wollen, wählen Sie „Pinnummer ändern“.
Nun muss das aktuelle Passwort eingegeben werden, ein Neues vergeben werden und das neue Kennwort zur Bestätigung wiederholt
werden.
3.4.5 Lokale Zeiteinstellungen
Hier können Sie die Datum- und Uhrzeiteinstellungen vornehmen. Voreingestellt ist der Datum-Zeit-Modus „Auto“ (=empfohlene Einstellung).
Der Receiver holt sich Zeit- und aktuelles Datum dann automatisch, es muss lediglich Sommer- oder Winterzeit festgelegt werden.
Für Mitteleuropa Sommer = GMT +01:00 und Winter = GMT 00:00 !
Wenn Datum-Zeit-Modus „manuell“ gewählt ist muss alles manuell eingestellt werden.
Page 62

Bedienungsanleitung
25
DE
3.4.6 Werkseinstellung
Durch Rücksetzung des Receivers auf die Werkseinstellungen werden sämtliche vorgenommene Einstellungen gelöscht und das Gerät
startet wieder im Auslieferungszustand. Die Auswahl erfordert das festgelegte Passwort (siehe Kapitel 3.4.4), bzw. das Standardpasswort
„0000“.
Es folgt ein Warnhinweis der nochmals darauf hindeutet das alle Daten gelöscht werden.
Zur Durchführung wählen Sie „Ja“ und bestätigen Sie mit OK
OKOK
OK.
3.4.7 Software Upgrade
Hier kann ein Softwareupdate oder auch Senderlistenupdate durchgeführt werden.
USB Update:
USB Update:USB Update:
USB Update:
Softwareupdate über USB-Schnittstelle. Laden Sie die entsprechende Software/Senderliste unter www.triax-gmbh.de runter und ziehen Sie
die Dateien auf ein USB-Speichermedium. Schließen Sie das Speichermedium ans Gerät an und warten bis dieses verbunden ist.
Wählen Sie nun mit OK „USB-Update“ an, öffnen Sie das Verzeichnis und wählen Sie die Update Datei an. Das Gerät beginnt mit dem
Updatevorgang und startet anschließend neu.
OTA Update:
OTA Update: OTA Update:
OTA Update:
Softwareupdate über Satellit. Nach Auswahl von „OTA Update“ werden bestimmte Parameter angegeben welche korrekt eingestellt sein
müssen zur Durchführung des Updates. In der Regel sind die notwendigen Daten voreingestellt. Mit Auswahl von OTA Update prüft der
Receiver ob ein Update verfügbar ist. Wenn ein Update vorhanden ist beginnt der Download und Installationsvorgang.
3.4.8 Version
Hier werden Informationen zur Hardware- und Softwarestand des Gerätes angezeigt
Page 63

Bedienungsanleitung
DE
26
3.4.9 Auto Aus
Die Auto Aus Funktion legt fest ab wann der Receiver automatisch abschaltet nachdem er eine gewisse Zeit nicht bedient wurde.
Werksseitig sind 3 Stunden voreingestellt. Die Funktion lässt sich anpassen auf 1 Std. / 2 Std. / 3 Std. / Aus.
3.5 AV - Audio / Videoeinstellungen (Symbol: Chinch-Stecker)
Im AV Menü lassen sich die Einstellungen konfigurieren welche Bild und Ton betreffen.
Das Menü umfasst folgende Einstellungen und Funktionen:
Das Menü umfasst folgende Einstellungen und Funktionen: Das Menü umfasst folgende Einstellungen und Funktionen:
Das Menü umfasst folgende Einstellungen und Funktionen:
• Kontrast
KontrastKontrast
Kontrast – Festlegung des Kontrast mit V+/-
• Helligkeit
HelligkeitHelligkeit
Helligkeit – Festlegung der Helligkeit mit V+/-
• Sättigung
SättigungSättigung
Sättigung – Festlegung der Sättigung mit V+/-
• Farbe
FarbeFarbe
Farbe – Festlegung des Farbtons mit V+/-
3.5.1 Digitaler Audioausgang
Wählen Sie die Ausgabe des digitalen Audioausgangs.
• Stumm
StummStumm
Stumm – keine Audioausgabe über digitalen Ausgang
• PCM
PCMPCM
PCM – Ausgabe als PCM
• Bitstromzugang
BitstromzugangBitstromzugang
Bitstromzugang – Ausgabe als Bitstream
3.5.2 Bildschirm-Format
Legen Sie hier das passende Bildschirmformat fest (empfohlene Einstellung = Vollbild).
3.5.3 Bildschirmauflösung
Legen Sie hier die passende Bildschirmauflösung für Ihr TV-Gerät fest (empfohlene Einstellung = automatisches Erkennen)
Page 64

Bedienungsanleitung
27
DE
4 Aufnahme / Multimedia
4.1 Aufnahme
Hinweis
HinweisHinweis
Hinweis: Der S-HD 11 hat im Auslieferungszustand keine PVR
keine PVRkeine PVR
keine PVR----Funkion
FunkionFunkion
Funkion! Die Aufnahmefunktion kann kostenpflichtig nachgerüstet werden.
Wenden Sie sich hierfür bitte per Mail an service_de@triax.com .
Nach Aktivierung stehen Ihnen zusätzlich folgende Funktionen zur Verfügung:
Nach Aktivierung stehen Ihnen zusätzlich folgende Funktionen zur Verfügung: Nach Aktivierung stehen Ihnen zusätzlich folgende Funktionen zur Verfügung:
Nach Aktivierung stehen Ihnen zusätzlich folgende Funktionen zur Verfügung:
• Aufnahme- und Wiedergabefunktion
• Timeshift-Funktion
• Multimedia-Modus zur Verwaltung und Wiedergabe von Audio,- Video,- und Bilddateien
Außerdem steht ein weiterer Hauptmenüpunkt „Aufnahme Multimedia zur Verfügung.
Für die Aufnahme muss ein USB-Speichermedium am USB-Eingang an der Front des Receivers angeschlossen werden.
Nach erfolgreicher Verbindung meldet das Gerät „USB-Speichergerät ist verbunden“.
Durch betätigen der Aufnahmetaste Taste ( ) kann nun das laufende TV-Programm aufgezeichnet werden, der Receiver meldet
„Aufnahme gestartet“. Durch nochmaliges betätigen der Taste kann die Aufnahmedauer festgelegt werden. Wählen Sie mit den Cursortasten
CH+/
CH+/CH+/
CH+/---- und V+/
V+/V+/
V+/---- oder über die Zahlen
ZahlenZahlen
Zahlentasten
tastentasten
tasten 0000----9999 die entsprechende Dauer und bestätigen Sie Ihre Eingabe mit der OK
OKOK
OK Taste.
Mit der INFO Taste können
Informationen zur laufenden Aufnahme angezeigt werden.
Mit der ■ Taste kann die Aufnahme beendet werden, es öffnet sich ein Fenster, wählen Sie die Aufnahme mit OK
OKOK
OK an um diese zu beenden.
Page 65

Bedienungsanleitung
DE
28
4.2 Timeshift
Mit der Timeshift-Funktion können Sie ein laufendes Programm unterbrechen und zu einem späteren Zeitpunkt weitersehen, betätigen Sie
hierfür die PAUSE
PAUSEPAUSE
PAUSE Taste . Der Receiver nimmt das Programm auf das USB-Speichermedium vorrübergehend auf. Das angezeigte Bild wird
eingefroren, so dass Sie an dieser Stelle weitersehen können. Sobald Sie die Sendung weiter sehen wollen, drücken Sie die Wiedergabe-Taste
►.
Sie sehen das Programm nun von diesem Zeitpunkt ab, von dem Sie die PAUSE
PAUSE PAUSE
PAUSE Taste gedrückt hatten.
Im Hauptmenü unter Aufnahme/Multimedia lassen sich die Timeshift Einstellungen vornehmen. Es stehen drei Optionen zur Verfügung.
PAUSE
PAUSEPAUSE
PAUSE – über die PAUSE Taste läst sich eine Sendung anhalten und zu einem späteren Zeitpunkt fortsetzen.
AUTO
AUTOAUTO
AUTO – das Gerät nimmt zusätzlich kontinuierlich im Hintergrund auf sodass eine laufende Sendung bei Bedarf zurückgespult werden kann
Aus
AusAus
Aus – Timeshift Funktion ist deaktiviert.
4.3 Wiedergabe von Aufnahmen
Im Multimedia Menü „Film“ und „Aufnahmemanager“ können Sie Ihre Aufnahmen auswählen und wiedergeben (siehe Kapitel 4.5 und 4.6).
Nach Start der Aufnahme zeigt Ihnen ein Informationsfenster kurzzeitig Informationen zur Aufnahme an.
Während der Wiedergabe
Während der Wiedergabe Während der Wiedergabe
Während der Wiedergabe stehen folgende Funktionen zur Verfügung:
stehen folgende Funktionen zur Verfügung:stehen folgende Funktionen zur Verfügung:
stehen folgende Funktionen zur Verfügung:
• Taste – pausieren der Wiedergabe
• ► Taste – fortsetzen der Wiedergabe
• FFW
FFWFFW
FFW Taste – vorspulen (mehrmaliges drücken der Taste erhöht Geschwindigkeit)
• FRW
FRWFRW
FRW Taste – zurückspulen (mehrmaliges drücken der Taste erhöht Geschwindigkeit)
• ■ Taste – Beenden der Wiedergabe
Für den Schnellzugriff auf Ihre Aufnahmen betätigen Sie während des TV
-
Betriebes die
USB
USBUSB
USB Taste.
Nach Auswahl des Speicherverzeichnis‘ gelangen Sie in die Aufnahmeliste wo all Ihre Aufzeichnungen gelistet sind und diese ausgewählt
werden können. Aus einer laufenden Aufnahme heraus kann mit ►►I und I◄◄ eine Aufnahme weiter oder zurück geschaltet werden.
Page 66

Bedienungsanleitung
29
DE
4.4 Multimedia Menü und USB-Speichermedium
Hinweis:
Hinweis:Hinweis:
Hinweis:
der Multimedia Modus ist nur verfügbar wenn die P
VR-Funktion freigeschaltet ist
und ein entsprechendes Speichermedium
am USB-Eingang des S-HD 11 angeschlossen wurde. Sollte die PVR Funktion nicht aktiviert sein dient die USB-Schnittstelle nur
dazu um Softwareupdates durchzuführen.
Sobald ein Speichermedium am Gerät angeschlossen wird, wird dieses initialisiert, nach Abschluss meldet das Gerät
„USB-Gerät ist verbunden“.
Im Multimedia Modus können Sie Aufnahmen verwalten und abspielen, Musik und Bilddateien wiedergeben und das Speichermedium
verwalten.
Die Menüs werden durch verschiedene Symbole dargestellt, oben ist der jeweilige Menüname gekennzeichnet.
Mit VVVV---- und V+
V+V+
V+ wechseln Sie zwischen den Menüs, mit OK
OKOK
OK öffnen Sie ein Menü.
Auf nachfolgendem Bild sehen Sie den Receiver im Multimedia Menü, auf dem Menüpunkt „Film“.
4.5 Multimedia Menü – Menüpunkt “Film”
Über dieses Menü können Sie auf dem Speichermedium gespeicherte Videodateien auswählen und abspielen.
In diesem Menü sind sowohl vom Gerät durchgeführte Aufnahmen, als auch andere auf dem USB Speichermedium vorhandene Videodateien
abrufbar. Navigieren Sie mit CH+/
CH+/CH+/
CH+/---- und V+/
V+/V+/
V+/---- und treffen Sie mit OK
OKOK
OK die Auswahl. Wenn eine Videodatei angewählt ist wird oben links in einem
Fenster eine kurze Vorschau der Datei wiedergegeben, im Fenster darunter wird die Dateigröße angegeben.
Die Wiedergabe kann mit OK
OKOK
OK oder der ► Taste gestartet werden.
Page 67

Bedienungsanleitung
DE
30
4.6 Multimedia Modus – Menüpunkt “Aufnahmemanager”
Über den Aufnahmemanager lässt sich das Speichermedium und die vom Gerät durchgeführten Aufnahmen verwalten.
Auch die Wiedergabe der Aufnahme ist über dieses Menü möglich.
Folgende Funktionen stehen hier zur Verfügung:
•
Blaue Taste – Speichermedium in FAT32 formatieren (Achtung!
Achtung!Achtung!
Achtung! Sämtliche Daten werden dabei gelöscht)
• ■ Taste – Speichermedium trennen
• INFO Taste – Informationen zum Speichermedium abrufen
/udska1 stellt das Speicherverzeichnis dar, mit Auswahl und OK
OKOK
OK gelangen Sie zu den Aufnahmen.
Navigieren Sie mit CH+/
CH+/CH+/
CH+/---- und V+/
V+/V+/
V+/---- und treffen Sie mit OK
OKOK
OK die Auswahl. Wenn eine Videodatei angewählt ist wird oben links in einem
Fenster eine kurze Vorschau der Datei wiedergegeben, im Fenster darunter wird die Dateigröße angegeben.
Die Wiedergabe kann mit OK
OKOK
OK oder der ► Taste gestartet werden.
4.7 Multimedia Modus – Menüpunkt “Bild”
Über dieses Menü können Sie Bilder wiedergeben die sich auf dem USB-Speichermedium befinden.
Navigieren Sie mit CH+/
CH+/CH+/
CH+/---- und VH+/
VH+/VH+/
VH+/---- und wählen gewünschtes Bild mit OK
OKOK
OK an. Das entsprechende Bild wird nun im Vollbild dargestellt.
Das Gerät schält die Bilder wie in einer Diashow automatisch nach einigen Sekunden weiter.
Der S-HD 11 unterstützt die gängigsten Bildformate.
Während der Wiedergabe stehen folgende Funktionen
Während der Wiedergabe stehen folgende FunktionenWährend der Wiedergabe stehen folgende Funktionen
Während der Wiedergabe stehen folgende Funktionen zur Verfügung:
zur Verfügung:zur Verfügung:
zur Verfügung:
• ∣∣∣∣◄◄////►►∣∣∣∣ – manuell Bilder vor- oder zurückschalten
• – anhalten der Wiedergabe
• ► – Fortsetzen der Wiedergabe
• INFO Taste
INFO Taste INFO Taste
INFO Taste – detaillierte Informationen zum Bild anzeigen.
• V+/V
V+/VV+/V
V+/V----
– Rotation des Bildes um 90°rechts oder links
• CH+/CH
CH+/CHCH+/CH
CH+/CH---- – Rotation des Bildes um 180° oben oder unten
• Exit:
Exit: Exit:
Exit: Wiedergabe aufhören
Page 68

Bedienungsanleitung
31
DE
4.8 Multimedia Modus – Menüpunkt “Musik”
Über dieses Menü können Sie Audiodateien vom USB-Speichermedium abspielen.
Tastenfunktionen:
Tastenfunktionen:Tastenfunktionen:
Tastenfunktionen:
• OK
OKOK
OK –––– Auswahl bestätigen, Wiedergabe starten
• ► Taste – Wiedergabe starten, fortsetzen der Wiedergabe
• Taste – pausieren der Wiedergabe
• ■ Taste – Beenden der Wiedergabe
• ∣∣∣∣◄◄////►►∣∣∣∣ – nächster Titel, voriger Titel
• FFW
FFWFFW
FFW Taste – vorspulen (mehrmaliges drücken der Taste erhöht Geschwindigkeit)
• FRW
FRWFRW
FRW Taste – zurückspulen (mehrmaliges drücken der Taste erhöht Geschwindigkeit)
5. Tips und Tricks / Probleme lösen
Fehlerbild
FehlerbildFehlerbild
Fehlerbild
Mögliche Ursache und Abhilfe
Mögliche Ursache und AbhilfeMögliche Ursache und Abhilfe
Mögliche Ursache und Abhilfe
Satellit wird nicht
gefunden, oder
kein Signal
Beispiel: ASTRA19E
Taste 1 (Vorprogrammierung: „Das Erste“)
Taste INFO („Das Erste“, TP-Frequenz 11836)
Signal und Qualität sind beide 0 %
Den Spiegel nach Süden ausrichten. Wenige Millimeter nach links drehen,
ca. 3 Sekunden warten und wiederholen, bis Signal und Qualität angezeigt
werden. Bei einem Signal von ca. 60%
verschwindet der schwarze Hintergrund und es erscheint das Fernsehbild.
Frontanzeige dunkel
Das Netzkabel ist nicht angeschlossen.
Schließen Sie das Netzkabel an die Netz-Steckdose an.
Möglichkeit eines Kurzschlusses an der
Antennenzuleitung: Anschlüsse prüfen.
Kein Ton oder Bild,
aber Menüanzeigen
des Receivers vorhanden
Die Antenne ist nicht auf den Satellit ausgerichtet.
Richten Sie die Antenne richtig aus.
Kein Signal (mit Symbol).
Prüfen Sie die Kabelverbindung vom LNB zum Receiver
und vom Receiver zu den angeschlossenen Geräten.
Richten Sie die Antenne aus.
An Frontanzeige ist Programmplatz
sichtbar, TV-Gerät zeigt kein Bild
Das System ist nicht korrekt angeschlossen.
Prüfen Sie die Verbindung des SCART-Kabels.
Das TV-Gerät ist nicht im AV-Modus.
Schalten Sie das TV-Gerät auf den jeweiligen AVEingang.
Schlechtes Bild,
Blockierfehler,
Klötzchenbildung,
Die Antenne ist nicht genau auf den Satelliten
Page 69

Bedienungsanleitung
DE
32
Kein Ton
ausgerichtet.
Richten Sie die An
tenne genauer aus. Benutzen Sie
dafür die
INFO-Taste auf der Fernbedienung. Signalanzeige für die
Antennenausrichtung wird angezeigt.Das LNB ist defekt. Ersetzen Sie das
LNB.
Kein Bild, kein Ton,
Signalstärke
vorhanden,
keine Signalqualität
Satelliten-Antenne ist auf einen falschen Satelliten
ausgerichtet.
Schlechter Empfang
von Sport 1, DMAX, HSE 24, Tele 5 etc.
Schnurloses Telefon stört (DECT-Standard). Telefon
anders platzieren, besseres Satellitenkabel verwenden.
Software-Absturz (der
Receiver lässt sich
nicht mehr bedienen
Sollte der unwahrscheinliche Fall eines SoftwareAbsturzes eintreten, trennen Sie den Receiver vom
Stromnetz. Schließen Sie ihn nach 10 Sekunden wieder
an. Dadurch ist das Problem in der Regel gelöst.
Bitte beachten Sie: ein Software-Absturz ist keine
Fehlfunktion, es tritt dadurch kein Garantiefall ein. Bei
technischen Geräten (z.B. auch PC, Funknetzwerk, etc.)
lässt sich ein Software-Absturz auf diesem Weg
unkompliziert und schnell lösen.
Die Fernbedienun
g
funktioniert nicht.
Die Batterien sind verbraucht. Erneuern Sie beide Batterien.
Die Fernbedienung ist falsch ausgerichtet. Richten Sie die Fernbedienung
auf die Vorderseite des Receivers und stellen Sie sicher, dass nichts
zwischen Fernbedienung und Receiver steht
Programm hat eine
neue Frequenz
erhalten und wird mit
den aktuellen Daten
nicht mehr
übertragen
Das entsprechende Programm löschen, dann
automatischen Suchlauf durchführen.
Favoritenliste
verlassen
FAV-Taste drücken, 1-Taste drücken.
Passwort
Das werkseitige Passwort lautet 0000
Persönliches
Passwort vergessen
Bitte kontaktieren Sie die Service Hotline, falls Sie Ihr
persönliches Passwort vergessen haben.
Externes USB-Speichermedium
wird nicht erkannt.
Bitte Receiver am Netzschalter ausschalten. USB-Speichermedium erneut
anschließen. Receiver wieder in den Normal-Modus
schalten. Die uns bekannten, handelsüblichen USB-Speichermedien
sind mit diesem Receiver kompatibel. Für größere USB-Festplatten
verwenden Sie ein externes Netzteil, unter Beachtung der
Bedienungsanleitung der USB-Festplatte.
Sollte sich eine Fehlfunktion trotzdem nicht beseitigen lassen, wenden Sie sich bitte an Ihren Fachhändler.
Sollte sich eine Fehlfunktion trotzdem nicht beseitigen lassen, wenden Sie sich bitte an Ihren Fachhändler.Sollte sich eine Fehlfunktion trotzdem nicht beseitigen lassen, wenden Sie sich bitte an Ihren Fachhändler.
Sollte sich eine Fehlfunktion trotzdem nicht beseitigen lassen, wenden Sie sich bitte an Ihren Fachhändler.
Page 70

Bedienungsanleitung
33
DE
6. Entsorgung
Receiver
Europäische Entsorgungsrichtlinie 2002/96/EG.Werfen Sie den Receiver keinesfalls in den normalen Hausmüll.
Erkundigen Sie sich in Ihrer Stadt- oder Gemeindeverwaltung nach Möglichkeiten einer umweltund sachgerechten Entsorgung des Geräts.
Batterien
Werfen Sie Batterien keinesfalls in den normalen Hausmüll. Batterien können Giftstoffe enthalten.
Entsorgen Sie die Batterien deshalb unbedingt entsprechend der geltenden gesetzlichen Bestimmungen im Rahmen der gesetzlichen
Rückgabepflicht. Erkundigen Sie sich in Ihrer Stadt oder Gemeindeverwaltung nach Möglichkeiten einer umwelt- und sachgerechten
Entsorgung. Geben Sie verbrauchte Batterien bei einer Sammelstelle ab. Dadurch leisten Sie einen positiven Beitrag zum Umweltschutz.
7. Technische Daten
Receiver
ReceiverReceiver
Receiver
Maße in mm (B × T × H)
210 x 140 x 40
Gewicht in Gramm ca.
Rec
eiver
1100 g
Eingangsfrequenzbereich
950 MHz ~ 2150 MHz
IF-Bandbreite
55 MHz/8 MHz (unter 5MS/s)
Stromversorgung LNB
13/18 V, 0,30 A max.
Spitzen Überlastungsschutz
LNB-Steuerung
22 KHz ± 2 KHz, 0,6 V pp ± 0,2 V
DiSEqC
-
Steuerung
Version
1.0, Version 1.2, Tone
-
Burst A/
Symbolrate
1 ~ 45 MS/s
Eingangsgeschwindigkeit
Max. 15 Mbit/s
Fehlerkorrektur (FEC)
1/2, 2/3, 3/4, 5/6, 7/8, auto
Video MPEG4 AVC/H.264 HP@L4.1 MPEG
-
2 MP@HL
Audio
MPEG
-
1/2 Audio
-
Layer 1/2, PCM
/AAC/AC
-
3 /DD+
Höhen
-
Seiten
-
Verhältnis
4:3 LB, 4:3 PS, 16:9, Vollbild
Videoauflösung
480p_60 / 480i_30 / 576p_50 / 576i_25 /
720p_60 / 720p_50 /
1080p_60 / 1080p_50 / 1080i_30 / 1080i_50 / Auto
Audiomodus
Links, Rechts, Stereo, AC3
-
Digitalton
Anschlussmöglichkeiten
AnschlussmöglichkeitenAnschlussmöglichkeiten
Anschlussmöglichkeiten
LNB IF
-
Eingang
Typ F, IEC 169
-24
TV-SCART (nur Ausgang)
Video output YUV, Audio L, R
COAXIAL
Digital Audio OUT
HDMI - Ausgang
Anschluss zur digitalen Übertragung von
Audio- und Video-Signal
USB USB 2.0
-
Schnittstelle
Stromversorgung
StromversorgungStromversorgung
Stromversorgung
Netzteil
-
Eingangsspannung
100-240 V ~, 50/60 Hz
Leistungsaufnahme
ca. 14 W (Betrieb mit Single LNB)
< 0,5 W (Standby)
Betriebstemperatur
0 ~ +40 ºC
Lagerungstemperatur
– 40 ºC ~ + 65 ºC
Page 71

Mode d’emploi
TRIAX DVB-S2 Reciever
Article
ArticleArticle
Article
Article no.
Article no.Article no.
Article no.
TRIAX DVB
-
S2
Receiver
305216
Version
VersionVersion
Version
C
Date
DateDate
Date
04/201
7
FR
FRFR
FR
Page 72

2
FR
Félicitations pour l’achat de votre récepteur satellite / enregistreur Haute Définition TRIAX S-HD 11.
Avant de démarrer
Avant de démarrerAvant de démarrer
Avant de démarrer
Il n’est pas indispensable de lire entièrement ce mode d’emploi pour recevoir des images de la Télévision
Numérique Satellite.
Toutefois, nous vous recommandons sa lecture pour vous donner un aperçu des nombreuses possibilités de
votre récepteur afin de bénéficier du meilleur de ses services.
Ce récepteur / enregistreur est destiné à la réception et à l’enregistrement sur un support externe de
programmes numériques gratuits reçus par satellite (FTA) et ce dans un cercle privé.
Conseils et recommandations
Conseils et recommandationsConseils et recommandations
Conseils et recommandations
• Placez votre récepteur sur une surface plane, horizontale et stable.
• Assurez-vous que votre récepteur est suffisamment éloigné de sources de chaleur, par exemple radiateurs. N’exposez
pas le récepteur à une humidité supérieure à 80% ou à une température ambiante inférieure à +15°C ou supérieure à
+35°C.
• Ne couvrez pas les grilles d’aération du récepteur. Laissez un minimum de 10 cm d’espace libre au-dessus du
récepteur. Ne rien poser dessus (exemple vase), éviter que du liquide ne puisse entrer à l’intérieur.
• Ne raccordez pas le récepteur à la tension secteur avant que tous les autres branchements n’aient été effectués.
• Il est recommandé de débrancher le récepteur de la prise secteur lors d’orages.
Attention! / Achtung! / Consignes de sécurité!
Attention! / Achtung! / Consignes de sécurité!Attention! / Achtung! / Consignes de sécurité!
Attention! / Achtung! / Consignes de sécurité!
EN
ENEN
EN
Failure to comply with the specified precautionary measures may cause serious injury to persons or damage to property. The
installation and commissioning may only be performed by suitably qualified persons, technicians or installers in compliance
with safety regulations.
Damage due to improper installation and commissioning, defective connectors on cables or any other incorrect handling will
void the warranty.
CAUTION: The safety requirements are according to EN 60728-11 and must be observed.
• Disconnect mains power before working on electrical systems.
• Any additional electrical wiring requirements should always be installed by a suitably qualified person(s).
Installation or service work should NEVER be undertaken during electrical / thunderstorms.
DE
DEDE
DE
Gewährleistung
Die gesetzliche Gewährleistung nach Paragraph 437 BGB beträgt 24 Monate.
Bei unsachgemäßer Installation und Handhabung erlischt jeglicher Garantieanspruch.
Bestimmungsgemäße
Und sachwidrige Verwendung
Die Montage und Inbetriebnahme darf nur von eingewiesenen Personen, Technikern
oder Installateuren unter Beachtung der Sicherheitsbestimmungen durchgeführt werden.
Schaden durch falsche Montage und Inbetriebnahme sowie durch unsachgemaβe Handhabung fuhren zum Erlöschen des
Garantieanspruchs.
FR
FRFR
FR
Veillez à bien respecter les consignes de sécurité ci
-
dessous. Leur non
-
respect peut provoquer des dommages matériels ou
corporels.
L’installation et la mise en route ne peuvent être effectués que par des techniciens ou des installateurs qualifiés en respectant
les consignes de sécurité.
La garantie ne sera pas appliquée lors de dégâts causés par une erreur de montage, de mise en route ou par un mauvais
raccordement ou toute autre manipulation incorrecte.
PRUDENCE : avant toute intervention, votre installation doit être conforme aux exigences définies par les dispositions
Européennes EN 50083 (conformité des installations collectives) et EN 60065 (normes en vigueur pour la protection électrique).
• Débranchez l’appareil avant toute intervention, car certains composants sous tension sont dangereux (risque
d’électrocution).
Toute intervention sur l’installation ou travaux de maintenance sont à proscrire en cas d’orage.
Page 73

Mode d‘emploi
3
FR
• Les performances et la fiabilité de votre récepteur sont garanties. La garantie ne couvre pas les dommages causés par
l’intervention de personnels non autorisés ni les dommages directs ou indirects résultants de chocs électriques. Dans
ce cas la garantie sera perdue.
• Ne jamais enlever le couvercle de votre récepteur car il y a risque d’électrocution.
• Pour toute question, n’hésitez pas à contacter votre revendeur TRIAX.
Environnement
EnvironnementEnvironnement
Environnement
Les piles contiennent des éléments très polluants pour l’environnement. NE PAS LES JETER
NE PAS LES JETERNE PAS LES JETER
NE PAS LES JETER. Pensez à les
déposer dans les bacs destinés au recyclage.
Les appareils électriques et électroniques sont susceptibles de contenir des éléments qui, bien
qu’indispensables au bon fonctionnement du système, peuvent s’avérer dangereux pour la santé et
l’environnement s’ils sont manipulés ou éliminés de manière incorrecte. Par conséquent, veuillez ne pas jeter
votre récepteur usagé avec les ordures ménagères.
Aidez
AidezAidez
Aidez----nous à préserver l’environnement dans lequel nous vivons !
nous à préserver l’environnement dans lequel nous vivons !nous à préserver l’environnement dans lequel nous vivons !
nous à préserver l’environnement dans lequel nous vivons !
Entretien
EntretienEntretien
Entretien
L’récepteur peut être nettoyé à l’aide d’un chiffon doux et sec.
N’utilisez ni tampon abrasif, ni poudre décapante, ni solvants tels qu’alcool ou térébenthine :
N’utilisez ni tampon abrasif, ni poudre décapante, ni solvants tels qu’alcool ou térébenthine : N’utilisez ni tampon abrasif, ni poudre décapante, ni solvants tels qu’alcool ou térébenthine :
N’utilisez ni tampon abrasif, ni poudre décapante, ni solvants tels qu’alcool ou térébenthine : ils pourraient
endommager la finition du produit.
ECOCONCEPTION
ECOCONCEPTIONECOCONCEPTION
ECOCONCEPTION : Faible consommation
: Faible consommation: Faible consommation
: Faible consommation
Ce récepteur satellite est conforme au RÈGLEMENT (CE) No 107/2009 de la commission du 4 février 2009
portant application de la directive 2005/32/CE du Parlement européen et du Conseil concernant les exigences
relatives à l'éco-conception des décodeurs numériques simples.
La conception de ce récepteur satellite notamment concernant sa faible consommation d’énergie lui permet de
diminuer son impact sur l’environnement.
La consommation de ce récepteur est :
< 0,5 Watts en mode veille
< 14 Watts en mode actif (hors télé-alimentation)
Votre récepteur satellite intègre également la fonction de mise en veille automatique au bout de 3 heures si celuici n’a subi aucun changement de son état (changement de chaîne, changement de volume, mise en route d’un
programmateur d’enregistrement, …). Cette mise en veille automatique peut être désactivée mais par défaut est
positionnée à 3 heures.
Attention
AttentionAttention
Attention
:
Ce symbole signifie que votre appareil électronique hors d’usage doit être collecté
séparément et non jeté avec les déchets ménagers. Dans ce but, l’Union Européenne
a institué un système de collecte et de recyclage spécifique dont les producteurs ont
Page 74

Mode d‘emploi
FR
4
Contents
Mode d’emploi ........................................................................................................................................................ 1
1.1. Présentation ....................................................................................................................................................................................... 5
1.2. Caractéristiques générales ................................................................................................................................................................. 6
1.3. Configuration de livraison ................................................................................................................................................................... 6
1.4. Télécommande ................................................................................................................................................................................... 6
2. Raccordement de votre récepteur satellite ................................................................................................... 9
2.1. Raccordement au téléviseur, magnétoscope et chaîne hifi .................................................................................................................. 9
2.2. Raccordement à un ensemble type Home Cinéma .............................................................................................................................. 9
3. Première mise en route : guide de démarrage rapide ................................................................................. 10
4. Menu Installation ....................................................................................................................................... 12
4.1. Réglage antenne ............................................................................................................................................................................... 12
4.2. Liste satellites ................................................................................................................................................................................... 12
4.3. Liste TP ............................................................................................................................................................................................. 12
4.4. Réglage du moteur ............................................................................................................................................................................ 14
4.5. Configuration des limites du moteur ................................................................................................................................................. 14
5. Menu réglages (système) .......................................................................................................................... 15
5.1. Langue .............................................................................................................................................................................................. 15
5.2. Transparence OSD ............................................................................................................................................................................ 15
5.3. Première langue ................................................................................................................................................................................ 15
5.4. Deuxième audio préféré .................................................................................................................................................................... 15
5.5. Verrouillage menu ............................................................................................................................................................................. 15
5.5.1. Verrouillage menu ........................................................................................................................ 16
5.5.2. Changer le code PIN .................................................................................................................... 16
5.6. Réglage de l’heure ............................................................................................................................................................................. 16
5.7. Configuration d’usine (exige la saisie du mot de passe) .................................................................................................................... 16
5.8. Mise à jour du logiciel ....................................................................................................................................................................... 16
5.9. Copie de liste de chaînes entre terminaux ......................................................................................................................................... 18
5.9.1. Export d’une liste de chaînes : ................................................................................................... 18
5.9.2. Import d’une liste de chaînes : ................................................................................................... 19
5.10. Version.............................................................................................................................................................................................. 19
5.11. Mise en veille auto ............................................................................................................................................................................ 19
6. Menu chaînes ............................................................................................................................................ 20
6.1. Gestionnaire des chaînes .................................................................................................................................................................. 20
6.1.1. Verrouiller une chaîne dans la liste des chaînes .................................................................... 20
6.1.2. Supprimer une chaîne dans la liste des chaînes .................................................................... 21
6.1.3. Déplacer une chaîne dans la liste des chaînes ...................................................................... 21
6.1.4. Éditer : ............................................................................................................................................ 21
6.2. Favoris .............................................................................................................................................................................................. 22
6.2.1. Navigation dans les listes de favoris : ...................................................................................... 23
6.3. Effacer toutes les chaînes ................................................................................................................................................................. 23
7. Utilisation quotidienne ............................................................................................................................... 24
7.1. Informations affichées à l’écran ........................................................................................................................................................ 24
7.2. Navigation dans les menus ............................................................................................................................................................... 24
7.3. Changement de chaîne...................................................................................................................................................................... 25
7.4. Changement du niveau sonore .......................................................................................................................................................... 25
7.5. Touche Mute ..................................................................................................................................................................................... 25
Page 75

Mode d‘emploi
5
FR
7.6. Télétexte ........................................................................................................................................................................................... 25
7.7. Sous-titres DVB ................................................................................................................................................................................. 26
7.8. Audio ................................................................................................................................................................................................ 26
7.9. EPG / Guide Electronique des Programmes ...................................................................................................................................... 27
7.10. Commutation TV/R ........................................................................................................................................................................... 29
7.11. Touche USB ...................................................................................................................................................................................... 29
8. Menu audio/vidéo ...................................................................................................................................... 30
9. Menu Enregistreur ..................................................................................................................................... 31
9.1. Enregistreur ...................................................................................................................................................................................... 31
9.1.1. Gestionnaire des enregistrements ........................................................................................... 32
9.1.2. Film ................................................................................................................................................. 32
9.1.3. Musique ......................................................................................................................................... 33
9.1.4. Image ............................................................................................................................................. 33
9.2. Configuration ENR ............................................................................................................................................................................. 33
9.3. Programmateurs (d’enregistrement) ................................................................................................................................................. 34
10. Touches des fonctions PVR ....................................................................................................................... 36
11. Enregistrement .......................................................................................................................................... 37
11.1. Enregistrement direct ........................................................................................................................................................................ 37
11.2. Timeshift........................................................................................................................................................................................... 39
11.3. Interface USB .................................................................................................................................................................................... 40
12.
12.12.
12. Caractéristiques techniques
Caractéristiques techniquesCaractéristiques techniques
Caractéristiques techniques ......................................................................................................................... 41
13.
13.13.
13. Guide de dépannage
Guide de dépannageGuide de dépannage
Guide de dépannage .................................................................................................................................... 43
Introduction
IntroductionIntroduction
Introduction
1.1. Présentation
Ce récepteur / enregistreur satellite Haute Définition TRIAX S
récepteur / enregistreur satellite Haute Définition TRIAX Srécepteur / enregistreur satellite Haute Définition TRIAX S
récepteur / enregistreur satellite Haute Définition TRIAX S----HD11
HD11HD11
HD11 est destiné à la réception et à l’enregistrement des
programmes numériques satellites gratuits MPEG4 HD (Haute définition) et MPEG 2 SD (Définition Standard).
Toutes ses fonctions sont accessibles à l’aide de sa télécommande et sont directement affichées à l’écran de votre
téléviseur via l’OSD (On Screen Display).
Pour pouvoir utiliser votre récepteur / enregistreur satellite, vous devez utiliser une ou plusieurs antenne(s) satellite(s)
correctement orientée(s) sur le satellite souhaité.
Le but de ce mode d’emploi est de vous permettre d’installer rapidement et facilement votre récepteur / enregistreur satellite
afin d’en profiter pleinement.
La plupart des satellites et leurs transpondeu
La plupart des satellites et leurs transpondeuLa plupart des satellites et leurs transpondeu
La plupart des satellites et leurs transpondeurs sont préprogrammés.
rs sont préprogrammés. rs sont préprogrammés.
rs sont préprogrammés.
Si de nouveaux programmes devaient être émis ou suite à des changements de fréquence, il est possible de lancer une
recherche automatique des chaînes pour mettre à jour la liste des programmes mémorisés.
Le menu est disponible en 12 langues.
Par défaut les satellites suivants sont présélectionnés : Astra1 19E, HotBird 13E, Astra 28,2°E.
Les changements sur certains satellites étant fréquents, nous ne pouvons garantir que la liste des programmes par défaut
soit à jour. Pour cela il vous est possible de mettre cette liste des chaînes à jour sur un récepteur et de transférer ces
réglages vers d’autres récepteurs à l’aide d’une clé USB (copie maître / esclave).
Page 76

Mode d‘emploi
FR
6
1.2. Caractéristiques générales
• Réception des chaînes satellite gratuites (FTA) HD & SD
• Conversion des signaux SD en HD (Upscaling)
• Mise à jour du logiciel du récepteur via l’interface USB
• Alimentation et commande du LNB (0/22 kHz), courant de téléalimentation max. de 300 mA
• Bande de fréquence d’entrée du tuner 950-2150 MHz
• 3 touches en face avant
• „Plug and Play“ : “vous branchez, vous regardez“
• Compatible avec le standard Unicable, JESS
• Capacité mémoire 4000 chaînes TV et radio
• Protection parentale par l’intermédiaire d’un mot de passe (par défaut : 0000)
• 8 listes de favoris
• Recherche automatique des chaînes
• Editeur de liste de favoris, copie de listes des chaînes entre récepteurs via l’interface USB
• 1 sortie audio numérique coaxiale pour du son Dolby Digital
• 1 sortie (pas d’entrée) péritel TV avec les formats CVBS
• 1 sortie numérique HDMI
• Télétexte rapide avec une capacité mémoire de 800 pages
• Réception des radios numérique
• Bandeau d’information en pied de page affiché
• Supporte les commutations DiSEqC 1.0, 1.2, USALS
• Format d’écran réglable 4:3, 16:9 et fullscreen
• Timer multi fonction, 27 enregistrements possibles, enregistrement via EPG
• Guide Electronique des Programmes (EPG) jusqu’à 7 jours si diffusé
• Fonction timeshift tournant en tache de fond (si un disque dur est raccordé) permettant ainsi de
revoir à tout moment une séquence diffusée (à paramétrer dans le menu)
• Tension d’alimentation : 100 - 240 V/AC, fréquence 50/60 Hz
• Faible consommation en mode actif < 14 W et < 0,5 W en mode veille
• Boitier métal noir, dimensions 210 x 140 x 40 mm, poids 1,1Kg
• Température de fonctionnement : +15°C à +35°C
• Modèle S-HD 11, référence 305216, code EAN 5702663052161
Remarque
RemarqueRemarque
Remarque : Un logiciel d’édition des listes des chaînes sur PC est également disponible. Pour plus de
renseignement visiter notre site Internet www.triax.fr
1.3. Configuration de livraison
Le carton de votre S-HD 11contient :
- 1 récepteur S-HD 11
- 1 télécommande et ses deux piles LR 03 AAA
- 1 mode d’emploi
Si l’un de ces accessoires devait manquer, veuillez contacter votre revendeur.
1.4. Télécommande
Insérez deux piles dans le logement prévu à cet effet en respectant la polarité indiquée et refermez soigneusement le
couvercle jusqu’à ce qu’il s’enclipse.
La télécommande transmet des signaux infrarouges au récepteur. La fonction des touches est indiquée ci-dessous.
Page 77

Mode d‘emploi
7
FR
Nr.
Nr.Nr.
Nr.
Symbole
SymboleSymbole
Symbole
Fonction
FonctionFonction
Fonction
1 Power
PowerPower
Power
Mise en route et mise en veille
2 0000
----
9999
Clavier numérique
3 TV
TVTV
TV
----
RRRR
Passage du mode TV au mode radio
4 VVVV
----
FMT
FMTFMT
FMT
Format d‘écran, touche rouge de fonction
5 Vert
VertVert
Vert
Fonction
précisée dans les sous
-
menus
6 CH+
CH+CH+
CH+
Incrémentation du numéro de chaîne
Déplacement du curseur vers le haut
7 VVVV
----
Baisse du volume sonore /Déplacement du curseur vers la gauche
8 CH
CHCH
CH
----
Décrémentation du numéro de chaîne
Déplacement du curseur vers le bas
9 EPG
EPGEPG
EPG
Guide Electronique des Programmes (si diffusé)
10 MENU
MENUMENU
MENU
Menu principal, permet de quitter un sous menu
11 FAV
FAVFAV
FAV
Accès aux listes favoris
12 BACK
BACKBACK
BACK
Permet de revenir en arrière d’une action ou de quitter un menu ou une option dans un sous
-
menu
13
Coupure son
14 TEXT
TEXTTEXT
TEXT
Télétexte et aux sous
-
titres télétexte
15 TIMER
TIMERTIMER
TIMER
Accès au Timer d’enregistrement
16 Jaune
JauneJaune
Jaune
Fonction précisée dans les sous
-
menus
17 OK
OKOK
OK
En fonctionnement normal, affichage de la liste des chaînes, dans un menu confirmation des
paramètres
18 V+
V+V+
V+
Augmentation du volume sonore / Déplacement du curseur vers la droite
19 SUB
SUBSUB
SUB
Affichage des sous
-
titres (si diffusés)
20 AUDIO
AUDIOAUDIO
AUDIO
Modification du mode audio
21 PVR
PVRPVR
PVR
Accès aux fonctions Enregistreur (PVR)
22 INFO
INFOINFO
INFO
Affichage des information
sur la chaîne affichée à l‘écran
23 USB
USBUSB
USB
Accès aux données présentes sur le support USB
24 MOVIE
MOVIEMOVIE
MOVIE
Accès direct aux enregistrements
25 Option
OptionOption
Option
Touche non utilisée
Page 78

Mode d‘emploi
FR
8
Page 79

Mode d‘emploi
9
FR
2. Raccordement de votre récepteur satellite
2.1. Raccordement au téléviseur, magnétoscope et chaîne hifi
Raccorder le récepteur satellite aux autres appareils et à l’antenne satellite avant d’effectuer le branchement
secteur. Cette précaution permet d’éviter toute détérioration du récepteur ou des autres appareils.
Lorsque tous les autres raccordements ont été effectués, brancher le récepteur à une alimentation 230 V/50 Hz.
Faire les raccordements suivants :
- Brancher votre récepteur directement sur la prise péritel AV1 de votre téléviseur (signaux SD) ou pour
disposer de signaux Haute Définition HD, raccorder la sortie HDMI de votre récepteur à une entrée
HDMI de votre téléviseur (cordon HDMI non fourni).
- Pour réaliser des enregistrements il vous faudra raccorder un disque dur externe sur la sortie USB de
votre récepteur. Branchez les fiches secteurs des appareils raccordés à la prise secteur et mettez ces
appareils sous tension.
- Branchez la fiche secteur du récepteur à la prise secteur. Mettez le récepteur sous tension à l’aide de
l’interrupteur marche-arrêt situé à l’arrière. Le récepteur se trouve en mode normal. La chaîne actuelle
est affichée à l’écran (une fois la 1
ère
installation du récepteur faite).
- Le récepteur est livré avec des chaînes préprogrammées, ce qui permet de l’utiliser sans attendre. Si
vous souhaitez vérifier la présence de nouvelles chaînes, veuillez lancer une recherche des chaînes.
Pour cela, veuillez consulter les informations fournies plus loin dans cette notice.
Pour passer au mode veille, appuyez sur la touche rouge située en haut au milieu de la télécommande. Le
récepteur affiche alors l’heure. En veille, il consomme moins de 0,5 Watt. Une consommation électrique
extrêmement faible.
2.2. Raccordement à un ensemble type Home Cinéma
Faire le raccordement suivant : brancher la sortie audio numérique « Coaxial » du récepteur à l’aide d’un cordon
audio numérique coaxial – non fourni – à votre ensemble Home Cinéma.
Page 80

Mode d‘emploi
FR
10
3. Première mise en route : guide de démarrage rapide
Ce chapitre vous permettra d’effectuer, dans un minimum de temps, les réglages indispensables de votre
récepteur satellite avant de partir à la découverte de son utilisation.
Avant de continuer la lecture de cette « Installation Rapide », vous devez posséder une antenne satellite
correctement orientée vers le ou les satellites souhaités.
Lors de la 1ère mise en route du récepteur, un menu d’installation automatique s’affiche, il permet de configurer
très rapidement le récepteur.
Sélectionnez la langue des menus avec les touches les touches ▲et▼ puis pressez sur la touche BLEU pour
passer à l’étape suivante.
Sélectionnez le pays (pour le choix de certains réglages) avec les touches les touches ► et ◄. Par défaut le
décalage horaire devrait être réglé correctement (+1 pour la France par exemple) puis pressez sur la touche
BLEU pour passer à l’étape suivante
Page 81

Mode d‘emploi
11
FR
Sélectionnez les paramètres de format d’écran (16/9, écran plein, …) - généralement écran plein est le bon
format) puis la résolution de sortie de votre terminal satellite vers votre TV avec les touches les touches ►/◄
▲et▼ puis pressez sur la touche BLEU pour passer à l’étape suivante. Si le récepteur est raccordé à l’aide d’un
cordon HDMI à votre téléviseur, paramétrer la résolution sur 1080i.
Par défaut le récepteur est paramétré pour recevoir ASTRA 19.2°E en position DiSEqC 1 et Hot Bird 13°E en
position DiSEqC 2. Si ce réglage vous convient pressez sur la touche BLEU pour passer à l’étape suivante. Dans
le cas contraire, vous reporter au chapitre « INSTALLATION » pour paramétrer votre antenne.
Pour finaliser la mise en route du récepteur, il suffit de mémoriser les réglages effectués.
Le récepteur est maintenant prêt à l’emploi.
Page 82

Mode d‘emploi
FR
12
4. Menu Installation
Si votre récepteur satellite a été correctement paramétré comme indiqué au chapitre 3 « première mise en route,
ce chapitre ne vous est d’aucune utilité.
4.1. Réglage antenne
Instructions de préréglage « Antenne fixe » :
- Satellite : sélection du satellite. Affichage de la liste des satellites activés dans l’option « Liste des
satellites ». Sélectionnez le satellite à éditer.
- Type LNB : réglez le type entre Ku, C, JESS, UNICABLE
- LNB OL : réglez la fréquence des OL du LNB utilisé. Le réglage par défaut est 9750/10600
- Transpondeur : liste des transpondeurs programmés (presser sur OK).
- 22K : réglage automatique par le récepteur.
- Alimentation LNB : elle est par défaut sur marche
- Mode Tone Burst : permet de régler pour employer un commutateur Tone Burst
- Mode DiSEqC1.0 : réglage de la réception multi-satellite en choisissant le type de DiSEqC utilisé.
- Presser sur recherche (touche de fonction bleu) pour lancer la recherche en fonction des paramètres
réglés.
4.2. Liste satellites
La liste des satellites enregistrés s’affiche. Vous pouvez activer ou désactiver les satellites de votre choix en
appuyant sur la touche OK. La sélection est représentée par le signe « coché ».
- Ajouter (touche de fonction rouge) : ajout manuel d’un satellite.
- Editer (touche de fonction verte) : modification du nom du satellite et de sa position. Important en
présence d’une parabole motorisée.
- Supprimer (touche de fonction jaune) : suppression d’un satellite enregistré et de ses chaînes.
- Rechercher (touche de fonction bleu) : recherche « aveugle » des chaînes sur un ou plusieurs
satellites.
4.3. Liste TP
Dans ce sous-menu, vous pouvez éditer les transpondeurs des satellites activés au point « Liste des satellites ».
Page 83

Mode d‘emploi
13
FR
- Ajouter (touche de fonction rouge) : ici, vous pouvez ajouter un nouveau transpondeur qui n’a pas
encore été enregistré. Utilisez cette fonction pour rechercher une chaîne dont vous connaissez les
paramètres.
- Editer (touche de fonction verte) : édition des paramètres du transpondeur sélectionné. Attention : la
modification a des conséquences sur les chaînes du transpondeur édité !
- Supprimer (touche de fonction jaune) : suppression du transpondeur sélectionné.
- Rechercher (touche de fonction bleue) : balayage des chaînes du transpondeur sélectionné en
fonction du filtre de recherche sélectionné.
Exemple de recherche des chaînes
Exemple de recherche des chaînesExemple de recherche des chaînes
Exemple de recherche des chaînes ::::
Vous savez que des nouvelles chaînes sont émises sur une fréquence en particulier.
Satellite : ASTRA 19,2°Est, fréquence 10836 MHz, symbole rate 22.000 Ks/s, polarisation horizontale.
Procédez comme suit : point Liste TP du sous-menu.
- Appuyez sur la touche de fonction rouge de la télécommande. La fenêtre « Ajouter TP » s’ouvre.
- Entrez la fréquence 10836 avec les touches 0 à 9 de la télécommande.
- Entrez le symbole rate 22000 avec les touches 0 à 9 de la télécommande.
- Réglez la polarisation H (pour horizontale) avec les touches ► et ◄.
- Enregistrez les données en confirmant par la touche OK.
Le nouveau transpondeur créé sera ajouté à la fin de la listes des transpondeurs du satellite ASTRA 19,2° Est
et il apparaîtra sur la liste des transpondeurs.
Page 84

Mode d‘emploi
FR
14
- Appuyez sur la touche de fonction bleue de la télécommande. La fenêtre « Recherche TP » s’ouvre.
- Lancez la recherche en confirmant le champ « OK » par la touche OK.
- Les chaînes trouvées seront ajoutées à la fin de la liste générale du satellite. L’opération est terminée.
4.4. Réglage du moteur
Dans ce sous-menu, vous pouvez paramétrer les réglages du moteur utilisé pour déplacer votre antenne.
- Satellite : sélection du satellite à balayer.
- Transpondeur : choix du transpondeur sur lequel effectuer une recherche.
- Réglage du moteur : sélection du type de moteur raccordé (Usals, DiSEqC, …).
Instructions de préréglage « Antenne motorisée » :
- Satellite : sélection du satellite à balayer.
- Transpondeur : choix du transpondeur sur lequel effectuer une recherche.
- Réglage du moteur : réglage du type de moteur.
- Longitude locale : uniquement si vous avez sélectionné « USALS » dans l’option Type de moteur.
- Latitude locale : uniquement si vous avez sélectionné « USALS » dans l’option Type de moteur.
4.5. Configuration des limites du moteur
Dans ce sous-menu, vous pouvez paramétrer les réglages des limites du moteur utilisé pour déplacer votre
antenne.
Page 85

Mode d‘emploi
15
FR
5. Menu réglages (système)
Normalement, votre récepteur satellite est correctement réglé lors de sa première mise en service (menu d’installation
automatique). Il vous est toutefois possible de modifier certains réglages comme la résolution HDMI par exemple. Dans
le cas contraire, vous pouvez vous reporter au chapitre 7 « Utilisation quotidienne ».
Le menu « réglages système » vous permet de personnaliser un certain nombre de réglages suivants :
- Langue
- Transparence OSD
- Première langue
- 2
ème
audio préféré
- Verrouillage menu
- Réglage de l’heure
- Configuration usine
- Mise à jour
- Version
- Mise en veille auto
5.1. Langue
Sélection de la langue du menu OSD (menus graphiques affichés à l’écran).
5.2. Transparence OSD
Réglage de la transparence des menus.
5.3. Première langue
Sélection de la langue audio principale.
5.4. Deuxième audio préféré
Présélection de la langue audio secondaire (si transmise par la chaîne), permet d’écouter la version originale.
5.5. Verrouillage menu
L’accès à ce menu exige la saisie du mot de passe (réglage d’usine : 0000).
Page 86

Mode d‘emploi
FR
16
5.5.1. Verrouillage menu
Si activé, les principaux points du menu servant à la configuration de base du récepteur sont verrouillés.
5.5.2. Changer le code PIN
Création d’un nouveau mot de passe. (Impérativement se souvenir du nouveau mot de passe)
- Code actuel : entrer le mot de passe actuel
- Nouveau code : entrer le nouveau mot de passe
- Confirmer le nouveau code : confirmer le nouveau mot de passe en le saisissant à nouveau.
5.6. Réglage de l’heure
Réglage de l’heure du récepteur. Laisse le réglage sur automatique, l’heure est récupérée dans les signaux satellites.
5.7. Configuration d’usine (exige la saisie du mot de passe)
Restaure la configuration d’usine du récepteur. Toutes les modifications apportées par l’utilisateur sont annulées. Le
récepteur démarre en mode normal dans sa configuration d’usine.
5.8. Mise à jour du logiciel
L’accès à ce menu exige la saisie du mot de passe (réglage d’usine : 0000). La mise à jour logicielle via l’interface USB
est la méthode de mise à jour la plus rapide et confortable. Si vous souhaitez réaliser une mise à jour, nous vous
recommandons de la faire par l’interface USB. Les dernières mises à jour sont disponibles sur
www.triax.fr
Page 87

Mode d‘emploi
17
FR
Mise à jour par USB : procédure détaillée :
1. Sélectionner le fichier de mise à jour.
2. La mise à jour démarre, lecture données, effacement mémoire flash.
3. La mise à jour continue, mise à jour mémoire flash.
Page 88

Mode d‘emploi
FR
18
Ne pas débrancher l’appareil pendant la mise à jour jusqu’à ce qu’il redémarre sur le dernier programme regardé.
Ne pas débrancher l’appareil pendant la mise à jour jusqu’à ce qu’il redémarre sur le dernier programme regardé.Ne pas débrancher l’appareil pendant la mise à jour jusqu’à ce qu’il redémarre sur le dernier programme regardé.
Ne pas débrancher l’appareil pendant la mise à jour jusqu’à ce qu’il redémarre sur le dernier programme regardé.
5.9. Copie de liste de chaînes entre terminaux
Il est intéressant de pouvoir programmer entièrement un récepteur dit maitre puis de pouvoir sauvegarder cette
programmation et de l’exporter pour programmer d’autres récepteurs dits « esclaves ».
5.9.1. Export d’une liste de chaînes :
Procéder comme suit :
- Programmer un récepteur maître (réglages antennes, liste chaînes principale et favoris, etc…)
- Insérer une clé USB dans le récepteur maître
- Aller dans le menu « Réglages », « Mise à jour », « Mise à jour par USB »
- Presser sur OK pour choisir le lieu de stockage des informations (type udska1 par exemple).
- Presser sur la touche Bleu « valider » pour exporter (transfert du récepteur bvers le support USB) la
liste des chaînes.
- Quitter le menu.
- Presser sur le bouton USB de la télécommande pour accéder à la « liste périphérique ».
- Presser sur la touche STOP pour retirer le périphérique USB en toute sécurité
- Enlever la clé USB.
Le fichier qui contient la programmation des chaînes s’appelle « userdb.bin ».
Page 89

Mode d‘emploi
19
FR
5.9.2. Import d’une liste de chaînes :
Procéder comme suit pour programmer un récepteur « esclave »:
- Faire la 1
ère
installation de votre récepteur « esclave »
- Insérer votre clé USB avec le fichier « userdb.bin »
- Aller dans le menu « Réglages », « Mise à jour », « Mise à jour par USB »
- Sélectionner le fichier « userdb.bin » puis presser sur OK pour lancer la copie dans le récepteur
« esclave ».
- Une fois que le récepteur redémarre, presser sur le bouton USB de la télécommande pour accéder à
la « liste périphérique ».
- Presser sur la touche STOP pour retirer le périphérique USB en toute sécurité
- Enlever la clé USB.
5.10. Version
Permet de connaître la version logicielle de votre récepteur satellite.
5.11. Mise en veille auto
Votre récepteur satellite récepteur intègre la fonction de mise en veille automatique au bout de 3 heures si celui-ci n’a
subi aucun changement de son état (changement de chaîne, changement de volume, mise en route d’un enregistrement,
…). Cette mise en veille automatique peut être désactivée mais par défaut est positionnée à 3 heures.
Page 90

Mode d‘emploi
FR
20
6. Menu chaînes
Ce menu regroupe 3 sous menus :
- Gestionnaire des chaînes
- Favoris
- Effacer toutes les chaînes
6.1. Gestionnaire des chaînes
Dans le menu « gestionnaire des chaînes TV », quatre fonctions sont disponibles décrites ci-après. Appuyez sur
« BACK » pour quitter le menu « gestionnaire des chaînes TV ».
6.1.1. Verrouiller une chaîne dans la liste des chaînes
Utilisez ce menu pour verrouiller une ou plusieurs chaînes de la liste des chaînes :
- Sélectionner la chaîne à verrouiller avec <▼▲> puis presser sur la touche <ROUGE>. Il vous sera
demandé d’entrer le mot de passe. Une fois celui-ci entré, le nom de la chaîne apparaîtra cochée
indiquant qu’elle est verrouillée et que le mot de passe sera systématiquement demandé pour y avoir
accès.
- Verrouiller d’autres chaînes ou quitter le menu en pressant sur <BACK>.
- Pour déverrouiller une chaîne verrouillée, sélectionner cette chaîne dans le menu verrouiller, entrer le mot
de passe et la chaîne sera déverrouillée.
Page 91

Mode d‘emploi
21
FR
6.1.2. Supprimer une chaîne dans la liste des chaînes
Utilisez ce menu pour supprimer une chaîne dans la liste des chaînes.
- Sélectionner la chaîne à supprimer avec <▼▲> puis presser sur la touche <VERTE>. Il vous sera
demandé d’entrer le mot de passe. Une fois celui-ci entré, la chaine sera supprimée et le récepteur
enregistrera cette action.
- Procéder de la même manière pour supprimer d’autres chaînes ou quitter le menu en pressant sur
<BACK>.
6.1.3. Déplacer une chaîne dans la liste des chaînes
Utilisez ce menu pour déplacer une chaîne dans la liste des chaînes.
- Sélectionner la ou les chaînes à déplacer (sélection multiple possible) en la ou les mettant en surbrillance
avec la touche OK (la coche jaune doit apparaître)
- Sélectionner avec <▼▲> l’emplacement dans la liste ou vous souhaitez que la chaîne prenne place.
- Puis presser sur la touche <JAUNE>. Les chaines sélectionnées prendront place à l’endroit sélectionné.
- Les chaînes sont maintenant positionnées à un nouvel endroit dans la liste des chaînes.
6.1.4. Éditer :
Utilisez ce menu pour Trier (alphabétiquement,…), sauter, trouver ou renommer une chaîne de la liste principale.
En activant la fonction édition des chaînes, le menu suivant apparaît :
Trier : il est possible de trier les chaînes par ordre alphabétique par exemple.
Sauter : il est possible de sauter (passer) une chaîne lors du zapping par exemple.
Trouver : il est possible de trouver une chaîne dans la liste des chaînes. Un clavier va apparaître pour entrer le
nom de la chaîne recherchée.
Renommer : il est possible de renommer les chaînes. Un clavier va apparaître pour renommer les chaînes.
Page 92

Mode d‘emploi
FR
22
6.2. Favoris
Utilisez ce menu pour créer des listes de favoris : 8 listes sont possibles.
- Dans le menu « chaînes », « Favoris »
- Sélectionner la ou les chaînes à mettre en favoris avec <▼▲> (elle est surlignée en bleu) puis presser
sur le numéro de la liste dans laquelle elle doit être mise <1 à 8>.
- Presser sur BACK pour sauvegarder.
Reproduire les opérations ci-dessus pour ajouter d’autres chaînes à une liste de favoris ou pour créer d’autres
listes de favoris.
Page 93

Mode d‘emploi
23
FR
6.2.1. Navigation dans les listes de favoris :
Presser sur la touche FAV
- Utiliser la touche verte pour naviguer entre les listes FAVORIS (par défaut la liste FAV 1 est activée)
- Utiliser la touche rouge pour sélectionner le satellite souhaité
- Utiliser la touche jaune pour trouver une chaîne dans la liste à l’aide d’un clavier
- Utiliser la touche bleu pour trier les chaînes
6.3. Effacer toutes les chaînes
A l’aide de ce menu, vous pouvez effacer toutes les chaînes de votre récepteur. Il vous sera nécessaire de
confirmer la demande d’effacement. Appuyer sur <BACK> pour sortir du menu « supprimer tout ».
Page 94

Mode d‘emploi
FR
24
7. Utilisation quotidienne
7.1. Informations affichées à l’écran
Les menus de l’interface permettent de configurer votre récepteur à votre guise. Pour cela, le récepteur et le
téléviseur doivent être sous tension et reliés par un câble (Péritel/SCART en SD ou un cordon HDMI en HD).
Appuyez sur la touche « MENU ». Le menu principal s’affiche. Appuyez sur la touche « BACK » pour revenir en
arrière ou sur la touche « MENU » pour quitter le menu.
Toutes ces informations sont également disponibles en pressant sur la touche <INFO> de la télécommande. En
pressant une deuxième fois sur la touche INFO les informations sont plus détaillées.
Lors du changement de chaîne, un bandeau d’information s’affiche au bas de l’image donnant ainsi un certain
nombre d’informations sur le programme diffusé telles que la date et l’heure, une information sur le programme
en cours ainsi que l’indication si le programme diffusé diffuse du télétexte, du sous-titrage, etc…
7.2.
Navigation dans les menus
Pour naviguer dans les menus, utilisez les touches CH+, CH-, V+, V-. Les options de menu sélectionnées sont
marquées. Pour confirmer, appuyez sur la touche OK. Pour quitter le menu, appuyez sur la touche Back. N’oubliez
pas de confirmer les modifications. Dans certains sous-menus, vous devrez aussi utiliser les touches
numériques. Aspect lors d’un appui sur la touche OK :
Page 95

Mode d‘emploi
25
FR
7.3. Changement de chaîne
Il y a plusieurs façons de changer de chaîne :
- soit en entrant directement sur le clavier de la télécommande le numéro de la chaîne.
- soit en pressant sur <OK>, sélectionner la chaîne avec <▲/▼>, puis presser sur OK pour confirmer.
- soit en utilisant les touches <CH ▲/▼> de votre télécommande.
7.4. Changement du niveau sonore
Pour augmenter ou baisser le volume, garder le doigt sur VOL + ou sur ► pour augmenter le son ou sur ◄ VOL
ou sur (-) pour le diminuer.
7.5. Touche Mute
Cette touche permet de couper (une pression) ou de remettre le son (deuxième pression).
7.6. Télétexte
Si les informations de télétexte sont diffusées par les programmes, vous pouvez y avoir accès en pressant sur
la touche <TEXT>.
En pressant sur <TEXT>, la page d’accueil du télétexte apparaît. Choisir la page à afficher avec <0…9>. Exemple,
pour la page 120, taper 1 puis 2 puis 0. Presser sur <TEXT> pour quitter le télétexte.
Page 96

Mode d‘emploi
FR
26
7.7. Sous-titres DVB
En pressant sur la touche <SUB>, vous avez accès au menu SOUS-TITRE. Si une chaîne transmet un signal
numérique de sous-titres, appuyez sur cette touche pour l’activer/le désactiver. Par sous-titrage on entend les
sous-titres transmis par certaines chaînes.
Deux choix sont possibles :
- activer ou désactiver le sous-titrage (sur OFF il est désactivé).
- si plusieurs langues sont diffusées elles seront listées, il suffira de choisir l’une d’elle pour l’activer.
7.8. Audio
Le menu audio via la touche <AUDIO> permet de sélectionner :
- le mode audio en fonction des modes audio diffusés (Mono, Gauche, Droit. La sélection s’effectue à
l’aide de <◄/►> / ▲/▼> et en confirmant avec <OK>
- la piste audio si différentes langues sont diffusées (comme ARTE par exemple, voir l’exemple cidessous). Quitter le menu audio en pressant sur <BACK>.
Page 97

Mode d‘emploi
27
FR
7.9. EPG / Guide Electronique des Programmes
En fonction de ce que les chaînes diffusent, vous avez soit accès :
- aux informations sur les programmes en cours et les programmes suivants, presser sur la touche
<INFO> de la télécommande. Les informations seront affichées dans le bandeau en bas de l’image
comme affiché ci-dessous. En pressant une deuxième fois sur la touche info plus de détails sont
donnés sur le programme en cours.
- au Guide Electronique des Programmes en pressant sur la touche <EPG> de la télécommande. En
fonction des informations diffusées, vous pouvez connaître la programmation des chaînes jusqu’à 7
jours.
Page 98

Mode d‘emploi
FR
28
L’EPG vous informe sur la grille des programmes (si les données correspondantes sont transmises par la
chaîne). Vous y trouvez les heures des émissions et leur contenu. Les touches V+/V-, et CH+/CH- vous
permettent de déplacer le curseur dans le tableau EPG.
Autres aspects du menu EPG en pressant sur la touche de fonction ROUGE :
Journalier
Hebdomadaire :
Page 99

Mode d‘emploi
29
FR
- Pour obtenir des informations détaillées sur un événement/programme, sélectionnez-le et appuyez sur
la touche INFO. Une fenêtre d’information apparaît.
- Appuyer sur la touche de fonction « Enregistrement » pour programmer directement l’enregistrement de
l’émission sélectionnée (le timer d’enregistrement est automatiquement créé).
- Appuyer sur les touches de fonction rouge « Jaune et bleu » pour vous déplacer sur le guide de la
semaine (jour précédent, jour suivant).
7.10. Commutation TV/R
La touche TV/R vous permet de basculer entre la télévision et la radio. En mode radio, le récepteur reproduit une
station de radio et affiche un fond d’écran. Pour passer du mode radio au mode TV, appuyez sur la touche
TV/Radio de la télécommande.
7.11. Touche USB
Accès au périphérique connecté à votre récepteur. Permet certaines actions sur votre disque dur comme le
formatage de celui-ci en FAT 32 (touche Bleu). Attention, le formatage de votre disque dur USB effacera toutes
les données contenues par celui-ci. Ainsi toutes les données présentes sur le disque dur seront
irrémédiablement perdues.
Enlevé avec précaution : permet de retirer le support de stockage USB externe en toute sécurité.
Page 100

Mode d‘emploi
FR
30
8. Menu audio/vidéo
Ce menu permet de régler les paramètres de sortie de votre récepteur satellite :
- Paramètres de l'écran : personnalisation de l’image et du son (luminosité, contraste, saturation, mode
SPDIF).
- Résolution d’écran : à ajuster en fonction de l’écran raccordé au récepteur satellite Format d’écran : 4:3
LB, 4:3 PS, 16:9, Fullscreen (par defaut : fullscreen).
- Résolution vidéo : sélection de la résolution vidéo maximale (par défaut : 1080i_50).
 Loading...