

Quick Installation Guide
TU-IDES
H/W: v1.0R

Table of Contents
Table of Contents
Español ......................................................................................................
1.
Antes de iniciar
2. .................................................................................
Cómo se instala
Troubleshooting .........................................................................................
..................................................................................
1
1
2
4
Version 03.21.2008
1. Antes de iniciar
Contenidos del paquete
TU-IDES
?
Cable de Serial SATA
?
Cable de alimentación tipo Y
?
?Guía de instalación rápida
Requisitos del sistema
CPU: 300MHz o superior / 800MHz o superior (Windows Vista)
?
M / 512MB RAM (Windows Vista)
?emoria: 256MB RAM o más o más
?Dispositivo IDE (Ej. disco duro, unidad de CD-ROM)
?PC con placa madre SATA
Aplicación
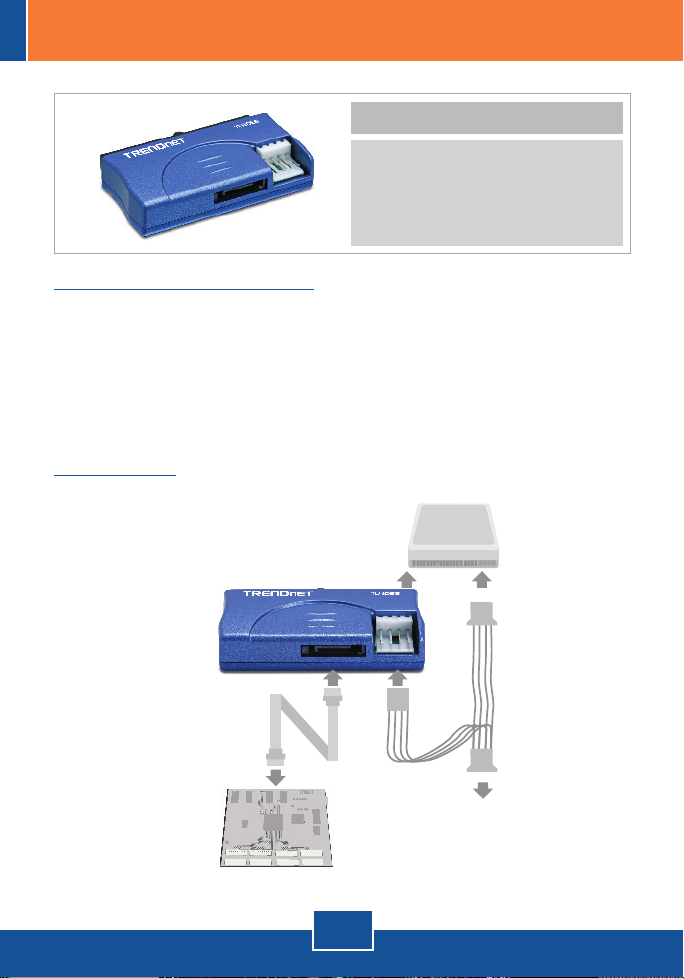
IDE to Serial
ATA Converter
(TU-IDES)
IDE
Device
To Connector of Serial
Motherboard
ATA Port
1
Español
Power
Cable
To PC Power
Supply Connector

2. Cómo se instala
1. Apague su PC. Luego, abra su
PC.
2. Conecte su dispositivo IDE al
TU-IDES.
3. Conecte el cable SATA
suministrado al receptáculo SATA
en el TU-IDES.
4. Conecte el conector de
alimentación Berg hembra del
cable de alimentación tipo Y
suministrado al TU-IDES.
2
Español

5. Conecte el conector de
alimentación Molex hembra del
cable de alimentación tipo Y
suministrado a su dispositivo IDE
(Ej. disco duro, unidad de CDROM).
6. Conecte el cable SATA
suministrado al receptáculo SATA
en la placa madre de su PC.
7. Conecte el conector de
alimentación Molex hembra
disponible en su PC al conector de
alimentación Molex macho del
cable de alimentación tipo Y
suministrado.
8. Encienda su PC.
Su configuración inalámbrica ha finalizado.
Para asegurar los más altos niveles de servicio y apoyo al cliente, registre su producto
Registre su producto
en línea en: www.trendnet.com/register
Gracias por elegir TRENDnet
3
Español

Troubleshooting
Q1:
My computer does not recognize my IDE device. What should I do?
A1:
First, verify that the computer meets the minimum requirements as listed in
section 1. Second, verify all the connectors are secured (see section 2). Third,
connect the SATA data cable to a different SATA receptacle on the motherboard.
Fourth, connect the TU-IDES to a different IDE power connector on your computer.
Fifth, connect a different IDE device to the TU-IDES.
If you still encounter problems or have any questions regarding the TU-IDES, please
contact TRENDnet's Technical Support Department.
4

Certifications
This equipment has been tested and found to comply with FCC and CE Rules.
Operation is subject to the following two conditions:
(1) This device may not cause harmful interference.
(2) This device must accept any interference received. Including interference that may
cause undesired operation.
Waste electrical and electronic products must not
be disposed of with household waste. Please
recycle where facilities exist. Check with you Local
Authority or Retailer for recycling advice.
NOTE: THE MANUFACTURER IS NOT RESPONSIBLE FOR ANY RADIO OR TV
INTERFERENCE CAUSED BY UNAUTHORIZED MODIFICATIONS TO THIS
EQUIPMENT. SUCH MODIFICATIONS COULD VOID THE USER’S AUTHORITY TO
OPERATE THE EQUIPMENT.

TRENDnet Technical Support
.
US Canada
Toll Free Telephone: 1(866) 845-3673
24/7 Tech Support
Europe (Germany France Italy Spain Switzerland UK)
Toll Free Telephone: +00800 60 76 76 67
English/Espanol - 24/7
. . . . .
Worldwide
Telephone: +(31) (0) 20 504 05 35
English/Espanol - 24/7
Product Warranty Registration
Please take a moment to register your product online.
Go to TRENDnet’s website at http://www.trendnet.com/register
20675 Manhattan Place
Torrance, CA 90501
USA
Copyright ©2008. All Rights Reserved. TRENDnet.
 Loading...