

Page 1

TU-ET100C
USB 1.1 Fast Ethernet Adapter
Quick Installation Guide
Guide d'installation rapide de
l'adaptateur Fast Ethernet USB 1.1 TU-ET100C
Kurzanleitung zur Installation des
Fast-Ethernet-Adapters TU-ET100C USB 1.1
Guía de instalación rápida del
adaptador Ethernet Fast USB 1.1 TU-ET100C
Version 10.21.04
TRENDnet
TRENDware, USA
What's Next in Networking
Copyright ©2004. All Rights Reserved. TRENDware International, Inc.
Page 2

Table of Contents
English ......................................................................................................
1. Prepare for Installation ......................................................................
2. Product Detail ....................................................................................
3. Hardware Installation .........................................................................
4. Driver Installation ...............................................................................
5. Verify Installation ...............................................................................
Troubleshooting ........................................................................................
1
1
2
3
4
15
18
Page 3

English QIG
1. Prepare for Installation
Thank you for purchasing TRENDnet's TU-ET100C USB 1.1 Fast Ethernet
Adapter.
This guide will help you set-up your USB 1.1 Fast Ethernet Adapter. Following
the installations should be quick and easy. If you run into problems, please
refer to the Troubleshooting section. If you need further technical support,
please visit www.TRENDNET.com or call technical support by phone.
Verify Package Contents
Please make sure you have everything in the box:
TU-ET100C
USB 1.1 Fast Ethernet Adapter
Quick Installation Guide
Guide d'installation rapide de
l'adaptateur Fast Ethernet USB 1.1 TU-ET100C
Kurzanleitung zur Installation des
Fast-Ethernet-Adapters TU-ET100C USB 1.1
Guía de instalación rápida del
adaptador Ethernet Fast USB 1.1 TU-ET100C
Version 10.21.04
TRENDnet
TRENDware, USA
What's Next in Networking
TU-ET100C
Quick Installation Guide
Minimum System Requirements
1. Pentium 300Mhz or faster with at least 64MB RAM
2. Computer with an available USB port
3. Windows XP, 2000, ME, 98SE
1
CD-ROM
English
Page 4
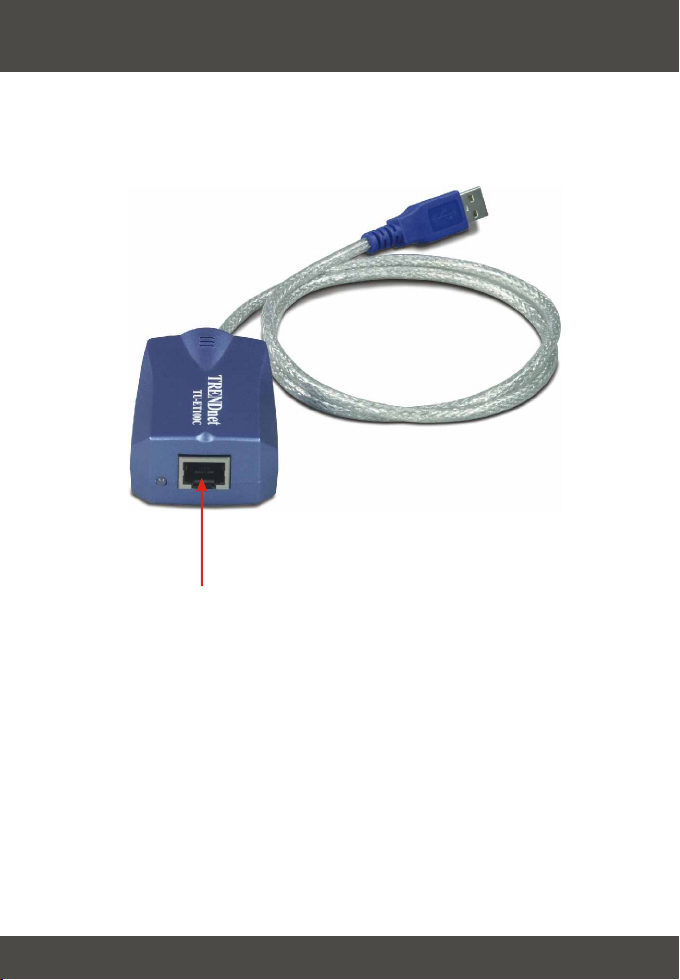
2. Product Detail
The USB 1.1 Fast Ethernet Adapter has one RJ-45 connector and an attached
USB cable.
RJ-45 connector
2
English
Page 5
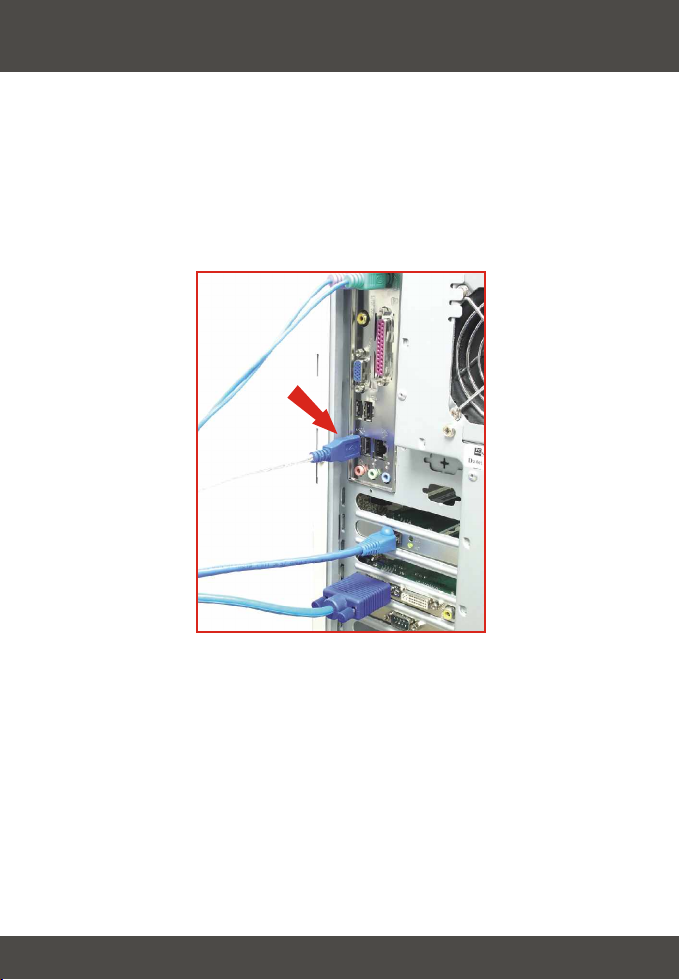
3. Hardware Installation
1. Turn on your computer and allow your operating system to fully load into the
system.
2. Connect the Type-A connector of your TU-ET100C into a USB slot of your
desktop or notebook.
3. Connect one end of the CAT-5 cable into the TU-ET100C's RJ-45 port, and
connect the other end into your switch, router, cable modem, or DSL modem.
3
English
Page 6
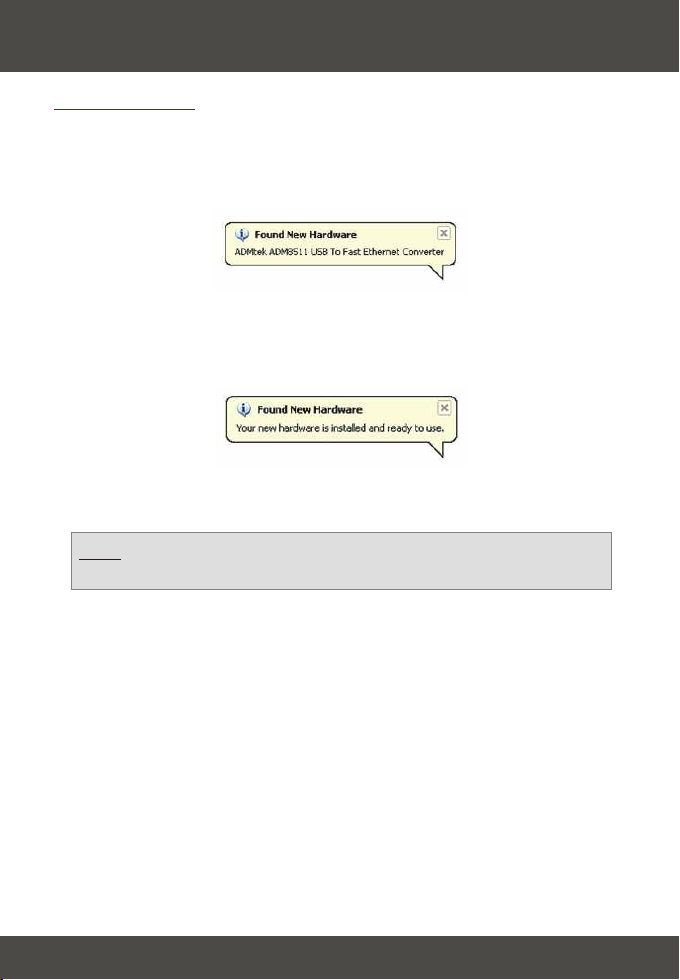
4. Driver Installation
Windows XP
After inserting the TU-ET100C into one of your USB ports, the “Found New
Hardware” message appears. You will notice a message at the lower right hand
corner of your desktop.
1. Allow Windows XP to install your drivers. You will get another message
telling you that your TU-ET100C is ready for use.
Your driver installation is now complete.
Note: If you would like to verify the TU-ET100C has been installed
properly for your windows, go to the Verify Installation section.
4
English
Page 7
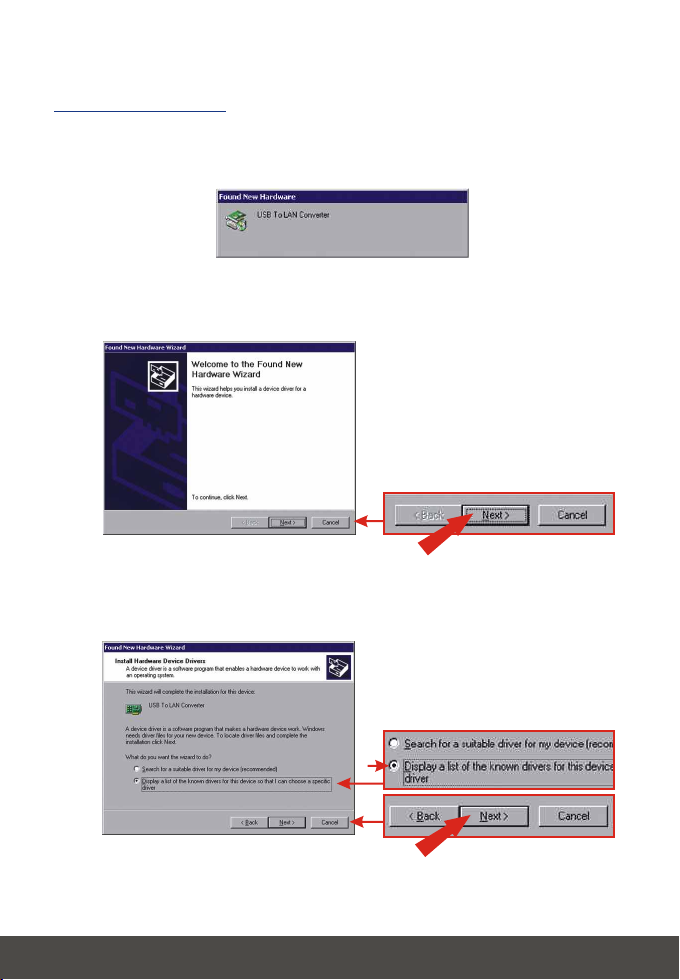
Windows 2000
After inserting the TU-ET100C into one of your USB slots, the “Found New
Hardware” message appears.
1. Insert the floppy disk that came with this product. Click Next.
2. Select Display a list of known drivers for this device. Click Next.
5
English
Page 8

3. Click Have Disk.
4. Click Browse…
5. Click the down arrow by the Look in text box and click 3½ Floppy (A:).
6
English
Page 9

6. Double click Win2000.
7. Click NET8511 and click Open.
8. Click OK.
7
English
Page 10

9. Click Next.
10. Click Yes.
11. Click Next.
8
English
Page 11

12. Click Yes.
13. Click Finish.
Your driver installation is now complete.
Note: If you would like to verify the TU-ET100C has been installed
properly for your windows, go to the Verify Installation section.
9
English
Page 12

Windows ME
After inserting the TU-ET100C into one of your USB slots, the “Found New
Hardware” message appears.
1. Insert the floppy disk that came with this product. Click Specify the location
of the driver. Click Next.
2. Click Search for a better driver, click Specify a location: and type in
A:\WinMe. Click Next.
10
English
Page 13

3. Click Next.
4. Click Finish.
Your driver installation is now complete.
Note: If you would like to verify the TU-ET100C has been installed
properly for your windows, go to the Verify Installation section.
11
English
Page 14

Windows 98SE
After inserting the TU-ET100C into one of your USB slots, the “Found New
Hardware” message appears.
1. Click Next.
2. Insert the floppy disk that came with this product. Click Specify the
location of the driver. Click Next.
12
English
Page 15

3. Click Specify a location: and type in A:\Win98. Click Next.
4. Click Next.
5. Insert the Windows 98SE CD-ROM into your computer's CD-ROM drive.
6. Click OK.
13
English
Page 16

7. Click Finish.
8. Click Yes.
Your driver installation is now complete.
Note: If you would like to verify the TU-ET100C has been installed
properly for your windows, go to the Verify Installation section.
14
English
Page 17

5. Verify Installation
Windows XP
1. Click Start, and then click Control Panel.
2. Double-click the System icon. On the Hardware tab, click the Device
Manager button.
3. Expand the “Network Adapters” heading to verify that the ADMtek ADM8511
USB to Fast Ethernet Converter has been installed.
15
English
Page 18

Windows 2000
1. Click Start, highlight Settings, and then click on Control Panel.
2. Double-click the System icon. On the Hardware tab, click the Device
Manager button.
3. Expand the “Network Adapters” heading to verify that the ADMtek ADM8511
USB to Fast Ethernet Converter has been installed.
16
English
Page 19

Windows ME
1. Click Start, highlight Settings, and then click on Control Panel.
2. Double-click the System icon, and click the Device Manager tab.
3. Expand the “Network Adapters” heading to verify that the ADMtek ADM8511
USB to Fast Ethernet Converter has been installed.
Windows 98SE
1. Click Start, highlight Settings, and then click on Control Panel.
2. Double-click the System icon, and click the Device Manager tab.
3. Expand the “Network Adapters” heading to verify that the ADMtek ADM8511
USB to Fast Ethernet Converter has been installed.
17
English
Page 20

Troubleshooting
Q1.
Can I connect or disconnect TU-ET100C while the computer is on?
A1.
Yes, you can connect or disconnect TU-ET100C while the computer is on
because the USB interface is Plug-and-Play compliant and hot-pluggable.
After successful installation of the TU-ET100C USB Fast Ethernet, I connected
Q2.
my USB device into a USB slot, but it does not seem to work. What should I do?
Make sure that the CAT-5 cable is connected properly into your switch, or
A2.
broad-band modem. Double check the connection at the other end of the CAT-5
cable, and verify that the cable is inserted properly into your TU-ET100C. Also,
verify that your switch or your broad-band modem is getting any power.
When I verify the installation of the TU-ET100C, I see an exclamation point on
Q3.
my network adapter. What should I do?
Go to Control Panel and double-click the System icon. Go to the Device
A3.
Manager and expand the Network adapters heading. Double-click ADMtek
ADM8511 USB to Fast Ethernet Converter (the icon that has an exclamation point
on it), and click the Driver tab. On the Driver tab, click Update Driver. Use 4.Driver
Installation in this installation manual to guide you in installing your driver.
If you have any questions regarding the TU-ET100C, please contact Trendware
Technical Support Department.
Contact Technical Support
Telephone: +1-310-626-6252
Fax: +1-310-626-6267
Website: www.TRENDNET.com
E-mail: support@trendware.com
Certifications
This equipment has been tested and found to comply with FCC and CE Rules.
Operation is subject to the following two conditions:
(1) This device may not cause harmful interference.
(2) This device must accept any interference received.
Including interference that may cause undesired operation.
Technical Support Hours
7:00AM ~ 6:00PM, Monday through Friday
Pacific Standard Time (except holidays)
18
Page 21

TRENDnet
TRENDware, USA
What's Next in Networking
Product Warranty Registration
Please take a moment to register your product online.
Go to TRENDware’s website at http://www.TRENDNET.com
@
TRENDware International, Inc.
3135 Kashiwa Street
Torrance, CA 90505
http://www.TRENDNET.com
Copyright ©2004. All Rights Reserved. TRENDware International, Inc.
 Loading...