

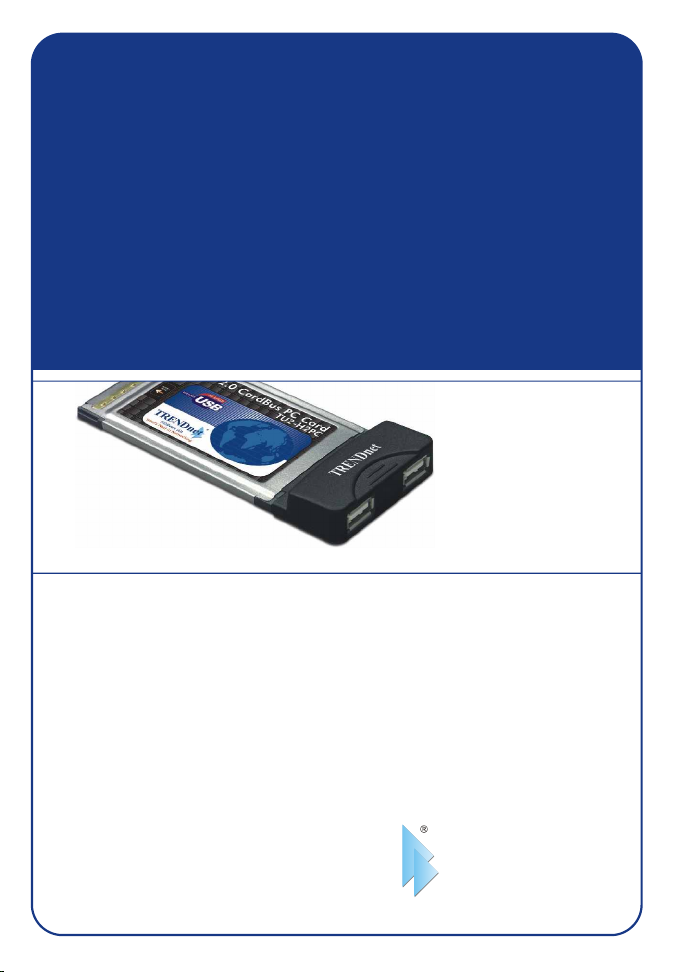
TU2-H2PC
Quick Installation Guide
Version 08.23.2005
TRENDnet
TRENDware, USA
What's Next in Networking
Copyright ©2005. All Rights Reserved. TRENDware International, Inc.

Table of Contents
Español .....................................................................................................
1. Preparación para la instalación .........................................................
2. Detalles del producto/ Instalación del Hardware ................................
3. Instalación de la unidad .....................................................................
4. Verificar la instalación ........................................................................
Troubleshooting ........................................................................................
1
1
2
3
5
6
Español QIG
1. Preparación para la instalación
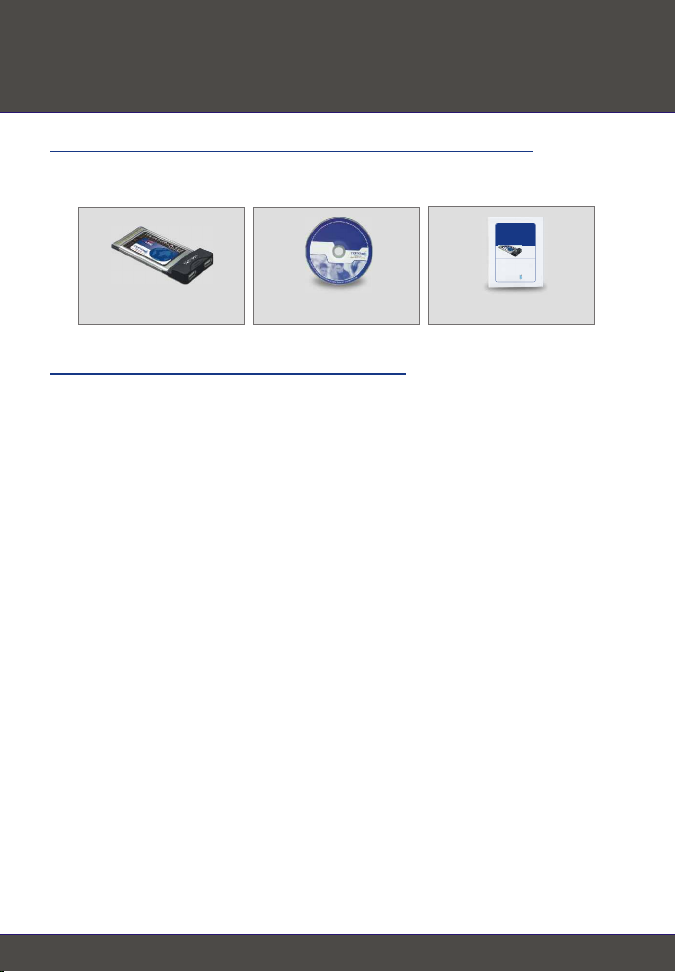
Verificación de los contenidos del paquete
Verifique que su caja contiene todo lo que incluimos en ella:
TU2-H2PC CD-ROM del controlador
Requisitos mínimos del sistema
1. Procesador Pentium 266Mhz o superior
2. 64MB de RAM o superior
3. Una ranura Tipo II CardBus de 32 bits disponible
4. Windows 98SE, ME, 2000, XP, 2003 o Mac OS 10.1 o superior
Guía de instalación rápida
TU2-H2PC
Quick Installation Guide
Version 08.23.2005
TRENDnet
TRENDware, USA
What's Next in Networking
1
Español

2. Detalles del producto/ Instalación del
Hardware
Detalles del producto
El Adaptador CardBus de 2 puertos USB 2.0 tiene 2 puertos USB de alta
velocidad.
2 puertos USB 2.0 para la
conexión de periféricos USB
Instalación del Hardware
1. Encienda su PC portátil y asegúrese de que el programa de Windows se
haya cargado correctamente.
2. Introduzca el TU2-H2PC en la ranura disponible de la Tarjeta en el PC.
3. Asegúrese de que el TU2-H2PC sea introducido por completo hasta el final
de la ranura.
4. Su portátil deberá emitir el sonido de un pito que indica que el nuevo
hardware ha sido instalado.
2
Español

3. Instalación de la unidad
Windows 98SE/ME/2000/XP/2003
Tras introducir el TU2-H2PC, le aparecerá en la pantalla "Found New
Hardware Wizard" (Asistente para nuevo hardware encontrado). Windows lo
detectará automáticamente, y le pedirá que instale el controlador USB 2.0 para
el TU2-H2PC.
Nota: Haga clic en el botón cancelar (esto aplica para Windows
98SE/ME/2000/XP), instale primero el Controlador USB siguiendo las
siguientes instrucciones:
1. Introduzca el CD-ROM del controlador TU2-H2PC en la unidad de CD-ROM
de su PC.
2. Haga doble clic en el icono “My computer” (Mi PC) en el escritorio de
Windows.
3. Haga doble clic en la unidad “CD ROM” y en la carpeta “Windows”.
4. Haga doble clic en el icono “setup.exe” para instalar el controlador
USB 2.0 de Windows.
3
Español

5. Haga un click en Close (Cerrar) y reinicie su PC.
Después de reiniciar su PC, le aparecerá la pantalla "Found New Hardware"
(Nuevo hardware encontrado). ME/2000/XP/2003 detectará e instalará
automáticamente el controlador USB 2.0 para el TU2-H2PC.
¡Felicidades!
La instalación ya está completa.
Nota: Si usted desea verificar que el TU2-H2PC ha sido instalado
correctamente para su Windows, vaya a la sección Verify Installation
(Verificar la instalación).
4
Español

4. Verificar la instalación
1. Haga clic en Start (Inicio) y después en Control Panel (Panel de Control).
Para Windows 2000, haga clic en Start (Inicio), después seleccione
Settings (Configuración) y por último, haga un clic en Control Panel
(Panel de Control).
2. Haga doble clic en el icono System (Sistema). Haga un clic en la pestaña
Hardware y a continuación haga un clic en el botón Device Manager
(Administrador de Dispositivos).
3. Extienda el encabezado “Universal Serial Bus controller” (Controlador Bus
serie universal) para comprobar que el Universal Serial Bus controller
(controlador Bus serie universal) ha sido instalado.
5
Español

Troubleshooting
Can I connect or disconnect the USB cable while the computer is on?
Q1.
Yes, you can connect or disconnect the USB cable, or any external USB
A1.
device while the computer is on, because the USB interface is Plug-and-Play and
hot-pluggable.
I have a USB 1.1 cable. Can it work with USB 2.0 devices?
Q2.
Yes, it works but it may cause problems for connecting high-speed
A2.
USB 2.0 external peripherals. Therefore it is recommended that you use
certified USB 2.0 cable.
After successful installation of the TU2-H2PC 2-Port USB 2.0 CardBus PC
Q3.
card, I connected my external USB device to the USB port, but it doesn't seem to
work. What should I do?
If you have an external AC power adapter comes with the external
A3.
USB device, connect the AC power adapter to the device and power on
the device. Also make sure that you have installed the correct driver for
your external USB device in Windows.
If you have any questions regarding the TU2-H2PC 2-Port USB 2.0 CardBus PC Card,
please contact Trendware Technical Support Department.
Certifications
This equipment has been tested and found to comply with FCC and CE Rules.
Operation is subject to the following two conditions:
(1) This device may not cause harmful interference.
(2) This device must accept any interference received.
Including interference that may cause undesired operation.
NOTE: THE MANUFACTURER IS NOT RESPONSIBLE FOR ANY RADIO OR TV
INTERFERENCE CAUSED BY UNAUTHORIZED MODIFICATIONS TO THIS
EQUIPMENT. SUCH MODIFICATIONS COULD VOID THE USER’S AUTHORITY TO
OPERATE THE EQUIPMENT.
6

@
TRENDnet
TRENDware, USA
What's Next in Networking
Product Warranty Registration
Please take a moment to register your product online.
Go to TRENDware’s website at http://www.TRENDNET.com
TRENDnet Technical Support
US/Canada Support Center European Support Center
Contact
Telephone:
Fax:
Email:
Tech Support Hours
7:30am - 6:00pm Pacific Standard Time
Monday - Friday
1(310) 626-6252
1(310) 626-6267
support@trendnet.com
TRENDware International, Inc.
3135 Kashiwa Street. Torrance, CA 90505
Contact
Telephone
Deutsch : +49 (0) 6331 / 268-460
Français : +49 (0) 6331 / 268-461
Español : +49 (0) 6331 / 268-462
English : +49 (0) 6331 / 268-463
Italiano : +49 (0) 6331 / 268-464
Dutch : +49 (0) 6331 / 268-465
Fax:
Tech Support Hours
8:00am - 6:00pm Middle European Time
Monday - Friday
08-00-90-71-61 (numéro vert)
+49 (0) 6331 / 268-466
http://www.TRENDNET.com
Copyright ©2005. All Rights Reserved. TRENDware International, Inc.
 Loading...