

Page 1

Guide d'installation rapide
TU2-ET100
V3
Page 2

Table of Contents
Français 1
1. Avant de commencer 1
2. Installation du matériel 2
Troubleshooting
4
Version 05.24.2010
Page 3

1. Avant de commencer
Contenu de l'emballage
• TU2-ET100
• Pilote sur CD-ROM
• Guide d´installation rapide en plusieurs
langues
Vérification de l'équipement
• Lecteur de CD-ROM
• Port USB: 2.0 ou 1.1
SE supportés CPU Mémoire
Windows 7 (32/64-bit)
Windows Vista (32/64-bit)
Windows XP (32/64-bit) /
2000 / ME / 98SE
Mac OS X (10.6)
Mac OS X (10.5)
Mac OS X (10.4)
Mac OS X (10.1-10.3)
1GHz ou supérieur
800MHz ou supérieur
300MHz ou supérieur
Microprocesseur Intel
867MHz ou supérieur
333MHz ou supérieur
300MHz ou supérieur
1GB RAM ou supérieur
512MB RAM ou supérieur
256MB RAM ou supérieur
1GB RAM ou supérieur
512MB RAM ou supérieur
256MB RAM ou supérieur
256MB RAM ou supérieur
1
Page 4
2. Installation du matériel
Remarque:
1. Pour l’installation des pilotes sur Windows 98SE et Me et Mac OS X, veuillez
consulter le guide de l’utilisateur sur le CD-ROM avec le pilote.
2. N'installez pas l'adaptateur USB TU2-ET100 avant de recevoir la consigne.
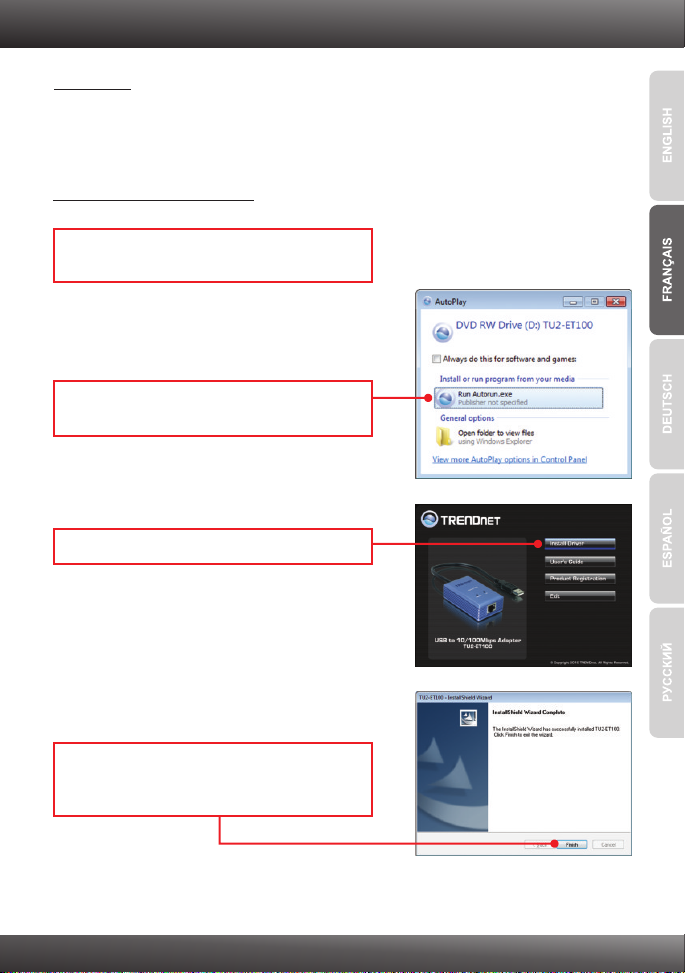
Windows 7 / Vista / XP / 2000
1. Insérez le CD-ROM avec le pilote dans votre
lecteur de CD-ROM.
2. Cliquez sur Run Autorun.exe
(Windows 7/Vista uniquement).
3. Cliquez sur Installer le driver.
4. Suivez les instructions de l'écran de
l'assistant d'installation et cliquez ensuite sur
Terminer.
2
Page 5
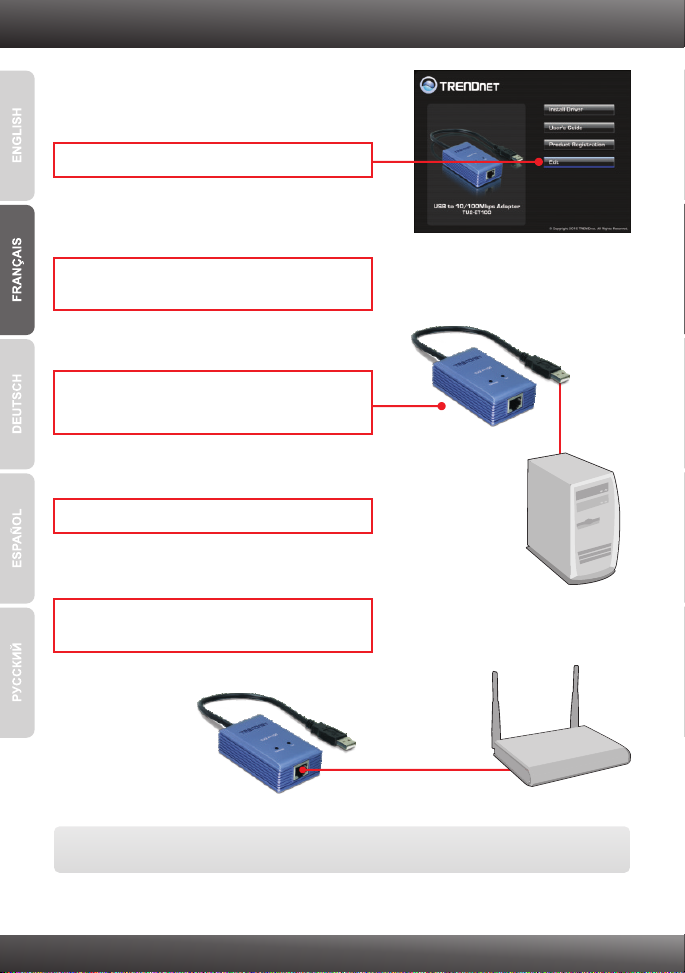
5. Cliquez sur Quitter.
6. Enlevez le CD-ROM de votre lecteur de
CD-ROM de votre ordinateur.
7. Branchez l’adaptateur à un port USB disponible
de votre ordinateur.
8. Les pilotes s'installeront automatiquement.
9. Branchez un câble RJ-45 depuis le switch, le
routeur ou le modem câble/DSL.
L'installation est maintenant complète.
3
Page 6

Troubleshooting
1.
I inserted the Driver CD-ROM into my computer's CD-ROM Drive and the
installation menu does not appear automatically. What should I do?
1.
For Windows 7, if the installation menu does not appear automatically, click on
the Windows Icon on the bottom left hand corner of the screen, click the
“Search programs and files” box, and type D:\autorun.exe, where “D” in
“D:\autorun.exe” is the letter assigned to your CD-ROM Drive, and then press
the ENTER key on your keyboard
2. For Windows Vista, if the installation menu does not appear automatically, click
Start, click the Start Search box, and type D:\autorun.exe where "D" in
"D:\autorun.exe" is the letter assigned to your CD-ROM Drive, and then press
the ENTER key on your keyboard.
3. For Windows 2000/XP, if the installation menu does not appear automatically,
click Start, click Run, and type D:\autorun.exe where "D" in "D:\autorun.exe" is
the letter assigned to your CD-ROM Drive, and then press the ENTER key on
your keyboard.
2. Can I connect or disconnect the TU2-ET100 while the computer is on?
Yes, you can connect or disconnect TU2-ET100 while the computer is on
because the USB interface is Plug-and-Play compliant and hot-pluggable.
3. Windows is unable to recognize my hardware. What should I do?
1. Make sure your computer meets the minimum requirements as specified in
Section 1 of this Quick Installation Guide.
2. Try plugging the adapter into a different USB port.
4. Windows recognizes my new hardware, but I'm unable to connect to my
network. What should I do?
1. Verify that the RJ-45 Ethernet cable is securely connected from your switch or
router to your adapter.
2. Verify that the LEDs on your adapter are lit.
3. Verify that the TCP/IP settings are set to Obtain an IP address automatically.
5. How do I install this device on Windows 98SE, ME and Mac OS X?
Refer to the User Guide included on the Driver CD-ROM for installation
instructions.
If you still encounter problems or have any questions regarding the TU2-ET100, please
contact TRENDnet's Technical Support Department.
4
Page 7

Page 8

Copyright ©2010. All Rights Reserved. TRENDnet.
 Loading...