

Page 1
Page 2
PREFACE
Congratulations on your purchase of the TS-S402 Network Storage Enclosure. Read this
manual carefully and keep it in a safe place for future reference.
Copyright®
© Copyright 2007. All rights reserved.
No part of this publication may be reproduced, transmitted, transcribed, stored in a
retrieval system, or translated into any language or computer language, in any form, by
any means, without the prior written permission of the manufacturer.
Notice
Product features and specifications described in this manual are subject to change
without notice. The manufacturer shall not be liable for any damage or loss of the
personal data caused by delay in performance, wrong operation, product service, or
other accidental circumstances.
Conventions
The manual uses the following symbols to help you quickly identify the important
information.
Used to indicate additional information you need to
Know when using your TS-S402 Network Storage Enclosure.
Used to indicate and avoid the risk of data loss or
damage to your TS-S402 Network Storage Enclosure.
Regulations
FCC Warning
This equipment has been tested and found to comply with the regulations
for a Class B digital device, pursuant to Part 15 of the FCC Rules. These
limits are designed to provide reasonable protection against harmful
interference when the equipment is operated in a commercial environment.
This
equipment generates, uses, and can radiate radio frequency energy and, if not installed
and used in accordance wi th this user’s guide, may cause harm ful interference to radio
communications. Operation of this equipment in a resid ential area is likely to cause
harmful interference, in which case the user will be required to correct the interference
at his own expense.
2 User’s Guide
Page 3

CE Mark Warning
This is a Class B product. In a domestic environment, this product may cause
radio interference, in which case the user may be re quired to take adequate
measures.
VCCI Warning
This is a pr oduct of VCCI Class B Compliance.
WEEE Notice
This symbol indicates that the product should not be treated as household
waste. To ensure protection of the environment, this product should be
disposed of in a manner consistent with EU regulations.
Multimedia NAS 3
TS-S402 3
Page 4

CONTENTS
PREFACE...........................................................................................................................................2
Copyright®................................................................................................................................2
Notice.......................................................................................................................................2
Conventions.............................................................................................................................2
Regulations...............................................................................................................................2
FCCWarning..................................................................................................................... 2
CEMarkWarning.............................................................................................................3
VCCIWarning...................................................................................................................3
WEEENotice.....................................................................................................................3
CONTENTS........................................................................................................................................4
OVERVIEW........................................................................................................................................7
PackageContents.....................................................................................................................7
Features....................................................................................................................................8
SystemRequirements..............................................................................................................
ProductOverview.....................................................................................................................9
LEDDefinitions.......................................................................................................................10
UNDERSTANDINGRAIDLEVELS......................................................................................................11
RAID0.....................................................................................................................................11
Characteristics................................................................................................................11
RAID1.....................................................................................................................................12
Characteristics................................................................................................................12
JBOD.......................................................................................................................................13
Characteristics................................................................................................................13
GETTINGSTAR TED..........................................................................................................................14
InstallingHardDisks...............................................................................................................14
ConnectingthePower............................................................................................................15
ConnectingtoaNetwork.......................................................................................................15
Tur ningYou r TS‐S402NetworkStorageEnclosureOnandOff..............................................16
InstallingtheNASUtility........................................................................................................16
UninstallingtheNASUtility....................................................................................................17
InitializingandAccessingYourTS‐S402NetworkStorageEnclosure.....................................17
Formattingtheinstalledharddisks
AttachingtheTS‐S402viaNASUtility............................................................................19
Networkconfiguration...................................................................................................20
Login...............................................................................................................................20
USINGEXTERNALUSBDEVICES......................................................................................................21
ConnectingUSBDevices........................................................................................................21
UsingtheUSBOne‐ClickBackupButton................................................................................21
DisconnectingUSBDevices....................................................................................................22
USINGTHENASUTILITY.................................................................................................................24
NAS
UtilityOverview..............................................................................................................24
AttachOtherNAS...................................................................................................................25
UserManagement.................................................................................................................25
DeviceInformation................................................................................................................26
NASShareFolder....................................................................................................................28
Creatinganewfolder.....................................................................................................29
................................................................................18
9
4 User’s Guide
Page 5

Deletingafolder.............................................................................................................29
Editingfolderproperties................................................................................................29
Mountingafolderasanetworkdrive...........................................................................30
Refreshingthefolderlistings.........................................................................................31
Changingthefolderstyle...............................................................................................31
Backup/Restore......................................................................................................................32
Addingabackuptask.....................................................................................................33
Deletingabackuptask...................................................................................................34
Editingabackuptask.....................................................................................................
Startingabackuptask....................................................................................................35
Settingabackupschedule.............................................................................................35
Removingabackupschedule.........................................................................................36
Viewingtaskproperties.................................................................................................36
DeviceSetting........................................................................................................................37
ChangeUser...........................................................................................................................37
SystemLog.............................................................................................................................38
Clearingallthelogs........................................................................................................38
Savinglogstoafile.........................................................................................................38
USING
THEWEB‐BASEDCONFIGURATIONTOOL...........................................................................39
LaunchingtheWeb‐basedConfigurationTool.......................................................................39
Web‐basedConfigurationToolOverview..............................................................................40
SystemStatus.........................................................................................................................41
Configuration.........................................................................................................................42
Networking..................................................................................................................... 42
Basic...............................................................................................................................43
ServerPreference...........................................................................................................44
FirmwareUpgrade.........................................................................................................44
Backup/Restore..............................................................................................................45
FactoryDefaults.............................................................................................................46
Reboot/Shutdown
RemotePackage.............................................................................................................48
ShareManagement................................................................................................................49
ShareFolder...................................................................................................................49
UserManagement.........................................................................................................51
GroupManagement.......................................................................................................53
..........................................................................................................47
35
Multimedia NAS 5
TS-S402 5
Page 6
................................................................................................................................................54
QuotaManagement.......................................................................................................55
SchedulingBackup.........................................................................................................57
DiskUtility..............................................................................................................................59
DiskInformation.............................................................................................................59
DiskMode......................................................................................................................60
FormatDisk....................................................................................................................61
PowerManagement.......................................................................................................62
SystemLogs............................................................................................................................ 63
SyslogServer..................................................................................................................63
SystemLogs....................................................................................................................64
ServiceConfiguration.............................................................................................................65
FTPServer......................................................................................................................65
This
pageallowsyoutochangetheFTPserversettingsonyourTS‐S402.....................65
iTunesServer..................................................................................................................66
UPnPServer...................................................................................................................67
DynamicDNS..................................................................................................................68
DownloadCenter...........................................................................................................69
BTClient.........................................................................................................................71
NASPrinter.....................................................................................................................72
SPECIFICATIONS..............................................................................................................................74
6 User’s Guide
Page 7
OVERVIEW
Read this section to familiarize yourself with some of the basic features of the product.
Package Contents
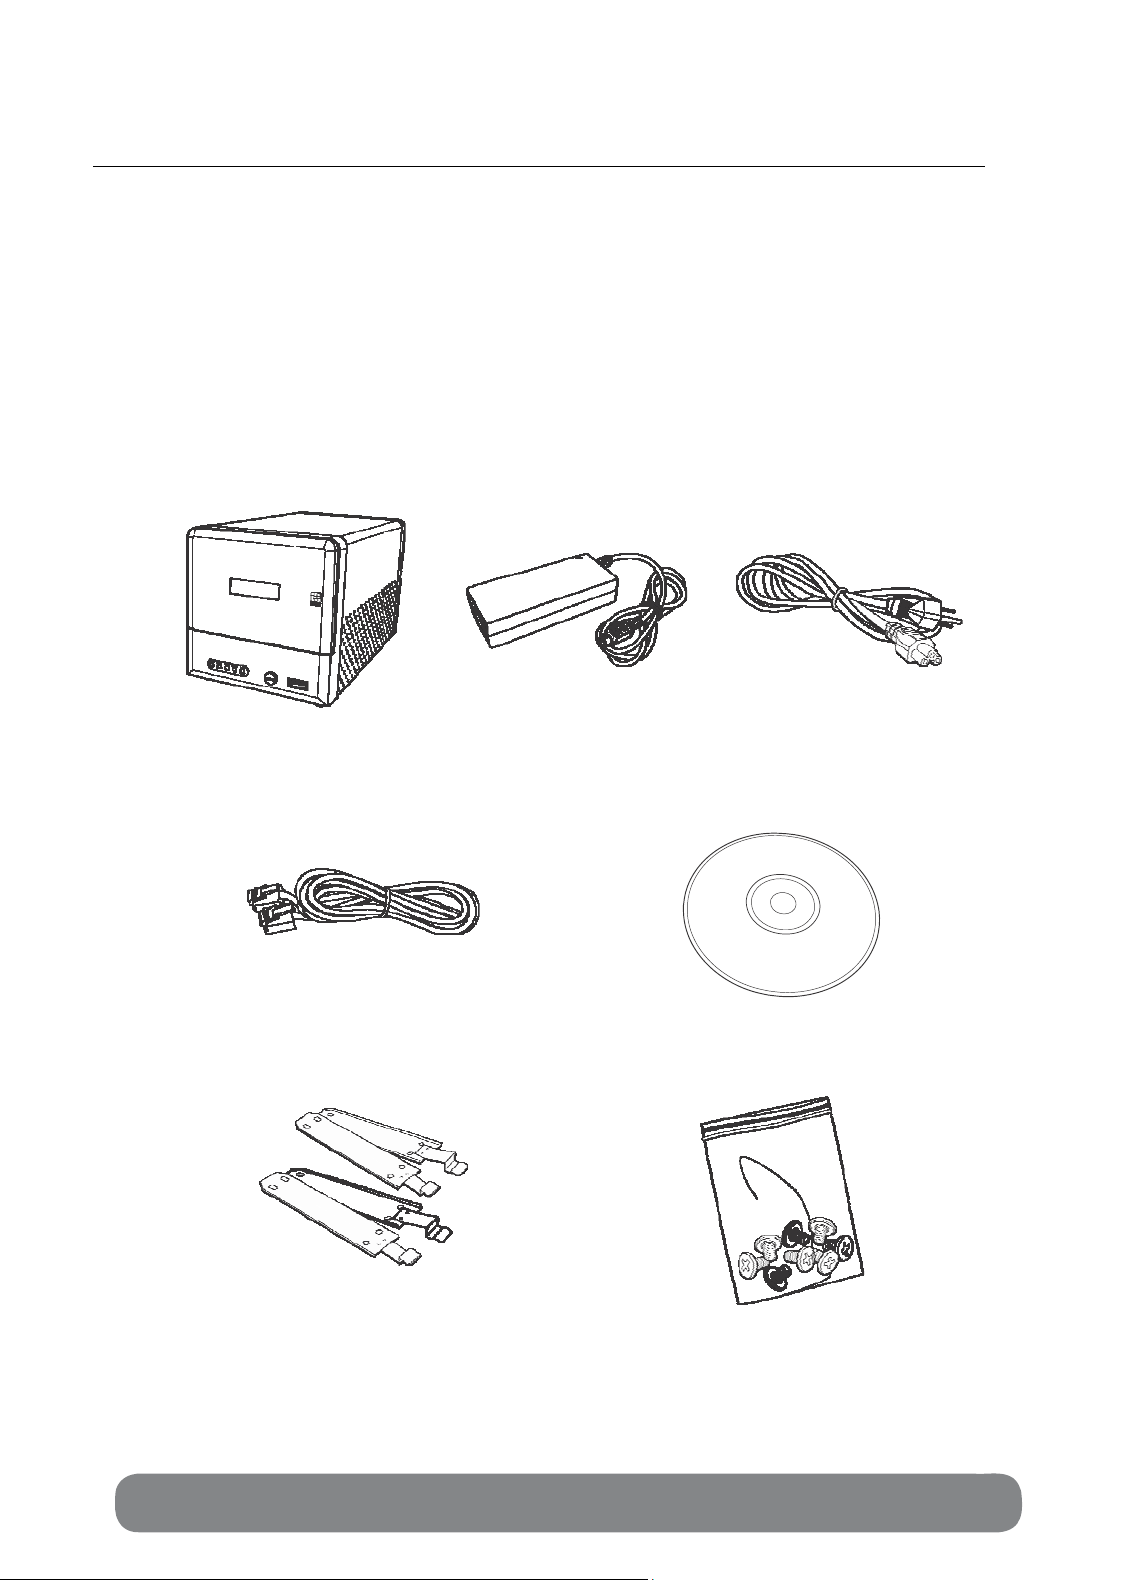
Make sure that the following items are present the package. If anything is missing or
damaged, contact your vendor immediately.
TS-S402 Network Storage Enclosure Power Adapter
Power Cord
RJ-45 Cable CD
HDD Brackets x 4 Screws x 8
Multimedia NAS 7
TS-S402 7
Page 8

Features
• Supports one 10/100/1000Mbps Auto-MDIX Gigabit Ethernet port for network
connection.
• Provides two USB ports for printer and USB storage device connections.
• Supports Windows based utility for Auto-IP discovery and setup, Disk status
monitor, Network drive wizard and remote backup.
• Automatic ally detects ne w dr i ves when insert e d.
• Web-based UI for easy configuration, uses AJAX technology to monitor the disk
status (disk usage, format progress, etc) instead of simply refreshing the web
page.
• Supports EXT2/EXT3 HDD file formats.
• Supports FAT16, FAT32, and NTFS USB storage file formats.
• Supports JBOD with software, treats two attached disks as one logical disk for
access.
• Supports Mirrored (RAID 1), and Striped (RAID 0) RAID formats.
• Supports firmware upgrade via Web UI.
• Supports installation of packages from remote devices.
• Built-in FTP server for users to transfer files using FTP client.
• Supports CIFS/SMB/NFS for Microsoft Network remote users easily retrieve files
through ”My Neighborhood”.
• Supports NTP protocol to synchronize clock time.
• Supports unified account management to control all sharing protocols.
• Provides USB one-click backup, to copy USB contents to HDD by pressing just
one button.
• Supports file-level backup, speeds up the file transfer rate by transferring only files
that are different between remote and local devices.
• Supports scheduler to plan backup events/schedules.
• Supports digital media server compatible with DLNA certified digital media players,
and iTunes server.
• Provides formatting function for new HDDs or USB storage devices.
• Supports up to 32 connected users (Samba & FTP) at one time.
• Supports code-page for multiple-language file names (English, German, French,
Italian, Spanish, Portuguese, Russian, Japanese, Traditional Chinese, Simplified
Chinese, and Korean).Supports FTPS(SSL FTP) protocol.
• Support AppleTalk for Macintosh Network.
• Account mana gem ent - support group.
• Supports User and Group Quota.
• Download Center (HTTP/FTP Download).
• Supports Dynamic DNS.
• Web login support https and user level.
8 User’s Guide
Page 9
• Support Jumbo Frame.
• Power Management Setting.
System Re quirements
Before using the TS-S402 Network Storage Encl osure, make sure you have a computer
with the followi ng requirements:
• 1Ghz processor or higher
• 512 MB RAM or above
• 30 MB available hard disk space
• CD-ROM driv e ( f or s of tware install ation)
• Installed network adapter
• Any installed web browser to view the web UI
• Windows XP SP2, Windows 2000 SP6, or Windows Vista (for Windows based
configuration utility) operating system
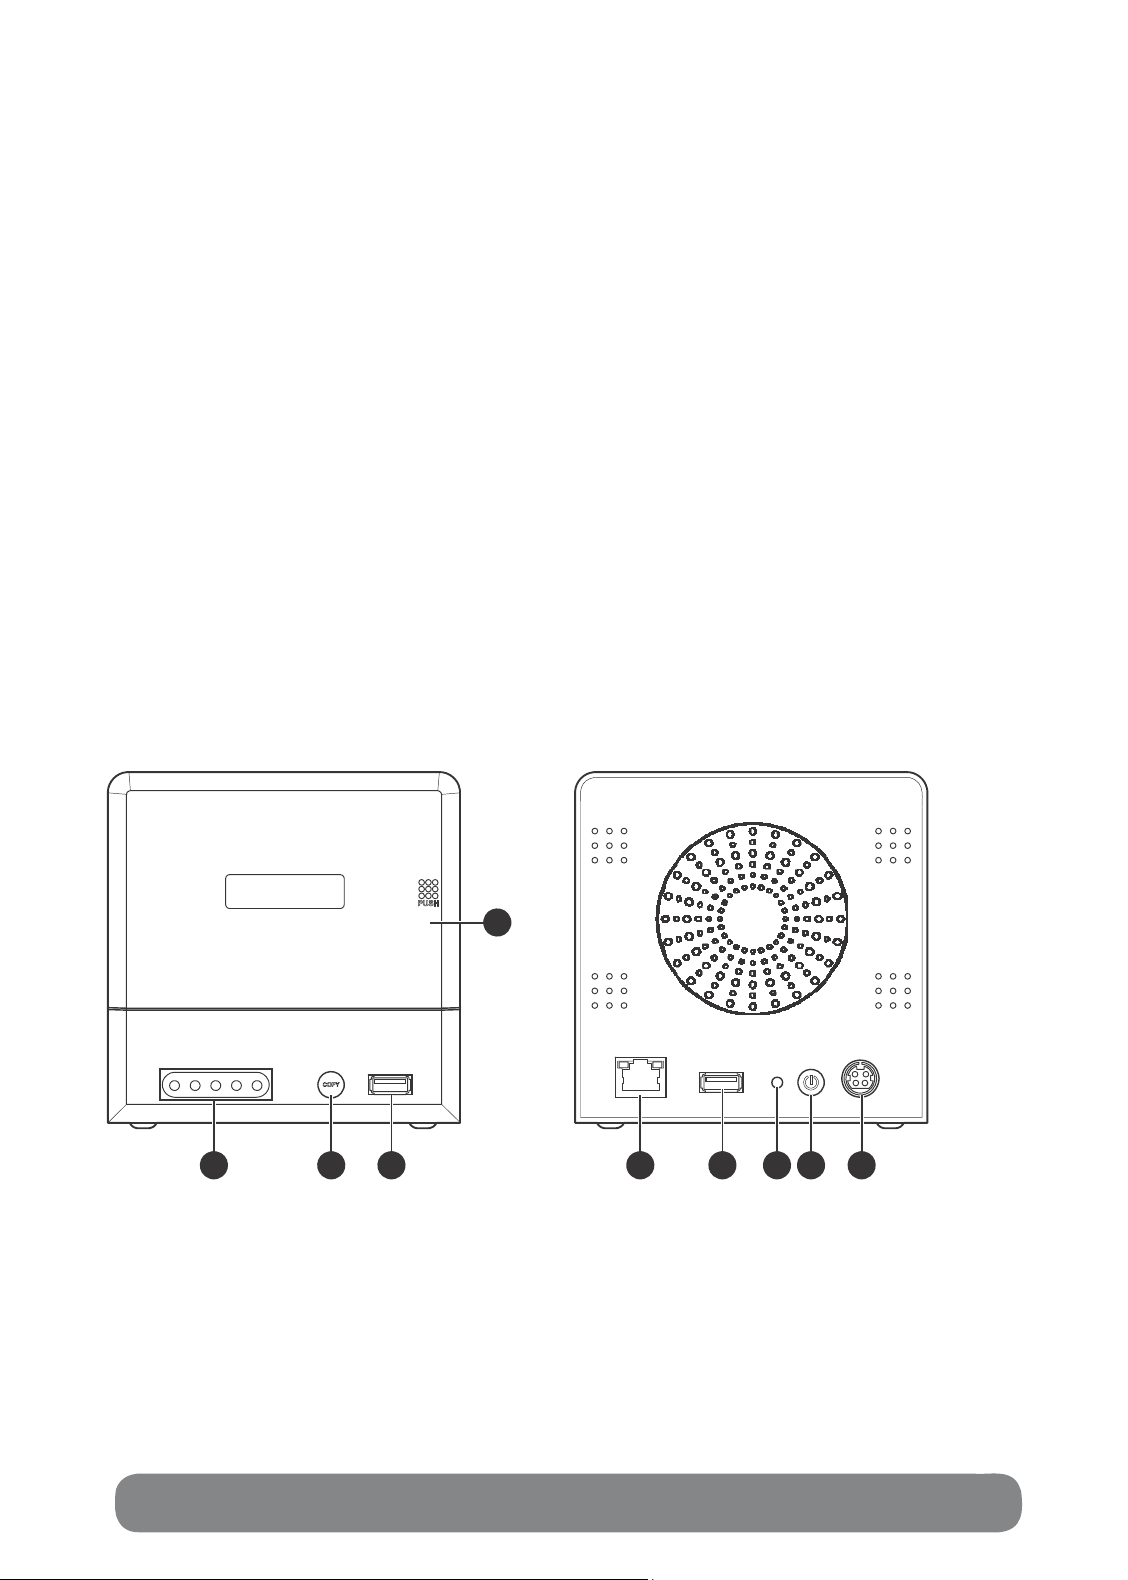
Product Overview
Front View
PWR
SYS
HDD1
1
4
HDD2
LA
N
2
3
Rear View
5
1 Front panel LED indicators 5 LAN port
6
7 8 9
2 USB one-click backup button 6 USB port
3 USB port 7 Reset button
4 HDD enclosure door 8 Power button
Multimedia NAS 9
TS-S402 9
9 Power jack
Page 10
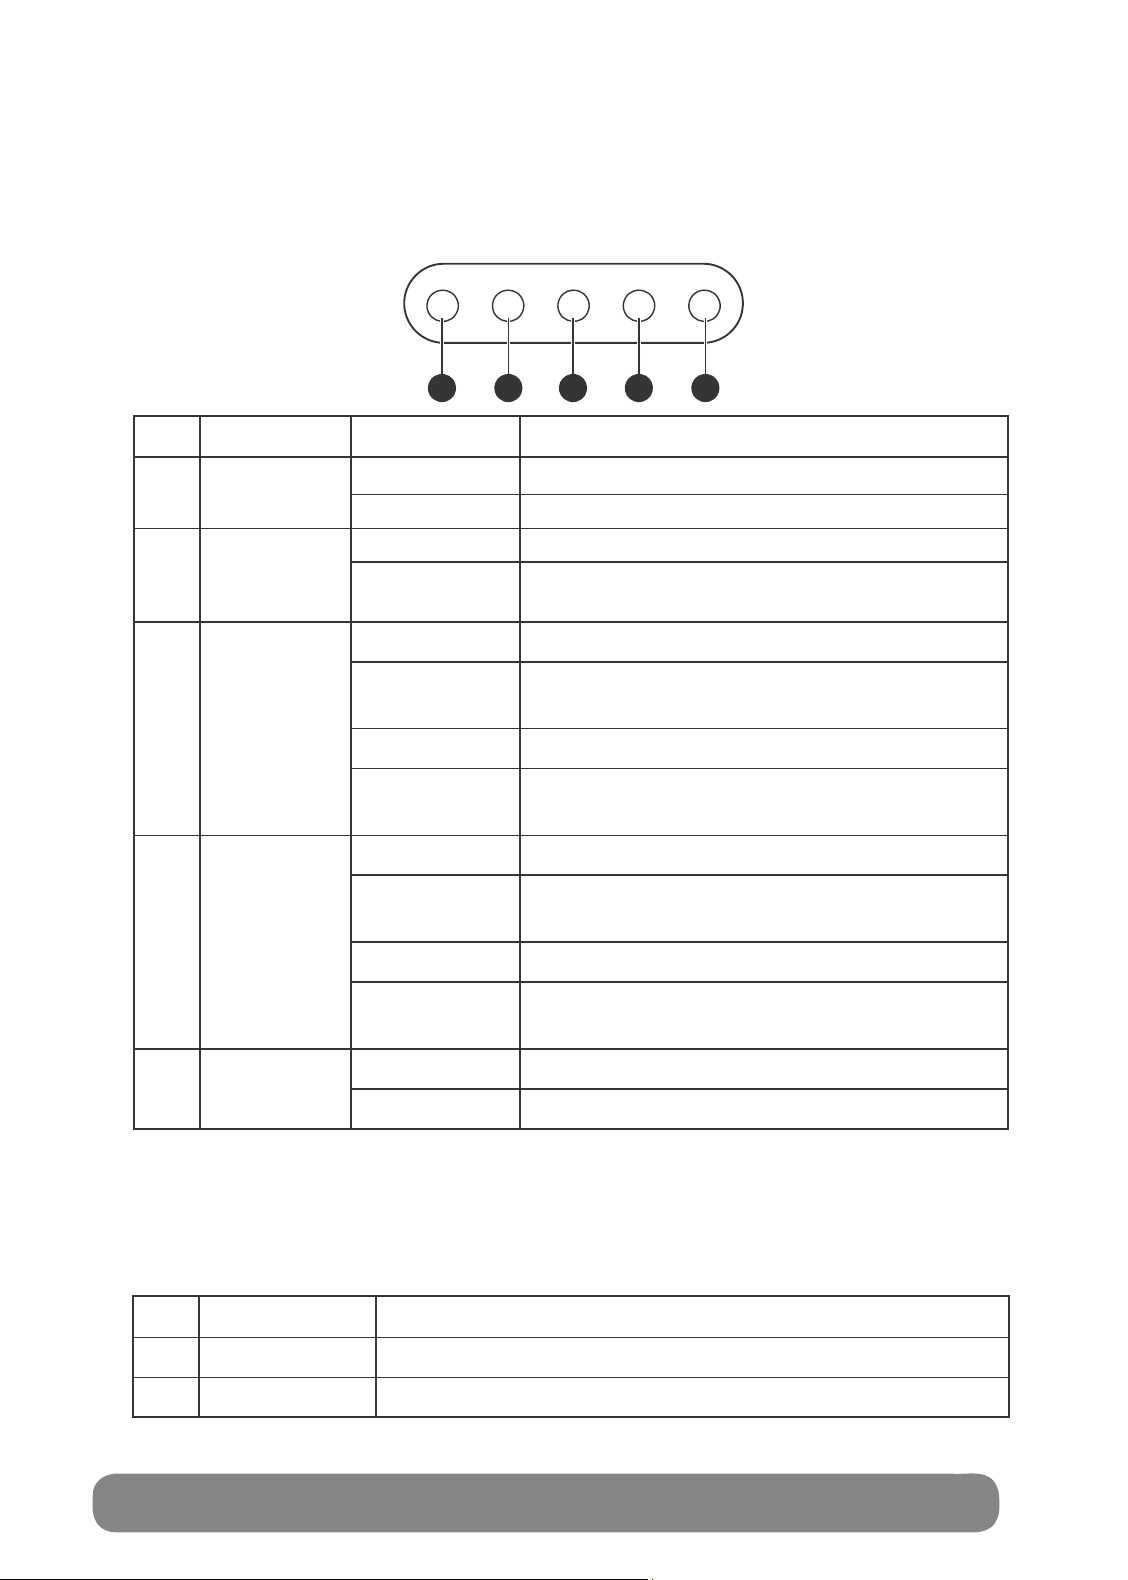
LED Definitions
p
The TS-S402 Network Storage Enclosure comes with five LED indicators on the front
panel. See the below table for descriptions of these LED indicators.
PWR SYS HDD1
1
2
3
HDD2 LAN
4
No. LED LED Color Description
1 Power LED Green Indicates the device is turned on.
Off Indicates the device is turned off.
2 System LED Green Indicates the device is ready for use.
Indicates the device is in the system boot
rocess.
Indicates HDD1 link and the capacity is less
than 10%.
3 HDD1
Access LED
Blinking Green
Green Indicates HDD1 link.
Amber
5
Blinking Green Indicates HDD1 activity.
Indicates HDD1 activity and the capacity is
less than 10%.
Indicates HDD2 link and the capacity is less
4 HDD2
Access LED
Blinking
Amber
Green Indicates HDD2 link.
Amber
than 10%.
Blinking Green Indicates HDD2 activity.
Blinking
Amber
Indicates HDD2 activity and the capacity is
less than 10%.
5 LAN LED Green Indicates network link.
Blinking Green Indicates network activity .
The LAN port, on the rear of the TS-S402 Network Storage Enclosure, is
equipped with two LED indicators representing the LAN link
mode. The following table gives the detailed definitions for
each LED indicator.
No. LED Color Description
1 2
1 Green Indicates Ethernet link in 1000Mbps mode.
2 Amber Indicates Ethernet link in 10/100Mbps mode.
10 User’s Guide
Page 11

UNDERSTANDING RAID LEVELS
This section introduces the basic concepts of RAID 0, RAID 1, and JBOD. Each one is
accompanied with illustrations, to help deepen your understanding of RAID. This allows
you to make use of the RAID feature with your hard disks for improved performance and
data security.
RAID 0
RAID 0, known as disk striping, has generally the best perfor mance, but does not offer
any redundancy. In this level, data is broken into small units called sectors, and sectors
are distributed across all disks in the array. As it does not provide any data protection, if
any disk in the array fails then all data in the array is lost. Such stripes allocation allows
to enhance I/O performance.
Characteristics
- Storage capacity = (number of disks) x (size of the smallest disk)
- A minimum of two disks is required.
- Extremely high performance in both read and write
- No fault-tolerance
The following diagram shows how the TS-S402 Network Storage Enclosure implements
the RAID 0 algorithm
by dividing data into blocks and distributing them across the two installed disks.
RAID 0
Data storage
(A, B, C ... )
20GB
DISK 1
A1
B1
A2
C1
C2
D2
10GB
DISK 2
A3
B2
B3
C3
C4
D1
D3
10GB
Multimedia NAS 11
TS-S402 11
Page 12
RAID 1
RAID Level 1, known as disk mirroring, is a popular approach to protect data from a
disk failure. To implement RAID Level 1, you need at least two physical hard drives. As
the disks are paired up, all disk writes are duplicated on both disks. You can back up
data without interruption using this algorithm. In case of a disk failure, the system can
continue to run without being affected.
Characteristics
- Storage capacity is equal to the size of the smallest disk.
- The disks are peers, containing the same data. (Minimum of two disks)
- Twice the read transaction rate of single disks
- Very high fault-tolerance
- One of most available solutions
- 100% data redundancy. Suitable for users who require data stability and the ability to
back up data.
The following diagram shows how both physical disks are seen as a single drive by the
TS-S402 Network Storage Enclosure. If one disk fails, you do not need to worry about
damage to the data as the other one contains an identical copy of the data.
RAID 1
Data storage
(A, B, C ... H)
10GB
DISK 1
A
B
C
D
10GB
e
DISK 2
A
B
C
D
10GB
12 User’s Guide
Page 13
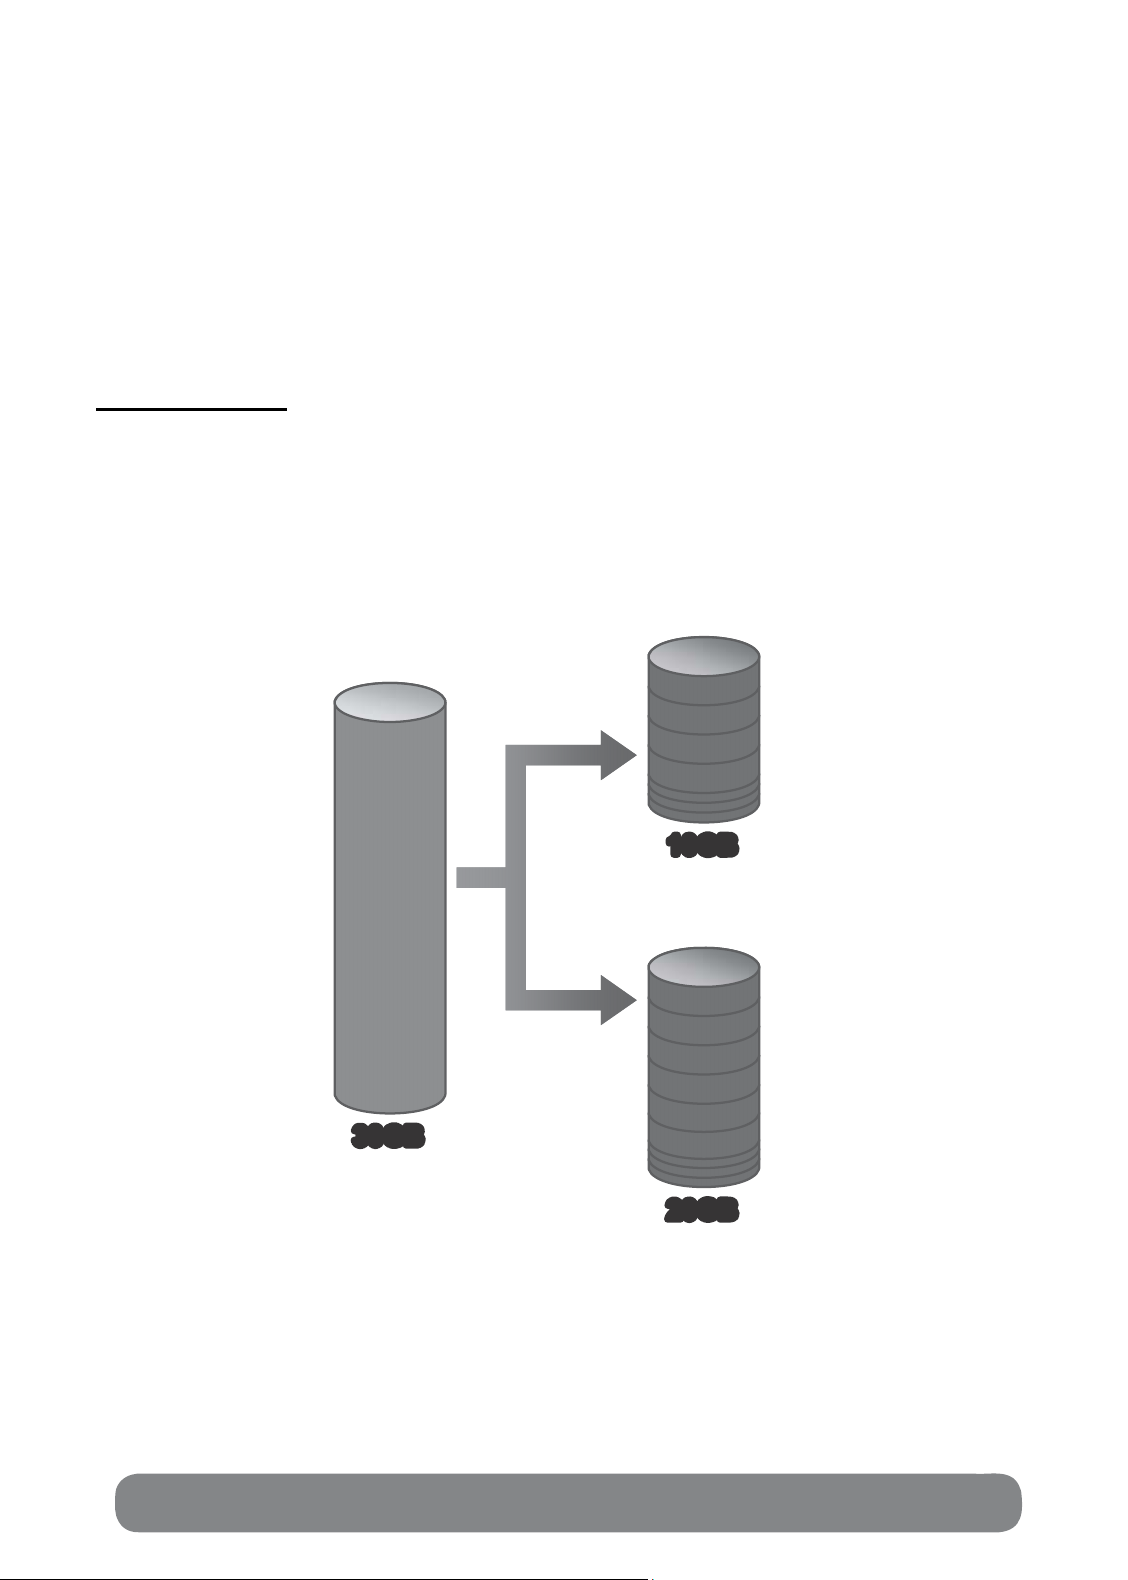
JBOD
JBOD (Just a Bunch Of Disks) is a group of disks. JBOD is not technically RAID but
“disk spanning.” In this mode, all the disks are grouped together so they appears as
a large single disk. Each disk can operate independently and is seen as an individual
disk. Therefore, the total capacity of JBOD is the sum of the capacities of each disk.
This allows the user to add disks until the desired total capacity is reached. Since JBOD
provides no performance increase and data protection, it is seldom used.
Characteristics
- Large capacity
- No redundancy
The following diagram shows how each disk represents a separate physical disk drive.
The JBOD algorithm simply groups these two hard disks to increase the storage
capacity on the TS-S402 Network Storage Enclosure. Each hard disk still functions as
an individual disk.
JBOD
Data
storage
(A, B, C ... J)
30GB
DISK 1
A
B
C
D
10GB
DISK 2
E
F
G
H
I
J
20GB
Multimedia NAS 13
TS-S402 13
Page 14
GETTING STARTED
This section provides information to help you set up your TS-S402 Network Storage
Enclosure before you can use it.
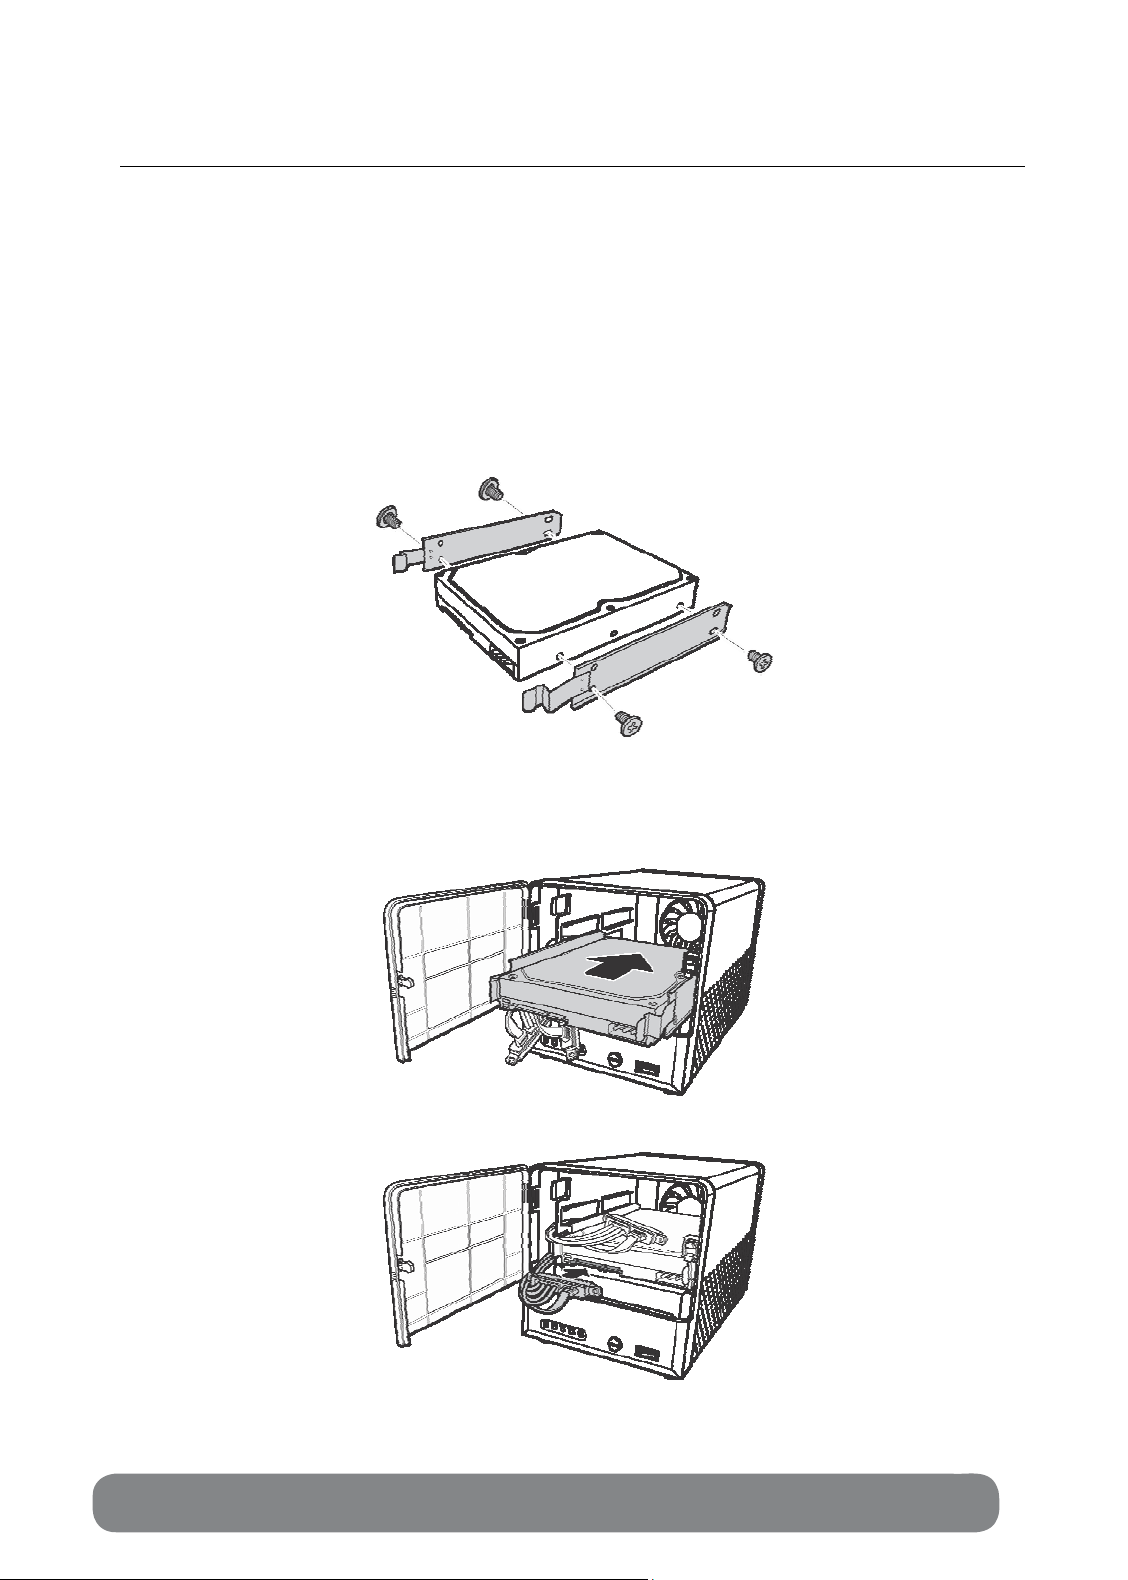
Installing Hard Disks
The TS-S402 Network Storage Enclosure supports up to two Serial ATA (SATA) hard
disks. To install hard disks into the TS-S402 Network Storage Enclosure, follow the
steps as described below.
1. Secure the supplied HDD brackets to the both sides of a 3.5” hard disk using four
screws as shown.
2. Push to open the HDD enclosure door and install the hard disk into the TS-S402
Network Sto rage Enclosure as shown.
3. Connect the SATA cable connector to the hard disk.
4. Repeat the same steps to install the second hard disk.
5. Close the HDD enclosure door when the installation is complete.
14 User’s Guide
Page 15
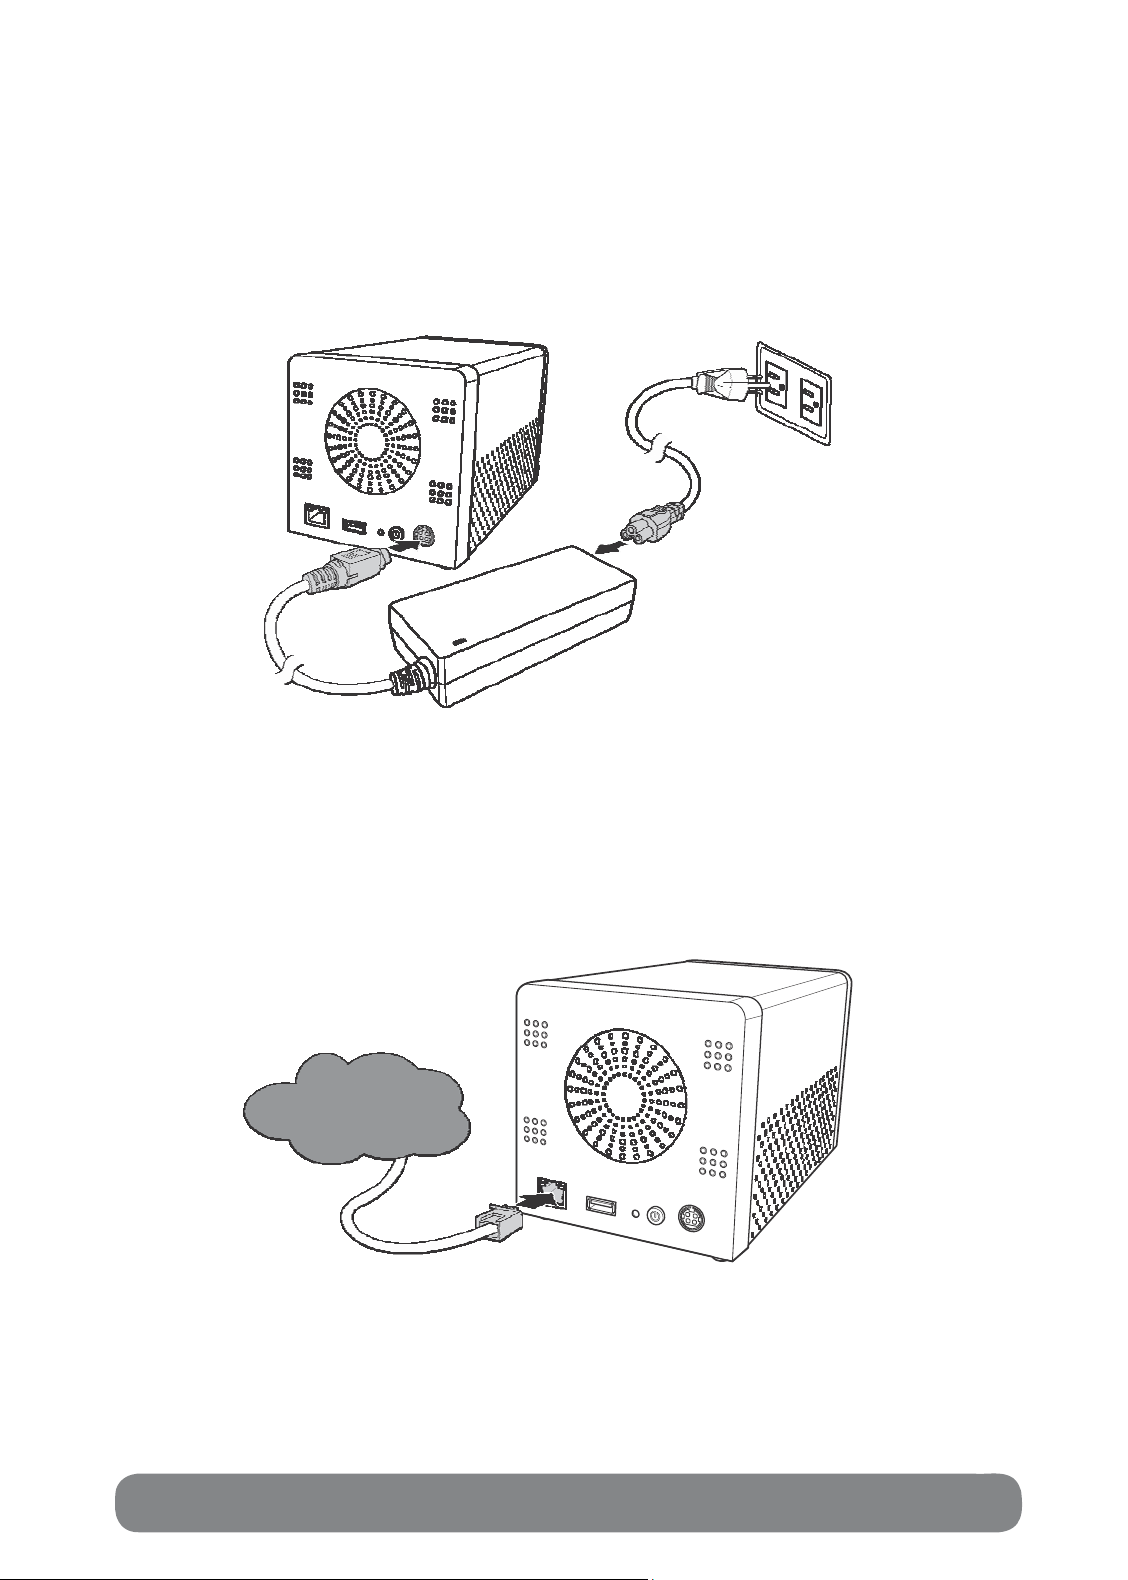
Connecting the Power
1. Connect one end of the supplied power adapter to the power jack on the rear of the TSS402 Network Storage Enclosure.
2. Then connect one end of the power cord to the power adapter and the other end to a wall
outlet as shown.
Connecting to a Network
1. Connect one end of the supplied RJ-45 cable to an available port on your network hub
or router.
2. Connect the other end of the RJ-45 cable to the LAN port on the rear of the TS-S402
Network Storage Enclosure.
Internet
Multimedia NAS 15
TS-S402 15
Page 16
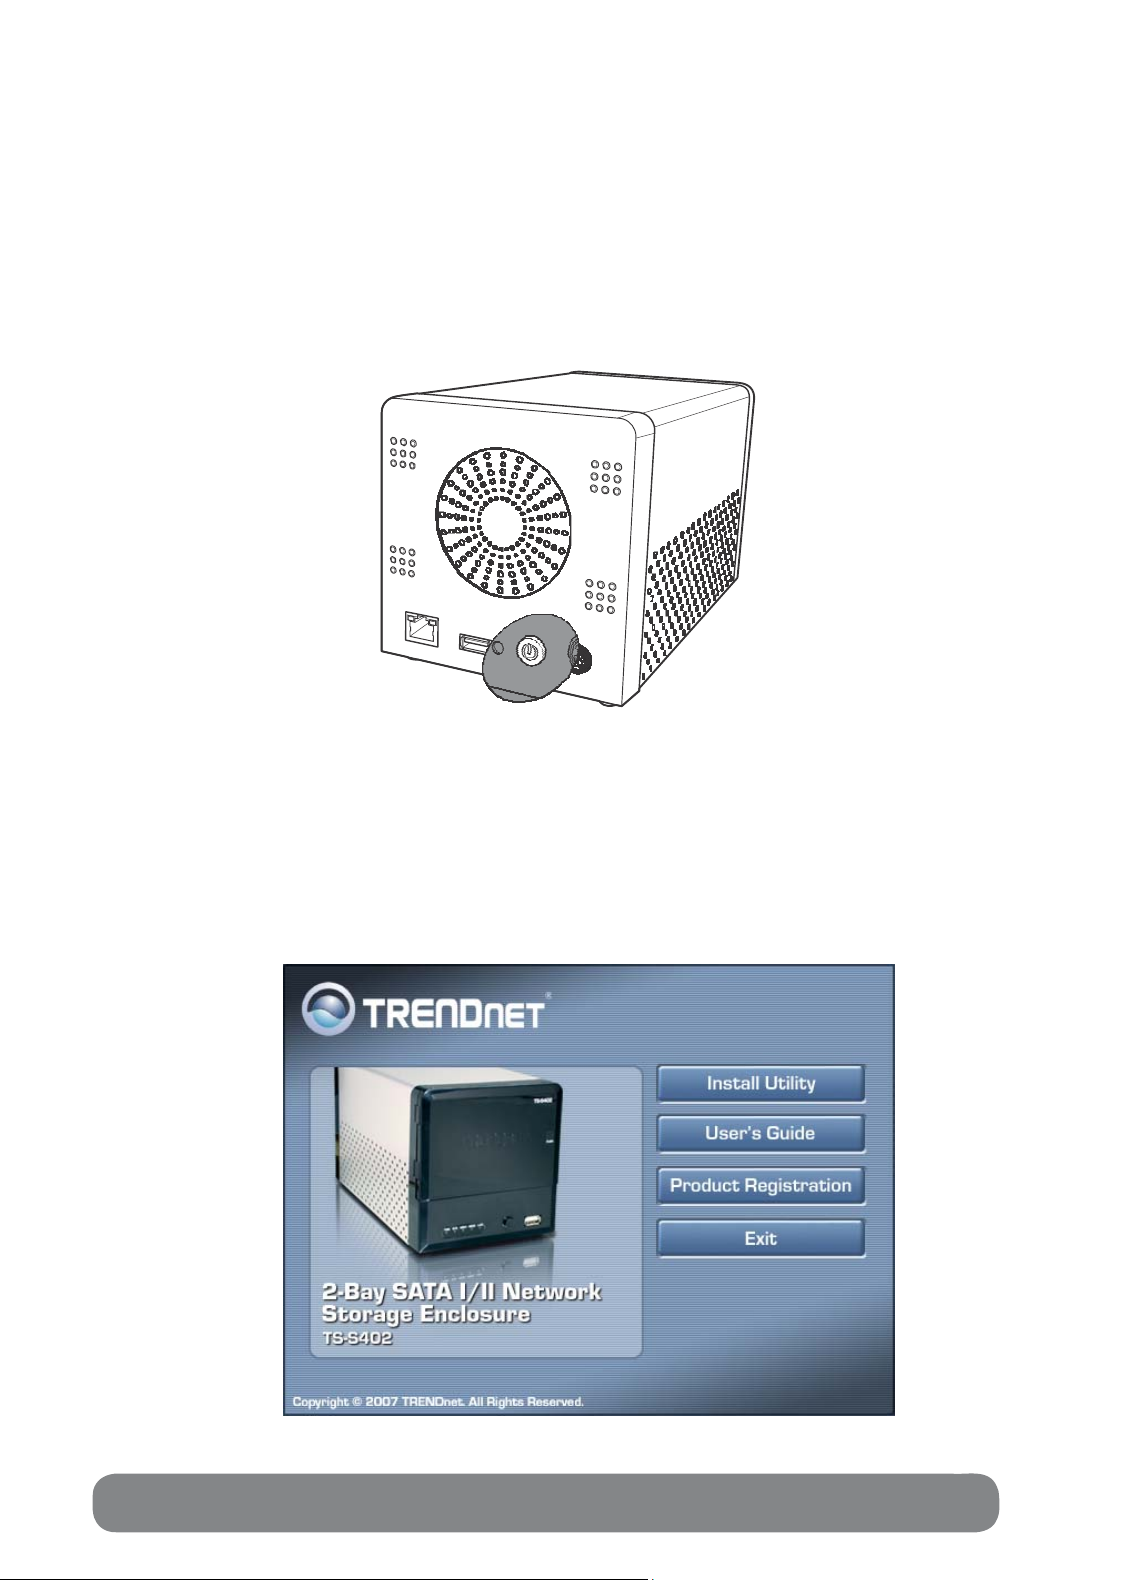
Turning Your TS-S402 Network Storage Enclosure On and Off
To turn your TS-S402 Network Storage Enclosure on, press and hold the POWER
button on the rear of the TS-S402 Network Storage Enclosure at least 1 second.
To turn your TS-S402 Network Storage Enclosure off, press and hold the POWER
button on the rear of the TS-S402 Network Storage Enclosure at least 5 seconds.
Installing the NAS Utility
You can run the NAS Utility on either a Windows® XP or Windows® Vista operating
system. Follow the steps below to install the NAS Utility onto your computer.
1. Turn on your computer and insert the supplied Utility CD into the CD-ROM Drive.
2. Select Install Utility from the following pop-up screen. The installation program starts
automatically.
16 User’s Guide
Page 17
3. If the CD does not start up automatically, browse your CD-ROM drive and double
click the Setup.exe file.
4. Follow the on-screen instructions to install the utility.
5. Upon completion, you can start to manage your TS-S402 Network Storage Enclosure
with the NAS Utility.
Uninstalling the NAS Utility
Follow the steps below to uninstall the NAS Utility from your computer.
1. You can remove the NAS Utility from the program entry in the Start menu or via the
Control Pa nel.
• Windows Vista users:
- Go to Start > All Programs > NAS Utility > Uninstall NAS Utility.
OR
- Go to Control Panel > Programs and Features, select NAS Utility, and click the
Uninstall/Change button to start uninstall process.
• Windows XP users:
- Go to Start > Programs > NAS Utility > Uninstall NAS Utility.
OR
- Go to Control Panel > Add or Remove Programs, select NAS Utility, and click
the Change/Remove button to start uninstall process.
If your installation directory is different other than the default, locate from the
directory you specified for the NAS Utility.
2. A message pops up for the NAS Utility uninstalling confirmation. Click Yes to continue or
No to abort.
3. The uninstaller starts to remove the NAS Utility from your computer.
Initializing and Accessing Your TS-S402 Network Storage
Enclosure
To launch the NAS Utility, double click the NAS Utility icon ( ) from your
desktop or the program entry in the Start menu. If you are using the default installation
directory, locate the NAS Utility as described below:
• Windows Vista users: Go to Start > All Programs > NAS Utility > NAS Utility.
• Windows XP users: Go to Start > Programs > NAS Utility > NAS Utility.
If the hard disks are being installed for the first time, you need to initialize the disks
before you can use them. Follow the steps described below.
Multimedia NAS 17
TS-S402 17
Page 18
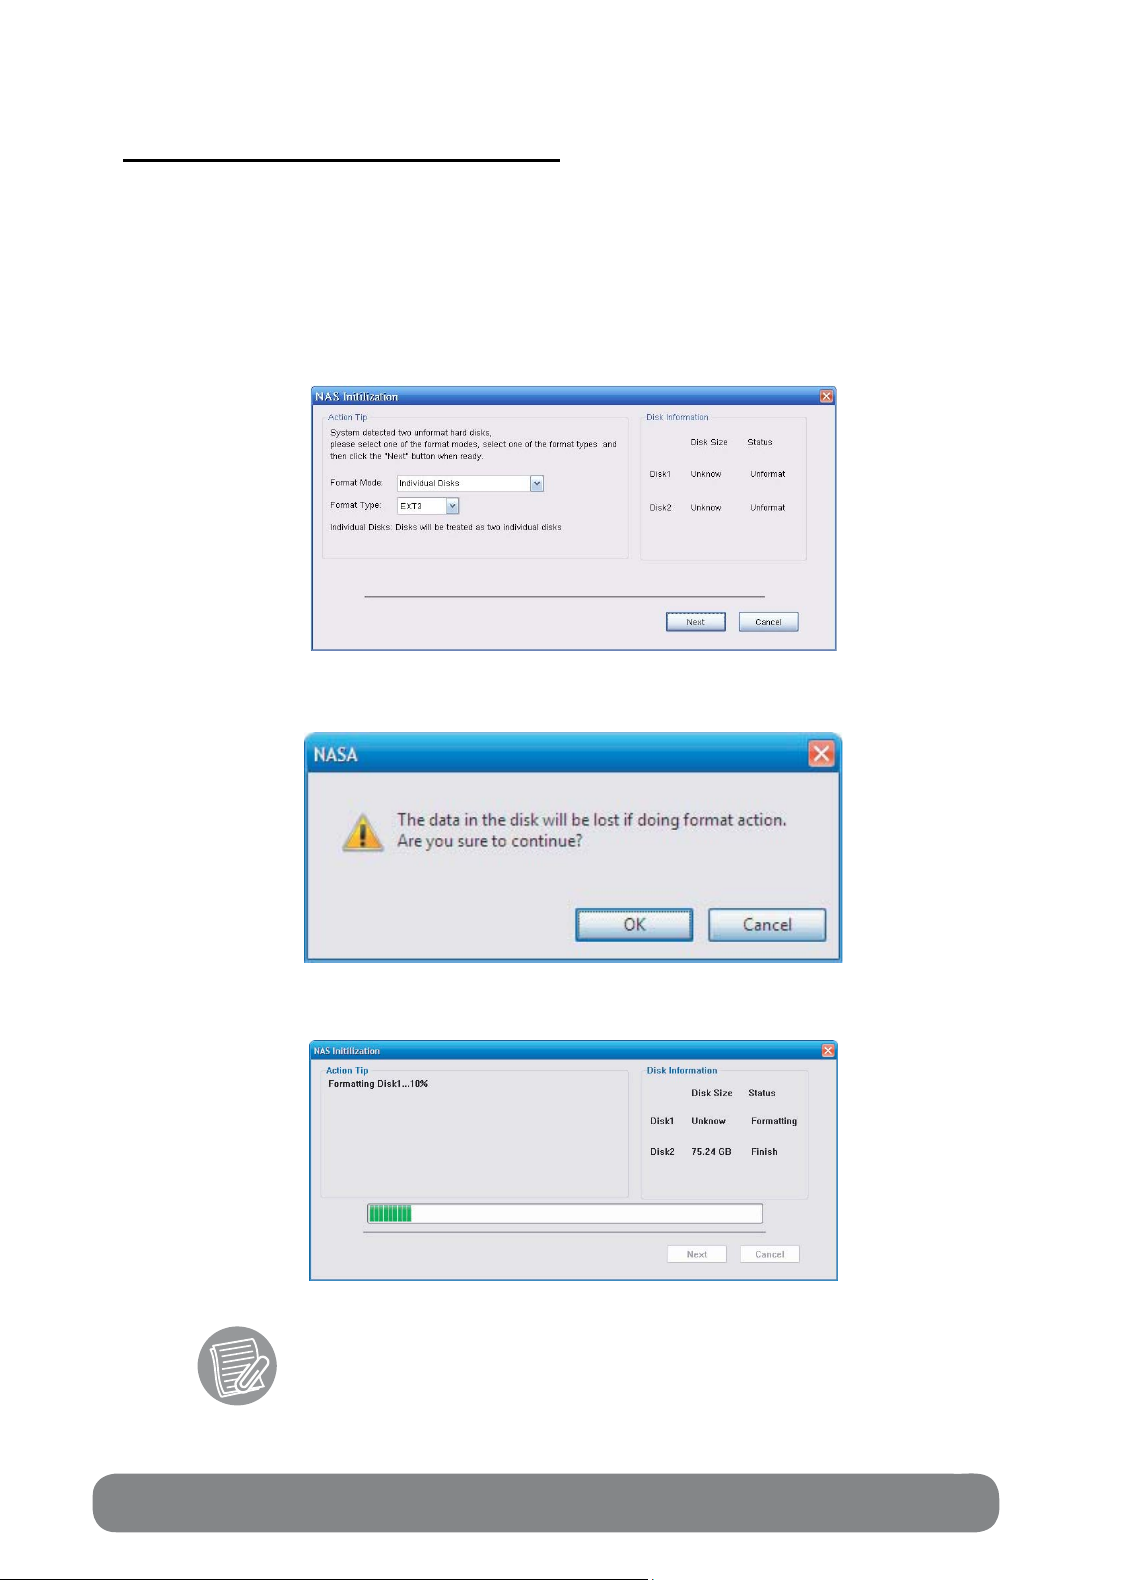
Formatting the installed hard disks
1. Select the format mode and type from the drop-down menus. The available options are
listed as below. After making your selection, click Next to continue.
- Format Mode: Individual disks, RAID 0 (Striped), RAID 1 (Mirrored), and JBOD
(Just a Bunch of Disks)
- Format Type: EXT2 and EXT3
2. The following message pops up to make you aware of the data loss resulting in this
action. Click OK to continue.
3. The system starts to format the hard disks.
The time required to format hard disks may differ depending on the
hard disk size.
18 User’s Guide
Page 19
4. When the format is complete, click Finish.
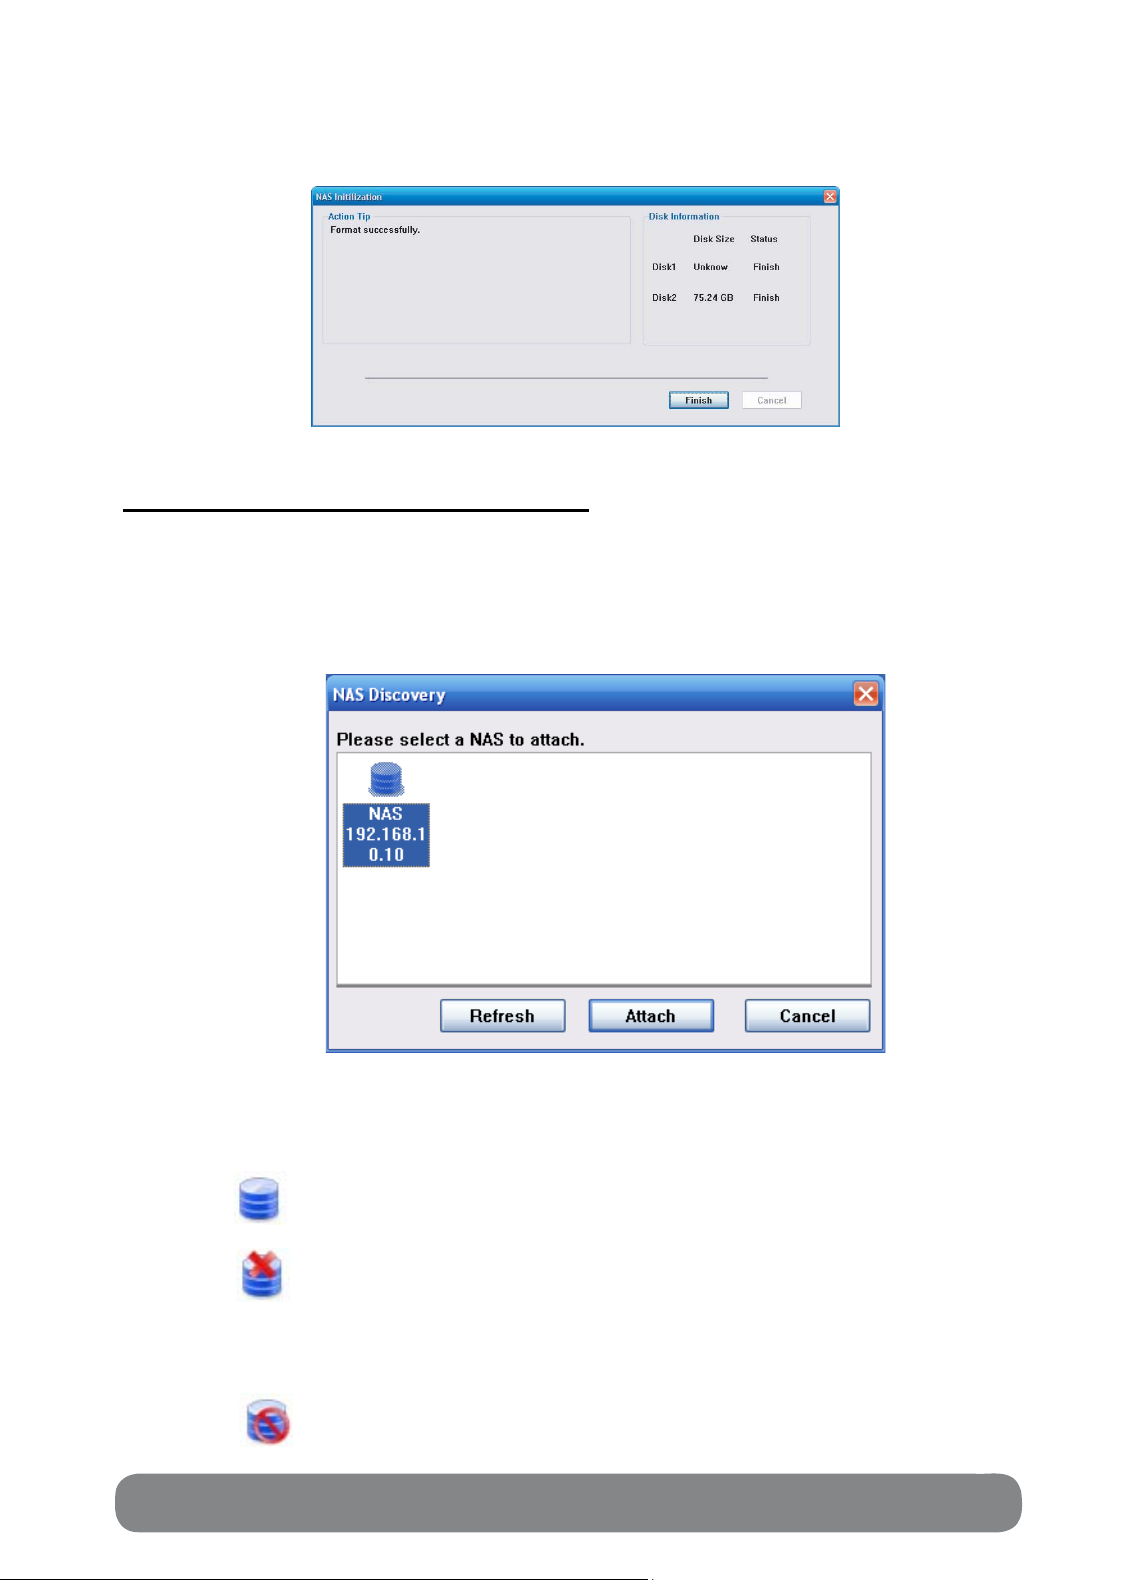
Attaching the TS-S402 via NAS Utility
Each time you launch the NAS Utility, the following screen appears. All the Multimedia
NAS devices connected to the network are displayed here. Select a TS-S402 Network
Storage Enclosure
and click Attach. You can click Refresh to refresh the screen at any time (The default IP
address of the TS-S402 Network Storage Enclosure is 192.168.10.10).
Each TS-S402 Network Storage Enclosure device may be displayed as one of the
following icons according
to its connectivity.
The TS-S402 Network Storage Enclosure is connected correctly.
The TS-S402 Network Storage Enclosure cannot be detected in
one of the following conditions:
• The TS-S402 Network Storag e Enclosure is not turned on,
unplugged or is in an incorrect subnet.
The assigned IP address of the TS-S402 Network Storage
Enclosure i s
Multimedia NAS 19
TS-S402 19
incorrect for the current network.
Page 20
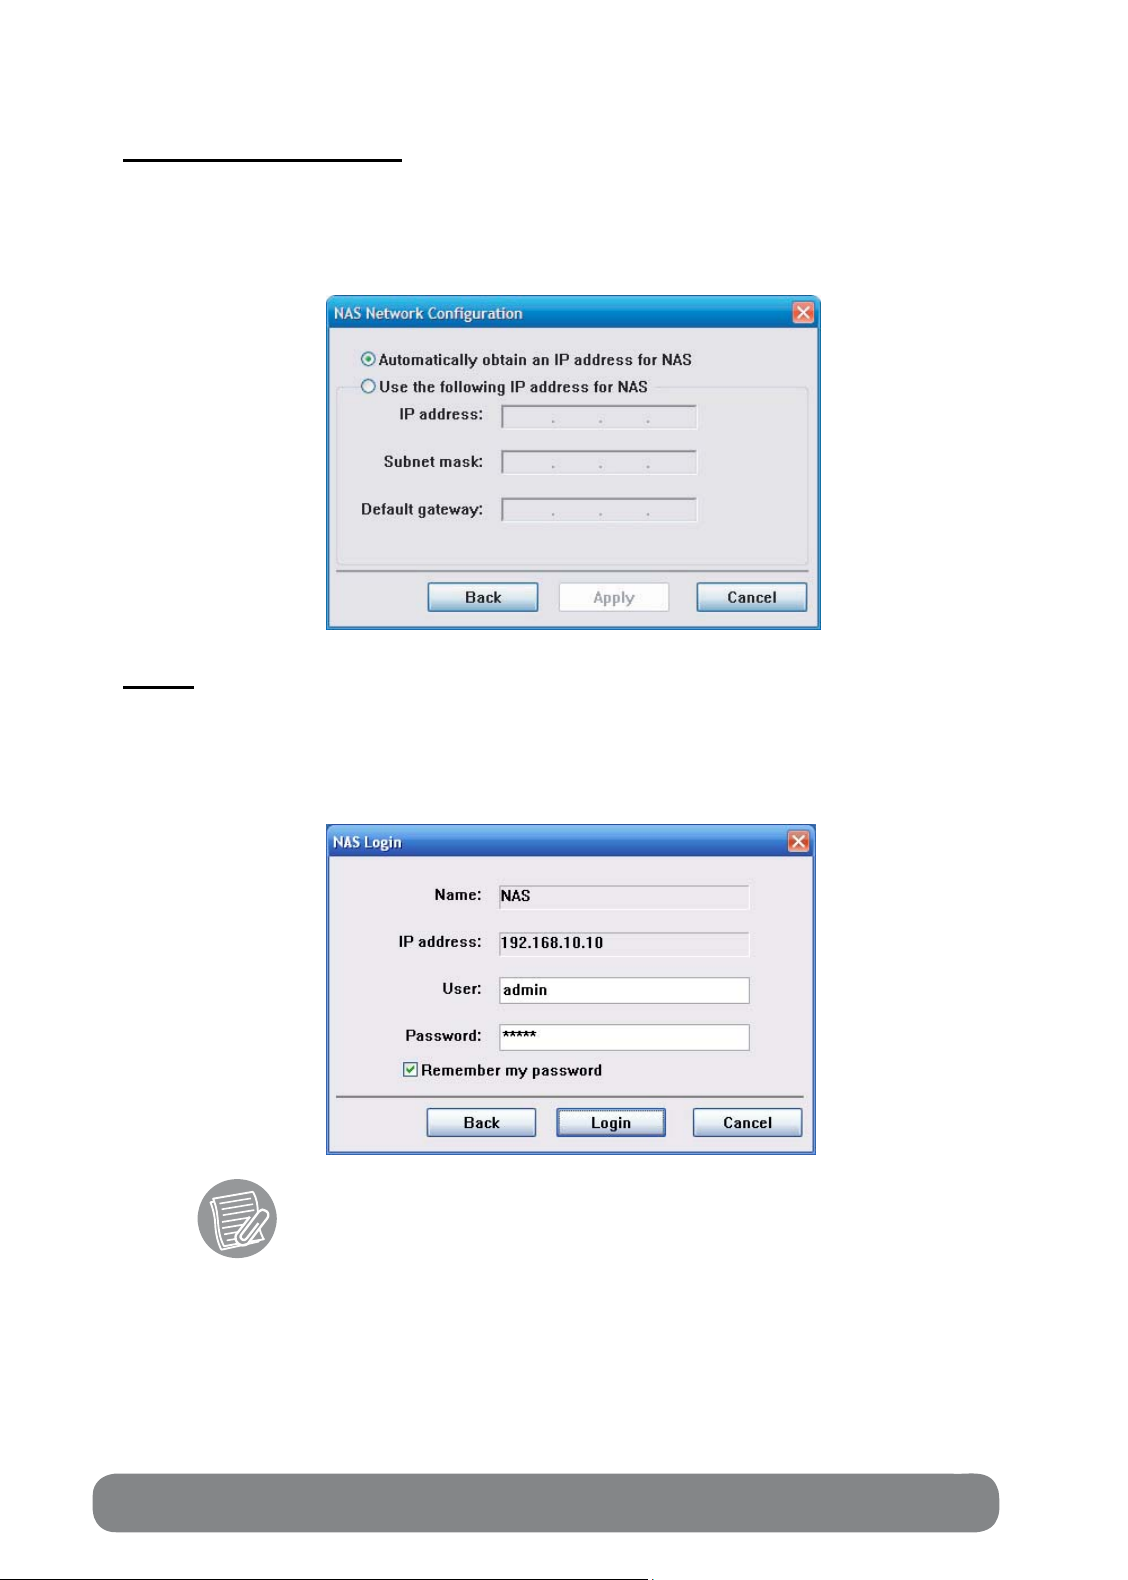
Network configuration
If the IP address of the TS-S402 Network Storage Enclosure is inconsistent with your
network domain, the following screen appears to prompt you to change the IP address
of the TS-S402 Network Storage Enclosure. Ensure the changed IP address belongs to
your network domain.
Login
After you have connected to a TS-S402 Network Storage Enclosure, the following
screen appears. Enter the default administration username (admin) and password
(admin). Click Login to launch the NAS Utility.
Check the Remember my password option so that you do not have
to type in the username and password for each time login.
Multimedia NAS 20
20 User’s Guide
Page 21
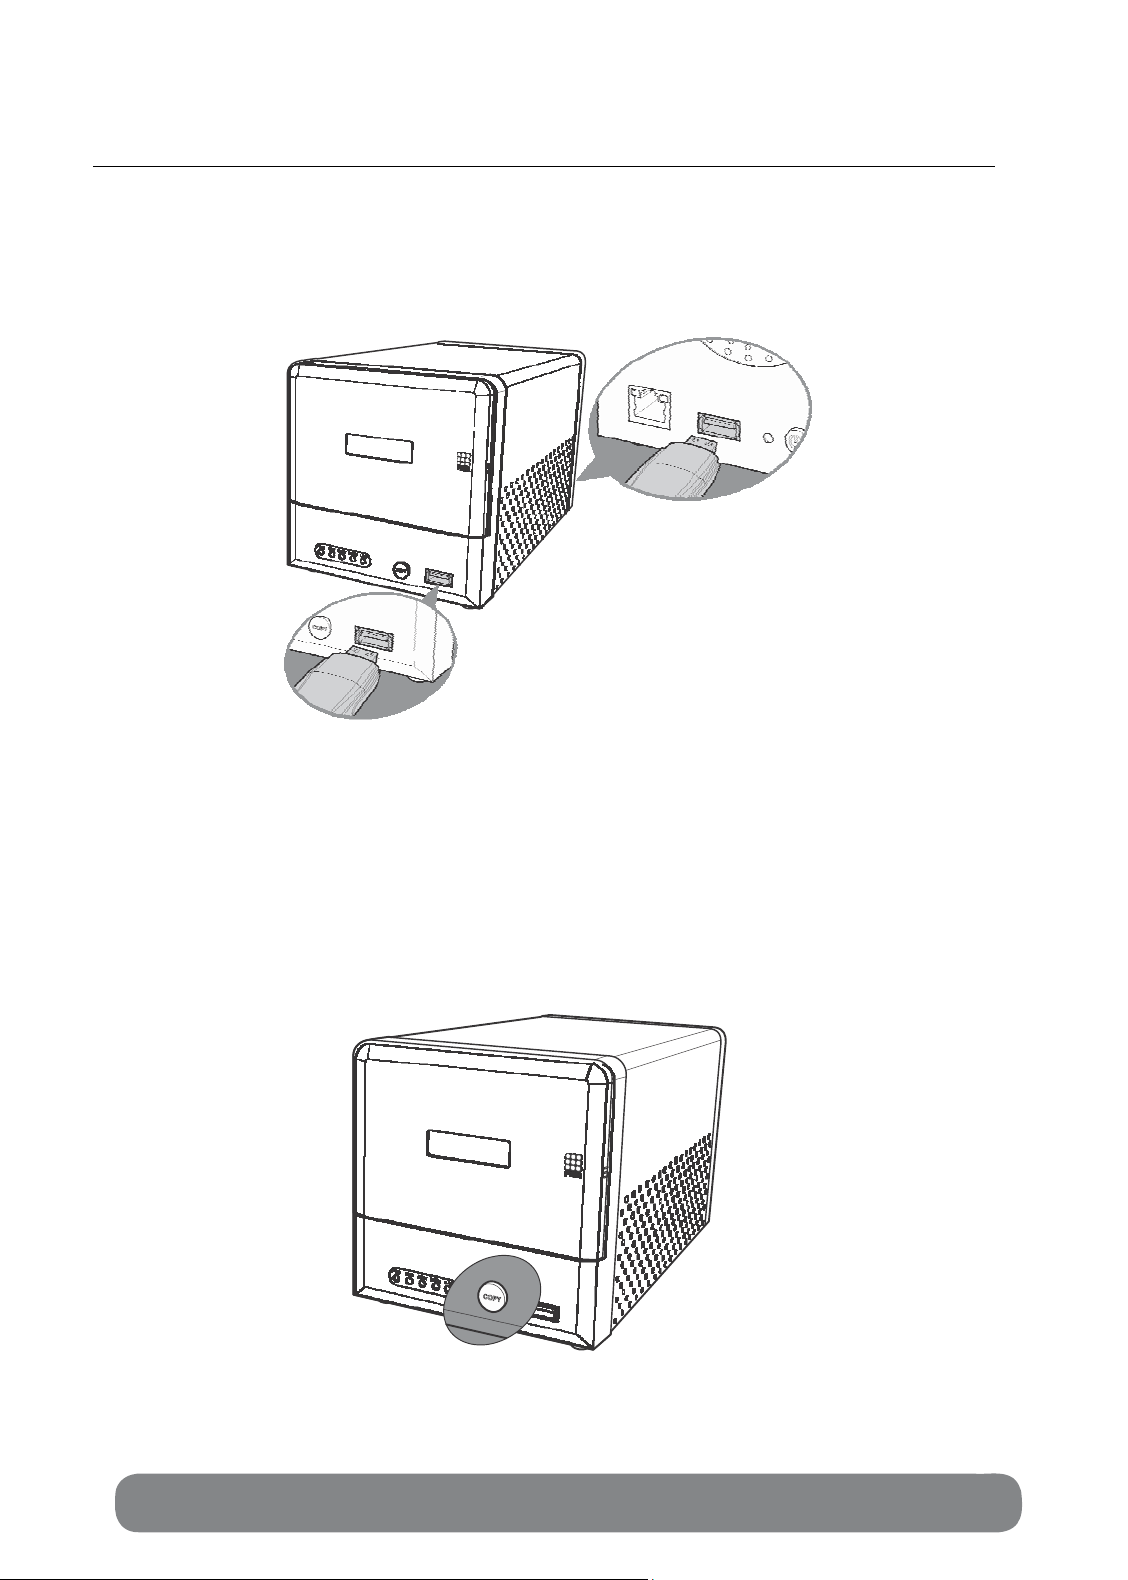
USING EXTERNAL USB DEVICES
Connecting USB Devices
Connect a USB device, such as a USB flash drive or USB printer, to one of the USB
ports on the front or rear of the TS-S402 Network Storage Enclosure as shown.
Using the USB One-Click Backup Button
With the convenient USB one-click backup button on the front of the TS-S402 Network
Storage Enclosure, you can backup the data stored in the connected USB devices to
your computer by simply pressing the USB one-click backup button as shown. All the
data from the connected USB devices will be backed up to the share folder in the TSS402 Network Storage Enclosure.
Multimedia NAS 21
TS-S402 21
Page 22
Disconnecting USB Devices
To safely remove a USB device from the TS-S402 Network Storage Enclosure, we
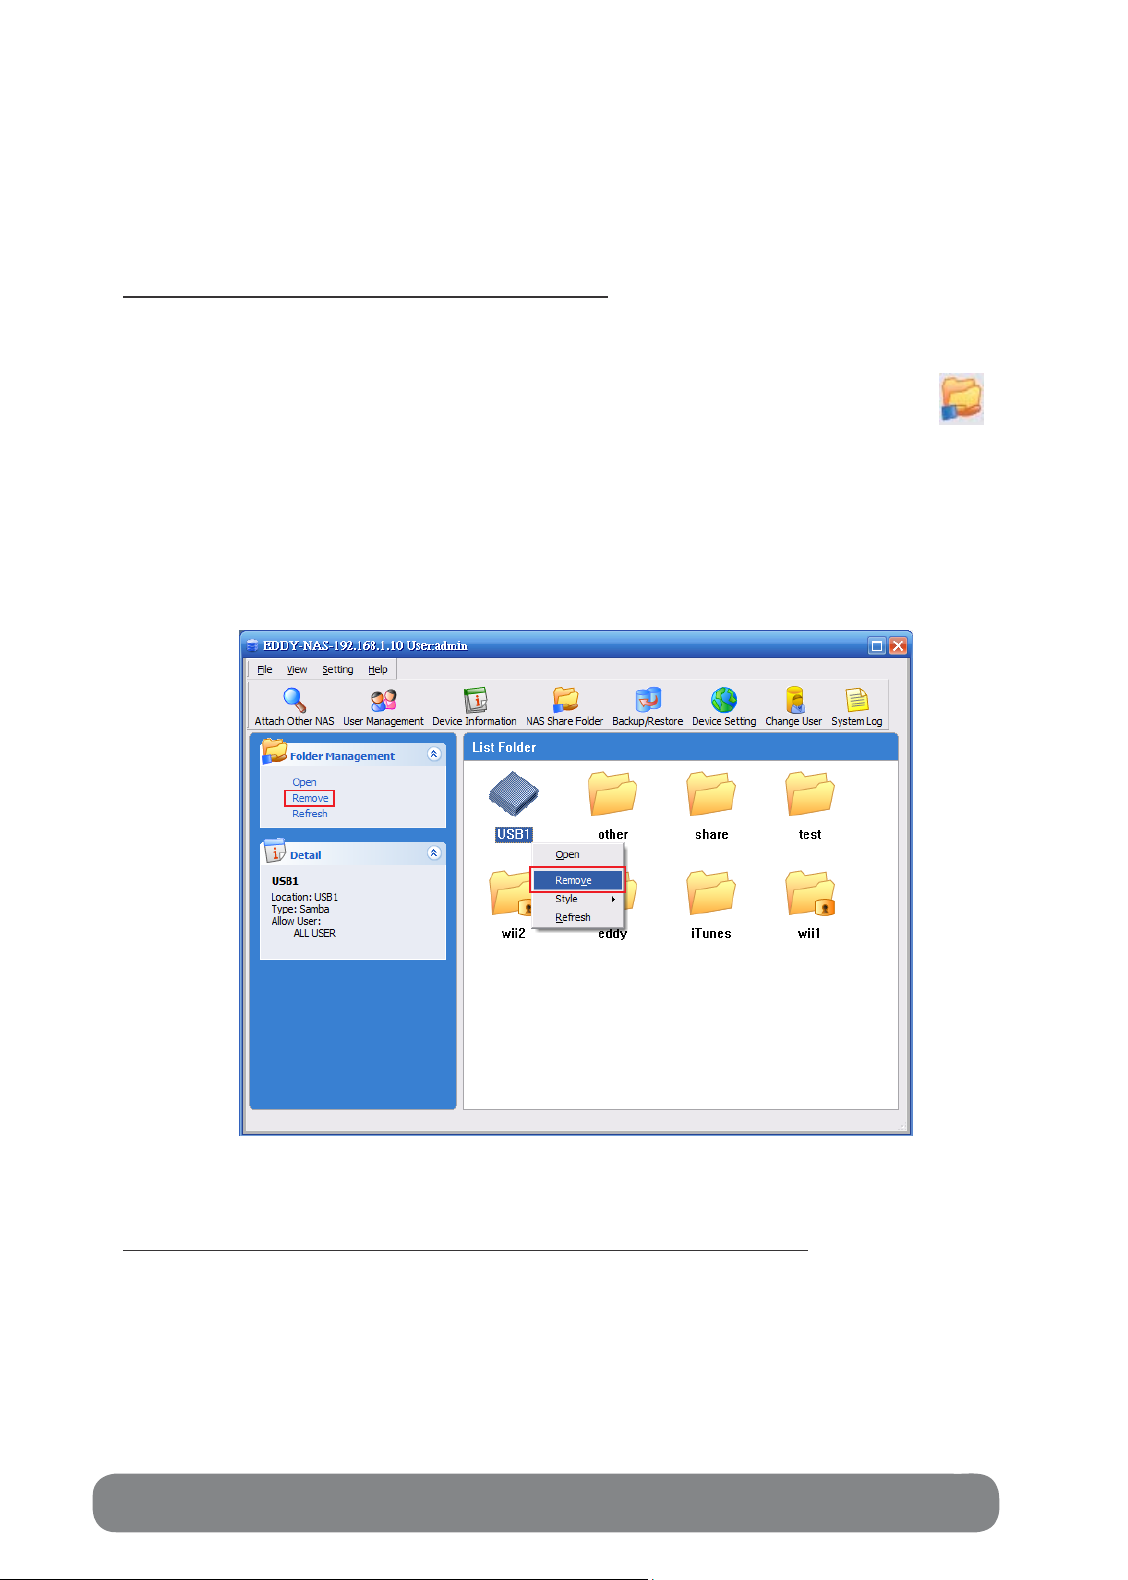
suggest first remove the device via the NAS Utility or the Web-based Configuration Tool.
When removing USB devices via the NAS Utility:
1. Open the NAS Utility as described in the section “Initializing and Accessing Your TSS402 Network Storage Enclosure”.
2. Select View > Share Folder from the menu bar, OR click NAS Share Folder
from the quick access tool bar. The NAS Share Folder screen displays.
(
3. From the NAS Share Folder main screen, select the USB device you want to
remove, cli ck Remove under Folder Management.
OR
Right-click the USB device you want to remove, and then select Remove from the pop-
up menu.
)
4. A confirmation message appears. Click OK to confirm or Cancel to abort.
5. When the USB device is removed, a message pops up telling you that it is safe to
unplug the USB device from the TS-S402 Network Storage Enclos ure.
When removing USB devices via the Web-based Configuration Tool:
1. Open the Web-based Configuration Tool as described in the section “Launching the
Web-based Configuration Tool”.
2. From the left panel of the Web-based Configuration Tool, click System Status >
System Status or Disk Utility > Disk Information.
3. All connected USB devices are displayed in the USB Information section.
22 User’s Guide
Page 23
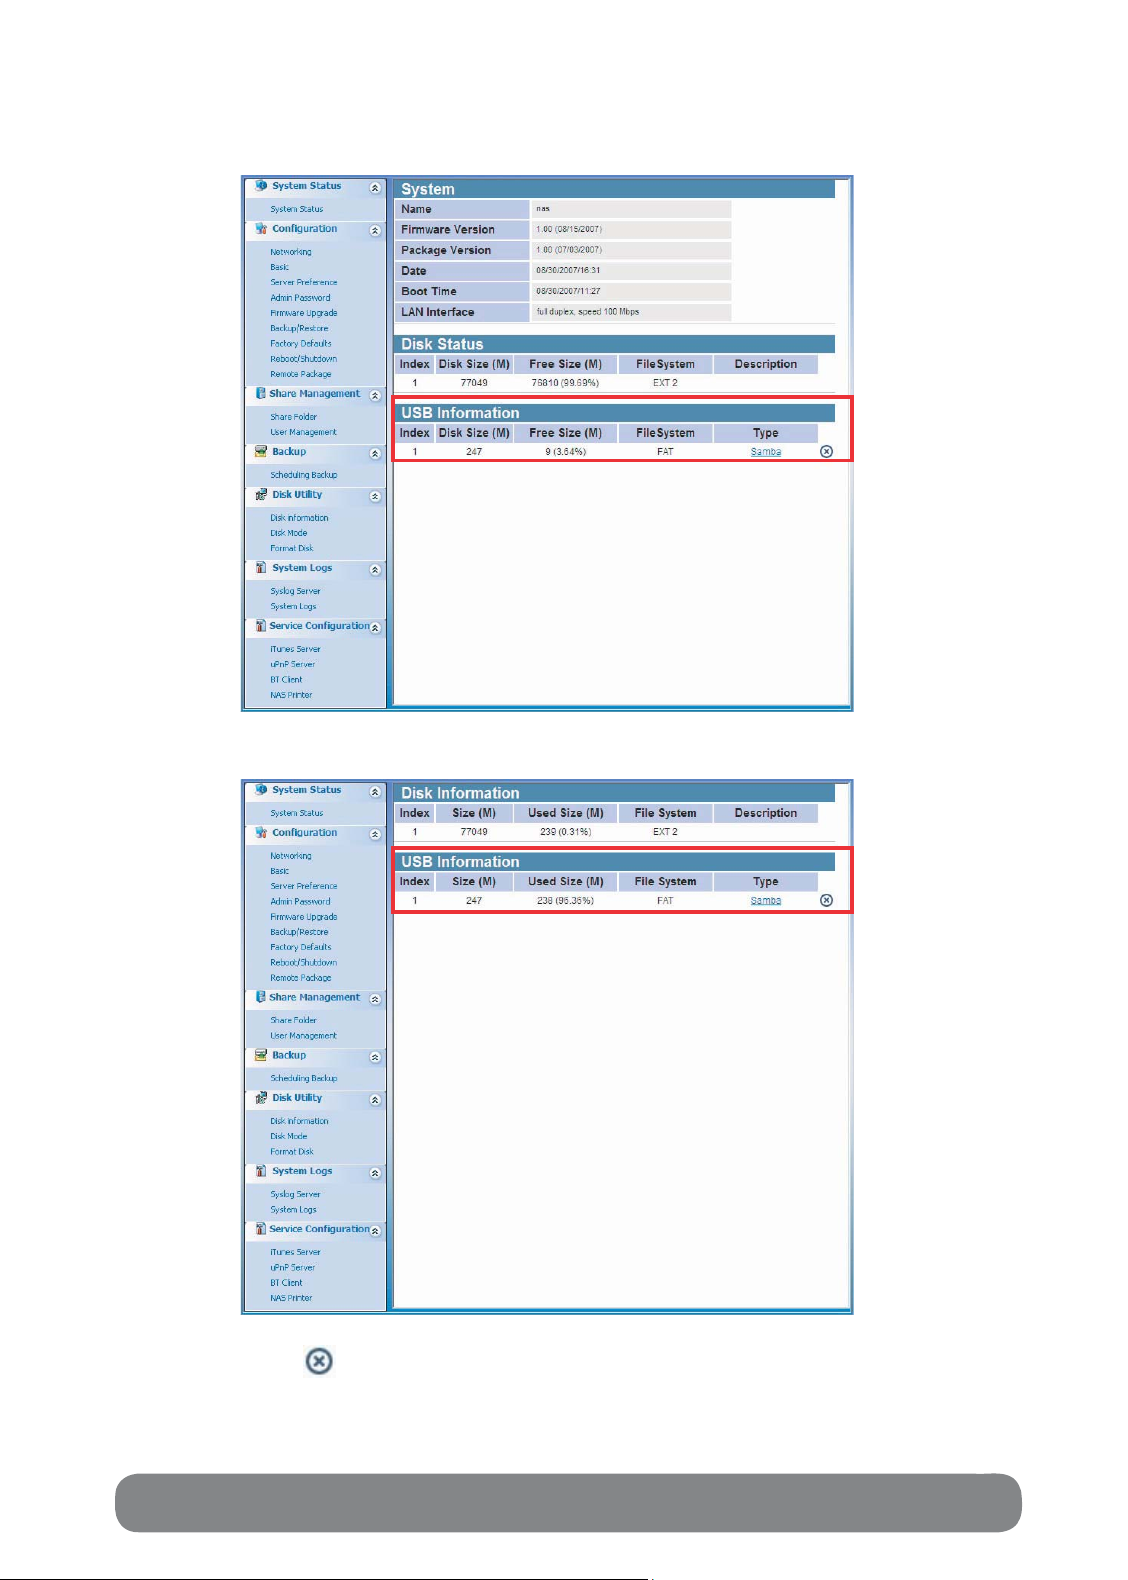
(The System Status screen)
(The Disk Information screen)
4. Click the Delete ( ) button to remove the USB device from the list.
5. You can now unplug the USB device from the TS-S402 Network Storage Enclosure.
Multimedia NAS 23
TS-S402 23
Page 24

USING THE NAS UTILITY
Read this section to learn about the main features of the NAS Utility.
NAS Utility Overview
The NAS Utility provides an user-friendly interface for you to manage your TS-S402
Network Storage Enclosure in a fast and easy way. The following illustrates the layout
of the NAS Utility main screen.
Shows
the current NAP IP addr
Menu bar
Lists the tasks
can be applied
to
the selected
file, folder,
Displays the details
of the selected item
or tips to help through
the operatio n.
and task.
The following table provides a list of options under eac h menu.
File
Attach Other NAS Allows you to attach other TS-S402 Network Storage
User Management Allows you to configure and manage the user’s
View
Share Folder Allo ws you to configure and view the folders in your
Backup/Restore Allows you to configure a backup task.
Device Information Displays the information of the attached TS-S402 Network
Storage Enclosure.
ess
Enclosure on your network.
access to the TS-S402 Network Storage
Enclosure.
Exit Exit the NAS Utility.
TS-S402 Network Storage Enclosure.
Quick access
tool
bar
M
ain scr
een
24 User’s Guide
Page 25

System Log Allows you to manage and view all the log messages
generated from the TS-S402 Network Storage
Enclosure.
Setting
Device Setting Opens the Web-based Configuration Tool.
Help
About Displays the current firmware version of the
TS-S402 Network Storage Enclosure.
Attach Other NAS
Use this feature to connect to another TS-S402 Network Storage Enclosure on your
network.
Select File > Attach Other NAS from the menu bar, OR click Attach Other NAS
(
) from the quick access tool bar. The NAS Discovery screen displays. Select a
TS-S402 Network Storage Enclosure and log in with the correct username and
password.
User Management
Use this feature to add users, remove users, change the password of a user, and view
the users who have the access right for the current attached TS-S402 Network Storage
Enclosure.
To configure the settings, select File > User Management from the menu bar, OR click
User Management (
displays.
) from the quick access tool bar. The following screen
Multimedia NAS 25
TS-S402 25
Page 26

See below for descriptions of each button function.
Button
Refresh
Button
Description
Click to refresh the user list.
Description
Change password Click to change the password of the selected user.
Delete
Add
Click to delete the user.
Click to create a new user account. Enter the
username and password as required.
Close
Click to exit the window.
Device Information
25
Use this feature to view the current attached TS-S402 Network Storage Enclosure
system and storage disk information.
Select View > Device Information from the menu bar, OR click Device Information
(
) from the quick access tool bar. The following screen displays.
26 User’s Guide
Page 27

The following details are displayed in this screen. Click OK to exit this screen.
System Info • NAS system name
• IP address
• MAC address
• Firmware version
Storage Info • Name of installed disks
• File system
• Total size
• Package version
• Boot time
• LAN interface
• Disk mode
• Used size
• Free size
Multimedia NAS 27
TS-S402 27
Page 28

Multimedia NAS
NAS Share Folder
To open the NAS Share Folder screen, select View > Share Folder from the menu
bar, OR click NAS Share Folder (
) from the quick access tool bar. The NAS Share
Folder screen display s.
The NAS Utility provides these icons to indicate each type of t he folder or drive.
A public folder
A private folder
A network drive
A USB drive
28 User’s Guide
Page 29

Creating a new folder
To create a new folder, do the following:
1. From the NAS Share Folder screen, click Add Folder under Folder Management.
OR
Right-click anywhere in the NAS Share Folder main screen, and then select Add
Folder from the pop-up menu.
2. The following window appears.
Specify the following options, then click Create.
• Disk Name: The disk for the new folder to be created on.
• Folder Name: Type the name for the folder.
• Protocol T ype: Samba (default), FTP, or NFS
• Folder Ty pe: Public (default), or Private
3. A new folder is created.
Deleting a folder
To remote a new folder, do the following:
1. From the NAS Share Folder screen, select the folder you want to delete, then click
Delete under Folder Management. O R
Right-click the folder you want to delete, and then select Delete from the pop-up
menu.
2. A confirmation message appears. Click OK.
3. The selected folder is delet e d.
Editing folder properties
Use this function to rename the folder, change the folder protocol, or configure the folder
for public or private access.
Multimedia NAS 29
TS-S402 29
Page 30

To edit a folder, do the following:
1. From the NAS Share Folder screen, select the folder you want to edit, and then click
Edit under Folder Management.
OR
Right-click the folder you want to edit, and then select Edit from the pop-up menu.
2. Make required changes to the folder.
The share folder is the system default folder, you
cannot delete it or modify its settings.
Mounting a folder as a network drive
To mount a folder as a network drive, do the following:
1. From the NAS Share Folder screen, select the folder you want to mount, and then click
Mount under Folder Management.
OR
Right-click the folder you want to mount, and then select Mount from the pop-up
menu.
2. The Map Network Drive screen displays.
3. Select a drive letter from the drop-down list.
4. Check the Reconnect at login option to mount this network drive automatically each
time you log in to your computer.
5. Click Finish. The selected folder is mounted to the network.
30 User’s Guide
Page 31

To unmount a folder from the network,
• Select the folder you want to cancel the mapping, then click Unmount under Folder
Management.
OR
• Right-click the folder you want to cancel the mapping, and then select Unmount from
the pop-up menu.
Refreshing the folder listings
To refresh the NAS Share Fol der screen, click Refresh under Folder Mana gement or
right-click anywhere in the NAS Share Folder main screen, and then select Add Folder
from the po p-up menu.
Changing the folder style
The NAS Share Folde r provides two styles for you to view a list of folders: Ic on St yle
and Re port Style. Right-click anywhere in the NAS Share Folder main screen, then
select Style from the pop-up menu.
Multimedia NAS 31
TS-S402 31
Page 32

Backup/Restore
To open the Backup/Restore screen, select View > Backup/Restore from the menu
bar, OR click Backup/Restore (
) from the quick access tool bar. The Backup/
Restore screen displays.
The NAS Utility provides these icons to indicate the status of each backup task.
A scheduled backup task
An unscheduled backup task
Backup task in progress
32 User’s Guide
Page 33

Adding a backup task
To create a new folder, do the following:
1. From the Backup/Restore screen, click Add T ask under Backup/Restore Task.
OR
Right-click anywhere in the Backup/Restore main screen, and then select Add
Task from the pop-up menu.
2. The following window appears. Click Select to browse for the source folder you want to
back up to the TS-S402 Network Storage Enclosure.
3. The select source folder appears in the list as shown. Click Next to continue.
Multimedia NAS 33
TS-S402 33
Page 34

4. Select the target folder of the TS-S402 Network Storage Enclosure for the files to be
backed up to . Click Next.
The backup/restore feature only supports share
folders in English charact ers.
5. Enter the task name, and click Apply.
6. A message pops up to ask if you want to set the task schedule at this moment. Click Yes
if you want to set the schedule, or No to set it later.
7. A backup task is created.
Deleting a backup task
To remove a backup task, do the following:
1. From the Backup/Restore screen, select the backup task you want to delete, then click
Delete T ask under Backup/Restore Task.
OR
Right-click the backup task you want to delete, and then select Delete T ask from the
pop-up menu.
34 User’s Guide
Page 35

2. A confirmation message appears. Click Yes.
3. The selected backup task is deleted.
Editing a backup task
Use this function to change the source and target folders for a backup task. To
edit a backup task, do the following:
1. From the Backup/Restore screen, select the backup task you want to modify, then click
Edit T ask under Backup/Restore Task.
OR
Right-click the backup task you want to modify, and then select Edit T ask from the pop-
up menu.
2. Follow the on-screens instructions to make changes to the backup task.
Starting a backup task
If you want to perform the backup task immediately, do the following:
1. From the Backup/Restore screen, select the backup task you want to start, then click
Backup Now under Backup/Restore Task.
OR
Right-click the backup task you want to start, and then select Backup Now from the
pop-up menu.
2. A confirmation message appears. Click Yes to start the selected backup task
immediately.
3. The selected backup task starts.
4. When the backup task is complete, click Close to close the progress window.
Setting a backup schedule
To schedule a backup task, do the following:
1. From the Backup/Restore screen, select the backup task you want to schedule, then
click Schedule Setting under Backup/Rest ore Task.
OR
Right-cli ck the bac kup task y ou want to sche d u l e, and then sel e c t Sc hedule
from the pop-up menu.
Multimedia NAS 35
TS-S402 35
Setting
Page 36

2. A confirmation message appears. Click Yes. The following screen appears.
3. Specify for a Routine or One Time schedule.
4. If Routine is selected, specify a daily, weekly, or monthly backup task, and
configure the start time.
If One Time is selected, specify a specific date and time to start the backup task.
5. Click Finish to complete the setting.
6. The pop-up window displays the task setting information. Click Yes to confirm.
Removing a backup schedule
To cancel a backup task schedule, do the fol lowing:
1. From the Backup/Restore screen, select the backup task you want to cancel its
schedule, then click Remove Schedule under Backup/Restore Task.
OR
Right-click the backup task you want to cancel the schedule, and then select
Remove Schedule from the pop-up menu.
2. A confirmation message appears. Click Yes.
3. The selected backup task schedule is removed.
Viewing task properties
To view task information, do the following:
1. From the Backup/Restore screen, select the backup task you want to view its
details, then click Show Property under Backup/Restore Task.
OR
Right-click the backup task you want to view the details, and the n select Show
Property from the pop-up menu.
36 User’s Guide
Page 37

2. The following details of the backup task are displayed in this screen. Click OK to exit
this screen.
Device Setting
Use this feature to launch the Web-based Configuration Tool, which allows you to
configure more settings for y our TS -S402 Network Storage Enclosure.
To open the Web-based Configuration Tool, select Setting > Device Setting from the
menu bar, OR click Device Setting (
) from the quick access tool bar.
For more information on the Web-based Configuration Tool, refer to the next chapter
“Using the Web-based Configuration Tool”.
Change User
To login in different user account:
Multimedia NAS 37
TS-S402 37
Page 38

System Log
To open the System Log screen, select View > System Log from the menu bar,
OR click System Log (
displays.
) from the quick access tool bar. The System Log screen
Clearing all the logs
To clear all the log messages generated from the TS-S402 Network Storage Enclosure,
do the following:
1. From the System Log screen, click Clear All Log under Log Message.
OR
Right-click anywhere in the System Log main screen, and then select Clear All log
from the pop-up menu.
2. A confirmation message appears. Click Yes.
3. Click Yes if you are sure to clear all logs.
4. All the system logs are cleared.
Saving logs to a file
You can save all the log messages to a txt file. Click Save Logs under Log Message
from the System Log screen. A “Save As” window appears. Type a file name, and click
Save to save all the log messages to a file.
38 User’s Guide
Page 39

USING THE WEB-BASED CONFIGURATION TOOL
Launching the Web-based Configuration Tool
You can configure more settings for your TS-S402 Network Storage Enclosure through
the web browser. Enter the IP address of your TS-S402 Network Storage Enclosure (the
default IP address is http://192.168.10.10) to access the configuration settings. You can
also use the Device Setting feature in the NAS Utility (see “Device Setting”) to open the
Web- based configuration tool.
If you are not in a private IP address range (192.168.
xxx.xxx), you must use the NAS Utility to change the
network configurations of your TS-S402 Network
The login screen appears as shown. Enter the username and password. (The default is
admin as the username and password.)
Storage Enclosure.
Multimedia NAS 39
TS-S402 39
Page 40

Web-based Configuration Tool Overview
The following illustrates the layout of the Web-based Configuration Tool main screen.
From the left panel of the Web-based Configuration Tool, click each heading to open its
respective settings page. The following sections give more detailed information on each
settings page.
40 User’s Guide
Page 41

System Status
This page allows you to view the system information, disk status, and connected USB
device information.
Multimedia NAS 41
TS-S402 41
Page 42

Configuration
Networking
This page allows you to configure the network connection settings of your Multimedia
NAS.
Networking
DHCP Client Select to acquire an IP address from the DNS server
automatically.
Static IP Enter the IP address, subnet mask, and gateway for the
TS-S402 Ne twork Storage Enclosure to use on the network.
DNS Server
Auto-detect Select to use the Dynamic DNS. When this option is
selected, the DNS server automatically assigns an IP
address to the TS-S402 Network Storage Enclosure.
Manual Enter the name and IP address of the DNS server you
want to use.
Apply Click to save the changes.
42 User’s Guide
Page 43

Basic
This page allows you to configure the basic settings of your TS-S402 Network Storage
Enclosure.
Machine name Enter the name of the TS-S402 Network Storage Enclosure.
Group Enter the name of the group to which the current
TS-S402 Network Storage Enclosure belongs.
Web Port Enter the port number used to communicate with the
current TS-S402 Network Storage Enclosure. The
default is 80.
Https Select this check box to enable web login https and user
level
Jumbo Frame Select this check box to enable Jumbo Frame.
Character Set Select the character encoding to display the Web UI
pages.
Time Zone Select an appropriate time zone for the current Multimedia
NAS.
Set System time Type the date and time in this field with the given format
(Month/Date/Year Hour: Min). Or click the
button to
select the date from a pop-up calendar.
Apply Click to save the changes.
Multimedia NAS 43
TS-S402 43
Page 44

Server Preference
This page allows you to enable or disable the file sharing protocols, including Samba,
FTP, NTF, UPnP A/V, and iTunes. Click Apply to save the changes.
Firmware Upgrade
This page allows you to update the firmware of your TS-S402 Network Storage Enclosure.
Click the Browse button to locate the firmware file you want to update. Then click the
Upgrade button to begin the upgrade process.
44 User’s Guide
Page 45

Backup/Restore
This page allows you to backup and restore the system configuration file for your
TS-S402 Network Storage Enclosure.
Backup configuration Click the Download configuration button to save the
current sys tem configuration of yo ur T S - S 402 Network
Storage Enclosure
to a file.
Restore configuration Click the Restore configuration button and the
Configuration File Restore page opens.
Configuration File R
estore
Click the Browse button to locate the configuration file you want to restore. Click the
Restore button to restore the file.
Multimedia NAS 45
TS-S402 45
Page 46

Factory Defaults
This page allows you to restore the factory default settings of your TS-S402 Network
Storage Enclosure.
Click the Yes button and a confirmation pop-up message is displayed. Click OK
to proceed, or Cancel to abort. The TS-S402 Network Storage Enclosure will reboot
automatically.
The LAN IP address and the password will be reset to their defaults. You may be required
to log in to the system again.
If the Web UI is not displayed after system reboot,
check if the IP address of the TS-S402 Network Storage Enclosure
belongs to the network domain you are using.
46 User’s Guide
Page 47

Reboot/Shutdown
This page allows you to reboot and power off your TS-S402 Net w ork Storage Enclosure
without pressing the
Power button.
Click the Yes button to reboot or power off the TS-S402 Network Storage Enclosure
immediately.
A
confirmation pop-up message is displayed. Click Yes to proceed, or No to abort.
The TS-S402 Network Storage Enclosure will reboot in 70 seconds.
Do not
close the browser during the reboot process.
Multimedia NAS 47
TS-S402 47
Page 48

Remote Package
This page allows you to install software pack ages from a remote TS-S402 Network
Storage Enclosure.
Click the Browse button to locate the package you want to upload. Then click the
Install button to begin the installation.
48 User’s Guide
Page 49

Share Management
Share Folder
This page lists the information of all sharing folders contained in yo ur TS-S4 02 Net work
Storage Enclosure.
Disk Displays the disk the folder belongs to.
Folder Name Displays the name of folder.
User Name Displays the users having the right to access the folder.
Type Displays the protocol type can be used to open the folder.
Add
Edit Click to edit a folder. The Edit Share Folder page displays.
Delete
Multimedia NAS 49
TS-S402 49
Click to add a folder. The Add Share Folder page
displays.
Click to delete a folder.
Page 50

Add/ Edit Share F
older
To add or edit a folder, click the Add or Edit button from the Share Folder page.
The Add/Edit Share Folder page displays .
Disk Name When adding a folder: Select a disk for the new folder
to be created.
When editing a folder: Displays the disk the folder
belongs to.
Folder Name Enter the name to display for the folder.
Protocol Type Select the protocol type to be used to open the folder .
Folder Type Select Anonymous to make the folder public, or
Private Folder for specific user access. When Private
Folder is selected, you need to add at least a user to
the User List.
User List Select a user from the drop-down list, and click the
Add New User button to add the user to the Allow
List.
Allow List Displays the users having the access right for the TS-
S402 Network Storage Enclosure. When the Read
only checkbo x is checked, the user cannot configure
any setting in the Web UI.
50 User’s Guide
Page 51

Delete Click to remove a user from the Allow List.
Apply Click to save the changes.
User Management
This page lists all users allowed to access your TS -S402 Network Storage Enclosure, and
the private folders each user owns.
User Name Displays the users that can log in to the TS-S402 Network
Storage Enc l osure.
Private Folder Displays the private folders can be accessed by the user.
Add
Edit
Delete
Click to add a user. The Add User page displays.
Click to edit a user . The Edit User page displays.
Click to delete a user .
If the user you want to delete owns one or
more private f olders, a pop-up message
prompts you to delete the private folder first.
Multimedia NAS 51
TS-S402 51
Page 52

Add/ Edit User
To add or edit a user, click the Add or Edit button from the User Management
page. The Add/Edit User page displays .
User Name When adding a us e r: Enter the name of a new user.
When editing a user: Displays the name of the user.
Password Enter the new password in this field.
Confirm Passw ord Enter the new password again in this field.
User Level Select the User Level to Admin or User.
Group List Select the Group for the user.
Groups Edit the Groups the user is in.
Apply Click to save the changes.
52 User’s Guide
Page 53

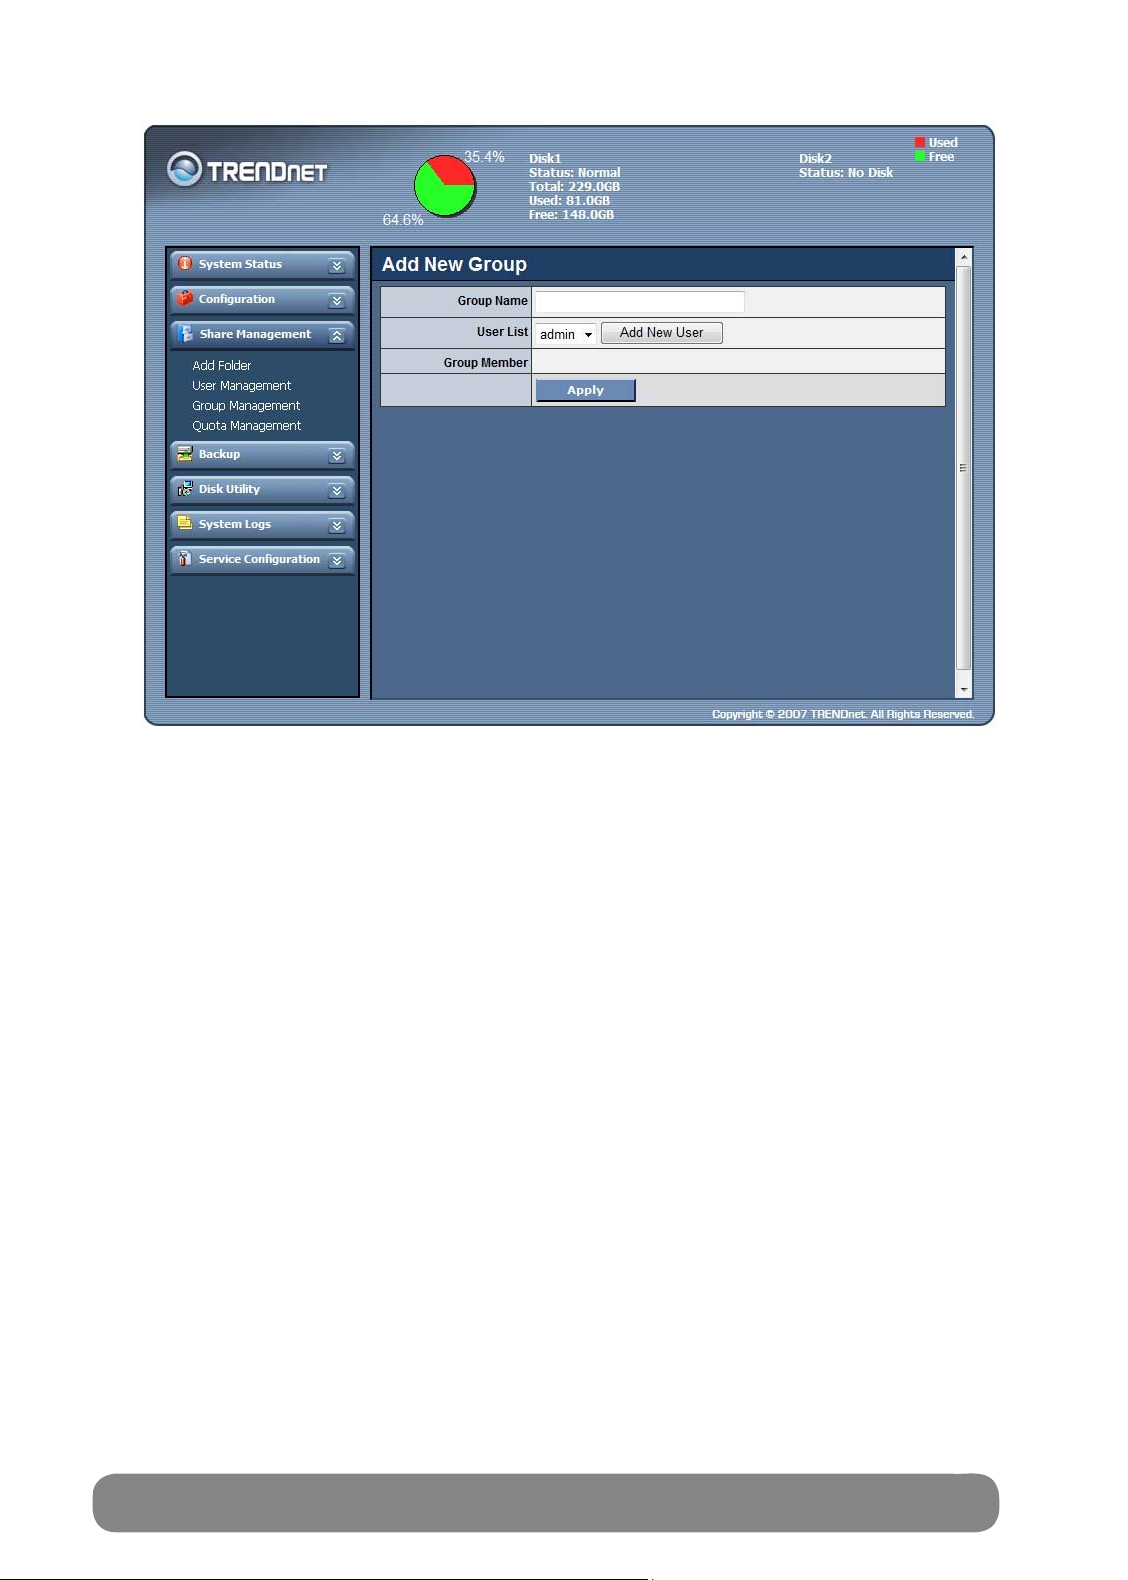
Group Management
This page lists all groups allowed to access your TS-S402 and t he users in the groups.
Group Name Displays the groups that can log in to the Multimedia
NAS.
User List Displays the users in the groups.
Add
Edit Click to edit a user. The Confi g Group pa ge d isplays.
Delete
Click to add a user. The Add New Group page displays.
Click to delete a group.
Multimedia NAS 53
TS-S402 53
Page 54

To add or edit a group, click the Add or Edit button from the User Management
page. The Add/Edit Group page displays.
Add/ Edit Group
Group Name When adding a group: Enter the name of a new
User List Displays all the user names.
Group Member Displays the users in this group.
Delete
Apply Click to save the changes.
group.
When editing a group: Displays the name of the
group.
Click to delete a user in this group.
54 User’s Guide
Page 55

Quota Management
This page lists the quota of the groups and users allowed to access your TS-S402.
User Name Displays the user names for the quota.
Group Name Displays the group names for the quota.
Quota Disk
Quota Size
Add
Edit Click to edit an user quota or a group quota.
Delete
Displays the disks selected for the quota.
Displays the quota assigned to the groups or the users.
Click to add an user quota or a group quota.
Click to delete an user quota or a group quota.
Multimedia NAS 55
TS-S402 55
Page 56

Add/ Edit Quota
To add or edit a quota, click the Add or Edit button from the User Management
page. The Add/Edit Quota page displays.
Select Group When adding an user or group: Select the name of an
Select Disk Select the disk for the quota.
Quota Size Enter the quota size in this field.
Apply Click to save the changes.
user or a group.
When editing a group: Displays the name of the user
or group.
56 User’s Guide
Page 57

Backup
Scheduling Backup
This page allows you to set up a schedul e to backup the specified local folders of the
TS-S402 Network Storage Enclosure.
Schedule Check the Enable checkbox to configure the settings
in this page.
Description Displays a short description associated with the
Scheduling Backup feature.
Auto Delete Check this checkbox to perform file synchronization
between the target and source folders during backup
process.
Setting Frequency Select to backup the folder hourly, daily, weekly or
monthly.
Setting Hours: Mins Select the time to start the backup task every hour or
every day.
Multimedia NAS 57
TS-S402 57
Page 58

Setting Day of Month Select on which date of every month to start the
backup task. This option is only available when Every
Month is specified in the Setting Frequency field.
Setting Day of Week Select on which day of every week to start the backup
task. This option is only available when Every Week is
specified in the Setting Frequency field.
Source Directory Select the source folder you want to make a backup
from the drop-down list.
Destination Directory Select the target folder where the backup copy of your
folder will be stored.
Apply Click to save the changes.
58 User’s Guide
Page 59

Disk Utility
Disk Information
This page lists the information of the system storage disks and connected USB devices.
Multimedia NAS 59
TS-S402 59
Page 60

Disk Mode
This page allows you to change the disk mode and file format for the storage disks on
your TS-S402 Network Storage Enclosure.
Mode Setting Select the mode for the TS-S402 Network Storage Enclosure
system to partition and format disks.
File System Select the file system type you want to use for the disks.
Apply Click to save the changes.
When the settings are made, the TS-S402 Network Storage Enclosure
system starts formatting the disks. This procedure will
destroy all the data on the disks. Ma ke sure you have
backed up any important data on the disks before the
format pro cess.
60 User’s Guide
Page 61

Format Disk
This page allows you to format the physical hard disks and USB storage devices from
your TS-S402 Network Storage Enclosure.
Format Disk
Disk Select the hard disk you want to f ormat.
File System Select the file system type you want to use for the
new storage.
Description Enter a brief descriptio n of the disk.
Format selected disk Click to start formatting the disk.
Format USB
USB Select the USB drive you want to format.
File System Select the file system type you want to use for the
new storage.
Format selected disk Click to start formatting the disk.
Multimedia NAS 61
TS-S402 61
Page 62

Power Management
This page allows you to change the power settings on your TS-S402
Power Management Check the Enable checkbox to configure the
settings in this page.
Turn Off Hard Drives Select the time to turn the hard drives off.
Apply Click to save the changes.
.
62 User’s Guide
Page 63

System Logs
Syslog Server
This page allows you to configure the remote server for sending out the system logs
generated from your TS-S402 Network Storage Enclosure.
Server IP Enter the IP address of the remote server. This
option is only available when Syslog server is
enabled.
Syslog server Enable this option to configure the server IP.
Mail Alert Enable this option to send out the system log
messages via SMTP server.
SMTP Enter the SMTP server address. This option is only
available when Mail Alert is enabled.
Mail address Enter the mail address for the TS-S402 Network
Storage Enclosure to send out the emails. This
option is only available when Mail Alert is
enabled.
Multimedia NAS 63
TS-S402 63
Page 64

SMTP Auth Enab le Enable this option to use SMTP Authentication
when sending out emails.
SMTP Auth User Enter the username for SMTP authentication. This
option is only available when SMTP Auth Enable is
enabled.
SMTP Auth Password Enter the password for SMTP authentication. This
option is only available when SMTP Auth Enable is
enabled.
System Logs
This page allows you view and clear a list of system log messages from the Multimedia
NAS.
Click the Clean log button to clear the system log screen.
64 User’s Guide
Page 65

Service Configuration
FTP Server
This page allows you to change the FTP server settings on your TS-S402.
FTP Port Enter the port to be used by FTP.
Upload Limit Enter the upload size limit. Enter 0 for no limit.
Download Li m i t Enter the download size limit. Enter 0 for no limit.
Apply Click to save the changes.
Multimedia NAS 65
TS-S402 65
Page 66

iTunes Server
This page allows you to configure an iTunes server in your TS-S402 Network Storage
Enclosure. You can use this server to share your iTunes music files with other users on
your local network.
iTunes Server Name Enter the name for the iTunes server.
Share folder Select the folder stored with your iTunes music files
as the shared folder.
Only one folder can be set for iTunes
Refresh time
(second)
music sharing.
Enter the desired time interval (in seconds) to
refresh the iTunes server automatically.
Enable Passw o rd Check this option to enable passwor d-protected file
sharing.
Set Password Enter the password for iTunes server access.
Confirm Pa ssword Enter the password again in this field.
66 User’s Guide
Page 67

UPnP Server
This page allows you to configure a UPnP A/V (Universal Plug and Play) media server
in your TS-S402 Network Storage Enclosure. Any user on your local network can
browse your media (pictures/videos/audio/music) from this server and playback them
on UPnP compatible media players or computers running an appropriate client
software, such as WinDVD player.
UPnP A/V Server Name Enter the name for the UPnP A/V server. Then
select the folder stored with your media files as the
shared folder. Click the Add New Share Folder
button to add the folder to the Share List.
Share List Displays the folders to be shared on the UPnP
server.
Delete Click to remove the sharing folder from the Share
List.
Apply Click to save the changes.
Multimedia NAS 67
TS-S402 67
Page 68

Dynamic DNS
This page allows you to configure Dynamic DNS in your TS-S402.
Dynamic DNS Check the Enable box to configure the settings on this
page.
Refresh Time (minute) Select the time to refresh the server. This option is only
available when Dynamic DNS is enable d.
Server Name Select the server name for your Dynamic DNS service.
This option is only available when Dynamic DNS is
enabled.
User Name Enter the user name of your Dynamic DNS account.
Password Enter the password of your Dynamic DNS account.
Host Name Enter the host name of your Dynamic DNS account.
Apply Click to save the settings.
68 User’s Guide
Page 69

Download Center
This page lists the download status for your downloads.
Name Displays the names of the downloads.
Complete Displays the percentage completed for the downloads.
Download Rate Displays the speed of the downloads.
Status Displays the status of the downloads.
Add
Run
Stop
Delete
Click to add a download.
Click to start downloading.
Click to stop downloading.
Click to delete a download.
Multimedia NAS 69
TS-S402 69
Page 70

Add Download
To add a download, click the Add from the Download Center page. The
Download Setting page displays.
URL Enter the address of the download server.
Like http:// or FTP://
Download Directory Select the download directory in your Multimedia NAS.
Download Lim i t Enter the limit for the download.
Retry Limit
Anonymous
Enter the limit for the retry. Enter 0 for no retry.
Check the Anonymous checkb ox to enable
downloading anonymously.
User Name
Enter the user name for the download. This option is
only available when Anonymous is disabled.
Password
Enter the password for the download. This option is
only available when Anonymous is disabled.
Apply Click to save the changes.
70 User’s Guide
Page 71

BT Client
This page lists the download status of BT seeds (the data from torrent files). You can
click the Add (
and cancel the download. Click the Add ( ) button to open the Upload Torrent And
Configuration page.
Upload Torrent And Configuration
), Remove ( ), start ( ), and stop ( ) buttons in this page to start
Max bandwidth up
(unit KB/s)
Enter the maximum upload rate for BT clients to
use.
Max bandwidth down Enter the maximum download rate for BT clients
to use.
Max peers count Enter the maximum number of connected peers.
Download the directory Select the folder which contains the torrent files
you want to save as the download files.
Seed Click the Browse button to locate the torrent file
saved in the TS-S402 Network Storage Enclosure.
Users can only download two BT seeds at the same
time.
Multimedia NAS 71
TS-S402 71
Page 72

NAS Printer
Your TS-S402 Network Storage Enclosure has a built-in printer server. To enable NAS
printer sharing,
connect a USB printer to an available USB port on your TS-S402 Network Storage
Enclosure. (See “Using External USB Devices” on page 20 for connections.) Users
can print out anything on this printer.
To set up the NAS printer, do the follo wing:
1. Click the NAS Printer from the left panel of the Web UI.
2. The following screen appears. Double click the NAS-Printer icon.
3. A pop up screen appears notifying you that the printer driver is not installed. Click
to continue with the installation.
OK
72 User’s Guide
Page 73

4. Select your printer manufacturer and model from the following screen and press the OK
button. If your printer is not listed, click the Have Disk button to install the printer driver
from the software CD that came supplied with your printer.
5. The installation progress screen appears.
6. When this following screen appears, the installation is finished.
• In order to use the shared printer, users must have
the printer driver installed on their computers.
• Yo u can connect the USB printer to either the front or
rear USB port on your TS-S402 Network Storage
Enclosure. Only the first connected USB printer will
be enabled for use.
Multimedia NAS 73
TS-S402 73
Page 74

SPECIFICATIONS
Interface
One 1000BASE-T Gigabit Ethernet
Two USB 2.0 Host
Power on/off button
USB quick backup button
Disk Management
Standard (Individual hard drive)
JBOD
RAID 0
RAID 1
File Sharing File System
CIFS/Samba
FTP
NFS
FAT32
EXT2
EXT3
Supported Hard Drives Memory
Two removable 3.5” external HDD
(SATA I/II) up to 1500GB
Flash: 4M-Byte
DDR SDRAM: 64M-Byte
Hard Drive Interface Data RAM Buffers
Two hot swappab le SATA II interfaces 128K Bytes
Media Servers Power
UPnP AV Multimedia Server
iTunes Server for iTunes player
12VDC, External Universal Switching
Power adapter
Extensive Services Emission
Remote package installation
Bit-torrent client
USB Print server
FCC Class B
CE mark Class B
VCCI-B
Dimensions (W x D x H) T emperature
204 x 120 x 120 mm
Operating: 0 ~ 40
Storage: -20 ~ 70
Diagnostic LEDs Humidity
Power LED
System LED
HDD1 access LED
HDD2 access LED
LAN LED
Operating: 10% ~ 90% RH
Storage: 5% ~ 95% RH
o
C
o
C
74 User’s Guide
Page 75

Limited Warranty
TRENDnet warrants its products against defects in material and workmanship, under normal use and service,
for the following lengths of time from the date of purchase.
TS-S402 2 years
If a product does not operate as warranted abov e during the applicable warranty period , TRENDnet shall, at
its option and expense, repair the defective product or deliver to customer an equivalent product to replace the
defective item. All products that are replaced will become the property of TRENDnet. Replacement
products may be new or reconditioned.
TRENDnet shall not be responsible for any software, firmware, information, or memory data of customer
contained in, stored on, or integrated with any products returned to TRENDnet pursuant to any warranty.
There are no user serviceable parts inside the product. Do not remove or attempt to service the product
through any unauthorized service center. This warranty is voided if (i) the product has been modified or
repaired by any unauthorized service center, (ii) the product was subject to accident, abuse, or improper use
(iii) the product was subject to conditions more severe than those specified in the manual.
Warranty service may be obtained by contacting TRENDnet office within the applicable warranty period for a
Return Material Authorization (RMA) number, accompanied by a copy of the dated proof of the purchase.
Products returned to TRENDnet must be pre-authorized by TRENDnet with RMA number marked on the
outside of the package, and sent prepaid, insured and packaged appropriately for safe shipment.
WARRANTIES EXCLUSIVE: IF THE TRENDNET PRODUCT DOES NOT OPERATE AS WARRANTED ABOVE, THE
CUSTOMER’S SOLE REMEDY SHALL BE, AT TRENDNET’S OPTION, REPAIR OR REPLACEMENT. THE FOREGOING
WARRANTIES AND REMEDIES ARE EXCLUSIVE AND ARE IN LIEU OF ALL OTHER WARRANTIES, EXPRESSED OR IMPLIED,
EITHER IN FACT OR BY OPERATION OF LAW, STATUTORY OR OTHERWISE, INCLUDING WARRANTIES OF
MERCHANTABILITY AND FITNESS FOR A PARTICULAR PURPOSE. TRENDNET NEITHER ASSUMES NOR AUTHORIZES ANY
OTHER PERSON TO ASSUME FOR IT ANY OTHER LIABILITY IN CONNECTION WITH THE SALE, INSTALLATION,
MAINTENANCE OR USE OF TRENDNET’S PRODUCTS.
TRENDNET SHALL NOT BE LIABLE UNDER THIS WARRANTY IF ITS TESTING AND EXAMINATION DISCLOSE THAT THE
ALLEGED DEFECT IN THE PRODUCT DOES NOT EXIST OR WAS CAUSED BY CUSTOMER’S OR ANY THIRD PERSON’S
MISUSE, NEGLECT, IMPROPER INSTALLATION OR TESTING, UNAUTHORIZED ATTEMPTS TO REPAIR OR MODIFY, OR ANY
OTHER CAUSE BEYOND THE RANGE OF THE INTENDED USE, OR BY ACCIDENT, FIRE, LIGHTNING, OR OTHER HAZARD.
LIMITATION OF LIABILITY: TO THE FULL EXTENT ALLOWED BY LAW TRENDNET ALSO EXCLUDES FOR ITSELF AND ITS
SUPPLIERS ANY LIABILITY, WHETHER BASED IN CONTRACT OR TORT (INCLUDING NEGLIGENCE), FOR INCIDENTAL,
CONSEQUENTIAL, INDIRECT, SPECIAL, OR PUNITIVE DAMAGES OF ANY KIND, OR FOR LOSS OF REVENUE OR PROFITS,
LOSS OF BUSINESS, LOSS OF INFORMATION OR DATE, OR OTHER FINANCIAL LOSS ARISING OUT OF OR IN
CONNECTION WITH THE SALE, INSTALLATION, MAINTENANCE, USE, PERFORMANCE, FAILURE, OR INTERRUPTION OF
THE POSSIBILITY OF SUCH DAMAGES, AND LIMITS ITS LIABILITY TO REPAIR, REPLACEMENT, OR REFUND OF THE
PURCHASE PRICE PAID, AT TRENDNET’S OPTION. THIS DISCLAIMER OF LIABILITY FOR DAMAGES WILL NOT BE
AFFECTED IF ANY REMEDY PROVIDED HEREIN SHALL FAIL OF ITS ESSENTIAL PURPOSE.
Governing Law: This Limited Warranty shall be governed by the laws of the state of California.
Note
: AC/DC Power Adapter, Cooling Fan, cables and Power Supply carry 1-Year Warranty
Multimedia NAS 75
TS-S402 75
Page 76

Some TRENDnet products include software code written by third party developers. These
codes are subject to the GNU General Public License ("GPL") or GNU Lesser General
Public License ("LGPL").
Go to http://www.trendnet.com/gpl
for the desired TRENDnet product to access to the GPL Code or LGPL Code. These
codes are distributed WITHOUT WARRANTY and are subject to the copyrights of the
developers. TRENDnet does not provid e technical support for these codes. Please go to
http://www.gnu.org/licenses/gpl.txt
each license.
or http://www.trendnet.com Download section and look
or http://www.gnu.org/licenses/lgpl.txt for specific terms of
76 User’s Guide
Page 77

Multimedia NAS 77
TS-S402 77
 Loading...