

Page 1

TRENDnetView
EVO
Administration
Guide
Friday, October 27, 2017
© TRENDnet
Page 2
Table of Contents
1. Software Purpose and Use Cases 3
2. Hardware Requirements 4
3. Getting Started 5
4. Free License 6-7
5. Installation of TRENDnetView EVO 8-10
6. Initialization of TRENDnetView EVO Server 11
7. Server Setup Wizard 12
8. Start & Stop Server Service 13
9. Management Application Installation 14-17
10. TRENDnetView EVO Console First Start 18-19
11. Setup Wizard 20-21
12. Interface Overview: Management Application 22-25
13. Conventions and Keyboard Shortcuts 26-28
14. Configuration Backup 29-31
15. Migration From Previous Product Versions 32-34
16. Server Settings 35
17. Storage 36-40
18. Watchdog 41-43
19. Security Policy 44-45
20. Overview of Devices and Channels 46
21. Add Devices Manually 47-51
22. Add Devices Using Autodiscovery 52-56
23. Manage Devices and Device Groups 57-59
24. Configure Channels 60-62
25. Channel Settings 63-66
26. Audio 67-68
27. Dewarp For Fisheye Cameras 69-70
28. Bulk Edit for Devices and Channels 71-72
29. Configure Recording Profiles 73-75
30. Assign Recording Configurations 76
TRENDnetView EVO 1
Page 3
31. Add Users and User Groups 77-80
32. Permissions and Membership 81-82
33. Anonymous User 83
34. Live Podcasts 84-86
35. Layout Templates 87
36. Data Sources 88-90
37. Streaming Server Configuration 91
38. Streaming Server User Interface 92-95
39. Mobile Application for Streaming Server 96-103
40. Event and Action Overview 104-105
41. Rules 106
42. Default Events 107
43. Add Events 108-111
44. Defaults Actions 112
45. Add Actions 113-122
46. Add Rules 123-128
47. Understanding Conditions 129-130
48. Manage Mail Servers 131-132
49. Create Schedules 133
50. Delay Timers 134
51. Health Monitoring 135-136
52. Audit 137-139
53. Problem Report Wizard 140-142
TRENDnetView EVO 2
Page 4
1 Software Purpose and Use Cases
About Software
TRENDnetView EVO is a free version of the new-generation TRENDnet video management software. Delivering an
outstanding quality performance, this video management system is ideal for use at small installations with
surveillance networks of sixteen cameras or fewer. The meticulously designed interface will allow any user to quickly
understand the whole process of configuration and start using the software.
Free software version allows up to 16 video channels from TRENDnet brand cameras. Client application TRENDnetView EVO Monitor - can only be connected to a single TRENDnetView EVO server, and streaming server
(Web/mobile access), which is an integral part of the server, is limited to one connection at a time.
Additionally, an advanced feature of event and action management is offered with this software bundle. Free version
upgrade is offered for TRENDnetView EVO.
Prerequisites
There are a number of requirements for the TRENDnetView EVO host system:
Microsoft Windows operating system (7 SP1, 8, 8.1, 10, Server 2008 R2, Server 2012 R2)
both .NET Framework 3.5 SP1 and 4.5 (4.6) installed
all Windows updates should be installed (especially, this is critical for Windows 8 and newer editions and
for pending updates)
ports for remote connections should be enabled through the firewalls (default ports are 60554 for
TRENDnetView EVO Monitor and TRENDnetView EVO Console and 8080 for the TRENDnetView EVO
Streaming Server and external services)
installation and recording directories should be added to antivirus exception list so that they are not
scanned or interfered with in any other manner
indexing and defragmentation services must be disabled for the storage locations
for TRENDnetView EVO Monitor application, DirectX 10+ is required along with the latest stable graphics
card drivers
For recording, the following recommendations apply:
for >20MB/s total recorded stream, RAID 5/6/10 with high speed hardware controller is strongly
advisable
defragmentation and indexing must be disabled for all storages
every recording location, regardless of its type, must have 10-15% of free space, not used by
TRENDnetView EVO or any other software
recording to the system disk is strongly not recommended
antivirus software or any other scanners should be disabled for the storage locations
no third-party VMS should be recording to the same location as TRENDnetView EVO
Virtualised environment is not supported for this software.
Antivirus scanning, defragmentation and indexing being enabled for TRENDnetView EVO files may
result in dramatically decreased write speed, recording disturbances and, occasionally, database corruption.
We strongly recommend that you make sure that storage locations are not affected by these processes.
TRENDnet is not responsible for software failures and/or footage loss caused by underlying OS and/or
hardware issues. It is the responsibility of the systems administrator to configure the server and provide
maintenance, unless otherwise agreed (e.g., if server hardware has been shipped by TRENDnet).
TRENDnetView EVO 3
Page 5
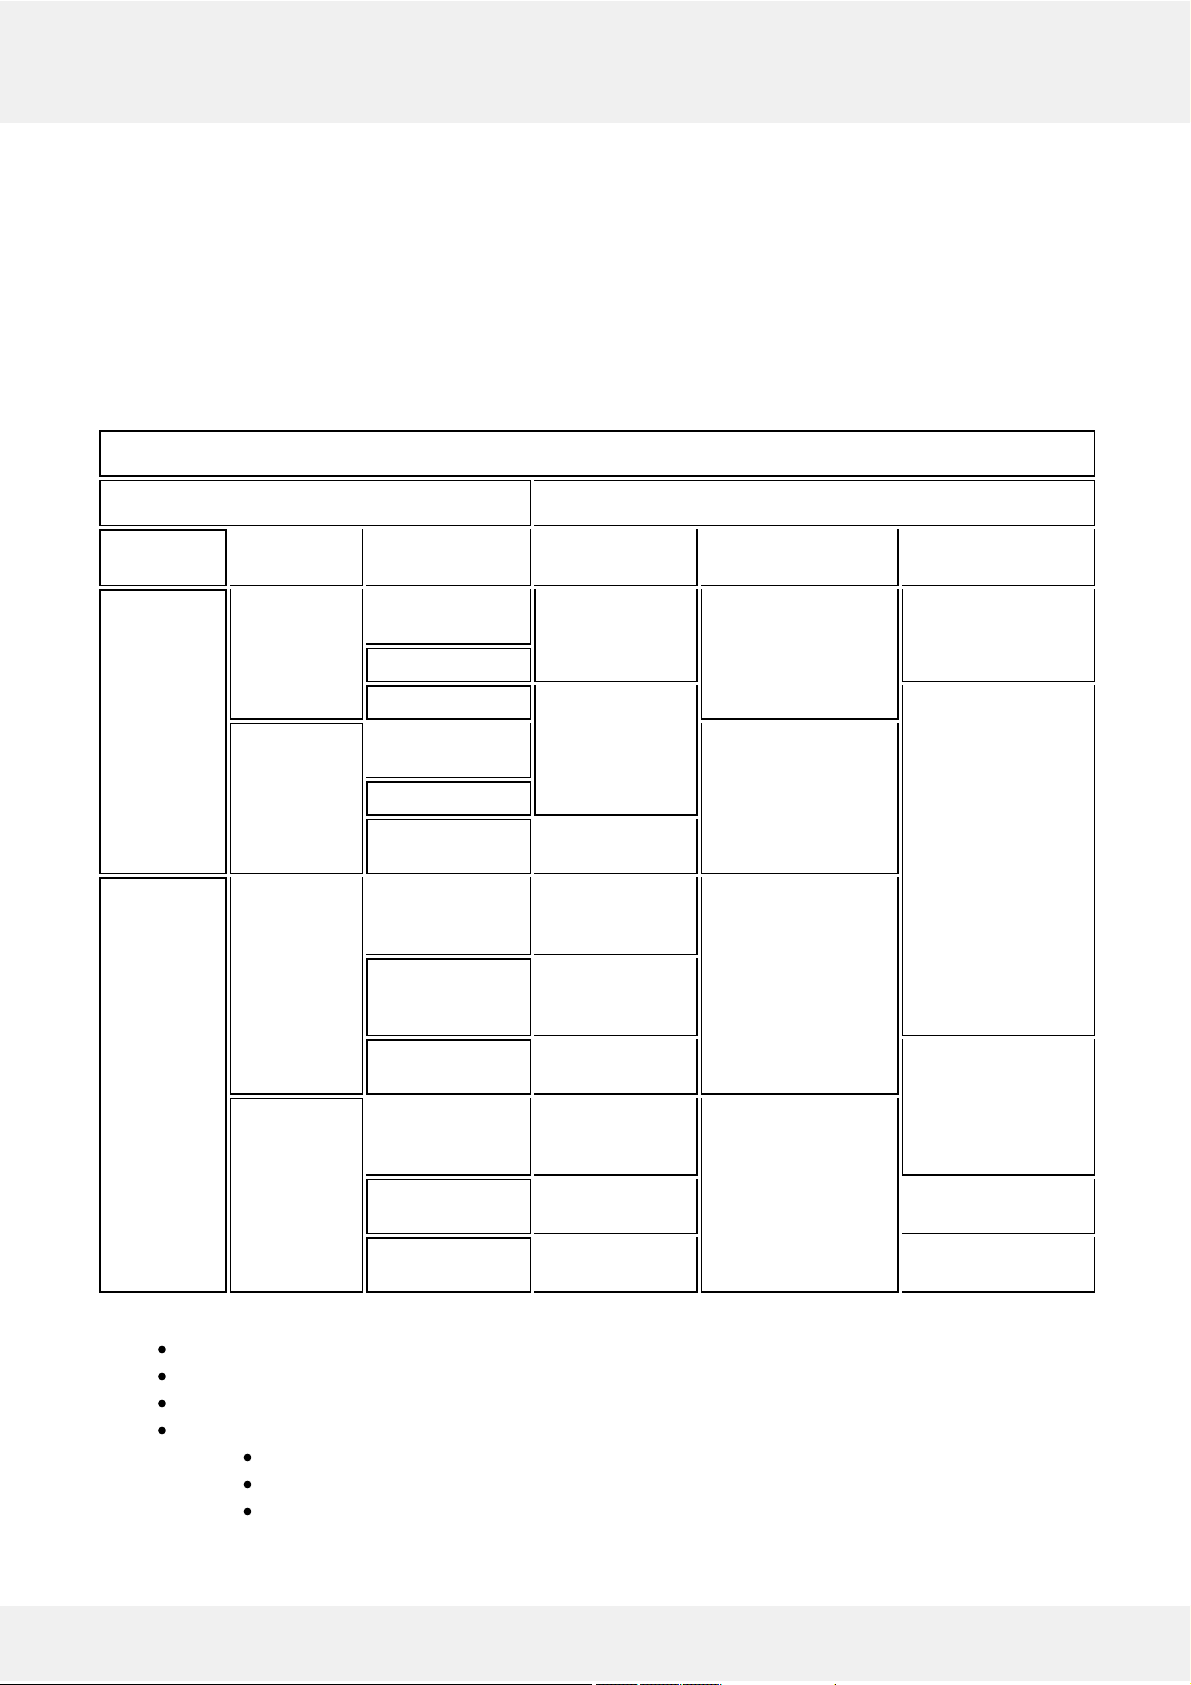
2 Hardware Requirements
The table below details the minimum recommended hardware sets for TRENDnet software. Please note that these
specific processor models are given only as examples and are not compulsory: you can use different CPU provided
that it has the same number of threads and its performance is analogous.
Calculations are given for two major configuration examples: all streams in D1 or FullHD resolution; of course,
intermediate and mixed cases may also exist. Please contact TRENDnet representatives if you require help with
choosing hardware.
HARDWARE RECOMMENDATION TABLE
Installation specifications Recommended hardware per usage scenario
Video
Stream
Number
of cameras
Motion
Detector
Server only Monitor*** only Server +
Monitor***
D1
30fps
Up to 9 None or camera-
side*
CPU: Intel
G1840; RAM
4GB
CPU: Intel G4500;
RAM 4GB
CPU: Intel i3-6300;
RAM 8GB
Software HP**
Software HA**
CPU: Intel
G4500; RAM
4GB
CPU: Intel i5-6600;
RAM 8GB
Up to 16
None or cameraside*
CPU: Intel i3-6300;
RAM 4GB
Software HP**
Software HA**
CPU: Intel i36300; RAM 8GB
FullHD
30fps
Up to 9 None or camera-
side*
CPU: Intel
G1840; RAM
4GB
CPU: Intel i5-6600;
RAM 8GB
Software HP**
CPU: Intel
G4500; RAM
4GB
Software HA**
CPU: Intel i56600; RAM 8GB
CPU: Intel i7-6700;
RAM 8GB
Up to 16
None or cameraside*
CPU: Intel
G4500; RAM
4GB
CPU: Intel i7-6700;
RAM 8GB
Software HP**
CPU: Intel i36300; RAM 8GB
CPU: Intel i7-6700;
RAM 16GB
Software HA**
CPU: Intel i76700; RAM 8GB
CPU: Intel i75930K; RAM 16GB
Notes:
DDR4 RAM is strongly recommended
*Please refer to the list of TRENDnet supported cameras for camera-side motion detector support
**High Performance/High Accuracy mode
***System must provide:
DirectX 10 support
Graphics card with at least 256MB memory
Latest graphics driver version
TRENDnetView EVO 4
Page 6
3 Getting Started
Before starting the installation, make sure that:
you have downloaded the correct software package
you have acquired the corresponding valid license key, see: Free License
the host operating system is stable (functioning correctly) and has all the updates and drivers installed
server hardware matches the project requirements, taking into account all used features and planned post-
deployment modifications
host system retains all the features and configuration required for software operation
We strongly advise that you keep the software versions (e.g., 1.x.x) and subversions (e.g., 1.2.x) across your
system match exactly. Software build numbers (e.g., 1.2.0.xxxxx) may differ slightly in case your are using 64bit and 32-bit editions.
If you are not sure about what server hardware to choose, do not hesitate to use TRENDnet provided hardware
calculators and/or contact TRENDnet representative for an accurate estimation.
We advise installing and activating the software on the ultimate server assembly, as extensive subsequent hardware
changes are likely to cause software license activation failure. If this happens, undo these changes, if possible, or
contact product support to find a solution.
TRENDnetView EVO is installed as a Windows service so please make sure that the Windows user you are logged in
as has sufficient privileges; otherwise, software may not be installed correctly. Note that there is no option to install
and run the software in application mode.
The following topics will guide you through the installation process, as well as providing details on product
configuration. If you are using a TRENDnet product for the first time, we strongly advise you to carefully read and
follow the instructions in this Adminstration Guide and related documentation.
TRENDnet is not responsible for software failures and/or footage loss caused by underlying OS and/or
hardware issues. It is the responsibility of the systems administrator to configure the server and provide
maintenance, unless otherwise agreed (e.g., if server hardware has been shipped by TRENDnet).
TRENDnetView EVO 5
Page 7
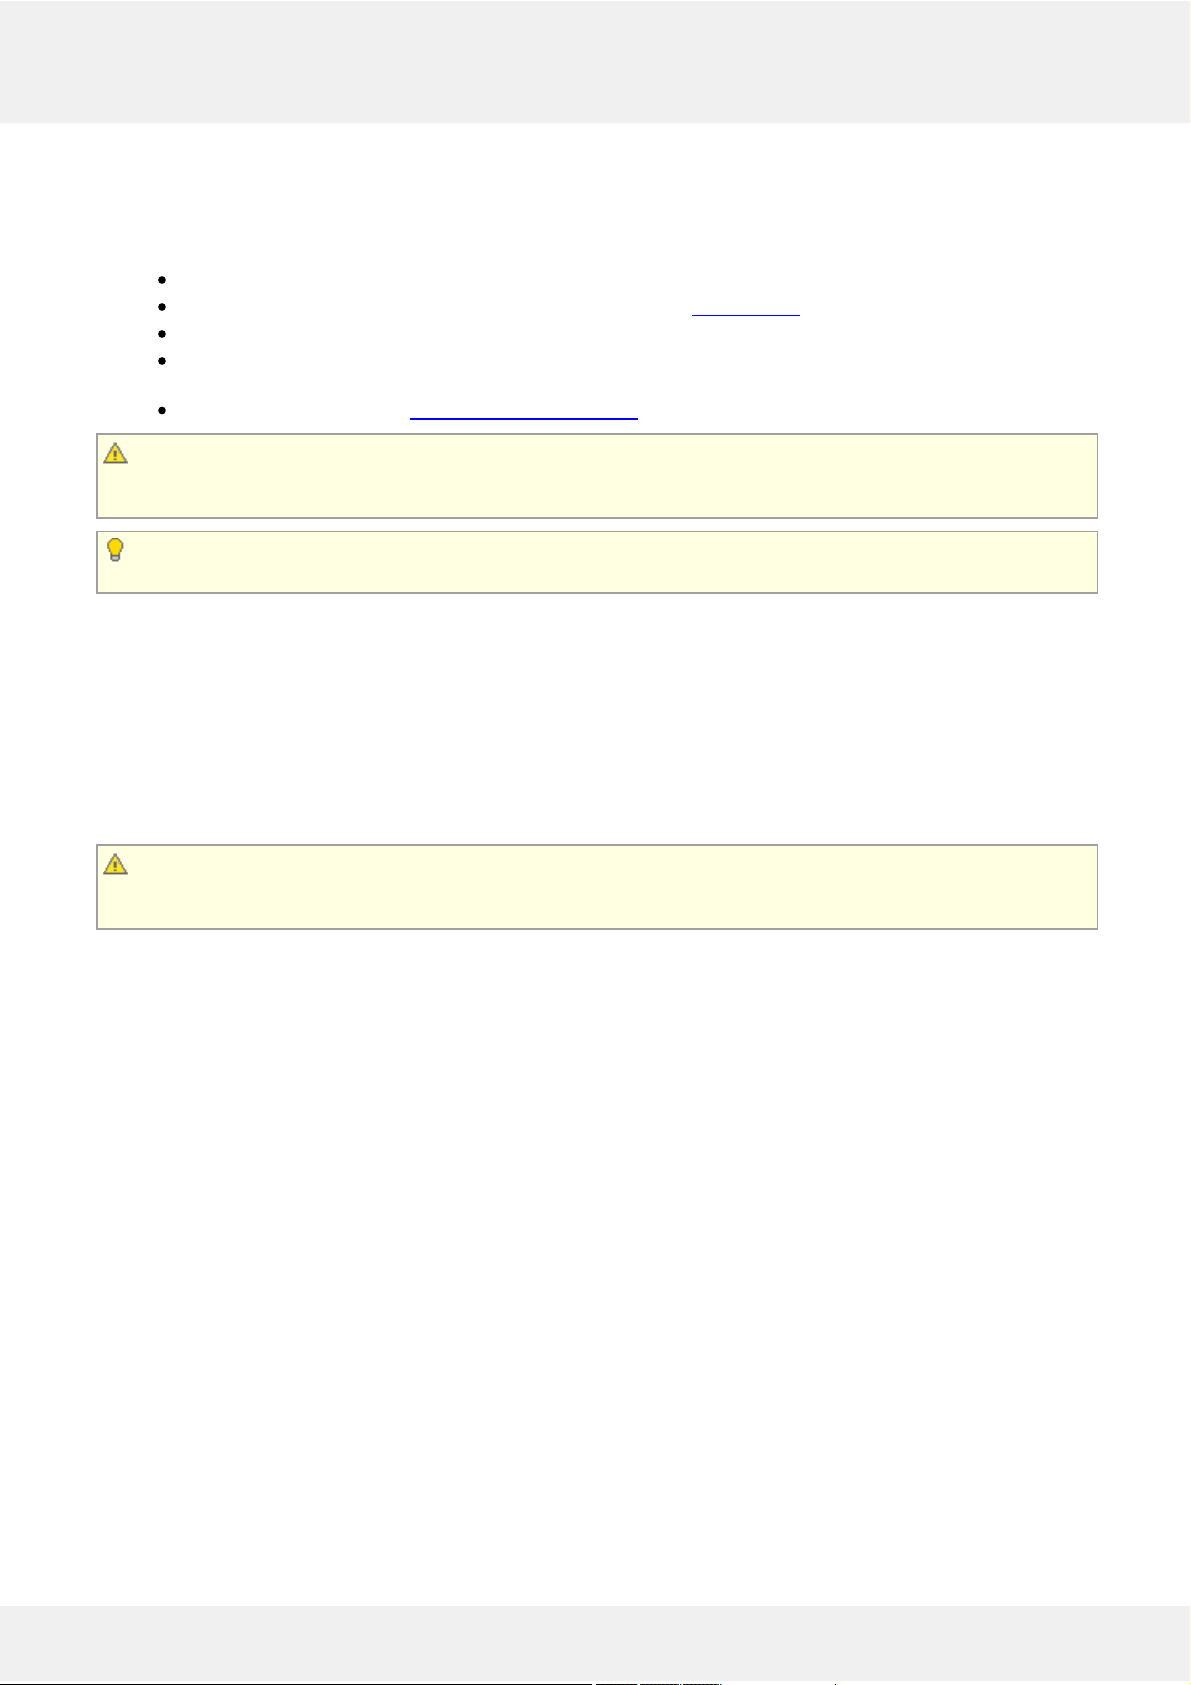
4 Free License
When you have installed and initialized the TRENDnetView EVO software, you will be given the chance to request a
free license in order to activate the software and continue using it.
The features and conditions of a free license are as follows:
free software updates
maximum 32 cameras
maximum 1 (one) connected TRENDnetView EVO Monitor at a time
TRENDnetView EVO Monitor can connect to maximum 1 (one) server with free license
Internet connection is required for the license request.
Activation is not possible on virtual machines!
Retrieve License
The Registration and Activation Wizard will pop up automatically after the software installation.
Free license request form
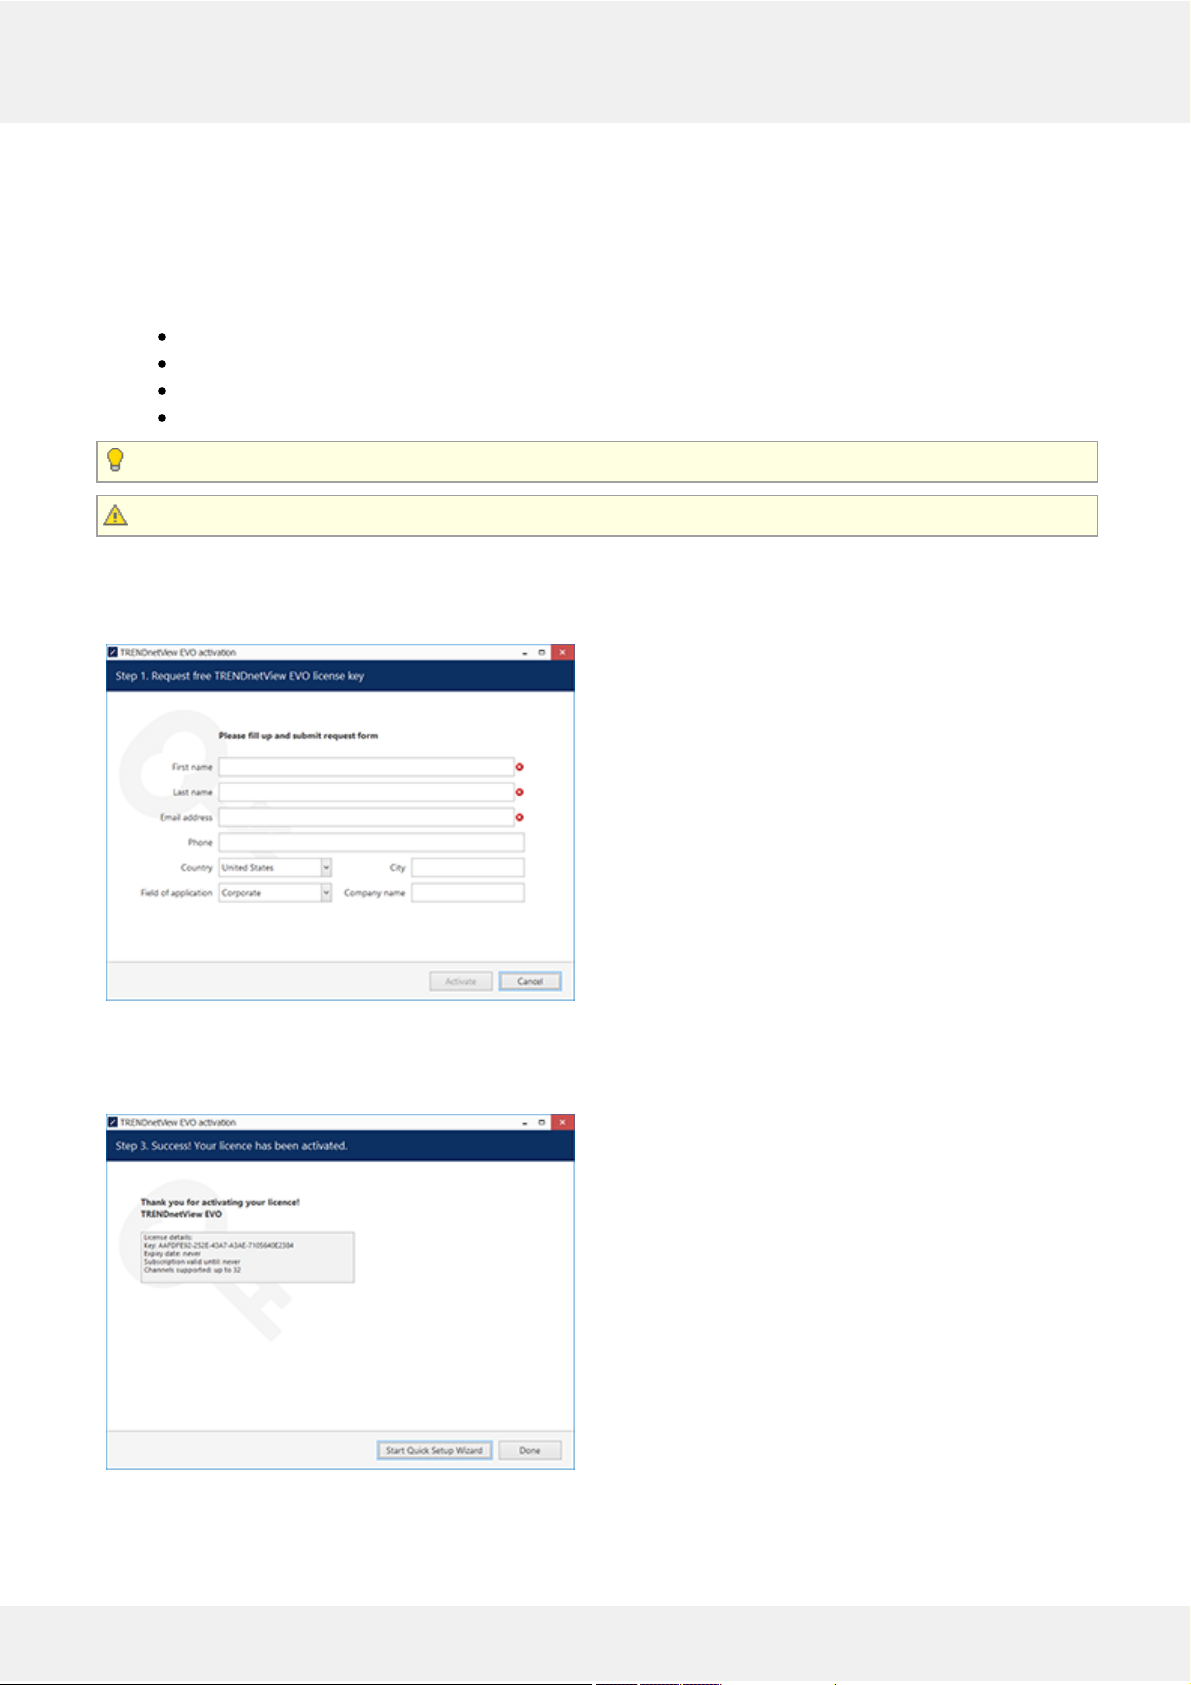
The wizard will automatically connect to TRENDnet activation server and retrieve the license details. If the request
fails, check your Internet connection and try again.
License details retrieved
Congratulations! You are now ready to use TRENDnetView EVO. Click the Start Quick Setup Wizard button below
to continue with server configuration.
TRENDnetView EVO 6
Page 8
Manage License
When a server already has a license key installed, you can retrieve that information in two ways:
right-click server icon in the system tray and select About. The dialog box will contain basic information
about the product version and license type
run the TRENDnetView EVO Registration and Activation wizard from the Start menu
Select Remove License if you wish to completely delete all the license information from the server.
TRENDnetView EVO 7
Page 9
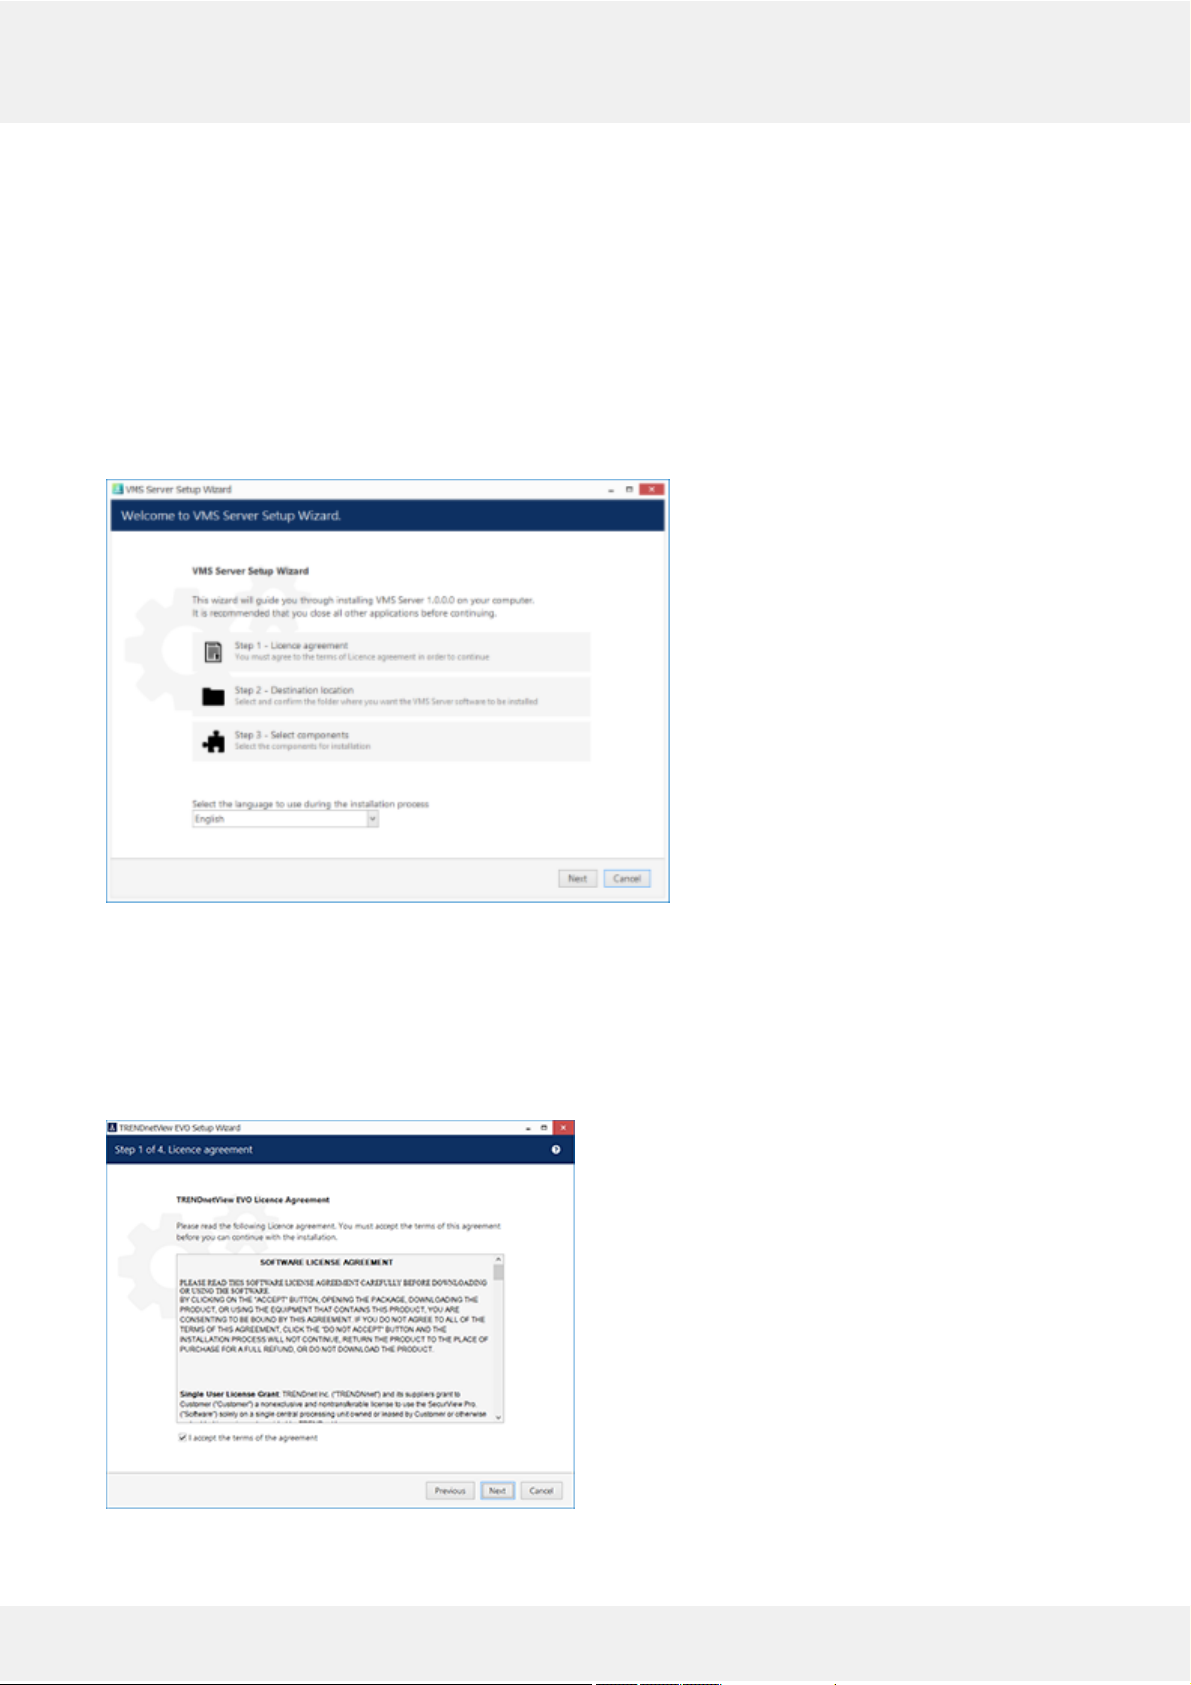
5 Installation of TRENDnetView EVO
Start the installation process by double-clicking on the TRENDnetView EVO executable package file. The
TRENDnetView EVO Setup Wizard will guide you through the installation process, providing available installationtime options depending on the chosen software package. Note that, depending on your Windows UAC
configuration, you may have to confirm and/or provide administrative credentials.
We strongly advise that you stop all running third-party applications, as well as stopping antivirus scanning and
Windows (and any other) updates during this phase, as these may interfere with the process and result in corrupt
installation, which may cause unexpected behaviour and hard-to-track issues during further software operation.
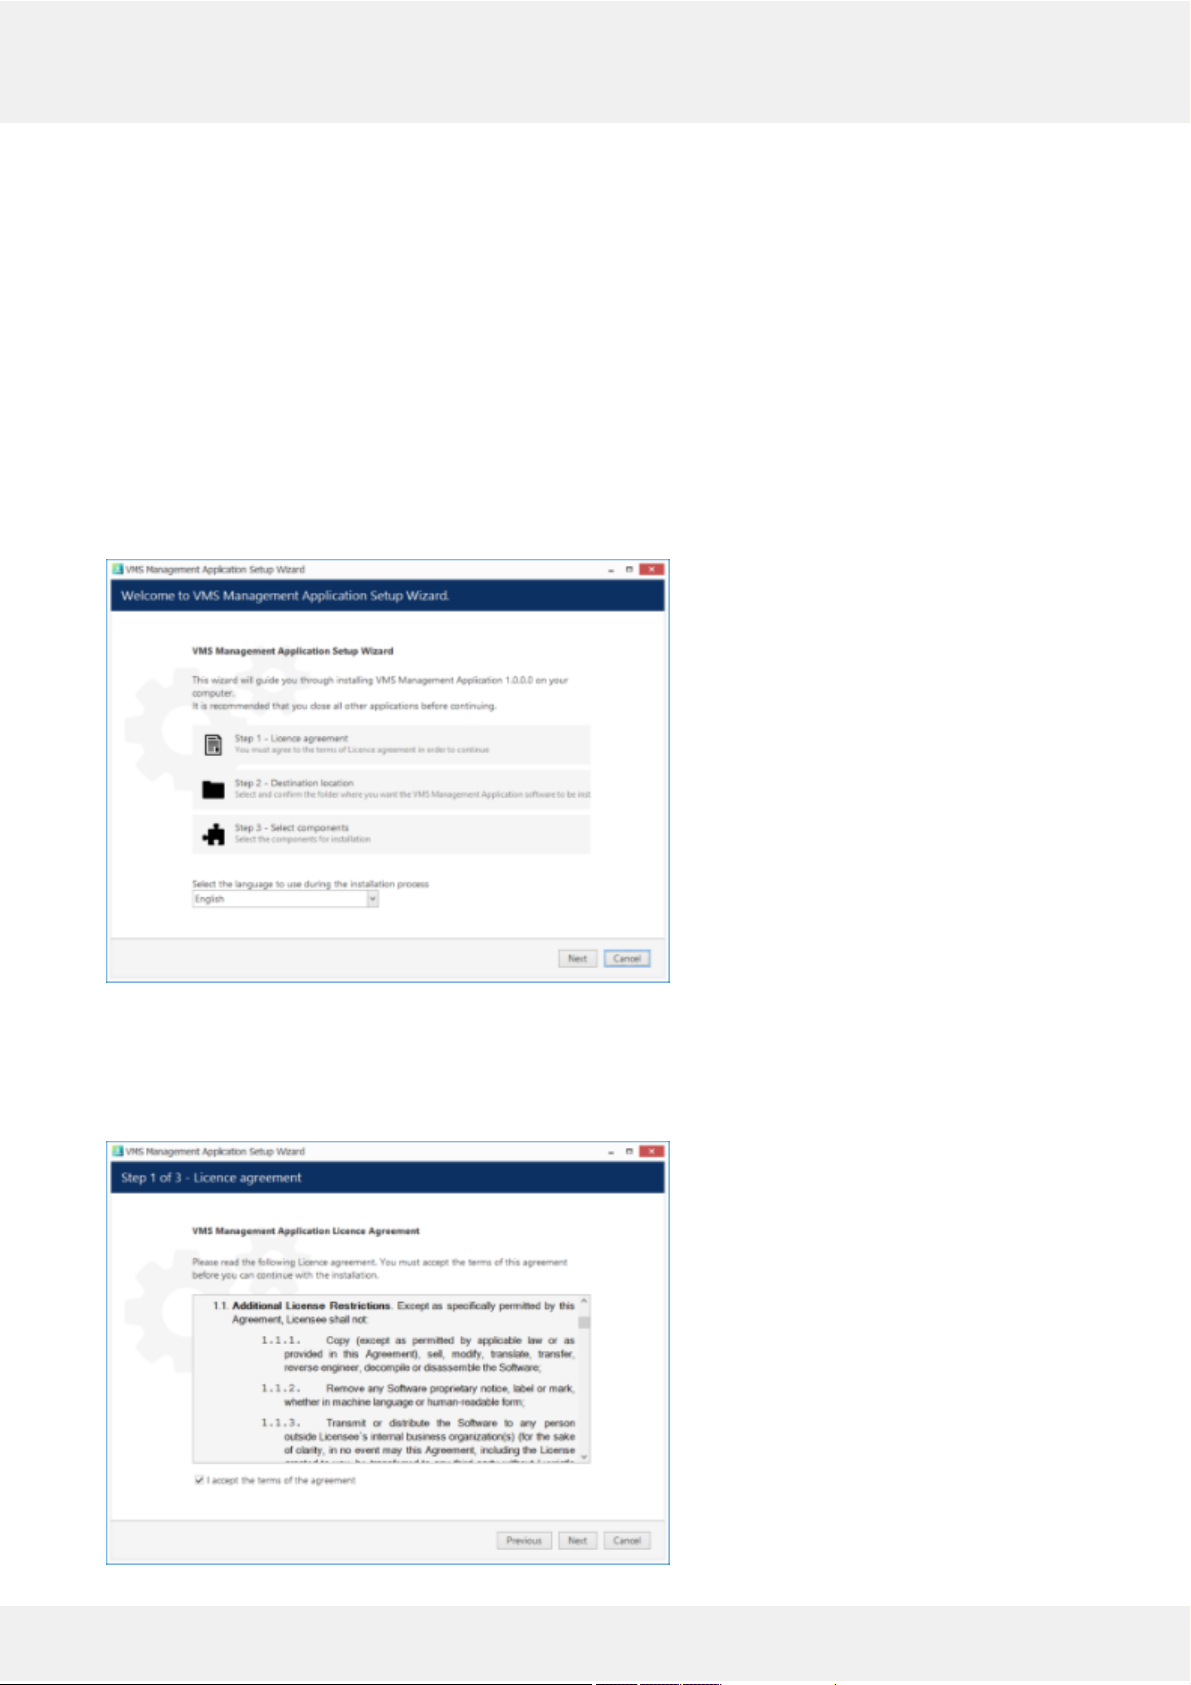
The TRENDnetView EVO Setup Wizard displays an overview of the process; also, you are able to select the
installation language here. You will be prompted to select the TRENDnetView EVO interface language later.
TRENDnetView EVO Setup Wizard
Step 1
Carefully read the TRENDnet license agreement: you must agree to all parts of the given document in order to
proceed. If you agree, select I agree... in order to continue; otherwise, terminate software installation. If you have
any questions regarding the contents of the present license agreement, please contact a TRENDnet representative at
http://www.trendnet.com/support
License Agreement
TRENDnetView EVO 8
Page 10
Step 2
Select the destination folder you want the software to be installed in. By default, TRENDnetView EVO is installed in:
32-bit: C:\Program Files (x86)\TRENDnetView EVO\TRENDnetView EVO
64-bit: C:\Program Files\TRENDnetView EVO\TRENDnetView EVO
If you are re-installing TRENDnetView EVO and previously selected a non-default location, make sure to select the
same destination directory, or, alternatively, completely uninstall previous TRENDnetView EVO version. If unsure
about this, ask for TRENDnet technical support team assistance. A full description of the software upgrade
procedure is available in the corresponding section of the TRENDnetView EVO administration manual.
The TRENDnetView EVO Setup Wizard estimates how much disk space will be required. Make sure you have
enough free space on the target disk. Note that low system disk space will dramatically decrease system performance
and affect overall system stability.
Installation Directory
Step 3
Some components are optional and so you can choose not to install them. The main TRENDnetView EVO parts are
obligatory and cannot be deselected (by default, these options are selected and greyed out). You may also select the
TRENDnetView EVO interface language here.
If not chosen at this stage, TRENDnetView EVO Monitor can be installed separately later.
TRENDnetView EVO 9
Page 11
Select Software Components
If you are ready to proceed, click Next to begin the installation. Depending on selected components and host system
condition, the process may take some time to complete, so please be patient.
Installation Progress
Upon completion, the setup wizard will show you an installation summary. If all the steps have been fulfilled
successfully, simply click Finish to close the wizard.
Installation Complete
After the installation has been completed, there are a few more steps necessary for you to begin using the software:
apply server initialization settings via Server Setup Wizard - it will pop up automatically after the
installation in case you are doing a clean or a new installation
activate the software - if it is not activated, the Registration and Activation Wizard will also pop up
automatically
after you run the console for the first time, you will be offered to complete the Quick Setup Wizard to
start the deployment, following the recommended configuration steps
All of these steps are described in details in the full version of the TRENDnetView EVO management manual, which
is available right after the installation via your Start menu.
TRENDnetView EVO 10
Page 12
6 Initialization of TRENDnetView EVO Server
After completing the installation wizard, you will be offered to enter server setup. The settings selected during server
setup can be changed later at any time via Server Setup Wizard, which will be available via your Start menu.
Choose Server Name and TCP port
Setting Description Default
Value
Server name User defined server title Server
Name
or last
used
title
Server port TCP port for incoming remote Client connections 60554
Note that the port defined here will be used to retrieve the server data via local TRENDnetView EVO Monitor and
TRENDnetView EVO Console connections. You will need to define the external (Internet) port for your
TRENDnetView EVO via TRENDnetView EVO Console in order to be able to receive video streams from remote
TRENDnetView EVO Monitor connections.
Setup Completed
TRENDnetView EVO 11
Page 13
7 Server Setup Wizard
The server setup wizard is available as a separate tool for any type of product installation, and is reachable via Start
menu: Start -> All Apps -> TRENDnet -> Server Setup Wizard (in Windows 7 and older versions, use Start -> All
Programs -> software installation folder -> Tools -> Server Setup Wizard); alternatively, use Search to locate Server
Setup Wizard in the programs menu. This wizard allows you to quickly change basic server settings initially defined
at Initialization stage.
Make sure you stop the TRENDnetView EVO server process before launching the wizard: this can be done either via
Windows Services or using the TRENDnetView EVO service tray icon.
TRENDnetView EVO 12
Page 14
8 Start & Stop Server Service
After software installation (except for the TRENDnetView EVO Console or TRENDnetView EVO Monitor only
installations), two components are registered as Windows services: VMSServer (TRENDnetView EVO Server)
and the accompanying VMSWatchdog (TRENDnetView EVO Server Watchdog) service. Both these services are set
to automatic start meaning that they will be launched straight after Windows start-up regardless of whether any user
is logged in or not.
By default, the server will run in silent service mode, i.e., without any status indication other than that in the
Windows Services management console; from there, both services can be stopped, started and restarted.
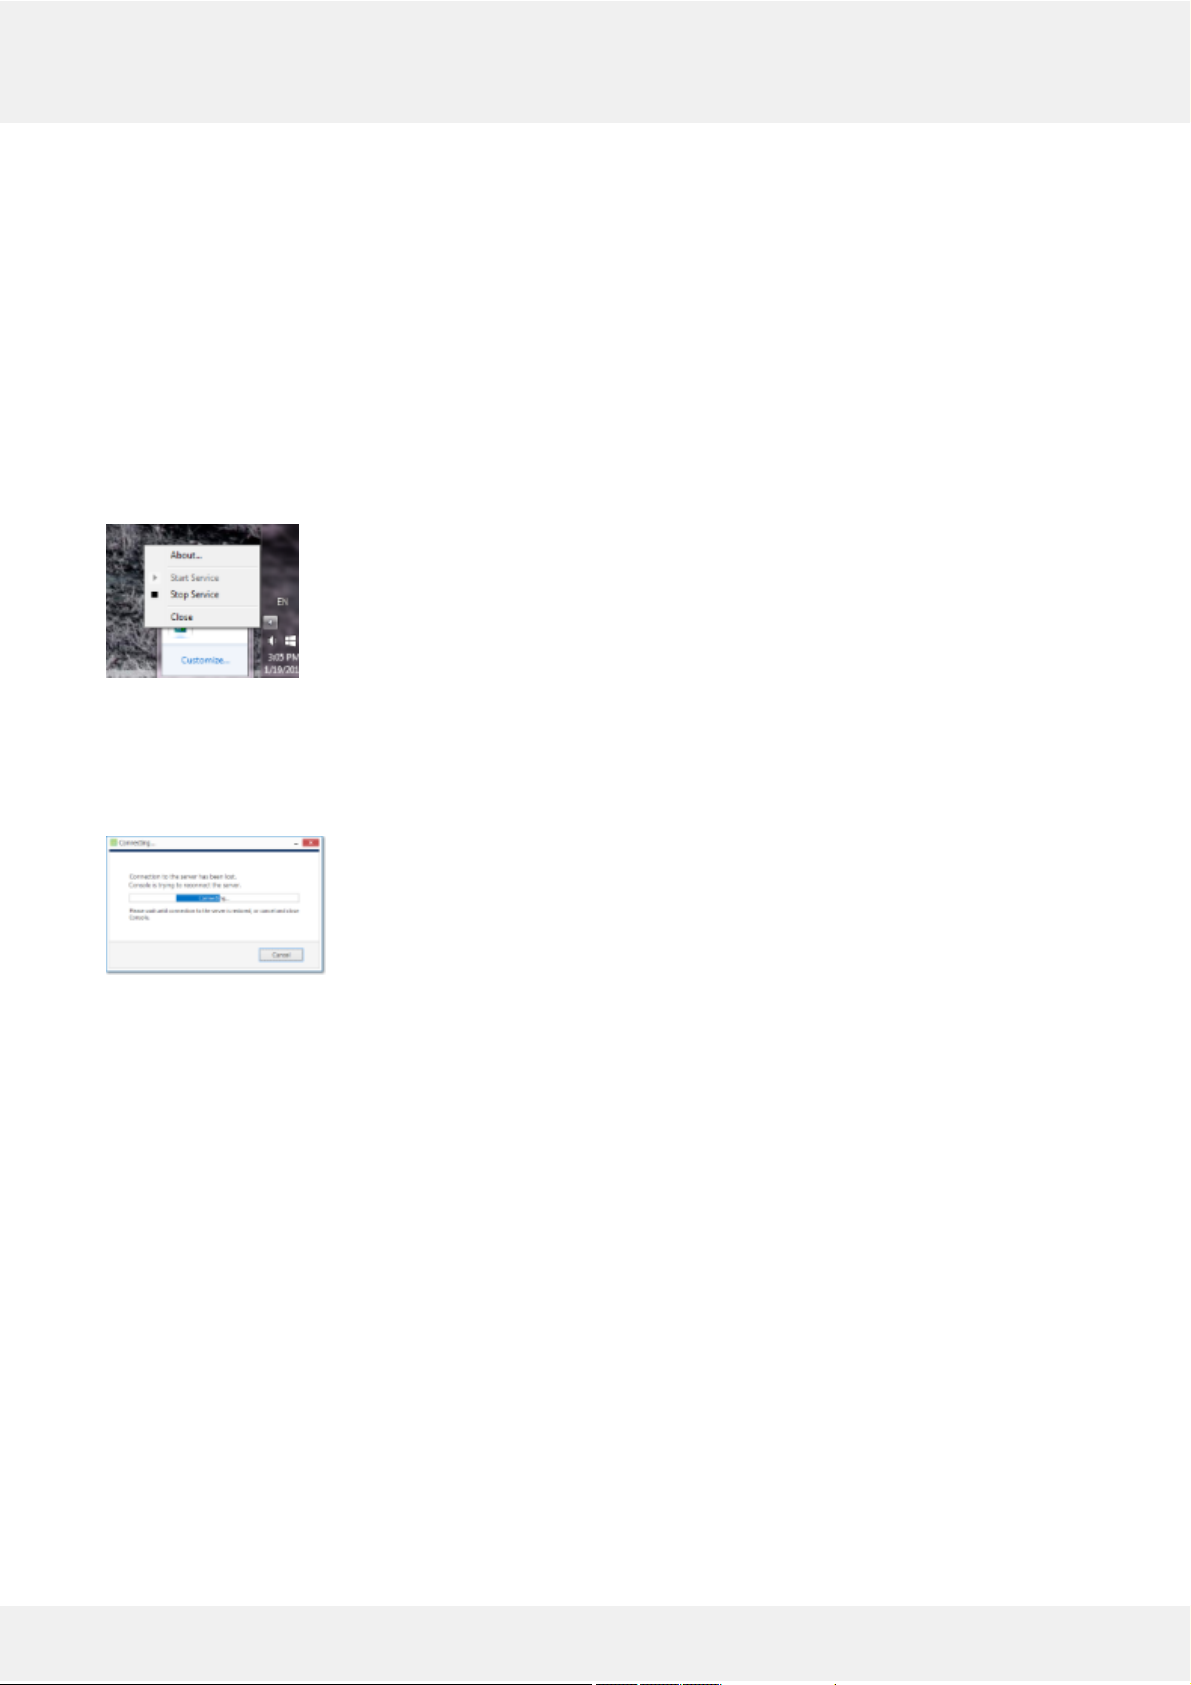
Double-click the server shortcut on your desktop to launch the system tray shell for the server: the server icon will
appear in the system tray, allowing you to start and stop the service by right-clicking it and selecting your desired
option. TRENDnetView EVO Watchdog service runs silently in background as an auxiliary service and has no user
interface except for the settings' dialog box in TRENDnetView EVO Console.
Start and stop the server service from the system tray
If the server service is stopped while TRENDnetView EVO Console connections are active, the wait-for-serverconnection window will appear on top of TRENDnetView EVO Console, disabling any input. The same thing will
happen if there are any problems with server connectivity. It will automatically disappear when the server is online
again; alternatively, you can click Close to exit TRENDnetView EVO Console at this point and open it manually later.
Connection lost
TRENDnetView EVO 13
Page 15
9 Management Application Installation
All server configuration is conducted through a dedicated interface - the TRENDnetView EVO Console management
application. The management interface has been intentionally separated from the TRENDnetView EVO Monitor
application in order to concentrate all administrative utilities in one place and also to conceal the unnecessary
menus from the TRENDnetView EVO Monitor operator.
The TRENDnetView EVO Console central server management application can be installed separately - either
locally on one of the servers, or remotely, on a dedicated server management machine.
Start the installation by double-clicking on the TRENDnetView EVO Console executable package file. The
TRENDnetView EVO Console Setup Wizard will guide you through the installation process, providing available
installation-time options depending on the chosen software package.
The TRENDnetView EVO Console Setup Wizard shows you the process overview; also, you also have the
opportunity to select the installation language here. You will be prompted to select TRENDnetView EVO interface
language later.
TRENDnetView EVO Console Setup Wizard
Carefully read the TRENDnet, Inc. license agreement: you must agree to all parts of the given document in order to
proceed. Select I agree... in order to continue, if you do; otherwise, terminate software installation. If you have
questions regarding the contents of this license agreement, you can contact a TRENDnet Representative at
http://www.trendnet.com/support
TRENDnetView EVO 14
Page 16

License agreement
Select destination folder for TRENDnetView EVO Console to be installed in.
Installation directory
The setup wizards will estimate the amount of disk space required for the installation. Make sure you have enough
free space on the target disk. Note that low system disk space will dramatically decrease system performance and
affect overall system stability.
Along with TRENDnetView EVO Console, this installation package also allows you to have TRENDnetView EVO
Monitor application installed at the same time. If you do not wish to install TRENDnetView EVO Monitor at the
moment, simply uncheck it in the components list.
Select software components
If you are ready to proceed, hit Next to begin the installation. Depending on selected components and host system
condition, the process may take some time to complete, so please be patient.
TRENDnetView EVO 15
Page 17

Installation progress
Upon completion,the setup wizard will show you an installation summary. If all the steps have been fulfilled
successfully, simply hit Finish to close the wizard.
Installation complete
After completing the TRENDnetView EVO Console installation, you will be given the option to enter the settings of
server you wish to connect to. You can skip this step if you wish to configure your Global server later; you will be
asked for the same information next time you run TRENDnetView EVO Console.
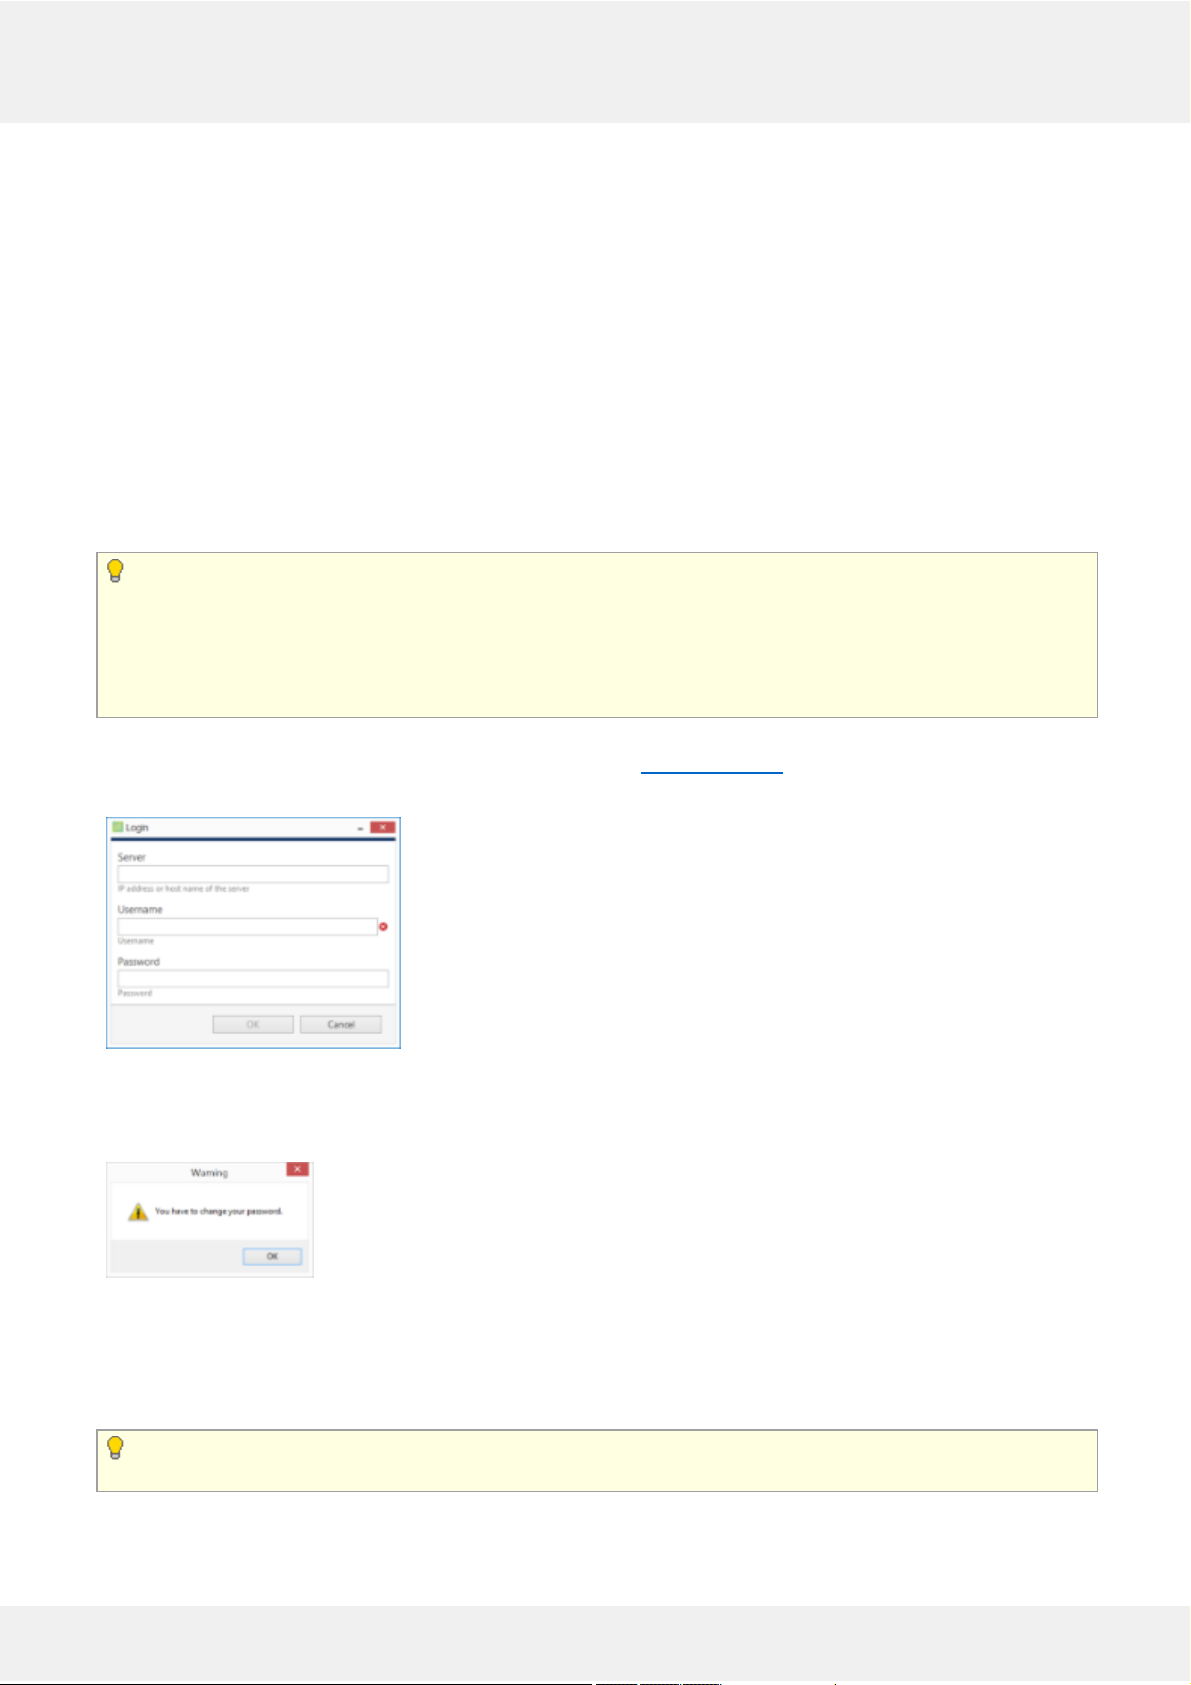
To log in, simply enter your server's local or remote address (IP or host name) and user information. Note that users
must have corresponding permissions in order to connect. Default username and password are admin/[empty].
TRENDnetView EVO 16
Page 18
TRENDnetView EVO Console login window
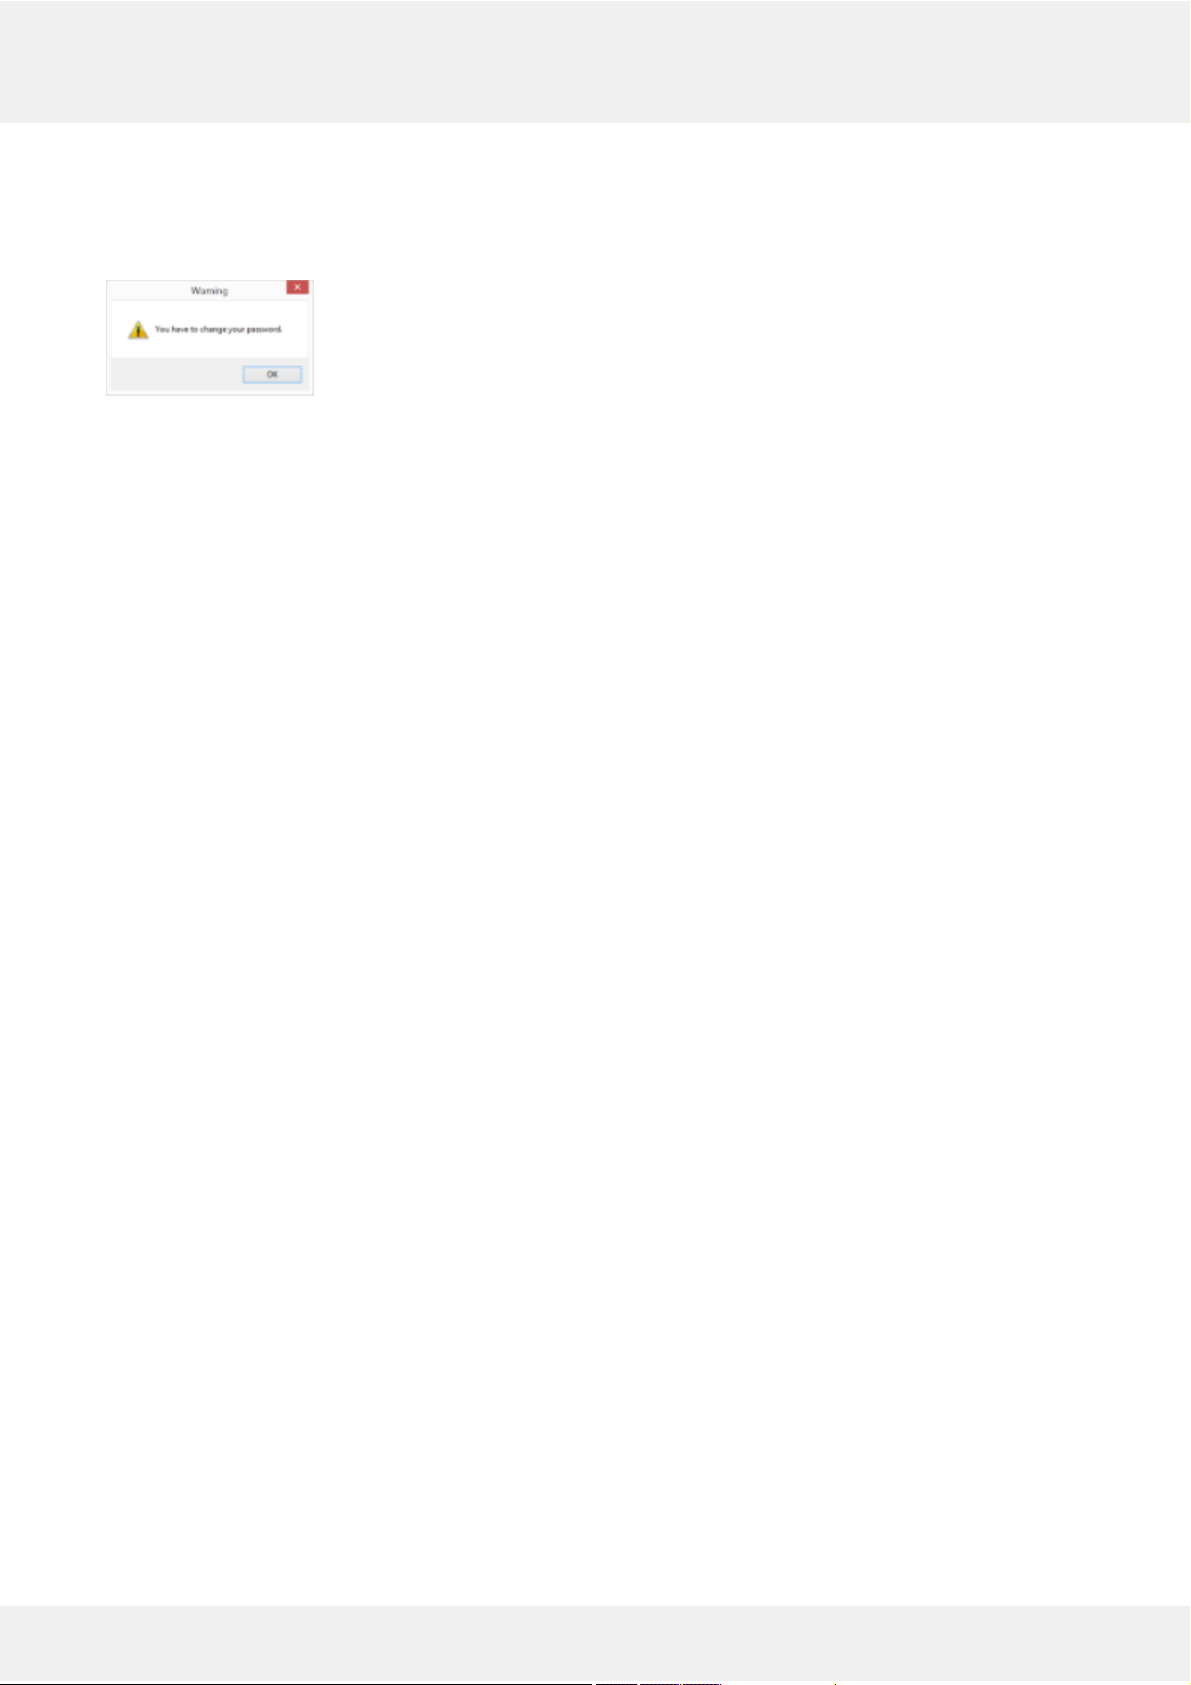
After logging in for the first time with the default username and password, you will be reminded to change your
password. For security reasons, we strongly recommend that you do so.
Password change reminder
TRENDnetView EVO 17
Page 19
10 TRENDnetView EVO Console First Start
All server configuration is conducted through a dedicated interface - the TRENDnetView EVO Console management
application. The management interface has been intentionally separated from the TRENDnetView EVO Monitor
application in order to concentrate all administrative utilities in once place and also to conceal the unnecessary
menus from the TRENDnetView EVO Monitor operator. Applications are totally independent from each other and
can be or not be installed on the same machine. TRENDnetView EVO Console for a single installation management
can be installed on one or more computers, depending on the system administrator's needs.
Run the TRENDnetView EVO Console application by double-clicking the TRENDnetView EVO Console shortcut
from the desktop or Start menu.
To log in, simply enter your TRENDnetView EVO server's local or remote address (IP or host name), TCP port and
user information. Note that, if you already have pre-configured user accounts, the user must have corresponding
permissions in order to connect.
The default username and password for the new installation is admin/[empty].
If your server has default TCP port configured (which is 60554), you do not need to specify it when connecting:
simply type the IP or hostname of the server to connect to. However, if the server TCP port has been altered,
you need to specify the port explicitly, making the connection address look as follows:
<address>:<port>, e.g., 192.168.1.77:60555 or localhost:60887
Server TCP port can be changed via TRENDnetView EVO Server Setup Wizard.
If you are refused by the connection, make sure that the server is running and accessible over the network. (For
more detailed information about what to do, please refer to the Troubleshooting section of this document: it is
constantly updated with most common cases).
TRENDnetView EVO Console login
After logging in for the first time with default username and password, you will be reminded to change your
password. For security reasons, we strongly recommend that you do so at once.
Change Password reminder
Immediately afterwards, you will be given the option to change the password using an additional dialog box. To
change the password, enter your old password (initial, default password is empty so just leave the field empty),
then enter your new administrative password for the current server, enter it for the second time to confirm, then
click OK to save.
The new password must comply with server policies, by default these are: minimum 8 characters total
length, including at least 2 lowercase and 2 uppercase letters.
TRENDnetView EVO 18
Page 20
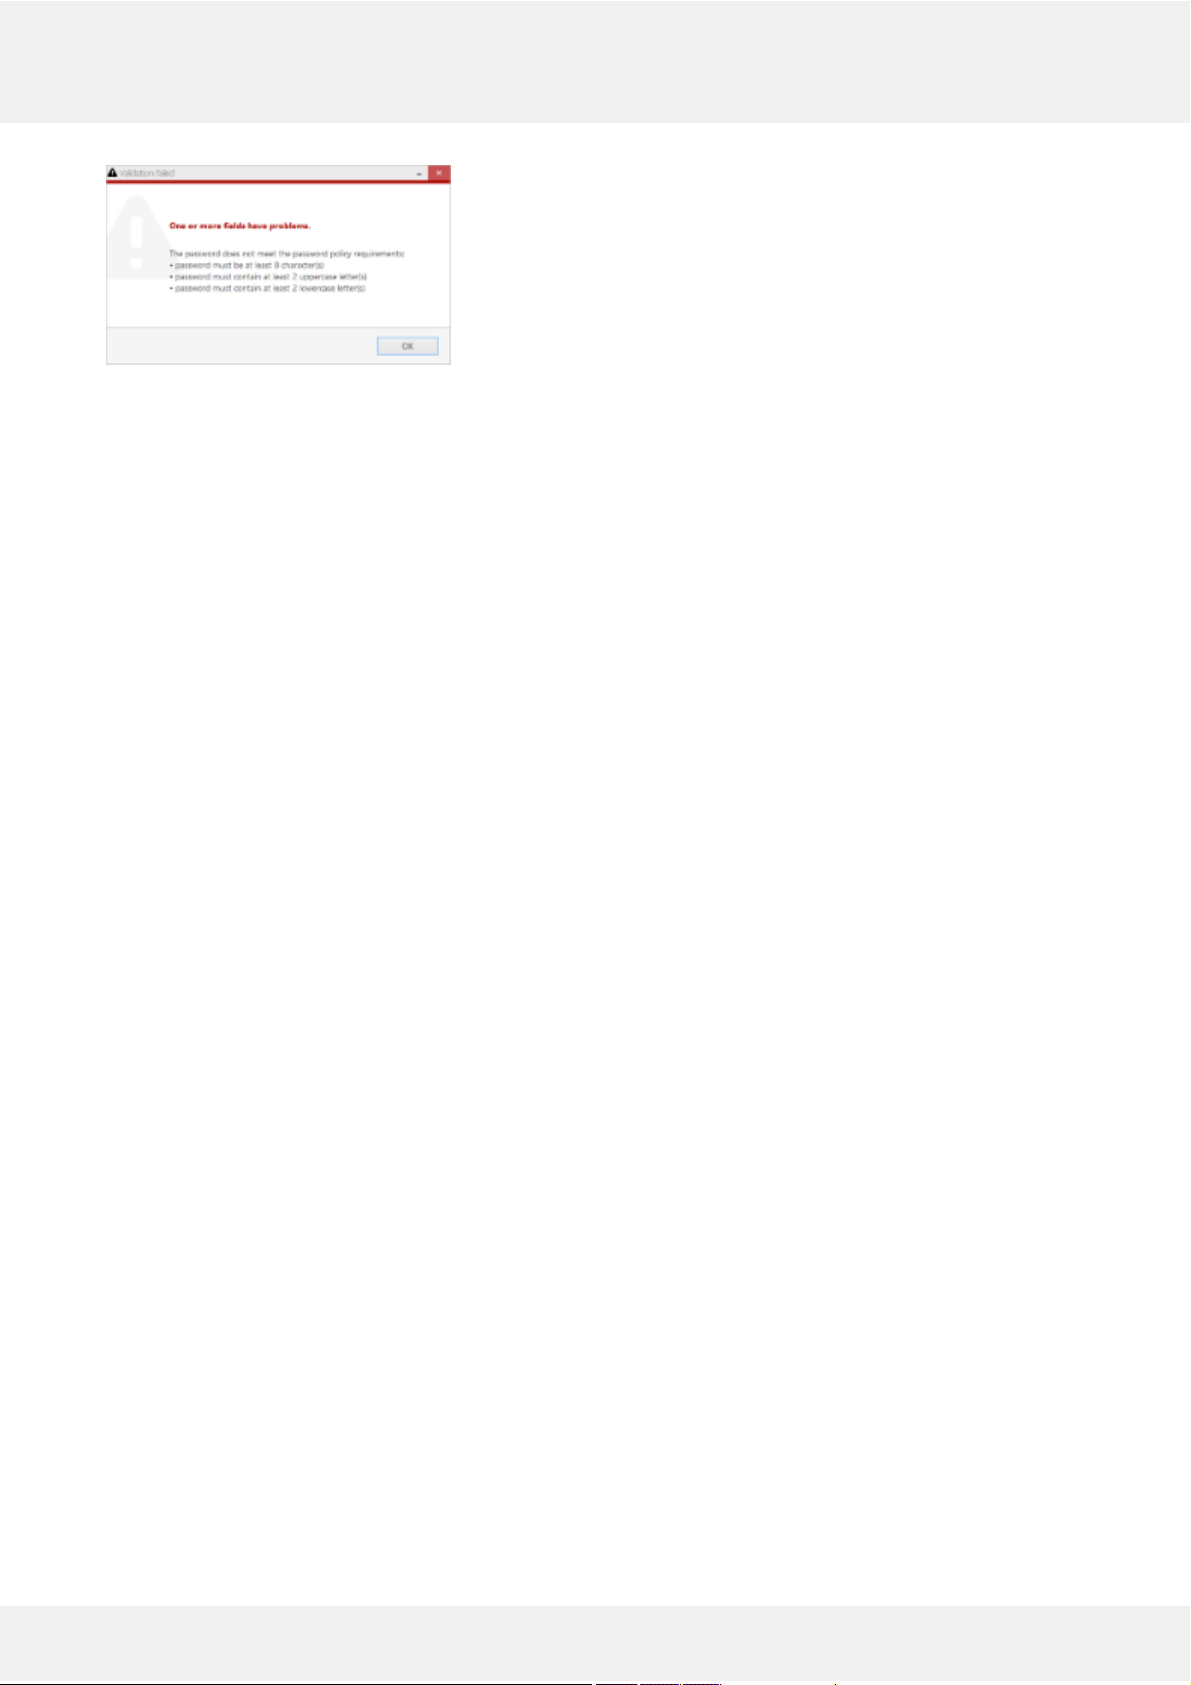
Password must meet the server policy requirements
After you are done with the password update, you will be given the opportunity to fill in the initial server settings
using the Quick Setup Wizard. We recommend that for optimum configuration progression you follow the steps in
the wizard.
TRENDnetView EVO 19
Page 21
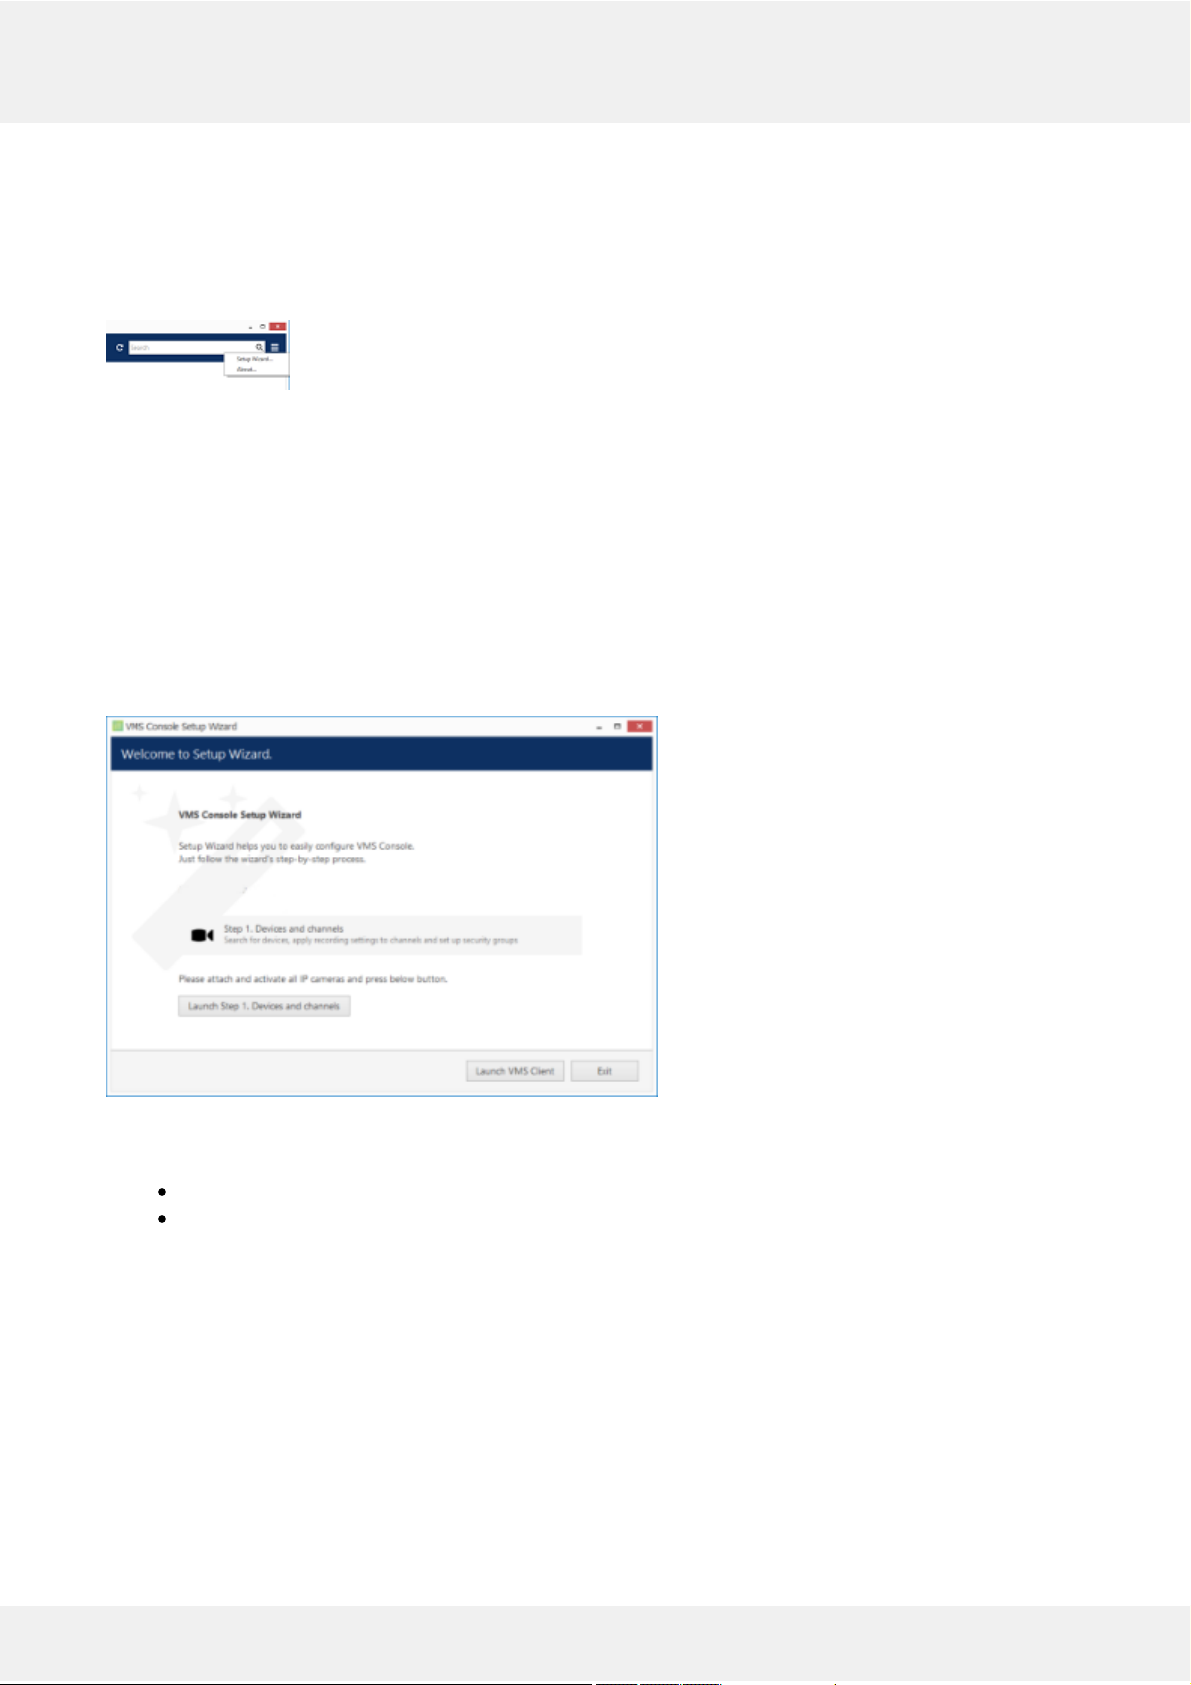
11 Setup Wizard
The TRENDnetView EVO Console Setup Wizard is automatically started after product installation and activation is
complete. You can skip the wizard at this point and launch it later anytime from the TRENDnetView EVO Console
upper-right-hand corner menu:
Run Setup Wizard from TRENDnetView EVO Console
Setup Wizard will show you the process summary and guide you through the steps to configure the installation. To
proceed with each next step, simply click the button below the step list; to exit the wizard prematurely, press either
Exit or Launch TRENDnetView EVO Monitor button in the bottom-left-hand corner.
Setup wizard for TRENDnetView EVO consists of just one step that covers devices and channels. Make sure you
connect all devices (IP cameras and/or other video sources) before launching the wizard: it will automatically scan
the network for available video sources.
Step 1: Devices and Channels
This step will allow you to automatically search and add cameras and other video source devices into your server
configuration. Press the Launch Step 1 button to begin.
Setup Wizard
First, select scan mode; the following options are available:
scan IP address range: specify a continuous LAN segment to be scanned
scan network adapter address range: select one or more network interfaces to be fully scanned
Use the Reset button below to discard all changes and start entering scan parameters again. When you are ready,
press OK button below to begin scanning.
After scanning has been completed, you will be taken to the Device Autodiscovery dialog box, which will allow you to
review the found devices and their channels, and enter/modify related settings. Use the Search field in the upperright-hand corner to find a specific device by model, IP, port or hardware ID (for IP devices, ID includes MAC
address).
Make sure you select all the devices you wish to add by putting a checkmark next to them. Devices with missing
configuration (model and/or IP) are unchecked by default and will not be added to active server configuration.
Switch to Channels tab to review the detected video channels of the discovered devices: this is particularly important
if you are using multichannel devices, e.g., capture boards and encoders. Use the Search field in the upper-righthand corner to find specific channels by name or device name.
Here you can edit the channel name and assign recording configuration. By default, recording is enabled for all
TRENDnetView EVO 20
Page 22
channels: click the Change button near Recording settings to manage recording profiles and assign them to your
channels. To add a new recording profile, click the + New recording configuration button below; you can find more
details about recording profiles in the corresponding section. Click OK to save and return back to devices and
channels; click Apply to save configuration changes.
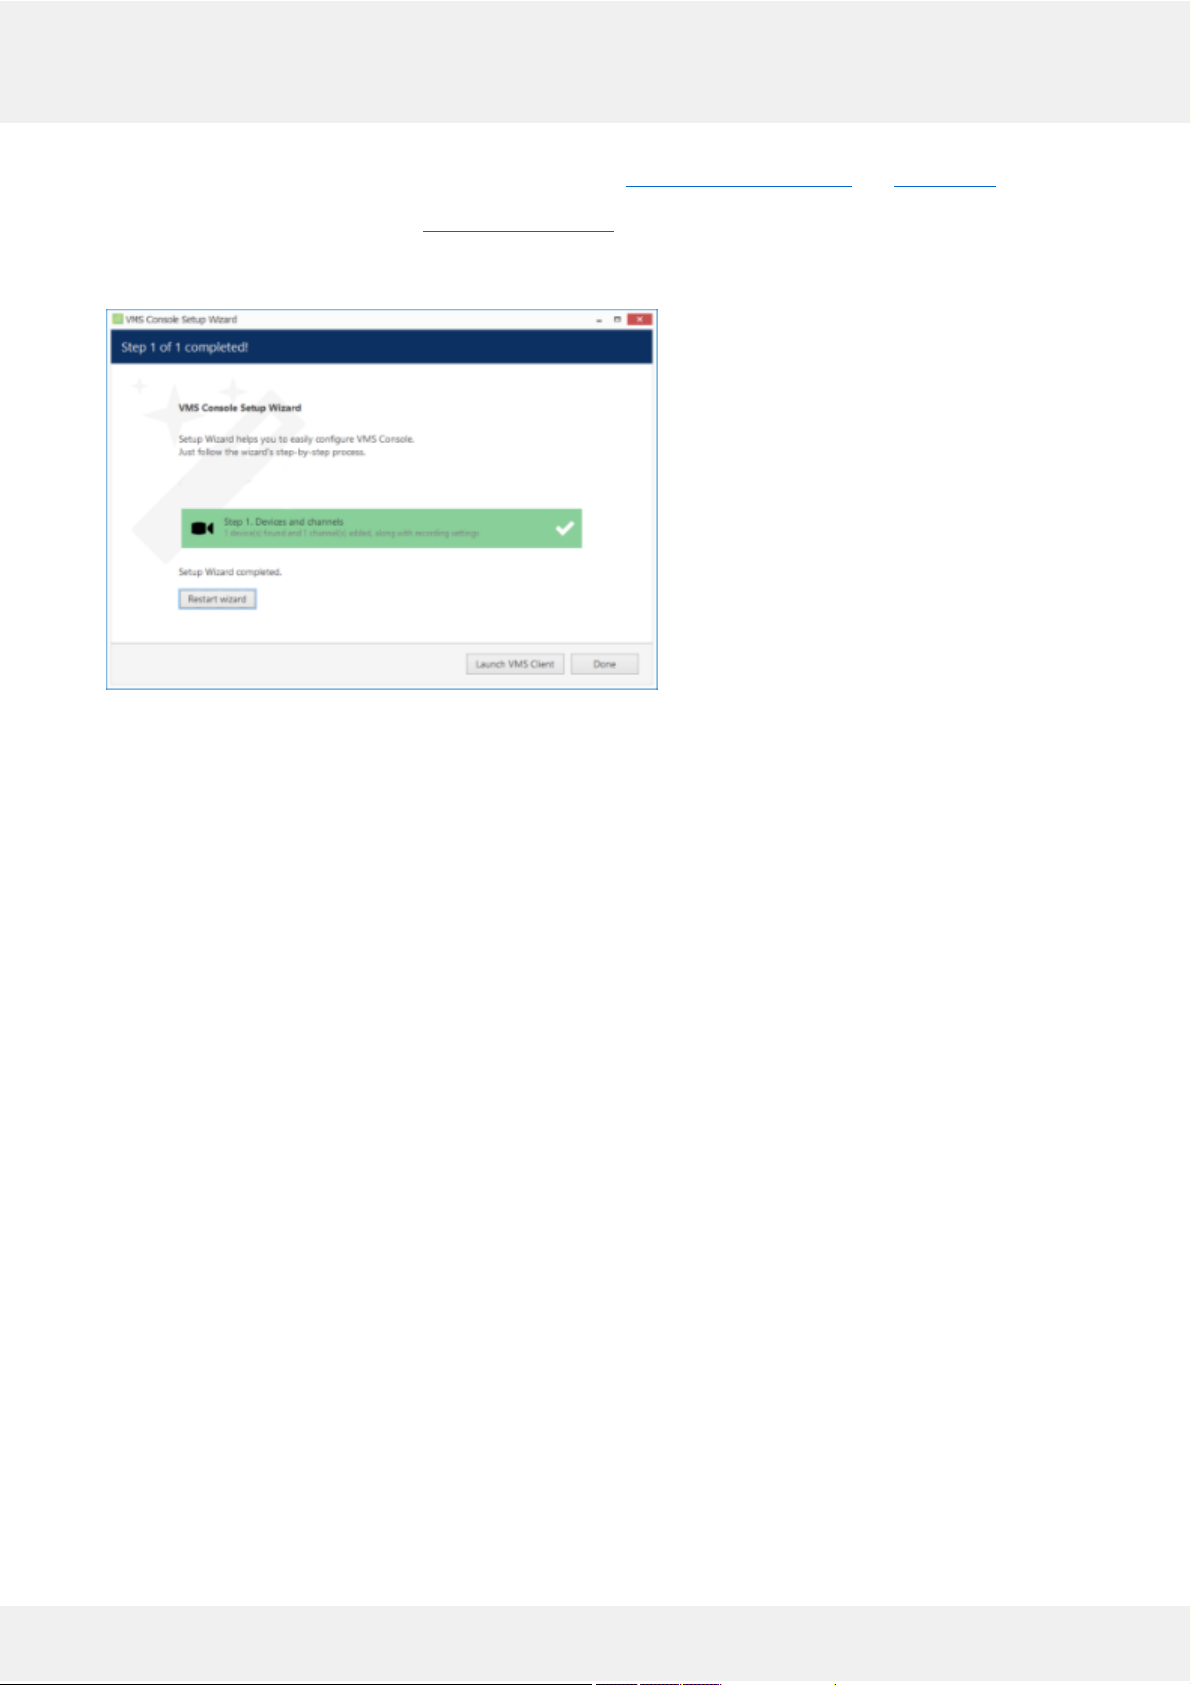
When you have finished with configuration, click Add selected devices and channels to go back to the wizard.
Wizard completed successfully
You can now either restart the wizard to cover the rest of your devices, or close it. Press the Launch TRENDnetView
EVO Monitor button to switch to the monitoring mode at once. You will be able to run this Setup Wizard again at
any time via your TRENDnetView EVO Console application menu in the upper right corner.
TRENDnetView EVO 21
Page 23
12 Interface Overview: Management Application
TRENDnetView EVO Console is a straightforward graphics user interface tool with access to all possible server
settings. To ensure comfortable and easy navigation, it is important that you become acquainted with its structure
before starting to use it.
Note that TRENDnetView EVO Console appearance depends on your software package and license limitations.
Sections unavailable due to license restrictions will be greyed out but still listed to get you acquainted with all available
features, and smaller functions will be simply hidden.
TRENDnetView EVO Console management application interface
Navigation Panel
TRENDnetView EVO Console Navigation Panel
The blue panel on top serves as navigation bar and its usage is similar to that of Windows Explorer. Here are its main
components (from left to right):
Left and Right arrows enable navigation through your browsing history and allow you to switch between
previous and next locations; you can also use Backspace on your keyboard to go back
Your current directory is displayed right next to these arrows
If you are in the Organizations view, an Exit button will appear
Currently logged in User account button with options to view user profile or to log out
Refresh button - reloads current item list
Search field - only items matching the search criteria will be displayed in the list
Application Menu
Application Menu, position: top right
Application menu button in the upper-right-hand corner gives you the following options:
launch the Setup Wizard
import the configuration from an XML file
import the configuration from another TRENDnetView EVO server database
change TRENDnetView EVO Console settings
set up automatic configuration backup
remotely upgrade system components
TRENDnetView EVO 22
Page 24
open the About section
Sections
Sections panel, position: bottom left
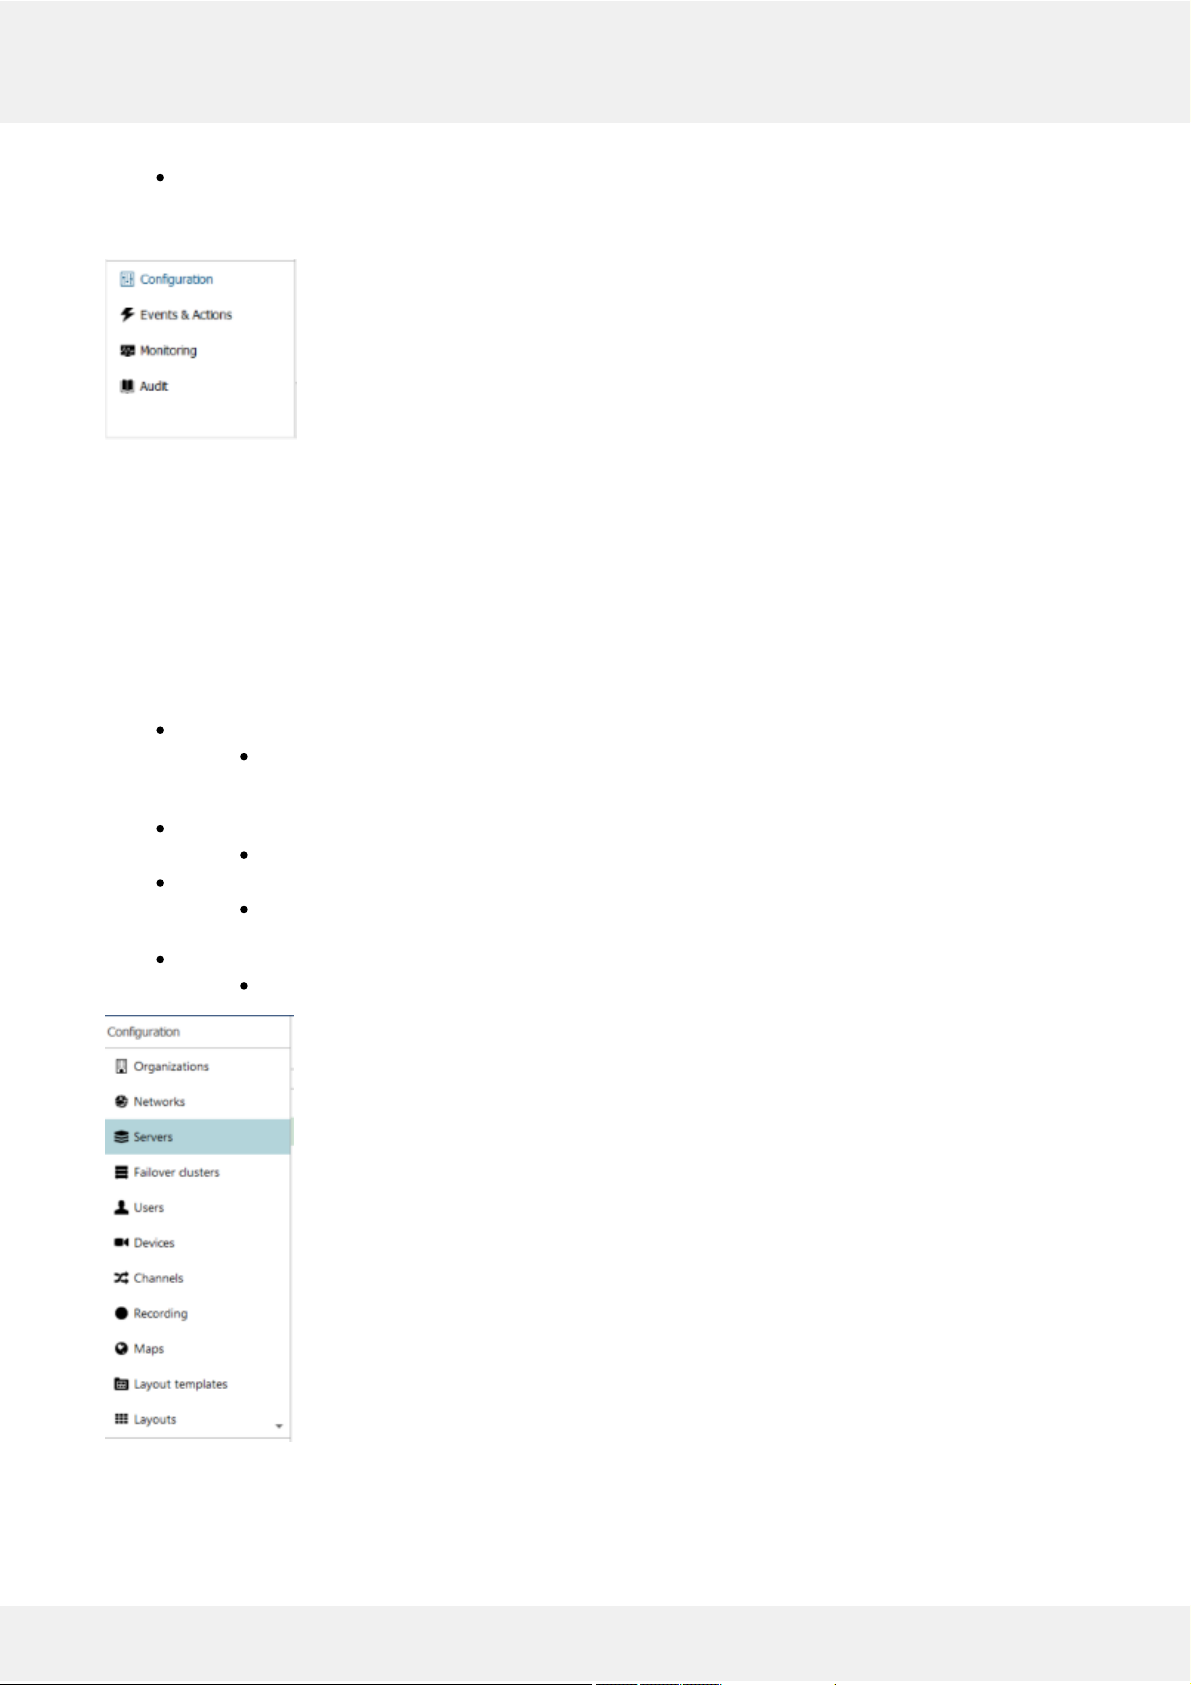
The bottom left panel allows you to switch between the four main TRENDnetView EVO Console sections:
Configuration, Events & Actions, Monitoring and Audit. The contents of the components panel on the left will change
depending on the selected section. If the TRENDnetView EVO Console windows is resized, the sections will be reduced
to icons.
Components
The panel on the left will display the list of all available configuration components based on the selected section. As a
result of license limitations, some of the items may be greyed out or unavailable. The list below shows maximum
available items by category:
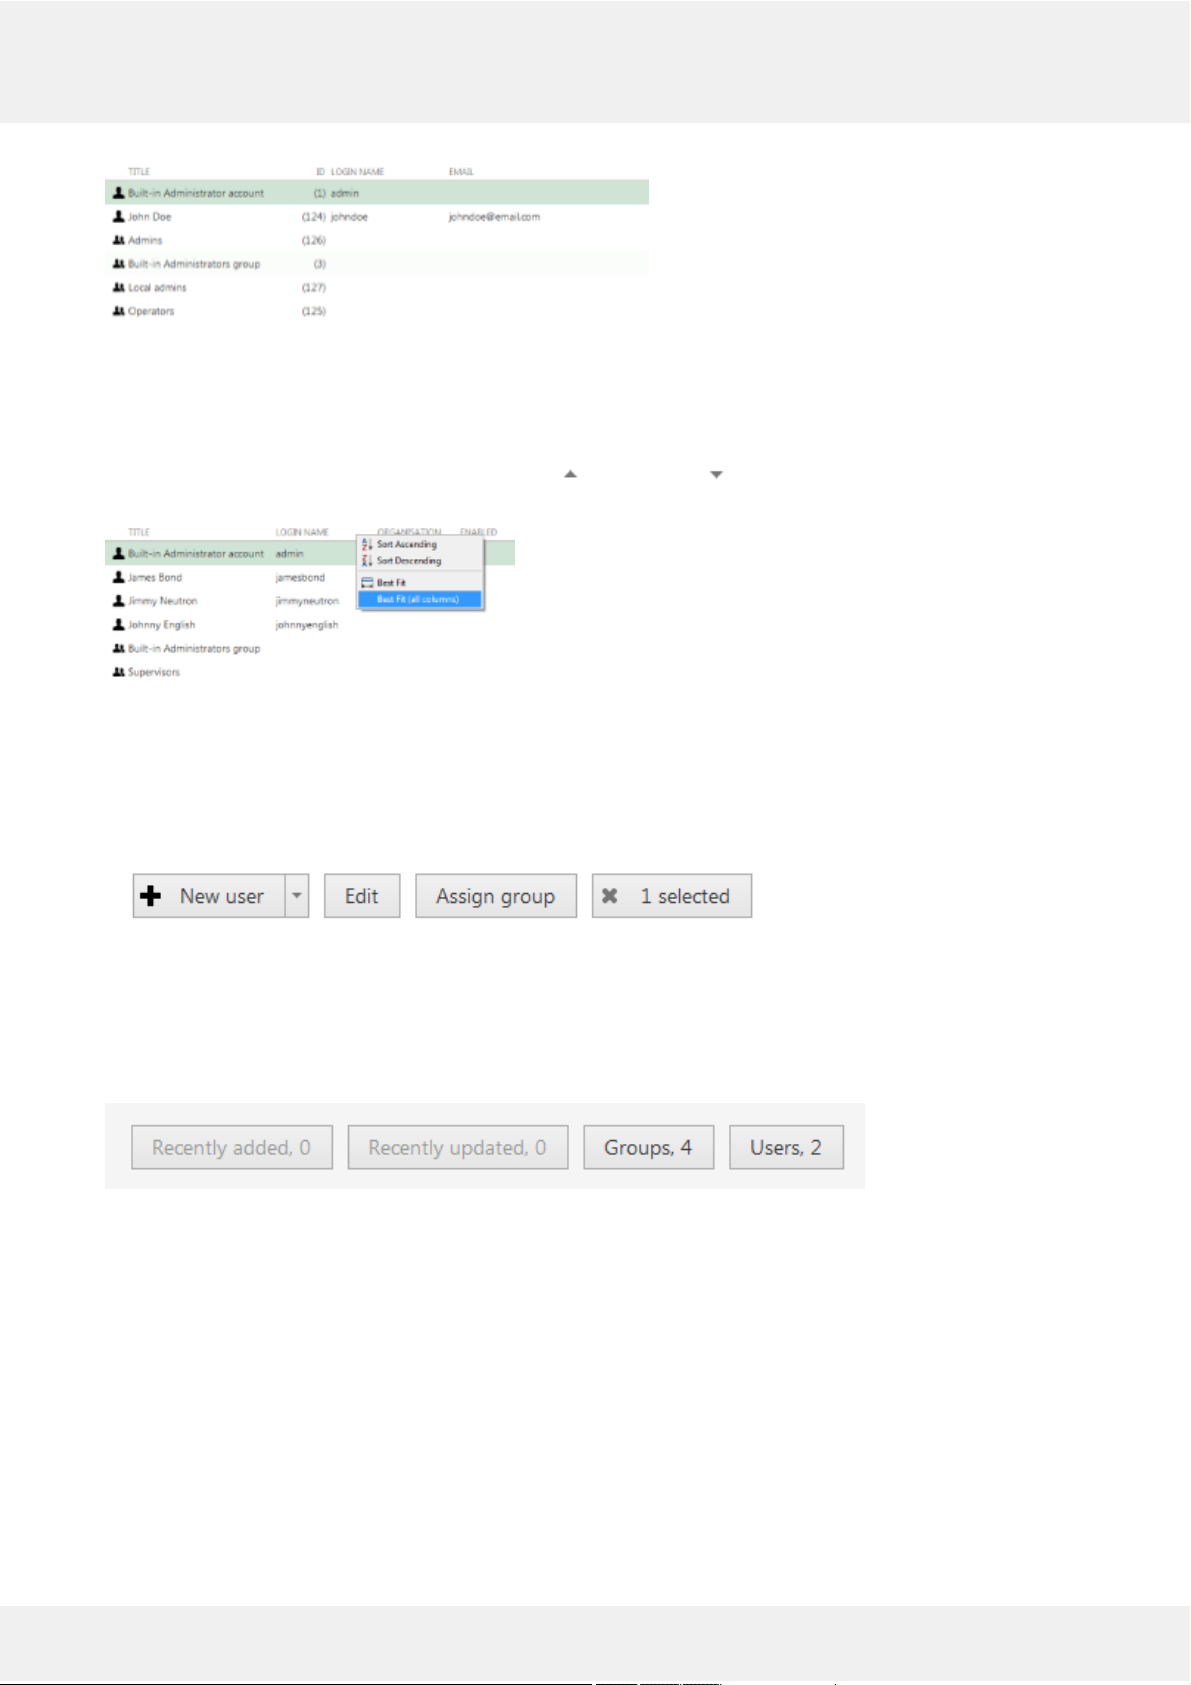
Configuration
Organizations, Networks, Servers, External Services, Failover clusters, Users, Devices, Channels,
Recording, Maps, Layout templates, Layouts, Video Walls, User Buttons, Visual groups, Live
Podcasts, Data Sources
Events & Actions
Rules, Events, Actions, Global Events, Conditions, Schedules, Mail servers
Monitoring
Servers, Devices, Channels, Streams, Archive Statistics, Storages, User Sessions, Video Walls,
External Services
Audit
Servers, Users
Components panel, position: left
Item List
TRENDnetView EVO 23
Page 25
Item list, position: centre
The main part of the TRENDnetView EVO Console window displays items in the selected category depending on the
search and/or item filters. You can select one or more items at once using the Shift or CTRL button.
Click any column title to use is as a sorting basis for the whole item list; the little arrow near the column title indicates
that it is currently being used for arrangement - either ascending or descending. Right-click item list header for
sorting options and column fit settings.
Right-click header for additional options
If you choose to remove a column from presentation of the item list, the settings will remain in effect until the
TRENDnetView EVO Console restart.
Item Actions
Item actions panel, position: top right, under Navigation panel
The panel above the item list displays the available actions, if applicable. Usually, the buttons here will allow you to
create a new item, edit or delete existing ones, create or edit contiguous items, etc.
Item Filters
Item filters panel, position: bottom right
The bottom panel contains miscellaneous item filters, such as: recently added and updated, corresponding groups etc.
Click any of the filters to apply them; use the X button to reset and display the full item list.
Application Settings
To change TRENDnetView EVO Console settings, go to the main application menu in the upper-right-hand corner and
choose Settings.
TRENDnetView EVO 24
Page 26
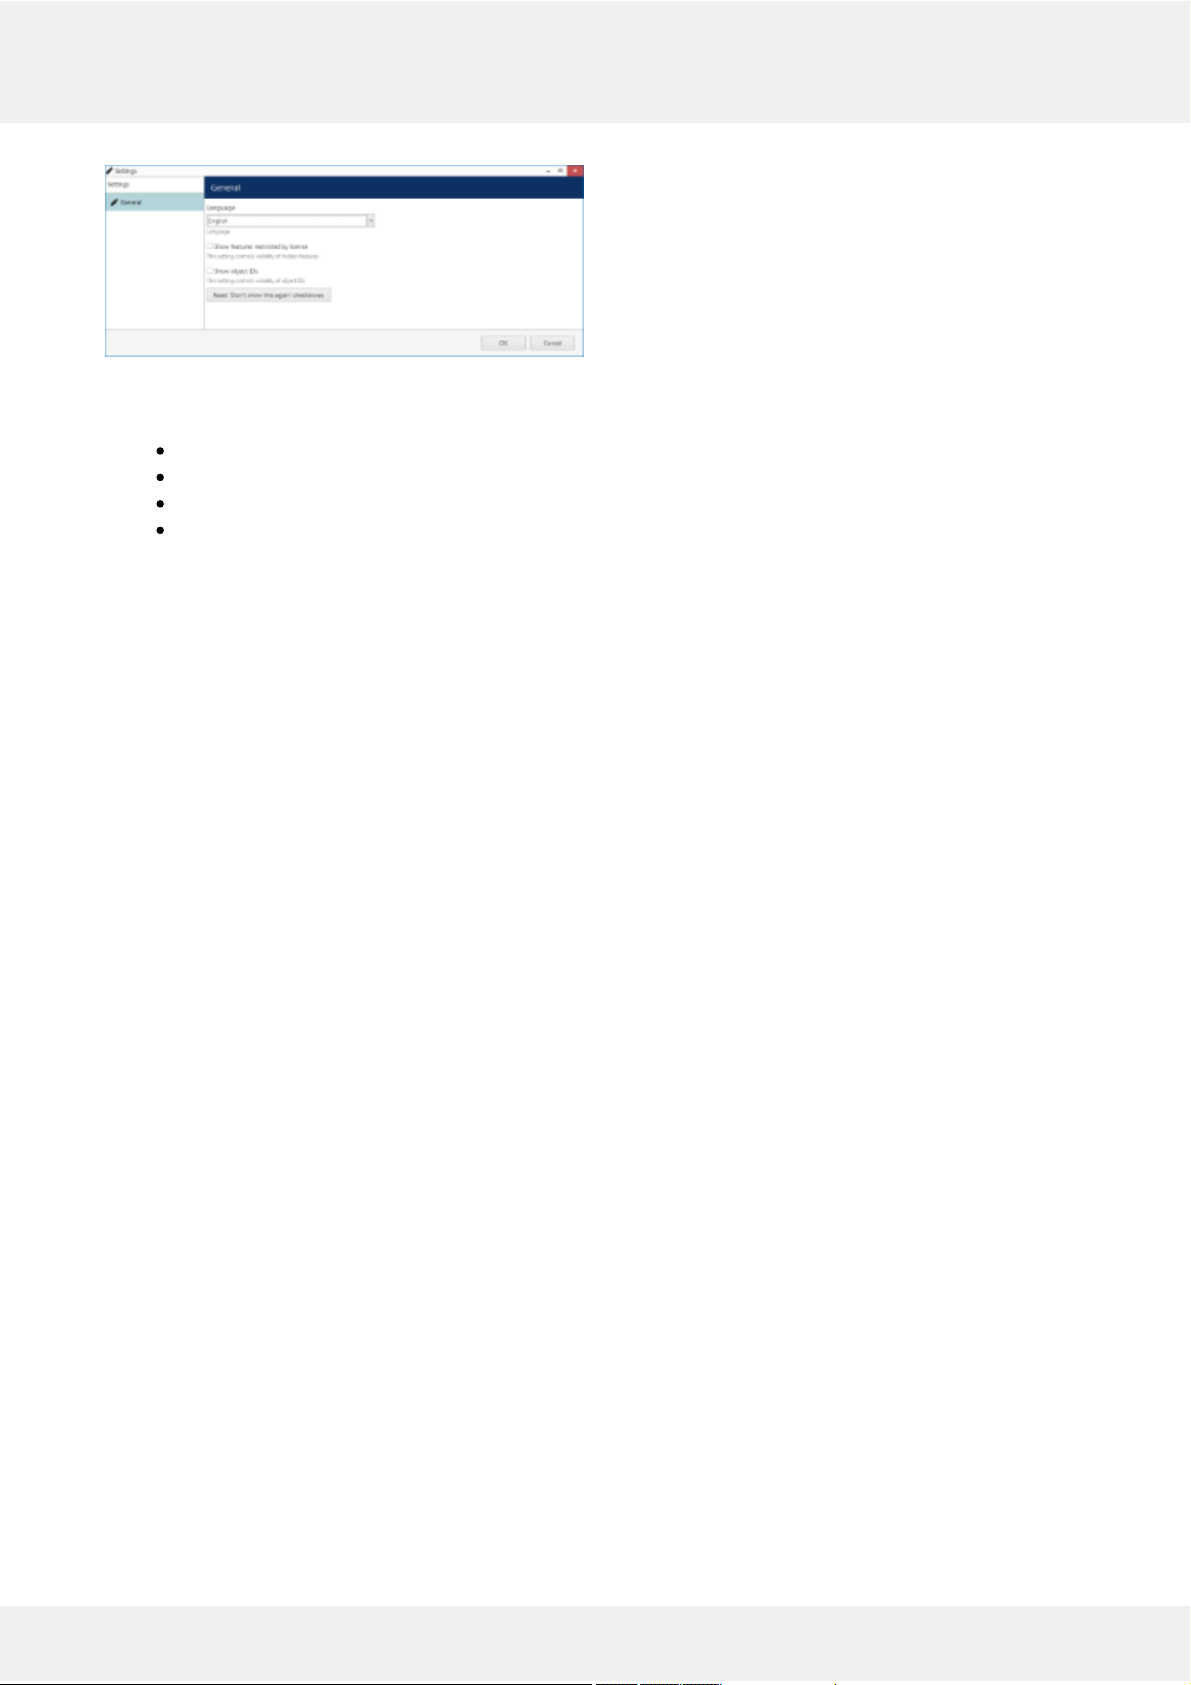
TRENDnetView EVO Console application settings
Here, it is possible to:
change application language (by default, the language chosen during installation is used)
show or hide software features restricted by license
show or hide object identifiers
reset all Don't show this again checkboxes, which have been set so far
TRENDnetView EVO 25
Page 27
13 Conventions and Keyboard Shortcuts
Mouse Gestures
Double-click an item containing more entities (e.g., any group): opens item contents in the same window
Double-click a non-expandable item (e.g., server, user): opens entity configuration dialog box
CTRL+click: select multiple items in a list
Shift+click: select every item between previously selected item and item clicked
Right-click on a text field: standard text edit menu
Right-click on a text field when creating an action: standard text edit plus text macros
Keyboard Shortcuts
Backspace: navigate to previous page in TRENDnetView EVO Console
CTRL+A: select all items
Visual Elements
General
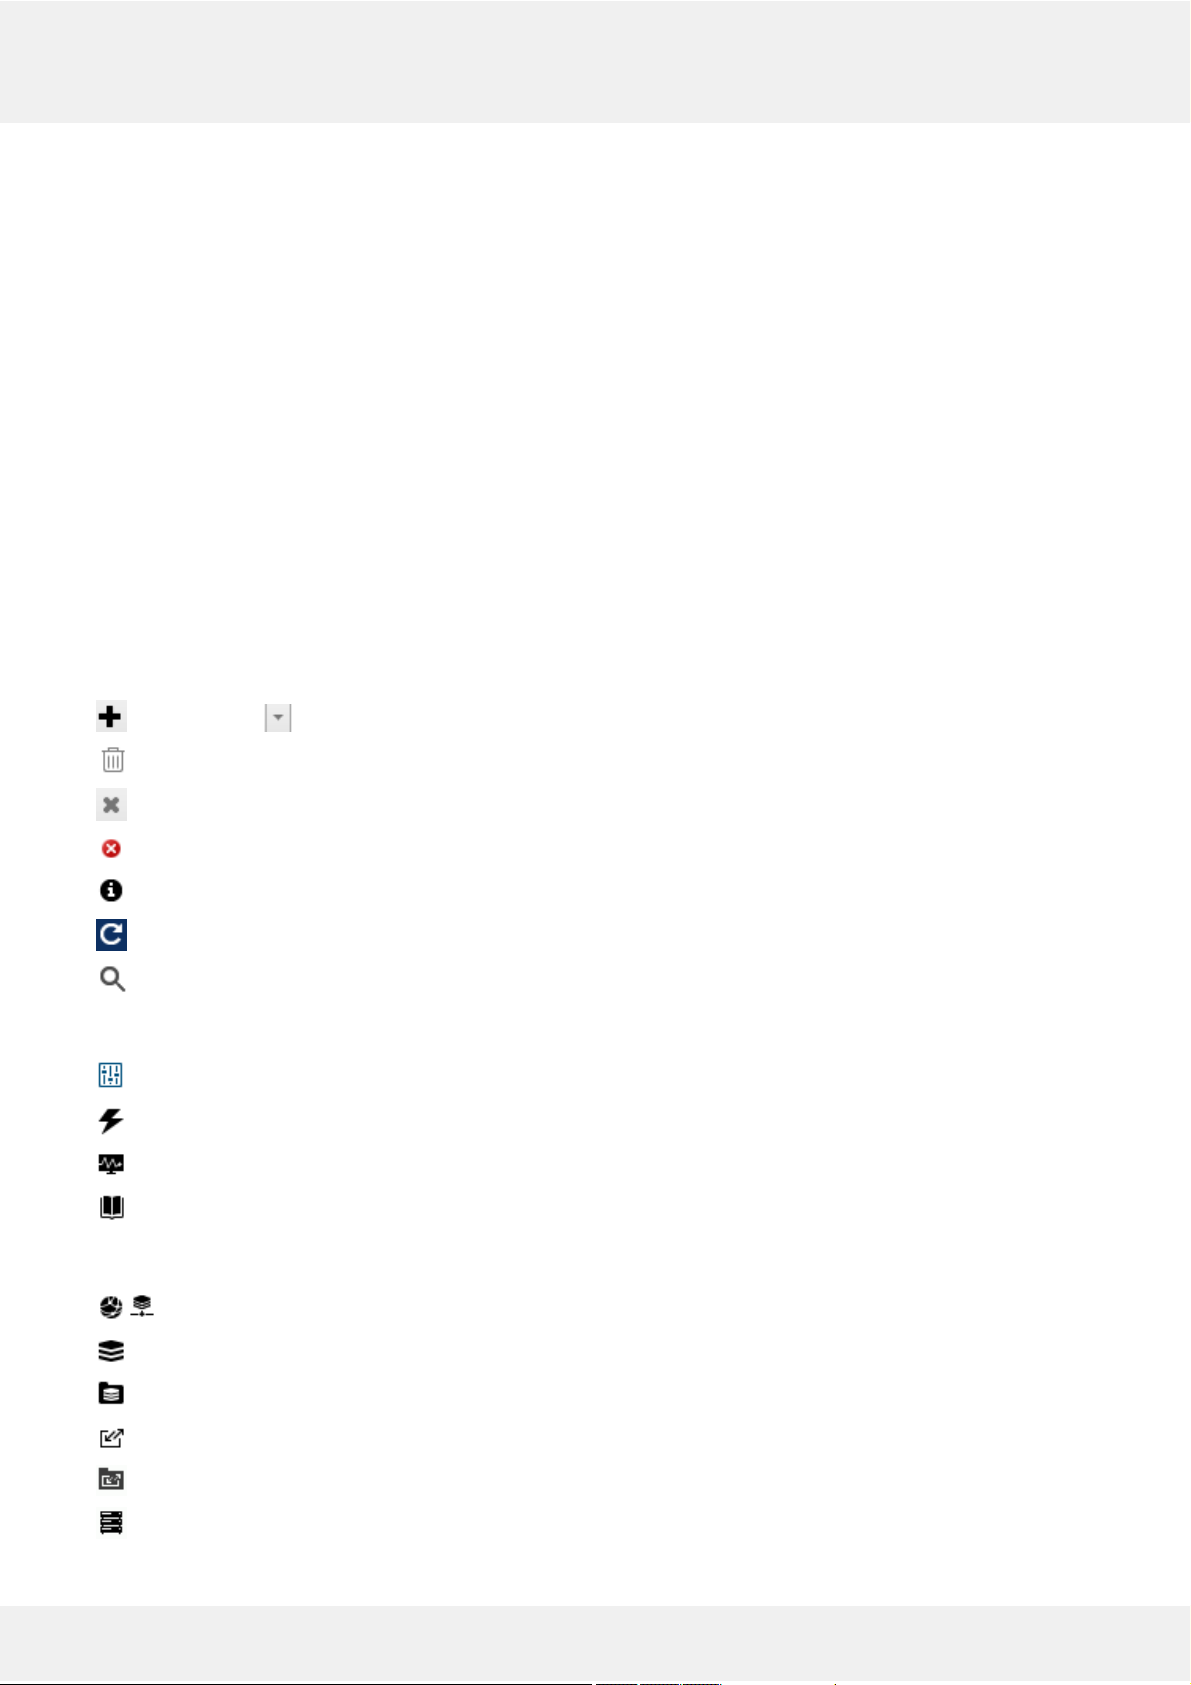
New item (click drop-down arrow to see available options)
Remove item(s)
Deselect item(s)
Unacceptable filed value, hover mouse cursor for more information
More information about the item, click to view the details
Refresh item list
Search
TRENDnetView EVO Console sections
Configuration
Events & Actions
Health monitoring
Audit log
Management
Network (server connection), connection settings
Server
Server group
External service
External service group
Failover cluster
TRENDnetView EVO 26
Page 28
Software Watchdog
Storage
Resources (all or any type)
User account/session
User group
General details
Members of the current item
Current item membership in other groups
User and user group permissions for target item
Device
Device group
Channel
Channel group
Recording profile (core recording settings)
Recording schedule (recording itinerary based on core recording settings)
Recording configuration (recording interface assignable to channels)
Motion detector
Layout Template
Layout
Layout group
Map
Video wall
User button
Visual group
Shared channel
Audit Journal (software log)
Set (period etc.)
Events & Actions
Rules
Events
Actions
Global events
TRENDnetView EVO 27
Page 29

Conditions
Event & Action schedules
Mail servers
Action delay timers
TRENDnetView EVO 28
Page 30
14 Configuration Backup
Server configuration is a time-consuming process and it is wise to save a copy of your TRENDnetView EVO database
after certain changes so that you have something to start the server with in case the main database becomes corrupt
because of a hard disk failure or some other reason. TRENDnetView EVO provides several options for database
backup and we strongly recommend that you create configuration restore points to save the trouble of re-configuring
the server from scratch.
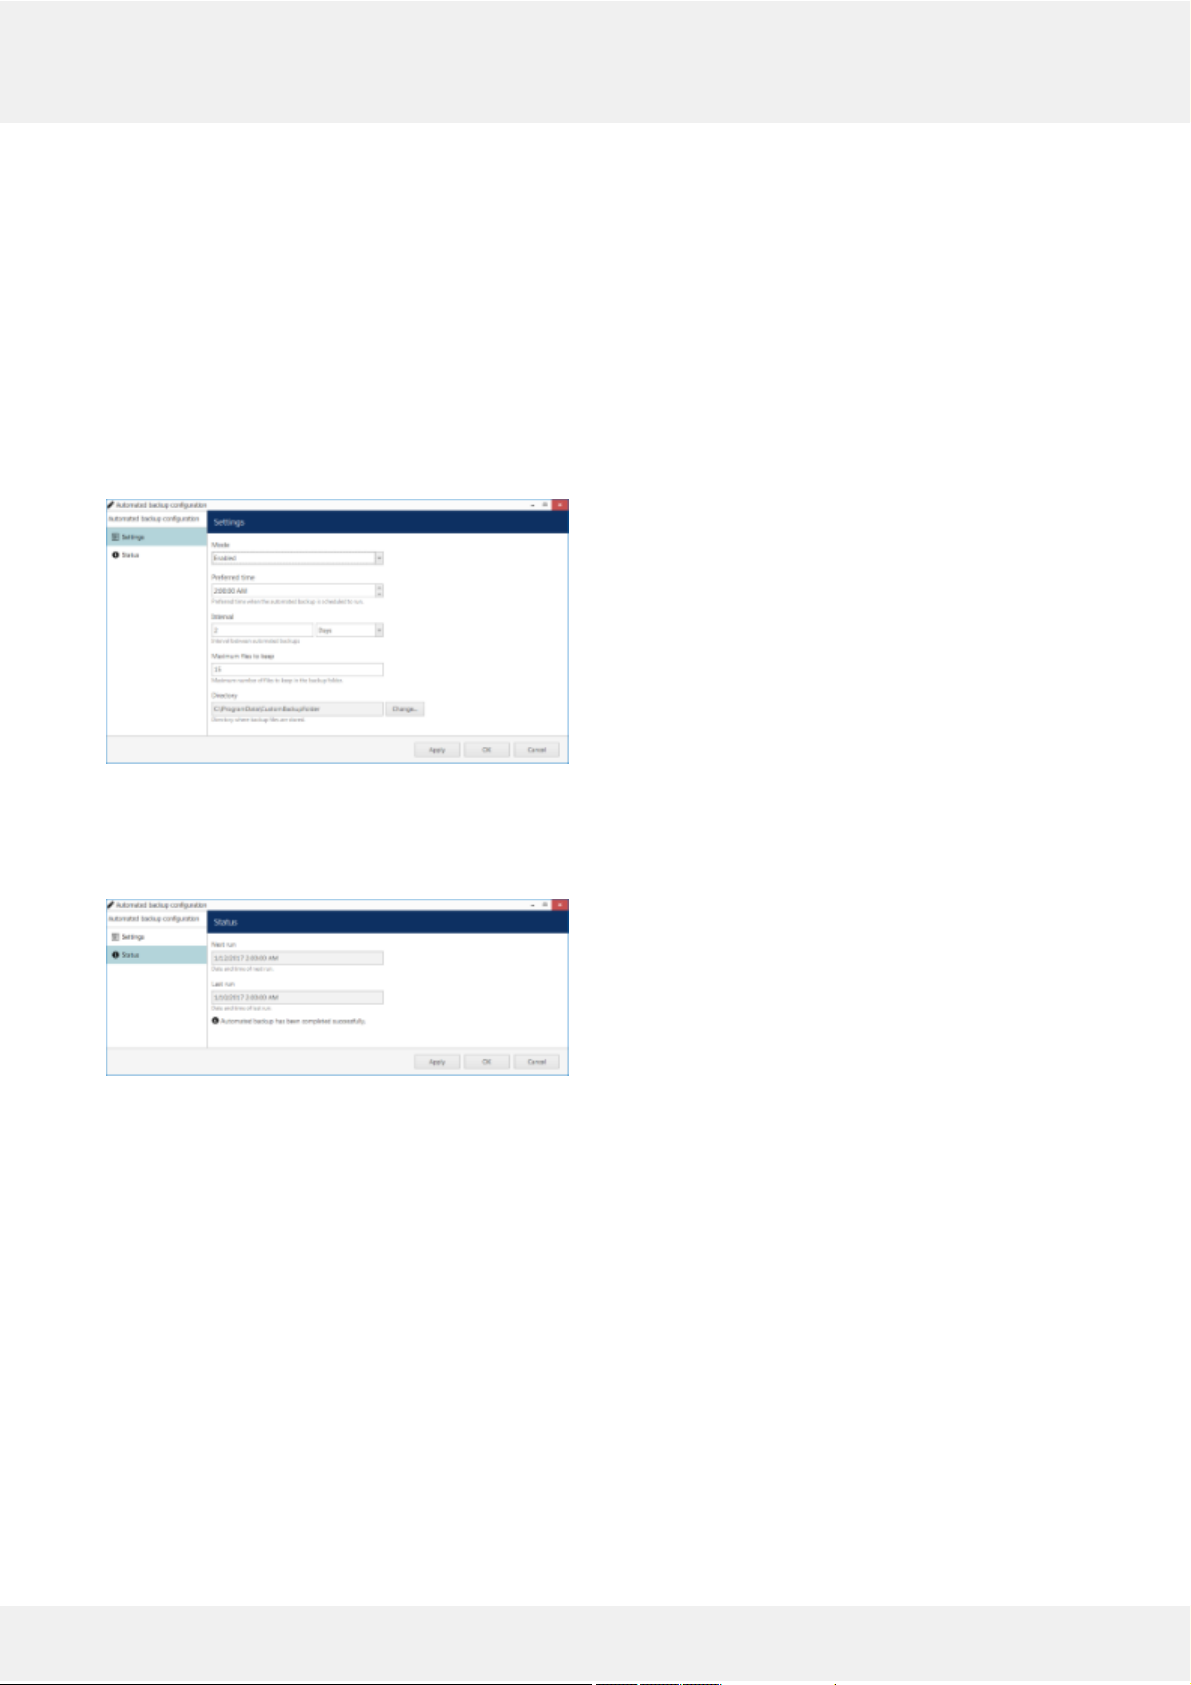
Automatic Backup
Automated configuration backup allows you to save your TRENDnetView EVO database based on a schedule. To
access the settings via TRENDnetView EVO Console, click the application menu button in the upper-right-hand
corner and choose Automated backup configuration.
Set automatic database backup preferences
Automated backup is enabled by default with the following settings: a restore point is created every two days at
2AM, with a maximum of 15 files to be kept. You can either leave the default settings, including the default location,
or define your own backup time and frequency in the Settings tab.
Backup status
In the Status tab, you can see the date of the last backup attempt and the next scheduled backup time.
Backup and Restore Wizard
Additionally to the automated backup, it is possible to create a configuration restore point manually at any time. The
TRENDnetView EVO Server Backup and Restore Wizard provides an opportunity to start the TRENDnetView EVO
with an earlier database version.
Run the TRENDnetView EVO Server Backup and Restore Wizard from your Windows Start menu: Start -> All
Apps -> TRENDnetView EVO -> TRENDnetView EVO Server Backup and Restore Wizard. In Windows 7 and
older versions, use Start -> All Programs -> software installation folder -> Tools -> TRENDnet, Inc. Server Backup
and Restore Wizard; alternatively, use Cortana/Search to locate the wizard in the programs menu.
TRENDnetView EVO 29
Page 31

Choose whether you want to back up or restore the database
Backup
Choose the first option to back up the database contents to serve as a restore point and click Next.
Choose items to back up
Here, you can choose the information to be saved and also add a custom description for your future reference. You
can either use the default destination folder or choose a custom one, even located on a different disk or a network
drive.
Restore point successfully created
The wizard will create the backup and display a success message. Click Finish to exit.
Restore
Choose this option if you wish to start the TRENDnetView EVO server with a database from an earlier time instead
of the current configuration.
TRENDnetView EVO 30
Page 32

Choose a restore point
Here, you have two options: select a backup file from the list or manually locate the necessary *.lxb file. In either
case, make sure you have chosen the right backup to be used and then click Next.
Choose items to restore
Make sure you have chosen a suitable database to be restored by reviewing the items and using your earlier
comments as a reference. Click Next when ready.
Restore in progress
The wizard will ask you to stop the TRENDnetView EVO services and start restoring the database after your
confirmation.
Caution! This is an irreversible operation. Do not abort the process or shut down the server machine during
the process.
If nothing interferes with the restore process and the backup file is intact, you will receive a success message after
the wizard finishes restoring your TRENDnetView EVO server configuration. Server service will be automatically
started with the restored database.
TRENDnetView EVO 31
Page 33

15 Migration From Previous Product Versions
It is possible to migrate the basic configuration from the older TRENDnet software version, first generation
TRENDnetVIEW Pro. All you have to do is export an XML file from first generation TRENDnetVIEW Pro and then
import it via TRENDnetView EVO Console.
In your first generation TRENDnetVIEW Pro Client, right-click your desired server and choose Tasks ->
Configuration Export.
Run Configuration Export from the server right-click menu
Export wizard will display a summary of all the exported resources and give you an option to save the configuration
in XML format. In order to do this, click the Export to... button and choose a location and enter the filename, then
click Save.
Export tool
Next, switch to your TRENDnetView EVO installation where you want to load the configuration: open
TRENDnetView EVO Console and log into the target server. In TRENDnetView EVO Console, click the application
menu button located in the upper-right-hand corner of the TRENDnetView EVO Console window and choose
Configuration import. Locate your pre-saved XML file in the Open file dialog box and click Open: Configuration
import dialog box will open, giving you the option to review the resources to be imported.
Choose devices to be imported
Review the list of devices to be imported from your pre-saved configuration; note that you can only view the settings
but there is no option to change them. You will be able to alter device settings later, after you import the
configuration. At this stage, you can choose whether or not the device will be imported: to do this, simply put a
checkmark next to each device name. By default, all devices are selected for import.
TRENDnetView EVO 32
Page 34

Choose channels to be imported
Next, switch to the Channels tab and review the channel list.
Choose users to be imported
When you have finished with devices and channels, review users and user groups to be imported.
Choose user groups to be imported
If some resource is already present in TRENDnetView EVO configuration, the wizard will mark the imported
copy to be merged to the existing one; you can change this by selecting the desired resource and choosing the
import type below: Import via -> Add/Merge. Merging means that user permissions are extended and in case
of any differences TRENDnetView EVO settings have priority. Otherwise, the import wizard will simply add
the target resource to your configuration and action type choice will be grayed out.
When you are done, click OK to import the configuration. TRENDnetView EVO will show you a short summary and
ask you to confirm the action.
TRENDnetView EVO 33
Page 35

Confirm import
After the import, you will be able to edit the newly added resources as usual via corresponding menu sections.
TRENDnetView EVO 34
Page 36

16 Server Settings
In order to access TRENDnetView EVO server settings via TRENDnetView EVO Console, select Configuration
section and then choose Servers components from the menu on the left.
Configuration -> Servers
Double-click server or click the Edit button on the upper panel to access server configuration dialog box.
Server details
On the Details tab, you can change the server name: it will appear everywhere in TRENDnetView EVO Console and
in the connected TRENDnetView EVO Monitor applications, including Web clients.
Connection properties
The Connections tab allows you to define ports for TRENDnetView EVO Monitor and TRENDnetView EVO
Streaming Server connection; the default ports are 60554 for TRENDnetView EVO Monitor and 8080 for
TRENDnetView EVO Streaming Server (HTTP). Note that, in case you plan to access your TRENDnetView EVO
server from the Internet, the ports must be properly forwarded on your router according to your desired topology
and allowed through the firewall. Details on the port forwarding setup can be found in your router operation guide.
Also, if you are going to use SNMP traps in your Event & Action scenarios, here you can define server's SNMP
community name and SNMP port for incoming and outgoing messages. Community will be used by the SNMP
manager to send requests; SNMP port will serve for both incoming and outgoing messages. Leave both values zeroed
to disable this functionality.
The next sections describe the remaining aspects of server settings in details.
TRENDnetView EVO 35
Page 37

17 Storage
Server storage configuration includes storage directories, size and duration quotas, cleanup time settings and
storage differentiation by name for further flexible allocation of the recorded streams.
To access the storage settings for the server via TRENDnetView EVO Console, choose the Configuration section,
then select Servers from the menu on the left, double-click your server and then click the Storage tab.
Access storage settings for selected server
Click Open storage properties to open the configuration dialog box.
Directories
All available local disks (also mapped network shares that appear as drives in Windows Explorer) will be
automatically listed and checked for recording with default archive directories. You can also add network paths to
remote storage locations. Use UP and DOWN arrows on the right to change the disk order (priority).
For each storage location, the following information will be displayed:
storage priority: determined by the item position in the list
storage profile (see description below)
current quota size
free space on disk
total disk size
Configure storage directories
Each directly attached storage location will be automatically assigned a quota of 90%; each network storage will
have a zero quota by default so you need to enter the quota size manually. We strongly advise that you review all the
settings and make sure that all the storage locations have sufficient free space, and, if necessary, set a lower quota or
free up some space. It is recommended that every recording location has 10-15% of free space: this helps avoid
fragmentation effect and also allows highly loaded software to effectively enforce recording quotas.
Minimum quota per each storage location for any storage type is 20GB.
TRENDnetView EVO 36
Page 38

We advise against recording to the system drive because it is often used by other processes like
defragmentation and system backup, not to mention OS itself, and thus doing so may affect recording
efficiency and stability. As a result, disk C: is not selected for recording by default.
To change the disk quota, simply highlight the desired location for storage from the item list, then enter the quota
size in GB and click Apply changes.
Storages
You can either use the Default storage category for all locations, or create multiple different storage profiles (types,
names). These can be used for manually distributed streaming between storage directories:
storage directories are marked with corresponding storage tags
each channel is assigned to a recording location
To choose a storage profile different from the Default, select the storage location from the Directories list and click
the Change button.
Change storage
Select one of the built-in storage profiles or create and edit a new one.
Choose storage profile
The built-in storage types are:
Disabled: storage location will not be used
Default: default storage tag
Fallback: storage destination to be used if all the storage units with specified tags have failed
Readonly: existing data will be available for reading and will not be erased; no new recordings will be
appended to this location
These profiles cannot be edited or removed. Fallback storage settings are available in the corresponding tab of the
Storage properties.
Readonly storage type can be used, for example, in the following cases:
it is necessary to view the old data from a different TRENDnetView EVO server when you need to
insert the disks originating from another computer and you do not wish that these data are erased
some storage unit contains important footage that has been requested to be kept for a longer time so
that the recordings are not erased over time while still allowing access to the footage
Click + New storage button to create a new storage profile, or select an existing one and click the Edit button in the
upper-right-hand corner to change its name.
New storage profile
TRENDnetView EVO 37
Page 39

Enter the storage profile title and click OK to save and exit.
The storage tag you have selected or just created will appear as selected. Click the Apply button below to confirm
storage configuration settings before proceeding.
Remote storage locations
In order to add a network storage (NAS, SAN, network share) that is not mapped as a drive in Windows, click +
New button on the upper panel and enter the setup details.
Add new storage directory
The table below details the available settings for network storage.
Setting Description Default Value
Path Full network path to the storage directory \\Server\Share\TRENDnet\Archive
Files
Username User name to connect to the storage [empty]
Password Define storage access password, if applicable [empty]
Quota Maximum amount of storage in gigabytes to be used for
recording; 85-90% is recommended
20GB
Storage Storage profile to be assigned to the target storage directory Disabled
Duration Quota
Set the global recording duration limit for your server here: enable quota management and then enter desired
number of days. All recordings older than the number of days specified will be erased.
Global duration quota
Note that the global duration quota has priority over the individual (per-channel) duration quota that is set in the
recording configurations.
Retention
You can set the software erasing mechanism so that it cleans up old recordings only during specific periods of time,
e.g., when the recorder is less overloaded or when the quality of recordings are less important.
TRENDnetView EVO 38
Page 40

Set cleanup hours
To do this, enable the cleanup hours setting and specify the time period during which erasing is allowed.
This control has priority over the storage quota. Setting insufficient cleanup time may lead to storage overflow
and result in recordings being lost. We strongly recommend that you do not enable any cleanup hours'
restrictions unless you absolutely know what you are doing.
Fallback
You can dedicate a specific recording location to serve as a failover storage, called fallback storage. Such storage
location will be used for recording only if all specified target storages of the certain type have failed.
TRENDnetView EVO server automatically detects when a channel or channels cannot be written onto their normal
destination storage and switches to the fallback storage after the specified timeout has been reached. Minimum and
also default timeout is thirty seconds, and maximum is five minutes. A default system event is raised when fallback
is activated.
Fallback storage settings
After setting the desired timeout, switch to the Directories tab and specify, which storage will serve as fallback.
Set fallback storage units
Usage example:
Consider a system where all main streams are recorded to the storage with the tag Main and all secondary streams
are, in their turn, recorded to the Substreams storage. If either or both of these storages fail, recording will
automatically proceed to the Fallback storage.
The fallback storage must be able to handle the load and have enough free space to keep the recordings until
the main storage gets back online.
Server checks if the main storage is available if one of the conditions has been fulfilled:
server has finished and closed a data file (4GB)
TRENDnetView EVO 39
Page 41

the data file has not reached 4GB in size but six hours have passed
server was restarted
In other words, the recording function checks if the main storage is available every 6h OR every 4GB of recorded
data OR after a restart (upon startup). If the main storage is OK, TRENDnetView EVO server continues to record
onto it; the recordings made onto the fallback storage stay there and are not transferred anywhere.
TRENDnetView EVO 40
Page 42

18 Watchdog
General
Server Watchdog is an integral part of the server core. It protects the software from certain types of failures by
automatically attempting to restart the server.
Watchdog operates based on the software and system overall health monitoring; default trigger values have been
selected on the grounds of our analysis of extensive tests run on systems of different configuration and stability level.
Although it is possible to disable the Server Watchdog service, we strongly advise against doing so, as the principal
role of Watchdog is to keep the software operation as stable as possible in the given circumstances.
Watchdog operation can be tracked by messages in the Windows Application log. If you do experience frequent
disturbances such as software restarts or server rebooting, this will be an indication of some serious issue related to
the software, operating system and/or underlying hardware. In such a situation, the best course of action is to:
carefully read the messages in the Windows Application Log, as these may already contain some indication
of why Watchdog was triggered;
refer to the relevant topic in the Troubleshooting section of this manual to read about typical causes of
such cases;
send a Problem Report from the faulty server, providing as much information as possible about the issue;
consult the TRENDnet, Inc. technical support team directly at http://www.trendnet.com/support
Configuration
Watchdog operation can be configured for each server independently. To access Watchdog settings, in
TRENDnetView EVO Console select Configuration in the bottom left menu and select Servers from the list on the
left, then double-click the desired server or simply click Edit button on the top panel for the pre-selected server.
Locate server for Watchdog configuration
In the Server dialog box, select Watchdog from the left menu.
TRENDnetView EVO 41
Page 43

Watchdog configuration
The table below contains a detailed explanation of Watchdog settings. Please note that for most cases default and
near-default settings are recommended; it is advisable that you consult with TRENDnet support if for some reason
you plan to make extensive changes to these settings. Click the information icon next to each setting to read more
about them.
Setting Description Default
Value
Enable Watchdog Enables Watchdog operation for the target server Enabled
Grace Interval, seconds Time interval in seconds, counting from server
start, during which Watchdog will not attempt to
restart the software
30
Reboot Interval, minutes Watchdog will reboot Windows if there have been
a certain number (N) of software restarts (N is
specified below) in the given time interval;
the default for rebooting is 3 restarts in 5
minutes; setting the specified number to 0 will
disable rebooting
5
Number of Failures to Reboot Watchdog will reboot Windows in case there have
been N software restarts in the time interval
specified above; the default for rebooting is 3
restarts in 5 minutes; setting the specified
number to 0 will disable rebooting
3
System Committed Memory Usage Ratio, % Watchdog will restart the software if the ratio of
total system committed memory exceeds the
specified percentage; this value is shown under
Memory section of Performance tab in the
Windows Task Manager
Enabled,
70%
System Pool Nonpaged Memory Usage, MB Watchdog will restart software if the amount of
system nonpaged pool memory exceeds the
specified amount
Disabled
Private Memory Usage Ratio, % Watchdog will restart software if the amount of
private memory used by server process exceeds
the specified value
Enabled,
45%
Virtual Memory Usage Ratio Watchdog will restart software if the amount of
virtual memory used by server process exceeds
the specified ratio; ratio shows the amount of
virtual memory used by server process versus
maximum per-process virtual memory allowed by
Enabled,
90%
TRENDnetView EVO 42
Page 44

OS
Enable Periodic Restart Enables automatic software restart every N days
or hours; use hours for troubleshooting purposes
Enabled,
7 days
Enable Periodic Restart Hours Limit periodic restart to specific hours, e.g. only
restart at night; we recommend to leave at least a
1h interval for the restarts
Disabled
TRENDnetView EVO 43
Page 45

19 Security Policy
Security settings related to password management, connections etc. can be defined for each server. To access server
security policy settings via TRENDnetView EVO Console, choose the Configuration section, select Servers from the
menu on the left, double-click your target server and then click the Security policy tab.
It is recommended that, in order to enhance your system security, you do not leave the default policy settings but
rather define your own, system-specific preferences.
Server security settings
The table below details the available settings.
Setting Description Default
Value
Minimum password
length
Minimal mandatory length of a user password 8
Minimum number of
special symbols
Define how many (at least) special characters (#$%&...) must be
present in a user password
2
Minimum number of
digits
Define how many (at least) digits must be present in a user password 2
Minimum number of
uppercase letters
Define how many (at least) UPPERCASE letters must be present in a
user password
2
Minimum number of
lowercase letters
Define how many (at least) lowercase letters must be present in a user
password
2
Number of previous
passwords to remember
Password history to be kept by the server to prevent the user from
using the same password again when changing it
1
Maximum number of
days between password
change
Define how frequently TRENDnetView EVO will ask users to change
their password; this setting can be overridden in the user settings to
make the password never expire for a specific user
0
(unlimited)
Maximum number of
simultaneous
connections with the
same login name
Allowed number of simultaneous incoming connections from the same
user account via any port (TCP/HTTP) or client app, this setting can be
overridden for the specific user in the user settings; 0=unlimited
0
(unlimited)
Password related policies are solely meant for TRENDnetView EVO internal users and they do not affect any other
user account settings (e.g., Windows users etc.). All policies are in effect for all user accounts, including the builtin root admin user account.
The maximum number of simultaneous connections from the same user account can be re-defined for
any specific user via user settings dialog box. User-specific setting has priority over global connection quota
and it may be either larger or smaller than the global quota.
Example 1: global policy is set to 0, which means no imposed limitations. However, user account admin has
his max number of connections set to 3, which means that three incoming connections with this user account
are allowed at a time so that the administrator can connect via TRENDnetView EVO Console, TRENDnetView
EVO Monitor and TRENDnetView EVO Mobile at once for troubleshooting purposes.
TRENDnetView EVO 44
Page 46

Example 2: global policy is set to 1, which means only one connection from each user is allowed at a time.
However, user demo has an allowance of 30 simultaneous connections so that this account can be used for
demonstration purposes.
TRENDnetView EVO 45
Page 47

20 Overview of Devices and Channels
The idea of a camera as a surveillance software entity being commonplace has resulted in the concept of devices and
channels. Devices and channels represent the separation of physical and data layers for reasons of security and ease
of management.
"Device" refers to any piece of physical equipment that serves as a data provider; a hardware piece delivering
video, audio and event streams to the server. IP cameras, video encoders, capture boards, USB web cameras - these
are all examples of devices that can be added to TRENDnet software. Devices do not include any data streams.
"Channel" refers to any actual video stream (with corresponding audio/event stream, if applicable) delivered to the
server from any of the configured devices. Software licensing mechanism counts channels and not devices.
In TRENDnetView EVO Console, devices hold camera TCP/IP and user settings, as well as actual hardware model.
By contrast, channels do not possess these properties: this allows them to be handled as virtual entities, detaching
and re-attaching them from/to devices. Channels feature video stream configuration settings - resolution, frame
rate, bit rate and others - as well as all supplementary data streams, such as audio, motion and digital input/output
events, PTZ control and camera-side analytics information.
As there are also some multichannel devices, e.g., capture boards and video encoders, each device can have one or
more channels attached to it - these can either be assigned or detected automatically; maximum number of channels
for each specific device is stipulated by the device model.
Devices only appear within TRENDnetView EVO Console, allowing the administrator to apply all necessary
configurations. TRENDnetView EVO Monitor only displays the channels and does not provide any access to the
devices' properties to the end users.
Both devices and channels can be grouped independently. For internal TRENDnetView EVO Console management,
device groups and channel groups are available; for TRENDnetView EVO Monitor channel grouping, visual groups
can be used.
TRENDnetView EVO 46
Page 48

21 Add Devices Manually
You can add devices manually instead of using autodiscovery in the following cases:
actual devices have not been connected yet
devices are not connected at the current stage but it is planned that they will be connected later
the server needs to be configured while being away from its future position
some devices in use cannot be automatically discovered
Only IP devices can be added manually. Attached devices (e.g., capture boards) require autodiscovery.
Add single device
To access the configuration dialog box from TRENDnetView EVO Console, open the Configuration section and
select Devices in the menu on the left; in the upper panel, then click the + New device button.
Add new device
Enter a user-defined name for your new device and pick a model. If your camera model is not listed, select the
closest similar model or choose a generic type.
Select device model
After you have chosen manufacturer and model, additional tabs will become available in the main
configuration dialog box: Network and Channels. These tabs are described in details later in this section.
TRENDnetView EVO 47
Page 49

Network and Channels become available after device model has been chosen
Details
Setting Description Default
value
Title User-defined device name [empty]
Model IP device manufacturer and model, or generic type [empty]
Hardware ID Unique hardware identifier containing a device hardware
identifier; this filed should be left empty, as it will be filled
automatically later, when the device has been connected and
identified
[empty]
Membership
Choose groups for the current device to become a member of. Use Add and Remove buttons below or double-click to
manipulate groups. One device may belong to several groups at once.
Define groups for the device being added
Permissions
Add users and/or user groups simply by checking at least one permission for the target server; remove by clearing
permissions - either by deselecting them or by clicking the Clear button below. You can also double-click users to
remove them from the list of privileged users. Devices with an empty permission list will not be available to anyone
except for the root (global) administrator.
Add user permissions for this device
TRENDnetView EVO 48
Page 50

Network
Enter TCP/IP settings for device access here.
Enter TCP/IP settings for device access
Before filling in the details, make sure the settings match those on the camera. If device has not been connected yet,
ensure that the same settings are applied during the camera installation. You can use the Ping Device button to
check camera availability and/or verify your settings; the Open Device in Browser button will try to reach your
camera Web interface using you default browser.
Setting Description Default
value
Host Device IP address [empty]
Port Device HTTP port 80
Username Device user credentials; note that you need to provide a
valid administrative user profile to be able to change
device settings via software
[empty]
Password Password for camera access Enabled
Channels
Here you can detach automatically detected channels from the device and replace them with one of the existing 'free'
channels (not attached to any device). Use the Reset button to undo any changes made to the channels (this only
works for current editing session, reset will not be available after you save the changes and reopen this dialog box).
If you wish the original camera channel(s) to stay attached to the device, just leave the channel list as it is.
Channels
Add multiple devices*
*Feature is subject to license limitations and may be unavailable in some software editions.
If you have a number of devices of the same type in your system, you can add them all at once to save time. This
method is especially useful if you have multiple groups of devices of the same type.
Open the Configuration section and select Devices in the menu on the left; in the upper panel, click the little arrow
next to the + New device button and select Create multiple devices.
TRENDnetView EVO 49
Page 51

Add devices
Create multiple devices dialog box
You can add any number of different devices here (assuming this is permitted by license limitations). First, select the
device model from the list, and then enter your desired number of existing devices of the same model.
Select the desired model and number of devices
When you are ready, click the + Add button below to attach the camera set to the new devices list. As soon as there is
at least one device, additional tabs will become available: Device Parameters and Channel settings. Device list on
the right will be available in all tabs.
To remove any of the listed items, select them with your left mouse button (use CTRL+click or Shift+click to select
multiple devices at once) and hit the Delete button on the upper panel or on your keyboard. Select any device and
use the Add button on the upper panel to add a copy of that device.
Add several new devices
Device parameters
For each added device, enter corresponding settings. Note that you can skip IP and port on this step if you wish to
use automatic incremental IP assigning (see IPs and Ports tab description below).
Modify device parameters
Select a device by clicking on it in the item list: it will become highlighted green and related available settings will be
displayed in the Device parameters window. You can select multiple devices by holding CTRL or Shift when
clicking.
Setting Description Default value
Device name User-defined device name Device model
Model Device manufacturer and model, or
generic type; click Change to alter
Loaded
automatically
Host Device hostname or IP address [empty]
Port Device HTTP port 80
Username Device user credentials; note that
you need to provide a valid
administrative user profile to be able
[empty]
TRENDnetView EVO 50
Page 52

to change device settings via
software
Password Password for camera access [empty]
Server Target server, to which the device
will be attached
Central
Server
When you have finished, click the Apply button below for the changes to take effect.
If you do not apply the modifications, they will be discarded when you select a different device from the item
list. Remember to always click the Apply button.
You will be asked to review the list of modified fields and confirm the changes.
Confirm changes
Click OK to accept the changes and go back to the configuration dialog box.
You can select multiple devices and assign IP addresses incrementally with the defined increment. Similarly, it is
possible to change the HTTP port for all devices at once, if required (port value stays the same for all selected
devices, with no increment). In order to do this, select desired devices by using CTRL+click or Shift+click, then start
entering the IP address: the field will expand, giving you the option to enter the increment.
Assign IP addresses with increment
Click the Apply button below to save the changes, similarly to the previous step.
Channel Settings
Here you can modify channel names and recording configuration. Note that channel name is not copied from the
device name.
Unlike with automatic device discovery, default recording configuration here is [none], meaning that recording is
not conducted. Select one or multiple devices and then click the Change button in order to choose an
existing recording configuration for the target devices or create a new one.
Depending on the selected device model, the number of channels may coincide with or exceed the number of
devices, e.g., when device is a 4-channel encoder.
Channel properties
Select one or multiple devices and click Change, then select appropriate recording profile or create a new one.
When you have finished, click OK to add all the new devices and their channels to your server configuration.
See Also
TRENDnetView EVO 51
Page 53

22 Add Devices Using Autodiscovery
Use automatic device discovery feature to find all available devices. This method is of great help when dealing with
large amounts of cameras, and also when exact addresses of devices are not available.
To access the configuration dialog box from TRENDnetView EVO Console, open Configuration section and select
Devices in the menu on the left; in the upper panel, click down arrow near New device button and then select Find
devices.
Find devices
Scan Parameters
First, select scan mode; the following options are available:
scan IP address range: specify a continuous LAN segment to be scanned
scan network adapter address range: select one or more network interfaces to be fully scanned
scan attached devices: the local hardware system will be scanned for capture boards and Direct Show
video sources
If you have chosen to search for IP video sources, you should review additional connection settings and change or
update them, if required:
ports: HTTP ports, comma separated
user credentials: pairs of comma-separated user names and passwords, one pair per line
Use the Reset button below to discard all changes and start entering scan parameters again. When you are ready,
press OK button below to begin scanning.
Scan attached devices
TRENDnetView EVO 52
Page 54

Scan network adapter address range
Scan IP address range
Device Autodiscovery
After scanning has been completed, you will be taken to the Device Autodiscovery dialog box, which will allow you to
review the found devices and their channels, and enter/modify related settings. Use the Search field in the upperright-hand corner to find a specific device by name, model, IP, port or hardware ID (for IP devices, ID includes MAC
address).
There are two types of selection in the item list: checkboxes and colour highlight. Checkboxes are used to
choose the items to be added to server configuration after you close the dialog box; highlighted items are
subject to immediate properties changes. Use CTRL+click or Shift+click to select all or several items at once to
change their settings.
Click a device in the item list to load its settings into the Device Properties window. Note that some settings may be
missing for some of the automatically found devices; this depends mostly on device and whether user data was
correctly provided. In such cases, simply fill in the missing data manually and click the Apply button below to save
the configuration changes.
TRENDnetView EVO 53
Page 55

Set up discovered devices
If device is not integrated with the software (native support), it may be detected as generic type (e.g., ONVIF). If you
think some devices have not been discovered, check if they have different HTTP ports; also, try adding
them manually.
Setting Description Default value
Device name User-defined video source name Autodetected
model + IP,
empty if not
detected
Model Device manufacturer and model, or
generic type
Autodetected
vendor and
model, empty
if not detected
Host Device IP address Autodetected
Port Device HTTP port Autodetected
Username Device user credentials; note that you
have to provide administrative profile
credentials in order to be able to change
device settings via software interface
Appropriate
username
from provided
list or
autodetected
Password Device user password Appropriate
password
from provided
list or
autodetected
Make sure you select all the devices you wish to add by putting a checkmark next to them. Devices with missing
configuration (model and/or IP) are unchecked by default and will not be added to active server configuration.
Device models set on this step cannot be altered in future. In order to change the model further on, you will
need to delete the channel attached to such a device, and then create a new channel with your desired model:
see how to replace a camera for details.
Switch to Channels tab to review the detected video channels of the discovered devices: this is particularly important
if you are using multichannel devices, e.g., capture boards and encoders. Use the Search field in the upper-righthand corner to find specific channels by name or device name.
TRENDnetView EVO 54
Page 56

Set up discovered channels
Here you can edit the channel name and assign recording configuration. By default, recording is enabled for all
channels: click the Change button near Recording settings to manage recording profiles and assign them to your
channels. To add a new recording profile, click the + New recording configuration button below; you can find more
details about recording profiles in the corresponding section. Click OK to save and return back to devices and
channels; click Apply to save configuration changes.
After changing the channel recording configuration, do not forget to click Apply, otherwise the changes will
not take effect.
Recording configuration here is assigned to the main streams of the target channels. In order to set up
substream recording, please go to channel configuration.
Select the recording configuration or create a new recording profile
Click the Start device search button above at any time to restart device discovery.
All previously discovered devices and all configuration changes will be discarded if you restart camera
autodiscovery.
When you are ready, click the Add selected devices and channels button below; all checked devices will be added
with selected corresponding channels. Newly added devices and channels will be added to the item list.
Added devices will appear in the item list
Use the buttons on the upper panel to manage your devices. You can now add new devices and/or device groups,
TRENDnetView EVO 55
Page 57

launch autodiscovery again, assign devices to groups, as well as removing both devices and groups.
When deleting devices, remember that corresponding channels will not be removed at the same time and
therefore your newly discovered devices may not be added due to license limitation. Go to the Channels tab to
manage them separately.
See Also
TRENDnetView EVO 56
Page 58

23 Manage Devices and Device Groups
This topic describes general device handling as well as common use cases in device management.
Manage Devices
Device management is accessible via TRENDnetView EVO Console Configuration section, under Devices category in
the menu on the left.
Configuration -> Devices
Upper panel items allow you to add devices automatically or manually, edit, view and remove them, as well as
quickly assign groups and servers. Double-click any device to open it for editing; click View channels on the upper
panel to open channel-specific controls in the same window. If device has multiple channels, all of them will be
listed.
Please refer to the Add Devices Manually section of this document for detailed description of all available tabs and
settings.
Use bottom panel buttons to quickly filter recently added/updated devices, choose groups only or solely devices not
assigned to any of the servers.
Remove Devices
To remove a device, select it in the item list and use the Recycle bin button on the upper panel to delete the
target device. Use Shift+click or CTRL+click to select multiple devices, or CTRL+A to select all.
You can choose to remove all associated channels together with the device(s)
You will be offered to remove all the attached channels together with the device(s). Press Yes to delete the channels
or choose No to leave the channels: they will appear as detached in the channel list then and you will be able to reattach them to other devices, keeping the channel recording configuration. If you choose Yes, all existing shared
channels based on the channels of the target device will be removed automatically as well.
Channels that have any associated rules in the Event and Action Configurator cannot be removed. If you
try deleting such a channel, you will get an error saying The channel cannot be removed because it is in use.
In order to remove such a channel. you need to delete the rules related to it first. To do so, just go to the Events
& Actions section, choose Rules in the menu on the left, select the target server and open the configurator,
then remove the necessary rules from the central column by using the < and > buttons.
Add Device Groups
As with other resources, devices can be grouped together for easier management. Click the little arrow near + New
TRENDnetView EVO 57
Page 59

device button and select New device group.
Device group details
Enter a name for the device group in the Details tab, then switch to the Members tab and choose devices to join this
group. Double-click items or use the Add/Remove buttons below to select and deselect devices.
Device group members
In the Membership tab, you can select 'higher' level groups to contain this device group (nested architecture).
Device group permissions
Finally, open the Permissions tab to assign user privileges for this device groups: check at least one permission to
select the user or user group, uncheck all or use the Clear button below to deselect. When you have finished, click
OK; the newly created group will then appear in the item list.
Double-click any group to open its contents in the same window; use the buttons on the upper panel to edit/remove
it. Click Edit to adjust group settings: procedure is similar to that of creating a new device group.
Replace Camera
Consider the following common scenario: one of the installed cameras needs to be replaced by a device that is
better/more suitable/backup/etc. while keeping the whole configuration effective. As long as the replacement device
has the same model, the process is virtually unnoticed by the software. If the new camera model does differ from the
original, some modifications are required to be made in TRENDnetView EVO Console.
The procedure in TRENDnetView EVO Console is the following:
go to Devices
open the Device properties of the target device, go to the Channels tab and detach all the channels, then
close the Device properties
delete old device from the Devices list
create a new device with the necessary model
open the new device's Device Properties, go to the Channels tab, detach its new channel(s) - meaning they
will not be created - and attach old one(s)
As a result, the device part of the configuration will be replaced and all the channel configurations will stay
untouched.
TRENDnetView EVO 58
Page 60

Note that video stream specific configurations - resolution, FPS, frame adjustments - are not saved when reattaching the channel due to differences between device capabilities. However, the channel permissions,
membership, recording configuration and motion detector settings are all preserved.
TRENDnetView EVO 59
Page 61

24 Configure Channels
Channels are video streams received from physical devices attached to the system. Several channels can originate
from a single device - in the case of multichannel devices, i.e., capture boards, but single channel can only be
attached to one device at a time, as it makes no sense for a video stream to come from two cameras at once.
Channels are created automatically at the same time as the source device but can later be detached and attached
to different devices.
Channels include the video stream configuration settings - resolution, frame rate, bit rate and others - as well as all
supplementary data streams, such as audio, motion and digital input/output events, PTZ control and camera-side
analytics information. Recording configurations are assigned to channels and they are also displayed in
TRENDnetView EVO Monitor.
To access the channel configuration dialog box in the TRENDnetView EVO Console, open the Configuration section
and select Channels from the menu on the left side. Use the filters on the bottom panel to quickly access specific
channel sets.
The upper panel buttons enable you to create new items in this category, as described below, and perform channelspecific actions, such as editing, assigning groups, assigning recording configuration and deleting selected channels.
To select multiple items, hold CTRL or Shift and click items in the list.
Channels currently bound to devices cannot be deleted: the recycle bin button will only appear when
detached channels are selected. To remove a channel, go to Devices, open properties of the target device
and disengage the channel on the Channels tab by clicking the Detach button; also, you will be offered to
delete all associated channels when you remove the device itself - this will also remove any existing shared
channels.
Channels that have any associated rules in the Event and Action Configurator cannot be removed. If you
try deleting such a channel, you will get an error saying The channel cannot be removed because it is in use.
In order to remove such a channel. you need to delete the rules related to it first. To do so, just go to the Events
& Actions section, choose Rules in the menu on the left, select the target server and open the configurator,
then remove the necessary rules from the central column by using the < and > buttons.
Configuration -> Channels
All available channels and channels groups will be listed here. The upper panel offers a range of configuration
opportunities.
Create Channel Group
Channel groups can be added for easier management in TRENDnetView EVO Console; by default, there are no builtin channel groups. Click "+ Create channel group" button to bring up the corresponding dialog box.
Enter the group title here, select channels to be group members and select higher level group(s) to contain target
group as a member, if desired. Set user permissions for channels in this group.
TRENDnetView EVO 60
Page 62

Edit Channel group properties
Click OK when you are ready: newly created group will appear in the item list.
Edit Channel Group
Double-click any existing channel group in the list or use the Edit button in the upper panel to bring up the
configuration dialog box. Available options are analogous to the ones displayed during group creation time.
Edit Channel
Channels are automatically created together with each newly created device; it is not possible to create a channel
separately. Click any channel in the list twice or use the Edit button on the upper panel to manage the channel
properties.
Edit channel properties
The configuration dialog box enables the following changes:
Details tab: change channel title and assign recording configuration
Motion detector tab: choose between camera-side or software-side motion detection*, default state is
disabled
Membership tab: select the target channel group to add this channel into
Permissions tab: allow users and user groups to access and administer target channel
Channel configuration tab: open an additional channel configuration dialog box to manage video
stream settings, frame adjustments and Digital Input/Output
Please refer to the Channel Settings topic for detailed description for each of the tabs.
Motion detector on the software side has two options: high performance and high accuracy:
High Performance mode: this type of analysis is performed for only key frames whose frequency can vary
from several frames per second to one frame every few seconds - this is less sensitive for picture quality, but
greatly affects detector operation. CPU consumption is significantly lower due to this, and it can be
additionally reduced by increasing time interval between two analyzed frames.
High Accuracy mode: this mode performs motion analysis for the whole video stream, so we recommend
selecting this option when you want to achieve best detection results. The lower time interval means higher
precision. Keep in mind that CPU and virtual memory usage is much greater if this mode is selected.
Assign Group
Channel membership can be managed via the channel properties dialog box. To quickly assign group to any of
existing channels, select desired channel(s) (use CTRL+click or Shift+click to select multiple items) and click Assign
group button on the upper panel.
TRENDnetView EVO 61
Page 63

Assign channel group
Pick a group from the existing channel groups' list and click OK to save. If any of the channels already belonged to
some group, it is not a problem: membership in multiple channel groups is allowed.
Replace Camera
Consider the following common scenario: one of the installed cameras needs to be replaced by a device that is
better/more suitable/backup/etc. while keeping the whole configuration effective. As long as the replacement device
has the same model, the process is virtually unnoticed by the software. If the new camera model does differ from the
original, some modifications are required to be made in TRENDnetView EVO Console.
The procedure in TRENDnetView EVO Console is the following:
go to Devices
open the Device properties of the target device, go to the Channels tab and detach all the channels, then
close the Device properties
delete old device from the Devices list
create a new device with the necessary model
open the new device's Device Properties, go to the Channels tab, detach its new channel(s) - meaning they
will not be created - and attach old one(s)
As a result, the device part of the configuration will be replaced and all the channel configurations will stay
untouched.
Note that video stream specific configurations - resolution, FPS, frame adjustments - are not saved when reattaching the channel due to differences between device capabilities. However, the channel permissions,
membership, recording configuration and motion detector settings are all preserved.
Other
Select one or multiple channels/channel groups and click the Disable button on the upper panel to deactivate target
items. Disabled channels will not be requested from actual physical devices, and, as a consequence, will not be
recorded; neither will they be displayed in TRENDnetView EVO Monitor application(s).
The filter panel at the bottom enables you to view recently added/updated items, as well as other relevant filters. The
filter that is currently active is highlighted blue: click the N filtered button to reset all filters and display all the
available items again.
Filters
See Also
TRENDnetView EVO 62
Page 64

25 Channel Settings
The channel configuration dialog box has several setting categories; these are described in details in this topic.
Details
Here you can change channel title and assign recording configuration.
Channel details
Click the Change button to choose the recording configuration: you can pick an existing configuration or create a
new one, or a schedule on the spot from the same dialog box.
Please choose Continuous Recording configuration for edge streams to ensure proper recording.
When you assign a motion-based recording configuration to a channel with a disabled motion detector,
the software will automatically suggest enabling motion detection for the target channel. The camera-side
detector is given priority; if it is not available, the software-side detector will be enabled and set to the highperformance mode. We recommend that you review the motion detector settings to make sure it operates as
desired, especially if the camera-side detector is in use.
Note that if you leave motion detection OFF and assign motion-based recording configuration to the target channel,
no data will be recorded.
Automatically enable motion detection
Motion detector
Choose between camera-side or software-side motion detectors; the default detector state is disabled.
When selecting camera-side motion detection, make sure to go to device Web interface of the camera
to enable and configure motion detection. Settings may vary depending on device manufacturer; also, check
with TRENDnet to make sure hardware motion detection is supported for the target device.
Camera-side motion detection is recommended for two basic reasons:
computational load is transferred from servers to devices, decreasing server load, and
on most devices, hardware-side motion detection is performed on raw video stream, which means
superior accuracy compared to software-side detector, as software only gets access to compressed
stream.
TRENDnetView EVO 63
Page 65

Software-side motion detection settings
The motion detector on the software side has two options: high performance and high accuracy:
High Performance mode: this type of analysis is performed for only key frames whose frequency can vary
from several frames per second to one frame every few seconds - this is less sensitive for picture quality, but
greatly affects detector operation. CPU consumption is significantly lower due to this, and it can be
additionally reduced by increasing time interval between two analyzed frames.
High Accuracy mode: this mode performs motion analysis for the whole video stream, so we recommend
selecting this option when you want to achieve best detection results. The lower time interval means higher
precision. Keep in mind that CPU and virtual memory usage is much greater if this mode is selected.
In both modes, the level of sensitivity can be adjusted, as can the time interval setting which defines the
frequency of frame analysis.
Regardless of which mode you select, you can further decrease the amount of server-side calculations by using a
lower-resolution stream (if available). For example, if your main stream is 3MP and your substream is D1, the
motion detection engine will spend much less system resources on D1 analysis than it would spend on a 3MP image.
Note that some cameras deliver lower-resolution streams as cropped high-resolution images (not resized, as it would
be expected) - in such cases, using a substream for MD analysis will produce wrong results and therefore doing
so is not advisable.
Most cameras provide second stream as first stream image scaled to fit low resolution; however, some devices
crop the centre of a high-resolution image to fit the small frame, and thus the substream picture appears as if
it were zoomed in. Keep this in mind when you are using substream for live view and especially for softwareside motion detector analysis.
Click the Motion detection exclusions button in order to set up exclusion zones. Note that these settings only
cover the software-side motion detector; in order to configure the exclusions for the camera-side motion detector, go
to the Web interface of the target device.
Set up exclusion zones for the motion detector
First, choose the grid size for the detector: this will define the size of the smallest detection region. Minimum grid
size is 2x2 cells (resulting in four detection areas), and maximum size is 64x64 cells. Then, mark your desired
exclusion area simply by clicking and dragging on the viewport; you can draw several rectangles to form a complex
polygonal area. Exclusion area(s) will be highlighted light green. In order to cancel the selection, simply draw a
TRENDnetView EVO 64
Page 66

rectangle over it.
Settings in the bottom are here to ease the configuration process:
Maintain aspect ratio: displays original picture proportions, if selected, or stretches the picture to fill the
viewport
Show motion: shows currently present motion, if selected
In order to test the behaviour of the selected grid size, enable the Show motion option, the click Apply and see how
the detector works with your defined grid.
When you have finished, click OK to return to the main channel configuration dialog box.
Membership
Choose the group(s) you want to contain the target channel as a member: double-click the relevant items or use the
Add/Remove buttons below to select/deselect.
Choose channel membership
Permissions
Allow users and user groups to access and administer target channel. To add a user or user group, simply select at
least one permission, then remove all the users or user groups by clearing all permissions - either manually or by
using the Clear button below.
Change user privileges
Data Source
Here, you can choose a data provider to embed some textual data with the video Please refer to the Data Sources
section of this document for setup guidelines.
Channel Configuration
The Channel Configuration tab allows you to adjust advanced channel settings. Some of these can be changed via
TRENDnetView EVO Console but sometimes software does not cover some of the device settings, so you are also
given the option to go straight to the device Web interface - simply click the Open device in browser button to do
this.
TRENDnetView EVO 65
Page 67

You can open the target device in browser or go to the software provided settings' dialog box
Click Open channel properties to access the additional channel configuration dialog box. The available tabs depend
on the device model and capabilities: for some cameras, only basic configuration options are present, while for
others, advanced settings are accessible. If you see that a camera has certain capabilities that are not configurable
via TRENDnetView EVO Console configuration interface, go to the device's Web interface in order to change that
specific setting.
Video Input tab: set video transport (the available list of options depends on the device type and model;
common types include HTTP, RTSP* and native transport)
Video Adjustment tab: fine-tune picture settings such as brightness and contrast level
Substream tab: enable second (lower resolution) stream
Video Configuration tab: choose streaming settings**
Motion Detection tab: with some devices, the camera-side motion detector must be explicitly enabled
here
Events tab: enable event generation from device digital inputs (DI)
External PTZ tab: adjust external PTZ controller settings; communication port must match the
communication port that the RS232/485 controller is connected to, and baud rate has to match the baud
rate of your PTZ controller/analog PTZ camera
Digital Outputs tab: enable control for camera digital (relay) outputs (DO)
RTSP tab: appears if RTSP transport type has been chosen; set RTSP port and mode
(TCP/UDP/multicast***) here
*You may have to specify the RTSP port on the corresponding tab if it differs from default (port 554 for most
cameras). To do this, select the RTSP transport type and then click Apply: as a result, the RTSP tab will become
available. For ONVIF devices, the RTSP port is set automatically.
**Remember, the higher the resolution/bitrate/quality/frame rate you set, the more storage space and bandwidth it
will use when recording. These settings also affect CPU/virtual memory resource consumption for live video and
software-side motion detection.
***Multicast mode availability depends on device integration.
Note that a valid administrative account login and password for the camera should be provided in Device
settings in order to access and set the device configuration.
Dewarp
Here, you can configure generic dewarp settings or enable dewarp engine for the Panomorph Enables® lens. For
details, please see the subsequent topic on dewarp setup.
TRENDnetView EVO 66
Page 68

26 Audio
TRENDnetView EVO is capable of receiving audio streams from cameras, recording and playing them back, as well
as sending audio back to the cameras from TRENDnetView EVO Monitor stations. It is also possible to bind an
external audio source to a video channel.
There are a few conditions stipulating audio feature availability:
the target device should be capable of sending/receiving audio
relevant additional equipment should be plugged into the device (microphone and/or speakers), if
necessary (if these are not built in by design)
one-way or two-way audio should be enabled and set up on the device side so that it is available via device
Web interface
selected audio codec should be G.711
audio should be enabled in the channel settings via TRENDnetView EVO Console (see the description
below)
feature should be supported by TRENDnetView EVO for the target device (see the list of supported devices
and features provided by TRENDnet)
in order to send audio to the device, TRENDnetView EVO Monitor workstation must have a microphone
connected to it - either a built-in or an external one
if you plan to use an external audio source, relevant audio capturing equipment should be plugged into the
server, to which the target device is connected, and enabled via Windows audio settings
G.726 and AAC audio codecs, which are often implemented on the camera side, are not supported at this
point, so please always select the G.711 option. Setting other codecs on the device side may result in
TRENDnetView EVO being unable to decode the incoming video stream.
Enabling Audio
In order to enable audio capabilities for your desired device, open the Configuration section and choose
Channels from the menu on the left, then open your target channel for editing - either by double-clicking it or by
selecting it with a single click and clicking the Edit button on the upper panel. In the channel settings' dialog box,
switch to the Channel configuration tab.
Go to the Channel configuration tab
If you plan to use camera-side audio and have not checked audio configuration on the camera side yet, click the
Open device in browser button to go to the camera Web interface and adjust the settings, then make sure that audio
is operable in the browser preview (you may need to install an ActiveX control in order to get it working; please
check with your device's user guide for tips and browser requirements).
Press the Open channel properties button to bring up the dialog box and switch to the Audio tab. Here, you have
three options:
No Audio Souce: disable audio functionality for the target channel (default)
Internal Audio Source: enable audio reception from the device side and sending the reverse audio to
the device
choose an audio input from the drop-down list, if the target device has multiple ones
External Audio Source Attached: use an external audio source connected to the same server as the
device, from which the target channel originates
choose an audio input device from the drop-down list, if the target server has multiple ones
connected to it
TRENDnetView EVO 67
Page 69

Choose the audio delivery option
When you have chosen your preferred option, click OK to save and exit, then close the Channel settings dialog box.
You should now be able to listen to live audio, record it along with the video stream and talk back to your camera via
TRENDnetView EVO Monitor and TRENDnetView EVO Mobile applications.
Combining Video and Audio Sources
TRENDnetView EVO allows channels to use audio coming from a different channel in case the target channel does
not have its own incoming audio or in case you wish to combine audio and video data from different channels. Such
combinations are used for both live and recording.
In order to do this, double-click the target channel (the one without audio) in the channel list to open it for editing,
then choose the Audio tab on the left.
Choose another channel as audio source
Click the Change button to see the list of channels and choose the one that you want audio to be coming from. Hit
Apply or OK to save your changes.
Audio must be configured for the channel used as an external audio source via channel configuration as
described earlier.
TRENDnetView EVO 68
Page 70

27 Dewarp For Fisheye Cameras
Fisheye lens is an ultra-wide-angle lens that produces a wide panoramic image at the cost of strong visual distortion.
Usually, devices with such lenses capture a 360-degree geometrically distorted image and projects it as a circle
within the image frame. Fisheye lens can be either built-in by design or purchased separately and installed on your
desired camera. TRENDnetView EVO dewarp feature allows to correct the perspective and obtain several "normal"
views from a single distorted fisheye picture.
In order to access dewarp settings via TRENDnetView EVO Console, open the Configuration section and choose
Channels from the menu on the left. Find the channel you wish to dewarp in the list (use Search or filters, if
necessary) and double-click it in order to open it for editing (alternatively, use the Edit button on the upper panel to
open the dialog box), then switch to the Dewarp tab.
Please note that the location of dewarp settings has changed starting from the product version 1.5.0. For
previous software versions, the corresponding settings can be found in the general Channel Properties dialog
box.
Dewarp settings
You have the following options here:
Regular lens: choose this option if you wish to disable the dewarp engine (selected by default)
Immervision Enables® lens: choose this option if your camera has a Panomorph lens installed (you
can check this in the camera specification)
Fisheye lens: choose this option if your camera has a regular 360-degree view lens
For devices having a Panomoph lens, choose the lens model from the drop-down list - you can find this information
in your camera specification or request it from the device manufacturer. You do not need to define any parameters
manually in this case; rather, you only need to choose your camera mounting position, and the dewarp engine will
automatically produce a correct dewarping result.
Note that the dewarp engine will fail to operate if you choose a wrong Panomorph lens model. Check with your
camera documentation and manufacturer for the precise lens model information.
For a regular fisheye lens, you are requested to define the fisheye sphere size and camera position by using the
overlay controls and settings on the right side:
Hemisphere diameter: click and drag any of the small pink circles on the overlay sphere to change its size
and align it with the actual fisheye sphere in the picture
Horizontal and vertical centre: automatically positioned in the picture centre, to change it click and
drag the small pink circle inside the sphere
Mounting direction: select camera mounting position from the drop-down list (wall/ceiling/floor)
For your convenience, the defined parameters are also displayed in the numeric form on the right side of the dialog
box. Use the button below the preview to reset all dewarp settings to the default ones.
In case you change the stream resolution at some point, its aspect ratio may also be changed and this will
affect dewarp operation. Therefore, check the dewarp settings after changing the resolution and adjust the
TRENDnetView EVO 69
Page 71

parameters, if necessary.
Note that all dimensions are given not in pixels but in reference to the video stream size, therefore, relative
values are used instead of absolute ones.
When finished, click OK to save the changes and close this dialog box and return to the general channel
configuration. Dewarp results will immediately become available in the TRENDnetView EVO Monitor application;
you can find the details on usage in the corresponding section of the TRENDnetView EVO Monitor documentation.
TRENDnetView EVO 70
Page 72

28 Bulk Edit for Devices and Channels
For easier resource management, it has been made possible to edit certain settings of devices and channels, e.g.,
recording settings and motion detection, for multiple items at once. To do so, simply select more than one device or
channel in the item list using CTRL+click or Shift+click (use CTRL+A to mark all) and then click the Bulk Edit
button on the top panel. Note that the button will not be there unless at least two items are selected.
Some settings will be grayed out, indicating that these either cannot be changed at all or specifically via
bulk edit
{Multiple values} text in the setting field indicates that selected items have different options, e.g., have
different recording configurations
leave such a field untouched if you wish to keep these settings different
change the value of such a field to something specific using the Change button to assign the
same setting to all selected items
Fields containing specific values or empty fields indicate that all selected items have the same setting
(often default); change the value to assign the setting to all items at once
Edit Multiple Devices
Select at least two devices in the list and click Bulk Edit on the top panel to bring up the corresponding dialog box.
Some settings will be grayed out, indicating that these settings either cannot be changed at all or specifically via bulk
edit.
Edit multiple devices using bulk edit
For devices, you will be able to modify the following settings:
Details tab:
Server: the server where the devices belong
Network tab:
Port: HTTP port to connect to the device (for IP devices)
Username and password: user credentials to log in with
When done, click OK to save and close the dialog box: the settings will be applied to all the selected devices.
Edit Multiple Channels
Select at least two channels in the list and click Bulk Edit on the top panel to bring up the corresponding dialog box.
Some settings will be grayed out, indicating that they either cannot be changed at all or specifically via bulk edit: for
instance, it is impossible to change the title field this way, as each channel normally has its own name, which
therefore should be edited for each channel individually.
TRENDnetView EVO 71
Page 73

Edit multiple channels using bulk edit
For channels, the following settings can be changed via bulk edit:
Details tab:
Organisation*: the organisation the channel belongs to
Main stream recording configuration: default recording setting for the main stream
Main stream storage: main stream recording destination
Substream recording configuration: default recording setting for the secondary stream, if
available
Substream storage: secondary stream recording destination
Edge** recording configuration: set Continuous Recording here for proper operation
Edge** storage: recording destination for the footage fetched from the device
Video lost time: timeout for streams absence, after which the video stream is considered lost
and the corresponding event is raised in the E&A engine
Motion detector tab:
Mode***: choose between camera-side or software-side (high performance or high accuracy
software modes available) motion detection
*Global edition only
**Only for channels coming from ONVIF devices
***You will find more details on the motion detection modes in the Channel Configuration topic
When done, click OK to save and close the dialog box: the settings will be applied to all the selected channels.
TRENDnetView EVO 72
Page 74

29 Configure Recording Profiles
This topic describes how to create and configure stream recording profiles. For global server storage settings, please
see the Storage section of this document.
To access recording configuration dialog boxes in TRENDnetView EVO Console, select the Configuration section
and choose Recording in the menu on the left.
There are three types of resources in the Recording setup:
profile: choose what data streams are recorded and in what mode (continuous/alert triggered)
schedule: set a recording timetable based on profiles
configuration: profile- or schedule-based recording configuration to be assigned to channels
Buttons on the upper panel give the option to create, edit and remove recording resources.
Recording resource cannot be deleted if it is currently in use, i.e., when a recording profile is assigned to a
recording configuration or a schedule, or when any of the recording resources are assigned to a channel.
Create Recording Profile
Recording profiles allow users to set which data streams are recorded and how. Profiles cannot be assigned directly
to devices; rather, these are used as components for recording schedules and recording configurations. For this
reason, profiles do not include such settings as pre-recording interval: this setting is defined per-channel and,
therefore, is set in the recording configuration.
To add a new recording profile, click the down arrow button near + New recording configuration and select + New
recording profile. The profile creation dialog box will appear.
Recording profile properties
The dialog box has two sections: for continuous and event-driven recording. Note that you only can select one mode
at a time: if continuous recording is selected, alert-based recording options will be greyed out.
To configure motion-based recording, enable Video stream in the Alert recording section and enable Detected
motion triggers alert setting. If you wish to record still frames at low rate during non-motion period, keep the Video
stream option in the Continuous recording section enabled and set your desired frame rate - e.g., 1FPS - then set
high FPS or no limit in the Alert recording section. If you only wish to record while motion is present, deselect the
Video stream option in the Continuous recording section.
When you assign a motion-based recording configuration to a channel with a disabled motion detector,
the software will automatically suggest enabling motion detection for the target channel. The camera-side
detector is given priority; if it is not available, the software-side detector will be enabled and set to the highperformance mode. We recommend that you review the motion detector settings to make sure it operates as
desired, especially if the camera-side detector is in use.
Setting Description Default
Value
Title User-defined recording profile name [empty]
Video stream (continuous) Select to enable continuous video recording Disabled
Limit frame rate (for continuous video
recording)
Set frame rate restriction for recorded video; note that for
compressed video streams (e.g., H.264) actual frame rate
may differ due to compression algorithms
10 FPS
Audio stream (continuous) Select to enable continuous audio recording Disabled
Data stream Select to enable data recording from the associated the
data source
Disabled
VCA stream Select to enable continuous video analytics event Disabled
TRENDnetView EVO 73
Page 75

recording
Video stream (alert) Select to enable alert-driven video recording; video will
only be recorded after alert generation, for the time
period defined in the Post-recording interval
Disabled
Limit frame rate (for alert video
recording)
Set frame rate restriction for recorded video; note that for
compressed video streams (e.g., H.264) actual frame rate
may differ due to compression algorithms
10 FPS
Post-recording interval The time period during which alert-driven recording will
be conducted after alert generation
10
seconds
Detected motion triggers alert Motion will act as a trigger for recording; enable this
setting to set up motion-based recording
Disabled
When done, click OK to save recording profile: it will appear in the item list of the Recording section. The profile is
now ready for further configuration.
Create Recording Schedule
Recording schedules are sets of recording profiles that define what recording profiles are used depending on the day
and time of the week.
To add a new recording schedule, click the down arrow button near + New recording configuration and select +
New recording schedule. The schedule creation dialog box will appear, allowing you to enter a user-defined name
for the new schedule and add multiple profiles to define recording behaviour.
Recording schedule properties
Click the Add button below to insert a new profile with defined start time.
Add a profile to the recording schedule
Note that only begin time is set for each added profile: the end time is determined by the start time of the next
profile. For example, if you require continuous recording during weekdays and motion-driven recording during
weekends, your continuous recording profile should be scheduled to start on Monday at 12 a.m. and motion-driven
one - on Saturday at 12 a.m..
Click OK to save and add the profile to the schedule. Multiple profiles will be automatically sorted based on their
start time.
Use the Edit and Remove buttons below to manage the profiles added. When you are finished, click OK to save; the
newly created schedule will be added to the item list in the Recording section.
Create Recording Configuration
Recording configurations are global recording arrangements that can be assigned to a per-channel recording setup.
Recording configurations can be based on a single recording profile or on a pre-defined recording schedule.
To add a new configuration, click the down arrow button next to + New recording configuration.
Recording configuration dialog box
The corresponding dialog box will then appear, allowing you to enter the configuration properties.
Setting Description Default
Value
Title User-defined recording configuration [empty]
TRENDnetView EVO 74
Page 76

name
Controlled by Choose existing recording profile or
schedule for current configuration or
create a new one from the sub-dialog
[none]
Pre-recording interval Set the pre-recording interval for
alert-driven recording, if applicable;
note that large pre-recording interval
will increase virtual memory usage if the used profile is not alert or
motion driven, set 0 here to decrease
memory usage
10 seconds
Amount quota Storage quota in GB: the maximum
amount of space that can be taken up
by recordings, if the maximum size is
reached, the oldest footage will
deleted; set 0 to disable any
limitations
0
(unlimited)
Duration quota Duration quota in days: the
maximum number of days that
recordings are kept in the archive;
after this, recordings will be
erased; set 0 to disable any
limitations
0
(unlimited)
Before setting recording limitations, make sure there is sufficient space in the server storage for all cameras. The
quotas may be ignored if actual storage size is insufficient, and this will result in shorter footage durations.
Note that quotas do not give priority to channels that are assigned configuration. For example, if you set the
duration quota to ten days, it merely means that the maximum recording duration will be ten days for a
channel with given configuration; this will not reduce recording duration for other channels.
For security reasons, it has been made impossible to erase recordings from individual channels and/or time
periods, so that archive integrity is preserved. Recordings are erased automatically when storage or duration
quota is reached; if you need to erase footage from an existing channel, simply assign a recording
configuration with an individual quota to it, wait until the footage is erased (actual timing depends on archive
size) and assign a new recording configuration.
When you have finished, click OK to save and exit. Recording configuration will now be added to the item list and
will become available in channel recording configuration.
TRENDnetView EVO 75
Page 77

30 Assign Recording Configurations
Recording configurations can be assigned to channels and channel groups to define how data streams are recorded.
There are several ways to assign a recording configuration:
when using device autodiscovery: via Found channels tab (automatically discovered channels are assigned
the Continuous recording configuration by default)
when creating multiple devices: from multiple channel creation dialog box, Channel settings tab
(manually added devices are set not to be recorded by default)
after adding a single device manually: via Channels section, Edit channel dialog box, Details tab (manually
added devices are set not to be recorded by default)
for existing channels, per channel: via Edit channel dialog box, Details tab
for existing multiple channels: via Channels section, using Assign recording configuration button on the
upper panel
Topic body below explains how to assign configurations via main TRENDnetView EVO Console window (latter
option). All the rest alternatives are similar: you are offered configuration selection list at once from corresponding
setup window.
Enable Recording
Select the channels that are subject to recording configuration changes
In TRENDnetView EVO Console, choose Configuration section and select Channels from the menu on the left.
Select one or multiple channels and/or channel groups (use CTRL+click or Shift+click to select several items at
once) and then click the Assign recording configuration button on the upper panel. The list of available
configurations will appear.
Choose a recording configuration for the channels selected
Note that you can only directly assign configurations, not profiles or schedules. Configurations are based on
profiles or schedules (sets of profiles); please refer to the Configure Recording Profiles section of this document for
details.
Click the + New recording configuration button below to create additional configurations from existing
profiles/schedules at this point.
When you assign a motion-based recording configuration to a channel with a disabled motion detector,
the software will automatically suggest enabling motion detection for the target channel. The camera-side
detector is given priority; if it is not available, the software-side detector will be enabled and set to the highperformance mode. We recommend that you review the motion detector settings to make sure it operates as
desired, especially if the camera-side detector is in use.
Add new recording configuration
Press OK to save and go back to the channel list: newly created recording configuration will be automatically
assigned to channels previously selected.
Disable Recording
To disable recording for any channel(s), choose the No recording configuration, which is present in the list by
default. If you have deleted it, simply create a new recording profile without any streams selected for recording and
then create a recording configuration for this profile.
TRENDnetView EVO 76
Page 78

31 Add Users and User Groups
User management is accessible via the Users component of the Configuration section. By default, the system already
features a built-in global Administrator account and built-in Administrators group.
The built-in Administrator user account and built-in Administrators group are root users with access to
absolutely all the available resources. As a result, resources choice is unavailable for the Administrators group,
and it is also impossible to add Administrator user to any other group.
Any users added as members to the built-in Administrators group will have the same full authority as root
users.
Configuration -> Users
Add Users
Click the + New user button on the upper panel to bring up the configuration dialog box.
Details
Enter user login information here.
Enter user details
The table below details the available settings.
Setting Description Default
Value
User login name Alphanumeric user name for login, no
spaces allowed
empty
Active Allow the user to log in via
TRENDnetView EVO Console and
Enabled
TRENDnetView EVO 77
Page 79

TRENDnetView EVO Monitor:
any users who have been disabled will
not be able to use software
User full name User full name empty
Email address User email address used for
notifications
empty
Set/new password Enable to enter a password and re-
enter it to make sure no typos were
made; mandatory when creating a new
user
empty
Password never expires User will not be prompted to change his
password once in a while; enable this to
ensure a permanent password for this
user account (this setting can be
overridden by the User must change
password.. setting in the same dialog
box); otherwise, password will expire
after the number of days specified in
the server security policy
Disabled
(not
selected)
User must change password at next logon User will be prompted to change his
password upon his next logon attempt;
enable this if you want to force user
change the password even if his
password is set to never expire
Disabled
(not
selected)
User cannot change password Enable this to prevent the user from
changing his password; this option is
not available if user password is not
permanent or if you have selected to
force user change their password at
next logon using the settings above
Disabled
(not
selected)
PTZ Priority 0 = lowest, 10 = highest 5
Override default limit of simultaneous connections Maximum number of simultaneous
connections allowed from this user
account; the setting has priority
over server-defined limitations;
0=unlimited
Disabled
(not
selected)
Deleting a user also removes all the settings related to that user; restoring these may be time-consuming. Use
the Active setting to enable/disable users and temporarily block access for those.
If two or more users try using PTZ control of a device at the same time, PTZ priority is used to decide who
gains access first: user with a lower priority is blocked for ten seconds to allow a higher-priority user to use
PTZ. If two users with the same PTZ priority have an access conflict, they will be both granted PTZ access
simultaneously.
Default PTZ priority for all users, including those built-in and imported, is equal to five (medium priority).
You can assign any user a higher PTZ priority (six to ten) or a lower one (four to zero) by editing individual
user properties.
Membership
Choose which groups you want the selected user to be a member of. Every user can participate in one or multiple
groups, depending on the system structure.
TRENDnetView EVO 78
Page 80

Add the groups you want the selected user to be a member of
Manipulate the groups by double-clicking a group or using the Add/Remove buttons below. Use the Search field in
the upper-right-hand corner to filter the groups available.
Resources
Each user can be granted permissions for server and channel/channel group administration. Select resources by
adding at least one permission; remove them by clearing permissions using the Clear button below, or simply by
double-clicking them in the Selected resources list.
Add resources for the selected user
Click OK when you have finished to return to Users; the newly created account will be added to the item list. Use the
buttons on the upper panel to edit user details at any time, to quickly assign groups and remove specified users (hold
CTRL of Shift to select multiple items at once).
If there are a large number of user accounts, the Search field in the upper-right-hand corner and the content filters
in the bottom panel can help you quickly find the accounts you are looking for.
Add User Groups
When the number of users is large, it may be more convenient to create multiple user groups and then distribute
resources between user groups, rather than between individual users. One user can be a member of several groups.
Click the down arrow near the + Create new user button and select New user group from the drop-down list to
bring up the configuration dialog box.
New user group
TRENDnetView EVO 79
Page 81

In the Details tab, enter group name.
Choose group members
In the Members tab, choose which users and/or user groups will become members of the target group: manipulate
items by double-clicking them or using the Add/Remove buttons below.
Choose group membership
In the Membership tab, select the group(s) you want to include the current group as a member: manipulate items by
double-clicking them or use Add/Remove buttons below.
Finally, you can grant resources permissions using the Resources tab in a similar way to adding a single user. Select
resources by adding at least one permission; remove them by clearing the permissions using the Clear button below,
or simply by double-clicking them in the Selected resources list.
Click OK when you have finished to return to Users; the newly created group will be added to the item list. Use the
buttons on the upper panel to edit the group details at any time. If there are a large number of user accounts, the
Search field in the upper-right-hand corner and the contents filters in the bottom panel can help you to quickly find
the accounts you are looking for.
TRENDnetView EVO 80
Page 82

32 Permissions and Membership
Permissions
You can handle the user and user group permissions for channels, devices and servers via the User and User group
configuration dialog box -> Resources tab, or via server/device/channel settings -> Permissions tab.
All the available resources are listed in the column on the right; double-click the items or use the Add/Remove
buttons below to move items between columns. When you have finished, click OK to save and exit.
The following basic types of permissions are available:
Server
Administer: access server configuration
Access archive: access to all playback modes for non channel-specific footage of the target server
Channel
Administer: access channel configuration
Receive device data: live view
Access archive: channel availability in playback, instant playback, sequence and smart search
Navigate: pan, tilt and zoom a PTZ capable device, from which the target channel originates
Control digital output: send commands for DI control
ManageBookmarks: add new bookmarks to the target channel footage
Network
Administer: access network configuration
External Service
Administer: change external service settings via TRENDnetView EVO Console
External Service Group
View: see and browse the data coming from the external service in TRENDnetView EVO Console
Layout
View: see and use the layout in TRENDnetView EVO Monitor
Administer: delete or replace existing layouts via TRENDnetView EVO Monitor
Layout Groups
View: see and use layouts from the target group in TRENDnetView EVO Monitor
Administer: add new shared layouts from TRENDnetView EVO Monitor and delete existing
layouts
Visual Group
View: see visual group contents in TRENDnetView EVO Monitor*
Administer: edit visual group contents in TRENDnetView EVO Console
Map
View: see and use the map in TRENDnetView EVO Monitor
Administer: change map settings in TRENDnetView EVO Console
Video Wall
View: see and use the video wall in TRENDnetView EVO Monitor
Administer: change video wall settings in TRENDnetView EVO Console
User Button
View: see, use and attach the target user button to viewports in TRENDnetView EVO Monitor
Administer: change user button settings in TRENDnetView EVO Console
*A visual group will only be displayed in TRENDnetView EVO Monitor if the user has permissions to see at least one
visual group element.
Membership
Users can be grouped logically to make permissions management easier. Groups can overlap, meaning that a single
user can belong to multiple groups at once, and some groups can be nested - i.e., one group can contain one or more
TRENDnetView EVO 81
Page 83

other groups.
To manage user membership from the user configuration dialog box, double-click any user. This will open the
properties window, where you can switch to Membership tab. Here you can pick which group - or groups - this
user will be a member of.
User membership
Double-click on groups or use the Add/Remove buttons below to move groups between columns. When you have
finished, click OK to save changes and exit.
Alternatively, you can select one or multiple users from the users list, then click the Assign group button on the
upper panel: a list of available groups will appear, allowing you to select one of the existing groups. After this, click
OK to add selected users to the target group.
Select multiple users and assign them to a group
We strongly recommend grouping users and resources as it makes the permission management process much
easier. Individual user permissions can be combined with permissions inherited from multiple groups at once.
TRENDnetView EVO 82
Page 84

33 Anonymous User
Anonymous user is a built-in user account, which has been designed for unauthorised access to video streams via
HTTP API - a very basic example of TRENDnetView EVO API usage.
The anonymous user is disabled by default and does not have any permissions. In order to allow HTTP access:
enable the anonymous user: double-click him in the user list, mark him as active, then save;
add the Receive Data permission for this user in the properties of the target channel(s).
Add permission for the anonymous user to receive live view data
Now you can use a short link to receive live video feed over HTTP from your configured channels without
authorisation.
Live stream received with anonymous URL
The link can be embedded into your own webpage to provide 'Live Cam' functionality.
HTTP link is built as follows:
IP:PORT/publicLive/<channel_id>/mainStream
where
IP is server IP address or hostname,
PORT is server HTTP port (8080 by default),
<channel_id> is internal channel identifier, which can be looked up in TRENDnetView EVO
Console when IDs are enabled in the application settings.
Example: 192.168.1.83:8080/publicLive/184/mainStream
This functionality requires that Streaming Server is enabled (HTTP port is not set to zero in the target server
settings).
In order to see the channel identifiers in TRENDnetView EVO Console, go to the application settings via main menu
button in the upper-right-hand corner and choose Settings. In the dialog box, enable the Show object IDs option and
save.
Enable object identifiers in TRENDnetView EVO Console
TRENDnetView EVO 83
Page 85

34 Live Podcasts
TRENDnetView EVO channels can be shared by streaming over RTMP and thus be used for live casting - either with
popular streaming services or with your own RTMP server. This manual covers examples of how to set up live
streaming for Youtube and Wowza live casts - working with other RTMP servers is similar.
Before sharing a channel, check its settings and make sure that:
the channel is enabled in the configuration and video is available,
stream codec is H.264 (other codecs will not work!),
if you want to use substream and/or audio, make sure you have enabled them in the channel
properties.
TRENDnetView EVO free edition only allows 1 (one) podcast per server.
To access shared channel management in TRENDnetView EVO Console, go to the Configuration section in the
bottom left panel and select the Live Podcasts component in the menu on the left.
Click the + New live podcast button in the upper panel to bring up the shared channel creation dialog box.
Sharing a channel for Youtube live streaming
First, choose where you are going to stream the channel: it can be a specific public service or generic RTMP
streaming to a service that is not listed, including your own RTMP server; depending on your choice, settings may
vary to suit the specific service. Then, enter streaming configuration.
The table below explains the settings in details.
Setting Description Default
value
Sharing type Choose between Youtube, Wowza or generic RTMP
streaming
Generic
RTMP
Channel Target channel to be streamed [none]
Use substream When not enabled, main (higher resolution) stream
will be used; enable this option if you want to cast the
lower resolution stream
Disabled
Enable audio Enable this option to include sound for the shared
channel, works both for main and secondary streams
Enabled
RTMP URL Full URL to be used for casting, the link is normally
provided by the RTMP streaming engine
[empty]
Youtube Live Streaming
Youtube live casting can use RTMP streams from your TRENDnetView EVO server for further streaming.
In order to set up live streaming with Youtube, log in to your account on youtube.com and go to Creator Studio tools
TRENDnetView EVO 84
Page 86

-> Live streaming -> Stream now. If you have never created any live casts before, you may have to verify your
account - just follow the guidelines on the website.
You need to have a valid Youtube (Google) account in order to be able to use this type of streaming, and
comply with Youtube live streaming conditions. TRENDnet is not responsible for the third-party service
operability and policies.
Scroll down to the Encoder Setup section: you will need the link and the secret stream key in order to build the
RTMP link.
In TRENDnetView EVO Console, open the Shared Channels section and add a new shared channel, fill in the
settings as follows:
Sharing type: Youtube
Channel: target channel from the list of existing channels
Use substream: up to you
Enable audio: up to you
RTMP URL: rtmp://<server_URL>/<stream_key>, where
rtmp:// indicates that RTMP protocol will be used for streaming
<server_URL> is Server URL link provided by Youtube, e.g., a.rtmp.youtube.com/live2/
<stream_key> is Stream Name/Key generated by Youtube in the form of xxxx-xxxx-xxxx-xxxx
Wowza Streaming
Alike Youtube, Wowza streaming engine can receive video feeds from TRENDnetView EVO server and stream them
out to any device. You need to install Wowza Streaming Engine first and then configure live streaming as described
below.
TRENDnetView EVO does not include any installation files or licenses for Wowza Media Systems software.
Wowza engine is used as a third-party agent capable of receiving RTMP streams; all installation, setup and
management of this engine is to be handled by you or your Wowza administrator, and TRENDnet is not
responsible for the third-party engine operability and policies.
First, go to your Wowza Streaming Engine Manager and create a new application of the Live type.
Once you have created a new application, go to the Source Security settings of that application in your Wowza
Streaming Engine Manager and set RTMP Sources security to Open (no authentication). This is required as
TRENDnetView EVO currently does not support authentication for RTMP streaming.
Then, go to TRENDnetView EVO Console, open the Shared Channels section and add a new shared channel, then
fill in the settings as follows:
Sharing type: Wowza
Channel: target channel from the list of existing channels
Use substream: up to you
Enable audio: up to you
RTMP URL: rtmp://<ip>:<port>/<app_name>/<stream_name>, where
rtmp:// indicates that RTMP protocol will be used for streaming
<ip> is Wowza Streaming Engine server address - either IP or domain name
<port> is target (remote) RTMP port, 1935 by default
<app_name> is the name of the application you have created in Wowza
<stream_name> is a custom name for the RTMP stream (can be any name, use underscores
instead of spaces), will appear in Wowza automatically
When you have finished, click OK to save and exit; the newly created channel share will appear in the item list and
TRENDnetView EVO server will attempt to stream the data to the target URL at once. If you wish to pause the
streaming, use the Disable button on the top panel. After sharing the channel, you should be able to view the stream
on the RTMP server side and start the casting, if it has not started automatically.
If you have trouble receiving the stream on the RTMP server side, check the following:
TRENDnetView EVO 85
Page 87

make sure all used software is allowed through the firewall(s),
restart the RTMP server,
refresh connection list on the RTMP server side or refresh the webpage;
remove the shared channel in TRENDnetView EVO Console and try sharing the channel anew.
To edit any of the previously created channel shares, double-click it in the item list or select any with single mouse
click and then hit the Edit button on the upper panel. Use the Search field in the upper-right-hand corner to quickly
find the existing items, and the Disable button to disable and enable channel sharing. Use the recycle bin
button in the upper-right-hand corner to remove one or multiple shares: hold CTRL or Shift to select several items
at once, or CTRL+A to select all (actual original channels will not be affected).
When you remove the original channel (with or without its originating device), all shared channels based on it
are removed from the configuration automatically as well.
Filters in the bottom panel allow you to load recently added/modified items.
TRENDnetView EVO 86
Page 88

35 Layout Templates
Custom layouts templates can be created and then used in any TRENDnetView EVO Monitor applications connected
to the target server.
To access layout templates via TRENDnetView EVO Console, go to the Configuration section in the bottom left
panel and select the Layout templates component in the menu on the left. Use the Search field in the upper-righthand corner to filter existing items; press Refresh button to reload the item list.
Layout templates
Click the + New layout template button on the upper panel to bring up the configuration dialog box.
Create new custom layout template
Enter the template name, choose grid size and then modify the grid, if desired: you can select multiple cells at once
with your mouse and then use the Merge and Unmerge buttons below to create custom cell combinations. Note that
you can only create rectangular regions, not just any polygonal areas.
When you have finished, click the OK button; the newly created layout template will appear in the item list and it
will also appear in any connected TRENDnetView EVO Monitor applications after synchronization.
Use the Edit button to alter any template at any time: modifications will immediately be synchronised with
TRENDnetView EVO Monitor after you save the changes and modified templates will be available for use. However,
if the modified layout was already in use, its current output will not be altered, allowing you to save the old layout in
TRENDnetView EVO Monitor. Drag and drop the new layout template to the TRENDnetView EVO Monitor live
view display to load the updated template version.
TRENDnetView EVO 87
Page 89

36 Data Sources
This TRENDnetView EVO server functionality allows you to receive information from third-party textual data
providers like Point of Sale (POS) systems, bank machines and a multitude of other serial data devices capable of
delivering data strings over the following connection types:
UDP port (remote connection)
TCP port (remote connection)
COM port (direct hardware connection to the server)
The procedure of configuring the data reception from these sources is briefly as follows:
create a data source, then
create a data source profile, then
go back to the data source settings and use the data source profile as a basis for the data source, and then
assign the data source to the desired channel(s).
Gathered data is then stored and displayed embedded with the video stream from the channel(s) you choose to
associate with it.
Add Data Source
First, go to the Configuration section of TRENDnetView EVO Console and choose the Data Sources component
from the menu on the left. Then, click the + New data source button on the upper panel to open the data source
creation dialog box.
Give your data source a comprehensive name. Then, choose the server that is going to be accepting the serial data.
Leave the Data source profile field empty for now and select the desired transport for the data connection. You will
need to return here and choose the profile after you create the profile itself.
There are three possible connection types: UDP port, TCP port and COM port.
TCP/UDP Connection
Choose this option if your data provider is configured to feed the textual data into a specific TCP or UDP port.
You simply need to specify the incoming port for the server to listen to in the settings here. Make sure the port is
opened on all intermediate firewalls and not used by any other software on the server machine.
COM Port Connection
Choose this connection type if your data provider is connected directly into the TRENDnetView EVO server's COM
port.
For this configuration, you need to match the serial connection settings with those used from the device side.
Normally, this can be checked via Windows Device Manager for your target COM port.
COM port settings in the Windows Device Manager properties
The following serial port settings should be specified:
Baud rate: information transfer rate (9600 by default)
Data bits: the number of bits transmitted over the serial interface (8 by default)
Parity: how the parity is checked (no parity by default)
TRENDnetView EVO 88
Page 90

Stop bits: the number of bits to specify the end of a byte; if you select data bits to be 6, 7, or 8, then the
default value is 1 and the other available choice is 2; if you select data bits to be 5, then the only correct
choice for the stop bits is 1.5
COM port: serial port to read the data from, choose from the list of active ports
Other serial port parameters are not required for the TRENDnetView EVO server.
Click OK to save and close the data source creation dialog box. The next step is to create a data source profile to help
the server determine how the textual data should be parsed.
Add Data Source Profile
In the Data Sources section, click the little arrow next to the data source creation button and choose the + New data
source profile from the list. In the Details tab, enter a custom name for your data source profile and switch to the
Configuration tab.
It is now necessary to use an example of the data strings to set up the profile. This part of the setup is the same
regardless of what type of data source you have.
You can either use the actual data source you have configured on the previous step, or use a text file that
contains the lines of data in the expected format (note that the same encoding should be used). Use the buttons on
the right side of the text field to load the sample from either source. Use the Stop button to finish displaying new text
from the data source (do this if you see that the loaded data lines are sufficient to facilitate the configuration
process); use the Clear button to erase whatever is in the preview window before loading a different file or strings
from a data source.
Load a text sample to configure the data source profile
Based on the loaded sample, set the required parameters below:
Encoding: pick the correct encoding to ensure your text is readable
Line ending: choose what non-printable characters represent the end of the line, available options are:
CR - carriage return
LF - line feed
CR+LF - both together
Transaction start: specify text that designates the beginning of the data block
Transaction end: the very last data line of the expected data block
You can copy and paste the strings for transaction start and end directly from the sample preview field.
Data source profile configuration settings
Click OK to save and close the profile configuration dialog box. The next step you need to take is to go back to your
data source settings and specify the newly created data source profile that was missing in the initial
configuration. You can use a single data source profile for different data sources.
TRENDnetView EVO 89
Page 91

Assign Data Sources to Channels
Finally, go to the Channels section and pick a channel that needs to be associated with the data source. Double-click
the channel to open it for editing and switch to the Data source tab.
Click the Change button and pick your pre-created data source for this channel. Then, click the Overlay
configuration button below to define where and how the text will appear on top of the video stream.
Set up overlay text alignment within the viewport
Use the visual control to specify the text output area within the video stream viewport. There are also numerical
coordinates on the right side of the preview for your reference.
Make sure the video from the target channel is available before setting up the text overlay in order to ensure
correct text placement.
Additional settings are available here:
Line count: set the desired number of text lines to be fitted into the overlay area (default value is 20)
Timeout: the amount of time in seconds for every line of data to stay on the screen at maximum (older
text will disappear and text will be shifted upwards)
When ready, click OK to save and close the data overlay dialog box, then click OK to save and close the channel
configuration window.
Now your textual data from the data provider will be displayed overlaying the video stream in TRENDnetView EVO
Monitor and both live view and in the instant/regular archive playback mode in case the corresponding option is
enabled in the recording profile for the target channel; also, it will be possible to search through the recorded data.
If you wish the serial data to be available in the video playback mode in TRENDnetView EVO Monitor
application, make sure to set the Data stream to be recorded in the corresponding recording profile.
Note that the overlay text will not be displayed in other views and will also be unavailable for video export (not
supported at this point).
TRENDnetView EVO 90
Page 92

37 Streaming Server Configuration
Get permanent access to live streaming and archive video, no matter where you are in the world. The
TRENDnetView EVO Streaming Server allows quick and easy access to your cameras via web browser and/or native
mobile applications.
TRENDnetView EVO Streaming Server is a part of TRENDnetView EVO software integrated into the
TRENDnetView EVO Server core. It is designed for video streaming to multiple web-browsing platforms such as
Mozilla Firefox and Google Chrome. Some major TRENDnetView EVO Streaming Server features are: video stream
live view, archive playback, Pan-Tilt-Zoom control. The TRENDnetView EVO Streaming Server optimises video
streaming for web or mobile clients, to a degree dependent on connection speed and device viewing capabilities.
At this point, the browsers recommended for clients are Google Chrome and Mozilla Firefox (under any operating
system).
Audio and event streaming are not supported by the TRENDnetView EVO Streaming Server.
TRENDnetView EVO Streaming Server configuration on the TRENDnetView EVO Console side is simple and only
consists of HTTP port for streaming connections. To access the TRENDnetView EVO Streaming Server setup in
TRENDnetView EVO Console, go to the Configuration section and then click Servers in the menu on the left;
double-click the target server to bring up the configuration dialog box and switch to the Connections tab.
Server setup
You only need to define a HTTP port for TRENDnetView EVO Streaming Server; the default port is 8080. No other
settings require modification.
Please make sure that your chosen HTTP port:
is opened on the target server firewall;
is properly configured for port forwarding on all intermediate network equipment, if necessary;
is not being used by any other application or service on the target server.
Once you are done with the settings, click OK to save and close the dialog box. Your TRENDnetView EVO Streaming
Server will now be set up and accessible via a local - and, if used, external - IP. You can immediately check the
connection at once: just open your browser and type: <local IP>:<HTTP port>; for example, server configuration
for the snapshot above will require 192.168.1.82:8082.
TRENDnetView EVO 91
Page 93

38 Streaming Server User Interface
When configured, TRENDnetView EVO Streaming Server is accessible via browser from the server itself and from
computers on the local network, and, if system is not isolated, from the Internet. To access the TRENDnetView EVO
Streaming Server, open your browser and type:
<Server IP>:<HTTP port>
then press Enter. Your browser will connect to TRENDnetView EVO Streaming Server, and user authentication will
be requested: enter your user name and password to proceed.
Authentication required
After logging in, you will see TRENDnetView EVO Streaming Server user interface:
left menu: channel list and setup tabs
main window: live-streaming area
upper-right-hand corner: layout templates and layouts
upper-left-hand corner: the TRENDnetView EVO Streaming Server logo; click the logo to extend
viewing area by minimising the menu on the left
The channel availability depends on the user permissions. The built-in administrator has access to all
resources.
To allow channel access, go to Configuration section of TRENDnetView EVO Console, choose Users, then select the
user or user group for editing and add privileges on the Permissions tab:
Receive Device Data: enables live view
Access Archive: enables access to recorded video
Navigate: enables PTZ control
Set user permissions in order to see channels in TRENDnetView EVO Streaming Server
Left Menu: Configuration
The menu on the left has two tabs: devices, which shows which channels are available, and setup, which contains
streaming settings. Click on the titles to switch between them.
Devices
The video sources are loaded in a single list. To start streaming from a particular device, select layout template from
the menu in the upper-right-hand corner, then click your desired viewport so that it is highlighted blue, and then
TRENDnetView EVO 92
Page 94

click a device from the list.
Setup
The Setup tab allows you to choose PTZ control behaviour and configure stream options:
PTZ controls:
Always: if the camera supports Pan-Tilt-Zoom, virtual PTZ sphere will be always shown as
overlay control
When selected: if the camera has PTZ capabilities, the virtual PTZ sphere will be shown when
the corresponding stream is selected
Never: do not show PTZ controls at all, meaning that PTZ functionality will be disabled
Stream options:
Main: only the first (main) stream, [usually] of a larger resolution will be used for all devices
Secondary: only the secondary stream (substream), [usually] of a smaller resolution will be
used for all devices
Auto: the most appropriate stream will be selected automatically based on viewport size
Upper Right Menu: Layouts
Layout templates allow you to choose viewport layout: 1x1, 2x1, 1x2 and 2x2 are currently available options.
Default layout templates
Click on any thumbnail at any time to immediately load the corresponding layout template on the screen. If there
are any active streams, they will be discarded. If the target layout template has been already used in the same
browser and cookies have not been cleared, previously used channels will be loaded; if not, an empty template will
be displayed.
If you wish to save the layout currently being displayed, click on the 'portrait' button.
Layouts menu button
The layouts menu will appear, allowing you to save your layout under a user-defined name: enter the layout name
and click the Save button. Note that, at this point, only Latin characters [A-Za-z] and Arabic digits [0-9] are
supported for layout names; special symbols or characters from non-Latin alphabets are not allowed.
Layouts menu
From here, you can also load previously saved layouts simply by clicking them; if your layout list is longer than the
menu window, use the mouse wheel to scroll down.
The layouts are saved in your browser cookies, so:
TRENDnetView EVO Streaming Server layouts cannot be transferred to other browsers, user accounts or
computers
TRENDnetView EVO 93
Page 95

layouts are removed when browser cookie data is cleared
Main Window: Streams
Live
To start live-streaming, select a layout template from the upper-right-hand menu (1x1, 1x2, 2x1 or 2x2), then click
your desired viewport so that a blue frame selection appears around it, and then choose the target stream from the
Devices list on the left. To replace the existing live stream, either select it and choose a device 'on top' of it, or click
the X button in the upper-right-hand corner of the viewport to close it and then assign a new stream to this
viewport.
Notice that some images may appear with horizontal or vertical black stripes at the sides: this happens because
image aspect ratio is maintained instead of it being stretched to fill the viewport. When the picture size is smaller
than the target viewport, there will be a black background on either sides.
Live view with overlay PTZ controls
Each live view item contains the following information and controls:
upper-left-hand corner: stream name (static info)
upper-right-hand corner: archive playback (if applicable), presets button (click to load preset list), X
button (press to close the live stream and free the viewport)
bottom-right-hand corner: PTZ mode (if applicable), stream resolution, stream codec
(MP4/JPEG/WEBM) (static info) and zoom mode ON (static info)
centre: stream picture, virtual PTZ sphere (overlay control) (if applicable)
To pan and tilt the PTZ-capable cameras, use overlay PTZ controls: left-click and hold in the desired direction. By
default, pan/tilt mode is enabled for PTZ cameras: notice the PanTilt label in the bottom-right-hand corner of live
view.
In order to zoom IN and OUT: first, scroll your mouse wheel DOWN to enable zoom mode - in the bottom-righthand corner, a Zoom label will appear. In this mode, virtual PTZ sphere works for zoom only: click and drag UP
(upper hemisphere) to zoom IN, and DOWN (lower hemisphere) to zoom OUT. To release zoom mode and go back
to the pan-tilt sphere, simply scroll your mouse wheel UP until the Zoom label disappears.
For some cameras, you may notice that the further you drag the cursor from the sphere centre, the faster the camera
goes: in this way, PTZ speed is controlled; however, for other cameras, only the constant speed is supported either
by software or device itself, and the pan/tilt speed will remain constant no matter what position your mouse cursor
is in.
Archive Playback
If recording is enabled for the target channel, the stream overlay controls will include an archive playback button in
the upper-right-hand corner. Press the button to begin playback: the target stream will be displayed in single
channel mode. To switch back to live view, press the 'eye' button in the upper-right-hand corner; this will restore
your previous layout.
TRENDnetView EVO 94
Page 96

Archive playback view
Playback view contains the following information and controls:
upper-left-hand corner: stream name (static info)
upper-right-hand corner: 'eye' icon to go back to live view, X button (press to close the live stream and free
the viewport)
bottom-right-hand corner: timestamp (current time and server time zone shift)
centre: stream picture
centre bottom: playback controls
Overlay controls allow you to start/pause playback and jump back/forward by ten seconds, one minute, ten
minutes or an hour.
TRENDnetView EVO 95
Page 97

39 Mobile Application for Streaming Server
Install the TRENDnetView EVO Mobile application from Play Store (for Android users) or iTunes (for iOS users).
Supported OS:
Android 4.4 and higher;
iOS 8.2 and higher.
Add Server
Tap the Add Server button on the bottom panel to create a new server connection. The following parameters should
be filled in:
Name: server friendly name.
Host: server IP or domain name from your TRENDnetView EVO configuration.
Port: HTTP port to use (must match the one configured on the server side),the default one is 8080.
Username and password: user account credentials to connect to the TRENDnetView EVO server.
Startup Server: select if you wish to automatically connect to the target server on starting the
application. On startup, the app will load server list and try to connect to the selected server automatically.
Server settings
When you are ready, tap Done to save and exit the dialog box, or tap Cancel to discard the changes made and go
back to the main menu. To edit the existing server settings, tap and hold the server name in the list, then release and
then tap the Edit button that will appear in the upper-right-hand corner; existing server configurations can be
removed in the same way.
Settings
Note that these settings are global for all servers.
General
Language: set application localisation here
Date Format: set the date presentation format you want the application to use, e.g.,
YYYY/MM/DD
Time Format: set the time presentation format you want the application to use, e.g.,
HH:MM:SS (24h)
Timezone: choose between your mobile client or connected server time zone
Streams
Quality preference
Main: only the first (main) stream, [usually] of a larger resolution will be used for all
devices
Secondary: only the secondary stream (substream), [usually] of a smaller resolution
will be used for all devices
TRENDnetView EVO 96
Page 98

Auto: the most appropriate stream will be selected automatically based on viewport
size
Display video statistics
ON/OFF: defines if video stream properties are shown for both incoming and
outgoing streams
Decoder configuration: choose how the incoming streams will be decoded
Hardware only: hardware decoding modules available on your phone will be used
automatically (recommended for battery saving)
Hardware and software: software decoders will be used if required (warning: software
decoding is battery intensive!)
Per codec configuration: choose decoding settings individually for each of the expected
codecs
Icons
Show video stream event log icon: the button will appear on top of video and allow you to
view the decoder log
Show battery intensive decoder icon: the icon will appear in case a software decoder is in
use
Camera
Camera preferences for the reverse streaming
Off: choose this if you do not plan to stream device's video to the server
Camera 1: main mobile device camera (normally, back camera)
Camera 2: secondary camera (normally, front camera with less megapixels)
Resolution preference/FPS preference/Microphone ON/OFF
Preview: camera preview with the settings defined above
Widgets
Widget update interval
automatically load new frame every 30 seconds, every 1, 2, 5, 10 or 15 minutes
Network
Allow app to use
WiFi only, including VPN if configured
Both WiFi and 3G/4G mobile connection
Allow widgets to use
WiFi only, including VPN if configured
Both WiFi and 3G/4G mobile connection
About
Build version: application version information
Legal info: tap to view
When enabling camera and sound, you may be asked to confirm permissions for the app to access your
phone's camera(s) and microphone. Select YES to grant access to these components if you wish to be able to
stream video and audio from your phone to the server and clients connected to it.
TRENDnetView EVO 97
Page 99

Application settings
In addition to the settings, this menu section contains legal info and information about the application version.
Live View
When you connect to a server, the live view will be loaded by default. If you have already connected to the selected
server previously, live view layout from the last time it was opened will be loaded. Each channel name will
be displayed in the upper-left-hand corner of the picture, together with video stream properties - codec, bit rate,
frame rate and resolution; stream statistics can be turned OFF via app settings (see above). Tap the camera live view
video to switch to full screen; pinch to zoom IN/OUT (digital zoom).
Tap the "<" Back button in the upper-left-hand corner to return back; tap back once again to return to Home screen.
Live view
Swipe left/right to load the next set of channels on the same layout. Tap and hold channel live view to bring the
available channel list (similarly to the channel selection menu, chosen item will replace the selected channel).
TRENDnetView EVO 98
Page 100

Single channel live view
Tap any channel to replace the currently displayed layout with a single channel view with extra controls. These are:
Bottom left corner:
Camera icon: take a snapshot. Tap to save the currently displayed frame onto your device.
Bottom right corner (icon set varies depending on channel capabilities):
Speaker icon: audio IN. Tap once to enable incoming audio (the icon will turn blue), tap once
again to stop.
Microphone icon: audio OUT. Tap once to start sending audio back to the camera (the icon
will turn blue), tap once again to stop. Note: you do not need to tap and hold the mic icon, like
in the regular TRENDnetView EVO Monitor application, simply tap once to enable audio
streaming
Arrows: PTZ control (for PTZ capable cameras). Tap to bring up the controls, tap once again to
hide them. While having overlay PTZ controls ON:
swipe your finger or long tap inside the sphere to pan and tilt
long tap the ends of the zoom slider to zoom in and out
Audio IN, audio OUT and PTZ controls
While in this mode, you can swipe left or right to load previous or next channel in the list. Long tap on the free space
(where there is no stream) or on the stream itself (when PTZ controls are OFF) to bring up the list of all available
channels: swipe down and up to browse the list, tap any channel to display it.
Menu Controls
You can find the server control buttons in the upper-right-hand corner. For vertical screen orientation, all menu
controls (except for the timer) collapse into a single button with drop-down list.
Eye icon/timer: shows current server time. When you tap it, you are given the option to select the
time (the app will automatically switch to Archive mode afterwards)
Cameras: tap to select a channel from the list of available ones. Note that every channels can only be
mapped once and attempts to map a channel for the second time will result in it being placed in the new
position and removed from the old one
Views: tap to open layout selection. The layouts currently available are: 1x1, 2x1, 2x2, 3x2. "Add Current"
enables you to save current layout under a specified name. If a larger layout has been selected, existing
channels will be mapped automatically and all the extra slots will appear blank. To add more channels, tap
the "Cameras" button and pick one; all the slots will become marked with blue frames, tap any of them to
place the new video channel there.
Make snapshot: tap to save a snapshot to the gallery.
Cast: stream to Chromecast
Stream camera: send the video stream from your phone's camera back to the TRENDnetView EVO
server
TRENDnetView EVO 99
 Loading...