

Page 1
TRENDnet User’s Guide
Cover Page
Page 2
© Copyright 2021 TRENDnet. All Rights Reserved.
TRENDnet User’s Guide
Table of Contents
i
Contents
TRENDnet Hive Overview ................................................................ 1
What is TRENDnet Hive? ................................................................................................ 1
Features ......................................................................................................................... 1
Hive Pro Features........................................................................................................... 2
Adding devices to Hive .................................................................... 3
Hive Compatible Devices ............................................................................................... 3
Configure your device for Internet access ..................................................................... 3
Register your device with your Hive account ................................................................ 5
Hive Management Portal ................................................................ 6
Login to your Hive account ............................................................................................ 6
Hive Dashboard ............................................................................................................. 7
Create a new tenant........................................................................................................... 8
Manage devices in your Hive account ........................................................................... 9
Configure devices in your Hive account ...................................................................... 12
Provision devices in your Hive account ....................................................................... 15
Configuration Provisioning ............................................................................................... 15
Firmware Provisioning ..................................................................................................... 22
Assigning device licenses ............................................................................................. 27
Monitoring devices ...................................................................................................... 30
Event Monitoring ............................................................................................................. 30
Device Utilization ............................................................................................................. 32
Diagnostic Tools ........................................................................................................... 33
Ping IPv4 Host .................................................................................................................. 33
Device Reboot .................................................................................................................. 35
Cable Diagnostics ............................................................................................................. 36
Account Settings .......................................................................................................... 38
View Hive System Messages ............................................................................................ 45
View Device Logging ........................................................................................................ 46
View System Logging ....................................................................................................... 47
Configure alert notifications ............................................................................................ 48
Web Smart Switch Series Hardware Specifications ........................ 49
Web Smart Switch Series Software Specifications .......................... 51
Web Smart PoE Switch Series Hardware Specifications .................. 53
Web Smart PoE Switch Series Software Specifications ................... 55
Page 3
© Copyright 2018 TRENDnet. All Rights Reserved.
TRENDnet User’s Guide
TRENDnet Hive
1
TRENDnet Hive Overview
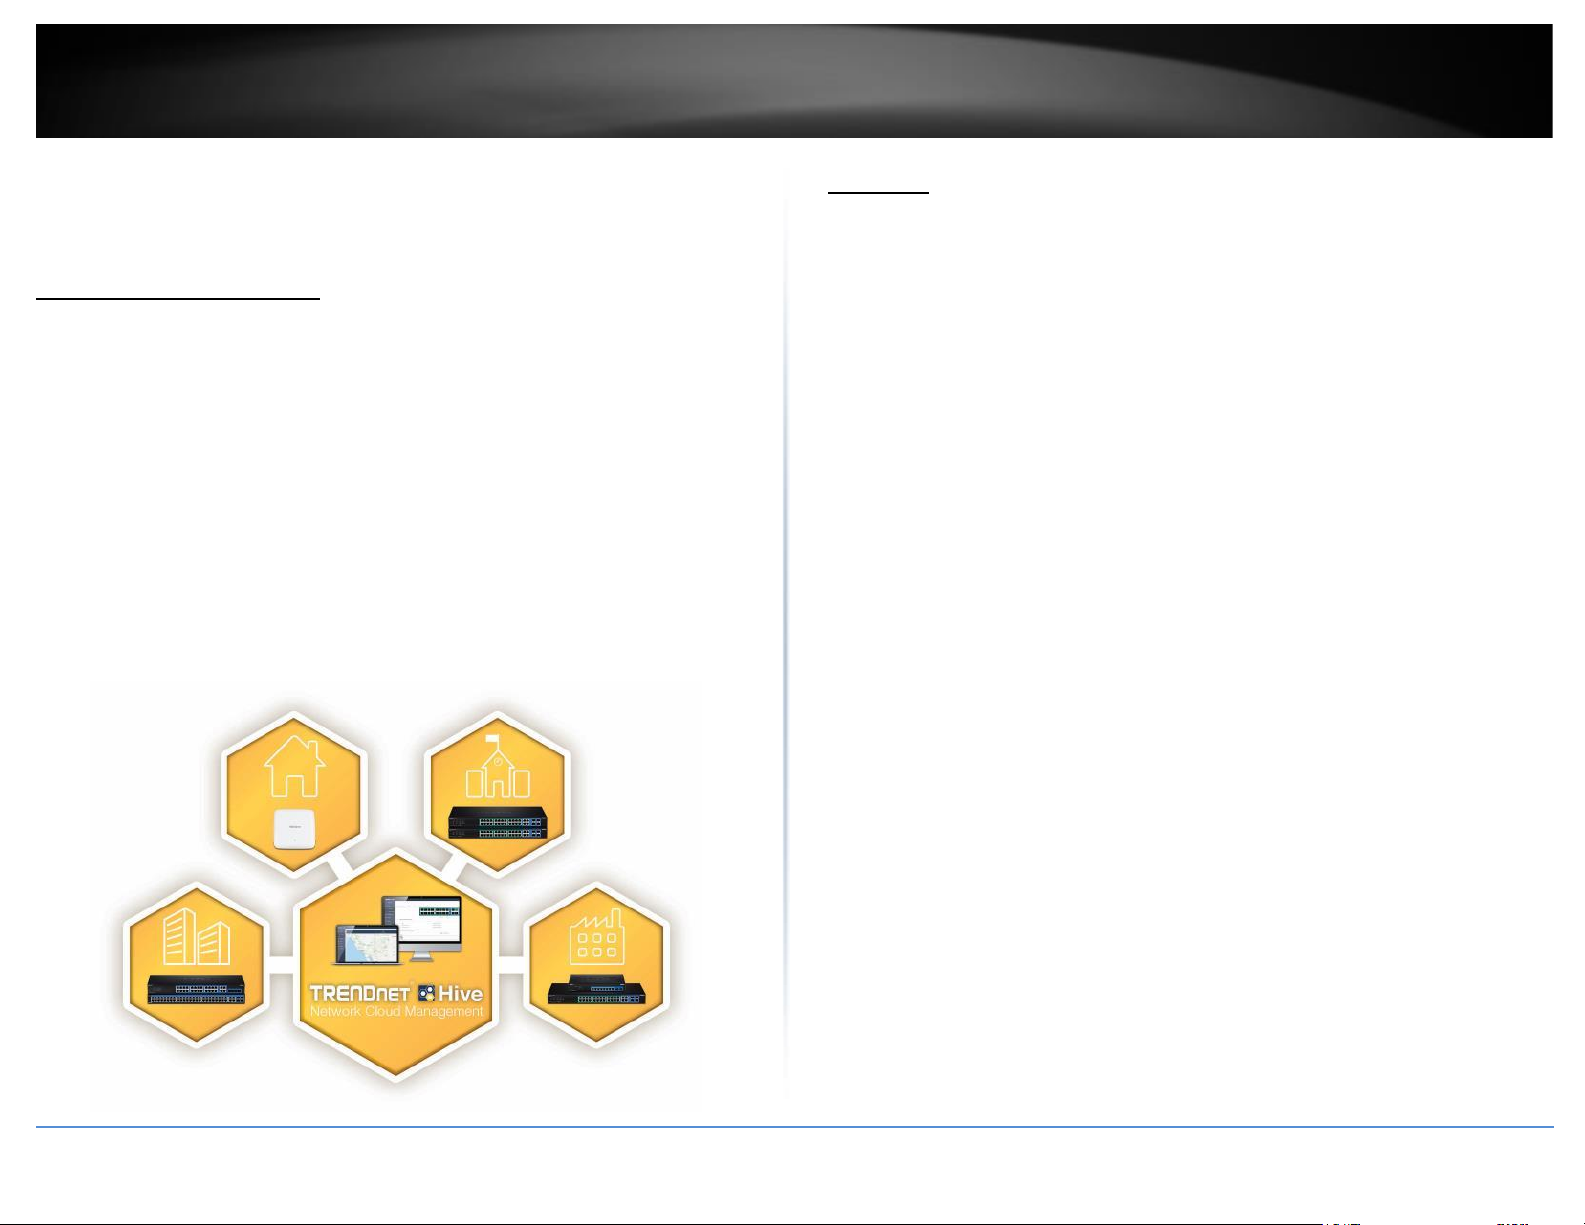
What is TRENDnet Hive?
TRENDnet Hive is a cloud management platform that provides a centralized
cloud-based management solution for TRENDnet network devices. TRENDnet
network devices can be connected to the Hive cloud management platform. The
TRENDnet Hive cloud networking solution offers better overall visibility of your
network devices from a single intuitive and easy-to-use cloud interface.
Advanced features supported with cloud networking include event and device
hardware monitoring, traffic statistics, notification alerts, and troubleshooting
tools. Network device provisioning can be accomplished through scheduled or
immediate deployment of batch firmware and configuration updates. Reduce
the time, complexity, and management costs of your network with TRENDnet
Hive.
Features
Cloud-Based Management
TRENDnet Hive network cloud manager provides better overall visibility of your
network devices from a single intuitive and easy-to-use cloud interface
Hassle-Free Remote Monitoring
Remote network management support allows you to monitor your network
devices from the cloud with device uptime, detailed logging, traffic statistics,
event snapshots, and device health (processor/memory hardware and PoE
budget utilization)
Intuitive Alerts and Notifications
Choose customized alerts and notifications to be sent based on exceeded
thresholds (CPU/memory) or events (port link status, device offline, switch loop)
Ease of Provisioning
Schedule batch firmware upgrades and configuration updates for deployment
from the cloud for your network devices. Create and customize configuration
files in the cloud and review records of when firmware and configuration update
tasks were carried out
Reduce time and management costs
Reduce maintenance time and costs by moving network device access to the
cloud
Minimal Downtime
Service-Level Agreement (SLA) guaranteed 99.9 percent uptime and service
availability
Page 4
© Copyright 2021 TRENDnet. All Rights Reserved.
2
TRENDnet User’s Guide
TRENDnet Hive
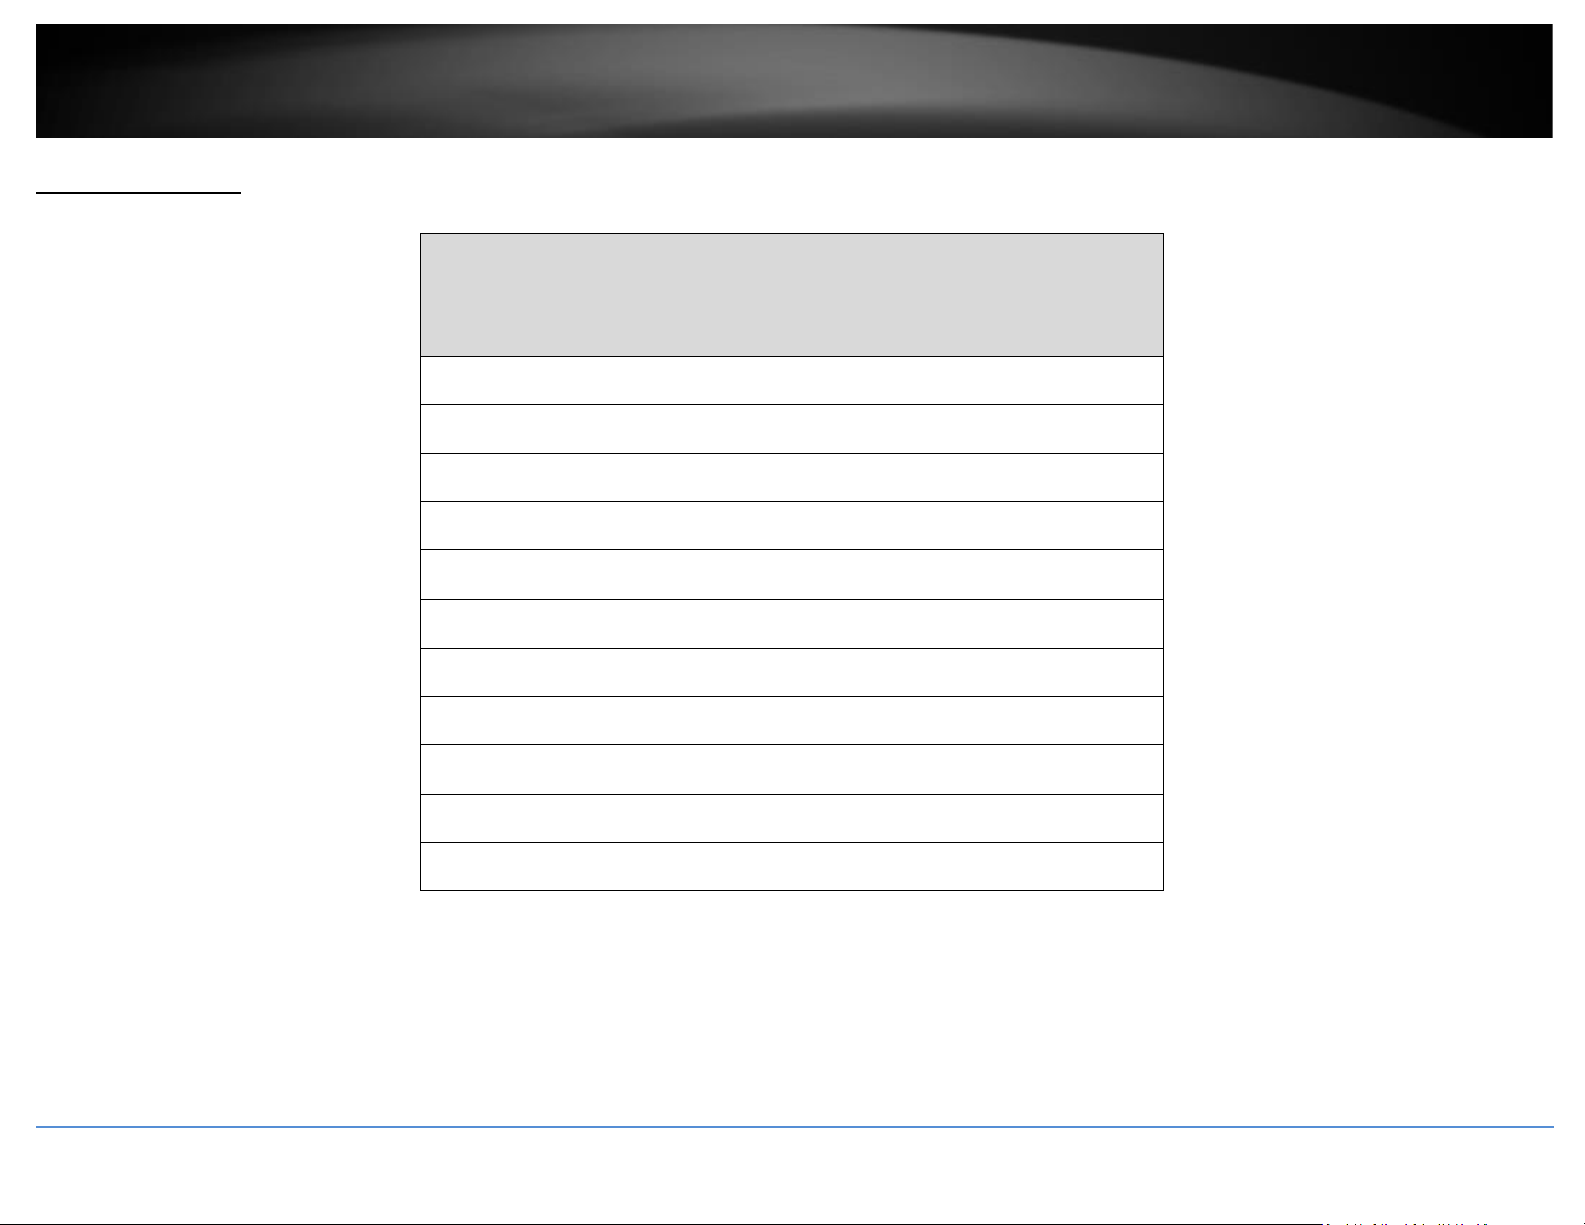
Hive Pro Features
Features
Multiple Device Management
Multiple Site Management
Supports all selected TRENDnet devices
Supports unlimited number of devices
Device Configuration & Monitoring
Batch Firmware and Configuration Deployment
Notification Alerts
Multiple Tenant Management
Multiple User Accounts
Role-based User Privileges
Google Maps™ mapping service
Disclaimer: Features and specifications are subject to change without notice.
Page 5
© Copyright 2021 TRENDnet. All Rights Reserved.
TRENDnet User’s Guide
TRENDnet Hive
3
Adding devices to Hive
Hive Compatible Devices
The device models listed below are currently compatible with TRENDnet Hive. You may
need to upgrade the device firmware to enable TRENDnet Hive.
Web Smart Switches
Model
Hardware Version (H/W)
TEG-082WS*
v2.XR
TEG-204WS*
v1.XR
TEG-284WS*
v1.XR
TEG-524WS*
v1.XR
PoE Web Smart Switches
Model
Hardware Version (H/W)
TPE-082WS*
v1.XR
TPE-1620WS*
v2.XR
TPE-1620WSF*
v1.XR
TPE-204US*
v1.XR
TPE-2840WS*
v2.XR
TPE-5028WS*
v1.XR
TPE-5048WS*
v1.XR
TPE-5240WS*
v1.XR
*Important Note: Please make sure you have updated TRENDnet Web Smart Switches to
enable TRENDnet Hive capability (firmware version 3.01.XXX or above).
Disclaimer: Supported models are subject to change without notice.
Configure your device for Internet access
Before connecting TRENDnet devices to the Hive management system, the devices must
be configured with the proper IP address, subnet mask, default gateway address, DNS
server settings, and connected to a network for Internet access before devices can
connect to the Hive management system. Devices must always remain connected to the
Internet to ensure they can be managed and monitored from your Hive account.
Example (TRENDnet Web Smart Switch):
Note: The following example will provide the steps for configuring the TRENDnet web
smart switch IP address, subnet mask, default gateway address, and DNS settings.
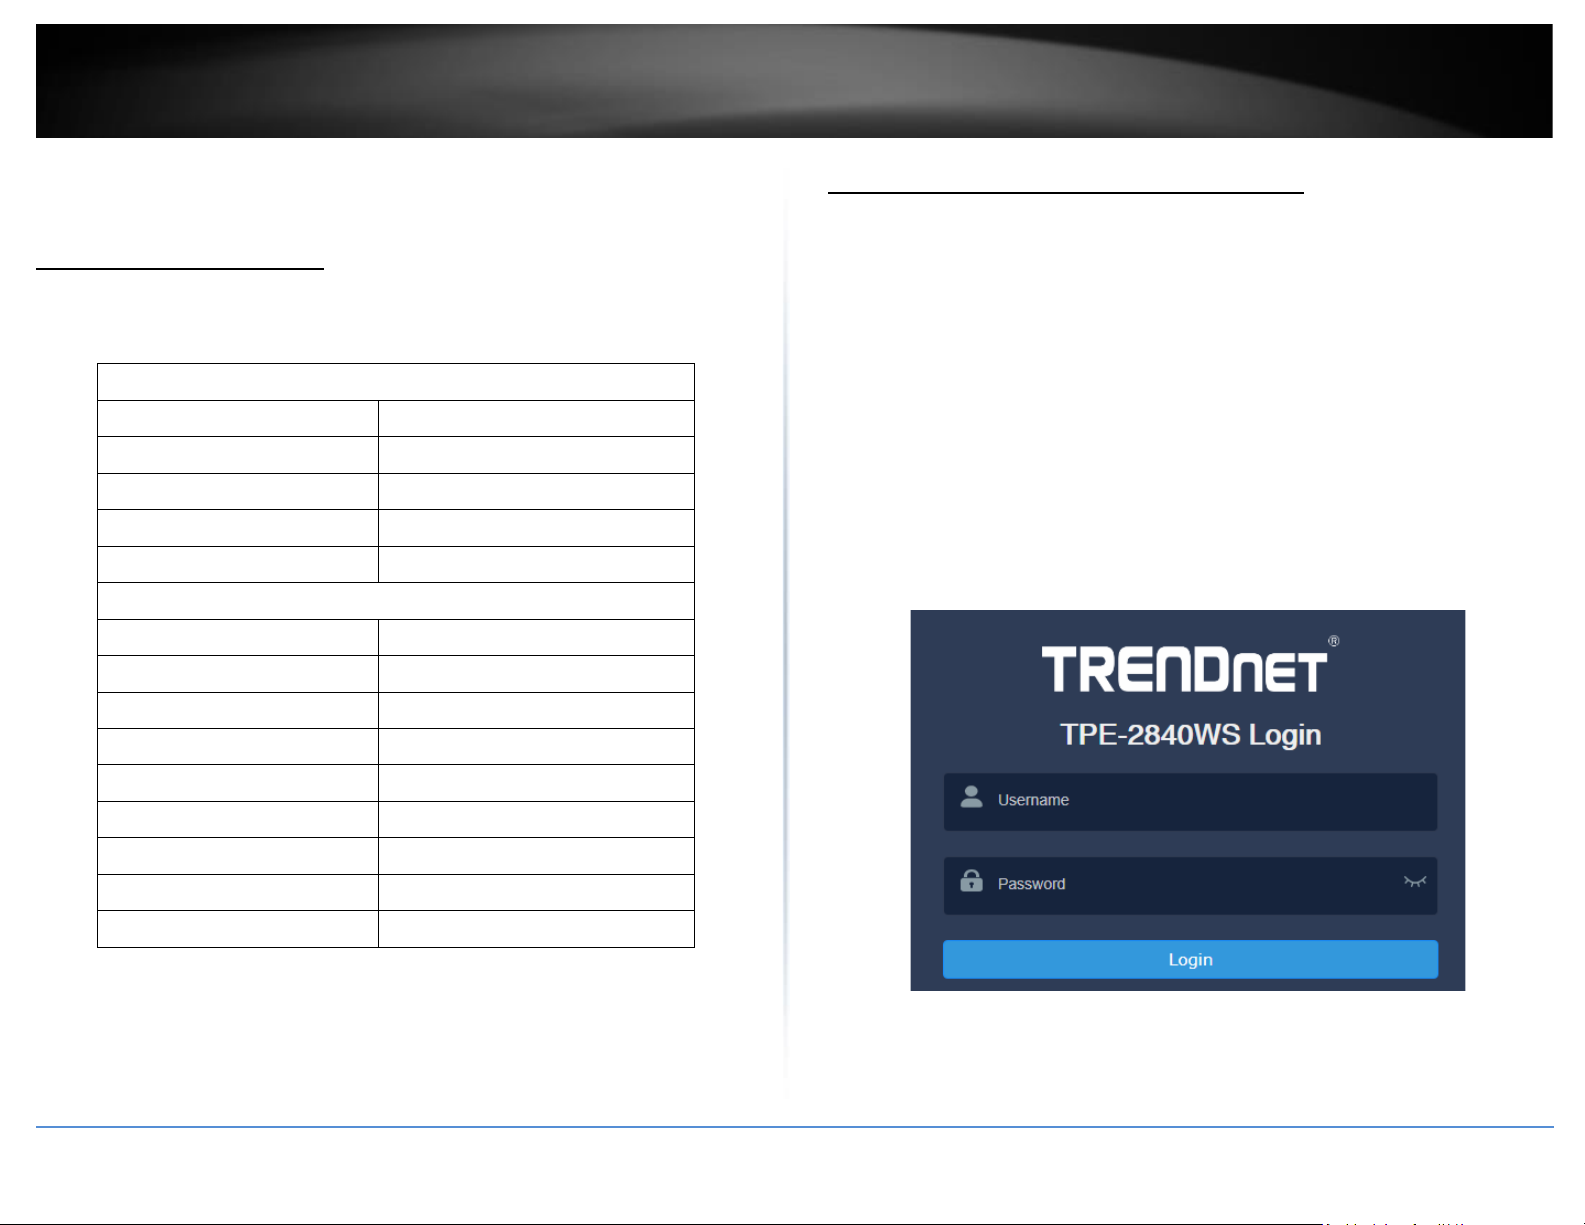
1. Login to the web smart switch management page.
Note: The TRENDnet web smart switch default IP address and subnet mask is
192.168.10.200 / 255.255.255.0. The TRENDnet web smart switch default user
name and password is admin / admin.
Page 6
© Copyright 2021 TRENDnet. All Rights Reserved.
TRENDnet User’s Guide
TRENDnet Hive
4
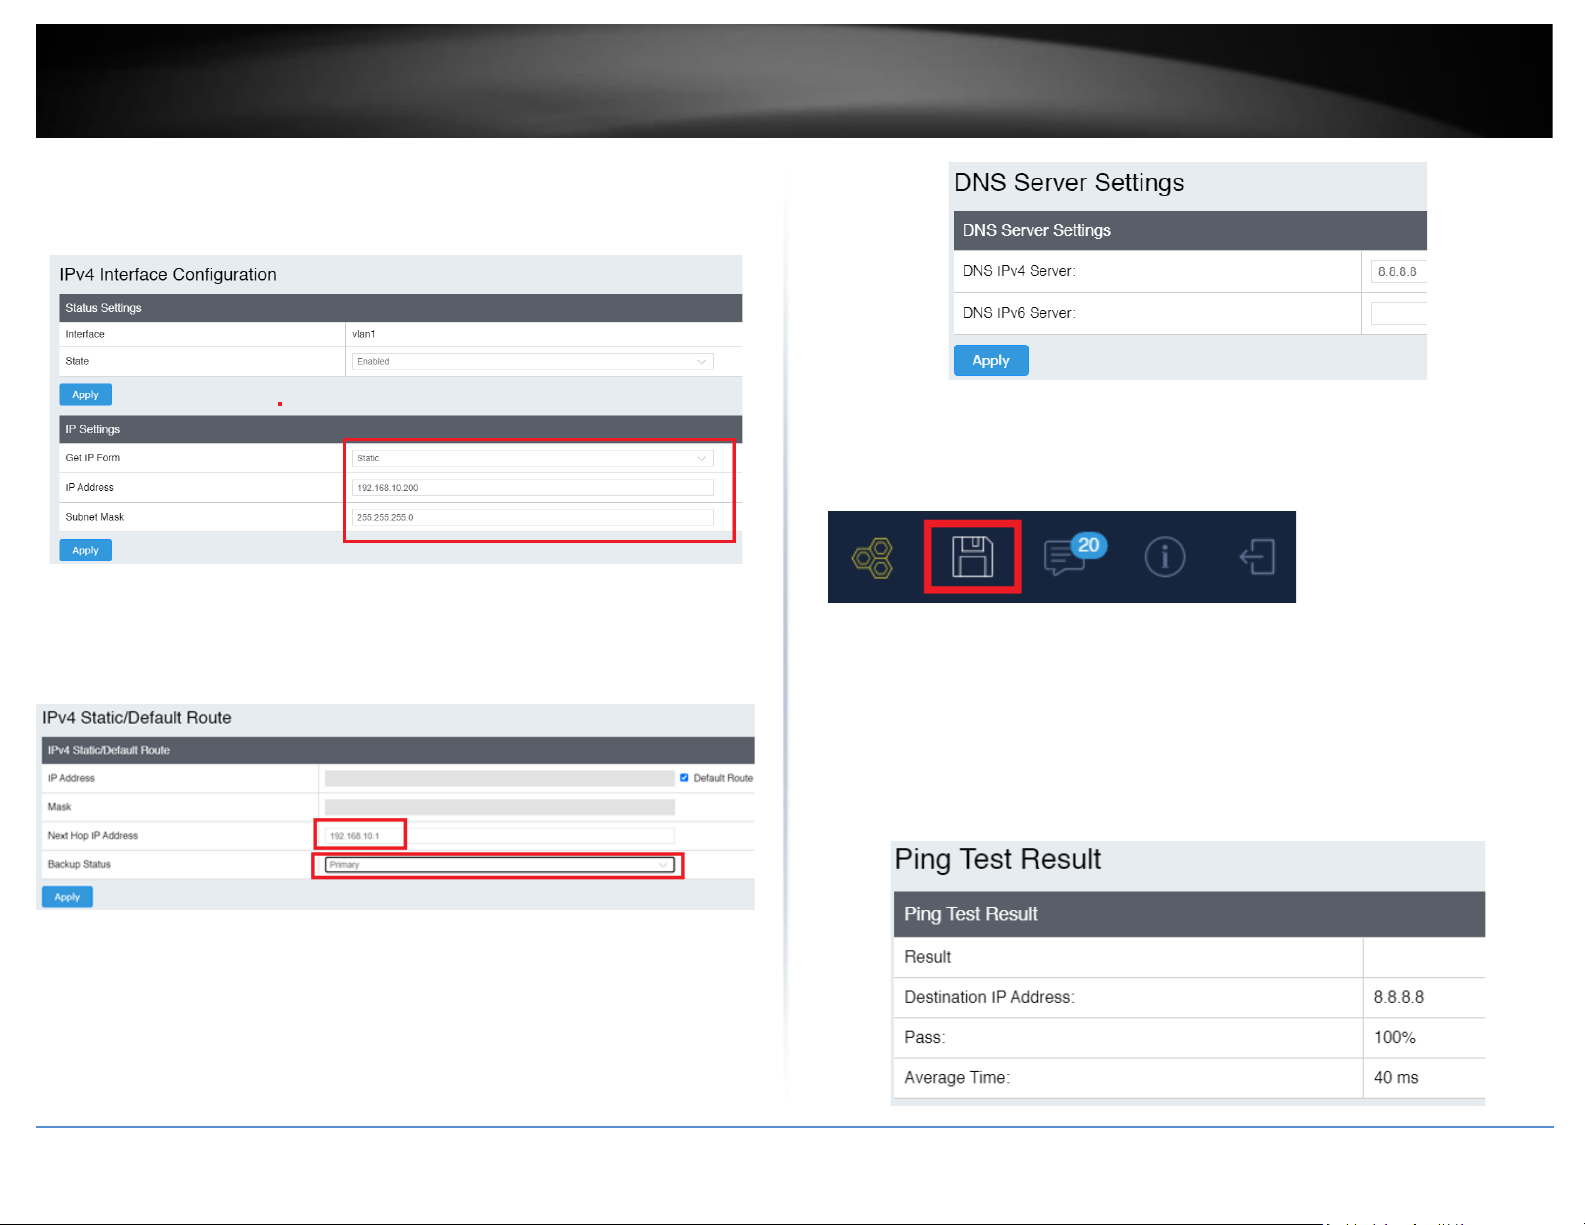
2. Click on System > L3 Feature > IPv4 Interface.
3. Enter the IP Address and Subnet Mask settings and click Apply.
Note: You may need to login to the switch with the new IP address settings.
4. Click on System > L3 Feature > IPv4 Static/Default Route.
5. Make sure Default Route is checked, enter the default gateway IP address in
the Next Hop IP Address field, select Primary for the Backup Up Status, and
click Apply.
6. Click on System > DNS.
7. Enter the DNS server IP address in the DNS IPv4 Server field and click Apply.
8. In the top right menu, click on the save disk icon to save to NV-RAM.
Note: You can also click on Save in the left navigation menu and click on Save
Settings to Flash.
9. After your switch has been configured with the proper IP address and DNS
server settings, connect your switch to your network with Internet access.
Note: After you have connected your switch to your network, you can verify
Internet access by conducting a ping test from the switch in the left navigation
menu Tools > Ping and for the Destination IP Address, enter an Internet IP
address such as 8.8.8.8, click Start. After a few seconds, click Show Ping Result
button when it becomes available to check the result. The pass result should
have a value higher than 0% to indicate that the switch can access the Internet.
Page 7
© Copyright 2021 TRENDnet. All Rights Reserved.
TRENDnet User’s Guide
TRENDnet Hive
5
Register your device with your Hive account
After your TRENDnet device has been properly configured and and connected for
Internet access, register your device with your Hive account by logging into your device
management page and in the cloud settings, enter your Hive user credentials to register
your device with your Hive account.
Example (TRENDnet Web Smart Switch):
Note: The following example will provide the steps for registering the TRENDnet web
smart switch to your Hive account.
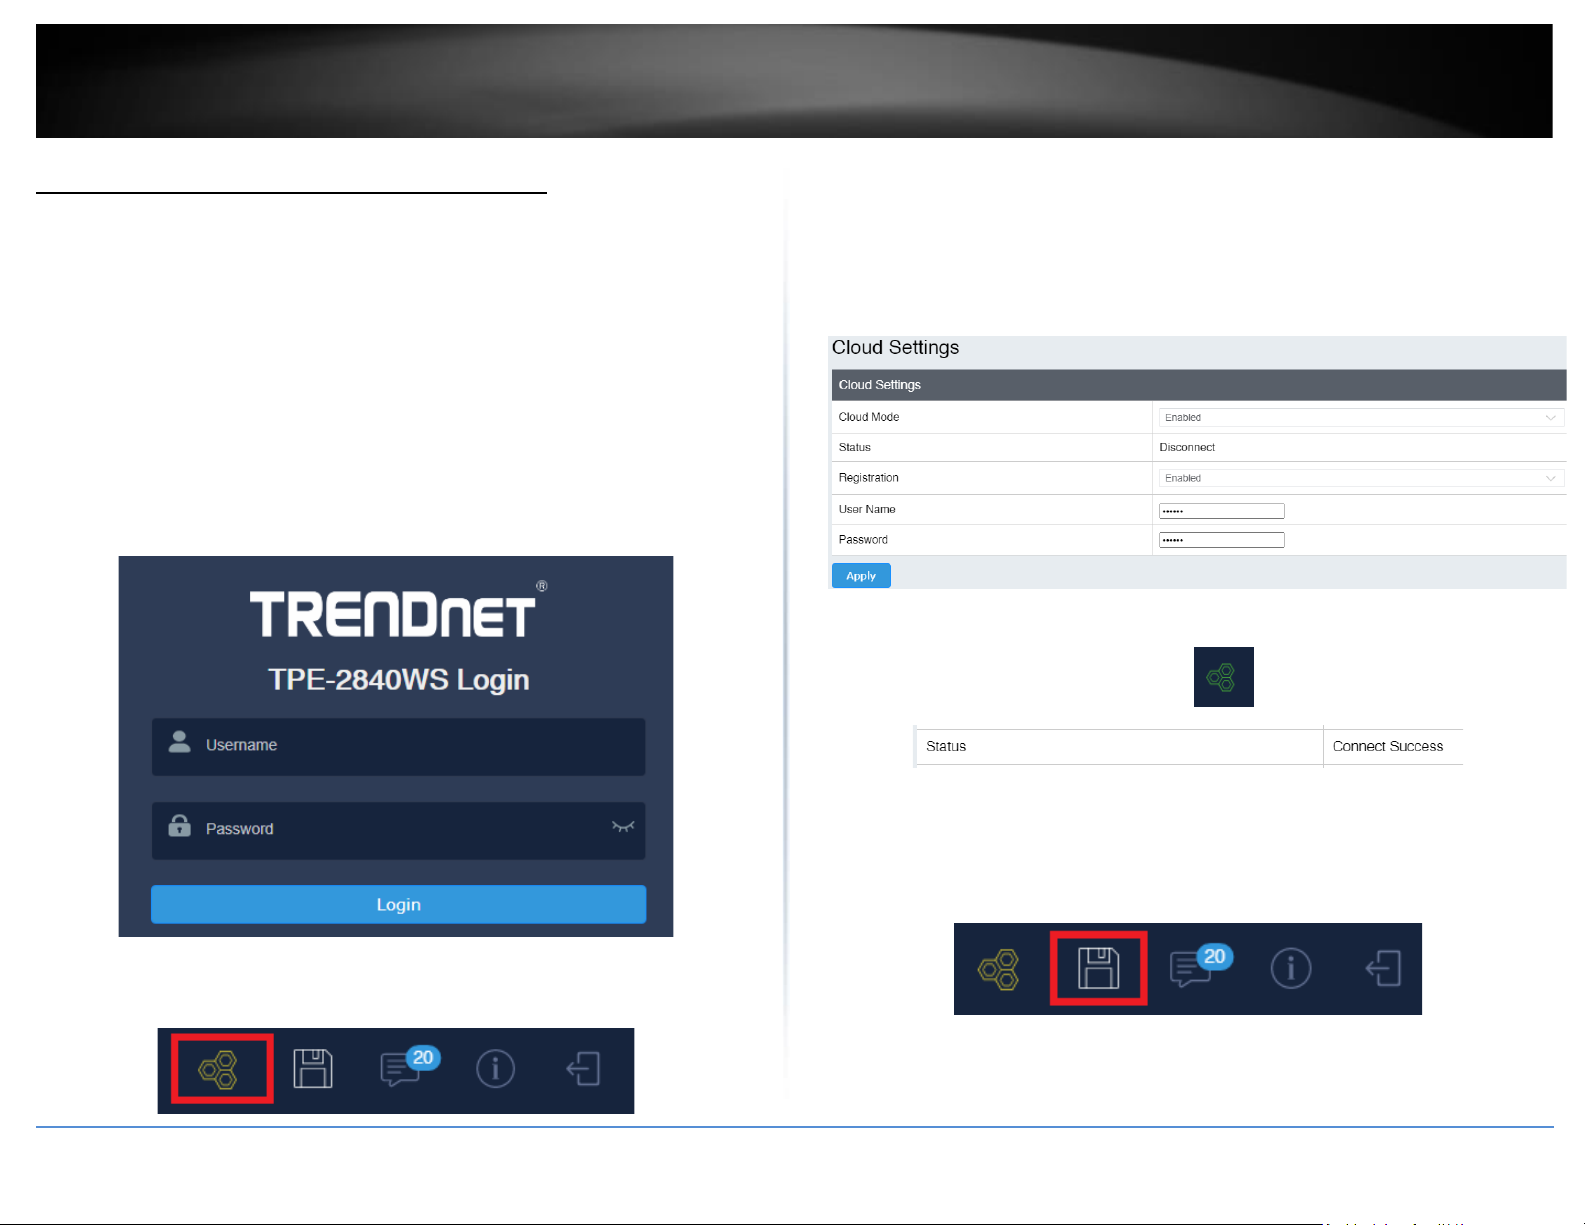
1. Login to the web smart switch management page.
Note: The TRENDnet web smart switch default IP address and subnet mask is
192.168.10.200 / 255.255.255.0. The TRENDnet web smart switch default user
name and password is admin / admin.
2. In the top right menu, click on the Hive icon.
Note: You can also click on System > Cloud Settings in the left navigation menu.
3. For the Cloud Mode, select Enabled.
4. For the Registration, select Enabled
5. Enter in your Hive account credentials in the User Name and Password fields,
then click Apply.
Note: Once the device is assigned to a specific Hive user account, the device
cannot be assigned to a different Hive user account.
Note: The Hive icon will turn green along with a status message update after
the switch has been successfully registered.
6. In the top right menu, click on the save disk icon to save to NV-RAM.
Note: You can also click on Save in the left navigation menu and click on Save
Settings to Flash.
Page 8
© Copyright 2021 TRENDnet. All Rights Reserved.
TRENDnet User’s Guide
Hive Management System
6
Hive Management Portal
This section will explain how to navigate, functionality and usage of the Hive management portal .
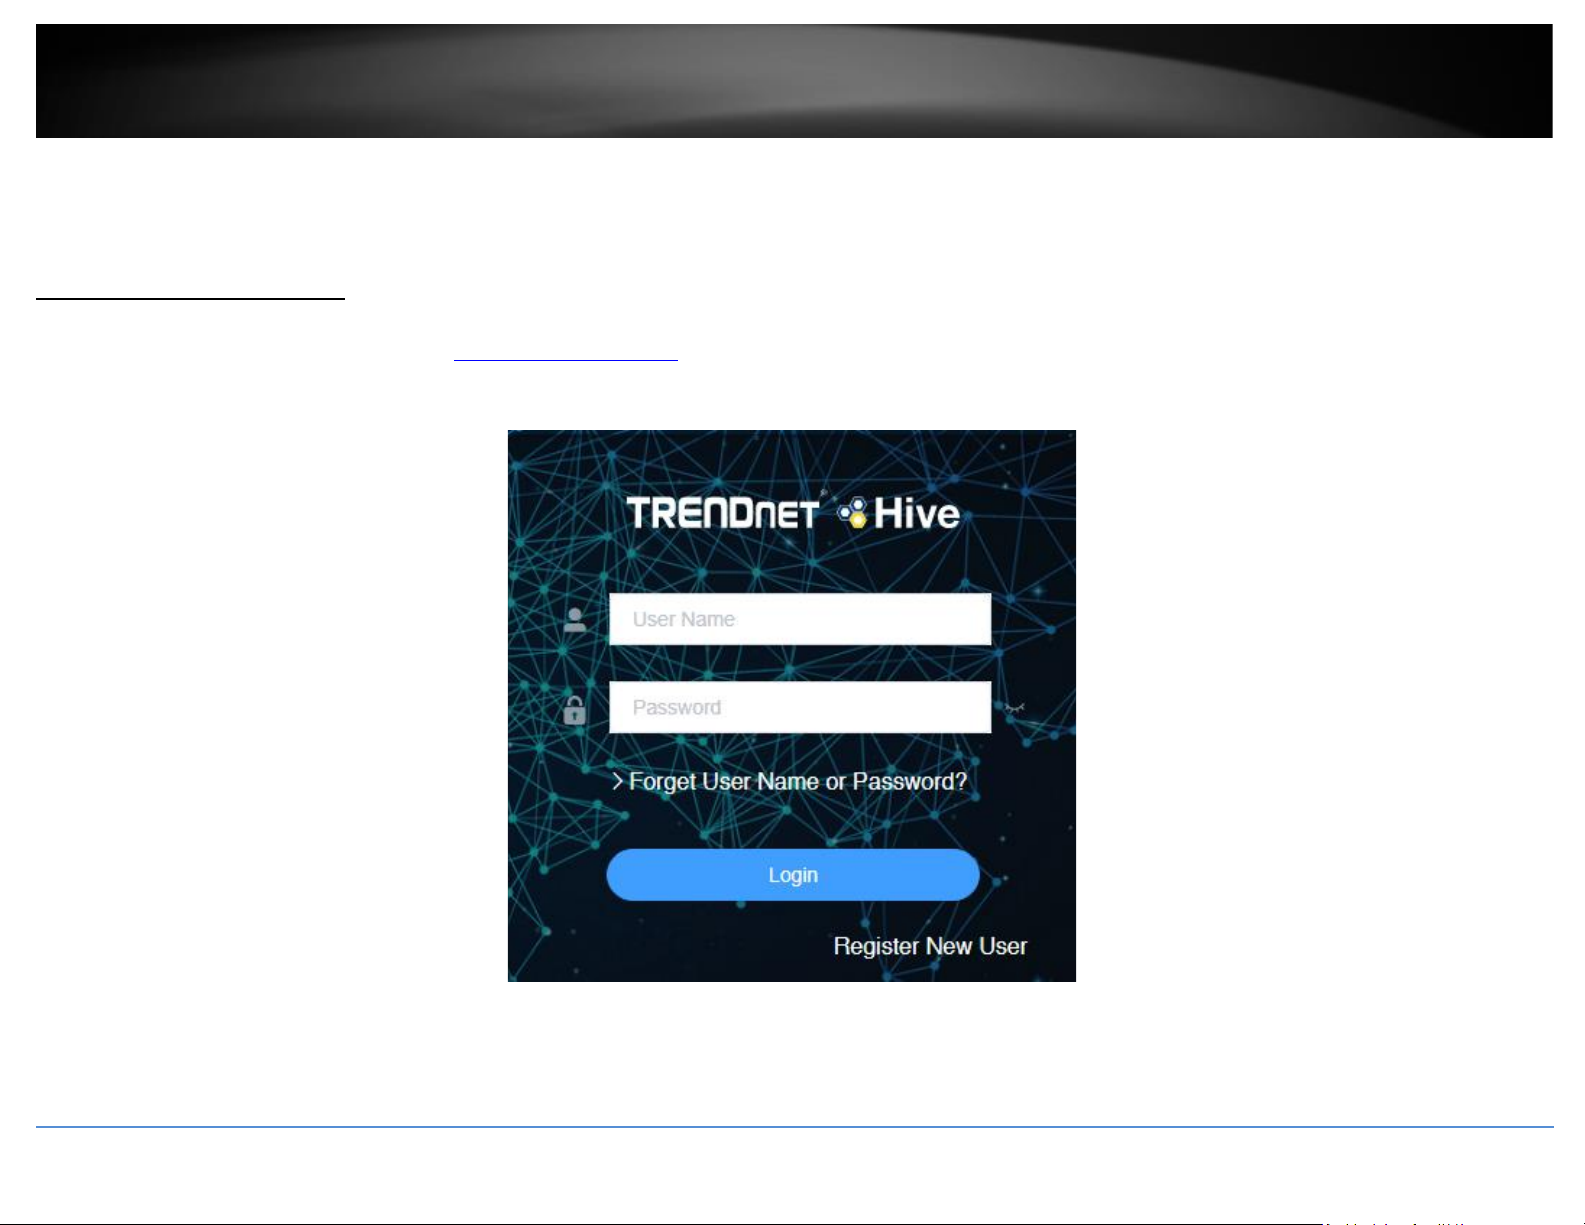
Login to your Hive account
Using a web browser, login to your Hive account at https://cloud.trendnet.com. Enter your user name and password account credentials and click Login.
Page 9
© Copyright 2021 TRENDnet. All Rights Reserved.
TRENDnet User’s Guide
Hive Management System
7
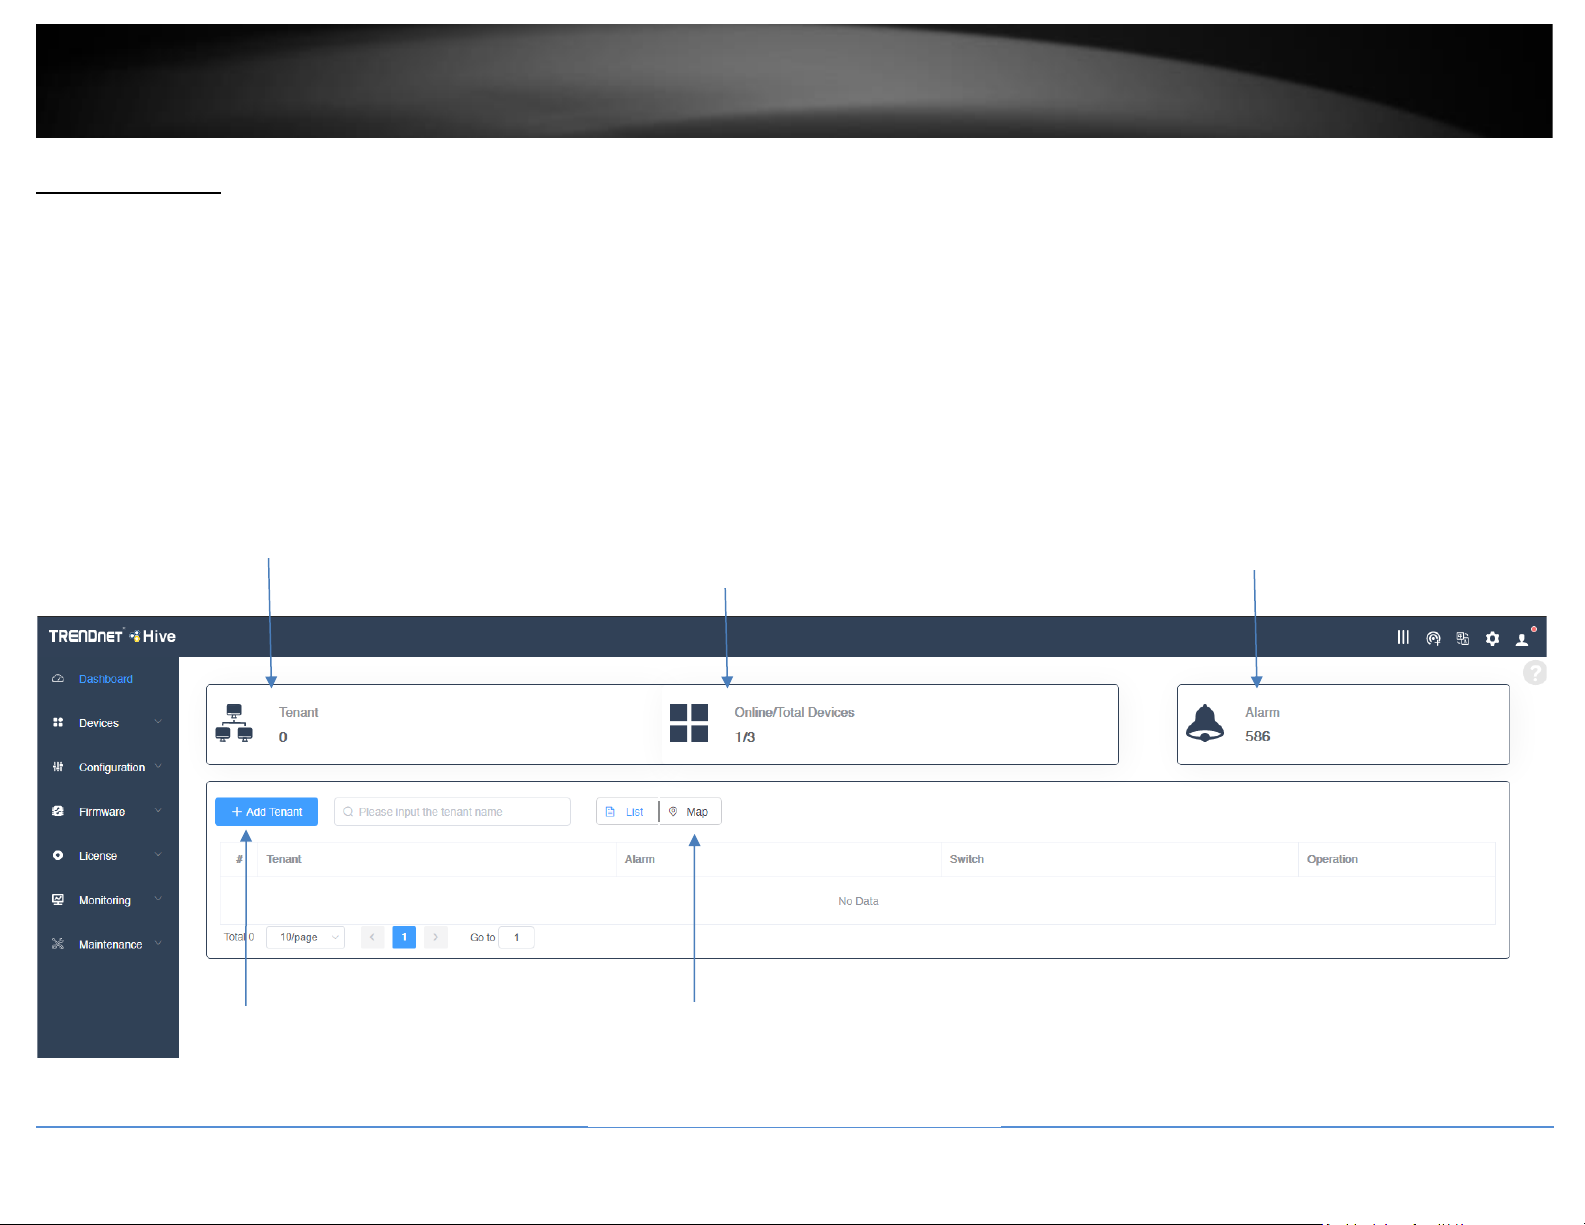
Hive Dashboard
The Hive dashboard displays the total number of tenants, devices (online/total) and the number of alarm notifications.
You can also create new tenants, remove tenants, check tenant location, check the alarm notifications and online/total number of devices for each tenant from this page.
Note: Devices must be assigned to tenant in order the devices to be managed from Hive.
What is a tenant in the Hive Management System?
A tenant is group in the Hive Management System for easier manageability of network locations, customers, or organizations where TRENDnet Hive compatible devices will be installed,
monitored and managed. Tenant management will allow for better organization, maintenance, monitoring of each network location, customer, or organization individually. Additional
users can be created for Hive access and restricted only to a specific tenant and restricted only to specific management sections for the specified tenant for access control purposes.
Tenant – Displays total number of tenants
Online/Total Devices – Displays the
number of devices online/total number of
devices. Click to view devices.
Alarm – Displays the number alert
notifications. Click to view alerts.
Add Tenant – Click to add a new tenant.
List | Map – Click List to display tenants in list
view, click Map to display tenants by location
on map. You can also view device location by
entering the device MAC address.
Page 10
© Copyright 2021 TRENDnet. All Rights Reserved.
TRENDnet User’s Guide
Hive Management System
8
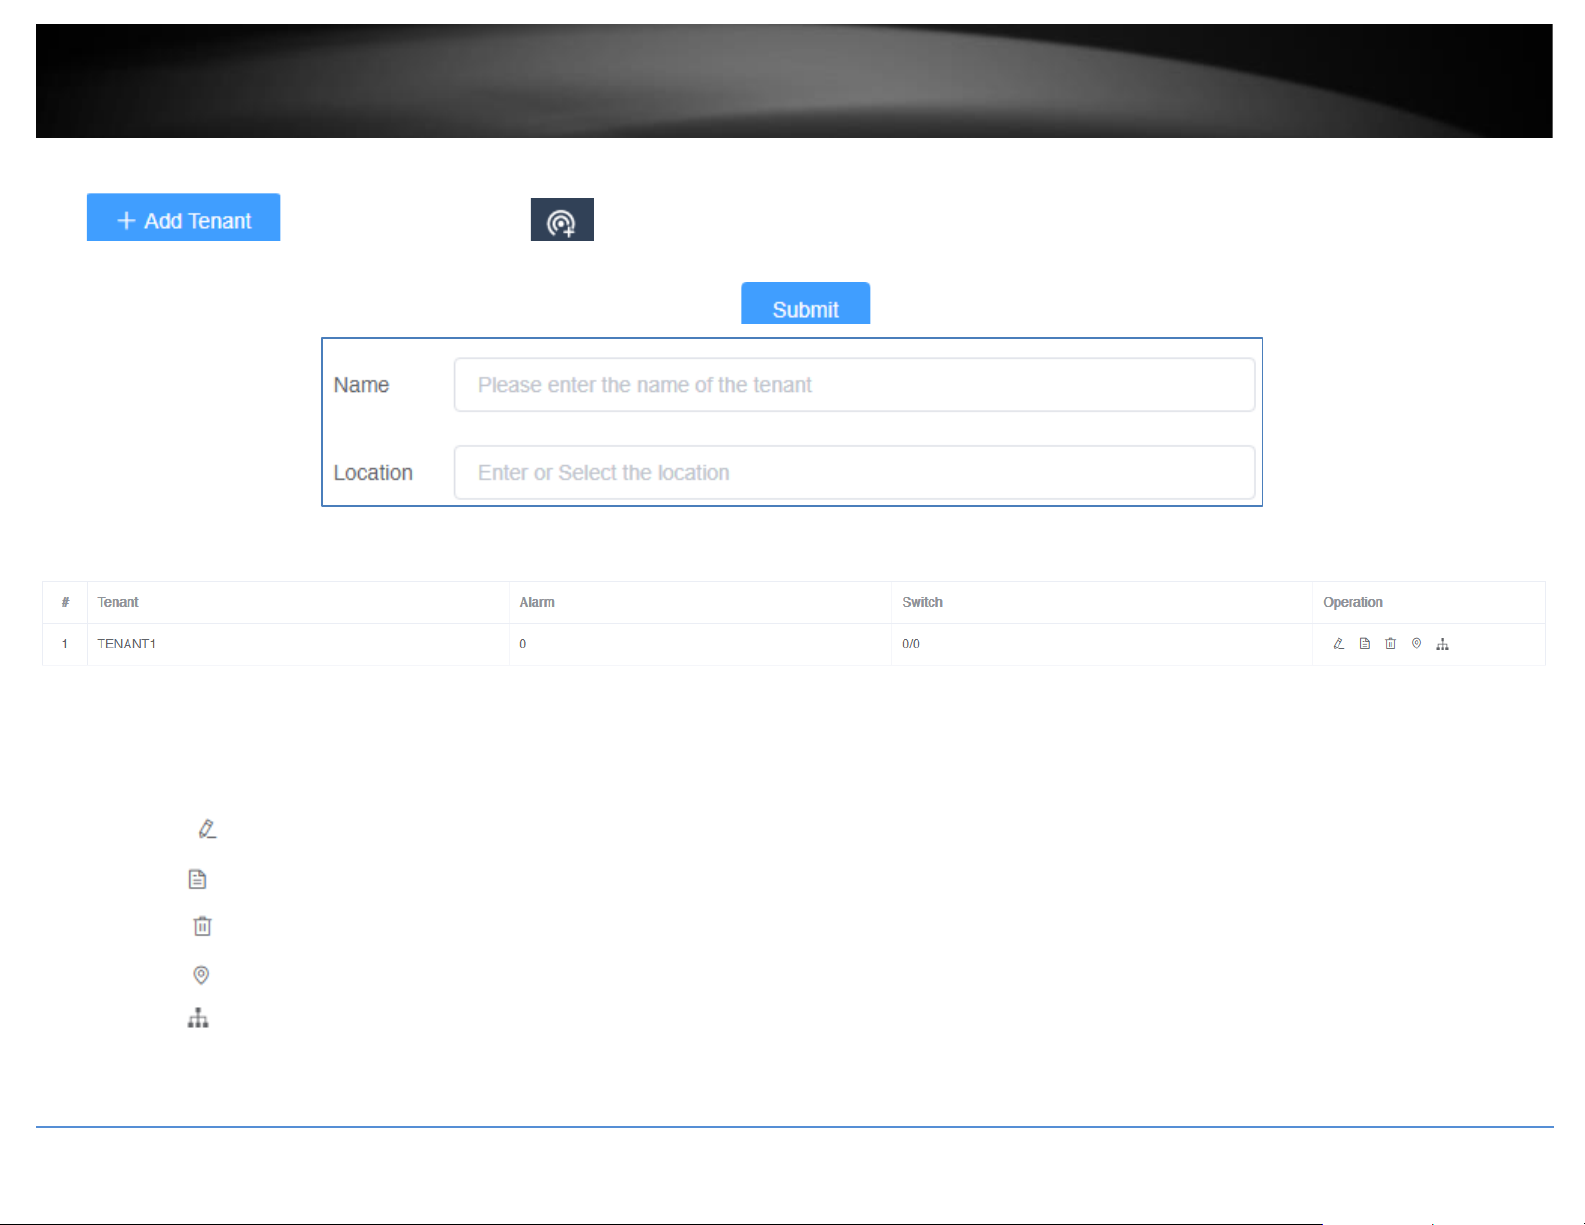
Create a new tenant
Click or in the top right menu, click to create a new tenant.
In the Add Tenant window, enter the Name and Location of the new tenant.Then click to create the new tenant.
The new tenant will be displayed in the tenant list.
• Tenant – Displays the tenant name.
• Alarm – Displays the number of alerts for this tenant.
• Switch – Displays the number of switch devices online / total number of switch devices for this tenant.
• Operation
o Edit tenant name and location.
o View available devices and assign devices to the tenant.
o Delete or remove the tenant.
o View tenant location on map.
o View tenant device topology.
Page 11

© Copyright 2021 TRENDnet. All Rights Reserved.
TRENDnet User’s Guide
Hive Management System
9
Manage devices in your Hive account
After you have registered your device with your Hive account from the device management interface, the device will be available in your Hive management portal.
To view newly registered devices in your Hive management portal, in the left navigation menu, click on Devices and click on Device List.
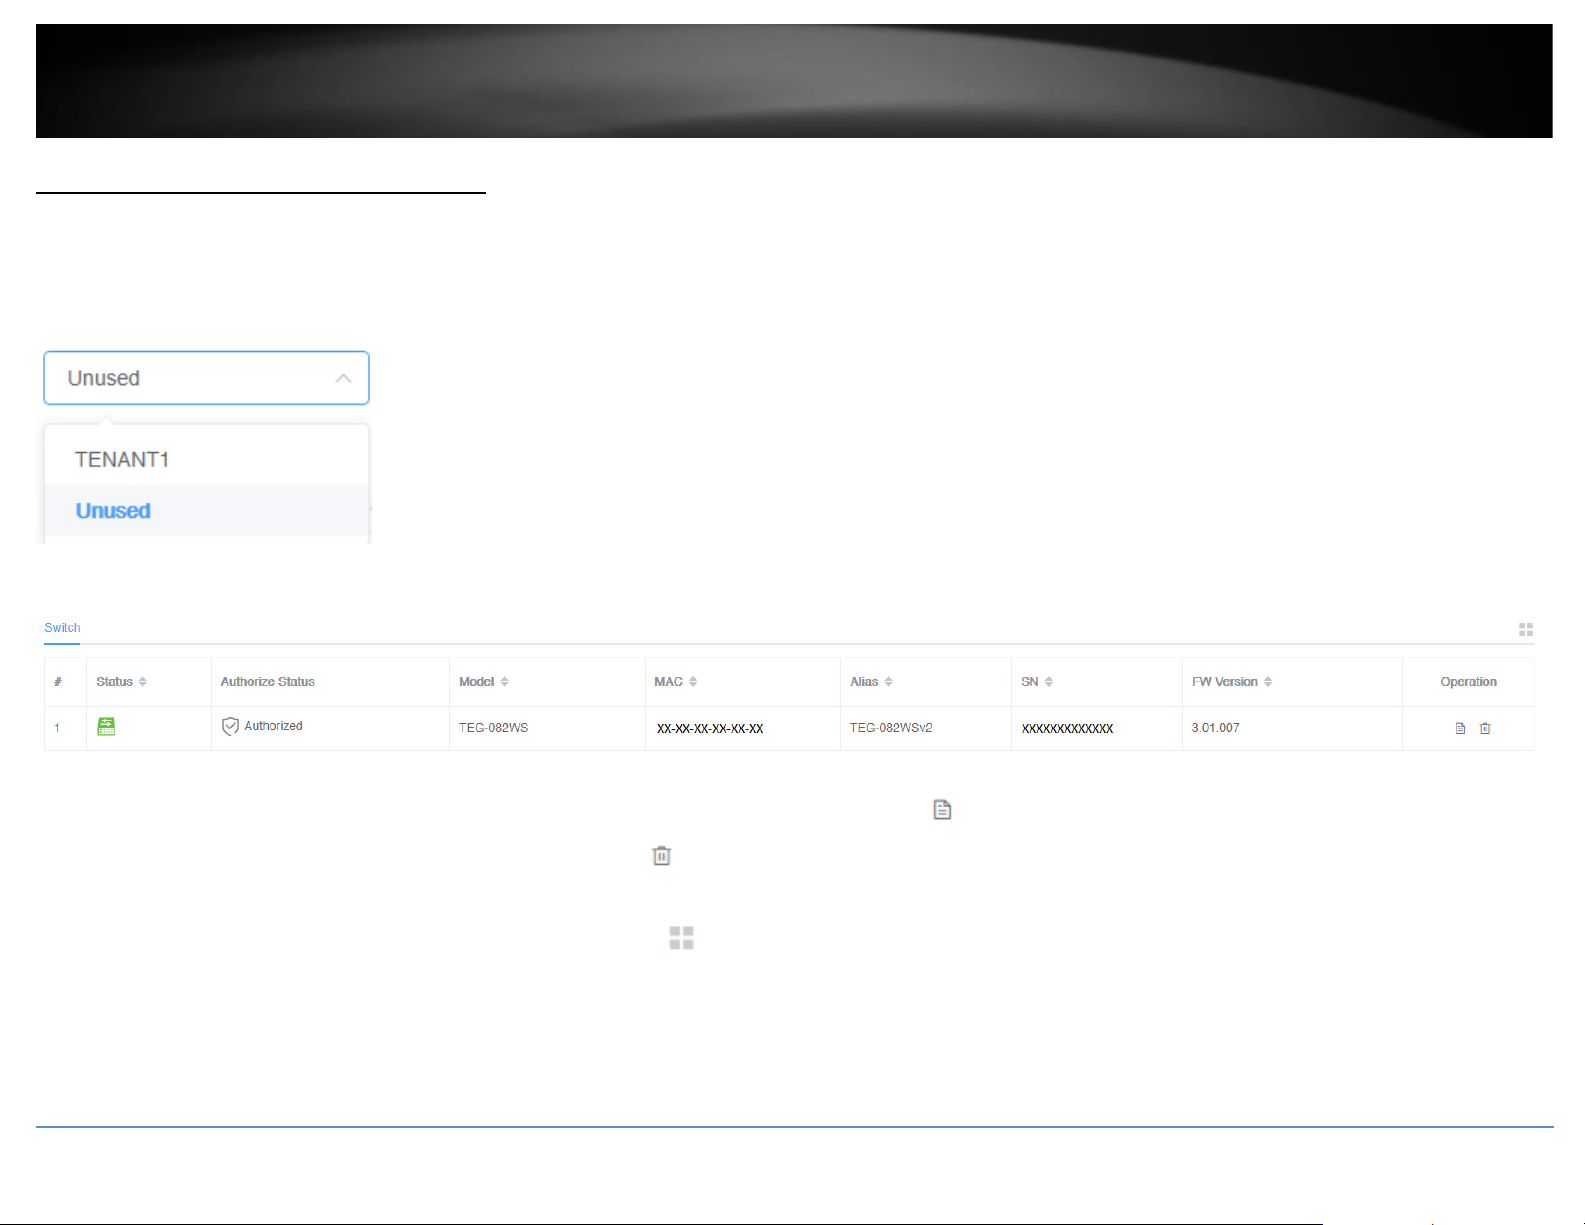
In the top left drop-down list, select Unused to view a list of devices that have not been assigned to tenants.
Note: The drop-down list will also allow you to select and view tenants which will display a list of devices assigned only to the selected tenant.
The Unused list will display a list of available devices and device information.
• Status
o
This icon will indicate that the device is registered to the Hive account but is currently offline.
Note: Devices that are offline can be assigned to a tenant but cannot be managed, monitoring, or configured. Please ensure that the device has the correct IP address,
gateway, and DNS configuration, and there are no issues preventing the device from reaching the Internet at the installed location. Additionally, you have configured the
cloud settings in the device management page and registering your device with your Hive user credentials.
o This icon will indicate that the device is registerd to the Hive account and is currently online.
Page 12
© Copyright 2021 TRENDnet. All Rights Reserved.
TRENDnet User’s Guide
Hive Management System
10
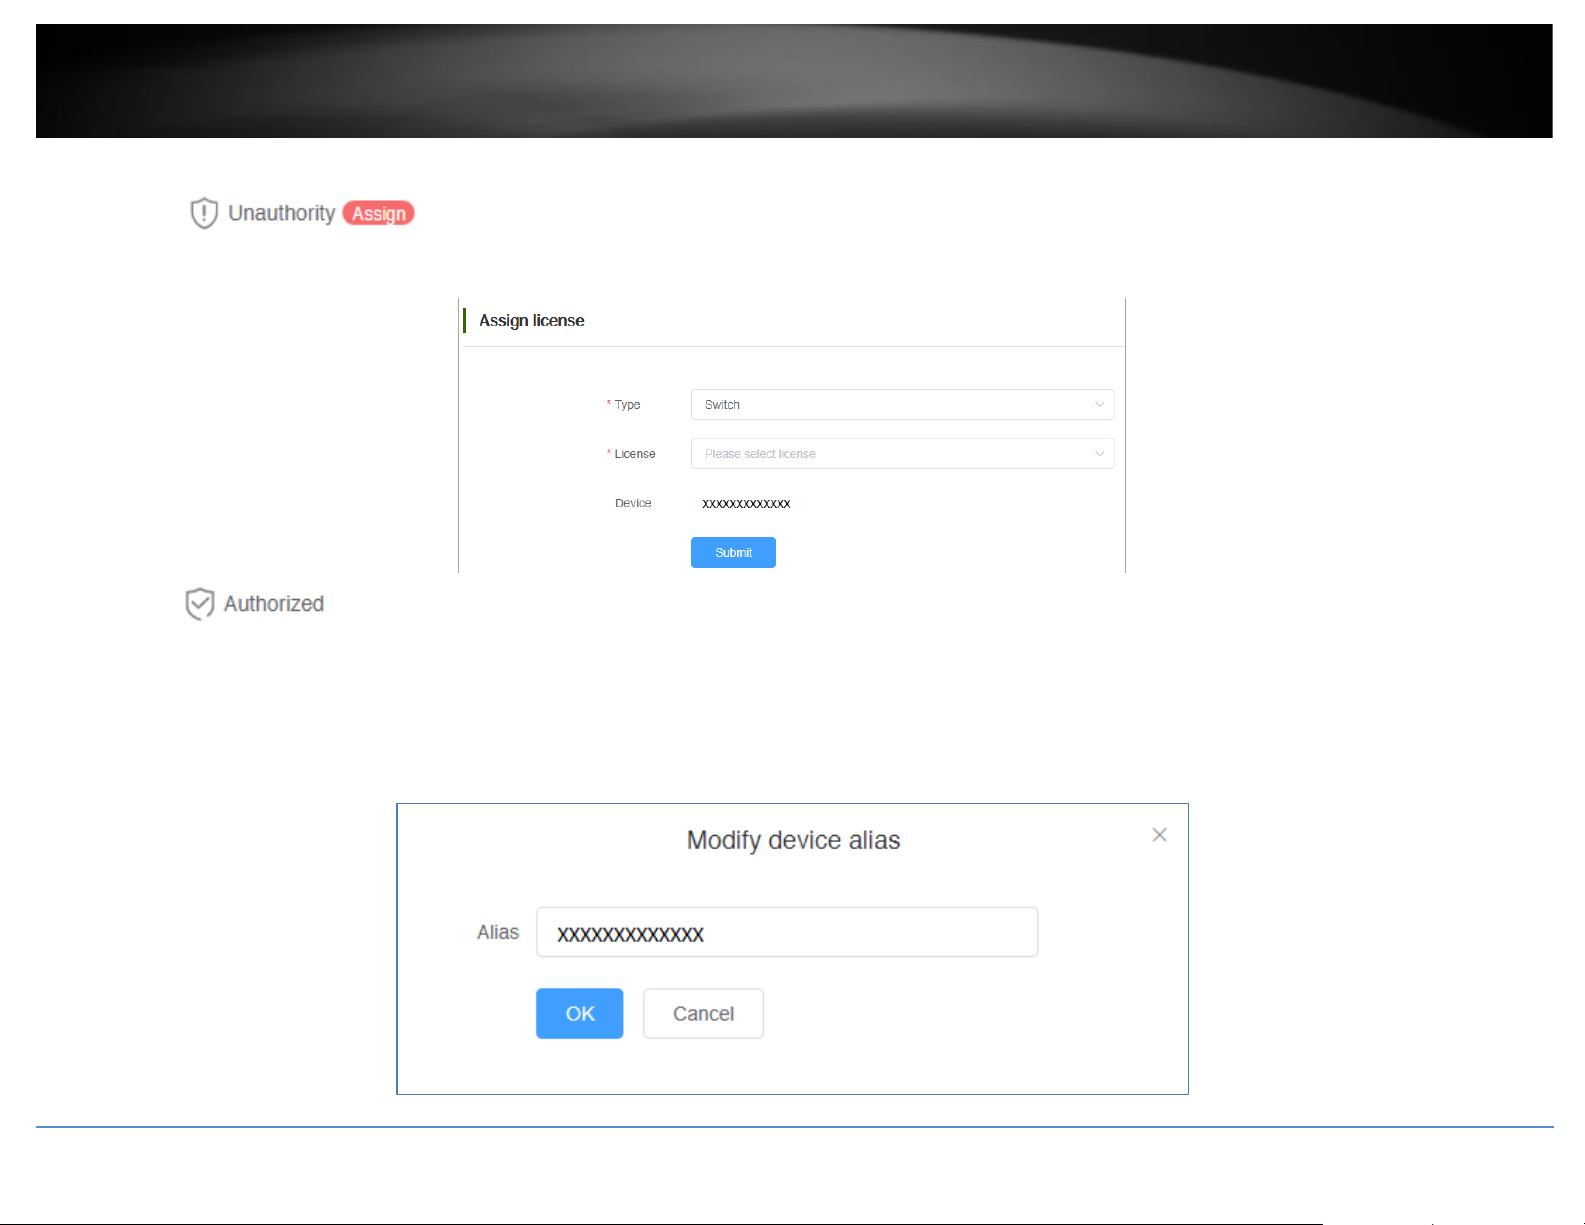
• Authorize Status
o
This indicates that the device does not have an active license subscription assigned. Click Assign to assign a valid license key to activate the device subscription.
Note: Devices require an active license subscription in order to use with the Hive Management System.
o
This indicates that the device has a valid active license subscription assigned and is authorized for use with your Hive account.
• Model – Displays the device model number.
• MAC – Displays the device MAC address.
• Alias – Displays the device name or label and is customizable. By default, the serial number (SN) is assigned to all devices as the Alias. Click the entry to modify the device alias,
then click OK. Note: It is recommended to change the device alias so that the device is easily identifiable in the Hive management system.
Page 13
© Copyright 2021 TRENDnet. All Rights Reserved.
TRENDnet User’s Guide
Hive Management System
11
• SN – Displays the device serial number.
• FW Version – Displays the device firmware version.
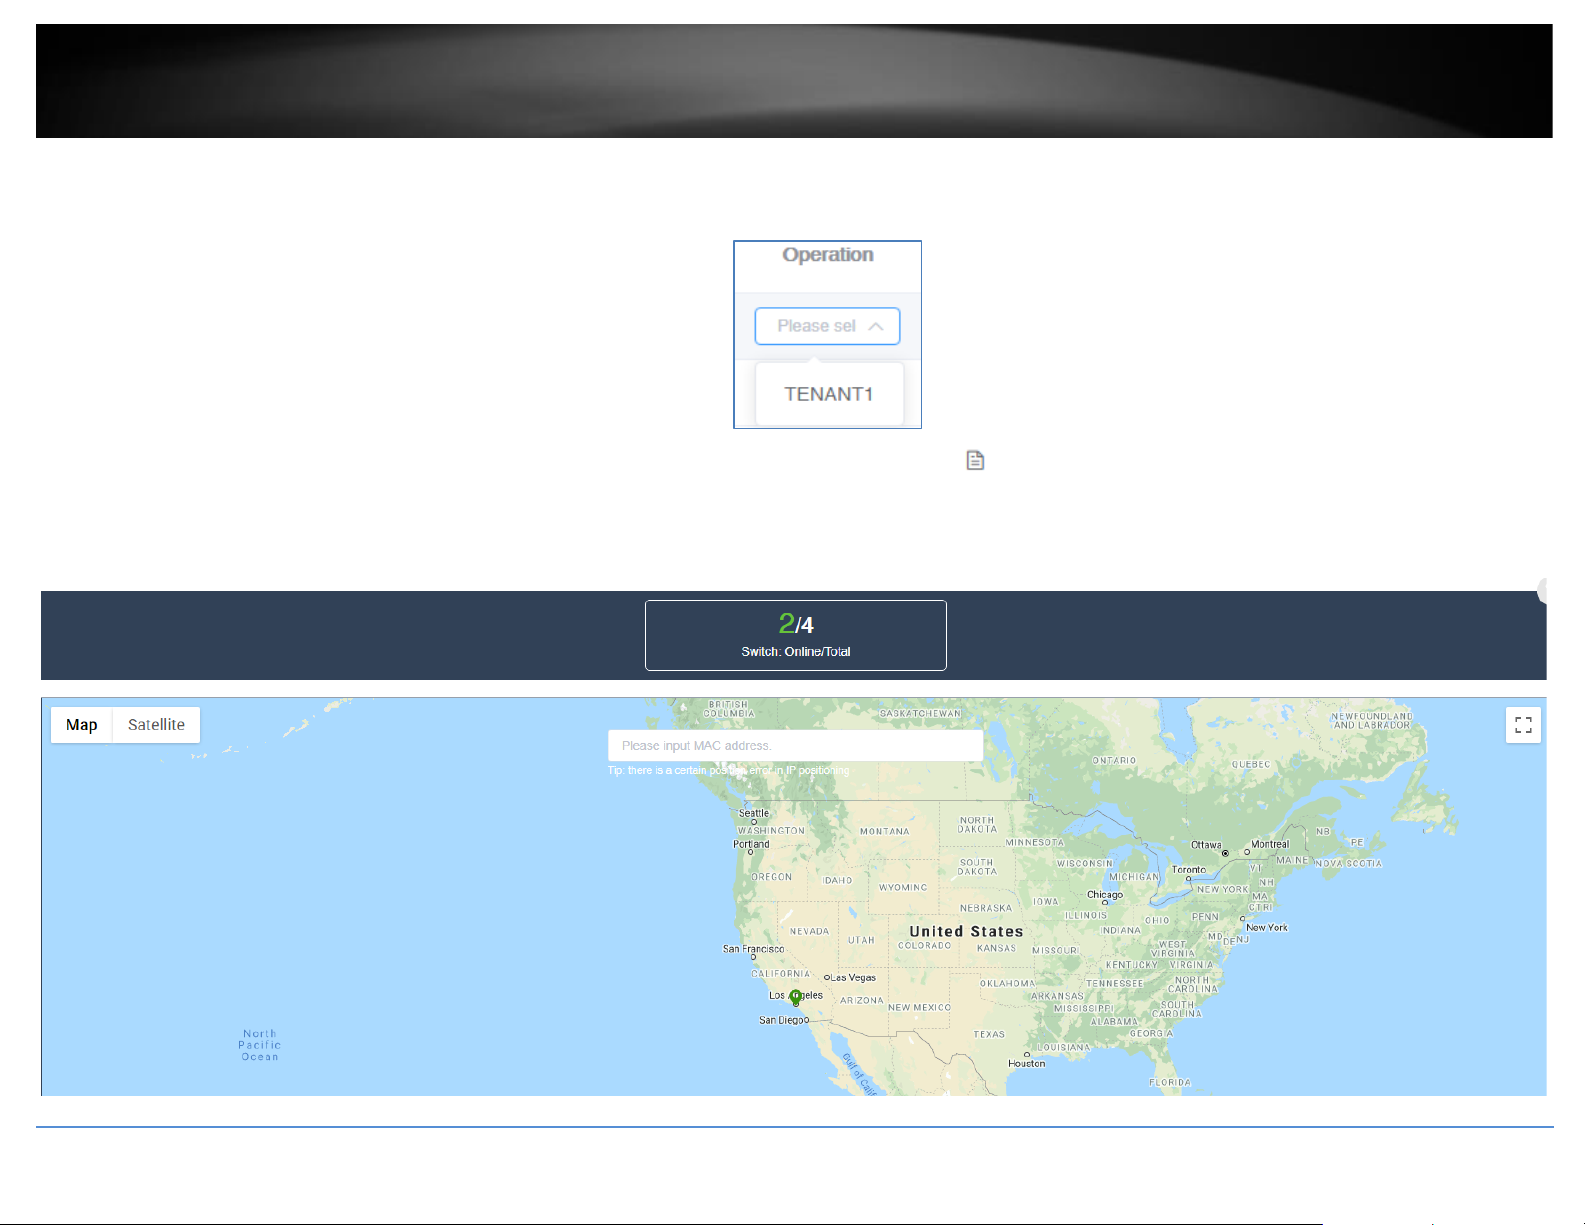
• Operation – Click the drop-down list to select which tenant you would like to assign the device.
Note: You can also assign a device to tenant under Dashboard and under Operation, click the edit button to select which devices to assign to the tenant.
To view the locations of registered devices in your Hive management portal, in the left navigation menu, click on Devices and click on Device Location. You can also view the location of
specific device by entering the device MAC address. (Format: XX-XX-XX-XX-XX-XX or XX:XX:XX:XX:XX:XX)
Page 14
© Copyright 2021 TRENDnet. All Rights Reserved.
TRENDnet User’s Guide
Hive Management System
12
Configure devices in your Hive account
After you have assigned your devices to a tenant, you can apply configuration settings to your devices in your Hive management portal in the left navigation menu, click on Devices and
click on Device List.
In the top left drop-down list and select the tenant to display the list of assigned devices.
In the example below, TENANT1 has been created and will be selected for this example.
Under TENANT1, the assigned device (TRENDnet Web Smart Switch Model TEG-082WS) will be displayed with the device information.
To apply configuration settings to the device (TEG-082WS), under the Operation section, click the edit button
Note: To remove the assigned deivce from the tenant, click the trash button .
Additional device information can be displayed by clicking the filter table icon at the top right of the table.
Filters: Status, Authorize End Time (Device License Expiration), Model, MAC, Alias, SN, Public IP, Local IP, FW (Firmware) Version, HW (Hardware) Version, Startup Time, Power
Consumption, Power Budget, Last Seen, CPU Usage, Memory Usage.
Page 15
© Copyright 2021 TRENDnet. All Rights Reserved.
TRENDnet User’s Guide
Hive Management System
13
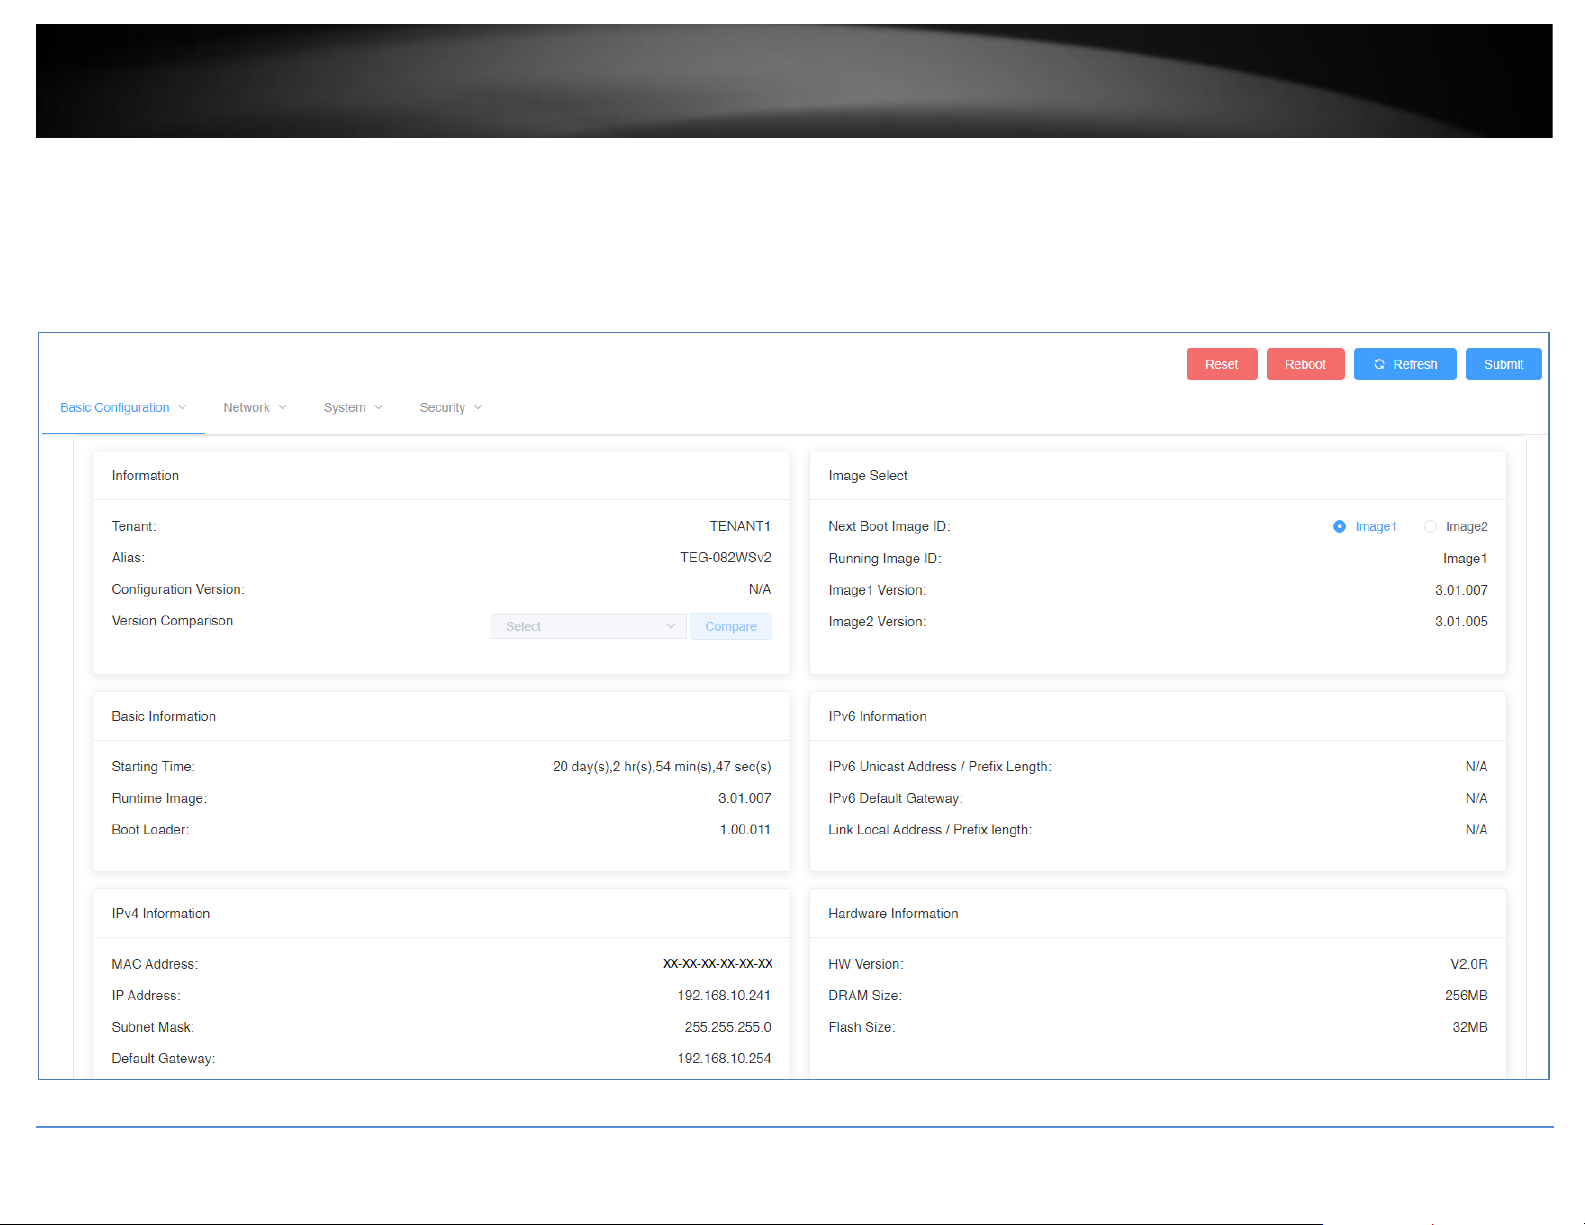
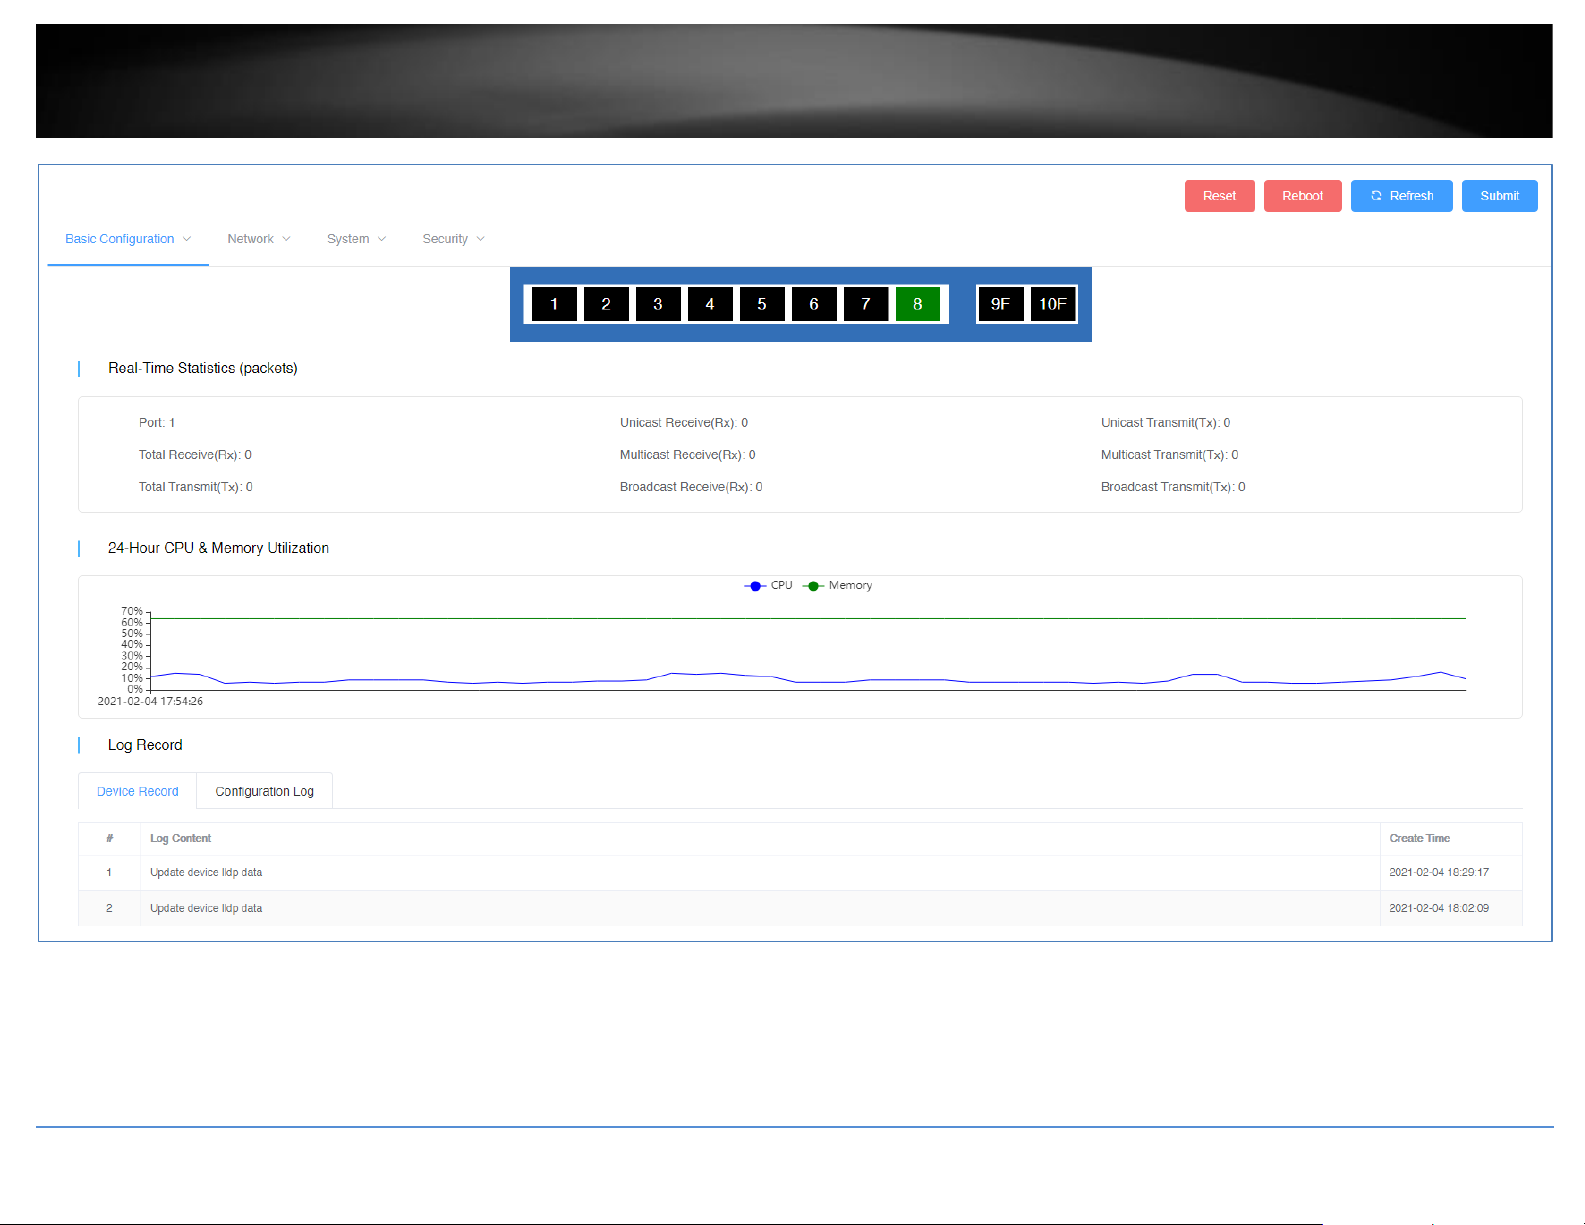
The available device configuration settings will be displayed.
Note: Please refer to the device User Guide for additional information on the device configuration settings.
• Displayed below are example configuration pages from TRENDnet Web Smart Switch Model TEG-082WS
• To apply configuration changes for Hive supported Web Smart Switches, modify the device configuration settings and click Submit.
• The Version Comparison function for Hive supported Web Smart Switches, will allow you to compare the current switch configuration with new configuration file created in the
Hive management system for provisioning.
Page 16
© Copyright 2021 TRENDnet. All Rights Reserved.
TRENDnet User’s Guide
Hive Management System
14
To view newly registered devices in your Hive management portal, in the left navigation menu, click on Devices and click on Device List.
Page 17
© Copyright 2021 TRENDnet. All Rights Reserved.
TRENDnet User’s Guide
Hive Management System
15
Provision devices in your Hive account
Devices in Hive can be provisioned through configuration and firmware upgrades.
Configuration Provisioning
To provision device configuration, configuration files must first be created in the Hive Management System. Batch configuration provisioning tasks can only be deployed for single
TRENDnet device model. (Example: Multiple TRENDnet TEG-082WS or multiple TPE-082WS switches but not both models for a single provisioning task.)
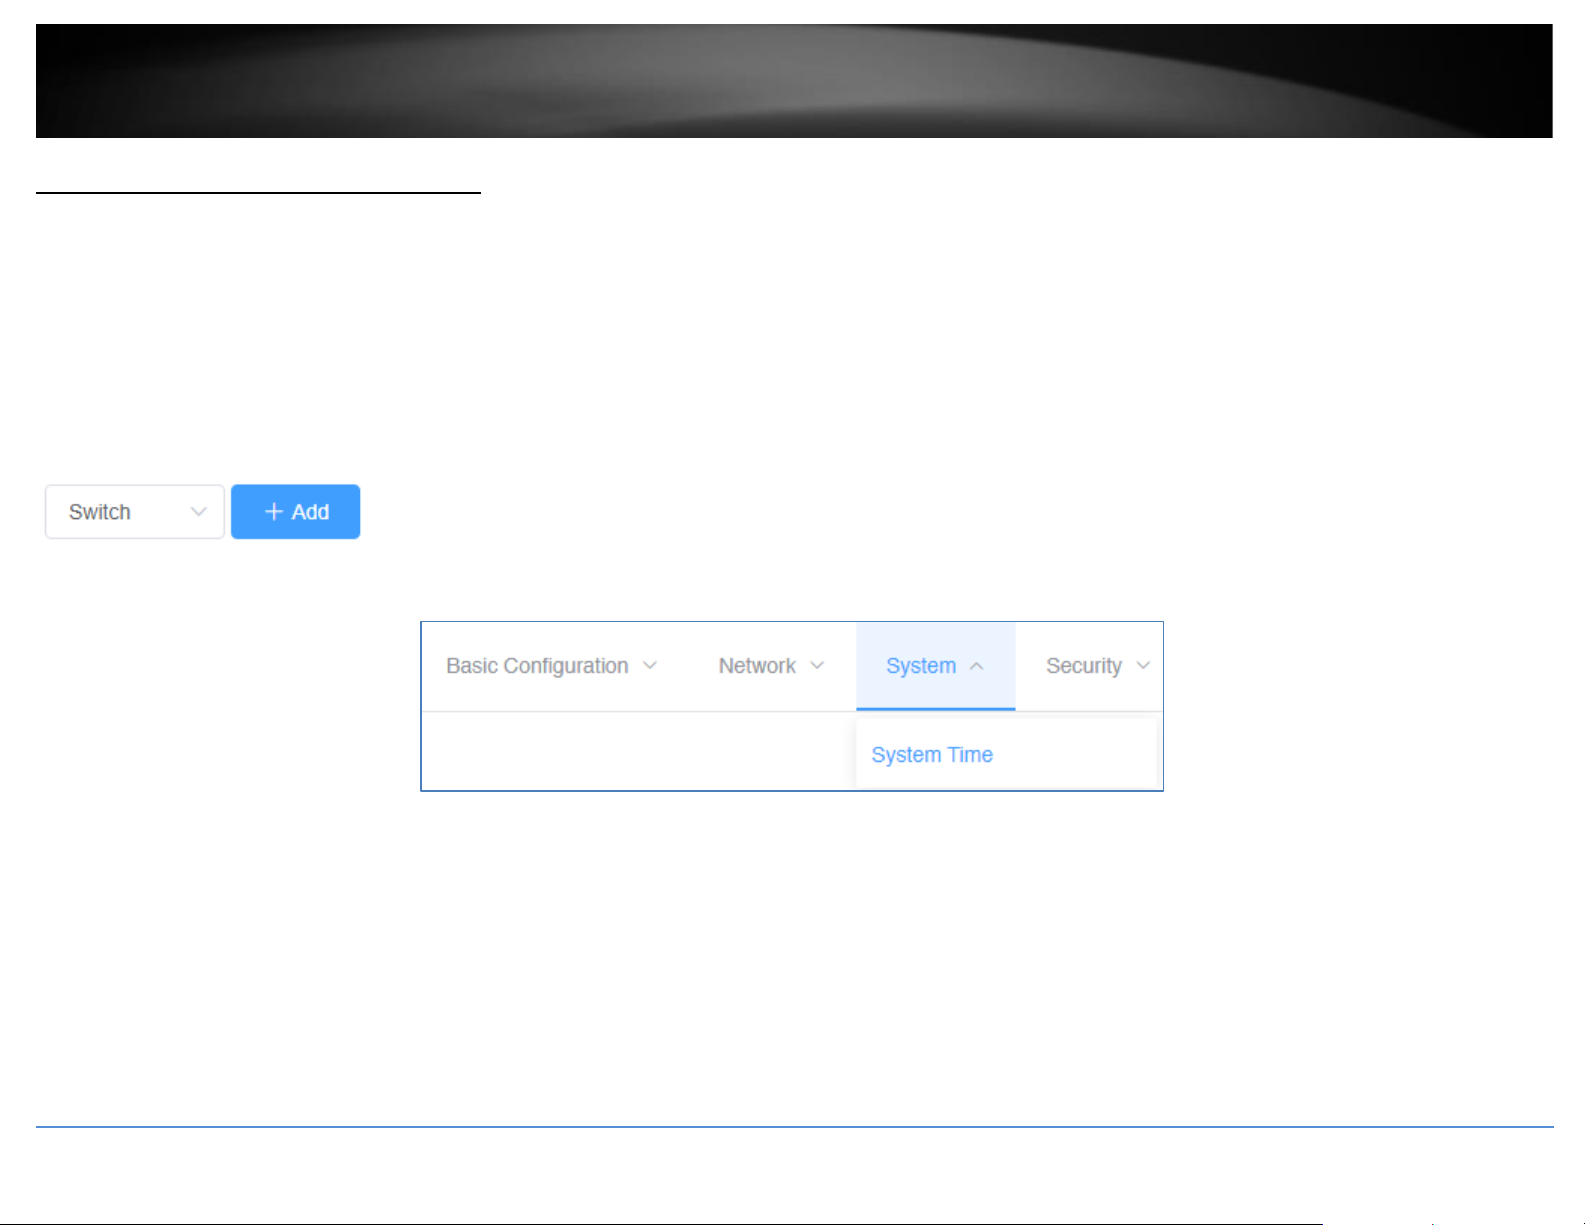
To create a new configuration file, in the left navigation menu, click on Configuration and click on Create.
In the top left, click the drop-down list to select the type of device to create a new configuration file and click Add.
In the example below, we will create a new configuration file for the TEG-082WS.
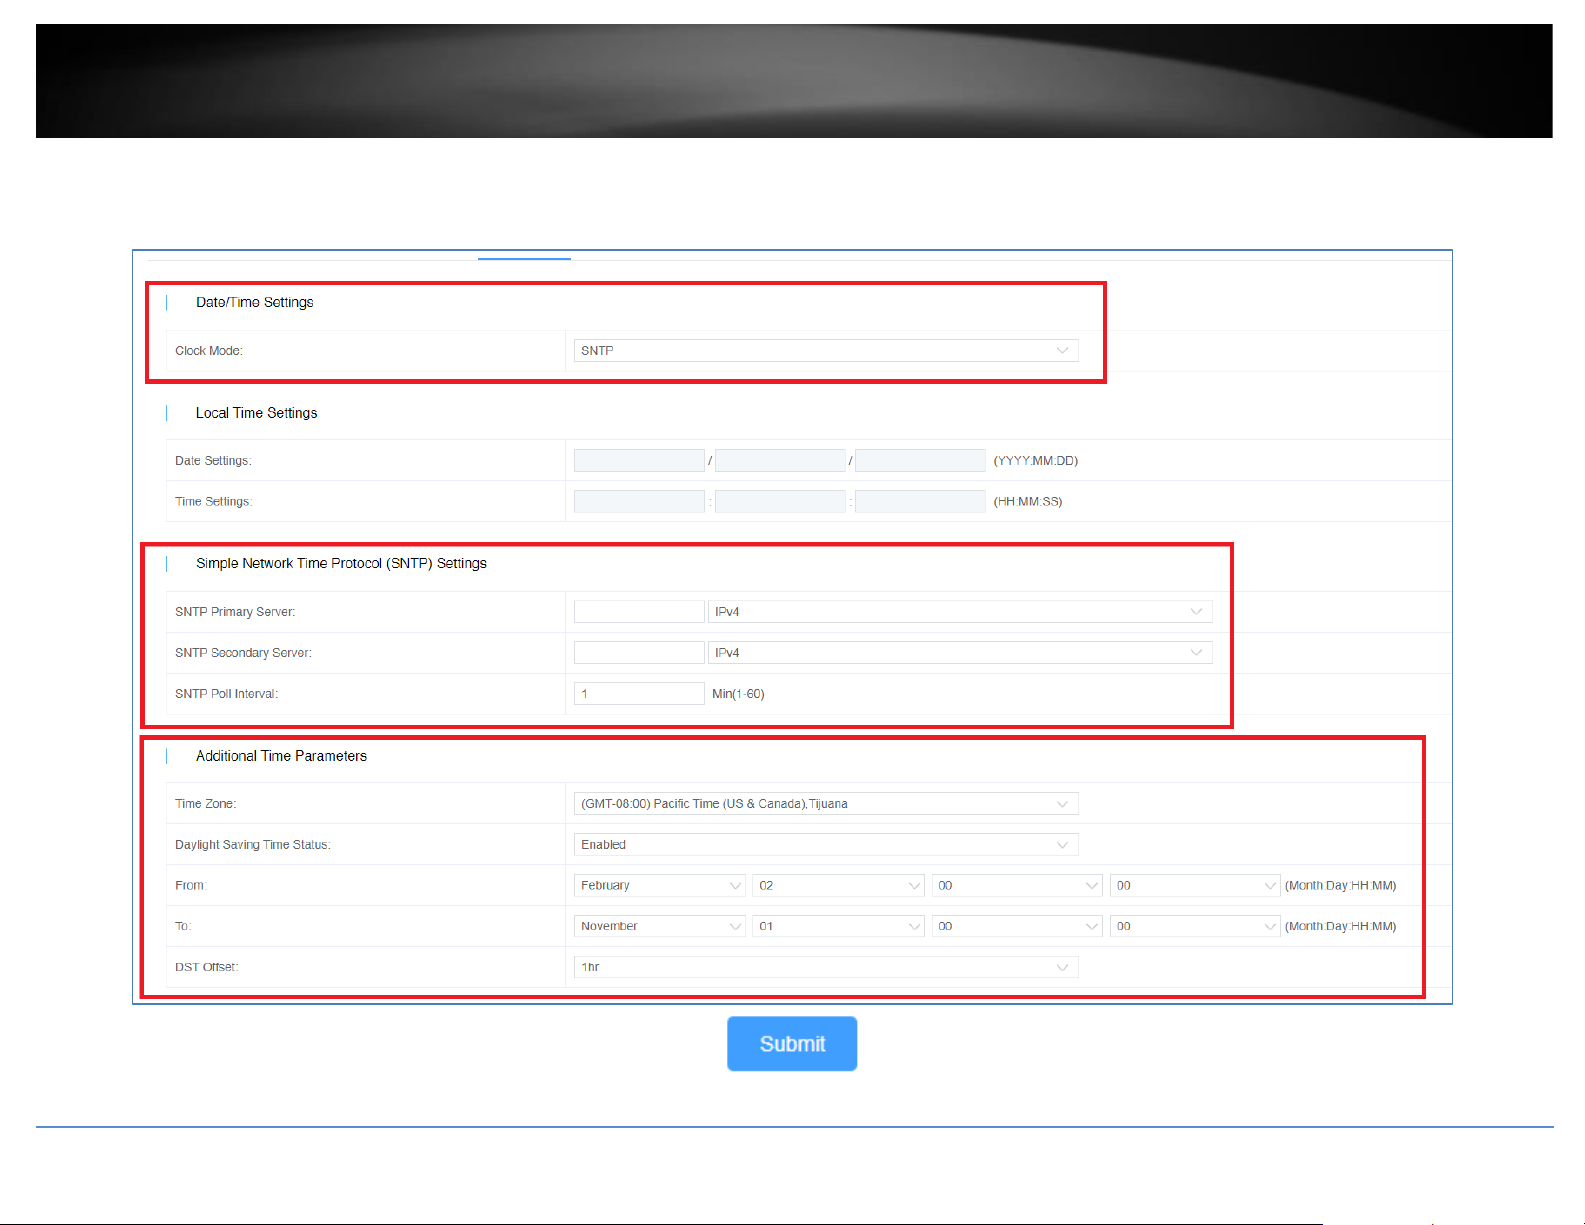
For the new configuration file, first configure the SNTP/Time Settings under System > System Time.
Page 18
© Copyright 2021 TRENDnet. All Rights Reserved.
TRENDnet User’s Guide
Hive Management System
16
If configuring SNTP, under Date/Time Settings, click the Clock Mode drop-down list and select SNTP.
In the Simple Network Time Protocol (SNTP) Settings, enter the SNTP Primary Server, SNTP Secondary Server as an IPv4 address, IPv6 address, or Domain Name and in top right. In the
Additional Time Parameters section, click the Time Zone drop-down list and select the correct Time Zone and enable and configure your daylight savings time, if any, then click Submit.
Page 19
© Copyright 2021 TRENDnet. All Rights Reserved.
TRENDnet User’s Guide
Hive Management System
17
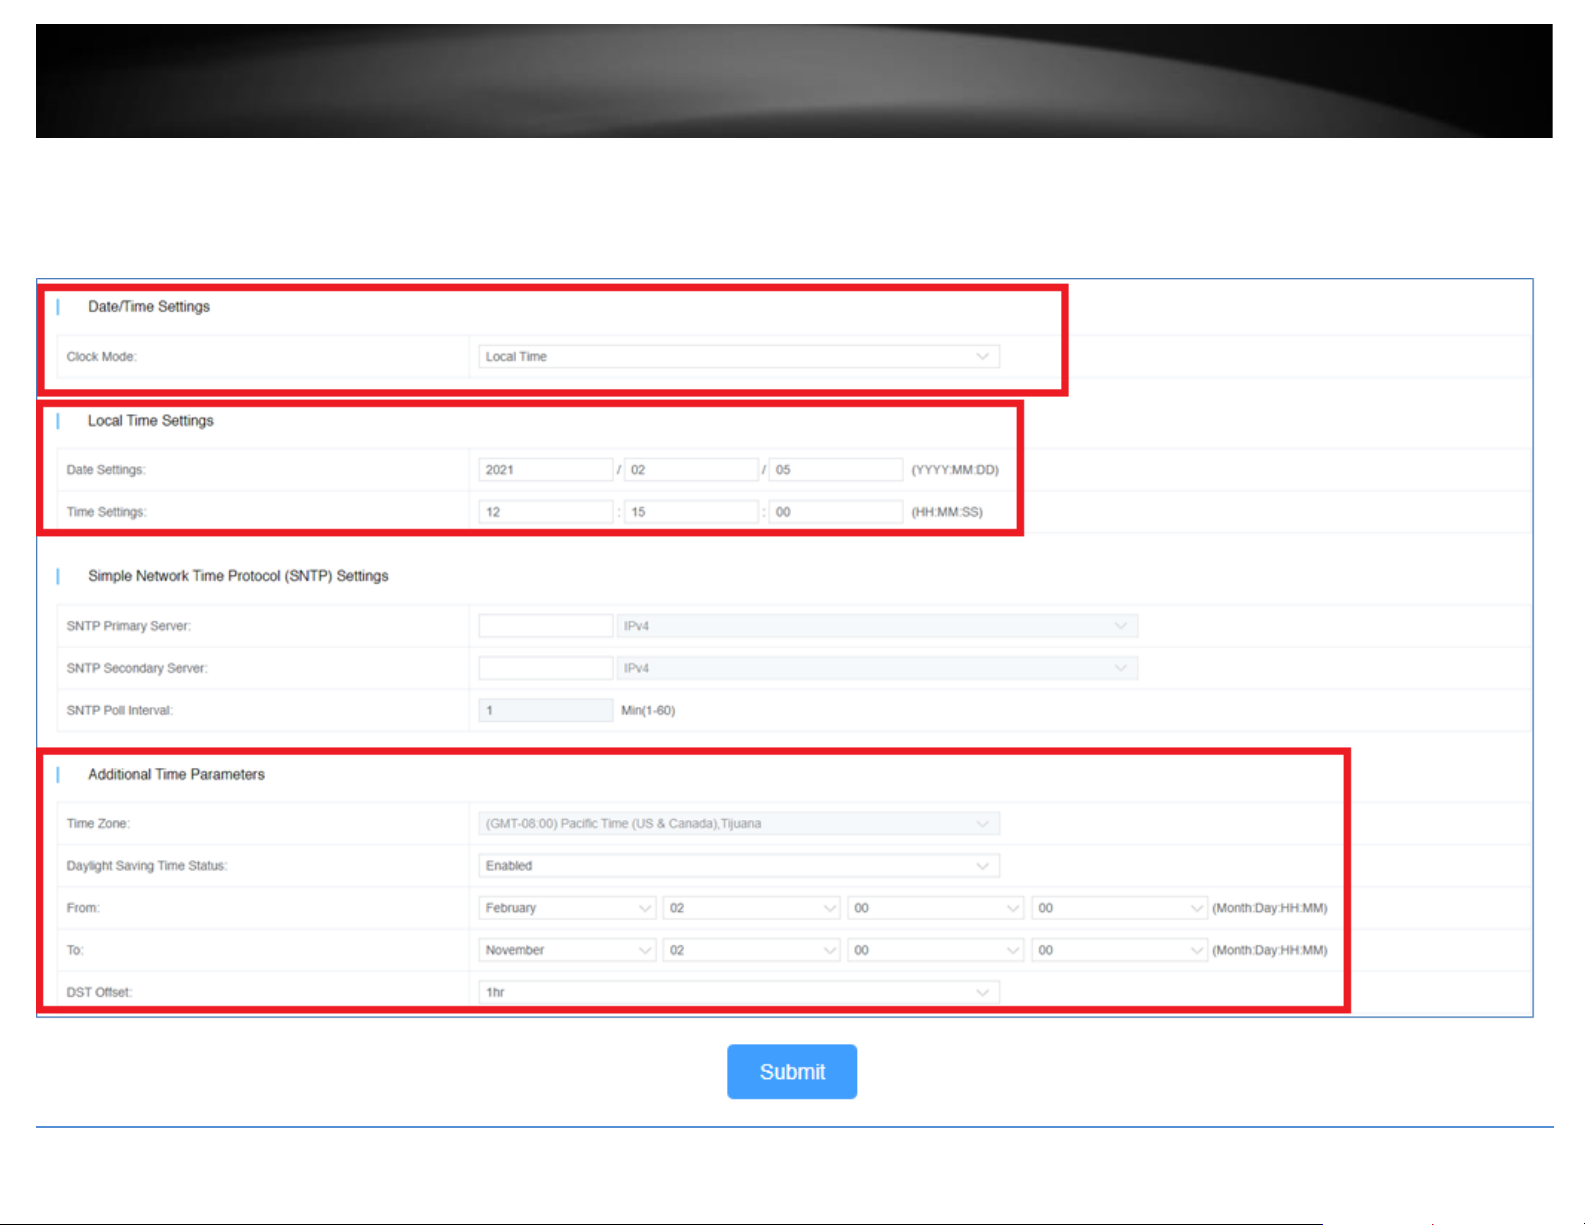
If configuring Local Time Settings, under Date/Time Settings, click the Clock Mode drop-down list and select Local Time.
In the Local Time Settings, enter the Date Settings and Time Settings. click Submit.
In the Additional Time Parameters section, click the Time Zone drop-down list and select the correct Time Zone and enable and configure your daylight savings time, if any, then click
Submit.
Page 20

© Copyright 2021 TRENDnet. All Rights Reserved.
TRENDnet User’s Guide
Hive Management System
18
After you have configured and saved the time and date settings for the configuration file, you can more configuration changes to the configuration file.
After applying all configuration changes for the new configuration file, in the Basic Configuration tab, select Basic Information.
Note: For each configuration change, please make sure to click Submit in the top right after configuration settings have been modified.
Enter a Configuration Name, a System Name, and click the Model drop-down list to select the TRENDnet device model. In the top right, click Submit to save the new configuration file..
Clicking the edit button will allow you to modify the configuration file.
Clicking the delete button will delete the configuration file.
Page 21

© Copyright 2021 TRENDnet. All Rights Reserved.
TRENDnet User’s Guide
Hive Management System
19
To provision devices with a new configuration file, click on Configuration and click on Provision.
In the top left drop-down list, select the tenant.
Click the Type drop-down list and select the device type. The click the Configuration File drop-down list to select the configuration file.
Page 22

© Copyright 2021 TRENDnet. All Rights Reserved.
TRENDnet User’s Guide
Hive Management System
20
After the configuration file is selected, the applicable online devices for the selected configuration file will appear in the Device/Online Device List.
Check the devices you would like to provision, and click to move the devices to the selected list.
Click the Provision Option drop-down list to select when to provision selected devices with the configuration file. After you have selected this desired option, click Submit.
• Start execution now – Selecting this option will execute the task immediately.
• Select execution time – Selecting this option will allow you to schedule a future date and time when to execute this task. Configure the date and time schedule when to execute
this task and click OK.
Note: If scheduling this task, checking the option to Send email reminder after task execution will send an email notification.
Page 23

© Copyright 2021 TRENDnet. All Rights Reserved.
TRENDnet User’s Guide
Hive Management System
21
After creating a scheduled configuration task, the task will be listed under Configuration > Schedule from the left navigation menu.
• Configuration – Displays the configuration file name.
• Operator – Displays the user that created the task.
• Version - Displays the configuration file version.
Note: If the original configuration file is modified under Configuration > Create section, a new version of the configuration file is created and the system will automatically update
the version number. (Example: 1.0, 2.0, 3.0, etc)
• Create Time – Displays the date and time the scheduled task was created.
• Execution Time - Displays the date and time the task is scheduled to be executed.
• Task Status – Displays the current task status.
o Waiting – Indicates that the scheduled task is pending to be carried out until the scheduled/Execution time is reached.
o Execution – Indicates that the scheduled task has already been completed.
• Operation
See task detail.
Cancel the task.
After a task is cancelled before the schedule date and time, you can restore or restart the task.
After tasks are executed, click this button to view more detail.
After configuration tasks have been executed, you can check the status details under Configuration > Record and in the Details column, click to view more information.
Page 24

© Copyright 2021 TRENDnet. All Rights Reserved.
TRENDnet User’s Guide
Hive Management System
22
Firmware Provisioning
Standard device firmware will be released by TRENDnet periodically and be available within the Hive Management System for provisioning and can be found under the Firmware >
Information section from the left navigation menu. You can check the current firmware version of devices under Devices > Devices List.
Note: Only Hive compatible device firmware releases will be available on the Hive Management System. For previous firmware releases, please download from our website
https://trendnet.com/support
A system message will be sent out to your Hive account when a new firmware is released. An indicator will appear in the top right menu above the Account/Logging button.
Mouse over the Account/Logging button to view the sub menu and click Message List to view system messages.
Page 25

© Copyright 2021 TRENDnet. All Rights Reserved.
TRENDnet User’s Guide
Hive Management System
23
To view the available device firmware releases, in the left navigation click on Firmware and click on Information.
• Model – Displays the device model(s) the firmware release applies.
• Operator – Displays the user account that created the firmware release.
• FW Version – Displays the firmware version number.
• Check Sum – Displays the firmware file checksum.
• MD5 – Displays the firmware file MD5 checksum.
• Create Time – Displays the date and time the firmware release was created.
To provision devices with a new firmware image file, click on Firmware and click on Provision.
In the top left drop-down list, select the tenant.
Page 26

© Copyright 2021 TRENDnet. All Rights Reserved.
TRENDnet User’s Guide
Hive Management System
24
Click the Type drop-down list and select the device type. The click the FW drop-down list to select the firmware image file.
After you have selected the Type and FW (firmware image file), the applicable online devices for the selected firmware file will appear in the Device/Online Device List.
Check the devices you would like to provision, and click to move the devices to the selected list.
Page 27

© Copyright 2021 TRENDnet. All Rights Reserved.
TRENDnet User’s Guide
Hive Management System
25
Click the Provision Option drop-down list to select when to provision selected devices with the firmware image file. After you have selected this desired option, click Submit.
• Start execution now – Selecting this option will execute the task immediately.
• Select execution time – Selecting this option will allow you to schedule a future date and time when to execute this task. Configure the date and time schedule when to execute
this task and click OK.
Note: If scheduling this task, checking the option to Send email reminder after task execution will send an email notification.
After creating a scheduled configuration task, the task will be listed under Firmware > Schedule from the left navigation menu.
• FW Version – Displays the firmware version number that will be used to provision devices.
• Operator – Displays the user that created the task.
• Create Time – Displays the date and time the scheduled task was created.
• Execution Time - Displays the date and time the task is scheduled to be executed.
• Task Status – Displays the current task status.
o Waiting – Indicates that the scheduled task is pending to be carried out until the scheduled/Execution time is reached.
o Execution – Indicates that the scheduled task has already been completed.
• Operation
See task detail.
Cancel the task.
After a task is cancelled before the schedule date and time, you can restore or restart the task.
After tasks are executed, click this button to view more detail.
Page 28

© Copyright 2021 TRENDnet. All Rights Reserved.
TRENDnet User’s Guide
Hive Management System
26
After firmware tasks have been executed, you can check the status details under Firmware > Record and in the Details column, click to view more information.
Page 29

© Copyright 2021 TRENDnet. All Rights Reserved.
TRENDnet User’s Guide
Hive Management System
27
Assigning device licenses
Note: Devices require an active license subscription in order to use with the Hive Management System.
After you have purchased a license subscription, you will sent a digital license key depending on the subscription purchased.
After receiving the license key, the key must be added to your Hive account to assign device licenses.
To add purchase a new license key to your account, in the Hive Management portal, click on License and Add License in the left navigation menu.
Click Add to add a new license key.
In the Add License window, enter your license key in the Key field provided and click Submit.
After you have entered in your license key, the new device licenses will appear in the License List (depending on the license susbscription purchased).
Page 30

© Copyright 2021 TRENDnet. All Rights Reserved.
TRENDnet User’s Guide
Hive Management System
28
• Key – Displays the device license key.
• Type – Displays the device type.
• Valid time – Displays the active duration of the device license.
• Device - If the device license is already assigned to a device, displays the alias name of the device.
• Start Time – Displays the time and date the device license was activated and assigned to a device.
• End Time – Displays the time and date the device license will expire after being assigned to a device.
Note: In the license list, you can search licenses by device type and license status filter fields at top of the page. Click Search after you have selected to filters.
To assign an available device subscription license to a devic, in the left navigation menu, click on Devices and click on Device List.
In the top left drop-down list, select Unused to view a list of devices that have not been assigned to tenants.
Note: The drop-down list will also allow you to select and view tenants which will display a list of devices assigned only to the selected tenant. If you already assigned the device to a
tenant, click the drop-down list and select the tenant the unlicensed device was assigned.
Page 31

© Copyright 2021 TRENDnet. All Rights Reserved.
TRENDnet User’s Guide
Hive Management System
29
In the list of devices under Authorize Status, unlicensed devices will have an Assign button. Click on Assign to assign a device license to the device.
• Authorize Status
o
This indicates that the device does not have an active license subscription assigned. Click Assign to assign a valid license key to activate the device subscription.
Note: Devices require an active license subscription in order to use with the Hive Management System.
o
This indicates that the device has a valid active license subscription assigned and is authorized for use with your Hive account.
Page 32

© Copyright 2021 TRENDnet. All Rights Reserved.
TRENDnet User’s Guide
Hive Management System
30
Monitoring devices
Event Monitoring
To monitor device events, in the left navigation menu, click on Monitoring and click on Events.
The Top 10 Device Events tab displays an event snapshot of the top 10 devices that generated the most events in the last 24 hours.
Click the top left drop-down list to select a specific tenant or select All to view devices from all tenants.
Click the drop-down list next to the tenant selection to select the type of event.
The devices will be listed on the left and the bars will display the number of occurrences the event took place.
Page 33

© Copyright 2021 TRENDnet. All Rights Reserved.
TRENDnet User’s Guide
Hive Management System
31
To view more detail on device events, in the left navigation menu, click on the Device Event Analysis tab.
Click the top left drop-down list to select a specific tenant or select All to view devices from all tenants.
Click the drop-down list next to the tenant selection to select a specific device or select All to view all devices.
Click the drop-down list next to the device selection and select the range of dates to view.
Note: Event data is limited to only to 30 days prior to the current date.
Click on Event Type drop-down list to select a specific event or select All to view all events. If none is select, by default, the chart will display all events.
Mouse over the chart to view the specific number of occurrences the events took place on the specific date.
Page 34

© Copyright 2021 TRENDnet. All Rights Reserved.
TRENDnet User’s Guide
Hive Management System
32
Device Utilization
To view device CPU, memory, and PoE utilization (if applicable), click on Monitoring and click on Utilization.
Click the top left drop-down list to select a specific tenant or select All to view devices from all tenants.
The current CPU, memory, and PoE budget utilization will be displayed for the devices.
Page 35

© Copyright 2021 TRENDnet. All Rights Reserved.
TRENDnet User’s Guide
Hive Management System
33
Diagnostic Tools
To access the diagnostic tools, in the left navigation menu, click on Maintenance and click on Diagnostic.
At the top, click the drop-down list to select the tenant to run the diagnostic and click on Start.
Ping IPv4 Host
To run a ping test to check for network connectivity from a device to an IPv4 host, click the Modus drop-down list and select Ping.
• Package Number – Value specifies the number of ping requests to send.
• Package Size – Value specifies the ping packet size in bytes.
• Target – Enter the IPv4 address of the host to send pings to check network connectivity.
In the list, check the devices you would like to run the ping test, click Submit.
Page 36

© Copyright 2021 TRENDnet. All Rights Reserved.
TRENDnet User’s Guide
Hive Management System
34
The submitted diagnostic test will appear in the list.
Under Operation
Click this button to show the test detail.
Click this button to delete the entry.
Under the test detail window, under Details, click view button for additional test detail for each device.
Page 37

© Copyright 2021 TRENDnet. All Rights Reserved.
TRENDnet User’s Guide
Hive Management System
35
Device Reboot
To reboot devices, click the Modus drop-down list and select Reboot.
Check the devices you would like to reboot and click Submit.
The submitted diagnostic test will appear in the list.
Under Operation
Click this button to show the test detail.
Click this button to delete the entry.
Page 38

© Copyright 2021 TRENDnet. All Rights Reserved.
TRENDnet User’s Guide
Hive Management System
36
Cable Diagnostics
To run cable diagnostics, click the Modus drop-down list and select Cable Diagnostics.
Click the Port drop-down list to select a specific port to run cable diagnostic or select All port to run a cable diagnostic on all ports.
Check the devices you would like to run the cable diagnostic and click Submit.
The submitted diagnostic test will appear in the list.
Under Operation
Click this button to show the test detail.
Click this button to delete the entry.
Page 39

© Copyright 2021 TRENDnet. All Rights Reserved.
TRENDnet User’s Guide
Hive Management System
37
Under the test detail window, under Details, click view button for additional test detail for each device.
Note: The view button will be available after the diagnostic test has completed.
Page 40

© Copyright 2021 TRENDnet. All Rights Reserved.
TRENDnet User’s Guide
Hive Management System
38
Account Settings
In the top right menu are the items below.
Expand/Collapse left navigation menu
Create new tenant
Select language
Alert notification settings
Account Settings and Logging
Page 41

© Copyright 2021 TRENDnet. All Rights Reserved.
TRENDnet User’s Guide
Hive Management System
39
Modify Hive Account Settings
To modify your Hive personal account information, in the top right menu, click the Account/Logging button and click on Personal Information.
The Basic Settings tab wil display your Hive User Name, Hive Account/Level/Type, Registration Date and Time, and contact information. You can edit the organization and address for
your Hive account on this tab. After you modify settings, click Submit.
Page 42

© Copyright 2021 TRENDnet. All Rights Reserved.
TRENDnet User’s Guide
Hive Management System
40
To edit your Hive account password, click on the Security Settings tab.
The Safety Level indicates the current security level of your account based on the complexity of your current Hive account password.
Note: It is recommended to change your Hive account password with High security level rating.
Under the Security Setting section, for the Password setting, click on Modify to modify your Hive account password.
Page 43

© Copyright 2021 TRENDnet. All Rights Reserved.
TRENDnet User’s Guide
Hive Management System
41
To change the email address your Hive account is associated, under the Security Setting section, for Bind mailbox, click on Modify to modify your Hive email address.
The current email address the Hive account is associated will be displayed in green.
Enter the new email address in the field provided, then click Get Code to receive a verification from the Hive system at the new email address.
Check the new email mailbox and enter the verification code received in the field provided, then click Submit.
Page 44

© Copyright 2021 TRENDnet. All Rights Reserved.
TRENDnet User’s Guide
Hive Management System
42
Create Users and Assign Permissions
To modify your Hive personal account information, in the top right menu, click the Account/Logging button and click on User Management.
To add a new user, at the top, click the button.
Enter the user details such as User Name, Email, Password.
Page 45

© Copyright 2021 TRENDnet. All Rights Reserved.
TRENDnet User’s Guide
Hive Management System
43
Click the Function drop-down to select the Hive section the user will have access. Any sections not seletected will not be accessible for the new user.
Note: When checking sections, if dependency sections are required in order to access a selected section, a notification will appear in red indicating other specific dependencies that must
also be checked in order for the user to access selected section.
Click the Tenant drop-down list to select the specific tenant the user will have access. The user will only have access to the selected tenant. Then click Submit to create the new user.
Note: To allow the user access to all tenants, check the All option.
Page 46

© Copyright 2021 TRENDnet. All Rights Reserved.
TRENDnet User’s Guide
Hive Management System
44
The new user will be displayed in the user list.
Under the Operation section
- Edit the user account settings. Allows you to modify the user email, access sections, and issue a reset password.
- Delete the user account.
Page 47

© Copyright 2021 TRENDnet. All Rights Reserved.
TRENDnet User’s Guide
Hive Management System
45
View Hive System Messages
System messages related the Hive Management system internally. (ex: New device firmware update release in Hive Management System).
To view Hive system messages, click the Account/Logging button and click on Message List.
The system messages will display in the list.
Note: You can click on the Read Messages tab to view messages that have already been read or click the Unread Messages tab to view messages that not yet been read.
Under the Operation section for each message,
- Click this button view the message details
- Click this button to delete the message.
At the top left of the page, you can click the Batch Operation to mark multiple messages as Read (Mark Read) or delete multiple messages (Batch Delete).
First, check all messages to apply the batch operation, then click the Batch Operation drop-down list and selected batch operation to use.
Page 48

© Copyright 2021 TRENDnet. All Rights Reserved.
TRENDnet User’s Guide
Hive Management System
46
View Device Logging
To view Hive device logging, click the Account/Logging button and click on Device Log
This section displays device logging from devices managed from your Hive account.
At the top left, enter the keyword (if any) to search in device logging.
Select the Start Date and End Date range of device logging to display.
Note: Logging data is limited only to 30 days prior to the current date.
Click the Select Level drop-down list to select only specific types of logging to be displayed (optional, if none selected, logging will be displayed for all)
Click the Event Type drop-down list to select only specific events to be displayed (optional, if none selected, logging will be displayed for all)
Click Search to display logging within your defined filters.
After the search has completed, you can click Export to export logging to an excel (.xlsx) file.
Under the Operation section for each log entry,
- Click this button to delete the logging entry.
Page 49

© Copyright 2021 TRENDnet. All Rights Reserved.
TRENDnet User’s Guide
Hive Management System
47
View System Logging
To view Hive system logging, click the Account/Logging button and click on System Log
This section displays Hive system logging of activity in your Hive account and alarm notifications.
At the top left, enter the keyword (if any) to search in system logging.
Select the Start Date and End Date range of system logging to display.
Note: Logging data is limited only to 30 days prior to the current date.
Click the Info Alarm drop-down list to select the class system logging to display.
Click Search to display logging within your defined filters.
After the search has completed, you can click Export to export logging to an excel (.xlsx) file.
Under the Operation section for each log entry,
- Click this button to delete the logging entry.
Page 50

© Copyright 2021 TRENDnet. All Rights Reserved.
TRENDnet User’s Guide
Hive Management System
48
Configure alert notifications
To configure alert notifications, in the top right menu.
Click the Alert Notifications button and click on Alert Settings.
Click the drop-down list in the left to select which tenant to configure the alert notification settings.
Enable/disable alert notificatons for Mail Push for email notifications.
Enable/disable alert notificatons for App Push for mobile app notifications.
Note: Some alert settings require threshold percentages or data restrictions to be entered. You can also click the copy current configuration and apply link to apply the alert notification
settings to a different tenant.
Page 51

© Copyright 2021 TRENDnet. All Rights Reserved.
TRENDnet User’s Guide
Hive Management System
49
Web Smart Switch Series Hardware Specifications
TEG-082WS (2.0R)
TEG-204WS (1.0R)
TEG-284WS (1.0R)
TEG-524WS (1.0R)
Device Interface
LED Mode select button and LED indicators
8 x Gigabit ports
16 x Gigabit ports
24 x Gigabit ports
48 x Gigabit ports
2 x SFP slots
4 x Shared Gigabit ports (RJ-45/SFP)
Data Transfer Rate
Ethernet: 10 Mbps (half duplex), 20 Mbps (full duplex)
Fast Ethernet: 100 Mbps (half duplex), 200 Mbps (full duplex)
Gigabit Ethernet: 2000 Mbps (full duplex)
Switch fabric
20 Gbps
40 Gbps
56 Gbps
104 Gbps
RAM buffer
4.1 Mbits
12 Mbits
MAC Address Table
8K entries
16K entries
Jumbo Frames
10 Kbytes
Forwarding
14.9Mpps (64-byte packet size)
29.8Mpps (64-byte packet size)
41.7Mpps (64-byte packet size)
77.4Mpps (64-byte packet size)
HOL Blocking Prevention
HOL Blocking Prevention supported on all models
Power Input
100 - 240V AC, 50/60 Hz, internal power supply
Power Consumption
7.1 Watts (max.)
14.6 Watts (max.)
17.3 Watts (max.)
34.9 Watts (max.)
Fan Quantity
Fanless
Noise Level
N/A (fanless)
MTBF
1,092,872 hours
835,519 hours
787,004 hours
400,158 hours
Page 52

© Copyright 2021 TRENDnet. All Rights Reserved.
TRENDnet User’s Guide
Hive Management System
50
TEG-082WS (2.0R)
TEG-204WS (1.0R)
TEG-284WS (1.0R)
TEG-524WS (1.0R)
Operating Temperature
-5° – 50°C (23° - 122°F)
Operating Humidity
Max. 95% non-condensing
Dimensions
280 x 125.8 x 44 mm
(11 x 5 x 1.74 in.)
280 x 180 x 44 mm
(11 x 7 x 1.74 in.)
440 x 140 x 44mm
(17.4 x 5.51 x 1.74 in.)
440 x 210 x 44mm
(17.3 x 8.3 x 1.74 in.)
Rack mountable 1U height
Weight
0.98 kg (2.2 lbs.)
1.76 kg (3.88 lbs.)
2.15 kg (4.73 lbs.)
3.48 kg (7.67 lbs.)
Certifications
CE
FCC
UL
Warranty
Lifetime
Package Contents
In addition to the switch, the package contents include the following:
Quick Installation Guide
Rack mount kit
Power cord (1.8m/6 ft.)
*Model requires update to firmware 3.01.XXX to enable Hive capability.
Page 53

© Copyright 2021 TRENDnet. All Rights Reserved.
TRENDnet User’s Guide
Hive Management System
51
Web Smart Switch Series Software Specifications
Standards
• IEEE 802.1d
• IEEE 802.1p
• IEEE 802.1Q
• IEEE 802.1s
• IEEE 802.1w
• IEEE 802.1X
• IEEE 802.1ab
• IEEE 802.3
• IEEE 802.3u
• IEEE 802.3x
• IEEE 802.3z
• IEEE 802.3ab
• IEEE 802.3ad
• IEEE 802.3az
Management
• CLI (Telnet / SSHv2) for basic
administration
• HTTP/HTTPS (SSL v2/3 TLS) Web based
GUI
• SNMP v1, v2c, v3
• RMON v1
• Static Unicast MAC Address
• Enable/disable 802.3az Power Saving
• LLDP and LLDP-MED
• Virtual Cable Diagnostics Test
• IPv6: IPv6 Neighbor Discovery, IPv6
Static IP, DHCPv6, Auto configuration
• Dual image and configuration
• TC Root/Protect
Hive Cloud Management
(requires update to
firmware 3.01.XXX to
enable Hive capability)
• Configure, monitor, and manage
through the TRENDnet Hive Cloud
Management Portal remotely via PC or
Mac web browser
• Multi-device management
• Provisioning through scheduled batch
firmware or configuration updates for
multiple switches
• Enable & disable PoE, set PD (powered
device) alive check, configure PoE
scheduling, and monitor PoE budget
utilization (for PoE switches only)
• Event/hardware network monitoring
(CPU/memory utilization)
• Configure features such as IP address
settings, VLANs, spanning tree,
loopback detection, IGMP snooping, link
aggregation, and bandwidth control
through cloud management
MIB
• IP Forward Table MIB RFC 1354
• RMON MIB RFC 1271
• IPv4 MIB RFC 1213
• IPv6 MIB RFC 2465
• GVRP MIB IEEE 802.1Q-VLAN
• LA MIB IEEE 802.3ad
• LLDP MIB IEEE 802.1ab
• IGMP Snooping MIB RFC 2933
• MLD Snooping MIB RFC 3019
• Private VLAN MIB IEEE 802.1Q
• DHCP Snooping MIB RFC 2026
• QoS MIB RFC 4323
• SNMP MIB RFC 3415
• STP MIB RFC 4318
• PNAC MIB IEEE 802.1x
• VLAN MIB IEEE 802.1q
• DNS MIB RFC 1611
• ACL MIB
• Bandwidth CTRL MIB
• LBD MIB
• Mirror MIB
• IPv6 Neighbor MIB
• SNTP MIB
• Storm CTRL MIB
• Statistics MIB
• Tool MIB
• Voice VLAN MIB
• DoS MIB
Spanning Tree
• IEEE 802.1D STP (Spanning Tree
protocol)
• IEEE 802.1w RSTP (Rapid Spanning Tree
protocol)
• IEEE 802.1s MSTP (Multiple Spanning
Tree protocol)
Link Aggregation
• Static Link Aggregation
• 802.3ad Dynamic LACP
Page 54

© Copyright 2021 TRENDnet. All Rights Reserved.
TRENDnet User’s Guide
Hive Management System
52
Quality of Service (QoS)
• 802.1p Class of Service (CoS)
• DSCP (Differentiated Services Code
Point)
• Bandwidth Control per port
• Queue Scheduling: Strict Priority,
Weighted Round Robin (WRR)
VLAN
• Multiple management VLAN assignment
• Asymmetric VLAN
• 802.1Q Tagged VLAN
• Dynamic GVRP
• MAC-based VLAN
• Protocol-based VLAN
• Up to 256 VLAN groups, ID Range 1-
4094
• Private VLAN (Protected Ports)
• Voice VLAN (10 user defined OUIs)
Multicast
• IGMP Snooping v1, v2, v3
• MLD Snooping v1, v2
• IGMP fast leave
• MVR (Multicast VLAN Registration)
• Static Multicast Address
• Up to 256 multicast entries
Port Mirror
• RX, TX, or Both
• Many to one
Access Control
• 802.1X Port-Based Network Access
Control , RADIUS, TACACS+
• Local Dial In User Authentication
• DHCP Snooping (per VLAN)
• Loopback Detection
• Duplicated Address Detection
• Trusted Host
• Denial of Service (DoS)
• IP MAC port binding
• Dynamic ARP inspection
• Block unknown multicast
ACL IPv4 L2-L4 & IPv6
• MAC Address
• VLAN ID
• Ether Type (IPv4 only)
• IP Protocol 0-255
• TCP/UDP Port 1-65535
• 802.1p
• DSCP (IPv4 only)
• IPv6 Address (IPv6 only)
Layer 3 Features
• IPv4 / IPv6 static routing
• IP interfaces: Up to 6
• Routing table entries: Up to 32 (IPv4 /
IPv6)
• ARP table (up to 128 entries)
• Inter-VLAN routing
Compatibility
Optional Software Utility: Windows® 10, 8.1, 8, 7, Vista, XP, Windows® 2003/2008 Server
Page 55

© Copyright 2021 TRENDnet. All Rights Reserved.
TRENDnet User’s Guide
Hive Management System
53
Web Smart PoE Switch Series Hardware Specifications
TPE-082WS*
(1.0R)
TPE-1620WS*
(2.0R)
TPE-1620WSF*
(1.0R)
TPE-2840WS*
(2.0R)
TPE-5028WS*
(1.0R)
TPE-5240WS*
(1.0R)
TPE-5048WS*
(1.0R)
Device Interface
LED Mode select button and LED indicators
8 x Gigabit PoE+
ports
16 x Gigabit PoE+ ports
24 x Gigabit PoE+ ports
48 x Gigabit PoE+ ports
2 x SFP slots
4 x Shared Gigabit ports (RJ-45/SFP)
Data Transfer Rate
Ethernet: 10 Mbps (half duplex), 20 Mbps (full duplex)
Fast Ethernet: 100 Mbps (half duplex), 200 Mbps (full duplex)
Gigabit Ethernet: 2000 Mbps (full duplex)
Switch fabric
20 Gbps
40 Gbps
56 Gbps
104 Gbps
RAM buffer
4.1 Mbits
12 Mbits
MAC Address Table
8K entries
16K entries
Jumbo Frames
10 Kbytes
Forwarding
14.9 Mpps (64-byte
packet size)
29.8Mpps (64-byte packet size)
41.7Mpps (64-byte packet size)
77.4Mpps (64-byte packet size)
HOL Blocking
Prevention
HOL Blocking Prevention supported on all models
Power Input
External power
supply (54V DC,
1.67A)
100 - 240V AC, 50/60 Hz, internal power supply
Power
Consumption
82 Watts (max.)
226W (max.)
460W (max.)
256W (max.)
446W (max.)
479W (max.)
963W (max.)
PoE Type
802.3at: Up to 30W per port
PoE Budget
75 Watts
185W
370W
185W
370W
740W
75 Watts
Fan Quantity
Fanless 2 3
5
Noise Level
N/A (fanless)
52 dBA (max.)
52.4 dBA (max.)
55 dBA (max.)
MTBF
862,966 hours
465,862 hours
192,382 hours
443,825 hours
277,604 hours
239,897 hours
338,601 hours
Page 56

© Copyright 2021 TRENDnet. All Rights Reserved.
TRENDnet User’s Guide
Hive Management System
54
TPE-082WS*
(1.0R)
TPE-1620WS*
(2.0R)
TPE-1620WSF*
(1.0R)
TPE-2840WS*
(2.0R)
TPE-5028WS*
(1.0R)
TPE-5240WS*
(1.0R)
TPE-5048WS*
(1.0R)
Operating
Temperature
-5° – 50°C (23° - 122°F)
Operating Humidity
Max. 95% non-condensing
Max. 90% non-
condensing
Max. 95% non-condensing
Dimensions
280 x 125.8 x 44
mm (11 x 5 x 1.74
in.)
440 x 250 x 44mm (17.3 x 9.8 x 1.74 in.)
440 x 430 x 44mm (17.3 x 17 x 1.74 in.)
Rack mountable 1U height
Weight
0.92 kg (2 lbs.)
3.66kg (8 lbs.)
3.89kg (8.5 lbs.)
3.75kg (8.26 lbs.)
3.92kg (8.64 lbs.)
6.12kg (13.5 lbs.)
6.58kg (14.5 lbs.)
Certifications
CE
FCC
External Power
Adapter (UL)
UL
Warranty
Lifetime
Package Contents
In addition to the switch, the package contents include the following:
Quick Installation Guide
Rack mount kit
Power adapter (54V
DC, 1.67A)
Power cord (1.8m/6 ft.)
*Model requires update to firmware 3.01.XXX to enable Hive capability.
Page 57

© Copyright 2021 TRENDnet. All Rights Reserved.
TRENDnet User’s Guide
Hive Management System
55
Web Smart PoE Switch Series Software Specifications
Standards
• IEEE 802.1d
• IEEE 802.1p
• IEEE 802.1Q
• IEEE 802.1s
• IEEE 802.1w
• IEEE 802.1X
• IEEE 802.1ab
• IEEE 802.3
• IEEE 802.3u
• IEEE 802.3x
• IEEE 802.3z
• IEEE 802.3ab
• IEEE 802.3ad
• IEEE 802.3af
• IEEE 802.3at
• IEEE 802.3az
Management
• CLI (Telnet / SSHv2) for basic
administration
• HTTP/HTTPS (SSL v2/3 TLS) Web based
GUI
• SNMP v1, v2c, v3
• RMON v1
• Static Unicast MAC Address
• Enable/disable 802.3az Power Saving
• LLDP and LLDP-MED
• Virtual Cable Diagnostics Test
• IPv6: IPv6 Neighbor Discovery, IPv6
Static IP, DHCPv6, Auto configuration
• Dual image and configuration
• TC Root/Protect
Hive Cloud Management
(requires update to
firmware 3.01.XXX to
enable Hive capability)
• Configure, monitor, and manage
through the TRENDnet Hive Cloud
Management Portal remotely via PC or
Mac web browser
• Multi-device management
• Provisioning through scheduled batch
firmware or configuration updates for
multiple switches
• Enable & disable PoE, set PD (powered
device) alive check, configure PoE
scheduling, and monitor PoE budget
utilization (for PoE switches only)
• Event/hardware network monitoring
(CPU/memory utilization)
• Configure features such as IP address
settings, VLANs, spanning tree,
loopback detection, IGMP snooping, link
aggregation, and bandwidth control
through cloud management
MIB
• IP Forward Table MIB RFC 1354
• RMON MIB RFC 1271
• IPv4 MIB RFC 1213
• IPv6 MIB RFC 2465
• GVRP MIB IEEE 802.1Q-VLAN
• LA MIB IEEE 802.3ad
• LLDP MIB IEEE 802.1ab
• IGMP Snooping MIB RFC 2933
• MLD Snooping MIB RFC 3019
• Private VLAN MIB IEEE 802.1Q
• DHCP Snooping MIB RFC 2026
• QoS MIB RFC 4323
• SNMP MIB RFC 3415
• STP MIB RFC 4318
• PNAC MIB IEEE 802.1x
• VLAN MIB IEEE 802.1q
• DNS MIB RFC 1611
• ACL MIB
• Bandwidth CTRL MIB
• LBD MIB
• Mirror MIB
• IPv6 Neighbor MIB
• SNTP MIB
• Storm CTRL MIB
• Statistics MIB
• Tool MIB
• Voice VLAN MIB
• DoS MIB
Spanning Tree
• IEEE 802.1D STP (Spanning Tree
protocol)
• IEEE 802.1w RSTP (Rapid Spanning Tree
protocol)
• IEEE 802.1s MSTP (Multiple Spanning
Tree protocol)
Link Aggregation
• Static Link Aggregation
• 802.3ad Dynamic LACP
Page 58

© Copyright 2021 TRENDnet. All Rights Reserved.
TRENDnet User’s Guide
Hive Management System
56
Quality of Service (QoS)
• 802.1p Class of Service (CoS)
• DSCP (Differentiated Services Code
Point)
• Bandwidth Control per port
• Queue Scheduling: Strict Priority,
Weighted Round Robin (WRR)
VLAN
• Multiple management VLAN assignment
• Asymmetric VLAN
• 802.1Q Tagged VLAN
• Dynamic GVRP
• MAC-based VLAN
• Protocol-based VLAN
• Up to 256 VLAN groups, ID Range 1-
4094
• Private VLAN (Protected Ports)
• Voice VLAN (10 user defined OUIs)
Multicast
• IGMP Snooping v1, v2, v3
• MLD Snooping v1, v2
• IGMP fast leave
• MVR (Multicast VLAN Registration)
• Static Multicast Address
• Up to 256 multicast entries
Port Mirror
• RX, TX, or Both
• Many to one
Access Control
• 802.1X Port-Based Network Access
Control , RADIUS, TACACS+
• Local Dial In User Authentication
• DHCP Snooping (per VLAN)
• Loopback Detection
• Duplicated Address Detection
• Trusted Host
• Denial of Service (DoS)
• IP MAC port binding
• Dynamic ARP inspection
• Block unknown multicast
ACL IPv4 L2-L4 & IPv6
• MAC Address
• VLAN ID
• Ether Type (IPv4 only)
• IP Protocol 0-255
• TCP/UDP Port 1-65535
• 802.1p
• DSCP (IPv4 only)
• IPv6 Address (IPv6 only)
Layer 3 Features
• IPv4 / IPv6 static routing
• IP interfaces: Up to 6
• Routing table entries: Up to 32 (IPv4 /
IPv6)
• ARP table (up to 128 entries)
• Inter-VLAN routing
Compatibility
Optional Software Utility: Windows® 10, 8.1, 8, 7, Vista, XP, Windows® 2003/2008 Server
Page 59

© Copyright 2021 TRENDnet. All Rights Reserved.
TRENDnet User’s Guide
Limited Warranty
57
Limited Warranty
TRENDnet warrants only to the original purchaser of this product from a TRENDnet
authorized reseller or distributor that this product will be free from defects in material
and workmanship under normal use and service. This limited warranty is nontransferable and does not apply to any purchaser who bought the product from a
reseller or distributor not authorized by TRENDnet, including but not limited to
purchases from Internet auction sites.
Limited Warranty
TRENDnet warrants its products against defects in material and workmanship, under
normal use and service. Specific warranty periods are listed on each of the respective
product pages on the TRENDnet website.
• AC/DC Power Adapter, Cooling Fan, and Power Supply carry a one-year
warranty.
Limited Lifetime Warranty
TRENDnet offers a limited lifetime warranty for all of its metal-enclosed network
switches that have been purchased in the United States/Canada on or after 1/1/2015.
• Cooling fan and internal power supply carry a one-year warranty
To obtain an RMA, the ORIGINAL PURCHASER must show Proof of Purchase and return
the unit to the address provided. The customer is responsible for any shipping-related
costs that may occur. Replacement goods will be shipped back to the customer at
TRENDnet’s expense.
Upon receiving the RMA unit, TRENDnet may repair the unit using refurbished parts. In
the event that the RMA unit needs to be replaced, TRENDnet may replace it with a
refurbished product of the same or comparable model.
In the event that, after evaluation, TRENDnet cannot replace the defective product or
there is no comparable model available, we will refund the depreciated value of the
product.
If a product does not operate as warranted during the applicable warranty period,
TRENDnet shall reserve the right, at its expense, to repair or replace the defective
product or part and deliver an equivalent product or part to the customer. The
repair/replacement unit's warranty continues from the original date of purchase. All
products that are replaced become the property of TRENDnet. Replacement products
may be new or reconditioned. TRENDnet does not issue refunds or credit. Please
contact the point-of-purchase for their return policies.
TRENDnet shall not be responsible for any software, firmware, information, or memory
data of customer contained in, stored on, or integrated with any products returned to
TRENDnet pursuant to any warranty.
There are no user serviceable parts inside the product. Do not remove or attempt to
service the product by any unauthorized service center. This warranty is voided if (i) the
product has been modified or repaired by any unauthorized service center, (ii) the
product was subject to accident, abuse, or improper use, or (iii) the product was subject
to conditions more severe than those specified in the manual.
Warranty service may be obtained by contacting TRENDnet within the applicable
warranty period and providing a copy of the dated proof of the purchase. Upon proper
submission of required documentation, a Return Material Authorization (RMA) number
will be issued. An RMA number is required in order to initiate warranty service support
for all TRENDnet products. Products that are sent to TRENDnet for RMA service must
have the RMA number marked on the outside of return packages and sent to TRENDnet
prepaid, insured and packaged appropriately for safe shipment. International customers
Page 60

© Copyright 2021 TRENDnet. All Rights Reserved.
TRENDnet User’s Guide
Limited Warranty
58
shipping from outside of the USA and Canada are responsible for any return shipping
and/or customs charges, including but not limited to, duty, tax, and other fees.
Refurbished product: Refurbished products carry a 90-day warranty after date of
purchase. Please retain the dated sales receipt with purchase price clearly visible as
evidence of the original purchaser's date of purchase. Replacement products may be
refurbished or contain refurbished materials. If TRENDnet, by its sole determination, is
unable to replace the defective product, we will offer a refund for the depreciated value
of the product.
WARRANTIES EXCLUSIVE: IF THE TRENDNET PRODUCT DOES NOT OPERATE AS
WARRANTED ABOVE, THE CUSTOMER'S SOLE REMEDY SHALL BE, AT TRENDNET'S
OPTION, REPAIR OR REPLACE. THE FOREGOING WARRANTIES AND REMEDIES ARE
EXCLUSIVE AND ARE IN LIEU OF ALL OTHER WARRANTIES, EXPRESSED OR IMPLIED,
EITHER IN FACT OR BY OPERATION OF LAW, STATUTORY OR OTHERWISE, INCLUDING
WARRANTIES OF MERCHANTABILITY AND FITNESS FOR A PARTICULAR PURPOSE.
TRENDNET NEITHER ASSUMES NOR AUTHORIZES ANY OTHER PERSON TO ASSUME FOR
IT ANY OTHER LIABILITY IN CONNECTION WITH THE SALE, INSTALLATION,
MAINTENANCE, OR USE OF TRENDNET'S PRODUCTS.
TRENDNET SHALL NOT BE LIABLE UNDER THIS WARRANTY IF ITS TESTING AND
EXAMINATION DISCLOSE THAT THE ALLEGED DEFECT IN THE PRODUCT DOES NOT EXIST
OR WAS CAUSED BY CUSTOMER'S OR ANY THIRD PERSON'S MISUSE, NEGLECT,
IMPROPER INSTALLATION OR TESTING, UNAUTHORIZED ATTEMPTS TO REPAIR OR
MODIFY, OR ANY OTHER CAUSE BEYOND THE RANGE OF THE INTENDED USE, OR BY
ACCIDENT, FIRE, LIGHTNING, OR OTHER HAZARD.
LIMITATION OF LIABILITY: TO THE FULL EXTENT ALLOWED BY LAW, TRENDNET ALSO
EXCLUDES FOR ITSELF AND ITS SUPPLIERS ANY LIABILITY, WHETHER BASED IN
CONTRACT OR TORT (INCLUDING NEGLIGENCE), FOR INCIDENTAL, CONSEQUENTIAL,
INDIRECT, SPECIAL, OR PUNITIVE DAMAGES OF ANY KIND, OR FOR LOSS OF REVENUE OR
PROFITS, LOSS OF BUSINESS, LOSS OF INFORMATION OR DATE, OR OTHER FINANCIAL
LOSS ARISING OUT OF OR IN CONNECTION WITH THE SALE, INSTALLATION,
MAINTENANCE, USE, PERFORMANCE, FAILURE, OR INTERRUPTION OF THE POSSIBILITY
OF SUCH DAMAGES, AND LIMITS ITS LIABILITY TO REPAIR, REPLACEMENT, OR REFUND
OF THE PURCHASE PRICE PAID, AT TRENDNET'S OPTION. THIS DISCLAIMER OF LIABILITY
FOR DAMAGES WILL NOT BE AFFECTED IF ANY REMEDY PROVIDED HEREIN SHALL FAIL
OF ITS ESSENTIAL PURPOSE.
Governing Law: This Limited Warranty shall be governed by the laws of the state of
California.
Some TRENDnet products include software code written by third party developers.
These codes are subject to the GNU General Public License ("GPL") or GNU Lesser
General Public License ("LGPL").
Visit http://www.trendnet.com/gpl or the support section on
http://www.trendnet.com and search for the desired TRENDnet product to access to
the GPL Code or LGPL Code. These codes are distributed WITHOUT WARRANTY and are
subject to the copyrights of the developers. TRENDnet does not provide technical
support for these codes. Please visit http://www.gnu.org/licenses/gpl.txt or
http://www.gnu.org/licenses/lgpl.txt for specific terms of each license.
PWP07172015v3 2021/02/10
Page 61

 Loading...