

Page 1

TRENDnet User’s Guide
Cover Page
Page 2

TRENDnet User’s Guide
Table of Contents
i
Contents
Product Overview ................................................................................ 2
Package Contents .......................................................................................................... 2
Features ......................................................................................................................... 2
Product Hardware Features........................................................................................... 3
Application Diagram ...................................................................................................... 3
Installation ........................................................................................... 4
Hardware Installation .................................................................................................... 4
KVM Switch Operation .................................................................................................. 4
Toggle Switch ............................................................................................................ 4
Keyboard Hot Key Commands ................................................................................... 4
KVM Switcher Software ....................................................................... 5
For Windows User ......................................................................................................... 5
For Mac User ................................................................................................................. 9
Troubleshooting ................................................................................. 13
© Copyright 2011TRENDnet. All Rights Reserved.
Page 3

TRENDnet User’s Guide
TK-215i
2
Product Overview
TK-215i
Package Contents
TK-215i
Quick Installation Guide
CD-ROM (Utility & User’s Guide)
If any package contents are missing or damaged, please contact the retail store, online
retailer, or reseller/distributor that the item was purchased.
Features
TRENDnet’s 2-Port HDMI KVM Switch, model TK-215i, controls two computers (with an
available HDMI port) with one set of console controls. No driver installation required,
simply plug in the integrated cables to share two computers with a fullHD 1080p display.
The TK-215i supports HDMI and 3.5 mm analog audio and features an ergonomic
computer toggle switch.
Computers
Control up to 2 computers
1080p HD
Supports for full HD 1080p (progressive 1920 x 1080 pixels) with a 60 Hz refresh rate
2-Way Audio
Full audio support through HDMI cable connections with optional 3.5 mm microphone
and speaker jacks
Toggle Switch
Use the integrated 1.5 m (5 ft.) cable to position the toggle switch in the most
ergonomic location
Console Connectors
Emulation Technology supports advanced USB keyboard and mouse designs
HDMI Display
HDMI 1.3 with HDCP support
Switch Software
Windows® and Mac® based KVM switch software to define hot keys and create autoscan intervals
© Copyright 2014 TRENDnet. All Rights Reserved.
Page 4
TRENDnet User’s Guide
TK-215i
3
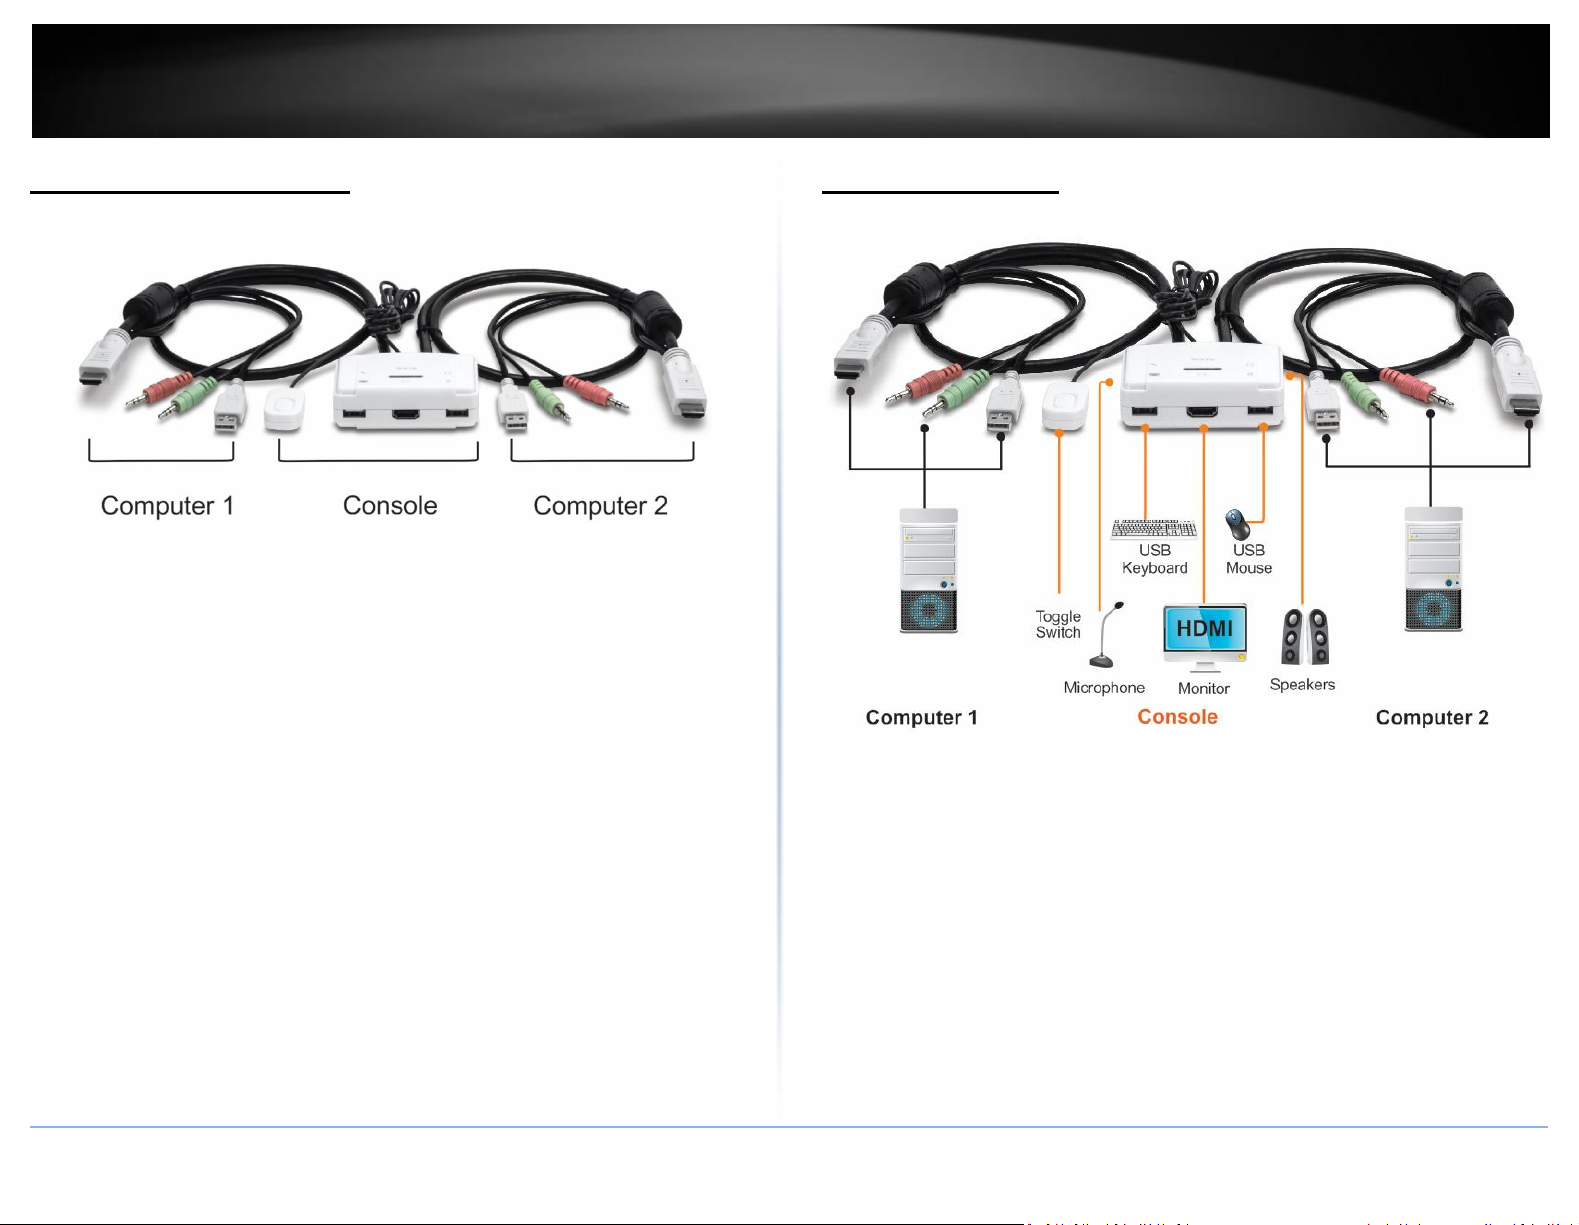
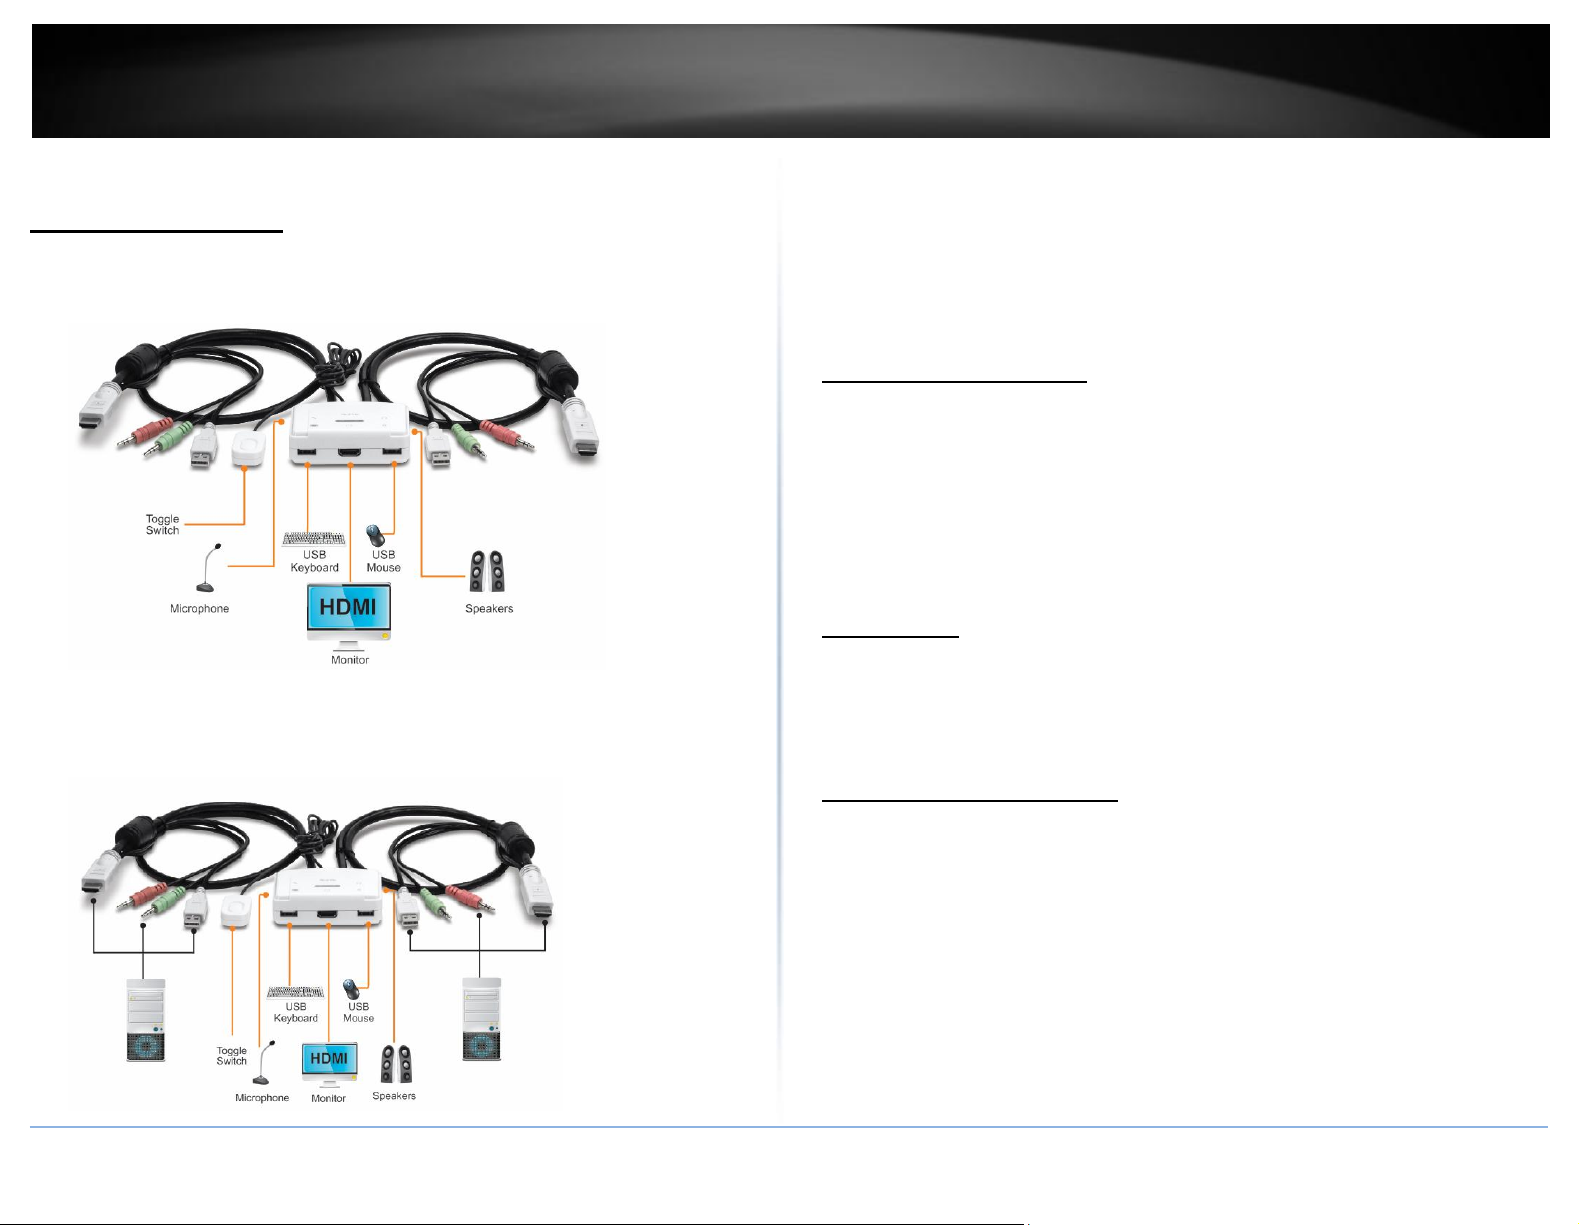
Product Hardware Features
Console Connector Computer 1 - 2 Connector
- Toogle Switch - HDMI Plug
- 3.5mm Microphone Port - 3.5mm Microphone Plug
- USB Keyboard Port - 3.5mm Speaker Plug
- HDMI Monitor Port - USB Plug
- USB Mouse Port
- 3.5mm Speaker Port
Application Diagram
© Copyright 2014 TRENDnet. All Rights Reserved.
Page 5
TRENDnet User’s Guide
TK-215i
4
Installation
Hardware Installation
1. Connects the shared USB keyboard, mouse, HDMI monitor, microphone/
speakers (optional) to your KVM Switch’s Console port.
Note:
1. The HDMI connection included both video and audio
2. Some computers with USB Interface may require you to manually enable the
USB option in the BIOS setting before using any USB device. If your USB
interface does not work, please check the USB Status option in BOS.
KVM Switch Operation
There are three ways to select the computers.
1. One-touch push button toggle switch
2. Keyboard hot key commands
3. KVM Switcher Software (see next section for detail)
Toggle Switch
2. Connects the first set of the USB/HDMI/Microphone/Speaker KVM cable
into the 1st computer and connect the other set of the
USB/HDMI/Microphone/Speaker KVM cable into the 2nd computer.
The one touch toggle switch allows you to switch to another computer by click the
button.
Keyboard Hot Key Commands
Hot Key Commands = Ctrl + Alt + [command key]
Universal Hot Key Commands = Scroll Lock + Scroll Lock
Note:
1. Each keystroke within a hot key sequence should be pressed within 2 seconds.
Otherwise, the hot key sequence will be exit.
© Copyright 2014 TRENDnet. All Rights Reserved.
Page 6

TRENDnet User’s Guide
TK-215i
5
2. The default Hot Key Sequence is Ctrl + Alt + 1 or 2. You can define your own hot
key via KVM Switcher Software.
KVM Switcher Software
3. The Universal Hot Key command is not working with Mac operating system.
4. Both the universal hotkey, Scroll Lock + Scroll Lock and the user-definable hotkey,
Ctrl + Alt + [command key] WILL NOT work on any empty port which does not
have computer connected. To force the KVM switch to switch to an empty port,
please press the toggle switch instead.
5. All the hot keys are only functional after your computers are booting into the OS.
If you want to switch computer in the BIOS/pre-boot stage, please press the
toggle switch button.
Note: The TK-215i KVM Switch does not require any drivers or software. The KVM
Switcher Utility is a convenience way to operate the KVM Switch.
For Windows User
1. Insert the Installation CD-ROM into your computer’s CD-ROM drive to initiate the
Auto-Run program, and the menu screen will appear as below.
© Copyright 2014 TRENDnet. All Rights Reserved.
Page 7

TRENDnet User’s Guide
TK-215i
6
2. Click Install Utility from the Auto-Run menu screen. The welcome screen
appears as below. Click Next >.
3. When completed, click Finish.
4. Right-click on the KVM Switching icon on the desktop.
5. If you would like to modify the hot key, type in a character. You can enter any
number, letter or symbol. Control keys such as Alt, Ctrl, Shift, CAPS LOCK, Tab,
Esc, and Num Lock and function keys cannot be used.
Function Key Example: CTRL + ALT + A
© Copyright 2014 TRENDnet. All Rights Reserved.
Page 8

TRENDnet User’s Guide
TK-215i
7
6. Click on the check box of the Fix Audio to Port and then select the desire
7. Select a desired Auto Scan period. The period is the waiting time that your KVM
computer to fix the speaker/microphone channel for the selected computer.
Once this option is checked, the speaker/microphone channel will be fixed and
become non-selectable. Note: Fixed Audio port features only supports for
analog audio. The HDMI audio always stay with the current computer.
Switch will switch to next computer.
8. Click OK to save the changes.
© Copyright 2014 TRENDnet. All Rights Reserved.
Page 9

TRENDnet User’s Guide
TK-215i
8
9. Right click on the KVM Switcher software icon in the system tray. If your
11. Click Start Auto-Scan to start auto-scan. Click the Stop Auto-Scan to stop auto-
computer is connected to computer 1 port, the system tray will show an icon
with the number 1. If your computer is connected to computer 2, the system
tray will show and icon with the number 2.
Note: After performing the port switch, you have to wait till the KVM Switch
icon shows the target port before you can perform next switching again.
10. Select the PC that you would like to switch to. The unconnected port or the
active port will be gray-out.
scan.
© Copyright 2014 TRENDnet. All Rights Reserved.
Page 10

TRENDnet User’s Guide
TK-215i
9
5. Click Continue, then following the instruction.
For Mac User
1. Insert the Installation CD-ROM into your computer’s CD-ROM drive.
2. Double-click TK-215i CD-ROM icon on the desktop
3. Double-click on the Macintosh folder
6. Click Close to finish the installation
4. Select the TrendnetUSBKVMSwitcher.pkg.
© Copyright 2014 TRENDnet. All Rights Reserved.
Page 11

TRENDnet User’s Guide
TK-215i
10
7. Double click on the Macintosh HD icon.
8. Double click on the Application icon.
9. Click on TrendnetUSB-KVM Switcher.
10. If you would like to modify the hot key, type in a character. You can enter any
number, letter or symbol. Control keys such as Alt, Ctrl, Shift, CAPS LOCK, Tab,
Esc, and Num Lock and function keys cannot be used.
Function Key Example: Command + Option + A.
12. Double click on the USB-KVM Switcher icon in the dock. If your computer is
connected to computer 1 port, the dock will show an icon with the number 1.
If your computer is connected to computer 2, the dock will show an icon with
the number 2.
© Copyright 2014 TRENDnet. All Rights Reserved.
Page 12

TRENDnet User’s Guide
TK-215i
11
11. Click on the check box of the Fix Audio to Port and then select the desire
12. Select a desired Auto Scan Period. The period is the time that your KVM Switch
computer to fix the speaker/microphone channel to the selected computer.
Once this option is checked, the speaker/microphone channel will be fixed and
become non-selectable. Note: Fixed Audio port features only supports for
analog audio. The HDMI audio always stay with the current computer.
will wait to switch to next computer.
13. Click OK to save the changes.
© Copyright 2014 TRENDnet. All Rights Reserved.
Page 13

TRENDnet User’s Guide
TK-215i
12
14. Right click on the KVM Switcher Software icon in the dock. If your computer is
16. Select the Start Auto-Scan to start auto-scan. Click the Stop Auto-Scan to stop
connected to computer 1 port, the dock will show an icon with the number 1.
If your computer is connected to computer 2, the dock will show an icon with
the number 2.
15. Select the computer that you would like to switch to.
the auto-scan.
© Copyright 2014 TRENDnet. All Rights Reserved.
Page 14

TRENDnet User’s Guide
TK-215i
13
Troubleshooting
1. I have the TK-215i connected properly, but my keyboard and mouse do not
work.
a. Make sure your USB ports are working properly by connecting your mouse
and keyboard directly to the USB ports on your computer.
b. Once you confirm that your computer’s USB port is functional, please
reboot all computers, and try to use the KVM switch again.
2. Can I connect and disconnect the USB cables while the computers are turned
on?
Yes, you can connected or disconnect the USB cable while the computers are
turned on, because the USB interface is Plug-and-Play and Hot-Pluggable.
3. Will the KVM switch remember the keyboard setting between computers?
Yes, the KVM switch will remember the keyboard setting when switching
between computers. (i.e.: Caps Lock, Num Lock, etc.)
4. How do I switch from one computer to another with the KVM Switch?
Windows User:
Toggle Switch push button, Universal Hot Key Commands or USB KVM Switcher
Software.
Mac User:
Toggle Switch push button or USB KVM Switcher Software
Linux User:
Toggle switch push button
5. Can I redirect to specific computer?
No, the binding/unbinding audio function only works with analog audio port.
The HDMI audio always stay with the current computer.
© Copyright 2014 TRENDnet. All Rights Reserved.
Page 15

TRENDnet User’s Guide
TK-215i
14
Limited Warranty
TRENDnet warrants its products against defects in material and workmanship, under normal
use and service, for the following lengths of time from the date of purchase.
TK-215i – 2 Years Limited Warranty
AC/DC Power Adapter, Cooling Fan, and Power Supply carry 1 year warranty.
If a product does not operate as warranted during the applicable warranty period, TRENDnet
shall reserve the right, at its expense, to repair or replace the defective product or part and
deliver an equivalent product or part to the customer. The repair/replacement unit’s
warranty continues from the original date of purchase. All products that are replaced
become the property of TRENDnet. Replacement products may be new or reconditioned.
TRENDnet does not issue refunds or credit. Please contact the point-of-purchase for their
return policies.
TRENDnet shall not be responsible for any software, firmware, information, or memory data
of customer contained in, stored on, or integrated with any products returned to TRENDnet
pursuant to any warranty.
There are no user serviceable parts inside the product. Do not remove or attempt to service
the product by any unauthorized service center. This warranty is voided if (i) the product has
been modified or repaired by any unauthorized service center, (ii) the product was subject to
accident, abuse, or improper use (iii) the product was subject to conditions more severe than
those specified in the manual.
Warranty service may be obtained by contacting TRENDnet within the applicable warranty
period and providing a copy of the dated proof of the purchase. Upon proper submission of
required documentation a Return Material Authorization (RMA) number will be issued. An
RMA number is required in order to initiate warranty service support for all TRENDnet
products. Products that are sent to TRENDnet for RMA service must have the RMA number
marked on the outside of return packages and sent to TRENDnet prepaid, insured and
packaged appropriately for safe shipment. Customers shipping from outside of the USA and
Canada are responsible for return shipping fees. Customers shipping from outside of the USA
are responsible for custom charges, including but not limited to, duty, tax, and other fees.
WARRANTIES EXCLUSIVE: IF THE TRENDNET PRODUCT DOES NOT OPERATE AS WARRANTED
ABOVE, THE CUSTOMER’S SOLE REMEDY SHALL BE, AT TRENDNET’S OPTION, REPAIR OR
REPLACE. THE FOREGOING WARRANTIES AND REMEDIES ARE EXCLUSIVE AND ARE IN LIEU OF
ALL OTHER WARRANTIES, EXPRESSED OR IMPLIED, EITHER IN FACT OR BY OPERATION OF
LAW, STATUTORY OR OTHERWISE, INCLUDING WARRANTIES OF MERCHANTABILITY AND
FITNESS FOR A PARTICULAR PURPOSE. TRENDNET NEITHER ASSUMES NOR AUTHORIZES ANY
OTHER PERSON TO ASSUME FOR IT ANY OTHER LIABILITY IN CONNECTION WITH THE SALE,
INSTALLATION MAINTENANCE OR USE OF TRENDNET’S PRODUCTS.
TRENDNET SHALL NOT BE LIABLE UNDER THIS WARRANTY IF ITS TESTING AND EXAMINATION
DISCLOSE THAT THE ALLEGED DEFECT IN THE PRODUCT DOES NOT EXIST OR WAS CAUSED BY
CUSTOMER’S OR ANY THIRD PERSON’S MISUSE, NEGLECT, IMPROPER INSTALLATION OR
TESTING, UNAUTHORIZED ATTEMPTS TO REPAIR OR MODIFY, OR ANY OTHER CAUSE
BEYOND THE RANGE OF THE INTENDED USE, OR BY ACCIDENT, FIRE, LIGHTNING, OR OTHER
HAZARD.
LIMITATION OF LIABILITY: TO THE FULL EXTENT ALLOWED BY LAW TRENDNET ALSO
EXCLUDES FOR ITSELF AND ITS SUPPLIERS ANY LIABILITY, WHETHER BASED IN CONTRACT OR
TORT (INCLUDING NEGLIGENCE), FOR INCIDENTAL, CONSEQUENTIAL, INDIRECT, SPECIAL, OR
PUNITIVE DAMAGES OF ANY KIND, OR FOR LOSS OF REVENUE OR PROFITS, LOSS OF
BUSINESS, LOSS OF INFORMATION OR DATE, OR OTHER FINANCIAL LOSS ARISING OUT OF OR
IN CONNECTION WITH THE SALE, INSTALLATION, MAINTENANCE, USE, PERFORMANCE,
FAILURE, OR INTERRUPTION OF THE POSSIBILITY OF SUCH DAMAGES, AND LIMITS ITS
LIABILITY TO REPAIR, REPLACEMENT, OR REFUND OF THE PURCHASE PRICE PAID, AT
TRENDNET’S OPTION. THIS DISCLAIMER OF LIABILITY FOR DAMAGES WILL NOT BE AFFECTED
IF ANY REMEDY PROVIDED HEREIN SHALL FAIL OF ITS ESSENTIAL PURPOSE.
Governing Law: This Limited Warranty shall be governed by the laws of the state of
California.
Some TRENDnet products include software code written by third party developers. These
codes are subject to the GNU General Public License ("GPL") or GNU Lesser General Public
License ("LGPL").
Go to http://www.trendnet.com/gpl or http://www.trendnet.com Download section and
look for the desired TRENDnet product to access to the GPL Code or LGPL Code. These codes
are distributed WITHOUT WARRANTY and are subject to the copyrights of the developers.
TRENDnet does not provide technical support for these codes. Please go to
http://www.gnu.org/licenses/gpl.txt or http://www.gnu.org/licenses/lgpl.txt for specific
terms of each license.
V1.0R /09.03.2014
© Copyright 2014 TRENDnet. All Rights Reserved.
Page 16

 Loading...