

TRENDnet User’s Guide
Cover Page

TRENDnet User’s Guide
Table of Contents
i
Contents
Product Overview ............................................................................ 1
Package Contents ........................................................................................................ 1
Features ...................................................................................................................... 1
Installing your Wireless Adapter ...................................................... 2
Windows® OS Installation ........................................................................................... 2
Mac® OS Installation ................................................................................................... 6
Connect to your wireless network using WPS ................................ 11
Windows® OS ............................................................................................................ 11
WPS connection using the built in utility (Virtual Push Button) ............................. 11
Mac® OS ................................................................................................................... 12
WPS connection using the built in utility (Virtual Push Button) ............................. 12
Technical Specifications ................................................................. 14
Troubleshooting ............................................................................ 15
Appendix ....................................................................................... 16
© Copyright 2017 TRENDnet. All Rights Reserved.
1
TRENDnet User’s Guide
TEW-648UBM
Product Overview
Features
TRENDnet’s Micro N150 Wireless USB Adapter, model TEW-648UBM, connects a laptop
or desktop computer to a high-speed WiFi N network. Seamlessly stream video,
download files, and play games with this ultra-compact wireless n adapter. WiFi
Multimedia Quality of Service prioritizes important video, audio, and gaming traffic.
Easy Setup
Get up and running in minutes with the intuitive guided setup
N150 WiFi
Connect your laptop or computer to high-speed WiFi N150 to download files, play
games, stream video, and more.
Wireless Encryption
TEW-648UBM
Package Contents
The package includes:
TEW-648UBM Micro N150 Wireless USB Adapter
CD-ROM (Drivers and User’s Guide)
Quick Installation Guide
If any package contents are missing or damaged, please contact the retail store, online
retailer, or reseller/distributor that the item was purchased.
Supports up to WPA2 encryption
Ultra-Compact Design
Micro design length is just over a quarter inch (7mm)
Operating Systems
Compatible with Windows® and Mac® operating systems
© Copyright 2017 TRENDnet. All Rights Reserved.

2
TRENDnet User’s Guide
TEW-648UBM
Installing your Wireless Adapter
This section describes how to install the software driver for the wireless adapter.
2. At the CD Autorun Prompt window, click Run Autorun.exe.
Note: If the Autorun prompt does not appear automatically, open the CD contents and
double-click Autorun.exe.
At the CD-ROM main menu, click Install Drivers.
Windows® OS Installation
Supported operating systems: Windows® 10, 8.1, 8, 7, Vista, XP
For any updates, please check the TRENDnet website www.trendnet.com.
1. Insert the included CD-ROM into your computer’s CD-ROM drive.
Note: If you do not have the included CD-ROM, you can download the drivers from
http://www.trendnet.com/support/.
Note: During the installation, you might see these warning message, please select
continue anyway to install the software.
(Windows 10)
© Copyright 2017 TRENDnet. All Rights Reserved.
3
TRENDnet User’s Guide
TEW-648UBM
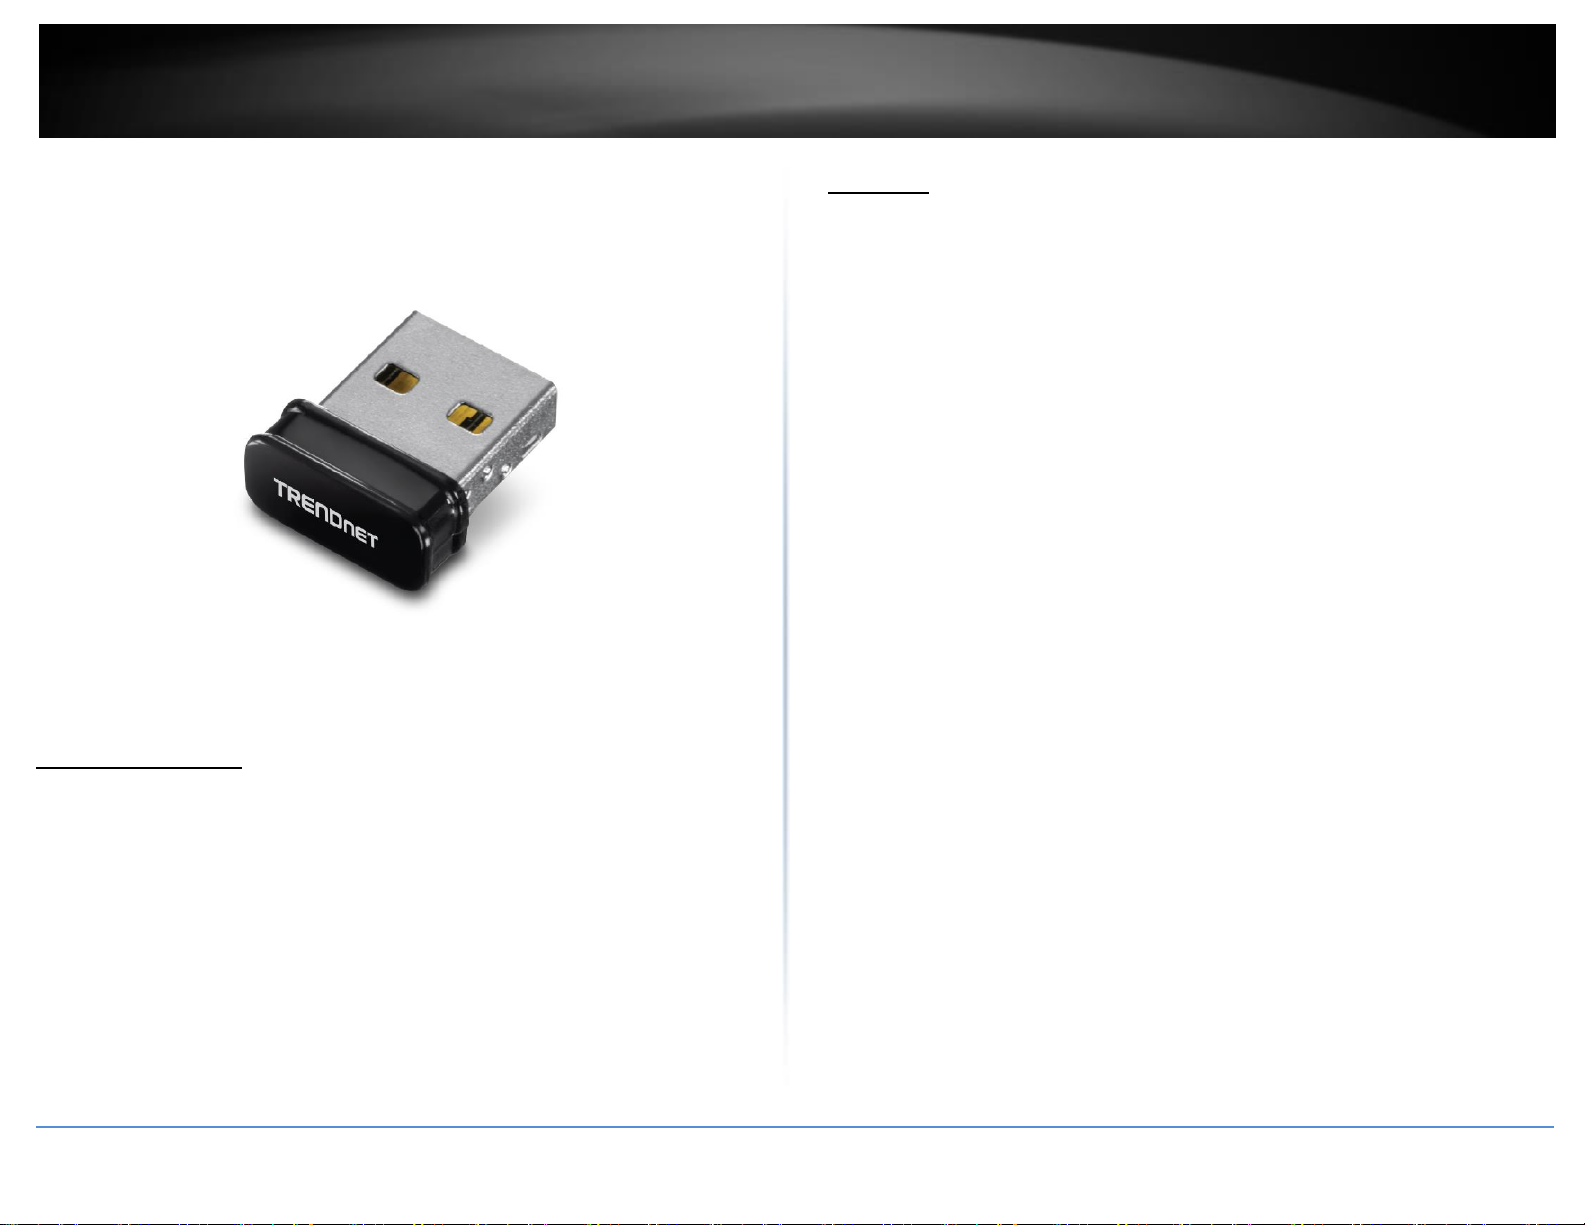
3. Select a language preference from the options provided.
4. Follow the InstallShield Wizard Instructions.
5. You will be prompted to accept the end user license agreement. Select I accept
the terms of the license agreement and click Next.
6. Wait for the driver installation to complete. This may take a few minutes.
Note: If you do not receive a security prompt, continue to the next step. If prompted,
click Install this driver software anyway.
© Copyright 2017 TRENDnet. All Rights Reserved.
4
TRENDnet User’s Guide
TEW-648UBM
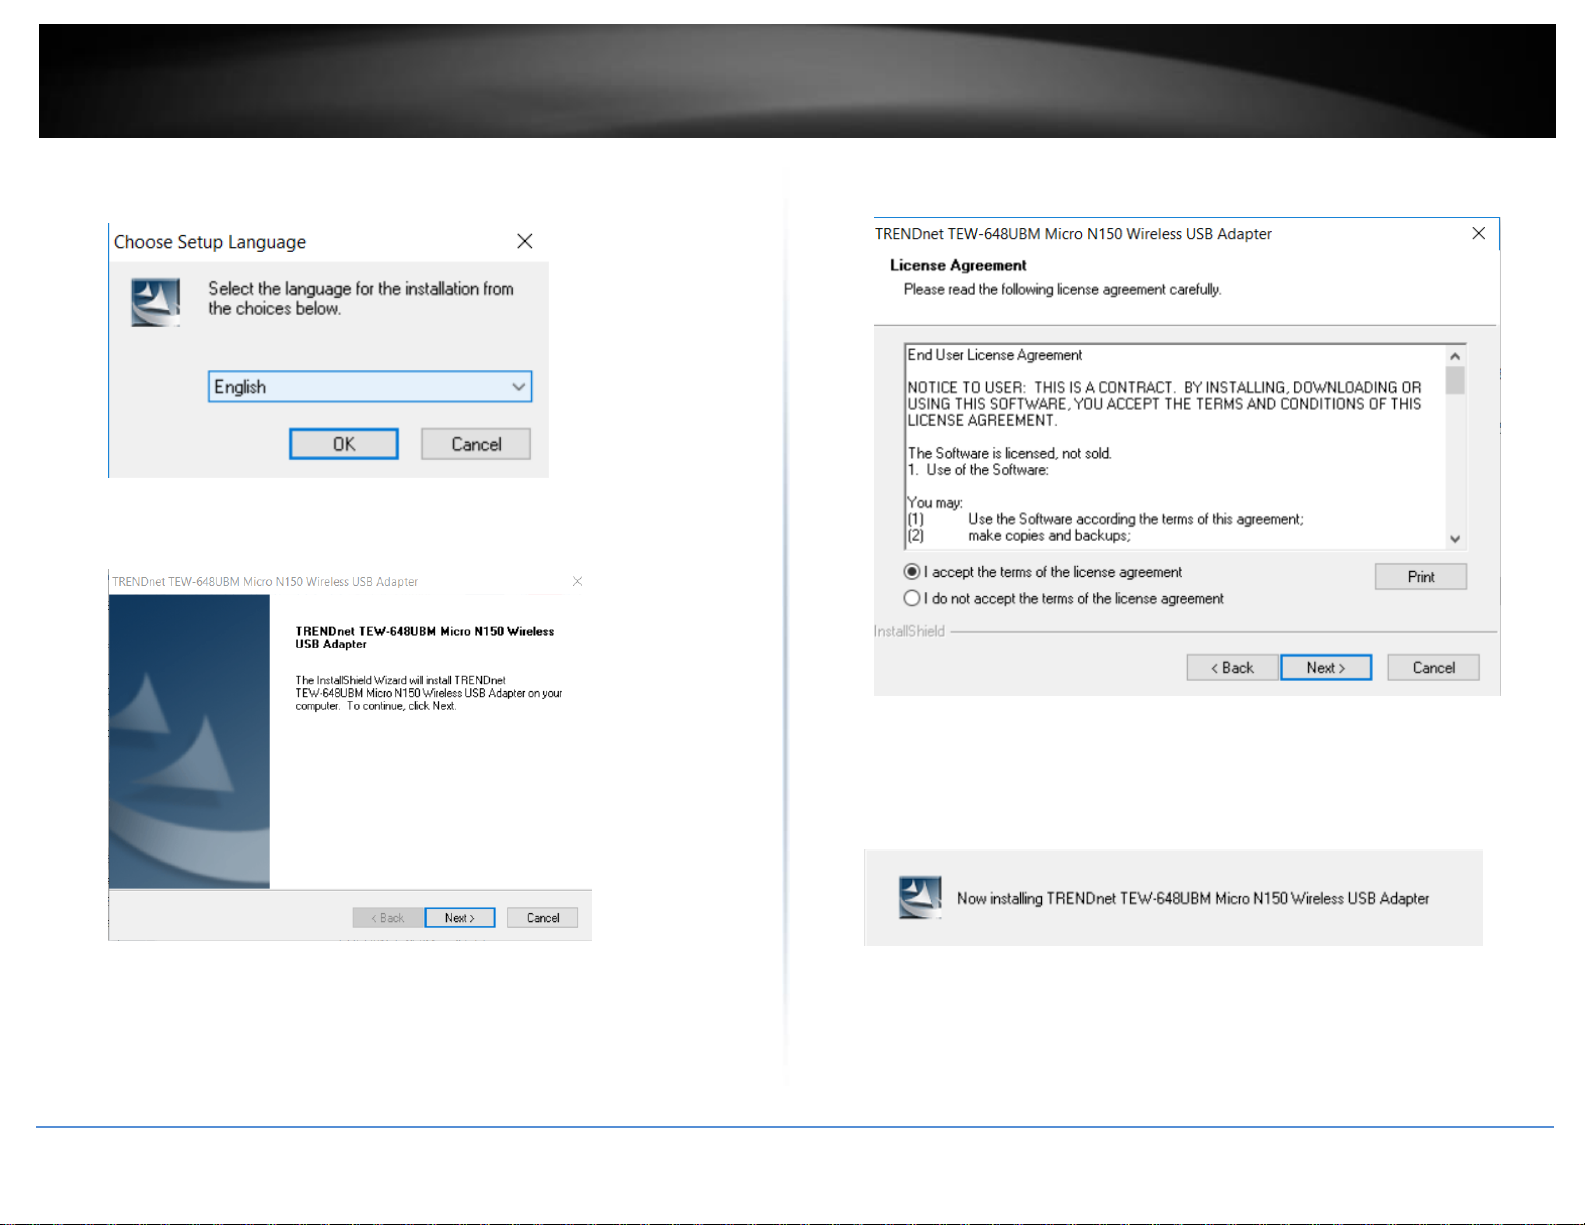
Blinking On
:
A steady blinking LED means that the network adapter has
been successfully installed.
Fast Blinking
:
When the LED is blinking fast, the network adapter is
transmitting or receiving data.
Off
:
When the LED is off, the network adapter has not been
correctly installed.
7. Click Finish to restart the computer.
8. After the computer is rebooted, plug the Wireless N USB Adapter into an
available USB slot on your computer.
Link/Activity LED
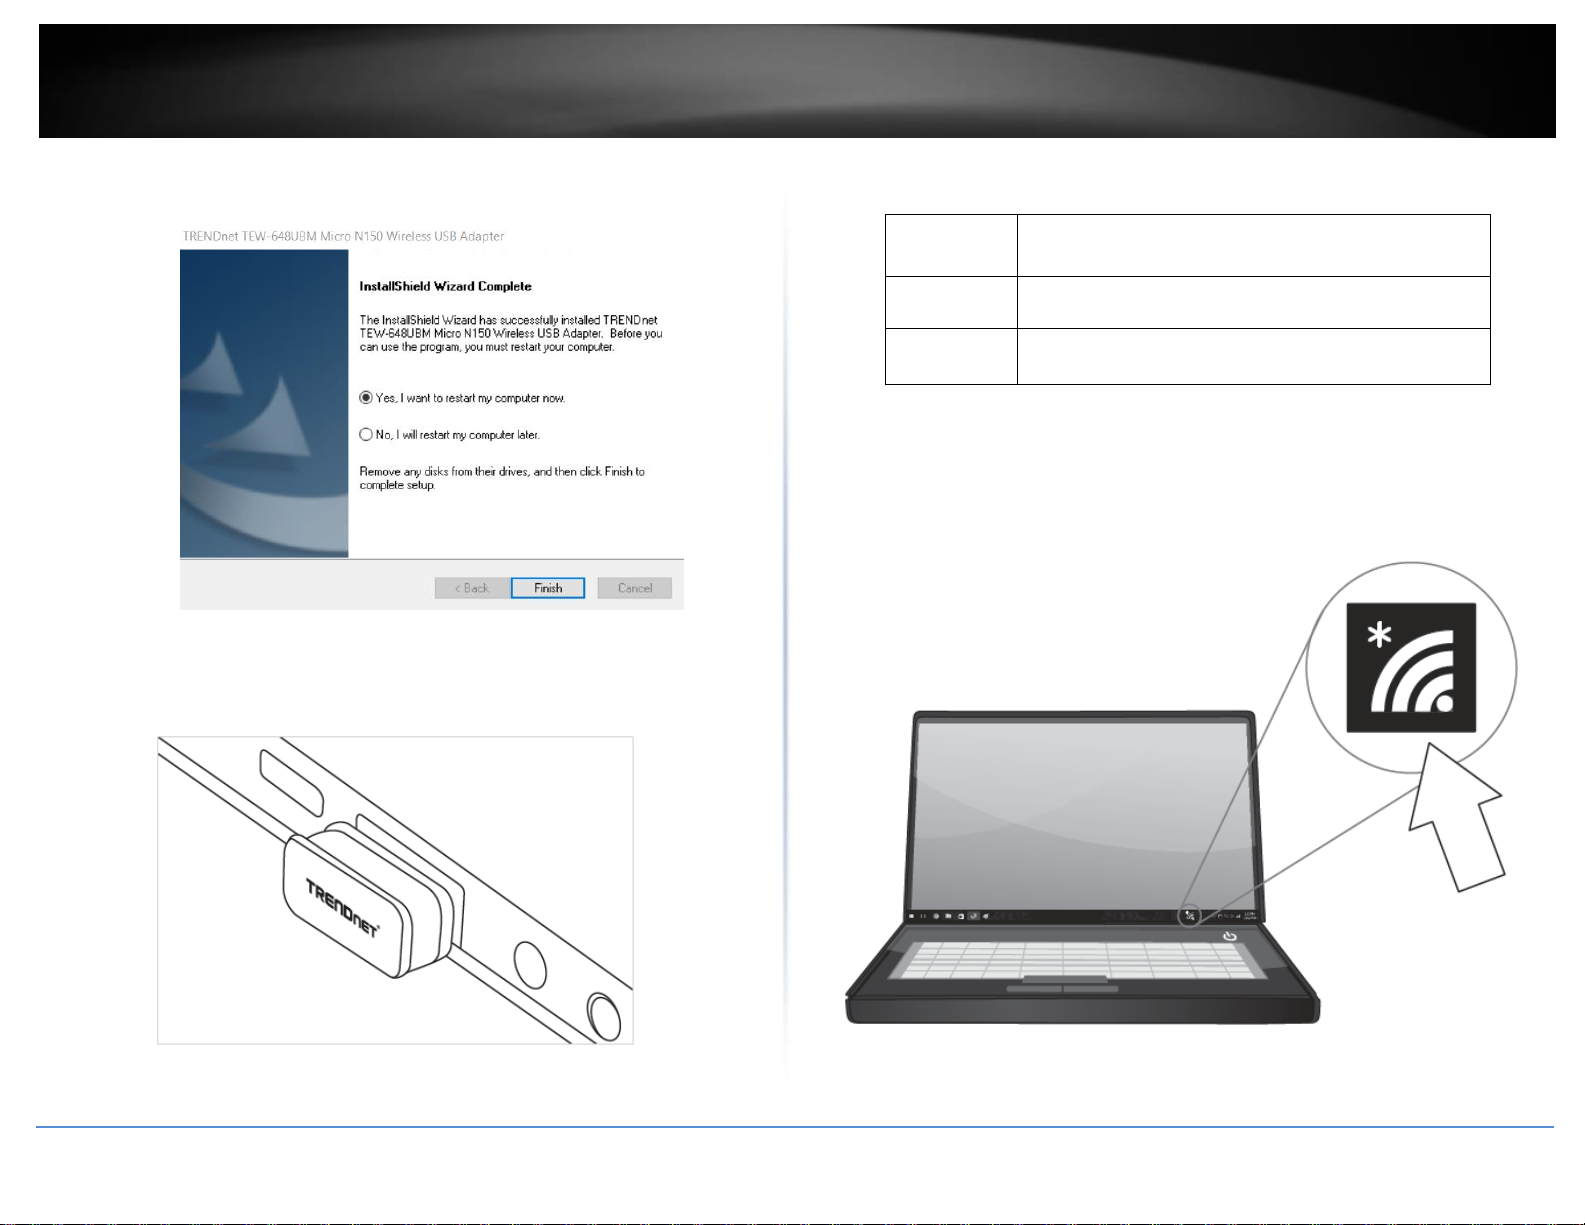
9. Click on the wireless icon in the taskbar located in the bottom right corner.
© Copyright 2017 TRENDnet. All Rights Reserved.
5
TRENDnet User’s Guide
TEW-648UBM
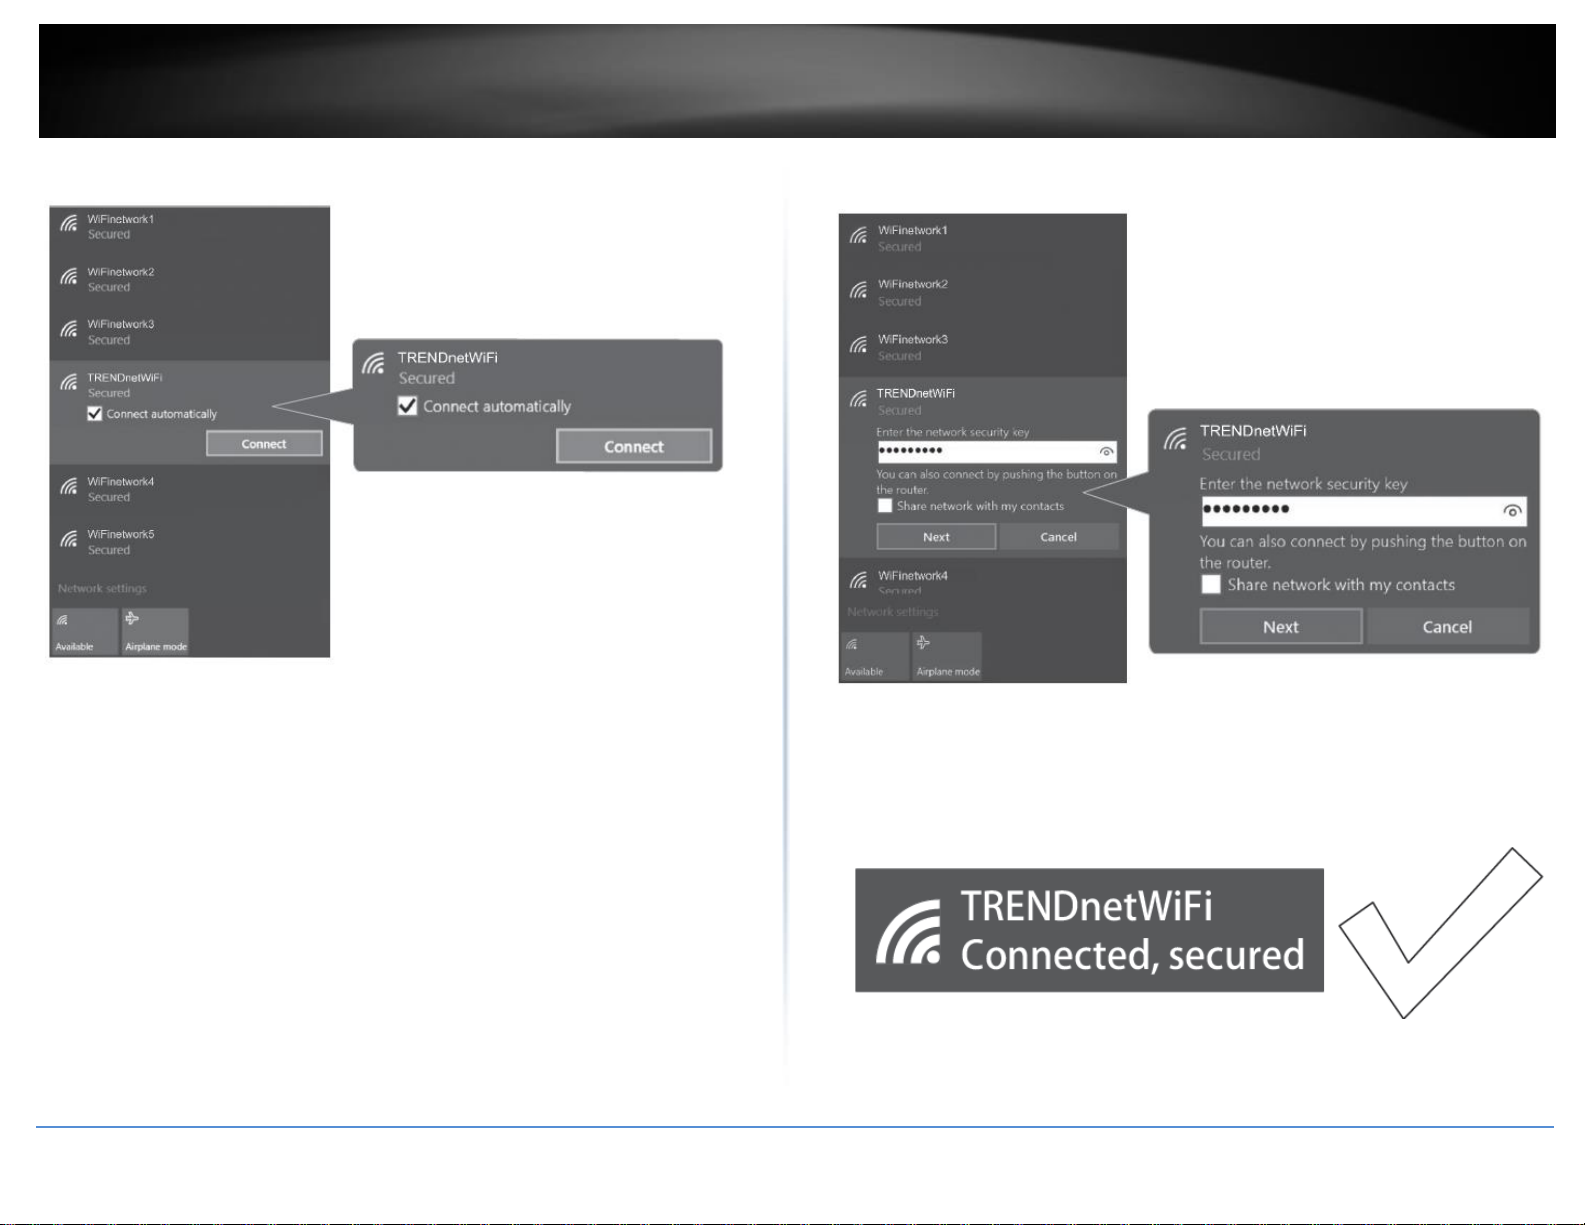
10. Click on the wireless network you would like to connect and click Connect.
11. Enter the WiFi Key (password) and click Next.
.
12. The status will display “Connected” to indicate a successful connection.
Note: If the connected message does not display, double check your WiFi key (password)
and re-enter it.
© Copyright 2017 TRENDnet. All Rights Reserved.
6
TRENDnet User’s Guide
TEW-648UBM
Mac® OS Installation
Supported operating systems: Mac® OS 10.7-10.12
For any updates, please check the TRENDnet website www.trendnet.com.
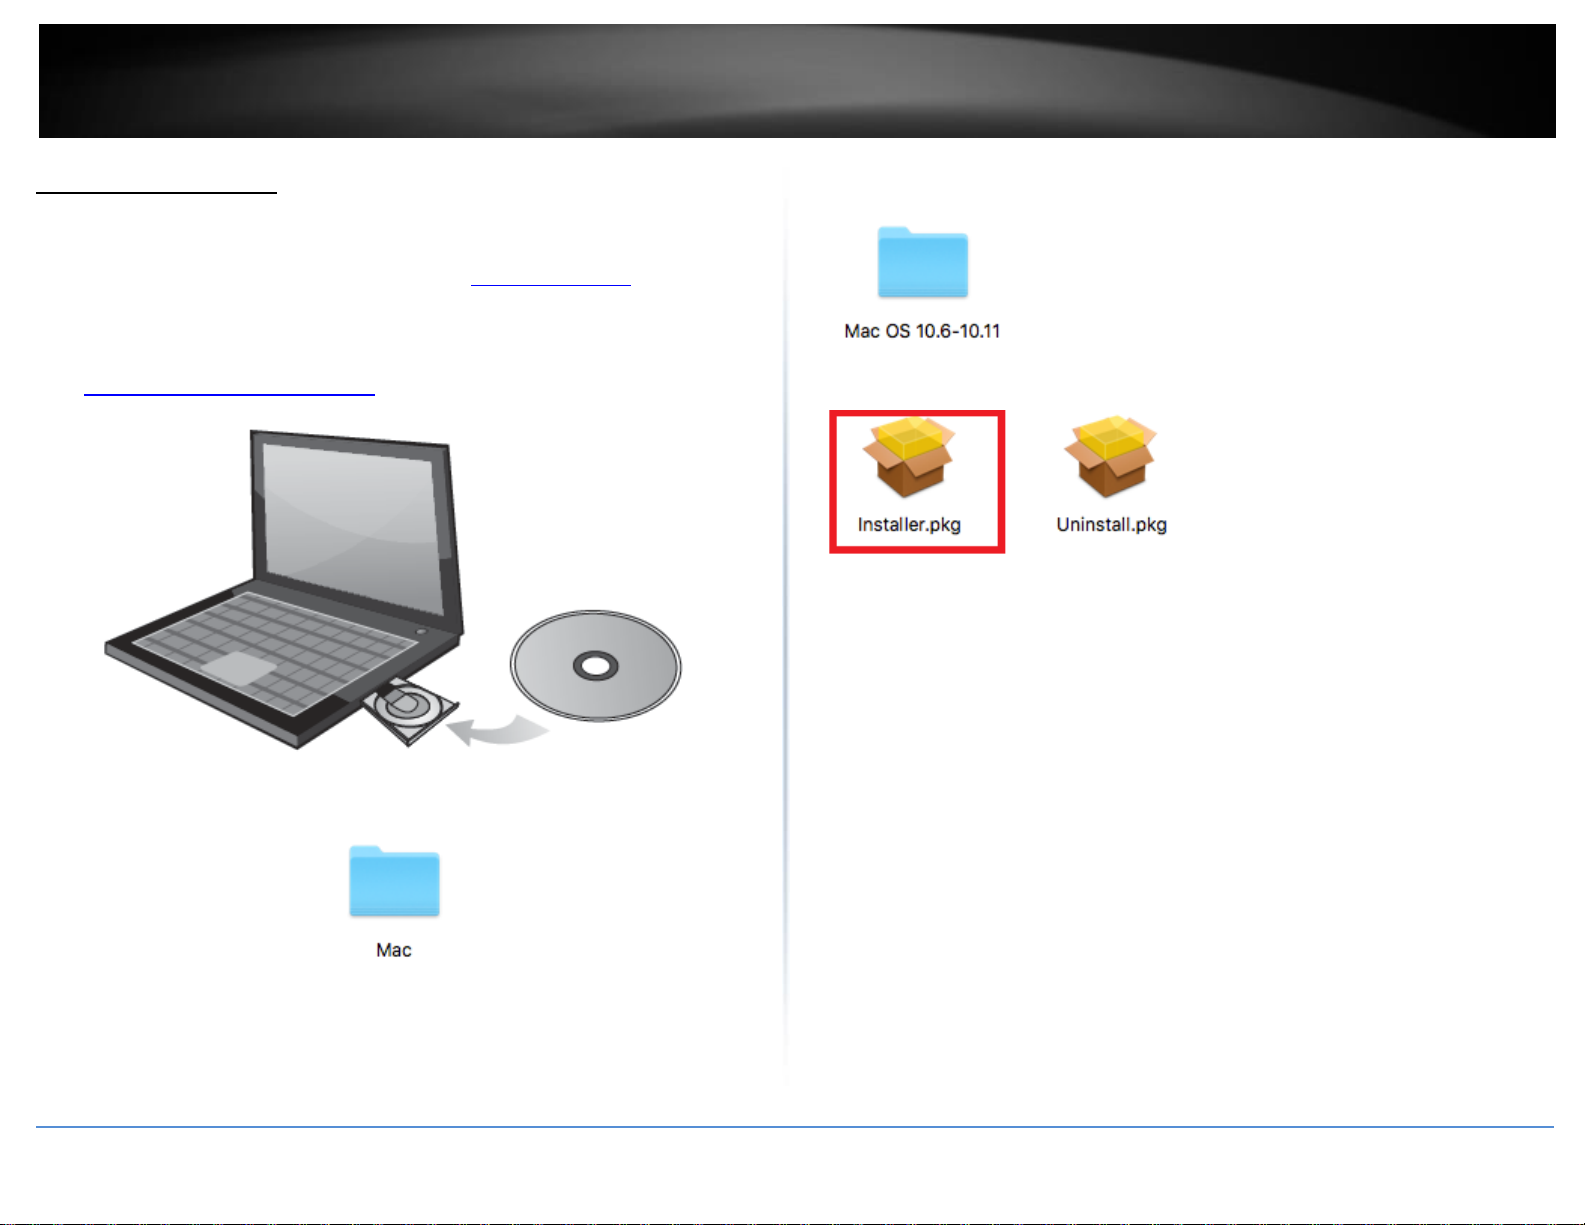
1. Insert the included CD-ROM into your computer’s CD-ROM drive.
Note: If you do not have the included CD-ROM, you can download the utility and drivers
from http://www.trendnet.com/support/
3. Open the folder according to the Mac® OS version you are running. For Mac® OS 10.7-
10.12, the folder will be named “Mac OS 10.7-10.12”.
4. Double click the Installer.pkg file to start the installation.
2. Open the folder named “Mac” on the included Utility and Driver CD ROM.
© Copyright 2017 TRENDnet. All Rights Reserved.

7
TRENDnet User’s Guide
TEW-648UBM
5. At the Introduction window, click Continue.
6. At the Read Me window, click Continue.
© Copyright 2017 TRENDnet. All Rights Reserved.

8
TRENDnet User’s Guide
TEW-648UBM
7.At the License Agreement window, click Continue.
9.At the Install window, click Install.
8. When prompted, click Agree.
© Copyright 2017 TRENDnet. All Rights Reserved.

9
TRENDnet User’s Guide
TEW-648UBM
10. When prompted, enter your Mac® user account password to authorize the install,
click Install Software.
11. When prompted, click Continue Installation.
12. Once the installation is complete, you will be prompted to restart the computer.
Click Restart to restart your computer.
© Copyright 2017 TRENDnet. All Rights Reserved.

10
TRENDnet User’s Guide
TEW-648UBM
13. After the computer is rebooted, plug the Wireless N USB Adapter into an available
USB slot on your computer.
17. Enter the WiFi Key (password) and click Join.
15. After the driver is successfully installed and wireless adapter is connected, a wireless
adapter icon will appear in the top menu bar. Click on the icon in the top menu bar.
16. A list of available wireless network will appear. Click on the wireless network you
would like to connect.
18. The wireless adapter icon will change to green WiFi bars to indicate a successful
connection.
Note: If the connected message does not display, double check your WiFi key (password)
and re-enter it.
© Copyright 2017 TRENDnet. All Rights Reserved.

11
TRENDnet User’s Guide
TEW-648UBM
Connect to your wireless network using WPS
WPS (Wi-Fi Protected Setup) is a feature that makes it easy to connect devices to your
wireless network. If your wireless router/access point supports WPS, you can use this
feature to easily connect wireless devices to your network.
Note: You can typically find out if you if your wireless router/access point supports WPS
just by looking at the physical device. There should be a WPS push button located on the
exterior casing of the device, if not, your device may not support WPS or you may need
to reference your device documentation as to how WPS can be initiated on the device. If
your device does not have an identifiable WPS push button on the exterior location, we
would recommend using the standard connection method on the previous page.
2. Click the network you would like to connect. Leave this window open.
Windows® OS
WPS connection using the built in utility (Virtual Push Button)
1. Click the WiFi icon in the system tray to scan for available wireless networks.
3. On your wireless router/access point, push the WPS button.
Note: Typically, the WPS button hold time is 3-5 sec., then release. For TRENDnet
routers/access points, the WPS hardware push button hold time is 3 seconds. If you are
using another brand device, you may need to refer to your device documentation for
WPS operation.
© Copyright 2017 TRENDnet. All Rights Reserved.

12
TRENDnet User’s Guide
TEW-648UBM
Mac® OS
WPS connection using the built in utility (Virtual Push Button)
1 On your wireless router/access point, push the WPS button.
Note: Typically, the WPS button hold time is 3-5 sec., then release. For TRENDnet
routers/access points, the WPS hardware push button hold time is 3 seconds. If you are
using another brand device, you may need to refer to your device documentation for
WPS operation.
4. The status will display “Connected” to indicate a successful connection.
Note: If the connected message does not display, double check your WiFi key (password)
and re-enter it.
2. Click on the wireless adapter icon in the top menu bar.
Note: If the WPS process fails, you will receive not receive a message “Connected”. You
may need to attempt the WPS process again. Please refer to your wireless router/access
point documentation regarding the operation of WPS.
© Copyright 2017 TRENDnet. All Rights Reserved.
3. Scroll to the bottom of the available wireless networks list and click the arrow at the
bottom.
4. After the additional menu opens, click on WPS.

13
TRENDnet User’s Guide
TEW-648UBM
5. In the WPS window, click PBC to activate WPS.
6. A series of status messages will appear. Wait for the WPS process to complete.
7. A status message will appear to indicate a successful connection.
Note: If the WPS process fails, you will receive not receive a message “Connected”. You
may need to attempt the WPS process again. Please refer to your wireless router/access
point documentation regarding the operation of WPS.
© Copyright 2017 TRENDnet. All Rights Reserved.

14
TRENDnet User’s Guide
TEW-648UBM
Technical Specifications
Interface
USB 2.0
Standards
IEEE 802.11b
IEEE 802.11g
IEEE 802.11n
Power Consumption
Receive: 90mA (max.)
Transmit: 250mA (max.)
Supported OS
Windows® 10 (32/64-bit), 8.1 (32/64-bit), 8 (32/64-bit), 7 (32/64-bit)
Mac OS® 10.7-10.12
Antenna
Built-in on board antenna
Frequency
2.4 ~ 2.48GHz
Modulation
OFDM, DSSS
Data Rate
802.11b: up to 11Mbps
802.11g: up to 54Mbps
802.11n: up to 150Mbps
Output Power
802.11b: 17 ± 1.5dBm
802.11g: 15 ± 1.5dBm
802.11n: 14 ± 1.5dBm
Receiving Sensitivity
802.11b: -81 ± 2dBm at 11Mbps
802.11g: -71 ± 2dBm at 54Mbps
802.11n: -65 ± 2dBm at 150Mbps
Encryption
64/128-bit WEP, WPA/WPA2-RADIUS, WPA-PSK/WPA2-PSK
Channels
1~11 (FCC), 1~13 (ETSI)
Temperature
Operating: 0° ~ 40 °C (32° - 104 °F)
Storage: -20° ~ 60 °C (-4° – 140 °F)
Humidity
Operating: 10 ~ 90% non-condensing
Storage: Max 95% non-condensing
Dimensions
17.5 x 15 x 7.3 mm (0.7 x 0.6 x 0.29 in.)
Weight
1.98 g (.07 oz.)
Certifications
CE
FCC
Warranty
3 year limited
© Copyright 2017 TRENDnet. All Rights Reserved.

15
TRENDnet User’s Guide
TEW-648UBM
Troubleshooting
Q: I inserted the Utility & Driver CD-ROM into my computer's CD-ROM Drive and the
installation menu does not appear automatically. What should I do?
Answer:
1. For Windows® 10/8.1/8/7, if the installation menu does not appear
automatically, click on the Windows Icon on the bottom left hand corner of the
screen,, click the “Search programs and files” box, and type D:\Autorun.exe,
where “D” in “D:\Autorun.exe” is the letter assigned to your CD-ROM Drive, and
then press the ENTER key on your keyboard
2. For Windows® Vista, if the installation menu does not appear automatically, click
Start, click the Start Search box, and type D:\Autorun.exe where "D" in
"D:\autorun.exe" is the letter assigned to your CD-ROM Drive, and then press the
ENTER key on your keyboard.
3. For Windows® XP, if the installation menu does not appear automatically, click
Start, click Run, and type
D:\Autorun where "D" in "D:\Autorun.exe" is the letter assigned to your CD-ROM
Drive, and then press the ENTER key on your keyboard.
Q: I completed all the steps in the quick installation guide, but my Wireless USB
Adapter is not connecting to my access point. What should I do?
Answer:
1. Verify that the SSID (Network Name) matches your wireless router or access
point's SSID
2. Please check with your network administrator for security key in order to access a
secured wireless access point or router. Please refer to the User's Guide for more
information regarding wireless network security.
3. Check your TCP/IP properties to ensure that Obtain an IP address automatically is
selected.
4. Double-click the Wireless Configuration Utility icon, click Available Networks and
then click Refresh to check and see if there are any available wireless networks
listed.
Q: Windows is unable to recognize my hardware. What should I do?
Answer:
1. Make sure your computer meets the minimum requirements as specified in
Section 1 of this quick installation guide.
2. You must complete the installation of the Wireless Configuration Utility (as
described in Section 2) before connecting the Wireless USB Adapter to your
computer.
3. Connect the Wireless USB Adapter to a different USB port on your computer.
© Copyright 2017 TRENDnet. All Rights Reserved.

16
TRENDnet User’s Guide
TEW-648UBM
Appendix
How to choose the type of security for your wireless network
Setting up wireless security is very important. Leaving your wireless network open and
unsecure could expose your entire network and personal files to outsiders. TRENDnet
recommends reading through this entire section and setting up wireless security on your
new router.
There are a few different wireless security types supported in wireless networking each
having its own characteristics which may be more suitable for your wireless network
taking into consideration compatibility, performance, as well as the security strength
along with using older wireless networking hardware (also called legacy hardware).
It is strongly recommended to enable wireless security to prevent unwanted users from
accessing your network and network resources (personal documents, media, etc.).
In general, it is recommended that you choose the security type with the highest
strength and performance supported by the wireless computers and devices in your
network. Please review the security types to determine which one you should use for
your network.
WPA: This encryption is significantly more robust than the WEP technology.
Much of the older 802.11a or 802.11g hardware has been upgraded (with
firmware/driver upgrades) to support this encryption standard. Total wireless
speeds under this encryption type however are limited to 54Mbps.
WPA-Auto: This setting provides the router with the ability to detect wireless
devices using either WPA or WPA2 encryption. Your wireless network will
automatically change the encryption setting based on the first wireless device
connected. For example, if the first wireless client that connects to your
wireless network uses WPA encryption your wireless network will use WPA
encryption. Only when all wireless clients disconnect to the network and a
wireless client with WPA2 encryption connects your wireless network will then
change to WPA2 encryption. NOTE: WPA2 encryption supports 802.11n speeds
and WPA encryption will limit your connection speeds to 54Mbps
WPA2: This is the most secure wireless encryption available today, similar to
WPA encryption but more robust. This encryption standard also supports the
highest connection speeds. TRENDnet recommends setting your router to this
encryption standard. If you find that one of your wireless network devices does
Wireless Encryption Types
WEP: Legacy encryption method supported by older 802.11a/b/g hardware.
This is the oldest and least secure type of wireless encryption. It is generally not
recommended to use this encryption standard, however if you have old 802.11
b, 802.11g or 802.11a wireless adapters or computers with old embedded
wireless cards(wireless clients), you may have to set your router to WEP to
allow the old adapters to connect to the router. Note: This encryption standard
will limit connection speeds to 54Mbps.
© Copyright 2017 TRENDnet. All Rights Reserved.
Note: Check the specifications of your wireless network adapters and wireless appliances
to verify the highest level of encryption supported.
not support WPA2 encryption, then set your router to either WPA or WPA-Auto
encryption.

17
TRENDnet User’s Guide
TEW-648UBM
Security Standard
WEP
WPA
WPA2
Compatible
Wireless
Standards
IEEE 802.11a/b/g
(802.11n devices
will operate at
802.11g to
connect using this
standard)
IEEE 802.11a/b/g
(802.11n/ac
devices will
operate at 802.11g
to connect using
this standard)
IEEE 802.11a/b/g/n/ac
Highest
Performance
Under This
Setting
Up to 54Mbps
Up to 54Mbps
Up to 150Mbps 11n*
Encryption
Strength
Low
Medium
High
Additional
Options
Open System or
Shared Key,
HEX or ASCII,
Different key sizes
TKIP or AES,
Preshared Key or
RADIUS
TKIP or AES,
Preshared Key or
RADIUS
Recommended
Configuration
Open System
ASCII
13 characters
TKIP
Preshared Key
8-63 characters
AES
Preshared Key
8-63 characters
WEP Key Format
HEX
ASCII
Character set
0-9 & A-F, a-f only
Alphanumeric (a,b,C,?,*, /,1,2, etc.)
64-bit key length
10 characters
5 characters
128-bit key length
26 characters
13 characters
Open or Shared \ WEP – Enter the WEP key for your wireless network. Wireless
network has WEP security enabled, open or shared. Please note that the Key Index 1-4
must also match the same index configured on the wireless router/access point.
WPA/WPA2-PSK/TKIP or AES – Wireless network has WPA/WPA2-PSK security enabled,
TKIP or AES. Note: 8-63 alphanumeric characters (a,b,C,?,*, /,1,2, etc.)
Below is brief comparison chart of the wireless security types and the recommended
configuration depending on which type you choose for your wireless network.
© Copyright 2017 TRENDnet. All Rights Reserved.
How to find your IP address?
Note: Please note that although the following procedures provided to follow for your
operating system on configuring your network settings can be used as general
guidelines, however, it is strongly recommended that you consult your computer or
operating system manufacturer directly for assistance on the proper procedure for
configuring network settings.
Command Prompt Method
Windows® XP/Vista/7/8/8.1/10
1. On your keyboard, press Windows Logo+R keys simultaneously to bring up the Run
dialog box.
2. In the dialog box, type cmd to bring up the command prompt.
3. In the command prompt, type ipconfig /all to display your IP address settings.
Note: If you are experiencing difficulties, please contact your computer or operating
system manufacturer for assistance.
How to configure your network settings to obtain an IP address automatically or use
DHCP?
Note: Please note that although the following procedures provided to follow for your
operating system on configuring your network settings can be used as general
guidelines, however, it is strongly recommended that you consult your computer or
operating system manufacturer directly for assistance on the proper procedure for
configuring network settings.
Windows® 10/8.1/8/7
a. Go into the Control Panel, click Network and Sharing Center.
b. Click Change Adapter Settings, right-click the Local Area Connection icon.
c. Then click Properties and click Internet Protocol Version 4 (TCP/IPv4).
d. Then click Obtain an IP address automatically and click OK.
Windows® Vista
a. Go into the Control Panel, click Network and Internet.
b. Click Manage Network Connections, right-click the Local Area Connection
icon and click Properties.
c. Click Internet Protocol Version (TCP/IPv4) and then click Properties.

18
TRENDnet User’s Guide
TEW-648UBM
d. Then click Obtain an IP address automatically and click OK.
Windows® XP
a. Go into the Control Panel, double-click the Network Connections icon
b. Right-click the Local Area Connection icon and the click Properties.
c. Click Internet Protocol (TCP/IP) and click Properties.
d. Then click Obtain an IP address automatically and click OK.
Note: If you are experiencing difficulties, please contact your computer or operating
system manufacturer for assistance.
How to connect to a wireless network using the built-in Windows utility?
Note: Please note that although the following procedures provided to follow for your
operating system on configuring your network settings can be used as general
guidelines, however, it is strongly recommended that you consult your computer or
operating system manufacturer directly for assistance on the proper procedure for
connecting to a wireless network using the built-in utility.
Windows® 10/8.1/8/7
1. Open Connect to a Network by clicking the network icon ( or ) in the notification
area.
2. In the list of available wireless networks, click the wireless network you would like to
connect to, then click Connect.
4. You may be prompted to enter a security key in order to connect to the network.
5. Enter in the security key corresponding to the wireless network, and click OK.
Windows® Vista
Windows XP
1. Right-click the network icon in the notification area, then click View Available
Wireless Networks.
2. In Connect to a Network, under Available Networks, click the wireless network you
would like to connect to.
3. You may be prompted to enter a security key in order to connect to the network.
4. Enter in the security key corresponding to the wireless network, and click Connect.
1. Open Connect to a Network by clicking the Start Button. and then click Connect
To.
2. In the Show list, click Wireless.
3. In the list of available wireless networks, click the wireless network you would like to
connect to, then click Connect.
4. You may be prompted to enter a security key in order to connect to the network.
5. Enter in the security key corresponding to the wireless network, and click OK.
© Copyright 2017 TRENDnet. All Rights Reserved.

19
TRENDnet User’s Guide
TEW-648UBM
Federal Communication Commission Interference Statement
This equipment has been tested and found to comply with the limits for a Class B digital device,
pursuant to Part 15 of the FCC Rules. These limits are designed to provide reasonable
protection against harmful interference in a residential installation. This equipment generates,
uses and can radiate radio frequency energy and, if not installed and used in accordance with
the instructions, may cause harmful interference to radio communications. However, there is
no guarantee that interference will not occur in a particular installation. If this equipment does
cause harmful interference to radio or television reception, which can be determined by
turning the equipment off and on, the user is encouraged to try to correct the interference by
one of the following measures:
Reorient or relocate the receiving antenna.
Increase the separation between the equipment and receiver.
Connect the equipment into an outlet on a circuit different from that to which
the receiver is connected.
Consult the dealer or an experienced radio/TV technician for help.
FCC Caution: Any changes or modifications not expressly approved by the party responsible
for compliance could void the user's authority to operate this equipment.
This device complies with Part 15 of the FCC Rules. Operation is subject to the following two
conditions: (1) This device may not cause harmful interference, and (2) this device must accept
any interference received, including interference that may cause undesired operation.
IMPORTANT NOTE:
Radiation Exposure Statement:
This equipment complies with FCC radiation exposure limits set forth for an uncontrolled
environment. End user must follow the specific operating instructions for satisfying RF
exposure compliance.This equipment should be installed and operated with minimum
distance 0.5cm between the radiator & your body.
This transmitter must not be co-located or operating in conjunction with any other
antenna or transmitter.
Country Code selection feature to be disabled for products marketed to the US/CANADA
RoHS
This product is RoHS compliant.
Europe – EU Declaration of Conformity
TRENDnet hereby declare that the product is in compliance with the essential requirements
and other relevant provisions under our sole responsibility.
Safety
EN 60950-1:2006+A11:2009+A1:2010+A12:2011+A2:2013
EMC
EN 301489-1 V2.2.0 (2017-03)
EN 301489-17 V3.2.0 (2017-03)
Radio Spectrum & Health
EN 300 328 V2.1.1 (2016-11)
EN 62311:2008
Directives:
EMC Directive 2014/30/EU
REACH Regulation (EC) No. 1907/2006
Ecodesign Directive 2009/125/EU
RoHS Directive 2011/65/EU
Radio Equipment Directive (RED) 2014/53/EU
Low Voltage Directive 2014/35/EU
WEEE Directive 2012/19/EU
CE Mark Warning
This is a Class A product. In a domestic environment, this product may cause radio
interference, in which case the user may be required to take adequate measures.
© Copyright 2017 TRENDnet. All Rights Reserved.

20
TRENDnet User’s Guide
Limited Warranty
Limited Warranty
TRENDnet warrants only to the original purchaser of this product from a TRENDnet
authorized reseller or distributor that this product will be free from defects in material
and workmanship under normal use and service. This limited warranty is nontransferable and does not apply to any purchaser who bought the product from a
reseller or distributor not authorized by TRENDnet, including but not limited to
purchases from Internet auction sites.
Limited Warranty
TRENDnet warrants its products against defects in material and workmanship, under
normal use and service. Specific warranty periods are listed on each of the respective
product pages on the TRENDnet website.
AC/DC Power Adapter, Cooling Fan, and Power Supply carry a one-year
warranty.
In the event that, after evaluation, TRENDnet cannot replace the defective product or
there is no comparable model available, we will refund the depreciated value of the
product.
If a product does not operate as warranted during the applicable warranty period,
TRENDnet shall reserve the right, at its expense, to repair or replace the defective
product or part and deliver an equivalent product or part to the customer. The
repair/replacement unit's warranty continues from the original date of purchase. All
products that are replaced become the property of TRENDnet. Replacement products
may be new or reconditioned. TRENDnet does not issue refunds or credit. Please
contact the point-of-purchase for their return policies.
TRENDnet shall not be responsible for any software, firmware, information, or memory
data of customer contained in, stored on, or integrated with any products returned to
TRENDnet pursuant to any warranty.
Limited Lifetime Warranty
TRENDnet offers a limited lifetime warranty for all of its metal-enclosed network
switches that have been purchased in the United States/Canada on or after 1/1/2015.
Cooling fan and internal power supply carry a one-year warranty
To obtain an RMA, the ORIGINAL PURCHASER must show Proof of Purchase and return
the unit to the address provided. The customer is responsible for any shipping-related
costs that may occur. Replacement goods will be shipped back to the customer at
TRENDnet’s expense.
Upon receiving the RMA unit, TRENDnet may repair the unit using refurbished parts. In
the event that the RMA unit needs to be replaced, TRENDnet may replace it with a
refurbished product of the same or comparable model.
© Copyright 2017 TRENDnet. All Rights Reserved.
There are no user serviceable parts inside the product. Do not remove or attempt to
service the product by any unauthorized service center. This warranty is voided if (i) the
product has been modified or repaired by any unauthorized service center, (ii) the
product was subject to accident, abuse, or improper use, or (iii) the product was subject
to conditions more severe than those specified in the manual.
Warranty service may be obtained by contacting TRENDnet within the applicable
warranty period and providing a copy of the dated proof of the purchase. Upon proper
submission of required documentation, a Return Material Authorization (RMA) number
will be issued. An RMA number is required in order to initiate warranty service support
for all TRENDnet products. Products that are sent to TRENDnet for RMA service must
have the RMA number marked on the outside of return packages and sent to TRENDnet
prepaid, insured and packaged appropriately for safe shipment. International customers

21
TRENDnet User’s Guide
Limited Warranty
shipping from outside of the USA and Canada are responsible for any return shipping
and/or customs charges, including but not limited to, duty, tax, and other fees.
Refurbished product: Refurbished products carry a 90-day warranty after date of
purchase. Please retain the dated sales receipt with purchase price clearly visible as
evidence of the original purchaser's date of purchase. Replacement products may be
refurbished or contain refurbished materials. If TRENDnet, by its sole determination, is
unable to replace the defective product, we will offer a refund for the depreciated value
of the product.
WARRANTIES EXCLUSIVE: IF THE TRENDNET PRODUCT DOES NOT OPERATE AS
WARRANTED ABOVE, THE CUSTOMER'S SOLE REMEDY SHALL BE, AT TRENDNET'S
OPTION, REPAIR OR REPLACE. THE FOREGOING WARRANTIES AND REMEDIES ARE
EXCLUSIVE AND ARE IN LIEU OF ALL OTHER WARRANTIES, EXPRESSED OR IMPLIED,
EITHER IN FACT OR BY OPERATION OF LAW, STATUTORY OR OTHERWISE, INCLUDING
WARRANTIES OF MERCHANTABILITY AND FITNESS FOR A PARTICULAR PURPOSE.
TRENDNET NEITHER ASSUMES NOR AUTHORIZES ANY OTHER PERSON TO ASSUME FOR
IT ANY OTHER LIABILITY IN CONNECTION WITH THE SALE, INSTALLATION,
MAINTENANCE, OR USE OF TRENDNET'S PRODUCTS.
TRENDNET SHALL NOT BE LIABLE UNDER THIS WARRANTY IF ITS TESTING AND
EXAMINATION DISCLOSE THAT THE ALLEGED DEFECT IN THE PRODUCT DOES NOT EXIST
OR WAS CAUSED BY CUSTOMER'S OR ANY THIRD PERSON'S MISUSE, NEGLECT,
IMPROPER INSTALLATION OR TESTING, UNAUTHORIZED ATTEMPTS TO REPAIR OR
MODIFY, OR ANY OTHER CAUSE BEYOND THE RANGE OF THE INTENDED USE, OR BY
ACCIDENT, FIRE, LIGHTNING, OR OTHER HAZARD.
LIMITATION OF LIABILITY: TO THE FULL EXTENT ALLOWED BY LAW, TRENDNET ALSO
EXCLUDES FOR ITSELF AND ITS SUPPLIERS ANY LIABILITY, WHETHER BASED IN
CONTRACT OR TORT (INCLUDING NEGLIGENCE), FOR INCIDENTAL, CONSEQUENTIAL,
INDIRECT, SPECIAL, OR PUNITIVE DAMAGES OF ANY KIND, OR FOR LOSS OF REVENUE OR
PROFITS, LOSS OF BUSINESS, LOSS OF INFORMATION OR DATE, OR OTHER FINANCIAL
LOSS ARISING OUT OF OR IN CONNECTION WITH THE SALE, INSTALLATION,
MAINTENANCE, USE, PERFORMANCE, FAILURE, OR INTERRUPTION OF THE POSSIBILITY
OF SUCH DAMAGES, AND LIMITS ITS LIABILITY TO REPAIR, REPLACEMENT, OR REFUND
OF THE PURCHASE PRICE PAID, AT TRENDNET'S OPTION. THIS DISCLAIMER OF LIABILITY
FOR DAMAGES WILL NOT BE AFFECTED IF ANY REMEDY PROVIDED HEREIN SHALL FAIL
OF ITS ESSENTIAL PURPOSE.
Governing Law: This Limited Warranty shall be governed by the laws of the state of
California.
Some TRENDnet products include software code written by third party developers.
These codes are subject to the GNU General Public License ("GPL") or GNU Lesser
General Public License ("LGPL").
Visit http://www.trendnet.com/gpl or the support section on
http://www.trendnet.com and search for the desired TRENDnet product to access to
the GPL Code or LGPL Code. These codes are distributed WITHOUT WARRANTY and are
subject to the copyrights of the developers. TRENDnet does not provide technical
support for these codes. Please visit http://www.gnu.org/licenses/gpl.txt or
http://www.gnu.org/licenses/lgpl.txt for specific terms of each license.
2017/06/24
© Copyright 2017 TRENDnet. All Rights Reserved.

 Loading...