

Guide d'installation rapide
Quick Installation Guide
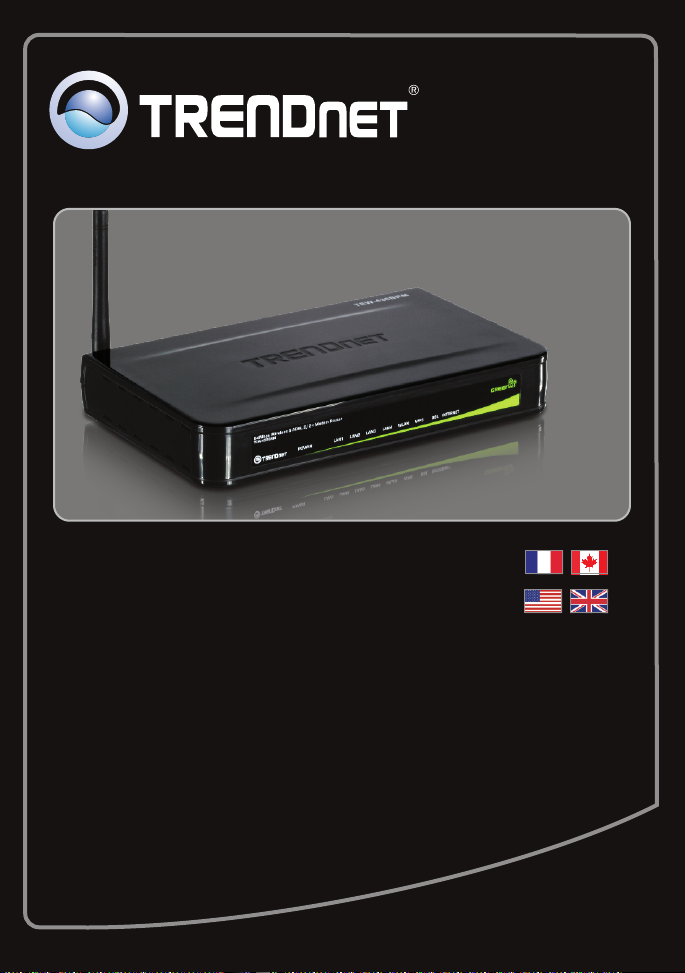
TEW-436BRM
1.01
Table of Contents
Français
Avant de commencer
1.
Installation du matériel
2. 3
Configuration du Modem
3. 4
Paramétrage du cryptage
4. 7
1
1
English 8
1. Before You Start 8
2. Hardware Installation 10
3. Configure The Modem 11
4. Setting up Encryption 14
Dépannage 15
Troubleshooting 17
Wireless Tips 19
Version 11.20.2009
1. Avant de commencer
Contenu de l'emballage
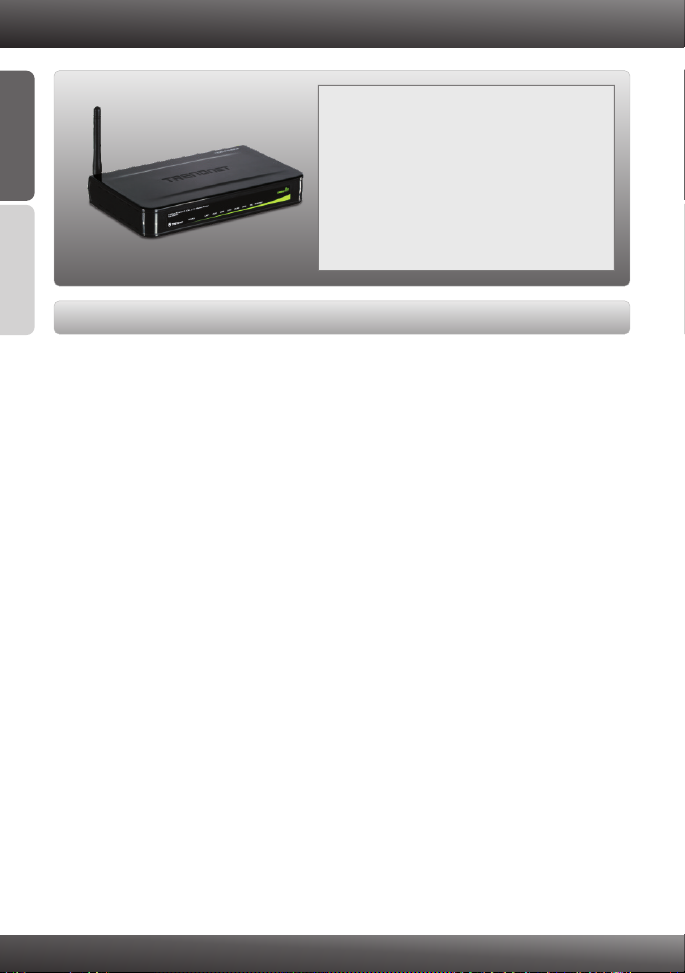
TEW-436BRM
?
?Guide d´installation rapide en plusieurs
FRANÇAIS
ENGLISH
Configuration nécessaire
Une connexion DSL en état de marche
?
?Un ordinateur avec un adaptateur réseau câblé ou sans fil correctement installé
?Navigateur Internet : Internet Explorer (5.0 ou supérieur)
langues
?
Guide de l'utilisateur sur CD-ROM
? (12V DC, 1A)
Adaptateur secteur
?Câble Ethernet de Cat. 5 (1.5m/5ft)
?Câble téléphonique RJ-11 (0.9m/ 3ft)
1

Obtenez les informations de votre fournisseur d'accès Internet (FAI)
Pendant l'installation de votre Modem Routeur ADSL Sans Fil, l'installation par Wizard
va automatiquement détecter votre type de connexion ISP. Si le routeur ne peut pas
détecter votre type de connexion, vous pouvez le sélectionner manuellement. Veuillez
vérifier avec votre fournisseur Internet (ISP) sur votre type de connexion DSL Internet
broadband et vous assurez que vous avez toutes les informations pour les types de
connexion suivants:
A.Connexion IP dynamique
Paramètres ADSL Modem (VPI ou VCI), si la détection automatique ne se déclenche
Votre FAI peut vous demander d'utiliser un nom d'hôte ou un nom de domaine
pas.
particulier.
B. Connexion IP statique ou fixe
Adresse IP Internet: _____._____._____._____ (p. ex. 215.24.24.129)
Masque de sous-réseau: _____._____._____._____
Adresse IP de la passerelle: _____._____._____._____
DNS principal: _____._____._____._____
Secondaire: _____._____._____._____
Paramètres ADSL Modem (VPI ou VCI), si la détection automatique ne se déclenche
pas.
C. Connexion IP dynamique PPPoE ou PPPoA
Nom d'utilisateur: _________
Mot de passe: ________________
Paramètres ADSL Modem (VPI ou VCI), si la détection automatique ne se déclenche
pas.
D. Connexion IPoA statique ou fixe (IP sur ATM)
Adresse IP Internet: _____._____._____._____ (p. ex. 215.24.24.129)
Masque de sous-réseau: _____._____._____._____
Adresse IP de la passerelle: _____._____._____._____
DNS principal: _____._____._____._____
Secondaire: _____._____._____._____
Paramètres ADSL Modem (VPI ou VCI), si la détection automatique ne se déclenche
pas.
FRANÇAISENGLISH
2
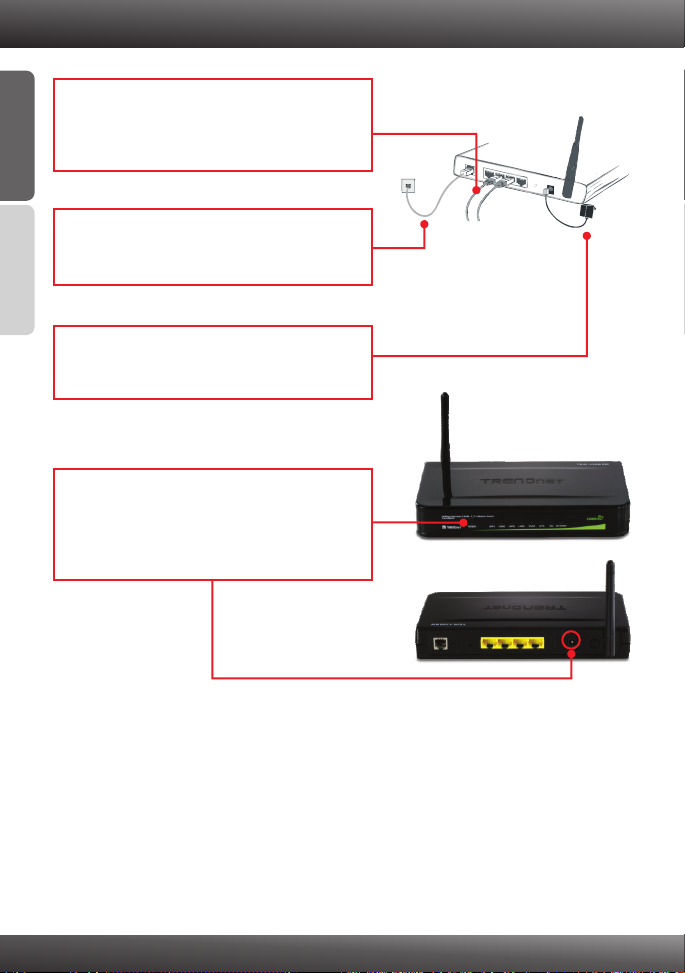
2. Installation du matériel
1. Branchez une extrémité du câble RJ-45 à l'un
des ports LAN du TEW-436BRM. Branchez
l'autre extrémité au port Ethernet de
FRANÇAIS
l'ordinateur.
Terminator
ADSL
LAN4
LAN3
ADSL
LAN2
LAN1
Power
2. Branchez une extrémité du câble RJ-11 au port
ADSL du TEW-436BRM. Branchez l'autre
extrémité à la prise du téléphone.
ENGLISH
3. Branchez l'adaptateur secteur AC au
TEW-436BRM et ensuite à une prise de
courant.
4. Vérifiez que les voyants lumineux suivants, se
trouvant sur l'avant, sont allumés : Power,
LAN, et WLAN. Si les lumières ne sont pas
allumées, appuyez sur Power ON/OFF à
l'arrière du TEW-436BRM.
To PCs
Power
3
3. Configuration du modem
Remarque: Il est recommandé que vous configuriez le modem à partir d'une station PC.
1. Ouvrez votre navigateur Internet, tapez-y
l'adresse http://192.168.10.1 et appuyez sur la
touche Enter (Entrez).
2. Saisissez le nom d'utilisateur et le mot de
passe, ensuite cliquez sur
Nom d'utilisateur: admin
Mot de passe: admin
Remarque: Le mot de passe par défaut est
une case sensible.
3. Cliquez sur Setup Wizard
(Assistant de configuration)
OK. Par défaut:
FRANÇAISENGLISH
4
Note:
1: L'exemple ci-dessous vous montre la détection automatique.Pour d'autres
méthodes de connexion, suivez les instructions à l'écran après la détection
automatique.
2. Dans l'exemple, la connexion DSL est PPPoE.
FRANÇAIS
4. Sélectionnez Auto-detect (détection
automatique), et cliquez ensuite sur Next
ENGLISH
(Suivant).
5. Sélectionnez le Channel Mode (Mode canal) et
cliquez sur Next (Suivant).
6. Configurez les paramètres en vous basant sur
les informations fournies par votre FA. Cliquez
ensuite sur Next (Suivant).
5
Remarque: Pour d'autres méthodes de connexion, suivez les instructions à l'écran
après la détection automatique.
7. Veuillez attendre la réinitialisation du
TEW-436BRM.
8. Cochez Test Internet Connection (Tester le
connexion Internet) et cliquez ensuite sur
Finish (Terminer).
9. Vérifiez que le test est bien terminé. Vérifiez
que les voyants DSL et Internet sont allumés.
Cliquez ensuite sur Close (Fermer).
10. Ouvrez votre navigateur et saisissez-y une
URL (p. ex. www.trendnet.com) afin de vérifiez
que vous disposez d'une connexion Internet.
FRANÇAISENGLISH
6

4. Paramétrage du cryptage
Remarque : Pour protéger votre réseau de tout accès non autorisé, il est recommandé
d'activer le cryptage sans fil.
FRANÇAIS
1. Cliquez sur Setup -> Wireless -> Security
(Installation -> Sans fil -> Sécurité)
ENGLISH
2. L'exemple ci-dessous est un WPA-PSK.
Sélectionnez les paramètres suivants :
Cryptage : WPA2(AES) Mode d'authentification
WPA : Personnel (Clé pré-partagée)
Format de clé pré-partagée : Phrase de passe
Clé pré-partagée : Saisissez une clé de
cryptage. Par exemple : trendnet
Enfin, cliquez sur Apply Changes (Appliquer
les modifications). Pour le WPA-PSK
ou le WPA2-PSK, la clé pré-partagée doit
comprendre entre 8 et 63 caractères ASCII ou
64 caractères HEX. Assurez-vous de noter la
clé de cryptage.
configuration sans fil est à présent terminée.
La
Si vous désirez des informations détaillées sur la configuration et les paramètres avancés du
TEW-436BRM, veuillez consulter la rubrique Dépannage, le guide de l'utilisateur sur CD-
ROM ou le site Internet de TRENDnet sur http://www.trendnet.com.
Enregistrez votre produit
Afin d’être sûr de recevoir le meilleur niveau de service clientèle et le meilleur support
possibles, veuillez prendre le temps d’enregistrer votre produit en ligne sur:
www.trendnet.com/register Nous vous remercions d’avoir choisi net.
TREND
7

1. Before You Start
Package Contents
TEW-436BRM
?
?Multi-Language Quick Installation Guide
?CD-ROM (User’s Guide)
?Power Adapter (12V DC, 1A)
?Cat.5 Ethernet Cable (1.5m/ 5ft)
?RJ-11 Telephone Cable (0.9m/ 3ft)
System Requirements
?
A working ADSL Internet Connection
?A computer with a wired or wireless network adapter properly installed.
?Web Browser: Internet Explorer (5.0 or above)
FRANÇAISENGLISH
8

Collect Internet Service Provider (ISP) Information
During the installation of your Wireless ADSL Modem Router, the Setup Wizard will
automatically detect your ISP connection type. If the router cannot detect your ISP
FRANÇAISENGLISH
connection type, you can manually specify the connection type. Please verify your DSL
Internet broadband connection type with your ISP and ensure you have all the
information for one of the following connection types:
A. Dynamic IP connection
ADSL Modem parameters (VPI or VCI), if it cannot be detected automatically.
ISP may require you to use a particular Hostname or Domain name.
B. Static or Fixed IP connection
Internet IP Address:_____. _____._____._____ (e.g. 215.24.24.129)
Subnet Mask: _____. _____._____._____
Gateway IP Address: ____. _____._____._____
Primary DNS:_____. _____._____._____
Secondary:_____. _____._____._____
ADSL Modem Parameters (VPI or VCI), if it cannot be detected
automatically.
C. PPPoE or PPPoA Dynamic IP connection
Login User Name: _________
Password: ________________
ADSL Modem Parameters (VPI or VCI), if it cannot be detected
automatically.
D. IPoA Static or Fixed (IP over ATM) connection
Internet IP Address:_____. _____._____._____ (e.g. 215.24.24.129)
Subnet Mask: _____. _____._____._____
Gateway IP Address: ____. _____._____._____
Primary DNS:_____. _____._____._____
Secondary:_____. _____._____._____.
ADSL Modem Parameters (VPI or VCI), if it cannot be detected
automatically.
9

2. Hardware Installation
1. Connect one end of the RJ-45 cable to one of
the TEW-436BRM's LAN ports. Connect the
other end of cable to the computer's Ethernet
port.
Terminator
ADSL
LAN4
LAN3
ADSL
LAN2
LAN1
Power
FRANÇAISENGLISH
2. Connect one end of the RJ-11 cable to the
TEW-436BRM's ADSL port. Connect the other
end of the cable to the phone jack.
3. Connect the AC Power Adapter to the
TEW-436BRM and then to a power outlet.
4. Verify that the following panel lights are on:
Power, LAN, and WLAN. If the lights are not
on, press the Power ON/OFF on the back of
the TEW-436BRM.
To PCs
Power
10

3. Configure the Modem
Note: It is recommended that you configure the Modem from a wired computer.
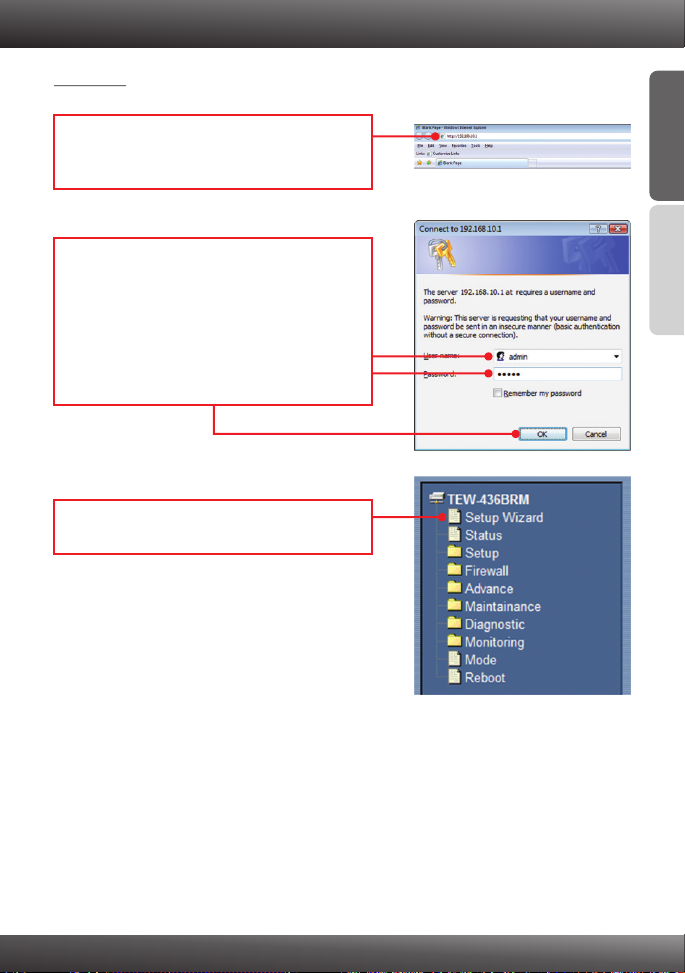
1. Open your web browser, type
FRANÇAISENGLISH
http://192.168.10.1 in the Address bar, and
then press Enter.
2. Enter the User Name and
password and then click OK. By default:
User name: admin
Password: admin
Note: User name and Password is case
sensitive.
3. Click Setup Wizard.
11

Note:
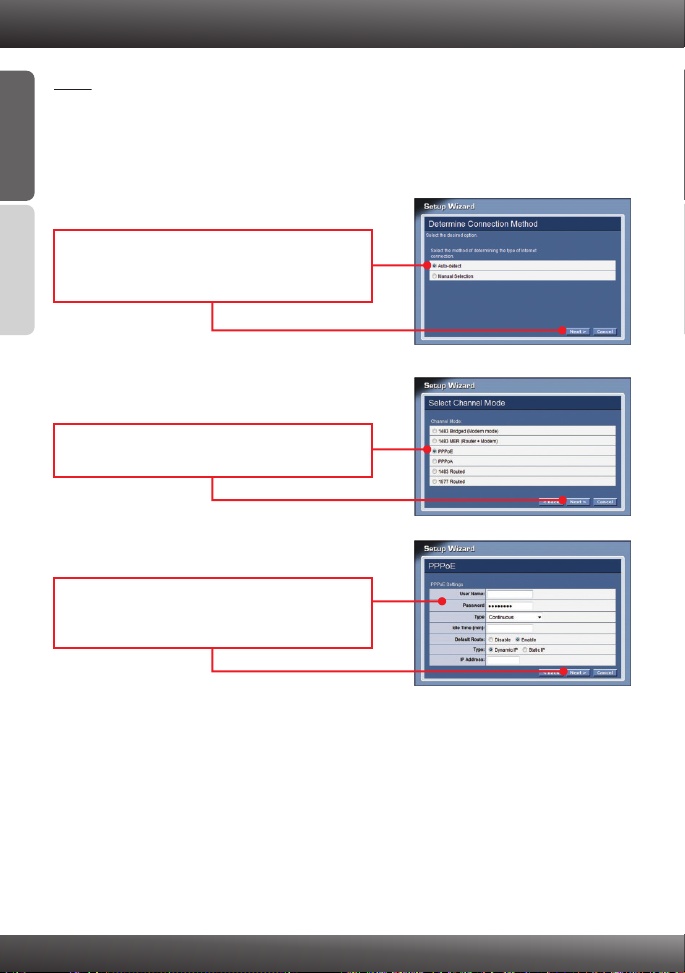
1. The example below is for Auto-detect. If the Setup Wizard could not automatically
detect your Internet connection, select Manual Selection and input the information
using the information provided by your ISP.
2. In the example below, the ADSL connection is PPPoE.
4. Select Auto-detect and then click Next.
5. Select the Channel Mode and then click Next.
6. Configure the settings based on information
provided by your ISP. Then click Next.
FRANÇAISENGLISH
12

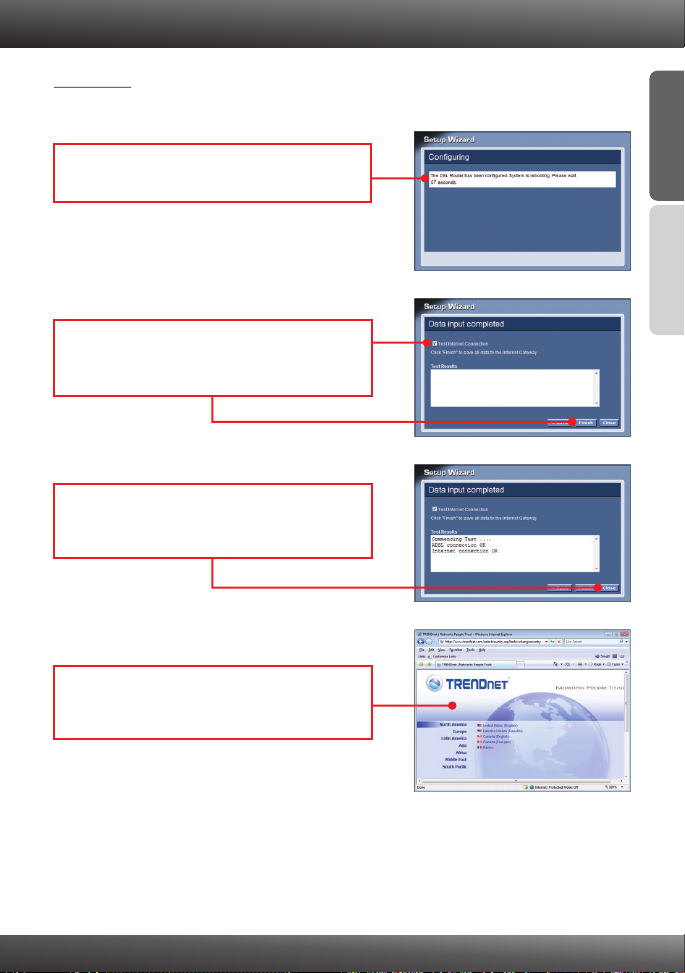
Note: For other connection methods, follow the on screen instructions after you select
auto-detect.
FRANÇAISENGLISH
7. Please wait while the TEW-436BRM reboots.
8. Check Test Internet Connection, and then
click Finish.
9. Verify that the test has completed successfully.
Check that the DSL and Internet LEDs are lit.
Then click Close.
10. Open up your browser and enter in a URL
(e.g. www.trendnet.com) to verify that you
have Internet connection.
13

4. Setting up Encryption
Note: To protect your network from any unauthorized access it is recommended to
enable wireless encryption.
1. Click Setup -> Wireless -> Security.
2. This example below is WPA2-PSK. Select the
following:
Encryption: WPA2(AES) WPA Authentication
Mode: Personal (Pre-Shared Key) Pre-Shared
Key Format: Passphrase
Pre-Shared Key: Enter an encryption key.
For Example: trendnet
Then click Apply Changes. For WPA-PSK or
WPA2-PSK, the Pre-Shared Key must be
between 8 and 63 ASCII or 64 HEX characters.
Make sure to copy down the encryption key.
Your Configuration is complete
For detailed information regarding the TEW-436BRM’s configuration and advanced settings,
please refer to the Troubleshooting section, User's Guide CD-ROM, or TRENDnet's website
at http://www.trendnet.com.
FRANÇAISENGLISH
Register Your Product
To ensure the highest level of customer service and support, please take a moment to
register your product Online at: www.trendnet.com/register
Thank you for choosing TRENDnet
14

Dépannage
J'ai saisi l'adresse IP http://192.168.0.1 dans la barre d'adresse de mon navigateur Internet,
mais un message d'erreur m'informe que « La page ne peut être affichée ». Comment puis-je
accéder à la page Internet de configuration du TEW-436BRM?
1.
Vérifiez à nouveau les paramètres de votre matériel en suivant les instructions de la partie
2.
2. Assurez-vous que les voyants LAN et WLAN sont allumés
3. Assurez-vous que vos paramètres TCP/IP sont bien sur Obtain an IP address
automatically (Obtenir une adresse IP automatiquement) (voir les étapes ci-dessous).
4.
Réinitialiser le TEW-436BRM. Pour réinitialiser le TEW-436BRM, prenez une épingle ou
un trombone et appuyez sur le bouton de réinitialisation au dos du modem sans fil pour 15
secondes. Ensuite, laissez-aller.
Windows Vista
1. Allez sur Control Panel (Panel de contrôle), cliquez sur
Network and Internet (Réseaux et Internet), cliquez sur
Network and Sharing Center (réseaux et centre de
partage), cliquez sur Manage Network Connections
(gérez vos connections réseaux) et enfin cliquez sur la
touche droite de la souris pour l'icône Local Area
Connection (connection du réseau local) et ensuite cliquez
sur Properties (Propriétés).
2. Cliquez sur Internet Protocol Version 4(TCP/IPv4)
(Protocole Internet Version 4(TCP/IPv4) et ensuite
sur Properties (Propriétés). Cliquez sur Obtain an
IP address automatically (Obtenir une adresse IP
automatiquement)
Windows XP/2000
1. Allez dans le Panneau configuration, double-
cliquez sur l'icône Connexions réseau, ensuite
faites un clic droit sur l'icône Connexion au
réseau local et cliquez sur Propriétés.
2. Cliquez sur Internet Protocol (TCP/IP)
(Protocole Internet (TCP/IP) et ensuite sur
Properties (Propriétés). Cliquez sur Obtain an
IP address automatically (Obtenir une
adresse IP automatiquement)
15

Le modem ne détecte pas automatiquement ma connexion DSL. Que faire ?
1.
Vérifiez que votre compte DSL est activé.
2. Assurez-vous que tous les câbles sont correctement branchés (voir la partie 2).
3. Dans la Partie 3, sélectionnez la sélection manuelle dans l'assistant d'installation et
configurez le modem en vous basant sur les informations fournies par votre FAI.
Tous les paramètres sont exacts, mais je n'arrive pas à établir une communication sans fil
avec le modem. Que faire ?
1. Vérifiez bien que le témoin lumineux Wi-fi LED sur le modem est allumé. S'il n'est pas
allumé, allumez le cycle d'alimentation du modem.
2. Débranchez l'alimentation électrique du modem. Attendez 15 secondes, puis branchez
l'appareil sous tension électrique à nouveau.
3. Contactez le fabricant de votre carte réseau sans fil. Assurez-vous que l'adaptateur réseau
sans fil est configuré avec le correct SSID. Le SSID par défaut du TEW-436BRM est
TRENDnet436. Si vous avez activé le cryptage sur tout le modem sans fil, assurez-vous
de configurer la carte réseau sans fil avec la même clé de cryptage.
J'ai oublié mon mot de passe de connexion. Que dois-je faire?
Prenez une épingle ou d'un trombone et appuyez sur le bouton de réinitialisation au dos du
modem sans fil pour 15 secondes. Ensuite, laissez-aller. Ceci renverra tous les paramètres
d'usine par défaut. Le nom d'utilisateur et mot de passe par défaut est admin.
Si vous avez la moindre question concernant la veuillez contacter le département
d’assistance technique de TRENDnet.
TEW-436BRM,
16

Troubleshooting
I typed http://192.168.10.1 in my Internet Browser's Address Bar, but an error message says
“The page cannot be displayed.” How can I get into the TEW-436BRM's web configuration
page?
1. C
heck your hardware settings again by following the instructions in Section 2.
2. Make sure the Power, LAN and WLAN lights are lit.
3. Make sure your TCP/IP settings are set to Obtain an IP address automatically
(see the steps below).
4.
Reset the TEW-436BRM. To reset the TEW-436BRM, take a pin or paperclip and press
the reset button on the back of the Wireless Modem for 15 seconds. Then let go.
Windows Vista
1. Go into the Control Panel, click Network and
Internet, click Network and Sharing Center,
click Manage Network Connections and
then right-click the Local Area Connection
icon and then click Properties.
2. Click Internet Protocol Version 4 (TCP/IPv4)
and then click Properties. Then click on
Obtain an IP address automatically.
Windows XP/2000
1. Go into the Control Panel, double-click the
Network Connections icon and then right-
click the Local Area Connection icon and
then click Properties.
2. Click Internet Protocol (TCP/IP) and then
click Properties. Then click on Obtain an IP
address automatically.
17

The Modem does not auto-detect my DSL connection. What should I do?
1.
Verify that your DSL account is activated.
2. Make sure all the cables are properly connected (see Section 2).
3. In Section 3, select manual selection in the Setup Wizard and configure the Modem based
on information provided by your ISP.
All the settings are correct, but I cannot make a wireless connection to the Modem. What
should I do?
1. Double check that the Wireless LED on the Modem is lit. If the Wireless LED is not lit,
power cycle the Modem.
2. Unplug the power to the Modem. Wait 15 seconds, then plug the power back in.
3. Contact the manufacturer of your wireless network adapter. Make sure the wireless
network adapter is configured with the proper SSID. The default SSID of the
TEW-436BRM is TRENDnet436. If you have enabled any encryption on the Wireless
Modem, make sure to configure the wireless network adapter with the same encryption
key.
I forgot my login password. What should I do?
Take a pin or paperclip and press the reset button on the back of the Wireless Modem for 15
seconds. Then let go. This will return all settings to factory default. The default user name
and password is admin.
If you still encounter problems or have any questions regarding the TEW-436BRM, please contact
TRENDnet's Technical Support Department.
18

Wireless Tips
The following are some general wireless tips to help minimize the impact of interference within an
environment.
Assign your network a unique SSID
Do not use anything that would be identifying like “Smith Family Network”. Choose
something that you would easily identify when searching for available wireless networks.
Do not turn off the SSID broadcast
The SSID broadcast is intended to be on and turning it off can cause connectivity issues.
The preferred method of securing a wireless network is to choose a strong form of encryption
with a strong and varied encryption key.
Note: after setting up the SSID, encryption type and encryption key/passphrase, please
make a note of them for future reference. You will need this information to connect your
wireless computers to the wireless router/access point.
Change the channel
Most wireless access points and routers are defaulted to channel 6. If you have a site survey
tool that will display the channels you can plan your channel selection around neighboring
access points to minimize interference from them. If your site survey tool does not display
the channel try using channels 1 or 11.
Change the channel bandwidth
If you are using an 802.11n router or access point you can also make the following changes.
Change the channel bandwidth to 20/40MHz. This will provide the highest possible
performance using an 802.11n device. Also, if using 802.11n you should be securing the
network with WPA2 security.
Note: Due to Wi-Fi certification considerations if you choose WEP, WPA or WPA2-TKIP
encryption this device may operate in legacy wireless mode (802.11b/g). You may not get
802.11n performance as these forms of encryption are not supported by the 802.11n
specification.
Avoid stacking hardware on top of each other to prevent overheating issues
Maintain enough free space around the hardware for good ventilation and airflow. There
should also be plenty of free space around the antennas to allow the wireless signal to
propagate. Please also make sure that the wireless hardware is not placed in any type of
shelving or enclosures.
There are a number of other environmental factors that can impact the range of wireless
devices.
1. Adjust your wireless devices so that the signal is traveling in a straight path, rather than at
an angle. The more material the signal has to pass through the more signal you will lose.
19

2. Keep the number of obstructions to a minimum. Each obstruction can reduce the range of
a wireless device. Position the wireless devices in a manner that will minimize the amount
of obstructions between them.
3. Building materials can have a large impact on your wireless signal. In an indoor
environment, try to position the wireless devices so that the signal passes through less
dense material such as dry wall. Dense materials like metal, solid wood, glass or even
furniture may block or degrade the signal.
4. Antenna orientation can also have a large impact on your wireless signal. Use the wireless
adapter's site survey tool to determine the best antenna orientation for your wireless
devices.
5. Interference from devices that produce RF (radio frequency) noise can also impact your
signal. Position your wireless devices away from anything that generates RF noise, such
as microwaves, HAM radios, Walkie-Talkies and baby monitors.
6. Any device operating on the 2.4GHz frequency will cause interference. Devices such as
2.4GHz cordless phones or other wireless remotes operating on the 2.4GHz frequency
can potentially drop the wireless signal. Although the phone may not be in use, the base
can still transmit wireless signals. Move the phone's base station as far away as possible
from your wireless devices.
If you are still experiencing low or no signal consider repositioning the wireless devices or installing
additional access points. The use of higher gain antennas may also provide the necessary
coverage depending on the environment.
20


GPL/LGPL General Information
This TRENDnet product includes free software written by third party developers. These codes are subject to the GNU
General Public License ("GPL") or GNU Lesser General Public License ("LGPL"). These codes are distributed WITHOUT
WARRANTY and are subject to the copyrights of the developers. TRENDnet does not provide technical support for these
codes. The details of the GNU GPL and LGPL are included in the product CD-ROM.
Please also go to (http://www.gnu.org/licenses/gpl.txt) or (http://www.gnu.org/licenses/lgpl.txt) for specific terms of each
license.
The source codes are available for download from TRENDnet's web site (http://trendnet.com/downloads/list_gpl.asp) for at
least three years from the product shipping date.
You could also request the source codes by contacting TRENDnet.
20675 Manhattan Place, Torrance, CA 90501, USA. Tel: +1-310-961-5500 Fax: +1-310-961-5511
Informations générales GPL/LGPL
Ce produit TRENDnet comprend un logiciel libre écrit par des programmeurs tiers. Ces codes sont sujet à la GNU General
Public License ("GPL" Licence publique générale GNU) ou à la GNU Lesser General Public License ("LGPL" Licence
publique générale limitée GNU). Ces codes sont distribués SANS GARANTIE et sont sujets aux droits d'auteurs des
programmeurs. TRENDnet ne fournit pas d'assistance technique pour ces codes. Les détails concernant les GPL et LGPL
GNU sont repris sur le CD-ROM du produit.
Veuillez également vous rendre en (http://www.gnu.org/licenses/gpl.txt) ou en (http://www.gnu.org/licenses/lgpl.txt) pour les
conditions spécifiques de chaque licence.
Les codes source sont disponibles au téléchargement sur le site Internet de TRENDnet web site
(http://trendnet.com/downloads/list_gpl.asp) durant au moins 3 ans à partir de la date d'expédition du produit.
Vous pouvez également demander les codes source en contactant TRENDnet.
20675 Manhattan Place, Torrance, CA 90501, USA. Tel: +1-310-961-5500 Fax: +1-310-961-5511
Allgemeine Informationen zu GPL/LGPL
Dieses Produkt enthält die freie Software "netfilter/iptables" (© 2000-2004 netfilter project http://www.netfilter.org) und die
freie Software „Linux „mtd“ (Memory Technology Devices) Implementation (© 2000 David Woodhouse), erstmals integriert in
Linux Version 2.4.0-test 3 v. 10.07.2000 (http://www.kernel.org/pub/linux/kernel/v2.4/old-test-kernels/linux-2.4.0-test3.tar.bz2),
sowie weitere freie Software. Sie haben durch den Erwerb dieses Produktes keinerlei Gewährleistungsansprüche gegen die
Berechtigten an der oben genannten Software erworben; weil diese die Software kostenfrei lizenzieren gewähren sie keine
Haftung gemäß unten abgedruckten Lizenzbedingungen. Die Software darf von jedermann im Quell-und Objektcode unter
Beachtung der Lizenzbedingungen der GNU General Public License Version 2, und GNU Lesser General Public License
(LGPL) vervielfältigt, verbreitet und verarbeitet werden. Die Lizenz ist unten im englischsprachigen Originalwortlaut
wiedergegeben. Eine nichtoffizielle Übersetzung in die deutsche Sprache finden Sie im Internet unter
(http://www.gnu.de/documents/gpl-2.0.de.html). Eine allgemeine öffentliche GNU Lizenz befindet sich auch auf der
mitgelieferten CD-ROM.
Sie können Quell-und Objektcode der Software für mindestens drei Jahre auf unserer Homepage www.trendnet.com im
Downloadbereich (http://trendnet.com/langen/downloads/list_gpl.asp) downloadend. Sofern Sie nicht über die Möglichkeit
des Downloads verfügen können Sie bei TRENDnet.
20675 Manhattan Place, Torrance, CA 90501 -U.S.A -, Tel.: +1-310-961-5500, Fax: +1-310-961-5511 die Software anfordern.
Información general sobre la GPL/LGPL
Este producto de TRENDnet incluye un programa gratuito desarrollado por terceros. Estos códigos están sujetos a la
Licencia pública general de GNU (“GPL”) o la Licencia pública general limitada de GNU (“LGPL”). Estos códigos son
distribuidos SIN GARANTÍA y están sujetos a las leyes de propiedad intelectual de sus desarrolladores. TRENDnet no ofrece
servicio técnico para estos códigos. Los detalles sobre las licencias GPL y LGPL de GNU se incluyen en el CD-ROM del
producto.
Consulte también el (http://www.gnu.org/licenses/gpl.txt) ó el (http://www.gnu.org/licenses/lgpl.txt) para ver las cláusulas
específicas de cada licencia.
Los códigos fuentes están disponibles para ser descargados del sitio Web de TRENDnet
(http://trendnet.com/downloads/list_gpl.asp) durante por lo menos tres años a partir de la fecha de envío del producto.
También puede solicitar el código fuente llamando a TRENDnet.
20675 Manhattan Place, Torrance, CA 90501, USA. Tel: +1-310-961-5500 Fax: +1-310-961-5511
Общая информация о лицензиях GPL/LGPL
В состав данного продукта TRENDnet входит бесплатное программное обеспечение, написанное сторонними
разработчиками. Это ПО распространяется на условиях лицензий GNU General Public License ("GPL") или GNU
Lesser General Public License ("LGPL"). Программы распространяются БЕЗ ГАРАНТИИ и охраняются авторскими
правами разработчиков. TRENDnet не оказывает техническую поддержку этого программного обеспечения.
Подробное описание лицензий GNU GPL и LGPL можно найти на компакт-диске, прилагаемом к продукту.
В пунктах (http://www.gnu.org/licenses/gpl.txt) è (http://www.gnu.org/licenses/lgpl.txt) изложены конкретные условия
каждой из лицензий.
Исходный код программ доступен для загрузки с веб-сайта TRENDnet (http://trendnet.com/downloads/list_gpl.asp) в
течение, как минимум, трех лет со дня поставки продукта.
Кроме того, исходный код можно запросить по адресу TRENDnet.
20675 Manhattan Place, Torrance, CA 90501, USA. Tel: +1-310-961-5500 Fax: +1-310-961-5511

GPL/LGPL informações Gerais
Este produto TRENDnet inclui software gratuito desenvolvido por terceiros. Estes códigos estão sujeitos ao GPL (GNU
General Public License) ou ao LGPL (GNU Lesser General Public License). Estes códigos são distribuídos SEM GARANTIA
e estão sujeitos aos direitos autorais dos desenvolvedores. TRENDnet não presta suporte técnico a estes códigos. Os
detalhes do GNU GPL e do LGPL estão no CD-ROM do produto.
Favor acessar http://www.gnu.org/licenses/gpl.txt ou http://www.gnu.org/licenses/lgpl.txt para os termos específicos de cada
licença.
Os códigos fonte estão disponíveis para download no site da TRENDnet (http://trendnet.com/langen/downloads/list_gpl.asp)
por pelo menos três anos da data de embarque do produto.
Você também pode solicitar os códigos fonte contactando TRENDnet, 20675 Manhattan Place, Torrance, CA 90501,
USA.Tel: +1-310-961-5500, Fax: +1-310-961-5511.
GPL/LGPL üldinformatsioon
See TRENDneti toode sisaldab vaba tarkvara, mis on kirjutatud kolmanda osapoole poolt. Koodid on allutatud GNU (General
Public License) Üldise Avaliku Litsentsi (GPL) või GNU (Lesser General Public License) ("LGPL") Vähem Üldine Avalik
Litsentsiga. Koode vahendatakse ILMA GARANTIITA ja need on allutatud arendajate poolt. TRENDnet ei anna koodidele
tehnilist tuge. Detailsemat infot GNU GPL ja LGPL kohta leiate toote CD-ROMil. Infot mõlema litsentsi spetsiifiliste terminite
kohta leiate (http://www.gnu.org/licenses/gpl.txt) või (http://www.gnu.org/licenses/lgpl.txt).
Infot mõlema litsentsi spetsiifiliste terminite kohta leiate (http://www.gnu.org/licenses/gpl.txt) või
(http://www.gnu.org/licenses/lgpl.txt). Lähtekoodi on võimalik alla laadida TRENDneti kodulehelt
(http://trendnet.com/langen/downloads/list_gpl.asp) kolme aasta jooksul alates toote kättesaamise kuupäevast.
Samuti võite lähtekoodi paluda TRENDneti'lt, 20675 Manhattan Place, Torrance, CA 90501, USA. Tel: +1-310-961-5500,
Fax: +1-310-961-5511.

 Loading...