

Page 1

PF-16
PCMCIA 10/100 Mbps
Ethernet Card
User’s Manual
Page 2

PCMCIA 10/100 Mbps Ethernet PC Card User’s Manual
Regulatory compliance
This equipment has been tested and found to comply with the limits for a
Class B digital device pursuant to Part 15 of the FCC Rules. This equipment also complies with CE EN55022 Class B and VCCI V3 Class B
specifications. These limits are designed to provide reasonable protection
against harmful interference when the equipment is operated in a commercial environment.
This equipment generates, uses, and can radiate radio frequency energy
and, if not installed and used in accordance with the instruction manual,
may cause harmful interference to radio communications. Operation of
this equipment in a residential area is likely to cause harmful interference
in which case the user will be required to correct the interference at his
own expense.
Changes or modifications not expressly approved by the parties responsible for compliance could void the user’s authority to operate the
equipment.
ii
Page 3

••! •••••••
Preface
Table of contents
Regulatory compliance.........................................................................ii
Table of contents .................................................................................iii
About this manual................................................................................iv
CHAPTER 1 1
Introduction 1
Features ............................................................................................................1
CHAPTER 2 2
Hardware installation 2
What’s in the package.......................................................................................2
Hardware description........................................................................................2
Inserting the Ethernet Card...............................................................................3
Ethernet Card RJ-45 connector LEDs..............................................................5
Disconnecting the Ethernet Card......................................................................5
CHAPTER 3 7
Driver installation for Win 95/98/NT 7
Driver installation for Windows 95..................................................................7
Driver installation for Windows 98..................................................................9
Driver installation for Windows NT 4.0.........................................................11
CHAPTER 4 14
Driver installation for DOS environments 14
System Requirements .....................................................................................14
Driver installation..............................................................................14
Driver installation program.............................................................................14
Quick installation............................................................................................15
The Install program............................................................................16
Using the Install program...............................................................................16
Auto configuration..........................................................................................18
Custom configuration.....................................................................................19
Manual installation............................................................................21
Enablers..........................................................................................................21
Driver installation..............................................................................24
Microsoft Windows NT 3.51..........................................................................24
Microsoft Windows for Workgroups 3.11......................................................25
iii
Page 4

PCMCIA 10/100 Mbps Ethernet PC Card User’s Manual
Netware 3.X/4.X client...................................................................................26
Microsoft LAN Manager................................................................................26
Artisoft LANtastic version 6.0........................................................................27
CHAPTER 5 28
Installation for Linux 28
System Requirements .....................................................................................28
Installing the driver for Linux.........................................................................29
APPENDIX A 31
Troubleshooting 31
Q&A for Windows environments........................................................31
Windows 95/98...............................................................................................31
Windows NT 4.0 and 3.51..............................................................................32
APPENDIX B 33
Enabler program error messages 33
CARDGO.EXE...............................................................................................33
APPENDIX C 35
Specifications .....................................................................................35
About this manual
This user’s manual describes how to install and operate your PCMCIA
10/100 Mbps Ethernet Card. Please read this manual before you install
the product.
This manual includes the following topics:
! Product description, features and specifications.
! Hardware installation procedure.
! Software installation procedure.
! Trouble shooting procedures
iv
Page 5

Chapter 1
Chapter 1
Chapter 1Chapter 1
Introduction
Thank you for purchasing the PCMCIA 10/100 Mbps Ethernet
Card.
This high-speed Ethernet network adapter card complies with the
PCMCIA Type II standard and uses a female RJ-45 adapter to
connect to the network.
The Ethernet Card is switchless and software configurable. An
enabler program is used to set up the card for your operating system; even without the card and socket service drivers for the
PCMCIA controller installed, you will still be able to use the card
by running the enabler program.
Features
•
Type II credit-card size (5.0 mm)
•
Complies with IEEE 802.3u 100Base-TX and 802.3
10Base-T protocols.
•
Supports all popular operating systems
•
Supports Nway auto-negotiation for 10/100 Mbps full/halfduplex
•
Complies with PCMCIA Release 2.1 specifications and later
•
Supports hot swap card insertion and removal
•
PC Card standard 68-pin 16-bit PCMCIA interface
•
5V power consumption
•
FCC/VCCI/CE certified
1
Page 6

Chapter 2
Chapter 2
Chapter 2Chapter 2
Hardware installation
This chapter covers inserting your Ethernet Card in the notebook’s
PCMCIA port, and connecting the card to a network.
What’s in the package
Please ensure that the following items are included in your package. If any items are missing, contact your dealer.
•
PCMCIA 10/100 Mbps Ethernet Card
•
RJ-45 adapter
•
Software and device driver disk
•
This user’s manual
Hardware description
The Ethernet Card is encased in a stainless compact frame and has
a 68-pin connector for attaching to the notebook’s PCMCIA port,
and a 15-pin flat connector for connecting to the Ethernet adapter.
2
Page 7
••! •••••••
—Hardware installati on
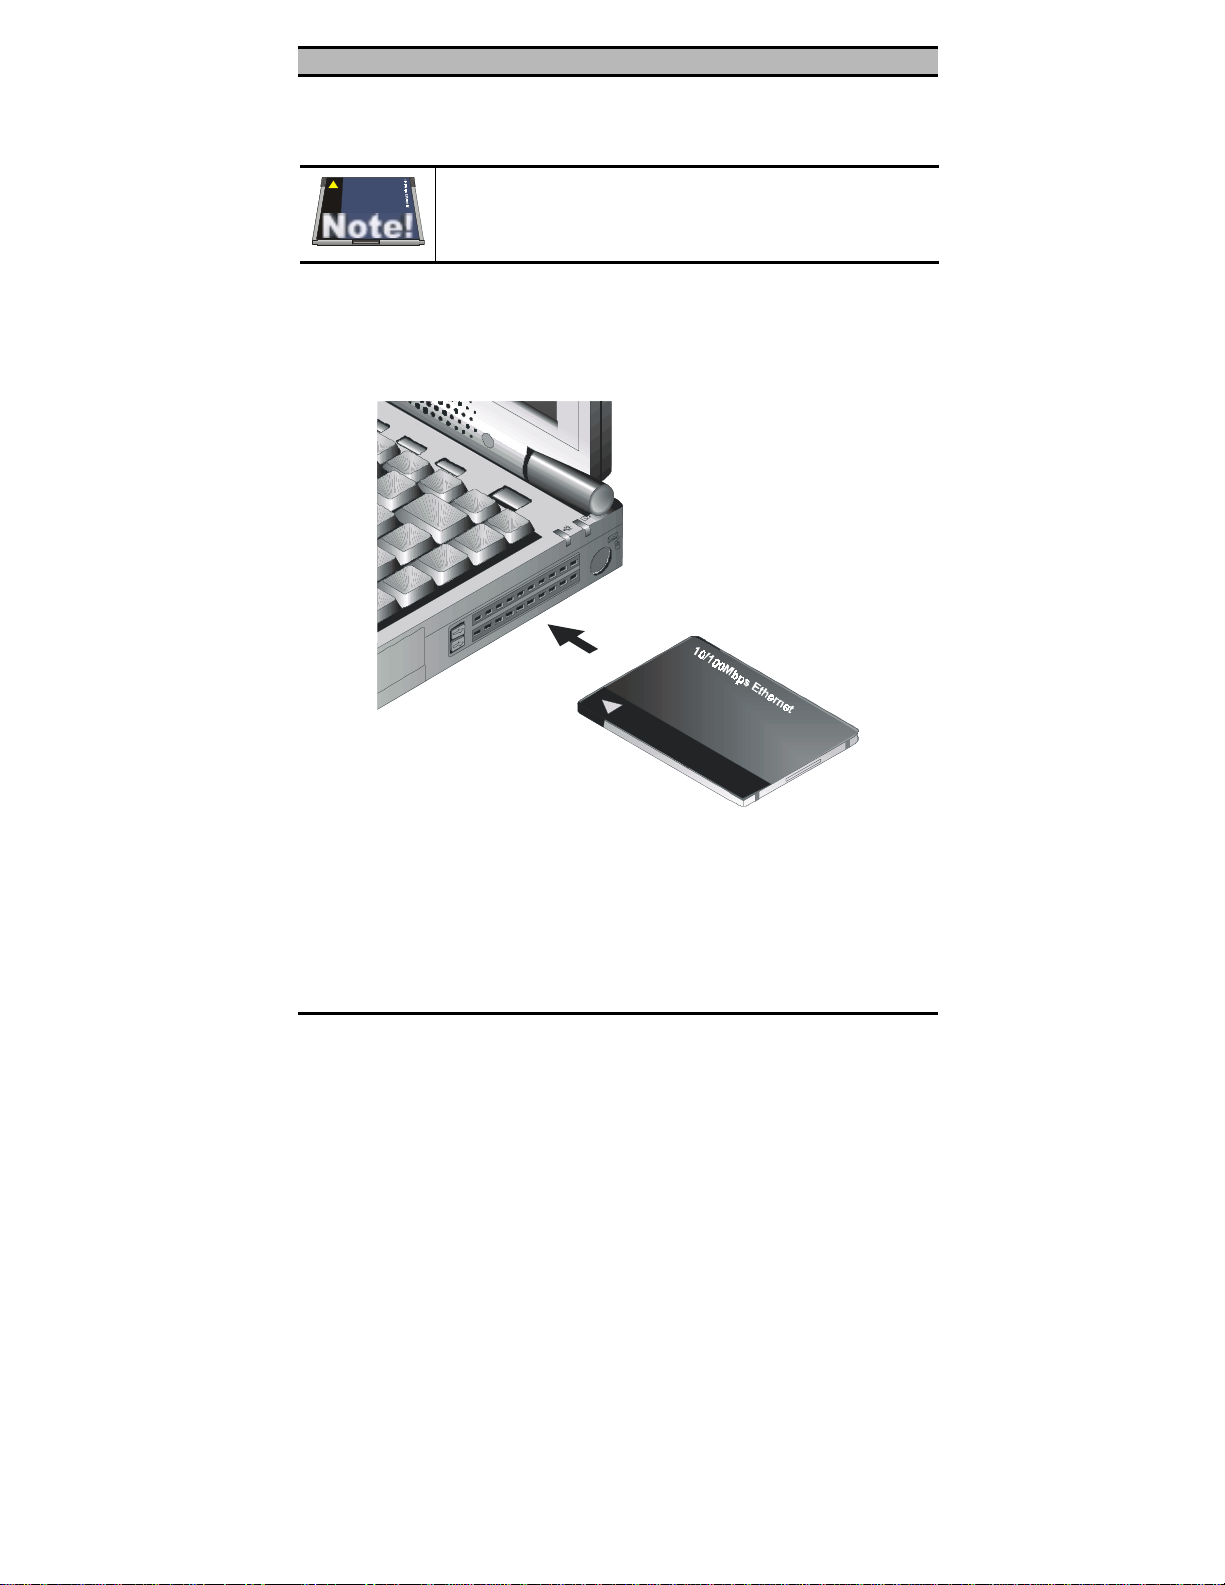
Inserting the Ethernet Card
These instructions apply to most notebook computers.
For detailed information on inserting PC cards into
your notebook, consult the notebook user’s manual.
Follow the procedure below to install the Ethernet Card.
1. With the card’s 68-pin connector facing the notebook’s
PCMCIA slots, slide the card all the way into an empty slot.
Do not force the connection!
Figure 2-1: Inserting the Ethernet Card
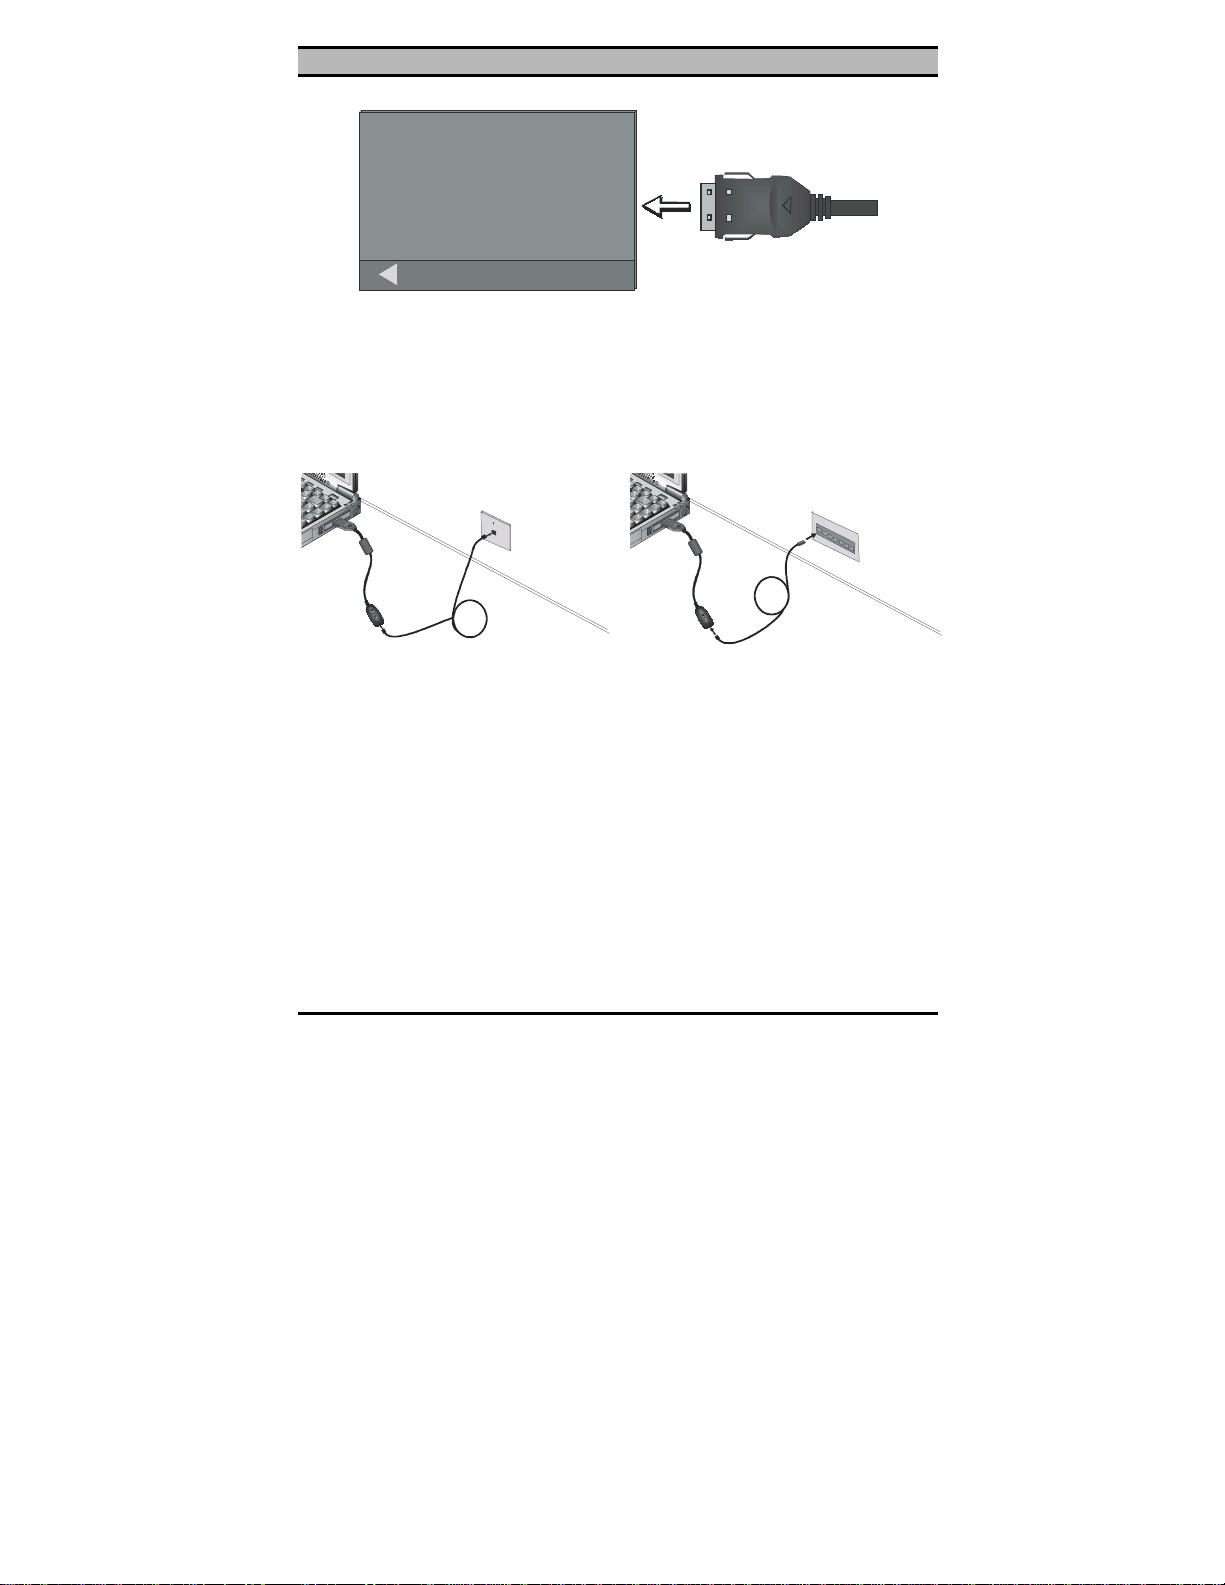
2. Plug the RJ-45 adapter into the Ethernet Card’s 15-pin
connector.
! 3
Page 8
PCMCIA 10/100 Mbps Ethernet PC Card User’s Manual
10/100Mbp s Etherne t
Figure 2-2: Connecting the RJ-45 adapter
3. Connect the RJ-45 adapter to the network.
You can connect the Ethernet adapter cable to a port on a
hub or to a RJ-45 phone jack with another male-to-male
RJ-45 line or connector.
X
N
L
M
0
0
1
T
C
A
t
e
n
r
e
th
t
s
E
a
F
X
N
L
M
0
0
1
T
C
A
t
e
n
r
e
h
t
t
s
E
a
F
1
0
0
B
A
S
E
-
T
P
o
r
t
s
Connecting to a phone jack
Connecting to a hub
Figure 2-3: Connecting to the network
After you have inserted the Ethernet Card, you must install the
drivers. If your operating system is Windows 98, Window 95, or
Windows NT, refer to Chapter 3. If your operating system is
Windows NT 3.51 or another DOS environment network operating system, refer to Chapter 4. If your operating system is Linux,
refer to Chapter 5.
4 !
Page 9
••! •••••••
—Hardware installati on
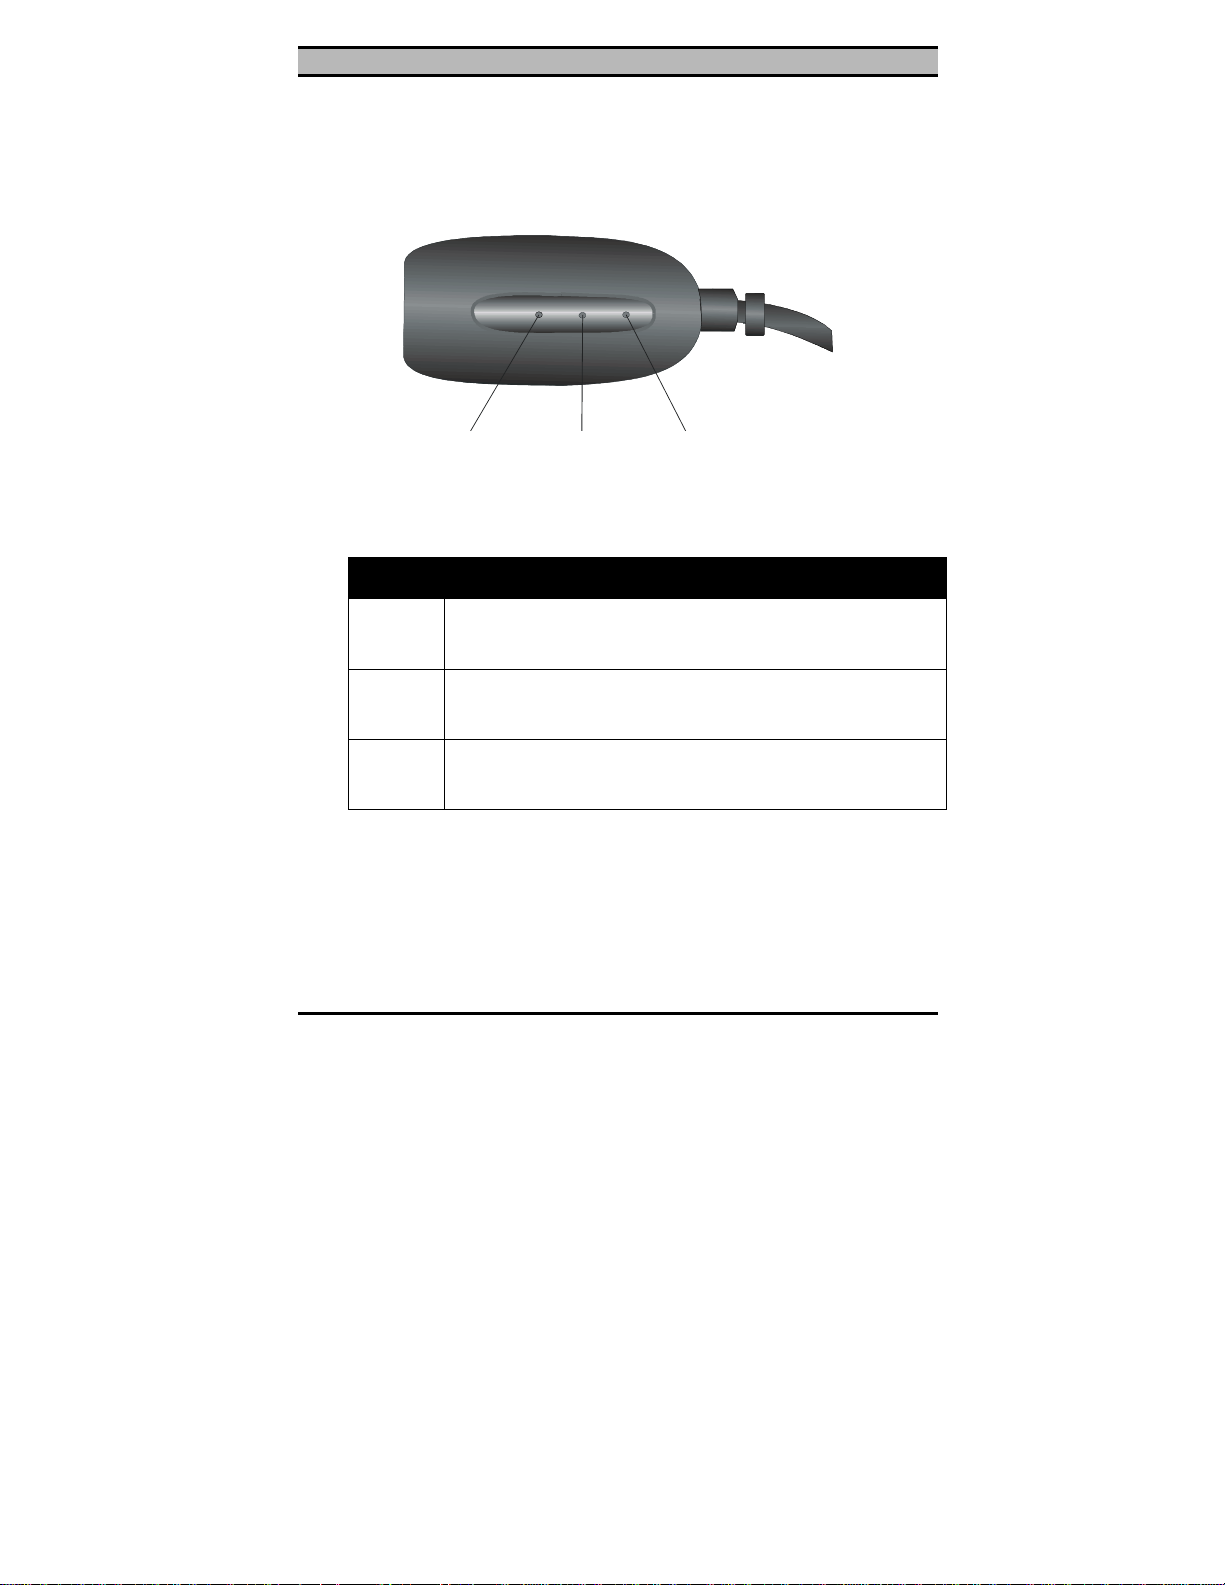
Ethernet Card RJ-45 connector LEDs
The following illustration shows the Ethernet Card RJ-45 connector LEDs:
Fast
Ethernet
ACT 1 00M
Figure 2-4: RJ-45 connector LEDs
ACT
100M
LNK
LNK
The following table describes the meaning of the LEDs:
LED MEANING
ACT
100M
LNK
Indicates transmit or receive activity. It is normally off.
When there is packet transmit or receive activity, this LED
is on.
Indicates the connection speed. When off, the connection
speed is 10 Mbps. When on, the connection speed is 100
Mbps.
Indicates whether the link is active or not. When lit, indicates that the link is active. When off, indicates that the link
is inactive.
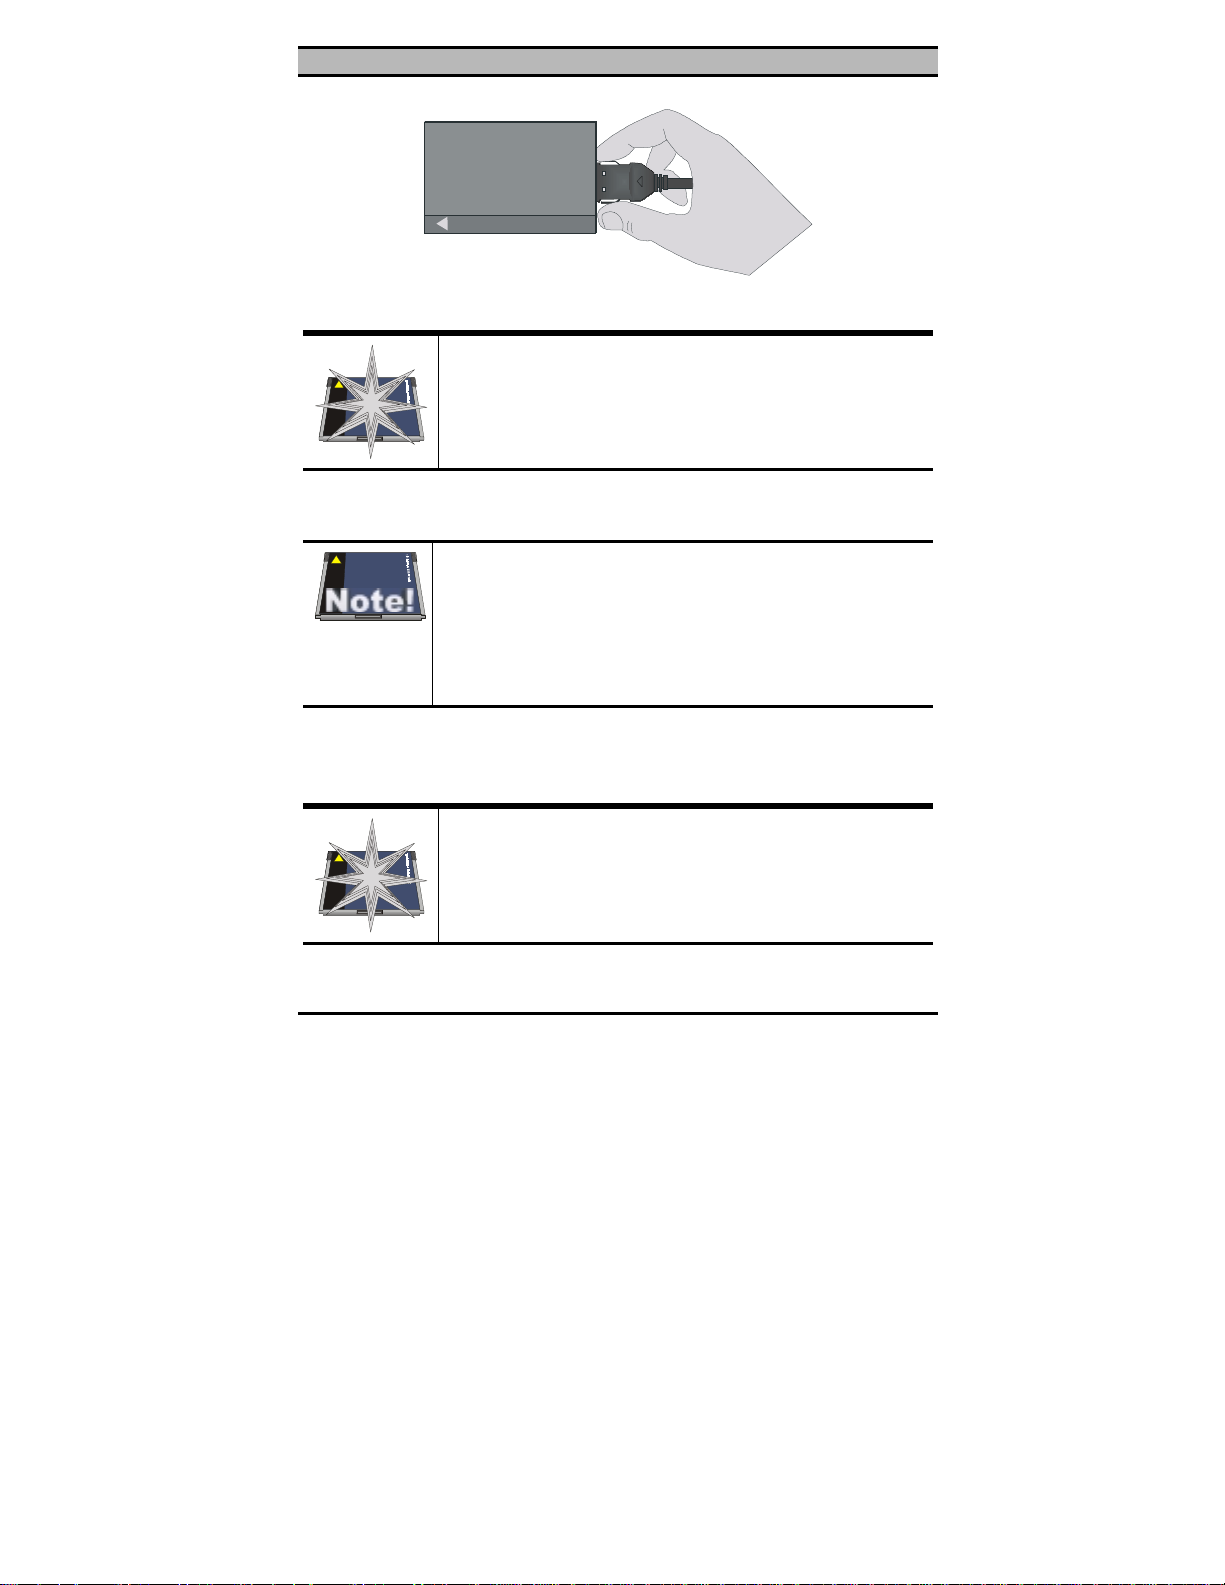
Disconnecting the Ethernet Card
The Ethernet Card RJ-45 connector is designed to lock in place
when connected to the Ethernet Card. The following illustration
shows the location of the clips:
! 5
Page 10
PCMCIA 10/100 Mbps Ethernet PC Card User’s Manual
10/100Mbps Ethernet
Figure 2-5: Disconnecting the RJ-45 cable
Warning!
Do not pull on the RJ-45 cable to disconnect the RJ-45 connector from the card. You may damage the RJ-45 connector
pins as well as the Ethernet Card.
After you have disconnected the RJ-45 cable, you can eject the
Ethernet Card from the notebook’s PC Card slot.
In Win 95/98 operating systems, you do not have to
power down the notebook to remove the card. The card
is hot-swappable—you can remove the card when the
notebook is powered on. However, Microsoft recommends that you stop the card. Refer to your Win 95/98
online help for information on stopping the Ethernet Card.
Most notebooks have an eject lever or button for ejecting PC cards
from the PC ports. Consult your notebook’s user’s manual for
details.
Warning!
Do not eject the Ethernet Card when a data transmission is
taking place. Exit your communications program normally,
stop the card if necessary, and then remove the card.
6 !
Page 11
Chapter 3
Chapter 3
Chapter 3Chapter 3
Driver installation for Win 95/98/NT
The following sections cover PCMCIA 10/100 Mbps Ethernet
Card driver installation in the Windows 95, Windows 98, and
Windows NT operating systems.
Driver installation for Windows 95
Installation of the Ethernet Card is just the same as for any normal
Windows 95 Plug & Play device. Follow the steps below to install the driver in Windows 95.
1. Insert the Ethernet Card into an available PCMCIA slot in
your notebook (refer to page 3 “Inserting the Ethernet
Card”).
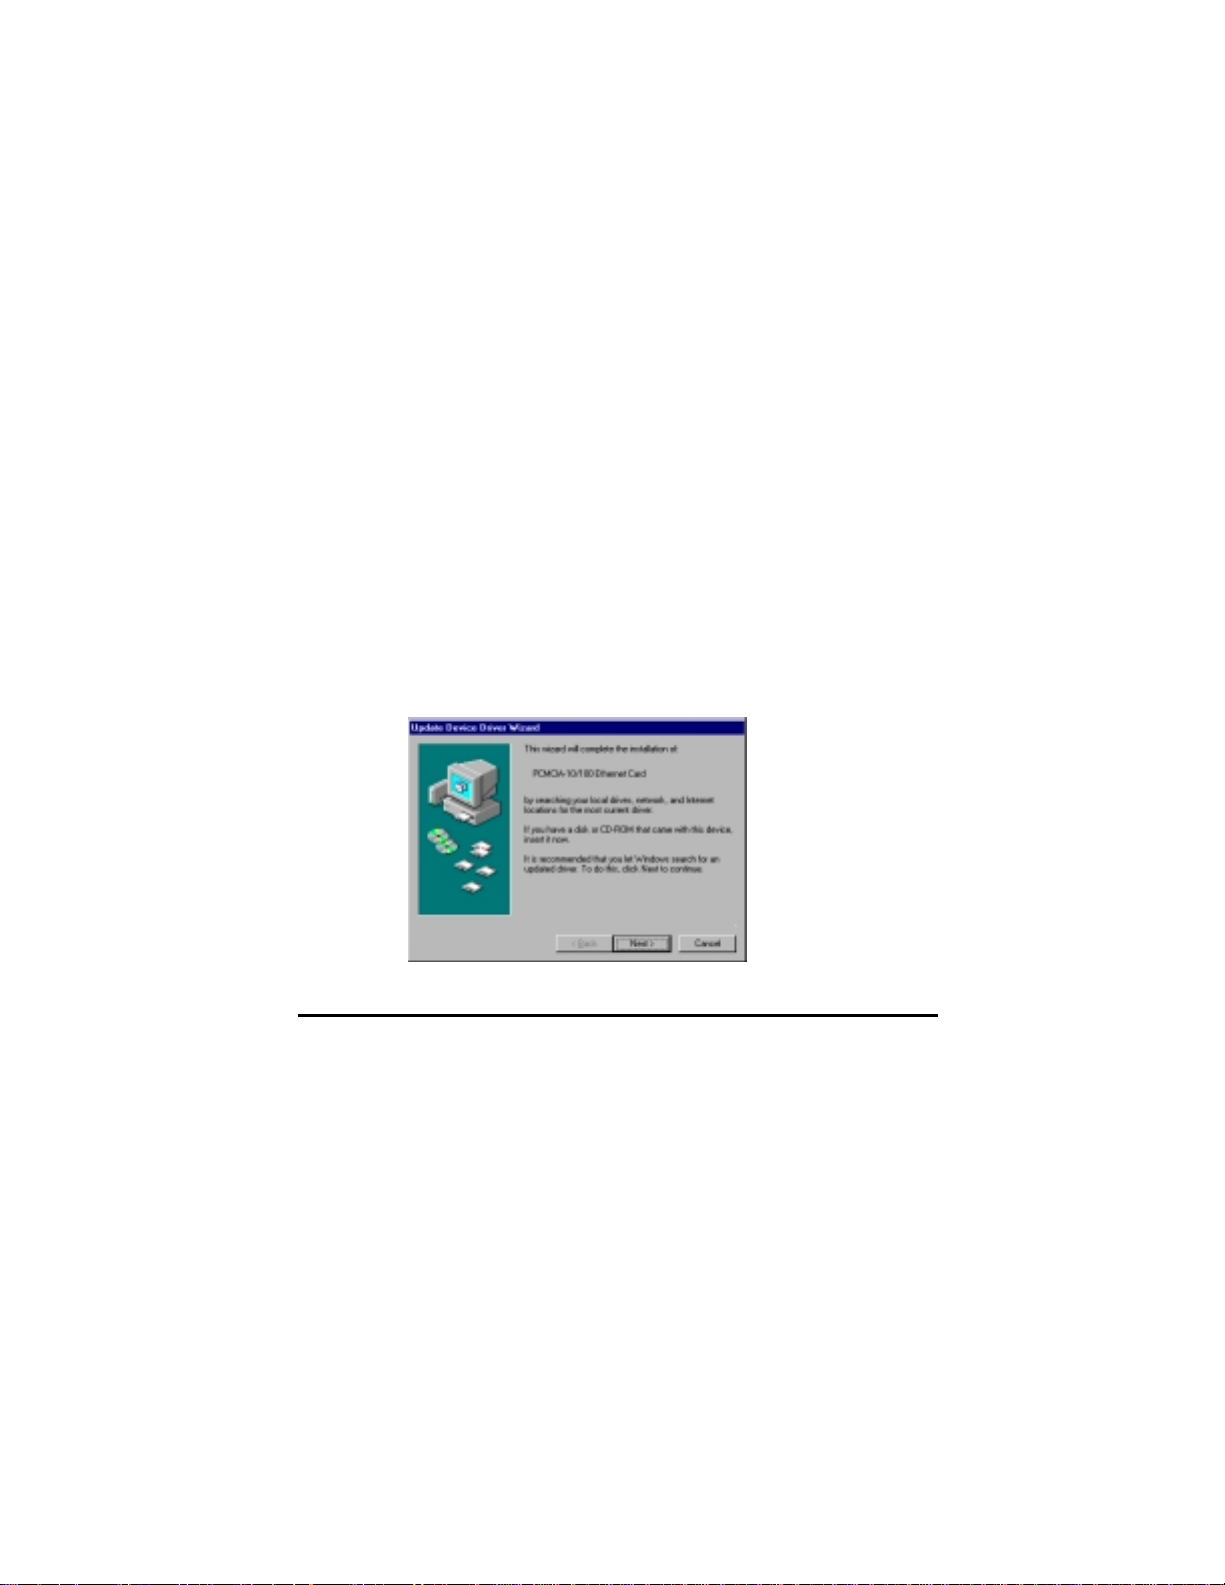
2. After Windows 95 detects the card, the Update Device
Driver Wizard window appears:
7
Page 12

PCMCIA 10/100 Mbps Ethernet PC Card User’s Manual
3. Insert the driver disk and click
to continue the instal-
Next
lation. Windows searches for the driver and the following
screen appears:
4. Click
. Windows 95 copies driver files to the hard
Finish
disk.
Windows 95 may need to copy required system files and will prompt you
to input the path to the files. Follow the
instructions on your screen, then click
OK
to continue.
5. After all files have been copied, Windows 95 prompts you
to restart the system. Click
to complete the installation.
Yes
8 !
Page 13

••! •••••••
—Driver installation for Win 95/98/NT
Driver installation for Windows 98
Follow the steps below to install the Ethernet Card drivers for
Windows 98.
1. Insert the Ethernet Card into an available PCMCIA slot on
your notebook (refer to page 3 “Inserting the Ethernet
Card”).
2. After Windows 98 detects the Ethernet Card, the Add New
Hardware Wizard window appears:
3. Click
to continue the installation. A screen appears
Next
prompting you to select an installation method:
4. Select
! 9
Search for the best driver for your device
click
. The following screen appears:
Next
and
Page 14

PCMCIA 10/100 Mbps Ethernet PC Card User’s Manual
5. Ensure that the
Microsoft Windows Update
checked, and ensure that the
Floppy disk drives
box is un-
box is
checked.
6. Insert the driver disk into your floppy disk drive and click
. The following screen appears:
Next
7. Click
. After Windows 98 copies files to your hard
Next
disk drive, you are prompted to restart the system.
Windows 98 may need to copy required system files and will prompt you
to input the path to the files. Follow the
instructions on your screen, then click
OK
to continue.
8. Click
10 !
to complete installation.
Yes
Page 15

••! •••••••
—Driver installation for Win 95/98/NT
Driver installation for Windows NT 4.0
This installation procedure assumes that you have installed the
network component on your computer.
To check whether the network component has been installed, double click the
Network
been installed, refer to the Windows NT 4.0 installation guide for
instructions on installing the component.
While installing the network component, Windows NT 4.0 will
prompt you to install the network adapter driver. Follow the steps
below to install the driver.
1. Insert the Ethernet Card into an available PCMCIA slot on
your notebook (refer to page 3 “Inserting the Ethernet
Card”).
2. Log in to NT 4.0 as “Administrator”.
icon in the
Control Panel
. If it has not
3. Double click the
select the
! 11
Adapters
Network
icon in the
Control Panel
, and
tab as shown in the following screen:
Page 16

PCMCIA 10/100 Mbps Ethernet PC Card User’s Manual
4. Click
to add a new adapter. The following screen ap-
Add
pears:
5. Click
Have Disk
. The following screen appears:
6. Type “A:\WINNT40” where “A” is your floppy drive letter.
Insert the driver disk, and click OK.
After finding the installation file, the
Select OEM Option
window is displayed.
7. Click OK. The following screen appears, prompting you
to input the IRQ, I/O port address, and connection type:
12 !
Page 17

••! •••••••
—Driver installation for Win 95/98/NT
8. Select the desired IRQ Level, I/O Port Address and Connection Type.
You must select an IRQ and I/O port
address that is not being used by another device; otherwise, you will have a
system conflict error.
To see the available IRQ and I/O port
addresses, use the Windows NT Diagnostics program in Windows NT
Administrator tools. Refer to the Windows NT online help for information on
Windows NT diagnostics.
9. Click OK to continue. Windows will configure the Ethernet Card. You are returned to the
Network
window.
10. Click
Close
to exit the
Network
window. Windows NT
4.0 will bind the adapter with the network component.
When Windows NT is finished binding the adapter to the
network component, you are prompted to restart the system.
11. Click
! 13
to finish the installation.
Yes
Page 18

Chapter 4
Chapter 4
Chapter 4Chapter 4
Driver installation for DOS environments
This section covers PCMCIA 10/100 Mbps Ethernet Card driver
installation for DOS environment operating systems.
System Requirements
Hardware Requirements
Software Requirements
Notebook equipped with Type II PC Card
slot and PC Card controller (compliant Rev.
2.1 or higher
The Card & Socket service drivers should
comply with PCMCIA Release 2.1 or higher
Driver installation
You must install the PCMCIA 10/100 Mbps Ethernet Card drivers
before your computer system can recognize your Ethernet Card.
The following sections cover client driver installation.
Driver installation program
INSTALL is the PCMCIA 10/100 Mbps Ethernet Card driver installation program. The INSTALL program automatically selects
the most suitable option settings, or you can perform a custom
configuration where you individually select each setting.
14
Page 19

••! •••••••
—Driver installation for DOS environments
Quick installation
This section gives a brief overview of the installation process. For
a more detailed description, refer to page 16, “The Install Program”.
1. Card and Socket Services software should be bundled with
your computer; if it is not, contact your dealer. It is recommended that you use this software when installing your
PCMCIA 10/100 Mbps Ethernet Card.
A system with Card and Socket Services installed allows
the PCMCIA card to automatically configure itself. While
the system is on, available system resources and insertion
or removal of the card will automatically be detected.
2. Run the INSTALL.EXE program found on your driver disk.
The install program guides you through the installation
process and will install the network drivers needed to run
the card on your network operating system.
If you successfully completed the installation, go to step 5.
If installation was unsuccessful, then go to the next step.
3. If you are using Card and Socket Services, select autoconfiguration. The install program will prompt Card and
Socket Services to assign an available hardware resource
configuration.
4. If you do not have Card and Socket Services or if your card
does not work with your version of Card and Socket Services, the enabler program can communicate directly with
the PCMCIA controller on your system. However, you
must select hardware resource settings that are not being
used by other devices; otherwise, your PC system may
have device conflicts.
! 15
Page 20

PCMCIA 10/100 Mbps Ethernet PC Card User’s Manual
5. Insert the PCMCIA 10/100 Mbps Ethernet Card into the
PCMCIA socket (refer to page 3). Then attach the network
cable to the card.
6. Restart your computer and connect to your network. If you
cannot connect to the network, refer to Appendix B and
Appendix C.
The Install program
Before you can use your PCMCIA 10/100 Mbps Ethernet Card,
you need to install and modify some files in your computer system.
You can make these changes manually, or you can let the
INSTALL.EXE program make them for you.
This section explains how you can use the INSTALL.EXE program to install the enablers and the files needed by the network
operating system.
Using the Install program
To run the INSTALL.EXE program, follow these instructions:
At the DOS prompt type “INSTALL” and press [Enter]. You see
an opening screen, which welcomes you to the program and asks if
you wish to continue.
PCM C IA 10/100Mbps Ethernet Card Installation Program
DO YOU WANT TO PR OCE ED?
Welcome to the PCM CIA 10/100Mbps Ethernet Card Installation Program.
INSTALL will set up your PCMCIA 10/100Mbps Ethernet Card.
If your network operating system is installed, insert your PCMC IA 10/100
Ethernet Card in any available PCM CIA slot on your computer and press
<Enter> to continue.
Otherwise press <F3> to return to DO S.
<Enter> to continue <F3> to return to DOS
16 !
Page 21

••! •••••••
—Driver installation for DOS environments
Press [Enter] to continue the installation.
The program prompts you for the directory where you want to in-
stall the driver files. You can choose the default directory name or
enter a new name. Then, press <Enter> to continue with the installation.
PCM C IA 10/100Mbps Ethernet Card Installation Program
INSTA LL will create a directory with all of the necessary files to use the
PCM CIA 10/100Mbps Ethernet Card. Please enter the drive and directory
name, or confirm the default directory.
C:\PCMCIA
ENTERING THE INSTALLATION PATH
<Enter> to continue < F3 > to return to DOS
The next screen asks if you want to do an Auto Configuration or a
Custom Configuration.
PCMCIA 10/100M bps Ethern et C ard Installation Program
SELECTING AUTO OR CUSTOM CONFIGURATION
To configure your PCM CIA 10/100M bps Ethernet Card, you can select either
Auto Configuration or Custom Configuration. Using the Auto Configuration
option, the INSTALL program will automatically configure your PCM C IA
10/100Mbps Ethernet Card. Select Custom Configuration if the default
configuration does not work for you or if you want to specify the interrupt (IRQ),
I/O addr ess, and m e m ory ad dress.
Auto Configuration
Custom Configuration
<Enter> to continue <F3> to return to DOS
Select
Auto Configuration
if you want to do a quick installation
and use the default configuration settings. If you wish to individually set any of the settings, then select
Custom Configuration
! 17
.
Page 22

PCMCIA 10/100 Mbps Ethernet PC Card User’s Manual
Auto configuration
To use auto configuration, you must have Card and Socket service
drivers installed. Refer to your computer user’s manual for information.
If you selected Auto Configuration, the program auto detects which IRQ, I/O Port, and memory space (MEMBASE) the PCMCIA
10/100 Mbps Ethernet Card can use. After successfully autodetecting the configuration, the program shows the following
screen:
PCM CIA 10/100M b p s E the rne t Card Installation Program
CONFIGURING THE PCMCIA 10/100M ETHERNET CARDbps
The INSTALL program has detected the following configuration options for your
PCMCIA 10/100Mbps Ethernet Card.
IR Q : 5
I/O BA SE : 0x400
MEMBASE : 0xD400
<Enter> to continue <F3> to return to DOS
After the configuration process, you are prompted to select the type of network that you are installing. Select a network operating
system from the list by moving the cursor to your selection and
pressing <Enter>.
18 !
Page 23

••! •••••••
Select the network drivers that you w ant to install. Use the up an d dow n arrow
ke ys to hig hlig ht th e d e si re d it e m . W he n a it e m is h ig h ligh ted p r e s s <E n te r>
to sele ct it. If th e n etwo r k d r ive r th at y ou w ant to install is n ot in th e fo llo w ing
list, press <Esc> to continue.
<En ter > to c on tinu e < E sc> to co n tinue <F 3 > to retu rn to D O S
—Driver installation for DOS environments
PCMC IA 10/100Mbps Ethernet Card Installation Program
SELECTING DRIVERS
Netware ODI Driver
Packet D river
Windows for Workgroups
LAN M anager
Artisoft LANtastic
After selecting the network operating system, the INSTALL program will copy and modify files on your boot drive. Your
CONFIG.SYS file will also be modified to include the Enabler
Driver. You should see the following message if the installation
has been successful:
PCMCIA 10/100M bps Ethern et C ard Installation Program
INSTALLATION SUCCESSFUL
INSTALL has created/modified your AUTOE XEC .BAT and CONFIG.SY S file
to enable the PCM CIA 10/100Mbps Ethernet Card. The original files have been
renamed to AUTOEXEC.PCM and CONFIG.PCM. If you have any problems
with the new CO N F IG.SYS file when you reboot your computer, you should
resto re the or igin a l files .
Remov e the Driver Disk and reboot your computer now.
Press any key to return to DOS
Custom configuration
To perform a custom installation, you need to select the Custom
Configuration Menu after you begin the INSTALL program.
After selecting the Custom Installation Menu, you see a series of
submenus prompting you to select an IRQ and I/O address.
! 19
Page 24

PCMCIA 10/100 Mbps Ethernet PC Card User’s Manual
Interrupt select
The first submenu is the Interrupt submenu. Move the cursor to
the interrupt of your choice and select it by pressing <Enter>. Interrupts available for your PCMCIA 10/100 Mbps Ethernet card
include 3, 4, 5, 9, 10, and 11.
PCM C IA 10/100M bps Ethernet Card Installation Program
Please select the hardware interrupt that you would like your PCMCIA
10/100Mbps Ethernet Card to use. Use the up and down arrow key s to
highlight the desired value. W hen the desired value is highlighted, press
<Enter> to select it.
SELECTING INTERRUPTS
3
4
5
5
9
10
11
<Enter> to continue <F3> to return to DOS
IO port select
Move the cursor to the desired I/O address and press <Enter>.
Available I/O Ports are 300H, 320H, 340H, 360H, 240H and 280H.
CardB us 1 0/100M bps E thernet Ca rd Installation Program
Please select the I/O Port that you wo uld like your PCM CIA 10 /100M b ps
Ethernet Card to use.
Use the up and down arrow keys to highlight the desired value. When a value is
high ligh te d p re s s < E n te r> to s e le c t i t.
SELECTING AN I/O PORT
300H
320H
340H
340H
360H
240H
280H
<Enter> to continue <F3> to return to DOS
20 !
Page 25

••! •••••••
—Driver installation for DOS environments
Memory space select
Move the cursor to the desired memory space address and press
<Enter>. Available memory space addresses are D000H, D400H,
D800H, and DC00H.
CardBus 1 0/100Mbps Ethernet Card Installation Program
Please select the memory address that you would like your PCMCIA 10/100M bp s
Ethernet Card to use.
Use the up and down arrow keys to highlight the desired value. When a value is
highlighted press <Enter> to select it.
SELECTING A M EMORY ADDRESS
D000H
D400H
D400H
D800H
DC00H
<Enter> to continue <F3> to return to DOS
Manual installation
In most cases, the INSTALL program can make all system
changes necessary for using your PCMCIA 10/100 Mbps Ethernet
Card. However, in some cases, you may wish to make changes
manually. This section explains how to manually make driver and
file modifications to enable your card.
Enablers
You can use CARDGO.EXE to enable the PCMCIA 10/100 Mbps
Ethernet Card.
The CARDGO program
The program CARDGO.EXE communicates with the PC Card
controller of your computer. This program is needed only for
DOS environment network operating systems. You may install
the Socket and Card Services to your notebook before executing
! 21
Page 26

PCMCIA 10/100 Mbps Ethernet PC Card User’s Manual
the driver. If you do not have the Socket and Card Services program, please contact your notebook vendor.
22 !
Page 27

••! •••••••
—Driver installation for DOS environments
The Install program will automatically add a line to your
CONFIG.SYS file using the following syntax and format:
DEVICE=[path_name]CARDGO.EXE [/
=xx] [/IO=xxx][/MEM=xxxx][/?]
IRQ
where
[/IRQ=xx]
[/IO=xxx]
[/MEM=xxxx]
[/?]
Specifies the hardware interrupt of your card. Default
value is 5.
Valid IRQs are 3, 4, 5, ,9, 10, and 11.
Specifies the I/O address. Default value is 300.
Valid port addresses are 300, 320, 340, 360, 240, and
280.
Specifies the memory address. Default value is
D400H.
Valid memory addresses are D000H, D400H, D800H,
and DC00H.
Displays all possible command syntax.
You can also run CARDGO.EXE by typing “CARDGO” at the
DOS prompt or by including it as a line in your
AUTOEXEC.BAT file.
After you executed CARDGO.EXE, you will see a display similar
to the following indicating that the installation was successful:
Socket
IRQ Number
I/O PORT Base
MEM Base :
:0
:05
: 300H
D000H
The list of error messages the client driver may display and the
correction methods suggested are given in Appendix B.
! 23
Page 28

PCMCIA 10/100 Mbps Ethernet PC Card User’s Manual
Driver installation
The following sections cover installation of the client driver for
Windows NT 3.51, Windows for Workgroups 3.11, Netware
3X/4X, Microsoft LAN Manager, and Artisoft LANtastic Version
6.0.
Microsoft Windows NT 3.51
Follow these instructions to install the Microsoft Windows NT
3.51 client for your Ethernet Card:
1. Insert the Ethernet Card into an available PCMCIA slot.
2. Boot the computer.
3. Click
4. Click
5. Type “A:\winnt351” (where “A” is your floppy drive) and
6. Set the proper IRQ, I/O port, memory address settings, and
7. Reboot the computer to complete the installation.
24 !
Control Panel
Network
lect
click
click OK.
connection type for this card.
icon.
Add Adapter
<other> Requires disk from manufacturer,
Continue
in the main window and click the
. Pull down the adapter’s list and se-
then
.
Page 29

••! •••••••
—Driver installation for DOS environments
Microsoft Windows for Workgroups 3.11
Follow these instructions to install the Windows for Workgroups
3.11 client for your Ethernet Card:
1. Run INSTALL.EXE, and choose Windows for Workgroups.
2. Run Windows by typing “WIN” at the DOS prompt.
3. Click the
4. Click the
5. Select the
6. Select the
7. Select
Unlisted or Updated Network Adapter
Network
Network Setup
Drivers
Add Adapters
icon in the Main Program Group.
icon from the Network window.
item from the Network Setup dialog box.
item in the Option dialog box.
Install driver field appears.
8. Type the path “A:\WFW311” and press <Enter>.
9. When the
PCMCIA 10/100 Mbps Ethernet Card
box appears, select the options step by step.
10. Follow the instructions on the screen.
11. Reboot your computer.
when the
dialog
! 25
Page 30

PCMCIA 10/100 Mbps Ethernet PC Card User’s Manual
Netware 3.X/4.X client
Follow these instructions to install the Netware 3.X/4.X client for
your Ethernet Card:
1. Run the INSTALL program, and select the
Driver
2. Follow the instructions on the screen to complete the installation.
3. Reboot the computer.
4. When the computer reboots, log on to the network.
.
Netware ODI
Microsoft LAN Manager
Follow these instructions to install the Microsoft LAN Manager
client for your Ethernet Card:
1. Run the INSTALL program, and choose
2. Type “lmsetup” in the LAN Manager Directory. Press
<Enter>.
3. Select
4. Select
5. Select
6. Insert the driver disk into the FDD and click OK.
Network Drivers
ter>.
Add New Configs
Other Driver
in “Configuration”. Press <En-
and then press <Enter>.
and press <Enter>.
LAN Manager
.
7. Select the Network Adapter Driver,
Mbps Ethernet Card
8. Press <Spacebar> to select the desired protocol.
26 !
, then click OK.
PCMCIA 10/100
Page 31

••! •••••••
—Driver installation for DOS environments
9. Click OK. The message “Configuration Complete” appears.
10. Click
, then press <F3> to exit.
Save
Artisoft LANtastic version 6.0
Follow these instructions to install the Artisoft LANtastic Version
6.0 client for your Ethernet Card:
1. Run the INSTALL program, and choose
2. Select
Artisoft LANtastic
, and specify C:\LANTASTI as
LANtastic
the destination directory.
3. When the
Select network adapter
NDIS Support for Network Adapters
screen appears, choose
.
4. When the install program prompts you for the manufacturer’s driver disk in the
Enter NDIS driver directory
screen, insert the driver disk.
5. Follow the instructions on the screen to complete the installation, then reboot the computer to start LANtastic.
.
! 27
Page 32

Chapter 5
Chapter 5
Chapter 5Chapter 5
Installation for Linux
This section covers the PCMCIA 10/100 Mbps Ethernet Card
driver installation for the Linux environment operating system.
Before you install the PCMCIA 10/100 Ethernet card
Linux driver, you must first configure the PCMCIA
interface in your Linux working environment.
System Requirements
•
Linux kernel version 2.0.x or later
•
PCMCIA interface 3.0.x or later
You can get the latest version of the PCMCIA interface package
from the one of the following URLs:
•
ftp://hyper.stanford.edu/pub/Linux/kernel/pcmcia
•
ftp://sunsite.unc.edu/pub/Linux/kernel/pcmcia
After downloading the PCMCIA interface package, refer to the
PCMCIA-HOWTO file for installation instructions.
28
Page 33

••! •••••••
—Installation for Linux
Installing the driver for Linux
Follow these instructions to install the driver for the Linux operating system:
1. Log on as the “root”.
2. Copy the driver code from the Installation disk using the
following syntax:
mount /dev/fd0 /mnt
cp /mnt/linux/en0100a.tar /tmp
cd /tmp
tar xvf en0100a.tar
3. Generate the driver using the following syntax:
cd /tmp/en0100a
make all
If the path of your PCMCIA source is not
“/usr/src/linux/pcmcia-3.0.9”, you need to modify the
“PCMCIASRC” variable of the “Makefile” file.
Consult your Linux documentation for details.
If the path of your loadable module is not
“/lib/modules/2.0.35”, you need to modify the
“DEST1” & “DEST2” variables of the “Makefile” file.
Consult your Linux documentation for details.
4. Install the driver using the following syntax:
make install
5. Configure the PCMCIA 10/100 Ethernet card using the
following syntax:
cd /etc/pcmcia
Add the following text to the “config” file. The config file
must be in “write” mode.
! 29
Page 34

PCMCIA 10/100 Mbps Ethernet PC Card User’s Manual
card “PCMCIA 10/100 Ethernet Card”
version “PCMCIA”, “10/100 Ethernet Card”
bind “pcnet_cs”
6. Configure the PCMCIA NIC interface using the following
syntax:
vi network.opts
7. Reboot Linux using the following syntax:
sync;sync;reboot
30 !
Page 35

Appendix A
Appendix A
Appendix AAppendix A
Troubleshooting
Q&A for Windows environments
These guidelines give you tips to deal with some problems on using Ethernet Card. If the problems remain unsolved, contact your
dealer for assistance.
Windows 95/98
Problem: Ejecting the card from the PCMCIA socket
hangs or reboots the computer.
Solution: To prevent this phenomenon from occurring,
stop the card by using the PC Card tool in the Control
Panel or the PC Card icon on the taskbar before you remove the card.
Problem: The card cannot be detected when reinserted.
Cause: This is caused by certain unstable PCMCIA status
lines when the card is removed and reinserted. The W indows 95/98 drivers may read an incorrect status during
this period of signal instability, and fail to detect the correct status of the card.
Solution: The card can be detected by clicking “Ref resh”
in Device Manager.
31
Page 36

PCMCIA 10/100 Mbps Ethernet PC Card User’s Manual
Windows NT 4.0 and 3.51
Question: Does the driver support “hot-swap” on NT 4.0
and 3.51?
Answer: Windows NT 4.0 and 3.51 don’t support hot
swapping. If you want to remove the card, shut down the
computer and rem ove it.
32 !
Page 37

Appendix B
Appendix B
Appendix BAppendix B
Enabler program error messages
CARDGO.EXE
Here is the list of error messages the CARDGO.EXE may display .
Error Message Solution
[Error 1]
[Error 2]
[Error 3]
[Error 4]
[Error 5]
[Error 6]
“The PCMCIA controller is
not present or recognized”
“There is no card in the
PCMCIA slot. Insert the
card.”
“The card in PCMCIA slot is
not PCMCIA 10/100 Mbps
Ethernet Card. Insert it”
“The I/O ports do not respond. Change to another
one”
“The I/O ports specified are
invalid. Change to another
one”
“The IRQ specified is invalid.
Change to another one”
There is no PCMCIA controller on your computer.
Install a PCMCIA controller
from another computer.
Ensure that the PC card is
correctly inserted into the
PCMCIA slot.
Ensure that the PC Card in
the notebook’s PCMCIA
slot is the Ethernet Card
and that it is correctly inserted.
Change to another I/O port
usi ng /IO=xxx. Refer to
“Manual Installation” in
Chapter 4.
Valid I/O addresses are
240, 280, 300, 320, 340,
and 360.
Valid IRQ values are 3, 4,
5, 9, 10, and 11.
33
Page 38

PCMCIA 10/100 Mbps Ethernet PC Card User’s Manual
Error Message Solution
[Error 7]
[Error 8]
[Error 9]
“The memory address
specified is invalid. Change
to another one”
“Enabler has been registered”
“Enabler can’t be
•
registered as a client”
“Can’t map memory”
•
“Configuration can’t be
•
requested”
Valid memory addresses
are D000, D400, D800, and
DC00.
The client driver has already been registered. You
don’t need to install the
client driver again.
These three errors are concerned with Socket and
Card services of the
PCMCIA controller.
Try using another third
party Socket and Card
service that supports this
PCMCIA controller.
34 !
Page 39

Specifications
Appendix C
Appendix C
Appendix CAppendix C
Standards Compliance:
Card Size:
Connection Mode:
Media Supported:
Operating Distance:
Network Interface:
Socket Interface:
Operating Temperature:
Certification:
Dimensions:
Power Consumption:
IEEE 802.3 10Base-T, 802.3u 100Base-TX
5.0mm Type II
Full or Half duplex for both 10 and 100 Mbps
Category-3,4,5 for 10Base-T
Category 5 for 100Base-TX
100m maximum hub-to-node distance
Female RJ-45 connector
68-pin 16-bit PCMCIA socket connector
10ºC to 50ºC
FCC/VCCI/CE Class B
85.6 x 54 x 5 mm
5V power supply and 3.3V operation
750mW/10 Mbps mode, 1150mW/100 Mbps mode
35
 Loading...