


Mira
Legal Information
By installing the Mira application, you are agreeing to TRENDnet’s terms of use and privacy policy.
Symbol Conventions
The symbols that may be found in this document are defined as follows.
Symbol |
Description |
|
Danger |
Indicates a hazardous situation which, if not avoided, will or could |
|
result in death or serious injury. |
||
|
||
|
|
|
Caution |
Indicates a potentially hazardous situation which, if not avoided, |
|
could result in equipment damage, data loss, performance |
||
|
degradation, or unexpected results. |
|
|
|
|
Note |
Provides additional information to emphasize or supplement |
|
important points of the main text. |
||
|
||
|
|
ii

Mira
|
Contents |
|
Chapter 1 Introduction................................................................................................................. |
1 |
|
Chapter 2 Select Country or Region.............................................................................................. |
2 |
|
Chapter 3 Registration.................................................................................................................. |
3 |
|
3.1 Register by Mobile Phone Number ...................................................................................... |
3 |
|
3.2 |
Register by Email Address..................................................................................................... |
3 |
Chapter 4 Device Management.................................................................................................... |
5 |
|
4.1 |
Activate an Inactive Device................................................................................................... |
5 |
4.2 Add Device for Management................................................................................................ |
6 |
|
|
4.2.1 Add an Online Device................................................................................................. |
7 |
|
4.2.2 Add a Device by Scanning Device QR Code............................................................... |
8 |
|
4.2.3 Add a Device by IP/Domain....................................................................................... |
9 |
|
4.2.4 Add a Device by a Domain....................................................................................... |
10 |
4.3 |
Connect Offline Device to Network.................................................................................... |
12 |
4.4 |
Unbind Device from Its Original Account........................................................................... |
13 |
4.5 |
Device Settings.................................................................................................................... |
13 |
|
4.5.1 Edit Information of Cameras Linked to Added Device............................................ |
13 |
|
4.5.2 Set Video and Image Encryption.............................................................................. |
14 |
|
4.5.3 Set DDNS................................................................................................................... |
15 |
|
4.5.4 Change Device's Verification Code.......................................................................... |
16 |
|
4.5.5 Remotely Configure Device ..................................................................................... |
17 |
4.6 Upgrade Device Firmware................................................................................................... |
25 |
|
Chapter 5 Favorites Management.............................................................................................. |
26 |
|
5.1 |
Add Cameras to Favorites on Device List Page.................................................................. |
26 |
5.2 |
Add Cameras to Favorites during Live View....................................................................... |
26 |
5.3 Remove Cameras from Favorites........................................................................................ |
27 |
|
Chapter 6 Share Device .............................................................................................................. |
28 |
|
6.1 |
Share a Single Device .......................................................................................................... |
28 |
6.2 |
Share Multiple Devices in a Batch...................................................................................... |
30 |
6.3 |
Silenced Mode for Devices Shared by Others.................................................................... |
31 |
iii

Mira
Chapter 7 Live View.................................................................................................................... |
32 |
|
7.1 |
Start and Stop Live View..................................................................................................... |
32 |
7.2 Set Window Division........................................................................................................... |
33 |
|
7.3 |
Digital Zoom ........................................................................................................................ |
33 |
7.4 |
PTZ Control.......................................................................................................................... |
34 |
|
7.4.1 Pan and Tilt a Camera.............................................................................................. |
34 |
|
7.4.2 Set a Preset............................................................................................................... |
34 |
|
7.4.3 Adjust PTZ Speed...................................................................................................... |
35 |
|
7.4.4 Other Functions........................................................................................................ |
35 |
7.5 |
Capturing and Recording..................................................................................................... |
36 |
7.6 Set Image Quality for Device Added by IP/Domain........................................................... |
37 |
|
7.8 |
Set Image Quality for Mira Device...................................................................................... |
39 |
Chapter 8 Playback..................................................................................................................... |
40 |
|
8.1 |
Start and Stop Playback...................................................................................................... |
40 |
8.2 |
Capturing and Recording..................................................................................................... |
41 |
8.3 Set Playback Quality for Device Added by IP/Domain ...................................................... |
41 |
|
8.4 Download Video Segment .................................................................................................. |
43 |
|
8.5 |
Adjust Playback Speed........................................................................................................ |
44 |
Chapter 9 Other Functions ......................................................................................................... |
45 |
|
9.1 |
Pictures and Videos............................................................................................................. |
45 |
9.2 |
Fingerprint Authentication................................................................................................. |
45 |
Chapter 10 System Settings........................................................................................................ |
46 |
|
10.1 Enable Push Notification................................................................................................... |
46 |
|
10.2 Save Device Parameters.................................................................................................... |
46 |
|
10.3 Auto receive Alarm after Power on................................................................................. |
46 |
|
10.4 Generate a QR Code with Device Information................................................................. |
47 |
|
10.6 View Traffic Statistics........................................................................................................ |
47 |
|
10.7 Generate a QR Code with Wi Fi Information................................................................... |
47 |
|
10.8 Floating Live View ............................................................................................................. |
48 |
|
10.9 Resume Latest Live View................................................................................................... |
48 |
|
10.10 Tablet Mode.................................................................................................................... |
48 |
|
iv

Mira
10.11 Display/Hide Channel Zero............................................................................................. |
49 |
10.12 Auto Download Upgrade File......................................................................................... |
49 |
v

Mira
Chapter 1 Introduction
The Mira, is designed for the phones or tablets based on Android 4.1 or later or iOS 8.0 or later. With the Mobile Client, you can remotely control devices via Wi Fi or mobile networks. You can also share your devices to other accounts with the sharing feature.
The Mobile Client provides access to the Mira service, which is a cloud service, to manage your devices.
 Note
Note
Network traffic charges may be produced during the use of the Mobile Client. For details, refer to the local ISP.
System Requirement
Android 4.1 or later versions. iOS 8.0 or later versions.
Conventions
In the following chapters, we simplify Mira app as "Mobile Client", devices such as NVR and network camera as "device", and devices which support being added to Mira service as "Mira Device".
1

Mira
Chapter 2 Select Country or Region
The first time you run the Mobile Client, you should select the region where your devices are located. Otherwise, the live view, playback and alarm notification of the devices will fail.
 Note
Note
●The country or the region cannot be changed once you have selected.
●You should select a correct country or region. Or it may affect subsequent operations.
After running the Mobile Client, tap Select Country or Region to select a country or region.
2

Mira
Chapter 3 Registration
You can register an account by your mobile phone number or your email address.With a registered account, you can log in to the Mobile Clients running on different mobile phones or tablets, which provides convenience for managing your devices.
3.1 Register by Mobile Phone Number
You can register an account by your mobile phone number.
Steps
1.Tap Login on the Home page to enter the Login page.
2.Tap Register to enter the Register page.
3.Tap Terms of Use and Privacy Policy to read the relevant content and then tap Agree to continue.
4.Enter your mobile phone number and then tap Get Security Code to receive the security code for identity verification.
5.Enter the security code you received and tap Next to continue.
6.Create a password.
 Note
Note
We highly recommend you to create a strong password of your own choosing (using a minimum of 8 characters, including at least three kinds of following categories: upper case letters, lower case letters, numbers, and special characters) in order to increase the security of your product. And we recommend you change your password regularly, especially in the high security system, changing the password monthly or weekly can better protect your product.
7.Tap Finish.
3.2 Register by Email Address
You can register an account by your email address.
Steps
1.Tap Login on the Home page to enter the Login page.
2.Tap Register to enter the Register page.
3.Tap Terms of Use and Privacy Policy to read the relevant content and then tap Agree to continue.
4.Enter your email address and then tap Get Security Code to get the security code for identity verification.
5.Enter the security code you received and then tap Next to continue.
3

Mira
6.Create a password.
 Note
Note
We highly recommend you to create a strong password of your own choosing (using a minimum of 8 characters, including at least three kinds of following categories: upper case letters, lower case letters, numbers, and special characters) in order to increase the security of your product. And we recommend you change your password regularly, especially in the high security system, changing the password monthly or weekly can better protect your product.
7.Tap Finish.
4

Mira
Chapter 4 Device Management
You can add devices to the Mobile Client, and configure device functions such as video and image encryption.
4.1 Activate an Inactive Device
When adding a device, if the device is not activated, a window will pop up to ask you to activate the device.
Before You Start
The device and the phone or tablet running the Mobile Client should be in the same LAN.
Steps
 Note
Note
For the access control device, you should activate it via other clients (e.g., Mira client software).
1.Add a device.
 Note
Note
See Add Device for Management for details.
2.On the Activate Device page, tap Set Device Password.
3.Create a password.
5
Mira
Figure 4 1 Activate Device
 Caution
The password strength of the device can be automatically checked. We highly recommend you change the password of your own choosing (using a minimum of 8 characters, including at least three kinds of following categories: upper case letters, lower case letters, numbers,and special characters) in order to increase the security of your product. And we recommend you change your password regularly, especially in the high security system, changing the password monthly or weekly can better protect your product.
Proper configuration of all passwords and other security settings is the responsibility of the installer and/or end user.
4.Tap Activate to activate the device.
5.Enable DHCP or manually configure network if you enter the Network Configuration page.
4.2 Add Device for Management
You need to add devices to the Mobile Client first so thatsubsequent operations such as live view and playback can be available. If you want to receive alarm event information from a device, you should add it by scanning QR code or a domain.
 Note
Note
● For details about managing alarmevent information, see Alarm Notification.
6
Mira
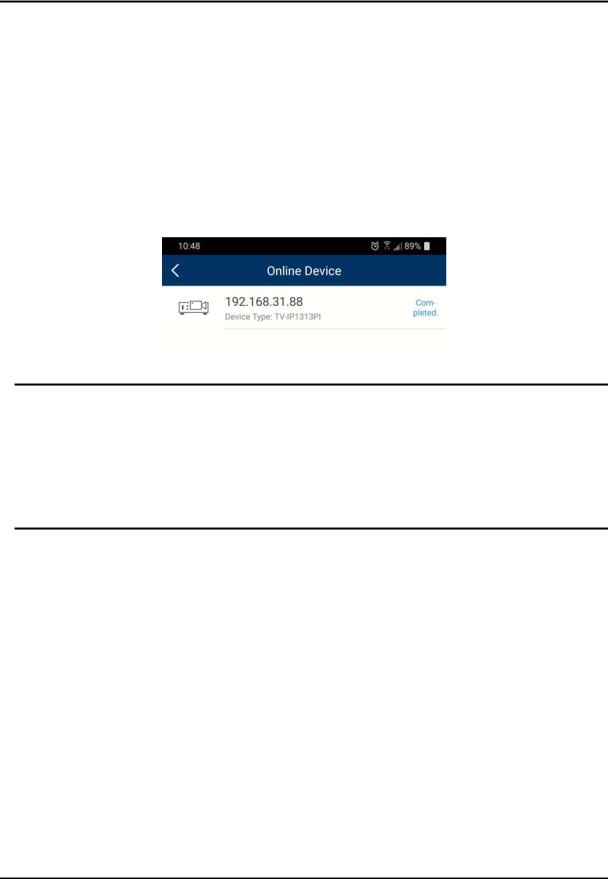
4.2.1 Add an Online Device
The Mobile Client can detect the online devices in the same local area network with your phone or tablet, and you can add the detected online devices to the Mobile Client.
Before You Start
Make sure the devices are connected to the same local area network with the phone or tablet.
Steps
1.On the device list page, tap  → Online Device to enter the Online Device page. All detected online devices will be in the list.
2.Select a device for adding.
Figure 4 2 Online Device
 Note
Note
●For network cameras, make sure the device Multicast Discovery function is enabled so that the online network camera can be automatically detected via private multicast protocol in the LAN. For details, see User Manual of the network camera.
●For the inactive device (excluding the access control device), tap Active to create a password for it before you can add the device properly. For more information about the device activation, see Activate an Inactive Device.
3.Optional: Edit the network information.
1) Tap  .
.
2) Change the device IP address to the same LAN as your phone's by either editing the IP address manually or enabling the device DHCP function.
3) Tap  and input the admin password of the device to save the settings.
4.Tap Add.
5.Enter the required information, including device alias, user name andthe password.
6.Tap  .
.
7.Optional: Delete the device.
– On the device list, if the list is in listmode, swipe the device name to the left and tap  →
→
Delete Device.
– On the device list, if the list is in thumbnail mode, tap the device name or tap  , and then tap Delete Device.
7

Mira
4.2.2 Add a Device by Scanning Device QR Code
You can add the device by scanning the device's QR code.
Steps
 Note
Note
If adding an access control device, you should activate the device and set the device network information via other clients (e.g., Mira client software) before adding it to this client.
1.On the device list page, tap  → Scan QR Code to enter the Scan QR Code page.
2.Scan the QR code.
–Scan the device QR code by aligning the QR Code with the scanning frame.
 Note
Note
●Usually, the QR code is printed on the label, which is on the back cover of the device.
●Tap  to enable the flashlight if the scanning environment is too dark.
–If there are device QR codes in photo album of the phone or tablet, tap  to extract QR code from local album.
3.Optional: Perform the following operations ifthe following situations occur.
–If the system fails to recognize the QR code, tap  to add the device manually. See Add a Device by Mira Domain or Add a Device by IP/Domain for details.
–If the device has been added to another account, you should unbind the device from the account first. See Unbind Device from Its Original Account for details.
–If the device is offline, you should connect a network for the device. For details, see Connect Offline Device to Network for details.
–If the device is not activated, the Activate Device page will pop up (excluding the access control device). You should activate the device.For details, see Activate an Inactive Device for details.
–If the Miraservice is disabled for the device, you should enable the function (excluding the access control device). For details, see Enable Mira Service When Adding Device on Mobile Client for details.
4.Tap Add on the Result page.
5.Enter the device verification code. The device will be added successfully.
 Note
Note
● The defaultdevice verification code is usually on the device label. If no verification code found, enter the device verification code you created when enabling Mira service.
● For details about enabling Mira service, see Enable Mira Service for Device.
6.Optional: Tap Configure DDNS to configure DDNS.
8

Mira
 Note
Note
●See Set DDNS for details.
●After DDNS being enabled, the device will be accessed via IP address in priority, so that remote configuration of the device will be supported and the streaming speed will be faster than streaming via Miraservice.
●If you skip this step, the device will be accessed via Mira service.
7.Tap Finish.
8.Optional: Delete the device.
– On the device list, if the list is in listmode, swipe the device name to the left and tap  →
→
Delete Device.
– On the device list, if the list is in thumbnail mode, tap the device name or tap  , and then tap Delete Device.
4.2.3 Add a Device by IP/Domain
You can add the device by fixed IP address or domain name. Thestreaming speed of devices added by IP/domain is faster than those added by Mira domain.
Before You Start
●If you want to add the access control device, activate it before adding. See the user manual of the access control device for details.
●You should activate it via other clients such as Mira client software. Make sure the device is powered on.
Steps
 Note
Note
The Mobile Client doesn't support receiving alarm event information from devices added by
IP/domain. For details about managing event information on the Mobile Client, see Alarm
Notification
1.Tap  and select Manual Adding.
2.Select IP/Domain as the adding type.
3.Enter the required information, such as alias, address, user name, camera No. and device password.
Address
Device IP address or domain name.
Camera No.
The number of the camera(s) under the device can be obtained after the device is successfully added.
4. Tap  to add the device.
9

Mira
 Note
Note
●If the device is offline, you should connect the device to a network. For details, see Connect Offline Device to Network.
●If the device is not activated, the Activate Device page will be popped up (exclude the access control device). You should activate the device.For details, see Activate an Inactive Device.
5.Optional: Perform the following operations after adding the device.
Edit Device |
On the Device Information page, tap |
to edit the basic information |
|
Information |
of the device. |
|
|
Star Live View |
Tap Start Live View to view the live view of the device. |
||
Delete a Device |
Tap |
and then tap Delete to delete the device. |
|
Configure Device |
Tap |
and then tap Remote Configuration to remotely configure |
|
Parameters |
device parameters such as basic information, time settings, recording |
||
|
schedule, etc. See Remotely Configure Device for details. |
||
Remote Controller |
Tap |
and then tap Remote Controller to remotely control the |
|
|
device. See Use Mobile Client as Device's Remote Controller for |
||
|
details. |
|
|
4.2.4 Add a Device by a Domain
For devices which support Mira service (a cloudservice), you can add them manually by Mira domain.
Before You Start
●Make sure the device is powered on.
●If adding access control device,you should activate the device and set the device network information via other clients (e.g., Mira client software) before adding it to this client.
Steps
1.On the device list page, tap  → Manual Adding to enter the Add Device page.
2.Select Mira Domain as the adding type.
3.Enter the device serial No. manually.
 Note
Note
●By default, the device serial No. is on the device label.
●For the video intercom devices, when entering the serial No. of the indoor station, the corresponding door station will also be added to the Mobile Client automatically.
●An indoor station can be linked to multiple door stations.
10

Mira
4.Tap  to search the device.
 Note
Note
●If the device has been added to another account, you should unbind the device from the account first. See Unbind Device from Its Original Account for details.
●If the device is offline, you should connect a network for the device. For details, see Connect Offline Device to Network for details.
●If the device is not activated, the Activate Device page will pop up (excluding the access control device). You should activate the device.For details, see Activate an Inactive Device for details.
●If Miraservice is disabled for the device, you should enable the function (excluding the access control device). For details, see Enable Mira Service When Adding Device on Mobile Client for details.
5.Tap Add on the Result page.
6.Enter the device verification code. The device will be added successfully.
 Note
Note
●The defaultdevice verification code is usually on the device label. If no verification code found, enter the device verification code you created when enabling Mira service.
●For details about enabling Mira service, see Enable Mira Service for Device.
7.Optional: Tap Configure DDNS to configure DDNS.
 Note
Note
●See Set DDNS for details.
●After DDNS being enabled, the device will be accessed via IP address in priority, so that remote configuration of the device will be supported, and the streaming speed will be faster than streaming via Miraservice.
●If you skip this step, the device will be accessed via Mira service.
8.Tap Finish.
9.Optional: Delete the device.
– On the device list, if the list is in listmode, swipe the device name to the left and tap  →
→
Delete Device.
– On the device list, if the list is in thumbnail mode, tap the device name or tap  , and then tap Delete Device.
11

Mira
4.3 Connect Offline Device to Network
When adding a device to the Mobile Client, if the device is offline, you should connect the device to a network first. The Mobile Client provides the following four methods for connecting offline devices to networks.
 Note
Note
For access control device, you should connect it to a network via other Clients (e.g., Mira client software).
Connecting to Wired Network
Using this method if a router is available for the device to connect to.
 Note
Note
Make sure the device is powered on.
Connecting to Wireless Network
Use this method if a wireless network is available for the device to connect to. "Device" here excludes wireless doorbell, wireless security control panel, and Mini Trooper (a kind of battery camera).
 Note
Note
●Make sure your phone has connected to a Wi Fi network before using the method.
●The device should support connecting to wireless network.
Connecting to Network by Wi Fi Configuration
You can use this method to connect wireless doorbell to the network by using the doorbell to scan the QR code generated by the Mobile Client.
Tap Connect to a Network on the Result page and then follow the instructions on the subsequent pages toconnect the device to the network.
Connecting to Network by Access Point
In the Mobile Client, Access Point (AP) refers to a networking hardware device (e.g., wireless doorbell or wireless security control panel), which can provide a Wi Fi network for the phone to connect to.
 Note
Note
You should have turned on WLAN in the phone's operation system.
Tap Connect to a Network on the Result page, select Wireless Connection as the connection type, and then follow the instructions on the subsequent pages to complete the connection process.
12
 Loading...