

Page 1
NX Variable Speed Drive Network Interface
Important: Retain these instructions
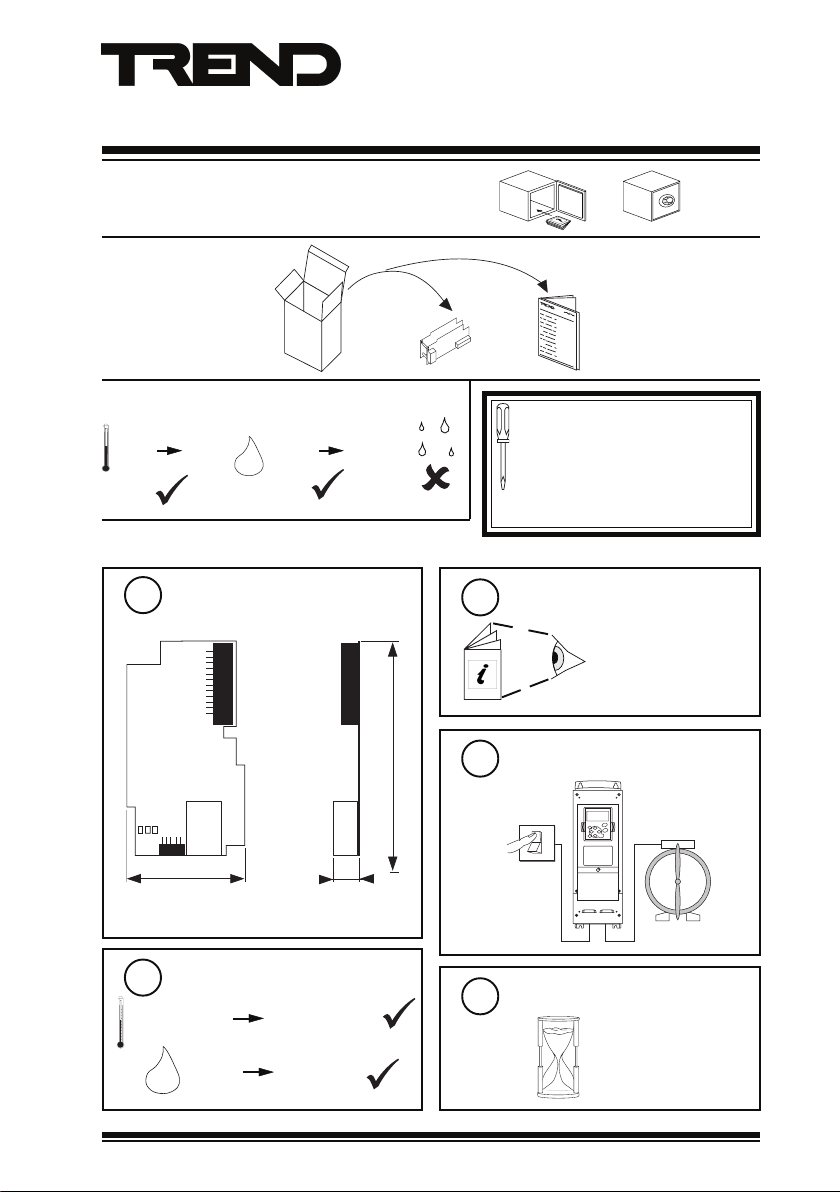
1 UNPACKING
Installation Instructions
NXIP
NXIP Installation
Instructions TG200827
2 STORING
-40 °C
(-40 °F)
+70 °C
(158 °F)
H O
0 %RH
2
3 INSTALLATION
Physical
1
54 mm (2.13”)
Requirements
2
-10 °C (14 °F)
0 %RH 90 %RH
H O
2
+50 °C (122 °F)
95 %RH
15 mm (0.59”)
3
4
100 mm (3.93”)
5
It is recommended that the installation
should comply with the HSE
Memorandum of Guidance on Electricity
at Work Regulations 1989.
For USA install equipment in
accordance with National Electric Code.
Install NX drive
NX Drive Installation
Instructions TG200434
Switch off Input power
O
I
Wait 5 minutes
5 minutes
NXIP Installation Instructions TG200827 Issue 1/D 15/1/07
1
Page 2
NXIP Installation Instructions
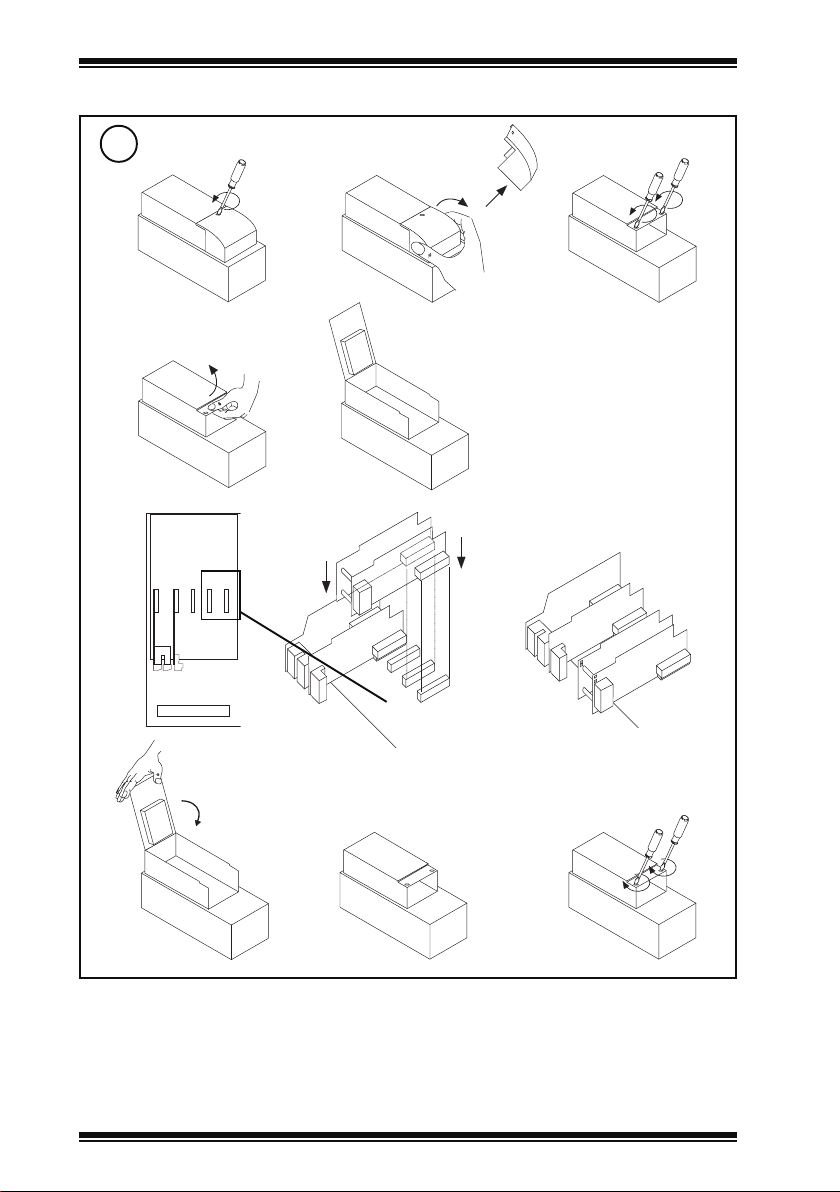
3 INSTALLATION (Continued)
Remove Cover
6
a
de
f
A B C D E
b
B C D E
c
gh i
2
NXIP Installation Instructions TG200827 Issue 1/D 15/1/07
Page 3
Installation Instructions NXIP
3 INSTALLATION (Continued)
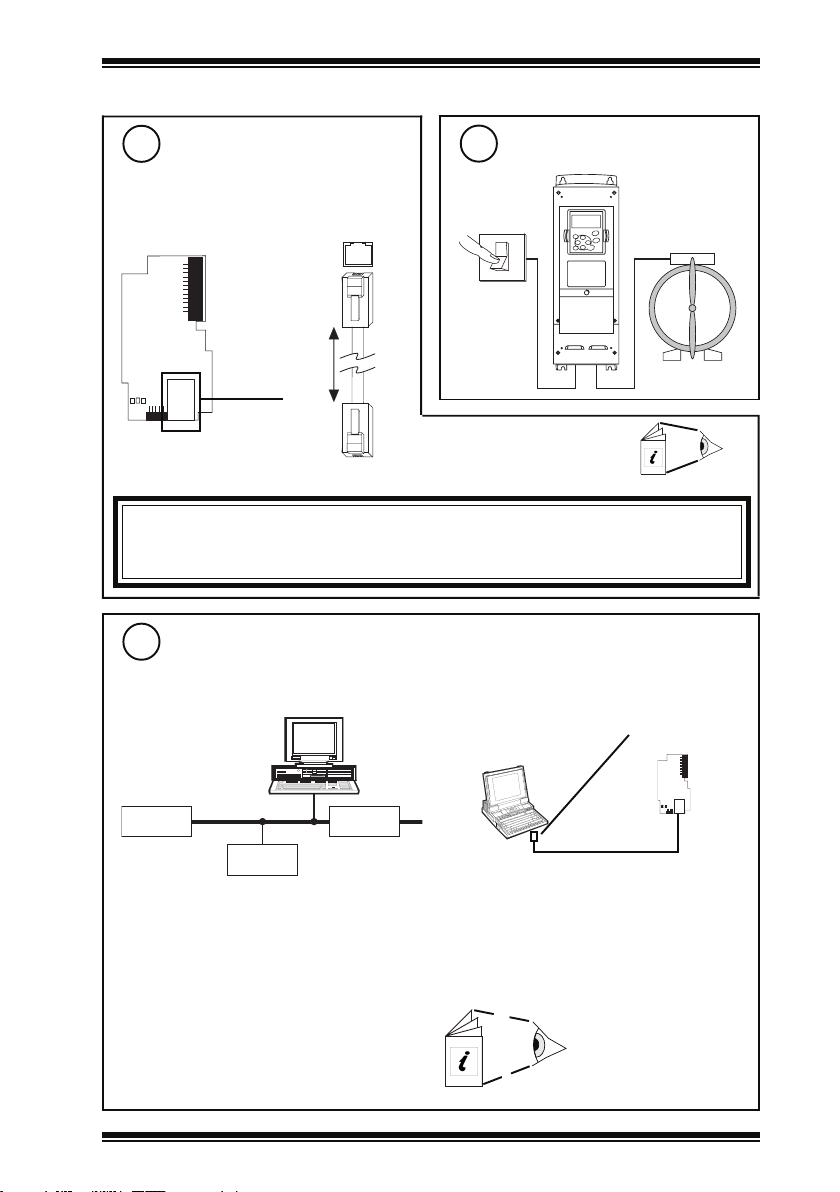
Connect Ethernet
7
Connect to an Ethernet hub
Use Ethernet cable .
NXIP
RJ45 Connector
RJ45 Connector
Ethernet hub/Switch
100 m (109 yds)
IQ System Products
Engineering Guide TE200369
Switch on Power to NX Drive
8
O
I
IMPORTANT
NXIPs do NOT support automatic addressing, and MUST NOT be installed on an Ethernet
network where automatic addressing is being used.
Connect to NXIP with IP Tool and SET
9
Either over Ethernet Network
SET and IP Tool
or Local PC Ethernet Connection
XCITE/XA crossover adaptor order
seqarately (XCITE/XA/5 pack of 5)
Router
NXIP
IQ3 or
3xtend/EINC L
Initially access NXIP using it MAC address
(written on label).
Note that a device with a virtual CNC (e.g.
IQ3 or 3xtend/EINC L) in supervisor mode
is required for SET to access the NXIP
over the Ethernet network.
NXIP Installation Instructions TG200827 Issue 1/D 15/1/07
SET and IP Tool
Local PC (Ethernet) connection can be
either to adjacent Ethernet hub using
standard cable only, or directly to NXIP
using standard cable and crossover
adaptor, XCITE/XA.
SET Manual TE200147
IP Tool Manual TE200638
3
Page 4

NXIP Installation Instructions
3 INSTALLATION (Continued)
10
11
Configure Addressing Details with IP Tool
retemaraPnoitpircseD
sserddA
eludoM
seludoM
Change NX Parameters from NX Keypad
NnaL .01gnidulcxe911ot4,1-egnaR.PIXNehtforebmunnaLehT
edoN .01gnidulcxe911ot4,1-egnaR.PIXNehtfosserddakr
CNIEetomeR
3xtend/EINC L Data Sheet TA200800
IP Tool Manual TE200638
sserddAPI .euqinuebtsumecivedhcaerofsserddaPIehT.PIXNehtfosserddaPIehT
usneottnatropmisiti
retuoRtluafeD noitanitsedehtfitneserasegassemhcihwotretuorehtfosserddaPIehT
masehtnoretuor
reifitnedI.PIXNehtyfitnediotdesulebalretcarahc61A
troPPDU etacinummocotPIXNehtybdesu,trop)locotorPmarg
sserddAPI.tenrehtEnoecivedetomerehtfosserddaPIehT
.retuor
ksaMtenbuS llaro
rebmu
ksaMtenbuS.ecivedetomerehtrof
estonsecived
owtenehT
ksamtenbusehT
daPIs'ecivedehtngissayam
rehtEnaotdetcennocCPaybdesuebot
ataDresU(PDUehT
luafeD.tropemasesutsumkrowtenretni
.ecivedrehtonaotsserd
.tenbusemasehtnoerayehttahtserusnesihT
,revresPCHDasahdetcennocsiecivedehthcihwotkrowtentenrehtEehtfI
PIfoegnarehtedistuosisserddaPIehttahter
revresPCHDeht,esacehttonsisihtfI.revresehtybdengissasesserdda
sserddaPIehtottesebdluohstI.tenbuslacolehtnotonsisserdda
afo
siPIXNehtfideificepsebtsumtI.PIXNehtsatenbuse
sisCNClautrivehtfoenofiro,sretuorsnapstahtkrowtenretninadliubot
afoedisrehtoehttenbusten
femasehtebtsumksamtenbusehT.PIXNehtfoksamtenbusehT
.krowtenretninarosnaLdliuboteratahtsretuorybdetaraq
nanosecivedllA.krowtentenrehtEehtrevosecivedmetsysQIrehtohtiw
PDUfiegnahcylnO.21675otst
.tenbusemasehtnoderiuqererasetiselpitlumfiro,desuydaerlasitrop
The following parameters must be set up in the NX Drive to allow the NXIP to operate.
retemaraPuneMegnahCotnosaeR
)ecalPlortnoC(1.3P3M
nurnoitacilppaehT
.noitacilppadradnatS
11.1.2P
21.1.2P
.1.2P
31
noitclesecnereferycneuqerfO/I
noitcelesecnereferycneuqerfdapyeK
noitcelesecnereferycneuqerfsubdleiF
dapyeK(
)lortnoC
2M
NX Drive Installation Manual
TG200434
Application Manual TE200443
4
fitnedI
)retemarap(
p.g.e(,3,2
.)PIXN(subdleiF=3
Important
If the watchdog strategy is to be used the
control place parameter must be set to Fieldbus.
NXIP Installation Instructions TG200827 Issue 1/D 15/1/07
,dapyeK,slanimretO/I:lortnocfoecruosehtsei
O/IeblliwsihtyllamroN.)PIXN.e.i(subdleiFro
nomtsujton(tinuehtlortnocotsi
.)tiroti
rycneuqerffoecruossetatciD
PIXNehtfi,subdleiFotdegnahcebnactubslanimret
rof.g.e)launamnoitacilppaees(sretemarapartxeehtseificepsevirdXNehtnignin
O/Inehwecnerefe
slanimretO/I=0.evobasalortnocniteseraslanimret
,dapyeK=25,4slanimretO/I=1)to
.lortnocnisidapyeKnehwtubevobasA
.lortnocnisisubdleiFnehwtubevobasA
Page 5

Installation Instructions NXIP
3 INSTALLATION (Continued)
12
Configure Optional Settings (if required)
Using Text comms from SET configure the optional settings as
required. The table below describes the settings and their
parameter identifier (used for Text comms). For details of the
SET Manual
TE200147
function of each module see the NXIP Data Sheet (TA200826).
Important
If the watchdog strategy is to be used the value of switch 4 must be set to 1, the value of switch
5 must be set to the required fail run mode, and the value of knob 2 must be set to the required
failure demand.
If IC-Comms are to be sent to IQ controllers on the IQ system current loop a 3xtend/EINC L is
required to interface between the current loop and Ethernet network.
By default all alarms are disabled. For alarms to be sent the alarm address and alarm Lan must
be specified in the address module, and the required alarm enable bits set to 1.
If the direction of the motor is to be changed switch 6 must be adjusted (0=normal, 1=reverse)
default = normal.
Warning: Ensure that the motor/associated mechanical equipment has the ability to have
its direction reversed before reversing it. If the motor/associated mechanical equipment
cannot have its direction reversed DO NOT reverse it.
eludoMeludoM
sserddA
eludoM
eludoM
yrotceriD
eludoM
reifitnedI
R2etubirttAotgnisserddaetubirtta
tupnIlatigiD
IlebaL.eludomehtsebircsedtahtgnirtS$
@lebaL.eludomehtsebircsedtahtgnirtS$
retemaraPnoitpircseDretemaraP
ybdesugnirtsretcarahc61
3etubirttAotgn
sserdda
naLm
enihcaM
elbadaeR
elbadaeR
deriuqeR
leveLNIPehtweivotresuehtybderiuqerNIPehtfolevelehT
edi
reifitn
reifitnedIetiS
elbanEmralA,1ro0egnaR.mralaehtselbasid/
selbanE
.delbane=1
orebmunehT
mralA
ralA.tneserasmralahcihwotecivedehtforebmunnaL
edIetiS
namuH
etatS
tneraPevobasitahteludomyrotceridehtf
.3etubirttadnareifitnedi
.2etubirttadnareifitn
.reganaMedoCetiSehtgnisutes
ddacamehtotstluafeD
.sser
luohstupniehttahtsutatsehT
.yhcareihehtnieludomsiht
.99ot0egnaReludom
F
ehthtiwnoitcnujnocnidesu,PIXNehtyfitnedi
G
isserddaetubirttaybdesugnirtsretcarahc61
ehthtiwnoitcnujnocnidesu,PIXNehtyfitnedi
erasmralahcihwotecivedehtfosserddakrowteN
A
.)01sserddagnidulcxe(911ot4,1egnaR.tnes
R
.)01sserddagnidulcxe(911ot4,1egnaR
ehtgniniatnocetisehtsreifitneditahtgnirtseuqinuA
O
ebsihttahtdednemmocersitI.retupmocaotPIXN
$
.PIXNehtgniniatnocetisehtseifitneditahtgnirtsA
R
sihtnitonnehW.ebd
.1ro0egnaR.detarenegsimraladna,etats
E
R
P
reifitnedI
NXIP Installation Instructions TG200827 Issue 1/D 15/1/07
5
Page 6

NXIP Installation Instructions
3 INSTALLATION (continued)
12
oM
Configure Optional Settings (Continued)
eludoMeludoM
yalpsiD
eludoM
elud
bonK
eludoM
smmoCCI
reifitnedI
~metI
CnoitanitseD
Kle
retemaraPnoitpircseDretemaraP
ecnerefeR
ludoM<
tneraPevobasitahteludomyrotceridehtforebmunehT
leveLNIPehtweivotresuehtybderiuqerNIPehtfolevelehT
naL
noitanitseD
sserdda
etadpU
lavretni
metiecruoS
gnirts
eciveD
etubirtta
noitanitseD
eludom
rebmun
noitaniseD
metieludom
cifingiS
tna
egnahc
baL.eludomehtsebircsedtahtgnirtS$
stinUfostinugnireenigneehtgnitacidnignirtsretcarahc4
aRfopoT.bonkehtfoeulavmumixamehTT
egn
fomottoB
egnaR
eulaV.eulavbonkehTV
reifitnedI
tsitahtretemarapeludomehT
:mrofehtniebdluohs
eludoM<
.)1rosnesseificeps
.eludomdeificepseht
.99ot0egnaReludom
.0=tluafeD
ahtgnirtsretcarahc6
ficeps>eludoM<
.)1rosnesseificeps
emaraPeludoM<
i=1,etubirtta
m=0.tneseb
lunottesfI.epyt
.eulavs'bonkeht
>retemaraPeludoM<>eludoM<
avaretemarapynaebnacdna,reifitnedi
hcareihehtnieludomsiht
.y
afeD.naLlacolehtseificeps0.01dna
ot0=egnaR.tnesebotsiegassem
neewteb)sdnocesni(emitfohtgnelehT
.detaepernehtdnatnesgnieb
:mrofehtniebdluohssihT.tnesebot
>retemaraPeludoM<>eludoM<
)V(1S.g.e.eludomdeificepseht
botsitahtetubirttaehT
.metiecruosfolebalhcta
.tnessismmoCCInaerofebegnahctsum
.bonkehtfoeulavmuminimehTB
I
sihT.deyalpsidebo
stignisueludomfoepytehtseificeps>
1S.g.e(rebmuneludomdnareifitnedieludom
nihtiwretemarapehtseificeps>retemaraPe
foeulaveht.g.e(deyalpsidebotsitahteludomeht
sretemarapehtgnisudeificepssitI.)rosnesa
nihtiwelbali
R
P
N
ebotsiegassemehthcihwotecivedehtfonaLehT
,3,2sesserddagnidulcxe911ot0=egnaR.tnes
.0=tlu
A
ehthcihwotecivedehtfosserddakrowtenehT
gnidulcxe911
.naLlacolehtseificeps0.01dna,3,2sesserdda
I
egassema
M
sitahtretemarapehtsenifedt
stignisueludomfoepytehtsei
1S.g.e(rebmuneludomdnareifitnedieludom
nihtiwretemarapehtseificeps>ret
foeulaveht.g.e(deyalpsidebotsitahteludomeht
s'retemarapehtgnisudeificepssitI.)rosnesa
iwelbaliavaretemarapynaebnacdna,reifitnedi
niht
B
ehthtiwdehctame
on=0.tnessiegassemlabolgafiecivednoitanitsed
.3etubirtta=3,2etubirtta=2,reifitned
E
otsinoitamrofnihcihwoteludomehtforebmunehT
T
metinoitanitsedeludomehtfoepyteludomehT
eulavsdnes)sretcarahcon(gnirtsl
Sottesebnacesiwrehto,epyteludomemasot
.)hctiws(Wro,)tupnilatigid(I,)bonk(K,)rosnes(
eulaveugolananahcihwybtnuomaehtsenifedsihT
S
%
6
NXIP Installation Instructions TG200827 Issue 1/D 15/1/07
Page 7

Installation Instructions NXIP
3 INSTALLATION (continued)
12
Configure Optional Settings (Continued)
eludoMeludoM
cigoL
eludoM
eludoMtolPP rosneStolpehtseulavesohwrosnesehtforebmunehT
rosneSS lebaL.eludomehtsebircsedtahtgnirtS$
hctiwS
eludoM
emiT
eludoM
resU
eludoM
reifitnedI
GyaleDnOlortnocstcepxePIXNehthcihw
WlebaL.eludomehtsebircsedtahtgnirtS$
TsruoH.32
UNIPesirohtuaotd
retemaraPnoitpircseDretemaraP
talavretniehT
ahcekamylnogninraW
oirePsnimerehw8ot01egnaR.golneewteblavretniehT
d
6=8,m03=7
stinUffostinugnireenigneehtgnitacidnignirtsretcarahc4
eulaV.eulavrosnesehTV
mralAhgiH
timiL
mralAhgiH
yaleD
mralAwoL
timiL
mralAwoL
yaleD
stiBmralA.sutatsmralatnerrucehtetacidnitahtstib8
stiB
sutatS.)1ro0(hctiwsehtfosutatsehTS
setuniM.6ot0egnarsetunimehtfoeulavtnerrucehTN
htnoM.21ot1egnarehtnomtnerrucehTM
raeY.99ot0egnarraeytnerrucehTY
leveLNIP.0=tluafed,99ot0=egnaR.leveLN
giheht
elbanEmralA
htnoMfoyaD.13ot1egnarhtnom
IPL
eulavs'rosneseht
.
detareneg
siHdna
.0=tluafeD.
=tluafeD.detareneg
.0
mralawoleht
ehtfoyadtnerrucehTD
.s003=tluafeD.delbanesiygetarts
.0=tluafeD.gnidrocersieludom
.)m51(1=tluafeD.h
.mrala=1.tibsutatsmralahgihehtsi
sneselbasid/elbanetahtstib8
ot0egnarsruohehtfoeulavtnerrucehTH
eretneebtsumtahtrebmuntigid-4ehT
godhctawehtfimetsysQIehtmorfsretemarap
.2eludomcigolotsegn
eblliwmralahgihrosnesahcihwevobaeulavehT
evobaebtsumrosnesehttaht)setunim(htgnelehT
simralahgihrosnesaerofebtimilmralah
.0=tluafed,setunim0372ot0egnaR.detareneg
eblliwmralawolrosnesahcihwwolebeulavehT
wolebebtsumrosnesehttaht)setunim(htgnelehT
simralawolrosnesarofebtimil
.0=tluafed,setunim0372ot0egnaR.detareneg
natibsutatsmralawolehtsiLerehwHL000000
Hd
.delbane=1.tibelbanemralahgiheht
.0=tluafed,9999ot0=egnaR.segnahc
reifitnedI
N
S
P
,m02=6,m01=5,m5=4,m1=3,h42=2,m51=1,h1=0
%
H
D
L
A
M
N
rosnesdnahgihro
tibelbanemralawolehtsiL,HL000000.smralawol
P
13
Write any changes to Flash memory
If any changes to strategy parameters have been made, a text comms reset command R(z=1)
should be sent to the NXIP to commit changes to the flash memory and render them non-volatile
to power interruptions. This should be done once after all changes are made.
The command R(z=1) should be used with caution to preserve memory life.
NXIP Installation Instructions TG200827 Issue 1/D 15/1/07
7
Page 8

NXIP Installation Instructions
3 INSTALLATION (Continued)
14
If the NXIP is to control the NX Drive it is necessary to set up an IQ controller or supervisor to specity
the following parameters. Controllers should use IC Comms and supervisors use text comms.
Note these paramteres will only control NX drive if P3.1 (Control Place) is set to Fieldbus. In standard strategy
K1 will only work if P3.1 (Control Place) is set to Fieldbus and P2.1.13 (Fieldbus frequency reference Select)
is set to 3 Fieldbus, or P2.1.11 and P2.1.12 are set to 3 appropriate to other Control Places.
If devices on the IQ current loop are to change the control parameters a 3xtend/EINC L is required to
interface between the current loop and Ethernet network.
A device (e.g. IQ3, or 3xtend/EINC L) that contains a virtual CNC operating in supervisor mode is required
if a supervisor is to access the NXIP using Ethernet.
Set up Control Parameters
metI
1KdnameD%001-0deepsrotommumixamdnamuminimneewtebegnarfo%001ot0
1WdnammoC
S
2WteseRtluaF1/0.0otkcabhctiwsteS.tluafraelcot1othctiwsteS
3WgodhctaW1/0fiya
langi
noitpircseDstinUegnaR
1/0)rotoMpotS(ffO=2)rotoMnuR(nO=1
gninaeM
.desugniebsiygetartsgodhctaw
ledNOs'eludomremitnahtsselslavretniralugerta0otteS
4 LICENSE FOR LWIP TCP/IP STACK
Copyright (c) 2001, 2002 Swedish Institute of Computer Science. All rights reserved.
Redistribution and use in source and binary forms, with or without modification, are premitted provided
that the following conditions are met:
1 Redistribtuion of source code must retain the above copyright notice, this list of conditions and
the following disclaimer.
2 Redistribution in binary form must reproduce the above copyright notice, this list of conditions and the
following disclaimer in the documentation and/or other materials provided with the distribtion.
3 The name of the author may not be used to endorse or promote products derived from this software
without specific prior written permission.
This software is provided by the author ‘As Is’ and any express or implied warranties, including, but not
limited to, the implied warranties of merchantability and fitness for a particular purpose are disclaimed.
In no event shall the author be liable for any direct, indirect, incidental, special, exemplary, or consiquential
damages (including, but not limited to, procurement of substitute goods or services; loss of use, data,
or profits; or business interruption) however caused and on any theory of liability, whether in contract,
strict liability, or tort including negligence or otherwise arising in any way out to the use of this software,
even if advised of the possibility of such damage.
5 DISPOSAL
WEEE Directive :
At the end of their useful life the packaging,
product, and batteries should be disposed
Do not dispose of with normal household waste.
Do not burn.
Manufactured for and on behalf of the Environmental and Combustion Controls Division of Honeywell Technologies Sàrl, Ecublens, Route
du Bois 37,Switzerland by its Authorized Representative, Trend Control Systems Limited.
Trend Control Systems Limited reserves the right to revise this publication from time to time and make changes to the content hereof
without obligation to notify any person of such revisions or changes.
Trend Control Systems Limited
P.O. Box 34, Horsham, West Sussex, RH12 2YF, UK. Tel:+44 (0)1403 21888 Fax:+44 (0)1403 241608 www.trend-controls.com
Trend Control Systems USA
6670 185th Avenue NE, Redmond, Washington 98052, USA. Tel: (425)897-3900, Fax: (425)869-8445 www.trend-controls.com
8
of using a suitable recycling centre.
NXIP Installation Instructions TG200827 Issue 1/D 15/1/07
 Loading...