

Page 1
Important: Retain these instructions
1
2345
6
EINC
TX RX
LAN
LAN
1
2 3 4 5
6 7 8
9 101112
13
14
15
V
24V
16
17
18
19
20
EINC
Installation Instructions - Sheet 1
NBOX/EINC
Node Controller
CONTENTS
1.1 Unpacking 1 - 1
1.2 Storing 1 - 1
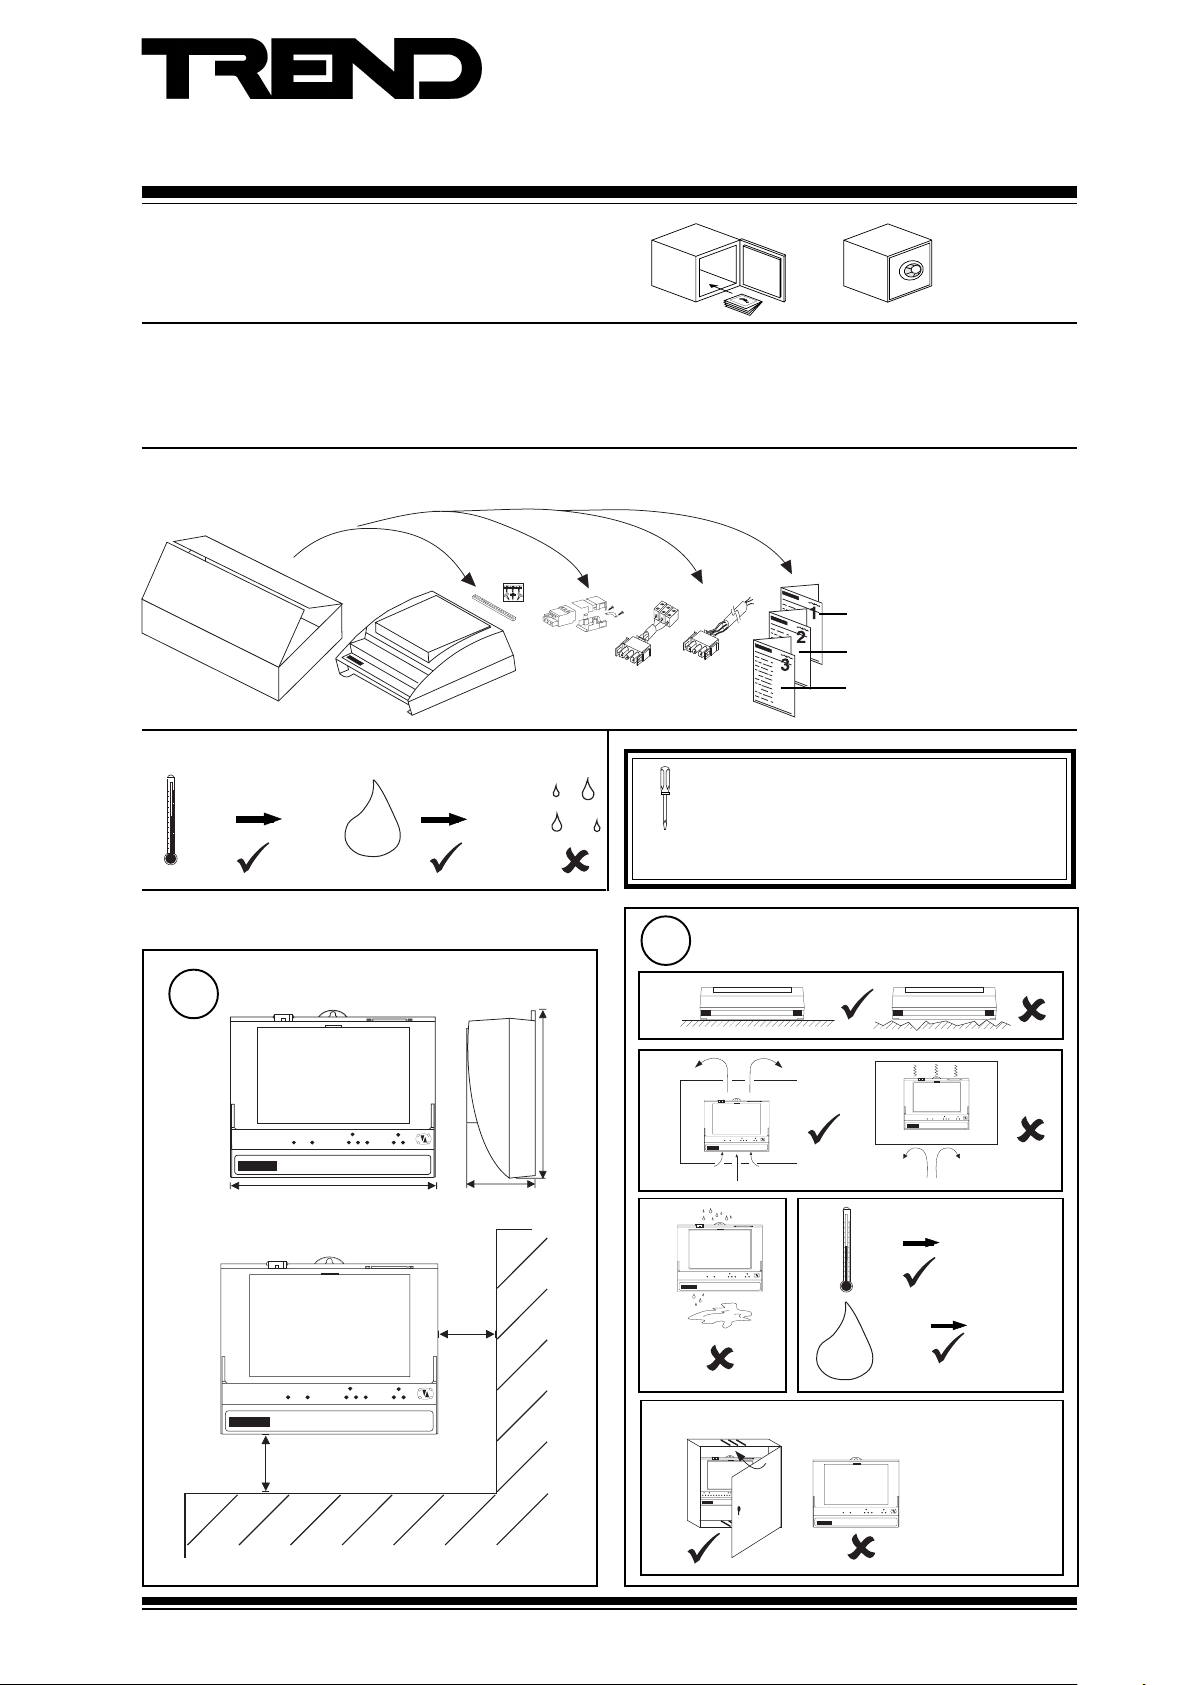
1 INSTALLATION
1.1 UNPACKING
/230
only
1.2 STORING
-10 °C
(14 °F)
+50 °C
(122 °F)
0
H2O
90 %RH
1.3 INSTALLATION - MOUNTING
Dimensions
1
1.3 Installation Instructions - Mounting 1 - 1
1.4 Installation Instructions - Configuration 1 - 4
3.1 Replacing the Fuse 3 - 1
4 Disposal 3 - 3
1
Installation Instructions TG200152
Sheet 1
Sheet 2
Sheet 3
/24 only
EJ105383
/24/USA
only
It is recommended that the installation should
comply with the HSE Memorandum of Guidance
on Electricity at Work Regulations 1989.
For USA install equipment in accordance with
the National Electric Code.
Requirements
2
a
b
EINC
EINC
230 mm (9.06")
100 mm (4")
NBOX/EINC Installation Instructions TG200152 Issue 2/D 4/7/06
70 mm (2.76")
50 mm
(2")
EINC
181 mm (7.13")
c
d
0 °C
4
EINC
(32 °F)
0 %RH
H2O
+45 °C
(113 °F)
Protection: IP30
e For UL rating (NBOX/EINC/24 only)
The unit is UL rate
as 'UL916,
accessory to
enclosed energy
management
equipment'
95 %RH
1 - 1
Page 2
NBOX/EINC Installation Instructions - Sheet 1
9
10
1.3 INSTALLATION - MOUNTING (Continued)
Mount MBOX
3 4
If using ENCLS/MBOX/IQ22x
ENCLS/MBOX/IQ22x Installation
Instructions TG200203.
Connecting Power
5
/230 version
NBOX/EINC/230 consumption < = 18 VA
Shrouded plug kit
E N L
Ø 6 mm
(0.24”)
e
Mounting
a
Screw terminal
E N L
b
c
d
EINC
f
9
10
Ø 6 mm
(0.24”)
2 30 V
~
2 4 V
172 mm (6.77")
209 mm (8.23")
104.5 mm (4.11")
7 mm (0.28")
~
M O D E M
R D S /R S 2 3 2
!
~
E N L
Terminal size 0.5 to 2.5 mm2 (14 to 20 AWG)
a
b
/24 version
NBOX/EINC/24 consumption < = 24 VA
0
I
DO NOT
SWITCH ON
24 Vac:
24 Vac
E N L
c
0V
Mat-N-Loc
to terminal
24V
adaptor
EJ105383
(supplied)
Earth
~
d
e
9
10
Earth/ground
the bus bar
230V
~
~
24V
MODEM
RDS/RS232
!
/USA only
24 Vac
Earth
Black
Red
White
2 part
Mat-N-Loc
connector
(supplied)
Earth/ground
the bus bar
WARNING: This apparatus must be earthed/
grounded (using input power earth
ground terminal).
1 - 2
NBOX/EINC Installation Instructions TG200152 Issue 2/D 4/7/06
Page 3
Installation Instructions - Sheet 1 NBOX/EINC
T- T+ R- R+
T R
T R
T R
T R
T- T+ R- R+
1.3 INSTALLATION - MOUNTING (Continued)
Connect Ethernet
6
Connect to an Ethernet hub
Use Ethernet cable.
Ethernet hub/switch10BASE-T
using AUI
Transceiver
IQ System
Products
RJ45 Connector
Engineering
Guide TE200369
Drop cable
15 way D
type Male
OR
R D S / R S 2 3 2
Transceiver
!
RJ45 Connector
2 3 0 V
~
~
2 4 V
100 m (110 yds)
no connection
M O D E M
R D S /R S 2 3 2
no connection
2 3 0 V
~
~
!
2 4 V
M O D E M
IMPORTANT
EINCs do NOT support automatic addressing, and MUST NOT be installed on an Ethernet network where automatic
addressing is being used.
Connect Current Loop
7
4 wire
Terminal size 0.5 to 2.55
m2 (14 to 20 AWG)
T R
2 wire
T R T R
R
R
R
R
T
T
Maximum Cable distance
Additional terminals
T
T
R
T R
R
X
Terminal size 0.5 to 2.55
m2 (14 to 20 AWG)
Note only 1 INC type node on a single Lan.
Cable 1k2 baud 9k6 baud 19k2 baud 38k4 baud * No. of Wires
Belden 9182 1000 m (1090 yds) 1000 m (1090 yds) 700 m (765 yds) 500 m (545 yds) 2
Belden 9207 1000 m (1090 yds) 1000 m (1090 yds) 500 m (545 yds) 350 m (380 yds) 2
IQ System
TP/1/1/22/HF/200
1000 m (1090 yds) 700 m (765 yds) 350 m (380 yds) 250 m (270 yds) 2
(Belden 8761)
IQSystem
TP/2/2/22/HF/200
1000 m (1090 yds) 500 m (545 yds) 250 m (270 yds) 125 m (135 yds) 4
(Belden 8723)
Close Flap
b
8
a
9
10
T
T
X
NBOX/EINC Installation Instructions TG200152 Issue 2/D 4/7/06
1 - 3
Page 4
NBOX/EINC Installation Instructions - Sheet 1
O
I
EINC
1.4 INSTALLATION - CONFIGURATION
Mount Unit
1
1
Open MBOX (If fitted in ENCLS/MBOX/IQ22x)
EINC Installation Instructions
section 1.3
3
a
Open Flap
b
5
Switch off
2
Open Panel
4
If appropriate
LAN
20
19
LAN
TX RX
24V
78
15
14
Set Internetwork Address (Lan number)
6
address
ON
ON
e.g.
ADDRESS
Address = 2 + 16 + 64 = 82
If address < 100, INC Mode If address = > 100, Internetwork Extension Mode
Internetwork
(on Ethernet)
EINC
EINC
Lan
(on current loop)
Internetwork
(on Ethernet)
NOT SET
SET
Address = A
1, 4 to 9, 11 to 119
0, 2, 3, 10 or >119
Lan
= A
Lan
= A
/
Lan
= A
/
Internetwork
(on Ethernet)
EINC L
Lan
= A
/
EINC
Internetwork
(on current loop)
Internetwork
(on Ethernet)
9
10
1 - 4
7
Sheet 2
2
EINC L Installation Instructions - Sheet 2
NBOX/EINC Installation Instructions TG200152 Issue 2/D 4/7/06
Page 5

1.4 INSTALLATION - CONFIGURATION (Continued)
Sheet 1
8
Set Current Loop Baud Rate
1
EINC Installation Instructions - Sheet 1
9
NOT SET
Installation Instructions - Sheet 2
NBOX/EINC
Node Controller
2
9
10
Baud Rate = C
=C
EINC
=C
38k4 baud
19k2 baud
10
13
Close Flap
Check Ethernet
11
SET
9k6 baud
1k2 baud
Switch On
=C
Note 1: 38k4 Lan not available with IQ2xx, IQ1xx, INC, LINC,
CNC, CNC2, INC2,and TMN.
Note 2: 38k4 Internetwork not available with INC, and LINC.
=C
Check Node Controller
12
(power)
0
I
(green)
Check supply
(watchdog)
(red)
EINC Faulty
if 10 BASE-T
(Link integrity)
(yellow)
Check Ethernet connection
9
10
RX
(yellow)
9
10
If another device on Ethernet
OK
(green)
check other decice
NBOX/EINC Installation Instructions TG200152 Issue 2/D 4/7/06
TX
(yellow)
Check other Ethernet device
Check other Ethernet device
2 - 1
Page 6

NBOX/EINC Installation Instructions - Sheet 2
9
10
~
230V
RDS/RS232
!
24V
~
MODEM
O
I
(
1.4 INSTALLATION - CONFIGURATION (Continued)
Check Current Loop Network
13
aRX
(yellow)
?
NBOX/EINC
OK
T - )
( R + )
( T + )
( R - )
IQ Faulty
Connect to EINC with IP Tool
14
Either over Ethernet
Router
EINC
EINC
Initially access EINC via its MAC address
9
10
( T - )
( T + )
( R - )
SET v6
(including IP Tool)
( R + )
Router
bTX
(yellow)
NBOX/EINC
?
c OK
(green)
Network Address Invalid
0,2,3 or >119
NBOX/EINC
or Local PC Ethernet Connection
XCITE/XA crossover adaptor
order separately (XCITE/XA/5
pack of 5)
Local PC (Ethernet) connection can be either to adjacent Ethernet
hub using standard cable only, or directly to EINC using standard
cable and crossover adaptor, XCITE/XA.
SET Manual TE200147
IP Tool Manual TE200638
OK
Check network cabling for
short circuits with a
multimeter (NOT Megger)
Check baud rate
Power up other nodes until
faulty node is found
(OK ). Correct fault.
SET v6
(including IP Tool)
Configure Addressing Details with IPTool
15
Parameter Setting Default Function Condition Note
IP Address
Subnet Mask
Address Module
2 - 2
UDP Port 0 to 65535 57612
Router 1
Lan number Lan number 1, 4 to 9, 11 to 119 20
Identifier
IP address
0.0.0.0 to 255.255.255.255
Mask
0.0.0.0 to 255.255.255.255
IP address
0.0.0.0 to 255.255.255.255
15 alphanumeric characters not /\({;?* characters
128.1.1.
<address switch>
255.255.
255.0
0.0.0.0
EINC Identifier for EINC
Ethernet IP address
Mask applied to IP address to generate
subnet number
Ethernet UDP port used by IQ system
equipment on Ethernet
IP address of router on same subnet as
EINC
Lan number of EINC on internetwork
<SET BY ADDRESS SWITCH>
NBOX/EINC Installation Instructions TG200152 Issue 2/D 4/7/06
EINC Data Sheet TA200137
IP Tool Manual TE200638
Last section set automatically
to address switch setting
All EINCs on same channel
must be on same subnet to
create internetwork
All IQ system devices must
use same port to
intercommunicate
MUST be set up for
communications outside own
subnet
Always set up for
supervisors/display panels
1
1
2
3
4
Page 7

Installation Instructions - Sheet 2 NBOX/EINC
1.4 INSTALLATION - CONFIGURATION (Continued)
Configure Addressing Details with IPTool (Continued)
15
Parameter Setting Default Function Condition Note
CNC
Address
Virtual CNCx
(x = 1 to 4)
Remote Trend
Device x
(remote EINCs)
(x = 1 to 20)
Device Mode networked unconfigured networked/stand alone on Ethernet
Port address Ethernet port 1 to 32767 disabled Ethernet port of virtual CNC
alarm IP
address
IP Address
Subnet Mask
1. Change if address clash on Ethernet or if routers between EINCs.
2. May change UDP port if port already used on Ethernet, or if multiple internetworks (i.e. sites) required on subnet (see Data Sheet).
3. Enables EINC virtual CNC to access Ethernet PC across router, or EINC to find other IQ system Ethernet devices across
router.
4. Also used by IQ system Supervisors and software tools to access EINC (Device address always 126).
5. Virtual CNCs inoperative until address set up.
6. Set up each virtual CNC used, separately.
7. Same port number to be set up in supervisor to communicate with virtual CNC.
8. Use virtual CNC in alarm mode to send alarms to Ethernet 962 v3 or greater/963 which connects via TCP dial up.
9. Lowest IP address (IQ3xcite or EINC) on each subnet across router to be set up; as many as possible in each subnet recommended.
10. If using 'updatelist' facility (not recommeded for mixed EINC/IQ3xcite system) also set up this EINC's details (and other
EINC's on this EINC's subnet, if not broadcast).
11. Out of the factory mode is ‘unconfigured’ which changes to ‘networked’ on first write to EINC by IPTool.
node address 1, 4 to 9, 11 to
119
IP address
e.g. 171.193.6.106
IP address
0.0.0.0 to 255.255.255.255
Mask
0.0.0.0 to 255.255.255.255
4
disabled
empty list
empty list
Node address of virtual CNC on virtual
Trend Lan
IP address of target device (e.g.
supervisor)
IP address of IQ system Ethernet device
other side of router
Subnet mask of IQ system Ethernet
device other side of router
If virtual CNC is to be used 5,6
If virtual CNC is to be used
and if default needs to be
changed
if CNC used in alarm mode 6,8
If network to span router
Set to stand alone if only IQ
system device on Ethernet
6,7
9,
10
11
16
Configure Optional Settings Using SET
Enter configuration mode using SET. The top level
a
prompt will be displayed as below.
b
Configure the optional settings the relevant upper
SET Manual TE200147
EINC L Data Sheet TA200137
case letter and pressing ENTER. If a value has been
changed X+ENTER will confirm it and return to the
top menu, whereas Q+ENTER will quit and return
with the value unchanged. The table below describes
the settings.
Note that it may be necessary to set up a virtual CNC in the
EINC if one is not available elsewhere on the network.
Parameter Setting Function Condition Note
addRess
User
remoteEincs send as Broadcast Y (1) or N (0)
uPdatelist
iDentifier
local
network
alarms to
ethernet
alarms to
alarm language tyPe 0 to 9 (digit) Selects language of network alarms If language to be changed 2
Copy your remote EINC
list to other EINCs (Y/N)
Address
Remote
lan
addrEss
remoTe
lan
Pin number Protects changes in configuration mode
generator number random number for default PIN generation
1 If set to zero - no alarms reported.
2 Language type values:0=English, 1=Spanish, 2=Finnish, 3=Swedish, 4=Norwegian, 5=Danish, 6=German, 7=Italian, 8=Portuguese, 9=French.
3 Broadcast preferable as it enables the internetwork link to be made via the subnet of EINCs across router, rather than one EINC. However,
normally stopped by router.
4 This facility allows remoteEincs list in one EINC to be set up, and then the list (including Broadcast status) to be copied to all other EINCs
so that internetwork across routers can be formed (not recommended for mixed EINC/IQ3 system).
15 alphanumeric
characters - not
/\({;?* characters
node address 1, 4-9,
11-119
Lan number
1, 4-9, 11-119
node address 1, 4-9,
11-119
Lan number
1, 4-9, 11-119
Copies remoteEincs list to local subnet and all subnets with
EINC in list
Identifier for Lan Always set for supervisors/Display Panels
node address of EINC alarm target for
Trend current loop network alarms
Lan number of EINC alarm target for
Trend current loop network alarms
node address of EINC alarm target for
Ethernet alarms
Lan number of EINC alarm target for
Ethernet alarms
Broadcast to EINC subnet if Y or directed
to 1 EINC on subnet if N
If current loop network alarms to be reported 1
If current loop network alarms to be reported 1
If Ethernet alarms to be reported 1
If Ethernet alarms to be reported 1
Default is blank (unprotected). Set up if security
required.
Read only, give to Technical Suppor t with Ethernet
mac address for default PIN see steps (17 and 19).
Default Y, broadcast. Change if broadcast messages
prohibited by router
If internetwork to span router, and to faciliate setup 4
3
NBOX/EINC Installation Instructions TG200152 Issue 2/D 4/7/06
2 - 3
Page 8

NBOX/EINC Installation Instructions - Sheet 2
XTEND -400007096
3 X t r e a m
L A N
M A C A d d r
00.10.70.00.UD.BB
O / S
S/No:
I P A d d r
Location
M A C A d d r
00.10.70.00.UD.BB
S/No:
Q3B____X73010003
I P A d d r
TX RX
LA N
LA N
1
2 3 4 5
6 7 8
9 1 01112
13
14
15
V
24 V
16
17
18
19
20
1.4 INSTALLATION - CONFIGURATION (Continued)
16
22
Write on Label
M A C A d d r
00.10.70.00.UD.BB
I P A d d r
3 X t r e a m
XTND -400007096
M A C A d d r
00.10.70.00.UD.BB
I P A d d r
IP Address, Location, Lan, network address,
S/No:
Q3B____X73010003
Location
S/No:
Q3B____X73010003
L A N
O / S
e.g. location/identifier
recommended
Check Communications
If address <100
Lan
EINC
Ethernet
EINC
Lan IQ
Tear off Label Strip
17
S/No:
M A C A d d r
00.10.70.00.UD.BB
Q3B____X73010003
Location
IP A d d r
S/No:
NB O X /E I NC
EINC -400007096
Q3B____X73010003
LA N
O /S
M A C A d d r
00.10.70.00.UD.BB
IP A d d r
OK
OK
TX RX
TX RX
LAN
12345678910
If address =>100
Lan
INC
Ethernet
EINC
I/N
S/No:
M A C A d d r
00.10.70.00.UD.BB
Q3B____X73010003
Location
IP A d d r
EINC
Lan
Check Virtual CNCs
23
Virtual CNCs in Supervisor Mode
SET, or 963
Virtual CNC in
Supervisor mode
CNCA
Ethernet
CNCB
EINC
Close MBOX if fitted in ENCLS/MBOX/IQ22x
24
a
b
IQ
Virtual CNCs in Alarm Mode
963
Connected to
remote site
Ethernet
CNC in
Alarm mode
CNCA
CNCDCNCC
EINC
CNCB
CNCDCNCC
Alarms from system sent to virtual CNC
Close Panel
25
For UL rating (NBOX/EINC/24 only)
The unit is UL rate as 'UL916,
accessory to enclosed
energy management
equipment'
Sheet 3
12
2 - 4
3
EINC Installation Instructions - Sheet 3
NBOX/EINC Installation Instructions TG200152 Issue 2/D 4/7/06
Page 9

3 REPLACING THE FUSE
Installation Instructions - Sheet 3
NBOX/EINC
Node Controller
Switch Off
1
O
I
Open MBOX (If fitted in ENCLS/MBOX/IQ22x)
3
a
Remove Cover
b
5
a
b
Open Panel (If appropriate)
2
LAN
20
19
TX RX
24V
78
15
14
Open Flap
3
4
b
c
LAN
a
9
10
Caution: This unit contains static sensitive devices. Suitable
anti-static precautions should be taken
throughout this operation to prevent damage to
the unit. 417-IEC-5134
Replace Fuse
6
12345678910
a
b
c
230 V 125 mA (T) 250V 20 mm
24 V 1.6 A(T) 20 mm
d
NBOX/EINC Installation Instructions TG200152 Issue 2/D 4/7/06
3 - 1
Page 10

NBOX/EINC Installation Instructions - Sheet 3
3 REPLACING THE FUSE (Continued)
Replace Cover
7
Close MBox (If fitted in ENCLS/MBOX/IQ22x)
9
a
b
Close Flap
8
a
Close Panel (For UL rating NBOX/EINC/24 only)
b
10
The unit is UL rate as
'UL916, accessory to
enclosed energy
management
equipment'
17
20
18
16
19
TX R X
V
1
2 3 4 5
24 V
6 7 8
9 1 01112
13
15
14
LA N
LA N
11
Switch On
0
I
3 - 2
NBOX/EINC Installation Instructions TG200152 Issue 2/D 4/7/06
Page 11

Installation Instructions - Sheet 3 NBOX/EINC
4 DISPOSAL
WEEE Directive :
At the end of their useful life the packaging ,
product, and batteries should be disposed of
Do not dispose of with normal household waste.
Do not burn.
by a suitable recycling centre.
NBOX/EINC Installation Instructions TG200152 Issue 2/D 4/7/06
3 - 3
Page 12

NBOX/EINC Installation Instructions - Sheet 3
This page is intentionally left blank
Manufactured for and on behalf of the Environmental and Combustion Controls Division of Honeywell Technologies Sàrl, Ecublens, Route
du Bois 37,Switzerland by its Authorized Representative, Trend Control Systems Limited.
Trend Control Systems Limited reserves the right to revise this publication from time to time and make changes to the content
hereof without obligation to notify any person of such revisions or changes.
Trend Control Systems Limited
P.O. Box 34, Horsham, West Sussex, RH12 2YF, UK. Tel:+44 (0)1403 211888 Fax:+44 (0)1403 241608 www.trend-controls.com
Trend Control Systems USA
6670 185th Avenue NE, Redmond, Washington 98052, USA. Tel: (425)869-8400, Fax: (425)869-8445 www.trend-controls.com
3 - 4
NBOX/EINC Installation Instructions TG200152 Issue 2/D 4/7/06
 Loading...